Page 1
PRODUCT INFORMATION:
INTENDED USE OF THE TOOL
WARNING
DO NOT DISCARD – GIVE TO USER
The manufacturer warrants this product to the original
user against defective material or workmanship for
either a period of lifetime, or consumable (drill bits 1/4"
and below only). Ask your distributor for more details.
The manufacturer reserves the right to determine
whether the part(s) failed because of defective material,
workmanship or other causes. Failures caused by
accident, alteration or misuse are not covered by this
warranty.
Replacements under warranty also carry a Lifetime
Warranty. The rights under this warranty are limited to
the original user and may not be transferred to
subsequent owners.
The warranty is in lieu of all other warranties, expressed
or implied, including warranties of merchantability and
fitness for a particular purpose.
Some states do not allow the exclusion or limitations of
incidental or consequential damages, so the above
limitations may not apply to you.
(M) MIXED WARRANTY
(Lifetime and Consumable)
1812422-14
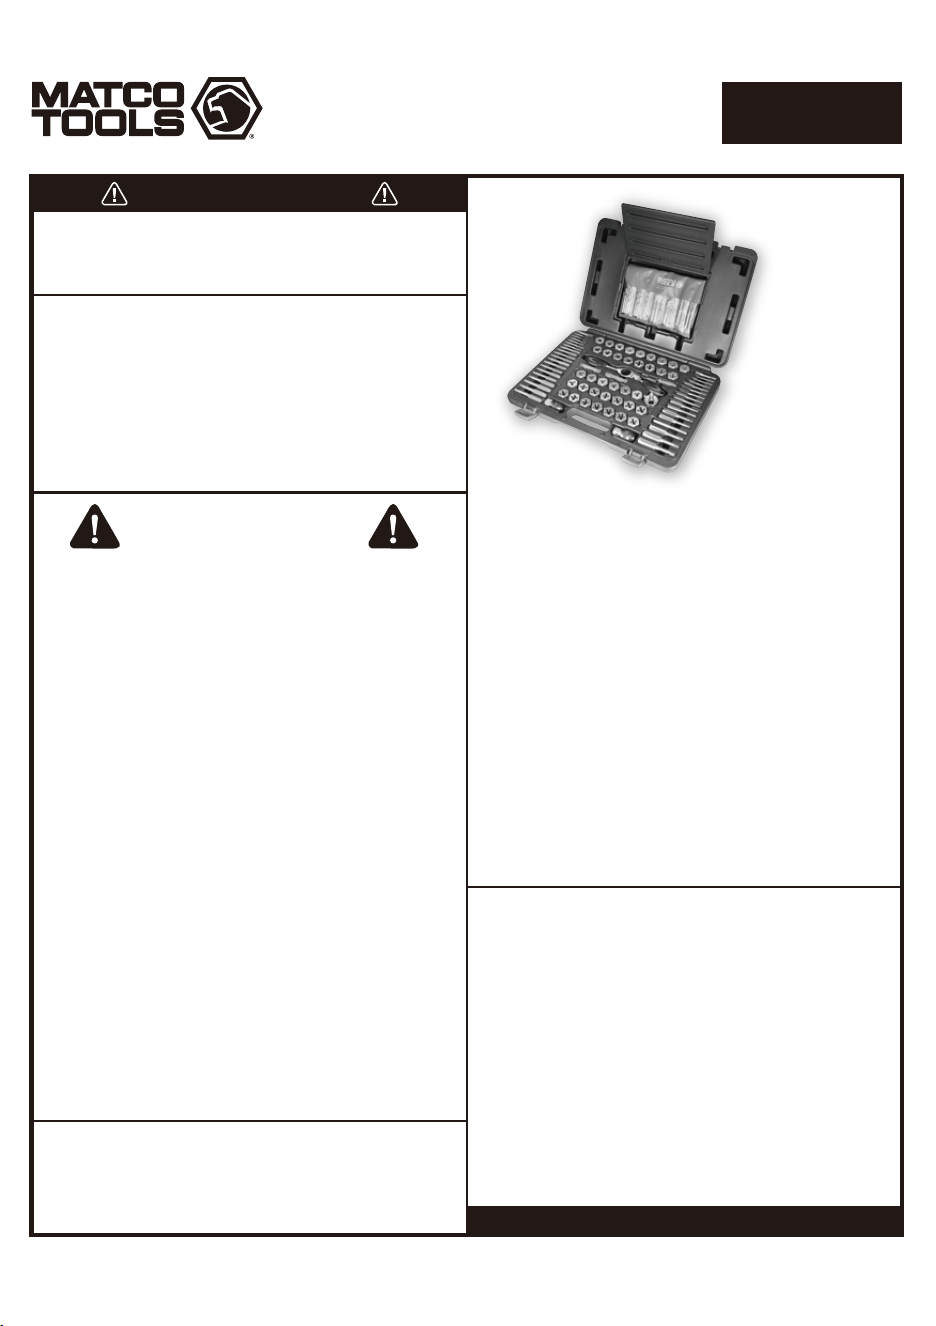
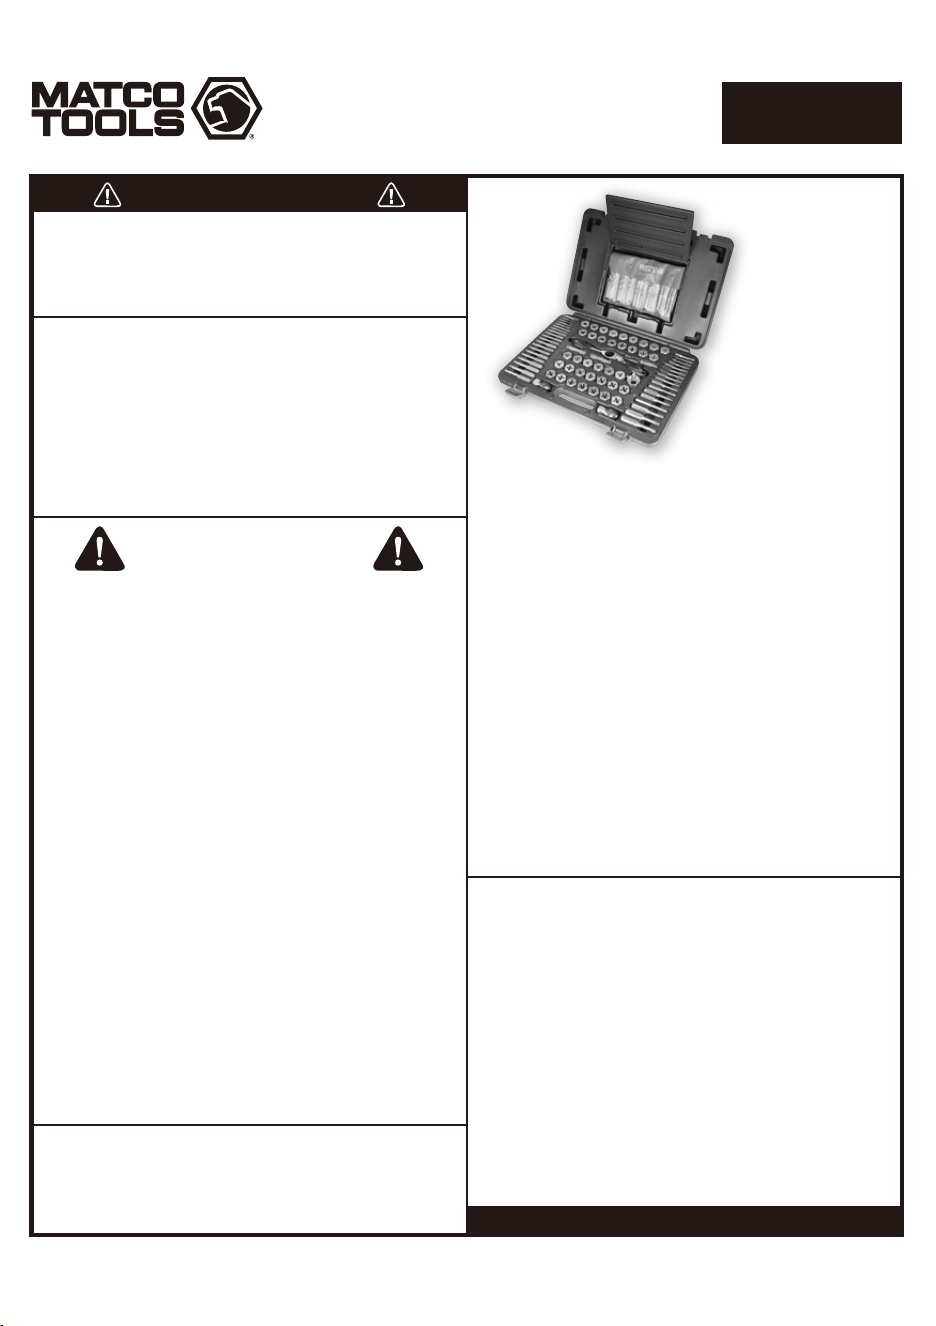
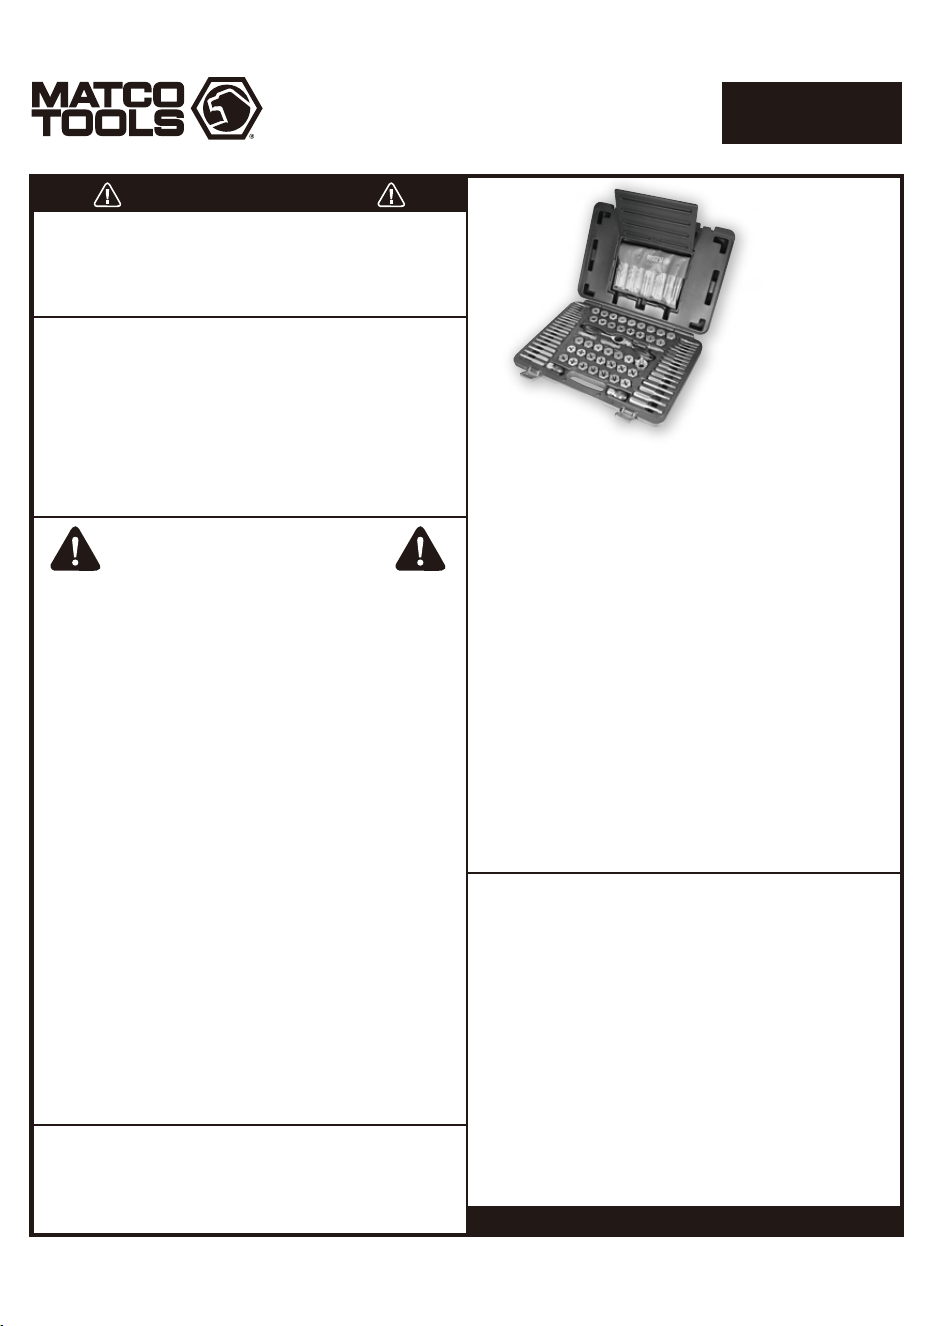
124 PIECE AUTO MASTER
TAP AND DIE SET
124MATDS
When unpacking, check the parts diagram and part
number listing on page 16-17 to make sure all parts are
included. If any parts are missing or damaged, please
call your distributor.
BEFORE USE
Study, understand and follow all instructions provided
with this product. Read these instructions carefully
before installing, operating, servicing or repairing this
tool. Keep these instructions in a safe, accessible place.
This tap and die tool set is designed for cutting male and
female threads of the thread pitches included in the kit
using the drill bits provided in this set our other high
quality appropriate size drill bits. This set is only suitable
for experienced technicians. Tap only appropriately sized
holes (see page 2); undersized holes will cause damage
to the tool or work piece. Do not use this tool outside of
the designed intent. Never modify the tool for any other
purpose or use.
Made in Taiwan
to Matco specifications
PAT. No. US8616095 B2
Caution: To help prevent personal injury
• Use of this product can expose you to chemicals
including ethylene glycol, gasoline vapors and engine
exhaust, which are known to the State of California to
cause cancer, birth defects, or reproductive harm. For
more information, visit www.P65Warnings.ca.gov.
Always wear ANSI approved safety equipment, safety
glasses and clothing when using this product. Study,
understand, and follow all instructions provided with
this product. Failure to read and follow all warnings
and operating instructions may result in damages and
serious injury or death.
• Always wear ANSI approved goggles when using this
product. (Users and Bystanders).
• Never use this tool for any application other than for
which it was designed.
• Only use accessories designed for this tool.
• Never alter or modify this tool in any way.
• Improper operation and/or maintenance of the tool,
modification of the tool, or use of the tool with
accessories not designed for it could result in serious
injury or death.
• Always select the correct accessories of the correct
size and design for the job that you are attempting to
perform.
• Always work in a clean, safe, well-lit, organized and
adequately equipped area.
• Do not begin repairs without assurance that vehicle is
in secure position, and will not move during repair.
WARNING
• Includes extractors and drill bits in the following sizes:
Extractor #1, #2, #3, #4, #5.
Drill bit No. 3, 7, 9, 16, 19, 20, 21, 25, 29, 30, 36, 39, 43,
Letter B, F, H, I, J, Q, O, R, S, T, U, Z and
Fractional sizes 5/64", 7/64", 5/32", 1/4", 19/64", 5/16",
21/64", 3/8", 25/64", 13/32", 27/64", 7/16", and 29/64".
• Includes taps and dies in the following sizes:
M3x0.5, M3x0.6, M4x0.7, M4x0.75, M5x0.8, M5x0.9,
M6x1.0, M7x1.0, M8x1.0, M8x1.25, M9x1.0, M9x1.25,
M10x1.0, M10x1.25, M10x1.5, M11x1.5, M12x1.25,
M12x1.5, M12x1.75, 1/8BSP, 4-40, 6-32, 8-32, 10-24,
10-32, 12-24, 1/4-20, 1/4-28, 5/16-18, 5/16-24, 3/8-16,
3/8-24, 7/16-14, 7/16-20,1/2-13, 1/2-20, 1/8NPT

Page 2
1812422-14
124 PIECE AUTO MASTER
TAP AND DIE SET
124MATDS
DRILL GUIDE
Below you will find the included tap and extractor sizes as well as the drill bits that pair with them. Select the thread
pitch you intend to tap, then match it with the drill bit size listed below. In rare cases if your material is exceptionally
thin or thick, you may need to step up (thick) or down (thin) in drill size within the pouch provided, however the
below drill bit pairings work with the majority of applications. The chart below also includes part numbers for each
piece found in this kit.
Thread Size
Extractor Size
Tap Part # Die Part # Drill Bit Size Drill Bit Part #
Drill Bit Size Drill Bit Part #
4-40 NC
6-32 NC
8-32 NC
10-24 NC
10-32 NC
12-24 NC
1/4"-20 NC
1/4"-28 NF
5/16"-18 NC
5/16"-24 NF
3/8"-16 NC
3/8"-24 NF
7/16"-14 NC
7/16"-20 NF
1/2"-13 NC
1/2"-20 NF
M3x0.6
M3x0.5
M4x0.75
M4x0.7
M5x0.9
M5x0.8
M6x1.0
M7x1.0
M8x1.25
M8x1.0
M9x1.25
M9x1.0
M10x1.5
M10x1.25
M10x1.0
M11x1.5
M12x1.75
M12x1.5
M12x1.25
1/8"-27 NPT
1/8"-28 BSP
MT440T
MT632T
MT832T
MT1024T
MT1032T
MT1224T
MT1420T
MT1428T
MT51618T
MT51624T
MT3816T
MT3824T
MT71614T
MT71620T
MT1213T
MT1220T
MT306T
MT305T
MT4075T
MT407T
MT509T
MT508T
MT610T
MT710T
MT8125T
MT810T
MT9125T
MT910T
MT1015T
MT10125T
MT1010T
MT1115T
MT12175T
MT1215T
MT12125T
MT1827T
MT1828T
MT440D
MT632D
MT832D
MT1024D
MT1032D
MT1224D
MT1420D
MT1428D
MT51618D
MT51624D
MT3816D
MT3824D
MT71614D
MT71620D
MT1213D
MT1220D
MT306D
MT305D
MT4075D
MT407D
MT509D
MT508D
MT610D
MT710D
MT8125D
MT810D
MT9125D
MT910D
MT1015D
MT10125D
MT1010D
MT1115D
MT12175D
MT1215D
MT12125D
MT1827D
MTBSP28
No. 43
No. 36
No.29
No. 25
No. 21
No. 16
No. 7
No. 3
Letter F
Letter I
5/16"
Letter Q
Letter U
25/64"
27/64"
29/64"
No. 39
No. 39
No. 30
No. 30
No. 20
No. 19
No. 9
Letter B
Letter J
Letter H
5/16"
Letter O
Letter R
Letter S
Letter T
3/8"
13/32"
Letter Z
7/16" *
Letter Q
21/64"
43A
36A
29A
25A
21A
16A
7A
3A
HDF
HDI
HD20A
HDQ
HDU
HD2538A
HD2738A
HD2938A
39A
39A
30A
30A
20A
19A
9A
HDB
HDJ
HDH
HD20A
HDO
HDR
HDSA
HDT
HD24A
HD2638A
HDZRS
HD2838A
HDQ
HD21A
Metric
* F/ material < 1/2" use 27/64"
PipeExtractor
Extractor part #
EO1A
EO2A
EO3A
EO4A
EO5A
5/64"
7/64"
5/32"
1/4"
19/64"
HD510A
HD710A
HD1010A
HD1610A
HD19A
Machine Screw
Fractional
Extractor #1
Extractor #2
Extractor #3
Extractor #4
Extractor #5
USAGE INFORMATION
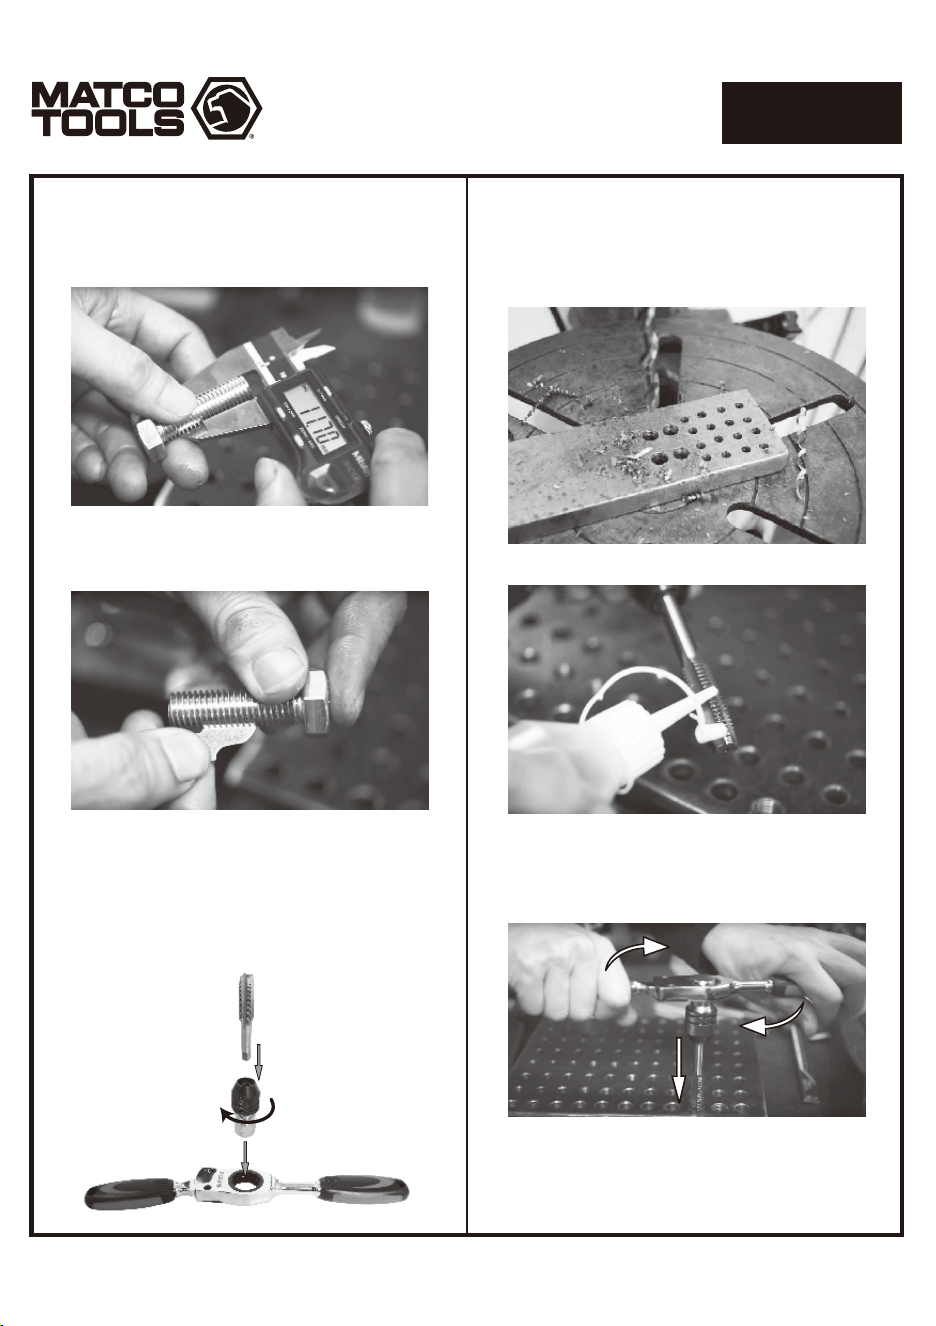
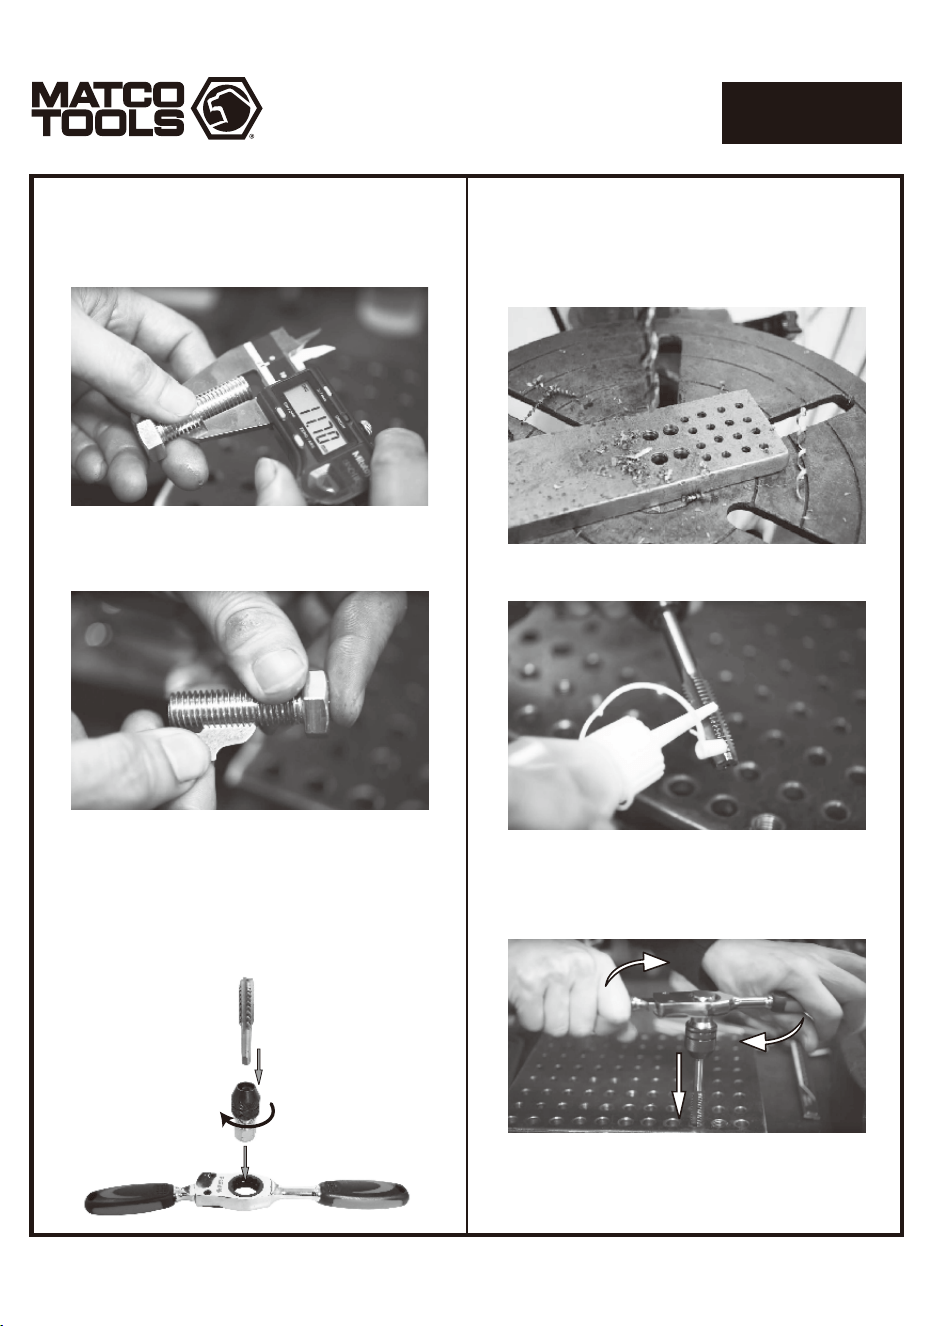
a.) Cutting Female Threads (Taps)
(1) Measure the external diameter of the bolt you
wish to use.
(2) Determine the thread pitch using the thread
gauge included with the product.
The prongs on the thread pitch must fit exactly
into the screw thread.
Page 3
1812422-14
124 PIECE AUTO MASTER
TAP AND DIE SET
124MATDS
(3) Choose the correct tap. The corresponding size
information can be found on the thread gauge
and the tap. Insert the tap into one of the two
tap holders. Fix the tap in place so that it cannot
fall out of the holder.
Please note that one tap holder is designed for
small taps and the other tap holder is designed
for large taps. Insert the tap holder into the
tap wrench.
(4) Locate or drill your own appropriately sized hole
for the tap being used with the drill bits provided
in the drill pouch in this kit (see page 2).
(5) Apply a small amount of cutting oil to the tap.
(6) Start to cut the thread. The first 4 cutting edges of
the tap are chamfered to allow for alignment with
the hole. Turn the handle in a clockwise direction,
maintaining a 90º perpendicular relationship
with tap and hole.
(7) Depending on the hardness of the tapped material,
you will likely have to back the tap out of the hole
1/4 - 1/2 turn every 2-3 full rotations, in order to break
up chips and for safe and consistent tapping.
The Rapid Select Ratchet allows you to switch
between forward and reverse quickly in order to
perform this procedure as effortlessly as possible.
(8) When tapping of the hole is finished, from behind
the tap blow chips out with pressurized air. Move
the arm on the ratchet to select reverse and slowly
back the tap out of the hole, being careful on the last
few turns not to catch and damage the threads
when removing the tap.
(9) Blow out all remaining chips from the work area
and install fastener.
Page 4
1812422-14
124 PIECE AUTO MASTER
TAP AND DIE SET
124MATDS
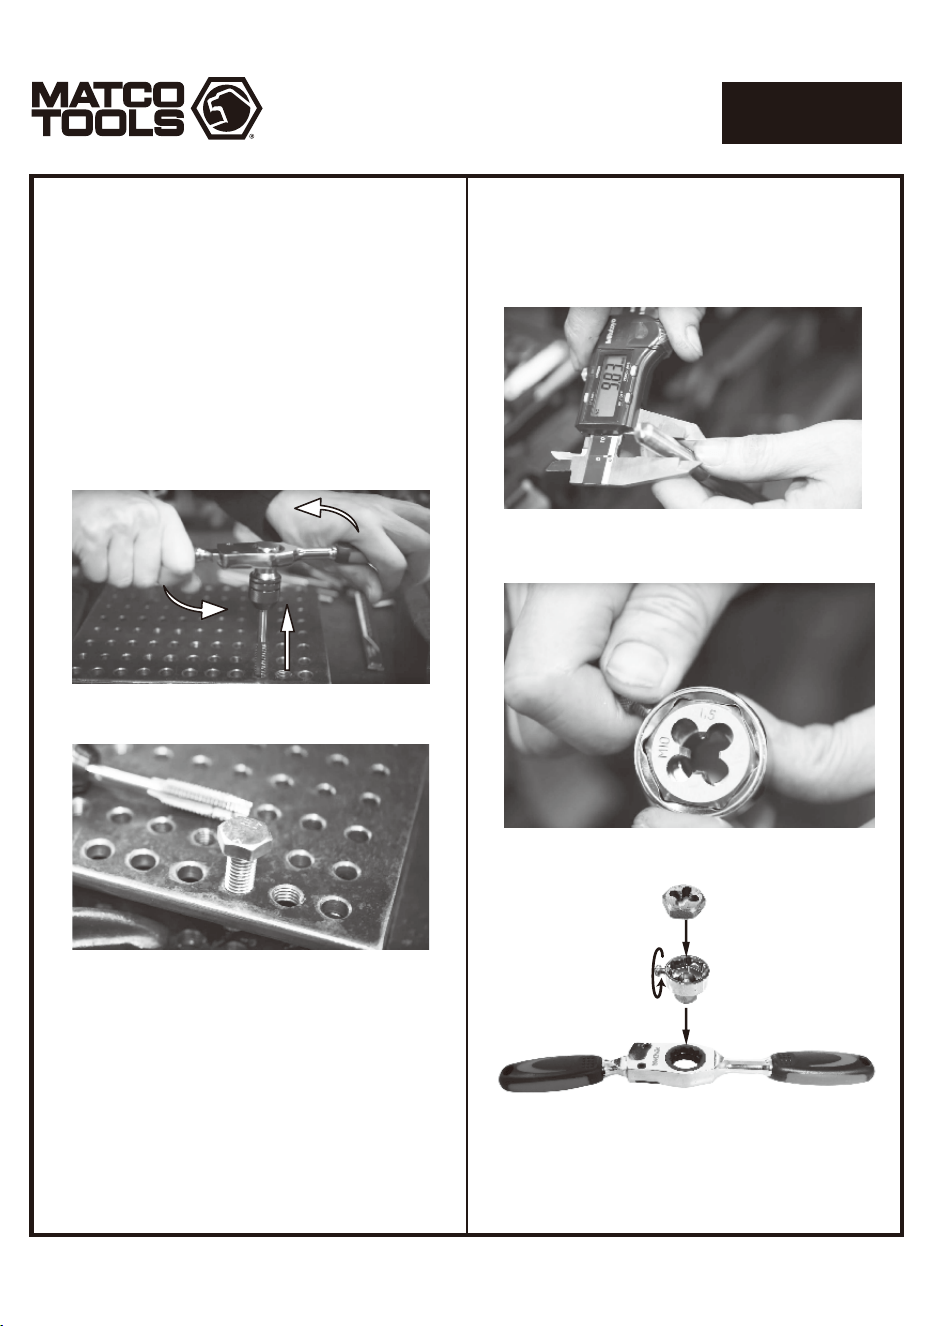
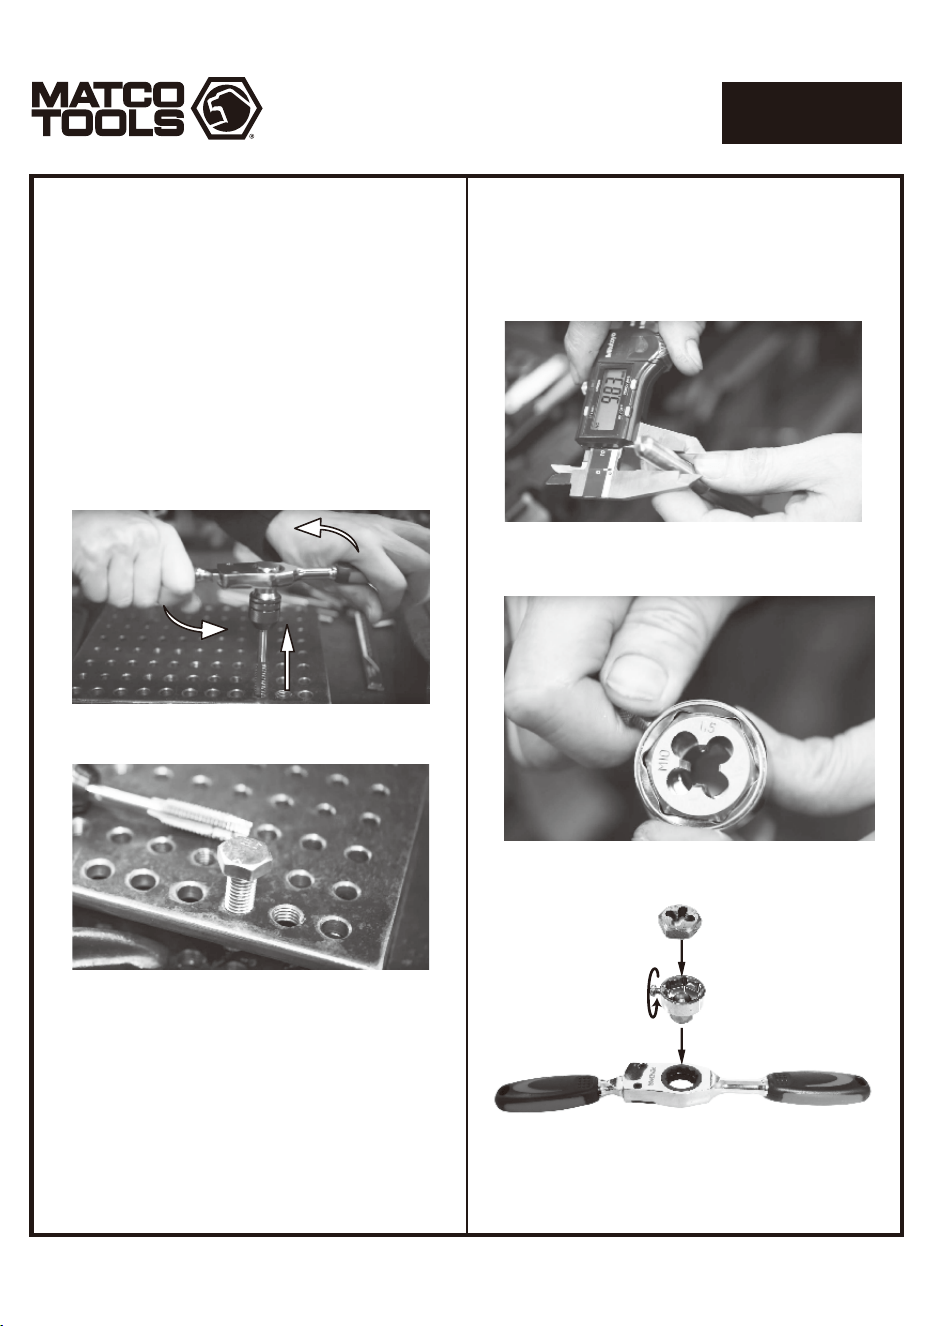
b.) Cutting Male Threads (Dies)
(1) Measure the outside diameter of the blank or
threaded bolt. If tracing the threads on a bolt, also
measure the thread pitch with the thread gauge.
(2) Choose the correct bolt die. Insert the bolt die into
the die holder. Secure the bolt die using the screw
on the die holder.
(3) Insert the die holder into the tap wrench (ratchet).
c.) Storage
FORWARD
REVERSE
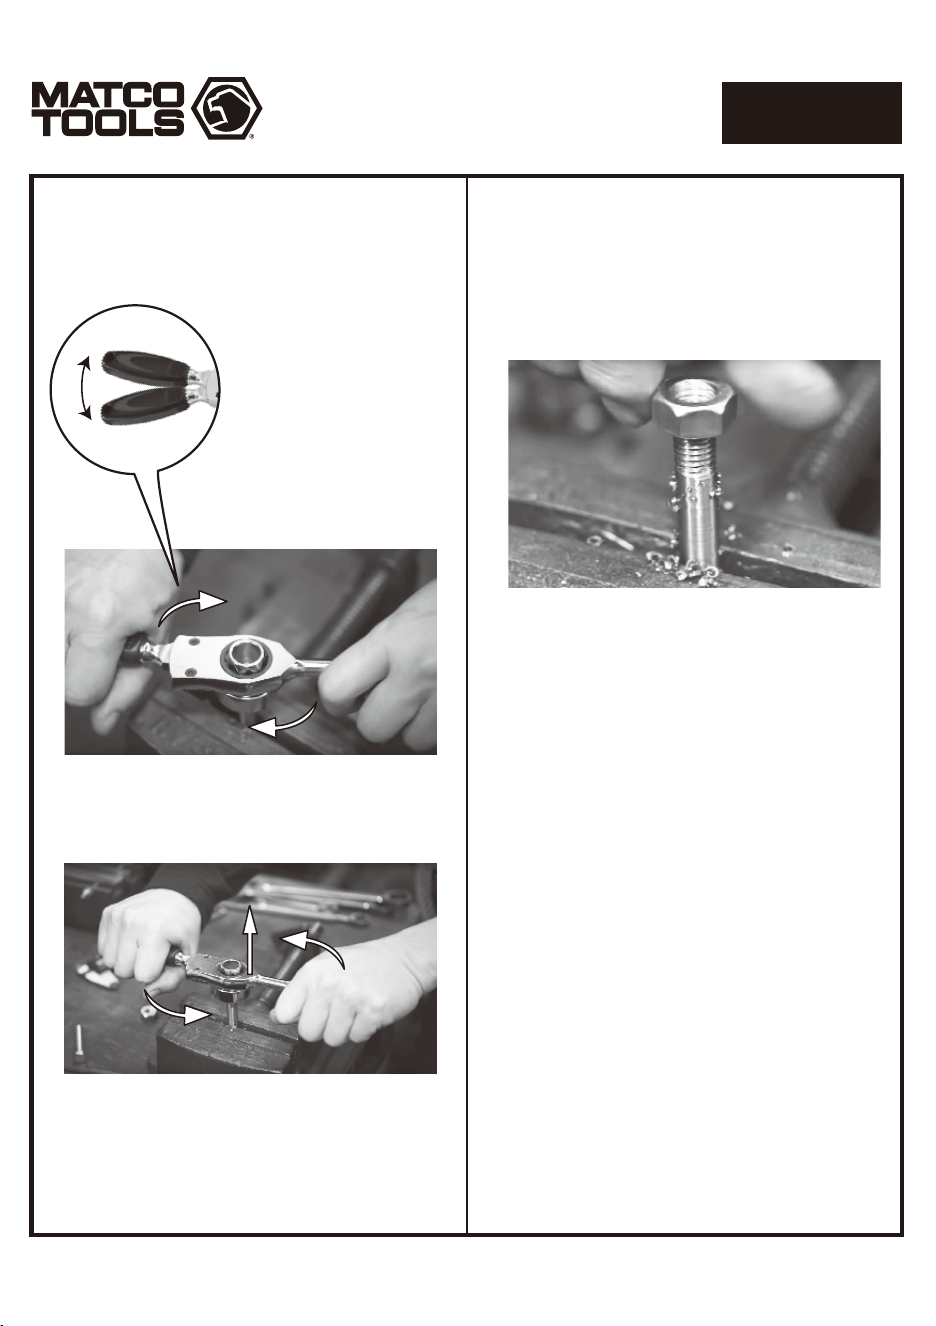
(4) Set the direction of rotation for the handle to the
forward position.
(5) Apply a small amount of
cutting oil to the work piece.
Ratchet the tool in
a clockwise direction.
Make sure the ratchet is
aligned with the work piece.
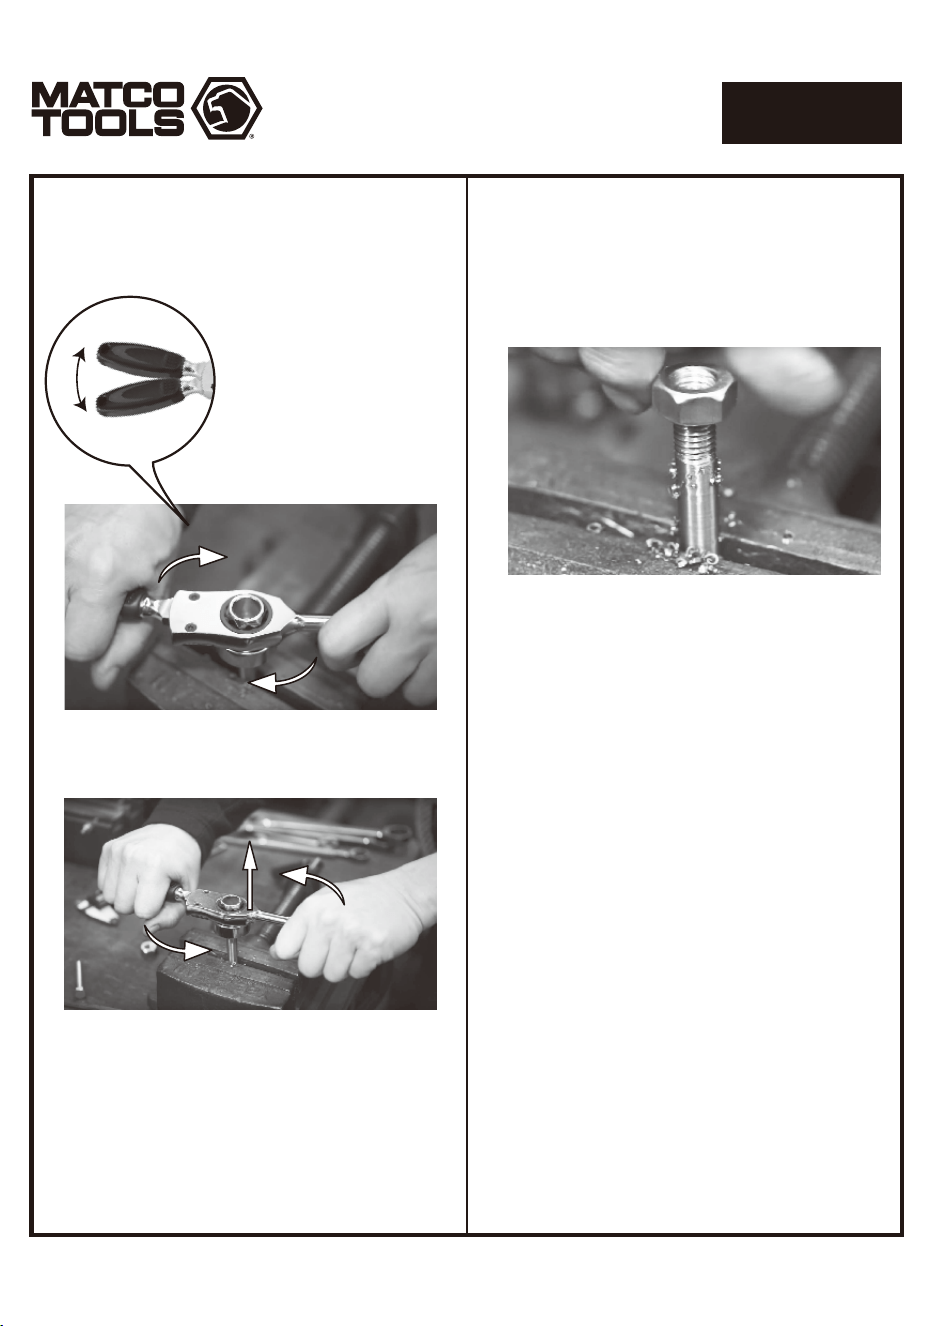
(6) Throughout the cut, use the
Rapid Select Ratchet to
quickly switch back and forth
between forward and reverse
to break up the chips for a
cleaner cut.
(7) Set the handle to the reverse position.
Use pressurized air to blow the chips from the work
piece. Ratchet the bolt die counter-clockwise to
remove the die from the workpiece.
(8) Clean the rest of the chips from the threads and
check your work with a threaded nut before
installing bolt. It may be necessary to apply a small
amount of oil or using a fine file to ease the edges
of the threads before installation.
Apply a small amount of oil to the die and tap for
storage. Store the product in a cool, dry place. Ensure
that no condensation forms.
Page 5
1812422-14
124 PIECE AUTO MASTER
TAP AND DIE SET
124MATDS
EL USO DE LA HERRAMIETA
DESEMPACADO
Cuando desempaque el producto, revise el diagrama y la
lista de piezas en página 16-17 para verificar que se hayan
enviado todas las piezas. De perder piezas o tener piezas
dañadas, favor llamar a su distribuidor inmediatamente.
Estudie, entienda y siga todas las instrucciones que se
proveen con este producto. Lea las instrucciones
detenidamente antes de instalar, operar, dar servicio o
reparar esta herramienta. Guarde estas instrucciones
en un lugar seguro y accesible.
Precaución: Para ayudar a evitar lesiones a las personas
• El uso de este producto puede exponerlo a productos
químicos que incluyen etilenglicol, vapores de gasolina y
gases de escape del motor, que en el estado de California
son causantes de cáncer, defectos de nacimiento o daños
reproductivos. Para obtener más información, visite
www.P65Warnings.ca.gov. Siempre use equipo de
seguridad aprobado por ANSI, gafas de seguridad y ropa
cuando use este producto. Estudie, comprenda y siga
todas las instrucciones proporcionadas con este
producto. Si no lee y sigue todas las advertencias e
instrucciones de funcionamiento puede ocasionar daños
y lesiones graves o la muerte.
• Siempre use guantes del tipo aprobado por la ANSI para
trabajar con esta herramienta (tanto usuarios como
espectadores).
• Nunca utilice esta herramienta para cualquier otra cosa que
no sean las aplicaciones para lo que fue diseñada.
• Sólo utilice los accesorios diseñados para esta herramienta.
• No modifique o altere esta herramienta de ninguna manera.
• El funcionamiento y/o mantenimiento inadecuado de la
herramienta, la modificación, o la utilización de la
herramienta con accesorios inadecuados podrían causar
lesiones graves o la muerte.
• Siempre usar los correctos accesorios para el trabajo
queUd. está realizando.
• Trabaje siempre en un área limpia, segura, bien
iluminada, organizada y equipada adecuadamente.
• NUNCA empiece reparaciones sin estar seguro de que el
vehículo esté en posición segura y que no se mueva
durante la reparación.
• Includes extractors and drill bits in the following sizes:
Extractor #1, #2, #3, #4, #5.
Drill bit No. 3, 7, 9, 16, 19, 20, 21, 25, 29, 30, 36, 39, 43,
Letter B, F, H, I, J, Q, O, R, S, T, U, Z and
Fractional sizes 5/64", 7/64", 5/32", 1/4", 19/64", 5/16",
21/64", 3/8", 25/64", 13/32", 27/64", 7/16", and 29/64".
• Includes taps and dies in the following sizes:
M3x0.5, M3x0.6, M4x0.7, M4x0.75, M5x0.8, M5x0.9,
M6x1.0, M7x1.0, M8x1.0, M8x1.25, M9x1.0, M9x1.25,
M10x1.0, M10x1.25, M10x1.5, M11x1.5, M12x1.25,
M12x1.5, M12x1.75, 1/8BSP, 4-40, 6-32, 8-32, 10-24,
10-32, 12-24, 1/4-20, 1/4-28, 5/16-18, 5/16-24, 3/8-16,
3/8-24, 7/16-14, 7/16-20,1/2-13, 1/2-20, 1/8NPT
Page 6
INFORMACIÓN DEL PRODUCTO:
The manufacturer warrants this product to the original
user against defective material or workmanship for
either a period of lifetime, or consumable (drill bits 1/4"
and below only). Ask your distributor for more details.
El fabricante se reserva el derecho de determinar si la
pieza, o partes fallaron debido al material y/o mano de
obra defectuosos u otras causas. Las fallas causadas por
accidentes, alteraciones o mal uso no están cubiertas por
esta garantía.
Los reemplazos bajo garantía también llevan una
garantía de por vida. Los derechos bajo esta garantía
están limitados al usuario original y no pueden ser
transferidos a los propietarios posteriores.
Esta garantía es en lugar de todas las demás garantías,
expresas o implícitas, incluyendo garantías de
comerciabilidad y adecuación para un propósito particular.
Algunos Estados no permiten la exclusión o limitaciones
de daños incidentales o consecuentes, por lo que las
limitaciones anteriores pueden no aplicarse a usted
(M) MIXED WARRANTY
(Lifetime and Consumable)
1812422-14
124 PIECE AUTO MASTER
TAP AND DIE SET
124MATDS
This tap and die tool set is designed for cutting male and
female threads of the thread pitches included in the kit
using the drill bits provided in this set our other high
quality appropriate size drill bits. This set is only suitable
for experienced technicians. Tap only appropriately sized
holes (see page 2); undersized holes will cause damage
to the tool or work piece. Do not use this tool outside of
the designed intent. Never modify the tool for any other
purpose or use.
HECHO en Taiwán
Para Matco especificaciones
PAT. No. US8616095 B2
ADVERTENCIA
NO LO DESCARTE O DESECHE, ENTREGESELO AL USUARIO
ADVERTENCIA

Page 7
1812422-14
124 PIECE AUTO MASTER
TAP AND DIE SET
124MATDS
DRILL GUIDE
Below you will find the included tap and extractor sizes as well as the drill bits that pair with them. Select the thread
pitch you intend to tap, then match it with the drill bit size listed below. In rare cases if your material is exceptionally
thin or thick, you may need to step up (thick) or down (thin) in drill size within the pouch provided, however the
below drill bit pairings work with the majority of applications. The chart below also includes part numbers for each
piece found in this kit.
Thread Size
Extractor Size
Tap Part # Die Part # Drill Bit Size Drill Bit Part #
Drill Bit Size Drill Bit Part #
4-40 NC
6-32 NC
8-32 NC
10-24 NC
10-32 NC
12-24 NC
1/4"-20 NC
1/4"-28 NF
5/16"-18 NC
5/16"-24 NF
3/8"-16 NC
3/8"-24 NF
7/16"-14 NC
7/16"-20 NF
1/2"-13 NC
1/2"-20 NF
M3x0.6
M3x0.5
M4x0.75
M4x0.7
M5x0.9
M5x0.8
M6x1.0
M7x1.0
M8x1.25
M8x1.0
M9x1.25
M9x1.0
M10x1.5
M10x1.25
M10x1.0
M11x1.5
M12x1.75
M12x1.5
M12x1.25
1/8"-27 NPT
1/8"-28 BSP
MT440T
MT632T
MT832T
MT1024T
MT1032T
MT1224T
MT1420T
MT1428T
MT51618T
MT51624T
MT3816T
MT3824T
MT71614T
MT71620T
MT1213T
MT1220T
MT306T
MT305T
MT4075T
MT407T
MT509T
MT508T
MT610T
MT710T
MT8125T
MT810T
MT9125T
MT910T
MT1015T
MT10125T
MT1010T
MT1115T
MT12175T
MT1215T
MT12125T
MT1827T
MT1828T
MT440D
MT632D
MT832D
MT1024D
MT1032D
MT1224D
MT1420D
MT1428D
MT51618D
MT51624D
MT3816D
MT3824D
MT71614D
MT71620D
MT1213D
MT1220D
MT306D
MT305D
MT4075D
MT407D
MT509D
MT508D
MT610D
MT710D
MT8125D
MT810D
MT9125D
MT910D
MT1015D
MT10125D
MT1010D
MT1115D
MT12175D
MT1215D
MT12125D
MT1827D
MTBSP28
No. 43
No. 36
No.29
No. 25
No. 21
No. 16
No. 7
No. 3
Letter F
Letter I
5/16"
Letter Q
Letter U
25/64"
27/64"
29/64"
No. 39
No. 39
No. 30
No. 30
No. 20
No. 19
No. 9
Letter B
Letter J
Letter H
5/16"
Letter O
Letter R
Letter S
Letter T
3/8"
13/32"
Letter Z
7/16" *
Letter Q
21/64"
43A
36A
29A
25A
21A
16A
7A
3A
HDF
HDI
HD20A
HDQ
HDU
HD2538A
HD2738A
HD2938A
39A
39A
30A
30A
20A
19A
9A
HDB
HDJ
HDH
HD20A
HDO
HDR
HDSA
HDT
HD24A
HD2638A
HDZRS
HD2838A
HDQ
HD21A
Metric
* F/ material < 1/2" use 27/64"
PipeExtractor
Extractor part #
EO1A
EO2A
EO3A
EO4A
EO5A
5/64"
7/64"
5/32"
1/4"
19/64"
HD510A
HD710A
HD1010A
HD1610A
HD19A
Machine Screw
Fractional
Extractor #1
Extractor #2
Extractor #3
Extractor #4
Extractor #5
INFORMACION PARA SU USO
a.) Para cortar roscas hembra (Taps)
(1) Medir el diámetro exterior del perno que
desee utilizar.
(2) Determinar el grado de rosca que utilizara con el
calibrador que se incluye con el producto. Las
puntas de la rosca deben encajar exactamente en
el enroscado.
Page 8
1812422-14
124 PIECE AUTO MASTER
TAP AND DIE SET
124MATDS
(3) Seleccione la terraja correcta. La información
correspondiente se puede encontrar con el calibrador
de brocas y terrajas. Inserte la llave en uno de los dos
titulares de la tuerca o terraja. Fijar la terraja en su
lugar para que no se caiga fuera del soporte.
Tenga en cuenta que uno de los titulares de la terraja
está diseñado para pequeños golpecitos y la otra para
grandes. Inserte uno de los extremos de la terraja en
el trinquete o llave.
(4) Locate or drill your own appropriately sized hole
for the tap being used with the drill bits provided
in the drill pouch in this kit (see page 2).
(5) Aplicar una pequeña cantidad de aceite antes del
corte.
(6) Comience a cortar el enroscado. Los primeros 4 filos
del corte están biselados para permitir la alineación
con el agujero. Girar el mango en dirección a las
manecillas del reloj, mantener una alineación
perpendicular de 90 grados con el agujero.
(7) Dependiendo de la dureza del material tachado,
usted será capaz de sacar la terraja del agujero de
1/4 - 1/2 rotando de 2-3 vueltas completas, con el fin
de soltar las lascas y para realizar golpes seguros y
consistentes. El funcionamiento rápido de la llave o
trinquete permite alternar entre el avance y el
retroceso más rápidamente a fin de realizar este
procedimiento tan fácilmente como sea posible.
(8) Cuando termine de perforar, limpie las lascas o
rebabas con aire presurizado haciéndolo de atrás
para delante. Mueva el brazo del trinquete para
seleccionar la reversa y lentamente sacar la terraja
del agujero siendo muy cauteloso en las últimas
vueltas de no tocar o dañar el enroscado.
(9) Elimine el resto de las virutas del área de trabajo
e instale el sujetador.
Page 9
1812422-14
124 PIECE AUTO MASTER
TAP AND DIE SET
124MATDS
b.) Cortar roscas macho (Dies)
(1) Medir el diámetro exterior del perno en blanco o ya
enroscado. Si está siguiendo el enroscado en un
perno, también mida las líneas del enroscado con
el calibrador.
(2) Seleccione el troquel correcto. Insertar el perno en el
soporte y fíjelo o asegúrelo firmemente utilizado el
tornillo del soporte.
(3) Inserte el sostenedor del troquel o dado en la
llave del trinquete.
c.) Almacenamiento
AVANCE
RETROCESO
(4) Establecer la dirección de rotación mediante la
palanca de la llave a la posición de avance.
(5) Aplicar una pequeña
cantidad de aceite a la pieza
de trabajo. Mueva el trinquete
en sentido de las manecillas
del reloj. Asegúrese de que el
trinquete este en posición
perpendicular de 90 grados.
(6) A lo largo del corte, utilice el
sistema rápido del trinquete
que puede cambiar
rápidamente de adelante
hacia atrás para eliminar las
virutas y hacer una un trabajo
más limpio.
(7) Ajuste el mango a la posición de reversa o marcha
atrás. Utilice aire comprimido para soplar las virutas
de la pieza de trabajo. Utilice el perno del trinquete
en sentido contrario a las manecillas del reloj para
soltar el perno de la pieza de trabajo.
(8) Limpiar el resto de las virutas de las roscas y
comprobar la efectividad de su trabajo enroscando
una tuerca antes de instalar el perno definitivo.
Puede ser necesario aplicar una pequeña cantidad
de aceite o para suavizar los bordes del enroscado
con una lima fina antes de su instalación.
Aplique una pequeña cantidad de aceite al producto
antes de su almacenamiento y guardarlo en un lugar
fresco y seco, para garantizar que no se produce
condensación.
Page 10
1812422-14
124 PIECE AUTO MASTER
TAP AND DIE SET
124MATDS
• Includes extractors and drill bits in the following sizes:
Extractor #1, #2, #3, #4, #5.
Drill bit No. 3, 7, 9, 16, 19, 20, 21, 25, 29, 30, 36, 39, 43,
Letter B, F, H, I, J, Q, O, R, S, T, U, Z and
Fractional sizes 5/64", 7/64", 5/32", 1/4", 19/64", 5/16",
21/64", 3/8", 25/64", 13/32", 27/64", 7/16", and 29/64".
• Includes taps and dies in the following sizes:
M3x0.5, M3x0.6, M4x0.7, M4x0.75, M5x0.8, M5x0.9,
M6x1.0, M7x1.0, M8x1.0, M8x1.25, M9x1.0, M9x1.25,
M10x1.0, M10x1.25, M10x1.5, M11x1.5, M12x1.25,
M12x1.5, M12x1.75, 1/8BSP, 4-40, 6-32, 8-32, 10-24,
10-32, 12-24, 1/4-20, 1/4-28, 5/16-18, 5/16-24, 3/8-16,
3/8-24, 7/16-14, 7/16-20,1/2-13, 1/2-20, 1/8NPT
This tap and die tool set is designed for cutting male and
female threads of the thread pitches included in the kit
using the drill bits provided in this set our other high
quality appropriate size drill bits. This set is only suitable
for experienced technicians. Tap only appropriately sized
holes (see page 2); undersized holes will cause damage
to the tool or work piece. Do not use this tool outside of
the designed intent. Never modify the tool for any other
purpose or use.
UTILISATION PRÉVUE DE L’OUTIL
DÉBALLAGE
Lors du déballage, vérifier que les pièces contenues dans
le schéma et la liste des numéros de pièces de la page
16-17 sont toutes incluses. Si une pièce est manquante ou
abîmée, veuillez appeler immédiatement votre distributeur.
Etudier, comprendre et suivre toutes les instructions
fournies avec ce produit. Lire ces instructions
attentivement avant d’installer, d’utiliser, d’entretenir
et de réparer cet outil. Conserver ces instructions dans
un endroit sécuritaire et accessible.
Mise en garde: Pour aider à prévenir les blessures
• L'utilisation de ce produit peut vous exposer à des produits
chimiques, notamment l'éthylène glycol, les vapeurs
d'essence et les gaz d'échappement des moteurs, qui sont
reconnus par l'État de Californie pour causer le cancer, des
anomalies congénitales ou des problèmes de reproduction.
Pour plus d'informations, visitez
www.P65Warnings.ca.gov. Toujours porter un équipement
de sécurité, des lunettes de sécurité et des vêtements
homologués ANSI lors de l'utilisation de ce produit.
Étudier, comprendre et suivre toutes les instructions
fournies avec ce produit. Ne pas lire et suivre tous les
avertissements et instructions d'utilisation peut entraîner
des dommages et des blessures graves ou la mort.
• Toujours porter des lunettes à coques approuvées par l’ANSI
lorsque vous utilisez ce produit. (Utilisateurs et Spectateurs).
• Ne jamais utiliser cet outil pour aucune application qui n’est
pas conçue.
• Seulement utiliser les accessoires conçus pour cet outil.
• Ne jamais modifier cet outil.
• Le fonctionnement et/ou l’entretien incorrect de cet outil, la
modification de cet outil, ou l’utilisation de cet outil avec les
accessoires non conçus pour lui devrait causer des blessures
graves ou la mort.
• Toujours utiliser les accessoires adéquats pour le travail que
vous effectuez.
• Toujours travailler dans un environnement propre, sécuritaire,
bien éclairé, organisé et suffisamment équipé.
• Ne pas commencer les réparations sans assurance que le
véhicule est en position de sécurité, et ne se déplace pas lors
de la réparation.
Page 11
INFORMATIONS PRODUIT:
(M) MIXED WARRANTY
(Lifetime and Consumable)
1812422-14
124 PIECE AUTO MASTER
TAP AND DIE SET
124MATDS
Fabriqué à Taïwan
les spécifications de Matco
PAT. No. US8616095 B2
AVERTISSEMENT
NE PAS JETER-DONNER À L'UTILISATEUR
AVERTISSEMENT
The manufacturer warrants this product to the original
user against defective material or workmanship for either
a period of lifetime, or consumable (drill bits 1/4" and
below only). Ask your distributor for more details.
Le fabricant se réserve le droit de déterminer si la pièce
ou les pièces ont échoué en raison d'un défaut de
matériau, de fabrication ou d'autres causes. Les défauts
causés par un accident, une altération ou un mauvais
usage ne sont pas couverts par cette garantie.
Les remplacements sous garantie comportent également
une garantie à vie. Les droits sous cette garantie sont
limités à l'utilisateur original et ne peuvent être
transférés aux propriétaires suivants.
La garantie remplace toutes les autres garanties, explicites
ou implicites, y compris les garanties de qualité
marchande et d'adéquation à un usage particulier.
Certains états ne permettent pas l'exclusion ou les
limitations des dommages accessoires ou consécutifs,
de sorte que les limitations ci-dessus peuvent ne pas
s'appliquer à vous.

Page 12
1812422-14
124 PIECE AUTO MASTER
TAP AND DIE SET
124MATDS
DRILL GUIDE
Below you will find the included tap and extractor sizes as well as the drill bits that pair with them. Select the thread
pitch you intend to tap, then match it with the drill bit size listed below. In rare cases if your material is exceptionally
thin or thick, you may need to step up (thick) or down (thin) in drill size within the pouch provided, however the
below drill bit pairings work with the majority of applications. The chart below also includes part numbers for each
piece found in this kit.
Thread Size
Extractor Size
Tap Part # Die Part # Drill Bit Size Drill Bit Part #
Drill Bit Size Drill Bit Part #
4-40 NC
6-32 NC
8-32 NC
10-24 NC
10-32 NC
12-24 NC
1/4"-20 NC
1/4"-28 NF
5/16"-18 NC
5/16"-24 NF
3/8"-16 NC
3/8"-24 NF
7/16"-14 NC
7/16"-20 NF
1/2"-13 NC
1/2"-20 NF
M3x0.6
M3x0.5
M4x0.75
M4x0.7
M5x0.9
M5x0.8
M6x1.0
M7x1.0
M8x1.25
M8x1.0
M9x1.25
M9x1.0
M10x1.5
M10x1.25
M10x1.0
M11x1.5
M12x1.75
M12x1.5
M12x1.25
1/8"-27 NPT
1/8"-28 BSP
MT440T
MT632T
MT832T
MT1024T
MT1032T
MT1224T
MT1420T
MT1428T
MT51618T
MT51624T
MT3816T
MT3824T
MT71614T
MT71620T
MT1213T
MT1220T
MT306T
MT305T
MT4075T
MT407T
MT509T
MT508T
MT610T
MT710T
MT8125T
MT810T
MT9125T
MT910T
MT1015T
MT10125T
MT1010T
MT1115T
MT12175T
MT1215T
MT12125T
MT1827T
MT1828T
MT440D
MT632D
MT832D
MT1024D
MT1032D
MT1224D
MT1420D
MT1428D
MT51618D
MT51624D
MT3816D
MT3824D
MT71614D
MT71620D
MT1213D
MT1220D
MT306D
MT305D
MT4075D
MT407D
MT509D
MT508D
MT610D
MT710D
MT8125D
MT810D
MT9125D
MT910D
MT1015D
MT10125D
MT1010D
MT1115D
MT12175D
MT1215D
MT12125D
MT1827D
MTBSP28
No. 43
No. 36
No.29
No. 25
No. 21
No. 16
No. 7
No. 3
Letter F
Letter I
5/16"
Letter Q
Letter U
25/64"
27/64"
29/64"
No. 39
No. 39
No. 30
No. 30
No. 20
No. 19
No. 9
Letter B
Letter J
Letter H
5/16"
Letter O
Letter R
Letter S
Letter T
3/8"
13/32"
Letter Z
7/16" *
Letter Q
21/64"
43A
36A
29A
25A
21A
16A
7A
3A
HDF
HDI
HD20A
HDQ
HDU
HD2538A
HD2738A
HD2938A
39A
39A
30A
30A
20A
19A
9A
HDB
HDJ
HDH
HD20A
HDO
HDR
HDSA
HDT
HD24A
HD2638A
HDZRS
HD2838A
HDQ
HD21A
Metric
* F/ material < 1/2" use 27/64"
PipeExtractor
Extractor part #
EO1A
EO2A
EO3A
EO4A
EO5A
5/64"
7/64"
5/32"
1/4"
19/64"
HD510A
HD710A
HD1010A
HD1610A
HD19A
Machine Screw
Fractional
Extractor #1
Extractor #2
Extractor #3
Extractor #4
Extractor #5

INFORMATION UTILISATION
a.) Couper les filets femelles (Robinets)
(1) Mesurer le diamètre extérieur du boulon que vous
souhaitez utiliser.
(2) Déterminer le pas de filetage en utilisant la jauge
de fil fourni avec le produit. Les dents sur le pas de
filetage doit correspondre exactement dans le filetage.
Page 13
1812422-14
124 PIECE AUTO MASTER
TAP AND DIE SET
124MATDS
(3) Choisissez la bonne prise. Les informations de taille
correspondante peut être trouvée sur la jauge de fil
et le robinet. Insérer le robinet dans l'une des deux
porte-tarauds. Fixer le robinet en place afin qu'il ne
puisse pas tomber hors du support.
S'il vous plaît noter que un support du robinet est
conçu pour les petits robinets et l'autre titulaire du
robinet est conçu pour les grands robinets. Insérez le
support du robinet dans le robinet clé (cliquet).
(4) Locate or drill your own appropriately sized hole
for the tap being used with the drill bits provided
in the drill pouch in this kit (see page 2).
(5) Appliquez une petite quantité de l'huile de coupe à
l'eau du robinet.
(6) Commencer à couper le fil. Les 4 premières arêtes
de coupe du robinet sont chanfreinées pour permettre
un alignement avec le trou. Tournez la poignée dans
le sens horaire le maintien d'une relation
perpendiculaire de 90 degrés avec le trou.
(7) En fonction de la dureté du matériau taraudé, vous
pourrez renvoyer le robinet hors du trou 1/4 - 1/2
tours toutes les 2-3 tours pleines, afin de briser les
copeaux et pour une coupe sûre et constante. Le
Rapide Select rochet vous permet de basculer entre
la marche avant et marche arrière rapidement afin
d'effectuer cette procédure aussi facilement que
possible.
(8) La coupe des filets des vis dans les trous est terminée,
utilisez de l'air pour souffler des puces métalliques
avant de retirer l'outil. Déplacez le bras sur le cliquet
pour sélectionner inverse et revenir lentement le
robinet du trou en faisant attention sur les quelques
derniers tours ne pas attraper et endommager les fils
en enlevant le robinet.
(9) Souffler tous les jetons restants de la zone de travail
et installer attache.
Page 14
1812422-14
124 PIECE AUTO MASTER
TAP AND DIE SET
124MATDS
b.) Couper les filets mâles (Dies)
(1) Mesurer le diamètre extérieur du boulon vierge ou
filetée. Si le traçage les discussions sur un boulon,
mesurent également le pas de vis avec la jauge de fil.
(2) Choisissez la matrice de boulon correct. Insérez la
matrice de boulon dans le support de la filière.
Garantir le boulon meurent en utilisant la vis sur le
support de matrice.
(3) Insérez le support de filière dans la clé du robinet
(à cliquet).
c.) Stockage
FORWARD
REVERSE
(4) Régler le sens de rotation de la poignée à la position
avancée.
(5) Appliquez une petite quantité
de l'huile de coupe à la pièce
de travail. Cliquet l'outil dans
un le sens horaire.
Assurez-vous que le cliquet
est de 90 degrés
perpendiculaires la pièce de
travail.
(6) Tout au long de la coupe,
utilisez le Select Rapide Rochet
pour changer rapidement et-
vient entre avant et arrière
pour briser les copeaux et
faire un coupe plus nette.
(7) Réglez la poignée à la position inverse. Utiliser de
l'air sous pression pour souffler la copeaux de la
pièce de travail. Cliquet le boulon die le sens
antihoraire pour retirer la matrice de la pièce.
(8) Nettoyer le reste des puces à partir des fils et vérifier
votre travail avec un écrou fileté avant d'installer le
boulon. Il peut être nécessaire d'appliquer une petite
quantité d'huile ou pour faciliter les bords des filets
avec une lime fine avant installation.
Appliquez une petite quantité d'huile à la matrice et
appuyez sur pour le stockage. Conserver le produit dans
un endroit frais et sec. Veiller à ce que ne se forme pas
de condensation.
Page 15
1812422-14
124 PIECE AUTO MASTER
TAP AND DIE SET
124MATDS
PARTS BREAKDOWN
812
Page 16
1812422-14
124 PIECE AUTO MASTER
TAP AND DIE SET
124MATDS
82 83 84 85 86 88 89 90 91 92 93 94 95 96 98 99 101 102100 103 104 105 106 107 108 109
115
116
117
118
9787
656463 67
66
6261
53
5/16 -24
48
1/2-13
1/2-20
47
4- 40
46
6-32
45
8-32
44
43
10-24
10-32
4241
12-24
1/4-20
4039
1/4-28
1/8 NPT
38
M9 1.0M8 1.25
M8 1.0
79
80 81
M10 1.0
M9 1.25
73
M12 1.75
M12 1.5
72
BSP 28
74
M11 1 .5
70
M12 1.25
71
M10 1.5
69
M10 1.25
68
M7 1.0
M6 1.0
75
76
7877
M3 0.6
56
M5 0.9
60
M5 0.8
59
M4 0.7
57
M4 0.75
58
M3 0.5
55
1/8 BSP28
M3x0.5
M3x0.6
M4x0.7
M4x0.75
M5x0.8
M5x0.9
M6x1.0
M7x1.0
M8x1.0
M8x1.25
M9x1.0
M9x1.25
M10x1.0
M10x1.25
M10x1.5
M11x1.5
M12x 1.25
M12x 1.5
M12x 1.75
7/16 -14
50
7/16-20
49
3/8-16
52
3/8-24
51
5/ 16-18
54
211
2
3
4
5
6
7
8
9
10
11
12
13
14
15
16
17
18
19
20
22
23
24
25
26
27
28
29
30
31
32
33
34
35
36
37
1/8 NPT27
4NC40
6NC32
8 NC32
10 NC24
10 NF32
12 NC 24
1/4 NC20
1/4 NF28
5/16 N C18
5/16 NF24
3/8 NC16
3/8 NF24
7/16 NC14
7/16 NF20
1/2 NC13
1/2 NF20
SAE METRIC
110
111
112
113
114
119
120
121
122
123
124
43
44
45
46
47
48
49
50
51
52
53
54
55
56
57
58
59
60
61
62
63
64
65
66
67
68
69
70
71
72
73
74
75
76
77
78
79
80
81
82
83
84
85
86
87
88
89
90
91
92
93
94
95
96
97
98
99
100
101
102
103
104
105
106
107
108
109
110
111
112
113
114
115
116
117
118
119
120
121
122
123
124
MT1024D
MT832D
MT632D
MT440D
MT1220D
MT1213D
MT71620D
MT71614D
MT3824D
MT3816D
MT51624D
MT51618D
MT305D
MT306D
MT407D
MT4075D
MT508D
MT509D
MT610D
MT710D
MT810D
MT8125D
MT910D
MT9125D
MT1010D
MT10125D
MT1015D
MT1115D
MT12125D
MT1215D
MT12175D
MTBSP28
MT35SD
MT40R
MT36STG
MT36MTG
MT37DH
MT38TH
MT39TH
HD2938A
HD2838A
HD2738A
10-24 Die
8-32 Die
6-32 Die
4-40 Die
1/2-20" Die
1/2-13" Die
7/16-20" Die
7/16-14" Die
3/8-24" Die
3/8-16" Die
5/16-24" Die
5/16-18" Die
M3x0.5 Die
M3x0.6 Die
M4x0.7 Die
M4x0.75 Die
M5x0.8 Die
M5x0.9 Die
M6x1.0 Die
M7x1.0 Die
M8x1.0 Die
M8x1.25 Die
M9x1.0 Die
M9x1.25 Die
M10x1.0 Die
M10x1.25 Die
M10x1.5 Die
M11x1.5 Die
M12x1.25 Die
M12x1.5 Die
M12x1.75 Die
1/8BSP28 Die
Screw Driver
Rapid Select Ratchet
SAE Pitch Gauge
Metric Pitch Gauge
Die Holder
M3-M6 Tap Holder
M6-M12 Tap Holder
29/64" Drill Bit
7/16" Drill Bit
27/64" Drill Bit
PARTS BREAKDOWN
812
Page 17
1812422-14
124 PIECE AUTO MASTER
TAP AND DIE SET
124MATDS
1
2
3
4
5
6
7
8
9
10
11
12
13
14
15
16
17
18
19
20
21
22
23
24
25
26
27
28
29
30
31
32
33
34
35
36
37
38
39
40
41
42
Index
MT1828T
MT305T
MT306T
MT407T
MT4075T
MT508T
MT509T
MT610T
MT710T
MT810T
MT8125T
MT910T
MT9125T
MT1010T
MT10125T
MT1015T
MT1115T
MT12125T
MT1215T
MT12175T
MT1827T
MT440T
MT632T
MT832T
MT1024T
MT1032T
MT1224T
MT1420T
MT1428T
MT51618T
MT51624T
MT3816T
MT3824T
MT71614T
MT71620T
MT1213T
MT1220T
MT1827D
MT1428D
MT1420D
MT1224D
MT1032D
1/8BSP28 Tap
M3x0.5 Tap
M3x0.6 Tap
M4x0.7 Tap
M4x0.75 Tap
M5x0.8 Tap
M5x0.9 Tap
M6x1.0 Tap
M7x1.0 Tap
M8x1.0 Tap
M8x1.25 Tap
M9x1.0 Tap
M9x1.25 Tap
M10x1.0 Tap
M10x1.25 Tap
M10x1.5 Tap
M11x1.5 Tap
M12x1.25 Tap
M12x1.5 Tap
M12x1.75 Tap
1/8" NPT27 Tap
4 NC40 Tap
6 NC32 Tap
8 NC32 Tap
10 NC24 Tap
10 NF32 Tap
12 NC24 Tap
1/4" NC20 Tap
1/4" NF28 Tap
5/16" NC18 Tap
5/16" NF24 Tap
3/8" NC16 Tap
3/8" NF24 Tap
7/16" NC14 Tap
7/16" NF20 Tap
1/2" NC13 Tap
1/2" NF20 Tap
1/8" NPT27 Die
1/4-28" Die
1/4-20" Die
1/2-24" Die
10-32 Die
Part No.
Description
Index Part No.
Description
Index Part No.
Description
LTR Z
13/32" Drill Bit
25/64" Drill Bit
3/8" Drill Bit
LTR U
LTR T
LTR S
LTR R
LTR Q
21/64" Drill Bit
LTR O
5/16" Drill Bit
19/64" Drill Bit
LTR J
LTR I
LTR H
LTR F
1/4" Drill Bit
LTR B
#3
#7
#9
#16
#19
#20
#21
5/32" Drill Bit
#25
#29
#30
7/64" Drill Bit
#36
#39
#43
5/64" Drill Bit
Extractor #5
Extractor #4
Extractor #3
Extractor #2
Extractor #1
HDZRS
HD2638A
HD2538A
HD24A
HDU
HDT
HDSA
HDR
HDQ
HD21A
HDO
HD20A
HD19A
HDJ
HDI
HDH
HDF
HD1610A
HDB
3A
7A
9A
16A
19A
20A
21A
HD1010A
25A
29A
30A
HD710A
36A
39A
43A
HD510A
EO5A
EO4A
EO3A
EO2A
EO1A