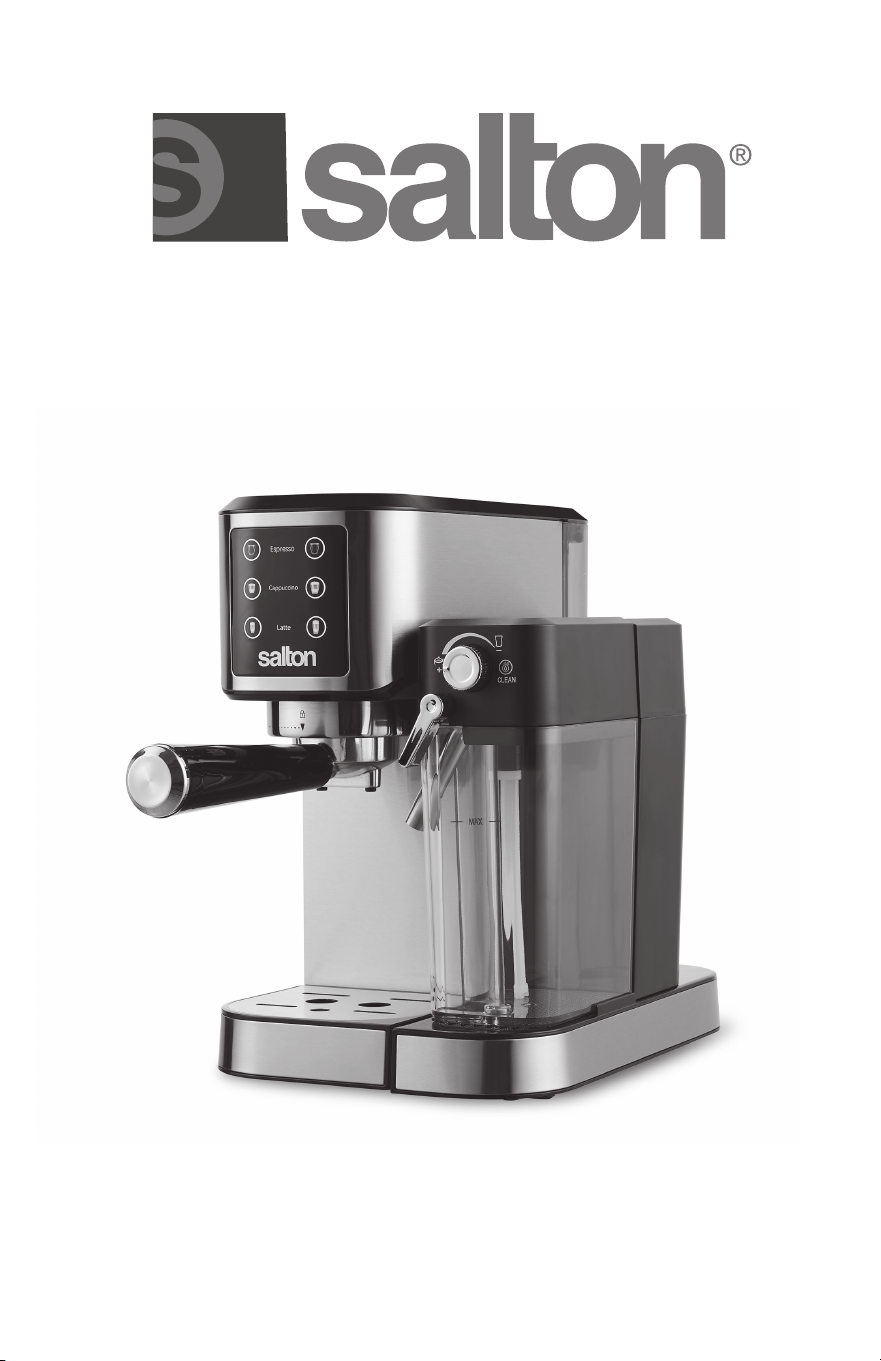
Instruction Booklet
Model: EX2152
One-Touch
Barista
+

IMPORTANT SAFEGUARDS
When using electrical appliances, basic safety precautions should
always be followed, including the following:
1. Read all instructions.
2. DO NOT touch hot surfaces. Use handles or knobs.
3. To protect against electrical hazards, do not immerse cord, plugs, or
the appliance in water or other liquid.
4. Close supervision is necessary when any appliance is used by or
near children. Children should be supervised to ensure that they do
not play with the appliance.
5. This appliance is not intended for use by persons (including children)
with reduced physical, sensory or mental capabilities or lack of
experience and knowledge, unless they have been given supervision
or instruction concerning the use of the appliance by a person
responsible for their safety.
6. Unplug from outlet when not in use and before cleaning. Allow to
cool before putting on or taking off parts, and before cleaning the
appliance.
7. DO NOT operate any appliance with a damaged cord or plug or
after the appliance malfunctions, or is dropped or damaged in any
manner. Return appliance to the manufacturer for examination,
repair or electrical or mechanical adjustment. All servicing, other
than cleaning, should be performed by an authorized service
representative. See Warranty section.
8. To disconnect ensure that the Espresso Maker is off then remove the
plug from the wall outlet. Always hold the plug, never pull the cord.
9. The use of accessories or attachments not recommended by Salton
may result in fi re, electric shock or injury.
10. DO NOT use outdoors.
11. Place the Espresso Maker on a fl at level surface. DO NOT let cord
hang over edge of table or counter, or touch hot surfaces.
12. DO NOT place on or near a hot gas or electric burner, or in a heated
oven.
2

13. DO NOT use appliance for other than intended use.
14. DO NOT leave unit unattended while in use.
15. DO NOT turn on the Espresso Maker without water in the reservoir.
16. WARNING: To avoid the risk of injury, never open or disengage the
brew chamber (portafi lter) during the brew cycle. Always properly
engage the fi lter holder to the locking mechanism. Failure to do so
may disengage the fi lter holder during the brew cycle and cause
injuries.
17. Extreme caution must be used when moving an appliance
containing hot liquids.
18. Any maintenance other than cleaning should be performed by an
authorized service facility.
SAVE THESE INSTRUCTIONS
HOUSEHOLD USE ONLY
SHORT CORD INSTRUCTIONS
1. A short power supply cord (or cord set) is provided to reduce the
hazards of entanglement or tripping over a longer cord.
2. Longer detachable power-supply cords or extension cords are
available and may be used if care is exercised in their use.
3. If a longer detachable power-supply extension cord is used:
a) The marked electrical rating of the extension cord should be at
least as great as the electrical rating of the appliance.
b) The cord should be arranged so that it will not drape over the
countertop or tabletop where it can be pulled on by children or
tripped over unintentionally.
GROUNDED PLUG
To reduce the risk of electric shock this appliance has a grounded plug
(2 blades and 1 pin). If the plug does not fi t fully into the electrical
outlet contact a qualifi ed electrician. Do not modify the plug in any way
or use an adaptor.
3

INTRODUCTION
Introducing the ultimate espresso maker designed for coff ee enthusiasts
who crave barista-quality beverages at home. This machine comes
equipped with preset functions for brewing espresso, cappuccinos, and
lattes eff ortlessly. Whether you prefer a rich, aromatic espresso shot,
a frothy cappuccino, or a smooth, creamy latte, this espresso maker
ensures consistent results with just the touch of a button. Its intuitive
design and user-friendly interface make it easy for anyone to create their
favorite espresso beverages, elevating your home coff ee experience to a
whole new level.
Espresso: A concentrated coff ee beverage made by forcing hot water
through fi nely-ground coff ee. Known for its rich, intense fl avor and thick,
velvety crema on top.
Cappuccino: A popular coff ee drink made with equal parts espresso,
steamed milk, and frothed milk. It off ers a creamy texture and robust
coff ee fl avor, often fi nished with a sprinkle of cocoa or cinnamon.
Latte: A smooth and creamy coff ee drink made with a shot of espresso
and a generous amount of steamed milk. It provides a mild, soothing
coff ee experience.
Choosing the right coff ee and grind
Medium to dark roasts are typically best for espresso. Medium roasts
off er a balanced fl avor, while dark roasts provide richer, bolder taste.
For best results, use freshly ground espresso beans. The grind for
espresso should be fi ne but not too fi ne. It should feel similar to fi ne
sand but not as powdery as fl our. Ensure the grind is uniform to promote
even extraction.
4
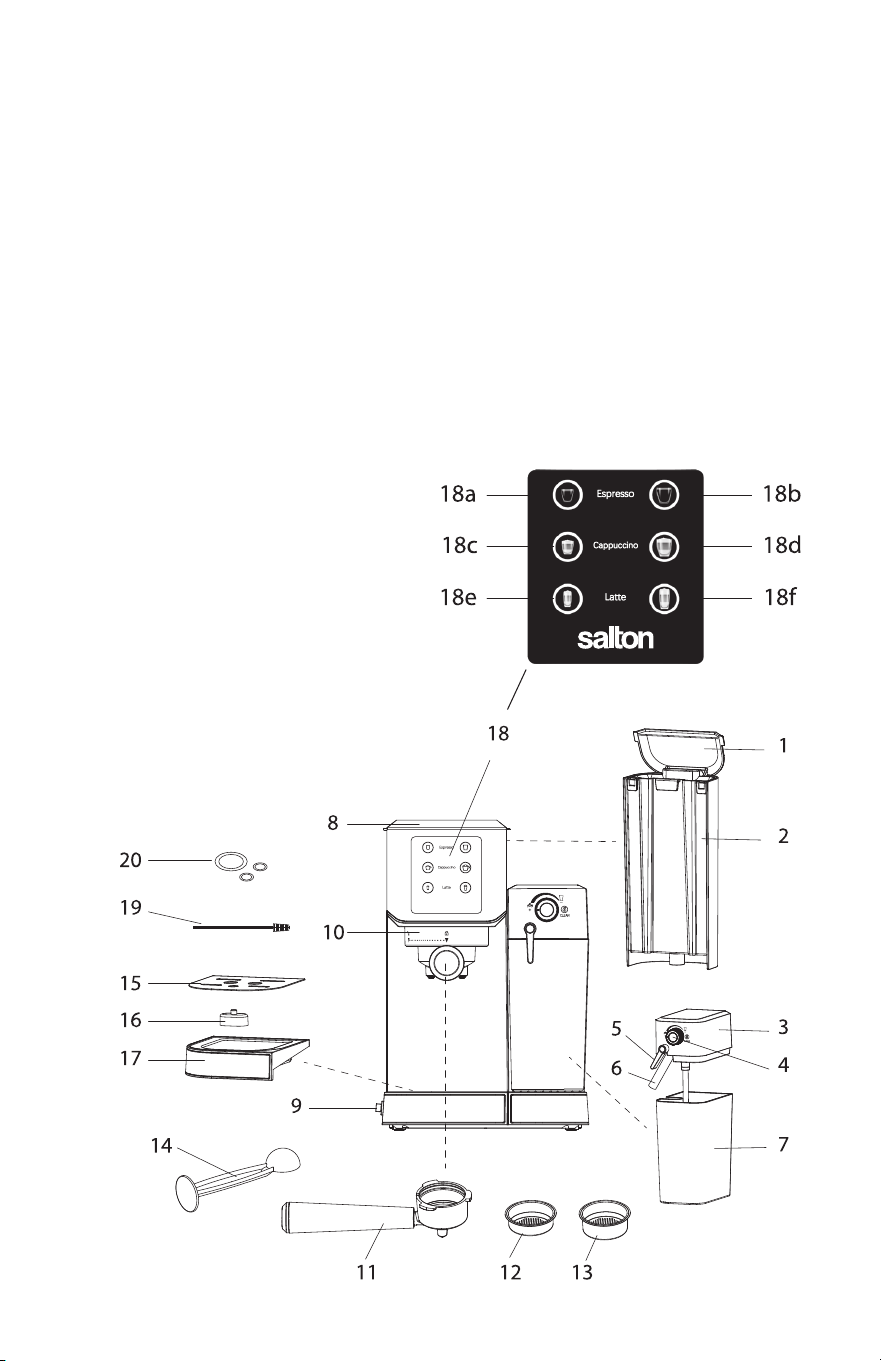
DESCRIPTION OF PARTS
1. Water Reservoir Lid
2. Removable Water Reservoir
3. Milk Reservoir Lid
4. Milk Frothing Adjustment Knob
5. Milk Frothing Lever
6. Milk Frothing Wand
7. Removable Milk Reservoir
8. Cup Warming Plate
9. On/Off Switch
10. Brew Head
11. Portafi lter
12. Single Shot Filter Basket
13. Double Shot Filter Basket
14. Coff ee Measuring Spoon/Tamper
15. Removable Drip Grid
16. Drip Tray Overfl ow Floater
17. Removable Drip Tray
18. Control Panel
a) Single Shot Espresso
b) Double Shot Espresso
c) Single shot Cappuccino
d) Double Shot Cappuccino
e) Single Shot Latte
f ) Double Shot Latte
19. Milk Tube Cleaning Brush
20. Additional/Extra Seal Rings
Large Size - For Water Tank
Small Size - For Milk Reservoir
5

BEFORE FIRST USE
Handwash the Water Reservoir, Milk Reservoir, Portafi lter, Single &
Double Shot Filter Baskets, Coff ee Measuring Spoon & Removable Drip
Grid in warm soapy water. Rinse thoroughly and dry. Wipe the Main
Housing with a soft damp cloth.
DO NOT immerse the Main Housing in water or any other liquid.
ATTENTON! Do not wash any parts/accessories of this unit in the
dishwasher. HANDWASH ONLY.
It is important to familiarize yourself with the product, identify all parts
and read the instruction manual prior to use to avoid the risk of injury.
Prime the unit before fi rst use
IMPORTANT: For fi rst time use or if the unit has not been used in
some time, it is important that the machine is RINSED/PRIMED as
follows:
1. Fill the Water Reservoir up to the “MAX” line, close Lid and place the
Water Reservoir back in the unit.
2. Fill the Milk Reservoir with water (not milk) up to the “MAX” line. Add
Milk Reservoir Lid on top of Milk Reservoir and slide back in the unit
until it locks in place.
3. Select one of the Filter Baskets (single or double) and place it in the
Portafi lter (without coff ee).
4. Place the Portafi lter in the Brew Head and turn it to the right until it
is locked tightly and the Portafi lter handle is aligned with the lock
symbol on the unit.
5. Place a large cup on the Removable Drip Grid.
6. Move the Milk Frothing Lever to the left, pointing the tip of the Milk
Frothing Wand inside the cup.
7. Plug into a 120 Volt AC wall outlet.
8. Press the On/Off Switch to the On (I) position.
9. The control panel will light up and the icons will blink while the unit
heats. Once the unit has fi nished heating, the icons will stop blinking
and remain illuminated. NOTE: if the Milk Reservoir is not locked in
position, the cappuccino and latte buttons will not illuminate.
10. Press the Double Shot Cappuccino button.
11. Let the cup fi ll with water from the Brew Head/Portafi lter and from
the Milk Frothing Wand.
12. When the brew cycle ends, carefully dispose of the water in the cup
and in the milk reservoir.
13. The unit is now primed and ready for use.
6

HOW TO USE
Cup Warming Plate
The Warming Plate will start heating as soon as the machine is turned
on. Place your espresso cups, mugs or shot glasses upside down on
the Warming Plate. This helps to warm the entire cup evenly. Leave the
cups on the Warming Plate until they are warm to the touch. This can
take around 10-15 minutes. The exact time will depend on the material
and thickness of the cups. Once the cups are warmed, remove from the
plate and brew your preferred drink directly into the pre-warmed cups.
This will help maintain the temperature of your espresso for a longer
period.
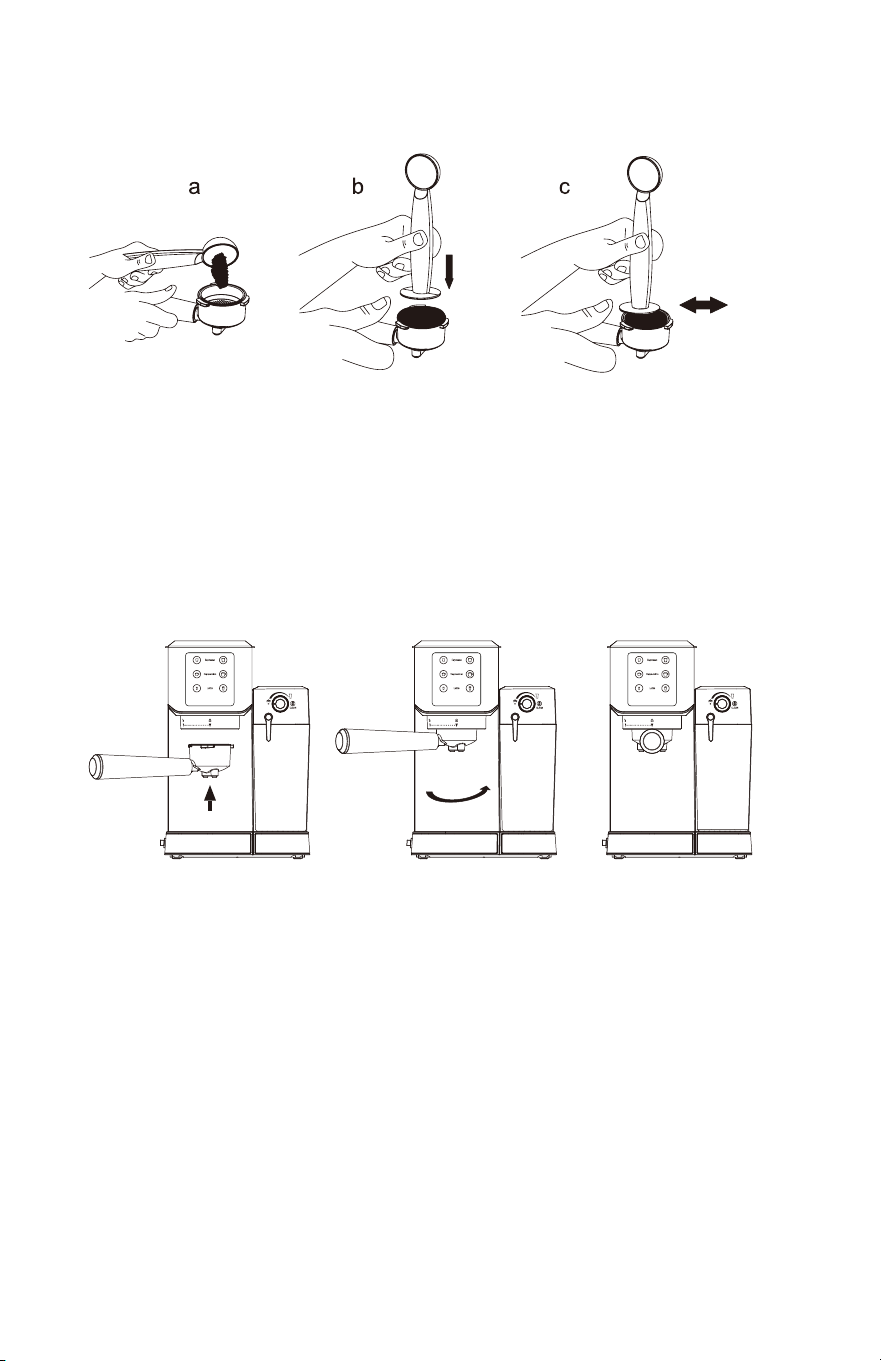
Inserting the Filter Basket in the Portafi lter
Insert the Filter Basket into the Portafi lter making sure to align the
dimple (side of the Filter Basket) with the notch (on Portafi lter above the
handle).
Turn the Filter Basket to the left or right to lock in place. This will help
to secure the Filter Basket in the Portafi lter Holder. There are two coff ee
fi lters: shallow (single shot) and deep (double shot).
WARNING: Make sure the Filter Basket has cooled down before
attempting to remove it from the Portafi lter.
Filling the Filter Basket with coff ee
Add ground espresso coff ee to Filter Basket with Coff ee Measuring
Spoon. DO NOT overfi ll past the “MAX” marking inside the Filter Basket.
Using the Tamper (opposite side of Measuring Spoon), press the ground
espresso coff ee tightly and evenly. Use shallow Filter Basket for single
shot and deep Filter Basket for double shot.
7
Clean the excess coff ee from the rim to ensure proper fi t under Brew
Head.
Inserting the Portafi lter into the Brew Head
Position the Portafi lter underneath the Brew Head.
Position the Handle on the Portafi lter so that it lines up with the open
lock symbol on the unit and fi ts into the grooves.
Turn then Portafi lter handle to the right until it is locked tightly and the
Portafi lter handle is aligned with the lock symbol on the unit
Filling the Removable Water Reservoir
Remove the Water Reservoir from the unit and fi ll it with desired amount
of water . Do not fi ll past the MAX line indicated on the Reservoir. Never
use warm water to fi ll the Water Reservoir. Close the Water Reservoir Lid
and slide back in the unit.
Filling the Removable Milk Reservoir
If making a cappuccino or a latte, remove the Removable Milk Reservoir
from the unit and fi ll with desired quantity of cold milk. Make sure your
milk is as cold as possible as cold milk froths better than warm milk. Do
not fi ll past the MAX line indicated on the Reservoir. Add Milk Reservoir
Lid on top of Milk Reservoir and slide back in the unit until it locks in
place.
8

NOTE: if the Milk Reservoir is not locked in position, the cappuccino
and latte buttons will not illuminate.
Turn the Milk Frothing Adjustment knob to the left (+) for more foam
(Cappuccino) and to the right (-) for less foam (Latte).
Once you are done preparing your beverage, you can either store the
leftover milk in the Milk Reservoir with Milk Reservoir Lid directly in the
fridge or dispose of the leftover milk. It is not recommended to keep the
milk directly in the Reservoir for more than 2 days.
Preparing Espresso/Cappuccino/Latte
When the unit is turned on, the control panel will light up and the
icons will blink while the unit heats. One the unit has fi nished heating;
the icons will stop blinking and remain illuminated. NOTE: if the Milk
Reservoir is not locked in position, the cappuccino and latte buttons will
not illuminate.
Espresso – press Single or Double shot of Espresso. The unit will start
brewing the espresso according to your selection. Once the brewing
process is done, the unit will stop automatically.
NOTE: If you would like to brew less coff ee than the preset function,
press the same button again to stop the brewing process when the
desired amount of coff ee is reached.
Cappuccino/Latte – Before pressing the Single or Double shot of
Cappuccino/Latte, make sure to add cold milk to the Milk Reservoir and
turn the Milk Frothing Adjustment Knob to your preference. TIP: + for
more foam, - for less foam. Remember to move the Milk Frothing Lever
to the left, pointing the tip of the Milk Frothing Wand inside the cup.
Press the Single or Double shot of Cappuccino/Latte. The unit will start
brewing the espresso according to your selection. Once the brewing
process is done, the unit will stop automatically.
NOTE: The level of foam can also be adjusted during the brewing cycle.
BEVERAGE TYPES SUGGESTED CUP
Espresso Single Double 50 ml 100 ml
Cappuccino Single Double 180 ml 350 ml
Latte Single Double 340 ml 450 ml
9

Frothing milk
This machine can also froth milk separately if you want to add more milk
foam to your drink or if you want to add milk foam to other drinks (such
as macchiato, hot chocolate, tea latte, etc).
To froth milk without coff ee, fi ll the Milk Reservoir with cold milk. Place
a cup on the Removable Drip Grid, pointing the tip of the Milk Frothing
Wand inside the cup. Turn the Milk Frothing Adjustment Knob to the left
(+) for more foam and to the right (-) for less foam.
Press and hold the Double Cappuccino button for 3 seconds. The unit
will start frothing the milk. Once frothing is complete, the unit will stop
automatically.
CARE AND CLEANING
Always switch off and unplug the Espresso Maker and allow it cool
before removing parts and cleaning.
1. Cleaning the Portafi lter & Single/Double Filter Baskets - Turn the
Portafi lter Handle to the left to the unlock position and remove from
Brew Head. Discard used ground coff ee. Handwash the Portafi lter
and Filter Baskets in warm soapy water. If the holes in the Filter
Baskets become clogged, clean the Filters with a fi ne brush. Rinse
thoroughly and dry.
2. Cleaning the Drip Grid/Tray - Empty the Drip Tray as needed. If
the Drip Tray Overfl ow Floater appears through the Drip Grid empty
the Drip Tray immediately. Handwash the Drip Grid and Drip Tray in
warm soapy water. Rinse thoroughly and dry.
3. Cleaning the Milk Reservoir & Frothing Wand – Although you can
store the Milk Reservoir with leftover milk in the refrigerator, it is
important to clean the Reservoir and Frothing Wand regularly to
avoid clogging and residue build up.
To clean the Milk Reservoir:
- Transfer any remaining milk to another container and refrigerate.
- Fill Milk Reservoir with water. DO NOT fi ll past the “MAX” line.
- Fill the Water Reservoir with water. Do not fi ll past the “MAX” line.
- Place both the Water Reservoir and the Milk Reservoir back in
position on the unit.
- Select one of the Filter Baskets (single or double) and place it in
the Portafi lter (without coff ee).
- Place the Portafi lter in the Brew Head and turn it to the right until it
is locked tightly and the Portafi lter handle is aligned with the lock
symbol on the unit.
- Place a large cup on the Removable Drip Grid.
10

- Move the Milk Frothing Lever to the left, pointing the top of the Milk
Frothing Wand inside the cup.
- Turn the Milk Frothing Adjustment Knob to the “CLEAN” position.
- Press the Double Shot Cappuccino OR Double Shot Latte Button.
- The unit will start releasing hot steam through the Milk Frothing
Wand. Once the cleaning cycle is complete, repeat, if necessary,
until the water runs clear and you no longer see any milk coming
out of the Frothing Wand.
- Dispose of any water left in the Water and Milk Reservoir.
Handwash the Water Reservoir, Milk Reservoir and Milk Reservoir
Lid in warm soapy water. Use the included Milk Tube Cleaning
Brush if necessary. Rinse throughly and dry.
4. Cleaning the Brew Head – Periodically run water through the
machine with the Portafi lter in place, but without coff ee, to rinse out
any lingering coff ee particles. To clean the Brew Head, proceed as if
you were making an espresso (omitting the coff ee) and pressing the
Double Shot Espresso button.
5. Wipe the Main Housing and the Cup Warming Plate with a soft
damp cloth. NEVER IMMERSE THE MAIN HOUSING IN WATER OR
ANY OTHER LIQUID.
6. All servicing, other than cleaning, should be performed by an
authorized service representative. See Warranty section.
IMPORTANT:
- DO NOT use abrasive cleaner or scouring pads on any parts/
accessories of the unit, as they will scratch the fi nish.
- DO NOT wash any parts/accessories of this unit in the dishwasher.
HANDWASH ONLY.
Descaling
Over a period of time, minerals and calcium found in water will
accumulate in your Espresso Maker and may aff ect its operation.
For best performance, descale the coff ee maker when you notice
an increase in the time required to brew espresso, or when there is
excessive steaming. You may also notice a build up of white deposits on
the surface of the brew head. The frequency of cleaning depends upon
the hardness of your water.
Follow below guidelines for suggested cleaning frequency.
Type of Water Cleaning Frequency
Soft Water (Filtered Water) Around every 80~100 Brew Cycles
Hard Water (Tap Water) Around every 40~50 Brew Cycles
11

1. Fill the Water Reservoir with distilled vinegar. Close Lid and place the
Water Reservoir back in the unit.
2. Fill the Milk Reservoir with distilled vinegar. Add Milk Reservoir Lid
on top of Milk Reservoir and slide back in the unit until it locks in
place.
3. Select one of the Filter Baskets (single or double) and place it in the
Portafi lter (without coff ee).
4. Place the Portafi lter in the Brew Head and turn it to the right until it
is locked tightly and the Portafi lter handle is aligned with the lock
symbol on the unit.
5. Place a large cup on the Removable Drip Grid.
6. Move the Milk Frothing Lever to the left, pointing the tip of the Milk
Frothing Wand inside the cup.
7. Plug into a 120 Volt AC wall outlet.
8. Press the On/Off Switch to the On (I) position.
9. The control panel will light up and the icons will blink while the unit
heats. Once the unit has fi nished heating, the icons will stop blinking
and remain illuminated. NOTE: if the Milk Reservoir is not locked in
position, the cappuccino and latte buttons will not illuminate.
10. Press the Double Shot Cappuccino or Latte button.
11. The unit will start releasing hot water through the Milk Frothing Wand
and the Portafi lter.
12. Let the cycle run and then repeat once again.
13. Turn the Milk Frothing Adjustment Knob to the “CLEAN” position.
14. Press the Double Shot Cappuccino or Latte button
15. The unit will start releasing hot steam through the Milk Frothing
Wand.
16. Let the cycle run and then repeat once again.
17. Dispose of any leftover vinegar from the Water Reservoir and Milk
Reservoir.
18. Carefully dispose of the vinegar in the cup and place again on the
Removable Drip Grid.
19. Fill the Water Reservoir and Milk Reservoir with fresh water.
20. Repeat steps 3 through 17.
21. Handwash the Water Reservoir, Milk Reservoir and Milk Reservoir
Lid in warm soapy water. Rinse thoroughly and dry.
12
13