
SHD
Rauchwarnmelder
Smoke Detector
Alarma de humo
Détecteur de fumée
Allarme fumo
10046653 10046654 10046655 10046656 10046657 10046658

3
DE
Sehr geehrte Kundin, sehr geehrter Kunde,
wir gratulieren Ihnen zum Erwerb Ihres Geräts. Lesen
Sie die folgende Anleitung sorgfältig durch und befolgen
Sie sie, um mögliche Schäden zu vermeiden. Für
Schäden, die durch Nichtbeachtung der Anleitung und
unsachgemäßen Gebrauch entstehen, übernehmen wir
keine Haftung. Scannen Sie den QR-Code, um Zugriff
auf die aktuellste Bedienungsanleitung und weitere
Informationen rund um das Produkt zu erhalten.
INHALT
Artikelbeschreibung 4
Empfohlene Anbringungsorte 4
Zu vermeidende Anbringungsorte 6
Aktivierung 6
Installation 6
Funktionstest und Betriebsmodi 8
Gerätesteuerung per Smartphone 9
Im Falle eines Brandes 12
Reinigung und Wartung 12
Fehlersuche und Fehlerbehebung 13
Hinweise zur Entsorgung 14
Konformitätserklärung 14
TECHNISCHE DATEN
Artikelnummer 10046653, 10046654, 10046655,
10046656, 10046657, 10046658
Stromversorgung
DC 3V⎓ (2 × 1,5V⎓AA-Batterien)
Alarm-Lautstärke >85dB (A) in 3Metern Entfernung
Empndlichkeit des
Rauchmelders
0,10–0,16dB/m
Zertiziert nach DINEN14604:2005 / AC: 2008
Zertikats-ID 1116-CPR-192
Klangbild ISO 8201

4
DE
ARTIKELBESCHREIBUNG
Dieses Gerät ist ein fotoelektrischer Rauchmelder. Es ist besonders
empndlich gegenüber Mikropartikeln, wie sie im Rauch eines schwelenden
Feuers entstehen. Ein Beispiel für einen solchen Schwelbrand ist eine
brennende Zigarette auf einer Couch oder einem Bettbezug, eine häuge
Ursache für verheerende Brände. Bitte beachten Sie, dass dieses Gerät
Flammen, Hitze, Kohlenmonoxid oder andere gefährliche Gase nicht erkennen
kann.
EMPFOHLENE ANBRINGUNGSORTE
Rauchwarnmelder sind in Schlaf- und Kinderzimmern sowie in Fluren, die als
Fluchtwege dienen, vorgeschrieben. Wir empfehlen auch die Anbringung eines
Rauchmelders im Wohnzimmer.
1. Dieser Rauchmelder eignet sich für die Installation in Flur, Schlafzimmer,
Wohn- und Esszimmer sowie in trockenen Kellern und Garagen.
2. Installieren Sie in jedem Stockwerk mindestens einen Rauchmelder im
Flur.
3. Rauch, Hitze und brennende Gegenstände breiten sich horizontal
aus, nachdem sie zur Decke aufgestiegen sind. Installieren Sie den
Rauchmelder daher in der Mitte der Decke.
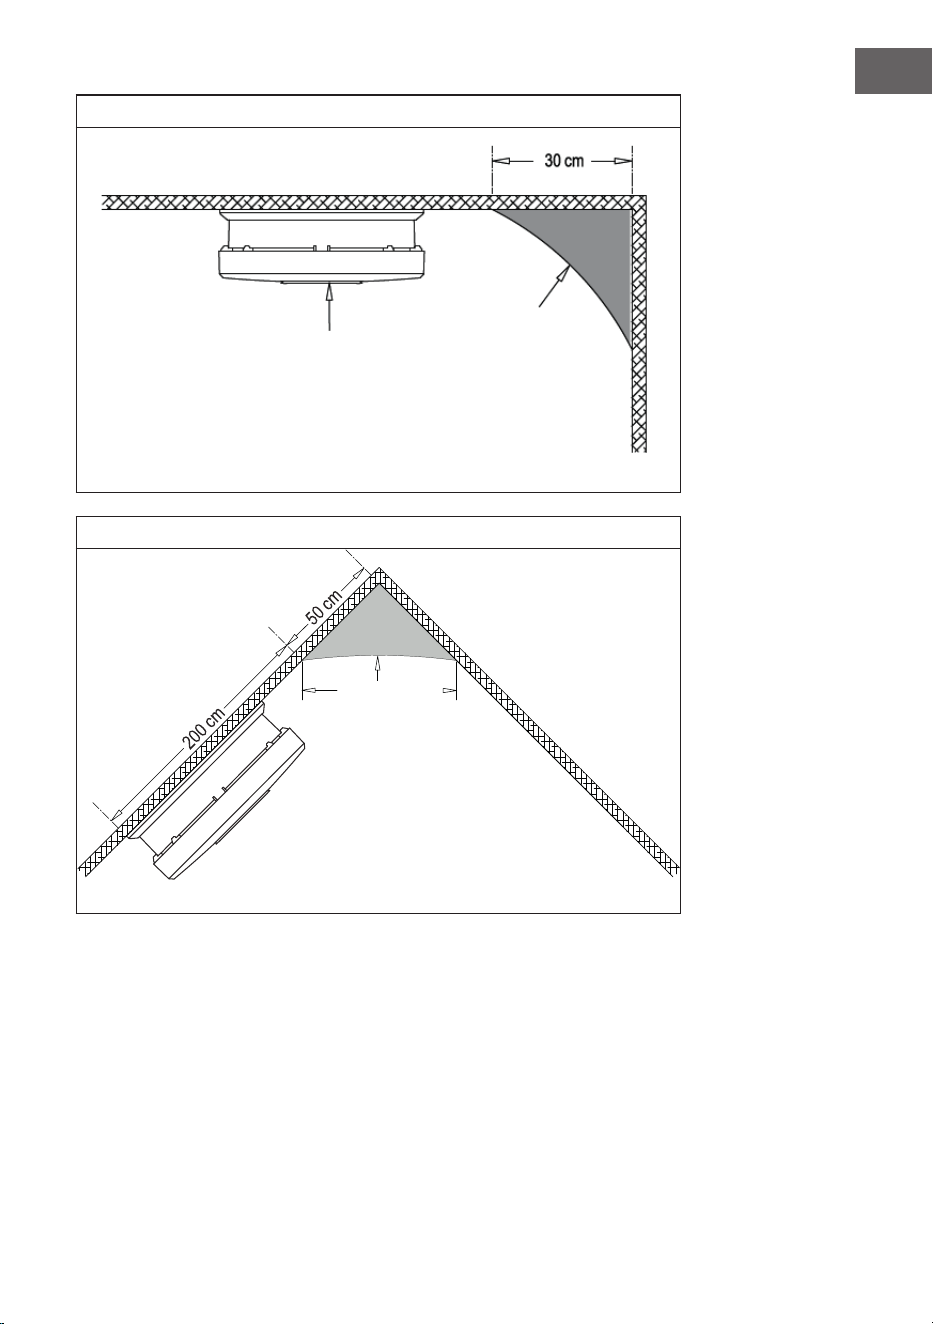
4. Wenn das Gerät aus irgendeinem Grund nicht in der Mitte der Decke
installiert werden kann, sollte der Abstand des Geräts zur Wandecke
mindestens 30cm betragen (siehe Abbildung1).
5. Wenn der Raum länger als 10m ist, müssen Sie mehrere Geräte
installieren.
6. Wenn die Decke schräg ist, muss der Rauchmelder mindestens 50cm vom
höchsten Punkt der Decke entfernt installiert werden (siehe Abbildung2).
5
DE
1
2
Am besten HIER
anbringen
Irgendwo in
diesem Bereich
anbringen
Nicht in diesem
Bereich anbrin-
gen
Nicht in
diesem Bereich
anbringen
Niemals HIER
anbringen
Decke

6
DE
ZU VERMEIDENDE ANBRINGUNGSORTE
1. In der Nähe von Geräten und/oder Bereichen, in denen regelmäßig Rauch/
Dampf entsteht (Küchen, Kaminzimmer, Kesselräume und ähnliche Orte).
Verwenden Sie spezielle Rauchmelder für diese Bereiche.
2. Bereiche mit hoher Luftfeuchtigkeit wie Badezimmer oder Waschräume.
Mindestens 3m von diesen Bereichen entfernt.
3. In der Nähe von Lüftungsöffnungen und Entlüftungsöffnungen für
Heizung und Kühlung. Mindestens 1m von diesen Bereichen entfernt.
Die Luft könnte den Rauch vom Rauchmelder wegblasen und einen Alarm
verhindern oder sogar einen Fehlalarm auslösen.
4. In Räumen, in denen die Temperatur unter 0°C fallen oder über 40°C
steigen kann.
5. In staubigen oder schmutzigen Bereichen stören Partikel den Betrieb des
Rauchmelders. Dadurch könnte ein Fehlalarm ausgelöst werden.
6. Die Montage (Verschraubung) auf asbesthaltigem Putz darf nur mit
emissionsarmen Verfahren durchgeführt werden
AKTIVIERUNG
Drücken Sie die Testtaste und halten Sie sie mehr als 3Sekunden gedrückt,
bis die LED leuchtet. Lassen Sie die Taste dann innerhalb von 2Sekunden los.
Es ertönt ein Piepton, der bedeutet, dass das Gerät aktiviert ist und in den
Betriebsmodus übergeht.
INSTALLATION
Hinweis: Die Halterung oder das Gerät lässt sich nicht schließen, wenn
die Batterie nicht ordnungsgemäß eingesetzt ist. Dies ist eine gesetzliche
Vorgabe zu Ihrer Sicherheit.
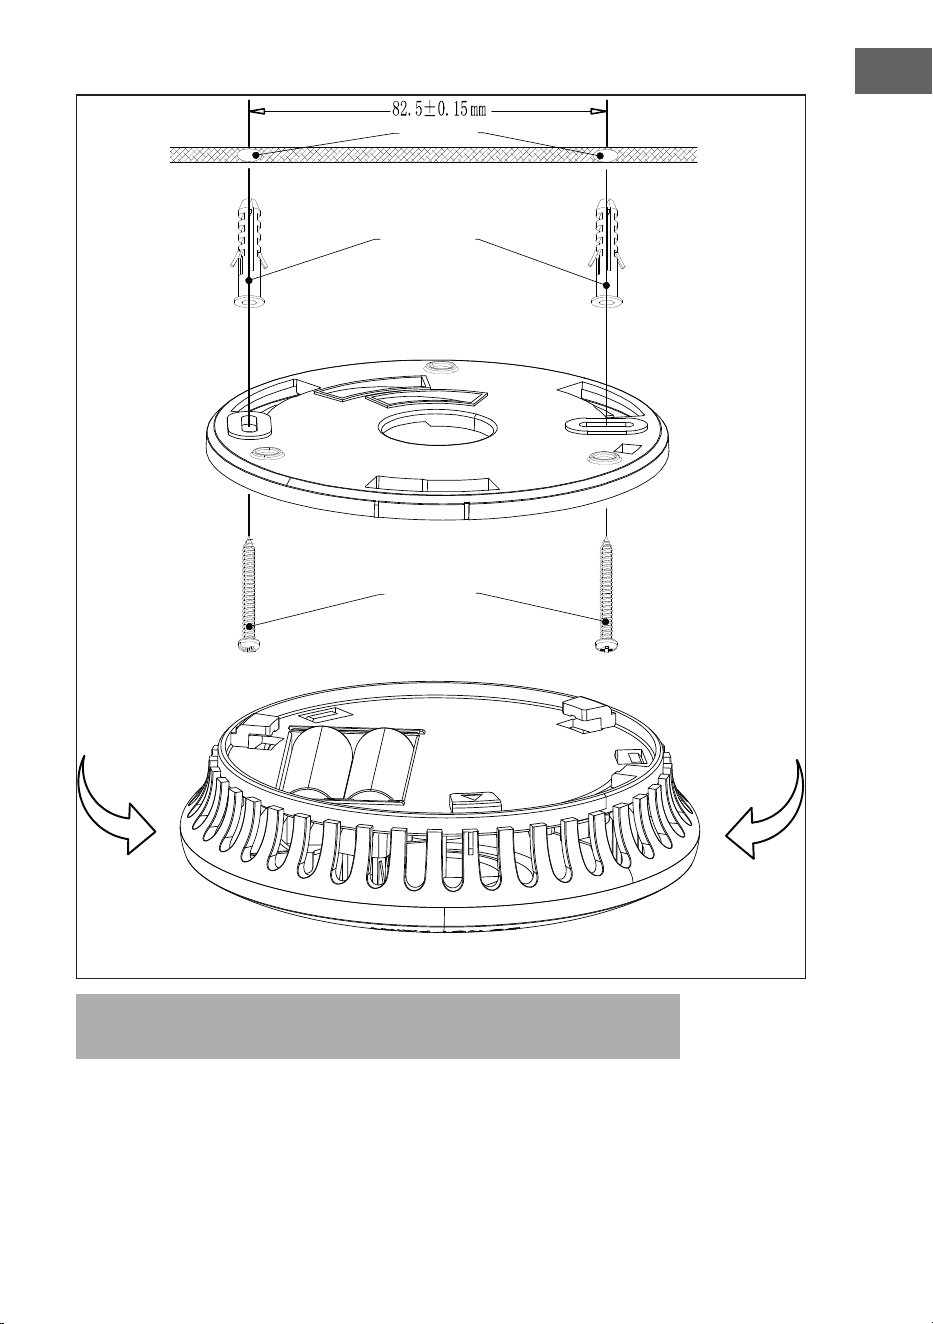
1. Entfernen Sie die Halterung vom Gehäuse des Rauchmelders.
2. Halten Sie die Halterung an der gewünschten Position an die Decke und
markieren Sie die Position der Befestigungslöcher für die Halterung mit
einem Bleistift.
3. Bohren Sie zwei Löcher für die Dübel.
4. Setzen Sie die Dübeln ein und befestigen Sie die Halterung mit den
Schrauben (siehe Montageanleitung).
5. Bringen Sie den Rauchmelder an der Halterung an und drehen Sie das
Gehäuse im Uhrzeigersinn, bis es in der Halterung einrastet.
6. Drücken Sie die Testtaste für mindestens 5Sekunden, um das Gerät
zu testen. Der Alarm ertönt: 3Pieptöne– 1,5Sekunden Pause. Wenn
kein Ton zu hören ist, deutet dies auf einen defekten Rauchmelder hin.
Eine Lösung für dieses Problem können Sie in diesem Handbuch unter
„Fehlersuche und Fehlerbehebung“ nden.
7. Wenn Sie weitere Fragen zur Installation haben, wenden Sie sich an Ihren
Händler.
7
DE
Hinweis: Um Verletzungen zu vermeiden, muss das Gerät gemäß den
Installationsanweisungen sicher an der Decke befestigt werden.
Decke
Kunststoff-
dübel
Schrauben
Zum Festzie-
hen drehen
Zum Lösen und
Entfernen gegen
den Uhrzeiger-
sinn drehen
Löcher
Halterung

8
DE
FUNKTIONSTEST UND BETRIEBSMODI
Testgerät
Testen Sie Ihr Gerät, indem Sie die Testtaste mindestens 5Sekunden lang
gedrückt halten. Wenn die elektronischen Schaltkreise, die Sirene und die
Batterie funktionieren, wird ein Alarm ausgelöst. Wenn kein Alarm ertönt,
ist das Gerät oder mindestens eine der Batterien möglicherweise defekt.
Verwenden Sie KEINE offene Flamme, um Ihren Rauchmelder zu testen, da
dies das Gerät beschädigen kann. Wir empfehlen Ihnen, das Gerät wöchentlich
zu testen.
Standby-Modus
Die rote LED auf der Frontplatte sollte alle 48Sekunden blinken, um
anzuzeigen, dass der Rauchmelder aktiv ist.
Alarm-Modus
Sobald das Gerät Rauchpartikel erkennt, ertönt die Sirene und die rote LED
blinkt einmal pro Sekunde. Die blinkende LED und der Alarm bleiben so lange
aktiv, bis die Luft frei von Rauchpartikeln ist. Das Gerät schaltet dann wieder in
den Standby-Modus.
Batterie-Warnmodus
Wenn Ihr Rauchmelder einen niedrigen Batteriestand aufweist, gibt das Gerät
alle 48Sekunden einen Signalton ab. Ersetzen Sie die Batterien in diesem Fall
umgehend. Wenn Sie die Batterien nicht auswechseln, kann es sein, dass Ihr
Rauchmelder nicht genug Strom hat, um Sie im Brandfall zu warnen.
Fehlermodus
Der Alarmton oder ein Signalton ertönt alle 48Sekunden ohne ersichtlichen
Grund (siehe „Fehlersuche und Fehlerbehebung“).
9
DE
GERÄTESTEUERUNG PER SMARTPHONE
Wenn Sie Ihr Blumfeldt-Gerät in Ihr heimisches WLAN einbinden, können
Sie es ganz bequem über die dazugehörige Blumfeldt-App bedienen. Die App
ermöglicht es Ihnen, nicht nur das Gerät über Ihr Smartphone fernzusteuern,
sondern bietet Ihnen zudem Zugang zu Rezepten und weiterführenden
Informationen.
Gehen Sie folgendermaßen vor, um Ihr Smartphone mit Ihrem Blumfeldt-
Gerät zu verbinden:
1 Laden Sie zuerst die Blumfeldt-App herunter, indem Sie mit Ihrem
Smartphone den QR-Code scannen (siehe unten) oder laden Sie diese
direkt aus dem App Store oder bei Google Play herunter.
2 Versichern Sie sich, dass Ihr Smartphone mit demselben WLAN-Netzwerk
verbunden ist, mit dem Ihr Blumfeldt-Gerät verbunden werden soll.
3 Öffnen Sie die Blumfeldt-App.
4 Melden Sie sich mit Ihrem Konto an. Wenn Sie noch keinen Account
haben, registrieren Sie sich in der Blumfeldt-App.
5 Folgen Sie den Anweisungen der App.
App-Download
Verwenden Sie die Scan-Funktion Ihres Handys, um den QR-Code zu scannen,
und speichern Sie die App auf Ihrem Smartphone.
Hinweis: Weitere Hinweise zur Bedienung der App und Hilfestellungen zur
Herstellung der Verbindung mit Ihrem Gerät liefert Ihnen die App, sobald
Sie sie das erste Mal öffnen.
iOS Android

10
DE
Fehlerbehebung bei Verbindungsproblemen
Wenn Ihr Blumfeldt-Gerät im WLAN nicht gefunden werden kann, überprüfen
Sie Folgendes:
1 Das Gerät ist nicht eingesteckt. Stellen Sie sicher, dass Ihr Gerät an eine
Steckdose angeschlossen ist.
2 Das Gerät bendet sich nicht im Kopplungsmodus. Stellen Sie sicher, dass
die WiFi-Anzeige (LED) auf dem Bedienfeld des Smart-Geräts blinkt, wie
in der Anweisung „WiFi-Einstellungen zurücksetzen“ Ihres Smart-Geräts
beschrieben (Anweisungen nden Sie in der Regel unter Geräteanschluss).
3 Der WiFi-Zugangspunkt arbeitet nicht auf 2,4 GHz. Vergewissern Sie sich,
dass Ihr Zugangspunkt auf dem 2,4-GHz-Band arbeitet und Sie eine eigene
SSID auf dem 2,4-GHz-Band haben. Wenn Sie sich über das Betriebsband
Ihres Access Points unsicher sind, wenden Sie sich bitte an Ihren Internet-
Provider.
Wichg: Bitte beachten Sie, dass, wenn Ihr WiFi-Router über ein Dualband verfügt -
also sowohl im 2,4-GHz- als auch im 5-GHz-Band arbeitet - Sie die SSIDs für jedes
Band trennen und die 2,4-GHz-SSID für die Verbindung verwenden müssen.
4 Überprüfen Sie die Firewall-Einstellungen Ihres WiFi-Netzwerks. Die
Firewall-Einstellung Ihres WiFi-Netzwerks erlaubt der Blumfeldt-App
möglicherweise nicht, die WiFi-Einstellungen auf Ihrem Smart-Gerät zu
kongurieren. Bitte stellen Sie sicher, dass Sie kein öffentliches WiFi-
Netzwerk nutzen, z. B. Flughäfen, Wohnheime, Firmen, etc.
5 Unterschiedliche Anmeldedaten im Smartphone und in der App.
Stellen Sie sicher, dass die in der Blumfeldt-App eingegebenen WiFi-
Anmeldedaten mit denen übereinstimmen, mit denen Ihr Smartphone
verbunden ist.
Wenn Sie die oben genannten Punkte befolgt haben und Ihr Smartphone sich immer
noch nicht mit der App verbinden kann, wenden Sie sich bitte per E-Mail an uns, um
Unterstützung zu erhalten: [email protected]

11
DE
Alarmabschaltung
Drücken Sie während des Alarms die Testtaste, um den Alarmton für etwa
8Minuten stummzuschalten. Die rote LED blinkt einmal alle 8Sekunden und
zeigt damit an, dass der Rauchmelder in den Alarmabschaltmodus übergeht.
Wenn Ihr Rauchmelder das volle Alarmsignal abgibt und Sie
keinen Test durchführen, warnt Sie der Rauchmelder vor einer potenziell
gefährlichen Situation, die Ihre sofortige Aufmerksamkeit erfordert.
Schalten Sie den Alarm erst dann stumm, wenn Sie sich vergewissert haben,
dass kein Brand vorliegt. Blockieren Sie nicht die Lüftungsöffnungen des
Rauchmelders und schalten Sie ihn nicht aus, da dies Ihren Schutz aufhebt.
Rauchmelder können manchmal auf Kochdämpfe oder andere Situationen
reagieren, die keine Notfälle sind. Im Falle eines bekannten Fehlalarms
kann Ihr Rauchmelder durch Drücken der Testtaste vorübergehend
stummgeschaltet werden. Nach 8Minuten schaltet Ihr Rauchmelder
automatisch auf volle Empndlichkeit zurück.
Wichtige Hinweise
• Drücken Sie die Stummschalttaste und lassen Sie sie wieder los, um den
Alarmton vorübergehend auszusetzen.
• Der Alarm wird stummgeschaltet und der Rauchmelder schaltet für ca.
8Minuten in einen Reset-Zyklus mit reduzierter Empndlichkeit.
• Während des Reset-Zyklus mit reduzierter Empndlichkeit blinkt die rote
LED einmal alle 8Sekunden.
• Nach Abschluss des Reset-Zyklus schaltet Ihr Rauchmelder automatisch
auf volle Empndlichkeit zurück und die rote LED blinkt wieder alle
48Sekunden.
GEFAHR
Ignorieren Sie niemals einen Alarm, da dies zu Verletzungen
oder zum Tod führen kann. Wenn Ihr Rauchmelder einen Alarm
auslöst und Sie sich nicht absolut sicher sind, woher der Rauch
kommt, sollten Sie sofort alle Personen aus dem Haus
evakuieren.

12
DE
IM FALLE EINES BRANDES
1. Bleiben Sie ruhig und handeln Sie schnell!
2. Helfen Sie Kindern und anderen gefährdeten Personen in Ihrem Haushalt,
sich aus dem Gefahrenbereich zu entfernen.
3. Bringen Sie sich SOFORT in Sicherheit. jede Sekunde zählt, also
verschwenden Sie keine Zeit damit, sich anzuziehen oder Wertsachen
mitzunehmen.
4. Öffnen Sie beim Verlassen keine Innentür, ohne vorher die Oberäche zu
prüfen. Öffnen Sie auf keinen Fall eine Tür, wenn sie heiß ist oder Rauch
durch den Spalt dringt! Benutzen Sie stattdessen einen alternativen
Ausgang. Wenn die Innenseite der Tür kühl ist, lehnen Sie sich mit der
Schulter dagegen, öffnen Sie sie leicht und schlagen Sie sie sofort zu, wenn
Hitze und/oder Rauch eindringen.
5. Wenn Rauch in der Luft liegt, halten Sie sich in Bodennähe auf. Atmen Sie
ach und vorzugsweise durch ein (möglichst nasses) Tuch.
6. Verlassen Sie die Gefahrenzone und vergewissern Sie sich, dass alle
anwesend sind. Rufen Sie die Feuerwehr nicht, während Sie sich im
Gefahrenbereich benden!
7. Betreten Sie keine Räume ohne Genehmigung der Feuerwehr.
REINIGUNG UND WARTUNG
• Reinigen Sie den Rauchmelder mindestens einmal im Monat, um Staub,
Schmutz und Ablagerungen zu entfernen. Am besten verwenden Sie
einen Staubsauger mit einer weichen Bürste und saugen alle Seiten und
Abdeckungen des Rauchmelders ab.
• Dieser Rauchmelder verfügt über eine Batterieüberwachung, bei der
der Alarm etwa alle 48Sekunden ertönt und die rote LED gleichzeitig für
mindestens 30Tage blinkt, wenn die Batterien schwach werden. Wenn
die Batterien defekt sind oder andere Fehler auftreten, sehen Sie unter
„Fehlersuche und Fehlerbehebung“ nach, um möglicherweise eine Lösung
zu nden.
• Sollten während der Garantiezeit weiterhin Fehler auftreten, wenden Sie
sich bitte an Ihren Händler.
Hinweis: Versuchen Sie nicht, die Abdeckung zu entfernen, um das Innere
zu reinigen. Andernfalls wird die Garantie beeinträchtigt.
Vorsichtsmaßnahmen
• Um Ihre maximale Sicherheit zu gewährleisten, installieren Sie alle
Rauchmelder genau wie in dieser Anleitung beschrieben.
• Halten Sie die Rauchdetektoren sauber. Achten Sie darauf, dass sich kein
Staub und Schmutz auf dem Gerät ansammelt, und prüfen Sie einmal pro
Woche, ob das Gerät ordnungsgemäß funktioniert.
• Tauschen Sie die Rauchmelder sofort aus, wenn sie nicht mehr richtig
funktionieren.
13
DE
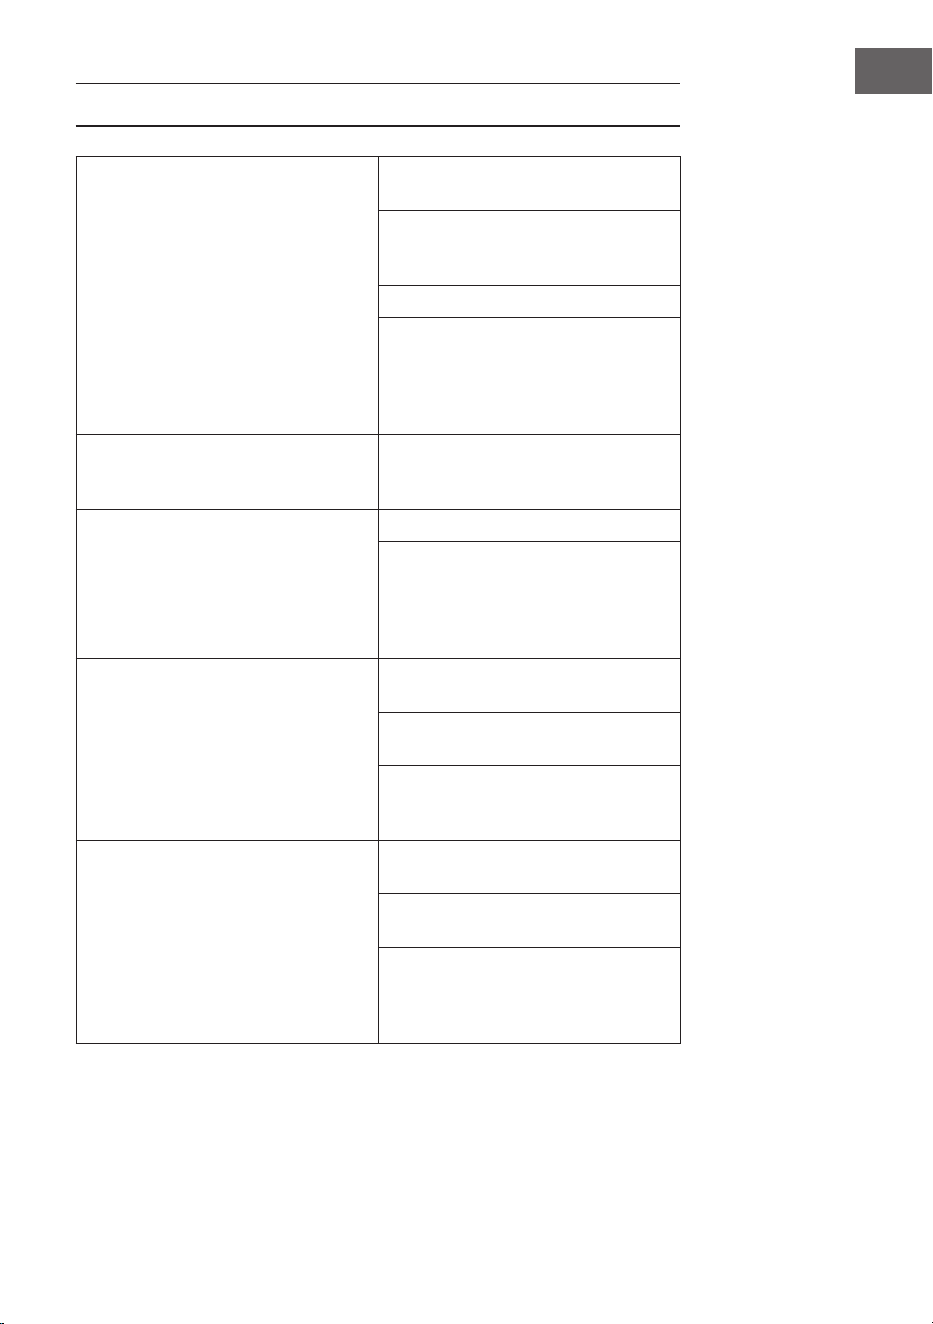
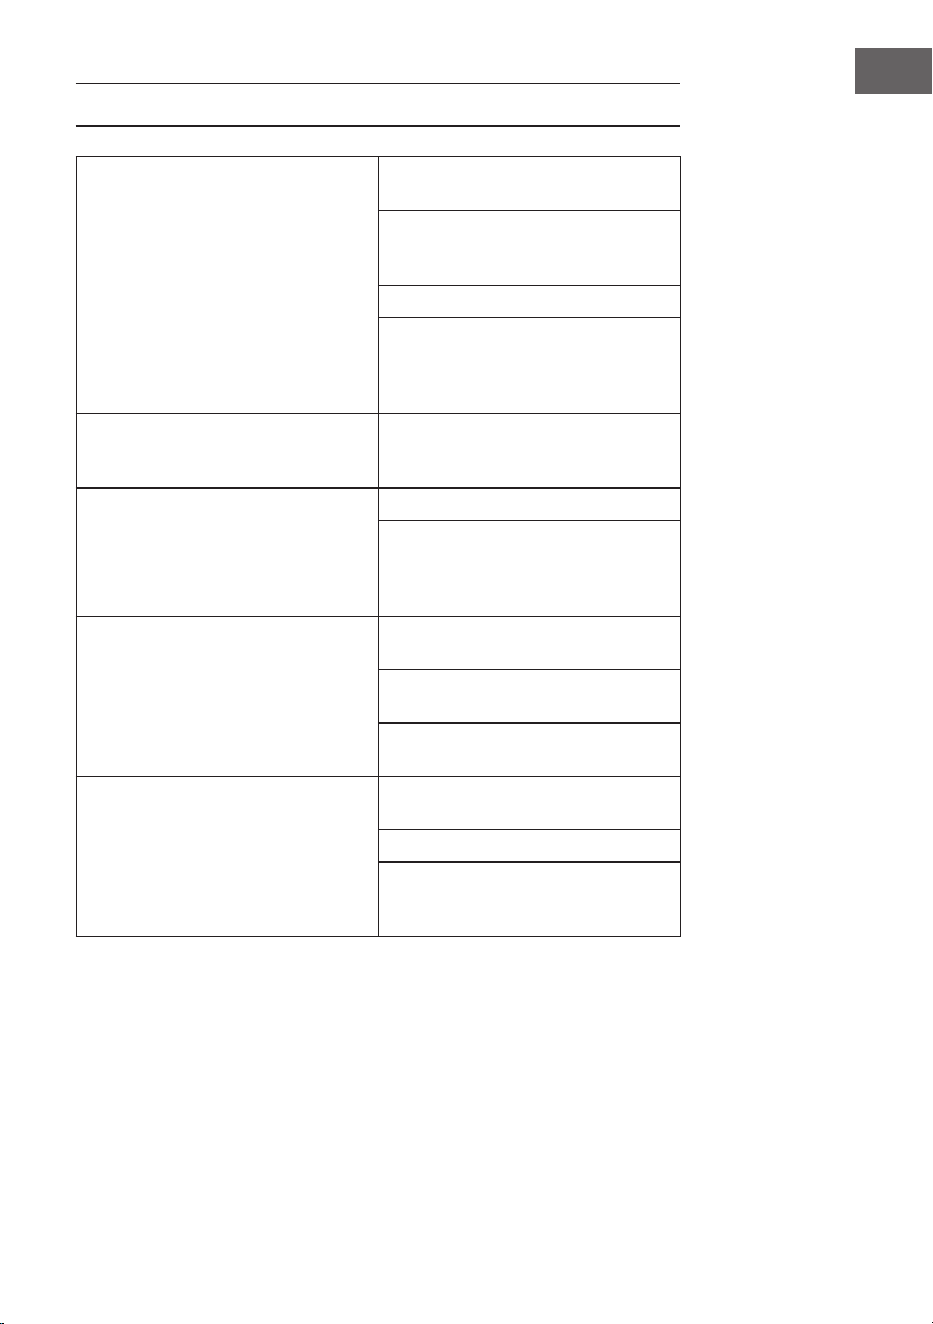
FEHLERSUCHE UND FEHLERBEHEBUNG
Der Rauchmelder gibt während der
Prüfung keinen Ton von sich.
Halten Sie die Testtaste mindestens
5Sekunden lang gedrückt.
Nehmen Sie den Rauchmelder von
der Halterung. Prüfen Sie, ob die
Batterie richtig angeschlossen ist.
Reinigen Sie den Rauchmelder.
Wenn der Fehler weiterhin besteht,
wenden Sie sich während der
Garantiezeit an Ihren Händler oder
tauschen Sie den Melder aus, wenn
Ihre Garantie abgelaufen ist.
Das Alarmsignal erfolgt alle
48Sekunden, gleichzeitig blinkt die
rote LED einmal.
Die Batterien sind fast leer. Ersetzen
Sie die Batterien.
Das Alarmsignal erfolgt alle
48Sekunden und der Rauchmelder
wechselt in den Fehlermodus.
Reinigen Sie den Rauchmelder.
Wenn der Fehler weiterhin besteht,
wenden Sie sich während der
Garantiezeit an Ihren Händler oder
tauschen Sie den Melder aus, wenn
Ihre Garantie abgelaufen ist.
Der Rauchwarnmelder gibt
unerwünschte Töne von sich, der
Alarm geht in unregelmäßigen
Abständen los oder wenn die
Bewohner kochen, duschen usw.
Drücken Sie die Testtaste, um den
Alarm zu stoppen.
Reinigen Sie den Rauchmelder (siehe
Kapitel „Reinigung und Wartung“).
Bringen Sie den Rauchmelder an
anderer Stelle an und drücken Sie
die Testtaste.
Der Alarm klingt anders als sonst. Er
startet und stoppt.
Reinigen Sie den Rauchmelder (siehe
Kapitel „Reinigung und Wartung“).
Setzen Sie sich mit dem Hersteller in
Verbindung.
Wenn die Garantie für das Gerät
abgelaufen ist, ersetzen Sie den
Rauchwarnmelder durch einen
neuen.
14
DE
HINWEISE ZUR ENTSORGUNG
Wenn es in Ihrem Land eine gesetzliche Regelung
zur Entsorgung von elektrischen und elektronischen
Geräten gibt, weist dieses Symbol auf dem Produkt
oder auf der Verpackung darauf hin, dass dieses
Produkt nicht im Hausmüll entsorgt werden darf.
Stattdessen muss es zu einer Sammelstelle für das
Recycling von elektrischen und elektronischen Geräten
gebracht werden. Durch regelkonforme Entsorgung
schützen Sie die Umwelt und die Gesundheit
Ihrer Mitmenschen vor negativen Konsequenzen.
Informationen zum Recycling und zur Entsorgung
dieses Produkts, erhalten Sie von Ihrer örtlichen
Verwaltung oder Ihrem Hausmüllentsorgungsdienst.
Dieses Produkt enthält Batterien. Wenn es in Ihrem
Land eine gesetzliche Regelung zur Entsorgung von
Batterien gibt, dürfen die Batterien nicht im Hausmüll
entsorgt werden. Informieren Sie sich über die
örtlichen Bestimmungen zur Entsorgung von Batterien.
Durch regelkonforme Entsorgung schützen Sie die
Umwelt und die Gesundheit Ihrer Mitmenschen vor
negativen Konsequenzen.
KONFORMITÄTSERKLÄRUNG
Hersteller:
Chal-Tec GmbH, Wallstraße 16, 10179 Berlin
info@electronic-star.de
Importeur für Großbritannien:
Berlin Brands Group UK Limited
PO Box 42
272 Kensington High Street
London, W8 6ND
United Kingdom
Hiermit erklärt Chal-Tec GmbH, dass der
Funkanlagentyp SHD der Richtlinie 2014/53/
EU entspricht. Der vollständige Text der EU-
Konformitätserklärung ist unter der folgenden
Internetadresse verfügbar: use.berlin/10046653

15
EN
Dear Customer,
Congratulations on purchasing this device. Please read
the following instructions carefully and follow them to
prevent possible damages. We assume no liability for
damage caused by disregard of the instructions and
improper use. Scan the QR code to get access to the
latest user manual and more product information.
CONTENTS
Article Description 16
Recommended Installation Locations 16
Installation Locations to Avoid 18
Activation 18
Installation 18
Function Test and Operating Modes 20
Device Control by Smartphone 21
In Case of Fire 24
Maintenance 24
Troubleshooting 25
Disposal Considerations 26
Declaration of Conformity 26
TECHNICAL DATA
Item number 10046653, 10046654, 10046655,
10046656, 10046657, 10046658
Power supply
DC 3V⎓ (2×1.5 V⎓LR6 (AA) batteries)
Alarm volume > 85 dB (A) at 3 meter distance
Alarm sensitivity 0.10-0.16 dB/m
Certied according to DIN EN14604:2005 / AC: 2008
Certicate ID 1116-CPR-192
Sound pattern ISO 8201

16
EN
ARTICLE DESCRIPTION
This device is a photoelectric smoke detector. It is particularly sensitive to
microparticles such as those produced in the smoke of a smoldering re. An
example of such smoldering res is a cigarette burning on a couch or bedding,
a common cause of devastating res. Please note that this device does not
detect ames, heat, carbon monoxide or other dangerous gases.
RECOMMENDED INSTALLATION LOCATIONS
Smoke alarms are mandatory in bedrooms and children‘s rooms, as well as in
hallways that serve as escape routes. We also recommend to equip the living
room.
1. This smoke detector is suitable for installation in the hallway, bedroom,
living room and dining room, as well as in dry basements and garages.
2. Install at least one smoke detector in the hallway of each oor.
3. Smoke, heat and burning objects spread horizontally after rising to the
ceiling. Therefore, install the alarm in the center of the ceiling.
4. If for any reason the device cannot be installed in the center of the ceiling,
the distance at which the device is positioned from the corner of the wall
should be at least 30 cm (see Figure 1).
5. If the length of the room is more than 10 m, you need to install several
units.
6. If the ceiling is sloped, the alarm must be installed at least 50 cm from the
highest ceiling point in the room (see Figure 2).

17
EN
1
2
Best to install HERE
Install
somewhere in
this area
Do not install in
this area
Do not
install in
this area
Never install HERE
Ceiling

18
EN
INSTALLATION LOCATIONS TO AVOID
1. Near equipment and/or areas where smoke/vapor regularly occurs
(kitchens, replace rooms, boiler rooms, and similar locations). Use special
smoke detectors for these areas.
2. Areas of high humidity, such as bathrooms or laundry rooms. At least 3 m
away from these areas.
3. Near vents and vents for heating and cooling. At least 1 m away from these
areas. The air could blow smoke away from the smoke detector and stop
an alarm or even cause a false alarm.
4. In rooms where the temperature could drop below 0 °C or rise above
40°C.
5. In dusty or dirty areas, particles will interfere with the operation of the
smoke detector. False alarm could be triggered.
6. Installation (screwing) on plaster containing asbestos may only be carried
out using low-emission processes
ACTIVATION
Press test button and hold it for above 3 seconds untilLED lights, and release
it within 2 seconds, the unit will generate a “beep“ indicates that it is activated
and goes into work status.
INSTALLATION
Note: The bracket or device will not close without the battery being
properly installed. This is a legal requirement and is for your safety.
1. Remove the bracket from the alarm body.
2. Hold the bracket in the installation position and mark the bracket
installation holes with a pencil.
3. Drill two holes for the dowels.
4. Attach the bracket to the dowels and tighten the screws (see installation
diagram).
5. Attach the alarm to the bracket and turn the alarm body clockwise until it
locks into the bracket.
6. Press the test button for at least 5 seconds to test the device. The
alarm will sound: 3 beeps - 1.5 second pause. If no sound is heard, this
indicates a faulty alarm. You may nd a solution in this manual under
“Troubleshooting“.
7. If you have further questions about the installation, contact your dealer.

19
EN
Note: To avoid injury, this unit must be securely fastened to the ceiling
according to the installation instructions.
Ceiling
Plastic dowel
Screws
Turn to
tighten
Rotate to
loosen and
remove
Holes
Bracket

20
EN
FUNCTION TEST AND OPERATING MODES
Test Device
Test your device by pressing and holding the test button for min. 5 sec. This
will sound an alarm if the electronic circuitry, siren and battery are working. If
no alarm sounds, the unit or batteries may be defective. DO NOT use an open
ame to test your alarm, this may damage the unit. We recommend that you
test the unit weekly.
Standby Mode
The red LED on the front panel should ash every 48 seconds to indicate that
the alarm is active.
Alarm Mode
As soon as the unit detects smoke particles, the siren will sound and the red
LED will ash one ash per second. The ashing LED and alarm will remain
until the air is free of smoke particles. The unit will then go back into standby
mode.
Battery Warning Mode
If your smoke detector enters a low battery condition, the unit will emit an
audible chirp every 48 seconds. In this case, you must replace the battery
immediately. If you do not replace the battery, your smoke detector may not
have enough power to warn you in a real re situation.
Error Mode
The alarm tone or a chirp sounds every 48 seconds for no apparent reason (see
“Troubleshooting“).

21
EN
DEVICE CONTROL BY SMARTPHONE
If you integrate the device into your home WiFi, you can conveniently operate
it via the associated Blumfeldt app. The app not only allows you to remotely
control the device via your smartphone, but also gives you access to recipes
and additional information.
Follow these steps to connect your smartphone to your Blumfeldt device:
1 Download the Blumfeldt app rst by scanning the QR code with your
smartphone (see below), or download it directly from App Store or Google
Play.
2 Make sure your smartphone is connected to the same WiFi network that
your Blumfeldt device is to be connected to.
3 Open the Blumfeldt app.
4 Sign in to your account. If you do not have an account, sign up in the
Blumfeldt app.
5 Follow the instructions from the app.
App Download
Use the scan function of your smartphone to scan the QR code and save the
app on your smartphone.
Note: The app provides further information on how to use the app and help
on how to connect to your device as soon as you open it for the rst time.
iOS Android

22
EN
Troubleshooting connection problems
If your Blumfeldt device cannot be found in the WLAN, check the following:
1 The device is not plugged in. Make sure that your device is plugged into an
electric socket.
2 The device is not in pairing mode. Make sure that the WiFi indicator (LED)
on the smart device control panel is blinking as described in the ‘Reset
WiFi settings‘ instruction of your smart device (instructions are usually
available on device connection process).
3 The WiFi access point does not operate on 2.4 GHz. Make sure that your
access point operates on 2.4 GHz band and you have a separate SSID on
2.4 GHz band. If you are not sure about the operating band of your access
point, please contact your internet provider company.
Important: please note that if your WiFi router is dual band - operating on
both 2.4 GHz and 5 GHz band - you need to separate the SSIDs for each
band and use the 2.4 GHz SSID for connection.
4 Firewall settings of your WiFi network; the rewall setting of your WiFi
network may not allow the Blumfeldt app to congure the WiFi settings on
your smart device. Please make sure that you are not using a public WiFi
network, e.g. airports, dormitories, companies, etc.
5 Different credentials used in smartphone and the app. Make sure that the
WiFi credentials entered in the Blumfeldt app are the same as the ones
that your smartphone is connected to.
Following the above mentioned points, if your smart device still fails to
connect to the app, please contact us via email for support:
23
EN
Alarm shutdown
During the alarm, press the test button to pause the alarm for approximately
8 minutes. The red LED will ash once every 8 seconds, indicating that the
smoke alarm is entering alarm shutdown mode.
If your smoke alarm emits the full alarm signal and you do not
test, the smoke alarm is warning you of a potentially dangerous situation that
requires your immediate attention.
Do not use the alarm shut-off until you have veried that there is no current
re situation. Do not block the alarm vents or turn off the smoke alarm, as this
will cancel your protection.
Smoke alarms can sometimes respond to cooking fumes or other situations
that are not emergencies. In the event of a known false alarm, your smoke
alarm can be temporarily silenced by pressing the test button. Within 8
minutes, your alarm will automatically return to full sensitivity.
Important Notes
• Press and release the mute button, the alarm sound will stop.
• The alarm will mute and go into a reduced sensitivity reset cycle for
approximately 8 minutes.
• During the reduced sensitivity reset cycle, the red LED will ash once
every 8 seconds.
• After the reset cycle is complete, your alarm will automatically return to
full sensitivity and the red LED will again ash every 48 seconds.
DANGER
Never ignore an alarm as this can result in injury or death. If
your smoke alarm goes off and sounds an alarm and you are
not absolutely sure where the smoke is coming from, get
everyone out of the house immediately.

24
EN
IN CASE OF FIRE
1. Stay calm and act quickly!
2. Help children and other vulnerable people in your household to escape
from the danger area.
3. Get to safety IMMEDIATELY. Seconds count, don‘t waste time getting
dressed or taking valuables.
4. Do not open any interior door when exiting without rst checking the
surface. If it is hot or if smoke is seeping through the gap, do not open that
door! Use an alternate exit instead. If the inside of the door is cool, lean
your shoulder against it, open it slightly, and slam it shut when heat and/or
smoke come in.
5. If smoke is in the air, stay close to the oor. Breathe shallowly and
preferably through a cloth (wet if possible).
6. Move out of the danger zone and make sure everyone is there. Do not call
re department from the danger zone!
7. Do not enter rooms without re department clearance.
MAINTENANCE
• Clean the alarm at least once a month to remove dust, dirt and debris. It is
best to use a vacuum cleaner with a soft brush, vacuum all sides and covers
of the smoke detector.
• This smoke detector has a battery monitor where the alarm will sound
approximately every 48 seconds and the red LED will ash simultaneously
for at least 30 days when the battery becomes low. If the battery is
defective or other errors occur look in the “Troubleshooting“ to possibly
nd a solution.
• If errors continue to occur during the warranty period, please contact your
dealer.
Note: Do not attempt to remove the cover to clean the inside. Doing so will
affect the warranty.
Precauons
• To ensure your maximum safety, install all smoke detectors exactly as
described in this manual.
• Keep the smoke detectors clean. Do not allow dust and dirt to accumulate
on the unit and test once a week for proper operation.
• Replace the smoke detectors immediately if they are not working properly.
25
EN
TROUBLESHOOTING
The smoke detector does not make
any sound during testing.
Press the test button for at least 5
seconds.
Remove the smoke detector from
the holder. Check that the battery is
connected correctly.
Clean the smoke detector.
If the fault persists, contact your
dealer during the warranty period
or replace the detector if your
warranty has expired.
The alarm signal occurs every 48
seconds, at the same time the red
LED ashes once.
The battery is almost empty. Replace
the battery.
The alarm signal occurs every 48
seconds and the alarm changes to
error mode.
Clean the smoke detector.
If the error persists, contact your
dealer during the warranty period
or replace the detector if your
warranty has expired.
The smoke alarm emits unwanted
sounds, alarms intermittently
or when occupants are cooking,
showering, etc.
Press the test button to stop the
alarm.
Clean the smoke alarm (see the
MAINTENANCE chapter).
Move the smoke alarm to a new
location and press the test button.
The alarm sounds differently than
usual. It starts and stops.
Clean the smoke alarm (see chapter
MAINTENANCE).
Contact the manufacturer.
If the warranty for the device has
expired, replace the smoke alarm
device with a new one.
26
EN
DISPOSAL CONSIDERATIONS
If there is a legal regulation for the disposal of electrical
and electronic devices in your country, this symbol
on the product or on the packaging indicates that this
product must not be disposed of with household waste.
Instead, it must be taken to a collection point for the
recycling of electrical and electronic equipment. By
disposing of it in accordance with the rules, you are
protecting the environment and the health of your
fellow human beings from negative consequences. For
information about the recycling and disposal of this
product, please contact your local authority or your
household waste disposal service.
This product contains batteries. If there is a legal regulation
for the disposal of batteries in your country, the batteries
must not be disposed of with household waste. Find out
about local regulations for disposing of batteries. By
disposing of them in accordance with the rules, you are
protecting the environment and the health of your fellow
human beings from negative consequences.
DECLARATION OF CONFORMITY
Manufacturer:
Chal-Tec GmbH, Wallstrasse 16, 10179 Berlin,
Germany. info@electronic-star.de
Importer for Great Britain:
Berlin Brands Group UK Limited
PO Box 42
272 Kensington High Street
London, W8 6ND
United Kingdom
Hereby, Chal-Tec GmbH declares that the radio equipment
type SHD is in compliance with Directive 2014/53/EU. The
full text of the EU declaration of conformity is available at
the following internet address: use.berlin/10046653
For Great Britain: Hereby, Chal-Tec GmbH declares
that the radio equipment type SHD is in compliance with
the relevant statutory requirements. The full text of the
declaration of conformity is available at the following
internet address: use.berlin/10046653

27
FR
Chère cliente, cher client,
Nous vous félicitons d'avoir acheté cet appareil. Veuillez
lire attentivement les instructions suivantes et les
respecter an d'éviter tout dommage potentiel. Nous
déclinons toute responsabilité pour les dommages causés
par le non-respect des instructions et une utilisation
inappropriée. Scannez le code QR pour accéder au
dernier manuel d'utilisation et à d'autres informations
sur le produit.
SOMMAIRE
Description de l’article 28
Emplacements recommandés 28
Emplacements à éviter 30
Activation 30
Installation 30
Test de fonctionnement et modes d’utilisation 32
Contrôle de l‘appareil par smartphone 33
En cas d’incendie 36
Entretien 36
Dépannage 37
Conseils pour le recyclage 38
Déclaration de conformité 38
FICHE TECHNIQUE
Numéro d'article 10046653, 10046654, 10046655,
10046656, 10046657, 10046658
Alimentation électrique
CC 3 V⎓ (2×1,5 V⎓piles LR6 (AA)
Volume de l'alarme > 85 dB (A) à une distance de 3 mètres
Sensibilité de l'alarme 0,10-0,16 dB/m
Certié selon la norme DIN EN14604:2005 / AC : 2008
ID du certicat 1116-CPR-192
Schéma sonore ISO 8201

28
FR
DESCRIPTION DE L'ARTICLE
Ce dispositif est un détecteur de fumée photoélectrique. Il est
particulièrement sensible aux microparticules telles que celles produites dans
la fumée d'un feu couvant. Un exemple de feu couvant est une cigarette qui
brûle sur un canapé ou une literie, cause fréquente d'incendies dévastateurs.
Veuillez noter que cet appareil ne détecte pas les ammes, la chaleur, le
monoxyde de carbone ou d'autres gaz dangereux.
EMPLACEMENTS RECOMMANDÉS
Les détecteurs de fumée sont obligatoires dans les chambres à coucher
et les chambres d'enfants, ainsi que dans les couloirs qui servent de voies
d'évacuation. Nous recommandons également d'équiper le salon.
1. Ce détecteur de fumée peut être installé dans le couloir, la chambre à
coucher, le salon et la salle à manger, ainsi que dans les sous-sols secs et les
garages.
2. Installez au moins un détecteur de fumée dans le couloir de chaque étage.
3. La fumée, la chaleur et les objets en feu se propagent horizontalement
après être montés au plafond. Il faut donc installer l'alarme au centre du
plafond.
4. Si, pour une raison quelconque, l'appareil ne peut être installé au centre du
plafond, la distance entre l'appareil et l'angle du mur doit être d'au moins
30 cm (voir gure 1).
5. Si la longueur de la pièce est supérieure à 10 m, vous devez installer
plusieurs appareils.
6. Si le plafond est incliné, l'alarme doit être installée à au moins 50 cm du
point le plus haut du plafond de la pièce (voir gure 2).

29
FR
1
2
Installation idéale
ICI
Installer quelque
part dans cette
zone
Ne pas installer
dans cette zone
Ne pas instal-
ler dans cette
zone
Ne jamais installer
ICI
Plafond

30
FR
EMPLACEMENTS À ÉVITER
1. Près des équipements et/ou des zones où la fumée/vapeur est
régulièrement présente (cuisines, salles de cheminée, chaufferies et autres
lieux similaires). Utilisez des détecteurs de fumée spéciaux pour ces zones.
2. Les zones à forte humidité, telles que les salles de bains ou les buanderies.
Au moins 3 m de distance de ces zones.
3. Près des bouches d'aération et des bouches de chauffage et de
climatisation. Au moins 1 m de distance de ces zones. L'air pourrait
éloigner la fumée du détecteur et arrêter l'alarme ou même provoquer une
fausse alarme.
4. Dans les pièces où la température peut descendre en dessous de 0 °C ou
monter au-dessus de 40 °C.
5. Dans les endroits poussiéreux ou sales, les particules interfèrent avec le
fonctionnement du détecteur de fumée. Une fausse alarme pourrait être
déclenchée.
6. La pose (vissage) sur des enduits contenant de l'amiante ne peut être
effectuée qu'à l'aide de procédés à faible émission
ACTIVATION
Appuyez sur le bouton de test et maintenez-le pendant plus de 3 secondes
jusqu'à ce que la LED s'allume, puis relâchez-le dans les 2 secondes, l'appareil
émettra un bip indiquant qu'il est activé et en état de fonctionnement.
INSTALLATION
Remarque : Le support ou l'appareil ne se fermera pas si la pile n'est pas
correctement installée. Il s'agit d'une exigence légale pour votre sécurité.
1. Retirez le support du corps de l'alarme.
2. Maintenez le support dans la position d'installation et marquez les trous
d'installation du support à l'aide d'un crayon.
3. Percez deux trous pour les chevilles.
4. Fixez le support sur les chevilles et serrez les vis (voir le schéma
d'installation).
5. Fixez l'alarme au support et tournez le corps de l'alarme dans le sens des
aiguilles d'une montre jusqu'à ce qu'il s'enclenche dans le support.
6. Appuyez sur le bouton de test pendant au moins 5 secondes pour tester
l'appareil. L'alarme retentit : 3 bips - 1,5 seconde de pause. Si aucun son
n'est émis, l'alarme est défectueuse. Vous pouvez trouver une solution
dans ce manuel sous la rubrique « Dépannage. »
7. Si vous avez d'autres questions concernant l'installation, contactez votre
revendeur.

31
FR
Remarque : Pour éviter toute blessure, cet appareil doit être solidement
xé au plafond conformément aux instructions d'installation.
Plafond
Cheville en
plastique
Vis
Tourner pour
serrer
Tourner pour
desserrer et
retirer
Trous
Support

32
FR
TEST DE FONCTIONNEMENT ET MODES
D'UTILISATION
Test de l'appareil
Testez votre appareil en appuyant sur le bouton de test et en le maintenant
pendant min. 5 sec. Il déclenche une alarme si le circuit électronique, la sirène
et la pile fonctionnent. Si aucune alarme ne retentit, il se peut que l'appareil ou
les piles soient défectueux. N'UTILISEZ PAS de amme nue pour tester votre
alarme, vous risqueriez d'endommager l'appareil. Nous vous recommandons
de tester l'appareil une fois par semaine.
Mode veille
Le voyant LED rouge sur le panneau avant doit clignoter toutes les 48
secondes pour indiquer que l'alarme est active.
Mode alarme
Dès que l'appareil détecte des particules de fumée, la sirène retentit et le
voyant rouge clignote une fois par seconde. La LED clignotante et l'alarme
restent allumées jusqu'à ce que l'air soit exempt de particules de fumée.
L'appareil repasse alors en mode veille.
Mode d'avertissement de la pile
Si la pile de votre détecteur de fumée est faible, l'appareil émet un signal
sonore toutes les 48 secondes. Dans ce cas, vous devez remplacer la pile
immédiatement. Si vous ne remplacez pas la pile, votre détecteur de fumée
risque de ne pas être sufsamment puissant pour vous avertir en cas
d'incendie réel.
Mode erreur
L'alarme sonore ou un bip retentit toutes les 48 secondes sans raison
apparente (voir « Dépannage »).
33
FR
CONTRÔLE DE L‘APPAREIL PAR SMARTPHONE
Si vous connectez l‘appareil à votre réseau Wi-Fi domestique, vous pouvez
l‘utiliser facilement via l‘application Blumfeldt associée. L‘application vous
permet non seulement de contrôler à distance l‘appareil via votre smartphone,
mais vous donne également accès à des recettes et à des informations
supplémentaires.
Procédez comme suit pour connecter votre smartphone avec votre
appareil Blumfeldt :
1 Téléchargez d‘abord l‘application Blumfeldt en scannant le code QR avec
votre smartphone (voir ci-dessous) ou téléchargez-le directement depuis
l‘App Store ou Google Play.
2 Assurez-vous que votre smartphone est connecté au même réseau WiFi
que votre appareil Blumfeldt.
3 Ouvrez l‘application Blumfeldt.
4 Connectez-vous avec votre compte. Si vous n‘avez pas encore de compte,
inscrivez-vous dans l‘application Blumfeldt.
5 Suivez les indications de l‘application.
Téléchargement de l‘application
Utilisez la fonction de scan de votre téléphone portable pour scanner le QR
Code et télécharger l‘application sur votre smartphone.
Remarque : L‘application fournit des informations supplémentaires sur la
façon d‘utiliser l‘application et de l‘aide sur la façon de se connecter à votre
appareil dès que vous l‘ouvrez pour la première fois.
iOS Android

34
FR
Résoluon des problèmes de connexion
Si votre appareil Blumfeldt est introuvable dans le Wi, vériez les points
suivants :
1. L‘appareil n‘est pas branché. Vériez que votre appareil est branché à une
prise.
2. L‘appareil ne se trouve pas en mode d‘appairage. Vériez que le voyant
WiFi (LED) du panneau de commande de l‘appareil intelligent clignote
comme décrit dans les instructions „Réinitialiser les paramètres WiFi“
pour votre appareil intelligent (les instructions se trouvent généralement
sous Connexion de l‘appareil).
3. Le point d‘accès WiFi ne fonctionne pas sur 2,4 GHz. Assurez-vous que
votre point d‘accès fonctionne sur la bande 2,4 GHz et que vous disposez
de votre propre SSID sur la bande 2,4 GHz. Si vous n‘êtes pas sûr de la
bande de fonctionnement de votre point d‘accès, veuillez contacter votre
fournisseur d‘accès Internet.
Important : veuillez noter que si votre routeur WiFi a une double bande - c‘est-
à-dire qu‘il fonctionne à la fois dans les bandes 2,4 GHz et 5 GHz - vous devez
séparez les SSID pour chaque bande et les 2,4 GHz Utilisez le SSID GHz pour vous
connecter.
4. Vériez les paramètres du pare-feu de votre réseau WiFi. Le paramétrage
de pare-feu de votre réseau Wi-Fi peut ne pas permettre à l‘application
Blumfeldt de congurer les paramètres Wi-Fi sur votre appareil connecté.
Veuillez vous assurer que vous n‘utilisez pas un réseau WiFi public, par ex.
aéroports, dortoirs, entreprises, etc.
5. Différentes données de connexion dans le smartphone et dans
l‘application. Vériez que les données de connexion WiFi saisies dans
l‘application Blumfeldt correspondent à celles de votre smartphone.
Si vous avez suivi les instructions ci-dessus et que votre smartphone ne parvient
toujours pas à se connecter à l‘application, veuillez nous envoyer un e-mail pour
obtenir de l‘aide : [email protected]
35
FR
Arrêt de l'alarme
Pendant l'alarme, appuyez sur le bouton de test pour interrompre l'alarme
pendant environ 8 minutes. Le voyant rouge clignote une fois toutes les 8
secondes, indiquant que le détecteur de fumée passe en mode d'arrêt de
l'alarme.
Si votre détecteur de fumée émet le signal d’alarme complet et que vous ne
faites pas de
test, le détecteur de fumée vous avertit d’une situation potentiellement
dangereuse qui nécessite votre attention immédiate.
N'utilisez pas l'arrêt de l'alarme tant que vous n'avez pas vérié qu'il n'y a
pas de situation d'incendie en cours. N'obstruez pas les orices d'alarme et
n'éteignez pas le détecteur de fumée, car cela annulerait votre protection.
Les détecteurs de fumée peuvent parfois réagir à des vapeurs de cuisson ou
à d'autres situations qui ne sont pas des urgences. En cas de fausse alarme
connue, vous pouvez désactiver temporairement votre détecteur de fumée
en appuyant sur le bouton de test. Au bout de 8 minutes, l'alarme revient
automatiquement à sa sensibilité maximale.
Remarques importantes
• Appuyez et relâchez le bouton de sourdine, le son de l'alarme s'arrête.
• L'alarme se met en sourdine et entre dans un cycle de réinitialisation à
sensibilité réduite pendant environ 8 minutes.
• Pendant le cycle de réinitialisation de la sensibilité réduite, le voyant rouge
clignote une fois toutes les 8 secondes.
• Une fois le cycle de réinitialisation terminé, l'alarme retrouve
automatiquement sa pleine sensibilité et le voyant rouge clignote à
nouveau toutes les 48 secondes.
DANGER
Ne jamais ignorer une alarme, car cela peut entraîner des
blessures ou la mort. Si votre détecteur de fumée se déclenche
et émet une alarme et que vous n'êtes pas absolument sûr de
l'origine de la fumée, faites sortir tout le monde de la maison
immédiatement.

36
FR
EN CAS D'INCENDIE
1. Restez calme et agissez rapidement !
2. Aidez les enfants et les personnes vulnérables de votre foyer à s'échapper
de la zone dangereuse.
3. Mettez-vous à l'abri IMMÉDIATEMENT. Les secondes comptent, ne
perdez pas de temps à vous habiller ou à prendre des objets de valeur.
4. N'ouvrez aucune porte intérieure en sortant sans avoir préalablement
vérié la surface. Si elle est chaude ou si de la fumée s'échappe par
l'interstice, n'ouvrez pas cette porte ! Utilisez plutôt une autre sortie. Si le
côté intérieur de la porte est froid, appuyez votre épaule contre la porte,
ouvrez-la légèrement et refermez-la lorsque la chaleur et/ou la fumée
pénètrent à l'intérieur.
5. S'il y a de la fumée dans l'air, restez près du sol. Respirez superciellement
et de préférence à travers un linge (humide si possible).
6. Sortez de la zone dangereuse et vériez que tout le monde est présent.
N'appelez pas les pompiers depuis la zone de danger !
7. Ne pas entrer dans les pièces sans l'autorisation des pompiers.
ENTRETIEN
• Nettoyez l'alarme au moins une fois par mois pour enlever la poussière,
la saleté et les débris. Il est préférable d'utiliser un aspirateur muni d'une
brosse douce et de passer l'aspirateur sur tous les côtés et les couvercles
du détecteur de fumée.
• Ce détecteur de fumée est doté d'un dispositif de contrôle de la pile
qui déclenche l'alarme toutes les 48 secondes environ et fait clignoter
simultanément le voyant rouge pendant au moins 30 jours lorsque la
pile est déchargée. Si la pile est défectueuse ou que d'autres erreurs se
produisent, consultez la section « Dépannage » pour trouver une solution.
• Si des erreurs continuent à se produire pendant la période de garantie,
veuillez contacter votre revendeur.
Remarque : N'essayez pas de retirer le couvercle pour nettoyer l'intérieur.
La garantie serait annulée.
Précauons
• Pour garantir une sécurité maximale, installez tous les détecteurs de
fumée exactement comme décrit dans ce manuel.
• Veillez à ce que les détecteurs de fumée restent propres. Ne laissez pas
la poussière et la saleté s'accumuler sur l'appareil et vériez son bon
fonctionnement une fois par semaine.
• Remplacez immédiatement les détecteurs de fumée s'ils ne fonctionnent
pas correctement.

37
FR
DÉPANNAGE
Le détecteur de fumée n'émet aucun
son pendant le test.
Appuyez sur le bouton de test
pendant au moins 5 secondes.
Retirez le détecteur de fumée de
son support. Vériez que la pile est
correctement connectée.
Nettoyez le détecteur de fumée.
Si la panne persiste, contactez votre
revendeur pendant la période de
garantie ou remplacez le détecteur si
votre garantie a expiré.
Le signal d'alarme est émis toutes les
48 secondes, en même temps que le
voyant rouge clignote une fois.
La pile est presque vide. Remplacez
la pile.
Le signal d'alarme retentit toutes
les 48 secondes et l'alarme passe en
mode d'erreur.
Nettoyez le détecteur de fumée.
Si la panne persiste, contactez votre
revendeur pendant la période de
garantie ou remplacez le détecteur si
votre garantie a expiré.
Le détecteur de fumée émet des
sons indésirables, des alarmes
intermittentes ou lorsque les
occupants cuisinent, se douchent,
etc.
Appuyez sur le bouton de test pour
arrêter l'alarme.
Nettoyez le détecteur de fumée (voir
le chapitre ENTRETIEN).
Déplacez le détecteur de fumée et
appuyez sur le bouton de test.
L'alarme sonne différemment de
d'habitude. Elle démarre et s'arrête.
Nettoyez le détecteur de fumée (voir
le chapitre ENTRETIEN).
Contactez le fabricant.
Si la garantie de l'appareil a expiré,
remplacez le détecteur de fumée par
un nouveau.
38
FR
CONSEILS POUR LE RECYCLAGE
S‘il existe une réglementation pour l‘élimination ou le
recyclage des appareils électriques et électroniques
dans votre pays, ce symbole sur le produit ou sur
l‘emballage indique que cet appareil ne doit pas
être jeté avec les ordures ménagères. Vous devez le
déposer dans un point de collecte pour le recyclage des
équipements électriques et électroniques. La mise au
rebut conforme aux règles protège l‘environnement
et la santé de vos semblables des conséquences
négatives. Pour plus d‘informations sur le recyclage
et l‘élimination de ce produit, veuillez contacter votre
autorité locale ou votre service de recyclage des
déchets ménagers.
Ce produit contient des piles. S‘il existe une
réglementation pour l‘élimination ou le recyclage
des piles dans votre pays, vous ne devez pas les jeter
avec les ordures ménagères. Renseignez-vous sur les
dispositions locales relatives à la collecte des piles
usagées. La mise au rebut conforme aux règles protège
l‘environnement et la santé de vos semblables des
conséquences négatives.
DÉCLARATION DE CONFORMITÉ
Fabricant :
Chal-Tec GmbH, Wallstraße 16, 10179 Berlin,
Allemagne.
info@electronic-star.de
Importateur pour la Grande Bretagne :
Berlin Brands Group UK Limited
PO Box 42
272 Kensington High Street
London, W8 6ND
United Kingdom
Le soussigné, Chal-Tec GmbH, déclare que l’équipement
radioélectrique du type SHD est conforme à la directive
2014/53/UE. Le texte complet de la déclaration UE de
conformité est disponible à l’adresse internet suivante :
use.berlin/10046653

39
IT
Gentile cliente,
Ti ringraziamo per aver acquistato questo dispositivo. Ti
invitiamo a leggere attentamente le seguenti istruzioni e
a seguirle per evitare possibili danni. Non ci assumiamo
alcuna responsabilità per danni causati dalla mancata
osservanza delle istruzioni e da un uso improprio.
Scansionare il codice QR per accedere al manuale d'uso
più recente e a maggiori informazioni sul prodotto.
INDICE
Descrizione dell’articolo 40
Luoghi di installazione consigliati 40
Luoghi di installazione da evitare 42
Attivazione 42
Installazione 42
Test di funzionamento e modalità operative 44
Gestione tramite smartphone 45
In caso di incendio 48
Manutenzione 48
Risoluzione dei problemi 49
Smaltimento 50
Dichiarazione di conformità 50
DATI TECNICI
Numero dell'articolo 10046653, 10046654, 10046655,
10046656, 10046657, 10046658
Alimentazione
DC 3V⎓ (2×1.5 V⎓LR6 (AA) batterie)
Volume dell'allarme > 85 dB (A) a 3 metri di distanza
Sensibilità dell'allarme 0,10-0,16 dB/m
Certicato in conformità con DIN EN14604:2005 / AC: 2008
ID del certicato 1116-CPR-192
Modello sonoro ISO 8201

40
IT
DESCRIZIONE DELL'ARTICOLO
Questo dispositivo è un rilevatore di fumo fotoelettrico. È particolarmente
sensibile alle microparticelle, come quelle prodotte dal fumo di un incendio. Un
esempio di tali incendi è la sigaretta che brucia sul divano o sulla biancheria da
letto, una causa comune di incendi devastanti. Si noti che questo dispositivo
non rileva amme, calore, monossido di carbonio o altri gas pericolosi.
LUOGHI DI INSTALLAZIONE CONSIGLIATI
Gli allarmi antifumo sono obbligatori nelle camere da letto e nelle stanze
dei bambini, nonché nei corridoi che servono come vie di fuga. Si consiglia di
installarli anche in soggiorno.
1. Questo rilevatore di fumo è adatto all'installazione in corridoio, camera da
letto, soggiorno e sala da pranzo, nonché in cantine e garage asciutti.
2. Installare almeno un rilevatore di fumo nel corridoio di ogni piano.
3. Il fumo, il calore e le amme si diffondono orizzontalmente dopo aver
raggiunto il softto. Pertanto, installare l'allarme al centro del softto.
4. Se per qualsiasi motivo non è possibile installare il dispositivo al centro del
softto, la distanza del dispositivo dall'angolo della parete deve essere di
almeno 30 cm (v. immagine 1).
5. Se la lunghezza della stanza è superiore a 10 m, è necessario installare più
unità.
6. Se il softto è inclinato, l'allarme deve essere installato ad almeno 50 cm
dal punto più alto del softto della stanza (v. immagine 2).

41
IT
1
2
Meglio installarlo
QUI
Installarlo da
qualche parte in
quest'area
Non installarlo in
quest'area
Non in-
stallarlo in
quest'area
Non installarlo mai
QUI
Softto

42
IT
LUOGHI DI INSTALLAZIONE DA EVITARE
1. In prossimità di dispositivi e/o aree in cui si producono regolarmente fumi/
vapori (cucine, sale con caminetti, locali caldaie e luoghi simili). Utilizzare
rilevatori di fumo speciali per queste aree.
2. Aree ad alta umidità, come bagni o lavanderie. Almeno 3 m di distanza da
queste aree.
3. Vicino alle bocchette di ventilazione e alle prese d'aria per il riscaldamento
e il raffreddamento. Almeno 1 m di distanza da queste aree. L'aria potrebbe
allontanare il fumo dal rilevatore di fumo e interrompere l'allarme o
addirittura provocare un falso allarme.
4. Nei locali in cui la temperatura potrebbe scendere sotto 0 °C o salire sopra
40 °C.
5. In aree polverose o sporche, le particelle interferiscono con il
funzionamento del rilevatore di fumo. Potrebbe scattare un falso allarme.
6. L'installazione (avvitamento) su intonaci contenenti amianto può essere
effettuata solo con processi a bassa emissione
ATTIVAZIONE
Premere il tasto di prova e tenerlo premuto per più di 3 secondi nché non si
accende il LED, quindi rilasciarlo entro 2 secondi; l'unità emette un "bip" che
indica che è stata attivata e passa allo stato operativo.
INSTALLAZIONE
Nota: la staffa o il dispositivo non si chiuderà senza che la batteria sia
correttamente installata. Si tratta di un requisito legale e serve a garantire
la sicurezza.
1. Rimuovere la staffa dalla struttura dell'allarme.
2. Tenere la staffa nella posizione di installazione e segnare i fori della staffa
con una matita.
3. Praticare due fori per i tasselli.
4. Fissare la staffa ai tasselli e serrare le viti (v. schema di installazione).
5. Collegare l'allarme alla staffa e ruotare la struttura dell'allarme in senso
orario nché non si blocca nella staffa.
6. Premere il tasto di prova per almeno 5 secondi per testare il dispositivo.
L'allarme suona: 3 bip - pausa di 1,5 secondi. Se non si sente alcun suono,
signica che l'allarme è difettoso. La soluzione può essere trovata in
questo manuale alla voce "Risoluzione dei problemi".
7. Per ulteriori domande sull'installazione, rivolgersi al rivenditore.

43
IT
Nota: per evitare lesioni, questa unità deve essere ssata saldamente al
softto secondo le istruzioni di installazione.
Softto
Tassello in
plastica
Viti
Girare per
stringere
Ruotare per
allentare e
rimuovere
Fori
Staffa

44
IT
TEST DI FUNZIONAMENTO E MODALITÀ
OPERATIVE
Test del dispositivo
Per testare il dispositivo, tenere premuto il tasto di prova per almeno
5 secondi. Se il circuito elettronico, la sirena e la batteria funzionano,
l'allarme viene attivato. Se non suona alcun allarme, l'unità o le batterie
potrebbero essere difettose. NON utilizzare una amma aperta per testare
l'allarme, perché potrebbe danneggiare l'unità. Si consiglia di testare l'unità
settimanalmente.
Modalità standby
Il LED rosso sul pannello frontale dovrebbe lampeggiare ogni 48 secondi per
indicare che l'allarme è attivo.
Modalità allarme
Non appena l'unità rileva particelle di fumo, la sirena suona e il LED rosso
lampeggia una volta al secondo. Il LED lampeggiante e l'allarme permangono
nché l'aria non è priva di particelle di fumo. L'unità torna quindi in modalità
standby.
Modalità di avviso in caso di batteria scarica
Se il rilevatore di fumo ha la batteria scarica, l'unità emette un segnale acustico
ogni 48 secondi. In questo caso, è necessario sostituire immediatamente la
batteria. Se non si sostituisce la batteria, il rilevatore di fumo potrebbe non
avere abbastanza energia per avvisare in caso di incendio reale.
Modalità di errore
Il segnale acustico o un cinguettio suona ogni 48 secondi senza alcun motivo
apparente (v. "Risoluzione dei problemi").
45
IT
GESTIONE TRAMITE SMARTPHONE
Se si collega l‘apparecchio al WiFi, è possibile gestirlo comodamente con
la relativa applicazione Blumfeldt. L‘app non solo consente di controllare
l´apparecchio da remoto dal proprio smartphone, ma consente anche di
accedere a ricette e ad altre informazioni.
Per collegare il telefono al dispositivo Blumfeldt, procedere come segue:
1 Per prima cosa scaricare l‘app Blumfeldt scansionando il codice QR con lo
smartphone (vedere sotto) o scaricarla direttamente dall‘App Store o da
Google Play.
2 Accertarsi che lo smartphone sia connesso alla stessa rete WiFi a cui deve
collegarsi il dispositivo Blumfeldt.
3 Aprire l‘applicazione Blumfeldt.
4 Accedere con il proprio account. Se non si possiede ancora un account,
registrarsi nell‘app Blumfeldt.
5 Seguire le istruzioni contenute nell‘App.
App-Download
Utilizzare la funzione di scansione del telefono per eseguire la scansione del
codice QR e salvare l‘applicazione sullo smartphone.
Nota: L‘applicazione fornisce ulteriori informazioni su come utilizzarla e su
come connettersi al dispositivo non appena viene aperta per la prima volta.
iOS Android

46
IT
Correzione degli errori in caso di problemi di connessione
Se non è possibile trovare il dispositivo Blumfeldt nella rete Wi-Fi, controllare
i seguenti punti:
1. La spina non è collegata. Assicurarsi che il dispositivo sia collegato a una
presa elettrica.
2. Il dispositivo non si trova in modalità di accoppiamento. Assicurarsi che
l‘indicazione Wi-Fi (LED) sul pannello di controllo del dispositivo smart
lampeggi come descritto alla voce „Resettare le impostazioni Wi-Fi“ del
dispositivo smart in questione (indicazioni a riguardo possono essere
normalmente trovate alla voce „Connessione dei dispositivi“).
3. Il punto di accesso Wi-Fi non opera sulla banda da 2,4 GHz. Assicurarsi
che il punto di accesso utilizzato operi sulla banda da 2,4 GHz e che sia
disponibile un SSID personale sulla banda da 2,4 GHz. Se non si è sicuri del
tipo di banda del punto di accesso, rivolgersi al fornitore di Internet.
Importante: tenere presente che se il router Wi-Fi è dotato di dualband e opera
dunque sia sulla banda da 2,4 GHz che su quella da 5 GHz, è necessario dividere
gli SSID per ogni banda e utilizzare per il collegamento l‘SSID della banda da 2,4
GHz.
4. Controllare le impostazioni del rewall della rete Wi-Fi. L‘impostazione
del rewall della rete Wi-Fi potrebbe non permettere alla app Blumfeldt
di congurare le impostazioni Wi-Fi sul dispositivo smart. Assicurarsi di
non utilizzare reti Wi-Fi pubbliche, come ad es. presso aeroporti, hotel,
aziende, ecc.
5. Diversi dati di registrazione su smartphone e app. Assicurarsi che i dati di
registrazione Wi-Fi inseriti nella app Blumfeldt corrispondano a quelli con
cui è collegato lo smartphone.
Se sono stati rispettati i punti citati in precedenza e lo smartphone continua a non
connettersi alla app, si prega di inviare un‘email al seguente indirizzo per ricevere
supporto: appsuppor[email protected].
47
IT
Spegnimento dell'allarme
Mentre l'allarme è attivo, premere il tasto di prova per mettere in pausa
l'allarme per circa 8 minuti. Il LED rosso lampeggia una volta ogni 8 secondi,
indicando che il rilevatore di fumo sta entrando in modalità di spegnimento
dell'allarme.
Se il rilevatore di fumo emette il segnale di allarme completo e non si
effettua il test, il rilevatore di fumo avverte di una situazione potenzialmente
pericolosa che richiede l'immediata attenzione dell'utente.
Non utilizzare la funzione di spegnimento dell'allarme prima di aver vericato
l'assenza di un incendio. Non bloccare le bocchette dell'allarme e non spegnere
il rilevatore di fumo per non annullare la protezione.
I rilevatori di fumo possono talvolta reagire ai fumi di cottura o ad altre
situazioni che non costituiscono un'emergenza. In caso di falso allarme, il
rilevatore di fumo può essere temporaneamente silenziato premendo il tasto
di prova. Entro 8 minuti, l'allarme tornerà automaticamente alla massima
sensibilità.
Note importanti
• Premendo e rilasciando il tasto di disattivazione dell'audio, il suono
dell'allarme si interromperà.
• L'allarme si disattiva e passa a un ciclo di ripristino a sensibilità ridotta per
circa 8 minuti.
• Durante il ciclo di ripristino della sensibilità ridotta, il LED rosso lampeggia
una volta ogni 8 secondi.
• Al termine del ciclo di ripristino, l'allarme tornerà automaticamente alla
massima sensibilità e il LED rosso tornerà a lampeggiare ogni 48 secondi.
PERICOLO
Non ignorare mai un allarme per non incorrere in lesioni o
morte. Se il rilevatore di fumo scatta e dà l'allarme e non si è
assolutamente sicuri della provenienza del fumo, fare uscire
immediatamente tutti dalla casa.

48
IT
IN CASO DI INCENDIO
1. Mantenere la calma e agire rapidamente!
2. Aiutare i bambini e le altre persone vulnerabili della famiglia a fuggire
dall'area di pericolo.
3. Mettersi al sicuro IMMEDIATAMENTE. I secondi contano, non perdere
tempo a vestirsi o a prendere gli oggetti di valore.
4. Non aprire le porte interne quando si esce senza aver prima controllato
la supercie. Se è calda o se il fumo ltra dalla fessura, non aprire la porta!
Utilizzare invece un'uscita alternativa. Se l'interno della porta è freddo,
appoggiarsi con la spalla, aprirla leggermente e chiuderla quando entrano
calore e/o fumo.
5. Se c'è fumo nell'aria, rimanere vicini al pavimento. Respirare
supercialmente e preferibilmente attraverso un panno (possibilmente
bagnato).
6. Allontanarsi dalla zona di pericolo e assicurarsi che tutti siano presenti.
Non chiamare i vigili del fuoco dalla zona di pericolo!
7. Non entrare nei locali senza l'autorizzazione dei vigili del fuoco.
MANUTENZIONE
• Pulire l'allarme almeno una volta al mese per rimuovere polvere, sporco
e detriti. È meglio utilizzare un aspirapolvere con una spazzola morbida e
aspirare tutti i lati e le coperture del rilevatore di fumo.
• Questo rilevatore di fumo è dotato di un monitoraggio della batteria,
in cui l'allarme suona ogni 48 secondi circa e il LED rosso lampeggia
simultaneamente per almeno 30 giorni quando la batteria si scarica. Se
la batteria è difettosa o si vericano altri errori, consultare la sezione
"Risoluzione dei problemi" per trovare una soluzione.
• Se gli errori continuano a vericarsi durante il periodo di garanzia,
contattare il rivenditore.
Nota: non tentare di rimuovere la copertura per pulire l'interno. Ciò
inuisce sulla garanzia.
Precauzioni
• Per garantire la massima sicurezza, installare tutti i rilevatori di fumo
esattamente come descritto in questo manuale.
• Mantenere puliti i rilevatori di fumo. Non lasciare che polvere e sporcizia
si accumulino sull'unità e vericare una volta alla settimana il corretto
funzionamento.
• Sostituire immediatamente i rilevatori di fumo se non funzionano
correttamente.

49
IT
RISOLUZIONE DEI PROBLEMI
Il rilevatore di fumo non emette
alcun suono durante il test.
Premere il tasto di prova per almeno
5 secondi.
Rimuovere il rilevatore di fumo dal
supporto. Vericare che la batteria
sia collegata correttamente.
Pulire il rilevatore di fumo.
Se il guasto persiste, contattare il
rivenditore durante il periodo di
garanzia o sostituire il rilevatore se
la garanzia è scaduta.
Il segnale di allarme viene emesso
ogni 48 secondi, mentre il LED rosso
lampeggia una volta.
La batteria è quasi scarica. Sostituire
la batteria.
Il segnale di allarme viene emesso
ogni 48 secondi e l'allarme passa alla
modalità di errore.
Pulire il rilevatore di fumo.
Se l'errore persiste, contattare il
rivenditore durante il periodo di
garanzia o sostituire il rilevatore se
la garanzia è scaduta.
Il rilevatore di fumo emette suoni
indesiderati, allarmi intermittenti
o si attiva quando si sta cucinando,
facendo la doccia, ecc.
Premere il tasto di prova per
interrompere l'allarme.
Pulire il rilevatore di fumo (v. il
capitolo MANUTENZIONE).
Spostare il rilevatore di fumo in una
nuova posizione e premere il tasto
di prova.
L'allarme suona in modo diverso dal
solito. Si avvia e si arresta.
Pulire il rilevatore di fumo (v. il
capitolo MANUTENZIONE).
Contattare il produttore.
Se la garanzia del dispositivo è
scaduta, sostituire il dispositivo di
allarme antifumo con uno nuovo.
50
IT
SMALTIMENTO
Se nel proprio paese si applicano le regolamentazioni
inerenti lo smaltimento di dispositivi elettrici ed
elettronici, questo simbolo sul prodotto o sulla
confezione segnala che questi prodotti non possono
essere smaltiti con i riuti normali e devono essere
portati a un punto di raccolta di dispositivi elettrici ed
elettronici. Grazie al corretto smaltimento dei vecchi
dispositivi si tutela il pianeta e la salute delle persone
da possibili conseguenze negative. Informazioni
riguardanti il riciclo e lo smaltimento di questi prodotti
si ottengono presso l’amministrazione locale oppure il
servizio di gestione dei riuti domestici.
Il prodotto contiene batterie. Se nel proprio paese si
applicano le regolamentazioni inerenti lo smaltimento
di batterie, non possono essere smaltite con i normali
riuti domestici. Preghiamo di informarvi sulle
regolamentazioni vigenti sullo smaltimento delle
batterie. Grazie al corretto smaltimento dei vecchi
dispositivi si tutela l’ambiente e la salute delle persone
da conseguenze negative.
DICHIARAZIONE DI CONFORMITÀ
Produttore:
Chal-Tec GmbH, Wallstraße 16, 10179 Berlino,
Germania.
info@electronic-star.de
Importatore per la Gran Bretagna:
Berlin Brands Group UK Limited
PO Box 42
272 Kensington High Street
London, W8 6ND
United Kingdom
Il fabbricante, Chal-Tec GmbH, dichiara che il tipo di
apparecchiatura radio SHD è conforme alla direttiva
2014/53/UE. Il testo completo della dichiarazione
di conformità UE è disponibile al seguente indirizzo
Internet: use.berlin/10046653

51
ES
Estimado cliente:
Le felicitamos por la adquisición de este producto. Lea
atentamente el siguiente manual y siga cuidadosamente
las instrucciones de uso con el n de evitar posibles
daños. La empresa no se responsabiliza de los daños
ocasionados por un uso indebido del producto o por
haber desatendido las indicaciones de seguridad.
Escanee el código QR para acceder al manual de usuario
más reciente y a más información sobre el producto.
ÍNDICE
Descripción del artículo 52
Lugares de instalación recomendados 52
Lugares de instalación que deben evitarse 54
Activación 54
Instalación 54
Prueba de funcionamiento y modos 56
Control del dispositivo por smartphone 57
En caso de incendio 60
Mantenimiento 60
Detección y reparación de anomalías 61
Retirada del aparato 62
Declaración de conformidad 62
DATOS TÉCNICOS
Número de artículo 10046653, 10046654, 10046655,
10046656, 10046657, 10046658
Alimentación
CC 3 V⎓( 2×1,5 V⎓pilas LR6 (AA))
Volumen de alarma > 85 dB (A) a 3 metros de distancia
Sensibilidad de la alarma 0.10-0,16 dB/m
Certicado conforme a DIN EN14604:2005 / AC: 2008
ID del certicado 1116-CPR-192
Patrón sonoro ISO 8201

52
ES
DESCRIPCIÓN DEL ARTÍCULO
Este dispositivo es un detector de humo fotoeléctrico. Es especialmente
sensible a micropartículas como las que se producen en el humo de un fuego
latente. Un ejemplo de este tipo de fuego latente es un cigarrillo encendido en
un sofá o en la ropa de cama, causa habitual de incendios devastadores. Tenga
en cuenta que este dispositivo no detecta llamas, calor, monóxido de carbono
ni otros gases peligrosos.
LUGARES DE INSTALACIÓN RECOMENDADOS
Los detectores de humo son obligatorios en los dormitorios y las habitaciones
infantiles, así como en los pasillos que sirven de vías de evacuación. También
recomendamos equipar la sala de estar.
1. Este detector de humo es adecuado para su instalación en el pasillo, el
dormitorio, el salón y el comedor, así como en sótanos secos y garajes.
2. Instale al menos un detector de humo en el pasillo de cada planta.
3. El humo, el calor y los objetos en llamas se propagan horizontalmente
tras elevarse hasta el techo. Por lo tanto, instale la alarma en el centro del
techo.
4. Si por cualquier motivo el aparato no puede instalarse en el centro del
techo, la distancia a la que se coloca el aparato de la esquina de la pared
debe ser de al menos 30 cm (véase la gura 1).
5. Si la longitud de la habitación es superior a 10 m, deberá instalar varias
unidades.
6. Si el techo está inclinado, la alarma debe instalarse como mínimo a 50 cm
del punto más alto del techo de la habitación (véase la gura 2).

53
ES
1
2
Mejor instalar AQUÍ
Instalar en algún
lugar de esta
zona
No instalar en
esta zona
No
instalar
en esta
zona
Nunca instale AQUÍ
Techo

54
ES
LUGARES DE INSTALACIÓN QUE DEBEN
EVITARSE
1. Cerca de equipos y/o zonas donde se produzcan regularmente humos/
vapores (cocinas, salas de chimeneas, salas de calderas y lugares similares).
Utilice detectores de humo especiales para estas zonas.
2. Zonas de alta humedad, como cuartos de baño o lavanderías. A una
distancia mínima de 3 m de estas zonas.
3. Cerca de respiraderos y rejillas de calefacción y refrigeración. A una
distancia mínima de 1 m de estas zonas. El aire podría alejar el humo del
detector de humo y detener una alarma o incluso provocar una falsa
alarma.
4. En locales donde la temperatura pueda descender por debajo de 0 °C o
subir por encima de 40 °C.
5. En zonas polvorientas o sucias, las partículas interferirán en el
funcionamiento del detector de humo. Podría activarse una falsa alarma.
6. La instalación (atornillado) sobre yeso que contenga amianto sólo podrá
realizarse mediante procesos con bajas emisiones
ACTIVACIÓN
Pulse el botón de prueba y manténgalo pulsado durante más de 3 segundos
hasta que se encienda el LED, y suéltelo antes de 2 segundos, la unidad
generará un "bip" que indica que está activada y pasa a estado de trabajo.
INSTALACIÓN
Nota: El soporte o dispositivo no se cerrará si la batería no está
correctamente instalada. Se trata de un requisito legal y es por su
seguridad.
1. Retire el soporte del cuerpo de la alarma.
2. Sujete el soporte en la posición de instalación y marque los oricios de
instalación del soporte con un lápiz.
3. Taladre dos agujeros para los tacos.
4. Fije el soporte a los tacos y apriete los tornillos (véase el esquema de
instalación).
5. Coloque la alarma en el soporte y gire el cuerpo de la alarma en el sentido
de las agujas del reloj hasta que encaje en el soporte.
6. Pulse el botón de prueba durante al menos 5 segundos para probar el
dispositivo. La alarma sonará: 3 pitidos - 1,5 segundos de pausa. Si no
se oye ningún sonido, esto indica que la alarma está defectuosa. Puede
encontrar una solución en este manual, en el apartado "Solución de
problemas".
7. Si tiene más preguntas sobre la instalación, póngase en contacto con su
distribuidor.

55
ES
Nota: Para evitar lesiones, esta unidad debe jarse rmemente al techo de
acuerdo con las instrucciones de instalación.
Techo
Taco de
plástico
Tornillos
Girar para
apretar
Girar para
aojar y
retirar
Agujeros
Soporte

56
ES
PRUEBA DE FUNCIONAMIENTO Y MODOS
Dispositivo de prueba
Prueba tu dispositivo manteniendo pulsado el botón de prueba durante
min. 5 seg. Esto hará sonar una alarma si el circuito electrónico, la sirena y la
batería funcionan. Si no suena ninguna alarma, es posible que la unidad o las
pilas estén defectuosas. NO utilice una llama abierta para probar la alarma,
ya que podría dañar la unidad. Le recomendamos que pruebe la unidad
semanalmente.
En modo de espera
El LED rojo del panel frontal debe parpadear cada 48 segundos para indicar
que la alarma está activa.
Modo Alarma
En cuanto la unidad detecte partículas de humo, sonará la sirena y el LED
rojo parpadeará un destello por segundo. El LED parpadeante y la alarma
permanecerán hasta que el aire esté libre de partículas de humo. La unidad
volverá al modo de espera.
Modo de aviso de batería
Si su detector de humo entra en una condición de batería baja, la unidad
emitirá un chirrido audible cada 48 segundos. En este caso, debe sustituir la
batería inmediatamente. Si no sustituye la pila, es posible que su detector de
humo no tenga potencia suciente para avisarle en una situación de incendio
real.
Modo error
El tono de alarma o un chirrido suenan cada 48 segundos sin motivo aparente
(véase "Solución de problemas").
57
ES
CONTROL DEL DISPOSITIVO POR
SMARTPHONE
Si conecta el aparato a su red WLAN doméstica, podrá controlarlo
cómodamente mediante la App correspondiente de Blumfeldt. La App le
permite no solo controlar el aparato mediante su smartphone, sino que
también le ofrece acceso a recetas y otra información adicional.
Proceda del siguiente modo para conectar su smartphone al dispositivo
Blumfeldt.
1 Descargue primero la App de Blumfeldt escaneando el código QR con su
smartphone (véase más abajo) o descárguelo directamente de la App Store
o de Google Play.
2 Asegúrese de que su smartphone esté conectado a la misma red WiFi a la
que debe conectarse su dispositivo Blumfeldt.
3 Abra la App de Blumfeldt.
4 Inicie sesión con su cuenta. Si aún no tiene una cuenta, regístrese en la
aplicación Blumfeldt.
5 Siga las instrucciones que aparecerán en la app.
Descarga la aplicación
Utilice la función de escaneado de su teléfono para escanear el código QR y
guarde la app en su smartphone.
Nota: La aplicación proporciona más información sobre cómo usar la
aplicación y ayuda sobre cómo conectarse al dispositivo tan pronto como se
abre por primera vez.
iOS Android

58
ES
Solución de problemas de conexión
Si su dispositivo Blumfeldt no se puede encontra en la WLAN, verique lo
siguiente:
1. El aparato no está enchufado. Asegúrese de que su dispositivo esté
conectado a un enchufe.
2. El aparato no se encuentra en modo sincronización. Asegúrese de que el
indicador de WiFi (LED) parpadea en el panel de control del dispositivo
inteligente, tal y como se describe en las instrucciones „Restablecer la
conguración de WiFi“ de su dispositivo inteligente (las instrucciones en
general se encuentran en el apartado „Conexión del dispositivo“).
3. El punto de acceso WiFi no funciona en 2,4 GHz. Asegúrese de que su
punto de acceso funcione en la banda de 2,4 GHz y que tenga su propio
SSID en la banda de 2,4 GHz. Si no está seguro de la banda operativa de su
punto de acceso, comuníquese con su proveedor de Internet.
Importante: tenga en cuenta que si su enrutador WiFi tiene una banda dual, es
decir, si funciona tanto en la banda de 2,4 GHz como en la de 5 GHz, separe los
SSID para cada banda y use el SSID de 2,4 GHz para conectarse.
4. Supervise los ajustes Firewall de su red WiFi. Es posible que la
conguración del Firewall de su red WiFi no permita que la aplicación
Blumfeldt congure los ajustes de WiFi en su dispositivo inteligente.
Asegúrese de que no está usando ninguna red WiFi pública, como por
ejemplo de aeropuertos, otros hogares, empresas, etc.
5. Los diferentes datos de inicio de sesión en el teléfono inteligente y en
la aplicación le aseguran de que los datos de inicio de sesión WiFi de la
aplicación de Blumfeldt coincidan con los que está conectado su teléfono
inteligente.
Si ha seguido todos los pasos anteriores y su teléfono inteligente aún no puede
conectarse a la aplicación, envíenos un correo electrónico para obtener ayuda:

59
ES
Desconexión de la alarma
Durante la alarma, pulse el botón de prueba para pausar la alarma durante
aproximadamente 8 minutos. El LED rojo parpadeará una vez cada 8 segundos,
indicando que la alarma de humo está entrando en el modo de apagado de
alarma.
Si su detector de humo emite la señal de alarma completa y usted no
prueba, la alarma de humos le está avisando de una situación potencialmente
peligrosa que requiere su atención inmediata.
No utilice la desconexión de la alarma hasta que haya comprobado que no
hay una situación de incendio en ese momento. No bloquee las rejillas de
ventilación de la alarma ni apague la alarma de humos, ya que anularía su
protección.
A veces, los detectores de humo responden a los humos de la cocina o a otras
situaciones que no son de emergencia. En caso de falsa alarma conocida, su
detector de humo puede silenciarse temporalmente pulsando el botón de
prueba. En 8 minutos, su alarma volverá automáticamente a la sensibilidad
máxima.
Notas importantes
• Pulse y suelte el botón de silencio, el sonido de la alarma se detendrá.
• La alarma se silenciará y entrará en un ciclo de restablecimiento de
sensibilidad reducida durante aproximadamente 8 minutos.
• Durante el ciclo de restablecimiento de la sensibilidad reducida, el LED
rojo parpadeará una vez cada 8 segundos.
• Una vez completado el ciclo de restablecimiento, su alarma volverá
automáticamente a la sensibilidad máxima y el LED rojo volverá a
parpadear cada 48 segundos.
PELIGRO
Nunca ignore una alarma, ya que puede provocar lesiones o la
muerte. Si su detector de humo se dispara y hace sonar una
alarma y no está completamente seguro de la procedencia del
humo, saque a todo el mundo de la casa inmediatamente.

60
ES
EN CASO DE INCENDIO
1. Mantenga la calma y actúe con rapidez
2. Ayude a los niños y a otras personas vulnerables de su hogar a escapar de
la zona de peligro.
3. Póngase a salvo INMEDIATAMENTE. Los segundos cuentan, no pierdas
tiempo vistiéndote o cogiendo objetos de valor.
4. No abra ninguna puerta interior al salir sin comprobar antes la supercie.
Si está caliente o si sale humo por el hueco, ¡no abras esa puerta! Utilice
una salida alternativa en su lugar. Si el interior de la puerta está frío, apoye
el hombro en ella, ábrala ligeramente y ciérrela de golpe cuando entre
calor y/o humo.
5. Si hay humo en el aire, permanezca cerca del suelo. Respire
supercialmente y preferiblemente a través de un paño (húmedo si es
posible).
6. Salga de la zona de peligro y asegúrese de que todo el mundo está allí. No
llame a los bomberos desde la zona de peligro
7. No entre en las habitaciones sin autorización de los bomberos.
MANTENIMIENTO
• Limpie la alarma al menos una vez al mes para eliminar el polvo, la suciedad
y los residuos. Lo mejor es utilizar un aspirador con un cepillo suave,
aspirar todos los lados y las cubiertas del detector de humo.
• Este detector de humo dispone de un monitor de batería en el que
la alarma sonará aproximadamente cada 48 segundos y el LED rojo
parpadeará simultáneamente durante al menos 30 días cuando la batería
se agote. Si la batería está defectuosa o se producen otros errores,
consulte la sección "Solución de problemas" para encontrar una posible
solución.
• Si se siguen produciendo errores durante el periodo de garantía, póngase
en contacto con su distribuidor.
Nota: No intente retirar la tapa para limpiar el interior. Hacerlo afectará a
la garantía.
Precauciones
• Para garantizar su máxima seguridad, instale todos los detectores de humo
exactamente como se describe en este manual.
• Mantenga limpios los detectores de humo. No permita que se acumule
polvo y suciedad en la unidad y compruebe una vez a la semana su correcto
funcionamiento.
• Sustituya inmediatamente los detectores de humo si no funcionan
correctamente.

61
ES
DETECCIÓN Y REPARACIÓN DE ANOMALÍAS
El detector de humo no emite ningún
sonido durante la prueba.
Pulse el botón de prueba durante al
menos 5 segundos
Retire el detector de humo del
soporte. Compruebe que la batería
está conectada correctamente.
Limpie el detector de humo.
Si el fallo persiste, póngase en
contacto con su distribuidor durante
el periodo de garantía o sustituya el
detector si la garantía ha expirado.
La señal de alarma se produce cada
48 segundos, al mismo tiempo que el
LED rojo parpadea una vez.
La batería está casi vacía. Sustituya
la batería.
La señal de alarma se produce cada
48 segundos y la alarma cambia al
modo de error.
Limpie el detector de humo.
Si el error persiste, póngase en
contacto con su distribuidor durante
el periodo de garantía o sustituya el
detector si la garantía ha expirado.
La alarma de humos emite sonidos
no deseados, alarma de forma
intermitente o cuando los ocupantes
están cocinando, duchándose, etc.
Pulse el botón de prueba para
detener la alarma.
Limpie la alarma de humos (consulte
el capítulo MANTENIMIENTO).
Mueva la alarma de humos a una
nueva ubicación y pulse el botón de
prueba.
La alarma suena de forma diferente
a la habitual. Arranca y se para.
Limpie la alarma de humos (consulte
el capítulo MANTENIMIENTO).
Contacte con el fabricante.
Si la garantía del dispositivo ha
expirado, sustitúyalo por uno nuevo.
62
ES
RETIRADA DEL APARATO
Si en su país existe una disposición legal relativa a la
eliminación de aparatos eléctricos y electrónicos, este
símbolo estampado en el producto o en el embalaje
advierte que no debe eliminarse como residuo
doméstico. En lugar de ello, debe depositarse en un
punto de recogida de reciclaje de aparatos eléctricos y
electrónicos. Una gestión adecuada de estos residuos
previene consecuencias potencialmente negativas
para el medio ambiente y la salud de las personas.
Puede consultar más información sobre el reciclaje y
la eliminación de este producto contactando con su
administración local o con su servicio de recogida de
residuos.
Este producto contiene baterías. Si en su país existe
una disposición legal relativa a la eliminación de
baterías, estas no deben eliminarse como residuo
doméstico. Infórmese sobre la normativa vigente
relacionada con la eliminación de baterías. Una gestión
adecuada de estos residuos previene consecuencias
potencialmente negativas para el medio ambiente y la
salud de las personas.
DECLARACIÓN DE CONFORMIDAD
Fabricante:
Chal-Tec GmbH, Wallstraße 16, 10179 Berlín,
Alemania.
info@electronic-star.de
Importador para Gran Bretaña:
Berlin Brands Group UK Limited
PO Box 42
272 Kensington High Street
London, W8 6ND
United Kingdom
Por la presente, Chal-Tec GmbH declara que el tipo de
equipo radioeléctrico SHD es conforme con la Directiva
2014/53/UE. El texto completo de la declaración UE de
conformidad está disponible en la dirección Internet
siguiente: use.berlin/10046653