Air conditioner
Installation manual
PC4NUDMAN / PC4NUNMAN / PC4NBDMAN / PC4NBNMAN
• Thank you for purchasing this Samsung air conditioner.
• Before operating this unit, please read this manual carefully and retain it for future
reference.
DB68-05903A-03_IM_SYS Universal 360 Panel_EU_EN_.indb 1DB68-05903A-03_IM_SYS Universal 360 Panel_EU_EN_.indb 1 2023-09-27 오전 9:02:512023-09-27 오전 9:02:51
2 English
Installation
360 cassette panels
Type A: Square panel Type B: Circular panel
Accessories
Item M4 screw Installation manual
Quantity 4 1
Shape
CAUTION
• After installing the product, be sure to explain to the
user how to use the air conditioner.
NOTE
• Tightening torque for the M4 screw:
1.2 to 1.8 N·m (
※
1N·m = 10 kgf·cm)
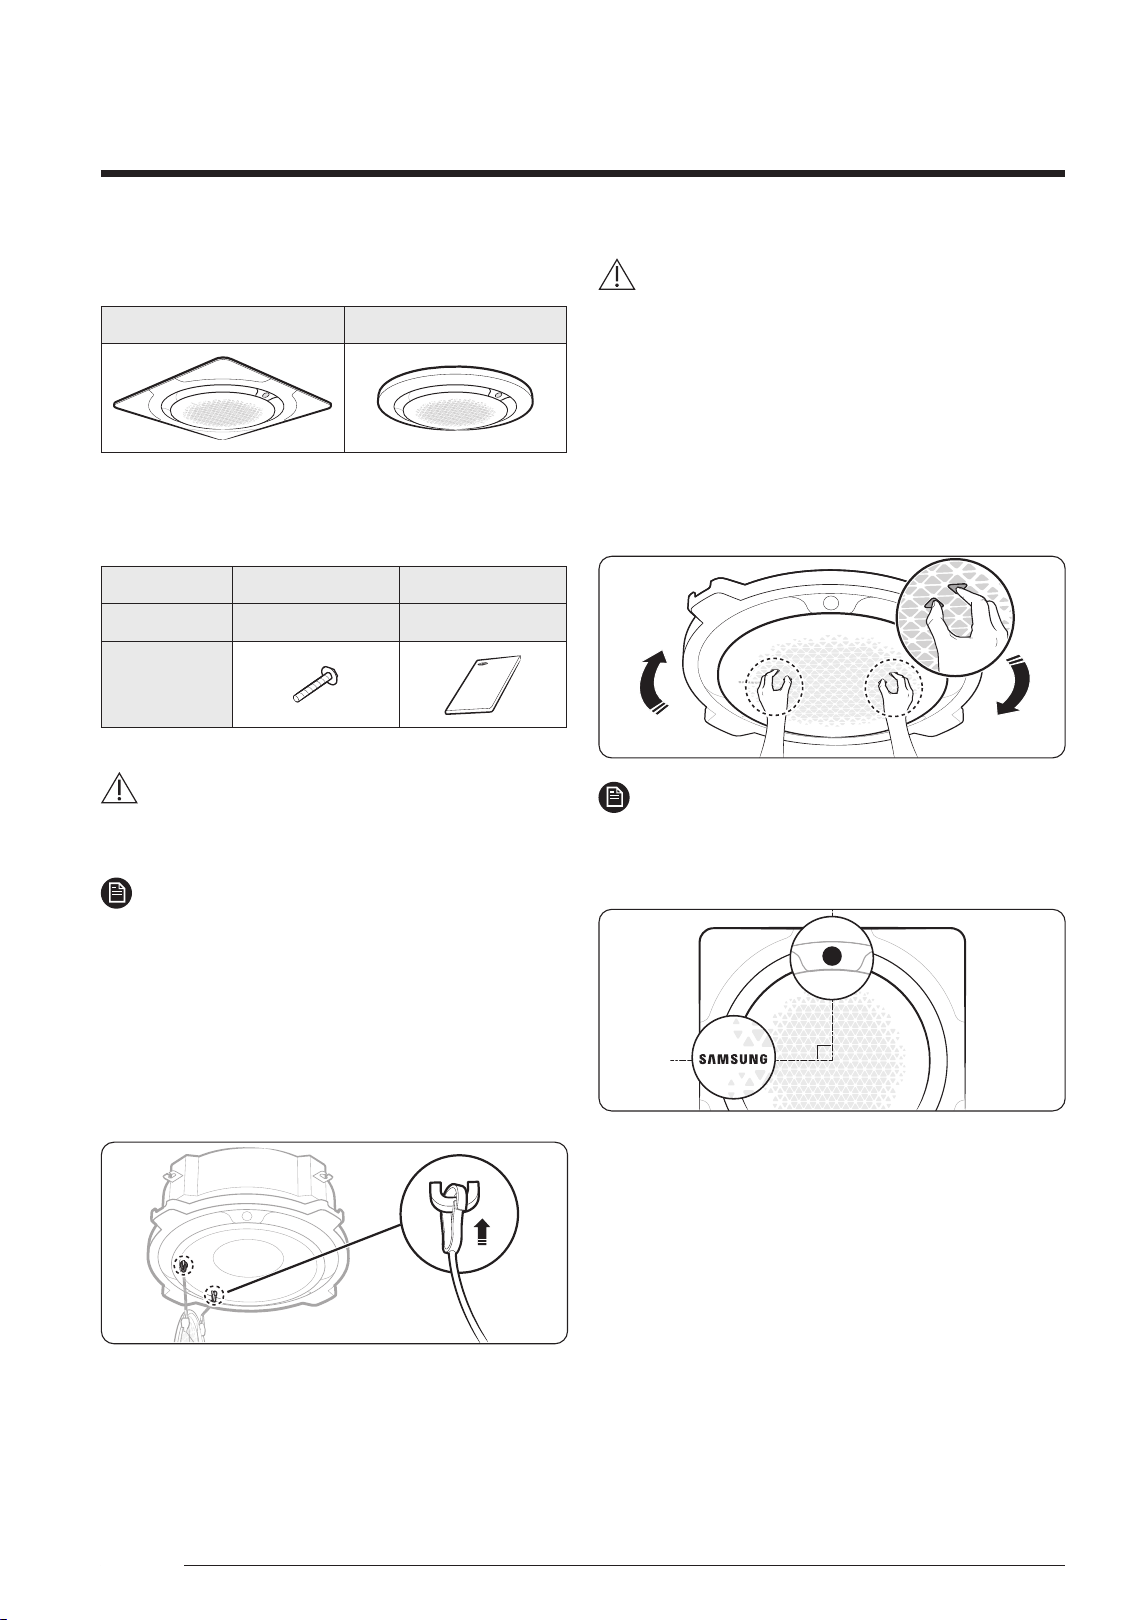
Installing the grille inlet for the
ceiling type and open type
1 Hook the two hook wires of the grille inlet onto the
two wire hooks on the indoor unit body.
CAUTION
• When servicing the product or replacing parts such as
motors and gears, be sure to remove the front grille
first. Failing to do so may cause the hook wires to
unhook and the front grille to drop on the floor.
• Be sure to check the letters for the wire hooks printed
on the indoor unit body and hook the hook wires
onto the specified positions.
2 Rotate the grille inlet clockwise until it is assembled
firmly in place.
NOTE
• When the grille inlet is installed correctly, the indoor
unit display is placed perpendicular to the Samsung
logo printed on the grille inlet.
English
DB68-05903A-03_IM_SYS Universal 360 Panel_EU_EN_.indb 2DB68-05903A-03_IM_SYS Universal 360 Panel_EU_EN_.indb 2 2023-09-27 오전 9:02:512023-09-27 오전 9:02:51
3English
English
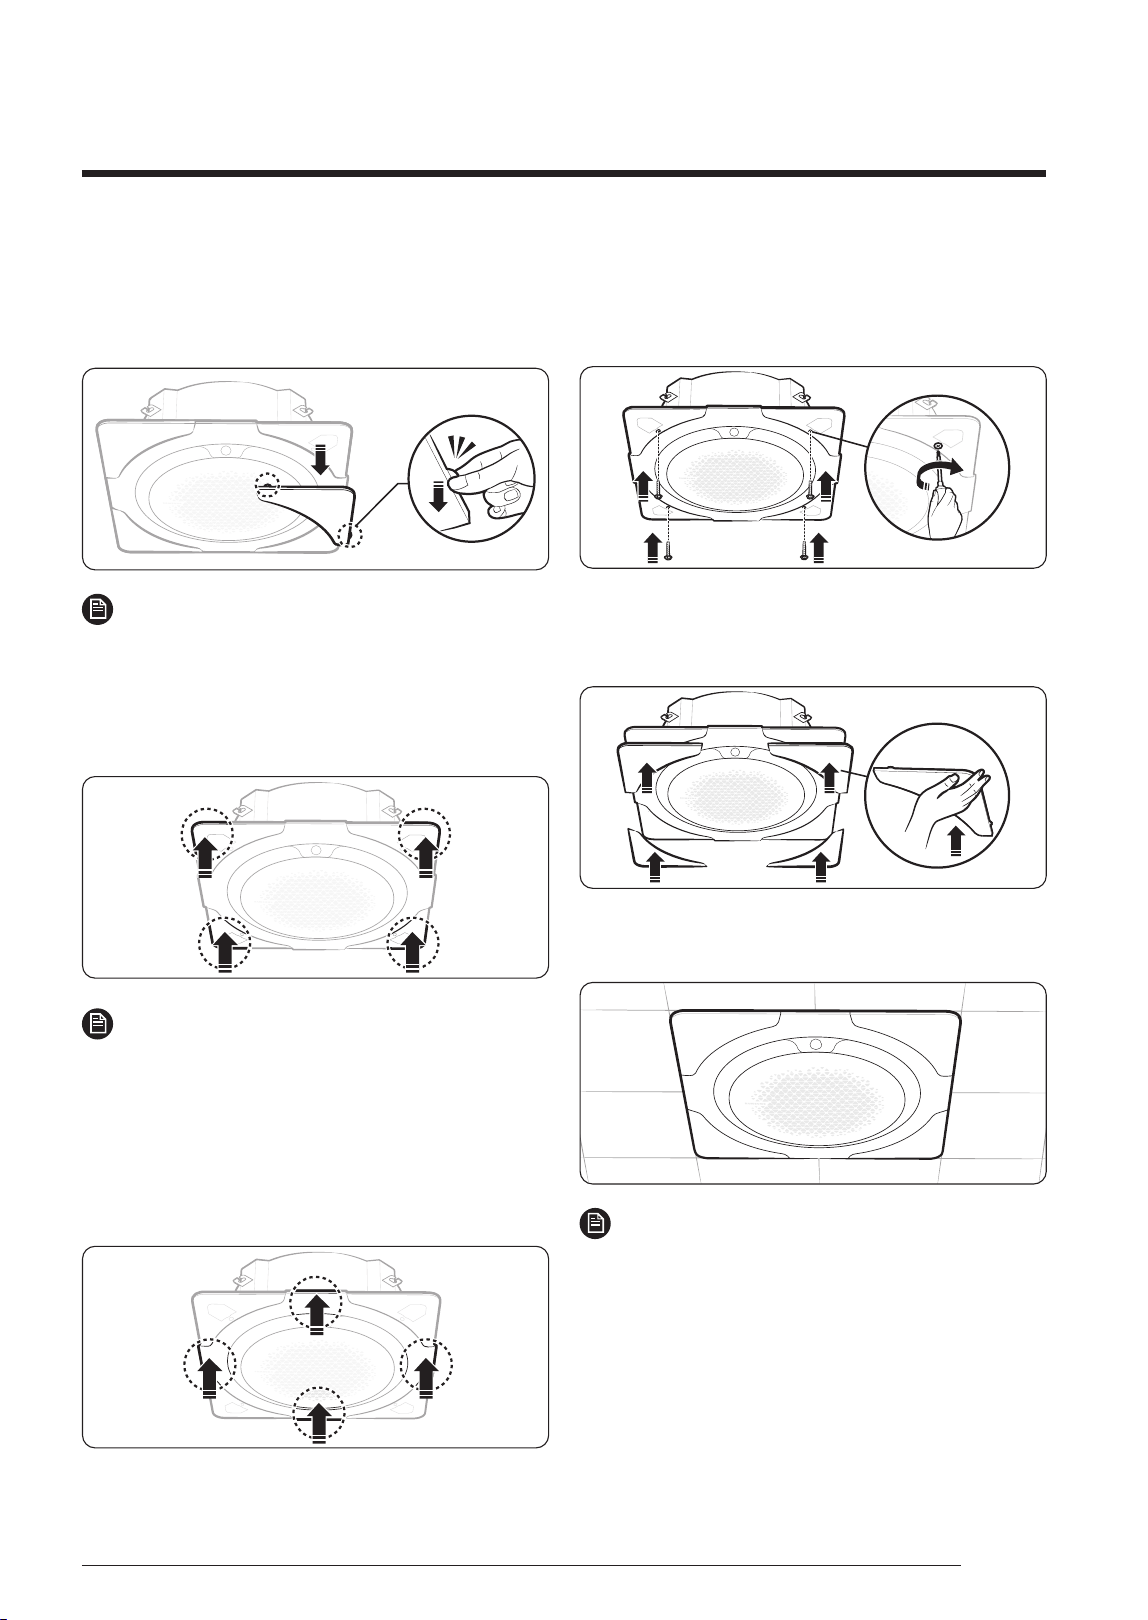
Installing the panel front for the
ceiling type
1 Remove the four cover panels from the panel front.
NOTE
• To remove the cover panels, use the two tongues at
the ends of each cover panel.
2 Push the four corners of the panel front toward the
indoor unit body one at a time until you hear “click”
so that they are assembled in place.
NOTE
• After assembling the panel front in place, you can
slightly adjust its position left and right. If required,
adjust the position of the panel front so that it aligns
with the ceiling opening.
3 Push the centres of the four sides of the panel front
toward the indoor unit body one at a time until you
hear “click” so that they are hooked in place.
4 Insert halfway the four screws into the four holes on
the panel front. Then fasten the screws tightly until
there is no gap between the ceiling and the panel
front.
5 Place each cover panel on a corner of the panel front.
Then push the cover panel upward until it is firmly
assembled to the panel front.
6 Check whether the panel front is firmly fixed to the
indoor unit body.
NOTE
• Make sure that the screws are fastened tightly until
there is no gap between the ceiling and the panel.
• If the panel is installed incorrectly, air may leak out.
DB68-05903A-03_IM_SYS Universal 360 Panel_EU_EN_.indb 3DB68-05903A-03_IM_SYS Universal 360 Panel_EU_EN_.indb 3 2023-09-27 오전 9:02:532023-09-27 오전 9:02:53
4 English
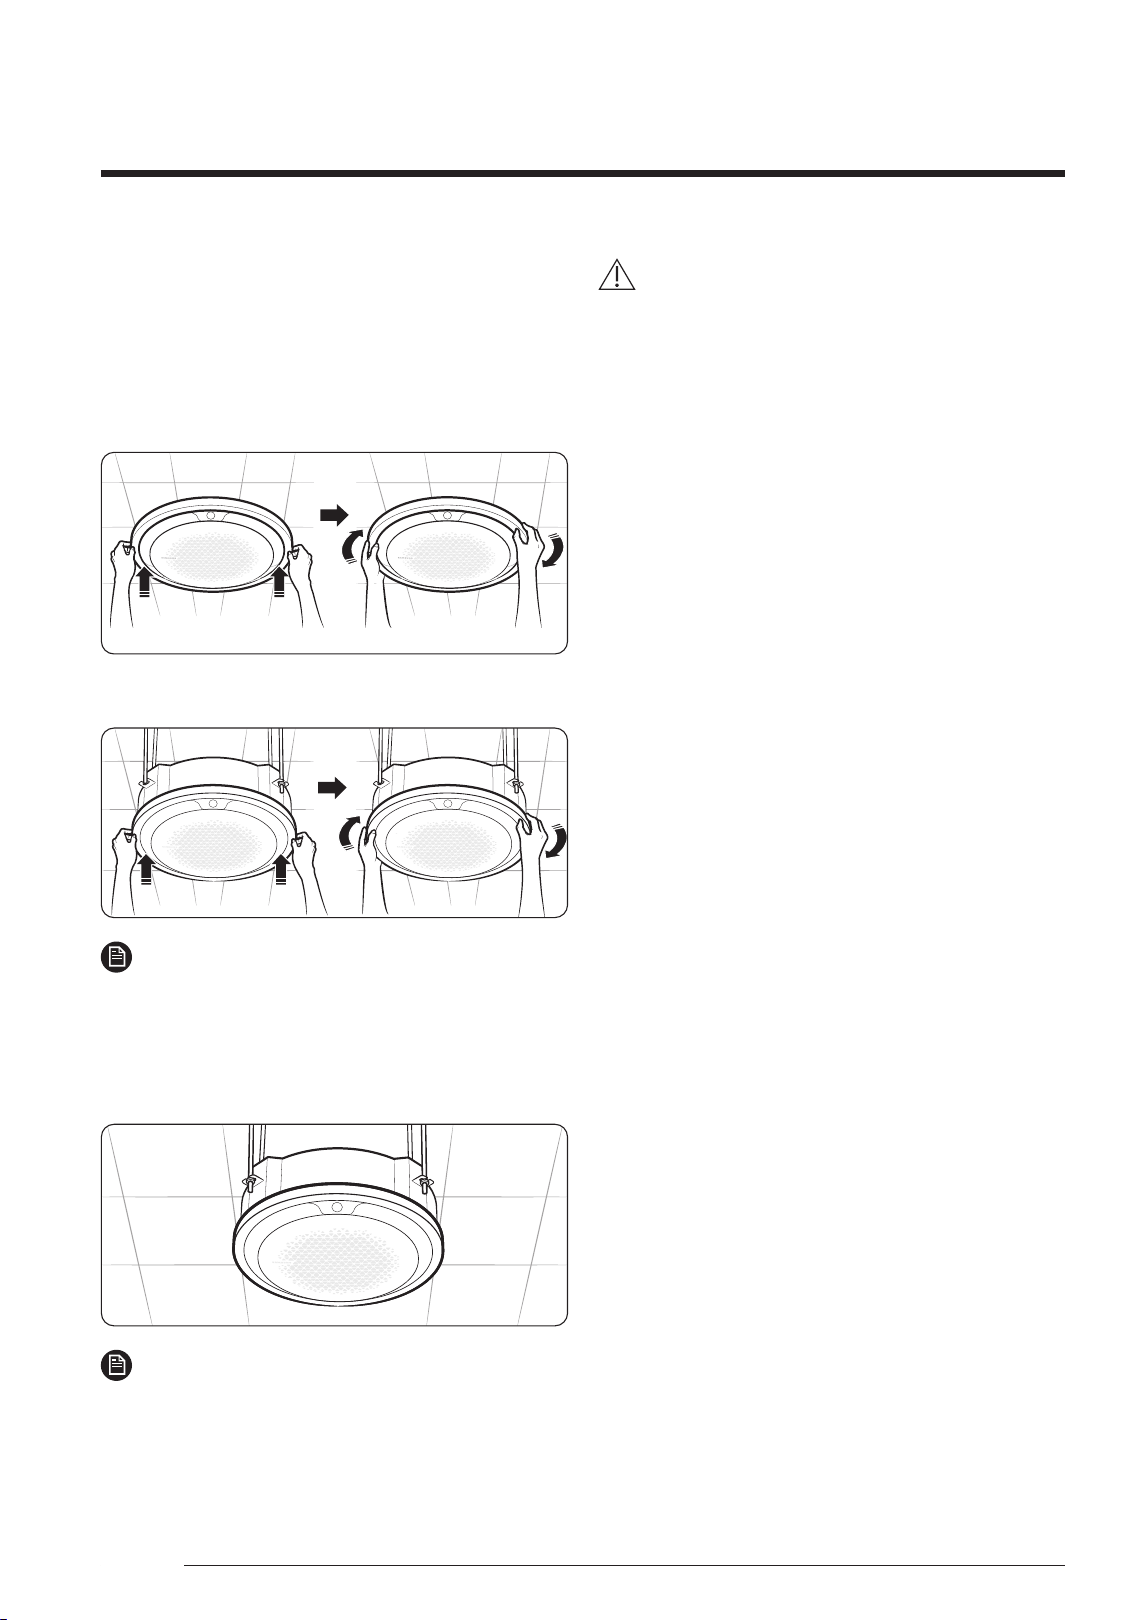
Installing the circular panel on the
indoor unit
1 Insert the decoration panel the indoor unit body.
Then rotate the decoration panel clockwise until it is
assembled firmly.
• Ceiling type
• Open type
NOTE
• Make sure that the panel is assembled firmly: rotate
the decoration panel until you feel that it is clamped
by the internal structure.
2 Check whether the decoration panel firmly fixed to
the indoor unit body.
NOTE
• Make sure that the decoration panel is installed
correctly so that there is no gap between the ceiling
and the panel.
• If the panel is installed incorrectly, air may leak out.
CAUTION
• Make sure to only apply paints and
varnishes for resins (ABS, HIPS) or paint
thinners.
If you apply lacquers for general use on
the panel, it may lead to discoloration or
erosion on the surface of the panel.
Installation
DB68-05903A-03_IM_SYS Universal 360 Panel_EU_EN_.indb 4DB68-05903A-03_IM_SYS Universal 360 Panel_EU_EN_.indb 4 2023-09-27 오전 9:02:542023-09-27 오전 9:02:54

5English
Memo
English
DB68-05903A-03_IM_SYS Universal 360 Panel_EU_EN_.indb 5DB68-05903A-03_IM_SYS Universal 360 Panel_EU_EN_.indb 5 2023-09-27 오전 9:02:542023-09-27 오전 9:02:54
This product is India RoHS compliant
Correct Disposal of This Product
(Waste Electrical & Electronic Equipment)
(Applicable in countries with separate collection systems)
This marking on the product, accessories or literature indicates that the product and its electronic accessories (e.g. charger,
headset, USB cable) should not be disposed of with other household waste at the end of their working life. To prevent
possible harm to the environment or human health from uncontrolled waste disposal, please separate these items from
other types of waste and recycle them responsibly to promote the sustainable reuse of material resources.
Household users should contact either the retailer where they purchased this product, or their local government office, for
details of where and how they can take these items for environmentally safe recycling.
Business users should contact their supplier and check the terms and conditions of the purchase contract. This product and
its electronic accessories should not be mixed with other commercial wastes for disposal.
(For India only)
For more information on safe disposal and recycling, visit our website www.samsung.com/in/support or contact our Helpline
numbers - 1800 40 SAMSUNG (1800 40 7267864)
1800 5 SAMSUNG (1800 5 7267864).
DB68-05903A-03_IM_SYS Universal 360 Panel_EU_EN_.indb 6DB68-05903A-03_IM_SYS Universal 360 Panel_EU_EN_.indb 6 2023-09-27 오전 9:02:542023-09-27 오전 9:02:54