USER GUIDE
DOUBLE-UP YOUR WARRANTY!
SCAN* TO REGISTER YOUR EXTRA 1 YEAR WARRANTY
* HOW? IT’S SIMPLE REALLY…
• SWITCH ON YOUR MOBILE CAMERA, POINT IT AT THE
QR CODE ON THE LEFT & TAP THE LINK THAT POPS UP
• IF THAT DOESN’T WORK, YOU’LL NEED TO DOWNLOAD & USE A QR CODE
SCANNER APP FROM YOUR PHONE’S APP STORE
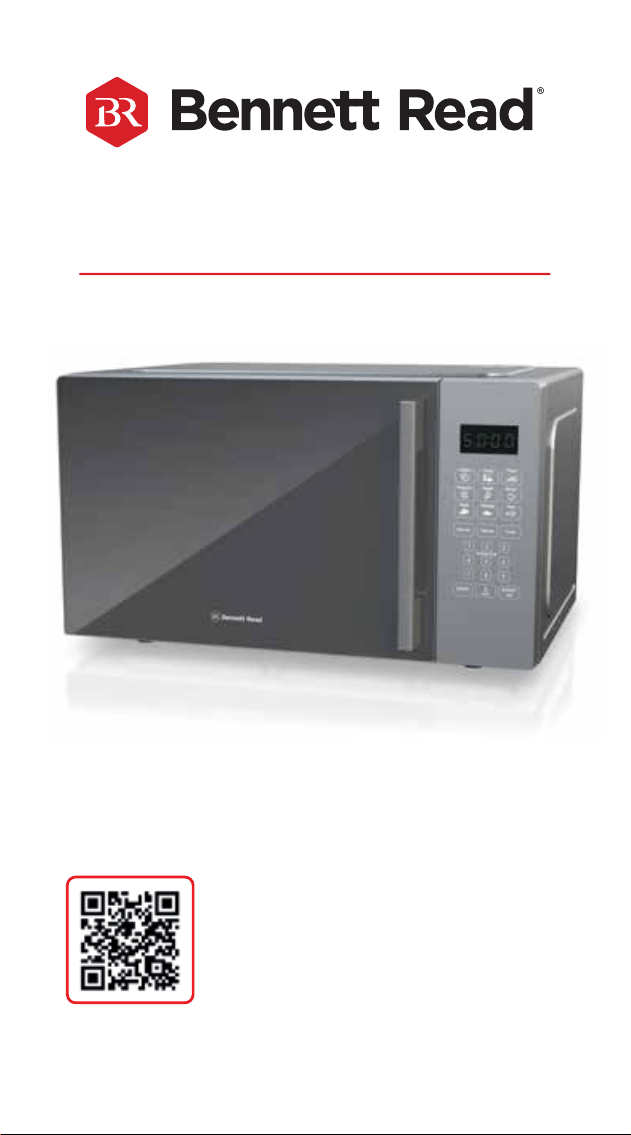
30L DIGITAL MICROWAVE
FAMILY-SIZED CAPACITY WITH DIGITAL, ONE-TOUCH EASE


CONGRATULATIONS ON PURCHASING A
BENNETT READ
®
30L DIGITAL MICROWAVE.
EXTENDED WARRANTY
Your BENNETT READ
®
30L DIGITAL MICROWAVE comes with a 1 (one) year
warranty. If you register your warranty online within 14 (fourteen) days of purchase,
we will extend the warranty to 2 (two) years. To activate your extended warranty,
scan the QR code on the cover of this user guide, then tap on the link and complete
the online form. Alternatively, visit www.bennettread.co.za, click the “Register
Warranty” tab at the top of the page, then complete the form provided. We also
stand behind it with a knowledgeable, dedicated Customer Care department, so
should you ever have a problem, you'll receive fast, considerate assistance (see
contact details at the end of the warranty section on page 15).
Please read this user guide carefully before using your BENNETT READ
®
30L DIGITAL MICROWAVE.
Keep this user guide for future reference.
SAFETY PRECAUTIONS
When using any electrical appliance, basic safety precautions should always be
followed including the following:
• Read the instruction manual carefully before use and save it for
future reference.
• Always ensure that the voltage on the rating label corresponds to the mains
voltage in your home.
• Incorrect operation and improper use can damage the appliance and cause
injury to the user.
• The appliance is intended for household use only and is not user-serviceable.
Commercial use voids the warranty and the supplier cannot be held responsible
for injury or damage caused when using the appliance for any other purpose
than that intended.
• Do not block any air vents.
• Keep the appliance safely out of reach of children below 8 years old. Close
supervision is required when any appliance is used near children.
• This appliance can be used by children aged from 8 years and above; and
persons with reduced physical, sensory or mental capabilities or lack of
experience and knowledge, if they have been given supervision and instruction
concerning use of the appliance in a safe way and understand the hazards
involved.
• Children should not play with the appliance.
• Cleaning and maintenance should not be done by children.
• Before using the appliance, be sure to untie the power cord wrapped around the
1
back to avoid any potential electrical hazard.
• Check the power cord and plug regularly for any damage. If the cord or the plug
is damaged, it must be replaced by the manufacturer or a qualied person in
order to avoid an electrical hazard.
• Do not operate the appliance if the door, or door seals are damaged. If either the
door, or door seals are damaged, they must be repaired/replaced by the
manufacturer or a qualied person in order to avoid any hazards.
• Do not use the appliance if it has been dropped or damaged in any way. In case
of damage, take the unit in for examination and/or repair to an authorised
Service Centre.
• To reduce the risk of electrical shock, do not immerse the element assembly,
control panel, microwave, plug, or power cord into water, or any other liquid.
• Do not let the cord hang over the edge of a table or counter. Ensure that the cord
is not in a position where it can be pulled on inadvertently.
• Do not allow the cord to touch hot surfaces, and do not place on or near a hot
gas or electric burner.
• Do not damage, bend, stretch, or twist the power cord; do not place heavy
objects on the power cord, or clamp the power cord.
• Never pull on the cord to disconnect the appliance from the wall outlet; instead,
grasp the plug and pull on the plug. Always unplug the unit when not in use,
before cleaning, or when adding or removing parts.
• Do not let children handle the electrical cord or any part of the appliance.
• Do not carry the appliance by the power cord.
• Use of an extension cord with this appliance is not recommended. However, if it
is necessary to use an extension cord, ensure that the cord is suited to the power
consumption of the appliance to avoid overheating of the extension cord,
appliance or plug point. Do not place the extension cord in a position where it
can be pulled on by children or animals, or tripped over.
• Do not use outdoors or in a damp area. Do not use this appliance for anything
other than its intended use.
• Do not use the appliance on a gas or electric cooking top, or over or near an
open ame.
• This appliance is intended for free-standing use only. Do not use inside
cupboards.
• This appliance must not be installed higher than 899mm above the oor. The
minimum height of free space necessary above the top surface of the microwave
must be at least 100mm.
• A re may occur if the appliance is covered or touches ammable material,
including curtains, draperies, walls, and the like, when in operation.
• Do not place glass or plastic dishes on top of the unit. Do not place or store any
item on top of the appliance.
• Always operate the appliance on a smooth, even, stable surface. Do not place
the unit on a hot surface.
• Do not place the appliance close to the edge of the countertop.
• Do not operate this appliance by means of an external timer or separate remote
control system.
• This appliance must be operated with the door closed.
• Avoid any contact with moving parts.
• Do not operate the unit with damp or wet hands.
• Do not place glass items directly into cold water after use. Allow items to cool
down before placing into cold water in order to avoid cracking.
• PLEASE NOTE: This unit becomes hot while in use. Do not touch the glass window
or any metallic parts during or immediately after use.
• The use of accessory attachments that are not recommended or supplied by the
manufacturer may result in injuries, re or electric shock.
• Always use oven gloves when removing cooked food, cookware or accessories
from the appliance.
• Only use utensils that are suitable for use in microwave ovens.
• This appliance is intended for heating food and beverages only. Drying of food
or clothing; heating of warming pads, slippers, sponges, damp cloth and similar
may lead to risk of injury, or re.
• Care should be taken not to displace the turntable whilst removing containers
from the microwave.
• Do not place oversized food in the microwave. This could damage the unit, and
the food will not cook properly.
• Do not place the following items in the microwave: non-microwave proof glass,
ceramic plates, paper, cards, non heat-resistant plastic, cloth, metallic objects and
containers, or other ammable items.
• This appliance should only be used to cook or bake consumable food.
• Only use cookware and utensils that are suitable and designed for high
temperatures in the microwave.
• Liquids or other food must not be heated in sealed containers as they are liable to
explode.
• Heating of liquids can result in delayed eruptive boiling. Care must be taken
when handling the container.
• Eggs in their shell as well as whole hard-boiled eggs should not be heated in the
microwave. They may explode, even after the microwave heating has nished.
• Closely monitor the microwave when heating food in plastic containers, to avoid
the possibility of ignition.
• The contents of feeding bottles and baby food jars are to be stirred or shaken.
The temperature must be checked before consumption to avoid burns.
• Do not cover the turntable or any other part of the microwave with metal foil. This
will cause the microwave to overheat and will void the warranty.
• Exercise caution when opening the microwave door, or moving accessories
during use of the microwave.
• Do not leave this appliance unattended during use. Always unplug the unit when
not in use or before cleaning.
• Failure to maintain the oven in a clean condition could lead to the deterioration of
the surfaces. Surface deterioration could adversely affect the life of the appliance
and possibly result in a hazardous situation.
• Do not move the unit while in use.
• Do not remove the Waveguide Cover.
• Extreme caution must be used when moving an appliance containing hot liquids.
• Do not cover the unit or obstruct heat dissipation.
• Ensure that the “Child Lock” is on if left unattended around children (see page11).
• Never immerse the unit in water or any other liquid for cleaning purposes. Do not
clean with a steam cleaner.
• Do not clean with caustic cleaners, metal brushes, metal scouring pads, fuel or
abrasive powder.
• If smoke is observed, switch off and unplug the appliance. Keep the door closed
in order to stie any ames. If any microwaved food is causing the smoke,
remove it from the appliance when safe to do so. If the smoke was not caused by
any microwaved food, stop using the appliance immediately and take it to an
authorised Service Centre.
• Do not dispose of this unit with domestic trash. Consult your local municipality for
proper disposal procedure.
• It is hazardous for anyone other than an authorised service facility to carry out
any service or repair operation, which involves the removal of any cover which
gives protection against exposure to microwave energy.
• The manufacturer does not accept responsibility for any damage or injury caused
by improper or incorrect use, or for repairs carried out by unauthorised
personnel.
• In case of technical problems, switch off the machine and do not attempt to repair
it yourself. Return the appliance to an authorised Tevo Service Center for
examination, adjustment or repair. Always insist on the use of original spare
parts. Failure to comply with the above-mentioned precautions and instructions
could affect the safe operation of this machine and the standard Tevo Service
Center repair process.
• Group 2 Class B appliance.
• Group 2 ISM equipment: group 2 contains all ISM equipment in which
radio-frequency energy is intentionally generated and/or used in the form of
electromagnetic radiation for the treatment of material, and EDM and arc welding
equipment. Class B equipment is suitable for use in domestic establishments and
in establishments directly connected to a low voltage power supply network which
supplies buildings used for domestic purposes.
• Internal light source LED<60lm.

CONGRATULATIONS ON PURCHASING A
BENNETT READ
®
30L DIGITAL MICROWAVE.
EXTENDED WARRANTY
Your BENNETT READ
®
30L DIGITAL MICROWAVE comes with a 1 (one) year
warranty. If you register your warranty online within 14 (fourteen) days of purchase,
we will extend the warranty to 2 (two) years. To activate your extended warranty,
scan the QR code on the cover of this user guide, then tap on the link and complete
the online form. Alternatively, visit www.bennettread.co.za, click the “Register
Warranty” tab at the top of the page, then complete the form provided. We also
stand behind it with a knowledgeable, dedicated Customer Care department, so
should you ever have a problem, you'll receive fast, considerate assistance (see
contact details at the end of the warranty section on page 15).
Please read this user guide carefully before using your BENNETT READ
®
30L DIGITAL MICROWAVE.
Keep this user guide for future reference.
SAFETY PRECAUTIONS
When using any electrical appliance, basic safety precautions should always be
followed including the following:
• Read the instruction manual carefully before use and save it for
future reference.
• Always ensure that the voltage on the rating label corresponds to the mains
voltage in your home.
• Incorrect operation and improper use can damage the appliance and cause
injury to the user.
• The appliance is intended for household use only and is not user-serviceable.
Commercial use voids the warranty and the supplier cannot be held responsible
for injury or damage caused when using the appliance for any other purpose
than that intended.
• Do not block any air vents.
• Keep the appliance safely out of reach of children below 8 years old. Close
supervision is required when any appliance is used near children.
• This appliance can be used by children aged from 8 years and above; and
persons with reduced physical, sensory or mental capabilities or lack of
experience and knowledge, if they have been given supervision and instruction
concerning use of the appliance in a safe way and understand the hazards
involved.
• Children should not play with the appliance.
• Cleaning and maintenance should not be done by children.
• Before using the appliance, be sure to untie the power cord wrapped around the
2
back to avoid any potential electrical hazard.
• Check the power cord and plug regularly for any damage. If the cord or the plug
is damaged, it must be replaced by the manufacturer or a qualied person in
order to avoid an electrical hazard.
• Do not operate the appliance if the door, or door seals are damaged. If either the
door, or door seals are damaged, they must be repaired/replaced by the
manufacturer or a qualied person in order to avoid any hazards.
• Do not use the appliance if it has been dropped or damaged in any way. In case
of damage, take the unit in for examination and/or repair to an authorised
Service Centre.
• To reduce the risk of electrical shock, do not immerse the element assembly,
control panel, microwave, plug, or power cord into water, or any other liquid.
• Do not let the cord hang over the edge of a table or counter. Ensure that the cord
is not in a position where it can be pulled on inadvertently.
• Do not allow the cord to touch hot surfaces, and do not place on or near a hot
gas or electric burner.
• Do not damage, bend, stretch, or twist the power cord; do not place heavy
objects on the power cord, or clamp the power cord.
• Never pull on the cord to disconnect the appliance from the wall outlet; instead,
grasp the plug and pull on the plug. Always unplug the unit when not in use,
before cleaning, or when adding or removing parts.
• Do not let children handle the electrical cord or any part of the appliance.
• Do not carry the appliance by the power cord.
• Use of an extension cord with this appliance is not recommended. However, if it
is necessary to use an extension cord, ensure that the cord is suited to the power
consumption of the appliance to avoid overheating of the extension cord,
appliance or plug point. Do not place the extension cord in a position where it
can be pulled on by children or animals, or tripped over.
• Do not use outdoors or in a damp area. Do not use this appliance for anything
other than its intended use.
• Do not use the appliance on a gas or electric cooking top, or over or near an
open ame.
• This appliance is intended for free-standing use only. Do not use inside
cupboards.
• This appliance must not be installed higher than 899mm above the oor. The
minimum height of free space necessary above the top surface of the microwave
must be at least 100mm.
• A re may occur if the appliance is covered or touches ammable material,
including curtains, draperies, walls, and the like, when in operation.
• Do not place glass or plastic dishes on top of the unit. Do not place or store any
item on top of the appliance.
• Always operate the appliance on a smooth, even, stable surface. Do not place
the unit on a hot surface.
• Do not place the appliance close to the edge of the countertop.
• Do not operate this appliance by means of an external timer or separate remote
control system.
• This appliance must be operated with the door closed.
• Avoid any contact with moving parts.
• Do not operate the unit with damp or wet hands.
• Do not place glass items directly into cold water after use. Allow items to cool
down before placing into cold water in order to avoid cracking.
• PLEASE NOTE: This unit becomes hot while in use. Do not touch the glass window
or any metallic parts during or immediately after use.
• The use of accessory attachments that are not recommended or supplied by the
manufacturer may result in injuries, re or electric shock.
• Always use oven gloves when removing cooked food, cookware or accessories
from the appliance.
• Only use utensils that are suitable for use in microwave ovens.
• This appliance is intended for heating food and beverages only. Drying of food
or clothing; heating of warming pads, slippers, sponges, damp cloth and similar
may lead to risk of injury, or re.
• Care should be taken not to displace the turntable whilst removing containers
from the microwave.
• Do not place oversized food in the microwave. This could damage the unit, and
the food will not cook properly.
• Do not place the following items in the microwave: non-microwave proof glass,
ceramic plates, paper, cards, non heat-resistant plastic, cloth, metallic objects and
containers, or other ammable items.
• This appliance should only be used to cook or bake consumable food.
• Only use cookware and utensils that are suitable and designed for high
temperatures in the microwave.
• Liquids or other food must not be heated in sealed containers as they are liable to
explode.
• Heating of liquids can result in delayed eruptive boiling. Care must be taken
when handling the container.
• Eggs in their shell as well as whole hard-boiled eggs should not be heated in the
microwave. They may explode, even after the microwave heating has nished.
• Closely monitor the microwave when heating food in plastic containers, to avoid
the possibility of ignition.
• The contents of feeding bottles and baby food jars are to be stirred or shaken.
The temperature must be checked before consumption to avoid burns.
• Do not cover the turntable or any other part of the microwave with metal foil. This
will cause the microwave to overheat and will void the warranty.
• Exercise caution when opening the microwave door, or moving accessories
during use of the microwave.
• Do not leave this appliance unattended during use. Always unplug the unit when
not in use or before cleaning.
• Failure to maintain the oven in a clean condition could lead to the deterioration of
the surfaces. Surface deterioration could adversely affect the life of the appliance
and possibly result in a hazardous situation.
• Do not move the unit while in use.
• Do not remove the Waveguide Cover.
• Extreme caution must be used when moving an appliance containing hot liquids.
• Do not cover the unit or obstruct heat dissipation.
• Ensure that the “Child Lock” is on if left unattended around children (see page11).
• Never immerse the unit in water or any other liquid for cleaning purposes. Do not
clean with a steam cleaner.
• Do not clean with caustic cleaners, metal brushes, metal scouring pads, fuel or
abrasive powder.
• If smoke is observed, switch off and unplug the appliance. Keep the door closed
in order to stie any ames. If any microwaved food is causing the smoke,
remove it from the appliance when safe to do so. If the smoke was not caused by
any microwaved food, stop using the appliance immediately and take it to an
authorised Service Centre.
• Do not dispose of this unit with domestic trash. Consult your local municipality for
proper disposal procedure.
• It is hazardous for anyone other than an authorised service facility to carry out
any service or repair operation, which involves the removal of any cover which
gives protection against exposure to microwave energy.
• The manufacturer does not accept responsibility for any damage or injury caused
by improper or incorrect use, or for repairs carried out by unauthorised
personnel.
• In case of technical problems, switch off the machine and do not attempt to repair
it yourself. Return the appliance to an authorised Tevo Service Center for
examination, adjustment or repair. Always insist on the use of original spare
parts. Failure to comply with the above-mentioned precautions and instructions
could affect the safe operation of this machine and the standard Tevo Service
Center repair process.
• Group 2 Class B appliance.
• Group 2 ISM equipment: group 2 contains all ISM equipment in which
radio-frequency energy is intentionally generated and/or used in the form of
electromagnetic radiation for the treatment of material, and EDM and arc welding
equipment. Class B equipment is suitable for use in domestic establishments and
in establishments directly connected to a low voltage power supply network which
supplies buildings used for domestic purposes.
• Internal light source LED<60lm.

CONGRATULATIONS ON PURCHASING A
BENNETT READ
®
30L DIGITAL MICROWAVE.
EXTENDED WARRANTY
Your BENNETT READ
®
30L DIGITAL MICROWAVE comes with a 1 (one) year
warranty. If you register your warranty online within 14 (fourteen) days of purchase,
we will extend the warranty to 2 (two) years. To activate your extended warranty,
scan the QR code on the cover of this user guide, then tap on the link and complete
the online form. Alternatively, visit www.bennettread.co.za, click the “Register
Warranty” tab at the top of the page, then complete the form provided. We also
stand behind it with a knowledgeable, dedicated Customer Care department, so
should you ever have a problem, you'll receive fast, considerate assistance (see
contact details at the end of the warranty section on page 15).
Please read this user guide carefully before using your BENNETT READ
®
30L DIGITAL MICROWAVE.
Keep this user guide for future reference.
SAFETY PRECAUTIONS
When using any electrical appliance, basic safety precautions should always be
followed including the following:
• Read the instruction manual carefully before use and save it for
future reference.
• Always ensure that the voltage on the rating label corresponds to the mains
voltage in your home.
• Incorrect operation and improper use can damage the appliance and cause
injury to the user.
• The appliance is intended for household use only and is not user-serviceable.
Commercial use voids the warranty and the supplier cannot be held responsible
for injury or damage caused when using the appliance for any other purpose
than that intended.
• Do not block any air vents.
• Keep the appliance safely out of reach of children below 8 years old. Close
supervision is required when any appliance is used near children.
• This appliance can be used by children aged from 8 years and above; and
persons with reduced physical, sensory or mental capabilities or lack of
experience and knowledge, if they have been given supervision and instruction
concerning use of the appliance in a safe way and understand the hazards
involved.
• Children should not play with the appliance.
• Cleaning and maintenance should not be done by children.
• Before using the appliance, be sure to untie the power cord wrapped around the
3
back to avoid any potential electrical hazard.
• Check the power cord and plug regularly for any damage. If the cord or the plug
is damaged, it must be replaced by the manufacturer or a qualied person in
order to avoid an electrical hazard.
• Do not operate the appliance if the door, or door seals are damaged. If either the
door, or door seals are damaged, they must be repaired/replaced by the
manufacturer or a qualied person in order to avoid any hazards.
• Do not use the appliance if it has been dropped or damaged in any way. In case
of damage, take the unit in for examination and/or repair to an authorised
Service Centre.
• To reduce the risk of electrical shock, do not immerse the element assembly,
control panel, microwave, plug, or power cord into water, or any other liquid.
• Do not let the cord hang over the edge of a table or counter. Ensure that the cord
is not in a position where it can be pulled on inadvertently.
• Do not allow the cord to touch hot surfaces, and do not place on or near a hot
gas or electric burner.
• Do not damage, bend, stretch, or twist the power cord; do not place heavy
objects on the power cord, or clamp the power cord.
• Never pull on the cord to disconnect the appliance from the wall outlet; instead,
grasp the plug and pull on the plug. Always unplug the unit when not in use,
before cleaning, or when adding or removing parts.
• Do not let children handle the electrical cord or any part of the appliance.
• Do not carry the appliance by the power cord.
• Use of an extension cord with this appliance is not recommended. However, if it
is necessary to use an extension cord, ensure that the cord is suited to the power
consumption of the appliance to avoid overheating of the extension cord,
appliance or plug point. Do not place the extension cord in a position where it
can be pulled on by children or animals, or tripped over.
• Do not use outdoors or in a damp area. Do not use this appliance for anything
other than its intended use.
• Do not use the appliance on a gas or electric cooking top, or over or near an
open ame.
• This appliance is intended for free-standing use only. Do not use inside
cupboards.
• This appliance must not be installed higher than 899mm above the oor. The
minimum height of free space necessary above the top surface of the microwave
must be at least 100mm.
• A re may occur if the appliance is covered or touches ammable material,
including curtains, draperies, walls, and the like, when in operation.
• Do not place glass or plastic dishes on top of the unit. Do not place or store any
item on top of the appliance.
• Always operate the appliance on a smooth, even, stable surface. Do not place
the unit on a hot surface.
• Do not place the appliance close to the edge of the countertop.
• Do not operate this appliance by means of an external timer or separate remote
control system.
• This appliance must be operated with the door closed.
• Avoid any contact with moving parts.
• Do not operate the unit with damp or wet hands.
• Do not place glass items directly into cold water after use. Allow items to cool
down before placing into cold water in order to avoid cracking.
• PLEASE NOTE: This unit becomes hot while in use. Do not touch the glass window
or any metallic parts during or immediately after use.
• The use of accessory attachments that are not recommended or supplied by the
manufacturer may result in injuries, re or electric shock.
• Always use oven gloves when removing cooked food, cookware or accessories
from the appliance.
• Only use utensils that are suitable for use in microwave ovens.
• This appliance is intended for heating food and beverages only. Drying of food
or clothing; heating of warming pads, slippers, sponges, damp cloth and similar
may lead to risk of injury, or re.
• Care should be taken not to displace the turntable whilst removing containers
from the microwave.
• Do not place oversized food in the microwave. This could damage the unit, and
the food will not cook properly.
• Do not place the following items in the microwave: non-microwave proof glass,
ceramic plates, paper, cards, non heat-resistant plastic, cloth, metallic objects and
containers, or other ammable items.
• This appliance should only be used to cook or bake consumable food.
• Only use cookware and utensils that are suitable and designed for high
temperatures in the microwave.
• Liquids or other food must not be heated in sealed containers as they are liable to
explode.
• Heating of liquids can result in delayed eruptive boiling. Care must be taken
when handling the container.
• Eggs in their shell as well as whole hard-boiled eggs should not be heated in the
microwave. They may explode, even after the microwave heating has nished.
• Closely monitor the microwave when heating food in plastic containers, to avoid
the possibility of ignition.
• The contents of feeding bottles and baby food jars are to be stirred or shaken.
The temperature must be checked before consumption to avoid burns.
• Do not cover the turntable or any other part of the microwave with metal foil. This
will cause the microwave to overheat and will void the warranty.
• Exercise caution when opening the microwave door, or moving accessories
during use of the microwave.
• Do not leave this appliance unattended during use. Always unplug the unit when
not in use or before cleaning.
• Failure to maintain the oven in a clean condition could lead to the deterioration of
the surfaces. Surface deterioration could adversely affect the life of the appliance
and possibly result in a hazardous situation.
• Do not move the unit while in use.
• Do not remove the Waveguide Cover.
• Extreme caution must be used when moving an appliance containing hot liquids.
• Do not cover the unit or obstruct heat dissipation.
• Ensure that the “Child Lock” is on if left unattended around children (see page11).
• Never immerse the unit in water or any other liquid for cleaning purposes. Do not
clean with a steam cleaner.
• Do not clean with caustic cleaners, metal brushes, metal scouring pads, fuel or
abrasive powder.
• If smoke is observed, switch off and unplug the appliance. Keep the door closed
in order to stie any ames. If any microwaved food is causing the smoke,
remove it from the appliance when safe to do so. If the smoke was not caused by
any microwaved food, stop using the appliance immediately and take it to an
authorised Service Centre.
• Do not dispose of this unit with domestic trash. Consult your local municipality for
proper disposal procedure.
• It is hazardous for anyone other than an authorised service facility to carry out
any service or repair operation, which involves the removal of any cover which
gives protection against exposure to microwave energy.
• The manufacturer does not accept responsibility for any damage or injury caused
by improper or incorrect use, or for repairs carried out by unauthorised
personnel.
• In case of technical problems, switch off the machine and do not attempt to repair
it yourself. Return the appliance to an authorised Tevo Service Center for
examination, adjustment or repair. Always insist on the use of original spare
parts. Failure to comply with the above-mentioned precautions and instructions
could affect the safe operation of this machine and the standard Tevo Service
Center repair process.
• Group 2 Class B appliance.
• Group 2 ISM equipment: group 2 contains all ISM equipment in which
radio-frequency energy is intentionally generated and/or used in the form of
electromagnetic radiation for the treatment of material, and EDM and arc welding
equipment. Class B equipment is suitable for use in domestic establishments and
in establishments directly connected to a low voltage power supply network which
supplies buildings used for domestic purposes.
• Internal light source LED<60lm.
CONGRATULATIONS ON PURCHASING A
BENNETT READ
®
30L DIGITAL MICROWAVE.
EXTENDED WARRANTY
Your BENNETT READ
®
30L DIGITAL MICROWAVE comes with a 1 (one) year
warranty. If you register your warranty online within 14 (fourteen) days of purchase,
we will extend the warranty to 2 (two) years. To activate your extended warranty,
scan the QR code on the cover of this user guide, then tap on the link and complete
the online form. Alternatively, visit www.bennettread.co.za, click the “Register
Warranty” tab at the top of the page, then complete the form provided. We also
stand behind it with a knowledgeable, dedicated Customer Care department, so
should you ever have a problem, you'll receive fast, considerate assistance (see
contact details at the end of the warranty section on page 15).
Please read this user guide carefully before using your BENNETT READ
®
30L DIGITAL MICROWAVE.
Keep this user guide for future reference.
SAFETY PRECAUTIONS
When using any electrical appliance, basic safety precautions should always be
followed including the following:
• Read the instruction manual carefully before use and save it for
future reference.
• Always ensure that the voltage on the rating label corresponds to the mains
voltage in your home.
• Incorrect operation and improper use can damage the appliance and cause
injury to the user.
• The appliance is intended for household use only and is not user-serviceable.
Commercial use voids the warranty and the supplier cannot be held responsible
for injury or damage caused when using the appliance for any other purpose
than that intended.
• Do not block any air vents.
• Keep the appliance safely out of reach of children below 8 years old. Close
supervision is required when any appliance is used near children.
• This appliance can be used by children aged from 8 years and above; and
persons with reduced physical, sensory or mental capabilities or lack of
experience and knowledge, if they have been given supervision and instruction
concerning use of the appliance in a safe way and understand the hazards
involved.
• Children should not play with the appliance.
• Cleaning and maintenance should not be done by children.
• Before using the appliance, be sure to untie the power cord wrapped around the
4
back to avoid any potential electrical hazard.
• Check the power cord and plug regularly for any damage. If the cord or the plug
is damaged, it must be replaced by the manufacturer or a qualied person in
order to avoid an electrical hazard.
• Do not operate the appliance if the door, or door seals are damaged. If either the
door, or door seals are damaged, they must be repaired/replaced by the
manufacturer or a qualied person in order to avoid any hazards.
• Do not use the appliance if it has been dropped or damaged in any way. In case
of damage, take the unit in for examination and/or repair to an authorised
Service Centre.
• To reduce the risk of electrical shock, do not immerse the element assembly,
control panel, microwave, plug, or power cord into water, or any other liquid.
• Do not let the cord hang over the edge of a table or counter. Ensure that the cord
is not in a position where it can be pulled on inadvertently.
• Do not allow the cord to touch hot surfaces, and do not place on or near a hot
gas or electric burner.
• Do not damage, bend, stretch, or twist the power cord; do not place heavy
objects on the power cord, or clamp the power cord.
• Never pull on the cord to disconnect the appliance from the wall outlet; instead,
grasp the plug and pull on the plug. Always unplug the unit when not in use,
before cleaning, or when adding or removing parts.
• Do not let children handle the electrical cord or any part of the appliance.
• Do not carry the appliance by the power cord.
• Use of an extension cord with this appliance is not recommended. However, if it
is necessary to use an extension cord, ensure that the cord is suited to the power
consumption of the appliance to avoid overheating of the extension cord,
appliance or plug point. Do not place the extension cord in a position where it
can be pulled on by children or animals, or tripped over.
• Do not use outdoors or in a damp area. Do not use this appliance for anything
other than its intended use.
• Do not use the appliance on a gas or electric cooking top, or over or near an
open ame.
• This appliance is intended for free-standing use only. Do not use inside
cupboards.
• This appliance must not be installed higher than 899mm above the oor. The
minimum height of free space necessary above the top surface of the microwave
must be at least 100mm.
• A re may occur if the appliance is covered or touches ammable material,
including curtains, draperies, walls, and the like, when in operation.
• Do not place glass or plastic dishes on top of the unit. Do not place or store any
item on top of the appliance.
• Always operate the appliance on a smooth, even, stable surface. Do not place
the unit on a hot surface.
• Do not place the appliance close to the edge of the countertop.
• Do not operate this appliance by means of an external timer or separate remote
control system.
• This appliance must be operated with the door closed.
• Avoid any contact with moving parts.
• Do not operate the unit with damp or wet hands.
• Do not place glass items directly into cold water after use. Allow items to cool
down before placing into cold water in order to avoid cracking.
• PLEASE NOTE: This unit becomes hot while in use. Do not touch the glass window
or any metallic parts during or immediately after use.
• The use of accessory attachments that are not recommended or supplied by the
manufacturer may result in injuries, re or electric shock.
• Always use oven gloves when removing cooked food, cookware or accessories
from the appliance.
• Only use utensils that are suitable for use in microwave ovens.
• This appliance is intended for heating food and beverages only. Drying of food
or clothing; heating of warming pads, slippers, sponges, damp cloth and similar
may lead to risk of injury, or re.
• Care should be taken not to displace the turntable whilst removing containers
from the microwave.
• Do not place oversized food in the microwave. This could damage the unit, and
the food will not cook properly.
• Do not place the following items in the microwave: non-microwave proof glass,
ceramic plates, paper, cards, non heat-resistant plastic, cloth, metallic objects and
containers, or other ammable items.
• This appliance should only be used to cook or bake consumable food.
• Only use cookware and utensils that are suitable and designed for high
temperatures in the microwave.
• Liquids or other food must not be heated in sealed containers as they are liable to
explode.
• Heating of liquids can result in delayed eruptive boiling. Care must be taken
when handling the container.
• Eggs in their shell as well as whole hard-boiled eggs should not be heated in the
microwave. They may explode, even after the microwave heating has nished.
• Closely monitor the microwave when heating food in plastic containers, to avoid
the possibility of ignition.
• The contents of feeding bottles and baby food jars are to be stirred or shaken.
The temperature must be checked before consumption to avoid burns.
• Do not cover the turntable or any other part of the microwave with metal foil. This
will cause the microwave to overheat and will void the warranty.
• Exercise caution when opening the microwave door, or moving accessories
during use of the microwave.
• Do not leave this appliance unattended during use. Always unplug the unit when
not in use or before cleaning.
• Failure to maintain the oven in a clean condition could lead to the deterioration of
the surfaces. Surface deterioration could adversely affect the life of the appliance
and possibly result in a hazardous situation.
• Do not move the unit while in use.
• Do not remove the Waveguide Cover.
• Extreme caution must be used when moving an appliance containing hot liquids.
• Do not cover the unit or obstruct heat dissipation.
• Ensure that the “Child Lock” is on if left unattended around children (see page11).
• Never immerse the unit in water or any other liquid for cleaning purposes. Do not
clean with a steam cleaner.
• Do not clean with caustic cleaners, metal brushes, metal scouring pads, fuel or
abrasive powder.
• If smoke is observed, switch off and unplug the appliance. Keep the door closed
in order to stie any ames. If any microwaved food is causing the smoke,
remove it from the appliance when safe to do so. If the smoke was not caused by
any microwaved food, stop using the appliance immediately and take it to an
authorised Service Centre.
• Do not dispose of this unit with domestic trash. Consult your local municipality for
proper disposal procedure.
• It is hazardous for anyone other than an authorised service facility to carry out
any service or repair operation, which involves the removal of any cover which
gives protection against exposure to microwave energy.
• The manufacturer does not accept responsibility for any damage or injury caused
by improper or incorrect use, or for repairs carried out by unauthorised
personnel.
• In case of technical problems, switch off the machine and do not attempt to repair
it yourself. Return the appliance to an authorised Tevo Service Center for
examination, adjustment or repair. Always insist on the use of original spare
parts. Failure to comply with the above-mentioned precautions and instructions
could affect the safe operation of this machine and the standard Tevo Service
Center repair process.
• Group 2 Class B appliance.
• Group 2 ISM equipment: group 2 contains all ISM equipment in which
radio-frequency energy is intentionally generated and/or used in the form of
electromagnetic radiation for the treatment of material, and EDM and arc welding
equipment. Class B equipment is suitable for use in domestic establishments and
in establishments directly connected to a low voltage power supply network which
supplies buildings used for domestic purposes.
• Internal light source LED<60lm.
CAUTION: HOT SURFACE
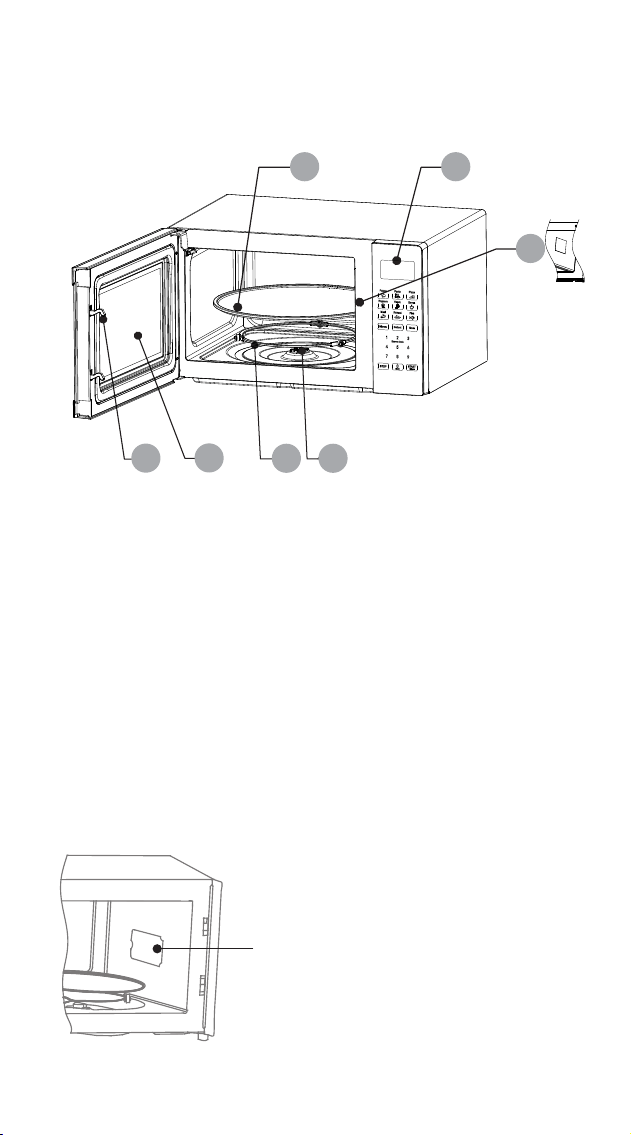
30L DIGITAL MICROWAVE OVERVIEW
5
1
5
2
3
Waveguide Cover
The Waveguide Cover is situated inside the
microwave cavity, next to the wall of the
control panel.
WARNING: Never remove the Waveguide
Cover.
4
6
7
1. Door Lock
2. Viewing Window
3. Rotating Ring
4. Rotating Axis
5. Turntable
6. Control Panel
7. Waveguide Cover

6
DIGITAL LED DISPLAY
CONTROL PANEL

CAUTION:
• It is necessary to turn food over during defrosting to ensure that even defrosting takes
place throughout the food.
• Usually defrosting will take more time than that of cooking the food.
• If the food can be cut by knife, the defrosting process can be considered completed.
• The microwave penetrates around 4cm into most food.
• Defrosted food should be consumed as soon as possible, it is not advisable to put it
back into the fridge, or to freeze it again.
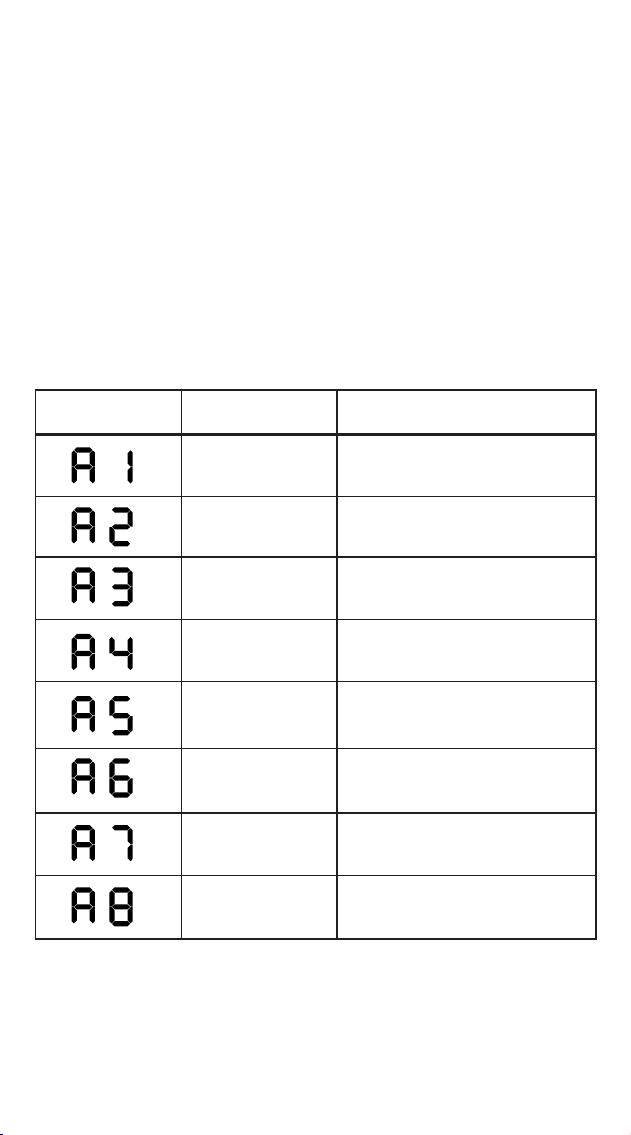
4. AUTO COOKING
There are eight automatic menu items, “Potato”, “Pasta”, “Pizza”, “Popcorn”,
“Vegetable”, “Beverage”, “Meat” and “Fish”. To select the desired menu item, press
the corresponding button repeatedly to select the desired food weight. The display will
show the corresponding weight. Press the “START/+30s” button to start operation.
A buzzing sound will notify you on completion of the operation.
CAUTION:
• The temperature of food before cooking should be 20 - 25 °C. Higher or lower food
temperatures before cooking would require an increase or decrease in cooking time.
• The temperature, weight and shape of food will largely inuence how well the food is
cooked.
5. TIMER
In standby mode, press the “Timer” button to enter the setting interface. The countdown
function icon and "0:00" will be displayed on the display screen. Press the 0 - 9
number buttons to input the time. The maximum time that can be input is 99:99. After
setting the time, press the "START/+30s" button to begin the countdown. A buzzing
sound will notify you on completion of the countdown.
6. REHEAT
The Reheat function is mainly to facilitate users to heat food according to the weight of
the food. Press the “Reheat” button repeatedly to select the appropriate weight of the
food, the range of weights that can be selected are 200g, 400g, 600g, 800g and
1000g. After selecting the weight, press the “START/+30s” button to begin operation.
A buzzing sound will notify you on completion of the operation.
7. EXPRESS COOK
7.1 In standby mode, you can directly press the 1 - 6 number buttons to start the
microwave oven. The working time is 1 - 6 minutes, e.g. press 1 to operate for 1
minute, press 2 to operate for 2 minutes, and so on. After selecting the time, press
“START/+30s” button to begin operation. A buzzing sound will notify you on
completion of the operation.
7.2 In standby mode, after placing food in the microwave and closing the door, press
the “START/+30s” button to start the microwave oven quickly. The default working
time is 30 seconds. A buzzing sound will notify you on completion of the
operation.
8. CLOCK
The clock function and "0" button are combined in one button. The clock is a 24 - hour
system. The operation of the clock function is as follows:
In standby mode, press and hold down the “0/Clock” button for more than 3 seconds
to enter the clock setting interface, press the 0 ~ 9 number buttons to input the clock
time directly and press the “START/+30s” button to conrm the set time and exit the
clock setting mode at the same time.
9. STOP
In the process of cooking settings, you can press the “STOP” button to cancel the set
operation and return to standby mode. In the process of microwave operation, you
can press the “STOP” button to pause. In the paused state, you can press the “STOP”
button again to cancel the function and return to standby mode.
10. START/+30s
After setting the cooking time or food weight, press the “START/+30s” button to start
the microwave oven immediately. During operation you can press the “START/+30s”
button to increase time, press once to increase by 30 seconds. NOTE: The menu mode
and weight defrosting mode time cannot be adjusted during operation. In the paused
state you can press the “START/+30s” button to continue operation.
BEFORE FIRST USE
Before using this unit, please read these instructions completely. Save this manual and
pass it on to the next user. Remove all packaging materials, labels, lm and/or stickers
from your appliance and dispose of them correctly. Check the package to verify that
all contents are included and undamaged. If the contents are incomplete, or appear
damaged, do not operate the appliance - return it with all packaging and receipt to
the place of purchase or an authorised Service Centre.
Ensure to place the microwave in a dry, non-corrosive environment. Keeping it away
from heat and humidity, such as a gas burner or water tank. Ensure that the
microwave has sufcient ventilation:
*the distance from the back of the microwave to the wall should be at least 10cm
*the distance from the side should be at least 5cm
*the distance above the top surface should be at least 20cm
*the distance from the bottom of the microwave to the ground should be at least
85cm
Position the microwave so that the plug is accessible, ensuring good grounding in case
of leakage. A ground loop can be formed to avoid electric shock. Situate it far away
from a TV, radio or antenna as picture disturbance or noise may occur. Ideally the
distance should be more than 5m.
Complete assembly by placing the rotating ring into the microwave cavity in the
correct position. Fit the turntable on to the rotating axis, making sure that it is tted
properly. The microwave must be operated with the door closed.
This appliance may produce an odour and emit smoke when switched on for the rst
time, as residues from the production process are eliminated. This is normal and does
not indicate a defect or hazard. Before rst use, we recommend placing a cup of
water into the cavity of the microwave and running the appliance on the high power
setting for 1 - 2 minutes, approximately 2 - 3 times. This will assist to eliminate any
possible residues from the production process.
USING THE CONTROL PANEL
1. BEFORE COOKING
The LED display will light up when plugged into a power supply. The unit will enter
standby mode and the LED display will show 1:00.
2. MICROWAVE FUNCTION
There are ten microwave power levels, 100P, 90P, 80P, 70P, 60P, 50P, 40P, 30P,
20P and 10P, respectively. Press the “Microw.” button repeatedly to select the desired
microwave power. Press 0 - 9 number buttons to input the cooking time. The maximum
time that can be input is 99:99. After entering the cooking time, press “START/+30s”
button to begin operation. A buzzing sound will notify you on completion of the
operation.
CAUTION:
• The max time which can be set is 99 minutes and 99 seconds.
• Never use a grill rack during microwave cooking.
• Never operate the appliance empty.
• At the maximum microwave power, the appliance will automatically lower the power
after a certain time of cooking to lengthen the service life.
• If you turn the food during operation, press the START/+30s button once and the
preset cooking procedure will continue.
• If you intend to remove the food before the preset time, you must press the STOP
button once to clear the preset procedure to avoid unintended operation of the same
program.
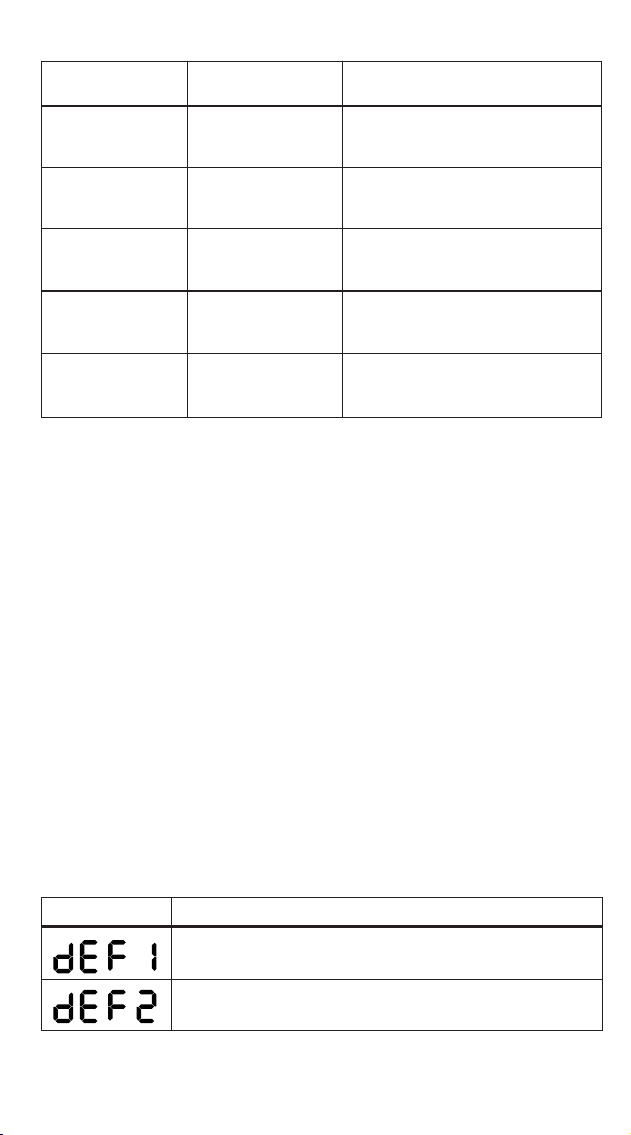
3. DEFROST
There are two defrost mode, dEF1 and dEF2, respectively. dEF1 for defrost by weight
and dEF2 for defrost by time. Press the “Defrost” button to select defrosting by weight or
by time. The display screen displays "dEF1" or "dEF2". Press 0 - 9 number buttons to
input the food weight or defrosting time. The weight range of dEF1 is 100g - 1500g,
and the maximum time that dEF2 can be entered is 99:99. After entering, press the
“START/+30s” button to begin operation. A buzzing sound will notify you on
completion of the operation. The dEF1 defrost mode by weight will make a beeping
sound to prompt you to turn the food over during defrosting.
11. CHILD LOCK FUNCTION
Use this feature to lock the control panel when you are cleaning, or to prevent children
from using the microwave unsupervised. All the buttons are rendered inoperable in this
mode.
1) Set lock: Hold the STOP button for 3 seconds.
2) Cancel lock: Hold the STOP button for 3 seconds.
CONTAINER AND UTENSILS GUIDELINE
It is strongly recommended to only use containers and utensils which are suitable and
safe for microwave cooking. Containers and utensils which are made of heat-resistant
ceramic, glass or plastic are suitable for microwave cooking. Never use metal
containers or utensils for microwave cooking, as this could result in sparks, re and
injury. Please use below guide as reference:
COOKING TIPS
The following factors may affect cooking results:
PRESET COOKING:
1) The “Preset Cooking Button” feature is designed to cook food which is between
20 - 25˚C in temperature. If the food is at a different temperature, the cooking effect
will vary. Please adjust it accordingly.
2) The shape, weight, and temperature of the food will affect the cooking outcome.
When using the “Preset Cooking” feature, please follow the weight range instructions
carefully.
FOOD ARRANGEMENT:
Place thicker food pieces towards the outside of the dish, the thinner parts towards the
centre, and spread them evenly. Do not overlap food pieces if possible.
COOKING TIME:
Start cooking with a short time setting, evaluate it after the cooking time has completed
and extend it accordingly (if needed). Over-cooking may result in smoke and burnt
food.
COOKING FOOD EVENLY:
Food such as chicken, hamburger patties or steak should be turned once during
cooking. Depending on the type of food, if applicable, interrupt the cooking process
and stir the food from the outside to the centre of the of dish, then resume cooking. This
only needs to be done once or twice during cooking.
ALLOW STANDING TIME:
After cooking, leave the food in the microwave for an adequate length of time. This
allows it to complete its cooking cycle and cool down in a gradual manner.
WHETHER THE FOOD IS DONE:
Colour and hardness of food help to determine if it is done. These include:
- Steam coming out from all parts of food, not just the edge
- Joints of poultry can be moved easily
- Pork or poultry shows no signs of blood
- Fish is opaque and can be sliced easily with a fork
BROWNING DISH:
When using a browning dish or self-heating container, always place a heat-resistant
insulator, such as a porcelain plate, under it to prevent damage to the turntable and
rotating ring.
MICROWAVE-SAFE PLASTIC WRAP:
When cooking food with high fat content, do not allow the plastic wrap to come into
contact with food as it may melt.
MICROWAVE-SAFE PLASTIC COOKWARE:
Some microwave-safe plastic cookware might not be suitable for cooking foods with
high fat and sugar content. Also, the preheating time specied in the dish instructions
must not be exceeded.
CARE & CLEANING
CLEANING
• Unplug the unit from the electrical outlet when not in use and before cleaning.
• Always wait for the unit to cool down completely before cleaning.
• Always clean surfaces which come into contact with food, food splashes or grease.
CAUTION: Built-up grease may overheat and begin to cause smoke or catch re.
• Wash accessories such as the turntable, rotating ring and rotation axis in warm,
soapy water, rinse and dry well.
• The interior walls and exterior of the appliance should be cleaned with a damp cloth
or sponge, and mild detergent. Do not use steel wool, scouring pads or scrape the
walls with a metal utensil, as this may damage the surfaces.
• Wipe the Waveguide Cover with a damp cloth or sponge, followed by a dry cloth
to dry.
• The door and control panel can be wiped with a damp cloth or sponge, followed
by wiping with a dry cloth/towel. Ensure to wipe the window, door seals and
adjacent parts.
• Clean the outside with a damp sponge. Do not use an abrasive cleaner as it may
damage the exterior nish.
• Do not use bleach or other abrasive substances or solvents to clean your appliance.
• Do not immerse the unit in water or any other liquid, or hold it under a running tap
to clean.
• To remove stubborn spots/marks, wipe the surfaces with a cloth slightly dampened
in soapy water or mild non-abrasive cleaner. Wipe and dry surfaces with a clean,
dry, soft cloth.
• Let all parts and surfaces dry thoroughly prior to plugging in the microwave and
using it, and before putting the microwave away for long-term storage.
REMOVING ODOURS AFTER USE
We recommend 3 alternative methods to assist in removing odours after use:
Method 1:
Place several lemon slices in a cup then insert it into the microwave cavity. Heat the
microwave on high power for 2 - 3 minutes.
Method 2:
Place a cup of red tea into the microwave cavity. Heat the microwave on high power
for 1 - 2 minutes.
Method 3:
Place several orange peels into the microwave cavity. Heat the microwave on high
power for 1 minute.
SERVICING:
If you believe that there is a problem with your microwave that may require minor
servicing, please check the following before calling your nearest Tevo Service Center:
1. Place one cup of water (approx.150ml) in a glass measure in the microwave and
close the door securely. The microwave’s inside lamp should go off if the door is
closed properly. Set the timer for 1 minute and press the “Start/Stop” button.
Observe the following:
2. Does the microwave lamp light up?
3. Does the cooling fan work?
(Put your hand over the rear ventilation openings.)
4. Does the turntable rotate?
(The turntable can rotate clockwise or counter clockwise. This is normal.)
5. Is the water inside the microwave hot?
If “NO” is the answer to any of the above questions, please check your wall socket
and the fuse in your meter box.
If both the wall socket and the fuse are functioning properly, contact your nearest Tevo
Service Center.
SERVICING SAFEGUARDS:
CAUTION: MICROWAVE RADIATION (Service Professionals Only)
The high voltage capacitor remains charged after disconnection; short the negative
terminal of H. Use a screwdriver to discharge the V capacitor to the microwave oven
chassis before working.
During servicing, the below listed parts are liable to be removed and give access to
potential voltage above 250V to earth:
• Magnetron
• High voltage transformer
• High voltage capacitor
• High voltage diode
• High voltage fuse
The following conditions may cause undue microwave exposure during servicing:
• Improper tting of magnetron
• Improper matching of door interlock, door hinge and door
• Improper tting of switch support
• Door, door seal or enclosure has been damaged
7
CAUTION:
• It is necessary to turn food over during defrosting to ensure that even defrosting takes
place throughout the food.
• Usually defrosting will take more time than that of cooking the food.
• If the food can be cut by knife, the defrosting process can be considered completed.
• The microwave penetrates around 4cm into most food.
• Defrosted food should be consumed as soon as possible, it is not advisable to put it
back into the fridge, or to freeze it again.
4. AUTO COOKING
There are eight automatic menu items, “Potato”, “Pasta”, “Pizza”, “Popcorn”,
“Vegetable”, “Beverage”, “Meat” and “Fish”. To select the desired menu item, press
the corresponding button repeatedly to select the desired food weight. The display will
show the corresponding weight. Press the “START/+30s” button to start operation.
A buzzing sound will notify you on completion of the operation.
CAUTION:
• The temperature of food before cooking should be 20 - 25 °C. Higher or lower food
temperatures before cooking would require an increase or decrease in cooking time.
• The temperature, weight and shape of food will largely inuence how well the food is
cooked.
5. TIMER
In standby mode, press the “Timer” button to enter the setting interface. The countdown
function icon and "0:00" will be displayed on the display screen. Press the 0 - 9
number buttons to input the time. The maximum time that can be input is 99:99. After
setting the time, press the "START/+30s" button to begin the countdown. A buzzing
sound will notify you on completion of the countdown.
6. REHEAT
The Reheat function is mainly to facilitate users to heat food according to the weight of
the food. Press the “Reheat” button repeatedly to select the appropriate weight of the
food, the range of weights that can be selected are 200g, 400g, 600g, 800g and
1000g. After selecting the weight, press the “START/+30s” button to begin operation.
A buzzing sound will notify you on completion of the operation.
7. EXPRESS COOK
7.1 In standby mode, you can directly press the 1 - 6 number buttons to start the
microwave oven. The working time is 1 - 6 minutes, e.g. press 1 to operate for 1
minute, press 2 to operate for 2 minutes, and so on. After selecting the time, press
“START/+30s” button to begin operation. A buzzing sound will notify you on
completion of the operation.
7.2 In standby mode, after placing food in the microwave and closing the door, press
the “START/+30s” button to start the microwave oven quickly. The default working
time is 30 seconds. A buzzing sound will notify you on completion of the
operation.
8. CLOCK
The clock function and "0" button are combined in one button. The clock is a 24 - hour
system. The operation of the clock function is as follows:
In standby mode, press and hold down the “0/Clock” button for more than 3 seconds
to enter the clock setting interface, press the 0 ~ 9 number buttons to input the clock
time directly and press the “START/+30s” button to conrm the set time and exit the
clock setting mode at the same time.
9. STOP
In the process of cooking settings, you can press the “STOP” button to cancel the set
operation and return to standby mode. In the process of microwave operation, you
can press the “STOP” button to pause. In the paused state, you can press the “STOP”
button again to cancel the function and return to standby mode.
10. START/+30s
After setting the cooking time or food weight, press the “START/+30s” button to start
the microwave oven immediately. During operation you can press the “START/+30s”
button to increase time, press once to increase by 30 seconds. NOTE: The menu mode
and weight defrosting mode time cannot be adjusted during operation. In the paused
state you can press the “START/+30s” button to continue operation.
BEFORE FIRST USE
Before using this unit, please read these instructions completely. Save this manual and
pass it on to the next user. Remove all packaging materials, labels, lm and/or stickers
from your appliance and dispose of them correctly. Check the package to verify that
all contents are included and undamaged. If the contents are incomplete, or appear
damaged, do not operate the appliance - return it with all packaging and receipt to
the place of purchase or an authorised Service Centre.
Ensure to place the microwave in a dry, non-corrosive environment. Keeping it away
from heat and humidity, such as a gas burner or water tank. Ensure that the
microwave has sufcient ventilation:
*the distance from the back of the microwave to the wall should be at least 10cm
*the distance from the side should be at least 5cm
*the distance above the top surface should be at least 20cm
*the distance from the bottom of the microwave to the ground should be at least
85cm
Position the microwave so that the plug is accessible, ensuring good grounding in case
of leakage. A ground loop can be formed to avoid electric shock. Situate it far away
from a TV, radio or antenna as picture disturbance or noise may occur. Ideally the
distance should be more than 5m.
Complete assembly by placing the rotating ring into the microwave cavity in the
correct position. Fit the turntable on to the rotating axis, making sure that it is tted
properly. The microwave must be operated with the door closed.
This appliance may produce an odour and emit smoke when switched on for the rst
time, as residues from the production process are eliminated. This is normal and does
not indicate a defect or hazard. Before rst use, we recommend placing a cup of
water into the cavity of the microwave and running the appliance on the high power
setting for 1 - 2 minutes, approximately 2 - 3 times. This will assist to eliminate any
possible residues from the production process.
USING THE CONTROL PANEL
1. BEFORE COOKING
The LED display will light up when plugged into a power supply. The unit will enter
standby mode and the LED display will show 1:00.
2. MICROWAVE FUNCTION
There are ten microwave power levels, 100P, 90P, 80P, 70P, 60P, 50P, 40P, 30P,
20P and 10P, respectively. Press the “Microw.” button repeatedly to select the desired
microwave power. Press 0 - 9 number buttons to input the cooking time. The maximum
time that can be input is 99:99. After entering the cooking time, press “START/+30s”
button to begin operation. A buzzing sound will notify you on completion of the
operation.
CAUTION:
• The max time which can be set is 99 minutes and 99 seconds.
• Never use a grill rack during microwave cooking.
• Never operate the appliance empty.
• At the maximum microwave power, the appliance will automatically lower the power
after a certain time of cooking to lengthen the service life.
• If you turn the food during operation, press the START/+30s button once and the
preset cooking procedure will continue.
• If you intend to remove the food before the preset time, you must press the STOP
button once to clear the preset procedure to avoid unintended operation of the same
program.
3. DEFROST
There are two defrost mode, dEF1 and dEF2, respectively. dEF1 for defrost by weight
and dEF2 for defrost by time. Press the “Defrost” button to select defrosting by weight or
by time. The display screen displays "dEF1" or "dEF2". Press 0 - 9 number buttons to
input the food weight or defrosting time. The weight range of dEF1 is 100g - 1500g,
and the maximum time that dEF2 can be entered is 99:99. After entering, press the
“START/+30s” button to begin operation. A buzzing sound will notify you on
completion of the operation. The dEF1 defrost mode by weight will make a beeping
sound to prompt you to turn the food over during defrosting.
11. CHILD LOCK FUNCTION
Use this feature to lock the control panel when you are cleaning, or to prevent children
from using the microwave unsupervised. All the buttons are rendered inoperable in this
mode.
1) Set lock: Hold the STOP button for 3 seconds.
2) Cancel lock: Hold the STOP button for 3 seconds.
CONTAINER AND UTENSILS GUIDELINE
It is strongly recommended to only use containers and utensils which are suitable and
safe for microwave cooking. Containers and utensils which are made of heat-resistant
ceramic, glass or plastic are suitable for microwave cooking. Never use metal
containers or utensils for microwave cooking, as this could result in sparks, re and
injury. Please use below guide as reference:
COOKING TIPS
The following factors may affect cooking results:
PRESET COOKING:
1) The “Preset Cooking Button” feature is designed to cook food which is between
20 - 25˚C in temperature. If the food is at a different temperature, the cooking effect
will vary. Please adjust it accordingly.
2) The shape, weight, and temperature of the food will affect the cooking outcome.
When using the “Preset Cooking” feature, please follow the weight range instructions
carefully.
FOOD ARRANGEMENT:
Place thicker food pieces towards the outside of the dish, the thinner parts towards the
centre, and spread them evenly. Do not overlap food pieces if possible.
COOKING TIME:
Start cooking with a short time setting, evaluate it after the cooking time has completed
and extend it accordingly (if needed). Over-cooking may result in smoke and burnt
food.
COOKING FOOD EVENLY:
Food such as chicken, hamburger patties or steak should be turned once during
cooking. Depending on the type of food, if applicable, interrupt the cooking process
and stir the food from the outside to the centre of the of dish, then resume cooking. This
only needs to be done once or twice during cooking.
ALLOW STANDING TIME:
After cooking, leave the food in the microwave for an adequate length of time. This
allows it to complete its cooking cycle and cool down in a gradual manner.
WHETHER THE FOOD IS DONE:
Colour and hardness of food help to determine if it is done. These include:
- Steam coming out from all parts of food, not just the edge
- Joints of poultry can be moved easily
- Pork or poultry shows no signs of blood
- Fish is opaque and can be sliced easily with a fork
BROWNING DISH:
When using a browning dish or self-heating container, always place a heat-resistant
insulator, such as a porcelain plate, under it to prevent damage to the turntable and
rotating ring.
MICROWAVE-SAFE PLASTIC WRAP:
When cooking food with high fat content, do not allow the plastic wrap to come into
contact with food as it may melt.
MICROWAVE-SAFE PLASTIC COOKWARE:
Some microwave-safe plastic cookware might not be suitable for cooking foods with
high fat and sugar content. Also, the preheating time specied in the dish instructions
must not be exceeded.
CARE & CLEANING
CLEANING
• Unplug the unit from the electrical outlet when not in use and before cleaning.
• Always wait for the unit to cool down completely before cleaning.
• Always clean surfaces which come into contact with food, food splashes or grease.
CAUTION: Built-up grease may overheat and begin to cause smoke or catch re.
• Wash accessories such as the turntable, rotating ring and rotation axis in warm,
soapy water, rinse and dry well.
• The interior walls and exterior of the appliance should be cleaned with a damp cloth
or sponge, and mild detergent. Do not use steel wool, scouring pads or scrape the
walls with a metal utensil, as this may damage the surfaces.
• Wipe the Waveguide Cover with a damp cloth or sponge, followed by a dry cloth
to dry.
• The door and control panel can be wiped with a damp cloth or sponge, followed
by wiping with a dry cloth/towel. Ensure to wipe the window, door seals and
adjacent parts.
• Clean the outside with a damp sponge. Do not use an abrasive cleaner as it may
damage the exterior nish.
• Do not use bleach or other abrasive substances or solvents to clean your appliance.
• Do not immerse the unit in water or any other liquid, or hold it under a running tap
to clean.
• To remove stubborn spots/marks, wipe the surfaces with a cloth slightly dampened
in soapy water or mild non-abrasive cleaner. Wipe and dry surfaces with a clean,
dry, soft cloth.
• Let all parts and surfaces dry thoroughly prior to plugging in the microwave and
using it, and before putting the microwave away for long-term storage.
REMOVING ODOURS AFTER USE
We recommend 3 alternative methods to assist in removing odours after use:
Method 1:
Place several lemon slices in a cup then insert it into the microwave cavity. Heat the
microwave on high power for 2 - 3 minutes.
Method 2:
Place a cup of red tea into the microwave cavity. Heat the microwave on high power
for 1 - 2 minutes.
Method 3:
Place several orange peels into the microwave cavity. Heat the microwave on high
power for 1 minute.
SERVICING:
If you believe that there is a problem with your microwave that may require minor
servicing, please check the following before calling your nearest Tevo Service Center:
1. Place one cup of water (approx.150ml) in a glass measure in the microwave and
close the door securely. The microwave’s inside lamp should go off if the door is
closed properly. Set the timer for 1 minute and press the “Start/Stop” button.
Observe the following:
2. Does the microwave lamp light up?
3. Does the cooling fan work?
(Put your hand over the rear ventilation openings.)
4. Does the turntable rotate?
(The turntable can rotate clockwise or counter clockwise. This is normal.)
5. Is the water inside the microwave hot?
If “NO” is the answer to any of the above questions, please check your wall socket
and the fuse in your meter box.
If both the wall socket and the fuse are functioning properly, contact your nearest Tevo
Service Center.
SERVICING SAFEGUARDS:
CAUTION: MICROWAVE RADIATION (Service Professionals Only)
The high voltage capacitor remains charged after disconnection; short the negative
terminal of H. Use a screwdriver to discharge the V capacitor to the microwave oven
chassis before working.
During servicing, the below listed parts are liable to be removed and give access to
potential voltage above 250V to earth:
• Magnetron
• High voltage transformer
• High voltage capacitor
• High voltage diode
• High voltage fuse
The following conditions may cause undue microwave exposure during servicing:
• Improper tting of magnetron
• Improper matching of door interlock, door hinge and door
• Improper tting of switch support
• Door, door seal or enclosure has been damaged
8
MAXIMUM ALLOWANCEDISPLAY
For defrosting, the weight range from 100g to 1500g
POWER LEVEL
HIGH
APPLICATION
Quick and thorough cooking
Medium express cooking
Steaming food
Defrosting food
Keeping warm
MEDIUM - HIGH
MEDIUM
MEDIUM - LOW
LOW
For defrosting, the maximum time is 99:99
POWER OUTPUT
100% & 90%
80% & 70%
60% & 50%
40% & 30%
20% & 10%
CAUTION:
• It is necessary to turn food over during defrosting to ensure that even defrosting takes
place throughout the food.
• Usually defrosting will take more time than that of cooking the food.
• If the food can be cut by knife, the defrosting process can be considered completed.
• The microwave penetrates around 4cm into most food.
• Defrosted food should be consumed as soon as possible, it is not advisable to put it
back into the fridge, or to freeze it again.
4. AUTO COOKING
There are eight automatic menu items, “Potato”, “Pasta”, “Pizza”, “Popcorn”,
“Vegetable”, “Beverage”, “Meat” and “Fish”. To select the desired menu item, press
the corresponding button repeatedly to select the desired food weight. The display will
show the corresponding weight. Press the “START/+30s” button to start operation.
A buzzing sound will notify you on completion of the operation.
CAUTION:
• The temperature of food before cooking should be 20 - 25 °C. Higher or lower food
temperatures before cooking would require an increase or decrease in cooking time.
• The temperature, weight and shape of food will largely inuence how well the food is
cooked.
5. TIMER
In standby mode, press the “Timer” button to enter the setting interface. The countdown
function icon and "0:00" will be displayed on the display screen. Press the 0 - 9
number buttons to input the time. The maximum time that can be input is 99:99. After
setting the time, press the "START/+30s" button to begin the countdown. A buzzing
sound will notify you on completion of the countdown.
6. REHEAT
The Reheat function is mainly to facilitate users to heat food according to the weight of
the food. Press the “Reheat” button repeatedly to select the appropriate weight of the
food, the range of weights that can be selected are 200g, 400g, 600g, 800g and
1000g. After selecting the weight, press the “START/+30s” button to begin operation.
A buzzing sound will notify you on completion of the operation.
7. EXPRESS COOK
7.1 In standby mode, you can directly press the 1 - 6 number buttons to start the
microwave oven. The working time is 1 - 6 minutes, e.g. press 1 to operate for 1
minute, press 2 to operate for 2 minutes, and so on. After selecting the time, press
“START/+30s” button to begin operation. A buzzing sound will notify you on
completion of the operation.
7.2 In standby mode, after placing food in the microwave and closing the door, press
the “START/+30s” button to start the microwave oven quickly. The default working
time is 30 seconds. A buzzing sound will notify you on completion of the
operation.
8. CLOCK
The clock function and "0" button are combined in one button. The clock is a 24 - hour
system. The operation of the clock function is as follows:
In standby mode, press and hold down the “0/Clock” button for more than 3 seconds
to enter the clock setting interface, press the 0 ~ 9 number buttons to input the clock
time directly and press the “START/+30s” button to conrm the set time and exit the
clock setting mode at the same time.
9. STOP
In the process of cooking settings, you can press the “STOP” button to cancel the set
operation and return to standby mode. In the process of microwave operation, you
can press the “STOP” button to pause. In the paused state, you can press the “STOP”
button again to cancel the function and return to standby mode.
10. START/+30s
After setting the cooking time or food weight, press the “START/+30s” button to start
the microwave oven immediately. During operation you can press the “START/+30s”
button to increase time, press once to increase by 30 seconds. NOTE: The menu mode
and weight defrosting mode time cannot be adjusted during operation. In the paused
state you can press the “START/+30s” button to continue operation.
BEFORE FIRST USE
Before using this unit, please read these instructions completely. Save this manual and
pass it on to the next user. Remove all packaging materials, labels, lm and/or stickers
from your appliance and dispose of them correctly. Check the package to verify that
all contents are included and undamaged. If the contents are incomplete, or appear
damaged, do not operate the appliance - return it with all packaging and receipt to
the place of purchase or an authorised Service Centre.
Ensure to place the microwave in a dry, non-corrosive environment. Keeping it away
from heat and humidity, such as a gas burner or water tank. Ensure that the
microwave has sufcient ventilation:
*the distance from the back of the microwave to the wall should be at least 10cm
*the distance from the side should be at least 5cm
*the distance above the top surface should be at least 20cm
*the distance from the bottom of the microwave to the ground should be at least
85cm
Position the microwave so that the plug is accessible, ensuring good grounding in case
of leakage. A ground loop can be formed to avoid electric shock. Situate it far away
from a TV, radio or antenna as picture disturbance or noise may occur. Ideally the
distance should be more than 5m.
Complete assembly by placing the rotating ring into the microwave cavity in the
correct position. Fit the turntable on to the rotating axis, making sure that it is tted
properly. The microwave must be operated with the door closed.
This appliance may produce an odour and emit smoke when switched on for the rst
time, as residues from the production process are eliminated. This is normal and does
not indicate a defect or hazard. Before rst use, we recommend placing a cup of
water into the cavity of the microwave and running the appliance on the high power
setting for 1 - 2 minutes, approximately 2 - 3 times. This will assist to eliminate any
possible residues from the production process.
USING THE CONTROL PANEL
1. BEFORE COOKING
The LED display will light up when plugged into a power supply. The unit will enter
standby mode and the LED display will show 1:00.
2. MICROWAVE FUNCTION
There are ten microwave power levels, 100P, 90P, 80P, 70P, 60P, 50P, 40P, 30P,
20P and 10P, respectively. Press the “Microw.” button repeatedly to select the desired
microwave power. Press 0 - 9 number buttons to input the cooking time. The maximum
time that can be input is 99:99. After entering the cooking time, press “START/+30s”
button to begin operation. A buzzing sound will notify you on completion of the
operation.
CAUTION:
• The max time which can be set is 99 minutes and 99 seconds.
• Never use a grill rack during microwave cooking.
• Never operate the appliance empty.
• At the maximum microwave power, the appliance will automatically lower the power
after a certain time of cooking to lengthen the service life.
• If you turn the food during operation, press the START/+30s button once and the
preset cooking procedure will continue.
• If you intend to remove the food before the preset time, you must press the STOP
button once to clear the preset procedure to avoid unintended operation of the same
program.
3. DEFROST
There are two defrost mode, dEF1 and dEF2, respectively. dEF1 for defrost by weight
and dEF2 for defrost by time. Press the “Defrost” button to select defrosting by weight or
by time. The display screen displays "dEF1" or "dEF2". Press 0 - 9 number buttons to
input the food weight or defrosting time. The weight range of dEF1 is 100g - 1500g,
and the maximum time that dEF2 can be entered is 99:99. After entering, press the
“START/+30s” button to begin operation. A buzzing sound will notify you on
completion of the operation. The dEF1 defrost mode by weight will make a beeping
sound to prompt you to turn the food over during defrosting.
11. CHILD LOCK FUNCTION
Use this feature to lock the control panel when you are cleaning, or to prevent children
from using the microwave unsupervised. All the buttons are rendered inoperable in this
mode.
1) Set lock: Hold the STOP button for 3 seconds.
2) Cancel lock: Hold the STOP button for 3 seconds.
CONTAINER AND UTENSILS GUIDELINE
It is strongly recommended to only use containers and utensils which are suitable and
safe for microwave cooking. Containers and utensils which are made of heat-resistant
ceramic, glass or plastic are suitable for microwave cooking. Never use metal
containers or utensils for microwave cooking, as this could result in sparks, re and
injury. Please use below guide as reference:
COOKING TIPS
The following factors may affect cooking results:
PRESET COOKING:
1) The “Preset Cooking Button” feature is designed to cook food which is between
20 - 25˚C in temperature. If the food is at a different temperature, the cooking effect
will vary. Please adjust it accordingly.
2) The shape, weight, and temperature of the food will affect the cooking outcome.
When using the “Preset Cooking” feature, please follow the weight range instructions
carefully.
FOOD ARRANGEMENT:
Place thicker food pieces towards the outside of the dish, the thinner parts towards the
centre, and spread them evenly. Do not overlap food pieces if possible.
COOKING TIME:
Start cooking with a short time setting, evaluate it after the cooking time has completed
and extend it accordingly (if needed). Over-cooking may result in smoke and burnt
food.
COOKING FOOD EVENLY:
Food such as chicken, hamburger patties or steak should be turned once during
cooking. Depending on the type of food, if applicable, interrupt the cooking process
and stir the food from the outside to the centre of the of dish, then resume cooking. This
only needs to be done once or twice during cooking.
ALLOW STANDING TIME:
After cooking, leave the food in the microwave for an adequate length of time. This
allows it to complete its cooking cycle and cool down in a gradual manner.
WHETHER THE FOOD IS DONE:
Colour and hardness of food help to determine if it is done. These include:
- Steam coming out from all parts of food, not just the edge
- Joints of poultry can be moved easily
- Pork or poultry shows no signs of blood
- Fish is opaque and can be sliced easily with a fork
BROWNING DISH:
When using a browning dish or self-heating container, always place a heat-resistant
insulator, such as a porcelain plate, under it to prevent damage to the turntable and
rotating ring.
MICROWAVE-SAFE PLASTIC WRAP:
When cooking food with high fat content, do not allow the plastic wrap to come into
contact with food as it may melt.
MICROWAVE-SAFE PLASTIC COOKWARE:
Some microwave-safe plastic cookware might not be suitable for cooking foods with
high fat and sugar content. Also, the preheating time specied in the dish instructions
must not be exceeded.
CARE & CLEANING
CLEANING
• Unplug the unit from the electrical outlet when not in use and before cleaning.
• Always wait for the unit to cool down completely before cleaning.
• Always clean surfaces which come into contact with food, food splashes or grease.
CAUTION: Built-up grease may overheat and begin to cause smoke or catch re.
• Wash accessories such as the turntable, rotating ring and rotation axis in warm,
soapy water, rinse and dry well.
• The interior walls and exterior of the appliance should be cleaned with a damp cloth
or sponge, and mild detergent. Do not use steel wool, scouring pads or scrape the
walls with a metal utensil, as this may damage the surfaces.
• Wipe the Waveguide Cover with a damp cloth or sponge, followed by a dry cloth
to dry.
• The door and control panel can be wiped with a damp cloth or sponge, followed
by wiping with a dry cloth/towel. Ensure to wipe the window, door seals and
adjacent parts.
• Clean the outside with a damp sponge. Do not use an abrasive cleaner as it may
damage the exterior nish.
• Do not use bleach or other abrasive substances or solvents to clean your appliance.
• Do not immerse the unit in water or any other liquid, or hold it under a running tap
to clean.
• To remove stubborn spots/marks, wipe the surfaces with a cloth slightly dampened
in soapy water or mild non-abrasive cleaner. Wipe and dry surfaces with a clean,
dry, soft cloth.
• Let all parts and surfaces dry thoroughly prior to plugging in the microwave and
using it, and before putting the microwave away for long-term storage.
REMOVING ODOURS AFTER USE
We recommend 3 alternative methods to assist in removing odours after use:
Method 1:
Place several lemon slices in a cup then insert it into the microwave cavity. Heat the
microwave on high power for 2 - 3 minutes.
Method 2:
Place a cup of red tea into the microwave cavity. Heat the microwave on high power
for 1 - 2 minutes.
Method 3:
Place several orange peels into the microwave cavity. Heat the microwave on high
power for 1 minute.
SERVICING:
If you believe that there is a problem with your microwave that may require minor
servicing, please check the following before calling your nearest Tevo Service Center:
1. Place one cup of water (approx.150ml) in a glass measure in the microwave and
close the door securely. The microwave’s inside lamp should go off if the door is
closed properly. Set the timer for 1 minute and press the “Start/Stop” button.
Observe the following:
2. Does the microwave lamp light up?
3. Does the cooling fan work?
(Put your hand over the rear ventilation openings.)
4. Does the turntable rotate?
(The turntable can rotate clockwise or counter clockwise. This is normal.)
5. Is the water inside the microwave hot?
If “NO” is the answer to any of the above questions, please check your wall socket
and the fuse in your meter box.
If both the wall socket and the fuse are functioning properly, contact your nearest Tevo
Service Center.
SERVICING SAFEGUARDS:
CAUTION: MICROWAVE RADIATION (Service Professionals Only)
The high voltage capacitor remains charged after disconnection; short the negative
terminal of H. Use a screwdriver to discharge the V capacitor to the microwave oven
chassis before working.
During servicing, the below listed parts are liable to be removed and give access to
potential voltage above 250V to earth:
• Magnetron
• High voltage transformer
• High voltage capacitor
• High voltage diode
• High voltage fuse
The following conditions may cause undue microwave exposure during servicing:
• Improper tting of magnetron
• Improper matching of door interlock, door hinge and door
• Improper tting of switch support
• Door, door seal or enclosure has been damaged
9
DISPLAY METHOD
The optional weights are 250g,
500g and 750g
The optional weights are 50g,
100g and 150g
The optional weights are 200g
and 400g
The optional weight is 100g
The optional weights are 200g,
400g and 600g
FOOD TYPE
Potato
Pasta
Pizza
Popcorn
Vegetable
Beverage
Meat
Fish
The optional weights are 1 cup, 2
cups or 3 cups, each one about
250ml
The optional weights are 200g,
400g and 600g
The optional weights are 200g,
400g and 600g

CAUTION:
• It is necessary to turn food over during defrosting to ensure that even defrosting takes
place throughout the food.
• Usually defrosting will take more time than that of cooking the food.
• If the food can be cut by knife, the defrosting process can be considered completed.
• The microwave penetrates around 4cm into most food.
• Defrosted food should be consumed as soon as possible, it is not advisable to put it
back into the fridge, or to freeze it again.
4. AUTO COOKING
There are eight automatic menu items, “Potato”, “Pasta”, “Pizza”, “Popcorn”,
“Vegetable”, “Beverage”, “Meat” and “Fish”. To select the desired menu item, press
the corresponding button repeatedly to select the desired food weight. The display will
show the corresponding weight. Press the “START/+30s” button to start operation.
A buzzing sound will notify you on completion of the operation.
CAUTION:
• The temperature of food before cooking should be 20 - 25 °C. Higher or lower food
temperatures before cooking would require an increase or decrease in cooking time.
• The temperature, weight and shape of food will largely inuence how well the food is
cooked.
5. TIMER
In standby mode, press the “Timer” button to enter the setting interface. The countdown
function icon and "0:00" will be displayed on the display screen. Press the 0 - 9
number buttons to input the time. The maximum time that can be input is 99:99. After
setting the time, press the "START/+30s" button to begin the countdown. A buzzing
sound will notify you on completion of the countdown.
6. REHEAT
The Reheat function is mainly to facilitate users to heat food according to the weight of
the food. Press the “Reheat” button repeatedly to select the appropriate weight of the
food, the range of weights that can be selected are 200g, 400g, 600g, 800g and
1000g. After selecting the weight, press the “START/+30s” button to begin operation.
A buzzing sound will notify you on completion of the operation.
7. EXPRESS COOK
7.1 In standby mode, you can directly press the 1 - 6 number buttons to start the
microwave oven. The working time is 1 - 6 minutes, e.g. press 1 to operate for 1
minute, press 2 to operate for 2 minutes, and so on. After selecting the time, press
“START/+30s” button to begin operation. A buzzing sound will notify you on
completion of the operation.
7.2 In standby mode, after placing food in the microwave and closing the door, press
the “START/+30s” button to start the microwave oven quickly. The default working
time is 30 seconds. A buzzing sound will notify you on completion of the
operation.
8. CLOCK
The clock function and "0" button are combined in one button. The clock is a 24 - hour
system. The operation of the clock function is as follows:
In standby mode, press and hold down the “0/Clock” button for more than 3 seconds
to enter the clock setting interface, press the 0 ~ 9 number buttons to input the clock
time directly and press the “START/+30s” button to conrm the set time and exit the
clock setting mode at the same time.
9. STOP
In the process of cooking settings, you can press the “STOP” button to cancel the set
operation and return to standby mode. In the process of microwave operation, you
can press the “STOP” button to pause. In the paused state, you can press the “STOP”
button again to cancel the function and return to standby mode.
10. START/+30s
After setting the cooking time or food weight, press the “START/+30s” button to start
the microwave oven immediately. During operation you can press the “START/+30s”
button to increase time, press once to increase by 30 seconds. NOTE: The menu mode
and weight defrosting mode time cannot be adjusted during operation. In the paused
state you can press the “START/+30s” button to continue operation.
BEFORE FIRST USE
Before using this unit, please read these instructions completely. Save this manual and
pass it on to the next user. Remove all packaging materials, labels, lm and/or stickers
from your appliance and dispose of them correctly. Check the package to verify that
all contents are included and undamaged. If the contents are incomplete, or appear
damaged, do not operate the appliance - return it with all packaging and receipt to
the place of purchase or an authorised Service Centre.
Ensure to place the microwave in a dry, non-corrosive environment. Keeping it away
from heat and humidity, such as a gas burner or water tank. Ensure that the
microwave has sufcient ventilation:
*the distance from the back of the microwave to the wall should be at least 10cm
*the distance from the side should be at least 5cm
*the distance above the top surface should be at least 20cm
*the distance from the bottom of the microwave to the ground should be at least
85cm
Position the microwave so that the plug is accessible, ensuring good grounding in case
of leakage. A ground loop can be formed to avoid electric shock. Situate it far away
from a TV, radio or antenna as picture disturbance or noise may occur. Ideally the
distance should be more than 5m.
Complete assembly by placing the rotating ring into the microwave cavity in the
correct position. Fit the turntable on to the rotating axis, making sure that it is tted
properly. The microwave must be operated with the door closed.
This appliance may produce an odour and emit smoke when switched on for the rst
time, as residues from the production process are eliminated. This is normal and does
not indicate a defect or hazard. Before rst use, we recommend placing a cup of
water into the cavity of the microwave and running the appliance on the high power
setting for 1 - 2 minutes, approximately 2 - 3 times. This will assist to eliminate any
possible residues from the production process.
USING THE CONTROL PANEL
1. BEFORE COOKING
The LED display will light up when plugged into a power supply. The unit will enter
standby mode and the LED display will show 1:00.
2. MICROWAVE FUNCTION
There are ten microwave power levels, 100P, 90P, 80P, 70P, 60P, 50P, 40P, 30P,
20P and 10P, respectively. Press the “Microw.” button repeatedly to select the desired
microwave power. Press 0 - 9 number buttons to input the cooking time. The maximum
time that can be input is 99:99. After entering the cooking time, press “START/+30s”
button to begin operation. A buzzing sound will notify you on completion of the
operation.
CAUTION:
• The max time which can be set is 99 minutes and 99 seconds.
• Never use a grill rack during microwave cooking.
• Never operate the appliance empty.
• At the maximum microwave power, the appliance will automatically lower the power
after a certain time of cooking to lengthen the service life.
• If you turn the food during operation, press the START/+30s button once and the
preset cooking procedure will continue.
• If you intend to remove the food before the preset time, you must press the STOP
button once to clear the preset procedure to avoid unintended operation of the same
program.
3. DEFROST
There are two defrost mode, dEF1 and dEF2, respectively. dEF1 for defrost by weight
and dEF2 for defrost by time. Press the “Defrost” button to select defrosting by weight or
by time. The display screen displays "dEF1" or "dEF2". Press 0 - 9 number buttons to
input the food weight or defrosting time. The weight range of dEF1 is 100g - 1500g,
and the maximum time that dEF2 can be entered is 99:99. After entering, press the
“START/+30s” button to begin operation. A buzzing sound will notify you on
completion of the operation. The dEF1 defrost mode by weight will make a beeping
sound to prompt you to turn the food over during defrosting.
11. CHILD LOCK FUNCTION
Use this feature to lock the control panel when you are cleaning, or to prevent children
from using the microwave unsupervised. All the buttons are rendered inoperable in this
mode.
1) Set lock: Hold the STOP button for 3 seconds.
2) Cancel lock: Hold the STOP button for 3 seconds.
CONTAINER AND UTENSILS GUIDELINE
It is strongly recommended to only use containers and utensils which are suitable and
safe for microwave cooking. Containers and utensils which are made of heat-resistant
ceramic, glass or plastic are suitable for microwave cooking. Never use metal
containers or utensils for microwave cooking, as this could result in sparks, re and
injury. Please use below guide as reference:
COOKING TIPS
The following factors may affect cooking results:
PRESET COOKING:
1) The “Preset Cooking Button” feature is designed to cook food which is between
20 - 25˚C in temperature. If the food is at a different temperature, the cooking effect
will vary. Please adjust it accordingly.
2) The shape, weight, and temperature of the food will affect the cooking outcome.
When using the “Preset Cooking” feature, please follow the weight range instructions
carefully.
FOOD ARRANGEMENT:
Place thicker food pieces towards the outside of the dish, the thinner parts towards the
centre, and spread them evenly. Do not overlap food pieces if possible.
COOKING TIME:
Start cooking with a short time setting, evaluate it after the cooking time has completed
and extend it accordingly (if needed). Over-cooking may result in smoke and burnt
food.
COOKING FOOD EVENLY:
Food such as chicken, hamburger patties or steak should be turned once during
cooking. Depending on the type of food, if applicable, interrupt the cooking process
and stir the food from the outside to the centre of the of dish, then resume cooking. This
only needs to be done once or twice during cooking.
ALLOW STANDING TIME:
After cooking, leave the food in the microwave for an adequate length of time. This
allows it to complete its cooking cycle and cool down in a gradual manner.
WHETHER THE FOOD IS DONE:
Colour and hardness of food help to determine if it is done. These include:
- Steam coming out from all parts of food, not just the edge
- Joints of poultry can be moved easily
- Pork or poultry shows no signs of blood
- Fish is opaque and can be sliced easily with a fork
BROWNING DISH:
When using a browning dish or self-heating container, always place a heat-resistant
insulator, such as a porcelain plate, under it to prevent damage to the turntable and
rotating ring.
MICROWAVE-SAFE PLASTIC WRAP:
When cooking food with high fat content, do not allow the plastic wrap to come into
contact with food as it may melt.
MICROWAVE-SAFE PLASTIC COOKWARE:
Some microwave-safe plastic cookware might not be suitable for cooking foods with
high fat and sugar content. Also, the preheating time specied in the dish instructions
must not be exceeded.
CARE & CLEANING
CLEANING
• Unplug the unit from the electrical outlet when not in use and before cleaning.
• Always wait for the unit to cool down completely before cleaning.
• Always clean surfaces which come into contact with food, food splashes or grease.
CAUTION: Built-up grease may overheat and begin to cause smoke or catch re.
• Wash accessories such as the turntable, rotating ring and rotation axis in warm,
soapy water, rinse and dry well.
• The interior walls and exterior of the appliance should be cleaned with a damp cloth
or sponge, and mild detergent. Do not use steel wool, scouring pads or scrape the
walls with a metal utensil, as this may damage the surfaces.
• Wipe the Waveguide Cover with a damp cloth or sponge, followed by a dry cloth
to dry.
• The door and control panel can be wiped with a damp cloth or sponge, followed
by wiping with a dry cloth/towel. Ensure to wipe the window, door seals and
adjacent parts.
• Clean the outside with a damp sponge. Do not use an abrasive cleaner as it may
damage the exterior nish.
• Do not use bleach or other abrasive substances or solvents to clean your appliance.
• Do not immerse the unit in water or any other liquid, or hold it under a running tap
to clean.
• To remove stubborn spots/marks, wipe the surfaces with a cloth slightly dampened
in soapy water or mild non-abrasive cleaner. Wipe and dry surfaces with a clean,
dry, soft cloth.
• Let all parts and surfaces dry thoroughly prior to plugging in the microwave and
using it, and before putting the microwave away for long-term storage.
REMOVING ODOURS AFTER USE
We recommend 3 alternative methods to assist in removing odours after use:
Method 1:
Place several lemon slices in a cup then insert it into the microwave cavity. Heat the
microwave on high power for 2 - 3 minutes.
Method 2:
Place a cup of red tea into the microwave cavity. Heat the microwave on high power
for 1 - 2 minutes.
Method 3:
Place several orange peels into the microwave cavity. Heat the microwave on high
power for 1 minute.
SERVICING:
If you believe that there is a problem with your microwave that may require minor
servicing, please check the following before calling your nearest Tevo Service Center:
1. Place one cup of water (approx.150ml) in a glass measure in the microwave and
close the door securely. The microwave’s inside lamp should go off if the door is
closed properly. Set the timer for 1 minute and press the “Start/Stop” button.
Observe the following:
2. Does the microwave lamp light up?
3. Does the cooling fan work?
(Put your hand over the rear ventilation openings.)
4. Does the turntable rotate?
(The turntable can rotate clockwise or counter clockwise. This is normal.)
5. Is the water inside the microwave hot?
If “NO” is the answer to any of the above questions, please check your wall socket
and the fuse in your meter box.
If both the wall socket and the fuse are functioning properly, contact your nearest Tevo
Service Center.
SERVICING SAFEGUARDS:
CAUTION: MICROWAVE RADIATION (Service Professionals Only)
The high voltage capacitor remains charged after disconnection; short the negative
terminal of H. Use a screwdriver to discharge the V capacitor to the microwave oven
chassis before working.
During servicing, the below listed parts are liable to be removed and give access to
potential voltage above 250V to earth:
• Magnetron
• High voltage transformer
• High voltage capacitor
• High voltage diode
• High voltage fuse
The following conditions may cause undue microwave exposure during servicing:
• Improper tting of magnetron
• Improper matching of door interlock, door hinge and door
• Improper tting of switch support
• Door, door seal or enclosure has been damaged
10
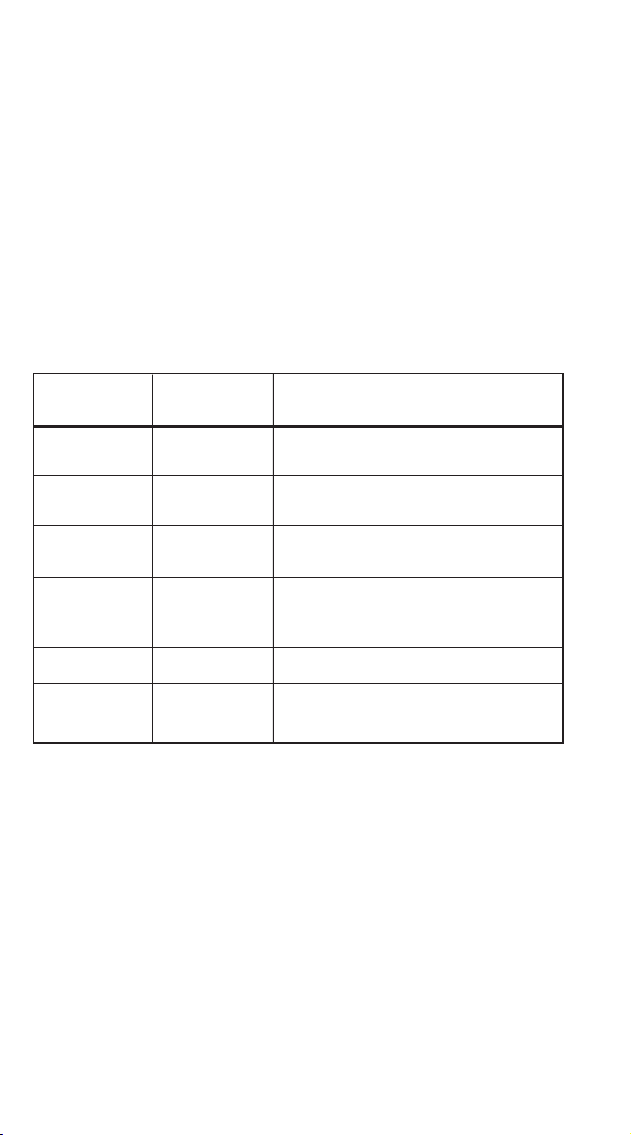
CAUTION:
• It is necessary to turn food over during defrosting to ensure that even defrosting takes
place throughout the food.
• Usually defrosting will take more time than that of cooking the food.
• If the food can be cut by knife, the defrosting process can be considered completed.
• The microwave penetrates around 4cm into most food.
• Defrosted food should be consumed as soon as possible, it is not advisable to put it
back into the fridge, or to freeze it again.
4. AUTO COOKING
There are eight automatic menu items, “Potato”, “Pasta”, “Pizza”, “Popcorn”,
“Vegetable”, “Beverage”, “Meat” and “Fish”. To select the desired menu item, press
the corresponding button repeatedly to select the desired food weight. The display will
show the corresponding weight. Press the “START/+30s” button to start operation.
A buzzing sound will notify you on completion of the operation.
CAUTION:
• The temperature of food before cooking should be 20 - 25 °C. Higher or lower food
temperatures before cooking would require an increase or decrease in cooking time.
• The temperature, weight and shape of food will largely inuence how well the food is
cooked.
5. TIMER
In standby mode, press the “Timer” button to enter the setting interface. The countdown
function icon and "0:00" will be displayed on the display screen. Press the 0 - 9
number buttons to input the time. The maximum time that can be input is 99:99. After
setting the time, press the "START/+30s" button to begin the countdown. A buzzing
sound will notify you on completion of the countdown.
6. REHEAT
The Reheat function is mainly to facilitate users to heat food according to the weight of
the food. Press the “Reheat” button repeatedly to select the appropriate weight of the
food, the range of weights that can be selected are 200g, 400g, 600g, 800g and
1000g. After selecting the weight, press the “START/+30s” button to begin operation.
A buzzing sound will notify you on completion of the operation.
7. EXPRESS COOK
7.1 In standby mode, you can directly press the 1 - 6 number buttons to start the
microwave oven. The working time is 1 - 6 minutes, e.g. press 1 to operate for 1
minute, press 2 to operate for 2 minutes, and so on. After selecting the time, press
“START/+30s” button to begin operation. A buzzing sound will notify you on
completion of the operation.
7.2 In standby mode, after placing food in the microwave and closing the door, press
the “START/+30s” button to start the microwave oven quickly. The default working
time is 30 seconds. A buzzing sound will notify you on completion of the
operation.
8. CLOCK
The clock function and "0" button are combined in one button. The clock is a 24 - hour
system. The operation of the clock function is as follows:
In standby mode, press and hold down the “0/Clock” button for more than 3 seconds
to enter the clock setting interface, press the 0 ~ 9 number buttons to input the clock
time directly and press the “START/+30s” button to conrm the set time and exit the
clock setting mode at the same time.
9. STOP
In the process of cooking settings, you can press the “STOP” button to cancel the set
operation and return to standby mode. In the process of microwave operation, you
can press the “STOP” button to pause. In the paused state, you can press the “STOP”
button again to cancel the function and return to standby mode.
10. START/+30s
After setting the cooking time or food weight, press the “START/+30s” button to start
the microwave oven immediately. During operation you can press the “START/+30s”
button to increase time, press once to increase by 30 seconds. NOTE: The menu mode
and weight defrosting mode time cannot be adjusted during operation. In the paused
state you can press the “START/+30s” button to continue operation.
BEFORE FIRST USE
Before using this unit, please read these instructions completely. Save this manual and
pass it on to the next user. Remove all packaging materials, labels, lm and/or stickers
from your appliance and dispose of them correctly. Check the package to verify that
all contents are included and undamaged. If the contents are incomplete, or appear
damaged, do not operate the appliance - return it with all packaging and receipt to
the place of purchase or an authorised Service Centre.
Ensure to place the microwave in a dry, non-corrosive environment. Keeping it away
from heat and humidity, such as a gas burner or water tank. Ensure that the
microwave has sufcient ventilation:
*the distance from the back of the microwave to the wall should be at least 10cm
*the distance from the side should be at least 5cm
*the distance above the top surface should be at least 20cm
*the distance from the bottom of the microwave to the ground should be at least
85cm
Position the microwave so that the plug is accessible, ensuring good grounding in case
of leakage. A ground loop can be formed to avoid electric shock. Situate it far away
from a TV, radio or antenna as picture disturbance or noise may occur. Ideally the
distance should be more than 5m.
Complete assembly by placing the rotating ring into the microwave cavity in the
correct position. Fit the turntable on to the rotating axis, making sure that it is tted
properly. The microwave must be operated with the door closed.
This appliance may produce an odour and emit smoke when switched on for the rst
time, as residues from the production process are eliminated. This is normal and does
not indicate a defect or hazard. Before rst use, we recommend placing a cup of
water into the cavity of the microwave and running the appliance on the high power
setting for 1 - 2 minutes, approximately 2 - 3 times. This will assist to eliminate any
possible residues from the production process.
USING THE CONTROL PANEL
1. BEFORE COOKING
The LED display will light up when plugged into a power supply. The unit will enter
standby mode and the LED display will show 1:00.
2. MICROWAVE FUNCTION
There are ten microwave power levels, 100P, 90P, 80P, 70P, 60P, 50P, 40P, 30P,
20P and 10P, respectively. Press the “Microw.” button repeatedly to select the desired
microwave power. Press 0 - 9 number buttons to input the cooking time. The maximum
time that can be input is 99:99. After entering the cooking time, press “START/+30s”
button to begin operation. A buzzing sound will notify you on completion of the
operation.
CAUTION:
• The max time which can be set is 99 minutes and 99 seconds.
• Never use a grill rack during microwave cooking.
• Never operate the appliance empty.
• At the maximum microwave power, the appliance will automatically lower the power
after a certain time of cooking to lengthen the service life.
• If you turn the food during operation, press the START/+30s button once and the
preset cooking procedure will continue.
• If you intend to remove the food before the preset time, you must press the STOP
button once to clear the preset procedure to avoid unintended operation of the same
program.
3. DEFROST
There are two defrost mode, dEF1 and dEF2, respectively. dEF1 for defrost by weight
and dEF2 for defrost by time. Press the “Defrost” button to select defrosting by weight or
by time. The display screen displays "dEF1" or "dEF2". Press 0 - 9 number buttons to
input the food weight or defrosting time. The weight range of dEF1 is 100g - 1500g,
and the maximum time that dEF2 can be entered is 99:99. After entering, press the
“START/+30s” button to begin operation. A buzzing sound will notify you on
completion of the operation. The dEF1 defrost mode by weight will make a beeping
sound to prompt you to turn the food over during defrosting.
11. CHILD LOCK FUNCTION
Use this feature to lock the control panel when you are cleaning, or to prevent children
from using the microwave unsupervised. All the buttons are rendered inoperable in this
mode.
1) Set lock: Hold the STOP button for 3 seconds.
2) Cancel lock: Hold the STOP button for 3 seconds.
CONTAINER AND UTENSILS GUIDELINE
It is strongly recommended to only use containers and utensils which are suitable and
safe for microwave cooking. Containers and utensils which are made of heat-resistant
ceramic, glass or plastic are suitable for microwave cooking. Never use metal
containers or utensils for microwave cooking, as this could result in sparks, re and
injury. Please use below guide as reference:
COOKING TIPS
The following factors may affect cooking results:
PRESET COOKING:
1) The “Preset Cooking Button” feature is designed to cook food which is between
20 - 25˚C in temperature. If the food is at a different temperature, the cooking effect
will vary. Please adjust it accordingly.
2) The shape, weight, and temperature of the food will affect the cooking outcome.
When using the “Preset Cooking” feature, please follow the weight range instructions
carefully.
FOOD ARRANGEMENT:
Place thicker food pieces towards the outside of the dish, the thinner parts towards the
centre, and spread them evenly. Do not overlap food pieces if possible.
COOKING TIME:
Start cooking with a short time setting, evaluate it after the cooking time has completed
and extend it accordingly (if needed). Over-cooking may result in smoke and burnt
food.
COOKING FOOD EVENLY:
Food such as chicken, hamburger patties or steak should be turned once during
cooking. Depending on the type of food, if applicable, interrupt the cooking process
and stir the food from the outside to the centre of the of dish, then resume cooking. This
only needs to be done once or twice during cooking.
ALLOW STANDING TIME:
After cooking, leave the food in the microwave for an adequate length of time. This
allows it to complete its cooking cycle and cool down in a gradual manner.
WHETHER THE FOOD IS DONE:
Colour and hardness of food help to determine if it is done. These include:
- Steam coming out from all parts of food, not just the edge
- Joints of poultry can be moved easily
- Pork or poultry shows no signs of blood
- Fish is opaque and can be sliced easily with a fork
BROWNING DISH:
When using a browning dish or self-heating container, always place a heat-resistant
insulator, such as a porcelain plate, under it to prevent damage to the turntable and
rotating ring.
MICROWAVE-SAFE PLASTIC WRAP:
When cooking food with high fat content, do not allow the plastic wrap to come into
contact with food as it may melt.
MICROWAVE-SAFE PLASTIC COOKWARE:
Some microwave-safe plastic cookware might not be suitable for cooking foods with
high fat and sugar content. Also, the preheating time specied in the dish instructions
must not be exceeded.
CARE & CLEANING
CLEANING
• Unplug the unit from the electrical outlet when not in use and before cleaning.
• Always wait for the unit to cool down completely before cleaning.
• Always clean surfaces which come into contact with food, food splashes or grease.
CAUTION: Built-up grease may overheat and begin to cause smoke or catch re.
• Wash accessories such as the turntable, rotating ring and rotation axis in warm,
soapy water, rinse and dry well.
• The interior walls and exterior of the appliance should be cleaned with a damp cloth
or sponge, and mild detergent. Do not use steel wool, scouring pads or scrape the
walls with a metal utensil, as this may damage the surfaces.
• Wipe the Waveguide Cover with a damp cloth or sponge, followed by a dry cloth
to dry.
• The door and control panel can be wiped with a damp cloth or sponge, followed
by wiping with a dry cloth/towel. Ensure to wipe the window, door seals and
adjacent parts.
• Clean the outside with a damp sponge. Do not use an abrasive cleaner as it may
damage the exterior nish.
• Do not use bleach or other abrasive substances or solvents to clean your appliance.
• Do not immerse the unit in water or any other liquid, or hold it under a running tap
to clean.
• To remove stubborn spots/marks, wipe the surfaces with a cloth slightly dampened
in soapy water or mild non-abrasive cleaner. Wipe and dry surfaces with a clean,
dry, soft cloth.
• Let all parts and surfaces dry thoroughly prior to plugging in the microwave and
using it, and before putting the microwave away for long-term storage.
REMOVING ODOURS AFTER USE
We recommend 3 alternative methods to assist in removing odours after use:
Method 1:
Place several lemon slices in a cup then insert it into the microwave cavity. Heat the
microwave on high power for 2 - 3 minutes.
Method 2:
Place a cup of red tea into the microwave cavity. Heat the microwave on high power
for 1 - 2 minutes.
Method 3:
Place several orange peels into the microwave cavity. Heat the microwave on high
power for 1 minute.
SERVICING:
If you believe that there is a problem with your microwave that may require minor
servicing, please check the following before calling your nearest Tevo Service Center:
1. Place one cup of water (approx.150ml) in a glass measure in the microwave and
close the door securely. The microwave’s inside lamp should go off if the door is
closed properly. Set the timer for 1 minute and press the “Start/Stop” button.
Observe the following:
2. Does the microwave lamp light up?
3. Does the cooling fan work?
(Put your hand over the rear ventilation openings.)
4. Does the turntable rotate?
(The turntable can rotate clockwise or counter clockwise. This is normal.)
5. Is the water inside the microwave hot?
If “NO” is the answer to any of the above questions, please check your wall socket
and the fuse in your meter box.
If both the wall socket and the fuse are functioning properly, contact your nearest Tevo
Service Center.
SERVICING SAFEGUARDS:
CAUTION: MICROWAVE RADIATION (Service Professionals Only)
The high voltage capacitor remains charged after disconnection; short the negative
terminal of H. Use a screwdriver to discharge the V capacitor to the microwave oven
chassis before working.
During servicing, the below listed parts are liable to be removed and give access to
potential voltage above 250V to earth:
• Magnetron
• High voltage transformer
• High voltage capacitor
• High voltage diode
• High voltage fuse
The following conditions may cause undue microwave exposure during servicing:
• Improper tting of magnetron
• Improper matching of door interlock, door hinge and door
• Improper tting of switch support
• Door, door seal or enclosure has been damaged
11
CONTAINER
MATERIAL
NOTES
Never use ceramics which are decorated
with metal rim or glazed
YES
YES
YES
YES
NO
MICROWAVE
SAFE
Heat-resistant
ceramic
Heat-resistant
plastic
Heat-resistant
glass
Plastic lm
Grill rack
Must not be used for long microwave
cooking times
It should not be used when cooking meat
as high temperatures may cause the lm
to melt and contaminate the food
Must not be used for long microwave
cooking times
Can cause sparks, re and injury
NO
Stainless Steel
Cutlery/Utensils
Can cause sparks, re and injury

CAUTION:
• It is necessary to turn food over during defrosting to ensure that even defrosting takes
place throughout the food.
• Usually defrosting will take more time than that of cooking the food.
• If the food can be cut by knife, the defrosting process can be considered completed.
• The microwave penetrates around 4cm into most food.
• Defrosted food should be consumed as soon as possible, it is not advisable to put it
back into the fridge, or to freeze it again.
4. AUTO COOKING
There are eight automatic menu items, “Potato”, “Pasta”, “Pizza”, “Popcorn”,
“Vegetable”, “Beverage”, “Meat” and “Fish”. To select the desired menu item, press
the corresponding button repeatedly to select the desired food weight. The display will
show the corresponding weight. Press the “START/+30s” button to start operation.
A buzzing sound will notify you on completion of the operation.
CAUTION:
• The temperature of food before cooking should be 20 - 25 °C. Higher or lower food
temperatures before cooking would require an increase or decrease in cooking time.
• The temperature, weight and shape of food will largely inuence how well the food is
cooked.
5. TIMER
In standby mode, press the “Timer” button to enter the setting interface. The countdown
function icon and "0:00" will be displayed on the display screen. Press the 0 - 9
number buttons to input the time. The maximum time that can be input is 99:99. After
setting the time, press the "START/+30s" button to begin the countdown. A buzzing
sound will notify you on completion of the countdown.
6. REHEAT
The Reheat function is mainly to facilitate users to heat food according to the weight of
the food. Press the “Reheat” button repeatedly to select the appropriate weight of the
food, the range of weights that can be selected are 200g, 400g, 600g, 800g and
1000g. After selecting the weight, press the “START/+30s” button to begin operation.
A buzzing sound will notify you on completion of the operation.
7. EXPRESS COOK
7.1 In standby mode, you can directly press the 1 - 6 number buttons to start the
microwave oven. The working time is 1 - 6 minutes, e.g. press 1 to operate for 1
minute, press 2 to operate for 2 minutes, and so on. After selecting the time, press
“START/+30s” button to begin operation. A buzzing sound will notify you on
completion of the operation.
7.2 In standby mode, after placing food in the microwave and closing the door, press
the “START/+30s” button to start the microwave oven quickly. The default working
time is 30 seconds. A buzzing sound will notify you on completion of the
operation.
8. CLOCK
The clock function and "0" button are combined in one button. The clock is a 24 - hour
system. The operation of the clock function is as follows:
In standby mode, press and hold down the “0/Clock” button for more than 3 seconds
to enter the clock setting interface, press the 0 ~ 9 number buttons to input the clock
time directly and press the “START/+30s” button to conrm the set time and exit the
clock setting mode at the same time.
9. STOP
In the process of cooking settings, you can press the “STOP” button to cancel the set
operation and return to standby mode. In the process of microwave operation, you
can press the “STOP” button to pause. In the paused state, you can press the “STOP”
button again to cancel the function and return to standby mode.
10. START/+30s
After setting the cooking time or food weight, press the “START/+30s” button to start
the microwave oven immediately. During operation you can press the “START/+30s”
button to increase time, press once to increase by 30 seconds. NOTE: The menu mode
and weight defrosting mode time cannot be adjusted during operation. In the paused
state you can press the “START/+30s” button to continue operation.
BEFORE FIRST USE
Before using this unit, please read these instructions completely. Save this manual and
pass it on to the next user. Remove all packaging materials, labels, lm and/or stickers
from your appliance and dispose of them correctly. Check the package to verify that
all contents are included and undamaged. If the contents are incomplete, or appear
damaged, do not operate the appliance - return it with all packaging and receipt to
the place of purchase or an authorised Service Centre.
Ensure to place the microwave in a dry, non-corrosive environment. Keeping it away
from heat and humidity, such as a gas burner or water tank. Ensure that the
microwave has sufcient ventilation:
*the distance from the back of the microwave to the wall should be at least 10cm
*the distance from the side should be at least 5cm
*the distance above the top surface should be at least 20cm
*the distance from the bottom of the microwave to the ground should be at least
85cm
Position the microwave so that the plug is accessible, ensuring good grounding in case
of leakage. A ground loop can be formed to avoid electric shock. Situate it far away
from a TV, radio or antenna as picture disturbance or noise may occur. Ideally the
distance should be more than 5m.
Complete assembly by placing the rotating ring into the microwave cavity in the
correct position. Fit the turntable on to the rotating axis, making sure that it is tted
properly. The microwave must be operated with the door closed.
This appliance may produce an odour and emit smoke when switched on for the rst
time, as residues from the production process are eliminated. This is normal and does
not indicate a defect or hazard. Before rst use, we recommend placing a cup of
water into the cavity of the microwave and running the appliance on the high power
setting for 1 - 2 minutes, approximately 2 - 3 times. This will assist to eliminate any
possible residues from the production process.
USING THE CONTROL PANEL
1. BEFORE COOKING
The LED display will light up when plugged into a power supply. The unit will enter
standby mode and the LED display will show 1:00.
2. MICROWAVE FUNCTION
There are ten microwave power levels, 100P, 90P, 80P, 70P, 60P, 50P, 40P, 30P,
20P and 10P, respectively. Press the “Microw.” button repeatedly to select the desired
microwave power. Press 0 - 9 number buttons to input the cooking time. The maximum
time that can be input is 99:99. After entering the cooking time, press “START/+30s”
button to begin operation. A buzzing sound will notify you on completion of the
operation.
CAUTION:
• The max time which can be set is 99 minutes and 99 seconds.
• Never use a grill rack during microwave cooking.
• Never operate the appliance empty.
• At the maximum microwave power, the appliance will automatically lower the power
after a certain time of cooking to lengthen the service life.
• If you turn the food during operation, press the START/+30s button once and the
preset cooking procedure will continue.
• If you intend to remove the food before the preset time, you must press the STOP
button once to clear the preset procedure to avoid unintended operation of the same
program.
3. DEFROST
There are two defrost mode, dEF1 and dEF2, respectively. dEF1 for defrost by weight
and dEF2 for defrost by time. Press the “Defrost” button to select defrosting by weight or
by time. The display screen displays "dEF1" or "dEF2". Press 0 - 9 number buttons to
input the food weight or defrosting time. The weight range of dEF1 is 100g - 1500g,
and the maximum time that dEF2 can be entered is 99:99. After entering, press the
“START/+30s” button to begin operation. A buzzing sound will notify you on
completion of the operation. The dEF1 defrost mode by weight will make a beeping
sound to prompt you to turn the food over during defrosting.
11. CHILD LOCK FUNCTION
Use this feature to lock the control panel when you are cleaning, or to prevent children
from using the microwave unsupervised. All the buttons are rendered inoperable in this
mode.
1) Set lock: Hold the STOP button for 3 seconds.
2) Cancel lock: Hold the STOP button for 3 seconds.
CONTAINER AND UTENSILS GUIDELINE
It is strongly recommended to only use containers and utensils which are suitable and
safe for microwave cooking. Containers and utensils which are made of heat-resistant
ceramic, glass or plastic are suitable for microwave cooking. Never use metal
containers or utensils for microwave cooking, as this could result in sparks, re and
injury. Please use below guide as reference:
COOKING TIPS
The following factors may affect cooking results:
PRESET COOKING:
1) The “Preset Cooking Button” feature is designed to cook food which is between
20 - 25˚C in temperature. If the food is at a different temperature, the cooking effect
will vary. Please adjust it accordingly.
2) The shape, weight, and temperature of the food will affect the cooking outcome.
When using the “Preset Cooking” feature, please follow the weight range instructions
carefully.
FOOD ARRANGEMENT:
Place thicker food pieces towards the outside of the dish, the thinner parts towards the
centre, and spread them evenly. Do not overlap food pieces if possible.
COOKING TIME:
Start cooking with a short time setting, evaluate it after the cooking time has completed
and extend it accordingly (if needed). Over-cooking may result in smoke and burnt
food.
COOKING FOOD EVENLY:
Food such as chicken, hamburger patties or steak should be turned once during
cooking. Depending on the type of food, if applicable, interrupt the cooking process
and stir the food from the outside to the centre of the of dish, then resume cooking. This
only needs to be done once or twice during cooking.
ALLOW STANDING TIME:
After cooking, leave the food in the microwave for an adequate length of time. This
allows it to complete its cooking cycle and cool down in a gradual manner.
WHETHER THE FOOD IS DONE:
Colour and hardness of food help to determine if it is done. These include:
- Steam coming out from all parts of food, not just the edge
- Joints of poultry can be moved easily
- Pork or poultry shows no signs of blood
- Fish is opaque and can be sliced easily with a fork
BROWNING DISH:
When using a browning dish or self-heating container, always place a heat-resistant
insulator, such as a porcelain plate, under it to prevent damage to the turntable and
rotating ring.
MICROWAVE-SAFE PLASTIC WRAP:
When cooking food with high fat content, do not allow the plastic wrap to come into
contact with food as it may melt.
MICROWAVE-SAFE PLASTIC COOKWARE:
Some microwave-safe plastic cookware might not be suitable for cooking foods with
high fat and sugar content. Also, the preheating time specied in the dish instructions
must not be exceeded.
CARE & CLEANING
CLEANING
• Unplug the unit from the electrical outlet when not in use and before cleaning.
• Always wait for the unit to cool down completely before cleaning.
• Always clean surfaces which come into contact with food, food splashes or grease.
CAUTION: Built-up grease may overheat and begin to cause smoke or catch re.
• Wash accessories such as the turntable, rotating ring and rotation axis in warm,
soapy water, rinse and dry well.
• The interior walls and exterior of the appliance should be cleaned with a damp cloth
or sponge, and mild detergent. Do not use steel wool, scouring pads or scrape the
walls with a metal utensil, as this may damage the surfaces.
• Wipe the Waveguide Cover with a damp cloth or sponge, followed by a dry cloth
to dry.
• The door and control panel can be wiped with a damp cloth or sponge, followed
by wiping with a dry cloth/towel. Ensure to wipe the window, door seals and
adjacent parts.
• Clean the outside with a damp sponge. Do not use an abrasive cleaner as it may
damage the exterior nish.
• Do not use bleach or other abrasive substances or solvents to clean your appliance.
• Do not immerse the unit in water or any other liquid, or hold it under a running tap
to clean.
• To remove stubborn spots/marks, wipe the surfaces with a cloth slightly dampened
in soapy water or mild non-abrasive cleaner. Wipe and dry surfaces with a clean,
dry, soft cloth.
• Let all parts and surfaces dry thoroughly prior to plugging in the microwave and
using it, and before putting the microwave away for long-term storage.
REMOVING ODOURS AFTER USE
We recommend 3 alternative methods to assist in removing odours after use:
Method 1:
Place several lemon slices in a cup then insert it into the microwave cavity. Heat the
microwave on high power for 2 - 3 minutes.
Method 2:
Place a cup of red tea into the microwave cavity. Heat the microwave on high power
for 1 - 2 minutes.
Method 3:
Place several orange peels into the microwave cavity. Heat the microwave on high
power for 1 minute.
SERVICING:
If you believe that there is a problem with your microwave that may require minor
servicing, please check the following before calling your nearest Tevo Service Center:
1. Place one cup of water (approx.150ml) in a glass measure in the microwave and
close the door securely. The microwave’s inside lamp should go off if the door is
closed properly. Set the timer for 1 minute and press the “Start/Stop” button.
Observe the following:
2. Does the microwave lamp light up?
3. Does the cooling fan work?
(Put your hand over the rear ventilation openings.)
4. Does the turntable rotate?
(The turntable can rotate clockwise or counter clockwise. This is normal.)
5. Is the water inside the microwave hot?
If “NO” is the answer to any of the above questions, please check your wall socket
and the fuse in your meter box.
If both the wall socket and the fuse are functioning properly, contact your nearest Tevo
Service Center.
SERVICING SAFEGUARDS:
CAUTION: MICROWAVE RADIATION (Service Professionals Only)
The high voltage capacitor remains charged after disconnection; short the negative
terminal of H. Use a screwdriver to discharge the V capacitor to the microwave oven
chassis before working.
During servicing, the below listed parts are liable to be removed and give access to
potential voltage above 250V to earth:
• Magnetron
• High voltage transformer
• High voltage capacitor
• High voltage diode
• High voltage fuse
The following conditions may cause undue microwave exposure during servicing:
• Improper tting of magnetron
• Improper matching of door interlock, door hinge and door
• Improper tting of switch support
• Door, door seal or enclosure has been damaged
12

CAUTION:
• It is necessary to turn food over during defrosting to ensure that even defrosting takes
place throughout the food.
• Usually defrosting will take more time than that of cooking the food.
• If the food can be cut by knife, the defrosting process can be considered completed.
• The microwave penetrates around 4cm into most food.
• Defrosted food should be consumed as soon as possible, it is not advisable to put it
back into the fridge, or to freeze it again.
4. AUTO COOKING
There are eight automatic menu items, “Potato”, “Pasta”, “Pizza”, “Popcorn”,
“Vegetable”, “Beverage”, “Meat” and “Fish”. To select the desired menu item, press
the corresponding button repeatedly to select the desired food weight. The display will
show the corresponding weight. Press the “START/+30s” button to start operation.
A buzzing sound will notify you on completion of the operation.
CAUTION:
• The temperature of food before cooking should be 20 - 25 °C. Higher or lower food
temperatures before cooking would require an increase or decrease in cooking time.
• The temperature, weight and shape of food will largely inuence how well the food is
cooked.
5. TIMER
In standby mode, press the “Timer” button to enter the setting interface. The countdown
function icon and "0:00" will be displayed on the display screen. Press the 0 - 9
number buttons to input the time. The maximum time that can be input is 99:99. After
setting the time, press the "START/+30s" button to begin the countdown. A buzzing
sound will notify you on completion of the countdown.
6. REHEAT
The Reheat function is mainly to facilitate users to heat food according to the weight of
the food. Press the “Reheat” button repeatedly to select the appropriate weight of the
food, the range of weights that can be selected are 200g, 400g, 600g, 800g and
1000g. After selecting the weight, press the “START/+30s” button to begin operation.
A buzzing sound will notify you on completion of the operation.
7. EXPRESS COOK
7.1 In standby mode, you can directly press the 1 - 6 number buttons to start the
microwave oven. The working time is 1 - 6 minutes, e.g. press 1 to operate for 1
minute, press 2 to operate for 2 minutes, and so on. After selecting the time, press
“START/+30s” button to begin operation. A buzzing sound will notify you on
completion of the operation.
7.2 In standby mode, after placing food in the microwave and closing the door, press
the “START/+30s” button to start the microwave oven quickly. The default working
time is 30 seconds. A buzzing sound will notify you on completion of the
operation.
8. CLOCK
The clock function and "0" button are combined in one button. The clock is a 24 - hour
system. The operation of the clock function is as follows:
In standby mode, press and hold down the “0/Clock” button for more than 3 seconds
to enter the clock setting interface, press the 0 ~ 9 number buttons to input the clock
time directly and press the “START/+30s” button to conrm the set time and exit the
clock setting mode at the same time.
9. STOP
In the process of cooking settings, you can press the “STOP” button to cancel the set
operation and return to standby mode. In the process of microwave operation, you
can press the “STOP” button to pause. In the paused state, you can press the “STOP”
button again to cancel the function and return to standby mode.
10. START/+30s
After setting the cooking time or food weight, press the “START/+30s” button to start
the microwave oven immediately. During operation you can press the “START/+30s”
button to increase time, press once to increase by 30 seconds. NOTE: The menu mode
and weight defrosting mode time cannot be adjusted during operation. In the paused
state you can press the “START/+30s” button to continue operation.
BEFORE FIRST USE
Before using this unit, please read these instructions completely. Save this manual and
pass it on to the next user. Remove all packaging materials, labels, lm and/or stickers
from your appliance and dispose of them correctly. Check the package to verify that
all contents are included and undamaged. If the contents are incomplete, or appear
damaged, do not operate the appliance - return it with all packaging and receipt to
the place of purchase or an authorised Service Centre.
Ensure to place the microwave in a dry, non-corrosive environment. Keeping it away
from heat and humidity, such as a gas burner or water tank. Ensure that the
microwave has sufcient ventilation:
*the distance from the back of the microwave to the wall should be at least 10cm
*the distance from the side should be at least 5cm
*the distance above the top surface should be at least 20cm
*the distance from the bottom of the microwave to the ground should be at least
85cm
Position the microwave so that the plug is accessible, ensuring good grounding in case
of leakage. A ground loop can be formed to avoid electric shock. Situate it far away
from a TV, radio or antenna as picture disturbance or noise may occur. Ideally the
distance should be more than 5m.
Complete assembly by placing the rotating ring into the microwave cavity in the
correct position. Fit the turntable on to the rotating axis, making sure that it is tted
properly. The microwave must be operated with the door closed.
This appliance may produce an odour and emit smoke when switched on for the rst
time, as residues from the production process are eliminated. This is normal and does
not indicate a defect or hazard. Before rst use, we recommend placing a cup of
water into the cavity of the microwave and running the appliance on the high power
setting for 1 - 2 minutes, approximately 2 - 3 times. This will assist to eliminate any
possible residues from the production process.
USING THE CONTROL PANEL
1. BEFORE COOKING
The LED display will light up when plugged into a power supply. The unit will enter
standby mode and the LED display will show 1:00.
2. MICROWAVE FUNCTION
There are ten microwave power levels, 100P, 90P, 80P, 70P, 60P, 50P, 40P, 30P,
20P and 10P, respectively. Press the “Microw.” button repeatedly to select the desired
microwave power. Press 0 - 9 number buttons to input the cooking time. The maximum
time that can be input is 99:99. After entering the cooking time, press “START/+30s”
button to begin operation. A buzzing sound will notify you on completion of the
operation.
CAUTION:
• The max time which can be set is 99 minutes and 99 seconds.
• Never use a grill rack during microwave cooking.
• Never operate the appliance empty.
• At the maximum microwave power, the appliance will automatically lower the power
after a certain time of cooking to lengthen the service life.
• If you turn the food during operation, press the START/+30s button once and the
preset cooking procedure will continue.
• If you intend to remove the food before the preset time, you must press the STOP
button once to clear the preset procedure to avoid unintended operation of the same
program.
3. DEFROST
There are two defrost mode, dEF1 and dEF2, respectively. dEF1 for defrost by weight
and dEF2 for defrost by time. Press the “Defrost” button to select defrosting by weight or
by time. The display screen displays "dEF1" or "dEF2". Press 0 - 9 number buttons to
input the food weight or defrosting time. The weight range of dEF1 is 100g - 1500g,
and the maximum time that dEF2 can be entered is 99:99. After entering, press the
“START/+30s” button to begin operation. A buzzing sound will notify you on
completion of the operation. The dEF1 defrost mode by weight will make a beeping
sound to prompt you to turn the food over during defrosting.
11. CHILD LOCK FUNCTION
Use this feature to lock the control panel when you are cleaning, or to prevent children
from using the microwave unsupervised. All the buttons are rendered inoperable in this
mode.
1) Set lock: Hold the STOP button for 3 seconds.
2) Cancel lock: Hold the STOP button for 3 seconds.
CONTAINER AND UTENSILS GUIDELINE
It is strongly recommended to only use containers and utensils which are suitable and
safe for microwave cooking. Containers and utensils which are made of heat-resistant
ceramic, glass or plastic are suitable for microwave cooking. Never use metal
containers or utensils for microwave cooking, as this could result in sparks, re and
injury. Please use below guide as reference:
COOKING TIPS
The following factors may affect cooking results:
PRESET COOKING:
1) The “Preset Cooking Button” feature is designed to cook food which is between
20 - 25˚C in temperature. If the food is at a different temperature, the cooking effect
will vary. Please adjust it accordingly.
2) The shape, weight, and temperature of the food will affect the cooking outcome.
When using the “Preset Cooking” feature, please follow the weight range instructions
carefully.
FOOD ARRANGEMENT:
Place thicker food pieces towards the outside of the dish, the thinner parts towards the
centre, and spread them evenly. Do not overlap food pieces if possible.
COOKING TIME:
Start cooking with a short time setting, evaluate it after the cooking time has completed
and extend it accordingly (if needed). Over-cooking may result in smoke and burnt
food.
COOKING FOOD EVENLY:
Food such as chicken, hamburger patties or steak should be turned once during
cooking. Depending on the type of food, if applicable, interrupt the cooking process
and stir the food from the outside to the centre of the of dish, then resume cooking. This
only needs to be done once or twice during cooking.
ALLOW STANDING TIME:
After cooking, leave the food in the microwave for an adequate length of time. This
allows it to complete its cooking cycle and cool down in a gradual manner.
WHETHER THE FOOD IS DONE:
Colour and hardness of food help to determine if it is done. These include:
- Steam coming out from all parts of food, not just the edge
- Joints of poultry can be moved easily
- Pork or poultry shows no signs of blood
- Fish is opaque and can be sliced easily with a fork
BROWNING DISH:
When using a browning dish or self-heating container, always place a heat-resistant
insulator, such as a porcelain plate, under it to prevent damage to the turntable and
rotating ring.
MICROWAVE-SAFE PLASTIC WRAP:
When cooking food with high fat content, do not allow the plastic wrap to come into
contact with food as it may melt.
MICROWAVE-SAFE PLASTIC COOKWARE:
Some microwave-safe plastic cookware might not be suitable for cooking foods with
high fat and sugar content. Also, the preheating time specied in the dish instructions
must not be exceeded.
CARE & CLEANING
CLEANING
• Unplug the unit from the electrical outlet when not in use and before cleaning.
• Always wait for the unit to cool down completely before cleaning.
• Always clean surfaces which come into contact with food, food splashes or grease.
CAUTION: Built-up grease may overheat and begin to cause smoke or catch re.
• Wash accessories such as the turntable, rotating ring and rotation axis in warm,
soapy water, rinse and dry well.
• The interior walls and exterior of the appliance should be cleaned with a damp cloth
or sponge, and mild detergent. Do not use steel wool, scouring pads or scrape the
walls with a metal utensil, as this may damage the surfaces.
• Wipe the Waveguide Cover with a damp cloth or sponge, followed by a dry cloth
to dry.
• The door and control panel can be wiped with a damp cloth or sponge, followed
by wiping with a dry cloth/towel. Ensure to wipe the window, door seals and
adjacent parts.
• Clean the outside with a damp sponge. Do not use an abrasive cleaner as it may
damage the exterior nish.
• Do not use bleach or other abrasive substances or solvents to clean your appliance.
• Do not immerse the unit in water or any other liquid, or hold it under a running tap
to clean.
• To remove stubborn spots/marks, wipe the surfaces with a cloth slightly dampened
in soapy water or mild non-abrasive cleaner. Wipe and dry surfaces with a clean,
dry, soft cloth.
• Let all parts and surfaces dry thoroughly prior to plugging in the microwave and
using it, and before putting the microwave away for long-term storage.
REMOVING ODOURS AFTER USE
We recommend 3 alternative methods to assist in removing odours after use:
Method 1:
Place several lemon slices in a cup then insert it into the microwave cavity. Heat the
microwave on high power for 2 - 3 minutes.
Method 2:
Place a cup of red tea into the microwave cavity. Heat the microwave on high power
for 1 - 2 minutes.
Method 3:
Place several orange peels into the microwave cavity. Heat the microwave on high
power for 1 minute.
SERVICING:
If you believe that there is a problem with your microwave that may require minor
servicing, please check the following before calling your nearest Tevo Service Center:
1. Place one cup of water (approx.150ml) in a glass measure in the microwave and
close the door securely. The microwave’s inside lamp should go off if the door is
closed properly. Set the timer for 1 minute and press the “Start/Stop” button.
Observe the following:
2. Does the microwave lamp light up?
3. Does the cooling fan work?
(Put your hand over the rear ventilation openings.)
4. Does the turntable rotate?
(The turntable can rotate clockwise or counter clockwise. This is normal.)
5. Is the water inside the microwave hot?
If “NO” is the answer to any of the above questions, please check your wall socket
and the fuse in your meter box.
If both the wall socket and the fuse are functioning properly, contact your nearest Tevo
Service Center.
SERVICING SAFEGUARDS:
CAUTION: MICROWAVE RADIATION (Service Professionals Only)
The high voltage capacitor remains charged after disconnection; short the negative
terminal of H. Use a screwdriver to discharge the V capacitor to the microwave oven
chassis before working.
During servicing, the below listed parts are liable to be removed and give access to
potential voltage above 250V to earth:
• Magnetron
• High voltage transformer
• High voltage capacitor
• High voltage diode
• High voltage fuse
The following conditions may cause undue microwave exposure during servicing:
• Improper tting of magnetron
• Improper matching of door interlock, door hinge and door
• Improper tting of switch support
• Door, door seal or enclosure has been damaged
13

CAUTION:
• It is necessary to turn food over during defrosting to ensure that even defrosting takes
place throughout the food.
• Usually defrosting will take more time than that of cooking the food.
• If the food can be cut by knife, the defrosting process can be considered completed.
• The microwave penetrates around 4cm into most food.
• Defrosted food should be consumed as soon as possible, it is not advisable to put it
back into the fridge, or to freeze it again.
4. AUTO COOKING
There are eight automatic menu items, “Potato”, “Pasta”, “Pizza”, “Popcorn”,
“Vegetable”, “Beverage”, “Meat” and “Fish”. To select the desired menu item, press
the corresponding button repeatedly to select the desired food weight. The display will
show the corresponding weight. Press the “START/+30s” button to start operation.
A buzzing sound will notify you on completion of the operation.
CAUTION:
• The temperature of food before cooking should be 20 - 25 °C. Higher or lower food
temperatures before cooking would require an increase or decrease in cooking time.
• The temperature, weight and shape of food will largely inuence how well the food is
cooked.
5. TIMER
In standby mode, press the “Timer” button to enter the setting interface. The countdown
function icon and "0:00" will be displayed on the display screen. Press the 0 - 9
number buttons to input the time. The maximum time that can be input is 99:99. After
setting the time, press the "START/+30s" button to begin the countdown. A buzzing
sound will notify you on completion of the countdown.
6. REHEAT
The Reheat function is mainly to facilitate users to heat food according to the weight of
the food. Press the “Reheat” button repeatedly to select the appropriate weight of the
food, the range of weights that can be selected are 200g, 400g, 600g, 800g and
1000g. After selecting the weight, press the “START/+30s” button to begin operation.
A buzzing sound will notify you on completion of the operation.
7. EXPRESS COOK
7.1 In standby mode, you can directly press the 1 - 6 number buttons to start the
microwave oven. The working time is 1 - 6 minutes, e.g. press 1 to operate for 1
minute, press 2 to operate for 2 minutes, and so on. After selecting the time, press
“START/+30s” button to begin operation. A buzzing sound will notify you on
completion of the operation.
7.2 In standby mode, after placing food in the microwave and closing the door, press
the “START/+30s” button to start the microwave oven quickly. The default working
time is 30 seconds. A buzzing sound will notify you on completion of the
operation.
8. CLOCK
The clock function and "0" button are combined in one button. The clock is a 24 - hour
system. The operation of the clock function is as follows:
In standby mode, press and hold down the “0/Clock” button for more than 3 seconds
to enter the clock setting interface, press the 0 ~ 9 number buttons to input the clock
time directly and press the “START/+30s” button to conrm the set time and exit the
clock setting mode at the same time.
9. STOP
In the process of cooking settings, you can press the “STOP” button to cancel the set
operation and return to standby mode. In the process of microwave operation, you
can press the “STOP” button to pause. In the paused state, you can press the “STOP”
button again to cancel the function and return to standby mode.
10. START/+30s
After setting the cooking time or food weight, press the “START/+30s” button to start
the microwave oven immediately. During operation you can press the “START/+30s”
button to increase time, press once to increase by 30 seconds. NOTE: The menu mode
and weight defrosting mode time cannot be adjusted during operation. In the paused
state you can press the “START/+30s” button to continue operation.
BEFORE FIRST USE
Before using this unit, please read these instructions completely. Save this manual and
pass it on to the next user. Remove all packaging materials, labels, lm and/or stickers
from your appliance and dispose of them correctly. Check the package to verify that
all contents are included and undamaged. If the contents are incomplete, or appear
damaged, do not operate the appliance - return it with all packaging and receipt to
the place of purchase or an authorised Service Centre.
Ensure to place the microwave in a dry, non-corrosive environment. Keeping it away
from heat and humidity, such as a gas burner or water tank. Ensure that the
microwave has sufcient ventilation:
*the distance from the back of the microwave to the wall should be at least 10cm
*the distance from the side should be at least 5cm
*the distance above the top surface should be at least 20cm
*the distance from the bottom of the microwave to the ground should be at least
85cm
Position the microwave so that the plug is accessible, ensuring good grounding in case
of leakage. A ground loop can be formed to avoid electric shock. Situate it far away
from a TV, radio or antenna as picture disturbance or noise may occur. Ideally the
distance should be more than 5m.
Complete assembly by placing the rotating ring into the microwave cavity in the
correct position. Fit the turntable on to the rotating axis, making sure that it is tted
properly. The microwave must be operated with the door closed.
This appliance may produce an odour and emit smoke when switched on for the rst
time, as residues from the production process are eliminated. This is normal and does
not indicate a defect or hazard. Before rst use, we recommend placing a cup of
water into the cavity of the microwave and running the appliance on the high power
setting for 1 - 2 minutes, approximately 2 - 3 times. This will assist to eliminate any
possible residues from the production process.
USING THE CONTROL PANEL
1. BEFORE COOKING
The LED display will light up when plugged into a power supply. The unit will enter
standby mode and the LED display will show 1:00.
2. MICROWAVE FUNCTION
There are ten microwave power levels, 100P, 90P, 80P, 70P, 60P, 50P, 40P, 30P,
20P and 10P, respectively. Press the “Microw.” button repeatedly to select the desired
microwave power. Press 0 - 9 number buttons to input the cooking time. The maximum
time that can be input is 99:99. After entering the cooking time, press “START/+30s”
button to begin operation. A buzzing sound will notify you on completion of the
operation.
CAUTION:
• The max time which can be set is 99 minutes and 99 seconds.
• Never use a grill rack during microwave cooking.
• Never operate the appliance empty.
• At the maximum microwave power, the appliance will automatically lower the power
after a certain time of cooking to lengthen the service life.
• If you turn the food during operation, press the START/+30s button once and the
preset cooking procedure will continue.
• If you intend to remove the food before the preset time, you must press the STOP
button once to clear the preset procedure to avoid unintended operation of the same
program.
3. DEFROST
There are two defrost mode, dEF1 and dEF2, respectively. dEF1 for defrost by weight
and dEF2 for defrost by time. Press the “Defrost” button to select defrosting by weight or
by time. The display screen displays "dEF1" or "dEF2". Press 0 - 9 number buttons to
input the food weight or defrosting time. The weight range of dEF1 is 100g - 1500g,
and the maximum time that dEF2 can be entered is 99:99. After entering, press the
“START/+30s” button to begin operation. A buzzing sound will notify you on
completion of the operation. The dEF1 defrost mode by weight will make a beeping
sound to prompt you to turn the food over during defrosting.
11. CHILD LOCK FUNCTION
Use this feature to lock the control panel when you are cleaning, or to prevent children
from using the microwave unsupervised. All the buttons are rendered inoperable in this
mode.
1) Set lock: Hold the STOP button for 3 seconds.
2) Cancel lock: Hold the STOP button for 3 seconds.
CONTAINER AND UTENSILS GUIDELINE
It is strongly recommended to only use containers and utensils which are suitable and
safe for microwave cooking. Containers and utensils which are made of heat-resistant
ceramic, glass or plastic are suitable for microwave cooking. Never use metal
containers or utensils for microwave cooking, as this could result in sparks, re and
injury. Please use below guide as reference:
COOKING TIPS
The following factors may affect cooking results:
PRESET COOKING:
1) The “Preset Cooking Button” feature is designed to cook food which is between
20 - 25˚C in temperature. If the food is at a different temperature, the cooking effect
will vary. Please adjust it accordingly.
2) The shape, weight, and temperature of the food will affect the cooking outcome.
When using the “Preset Cooking” feature, please follow the weight range instructions
carefully.
FOOD ARRANGEMENT:
Place thicker food pieces towards the outside of the dish, the thinner parts towards the
centre, and spread them evenly. Do not overlap food pieces if possible.
COOKING TIME:
Start cooking with a short time setting, evaluate it after the cooking time has completed
and extend it accordingly (if needed). Over-cooking may result in smoke and burnt
food.
COOKING FOOD EVENLY:
Food such as chicken, hamburger patties or steak should be turned once during
cooking. Depending on the type of food, if applicable, interrupt the cooking process
and stir the food from the outside to the centre of the of dish, then resume cooking. This
only needs to be done once or twice during cooking.
ALLOW STANDING TIME:
After cooking, leave the food in the microwave for an adequate length of time. This
allows it to complete its cooking cycle and cool down in a gradual manner.
WHETHER THE FOOD IS DONE:
Colour and hardness of food help to determine if it is done. These include:
- Steam coming out from all parts of food, not just the edge
- Joints of poultry can be moved easily
- Pork or poultry shows no signs of blood
- Fish is opaque and can be sliced easily with a fork
BROWNING DISH:
When using a browning dish or self-heating container, always place a heat-resistant
insulator, such as a porcelain plate, under it to prevent damage to the turntable and
rotating ring.
MICROWAVE-SAFE PLASTIC WRAP:
When cooking food with high fat content, do not allow the plastic wrap to come into
contact with food as it may melt.
MICROWAVE-SAFE PLASTIC COOKWARE:
Some microwave-safe plastic cookware might not be suitable for cooking foods with
high fat and sugar content. Also, the preheating time specied in the dish instructions
must not be exceeded.
CARE & CLEANING
CLEANING
• Unplug the unit from the electrical outlet when not in use and before cleaning.
• Always wait for the unit to cool down completely before cleaning.
• Always clean surfaces which come into contact with food, food splashes or grease.
CAUTION: Built-up grease may overheat and begin to cause smoke or catch re.
• Wash accessories such as the turntable, rotating ring and rotation axis in warm,
soapy water, rinse and dry well.
• The interior walls and exterior of the appliance should be cleaned with a damp cloth
or sponge, and mild detergent. Do not use steel wool, scouring pads or scrape the
walls with a metal utensil, as this may damage the surfaces.
• Wipe the Waveguide Cover with a damp cloth or sponge, followed by a dry cloth
to dry.
• The door and control panel can be wiped with a damp cloth or sponge, followed
by wiping with a dry cloth/towel. Ensure to wipe the window, door seals and
adjacent parts.
• Clean the outside with a damp sponge. Do not use an abrasive cleaner as it may
damage the exterior nish.
• Do not use bleach or other abrasive substances or solvents to clean your appliance.
• Do not immerse the unit in water or any other liquid, or hold it under a running tap
to clean.
• To remove stubborn spots/marks, wipe the surfaces with a cloth slightly dampened
in soapy water or mild non-abrasive cleaner. Wipe and dry surfaces with a clean,
dry, soft cloth.
• Let all parts and surfaces dry thoroughly prior to plugging in the microwave and
using it, and before putting the microwave away for long-term storage.
REMOVING ODOURS AFTER USE
We recommend 3 alternative methods to assist in removing odours after use:
Method 1:
Place several lemon slices in a cup then insert it into the microwave cavity. Heat the
microwave on high power for 2 - 3 minutes.
Method 2:
Place a cup of red tea into the microwave cavity. Heat the microwave on high power
for 1 - 2 minutes.
Method 3:
Place several orange peels into the microwave cavity. Heat the microwave on high
power for 1 minute.
SERVICING:
If you believe that there is a problem with your microwave that may require minor
servicing, please check the following before calling your nearest Tevo Service Center:
1. Place one cup of water (approx.150ml) in a glass measure in the microwave and
close the door securely. The microwave’s inside lamp should go off if the door is
closed properly. Set the timer for 1 minute and press the “Start/Stop” button.
Observe the following:
2. Does the microwave lamp light up?
3. Does the cooling fan work?
(Put your hand over the rear ventilation openings.)
4. Does the turntable rotate?
(The turntable can rotate clockwise or counter clockwise. This is normal.)
5. Is the water inside the microwave hot?
If “NO” is the answer to any of the above questions, please check your wall socket
and the fuse in your meter box.
If both the wall socket and the fuse are functioning properly, contact your nearest Tevo
Service Center.
SERVICING SAFEGUARDS:
CAUTION: MICROWAVE RADIATION (Service Professionals Only)
The high voltage capacitor remains charged after disconnection; short the negative
terminal of H. Use a screwdriver to discharge the V capacitor to the microwave oven
chassis before working.
During servicing, the below listed parts are liable to be removed and give access to
potential voltage above 250V to earth:
• Magnetron
• High voltage transformer
• High voltage capacitor
• High voltage diode
• High voltage fuse
The following conditions may cause undue microwave exposure during servicing:
• Improper tting of magnetron
• Improper matching of door interlock, door hinge and door
• Improper tting of switch support
• Door, door seal or enclosure has been damaged
14

WARRANTY
Your BENNETT READ
®
30L DIGITAL MICROWAVE warranty covers manufacture
faults for a period of 1 (one) year. If you register your warranty online at
www.bennettread.co.za within 14 (fourteen) days of purchase, then your warranty will
be extended to 2 (two) years. Tevo undertakes to repair or replace this product at no
charge, if found to be defective due to a manufacturing fault during the warranty
period. This warranty excludes damage caused by misuse, neglect, shipping accident,
commercial use, incorrect installation, or work carried out by anyone other than an
authorised and qualied Tevo Service Technician. Tevo is not liable for incidental or
consequential damages of any nature associated with the use of this product. Tevo’s
liability will not exceed the purchase price of this product.
PLEASE KEEP YOUR RECEIPT TO VERIFY YOUR WARRANTY.
This warranty applies to product used for personal or domestic use only, and
specically excludes any malfunction or defect arising from commercial use.
Warranty and Service enquiries can be made by contacting:
Tevo (Pty) Ltd
Johannesburg (012) 740 5000
Durban (031) 570 5900
Cape Town (021) 380 0038/9
Customer Service Help Line: 0861 77 88 88
www.bennettread.co.za
ENVIRONMENTALLY FRIENDLY DISPOSAL
Do not dispose of electrical appliances with general municipal waste. Hazardous
substances can leak and contaminate the groundwater, affecting the food chain and
ultimately damaging the environment and your health. Contact your local municipality
for information on safe disposal in your area.
SPECIFICATIONS:
Model: BRMIC11
Capacity: 30L
Voltage: 230V-, 50Hz
Microwave Input Power: 1520W
Microwave Input Power: 950W
Microwave Frequency: 2450MHz
PLEASE RECYCLE
15


®
EVERYDAY EXCEPTIONAL
Brought to you by:
www.tevo.co.za
info@tevo.co.za
0861 77 88 88