Scan to register
bellakitchenware.com
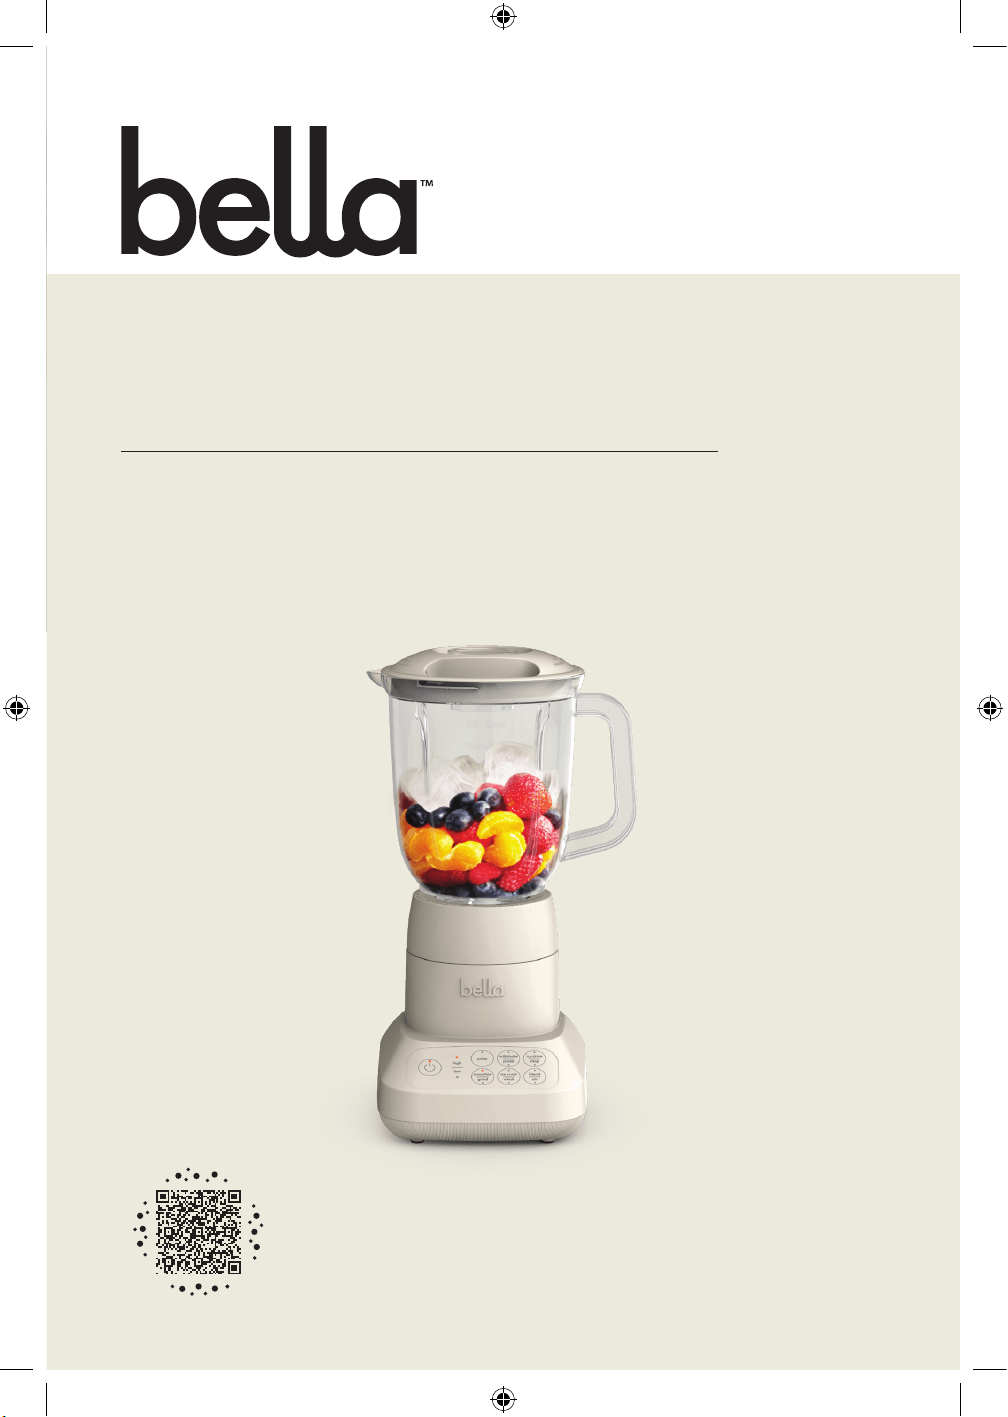
Flip & Store
Blender
Instruction Manual
Licuadora
Flip & Store
Manual de instrucciones
35103_35144_35145_35146_35218_Bella 10 speed Countertop Blender_IN_V2_R1.indd 135103_35144_35145_35146_35218_Bella 10 speed Countertop Blender_IN_V2_R1.indd 1 2024-08-09 11:37 AM2024-08-09 11:37 AM

B
35103_35144_35145_35146_35218_Bella 10 speed Countertop Blender_IN_V2_R1.indd 235103_35144_35145_35146_35218_Bella 10 speed Countertop Blender_IN_V2_R1.indd 2 2024-08-09 11:37 AM2024-08-09 11:37 AM

1
TABLE OF CONTENTS
IMPORTANT SAFEGUARDS ....................................................................................................................................................2
ADDITIONAL IMPORTANT SAFEGUARDS ........................................................................................................................3
NOTES ON THE PLUG ..............................................................................................................................................................4
NOTES ON THE CORD.............................................................................................................................................................4
PLASTICIZER WARNING .........................................................................................................................................................4
ELECTRIC POWER ......................................................................................................................................................................4
GETTING TO KNOW YOUR FLIP & STORE BLENDER ....................................................................................................5
BEFORE USING FOR THE FIRST TIME ................................................................................................................................ 6
OPERATING INSTRUCTIONS ............................................................................................................................................... 6
USER MAINTENANCE INSTRUCTIONS ............................................................................................................................8
CARE & CLEANING INSTRUCTIONS ..................................................................................................................................8
STORAGE INSTRUCTIONS .................................................................................................................................................... 9
WARRANTY ...............................................................................................................................................................................10
ÍNDICE
MEDIDAS IMPORTANTES DE SEGURIDAD ...................................................................................................................... 11
MEDIDAS IMPORTANTES DE SEGURIDAD ADICIONALES .......................................................................................12
NOTAS SOBRE EL ENCHUFE ...............................................................................................................................................13
NOTAS SOBRE EL CABLE ...................................................................................................................................................... 13
ADVERTENCIA SOBRE EL ACABADO ............................................................................................................................... 13
ENERGÍA ELÉCTRICA..............................................................................................................................................................13
CONOZCA MEJOR SU LICUADORA FLIP & STORE .....................................................................................................14
ANTES DEL PRIMER USO .......................................................................................................................................................15
INSTRUCCIONES DE FUNCIONAMIENTO .................................................................................................................... 15
INSTRUCCIONES DE MANTENIMIENTO PARA EL USUARIO..................................................................................17
INSTRUCCIONES DE LIMPIEZA Y CUIDADO .................................................................................................................17
INSTRUCCIONES DE ALMACENAMIENTO ...................................................................................................................18
GARANTÍA ................................................................................................................................................................................. 19
35103_35144_35145_35146_35218_Bella 10 speed Countertop Blender_IN_V2_R1.indd 135103_35144_35145_35146_35218_Bella 10 speed Countertop Blender_IN_V2_R1.indd 1 2024-08-09 11:37 AM2024-08-09 11:37 AM

2
IMPORTANT SAFEGUARDS
When using electrical appliances, basic safety precautions shouldalways
be followed, including the following:
1. READ ALL INSTRUCTIONS.
2. To protect against risk of electric shock do not put the appliance base, power
cord or plug in water or other liquid. Ensure that appliance does not get wet
(water splashes etc.) and do not use it with wet hands.
3. This appliance is not intended for use by persons (including children) with
reduced physical, sensory, or mental capabilities, or lack of experience and
knowledge, unless they are closely supervised and instructed concerning use
of the appliance by a person responsible for their safety. Close supervision is
necessary when any appliance is used by or near children. Children should be
supervised to ensure that they do not play with the appliance.
4. Turn the appliance OFF, then unplug from the outlet when not in use, before
assembling or disassembling parts and before cleaning. To unplug, grasp the
plug and pull from the outlet. Never pull from the power cord.
5. Donotoperateanyappliancewithadamagedcordorplugoraerthe
appliance malfunctions, or is dropped or damaged in any manner. Contact the
manufacturer at their customer service telephone number for information on
examination, repair, or adjustment. Always operate blender with cover in place.
6. Avoid contacting moving parts.
7. Donotoperateanyappliancewithadamagedcordorplugoraerthe
appliance malfunctions, or is dropped or damaged in any manner. Return
appliance to the nearest authorized service facility for examination, repair,
electrical or mechanical adjustment. Contact customer service for examination,
repair or adjustment.
8. The use of attachments, including canning jars, cups or covers not
recommended or sold by the manufacturer may cause a risk of injury to
persons. Only items designed for use with this appliance should be used at all
times.
9. Do not use outdoors. This unit is designed to be used only indoors.
10. Do not let cord hang over edge of table or counter. The cord can get tangled or
cause the appliance to fall.
11. Do not let cord contact hot surface, including the stove. The protective
insulation will burn making the appliance inoperable or unsafe to operate.
12. This blender is turned on by pressing the desired speed.
13. Blades are sharp. Handle carefully. Use the blade’s collar to handle. Touching
the blades can cause injuries.
14. Keep hands and utensils out of container while blending to reduce the risk of
severe injury to persons or damage to the blender. A scraper may be used but
must be used only when the blender is not running.
15. To reduce the risk of injury, never place cutter-assembly blades on the motor
base without jar properly attached. Always completely assemble the blade
and the jar in place.
16. Always operate blender with cover properly placed on the jar.
35103_35144_35145_35146_35218_Bella 10 speed Countertop Blender_IN_V2_R1.indd 235103_35144_35145_35146_35218_Bella 10 speed Countertop Blender_IN_V2_R1.indd 2 2024-08-09 11:37 AM2024-08-09 11:37 AM

3
17. When blending hot liquids, remove center piece of two-piece cover. Blending
boiling liquids may cause the lid to unlock itself from the jar and the hot liquid
can cause serious personal injuries.
18. Flashing light indicates ready to operate. Avoid any contact with blades or
moveable parts.
FOR HOUSEHOLD USE ONLY
SAVE THESE INSTRUCTIONS
ADDITIONAL IMPORTANT
SAFEGUARDS
All users of this appliance must read and understand this owner’s manual before
operating or cleaning this appliance.
1. The cord to the appliance should be plugged into a 120 V AC electrical outlet
only.
2. If this appliance begins to malfunction during use, immediately stop
the appliance and unplug the cord. Do not use or attempt to repair the
malfunctioning appliance.
3. If this appliance falls or accidentally becomes immersed in water, unplug it
immediately. Do not reach into the water.
4. Donotusethisapplianceaerithasfallenintoorbecomesimmersedinwater.
5. To reduce the risk of injury to persons or property, never use this appliance in
an unstable position.
6. Do not use this appliance for other than its intended use. The appliance may
be damaged and cause serious personal injury or cause property damage.
7. Do not use if the jar is cracked or chipped.
IMPORTANT: Donotoverll.Neverllingredientsbeyondthejar’smaxline.
WARNING: Failure to add enough liquid before processing may cause the jar
to break or chip.
WARNING: To avoid spills, make sure the lid is properly locked in place on the
jar with the lid cap in position before pressing any SPEED or selecting one of
the blending functions.
35103_35144_35145_35146_35218_Bella 10 speed Countertop Blender_IN_V2_R1.indd 335103_35144_35145_35146_35218_Bella 10 speed Countertop Blender_IN_V2_R1.indd 3 2024-08-09 11:37 AM2024-08-09 11:37 AM

4
NOTES ON THE PLUG
This appliance has a polarized plug (one blade is wider than the other). To reduce
theriskofelectricshock,thisplugwilltinapolarizedoutletonlyoneway.Ifthe
plugdoesnottfullyintotheoutlet,reversetheplug.Ifitstilldoesnott,contacta
qualiedelectrician.Donotmodifythepluginanyway.
NOTES ON THE CORD
A. A short power-supply cord (or detached power-supply cord) is provided to
reduce the risk resulting from becoming entangled in or tripping over a long
cord.
B. Longer detachable power-supply cords or extension cords are available and
may be used if care is exercised in their use.
C. If a long detachable power-supply cord or extension cord is used:
1. The marked electrical rating of the cord set, or extension cord should be at
least as great as the electrical rating of the appliance.
2. If the appliance is of the grounded type, the extension cord should be a
grounding-type3-wire cord.
3. The longer cord should be arranged so that it will not drape over the
countertop or tabletop where it can be pulled on by children or tripped
over.
PLASTICIZER WARNING
CAUTION: Topreventplasticizersfrommigratingtothenishofthecountertopor
tabletop or other furniture, place NON-PLASTIC coasters or place mats between
theapplianceandthenishofthecountertoportabletop.Failuretodosomay
causethenishtodarken,permanentblemishesmayoccur,orstainscanappear.
ELECTRIC POWER
If the electrical circuit is overloaded with other appliances, your appliance may not
operate properly. It should be operated on a separate electrical circuit from other
appliances.
35103_35144_35145_35146_35218_Bella 10 speed Countertop Blender_IN_V2_R1.indd 435103_35144_35145_35146_35218_Bella 10 speed Countertop Blender_IN_V2_R1.indd 4 2024-08-09 11:37 AM2024-08-09 11:37 AM
5
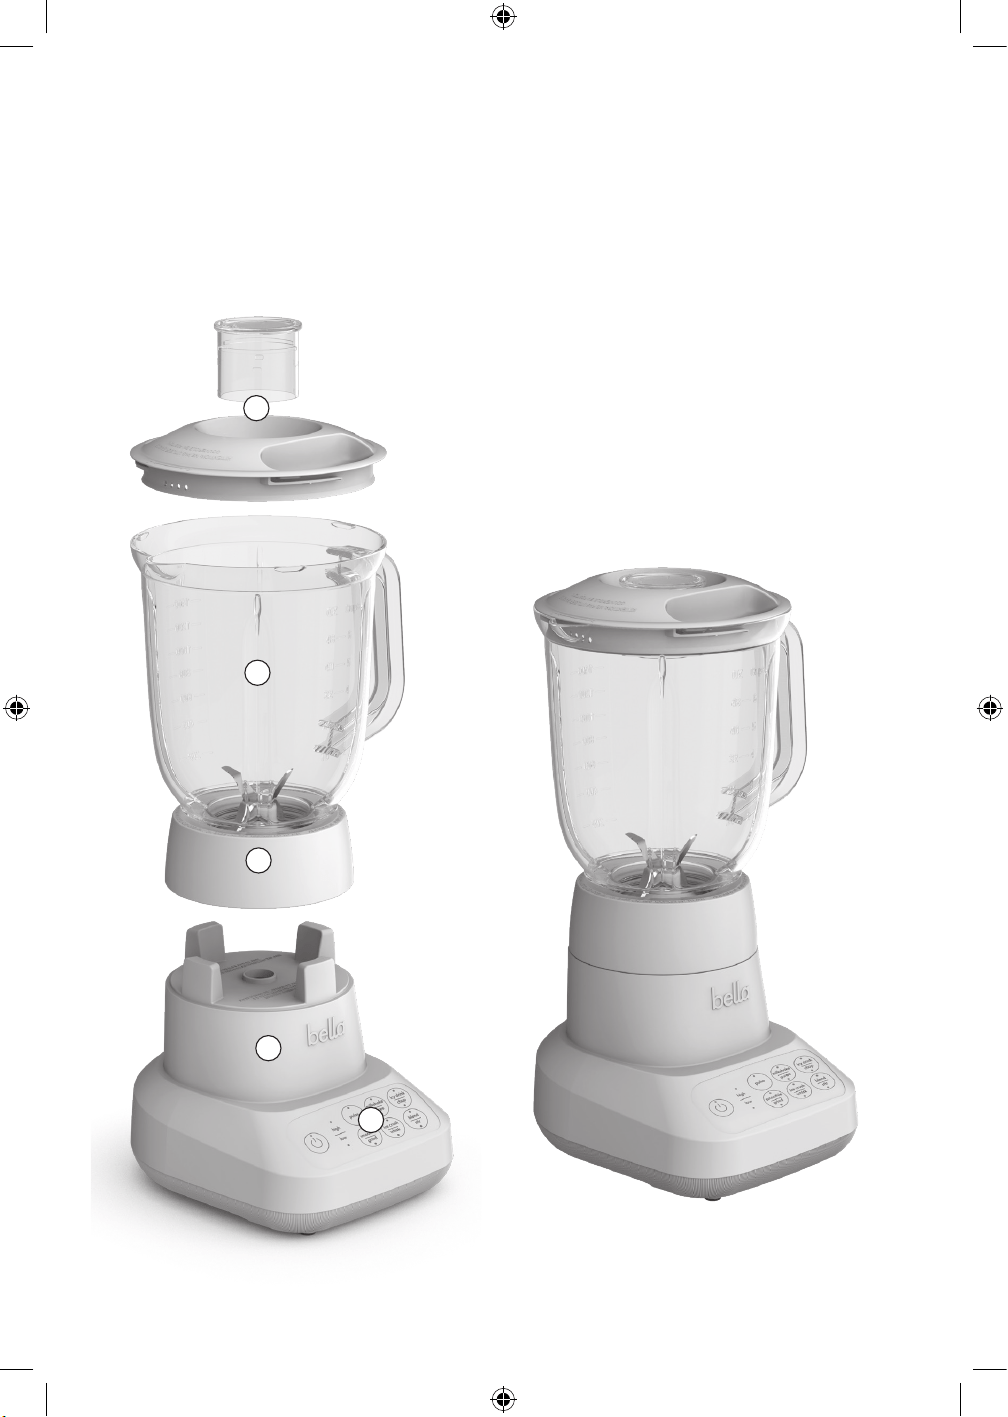
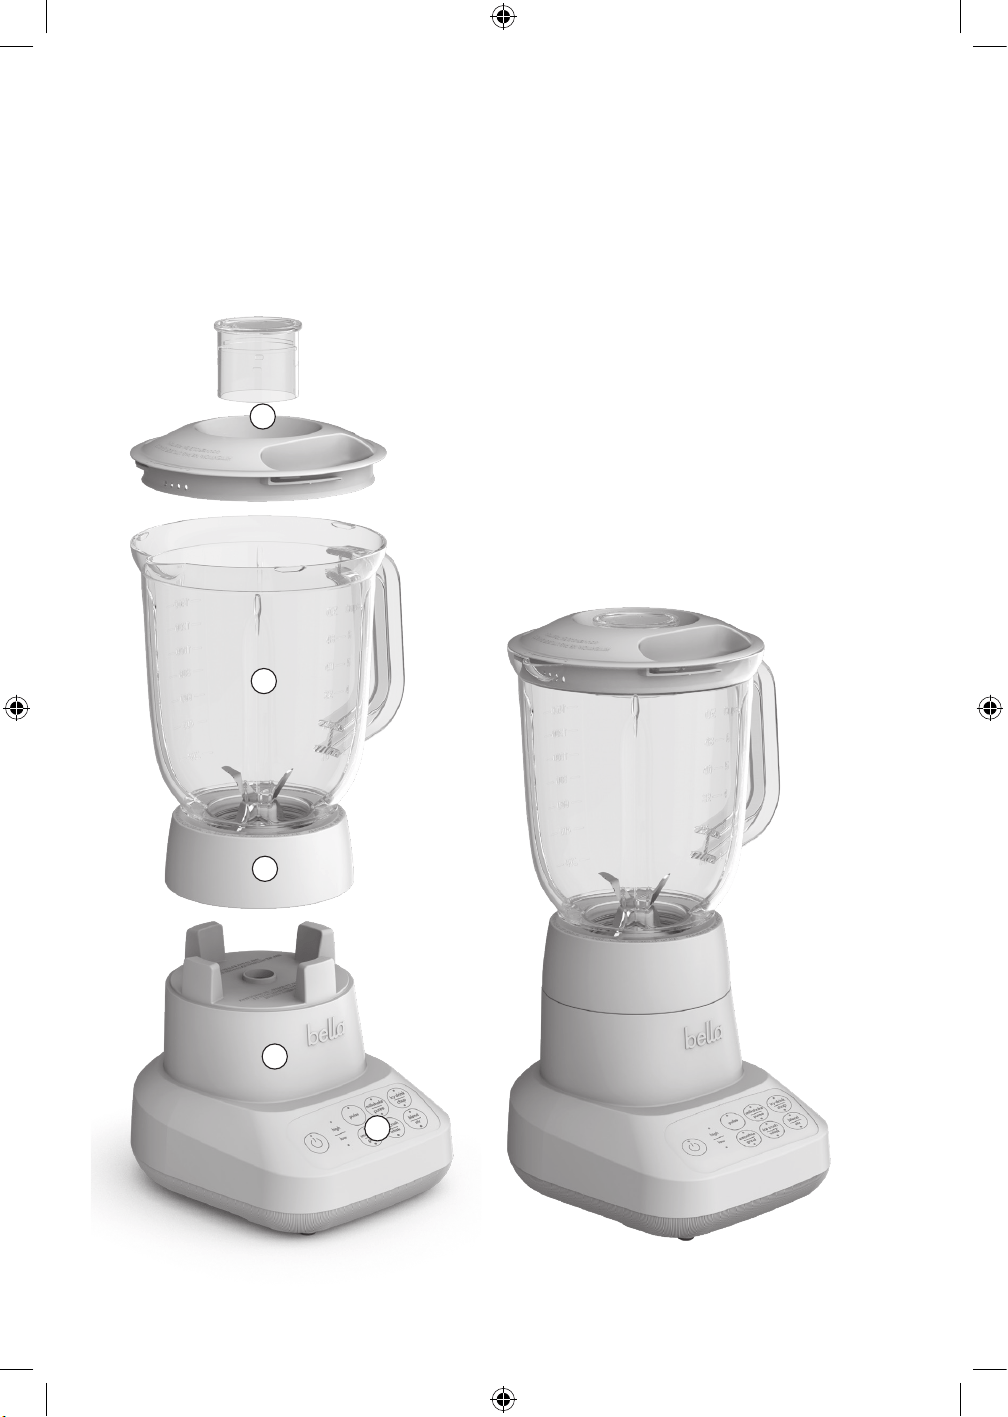
GETTING TO KNOW YOUR BELLA FLIP & STORE BLENDER
Product may vary slightly from illustration.
1. Lid with measuring cap
2. Plastic jar
3. Blade base
4. Motor base
5. Speed control
1
2
3
4
5
35103_35144_35145_35146_35218_Bella 10 speed Countertop Blender_IN_V2_R1.indd 535103_35144_35145_35146_35218_Bella 10 speed Countertop Blender_IN_V2_R1.indd 5 2024-08-09 11:37 AM2024-08-09 11:37 AM

6
BEFORE USING FOR THE FIRST TIME
1. Carefully unpack the Flip & Store Blender and remove all packaging materials. Check the contents to
ensure that all parts are present, and have been received in good condition.
2. Only handle blending blade by its collar.
WARNING: Do not touch blades. Blades are very sharp. Use extreme care when handling. Failure to do so can result
in personal injury.
3. Wash lid, measuring cap and jar in warm, soapy water. Rinse and dry thoroughly.
4. Cleanjarbeforerstuse.Fillcupone-quarterfullwithclean,warmwater.Followingthestepsoutlinedinthe
operating instructions, pulse several times using the blending blade. Rinse thoroughly.
5. The motor base may be wiped with a damp cloth.
WARNING: DO NOT IMMERSE THE MOTOR BASE IN WATER.
OPERATING INSTRUCTIONS
1. Placethemotorbaseonaat,clean,drycountertoportable.
2. Make sure the unit is unplugged.
3. The Flip & Store Blender comes with one plastic jar and one lid. Place the food to be processed into the plastic
jar.
4. To assemble the jug, place the sealing gasket on the inner edge of the blade base. Mount the plastic jar into the
bladebaseandturnthebladebaseonacounter-clockwisedirectionuntilitisxed.
IMPORTANT: Check to make sure if the plastic jar is properly attached to the blade base.
5. Place the assembled plastic jar and blade base onto the motor block until it is securely engaged.
IMPORTANT:Checktomakesurethejarisproperlyxedtothemotorblock.
6. Insert the measuring cup into the opening of the lid. Twist it counter-clockwise until it is locked.
WARNING: Never operate the Blender when the plastic jar is empty.
WARNING: Neveroverllthejar.DonotexceedtheMaxLine.
7. ToinserttheplasticjarmakesuretheblenderisswitchedO.
8. Placeingredientsinthejar;xthelidtotheplasticjarandtwistitcounter-clockwiseuntilitislocked.
9. To process, plug the unit into a 120V plug and press any of the speeds on the speed control base.
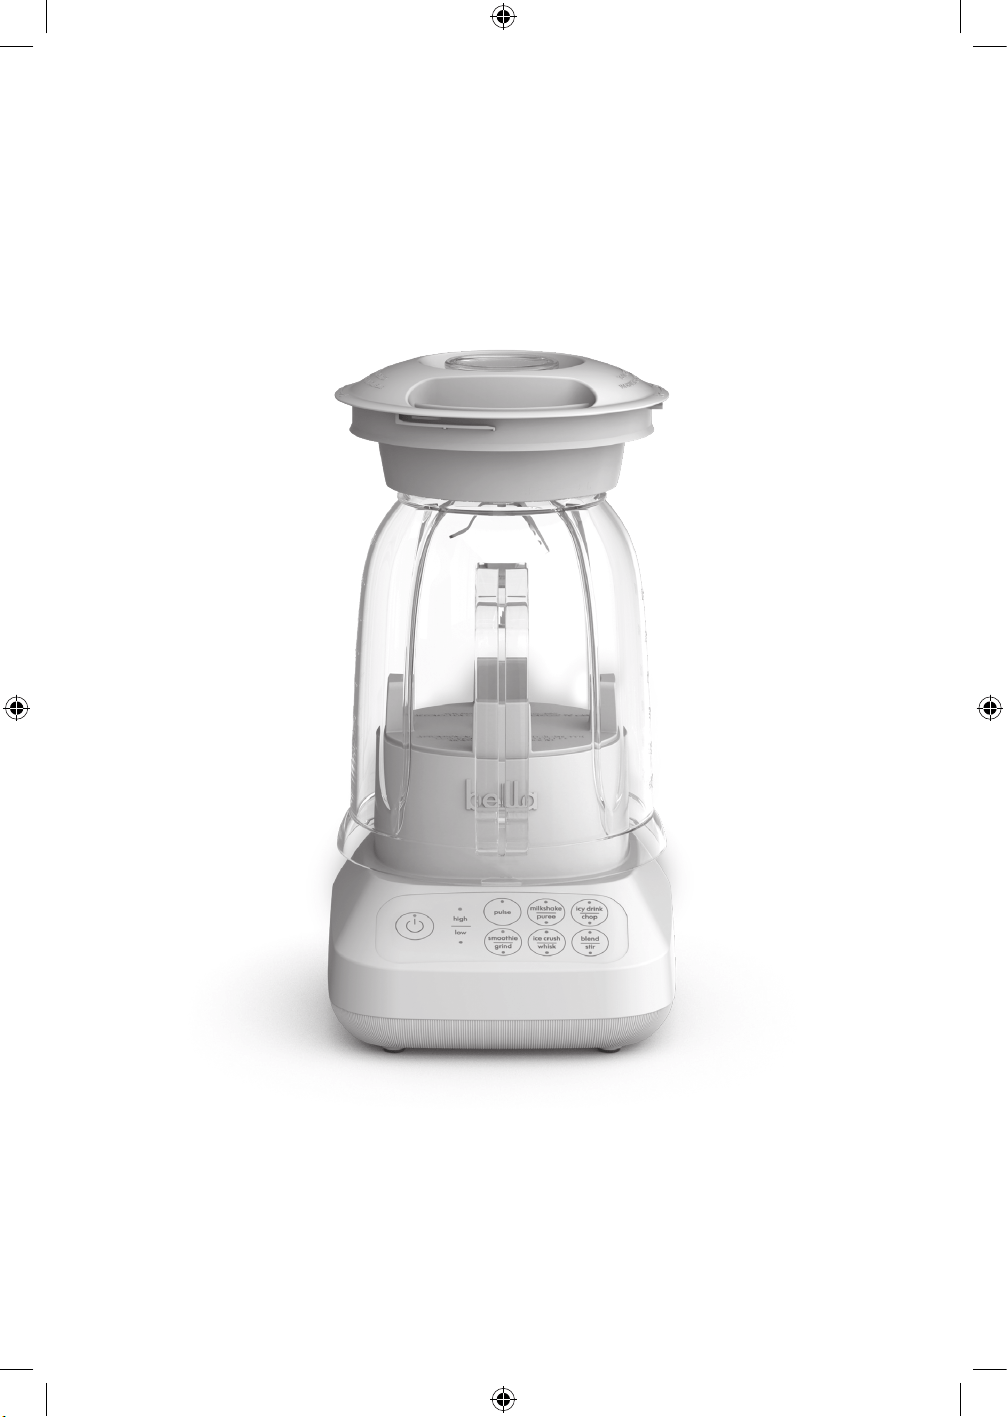
CONTROL PANEL CHART
POWER
• Whenthepowerbuttonispressed,theorangelightwillilluminateandash.
• Press to stop any operation.
HIGH/LOW
• When the power button is pressed, the orange light on the HIGH setting will illuminate.
• User can change speed by clicking the HIGH/LOW button. The default setting is HIGH for selecting the
milkshake, icy drink, smoothie, ice crush and blend. Press the HIGH/LOW button until the orange light is under
LOW to select puree, chop, grind, whisk and stir.
• Pressrstthepowerbutton,ifaHIGH setting is desired, simply press the mode button. If a LOW setting is
desired, press the HIGH/LOW button until the orange light is bright under LOW, then the desired mode button.
To stop the function, you can either click the power button again or directly press the mode button again.
PULSE
• When the button is pressed, the orange light will illuminate.
• Select PULSE to blend ingredients through controlled bursts of power.
• Use PULSE to dislodge ingredients clumped around the blade and at the bottom of the jar.
• PULSE is activated as the button is pressed. Release the PULSE button to stop.
• For best results, time the PULSES to ensure that blades come to a complete stop before pulsing again.
35103_35144_35145_35146_35218_Bella 10 speed Countertop Blender_IN_V2_R1.indd 635103_35144_35145_35146_35218_Bella 10 speed Countertop Blender_IN_V2_R1.indd 6 2024-08-09 11:37 AM2024-08-09 11:37 AM

7
MILKSHAKE/PUREE
MILKSHAKE:
• Turn Blender on. Select HIGH mode, then click the MILKSHAKE/PUREE button to start the milkshake mode. The
orange light will illuminate.
• Blends fresh fruits or syrups with your milk of choice into the perfect milkshake.
• Press the MILKSHAKE/PUREE button again to turn MILKSHAKE OFF.
• MILKSHAKEhasaxedcycletimeandwillautomaticallyturnOFFaer57seconds.
PUREE:
• Turn Blender on. Select LOW mode, then click the MILKSHAKE/PUREE button to start the puree mode. The
orange light will illuminate.
• Blends cooked vegetables with water and or milk or cream to make the perfect puree.
• Press the MILKSHAKE/PUREE button again to turn PUREE OFF.
• PUREEhasaxedcycletimeandwillautomaticallyturnOFFaer54seconds.
ICY DRINK/CHOP
ICY DRINK:
• Turn Blender on. Select High mode, then click the ICY DRINK/CHOP button to start the icy drink mode. The
orange light will illuminate.
• Perfect for preparing frozen margaritas, daiquiris, frosé and many more refreshing summer drinks.
• For best results, remove ice cubes from freezer for 5 minutes before using.
• Add desired amount of ice cubes (maximum 6 at a time for best results) and ingredients to the blender jar.
• Additional mix or ice cubes may be added through the cap. When the desired drink consistency is achieved,
press the power button or the illuminated ICY DRINKbuttontoturntheblendero.
• Press the ICY DRINK/CHOP button again to turn ICY DRINK OFF.
• ICYDRINKhasaxedcycletimeandwillautomaticallyturnOFFaer75seconds.
CHOP:
• Turn Blender on. Select Low mode, then click the icy drink/chop button to start the chop mode. The orange light
will illuminate.
• Chops fresh vegetables into even pieces. Raw vegetables should be no bigger than ½ pieces before chopping
them in the blender.
• Press the ICY DRINK/CHOP button again to turn CHOP OFF.
• CHOPhasaxedcycletimeandwillautomaticallyturnOFFaer80seconds.
SMOOTHIE/GRIND
SMOOTHIE:
• Turn Blender on. Select HIGH mode, then click the SMOOTHIE/GRIND button to start the smoothie mode. The
orange light will illuminate.
• Blends fresh or frozen fruits and vegetables into the perfect smoothie.
• Press the SMOOTHIE/GRIND button again to turn SMOOTHIE OFF.
• SMOOTHIEhasaxedcycletimeandwillautomaticallyturnOFFaer85seconds.
GRIND:
• Turn Blender on. Select LOW mode, then click the SMOOTHIE/GRIND button to start the grind mode. The
orange light will illuminate.
• Grindscoeeandspices.
• Press the SMOOTHIE/GRIND button again to turn GRIND OFF.
• GRINDhasaxedcycletimeandwillautomaticallyturnOFFaer60seconds.
ICE CRUSH/WHISK
ICE CRUSH:
• Turn Blender on. Select HIGH mode, then click the ICE CRUSH/WHISK button to start the ice crush mode. The
orange light will illuminate.
• ICE CRUSH quickly crushes up to 6 ice cubes and is perfect for preparing frozen desserts or drinks.
• Press the ICE CRUSH/WHISK button again to turn ICE CRUSH OFF.
• ICECRUSHhasaxedcycletimeandwillautomaticallyturnOFFaer54seconds.
WHISK:
• Turn Blender on. Select LOW mode, then click the ICE CRUSH/WHISK button to start the whisk mode. The
orange light will illuminate.
• Whisks sauces like mayonnaise, eggs for omelette, and cake and pancake batter.
• Press the ICE CRUSH/WHISK button again to turn WHISK OFF.
35103_35144_35145_35146_35218_Bella 10 speed Countertop Blender_IN_V2_R1.indd 735103_35144_35145_35146_35218_Bella 10 speed Countertop Blender_IN_V2_R1.indd 7 2024-08-09 11:37 AM2024-08-09 11:37 AM

8
• WHISKhasaxedcycletimeandwillautomaticallyturnOFFaer60seconds.
BLEND/STIR
BLEND:
• Turn Blender on. Select HIGH mode, then click the BLEND/STIR button to start the blend mode. The orange
light will illuminate.
• BLENDanysovegetablesorfruitswithliquidofyourchoice.
• Press the BLEND/STIR button again to turn BLEND OFF.
• BLENDhasaxedcycletimeandwillautomaticallyturnOFFaer60seconds.
STIR:
• Turn Blender on. Select LOW mode, then click the BLEND/STIR button to start the stir mode. The orange light
will illuminate.
• Stir ingredients until they are combined.
• Press the BLEND/STIR button again to turn STIR OFF.
• STIRhasaxedcycletimeandwillautomaticallyturnOFFaer50seconds.
10.Whentheprocessingiscompleted,alwayspressthepowerbuttontoturnotheblenderandmakesureto
unplug the unit.
11. Pull up the plastic jar from the motor base.
NOTE: Number of cycles needed to achieve desired results will vary best on quantities and recipes.
USER MAINTENANCE INSTRUCTIONS
This appliance requires little maintenance. It contains no user-serviceable parts. Any servicing requiring disassembly
otherthancleaningmustbeperformedbyaqualiedappliancerepairtechnician.
CARE & CLEANING INSTRUCTIONS
CAUTION: Never immerse the motor base, plug or cord in water or any other liquid.
1. Always unplug the Flip & Store Blender before cleaning.
2. Wheneverpossible,simplerinsepartsimmediatelyaerprocessingtomakecleanupeasier.
3. Always handle blades using the blade collar.
CAUTION:Useextremecarewhenhandlingblades.Donottouchthebladeswithyourngers.Thebladesarevery
sharp and can cause injury if touched.
4. Forquickclean-ups,llplasticjarone-quarterfullwithcleanwarmwater.Presspulseseveraltimesusing
several times. Rinse thoroughly.
5. Removethelidaerusetoclean.Washthelidandtheplasticjarinwarmsoapywater.Rinseanddry
thoroughly.
CAUTION: never use rough scouring pars or abrasive cleansers on any plastic or metal parts as the surface may be
damaged.
6. The plastic jar and lid are top-rack ONLY dishwasher safe.
IMPORTANT:aerdishwashing,alwayschecktomakesurethegasketsealonthelidisproperlyinplaceastheheat
from some dishwasher may cause to become loose.
7. The motor base may be wiped with a damp cloth or sponge. Dry thoroughly.
8. Clean blade and blade collar with a small brush to avoid injuries when getting too close to blades.
WARNING: DO NOT IMMERSE THE MOTOR BASE IN WATER.
35103_35144_35145_35146_35218_Bella 10 speed Countertop Blender_IN_V2_R1.indd 835103_35144_35145_35146_35218_Bella 10 speed Countertop Blender_IN_V2_R1.indd 8 2024-08-09 11:37 AM2024-08-09 11:37 AM
9
STORAGE INSTRUCTIONS:
a. Unplug and clean the unit.
b. Store in original box or in a clean, dry place.
c. Never store 10-speed blender while it is hot or plugged in. Never wrap cord tightly around appliance. Never
place any stress on cord, especially where the cord enters the unit, as this could cause the cord to fray and
break.
d. This unit comes with a cord storage at the base for convenient storage.
e. This unit is part of the Bella Fit Anywhere family and can be stored as shown in the below illustration for
maximum convenience.
35103_35144_35145_35146_35218_Bella 10 speed Countertop Blender_IN_V2_R1.indd 935103_35144_35145_35146_35218_Bella 10 speed Countertop Blender_IN_V2_R1.indd 9 2024-08-09 11:37 AM2024-08-09 11:37 AM

10
SENSIO Inc. hereby warrants that for a period of TWO YEARS from the date of purchase,
this product will be free from mechanical defects in material and workmanship, and
for 90 days in respect to non-mechanical parts. At its sole discretion, SENSIO Inc. will
either repair or replace the product found to be defective, or issue a refund on the
product during the warranty period.
The warranty is only valid for the original retail purchaser from the date of initial retail
purchase and is not transferable. Keep the original sales receipt, as proof of purchase is
required to obtain warranty validation. Retail stores selling this product do not have the
right to alter, modify, or in any way revise the terms and conditions of the warranty.
EXCLUSIONS:
The warranty does not cover normal wear of parts or damage resulting from any of the
following: negligent use of the product, use of improper voltage or current, improper
routine maintenance, use contrary to the operating instructions, disassembly, repair, or
alteration by anyone other than qualied SENSIO Inc. personnel. Also, the warranty
does not cover Acts of God such as re, oods, hurricanes, or tornadoes.
SENSIO Inc. shall not be liable for any incidental or consequential damages caused
by the breach of any express or implied warranty. Apart from the extent prohibited
by applicable law, any implied warranty of merchantability or tness for a particular
purpose is limited in time to the duration of the warranty. Some states, provinces or
jurisdictions do not allow the exclusion or limitation of incidental or consequential
damages, or limitations on how long an implied warranty lasts, and therefore, the
above exclusions or limitations may not apply to you. The warranty covers specic legal
rights which may vary by state, province and/or jurisdiction.
HOW TO OBTAIN WARRANTY SERVICE:
You must contact Customer Service at our toll-free number: 1-866-832-4843.
A Customer Service Representative will attempt to resolve warranty issues over the
phone. If the Customer Service Representative is unable to resolve the problem, you will
be provided with a case number and asked to return the product to SENSIO Inc. Attach
a tag to the product that includes: your name, address, daytime contact telephone
number, case number, and description of the problem. Also, include a copy of the
original sales receipt. Carefully package the tagged product with the sales receipt,
and send it (with shipping and insurance prepaid) to SENSIO Inc.’s address. SENSIO
Inc. shall bear no responsibility or liability for the returned product while in transit to
SENSIOInc.’s Customer Service Center.
LIMITED TWO-YEAR WARRANTY
LIMITED TWO-YEAR WARRANTY
35103_35144_35145_35146_35218_Bella 10 speed Countertop Blender_IN_V2_R1.indd 1035103_35144_35145_35146_35218_Bella 10 speed Countertop Blender_IN_V2_R1.indd 10 2024-08-09 11:37 AM2024-08-09 11:37 AM

11
MEDIDAS IMPORTANTES DE
SEGURIDAD
Al utilizar electrodomésticos, se deben tomar siempre precauciones de seguridad
básicas, incluidas las siguientes:
1. LEA TODAS LAS INSTRUCCIONES.
2. Para protegerse de descargas eléctricas, no sumerja la base, el cable o el
enchufe del aparato en agua u otro líquido. Asegúrese de que el aparato no
se moje (con salpicaduras de agua, etc.) y no lo use con las manos mojadas.
3. Este aparato no está diseñado para que lo utilicen personas (incluidos
niños) con capacidades físicas, sensoriales o mentales limitadas, ni con falta
de experiencia o conocimiento, a menos que hayan recibido supervisión o
instrucciones sobre el uso del aparato por parte de una persona responsable
de su seguridad. Es necesaria una estrecha supervisión cuando los niños
utilizan un aparato o si este se utiliza cerca de ellos. Se debe supervisar a los
niños para asegurarse de que no jueguen con el aparato.
4. Apague el aparato, luego desenchúfelo del tomacorriente cuando no esté
en uso, antes de ensamblar o desensamblar piezas y antes de limpiarlo. Para
desenchufarlo, sujete el enchufe y tire del tomacorriente. Nunca tire del cable
de alimentación.
5. No utilice un aparato con un cable o enchufe dañados, después de una avería,
de una caída o si se dañó de alguna manera. Comuníquese con el fabricante
a su número de teléfono de Atención al Cliente para obtener información
sobre el proceso de revisión, reparación o ajuste. Siempre haga funcionar la
licuadora con la tapa puesta.
6. Evite el contacto con las piezas móviles.
7. No utilice un aparato con un cable o enchufe dañados, después de una avería,
de una caída o si se dañó de cualquier manera. Devuelva el aparato al centro
de servicio técnico autorizado más cercano para su revisión, reparación o
ajuste eléctrico o mecánico. Comuníquese con el servicio al cliente para que
realicen un examen, reparación o ajuste.
8. El uso de accesorios como tarros de conservas, tazas o cubiertas no
recomendados ni vendidos por el fabricante pueden causar riesgo de lesiones
a las personas. Solo se deben usar en todo momento los componentes
diseñados para este aparato.
9. No lo utilice al aire libre. Esta unidad está diseñada para usarse solo en
interiores.
10. No deje que el cable cuelgue del borde de la mesa o mostrador. El cable
puede enredarse o hacer que el aparato se caiga.
11. Nopermitaqueelcableentreencontactoconsuperciescalientes,incluidala
estufa. El aislamiento protector se quemará y hará que el aparato no funcione
o sea peligroso para su funcionamiento.
12. Para encender la licuadora, debe presionar la velocidad deseada.
13. Lascuchillassonlosas.Manipúlelasconcuidado.Useelarodelascuchillas
para manipularlas. Tocar las cuchillas puede provocar lesiones.
35103_35144_35145_35146_35218_Bella 10 speed Countertop Blender_IN_V2_R1.indd 1135103_35144_35145_35146_35218_Bella 10 speed Countertop Blender_IN_V2_R1.indd 11 2024-08-09 11:37 AM2024-08-09 11:37 AM

12
14. Mantenga las manos y utensilios fuera del envase durante el licuado para
reducir el riesgo de causar lesiones graves a las personas o daños a la
licuadora. Puede usar una espátula, pero solo cuando la licuadora no esté
funcionando.
15. Para reducir el riesgo de lesiones, nunca coloque las cuchillas del conjunto del
cortador en la base del motor si la jarra está mal instalada. Siempre monte
completamente la cuchilla y la jarra en su lugar.
16. Siempre haga funcionar la jarra de la licuadora con la tapa puesta.
17. Cuando licúe líquidos calientes, retire la pieza central de la tapa de dos
piezas. Licuar líquidos hirviendo puede hacer que la tapa se salga por sí sola
de la jarra y que el líquido caliente provoque lesiones personales.
18. La luz parpadeante indica que la licuadora está lista para funcionar. Evite el
contacto con las cuchillas o las piezas móviles.
SOLO PARA USO DOMÉSTICO
GUARDE ESTAS INSTRUCCIONES
MEDIDAS DE SEGURIDAD
IMPORTANTES ADICIONALES
Todos los usuarios de este aparato deben leer y entender este manual del
propietario antes de operarlo o limpiarlo.
1. El cable de este aparato debe conectarse solo a un tomacorriente de
120 V de CA.
2. Si este aparato comienza a funcionar de manera incorrecta, deténgalo y
desenchufe el cable de inmediato. No use ni intente reparar el aparato si está
averiado.
3. Si este aparato se cae o se sumerge en agua por accidente, desenchúfelo
inmediatamente. No toque el agua.
4. No utilice este aparato después de que se haya caído o sumergido en agua.
5. Para reducir el riesgo de provocar lesiones a personas o daños a la propiedad,
nunca use este aparato en una posición inestable.
6. No utilice este aparato para otro uso que no sea el indicado. Un aparato
puede estar dañado y causar lesiones personales graves o daños a la
propiedad.
7. No lo utilice si la jarra está agrietada o descascarillada.
IMPORTANTE: No la llene en exceso. Nunca llene la jarra con ingredientes
por encima de la línea de llenado máximo.
ADVERTENCIA:Sinoañadelíquidosucienteantesdelprocesamiento,puede
quebrar o descascarillar la jarra.
ADVERTENCIA: Para evitar derrames, asegúrese de que la tapa esté bien
colocadaenlajarraconlatapadeloricioensulugarantesdepresionar
cualquier botón SPEED (velocidad) o de seleccionar una de las funciones de
licuado.
35103_35144_35145_35146_35218_Bella 10 speed Countertop Blender_IN_V2_R1.indd 1235103_35144_35145_35146_35218_Bella 10 speed Countertop Blender_IN_V2_R1.indd 12 2024-08-09 11:37 AM2024-08-09 11:37 AM

13
NOTAS SOBRE EL ENCHUFE
Este aparato posee un enchufe polarizado (una clavija es más ancha que la
otra). Para reducir el riesgo de descarga eléctrica, este enchufe encajará en un
tomacorriente polarizado en un solo sentido. Si el enchufe no entra completamente
en el tomacorriente, gire el enchufe. Si aun así no encaja, contacte a un técnico
electricistacalicado.Nomodiqueelenchufedeningunamanera.
NOTAS SOBRE EL CABLE
A. Se proporciona un cable de alimentación corto (o un cable de alimentación
desconectable) para reducir el riesgo de enredos o tropiezos con un cable
largo.
B. Hay disponibles cables de alimentación desconectables más largos o cables
de extensión, y estos se pueden utilizar si se tiene cuidado en su uso.
C. Si se utiliza un cable de alimentación desconectable largo o un cable de
extensión:
1. Laclasicacióneléctricamarcadaenelcabledealimentación
desconectable o cable de extensión deberá ser al menos igual a la
clasicacióneléctricadelaparato.
2. Si el aparato es del tipo con conexión a tierra, el cable de extensión
deberá ser un cable de 3 hilos con conexión a tierra.
3. El cable más largo debe colocarse de manera que no cuelgue de una
encimera o mesa de donde los niños pudieran jalarlo o tropezar con él.
ADVERTENCIA SOBRE EL ACABADO
PRECAUCIÓN: Para evitar que el acabado del mostrador o de la mesa u otros
muebles se dañe, coloque posavasos o manteles individuales que NO SEAN
DEPLÁSTICOentreelaparatoylasuperciedelmostradorodelamesa.No
hacerlo puede provocar el oscurecimiento del acabado, provocar desperfectos
permanentes o causar la aparición de manchas.
ALIMENTACIÓN ELÉCTRICA
Si el circuito eléctrico está sobrecargado con otros aparatos, este aparato podría
no funcionar correctamente. Debe utilizarse en un circuito eléctrico diferente al de
otros electrodomésticos.
35103_35144_35145_35146_35218_Bella 10 speed Countertop Blender_IN_V2_R1.indd 1335103_35144_35145_35146_35218_Bella 10 speed Countertop Blender_IN_V2_R1.indd 13 2024-08-09 11:37 AM2024-08-09 11:37 AM
14
CONOZCA MEJOR SU LICUADORA FLIP & STORE DE BELLA
El producto puede diferir ligeramente del que aparece en las ilustraciones
1. Tapa con taza medidora
2. Jarra de plástico
3. Base de la cuchilla
4. Base del motor
5. Control de velocidad
1
2
3
4
5
35103_35144_35145_35146_35218_Bella 10 speed Countertop Blender_IN_V2_R1.indd 1435103_35144_35145_35146_35218_Bella 10 speed Countertop Blender_IN_V2_R1.indd 14 2024-08-09 11:37 AM2024-08-09 11:37 AM
15
ANTES DEL PRIMER USO
1. Desempaque con cuidado la licuadora Flip & Store y retire todos los materiales del embalaje. Revise el
contenido para asegurarse de que no falte ninguna pieza y de que estén en buen estado
2. Manipule la cuchilla de licuado únicamente por el aro
ADEVERTENCIA: No toque las cuchillas. Lascuchillasdecortadorsonmuylosas.Tengamuchocuidadoal
manipularlas. No hacerlo puede causar lesiones.
3. Lave la tapa, la taza medidora y la jarra con agua tibia y jabón. Enjuague y seque por completo.
4. Limpie la jarra antes del primer uso. Llene la taza hasta un cuarto de su capacidad con agua limpia y tibia.
Siga los pasos que se indican en las instrucciones de funcionamiento y presione el botón varias veces usando la
cuchilla de licuado. Enjuague bien.
5. Puede limpiar la base del motor con un paño húmedo.
ADVERTENCIA: NO SUMERJA LA BASE DEL MOTOR EN AGUA.
INSTRUCCIONES DE FUNCIONAMIENTO
1. Coloque la base del motor sobre una encimera o mesa plana, limpia y seca.
2. Asegúrese de que la unidad esté desenchufada.
3. La licuadora Flip & Store incluye una jarra de plástico y una tapa. Coloque el alimento que vaya a procesar en
la jarra de plástico.
4. Para montar la jarra, coloque la junta de sellado en el borde interno de la base de la cuchilla. Monte la jarra
deplásticoenlabasedelacuchillaygirelabasedelacuchillahacialaizquierdahastaqueseje.
IMPORTANTE:Veriqueyasegúresedequelajarradeplásticoestéjadacorrectamentealabasedelacuchilla.
5. Coloque la jarra de plástico montada y la base de la cuchilla en el bloque del motor hasta que se conecte
rmemente.
IMPORTANTE:Veriqueyasegúresedequelajarraestéjadacorrectamentealbloquedelmotor.
6. Inserte la taza medidora en la abertura de la tapa. Gírela hacia la izquierda hasta que se bloquee.
ADVERTENCIA: Nunca opere la licuadora con la jarra de plástico vacía.
ADVERTENCIA: Nunca llene en exceso la jarra. NO supere la línea de llenado MÁX.
7. Para insertar la jarra de plástico asegúrese de que la licuadora esté apagada.
8. Coloquelosingredientesenlajarra,jelatapaenlajarradeplásticoygírelahacialaizquierdahastaquese
bloquee.
9. Para comenzar a procesar los ingredientes, enchufe la unidad a un tomacorriente de 120 V y presione
cualquiera de los botones de velocidad de la base de control de velocidad.
TABLA DEL PANEL DE CONTROL
POWER (ENCENDIDO)
• Al presionar el botón de encendido, se encenderá una luz anaranjada y comenzará a parpadear.
• Presione para detener cualquier operación.
HIGH/LOW (ALTO/BAJO)
• Al presionar el botón de encendido, se encenderá una luz anaranjada en el ajuste HIGH (alta).
• El usuario puede presionar el botón HIGH/LOW (alto/bajo) para cambiar la velocidad. El ajuste
predeterminado es HIGH (alto) para seleccionar MILKSHAKE (malteada), ICY DRINK (bebida congelada),
SMOOTHIE (batido), ICE CRUSH (triturar de hielo) y BLEND (licuar). Presione el botón HIGH/LOW (alto/bajo)
hasta que aparezca la luz anaranjada en LOW para seleccionar PUREE (puré), CHOP (cortar), GRIND (moler),
WHISK (batir) y STIR (revolver).
• Primero presione el botón de encendido y, si desea usar el ajuste HIGH (alto), solo presione el botón de modo.
Si desea usar el ajuste LOW (bajo), presione el botón HIGH/LOW (alto/bajo) hasta que la luz anaranjada se
encienda debajo de LOW (bajo), luego seleccione el botón de modo deseado. Para detener la función, puede
presionar de nuevo el botón de encendido o el botón de modo.
PULSE (PULSAR)
• Al presionar el botón, se encenderá una luz anaranjada.
35103_35144_35145_35146_35218_Bella 10 speed Countertop Blender_IN_V2_R1.indd 1535103_35144_35145_35146_35218_Bella 10 speed Countertop Blender_IN_V2_R1.indd 15 2024-08-09 11:37 AM2024-08-09 11:37 AM

16
• Seleccione PULSE (pulsar) para mezclar los ingredientes mediante ráfagas controladas de potencia.
• Utilice la función PULSE (pulsar) para eliminar los ingredientes acumulados alrededor de la cuchilla y en el
fondo de la jarra.
• La función PULSE (pulsar) se activa al presionar el botón. Suelte el botón PULSE (pulsar) para detener la
función.
• Para obtener los mejores resultados, cronometre los PULSOS para asegurarse de que las cuchillas se detengan
por completo antes de volver a pulsar.
MILKSHAKE/PUREE (MALTEADA/PURÉ)
MILKSHAKE(MALTEADA):
• Encienda la licuadora. Seleccione el modo HIGH (alto), luego presione el botón MILKSHAKE/PUREE
(malteada/puré) para iniciar el modo MILKSHAKE (malteada). Se encenderá la luz anaranjada.
• Le permite licuar frutas frescas o jarabes con su leche preferida para preparar sabrosas malteadas.
• Presione de nuevo el botón MILKSHAKE/PUREE (malteada/puré) para apagar la función MILKSHAKE
(malteada).
• LafunciónMILKSHAKE(malteada)tieneunciclodefuncionamientojoyseapagaautomáticamentedespués
de 57 segundos.
PUREE(PURÉ):
• Encienda la licuadora. Seleccione el modo low (bajo), luego haga clic en el botón milkshake/puree (malteada/
puré) para iniciar el modo puree (puré). Se encenderá la luz anaranjada.
• Le permite licuar verduras con agua o leche o crema para hacer purés sabrosos.
• Presione de nuevo el botón milkshake/puree (malteada/puré) para apagar la función PUREE (puré).
• LafunciónPUREE(puré)tieneunciclodefuncionamientojoyseapagaautomáticamentedespuésde54
segundos.
ICY DRINK/CHOP (BEBIDA CONGELADA/CORTAR)
ICYDRINK(BEBIDACONGELADA):
• Encienda la licuadora. Seleccione el modo HIGH (alto), luego presione el botón ICY DRINK/CHOP (bebida
congelada/cortar) para iniciar el modo ICY DRINK (bebida congelada). Se encenderá la luz anaranjada.
• Es ideal para preparar margaritas, daiquiris, frosé y muchas otras bebidas refrescantes heladas de verano.
• Para obtener los mejores resultados, saque los cubos de hielo del congelador 5 minutos antes de utilizarlos.
• Añada la cantidad de cubos de hielo que desee (un máximo de 6 a la vez para obtener los mejores resultados)
y los ingredientes a la jarra de licuado.
• Puede añadir más mezcla o cubitos de hielo por la tapa. Cuando se alcance la consistencia deseada de la
bebida, presione el botón de encendido o el botón iluminado ICY DRINK (bebida congelada) para apagar la
licuadora.
• Presione de nuevo el botón ICY DRINK/CHOP (bebida congelada/cortar) para apagar la función ICY DRINK
(bebida congelada).
• LafunciónICYDRINK(bebidacongelada)tieneunciclodefuncionamientojoyseapagaautomáticamente
después de 75 segundos.
CHOP(CORTAR):
• Encienda la licuadora. Seleccione el modo LOW (bajo), luego presione el botón ICY DRINK/CHOP (bebida
congelada/cortar) para iniciar el modo CHOP (cortar). Se encenderá la luz anaranjada.
• Corta verduras frescas en trozos uniformes. Los trozos de verdura cruda no deben tener un tamaño superior a
½ (1,27 cm) antes de cortarlas en la licuadora.
• Presione de nuevo el botón ICY DRINK/CHOP (bebida congelada/cortar) para apagar la función CHOP
(cortar).
• LafunciónCHOP(cortar)tieneunciclodefuncionamientojoyseapagaautomáticamentedespuésde80
segundos.
SMOOTHIE/GRIND (BATIDO/MOLER)
SMOOTHIE(BATIDO):
• Encienda la licuadora. Seleccione el modo HIGH (alto), luego presione el botón SMOOTHIE/GRIND (batido/
moler) para iniciar el modo SMOOTHIE (batido). Se encenderá la luz anaranjada.
• Combine frutas y verduras frescas o congeladas para obtener el batido perfecto.
• Presione de nuevo el botón SMOOTHIE/GRIND (batido/moler) para apagar la función SMOOTHIE (batido).
• LafunciónSMOOTHIE(batido)tieneunciclodefuncionamientojoyseapagaautomáticamentedespuésde
85 segundos.
GRIND(MOLER):
• Encienda la licuadora. Seleccione el modo LOW (bajo), luego presione el botón SMOOTHIE/GRIND (batido/
moler) para iniciar el modo GRIND (moler). Se encenderá la luz anaranjada.
• Muele café y especias.
35103_35144_35145_35146_35218_Bella 10 speed Countertop Blender_IN_V2_R1.indd 1635103_35144_35145_35146_35218_Bella 10 speed Countertop Blender_IN_V2_R1.indd 16 2024-08-09 11:37 AM2024-08-09 11:37 AM

17
• Presione de nuevo el botón SMOOTHIE/GRIND (batido/moler) para apagar la función GRIND (moler).
• LafunciónGRIND(moler)tieneunciclodefuncionamientojoyseapagaautomáticamentedespuésde60
segundos.
ICE CRUSH/WHISK (TRITURAR HIELO/BATIR)
ICECRUSH(TRITURARHIELO):
• Encienda la licuadora. Seleccione el modo HIGH (alto), luego presione el botón ICE CRUSH/WHISK (triturar
hielo/batir) para iniciar el modo ICE CRUSH (triturar hielo). Se encenderá la luz anaranjada.
• La función ICE CRUSH (triturar hielo) le permite triturar rápidamente hasta 6 cubos de hielo y es perfecta para
preparar postres o bebidas heladas.
• Presione de nuevo el botón ICE CRUSH/WHISK (triturar hielo/batir) para apagar la función ICE CRUSH
(triturar hielo).
• LafunciónICECRUSH(triturarhielo)tieneunciclodefuncionamientojoyseapagaautomáticamente
después de 54 segundos.
WHISK(BATIR):
• Encienda la licuadora. Seleccione el modo LOW (bajo), luego presione el botón iCE CRUSH/WHISK (triturar
hielo/batir) para iniciar el modo WHISK (batir). Se encenderá la luz anaranjada.
• Permite batir salsas como mayonesa, huevos para tortilla y masas para pasteles y panqueques.
• Presione de nuevo el botón ICE CRUSH/WHISK (triturar hielo/batir) para apagar la función WHISK (batir).
• LafunciónWHISK(batir)tieneunciclodefuncionamientojoyseapagaautomáticamentedespuésde60
segundos.
BLEND/STIR (LICUAR/REVOLVER)
BLEND(LICUAR):
• Encienda la licuadora. Seleccione el modo HIGH (alto), luego presione el botón BLEND/STIR (licuar/revolver)
para iniciar el modo BLEND (licuar). Se encenderá la luz anaranjada.
• Licúe cualquier tipo de verduras o frutas con líquidos de su preferencia.
• Presione de nuevo el botón BLEND/STIR (licuar/revolver) para apagar la función BLEND (licuar).
• LafunciónBLEND(licuar)tieneunciclodefuncionamientojoyseapagaautomáticamentedespuésde60
segundos.
STIR(REVOLVER):
• Encienda la licuadora. Seleccione el modo LOW (bajo), luego presione el botón BLEND/STIR para iniciar el
modo STIR (revolver). Se encenderá la luz anaranjada.
• Revuelva los ingredientes hasta que se combinen.
• Presione de nuevo el botón BLEND/STIR (licuar/revolver) para apagar la función STIR (revolver).
• LafunciónSTIR(revolver)tieneunciclodefuncionamientojoyseapagaautomáticamentedespuésde50
segundos.
10. Cuando termine de procesar, presione siempre el botón de encendido para apagar la licuadora y también
asegúrese de desenchufar la unidad.
11. Tire la jarra de plástico hacia arriba para sacarla de la base del motor.
NOTA: La cantidad de ciclos de funcionamiento necesarios para obtener los resultados deseados variará según las
cantidades y las recetas.
INSTRUCCIONES DE MANTENIMIENTO PARA EL USUARIO
Este aparato requiere poco mantenimiento. No contiene piezas que el usuario pueda reparar. Cualquier
mantenimientoquerequieradesarmarlo,apartedelalimpieza,debeserrealizadoporuntécnicocalicadoen
reparación de electrodomésticos.
INSTRUCCIONES DE LIMPIEZA Y CUIDADO
PRECAUCIÓN: Nunca sumerja la base del motor, el enchufe o el cable en agua ni en otro líquido.
1. Siempre desenchufe la licuadora Flip & Store antes de limpiarla.
2. Siempre que sea posible, enjuague inmediatamente las piezas después del procesamiento para facilitar su
limpieza.
3. Manipule siempre las cuchillas por el aro de las cuchillas.
PRECAUCIÓN: Tenga mucho cuidado al manipular las cuchillas. No toque las cuchillas con los dedos.
Lascuchillassonmuylosasypuedencausarlesionessisetocan.
4. Para limpiar rápidamente, llene la jarra de plástico hasta un cuarto de su capacidad con agua limpia y tibia.
Presione PULSE (pulsar) varias veces. Enjuague bien.
5. Retire la tapa después de cada uso para limpiarla. Lave la tapa y la jarra de plástico con agua tibia y jabón.
Enjuague y seque por completo.
PRECAUCIÓN: Nunca use estropajos ásperos ni limpiadores abrasivos en las piezas plásticas o metálicas, ya que
puededañarlassupercies.
35103_35144_35145_35146_35218_Bella 10 speed Countertop Blender_IN_V2_R1.indd 1735103_35144_35145_35146_35218_Bella 10 speed Countertop Blender_IN_V2_R1.indd 17 2024-08-09 11:37 AM2024-08-09 11:37 AM
18
6. La jarra de plástico y la tapa son aptas para lavarse SOLO en la rejilla superior del lavavajillas.
IMPORTANTE:Despuésdelavarenellavavajillas,veriquesiemprequeelsellodelajuntadelatapaestéinstalado
correctamente,yaqueelcalordealgunoslavavajillaspuedehacerqueseaoje.
7. Puede limpiar la base del motor con un paño o esponja húmedos. Seque bien.
8. Limpie la cuchilla y el aro de la cuchilla con un cepillo pequeño para evitar lesiones al estar muy cerca de las
cuchillas.
ADVERTENCIA: NO SUMERJA LA BASE DEL MOTOR EN AGUA.
INSTRUCCIONES DE ALMACENAMIENTO:
a. Desenchufe y limpie la unidad.
b. Guárdela en la caja original o en un lugar limpio y seco.
c. Nunca guarde la licuadora de 10 velocidades mientras está caliente o enchufada. Nunca enrolle el cable
de forma que quede apretado alrededor del aparato. No ejerza nunca ninguna presión sobre el cable, en
especial en la zona en la que este ingresa en la unidad, ya que esto podría provocar que el cable se deshilache
y se rompa.
d. Esta unidad incluye un almacenamiento para el cable en la base para facilitar el almacenamiento.
e. Esta unidad es parte de la familia de productos “Fit Anywhere” de Bella y puede guardarse como se muestra
en la ilustración de abajo para mayor comodidad.
35103_35144_35145_35146_35218_Bella 10 speed Countertop Blender_IN_V2_R1.indd 1835103_35144_35145_35146_35218_Bella 10 speed Countertop Blender_IN_V2_R1.indd 18 2024-08-09 11:37 AM2024-08-09 11:37 AM

19
Mediante la presente, SENSIO Inc. garantiza que, durante el plazo de DOS AÑOS a partir
de la fecha de compra, este producto no presentará defectos mecánicos en el material
ni en la mano de obra, y durante 90 días, no los presentará en las piezas no mecánicas.
A su entera discreción, SENSIO Inc. reparará o reemplazará el producto que resulte
defectuoso, o emitirá un reembolso por el producto durante el plazo de garantía.
Esta garantía es válida únicamente para el comprador minorista original a partir de
la fecha de compra minorista inicial y no es transferible. Conserve el recibo de compra
original, ya que se exige una prueba de compra para obtener la validación de la garantía.
Las tiendas minoristas no tienen derecho a alterar, modicar ni corregir de ninguna
manera los términos y condiciones de la garantía.
EXCLUSIONES:
La garantía no cubre el desgaste normal de las piezas ni el daño ocasionado por
cualquiera de las siguientes causas: uso negligente del producto, uso de un voltaje
o corriente incorrectos, mantenimiento de rutina inadecuado, uso contrario al de las
instrucciones de funcionamiento, desarmado, reparación o alteración a cargo de personas
que no sean miembros del personal calicado de SENSIO Inc. Asimismo, la garantía no
cubre actos de la naturaleza, como incendios, inundaciones, huracanes o tornados.
SENSIO Inc. no asumirá responsabilidad por daños incidentales o resultantes ocasionados
por la violación de cualquier garantía expresa o implícita. Salvo en la medida en que lo
prohíban las leyes aplicables, cualquier garantía implícita de comerciabilidad o aptitud
para un propósito particular se limita temporalmente a la duración de la garantía. Algunos
estados, provincias o jurisdicciones no permiten la exclusión ni la limitación de daños
incidentales o resultantes, o limitaciones sobre la duración de una garantía implícita y, por
lo tanto, es posible que las exclusiones o limitaciones mencionadas no le correspondan.
La garantía cubre derechos legales especícos que pueden variar de un estado, una
provincia o una jurisdicción a otros.
CÓMO OBTENER EL SERVICIO DE GARANTÍA:
Debe comunicarse con el Servicio de atención al cliente a nuestro número telefónico
gratuito: 1-866-832-4843. Un representante del Servicio de atención al cliente intentará
resolver los problemas referidos a la garantía por teléfono. Si este no puede resolver el
problema, le proporcionarán un número de caso y le solicitarán que devuelva el producto
a SENSIO Inc. Adhiera una etiqueta al producto que incluya: su nombre, dirección,
número telefónico de contacto durante el día, número de caso y descripción del problema.
Además, incluya una copia del recibo de compra original. Envuelva cuidadosamente
el producto etiquetado con el recibo de compra, y envíelo (con el envío y el seguro
prepagados) a la dirección de SENSIO Inc. SENSIO Inc. no asumirá obligación ni
responsabilidad alguna por el producto devuelto que esté en el trayecto hacia el Centro
de servicio al cliente de SENSIO Inc.
GARANTÍA LIMITADA DE DOS AÑOS
35103_35144_35145_35146_35218_Bella 10 speed Countertop Blender_IN_V2_R1.indd 1935103_35144_35145_35146_35218_Bella 10 speed Countertop Blender_IN_V2_R1.indd 19 2024-08-09 11:37 AM2024-08-09 11:37 AM

20
35103_35144_35145_35146_35218_Bella 10 speed Countertop Blender_IN_V2_R1.indd 2035103_35144_35145_35146_35218_Bella 10 speed Countertop Blender_IN_V2_R1.indd 20 2024-08-09 11:37 AM2024-08-09 11:37 AM

21
35103_35144_35145_35146_35218_Bella 10 speed Countertop Blender_IN_V2_R1.indd 2135103_35144_35145_35146_35218_Bella 10 speed Countertop Blender_IN_V2_R1.indd 21 2024-08-09 11:37 AM2024-08-09 11:37 AM
For customer service questions or comments
Dudas o comentarios contactar el departamento de servicio al cliente
1-866-832-4843 / help@bellahousewares.com
Sensio Inc.
dba Made by Gather
TM
New York, NY 10016/USA
35103_35144_35145_35146_35218_IM_R1
35103_35144_35145_35146_35218_Bella 10 speed Countertop Blender_IN_V2_R1.indd 2235103_35144_35145_35146_35218_Bella 10 speed Countertop Blender_IN_V2_R1.indd 22 2024-08-09 11:37 AM2024-08-09 11:37 AM