IMMERSION BLENDER
WITH WHISK
Instruction Manual and Recipe Guide
BATIDORA A IMMERSIÓN
DE MANO Y BATIDOR
Manual de instrucciones y guía de recetas
WWW.BELLAHOUSEWARES.COM
Register your product and get support • Registrar y obtener asistencia de su producto
THANK YOU
for your purchase
BellaLifestyle
BellaLife
#myBELLAlife
for special announcements trendy recipes!
REGISTER
AND SIGN UP
Rate, review or ask us a question.
TELL US WHAT
YOU THINK!
GO TO
:
bellahousewares.com

Table of Contents
Important Safeguards ........................................................................................................................................ 2
Additional important safeguards .....................................................................................................................3
Notes on the Plug ............................................................................................................................................... 3
Electric Power...................................................................................................................................................... 3
Getting to Know Your Bella Immersion Blender ............................................................................................ 3
Before using the Bella Immersion Blender for the rst time ........................................................................ 4
Operating Instructions ....................................................................................................................................... 4
Cleaning and Maintenance ................................................................................................................................5
Storing Instructions ............................................................................................................................................5
Recipes ............................................................................................................................................................. 6-8
Warranty .............................................................................................................................................................. 9
Índice
Medidas De Seguridad Importantes .............................................................................................................. 14
Medidas De Seguridad Adicionales ............................................................................................................... 11
Notas Sobre el Enchufe ................................................................................................................................... 11
Corriente Eléctrica ............................................................................................................................................ 11
Familiarícese con su batidora a immersión Bella ........................................................................................ 11
Antes de utilizar por primera vez ................................................................................................................... 12
Instrucciones de Funcionamiento .................................................................................................................. 12
Limpieza y Mantenimiento .............................................................................................................................. 13
Recetas ..........................................................................................................................................................14-16
Garantía.............................................................................................................................................................. 17

2
IMPORTANT SAFEGUARDS
Before using the electrical appliance, the included basic precautions should
always befollowed:
1. READ ALL INSTRUCTIONS BEFORE USING THE IMMERSION BLENDER.
2. To protect against risk of electrical shock do not put cord, plugs, or appliance
in water or other liquid. Ensure that appliance does not get wet (water
splashes etc.) and do not use it with wet hands.
3. This appliance should not be used by children and care should be taken
whenused near children so that they do not play with the appliance and
possibly cause injury.
4. Unplug from outlet when not in use, before putting on or taking off parts,
andbefore cleaning. You might accidentally start the appliance if the unit is
still plugged into the outlet and cause serious personal injury
5. Avoid contacting moving parts. Blades are sharp and spin at a high speed
andcancause injuries.
6. Do not operate any immersion blender with a damaged cord or plug or after
the immersion blender malfunctions, or is dropped or damaged in any
manner. Return immersion blender to the nearest authorized service facility
for examination, repair or electrical or mechanical adjustment. A damaged
appliance may cause seriouspersonal injury, start res, or cause property
damage.
7. The use of attachments not recommended or sold by the manufacturer
maycausere, electric shock or injury. Only items designed for use with
thisappliance shouldbe used at all times.
8. Do not use outdoors. This unit is designed to be used only indoors.
9. Do not let cord hang over edge of table or counter. The cord can get tangled
orcause the appliance to fall.
10. Do not let cord contact hot surface, including the stove. The protective
insulation will burn making the appliance inoperable or unsafe to operate.
11. When mixing liquids, especially hot liquids, use a tall container or make small
quantities at a time to reduce spillage. Hot liquids can spill and cause burns.
12. Keep hands and utensils out of the container while blending to prevent
thepossibility of severe injury to persons or damage to the unit.
A scraper may be used but must be used only when the unit is not running.
13. Blades are sharp. Handle carefully. Use the blade’s collar to handle.
Touching the blades can cause injuries.
SAVE THESE INSTRUCTIONS
FOR HOUSEHOLD USE ONLY
3
ADDITIONAL IMPORTANT
SAFEGUARDS
Notes on the Plug
This appliance has a polarized plug (one blade is wider than the other).
To reduce the risk of electric shock, this plug will t in a polarized outlet only
oneway. If the plug does not t fully into the outlet, reverse the plug. If it still
does not t, contact a qualied electrician. Do not modify the plug in any way.
Electric Power
If the electrical circuit is overloaded with other appliances, your appliance
may not operate properly. It should be operated on a separate electrical circuit
fromother appliances.
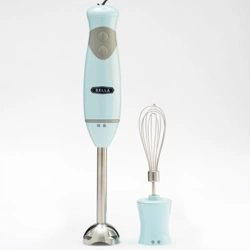
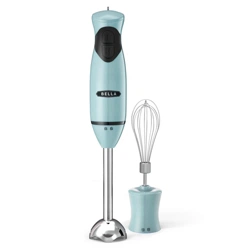
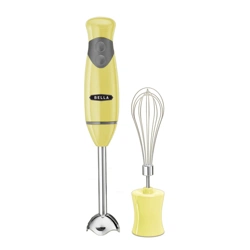
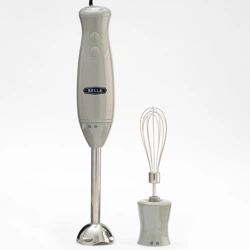
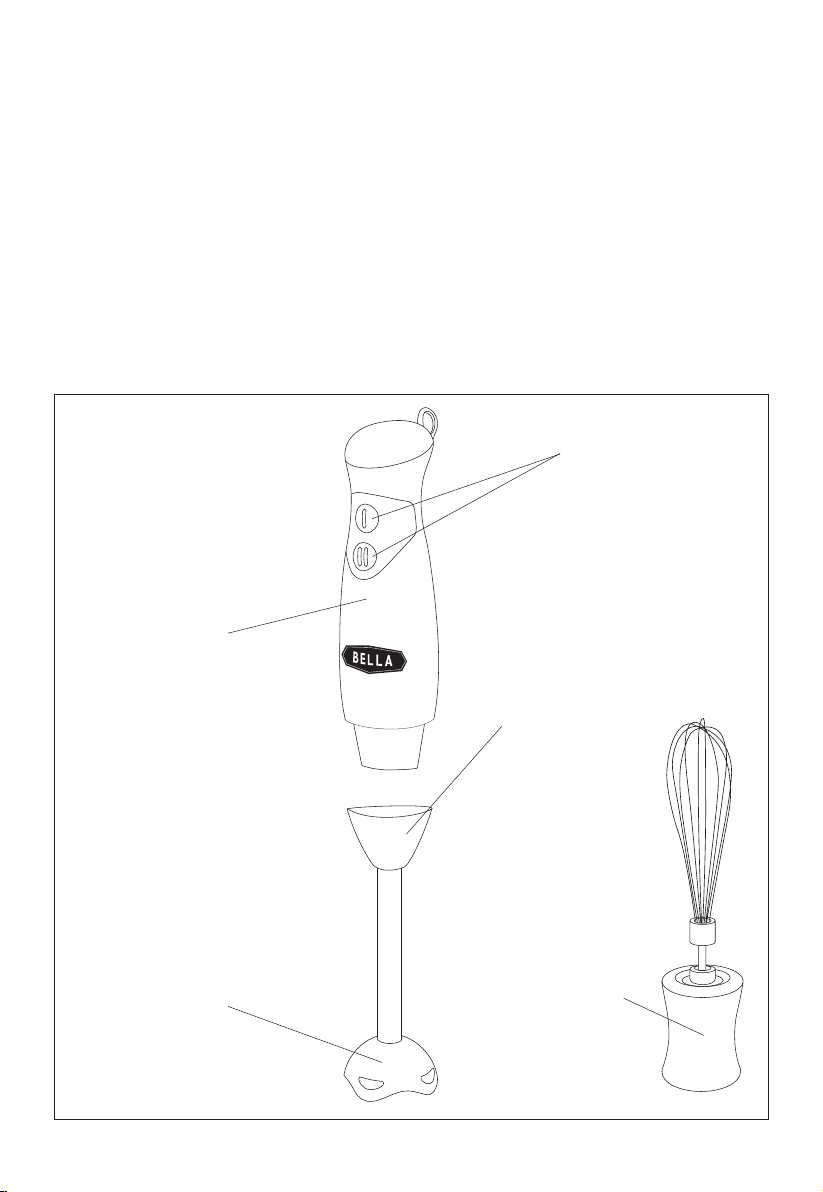
Getting to Know Your Bella Immersion Blender
Product may vary slightly from illustration
Motor
Housing
2 Speed Control Buttons
(High and Low)
Detachable
Blending Shaft
With Stainless steel
blending blade
Stainless steel
whisk attachment
4
Before using the Bella immersion blender for the rst time
1. Remove all packaging materials before using.
2. Wash the blending shaft and the whisk attachment in soapy water. Rinse and dry thoroughly.
CAUTION: Do not touch blades. The blending shaft attachment is very sharp.
Use extreme care when handling. Failure to do so can result in personal injury.
3. The housing may be wiped with a damp cloth.
CAUTION: Do not immerse motor housing in water or other liquids.
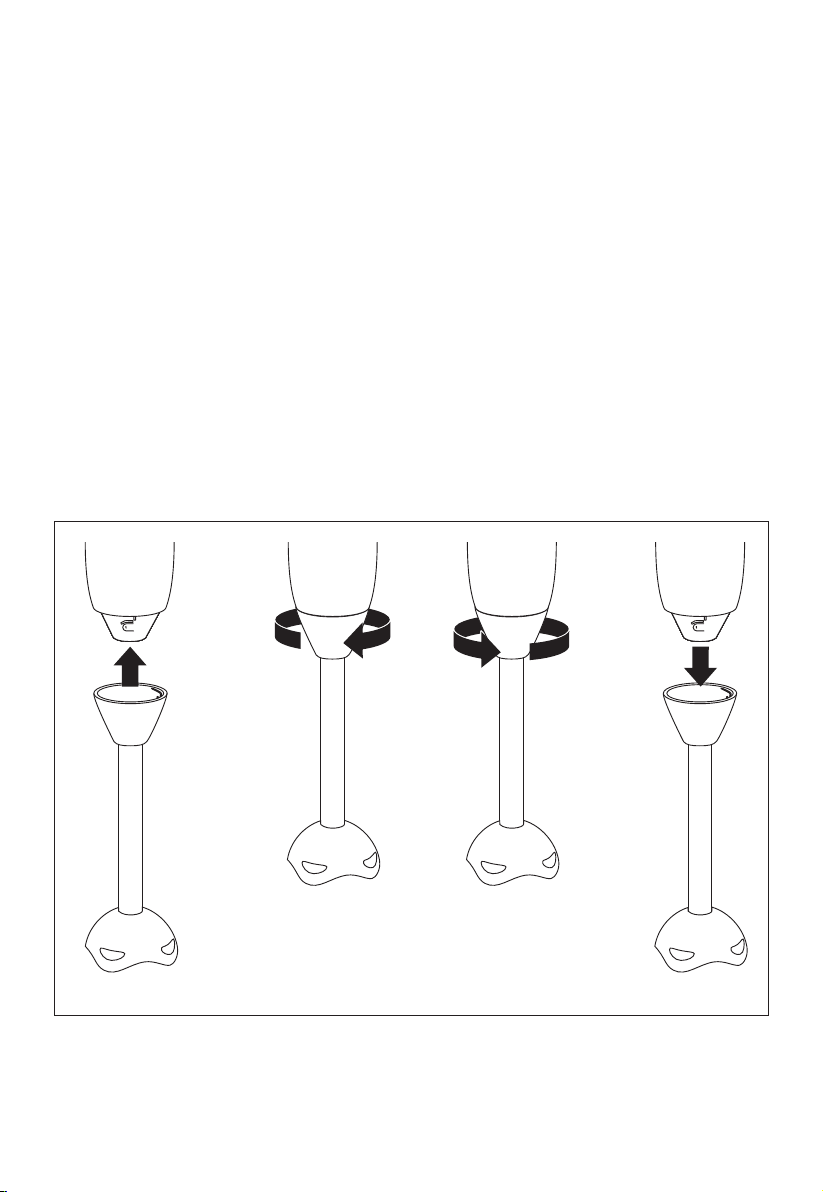
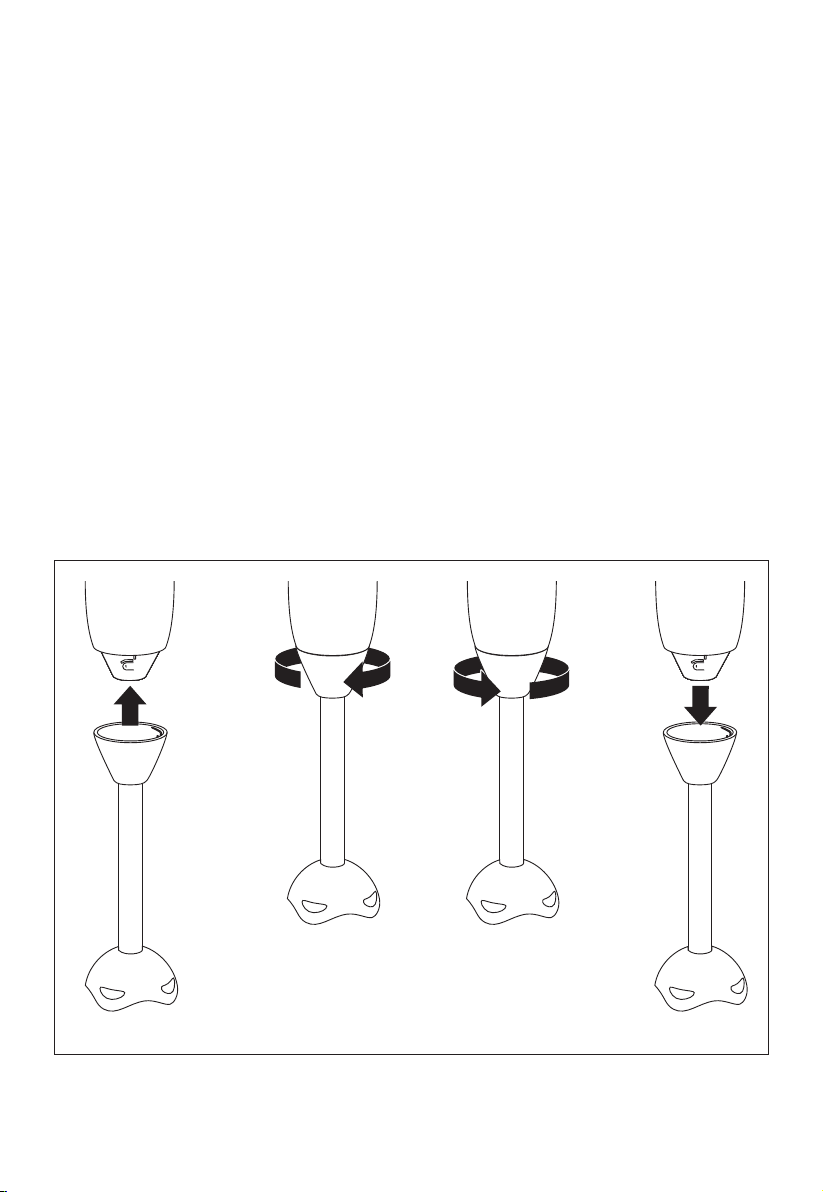
Operating Instructions
IMPORTANT: Blades are very sharp, handle with care. Ensure the immersion blender is unplugged
fromthepower outlet before assembling or removing attachments.
1. To assemble the detachable blending shaft to the motor housing, turn the shaft on a
counter-clockwise direction until tightened.
2. Plug the immersion blender to the power outlet.
3. Lower the immersion blender into food and press the desired speed at the top of the motor
housing.
NOTE: Maximum duration at high speed cannot exceed 1 minute.
Let the unit rest for 1 minute between two consecutive blending cycles.
NOTE: Do not run the immersion blender without any load for more than 15s.
4. When nished processing, stop the immersion blender by releasing the speed control button at the
top ofthemotor housing.
5. To disassemble, just turn in the blending shaft on a clockwise direction
CAUTION: Make sure the level of liquid or food in the container is below the joint of the blender,
as this could cause an electric shock.
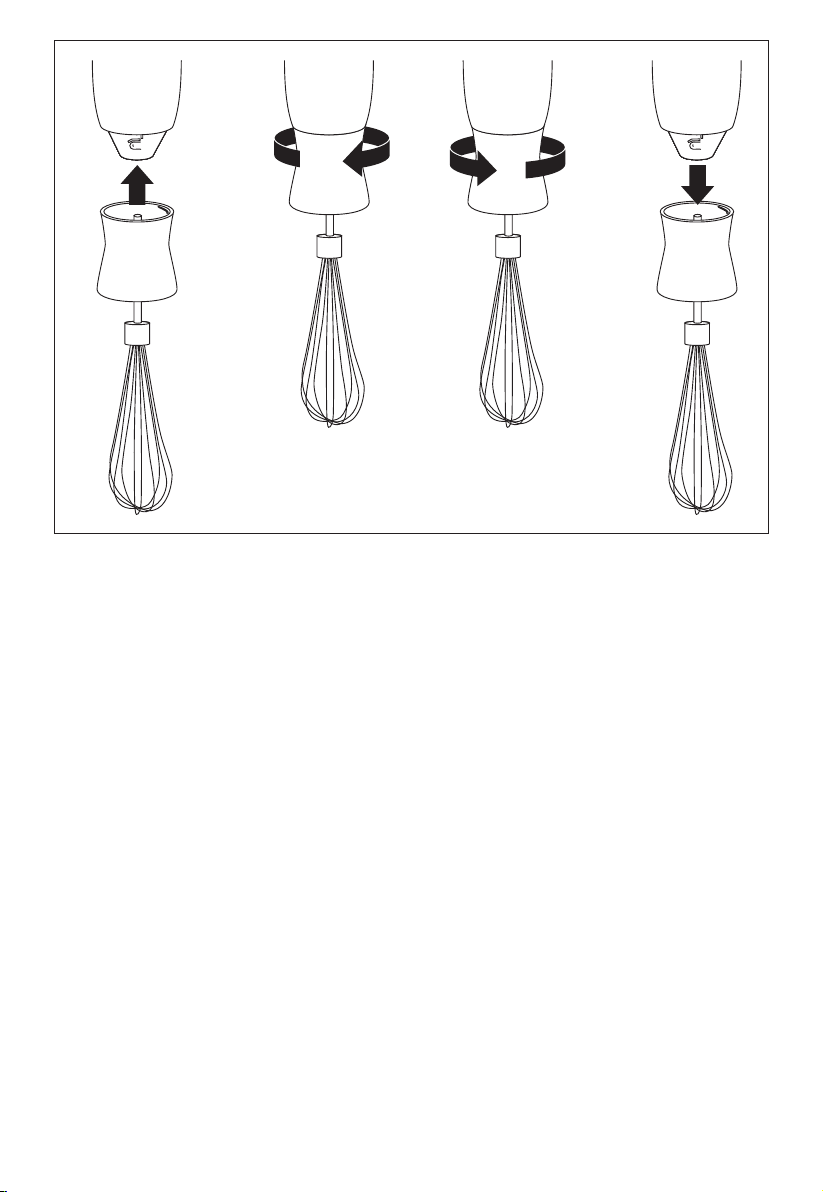
To assemble and disassemble the attachments, follow steps 1 to 4.
1 32 4

5
1 32 4
CAUTION: Due to its design, this product is not suitable for prolonged use. To avoid the handle becoming
uncomfortably hot, use the product in short bursts and allow to cool as necessary.
Cleaning and Maintenance
This appliance requires little maintenance. It contains no user-serviceable parts. Any servicing requiring
disassembly other than cleaning must be performed by a qualied appliance repair technician.
1. Unplug the appliance and remove the detachable blending shaft or whisking attachment.
2. Wash the detachable blending shaft or whisk attachments under running water, without the use
ofabrasivecleaner or detergent. When nished cleaning the detachable blending shaft or whisk
attachment, placeit uprightsothat any water that may have got into, can drain out. The blending
shaft is dishwasher safe; ontop rackonly.
NOTE: Do not soak the detachable blending shaft or whisk attachment in water for a long period
oftime because overtime the lubrication on the bearings may wash away.
3. Wipe the motor housing with a damp cloth. Never immerse it in water for cleaning as electric
shockmayoccur.
4. Dry thoroughly.
CAUTION: Blades are very sharp, handle with care.
TIP: For quick cleaning between processing tasks, hold the immersion blender in a cup half lled
withwater andturn on for a few seconds.
Storing Instructions
1. Unplug and clean unit.
CAUTION: Blades are sharp. Handle carefully.
2. Never store unit while it is still plugged in.
3. Never wrap cord tightly around the appliance. Do not put any stress on the cord where it enters
theunit, as it could cause the cord to fray and break.

Recipes
6
Mayonnaise
• 1 large egg
• 1 cup light tasting Olive Oil
• 2-3 teaspoons of lemon or lime juice (about half of a lemon/lime)
• A generous pinch of salt
Place all the ingredients into a jar and using the blending shaft run on Low until the mixture
starts thickening. Process for 5 more seconds using a gentle up and down motion until
thedesired consistency is reached.
Hollandaise Sauce:
• 2 egg yolks
• 2 ⁄ 3 tablespoonwater
• 2 ⁄ 3 tablespoonfresh lemon juice
• 4-51⁄3 ounces very soft unsalted butter
• Cayenne pepper, salt to taste
• White pepper to taste
1. Whisk the yolks, water, and lemon juice in a saucepan until the mix becomes thick and
pale. Setthe pan over moderately low heat and continue to whisk at low speed. Makesure
to reach all angles of the bowl. To prevent over cooking, move the pan frequently off
the burner for a fewseconds, and then back on. Sit the pan on cold water to lower
thetemperature, if needed.
2. As they cook, the eggs will become frothy, increase in volume, and then thicken.
Keep whisking on low speed and remove from the heat when you can see the bottom
ofthepan through thestreaks of the whisk and the eggs are thick and smooth.
3. Add a spoonful of soft butter and whisk constantly to incorporate each addition.
As the emulsion forms, you may add the butter in slightly larger amounts and whisk
untilfullyabsorbed. Continue incorporating butter until the sauce has thickened to
thedesiredconsistency.
4. Season lightly with salt, pepper, and a dash of cayenne pepper. Whisk well.
Taste and adjust theseasoning. Add droplets of lemon juice if needed.

Recipes
7
Broccoli cheese soup
• 2 cups of broccoli cuts
• 3 tablespoons of butter
• 1/2 cup of diced onion
• 1 clove garlic, minced
• 2 cups of chicken stock (use vegetable stock if preferred)
• 4 oz of American cheese, cubed
• 4 oz of cheese sauce
• 1 cup of milk
• 1/4 tbsp. garlic powder
• 1/3 cup of cornstarch
1. In a large pot, melt the butter over low-medium heat. Add the diced onion, garlic and
stiroccasionally until the onion becomes transparent. Add broccoli and chicken broth;
let it simmer until the broccoli is tender.
2. While the broccoli is cooking; whisk the milk, the garlic powder and the cornstarch
in aseparate bowl until a uniform, lump free sauce is reached. Heat the mixture for
20seconds inthemicrowave. Set aside.
3. Reduce the heat, add the American cheese as well as the cheese sauce.
Stir constantly until thecheeses have melted.
4. Remove the pot from the stove and using the immersion blender puree the soup to desired
consistency. Add the milk mixture to the soup until the desired consistency is reached.
Meringue
• 4 egg whites, at room temperature
• Pinch salt (or cream tartar)
• 1 cup of caster sugar
1. Preheat oven to 120°C (248F). Measure and prepare all your ingredients in advance.
Line 2 large baking trays with non-stick baking paper.
2. Separate the egg white from the yolks. Place the egg whites and the salt in a large and dry
mixing bowl. Use the whisk attachment on the immersion blender to whisk the egg whites
until soft peaks form. Add the sugar gradually, a spoonful at a time, and just combine.
3. After all the sugar has been added, continue to whisk until the mixture is very thick and
glossy. The sugar has to be dissolved and a long trailing peak should form when the whisk
is lifted. Donot overbeat. Spoon the mixture onto the lined trays to form the meringues.
Place the tray inthe oven and reduce the temperature to 90°C (194F). Leave the oven on
for1 1/2 hours or until the meringues are crisp and sound hollow when tapped on the base.
Turn the oven off and allow the meringues to cool in the oven for 4 hours. Remove from
theoven if they start turning brown.

Recipes
8
Strawberry Vanilla Cake in a Mug
• 1 tablespoon butter, softened
• 1 large egg
• 1/2 teaspoon vanilla extract
• 2 tablespoons granulated sugar
• 1/4 cup all-purpose our
• 1 teaspoon baking powder
• 1/2 teaspoon cinnamon
• 3 tablespoons strawberries, diced
• Sprinkle of confectioner’s sugar
1. In a medium bowl, combine all ingredients (except strawberries). Whisk in high until
batterisjustsmooth, but do not overmix. Gently fold in the strawberries.
2. Spray a 12oz; microwave-safe mug with cooking spray and pour the mixture into the mug.
Fill half of the cup so there is enough space for the cake to rise.
3. Microwave on high for 75 to 90 seconds, or until done. Sprinkle confectioner’s sugar
ontopandenjoy.

Limited TWO-YEAR Warranty
SENSIO Inc. hereby warrants that for a period of TWO YEARS from the date
of purchase, this product will be free from mechanical defects in material and
workmanship, and for 90 days in respect to non-mechanical parts. At its sole
discretion, SENSIO Inc. will either repair or replace the product found to be
defective, or issue a refund on the product during the warranty period.
The warranty is only valid for the original retail purchaser from the date of initial
retail purchase and is not transferable. Keep the original sales receipt, as proof
of purchase is required to obtain warranty validation. Retail stores selling this
product do not have the right to alter, modify, or in any way revise the terms and
conditions of the warranty.
EXCLUSIONS:
The warranty does not cover normal wear of parts or damage resulting from
any of the following: negligent use of the product, use of improper voltage or
current, improper routine maintenance, use contrary to the operating instructions,
disassembly, repair, or alteration by anyone other than qualied SENSIO Inc.
personnel. Also, the warranty does not cover Acts of God such as re, oods,
hurricanes, or tornadoes.
SENSIO Inc. shall not be liable for any incidental or consequential damages
caused by the breach of any express or implied warranty. Apart from the extent
prohibited by applicable law, any implied warranty of merchantability or tness
for a particular purpose is limited in time to the duration of the warranty. Some
states, provinces or jurisdictions do not allow the exclusion or limitation of
incidental or consequential damages, or limitations on how long an implied
warranty lasts, and therefore, the above exclusions or limitations may not apply to
you. The warranty covers specic legal rights which may vary by state, province
and/or jurisdiction.
HOW TO OBTAIN WARRANTY SERVICE:
You must contact Customer Service at our toll-free number: 1-866-832-4843.
A Customer Service Representative will attempt to resolve warranty issues
over the phone. If the Customer Service Representative is unable to resolve the
problem, you will be provided with a case number and asked to return the product
to SENSIO Inc. Attach a tag to the product that includes: your name, address,
daytime contact telephone number, case number, and description of the problem.
Also, include a copy of the original sales receipt. Carefully package the tagged
product with the sales receipt, and send it (with shipping and insurance prepaid)
to SENSIO Inc.’s address. SENSIO Inc. shall bear no responsibility or liability for
the returned product while in transit to SENSIO Inc.’s Customer Service Center.
9

10
MEDIDAS DE SEGURIDAD
IMPORTANTES
Antes de usar el electrodoméstico, siempre deben cumplirse las precauciones
deseguridad básicas, incluidas las siguientes:
1. LEA TODAS LAS INSTRUCCIONES.
2. Para protegerse contra una descarga eléctrica, no sumerja el cable,
losenchufes niel aparato en agua u otros líquidos. Asegúrese de que
elelectrodoméstico no semoje (salpicaduras de agua, etc.) y no lo use con
las manos mojadas.
3. Los niños no deben usar este electrodoméstico y se debe tener cuidado
cuando seutiliza cerca de niños para que no jueguen con el electrodoméstico
y puedan ocasionar lesiones.
4. Desenchufe el aparato del tomacorriente cuando no lo use, antes de colocarle
oextraerle piezas, y antes de limpiarlo. Podría encender el electrodoméstico
accidentalmente si la unidad todavía está enchufada al tomacorriente y
ocasionar lesiones personales graves.
5. Evite tocar las piezas móviles. Las hojas están aladas y giran a una alta
velocidady pueden ocasionar lesiones.
6. No utilice cualquier batidora a immersión que tenga un cable o enchufe
dañado odespués que la batidora a immersión muestre un funcionamiento
defectuoso, quese haya caído o que se haya dañado de cualquier manera.
Devuelva la batidora a immersión a las instalaciones de servicio autorizado
más cercanas para surevisión, reparación o ajuste eléctrico o mecánico. Un
electrodoméstico dañado puede ocasionar lesiones personales graves, iniciar
incendios uocasionar daños alapropiedad.
7. El uso de accesorios no recomendados o vendidos por el fabricante puede
ocasionar incendios, descarga eléctrica o lesiones. Siempre se deben usar
solo losartículos diseñados para utilizarse con este electrodoméstico.
8. No utilice este aparato en exteriores. Esta unidad está diseñada solo para
usoeninteriores.
9. No permita que el cable cuelgue del borde de la mesa o mesada.
El cable puede enredarse o hacer que el electrodoméstico se caiga.
10. No permita que el cable toque supercies calientes, incluida la estufa.
Elaislante de protección se quemará haciendo que el electrodoméstico
no se pueda utilizar ono sea seguro utilizarlo.
11. Al mezclar líquidos, especialmente líquidos calientes, utilice un contenedor
alto omezcle pequeñas cantidades a la vez para evitar derrames.
Los líquidos calientes se pueden derramar y ocasionar quemaduras.
12. Mantenga las manos y los utensilios fuera del contenedor durante el batido
para evitar la posibilidad de lesiones severas a personas o daños a la
unidad.Se puede utilizar un raspador solo cuando la unidad no está
enfuncionamiento.
13. Las hojas son aladas. Manipúlelas con cuidado. Use el aro metálico de la
hoja para manipular esta última. Tocar las hojas puede causar lesiones.
GUARDE ESTAS INSTRUCCIONES
SOLO PARA USO DOMÉSTICO

11
MEDIDAS DE SEGURIDAD
ADICIONALES
Notas Sobre el Enchufe
Este electrodoméstico cuenta con un enchufe polarizado (una pata es más ancha
que la otra). Para reducir el riesgo de descarga eléctrica, este enchufe encaja de
una sola manera en un tomacorriente polarizado. Si el enchufe no encaja bien en
el tomacorriente, dele vuelta. Si aun así no encaja, comuníquese con un electricista
calicado. No realice ningún tipo de modicación al enchufe.
Corriente Eléctrica
Si el circuito eléctrico está sobrecargado con otros electrodomésticos, es posible
que el electrodoméstico no funcione correctamente. El electrodoméstico debe
funcionar en un circuito eléctrico separado de otros aparatos.
Familiarícese con su batidora a immersión Bella
El producto puede variar ligeramente con respecto a la ilustración.
Motor
Boton de control
- 2 velocidades (Alta y baja)
Brazo de
licuado
detachable
Cuchilla
para licuar
Accessorio
para batir
12
Antes de utilizar por primera vez
1. Retire todo el material de empaque antes de su uso.
2. Lave el brazo de licuado y el accesorio de batir en agua jabonosa. Enjuague y seque completamente.
PRECAUCIÓN: No toque la cuchilla. La cuchilla tiene mucho lo. Tenga mucho cuidado al
manipularlas. De lo contrario, podría ocasionar lesiones personales.
3. El motor se puede limpiar con un paño húmedo.
PRECAUCIÓN: No sumerja el motor en agua u otros líquidos.
Instrucciones de Funcionamiento
IMPORTANTE: La cuchilla tienen mucho lo, manipule con cuidado. Asegúrese de que la batidora
deinmersión esté desenchufada del tomacorriente antes de ensamblar o retirar accesorios.
1. Para ensamblar el brazo de licuado en el motor, gire el brazo hacia la izquierda hasta que
estéajustada.
2. Conecte batidora a immersión de inmersión al tomacorriente.
3. Sumerja la batidora a immersión en los alimentos y presione a la velocidad deseada en el bóton
decontrol.
NOTA: La duración máxima a velocidad alta no puede exceder 1 minuto. Deje que la unidad
descanse por1 minuto entre dos ciclos consecutivos de batido.
NOTA: No opere la batidora a immersión sin carga por más de 15s.
4. Al terminar de procesar, detenga la batidora a immersión al liberar el botón de control de velocidad
enlapartesuperior de la carcasa del motor. Al terminar de processor, suelté el bóton de control
develocidad para deternes la batidora immersión.
5. Para desensamblar, solo gire el brazo de licuado hacia la derecha
PRECAUCIÓN: Asegúrese de que el nivel de líquido o alimentos en el contenedor esté debajo
delaunión del batidor, ya que esto puede ocasionar una descarga eléctrica.
Para ensamblar y desensamblar los accesorios, siga los pasos 1 al 4 enumerados
anteriormente.
1 32 4
13
1 32 4
PRECAUCIÓN: Debido a su diseño, este producto no es adecuado para su uso prolongado. Para evitar que
el mango se caliente demasiado, utilice el aparato en arranques pequeños y permita que se enfríe según
sea necesario.
Limpieza y Mantenimiento
Este electrodoméstico requiere poco mantenimiento. No contiene piezas que puedan ser reparadas por
el usuario. Cualquier mantenimiento para el que sea necesario desarmar el aparato, aparte de la limpieza,
debeser realizado porun técnico autorizado para reparar electrodomésticos.
1. Desenchufe el electrodoméstico y retire el brazo de licuado desmontable o accesorio para batir.
2. Lave el brazo de licuado desmontable o accesorio el brazo de licuado bajo un chorro de agua, sin
usar un limpiador o detergente abrasivo. Al terminar de limpiar el brazo de licuado desmontable,
colóquela enposición vertical para poder drenar el agua que pudo haber entrado. El brazo de
licuado se puede lavar enlavavajillas; solo en la rejilla superior.
NOTA: No sumerja la varilla batidora desmontable o accesorio de batidor de globo en agua durante
unlargo período de tiempo, ya que con el tiempo se podría lavar la lubricación de los cojinetes.
3. Limpie el motor con un paño húmedo. Nunca la sumerja en agua para limpiarla, ya que sepodría
producir una descarga eléctrica.
4. Séquelo completamente.
PRECAUCIÓN: Las hojas tienen mucho lo, manipule con cuidado.
SUGERENCIA: Para una limpieza rápida entre tareas de procesamiento, sostenga la batidora a
immersión enunvaso medio lleno de agua y enciéndala por unos segundos.
Instrucciones de Almacenamiento
1. Desconecte y limpie la unidad.
PRECAUCIÓN: Las hojas son aladas. Manipúlelas con cuidado.
2. Nunca guarde la unidad enchufada.
3. Nunca ate el cable de forma ceñida alrededor del electrodoméstico. No aplique tensión en el cable
en laparte que ingresa a la unidad, ya que el cable podría pelarse y romperse.

Recetas
14
Mayonesa
• 1 huevo grande
• 1 taza de aceite de oliva, degustacion ligera
• 2-3 cucharaditas de jugo de limón (aproximadamente la mitad de un limón/lima)
• Una generosa pizca de sal
Coloque todos los ingredientes en un frasco. Use el brazo de licuadora para mezclar
los ingredients. Haga un movimiento ascendente y descendente hasta que la mezcla
empiece a espesar. Procese 5 segundos más utilizando un suave movimiento ascendente
ydescendente hasta alcanzar la consistencia deseada.
Salsa holandesa:
• 2 yemas de huevo
• 2/3 cucharada de agua
• 2/3 cucharada de jugo de limón fresco
• 4-5 1/3 oz de mantequilla muy suave
• Pimienta de cayena, sal al gusto
• Pimienta blanca al gusto
1. Batir las yemas, el agua y el jugo de limón en una cacerola hasta que la mezcla se vuelva
espesa y pálida. Ponga la olla a fuego moderadamente bajo y continuar batiendo a baja
velocidad. Asegúrese de llegar a todos los ángulos de la taza. Para evitar el exceso de
cocción, mueva laollacon frecuencia fuera del quemador durante unos segundos y vuelva
aencenderla. Siénteselacacerola en agua fría para igualar la temperatura, si es necesario.
2. Como se cocinan, los huevos se convertirán en espumosa, aumentar de volumen, y luego
espesar. Mantenga batiendo a velocidad baja y retire del fuego cuando se puede ver el
fondo de la olla a través de las vetas de la batidora y la mezcla es espesa y uniforme.
3. Añadir una cucharada de mantequilla blanda y batir constantemente para incorporar
cada adición. Como las formas de emulsión, puede añadir la mantequilla en cantidades
ligeramente mayores y batir hasta que se absorba completamente. Continuar la
incorporación de la mantequilla hasta que la salsa haya espesado con la consistencia
deseada.
4. Sazone ligeramente con sal, pimienta y una pizca de pimienta de cayena.
Batir bien. Pruebe y ajuste la sazón, agregando gotas de jugo de limón, si es necesario.

Recetas
15
Sopa de brocoli y queso
• 2 tazas de brócoli cortados
• 3 cucharadas de mantequilla
• 1/2 taza de cebolla picada
• 1 diente de ajo, picado
• 2 tazas de caldo de pollo (use caldo de verduras si preere)
• 4 onzas de queso americano, en cubos
• 4 onzas de salsa de queso
• 1 taza de leche
• 1/4 cda. polvo de ajo
• 1/3 taza de fecula de maíz
1. En una olla grande, derrita la mantequilla a fuego medio-bajo. Añada la cebolla picada,
elajo yrevuelva ocasionalmente hasta que la cebolla se convierte transparente. Agregue
elbrócoli yelcaldo de pollo; deje hervir hasta que el brócoli esté tierno.
2. Mientras que los brócolis están cocinando; use el accesorio para batir y bata la leche, el ajo
en polvo y la harina de maíz en un tazón separado hasta que este uniforme y sin grumos.
Calentarlamezcla durante 20 segundos en el microondas. Separar.
3. Baje el fuego, añadir el queso americano, así como la salsa de queso.
Revuelva constantemente hasta que se derritan los quesos.
4. Retire la olla de la estufa y licue la sopa en la olla con la batidora a immersión hasta la
consistenciadeseada. Agregue la mezcla de leche a la sopa, continue licuando hasta que
sealcance la consistencia deseada.
Merengue
• 4 claras de huevo, a temperatura ambiente
• Una pizca de sal (o crema tartara)
• 1 taza de azúcar en polvo
1. Precaliente el horno a 120 ° C (248F). Mida y prepare todos los ingredientes con antelación.
Línee2 grandes bandejas de horno con papel de hornear antiadherente.
2. Separar la clara de huevo de las yemas y colocar las claras de huevo y la sal en un tazón
grande y seco. Utilice la conexión del batir en la batidora de mano para batir las claras de
huevo hasta que se formen picos suaves. Añadir el azúcar poco a poco, una cucharada a
lavez, ysimplemente combinar.
3. Después de todo el azúcar se ha añadido, continúe batiendo hasta que la mezcla es muy
gruesa y brillante. El azúcar tiene que ser disuelto y un pico largo trailing debe formar
cuando se levanta el batidor. No overbeat. Vierta la mezcla sobre las bandejas forradas
para formar los merengues. Coloque la bandeja en el horno y reducir la temperatura a 90°C
(194F). Deja el horno durante 11/2 horas o hasta que los merengues son nítidos y sonido
hueco cuando se le golpea en la base. Apague el horno y deje que los merengues se enfríen
en el horno durante 4 horas.

Recetas
16
Pastel de fresas y vainilla en una taza
• 1 cucharada de mantequilla, suavizada
• 1 huevo grande
• 1/2 cucharadita de extracto de vainilla
• 2 cucharadas de azúcar granulada
• 1/4 de taza de harina para todo uso
• 1 cucharadita de polvo para hornear
• 1/2 cucharadita de canela
• 3 cucharadas de fresas, cortados en cubitos
• Azúcar en polvo
1. En un tazón mediano, combine todos los ingredientes (excepto las fresas). Use el accesorio
para batir y bata en alto hasta que la masa este suave, pero no mezcle demasiado.
Incorporesuavemente las fresas.
2. Rocie la taza de 12 onzas con aceite en aerosol y vierta la mezcla en la taza. Asegurese
que la taza es para microondas. Llene la mitad de la taza y asegurese que ahiga espacio
suciente para que elpastel crezca.
3. Lleve al microondas en alto durante 75 a 90 segundos o hasta que la mezcla se cocine.
Espolvoreeazúcar en polvo para decorar y disfrute.

Garantía limitada de DOS AÑOS
Mediante la presente, SENSIO Inc. garantiza que, durante el plazo de DOS AÑOS
a partir de la fecha de compra, este producto no presentará defectos mecánicos
en el material ni en la mano de obra, y durante 90 días, no los presentará en las
piezas no mecánicas. A su entera discreción, SENSIO Inc. reparará o reemplazará
el producto que resulte defectuoso, o emitirá un reembolso por el producto
durante el plazo de garantía.
Esta garantía es válida únicamente para el comprador minorista original a partir
de la fecha de compra minorista inicial y no es transferible. Conserve el recibo de
compra original, ya que se exige una prueba de compra para obtener la validación
de la garantía. Las tiendas minoristas no tienen derecho a alterar, modicar ni
corregir de ninguna manera los términos y condiciones de la garantía.
EXCLUSIONES:
La garantía no cubre el desgaste normal de las piezas ni el daño ocasionado
por cualquiera de las siguientes causas: uso negligente del producto, uso de
un voltaje o corriente incorrectos, mantenimiento de rutina inadecuado, uso
contrario al de las instrucciones de funcionamiento, desarmado, reparación o
alteración a cargo de personas que no sean miembros del personal calicado
de SENSIO Inc. Asimismo, la garantía no cubre actos de la naturaleza, como
incendios, inundaciones, huracanes o tornados.
SENSIO Inc. no asumirá responsabilidad por daños incidentales o resultantes
ocasionados por la violación de cualquier garantía expresa o implícita. Salvo en
la medida en que lo prohíban las leyes aplicables, cualquier garantía implícita de
comerciabilidad o aptitud para un propósito particular se limita temporalmente
a la duración de la garantía. Algunos estados, provincias o jurisdicciones no
permiten la exclusión ni la limitación de daños incidentales o resultantes, o
limitaciones sobre la duración de una garantía implícita y, por lo tanto, es posible
que las exclusiones o limitaciones mencionadas no le correspondan. La garantía
cubre derechos legales especícos que pueden variar de un estado, una provincia
o una jurisdicción a otros.
CÓMO OBTENER EL SERVICIO DE GARANTÍA:
Debe comunicarse con el Servicio de atención al cliente a nuestro número
telefónico gratuito: 1-866-832-4843. Un representante del Servicio de atención
al cliente intentará resolver los problemas referidos a la garantía por teléfono.
Si este no puede resolver el problema, le proporcionarán un número de caso
y le solicitarán que devuelva el producto a SENSIO Inc. Adhiera una etiqueta
al producto que incluya: su nombre, dirección, número telefónico de contacto
durante el día, número de caso y descripción del problema. Además, incluya
una copia del recibo de compra original. Envuelva cuidadosamente el producto
etiquetado con el recibo de compra, y envíelo (con el envío y el seguro
prepagados) a la dirección de SENSIO Inc. SENSIO Inc. no asumirá obligación ni
responsabilidad alguna por el producto devuelto que esté en el trayecto hacia el
Centro de servicio al cliente de SENSIO Inc.
17
GRACIAS
para su compra
BellaLifestyle
BellaLife
#myBELLAlife
para arriba para anuncios especiales y los
ingresos de la moda!
REGISTRARSE
Y FIRMAR
VISITE
:
bellahousewares.com
Evaluar, revisar o hacernos una pregunta.
CUÉNTANOS LO
QUE PIENSAS!
!


SO_316194_14825_R0
BELLA is a registered trademark of Sensio Inc., Montréal, Canada H3C 4S9.
All rights reserved.
BELLA es una marca registrada de Sensio Inc., Montréal, Canada H3C 4S9.
Todos los derechos reservados.
For customer service questions or comments
Dudas o comentarios contactar el departamento de servicio al cliente
1-866-832-4843 / [email protected]