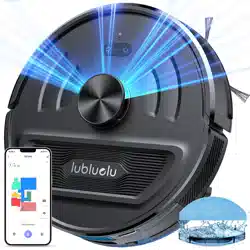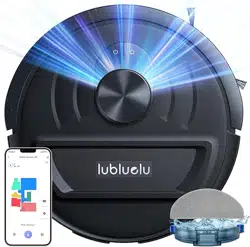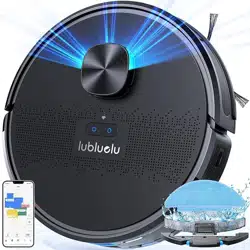
Robot vacuum
Any after-sales problems, scan it!
In order to have a clear understanding of this robot please scan
the QR Code with your mobile phone to get a video of the
installation and operation of the product before use.
If you still have any other questions after watching the video,
please feel free to contact us.
Warm Tip
Robot Vacuum Cleaner
APP Download

PSTI Policy
protecting their information. This policy is intended to give XINCHENG HOLDING (HK) CO .,LIMITED customers clear guidelines for conducting
vulnerability discovery activities and to convey our preferences in how to submit discovered vulnerabilities to us.
This policy describes what systems and types of research are covered under this policy, how to send us vulnerability reports, and how long we
ask security researchers to wait before publicly disclosing vulnerabilities.
We encourage you to contact us to report potential vulnerabilities in our systems.
• Notify XINCHENG HOLDING (HK) CO .,LIMITED as soon as
possible after you discover a real or potential security issue.
• Make every effort to avoid privacy violations, degradation of user
experience, disruption to production systems, and destruction or
manipulation of data.
• Only use exploits to the extent necessary to confirm a vulnerabili-
ty’s presence. Do not use an exploit to compromise or exfiltrate
data, establish persistent command line access, or use the exploit
to pivot to other systems.
• Provide XINCHENG HOLDING (HK) CO .,LIMITED a reasonable
amount of time to resolve the issue before you disclose it publicly.
• Do not submit a high volume of low-quality reports.
Once the XINCHENG HOLDING (HK) CO .,LIMITED customer has
established that a vulnerability exists or encounter any sensitive
data (including personally identifiable information, financial
information, or proprietary information or trade secrets of any party),
XINCHENG HOLDING (HK) CO .,LIMITED customer must stop his
test, notify XINCHENG HOLDING (HK) CO .,LIMITED immediately,
and not disclose this data to anyone else.
GUIDELINES
Under this policy, “research” means activities in which you:
• Network denial of service (DoS or DDoS) tests or other tests that impair
access to or damage a system or data.
• Physical testing (e.g. office access, open doors, tailgating), social
engineering (e.g. phishing, vishing), or any other non-technical
vulnerability testing.
• Any product not expressly listed in the statement of compliance, are
excluded from scope. Additionally, vulnerabilities found in systems from
our vendors fall outside of this policy’s scope and should be reported
directly to the vendor according to their disclosure policy (if any). If you
aren’t sure whether a system is in scope or not, contact us.
Once the XINCHENG HOLDING (HK) CO .,LIMITED customer has
established that a vulnerability exists or encounter any sensitive data
(including personally identifiable information, financial information, or
proprietary information or trade secrets of any party), XINCHENG
HOLDING (HK) CO .,LIMITED customer must stop his test, notify
XINCHENG HOLDING (HK) CO .,LIMITED immediately, and not disclose
this data to anyone else.
SCOPE
This vulnerability disclosure policy apply for internet connected products
sold in the UK market and listed in the declaration of statement of
compliance to the PSTI regulation
The following test methods are not authorized for testing vulnerabilities

VULNERABILITY REPORTING PROCESS
SERVICE FOR SECURITY UPDATE
Any XINCHENG HOLDING (HK) CO .,LIMITED customer can report a vulnerability issue observed on an XINCHENG HOLDING (HK)
CO.,LIMITED internet connected product on the following email address [email protected]
Reports may be submitted anonymously. If the customer share the contact information, we will acknowledge receipt of your report within 7
business days per email.
In order to help XINCHENG HOLDING (HK) CO .,LIMITED triage and prioritize submissions, we recommend that your reports:
• precisely describe the concerned product by for example giving the XINCHENG HOLDING (HK) CO .,LIMITED internet connected product
model reference or the EAN.
• The date and the shop the XINCHENG HOLDING (HK) CO .,LIMITED internet connected has been purchased.
• Describe the location the vulnerability was discovered and the potential impact of exploitation.
• Offer a detailed description of the steps needed to reproduce the vulnerability (proof of concept scripts or screenshots are helpful).
• Be in English
• When the XINCHENG HOLDING (HK) CO .,LIMITED customer choose to share his contact information with XINCHENG HOLDING (HK) CO
.,LIMITED, we commit to coordinating with you as openly and as quickly as possible:
• Within 7 business days, XINCHENG HOLDING (HK) CO .,LIMITED will acknowledge that your report has been received.
• To the best of his ability, XINCHENG HOLDING (HK) CO .,LIMITED will confirm the existence of the vulnerability to the customer and be as
transparent as possible about what steps have been taken during the remediation process, including on issues or challenges that may delay
resolution.
• XINCHENG HOLDING (HK) CO .,LIMITED will maintain an open dialogue to discuss issues.
• XINCHENG HOLDING (HK) CO .,LIMITED will and keep the customer updated per email on the progress in a regular way.
• The customer will be informed by XINCHENG HOLDING (HK) CO .,LIMITED when the reported issue can be considered as closed.
The service for the security update of the XINCHENG HOLDING (HK) CO .,LIMITED internet connected product is defined in the declaration
of statement of compliance available in the website page.

Safety Warnings
Introduction
Installation and APP Connection
Use Instructions
Maintenance
Malfunctions and Troubleshooting
DE
FR
IT
ES
001
003
007
017
021
027
029
057
085
113
........................................................................................................................................................
..................................................................................................................................................................
....................................................................................................................
................................................................................................................................. ........................
Function Module 019
.............................................................................................................................. ........................
................................................................................................................................................................
Routine Maintenance 024
..................................................................................................................................................
................................................................................................................
.....................................................................................................................................................................................
.....................................................................................................................................................................................
.....................................................................................................................................................................................
.....................................................................................................................................................................................
Table of Contents

001 002 003 004 005 006 007 008 009 010 011 012 013 014
015 016 017 018 019 020 021 022 023 024 025 026 027 028
029 030 031 032 033 034 035 036 037 038 039 040 041 042
043 044 045 046 047 048 049 050 051 052 053 054 055 056
057 058 059 060 061 062 063 064 065 066 067 068 069 070
071 072 073 074 075 076 077 078 079 080 081 082 083 084
085 086 087 088 089 090 091 092 093 094 095 096 097 098
099 100 101 102 103 104 105 106 107 108 109 110 111 112
113 114 115 116 117 118 119 120 121 122 123 124 125 126
127 128 129 130 131 132 133 134 135 136 137 138 139 140
Do not use the bumper as the handle.
Safety Warnings
•
•
•
•
•
•
•
•
•
•
•
•
•
•
•
•
•
•
•
Application Restrictions
This machine is used for indoor cleaning only. Do not use the machine outdoors (such as open balcony), on non-floors (such as sofa) or in
commercial or industrial places.
Do not use the machine in the place of cliff without protective rails (such as duplex floors, open balcony, furniture top).
Do not use the machine in the place more than 104°F or less than 32°F or on the ground with any liquids and viscous substances.
Please hang up the wires on the ground indoors before use, to avoid the wires being entangled during cleaning.
Please remove the fragile items and debris (such as vases, plastic bags, etc.) on the ground to avoid valuables being damaged due to
obstacles or minor collisions.
Those with physical, mental or perceptual impairments, including children, are prohibited to use or operate the machine.
This machine should not be used as a toy by the children. Please keep children and pets away when the machine is working.
Place the cleaning brush beyond the reach of the children.
Do not place any objects (including children or pets) on the stationary or moving machine.
Do not keep any parts of human body or pets such as hair and finger close to the suction port during the cleaning.
Do not use the machine to clean the burning objects (such as unquenched cigarette butts)
Do not use the machine to clean the plush carpet (some dark carpets may not be cleaned properly)
Do not use the machine to clean the hard or sharp objects (such as decoration wastes, glass, iron nails, etc.)
Please cut off the power before cleaning or maintaining the machine or the charging base.
Do not wipe any parts of the machine with a damp cloth or any liquid.
Please strictly abide by the operation instructions. Any losses or injuries caused by improper operation shall be borne by the user.
Do not activate the mop function on carpets or on top of furniture.
Please remove the water tank during charging.
001 002 003 004 005 006 007 008 009 010 011 012 013 014
015 016 017 018 019 020 021 022 023 024 025 026 027 028
029 030 031 032 033 034 035 036 037 038 039 040 041 042
043 044 045 046 047 048 049 050 051 052 053 054 055 056
057 058 059 060 061 062 063 064 065 066 067 068 069 070
071 072 073 074 075 076 077 078 079 080 081 082 083 084
085 086 087 088 089 090 091 092 093 094 095 096 097 098
099 100 101 102 103 104 105 106 107 108 109 110 111 112
113 114 115 116 117 118 119 120 121 122 123 124 125 126
127 128 129 130 131 132 133 134 135 136 137 138 139 140
1.Caution - Use of controls or adjustments or performance of procedures otherthan those specified herein may result in hazardous radiation exposure.
2.The laser safety classification of this product is ba sed on EN 60825-1: 2014+A11: 2021 & EN 50689: 2021.
Safety Warnings
Battery and Charging
•
•
•
•
•
•
•
•
Do not use the battery, charging base or charger produced by any third parties.
Do not disassemble, repair or modify the battery or charging base without authorization.
Do not keep the charging base close to heat sources (such as radiator).
Do not wipe or clean the spring contacts of the charging base with a damp cloth or wet hands.
Do not discard the used battery arbitrarily. The used battery should be handed over to professional recycling agency for proper disposal.
Do not use the machine if the power cord is broken or wrecked, please buy new power cord through official channels.
Please power off the machine during transportation. It’s recommended to transport the machine with original package.
If the machine will not be used for a long time, please power it off after being fully charged, then store in a cool and dry place. Charge the
battery at least every three months to avoid the battery failure due to excessive discharging.
CLASS 1 LASER PRODUCT
CONSUMER LASER PRODUCT
Classification to
EN 60825-1 2014+A11 2021
&
EN 50689 2021
001 002 003 004 005 006 007 008 009 010 011 012 013 014
015 016 017 018 019 020 021 022 023 024 025 026 027 028
029 030 031 032 033 034 035 036 037 038 039 040 041 042
043 044 045 046 047 048 049 050 051 052 053 054 055 056
057 058 059 060 061 062 063 064 065 066 067 068 069 070
071 072 073 074 075 076 077 078 079 080 081 082 083 084
085 086 087 088 089 090 091 092 093 094 095 096 097 098
099 100 101 102 103 104 105 106 107 108 109 110 111 112
113 114 115 116 117 118 119 120 121 122 123 124 125 126
127 128 129 130 131 132 133 134 135 136 137 138 139 140
Robot
Introduction
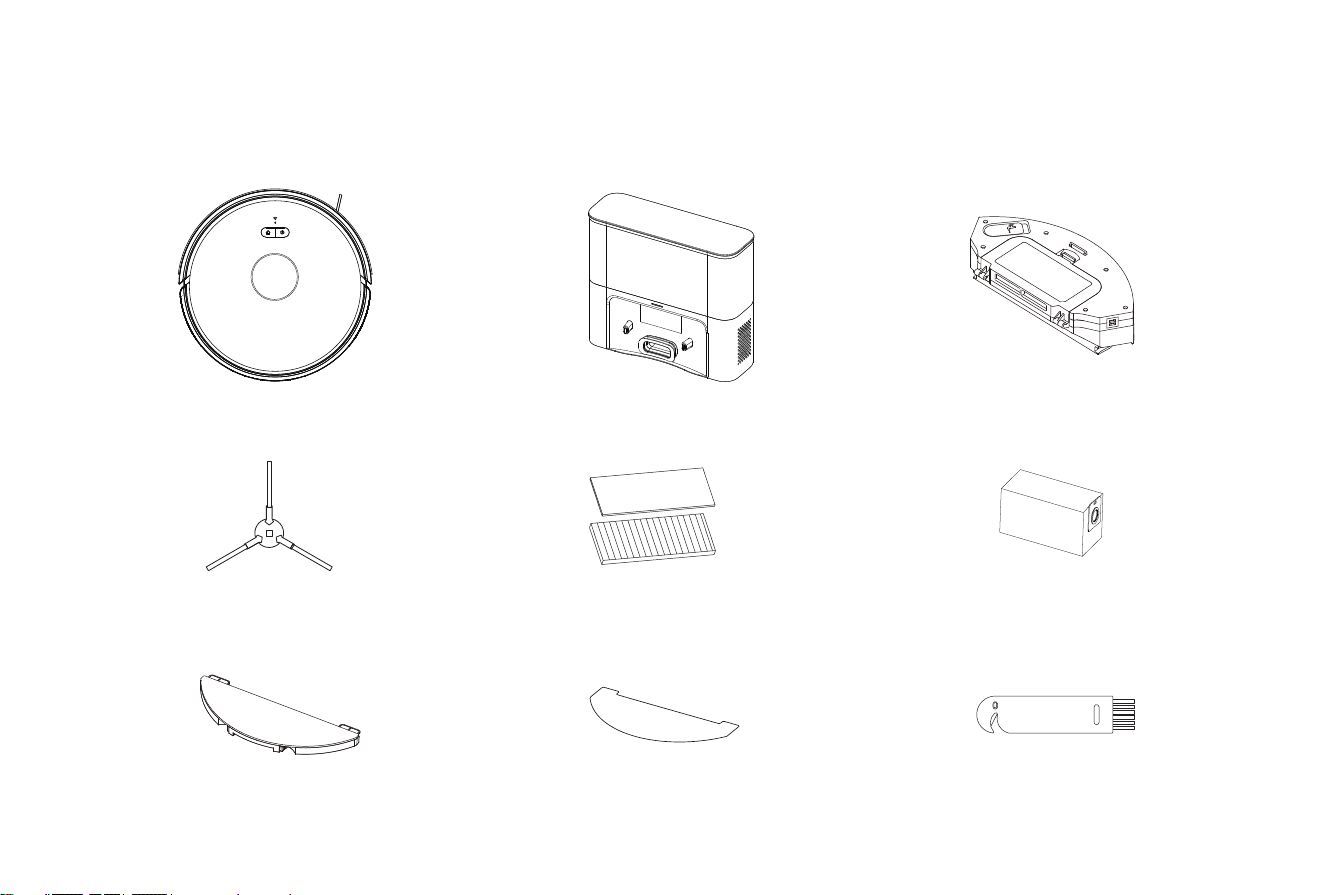
Packing List
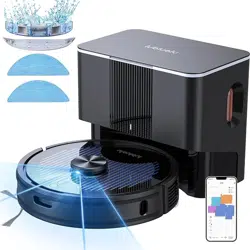
Dust Collecting Base 2-in-1 Dustbin & Water Tank
Side Brush
Mop Pad
HEPA Filter+sponge
Mop Cloth
Dust Bag
Cleaning Tool
001 002 003 004 005 006 007 008 009 010 011 012 013 014
015 016 017 018 019 020 021 022 023 024 025 026 027 028
029 030 031 032 033 034 035 036 037 038 039 040 041 042
043 044 045 046 047 048 049 050 051 052 053 054 055 056
057 058 059 060 061 062 063 064 065 066 067 068 069 070
071 072 073 074 075 076 077 078 079 080 081 082 083 084
085 086 087 088 089 090 091 092 093 094 095 096 097 098
099 100 101 102 103 104 105 106 107 108 109 110 111 112
113 114 115 116 117 118 119 120 121 122 123 124 125 126
127 128 129 130 131 132 133 134 135 136 137 138 139 140
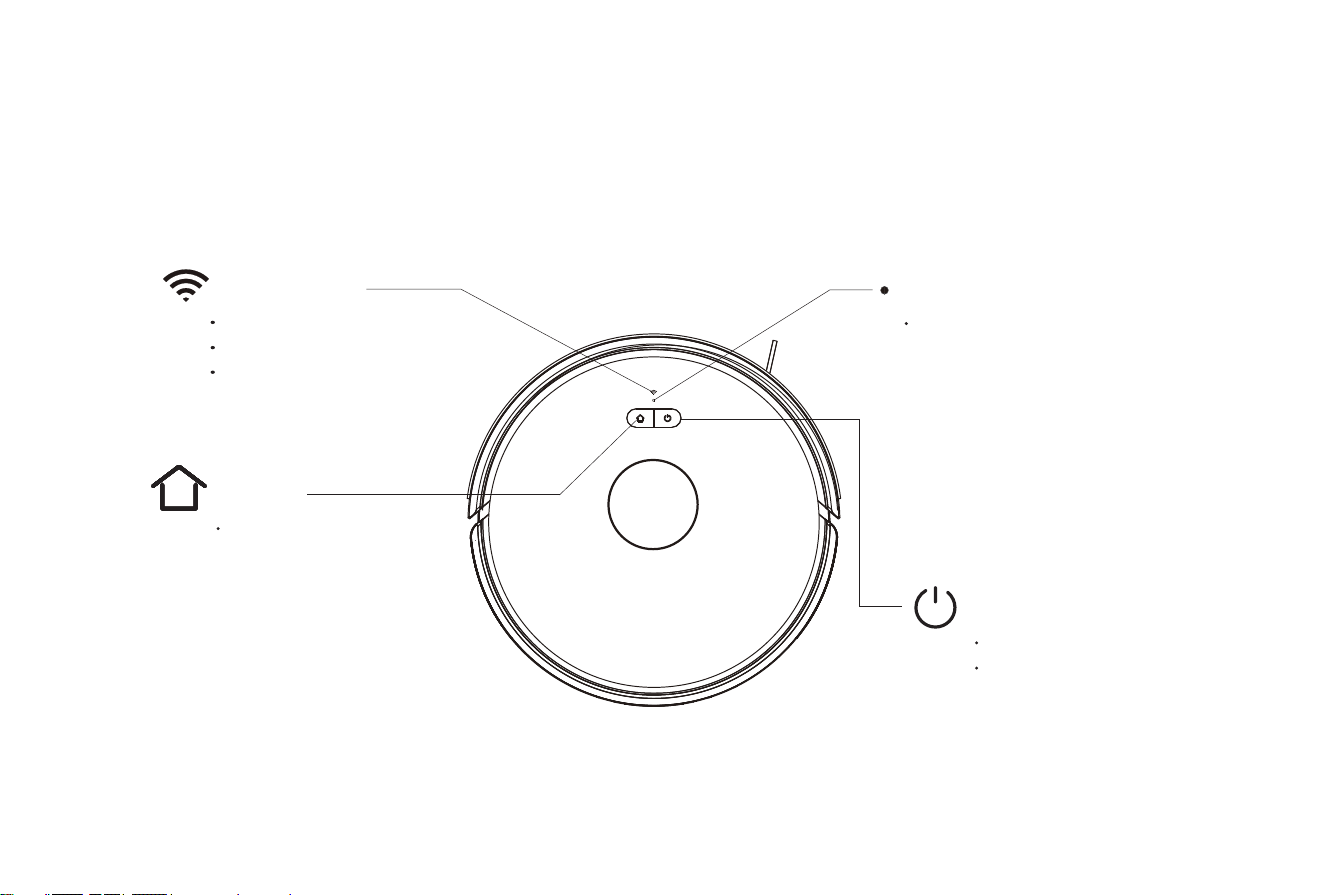
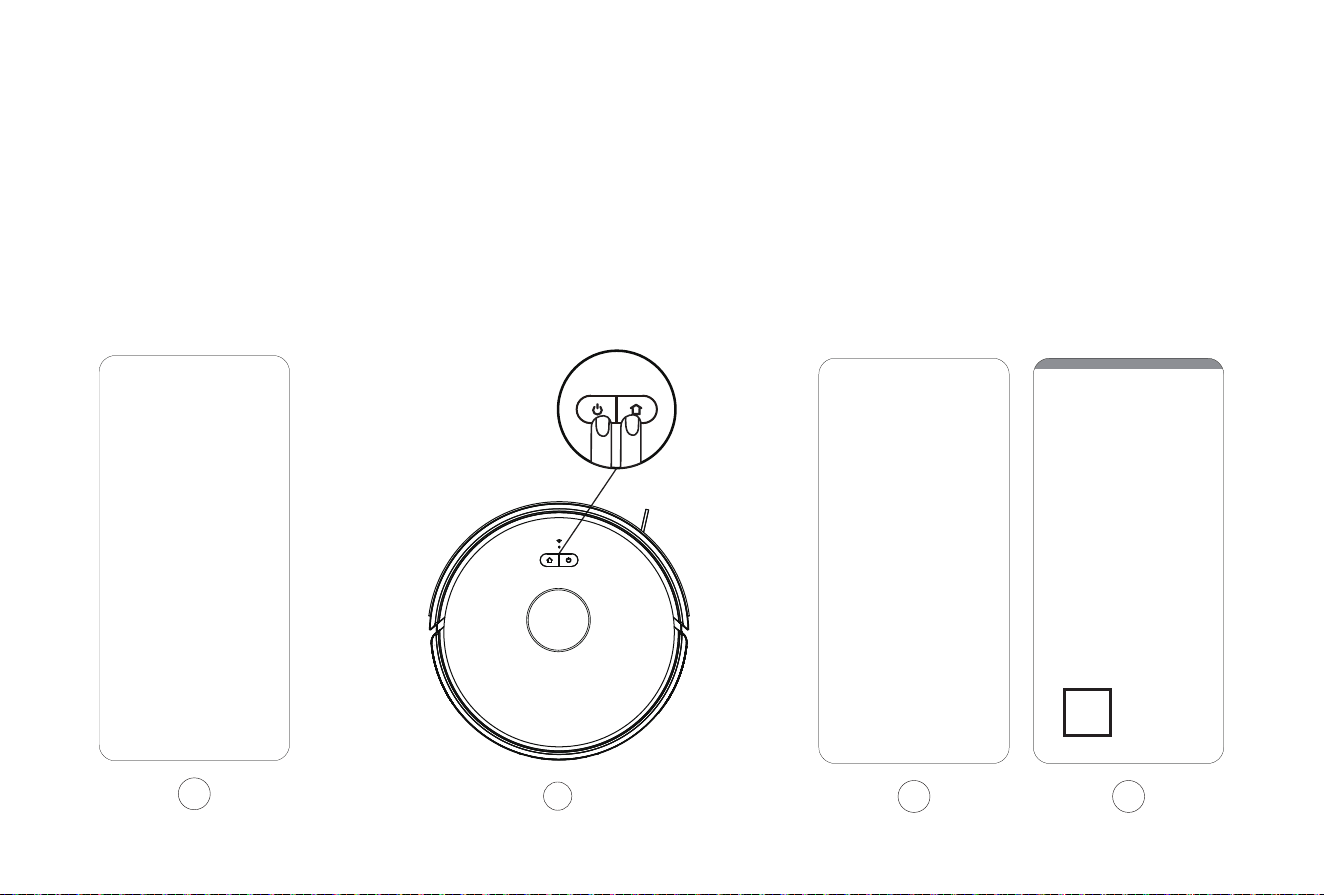
Machine
Introduction
Recharge
Short Press to Recharge
WIFI Indicator
Light OFF: Offline
Light Flash: Connecting
Light ON: Online
Power/Clean/Pause
Short press to start Clean/Pause
Press and hold for 3 seconds to
Power ON/OFF
System Reset
Insert a pin to trigger the switch,
the machine will shut off to reset
the system.
Machine
001 002 003 004 005 006 007 008 009 010 011 012 013 014
015 016 017 018 019 020 021 022 023 024 025 026 027 028
029 030 031 032 033 034 035 036 037 038 039 040 041 042
043 044 045 046 047 048 049 050 051 052 053 054 055 056
057 058 059 060 061 062 063 064 065 066 067 068 069 070
071 072 073 074 075 076 077 078 079 080 081 082 083 084
085 086 087 088 089 090 091 092 093 094 095 096 097 098
099 100 101 102 103 104 105 106 107 108 109 110 111 112
113 114 115 116 117 118 119 120 121 122 123 124 125 126
127 128 129 130 131 132 133 134 135 136 137 138 139 140
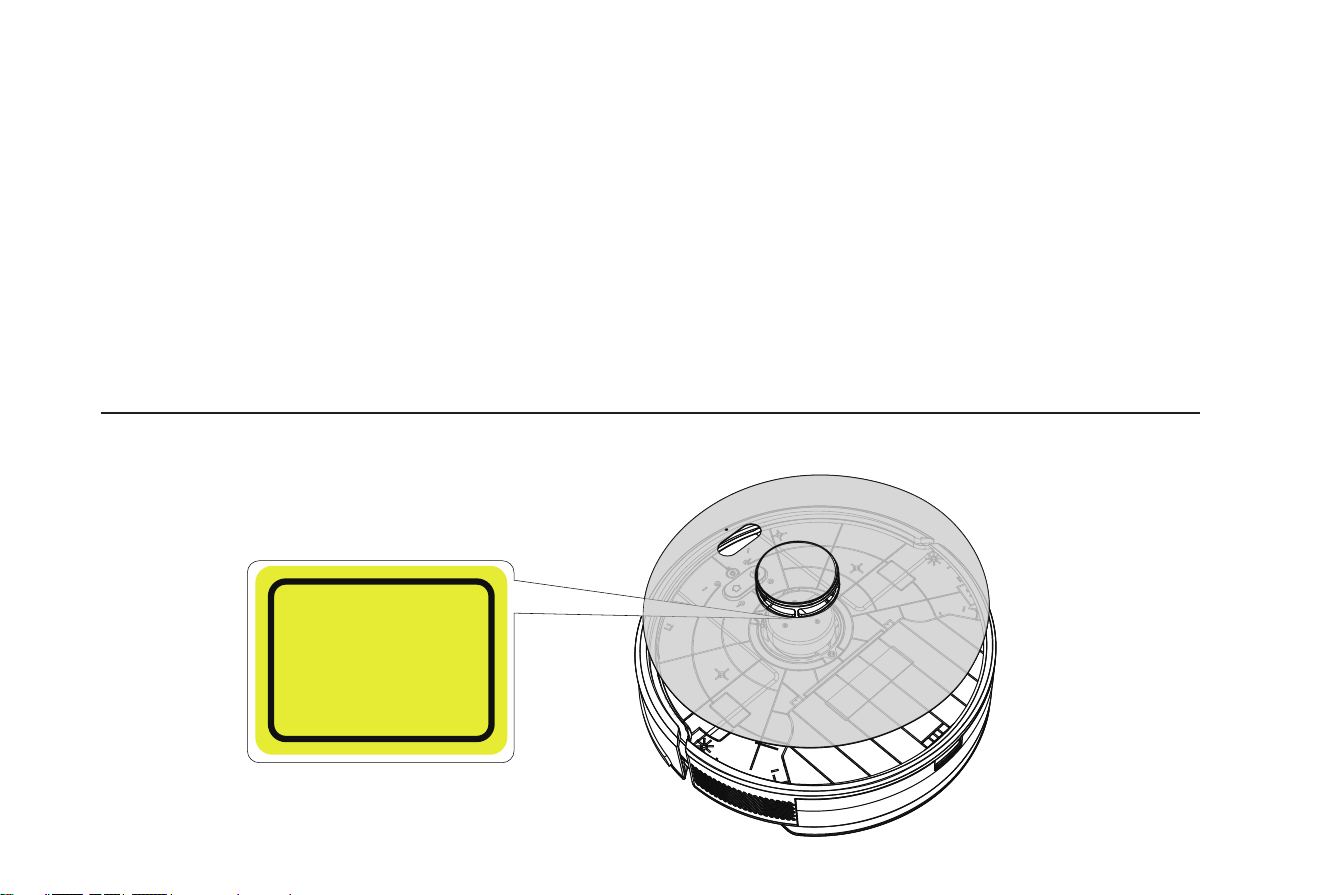
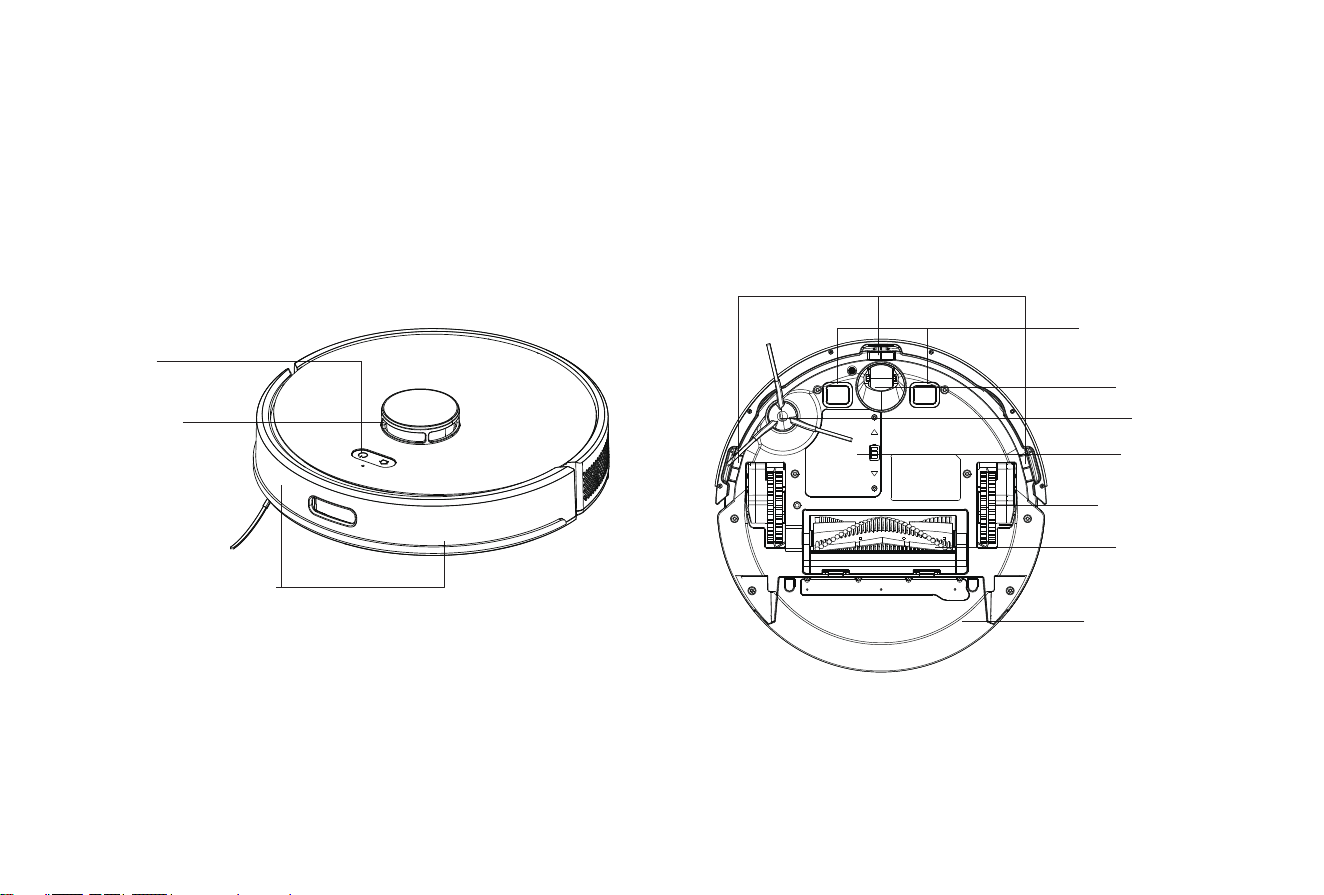
Sensor and Structure
Charging Contacts
Omni Wheel
Side Brush
Battery cover
Driving Wheel
Rolling Brush
Clilff sensor
Laser radar
Button
2-in-1 Dustbin &
Water Tank
Introduction
Infrared Bumper Sensor
001 002 003 004 005 006 007 008 009 010 011 012 013 014
015 016 017 018 019 020 021 022 023 024 025 026 027 028
029 030 031 032 033 034 035 036 037 038 039 040 041 042
043 044 045 046 047 048 049 050 051 052 053 054 055 056
057 058 059 060 061 062 063 064 065 066 067 068 069 070
071 072 073 074 075 076 077 078 079 080 081 082 083 084
085 086 087 088 089 090 091 092 093 094 095 096 097 098
099 100 101 102 103 104 105 106 107 108 109 110 111 112
113 114 115 116 117 118 119 120 121 122 123 124 125 126
127 128 129 130 131 132 133 134 135 136 137 138 139 140
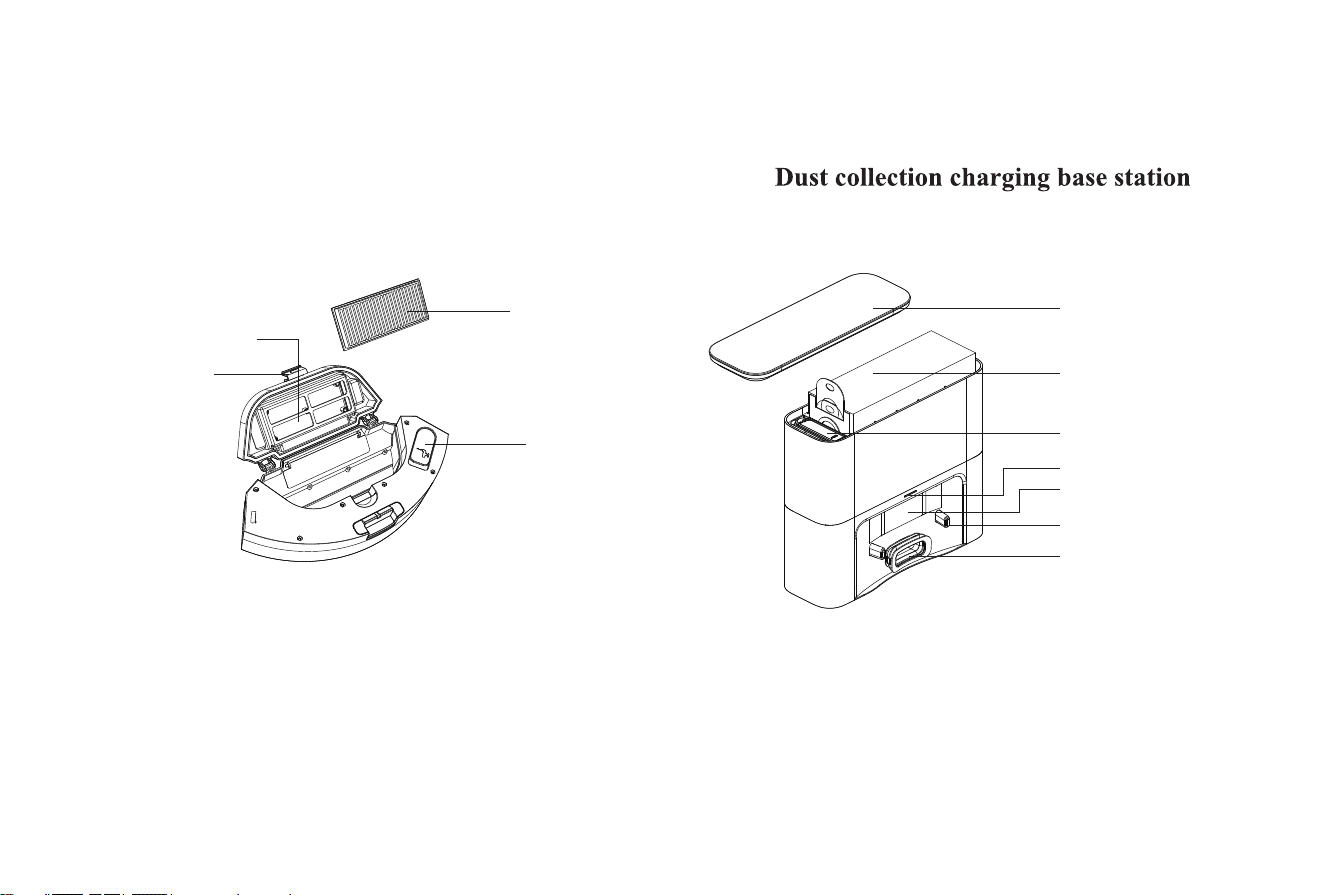
Cover
Dust Bag
Lift Position
Indicator
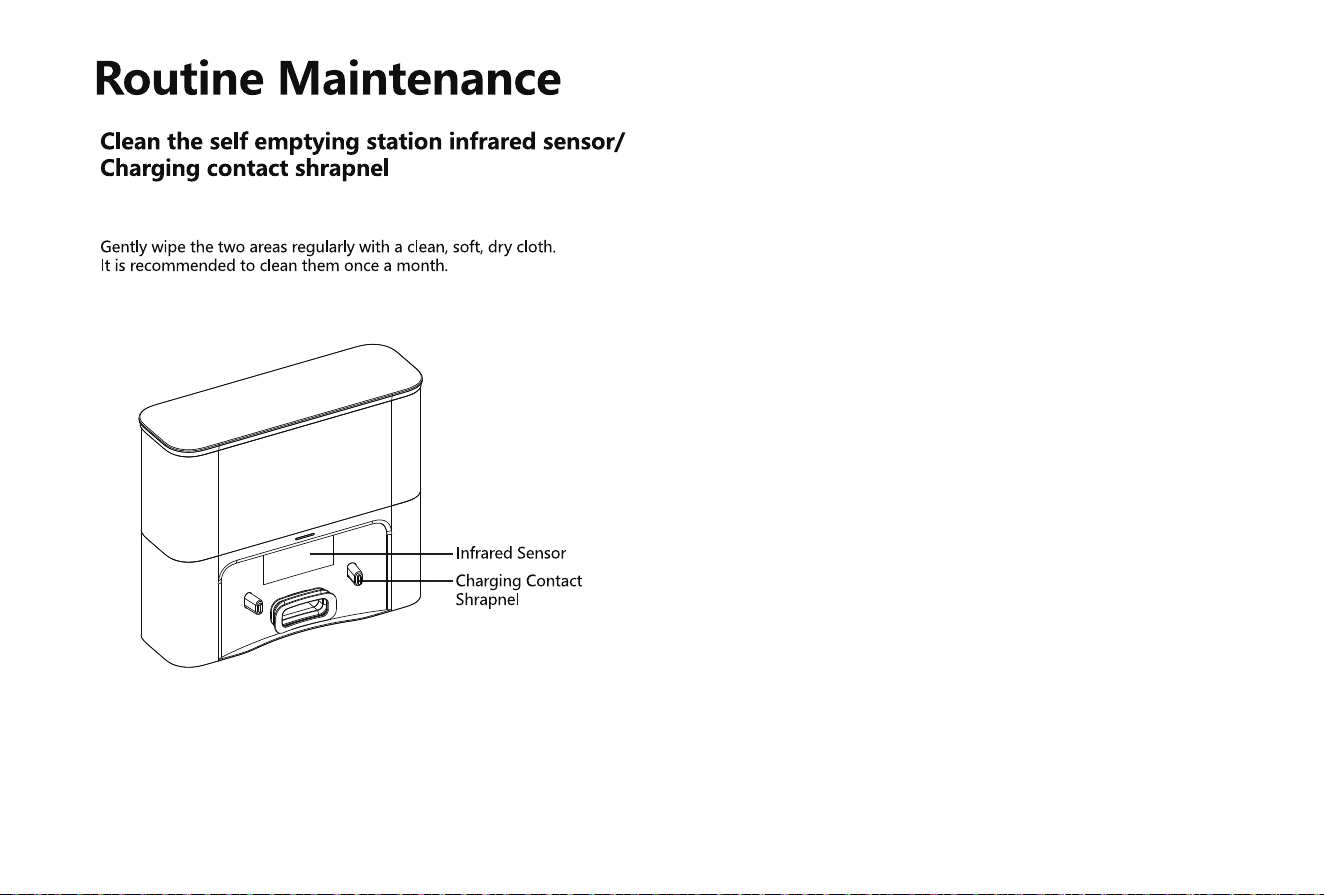
Charging Shrapnel
Infrared Sensor
Dust Collection
2-in-1 Dustbin & Water Tank
Introduction
Tank Cover
High-efficiency filter cover
Dustbin Button
HEPA Filter
001 002 003 004 005 006 007 008 009 010 011 012 013 014
015 016 017 018 019 020 021 022 023 024 025 026 027 028
029 030 031 032 033 034 035 036 037 038 039 040 041 042
043 044 045 046 047 048 049 050 051 052 053 054 055 056
057 058 059 060 061 062 063 064 065 066 067 068 069 070
071 072 073 074 075 076 077 078 079 080 081 082 083 084
085 086 087 088 089 090 091 092 093 094 095 096 097 098
099 100 101 102 103 104 105 106 107 108 109 110 111 112
113 114 115 116 117 118 119 120 121 122 123 124 125 126
127 128 129 130 131 132 133 134 135 136 137 138 139 140
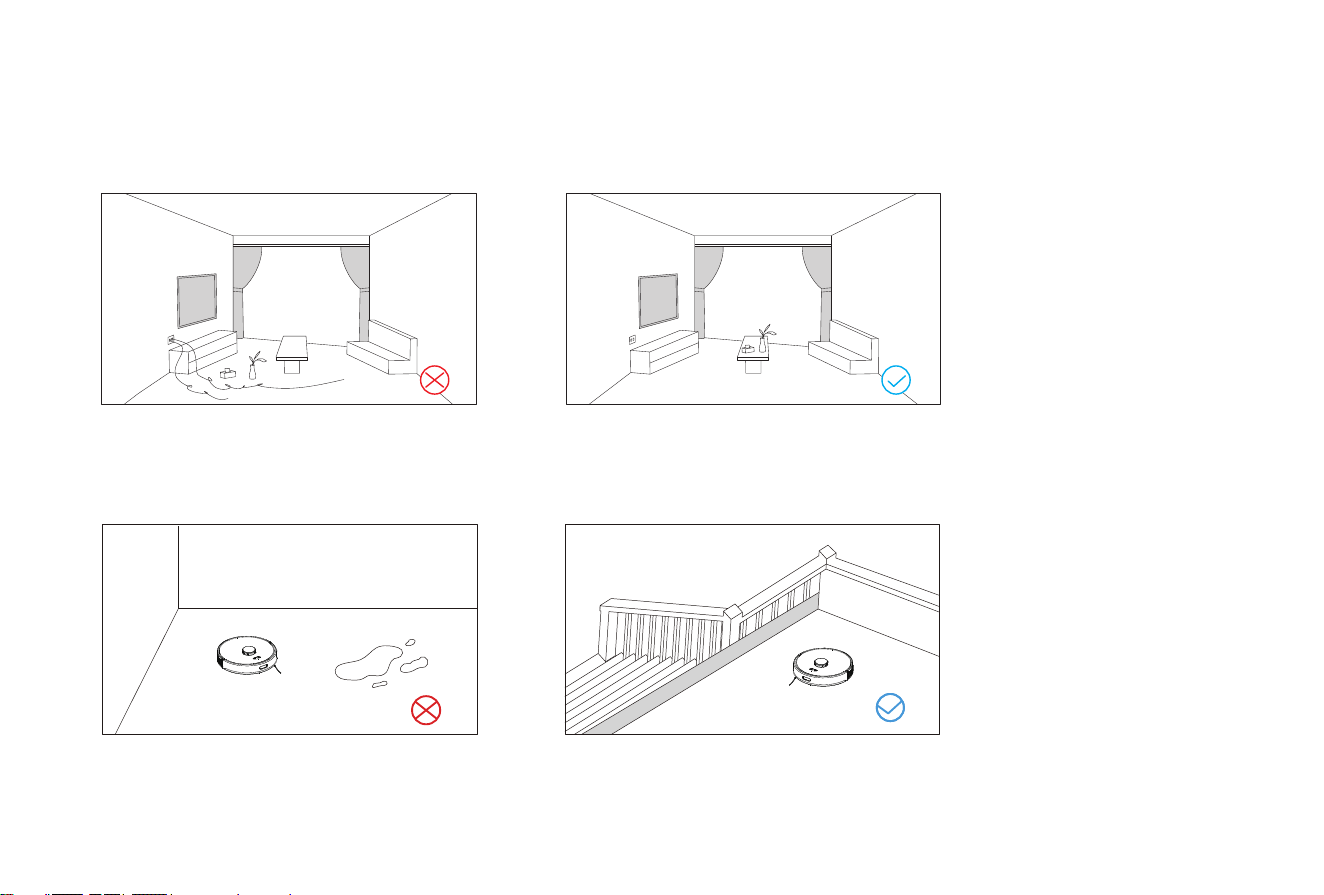
Notices
Installation and APP Connection
Please sort out the wires, debris and fragile,
unstable, valuable and potentially dangerous
Do not use the robot to clean liquid.
When used in a suspended circumstance, it shall be
protected by rails to avoid accidental falling or
pushing other articles from falling; otherwise,
personal or property damage may be caused.
objects on the ground before starting the device.
Avoid personal injury or property damage caused
by entanglement, jamming, dragging, or bumping
of equipment.
001 002 003 004 005 006 007 008 009 010 011 012 013 014
015 016 017 018 019 020 021 022 023 024 025 026 027 028
029 030 031 032 033 034 035 036 037 038 039 040 041 042
043 044 045 046 047 048 049 050 051 052 053 054 055 056
057 058 059 060 061 062 063 064 065 066 067 068 069 070
071 072 073 074 075 076 077 078 079 080 081 082 083 084
085 086 087 088 089 090 091 092 093 094 095 096 097 098
099 100 101 102 103 104 105 106 107 108 109 110 111 112
113 114 115 116 117 118 119 120 121 122 123 124 125 126
127 128 129 130 131 132 133 134 135 136 137 138 139 140
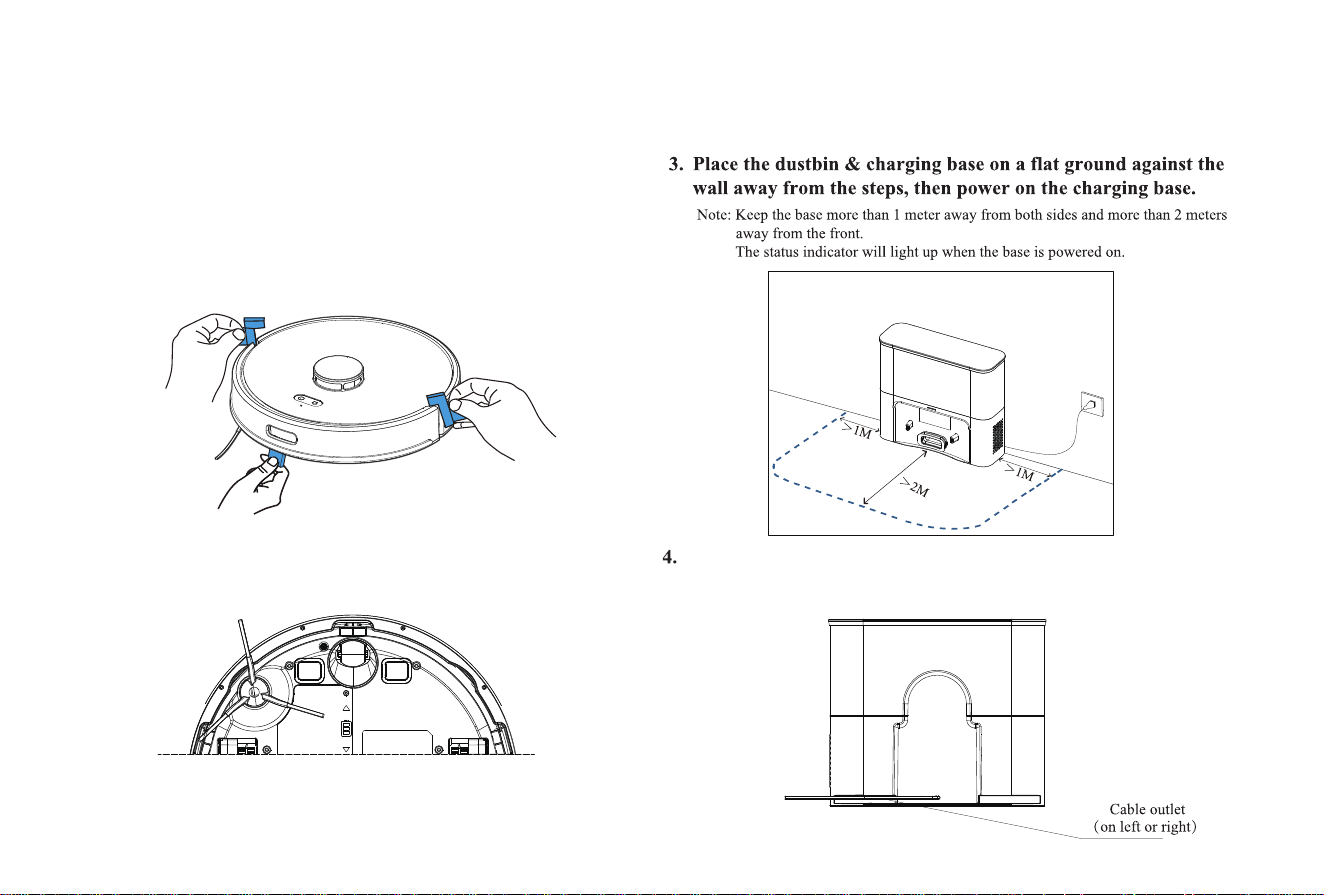
1. Remove the protective strips.
2. Install the side brushes.
Press left brush (L) and the right brush (R) respectively
into corresponding holes until the "click" sound is heard.
Installation and APP Connection
Route the power cables along the cable duct to prevent them
from being dragged or displaced by the robot.
001 002 003 004 005 006 007 008 009 010 011 012 013 014
015 016 017 018 019 020 021 022 023 024 025 026 027 028
029 030 031 032 033 034 035 036 037 038 039 040 041 042
043 044 045 046 047 048 049 050 051 052 053 054 055 056
057 058 059 060 061 062 063 064 065 066 067 068 069 070
071 072 073 074 075 076 077 078 079 080 081 082 083 084
085 086 087 088 089 090 091 092 093 094 095 096 097 098
099 100 101 102 103 104 105 106 107 108 109 110 111 112
113 114 115 116 117 118 119 120 121 122 123 124 125 126
127 128 129 130 131 132 133 134 135 136 137 138 139 140
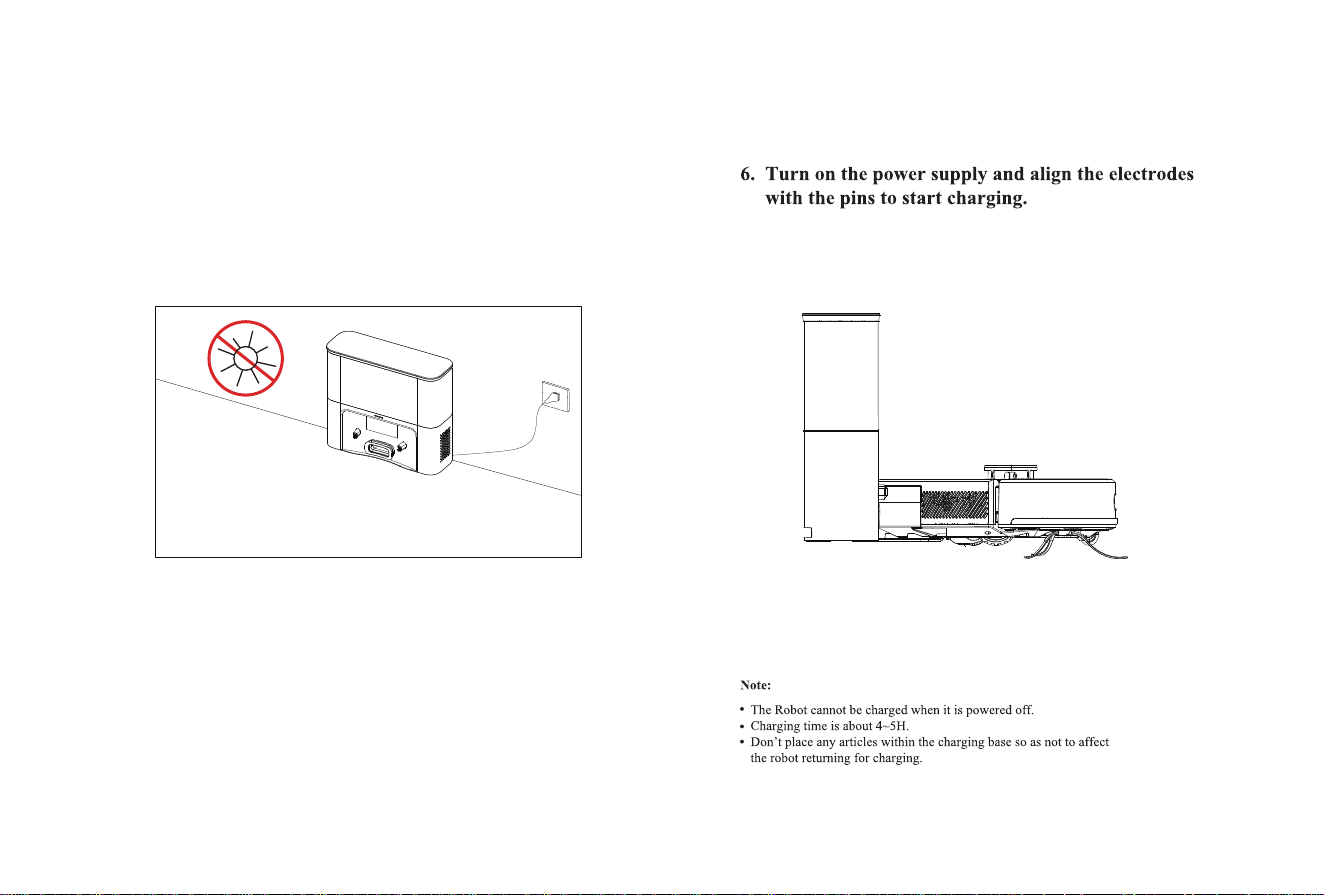
5. Do not move the charging base arbitrarily and keep it away
from direct sunlight
Installation and APP Connection
001 002 003 004 005 006 007 008 009 010 011 012 013 014
015 016 017 018 019 020 021 022 023 024 025 026 027 028
029 030 031 032 033 034 035 036 037 038 039 040 041 042
043 044 045 046 047 048 049 050 051 052 053 054 055 056
057 058 059 060 061 062 063 064 065 066 067 068 069 070
071 072 073 074 075 076 077 078 079 080 081 082 083 084
085 086 087 088 089 090 091 092 093 094 095 096 097 098
099 100 101 102 103 104 105 106 107 108 109 110 111 112
113 114 115 116 117 118 119 120 121 122 123 124 125 126
127 128 129 130 131 132 133 134 135 136 137 138 139 140
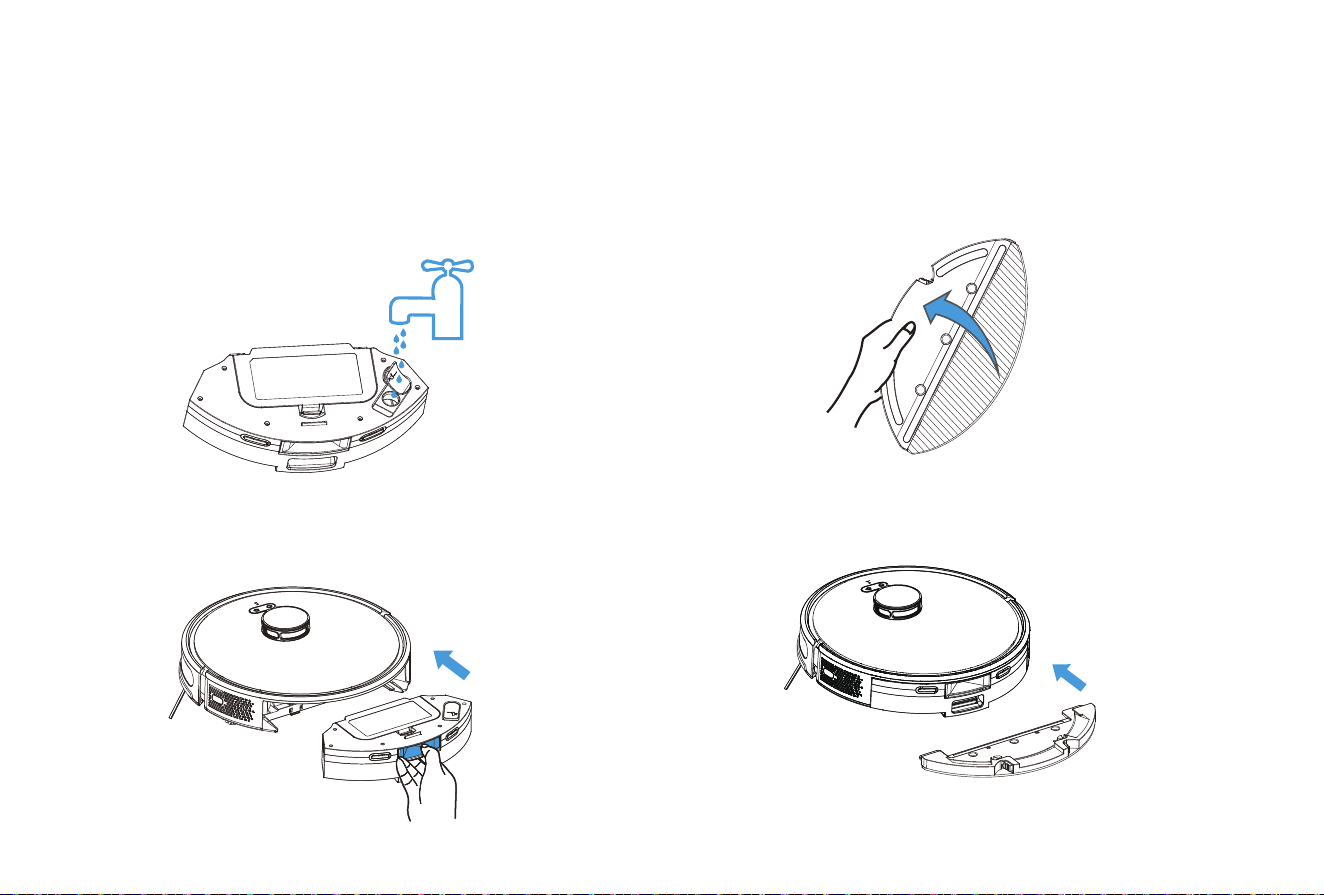
1. Do not rinse the dust box with water to prevent
damage to the air pump motor caused by water entering,
resulting in no water coming out when mopping the floor.
Install Mopping Module
2. Install the 2-in-1 dustbin & water tank into the machine.
Installation and APP Connection
3. Install the mop to the holder.
4. Install the holder to the bottom of 2-in-1 dustbin & water
tank.
*Do not use the mopping function on the carpet, otherwise the carpet will get
wet. Set Restricted Zone / Selected Zone to clean to avoid the carpet area.
001 002 003 004 005 006 007 008 009 010 011 012 013 014
015 016 017 018 019 020 021 022 023 024 025 026 027 028
029 030 031 032 033 034 035 036 037 038 039 040 041 042
043 044 045 046 047 048 049 050 051 052 053 054 055 056
057 058 059 060 061 062 063 064 065 066 067 068 069 070
071 072 073 074 075 076 077 078 079 080 081 082 083 084
085 086 087 088 089 090 091 092 093 094 095 096 097 098
099 100 101 102 103 104 105 106 107 108 109 110 111 112
113 114 115 116 117 118 119 120 121 122 123 124 125 126
127 128 129 130 131 132 133 134 135 136 137 138 139 140
Installation and APP Connection
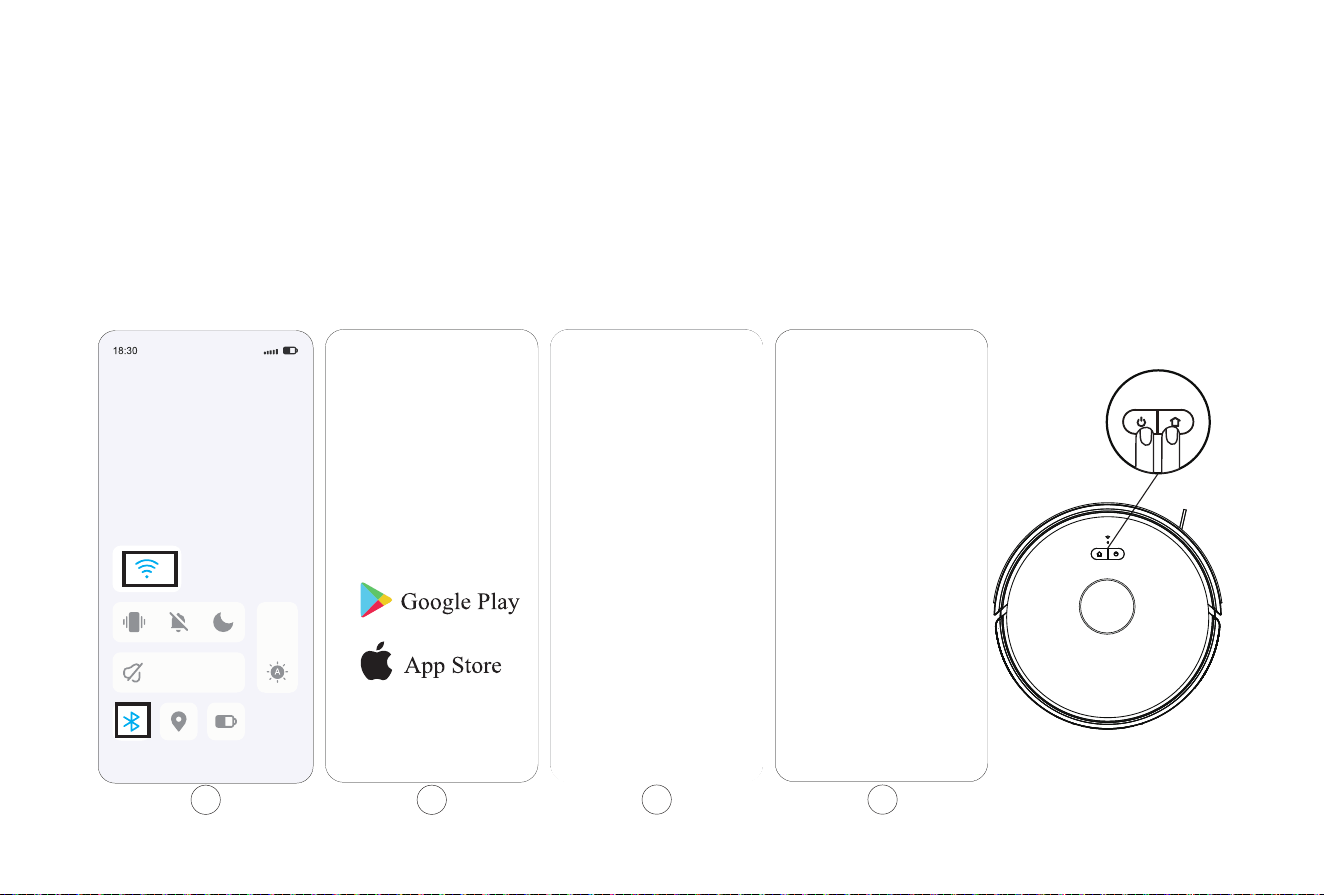
Quick Connection
4.Turn on the robot vacuum, then press the "OFF/ON" and the“Home" button meantime for at least 3 seconds until the WiFi butt on flashes.
1.Activate the Bluetooth and make sure your phone is connected with the 2.4 GHz WiFi that usually only shows the name of the WiFi.
Please don't connect the 5GHz WiFi with your phone.
2.Download and install the APP: Search the "smart life" in Appstore/Google Play or scan the QR code to download it.
3.Open the "smart life" App, agree to the "User Agreement and Privacy Policy" and register your account.
3
1 2
4
001 002 003 004 005 006 007 008 009 010 011 012 013 014
015 016 017 018 019 020 021 022 023 024 025 026 027 028
029 030 031 032 033 034 035 036 037 038 039 040 041 042
043 044 045 046 047 048 049 050 051 052 053 054 055 056
057 058 059 060 061 062 063 064 065 066 067 068 069 070
071 072 073 074 075 076 077 078 079 080 081 082 083 084
085 086 087 088 089 090 091 092 093 094 095 096 097 098
099 100 101 102 103 104 105 106 107 108 109 110 111 112
113 114 115 116 117 118 119 120 121 122 123 124 125 126
127 128 129 130 131 132 133 134 135 136 137 138 139 140
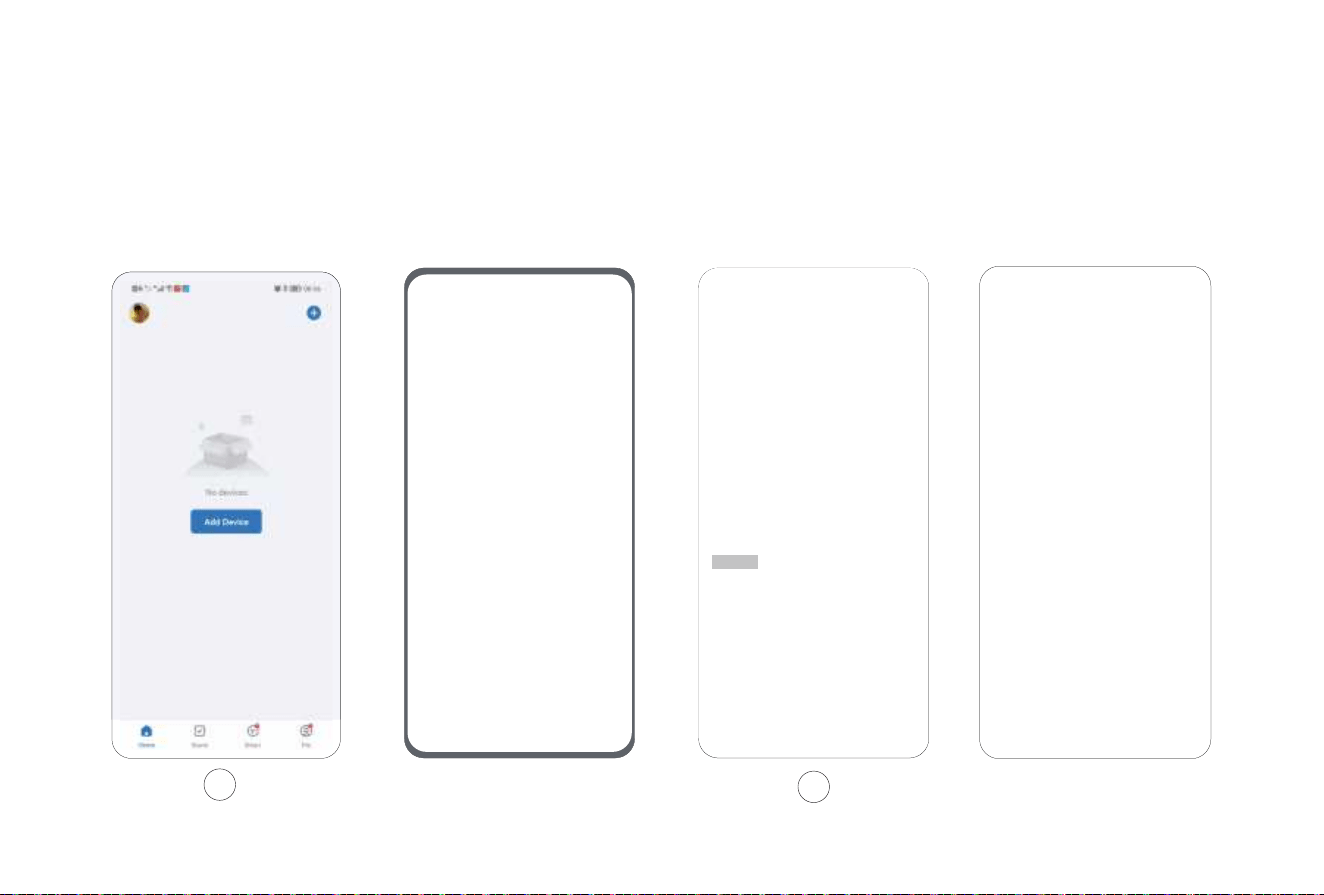
Quick Connection
5.Add your device: Open the"smart life "APP and click "Add" Device" to add your robot vacuum.
Installation and APP Connection
6.Discovering Devices: Allow "smart life"APP to get the related permissions,then click 'Add' ( it usually needs to take 8-10 seconds.)
6
5
Smart life
Smart life
smart life
001 002 003 004 005 006 007 008 009 010 011 012 013 014
015 016 017 018 019 020 021 022 023 024 025 026 027 028
029 030 031 032 033 034 035 036 037 038 039 040 041 042
043 044 045 046 047 048 049 050 051 052 053 054 055 056
057 058 059 060 061 062 063 064 065 066 067 068 069 070
071 072 073 074 075 076 077 078 079 080 081 082 083 084
085 086 087 088 089 090 091 092 093 094 095 096 097 098
099 100 101 102 103 104 105 106 107 108 109 110 111 112
113 114 115 116 117 118 119 120 121 122 123 124 125 126
127 128 129 130 131 132 133 134 135 136 137 138 139 140
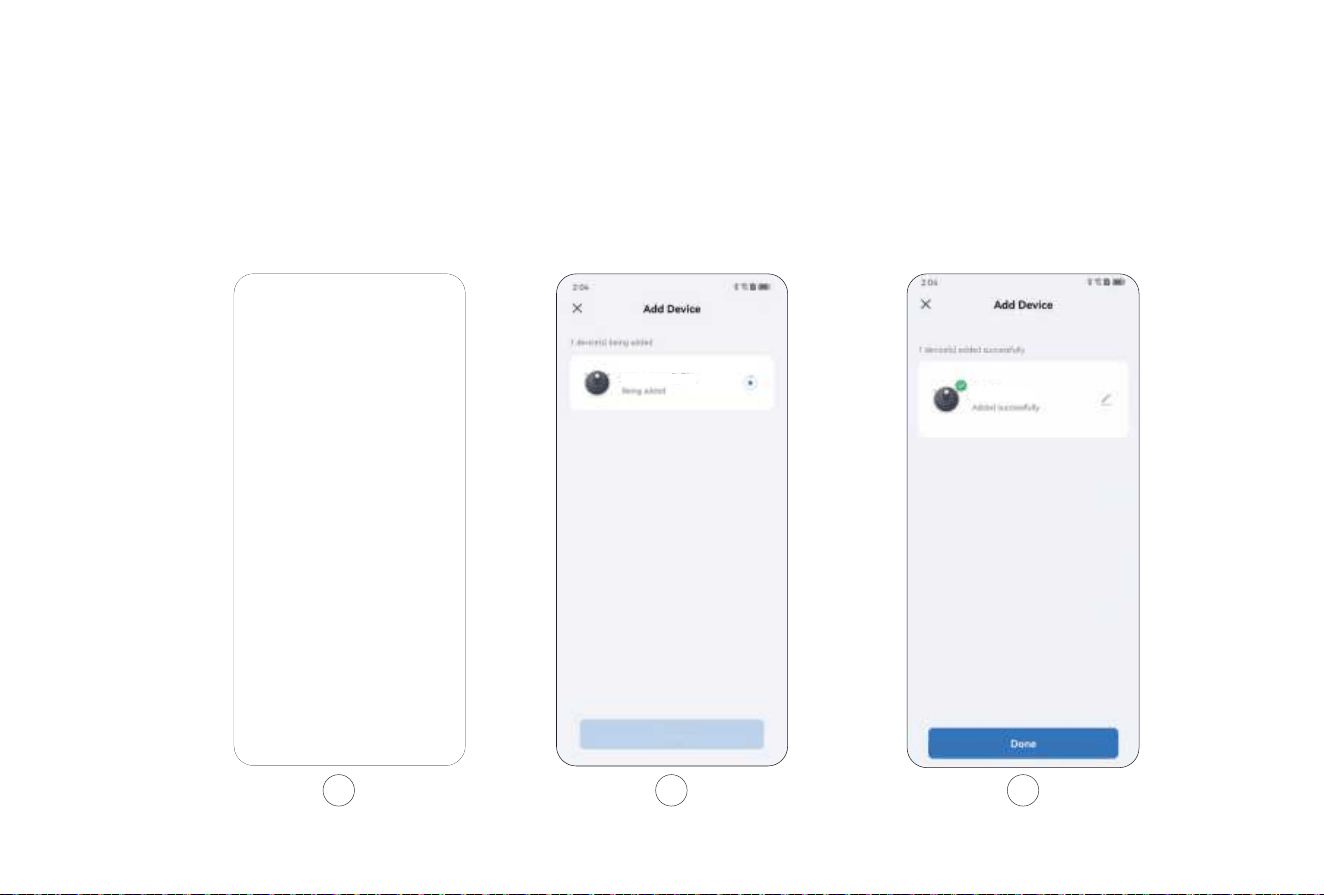
Quick Connection
Installation and APP Connection
9.Click "Done" and log in to the App operation page.
7.Enter the WiFi password and click the "next"
8.Wait for auto-connecting. It needs to take 1-2 minutes.
7 8 9
Please connect to Wi-Fi
Please connect to Wi-Fi
SL60 Plus
ROBOT VACUUM CLEANER
SL60 Plus
ROBOT VACUUM CLEANER
001 002 003 004 005 006 007 008 009 010 011 012 013 014
015 016 017 018 019 020 021 022 023 024 025 026 027 028
029 030 031 032 033 034 035 036 037 038 039 040 041 042
043 044 045 046 047 048 049 050 051 052 053 054 055 056
057 058 059 060 061 062 063 064 065 066 067 068 069 070
071 072 073 074 075 076 077 078 079 080 081 082 083 084
085 086 087 088 089 090 091 092 093 094 095 096 097 098
099 100 101 102 103 104 105 106 107 108 109 110 111 112
113 114 115 116 117 118 119 120 121 122 123 124 125 126
127 128 129 130 131 132 133 134 135 136 137 138 139 140
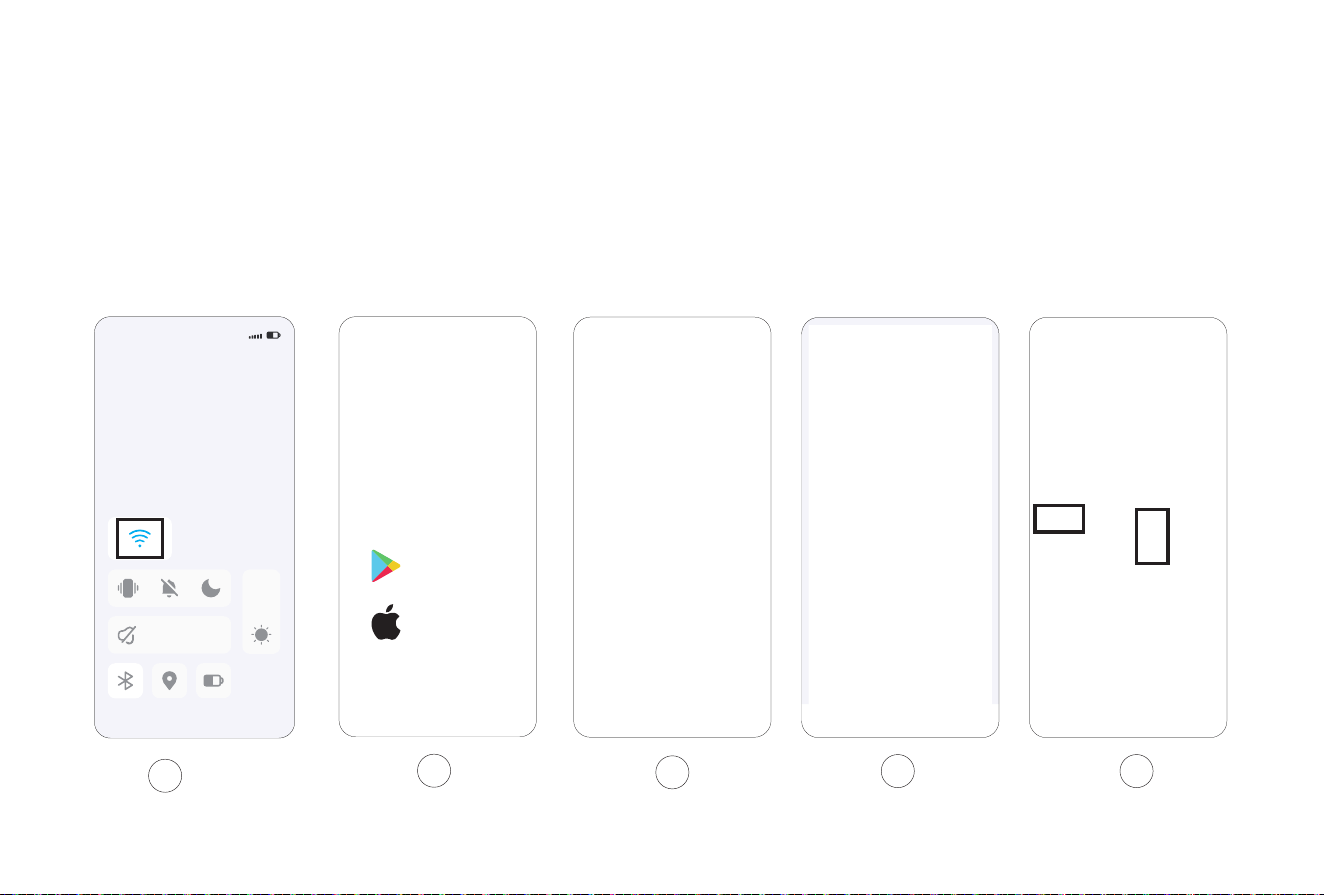
Slow Connection
Installation and APP Connection
5.Choose "Small Home Appliances" – Robot Vacuum (Wi-Fi)
1.Activate the WiFi in phone to connect to 2.4GHz network.
2.Download App: Search "Smart Life"in Appstore or scan
the QR code.
3.Registration: Open the APP and complete the registration.
4.Log in the APP and click "Add Device"/+ Button
2
3
4 5
1
A
18:30
Google Play
App Store
001 002 003 004 005 006 007 008 009 010 011 012 013 014
015 016 017 018 019 020 021 022 023 024 025 026 027 028
029 030 031 032 033 034 035 036 037 038 039 040 041 042
043 044 045 046 047 048 049 050 051 052 053 054 055 056
057 058 059 060 061 062 063 064 065 066 067 068 069 070
071 072 073 074 075 076 077 078 079 080 081 082 083 084
085 086 087 088 089 090 091 092 093 094 095 096 097 098
099 100 101 102 103 104 105 106 107 108 109 110 111 112
113 114 115 116 117 118 119 120 121 122 123 124 125 126
127 128 129 130 131 132 133 134 135 136 137 138 139 140
Slow Connection
6.Enter the password and click "Next".
Installation and APP Connection
7.Press both "Power + Charge" buttons for 3 seconds and the light
starts to flash, which means the machine starts network distribution.
8.Click "Confirm the Indicator is Blinking" button.
9.Select the AP mode.
6
7
8 9

001 002 003 004 005 006 007 008 009 010 011 012 013 014
015
016 017 018 019 020 021 022 023 024 025 026 027 028
029 030 031 032 033 034 035 036 037 038 039 040 041 042
043 044 045 046 047 048 049 050 051 052 053 054 055 056
057 058 059 060 061 062 063 064 065 066 067 068 069 070
071 072 073 074 075 076 077 078 079 080 081 082 083 084
085 086 087 088 089 090 091 092 093 094 095 096 097 098
099 100 101 102 103 104 105 106 107 108 109 110 111 112
113 114 115 116 117 118 119 120 121 122 123 124 125 126
127 128 129 130 131 132 133 134 135 136 137 138 139 140
Slow Connecton
Installation and APP Connection
12.Wait for the connection.
13.Click “Done” to log in APP.
10.Click “Next”.
11.Then select Smart Life XXX and return.
10
12
11
13
SL60 Plus
ROBOT VACUUM CLEANER

001 002 003 004 005 006 007 008 009 010 011 012 013 014
015 016
017 018 019 020 021 022 023 024 025 026 027 028
029 030 031 032 033 034 035 036 037 038 039 040 041 042
043 044 045 046 047 048 049 050 051 052 053 054 055 056
057 058 059 060 061 062 063 064 065 066 067 068 069 070
071 072 073 074 075 076 077 078 079 080 081 082 083 084
085 086 087 088 089 090 091 092 093 094 095 096 097 098
099 100 101 102 103 104 105 106 107 108 109 110 111 112
113 114 115 116 117 118 119 120 121 122 123 124 125 126
127 128 129 130 131 132 133 134 135 136 137 138 139 140
Press and hold for 3 seconds till the indicator is illuminated,
After the machine is powered on, short press or APP to start
cleaning.
Manual Mode: In the PAUSE state, short press to start the
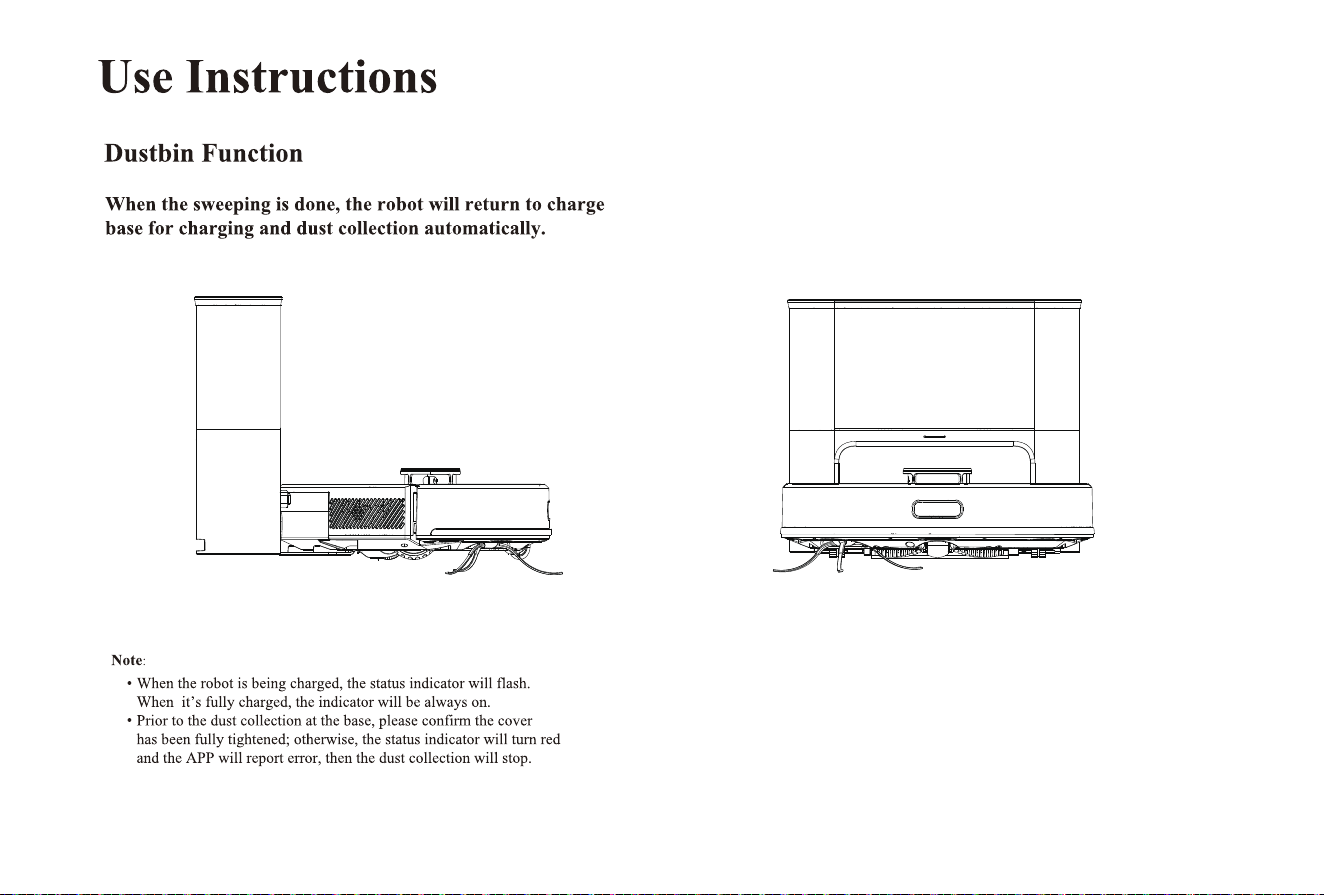
Use Instructions
Power ON/OFF
Clean/Pause
Notes:
Charging
which means the machine has been powered on. Press and hold
for 3 seconds in standby mode, the indicator is OFF, which
means the machine has been powered off. Note: The machine
cannot be powered off during the charging.
Auto Mode: The machine will automatically return to the charging
base for charging after cleaning.
recharging or APP to start the recharging.
Do not clean the liquid.
The machine cannot start cleaning if the battery is lower than 15%, please charge
the machine first.
If the battery is lower than 15% during the cleaning, the machine will automatically
return to the base for charging.
Please clear up the wires on the ground (including the power cord of charging base)
before cleaning to avoid power failure or property damages due to cable
entanglement during cleaning.
Note: If the machine cannot find the charging base, it will automatically return to
the starting position, please place the machine back to the charging base manually.
·
·
·
·
001 002 003 004 005 006 007 008 009 010 011 012 013 014
015 016 017
018 019 020 021 022 023 024 025 026 027 028
029 030 031 032 033 034 035 036 037 038 039 040 041 042
043 044 045 046 047 048 049 050 051 052 053 054 055 056
057 058 059 060 061 062 063 064 065 066 067 068 069 070
071 072 073 074 075 076 077 078 079 080 081 082 083 084
085 086 087 088 089 090 091 092 093 094 095 096 097 098
099 100 101 102 103 104 105 106 107 108 109 110 111 112
113 114 115 116 117 118 119 120 121 122 123 124 125 126
127 128 129 130 131 132 133 134 135 136 137 138 139 140
001 002 003 004 005 006 007 008 009 010 011 012 013 014
015 016 017 018
019 020 021 022 023 024 025 026 027 028
029 030 031 032 033 034 035 036 037 038 039 040 041 042
043 044 045 046 047 048 049 050 051 052 053 054 055 056
057 058 059 060 061 062 063 064 065 066 067 068 069 070
071 072 073 074 075 076 077 078 079 080 081 082 083 084
085 086 087 088 089 090 091 092 093 094 095 096 097 098
099 100 101 102 103 104 105 106 107 108 109 110 111 112
113 114 115 116 117 118 119 120 121 122 123 124 125 126
127 128 129 130 131 132 133 134 135 136 137 138 139 140
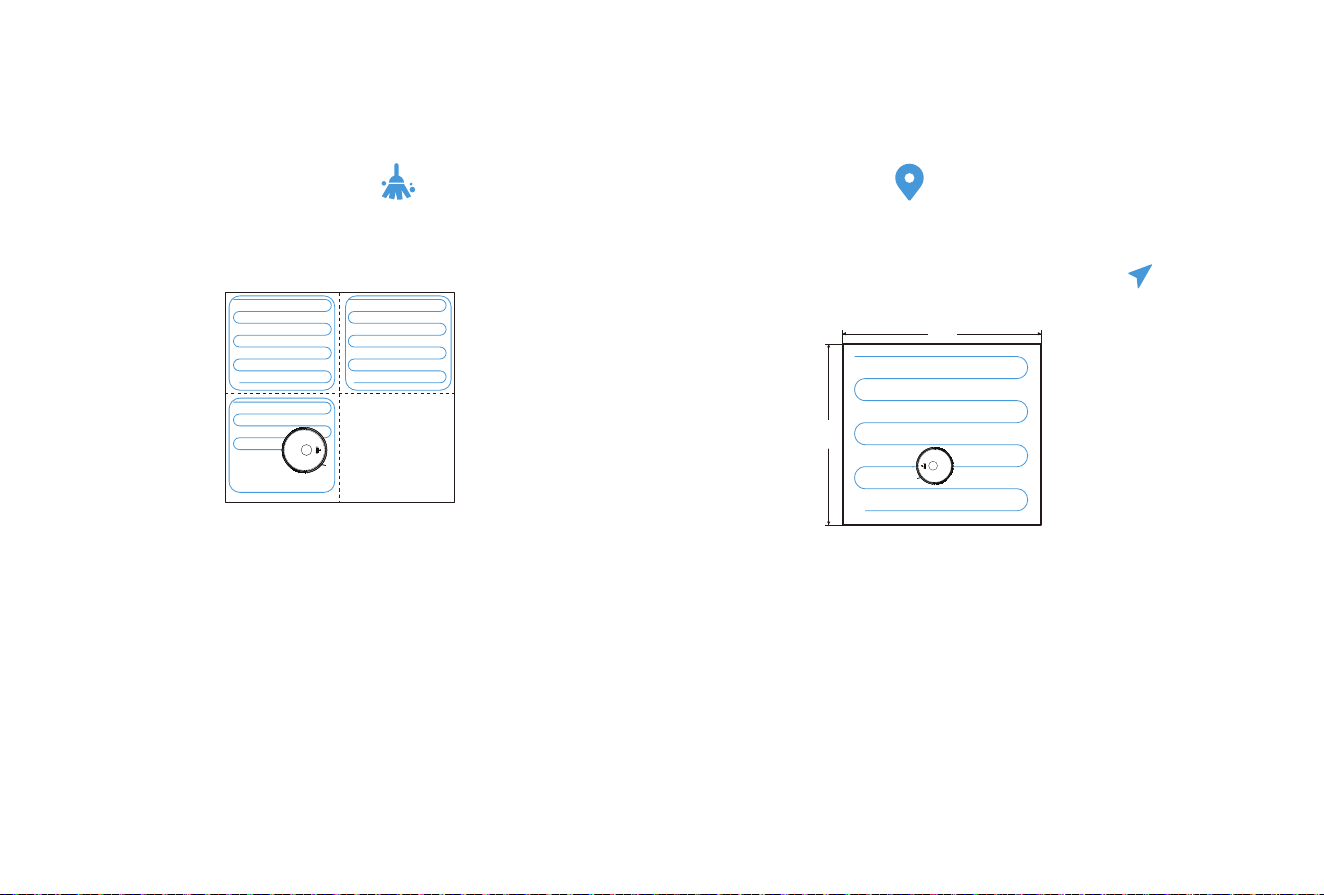
1.Before the first use, Robot Vacuum will scan the domestic
environment first and generate a map with smart area divisions.
2.Based on the existing area divisions, Robot Vacuum will clean
along the edges to form a closed area first and fill in the area in
a Z-shaped manner, then clean the remaining areas one after one.
2.Select a point to be cleaned on the map, then click "Go
Here" to start the clean.
3.Robot Vacuum will move to the designated location and clean
an area of 1.6m×1.6m square with itself as the center twice,
then return the charging base for recharging.
3.After cleaning, Robot Vacuum will return to the base for
recharging.
Note:
To generate the map better, it’s recommended to start from the charging base
before the first use.
When the machine is working, do not move it arbitrarily, otherwise it may
start repositioning; if the repositioning fails, the machine will abandon the
previous task and may not return for recharging.
Function Module
Smart Clean (Default)
1.Select " Press to run” in the APP.
Targeted Clean
•
•
Note:The map needs to be generated in the APP before use
1.6 m
1.6 m
Cleaned area Cleaned area
Area to be cleaned
Area being cleaned
001 002 003 004 005 006 007 008 009 010 011 012 013 014
015 016 017 018 019
020 021 022 023 024 025 026 027 028
029 030 031 032 033 034 035 036 037 038 039 040 041 042
043 044 045 046 047 048 049 050 051 052 053 054 055 056
057 058 059 060 061 062 063 064 065 066 067 068 069 070
071 072 073 074 075 076 077 078 079 080 081 082 083 084
085 086 087 088 089 090 091 092 093 094 095 096 097 098
099 100 101 102 103 104 105 106 107 108 109 110 111 112
113 114 115 116 117 118 119 120 121 122 123 124 125 126
127 128 129 130 131 132 133 134 135 136 137 138 139 140
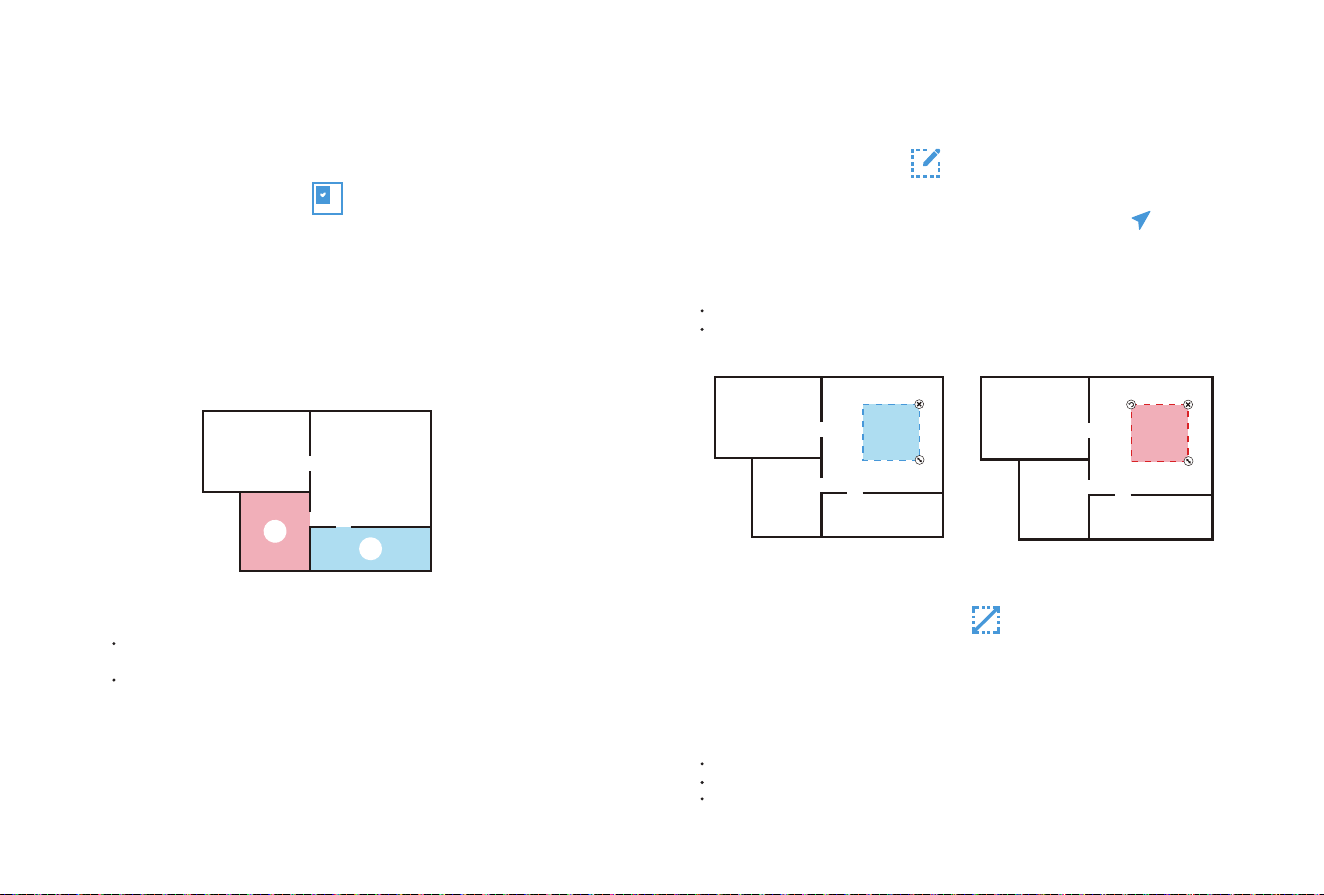
Function Module
1.Select the cleaning function for the selected area in the APP.
2.Select the area to be cleaned on the map and click "Select Room"
3.Robot Vacuum will clean the designated area.
Note:
Please clear the obstacles around the designated area to ensure the machine can
access.
The map needs to be generated in the APP before use.
Designated Clean
Select “Area Sweep” in the APP and click "+ cleaning area" in the
right. Select an area to be cleaned on the map and click "Go Here”
Robot Vacuum will start the clean within the customized area.
Customized Clean
Select “Fordiden Edit” in the APP and set the restricted area on the
map (+, Mop & sweep or + Mop forbid area), then save the settings
and the machine will not access to the set area for cleaning.
Restricted Area Setting
1
2
Note:
Please clear the obstacles around the designated area to ensure the machine can access.
The map needs to be generated in the APP before use.
Customized Clean Restricted Area Setting
Note:
The map needs to be generated in the APP before use.
The selected restricted area should not be too close to the charging base.
When Robot Vacuum is moved or the domestic environment has significantly
changed, the map may become invalid and the restricted area may get lost
001 002 003 004 005 006 007 008 009 010 011 012 013 014
015 016 017 018 019 020
021 022 023 024 025 026 027 028
029 030 031 032 033 034 035 036 037 038 039 040 041 042
043 044 045 046 047 048 049 050 051 052 053 054 055 056
057 058 059 060 061 062 063 064 065 066 067 068 069 070
071 072 073 074 075 076 077 078 079 080 081 082 083 084
085 086 087 088 089 090 091 092 093 094 095 096 097 098
099 100 101 102 103 104 105 106 107 108 109 110 111 112
113 114 115 116 117 118 119 120 121 122 123 124 125 126
127 128 129 130 131 132 133 134 135 136 137 138 139 140
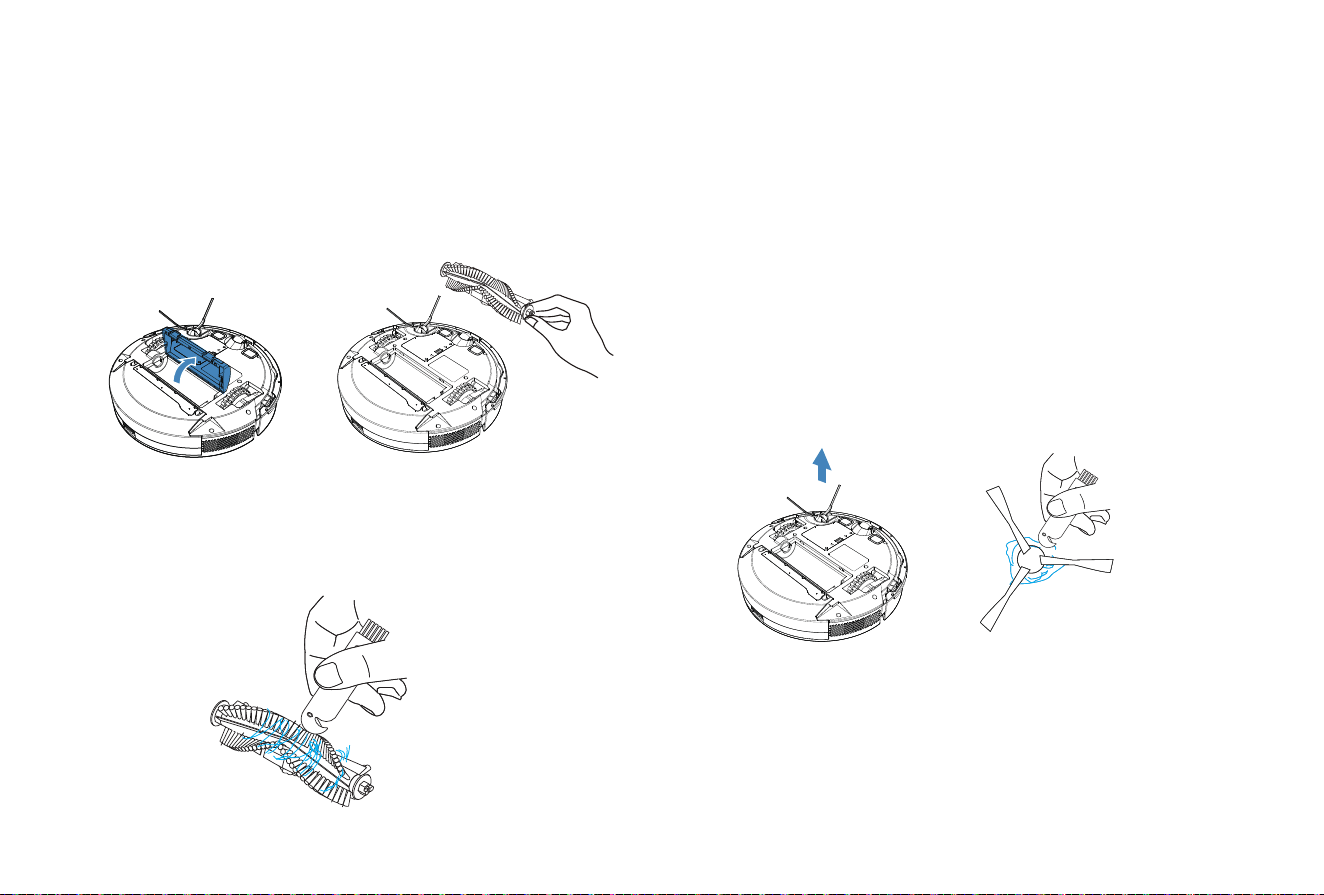
Maintenance
Side brush
(to be cleaned every week)
It’s recommended to clean the rolling brush every 1~2 weeks.
1. Turn the machine over and press the buckle to remove the brush lid.
2. Remove the rolling brush.
1. Turn the machine over and pull out the side brush vertically.
2. Remove the entangled hairs and dirt, then reinstall the side brush.
3. Press the left brush (L) and the right brush (R) into the correspond-
ing holes to complete the brush installation.
Note: It is recommended to replace the side brush every 3~6 months (especially
when the side brush is seriously deformed) for the sake of satisfactory cleaning
effect.
3. Clean the main brush and rolling brush with the tool provided and
remove the entangled debris on the rolling brush.
001 002 003 004 005 006 007 008 009 010 011 012 013 014
015 016 017 018 019 020 021
022 023 024 025 026 027 028
029 030 031 032 033 034 035 036 037 038 039 040 041 042
043 044 045 046 047 048 049 050 051 052 053 054 055 056
057 058 059 060 061 062 063 064 065 066 067 068 069 070
071 072 073 074 075 076 077 078 079 080 081 082 083 084
085 086 087 088 089 090 091 092 093 094 095 096 097 098
099 100 101 102 103 104 105 106 107 108 109 110 111 112
113 114 115 116 117 118 119 120 121 122 123 124 125 126
127 128 129 130 131 132 133 134 135 136 137 138 139 140
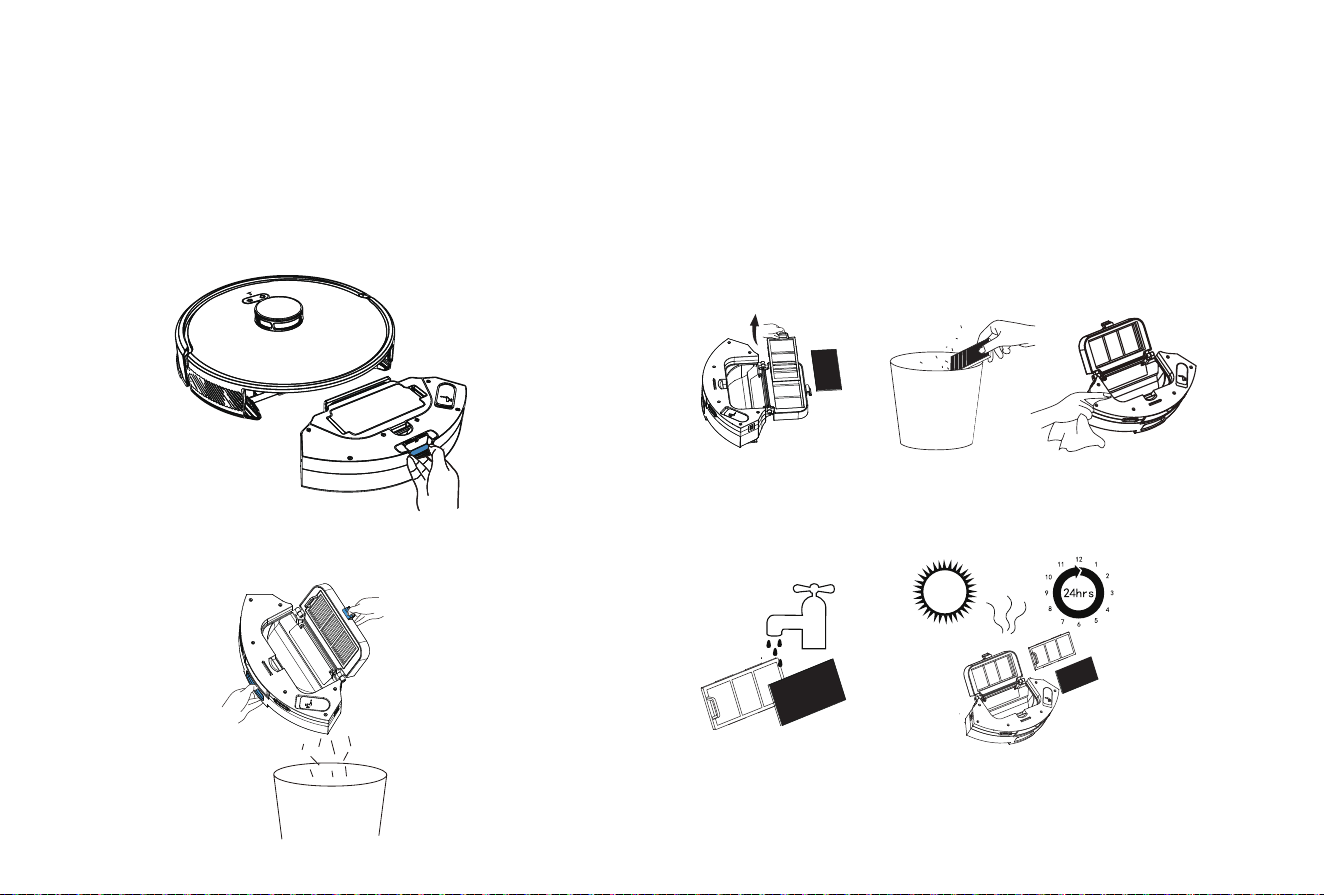
3. If the trash can is too dirty, you can clean it with a dry rag.
Please dry it thoroughly before using it again.
Maintenance
(to be cleaned every 2~3 days)
1. Press and hold the button to pull out the dustbin.
2. Press and hold the dustbin lock to open and dump the dirt inside.
Dustbin and Filter
(to be cleaned every week)
1. Clean the filter: Remove the filter sponge and HEPA filter. Gently
tap the HEPA filter to remove the dust.
2. Clean the dustbin: Open the dustbin and clean with a brush or rag.
Notes:
1. Please do not add detergent when washing the dustbin with water; make it
thoroughly dry after wash.
2. It is recommended to replace the HEPA filter every 3~6 months
Clean the dustbin
001 002 003 004 005 006 007 008 009 010 011 012 013 014
015 016 017 018 019 020 021 022
023 024 025 026 027 028
029 030 031 032 033 034 035 036 037 038 039 040 041 042
043 044 045 046 047 048 049 050 051 052 053 054 055 056
057 058 059 060 061 062 063 064 065 066 067 068 069 070
071 072 073 074 075 076 077 078 079 080 081 082 083 084
085 086 087 088 089 090 091 092 093 094 095 096 097 098
099 100 101 102 103 104 105 106 107 108 109 110 111 112
113 114 115 116 117 118 119 120 121 122 123 124 125 126
127 128 129 130 131 132 133 134 135 136 137 138 139 140
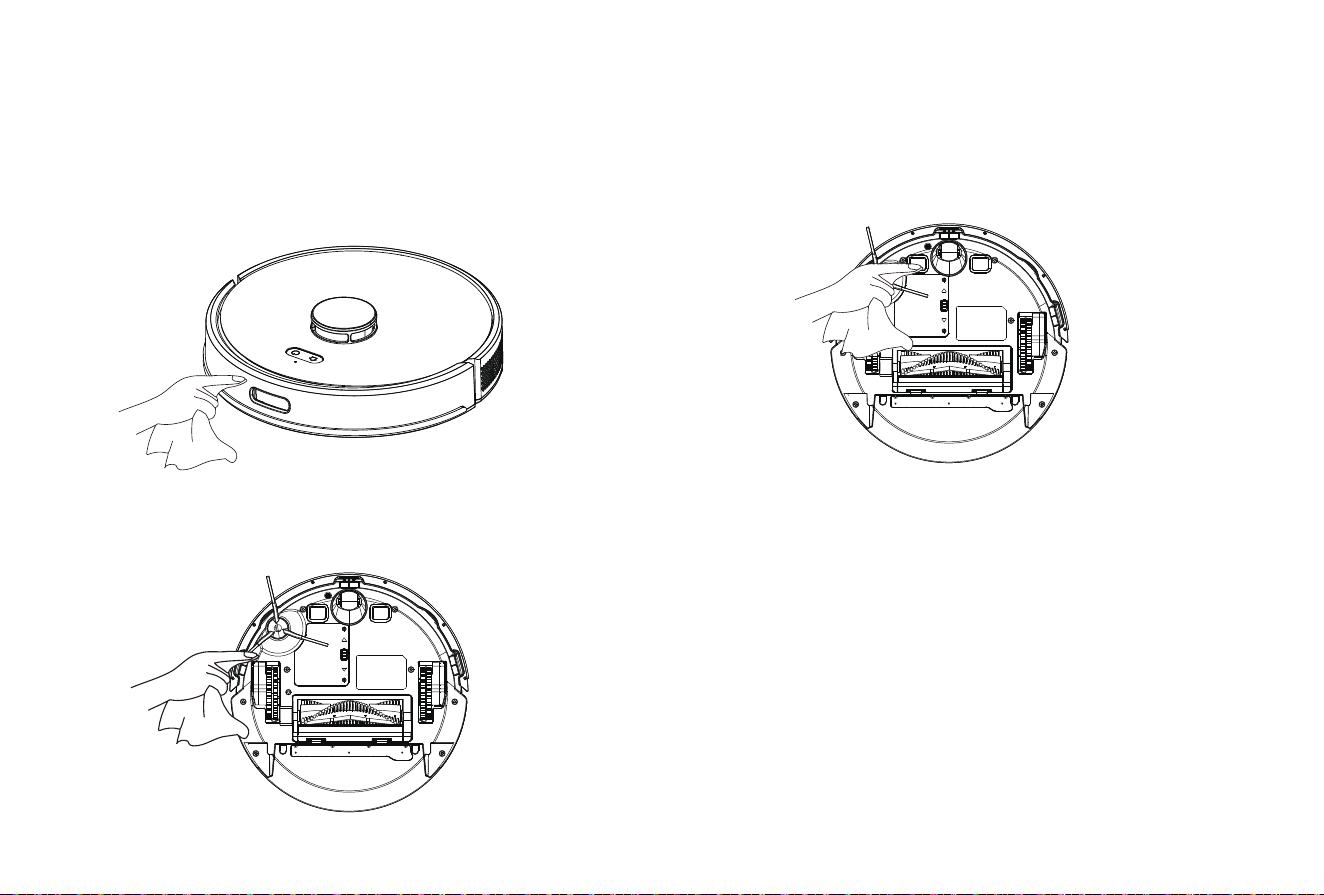
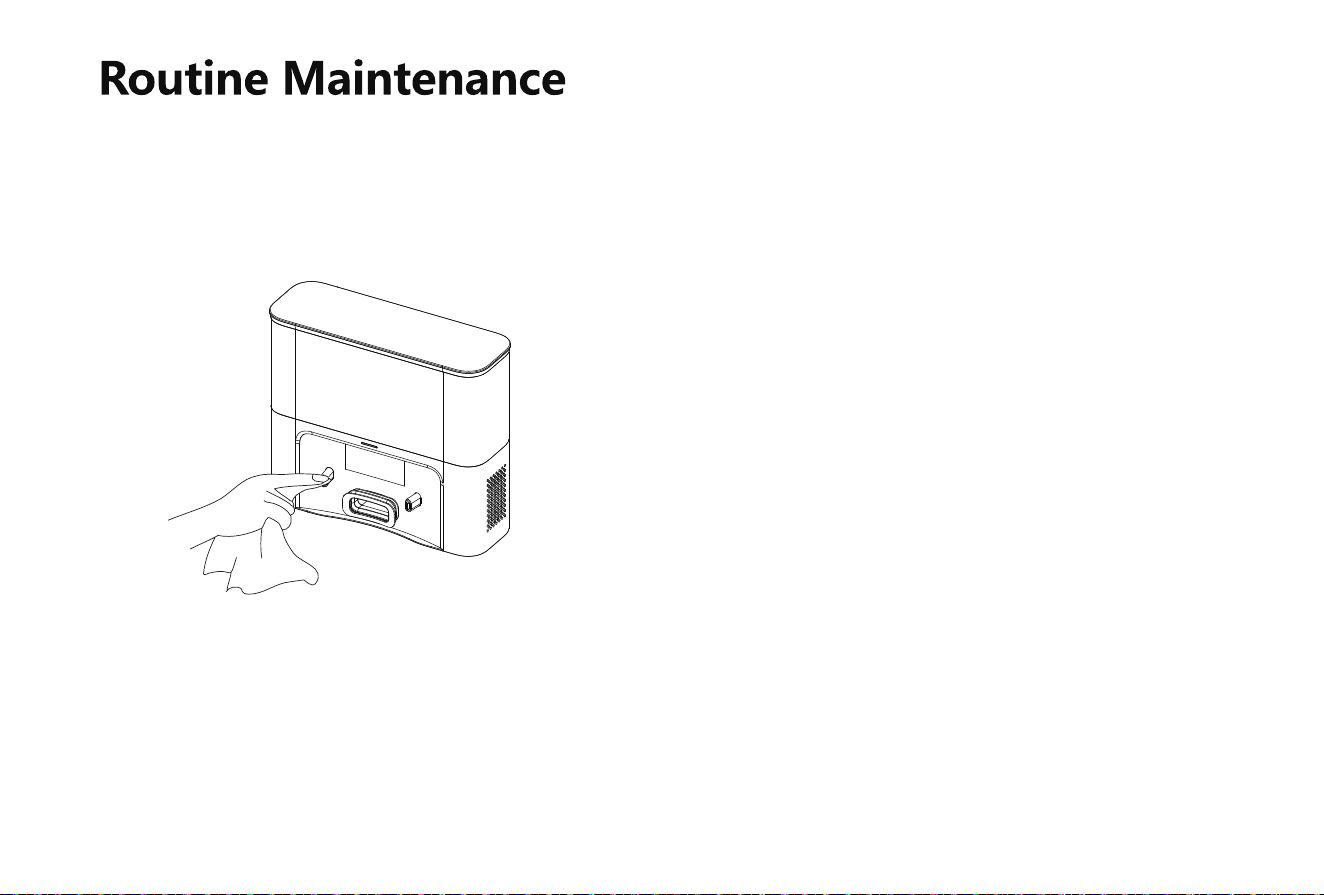
Maintenance
(to be cleaned every month)
Clean the infrared bumper sensor
(to be cleaned every month)
Clean the charging contacts
(to be cleaned every month)
Clean the Cliff sensor
001 002 003 004 005 006 007 008 009 010 011 012 013 014
015 016 017 018 019 020 021 022 023
024 025 026 027 028
029 030 031 032 033 034 035 036 037 038 039 040 041 042
043 044 045 046 047 048 049 050 051 052 053 054 055 056
057 058 059 060 061 062 063 064 065 066 067 068 069 070
071 072 073 074 075 076 077 078 079 080 081 082 083 084
085 086 087 088 089 090 091 092 093 094 095 096 097 098
099 100 101 102 103 104 105 106 107 108 109 110 111 112
113 114 115 116 117 118 119 120 121 122 123 124 125 126
127 128 129 130 131 132 133 134 135 136 137 138 139 140
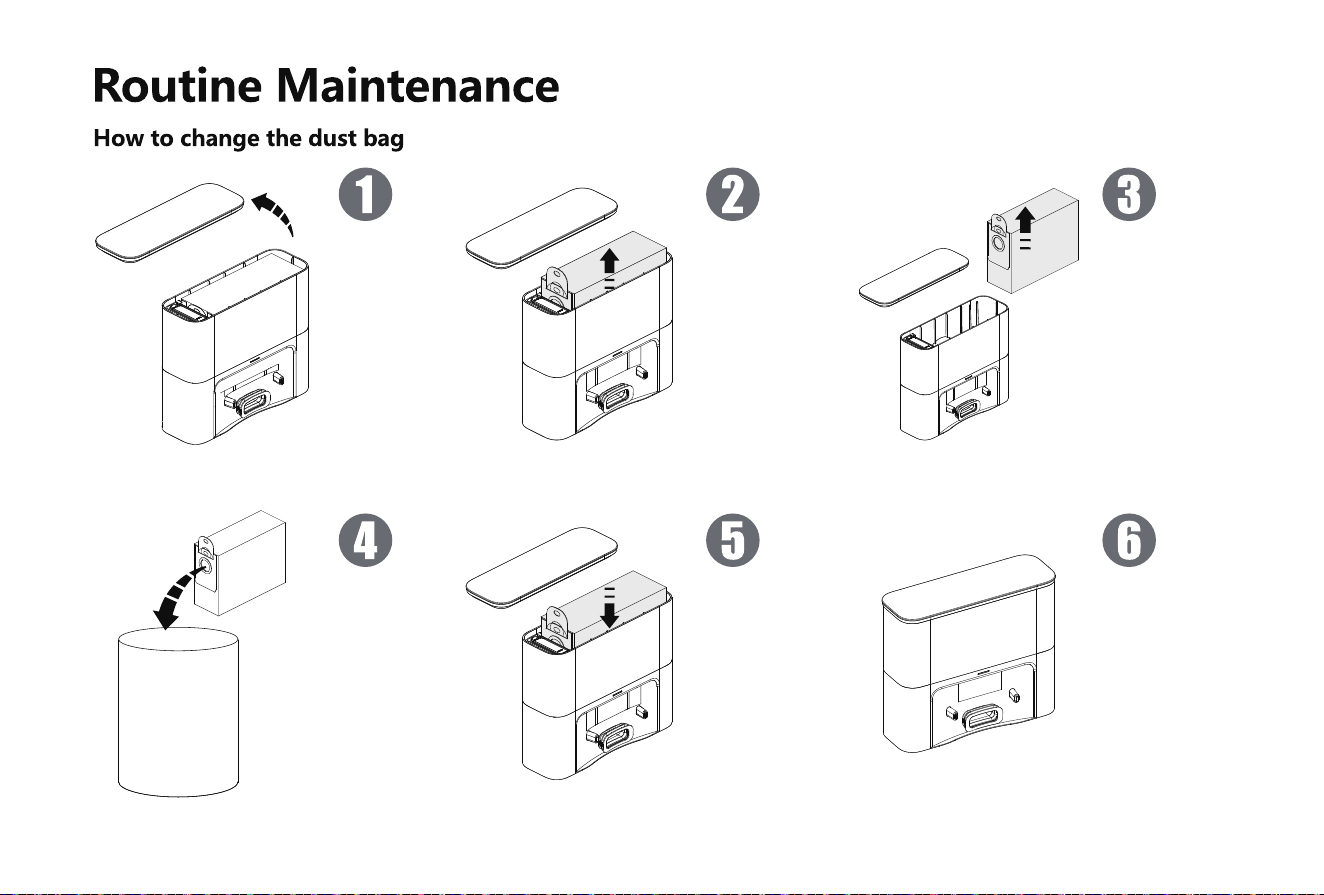
1. Unplug the power and open the
self-emptying station cover.
1. Throw the used dust bag in the
trash.
2. Pull up dust bag handle.
5. Install the new dustbag into the
dock, mak ing sure the dustbag
handle is not pulled out.
3. Remove the dust bag from the
self-emptying station.
6. After covering self-emptying
station is, turn on the power.
001 002 003 004 005 006 007 008 009 010 011 012 013 014
015 016 017 018 019 020 021 022 023 024
025 026 027 028
029 030 031 032 033 034 035 036 037 038 039 040 041 042
043 044 045 046 047 048 049 050 051 052 053 054 055 056
057 058 059 060 061 062 063 064 065 066 067 068 069 070
071 072 073 074 075 076 077 078 079 080 081 082 083 084
085 086 087 088 089 090 091 092 093 094 095 096 097 098
099 100 101 102 103 104 105 106 107 108 109 110 111 112
113 114 115 116 117 118 119 120 121 122 123 124 125 126
127 128 129 130 131 132 133 134 135 136 137 138 139 140
001 002 003 004 005 006 007 008 009 010 011 012 013 014
015 016 017 018 019 020 021 022 023 024 025
026 027 028
029 030 031 032 033 034 035 036 037 038 039 040 041 042
043 044 045 046 047 048 049 050 051 052 053 054 055 056
057 058 059 060 061 062 063 064 065 066 067 068 069 070
071 072 073 074 075 076 077 078 079 080 081 082 083 084
085 086 087 088 089 090 091 092 093 094 095 096 097 098
099 100 101 102 103 104 105 106 107 108 109 110 111 112
113 114 115 116 117 118 119 120 121 122 123 124 125 126
127 128 129 130 131 132 133 134 135 136 137 138 139 140
Battery
Firmware Upgrading
(to be cleaned every month)
Clean the signal transmitting area
The machine is equipped with high-performance rechargeable
lithium-ion battery. For the sake of battery performance, please keep
the machine fully charged in daily maintenance.
If the machine will not be used for a long time, please power it off
before storage and charge the battery at least every three months to
avoid battery failure.
The firmware can be upgraded through the APP when new firmware is
detected. Please follow the instructions to complete the upgrading. More
than half battery may be needed for the upgrading, it’s recommended to
complete the firmware upgrading on the charging base.
•
•
001 002 003 004 005 006 007 008 009 010 011 012 013 014
015 016 017 018 019 020 021 022 023 024 025 026
027 028
029 030 031 032 033 034 035 036 037 038 039 040 041 042
043 044 045 046 047 048 049 050 051 052 053 054 055 056
057 058 059 060 061 062 063 064 065 066 067 068 069 070
071 072 073 074 075 076 077 078 079 080 081 082 083 084
085 086 087 088 089 090 091 092 093 094 095 096 097 098
099 100 101 102 103 104 105 106 107 108 109 110 111 112
113 114 115 116 117 118 119 120 121 122 123 124 125 126
127 128 129 130 131 132 133 134 135 136 137 138 139 140
Malfunctions and Troubleshooting
Descriptions
Machine cannot be switched on
Machine cannot be switched on.
Machine cannot return to charging
base.
Abnoral behaviors
Strange noises when cleaning.
Machine cannot be charged.
Reduced cleaning ability or ashes
out of the machine
Failed WiFi connection
Appointment cleaning cannot be
activated.
• The battery is low, please place the machine to the spring contact of the charging base and the machine
will automatically power on.
• Ambient temperature is less than 32°For more than 104°F, please use the machine in the 32°F~ 104°F
environment.
• Please remove the machine and confirm whether the indicator of the charging base is illuminated,
whether the charging base and the adapter have been plugged into the socket.
• Poor contact, please clean the spring contacts of the charging base and the machine, or move the edge
brushes aside.
• The machine is too far away from the charging base, please place the machine near and try again.
• Many obstacles on the way back to the charging base.
The main brush, side brush or wheel may be entangled with foreign objects, please clean up after
power off.
• The dustbin is full, please clean the dustbin.
• The filter has been blocked, please clean or replace the filter.
• The rolling brush is entangled with foreign objects, please clean up the rolling brush.
• The ground is too dirty, please increase the suction force.
• WiFi signal is weak, please confirm the machine is covered by strong WiFi signal.
• Wrong WiFi connection, please reset WiFi, download the latest phone client and try again.
• Wrong password.
• This machine only supports 2.4GHz WiFi band.
The battery is low, the appointment cleaning cannot be activated unless the remaining battery is higher
than 15%.
Please power off and restart the machine.
001 002 003 004 005 006 007 008 009 010 011 012 013 014
015 016 017 018 019 020 021 022 023 024 025 026 027
028
029 030 031 032 033 034 035 036 037 038 039 040 041 042
043 044 045 046 047 048 049 050 051 052 053 054 055 056
057 058 059 060 061 062 063 064 065 066 067 068 069 070
071 072 073 074 075 076 077 078 079 080 081 082 083 084
085 086 087 088 089 090 091 092 093 094 095 096 097 098
099 100 101 102 103 104 105 106 107 108 109 110 111 112
113 114 115 116 117 118 119 120 121 122 123 124 125 126
127 128 129 130 131 132 133 134 135 136 137 138 139 140
Malfunctions and Troubleshooting
*The robot vacuum contains five languages
English (default), German, French, Italian, Spanish, according to your own needs, choose the language for voice broadcast through the APP "Smart Life". "Setting"- "Voice and volume"
Voice Prompt
Solutions
Insert dustbin
Put the machine flat on the ground before
starting
Front bumper is stuck
Battery is low, going to recharge
Put the vacuum on the floor before starting
The vacuum is stuck
Wheels are stuck
Rolling brush is stuck
Side brush is stuck
The voice prompt will be heard when the dustbin is removed. Please insert the dustbin.
Please pick up the machine; if the machine is not fully contact the ground, please move the
machine to a flat place and start again.
The machine is tilted, please move the machine to a flat place and start again
The edge or bumper sensor is stuck, please gently push the bumper to eliminate any
possible blockages.
Please move the machine to an open place and start it again.
Place the machine on the charging base for charging.
The main wheel is stuck or entangled, please check the main wheel and remove the foreign
objects.
The side brush is entangled or stuck, please check the side brush and remove the foreign
objects.
The rolling brush is entangled or stuck, please check the rolling brush and remove the
foreign objects.
14.4V
42W
19.0V 1A
2600mAh
EN: Not suitable for children under 36 months.
DE: Nicht geeignet für Kinder unter 36 Monaten.
FR:Ne convient pas aux enfants de moins de 36 mois.
IT: Non adatto ai bambini di età inferiore ai 36 mesi.
ES: No apto para niños menores de 36 meses.
NL:Niet geschikt voor kinderen onder de 36 maanden.
SE: Svenska: Inte lämplig för barn under 36 månader.
PL: Nieodpowiednie dla dzieci poniżej 36 miesięcy.
Manufacturer: Shenzhen KingChuang Smart Navi Technology Co.,Ltd.
Address: Building 10, Furong Industrial Zone, 177 Furong Avenue, Xinqiao Street, Baoan District, Shenzhen, China
Name: GAVIMOSA CONSULTORIA, SOCIEDAD LIMITADA
Address: CASTELLANA 9144, 28046 Madrid
Email: [email protected]
Name: Sea&Mew Accounting Ltd
Address: Electric Avenue Vision 25, London, Enfield EN3 7GD
Email: [email protected]
CUSTOMER SERVICE
Please contact us if you need any help as following:
▪ Technical Support
▪ Package is NOT in perfect condition
▪ Parts missing
▪ Any other quality issues
▪ If the above problem occurs look at the bottom of
the robot and scan QR code
Robot Vacuum Cleaner
Rated Voltage
Rated Power
Input
Battery