USER MANUAL
RAVISION PT-1
WIFI SOLAR CAMERA

3
SECTIONS
Packing List
Features
Specification
Product Diagram
Charging
Pairing the camera with the APP
Wi-Fi connection
How to Share Your Camera And
Password with More Users
Push Mode
Cloud storage
Camera installation
Common Settings
Device settings
4
5
6
8
10
14
16
21
22
23
24
26
26
4
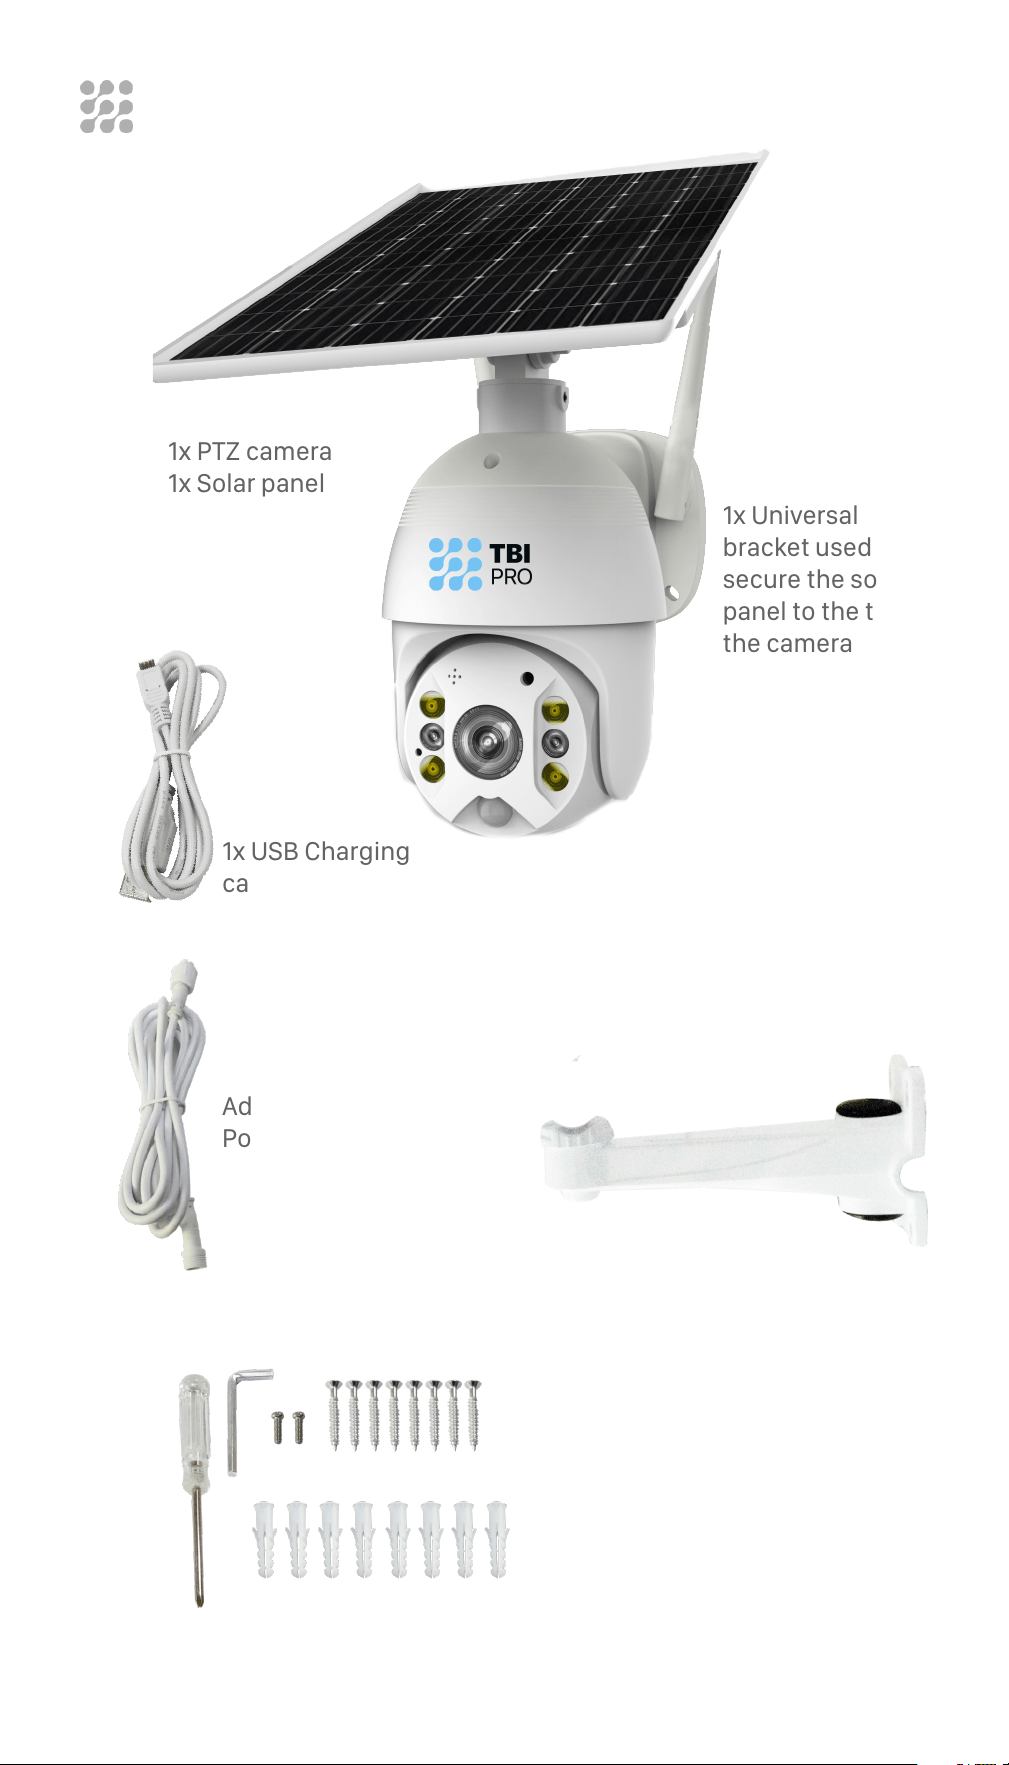
PACKING LIST
Screw kit:
1х Hexagon spanner
1х Screw driver
8х Screws
2х Socket hexagon screws
8х Expansion anchors
Additional 7 ft
Power Cable
1x USB Сharging
cable
1х Wall bracket for Solar Panel
1x Universal
bracket used to
secure the solar
panel to the top of
the camera
1х PTZ camera
1х Solar panel
5
FEATURES
Super long lasting camera usage,
with 15300 maH built-in batteries
High performance 1/2.7” black light
full color image processor
1080P HD video Ultra-low power consumption,
super long standby
Built-in microphone and speaker
support two-way voice intercom
Supports cloud storage and up to
128G TF Micro SD card
APP supports Android/IOS Metal body, IP65 outdoor
waterproof

6
SPECIFICATION
Main Chipset
Sensor
Compression Mode
Video Stream
Internet
General
HI3518EV300
1/2.7” Image Sensor PS2063
H.264+/H.265
1920*1080 15fps
Wi-Fi
RaVision Camera only support 2.4GHz WiFi,
5GHz is not supported
Alarm Mode
Mode
Distance
Angle
Method
PIR + Radar dual sensor detection
up to 40ft
120°
Sending alarm info into smartphone
PTZ
Angle
Rotate Speed
Horizontal: 355°, Vertical: 120°
Horizontal: 55°/s, Vertical: 40°/s
Day&Night
Colorful night vision
Infrared
White light
0.00001LUX
up to 100ft
up to 100ft
Audio
Built-in speaker
Built-in microphone
3W
up to 67ft
Lens
Lens
Angle
3.6mm
120°
7
Storage
Cloud storage
Local storage
Cloud storage (alarm video)
TF card (Max 128G)
SPECIFICATION
Power supply mode
Solar Power
Battery capacity
Max service rating
Standby power
Power
Solar panel +15300 maH 6 pcs batteries
included (battery life varies based on
settings, usage & temperature). Batteries
type is 18650
7.8W
Now included in the set: 6 pcs x 2550
maH=15300 maH 18650 type batteries.
Supports 6 pcs 18650 type batteries with
18000 maH=6*3000 maH
4W
0.003W
Working Environment
Environment
Temperature
Humidity
Net weight
Box Size
Others
Outside/Inside
Indoor/outdoor
-22°F~+140°F
0%~90%RH
2.1KG/PC
287*201*172 mm
8
PRODUCT DIAGRAM
USB charge port
Battery 18650
Universal bracket
Bracket base
Microphone
Photosensitive
White light Led
Lens
Indicator
Infrared LED
PIR
Reset switch
Solar panel
Solar
power
cable
Camera
power
cable
Waterproof
cap
Antena
Interface cover
Manufacturer’s test
tool debugging
interface,
NOT for Client use -
do not use it!
TF card
9
PRODUCT SIZES
170 mm
177 mm
267 mm
244 mm
101 mm
Antena
10
IMPORTANT
For the First Use, please connect the Solar
Panel USB port using a standard and high-
quality DC 5V or 9V battery charger adapter
(not included), and plug into a power source,
using the USB cable provided.
Please charge the
camera for about
8 - 10 hours, until
the batteries are
fully charged.
CHARGING
6 pcs of 18650 rechargeable batteries for 15300 mAh are already included
in the solar panel.
The App will indicate the camera battery status, after it is connected with
the camera.
The green light flashes while
charging and remains on
after charging.
The red light flashes on the
solar panel when there is no
energy in the batteries.

11
CHARGING
IMPORTANT SAFEGUARDS
ON RECHARGEABLE BATTERY USE
RaVision PT-1 is not designed for 24/7 full capacity use
or around-the-clock live streaming.
It is designed to record motion events and remote
viewing of live streaming only when needed.
Properly Install the Battery Powered Cameras
Adjust the sensitivity of the PIR Sensor
Set up Motion Detection Schedule
Keep the Cameras out of Cold/Hot Environments
Mount cameras in well-lit areas
Avoid Weak WiFi Connections
HELPFUL TIPS
TO EXTEND THE BATTERY LIFE OF YOUR
RAVISION BATTERY-POWERED CAMERA

12
CHARGING
Please charge the battery in temperatures between 32°F
and 113°F.
Always use the battery in temperatures between -4°F and
140°F.
Please make sure the battery compartment is clean.
Please keep the USB charging port dry, clean and free of
any debris and make sure the battery contacts are aligned.
Always make sure the USB charging port is clean.
Never charge, use or store the battery near any ignition
sources, such as fire or heaters.
Always store the battery in a cool, dry and ventilated
environment.
Never store the battery with any hazardous or combustible
objects.
Do keep the battery away from children.
Do Not short-circuit the battery by connecting wires or
other metal objects to the positive (+) and negative (-)
terminals. Do NOT transport or store the battery with
necklaces, hairpins or other metal objects.
Do NOT disassemble, cut, puncture, short-circuit the
battery, or dispose of it in water, fire, microwave ovens or
pressure vessels.
Do NOT use the battery if it gives off an odor, generates
heat, becomes discolored or deformed, or appears
abnormal in any way. If it is being used or charged, remove
it from the device or charger and stop using immediately.
Always follow the local waste and recycle laws when
disposing of the battery.
WARNINGS
13
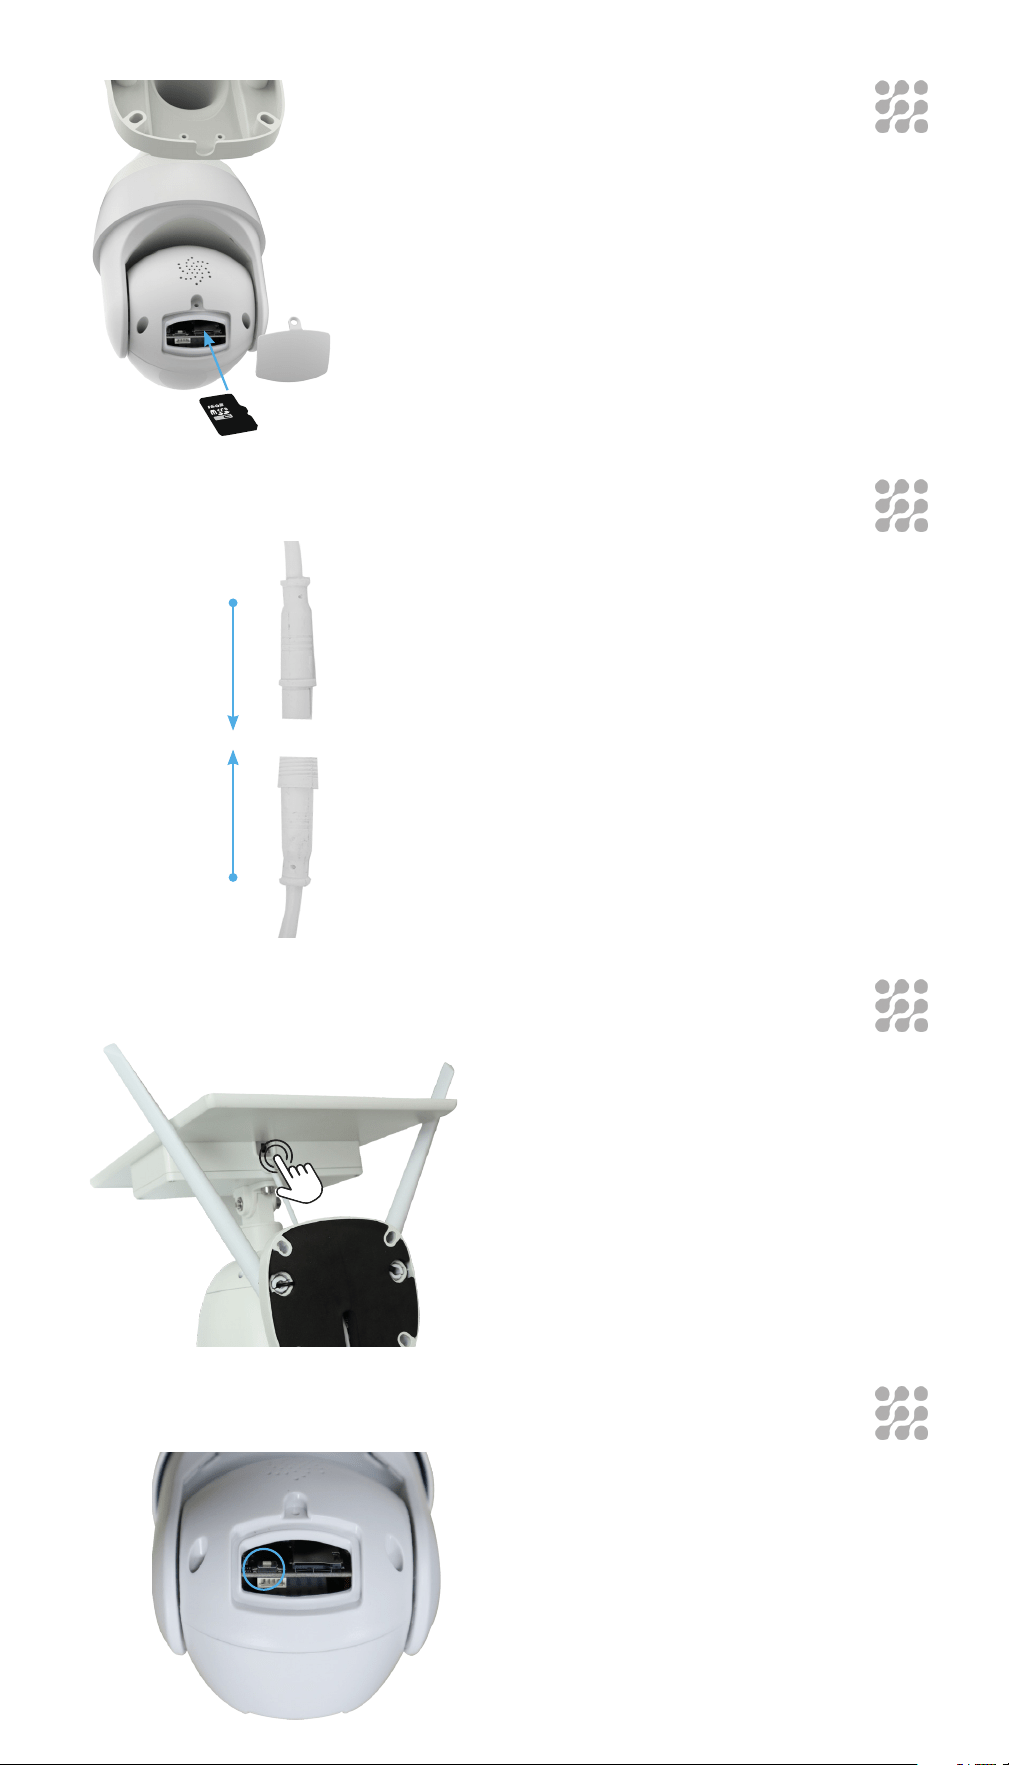
INSERTING THE SD CARD
Install the TF Micro SD сard when
the camera is off.
The camera supports the 10 class
TF card with a maximum capacity
of 128GB
Push the “ON” button on the Solar
Panel and directly connect the
Camera power cable to the Solar
panel power cable, after which
the front Camera LED will begin
flashing Blue.
At the same time you will hear
the following voice prompt/voice
notification, “The camera is now
ready to begin pairing.”
TURNING ON THE CAMERA
Turn the ON/OFF button on
the Solar Panel, or just simply
disconnect the Camera power
cable from the Solar power cable.
HOW TO TURN OFF THE CAMERA
Press the RST button to reset the
camera.
After 3-5 seconds, the LED will
begin flashing, and you will hear
the following voice prompt/voice
notification, “system reset”.
HOW TO RESET THE CAMERA
14
PAIRING THE CAMERA WITH
THE APP
First, connect your phone to 2.4 Ghz Wifi before you pair the
camera. Also be sure to know or keep record of your router
password beforehand.
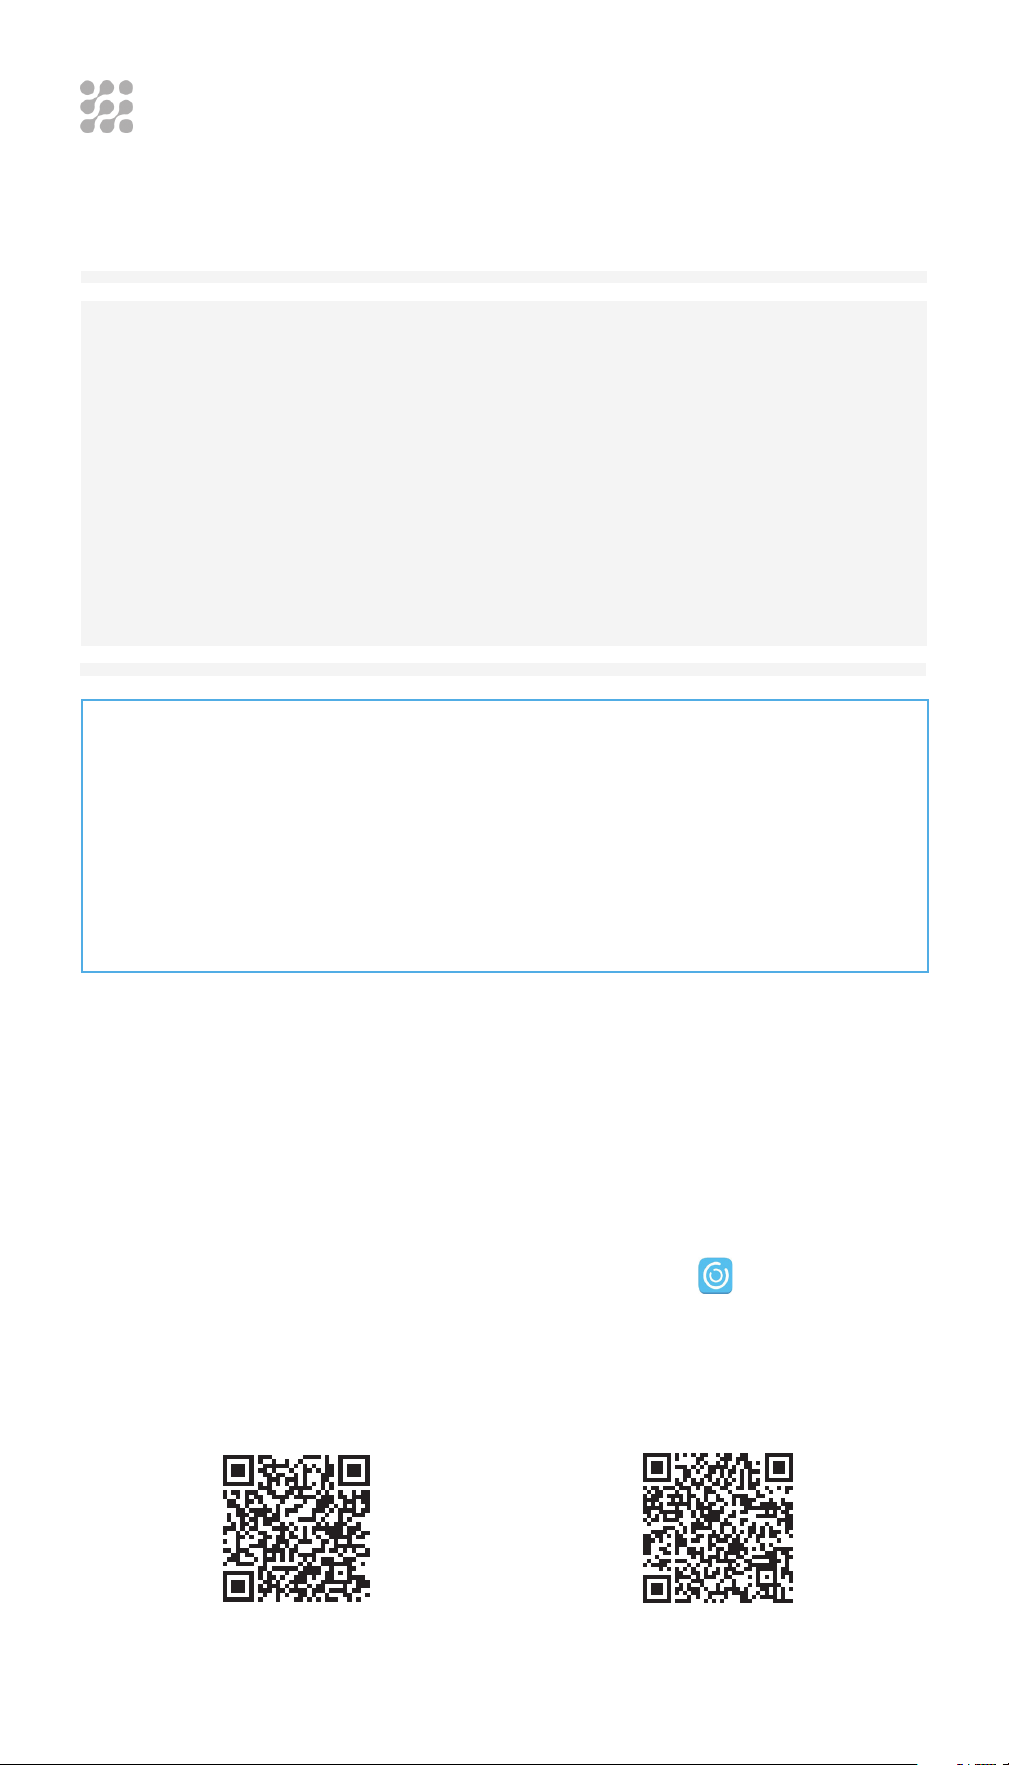
To download and install the app, scan the QR codes below (they can
also be found on the product box), or search for UBox (developed by
Maxwell Wang), from the App Store (for IOS devices), and the Google Play
Store (for Android).
Download the APP
iOS Android
RaVision Camera only supports 2.4GHz
Wi-Fi, 5GHz is not supported
Make sure the distance between your phone, router and
the camera is no more than 1.5 feet when you’re ready to
pair the camera. Ensure that the Wi-Fi signal strength on
your phone is good.
CHECKING
THE PHONE CONNECTION
APP INSTALLATION
15
PAIRING THE CAMERA WITH
THE APP
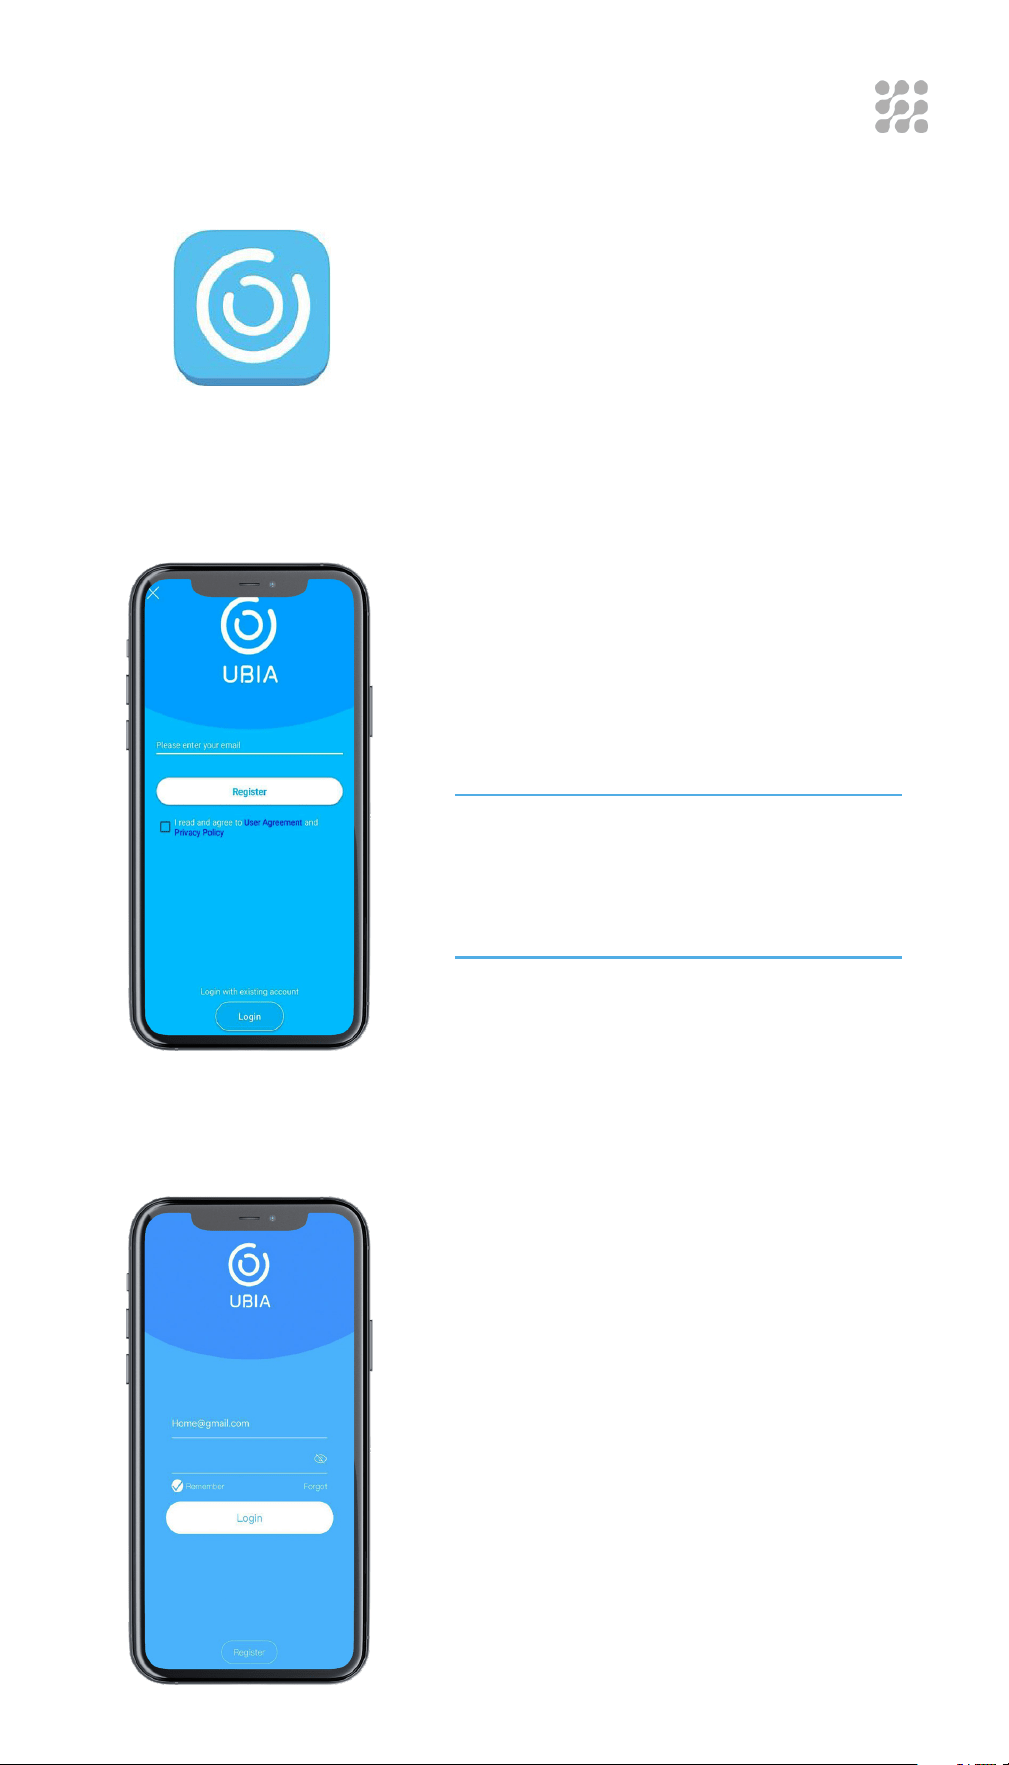
STEP 1
Open the UBox app (developed by
Maxwell Wang), on your smartphone.
STEP 2
Enter your E-mail address, read and
agree to the User Agreement and Privacy
Policy, and then press “Register”. You will
receive a verification code in your E-mail
box (for a better user experience, please
allow all permissions, to avoid missing
any important notifications from the
app).
Input the “verification code” and press
“Next” (if you do not find the mail in your
primary email box, kindly check your
spam box).
Set the login/password and confirm the
login/password. Then press “Register”
for the next step. (For your password
safety, the password requires more
than 8 characters plus a combination of
letters).
STEP 3
Enter your E-mail address and input your
login password. Then press “Login”. You
can also click, “Remember”, to save your
E-mail login and password.
16
WI-FI CONNECTION
You are already in the App;
kindly follow the next steps below.
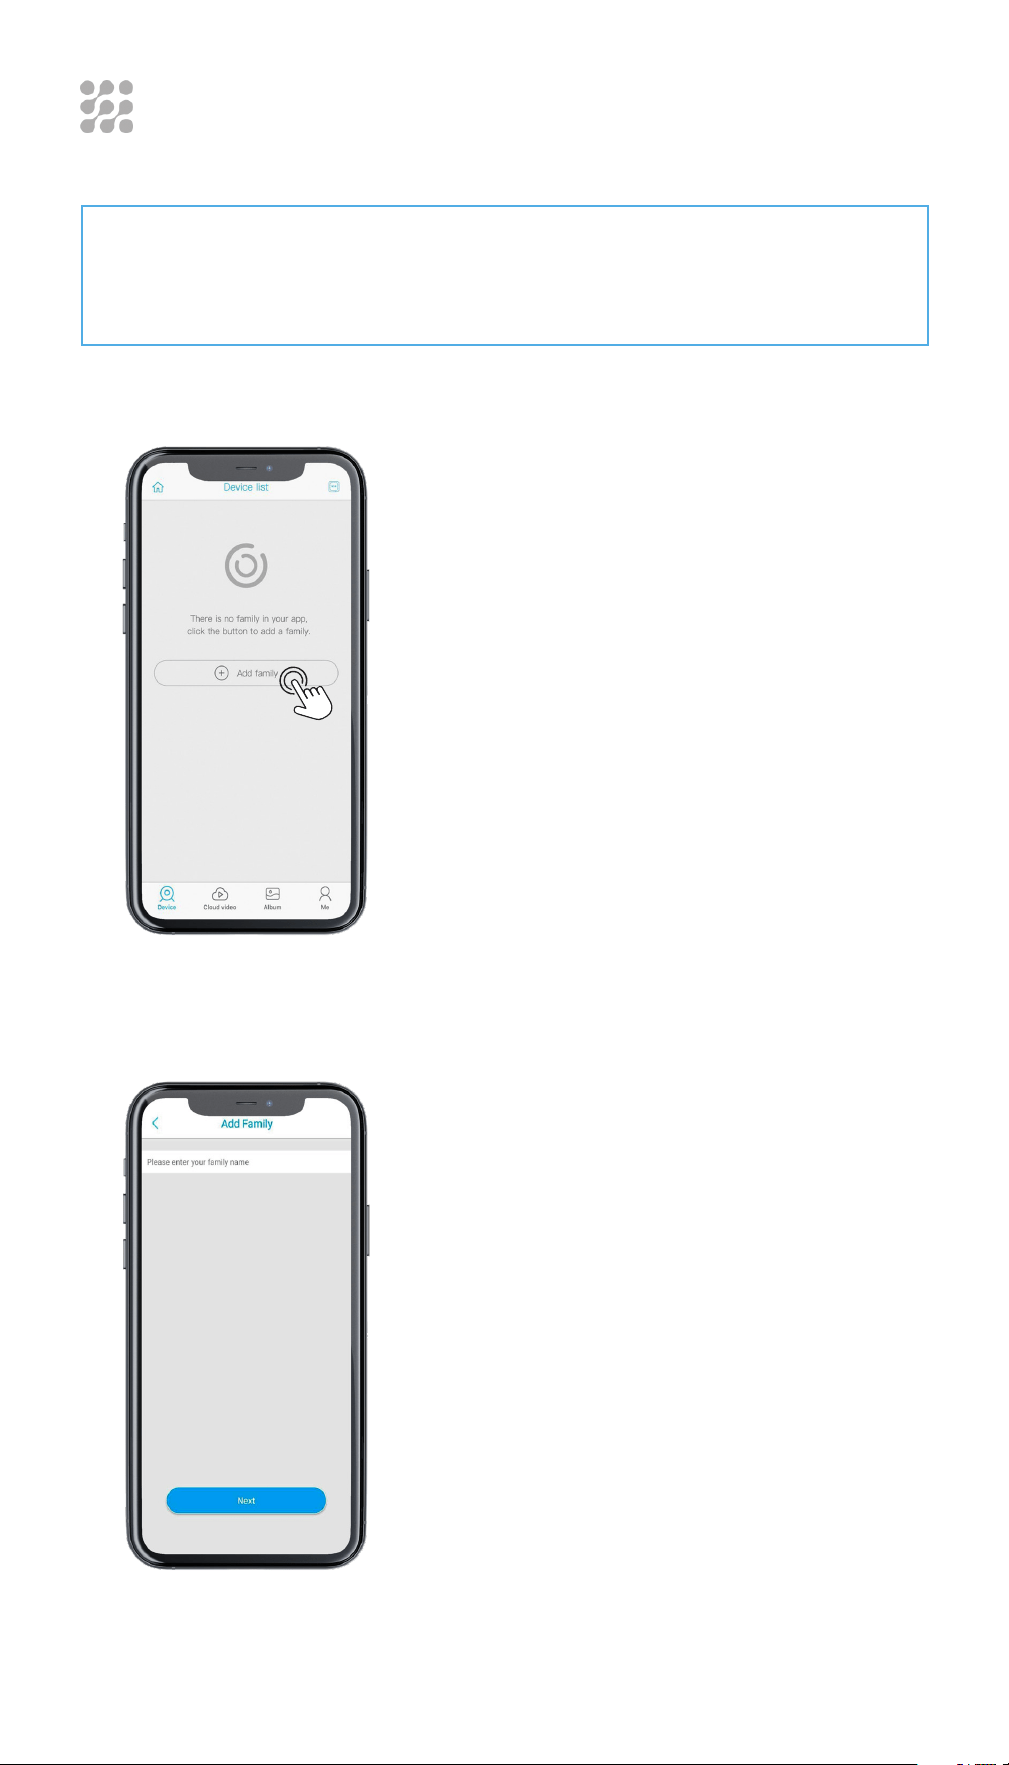
STEP 1
Press “Add Family” then set the room or
position as per reminders..
STEP 2
Enter your Family name and then
press “Next”. It is necessary for
your convenience because the App
remembers Your Wi-Fi password and the
camera location for easy installation in
different places or Wi-Fi connections
gears.
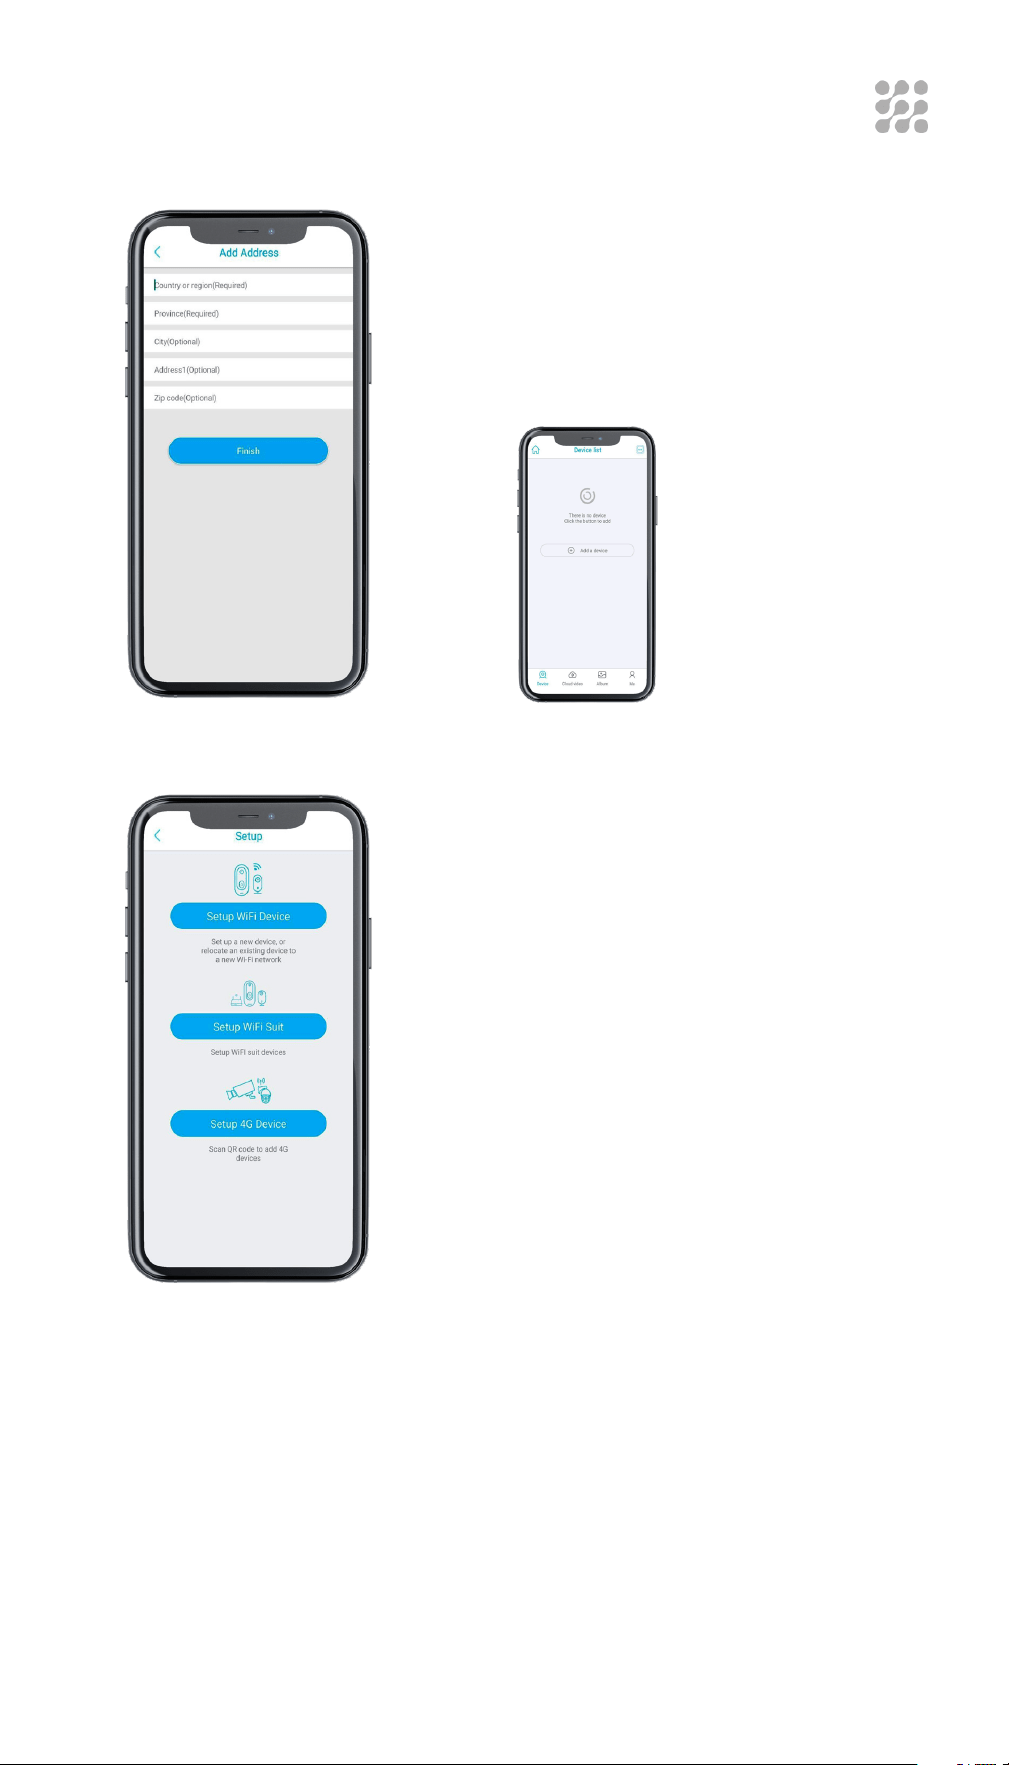
17
WI-FI CONNECTION
STEP 3
Input the necessary information, like
Country, City, Province, and then press
“Finish”.
STEP 4
Connect the Camera with solar panel by
cable, and make sure the smart phone is
connected to an available Wi-Fi.
Then press “Setup Wi-Fi device”.
STEP 5
When the device power will turn ON then you should:
• Check on the Camera that the Blue indicator LED is blinking.
or
• Wait for the voice prompt “The device is waiting for pairing”, which
means your device is in paring mode.
Press
“Add a device”
to add a camera
smart device.
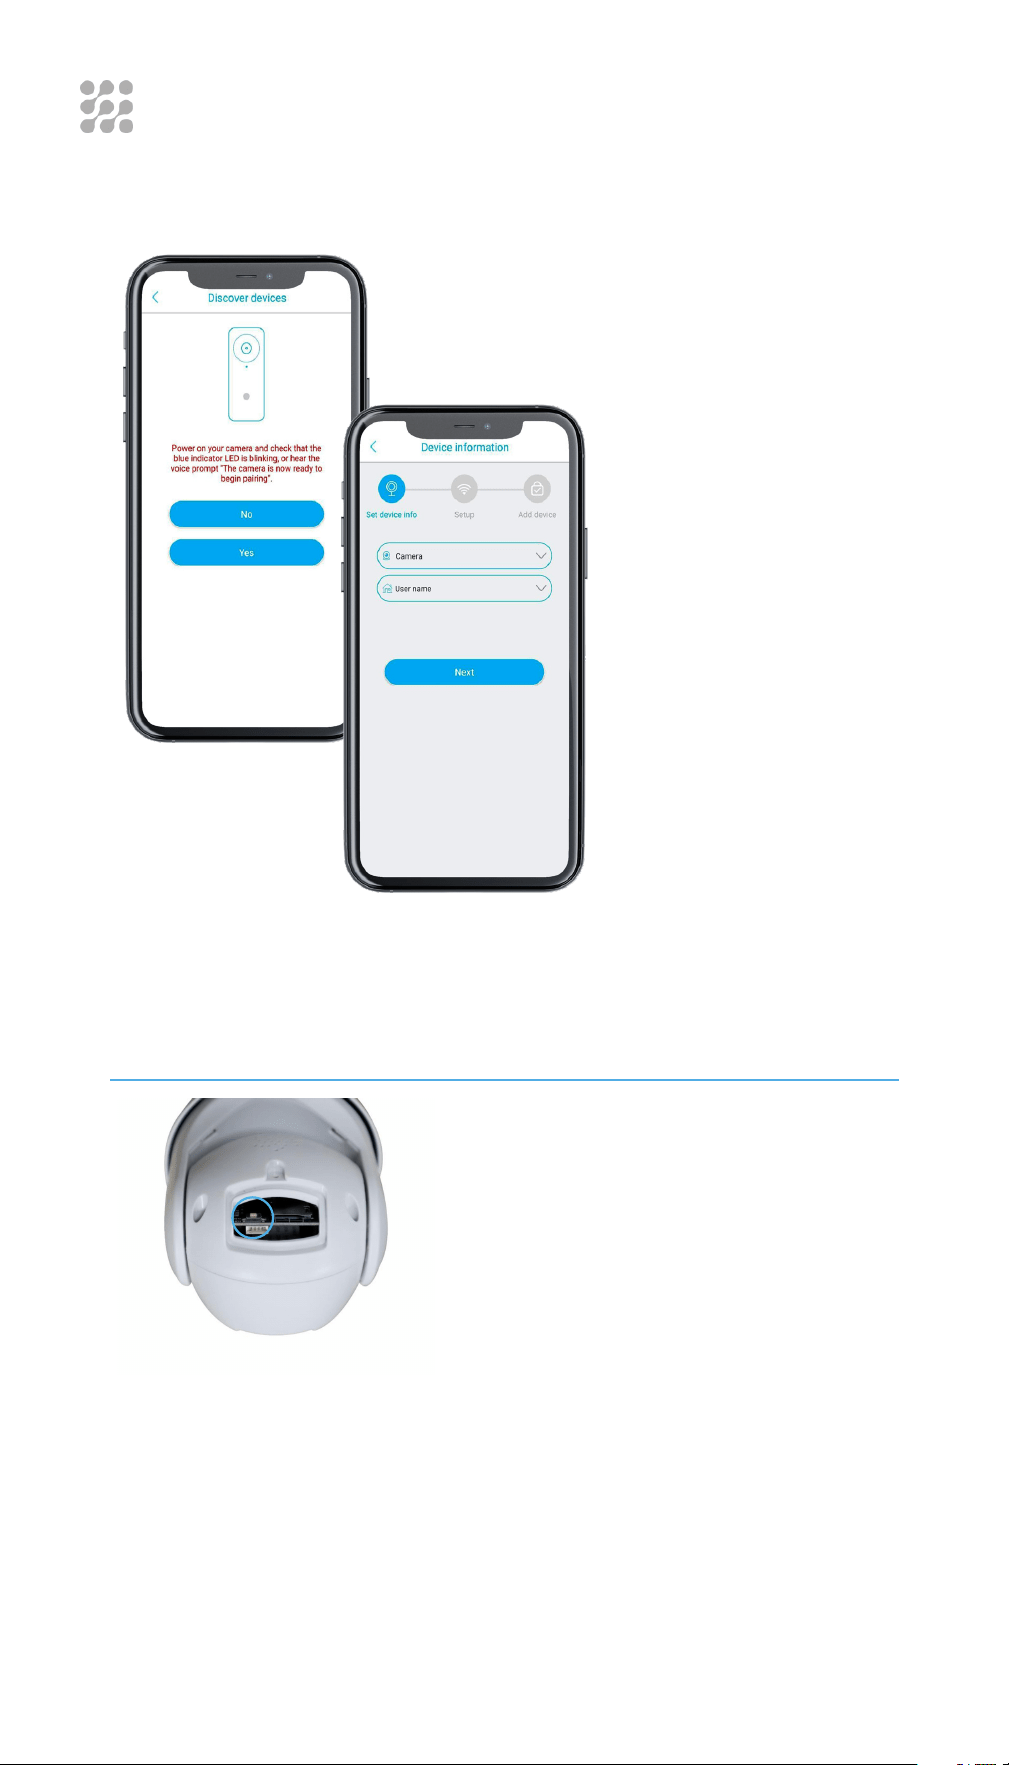
18
WI-FI CONNECTION
STEP 6
Then press “Yes” in the App display.
If you do not hear the voice prompt, or
do not see the blue LED light blinking,
then RESET the Camera by pressing the
RESET button for 3-5 secs until the blue
indicator lights up, and then release.
The device will reboot and enter the
pairing state.
“Yes” you will see Device
Information and then press
“NEXT”.
19
WI-FI CONNECTION
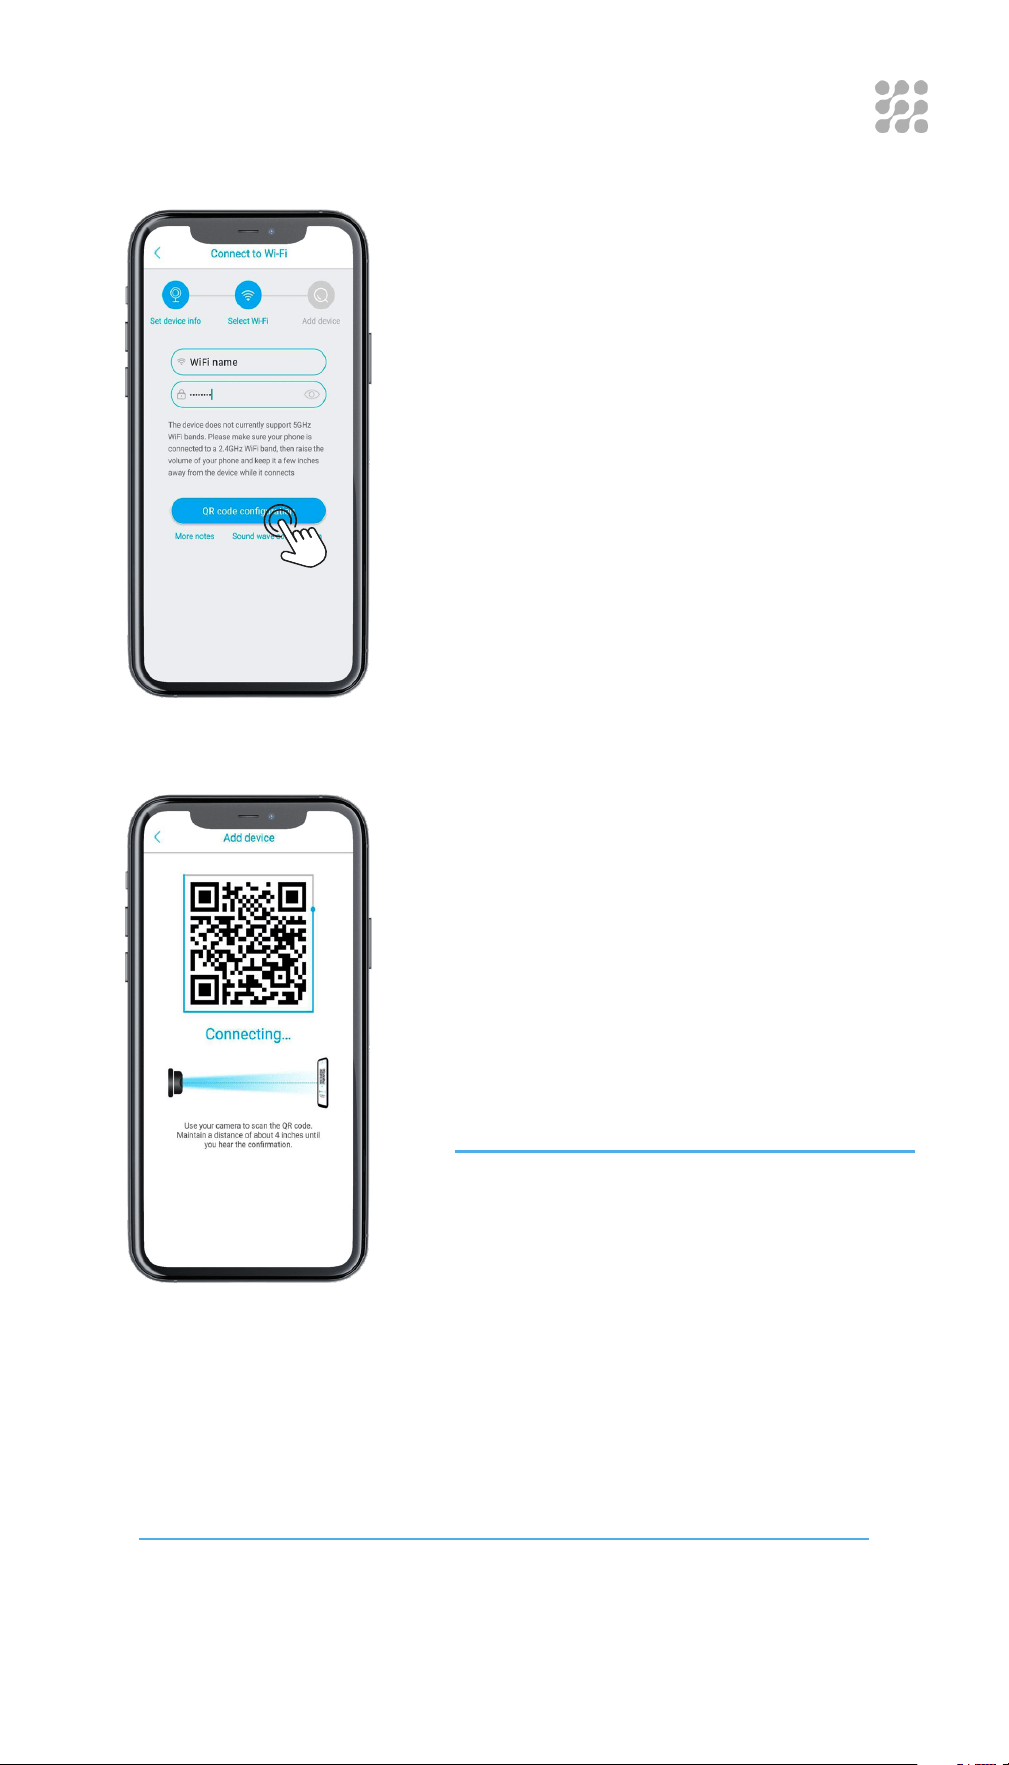
STEP 7
The app will input the Wi-Fi name
automatically, please input the correct
Wi-Fi password. You can choose the
QR code configuration or “Sound wave
configuration”.
STEP 8
There are 2 ways for Camera Connection
by Sound wave or by QR code
Sound wave configuration: make sure
the camera and smart phone are within
a 3.3ft (1 meter) distance; you will hear
the wave sound DI-DI. Follow the tips
shown in the smart phone to finish
configuration.
QR code configuration: select the QR
code configuration and a QR code will
be displayed on the smart phone. Use
the Solar Camera to scan the QR code,
4 inches (10cm) away from the smart
phone.
STEP 9
Select the family name or device location, and then press,
“Done”.
The device will be installed to the smart phone automatically.
Setup success! The camera is ready to use.
20
WI-FI CONNECTION
After you have fully charged the Solar Panel please reset
the camera by pressing the RESET button for 3-5 secs until
the blue indicator lights up, and then release.
Please turn up your phone volume to the maximum, as the
camera pairs through sound waves.
Please place the camera and phone as close to your router
as possible (within 1.5 feet), to get a strong wi-fi signal.
Please click on the eye icon when you input your router wi-fi
password, to ensure that your wi-fi password is correct.
Please make sure your router setting is DHCP enabled,
otherwise your router will not send out wi-fi signal to any
device for pairing.
Please make sure your Wi-Fi connection is 2.4GHz (5GHz is
not supported)
IF YOU’RE UNABLE
TO PAIR THE CAMERA
PLEASE SEE THE SUGGESTIONS BELOW:
21
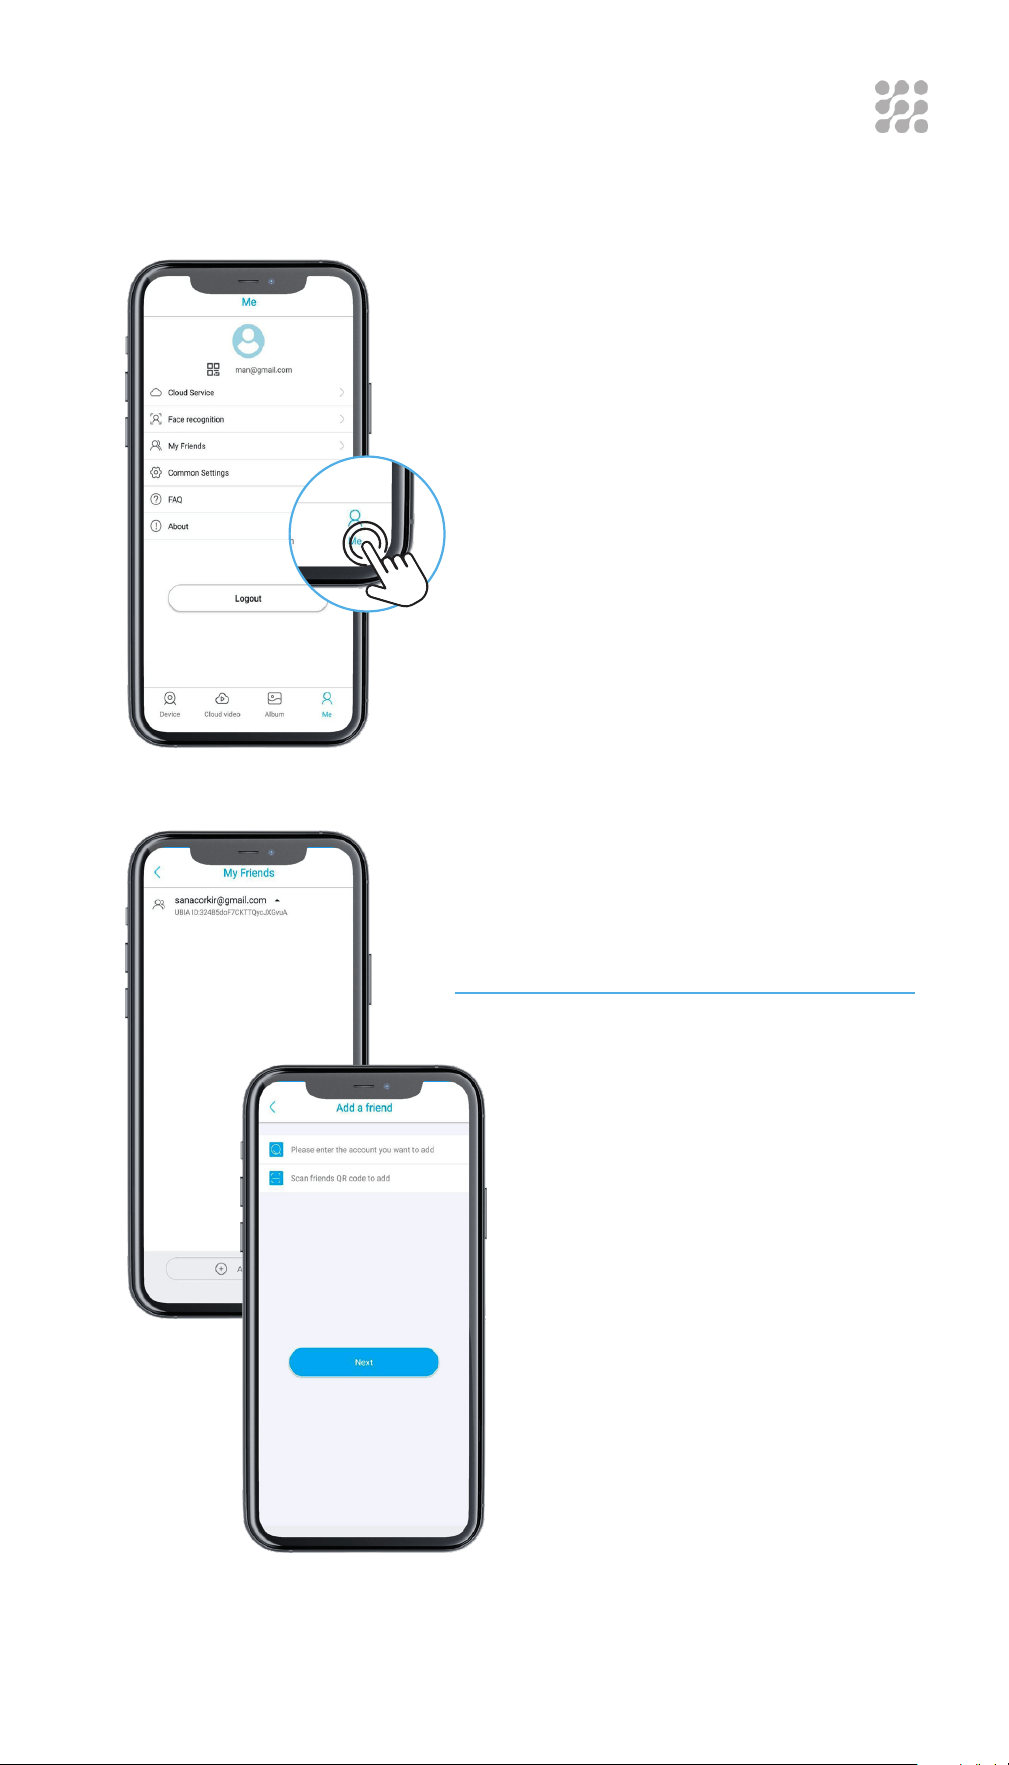
HOW TO SHARE YOUR CAMERA AND
PASSWORD WITH MORE USERS
STEP 1
After you’ve completed the connection
with the App, click on the “Me” icon
located at the bottom panel of the App.
STEP 2
Next, select “my friends” and then “add a
friend”.
Your friend should install the
UBox app (developed by Maxwell
Wang), and pass verification.
After that, you can add his E-mail
address (which he indicated in the
application), or scan his QR code.
Quick tip: E-mail connection is
easier.
• Your camera password can be seen
by the invited users, but they can
not modify it.
• Invited users can change all
camera settings, so the camera will
work according to the last change
made in the settings among all
users.
• If your camera does not work as
you set before, please check the
settings from the invited users’
device.

22
PUSH MODE
STEP 1
In “Device list”, click the settings icon.
STEP 2
Here you will find the “Base settings”
menu, in which you can see the “accept
call” menu.
Click on it if you wish to change the
settings:
Silence: You can choose to mute all
incoming notifications or call in. All
motion triggered videos will be properly
saved in the cloud storage or Micro SD
card.
Notification: Camera will receive
notification and banner.
Call in: Camera will receive the call in
sound and banners simultaneously with
a “ding dong” sound.
23
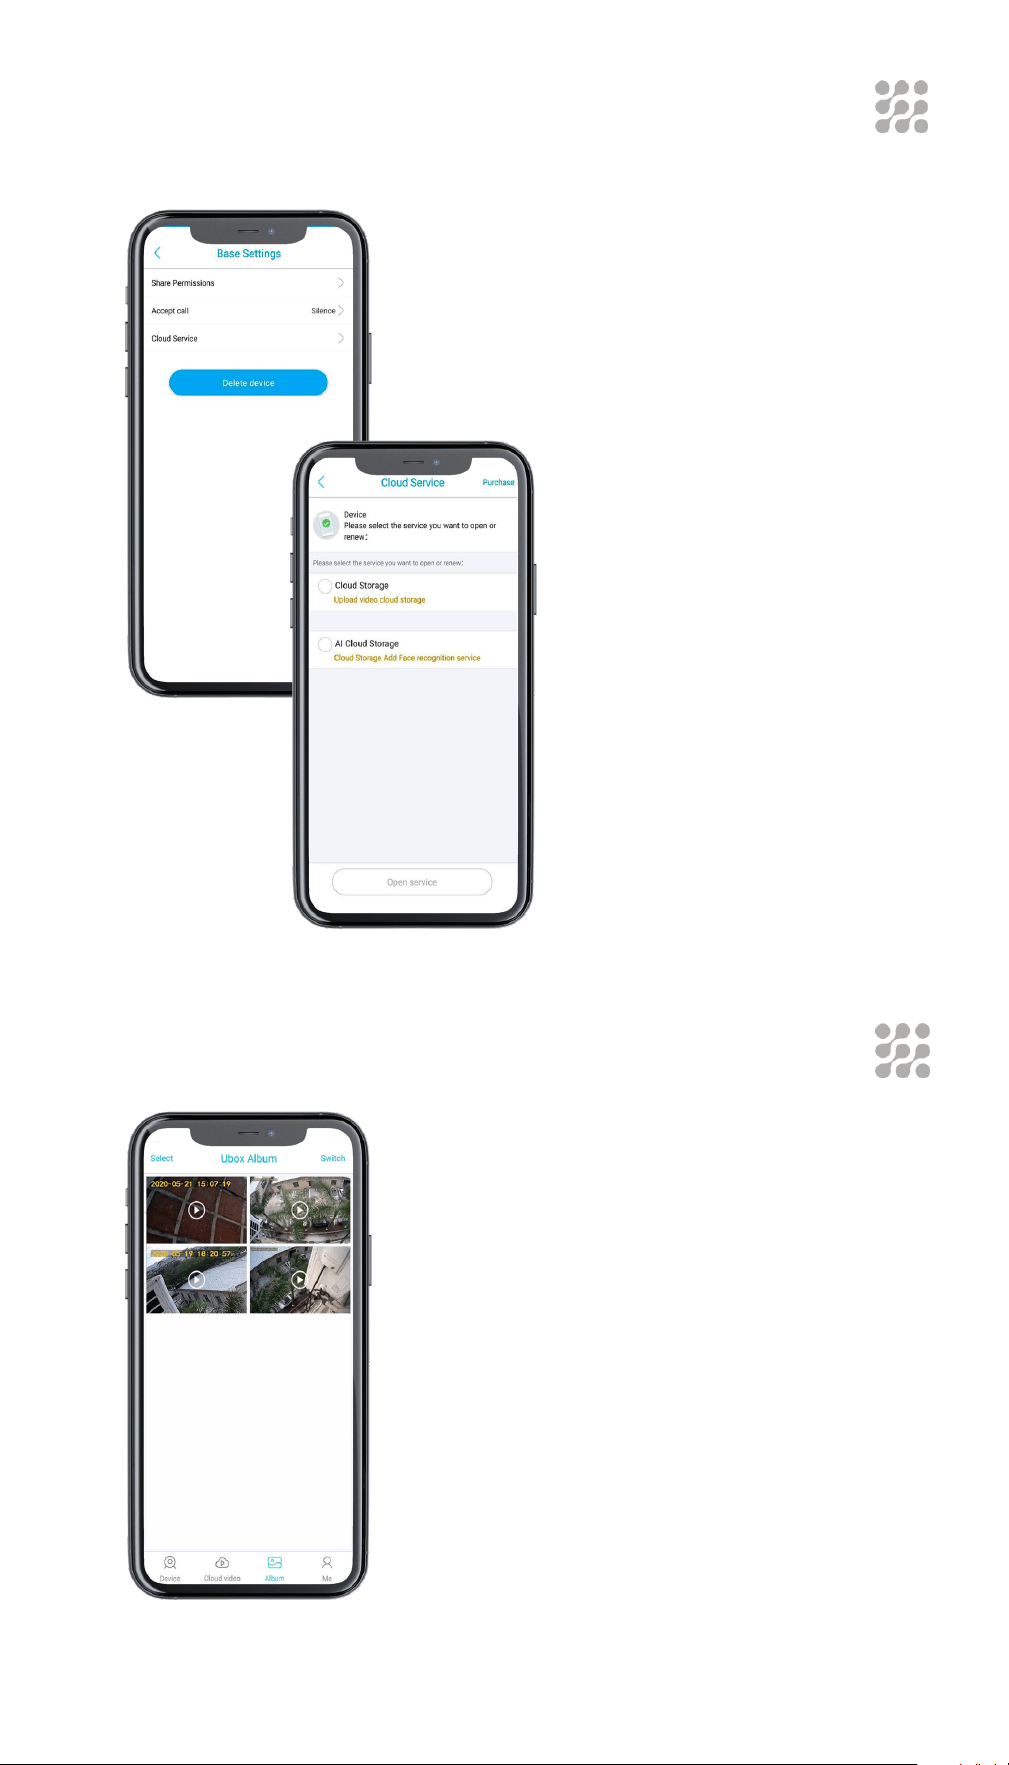
CLOUD STORAGE
MICRO SD CARD VIDEO PLAYBACK
You can play back all cloud videos here.
Cloud video length is 8 seconds by
default, with 20 free video clips per day.
The oldest footage will be overwritten by
the most recent ones each day.
You can record video from the camera.
For this, insert the SD card into the SD
card slot (located on the rear panel of the
camera).
Find the camera icon in the UBox app
and click it to record the video. You can
watch all of your recorded video in the
album.

24
CAMERA INSTALLATION
CHECK YOUR CAMERA
SIGNAL STRENGTH
RECOMMENDED HEIGHT
TO INSTALL THE CAMERA
If you are not satisfied with the video quality, and the signal strength in
the App is not strong, we would suggest adding a wi-fi extender between
the router and the camera.
We suggest installing the camera at about 8ft. You may physically adjust
the camera angle according to the live view in your mobile, to focus your
motion area and get more accurate motion triggered events.
If your camera receives numerous unexpected motion alerts:
• Please adjust your camera installation angle a bit lower to
focus the motion area.
• Please change your PIR sensitivity to Low to reduce the PIR
sensitivity.
• Do not install the camera with nearby bushes, shrubs,
grasses and tree leaves coming into the PIR range.
25
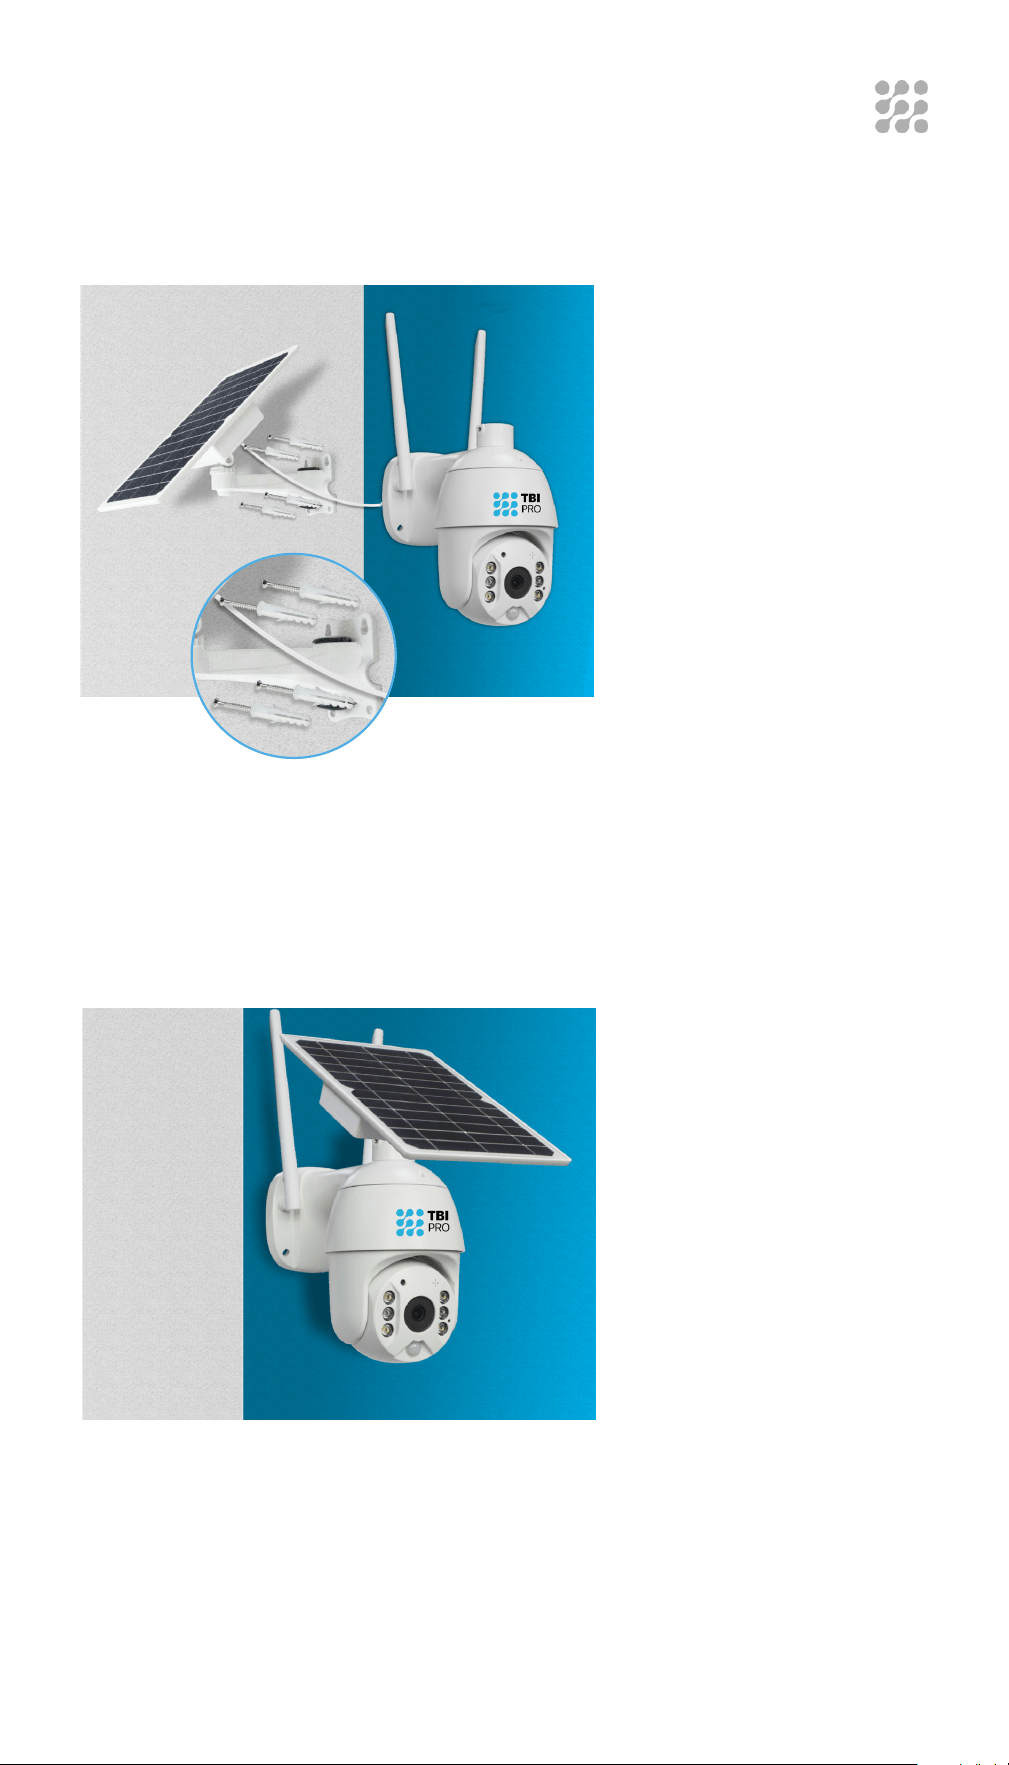
CAMERA INSTALLATION
Separated installation
Adjust the bracket on
the wall and then mark 4
holes for mounting.
Fix the bracket to the wall
with expansion screws.
To properly screw the
camera, use the special
sticker (included), which
will give you the correct
location of the holes.
To fix the Solar Panel
to the additional Wall
Bracket, use 2 pcs Socket
hexagon screws.
2 ways installation of the Solar Panel
Integrated Installation
To properly screw the
camera, use the special
sticker (included), which
will give you the correct
location of the holes.
To fix the Solar Panel to
the Universal Bracket
on the top of the
camera (can be seen
in the product diagram
chapter), use the same
2 pcs Socket Hexagon
screws, just as in the
Separated Installation of
the Solar Panel.
26
COMMON SETTINGS
DEVICE SETTINGS
Mute when viewing device
Function to turn on or off the sound of
the camera.
Mute when Playback
Function to turn on or off the sound of
recorded videos.
Default resolution
Resolution selection function (clearer –
HD 1080, less clear - SD).
Turn off alarm vibration
Function to turn vibration on or off when
an alarm is triggered.
Turn off the alarm ringtone
The function to enable or disable the
ringtone when the alarm is triggered.
Clear cache data
Function to clear cache data.
In this section you can configure important camera settings that allow
you to enjoy its high-tech features.
27
In this menu you can:
• Enable or disable cloud recording
• See the entire memory of your SD card
• See the available memory of your SD
card
• Format memory card
In this menu you can:
• Select normal
camera view
• Select a mirror
image of the
video from the
camera
• Select inverted
camera video
display
• Select the
inverted and
mirror image of
the video from
the camera
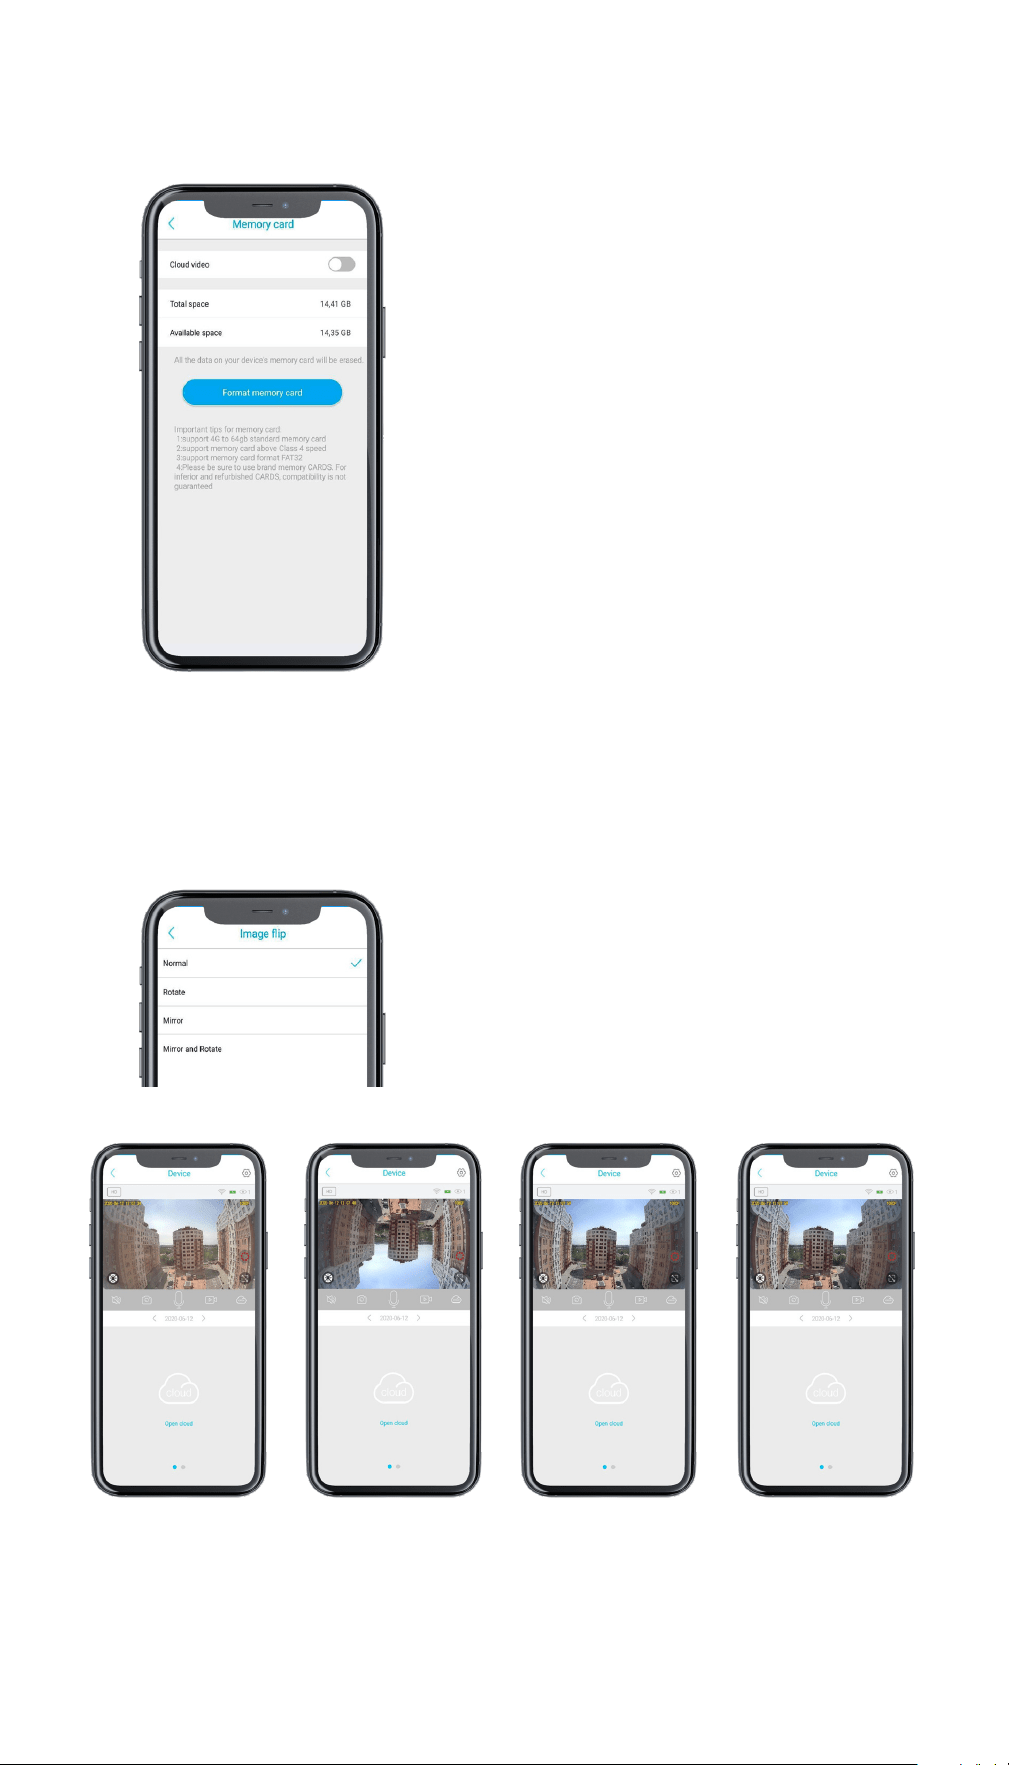
MEMORY CARD
IMAGE FLIP
28
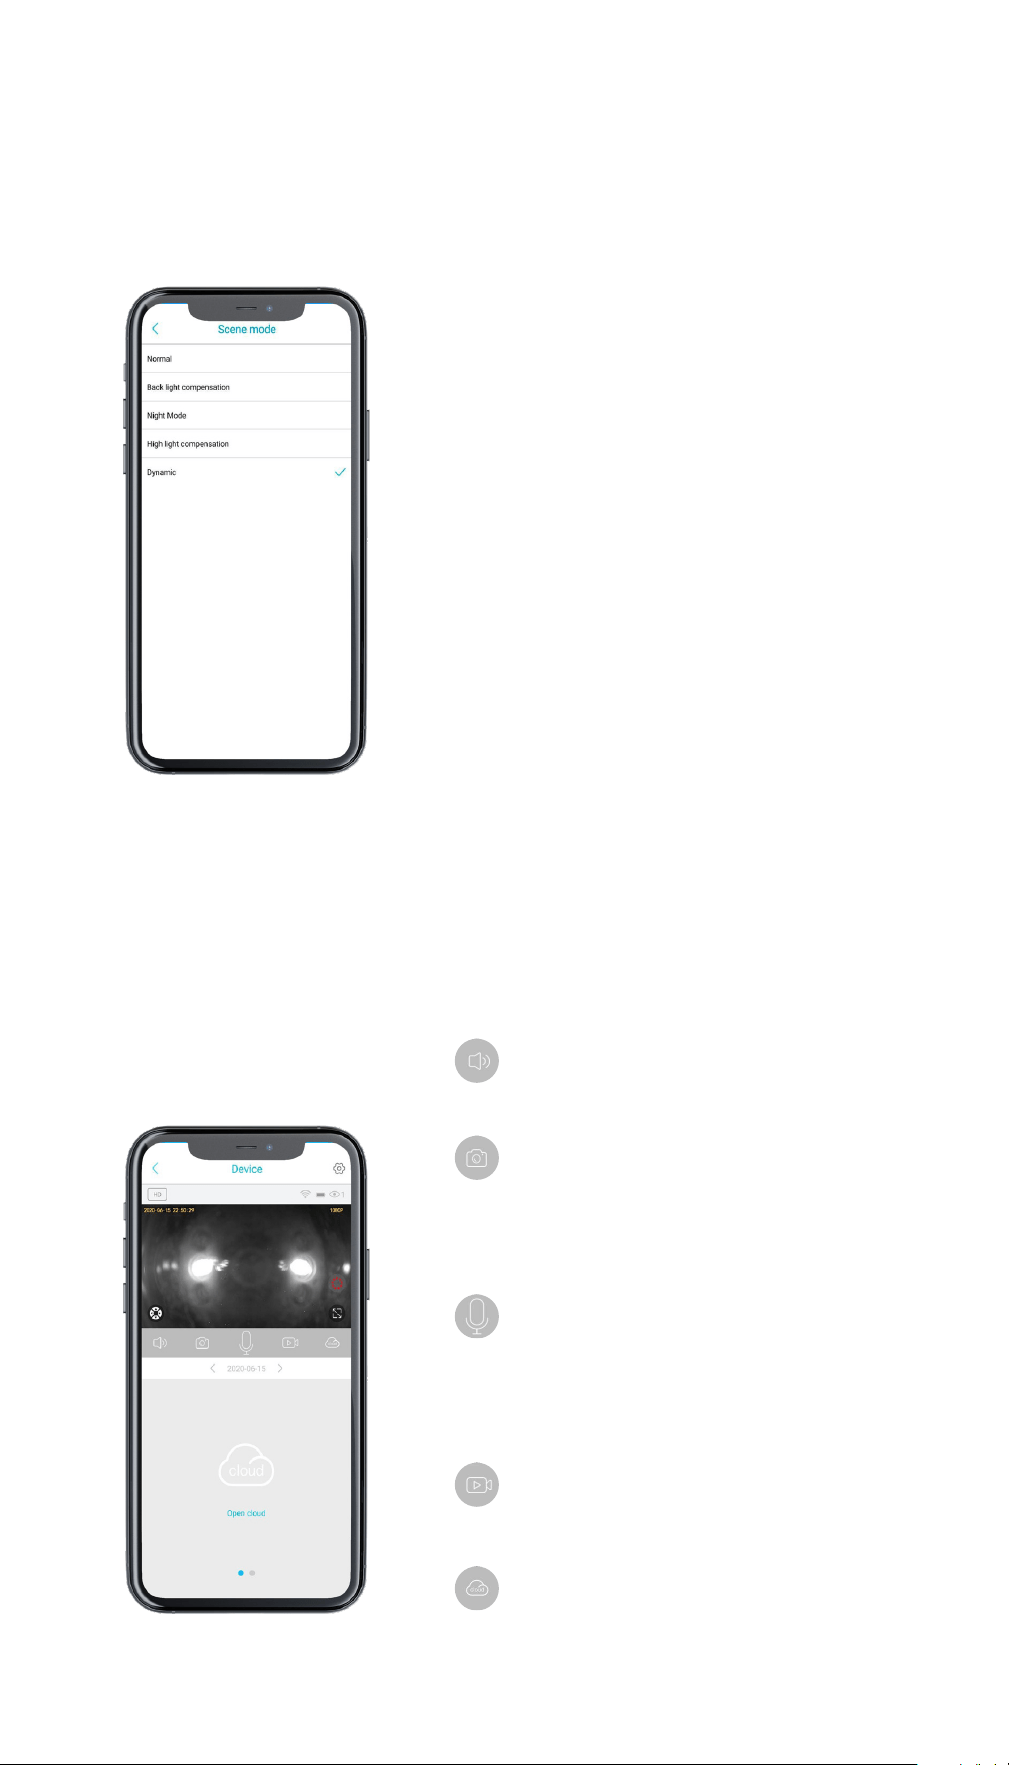
In this mode, you can select:
Normal
Normal daylight camera recording.
Back light compensation
Сamera can compensate for backlight by
enhancing automatic exposure control
on the camera.
Night mode
Switching the camera to night vision.
High light compensation
Cameras’ image sensors detect string
lights in video and reduce exposure
on these spots to enhance the overall
quality.
Dynamic
Automatic setup of the camera, which
will switch between the modes itself.
Turn on or off the sound that is
recorded on the camera.
Allows you to take a picture of the
object through the camera.
Turning on or off two-way
communication, you will be heard
through the camera.
When the camera sound is turned
off (point 1), you cannot hear the
feedback.
It allows you to shoot video
It allows you to shoot a video
through the camera.
The function of saving a video or
photo to the could storage or to
the micro SD card.
SCENE MODE
MAIN SETTINGS
29
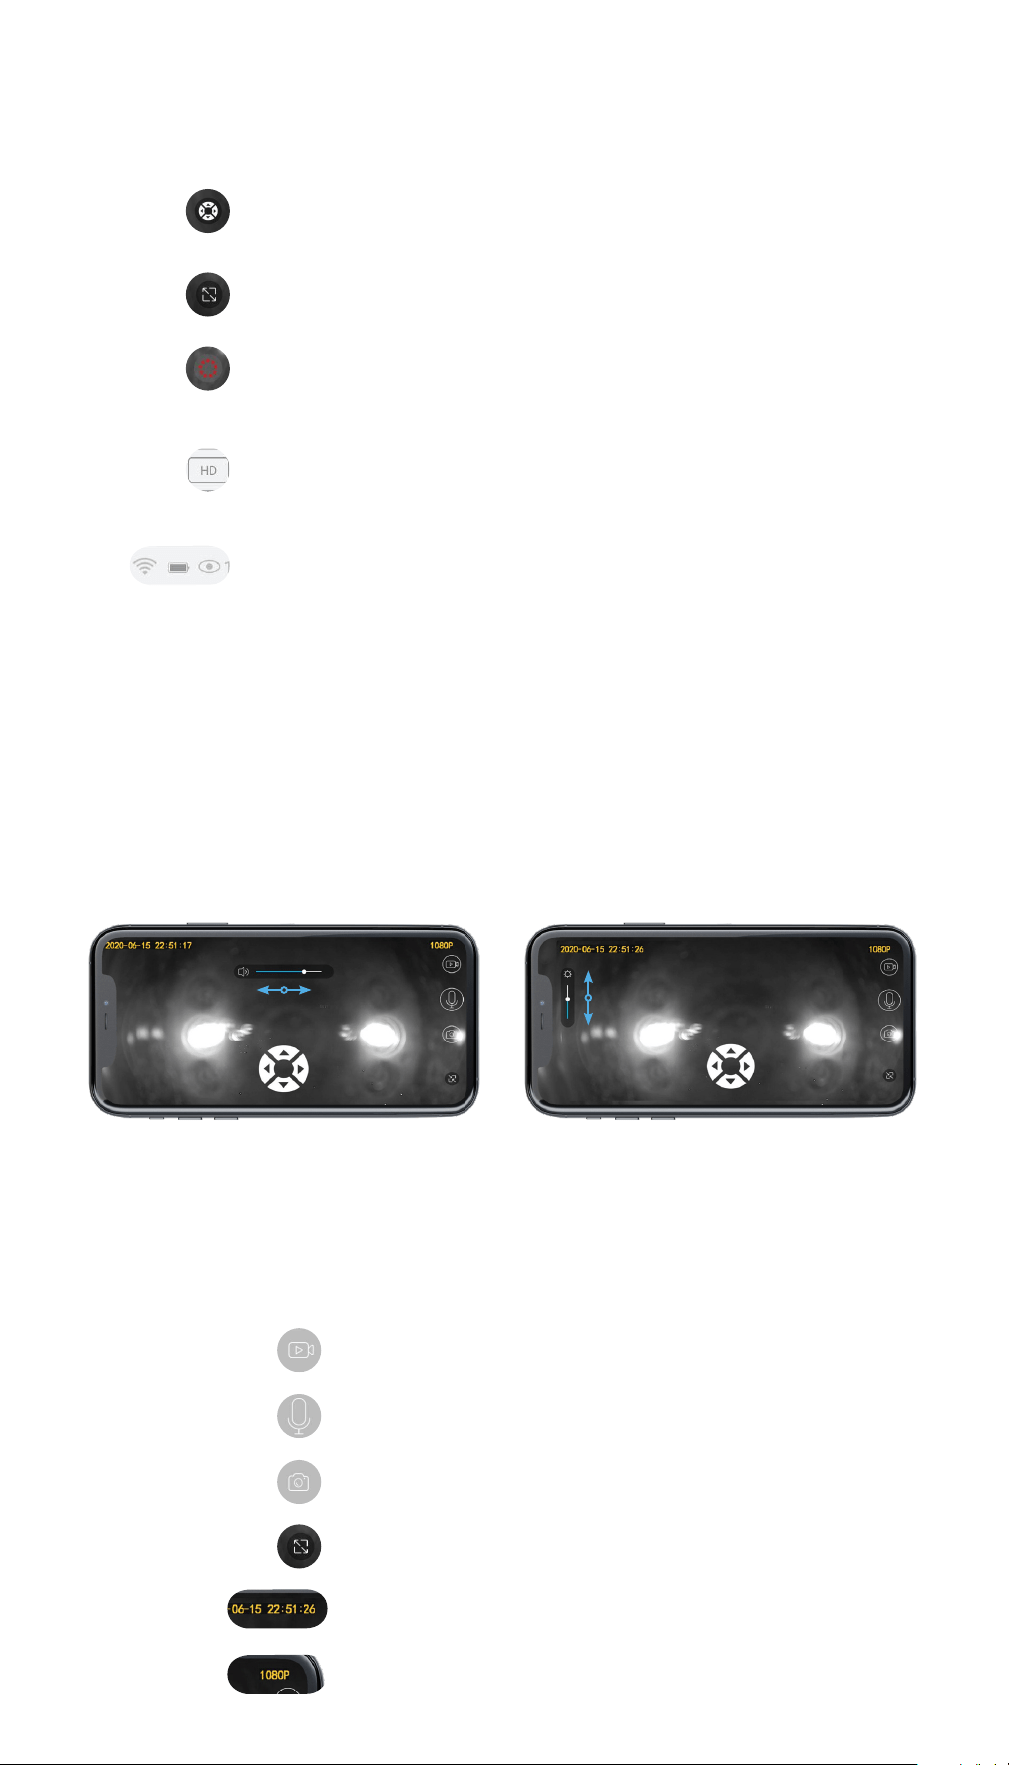
MAIN SETTINGS
FULL SCREEN VIEWING
A function that gives you the ability to rotate the
camera for a better setup of viewing of the area.
Function for full screen viewing.
Function to quickly turn on night mode or flashlight.
Both modes cannot be enabled together.
Function for switching recording quality (HD (Full
High Definition) or SD (standard definition)).
Information about the network status, charging and
how many users are currently viewing the camera.
In this mode, you can also control the camera using the buttons located
in the middle of the screen, for more precise camera settings or viewing
the area.
Camera video recording function
Two-way communication enable function
Camera photography function
Exit full screen mode
Time and date display
Selected recording quality
• You can change the volume if you
swipe right or left. Swipe to the
right to increase volume, to the left
to decrease.
• You can also change the
brightness of the display of your
phone using swipe up or down.
To add brightness - swipe up,
decrease - down.
30
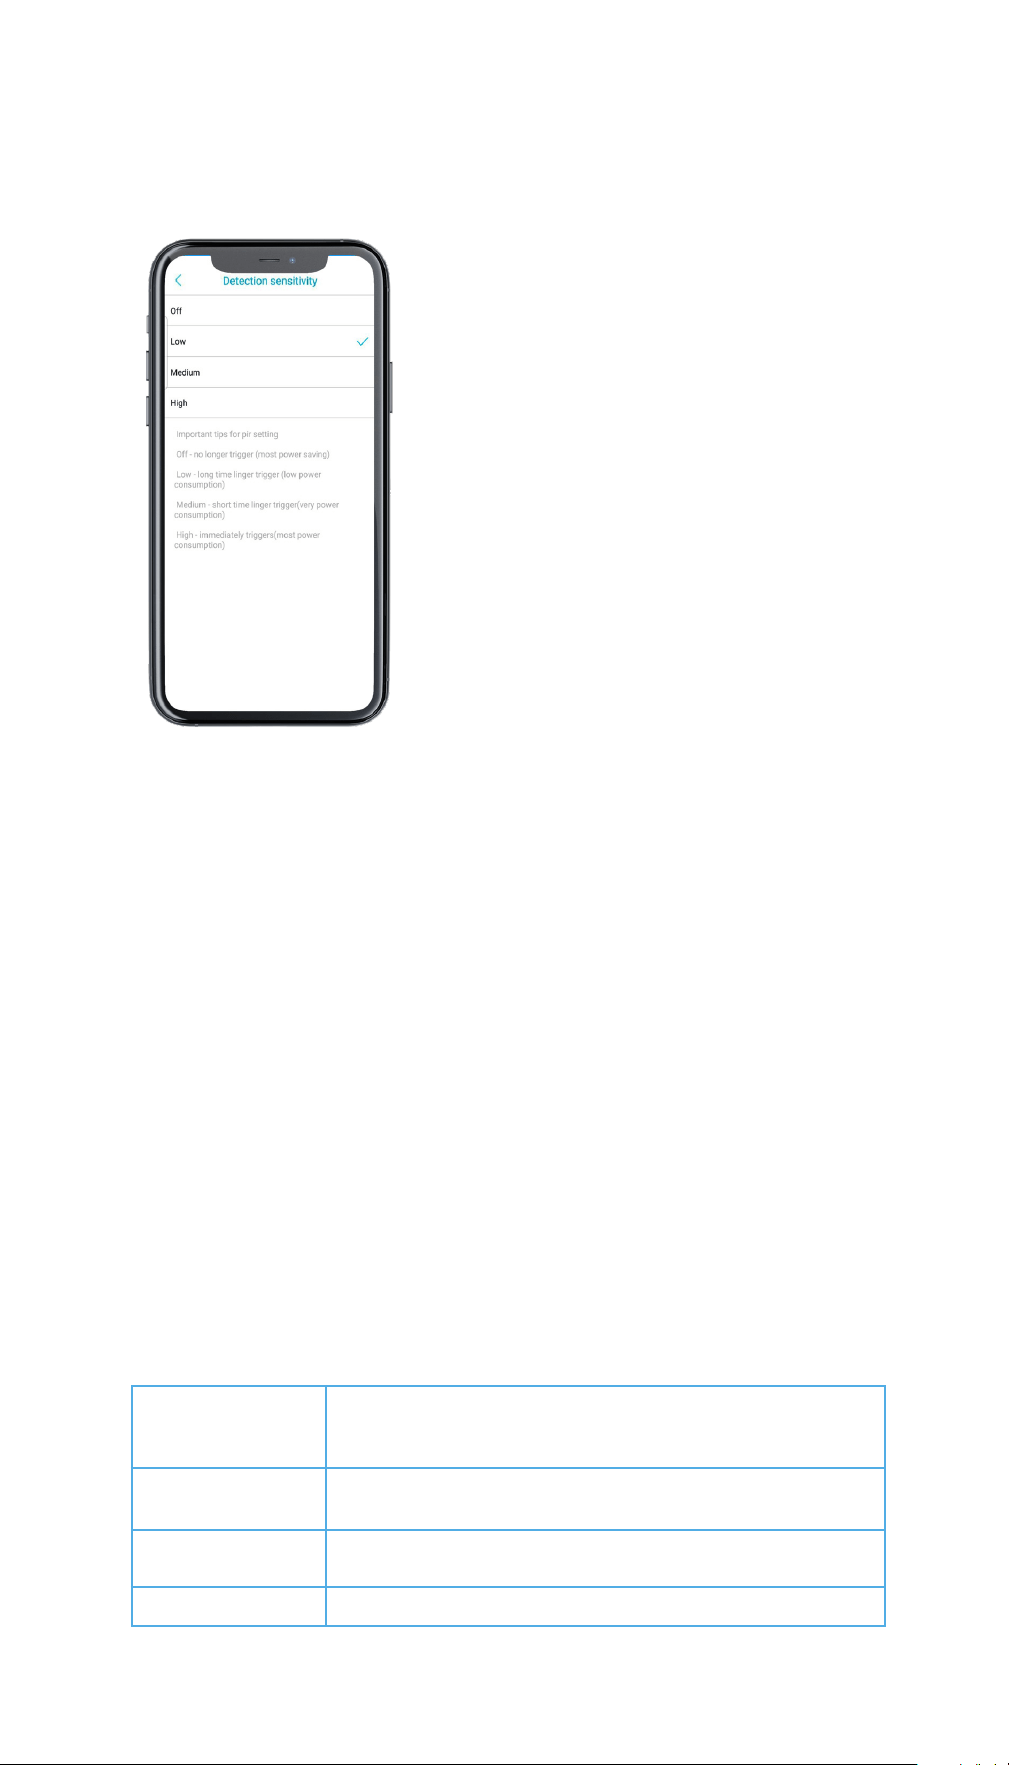
In this mode, you can select:
Off
No longer trigger (maximum power
saving)
Low
Long time linger trigger (low power
consumption)
Medium
Short time linger trigger (medium power
consumption)
High
High immediately triggering (maximum
power consumption)
DETECTION SENSITIVITY
To find the best sensitivity values at different times of the day or night,
please test the system at different hours. You may ask a friend to make
movements in front of the camera if you want to adjust the sensiivity.
The ideal sensitivity level is the one in which your friend’s movements
continually triggers the motion detection, and there are no false triggers
(or very few), when your friend isn’t moving. It is recommended to set the
sensitivity higher in the daytime and lower at night.
When installing the camera, please install it angularly (the angle between
the sensor and the detected object should be larger than 10° ) for
effective motion detection.
If the moving object approaches the PIR sensor vertically, the sensor may
not detect the motion events PIR Sensor Detecting Distance.
The PIR senor has 3 sensitivity levels for your
adjustment: Low/Med/High.
Sensitivity
Low
Medium
High
Detecting Time
(For moving and living things)
triggers on seventh second when the object appears,
and continues counting for 10 seconds
triggers on fourth to fifth second when the object
appears, and continues counting for 10 seconds
triggers immediately for every moving thing

31
DETECTION SENSITIVITY
The default sensitivity of the PIR sensor is at “Mid”.
Higher sensitivity would lead to more false alarms.
You are advised to set up the sensitivity level to “Low” or “Mid” when you
install the camera outdoors.
• Do not install the camera facing any objects with bright lights, including
sunshine, bright lamp lights, etc.
• Do not place the camera too close to a place where there are frequently
moving vehicles. Based on our numerous tests, the recommended
distance between the camera and a vehicle is 65ft (20 meters).
• Stay away from outlets, including air conditioner vents, humidifier
outlets, the heat transfer vents of projectors, etc.
• Do not install the camera facing a mirror.
• Keep the camera at least 3,3ft (1 meter) away from any wireless devices,
including Wi-Fi routers and phones in order to avoid wireless interference.
IMPORTANT NOTES
FOR REDUCING FALSE ALARMS

32
In this mode, you can select:
15s
In this mode, the camera will record a 15
second video when the PIR sensor fires.
30s
In this mode, the camera will record a 30
second video when the PIR sensor fires.
60s
In this mode, the camera will record a 60
second video when the PIR sensor fires.
Always
Camera always on.
In this mode, you can select:
50Hz
60Hz
By using a frequency converter, you can
convert both 60Hz to 50Hz and 50Hz to
60Hz for home appliances, it is also a
voltage converter for changing 110V to
220V.
DETECTION SENSITIVITY
POWER FREQUENCY

33
In this mode, you can select:
Enabled
To turn on the indicator
Disabled
To turn off the indicator
Here you can change the camera name
Synchronization time - Time
synchronization is used to synchronize
the date and time of your phone with the
camera.
LED INDICATOR
DEVICE NAME

34
Your camera name
ID number camera
Camera model name
Camera firmware number
Cameras’ vendor
You can also update the firmware to the
new version (if available)
DEVICE INFO

Questions?
Contact us at
suppor[email protected]
+1 800 674 92 29
(Mon-Fri 8:00-20:00 GMT-6)
www.TBI-STORE.com
