Visit Our Website
SCAN ME
PyleUSA.com
USER GUIDE
Desktop Audio Power Amplifier
Questions or Comments?
We are here to help!
Phone: 1.718.535.1800
PyleUSA.com/ContactUs
PT506BT - PT506BT.6
www.PyleUSA.com2 www.PyleUSA.com 3
READ ALL INSTRUCTIONS CAREFULLY BEFORE USING THIS PRODUCT.
RETAIN THIS OWNER’S MANUAL FOR FUTURE REFERENCE.
TABLE OF CONTENTS
Features and Technical Specs
INTRODUCTION
Wireless BT Operation Instructions
Features and Controls
Aux (3.5mm) Input Connection & Operation
Connection Diagram
Help & Troubleshooting
FCC INFORMATION
Register Product
Features:
• Compact Stereo Amplier Receiver
• Desktop Home Theater Audio System Design
• Built-in Bluetooth for Wireless Audio Streaming
• Connect & Stream Audio from External Devices
• Digital LED Display with FM Radio
• USB Flash Drive & SD Memory Card Readers
• USB Port Doubles as Device Charge Port
• Aux (3.5mm) Audio Input
• RCA (L/R) + Subwoofer Input Connectors
• (4) Pair Push Type Speaker Output Connectors
• (2) 1/4'' Microphone Input Jacks
• Front Panel Audio Control Center
• Selectable Audio Input (BT/USB/SD/FM/AUX)
• Line, Echo, Bass, Treble, Mic1, Mic2 Rotary Controls
• Built-in Short Circuit and Over Voltage Protection
• Perfect for Home, Oce or Business Audio Applications
Bluetooth Connectivity:
• Instantly Receives Wireless Music Streaming
• Works with all of Your Favorite Devices
• Wireless Range up to 30’+ ft.
• Bluetooth Version: 4.0
What's in the Box:
• Amplier Receiver System • Power Cable
Technical Specs:
• Power Output: 600 Watt MAX
• Frequency Response: 20Hz - 20KHz
• Signal to Noise Ratio: >81dB
• T.H.D.: <0.1%
• Radio Station Memory: 30 Station Presets
• Digital File-type Compatibility: MP3, WAV
• Maximum USB/SD Flash Support: 32GB
• Construction Material: Engineered Metal Alloy Housing
• Power Supply: 120/240V
• Dimensions (L x W x H): 12.6’’ x 7.5 x 3.0’’ -inches
3
4
4
5
6
7
8
9
9
California Prop 65 Warning
WARNING:
This product contains Nickel Carbonate which is known to the
state of California to cause cancer birth defects and
other reproductive harm. Do not ingest.
For more info go to: www.P65warnings.ca.gov
www.PyleUSA.com4 www.PyleUSA.com 5
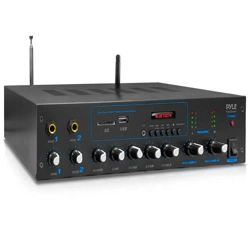
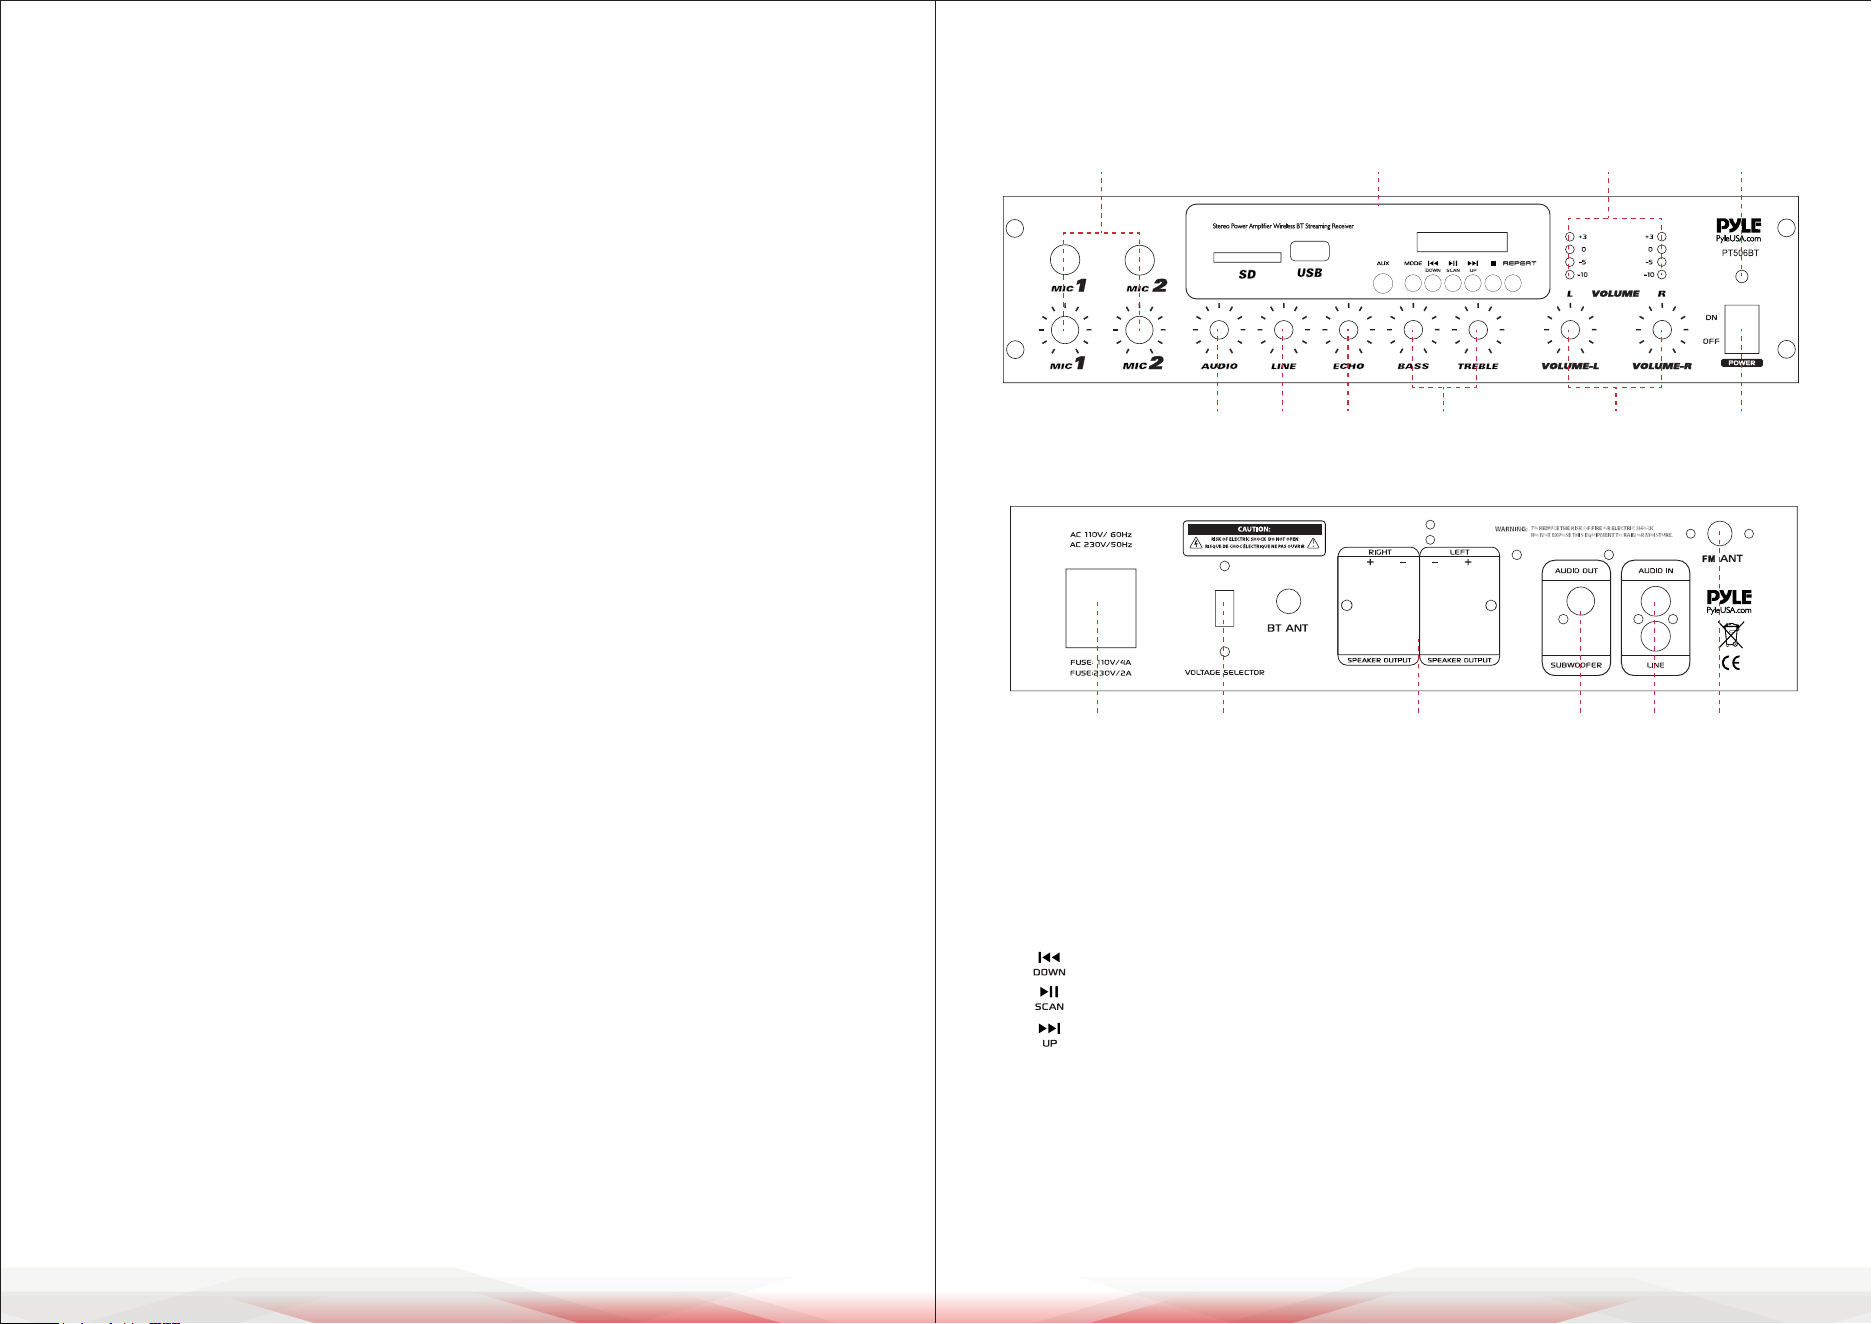
Features and Controls
FRONT PANEL
BACK PANEL
1. 1/4" MIC1 & MIC2 Input Jacks with Separate Volume Control
2. BT/USB/SD/FM/AUX Function Control
• USB/SD Ports: The USB port doubles as a device charging port (5V/1A)
• AUX: 3.5mm AUX input
• MODE: Switches between BT/USB/SD/AUX/FM functions
: Previous Track/FM Frequency Down Button
: Play/Pause/FM Scan Button
: Next Track/FM Frequency Up Button
• REPEAT BUTTON: Allows music playback in repeat mode (All or Single mode)
• ALL: Repeats all tracks in the USB or SD card in sequence without interruption
• SINGLE: Repeats the current track only
3. LED Output (L & R) Level Indicators
4. Power On/O LED Indicator: Lights up when the amplier is turned on
INTRODUCTION
Pyle's PT506BT / PT506BT.6 Desktop Audio Power Amplier is the perfect
solution for all your audio needs. With the latest sound amplication technology
and an impressive 200-watt power output, this receiver delivers pure stereo
sound from a wide range of connected music sources.
The built-in Wireless BT audio receiver allows you to stream music wirelessly
and works with all your favorite devices (such as smartphones, tablets, laptops,
and computers). Enjoy full-range stereo sound reproduction when streaming
audio with a wireless range of up to 30 feet.
Additional features include FM Radio with an LCD display, USB ash drive reader,
SD card reader, (2) 1/4" microphone inputs, push-type speaker terminal
connectors, RCA stereo inputs, RCA subwoofer output, and an Aux (3.5mm) jack
to connect even more external devices. Take control of your sound with the Pyle
Desktop Audio Power Amplier.
Wireless BT Operation Instructions
External devices with a built-in Wireless BT feature can be connected to this
amplier wirelessly to play through the amplier’s speakers.
1. First, ensure that the amplier is powered on and the volume is turned to the
minimum position. It’s recommended to extend the Wireless BT antenna on
the back panel for better reception.
2. Press the BT/Line button on the front panel. You will hear “POWER ON”
followed by “PAIRING,” indicating that the unit is ready to pair with your
external device.
3. Turn on the Wireless BT feature of your external device (such as a smartphone
or computer).
4. Search for available Wireless BT devices within range and select “PYLEUSA”
from the list.
5. After a few seconds, you will hear “Your Device is Connected,” conrming
successful pairing.
6. You can now play music on your external device, and it will stream through
the amplier.
11 12 13 14 15 16
1 2 3 4
567
10 9 8
www.PyleUSA.com6 www.PyleUSA.com 7
5. Power On/O Switch
6. MASTER (L & R) Volume Control: Separate left and right channel volume
control, which does not aect the microphone volume.
7. TREBLE/BASS Controls: Adjusts bass and treble for desired sound
enhancement.
8. ECHO Control: Adjusts the microphone echo level.
9. LINE Control: Adjusts the LINE input level.
10. AUDIO Control: Adjusts the input level for BT/USB/SD/AUX/FM sources.
11. Power Plug: Connects to AC 110V/60Hz or AC 230V/50Hz outlets.
12. Voltage Selector: Switches between 110V/60Hz and 230V/50Hz power
settings.
13. Speaker Output (Push-Type Speaker Terminal): Easily connect speaker
wires to the amplier. Supports speaker impedance from 4-8 ohms for
stereo output, with a minimum impedance of 4 ohms per channel in stereo
mode.
14. Subwoofer RCA Output Jack
15. LINE RCA Stereo Audio Input
16. AM/FM Antenna
Aux (3.5mm) Input Connection & Operation
Once the unit is powered on, any device connected to the 3.5mm AUX jack via
an audio connection cable will play automatically. When the wall plate detects
audio input via the AUX connection, it will override any Bluetooth-connected
audio transmission.
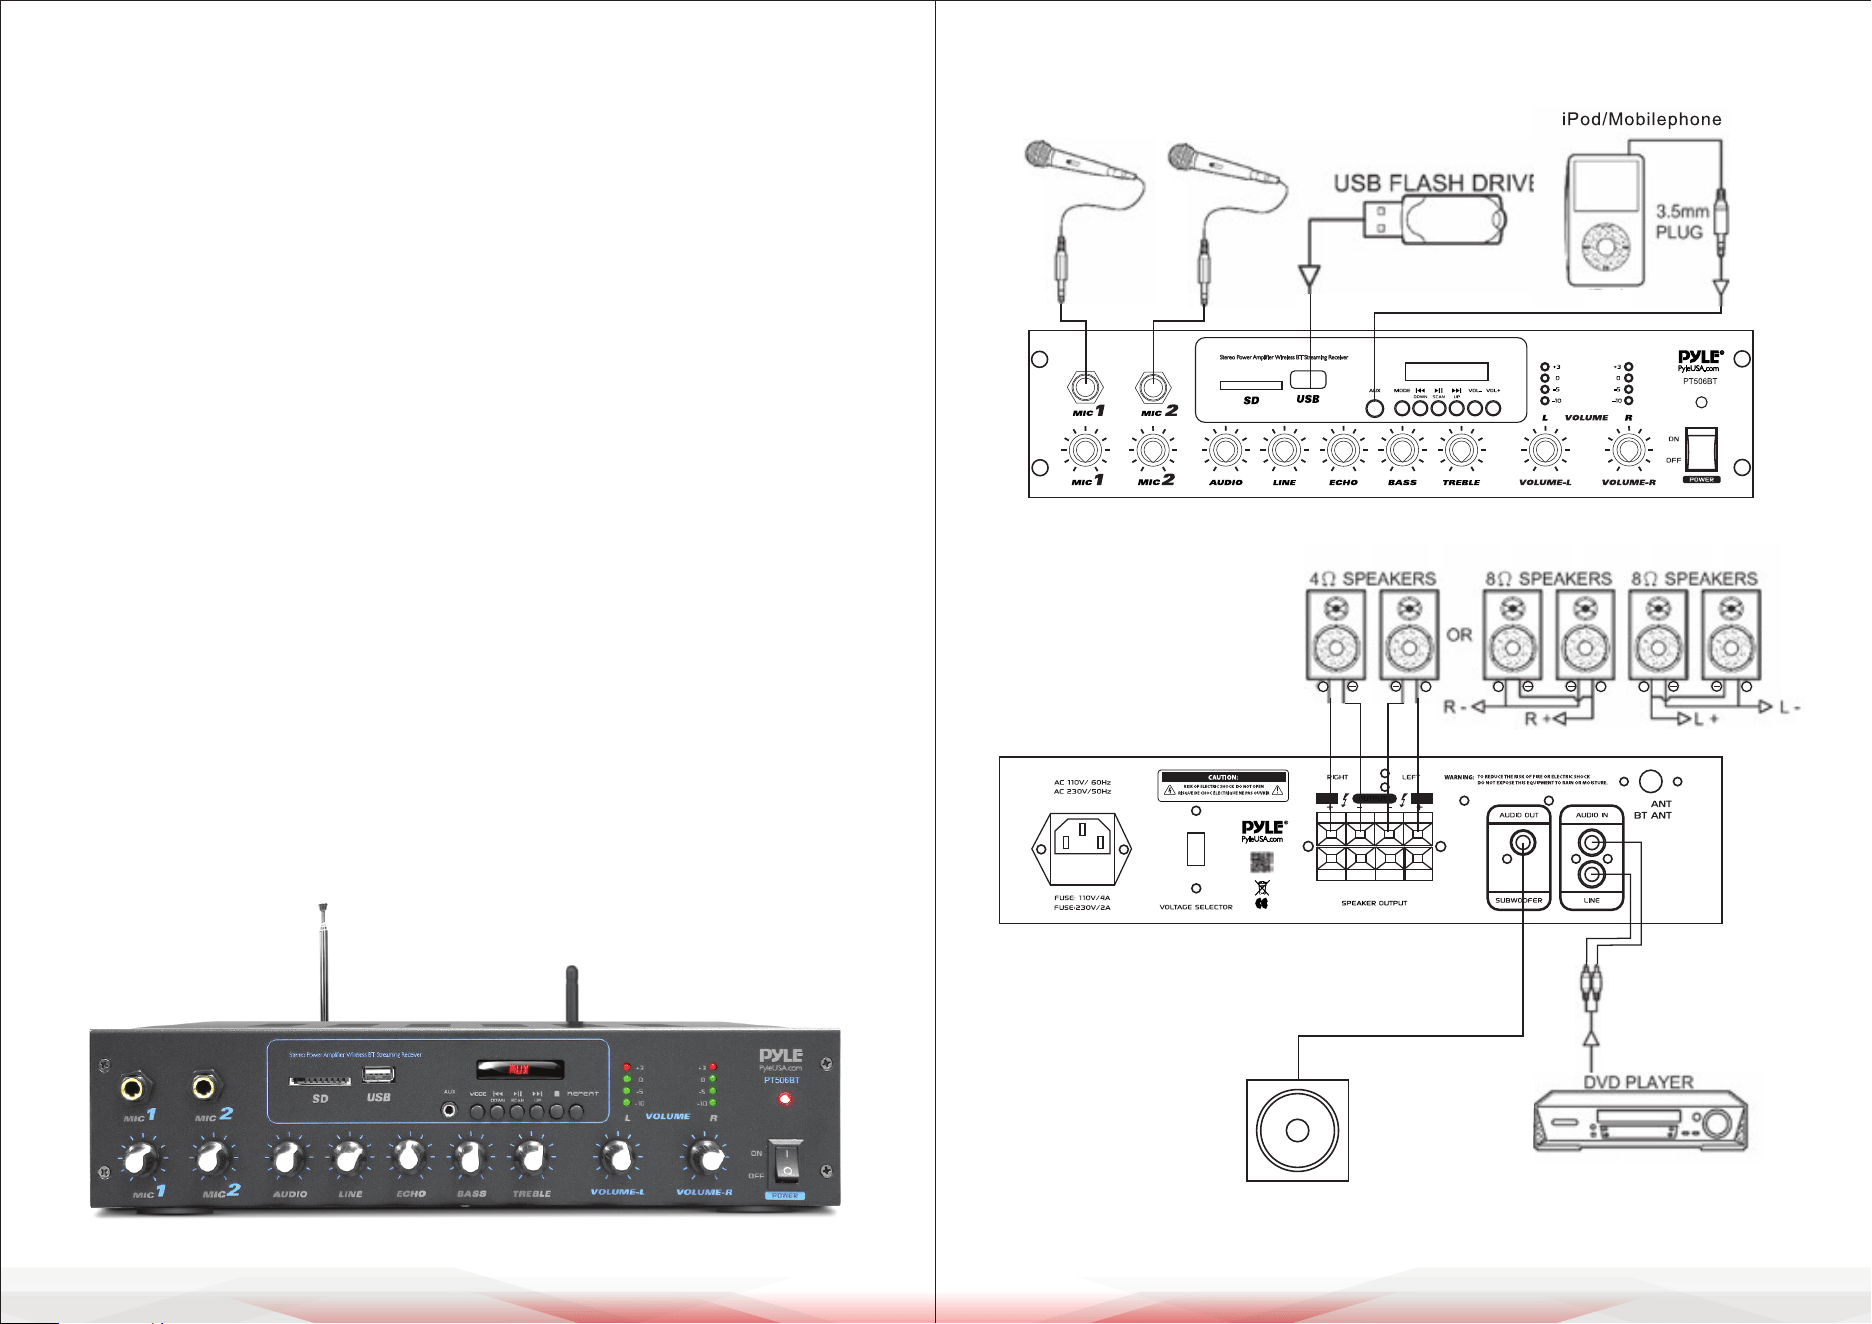
Connection Diagram
FM
+ + + ++ +
SUBWOOFER

www.PyleUSA.com8 www.PyleUSA.com 9
FCC INFORMATION
WARNING:
Changes or modications not expressly approved by the party responsible for compliance
could void the user’s authority to operate the equipment.
NOTE:
This equipment has been tested and found to comply with the limits for a Class B
digital device, pursuant to Part 15 of the FCC Rules. These limits are designed to provide
reasonable protection against harmful interference in a residential installation.
This unit generates, uses, and can radiate radio frequency energy, and if not installed
and used in accordance with the instructions, may cause harmful interference to radio
communications. However, there is no guarantee that interference will not occur in a
particular installation. If this equipment does cause harmful interference to radio or
television reception, which can be determined by turning the equipment o and on,
the user is encouraged to try and correct the interference by one or more of the
following measures:
• Reorient or relocate the receiving antenna.
• Increase the separation between the equipment and receiver.
• Connect the equipment to an outlet on a circuit dierent from that to which the
receiver is connected.
• Consult the dealer or an experienced radio/TV technician for help.
This device complies with Part 15 of the FCC Rules. Operation is subject to the
following two conditions:
1. This device may not cause harmful interference.
2. This device must accept any interference received, including interference that may
cause undesired operation.
Help & Troubleshooting
If you experience any of the following issues while using the unit, use this
troubleshooting guide to resolve the problem. If the issue persists, consult your
nearest dealer.
Problem Possible Cause & Solution
No Power
No Sound
Microphone
No Sound
Severe Hum or Noise
• Ensure the power cord is securely connected.
• Test the outlet by plugging in a different device to
verify it’s working.
• Ensure the correct input is selected on the
amplier.
• Make sure the Music Master Volume control is not
set to minimum.
• Check if the fuse is defective.
• Inspect the speaker cables and speakers to ensure
they are properly connected and functioning.
• Conrm the microphone is turned on.
• Ensure the microphone cable is securely
connected and functioning.
• Check that the microphone volume for tha
channel is not set to minimum.
• Test the microphone to conrm it is working
properly.
• Ensure all cables and wires are securely connected.
• Test a different source device to see if the noise
persists. If it doesn’t, the issue may be with the
original device.
• Try connecting the device to a different input on
the amplier.
• Lower the volume to prevent distortion in the
loudspeakers.
Register Product
Thank you for choosing PyleUSA. By registering your product,
you ensure that you receive the full benets of our exclusive
warranty and personalized customer support.
Complete the form to access expert support and to keep your
PyleUSA purchase in perfect condition.
Start Here
Model Number:
PT506BT
PyleUSA.com/pages/register