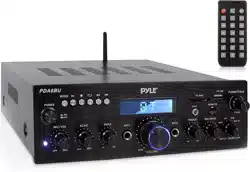
User Manual Bluetooth Stereo Amplifier/Receiver
PDA6BU FRONT & BACK PANEL
1. USB / SD Card/Bluetooth Control Console: After inserting a USB flash drive / SD Card into the input terminal, be sure to set the input selector (13) to USB/SD, then press the mode button to choose between audio from the USB Port, SD Card input, Bluetooth or FM radio. If you want to use the Bluetooth, check the below steps.
STEPS FOR CONNECTING WITH BLUETOOTH DEVICE
A. Press MODE button under the ID3 display screen and enter into bluetooth mode.
B. Search on the bluetooth device and you can find the bluetooth name “ PDA6BU” C. Select the PDA6BU bluetooth name and wait for the device to pair. The screen will display “SEARCHING”.
D. The PDA6BU will make a noise confirming that the devices have successfully paired and screen will display “BLUETOOTH CONNECTED”
E. Once paired you can play music from your bluetooth device. You can also use the control buttons on the unit to select the tracks from your bluetooth device
Use the other controls, play/pause, stop, repeat (ALL / NORMAL / SINGLE / FOLDER / RANDOM / BROWSE), previous track & next track to play audio from the USB flash drive / SD Card or bluetooth.
****NOTE: The USB input is ONLY mean to connect to a USB flash drive (thumb drive). Connecting a MP3 player or computer directly to the USB flash drive input will result in the unit failing to play the audio from those devices.****
2. USB / SD Card Control Console Display Screen
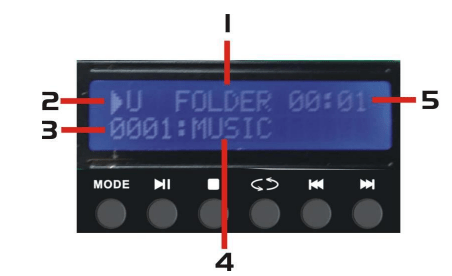
(1) Search mode: When the word FOLDER is flashing on the screen, the unit is in FOLDER SEARCHING mode. Turn the FOLDER/TRACK knob to search through the folder. Press the FOLDER / TRACK knob to choose a track. Upon exiting the folder mode, the word ALL will appear on the screen. This indicates that the unit will play all the tracks from the USB flash drive / SD Card. When the REPEAT button is pressed, there will be 6 different displays depending on the setting you choose; ALL / NORMAL / SINGLE / FOLDER / RANDOM / BROWSE.
(2) Input Source: The display will show U when set to USB mode and S when set to SD card mode. Press the mode button to switch from one input to the other.
(3) Track Number: The track number (for all tracks on the entire flash drive) will appear here. In the picture above the unit is playing track number 1.
(4) Track or Folder Information: The name of the folder will appear here. In the picture above the folder being played is named MUSIC.
(5) Elapsed Time: The elapsed time of the current track will display here.
3. Track / Folder Searching Knob:
- * Turn this knob clockwise to search through all of the tracks inside the USB flash drive / SD Card. Each track will appear by the name of the track. It will show the tracks or folders chronologically (from when the files were loaded onto the USB flash drive / SD Card. Press the knob to begin playing the desired track. First the tracks on the root file will be displayed and then the tracks that are in folders.
- * Press this knob to activate the folder searching function. Once pressed the word “ FOLDER” will begin flashing on the display screen. Then, turn this knob clockwise to search the folders inside the USB flash drive / SD Card. Press the knob to begin playing the tracks from that folder.
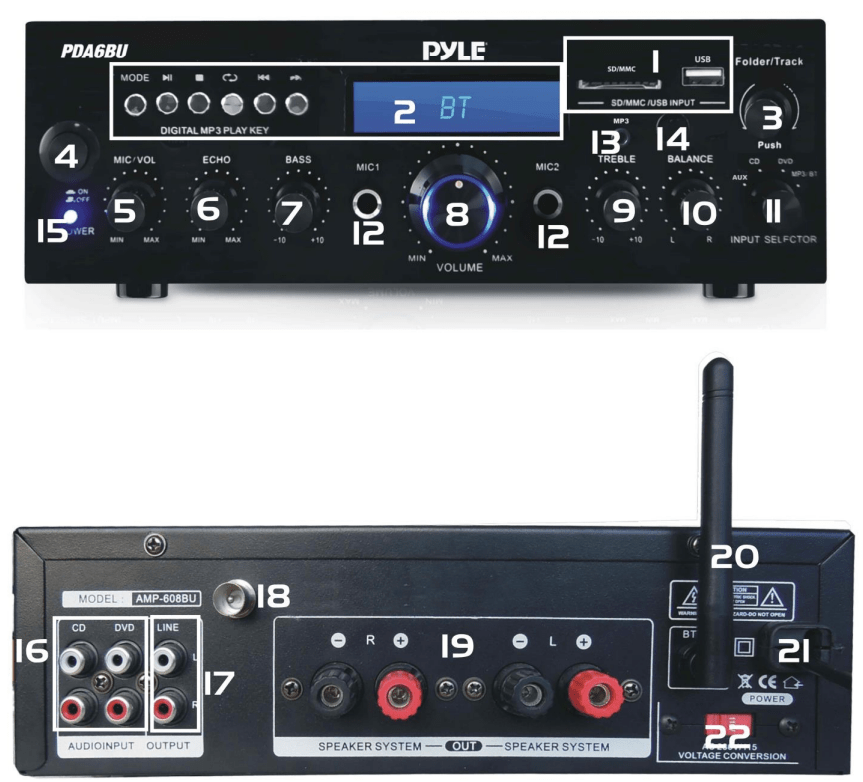
1. SD Card Reader/USB Port: for using external media on this device, just plug your SD/USB into these ports.
2. LCD Screen: all information regarding external media or this device will be displayed from this screen
3. Folder and track selection
4. Power Button: Press this button to power the unit on and off.
5. Microphone Volume Control Knob: Turn this knob to adjust the volume of microphone
6. Microphone Echo Volume Control Knob: Turn this knob to adjust the microphone echo volume level.
7. Bass Control: Turn this knob to adjust the low frequencies of Channel 1 & Channel 2.
8. Master Volume Fader- Move the fader up and down to adjust the master volume.
9. Treble Control: Turn this knob to adjust the high frequencies of Channel 1 & Channel 2.
10. Balance: Control the volume balance from left to right.
11. Input Selector: Turn this button to choose the favorable input
12. MICROPHONE INPUTS: KARAOKE or EXTERNAL MIC connects to these jacks.
13. IPOD/MP3 JACK-IPOD/MP3 connects to this jack.
14. REMOTE RECEIVER: To receive the remote control signal
15. POWER LED INDICATOR: When you turn on the unit, the LED will be on.
16. AUDIO INPUT: Connect the audio output jacks of DVD/CD, to these jacks.
17. LINE OUTPUT: Connect the RECORD input jacks to these jacks.
18. FM ANTENNA CONNECTOR: Connect for AM and FM antennas.
19. SPEAKER OUTPUT: Connect your speaker system to these terminals.
20. BLUETOOTH ANTENNA: Pease pull the antenna out when using Bluetooth input
21. POWER SUPPLY: Connect to AC 11 OV/60Hz & 220V/50Hz outlet.
22. POWER VOLTAGE SELECTOR: 110V/220V
REMOTE CONTROL
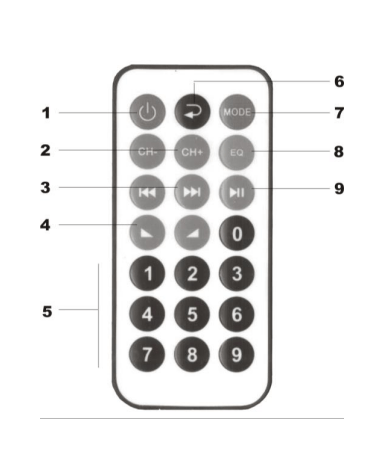
1. Press this button to turn on the MP3
2. When in FM mode, press this two buttons to select Previous or next station
3. Press these two buttons to select the previous Or next track in USB or SD or Bluetooth mode
4. Volume up or down
5. Press the numbers to select the tracks directly. The Unit takes 1-2 seconds to response
6. Press this button to select the different repeat mode. If press this button for more than 3 seconds, it will Go to FOLDER searching
7. Press this button to select the playing mode, such as USB/SD/FM/BLUETOOTH
8. EQ function, if the mp3 with EQ
9. Play and pause function for MP3
Main Features:
- * MAX Power Output: 200 Watt @ 4 Ohm
- *RMS Power Output: 100 Watt x 2 @ 8 Ohm
- * Bluetooth/USB/SD/FM player
- * Independent Knob for Folder / Track searching
- * Dual Microphone inputs (2 x ¼” Microphone Input Connector Jacks)
- * Independent Microphone Volume Control
- * Bass / Treble Controls
- * Balance Volume Control
- * LCD Digital screen to display media information (track / folder)
- * “Repeat and Random” Audio File Functions
- * 40’ + Bluetooth Wireless Range
- * Frequency Response/Adjustment: 20Hz - 20KHz (+/-10dB)
- *Tone Control: Bass, f=100Hz +/-8dB
- * T.H.D: 71dB
- * Power supply: 110/230V | Switchable
- * Dimension(WxDxH): 9.8” x 9.8” x 3.9
TROUBLESHOOTING
If you experience any of the following difficulties while using the unit,use this trouble shooting guide to help you remedy the problem,should any problem persist, consult your nearest dealer.
| PROBLEM |
POSSIBLE CAUSE
|
No power
|
- The ac power cord Is disconnected
- poor connection at the wall socket or the wall socket Is Inactive
|
No sound
|
- The speakers and components owe disconnected
- Make sure you select the correct component on the unit
- Volume control at lowest level
- Speakerwlre short or open
|
One master speaker NO sound
|
- Bad or incorrect speakers connections
- Balance not In canter
- Speaker wire short or open
|
Bad sound
|
- The place is unfit for the speakers
- Bad or incorrect speakers connections
- Treble and bass control are too low
|
Microphone no sound
|
- Microphone volume Is too low
- Microphone not turn on
- Microphone wire short or open
|
Severe hum or noise Is heard
|
- Check that the speakersand components are connected securely
- The plugs and jacks are dirty
|
Frequently Asked Questions
1. This amp + 2 jbl arena 130s. anyone have an answer as to why the distortion is quite bad at around 45-50% volume?
- Most amplifiers with a 1 volt signal coming in the input will max out around 50 % on the volume control. After the amp is maxed, the sound will be distorted. Known as clipping. The extra control on your volume is fir a weaker signal in the input.
2. Can i connect this via bluetooth to my pyle 6.5’ bluetooth speakers?
- No, this is a Bluetooth receiver, not a transmitter. It can only receive from your other Bluetooth devices that deliver audio.
3. Does the mode button on the remote change the input?
- The remote only changes the input from FM, Bluetooth, or MP3. The lower right switch, is a manual switch to select Aux (auxiliary input on the front panel), CD, DVD (phono plugs on the back panel), or what they call MP3 (which is all of: FM, bluetooth & MP3 (SD card / USB))
4. Where is the power cord located and what are the over-all dimensions ?
- Is this some kinda game we're playing? If I remember correctly, the power supply was in the rear right - hand corner of the unit, when viewed face-on. the power cord is on the back apron in the same corner. I don't have the unit anymore, but the dimensions were approximately 12 in W x 8 in D x 3.5 in H. When my unit quit working, the blue "power on" LED did not light up, but the LCD display did. No audio.
5. Does this stereo come with an antenna or do I need to buy one
- It comes with an attached bluetooth antenna, but it is pretty useless. Sent mine back within 24 hours because Bluetooth, even with the antenna, was crappy.
6. Why is my Pyle speaker not connecting to Bluetooth?
You may have to unpair the speaker, then re-pair to your device.
- Make sure the Bluetooth Speaker is turned ON before beginning the pairing process.
7. How do I reset my Pyle Bluetooth speaker?
- First, remove all the paired devices from the speaker. Then, press and hold the Bluetooth button and the power button simultaneously for more than three seconds to reset the speaker to factory settings.
8. Why is my speaker Bluetooth not working?
- If your Bluetooth devices won't connect, it's likely because the devices are out of range, or aren't in pairing mode. If you're having persistent Bluetooth connection problems, try resetting your devices, or having your phone or tablet "forget" the connection.
9. Why is my Bluetooth speaker not responding?
- Turn off your Bluetooth device, wait a few seconds, then turn it back on. Make sure your Bluetooth device is in range. If your Bluetooth device is unresponsive or sluggish, check to make sure it's not too close to any other USB device that's plugged into a USB 3.0 port.
10. How do I fix the Bluetooth pairing problem?
Step 1: Check Bluetooth basics
- Turn Bluetooth off and then on again. Learn how to turn Bluetooth on and off
- Confirm that your devices are paired and connected. Learn how to pair and connect via Bluetooth
- Restart your devices. Learn how to restart your Pixel phone or Nexus device.
11. Does the remote have a power switch?
- Only volume is managed by the remote. The other buttons don’t control anything, so I’m not sure why they’re there.
12. Do you pair this amp with an active or passive sub?
- Perhaps both. Mine is connected to a 1200 watt amp to power two 18″ subwoofers. The lows will undoubtedly sound great with an amp.
13. Do these 70.7vrms speakers work with this?
- No. This amplifier has a low impedance. This means that it is compatible with speakers with load impedances ranging from 4 to 16 Ohms. It is not a constant voltage amplifier capable of driving speakers powered by 70V or 100V.
14. Is the output of 200 watts rms?
- 200 Watts at 4 Ohms is the maximum power output, and 100 Watts x 2 at 8 Ohms is the RMS power output.
15. Is it possible to play different music on each channel if each set of speakers is in a different room?
- No. One “zone” with Left, Right, and Center is all there is.
WARNING!
CAUTION: TO REDUCE THE RISK OF ELECTRIC SHOCK, DO NOT REMOVE THE COVER OF THIS UNIT. THERE ARE NOUSER-SERVICEABLE PARTS INSIDE. REFER ALL SERVICING TO A QUALIFIED TECHNICIAN.
 This symbol is intended to alert the user to the presence of “dangerous” voltage within the product’s enclosure that may be of sufficient magnitude to constitute a risk of Electric shock. Users should exhibit extra safety when this symbol a appears in this instruction manual and follow all precautions as they are stated.
 The exclamation point symbol is intended to alert the user to the presence of important operating and maintenance (servicing) instructions in this manual.
- Read these instructions thoroughly before using this item.
- Keep these instructions for future reference.
- Heed all warnings.
- Follow all instructions.
- WARNING: To prevent fire or electric shock, do not expose this equipment to rain or moisture. Do not store or operate this product near any liquids.
- Clean only with a dry cloth.
- Do not store or operate this product near any heat sources such as radiators, heat registers, stoves, or other apparatuses (including amplifiers) that produce heat. 8-
- Do not defeat the safety purpose of the polarized or grounding-type plug. A polarized plug has two blades with one wider than the other. A grounding plug has two blades and a round grounding prong. The wide blade or third prong is provided for your safety. If the provided plug does not fit your outlet, consult an electrician for the replacement of the obsolete outlet.
- Protect the all wires connected to this unit from being walked on or pinched, particularly plugs and the point where they exit from the unit. When removing the cord from the power outlet, remove it by holding the plug not by pulling the cord.
- Unplug the unit during lighting storms or when unused for long periods of time.
- When wiring this unit and all other equipment used in connection to this unit make sure that all of your equipment is turned OFF.
- Once installation and wiring is complete power on all your equipment with the volume and level controls turned DOWN. Once All the equipment is ON slowly raise the volume or level controls to their proper positions.
- When grounding this unit, be sure to do so correctly, so as not to defeat the built-in grounding in this unit.
- Before placing, installing, rigging, or suspending any product, inspect all hardware, suspension, cabinets, transducers, brackets and associated equipment for damage. Any missing, corroded, deformed, or non-load rated component could significantly reduce the strength of the installation, placement or array. Any such condition severely reduces the safety of the installation and should be immediately corrected. Use only hardware which is rated for the loading conditions of the installation and any possible short-term, unexpected overloading. Never exceed the rating of the hardware or equipment.
- Consult a licensed, professional engineer regarding physical equipment installation. Ensure that all local, state and national Regulations regarding the safety and operation of equipment are understood and adhered to.
- Refer all servicing to qualified service personnel. Servicing is required when the apparatus has been damaged in any way, Such as power supply cord or plug is damaged, liquid has been spilled or objects have fallen into the apparatus, the apparatus Has been exposed to rain or moisture, does not operate normally, or has been dropped.