Creative Consumer Electronics
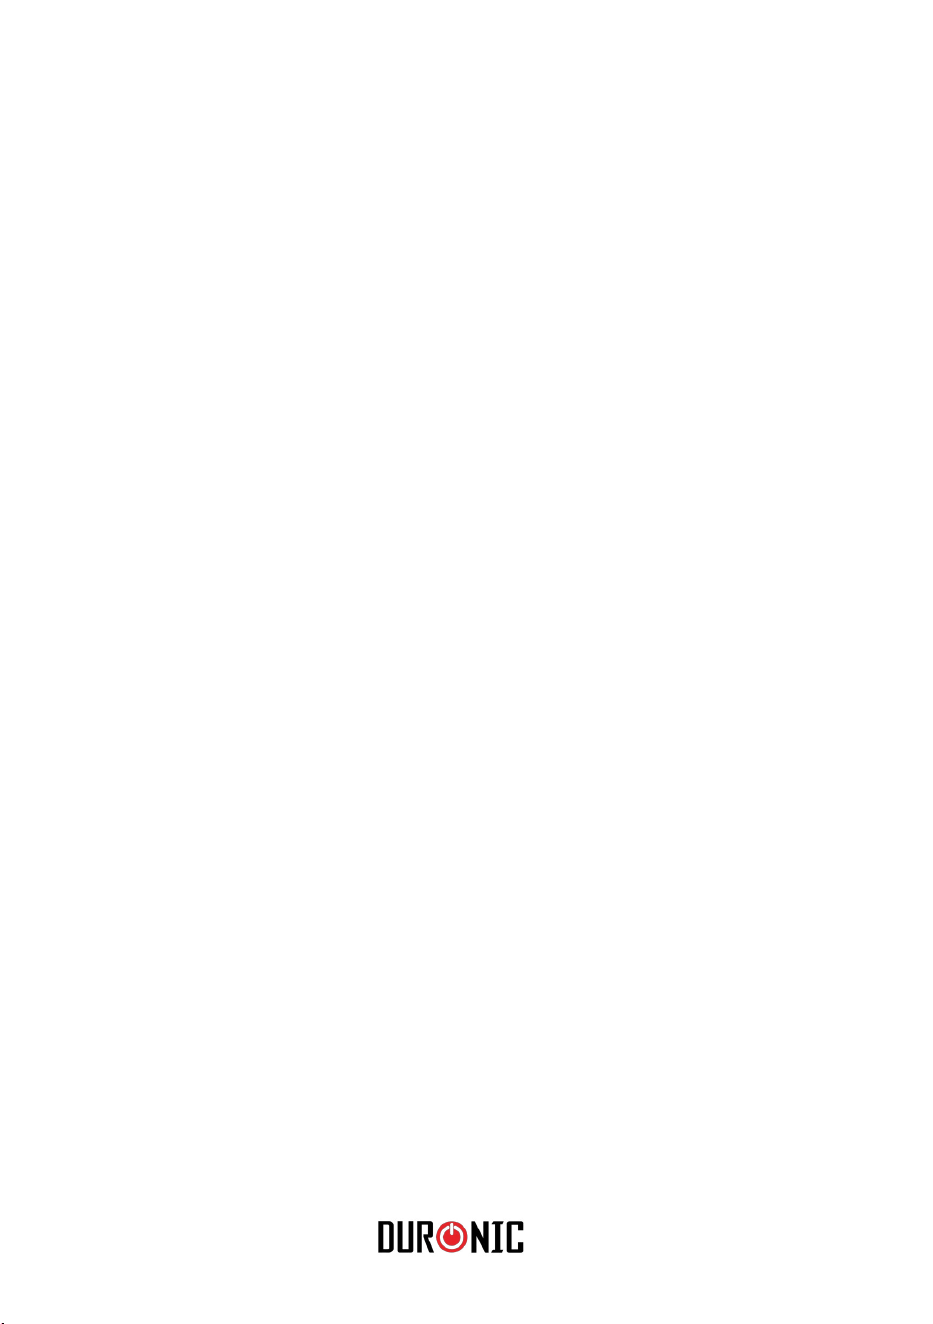
Mica Heater - HV051 / HV101
PLEASE READ ALL THE INSTRUCTIONS BEFORE USE

2
3
English Manual
Manuel d’utilisation en français
Gebrauchsanleitung auf Deutsch
Manual de Instrucciones en Español
Manuale D’istruzioni In Italiano
5
21
35
49
63
Contents
Instrukcja obsługi. Polski
78
Türkçe Kullanım Kılavuzu
93
Gebruikershandleiding Nederlands
107

4
5
English Manual

6

7
Contents
Features & Specications
I
ntroduction
Remove Packaging
Installation of Wheels
Operation
Important Safeguards
Cleaning, Storage & Warning
Trouble-shooting
8
9
10
11
12
14
16
17

8
Features & Specications
The Duronic HV101 and HV051 use a “Mica Heating Element” which is a
leading technology in heating. Our mode is not only oil free, but also offers
more than a standard oil heater. It heats up within a minute hence making it a
very cost effective heater. All our Mica heaters have easy carry handles and
wheels to make it a fantastic portable heater.
Full heat in 1 Minute
Three Power settings
Covering sensor (overheat protection) and Tip over protection
On/Off switch with light indicator
Temperature setting indicator
Comfortable zone
Anti -frost
Light weight
Quiet operation
No oil =No leakage
No dehumidifying
Power cord storage on front
Oil-Free Column Heater
Special Features
Specication
Item Power Voltage Rating Unit Size Unit Weight
HV101 2500W 220-240V,
50/60Hz
710(L)*232(W)*648(H )mm 6.1kg
HV051 1500W 220-240V,
50/60Hz
525(L)”232(W)”648(H)mm 4.8kg

9
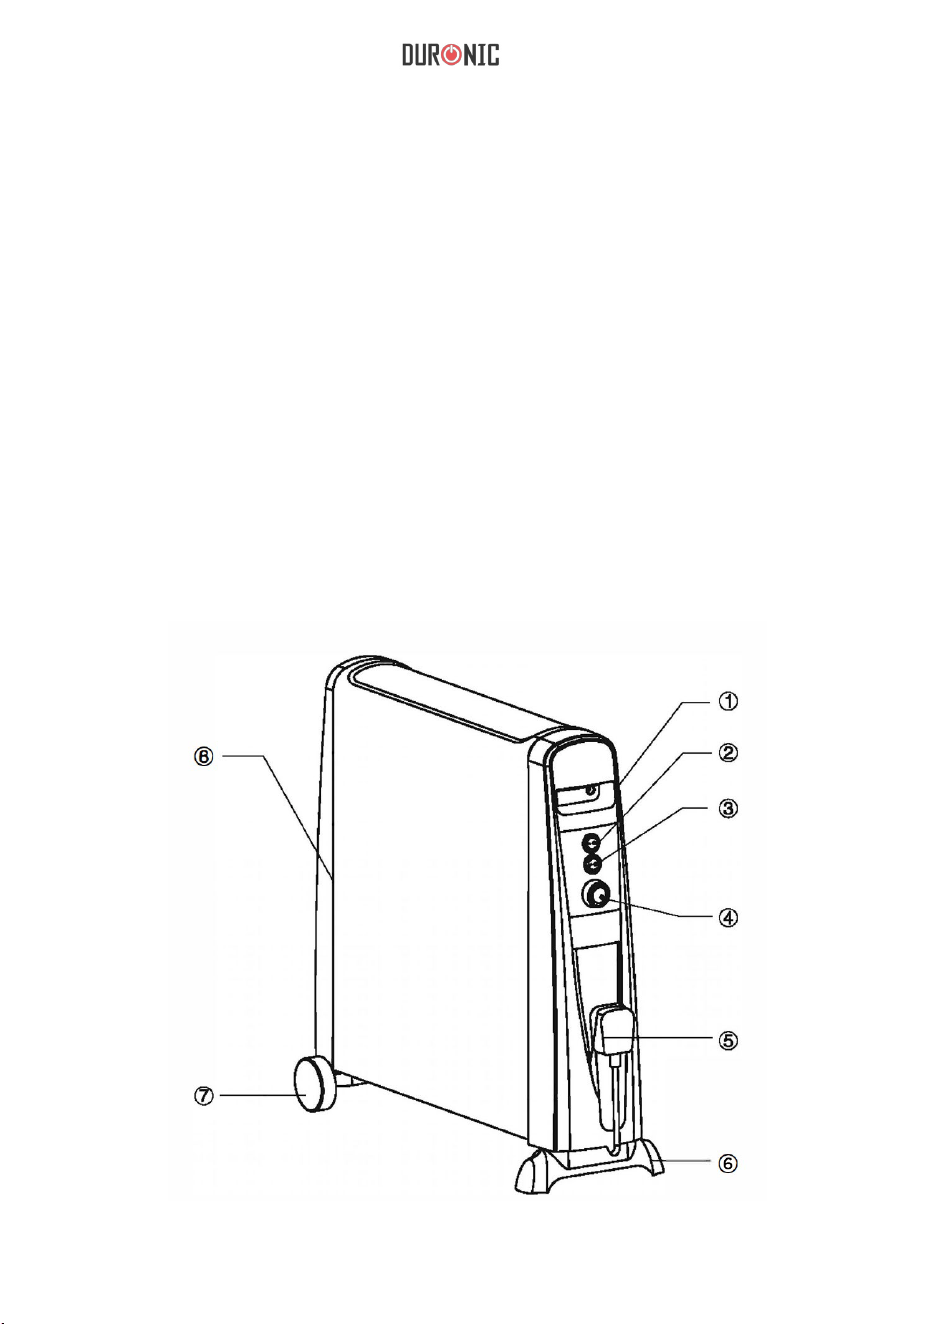
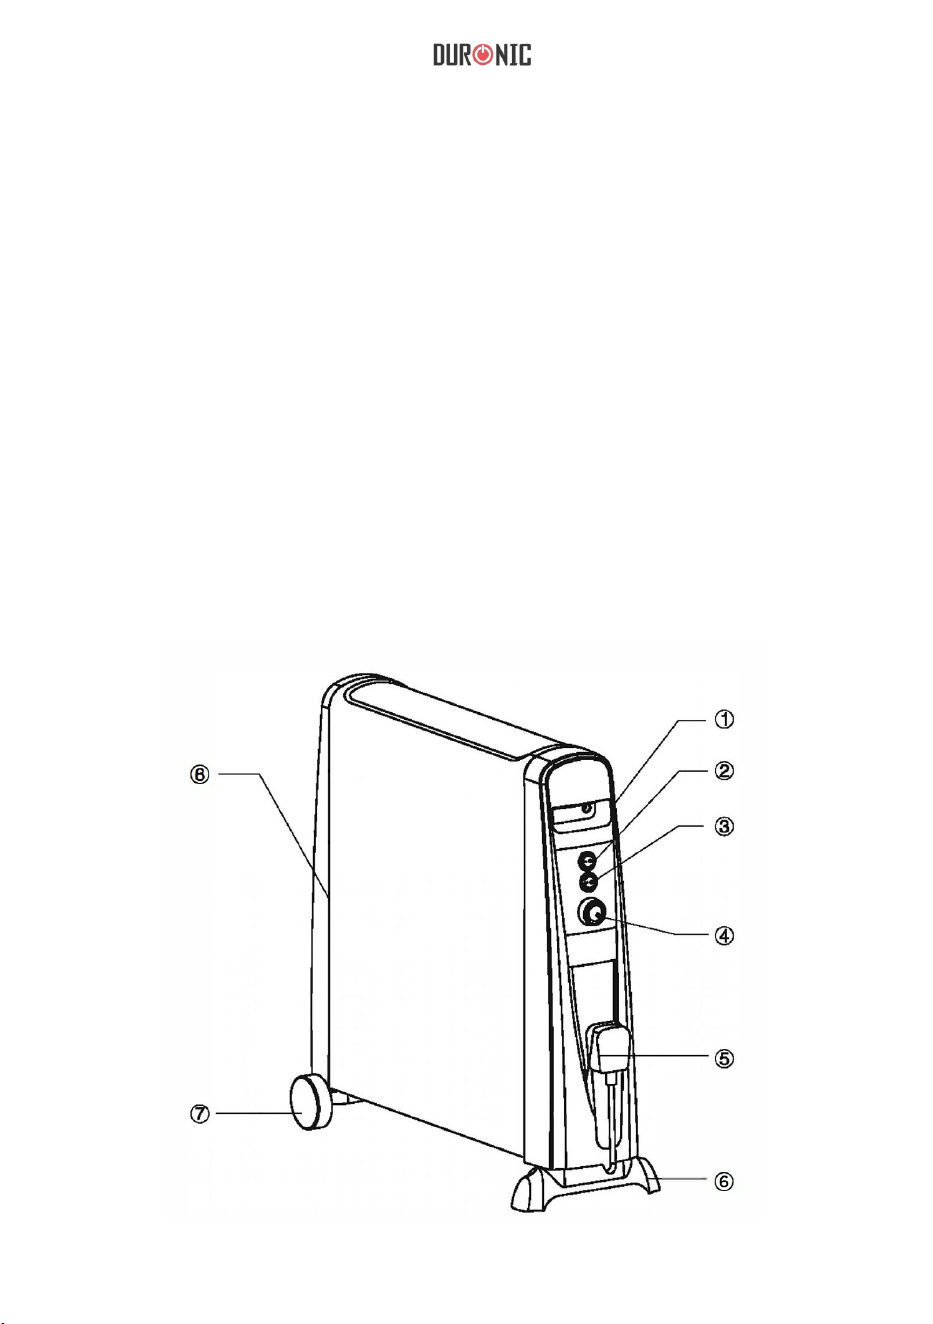
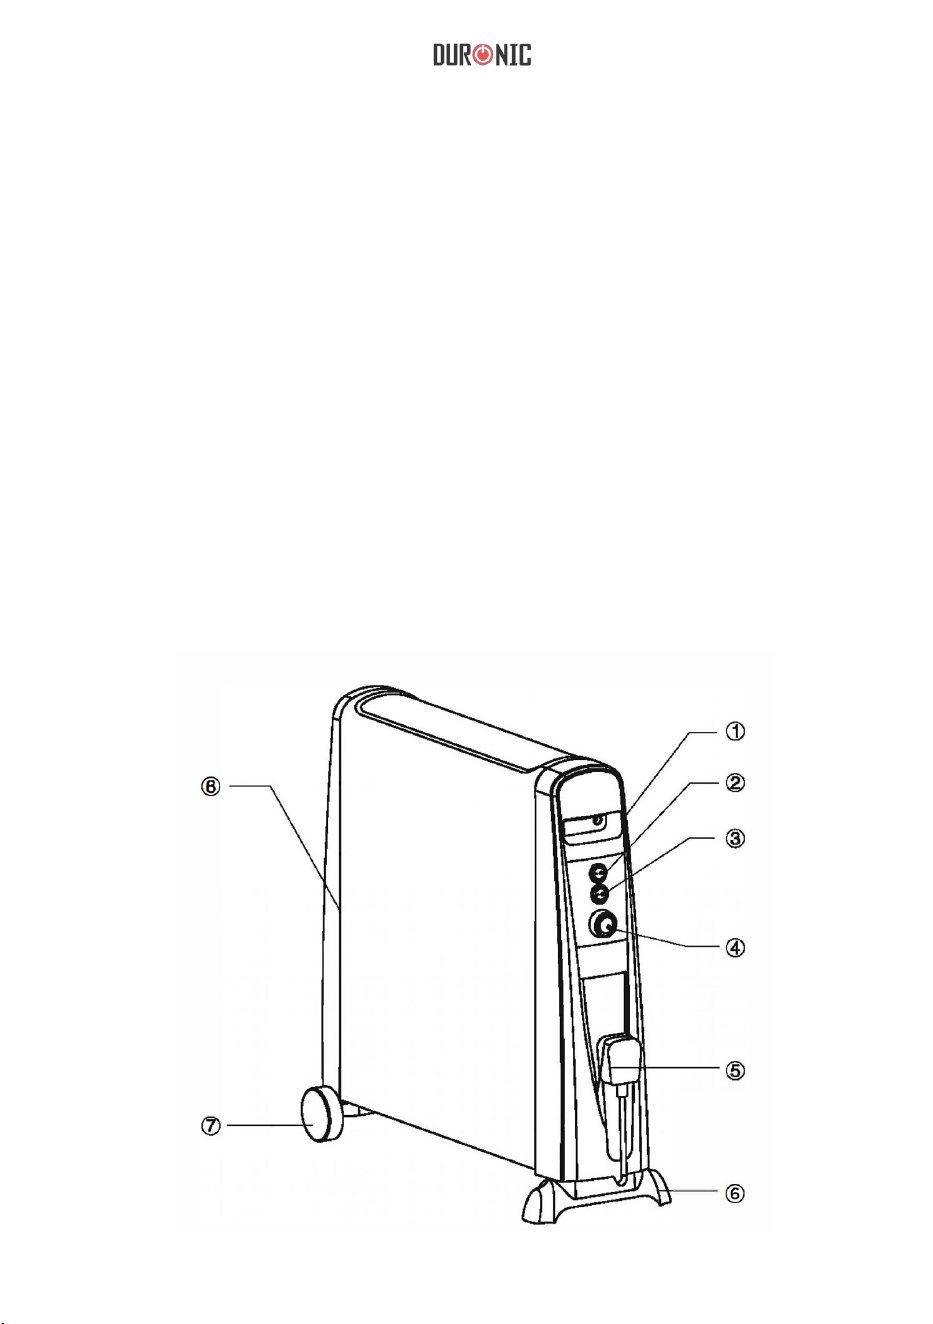
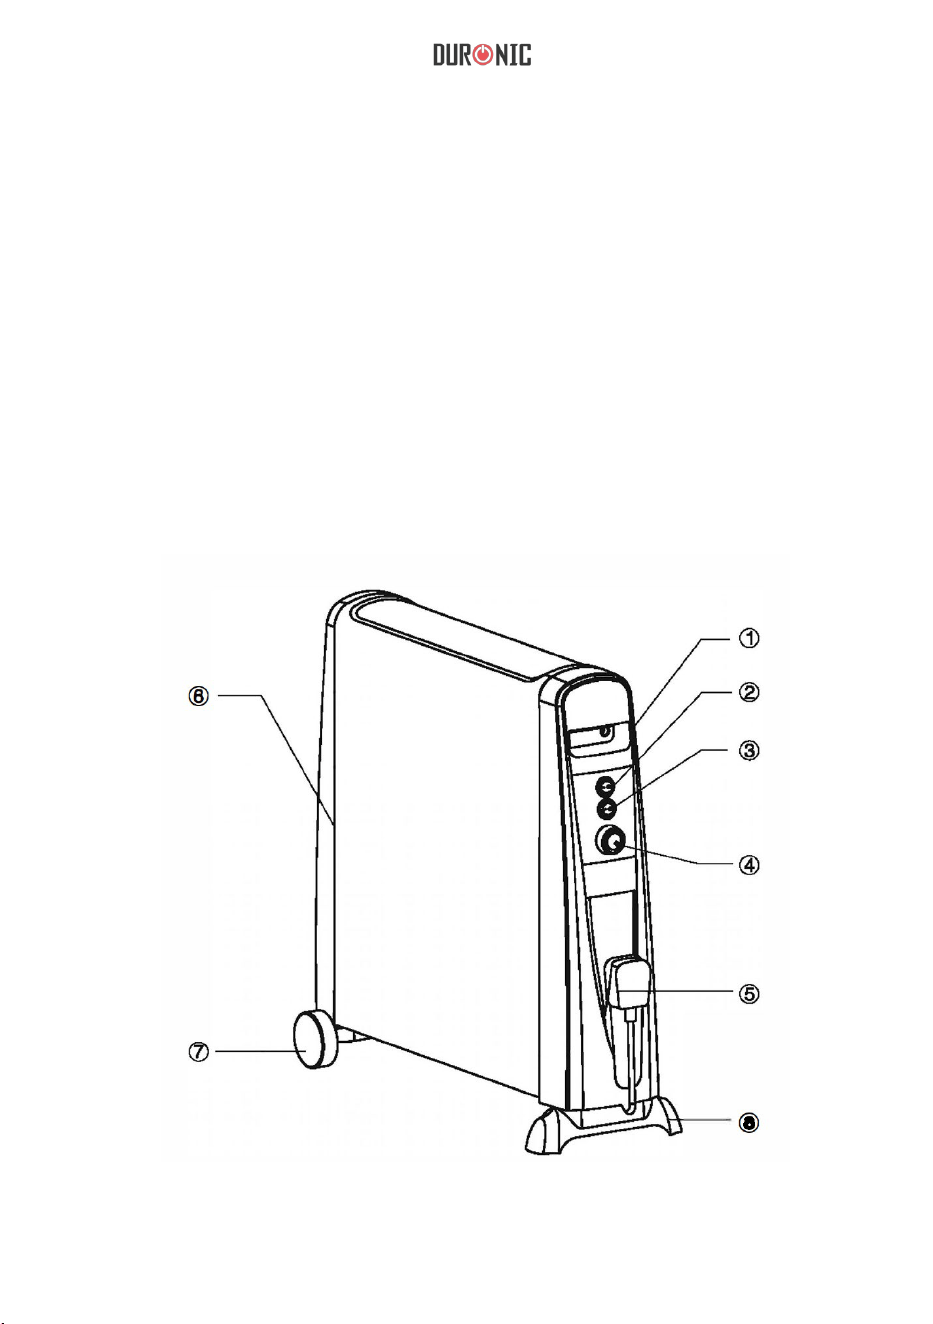
Unit Layout
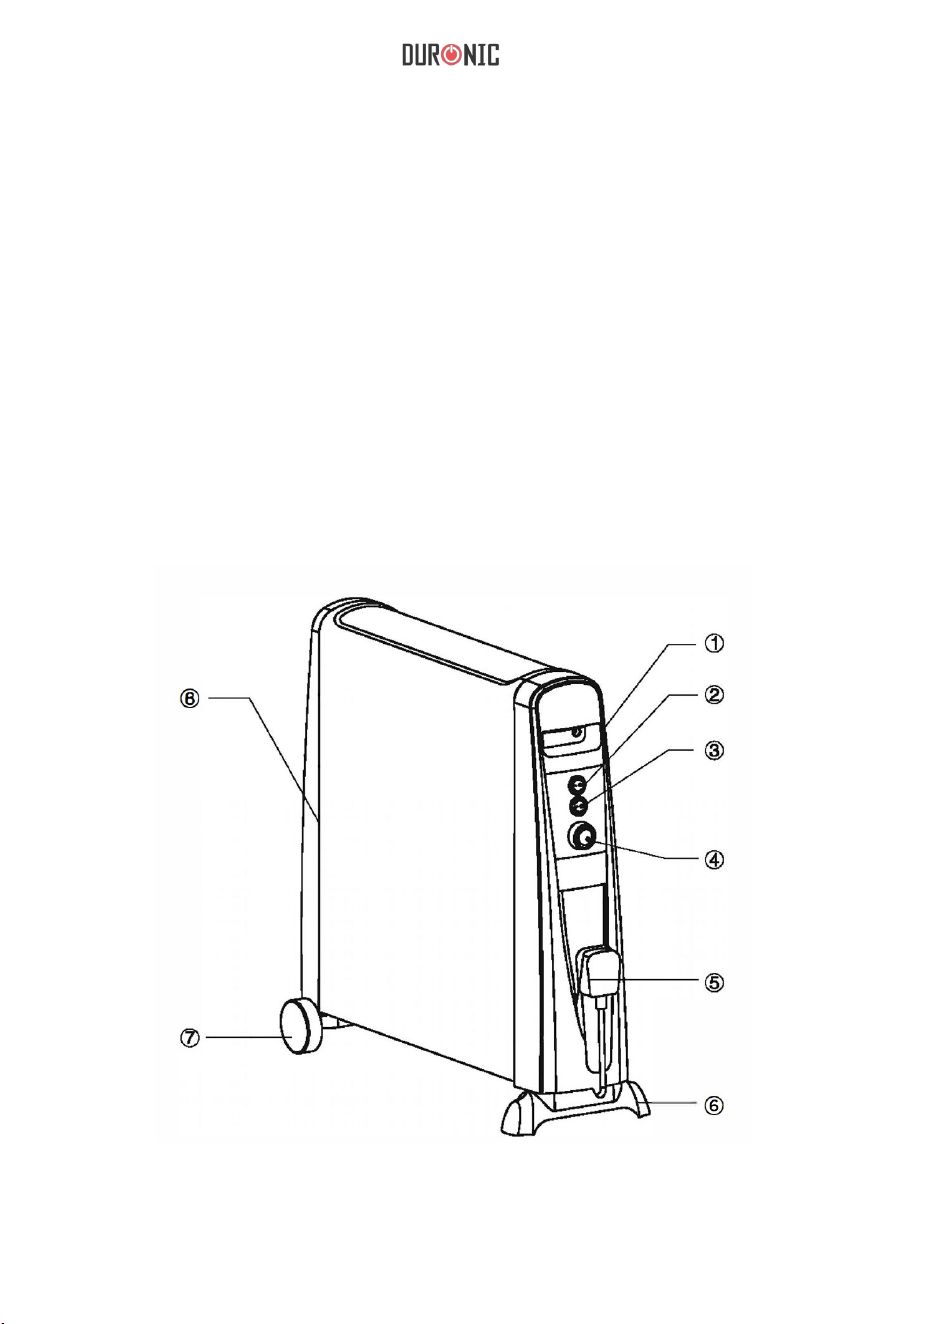
1. Built-in handle
2. I ON/OFF Switch
3. I I ON/OFF Switch
4. Temperature Control Knob
5. Storage location for cord
6.
Stand
7. Wheel
8. Right panel
10
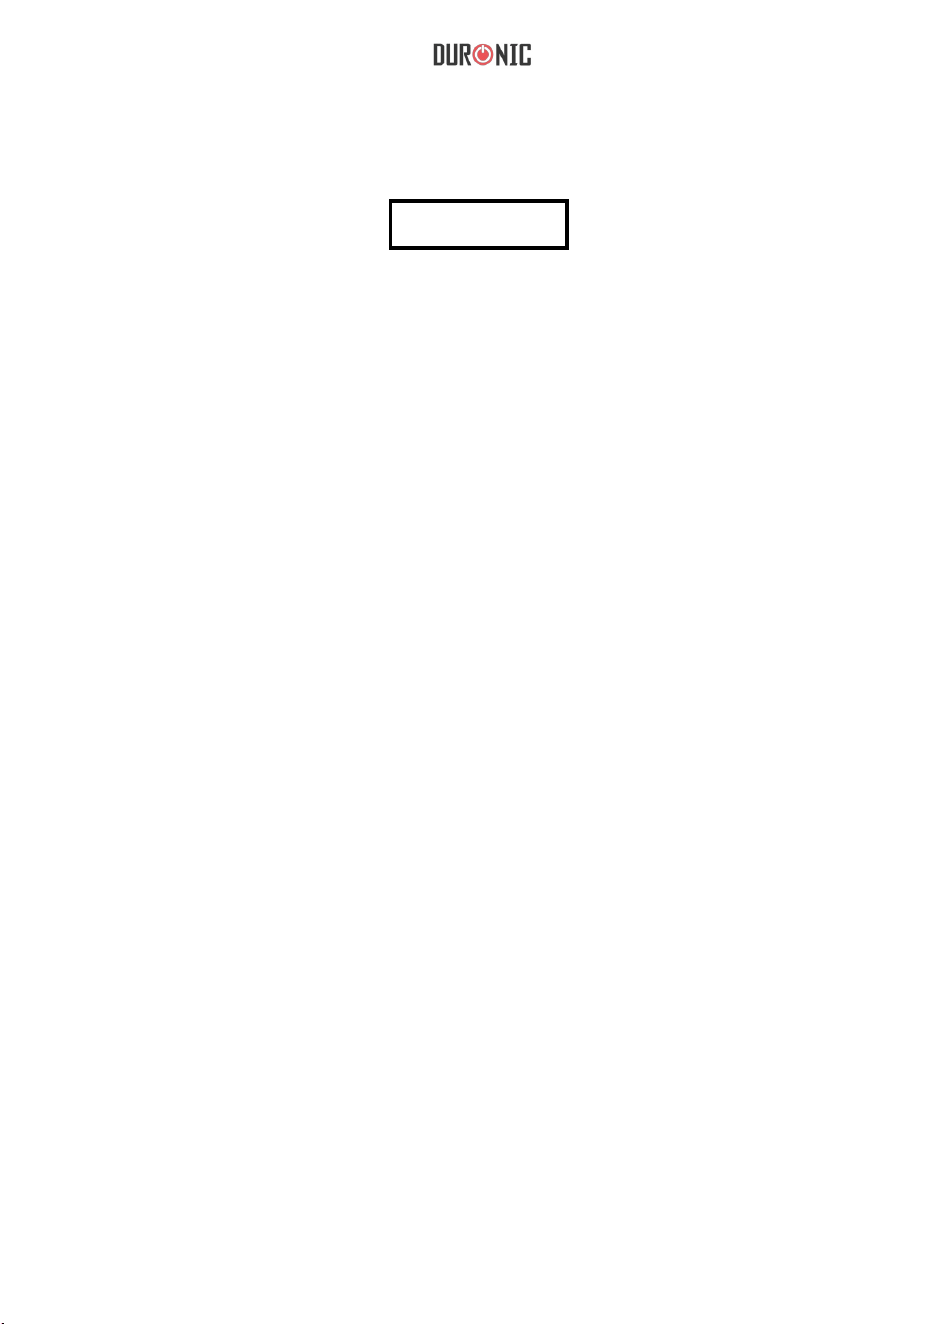
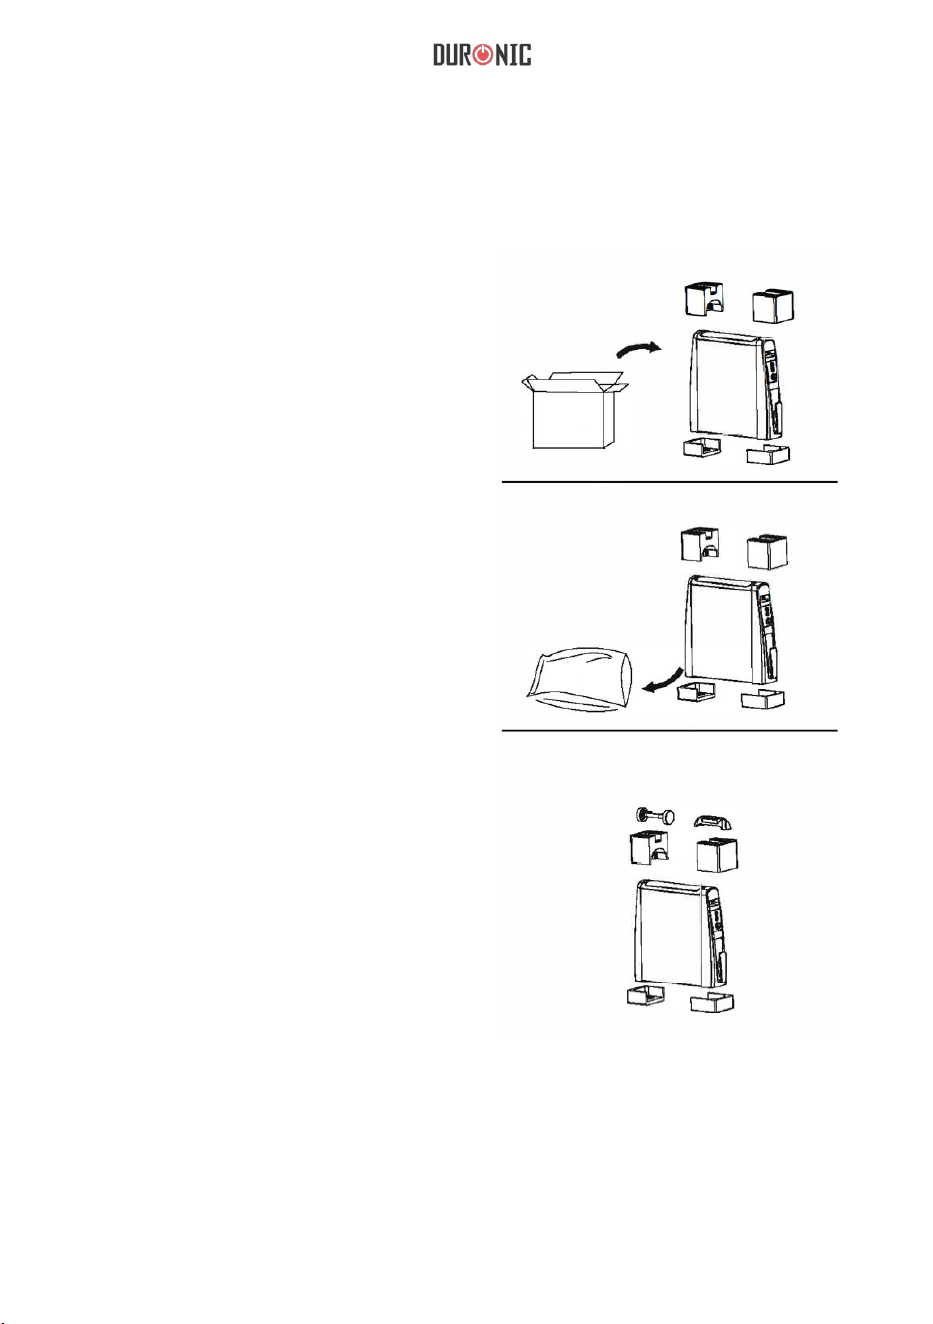
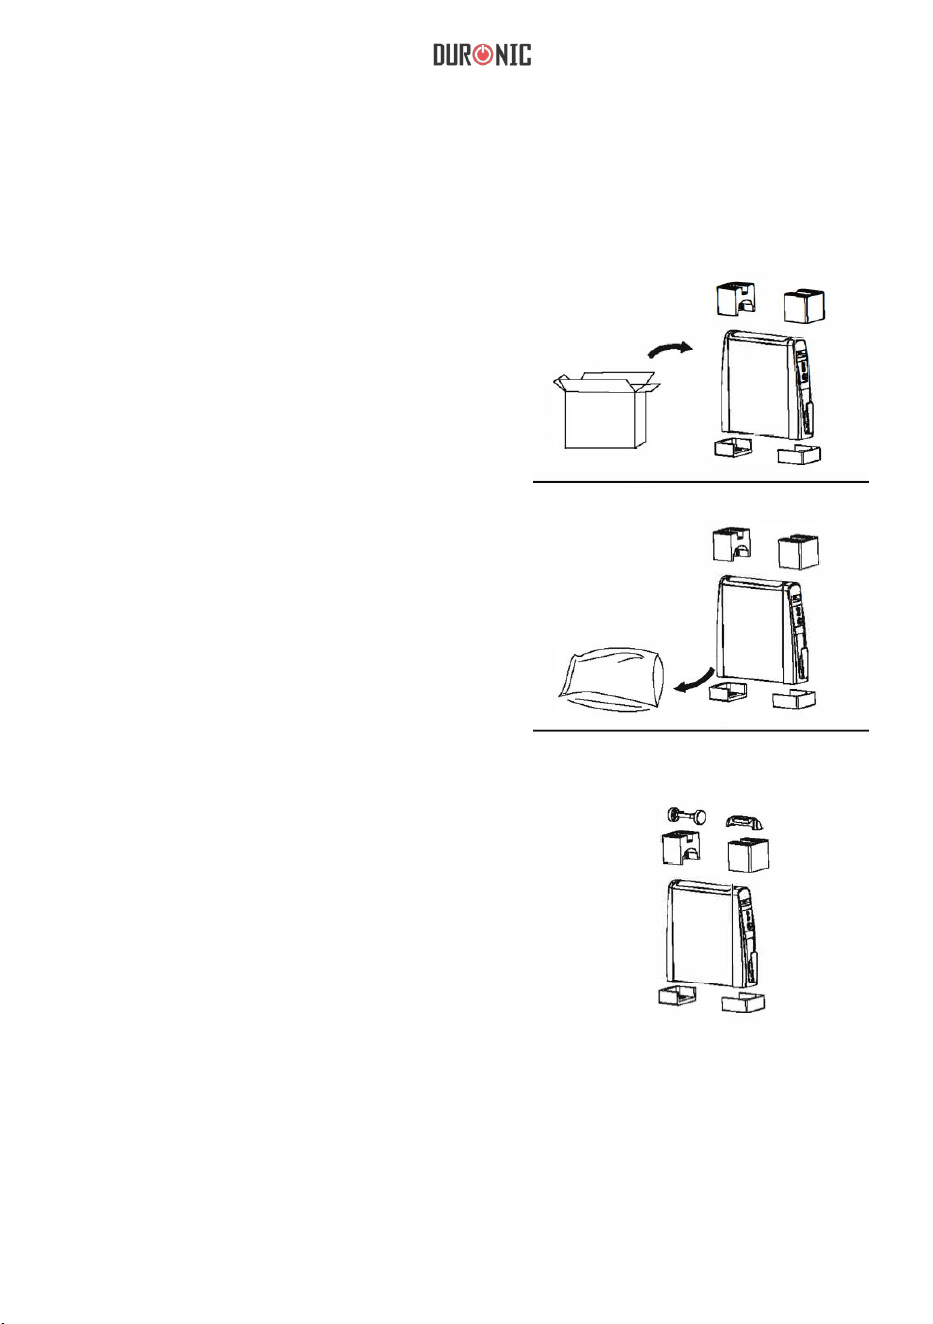
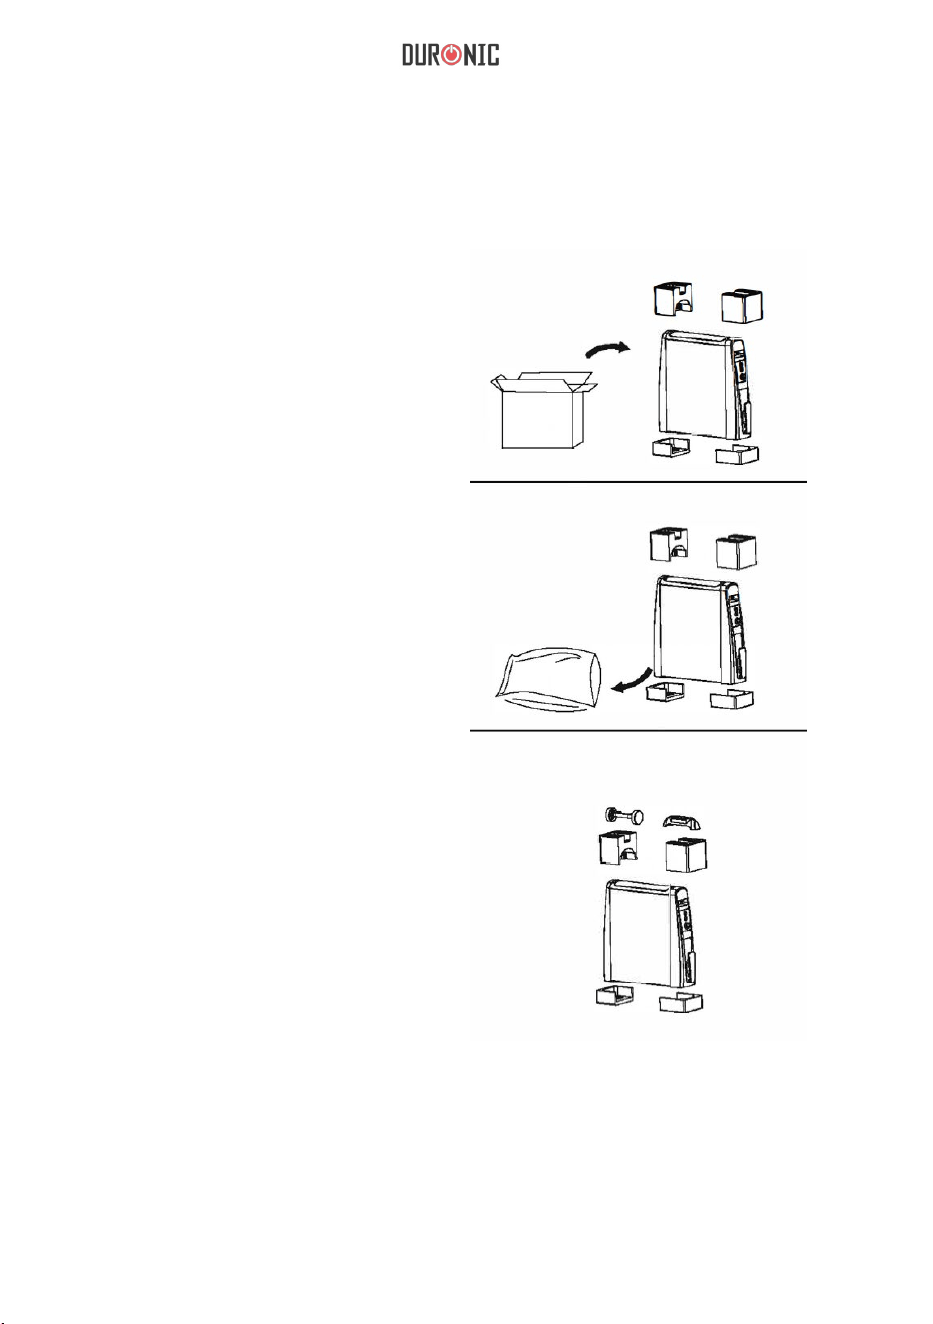
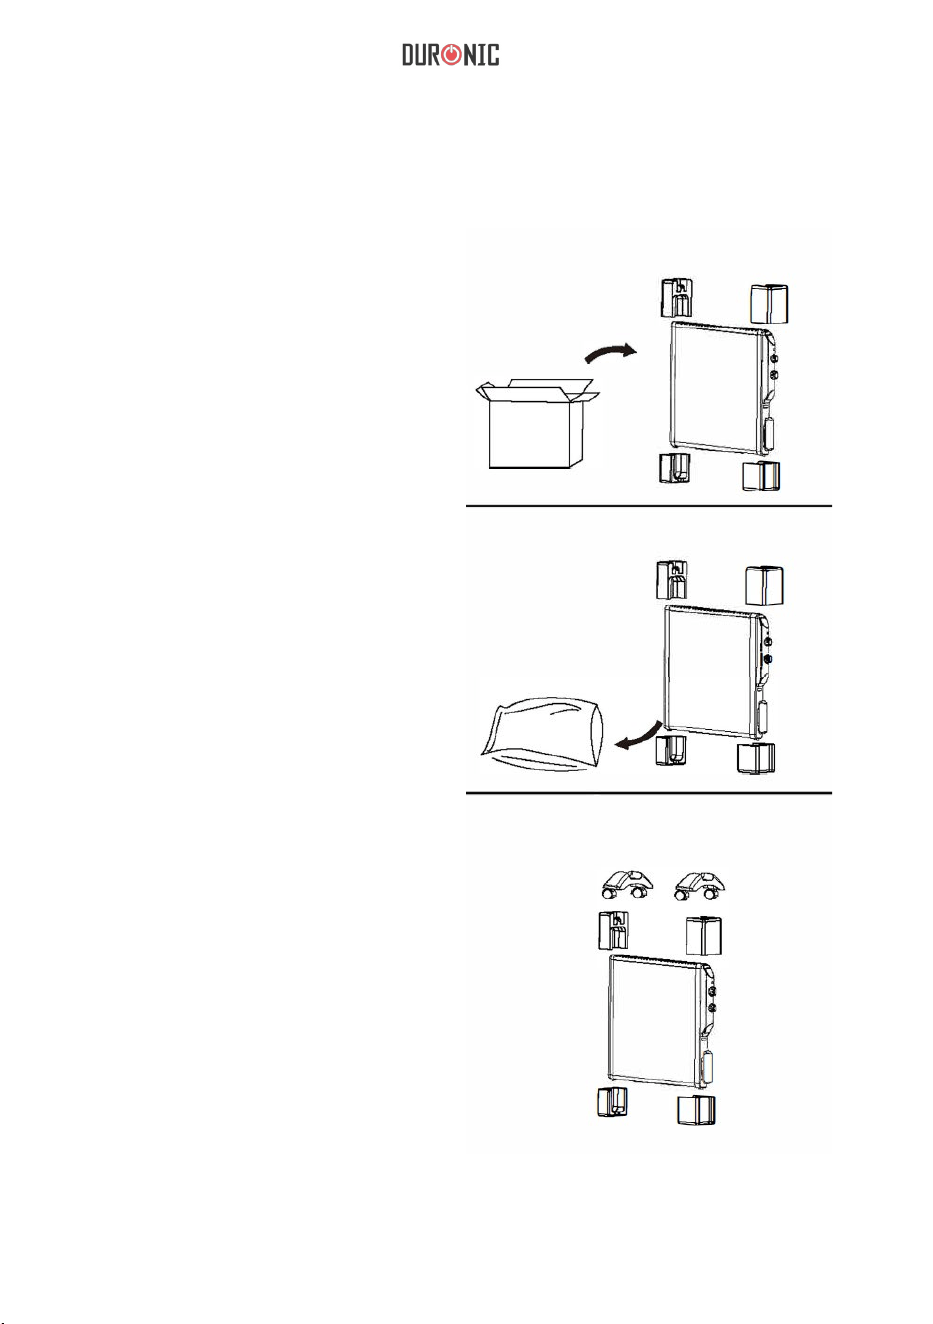
Removing the Packaging
1. Take the heater and the packaging
out of the box .
2. Remove the foam from both ends of
the heater. Remove the polybag
which is covering the heater and
store away. Keep any bags and foam
away from children.
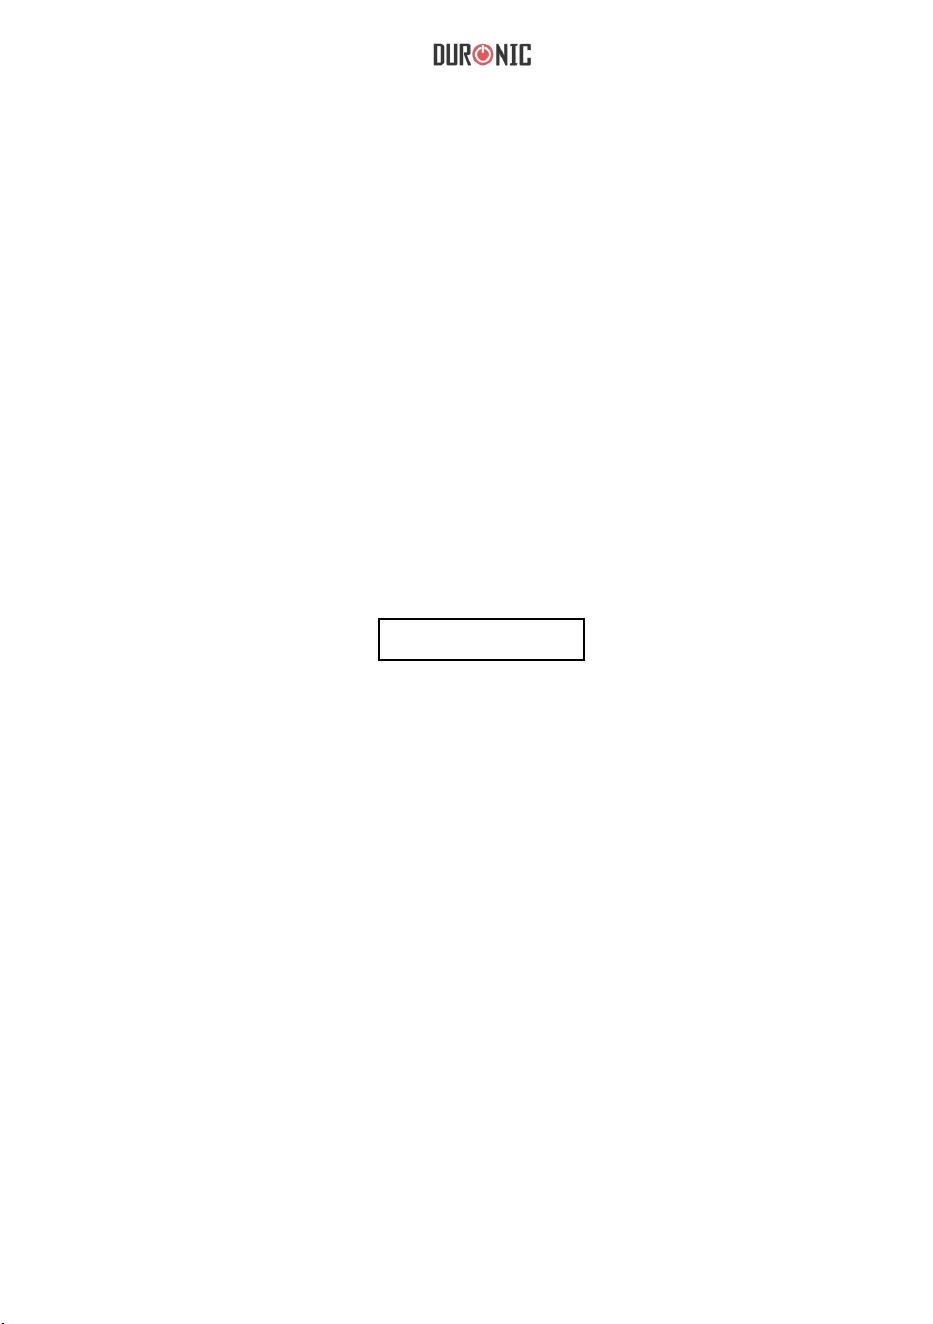
3. Remove the front foot and wheels
from the foam packaging
4. Keep your packaging safe, as this is
part of the guarantee. It is also useful
for storing the heater when not in use.
11
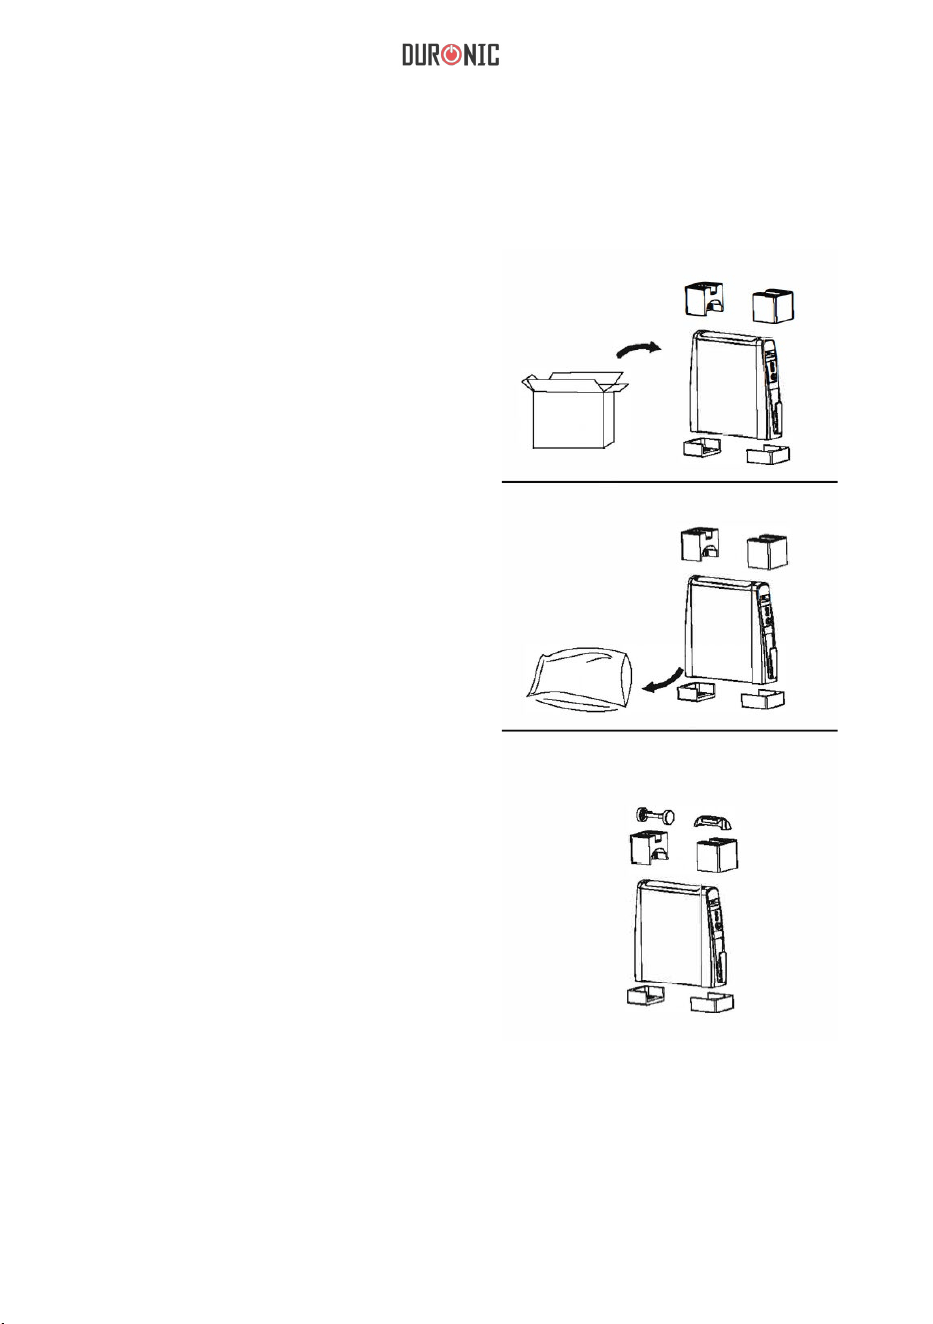
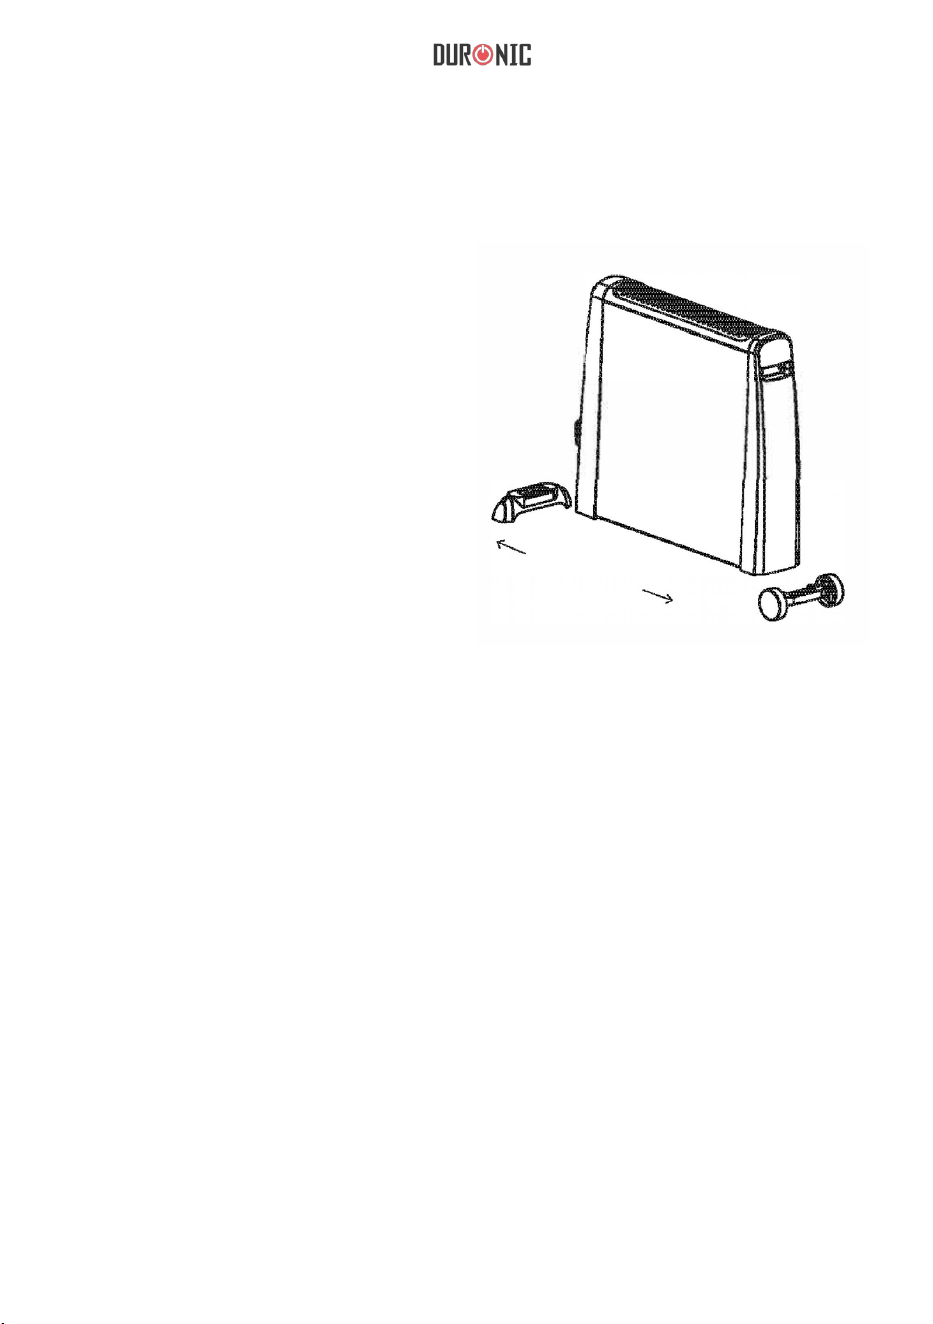
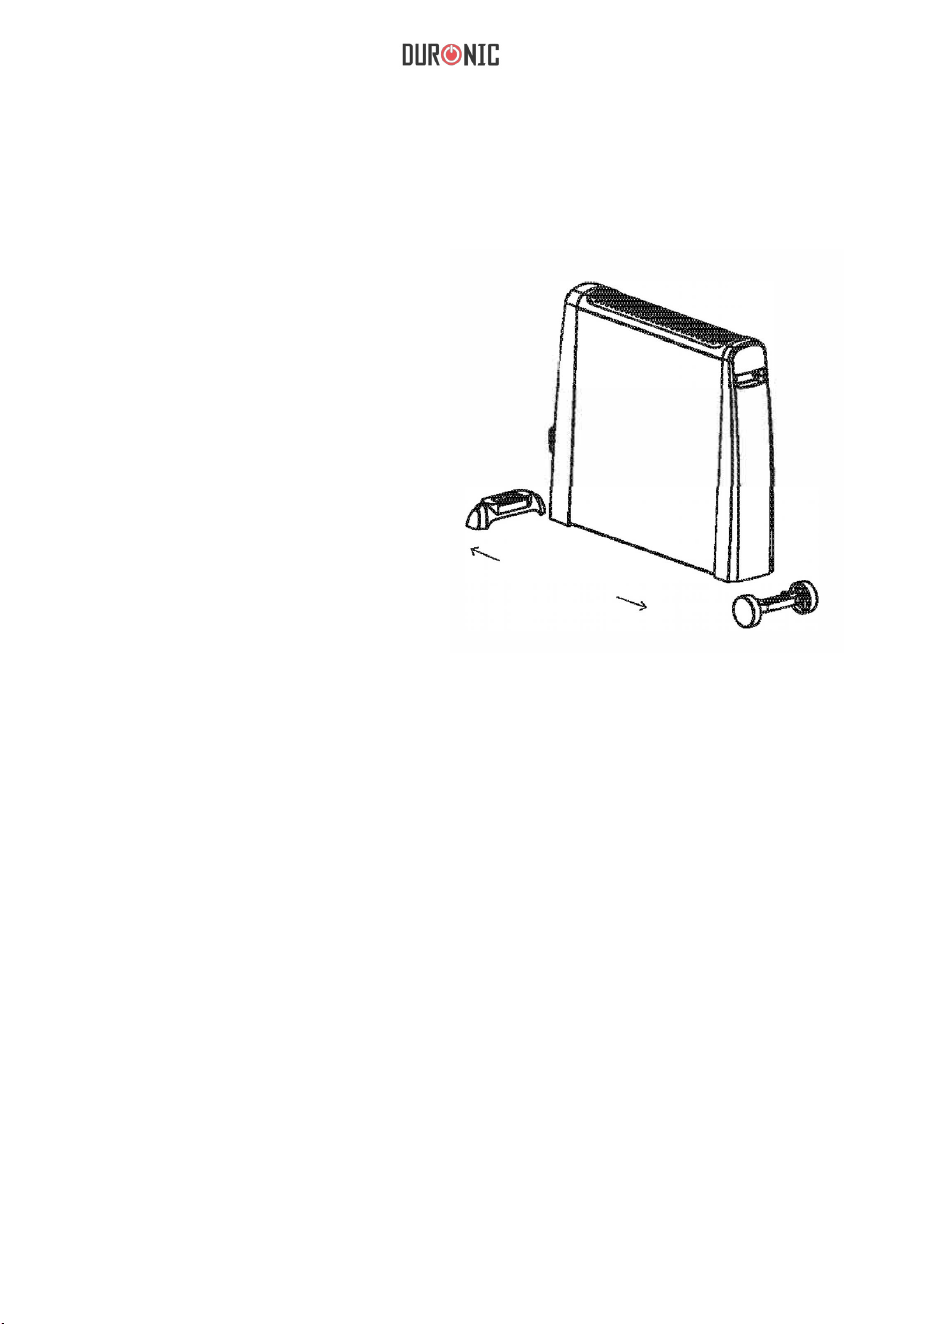
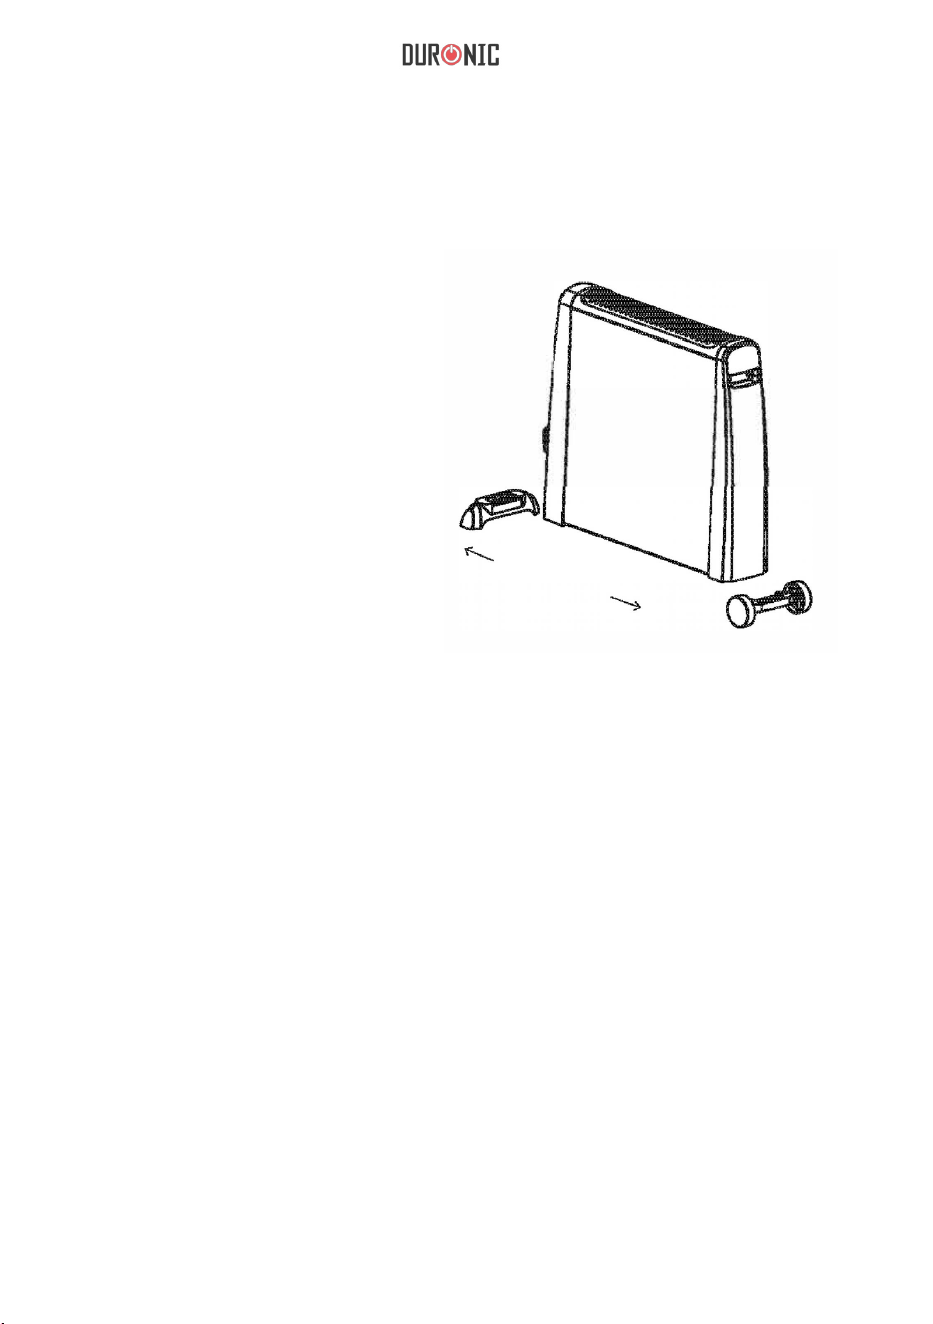
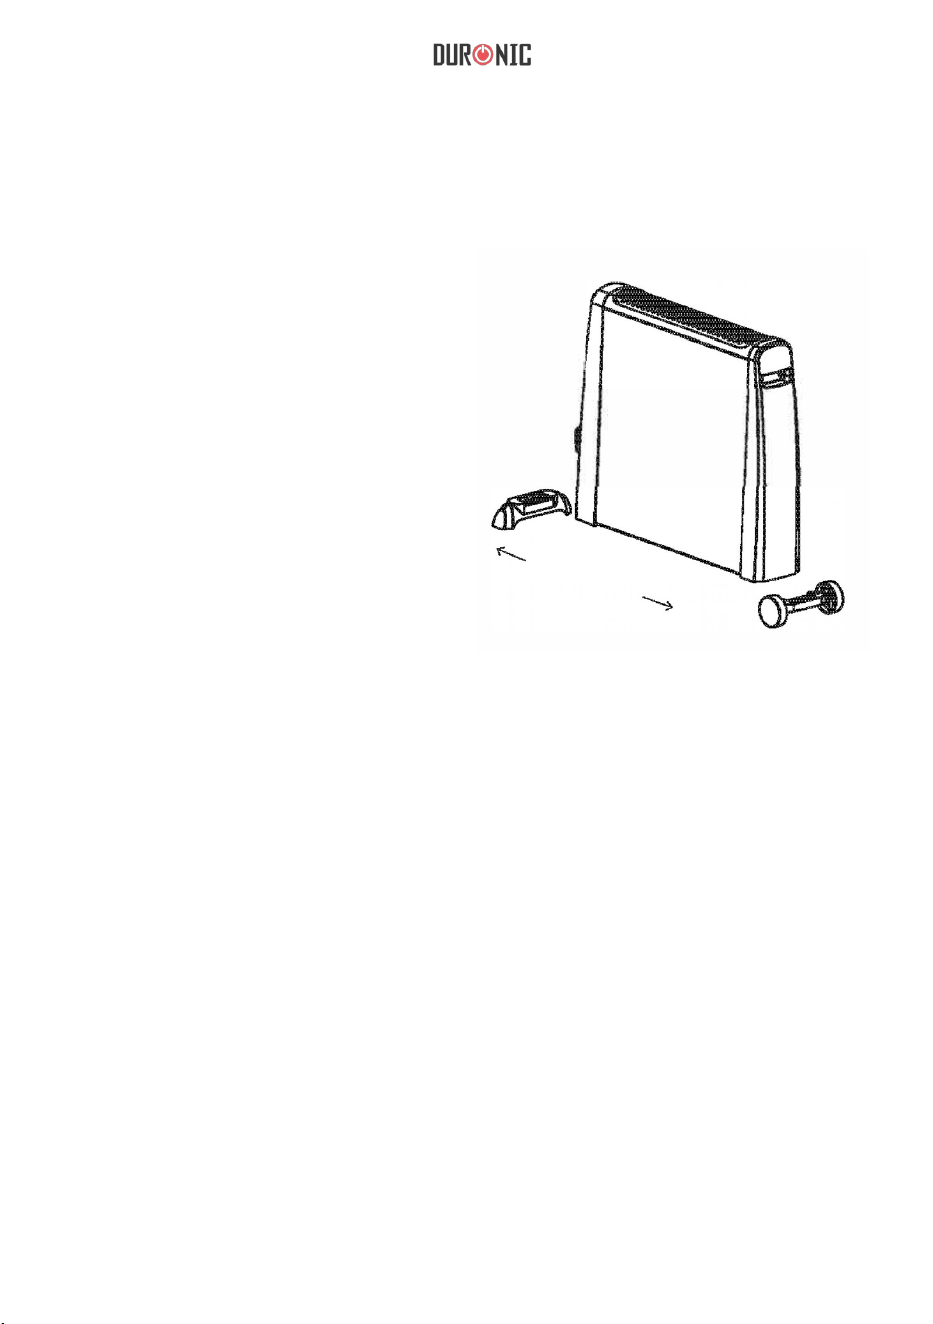
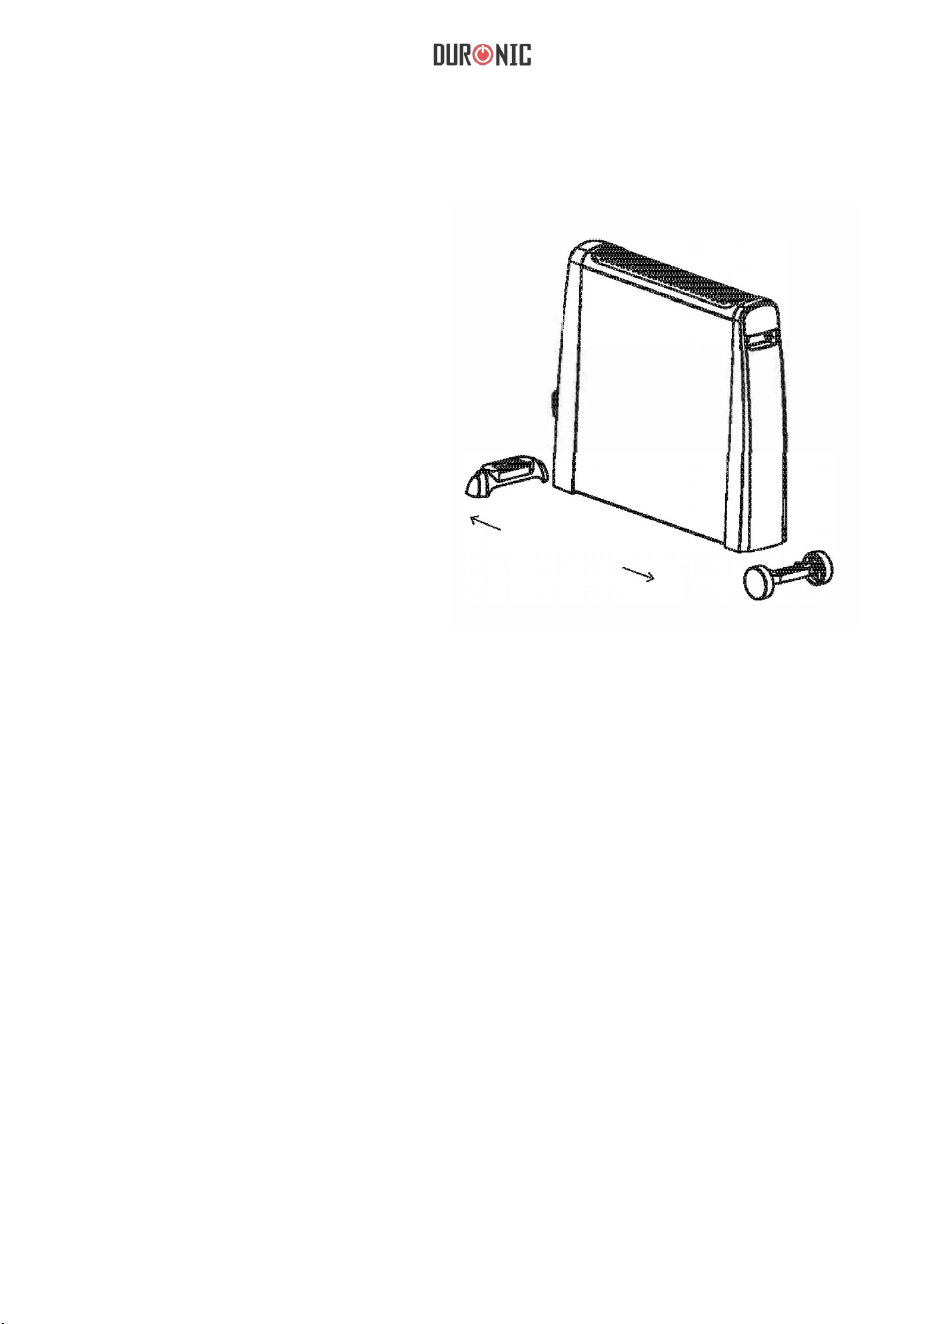
Installation of the wheels and the base
Insert the wheels and the base onto
the bottom of the heater by slotting
them into the gaps.

12
Operation
PLEASE READ THE
INSTRUCTIONS IN FULL
BEFORE USING THIS
HEATER.
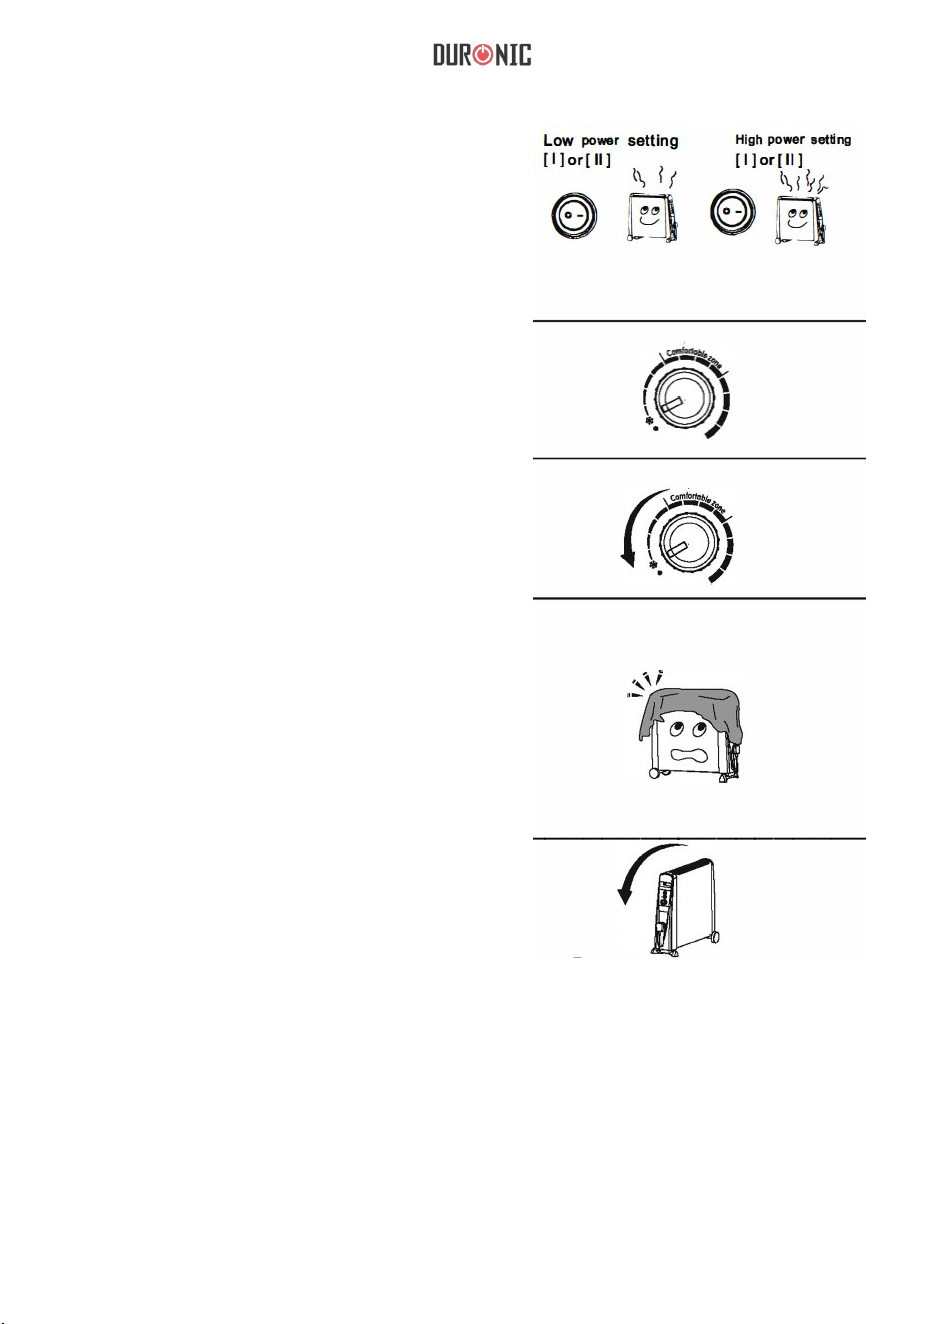
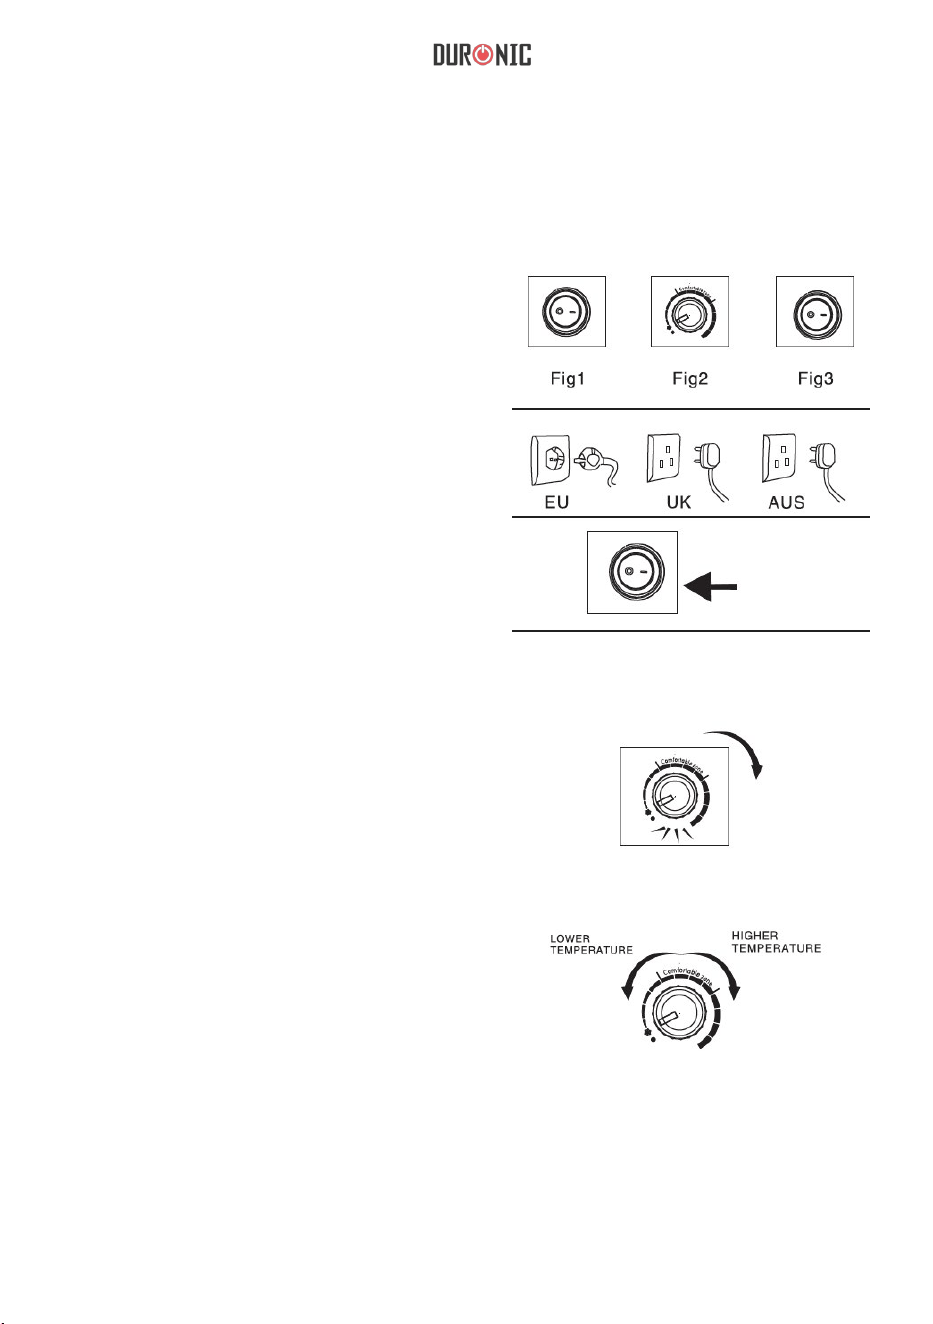
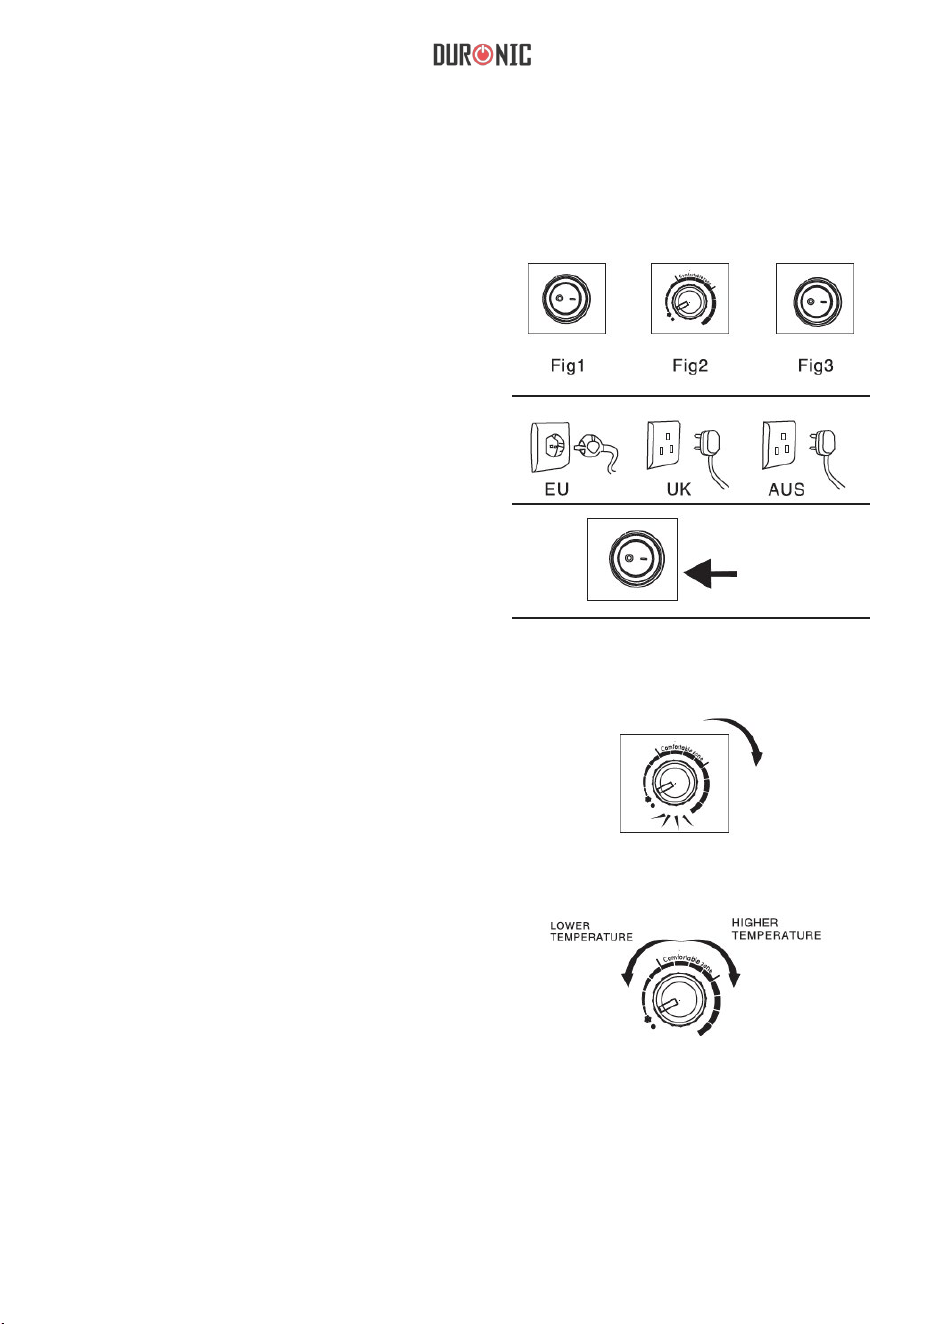
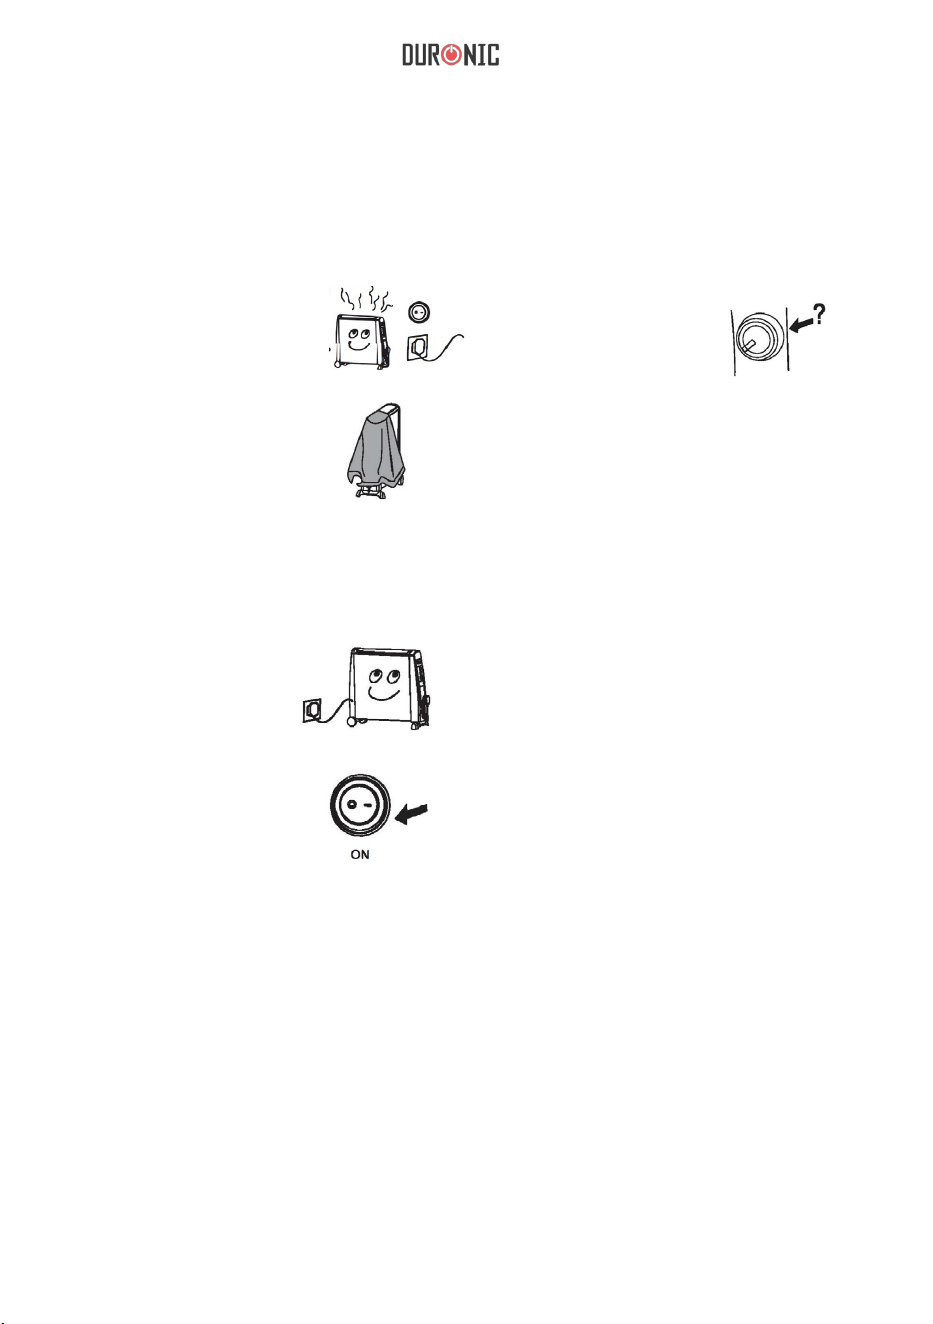
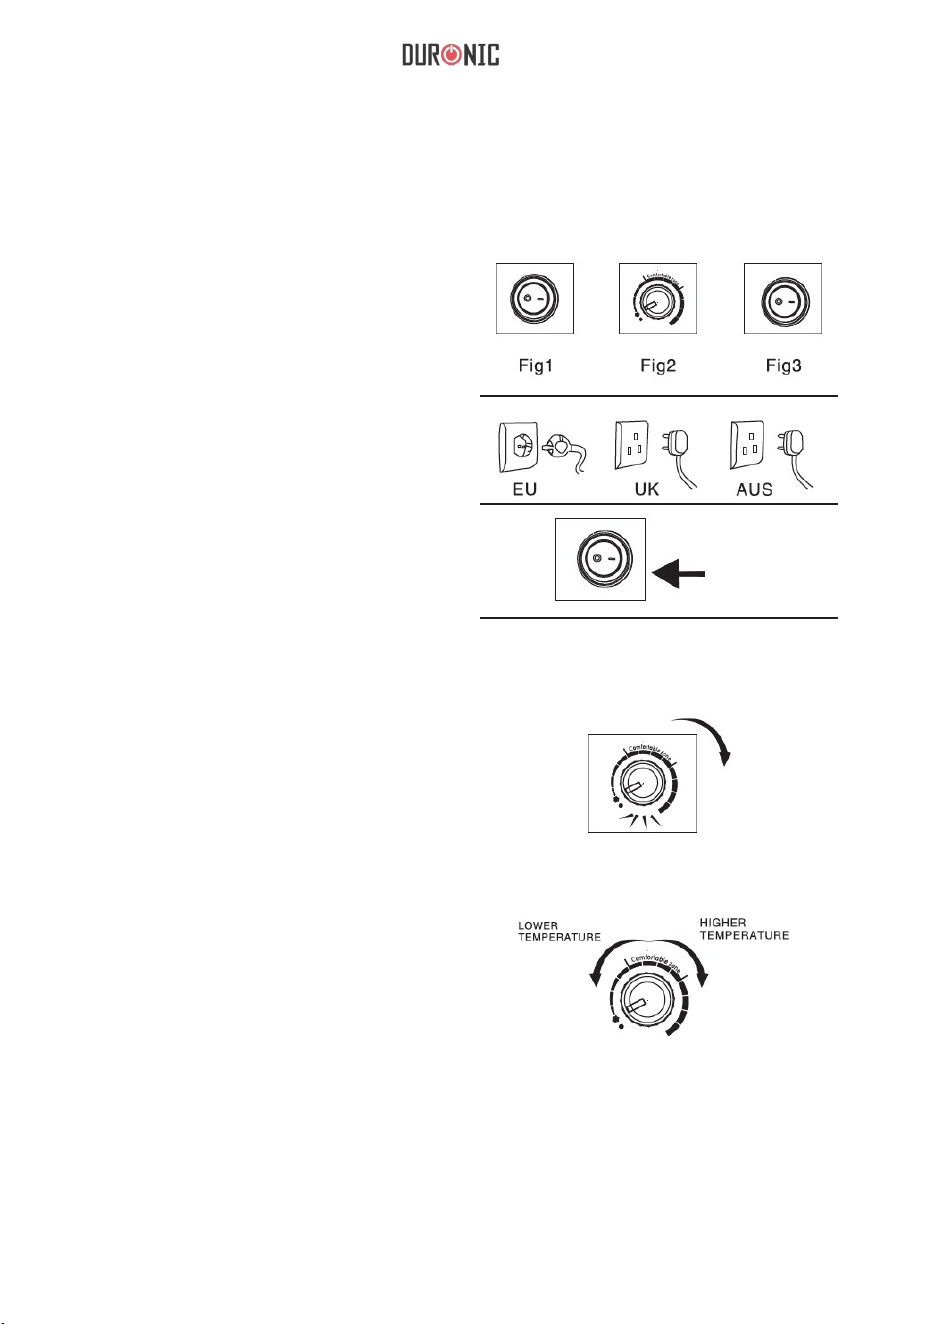
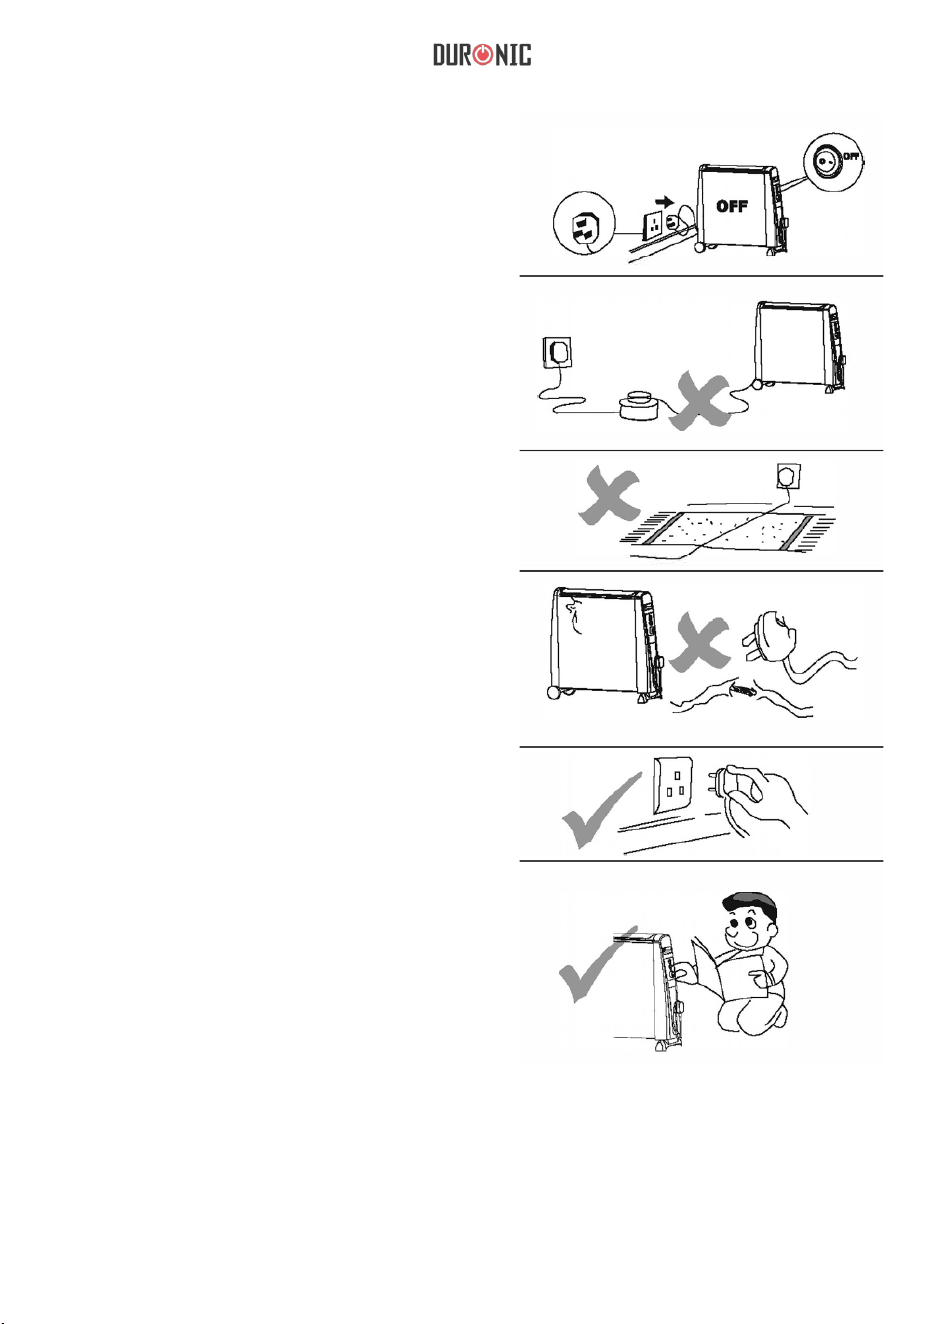
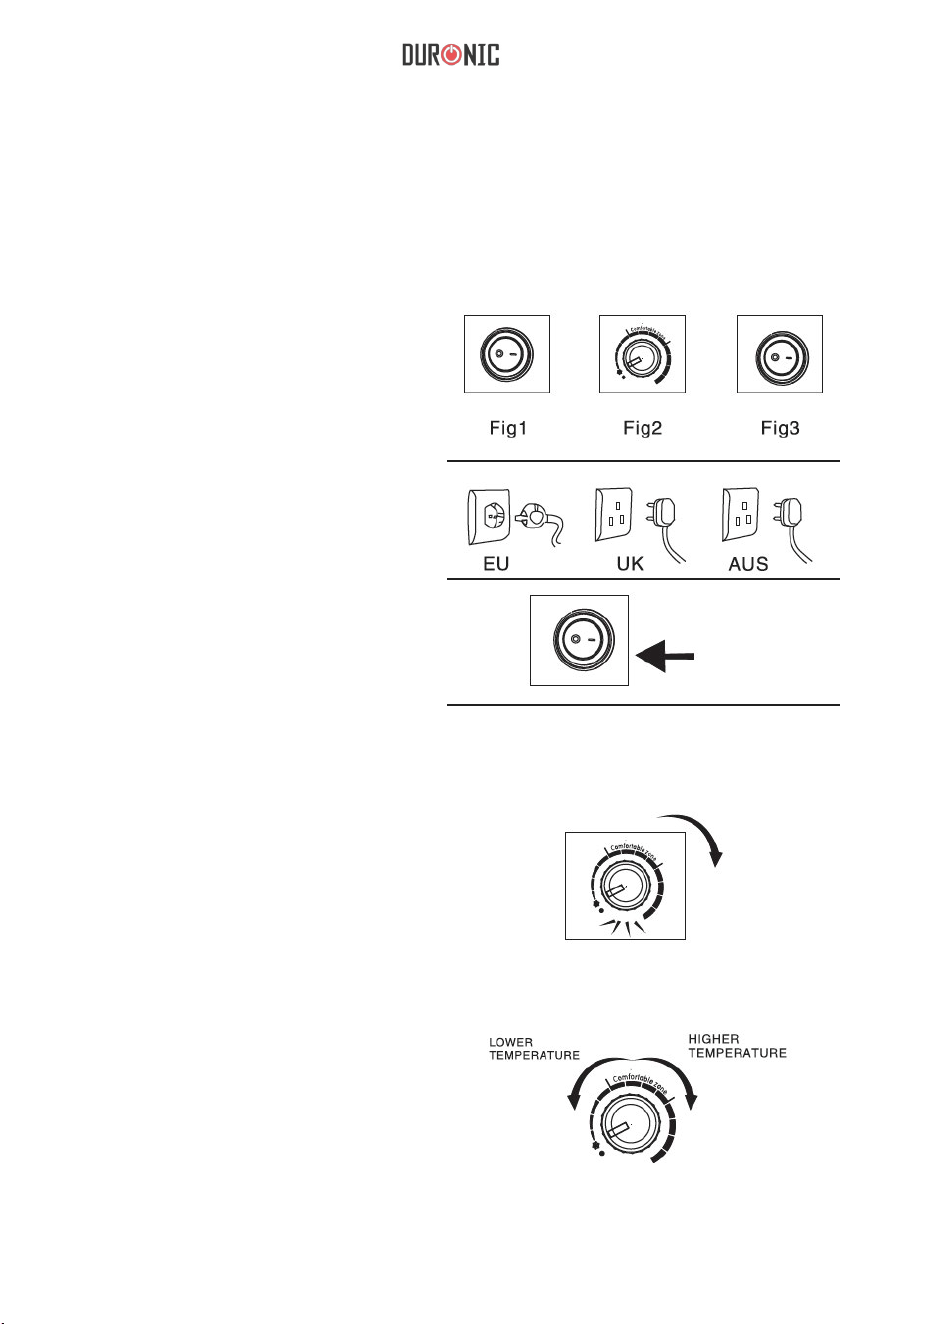
1.Check that the unit is at:
- [OFF] position (Fig. 1 ).
-The Temperature Control
Knob is at [OFF] position
(Fig. 2).
- Also the power at Low Heat
Position (Fig. 3)
2.Plug in the power cord to a
suitable electrical outlet.
(Rated not less than 10 AMP)
3.Press the ON/OFF switch to
[ON] position.
At this moment, its light
indicator is on.
4. Turn the temperature control knob to
your desired temperature. The light
indicator and heater will turn on until the
room has reached the desired
temperature. It will then automatically
turn off until the room temperature drops.
The heater will then turn on again so that
the desired room temperature is
maintained. According to personal needs
you can adjust the temperature control
knob to increase or decrease the room
temperature.
13
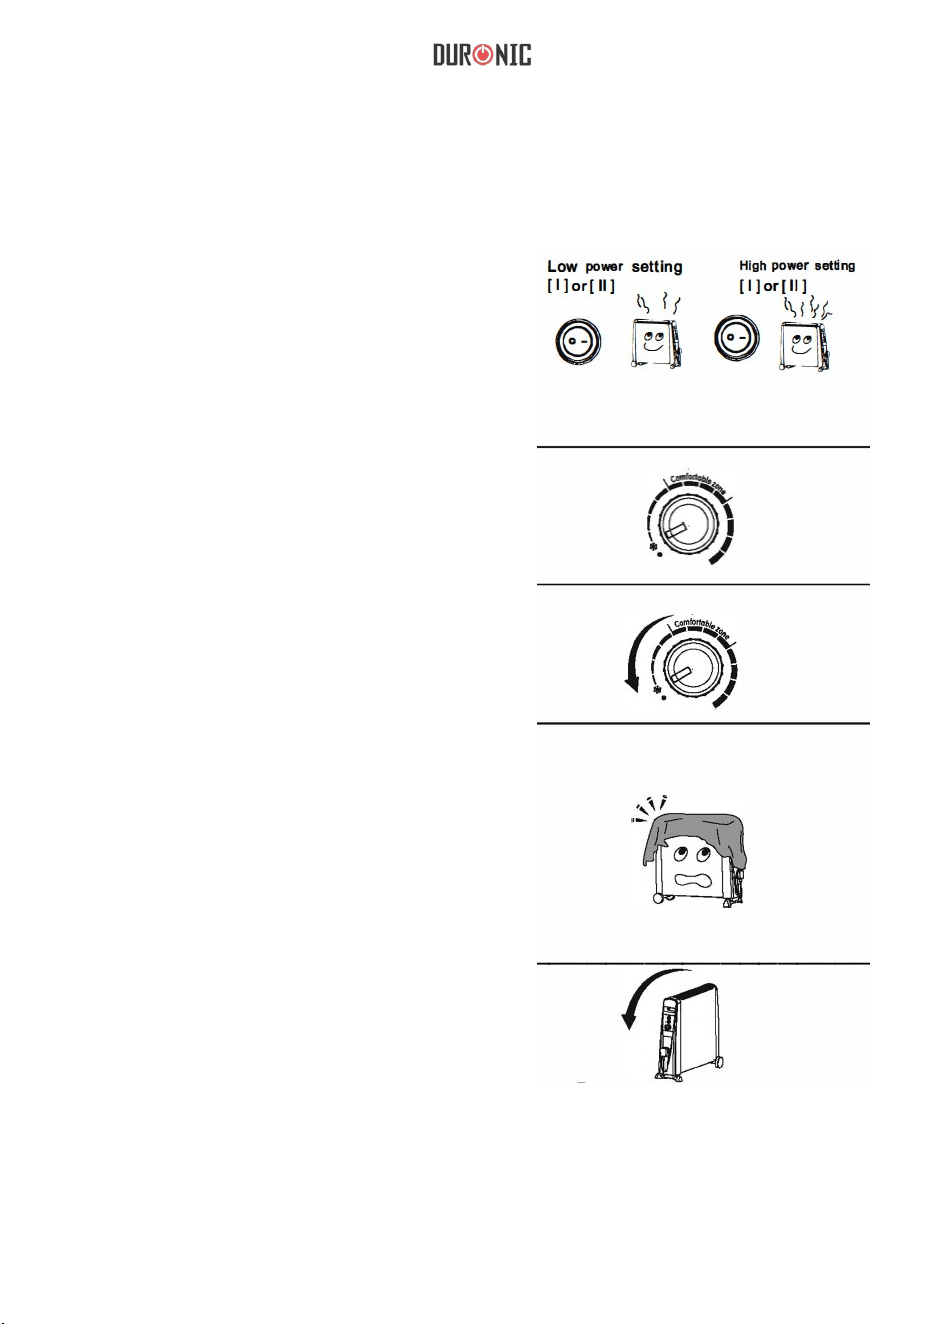
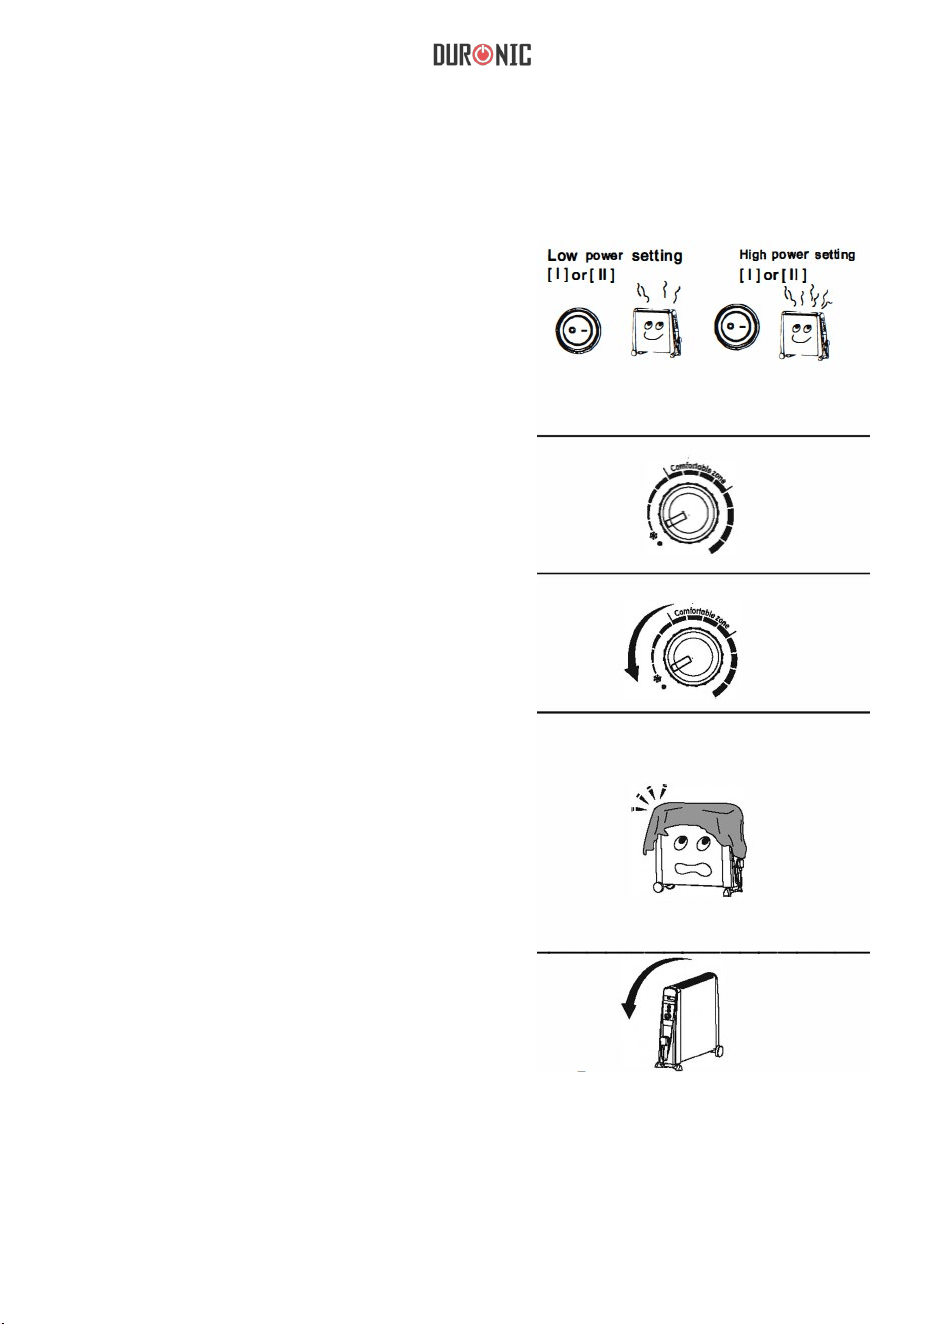
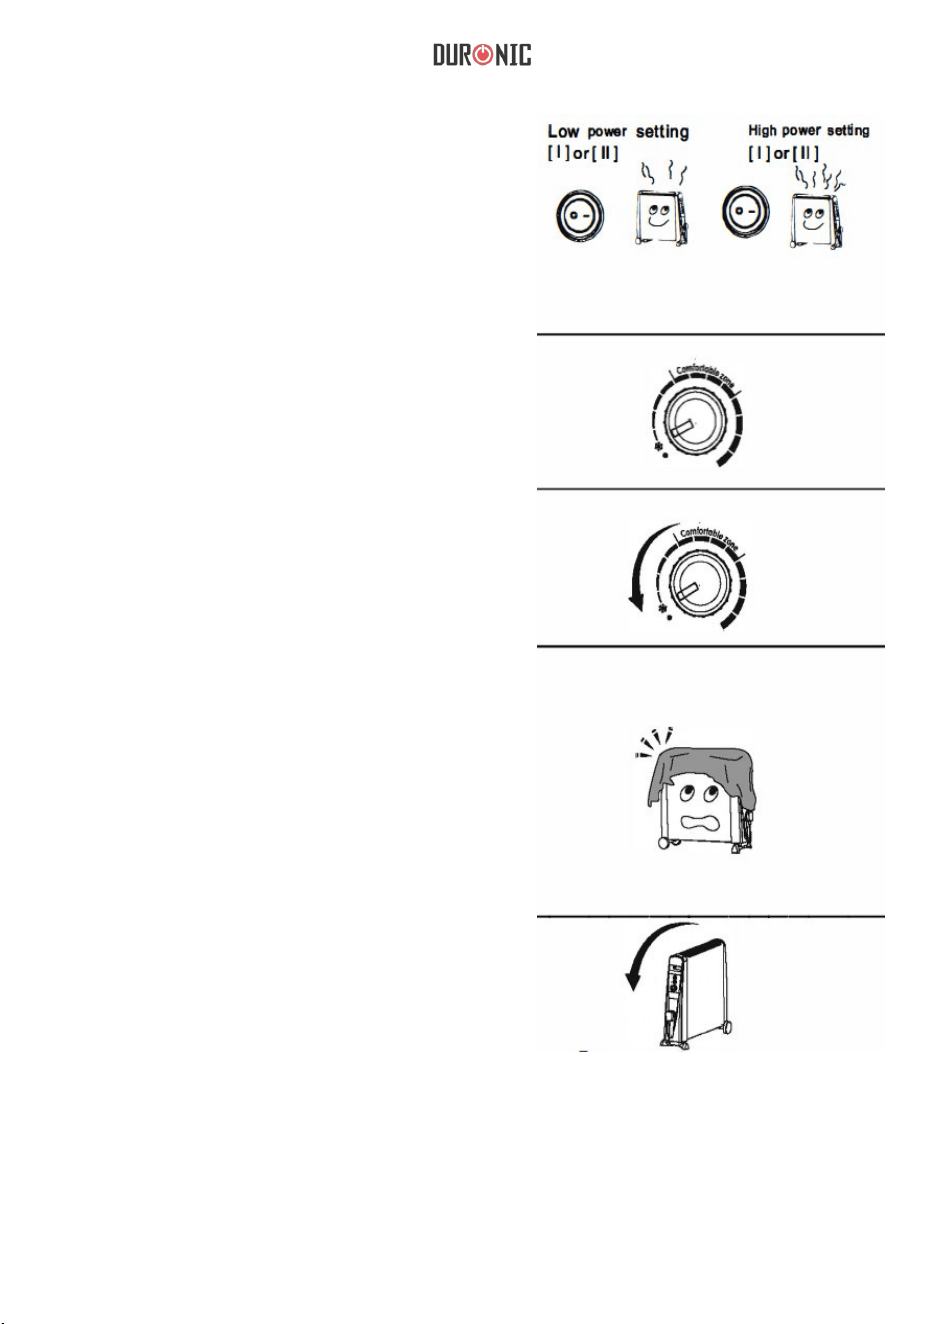
5. Then press the Power switch to:[ I ]
H
eating power setting I [II] Heating power
setting II HV101
[ I ] 1500W, [ II ] 1 ooow,
[ I ]& [ II ] 2500W HV051
[I] 1000W, [II] 500 W,[ I ]& [ II ] 1500W
6. For a pleasant temperature
there is an area indicated on the
Temperature Control Knob which is
known as the “Comfortable Zone”.
7. Anti-Frost Function
This function will keep the surrounding
temperature above freezing point. To
do this, simply plug in the power cord,
and turn the Temperature control knob
to the “Snowflake” position.
a. Covering Sensors
Even though a warning label “DO NOT
COVER” has been placed on the unit,
some users may accidentally cover the
unit with towels or blankets etc.
Therefore, a safety device has been
installed within the heater to detect
overheating. Once the unit overheats,
power will be cut off. When the unit
temperature falls again, power will be
resumed.
8.
Tip over protection.
If the heater is accidentally knocked over,
it will switch off automatically.
14
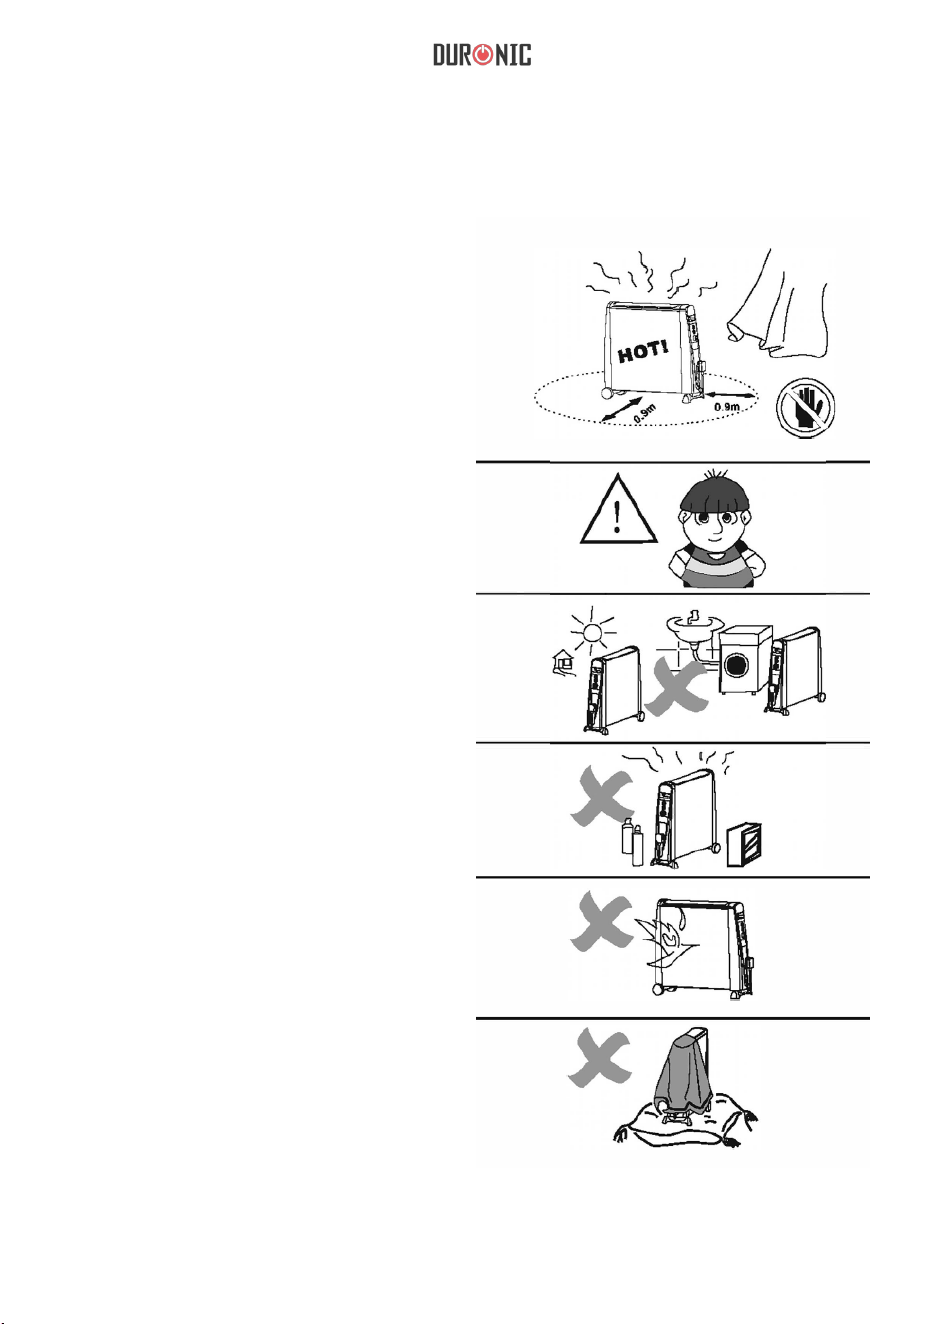
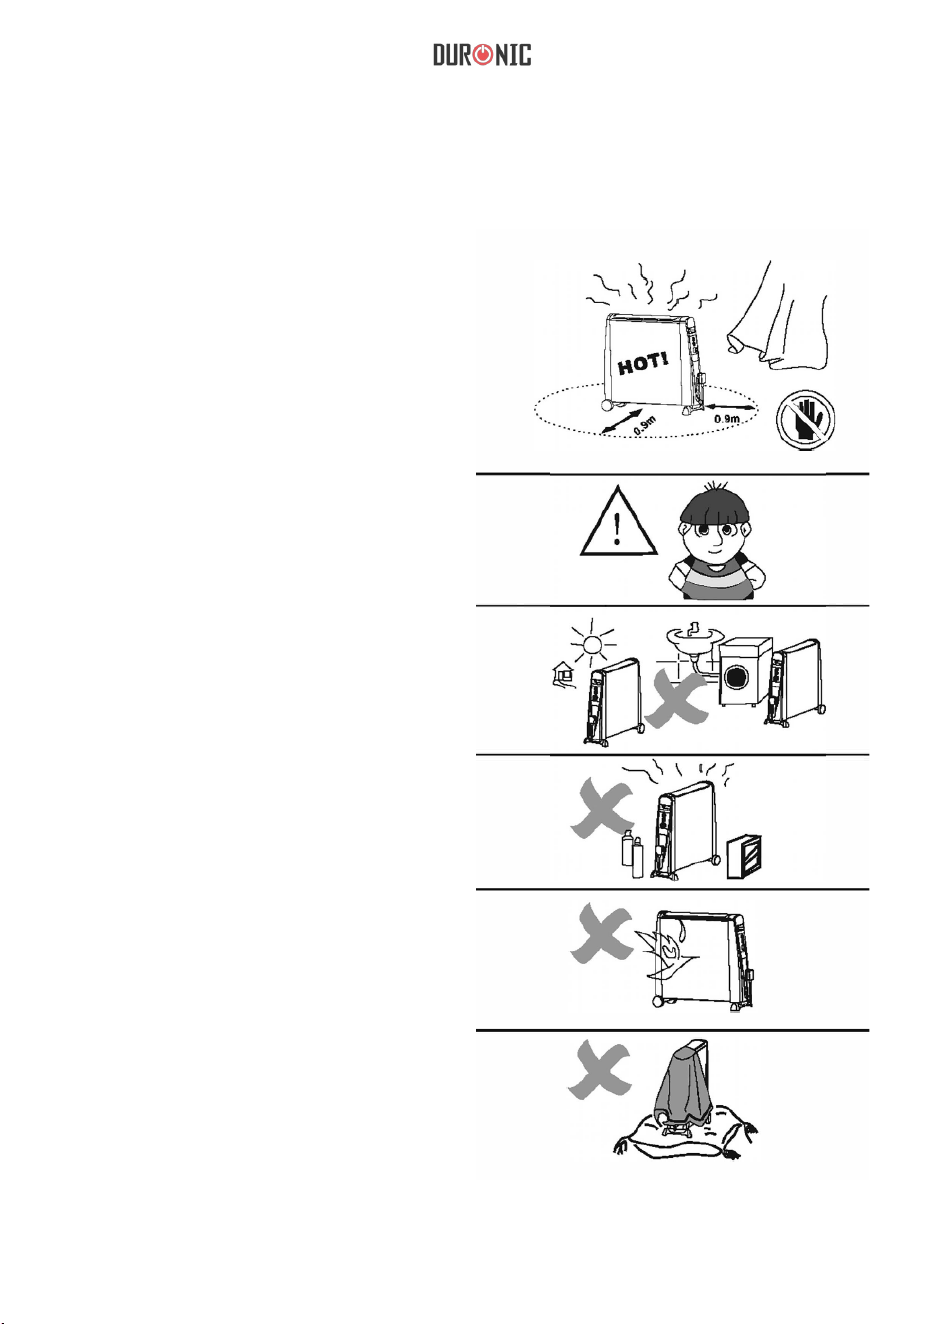
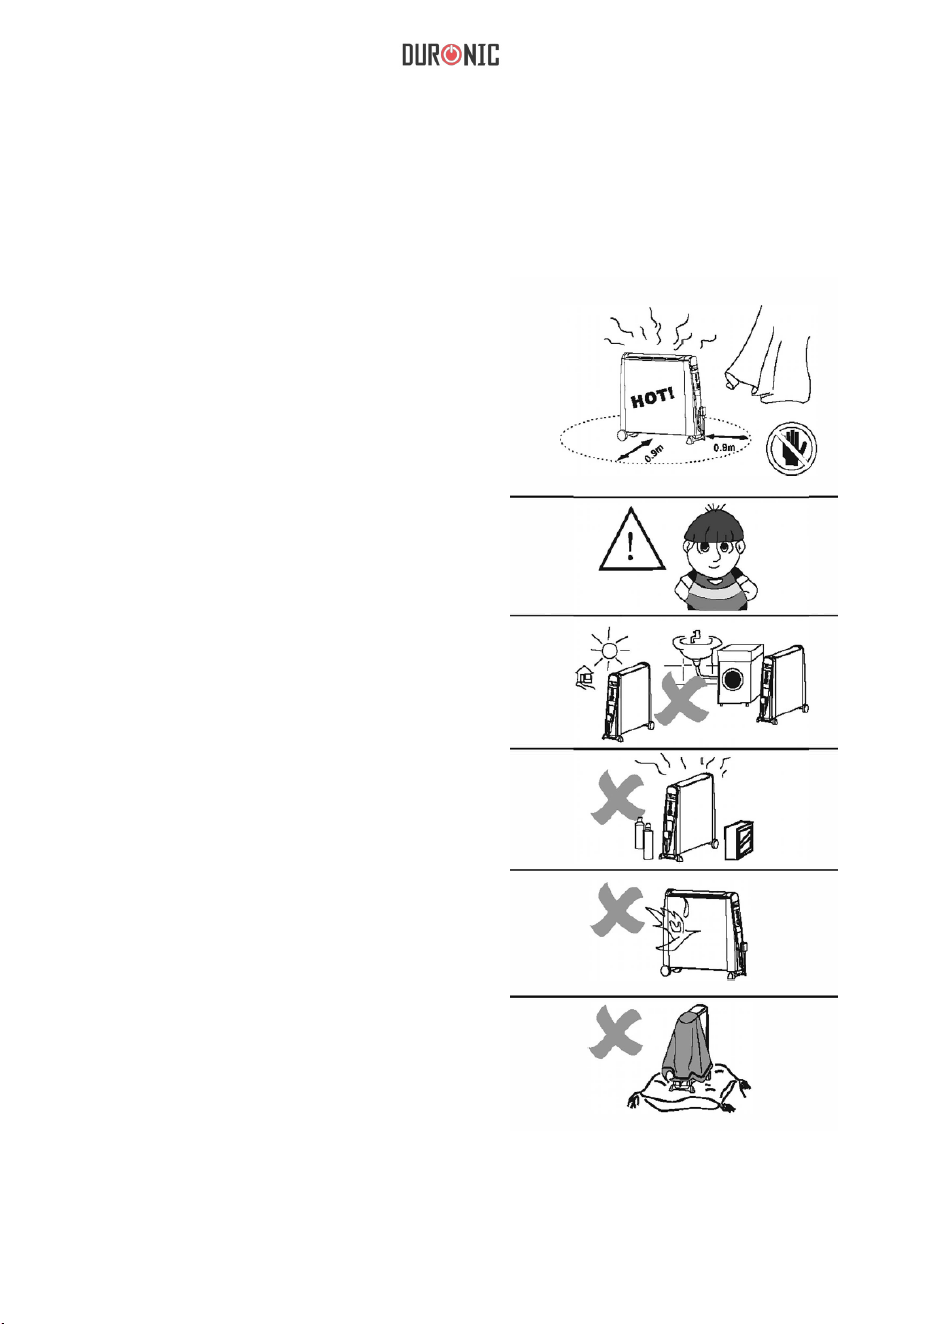
Important Safeguards
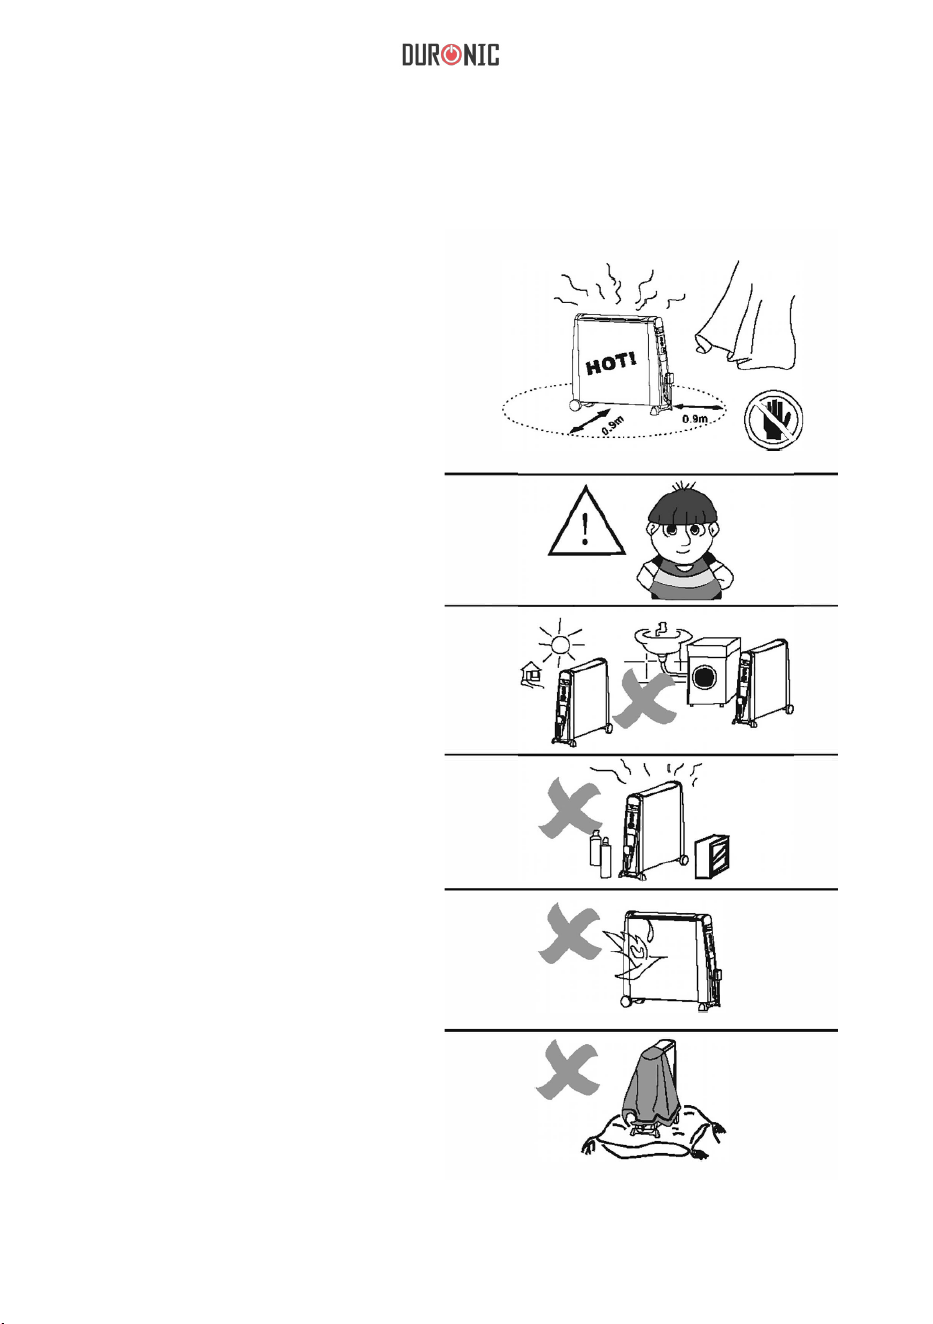
The heater is hot when in use. To
avoid burns, do not let bare skin
touch the hot surface. Use the
handles when moving the heater.
Keep combustible materials, such
as curtains etc., and other
furnishings at least 3 feet (0.9m)
radius from the heater to avoid a
re hazard.
Extreme caution is necessary when
any heater is used near children,
Do not leave children unattended
when this heater is ON. The heater
is not a toy.
Do not use the heater outdoors.
This heater is not intended for use
in bathrooms, laundry areas and
similar indoor locations. Never use
the heater near any forms of water.
Do not use the heater in areas
where gasoline, paint or ammable
liquids are used or stored.
Do not insert or allow any objects to
enter any ventilation or exhaust
opening as this may cause an
electric shock or re, or damage
the heater.
To prevent a possible re, do not
block air intakes or exhaust in any
manner.
Do not operate this appliance on a
soft or uneven surface as that can
block the openings.

15
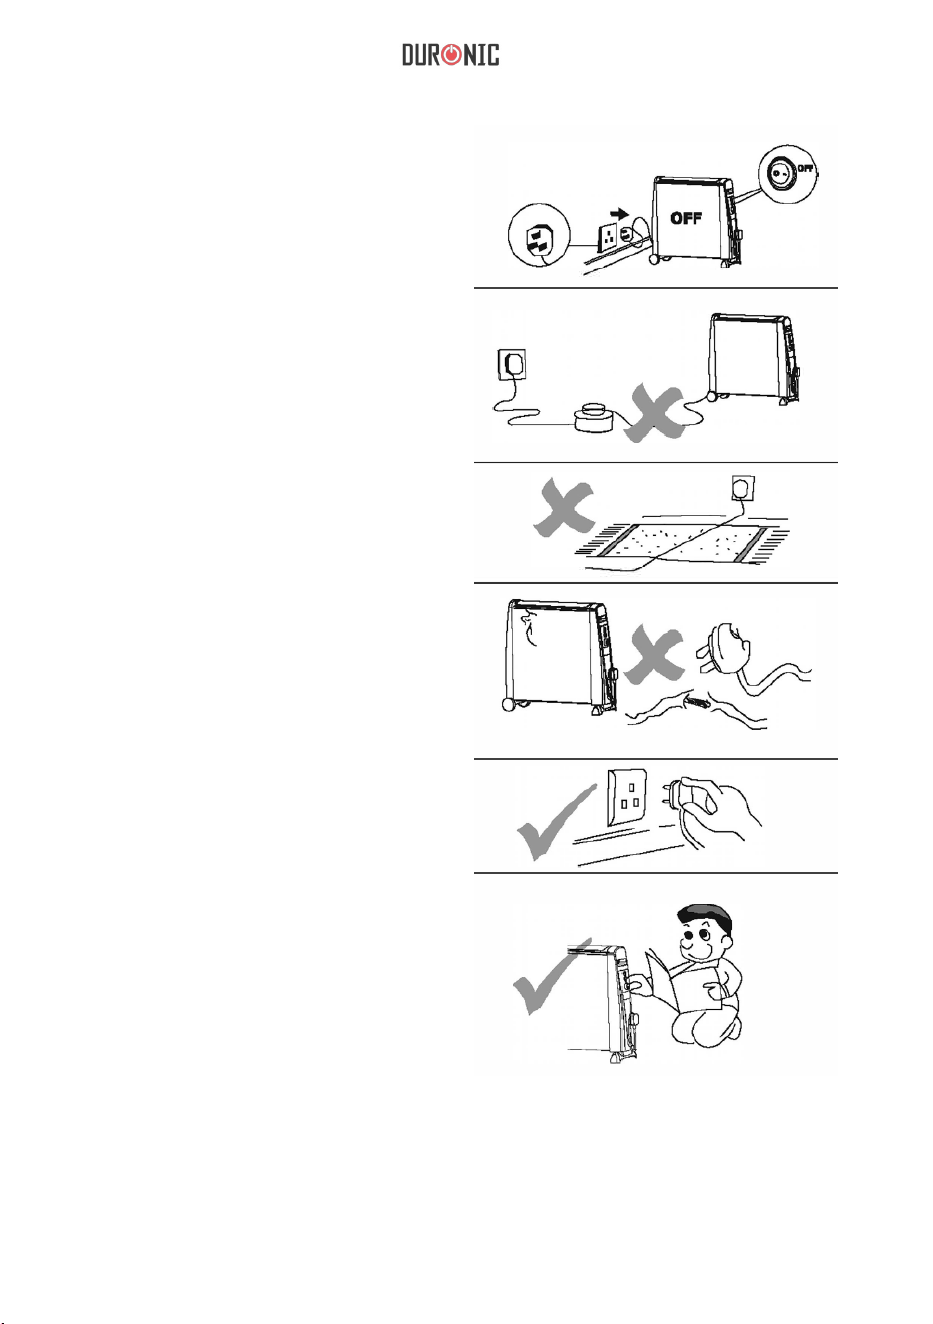
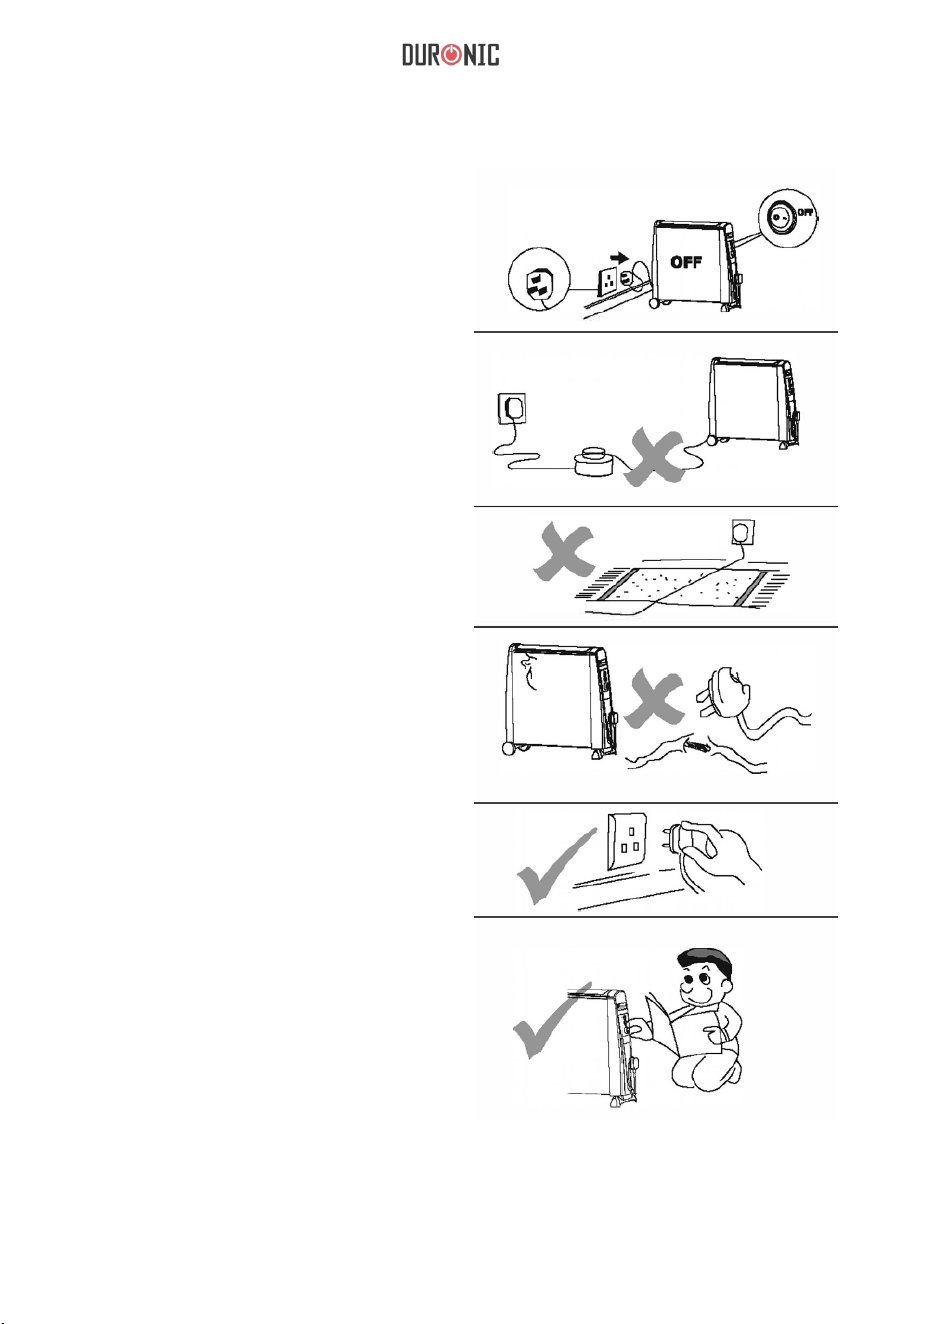
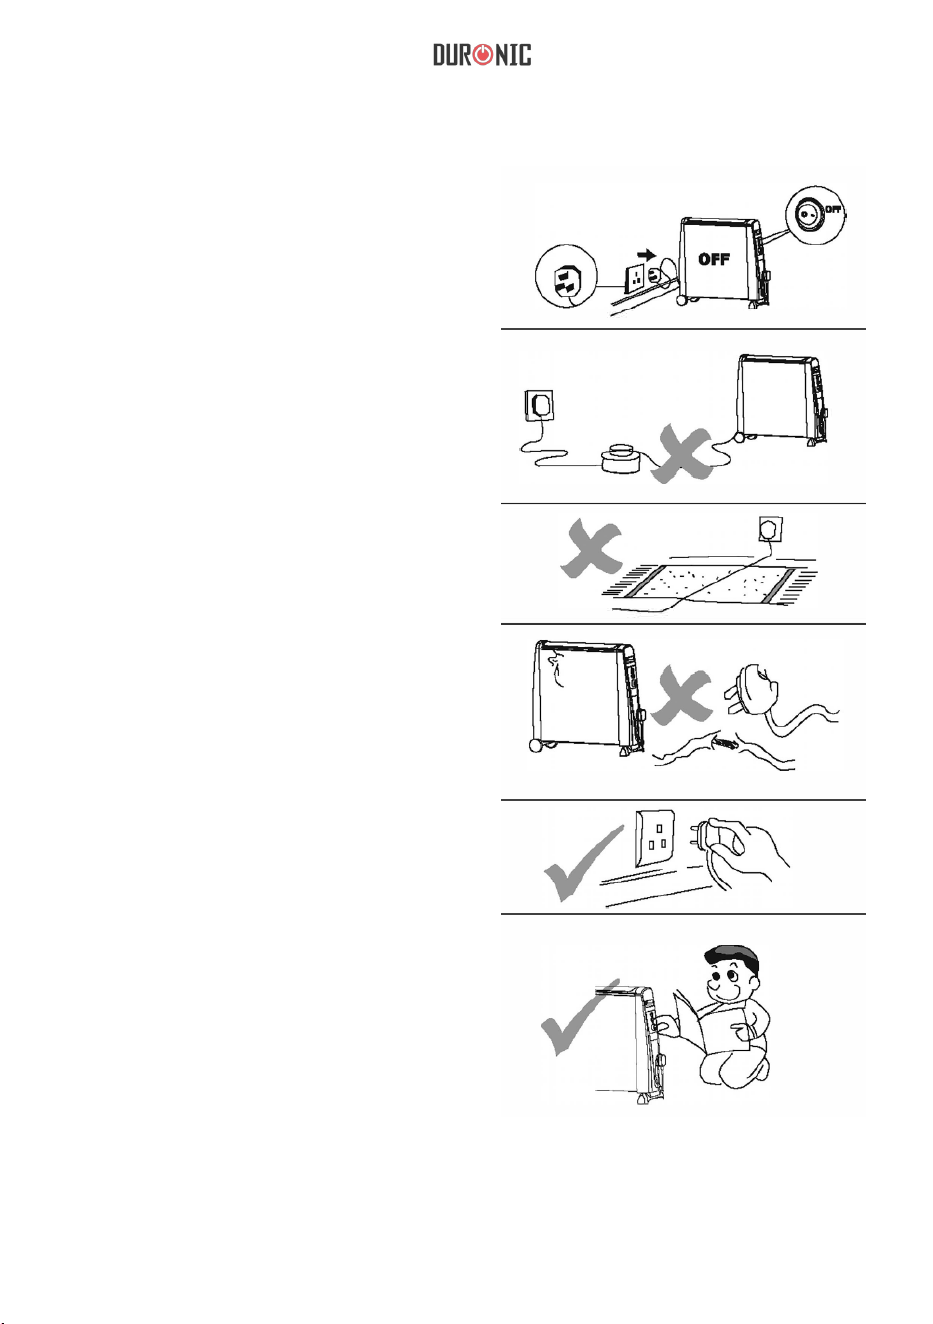
Always unplug the heater when not in
use. To disconnect the heater,
remove plug from outlet.
Please avoid using an extension lead
with this heater. All extension leads
have a maximum wattage allowance,
and by using this heater with other
appliances the wattage allowance
may be exceeded and overheat the
plug and extension socket and result
in a fire risk.
Do not run the cord under carpeting.
Do not cover the cord with throw rugs,
runners, etc. Arrange the cord tidily
where is cannot be tripped over. Do
not operate any heater with a
damaged cord or plug. If the supply
cord is damaged, it must be replaced
by a qualified person in order to
avoid
hazard.
Connect to properly grounded outlets
only.
Use this heater only for the purpose
as described in this manual. Any other
use not recommended by the
manufacturer may cause fire, electric
shock, or injury to persons. Do not
use this heater with a programmer,
timer or any other device that
switches the heater on automatically,
since a fire risk exists if the heater is
covered or positioned incorrectly.

16
Cleaning
Storage
Warning
1. Before cleaning turn off the heater, unplug the power cord and allow the
heater to cool.
2. Do not immerse the power cord, plug or heater in water or other liquids, or
pour water or other liquids over the heater.
3. Use a vacuum cleaner to remove dust and lint from the metal grill of the
heater. Wipe the heater with a dry cloth to remove dust and a damp cloth (not
wet) to clean off stains.
4. Do not use detergents, abrasive cleaning products or any kind of polishing
material on the body of the heater as these can damage the nish.
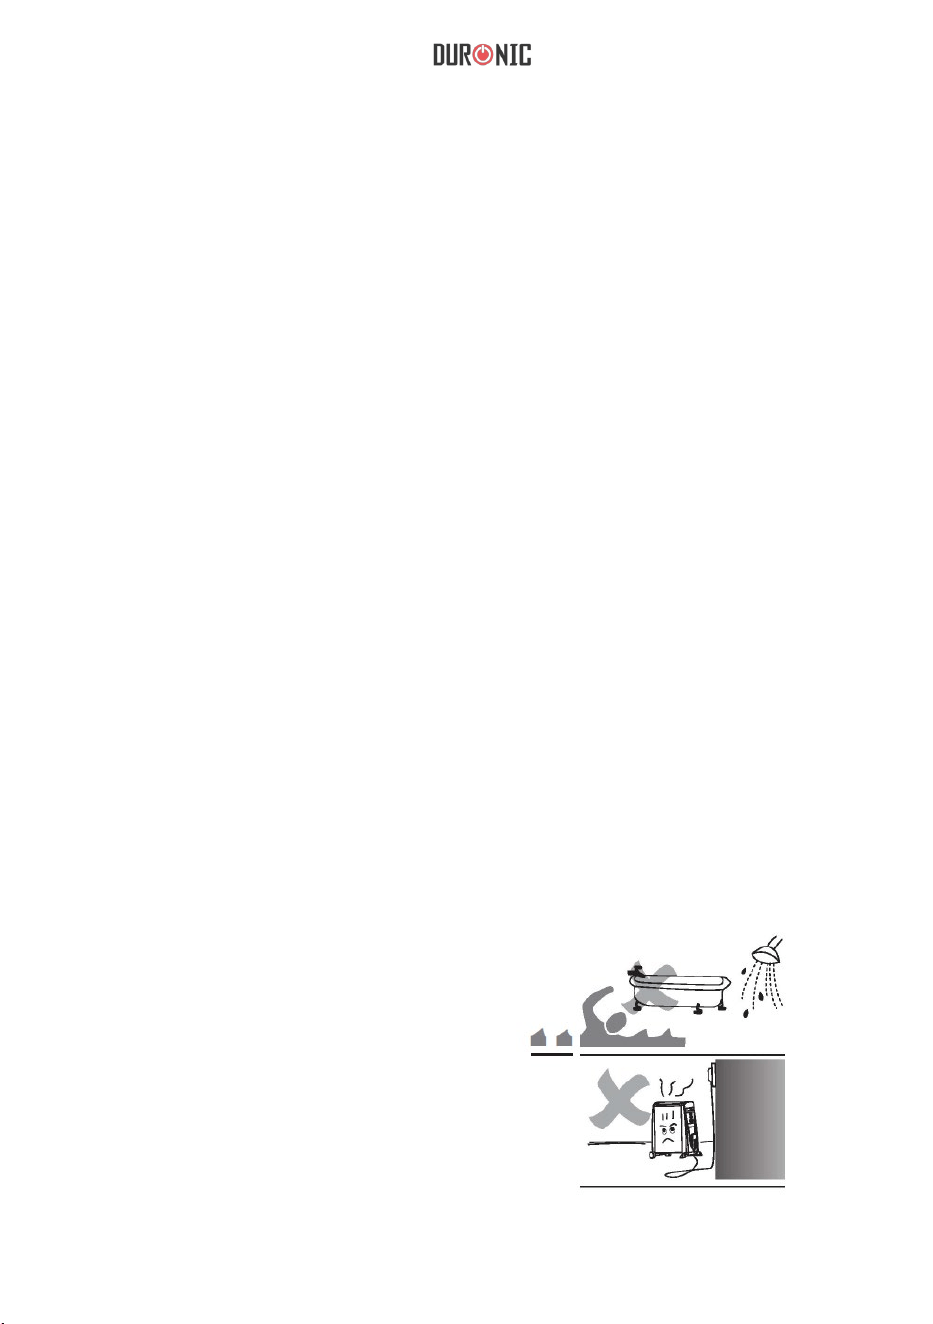
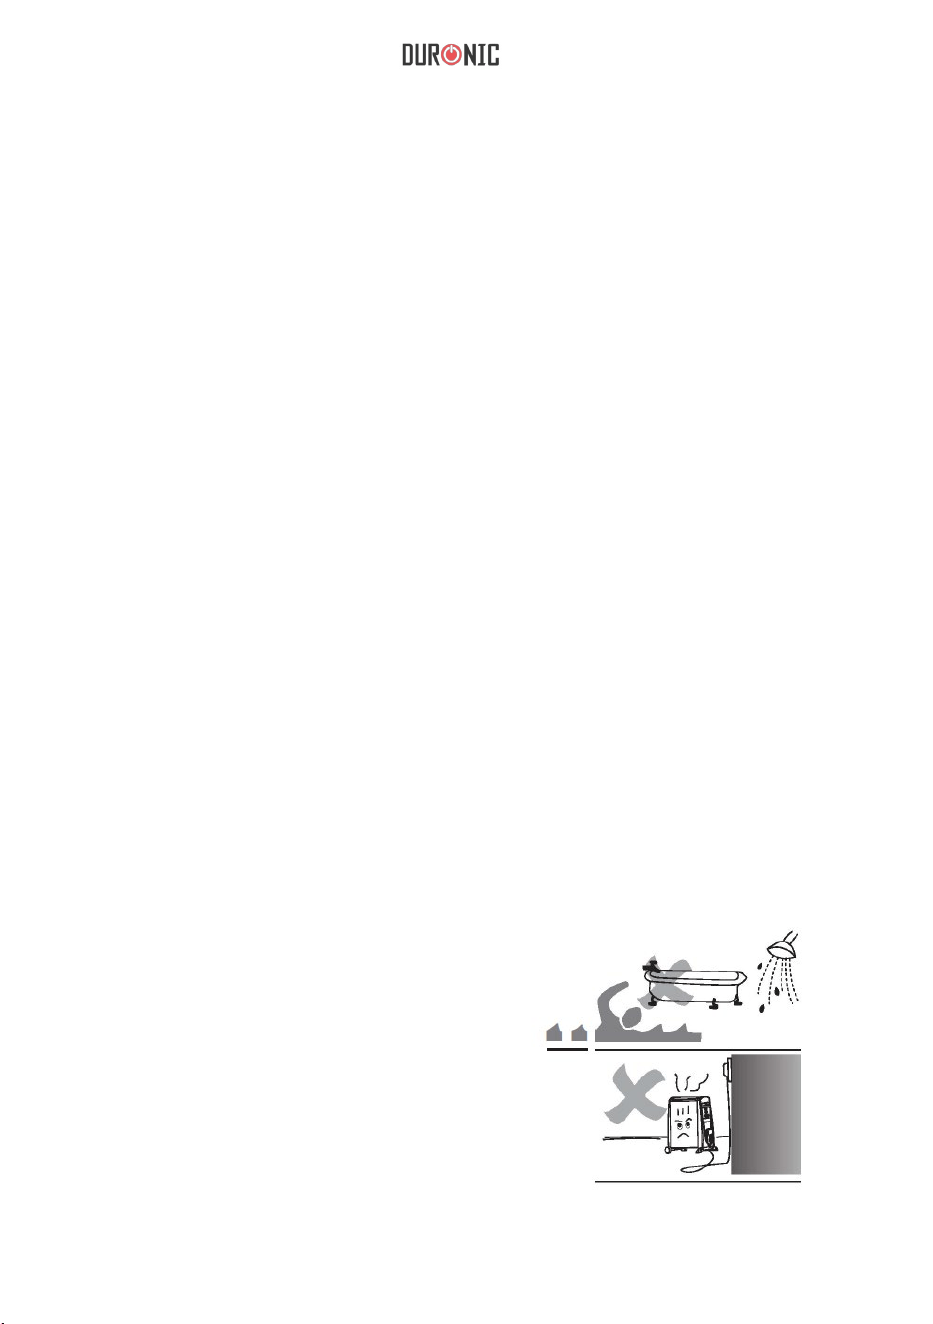
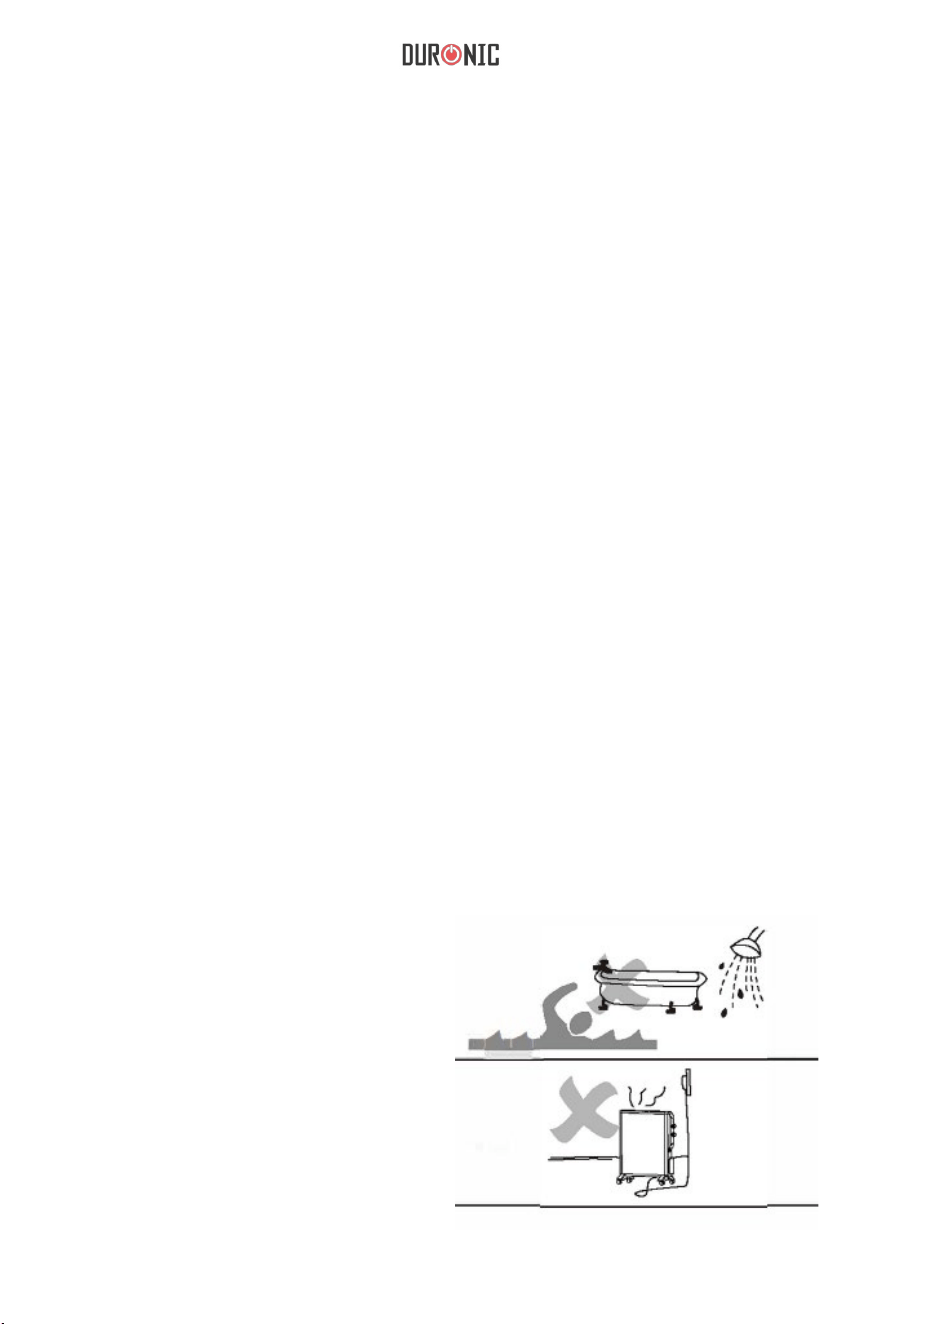
Do not use this heater in the immediate
surroundings of a bath, a shower or a
swimming pool
The heater must not be located
immediately below a socket-outlet.
1. Store the heater in a cool dry location, preferably covered to prevent dust
and dirt building up in the heater. Use old packaging to repack the unit.
2. Unplug the heater and store the mains lead in the storage tidy at the front of
the heater. Ensure that the plug does not trail.
Any other servicing should be performed by an authorized service
representative.

17
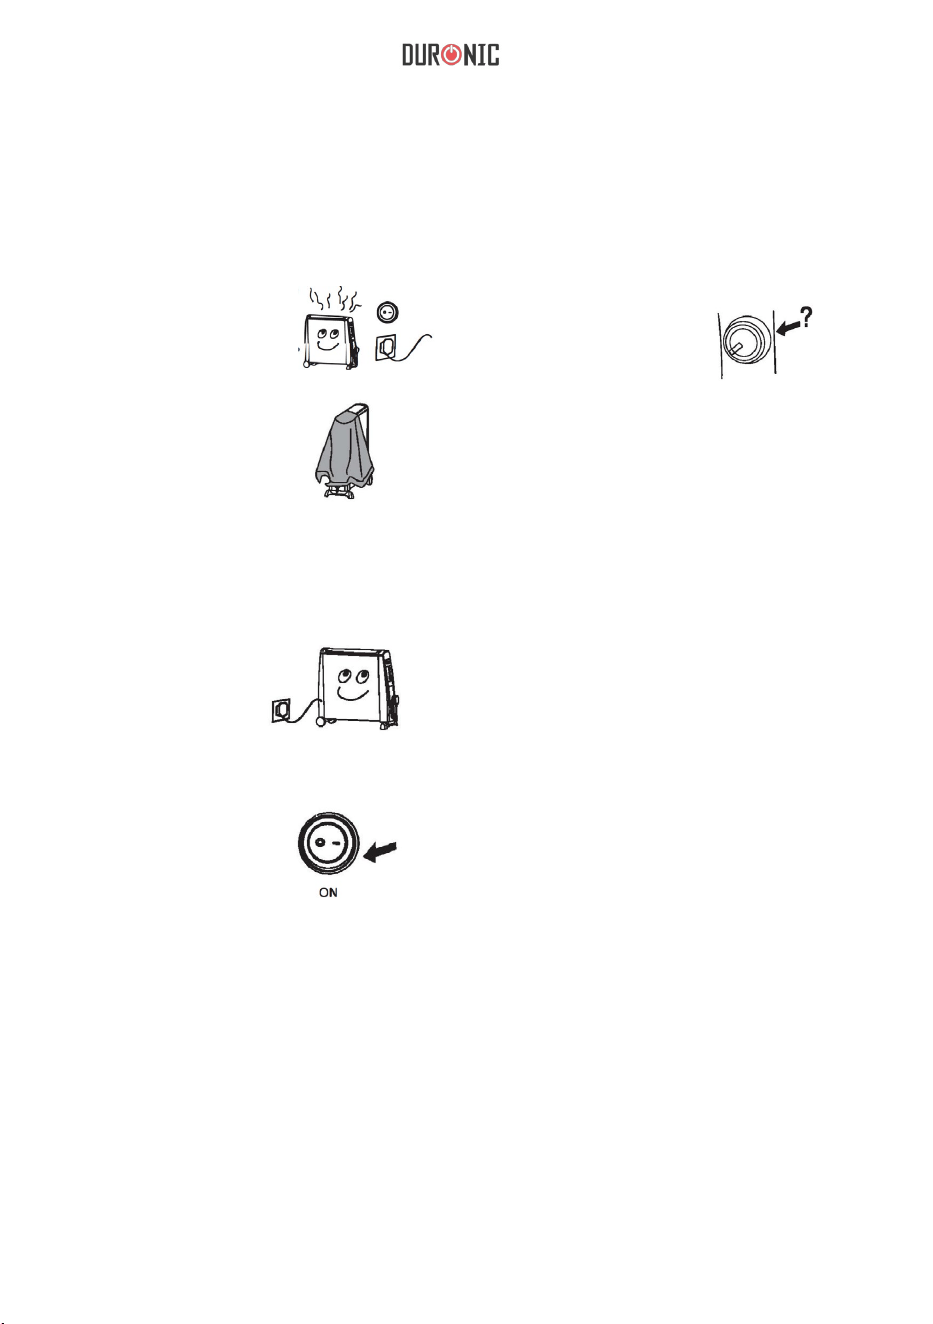
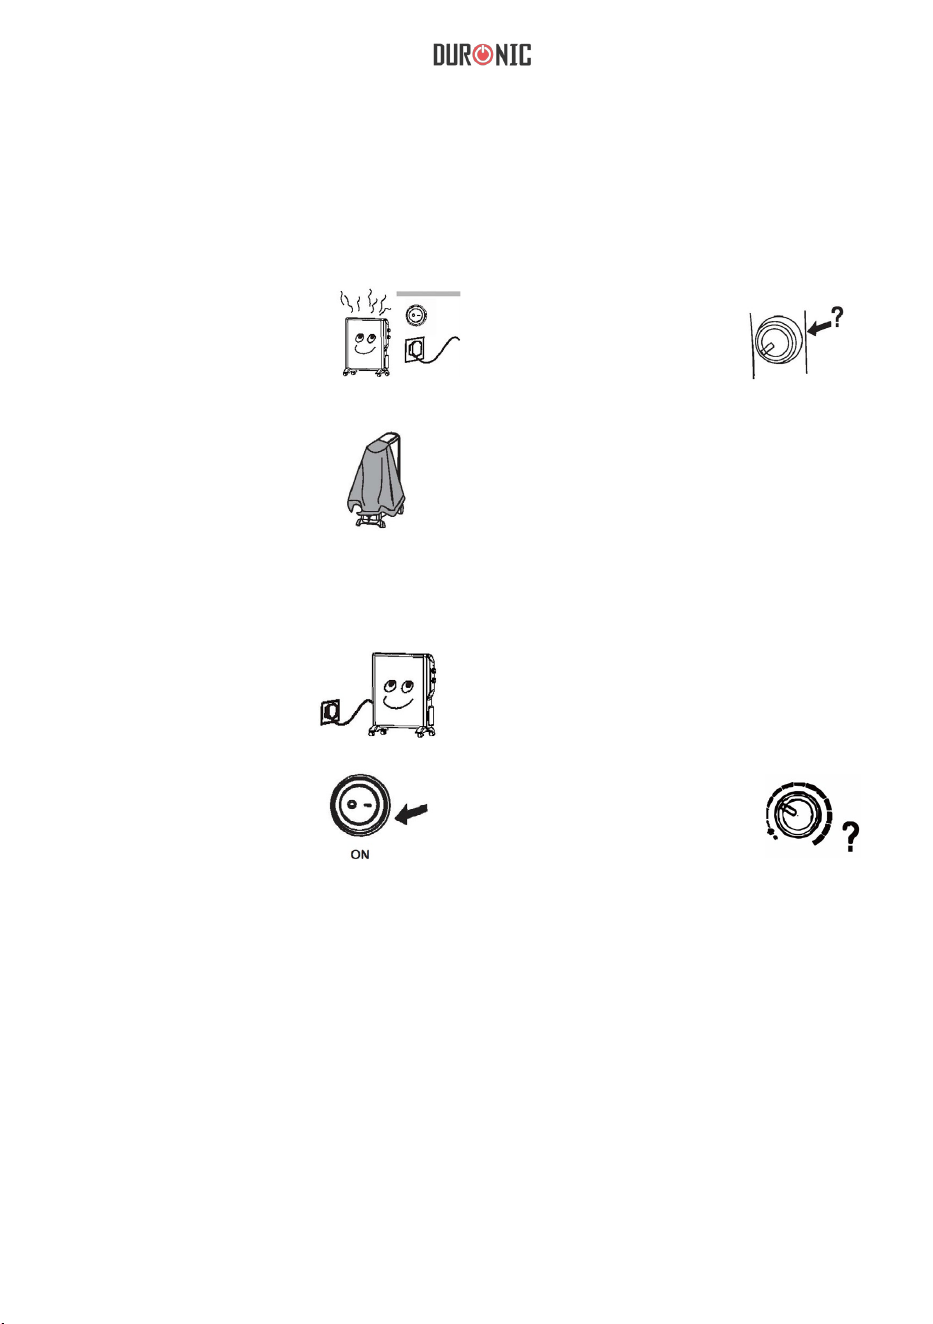
Troubleshooting
Heater is not warm
1. Check the heater is
plugged in.
3. Check that the
heater is not
covered.
2. Check that the
temperature setting is
in right position.
4. On the lowest heat settings
not all panels heat up. This
does not mean that the
heater is defect.
1. Check the power
cord is plugged
into the
electrical outlet
2. Check whether the
electricity or the main
fuse is working
4. Check that heater
is on the Thermostat
Control Condition.
After storage or restarting the heater, the heater may smell slightly.
This is because the heater absorbs the air from the room,
which may contain cigarette smoke, cosmetic fumes and smells
from furniture or the walls etc. When the heater starts up again,
it will emit those smells, this is normal and after a short period
of time the smell will start to disappear.
3. Make sure the
power switch is
at the [ON]
position.
Heater is not operating
There is a smell coming from the heater
Keep these instructions safe
18
Warranty
1 Year Guarantee from Shine-Mart Ltd, Trademark owners of Duronic Products.
NOTE: THESE STATEMENTS DO NOT AFFECT YOUR STATUTORY RIGHTS AS A
CONSUMER
This product has been manufactured under the strictest or quality control procedures, and
using the highest quality of materials, to ensure excellent performance and reliability. It will
give very good and long lasting service, provided it is properly used and maintained. The
product is guaranteed for 1 years from the date of original purchase. If any defect arises due
to a faulty materials or poor workmanship, the faulty product must be returned to the original
place of purchase. Refund or replacement is at the discretion of that company.
Duronic Products are offered with a 1 year guarantee under the following conditions:
1. The product must be returned to the retailer with original proof of purchase.
2. The product must be installed and used in accordance with the instructions contained in
this operating manual.
3. It must be used only for domestic purposes.
4. It does not cover wear and tear, malicious damage, misuse, neglect, inexpert repairs or
consumable parts.
5. Shine-Mart Ltd has no responsibilities for accidental or consequential loss or damage.
6. Shine-Mart Ltd are not liable to carry out any type of servicing work, under the guarantee
7. Valid in the UK only
This product is tted with BS:1363 plug and fuse
Imported by Shine-Mart Ltd, RM3 8SB
Information on waste Disposal for Consumers of
Electrical & Electronic Equipment.
This mark on a product and/or accompanying documents indicates that when it
is to be disposed of, it must be treated as Waste
Electrical & Electronic Equipment, (WEEE).
Any WEEE marked products must not be mixed with general household waste,
but kept separate for the treatment, recovery and recycling of the materials used.
For proper treatment, recovery and recycling; please take all WEEE marked
waste to your Local Authority Civic waste site,
where it will be accepted free of charge.
If customers dispose of Waste Electrical & Electronic Equipment correctly, they
will be helping to save valuable resources and preventing any potential negative
effects upon human health and the environment, of any hazardous materials that
the waste may contain.

19

20

21
Manuel d’utilisation en français

22
Contenu
Caractéristiques et spécications
Liste des éléments
Emballage
Installation des roues
Utilisation
Mesures de sécurité
Nettoyage, stockage et précautions
Dépannage
23
24
25
26
27
29
31
32
23
Caractéristiques et spécications
Les chauffages HV101 et HV051 de Duronic utilisent des panneaux
chauffants en MICA, ce qui représente la technologie la plus avancée en
matière de chauffage. Notre modèle n’est pas seulement dénué d’huile, mais
aussi plus silencieux qu’un chauffage à huile. Il chauffe en moins d’une
minute afin de proposer un rapport qualité/prix plus intéressant. Tous nos
chauffages MICA sont très faciles à transporter grâce à leur poignée et
roulettes intégrées pour offrir plus de mobilité.
Temps de chauffe à pleine puissance en 1 minute
Trois paramètres de puissance
Protection surchauffe et anti-trébuchement
Interrupteur avec indicateur lumineux
Indicateur de température paramétrée
Zone confortable paramétrable
Anti-gel
Léger
Silencieux
Aucune huile = aucune fuite
Ne déshumidie pas l’air
Système de rangement du cordon d’alimentation
Radiateur en MICA sans huile
Caractéristiques
Spécications
Modèle Puissance Voltage Dimensions Poids
HV101 2500W 220-240V,
50/60Hz
710(L)*232(W)*648(H )mm 6.1kg
HV051 1500W 220-240V,
50/60Hz
525(L)”232(W)”648(H)mm 4.8kg
24
Liste des éléments
1. Poignée intégrée
2. interrupteur principal
3. interrupteur secondaire
4. Contrôle de la témpérature
5. Système de rangement du cordon
6. Socle
7. Roulettes
8. Panneau latéral
25
Emballage
1. Veuillez lire les instructions avant
d’utiliser ce chauffage.
2. Enlevez la mousse de chaque côté
du chauffage. Enlevez le sac
plastique qui recouvre le chauffage.
Veuillez garder le sac et la mousse
hors de portée des enfant.
3. Retirez les roulettes et le socle
de l’emballage.
4.Gardez votre emballage à l’abri en
raison de son utilité en cas de
recours à la garantie. Vous pouvez
également ranger le chauffage dans
son emballage durant la période
estivale ou lorsqu’il n’est pas utilisé.
26
Installation des roulettes
Inserrez les roulettes à la base du
chauffage dans le support pour
roulettes. De la même manière,
procédez à l’insertion du socle de
l’autre côté du chauffage.
27
Utilisation
Veuillez lire ces instructions
d’utilisation avant d’utiliser ce
produit.
1.Vériez que l’appareil
est éteint (Fig. 1 ). Le
contrôle de la température
doit être sur 0 (Fig. 2).
La puissance doit être au
minimum (Fig. 3)
2.Brancher l’alimentation à la prise
électrique (10 AMP min.)
3.Allumez le radiateur grâce à
l’interrupteur prévu sur le
côté. Le radiateur est
maintenant en mode veille
4. Tournez l’interrupteur pour
sélectionner la température
souhaitée. L’indicateur lumineux
et le chauffage s’allumeront
jusqu’à ce que la pièce a
atteinte la température désirée.
Il s’éteindra ensuite jusqu’à ce
que la température retombe, le
radiateur se rallumera alors
automatiquement.

28
5. Pressez l’interrupteur I et/ou II en
fonction de la puissance désirée. Pour le
HV101 I correspond à 1500W, II
correspond à 1000W, I et II à 2500W.
Pour le HV051, U correspond à 1000W,
II correspond à 500W et I et II à 1500W.
6 . Pour obtenir un niveau de chaleur
désirable, une zone de chaleur
comfortable peut être sélectionné. Pour
cela, placez l’interrupteur sur
“comfortable zone”.
7. Foncton anti-gel
Cette fonction permet de garder la
pièce à une température positive. Pour
cela, branchez le radiateur et placez le
contrôle de température sur la position
“neige”.
8. Couvrir les détecteurs Même si une
étiquette « ne pas couvrir » a été placée
sur le chauffage, certains utilisateurs
pourraient accidentellement couvrir
l’unité et mettre des serviettes,
couvertures, etc. C’est pourquoi nous
dotons nos produits d’un détecteur
antisurchauffe
qui provoquera l’extinction
automatique du chauffage. Lorsque la
température redescend
de nouveau, le chauffage se rallumera
automatiquement.
9. Sécurité anti-trébuchement Si le
chauffage tombe accidentellement, celui-ci
s
’éteindra automatiquement.
29
Mesures de sécurité
Ce chauffage est chaud en
fonctionnement. Pour éviter des
brulures, ne touchez pas les
panneaux chauffants. Utilisez les
poignées situées de chaque côté du
chauffage lorsque vous déplacez le
chauffage. Gardez les matériaux
combustibles tels que les rideaux
par exemple hors de portée. Il est
recommandé de garder par mesure
de sécurité le champ libre sur un
périmètre de 90 cm. Soyez vigilant
lorsque le chauffage est allumé à
proximité des enfants. Ne laissez
pas des enfants sans surveillance à
proximité du radiateur lorsque celui-ci
est en fonctionnement. Ce chauffage
n’est pas un jouet et n’est pas conçu
pour une utilisation extérieure. Ce
chauffage n’est pas non plus
destiné à être utilisé près d’une
source d’eau, tel que la salle de
bain, la buanderie, etc. N’utilisez
pas le radiateur en présence
d’essence, de peinture ou de tout
autre liquide inammable. Ne pas
insérer ou tenter d’insérer des
objets à l’intérieur de la ventilation
en raison du risque de choc
électrique ou de dommages qui
pourrait survenir. Pour éviter tout
accident incendiaire éventuel, ne
bloquez pas les grilles d’aération d’une
manière ou d’une autre. Ne pas utiliser
cet appareil sur une surface douce
ou instable car cela pourrait bloquer
l’entrée d’air.
30
Débranchez toujours le chauffage
lorsqu’il n’est pas utilisé. Pour
débrancher le chauffage, retirez
l’alimentation de la prise électrique.
Evitez d’utiliser une rallonge
électrique. Toutes les rallonges
électriques ont un voltage maximum
à respecter qui peut s’embraser. Ne
placez pas le câble d’alimentation
sous un tapis. Assurez-vous que
le câble d’alimentation ne soit pas
situé en plein passage où il pourrait
être sujet au trébuchement
accidentel. Ne pas utilisez le
chauffage si le câble d’alimentation
ou la prise est endommagé. Si la
prise fournie est endommagée,
celleci
doit être remplacée par une
personne qualié pour éviter tout
risque relatif à la sécurité d’utilisation
de l’appareil. Branchez ce radiateur
directement sur la prise électrique.
Utilisez ce manuel pour les modèles
précédemment cités uniquement. Ce
manuel ne peut être utilisé pour
d’autres radiateurs qui pourraient
présenter des mesures de sécurité
différentes des modèles présentés
ici. N’utilisez pas ce chauffage avec
un programmateur ou tout autre
appareil qui déclencherait le
chauffage automatiquement en
raison du risque d’incendie lié à
l’utilisation de ces appareils et tout
particulièrement si le chauffage est
mal positionné.

31
Nettoyage
Stockage
Précautions
Avant de nettoyer le chauffage, vériez que celui-ci soit éteint. Débranchez
l’alimentation et laissez le chauffage refroidir. N’immergez et ne versez pas
d’eau sur l’alimentation, le câble d’alimentation ou le chauffage.
Utilisez un aspirateur pour enlever la poussière présente sur les grilles.
Essuyez les grilles en métal avec un chiffon sec pour enlever la poussière et
un chiffon humide pour enlever les tâches.
N’utilisez aucun détergent, poudre détergente abrasive ou tout autre forme de
matériel polissant sur le radiateur car ces produits peuvent enlever la nition.
N’utilisez pas ce chauffage dans des
endroits sujets aux projections d’eau
telle que la baignoire, la douche ou
une piscine.
Le chauffage ne peut se trouver
juste à côté de la prise électrique.
Entreposez le chauffage dans un endroit sec et frais et couvrez de préférence
le chauffage pour éviter tout dépôt de poussière. Utilisez l’emballage fourni.
Débranchez le chauffage et ranger la prise électrique dans l’emplacement
prévu. Assurez-vous que la prise ne traine pas.
Tout forme de réparation doit être réalisée par un représentant autorisé.
32
Dépannage
Le chauffage ne chauffe pas
1. Vériez que le
chauffage est en
fonctionnement.
3. Vériez
qu’aucun objet
de recouvre la
façade du
chauffage.
2. Vériez que le
bouton d’allumage
est enclenché.
4. Le chauffage fonctionne
normalement lorsqu’au
moins un des panneaux
chauffe.
1. Veriez que le
cordon
d’alimentation soit
branché à
la prise électrique.
2. Vériez que
l’électricité et le
fusible principale
fonctionnent
4. Vériez que la
température
ambiante ne soit
pas supérieure à la
température par
défaut.
Après avoir entreposé ou redémarré le chauffage, certaines
odeurs peuvent s’émaner. Cela résulte de l’absorption d’air dans
le chauffage, l’air pouvant contenir de la fumée de cigarette, des
cosmétiques, etc. Lorsque le chauffage s’allume, les panneaux
seront ainsi exposés à ces odeurs qui disparaitront
rapidement.
3. Assurez-vous que
la touche ON soit
enclenchée.
Le chauffage ne s’allume pas
Des odeurs s’émanent du chauffage
Gardez ce manuel.

33
Garantie et service après-vente
1 an de garantie de la part de Shine-Mart Ltd, propriétaire de la marque Duronic.
NOTE : CES DÉCLARATIONS N’AFFECTENT EN RIEN VOTRE DROIT STATUTAIRE EN
TANT QUE CONSOMMATEUR
Ce produit a été produit en suivant les procédures de contrôle de qualité les plus strictes en
utilisant des matériaux de qualité pour assurer une excellente durabilité et performance. Cet
appareil vous offrira de longues années de service tant que vous utilisez correctement cette
machine et suivez les instructions de maintenance contenues dans ce manuel. Ce produit est
garanti pour 1 an à partir de la date originale d’achat. Si ce produit était endommage en
raison d’un problème électrique ou d’une fabrication imparfaite, le produit défectueux peut
être remplacé
au vendeur à la discrétion de la marque sous conditions :
1. Le produit doit être retourné avec la preuve originale d’achat.
2. Le produit doit être installé et utilisé en accord avec les instructions contenues dans ce
manuel d’utilisation.
3. Le produit doit être réservé à un usage privé.
4. La garantie ne protège pas contre les dommages dus à l’usure normale, l’utilisation
malveillante, la mauvaise utilisation, la négligence, les réparations conduites par des non-
experts ainsi que les pièces consommables.
5. Shine-Mart Ltd ne porte pas de responsabilité pour tout damage ou
perte accidentel ou conséquent causé par ce produit.
6. Shine-Mart Ltd se dégage de toute responsabilité en matière de réparation durant la
période de garantie.
7. Valide dans toute l’Union Européenne.
Ce produit est fourni avec une prise européenne
Importé par Shine-Mart Ltd, RM3 8SB.
Ce symbole apparaît sur le produit et/ou les documents accompagnant ce
produit pour indiquer que pour procéder à la destruction de ce produit, celui-ci
doit être traité comme un déchet électrique et électronique (WEEE).
Les produits marqués WEEE ne doivent être mélangés avec les déchets
ménagers et doivent être séparés pour traitement et recyclage des composants.
An de traiter et recycler ce produit, veuillez prendre tous les composants
marqués WEEE au site de recyclage le plus proche où ce produit sera repris
gratuitement. Si les clients jettent les déchets électriques et électroniques
WEEE correctement, ce geste aidera la préservation des ressources précieuses
et prévient les potentiels effets négatifs que ces composants ou tout autre
composant dangereux ont sur la santé humaine et l’environnement.
Garantie
Suivez-nous sur
www.duronic.com @Duronic_FranceDuronic France@duronic_france

34
35
Gebrauchsanleitung auf Deutsch

36
Inhalt
Eigenschaften und Spezikationen
Einleitung
Verpackung entfernen
Einbau der Räder
Betrieb
Wichtige Schutzmaßnahm
Reinigung, Lagerung & Warnung
Fehlerbehebung
37
38
39
40
41
43
45
46
37
Eigenschaften und Spezikationen
Die Duronic HV101 und HV051 verwenden 'Mica Heizelemente', eine
führende Technologie für Heizgeräte. Unsere Modelle sind nicht nur ölfrei,
sondern haben mehr zu bieten als standardmäßige Heizgeräte. Sie
erwärmen innerhalb einer Minute und sind daher sehr kostengünstig. Alle
unsere Radiatoren haben praktische Griffe und Räder, wodurch sie
einfach zu transportieren sind.
Vollständiges Aufheizen innerhalb einer Minute
3 Leistungseinstellungen
Überhitzungschutzsensoren und Umkippschutz
Ein- und Ausschalter mit Lichtanzeige
Temperaturregler
Angenehmer-Bereich Modus
Fro
stschutz
Leichtgewicht
Leiser Betrieb
Kein Öl = Keine Auslaufen
Kein Entfeuchten
Kabelstaufach an der Vorderseite
Ölfreier Säulenradiator
Besonderheiten:
Spezikationen
Artikel Leistung Voltzahl Stückgröße Gewicht
HV101 2500W 220-240V,
50/60Hz
710(L)*232(W)*648(H )mm 6.1kg
HV051 1500W 220-240V,
50/60Hz
525(L)”232(W)”648(H)mm 4.8kg
38
Einheitsaufbau
1. Eingebaute Handgriffe
2. I Ein-/ Ausschalter
3. I I Ein-/ Ausschalter
4. Temperaturregler
5. Kabelstaufach
6.
Fuß
7. Räder
8.
Wand
39
Auspacken
1.
Nehmen Sie den Radiator aus
dem Karton.
2.
Entfernen Sie den Schaumstoff an
beiden Enden des Radiators sowie
den Polybeutel und verstauen Sie
diesen. Halten Sie die Verpackung
von Kindern fern.
3.
Nehmen Sie den Fuß und die
Räder aus der Verpackung.
4.Bitte heben Sie die Verpackung auf,
da sie ein Teil der Gewährleistung ist.
Sie ist außerdem zur Lagerung
nützlich, wenn der Radiator nicht
genutzt wird.
40
Einbau der Räder und des Fusses
Schieben Sie die Räder und den
Fuß am Boden des Heizgeräts in
die Lücken ein.
41
Betrieb
BITTE LESEN SIE DIE
GEBRAUCHSANLEITUNG VOR DEM
GEBRAUCH SORGFÄLTIG DURCH
1.Stellen Sie sicher, dass
- das Gerät ausgeschaltet ist [Off] (Bild
1)
- der Temperaturregler ausgeschaltet ist
[OFF] (Bild 2)
- der Leistungregler auf geringer
Wärme eingestellt ist (Bild 3)
2. Stecken Sie den Stecker in die
Steckdose (nicht
weniger als 10 Amp)
3.
Drücken Sie den Ein- und Ausschalter
in die [ON] Position.
Die Leuchtanzeige wird aufleuchten.
4. Stellen Sie den Temperaturregler auf
die gewünschte Temperatur. Die
Leuchtanzeige und der Radiator werden
den Betrieb aufnehmen, bis die
gewünschte Raumtemperatur erreicht ist
und sich daraufhin ausschalten. Sobald
die Raumtemperatur sinkt wird sich der
Radiator wieder anstellen, sodass die
gewünschte Raumtemperatur stets
erhalten bleibt. Je nach Präferenz kann
die Temperatur mit dem Knopf höher
oder kälter reguliert werden.

42
5. Wählen Sie eine Leistungseinstellung
[ I ] Leistungeinstellung I
[II] Leistungeinstellung II
HV101:
[ I ] 1500W, [ II ] 1000W,
[ I ]& [ II ] 2500W
HV051:
[I] 1000W, [II] 500W,[ I ] & [ II ] 1500W
6.
Der Angenehmer-Bereich Modus
(
Comfortable zone) auf dem
Temperaturregler
zeigt angenehme
Temperaturen.
7. Frostschutz-Funktion
Diese Funktion wird die
Umgebungstemperatur über dem
Gefrierpunkt halten. Stellen Sie den
Radiator ein und drehen Sie den
Temperaturregler auf die
Schneeflocken-Position
a. Sensoren
Der Radiator hat eingebaute Sensoren.
Wenn er von Decken oder Handtüchern
oä. verdeckt wird, schaltet er sich
automatisch aus. Wenn die
Gerätetemperatur sinkt, nimmt er den
Betrieb wieder auf. Dies ist eine
Sicherheitsfunktion um eine Brandgefahr
zu vermeiden.
9.
Umkippschutz
Wenn der Radiator versehentlich
umgekippt ist, schaltet er sich automatisch
aus.
43
Wichtige Schutzmaßnahmen
Während der Benutzung ist der
Radiator sehr heiß. Um
Verbrennungen zu vermeiden,
berühren Sie keine heißen
Oberflächen. Benutzen Sie die
Handgriffe um den Radiator zu
bewegen. Halten Sie einen
Abstandsradius von mindestens
90cm vom Radiator zu brennbaren
Materialien, zB. Gardinen, ein.
Vorsicht bei der Benutzung in der
Nähe von Kindern. Lassen Sie
Kinder nicht unbeaufsichtigt, wenn
das Gerät eingeschaltet ist. Es ist
k
ein Spielzeug.
Dieses Heizgerät ist nur für die
Anwendung im Innenbereich. Nicht
in einem Badezimmer,
Waschküche
oder in der Nähe von Wasser
verwenden.
Nicht in der Nähe von Benzin,
Farbe
oder brennbaren
Flüssigkeiten
verwenden.
Lassen Sie keine Gegenstände in
das
Gerät geraten. Es könnte
einen
Stromschlag, Brand oder
Schaden am Gerät verursachen.
Blockieren Sie die Lufteinlässe nicht.
Nie auf einem unebenen oder
weichen Untergrund
verwenden.
44
Entnehmen Sie den Stecker, wenn
das Gerät nicht in Gebrauch ist.
Vermeiden Sie die Nutzung von
Verlängerungskabel mit dem Gerät.
Verlängerungskabel haben eine
Höchstwattzahl, und wenn Sie dieses
Gerät mit anderen
Geräten verwenden
kann diese Zahl überschritten werden,
den Stecker und das
Verlängerungskabel überhitzen und
dadurch eine Brandgefahr darstellen.
Führen Sie das Kabel nicht unter
einen Teppich und verdecken es nicht
mit einem Läufer. Verlegen Sie das
Kabel so, dass niemand darüber
stolpern kann.
Wenn das Kabel oder der Stecker
beschädigt ist, verwenden Sie den
Radiator nicht. Bei einem
Kabelschaden muss es von einer
qualifizierten Person ersetzt werden
um Gefahren zu vermeiden.
Den Stecker nur in ordungsgemäß
geerdete Netzsteckdosen stecken.
Den Radiator nur für den
Verwendungszweck verwenden.
Nichtbefolgung kann zu Feuer,
Stromschlag oder Verletzungen
führen. Benutzen Sie das Gerät nicht
mit einem Programmiergerät, Timer
oder anderem Gerät, das den Radiator
automatisch einschaltet, da ein
Feuerrisiko besteht, wenn der
Radiator nicht korrekt positioniert oder
bedeckt ist.
45
Reinigung
Lagerung
1.
Schalten Sie den Radiator vor der Reinigung aus, entnehmen Sie den
Stecker und erlauben Sie Zeit zum abkühlen.
2.
Tauchen Sie weder das Kabel, noch den Stecker, noch den Radiator in
Wasser oder andere Flüssigkeiten und gießen Sie keine Flüssigkeiten
über das Gerät.
3.
Verwenden Sie einen Staubsauger um Staub und Flusen von dem Radiator
zu entfernen. Nehmen Sie ein trockenes Tuch um
Staub zu entfernen und
ein feuchtes Tuch um Flecken zu entfernen.
4.
Verwenden Sie keine Reinigungsmittel, Scheuerpulver oder Poliermaterialien
um den Radiator zu reinigen, da diese das Heizgerät beschädigen können.
Verwenden Sie dieses Heizgerät nicht
in der Nähe von einem Bad, einer
Dusche oder einem Schwimmbecken.
Stellen Sie das Heizgerät nicht
direkt unter Steckdosen auf.
1.
Lagern Sie den Radiator in einem kühlen, trockenen Raum, am besten
abgedeckt, um es vor Staub zu schützen. Benutzen Sie die Originalverpackung.
2.
Entnehmen Sie den Stecker und lagern Sie das Kabel in dem Staufach auf
der Vorderseite.
Warnung
Wartung und Reparaturen sollten von einem autorisierten Dienstleister
ausgeführt werden.
46
Fehlerbehebung
Der Radiator ist nicht heiß
1. Prüfen Sie, dass
das Gerät
eingesteckt ist
3.
Prüfen Sie, dass
das Gerät nicht
bedeckt ist
2. Prüfen Sie, dass die
Temperaturregelung
auf der richtigen
Position steht.
4.
Auf den niedringeren Einstellungen
werden nicht alle Säulen
heiß. Das Heizgerät ist
in diesem Fall nicht
defekt.
1. Prüfen Sie, dass
das Gerät
eingesteckt ist.
2.
Stellen Sie sicher,
dass der Strom und die
Hauptsicherung
funktionieren.
4. Prüfen Sie, dass die
Thermostatsteuerung
eingeschaltet ist.
Nach der ersten Verwendung oder wenn Sie das Gerät für eine
lange Zeit nicht verwendet wurde, könnte das Heizgerät leicht
riechen. Das Heizgerät absorbiert die Zimmerluft, welche
Zigarettenrauch und Geruch von Kosmetikern und Möbel enthalten
kann. Wenn Sie das Heizgerät verwenden, werden diese Gerüche
abgegeben und nach einer kurzen Zeit verschwinden sie.
3.
Stellen Sie sicher,
dass das Gerät
eingeschaltet ist.
Der Radiator funktioniert nicht
Der Radiator stößt einen Geruch ab
Bewahren Sie diese Betriebsanleitung für den späteren Gebrauch auf.
1 Jahr Gewährleistung von Shine-Mart Ltd, der Markeninhaber von Duronic Produkte.
ZUR BEACHTUNG : DIESE BEDINGUNGEN HABEN KEINE BEEINFLUSSUNG AUF
IHREN GESETZLICHEN RECHTE ALS VERBRAUCHER
Dieses Produkt wurde unter die strengsten Qualitätskontrollen hergestellt, und verwendet
hochwertige Werkstoffe um ausgezeichnete Leistung und Zuverlässigkeit zu sichern. Es wird
eine sehr gute und langlebige Dienstleistung, sofern es korrekt genutzt und gewartet ist.
Das Produkt ist für 1 Jahr ab dem ursprünglichen Kaufdatum gewährleistet. Bei Auftreten
eines Defekts durch schlechten Werkstoffe oder Verarbeitung, sollte das fehlerhafte Produkt
an den ursprünglichen Kaufort zurückgegeben werden. Eine Rückerstättung oder einen
Umtausch ist nach dem Ermessen der Firma.
Duronic Produkte kommt mit 1 Jahr Gewährleistung unter den folgenden Bedingungen :
1.
Da
s Produkt sollte mit dem ursprünglichen Kaufnachweis zurückgegeben werden.
2. Das Produkt sollte installiert und verwendet werden im Einvernehmen mit der
An
weisungen in der Anleitung
3.
Es s
ollte nur für den Heimgebrauch sein
4.
Na
türlicher Abnutzung oder Schäden, böswillige Beschädigung, Missbrauch,
unsachgemäßer Reparaturen und Verschleißteile sind von der Gewährleistung
a
usgeschlossen.
5.
Sh
ine-Mart Ltd hat keine Verantwortung für indirekte zufällige Verluste oder
F
olgeschaden.
6. Shine-Mart Ltd sind nicht verantwortlich Wartungsarbeiten unter die
Ge
währleistung zu machen
7.
Gu
ltig in der EU
Diese Produkt ist mit tted CE geprüfte Typ-F Euro Stecker/BS Stecker ausgestattet
Von Shine-Mart Ltd, RM3 8SB importiert
Information über Abfallablagerung für Verbraucher von eletrischer und elektronische Geräte.
Dieses Zeichen auf einem Produkt und/oder mitgelieferte Dokumenten zeigt, dass wenn es
beseitigt werden, muss es als Elektro-und Elektronik-Altgeräte, (WEEE) behandelt werden.
WEEE markierte Produkte muss nicht mit Hausmüll gemischt werden, sondern getrennt
gehalten für die Behandlung, Aufbereitung und wiederverwendung von die Werkstoffe.
Für die korrekte Behandlung, Aufbereitung und wiederverwendung bitte alle WEEE markierte
Produkte zu Ihre kommunalen Abfallbeseitigungsanlage nehmen, wo es kostenlos akzeptiert
werden wird.
Wenn Kunden Elektro-und Elektronik-Altgeräte korrekt beseitigen, werden Sie helfen wertvolle
Ressourcen zu sparen und mögliche negative Auswirkungen auf Gesundheit und der Umwelt
zu vermeiden.
Gewährleistung

48

49
Manual De Instrucciones En Español

50

51
Contenido
Características y especicaciones
Introducción
Embalaje
Instalación de ruedas
Operación
Medidas de Seguridad
Limpieza, almacenamiento y precauciones
Compruebe el calefactor antes de alguna reparación
52
53
54
55
56
58
60
61

52
Características y especicaciones
El Duronic HV101 y HV051 utiliza un elemento de calefacción “Mica” que es
una tecnología de calefacción usada para la mayoría de calefactores.
Nuestros modelos no simplemente son sin aceite sino que también son más
silenciosas que cualquier calefactor de aceite común. Se calienta dentro de
1 minuto por lo tanto, lo que es un calentador más rentable. Todos nuestros
calefactores Mica tienen ranuras, manija y ruedas para que sea un fantástico
calefactor portátil.
1 minuto para alcanzar full poder de calentamiento
Tres ajustes de potencia
Sensor de seguridad (protección contra sobrecalentamiento) y Protección anti
golpes
On/Off Interruptor con indicador luminoso
Indicador de ajuste de temperatura
Zona cómoda
Anti -frost
Ligero
Calefactor silencioso
No usa aceite – No goteras
Sin deshumidicación
Almacenamiento del cable de alimentación en la parte delantera
Calefactor de columna sin aceite
Características especiales
Especicaciones
Modelo Potencia Voltaje Dimensiones Peso
HV101 2500W 220-240V,
50/60Hz
710(L)*232(W)*648(H )mm 6.1kg
HV051 1500W 220-240V,
50/60Hz
525(L)”232(W)”648(H)mm 4.8kg
53
Estructura de la unidad
1. Manija incorporada
2.
I ON/OFF Interruptor
3. I I ON/OFF Interruptor
4.
Perilla de control de temperaturas
5.
Almacenamiento del cable de conexión
6. Base frontal
7. Ruedas
8. Panel derecho
54
Embalaje
1. Saque el calefactor y el embalaje de
la caja.
2. Quite la espuma de ambos extreos
del calefactor. Retire la bolsa que
cubre el calefactor y guarde. Mantenga
las bolsas y espuma fuera del alcance
de los niños.
3. Retire la espuma que empaqueta el
pie delantero, ruedas y mando a
distancia.
4. Mantenga su embalaje seguro, ya
que esta es una parte necesaria de la
garantía. También puede reutilizar
para almacenar su calefactor cuando
no lo esté utilizando.

55
Instalación de ruedas
Inserte las ruedas en la parte inferior
trasera del calefactor, del mismo
modo, el pie irá en la parte frontal del
calefactor.
56
Operación
POR FAVOR LEA TODAS LAS
INSTRUCCIONES
ANTES DE UTILIZAR EL CALEFACTOR.
1. Chequee que la unidad este en
posición [OFF] (Fig. 1)
- Mantenga la perilla del control de la
temperatura en [OFF] (Fig. 2)
- También el botón de la potencia en
posición bajo (Fig. 3)
2.Enchufe el cable de alimentación
a una toma eléctrica adecuada.
(Valor nominal no inferior a 1 AMP)
3.A continuación, pulse el interruptor
ON/OFF y encidenda, posición [ON]
En este momento, el indicador
luminoso está encendido.
4 . Gire la perilla de control de
temperatura para ajustar a una
temperatura deseada. El indicador
luminoso se enciende hasta que la
habitación alcanza la temperatura
deseada. Cuando la temperatura de la
habitación baje, el calefactor volvera a
encender hasta que la temperatura se
eleve a la temperatura deseada
nuevamente. La temperatura deseada
se mantiene por el procedimiento de
repetición anterior. Según las
necesidades personales, puede ajustar
la perilla de control de temperatura para
aumentar o disminuir la temperatura
como se muestra en la figura.
57
5.Luego presione el interruptor a:
[I] potencia de calefacción I
[II] potencia de calefacción II HV101
[ I ] 1500W, [ II ] 1000W,
[ I ]& [ II ] 2500W HV051
[I] 1000W, [II] 500 W,[ I ]& [ II ] 1500W
6 . Para obtener un nivel de calor deseable, en la
periila de control de temperaturas que es
conocido como la “Zona Cómoda” donde puede
ajustar el calor deseable dentro de esta variedad.
7. Función Anti-Frost
Mantendrá la temperatura por encima del
punto de “congelación”. Para ello, simplemente
conecte el cable de alimentación, y gire la
perillaa de control de temperatura a posición
“Copo de nieve” signo de nieve.
a. Sensor de seguridad
A pesar de que una etiqueta de advertencia
‘‘DO NOT COVER’’ (NO CUBRIR) esta
colocada en la unidad, algunos usuarios
accidentalmente tapan la unidad con toallas,
paños etc. Tiene sensor de seguridad para
prevenir que se sobrecaliente, en caso de que
esto pase el calefactor se apagara
automáticamente, una vez que el calefactor se
enfrié entonces volverá a encenderse.
9. Sugerencia sobre la protección
Si el calefactor accidentalmente se cae, se
apaga de forma automática.

58
Medidas de Seguridad
El calefactor está caliente cuando está en uso.
Para evitar quemaduras, no permita que la piel
toque la superficie caliente, use los asideros que
están en cada lado al mover este calefactor.
Mantenga materiales combustibles como
cortinas y otros objetos como muebles por lo
menos 3 pies (0,9 m) del calefactor por razones
de seguridad.
Extrema precaución es necesaria cuando el
calefactor se utiliza cerca de niños. No deje niños
sin supervisión cuando este aparato está
encendido. El calefactor no es un juguete.
No utilice este calefactor al aire libre. Este
calefactor no está diseñado para utilizar en
cuarto de baño, áreas de lavandería y
lugares de aire libres similares. Nunca use el
calefactor cerca de alguna forma de agua.
No utilice este calefactor en áreas donde
puede haber gasolina, pintura o líquidos
inflamables que sean usados o almacenados.
No inserte o deje que ningún objeto entré,
entre las aberturas de ventilación ya que esto
puede causar descarga eléctrica, incendio o
dañar el calefactor.
Para prevenir un posible incendio, NO bloquee
entradas de aire de ninguna manera, NO utilice
esta unidad en una superficie suave o
desnivelada, aberturas de entrada pueden ser
bloqueadas.
59
Utilice este manual para los modelos
anteriormente citados únicamente. Este
manual no puede ser utilizado para otros
calefactores que podrían presentar medidas de
seguridad diferentes. No utilice este calefactor
con un programador u otro aparato que pondría
encender el calefactor automáticamente debido
al riesgo de incendio atado(vinculado) a la
utilización de estos aparatos y muy
particularmente si el calefactor esta mal
situada.
Siempre desenchufe el calefactor cuando no
esté en uso. Para desconectar, desenchúfelo.
Por favor evite el uso de un cable de
extensión. Todos los cables de extensión
tienen una asignación de potencia máxima,
mediante el uso de este calefactor con otros
aparatos pueden superar este margen de
potencia y pueden sobrecalentar el enchufe,
extensión que puede ocasionar un incendio.
No corra el cable de alimentación debajo de
carpetas o similares, asegúrese de que el cable
este fuera del alcance de objetos o que pueda
ocasionar lecciones como tropiezos.
Nunca opere un calefactor si el cable de
alimentación esta dañado, si este es su caso
debe ser reemplazado inmediatamente por
alguna persona certificada para evitar
cualquier riesgo.
Conecte siempre a un toma corriente.

60
Limpieza
Almacenamiento
1. Antes de limpiar, apague el calefactor, desenchufe el
cable de alimentación y deje que enfríe.
2. No sumerja el cable, el enchufe o el calefactor en
agua u otros líquidos. No riegue agua u otros líquidos sobre el aparato.
3. Utilice una aspiradora para limpiar el polvo de todos los
metales del calefactor. Limpie el calefactor con un paño húmedo (no mojado)
para limpiar cualquier mancha.
4. No utilice detergentes, abrasivos de limpieza o cualquier
tipo de abrillantamiento porque puede dañar el acabado del calefactor.
No use este calefactor a los
alrededores de un baño, una ducha o
una piscina
El calefactor no debe estar
situada debajo de una toma de
corriente.
1 . Almacene el calefactor en algún lugar seco, preferiblemente que este
cubierto para prevenir de polvos o simplemente utilice el embalaje para
almacenar su calefactor.
2 . Desenchufe el calefactor y almacene el cable de alimentación en la parte
delantera. Asegúrese que el enchufe no arrastre y deje que enfríe antes de
limpiarlo.
Precauciones
Cualquier otro servicio debe de ser realizado con algún representante
autorizado.

61
Solución de problemas
El calefactor no calienta
1. Compruebe que el
calefactor esté en
funcionamiento.
3. Compruebe que
ningún objeto este
cubriendo el
calefactor.
2. Compruebe que el
botón de la
temperatura este en la
posición correcta.
4. El calefactor funciona
normalmente
cuando al menos uno de los
paneles esta funcionando.
1 . Compruebe que
el cable de
alimentación esté
conectado a la toma
corriente.
2. Asegúrese de que la
electricidad y el fusible
principal
funcione.
4. Comprobar la
resistencia si se
encuentra en el
termostato de
control.
Después de haber almacenado, algunos olores pueden
producirce. El resultado de la absorción de aire en el calefactor,
aire puede contener el humo de tabaco, cosméticos, etc. Cuando
el calefactor enciende, los paneles serán expuestos a soltar olores
rápidamente.
3. Asegúrese de
que el botón
(interruptor) este
en posición
[ON].
El calefactor no enciende
Olores proceden del calefactor
Conserve este manual de seguridad.
Garantía de servicio después de venta
NOTA: ESTAS DECLARACIONES NO AFECTAN SUS DERECHOS LEGALES COMO
CONSUMIDOR
Este producto ha sido fabricado bajo las más estrictas control de calidad y utilizando
materiales
de alta calidad para asegurar conabilidad y excelente funcionamiento. Este exprimidor
dará buen servicio y una larga duración, siempre y cuando se utilice correctamente y sea
bien mantenido. El producto está garantizado por 1 año desde la fecha de compra original.
Si surge cualquier defecto debido a un error/defecto de fábrica o mano de obra, entonces
el producto debe ser devuelto al lugar original de compra. Reembolso o reemplazo es a
discreción de la compañía.
Productos Duronic se ofrecen con una garantía de 1 año bajo las siguientes condiciones:
1. El producto debe ser devuelto al vendedor con comprobante de compra original.
2. El producto debe instalarse y usarlo según las instrucciones contenidas en este manual.
3. Este aparato es únicamente de uso doméstico.
4. No cubre desgaste, daños maliciosos, uso indebido, negligencia, reparaciones inexpertas
o
pa
rtes consumibles.
5. Shine-Mart Ltd no será responsable por cualquier daño consecuente, accidentes o
pérdidas.
6. Shine-Mart Ltd no es responsable ah llevar a cabo cualquier tipo de servicio, bajo la
garantía.
7. Valido solamente dentro de la (EU).
Este producto esta equipado con enchufe/fusible Europeo
Importado por Shine-Mart Ltd, RM3 8SB
Información sobre la eliminación de residuos para los consumidores
de equipos eléctricos y eléctricos:
Esta marca en un producto y/o documentos adjuntos indica que cuando se va a
desechar, se debe tratar como equipos residuos eléctricos y electrónicos (RAEE)
Cualquier producto marcado (RAEE) no debe ser mezclado con la basura
doméstica, sino separado para el tratamiento, recuperación y reciclaje
de los materiales utilizados.
Para el tratamiento adecuado, recuperación y reciclaje; por favor, tome todos los
productos (RAEE) y llévelo al sitio de residuos de su
Autoridad Local, donde será aceptado de forma gratuita.
Si los clientes desechan los residuos eléctricos y electrónicos correctamente,
ayudar a ahorrar valiosos recursos y prevenir los efectos negativos sobre la salud
humana y el medio ambiente, de materiales peligrosos que pueden
contener los residuos
Garantía

62
63
Manuale D’istruzioni In Italiano

64
65
Indice
Caratteristiche e specicazioni
Introduzione
Imballaggio
Installazione delle ruote
Operazioni
Istruzioni di sicurezza
Pulizia, conservazione e avvertimenti
Risoluzione problemi
66
67
68
69
70
72
74
75
66
Caratteristiche e specicazioni
I caloriferi Duronic HV101 e HV051 utilizzano “Mica Heating Element” che è
la tecnologia principale utilizzata per produrre i nostri caloriferi. I nostri
caloriferi non sono solo senza olio, ma sono anche più silenziosi rispetto ad
un calorifero ad olio. Si riscalda in un minuto rendendolo una soluzione
economicamente efciente rispetto ai caloriferi ad olio tradizionali. Tutti i
nostri caloriferi MICA sono semplici da trasportare grazie alle maniglie e alle
ruote che li rendono dei fantastici caloriferi portatili.
Si riscalda alla potenza massima in 1 minuto
3 impostazioni variabili
Rilevatori di copertura (protezione surriscaldamento)
Tasto On/Off con indicatori luminosi
Indicatore temperatura
Area ottimale di riscaldamento
Anti congelamento
Leggero
Operazioni silenziose
No Olio = no perdite
Non deumidica l’aria
Vano per riporre il cavo di alimentazione
Calorifero elettrico senza olio
Caratteristiche
Specicazione:
Modello Potenza Voltaggio Dimensioni Peso
HV101 2500W 220-240V,
50/60Hz
710(L)*232(W)*648(H )mm 6.1kg
HV051 1500W 220-240V,
50/60Hz
525(L)”232(W)”648(H)mm 4.8kg
67
Componenti del calorifero.
1. Maniglia incorporata
2. Tasto ON/OFF I
3. Tasto ON/OFF II
4. Selettore controllo temperatura
5. Sistema di organizzazione del cavo
6. Piedistallo anteriore
7. Ruote
8. Pannello di riscaldamento

68
Rimuovere l’imballo
1. Rimuovere il calorifero e l’imballo
dalla confezione.
2. Rimuovere i supporti di polistirolo
dal calorifero. Rimuovere la busta di
polietilene che copre il calorifero e
conservarla. Tenere qualsiasi
elemento dell’imballo lontano dalla
portata dei bambini.
3. Rimuovere il piedistallo, le ruote ed
il telecomando dall’imballo di
polistirolo.
4. Conservare l’imballo in quanto fa
parte della garanzia del prodotto. Inol-
tre lo si può utilizzare per riporre il
calorifero in maniera sicura durante i
mesi estivi.
69
Installazione e montaggio delle ruote
Inserire le ruote sotto la parte
posteriore del calorifero. Fare lo
stesso con l’altro paio di ruote
inserendole sotto la parte anteriore.

70
SI PREGA DI LEGGERE
ATTENTAMENTE LE PRESENTI
ISTRUZIONI PRIMA DI
UTILIZZARE IL CALORIFERO.
1.Assicurarsi che il calorifero
sia spento, pulsante in
posizione [OFF] (Fig. 1 ).
Il selettore della temperatura
sia in posizione [OFF] (Fig. 2).
- La potenza sia al minimo
(Fig. 3)
2.Connettere la spina alla presa
di corrente.
(con potenza superiore a 10 Am)
3.Premere il pulsante ON/OFF per
accendere il calorifero.
A questo punto, si accenderanno
gli indicatori luminosi.
4. Impostare il selettore alla temperatura
desiderata. Il calorifero si avvierà e
riscalderà la stanza nchè non verrà
raggiunta la temperatura selezionata.
Quindi si spegnerà automaticamente,
nchè la temperatura non scenderà di
nuovo, per poi riaccendersi.
Si accenderà e spegnerà ciclicamente
mantenendo la temperatura della stanza
costantemente alla temperatura
desiderata.
Operatività
71
5.Quindi premere il pulsante di
accensione:[ I ] Impostazione di
riscaldamento I [II] mpostazione di
riscaldamento II HV101
[ I ] 1500W, [ II ] 1000W,
[ I ]& [ II ] 2500W HV051
[I] 1000W, [II] 500 W,[ I ]& [ II ] 1500W
6. Per un temperatura ideale,
sul selettore è indicata una area di
temperatura denominata
“temperatura ideale”.
7. Funzione Anti-congelamento
Questa funzione terrà la temperatura
ambiente sopra il “punto di
congelamento”. Per fare ciò, impostare
il selettore sull’icona rafgurante il
occo di neve.
a. Coprire i rilevatori
Malgrado una etichetta di avviso “NON
COPRIRE” sia stata posta sul calorifero,
alcune persone potrebbero, comunque,
coprire accidentalmente l’apparecchio
com asciugamani, vestiti, coperte, ecc.
Perciò un dispositivo di sicurezza è
stato installato dentro al calorifero per
poter rilevare qualsiasi tipo di copertura.
9. Sicurezza contrro gli urti
Se il calorifero su bisce un urto
accidntale o si rovescia, il sensore lo
spegnerà automaticamente.
72
Informazioni di sicurezza
Il calorifero è moslto caldo quando
acceso ed in funzione. Per evitare
bruciature non toccare la superce del
calorifero; utilizzare le maniglie agli
estremi del calorifero per spostarlo.
Tenere materiali combustibili come
tende, mobili, ecc. almeno ad 1 metro
dal calorifero per motivi di sicurezza.
Estrema attenzione è necessaria
quando il calorifero è utilizzato in
presenza di bambini. I bambini devono
essere necessariamente supervisionati
quando in preseenza di questo
dispositivo. Il calorifero NON è un
giocattolo.
Non utilizzare il calorifero all’aria aperta.
Non utilizzarlo in bagni, lavanderie o
locali simili. Non utilizzare il calorifero
vicino a nessun luogo con presenza
d’acqua.
Non utilizzare il calorifero in aree con
presenza di gasiolio, vernice fresca o
altri liquidi inammabili.
Non inserire alcun oggetto in nessuna
apertura per la ventilazione o per il
rilascio del calore in quanto potrebbe
causare una scossa elettrica, incendio o
danneggiare il calorifero.
Per prevenire qualunque eventualità
di incendio, non bloccare in alcun
modo nessuna fessura o apertura.
Non utilizzare questo apparecchio so
superci morbide come tappeti o
superci irregolari in quanto le
aperture potrebbero essere bloccate.
73
Disconnettere sempre il calorifero
quando non in uso. Per disconnettere il
calorifero satccare la spina dalla presa di
corrente.
Si prega di evitare l’uso di prolunghe con
questo calorifero. Tutte le prolunghe
hanno un portata massima di wattaggio;
una prolunga, abbinata a questo
calorifero, potrebbe superare la poratat
massima di wattaggio supportato; ciò
potrebbe portare a rischi di
surriscaldamento della presa di corrente
e risultare in incendi.
Non far passare il cavo di alimentazione
sotto la tappezzeria. Non coprire il cavo
di alimentazione, con tappeti sistemi di
gestione di cablaggi. Tenere il cavo di
alimentazione lontano da angoli e
superci spigolose per evitare grovigli.
Non utilizzare il calorifero con il cavo di
alimentazione o la spina danneggiati. Se
il cavo di alimentazione risulta
danneggiato, va sostituito da una
persona qualicata per evitare qualsiasi
rischio.
Connettere la spina di corrente solo a
prese di corrente con la presa a terra.
Utilizzare questo calorifero solo per l’uso
menzionato nel presente manuale.
Qualsiasi altro utilizzo non raccomandato
dal produttore può causare, scosse
elettriche, incendi o gravi infortuni a
persone. Non utilizzare il calorifero con
un programmatore o un timer con la
funzione di attivarlo automaticamente,
poichè, se posizionato male, può causare
rischo di incendi.
74
Pulizia
Conservazione
Precauzioni
1. Prima della pulizia, spegnere il calorifero, staccare la spina dalla corrente e
lasciare che l’apparecchio si spegni.
2. Non immergere il cavo di alimentazione, la spina della corrente o il
calorifero in acqua o altri liquid; non versare acqua o altri liquidi sul calorifero.
3. Utilizzare un aspirabriciole per pulire e rimuovere la polvere dalla griglia di
metallo del calorifero. Pulire il calorifero utilizzando un panno per rimuovere la
polvere ed un pannno umido per pulire la sporcizia.
4. Non utilizzare detergenti, abrasivi, polveri per la pulizia o qualsiasi materiale
lucidante sul calorifero, in quanto potrbbero danneggiare la supercie del
calorifero.
Non utilizzare il calorifero nelle
immediate vicinanze di una vasca da
bagno, docce o piscine.
Non posizionare il calorifero nelle
immediate vicinanze di una presa
di corrente elettrica.
1. Conservare il calorifero in un luogo fresco e asciutto e preferibilmente
al chiuso per prevenire l’accumulazione di polveri e sporcizia. Altrimenti,
utilizzare l’imballo originale per riporre il calorifero.
2. Staccare la spina del calorifero e avvolgere il cavo di alimentazione sulla
parte anteriore dell’apparecchio. Assicurarsi che la spina di corrente non sia
trainata.
Qualsiasi altra operazione di manutenzione sul calorifero deve
essre operata da personale autorizzato.

75
Risuoluzione problemi
Il calorifero non riscalda
1. Controllare che il
calorifero sia attaccato
alla corrente.
3. Controllare che il
calorifero non sia
coperto.
2. Controllare che
la temperatura sia
stata impostata.
4. Alla temperatura piò bassa
non tutti i pannelli
riscaldano. Ciò non
signica che i pannelli
siano difettosi.
1. Controllare che la
spina sia collegata
alla presa di
corrente.
2. Controllare che
l’elettricità o
i fusibili principali siano
funzionanti.
4. Controllare che la
temperatura è
superiore rispetto
alla temperatura
ambiente.
Cattivo odore può essere emesso dal calorifero quando riaccesso, dopo che
è stato riposto per molto tempo. Ciò può accadere perchè, il calorifero ha
assorbito l’aria circostante, che può essere piena di polveri ceneri e altri odori
presenti in casa. Quando il calorifero verrà riacceso, potrebbe rilasciare
questo insieme di odori; dopo poco tempo di attività l’odore andrà via.
3. Assicurarasi che
l’interruttore sia
sulla posizione
ON
Il calorifero non funziona
Un cattivo odore è emesso dal calorifero
Conservare il manuale al sicuro
Questo prodotto è garantito per una durata determinata con il distributore a partire dalla data
di acquisto contro ogni difetto derivante da difetti di fabbricazione o dei materiali. Questa
garanzia non copre difetti o danni derivanti da installazione impropria, uso improprio o usura
anomala del prodotto.
L’apparecchio deve essere restituito nella sua confezione originale e accompagnato dalla
ricevuta e deve essere stato utilizzato in modo corretto. È importante rispettare le istruzioni
per l’uso e le precauzioni di sicurezza indicate di seguito. Inoltre, non possiamo garantire
l’apparecchio se è stato modicato o riparato dall’acquirente o da terzi.
1 anno di garanzia da Shine-Mart Ltd, proprietari del marchio commerciale Duronic.
NOTA: QUESTE DICHIARAZIONI NON INFLUISCONO SUI DIRITTI LEGALI DEL
CONSUMATORE
Questo prodotto è stato realizzato con le rigorose procedure del controllo qualità, e
utilizzando materiali di altissima qualità, per garantire afdabilità e prestazioni eccellenti.
Vi regalerà un servizio ottimo e a lungo termine, purchè venga opportunamente usata e
mantenuta. Il prodotto è garantito per 1 anno dalla data di acquisto. Se sorge qualche
difetto a causa di materiali difettosi o scarsa manodopera, il prodotto difettoso dovrà essere
restituito al luogo originale di acquisto. Il rimborso o la sostituzione sono a discrezione
dell’azienda. I prodotti Duronic offrono 1 anno di garanzia alle seguenti condizioni:
1. Il prodotto deve essere restituito al rivenditore con la prova d’acquisto originale
2. Il prodotto deve essere installato e usato seguendo le istruzioni contenute nel manuale.
3. Il prodotto va utilizzato solo per scopi domestici. Non è da utilizzarsi per uso commerciale.
4. La garanzia non copre usura, danni volontari, abuso, negligenza, riparazioni
inesperte o consumo dei materiali.
5. Shine-Mart Ltd non è responsabile per Danni accidentali o consequenziali.
6. Shine-Mart Ltd non è tenuta a eseguire qualsiasi tipo di riparazione, ai sensi
della garanzia.
7. Termini validi in tutta l’unione europea *Ci riserviamo il diritto di modicare le sopracitate
condizioni Per parti di ricambio si prega di consultare il sito www.duronic.com
Corretto smaltimento del prodotto.
Qusto prodotto è inclusivo di spina certicata BS
importata da Shine-Mart Ltd, RM3 8SB
Questo segno su un prodotto o su documenti indica che quando deve essere
smaltito, deve essere trattato come i rifiuti elettrici ed elettronici (WEEE) Tutti I
prodotti marcati WEEE non devono essere buttati nei rifiuti domenistici generici,
ma separati per il trattamento, il recupero e il riciclaggio dei materiali utilizzati.
Per un corretto trattamento, recupero e riciclaggio; si prega di portare tutti I
prodotti marcati WEEE al Vostro centro smaltimenti rifiuti autorizzato, dove
saranno accettati gratuitamente. Se i consumatori sono propensi allo smaltimento
corretto di rifiuti elettrici ed elettronici, aiuteranno a salvare risorse importanti e a
prevenire i potenziali effetti negativi sulla salute umana e sull’ambiente di tutti i
materiali pericolosi che i rifiuti possono contenere.
Garanzia
78
Instrukcja obsługi. Polski

79

80
Spis treści
Charakterystyka i specyfikacja
Opis urządzenia
Odpakowywanie
Instalacja kół
Obsługa
Ważne zalecenia bezpieczeństwa
Czyszczenie, przechowywanie i ostrzeżenia
Rozwiązywanie problemów
81
82
83
84
85
87
89
90

81
Charakterystyka i specyfikacja
Duronic HV101 i HV051 wykorzystuje elementy Mica-thermic, która
wiedzie prym w technologii grzewczej. Ten produkt jest nie tylko
bezolejowy, ale także oferuje dużo więcej niż standardowy grzejnik.
Nagrzewa się w ciągu minuty co pozytywnie wpływa na oszczędność
kosztów. Wszystkie nasze grzejniki Micatermiczne posiadają kółka co
czynie je w pełni przenośnymi urządzeniami.
W pełni nagrzany w ciągu 1 minuty
Tzy tryby mocy
Czujnik zakrycia (zapobieganie przegrzaniu) oraz Zabezpieczenie przewrócenia
Włącznk/ Wyłącznik ze świetlnym indykatorem
Termostat
Oznaczony przedział komfortu
Funkcja przeciw zamarzaniu
Lekki
Cichy
Brak oleju - Brak wycieków
Brak nawilżacza
Organizacja przewodu na obudowie
Grzejnik bezolejowy
Ogólna charakterystyka
Specyfikacja
Model Moc Napięcie
znamionowe
Wymiary Waga
HV101 2500 W 220-240 V,
50/60Hz
710(D)*232(Sz)*648(W)mm 4,6 kg
HV051
1500 W 220-240 V,
50/60Hz
525(D)”232(Sz)”648(W)mm
48 kg
82
Opis urządzenia
1. Wbudowany uchwyt
2. Włącznik trybu I
3. Włącznik trybu II
4. Pokrętło temperatury
5. Organizer kabla
6. Nóżka
7. Koła
8. Prawy panel
83
Odpakowywanie
1. Wyjmij grzejnik z kartonu.
2. Usuń piankowe zabezpieczenia z
obu rogów urządzenia. Usuń foliowe
zabezpieczenia pokrywające
powierzchnię grzejnika. Przechowuj
zabezpieczenia z dala od dzieci.
3. Wyjmij nóżki i kółka za
piankowych zabezpieczeń.
4. Przechowuj elementy opakowania
bezpiecznie, ponieważ są częścią
gwarancji. Są także przydatne w
przechowywaniu grzejnika poza
sezonem grzewczym.
84
Instalacja kół
Umieść koła i nóżkę pod
powierzchnią grzejnika
umieszczając w
przewidzianych otworach.
85
1.
Wyłącz tryb pracy I i II (ryz. 1 i
3) oraz temperatury (rys. 2)
na pozycję [0] - wyłączony
2. Podłącz wtyczkę do gniazdka
elektrycznego (min. 10 AMP).
3.
Włącz tryb pracy przełączając
włącznik trybu I lub II.
Wskaźnik świetlny zacznie
świecić
Obsługa
DOKŁADNIE ZAPOZNAJ SIĘ Z INSTRUKCJĄ ZANIM UŻYJESZ URZĄDZENIA
4. Przekręć pokrętło
temperatury zgodnie z ruchem
wskazówek zegara, aby
włączyć urządzenie.
Grzejnik i lampka kontrolna będą
włączone aż do czasu
osiągnięcia wybranej
temperatury,
a następnie wyłączy się. Kiedy
temperatura pomieszczenia
spadnie, grzejnik ponownie się
uruchomi i ponownie wyłączy
po jej osiągnięciu. Cykl ten
zapewni utrzymanie stałej
temperatury pomieszczenia.
Temperatura może być
zmieniana poprzez pokrętło
temperatury.
86
5. Uruchom jeden z trybów pracy:
a) HV101:
[I]: 1500 W
[II]: 1000 W
[I] & [II] 2500 W
b) HV051:
[I]: 1000 W
[II]: 500 W
[I] & [II] 1500 W
6. Dla zapewnienia komfortowej
temperatury usta pokrętło w przedziale
oznaczonym “Comfortable Zone”.
8.Czujniki zakrycia.
Pomimo oznaczeń “DO NOT COVER” - nie
zakrywać, niektórzy użytkownicy decydują
się na zakrywanie urządzenia ręcznikami,
kocami itp co powoduje przegrzewanie
urządzenia. Aby zapobiec tej praktyce
urządzenie zostało wyposażone w czujniki,
które wyłączają urządzenie, gdy następuje
jego przegrzanie. Jeżeli temperatura obniży
się - grzejnik ponownie znacznie pracować.
7. Zabezpieczenie przed przewróceniem.
Przewrócony grzejnik automatycznie wyłącza
się.
7. Funkcja przeciw zamarzaniu.
W tym trybie pomieszczenie nagrzewane jest
powyżej punktu zamarzania. Podłącz
wtyczkę do gniazdka i ustaw pokrętło
temperatury na "śnieżynkę", aby uruchomić
ten tryb.

87
Ważne zalecenia bezpieczeństwa
Grzejnik podczas pracy znacząco się
nagrzewa. W celu uniknięcia
poparzeń, nie dotykaj gorącej
powierzchni grzejnika - użyj
wbudowanego uchwytu, aby
przesunąć urządzenie. Łatwopalne
materiały jak np. zasłony trzymaj w
odległości min. 0.9 m, aby zapobiec
ryzyku pożaru. Szczególna
ostrożność jest konieczna w
przypadku użytkowania urządzenia w
pobliżu dzieci. Nie zostawiaj dzieci
bez opieki, gdy grzejnik jest
włączony. Grzejnik to nie zabawka.
Grzejnik nie nadaje się do
użytkowania na świeżym powietrzu.
Grzejnik nie został zaprojektowany
do użytkowania w łazienkach,
pralniach i innych pomieszczeniach z
dużą bliskością wody. Nie używaj
grzejnika w pomieszczeniach z
oparami benzyny, lakierów lub
innych łatwopalnych płynów. Nie
wkładaj lub nie pozwól, aby
jakiekolwiek obiekty wpadły do
otworów wentylacyjnych lub
wyciągów, ponieważ może to
spowodować porażenie prądem,
zwiększyć ryzyko pożaru lub
uszkodzić urządzenie. Aby zapobiec
ryzyku pożaru, nie blokuj otworów
wentylacyjnych i wyciągów. Nie
używaj tego urządzenie na miękkim
lub nierównym podłożu, ponieważ
może to spowodować zablokowanie
otworów wentylacyjnych.

88
Zawsze odłączaj urządzenie z
gniazdka elektrycznego, gdy go nie
używasz. W celu odłączenia od
zasilania wyciągnij wtyczkę z
gniazdka zasilającego. Unikaj
stosowania przedłużacza. Stosowanie
grzejnika z innymi urządzeniami może
spowodować przepalenie
przedłużacza ze względu na
przekroczenie maksymalnej,
obsługiwanej mocy co powoduje
ryzyko pożaru. Nie przykrywaj
przewodu zasilającego dywanem,
wykładziną lub innymi materiałami.
Ustaw przewód zasilający tak, aby
zmniejszyć ryzyko potknięcia. Nie
użytkuj urządzenia, gdy przewód,
wtyczka lub samo urządzenie jest
uszkodzone. W przypadku
uszkodzenia przewodu zasilającego
musi on zostać wymieniony przez
wykwalifikowana osobę, aby uniknąć
ryzyka wypadku. Podłączaj
urządzenie wyłącznie do uziemionego
gniazdka. Używaj grzejnika zgodnie z
instrukcją. Użytkowanie niezgodnie z
instrukcją może spowodować ryzyko
pożaru, porażenia prądem lub innych
obrażeń. Nie używaj grzejnika z
programatorem, timerem lub innym
urządzeniem, które automatycznie
uruchamia grzejnik ze względu na
ryzyko pożaru, zwłaszcza, gdy
urządzenie jest niewłaściwie
ustawione.
89
Czyszczenie
Przechowywanie
1. Wyłącz urządzenie i odłącz z gniazdka zasilającego oraz pozwól schłodzić
się, zanim przystąpisz do czyszczenia.
2. Nie zanurzaj przewodu zasilającego, wtyczki lub samego urządzenia wodzie
lub innych płynach oraz nie polewaj wodą lub innymi płynami na powierzchnię
grzejnika.
3. Użyj odkurzacza, aby usunąć kurz i zanieczyszczenia z powierzchni siatki
grzejnika. Przetrzyj grzejnik suchą ściereczką, aby usunąć kurz oraz wilgotną
(niemokrą) szmatką, aby usunąć uporczywe plamy.
4. Nie używaj detergentów, agresywnych produktów do czyszczenia lub różnego
rodzaju produktów do polerowania na powierzchni grzejnika. Może to
uszkodzić powierzchnię obudowy.
Nie zanurzaj grzejnika w otoczeniu
wody jak przy np. wannie, prysznicu
lub basenie.
Grzejnik nie może znajdować się
bezpośrednio pod gniazdkiem
elektrycznych.
1. Przechowuj urządzenie w chłodnym, suchym pomieszczeniu, najlepiej
przykrytemu, aby zapobiec osadzaniu się kurzu i brudu. Użyj oryginalnego
opakowania, aby zabezpieczyć urządzenie.
2. Odłącz przewód zasilający i nóżki i przechowuj je uporządkowane wraz z
grzejnikiem.
Ostrzeżenia
Naprawy powinny być wykonywane przez autoryzowany serwis.
90
Rozwiązywanie problemów
Grzejnik nie jest gorący
1. Sprawdź, czy
grzejnik jest
włączony.
3. Sprawdź, czy
grzejnik nie jest
przykryty.
2. Sprawdź, czy
pokrętło temperatury
jest we właściwej
pozycji.
Ustawiając niską
temperaturę grzejnik
może się nie włączyć.
Nie oznacza to, że nie
działa.
1. Sprawdź, czy
wtyczka jest
podłączona do
gniazdka..
2. Sprawdź, czy działa główne
zasilanie.
4. Sprawdź czy pokrętło
temperatury jest
prawidłowo ustawione..
Po długim przechowywaniu grzejnika może uwalniać się z niego
specyficzny zapach. Jest to spowodowane absorbowaniem powietrza z
pomieszczenia, które może zawierać dym papierosowy, opary kosmetyków,
oraz zapach mebli i ścian. Kiedy urządzenie jest uruchamiane po pewnym
czasie zapach ten może ponownie się ulatniać. Jest to normalne zjawisko i
po pewnym czasie ustępuje.
3. Upewnij się, czy
pokrętło mocy jest
ustawione w pozycji
pracy.
Grzejnik nie działa
Grzejnik emituje specyficzny zapach
Zachowaj instrukcję do wglądu

91
Warunki Gwarancji
1 Rok Gwarancji firmy Shine-Mart LTD, marki handlowej Duronic Products.
UWAGA: ten dokument nie wpływa na twoje ustawowe prawo jako konsumenta.
Ten produkt został wykonany zgodnie z restrykcyjnymi normami kontroli i wykorzystuje
najwyższej jakości materiały dla uzyskania doskonałej wydajności i niezawodności.
Długotrwałość produkty zostaje osiągnięta przez właściwe użytkowanie i konserwację.
Gwarancja obejmuje 1 rok od daty zamówienia. Jeżeli jakikolwiek defekt powstanie ze
względu na wadliwość materiału lub niewłaściwe wykonanie to uszkodzony produkt musi
zostać dostarczony do miejsca, z którego został zamówiony. Zwrot pieniędzy lub wymiana
produktu jest w gestii firmy.
Duronic Products oferuje jeden rok gwarancji na podstawie poniższych warunków:
1. Produkt musi zostać zwrócony do sprzedawcy z oryginalnym dowodem zakupu.
2. Produkt był instalowany i użytkowany zgodnie z instrukcją obsługi.
3. Produkt użytkowany był wyłącznie w celach domowych.
4. Gwarancja nie obejmuje naturalnego zużycia się produktu, celowego uszkodzenia,
niewłaściwego użycia, zaniedbania, niewłaściwych napraw lub części eksploatacyjnych.
5. Shine-Mart Ltd. nie ponosi odpowiedzialności za przypadkowe albo celowe zgubienie
produktu lub jego uszkodzenie.
6. Firma Shine-Mart Ltd nie jest zobowiązana do przeprowadzania jakichkolwiek prac
serwisowych w ramach gwarancji.
7. Obowiązuje na obszarze Unii Europejskiej.
Ten produkt jest wyposażony we wbudowaną wtyczkę typu Euro-Plug / BS z
certyfikatem CE importowaną przez Shine-Mart Ltd, RM3 8SB
Informacja o odpadach i utylizacja dla użytkowników sprzętu elektrycznego i
elektronicznego.
Usuwanie wyeksploatowanych urządzeń elektrycznych i elektronicznych (dotyczy
krajów Unii Europejskiej i innych krajów europejskich z wydzielonymi systemami
zbierania odpadów). Ten symbol na produkcie lub jego opakowaniu oznacza, że
produkt nie powinien być zaliczany do odpadów domowych. Należy go przekazać
do odpowiedniego punktu, który zajmuje się zbieraniem i recyklingiem urządzeń
elektrycznych i elektronicznych. Prawidłowe usunięcie produktu zapobiegnie
potencjalnym negatywnym konsekwencjom dla środowiska naturalnego i zdrowia
ludzkiego, których przyczyną mogłoby być niewłaściwe usuwanie produktu.
Recykling materiałów pomaga w zachowaniu surowców naturalnych.
Śledź Nas

93
Türkçe Kullanım Kılavuzu

94

95
Teknik Özellikler
Tanıtım
Paketi Kaldırma
Tekerleklerin Bağlanması
Operasyon
Önemli Güvenlik Önlemleri
Temizlik, Depolama, Dikkat
Sorun Çözme
96
97
98
99
100
102
104
105
İçindekiler
96
Özellikler
1 Dakikada tam ısınma
Üç güç ayarı
Koruma sensörü (aşırı ısınma koruması) ve Devrilme koruması
Işık göstergeli açma/kapama düğmesi
Sıcaklık ayar göstergesi
Rahat konumlama
Donma önleyici
Hafif ağırlık
Sessiz çalışma
Yağsız, sızıntısız çalışma
Nem alma yok
Teknik Özellikler
Yağsız Sütun Isıtıcı
Duronic HV101 ve HV051, ısıtmada lider bir teknoloji olan "Mika Isıtma
Elemanı" kullanır. Modumuz sadece yağsız olmakla kalmaz, aynı zamanda
standart bir yağ ısıtıcısından daha fazlasını sunar. Bir dakika içinde ısınır, bu
da onu çok uygun maliyetli bir ısıtıcı haline getirir. Tüm Mika ısıtıcılarımız,
harika bir taşınabilir ısıtıcı olması için kolay taşıma kollarına ve tekerleklere
sahiptir.
Kablo saklama bölgesi
Teknik özellikler
AğırlıkÜrün
HV101
Güç
2500W
Voltaj
220-240V,
50/60Hz
Ürün
Büyüklüğü
710(L)*232(W)*648(H )mm 6.1kg
HV051 1500W 220-240V,
50/60Hz
525(L)”232(W)”648(H)mm 4.8kg

97
Ürün
Yerleşimi
1. Dahili Kol
2. I AÇMA/KAPAMA Anahtarı
3
.
II AÇMA/KAPAMA Anahtarı
4. Sıcaklık Kontrol Düğmesi
5. Kablo için depolama yeri
6.
Stand
7. Tekerlek
8
.
Sağ panell

98
Paketin Çıkarılması
1. Isıtıcıyı ve paketini kutudan
çıkarın.
2.
Isıtıcının her iki ucundaki köpüğü
çıkarın. Isıtıcıyı kaplayan çoklu
torbayı çıkarın ve saklayın.
Poşetleri ve köpükleri çocuklardan
uzak tutun.
3.
Ön ayağı ve tekerlekleri köpük
ambalajından çıkarın.
4. Ambalajınızı güvende tutun, çünkü
bu garantinin bir parçasıdır.
Kullanılmadığı zamanlarda ısıtıcıyı
saklamak için de kullanışlıdır.

99
Tekerleklerin ve tabanın montajı
Tekerlekleri ve tabanı boşluklara
yerleştirerek ısıtıcının altına
yerleştirin.
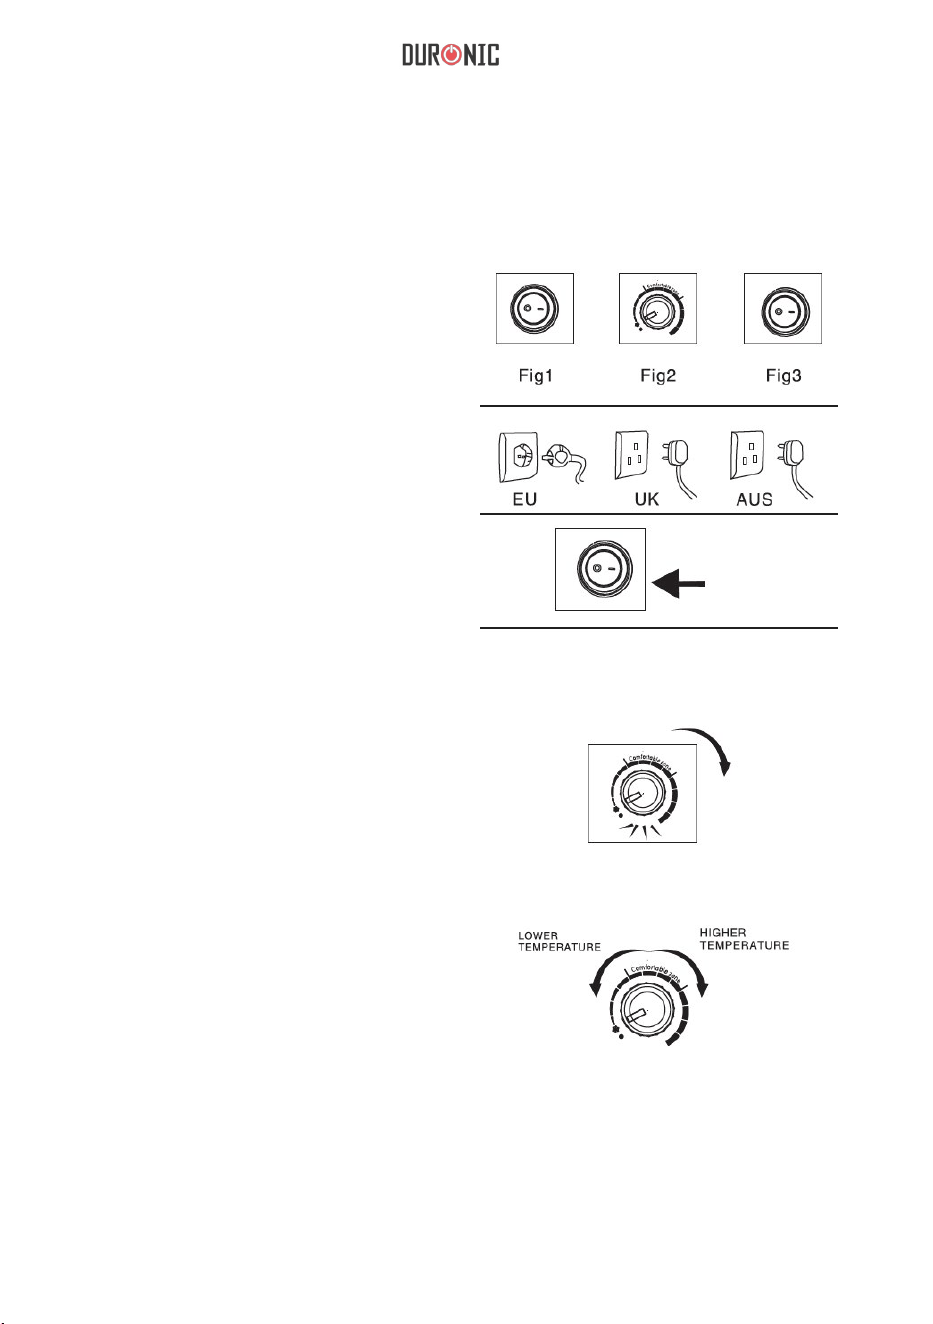
100
BU ISITICIYI KULLANMADAN
ÖNCE LÜTFEN TALIMATLARIN
TAMAMINI OKUYUN.
1. Ünitenin aşağıdaki konumda
olduğunu kontrol edin: [OFF]
konumunda olduğunu kontrol
edin (Şekil 1 ).
Sıcaklık Kontrol Düğmesi
[KAPALI] konumundadır (Şekil 2)
Ayrıca güç Düşük Isı
Konumundadır (Şekil 3)
2. Güç kablosunu uygun bir
elektrik prizine takın.
(10 AMP'den az olmayacak
şekilde derecelendirilmiştir)
3.AÇMA/KAPAMA düğmesine
[AÇIK] konumuna basın.
Bu anda ışıklı göstergesi yanar.
4.
Sıcaklık kontrol düğmesini istediğiniz
sıcaklığa çevirin. Oda istenen
sıcaklığa ulaşana kadar ışıklı
gösterge ve ısıtıcı yanacaktır. Daha
sonra oda sıcaklığı düşene kadar
otomatik olarak kapanacaktır. Isıtıcı
daha sonra tekrar açılacak ve
böylece istenen oda sıcaklığı
korunacaktır. Kişisel ihtiyaçlara göre
oda sıcaklığını artırmak veya
azaltmak için sıcaklık kontrol
düğmesini ayarlayabilirsiniz.
Operasyon

101
5. Ardından Güç düğmesine basarak:[ I ]
Isıtma gücü ayarı [I] [II] Isıtma gücü
Ayar II HV101
[I] 1500W, [II] 1000W,
[ I ]& [ II ] 2500W HV051
[1000W, [II] 500W, [ I ]& [ II ] 1500W
6. Konforlu bir sıcaklık için Sıcaklık
Kontrol Düğmesi üzerinde
"Konforlu Bölge" olarak bilinen bir
alan vardır.
7.
Donma Önleyici Fonksiyon
Bu fonksiyon çevredeki sıcaklığı donma
noktasının üzerinde tutacaktır. Bunu
yapmak için güç kablosunu prize takın
ve sıcaklık kontrol düğmesini "Kar
Tanesi" konumuna getirin.
a. Koruma Sensörleri
Ünite üzerine "KAPATMAYIN" uyarı etiketi
yerleştirilmiş olmasına rağmen, bazı
kullanıcılar üniteyi yanlışlıkla havlu veya
battaniye vb. ile örtebilir. Bu nedenle, aşırı
ısınmayı tespit etmek için ısıtıcının içine bir
güvenlik cihazı yerleştirilmiştir. Ünite aşırı
ısındığında, güç kesilecektir. Ünite sıcaklığı
tekrar düştüğünde, güç yeniden
sağlanacaktır.
8
.
Devrilme Koruması
Isıtıcı yanlışlıkla devrilirse,
otomatik olarak kapanır.

102
Önemli Güvenlik Önlemleri
Isıtıcı kullanımdayken sıcaktır.
Yanıkları önlemek için çıplak cildin
sıcak yüzeye temas etmesine izin
vermeyin. Isıtıcıyı taşırken
tutamakları kullanın. Yanıcı
malzemeleri, örneğin:
Yangın tehlikesini önlemek için
ısıtıcıdan en az 3 fit (0,9 m)
yarıçapında perde vb. ve diğer
mobilyalar gibi. Herhangi bir ısıtıcı
çocukların yakınında kullanıldığında
son derece dikkatli olunmalıdır. Bu
ısıtıcı AÇIK durumdayken çocukları
gözetimsiz bırakmayın. Isıtıcı bir
oyuncak değildir. Isıtıcıyı açık
havada kullanmayın. Bu ısıtıcı
banyolarda, çamaşırhanelerde ve
benzeri kapalı mekanlarda
kullanılmak üzere tasarlanmamıştır.
Isıtıcıyı asla herhangi bir su türünün
yakınında kullanmayın. Isıtıcıyı
benzin, boya veya yanıcı sıvıların
kullanıldığı veya depolandığı
alanlarda kullanmayın. Elektrik
çarpmasına veya yangına neden
olabileceğinden veya ısıtıcıya zarar
verebileceğinden, herhangi bir
havalandırma veya egzoz deliğine
herhangi bir nesne sokmayın veya
girmesine izin vermeyin. Olası bir
yangını önlemek için, hava
girişlerini veya egzozu herhangi bir
şekilde engellemeyin. Açıklıkları
tıkayabileceğinden bu cihazı
yumuşak veya düz olmayan bir
yüzeyde çalıştırmayın.
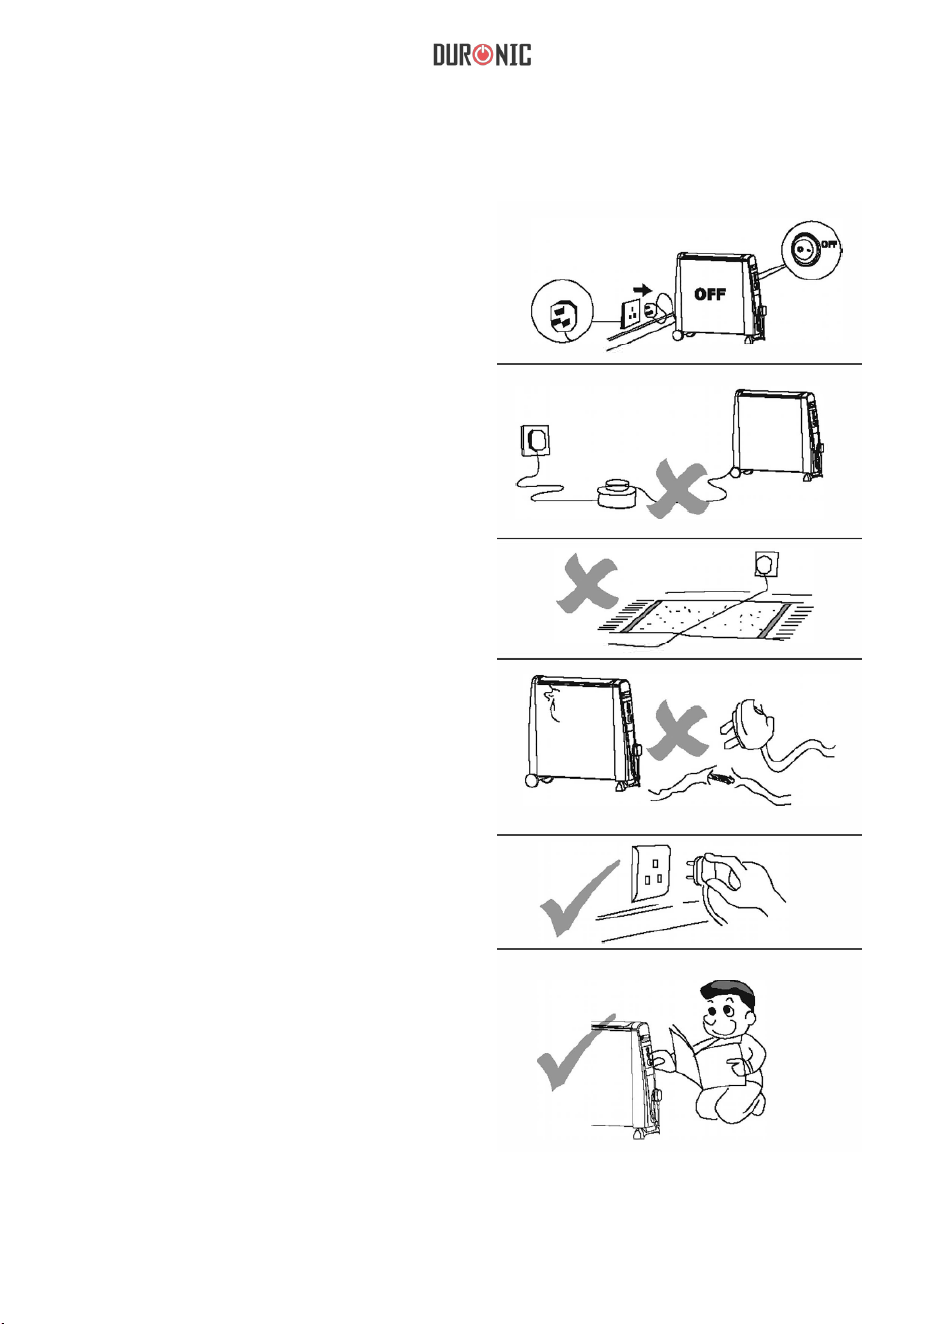
103
Isıtıcıyı kullanmadığınız zamanlarda
daima fişini çekin. Isıtıcının
bağlantısını kesmek için,
fişi prizden çıkarın. Lütfen bu ısıtıcı ile
uzatma kablosu kullanmaktan kaçının.
Tüm uzatma kablolarının maksimum
watt değeri vardır ve bu ısıtıcı başka
cihazlarla birlikte kullanıldığında watt
değeri aşılabilir, fiş ve uzatma soketi
aşırı ısınabilir ve yangın riskine neden
olabilir. Kabloyu halıların altından
geçirmeyin. Kabloyu kilim, yolluk vb.
ile örtmeyin. Kabloyu takılıp
düşülmeyecek şekilde düzenli olarak
yerleştirin. Hasarlı bir kablo veya fiş
ile herhangi bir ısıtıcıyı çalıştırmayın.
Eğer besleme
kablosu hasar görmüşse, tehlikeyi
önlemek için yetkili bir kişi tarafından
değiştirilmelidir. Sadece uygun şekilde
topraklanmış prizlere bağlayın. Bu
ısıtıcıyı yalnızca bu kılavuzda
açıklanan amaç için kullanın. Üretici
tarafından tavsiye edilmeyen başka
herhangi bir kullanım yangına, elektrik
çarpmasına veya kişilerin
yaralanmasına neden olabilir. Bu
ısıtıcıyı bir programlayıcı, zamanlayıcı
veya ısıtıcıyı otomatik olarak açan
başka bir cihazla birlikte kullanmayın,
çünkü ısıtıcı kapatılırsa veya yanlış
yerleştirilirse yangın riski vardır.
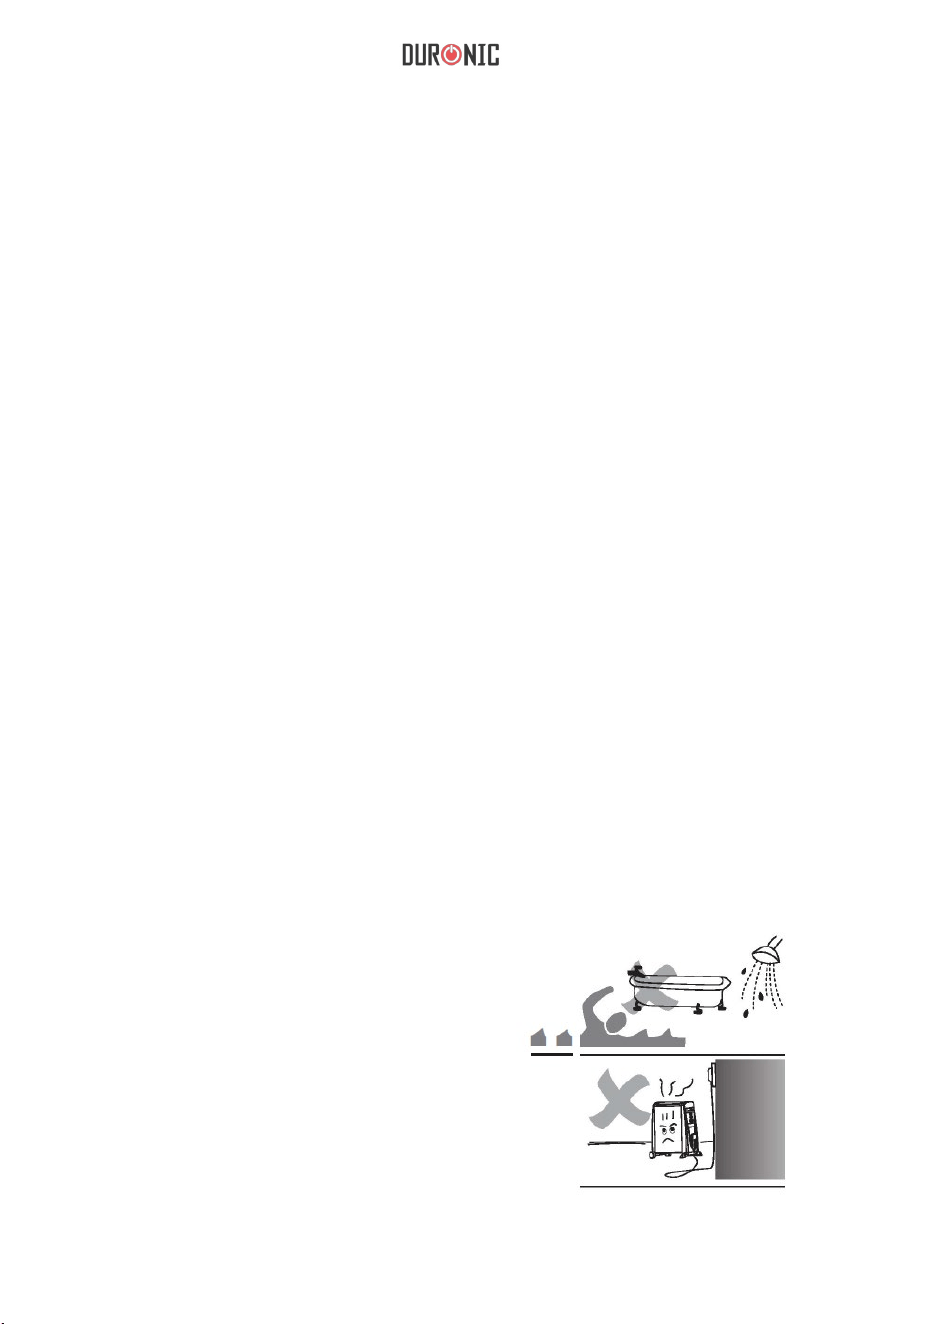
104
Temizlik
1. Temizlemeden önce ısıtıcıyı kapatın, güç kablosunu çekin ve ısıtıcının
soğumasını bekleyin.
2.
Depolama
Dikkat
Güç kablosunu, fişi veya ısıtıcıyı suya veya diğer sıvılara batırmayın veya
ısıtıcının üzerine su veya diğer sıvıları dökmeyin.
3
.
Isıtıcının metal ızgarasındaki toz ve tüyleri temizlemek için bir elektrikli
süpürge kullanın. Isıtıcıyı tozdan arındırmak için kuru bir bezle ve
lekeleri temizlemek için nemli bir bezle (ıslak değil) silin.
4. Isıtıcının gövdesinde deterjan, aşındırıcı temizlik ürünleri veya herhangi bir
parlatma malzemesi kullanmayın, bunlar kaplamaya zarar verebilir.
Diğer
tüm
servis
işlemleri
yetkili
bir
servis
temsilcisi
tarafından
gerçekleştirilmelidir.
1.
Isıtıcının içinde toz ve kir birikmesini önlemek için ısıtıcıyı tercihen üstü kapalı olarak
serin ve kuru bir yerde saklayın. Üniteyi yeniden paketlemek için eski paketi
kullanın.
2. Isıtıcının fişini çekin ve şebeke kablosunu ısıtıcının ön tarafındaki saklama
düzeninde saklayın. Fişin iz bırakmadığından emin olun.
Bu ısıtıcıyı banyo, duş veya yüzme
havuzunun yakın çevresinde
kullanmayın.
Isıtıcı bir prizin hemen altına
yerleştirilmemelidir.

105
Sorun giderme
Isıtıcı sıcak değil
1. Isıtıcının fişinin
takılı olduğunu
kontrol edin.
3.
Güç anahtarının
[ON]
konumunda
olduğundan
emin olun.
2.
Sıcaklık ayarının
doğru konumda
olduğunu kontrol
edin.
4.
Isıtıcı çalışmıyor
1.
En düşük ısı ayarlarında
tüm paneller ısınmaz. Bu
ısıtıcının arızalı olduğu
anlamına gelmez.
2. Elektrik veya ana
sigortanın çalışıp
çalışmadığını
kontrol edin.
4.
Güç kablosunun
elektrik prizine
takılı olup
olmadığını
kontrol edin.
3.
Isıtıcının
kapalı
olmadığını
kontrol edin.
Isıtıcının Termostat
Kontrol Durumunda
olduğunu kontrol edin.
Isıtıcıdan gelen bir koku var
Isıtıcıyı depoladıktan veya yeniden çalıştırdıktan sonra ısıtıcı
hafifçe kokabilir. Bunun nedeni ısıtıcının odadaki havayı
emmesidir; bu hava sigara dumanı, kozmetik dumanları ve
mobilyalardan veya duvarlardan vb. gelen kokular içerebilir. Isıtıcı
tekrar çalışmaya başladığında bu kokuları yayacaktır, bu normaldir
ve kısa bir süre sonra koku kaybolmaya başlayacaktır.
Bu talimatları güvende tutun
106
GARANTİ BELGESİ
Duronic Ürünlerinin Ticari Marka sahipleri olan Shine-Mart Ltd’den 1 Yıl Garanti.
NOT: BU AÇIKLAMALAR BİR TÜKETİCİ OLARAK YASAL HAKLARINIZI ETKİLEMEZ
Bu ürün, mükemmel performans ve güvenilirlik sağlamak için en katı veya kalite kontrol
prosedürleri altında ve en yüksek kalitede malzemeler kullanılarak üretilmiştir.
Doğru kullanılması ve bakımının yapılması koşuluyla çok iyi ve uzun ömürlü hizmet
verecektir. Ürün, orijinal satın alma tarihinden itibaren 1 yıl garantilidir.
Hatalı malzeme veya kötü işçilik nedeniyle herhangi bir kusur ortaya çıkarsa, hatalı ürün
orijinal satın alma yerine iade edilmelidir.
Para iadesi veya değiştirme o şirketin takdirine bağlıdır. Duronic Ürünleri aşağıdaki koşullar
altında 1 yıl garanti ile sunulmaktadır:
1. Ürün, orijinal satın alma belgesiyle birlikte perakendeciye iade edilmelidir.
2. Ürün, bu kullanım kılavuzunda yer alan talimatlara uygun olarak kurulmalı ve
kullanılmalıdır.
3. Sadece evsel amaçlar için kullanılmalıdır.
4. Aşınma ve yıpranma, kötü niyetli hasar, yanlış kullanım, ihmal, uzman olmayan
onarımlar veya sarf malzemelerini kapsamaz.
5. Shine-Mart Ltd’nin kazara veya dolaylı kayıp veya hasarlar için hiçbir sorumluluğu
yoktur.
6. Shine-Mart Ltd, garanti kapsamında herhangi bir servis çalışması yapmakla yükümlü
değildir.
Bu ürün F tipi ş ve sigorta ile donatılmıştır.
Shine-Mart Ltd, RM3 8SB tarafından ithal edilmiştir
Elektrikli ve Elektronik Ekipman Tüketicileri için Atık Bertarafına İlişkin Bilgiler. Bir ürün
ve/veya beraberindeki belgeler üzerindeki bu işaret, ürünün bertaraf edilecekse, Atık
Elektrikli ve Elektronik Ekipman (WEEE) olarak değerlendirilmelidir.
WEEE işaretli ürünler genel evsel atıklarla karıştırılmamalı, kullanılan malzemelerin
işlenmesi, geri kazanımı ve geri dönüşümü için ayrı tutulmalıdır. Uygun işlem, geri
kazanım ve geri dönüşüm için; lütfen tüm WEEE işaretli atıkları, ücretsiz olarak kabul
edilecekleri Yerel Yetkili Sivil atık sahanıza götürün.
Müşteriler Atık Elektrikli ve Elektronik Ekipmanı doğru bir şekilde bertaraf ederlerse,
değerli kaynakların korunmasına yardımcı olacak ve atığın içerebileceği tehlikeli
maddelerin insan sağlığı ve çevre üzerindeki olası olumsuz etkilerini önleyeceklerdir.
Bizi Takip Edin
107
Gebruikershandleiding Nederlands

108

109
Features & Specicati
es
I
n
troductie
Verpakking verwijderen
Montage van de wielen
Gebruik
Belangrijke veiligheidsmaatregelen
Schoonmaak, opslag en waarschuwingen
Trouble-shooting
110
111
112
113
114
116
118
119
Inhoud

110
Features & Specicaties
Olie-vrije Radiator
De Duronic HV101 en HV051 gebruiken een “Mica Heating Element”, een
van de leiders in verhittingstechnologie. Onze radiatoren zijn niet alleen olie
vrij, maar ze bieden meer dan standaard olie radiatoren. Doordat ze binnen
een minuut op temperatuur zijn, zijn ze erg zuinig – ook op financieel gebied.
Al onze Mica radiatoren hebben handvaten en wielen op ze makkelijk te
kunnen verplaatsen.
Speciale features
Full heat in 1 Minute
Op temperatuur in 1 minuut
Drie vermogensopties
Bedekking sensor (overheat protection) en omval-protection
Aan/Uit-knop met lampje
Temperatuurinstelling indicator
Comfortable zone
Anti-vries
Lichtgewicht
Stil tijdens gebruik
Geen olie = geen lekkages
Geen luchtontvochting
Netsnoer opslag aan voorzijde
Eigenschappen
VoltageToestel
HV101
Vermogen
2500W 220-240V,
50/60Hz
Afmetingen
710(L)*232(W)*648(H )mm
Gewicht
6.1kg
HV051 1500W 220-240V,
50/60Hz
525(L)”232(W)”648(H)mm 4.8kg

111
Layout van het toestel
1. Ingebouwd handva
2. I AAN/UIT KNOP
3
.
I I AAN/UIT KNOP
4. Temperature Control Knop
5. Opslag voor kabel
6.
7. Wiel
8
.
Rechter paneel
Voetstuk

112
Verpakking verwijderen
1. Neem de radiator en de
verpakking uit de doos.
2. Verwijder het piepschuim aan beide
kanten van de radiator. Verwijder
ook de plastic zak die op de
radiator ligt, en sla deze op. Hou
piepschuim en plastic zak buiten
het bereik van kinderen.
3. Verwijder het voetstuk en de
wielen uit het piepschuim.
4. Gooi de verpakking liefst niet weg,
dit hoort namelijk bij de garantie.
Het is ook handig om de radiator
bijvoorbeeld in de zomer weer op te
slaan.

113
Montage van de wielen en het voetstuk
Bevestig de wielen en het voetstuk
aan de onderkant van de radiator
door ze op de juiste plek te
schuiven.

114
LEES GELIEVE ALLE
INSTRUCTIES ZORGVULDIG
DOOR VOOR U DE RADIATOR
GEBRUIKT.
1.Controleer of het volgende
waar is:
- Het toestel is in de [OFF] stand
(Fig. 1 ).
- De Temperature Control
Knop staat op de [OFF] stand
(Fig. 2).
- Het vermogen staat op de Low
Heat Stand (Fig. 3)
2. Steek de stekker in een
geschikt stopcontact
(Niet minder dan 10 ampère)
3.Zet de ON/OFF knop op de
[ON] stand.
Nu hoort het lampje aan te gaan.
4. Zet de temperatuur knop op de
gewenste temperatuur. Het lampje
zal branden totdat de kamer op de
gewenste temperatuur is. Dan
schakelt de radiator zichzelf uit,
totdat de temperatuur weer gedaald
is. Dan schakelt het toestel zich
weer aan totdat de gewenste
temperatuur weer bereikt is. U kunt
ten alle tijde de temperatuur knop
draaien om de kamer zo warm te
maken als geschikt is voor uw eigen
behoeften.
Gebruik

115
5.
Zet de Power knop vervolgens op: [ I ]
Heating power setting I [II] Heating
power
setting II HV101
[ I ] 1500W, [ II ] 1000W,
[ I ]& [ II ] 2500W HV051
[I] 1000W, [II] 500 W,[ I ]& [ II ] 1500W
6. Als u niet weet wat de ideale
temperatuurinstelling voor u is, zet de
knop dan op de “Comfortable Zone”
voor een aangename temperatuur.
7. Anti-Vries Functie
Deze functie houdt de ruimte boven het
vriespunt. Om dit te doen, zet het toestel
aan en zet de temperatuur knop op de
“sneeuwvlok” stand.
a. Bedekking Sensors
Ookal zit er een “DO NOT
COVER” sticker op het toestel, bedekken
sommige mensen het toestel alsnog per
ongeluk met een handdoek of
kledingsstuk.
Daarom heft het toestel een ingebouwde
veiligheidsmaatregel die oververhitting
detecteert. Als het toestel te heet wordt,
schakelt deze zichzelf uit. Wanneer het
vervolgens voldoende afgekoeld is,
schakelt het zich weer aan.
8.
Omval-protection.
Als het toestel
omvalt, schakelt
het zichzelf
automatisch uit.

116
Belangrijke
veiligheidsmaatregelen
Het toestel is heet als het in gebruik
is. Raak niet met blote huid aan om
brandwonden te voorkomen.
Gebruk de handvaten om het
toestel te verplaatsen.
Hou vlambare materialmen, zoals
gordijnen, minstens 90cm van het
toestel af om brandgevaar te
voorkomen.
Wees extreme voorzichtig wanneer
het toestel in de buurt van kinderen
staat.
Laat kinderen niet zonder toezicht
in de buurt komen, en laat ze niet
met het toestel spelen: het is geen
speelgoed!
Gebruik de radiator niet buiten.
De radiator is niet geschikt voor
badkamers, wasruimtes of dergelijk
binnenruimtes. Gebruik het toestel
nooit in de buurt van water.
Gebruik het toestel niet in ruimtes
waar benzine, verf of andere
vlambare vloeistoffen worden
gebruikt of opgeslagen.
Stop geen objecten, en laat geen
objecten in ventilatie- of
uitlaatgaten van het toestel komen;
dit kan een elektrische schok,
brand, of schade aan het toestel
veroorzaken.
Om brand te voorkomen, blokkeer
de uitlaat en luchtinname gaten
niet.
Gebruik het toestel niet op zachte
of ongelijke ondergronden; dit kan
de openingen versperren.

117
Ontkoppel altijd van het stopcontact
als u de radiator niet gebruikt. Om te
ontkoppelen, haal de stekker uit het
stopcontact.
Gebruik geen verlengkabel voor de
radiator. Alle verlengkabels hebben
een maximaal wattage vermogen.
Door het toestel in combinatie met
andere apparaten aan te sluiten op
een verlengkabel, kan dit vermogen
overschreden worden en kan er brand
ontstaan door oververhitting.
Leg de kabel niet onder een tapijt of
deken.
Leg de kabel neer, zodat er niet over
gestruikeld kan worden. Gebruik de
radiator niet als de kabel of de stekker
beschadigd zijn. In het geval van
schade aan de kabel of stekker moet
een bevoegd persoon de reparatie
uitvoeren.
Verbind aan geaard stopcontact.
Gebruik alleen voor doeleinden zoals
in deze handleiding omschreven. Elk
ander, niet omschreven gebruik kan
leiden tot brand, elektrische schokken
of letsel aan personen. Gebruik het
toestel niet met een timer of dergelijk
apparaat die de radiator automatisch
aan zet, aangezien er brand kan
ontstaan als het toestel bedekt of
verkeerd gepositioneerd is.

118
Schoonmaak
1. Schakel het toestel uit, ontkoppel het van het stopcontact en laat het
afkoelen alvorens het schoon te maken.
2. Dompel de kabel, stekker of radiator zelf niet onder in water of andere
vloeistoffen. Giet geen water of andere vloeistoffen op het toestel.
Opslag
Waarschuwing
3
.
Gebruik een stofzuiger om pluis en stof te verwijderen van het rooster.
Veeg het toestel met een vochtige (NIET natte) doek af, om vlekken te
verwijderen.
4.
Reparaties moeten uitgevoerd worden door een bevoegd persoon.
1.
Sla de radiator op in een koele, droge locatie, het liefst bedekt om te voorkomen dat stof
en viezigheid zich ophopen in het toestel. Hierbij kunt u de originele verpakking gebruiken.
2.
Gebruik geen wasmiddel, schurende schoonmaakproducten of polijstend
materiaal op de behuizing, aangezien deze de toplaag kunnen aantasten.
Ontkoppel de radiator en sla het netsnoer op, op de kabelopslag aan de voorkant van het
toestel.
Zorg dat het netsnoer niet over de grond sleept.
Gebruik de radiator niet in de nabijheid
van een bad, douche of zwembad.
De radiator hoort niet direct onder een
stopcontact neergezet te worden.
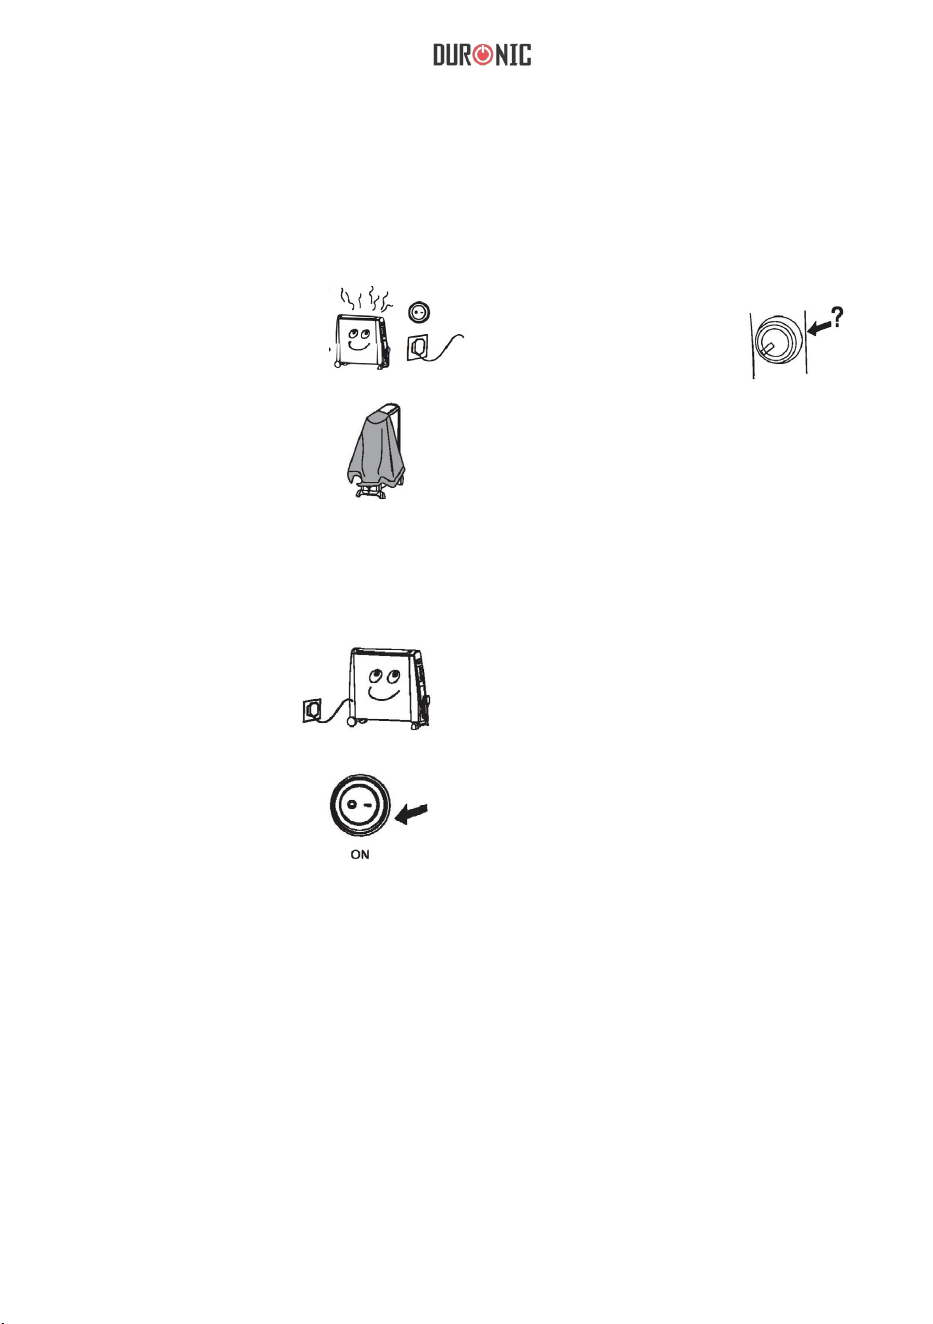
119
Troubleshooting
Radiator wordt niet warm
1. Controleer of de
stekker in het
stopcontact
gestoken is.
3.
3. Zorg dat de
aan/uit-knop
op [ON] staat.
2. Controleer of de
temperatuur knop
op de juist stand
staat.
4.
Radiator werkt niet
1.
Op de laagste temperatuur
stand worden niet alle panelen
warm. Dit betekent niet dat de
radiator defect is.
2. Controleer of de
elektriciteit werkt
en de zekeringen
werken.
4.
Controleer of de
stekker in het
stopcontact
gestoken is.
3.
Controleer of
het toestel
niet bedekt is.
4. Controleer of de radiator
op de Thermostat Control
Condition staat.
De radiator geeft een vreemde geur af.
Na de radiator opnieuw opgestart te hebben, kan er een lichte geur
vrijkomen. Dit komt omdat het toestel de lucht van de ruimte
absorbeert. Als er sporen van rook, cosmetische producten, of
ingetrokken geuren van meubels zijn worden deze bij het opstarten
weer uitgestoot. Na een korte tijd zullen deze geurtjes weer
verdwijnen.
Bewaar deze instructies goed.
120
Garantie
1 Jaar Garantie van Shine-Mart Ltd Handelsmerk eigenaars van Duronic Producten. LET
OP: DEZE STELLINGEN HEBBEN GEEN INVLOED OP UW WETTELIJKE RECHTEN ALS
CONSUMENT
Dit product is vervaardigd onder de strengste kwaliteitscontrole procedures, met materialen
van de hoogste kwaliteit, om uitstekende werking en betrouwbaarheid te verzekeren. Het
zal zeer goed en langdurig dienstdoen, naar gelang het correct gebruikt en onderhouden
wordt. Het product heeft 1 jaar garantie van de originele aankoopdatum. Als een defect zich
toont vanwege een materiaal- of constructiefout, dient het defecte apparaat bij de originele
aankoop locatie geretourneerd te worden. Terugbetaling of vervanging is ter discretie van
dat bedrijf.
Duronic Producten worden aangeboden met een 1-jarige garantie onder de volgende
omstandigheden:
1. Het product dient naar de verkoper geretourneerd te worden met aankoopbewijs.
2. Het product dient geïnstalleerd en gebruikt te worden naar de instructies in deze
gebruikshandleiding.
3. Het product is alleen geschikt voor huishoudelijk gebruik.
4. De garantie dekt geen gebruiksschade, opzettelijke schade, verkeerd gebruik of
verwaarlozing.
5. Shine-Mart Ltd heeft geen verantwoordelijkheid voor accidentele schade of verlies.
6. Shine-Mart Ltd is niet aansprakelijk voor onderhoud onder de garantie.
7. Alleen geldig in Nederland
Dit product is uitgerust met een CE:1363 stekker en zekering.
Geïmporteerd door Shine-Mart Ltd, RM3 8SB
Informatie over afvalverwerking voor Afgedankte Elektrische en Elektronische Apparatuur
(AEEA).
Dit teken geeft aan dat een product en/of bijbehorende documentatie bij verwijdering, dient
te worden behandeld als Afgedankte Elektrische en Elektronische Apparatuur (AEEA).
Alle AEEA gemarkeerde producten dienen niet te worden gemengd met algemeen
huishoudelijk afval, maar moeten apart worden gehouden voor de behandeling, herwinning
en hergebruik van de gebruikte materialen.
Volg ons