- 1 -
Absolute True Fidelity DAC RD160
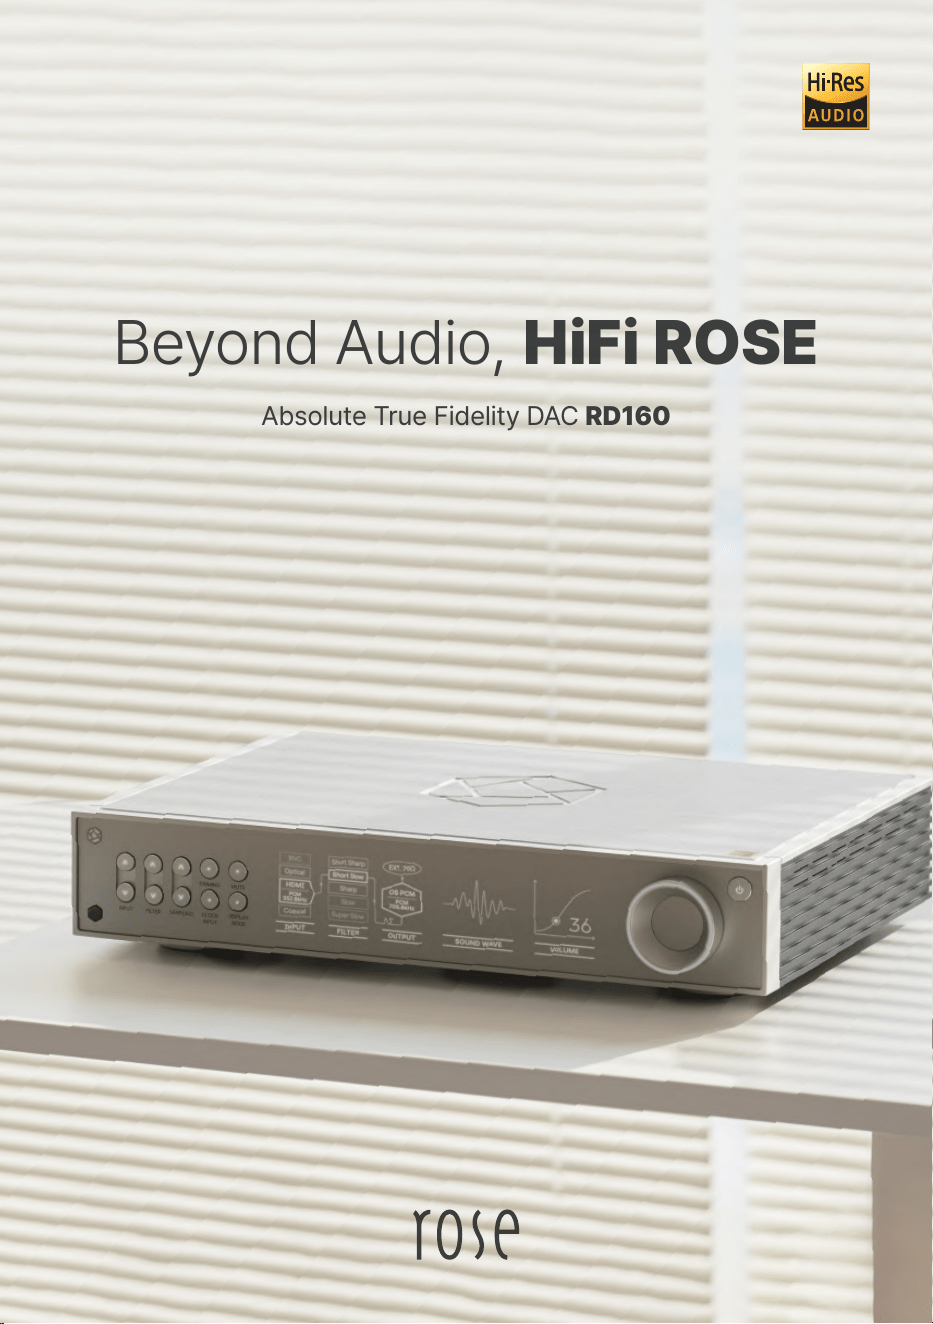
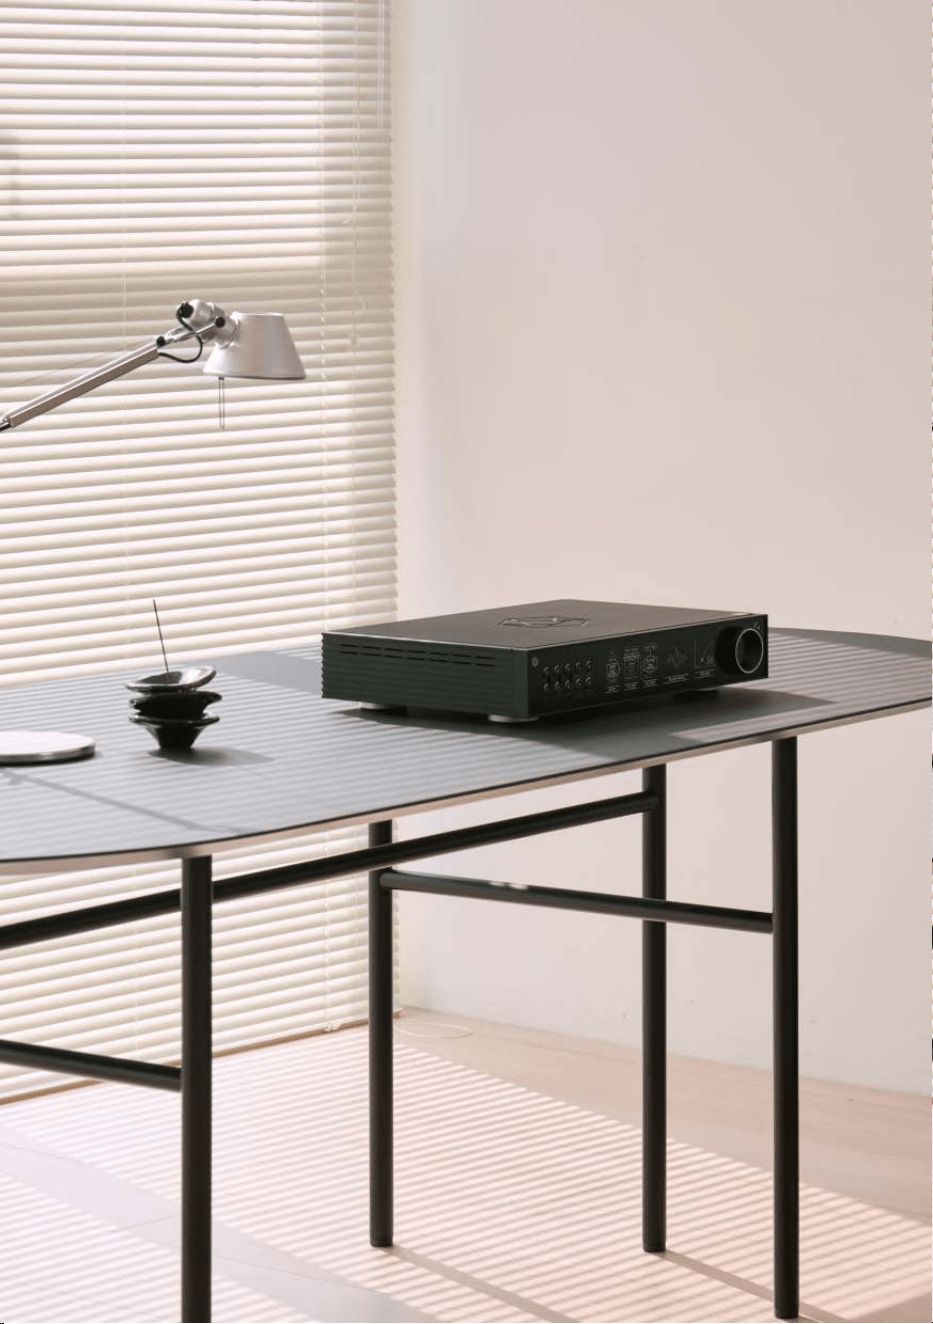
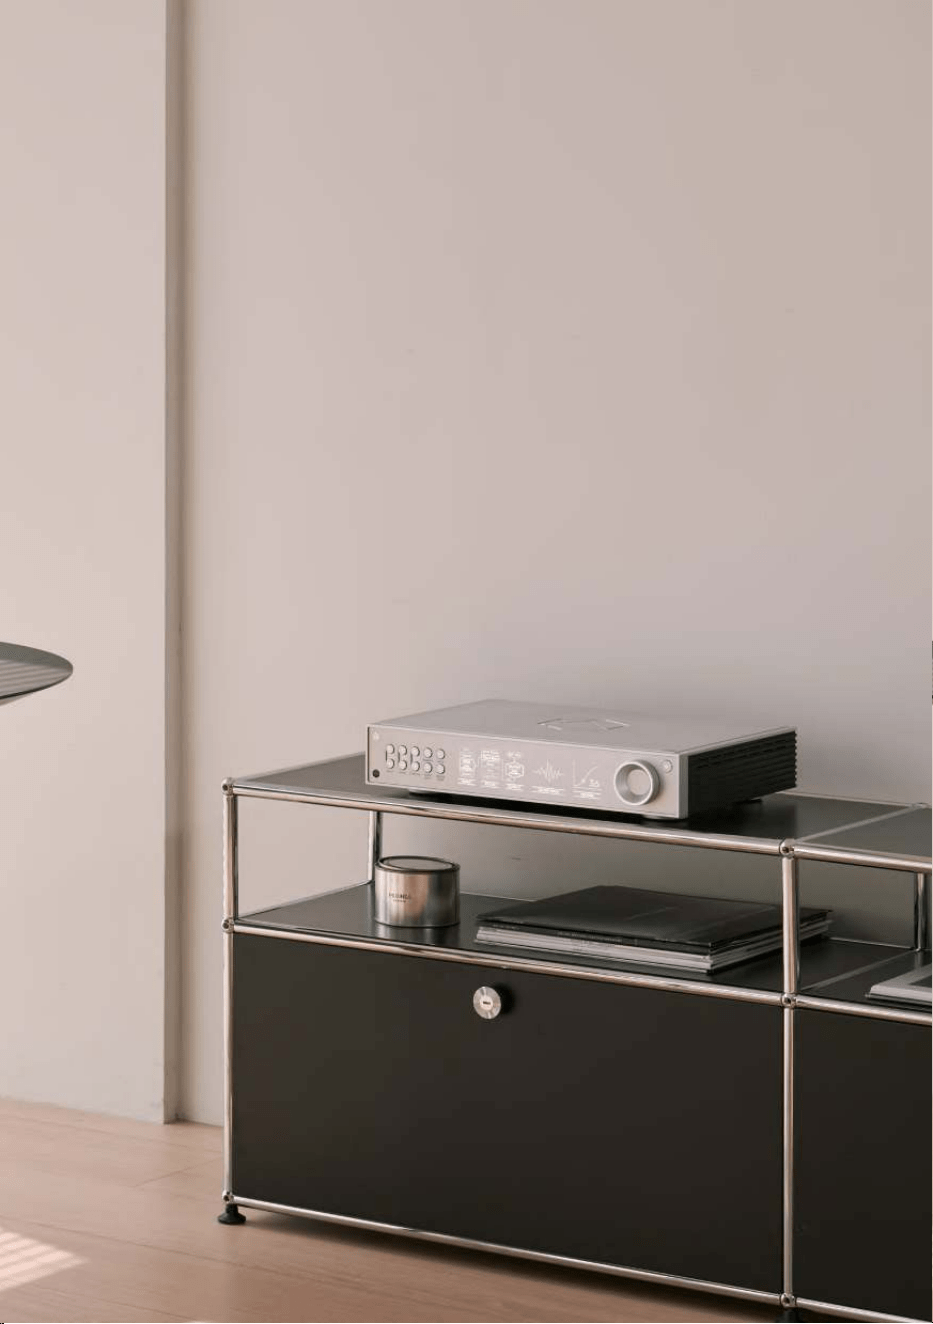
Beyond Audio, HiFi ROSE
- 2 -
- 3 -
- 4 -
HiFi ROSE
Products
Hi-Res
DSD
Native DSD 512
PCM
32bit/768kHz
In/Out Port
Digital In
USB SFP, USB 2.0 B-Type, Optical,
Coaxial 1(RCA), Coaxial 2(BNC), AES/EBU, I2S-HDMI
Analog Out
Unbalanced, Balanced
Clock In
BNC 75Ω, SMA 50Ω
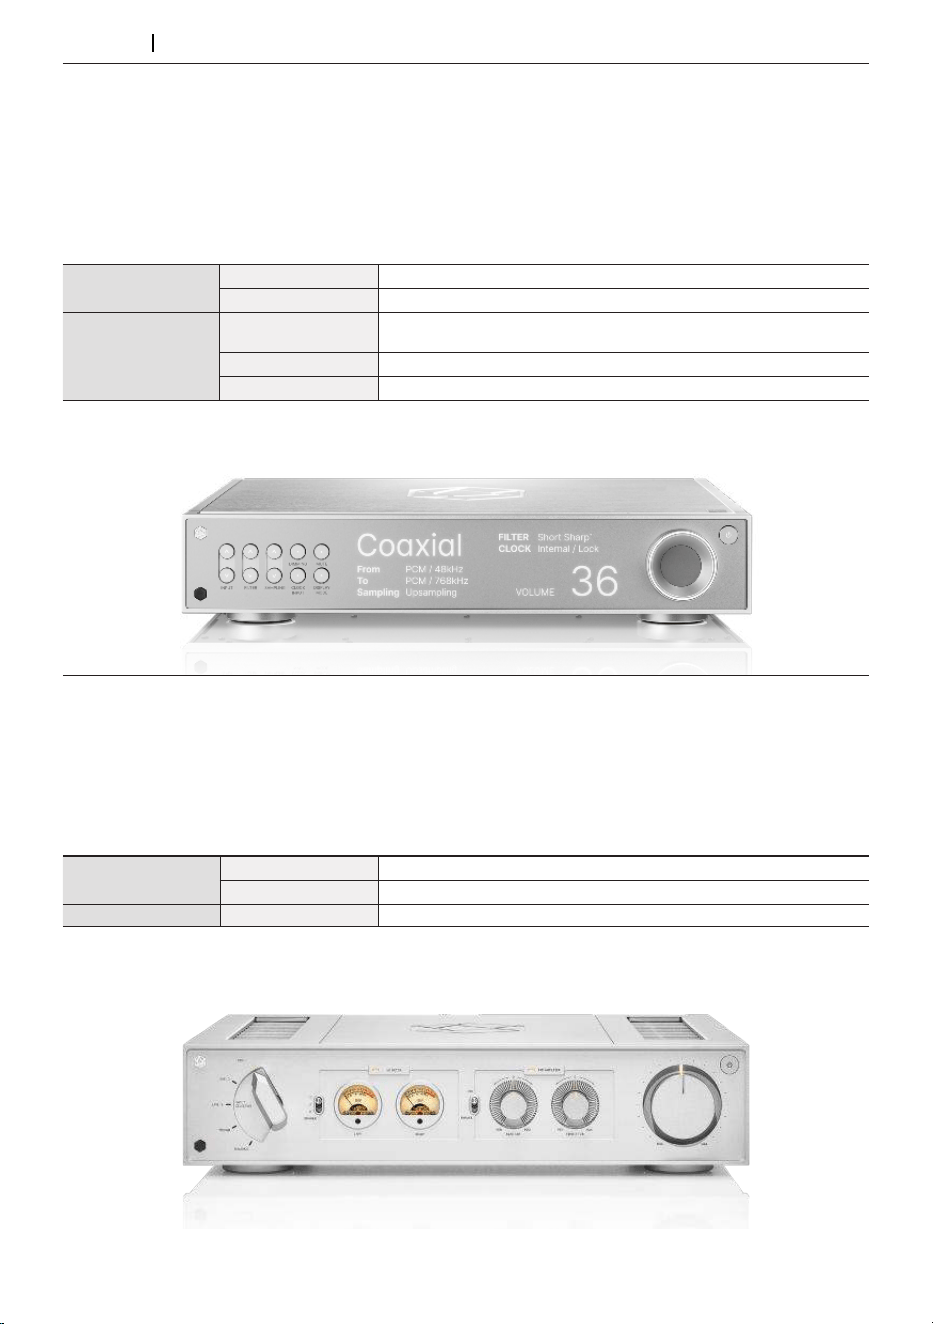
Absolute True Fidelity DAC RD160
Design 430*330*88 mm / 10 kg / Solid Aluminum, Rust-proof Steel / Color: Black, Silver
▪ROSE DPC™ (Digital Processing Core) Module
▪ROSE CIM™ (Completely Isolated & Moduled) Architecture
▪Three Independently Customized Reference Linear Power Supply Units
▪ROSE NRA™ (Noise Reduction Analog) Filter for Flat and Wide Frequency Response
▪High-Precision OCXO Clock for Long-Term Jitter Reduction
▪Lavish Internal Wiring with High-Purity OFC and OCC
▪Fiber Optic USB Connectivity
Top-notch Master Integrated Amplifier RA280
Design 430*355*110 mm / 9.5 kg / Solid Aluminum, Rust-proof Steel / Color: Black, Silver
In/Out Port
Analog In
LINE1, LINE2, LINE3, BALANCED, PHONO(MM)
Analog Out
Sub Woofer
Speaker OutStereo
250W x 2ch(4Ω, 8Ω)
▪Class AD Amplifier with Next-Generation GaN FET
▪Independently Developed LC Filter by HiFi ROSE
▪Highly Efficient and Stable Power Supply
▪Powerful 250W Output
▪Phono Amplifier for MM
▪Bass/Treble Control Volume
- 5 -
HiFi ROSE
Products
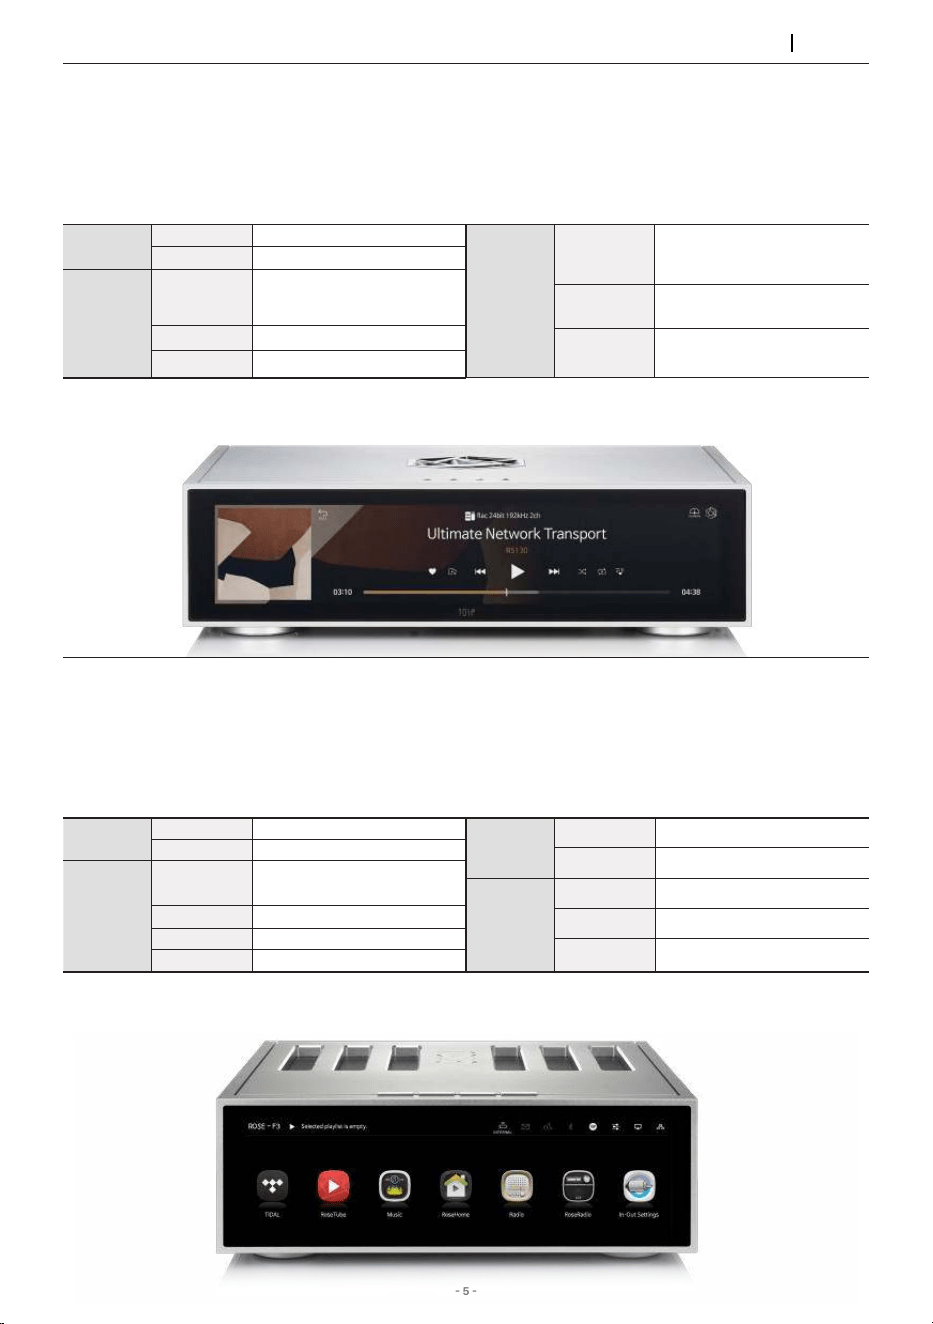
Advanced All-In-One Network Streamer RS520
▪Reference Grade Network Streaming All-in-One
▪Network Transport + DAC + Class AD Amplifier with Next-Generation GaN FET
▪High-Resolution Music Playback (DSD512, PCM 32bit/768kHz)
▪Highly Precise Femto Clock
▪Linear Power Supply for Significant Noise Reduction
Connectivity Bluetooth, DLNA, Airplay, Spotify Connect, Roon Ready
Design 346*328*127 mm / 8.1 kg / 12.6” Wide viewing angle touch screen / Color: Black, Silver
In/Out
Port
HDMI Out
4K
Speaker Out
250W x 2ch(4Ω, 8Ω)
Network
Connection
Ethernet
10/100/1000 BASE-T
Wi-Fi
USB Dongle
Bluetooth
USB Dongle V.4.2
Hi-Res
DSD
Native DSD 512
PCM
32bit/768kHz
In/Out
Port
Digital In
USB 2.0 Type-B,
Optical, Coaxial, HDMI eARC
Digital Out
USB 3.0 Type-A, Optical, Coaxial
Analog In
Line In
Analog Out
Unbalanced
▪Linear Power Supply Utilizing Supercapacitor for Battery-Level Noise Reduction
▪High-Precision OCXO Clock for Long-Term Jitter Reduction
▪External Master Clock Input
▪Network Streaming with SSD Caching Playback
▪Fiber Optic Ethernet & USB Connectivity
Connectivity Bluetooth, DLNA, Airplay, Spotify Connect, Roon Ready
Design 430*317*125 mm / 12 kg / 15.4” Wide viewing angle touch screen / Color: Black, Silver
Ultimate Network Transport RS130
Hi-Res
DSD
Native DSD 512
PCM
32bit/768kHz
In/Out
Port
Digital Out
USB 2.0 Type-A,
Optical, Coaxial,
AES/EBU, I2S-HDMI
Clock In
BNC 75Ω, 50Ω
HDMI Out
4K
Network
Connection
Ethernet
10/100/1000 BASE-T
(SFP COPPER Type)
Wi-Fi
USB Dongle
Bluetooth
USB Dongle V.4.2
- 6 -
HiFi ROSE
Products
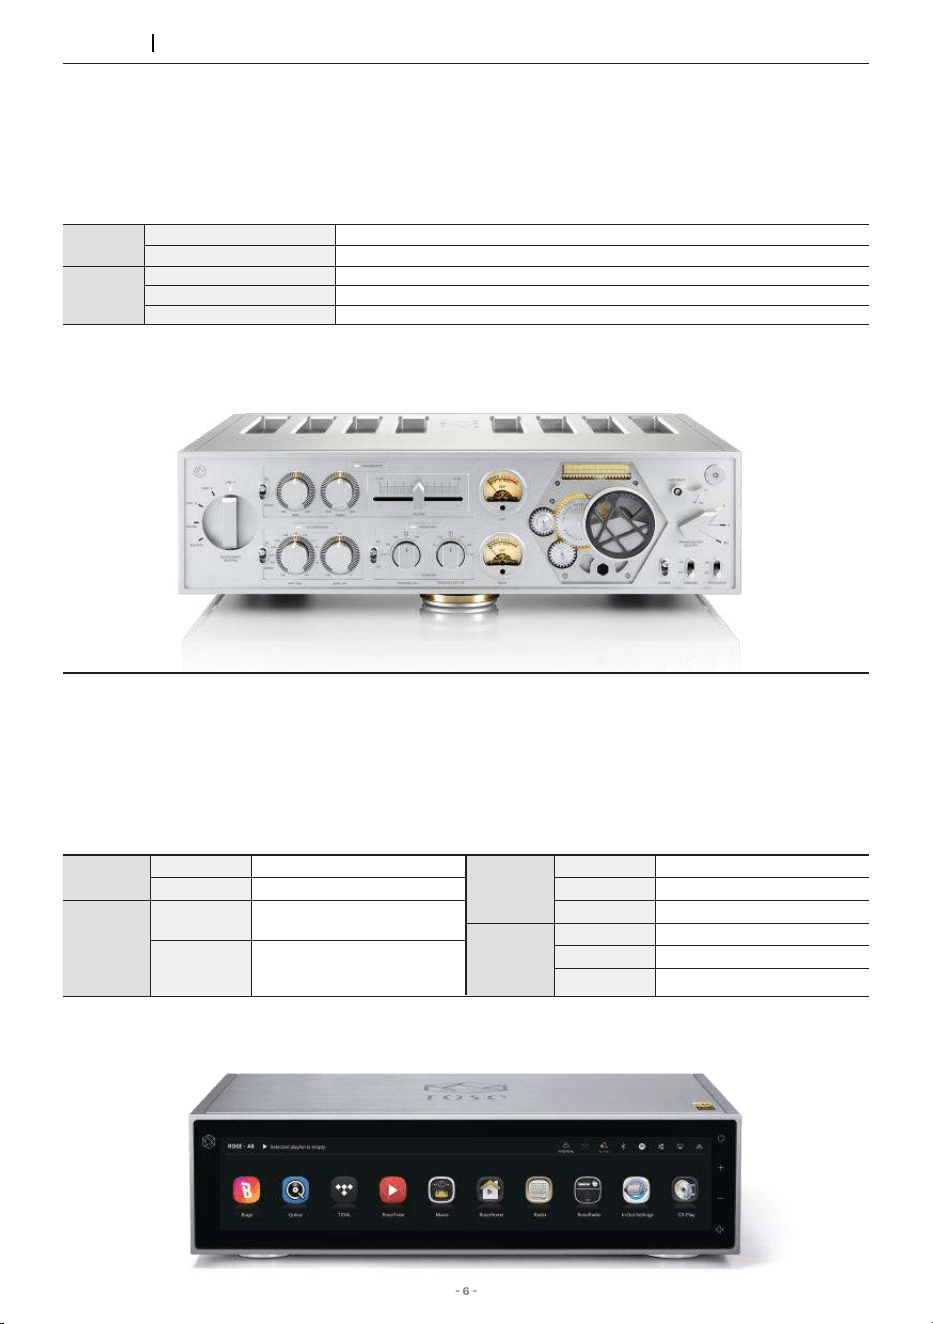
▪Class AD Amplifier with Next-Generation GaN FET
▪Multi-Output Component
▪Designed to Play Up to the Super Tweeter Realm
▪Balanced Power Supply
▪Phono Amplifier with Variable EQ
Design 430*391*124 mm / 16.7 kg / Solid Aluminum, Rust-proof Steel / Color: Silver
In/Out
Port
Analog In
LINE1, LINE2, LINE3(Bypass), BALANCED, PHONO(MM/MC)
Analog Out
Sub Woofer
Speaker
Out
Stereo(A/B)
200W x 4ch(8Ω)
Stereo(A), BTL(B)
Stereo(A): 200W x 4ch(8Ω) / BTL(B): 400W x 2ch(8Ω)
BTL(A/B)
BTL(A): 400W x 2ch(8Ω) / BTL(B): 400W x 2ch(8Ω)
Absolute Pure Sound Integrated Amplifier RA180
High Performance Network Streamer RS150B
▪Flagship Network Streamer
▪Network Transport + DAC
▪Advanced DAC Design for Pure Sound with Low Noise and Distortion
▪High-Resolution Music Playback (DSD512, PCM 32bit/768kHz)
▪Highly Precise Femto Clock
▪Linear Power Supply for Significant Noise Reduction
Connectivity Bluetooth, DLNA, Airplay, Spotify Connect, Roon Ready
Design 430*318*124 mm / 11 kg / 14.9” Wide viewing angle touch screen / Color: Black, Silver
Hi-Res
DSD
Native DSD 512
PCM
32bit/768kHz
In/Out
Port
Digital In
USB 2.0 Type-B, Optical,
Coaxial, AES/EBU, HDMI ARC
Digital Out
USB 3.0 Type-A, Optical,
Coaxial, AES/EBU,
I2S-DVI, I2S-RJ45
In/Out
Port
Analog In
Line In
Analog Out
Unbalanced, Balanced
HDMI Out
4K
Network
Connection
Ethernet
10/100/1000 BASE-T
Wi-Fi
USB Dongle
Bluetooth
USB Dongle V.4.2
- 7 -
HiFi ROSE
Products
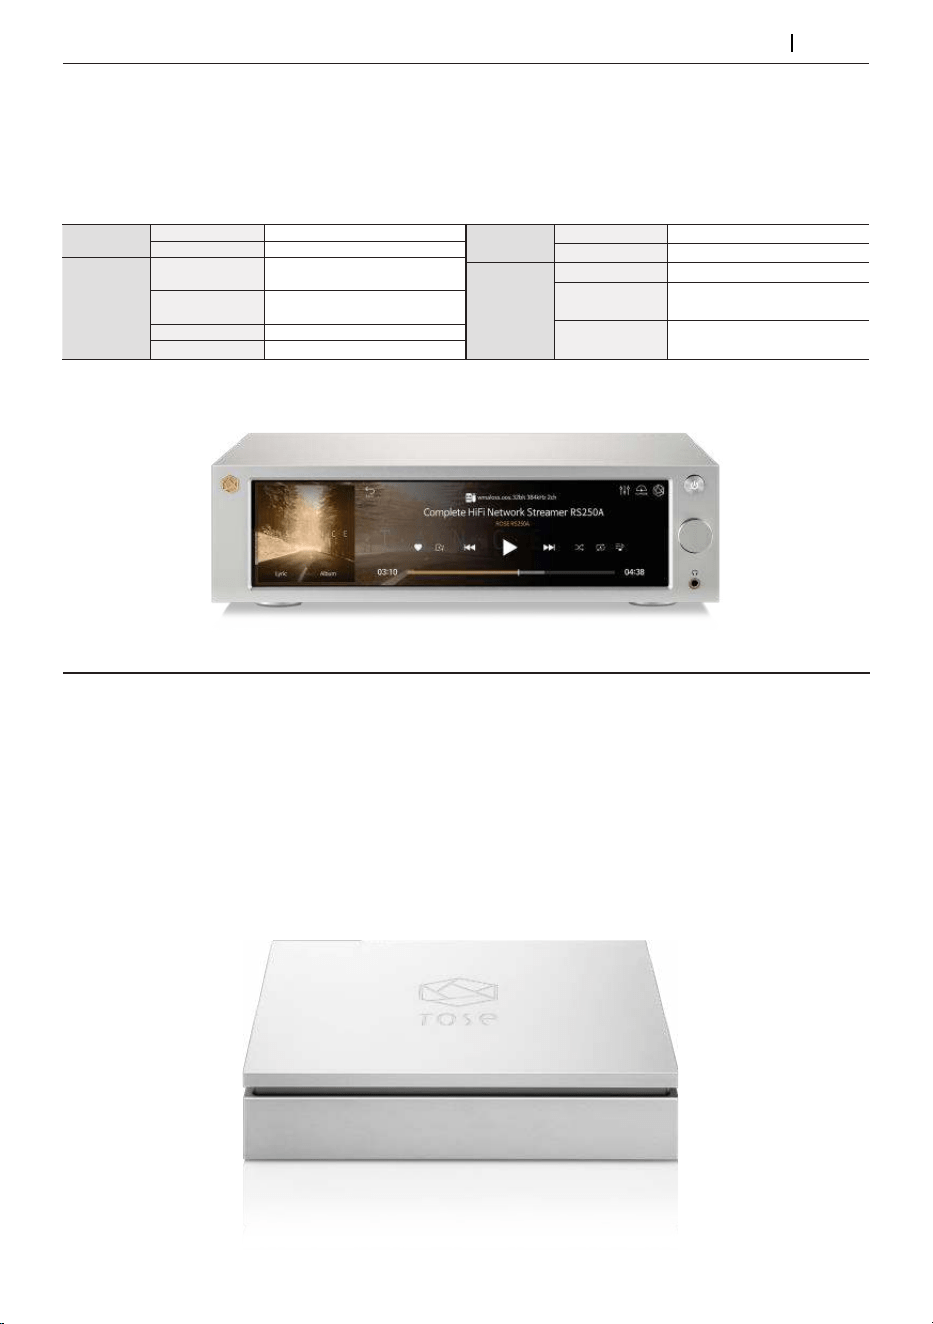
▪Reference Grade Network Streamer
▪Network Transport + DAC
▪High-Resolution Music Playback (DSD512, PCM 32bit/768kHz)
▪Highly Precise Femto Clock
▪Linear Power Supply for Significant Noise Reduction
Connectivity Bluetooth, DLNA, Airplay, Spotify Connect, Roon Ready
Design 278*231*83 mm / 3.2 kg / 8.8” Wide viewing angle touch screen / Color: Black, Silver
Hi-Res
DSD
Native DSD 512
PCM
32bit/768kHz
In/Out
Port
Digital In
USB 2.0 Type-B,
Optical, Coaxial
Digital Out
USB 3.0 Type-A,
Optical, Coaxial
Analog In
Line In
Analog Out
Unbalanced
In/Out
Port
HDMI Out
4K
Headphone Out
3.5mm
Network
Connection
Ethernet
10/100/1000 BASE-T
Wi-Fi
802.11 a/b/g/n/ac
(2.4GHz/5GHz)
Bluetooth
V4.0 / V3.0+HS
Complete HiFi Network Streamer RS250A
Input USB 3.0 Type-B, SFP(10G)
Output USB 3.0-2ports, USB 2.0-2ports
Design 152*153.5*33.5 mm / 1.2 kg / Color: Silver
▪Compact Design Maximizing Usability and Functionality
▪Optical USB Port
▪Supports USB 3.0/2.0 via Four Independent USB Ports
▪Guaranteed Stable Data Transmission Speed
▪Supports Long-Distance Transmission
HiFi ROSE USB Fiber Optical Hub RSA720
- 8 -
HiFi ROSE
Products
Rear USB Type-B
Design 152*152*25 mm / 0.9 kg / Color: Silver
▪USB Isolator Adopted to Block Motion Noise
▪USB B-Type Port for HiFi Audio
▪900g Weight for Stable CD Playback
▪Minimized Motion Noise with Insulators
▪CD Ripping Features Included
HiFi ROSE CD Drive RSA780 Series

- 9 -
Innovative ROSE OS System
Play CDs by connecting an external
USB CD-ROM.
Play CD
Supports MQA’s Full Decoder.
Enjoy studio mastering sound quality.
MQA
Qobuz
Enjoy music streaming with
Qobuz’s various functions. Support for
Hi-Res Audio(24bit/192kHz) means
you can enjoy high-resolution music.
Enjoy music streaming and videos
with TIDAL’s unique features.
Supports MQA Full Decoder, so you
can enjoy high-resolution music.
TIDAL
Create your own playlist. You can also
register your friends and share it with
them.
My Playlist
12
6
9 3
1
2
4
5
7
8
10
11
Various design clock functions are
provided, such as alarms and
weather information.
Clock
Enjoy curated playlists divided by
Apple Music’s own musical tastes. You can
enjoy various tracks in Apple Music.
Apple Music App
You can perform file and folder
management tasks, such as moving,
copying, and deleting, on storage device.
File Manager
You can enjoy high-definition videos
on YouTube, TIDAL, and Bugs, and play
video files in various formats.
4K Video
Rip CDs by connecting an external
USB CD-ROM and save them on
a storage device.
CD Ripping
You can enjoy all content and music
on YouTube.
ROSE Tube
Roon Ready
ROSE OS is fully compatible with Roon
Core, with Roon Ready certification in
compliance with all requirements of Roon
Labs. You can enjoy HiFi sound quality on
your ROSE device with the powerful music
management capabilities of Roon.
Spotify Connect allows you to play and
wirelessly control Spotify music on your
ROSE OS over a network. With the Spotify
Connect function, you can enjoy a variety
of music with HiFi sound quality on your
ROSE device.
Spotify Connect
HiFi ROSE devices are certified with a
‘High-Resolution Audio’ license
from the JAS (Japan Audio Society).
Hi-Res Audio
Manage your music files under various
categories, such as albums, artists,
and genres.
Music Library
Enjoy Rose Radio, which consists of about
30,000 radio channels from 200 countries
around the world. Channels are organized
into various categories, and you can easily
search for channels with filters of genre/
region/language.
ROSE Radio
Enjoy the immersive world of high-
resolution music with Audirvana.
You can experience the depth of
your favorite tracks.
Audirvana
HiFi ROSE
OS System
- 10 -
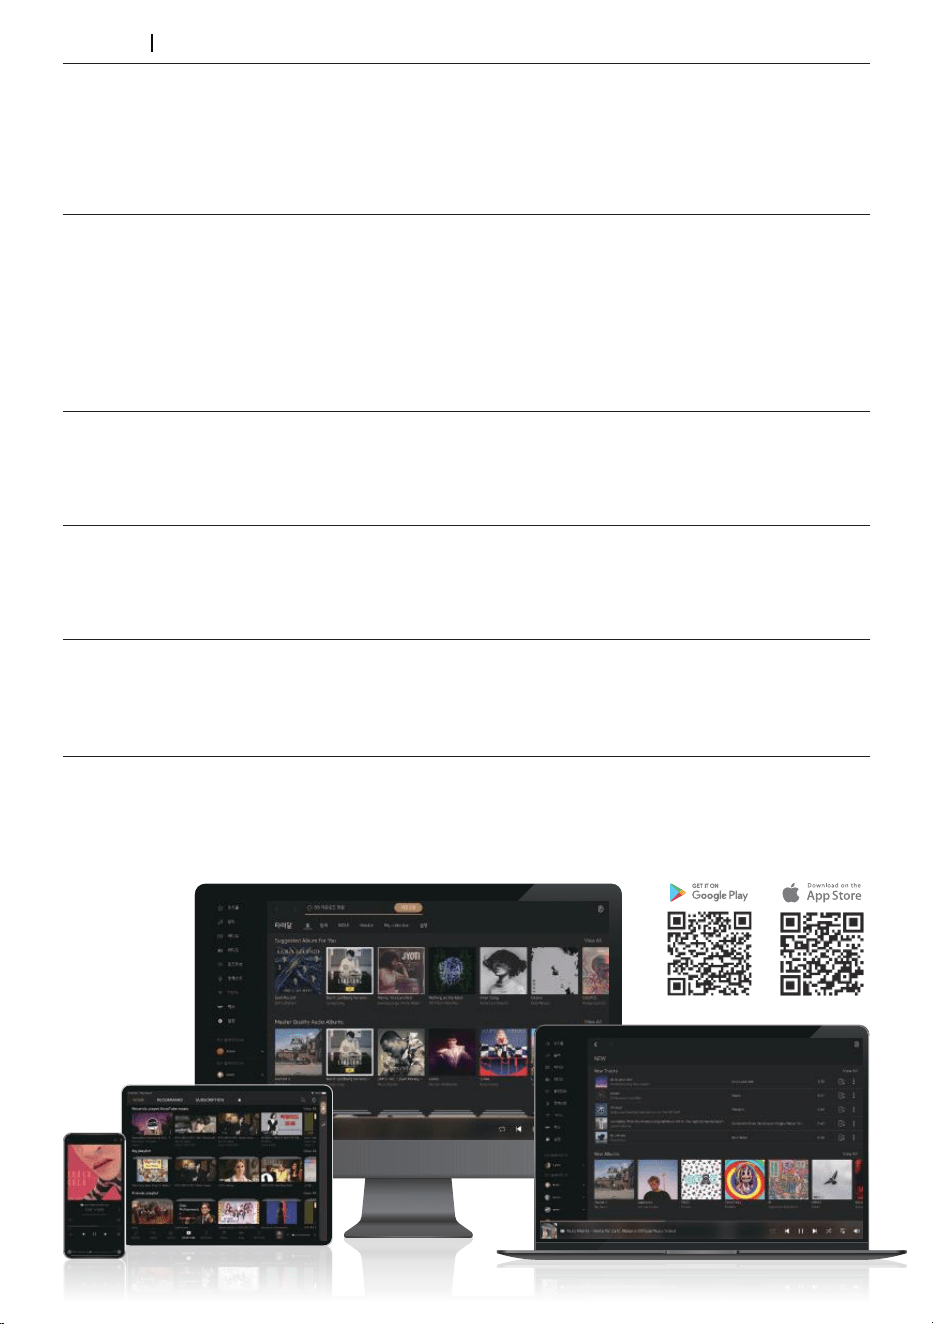
ROSE Connect Remote Application
A dedicated Remote App is provided that allows users to conveniently control and smartly manage their
ROSE device. The Remote App is supported on various platforms, including the iPhone, iPad, Android
phone, and PCs.
You can create your own playlist.
Make a playlist on Music and ROSE Tube and check it out at Home - My Music.
Playlist
You can simply and easily play music stored on your phone on your ROSE device.
Enjoy a lossless, high-quality streaming service.
Streaming
You can freely and conveniently control various HiFi ROSE functions wirelessly.
Control
Remote
Search
Control
You can control a variety of functions remotely including Music, ROSE Tube, TIDAL, Qobuz,
Bugs, Radio, Apple Music and CD Ripping.
ROSE Connect includes the remote control function.
You can conveniently search for a variety of music in the Media Library.
You can share your playlists with your friends or listen to music recommended by them. Communicate
with your friends through music.
Share with Friends
Scan the music in your local memory to organize it into various categories.
Media Library
HiFi ROSE
Remote App

- 11 -
RD160 Product User Manual
OWNER’S MANUAL

- 12 -
14
14
16
15
17
17
24
24
25
26
22
23
Safety Precautions
1. Warnings
2. Precautions
Components List
Location / Function of Buttons and Ports
1. Front Side of the Product
1-1. Volume Control Function
1-1-1. VOLUME
1-1-2. MUTE
1-1-3. Pre-Out Level Settings
1-2. Input Source Switching
1-3. D/A Converter Settings
1-3-1. FILTER
1-3-2. SAMPLING
1-3-3. CLOCK INPUT
1-4. System Settings
1-4-1. DIMMING
1-4-2. DISPLAY MODE
2. Rear Side of the Product
3. Remote Control
Product Installation
1. Product Design Method and Recommended Installation Location
2. How to Connect the Power Cord
3. How to Properly Connect Rear Ports and Cables
3-1. Connection Between Analog Output Port and Amplifier or AV Receiver
3-2. Connection Between Digital Input Port and Audio Device (TV or Devices
That Provide Digital Output Capabilities)
3-2-1. OPTICAL/COAX.1,2
3-2-2. AES/EBU
3-2-3. I2S IN
3-3. PC AUDIO Connection
3-4. SFP AUDIO Connection
3-5. TRIGGER Input Terminal and Pin out
3-6. EXT. CLOCK Connection
3-7. Circuit Breaker
3-8. GND Connection
목 차
Table of Contents

- 13 -
38
40
Product Specifications
Quality Guaranteed

- 14 -
Safety Precautions
1. Warnings
1. Do not apply excessive force on the product, throw it, or strike it with sharp objects.
2. Children should only use the product under adult supervision to ensure proper usage.
3. Use within a temperature range of 0°C to 40°C and do not use in hot or humid conditions. Install the
product in a well-ventilated area, not an enclosed space. The product may break, corrode, overheat,
or catch fire in an environment below 0°C or in a sealed environment with a high temperature,
such as a sauna. Moisture or liquid can also damage the surface of the product and its circuit
components.
4. Be sure to use a genuine power cable provided by ROSE. Any other cable may cause operational
errors or damage (decreased performance) to the product.
5. Do not spill dirt or liquid on the product. It may damage the components and circuits. If the product
gets wet, do not turn it on and contact your nearest service center. However, free repairs are not
available in this case.
6. Do not connect accessories that are not certified by ROSE to the product.
7. Please install this product at least 1 m (3 ft) away from devices that may cause radio interference
(wireless routers, microwave ovens, etc.). Noise may be generated by electromagnetic waves.

- 15 -
2. Precautions
1. The contents of the owner’s manual are described based on the default settings of the product.
2. Some contents of this manual may be changed without prior notice to the user in order to improve
product performance.
3. The features and additional services of the product may vary depending on the country, software
specifications, and policy changes of the service provider.
4. Do not use chemical solutions (alcohol, thinner, solvents, etc.) or detergent to clean the product.
Rubbing the product with a chemical solution can create heat and cause the product to catch fire.
When cleaning the product, wipe it with a soft cloth or towel.
5. Do not disassemble, modify or repair the product on your own. If you do, you will no longer qualify
for free repairs. If a malfunction occurs because of this, contact an authorized service center for
repairs.
6. Only programs provided by the manufacturer are available. Transferring independently created files
or user-modified files to the product can cause operational errors or cause serious problems with
the product. ROSE is not responsible for any problems that arise in this case.
7. If the touch screen is damaged, do not touch it with your hands. Contact the service center
immediately, as it may cause injury.
8. When you‘re not going to use the product for a long time, be sure to unplug the power plug from the
AC outlet. Even after the power has been shut off (manual standby mode), a minimal current remains
in the equipment. Remove the plug to prevent power consumption.
9. To ensure trouble-free use, you must first connect the power then turn on the device by pressing
the power button on either the remote control or the device itself. You can turn the power off by
pressing the same button.
10. After connecting the power plug and turning on the equipment with the power button, it takes about
10 seconds to complete booting, so please wait for a while.
11. The power will automatically turn off if there is no input signal for more than a set time. If the product
is turned off, press the power button on the main unit or the remote control to turn it back on and
use it again.
12. Do not power on the device within 10 seconds after shutting off the power and entering manual
standby mode. Doing so may cause noise.
13. Install the product close to an outlet so that it is easy to remove the plug from the outlet.
14. Do not use the product near water. Do not expose the product to a dripping or splashing
environment and do not place objects containing liquids, such as vases, on the device.
15. Do not block the ventilation openings. Install this product according to the product installation and
orientation instructions.
16. Unplug the product during lightning storms or when unused for long periods of time.
- 16 -
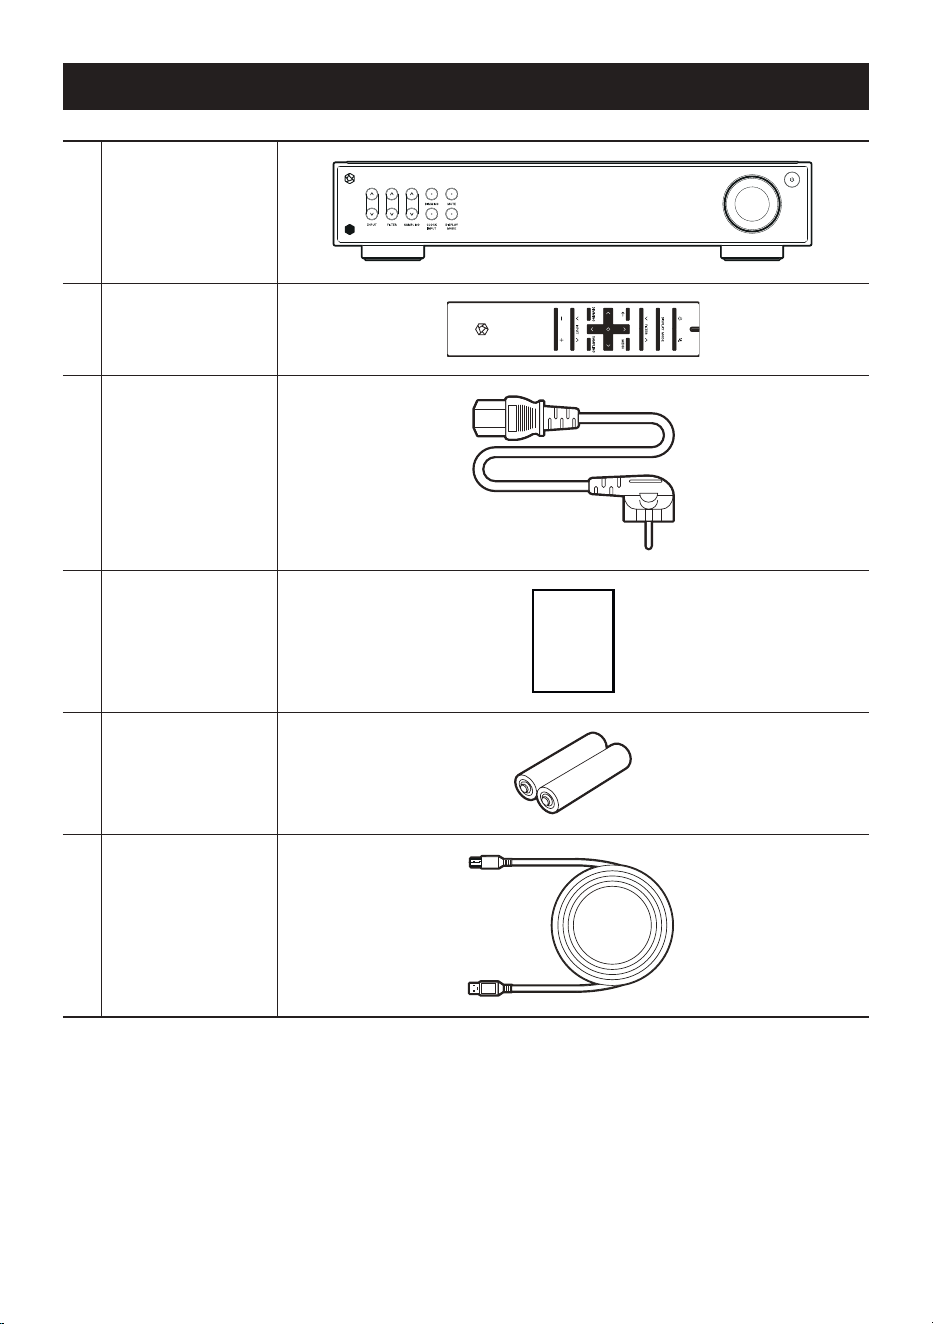
Components List
1Main Device
2Remote Control
3Power Cable, 1.8m
4User Manual
MANUAL
5
AAA Batteries for
Remote Control
6
USB Cable
Type-B, 1m
- 17 -
Location / Function of Buttons and Ports
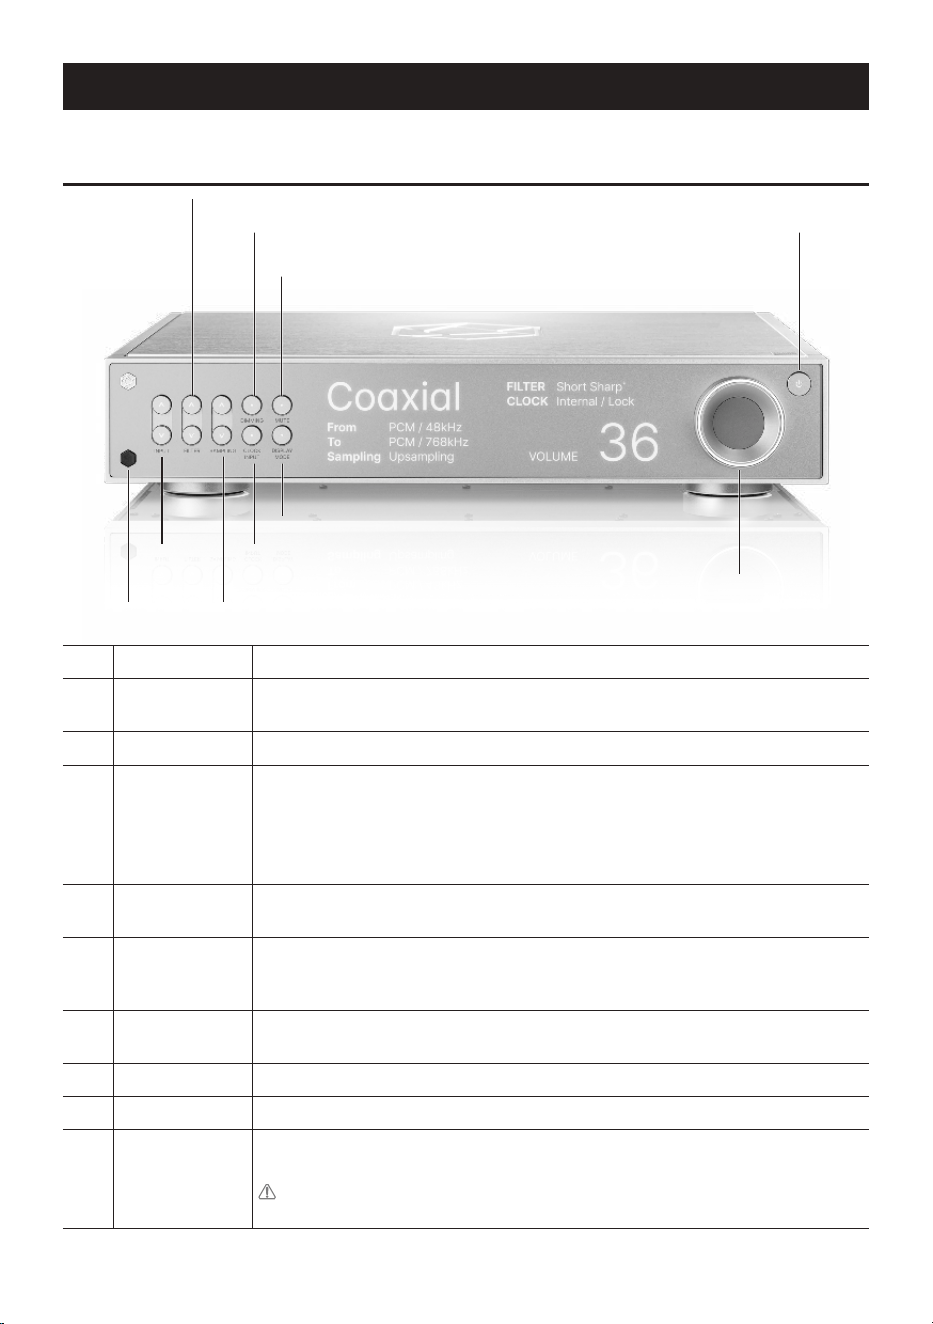
1. Front Side of the Product
1FILTER Selector
You can change the filter settings.
2
LED Dimming
Switch
You can adjust the brightness of the LED to 6 different levels (including turning the
screen off).
3MUTE
You can enable / disable sound by pressing the Mute button.
4
Power Button
(Status Display
LED)
When the power button is pressed, the LED blinks, and when booting is complete,
the LED turns off.
※ If there is no input signal for about 20 minutes, the product automatically turns
off. If it is turned off automatically, turn it on again with the power button on the
main body or the power button on the remote control to use it.
5
Remote Control
Receiver
This is the optic receiver part that receives infrared signals from the remote
control.
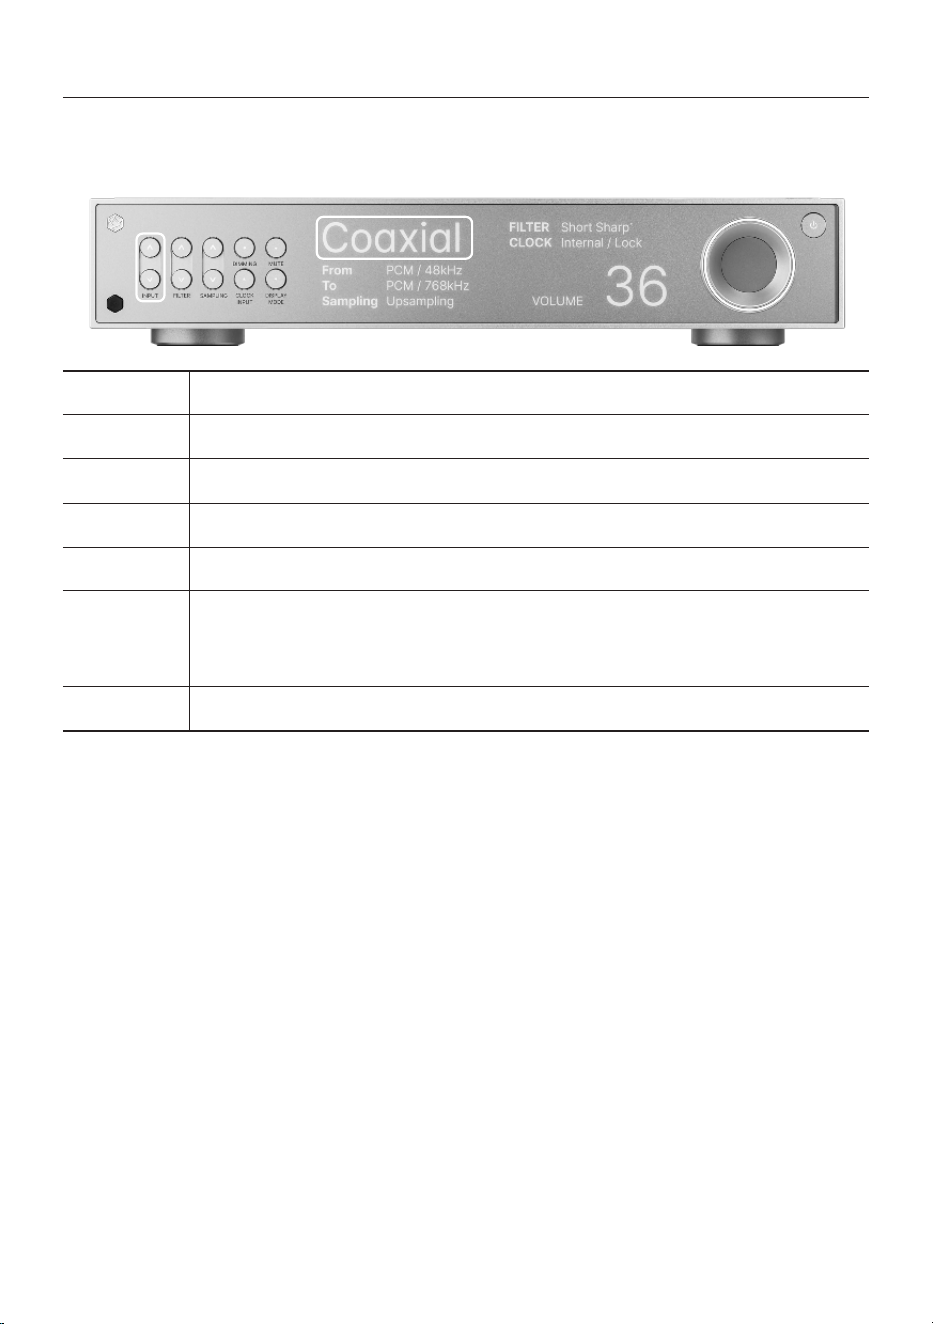
6
INPUT
Source Selector
Selects the input of devices connected to each input on the rear side. The input
selector is compatible with a total of seven external inputs: AES/EBU, Coaxial, BNC,
Optical, I2S, USB, SFP.
7
SAMPLING
Selector
You can change the sampling output.
8CLOCK INPUT
You can change the clock input mode.
9DISPLAY MODE
You can switch the screen to other modes.
10Main Volume
You can adjust the volume level by turning it clockwise (+) or counterclockwise (-).
Volume can be adjusted from 1 to 100.
Caution : Please note that listening to music at high volume for a long time
may cause hearing damage.
FILTER Selector
LED Dimming
Switch
Power
Button
CLOCK INPUT
Remote
Control
Receiver
Main Volume
SAMPLING Selector
INPUT
Source
Selector
DISPLAY MODE
MUTE
1
2
3
4
10
7
6
9
8
5
- 18 -
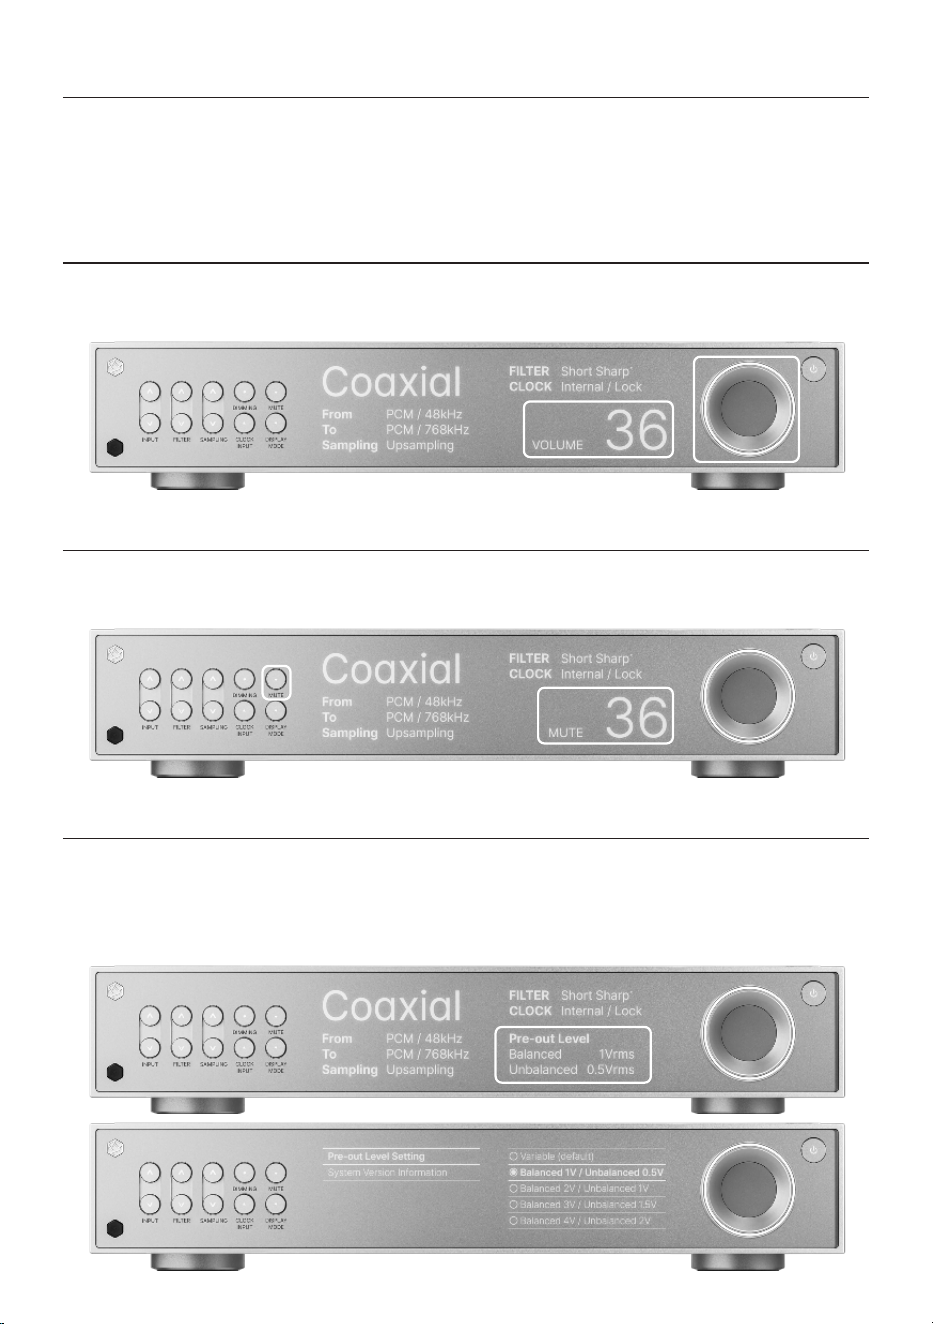
1-1. Volume Control Function
• You can connect this product directly to a power amplifier without a preamplifier.
• You can adjust the volume by turning the knob on the right, or mute the sound by pressing the MUTE
button.
1-1-1. VOLUME
• You can adjust the volume level by turning it clockwise (+) or counterclockwise (-).
1-1-2. MUTE
• You can enable / disable sound by pressing the Mute button.
1-1-3. Pre-Out Level Settings
• You can set the pre-out output level from 1V to 9V via the MENU button on the remote control. When
setting the output level, the volume control function is disabled.
※ This function can be used by pressing the MENU button on the remote control. (p. 23)
- 19 -
1-2. Input Source Switching
• You can change the input source of this product using the functions below.
• Input source settings include AES/EBU, Coaxial, BNC, Optical, I2S, USB, and SFP.
AES/EBU
Inputs a digital signal output from an external device via the XLR terminal.
Coaxial
Inputs a digital signal output from an external device via the Coaxial terminal.
BNC
Inputs a digital signal output from an external device via the BNC terminal.
Optical
Inputs a digital signal output from an external device via the Optical terminal.
I2S
Inputs a digital signal output from an external device via the HDMI terminal.
USB
Inputs a digital signal output from an external device via the USB terminal.
※ To connect PC, you must install the driver on your computer, then convert the audio file.
※ For a detailed description of PC AUDIO, refer to “PC AUDIO Connection”. (p. 30)
SFP
Inputs a digital signal output from an external device via the SFP terminal.
- 20 -
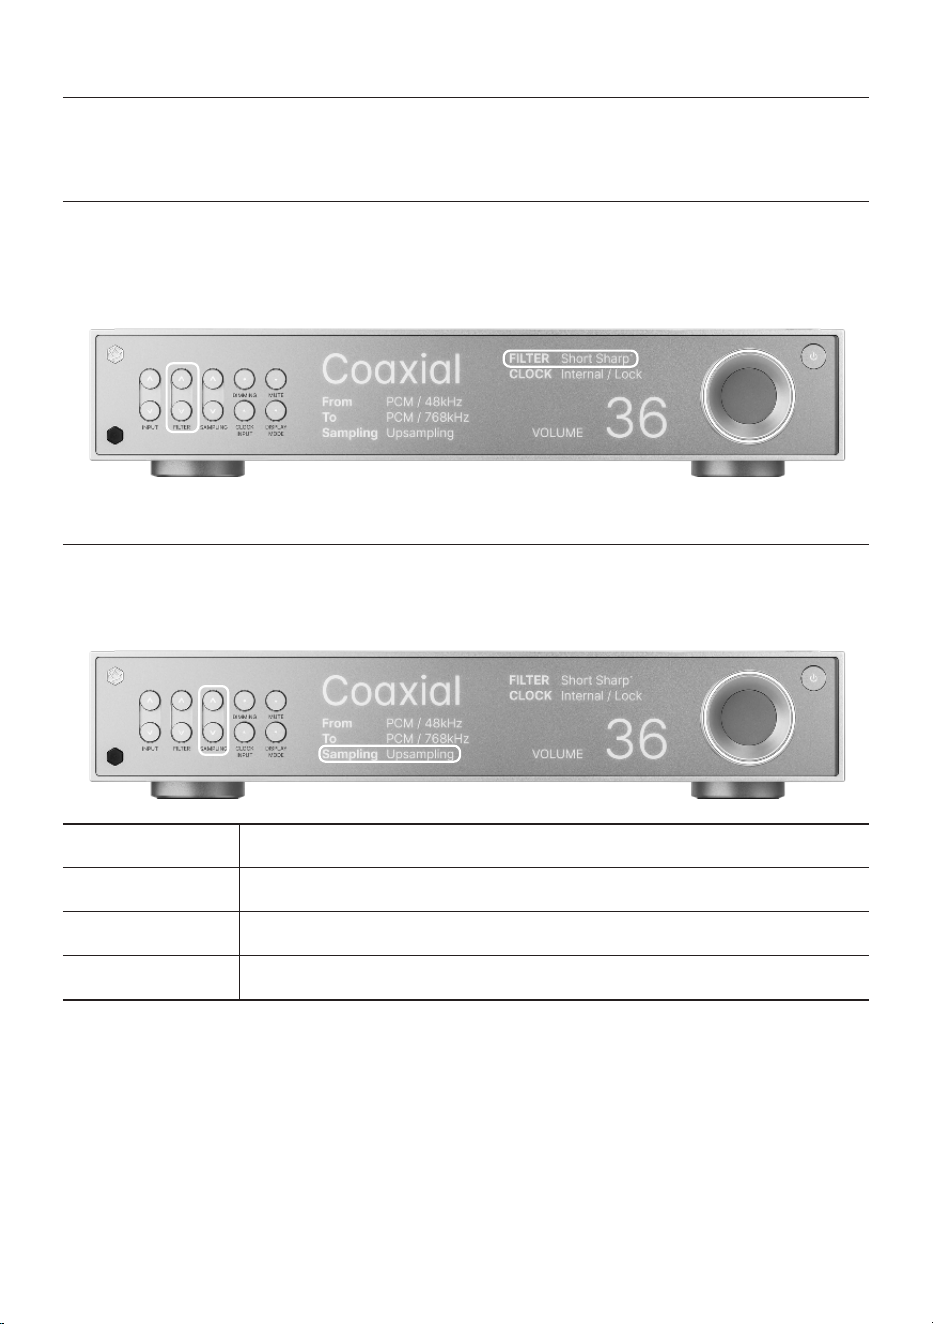
1-3. D/A Converter Settings
• You can change or adjust the settings of the product using the functions below.
1-3-1. FILTER
• You can change the filter settings by pressing up or down.
• You can set the filter to one of six options: Sharp, Slow, Short sharp, Short slow, Super slow, or Low
short.
1-3-2. SAMPLING
• You can change the sampling output by pressing up or down.
• You can set the sampling to one of four options: Upsampling, To PCM, To DSD, and Bypass.
Upsampling
Increases the resolution of all audio files to their original format.
To PCM
Converts the resolution of the audio file to PCM format.
To DSD
Converts the resolution of the audio file to DSD format.
Bypass
Outputs the audio file in its original resolution.
- 21 -
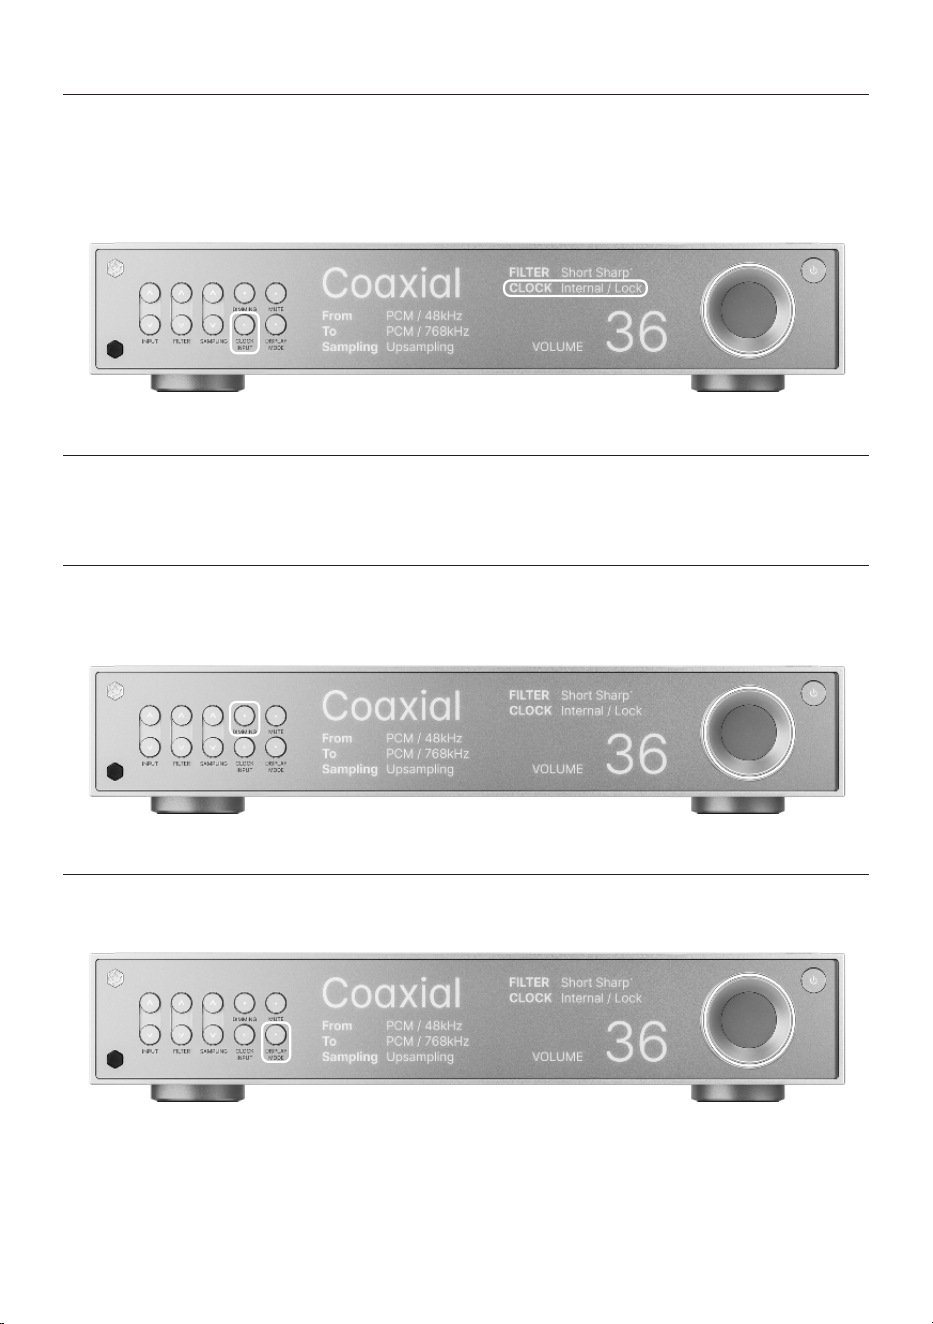
1-3-3. CLOCK INPUT
• You can change the clock input mode by pressing the button.
• If you select Internal, which is the default setting mode, the product will be set to internal clock mode.
When receiving the master clock input from an external clock generator, you can select EXT. 50Ω or
EXT. 75Ω.
1-4. System Settings
• You can change the settings of the product using the functions below.
1-4-1. DIMMING
• You can adjust the brightness of the light on the front of the product to 6 different levels (including
turning the screen off) with the buttons.
1-4-2. DISPLAY MODE
• You can switch the screen to other modes by pressing the button.
- 22 -
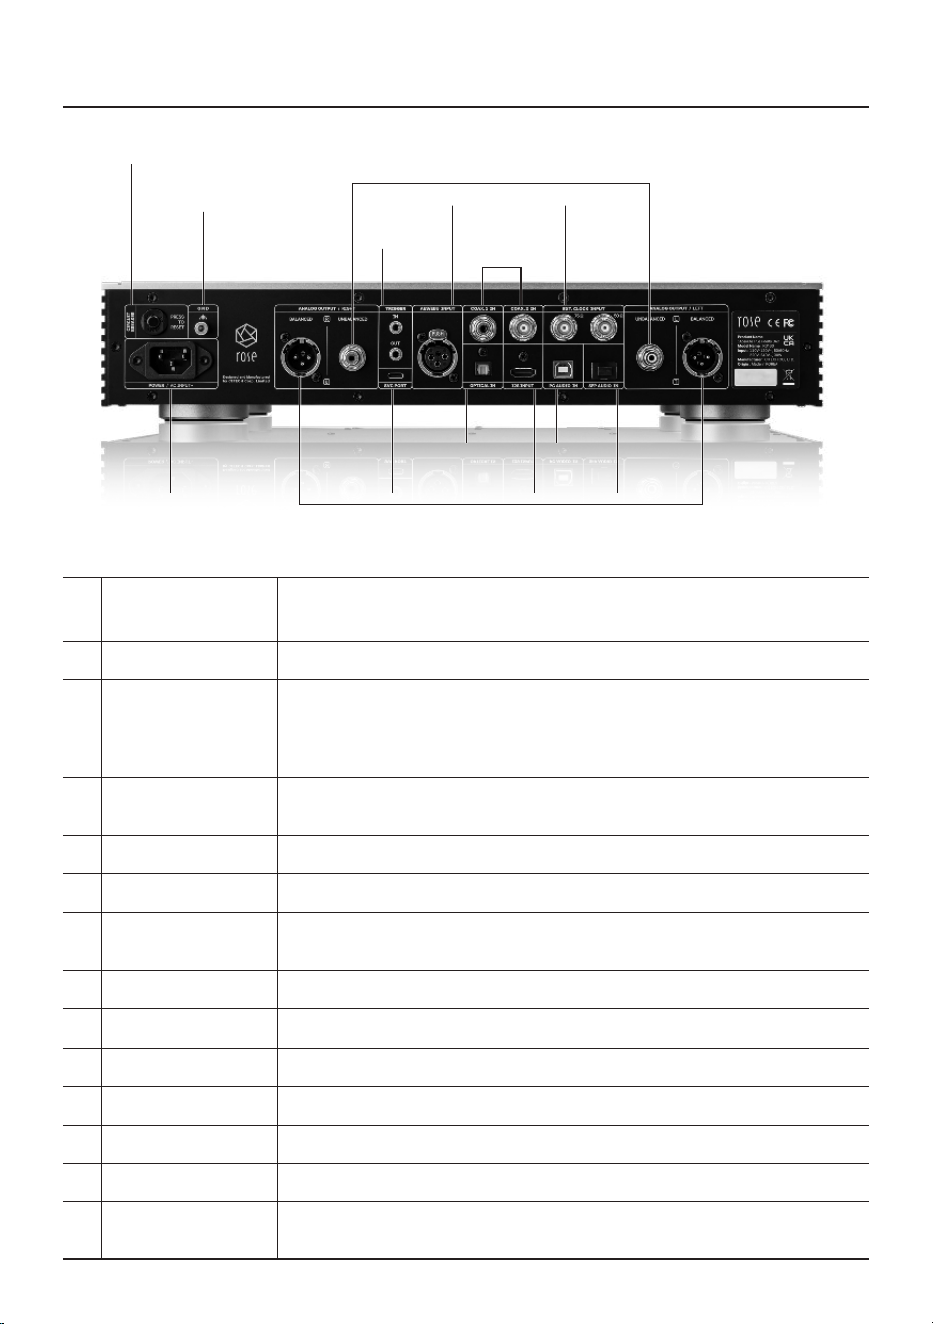
2. Rear Side of the Product
1CIRCUIT BREAKER
This protection terminal prevents damage to the set due to overvoltage or
overcurrent.
2GND
This port is used to ground the product and external devices.
3TRIGGER In/Out
This is a function that automatically turns on the set without operation through
the remote control when power is supplied from an external device. When you
press the power on button on the set, a power control signal is output to the
trigger out terminal after the power is stabilized.
4
UNBALANCED
Output
Connect the RCA cable to this port to output analog signals.
5AES/EBU Input
Connect the AES/EBU cable to this port to input digital signals.
6COAX. Input
Connect the COAXIAL cable to this port to input digital signals.
7EXT. CLOCK Input
You can connect a 50Ω SMA cable or 75Ω BNC cable to the EXT CLOCK port.
You can input an external clock by changing the mode in the input settings.
8POWER (AC Input~)
Connect the AC power cable here.
9SVC PORT
This port is used for system updates. (A/S Service Only)
10OPTICAL Input
Connect the OPTICAL cable to this port to input digital signals.
11BALANCED Output
Connect the Balanced cable to this port to output analog signals.
12I2S Input
Connect the HDMI cable to the I2S port to input digital signals.
13PC AUDIO Input
Connect the USB Type-B cable to this port to input digital signals.
14SFP AUDIO Input
You can connect an SFP module and an external USB 3.0 fiber hub here with an
optical cable.
POWER
(AC Input~)SVC PORT
SFP
AUDIO In
I2S
Input
PC
AUDIO In
9
14
12
1310
AES/EBU
Input
TRIGGER
EXT. CLOCK
Input
8
BALANCED
11
UNBALANCED
4
7
COAX. In
6
GND
CIRCUIT
BREAKER
1
2
3
5
OPTICAL
In
- 23 -
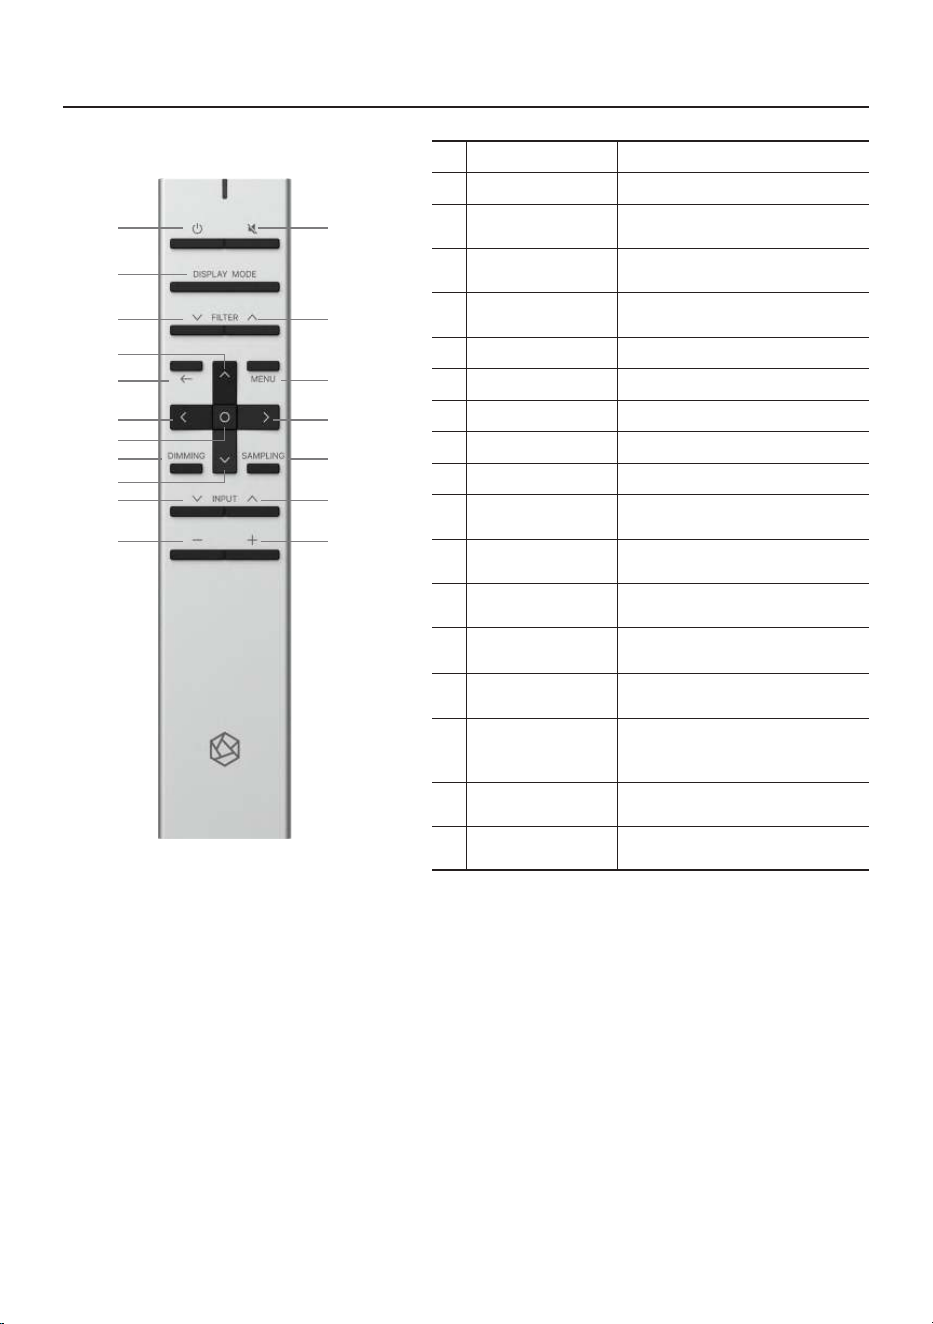
3. Remote Control
※ This remote control uses infrared (IR) and may malfunction if supplied power decreases.
In this case, replace the battery before use.
1Power On/Off
Used to power the set on or off.
2Mute
Used to mute music.
3
Play / Pause
Current Song
4
Switch to Next
Filter
5
Switch to
Previous Filter
6Go Back
7Menu
8Move Focus Up
9Move Focus Left
10Move Focus Right
11
Move Focus
Down
12
Select Current
Focus
13
Change LED
Brightness
Used to adjust the brightness of
the LED to 6 different levels
14
Change
Sampling
Used to change
the sampling output
15
Switch to Next
Input Source
16
Switch to
Previous Input
Source
17Volume Down
Press and hold to adjust the
volume down
18Volume Up
Press and hold to adjust the
volume up
2
5
7
1
3
4
6
8
12
1314
1516
1718
109
11

- 24 -
Product Installation
1. Product Design Method and Recommended Installation Location
• This product is designed to be used on a table or shelf.
• This product can malfunction during cold weather or hot weather.
(Operating temperature: 0 to 40℃, Storage temperature: -10 to 50℃)
• If the space where the product is installed is small, provide adequate ventilation for the product. A
longer operating life is ensured when electronics are properly ventilated and maintained so that they
do not overheat more than necessary. Do not install this product directly on a device that generates a
lot of heat, such as a amplifier.
• The figure below shows the minimum ventilation requirements required for the product.
• Keep at least 2.5cm apart on each side of this product to prevent airflow from clogging.
• Secure a depth of 40cm for airflow and cabling.
Ventilation Openings
(Located on both sides of the product)
25mm
25mm
25mm
25mm
90mm
- 25 -
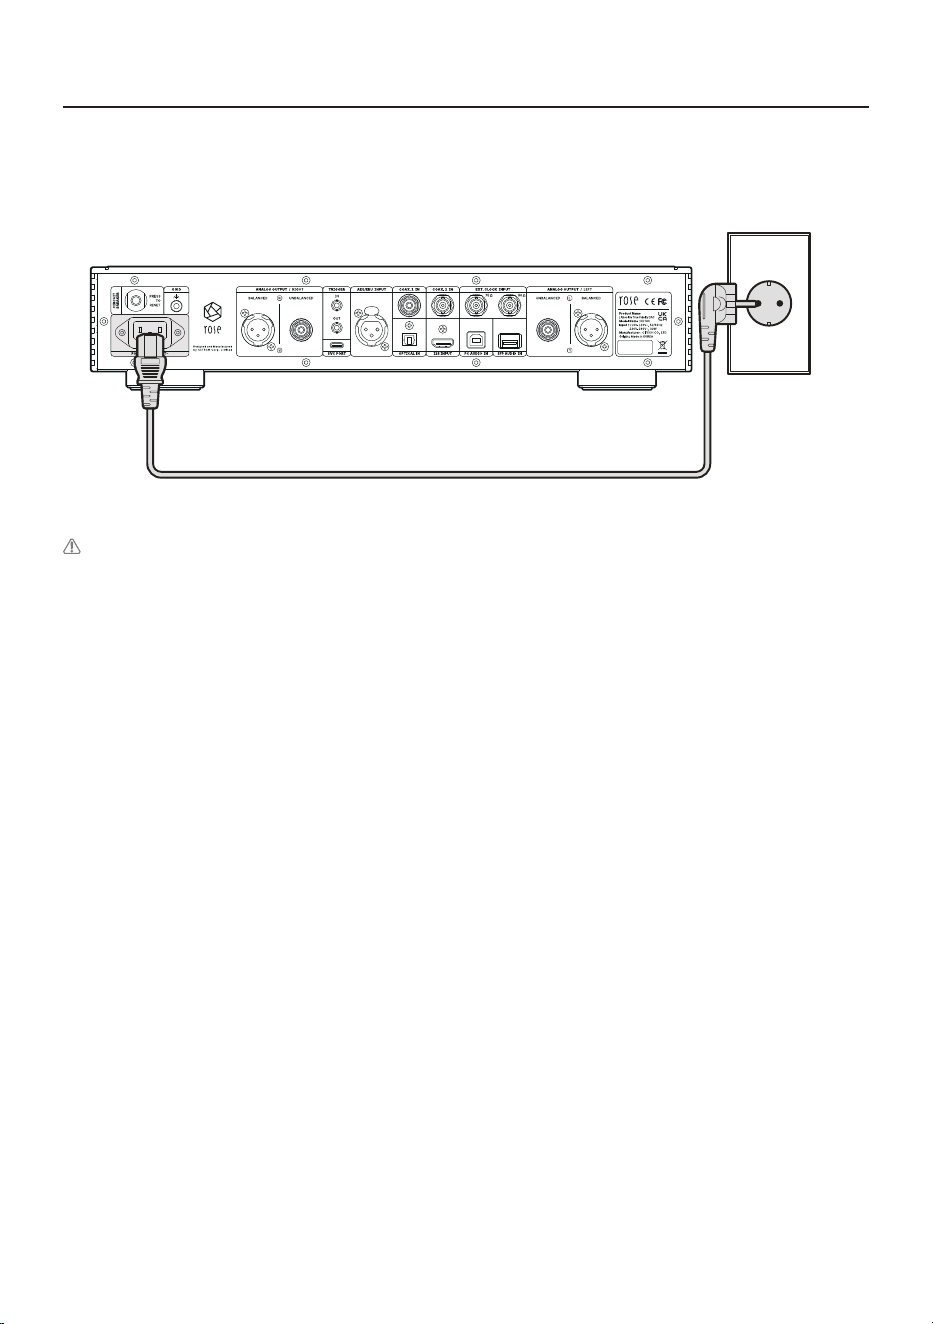
2. How to Connect the Power Cord
• This product includes a removable power cord. Please connect the power cord after connecting all
audio cables.
RD160
Concentric Plug
Caution : When disconnecting the power cord, always disconnect the power outlet first with the
power switch off.
- 26 -
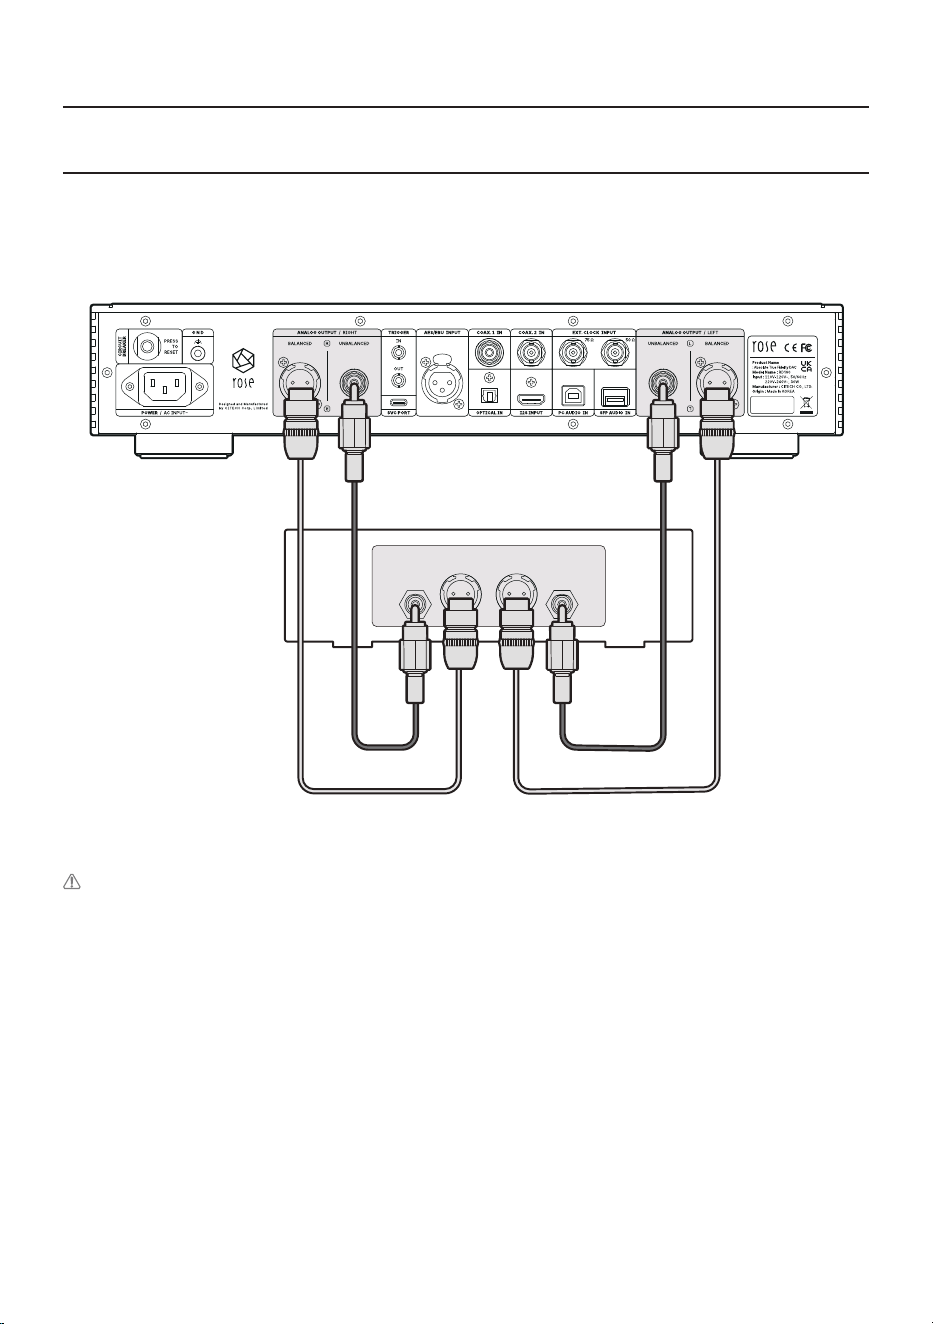
3. How to Properly Connect Rear Ports and Cables
3-1. Connection Between Analog Output Port and Amplifier or AV Receiver
• You can connect the analog (BALANCED/UNBALANCED) audio output of this product to the analog
input port of the amplifier or AV receiver as shown in the figure below.
RD160
Amplifier, AV Receiver
UNBALANCED
R
UNBALANCED
L
BALANCED
LR
Caution: Before connecting this product to the amplifier, set the volume of the product to
mute or below level 5, and then connect it using an interconnector. If you connect the cable while
the product is playing music at a high volume, a loud shock sound may occur.
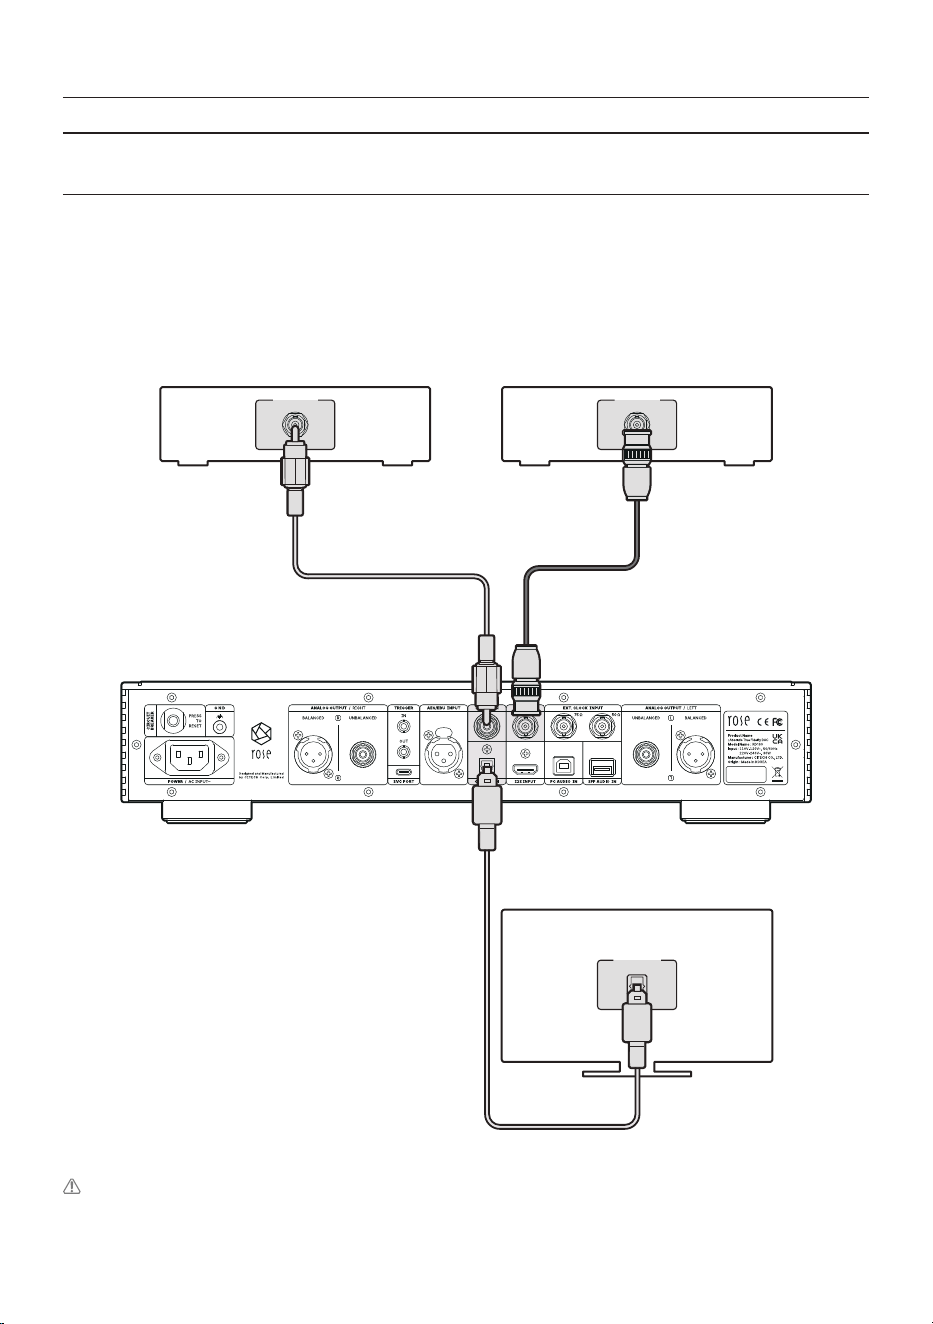
- 27 -
(TV or Devices That Provide Digital Output Capabilities)
3-2-1. OPTICAL/COAX.1,2
• You can connect the digital input/output port of an external device to the digital (OPTICAL/COAXIAL)
input/output port of this product as shown in the figure below.
• This product can reproduce linear PCM signals with sampling frequencies of 96kHz, 176.4kHz,
192kHz and 384kHz. (However, OPTICAL is supported up to 192kHz)
• You can change the Input Setting from the screen, settings and the remote control.
RD160
OPTICAL OUT
TV
COAXIAL OUT
CD Player
COAXIAL OUT
CD Player
Caution: Do not input signals other than linear PCM signals such as Dolby Digital, DTS, and AAC to this
device. It may cause noise and damage to the speakers.
3-2. Connection Between Digital Input Port and Audio Device
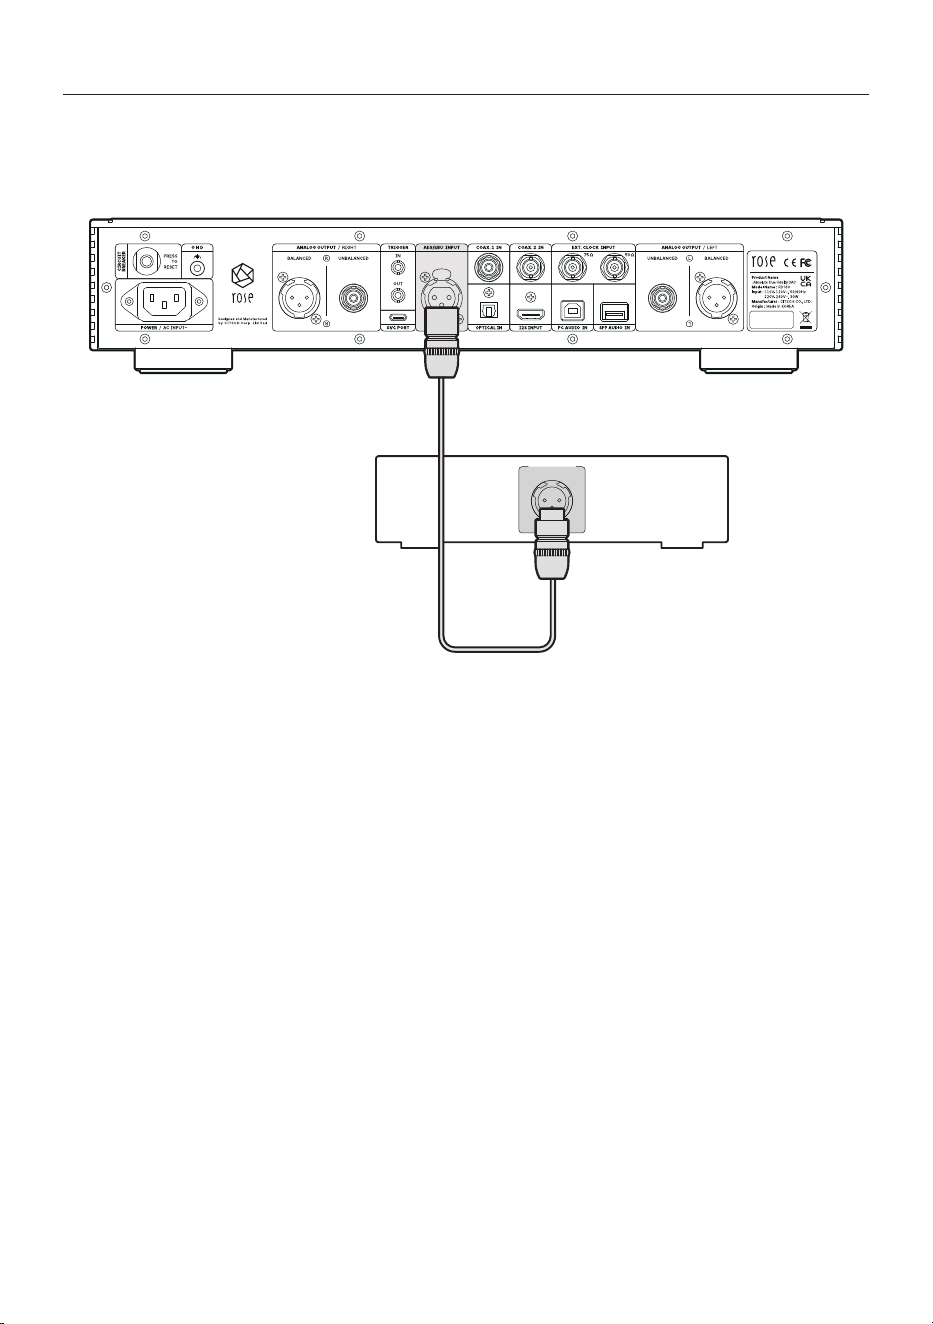
- 28 -
3-2-2. AES/EBU
• You can connect the digital output port of an external device to the AES/EBU input port of this
product as shown in the figure below.
RD160
AES/EBU OUT
CD Player
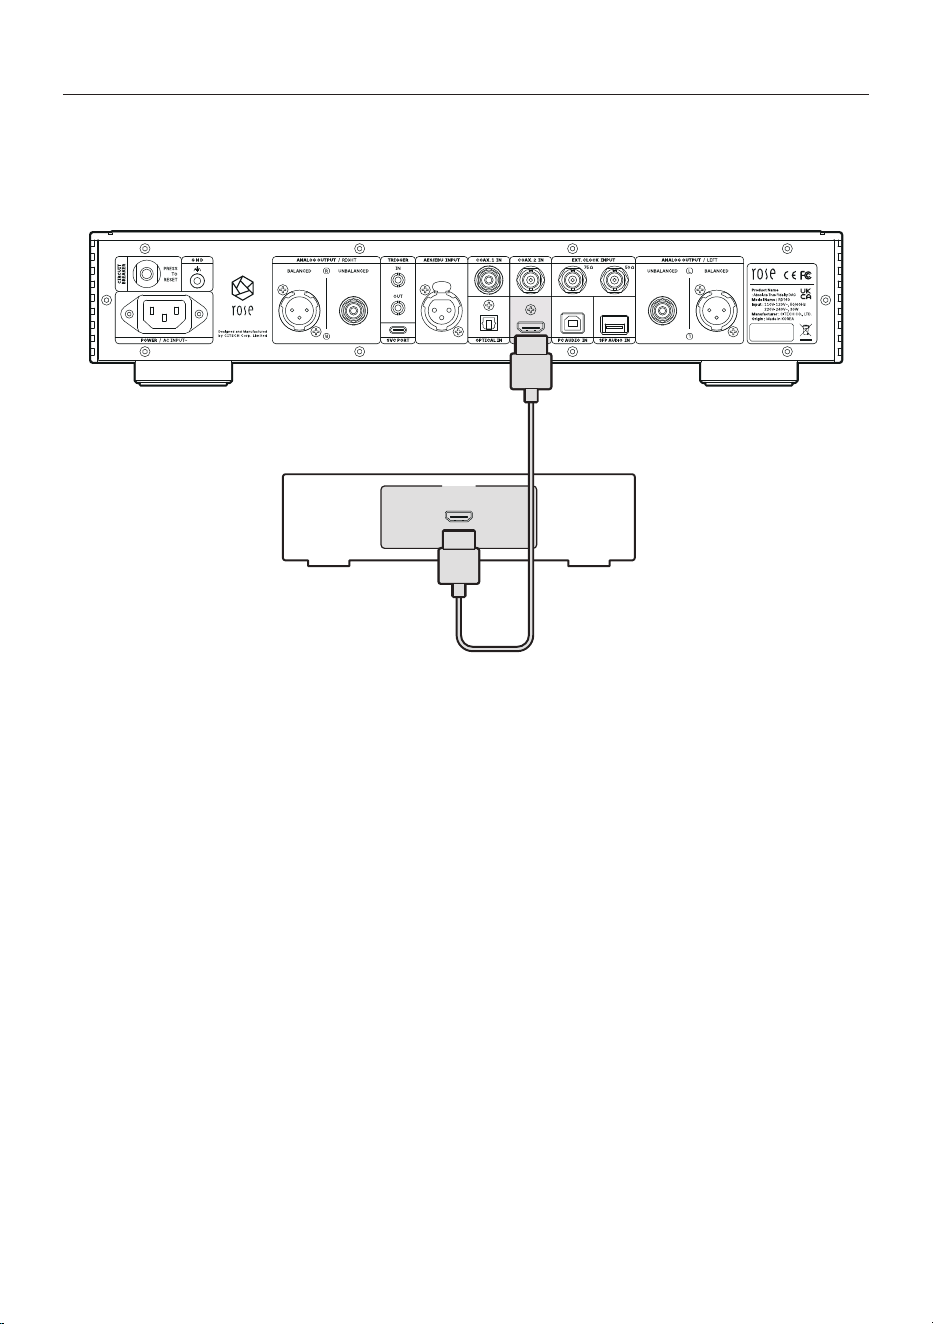
- 29 -
3-2-3. I2S IN
• You can connect the digital output port of an external device to the I2S input port of this product as
shown in the figure below.
RD160
I2S OUT
Player
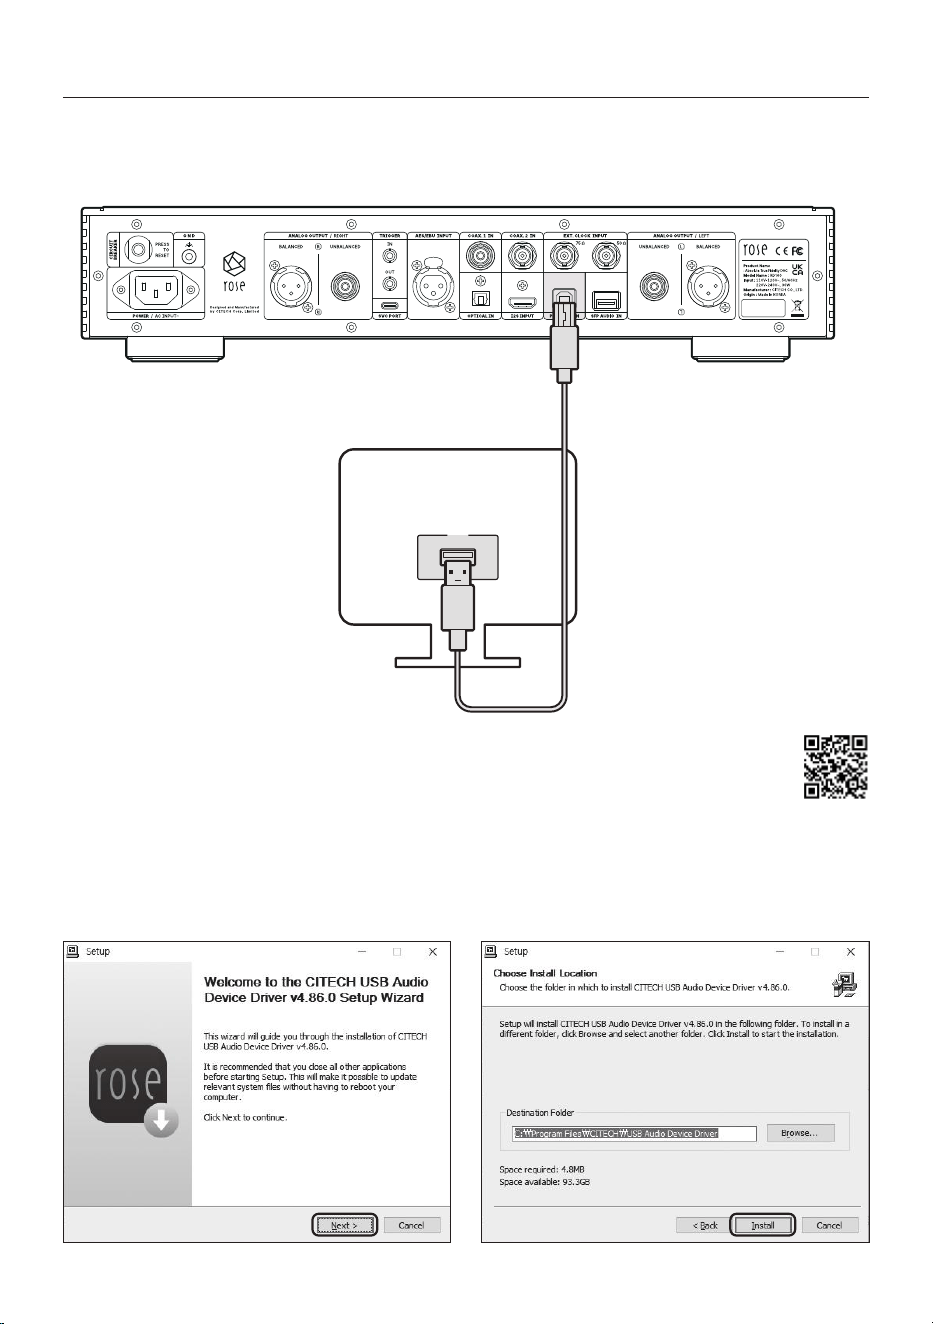
- 30 -
3-3. PC AUDIO Connection
• Connect the device as shown in the figure below.
RD160
USB
PC
• 3-3-1. After accessing the ROSE website,
download the Rose_UsbAudio_[VERSION].zip file in “Downloads”
under “Support”. You can access this category by entering the URL in the
browser (https://hifirose.com/download) or by scanning the QR code on the right.
• 3-3-2. When you unzip the downloaded Rose_UsbAudio_[VERSION] file and run Rose_UsbAudio_
[VERSION].exe, the screen appears as shown in the picture below. Please select Next.

- 31 -
• 3-3-3. Reboot after installing USB Audio Device Driver.
• 3-3-4. After driver installation is complete, switch the source to USB IN in the In/Out Setting,
and you can check the RD160-DAC on your PC as shown below.
• 3-3-5. When you set the sound device to RD160-DAC in the system tray area of your PC, you are
ready to use the device connected to the USB IN port.
- 32 -
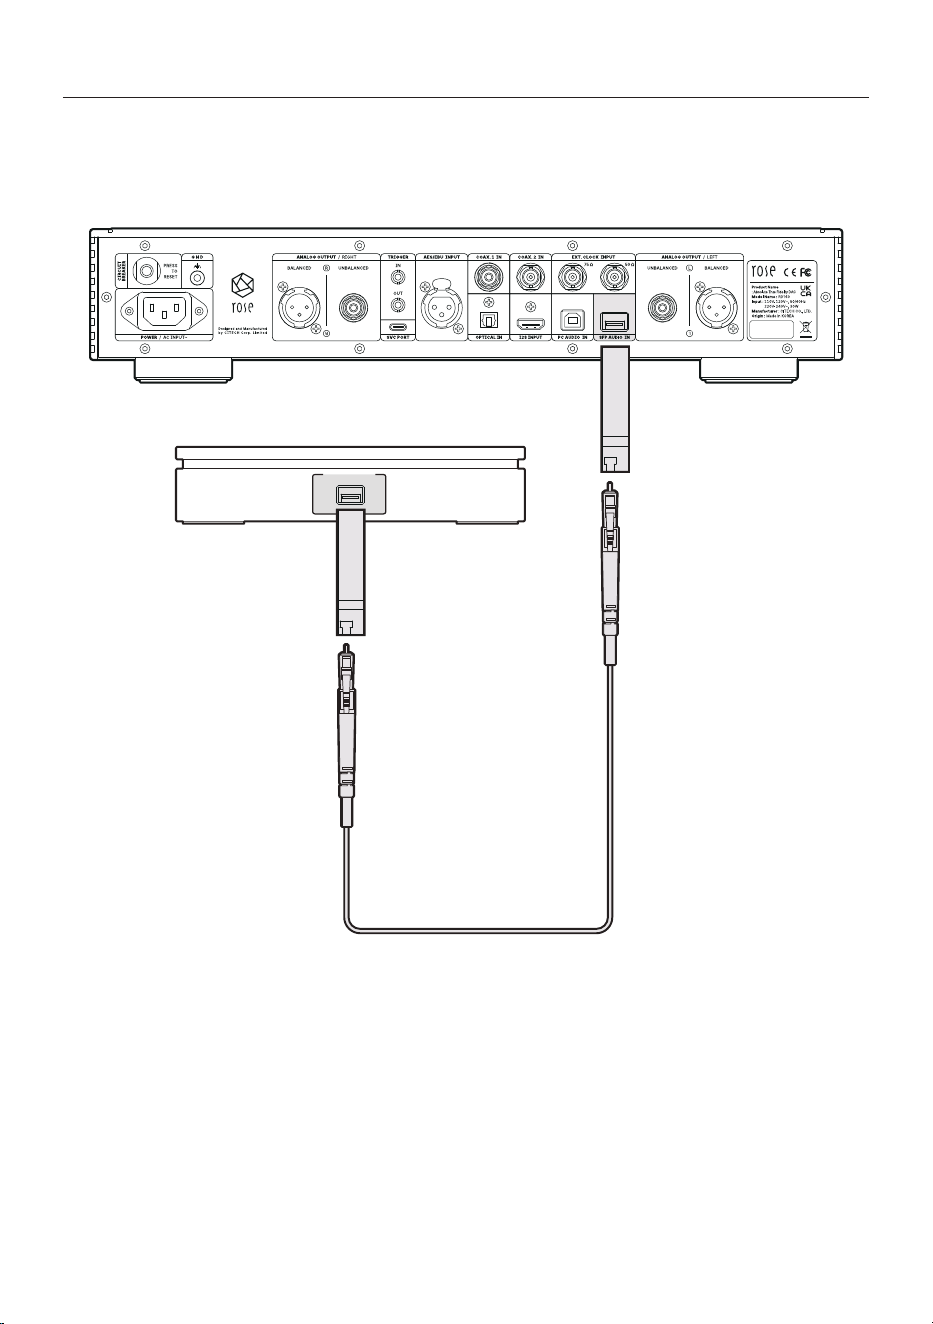
3-4. SFP AUDIO Connection
• You can connect an external digital output device to the SFP AUDIO IN port of this product using an
SFP module and optical cable as shown in the figure below.
RD160
USB 3.0 SFP
External Device
SFP
Module
SFP
Module
- 33 -
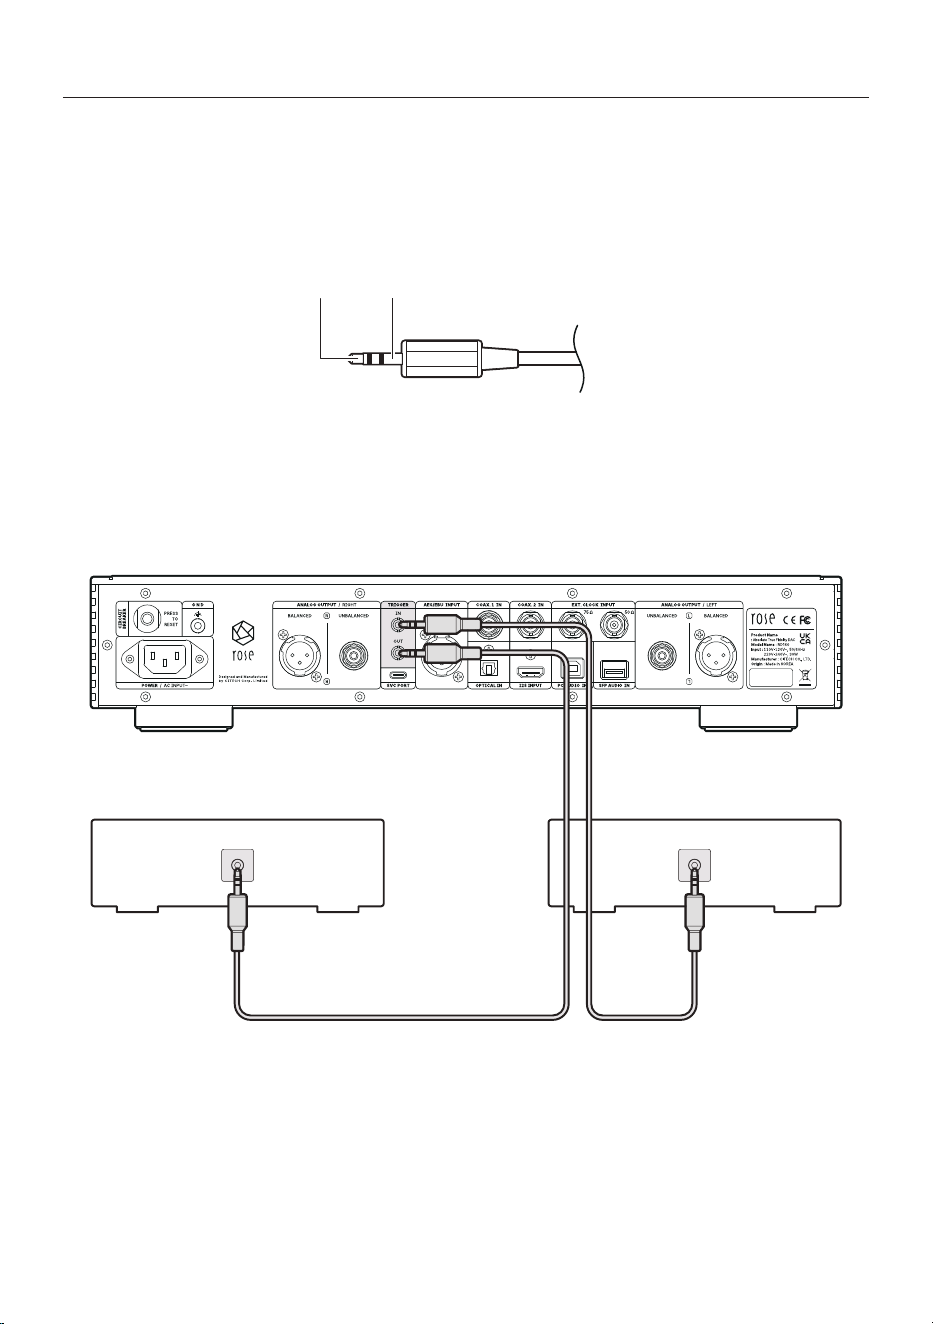
3-5. TRIGGER Input Terminal and Pin out
• The trigger function can control the power by linking the product and the source device.
• If you are using a source device with a trigger output terminal, you can use it as a trigger function
to control the power on and off by connecting it to the trigger input terminal of the product with a
monaural mini-plug cable.
RA280
Concentric Plug
PIN 3 COLD( Input)
PIN 2
HOT(+Input)
PIN 1
Shield / Ground
RD160
TRIGGER OUT
CD Player
TRIGGER IN
Amplifier
Trigger Input Voltage
Trigger Output Voltage
: DC 3.3V ~ DC 12V
: DC 12V
Grounding
Power Button
Signal
- 34 -
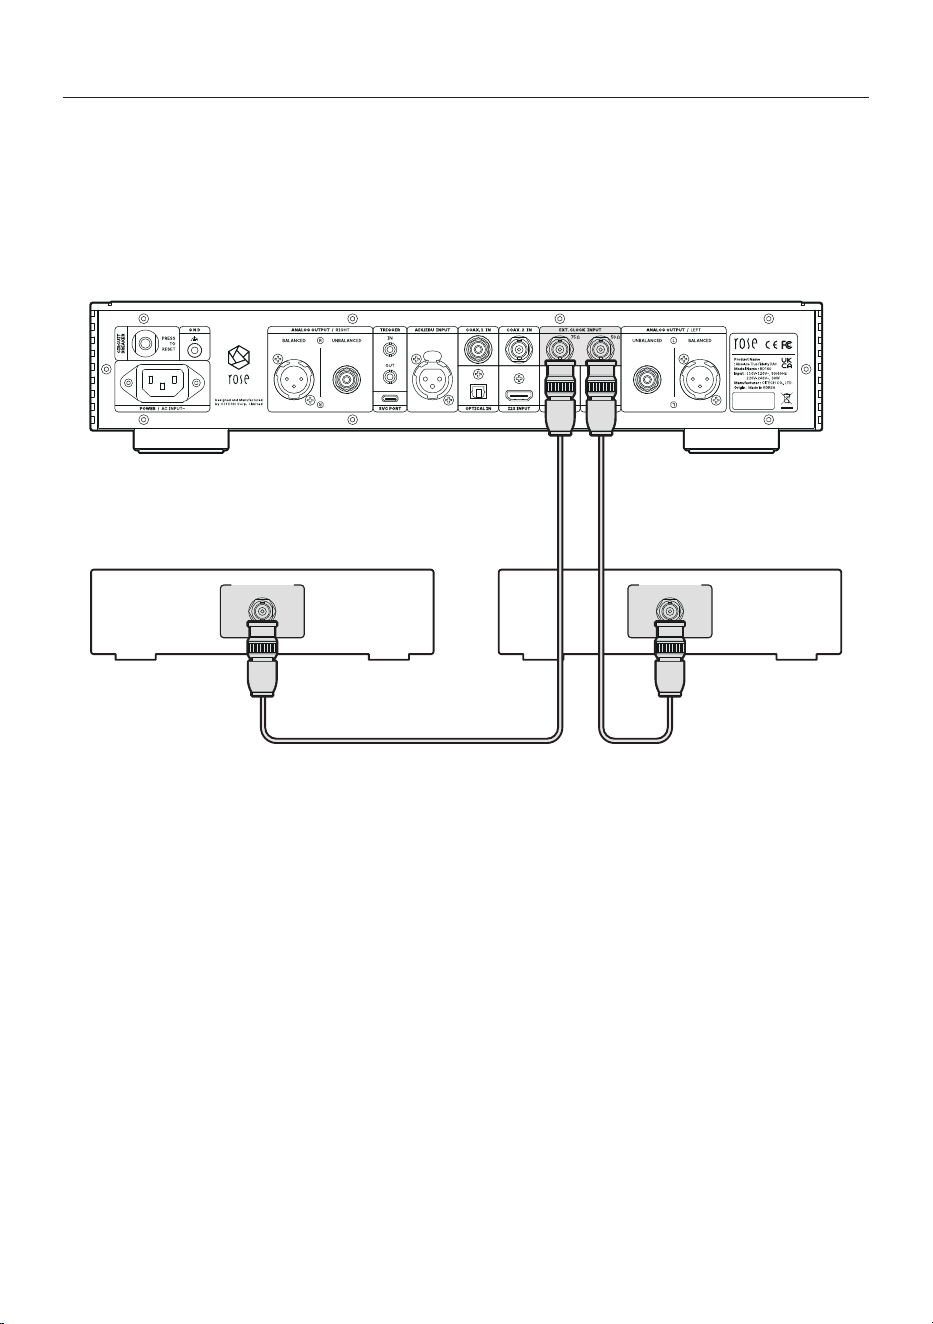
3-6. EXT. CLOCK Connection
• You can use an external clock by connecting it to the EXT. CLOCK port of this product as shown in the
figure below.
• To use the master clock using an external device, you can select “External 50Ω” or “External 75Ω”.
※ Please make sure that the external device has an output impedance value of 50Ω or 75Ω and connect it to
the appropriate port.
RD160
EXT. CLOCK OUT
Master Clock
EXT. CLOCK OUT
Master Clock

- 35 -
3-7. Circuit Breaker
• This is a circuit breaker terminal to protect the circuit from damage caused by overvoltage or
overcurrent.
• Similar to the power circuit breaker in a home, when overvoltage or overcurrent is applied from the
outside, the switch terminal protrudes outward to block the power supply. When pressed again by
hand, the terminal is inserted inward, connecting the internal circuit to the power supply.
※ If the protruding motion is repeated even after you press the switch, there may be a problem with the internal
circuit. Please remove the power cord and request product repair.
RD160
- 36 -
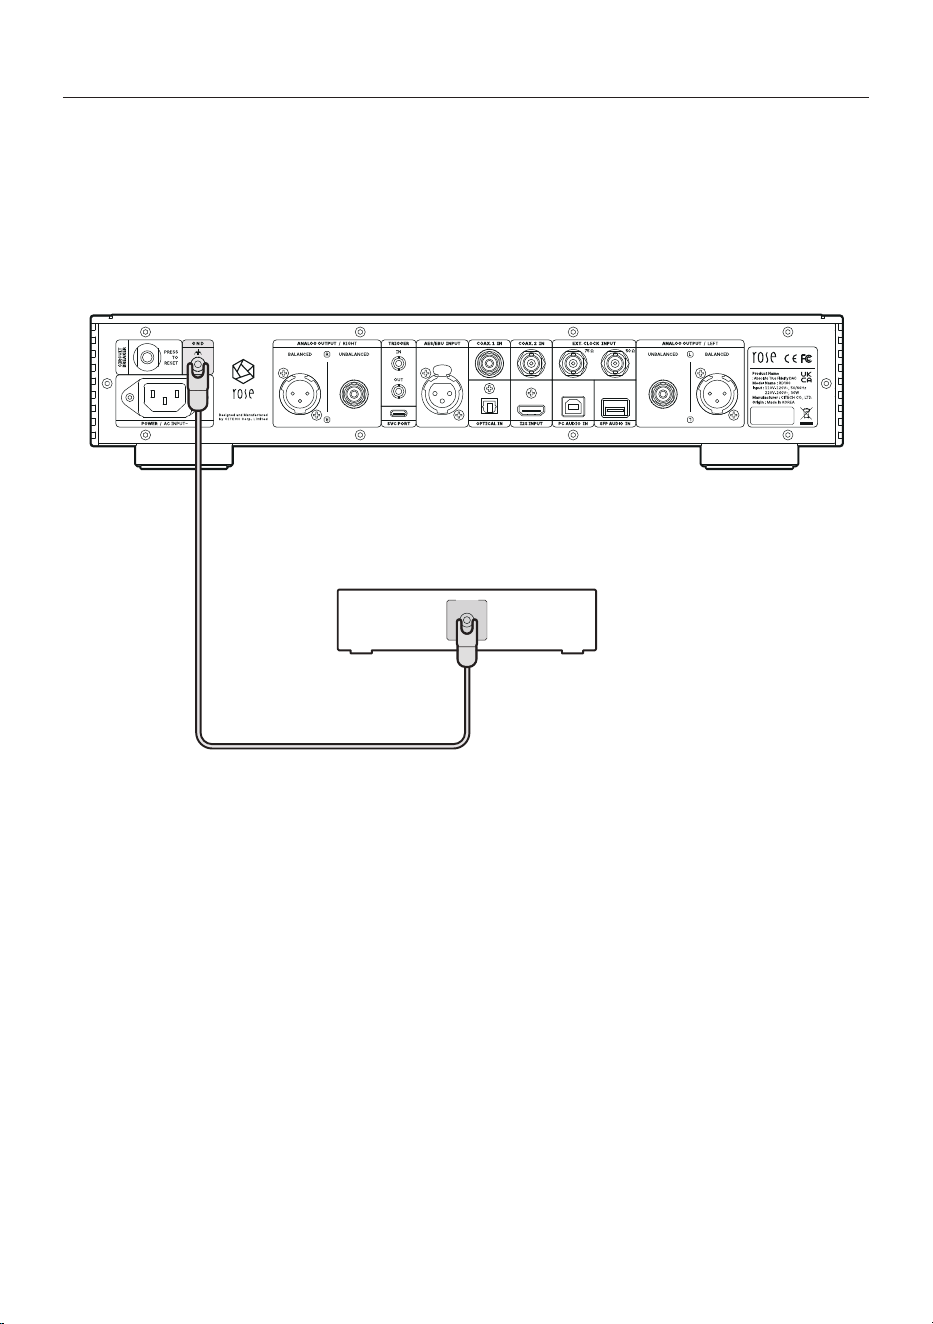
3-8. GND Connection
• You can ground the GND terminal of an external device to the GND terminal of this product as shown
in the figure below.
※ When a lot of noise is generated, you can reduce the noise by connecting this GND terminal to the signal
GND of an external device.
※ Reversing the signal GND connection may increase noise and cause unintended errors. In this case, please
remove the signal GND connection line between the devices.
RD160
External Device
GND
- 37 -

- 38 -
Product Specifications
Benchmark
Input Sensitivity
0dBF 1kHz
Output Impedance
300Ω
Output Level
4.5Vrms(RCA), 9Vrms(XLR)
THD + N
0.005%(RCA), 0.005%(XLR) (1kHz 0dBF)
Signal to Noise Ratio
124dB(RCA), 124dB(XLR)
Residual Noise
0.3mV(RCA), 0.4mV(XLR)
Stereo Crosstalk
-124dB(RCA), -124dB(XLR) (1kHz 0dBF)
Frequency
Response
10Hz ~ 20kHz (-0.3dB)
10Hz ~ 50kHz (-1.5dB)
10Hz ~ 73kHz (-3.0dB)
Sampling Rate
PCM
8kHz~768kHz(8/16/24/32bit per Sample)
DSD
DSD64(2.8MHz)/DSD128(5.6MHz)/DSD256(11.2MHz)/DSD512(22.6MHz)
Technical
DAC
2 × AK4499EXEQ + 2 × AK4191EQ (AKM)
PSU
3 × Independently Customized Reference Linear Toroidal
CPU
RK3128 Quad core Cortex-A7mp
RAM
DDR3 1866MHz 1GB
FLASH
8GB eMMC
Oscillator
High Precision OCXO clock
Inputs
Digital
USB SFP Module
USB 2.0 Type-B
HDMI I2S
Coaxial RCA
Coaxial BNC
Optical
AES/EBU
PCM 32bit/768kHz, DSD512(22.6MHz)
PCM 32bit/768kHz, DSD512(22.6MHz)
PCM 32bit/768kHz, DSD512(22.6MHz)
PCM 32bit/384kHz, DSD128(5.6MHz) (only DoP)
PCM 32bit/384kHz, DSD128(5.6MHz) (only DoP)
PCM 32bit/192kHz, DSD64(2.8MHz) (only DoP)
PCM 32bit/384kHz, DSD128(5.6MHz) (only DoP)
External Clock
BNC 75Ω(10MHz), SMA 50Ω(10MHz)
Outputs
Analog
Unbalanced, Balanced

- 39 -
Feature
PCM Filter
Sharp
Slow
Short Sharp (default)
Short Slow
Super Slow
Low Short
Pre-Out Level
1V~9V
Power
Input Voltage
AC110V-120V~, 220V-240V~, 50/60Hz
Standby
0.3W
Playback
30W
Environmental
Operating ˚C
0~40˚C
Storage ˚C
-10~50˚C
Physical
Display
AMOLED hidden screen
Dimension
430(W) × 330(D) × 88(H) mm
Weight
10kg
Material
Solid Aluminum / Rust-proof Steel
Finish
Silver, Black
IR
38kHz IR Receiver
- 40 -
Quality Guaranteed
Model Name
RD160
Purchase Date
DD / MM / 20YY
Place of Purchase
Shop Name
Contact Address
Serial No.
Contact Address
Warranty Period
Until 1 year from the date of purchase
• Name of the Company that Received the Conformity Assessment: CITECH Co., Ltd.
• Manufacturer/Country of Manufacture: CITECH Co., Ltd. / Republic of Korea
• Identification Code of the Certified Company: SYH
• Certification No.: R-R-SYH-RD160
Product Website: www.hifirose.com
• Get news about the latest events and new product information from ROSE through the newsletter.
• You can find an authorized dealer or reseller near you on the website.

- 41 -
Things to Check Before Contacting the Service Center
• Please restart the product if the screen freezes. Press the power button to turn the power off, then
turn it back on.
• If the switch does not work while the product is in use, it may be because it was exposed to severe
static electricity. Please disconnect the power cord before starting again.
• When the product is used for a long time in a confined space that does not meet the product
installation conditions (p. 24), it may generate heat and become hot, affecting the life and
performance of the product.
Always keep the ventilation openings on the top of the main body open so that heat dissipation inside
is not disturbed.
• If there is no output sound, check the input source selector of the main unit, and check that the
speaker connection status, and the volume control level are not “0.”
• If the remote control does not work, the battery may be empty. Replace it with a new battery.
Repair Service Guide
• Free Repair
Limited to naturally occurring failures within one year from the date of purchase, which is the warranty
period of the product.
• Paid Repair
If the warranty period has expired, or even if it is within the warranty period, in the following cases, the
actual cost of repair (including part costs) will be charged.
- Failure due to consumer negligence during use
- Repairs or modifications made by persons other than company engineers
- Failure or damage caused by an abnormality in the power supply
- Failure due to a natural disaster
• Repair Service Application Guide
If a failure occurs during use, stop using it immediately and consult with the place of purchase or the
customer support office of the company first.
• Information required for reporting
- Model name and serial number (manufacture date)
- Place and date of purchase
- Consumer information including contact information and address
- Symptoms of failure
- All other matters necessary for repair service
• Precautions for Product Delivery to the Service Center
Be sure to pack the product in the original box and inner protective material to prevent damage when
delivering the product by courier. Please note that we are not responsible for damage to the product
during transportation of the product in other packaging.
- 42 -
HiFi ROSE / CITECH
UK PSTI Statement of Conformity
We, Citech, Co., Ltd. hereby declares that this product complies
with the applicable security requirements set out in Schedule 1
of The Product Security and Telecommunications Infrastructure (Security
Requirements for Relevant Connectable Products) Regulations 2023
at the time of this Statement, required by the UK government
in the Product Security & Telecommunications Infrastructure Act 2022.
Citech, Co., Ltd. will provide software security updates
for this product as described on this webpage:
https://hifirose.com/Legal/
If you detect a vulnerability with this product,
please contact us following the guidance covered on this webpage:
https://hifirose.com/QnA?category=34zK754S49/
※ This statement was last updated on 04.04.2024.

- 43 -
Memo

- 44 -
Memo

- 45 -
Memo

- 46 -
Memo

- 47 -
Memo

- 48 -
Memo