4
Warm Tips
1. All analog audio outputs will work at the same time no matter what
audio input is selected. While the optical output will only work when
PC-USB inputs.
2. Only USB input supports PCM 384Khz/32bit DSD256, coaxial and
optical inputs only support PCM 192KHz/24Bit at the highest.
3. For win7, PC-USB only can be recognized when the driver is installed.
For other systems, the driver is only required when playing DSD files.
4. P1PLUS is designed with pluggable tube sockets, default comes with
JAN5654 tubes, can be replaced by 6J1, 6J2, 6J3, 6J4, 6J5, 6K4, 6*1N,
6*4N, 6*5N, 5654/5654W, 5725, 6AK5, EF95, 6BA6, 403B, etc. and can
be replaced directly. For more other models, please check and
compare their related parameters to judge whether they can be
replaced.
5. Stereo RCA / 3.5mm AUX output and 3.5mm headphone output
can work at the same time, and the volume / treble / bass of the
three outputs are controlled simultaneously. Recommend to use TRS
headphones, P1PLUS may not be compatible with TRRS headphones
which with microphone function.
6. Please keep P1PLUS away from WiFi routers, wireless phones, radios
and other wireless RF devices, otherwise the tube working may be
interfered and some noise may occur.
7. The equipped power adapter of P1PLUS should avoid sharing
sockets with inductive loads such as refrigerators, fans, washing
machines, etc., otherwise the power adapter may be interfered and
various kinds of noise will be caused.
8. The working voltage of P1PLUS is DC 12V (above 1.5A), below or
over this will cause bad performance or damage.
Manual
P1 PLUS
Copyright © 2013 by DOUK AUDIO Inc.
www.doukaudio.com
6
Operation Steps
1. Install the equipped vacuum tubes into the tube sockets, before
insertion please align the pins of tube to the holes of socket.
(Please check whether the tube pins are deformed or not.)
2. Connect audio outputs
Please connect the power amplifier or active speaker to the RCA
or 3.5mm AUX output of the P1PLUS, or insert the headphone into its
3.5mm headphone jack output.
3. Connect audio inputs
Please connect the audio source or other devices to the input of the
P1PLUS via the correct input channels and high-quality audio cables.
* If you want to use Bluetooth input, please do that after the 5th step.
4. Connect the equipped DC 12V power adapter to the power
interface of the P1PLUS, and then plug it to the wall socket.
5. Short press the Mode Knob or press the turn on/off button on the
remote control to turn P1PLUS on, and then switch to the correct
input channel mode according to your connection.
* If you want to use Bluetooth input, please switch to BT mode and
there will be BT flashing in the display screen that means P1PLUS
entered Bluetooth pairing mode, please search Douk Audio P1PLUS
in your phone and click to connect. After successful
connection, the BT in the screen will be steady on.
6. Rotate the Mode Knob to adjust the volume, anticlockwise to turn
down and clockwise to turn up. The volume also can be adjusted
by pressing the volume button +/- on the remote control.
7. Short press the Tone Knob to enter treble or bass mode, and then
rotate to adjust the treble or bass,anticlockwise to turn down and
clockwise to turn up. The treble and bass also can be adjusted by
pressing the treble / bass button +/- on the remote control.
8. The brightness and color of the VU meter also can be adjusted freely,
please refer to the introduction of the VU meter above to enjoy more fun.
9. After use, please long press the Mode Knob or press the turn on/off
button on the remote control to turn P1PLUS off, and then disconnect
the power adapter.
37
Q: There is no sound output when browsing webpage video, but the
FOOBAR play is normal.
A: Please close FOOBAR: you can click the small speaker in the lower right
corner of the desktop-play device-double-click the USB device,
and select "Advanced" in the menu, and then uncheck the two check
marks in exclusive mode.
Q: The computer can recognize USB DAC but the driver cannot be installed?
A: This is usually because the computer system lacks a digital signature
patch or USB DAC has been banned by anti-virus software. Please
install a lower version driver (such as version 2.15) or turn off the
anti-virus software.
Q: The driver cannot be installed, and there is always an exclamation
point on the device manager.
A: Please close the auto install driver function of your computer system,
and then install USB driver in the U-disk again.
Q: Why is the sound very low when the headphone is connected to the
headphone amplifier?
A: Please confirm whether the impedance, plug type and other parameters
of headphone are compatible with the headphone amplifier, or whether
the input signal is too low.
Q: Why is the sound from headphone distorted after connecting to the
headphone amplifier?
A: Please confirm the volume of audio source and headphone amplifier.
If the volume is too high that exceeds the power which the headphone
can bear, distortion will be caused.
Q: Why is there a thumping sound when swithing on/off?
A: Please confirm the on-off sequence is correct, normally it follows the
order of signal transmission when turn on: audio source → preamp /
DAC → amplifier → speaker. (The sequence is reversed when switching
30
How to Install ASIO plug-in
Double click ASIOProxyInstall-0.6.5, and then install it according to the
prompts.
26
Background noise
How to Set PC-USB Driver
1. Please connect the equipped USB cable to the USB input of P1PLUS
and the USB output of the computer. (The PC-USB input of P1PLUS is
hot-swappable.)
2. Short press the Mode Knob or press the input selection button on
the remote control to switch to the PC-USB input mode.
3. Please download the USB driver from the equipped U-disk or
contact us directly.
4. When download the USB driver, please right-click on the
"Douk Audio" file as shown, and then click Extract to "Douk Audio".
32
4. Open Foobar 2000, click Library, select Configure and then click output.
Then please select the options as the following pictures show.
33
Frequently-asked Questions
5. When the above steps are finished, please import the music
files and then DSD (Direct Stream Digital) files can be played.
Q: All my cables are connected, why is there no sound output?
A: 1. Check whether P1PLUS is powered on or not (judge from power
adapter / display screen), the input channel has been switched
to the correct mode or not.
34
2. Check whether the devices from P1PLUS to amplifier/speaker or
headphone are connected correctly, the volume of them is in
the minimum state or not.
3. If the above are all normal, please check whether the input
signal of audio source is muted, paused, or the volume is in
the minimum state or not.
Q: Why is the sound distorted ?
A: P1PLUS with preamplification function. Distortion usually occurs
when the volume of audio source, P1 PLUS and the amplifier/speaker
are adjusted to the maximum state, just turn down the volume of one
of them. In general, adjust the volume of amplifier to about 60%, then
fine-tune the volume of preamp (distortion will be greatly reduced in
this way).
Q: Why is there a loud current sound or buzzing sound on the speaker?
A: 1. Please use the original power supply. Many power supplies in the
market have interference, which will cause current sound.
2. When using unshielded signal cable in no load, there will be
interference signals. Please use the shielded signal cable or unplug it.
3. If there is still noise after eliminating above situations, please confirm
whether it is external noise or internal noise. Disconnect all inputs and
only retain power supply and power cable. If the noise disappears, it
is from audio input; if the noise is still there, it is possibly disturbed by
power supply or generated by the internal of product.
Q: Why Bluetooth cannot be searched? How to switch to Bluetooth mode?
A: Short press the Mode Knob on the top panel or press "SELECT" button on
remote control to switch to the BT mode, there will be BT flashing in the
screen, then use your phone or tablet to search for "Douk Audio P1 PLUS",
click and connect it, then play music.
35
Q: Why does the Bluetooth playback lag or even disconnect?
Why is the Bluetooth background noise/current noise obvious?
A: Please check whether the Bluetooth antenna is installed correctly,
whether there is interference or blocking (such as WiFi router / wireless
telephone / FM radio, etc., since they may be in the same frequency
band as Bluetooth, and inductive loads such as fans/ refrigerators/
air conditioners will also cause some interference), whether the
Bluetooth is blocked or too far away from the device (more than 15 meters).
Q: Can P1PLUS be connected to my computer via Bluetooth? Why is there
no sound when connected to PC?
A: Compared with phones, computers with poor compatibility and
troublesome operations when using Bluetooth. Need the computer with
Bluetooth function and to update the driver and set the output device
to Bluetooth after connection.
Q: Why is the P1PLUS unrecognized or unplayable after connecting to the
computer via USB input?
A: Please confirm the system version of the computer is compatible, whether
the product needs to install a driver. For example, for Win7 system, most
of our models of DAC need to install a driver to use.
Q: Why P1PLUS can't be recognized by the computer via USB after installing
the driver for after a period of time?
A: The change and updation of computer system, software and hardware
and security software may sometimes lead to driver loss, please reinstall
the driver and try again.
Q: USB DAC can not work after connecting with phone, is a driver required?
A: No, connect phone to USB DAC is driver-free, please check whether the
phone and the connection cable support OTG function, and some phones
need to open the OTG option and set the output device in the settings.
Q: Why do the sampling rates of music and the actual display are different?
36
A: The sample rate displayed on the product is the real-time sample rate
of the playback device. If not match, please switch the output sample
rate in the settings of play device.
Q: Why is there no sound output when optical and coaxial inputs are used?
A: Please confirm the optical and coaxial of the connected device is
output or input. For example, if connected to the TV optical output,
please set the output mode and sampling rate on TV. (usually with PCM
output mode option)
Q: After connecting P1PLUS to the computer via USB input, but there is
no response? Or after connecting, the computer prompts that USB
DAC cannot be recognized?
A: Please connect another USB interface of computer or change another
USB cable, please contact us if there is still no response.
Q: There is some noise and the music sound is very low when playing DSD
music?
A: Please set the computer system volume to 100: click the small speaker
in the lower right corner of the computer-play-device-double-click
the USB device, and adjust the volume to 100.
Q: The volume of DSD playing is lower than PCM playing?
A: This is normal, the sound of DSD is 3dB smaller than PCM.
Q: There is prompt that the device current is too large when connecting
to the iphone.
A: Connecting P1PLUS to iphone via USB input needs to use a camera kit
that supports large current, some camera kits require a separate power
supply.And we cannot guarantee that every mobile phone can be
compatible, because some mobile phones without built-in drivers.
Q: The sampling rate of the P1PLUS only can show 24Bit/192Khz in the computer?
This is because the computer system can only display up to 192KHz.
But in fact using FOOABR ASIO can play DSD256 PCM384KHz.
38
off. As the internal capacitors will be discharged for a while after
shutdown. If turn off the preamp firstly and then turn off amplifier, impact
sound will be easily caused which may damage the amplifier or speaker
in severe cases.)
Q: Why does the volume of different audio sources(such as changing CD
player to phone) differ the volume of the P1PLUS is unchanged?
A: Different audio devices can output different signal amplitudes, for
example, the phone usually is 0.35V, while CD player is 1V.
Q: Why is there a faint sound even when the volume is turned up to the
maximum without installing the tubes?
A: Preamp is for audio signal amplification, other components such as
capacitors or resistors will still produce a weak signal coupling although
no tubes are plugged in. Please install the tube correctly before use.
Q: How long is the service life of vacuum tubes? Can I replace them by
myself?
A: The service life of the vacuum tubes is about 4000-4500 hours, they are
not easy to break as long as not damaged by external forces. Before
replacing, please confirm the model that can be replaced.
Q: For P1PLUS, the commonly used vacuum tubes can be replaced by
what models?
A: Commonly the tubes of P1PLUS can be replaced by: 6J1, 6J2, 6J3, 6J4,
6J5, 6K4, 6*1N, 6*4N, 6*5N, 5654/5654W, 5725, 6AK5, EF95, 6BA6, 403B, etc.
Q: What should be paid attention to when using the tube devices?
A: The vacuum tube is a high-resistance component, easy to be interfered
with, so it should be as far away as possible from RF interference or
electromagnetic interference sources and avoid vibration; The tube will
generate heat when working, so it should be well ventilated and heat
dissipated.
27
5. After unzipping, please double click “setup.exe” to run it.
6. Click Next as the following pictures show.
28
7. When there is a tip Always trust software from “SAVITECH CORP” ,
please select it and click Install.
8. When the installation is finished, the system will prompt to restart,
click "Yes" and wait for the restart to complete.
29
10. In the pop-up box, select the USB device (USB Driver-P1PLUS) recognized
by the PC, click to confirm the recognized digital output, and set it as the
default value.
9. After the restarting, please find the speaker icon on the right lower corner,
and right click it to select Play Device.
Specifications
5
Brand
Model
Chipset
Max. Sampling rate USB supported
Max. Sampling rate
Coaxial/Optical supported
Operation systems
PC-USB supported
Bluetooth version
Frequency response
Treble / bass range
THD
SNR
Input sensitivity
Output level
Matched impedance
of headphones
Output power of headphone jack
Working voltage
Net weight
Dimensions(W*D*H)
Package weight
Package dimensions(W*D*H)
Douk Audio
P1 PLUS
Bluetooth / PC-USB Coaxial / Optical /
Stereo RCA / 3.5mm AUX
Optical / Stereo RCA / 3.5mm AUX /
3.5mm headphone jack
QCC5125+SA9137L+ES9018K2M+TPA6120
PCM 384KHz/32Bit / DSD256
5.1 (support APTX/APTX-HD/LDAC)
20Hz-20kHz(±1.8dB)
±10db
0.1%
≥106dB
0dBFS
2V
750mW
DC 12V (≥1.5A)
906g / 2.0lb
224*86*95mm / 8.82*3.39*3.74in
1.60kg / 3.53lb
195*288*100mm / 7.68*11.34*3.94in
PCM 192KHz/24Bit
W7 / W8 / W10 / W11 / MAC / Linux
16-600Ω
Audio input
Audio output
16
注意事項
1. すべてのアナログオーディオ出力は、選択されたオーディオ入力に関係
なく同時に動作します。ただし、光出力はPC-USB入力時のみ動作します。
2. USB入力のみがPCM 384Khz/32bit DSD256をサポートし、同軸お
よび光入力は最高はPCM 192KHz/24Bitになります。
3. Win7では、ドライバがインストールされている場合にのみPC-USBが
認識されます。他のシステムでは、DSDファイルを再生するときにのみ
ドライバが必要です。
4. P1PLUSはプラグ可能なチューブソケットを備えて設計されており、
デフォルトではJAN5654チューブが付属しています。これは6J1,6J2,
6J3,6J4,6J5,6K4,6*1N,6*4N,6*5N,5654/5654W,5725,6AK5,
EF95,6BA6,403Bなどに直接交換可能です。他のモデルについては、
関連パラメータを確認し比較して、交換可能かどうかをご判断ください。
5. ステレオRCA / 3.5mm AUX出力と3.5mmヘッドフォン出力は同時に
動作し、これら三つの出力のボリューム/トレブル/ベースは同時に制御さ
れます。TRSヘッドフォンの使用を推奨します。P1PLUSはマイク機能付
きのTRRSヘッドフォンと互換性がない場合があります。
6. P1PLUSはWiFiルーター、無線電話、ラジオなどの無線RFデバイスから
離して保管してください。そうしないと、チューブの動作が干渉され、
ノイズが発生する可能性があります。
7. P1PLUSの付属電源アダプターは、冷蔵庫、扇風機、洗濯機などの誘導
負荷と同じソケットを共有しないようにしてください。そうしないと、電
源アダプターが干渉され、さまざまなノイズが発生する可能性があります。
8. P1PLUSの動作電圧はDC 12v(1.5A以上)で、これ以下またはこれ
以上では性能が悪くなるか、損傷する可能性があります。
18
操作手順
1. 付属の真空管をチューブソケットに取り付けます。挿入する前に、
チューブのピンがソケットの穴に合うようにしてください。
(チューブのピンが変形していないかご確認ください。)
2. オーディオ出力を接続します
P1PLUSのRCAまたは3.5mm AUX出力にパワーアンプやアクティブス
ピーカーを接続するか、3.5mmヘッドフォンジャック出力にヘッドフォン
を挿入してください。
3. オーディオ入力を接続します
正しい入力チャンネルと高品質のオーディオケーブルを使用して、
オーディオソースまたは他のデバイスをP1PLUsの入力に接続してください。
*Bluetooth入力を使用したい場合は、5番目のステップの後に行ってください。
4. 付属のDC 12V電源アダプターをP1PLUSの電源インターフェースに接続し、
その後、壁のソケットに差し込みます。
5. モードノブを短く押すか、リモートコントロールの電源オン/オフボタンを
押してP1 PLUSをオンにし、その後、接続に応じて正しい入力チャンネル
モードに切り替えます。
*Bluetooth入力を使用したい場合は、BTモードに切り替えてください。
ディスプレイ画面にBTが点滅すると、P1 PLUSがBluetoothペアリン
グモードに入ったことを意味します。スマホでDouk Audio P1 PLUS
を検索し、クリックして接続してください。接続が成功すると、画面の
BTが点灯します。
6. モードノブを回して音量を調整します。反時計回りに回すと音量が下がり、
時計回りに回すと音量が上がります。音量は、リモートコントロールの
音量ボタン+/-を押すことでも調整できます。
7. トーンノブを短く押してトレブルまたはベースモードに入り、その後、回転
させてトレブルまたはベースを調整します。反時計回りに回すとトレブル/
ベースが下がり、時計回りに回すと上がります。トレブルとベースは、リモ
ートコントロールのトレブル/ベースボタン+/-を押すことでも調整できます。
8. VUメーターの明るさと色も自由に調整できます。
詳しくは上記のVUメーターの紹介を参照して、より楽しんでください。
9. 使用後は、モードノブを長押しするか、リモートコントロールの電源オン/
オフボタンを押してP1PLUSをオフにし、その後、電源アダプターを切断し
てください。
25
Frequency response
S/N ratio
10
Warme Tipps
1. Alle analogen Audioausgänge funktionieren gleichzeitig, unabhängig davon,
welcher Audioeingang ausgewählt ist. Während der optische Ausgang nur
bei PC-USB-Eingängen funktioniert.
2. Nur der USB-Eingang unterstützt PCM 384 kHz/32 Bit DSD256, koaxiale
und optische Eingänge unterstützen nur PCM 192 kHz/24 Bit auf höchstem
Niveau.
3. Unter Win7 kann PC-USB nur erkannt werden, wenn der Treiber
installiert ist. Bei anderen Systemen wird der Treiber nur beim Abspielen
von DSD-Dateien benötigt.
4. P1PLUS ist mit steckbaren Röhrenfassungen ausgestattet, wird
standardmäßig mit JAN5654-Röhren geliefert und kann durch 6J1, 6J2,
6J3, 6J4, 6J5, 6K4, 6*1N, 6*4N, 6*5N, 5654/5654W, 5725, 6AK5 ersetzt
werden. EF95, 6BA6, 403B usw. und können direkt ausgetauscht werden.
Bei anderen Modellen überprüfen und vergleichen Sie bitte die
entsprechenden Parameter, um zu beurteilen, ob sie ersetzt werden können.
5. Stereo-RCA/3.5-mm-AUX-Ausgang und 3.5-mm-Kopfhörerausgang
können gleichzeitig arbeiten, und die Lautstärke/Höhen/Bässe der drei
Ausgänge werden gleichzeitig gesteuert. Wir empfehlen die Verwendung
von TRS-Kopfhörern. P1PLUS ist möglicherweise nicht mit
TRRS-Kopfhörern kompatibel, die über eine Mikrofonfunktion verfügen.
6. Bitte halten Sie P1PLUS von WLAN-Routern, Mobiltelefonen, Radios
und anderen drahtlosen HF-Geräten fern, da sonst die Funktion der
Röhre beeinträchtigt werden kann und es zu Geräuschen kommen kann.
7. Das mit dem P1PLUS ausgestattete Netzteil sollte die gemeinsame
Nutzung von Steckdosen mit induktiven Lasten wie Kühlschränken,
Ventilatoren, Waschmaschinen usw. vermeiden, da es sonst zu Störungen
des Netzteils und zu verschiedenen Geräuschen kommen kann.
8. Die Arbeitsspannung des P1PLUS beträgt 12 V Gleichstrom (über 1,5 A).
Eine Unter- oder Überspannung führt zu schlechter Leistung oder Schäden.
12
Bedienungsschritte
1. Installieren Sie die ausgestatteten Vakuumröhren in den Röhrenfassungen.
Richten Sie vor dem Einsetzen bitte die Stifte der Röhre an den Löchern
der Fassung aus.
(Bitte prüfen Sie, ob die Rohrstifte verformt sind oder nicht.)
2. Audioausgänge anschließen
Bitte schließen Sie den Leistungsverstärker oder Aktivlautsprecher an
den RCA- oder 3.5-mm-AUX-Ausgang des P1PLUS an oder stecken Sie
den Kopfhörer in den 3.5-mm-Kopfhörerbuchsenausgang.
3. Audioeingänge anschließen
Bitte schließen Sie die Audioquelle oder andere Geräte über die richtigen
Eingangskanäle und hochwertige Audiokabel an den Eingang des P1PLUS an.
* Wenn Sie die Bluetooth-Eingabe nutzen möchten, tun Sie dies bitte nach
dem 5. Schritt.
4. Schließen Sie das mitgelieferte 12-V-Gleichstromnetzteil an die
Stromschnittstelle des P1PLUS an und stecken Sie es dann in die Steckdose.
5. Drücken Sie kurz den Modusknopf oder drücken Sie die Ein-/Ausschalttaste
auf der Fernbedienung, um P1PLUS einzuschalten, und wechseln Sie dann
entsprechend Ihrer Verbindung in den richtigen Eingangskanalmodus.
* Wenn Sie den Bluetooth-Eingang verwenden möchten, wechseln Sie bitte
in den BT-Modus. Auf dem Bildschirm blinkt BT, was bedeutet, dass
P1PLUS in den Bluetooth-Kopplungsmodus gewechselt ist. Suchen Sie
bitte in Ihrem Telefon nach Douk Audio P1PLUS und klicken Sie, um
eine Verbindung herzustellen. Nach erfolgreicher Verbindung leuchtet
das BT auf dem Bildschirm dauerhaft.
6. Drehen Sie den Modusknopf, um die Lautstärke einzustellen, gegen den
Uhrzeigersinn, um sie zu verringern, und im Uhrzeigersinn, um sie zu
erhöhen. Die Lautstärke kann auch durch Drücken der Lautstärketaste
+/- auf der Fernbedienung eingestellt werden.
7. Drücken Sie kurz den Tonknopf, um in den Höhen- oder Bassmodus zu
wechseln, und drehen Sie ihn dann, um die Höhen oder Bässe einzustellen,
gegen den Uhrzeigersinn, um ihn zu verringern, und im Uhrzeigersinn,
um ihn zu erhöhen. Die Höhen und Bässe können auch durch Drücken
der Höhen-/Bass-Taste +/- auf der Fernbedienung eingestellt werden.
8. Die Helligkeit und Farbe des VU-Meters können ebenfalls frei eingestellt
werden. Weitere Informationen zum Spaß finden Sie in der Einführung
zum VU-Meter oben.
9. Nach dem Gebrauch drücken Sie bitte lange den Modusknopf oder die
Ein-/Ausschalttaste auf der Fernbedienung, um P1PLUS auszuschalten,
und trennen Sie dann das Netzteil.
Spezifikationen
11
Marke
Modell
Chipsatz
Max. Abtastrate USB unterstützt
Max. Abtastrate
Koaxial/Optisch unterstützt
Betriebssysteme
PC-USB unterstützt
Bluetooth Version
Frequenzgang
Höhen-/Bass bereich
THD
SNR
Eingangsempfindlichkeit
Ausgabelautstärke
Angepasste Impedanz
der Kopfhörer
Ausgangsleistung der Kopfhörerbuchse
Betriebsspannung
Nettogewicht
Abmessungen (B*T*H)
Paketgewicht
Verpackungsabmessungen (B*T*H)
Douk Audio
P1PLUS
Bluetooth / PC-USB / Koaxial /
Optisch / Stereo-RCA / 3,5 mm AUX
Optisch / Stereo-RCA / 3,5-mm-AUX /
3.5-mm-Kopfhöreranschluss
QCC5125+SA9137L+ES9018K2M+TPA6120
PCM 384KHz/32Bit / DSD256
5.1 (unterstützt APTX/APTX-HD/LDAC)
20Hz-20kHz(±1.8dB)
±10 dB
0.1 %
≥106 dB
0dBFS
2V
750mW
DC 12V (≥1.5A)
906 g / 2,0 lb
224 * 86 * 95 mm / 8,82 * 3,39 * 3,74 Zoll
1,60 kg / 3,53 Pfund
195 * 288 * 100 mm / 7,68 * 11,34 * 3,94 Zoll
PCM 192KHz/24Bit
W7 / W8 / W10 / W11 / MAC / Linux
16-600Ω
Audioeingang
Audioausgang
22
Warm Tips
1. 어떤 오디오 입력을 선택하든 모든 아날로그 오디오 출력은 동시에 작동합니다.
반면에 광 출력은 PC-USB 입력 시에만 작동합니다.
2. USB 입력만 PCM 384Khz/32bit DSD256, 동축 및 광 입력은 최대
PCM 192KHz/24Bit만 지원합니다.
3. win7의 경우 드라이버가 설치되어 있을 때만 PC-USB를 인식할 수 있습니다.
다른 시스템의 경우 드라이버는 DSD 파일을 재생할 때만 필요합니다.
4. P1PLUS는 플러그형 튜브 소켓으로 설계되었으며 기본 제공되는 JAN5654
진공관은 6J1, 6J2, 6J3, 6J4, 6J5, 6K4, 6*1N, 6*4N, 6*5N, 5654/5654W,
5725, 6AK5, EF95, 6BA6, 403B 등으로 교체할 수 있으며 직접 교체할 수
있습니다. 기타 모델의 경우 관련 파라미터를 확인하고 비교하여 교체 가능
여부를 판단하십시오.
5. 스테레오 RCA / 3.5mm AUX 출력 및 3.5mm 헤드폰 출력동시에 작동할
수 있으며 세 출력의 볼륨/트레블/베이스가 동시에 제어됩니다. TRS 헤드폰을
사용하는 것이 좋습니다. P1PLUS는 마이크 기능이 있는 TRRS 헤드폰과
호환되지 않을 수 있습니다.
6. P1PLUS는 WiFi 라우터, 무선 전화기, 라디오 및 기타 무선 RF 장치에서 멀리
떨어져 있어야 합니다. 그렇지 않으면 진공관 작동이 방해되어 약간의 소음이
발생할 수 있습니다.
7. P1PLUS의 장착된 전원 어댑터는 공유를 피해야 합니다. 냉장고, 선풍기,
세탁기와 같은 유도 하중이 있는 소켓 기계 등, 그렇지 않으면 전원 어댑터가
간섭되어 다양한 종류의 소음이 발생할 수 있습니다.
8. P1PLUS의 작동 전압은 DC 12V(이상 1.5A), 이하 또는 이로 인해 성능이
떨어지거나 손상될 수 있습니다.
24
사용 방법
1. 장착된 진공관을 튜브 소켓에 장착하고 삽입하기 전에 튜브의 핀과 소켓의
구멍을 정렬하십시오.(튜브 핀의 변형여부 확인 부탁드립니다.)
2. 오디오 출력 연결
파워앰프 또는 액티브 스피커를 P1PLUS의 RCA 또는 3.5mm AUX 출력에
연결하거나 헤드폰을 3.5mm 헤드폰 잭 출력에 삽입하십시오.
3. 오디오 입력 연결
올바른 입력 채널과 고품질 오디오 케이블을 통해 오디오 소스 또는 기타 장치를
P1PLUS 입력에 연결하십시오.
* 블루투스 입력을 사용하시려면 5단계 이후에 해주세요.
4. 장착된 DC 12V 전원 어댑터를 P1PLUS의 전원 인터페이스에 연결한 다음 벽
소켓에 연결합니다.
5. 모드 노브를 짧게 누르거나 리모컨의 켜기/끄기 버튼을 눌러 P1PLUS를 켠 다음
연결에 따라 올바른 입력 채널 모드로 전환합니다.
* 블루투스 입력을 이용하시려면 BT모드로 전환하여 디스플레이 화면에 P1PLUS
가 블루투스 페어링 모드로 진입하였음을 의미하는 BT 점멸이 발생할 것이므로
휴대폰에서 Douk Audio P1PLUS를 검색 후 클릭하여 연결하시기 바랍니다.
연결 성공후 화면의 BT가 안정적으로 켜집니다.
6. Mode Knob을 회전하여 볼륨을 조절하고 시계 반대 방향으로 볼륨을 낮추며
시계 방향으로 볼륨을 조절합니다. 리모컨의 볼륨 버튼 +/-을 눌러 볼륨을
조절할 수도 있습니다.
7. 톤 노브를 짧게 눌러 트레블 또는 베이스 모드로 진입한 다음 회전하여 트레블
또는 베이스를 시계 방향으로 조절하여 아래로, 시계 방향으로 돌리면 위로
올라갑니다. 리모컨에서 트레블/베이스 버튼 +/-을 눌러 트레블 및 베이스를
조절할 수도 있습니다.
8. VU 미터의 밝기와 색상도 자유롭게 조절할 수 있으니 위의 VU 미터 소개를
참고하여 더욱 재미있게 즐기시기 바랍니다.
9. 사용 후 모드 노브를 길게 누르거나 리모컨의 전원 켜기/끄기 버튼을 눌러
P1PLUS를 끈 다음 전원 어댑터를 분리하십시오.
제품 정보
23
브랜드
모델
USB 지원하는 최대 샘플링 속도
동축/광 지원하는 최대 샘플링 속도
PC-USB 지원하는 운영 체제
블루투스 버전
주파수 응답
트레블 / 베이스 범위
THD
SNR
입력 감도
출력 레벨
헤드폰의 일치 임피던스
헤드폰 잭의 출력 파워
작동 전압
순중량
치수(W*D*H)
포장 중량
패키지 치수(W*D*H)
Douk Audio
P1 PLUS
블루투스 / PC-USB 동축 / 광 /
스테레오 RCA / 3.5mm AUX
광 / 스테레오 RCA / 3.5mm AUX /
3.5mm 헤드폰 잭
QCC5125+SA9137L+
ES9018K2M+TPA6120
PCM 384KHz/32Bit / DSD256
PCM 192KHz/24Bit
W7 / W8 / W10 / W11 / MAC / Linux
5.1(APTX/APTX-HD/LDAC 지원)
20Hz-20kHz(±1.8dB)
±10db
0.1%
≥106dB
0dBFS
2V
16-600Ω
750mW
DC 12V (≥1.5A)
906g / 2.0lb
224*86*95mm / 8.82*3.39*3.74in
1.60kg / 3.53lb
195*288*100mm / 7.68*11.34*3.94in
오디오 입력
오디오 출력
칩셋
仕様
17
ブランド
モデル
USB対応の最大サンプリングレート
同軸/光対応の最大サンプリングレート
PC-USB対応のオペレーションシステム
Bluetoothバージョン
周波数応答
トレブル/ベース範囲
THD
SNR
入力感度
出力レベル
ヘッドフォンのインピーダンスマッチ
ヘッドフォンジャックの出力電力
動作電圧
ネット重量
寸法(W*D*H)
パッケージ重量
パッケージ寸法(W*D*H)
Douk Audio
P1 PLUS
Bluetooth / PC-USB 同軸 / 光 /
ステレオRCA/ 3.5mm AUX
光 / ステレオRCA / 3.5mm AUX /
3.5mmヘッドフォンジャック
QCC5125+SA9137L+
ES9018K2M+TPA6120
PCM 384KHz/32Bit / DSD256
PCM 192KHz/24Bit
W7 / W8 / W10 /W11/ MAC/Linux
5.1(support APTX/APTX-HDALDAC)
20Hz-20kHz(±1.8dB)
±10db
0.10%
≧106dB
0dBFS
2V
16-600Ω
750mW
DC12V(≧1.5A)
906g / 2.0lb
224*86*95mm / 8.82*3.39*3.74in
1.60kg / 3.53lb
195*288*100mm / 7.68*11.34*3.94in
オーディオ入力
オーディオ出力
チップセット
31
How to Set Foobar2000
1. Please download Foobar2000 from the official website or install
it from our U-disk, it is driver-free. Double click it to enter.
2. Single click File, select Preferences, click Components and then
click Install.
3. Select the three files foo_input_sacd.fb2k-component,
foo_out_asio.fb2k-component, and WASAPI.fb2k-component at
the same time and click to open them. As the following pictures
show, click Apply and then click OK.
1
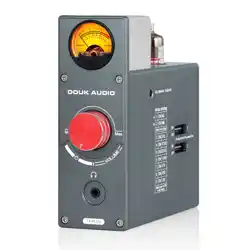
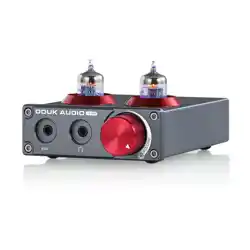
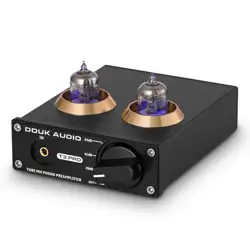
Introduction of Panels
Front and Rear Panels
1. VU meter
2. Display screen
3. Infrared receiving window
4. 3.5mm headphone jack output
5. Stereo RCA output
6. 3.5mm AUX output
7. 3.5mm AUX input
8. Stereo RCA input
9. Coaxial input
10. Optical input
11. Optical output
(only valid when the PC-USB inputs)
12. PC-USB input
13. Bluetooth antenna socket
14. Power interface
(working voltage not exceed DC 12V)
Introduction in English
Introduction in German
Introduction in Japanese
Introduction in Korean
Data Measurement
USB Driver Installation
ASIO Plug-in Installation
Foobar2000 Settings
Frequently Asked Questions
Cautions & Contact
-------------------------------1
------------------------------7
---------------------------13
------------------------------19
---------------------------------25
-------------------------------26
----------------------------30
---------------------------------31
------------------------33
----------------------------------39
Front Panel Rear Panel
2
Introduction of the VU meter
1. Single click the knob to switch different modes: Brightness--
Single color—Multi-color (Cycle switching), rotate the knob in
each mode can change the corresponding mode parameters.
1. VU meter interface
2. Mode Knob
Single click: turn on/switch input channel;
Double click: mute/unmute;
Rotation: anticlockwise to turn down the volume, Clockwise to turn up;
Long press: turn off.
3. Tone Knob
Short press: switch treble / bass mode;
Rotation: anticlockwise to turn down the treble/bass, clockwise to turn up.
Multifunctional knob
Top Panel
3
Introduction of the remote control
Introduction of the OLED Display Screen
a) Brightness: to set the brightness of the VU meter.
b) Single-color: switch among different single-color modes.
c) Multi-color: switch among 3 kinds of multi-color combination.
2. Long press the knob for 3S: turn on/off the marquee light mode
(The color of the VU meter will change automatically.), in this mode,
rotate the knob can adjust the color change speed.
A. Input channel
(USB/BT/COA/OPT/RCA/AUX)
B. Volume ( 0-99)
C. Sampling rate
(Display -- when no signal inputs)
D. Volume progress bar
E. Tone
F. Gain
1. Turn on/off
2. Input selection
3. Mute
4. Bass +
5. Treble –
6. Treble +
7. Bluetooth resetting
8. Bass –
9-10. No function
11. Volume –
12. Volume +
13. Display screen on/off
E
F
Bass:
+
10dB
13
パネルの紹介
フロントパネルとリアパネル
1. VUメーター
2. ディスプレイ画面
3. 赤外線受信窓
4. 3.5mmヘッドフォンジャック出力
5. ステレオRCA出力
6. 3.5mm AUX出力
7. 3.5mm AUX入力
8. ステレオRCA入力
9. 同軸入力
10. 光入力
11. 光出力
(PC-USB入力時のみ有効)
12. PC-USB入力
13. Bluetoothアンテナソケット
14. 電源インターフェース
(動作電圧はDC 12Vを超えては禁止)
フロントパネル リアパネル
14
VUメーターの紹介
1. ノブを一回クリックして異なるモードを切り替える︓輝度--単色—
マルチカラー(サイクル切り替え)、各モードでノブを回転させると
対応するモードパラメーターが変わります。
1. VUメーターインターフェース
2. モードノブ
シングルクリック︓電源を入れる/入力チャンネルを切り替える︔
ダブルクリック︓ミュート/ミュート解除︔
回転︓反時計回りに音量を下げる、時計回りに音量を上げる︔
長押し︓電源を切る。
3. トーンノブ
短押し︓トレブル/ベースモードを切り替える︔
回転︓反時計回りにトレブル/ベースを下げる、時計回りに上げる。
マルチファンクションノブ
トップパネル
15
リモートコントロールの紹介
OLEDディスプレイスクリーンの紹介
a) 輝度︓VUメーターの明るさを設定します。
b) 単色︓異なる単色モードを切り替えます。
c) マルチカラー︓3種類のマルチカラー組み合わせを切り替えます。
2. ノブを3秒間長押し︓マーキーライトモードをオン/オフにします
(VUメーターの色が自動的に変わります。)、このモードでは、
ノブを回転させると色の変化速度を調整できます。
A. 入力チャンネル
(USB/BT/COA/OPT/RCA/AUX)
B. ボリューム(0-99)
C. サンプリングレート
(表示 -- シグナル入力がないとき)
D. ボリュームプログレスバー
E.トーン
F. ゲイン
1. 電源のオン/オフ
2. 入力選択
3. ミュート
4. ベース+
5. トレブル-
6. トレブル+
7. Bluetoothのリセット
8. ベース-
9-10. 機能なし
11. ボリューム-
12. ボリューム+
13. ディスプレイ画面のオン/オフ
E
F
Bass:
+
10dB
19
패널 소개
전면 및 후면 패널
1. VU 미터
2. 디스플레이 화면
3. 적외선 수신창
4. 3.5mm 헤드폰 잭 출력
5. 스테레오 RCA 출력
6. 3.5mm AUX 출력
7. 3.5mm AUX입력
8. 스테레오 RCA 입력
9. 동축 입력
10. 광 입력
11. 광 출력
(PC-USB 입력 시에만 유효)
12. PC-USB 입력
13. 블루투스 안테나 소켓
14. 전력 인터페이스
(작동전압이 DC 12V를 초과하지 않음)
전면 패널 후면 패널
20
VU 미터 소개
1. 노브를 한 번 클릭하여 다양한 모드 전환: 밝기-단일 색상―다색(사이클 스위칭),
각 모드에서 노브를 돌려 해당 모드 파라미터를 변경할 수 있습니다.
1. VU 미터 인터페이스
2. 모드(Mode) 노브
한 번 클릭: 입력 채널 켜기/전환;
두 번 클릭: 음소거/무음;
회전: 볼륨을 낮추기 위해 시계 반대 방향, 시계 방향으로 돌리면 위로 이동합니다;
길게 누름: 꺼짐.
3. 톤(Tone ) 노브
짧게 누름: 스위치 고음/저음 모드;
회전: 시계 반대 방향으로 트레블/베이스를 아래로, 시계 방향으로 위를 향합니다.
다기능 노브
상단 패널
21
리모컨 소개
OLED 디스플레이 화면 소개
a) 밝기: VU 미터의 밝기를 설정합니다.
b) 단일 색상: 다양한 단일 색상 모드 간의 전환.
c) 멀티 컬러: 3가지 멀티 컬러 조합 중 스위치.
2. 3S를 위해 노브를 길게 누릅니다. 마퀴 라이트 모드를 켜거나 끕니다 .
(VU 미터의 색상은 자동으로 변경됩니다.), 이 모드에서는,
노브를 돌려 색상 변화 속도를 조절할 수 있습니다.
A. 입력 채널
(USB/BT/COA/OPT/RCA/AUX)
B. 볼륨( 0-99)
C. 샘플링 레이트
(표시 - 신호 입력이 없을 때)
D. 볼륨 진행 바
E. 톤(Tone )
F. 가인( Gain )
1. 켜기/끄기
2. 입력 선택
3. 음소거
4. 베이스 +
5. 트레블 –
6. 트레블 +
7. 블루투스 재설정
8. 베이스 –
9-10. 기능 없음
11. 볼륨 –
12. 볼륨 +
13. 화면 켜기/끄기
E
F
Bass:
+
10dB
7
Einführung von Panels
Vorder- und Rückseite
1. VU-Meter
2. Bildschirm anzeigen
3. Infrarot-Empfangsfenster
4. 3.5-mm-Kopfhörerbuchsenausgang
5. Stereo-RCA-Ausgang
6. 3.5-mm-AUX-Ausgang
7. 3.5-mm-AUX-Eingang
8. Stereo-RCA-Eingang
9. Koaxialer Eingang
10. Optischer Eingang
11. Optischer Ausgang
(nur gültig, wenn der
PC-USB-Eingänge)
12. PC-USB-Eingang
13. Bluetooth-Antennenbuchse
14. Stromschnittstelle
(Arbeitsspannung darf 12 V
DC nicht überschreiten)
Frontblende Rückwand
8
Einführung des VU-Meters
1. Klicken Sie einmal auf den Knopf, um zwischen verschiedenen
Modi zu wechseln: Helligkeit – Einzelfarbe – Mehrfarbig
(Zyklusumschaltung). Drehen Sie den Knopf in jedem Modus,
um die entsprechenden Modusparameter zu ändern.
1. VU-Meter-Schnittstelle
2. Modusknopf
Einfacher Klick: Eingangskanal einschalten/wechseln;
Doppelklick: Stummschaltung/Stummschaltung aufheben;
Drehung: gegen den Uhrzeigersinn, um die Lautstärke zu verringern,
Zum Aufdrehen im Uhrzeigersinn drehen;
Langes Drücken: Ausschalten.
3. Tone-Regler
Kurz drücken: Höhen-/Bassmodus umschalten;
Drehung: gegen den Uhrzeigersinn, um die Höhen/Bässe abzusenken,
im Uhrzeigersinn, um sie anzuheben.
Multifunktionsknopf
Oberes Panel
9
Einführung der Fernbedienung
Einführung des OLED-Bildschirms
a) Helligkeit: Zum Einstellen der Helligkeit des VU-Meters.
b) Einfarbig: Wechseln Sie zwischen verschiedenen einfarbigen Modi.
c) Mehrfarbig: Wechseln Sie zwischen drei Arten von
Mehrfarbenkombinationen.
2. Drücken Sie lange auf den Knopf für 3 Sekunden: Ein-/Ausschalten
des Lauflichtmodus
(Die Farbe des VU-Meters ändert sich automatisch.) In diesem Modus
kann durch Drehen des Knopfes die Geschwindigkeit des Farbwechsels
angepasst werden.
A. Eingangskanal
(USB/BT/COA/OPT/RCA/AUX)
B. Lautstärke (0-99)
C. Abtastrate(Anzeige – wenn keine
Signaleingänge vorliegen)
D. Lautstärke-Fortschrittsbalken
E. Ton
F. Gewinn
1. Ein-/Ausschalten
2. Eingangsauswahl
3. Stumm
4. Bass +
5. Höhen –
6. Höhen +
7. Bluetooth-Zurücksetzen
8. Bass –
9-10. Keine Funktion
11. Lautstärke –
12. Lautstärke +
13. Bildschirm ein/aus
E
F
Bass:
+
10dB
39
Cautions
1. Don't open the case without permission, improper operation may
cause electric shock.
2. Don't the plug or unplug the tubes during its work, otherwise the
tubes or P1PLUS will be damaged.
3. Please don’t replace mismatched tube models, otherwise the tubes
and P1PLUS will be damaged.
4. Please use the regular manufacturer's switching power supply,
poor-quality power adapters may result in the damage to the P1PLUS.
5. Don't put P1PLUS in the environment of high temperature or high
humidity.
Website: www.doukaudio.com
Email: nobsound@doukaudio.com
WeChat/Whatsapp: +86-17704028602
Address: Room 1329, Wang Cheng Building, Long Guan East Road,
Long Hua District, Shen Zhen, Guang Dong, China, 518000
Q: What's the function of VU meter?What is the difference between VU
meter and voltmeter, ammeter?
A: VU meter, voltmeter and ammeter all refer to a level indication meter.
Some indicates voltage, some indicates decibels, some indicates
current. The P1PLUS uses VU meter to indicate the level of audio signal.
Contact information