
www.auna-multimedia.com
Milano
Lautsprechertisch
Speaker table
Mesa con altavoces
Enceinte table
Tavolino altoparlante
10034605 10034606


3
DE
English 15
Español 27
Français 39
Italiano 51
Sehr geehrter Kunde,
wir gratulieren Ihnen zum Erwerb Ihres Gerätes.
Lesen Sie die folgenden Hinweise sorgfältig durch
und befolgen Sie diese, um möglichen Schäden
vorzubeugen. Für Schäden, die durch Missachtung der
Hinweise und unsachgemäßen Gebrauch entstehen,
übernehmen wir keine Haftung. Scannen Sie den
folgenden QR-Code, um Zugri auf die aktuellste
Bedienungsanleitung und weitere Informationen rund
um das Produkt zu erhalten:
INHALTSVERZEICHNIS
Technische Daten 4
Sicherheitshinweise 4
Zusammenbau 6
Geräteübersicht und Tastenfunktionen 8
Bedienung 9
Reinigung und Pege 13
Hinweise zur Entsorgung 13
Konformitätserklärung 14
4
DE
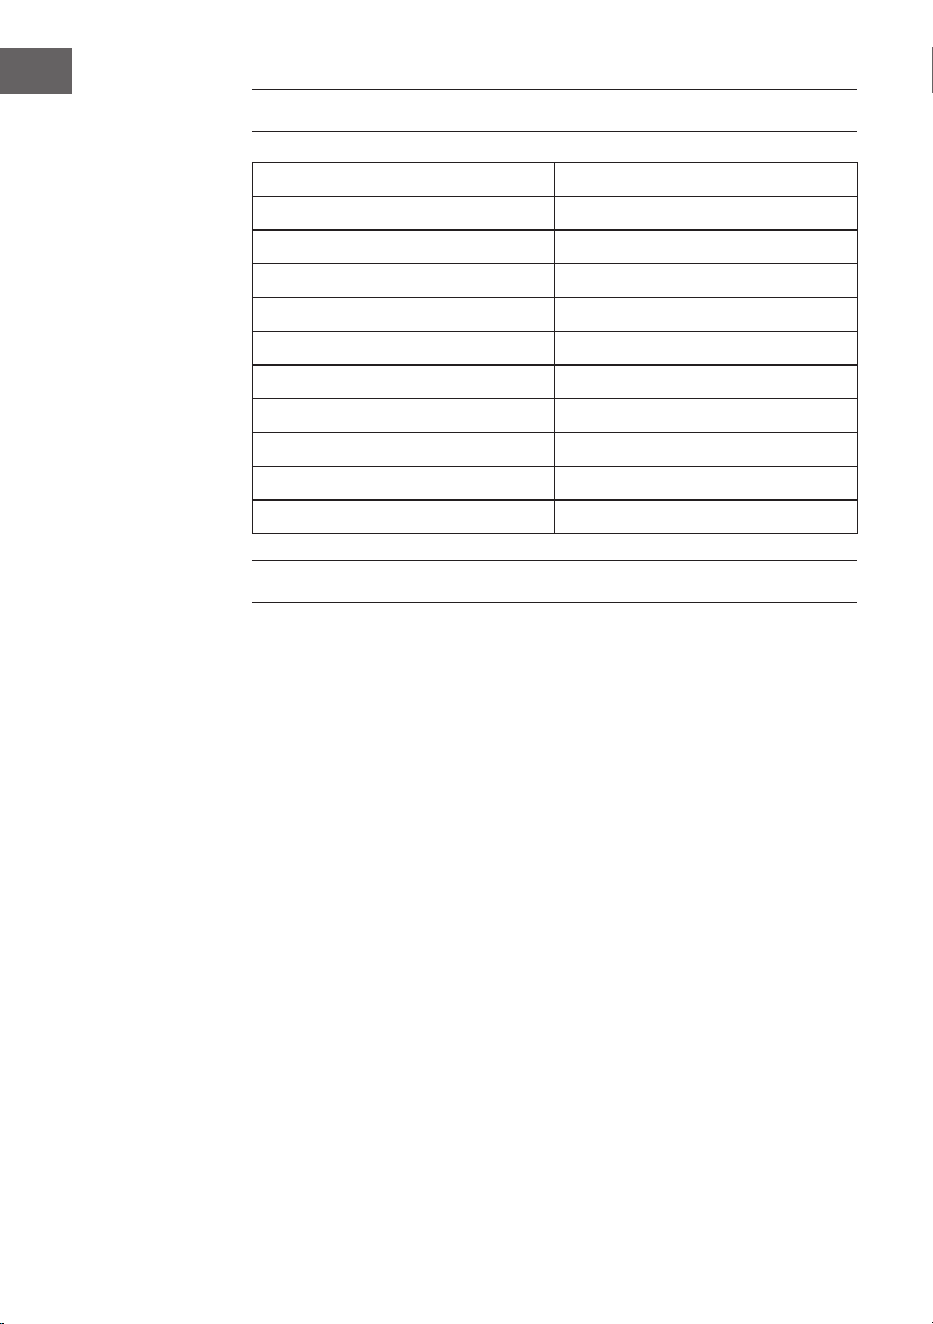
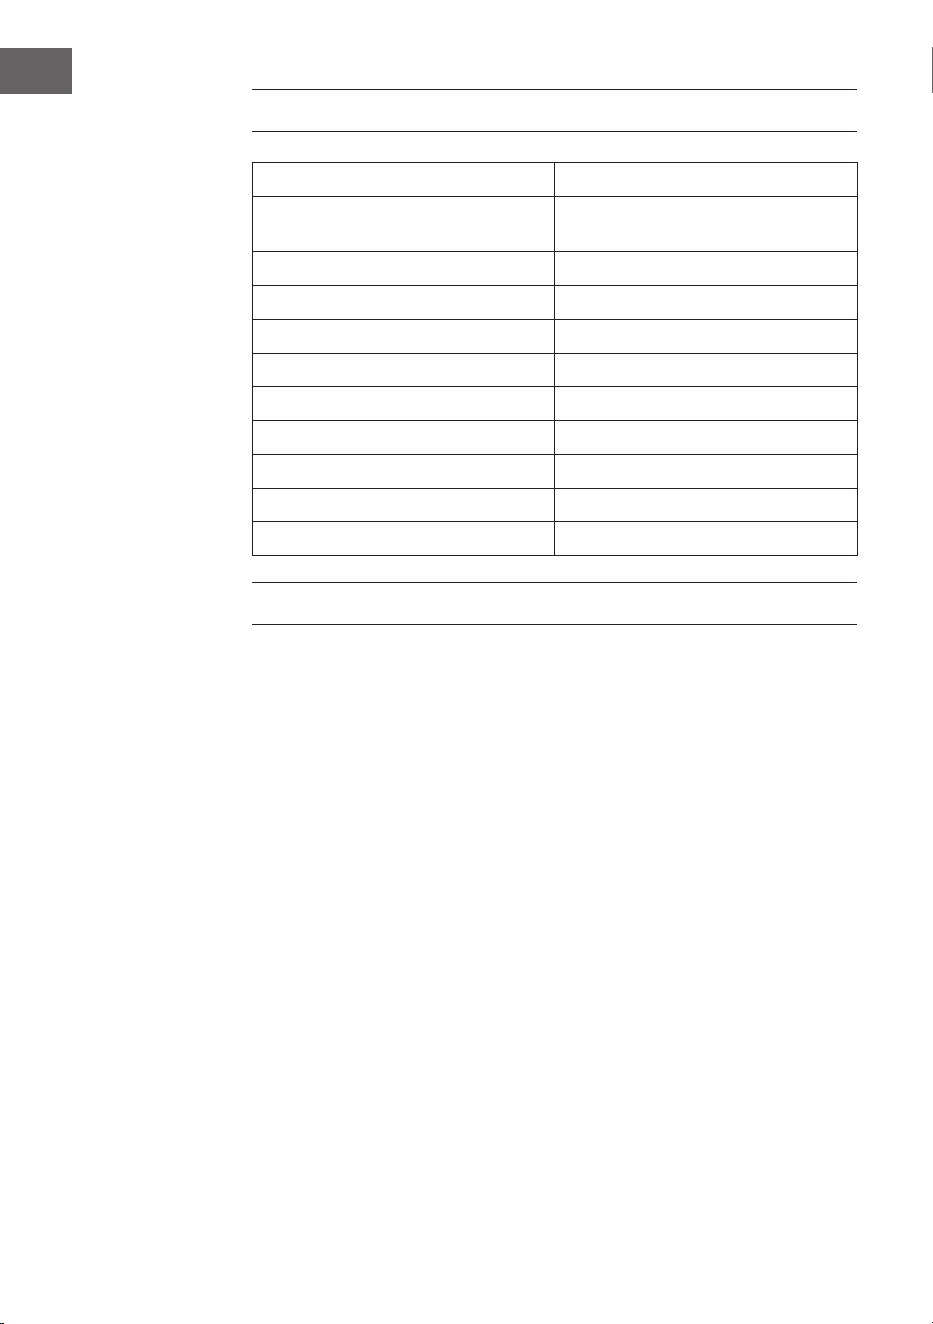
TECHNISCHE DATEN
Artikelnummer 10034605, 10034606
Stromversorgung (Netzteil) 220-240 V ~ 50/60 Hz
BT-Übertragungsdistanz bis zu 10 m
BT-Frequenz 2.402 - 2.480 GHz
RMS 30 W (15 W x 2)
Frequenzbereich 90 Hz - 18 kHz
Störabstand ≥ 75 dB
Trennverhältnis ≥ 35 dB
Betriebsspannung DC 16 V / 3 A
USB-Ladebuchse 5 V / 2.1 A und 5 V / 1 A
Kabelloses Laden 5 W (5 V / 1 A)
SICHERHEITSHINWEISE
Besondere Hinweise zum Gerät
• Die maximale Tragkraft dieses Produkts beträgt 5 kg. Stellen Sie keine
Gegenstände auf das Gerät, die mehr als 5 kg wiegen, andernfalls
übernehmen wir keine Haftung.
• Verwenden Sie das Produkt nicht als Sitz. Achten Sie auch darauf, dass
Kinder sich nicht darauf setzen.
• Verwenden Sie zum Auaden nur das Original-Netzteil, andernfalls
kann es dazu kommen, dass der Lautsprecher langsam oder gar nicht
aufgeladen wird. Im Extremfall kann das Netzteil ausbrennen oder das
Gerät beschädigt werden.

5
DE
Allgemeine Hinweise
• Blitzschlag - Wenn Sie das Gerät länger nicht benutzen oder es
gewittert, ziehen Sie den Stecker aus der Steckdose der trennen Sie das
Gerät vom Antennenanschluss. Dadurch werden Schäden am Produkt
durch Blitzschlag und Überspannung vermieden.
• Überlastung - Überlasten Sie keine Steckdosen, Verlängerungskabel
oder integrierten Steckdosen, da dies zu einem Brand oder Stromschlag
führen kann.
• Fremdkörper und Flüssigkeitseintritt - Schieben Sie niemals
Gegenstände jeglicher Art durch Önungen in das Gerät, da sie
gefährliche Spannungspunkte berühren oder Teile kurzschließen
können, die zu einem Brand oder einem elektrischen Schlag führen
könnten. Verschütten Sie niemals Flüssigkeiten jeglicher Art auf dem
Gerät.
• Reparatur und Wartung - Versuchen Sie nicht, dieses Produkt selbst zu
warten, da Sie sich durch das Önen oder Entfernen von Abdeckungen
gefährlichen Spannungen oder anderen Gefahren aussetzen.
Überlassen Sie alle Wartungsarbeiten qualiziertem Servicepersonal.
• Schäden, die einen Service erfordern - Ziehen Sie den Netzstecker aus
der Steckdose und wenden Sie sich an einen qualizierten Fachbetrieb
wenn eine der folgenden Situationen eintritt:
a) Wenn das Netzkabel oder der Stecker beschädigt ist.
b) Wenn Flüssigkeit verschüttet wurde oder Gegenstände auf das
Produkt gefallen sind.
c) Wenn das Produkt Regen oder Wasser ausgesetzt war.
d) Wenn das Produkt heruntergefallen oder beschädigt ist.
e) Wenn das Produkt eine deutliche verringerte Leistung aufweist.
• Ersatzteile - Wenn Ersatzteile benötigt werden, stellen Sie sicher, dass
der Fachbetrieb, der die Teile ersetzt, nur Ersatzteile verwendet, die
vom Hersteller zugelassen sind oder dieselben Eigenschaften wie das
Originalteil haben. Unbefugter Austausch kann zu Feuer, Stromschlag
oder anderen Gefahren führen.
• Wärme - Stellen Sie das Gerät nicht in der Nähe von Wärmequellen
wie Heizkörpern, Heizregistern, Öfen oder anderen Produkten
(einschließlich Verstärkern) aufgestellt.
Hinweis: Kinder ab 8 Jahren, psychisch, sensorisch und körperlich
eingeschränkte Menschen dürfen das Gerät nur benutzen, wenn sie
vorher von einer für sie verantwortlichen Aufsichtsperson ausführlich
mit den Funktionen und den Sicherheitsvorkehrungen vertraut gemacht
wurden und die damit verbundenen Risiken verstehen.

6
DE
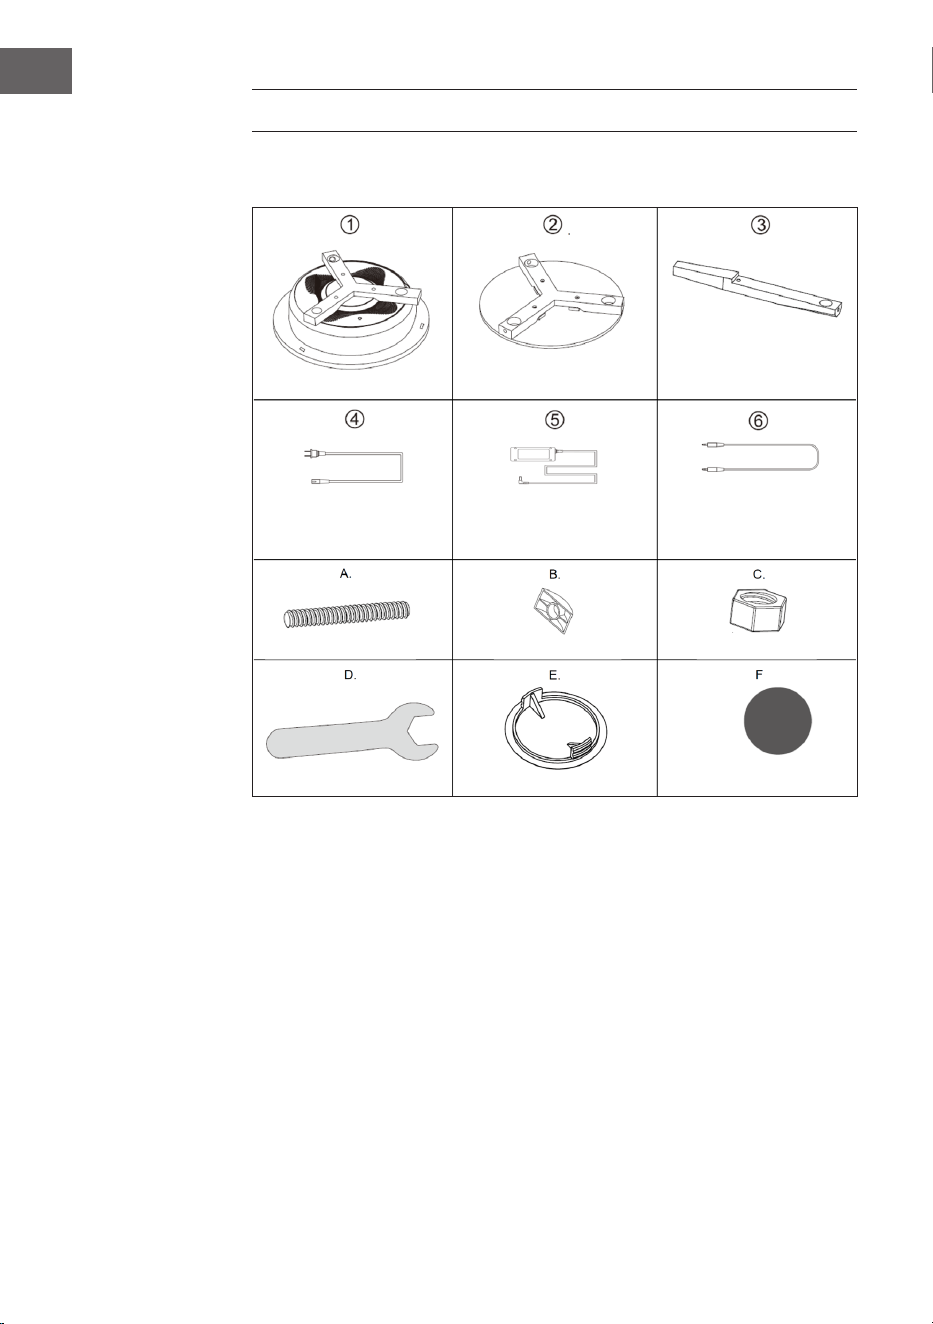
ZUSAMMENBAU
Einzelteile
Hauptkörper (1x)
Netzkabel (1x)
Bolzen (6x)
Schlüssel (1x)
Tischplatte (1x)
Netzteil (1x)
D-Muttern (6x)
Abdeckung (6x)
Beine (3x)
3.5 mm Kabel (1x)
Muttern (6x)
Schutzpad (3x)

7
DE
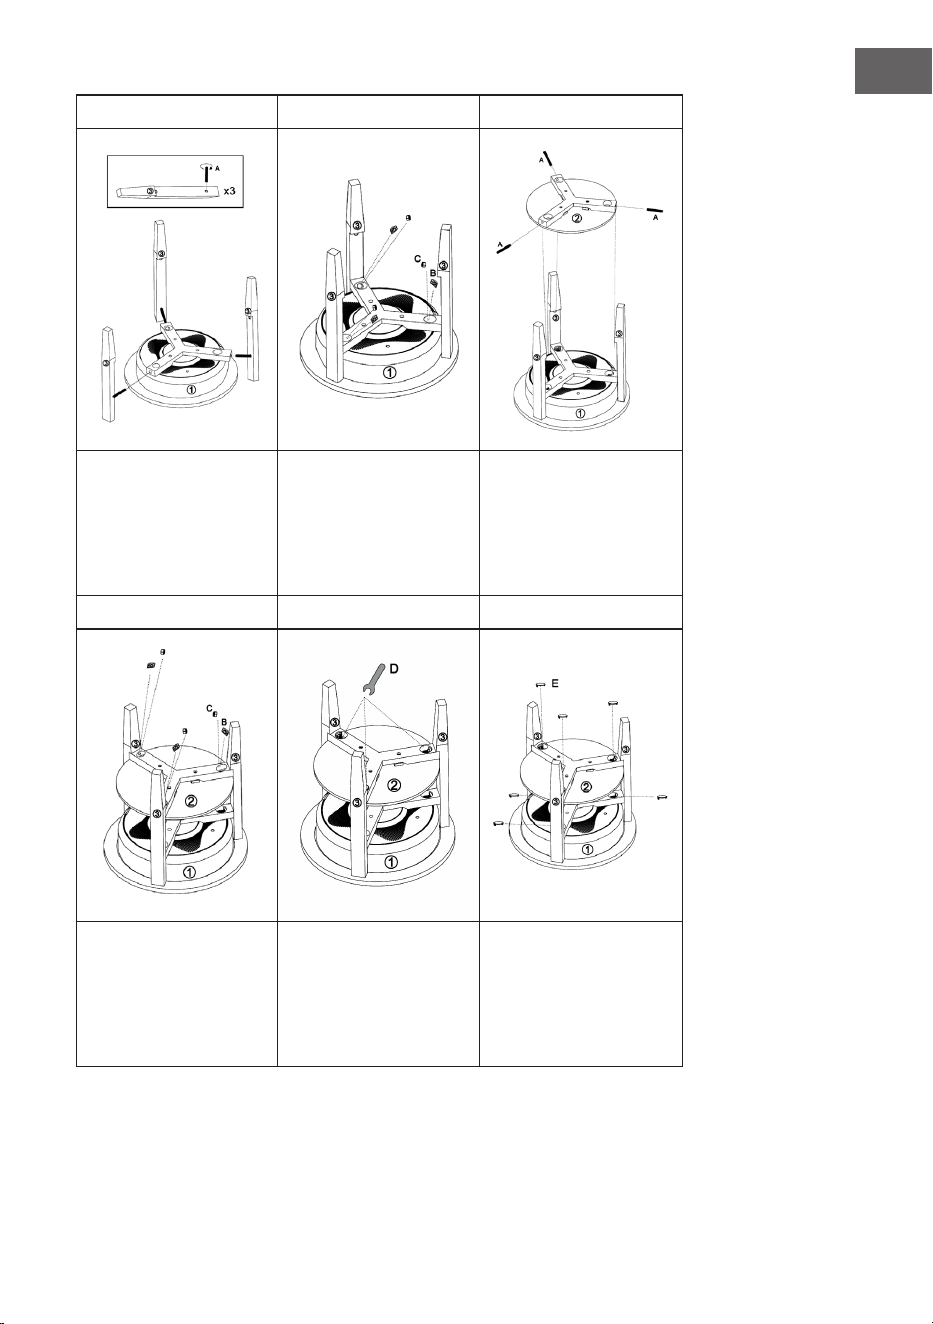
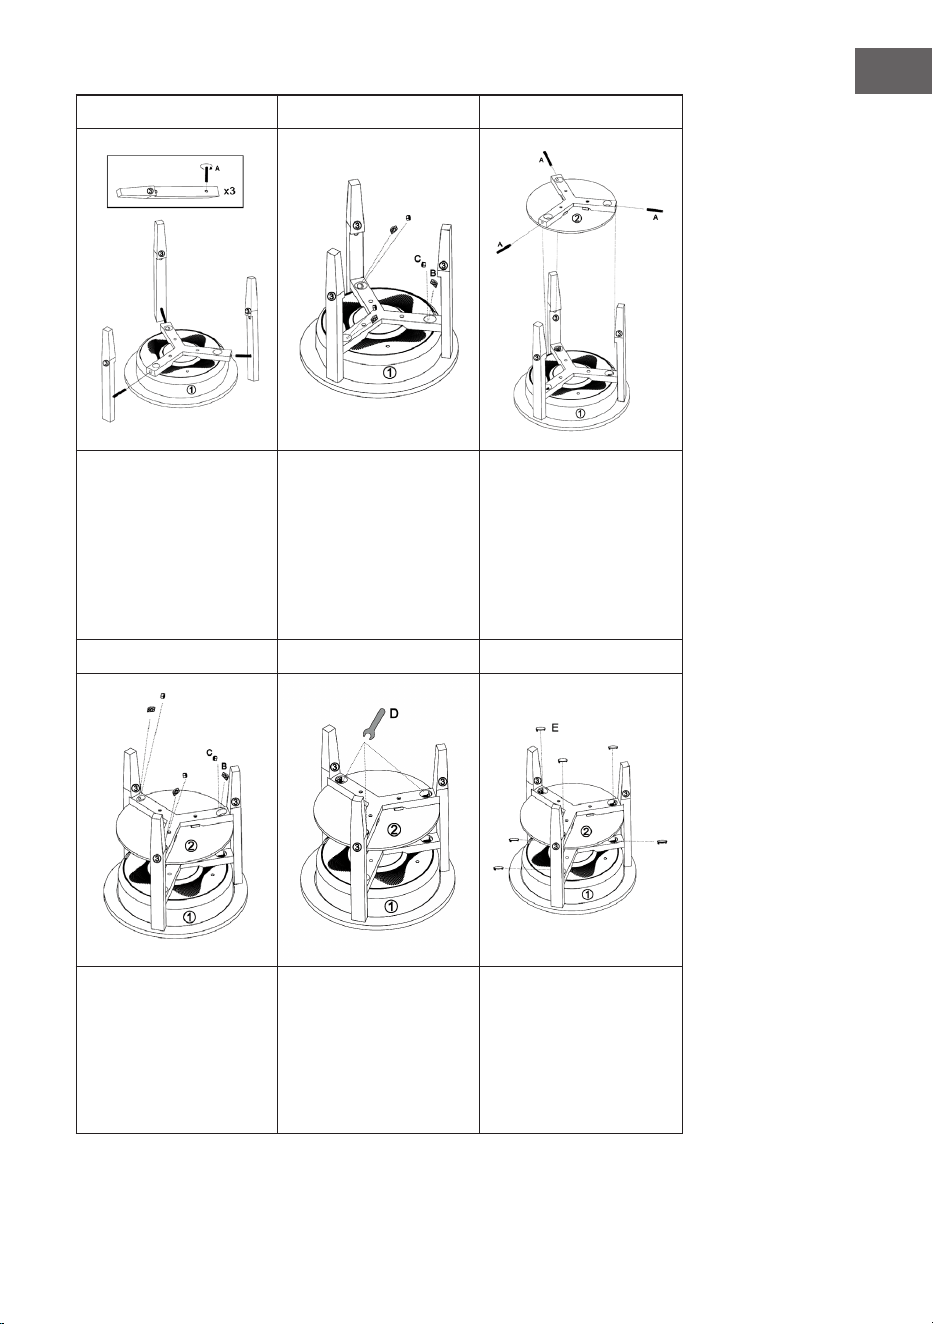
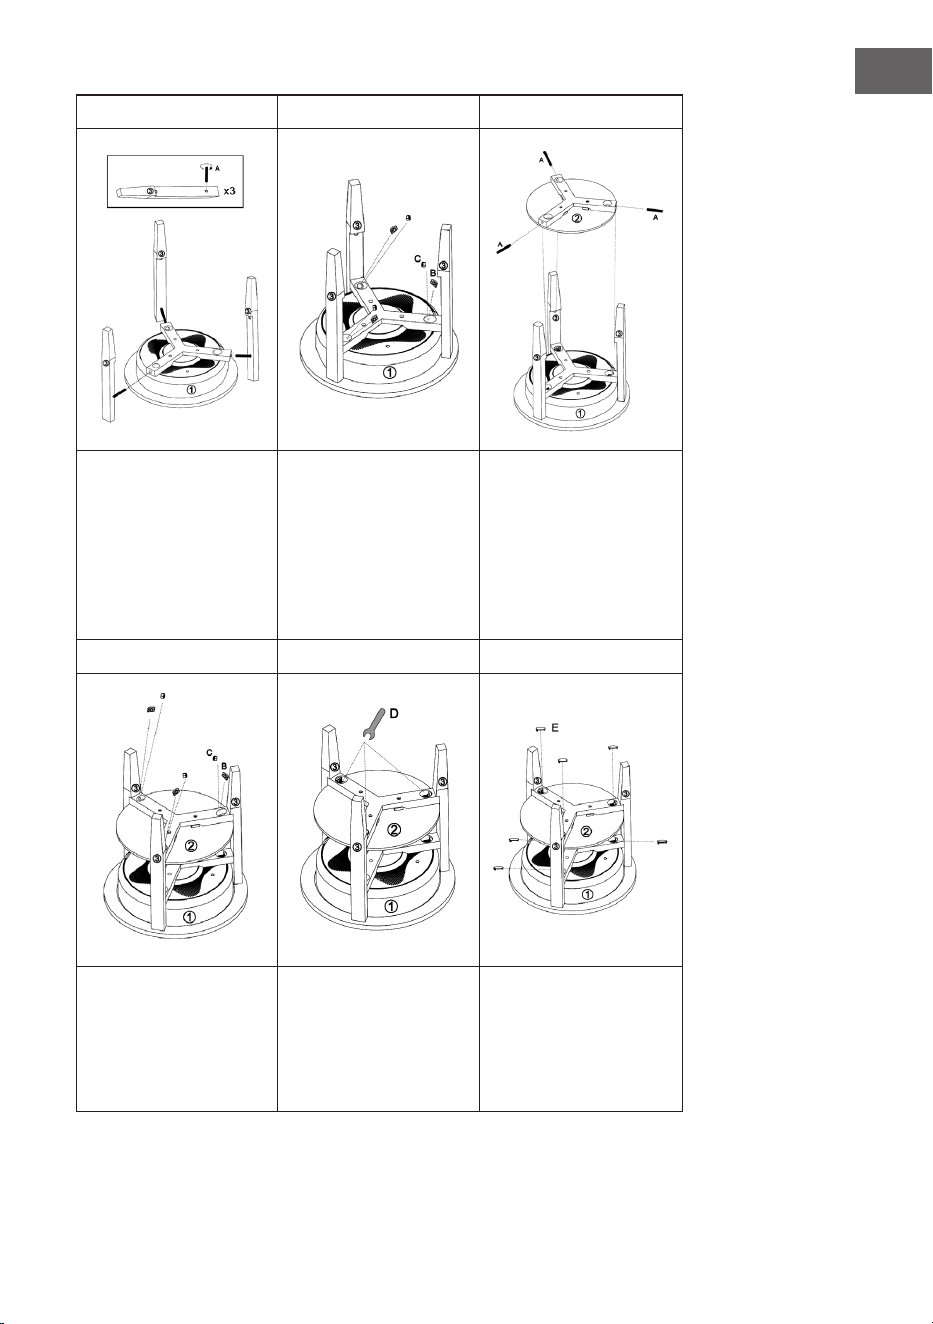
1 2 3
Stecken Sie die Bolzen
(A) in die Löcher im
Hauptkörper (1). Setzen
Sie die Beine (3) in den
Hauptkörper ein und
schrauben Sie die Bolzen
(A) in die Löcher in den
Beinen.
Schrauben Sie die
D-Muttern (B) und
die Muttern (C), wie
dargestellt, von oben in
den Hauptkörper (1).
Stecken Sie die Bolzen
(A) in die Löcher der
Tischplatte. Setzen Sie
die Tischplatte an die
Kerben der Beine (3) und
schrauben Sie die Bolzen
(A) in die Löcher in den
Beinen (3).
4 5 6
Schrauben Sie die
D-Muttern (B) und
die Muttern (C), wie
dargestellt, von oben in
die Tischplatte (1).
Ziehen Sie alle
Befestigungen mit dem
Schlüssel (D) an.
Setzen Sie die
Abdeckungen (E) auf die
Löcher am Hauptkörper
und an der Tischplatte
und Befestigen Sie zum
Schluss die Schutzpads an
den Beinen

8
DE
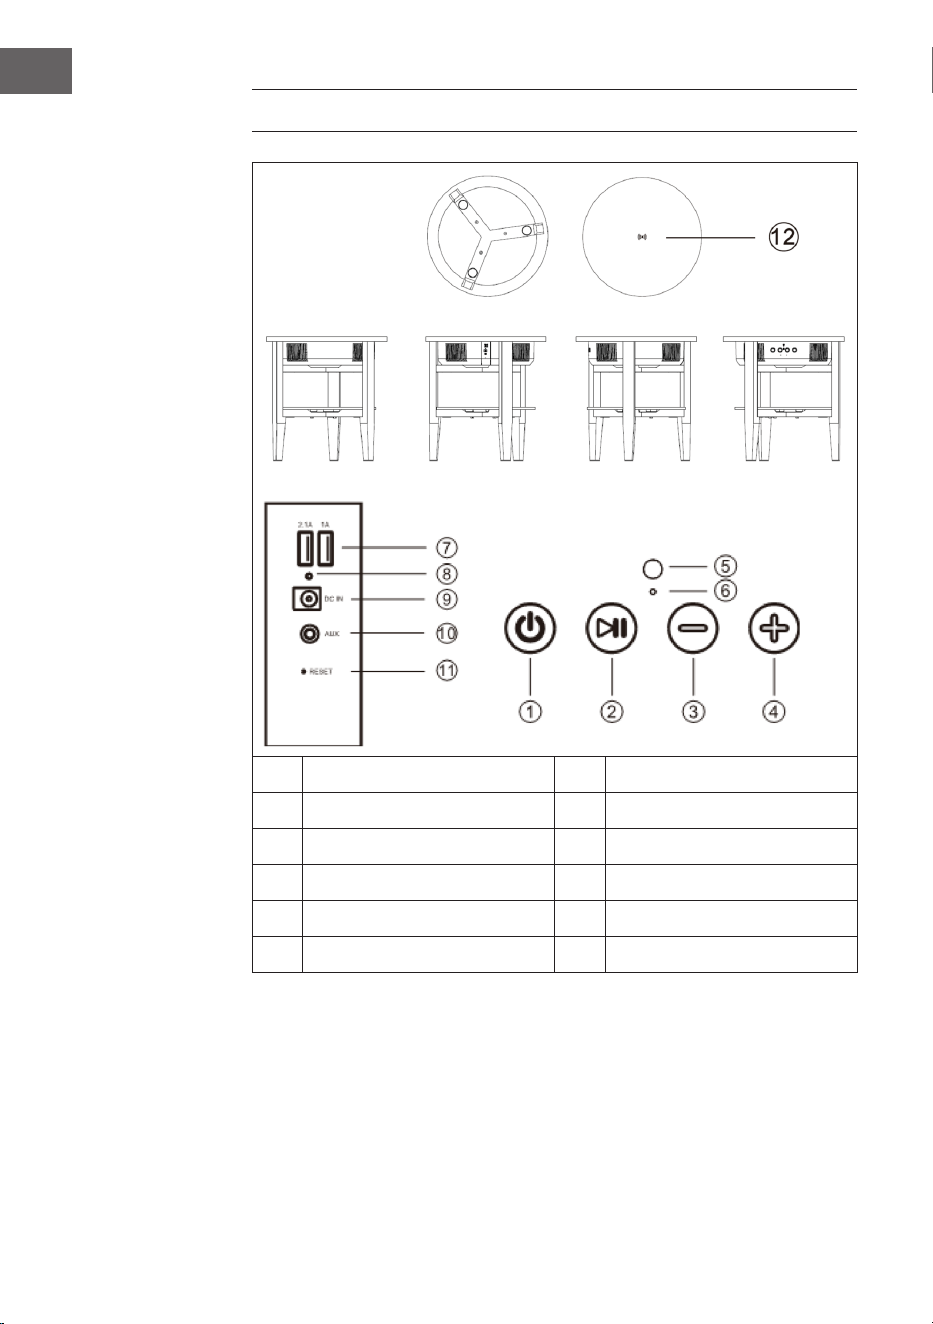
GERÄTEÜBERSICHT UND TASTENFUNKTIONEN
1 Ein/Aus-Taste 7 USB-Ports
2 Play/Pause-Taste 8 Ladeleuchte
3 Lautstärke+ 9 Netzeingang
4 Lautstärke- 10 AUX-Eingang
5 Mikrofon 11 Reset
6 LED-Leuchte 12 Kabelloses Ladedock

9
DE
BEDIENUNG
Sprachausgabe
In folgenden Situationen ertönt eine Sprachausgabe aus den Lautsprechern:
• wenn das Gerät eingeschaltet wird,
• wenn das Gerät ausgeschaltet wird,
• Wenn auf eine BT-Verbindung gewartet wird,
• Wenn eine BT-Verbindung hergestellt wird,
• Wenn eine BT-Verbindung getrennt wird,
• Wenn die Lautstärke auf Maximum gestellt wird,
• Wenn die Batterie schwach ist und geladen werden muss.
Gerät ein/ausschalten
• Drücken Sie lang auf die Ein-Taste und es ertönt „Power on“ (Gerät
ein) aus den Lautsprechern. Das Gerät aktiviert automatisch BT und es
ertönt „BT waiting for connection“ (BT wartet auf Verbindung) aus den
Lautsprechern. Sie können nun ihr Smartphone oder Pad via BT mit den
Lautsprechern verbinden.
• Drücken Sie lang auf die Aus-Taste und es ertönt „Power o“ (Gerät aus)
aus den Lautsprechern. Das Gerät geht danach aus.
AUX Auto-Schalter
• Stecken Sie das AUX-Kabel in die AUX-Buchse an der Rückseite des
Lautsprechers. Der Lautsprecher wechselt automatisch in den AUX-
Modus, das blaue und grüne LED-Licht leuchten. Der BT-Modus wird
automatisch ausgeschaltet.
• Nach dem Entfernen des AUX-Kabels wird der BT-Modus automatisch
wieder eingeschaltet, dann es ertönt „BT waiting for connection“ (BT
wartet auf Verbindung) aus den Lautsprechern.

10
DE
BT-Verbindung herstellen
1. Wenn sich der Lautsprecher im BT-Modus bendet, wechselt er
automatisch in den Paarungszustand. Die blaue LED-Leuchte blinkt
langsam.
2. Önen Sie die BT-Einstellungen auf Ihrem Smartphone/Pad und
suchen Sie in der BT-Geräteliste nach dem Lautsprecher. Sobald Ihr
Smartphone/Pad mit dem Lautsprecher verbunden ist, ertönt „BT ist
connected“ (BT verbunden) und die blaue LED leuchtet dauerhaft. Wir
die Verbindung zwischendurch getrennt, blinkt die blaue LED-Leuchte
langsam.
3. Wenn dieser Lautsprecher mit dem Smartphone verbunden ist und Sie
Musik via BT abspielen, hält der Lautsprecher an, wenn Sie kurz die
Play/Pause/-Taste drücken. Um die Wiedergabe fortzusetzen, drücken
Sie erneut die Play/Pause-Taste.
4. Wenn dieser Lautsprecher mit dem Smartphone verbunden ist, drücken
Sie lange die Play/Pause-Taste, um die BT-Verbindung zu trennen. Sie
können nun eine BT-Verbindung zu einem anderen Gerät herstellen.
Hinweis: Die beste Entfernung zwischen Smartphone/Pad und
Lautsprecher ist ≤ 10 m.
Anrufe per BT annehmen
• Wenn ein Anruf eingeht, ertönt die Telefonnummer des eingehenden
Anrufs mit dem Ton „dudu“ oder dem Ton „Cell phone rings“ (Handy
klingelt) aus dem Lautsprecher, sofern er mit einem Android-
Smartphone verbunden ist. Wenn der Lautsprecher mit einem iPhone
verbunden ist, ertönt die Telefonnummer des eingehenden Anrufs und
„Cell phone rings“ (Handy klingelt) aus dem Lautsprecher.
• Drücken Sie kurz die Play/Pause-Taste, um das Telefonat anzunehmen
und über das Mikrofon zu sprechen. Drücken Sie erneut kurz auf die
Play/Pause-Taste, um das Telefonat zu beenden.
• Drücken Sie lang die Play/Pause-Taste, um das Telefonat abzuweisen.
• Drücken sie doppelt auf die Play/Pause-Taste, um die letze verbundene
Telefonnummer zurückzurufen.
Lautstärke anpassen
• Drücken Sie auf die Taste (+) , um die Lautstärke zu erhöhen.
• Drücken Sie auf die Taste (-) , um die Lautstärke zu verringern.

11
DE
USB-Laden
• Wenn der Lautsprecher eingeschaltet ist, können Sie über die USB-
Anschlüsse (2.1 A / 1 A) iPhones und Android-Handys gleichzeitig
auaden.
• Wenn der Lautsprecher ausgeschaltet aber mit den Netzteil verbunden
ist, können Sie über die USB-Anschlüsse (2.1 A / 1 A) iPhones und
Android-Handys gleichzeitig auaden.
• Wenn der Lautsprecher ausgeschaltet und nicht mit dem Netzteil
verbunden ist, können am USB-Anschluss keine externen Geräte
aufgeladen werden.
Kabelloses Laden
Die Ladespule des drahtlosen Ladegeräts (nur für Mobiltelefon, die
den Qi-Standard des drahtlosen Ladens unterstützen) muss auf die
drahtlose Lademarke zeigen, die sich in der Mitte des Tisches bendet.
Der Lautsprecher muss entweder eingeschaltet oder mit dem Netzteil
verbunden sein, andernfalls kann er das Gerät nicht auaden. Sobald das
Gerät verbunden ist un geladen wird, ertönt das Signal „di“.
Schwacher Akku und Auaden
• Wenn die Batteriekapazität niedrig ist, ertönt die Meldung „Low
Battery“ (schwache Batterie), um den Benutzer daran zu erinnern, dass
der Lautsprecher aufgeladen werden muss. Laden Sie den Lautsprecher
dann nicht auf, wird er automatisch ausgeschaltet.
• Nach dem Anschluss des Netzteils an der Steckdose, leuchtet auf
der Rückseite des Lautsprechers die rote LED-Leuchte, solange der
Lautsprecher noch geladen wird. Ist der Akku voll aufgeladen, erlischt
die rote LED-Leuchte.

12
DE
Mehrere Lautsprechertische verbinden
Die TWS-Funktion ermöglicht es Ihnen, zwei Lautsprechertische
miteinander zu verbinden. Die erste Tisch ist der Master, der mit dem BT-
Gerät verbunden ist und alle Funktionen bedient. Der zweite Tisch ist der
Sub-Lautsprecher, der True Wireless Sound liefert.
• Schalten Sie beide Lautsprechertische ein und klicken Sie doppelt
auf die Ein/Aus-Taste auf einen der beiden Lautsprechertische.
Beide Lautsprecher gehen in den Paarungszustand und Sie hören ein
akustisches Signal. Die blauen LED-Anzeigen beider Lautsprechertische
blinken gleichzeitig schnell. Nach der Paarung blinkt die LED-Anzeige
des ersten Lautsprechers (Master) langsam, die LED des zweiten
Lautsprechers (Sub-Lautsprecher) leuchtet grün. Nach der Verbindung
mit einem Smartphone oder einem anderen BT-Gerät leuchtet die
Master-Lautsprecher-LED durchgehend blau, der Sub-Lautsprecher-LED
leuchtet durchgehend grün.
• Wenn die Lautsprechertische erfolgreich gekoppelt sind, drücken
Sie kurz die Ein/Aus-Taste des Master-Lautsprechers oder des Sub-
Lautsprechers, um den TWS-Modus zu beenden.
• Wenn die Lautsprecher im gepaarten TWS-Modus mit einem BT-
Gerät verbunden sind, können die beiden Lautsprecher immer noch
als gekoppelte Lautsprecher arbeiten, wenn sie das AUX-Kabel
in die AUX-Buchse am ersten Lautsprecher (Master) stecken. Am
Master-Lautsprecher leuchtet das LED-Licht grün und blau, am Sub-
Lautsprecher leuchtet das LED-Licht grün. Der TWS-Modus wird
deaktiviert, wenn an der AUX-Buchse des Sub-Lautsprechers ebenfalls
ein AUX-Kabel angeschlossen wird.
• Im TWS-Modus können Telefonate nur am Master-Lautsprecher
angenommen werden.
Automatische Abschaltung
Wenn nach dem Einschalten des Lautsprechers keine BT-Verbindung
hergestellt wird, die BT-Verbindung getrennt wurde oder kein LINE IN-
Signal ankommt, geht der Lautsprecher nach 10 Minuten automatisch aus
und es ertönt „Power o“ (Gerät aus)

13
DE
REINIGUNG UND PFLEGE
• Verwenden Sie ein weiches Tuch, um die Oberäche des Lautsprechers
zu reinigen. Verwenden Sie zur Reinigung keine Scheuerschwämme,
Scheuermittel oder scharfe Reiniger.
• Wenn der Lautsprecher während eines Gewitters nicht richtig
funktioniert, ziehen Sie den Stecker aus der Steckdose und stecken Sie
ihn nach einer Minute wieder ein.
• Lassen Sie keine kleinen Gegenstände oder Flüssigkeiten in den
Lautsprecher fallen.
• Falls Sie kleine Gegenstände oder eine Flüssigkeit im Inneren des
Lautsprechers nden und Rauch oder Geruch austritt, trennen Sie den
Lautsprecher sofort vom Stromnetz und wenden Sie sich zur Inspektion
und Reparatur an einen Fachbetrieb.
14
DE
SPEZIELLE ENTSORGUNGSHINWEISE FÜR
VERBRAUCHER IN DEUTSCHLAND
Entsorgen Sie Ihre Altgeräte fachgerecht. Dadurch wird gewährleistet,
dass die Altgeräte umweltgerecht verwertet und negative Auswirkungen
auf die Umwelt und menschliche Gesundheit vermieden werden. Bei der
Entsorgung sind folgende Regeln zu beachten:
• Jeder Verbraucher ist gesetzlich verpichtet, Elektro- und
Elektronikaltgeräte (Altgeräte) sowie Batterien und Akkus
getrennt vom Hausmüll zu entsorgen. Sie erkennen die
entsprechenden Altgeräte durch folgendes Symbol der
durchgestrichene Mülltonne (WEEE Symbol).
• Sie haben Altbatterien und Altakkumulatoren, die nicht vom Altgerät
umschlossen sind, sowie Lampen, die zerstörungsfrei aus dem
Altgerät entnommen werden können, vor der Abgabe an einer
Entsorgungsstelle vom Altgerät zerstörungsfrei zu trennen.
• Bestimmte Lampen und Leuchtmittel fallen ebenso unter das Elektro-
und Elektronikgesetz und sind dementsprechend wie Altgeräte zu
behandeln. Ausgenommen sind Glühbirnen und Halogenlampen.
Entsorgen Sie Glühbirnen und Halogenlampen bitte über den Hausmüll,
sofern Sie nicht das WEEE Symbol tragen.
• Jeder Verbraucher ist für das Löschen von personenbezogenen Daten
auf dem Elektro- bzw. Elektronikgerät selbst verantwortlich.
Rücknahmepicht der Vertreiber
Vertreiber mit einer Verkaufsäche für Elektro- und Elektronikgeräte von
mindestens 400 Quadratmetern sowie Vertreiber von Lebensmitteln
mit einer Gesamtverkauläche von mindestens 800 Quadratmetern, die
mehrmals im Kalenderjahr oder dauerhaft Elektro- und Elektronikgeräte
anbieten und auf dem Markt bereitstellen, sind verpichtet,
1 bei der Abgabe eines neuen Elektro- oder Elektronikgerätes an einen
Endnutzer ein Altgerät des Endnutzers der gleichen Geräteart, das
im Wesentlichen die gleichen Funktionen wie das neue Gerät erfüllt,
am Ort der Abgabe oder in unmittelbarer Nähe hierzu unentgeltlich
zurückzunehmen und
2 auf Verlangen des Endnutzers Altgeräte, die in keiner äußeren
Abmessung größer als 25 Zentimeter sind, im Einzelhandelsgeschäft
oder in unmittelbarer Nähe hierzu unentgeltlich zurückzunehmen; die
Rücknahme darf nicht an den Kauf eines Elektro- oder Elektronikgerätes
geknüpft werden und ist auf drei Altgeräte pro Geräteart beschränkt.

15
DE
• Bei einem Vertrieb unter Verwendung von Fernkommunikationsmitteln
ist die unentgeltliche Abholung am Ort der Abgabe auf Elektro- und
Elektronikgeräte der Kategorien 1, 2 und 4 gemäß § 2 Abs. 1 ElektroG,
nämlich „Wärmeüberträger“, „Bildschirmgeräte“ (Oberäche von mehr
als 100 cm²) oder „Großgeräte“ (letztere mit mindestens einer äußeren
Abmessung über 50 Zentimeter) beschränkt. Für andere Elektro- und
Elektronikgeräte (Kategorien 3, 5 ,6) ist eine Rückgabemöglichkeit in
zumutbarer Entfernung zum jeweiligen Endnutzer zu gewährleisten
• Altgeräte dürfen kostenlos auf dem lokalen Wertstohof oder in
folgenden Sammelstellen in Ihrer Nähe abgegeben werden: www.take-
e-back.de
• Für Elektro- und Elektronikgeräte der Kategorien 1, 2 und 4 an bieten
wir auch die Möglichkeit einer unentgeltlichen Abholung am Ort der
Abgabe. Beim Kauf eines Neugeräts haben sie die Möglichkeit eine
Altgerätabholung über die Webseite auszuwählen.
• Batterien können überall dort kostenfrei zurückgegeben werden, wo sie
verkauft werden (z. B. Super-, Bau-, Drogeriemarkt). Auch Wertsto- und
Recyclinghöfe nehmen Batterien zurück. Sie können Batterien auch per
Post an uns zurücksenden. Altbatterien in haushaltsüblichen Mengen
können Sie direkt bei uns von Montag bis Freitag zwischen 07:30 und
15:30 Uhr unter der folgenden Adresse unentgeltlich zurückgeben:
Chal-Tec GmbH
Member of Berlin Brands Group
Handwerkerstr. 11
15366 Dahlwitz-Hoppegarten
Deutschland
• Wichtig zu beachten ist, dass Lithiumbatterien aus Sicherheitsgründen
vor der Rückgabe gegen Kurzschluss gesichert werden müssen (z. B.
durch Abkleben der Pole).
• Finden sich unter der durchgestrichenen Mülltonne auf der Batterie
zusätzlich die Zeichen Cd, Hg oder Pb ist das ein Hinweis darauf, dass
die Batterie gefährliche Schadstoe enthält. (»Cd« steht für Cadmium,
»Pb« für Blei und »Hg« für Quecksilber).
Hinweis zur Abfallvermeidung
Indem Sie die Lebensdauer Ihrer Altgeräte verlängern, tragen Sie dazu
bei, Ressourcen eizient zu nutzen und zusätzlichen Müll zu vermeiden.
Die Lebensdauer Ihrer Altgeräte können Sie verlängern indem Sie defekte
Altgeräte reparieren lassen. Wenn sich Ihr Altgerät in gutem Zustand
bendet, könnten Sie es spenden, verschenken oder verkaufen.

16
DE
HINWEISE ZUR ENTSORGUNG
Wenn es in Ihrem Land eine gesetzliche Regelung
zur Entsorgung von elektrischen und elektronischen
Geräten gibt, weist dieses Symbol auf dem Produkt
oder auf der Verpackung darauf hin, dass dieses
Produkt nicht im Hausmüll entsorgt werden darf.
Stattdessen muss es zu einer Sammelstelle für
das Recycling von elektrischen und elektronischen
Geräten gebracht werden. Durch regelkonforme
Entsorgung schützen Sie die Umwelt und die
Gesundheit Ihrer Mitmenschen vor negativen
Konsequenzen. Informationen zum Recycling
und zur Entsorgung dieses Produkts, erhalten
Sie von Ihrer örtlichen Verwaltung oder Ihrem
Hausmüllentsorgungsdienst.
KONFORMITÄTSERKLÄRUNG
Hersteller:
Chal-Tec GmbH, Wallstraße 16, 10179 Berlin,
Deutschland.
Importeur für Großbritannien:
Berlin Brands Group UK Ltd
PO Box 1145
Oxford, OX1 9UW
United Kingdom
Hiermit erklärt Chal-Tec GmbH, dass der
Funkanlagentyp Milano der Richtlinie 2014/53/
EU entspricht. Der vollständige Text der EU-
Konformitätserklärung ist unter der folgenden
Internetadresse verfügbar: use.berlin/10034605

17
EN
Dear Customer,
Congratulations on purchasing this device. Please read
the following instructions carefully and follow them to
prevent possible damages. We assume no liability for
damage caused by disregard of the instructions and
improper use. Scan the QR code to get access to the
latest user manual and more product information.
CONTENT
Technical Data 18
Safety Instructions 18
Assembly 20
Device Overview and Key Functions 22
Operation 23
Cleaning and Care 27
Hints on Disposal 27
Declaration of Conformity 28

18
EN
TECHNICAL DATA
Item number 10034605, 10034606
Power supply (power supply unit) 220-240 V ~ 50/60 Hz
BT transmission distance up to 10 m
BT frequency 2.402 - 2.480 GHz
RMS 30 W (15 W x 2)
Frequency range 90 Hz - 18 kHz
Signal to noise ratio ≥ 75 dB
Separation ratio ≥ 35 dB
Operating voltage DC 16 V / 3 A
USB charging socket 5 V / 2.1 A and 5 V / 1 A
Wireless charging 5 W (5 V / 1 A)
SAFETY INSTRUCTIONS
Special notes about the device
• The maximum load capacity of this product is 5 kg. Do not place objects
weighing more than 5 kg on the device, otherwise we do not assume
any liability.
• Do not use the product as a seat. Also make sure that children do not sit
on it.
• Use only the original power supply to charge the speaker, otherwise the
speaker may be slowly charged or not charged at all. In extreme cases,
the AC adapter may burn out or damage the unit.

19
EN
General information
• Lightning - If you are not going to use the device for a long time or
if there is a storm, disconnect the plug from the electrical outlet and
disconnect the device from the antenna connector. This will avoid
damage to the product that may be caused by lightning or overvoltage.
• Overload - Do not overload power outlets, extension cords, or built-in
power outlets, as this may result in a re or electric shock.
• Foreign objects and liquid - Never push objects of any kind through
openings in the device as they may touch dangerous voltage points or
short out parts, which could result in a re or electric shock. Never spill
liquids of any kind on the device.
• Repairs and maintenance - Do not attempt to service this product
yourself, as opening or removing covers will expose you to dangerous
voltages or other hazards. Leave all maintenance to qualied service
personnel.
• Damage requiring service - Disconnect the power plug from the outlet
and consult a qualied specialist if any of the following conditions
occur:
a) If the power cord or plug is damaged.
b) If liquid has been spilled or objects have fallen onto the product.
c) If the product has been exposed to rain or water.
d) If the product has been dropped or damaged.
e) If the product has a markedly reduced performance.
• Replacement parts - When replacement parts are required, make
sure that the service professional who replaces the parts only uses
replacement parts that have been approved by the manufacturer or
that have the same characteristics as the original part. Unauthorized
replacement may result in re, electric shock or other hazards.
• Heat - Do not place the unit near heat sources such as radiators,
heaters, stoves or other products (including ampliers).
Note: This device may be only used by children 8 years old or older and
persons with limited physical, sensory and mental capabilities and/or
lack of experience and knowledge, provided that they have been
instructed in use of the device by a responsible person who understands
the associated risks.
20
EN
ASSEMBLY
Parts
Main body (1x)
Power cord (1x)
Bolt (6x)
Spanner (1x)
Table top (1x)
Power adaptor (1x)
D-Nut (6x)
Cover (6x)
Legs (3x)
3.5 mm cable (1x)
Nut (6x)
Protective Pads (3x)
21
EN
1 2 3
Insert the bolts (A) into
the holes in the main
body (1). Insert the legs (3)
into the main body and
screw the bolts (A) into
the holes in the legs.
Screw the D nuts (B) and
nuts (C) into the main
body (1) from above as
shown.
Insert the bolts (A) into
the holes in the table top.
Place the table top on the
notches of the legs (3) and
screw the bolts (A) into
the holes in the legs (3).
4 5 6
Screw the D nuts (B) and
the nuts (C) into the table
top (1) from above as
shown.
Tighten all fasteners with
the key (D).
Place the covers (E) on
the holes on the main
body and on the table
top and nally attach the
protective pads to the
legs.
22
EN
DEVICE OVERVIEW AND KEY FUNCTIONS
1 Power button 7 USB ports
2 Play/Pause button 8 Charging light
3 Volume+ 9 Mains inlet
4 Loudness 10 AUX input
5 Microphone 11 Reset
6 LED light 12 Wireless loading dock

23
EN
OPERATION
Voice output
In the following situations, you will hear voice output from the speakers:
• When the unit is turned on,
• When the unit is turned o,
• When waiting for a bt connection,
• When a bt connection is established,
• When a bt connection is disconnected,
• When the volume is set to maximum,
• When the battery is weak and needs charging.
Switching the unit on/o
• Press and hold the On button and you will hear „Power on“ from the
speakers. The unit will automatically activate BT and you will hear „BT
waiting for connection“ from the speakers. You can now connect your
smartphone or pad to the speakers via BT.
• Press and hold the O button and you will hear „Power o“ from the
loudspeakers. The device will then turn o.
AUX Auto Switch
• Plug the AUX cable into the AUX jack on the back of the speaker. The
speaker will automatically switch to AUX mode and the blue and green
LED lights will illuminate. BT mode is automatically turned o.
• After removing the AUX cable, the BT mode is automatically turned on
again, then „BT waiting for connection“ sounds from the speakers.

24
EN
Establish BT connection
1. When the speaker is in BT mode, it automatically switches to pairing
mode. The blue LED ashes slowly.
2. Open the BT settings on your smartphone/pad and search for the
loudspeaker in the BT device list. As soon as your smartphone/pad is
connected to the loudspeaker, „BT is connected“ sounds and the blue
LED lights up permanently. If the connection is disconnected, the blue
LED ashes slowly.
3. If this speaker is connected to the smartphone and you are playing
music via BT, the speaker will stop when you briey press the Play/
Pause/ button. To resume playback, press the Play/Pause button again.
4. When this speaker is connected to the smartphone, press and hold the
Play/Pause button to disconnect the BT connection. You can now make
a BT connection to another device.
Note: The best distance between Smartphone/Pad and speaker is ≤ 10m.
Answering calls via BT
• When a call comes in, the phone number of the incoming call sounds
with the sound „dudu“ or the sound „Cell phone rings“ from the speaker,
if it is connected to an Android smartphone. If the speaker is connected
to an iPhone, the phone number of the incoming call sounds and „Cell
phone rings“ from the speaker.
• Briey press the Play/Pause button to answer the call and talk through
the microphone. Briey press the Play/Pause button again to end the
call.
• Press and hold the Play/Pause button to reject the call.
• Press the Play/Pause button twice to call back the last connected phone
number.
Adjusting the Volume
• Press the (+) button to increase the volume.
• Press the (-) button to decrease the volume.

25
EN
USB charging
• When the speaker is on, you can charge iPhones and Android phones
simultaneously via the USB ports (2.1 A / 1 A).
• If the speaker is turned o but connected to the AC adapter, you can
charge iPhones and Android phones simultaneously via the USB ports
(2.1 A / 1 A).
• If the speaker is turned o and not connected to the AC adapter, no
external devices can be charged from the USB port.
Wireless charging
The charger coil of the wireless charger (only for mobile phones that
support the Qi wireless charger standard) must point to the wireless charger
mark located in the middle of the table. The speaker must either be turned
on or connected to the AC adapter, otherwise it cannot charge the device.
Once the unit is connected and uncharged, the „di“ signal will sound.
Low battery and charging
• If the battery capacity is low, the „Low Battery“ message will sound to
remind the user that the speaker needs charging. If you do not charge
the speaker, it will automatically turn o.
• After connecting the AC adapter to the wall outlet, the red LED light on
the back of the speaker lights up while the speaker is charging. When
the battery is fully charged, the red LED goes out.

26
EN
Connecting multiple speaker tables
The TWS function allows you to connect two speaker tables together. The
rst table is the master, which is connected to the BT unit and controls
all functions. The second table is the sub-loudspeaker that delivers True
Wireless Sound.
• Turn on both speaker tables and double-click the On/O button on
either speaker table. Both speakers will go into pairing mode and you
will hear an audible signal. The blue LED indicators on both speaker
tables will ash rapidly at the same time. After pairing, the LED
indicator of the rst speaker (master) ashes slowly, the LED of the
second speaker (sub-loudspeaker) lights up green. After connection to
a smartphone or another BT device, the master loudspeaker LED lights
up continuously blue, the sub-loudspeaker LED lights up continuously
green.
• When the speaker tables are successfully paired, briey press the On/
O button on the master speaker or sub-speaker to exit TWS mode.
• If the speakers are connected to a BT device in paired TWS mode, the
two speakers can still work as paired speakers if you plug the AUX cable
into the AUX jack on the rst speaker (master). On the master speaker,
the LED lights up green and blue, on the sub-speaker, the LED lights
up green. The TWS mode is deactivated when an AUX cable is also
connected to the AUX jack of the sub-speaker.
• In TWS mode, calls can only be accepted at the master speaker.
Auto power o
If no BT connection is established after switching on the loudspeaker, the
BT connection has been disconnected or no LINE IN signal is received, the
loudspeaker automatically switches o after 10 minutes and „Power o“
sounds.

27
EN
CLEANING AND CARE
• Use a soft cloth or cotton dipped in a neutral solution for cleaning the
surface of the speaker. Do not use the type of cloth that you use for
washing dishes or aggressive chemical agents.
• If the speaker is not working properly during a storm, please disconnect
the plug from the power socket and reinsert it after a minute.
• Do not drop small items or a liquid into the speaker.
• In the event that you nd small items or a liquid inside the speaker ,you
see smoke or smell an odour,immediately disconnect the speaker from
the power grid .send the speaker to an authorised service centre.

28
EN
DISPOSAL CONSIDERATIONS
If there is a legal regulation for the disposal of
electrical and electronic devices in your country,
this symbol on the product or on the packaging
indicates that this product must not be disposed of
with household waste. Instead, it must be taken to
a collection point for the recycling of electrical and
electronic equipment. By disposing of it in accordance
with the rules, you are protecting the environment and
the health of your fellow human beings from negative
consequences. For information about the recycling
and disposal of this product, please contact your local
authority or your household waste disposal service.
DECLARATION OF CONFORMITY
Manufacturer:
Chal-Tec GmbH, Wallstrasse 16, 10179 Berlin,
Germany.
Importer for Great Britain:
Berlin Brands Group UK Ltd
PO Box 1145
Oxford, OX1 9UW
United Kingdom
Hereby, Chal-Tec GmbH declares that the radio
equipment type Milano is in compliance with Directive
2014/53/EU. The full text of the EU declaration of
conformity is available at the following internet address:
use.berlin/10034605
For Great Britain: Hereby, Chal-Tec GmbH declares that
the radio equipment type Milano is in compliance with
the relevant statutory requirements. The full text of the
declaration of conformity is available at the following
internet address: use.berlin/10034605

29
ES
Estimado cliente:
Le felicitamos por la adquisición de este producto.
Lea atentamente el siguiente manual y siga
cuidadosamente las instrucciones de uso con el n de
evitar posibles daños. La empresa no se responsabiliza
de los daños ocasionados por un uso indebido del
producto o por haber desatendido las indicaciones de
seguridad. Escanee el código QR para obtener acceso
al manual de usuario más reciente y otra información
sobre el producto:
ÍNDICE DE CONTENIDOS
Datos técnicos 30
Indicaciones de seguridad 30
Montaje 32
Visión general del aparato y funciones de los botones 34
Manejo 35
Limpieza y mantenimiento 39
Retirada del aparato 39
Declaración de conformidad 40
30
ES
DATOS TÉCNICOS
Número de artículo 10034605, 10034606
Suministro eléctrico (fuente de
alimentación)
220-240 V ~ 50/60 Hz
Distancia de transmisión BT bis zu 10 m
Frecuencia BT 2.402 - 2.480 GHz
RMS 30 W (15 W x 2)
Rango de frecuencia 90 Hz - 18 kHz
Relación señal-ruido ≥ 75 dB
Ratio de separación ≥ 35 dB
Tensión de funcionamiento DC 16 V / 3 A
Conector de carga USB 5 V / 2.1 A und 5 V / 1 A
Carga inalámbrica 5 W (5 V / 1 A)
INDICACIONES DE SEGURIDAD
Indicaciones especiales sobre el aparato
• La capacidad máxima de carga del producto es de 5 kg. No coloque
ningún objeto encima del aparato que pese más de 5 kg; de lo
contrario, el fabricante no se responsabilizará de posibles daños.
• No utilice el producto como asiento. Asegúrese de que los niños
tampoco se sienten encima.
• Para cargar el aparato, utilice solamente la fuente de alimentación
original; de lo contrario, puede ocurrir que el altavoz se carga más lento
o no se cargue. En casos extremos, la fuente de alimentación puede
arder o dañar el aparato.

31
ES
Indicaciones generales
• Relámpago - Si no va a utilizar el aparato durante un periodo largo
de tiempo o si hay una tormenta eléctrica, desenchufe el aparato de la
toma de corriente y desconecte el conector de antena. De este modo,
protegerá el aparato de los daños que pueden ocasionar relámpagos y
la sobretensión.
• Sobrecarga - No sobrecargue las tomas de corriente, cables
alargadores o tomas de corriente integradas para evitar el riesgo de un
incendio o de descarga eléctrica.
• Objetos extraños y entrada de líquido - No introduzca objetos de
ningún tipo en las ranuras del aparato, ya que podría tocar elementos
con voltajes peligrosos o piezas salientes que podrían causar un
incendio o una descarga eléctrica. No derrame líquido de ningún tipo
sobre el aparato.
• Reparación y mantenimiento - No intente reparar el aparato usted
mismo, ya que si abre o retira las cubiertas, podría provocar una tensión
peligrosa u otro riesgo. Contacte con un servicio técnico para su
reparación.
• Daños que requieren una reparación - Desconecte el enchufe de
la toma de corriente y póngase en contacto con un servicio técnico
cualicado si:
a) El cable de alimentación o el enchufe está dañado.
b) Se ha derramado líquido o se ha caído un objeto en el interior del
aparato.
c) El producto ha estado expuesto a la lluvia o agua.
d) Se ha dejado caer el producto o está dañado.
e) El rendimiento del producto ha disminuido considerablemente.
• Piezas de repuesto - Si necesita piezas de repuesto, asegúrese de
que el técnico que cambiará las piezas utiliza solamente las piezas
de recambio originales del fabricante o piezas con las mismas
características que las piezas originales. Las piezas no autorizadas
pueden provocar incendios, descargas eléctricas y otros riesgos.
• Calor - No instale el aparato cerca de las fuentes de calor como
radiadores, calentadores, hornos u otros aparatos similares (incluidos
amplicadores).
Nota: Este aparato puede ser utilizado por niños mayores de 8 años y
personas con discapacidades físicas, sensoriales y mentales y/o con
falta de experiencia y conocimientos, siempre y cuando hayan sido
instruidos sobre el uso del aparato y comprendan los peligros y riesgos
asociados.

32
ES
MONTAJE
Componentes
Estructura principal
(x1)
Cable de
alimentación (x1)
Pernos (x6)
Llave (x1)
Tablero de la mesa (x1)
Fuente de alimentación
(x1)
Tuercas D (x6)
Tapa (x6)
Patas (x3)
cable de 3,5 mm (x1)
Tuercas (x6)
Almohadilla de
protección (x3)
33
ES
1 2 3
Coloque los pernos (A)
en los oricios de la
estructura principal (1).
Coloque las patas (3) en
la estructura principal y
atornille los pernos (A) en
los oricios de las patas.
Fije la tuerca D (B) y
las tuercas (C) como
se representa en la
estructura principal desde
arriba (1).
Coloque los pernos (A) en
los oricios del tablero
de la mesa. Coloque el
tablero de la mesa en
las muescas de las patas
(3) y atornille los pernos
(A) en los oricios de las
patas (3).
4 5 6
Fije la tuerca D (B) y las
tuercas (C) al tablero de
la mesa desde arriba (1)
como se representa.
Apriete todas las
jaciones con la llave (D).
Coloque las cubiertas
(E) en los oricios de
la estructura principal
y al tablero de la mesa
y, a continuación, je
las almohadillas de
protección a las patas.

34
ES
VISIÓN GENERAL DEL APARATO Y FUNCIONES
DE LOS BOTONES
1 Botón on/o 7 Puertos USB
2 Botón Play/Pause 8 Luz de carga
3 Volumen+ 9 Entrada de red
4 Volumen - 10 Entrada AUX
5 Micrófono 11 Reset
6 Luz LED 12 Carga inalámbrica

35
ES
MANEJO
Respuesta de voz
En las siguientes situaciones se emitirá una respuesta de voz desde los
altavoces:
• cuando el aparato se enciende
• cuando el aparato se apaga
• Cuando se espera a una conexión BT
• Cuando se establece una conexión BT
• Cuando se cancela una conexión BT
• Cuando el volumen se regula al máximo
• Cuando el nivel de la batería es bajo y debe cargarse.
Apagar/encender aparato
• Pulse el botón on y suena „Power on“ (aparato encendido) de los
altavoces. El aparato activa automáticamente el BT y suena „BT waiting
for connection“ (BT esperando a conexión) en los altavoces. Ahora
podrá conectar su smartphone o iPad a los altavoces a través del BT.
• Pulse el botón o y suena „power o“ (aparato apagado) en los
altavoces. A continuación, el aparato se apaga.
Cambio automático AUX
• Conecte el cable AUX a su toma situada en la parte trasera del aparato.
El altavoz pasa automáticamente al modo AUX y se iluminan la luz azul
y verde LED. El modo BT se desactiva automáticamente.
• Después de retirar el cable AUX, el modo BT se activa automáticamente
y suena „BT waiting for connection“ (Bt esperando a conexión) en los
altavoces.

36
ES
Establecer conexión BT
1. Si el altavoz se encuentra en modo BT, pasa automáticamente al estado
de sincronización. La luz LED azul parpadea lentamente.
2. Abra los ajustes BT en su smartphone/iPad y busque en la lista de
dispositivos BT el altavoz. En cuanto su smartphone/ipad se conecte
con el altavoz, suena „BT is connected“ (BT conectado) y la luz LED azul
se ilumina de manera permanente. Si la conexión se interrumpe, la luz
LED azul parpadea lentamente.
3. Si este altavoz está conectado con el smartphone y reproduce música
a través de BT, el altavoz se detiene si pulsa el botón Play/Pause. Para
continuar con la reproducción, pulse de nuevo el botón Play/Plause.
4. Cuando este altavoz esté conectado al smartphone, pulse el botón
Play/Pause para interrumpir la conexión BT. Ahora puede establecer
una conexión BT con otro aparato.
Nota: La mejor distancia entre el smartphone/iPad y el altavoz es de ≤
10 m.
Aceptar llamadas por BT
• Si recibe una llamada, suena el número de teléfono de la llamada
entrante con el tono „dudu“ o el tono „cell phone rings“ (móvil
sonando) del altavoz en cuanto se conecte con un smartphone de
Android. Si el altavoz se conecta con un iPhone, suena el número de
teléfono de la llamada entrante y „Cell phone rings“ (el móvil está
sonando) en el altavoz.
• Pulse el botón Play/Pause para aceptar la llamada y hablar por el
micrófono. Pulse de nuevo el botón Play/Pause para nalizar la llamada.
• Pulse el botón Play/Pause para rechazar la llamada.
• Pulse dos veces el botón Play/Pause para rellamar al último número de
teléfono.
Ajustar volumen
• Pulse el botón (+) para subir el volumen.
• Pulse el botón (-) para reducir el volumen.

37
ES
Carga USB
• Si el altavoz está encendido, puede cargar al mismo tiempo iPhones y
teléfonos Android a través de las tomas USB (2.1 A / 1 A).
• Si el altavoz está apagado pero conectado a la red eléctrica, puede
cargar al mismo tiempo iPhones y teléfonos Android a través de las
tomas USB (2.1 A / 1 A).
• Si el altavoz está apagado y no está conectado a la red eléctrica, no
puede cargar ningún dispositivo externo en las tomas USB.
Carga inalámbrica
La bobina de carga del cargador inalámbrico (solo para teléfono móvil que
sea compatible con el estándar Qi de carga inalámbrica) debe orientarse
a la marca de carga inalámbrica situada en el centro de la mesa. El altavoz
debe encenderse o conectarse a la fuente de alimentación; de lo contrario,
el aparato no puede cargar. En cuanto el aparato se conecte y se cargue,
suena la señal „di“.
Nivel bajo de batería y carga
• Si la capacidad de la batería es baja, suena el aviso „low battery“
(batería baja) para recordar al usuario que debe cargar el altavoz. Si no
carga el altavoz, este se apaga automáticamente.
• Después de conectar la fuente de alimentación a la toma de corriente,
se ilumina en la parte trasera de altavoz la luz LED roja mientras el
aparato continúe cargándose. Si la batería está completamente llena,
se apaga la luz LED roja.

38
ES
Conectar varias mesas de altavoces
La función TWS le permite conectar dos mesas de altavoces entre sí. La
primera mesa es la maestra, con la que se conecta el dispositivo BT y que
controla todas las funciones. La segunda mesa es el sub-altavoz que emite
True Wireless Sound.
• Encienda ambas mesas de altavoces y haga clic dos veces en el botón
on/o de ambas mesas de altavoces. Los dos altavoces entran en
estado de sincronización y escuchará una señal acústica. El indicador
LED azul de ambas mesas de altavoces parpadea rápidamente al
mismo tiempo. Tras la sincronización parpadea el indicador LED del
primer altavoz (Master) lentamente, el LED del segundo altavoz (sub-
altavoz) se ilumina en color verde. Tras la conexión con un smartphone
u otro dispositivo BT, el LED del altavoz maestro se ilumina en azul
permanentemente, el LED del sub-altavoz se ilumina permanentemente
en verde.
• Cuando las mesas de altavoz se hayan sincronizado correctamente,
pulse el botón on/o del altavoz maestro o del sub-altavoz para
nalizar el modo TWS.
• Si los altavoces están conectados a un dispositivo BT en modo
de sincronización TWS, ambos pueden trabajar como altavoces
sincronizados si conecta el cable AUX a la toma del primer altavoz
(maestro). En el altavoz maestro se ilumina la luz LED en verde y azul
y en el sub-altavoz se ilumina la luz LED en verde. El modo TWS se
desactiva cuando en la toma AUX del sub-altavoz se conecta también
un cable AUX.
• En modo TWS solo puede aceptar llamadas desde el altavoz maestro.
Apagado automático
Si después de encender el altavoz no se establece ninguna conexión BT,
esta se ha interrumpido o no entra ninguna señal LINE IN, el altavoz se
apaga automáticamente tras 10 minutos y suena „power o“ (aparato
apagado)
39
ES
LIMPIEZA Y MANTENIMIENTO
• Limpie la supercie del altavoz con un paño suave y un producto de
limpieza neutro. No use el tipo de paño que utiliza para lavar platos o
productos químicos abrasivos.
• Si el altavoz no funciona correctamente durante una tormenta,
desconéctelo de la red eléctrica y espere 1 minuto antes de volver a
conectarlo.
• No deje caer objetos pequeños ni líquidos encima del altavoz.
• Si detecta en el interior del altavoz objetos pequeños o líquido, o si
ve que el altavoz emite humo u olor, desconéctelo de inmediato de
la corriente eléctrica y póngase en contacto con el servicio técnico
autorizado.
RETIRADA DEL APARATO
Si el aparato lleva adherida la ilustración de la
izquierda (el contenedor de basura tachado)
entonces rige la normativa europea, directiva
2012/19/UE. Este producto no debe arrojarse a un
contenedor de basura común. Infórmese sobre las
leyes territoriales que regulan la recogida separada
de aparatos eléctricos y electrónicos. Respete las
leyes territoriales y no arroje aparatos viejos al cubo
de la basura doméstica. Una retirada de aparatos
conforme a las leyes contribuye a proteger el medio
ambiente y a las personas a su alrededor frente a
posibles consecuencias perjudiciales para la salud.
El reciclaje ayuda a reducir el consumo de materias
primas.

40
ES
RETIRADA DEL APARATO
Si en su país existe una disposición legal relativa a
la eliminación de aparatos eléctricos y electrónicos,
este símbolo estampado en el producto o en
el embalaje advierte que no debe eliminarse
como residuo doméstico. En lugar de ello, debe
depositarse en un punto de recogida de reciclaje
de aparatos eléctricos y electrónicos. Una gestión
adecuada de estos residuos previene consecuencias
potencialmente negativas para el medio ambiente
y la salud de las personas. Puede consultar más
información sobre el reciclaje y la eliminación de este
producto contactando con su administración local o
con su servicio de recogida de residuos.
DECLARACIÓN DE CONFORMIDAD
Fabricante:
Chal-Tec GmbH, Wallstraße 16, 10179 Berlín, Alemania.
Importador para Gran Bretaña:
Berlin Brands Group UK Ltd
PO Box 1145
Oxford, OX1 9UW
United Kingdom
Por la presente, Chal-Tec GmbH declara que el tipo
de equipo radioeléctrico Milano es conforme con
la Directiva 2014/53/UE. El texto completo de la
declaración UE de conformidad está disponible en la
dirección Internet siguiente: use.berlin/10034605

41
FR
Cher client,
Toutes nos félicitations pour l’acquisition de ce nouvel
appareil. Veuillez lire attentivement les instructions
suivantes de branchement et d’utilisation an d’éviter
d’éventuels dommages. Le fabricant ne saurait être tenu
pour responsable des dommages dus au non-respect
des consignes de sécurité et à la mauvaise utilisation
de l’appareil. Scannez le QR-Code pour accéder à
la dernière version du mode d‘emploi et à d‘autres
informations concernant le produit:
SOMMAIRE
Fiche technique 42
Consignes de sécurité 42
Assemblage 44
Aperçu de l‘appareil et fonctions des touches 46
Utilisation 47
Nettoyage et entretien 51
Conseils pour le recyclage 51
Déclaration de conformité 52

42
FR
FICHE TECHNIQUE
Numéro d'article 10034605, 10034606
Alimentation (adaptateur secteur) 220-240 V ~ 50/60 Hz
Distance de retransmission du BT bis zu 10 m
Fréquence de BT 2.402 - 2.480 GHz
RMS 30 W (15 W x 2)
Plage de fréquences 90 Hz - 18 kHz
Rapport signal bruit ≥ 75 dB
Rapport de séparation ≥ 35 dB
Tension de fonctionnement DC 16 V / 3 A
Port de charge USB 5 V / 2.1 A und 5 V / 1 A
Recharge sans l 5 W (5 V / 1 A)
CONSIGNES DE SÉCURITÉ
Consignes particulières concernant l‘appareil
• La charge maximale supportée par ce produit est de 5 kg. Ne placez pas
d‘objets pesant plus de 5 kg sur l‘appareil, sinon nous déclinons toute
responsabilité.
• N‘utilisez pas le produit en guise de siège, assurez-vous également que
les enfants ne s‘y assoient pas.
• Utilisez uniquement l’adaptateur secteur original pour charger, sinon
l‘enceinte risque de charger lentement ou pas du tout. Dans les cas
extrêmes, l‘alimentation peut brûler ou l‘appareil être endommagé.

43
FR
Consignes générales
• Foudre - Si vous n‘utilisez pas l‘appareil pendant une longue période
ou s‘il y a de l‘orage, débranchez la che de la prise et débranchez
l‘antenne de l‘appareil. Cela évite d‘endommager le produit à cause de
la foudre et des surtensions.
• Surcharge - Ne surchargez pas les prises de courant, les rallonges ou
les prises de courant, car cela pourrait provoquer un incendie ou une
électrocution.
• Corps étranger et insertion de liquides - Ne glissez jamais d‘objets
d‘aucune sorte à travers les ouvertures de l‘appareil, car ils pourraient
toucher des points de tension dangereux ou court-circuiter des
éléments, ce qui pourrait provoquer un incendie ou une électrocution.
Ne renversez jamais de liquides d‘aucune sorte sur l‘appareil.
• Réparation et maintenance - Ne tentez pas de réparer ce produit
vous-même en vous exposant à des tensions dangereuses ou à d‘autres
risques en ouvrant ou en retirant les couvercles. Conez toute la
maintenance à un personnel qualié.
• Dégâts nécessitant une intervention de professionnel - Débranchez
la che de la prise et consultez un spécialiste qualié si l‘une des
situations suivantes se produit :
a) Lorsque le câble secteur ou la che sont endommagés.
b) Lorsque des liquides ont été renversés ou que des objets sont
tombés sur l‘appareil.
c) Lorsque le produit a été exposé à la pluie ou à l‘eau.
d) Lorsque le produit a fait une chute ou a été endommagé.
e) Lorsque le produit a des performances sensiblement réduites.
• Pièces de rechange - Si des pièces de rechange sont nécessaires,
assurez-vous que l‘entreprise spécialisée qui remplace les pièces
n‘utilise que des pièces de rechange approuvées par le fabricant ou qui
ont les mêmes caractéristiques que la pièce d‘origine. Le remplacement
non autorisé peut entraîner un incendie, un choc électrique ou vous
exposer à d‘autres dangers.
• Chaleur - Ne placez pas l‘appareil à proximité de sources de chaleur
telles que des radiateurs, des grilles de chauage, des poêles ou
d‘autres produits (y compris les amplicateurs).
Note: Cet appareil peut être utilisé par des enfants de 8 ans ou plus et
des personnes ayant des capacités physiques, sensorielles et mentales
limitées et / ou dénuées d‘expérience et de connaissances, à condition
d‘avoir été instruits au fonctionnement de l‘appareil par une personne
responsable et d‘en comprendre les risques associés.

44
FR
ASSEMBLAGE
Pièces détachées
Corps principal (1x)
Câble secteur (1x)
Boulons (6x)
Clé plate (1x)
Plateau de table (1x)
Adaptateur secteur (1x)
Ecrous D (6x)
Cache (6x)
Pieds (3x)
Câble 3.5 mm (1x)
Ecrous (6x)
Coussinet de
protection (3x)
45
FR
1 2 3
Insérez les boulons (A)
dans les trous du corps
principal (1). Insérez les
pieds (3) dans le corps
principal et vissez les
boulons (A) dans les trous
des pieds.
Visser les écrous D (B)
et (C) par le haut dans le
corps principal (1) comme
indiqué.
Insérez les boulons (A)
dans les trous du plateau
de la table. Placez le
plateau de la table sur
les encoches des pieds
(3) et vissez les boulons
(A) dans les trous des
pieds (3).
4 5 6
Vissez les écrous D (B) et
les écrous (C) par le haut
dans le dessus de la table
(1) comme indiqué.
Serrez toutes les attaches
avec la clé (D).
Placez les caches (E)
sur les trous du corps
principal et sur le dessus
de la table, puis xez les
coussinets de protection
aux pieds

46
FR
APERÇU DE L‘APPAREIL ET FONCTIONS DES
TOUCHES
1 Touche d'alimentation 7 Ports USB
2 Touche lecture / pause 8 Témoin de charge
3 Volume + 9 Prise d'alimentation
4 Volume - 10 Entrée AUX
5 Micro 11 Reset
6 Voyants LED 12 Dock de charge sans l

47
FR
UTILISATION
Message vocal
Dans les situations suivantes, l‘enceinte émet un message vocal :
• Lorsque vous allumez l‘appareil,
• Lorsque vous éteignez l‘appareil,
• Lorsque l‘appareil est en attente de connexion BT,
• Lorsqu‘une connexion BT est établie,
• Lorsqu‘une connexion BT est interrompue,
• Lorsque le volume est réglé sur maximum,
• Lorsque la batterie est faible et doit être rechargée.
Pour allumer ou éteindre l‘appareil
• Appuyez longuement sur la touche On et l‘enceinte émet „Power On“
(appareil allumé). L‘appareil allume automatiquement BT et émet le
message „BT waiting for connection“ (en attente de connexion BT).
Vous pouvez maintenant connecter votre smartphone ou votre tablette
par BT à l‘enceinte.
• Appuyez longuement sur le bouton d‘arrêt, l‘appareil émet „Power O“.
Puis il s‘éteint.
Commutateur automatique AUX
• Branchez le câble AUX dans la prise AUX située à l‘arrière de l‘enceinte.
L‘enceinte passe automatiquement en mode AUX, les voyants LED bleu
et vert s‘allument. Le mode BT s‘éteint automatiquement.
• Après avoir débranché le câble AUX, le mode BT se rallume
automatiquement, puis l‘enceinte émet „BT waiting for connection“ (BT
en attente de connexion).

48
FR
Etablissement d‘une connexion BT
1. Lorsque l‘enceinte est en mode BT, elle passe automatiquement en
mode jumelage. Le voyant bleu clignote lentement.
2. Ouvrez les paramètres BT de votre smartphone / tablette et recherchez
l‘enceinte dans la liste des périphériques BT. Dès que votre smartphone
/ tablette est connecté à l‘enceinte, l‘appareil émet le message „BT
is connected“ (BT est connecté) et le voyant bleu reste allumé en
permanence. Si la connexion est interrompue, le voyant bleu clignote
lentement.
3. Si cette enceinte est connectée au smartphone et que vous écoutez de
la musique en BT, elle se met en pause si vous appuyez brièvement sur
la touche lecture/pause. Pour reprendre la lecture, appuyez à nouveau
sur la touche Lecture/Pause.
4. Lorsque cette enceinte est connectée au smartphone, appuyez
longuement sur la touche lecture / pause pour quitter la connexion
BT. Vous pouvez maintenant établir une connexion BT avec un autre
appareil.
Remarque : La distance idéale entre smartphone / tablette et enceinte
est ≤ 10 m.
Prise d‘appel par BT
• Lorsqu‘un appel arrive, le numéro de téléphone de l‘appel entrant
sonne sur l‘enceinte en faisant „doudou“ ou le message „Cell phone
rings“ (Le téléphone sonne), si elle est connectée à un smartphone
Android. Si l‘enceinte est connectée à un iPhone, le numéro de
téléphone de l‘appel entrant sonne et le message „Cell phone rings“ (Le
téléphone sonne) est émis par l‘enceinte.
• Appuyez brièvement sur la touche lecture / pause pour répondre à
l‘appel et parlez dans le micro. Appuyez à nouveau brièvement sur la
touche lecture / pause pour mettre n à l‘appel.
• Appuyez longuement sur la touche lecture / pause pour rejeter l‘appel.
• Appuyez deux fois sur la touche lecture / pause pour rappeler le dernier
numéro.
Réglage du volume
• Appuyez sur la touche (+) pour augmenter le volume.
• Appuyez sur la touche (-) pour réduire le volume.

49
FR
Recharge USB
• Lorsque l‘enceinte est active, vous pouvez utiliser les ports USB (2.1 A /
1 A) pour charger les iPhone et téléphones Android simultanément.
• Si l‘enceinte est désactivée mais connectée à l‘adaptateur secteur, vous
pouvez utiliser les ports USB (2.1 A / 1 A) pour charger simultanément un
iPhone et un téléphone Android.
• Si l‘enceinte est désactivée et n‘est pas connectée à l‘adaptateur
secteur, vous ne pourrez pas charger de périphériques externes sur le
port USB.
Recharge sans l
La bobine de charge du chargeur sans l (uniquement pour les téléphones
mobiles prenant en charge la norme de charge Qi) doit pointer vers la
marque de charge sans l située au centre de la table. L‘enceinte doit être
soit allumée ou connectée à l‘adaptateur secteur, sinon elle ne chargera pas
l‘appareil. Dès que l‘appareil est connecté et charge, le signal „di“ est émis“.
Batterie faible et recharge
• Lorsque la batterie faiblit, l‘enceinte émet le message „Low battery“
(Batterie faible) pour rappeler à l‘utilisateur que l‘enceinte doit
être rechargée. Si vous ne chargez pas l‘enceinte, elle s‘éteindra
automatiquement.
• Une fois l’adaptateur secteur connecté à la prise secteur, le voyant
rouge situé à l’arrière de l’enceinte s’allume pendant la charge. Lorsque
la batterie est complètement chargée, le voyant rouge s‘éteint.

50
FR
Pour connecter plusieurs enceintes-tables
La fonction TWS vous permet de connecter deux enceintes tables
ensemble. La première table est le master, est connectée à l‘appareil BT et
remplit toutes les fonctions. La deuxième table est l‘enceinte caisson de
basse qui délivre un son True Wireless.
• Allumez les deux enceintes tables et double-cliquez sur la touche
d‘alimentation sur l‘une des deux enceintes tables. Les deux enceintes
passent en mode de jumelage et vous entendez un signal sonore. Les
voyants bleus des deux enceintes tables clignotent simultanément.
Après le jumelage, la LED de la première enceinte (Master) clignote
lentement, la LED de la deuxième enceinte (Sub-speaker) s’allume en
vert. Une fois connectée à un smartphone ou à un autre appareil BT, le
voyant de l‘enceinte principale s‘allume en bleu et celui de l‘enceinte
secondaire en vert.
• Lorsque les enceintes tables sont correctement jumelées, appuyez
brièvement sur la touche marche / arrêt de l‘enceinte principale ou
secondaire pour quitter le mode TWS.
• Lorsque les enceintes sont jumelées à un appareil BT en mode TWS,
elles peuvent toujours fonctionner en tant qu‘appareils jumelés si
vous branchez le câble AUX dans la prise AUX de la première enceinte
(master). Le voyant LED de l‘enceinte principale s‘allume en vert et en
bleu et le voyant LED du caisson de basse s‘allume en vert. Le mode
TWS est désactivé si un câble AUX est également connecté à la prise
AUX du caisson de basses.
• En mode TWS, les appels ne peuvent être acceptés que sur l‘enceinte
principale.
Arrêt automatique
Si aucune connexion BT n’est établie après la mise sous tension de
l‘enceinte, si la connexion BT est interrompue ou si aucun signal LINE
IN Signal n’est reçu, l‘enceinte s’éteint automatiquement au bout de 10
minutes et émet le message „Power O“ (appareil arrêté).

51
FR
NETTOYAGE ET ENTRETIEN
• Utilisez un chion doux pour nettoyer la surface de l’enceinte. N‘utilisez
pas de tampons à récurer, de nettoyants abrasifs ou de produits
puissants pour le nettoyage.
• Si l‘enceinte ne fonctionne pas correctement pendant un orage,
débranchez la che de la prise et rebranchez-la au bout d‘une minute.
• Ne laissez pas tomber de petits objets ou de liquides dans l‘enceinte.
• Si vous trouvez des petits objets ou du liquide à l‘intérieur de
l‘enceinte et que de la fumée ou une odeur s‘en dégage, débranchez
immédiatement l‘enceinte et contactez un spécialiste pour inspection et
réparation.

52
FR
CONSEILS POUR LE RECYCLAGE
S‘il existe une réglementation pour l‘élimination ou le
recyclage des appareils électriques et électroniques
dans votre pays, ce symbole sur le produit ou sur
l‘emballage indique que cet appareil ne doit pas
être jeté avec les ordures ménagères. Vous devez le
déposer dans un point de collecte pour le recyclage
des équipements électriques et électroniques.
La mise au rebut conforme aux règles protège
l‘environnement et la santé de vos semblables des
conséquences négatives. Pour plus d‘informations
sur le recyclage et l‘élimination de ce produit, veuillez
contacter votre autorité locale ou votre service de
recyclage des déchets ménagers.
DÉCLARATION DE CONFORMITÉ
Fabricant :
Chal-Tec GmbH, Wallstraße 16, 10179 Berlin,
Allemagne.
Importateur pour la Grande Bretagne :
Berlin Brands Group UK Ltd
PO Box 1145
Oxford, OX1 9UW
United Kingdom
Le soussigné, Chal-Tec GmbH, déclare que
l’équipement radioélectrique du type Milano est
conforme à la directive 2014/53/UE. Le texte complet
de la déclaration UE de conformité est disponible à
l’adresse internet suivante : use.berlin/10034605

53
IT
Gentile cliente,
La ringraziamo per aver acquistato il dispositivo.
La preghiamo di leggere attentamente le seguenti
istruzioni per l’uso e di seguirle per evitare possibili
danni tecnici. Non ci assumiamo alcuna responsabilità
per danni scaturiti da una mancata osservazione delle
avvertenze di sicurezza e da un uso improprio del
dispositivo. Scansionare il codice QR seguente, per
accedere al manuale d’uso più attuale e per ricevere
informazioni sul prodotto.
INDICE
Dati tecnici 54
Avvertenze di sicurezza 54
Assemblaggio 56
Descrizione del dispositivo e tasti funzione 58
Utilizzo 59
Pulizia e manutenzione 63
Smaltimento 63
Dichiarazione di conformità 65

54
IT
DATI TECNICI
Numero articolo 10034605, 10034606
Alimentazione (alimentatore) 220-240 V ~ 50/60 Hz
Distanza di trasmissione BT bis zu 10 m
Frequenza BT 2.402 - 2.480 GHz
RMS 30 W (15 W x 2)
Intervallo di frequenza 90 Hz - 18 kHz
Rapporto segnale-rumore ≥ 75 dB
Tasso di separazione ≥ 35 dB
Tensione di esercizio DC 16 V / 3 A
Connessione di carica USB 5 V / 2.1 A und 5 V / 1 A
Carica senza lo 5 W (5 V / 1 A)
AVVERTENZE DI SICUREZZA
Avvertenze particolari sul dispositivo
• Il carico massimo del prodotto è di 5 kg. Non poggiarci sopra
oggetti che pesano più di 5 kg, altrimenti non ci assumiamo alcuna
responsabilità.
• Non utilizzare il prodotto per sedersi. Assicurarsi che i bambini non ci si
siedano sopra.
• Utilizzare solo l’alimentatore originale per la carica, altrimenti può
capitare che la cassa si carichi molto lentamente o non si carichi
proprio. In casi estremi può bruciare il cavo di alimentazione o il
dispositivo può subire danni.

55
IT
Avvertenze generali
• Colpo di fulmine – Se il dispositivo non viene utilizzato o c’è un
temporale, staccare la spina dalla presa di corrente e scollegare il
dispositivo dalla connessione dell’antenna. In questo modo si evitano
danni al dispositivo dovuti a colpi di fulmine o sovratensione.
• Sovraccarico – Non sovraccaricare prese elettriche, prolunga o
prese di corrente integrate, in quanto ciò potrebbe causare incendi o
folgorazioni.
• Corpi estranei e liquidi – Non inlare nessun tipo di oggetto nelle
aperture del dispositivo, in quanto si potrebbe entrare in contatto
con pericolosi punti di tensione o causare il cortocircuito di alcune
componenti. Questo potrebbe causare incendi o folgorazioni. Non
rovesciare liquidi sul dispositivo.
• Riparazione e manutenzione – Non cercare di eettuare opere di
manutenzione in modo autonomo, dato che rimuovendo o aprendo
le coperture potrebbero liberarsi tensioni pericolose o insorgere
altri rischi. Lasciare che le opere di manutenzione siano eettuate da
personale tecnico qualicato.
• Danni che necessitano manutenzione – Staccare la spina dalla
presa elettrica e rivolgersi a un’azienda specializzata se si vericano le
seguenti situazioni:
a) Se cavo di alimentazione o spina sono danneggiati.
b) Se sono stati rovesciati liquidi o sono caduti oggetti sopra al
dispositivo.
c) Se il prodotto è stato esposto a pioggia o acqua.
d) Se il prodotto è caduto o è danneggiato.
e) Se il prodotto presenta prestazioni sensibilmente al di sotto della
norma.
• Parti di ricambio – Se sono necessarie parti di ricambio, assicurarsi
che l’azienda specializzata che si occupa della sostituzione utilizzi solo
parti autorizzate dal produttore o con caratteristiche equivalenti alle
parti originali. Una sostituzione non adeguata può causare incendi,
folgorazioni o altri rischi.
• Calore – Non posizionare il dispositivo nei pressi di fonti di calore,
come termosifoni, radiatori convettivi, forni o altri prodotti (inclusi
amplicatori).
Nota: Questo dispositivo può essere utilizzato da bambini a partire
da 8 anni e da persone con limitate capacità siche e psichiche o con
conoscenza ed esperienza limitate, solo se sono stati istruiti sulle
modalità d’uso e comprendono i rischi e i pericoli connessi.

56
IT
ASSEMBLAGGIO
Singoli componenti
Struttura principale (1x)
Cavo di alimentazione
(1x)
Bulloni (6x)
Chiave inglese (1x)
Piano del tavolino (1x)
Alimentatore (1x)
Dadi a D (6x)
Coperture (6x)
Gambe (3x)
Cavo da 3,5 mm (1x)
Dadi (6x)
Pad protettivi (3x)

57
IT
1 2 3
Inserire i bulloni (A)
nei fori sulla struttura
principale (1). Inserire le
gambe (3) nella struttura
principale e avvitare i
bulloni (A) nei fori delle
gambe.
Avvitare dall’alto nella
struttura principale i dadi
a D (B) e i dadi (C), come
mostrato in immagine.
Inserire i bulloni (A) nei
fori sul piano del tavolo.
Inserire il piano del tavolo
negli intagli delle gambe
(3) e avvitare i bulloni (A)
nei fori delle gambe (3).
4 5 6
Avvitare dall’alto nel
piano del tavolo i dadi a
D (B) e i dadi (C), come
mostrato in immagine.
Stringere tutti i ssaggi
con la chiave (D).
Posizionare le coperture
(E) sui fori sulla struttura
principale e sul piano del
tavolo e ssare poi i pad
protettivi alle gambe.

58
IT
DESCRIZIONE DEL DISPOSITIVO E TASTI
FUNZIONE
1 On/O 7 Porta USB
2 Play/Pausa 8 Spie di carica
3 Volume+ 9 Ingresso di alimentazione
4 Volume- 10 Ingresso AUX
5 Microfono 11 Reset
6 Spie LED 12 Stazione di carica senza lo

59
IT
UTILIZZO
Messaggi vocali
Nelle seguenti situazioni vengono emessi messaggi vocali dagli
altoparlanti:
• Quando si accende il dispositivo.
• Quando si spegne il dispositivo.
• Quando si attende una connessione BT.
• Quando si stabilisce una connessione BT.
• Quando viene interrotta una connessione BT.
• Quando si imposta il volume al massimo.
• Quando la batteria è scarica e deve essere ricaricata.
Accendere/spegnere il dispositivo
• Premere a lungo On e dagli altoparlanti si sentirà il messaggio “Power
on” (dispositivo acceso). Il dispositivo attiva automaticamente il BT e
dagli altoparlanti si sentirà il messaggio “BT waiting for connection”
(BT in attesa di collegamento). Ora è possibile collegare smartphone o
tablet con gli altoparlanti tramite BT.
• Premere a lungo O e dagli altoparlanti si sentirà il messaggio “Power
o” (dispositivo spento). Il dispositivo si spegne.
Interruttore automatico AUX
• Inserire il cavo AUX nell’apposito collegamento sul retro del dispositivo.
L’altoparlante passa automaticamente in modalità AUX, si illuminano le
spie LED blu e verde. La modalità BT viene spenta automaticamente.
• Quando si stacca il cavo AUX, viene reimpostata automaticamente la
modalità BT e dagli altoparlanti si sentirà il messaggio “BT waiting for
connection” (BT in attesa di collegamento).

60
IT
Stabilire una connessione BT
1. Quando l’altoparlante si trova in modalità BT, passa automaticamente
allo stato di accoppiamento. La spia LED blu lampeggia lentamente.
2. Aprire le impostazioni BT su smartphone/tablet e cercare l’altoparlante
nell’elenco dei dispositivi. Quando smartphone/tablet è connesso
con l’altoparlante, verrà emesso il messaggio “BT is connected”
(BT connesso) e il LED blu resta illuminato. Se la connessione viene
interrotta, la spia LED blu lampeggia lentamente.
3. Se l’altoparlante è collegato con lo smartphone e si desidera riprodurre
musica tramite BT, l’altoparlante si interrompe temporaneamente se si
preme brevemente Play/Pausa. Per riprendere la riproduzione, premere
di nuovo Play/Pausa.
4. Se l’altoparlante è collegato con lo smartphone, premere a lungo Play/
Pausa per interrompere la connessione BT. Ora è possibile realizzare
una nuova connessione con un altro dispositivo.
Avvertenza: la distanza ideale tra smartphone/tablet e altoparlante è ≤
10 m.
Rispondere a chiamate telefoniche tramite BT
• Quando c’è una chiamata in entrata, il numero di telefono della
chiamata in entrata risuona con “dudu” o con il messaggio dagli
altoparlanti “Cell phone rings” (suona il cellulare) se il dispositivo è
collegato a uno smartphone Android. Se l’altoparlante è collegato a
un iPhone, quando c’è una chiamata in entrata, il numero di telefono
risuona e dagli altoparlanti si sente “Cell phone rings” (suona il
cellulare).
• Premere brevemente Play/Pausa per rispondere alla chiamata e parlare
dal microfono Premere nuovamente Play/Pausa per terminare la
chiamata.
• Premere a lungo Play/Pausa per riutare la chiamata.
• Premere due volte Play/Pausa per richiamare l’ultimo numero.
Regolare il volume
• Premere (+) per alzare il volume.
• Premere (-) per abbassare il volume.

61
IT
Carica USB
• Quando l’altoparlante è acceso, è possibile caricare
contemporaneamente iPhone e smartphone Android con le connessioni
USB (2.1 A/1A).
• Quando l’altoparlante è spento ma collegato con l’alimentatore, è
possibile caricare contemporaneamente iPhone e smartphone Android
con le connessioni USB (2.1 A/1A).
• Quando l’altoparlante è spento e non è collegato con l’alimentatore,
non è possibile caricare dispositivi esterni.
Carica senza li
La bobina di carica del caricatore senza li (solo per cellulari che
supportano lo standard Qi della carica senza li) deve essere rivolta al
segno di carica, che si trova al centro del tavolino. L’altoparlante deve
essere acceso o collegato all’alimentatore, altrimenti non è possibile
caricare il dispositivo. Quando il dispositivo è collegato e viene caricato,
viene emesso il segnale “di”.
Batteria scarica e ricarica
• Quando la carica della batteria è bassa, viene emesso il messaggio
vocale “Low Battery” (batteria quasi scarica) per ricordare all’utente
di caricare l’altoparlante. Se non si carica l’altoparlante, si spegne
automaticamente.
• Dopo aver collegato l’alimentatore alla presa elettrica, la spia LED
rossa sul retro dell’altoparlante si illumina nché l’altoparlante viene
caricato. Quando la batteria è completamente carica, la spia LED rossa
si spegne.

62
IT
Collegare tra loro diversi tavolini altoparlante
La funzione TWS permette di collegare tra loro due tavolini altoparlante.
Il primo tavolino è il Master che viene collegato con il dispositivo BT e
gestisce tutte le funzioni. Il secondo tavolino è l’altoparlante Sub, che
trasmette True Wireless Sound.
• Accendere entrambi i tavolini altoparlante e cliccare due volte su On/
O di uno dei due tavolini. Entrambi gli altoparlanti entrano in stato di
accoppiamento e viene emesso un segnale acustico. Le indicazioni LED
blu di entrambi i tavolini altoparlante lampeggiano alla stessa velocità.
Dopo l’accoppiamento, l’indicazione del primo altoparlante (Master)
lampeggia lentamente e il LED del secondo altoparlante (Sub) si
illumina di verde. Dopo il collegamento con uno smartphone o un altro
dispositivo BT, il LED dell’altoparlante Master resta illuminato di blu e
quello dell’altoparlante SUB di verde.
• Una volta accoppiati con successo i due tavolini altoparlante, premere
brevemente On/O sull’altoparlante Master o Sub per terminare la
modalità TWS.
• Se gli altoparlanti sono collegati a un dispositivo BT in modalità TWS
accoppiata, i due altoparlanti possono continuare ad operare come
altoparlanti accoppiati se si inserisce il cavo AUX nell’ingresso AUX
del primo altoparlante (Master). Sull’altoparlante Master si illumina la
luce LED di verde e di blu, mentre su quello Sub si illumina di verde.
La modalità TWS viene disattivata quando anche all’ingresso AUX
dell’altoparlante Sub viene collegato un cavo AUX.
• In modalità TWS possono essere ricevute telefonate solo
sull’altoparlante Master.
Spegnimento automatico
Se dopo l’accensione dell’altoparlante non viene stabilità alcuna
connessione BT, se la connessione BT è stata interrotte o se non arriva
alcun segnale LINE-IN, l’altoparlante si spegne automaticamente dopo 10
minuti e viene emesso il messaggio “Power o” (dispositivo spento).

63
IT
PULIZIA E MANUTENZIONE
• Utilizzare un panno morbido per pulire le superci dell’altoparlante.
Non utilizzare spugne abrasive, prodotti abrasivi o detergenti
aggressivi.
• Se l’altoparlante non funziona correttamente durante un temporale,
staccare la spina e ricollegarla dopo un minuto.
• Non far cade piccoli oggetti o liquidi nell’altoparlante.
• Se ci sono piccoli oggetti o liquidi all’interno del dispositivo o
se esce fumo o compaiono odori, staccare subito l’altoparlante
dall’alimentazione e rivolgersi a un’azienda specializzata per ispezione
e riparazione.

64
IT
SMALTIMENTO
Se nel proprio paese si applicano le
regolamentazioni inerenti lo smaltimento di
dispositivi elettrici ed elettronici, questo simbolo
sul prodotto o sulla confezione segnala che questi
prodotti non possono essere smaltiti con i riuti
normali e devono essere portati a un punto di
raccolta di dispositivi elettrici ed elettronici. Grazie
al corretto smaltimento dei vecchi dispositivi si
tutela il pianeta e la salute delle persone da possibili
conseguenze negative. Informazioni riguardanti
il riciclo e lo smaltimento di questi prodotti si
ottengono presso l’amministrazione locale oppure il
servizio di gestione dei riuti domestici.
DICHIARAZIONE DI CONFORMITÀ
Produttore:
Chal-Tec GmbH, Wallstraße 16, 10179 Berlino,
Germania.
Importatore per la Gran Bretagna:
Berlin Brands Group UK Ltd
PO Box 1145
Oxford, OX1 9UW
United Kingdom
Il fabbricante, Chal-Tec GmbH, dichiara che il
tipo di apparecchiatura radio Milano è conforme
alla direttiva 2014/53/UE. Il testo completo della
dichiarazione di conformità UE è disponibile al
seguente indirizzo Internet: use.berlin/10034605