
For your safety and continued enjoyment of this product,
always read the instruction book carefully before using.
G riddler
®
Five
GR-5 SERIES
Instruction
& Recipe
Booklet

2

3
IMPORTANT
SAFEGUARDS
When using electrical appliance, basic safety
precautions should always be followed, including
the following:
1. READ ALL INSTRUCTIONS.
2. Do not touch hot surfaces; use handles or
knobs.
3. To protect against fire, electric shock, and
injury to persons, DO NOT IMMERSE
CORD OR PLUG OR APPLIANCE (except
for removable plates) in water or other
liquids.
4.
Close supervision is necessary when any
appliance is used by or near
children or individuals with certain disabilities.
5. Unplug from outlet when not in use and
before cleaning. Allow to cool before putting
on or taking off parts, and before cleaning
appliance.
6. Do not operate any appliance with a
damaged cord or plug, or after the
appliance has malfunctioned or has been
damaged in any manner.
Return the appliance to the nearest
Cuisinart
®
Consumer Service Center for
examination, repair or adjustment.
7. The use of accessory attachments not
recommended by Cuisinart may result in fire,
electric shock, or risk of injury to persons.
8. Do not use outdoors.
9. Do not let power cord hang over edge of
table or counter, or touch
hot surfaces.
10. Do not place on or near hot gas or electric
burner, or in a heated oven.
11. Unplug the unit when finished using.
12. Do not use appliance for other than its
intended use.
13. Extreme caution must be exercised when
moving an appliance containing hot oil or
other hot liquids.
14. To disconnect, press the ON/OFF button to
turn the unit off, then remove plug from wall
outlet.
15. WARNING: TO REDUCE THE RISK OF
FIRE OR ELECTRIC SHOCK, ONLY
AUTHORIZED PERSONNEL SHOULD DO
REPAIRS.
16. Do not operate your appliance in an
appliance garage or under a wall cabinet.
When storing in an appliance garage,
always unplug the unit from the electrical
outlet. Not doing so could create a risk of
fire, especially if the appliance touches the
walls of the garage or the door touches the
unit as it closes.
SAVE THESE
INSTRUCTIONS
FOR HOUSEHOLD
USE ONLY
SPECIAL CORD SET
INSTRUCTIONS
A short power-supply cord is provided to reduce
the risks resulting from becoming entangled in or
tripping over a longer cord. Longer extension cords
are available and may be used if care is exercised
in their use.
If a long extension cord is used, the marked
electrical rating of the extension cord should be at
least as great as the electrical rating of the
appliance, and the longer cord should be
arranged so that it will not drape over the
countertop or tabletop where it can be pulled on
by children or animals, or tripped over.
NOTICE
This appliance has a polarized plug (one blade is
wider than the other). As a safety feature, this
plug will fit in a polarized outlet only one way. If
the plug does not fit in the outlet, reverse the
plug. If it still does not fit, contact a qualified
electrician. Do not modify the plug in any way.
CONTENTS
Important Safeguards .......................................... 3
Parts and Features .............................................. 4
Before the First Use ............................................. 4
Getting to Know Your Control Panel .................... 5
The Griddler
®
Five Does It All .............................. 6
Assembly Instructions ......................................... 7
Operating Instructions ......................................... 9
Tips & Hints ........................................................ 10
Cleaning and Maintenance ................................. 11
Storage ................................................................ 11
Warranty ............................................................. 12
Recipes ................................................................14
Cooking Guide & Food Temperature Chart ..... 26
5
7
4
8
6
9
1 2
3b
3a
4
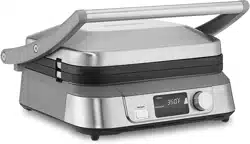
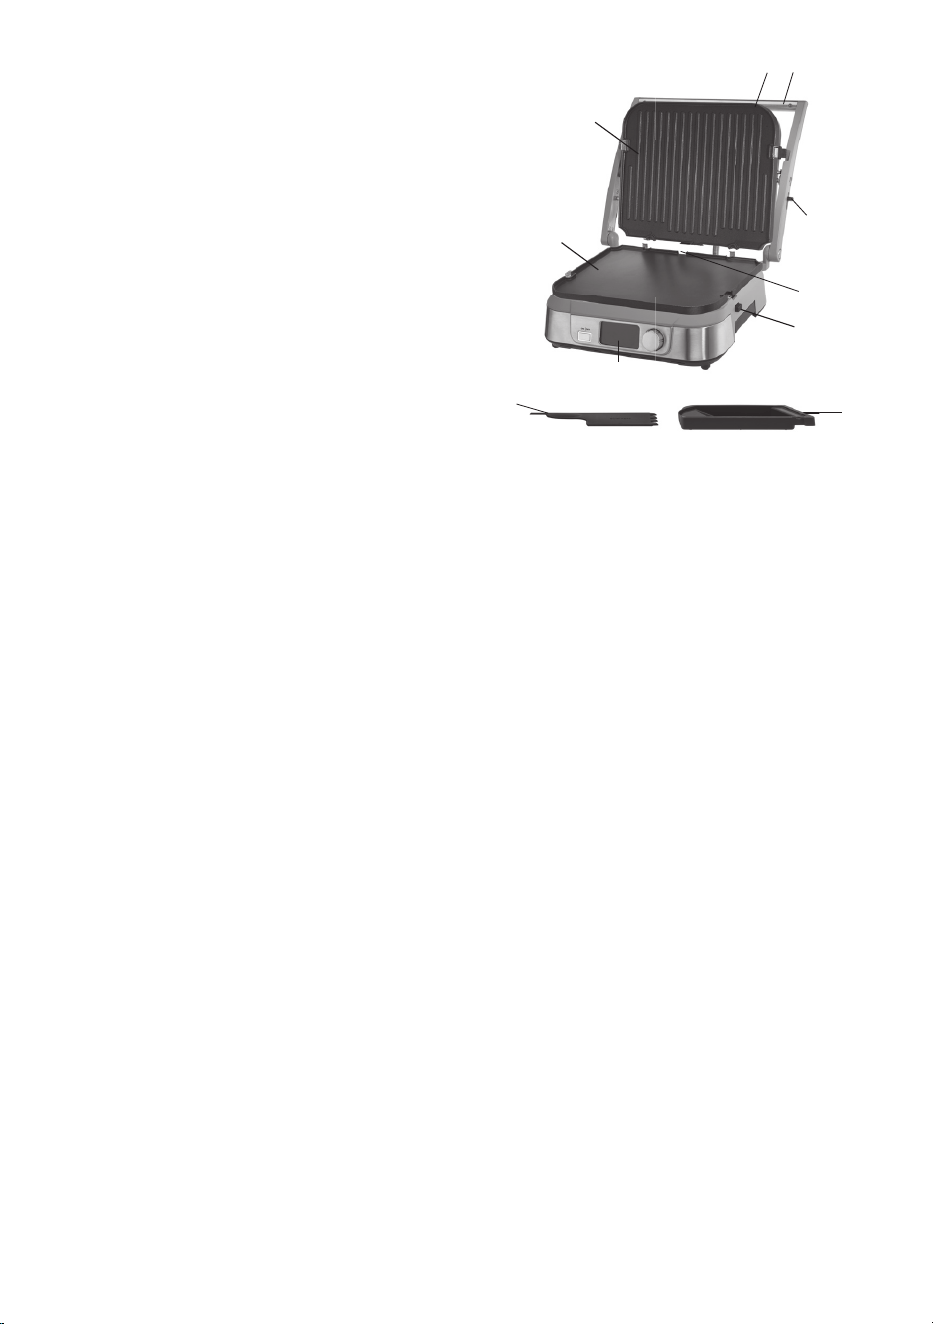
PARTS
AND FEATURES
1. Top Cover
Solid construction with stainless steel, self-
adjusting cover
2. Stainless Steel Handle
Sturdy stainless steel handle adjusts cover to
accommodate thickness
of food
3. Removable and Reversible
Cooking Plates
Nonstick and dishwasher safe for
easy cleanup
a. Grill Side: Perfect for grilling
steak, burgers,
chicken and vegetables
b. Griddle Side: Prepare flawless pancakes,
eggs, bacon and seared foods
4. Control Panel and Display
(see page 5)
5. Drip Tray
Collects grease and removes from
base for easy cleanup (top rack dishwasher safe)
6. Drip Spout
Allows grease to drip into the drip tray
7. Cleaning/Scraping Tool
Helps clean grill and griddle plates after
cooking (top rack dishwasher safe)
8. Plate Release Buttons
Push in to release and remove
cooking plates
9. Hinge Release Lever
Allows the cover to extend back for cooking
in the flat position
10. BPA Free
All parts that come in contact with food are
BPA free
BEFORE THE FIRST USE
Remove all packing materials and any
promotional labels or stickers from your grill. Be
sure all parts (listed under Parts and Features)
of your new appliance have been included
before discarding any packing materials. You
may want to keep the box and packing materials
for use at a later date.
ATTENTION: Be sure to unpack your new
Cuisinart
®
Griddler
®
Five carefully.
It comes with two accessories:
an integrated drip tray inserted at the base of
the unit, and a scraping tool. The Griddler
®
Five
base and cover will become hot during cooking.
If you need to adjust the cover or to lay the
product in the flat position, be sure to use an
oven mitt to protect your hand. The reversible
grill and griddle plates are interchange-
able.
Before using your Cuisinart
®
Griddler
®
Five for
the first time, remove any dust from shipping by
wiping the base, cover and controls with a damp
cloth. Thoroughly clean cooking plates, drip tray
and scraping tool. Refer to Assembly
Instructions for plate removal.
1 32
A
F
D
B
E
C
5
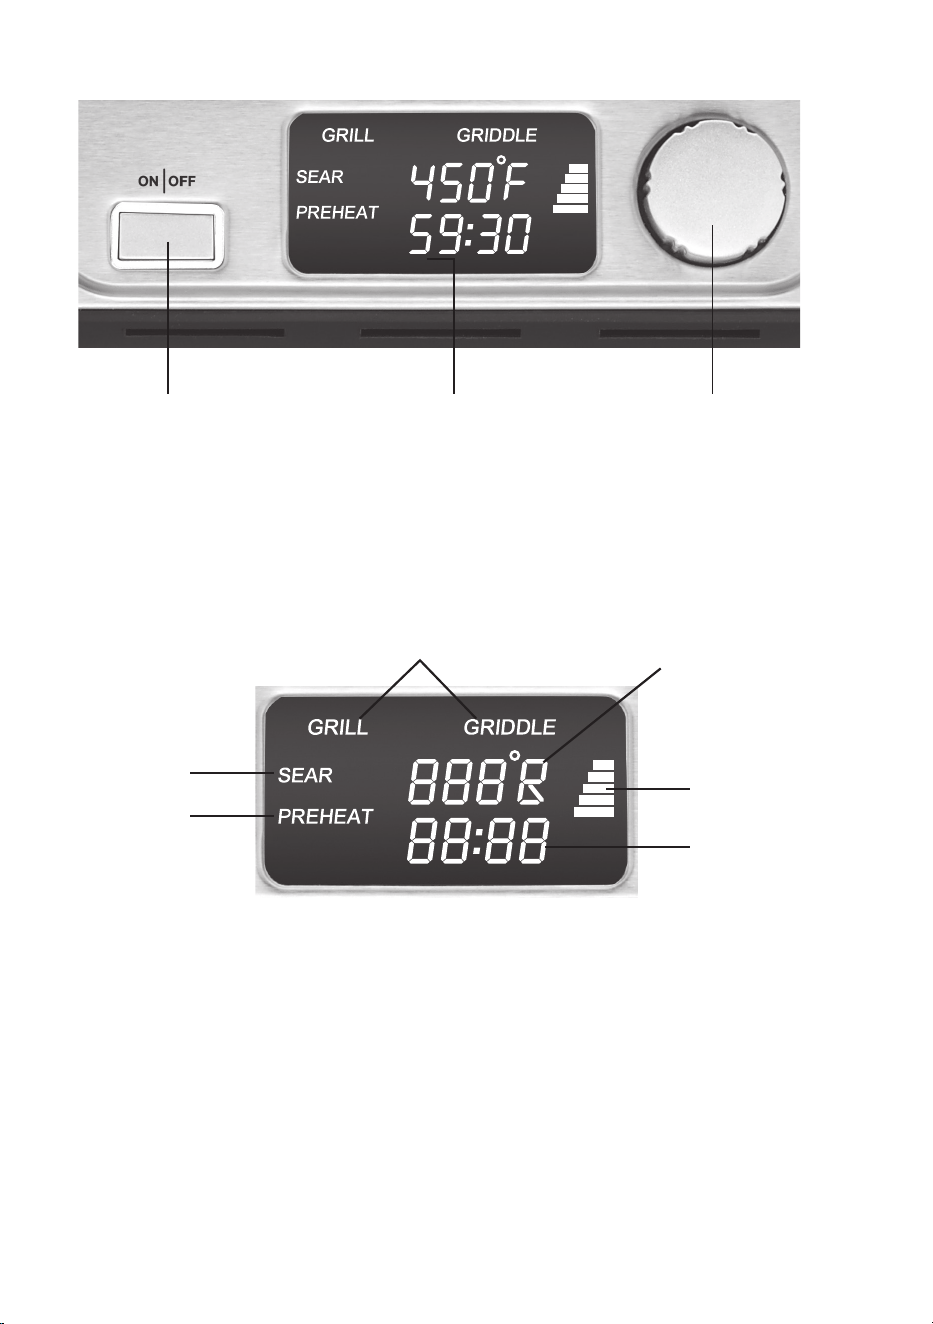
GETTING TO KNOW YOUR CONTROL PANEL
1. ON/OFF Button
Press to turn unit on and off.
2. Large LCD
The backlit LCD screen is easy to
read; it displays the cooking function
(Grill or Griddle), Temperature,Timer,
Sear, Preheat and the Preheat Bars.
3. Select and Confi rm Dial
Use to select cooking function
(Grill or Griddle). Set the
temperature and the count-up
or countdown timer. Use dial to
increase temperature and time if
desired.
A. Cooking Function
Grill or Griddle
B. Temperature
175˚F – 450˚F in 25˚ increments
C. Timer
Set to count up or count down.
See operating instructions.
D. Preheat
Appears in LCD when Griddler
®
Five is heating.
E. Preheat Bars
Appear when Griddler
®
Five is
heating, to show heat-up progress.
F. Sear
Appears when Griddler® Five is in
Sear Mode – 450˚F. Searing will last
for 2 minutes, then temperature will
change to 425˚F.
START-UP SCREEN
6
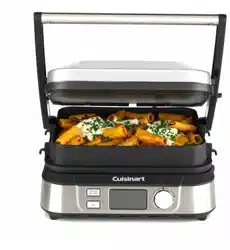
THE GRIDDLER
®
FIVE
DOES IT ALL
The Griddler
®
Five is the ultimate kitchen
appliance, offering you five separate cooking
options. Simply flip the reversible cooking plates
and adjust the hinge to use as a contact grill,
panini press, full grill, full griddle, or half grill/half
griddle. See Assembly Instructions and
Operating Instructions.
Contact Grill
Use the Griddler
®
Five as a Contact Grill to cook
burgers, boneless pieces of meat and thin cuts
of meat and vegetables.
The Contact Grill function works best when you
want to cook something in a short amount of
time or when you are looking for a healthy
method of grilling. When cooked on the Contact
Grill, food will cook quickly because you are
grilling both sides of the food at the same time.
The ribs on the grill side of the plates, combined
with the grease spout at the rear of the plate,
allow the grease to drip from the meat and drain
off the plates.
When the Griddler
®
Five is used as a Contact
Grill, the grill side of both plates is
recommended. Rest the cover evenly on top of
the food until it has reached the desired, cooked
temperature.
The Griddler
®
Five was designed with a unique
handle and hinge that allow the cover to adjust
to the thickness of the food. You can easily grill
anything from a thinly sliced potato to a thick
sirloin steak with even results.
When cooking more
than one food item in
the Contact Grill, it is
important that the
thickness of each food
item is consistent so the
cover will close evenly
on the food.
Panini Press
Use the Griddler
®
Five as a Panini Press to grill
sandwiches, breads and quesadillas.
The word panini is Italian for grilled sandwiches.
Panini can include any combination of
ingredients, such as vegetables, meat and
cheese layered between two pieces of fresh-
baked bread. The sandwich is then pressed
between two grill or griddle plates to toast the
bread and warm the sandwich. Experiment to
make a variety of savory or sweet sandwiches
for any meal. We recommend using fresh-baked
bread to produce the best-tasting panini.
Popular breads used for panini are focaccia (a
flat bread frequently baked with rosemary, salt
and onion on top), ciabatta
(a rectangular bread with a slightly domed crust)
and thick slices of classic Italian bread. But any
type of sliced bread or roll can be used to make
a great panini!
When the Griddler
®
Five is used as a Panini
Press, the grill side of both plates is
recommended. We recommend the grill side of
the plates because traditional-style panini
sandwiches have grill marks on the bread.
However, depending upon the type of sandwich
you are preparing, you may wish to use the
griddle side of the plates or any combination of
the two. The Griddler
®
Five functions as a Panini
Press in the same manner that it functions as a
Contact Grill. The Griddler
®
Five was designed
with a unique handle and hinge that allow the
cover to adjust to the thickness of the sandwich
you are preparing, and to rest there evenly. Light
pressure can be applied to the handle to press
and heat the sandwich to your liking.
When cooking two
or more panini, it is
important that the
thickness of the
sandwiches is
consistent, so the
cover will close evenly on the panini.
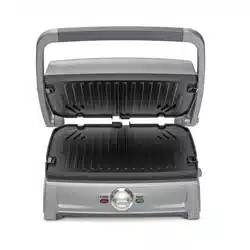
Full Grill
Use the Griddler
®
Five as a Full Grill to
cook burgers, steak, poultry (we do not
recommend cooking bone-in chicken, since it
does not cook evenly on a Full Grill), fish and
vegetables.
Full Grill refers to using the Griddler
®
Five with
the cover lying flat, creating a double flat cooking
surface. In this position, the foods you are grilling
will have to be turned over for cooking. When the
Griddler
®
Five is used
as a Full Grill, the grill
side of both plates
should be used.

7
Cooking on the Full Grill is the most versatile
method of using the Griddler
®
Five.
With the Full Grill, you have double the surface
area (200 sq. inches) for grilling. You have the
option of cooking different types of foods on
separate plates without combining their flavors,
or cooking large amounts of the same type
of food.
The Full Grill also accommodates different cuts
of meat with varying thicknesses, allowing you to
cook each piece to your liking.
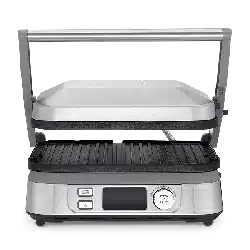
Full Griddle
Use the Griddler
®
Five as a Full Griddle to cook
pancakes, eggs, French toast, hash browns and
breakfast meats.
When you use the Griddler
®
Five as a Full
Griddle, open the
cover so it lies flat,
creating a double, flat
cooking surface. In
this position, the
foods you are
preparing will have to
be turned over for
cooking. When using this cooking function, the
griddle side of both plates should be used.
Cooking on the Full Griddle is a wonderful way
to prepare breakfast for two or for a large family.
The large surface area allows you to cook a
variety of different foods at the same time, or
large amounts of your favorite food.
Half Grill/Half Griddle
Use the Griddler
®
Five as a Half Grill/Half Griddle
in order to create full meals like bacon and eggs
or steak and potatoes at the same time.
When using the Griddler
®
Five
®
as a Half Grill/Half Griddle,
simply place the unit in the
flat position and insert the
griddle plate on the lower
portion of the Griddler
®
Five and the grill plate on
the upper portion.
ASSEMBLY INSTRUCTIONS
Place Griddler
®
Five on a clean, flat surface
where you intend to cook. The Griddler
®
can be
positioned in three ways:
Closed Position –
Upper plate/cover
rests flat on lower
plate/base. This is
your starting and
heating position
when using the
Contact Grill or
Panini Press functions.
Open Position – Upper plate/cover is open
slightly beyond a 90˚ angle. Open the cover to
this position before using the Griddler
®
Five as a
Contact Grill or
Panini Press.
To adjust the
Griddler
®
Five to this
position, simply lift
the handle until you
feel it come to a
resting position. The
unit will stay in this
position until you
close the cover or
continue to open it to the flat position.
The cover will stay in the upright position until
you lower the handle for cooking. When this is
done, the cover will release itself so that it lies
flat on the top of the food you are preparing.
This allows you to cook your food evenly from
both top and bottom. When you lift the handle to
open the Griddler
®
Five after cooking, the cover
will remain floating. In order to lock the cover
back into the upright position, you must close
the Griddler
®
Five, without any food in place, and
open it again.
Flat Position – Upper plate/cover is level with
lower plate/base. The upper and lower plates
line up to
create one
large cooking
surface. The
Griddler
®
Five
is in this
position when
it is used as a
Full Grill, Full
Griddle, or Half
Grill/Half Griddle.
To adjust the Griddler
®
Five to this position,
locate the hinge release lever on the right arm.
With your left hand on the handle, use your right
hand to slide the lever toward you. Push the
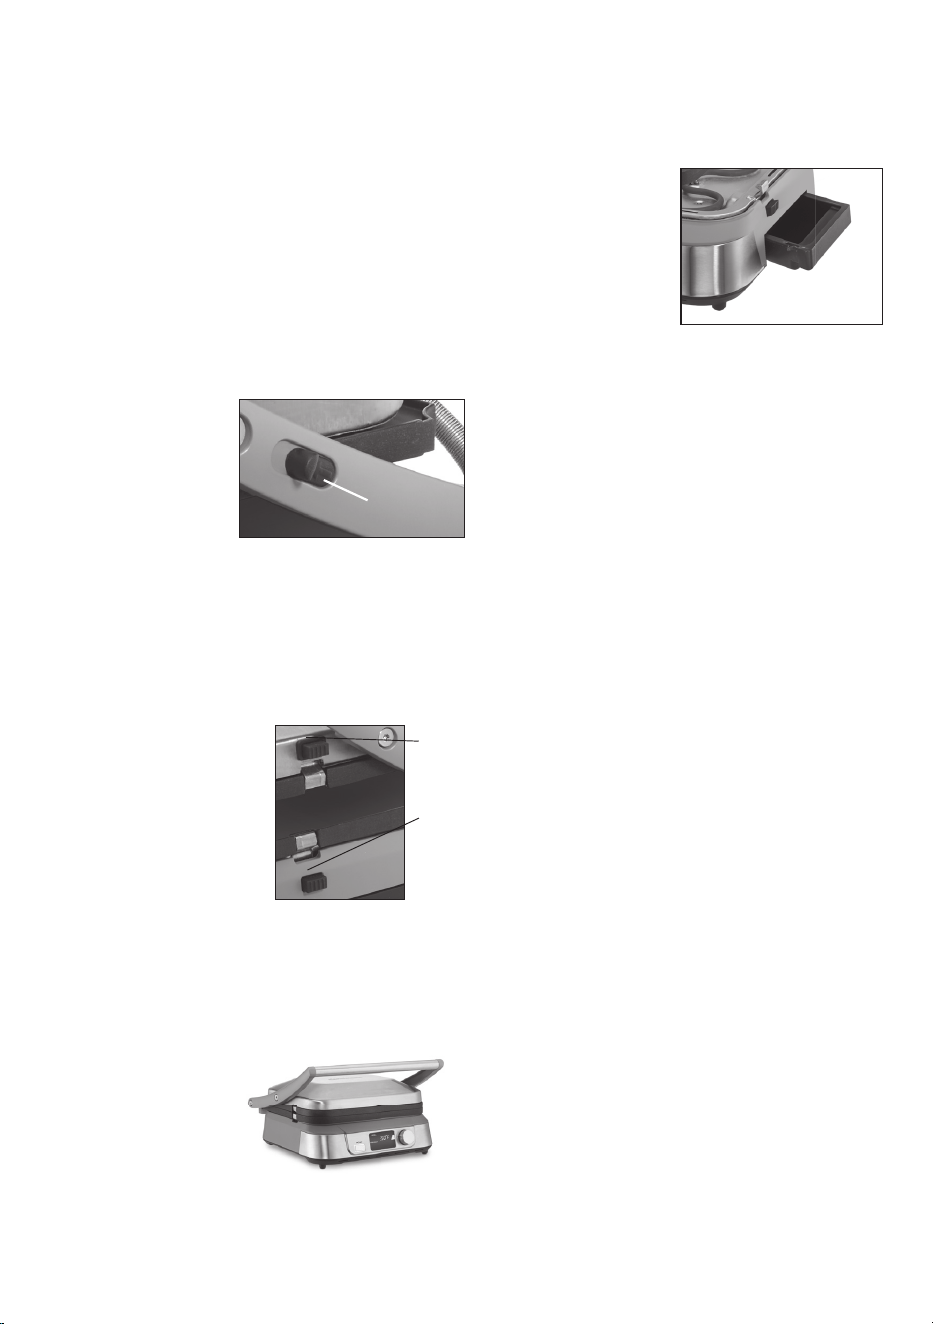
Hinge release lever
Lower
plate
release
button
Upper
plate
release
button
8
handle back until the cover rests flat on the
counter. To change position, lift the handle and
cover to return it to the closed position.
If the Griddler
®
Five is already in the open
position and you wish to adjust it to the flat
position, pull the handle slightly toward you and
then lift the hinge release lever. Push the handle
back until the cover rests in the flat position.
Pulling the handle forward slightly before lifting
the hinge release lever will take some of the
pressure off of the hinge and you will be able to
adjust the Griddler
®
Five more easily.
To insert cooking plates
Adjust the Griddler
®
Five to the flat position with
the control panel
directly in front of
you. Insert one plate
at a time. Each plate
is designed to fit in
either the upper
housing or the lower
housing of the Griddler
®
Five.
If you are facing the Griddler
®
Five, the drip
spout should be at the rear of the plate. Locate
the metal brackets at the center of the housing.
Tilt the back end of the plate and line up the
cutouts at the back of the plate with the metal
brackets. Slide the plate underneath the
brackets and push down
the front end of the
plate. It will snap into
place. Turn the Griddler
®
Five around and insert
the second plate on
either its grill or griddle
side into the upper
housing as you did with
the first plate.
To remove cooking plates
Once the Griddler
®
Five is cooled, adjust to flat
position. Locate the plate release button on one
side of the unit. Press firmly on button and the
plate will pop up
slightly from the base.
Grasp the plate with
two hands, slide it out
from under the metal
brackets, and lift it out
of the base. Press on
the other plate release button to remove the
other cooking plate in the same manner.
To position drip tray
One side of the base has a slot provided for the
drip tray. Slide the drip tray into the base
according to the instruction on the tray.
Grease from the food
will run off the plates
through the drip spout
and into the drip tray.
Slowly remove the drip
tray. Grease should be
safely disposed of after
the Griddler
®
Five has
cooled down completely. The drip tray can be
cleaned in the dishwasher.

9
OPERATING
INSTRUCTIONS
When you are ready to begin cooking and the
Griddler®Five is positioned on a flat surface,
make sure the drip tray and desired plate
surfaces are installed. Plug your Griddler
®
Five
into an electrical outlet and press the ON/OFF
button. The LCD will show the start-up screen
for several seconds.
Select Cooking Function:
When the word GRILL is flashing, this indicates
you need to select and confirm your cooking
function. To do so, rotate the Select & Confirm
dial to the left or right to choose your function:
Grill or Griddle. To confirm your cooking
function, press the Select & Confirm dial. The
selected cooking function is now confirmed and
no longer flashing.
Set Temperature:
To select the desired temperature, rotate the
Select & Confirm dial to the left (decrease
temperature) or the right (increase temperature).
This will allow you to scroll through temperatures
at 25-degree increments. To confirm your
temperature, press the Select & Confirm dial.
The selected temperature is no longer flashing.
The Griddler
®
Five has preset temperatures for
GRILL mode and GRIDDLE mode. The preset
for GRILL is 400˚F and the preset for GRIDDLE
is 350˚F. When temperature becomes solid, your
Griddler
®
Five will begin to preheat, and the
word Preheat and the Preheat Bars will appear
in your LCD.
The Preheat Bars show the progress of the
preheating cycle. When 5 bars are illuminated,
your Griddler
®
Five will beep one time, indicating
it has reached the set temperature. The word
Preheat and the Preheat Bars will disappear
from the LCD.
NOTE: If you have completed the cooking cycle
and would like to continue cooking on a lower
temperature, follow the above steps to set your
temperature. The Preheat Bars will scroll from
the bottom to top, indicating the Griddler
®
Five is
cooling to a lower selected temperature.
Set Timer:
After your Griddler
®
Five has reached the set
temperature, the timer will appear in the LCD
flashing 00:00.
• Countdown Timer – To select your cook time
to count down, rotate the Select & Confirm dial
to the left (decrease time) or right (increase
time). NOTE: Timer adjusts in 30-second
increments (59:30 max cooking time). Add
food to the Griddler
®
Five, then press the
Select & Confirm dial to start the timer. If timer
is not selected within 1 minute after preheat,
the time of 00:00 goes blank. The timer can be
activated at any time during the cooking
process by adjusting the Select & Confirm dial.
After set time has elapsed, the Griddler
®
Five
will beep 3 times and the timer will begin
counting up – this indicates how much time
has elapsed after the cooking time has
expired. Unit will also beep 3 times every 10
seconds continuously until cooking is stopped.
To disable beep, press Select & Confirm dial.
• Count-Up Timer – After the Griddler
®
Five is
preheated, you will see 00:00 flashing in the
LCD. Add food to the Griddler
®
Five and press
the Select & Confirm dial. Timer will begin
counting up from 00:00 (59:59 max cooking
time). If the timer reaches 59:59, the unit will
beep 3 times and then turn off.
Changing Settings:
To change any of your settings (Cooking
Function, Temperature and Time) at any time
during use, press and hold the Select & Confirm
dial to scroll through Time, Temperature and
Function continuously, until the Select & Confirm
dial is released. When dial is released, the
setting you wish to change should be flashing.
After desired setting is changed and confirmed,
the display will move to the next function.

10
TIPS & HINTS
• It may take up to 10 minutes to reach operating
temperature, depending on the temperature
level that was set.
• For cooking recommendations, refer to the
Cooking Guide and Food Temperature Chart
on pages 26–27
of the Recipe Book.
• Always exercise caution when handling the
Griddler
®
Five during cooking, as the Griddler
®
Five housing will become hot during use. To
open the Griddler
®
Five, grasp the handle. The
arms are made of die-cast aluminum and will
become hot during use. Do not touch them
during or immediately following cooking.
• The cover is made of stainless steel and will
become very hot and should not be touched
during or immediately following cooking. If you
need to adjust the cover, be sure to use an
oven mitt to prevent burns.
• The lower housing is made of plastic and can
become very warm. If you need to move the
Griddler
®
Five during cooking, be sure to
handle it from the base only while wearing an
oven mitt. Do not touch the cover.
• Allow the Griddler
®
Five to cool down before
handling (at least 30 minutes).
• The first time you use the Griddler
®
Five, it may
have a slight odor and may smoke a bit. This is
normal and common to appliances with
nonstick surfaces.
• The Griddler
®
Five comes with a black
cleaning/scraping tool. This can be used for
cleaning both the grill and griddle sides of the
plates after you have finished cooking and the
unit has cooled down completely (at least 30
minutes). Using the cleaning tool on a hot
surface for too long will cause the plastic
to melt.
• Never use metal utensils, as they will scratch
the nonstick plates.
• Never leave plastic utensils in contact with the
hot grill plates. This includes the provided
cleaning tool.
• In between recipes, use a wooden or heatproof
plastic utensil to scrape excess food buildup
through grease channels and into drip tray.
Then, carefully wipe off any residue with a
paper towel before proceeding with
next recipe.

11
CLEANING AND
MAINTENANCE
Allow the unit to cool down for at least 30
minutes before handling.
• Once you have finished cooking, press the ON/
OFF button to power off and unplug the power
cord from the wall outlet.
• Use the cleaning/scraping tool to remove any
leftover food from the cooking plates. The
scraping tool can be washed by hand or in the
top rack of the dishwasher.
• Dispose of grease from the drip tray once
cooled. The drip tray can be cleaned by hand
or in the top rack of the dishwasher.
• Press the plate release buttons to remove
plates from the housing. Be sure that the
plates have cooled completely before handling
(at least 30 minutes). The cooking plates can
be washed in the dishwasher. Do not use
metallic objects such as knives or forks for
cleaning. Do not use a scouring pad for
cleaning; the nonstick coating can be
damaged.
• If you have been cooking seafood, wipe the
cooking plates with lemon juice to prevent
seafood flavor transferring to the next recipe.
• The housing base, cover and control panel can
be wiped clean with a soft,
dry cloth. For tough stains, dampen cloth.
Never use an abrasive cleaner or
harsh pad.
Any other servicing should be performed by an
authorized service representative.
STORAGE
Always make sure the Griddler
®
Five is cool
and dry before storing.
The power cord can be wrapped around the
back of the base for storing.
The cooking plates and drip tray should be
stored in the Griddler
®
Five when not in use.
The scraping tool can be stored in a drawer
or cabinet.

12
Limited Warranty
Subject to the exclusions and limitations contained
herein, Conair LLC dba Cuisinart (“Cuisinart”) warrants
that the Cuisinart
®
Griddler
®
Five ("Product")
will be free from material defects in materials and
workmanship under normal home use conditions for
a period of THREE (3) years beginning on the date the
Product was purchased in its original, sealed
packaging, unless otherwise specied in this Limited
Warranty. This Limited Warranty is only for U.S.
consumers (dened herein as purchasers at retail for
personal, family, or household use) who originally
purchase the Product from Cuisinart or an authorized
Cuisinart
®
reseller (if you are unsure whether a
retailer or other point of sale is an authorized or
unauthorized Cuisinart reseller, contact Cuisinart).
This Limited Warranty does NOT
cover:
• Normal wear and tear;
• Any Product purchased by commercial purchasers
or for commercial or non-household uses;
• Accessories, parts, or software added to
the Product after the system is shipped
from Cuisinart;
• Any costs associated with the replacement or
repair of the Product, including labor, installation,
or other costs incurred by you without prior
Cuisinart approval;
• Damage to the Product, defective conditions, or
nonconformities due to: (1) external causes,
including shipping, accidents, problems with
electrical power (Product designed only for use
with 120-volt outlets), abnormal conditions (such
as mechanical or environmental); (2) usage not in
accordance with Product instructions; (3) misuse,
neglect, unauthorized alteration, unauthorized
repair; and (4) acts of god or other events beyond
Cuisinart’s control;
• Though necessary repairs and maintenance might
be performed by any company, damage caused by
you or any nonauthorized third party, may void,
this Limited Warranty;
• Damage caused by accessories or replacement
parts not specically authorized by Cuisinart, may
void, this Limited Warranty; and
• Any Product where the original Product
identication markings (trademark or serial
number) have been removed, altered, or
obliterated from the Product.
It is recommended that you visit the website, https://
cuisinart.registria.com, for a fast, ecient way to
complete your product registration. However, product
registration does not eliminate the need for the
consumer to maintain the original proof of purchase
in order to obtain the warranty benets. In the event
that you do not have proof of purchase date, the
purchase date for purposes of this Limited Warranty
will be the date of manufacture.
Hassle-free warranty
If the Product that is the subject of this Limited
Warranty fails during the warranty period for reasons
covered by this Limited Warranty, Cuisinart will, at its
option, repair the Product, replace the Product with
another identical or reasonably equivalent product, or
if Cuisinart is unable to repair or replace the Product,
refund the purchase price, less the amount directly
attributable to the consumer’s prior usage of the
Product. To obtain a return shipping label, email us at
https://www.cuisinart.com/customer-care/product-
assistance/product-inquiry/, or call our Consumer
Service Center toll-free at 1-800-726-0190 to speak
with a representative.
Upon receipt of the Product, Cuisinart will inspect the
Product and, if required under this Limited Warranty,
attempt to repair, replace, or refund the Product
within thirty (30) days. However, there may be delays
beyond Cuisinart’s control, in which case that time
period may be extended as reasonably necessary.
IMPORTANT: If the nonconforming Product is to be
serviced by someone other than Cuisinart’s
Authorized Service Center, please remind the servicer
to call our Consumer Service Center at 1-800-726-
0190 to ensure that the problem is properly
diagnosed, the Product is serviced with the correct
parts, and the product is still under warranty.
California Residents Only
The three (3) year Limited Warranty period begins on
the date the Product was delivered, which may be
dierent than the date the Product was purchased.
California residents also have the option of obtaining
the benets of this Limited Warranty by bringing the
Product to (A) the store where it was purchased or (B)
another retail store that sells Cuisinart products of
the same type. The retail store shall then, according
to its preference, either repair the Product, refer the
consumer to an independent repair facility, replace
the Product with another identical or reasonably
equivalent product, or refund the purchase price less
the amount directly attributable to the consumer’s
prior usage of the Product. California residents may
also, according to their preference, return

13
nonconforming products directly to Cuisinart for
repair or, if necessary, replacement with another
identical or reasonably equivalent product by calling
our Consumer Service Center toll-free at
1-800-726-0190. Cuisinart will be responsible
for the cost of such repair, replacement, and/or
shipping and handling for such nonconforming
products under warranty.
THIS LIMITED WARRANTY GIVES YOU SPECIFIC LEGAL
RIGHTS, AND YOU MAY ALSO HAVE OTHER RIGHTS
THAT VARY FROM STATE TO STATE OR BY
JURISDICTION. IN THE EVENT THIS LIMITED
WARRANTY IS BREACHED, YOU MAY HAVE CLAIMS
FOR REPLACEMENT, DAMAGES, OR OTHER PENALTIES
LIMITATIONS OF LIABILITY/ADDITIONAL LIMITATIONS
AND EXCLUSIONS
ALL EXPRESS AND IMPLIED WARRANTIES ARE
LIMITED IN DURATION TO THE LIMITED WARRANTY
PERIOD. NO WARRANTIES APPLY AFTER THAT
PERIOD. SOME STATES DO NOT ALLOW LIMITATIONS
ON HOW LONG AN IMPLIED WARRANTY LASTS, SO
THIS LIMITATION MAY NOT APPLY TO YOU.
CUISINART’S RESPONSIBILITY UNDER THIS OR ANY
OTHER WARRANTY, IMPLIED OR EXPRESS, IS LIMITED
TO REPAIR, REPLACEMENT, OR REFUND, AS SET
FORTH ABOVE. THESE REMEDIES ARE THE SOLE AND
EXCLUSIVE REMEDIES FOR ANY BREACH OF
WARRANTY. TO THE MAXIMUM EXTENT PERMITTED
BY LAW, CUISINART IS NOT RESPONSIBLE FOR ANY
DIRECT, INDIRECT, SPECIAL, INCIDENTAL, OR
CONSEQUENTIAL DAMAGES RESULTING FROM ANY
BREACH OF WARRANTY OR UNDER ANY OTHER
LEGAL THEORY (INCLUDING, BUT NOT LIMITED TO,
LOST PROFITS, DOWNTIME, GOODWILL, DAMAGE TO
OR REPLACEMENT OF EQUIPMENT AND PROPERTY,
AND ANY COSTS OF RECOVERING, REPROGRAMMING,
OR REPRODUCING ANY PROGRAM OR DATA STORED
IN OR USED WITH A SYSTEM CONTAINING THE
PRODUCT), EVEN IF CUISINART HAS BEEN ADVISED
OF THE POSSIBILITY OF SUCH DAMAGES. SOME
STATES DO NOT ALLOW THE EXCLUSION OR
LIMITATION OF INCIDENTAL OR CONSEQUENTIAL
DAMAGES, SO THE ABOVE LIMITATIONS OR
EXCLUSIONS MAY NOT APPLY TO YOU. ALL EXPRESS
AND IMPLIED WARRANTIES ARE LIMITED IN
DURATION TO THE LIMITED WARRANTY PERIOD. NO
WARRANTIES APPLY AFTER THAT PERIOD. SOME
STATES (OR JURISDICTIONS) DO NOT ALLOW
LIMITATIONS ON HOW LONG AN IMPLIED WARRANTY
LASTS, SO THIS LIMITATION MAY NOT APPLY TO YOU.
This Limited Warranty is issued by:
Conair LLC
1 Cummings Point Road
Stamford, CT 06902
1-800-726-0190

14
RECIPES
Blueberry Buttermilk Pancakes .......................................................................................... 15
Breakfast Tortas ................................................................................................................. 15
Challah French Toast .......................................................................................................... 16
Mini Hash Browns ............................................................................................................. 16
Grilled Green Beans with Walnut-Mint Pesto ..................................................................... 17
Grilled Peach Salad ............................................................................................................ 17
Grilled Vegetable Salad ...................................................................................................... 17
Black Bean Veggie Burger .................................................................................................. 18
Buffalo Chicken Quesadillas .............................................................................................. 19
Chermoula Salmon with Grilled Potatoes........................................................................... 19
Cuban Sandwich ................................................................................................................ 20
Greek-Style Kebabs ........................................................................................................... 20
Grilled Pizza with Bacon and Olives ................................................................................... 21
Hamburgers with Caramelized Onions and Gruyère .......................................................... 21
Italian Panini with Grilled Chicken ...................................................................................... 22
Latin Pork Chops ................................................................................................................ 22
Shrimp Fajitas ..................................................................................................................... 22
Skirt Steak with Chimichurri Sauce .................................................................................... 23
Toasted Avocado, Cheese and Tomato Panini ................................................................... 24
Chocolate Hazelnut Panini with Strawberries .................................................................... 24
Grilled Pineapple ................................................................................................................ 25
S’more Panini ..................................................................................................................... 25

15
Blueberry Buttermilk Pancakes
These pancakes are light and fluffy with a nice
tang thanks to the buttermilk and lemon.
Plate Side: Griddle
Griddler
®
Cooking Position: Open and flat
Makes about twelve, 4-inch pancakes
1½ cups unbleached, all-purpose flour
1½ teaspoons baking powder
½ teaspoon baking soda
¼ teaspoon kosher salt
¼ teaspoon ground cinnamon
1½ cups buttermilk
2 large eggs
1 tablespoon pure maple syrup
½ teaspoon pure vanilla extract
1 cup fresh blueberries
½ teaspoon grated lemon zest
1 teaspoon unsalted butter, optional
1. Put the dry ingredients, through the
cinnamon, in a large mixing bowl. Whisk to
combine; reserve.
2. Combine the buttermilk, eggs, maple syrup,
and vanilla extract and whisk well. Add to
the reserved dry ingredients and whisk until
just combined (dry sections are OK). Add
the blueberries and lemon zest and fold
to incorporate, but do not overmix or the
pancakes will be tough.
3. Turn on the Cuisinart
®
Griddler
®
. Select
Griddle and set to 350°F.
4. Once preheated, use a ¼-cup measure, drop
batter onto preheated griddle (if you like
extra-buttery pancakes, put 1 teaspoon of
butter on each plate and melt before dropping
batter on plates), and set the count-up timer.
Cook pancakes until bubbles form, about 4 to
5 minutes; flip and cook until done, about 3
minutes longer.
5. Transfer to warm plates to serve. As you finish
each batch of pancakes, you can keep them
warm on a wire rack placed on a baking sheet
in a low oven (200°F). Repeat until all the
batter is used.
Nutritional information per serving (2 pancakes): Calories
189 (32% from fat) • carb. 24g • pro. 7g
fat 7g • sat. fat 2g • chol. 171mg • sod. 203mg
calc. 102mg • fiber 1g
Breakfast Tortas
If you like spicy, add extra heat to this sandwich
by using hot, smoked Spanish chorizo.
Plate Side: Bottom Griddle, Top Grill
Griddler
®
Cooking Position: Open and flat, and
then closed
Makes 2 tortas
1 tablespoon vegetable oil, divided
4 eggs
2 Kaiser rolls, cut in half lengthwise
½ avocado
2 ounces Spanish chorizo, thinly sliced
on the bias
2 tablespoons store-bought green
salsa, plus more for serving
2 slices Monterey Jack cheese
1. Turn on the Cuisinart
®
Griddler
®
. Select
Griddle and set to 350°F.
2. Once preheated, drizzle 2 teaspoons of the
vegetable oil onto the bottom plate. Crack the
eggs onto the bottom plate. Set the count-
up timer to 5 minutes. At the 3-minute mark
(when the egg whites are set and opaque), flip
the eggs. When time expires, transfer 2 of the
eggs to the bottom of each roll. Reserve.
3. While the eggs are cooking, divide the
avocado evenly between the inside surfaces
of the 2 tops of bread. Use a fork to smash
into an even layer. Reserve.
4. When the eggs finish cooking, put the chorizo
on the bottom plate and close the grill. Set
the temperature to 425°F. Once preheated,
transfer the chorizo to the top of the eggs in
an even layer.
5.
Drizzle each sandwich with 1 tablespoon of the
salsa. Top with one slice of cheese and the top
of the bun with the smashed avocado.
6. Brush the tops of each sandwich with the
remaining oil. Transfer the two sandwiches
to the Griddler
®
. Close the Griddler
®
and set
the count-up timer. Lightly press down on
the sandwiches for about 20 seconds. Cook
for about 4 minutes total, until the cheese is
melted and the tops are lightly golden and
grill marks are visible.
7. Remove from Griddler
®
and let cool slightly.
Cut in half on the bias. Serve with more salsa
on the side.

16
Nutritional information per serving (one torta): Calories 789
(59% from fat) carb. 42g • pro. 39g fat 52g • sat. fat 18g •
chol. 435mg • sod. 1229mg calc. 482mg • fiber 4g
Challah French Toast
We love using eggy challah bread for French
toast. Thanks to its soft yet sturdy structure, it
soaks up the custard better than any other bread,
making for the most decadent breakfast.
Plate Side: Griddle
Griddler
®
Cooking Position: Open and flat
Makes 8 servings
8 large eggs
2 cups milk (we used reduced fat, but
any variety will do)
1 tablespoon pure vanilla extract
2 tablespoons pure maple syrup
1 teaspoon ground cinnamon
Pinch ground nutmeg
1 to 2 pinches kosher salt
8 slices challah bread, ¾ inch thick
Unsalted butter or coconut oil, for
griddle
Confectioners’ sugar for
serving
Fresh fruit for serving
1. Put the eggs, milk, vanilla extract, maple
syrup, cinnamon, nutmeg and salt into a
medium bowl. Whisk to fully combine and
pour into a 13 x 9-inch baking dish.
2. Soak half of the bread in the milk mixture,
turning so both sides are saturated.
3. While the bread is soaking, turn on the
Cuisinart
®
Griddler
®
. Select Griddle and set to
350°F.
4. Once preheated, put the soaked bread on
the hot griddle and select the count-up
timer. Cook 3½ to 4 minutes per side. Soak
remaining bread while first batch of French
toast is cooking.
5. Remove and reserve the cooked French
toast in a warm oven and then repeat with
remaining soaked bread.
6. To serve, dust with confectioners’ sugar and
top with fresh fruit and maple syrup,
if desired.
Nutritional information per slice: Calories 195
(32% from fat) • carb. 25g • pro. 7g • fat 7g
sat. fat 3g • chol. 172mg • sod. 208mg
calc. 116mg • fiber 1g
Mini Hash Browns
Quickly stirring the shredded potatoes in salted
water and then squeezing out all liquid prevents
them from oxidizing.
Plate Side: Griddle
Griddler
®
Cooking Position: Open and flat
Makes 8 servings
2 cups water
2 teaspoons plus 1 pinch kosher salt,
divided
1 pound Yukon gold potatoes
Pinch freshly ground black
pepper
3 tablespoons vegetable oil, plus more
to brush plates
1. Put the water and 2 teaspoons of salt into a
medium mixing bowl. Whisk until salt is fully
dissolved; reserve.
2. Shred the potatoes to a medium thickness,
using either a medium shredding disc of a
Cuisinart
®
Food Processor or a box grater.
Immediately transfer to the salted water and
stir a few times. Drain and then put into a tea
towel or dish towel and squeeze out all water.
3. Put the squeezed potatoes into a mixing bowl
and toss with the remaining pinch of salt,
pepper and 3 tablespoons of the oil.
4. Turn on the Cuisinart
®
Griddler
®
. Select
Griddle and set to 425°F.
5 Once preheated, brush the plates with
additional oil and then, using a ¼-cup scoop
or measuring cup, dollop the seasoned
potatoes onto the hot, oiled griddle, 4 scoops
per side, and select the count-up timer.
Flatten slightly with a heatproof spatula.
Brush the tops with additional oil and allow to
cook until bottoms are browned and crispy,
about 6 to 8 minutes. Carefully flip each hash
brown and cook on the opposite side until
very crispy, an additional 8 minutes.
6. Remove and transfer to a wire rack to
maintain crispiness while cooking next batch
of potatoes.
Nutritional information per hash brown: Calories 89 (51%
from fat) • carb. 10g • pro. 1g • fat 5g
sat. fat 1g • chol. 0mg • sod. 146mg • calc. 7mg fiber 1g

17
Grilled Green Beans with
Walnut-Mint Pesto
As these green beans with the pesto cool, the
flavors will stand out even more, making them
perfect for a party.
Plate Side: Grill
Griddler
®
Cooking Position: Closed
Makes
2
/
3
cup pesto and 2½ cups
green beans
1 small garlic clove
1 ounce fresh mint leaves
1 1-inch piece lemon peel
¼ cup toasted walnuts
1 tablespoon shredded Parmesan
2 teaspoons lemon juice
½ teaspoon salt
¼ teaspoon freshly ground black pepper
½ cup extra virgin olive oil
16 ounces green beans, washed and
trimmed
1 tablespoon olive oil
½ teaspoon salt
¼ teaspoon freshly ground black pepper
¼ teaspoon grated lemon zest
1. Make the walnut-mint pesto: Put the garlic in
a mini chopper. Process until finely chopped.
Scrape down the sides and add the mint
leaves and lemon peel. Pulse to roughly
chop. Add the remaining ingredients, except
for the olive oil. Pulse to combine. With the
food processor running, add the olive oil
through the drip hole and process until mostly
smooth. Reserve.
2. Turn on the Cuisinart
®
Griddler
®
. Select Grill
and set the temperature to 425°F.
3. Toss the green beans with olive oil, salt and
pepper. Once preheated, put half of the green
beans on the bottom plate in a single layer.
Close the Griddler
®
and set the count-up
timer. Cook for about 8 minutes, until soft and
grill marks are visible.Transfer grilled beans to
a large bowl and repeat with remaining green
beans.
4. When all the green beans are grilled, toss with
2 tablespoons of the walnut mint pesto* and
the lemon zest.
* Remaining pesto maybe be stored in the
refrigerator for up to 2 weeks and stirred into
soups or pastas.
Nutritional information per serving (about 1 cup): Calories
199 (72% from fat) • carb. 12g • pro. 3g
fat 16g / sat. fat 2g • chol. 0mg • sod. 565mg
calc. 100mg • fiber 5g
Grilled Peach Salad
Light summer lunch served in minutes.
Plate side: Grill
Griddler
®
Cooking Position: Closed
Makes 2 servings
3 medium peaches, cut in half, pits
removed
2 cups baby arugula
4 ounces fresh mozzarella*
2 ounces prosciutto
1 teaspoon balsamic glaze
1 tablespoon extra virgin olive oil
Kosher salt
Freshly ground black pepper
1. Turn on the Cuisinart
®
Griddler
®
. Select Grill
and set to 400°F.
2. Once preheated, put peaches onto the grill,
cut side down, and set the count-up timer.
Close and grill for about 8 minutes, so that
the peaches are soft and grill marks are
visible.
3. While the peaches are grilling, put the arugula
and cheese in a large mixing bowl. Toss with
the olive oil, salt and pepper. Transfer to the
center of a large, round platter. Arrange the
peaches with prosciutto on top. Drizzle with
balsamic glaze.
* If available, burrata makes a great substitute.
Instead of tossing it with arugula, oil, salt and
pepper, arrange it on top with the peaches and
prosciutto.
Nutritional information per serving (based on 2 servings):
Calories 389 (52% from fat) • carb. 24g • pro. 22g • fat 22g
• sat. fat 8g • chol. 435mg
sod. 861mg calc. 158mg • fiber 4g
Grilled Vegetable Salad
This grilled salad makes a beautiful presentation,
perfect for entertaining.
Plate Side: Grill
Griddler
®
Cooking Position: Closed

18
Makes about 8 cups
1 medium red pepper (about 6 ounces),
cut into strips 1 to 1½ inches wide
1 medium yellow pepper (about 6
ounces), cut into strips 1 to 1½ inches
wide
1 medium zucchini (about 6.5 ounces),
sliced horizontally into ¼-inch thick
slices
1 small eggplant (about 10 ounces),
sliced horizontally into ¼-inch thick
slices
1 medium red onion (about 10 ounces),
cut into wedges,
keeping root intact
1 bunch asparagus (about 8 ounces),
hard ends trimmed and discarded
1 tablespoon fresh lemon juice
¼ cup extra virgin olive oil
2 to 3 ounces ricotta salata, crumbled
½ cup pitted Kalamata olives, roughly
chopped
½ cup fresh basil leaves
1. Turn on Cuisinart
®
Griddler
®
. Select Grill and
set to 425˚F.
2. Grill all veggies in batches in the closed
position. They are done once charred with
grill marks and soft. The peppers take about
8 minutes, zucchini 5 minutes, eggplant 6 to 8
minutes, red onion 5 minutes and asparagus
3 to 4 minutes. Once grilled, toss all the
vegetables together with the lemon juice, olive
oil, cheese, olives and basil leaves.
3. Serve immediately.
Nutritional information per serving (based on 8 servings):
Calories 147 (65% from fat) • carb. 11g pro. 3g • fat 11g •
sat. fat 2g • chol. 6mg
sod. 312mg • calc. 60mg • fiber 3g
Black Bean Veggie Burger
Packed with protein and studded with colorful,
vitamin-rich veggies, this burger will be a hit
among meat and non-meat eaters alike. A
Cuisinart
®
Food Processor will make the prep
quick, but it can easily be prepared by hand.
Plate Side: Griddle
Griddler
®
Cooking Position: Open and flat
Makes 6 burgers
1 tablespoon olive oil, plus more to
brush plates
2 garlic cloves, finely chopped
¼ medium to large onion, finely chopped
½ teaspoon kosher salt, divided
Pinch freshly ground black
pepper
1 can (15 ounces) black beans, drained
and rinsed
½ chipotle pepper in adobo, chopped,
plus 1 teaspoon adobo sauce
½ cup water, divided (this is approxi-
mate, you may not need the entire
amount)
1 cup cooked quinoa
½ cup diced carrot
½ cup diced zucchini
¼ cup chopped fresh cilantro
6 hamburger buns
1 avocado, sliced
1. Put the oil in a medium sauté pan set over
medium heat. Once hot, add the garlic, onion
and ¼ teaspoon of salt and pepper. Sauté
until softened and fragrant, about 5 minutes.
Add the black beans, chipotle and sauce,
and enough water to keep the pan from being
dry. Cook until beans are soft enough where
they can be easily mashed, about 10 minutes,
adding additional water as needed to prevent
the pan from going dry.
2. Once beans are soft, add the remaining salt,
quinoa, carrot and zucchini. Add additional
water, about 2 to 3 tablespoons, stir, partially
cover and reduce heat to medium-low and
cook until vegetables are just slightly cooked,
about 5 minutes.
3. Transfer mixture to a Cuisinart
®
Food
Processor fitted with the chopping blade. Add
the cilantro and pulse 4 to 5 times to slightly
mash the mixture.
4. Turn on the Cuisinart
®
Griddler
®
. Select
Griddle and set to 375ºF.
5. While Griddler
®
is heating, form burger
mixture into
1
/
3
-cup patties (the mixture may
be too warm to handle. If that is the case,
then allow to rest until slightly cooled).
6. Once preheated, brush the plates with
additional oil and put the prepared patties
onto the hot, oiled griddle. Select the count-
up timer and cook 3 minutes per side. Brush
the tops with additional oil and allow to
cook until bottoms are golden brown and
the burger is just getting firm, about 3 to 4

19
minutes. Carefully flip and cook on the other
side for another 3 to 4 minutes.
7. To serve, put on a bun and top with sliced
avocado. Serve immediately.
Nutritional information per burger: Calories 236 (25% from
fat) • carb. 36g • pro. 8g • fat 7g
sat. fat 1g • chol. 0mg • sod. 410mg • calc. 87mg fiber 5g
Buffalo Chicken Quesadillas
You won’t be able to stop eating these
quesadillas—they’re great for a large get-together
and can be kept warm in the oven at a low
temperature once they’re cut.
Plate Side: Griddle
Griddler
®
Cooking Position: Closed
Makes 6 quesadillas
2 pounds boneless, skinless chicken
thighs
2 cups Buffalo sauce, divided
4 cups shredded Mexican-blend cheese
12 tablespoons cream cheese
1½ tablespoons vegetable oil
12 7- to 8-inch flour tortillas
Blue cheese dressing,
for serving
Celery sticks, for serving
1. Turn on the Cuisinart
®
Griddler
®
. Select
Griddle and set to 425°F.
2. Once preheated, put the chicken on the
Griddler
®
. Close the Griddler
®
and set the
timer for 8 minutes, until chicken is fully
cooked through. Remove from Griddler
®
and
let cool slightly. When cool enough to handle,
thinly slice the chicken and toss with 1½ cups
of the Buffalo sauce. Reserve.
3. While the chicken is cooking, combine the
cream cheese with the remaining (½ cup)
Buffalo sauce. Spread about 1 tablespoon
of the cream cheese mixture onto the center
of one of the tortillas, leaving about a 1-inch
border all around. Sprinkle with
1
/
3
cup of the
shredded cheese. Top with ½ scoop of the
cooked chicken mixture and an additional
1
/
3
cup shredded cheese. Spread 1 more
tablespoon of the cream cheese mixture onto
another tortilla, also leaving about a 1-inch
border. Put the tortilla, cream-cheese side
down, onto the bottom tortilla. Brush the top
with vegetable oil.
4. When the chicken is done cooking, decrease
the temperature to 375°F. Once heated,
put the quesadilla on the bottom plate and
close the Griddler
®
. Set the count-up timer
and cook for about 3 to 3½ minutes, until
cheese is melted and the top of the quesadilla
is a little brown and crispy. Remove from
Griddler
®
, let cool slightly and cut into 8
pieces. Repeat with remaining ingredients.
Nutritional information per serving (1 quesadilla): Calories
821 (54% from fat) • carb. 41g • pro. 53g
fat 48g sat. / fat 25g • chol. 224mg • sod. 3414mg calc.
656mg • fiber 2g
Chermoula Salmon with
Grilled Potatoes
This zesty Moroccan marinade is a great match
for grilled fish and seafood.
Plate Side: Bottom Grill, Top Griddle
Griddler
®
Cooking Position: Closed, then open
and flat
Makes 1¾ cups chermoula and 3 to 4 servings of
salmon and potatoes
Chermoula marinade:
6 small garlic cloves
1 teaspoon paprika
¾ teaspoon kosher salt, divided
½ teaspoon freshly ground black pepper
1 teaspoon ground coriander
½ teaspoon ground cumin
1 teaspoon red pepper flakes
4 2 x ½-inch strips lemon peel, white
pith removed
¾ cup fresh cilantro, roughly chopped
¼ cup fresh parsley, roughly chopped
1
/
3
cup fresh lemon juice
2 tablespoons white wine vinegar
1 cup olive oil, reserving 1 tablespoon
1
/
3
cup pitted, whole Kalamata olives,
finely chopped
1 pound salmon, about 1½ inches thick
2 large (about 1 pound total)
russet potatoes, scrubbed
1. Make the chermoula: Put the garlic into a
mini chopper. Pulse to finely chop. Add the
paprika, ½ teaspoon of the salt, pepper,
coriander, cumin, red pepper flakes and
lemon peel. Pulse until a paste forms. Transfer
mixture to a small bowl. Add the cilantro,
parsley, lemon juice and vinegar. Slowly whisk
in the olive oil. Add the olives. Put the salmon
in a 9 x 13-inch baking dish; add ½ cup of

20
the marinade to cover the fish. Cover with
plastic wrap; marinate 1 to 2 hours. Bring to
room temperature before grilling.
2. Twenty minutes before cooking the salmon,
slice the potatoes into ¼-inch slices. Put
the potato slices in a large bowl with
the reserved tablespoon of olive oil and
remaining salt. Toss to evenly coat.
3. Turn on the Cuisinart
®
Griddler
®
. Select Grill
and set temperature to 425°F.
4. Once preheated, put the potatoes onto the
bottom plate of Griddler
®
in an even layer.
Close the Griddler
®
and set the timer for 16
minutes, until potatoes are browned and
crispy and fully cooked through. Transfer
the cooked potatoes to a large serving plate
and loosely cover with foil.
5. Put the salmon on the bottom plate of the
Griddler
®
. Set the count-up timer and cook
for about 8 to 9 minutes on the first side.
Flip salmon, reduce temperature to 400°F
and cook the second side of the salmon for
about 6 minutes, until desired doneness.
6. When salmon is cooked, transfer to
a serving plate and drizzle with 2 to 3
tablespoons of the remaining chermoula.
Serve salmon with the reserved potatoes.
Nutritional information per serving (based on 4 servings):
Calories 856 (75% from fat) • carb. 29g
pro. 27g • fat 73g • sat. fat 10g • chol. 69mg
sod. 819mg • calc. 91mg • fiber 4g
Cuban Sandwich
Ham and cheese magically come together
in this take on the traditional Cuban toasted
sandwich. A great way to use up any leftover
Latin Pork Chops (page 22).
Plate Side: Grill
Griddler
®
Cooking Position: Closed
Makes 2 large sandwiches, about 6 servings
2 large Cuban or Portuguese-style
soft rolls, about 10 inches long
1 tablespoon plus 1 teaspoon Dijon or
deli mustard
4 to 6 ounces sliced Swiss cheese, divided
4 to 6 ounces sliced roasted pork
4 to 6 ounces sliced ham
4 ounces dill pickles, thinly sliced hor-
izontally
1 teaspoon olive oil
1. Assemble sandwiches by slicing rolls and
placing on a work surface. Spread the
mustard on each side of both rolls. Put a
slice of cheese on the bottom of each roll.
Add the pork, ham and the pickle slices.
Finish with the remaining cheese and the
top of the roll. Brush the top with the olive
oil.
2. Fit the Cuisinart
®
Griddler
®
with the grill
plates. Turn unit on. Select Grill and set to
375°F.
3. Once preheated, place the sandwiches on
the grill and free the floating hinge. Press
the sandwiches firmly when closing the grill
and set the count-up timer. Keep it pressed
for about one minute. Continue cooking for
about 6 minutes total, until bread is crisp
and cheese is melted.
4. Slice sandwich in pieces to serve.
Nutritional information per serving (based on 6 servings):
Calories 215 (45% from fat) • carb. 13g pro. 16g • fat 10g
• sat. fat 5g • chol. 38mg
sod. 700mg • calc. 191mg • fiber 0g
Greek-Style Kebabs
Chicken or a hearty fish can be substituted
for the pork in this recipe. Simply adjust the
time accordingly and make sure both are fully
cooked through before serving.
Plate Side: Grill
Griddler
®
Cooking Position: Open and flat
Makes 10 kebabs
2 pounds trimmed pork shoulder
¼ cup olive oil
2 tablespoons fresh lemon juice
1 teaspoon kosher salt
1 teaspoon dried oregano
½ teaspoon pepper
1 small red onion, cut into 1-inch
chunks
1 pint cherry tomatoes
Pita bread, for serving, optional
Tzatziki*, for serving, optional
10 wooden skewers
1. Cut the pork into 1-inch pieces. Season
with the olive oil, lemon juice, salt, oregano
and pepper. Put 1 piece of pork onto 1
of the skewers. Then add a piece of the
onion (about 2 or 3 layers thick), followed
by another piece of pork, a tomato, another

21
piece of pork, onion and pork. Repeat with
the remaining skewers and ingredients.
2. Turn on the Cuisinart
®
Griddler
®
. Select Grill.
Set to 425°F.
3. Once preheated, put the kebabs on the
Griddler
®
and set the count-up timer. Cook
skewers, rotating until each side is browned,
for about 25 to 30 minutes, until fully cooked
through. Alternately, skewers may be cooked
in the closed position for about 5 to 6
minutes.
4. If desired, serve with pita bread and tzatziki.
* Tzatziki is a traditional Greek yogurt-based dip
served with kebabs. It may be bought pre-made
or can be made from scratch. Search Cuisinart.
com for recipes.
Nutritional information per serving (1 kebab): Calories 272
(73% from fat) • carb. 2g • pro. 16g
fat 22g / sat. fat 6g • chol. 64mg • sod. 274mg
calc. 19mg • fiber 1g
Grilled Pizza with Bacon and Olives
Use our method for grilling pizza and add any
toppings you’d like.
Plate Side: Griddle
Griddler
®
Cooking Position: Open, closed and flat
Makes 4 to 6 servings
6 slices bacon
12 ounces fresh pizza dough
1
/
3
cup pizza sauce
2 tablespoons sliced black olives
2 teaspoons olive oil
1. Put the bacon on the bottom plate of the
griddle. Turn the Cuisinart
®
Griddler
®
on and
select Griddle. Set to 425°F. When the bacon
is brown and crispy, transfer to a plate. Once
cool, crumble and reserve.
2. Shape the dough into a rectangle that fits the
size of the griddle. Put the pizza dough onto
the griddle and close the Griddler
®
. Set the
count-up timer and cook for about 4 minutes,
until lightly golden on both sides. Open the
grill and flip the pizza. Reduce heat to 400°F.
3. Top the partially cooked pizza dough with the
sauce, olives and crumbled bacon. Brush the
edges of the pizza with the olive oil.
4. Set the count-up timer again and continue
cooking for about 6 to 8 minutes in the open
position until the bottom of the pizza is crispy
and dough is fully cooked through.
Nutritional information per serving (based on 6 servings):
Calories 211 (39% from fat) • carb. 25g pro. 8g • fat 9g /
sat. fat 2g • chol. 15mg
sod. 571mg • calc. 0mg • fiber 1g
Hamburgers with Caramelized Onions
and Gruyère
This French-style burger is rich and delicious.
Plate Side: Bottom Grill, Top Griddle
Griddler
®
Cooking Position: Open and flat
Makes 4 burgers
1 yellow onion, thinly sliced
2 tablespoons olive oil, divided
1¼ teaspoon salt, divided
¼ cup water
4 brioche rolls
24 ounces ground beef
½ teaspoon freshly ground black pepper
4 slices Gruyère cheese
1. Combine the onion slices, 2 teaspoons of the
oil and ¼ teaspoon of the salt in a bowl. Turn
on the Cuisinart
®
Griddler
®
. Select Grill and
set to 425°F.
2. Once preheated, put the onions on the top
plate of the Griddler
®
. Set the count-up timer
and cook for about 20 minutes, until onions
are soft. Once the onions are soft, add 1
teaspoon of the water to the onions and stir
until water evaporates. Repeat until onions
are very soft and caramelized, about 10 more
minutes, until all water is used.
3. While the onions are cooking, put the buns
on the grill plate face-down. Cook until lightly
crisped, about 2 to 3 minutes. Set aside.
4. When the buns are toasted, form the ground
beef into 4 even-sized patties, 6 ounces each.
Sprinkle both sides evenly with the salt and
pepper. Brush with the olive oil.
5. Add the burgers to the bottom plate, and
cook until desired doneness. Top with cheese
and transfer to the grilled bottom buns. Top
the burgers with the onions, buns and serve.

22
Nutritional information per serving (1 burger): Calories 638
(60% from fat) • carb. 25g • pro. 39g
fat 43g / sat. fat 16g • chol. 133mg • sod. 1064mg calc.
182mg • fiber 1g
Italian Panini with Grilled Chicken
Looking for a quick, all-purpose grilled chicken
recipe? The grilled chicken in this recipe may be
enjoyed on its own.
Plate Side: Grill
Griddler
®
Cooking Position: Closed
Makes 4 panini
3 large (about 1½ pounds total) bone-
less, skinless chicken breasts, cut in
half lengthwise
¼ cup, plus 2 teaspoons olive oil, divided
1½ teaspoons Italian seasoning
1 teaspoon kosher salt
4 ciabatta rolls, cut in half lengthwise
4 slices jarred, roasted red bell peppers
1 cup arugula
½ pound fresh mozzarella, thinly sliced
1. Turn on the Cuisinart
®
Griddler
®
. Select
Grill and set to 425°F. While the Griddler
®
is preheating, season the chicken breasts
with 2 teaspoons of the olive oil and Italian
seasoning.
2. Once preheated, put the chicken breasts on
the bottom plate and set the count-up timer.
Close Griddler
®
and cook for about 6 minutes,
until the chicken is fully cooked through and
grill marks are visible. Remove chicken from
Griddler
®
and divide among the bottoms of
the 4 rolls.
3. Top each chicken piece with 1 slice of the
jarred bell peppers and ¼ cup of the arugula.
Drizzle the arugula with 2 teaspoons of the
olive oil and a small pinch of salt. Top with the
cheese and the top of the ciabatta roll. Brush
the top of the roll with oil.
4. Transfer 2 of the sandwiches to the back
of the hot grill. Close the Griddler
®
and set
the count-up timer. Press down on Griddler
handle and hold for 1 minute, then cook for
an additional 5 minutes until roll is crusty
and cheese is melted. Repeat with remaining
paninis. Cut in half before serving.
Nutritional information per serving:
Calories 234 (47% from fat)
carb. 37g • pro. 57g • fat 37g / sat. fat 10g
chol. 142mg • sod. 1273mg • calc. 234mg
fiber 1g
Latin Pork Chops
Jazz up weeknight pork chops with this Latin-
inspired marinade. Sliced leftovers are perfect in a
Cuban sandwich.
Plate Side: Grill
Griddler
®
Cooking Position: Closed
Makes 4 servings
1 small onion, sliced
4 garlic cloves, sliced
½ cup orange juice
2 tablespoons fresh lime juice
½ cup cilantro, roughly chopped
4 1-inch thick, boneless pork chops
½ teaspoon kosher salt
¼ teaspoon freshly ground black pepper
1. Stir together the onion and garlic with the
juices and cilantro.
2. Add the pork chops so they are covered
with the marinade. Cover and place in the
refrigerator for about 3 hours.
3. When ready to grill, remove chops from the
marinade, pat dry, and sprinkle evenly on
both sides with the salt and pepper.
4. Fit the Cuisinart
®
Griddler
®
with the grill
plates. Turn unit on. Select Grill and set to
450°F.
5. Once the grill comes to temperature, place
the chops on the grill in the closed position
and set the count-up timer. Pork chops are
done when an instant-read thermometer
reads 145°F in the thickest part, about 5
minutes.
6. Allow the chops to rest about 5 minutes
before serving.
Nutritional information per serving (based on 4 servings):
Calories 278 (40% from fat) • carb. 3g
pro. 37g • fat 12g • sat. fat 4g • chol. 114mg
sod. 350mg • calc. 24mg • fiber 0g
Shrimp Fajitas
This recipe is great for a festive dinner that guests
can assemble themselves at the table.
Plate Side: Bottom Grill, Top Griddle
Griddler
®
Cooking Position: Open and flat

23
Makes about 8 fajitas (3 shrimp per fajita)
1 pound frozen large shrimp, thawed
and fully peeled
3 tablespoons olive oil, divided
1 large garlic clove, finely chopped
¾ teaspoon chili powder
Pinch ground cumin
2 small bell peppers (any color), sliced
into ¼-inch strips
1 small red onion, sliced into ¼-inch
strips
½ teaspoon kosher salt, divided
Pinch pepper
Pinch garlic powder
1 tablespoon cilantro, roughly chopped
1 tablespoon fresh lime juice
4 wooden skewers, cut in half, optional
Small flour tortillas
Small lime wedges, for serving
Guacamole, for serving, optional
Salsa, for serving, optional
Sour cream, for serving, optional
1. Use paper towels to fully dry the peeled
shrimp. Put the dried shrimp in a small bowl
or plastic bag with 2 tablespoons of the
olive oil, garlic, chili powder and cumin. Stir
to evenly coat with all of the ingredients.
Refrigerate for 20 minutes to marinate.
2. While the shrimp is marinating, toss the
peppers and onions in the remaining oil.
Sprinkle with ¼ teaspoon of the salt and the
pinch of pepper and garlic powder. Turn on
the Cuisinart
®
Griddler
®
. Select Griddle and
set to 425°F.
3. Once preheated, put the peppers and onions
on the Griddler
®
. Set the timer for 15 minutes
and cook, stirring occasionally with silicone-
tipped tongs until peppers and onions are
browned and melted.
4. Once time expires, transfer all of the peppers
and onions to the top half of the griddle while
the shrimp cook. Transfer to a serving bowl
when shrimp are done and toss with the
chopped cilantro.
5. Once shrimp have marinated, remove from
the refrigerator. Combine with the lime juice
and remaining salt. If using wooden skewers,
put 3 shrimp on each skewer. Set the count-
up timer and cook the skewers on the bottom
half of the grill for about 5 minutes on the first
side and 3 minutes on the other side until fully
opaque. Alternately, shrimp may be cooked
directly on the bottom plate of the grill without
the skewers for the same amount of time.
Transfer shrimp to a serving plate.
6. To assemble fajitas, put 3 shrimp on a tortilla
and top with a spoonful of the peppers and
onions. Serve with a small lime wedge and, if
desired, guacamole, salsa and sour cream.
Nutritional information per serving (1 fajita): Calories 196
(40% from fat) • carb. 16g • pro. 13g • fat 9g
sat. fat 1g • chol. 85mg • sod. 418mg • calc. 76mg fiber 1g
Skirt Steak with Chimichurri Sauce
If you have any ripe fruit on hand, like ripe
pineapple or mango, chop it finely and add about
1 tablespoon to the sauce for added sweetness
and a pop of color.
Plate Side: Grill
Griddler
®
Cooking Position: Open and flat
Makes about 1 cup sauce, 3 to 4 servings
Sauce:
4 garlic cloves, finely chopped
½ teaspoon salt
Pinch cumin
Pinch red pepper flakes
1 tablespoon plus 2 teaspoons red wine
vinegar
2
/
3
cup extra virgin olive oil
¼ cup parsley leaves, roughly chopped
2 tablespoons fresh oregano leaves,
roughly chopped
Steak:
1 pound skirt steak, about 1 inch thick
2 teaspoons olive oil
½ teaspoon salt
¼ teaspoon pepper
1. Make the Chimichurri Sauce: Combine the
first 5 ingredients in a small bowl. While
whisking, add the extra virgin olive oil, and
then fold in the chopped parsley and oregano.
Cover and allow to sit so the flavors can
meld.
2. Turn on the Cuisinart
®
Griddler
®
. Select Grill
and set to 450°F.
3. While the Griddler
®
is preheating, season the
steak on both sides with the olive oil, salt and
pepper.
4. Once preheated, put the steak on the bottom
plate. Set the count-up timer and cook for
about 6 minutes on the first side and 4 to

24
5 minutes on the second side, until desired
doneness.
5. Transfer the steak to a cutting board and
allow to rest for 5 minutes. Slice, against the
grain. Serve with a spoonful of the sauce
drizzled on top.
Nutritional information per serving (based on 4 servings):
Calories 789 (59% from fat) • carb. 42g pro. 39g • fat 52g /
sat. fat 18g • chol. 435mg
sod. 1229mg • calc. 482mg • fiber 4g
Toasted Avocado, Cheese
and Tomato Panini
Simple ingredients with maximum taste.
Plate Side: Grill
Griddler
®
Cooking Position: Closed
Makes 2 sandwiches
2 ciabatta or French rolls
½ ripe avocado
1
/
8
–¼ teaspoon kosher salt, divided
1
/
8
teaspoon freshly ground black pepper
1 small/medium tomato
(about 4 ounces), thinly sliced
3 ounces sliced Havarti cheese (about 4
thin slices)
¼ teaspoon extra virgin olive oil
1. Slice the rolls and lay flat. Spread half of
the avocado on the bottom half of each roll.
Sprinkle with ½ of the salt and pepper. Divide
the tomato slices evenly and place on the
avocado. Sprinkle evenly with remaining salt
and pepper.
2. Add the cheese evenly, place tops on both
rolls, and then brush the top of each roll with
the olive oil.
3. Fit the Cuisinart
®
Griddler
®
with the grill
plates. Turn unit on. Select Grill and set to
375°F.
4. Once preheated, place the sandwiches in
the middle of the grill. Loosen the floating
hinge and press the top plate down on the
sandwiches in the closed position. Set the
count-up timer.
5. Grill until bread is crisp and cheese is melted,
about 7 minutes.
Nutritional information per ½ sandwich (based on 4
servings): Calories 172 (55% from fat) • carb. 12g
pro. 8g • fat 11g • sat. fat 5g • chol. 19mg
sod. 361mg • calc. 174mg • fiber 2g
Chocolate Hazelnut Panini with
Strawberries
Why should panini only be savory? Here we
take two favorite flavors, chocolate hazelnut
and strawberry, and put them together in this
delicious, sweet treat.
Plate Side: Grill
Griddler
®
Cooking Position: Closed
Makes 2 panini
2 brioche rolls or croissants
Olive oil or softened butter,
for brushing
¼ cup chocolate hazelnut spread
Pinch kosher salt
2 to 3 large strawberries, hulled and sliced
(you need enough to cover the entire
surface of the bottom of the roll/crois-
sant)
1. Turn on the Cuisinart
®
Griddler
®
. Select Grill
and set to 400°F.
2. While the Griddler
®
is heating, assemble
the panini. Halve the rolls or croissants
horizontally. Brush the outer parts with oil or
butter. Evenly spread the chocolate hazelnut
spread on the inside tops and bottoms.
Sprinkle with salt and lay the strawberry slices
across the bottom surface.
3. Put the two pieces together for each panini.
4. Once preheated, put the panini on the hot grill
and select the count-up timer. Using medium
pressure, press on the handle for 20 seconds
and then allow to cook for 3 minutes, or until
outside has visible grill marks and filling is
warmed through.
5. Remove and allow to cool for 1 minute. Cut
each panini in half and serve warm.
Nutritional information per serving (½ panini on croissant):
Calories 230 (50% from fat) • carb. 25g pro. 4g • fat 13g •
sat. fat 5g • chol. 19mg
sod. 142mg • calc. 33mg • fiber 2g

25
Grilled Pineapple
The heat of the grill caramelizes the pineapple,
making it super sweet. Perfect with vanilla ice
cream!
Plate Side: Grill
Griddler
®
Cooking Position: Closed
Makes 8 servings
1 medium fresh pineapple, peeled,
cored and cut into 8 slices
5 to 8 teaspoons granulated sugar
¼ teaspoon ground cinnamon
1. Turn on the Cuisinart
®
Griddler
®
. Select Grill
and set to 375°F.
2. Stir together the sugar and cinnamon and
sprinkle the pineapple slices evenly on both
sides with the mixture.
3. Once preheated, put half of the pineapple
slices onto the grill and set the count-up
timer. Close and grill for about 8 minutes,
so that the pineapple is slightly soft and
grill marks are visible. Repeat with
remaining slices.
4. Serve immediately.
Nutritional information per serving (one slice): Calories 189
(32% from fat) • carb. 24g • pro. 7g
fat 7g • sat. fat 2g • chol. 171mg • sod. 203mg
calc. 102mg • fiber 1g
S’more Panini
A nod to the campfire fare, you can use your
favorite chocolate bar in this panini, be it milk,
semisweet or dark.
Plate Side: Grill
Griddler
®
Cooking Position: Closed
Makes 2 panini
2 brioche rolls or croissants
Olive oil or softened butter,
for brushing
1 ounce chocolate (milk, semisweet or
dark), broken into pieces
4 standard-size marshmallows, halved
1. Turn on the Cuisinart
®
Griddler
®
. Select Grill
and set to 400°F.
2. While the Griddler
®
is heating, assemble
the panini. Halve the rolls or croissants
horizontally. Brush the outer parts with oil or
softened butter. Divide the chocolate between
the two bottom halves of the rolls/croissants.
Top with the halved marshmallows. Place the
top half of the rolls/croissants on top of the
fillings.
3. Once preheated, put the panini on the hot grill
and select the count-up timer. Using medium
pressure, press on the handle for 20 seconds
and then allow to cook for 3 minutes, or
until the outside has visible grill marks and
marshmallows have melted.
4. Remove and allow to cool for 1 minute. Cut
each panini in half and serve warm.
Nutritional information per serving (½ panini on croissant):
Calories 183 (45% from fat) • carb. 23g
pro. 3g • fat 9g • sat. fat 5g • chol. 20mg
sod. 105mg • calc. 11mg • fiber 1g

26
COOKING GUIDE AND FOOD TEMPERATURE CHART
FOOD PREPARATION
PLATE AND
POSITION
SUGGESTED GRILLING
TEMPERATURES AND TIMES
Bacon
Place in a single
layer.
Grill or
Griddle; Flat
or Open
Place bacon on cold plates. Turn to 425°F. Cook until desired
doneness. Should take about 20 to 25 minutes for 1 pound of
bacon (if using the flat position).
Beef, boneless
steak
Up to 2 inches thick.
Season to taste.
Drain off marinade
completely if
marinated before
grilling.
Allow to come to
room temperature
for best results.
Grill; Closed,
Open or Flat
When cooking in the closed position, preheat to SEAR/450°F.
Put the steak(s) on the preheated lower grill plate and close.
Sear for 2 minutes, then the grill will revert to 425°F. Cook for 2
to 10 minutes, depending on thickness and desired doneness.
Rest for 5 minutes before serving.
When cooking in the open or flat positions, preheat to 450°F.
Put the steaks on the preheated grill plates. Cook for about 4 to
6 minutes per side, depending on the thickness of the steaks
and desired doneness. Rest for 5 minutes before serving.
Rare: 125˚F to 130˚F
Medium Rare: 130˚F to 135˚F
Medium: 140˚F to 145˚F
Medium Well: 150˚F to 155˚F
Well Done: 160˚F+
Chicken Breasts
(boneless)
Pound to an even
thickness of no
more than 1 inch.
Grill; Closed
Preheat to 400°F. Cook for 7 to 9 minutes. (Internal temperature
should be 165˚F – juices will run clear with no signs of pink.)
Chicken Thighs
(boneless)
Spread to even
thickness.
Grill; Closed
Preheat to 400°F. Cook for 8 to 10 minutes. (Internal
temperature should be 170˚F – juices will run clear with no signs
of pink.)
Fish Fillet 1 – 2 inches thick. Grill; Closed
Preheat to 400°F. Cook for 10 to 18 minutes when grilling in
the closed position.
6 to 10 minutes per side in the flat position.
Fish Steaks
(sword, tuna,
salmon/boned)
No more than
2 inches thick.
Grill; Closed,
Open or Flat
Preheat to 400˚F. Cook for 10 to 15 minutes when grilling in the
closed position. 5 to 10 minutes per side in the flat position.
Beef, hamburgers
Shape meat into
burgers of even
weight and
thickness.
Grill; Closed
Open of Flat
Preheat to 450°F. Put the burgers on the preheated lower grill
plate. Grill burgers for about 4 to 8 minutes, depending on
thickness and desired doneness. If cooking flat or open, cook
about 5 to 6 minutes per side.
Sausages,
uncooked
Prick links with tines
of fork or tip of
paring knife.
Grill or
Griddle;
Closed
Preheat to 400°F. Put the links on the preheated grill/griddle
plates – the grill ribs are perfect for holding the links in place,
and allow easy turning for even cooking. Close the top. Grill
about 10 – 15 minutes, depending on the thickness of the
sausages.

27
Panini
Brush tops and
bottoms of bread
with oil or softened
butter before grilling.
Grill or
Griddle;
Closed
Preheat to 400°F. Put the prepared sandwiches on the
preheated lower grill/griddle plate. Close the top. Allow
sandwiches to cook for about 4 to 6 minutes, depending on
thickness of sandwiches.
Quesadillas
Prepare quesadillas
according to your
favorite recipe.
Grill or
Griddle;
Closed (with
cover height
adjuster)
Preheat to 400°F. Put the prepared quesadilla on the preheated
lower plate and close. Grill for about 2 to 3 minutes, depending
on thickness and filling of the quesadillas.
Eggs
Fried or over-easy.
Up to 4 eggs per
plate.
Griddle;
Open or Flat
Preheat to 350°F. Break the eggs onto the hot griddle plates.
Flip once whites are set, about 3 to 3½ minutes, and then
remove when cooked to desired doneness.
French Toast
Prepare French
toast as desired.
Griddle;
Open
Preheat to 350°F. Flip after 3 to 5 minutes, depending on
thickness. Cook for an additional 2 to 3 minutes.
Vegetables
Have vegetables
evenly cut. Season
or marinate if
desired.
Grill; Open,
Flat or
Closed
(if closed, be
sure that the
vegetables
are all the
exact same
thickness, or
results will
be uneven)
Preheat to 400°F. Grill until tender. This will vary depending on
the types of vegetables used, but should take between 10 and
30 minutes.
Pork Chop ½ – 1 inch thick.
Grill; Closed
or Open Flat
400˚F for 10 minutes, closed.
5 to 6 minutes per side; internal temperature should be 145˚F.

©2024 Cuisinart
Glendale, AZ 85307
Printed in China
24CE090455
IB-15045-ESP-C
Para su seguridad y para disfrutar plenamente
de este producto, siempre lea cuidadosa-
mente las instrucciones antes de usarlo.
Griddler
®
Cinco
SERIE GR-5
Manual de
instrucciones y
libro de recetas

2

3
MEDIDAS DE
SEGURIDAD
IMPORTANTES
1. LEA TODAS LAS INSTRUCCIONES.
2. No toque las partes calientes de este
aparato; utilice los mangos/asas/
agarraderas y los botones/perillas.
3. Para reducir el riesgo de incendio,
descarga eléctrica o heridas, NO
SUMERJA EL CABLE O EL ENCHUFE
en agua ni en ningún otro líquido.
4.
Supervise el uso de este aparato
cuidadosamente cuando sea usado por o
cerca de niños o personas con ciertas
discapacidades.
5. Desconecte el aparato cuando no está en
uso y antes de limpiarlo. Permita que se
enfríe antes de instalar/sacar piezas y
antes de limpiarlo.
6. No utilice este aparato si el cable o el
enchufe están dañados, después de un
mal funcionamiento, después de que se
haya caído o si está dañado; regréselo al
centro de servicio Cuisinart más cercano
para su revisión, reparación o ajuste.
7. El uso de accesorios no recomendados
por Cuisinart representa un riesgo de
incendio, descarga eléctrica o heridas.
8. No lo utilice en exteriores.
9. No permita que el cable cuelgue del borde
de la encimera o de la mesa, ni que tenga
contacto con superficies calientes.
10. No coloque el aparato sobre o cerca de
un quemador a gas o de una hornilla
eléctrica caliente, ni en un horno caliente.
11. Siempre desconecte el aparato después
del uso.
12. No utilice el aparato para ningún fin
que no sea el indicado.
13. Tenga sumo cuidado al mover un aparato
que contenga aceite u otros líquidos
calientes.
14. Siempre apague el aparato, presionando
el botón ON/OFF, antes de desconectarlo.
15. ADVERTENCIA: PARA REDUCIR EL
RIESGO DE INCENDIO O DESCARGA
ELÉCTRICA, LAS REPARACIONES
DEBEN SER REALIZADAS
ÚNICAMENTE POR PERSONAL
AUTORIZADO.
16. No haga funcionar el aparato debajo
o dentro de un armario/gabinete. Siempre
desconecte el aparato antes de
guardarlo en un armario/gabinete. Dejar
el aparato conectado presenta un riesgo
de incendio, especialmente si este toca
las paredes o la puerta del armario/
gabinete cuando cierra.
GUARDE ESTAS
INSTRUCCIONES
PARA USO
DOMÉSTICO
SOLAMENTE
USO DE EXTENSIONES
El cable provisto con este aparato es corto,
para reducir el peligro de que alguien se
enganche o tropiece con un cable más largo.
Se podrá usar una extensión eléctrica, pero
con cuidado.
La clasificación nominal de la extensión debe
ser por lo menos igual a la del aparato. El cable
más largo o la extensión deben ser
acomodados de manera que no cuelguen de la
encimera/mesa, donde pueden ser jalados por
niños o pueden causar tropiezos.
AVISO
El cable de este aparato está dotado de una
clavija polarizada (una pata es más ancha que
la otra). Como medida de seguridad, se podrá
enchufar de una sola manera en la toma de
corriente polarizada. Si no entra en la toma de
corriente, inviértala. Si aun así no entra
completamente, comuníquese con un
electricista. No intente modificarla.
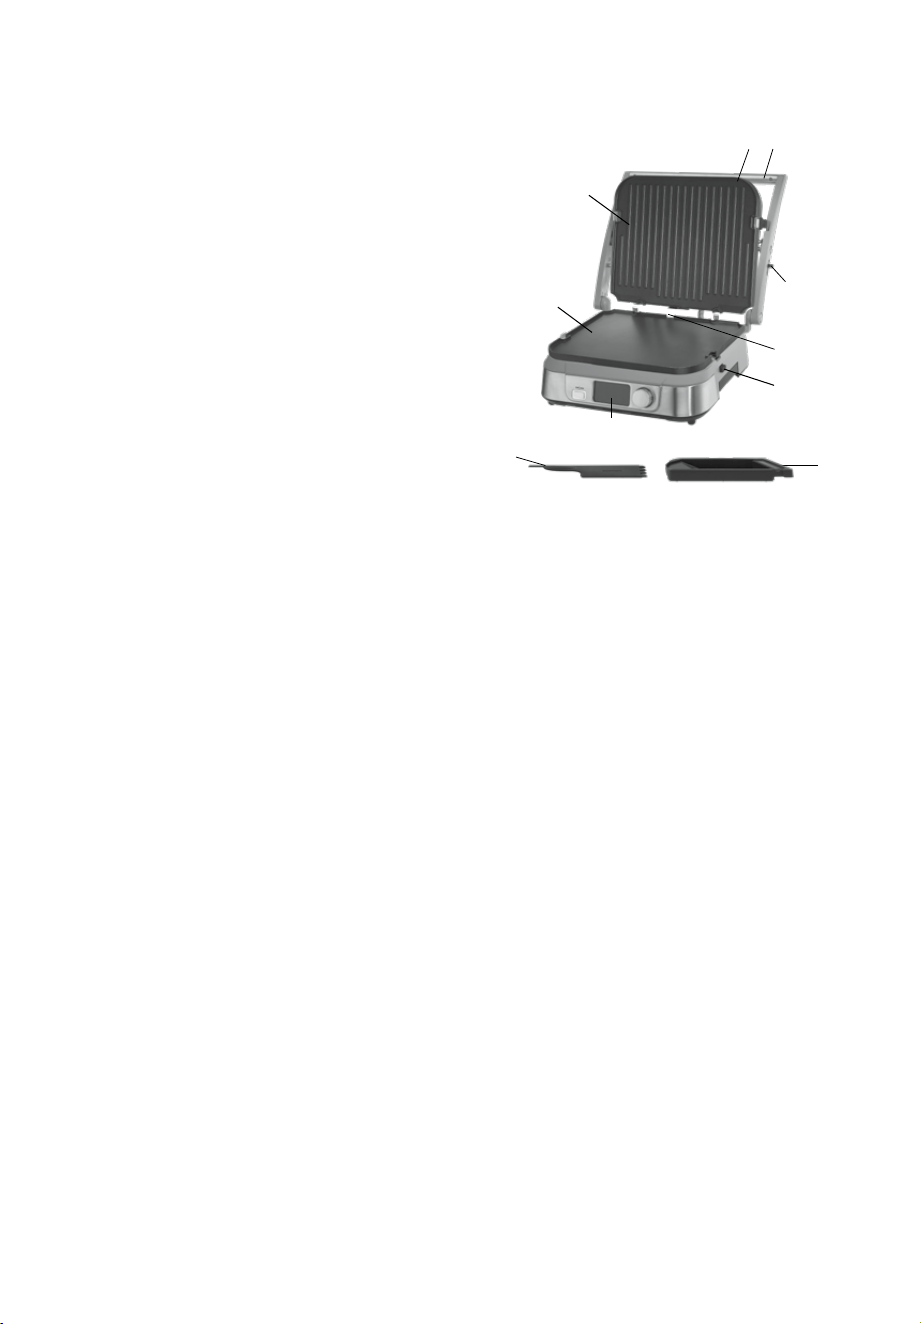
4
ÍNDICE
Medidas de seguridad importantes ....... 3
Piezas y características .......................... 4
Antes del primer uso .............................. 4
Panel de control ...................................... 5
El Griddler
®
Cinco lo hace todo ............. 6
Instrucciones de ensamblaje ................. 7
Instrucciones de operación .................... 9
Consejos y sugerencias ........................ 10
Limpieza y mantenimiento ................... 10
Almacenaje ........................................... 10
Garantía ................................................ 11
Recetas ................................................. 13
Guia de coccion/temperatura ............... 27
PIEZAS Y
CARACTERÍSTICAS
1. Base y cubierta
Resistente cuerpo de acero inoxidable con
bisagras “flotantes” y cubierta
autoajustable.
2. Cómoda agarradera
Sólida agarradera de acero inoxidable;
permite ajustar la cubierta para asar
alimentos de varios grosores.
3. Placas reversibles y removibles
Antiadherentes y aptas para lavavajillas,
para una fácil limpieza.
a. Lado “parrilla”: ideal para asar
bistec,
hamburguesas, pollo y vegetales.
b. Lado “plancha”: ideal para preparar
panqueques, huevos y tocino perfectos,
y sellar los alimentos.
4. Panel de control y pantalla
(véase la página 5)
5. Bandeja de goteo
Bandeja para recoger la grasa; removible y
apta para lavavajillas (nivel superior
solamente).
6. Pico de goteo
Dirige la grasa hacia la bandeja de goteo.
7. Limpiador/Raspador
Ayuda a limpiar las placas después de
cocinar (apto para lavavajillas; nivel superior
solamente).
8. Botones de liberación de las placas
Presiónelos para retirar las placas.
9. Botón de liberación de las bisagras
Permite abrir las placas completamente
para cocinar en la posición abierta.
10. Sin BPA
Ninguna de las piezas en contacto con los
alimentos contiene bisfenol A (BPA).
ANTES DEL PRIMER USO
Retire el aparato del material de embalaje y
quite las etiquetas promocionales pegadas a
su cuerpo. Asegúrese de que todas las piezas
descritas en la sección “Piezas y
características” están incluidas. Le
aconsejamos que guarde el material de
embalaje.
PRECAUCIÓN: Desembale el aparato
cuidadosamente.
Incluye dos accesorios:
una bandeja de goteo integrada, ubicada en la
base, y un limpiador/raspador. La base y la
cubierta del Griddler
®
Cinco se ponen muy
calientes durante el funcionamiento. Si
necesita ajustar la cubierta o poner las placas
en la posición abierta después de encender la
unidad, utilice guantes para el horno/manoplas
para proteger su mano. Las placas/parrillas
reversibles son intercambiables.
Antes de usar el aparato por primera vez,
límpielo con un paño ligeramente humedecido
para quitar el polvo acumulado durante el
transporte. Lave cuidadosamente las placas, la
bandeja de goteo y el limpiador/raspador.
Véase la sección “Instrucciones de
ensamblaje” para más información.
5
7
4
8
6
9
1 2
3b
3a
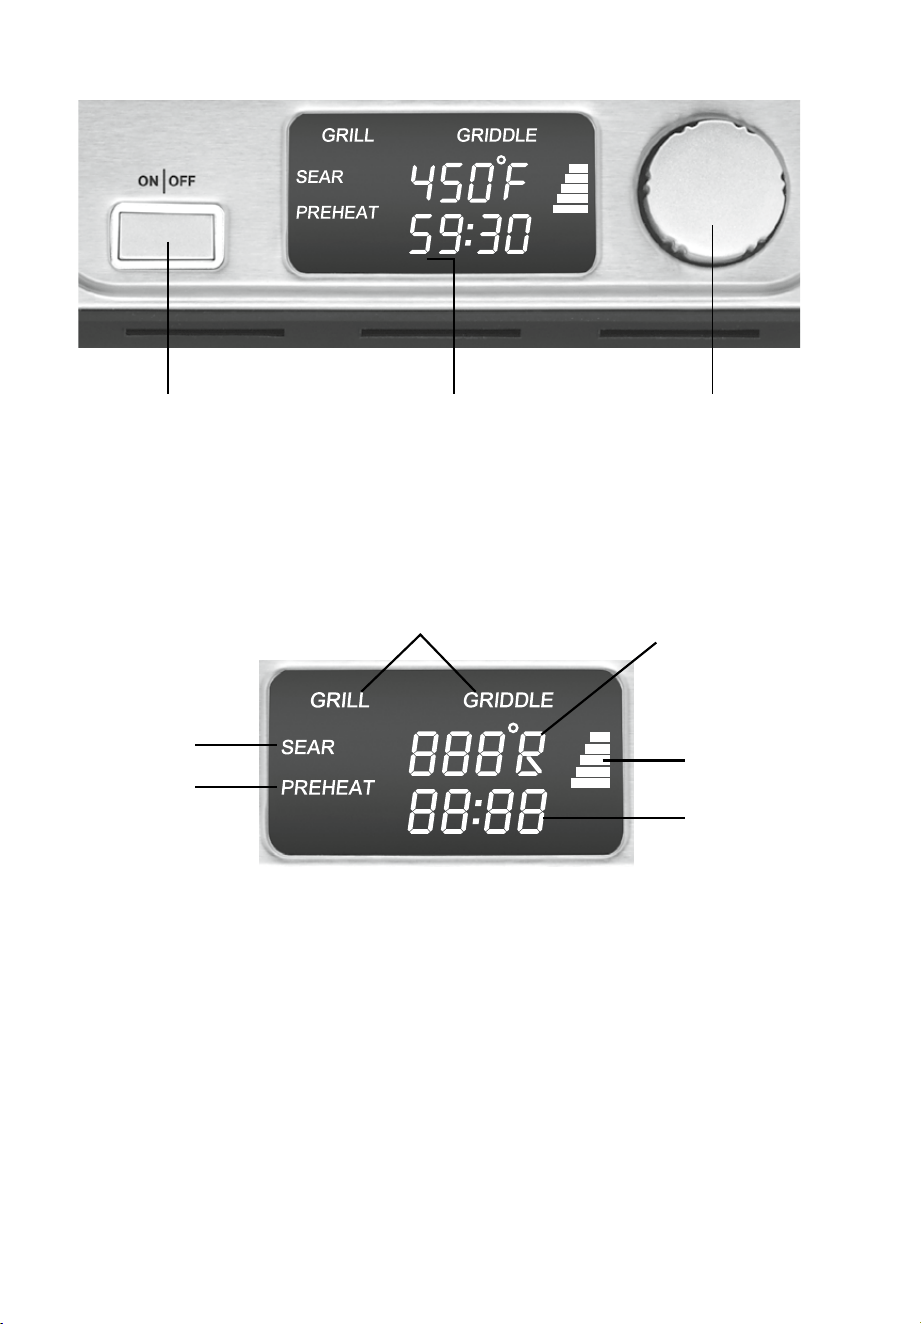
5
PANEL DE CONTROL
1. Botón ON/OFF
Botón de encendido/apagado.
2. Pantalla LCD grande
Pantalla LCD grande con
retroiluminación azul, fácil de leer;
muestra el modo de cocción, la
temperatura, el tiempo de cocción, el
indicador de la función para sellar, el
indicador de precalentamiento y las
barras de precalentamiento.
3. Perilla de control
Permite elegir y programar el modo
de cocción (parrilla o plancha), la
temperatura y el temporizador (cuenta
progresiva o regresiva). .
A. Modo de cocción
“GRILL” (parrilla) o “GRIDDLE”
(plancha)
B. Temperatura
Desde 175˚F hasta 450˚F, en
incrementos de 25˚
C. Temporizador
Cuenta progresiva o regresiva (véase
las instrucciones de operación).
D. Indicador “PREHEAT”
Indicador de precalentamiento;
permanece en la pantalla LCD hasta
que el Griddler
®
Cinco haya alcanzado
la temperatura programada.
E. Barras de precalentamiento
Muestran el progreso del
precalentamiento.
F. Indicador “SEAR”
Aparece cuando usa la función
para sellar en 450˚F. Después de
sellar los alimentos por 2 minutos, la
temperatura regresará a 425˚F.
PANTALLA DE INICIO
1 32
A
F
D
B
E
C
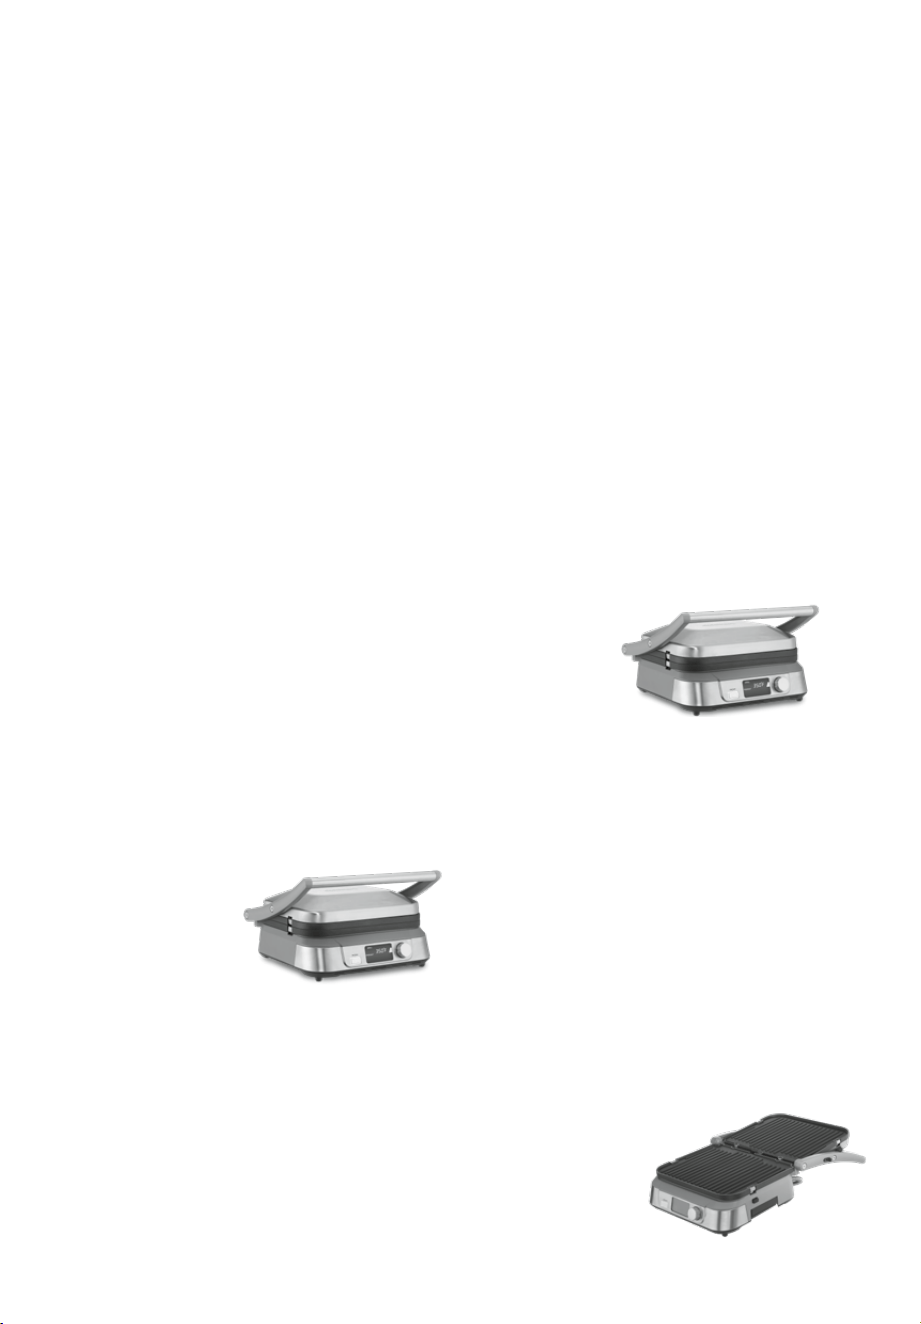
6
EL GRIDDLER
®
CINCO LO
HACE TODO
El Griddler
®
Cinco es un aparato de cocina
perfeccionado que reúne cinco aparatos en
uno. Placas reversibles y bisagras flotantes
transforman este ingenioso aparato en parrilla
de contacto, sandwichera panini, parrilla abierta,
plancha, o parrilla/plancha. Véase las secciones
“Instrucciones de ensamblaje” e
“Instrucciones de operación”.
Parrilla de contacto
Utilice el Griddler
®
Cinco como parrilla de
contacto para asar hamburguesas, carne
deshuesada, cortes delicados de carne y
vegetales.
La función “parrilla de contacto” asa ambos
lados de los alimentos al mismo tiempo. Por lo
tanto, es un método rápido para asar. También
es una forma más saludable de cocinar la
carne, ya que las ranuras en las placas y el pico
en la parte trasera de las mismas permiten
eliminar un máximo de grasa.
Para usar el Griddler
®
Cinco como parrilla de
contacto, le recomendamos que siempre utilice
el lado “parrilla” de las placas. Mantenga las
placas cerradas hasta que los alimentos estén
cocidos.
El Griddler
®
Cinco cuenta con una cómoda
agarradera y un sistema de bisagras ajustables
que permiten asar alimentos de varios grosores.
Se le hará tan fácil asar rodajas delgadas de
papa como un bistec de solomillo grueso.
Si desea asar varios
tipos de alimentos al
mismo tiempo,
asegúrese de que
estos tienen el mismo
espesor, para que se
asen uniformemente.
Sandwichera panini
Utilice el Griddler
®
Cinco como sandwichera
panini para asar panes, sándwiches o
quesadillas.
La palabra “panini” significa “sándwiches a la
parrilla” en italiano. Por lo general, los panini
incluyen una combinación de ingredientes, tales
como vegetales, carne y queso, entre tajadas
de pan fresco. El sándwich se prensa a la
parrilla o a la plancha para calentarse y tostar el
pan. El Griddler
®
Cinco le permitirá preparar una
gran variedad de sándwiches asados, salados o
dulces. Para obtener resultados óptimos, le
recomendamos que utilice pan fresco. Los
panes más populares para preparar panini son
la focaccia (un pan plano cubierto con romero,
sal y cebolla), la ciabatta (un pan blanco
rectangular) y el pan italiano. ¡Pero puede usar
cualquier tipo de pan, e incluso panecillos, para
preparar sabrosos panini!
Para usar el Griddler
®
Cinco como sandwichera
panini, le recomendamos que siempre utilice el
lado “parrilla” de las placas, porque así se
preparan los panini tradicionales. Sin embargo,
dependiendo del tipo de sándwich que desea
preparar, también podrá usar el lado “plancha”
de las placas, o combinar las placas. La función
“sandwichera panini” es muy similar a la función
“parrilla de contacto”. La plancha/parrilla
Griddler
®
Cinco cuenta con una cómoda
agarradera y un sistema de bisagras ajustables
que permiten asar todo tipo de sándwich.
Ejerza una leve presión sobre la agarradera
para asar el sándwich y calentar el pan a gusto.
Si desea asar
varios sándwiches
al mismo tiempo,
asegúrese de que
estos tienen el
mismo grosor,
para que se asen
uniformemente.
Parrilla abierta
Utilice el Griddler
®
Cinco como parrilla abierta
para asar carne, hamburguesas, pechuga de
pollo (no le recomendamos que ase pollo con
hueso, porque no se cocinará uniformemente),
pescado y vegetales.
“Parrilla abierta” se refiere al hecho que las
placas están completamente abiertas,
duplicando la superficie de cocción. Nota:
deberá voltear los alimentos para asarlos por el
otro lado. Para usar el Griddler
®
Cinco como
parrilla abierta, le recomendamos que utilice el
lado “parrilla” de las placas.
La parrilla abierta es
un método de
cocción muy versátil.
Cuando las placas
están abiertas, la
amplia superficie de
asado (1290 cm
2
)
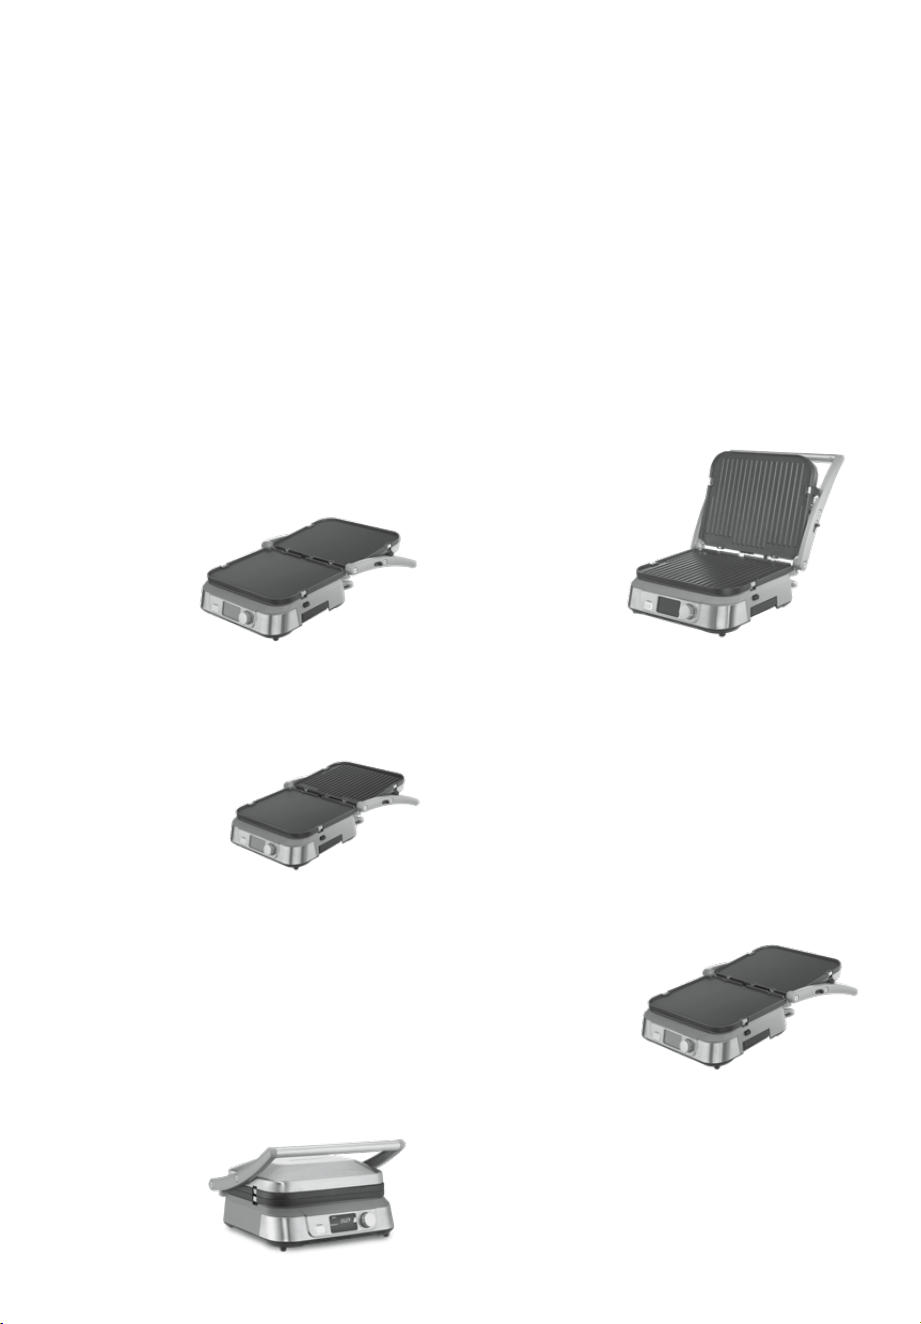
7
permite asar varios tipos de alimentos sin
mezclar sus sabores, o asar grandes
cantidades del mismo alimento al mismo
tiempo.
También permite asar carne de varios grosores,
precisamente al gusto.
Plancha
Utilice el Griddler
®
Cinco como plancha para
preparar panqueques, huevos, tostadas
francesas, croquetas de papa rallada (“hash
browns”) y carne de desayuno.
Para usar el Griddler
®
Cinco como plancha,
abra completamente las placas. Nota: deberá
voltear los alimentos para asarlos por el otro
lado. Para usar el Griddler
®
Cinco como
plancha, utilice el lado “plancha” de las placas.
La función “plancha” es ideal para preparar
desayuno para dos personas o una pequeña
familia. La
amplia
superficie de
cocción permite
cocinar varios
tipos de
alimentos a la
vez, o grandes
cantidades de su receta favorita.
Combinación plancha/parrilla
Utilice la
combinación
“plancha/parrilla”
para preparar
comidas completas,
por ejemplo tocino
asado con huevos,
o papas con bistec.
Para esto, simplemente abra el aparato e
instale una placa del lado “plancha” abajo y
una placa del lado “parrilla” arriba.
INSTRUCCIONES DE
ENSAMBLAJE
Coloque el aparato sobre una superficie limpia,
plana y segura. El aparato tiene tres
posiciones:
Posición cerrada
– La placa
superior
descansa sobre
la placa inferior.
Esta es la posición de precalentamiento y la
posición usada para usar las funciones “parrilla
de contacto” y “sandwichera panini”.
Posición semiabierta – La placa superior está
abierta en un ángulo de 90˚. Mantenga las
placas en esta posición para colocar los
alimentos que va a cocinar usando la función
“parrilla de contacto” o “sandwichera panini”.
Para abrir y bloquear la placa superior,
simplemente alce la agarradera hasta que la
cubierta se bloquee. La cubierta permanecerá
en esta posición hasta que la cierre o que abra
completamente las placas.
Para bajar la cubierta, presione la agarradera
hacia abajo. Las bisagras se ajustarán
automáticamente al grosor de los alimentos
para asarlos
uniformemente.
Al alzar la
agarradera
después de la
cocción para
abrir el Griddler
®
Cinco, la cubierta
seguirá flotando.
Para volver a
poner la cubierta
en la posición semiabierta, retire los alimentos
de la placa, cierre la cubierta, y luego ábrala de
nuevo.
Posición abierta – La placa superior y la placa
inferior están paralelas, formando una amplia
superficie de cocción plana. Esta es la posición
usada para usar las funciones “parrilla abierta”,
“plancha”, y “combinación parrilla/plancha”.
Para abrir completamente las placas, utilice el
botón de liberación de las bisagras.
Agarre la agarradera
con la mano
izquierda y deslice
el botón de
liberación de las
bisagras hacia
delante con la mano
derecha. Empuje la agarradera hacia atrás
hasta que las placas estén completamente
abiertas. Para cambiar de posición, alce la
agarradera y la cubierta, y vuelva a colocar las
placas en la posición cerrada.
Nota: si las placas están en la posición
semiabierta y desea llevarlas a la posición
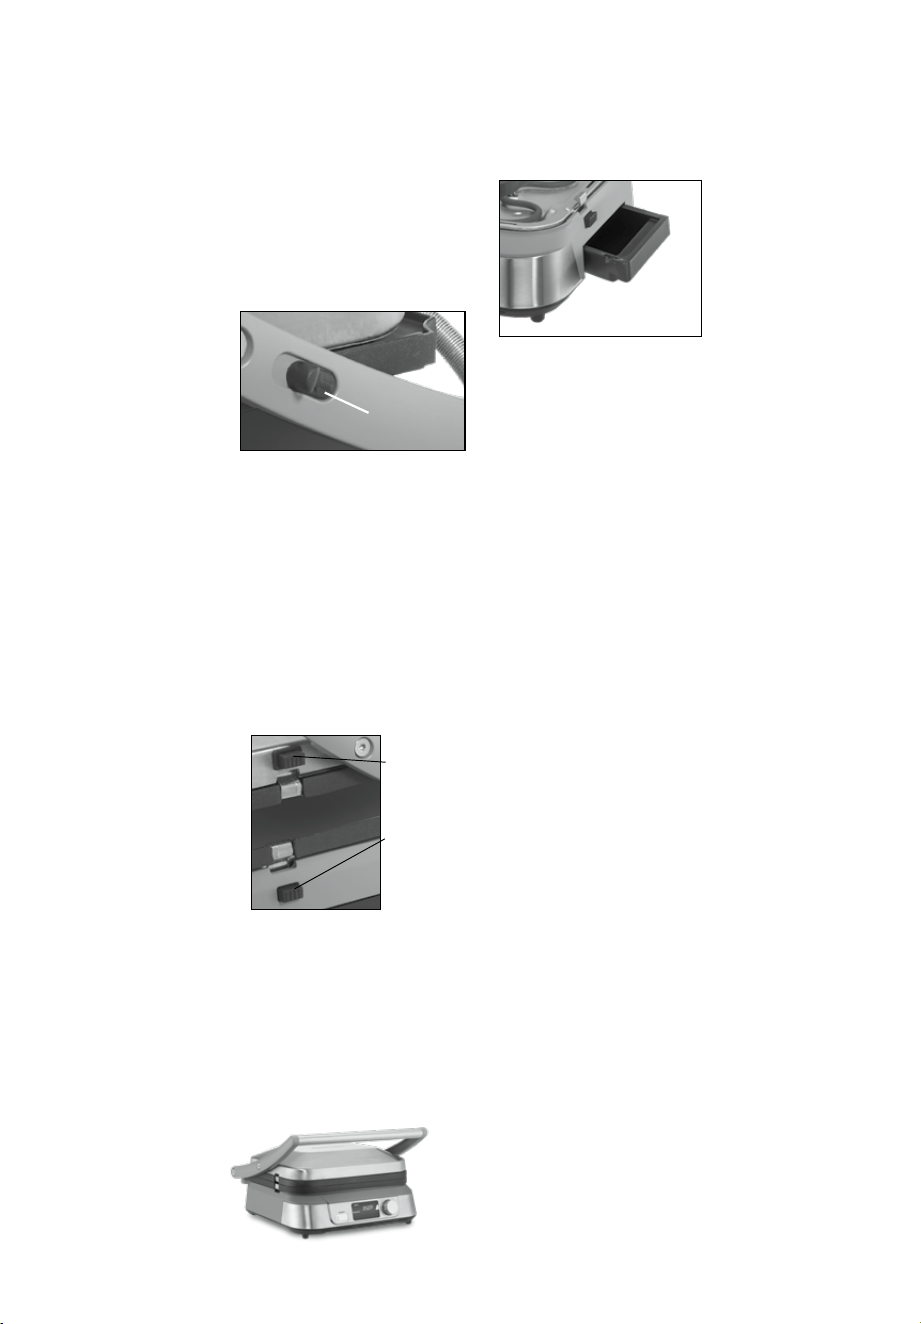
8
abierta, jale ligeramente la agarradera hacia
usted antes de deslizar el botón de liberación
de las bisagras. Luego, empuje la agarradera
hacia atrás, hasta que las dos placas estén
planas. Jalar ligeramente la agarradera aliviará
la presión sobre las bisagras y permitirá ajustar
las placas más fácilmente.
Instalación de las placas
Abra completamente el Griddler
®
Cinco. Instale
una placa a la vez. Cada placa encajará
solamente en un
lado del aparato: la
base o la cubierta.
La parte trasera de
cada placa es el
lado con el pico para
eliminar la grasa.
Localice las abrazaderas de metal en el centro
de la base. Incline la placa hacia atrás y haga
coincidir las muescas con las abrazaderas de
metal. Introduzca la parte trasera de la placa
debajo de las abrazaderas y presione la parte
delantera hacia abajo; la placa se bloqueará.
Voltee el aparato e instale la segunda placa, de
la misma manera.
Remoción de las placas
Permita que el aparato se enfríe y abra
completamente las placas. Ubique el botón de
liberación de la placa
en el costado del
aparato. Presione
firmemente el botón
de liberación; la placa
se liberará
ligeramente de la
base. Sostenga la
placa con ambas
manos, deslícela fuera de las abrazaderas de
metal y álcela. Retire la segunda placa de la
misma manera, presionando el otro botón de
liberación.
Instalación de la bandeja de goteo
Ubique la abertura en el costado de la base.
Introduzca la bandeja de goteo en la abertura,
según se especifica
en esta.
Durante la cocción,
las ranuras en las
placas evacuarán
la grasa hacia la
bandeja de goteo.
Retire lentamente la bandeja de goteo.
Después de cada uso, permita que el aparato
se enfríe y luego tire la grasa. Lave la bandeja,
a mano o en el lavavajillas (bandeja superior
solamente).
Botón de liberación
de las bisagras
Botón de
liberación
de la placa
inferior
Botón de
liberación
de la placa
superior

9
INSTRUCCIONES DE
OPERACIÓN
Después de colocar el Griddler®Cinco sobre
una superficie plana, cerciórese de que las
placas deseadas están instaladas. Enchufe en
cable en una toma de corriente y presione el
botón ON/OFF. La pantalla LCD mostrará la
pantalla de inicio por unos segundos.
Elija el modo de cocción deseado:
Cuando la palabra “GRILL” empiece a
parpadear, debe elegir y confirmar el modo de
cocción deseado. Para esto, gire la perilla de
control en sentido horario o antihorario para
elegir el modo de cocción: “GRILL” (parrilla) o
“GRIDDLE” (plancha). Para confirmar su
selección, presione la perilla de control; el
modo de cocción dejará de parpadear.
Elija la temperatura:
Gire la perilla de control en sentido horario para
aumentar la temperatura o en sentido
antihorario para bajar la temperatura. La
temperatura subirá/bajará en incrementos de
25°F (14°C). Para confirmar su selección,
presione la perilla de control; la temperatura
dejará de parpadear. El Griddler
®
Cinco tiene
temperaturas preprogramadas para ambos
modos, el modo parrilla (“GRILL”) y el modo
plancha (“GRIDDLE”). La temperatura
preprogramada para el modo parrilla (“GRILL”)
es 400˚F (200°C) y la temperatura
preprogramada para el modo plancha
(“GRIDDLE”) es 350˚F (180°C). Cuando el
indicador de temperatura deje de parpadear, el
Griddler
®
Cinco empezará a calentar y la
palabra “PREHEAT” y las barras de
temperatura aparecerán en la pantalla LCD.
Las barras de temperatura muestran el
progreso del precalentamiento. Cuando las 5
barras están iluminadas, esto significa que el
aparato ha alcanzado la temperatura
programada; el aparato también emitirá un
pitido. La palabra “PREHEAT” y las barras de
temperatura desaparecerán de la pantalla LCD.
NOTA: si el ciclo de cocción ha terminado pero
quiere seguir cocinando usando una
temperatura más baja, siga los pasos
anteriores para fijar la nueva temperatura. Las
barras de temperatura se desplazarán desde
abajo hasta arriba, indicando que el aparato se
está enfriando para alcanzar la temperatura
programada.
Programe del tiempo de cocción:
Al final del precalentamiento, cuando el aparato
hay alcanzado la temperatura programada,
“00:00” aparecerá en la pantalla LCD,
parpadeando.
• Temporizador de cuenta regresiva Gire la
perilla de control en sentido horario para
aumentar el tiempo o en sentido antihorario
para reducir el tiempo. NOTA: el tiempo de
cocción se ajusta en incrementos de 30
segundos, hasta un máximo de 59 minutos y
30 segundos. Coloque los alimentos en las
placas, y luego presione la perilla de control
para iniciar el temporizador. Si no elige un
tiempo de cocción, “00:00” desaparecerá de
la pantalla un minuto después del final del
precalentamiento. Para activar el
temporizador en cualquier momento durante
la cocción, simplemente gire la perilla de
control para ajustar el tiempo. Al final del
tiempo programado, la unidad emitirá 3
pitidos y el temporizador empezará una
cuenta progresiva para indicar el tiempo
transcurrido desde el final del ciclo de
cocción. La unidad también emitirá 3 pitidos
cada 10 segundos hasta que la apague. Para
desactivar el pitido, presione la perilla de
control.
• Temporizador de cuenta progresiva
Después del precalentamiento, “00:00”
aparecerá en la pantalla LCD, parpadeando.
Coloque los alimentos en las placas, y luego
presione la perilla de control para iniciar la
cuenta progresiva. El temporizador empezará
la cuenta progresiva, desde 00:00 hasta un
máximo de 59:59. Cuando el tiempo llegue a
59:59, la unidad emitirá 3 pitidos y se
apagará.
Cómo cambiar los ajustes:
Para cambiar el modo de cocción, la
temperatura o el tiempo de cocción en
cualquier momento durante la cocción,
presione y mantenga oprimido la perilla de
control para desplazarse por los ajustes:
“TIME” (tiempo de cocción), “TEMPERATURE”
(temperatura) y “FUNCTION” (modo de
cocción). Suelte la perilla al llegar al ajuste que
desea cambiar; el ajuste empezará a
parpadear. Cambie el ajuste y confirme su
selección; la pantalla pasará automáticamente
al ajuste siguiente.

10
CONSEJOS Y
SUGERENCIAS
• Dependiendo de la temperatura elegida, el
precalentamiento puede tomar hasta 10
minutos.
• Para determinar cómo cocinar sus alimentos
favoritos, véase la guía de cocción/
temperatura en las páginas 28–29 y el libro
de recetas.
• Siempre tenga mucho cuidado al manipular
el Griddler
®
Cinco, ya que el cuerpo del
aparato se pone muy caliente durante el uso.
Para abrir las placas, agarre la agarradera.
Los “brazos” de la agarradera están hechos
de aluminio fundido a presión y se pondrán
muy calientes durante el uso; no los toque
durante o inmediatamente después del uso.
• La cubierta, hecha de acero inoxidable,
también se pone muy caliente durante el uso;
no la toque durante o inmediatamente
después del uso. Si necesita ajustar la
cubierta durante el uso, utilice guantes para
el horno/manoplas.
• La base del aparato, hecha de plástico,
también puede ponerse muy caliente durante
el uso. Si necesita mover el aparato durante
el uso, sosténgalo por la base, usando
guantes para el horno/manoplas. No toque la
cubierta.
• Permita que el aparato se enfríe durante por
lo menos 30 minutos antes de manipularlo.
• Puede que el aparato produzca humo y un
ligero olor a quemado la primera vez que lo
use; esto es normal.
• El Griddler
®
Cinco incluye un limpiador/
raspador negro para limpiar las placas.
Permita que el aparato se enfríe durante por
lo menos 30 minutos antes de limpiar las
placas con el raspador; el contacto
prolongado con las placas calientes podría
hacer que el plástico se derrita.
• Nunca utilice utensilios de metal; esto puede
dañar el revestimiento antiadherente de las
placas.
• No permita que utensilios de plástico (incluso
el limpiador/raspador provisto) tengan
contacto con las placas calientes.
• Entre las recetas, empuje los residuos de
alimentos hacia la bandeja de goteo, usando
una espátula de madera o de plástico a
prueba de calor. Luego, restriegue
cuidadosamente las placas con un papel
absorbente antes de pasar a la receta
siguiente.
LIMPIEZA Y
MANTENIMIENTO
Permita que la unidad se enfríe por 30
minutos o más antes de manipularla.
• Apague el aparato, presionando el botón ON/
OFF, y desconecte el cable de la toma de
corriente.
• Utilice el limpiador/raspador provisto para
desalojar los residuos de alimentos de las
placas. Lave el raspador a mano o en el
lavavajillas (bandeja superior solamente).
• Tire a la basura la grasa acumulada en la
bandeja de goteo. Lave la bandeja de goteo
a mano o en el lavavajillas (bandeja superior
solamente).
• Retire las placas, presionando los botones de
liberación. Importante: permita que las placas
se enfríen por 30 minutos o más antes de
retirarlas o limpiarlas. Lave las placas a mano
o en el lavavajillas. No utilice utensilios de
metal para limpiar las placas. No utilice
estropajos metálicos; esto puede dañar el
revestimiento antiadherente de las placas.
• Nota: después de cocinar mariscos, le
recomendamos que restriegue las placas con
limón para evitar que los alimentos cocinados
después tengan sabor a mariscos.
• Limpie la base, la cubierta y el panel de
control con un paño suave y seco. Utilice un
paño ligeramente humedecido para quitar las
manchas resistentes. Nunca utilice
limpiadores abrasivos ni estropajos
metálicos.
Cualquier otro servicio debe ser realizado por
un técnico autorizado.
ALMACENAJE
Asegúrese de que el aparato está frío y seco
antes de guardarlo.
El cable puede enrollarse alrededor de la parte
trasera de la base.
Guarde las placas y la bandeja de goteo en el
aparato. Guarde el raspador en un cajón o
gabinete.

11
Garantía Limitada
Sujeto a las exclusiones y limitaciones contenidas
en este documento, Conair LLC/Cuisinart
(“Cuisinart”) garantiza que este Producto
Cuisinart
®
estará libre de defectos de materiales y
fabricación en condiciones normales de uso
doméstico durante un período de TRES (3) años a
partir de la fecha de compra del Producto en su
embalaje original sellado, a menos que se
especique lo contrario en esta Garantía Limitada.
Esta Garantía Limitada es solo para consumidores
de Estados Unidos (denidos aquí como
compradores al por menor para uso personal,
familiar o doméstico) que compren originalmente
el Producto a Cuisinart o a un revendedor
autorizado de Cuisinart. Si no está seguro de si un
minorista u otro punto de venta es un revendedor
autorizado de Cuisinart, póngase en contacto con
Cuisinart.
Esta Garantía Limitada NO cubre:
• El desgaste normal;
• Cualquier Producto adquirido por compradores
comerciales o para usos comerciales o no
domésticos;
• Accesorios, piezas o programas añadidos al
Producto después de que Cuisinart lo haya
enviado;
• Cualquier costo asociado con el reemplazo o
reparación del Producto, incluyendo mano de
obra, instalación u otros costos incurridos por
usted sin previa aprobación de Cuisinart;
• Daños, defectos y fallas debidos a: (1) causas
externas, incluyendo el envío, accidentes,
problemas con el suministro eléctrico (el
Producto está diseñado para su uso exclusivo
con enchufes de 120 V), condiciones
anormales (como mecánicas o
medioambientales); (2) uso no conforme a las
instrucciones del Producto; (3) uso indebido,
negligencia, alteración no autorizada,
reparación no autorizada; y (4) casos fortuitos
u otros acontecimientos fuera del control de
Cuisinart;
• Aunque cualquier empresa puede realizar las
reparaciones y el mantenimiento necesarios,
los daños causados por usted o por terceros
no autorizados pueden anular esta Garantía
Limitada;
• Los daños causados por accesorios o
repuestos no autorizados especícamente por
Cuisinart pueden anular esta Garantía
Limitada; y
• Cualquier Producto cuyas marcas de
identicación originales (marca comercial o
número de serie) hayan sido retiradas,
alteradas o borradas del Producto.
Se recomienda llenar el formulario de registro
disponible en https://cuisinart.registria.com a n
de facilitar la vericación de la fecha de compra
original de este producto. Sin embargo, no es
necesario registrar el producto para recibir
servicio bajo esta garantía. En ausencia de prueba
de la fecha de compra, el período de garantía será
calculado a partir de la fecha de fabricación
del producto.
Garantía de sin dificultades
Si el Producto objeto de esta Garantía Limitada
falla durante el período de garantía por razones
cubiertas por esta Garantía Limitada, Cuisinart, a
su elección, reparará el Producto, sustituirá el
Producto por otro idéntico o razonablemente
equivalente, o si Conair no puede reparar o
sustituir el Producto, reembolsará al consumidor
el precio de compra, menos la cantidad
directamente atribuible al uso anterior del
Producto por parte del consumidor. Para obtener
una etiqueta de devolución, contáctenos,
visitando https://www.cuisinart.com/customer-
care/product-assistance/product-inquiry// o
llamando a nuestro servicio de atención al cliente,
al 1-800-726-0190, para hablar con un
representante.
Tras la recepción del Producto, Conair
inspeccionará el Producto y, si lo requiere esta
Garantía Limitada, intentará reparar, reemplazar o
reembolsar el Producto en un plazo de treinta (30)
días. No obstante, pueden producirse retrasos
fuera del control de Cuisinart, en cuyo caso dicho
plazo
podrá ampliarse en la medida en que sea
razonablemente necesario.
IMPORTANTE: Si debe llevar el producto
defectuoso a un centro de servicio no autorizado,
por favor informe al personal del centro de
servicio que deben llamar al servicio de atención
al cliente Cuisinart, al 1-800-726-0190, a n de
diagnosticar el problema correctamente, usar las
piezas correctas para repararlo y comprobar que
el producto aún esté bajo garantía.
Residentes de California
El período de Garantía Limitada de TRES (3) años
comienza en la fecha de entrega del Producto,
que puede ser diferente de la fecha de compra
del Producto. Los residentes en California también
tienen la opción de obtener los benecios de esta
Garantía Limitada devolviendo el producto
defectuoso (A) a la tienda donde lo compraron, o
(B) a otra tienda que venda productos Cuisinart
®
del mismo tipo. La tienda podrá, a su elección,
reparar el producto, referir al consumidor a un
centro de servicio independiente, sustituir el
producto por uno idéntico o razonablemente
equivalente, o reembolsar al consumidor el precio
de compra menos la cantidad directamente

12
atribuible al uso anterior del producto por el
consumidor.
Los residentes de California también pueden, si lo
desean, enviar el producto defectuoso
directamente a Cuisinart para que sea reparado o
sustituido por uno idéntico o razonablemente
equivalente. Para esto, deben llamar a nuestro
servicio de atención
al cliente al 1-800-726-0190. Cuisinart será
responsable por los gastos de reparación,
reemplazo, manejo y envío de los productos
defectuosos durante el período de garantía.
ESTA GARANTÍA LIMITADA LE OTORGA DERECHOS
LEGALES ESPECÍFICOS, Y TAMBIÉN PUEDE TENER
OTROS DERECHOS QUE VARÍAN DE UN ESTADO A
OTRO O EN FUNCIÓN DE LA JURISDICCIÓN. EN
CASO DE INCUMPLIMIENTO DE ESTA GARANTÍA
LIMITADA, USTED PUEDE RECLAMAR LA
SUSTITUCIÓN, UNA INDEMNIZACIÓN POR DAÑOS Y
PERJUICIOS U OTRAS SANCIONES.
LIMITACIONES DE RESPONSABILIDAD/
LIMITACIONES Y EXCLUSIONES ADICIONALES
TODAS LAS GARANTÍAS EXPRESAS E IMPLÍCITAS
TIENEN UNA DURACIÓN LIMITADA AL PERÍODO DE
GARANTÍA LIMITADA. NO SE APLICARÁ NINGUNA
GARANTÍA DESPUÉS DE ESTE PERÍODO. ALGUNOS
ESTADOS NO PERMITEN LIMITACIONES EN LA
DURACIÓN DE UNA GARANTÍA IMPLÍCITA, DE
MODO QUE LAS LIMITACIONES MENCIONADAS
PUEDEN NO REGIR PARA USTED. LA
RESPONSABILIDAD DE CUISINART BAJO ESTA O
CUALQUIER OTRA GARANTÍA, IMPLÍCITA O
EXPRESA, SE LIMITA A LA REPARACIÓN,
SUSTITUCIÓN O REEMBOLSO, SEGÚN LO
ESTABLECIDO ANTERIORMENTE. ESTOS
RECURSOS SON LOS ÚNICOS Y EXCLUSIVOS EN
CASO DE INCUMPLIMIENTO DE LA GARANTÍA. EN
LA MEDIDA MÁXIMA PERMITIDA POR LA LEY,
CUISINART NO SE HACE RESPONSABLE DE
NINGÚN DAÑO DIRECTO, INDIRECTO, ESPECIAL,
INCIDENTAL O CONSECUENTE RESULTANTE DE
CUALQUIER INCUMPLIMIENTO DE LA GARANTÍA O
BAJO CUALQUIER OTRA TEORÍA LEGAL
(INCLUYENDO, PERO NO LIMITADO A, LUCRO
CESANTE, TIEMPO DE INACTIVIDAD, PÉRDIDA DEL
FONDO DE COMERCIO, DAÑOS O SUSTITUCIÓN DE
EQUIPOS Y BIENES, Y CUALQUIER COSTE DE
RECUPERACIÓN, REPROGRAMACIÓN O
REPRODUCCIÓN DE CUALQUIER PROGRAMA O
DATOS ALMACENADOS EN O UTILIZADOS CON UN
SISTEMA QUE CONTENGA EL PRODUCTO),
INCLUSO SI CONAIR HA SIDO ADVERTIDO DE LA
POSIBILIDAD DE TALES DAÑOS. ALGUNOS
ESTADOS NO PERMITEN LA EXCLUSIÓN O
LIMITACIÓN DE DAÑOS ESPECIALES,
INCIDENTALES O CONSECUENTES, DE MODO QUE
LAS LIMITACIONES MENCIONADAS PUEDEN NO
REGIR PARA USTED. TODAS LAS GARANTÍAS
EXPRESAS E IMPLÍCITAS TIENEN UNA DURACIÓN
LIMITADA AL PERÍODO DE GARANTÍA LIMITADA.
NO SE APLICARÁ NINGUNA GARANTÍA DESPUÉS
DE ESTE PERÍODO. ALGUNOS ESTADOS (O
JURISDICCIONES) NO PERMITEN LIMITACIONES
EN LA DURACIÓN DE
UNA GARANTÍA IMPLÍCITA, DE MODO QUE LAS
LIMITACIONES MENCIONADAS PUEDEN NO REGIR
PARA USTED.
Esta Garantía Limitada es emitida por:
Conair LLC
1 Cummings Point Road
Stamford, CT 06902
1-800-726-0190

13
RECETAS
Panqueques de suero de leche con arándanos azules ...................................................... 14
Tortas de desayuno ........................................................................................................... 14
Tostadas francesas de pan Jalá ......................................................................................... 15
Mini “hash browns” (croquetas de papas ralladas) ........................................................... 15
Habichuelas asadas con pesto de nueces-menta ............................................................. 16
Ensalada de durazno asado................................................................................................ 17
Ensalada de vegetales asados ........................................................................................... 17
Hamburguesas vegetarianas de frijoles negros .................................................................. 18
Quesadillas de pollo “Buffalo” ............................................................................................ 18
Salmón a la “chermoula” con papas asadas ...................................................................... 19
Sándwiches cubanos ........................................................................................................ 20
Kebabs al estilo griego........................................................................................................ 21
Pizza de tocino y aceitunas asada ..................................................................................... 21
Hamburguesas con cebolla caramelizada y queso Gruyère .............................................. 22
Panini italianos de pollo asado ........................................................................................... 22
Chuletas de cerdo al estilo latino ........................................................................................ 23
Fajitas de camarones ........................................................................................................ 23
Bistec de falda con salsa chimichurri ................................................................................. 24
Panini de aguacate, queso y tomate .................................................................................. 25
Panini de crema de chocolate y avellanas con fresas ....................................................... 25
Piña asada .......................................................................................................................... 26
Panini de malvaviscos con chocolate ................................................................................. 26

14
Panqueques de suero de leche con
arándanos azules
El suero de leche y la ralladura de limón dan
a estos panqueques ligeros y esponjosos un
agradable sabor agrio.
Placas del lado: plancha
Posición: abierta
Rinde aproximadamente 12 panqueques de 4
pulgadas (10 cm)
1½ tazas (185 g) de harina común
1½ cucharaditas de polvo de hornear
½ cucharadita de bicarbonato de sodio
¼ cucharadita de sal kosher
¼ cucharadita de canela en polvo
1½ tazas (365 g) de suero de leche
(“buttermilk”)
2 huevos grandes
1 cucharada de jarabe de arce/maple
puro
½ cucharadita de extracto natural de
vainilla
1 taza (140 g) de arándanos azules
frescos
½ cucharadita de ralladura de limón
1 cucharadita (5 g) de mantequilla sin
sal (opcional)
1. Poner la harina, el bicarbonato, la sal y
la canela en un tazón grande. Batir para
mezclar; reservar.
2. Colocar el suero de leche, los huevos, el
jarabe de arce y la vainilla en otro tazón
grande; batir para mezclar. Agregar a
la mezcla de ingredientes secos y batir
brevemente para incorporar (pueden
quedar secciones secas). Agregar los
arándanos azules y la ralladura; mezclar
brevemente para incorporar (no mezclar
mucho, o los panqueques pueden
resultar duros)
3. Encender el Griddler
®
Cinco. Elegir la
función “GRIDDLE” (plancha) y ajustar la
temperatura a 350°F.
4. Después del precalentamiento, verter
porciones de ¼ de taza (60 ml) de
la mezcla en las placas. Si le gustan
los panqueques muy mantecosos,
colocar media cucharada (5 g a 10g)
de mantequilla en cada placa antes de
formar los panqueques. Iniciar la cuenta
progresiva. Cocinar los panqueques por 4
a 5 minutos, hasta que aparezcan burbujas
en la superficie. Luego, voltearlos y
cocinarlos por 3 minutos adicionales.
5. Servir, en platos calientes. Para mantener
los panqueques calientes, colocarlos sobre
una placa para horno y meterlos al horno
en 200 °F (100°C). Repetir con el resto de
la mezcla.
Información nutricional por porción (2 panqueques):
Calorías 189 (32 % de grasa) Carbohidratos 24 g
• Proteínas 7 g • Grasa 7g Grasa saturada 2 g •
Colesterol 171 mg • Sodio 203 mg • Calcio 102 mg •
Fibra 1 g
Tortas de desayuno
Si le gustan las cosas picantes, utilice chorizo
español ahumado picante.
Placas del lado: plancha abajo, parrilla arriba
Posición: semiabierta y abierta, y luego cerrada
Rinde 2 tortas
1 cucharada de aceite vegetal
4 huevos
2 panecillos tipo “Kaisersemmel”,
partidos longitudinalmente a la mitad
½ aguacate
2 onzas (55 g) de chorizo español, en
rodajas oblicuas delgadas
2 cucharadas de salsa verde comprada
+ un poco más para servir
2 tajadas de queso Monterrey Jack
1. Encender el Griddler
®
Cinco. Elegir la
función “GRIDDLE” (plancha) y ajustar la
temperatura a 350°F.
2. Después del precalentamiento, rociar 2
cucharaditas del aceite vegetal en la paca
inferior. Romper los huevos en la placa
inferior. Fijar el temporizador de cuenta
progresiva en 5 minutos. Después de 3
minutos (cuando las claras están cuajadas
y opacas), voltear los huevos. Al final del
tiempo, colocar un huevo en la mitad
inferior de cada panecillo. Reservar.
3. Mientras los huevos se están cociendo,
dividir el aguacate uniformemente entre los
dos panecillos, colocándolos en la mitad
superior de cada panecillo. Aplastar el
aguacate con un tenedor para que forme
una capa uniforme. Reservar.

15
4. Después de cocinar los huevos, colocar
el chorizo en la placa inferior y cerrar las
placas. Ajustar la temperatura a 425°F. Al
final del ciclo de precalentamiento, retirar
el chorizo de la placa y colocarlo encima
de los huevos, formando una capa
uniforme.
5.
Rociar cada sándwich con 1 cucharada
de la salsa. Agregar una tajada de queso
y cerrar cada sándwich con la mitad de
panecillo con aguacate aplastado.
6. Cepillar la parte superior de cada
sándwich con el aceite restante. Colocar
ambos sándwiches en el Griddler
®
.
Cerrar la unidad e iniciar la cuenta
progresiva. Presionar ligeramente la
agarradera por 20 segundos. Cocinar
por aproximadamente 4 minutos, hasta
que el queso esté derretido y que la
parte superior de los sándwiches esté
ligeramente dorada y tenga las marcas
de la parrilla.
7. Retirar del Griddler
®
y dejar enfriar
ligeramente. Cortar diagonalmente a la
mitad. Servir con más salsa, al lado de
cada sándwich.
Información nutricional por porción de 1 torta: Calorías
789 (59 % de grasa) • Carbohidratos 42 g Proteínas 39
g • Grasa 52 g • Grasa saturada 18 g Colesterol 435
mg • Sodio 1229 mg • Calcio
482 mg • Fibra 4 g
Tostadas francesas de pan Jalá
El pan Jalá es perfecto para hacer tostadas
francesas. Su textura densa y suave hace
que absorbe la mezcla mejor que otros
panes, dando lugar al desayuno más
exquisito.
Placas del lado: plancha
Posición: abierta
Rinde 8 porciones
8 huevos grandes
2 tazas (475 ml) de leche baja en
grasa o regular
1 cucharada de extracto natural de
vainilla
2 cucharadas de jarabe de arce/
maple puro
1 cucharadita de canela en polvo
1 pizca de nuez moscada rallada
1 a 2 pizcas de sal kosher
8 rebanadas gruesas de pan Jalá
Mantequilla sin sal o aceite de
coco para engrasar las placas
Azúcar glasé para servir
Frutas frescas, para servir
1. Colocar los huevos, la leche, la vainilla,
el jarabe de arce, la canela, la nuez
moscada y la sal en un tazón mediano.
Batir y verter la mezcla en un molde de
13 x 9 pulgadas (32 cm x 22 cm).
2. Remojar la mitad del pan en la mezcla de
leche, dando vuelta a las rebanadas para
que ambos lados estén saturados.
3. Mientras el pan se está remojando,
encender el Griddler
®
. Elegir la función
“GRIDDLE” (plancha) y ajustar la
temperatura a 350°F.
4. Después del precalentamiento, colocar
las rebanadas de pan en las placas
calientes e iniciar la cuenta progresiva.
Cocinar por 3½ a 4 minutos por lado.
Mientras las tostadas francesas se
están cocinando, poner a remojar las
rebanadas restantes.
5. Retirar y reservar las tostadas francesas
cocinadas; repetir con el resto del pan.
6. Para servir: espolvorear con azúcar glasé
y servir con frutas frescas y jarabe de
arce si desea.
Información nutricional por porción:
Calorías 195 (32 % de grasa) • Carbohidratos 25 g
• Proteínas 7 g • Grasa 7 g • Grasa saturada 3 g •
Colesterol 172 mg • Sodio 208 mg • Calcio 116 mg •
Fibra 1 g
Mini “hash browns” (croquetas de
papas ralladas)
Revolver rápidamente las papas ralladas en
agua salada y luego estrujarlas para eliminar
todo el líquido evita que las papas se oxiden.
Placas del lado: plancha
Posición: abierta
Rinde 8 porciones
2 tazas (475 ml) de agua
2 cucharaditas + una pizca de sal
kosher
1 libra (455 g) de papas Yukon Gold

16
1 pizca de pimienta negra reciénmolida
3 cucharadas aceite de oliva + un poco
más para engrasar las placas
1. Colocar el agua y 2 cucharaditas de la sal
en un tazón mediano. Batir hasta que la sal
esté completamente disuelta; reservar.
2. Rallar las papas (rallado medio), usando el
disco triturador medio de una procesadora
de alimentos Cuisinart
®
o un rallador de
caja. Colocar inmediatamente las papas
ralladas en el agua salada y revolver varias
veces. Escurrir las papas y colocarlas en
una toalla limpia; estrujar para eliminar el
agua.
3. Colocar las papas ralladas estrujadas en un
tazón mediano y agregar la sal remanente,
la pimienta y 3 cucharadas del aceite;
revolver.
4. Encender el Griddler
®
. Elegir la función
“GRIDDLE” (plancha) y ajustar la
temperatura a 425°F.
5. Después del precalentamiento, cepillar
las placas con aceite y formar croquetas
de ¼ de taza (colocar 4 croquetas por
lado). Iniciar la cuenta progresiva. Aplastar
ligeramente las croquetas con una espátula
a prueba del calor. Cepillar la parte superior
con aceite y asar por 6 a 8 minutos, hasta
que la parte inferior esté dorada y crujiente.
Voltear cuidadosamente cada croqueta y
cocinar por 8 minutos adicionales.
6. Retirar de las placas y colocar en una rejilla
mientras cocina la tanda siguiente.
Información nutricional por croqueta: Calorías 89 (51 %
de grasa) • Carbohidratos 10 g • Proteínas 1 g • Grasa 5
g • Grasa saturada 1 g • Colesterol 0 mg • Sodio 146 mg
• Calcio 7 mg • Fibra 1 g
Habichuelas asadas
con pesto de nueces-menta
Mientras estas habichuelas con pesto se
enfrían, los sabores se destacan aún más,
haciendo que sean perfectos para las fiestas.
Placas del lado: parrilla
Posición: cerrada
Rinde
2
/
3
de taza (160 ml) de pesto y 2½ tazas
de habichuelas
1 diente de ajo pequeño
1 cucharada de hojas de menta fresca
1 tira de 1 pulgada (2.5 cm) de cáscara
de limón pelada
¼ taza (30 g) de nueces tostadas
1 cucharada de queso Parmesano
rallado
2 cucharaditas de jugo de limón
½ cucharadita de sal
¼ cucharadita de pimienta negra recién
molida
½ taza (120 ml) de aceite de oliva virgen
extra
16 onzas (455 g) de habichuelas/judías
verdes, limpias
1 cucharada de aceite de oliva
½ cucharadita de sal
¼ cucharadita de pimienta negra recién
molida
¼ cucharadita de ralladura de limón
1. Preparar el pesto de nueces-menta: colocar
el ajo en el bol de una mini picadora.
Procesar hasta que esté finamente picado.
Raspar el bol y agregar la menta y la
cáscara de limón. Pulsar para picar grueso.
Agregar los ingredientes restantes, excepto
el aceite de oliva. Pulsar para mezclar.
Encender la procesadora y verter el aceite
de oliva en el empujador; procesar hasta
que la mezcla esté suave. Reservar.
2. Encender el Griddler
®
. Elegir la función
“GRILL” (parrilla) y ajustar la temperatura a
425°F.
3. Revolver las habichuelas con el aceite
de oliva y sazonar con sal y pimienta.
Después del precalentamiento, esparcir
la mitad de las habichuelas en la placa
inferior, en una sola capa. Cerrar las placas
e iniciar la cuenta progresiva. Asar por
aproximadamente 8 minutos, hasta que
las habichuelas estén suaves y tengan
las marcas de la parrilla. Colocar las
habichuelas asadas en un cuenco grande y
repetir con las habichuelas restantes.
4. Después de haber asado todas las
habichuelas, agregar 2 cucharadas del
pesto de nueces con menta y ralladura de
limón*.
* El pesto restante puede conservarse en el
refrigerador por hasta 2 semanas, y usarse en
sopas o pasta.

17
Información nutricional por porción de 1 taza
(235 ml): Calorías 199 (72 % de grasa) • Carbohidratos
12 g • Proteínas 3g • Grasa 16 g • Grasa saturada 2 g
• Colesterol 0 mg • Sodio
565 mg • Calcio 100 mg • Fibra 5 g
Ensalada de durazno asado
Almuerzo de verano rápido, listo en tan solo
minutos.
Función: parrilla
Posición: cerrada
Rinde 2 porciones
3 duraznos, partidos a la mitad
2 tazas llenas (120 g) de rúcula/
rúgula/arúgula tierna
4 onzas (115 g) de queso Mozzarella
fresco*
2 onzas (55 g) de jamón de Parma
(Prosciutto)
1 cucharadita de reducción de
vinagre balsámico
1 cucharada (15 ml) de aceite de
oliva virgen extra
Sal kosher
Pimienta negra recién molida
1. Encender el Griddler
®
. Elegir la función
“GRILL” (parrilla) y ajustar la temperatura
a 400°F.
2. Después del precalentamiento, colocar
los duraznos en la placa inferior, el lado
cortado apuntando hacia abajo e iniciar
la cuenta progresiva. Cerrar las placas
y asar por aproximadamente 8 minutos,
hasta que los duraznos estén suaves y
tengan las marcas de la parrilla.
3. Mientras los duraznos se están asando,
colocar la rúcula y el queso en un tazón
grande. Agregar el aceite de oliva, la sal y
la pimienta; revolver. Colocar la ensalada
en el centro de un plato para servir
redondo grande. Disponer los duraznos
asado y el jamón de Parma encima de
la ensalada. Rociar con la reducción de
vinagre balsámico.
* Si no tiene Mozzarella, puede sustituirle
Burrata. En vez de mezclar el queso con
la rúcula, el aceite, la sal y la pimienta,
disponerlo encima de la ensalada, junto con
los duraznos y el jamón de Parma.
Información nutricional por porción (basada
en 2 porciones): Calorías 389 (52 % de grasa)
Carbohidratos 24 g • Proteínas 22 g • Grasa 22 g
Grasa saturada 8 g • Colesterol 435 mg • Sodio 861
mg • Calcio 158 mg • Fibra 4 g
Ensalada de vegetales asados
Esta hermosa ensalada de vegetales asados
es perfecta cuando recibe invitados.
Placas del lado: parrilla
Posición: cerrada
Rinde aproximadamente 8 tazas
1 pimiento dulce rojo mediano, en
tiras de 1–1½ pulgadas (2.5 cm a 4
cm)
1 pimiento dulce amarillo mediano,
en tiras de 1–1½ pulgadas (2.5 cm
a 4 cm)
1 calabacín/calabacita (“zucchini”)
mediana, en tajadas horizontales
de ¼ de pulgada (0.5 cm)
1 berenjena mediana, en tajadas
horizontales de ¼ de pulgada (0.5
cm)
1 cebolla roja mediana, en pedazos ,
con la raíz intacta
½ libra (225 g) de espárragos, limpios
y pelados
1 cucharada de jugo de limón fresco
¼ taza (60 ml) de aceite de oliva
virgen extra
2 a 3 onzas (55 g a 85 g) de queso
Ricotta Salata, desmenuzado
½ taza (100 g) de aceitunas negras
“Kalamata” deshuesadas, picadas
grueso
½ taza (30 g) de hojas de albahaca
fresca
1. Encender el Griddler
®
. Elegir la función
“GRILL” (parrilla) y ajustar la temperatura
a 425°F.
2. Asar los vegetales en tandas, en la
posición cerrada, hasta que estén suaves
y tengan las marcas de la parrilla. Los
pimientos se demoran aproximadamente
8 minutos, los calabacines 5 minutos,
la berenjena 6 a 8 minutos, la cebolla
roja 5 minutos, y los espárragos 3 a 4
minutos. Cuando todos los vegetales
estén asados, colocarlos en un cuenco

18
grande, agregar el jugo de limón, el aceite
de oliva, el queso, las aceitunas y las hojas
de albahaca y revolver.
3. Servir inmediatamente.
Información nutricional por porción (basada en 8
porciones): Calorías 147 (65 % de grasa) Carbohidratos
11 g • Proteínas 3 g • Grasa 11 g Grasa saturada 2 g •
Colesterol 6 mg • Sodio
312 mg • Calcio 60 mg • Fibra 3 g
Hamburguesas vegetarianas de
frijoles negros
Repletas de proteínas y adornadas con
coloridos vegetales ricos en vitaminas,
estas hamburguesas les encantarán tanto
a los vegetarianos como a los demás. Una
procesadora de alimentos Cuisinart
®
facilitará
la preparación, pero todos los ingredientes se
pueden preparar fácilmente a mano.
Placas del lado: plancha
Posición: abierta
Rinde 6 hamburguesas
1 cucharada aceite de oliva + un poco
más para engrasar las placas
2 dientes de ajo, finamente picados
¼ cebolla amarilla mediana a grande,
finamente picada
½ cucharadita de sal kosher
1 pizca de pimienta negra recién
molida
1 lata de 15 onzas (440 g) de frijoles
negros, escurridos y enjuagados
½ chipotle en adobo picado + 1
cucharadita del adobo
½ taza (120 ml) de agua (aproximado;
puede que no necesite toda el agua)
1 taza (185 g) de quinua cocinada
½ taza (100 g) de zanahoria picada
½ taza (100 g) de calabacín/calabacita
picado
¼ taza (15 g) de cilantro fresco picado
6 panes para hamburguesas
1 aguacate, en tajadas
1. Calentar el aceite a fuego medio, en un
sartén mediano. Cuando esté caliente,
agregar el ajo, la cebolla y ¼ de cucharadita
de la sal y de la pimienta. Saltear por
aproximadamente 5 minutos, hasta
que estén tiernos y fragantes. Agregar
los frijoles negros, el chipotle, el adobo
reservado y suficiente agua como para
evitar que la mezcla se reseque. Cocinar
por aproximadamente 10 minutos, hasta
que los frijoles estén suaves y puedan
majarse fácilmente (agregar más agua si es
necesario).
2. Cuando los frijoles estén suaves, agregar
la sal restante, la quinua, la zanahoria y
el calabacín. Agregar 2 a 3 cucharadas
más de agua, revolver y cocinar a fuego
medio lento, parcialmente tapado, por
aproximadamente 5 minutos, hasta que los
vegetales empiecen a suavizarse.
3. Colocar la mezcla en el bol de una
procesadora de alimentos Cuisinart
®
equipada con cuchilla picadora. Agregar el
cilantro y pulsar 4 o 5 veces para majar la
mezcla.
4. Encender el Griddler
®
. Elegir la función
“GRIDDLE” (plancha) y ajustar la
temperatura a 375°F.
5. Mientras la unidad se está calentando,
preparar hamburguesas de
1
/
3
de taza de la
mezcla. Nota: si la mezcla está demasiado
caliente, permitir que se enfríe ligeramente
primero.
6. Después del precalentamiento, cepillar
las placas con aceite, colocar las
hamburguesas en las placas e iniciar la
cuenta progresiva. Cepillar la parte superior
con aceite y cocinar por 3 a 4 minutos,
hasta que la parte inferior esté dorada y
que las hamburguesas empiecen a ponerse
firmes. Después de este tiempo, dar la
vuelta y cocinar por el otro lado por 3 a 4
minutos.
7. Para servir, colocar la hamburguesa en el
pan y cubrir con tajadas de aguacate. Servir
inmediatamente.
Información nutricional por hamburguesa: Calorías 236
(25 % de grasa) • Carbohidratos 36 g Proteínas 8 g •
Grasa 7 g • Grasa saturada 1g Colesterol 0mg • Sodio
410 mg • Calcio 87 mg Fibra 5 g
Quesadillas de pollo “Buffalo”
No podrá parar de comer estas irresistibles
quesadillas. Son perfectas para las fiestas y
reuniones, ya que pueden mantenerse calientes
en el horno después de cortarlas.
Placas del lado: plancha
Posición: cerrada

19
Rinde 6 quesadillas
2 libras (910 g) de muslos de pollo,
deshuesados y sin piel
2 tazas (475 ml) de salsa picante
“Buffalo”
4 tazas (480 g) de mezcla de queso
mexicano rallado
12 cucharadas (180 g) de queso crema
1½ cucharadas de aceite vegetal
12 tortillas de trigo de 7 a 8 pulgadas
(18 cm a 20 cm)
Aderezo de queso azul para servir
Bastoncitos de apio para servir
1. Encender el Griddler
®
. Elegir la función
“GRIDDLE” (plancha) y ajustar la
temperatura a 425°F.
2. Después del precalentamiento, colocar
el pollo en la placa inferior. Cerrar las
placas y asar por 8 minutos, hasta que el
pollo esté completamente cocido. Retirar
del Griddler
®
y dejar enfriar ligeramente.
Cortar el pollo en trozos delgados y
mezclar con 1½ tazas (355 ml) de la salsa
“Buffalo”. Reservar.
3. Mientras el pollo se está cocinando,
mezclar el queso crema con ½ taza
(120 ml) de la salsa “Buffalo”. Esparcir
aproximadamente 1 cucharada de la
mezcla de queso crema en el centro
de una tortilla, dejando una orilla de
1 pulgada (2.5 cm) todo alrededor.
Rociar con
1
/
3
de taza de queso rallado.
Añadir ½ cucharón del pollo y
1
/
3
de
taza adicional de queso rallado. Esparcir
otra cucharada del queso crema en otra
tortilla, dejando una orilla de 1 pulgada
(2.5 cm) todo alrededor. Colocar la tortilla
con queso crema por encima de la tortilla
con pollo, el lado con queso crema
apuntando hacia abajo. Cepillar la parte
superior con aceite vegetal.
4. Cuando el pollo esté listo, ajustar la
temperatura del Griddler
®
a 375°F.
Cuando la unidad alcance esta
temperatura, colocar la quesadilla en la
placa inferior y cerrar las placas. Cocinar
por 3 a 3½ minutos, hasta que el queso
esté derretido y que la parte superior
de la quesadilla esté dorada y crujiente.
Retirar del Griddler
®
, dejar que se enfríe
ligeramente y cortar en 8 pedazos.
Repetir con el resto de los ingredientes.
Información nutricional por porción (una quesadilla):
Calorías 821 (54 % de grasa) • Carbohidratos 41 g
• Proteínas 53 g • Grasa 48 g • Grasa saturada 25g
Colesterol 224 mg • Sodio 3414 mg • Calcio
656 mg • Fibra 2 g
Salmón a la “chermoula”
con papas asadas
Esta refrescante marinada marroquí es
perfecta para aliñar y acompañar pescado o
mariscos asados.
Placas del lado: parrilla abajo, plancha arriba
Posición: cerrada, y luego semiabierta y
abierta
Rinde 1¾ tazas (415 ml) de marinada
“chermoula” y 3 a 4 porciones de salmón y
papas
Marinada “chermoula”
6 dientes pequeños de ajo
1 cucharadita de páprika
¾ cucharadita de sal kosher
½ cucharadita de pimienta negra
recién molida
1 cucharadita de semillas de cilantro
en polvo
½ cucharadita de comino en polvo
½ cucharadita de hojuelas de
pimiento rojo
4 tiras de 2 x ½ pulgadas (2.5 cm x
1.5 cm) de cáscara de limón
pelada (sin la parte blanca)
¾ taza (45 g) de cilantro fresco,
picado grueso
¼ taza (15 g) de perejil fresco, picado
grueso
1
∕
³
(80 ml) de jugo de limón fresco
2 cucharadas (30 ml) de vinagre de
vino blanco
1 taza (235 ml) de aceite de oliva,
reservando una cucharada
1
∕
³
taza (45 g) de aceitunas negras
deshuesadas, finamente picadas
1 libra (455 g) de salmón de
aproximadamente 1½ pulgadas (4
cm) de grueso
2 papas “Russet” grandes
(aproximadamente 455 g),
restregadas

20
1. Preparar la marinada “chermoula”: colocar
el ajo en el bol de una mini picadora. Pulsar
para picar finamente. Agregar la páprika,
½ cucharadita de la sal, la pimienta, las
semillas de cilantro, el comino, las hojuelas
de pimiento rojo y la cáscara de limón.
Pulsar hasta obtener una pasta. Colocar
la mezcla en un tazón pequeño. Agregar
el cilantro, el perejil, el jugo de limón y el
vinagre. Agregar progresivamente el aceite
de oliva, batiendo. Agregar las aceitunas.
Colocar el salmón en un molde rectangular
y cubrir con ½ taza
(120 ml) de la marinada. Cubrir con papel
film/plástico y refrigerar por 1 a 2 horas.
Dejar entibiar a temperatura ambiente antes
de asar.
2. Veinte minutos antes de cocinar el salmón,
cortar las papas en rodajas de ¼ de
pulgada (0.5 cm). Colocar las papas en un
tazón grande y agregar la cucharada de
aceite de oliva y la sal restantes. Revolver
para mezclar.
3. Encender el Griddler
®
. Elegir la función
“GRILL” (parrilla) y ajustar la temperatura a
425°F.
4. Después del precalentamiento, colocar las
rodajas de papa en la placa inferior, sin
superponerlas. Cerrar las placas, iniciar la
cuenta progresiva y asar por 16 minutos,
hasta que las papas estén completamente
cocidas, doradas y crujientes. Colocar
las papas asadas en un plato para servir
grande y cubrir sin apretar con papel de
aluminio.
5. Colocar el salmón en la placa inferior.
Iniciar la cuenta progresiva y cocinar por
8 a 9 minutos. Luego, voltear el salmón,
ajustar la temperatura a 400°F y cocinar por
aproximadamente 6 minutos adicionales,
hasta el punto deseado.
6. Cuando el salmón esté cocido, colocarlo
en un plato para servir y rociarlo con 2 a
3 cucharadas de la marinada “chermoula”
restante. Servir el salmón con las papas
asadas.
Información nutricional por porción (basada en 4
porciones): Calorías 856 (75 % de grasa) Carbohidratos
29 g • Proteínas 27 g • Grasa 73 g Grasa saturada 10 g
• Colesterol 69 mg • Sodio 819 mg
Calcio 91 mg • Fibra 4 g
Sándwiches cubanos
Estos sándwiches asados en los cuales el
jamón y el queso se juntan “mágicamente” son
inspirados del tradicional sándwich cubano.
Son una excelente manera de usar las sobras
de chuletas de cerdo al estilo latino (página 22).
Placas del lado: parrilla
Posición: cerrada
Rinde 6 porciones (2 sándwiches grandes)
2 panecillos suaves largos
1 cucharada + 1 cucharadita de
mostaza de Dijon o regular
4 a 6 onzas (115 g a 170 g) de queso suizo
rebanado
4 a 6 onzas (115 g a 170 g) de cerdo asado,
en tajadas
4 a 6 onzas (115 g a 170 g) de jamón, en
tajadas
4 onzas (115 g) de pepinos encurtidos,
finamente rebanados horizontalmente
1 cucharadita (5 ml) de aceite de oliva
1. Cortar los panecillos longitudinalmente a la
mitad y colocarlos en una superficie plana.
Untar mostaza en ambos lado de cada
panecillo. Colocar una rebana de queso
suizo en la parte inferior de cada panecillo.
Agregar el cerdo, el jamón y las rebanadas
de pepinos encurtidos. Agregar el queso
restante y cerrar cada sándwich. Cepillar la
parte superior con aceite de oliva.
2. Instalar las placas del Griddler
®
del lado
“parilla”. Encender la unidad. Elegir la
función “GRILL” (parrilla) y ajustar la
temperatura a 375°F.
3. Después del precalentamiento, colocar
los sándwiches en la placa inferior y
liberar la bisagra flotante. Cerrar las
placas, presionando firmemente. Iniciar
la cuenta progresiva. Seguir presionando
la agarradera por aproximadamente
un minuto. Luego, seguir asando por
aproximadamente 6 minutos, hasta que
el pan esté crujiente y que el queso esté
derretido.
4. Cortar los sándwiches en pedazos para
servir.
Información nutricional por porción (basada en 6
porciones): Calorías 215 (45 % de grasa) Carbohidratos
13 g • Proteínas 16 g • Grasa 10 g Grasa saturada 5 g •
Colesterol 38 mg • Sodio
700 mg • Calcio 191 mg • Fibra 0 g

21
Kebabs al estilo griego
Puede sustituir el cerdo con pollo o pescado
en esta receta. Simplemente ajuste la sazón
al gusto y cerciórese que los kebabs están
completamente cocidos antes de servir.
Placas del lado: parrilla
Posición: abierta
Rinde 10 kebabs
2 libras (910 g) de paleta de cerdo,
sin mucha grasa
¼ taza (60 ml) de aceite de oliva
2 cucharadas (30 ml) de jugo de
limón fresco
1 cucharadita de sal kosher
1 cucharadita de orégano seco
½ cucharadita de pimienta
1 cebolla roja pequeña, en pedazos
de 1 pulgada (2.5 cm)
1 pinta (475 g) de tomates de pera
Pan pita para servir (opcional)
Salsa Tzatziki* para servir
(opcional)
10 pinchos de madera
1. Cortar el cerdo en cubos de 1 pulgada
(2.5 cm). Restregar con el aceite de
oliva, el jugo de limón, la sal, el orégano
y la pimienta. Insertar un pedazo de
cerdo en uno de los pinchos. Agregar un
pedazo de cebolla de aproximadamente
2 o 3 capas de grueso, seguido de otro
pedazo de cerdo, un tomate, otro pedazo
de cerdo, más cebolla y otro pedazo
de cerdo. Repetir con el resto de los
pinchos y de los ingredientes.
2. Encender el Griddler
®
. Elegir la función
“GRILL” (parrilla) y ajustar la temperatura
a 425°F.
3. Después del precalentamiento, disponer
los kebabs en las placas calientes e
iniciar la cuenta progresiva. Asar los
kebabs, dándole la vuelta, por 25 a 30
minutos, hasta que estén bien cocidos.
Nota: también puede asar los kebabs en
la posición cerrada por 5 a 6 minutos.
4. Servir con pan pita y salsa Tzatziki si
desea.
* La salsa Tzatziki es una salsa a base de
yogur griego, que se sirve tradicionalmente
con los kebabs. Puede ser comprada o
hecha en casa. Visite www.cuisinart.com
para descubrir nuestras recetas.
Información nutricional por porción de 1 kebab:
Calorías 272 (73 % de grasa) • Carbohidratos 2 g
Proteínas 16 g • Grasa 22 g • Grasa saturada 6 g
Colesterol 64 mg • Sodio 274 mg
Calcio 19 mg Fibra 1 g
Pizza de tocino y aceitunas asada
Utilice nuestro método para asar pizza y
agregue los ingredientes de su elección.
Placas del lado: plancha
Posición: semiabierta, cerrada y abierta
Rinde 4 a 6 porciones
6 lonchas de tocino
12 onzas (340 g) de masa de pizza
fresca
1
/
3
taza (80 ml) de salsa de pizza
2 cucharadas de aceitunas negras
deshuesadas, en rodajas
2 cucharaditas (10 ml) de aceite de
oliva
1. Colocar el tocino en la placa inferior.
Encender el Griddler
®
y elegir la
función “GRIDDLE” (plancha). Ajustar la
temperatura a 425°F. Cuando el tocino
esté bien dorado y crujiente, colocarlo en
un plato. Una vez frío, desmenuzarlo y
reservar.
2. Estirar la masa de pizza para formar
un rectángulo del tamaño de la placa.
Colocar la masa de pizza en la placa
inferior y cerrar las placas. Asar por
aproximadamente 4 minutos, hasta que
ambos lados estén ligeramente dorados.
Abrir las placas y voltear la pizza. Ajustar
la temperatura a 400°F.
3. Cubrir la masa de pizza parcialmente
cocida con salsa de pizza, aceitunas y el
tocino desmenuzado. Cepillar la orilla de
la pizza con aceite de oliva.
4. Iniciar la cuenta progresiva. Asar por 6
a 8 minutos, en la posición semiabierta,
hasta que la parte de abajo de la pizza

22
esté crujiente y que la masa esté bien
cocida.
Información nutricional por porción (basada en 6
porciones): Calorías 211 (39 % de grasa) Carbohidratos
25 g • Proteínas 8 g • Grasa 9 g Grasa saturada 2g •
Colesterol 15 mg • Sodio
571 mg • Calcio 0 mg • Fibra 1 g
Hamburguesas con cebolla
caramelizada y queso Gruyère
Estas hamburguesas al estilo francés son ricas
y deliciosas.
Placas del lado: parrilla abajo, plancha
arriba
Posición: abierta
Rinde 4 hamburguesas
1 cebolla amarilla, en rodajas finas
2 cucharadas de aceite de oliva
1¼ cucharaditas de sal
¼ taza (60 ml) de agua
4 panecillos dulces “brioche”
24 onzas (680 g) de carne de res
molida
½ cucharadita de pimienta negra recién
molida
4 rebanadas de queso suizo
1. Colocar la cebolla, 2 cucharadas del aceite
y ¼ de cucharadita de la sal en un tazón;
revolver. Encender el Griddler
®
. Elegir
la función “GRILL” (parrilla) y ajustar la
temperatura a 425°F.
2. Después del precalentamiento, colocar
la cebolla en la placa superior. Asar por
aproximadamente 20 minutos, hasta que
esté suave. Cuando la cebolla esté suave,
agregar 1 cucharada de agua y revolver
hasta que el agua se haya evaporado.
Repetir estos pasos por aproximadamente
10 minutos más, hasta que la cebolla esté
muy suave y caramelizada.
3. Mientras la cebolla se está cocinando,
colocar los panecillos en la placa inferior,
el lado cortado apuntando hacia abajo.
Tostar por 2 a 3 minutos, hasta que estén
ligeramente crujientes. Reservar.
4. Cuando el pan esté tostado, formar con la
carne molida 4 hamburguesas de 6 onzas
(170 g) cada una. Sazonar ambos lados
uniformemente con sal y pimienta. Cepillar
con aceite de oliva.
5. Colocar las hamburguesas en la placa
inferior y cocinar hasta el punto deseado.
Cubrir las hamburguesas con queso
y colocarlas en la parte inferior de los
panecillos tostados. Añadir cebolla
caramelizada, y luego la otra mitad de los
panecillos. Servir.
Información nutricional por porción de 1 hamburguesa:
Calorías 638 (60 % de grasa) Carbohidratos 25 g •
Proteínas 39 g • Grasa 43 g Grasa saturada 16 g •
Colesterol 133 mg • Sodio 1064 mg
Calcio 182 mg • Fibra 1 g
Panini italianos de pollo asado
¿Está buscando una receta rápida de pollo
asado? El pollo asado en esta receta puede
comerse solo.
Placas del lado: parrilla
Posición: cerrada
Rinde 4 Panini
3 pechugas grandes de pollo
(aproximadamente 1½ libras/680 g en
total) deshuesadas y sin piel,
cortadas longitudinalmente a la mitad
¼ taza (60 ml) + 2 cucharaditas
(10 ml) de aceite de oliva
1½ cucharaditas de condimento italiano
1 cucharadita de sal kosher
4 panecillos de ciabatta, partidos
longitudinalmente a la mitad
4 rodajas de pimientos dulces rojos
asados (en lata)
1 taza (30 g) de rúcula/rúgula/arúgula
fresca
½ libra (225 g) de Mozzarella fresca, en
rodajas delgadas
1. Encender el Griddler
®
. Ajustar la
temperatura a 425°F. Mientras la unidad
se está calentando, restregar las pechugas
con 2 cucharaditas del aceite de oliva y el
condimento italiano.
2. Después del precalentamiento, colocar
las pechugas en la placa inferior e iniciar
la cuenta progresiva. Cerrar las placas y
asar las pechugas por aproximadamente
6 minutos, hasta que estén bien cocidas
y tengan las marcas de la parrilla. Retirar
el pollo de la placa y dividirlo entre las 4
mitades inferiores de panecillo.
3. Agregar 1 rodaja de pimiento rojo asado
y un cuarto de la rúcula. Rociar con 2
cucharaditas del aceite de oliva y una
pizca de sal. Agregar el queso y cerrar los

23
sándwiches. Cepillar la parte superior
con aceite de oliva.
4. Colocar dos sándwiches en la parte
de atrás de la placa inferior. Cerrar las
placas e iniciar la cuenta progresiva.
Presionar la agarradera por 1 minuto,
y luego seguir asando por 5 minutos
adicionales, hasta que el pan esté
crujiente y que el queso esté derretido.
Repetir con el resto de los panini. Cortar
a la mitad antes de servir.
Información nutricional por porción:
Calorías 234 (47 % de grasa) • Carbohidratos 37 g
Proteínas 57 g • Grasa 37 g • Grasa saturada 10 g
Colesterol 142 mg • Sodio 1273 mg • Calcio
234 mg • Fibra 1 g
Chuletas de cerdo al estilo latino
Dele vida a las chuletas de cerdo con esta
marinada al estilo latino. Las sobras son
perfectas para preparar sándwiches cubanos.
Placas del lado: parrilla
Posición: cerrada
Rinde 4 porciones
1 cebolla pequeña, en rodajas
4 dientes de ajo
½ taza (120 ml) de jugo de naranja
2 cucharadas (30 ml) de jugo de lima/
limón verde fresco
½ taza (30 g) de cilantro fresco,
picado grueso
4 chuletas de cerdo de 1 pulgada (2.5
cm) de espesor
½ cucharadita de sal kosher
¼ cucharadita de pimienta negra
recién molida
1. Colocar la cebolla, el ajo, el jugo de
naranja, el jugo de lima/limón verde y el
cilantro en un tazón; revolver.
2. Agregar las chuletas de cerdo y revolver
para cubrirlas con marinada. Cubrir y
refrigerar por aproximadamente 3 horas.
3. Justo antes de asar, retirar las chuletas
de la marinada, secarlas ligeramente con
papel absorbente y sazonar ambos lados
con sal y pimienta.
4. Instalar las placas del Griddler
®
del lado
“parilla”. Encender la unidad. Elegir la
función “GRILL” (parrilla) y ajustar la
temperatura a 450°F.
5. Después del precalentamiento, colocar
las chuletas en la placa inferior, cerrar las
placas e iniciar la cuenta progresiva. Asar
por aproximadamente 5 minutos, hasta
que la temperatura interna de la parte
más gruesas de las chuletas alcance
145°F (63°C).
6. Dejar reposar por aproximadamente 5
minutos antes de servir.
Información nutricional por porción (basada
en 4 porciones): Calorías 278 (40 % de grasa)
Carbohidratos 3 g • Proteínas 37 g • Grasa 12 g
Grasa saturada 4 g • Colesterol 114 mg • Sodio 350
mg • Calcio 24 mg • Fibra 0 g
Fajitas de camarones
Esta receta es ideal para una cena festiva;
cada invitado podrá armar su propia fajita.
Placas del lado: parrilla abajo, plancha
arriba
Posición: semiabierta y abierta
Rinde aproximadamente 8 fajitas (usando 3
camarones por fajita)
1 libra (455 g) de camarones grandes
congelados, descongelados y
pelados
3 cucharadas de aceite de oliva
1 diente de ajo grande, finamente
picado
¾ cucharadita de chile en polvo
1 pizca de comino en polvo
2 pimientos dulces (de cualquier
color), en tiras delgadas
1 cebolla roja pequeña, en tiras
delgadas
½ cucharadita de sal kosher
1 pizca de pimienta
1 pizca de ajo en polvo
1 cucharada de cilantro, picado
grueso
1 cucharada (15 ml) de jugo de lima/
limón verde fresco
4 pinchos de madera, cortados a la
mitad (opcional)
Tortillas de trigo pequeñas
Pedazos de lima/limón verde, para
servir

24
Guacamole, para servir (opcional)
Salsa mexicana, para servir (opcional)
Crema agria, para servir (opcional)
1. Secar bien los camarones con papel
absorbente. Colocar los camarones en un
tazón pequeño o una bolsa de plástico
hermética. Agregar 2 cucharadas del
aceite de oliva, el ajo, el chile en polvo y el
comino. Revolver para cubrir. Refrigerar por
20 minutos.
2. Mientras los camarones se están
marinando, revolver los pimientos y la
cebolla en el aceite restante. Rociar con
¼ de cucharadita de sal, una pizca de
pimienta y el ajo en polvo. Encender el
Griddler
®
. Elegir la función “GRIDDLE”
(plancha) y ajustar la temperatura a 425°F.
3. Después del precalentamiento, colocar los
pimientos y las cebollas en las placas. Fijar
el temporizador en 15 minutos y cocinar,
revolviendo ocasionalmente con pinzas con
puntas de silicona, hasta que estén suaves
y dorados.
4. Al final del tiempo, colocar los pimientos
y las cebollas en la otra placa mientras
cocina los camarones. Cuando los
camarones están cocinados, colocar la
mezcla de pimientos y cebollas en un tazón
y agregar el cilantro picado.
5. Sacar los camarones marinados del
refrigerador. Agregar el jugo de lima/limón
verde y la sal restante. Si usa pinchos
(opcional), insertar 3 camarones en cada
pincho. Iniciar la cuenta progresiva. Colocar
los pinchos en la placa inferior y cocinar
por 5 minutos por un lado y por 3 minutos
por el otro lado, hasta que los camarones
estén opacos. También puede cocinar
los camarones directamente en la placa
inferior, por la misma cantidad de tiempo.
Colocar los camarones en un plato para
servir.
6. Para armar las fajitas: colocar 3 camarones
en una tortilla y cubrir con una cucharada
de la mezcla de pimientos/cebollas. Servir
con un pedazo de lima/limón verde y, si
desea, guacamole, salsa mexicana y crema
agria.
Información nutricional por porción (1 fajita):
Calorías 196 (40 % de grasa) • Carbohidratos
16 g Proteínas 13 g • Grasa 9 g • Grasa saturada
1 g Colesterol 85 mg • Sodio 418 mg • Calcio
76 mg • Fibra 1 g
Bistec de falda con salsa chimichurri
Si tiene a mano frutas maduras, tales como
piña o mango, píquelas finamente y sirva los
bistecs con aproximadamente 1 cucharada de
la salsa para dar a este plato más dulzura y
color.
Placas del lado: parrilla
Posición: semiabierta o abierta
Rinde 3 a 4 porciones y 1 taza (235 ml) de
salsa
Salsa:
4 dientes de ajo, finamente picados
½ cucharadita de sal
1 pizca de comino en polvo
1 pizca de hojuelas de pimiento rojo
1 cucharada (15 ml) + 2 cucharaditas
(10 ml) de vinagre de vino tinto
2
⁄
3
taza (80 ml) de aceite de oliva virgen
extra
¼ taza (15 g) de hojas de perejil fresco,
picadas grueso
2 cucharadas llenas de hojas de
orégano fresco, picadas grueso
Bistec:
1 libra (455 g) de bistec de falda de
aproximadamente 1 pulgada (2.5 cm)
de espesor
2 cucharaditas (10 ml) de aceite de
oliva
½ cucharadita de sal
¼ cucharadita de pimienta blanca
recién molida
1. Preparar la salsa chimichurri: colocar los 5
primeros ingredientes en un tazón pequeño;
revolver, mientras agrega el aceite de oliva.
Luego, incorporar el perejil y el orégano.
Cubrir y dejar reposar para combinar los
sabores.
2. Encender el Griddler
®
. Elegir la función
“GRILL” (parrilla) y ajustar la temperatura a
450°F.
3. Mientras la unidad se está calentando,
sazonar ambos lados del bistec con aceite
de oliva, sal y pimienta.
4. Después del precalentamiento, colocar el
bistec en la placa inferior. Iniciar la cuenta
progresiva. Cocinar por 6 minutos por un
lado y por 4 a 5 minutos por el otro lado,
hasta el punto deseado.
5. Retirar el bistec de la placa y dejarlo
reposar por 5 minutos en una tabla de

25
cortar. Cortar en tajadas, en contra del
grano. Servir, rociando una cucharada de
salsa encima de la carne.
Información nutricional por porción (basada en 4
porciones): Calorías 789 (59 % de grasa) Carbohidratos
42 g • Proteínas 39 g • Grasa 52 g Grasa saturada 18 g
• Colesterol 435 mg • Sodio 1229 mg
Calcio 482 mg • Fibra 4 g
Panini de aguacate,
queso y tomate
Ingredientes simples con máximo sabor.
Placas del lado: parrilla
Posición: cerrada
Rinde 2 sándwiches
2 panes ciabatta o panecillos franceses
½ aguacate maduro
1
/
8
a ¼ cucharadita de sal kosher
1
/
8
cucharadita de pimienta negra recién
molida
1 tomate pequeño a mediano, en
rodajas delgadas
3 onzas (85 g) de queso Havarti,
rebanado (aproximadamente 4
rebanadas delgadas)
¼ cucharadita de aceite de oliva virgen
extra
1. Cortar los panecillos a la mitad y colocarlos
en una superficie plana. Esparcir el
aguacate en la mitad inferior de cada
panecillo. Sazonar con la mitad de la sal y
de la pimienta. Agregar rodajas de tomate.
Sazonar con la sal y la pimienta restantes.
2. Agregar el queso, cerrar los sándwiches y
cepillar la parte superior de cada panecillo
con aceite de oliva.
3. Instalar las placas del Griddler
®
del lado
“parilla”. Encender la unidad. Elegir la
función “GRILL” (parrilla) y ajustar la
temperatura a 375°F.
4. Después del precalentamiento, colocar los
sándwiches en el centro de la placa inferior.
Liberar la bisagra flotante y cerrar las
placas, presionando la agarradera. Iniciar la
cuenta progresiva.
5. Asar por aproximadamente 7 minutos,
hasta que el pan esté crujiente y que el
queso esté derretido.
Información nutricional por porción de ½ sándwich
(basada en 4 porciones): Calorías 172 (55 % de grasa) •
Carbohidratos 12 g • Proteínas 8 g • Grasa 11 g • Grasa
saturada 5 g • Colesterol 19 mg Sodio 361 mg • Calcio
174 mg • Fibra 2 g
Panini de crema de chocolate y
avellanas con fresas
¡No todos los panini son salados! Estos
sabrosos panini dulces reúnen dos sabores
favoritos: el chocolate con avellanas y las
fresas.
Placas del lado: parrilla
Posición: cerrada
Rinde 2 Panini
2 “brioches” (bollos) o “croissants”
(cruasán/medialuna)
Aceite vegetal o mantequilla suave
para cepillar
¼ taza (60 ml) de crema para untar de
chocolate y avellanas
1 pizca de sal kosher
2 a 3 fresas grandes, peladas y cortadas
en rodajas (necesita suficientes
rodajas para cubrir la parte inferior
del bollo)
1. Encender el Griddler
®
. Elegir la función
“GRILL” (parrilla) y ajustar la temperatura a
400°F.
2. Mientras la unidad se está calentando,
armar los panini. Cortar los bollos/cruasanes
horizontalmente a la mitad. Cepillar la parte
externa con aceite o mantequilla. Untar la
crema de chocolate en la parte de adentro.
Rociar con un poco de sal. Cubrir la mitad
inferior de cada bollo/cruasán con una capa
de rodajas de fresa.
3. Cerrar los panini.
4. Después del precalentamiento, colocar los
panini en la placa inferior e iniciar la cuenta
progresiva. Cerrar las placas, presionando
la agarradera por 20 segundos, y luego
asar por aproximadamente 3 minutos, hasta
que el relleno esté caliente y que los panini
tengan las marcas de la parrilla.
5. Retirar de la placa y dejar enfriar por 1
minuto. Cortar cada panini a la mitad y
servir tibio.

26
Información nutricional por porción de ½ panini, usando
cruasanes: Calorías 230 (50 % de grasa) Carbohidratos
25 g • Proteínas 4 g • Grasa 13 g Grasa saturada 5 g •
Colesterol 19mg • Sodio
142 mg • Calcio 33 mg • Fibra 2 g
Piña asada
El calor de la parrilla caramelizará la piña,
haciendo que sea aún más dulce. ¡Perfecta
para servir con helado de vainilla!
Placas del lado: parrilla
Posición: cerrada
Rinde 8 porciones
1 piña fresca mediana, pelada ,
descarozada y cortada en 8 rodajas
5 a 8 cucharaditas (25 g a 410 g) de azúcar
granulada
¼ cucharadita de canela en polvo
1. Encender el Griddler
®
. Elegir la función
“GRILL” (parrilla) y ajustar la temperatura a
375°F.
2. Colocar el azúcar y la canela en un bol
pequeño; revolver. Espolvorear la mezcla
uniformemente en ambos lados de la piña
3. Después del precalentamiento, colocar la
mitad de la piña en la placa inferior e iniciar
la cuenta progresiva. Cerrar las placas
y asar por aproximadamente 8 minutos,
hasta que la piña esté suave y tenga
las marcas de la parrilla. Repetir con las
rodajas restantes.
4. Servir inmediatamente.
Información nutricional por porción de 1 rodaja: Calorías
189 (32 % de grasa) • Carbohidratos
24 g Proteínas 7 g • Grasa 7 g • Grasa saturada
2 g Colesterol 171 mg • Sodio 203 mg
Calcio 102 mg • Fibra 1 g
Panini de malvaviscos con chocolate
Estos panini inspirados de los “s'mores”
americanos pueden prepararse con su
chocolate favorito: con leche, semidulce o
amargo/negro.
Placas del lado: parrilla
Posición: cerrada
Rinde 2 Panini
2 “brioches” (bollos) o “croissants”
(cruasánes/medialunas)
Aceite vegetal o mantequilla suave
para cepillar
1 onza (30 g) de chocolate (con leche,
semidulce o amargo/negro), en
pedacitos
4 malvaviscos, cortados a la mitad
1. Encender el Griddler
®
. Elegir la función
“GRILL” (parrilla) y ajustar la temperatura a
400°F.
2. Mientras a unidad se está calentando,
armar los panini. Cortar los bollos/
cruasanes horizontalmente a la mitad.
Cepillar la parte externa con aceite
o mantequilla. Dividir los pedacitos
de chocolate entre los sándwiches,
esparciéndolos en la mitad inferior de los
bollos/cruasanes. Cubrir con las mitades
de malvavisco. Cerrar los panini.
3. Después del precalentamiento, colocar los
panini en la placa inferior e iniciar la cuenta
progresiva. Cerrar las placas, presionando
la agarradera por 20 segundos, y luego
asar por aproximadamente 3 minutos,
hasta que los panini tengan las marcas
de la parrilla y que los malvaviscos estén
derretidos.
4. Retirar de la placa y dejar enfriar por 1
minuto. Cortar cada panini a la mitad y
servir tibio.
Información nutricional por porción de ½ panini, usando
cruasanes: Calorías 183 (45 % de grasa) Carbohidratos
23 g • Proteínas 3 g • Grasa 9 g Grasa saturada 5 g •
Colesterol 20 mg • Sodio
105 mg • Calcio 11 mg • Fibra 1 g

27
GUÍA DE COCCIÓN/TEMPERATURA
ALIMENTO PREPARACIÓN
PLACA/
POSICIÓN
TEMPERATURA Y TIEMPO
DE COCCIÓN SUGERIDOS
Tocino
Disponer en una
capa.
“Parrilla” o
“plancha”;
posición
semiabierta o
abierta.
Colocar el tocino en las placas frías. Ajustar la temperatura
a 425°F; asar hasta el punto deseado. Necesitará 20 a 25
minutos para cocinar 1 libra (455 g) de tocino (en la posición
abierta).
Res (bistec
deshuesado)
Hasta 2 pulgadas
(5 cm) de espesor.
Sazonar al gusto.
Escurrir antes de
asar si ha marinado
la carne.
Para mejores
resultados, dejar
entibiar a
temperatura
ambiente.
“Parrilla”;
posición
cerrada,
semiabierta o
abierta.
En la posición cerrada: precalentar las placas en
“SEAR”/450°F. Colocar los bistecs en la placa inferior y
cerrar las placas. Sellar la carne por 2 minutos, y luego
seguir asando por 2 a 10 minutos, dependiendo del grosor y
del punto deseado. Dejar reposar por 5 minutos antes de
servir.
En la posición semiabierta o abierta: precalentar las placas
a 450°F; colocar los bistecs en las placas. Asar por 4 a 6
minutos por lado, dependiendo del grosor y del punto
deseado. Dejar reposar por 5 minutos antes de servir.
Vuelta y vuelta/casi cruda: 125˚F a 130˚F
Poco hecha: 130˚F to 135˚F
No muy hecha: 140˚F a 145˚F
Al punto: 150˚F a 155˚F
Bien hecha: 160˚F+
Pollo, pechugas
(deshuesadas)
Ablandar la carne
hasta que tenga 1
pulgada (2.5 cm) o
menos de espesor.
“Parrilla”;
posición
cerrada
Precalentar las placas a 400°F; asar por 7 a 9 minutos. La
temperatura interna de la carne debe alcanzar 165°F (74
°C) y el jugo debe salir claro.
Pollo, muslos
(deshuesados)
Abrir a un espesor
uniforme.
“Parrilla”;
posición
cerrada
Precalentar las placas a 400°F; asar por 8 a 10 minutos. La
temperatura interna de la carne debe alcanzar 170°F (77
°C) y el jugo debe salir claro.
Filetes de pescado
1 a 2 pulgadas (2.5
cm a 5 cm) de
espesor.
“Parrilla”;
posición
cerrada
Precalentar las placas a 400˚F;
asar por 10 a 18 minutos en
la posición cerrada o
6 a 10 minutos en la posición abierta.
“Bistec” de
pescado (espada,
albacora, atún,
salmón)
No más de 2
pulgadas (5 cm) de
grueso.
“Parrilla”;
posición
cerrada,
semiabierta o
abierta.
Precalentar las placas a 400˚F; asar por 10 a 15 minutos en
la posición cerrada o 5 a 10 minutos en la posición abierta.
Res,
hamburguesas
Las hamburguesas
deben tener el
mismo peso y el
mismo grosor.
“Parrilla”;
posición
cerrada,
semiabierta o
abierta.
Precalentar las placas a 450°F. Colocar las hamburguesas
en la placa inferior y cerrar las placas. Asar por 4 a 8
minutos, dependiendo del grosor y del punto deseado. En la
posición semiabierta o abierta, asar por 5 a 6 minutos por
lado.
Salchichas crudas
Pinchar con los
dientes de un
tenedor o la punta
de un cuchillo.
“Parrilla” o
“plancha”;
posición
cerrada.
Precalentar las placas a 400°F. Colocar las salchichas en la
placa inferior. Las ranuras de la parrilla son perfectas para
mantener las salchichas en su puesto y hacen que sea más
fácil darle la vuelta. Cerrar las placas. Asar por 10 a 15
minutos, dependiendo del grosor de las salchichas.

28
Panini
Cepillar el exterior
del pan con aceite o
mantequilla derretida
antes de asar.
“Parrilla” o
“plancha”;
posición
cerrada.
Precalentar las placas a 400°F. Colocar los sándwiches en
la placa inferior. Cerrar las placas. Asar por 4 a 6 minutos,
dependiendo del grosor de los sándwiches.
Quesadillas
Preparar las
quesadillas, de
acuerdo a su receta
favorita.
“Parrilla”;
posición
cerrada
Precalentar las placas a 400°F. Colocar las quesadillas en la
placa inferior y cerrar las placas. Asar por 2 a 3 minutos,
dependiendo del grosor de las quesadillas y del tipo de
relleno.
Huevos
Fritos o fritos vuelta
y vuelta. Hasta 4
huevos por placa.
“Plancha”;
posición
semiabierta o
abierta.
Precalentar las placas 350°F. Romper los huevos
directamente en las placas calientes. Cocinar por 3 a 3½
minutos, hasta que las claras estén cuajadas. Dar la vuelta y
seguir cociendo hasta el punto deseado.
Tostadas
francesas
Remojar el pan en la
mezcla.
“Plancha”;
posición
semiabierta o
abierta.
Precalentar las placas 350°F. Cocinar por 3 a 5 minutos,
dependiendo del grosor de las rebanadas. Dar la vuelta.
Cocinar por 2 a 3 minutos adicionales.
Vegetales
Cortar los vegetales
en pedazos
uniformes. Sazonar o
marinar si desea.
“Parrilla”;
posición
semiabierta,
abierta o
cerrada
(si usa la
posición
cerrada, los
vegetales
deben tener
el mismo
grosor).
Precalentar las placas 400°F; asar los vegetales hasta que
estén tiernos, entre 10 y 30 minutos dependiendo del tipo
de vegetales.
Chuletas de cerdo
½ a 1 pulgada
(1.5 cm a 2.5 cm)
de espesor.
“Parrilla”;
posición
cerrada o
abierta.
En la posición cerrada: asar por 10 minutos en 400˚F.
En la posición abierta: asar por 5 a 6 minutos por lado. La
temperatura interna debe alcanzar de 145 °F (63 °C)
©2024 Cuisinart
Glendale, AZ 85307
Printed in China
24CE090455
IB-15045-ESP-C