For your safety and continued enjoyment of this product, always read the instruction booklet carefully before using.
Instruction & Recipe Booklet
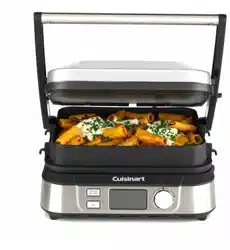
Griddler & Deep Pan - GR-5XA
2
IMPORTANT
SAFEGUARDS
READ ALL INSTRUCTIONS
BEFORE USING
When using any electrical appliance,
especially when children are present, basic
safety precautions should always be taken
to reduce the risk of fire, electric shock
and/or injury, including the following:
• Never leave unattended while cooking to
avoid possibility of fire.
• This appliance is intended for
HOUSEHOLD USE ONLY and similar
applications such as:
- staff kitchen areas in shops, offices and
other working environments;
- farmhouses;
- clients in hotels, motels and other
residential type environments;
- bed and breakfast settings
• This appliance is not intended for use by
persons (including children) with reduced
physical, sensory, or mental capabilities,
or lack experience and knowledge unless,
they have been given instruction and or
guidance concerning use of the appliance
by a person responsible for their safety.
•
Use only on an appropriate benchtop and
indoors only, sitting away from flammable
materials such as curtains, draperies and
walls of similar nature as a fire may occur if
comes in contact or becomes covered
during operation.
• Do not place on or near a hot gas,
electric burner, or in a heated oven.
• Do not use appliance for other than its
intended use.
•
This appliance is under 220V~240V use
only. Check voltage to be sure the voltage
indicated on the nameplate agrees with
your voltage.
• Always attach plug to grill first, then plug
cord to wall outlet. To safely disconnect,
press the
power button to stop
cooking cycle and remove plug from
electrical outlet.
• To avoid the possibility of the grill being
accidentally pulled off the working area,
which could result in damage to the grill
or personal injury, do not let the cord
hang over the edge of a table or
benchtop.
• To avoid damage to the cord and
possible fire or electrocution hazard, do
not let cord come into contact with any
hot surfaces including a stovetop.
• Do not operate this appliance if it has
been dropped or damaged (including the
cord) in any manner or is not operating
correctly.
• Do not operate this appliance in an
appliance cabinet or under a wall cabinet.
When storing in an appliance cabinet,
always unplug the grill from the electrical
outlet. Not doing so could create a risk
of fire, especially if the grill is in contact
with the walls of any cabinetry or on
closing the cabinet door and touching
the grill.
• Keep hands hair and clothing away
during operation to reduce the risk of
injury.
• Always unplug from the electrical outlet
when not in use before putting on or
taking off parts and before cleaning.
• The use of attachments not
recommended by Cuisinart may be
hazardous.
• At no time, before or during cooking and
cleaning immerse grill, plug or cord in
water, or any other liquids similarly under
running water too – this is to protect
against the starting of a fire and electric
shock that could induce injury to persons.
If the grill, plug or cord should fall into
water or other liquids, unplug the cord
from the electrical output immediately.
DO NOT reach into the water.
• The temperature of accessible surfaces
may be high when the appliance is
operating. Surfaces marked with this
symbol will be very hot to
touch during use – only use
handles and/or knobs. DO
NOT TOUCH until the grill has
cooled down.
• Do not clean with metal scouring pads.
Pieces can break off the pad and touch
electrical parts, involving a risk of electric
shock.

3
SPECIAL CORDSET
INSTRUCTIONS
A short power supply cord is provided to
reduce the risks resulting from becoming
entangled in or tripping over a longer cord.
Extension cords may be used if care is
exercised in their use.
If an extension cord is used, the marked
electrical rating of the extension cord must be
at least as great as the electrical rating of the
appliance, and the longer cord should be
arranged so that it will not drape over the
countertop or tabletop where it can be
tripped over unintentionally or pulled on by
children.
SAVE THESE
INSTRUCTIONS
BEFORE THE FIRST USE
Before using your Griddler & Deep Pan for
the first time, remove any dust from shipping
by wiping the housing, cover and control
panel.
Be sure to thoroughly clean all accessories
before first use. The removable reversible
plates, deep pan, grip handles for the deep
pan, an integrated drip tray (inserted at the
base of the unit), and a scraping tool. should
be hand-washed in hot, sudsy water and
thoroughly rinsed.
Before using your Griddler & Deep Pan,
ensure it is 15cm away from the wall or
from any items on the benchtop. Do not use
on heat-sensitive surfaces.
WHEN COOKING
Depending on the temperature level that has
been set, it may take up to 10 minutes to
reach operating temperature.
Always exercise caution when handling the
Griddler & Deep Pan during cooking and
after. The upper and lower housing are made
of plastic and may become very warm. It is
not recommended to be touched during or
immediately following cooking. If you need to
adjust the cover or move the base, be sure to
use oven mitts to prevent any burns.
Whenever grasping the handle, take extra
precaution with the arms, as they are made of
diecast aluminium and will become very hot,
very quickly.
ATTENTION
The first time you use the Griddler & Deep
Pan, it may have a slight odour and slightly
smoke. This is normal and common to
appliances with nonstick surfaces. The
Griddler & Deep Pan comes with a black
scraping tool to be used for cleaning the
sides of both the grill and griddle plates after
you have finished cooking and only when the
unit has completely cooled down (at least 30
minutes). Ensure short use of the cleaning
tool on a hot surface to avoid the plastic
melting.
Never use metal utensils, as they will scratch
the nonstick plates. Never leave plastic
utensils in contact with the hot grill plates.
This includes the provided cleaning tool.
CONTENTS
Important Safeguards ................................... 2
Before the First Use ......................................3
Parts & Features ...........................................4
Getting to Know Your Griddler ....................5
Plate Position ................................................6
Introducing the Griddler & Deep Pan .......... 6
Operating Instructions ..................................8
Cleaning & Maintenance ..............................10
Storage ......................................................... 10
2
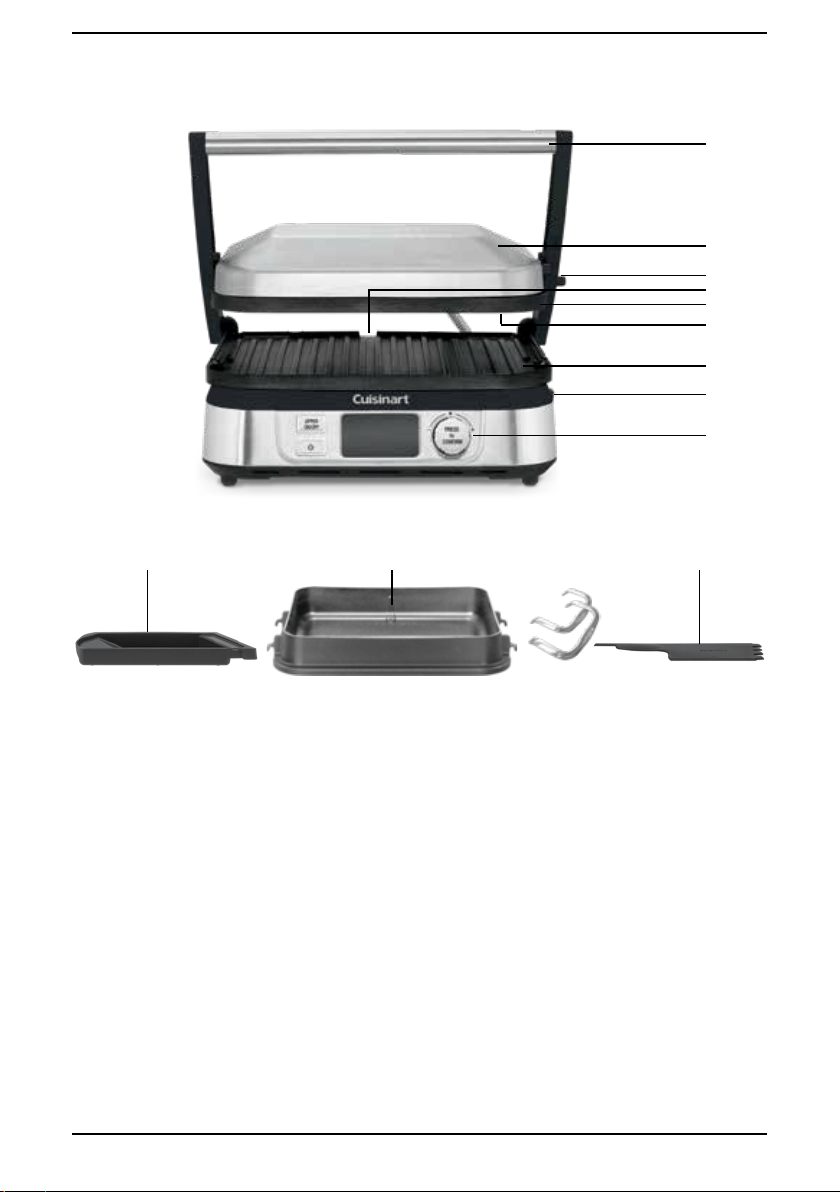
PARTS & FEATURES
4
A. Sturdy Stainless Steel Handle
B. Top Cover
Self-adjusting floating top cover
C. Hinge Release Lever
Allows the cover to extend back for
cooking in the flat position
D. Drip Spout
Allows grease to drip in to the drip
tray
E. Removable & Reversible Cooking Plates
Nonstick & dishwasher safe
E1. Griddle Side:
Prepare pancakes, eggs, bacon &
seared foods
E2. Grill Side:
Perfect for grilling steak, burgers,
chicken & vegetables
F. Plate Release Buttons
Push in to release & remove cooking
plates and deep pan
G. Control Panel & Display (see page 5)
H. Drip Tray
Collects grease & removes from base
for easy cleanup (top-rack dishwasher
safe)
I. Removable Deep Pan with Detachable
Handles
J. Cleaning/Scraping Tool
Helps clean grill & griddle plates after
cooking (top-rack dishwasher safe)
A
B
C
E
E1
E2
F
G
H I J
D
1 2 43
A
D
B
F
C
E
5
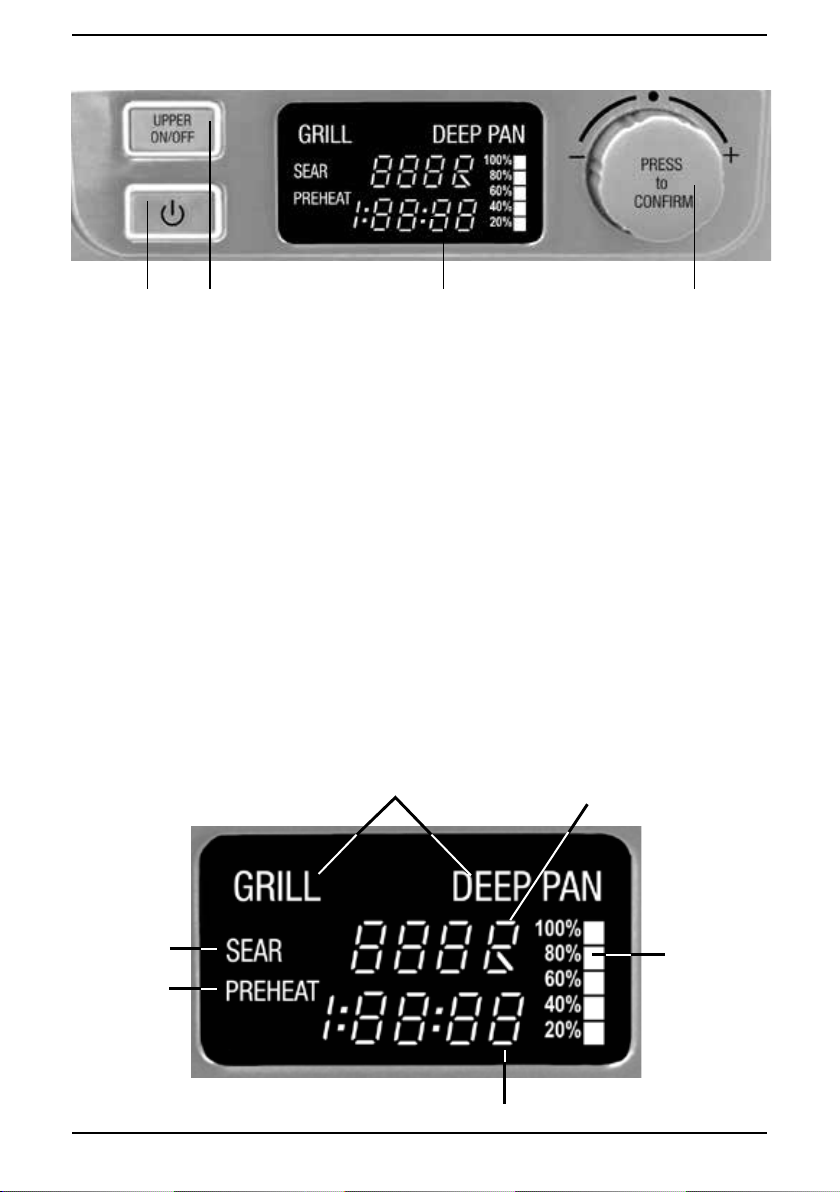
CONTROL PANEL
1. ON/OFF Button
Press to turn unit on and off.
2. Top Plate Button
Press to turn the top plate into Keep
Warm mode, or to turn the heater for top
plate off or on.
3. Large LCD
The backlit LCD screen is easy to read;
it displays the cooking function (Grill or
Deep Pan Mode), Temperature,Timer,
Preheat and the Preheat Status Bars.
4. PRESS to CONFIRM Dial
Turn the dial to select the temperature
and count up or down time. Press the
dial in to confirm.
START-UP SCREEN
A.Cooking Function
Grill or Deep Pan (The Griddler will
automatically select the function based
on the plates inserted.)
B. Temperature
(80°C, 120°C, 160°C, 180°C, 200°C &
230°C))
C. Timer
Set to count up or count down.
D. Sear
Appears in LCD when actuating the
machine or when 230°temperature is
selected.
E. Preheat
Appears in LCD when Griddler is
heating.
F. Preheat Bars
Appear when Griddler is heating, to
show heat-up progress.
GETTING TO KNOW YOUR GRIDDLER
6
PLATE POSITIONS
Your Griddler has 3 cooking positions as follows:
OPEN
When the top plate/cover sits in an upright place
(beyond a 90° angle) it will stabilize without
further support.
CLOSED
Hold handle while in open position to move top
plate/cover from the open position toward the
control panel so it rests on the food or plate.
FLAT
Hold handle while in open position while
locating the hinge-release lever on right-hand
side of arm then push and hold lever up while
moving the handle (cover) back until sitting flat
on surface.
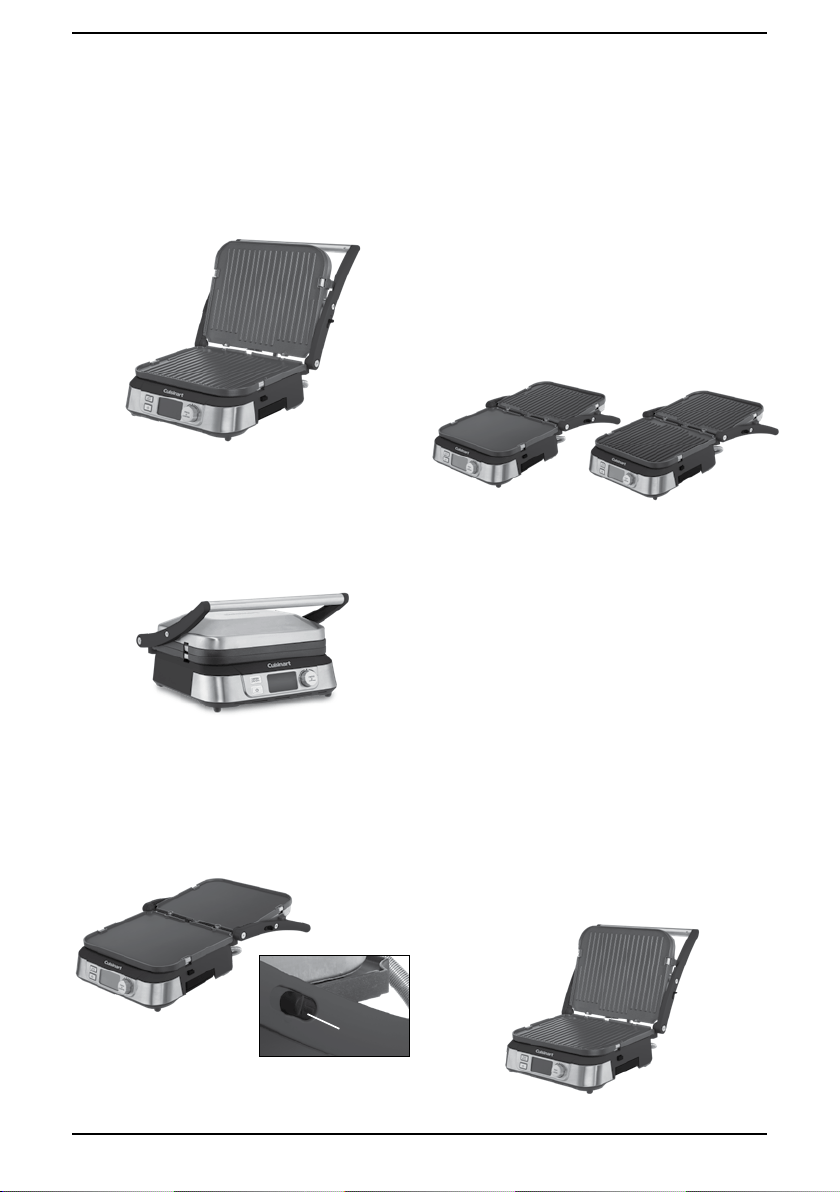
INTRODUCING THE
GRIDDLER & DEEP PAN
The Griddler & Deep Pan is the ultimate
kitchen appliance, offering you multiple
cooking options. Simply flip the reversible
cooking plates and adjust the hinge to use as a
contact grill, full grill, full griddle, half grill/ half
griddle or single lower plate cooking, and deep
pan.
INDOOR BBQ-STYLE GRILL & GRIDDLE
Use the Griddler as an open BBQ-style grill and
griddle in the flat position and create double
the cooking surface (1290cm²).
We suggest using both grill plates to cook
burgers, steak, fish & poultry, while using both
griddle plates to cook pancakes, eggs, French
toast, hash browns and bacon.
Alternatively use the Griddler as a HALF GRILL
/ HALF GRIDDLE to create full meals such as
steak and potatoes. Simply place the unit in
the flat position with the griddle plate on the
lower part and the grill plate on the upper.
SINGLE PLATE (GRILL OR GRIDDLE)
Turn the top plate off by pressing the UPPER
ON/OFF button until it is no longer illuminated.
If you wish to keep food warm, use the griddle
plate on top and place the unit into the flat
position and press the UPPER ON/OFF button
until light is at half illumination.
Hinge release lever

7
CONTACT GRILL OR SANDWICH
PRESS
In the open position insert both plates with grill
side up. Place food on bottom plate and lower the
handle so it is in contact with the food.
When using the Griddler as a sandwich press, insert
plates griddle side up and repeat as above.
DEEP-PAN COOKING
The deep pan is a unique option to create
endless baking opportunities, from baking a
cake to cooking a curry.
In the open position insert the deep pan, into
the lower part and the Griddler will
automatically set to DEEP PAN mode with the
top plate off. Press and hold the UPPER ON/
OFF BUTTON until fully illuminated to turn
upper plate on.
When ready to cook/bake, lower handle towards
lower plate until it rests comfortably closed.
If the deep pan is removed from base, the unit
will auto switch-off.
When you wish to remove the deep pan while it
is still hot, use the detachable handles to
support the pan and carry it to a heat protective
surface.
INSERTING/REMOVING COOKING
PLATES & DEEP PAN
Each grill/griddle plate is designed to fit in either
top or lower housing of the Griddler. While the
deep pan is designed only to fit in the lower
housing.
Insert one plate at a time, by locating the metal
brackets on the sides and line up the cutouts of
plate to push in place.
Once the Griddler has cooled, locate the plate
release button on the right-hand side (above the
metal bracket on the top of housing and below
the metal bracket on lower housing) and push
firmly so plate pops out.
POSITIONING DRIP TRAY
On the right-hand side of base, slide the drip
tray into slot provided, according to the
instruction on the tray.
Grease from the food will run off the plates
through the drop spout located at the back of
the bottom grill/griddle plate.
Slowly remove the drip tray by gently pulling
out from the side and safely dispose of grease.
The drip tray can be washed by hand or
cleaned in the dishwasher.
Lower plate
release
button
Top
plate
release
button
8
OPERATING INSTRUCTIONS
Sit Griddler & Deep Pan on a clean, flat surface
indoors where you intend to cook. When you are
ready to begin cooking make sure the drip tray
and desired plate surfaces are fitted. Plug your
Griddler into an electrical outlet and press the
ON/OFF (
) button. The LCD will show the
start-up screen (as per left image below).
SELECT COOKING FUNCTION:
There are two cooking functions. GRILL and
DEEP PAN. Depending on which plates you
have inserted into the bottom of the unit, the
Griddler will automatically detect which function
to cook and indicate on the LCD screen (see
images below).
Note: The Griddler has a preset temperature of
200ºC for both GRILL and DEEP PAN Modes.
SETTING THE TEMPERATURE FOR
GRILL OR GRIDDLE / SANDWICH
PRESS / OPEN BBQ MODE
To set temperatures for Grill, Griddle, Sandwich
Press or Open BBQ mode, the unit will detect
the GRILL function automatically and be preset
to 200°C. To change the temperature, rotate the
PRESS to CONFIRM dial to the left (decrease
temperature) or the right (increase temperature).
This will allow you to scroll through temperatures
- 80°C, 120°C, 160°C, 180°C, 200°C & 230°C.
Press the PRESS to CONFIRM dial for desired
temperature - when reached the temperature
will no longer flash.
“+” Temperature Increase
“-”
“-” Temperature Decrease
The Griddler will then begin to PREHEAT. This will
appear on the LCD screen as well as the preheat
status bar which shows the heating progression.
When 5 bars are illuminated, the grill is at the
correct temperature and the unit will BEEP.
GRILL will turn from red to green on the display
and you will now have the option to set a timer
when “00:00” appears in the screen.
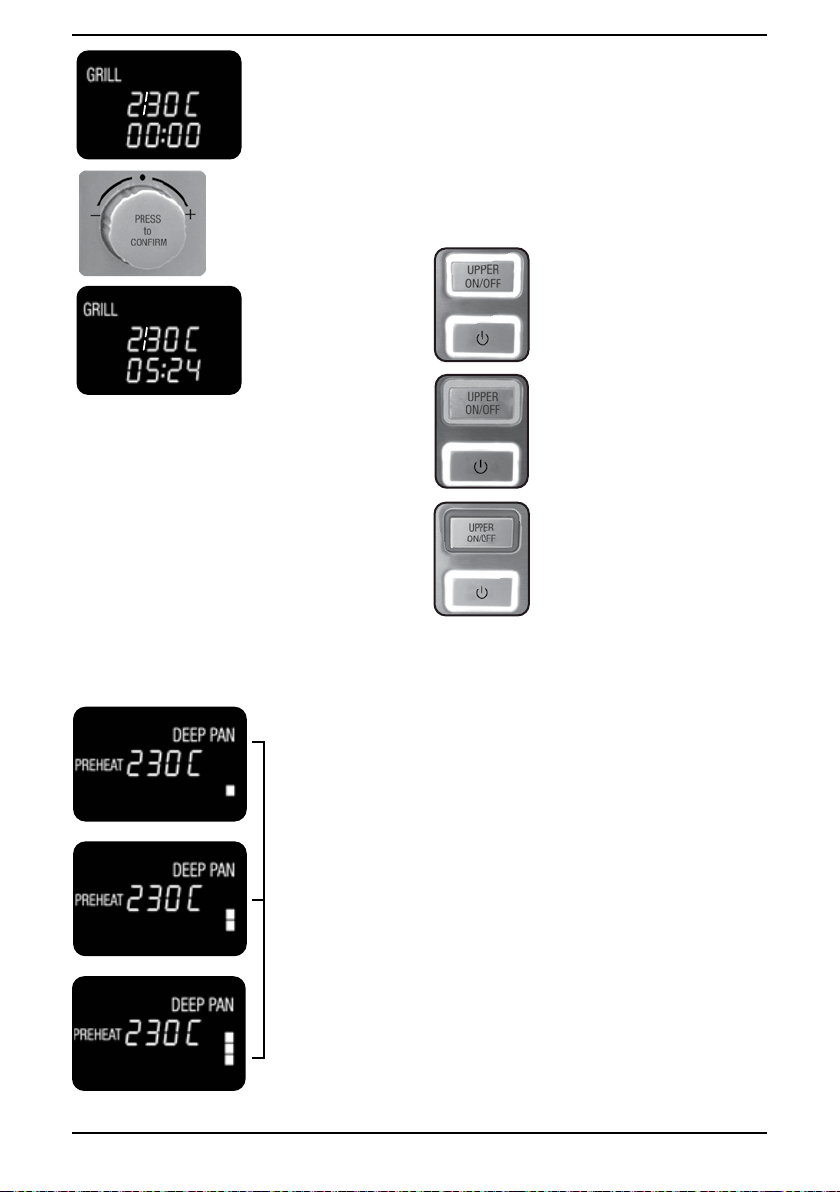
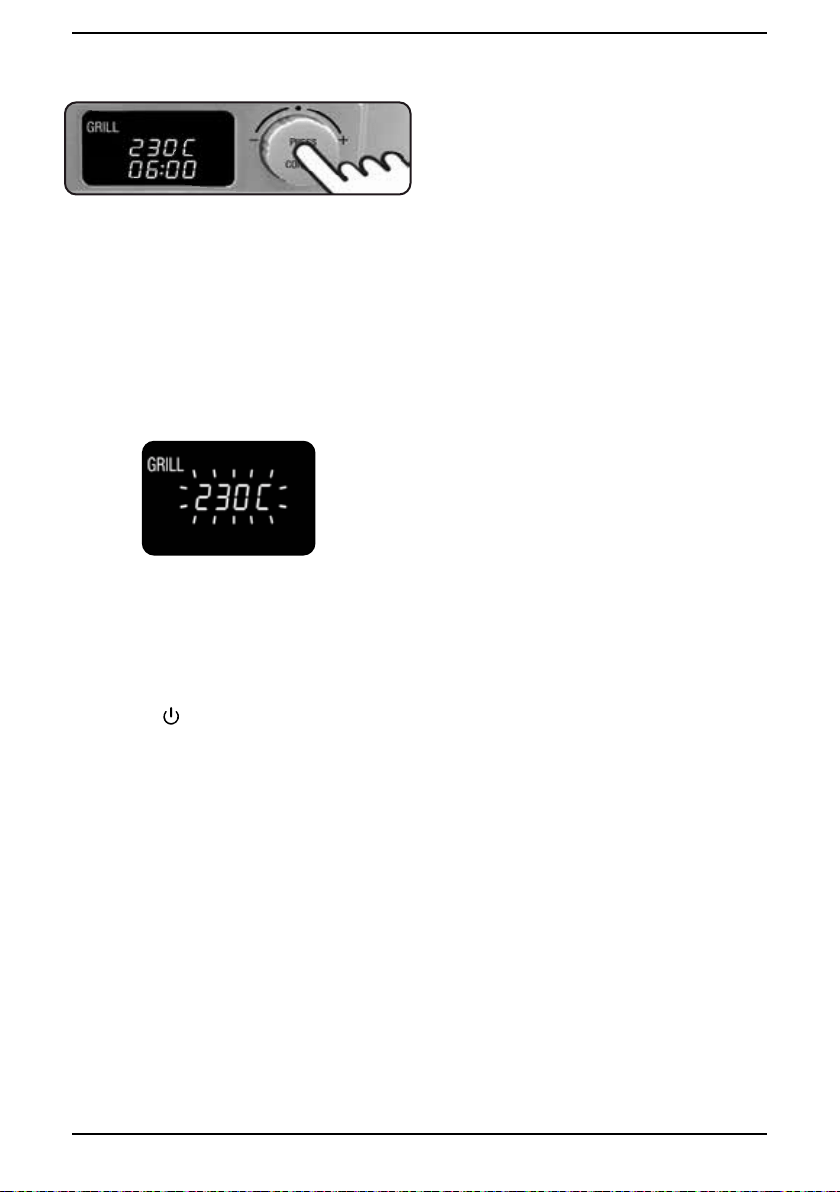
SETTING THE TIMER
NOTE: the timer is optional and is not
required for the cooking process to occur. If
not selected within 1 minute after preheat,
the timer will revert to --:--.
• Countdown Timer – When the 00:00 is
flashing, rotate the PRESS to
CONFIRM
dial to
the left (decrease time) or right (increase
time). The time will increase in 30 second
increments. If you wish to increase in 1 minute
increments rotate and hold the dial for more
than 3 seconds. Press the PRESS to
CONFIRM
dial to confirm time and begin countdown.
The unit will beep 3 times every 10 seconds
when the timer has finished counting down.
The timer will then start counting up to show
how much time has elapsed.
NOTE: Once the timer starts counting
upwards, it will beep every 3 seconds until
cooking is stopped. TO DISABLE THE BEEPS,
PRESS AND RELEASE THE PRESS to
CONFIRM
DIAL.
Preheating
Preheating is
almost done
The unit is
preheated Ready
to set timer
9
• Count-Up Timer – Add food to the Griddler
and press the PRESS to
CONFIRM
dial. The
timer will begin counting up from 00:00. If the
timer reaches 1:59:59, the unit will beep 3
times and then turn off.
SETTING THE TEMPERATURE IN DEEP
PAN MODE
When the Griddler is in deep pan mode, rotate
the PRESS to
CONFIRM
dial to the left or the
right for temperature selection. Press the
PRESS to
CONFIRM
button to confirm the
temperature.
DEEP PAN will illuminate on the screen in
orange to indicate that the unit has started
heating. Usually, the deep pan heater will stay
on unless there is a very small amount of food,
then the DEEP PAN will turn green to stop the
unit overheating.
SETTING THE UPPER PLATE TO KEEP
WARM OR OFF
To set the top plate heater to Keep Warm Mode
in GRILL, press the UPPER ON / OFF BUTTON
once when the unit is preheating or during the
cooking process. The light around the UPPER
ON / OFF BUTTON will be reduced to 50%
illumination and the top plate will remain at
80ºC.
To turn the top plate heater off, press the UPPER
ON / OFF BUTTON again so that the light
around the button is OFF.
When the Griddler is in Deep Pan mode, the top
plate heater is off automatically.
Open the top plate to the flat position. Hold the
UPPER ON / OFF BUTTON for 3 seconds until
the light around the button illuminates. The
upper plate will be ready for cooking in approx
6 minutes.
The unit is heated
and ready to set
timer
Timer begins to
countdown
“+” Time Increase
“-” Time Decrease
Status bars keep
running up
repeatedly while
in DEEP PAN
mode
Top Plate
heater is on
Top Plate -
Keep Warm mode
Top Plate -
heater is off
10
TO CHANGE SETTINGS WHILE
COOKING
To change Temperature and Time settings at
any time during use, press and hold the PRESS
to CONFIRM dial for at least 3 seconds to scroll
through Time and Temperature continuously,
until the PRESS to CONFIRM dial is released.
When dial is released, the setting you wish to
change should be flashing. Press the dial to
confirm the selection. After desired setting is
changed and confirmed, the display will move
to the next function.
CLEANING &
MAINTENANCE
Allow the unit to cool down for at least
30 minutes before handling.
•
Once you have finished cooking, press the
ON/OFF (
) button to power off and unplug
the power cord from the wall outlet.
• After the unit is completely cool, use the
cleaning/scraping tool to remove any
leftover food from the cooking plates. The
scraping tool can be washed by hand or in
the top rack of the dishwasher.
• Dispose of grease from the drip tray once
cooled. The drip tray can be cleaned by
hand or in the top rack of the dishwasher.
• Press the plate release buttons to remove
plates or the deep pan from the housing. Be
sure that the plates and the deep pan have
cooled completely before handling (at least
30 minutes). The cooking plates and the
Deep Pan can be washed on the top rack in
the dishwasher. Do not use metallic objects
such as knives or forks for cleaning. Do not
use a scouring pad for cleaning; the nonstick
coating can be damaged.
• If you have been cooking seafood, wipe the
cooking plates or the deep pan with lemon
juice to prevent seafood flavor transferring
to the next recipe.
•
The housing base, cover and control panel
can be wiped clean with a soft,
dry cloth. For tough stains, dampen cloth.
Never use an abrasive cleaner or harsh pad.
Any other servicing should be performed by an
authorized service representative.
STORAGE
Always make sure the Griddler & Deep Pan is
cool and dry before storing.
The power cord can be wrapped around the
back of the base for storing.
The cooking plates and drip tray should be
stored in the Griddler when not in use. The
scraping tool, the deep pan and stainless steel
grip handles can be stored in a drawer or
cabinet.
Press and hold for 3 seconds
cuisinart.com.au
IB-20/021A
©2021 Cuisinart
Suite 101 Ground Floor
18 Rodborough Rd
Frenchs Forest NSW, 2086
Australia
Visit our Website:
cuisinart.com.au
Printed in China
Trademarks or service marks of third parties referred to herein are
the trademarks or service marks of their respective owners.