Operating Instructions / Bedienungsanleitung / Mode d‘emploi / Instrucciones de uso /
Руководство по эксплуатации/Istruzioni per l‘uso / Gebruiksaanwijzing / Οδηγίες χρήσης / Instrukcja obsługi /
Használati útmutató / Návod k použití / Návod na použitie / Manual de instruções / Kullanma kılavuzu /
Manual de utilizare / Bruksanvisning / Käyttöohje / Работна инструкция / Betjeningsvejledning / Manuelt stasjonssøk
Digital Radio
00054247
00054248
(DIR3300SBT)
Digital-Radio
2
1. Table of contents ..........................................................2
2. Introduction..............................................................5
2.1 Explanation of warning symbols and notes..........................................5
2.2 Package contents.............................................................5
3. Safety instructions.........................................................6
4. Information and notes before getting started ...................................8
5. Setting up the radio and accessories ..........................................9
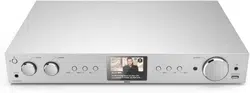
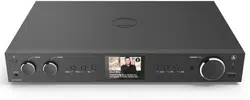
5.1 Rear view ..................................................................9
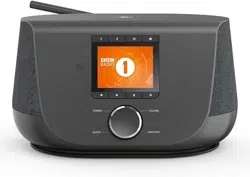
5.2 Front view .................................................................10
5.3 Remote control .............................................................11
6. Operating concept........................................................12
6.1 General operation ...........................................................12
6.2 Settings menu ..............................................................12
6.3 Managing favourites .........................................................12
6.4 Music operation.............................................................13
7. Getting started ..........................................................14
7.1 Remote control .............................................................14
7.2 Connecting and operating the radio ..............................................14
7.3 Prepare the network connection/Internet connection .................................15
7.4 WLAN/WiFi connection (wireless network) .........................................15
8. Navigation and controls ...................................................16
8.1 Control options .............................................................16
8.2 Language selection ..........................................................16
8.3 Setup wizard ...............................................................16
8.4 Time settings ...............................................................16
8.5 Keep network connected ......................................................17
8.6 Network wizard .............................................................17
8.7 Managing favourites .........................................................18
8.8 Screen display ..............................................................19
9. Menu structure ..........................................................20
10. DAB radio..............................................................21
10.1 Station list ................................................................21
10.2 Full scan .................................................................21
10.3 Delete inactive stations ......................................................21
10.4 DRC - Dynamic Range Control .................................................21
10.5 Station sequence ...........................................................21
TABle Of cONTeNTS
1. Table of contents

3
11. Internet radio & podcasts .................................................22
11.1 Country (based on the IP address of the radio) .....................................22
11.2 History (not yet available or empty during initial setup)...............................22
11.3 Search...................................................................22
11.4 Countries.................................................................22
11.5 Popular ..................................................................23
11.6 Discover .................................................................23
11.7 Add stations and create/maintain your own favourites lists (web browser required) ..........23
11.8 Calling up the administration interface...........................................24
11.9 Add your own stations .......................................................25
11.10 Delete stations............................................................26
12. Spotify connect .........................................................27
13. Amazon Music ..........................................................28
14. Music player (USB).......................................................30
15. UKW radio .............................................................31
15.1 Automatic station search .....................................................31
15.2 Manual station search .......................................................31
15.3 Settings ..................................................................31
16. AUX In (playback from external sources) .....................................32
17. Bluetooth
®
playback (RX) .................................................33
17.1 Connect a source device. . . . . . . . . . . . . . . . . . . . . . . . . . . . . . . . . . . . . . . . . . . . . . . . . . . . . .33
17.2 Music playback via Bluetooth
® .....................................................................................33
17.3 More settings .............................................................33
18. Routines...............................................................34
18.1 Sleep....................................................................34
18.2 Alarm clock ...............................................................34
18.3 Timer....................................................................35
TABle Of cONTeNTS

4
19. System settings - Overview ................................................36
20. Network & Audio ........................................................37
20.1 Internet settings............................................................37
20.1.1 Network wizard .........................................................37
20.1.2 Connecting to a WLAN. . . . . . . . . . . . . . . . . . . . . . . . . . . . . . . . . . . . . . . . . . . . . . . . . . . .37
20.1.3 Pre-Shared Key (PSK) .....................................................38
20.1.4 PIN ..................................................................38
20.1.5 WPS setup .............................................................39
20.1.6 View settings ...........................................................39
20.1.7 Manual settings.........................................................39
20.2 Bluetooth
®
receiver / transmitter (BT RX) .........................................42
20.2.1 Bluetooth
®
receiver ......................................................42
20.3 Equaliser .................................................................43
21. Screen settings .........................................................44
21.1 Display illumination .........................................................44
21.1.1 Operating mode.........................................................44
21.1.2 Standby mode ..........................................................44
21.1.3 Snooze mode...........................................................44
21.2 Colour scheme.............................................................44
22. System ................................................................45
22.1 Setup wizard ..............................................................45
22.2 Time settings ..............................................................45
22.2.1 Time / date setting .......................................................45
22.2.2 Time synchronisation .....................................................45
22.2.3 Time display............................................................46
22.2.4 Setting the time zone .....................................................46
22.2.5 Summer / winter time.....................................................46
22.3 Language ................................................................46
22.4 Auto standby..............................................................46
22.5 Software update ...........................................................46
22.6 Factory settings ............................................................46
23. About - System information ...............................................47
23.1 Info .....................................................................47
23.2 Data protection policy .......................................................47
24. Technical data ..........................................................48
TABle Of cONTeNTS
5
INTRODUcTION
2. Introduction
Thank you for choosing a Hama product. Take your time and read the following instructions and
information completely. Please keep these instructions in a safe place for future reference. If you sell the
device, please pass these operating instructions on to the new owner.
2.1 explanation of warning symbols and notes
Risk of electric shock
This symbol indicates a risk of electric shock from touching product parts carrying hazardous voltage.
Warning
This symbol is used to indicate safety instructions or to draw your attention to specic hazards and
risks.
Note
This symbol is used to indicate additional information or important notes.
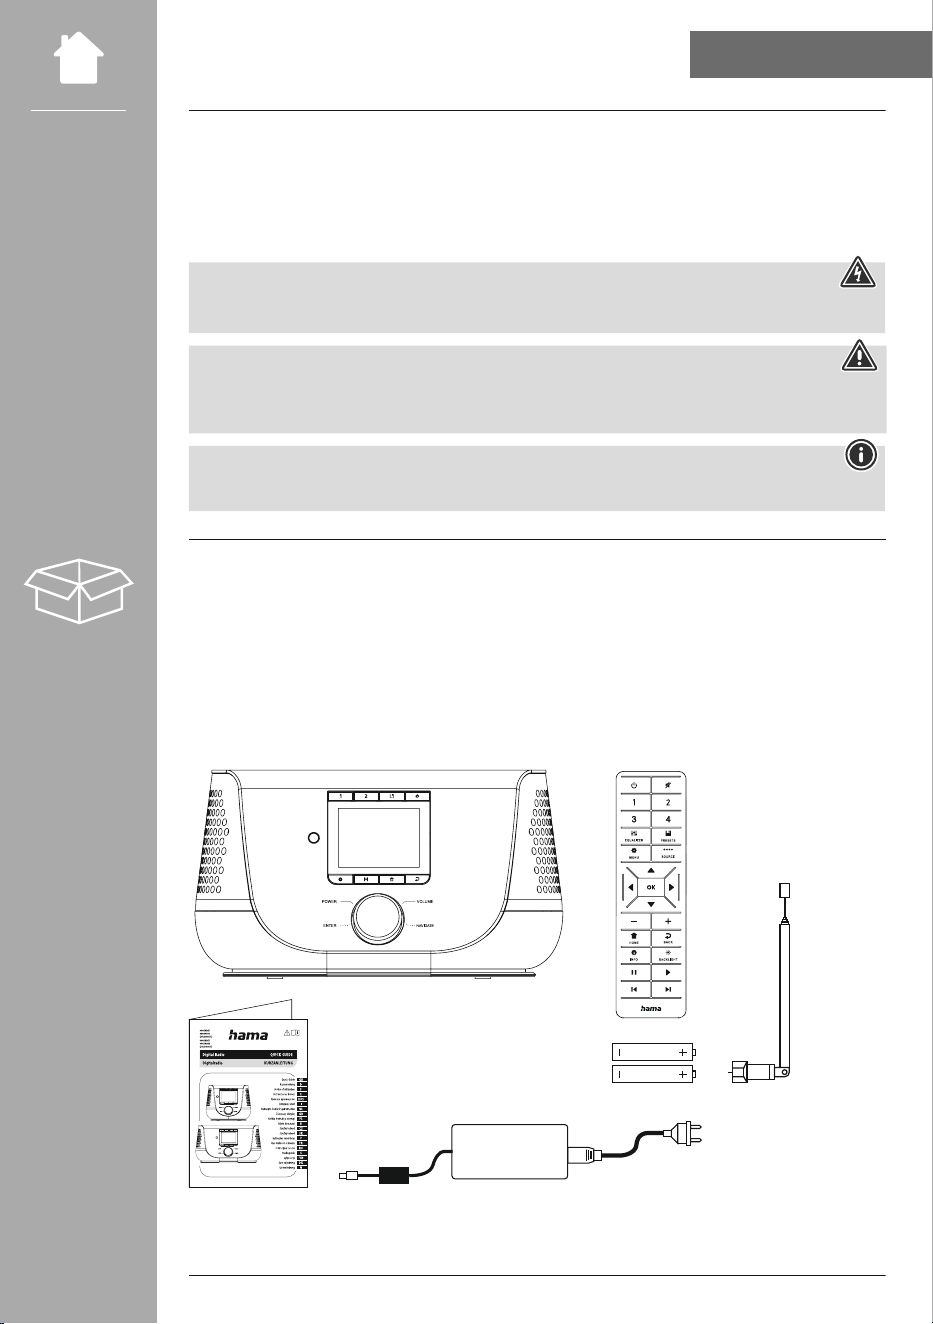
2.2 Package contents
• DIR3300SBT digital radio
• Remote control
• 2 x AAA (micro) batteries
• Power supply unit (18V/2.6A)
• Quick-start guide (multi-lingual)
• Telescope Antenna
AAA
AAA
6
SAfeTy INSTRUcTIONS
3. Safety instructions
• The product is intended for private, non-commercial use only.
• Protect the product from dirt, moisture and overheating and use it in dry rooms only.
• As with all electrical products, this device should be kept out of the reach of children.
• Do not drop the product and do not expose it to any major shocks.
• Do not operate the product outside the power limits specied in the technical data.
• Keep the packaging material out of the reach of children due to the risk of suffocation.
• Dispose of packaging material immediately in accordance with the locally applicable regulations.
• Do not modify the device in any way. Doing so voids the warranty.
• Do not use the product in the immediate vicinity of heaters, other heat sources or in direct sunlight.
• Do not use the product in areas in which electronic products are not permitted.
• Only use the article under moderate climatic conditions.
• The product is intended only for use inside buildings.
• Do not use the product in a damp environment and avoid splashing water.
• Route all cables so that there is no risk of tripping.
• Do not bend or crush the cable.
• Always pull directly on the plug when disconnecting the cable, never on the cable itself.
Risk of electric shock
• Do not open the device or continue to operate it if it becomes damaged.
• Do not use the product if the AC adapter, adapter cable or power cable is damaged.
• Do not attempt to service or repair the product yourself. Leave any and all service work to qualied
experts.
7
SAfeTy INSTRUcTIONS
Warning - Batteries
• When inserting batteries, note the correct polarity (+ and - markings) and insert the batteries
accordingly. Failure to do so could result in the batteries leaking or exploding.
• Only use batteries (or rechargeable batteries) that match the specied type.
• Before you insert the batteries, clean the battery contacts and the polarity contacts.
• Do not allow children to change batteries without supervision.
• Do not mix old and new batteries, or batteries of different types or from different manufacturers.
• Remove the batteries from products that are not being used for an extended period (unless these are
being kept ready for an emergency).
• Do not short-circuit batteries.
• Do not charge batteries.
• Do not burn batteries.
• Keep batteries out of the reach of children.
• Never open, damage or swallow batteries or allow them to enter the environment. They can contain
toxic, environmentally harmful heavy metals.
• Remove spent batteries from the product and dispose of them without delay.
• Avoid storing, charging and using in extreme temperatures and at extremely low atmospheric
pressures (such as at high altitudes).
Warning
• High sound pressure!
• There is a risk of hearing damage.
• To prevent any loss of hearing, avoid listening at loud volumes for prolonged periods.
• Always keep the volume at a sensible level. Loud volumes, even over short periods, can cause
hearing loss.
• Using this product limits your perception of ambient noise. For this reason, do not operate any
vehicles or machines while using this product.
8
INfORMATION AND NOTeS BefORe GeTTING STARTeD
4. Information and notes before getting started
This radio offers you the option of using virtually all of the functions conveniently in combination with a
smartphone or tablet. To do this, download the free UNDOK app (for iOS & Android).
Note on the UNDOK app
A detailed description of the UNDOK app and all of its functions can be found in our UNDOK guide at:
www.hama.com-
>
00054247 -
>
Downloads
www.hama.com-
>
00054248 -
>
Downloads
Note – Optimising reception
• This product is equipped with an antenna connection which allows the use of an active or passive
antenna. The antenna is connected with a coaxial F-connector.
• A telescopic antenna that enables DAB, DAB+ and FM reception is already included in the delivery.
For best reception, ensure that the antenna is fully extended and vertical.
• Try various different positions if necessary to get the best reception.
9
SeTTING UP The RADIO AND AcceSSORIeS
5. Setting up the radio and accessories
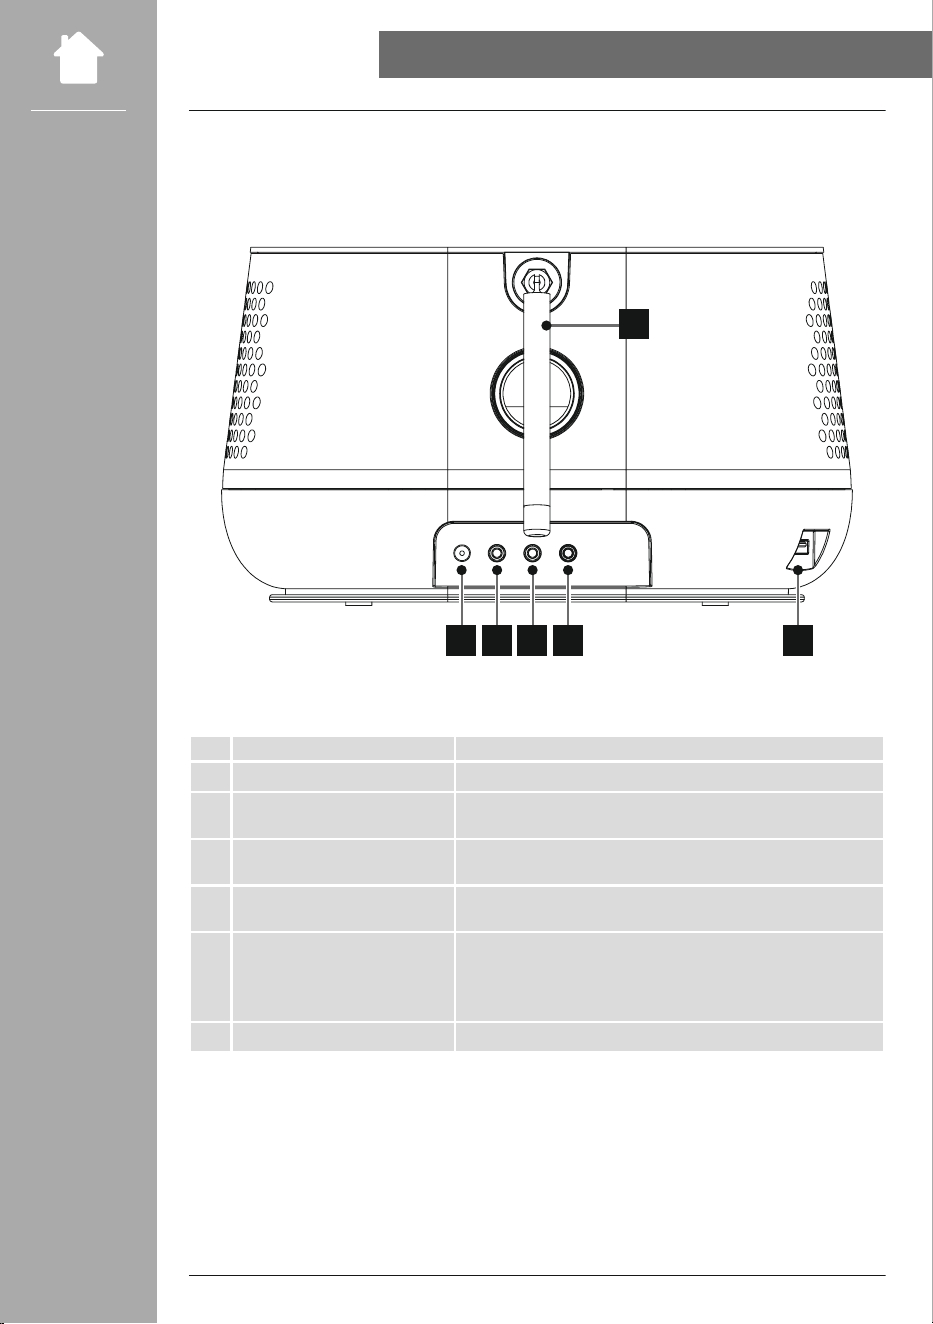
5.1 Rear view
No. Designation function
1 Mains connection Connection of the enclosed mains adapter to the power supply
2 Aux in (3.5mm)
Analogue connection with external audio sources via 3.5mm audio
cable
3 Headphones connection (3.5mm)
Analogue connection with wired headphones with 3.5mm jack
connection
4 Line out (3.5mm)
Analogue connection with external loudspeakers and other audio
devices via 3.5mm audio cable
5 USB connection
- Connection of USB storage media with FAT 16/32 formatting for
playback of audio content
- Charging port for smartphones/tablets and other USB devices
(max. 5V / 1A)
6 Antenna Antenna for receiving DAB/VHF signals
1 2 3 4 5
6
11
1
3
4
6
8
10
9
12
14
16
18
2
5
7
11
13
15
17
19
SeTTING UP The RADIO AND AcceSSORIeS
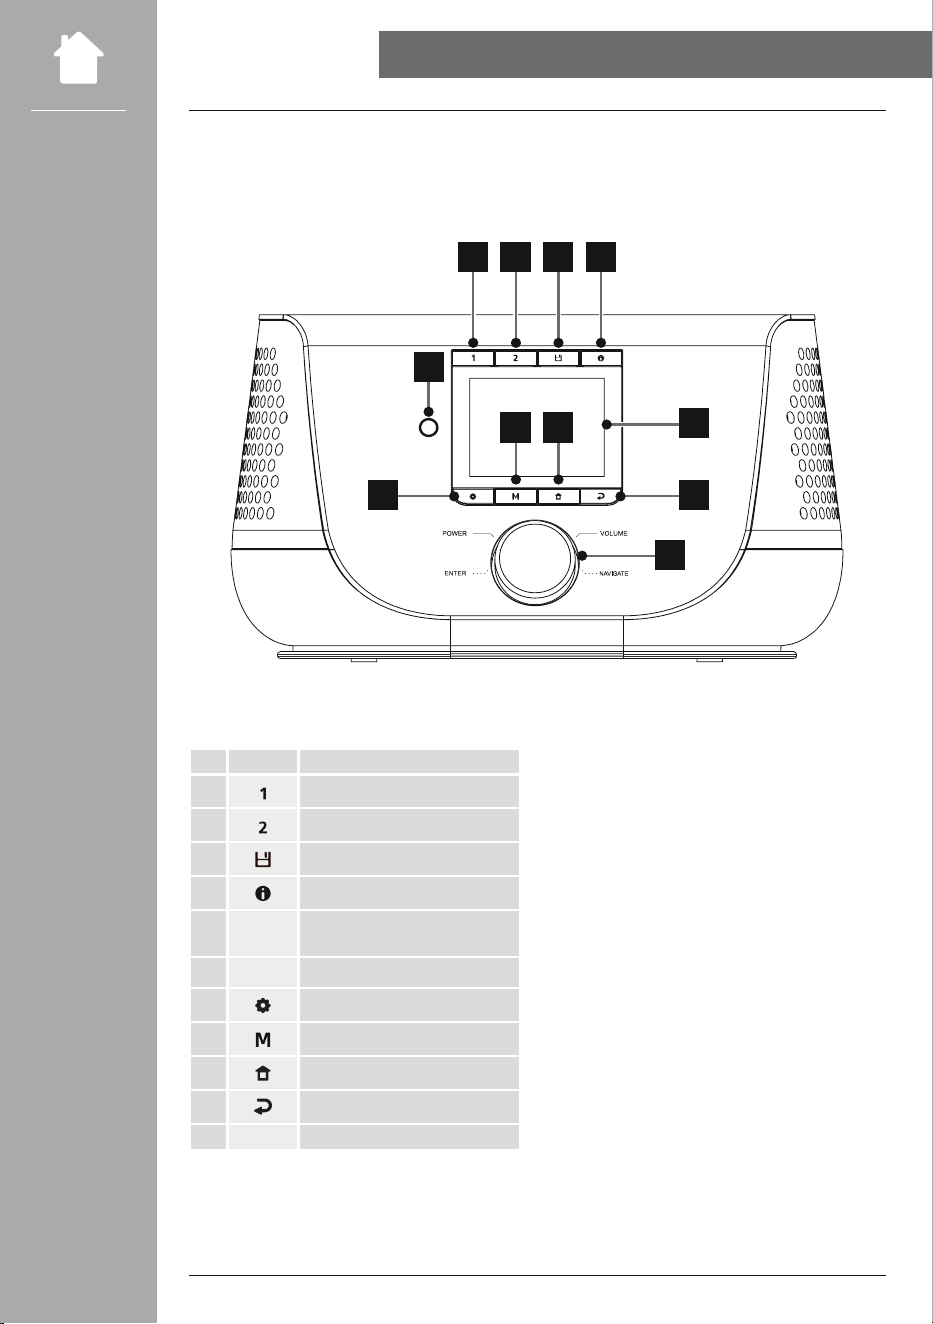
No. Button Designation
1
Power
2
Mute
3
- - -
Favourites buttons 1-4
4
Equaliser
5
List of favourites
6
Menu
7
Mode
8
OK
9
Navigation buttons left,
right, up, down
10
Reduce volume
11
Increase volume
12
Playback display
13
Back
14
Information
15
Display illumination
16
Pause
17
Continue
18
Previous track
19
Next track
AAA
AAA
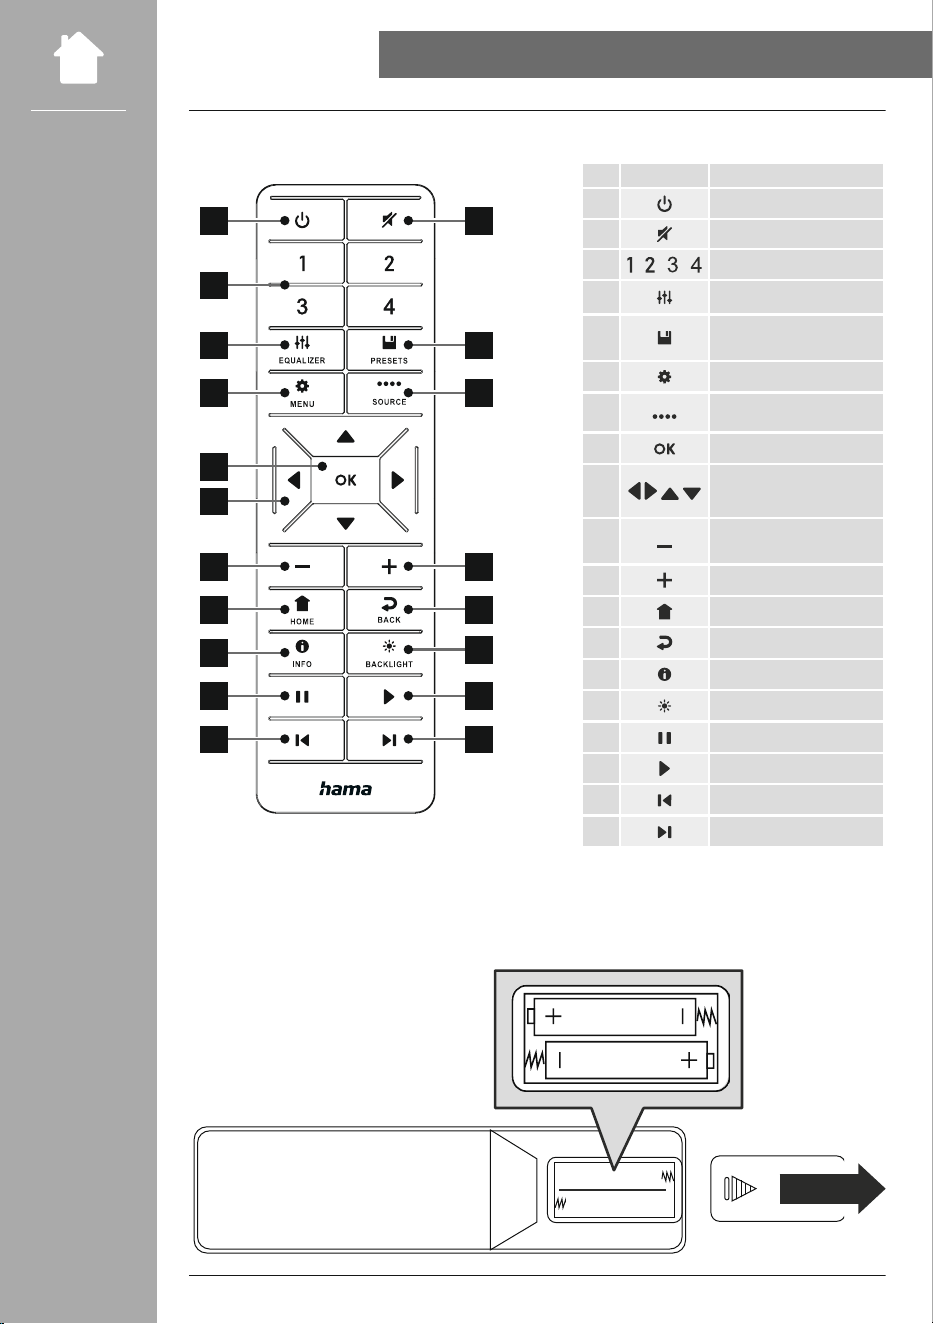
5.3 Remote control

12
OPeRATING cONcePT
6. Operating concept
6.1 General operation
Icon Designation function
Hand symbol Press once
2x
Hand symbol Press multiple times
Hand symbol Press repeatedly
3s
Hand symbol Hold for 3 seconds
Button
Remote
control
Designation function
NAVIGATe
Navigation rotary
dial
• Navigation forwards in the current menu
• Navigation backwards in the current menu
• Reduces the volume of the current playback
• Increases the volume of the current playback
eNTeR
[OK] rotary dial
button
• Conrmation button for opening the menu or
function currently highlighted
• Toggling between the presentation forms available
(full screen / split screen)
• long key press: Switch off and switch on the radio
[INfO] button
Changes the contents shown in the station information
(genre / artist / information)
[MODe] button Repeated pressing toggles between operating modes
[hOMe] button
All menus are closed and the radio returns to the
playback screen
6.2 Settings menu
Button
Remote
control
Designation function
[SeTTINGS] button
Opens the Settings menu for the currently active
mode
[BAcK] button
• Opens the station search / station list (DAB)
• Toggles between the setting for the volume and
manual frequency setting (VHF)
• Back to the previous menu
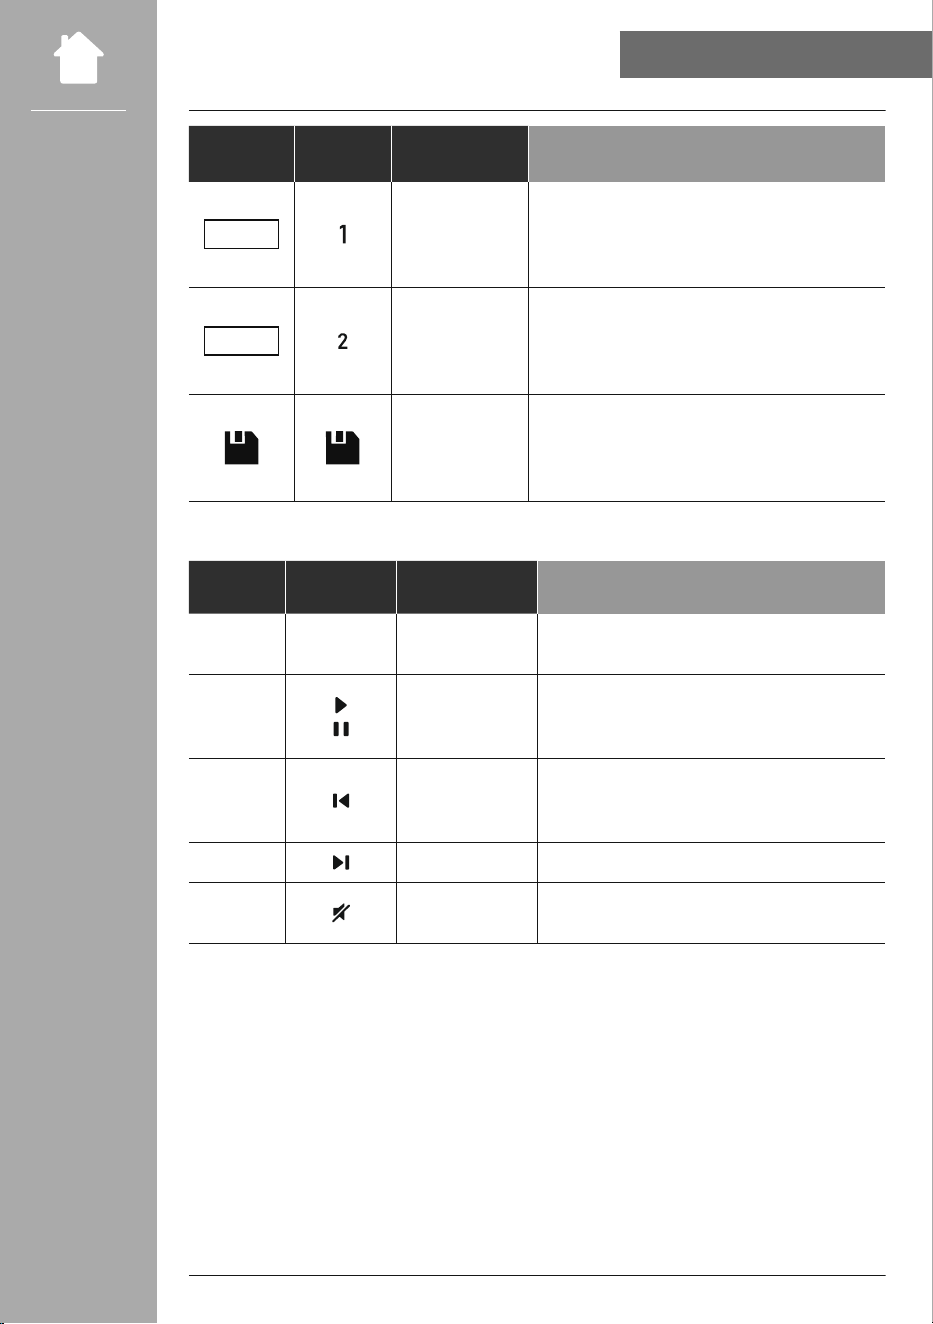
6.3 Managing favourites
13
OPeRATING cONcePT
Button
Remote
control
Designation function
1
[PReSeT 1] button
• Short key press: Access favourite storage space
1 for current playback mode
• long key press: Save the current station to
favourite storage space 1
2
[PReSeT 2] button
• Short key press: Access favourite storage space
2 for current playback mode
• long key press: Save the current station to
favourite storage space 2
[PReSeTS] button
• Short key press: Calls up the favourites list to
select favourites
• long key press: Calls up the favourites list to
save the selected station
6.4 Music operation
Button
Remote
control
Designation function
-
[STOP] button
The current playback is stopped and the current
position is not saved
[PlAy / PAUSe]
button
• The current playback is stopped and the current
position in the playback is saved
• Pressing the button again continues playback
[PReVIOUS]
button
The current track is started from the beginning.
Pressing the button again calls up the previous
track
[NeXT] button The next track on the storage medium is played
[MUTe] button
Disables the sound and re-enables it if pressed
again
14
GeTTING STARTeD
7. Getting started
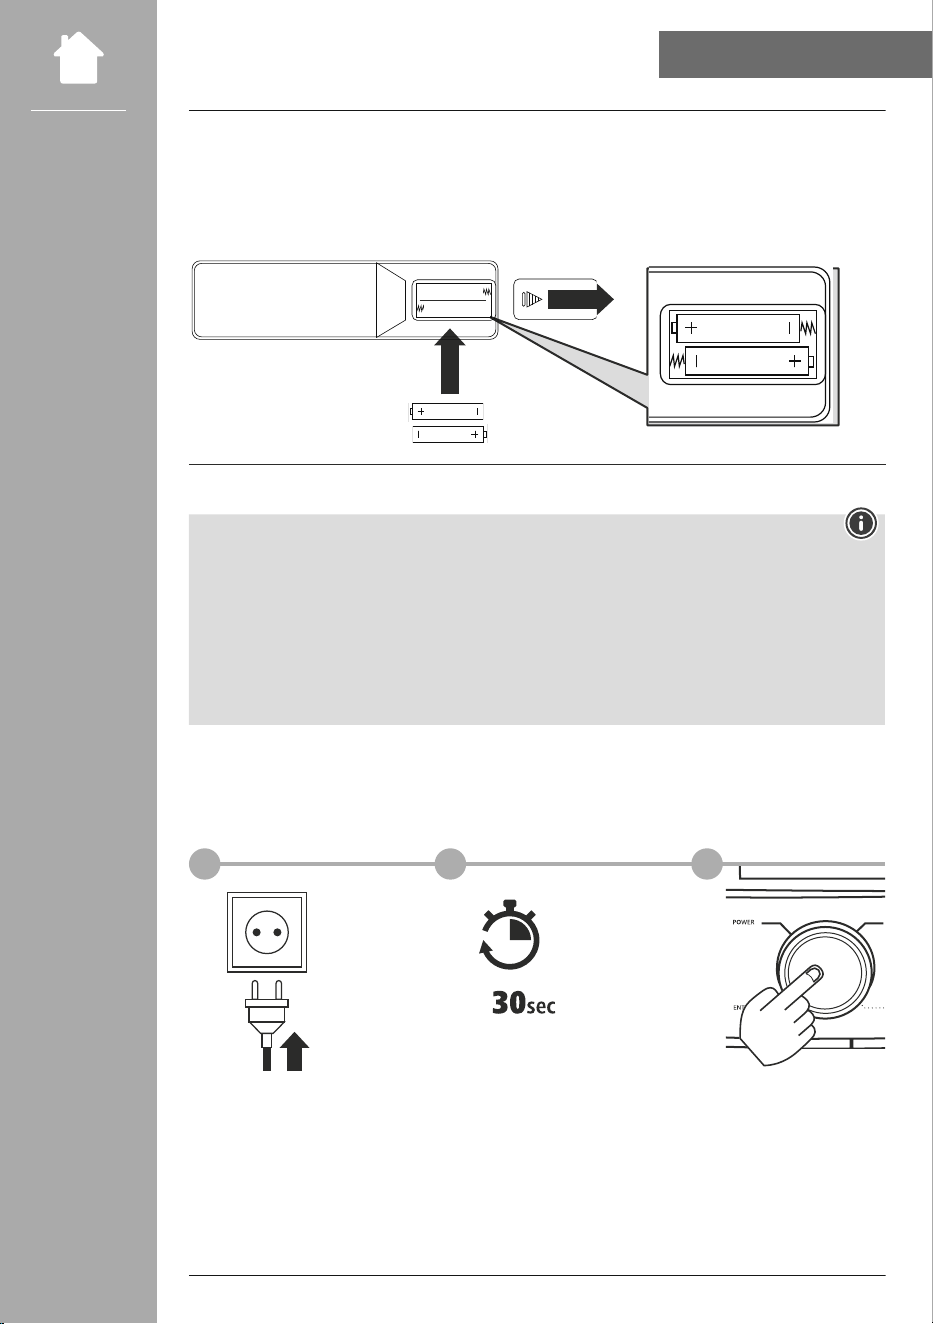
7.1 Remote control
• Open the battery compartment cover located on the rear of the remote control.
• Insert the batteries provided, making sure you match the polarities correctly. The correct polarity is
indicated by the plus and minus symbols in the battery compartment.
AAA
AAA
7.2 connecting and operating the radio
Warning
• Only operate the product from an approved socket that is connected to the public power supply. The
socket must be installed close to the product and must be easily accessible.
• Disconnect the product from the power supply using the On/Off switch – if this is not available,
unplug the power cord from the socket.
• If using a multi-socket power strip, make sure that the total power consumption of all connected
devices does not exceed the power strip's maximum throughput rating.
• If you will not be using the product for a prolonged period, disconnect it from mains power.
• Connect the network cable to a properly installed and easily accessible network socket.
• The power supply unit is suitable for mains voltages between 100 and 240 V, and is thus operable on
almost any AC power grid. Please note that a country-specic adapter may be necessary.
• You can nd an appropriate selection of Hama products at www.hama.com.
1 23
Once the product has been connected to mains power, initialisation takes place.
The radio starts up.
15
GeTTING STARTeD
7.3 Prepare the network connection/Internet connection
You can integrate this radio into a local network. To receive internet radio or access non-local media
(streaming, such as Spotify Connect), the network must be connected to the internet.
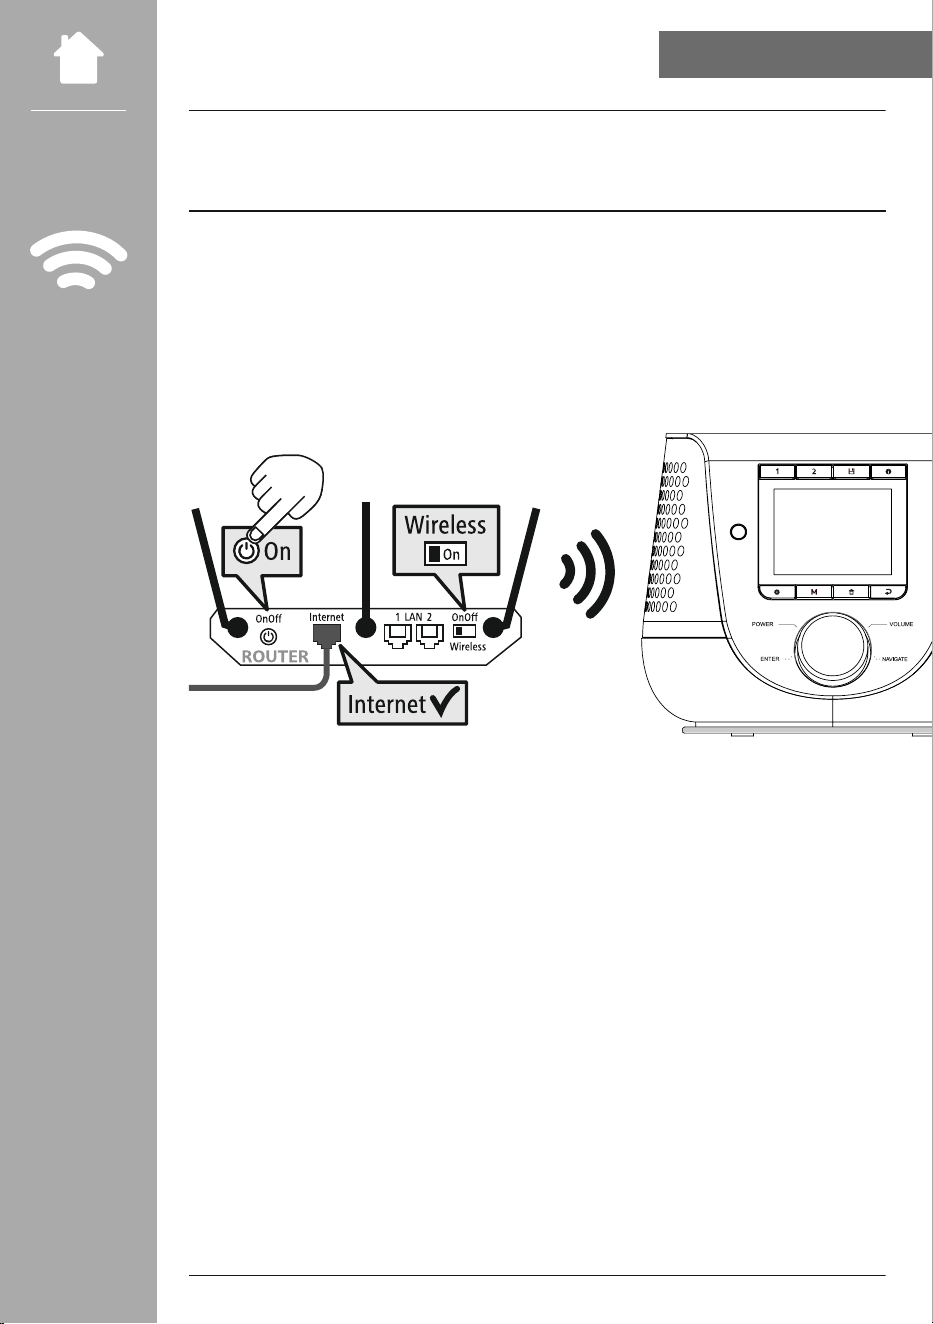
7.4 WlAN/Wifi connection (wireless network)
• Ensure the router is switched on, is functioning correctly and that there is a connection to the internet/
network.
• Activate the WLAN function of your router if it is not already activated.
• Follow your router´s operating instructions as regards the correct functioning of the WLAN connection.
• A detailed description of how to congure the WLAN connection is given in the 20.1.1 Network
wizard section.
16
NAVIGATION AND cONTROlS
8. Navigation and controls
Once the radio has been initialised for the rst time, switch it on using the button (Power button)
if required to start the product setup process. Below, the relevant steps are explained in brief. Further
information can be found in the relevant detailed sections.
8.1 control options
Please see the operating concept for information on the radio's general operation.
The radio can be used with the following control options:
1. Control elements on the device
2. The enclosed remote control
3. The free UNDOK app for Android and iOS devices
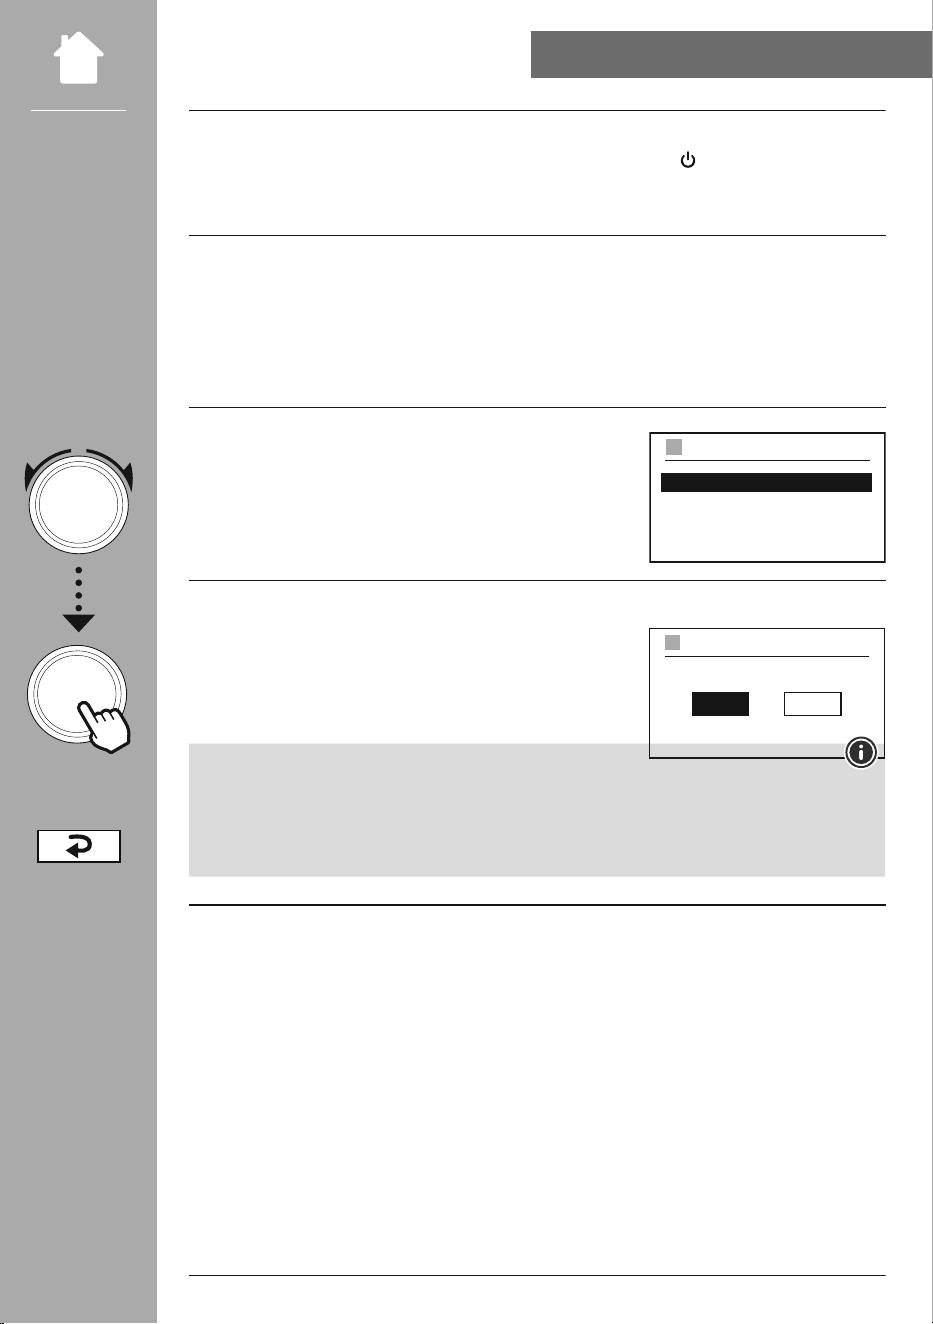
8.2 language selection
Once the initial start-up procedure is complete, you can choose
your preferred system language.
Please note that some parts of the interface are synchronised over
the Internet and it may be that some sections are not available in
your chosen language.
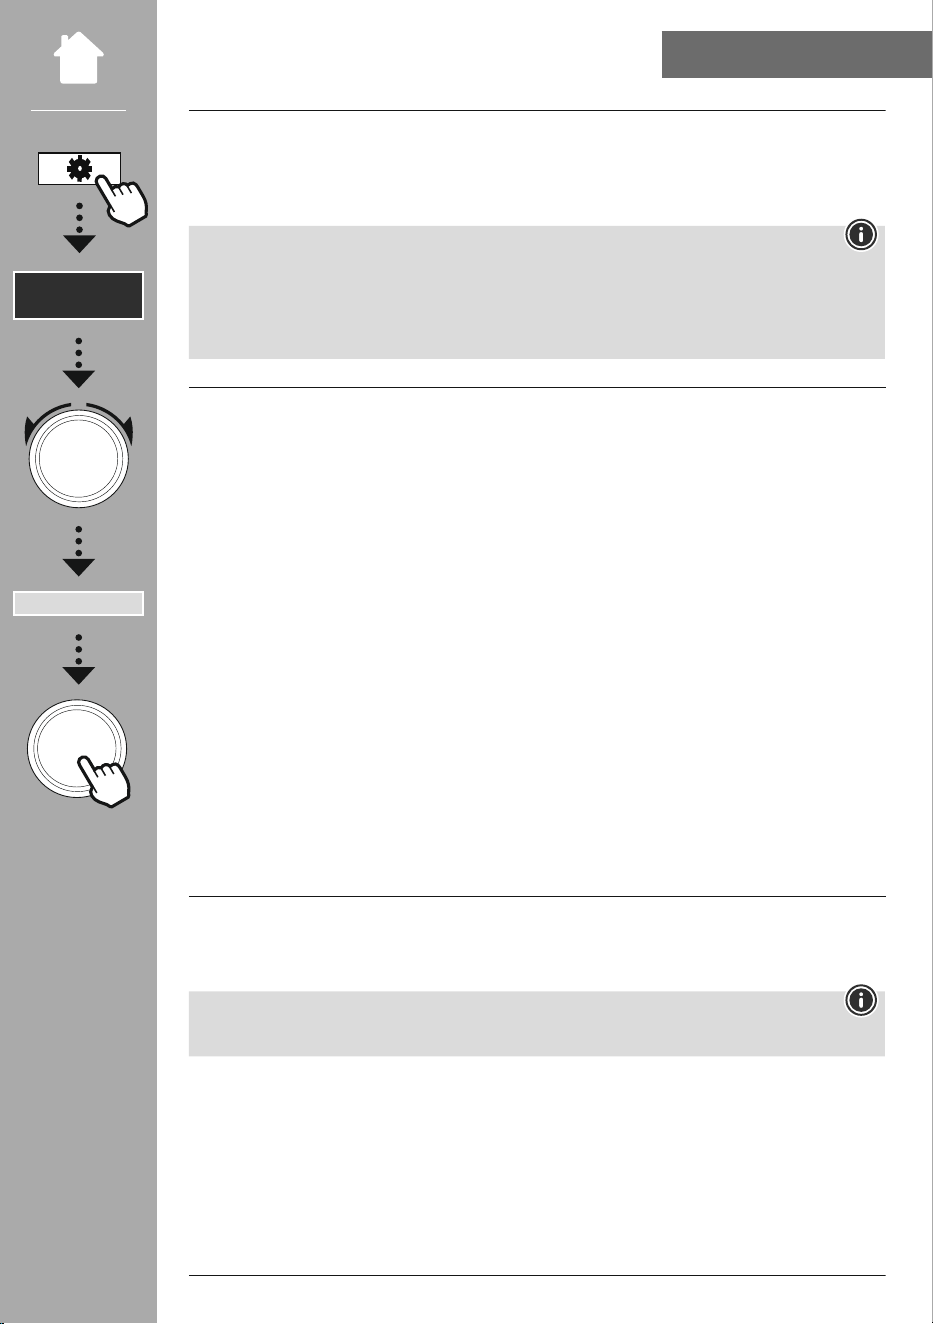
8.3 Setup wizard
We recommend using the setup wizard for quick and easy rst-
time setup (setting of the time, date, Internet connection, etc.).
If you skip the setup wizard's help with rst-time setup, you can
of course still make these settings via the System settings or re-
initiate the setup wizard.
Note on operation
To select between the various settings options, use the control elements explained in the operating
concept. These allow you to navigate between the menu items and subsequently conrm your
selection. If you have accidentally made an incorrect selection, you can return to the previous menu
item.
8.4 Time settings
The radio allows the time to be displayed in 12-hour (am/pm) or 24-hour format. The time can be
calibrated using the various reception methods (VHF/DAB/DAB+/Internet), enabling the current time to be
synchronised automatically in the event of
a power cut. If you disable synchronisation, there is the risk that the time information will need to be
repopulated manually after a power cut.
NAVIGATe
eNTeR
German
Italian
Norwegian
Polish
LANGUAGE
YES NO
SYSTEM SETTINGS
17
NAVIGATION AND cONTROlS
8.5 Keep network connected
This setting is a radio energy-saving function. If the function is switched off, the network function
automatically switches to standby mode in order to reduce energy consumption. This means that, when
the network function is disabled, the radio cannot be accessed from your PC, smartphone or tablet.
8.6 Network wizard
Using the network wizard will help you connect the radio to the local network or Internet.
Note – Reference to a different part of these operating instructions
Because this chapter is extensive, please follow the directions in section 20.1.1 Network wizard.
Once the network wizard has nished,the setup wizard is nished as well.
18
NAVIGATION AND cONTROlS
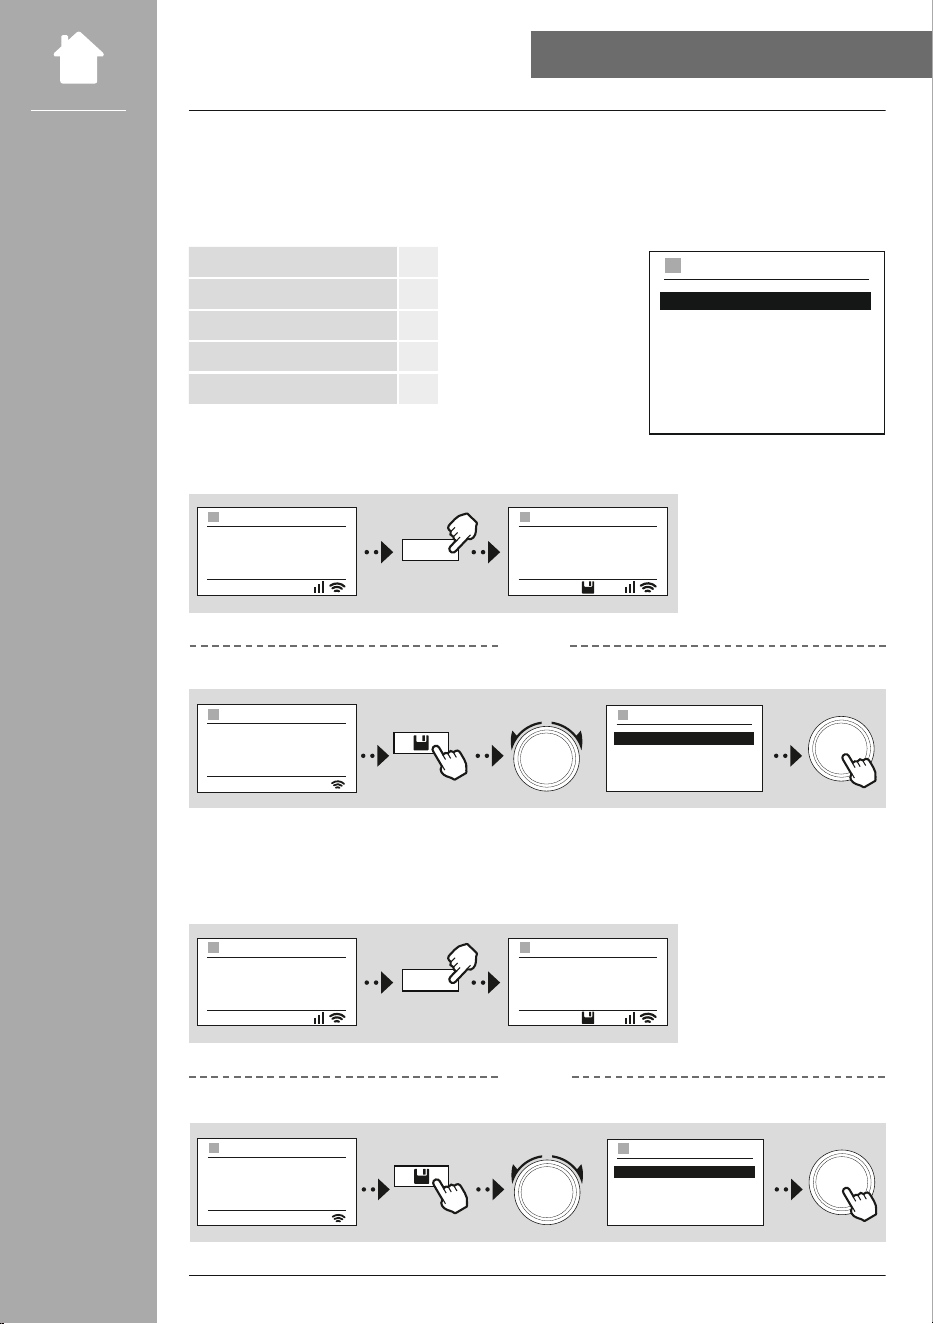
8.7 Managing favourites
Please see the operating concept for information on how to store content for the relevant mode in a
storage space and retrieve it. The following storage spaces are available for the reception methods
supported:
Digital radio DAB+ 30
Analogue radio VHF/FM 30
Internet radio 30
Spotify Connect 10
Amazon Music 8
Save favourites
OR
Remote control
on the product
Antenne Bayern
Artist: Hama
Song: Hama
12:35
DAB
1 - Antenne Bayern
2 - Bayern 3
3 - Rockantenne
4 - Bayern 1
RECALL FROM PRESET
NAVIGATE
3s
ENTER
1
3s
Antenne Bayern
Artist: Hama
Song: Hama
12:35
DAB
Antenne Bayern
Artist: Hama
Song: Hama
12:35
DAB
1
Access favourites
OR
Remote control
on the product
1
Antenne Bayern
Artist: Hama
Song: Hama
12:35
DAB
1
Antenne Bayern
Artist: Hama
Song: Hama
12:35
DAB
Antenne Bayern
Artist: Hama
Song: Hama
12:35
DAB
1 - Antenne Bayern
2 - Bayern 3
3 - Rockantenne
4 - Bayern 1
RECALL FROM PRESET
NAVIGATE
ENTER
1 - Antenne Bayern
2 - Bayern 3
3 - Rockantenne
4 - Bayern 1
5 - ...
6 - ...
7 - ...
RECALL FROM PRESET
19
NAVIGATION AND cONTROlS
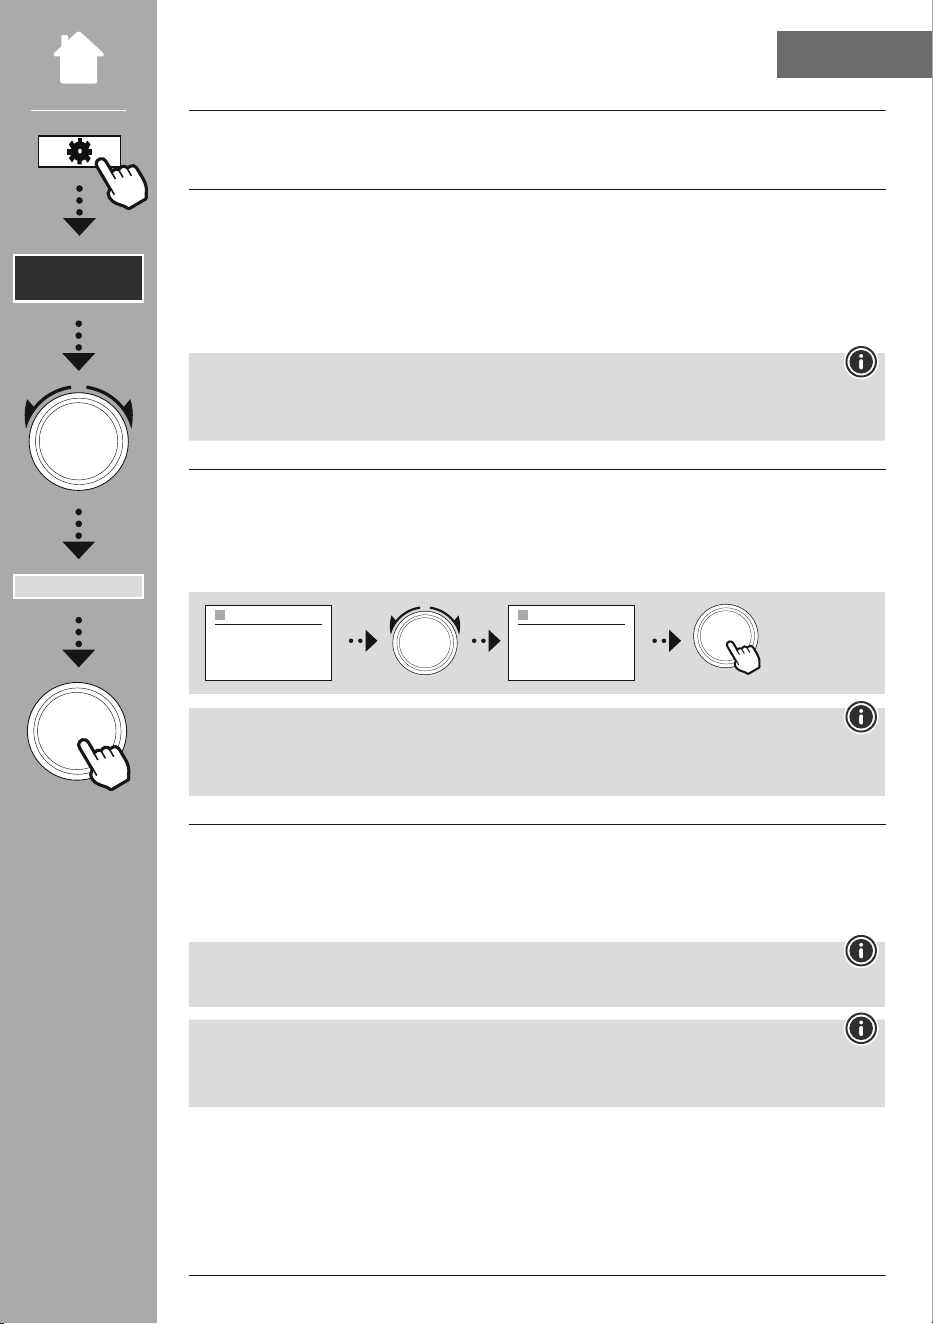
8.8 Screen display
For playback modes that display image content, which can be slideshow content, station logos or album
covers, for example, you can choose between different display methods.
1) Split screen
2) Display of image content on the entire screen
Please refer to the operating concept for the key assignment.
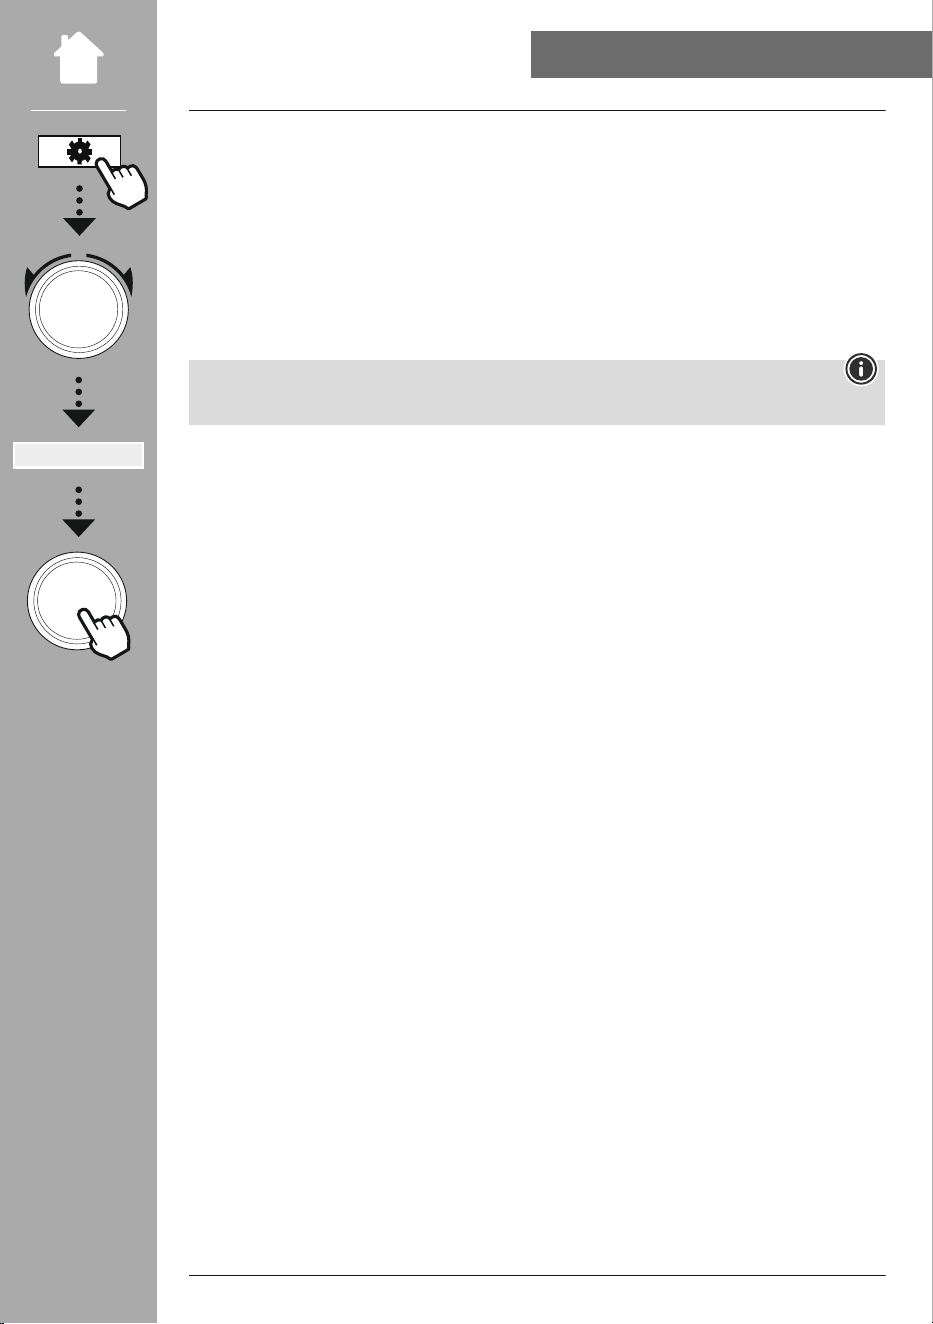
Note
This function is currently only available for Internet radio, DAB radio and Spotify Connect modes.
NAVIGATe
Slideshow
eNTeR
20
MeNU STRUcTURe
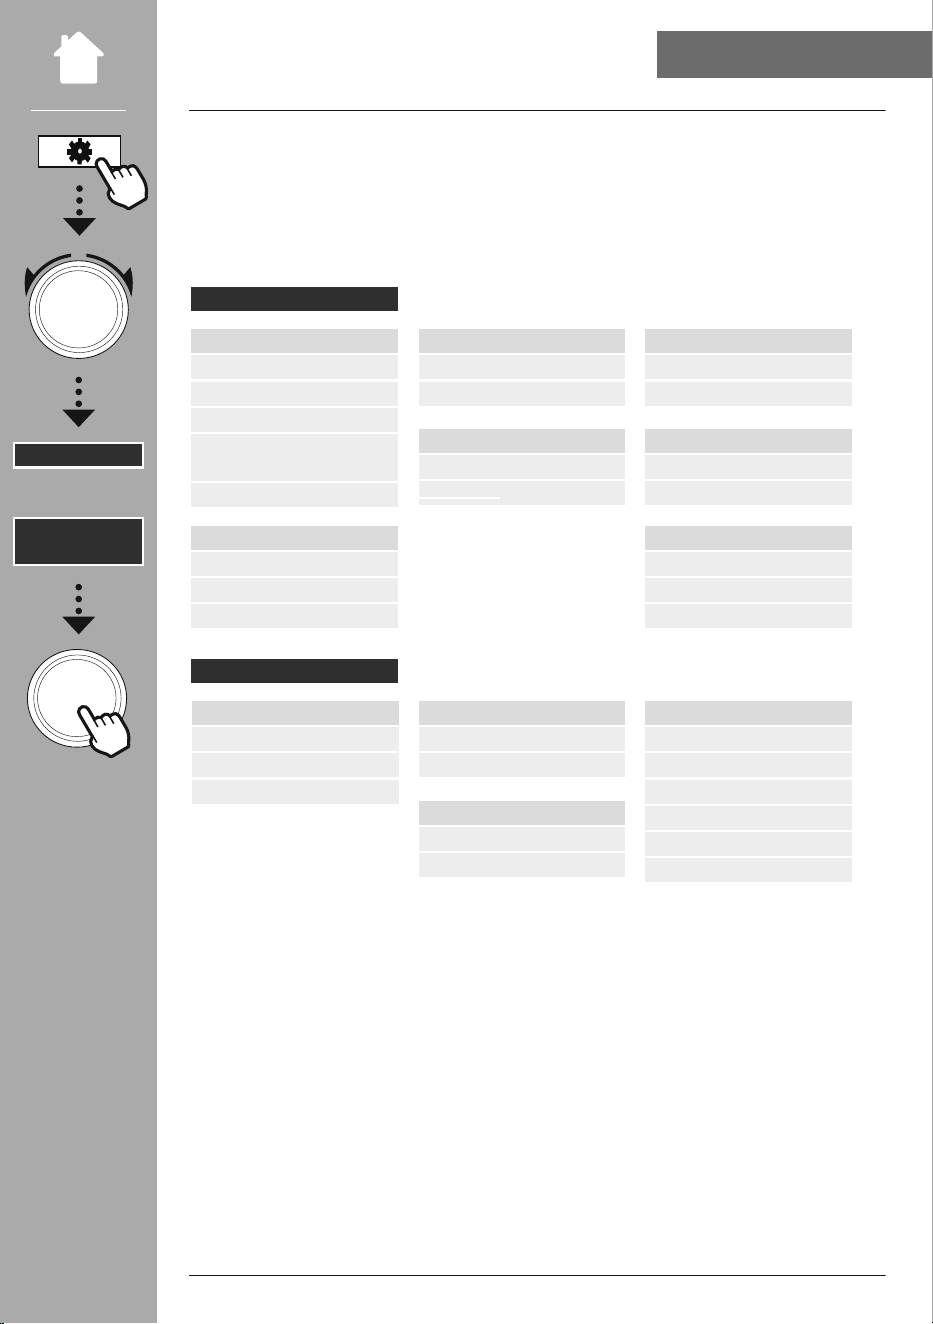
9. Menu structure
This device has a variety of reception methods and additional functions. These are summarised in the
radio's main menu and divided into several sections.
The following overview should help you to nd the desired function in the menu structure quickly. The
exact explanations are gone into in more detail in the following section and each operation is illustrated
graphically.
DAB
Station list
Scan
Prune invalid
DRC - Dynamic Range
Control
Station order
MAIN MeNU
external Sources
Bluetooth Streaming
Aux In
USB
fM
Scan setting
Audio setting
Routines
Sleep
Alarms
Timer
Internet radio
Last listened
Station list
Podcasts
Last listened
Station list
Streaming Services
Spotify
Amazon Music
SySTeM SeTTINGS
Display
Backlight
Color Theme
About
Info
Privacy policy
Network & Sound
Network
Bluetooth RX
Equaliser
System
Setup wizard
Time/Date
Language
Auto-Standby
Software update
Factory reset
NAVIGATe
MAIN MeNU
– – ODeR – –
SySTeM
SeTTINGS
eNTeR
21
DAB RADIO
10. DAB radio
This radio receives all common digital radio frequencies in the range of 174 MHz to 240 MHz (band III,
channels 5A to 13F). The automatic DAB station search starts automatically when DAB mode is started
for the rst time. As soon as this has been completed, the current station list is displayed.
By calling up the corresponding DAB settings menu, you can access the following settings options and
functions.
10.1 Station list
The station list offers a complete display of all radio stations that were found during the last complete
search.
Navigate to the desired station you want to call up and conrm this selection. The radio will now start
playing the corresponding station.
10.2 full scan
If the location of the radio changes or if new stations can be received, it is advisable to perform the
station search again. The entire frequency range is searched again and the station list is updated.
10.3 Delete inactive stations
Select "Delete inactive stations"to remove stations from the station list that are currently no longer
available.
10.4 DRc - Dynamic Range control
Some DAB network radio stations support a volume control feature that actively takes effect during
playback. If the volume suddenly increases, DRC automatically lowers it. If the volume suddenly becomes
quieter, DRC automatically raises it. The same happens when playback is suddenly quiet. The radio then
increases the volume again.
DRc high
Total equalisation of different volumes. Strong compression, can audibly reduce the
dynamics of a piece of music
DRc low
Partial equalisation of different volumes. More subtle compression, without too
much loss of dynamics
DRc off No equalisation
10.5 Station sequence
By default the radio sorts stations into alphabetical order. You can also sort by signal strength or
ensemble. If sorting by ensemble is selected, the stations are sorted according to the corresponding
frequency block on which the respective ensemble is broadcast. These are often frequency blocks which
are broadcast locally, regionally or nationally.
– – ODeR – –
MAIN MeNU
NAVIGATe
DAB
Station list
Station order
eNTeR
22
INTeRNeT RADIO & PODcASTS
11. Internet radio & podcasts
This radio has the ability to play radio stations and podcasts from around the world via Internet radio.
When you rst enter this mode, the radio displays the possible search and narrowing lters. These can be
called up later via the corresponding mode menu.
By calling up the Internet Settings menu, you can access the following settings options and functions.
11.1 country (based on the IP address of the radio)
When you select this lter, further lters will be displayed to further rene your selection.
local stations Stations from your immediate vicinity are displayed.
Popular Stations that enjoy high popularity within the selected country are displayed.
Genre
Stations are displayed which correspond to the desired genre within the selected
country. You can select the desired genre after selecting the lter function. (For
example, country, jazz, rock, kids, etc.)
Other
Depending on your location, there may be other lters available, such as by
broadcaster for the region.
11.2 history (not yet available or empty during initial setup)
The radio stores the stations called up in this History list - so you can quickly nd previously called-up
stations again.
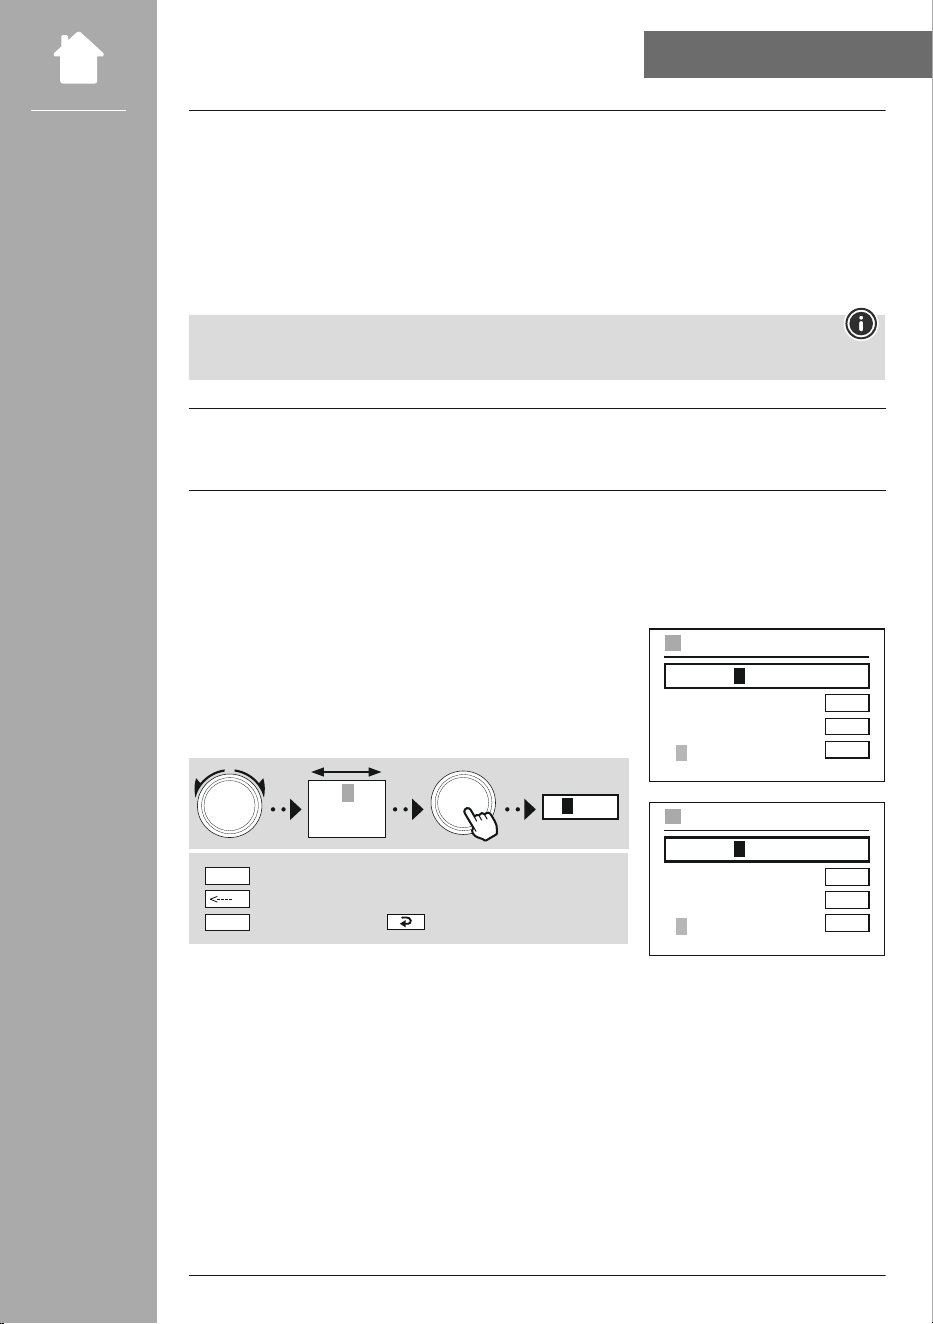
11.3 Search
The search function allows you to search specically for station
names or individual keywords.
You can use the on-screen keyboard to enter the search term and
then start the search. To do this, select "Done" and conrm this
selection. The radio then shows you the matching search results
based on the input you have made.
NAVIGATE
0 1 2 3 4 5 6
7 8 9 . , - @
a b c d e f g
3
ENTER
Start search
Delete character
Cancel search
ENTER
CANCEL
11.4 countries
With the "countries" lter function, you have the option of receiving radio from other countries as well.
Subsequently, you can rene the search to continents and a corresponding country. Depending on the
selected country, further restrictions such as genre, cities or popularity are available.
– – ODeR – –
MAIN MeNU
NAVIGATe
Internet radio
Last listened
Station list
Podcasts
Last listened
Station list
eNTeR
0 1 2 3 4 5 6 7 8 9 . , - @
a b c d e f g h i j k h l m
n o p q r s t u v w x y z
A B C D E F G H I J K L M
N O P Q R S T U V W X Y Z
<----
Stations
ENTER
CANCEL
23
INTeRNeT RADIO & PODcASTS
11.5 Popular
If the search lter "Popular" is selected, you will receive a selection of popular stations from the platform
provider based on user gures.
11.6 Discover
This function gives you further lter options to rene the selection of suitable search results.
Origin You can limit the search to the whole world, continents or individual countries.
Genre The search can be narrowed down to all genres or a specic selection.
language
Specify which language on which the search results should be based. Here too, you can
lter for a specic language or for all languages.
After the preset lters have been selected, select Show channels to display the list of results. The value in
brackets tells how many results were found.
11.7 Add stations and create/maintain your own favourites lists (web browser
required)
This radio has a locally stored station list which allows you to create your own station lists and add new
stations yourself. To use this option, you need a smartphone, tablet or computer that is on the same
network and has a web browser.
Note
The radio must be connected to the local network or the Internet and must have a valid IP address.
24
INTeRNeT RADIO & PODcASTS
11.8 calling up the administration interface
To access the administration interface, you must rst determine the radio's IP address on the local
network.
To do this, open the Network settings display, which you will
nd under System Settings - Network & Audio - Internet
Settings - Show Settings. Now make a note of the IP address
displayed there. Alternatively, the IP address can also be
determined from the device overview of most routers.
Now open the Internet browser on your smartphone, tablet or PC and enter the IP address in the address
line of the browser. (e.g. http://192.168.2.100)
If the IP address was entered correctly, the radio's administration interface should open.
In the top right-hand corner you will nd the supported languages for this interface. Select the desired
language from the drop-down menu here.
SySTeM
SeTTINGS
NAVIGATe
Network & Sound
Network
View settings
eNTeR
IP address
192.168.2.100
VIEW SETTINGS
25
INTeRNeT RADIO & PODcASTS
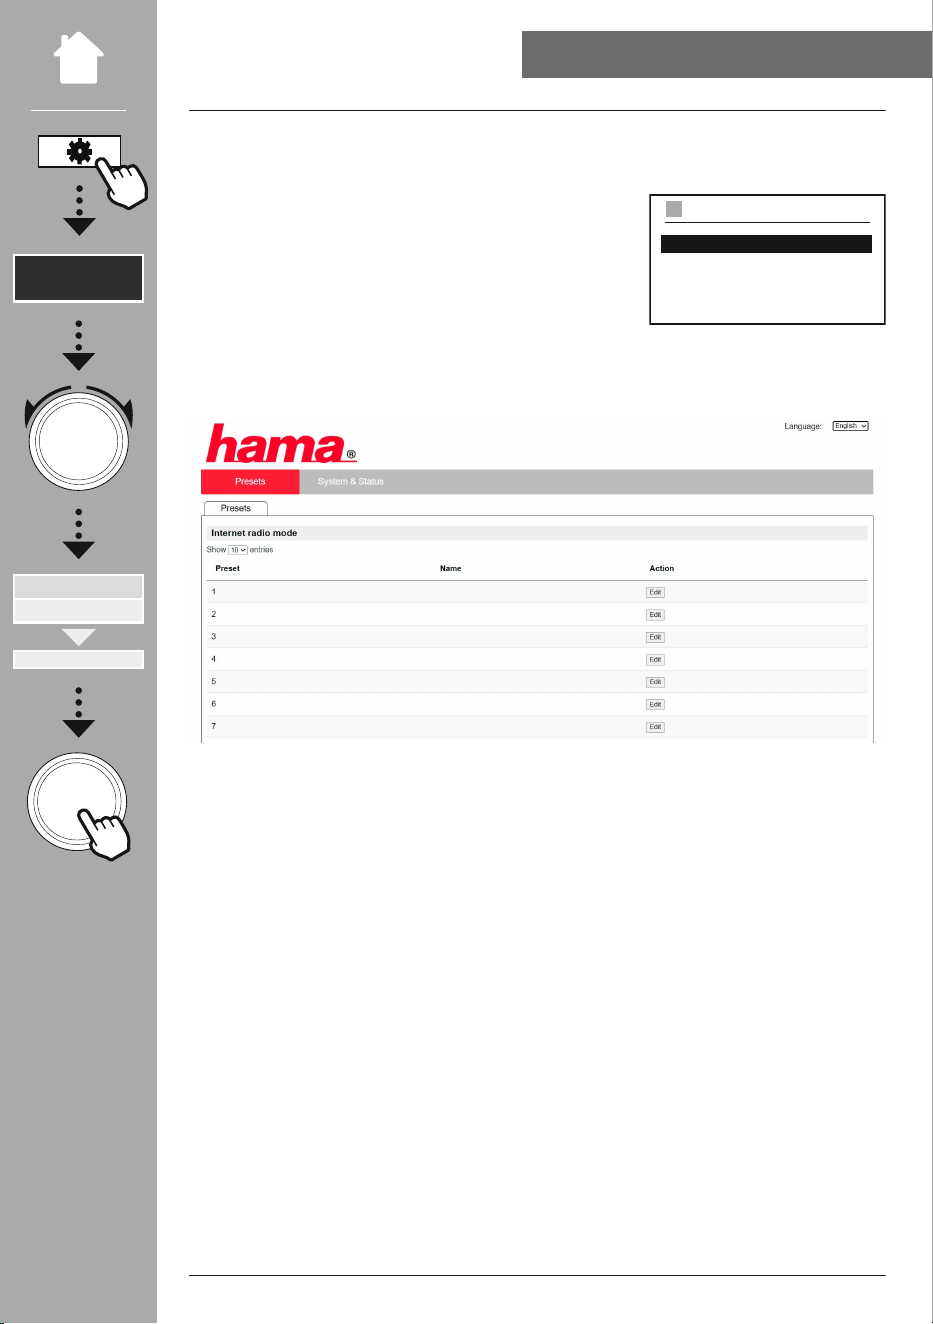
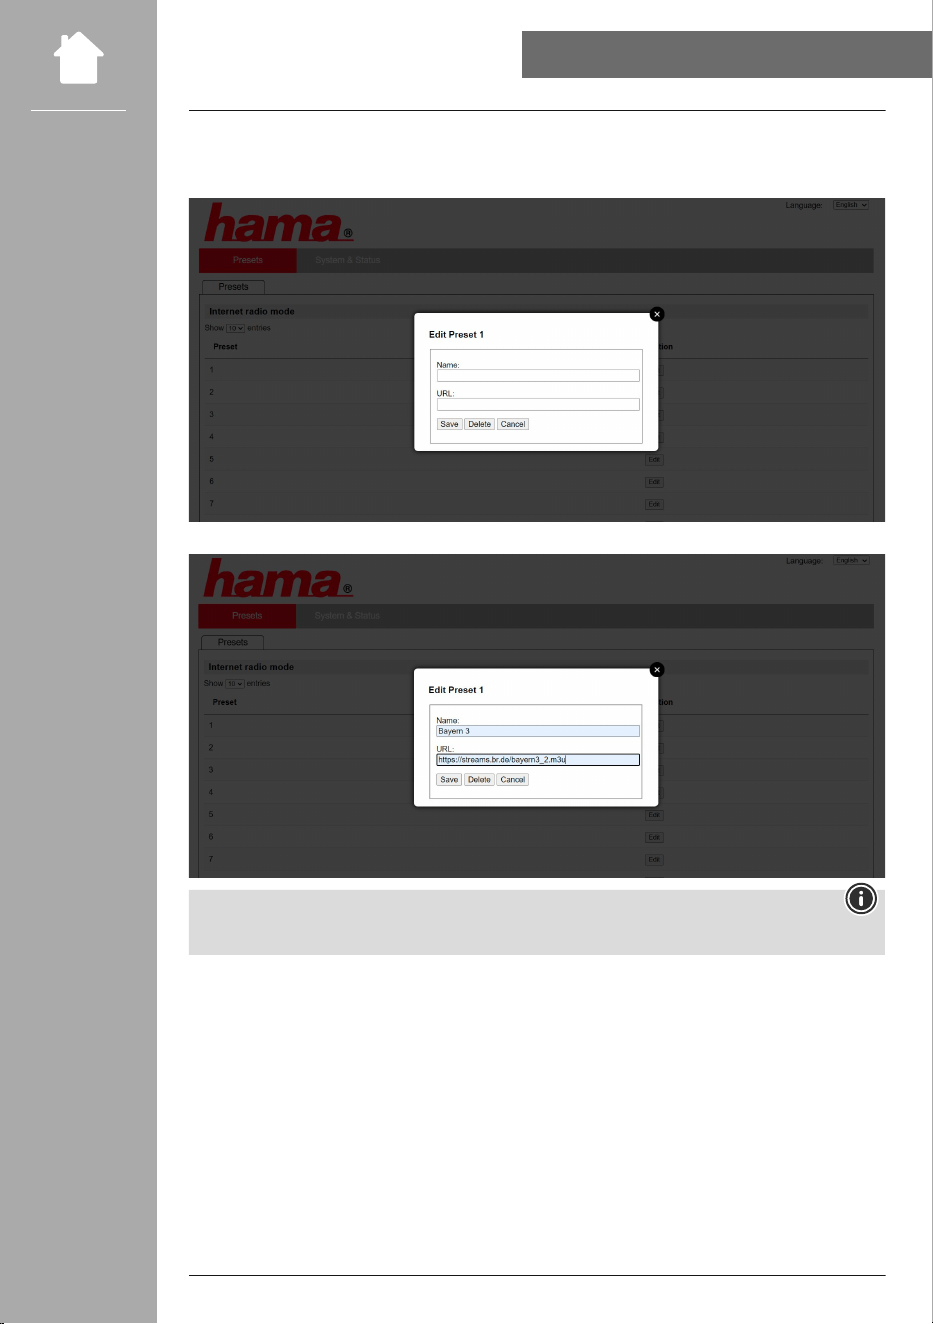
11.9 Add your own stations
To add or edit a favourite, click Change. The storage spaces of the web administration correspond to
those of the radio. Changes on the radio or in the web interface are adopted accordingly.
To edit or add a new station, complete the "Name" and "URL" elds and save the change.
Note
The storage spaces correspond to the storage spaces of the Internet radio.
26
INTeRNeT RADIO & PODcASTS
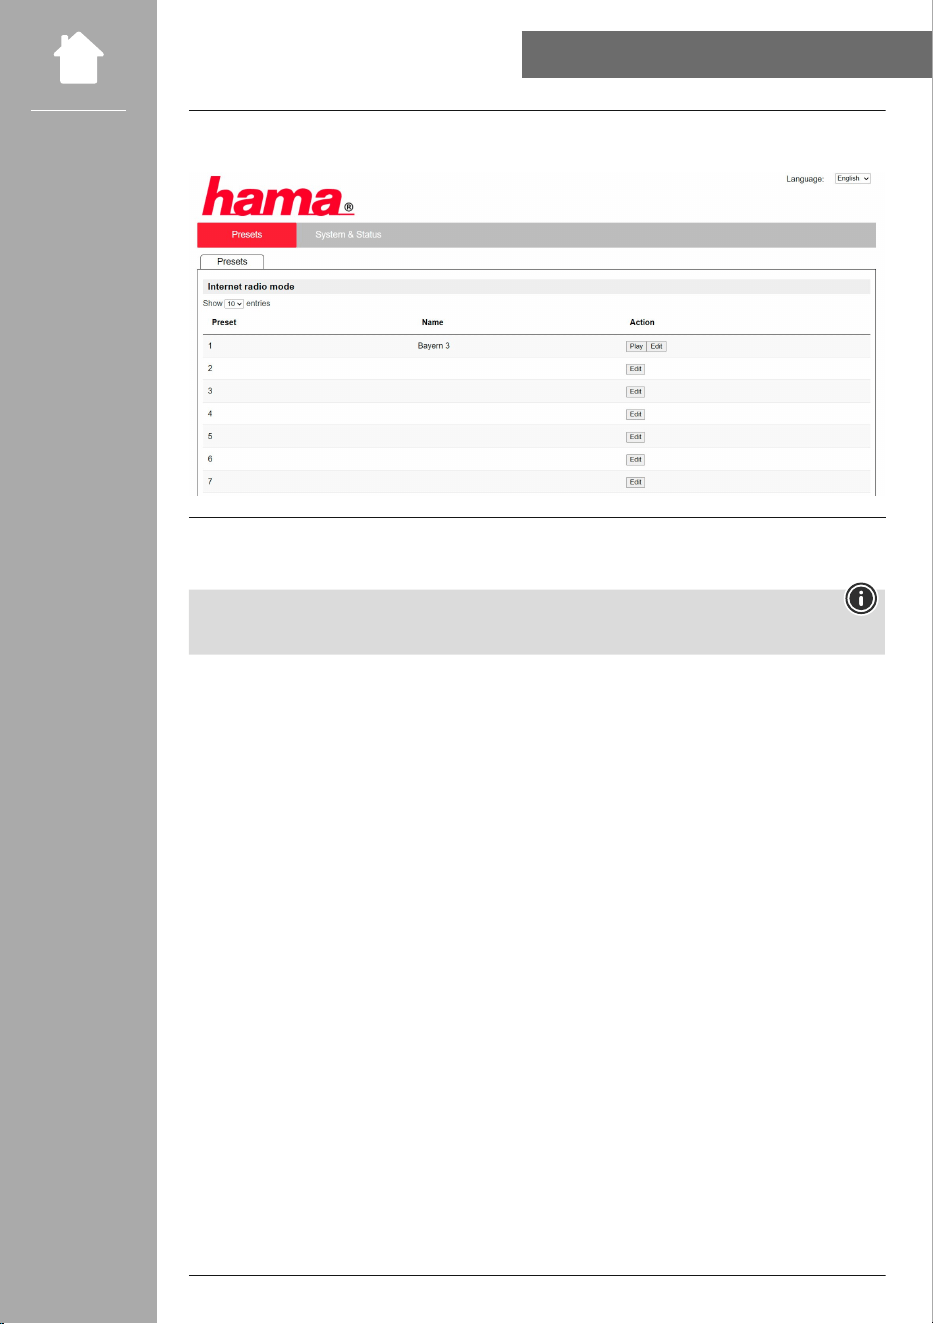
The added station is now displayed in the radio's favourites list and on the overview page of the web
portal. To access the station from the overview page, press "Play".
11.10 Delete stations
To delete a saved station, press the "change" button and then "Remove".
Note
Please note that only stations that offer transmission in AAC or MP3 format are supported.
27
SPOTIfy cONNecT
12. Spotify connect
Spotify Connect gives you access to millions of songs and brings them to your radio!
When you're on the move, transfer music seamlessly back to your smartphone or tablet PC. Save your
favourite playlists in the radio's favourites list and start playback without needing your smartphone.
Prerequisites:
• You must have the Spotify app installed on your Android/iOS device or your PC/notebook.
• This can be downloaded from the Google Play or Apple App Store. For the PC, you can get the software
from the Microsoft App Store or directly at www.spotify.com
• Once the app is installed, start it and log into your account (or, if you do not have an account, register
a new one).
Note
You often get a free trial month of Spotify Premium access when you sign up for the rst time.
If necessary, check availability at www.spotify.com.
However, this is not a mandatory requirement for this radio and use is also possible with a free
account - however, free access entails some restrictions by the provider.
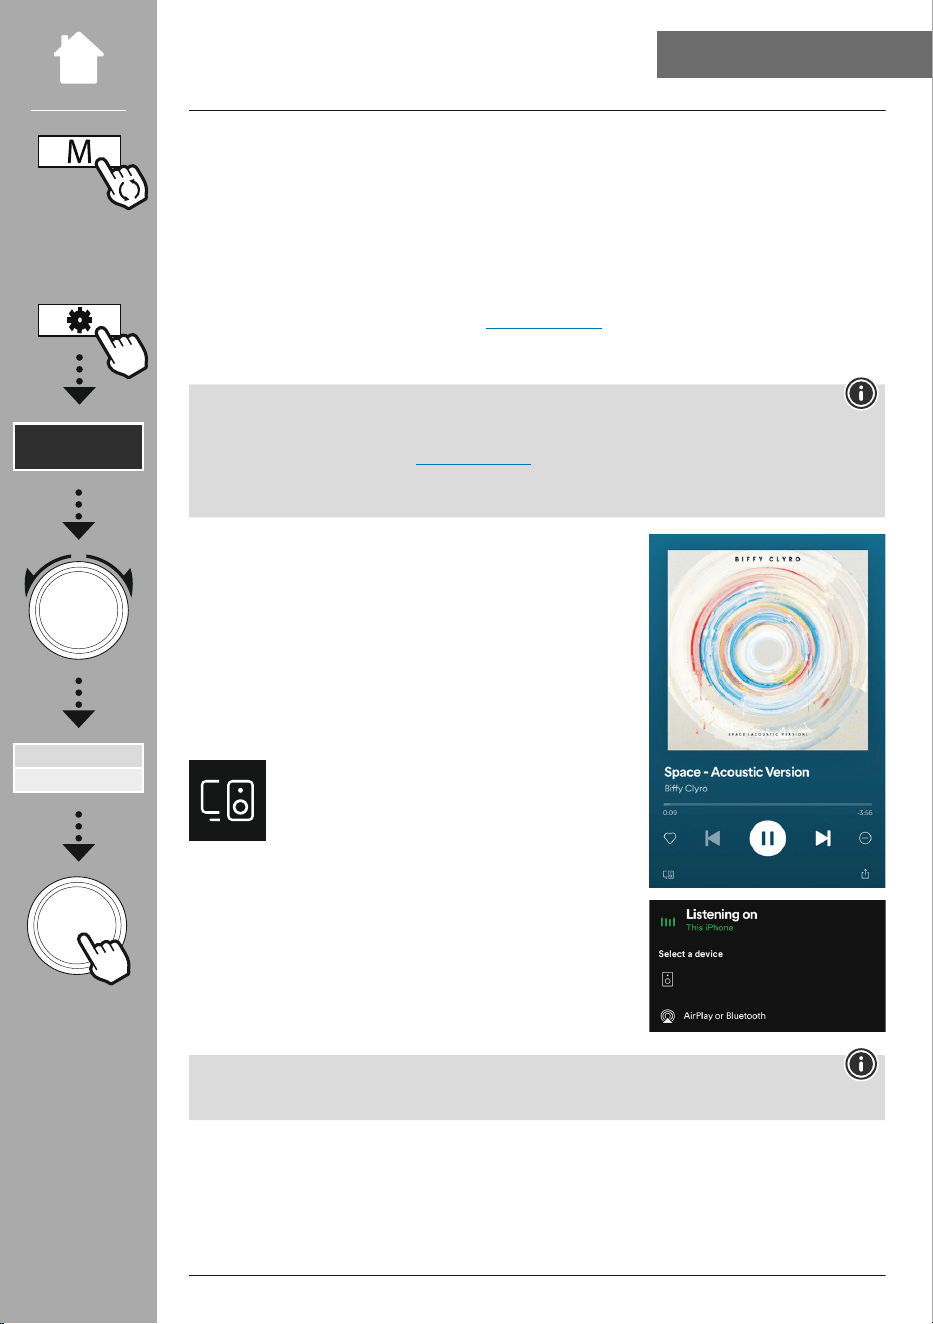
first use:
Before you can save your favourite playlists on the radio, you
must link the radio to your account once and save the playlist to a
favourites storage location.
Once saved, you can access tracks, albums and playlists without
a smartphone. Open the corresponding app/software on your
smartphone, tablet or PC and select the corresponding content that
you want to transfer to the radio.
Now click on the icon for Spotify Connect.
In the following list view, select the Hama digital
radio to which you want to transfer the content.
The current playback is now transferred to the radio and continued
there.
Using the favourites management options, you can now store this
content in the radio's memory and call it up again directly without
using the smartphone.
Note
For further information on operating options for the radio, please refer to the operating overview.
– – ODeR – –
SySTeM
SeTTINGS
NAVIGATe
Streaming Services
Spotify
eNTeR
DIR3200SBT
28
AMAzON MUSIc
13. Amazon Music
Amazon Music gives you access to millions of songs and brings them to your radio!
Find and enjoy your favourite music, playlists or radio stations directly from this radio's integrated user
interface
Prerequisites:
• You need a paid Amazon Premium account
• As an Amazon Prime customer, you already have access to a huge selection of music, at no additional
cost
• To use the full scope, you need an Amazon Music Unlimited account (info can be found at www.
amazon.de/Music/Unlimited or www.amazon.com/Music/Unlimited)
• To set up your Amazon account, you need the free UNDOK app for Android or iOS devices.
Setup:
• Open the UNDOK app and select the radio in the list of devices.
• In the UNDOK app, select Amazon Music as the source.
• You will now be asked to enter your Amazon login details, which you used to register for Amazon Prime
and/or Music Unlimited.
• After you have successfully logged in, the user interface for Amazon Music is available both in the
UNDOK app and on the radio.
Note on the UNDOK app
A detailed description of the UNDOK app and all of its functions can be found in our
UNDOK guide at:
www.hama.com-
>
00054247 -
>
Downloads
www.hama.com-
>
00054248 -
>
Downloads
Note
If you want to log out your Amazon account from the device, select the menu item "logout" in
"Amazon Music" mode. This is possible directly via the radio's user interface or in the UNDOK app.
Use:
• After logging in, you will see the Amazon Music menu.
• This offers numerous search and lter functions with which you can nd the right music directly via the
radio's menu.
• This menu can be accessed directly from the playback screen
.
Saving content:
You can save several contents and call them up directly via the radio's favourites management functions.
For information on saving and calling up content, see the operating concept.
– – ODeR – –
MAIN MeNU
NAVIGATe
Streaming Services
Amazon Music
eNTeR
29
AMAzON MUSIc
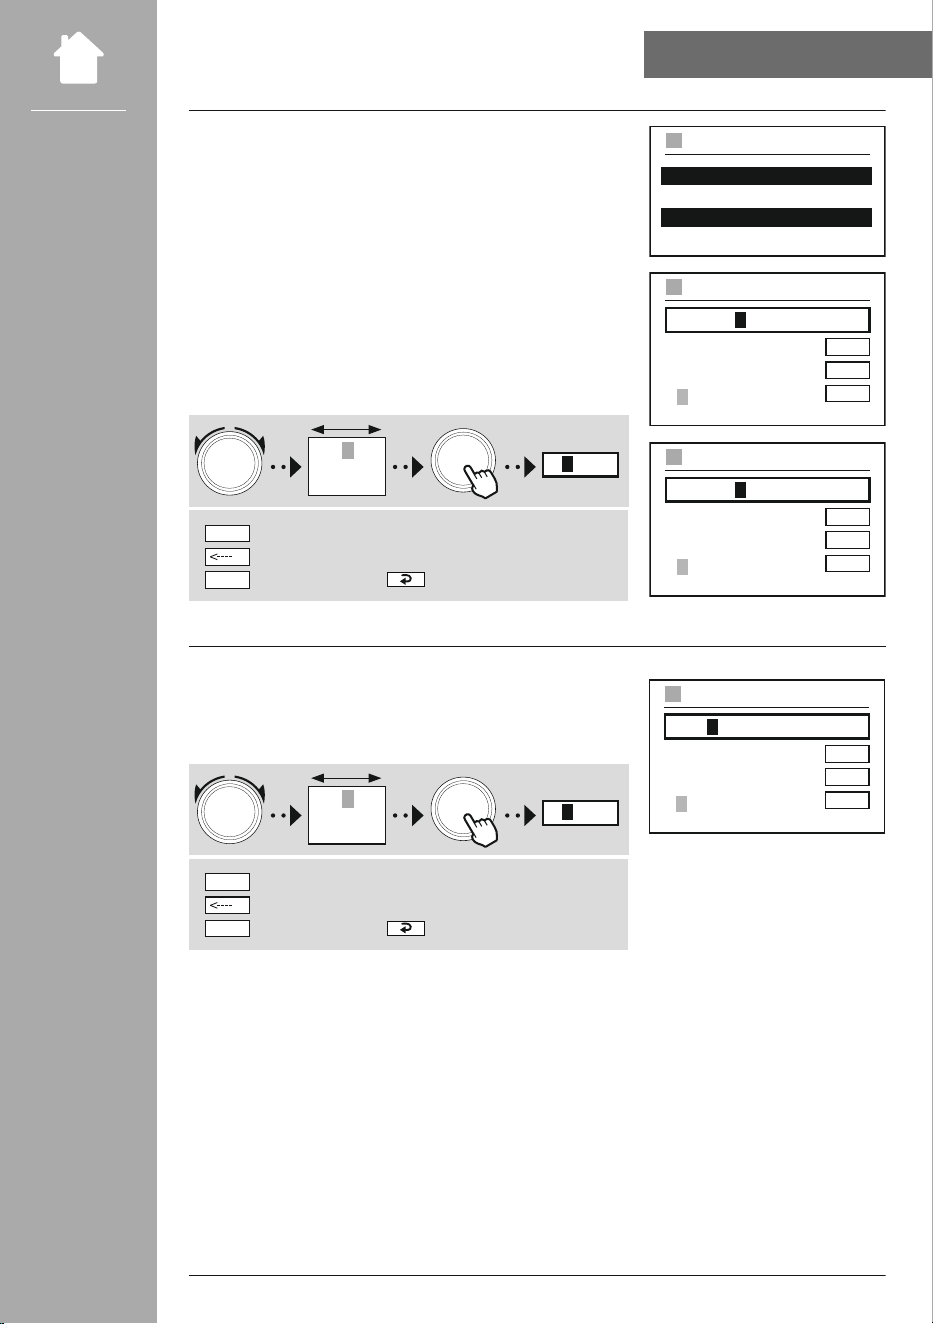
Search:
The search function allows you to search specically for content or
individual keywords.
You can use the on-screen keyboard to enter the search term and
then start the search. To do this, select "Done" and conrm this
selection. The radio then shows you the matching search results
based on the input you have made.
NAVIGATE
0 1 2 3 4 5 6
7 8 9 . , - @
a b c d e f g
3
ENTER
Start search
Delete character
Cancel search
ENTER
CANCEL
Playlists:
Playlists are a pre-congured compilation of music, often arranged according to a genre, artist or other
attributes.
Radio stations:
Radio stations are a dynamic compilation that constantly plays out new content. Compared to playlists,
the content is not limited but constantly changing.
My music:
Music that you have added to your favourites via the Amazon Music app or computer software is
displayed in this area.
Note
In addition to the listed functions, Amazon Music offers further content, which can change
dynamically.
(For example, Football Live, seasonal content, etc.)
0 1 2 3 4 5 6 7 8 9 . , - @
a b c d e f g h i j k h l m
n o p q r s t u v w x y z
A B C D E F G H I J K L M
N O P Q R S T U V W X Y Z
ENTER
<----
CANCEL
Artist
NAVIGATe
eNTeR

30
MUSIc PlAyeR (USB)
14. Music player (USB)
The radio has a USB port that allows you to play external storage media.
Please note that only storage media formatted in fAT16/fAT32 format are supported - other le
systems can lead to problems in recognising the storage medium and prevent playback. The radio
supports the playback of MP3 les.
connection
• Connect the storage medium, e.g. a USB stick, to the radio's USB port.
• As soon as the storage medium is connected, it is recognised and initiated by the radio.
• Conrm the prompt asking if you want to open the connected storage medium with yeS.
Once the storage medium has been initiated, the radio will display the user interface from which you can
use the playback functions.
This menu can be accessed again at any time.
USB playback
This menu shows you all the audio les and subdirectories contained on the connected storage medium.
Select the le or directory required to start playback.
To add a track to a playlist, highlight it by pressing and holding the conrmation button. The track will
then be added to your local playlist.
1
3s
2 - Artist 2
3 - Artist 3
1 - Artist 1
4 - Artist 4
PLAYLIST
Artist 1
Artist: Hama
Track: Hama
12:35
Playlist (up to 200 tracks)
Tracks that were previously added to the playlist are displayed in this menu item. Select the desired track
here and start playback.
Repeat (ON/Off)
If this function is active, the contents of the USB storage medium are repeated.
Shue play
If this function is active, the contents of the USB storage medium are played back in a random order.
empty playlist
Deletes all of the tracks added to the playlist from it. The tracks remain on the storage medium, but the
playlist created is completely purged.
– – ODeR – –
MAIN MeNU
NAVIGATe
external Sources
USB
eNTeR
31
UKW RADIO
15. UKW radio
This radio has a software-based VHF receiver that can receive and play analogue radio. It covers the
frequency range from 87.5 MHz to 108 MHz.
15.1 Automatic station search
The radio automatically searches for stations that can be played back with sucient quality. As soon as a
station is found, the search stops automatically and playback starts. Start the search again to search for
the next available station.
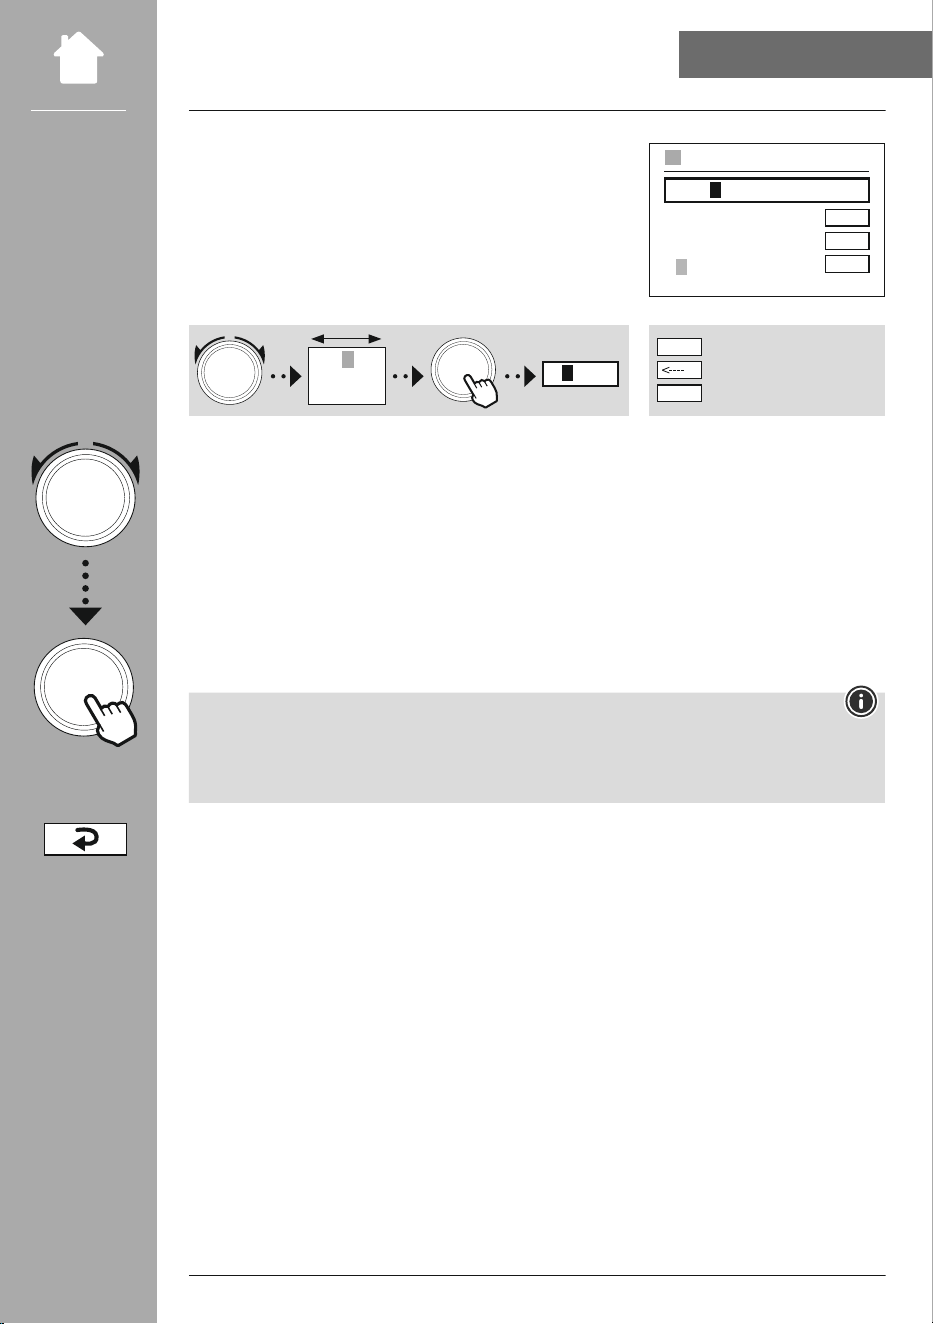
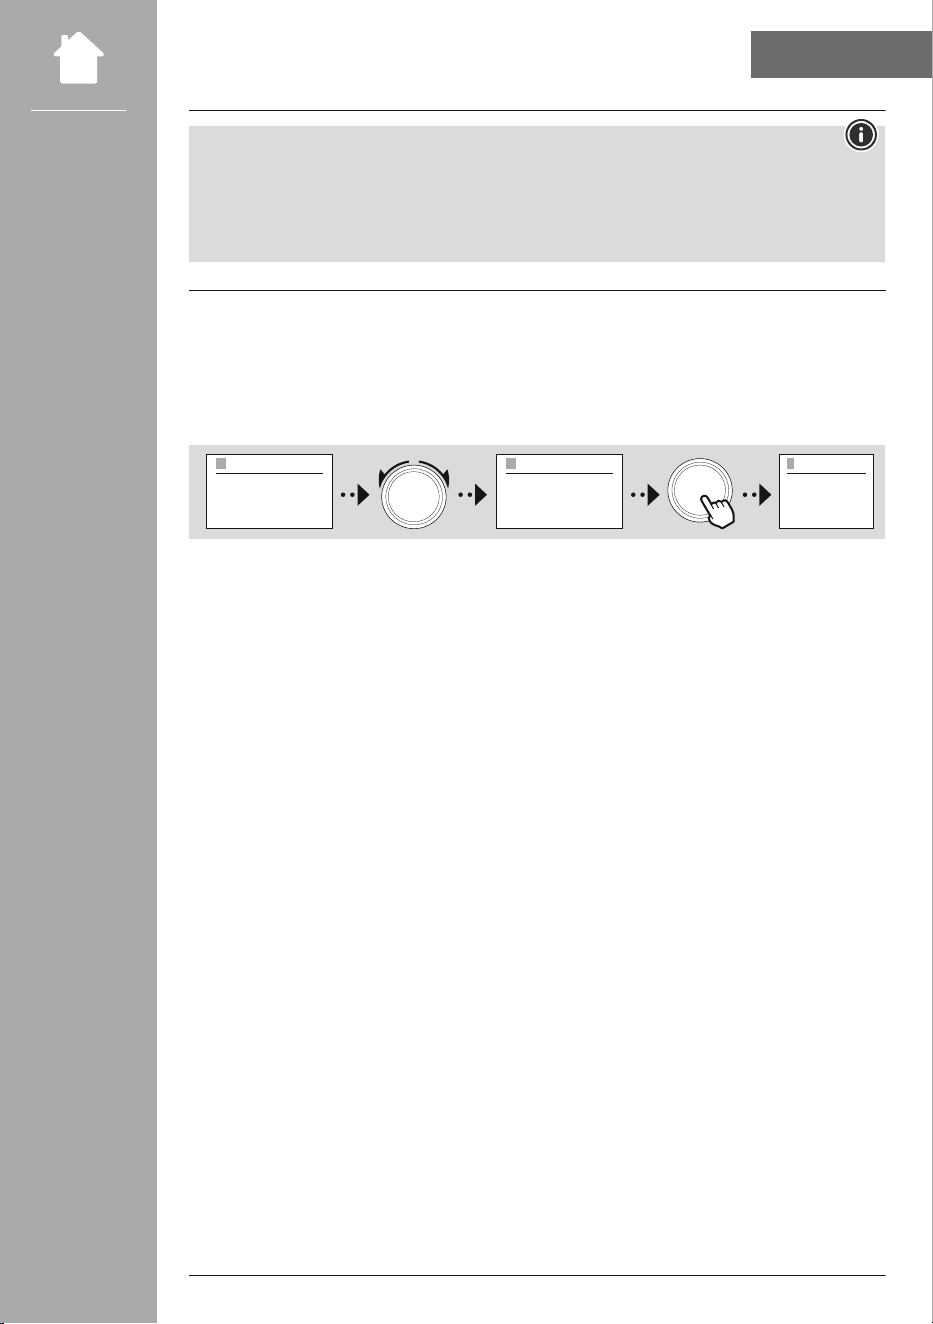
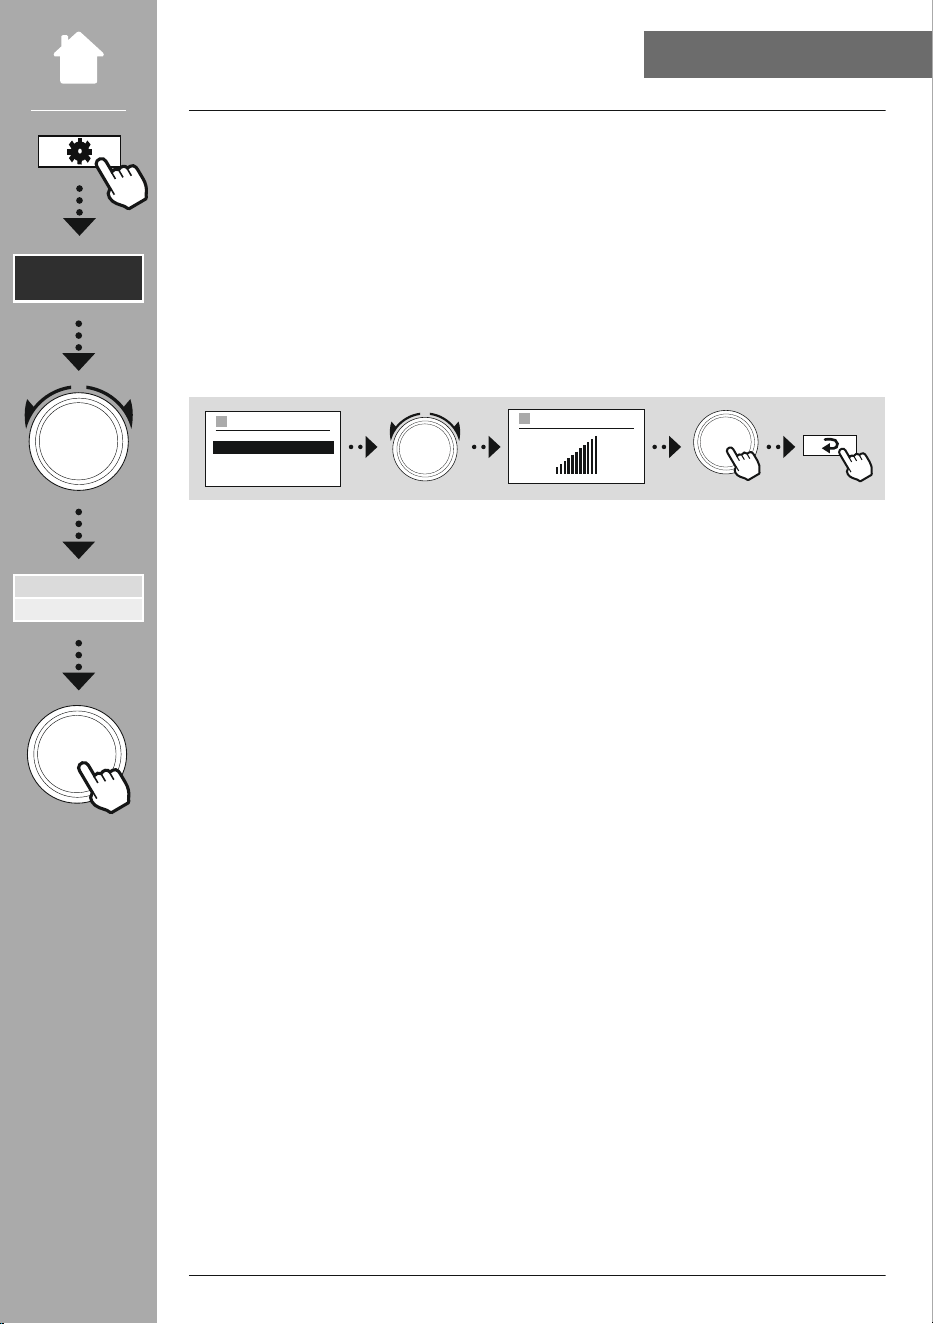
15.2 Manual station search
• To tune into a station manually, rst switch to tuning mode.
• Tuning now takes place in steps of 0.05 MHz.
• Once you have set the frequency, you can switch back to the radio's volume setting.
• If manual tuning is active, the currently set frequency is highlighted on the screen.
NAVIGATE
FM
88.05 MHZ
88.00 MHZ
88.10 MHZ
FM
88.00 MHZ
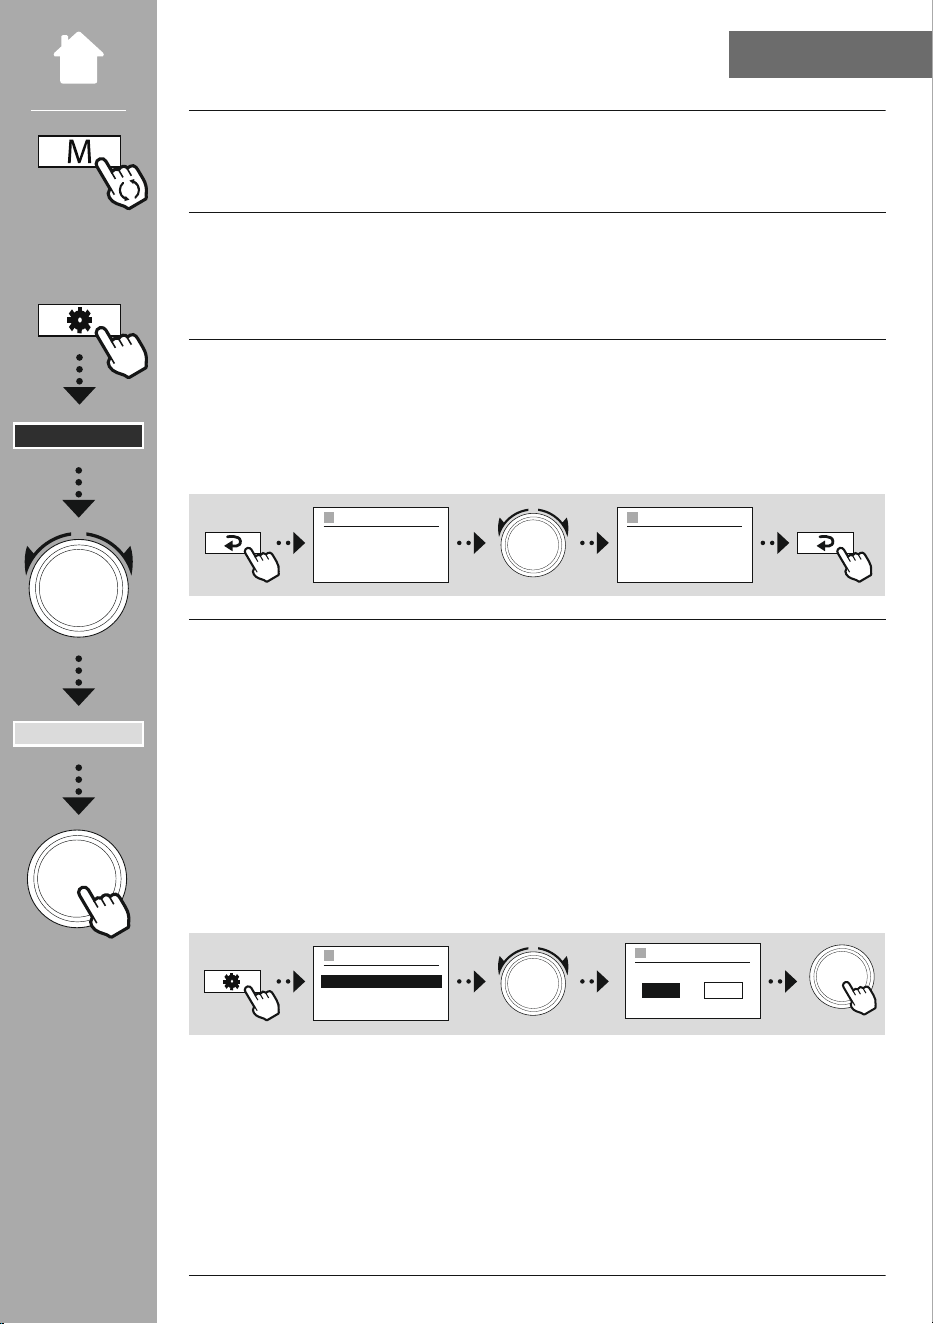
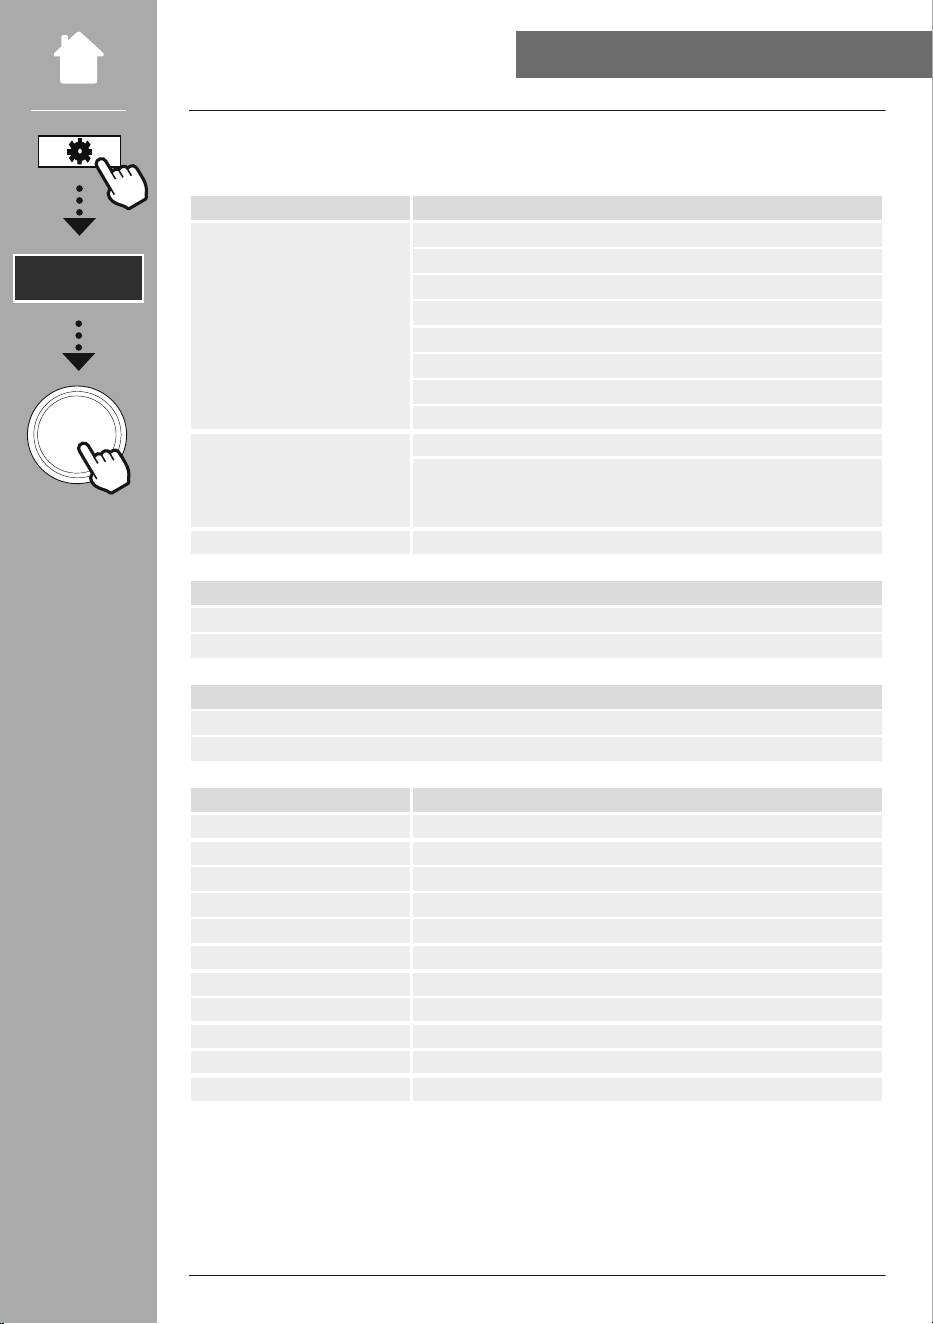
15.3 Settings
Additional functions are available to optimise the quality of playback and the reliability of the search.
• Search settings
Conrm the selection with "yeS" to play only stations that can be received by the radio in sucient
quality. Select "No" to also stop at stations which can only be received in weak quality.
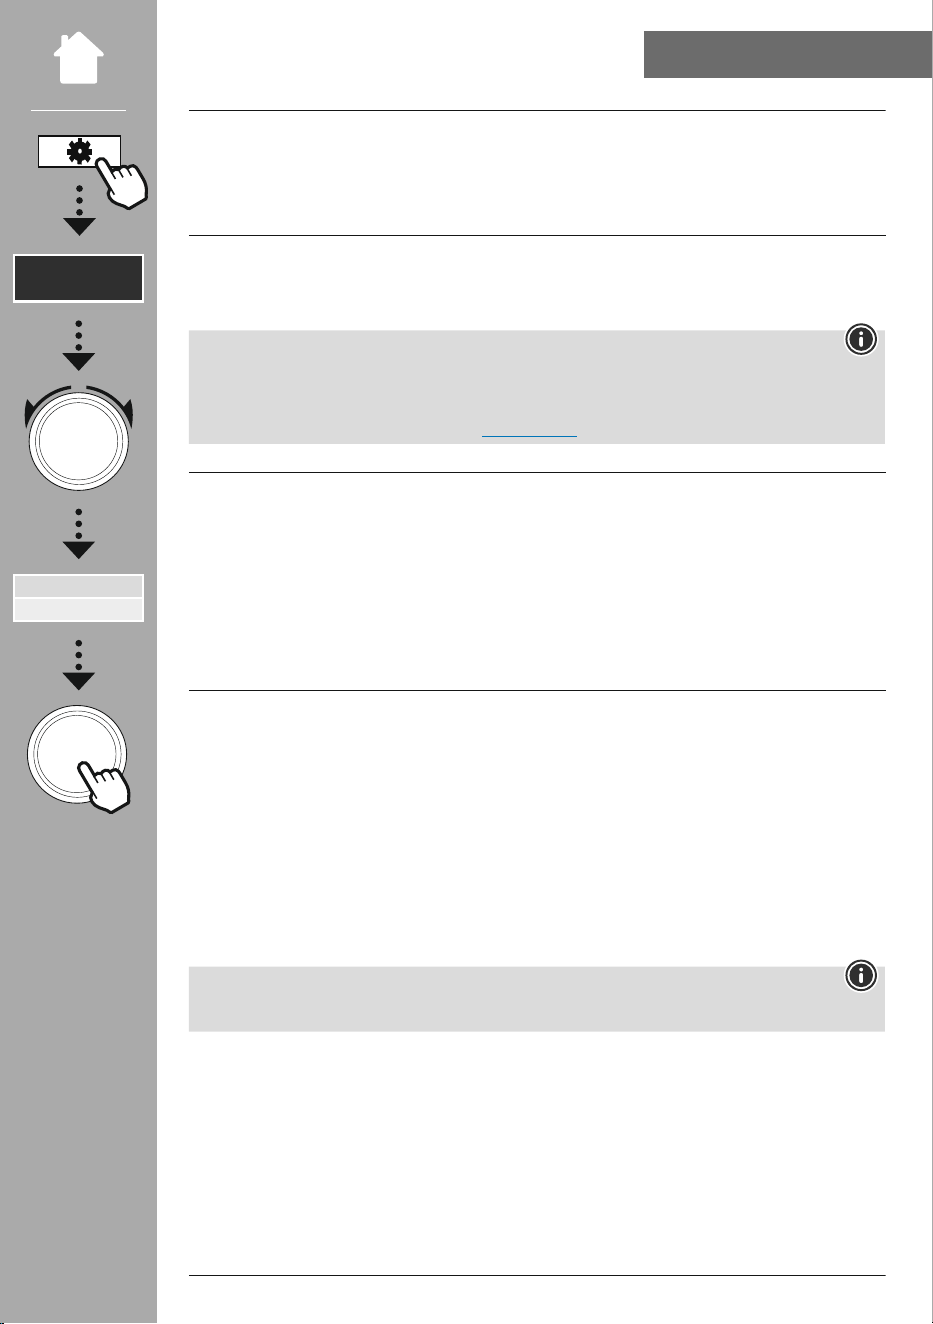
• Audio setting
With analogue radio signals, the radio may try to automatically calculate and play back a stereo quality
reproduction. If there are audible quality problems during playback, select "yeS" to play back the signal
unchanged in mono quality.
By selecting "NO" , the conversion to a stereo signal is carried out automatically.
NAVIGATE
ON OFF
Scanning
FM
SCANNING
AUDIO
ENTER
– – ODeR – –
MAIN MeNU
NAVIGATe
fM
eNTeR
32
AUX IN (PlAyBAcK fROM eXTeRNAl SOURceS)
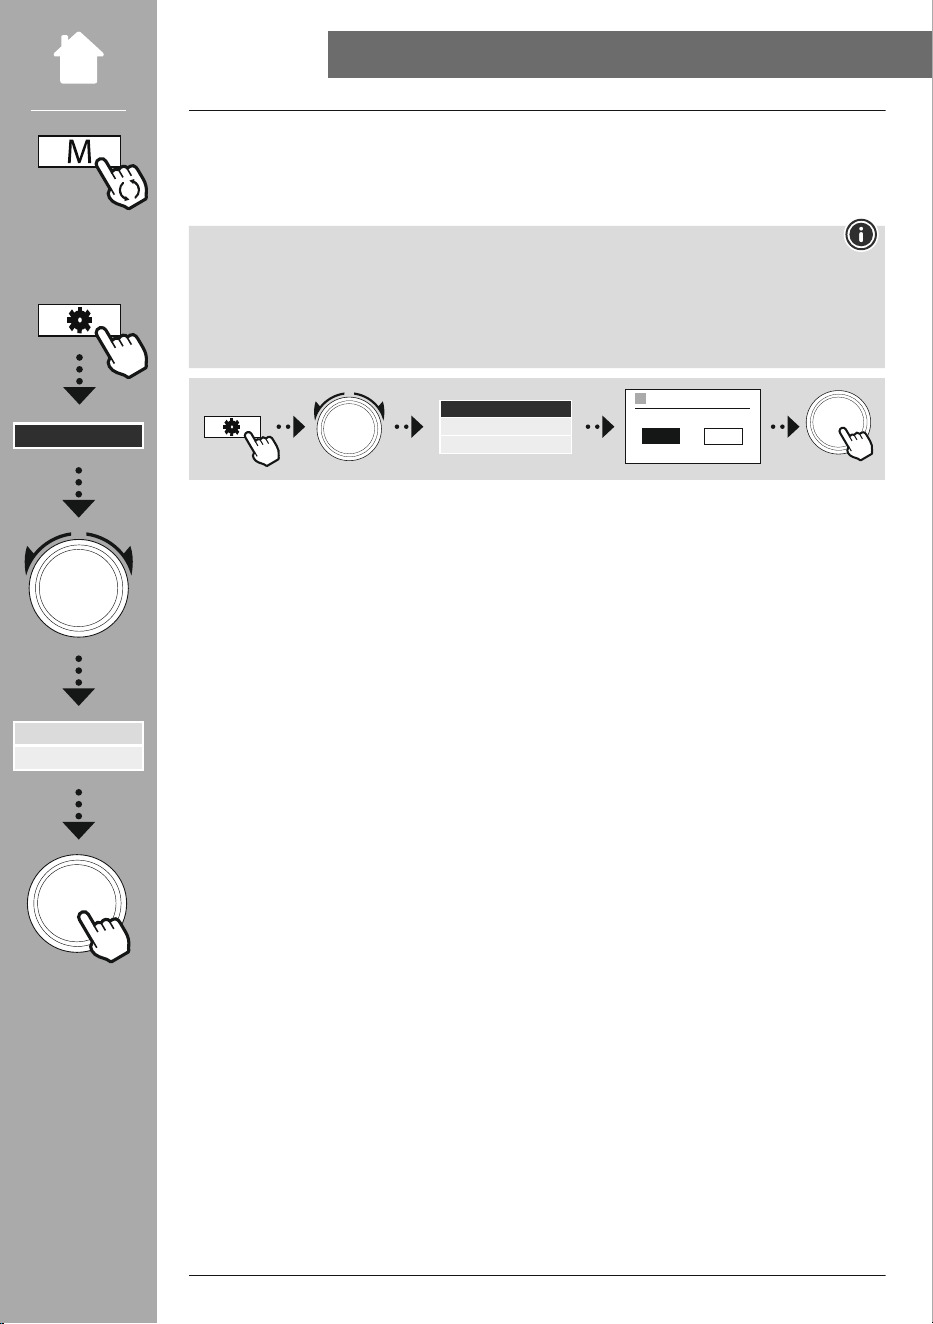
16. AUX In (playback from external sources)
This radio has a 3.5mm jack connection that allows you to connect external source devices to the radio.
Please note that all operations are carried out via the source device. On the radio, you can only change
the volume.
Note
• The radio detects whether a device is connected and playback is taking place.
• Occasionally, the input signal may be too weak and the radio may mistakenly go into standby mode.
• If this occurs, deactivate the radio's automatic switch-off mechanism.
• Please note that the radio does not automatically go into standby mode when there is no playback.
NAVIGATE
ON OFF
AUTO-STANDBY
ENTER
SySTeM SeTTINGS
System
Auto-Standby
– – ODeR – –
MAIN MeNU
NAVIGATe
external Sources
Aux In
eNTeR

33
BlUeTOOTh® PlAyBAcK (RX)
17. Bluetooth
®
playback (RX)
This radio has a Bluetooth
®
receiver which allows you to transfer audio content to the radio. The
transmitting device, for example a smartphone, is connected to the radio for this purpose and the audio
content is transmitted directly to the radio. To do this, activate Bluetooth
®
playback mode.
17.1 connect a source device
To pair the radio with a source device, enter the Bluetooth
®
settings menu and activate pairing via the
menu item "Pair new device".
NAVIGATE
ON OFF
PAIR NEW DEVICE
BLUETOOTH RECEIVER
PAIR NEW DEVICE
ENTER
17.2 Music playback via Bluetooth
®
As soon as your source device, for example a smartphone, is connected to the radio, start playback on the
source device.
The radio now plays back the content. The volume can be changed directly via the radio, but note that
the volume must also be adjusted on the source device.
17.3 More settings
To connect a new source device or to disconnect the active connection on the radio, refer to the further
information in Section 20.2 Bluetooth® receiver / transmitter (BT RX).
– – ODeR – –
MAIN MeNU
NAVIGATe
external Sources
Bluetooth Streaming
eNTeR
34
ROUTINeS
18. Routines
This radio has comfort functions which are available in addition to traditional radio playback.
18.1 Sleep
The snooze function provides you with predened time intervals from which you can choose. Based on
the selection, set a time period after which the radio is automatically switched off.
Note
• If the snooze function is activated, you can make separate settings for the display under Screen
settings - Display illumination.
• This allows the brightness, for example, to be reduced.
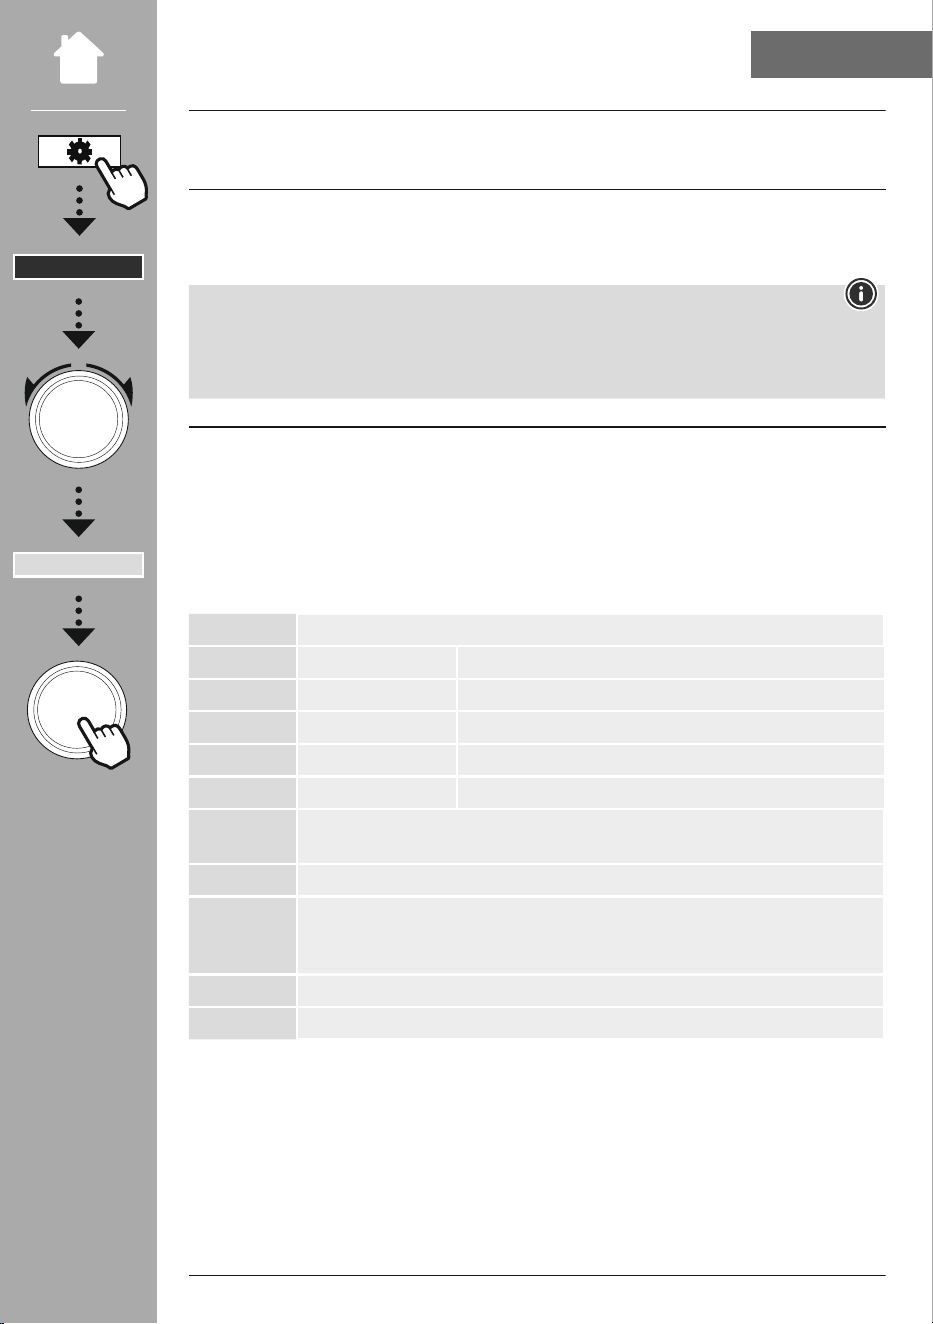
18.2 Alarm clock
The radio has two individually adjustable alarm times. Alarm 1 and alarm 2 are congured in the same
way.
conguration
First select whether you want to congure alarm 1 or alarm 2 and then specify the exact details:
Status Set when the corresponding alarm is active.
Off
Alarm is inactive
Daily
The alarm is triggered daily
Once
The alarm is only triggered once, at the set time
Saturday & Sunday
The alarm is always triggered on Saturdays and Sundays
Monday - Friday
The alarm is only triggered on Monday to Friday
Time
Dene the date (if "Once" is selected) on which and at what time the alarm is to be
active.
Source Set which source is to be used for the alarm (radio receiver or signal tone).
Programme
Set which station (only for alarm via radio receiver) is to be used. You can choose
between the last station you listened to or a station that has been saved in a favourite
storage space.
Volume Set the volume at which the corresponding station or alarm tone is to be played.
Save The settings previously made are saved and the alarm is congured.
MAIN MeNU
NAVIGATe
Routines
eNTeR
35
ROUTINeS
Note
• If a radio station is selected that is not available at the time of the alarm, the signal tone is played
automatically.
• Note that synchronisation of the time via the Internet or radio is recommended so that the time is
re-synchronised in the event of a power failure.
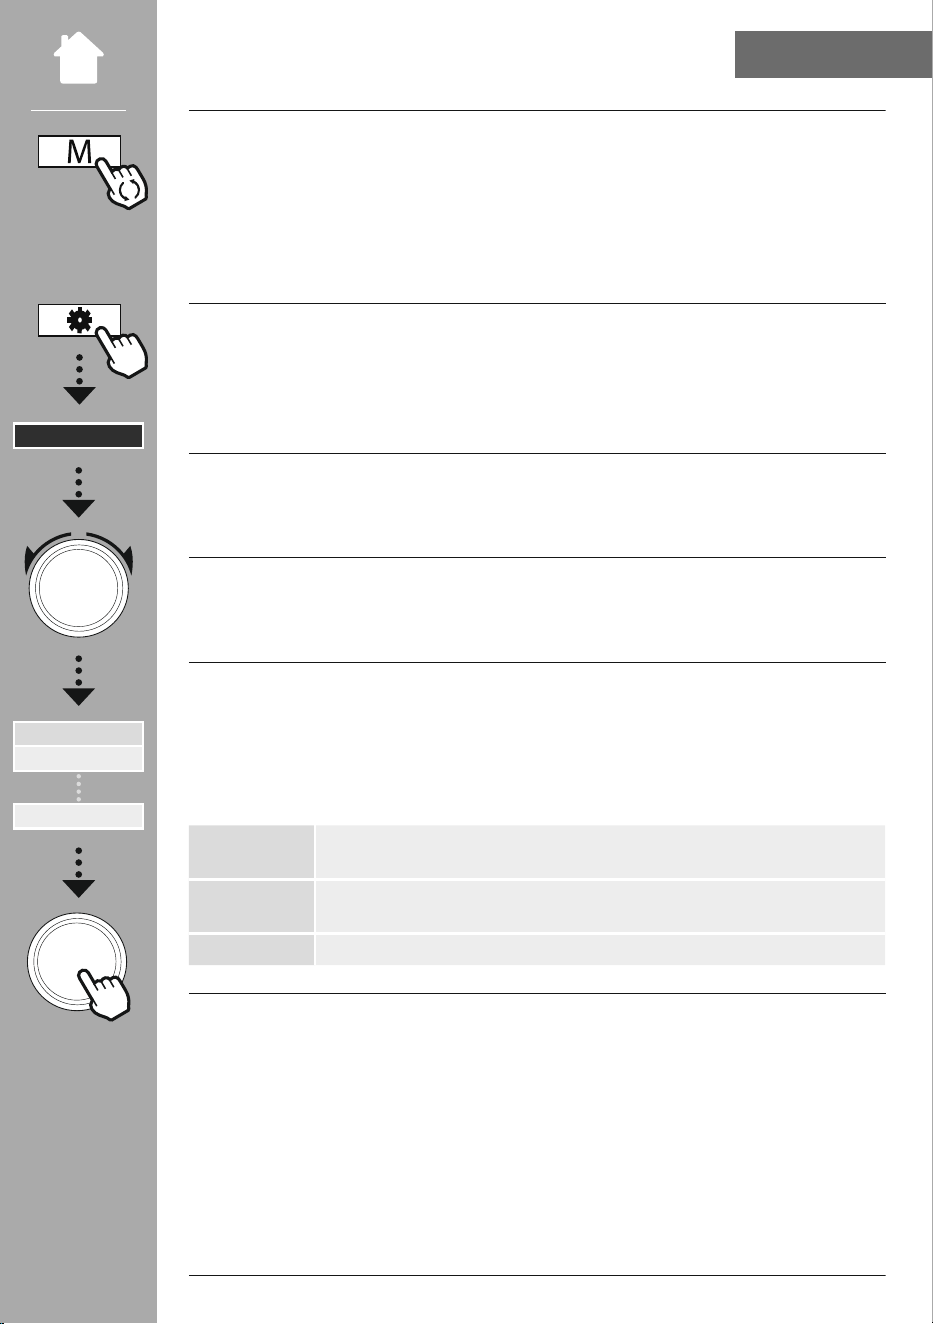
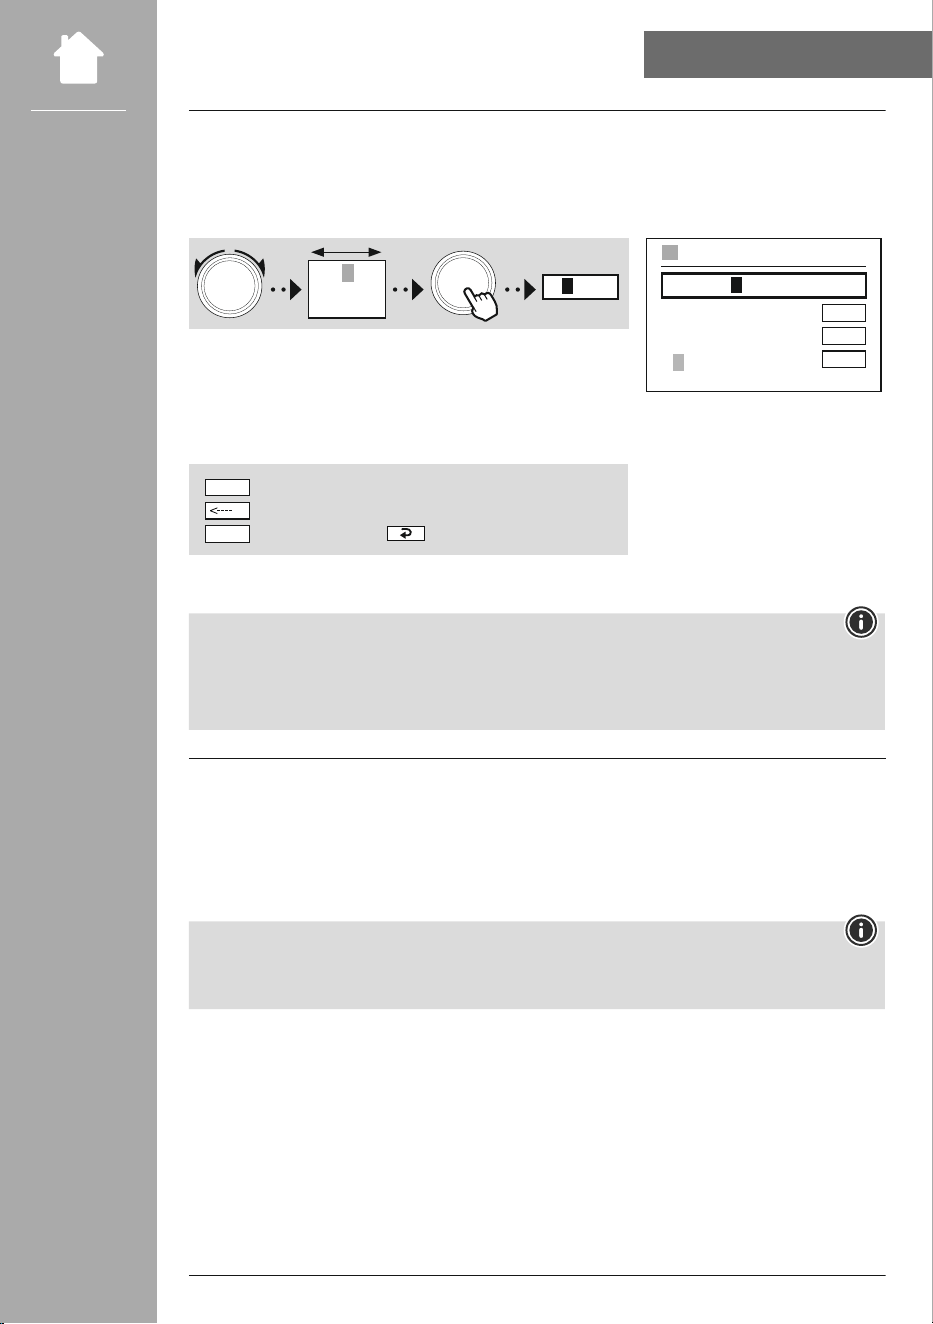
18.3 Timer
The timer can be congured to a value of 1-99 minutes.
Select the desired runtime for the timer and then conrm the selection to start the timer. When the timer
expires, a signal tone sounds.
NAVIGATE
ENTER
TIMER
30 min
TIMER
30 min
31 min
29 min
TIMER
START...
36
SySTeM SeTTINGS - OVeRVIeW
19. System settings - Overview
The system settings are divided into four main categories under which the other settings are located.
Network & Sound Submenus
Network settings
Network wizard
WPS Setup
View settings
Manual settings
NetRemote PIN Setup
Network prole
Clear network settings
Keep network connected
Bluetooth
®
RX/TX
Bluetooth Receiver
- Pair New Device
- Active Device
- Saved Devices
equaliser
DISPlAy
Backlight
Color Theme
ABOUT
Info
Privacy policy
System
Setup wizard
Time/Date Set Time/Date
Auto update
Date/time
Set timezone
Daylight savings
language
Auto-Standby
Software update Auto update
Check now
factory reset
SySTeM
SeTTINGS
eNTeR
37
NeTWORK & AUDIO
20. Network & Audio
The Network & Audio section contains all the settings options for the radio's connectivity and audio
settings. These may include the Internet connection, Bluetooth® receiver/transmitter (depending on the
product) and equaliser.
20.1 Internet settings
This menu contains all of the available settings to connect the radio to a wireless network
(WLAN 2.4 GHz or 5 GHz).
Note
• Numerous settings can be made conveniently via the app! With the free UNDOK app, you can set up
the network connection via your smartphone or tablet.
• More information is available in the free UNDOK guide from Hama.
20.1.1 Network wizard
• The network wizard guides you through setting up the radio's network and Internet connection.
• Immediately after starting the network wizard, all available connection points in the vicinity are
searched for that can be used via the available WiFi frequency bands.
• After the scanning process is complete, the search results are shown on the display and you can choose
from the WLAN networks found.
• Alternatively, restart the search using the "New search" function or you can connect the radio by
cable if it has a corresponding port.
20.1.2 connecting to a WlAN
Depending on the WLAN network, there are a number of ways to establish the connection to it.
The radio supports open (unsecure!) networks, WPA/WPA2 networks with password/pre-shared key and
conguration via WPS (WiFi Protected Setup). Networks that support connection via WPS are identied in
the list by the prex "WPS".
On the following screen, depending on the network, you have the choice between setting up by
"pressing the button" via Push Button Conguration (PBC) and entering a "PIN" and "Skip WPS". If
you try to connect to an open WLAN, i.e. without the corresponding security settings, the connection is
established immediately after selection.
Note
Setup via WPS by pressing a button is explained in the WPS setup section.
SySTeM
SeTTINGS
NAVIGATe
Network & Sound
Network
eNTeR
38
NeTWORK & AUDIO
20.1.3 Pre-Shared Key (PSK)
If you have selected "Skip WPS", you will be taken to the input mask for the pre-shared key (PSK),
i.e. the password for the WLAN you are trying to connect to. Navigate between the letters (lowercase/
uppercase), numbers and special characters to enter your password in the input mask.
NAVIGATE
0 1 2 3 4 5 6
7 8 9 . , - @
a b c d e f g
3
ENTER
0 1 2 3 4 5 6 7 8 9 . , - @
a b c d e f g h i j k h l m
n o p q r s t u v w x y z
A B C D E F G H I J K L M
N O P Q R S T U V W X Y Z
ENTER
<----
CANCEL
PRE-SHARED-KEY (PSK)
Password
The following functions are also available:
Conrm the input and start the connection setup
Deletes the last selected character in the input mask
Back to the network list (
)
ENTER
CANCEL
Once the entry has been conrmed, the radio continues to try and connect. If this is successful, the radio
conrms this with "connection established" in the display.
Note
• If the connection fails, this may be because the wrong password was entered.
• Check the conguration of your access point (for example, the router conguration).
• When entering the key, pay attention to uppercase / lowercase letters.
20.1.4 PIN
• If you want to carry out the conguration using a PIN, select the menu item "PIN" .
• The radio now generates a key consisting of eight numbers.
• Open the conguration interface of your access point and enter the key in the corresponding input
mask and start the connection establishment routine on the access point and the radio.
• Both devices now establish the connection.
Note
Often, the access point's input mask is located in the "Wireless/WlAN/Wifi" area - check the router
or repeater's operating instructions if necessary.
39
NeTWORK & AUDIO
20.1.5 WPS setup
• If this menu item is selected or if you want to establish a connection by pressing a button via the
network wizard, the radio display shows "Press WPS button on remote station" after selecting this
function.
• Depending on the access point used, a physical button (WPS) is often available or the connection
process can be started via the conguration interface.
• Once the process has been started on the access point, please conrm the process on the radio as well.
• The connection will now be established automatically.
Note
If necessary, check the operating instructions of the router or repeater used.
20.1.6 View settings
Shows you the current conguration of the radio on the network.
20.1.7 Manual settings
Wireless connection - DhcP active
Select the "Wireless connection" option and then "DhcP active". Now enter the exact name of the
network (SSID) using the on-screen keyboard.
Then select whether the network is secured (WEP/WPA/WPA2)
or unsecured (open). If it is a secure connection, you will be
redirected to an input mask with an on-screen keyboard where you
must enter the key (PSK) or the password. In the case of an open
network, this step is not necessary.
NAVIGATE
0 1 2 3 4 5 6
7 8 9 . , - @
a b c d e f g
3
ENTER
Conrm the input and start the connection setup
Deletes the last selected character in the input mask
Back to the network list ( )
ENTER
CANCEL
Once the input has been conrmed, the radio will attempt to
connect to the network.
0 1 2 3 4 5 6 7 8 9 . , - @
a b c d e f g h i j k h l m
n o p q r s t u v w x y z
A B C D E F G H I J K L M
N O P Q R S T U V W X Y Z
ENTER
<----
CANCEL
SSID
MyHome
0 1 2 3 4 5 6 7 8 9 . , - @
a b c d e f g h i j k h l m
n o p q r s t u v w x y z
A B C D E F G H I J K L M
N O P Q R S T U V W X Y Z
ENTER
<----
CANCEL
PRE-SHARED-KEY (PSK)
Password
40
NeTWORK & AUDIO
Wireless connection - DhcP inactive
Select the "Wireless connection" option and then "DhcP
inactive". Now enter the necessary network information such
as IP address, subnet mask, gateway address, primary DNS and
secondary DNS in the input elds. Once the network data has been
entered, enter the exact name of the network (SSID) using the
on-screen keyboard.
Then select whether the network is secured (WEP/WPA/WPA2)
or unsecured (open). If it is a secure connection, you will be
redirected to an input mask with an on-screen keyboard where you
must enter the key (PSK) or the password. In the case of an open
network, this step is not necessary.
NAVIGATE
0 1 2 3 4 5 6
7 8 9 . , - @
a b c d e f g
3
ENTER
Conrm the input and start the connection setup
Deletes the last selected character in the input mask
Back to the network list (
)
ENTER
CANCEL
Once the input has been conrmed, the radio will attempt to connect to the network.
NetRemote PIN setup
To prevent other users from accessing your radio's conguration,
you can assign a network PIN via the input mask. First delete the
default PIN "1234" from the input mask and then enter a new
four-digit PIN.
NAVIGATE
0 1 2 3 4 5 6
7 8 9 . , - @
a b c d e f g
3
ENTER
Conrm the input and start the connection setup
Deletes the last selected character in the input mask
Back to the network list (
)
ENTER
CANCEL
IP adress 2 - Bayern 3
192.168.2.100
Subnet mask 2 -
255.255.255.0
IP ADRESS
0 1 2 3 4 5 6 7 8 9 . , - @
a b c d e f g h i j k h l m
n o p q r s t u v w x y z
A B C D E F G H I J K L M
N O P Q R S T U V W X Y Z
ENTER
<----
CANCEL
SSID
MyHome
0 1 2 3 4 5 6 7 8 9 . , - @
a b c d e f g h i j k h l m
n o p q r s t u v w x y z
A B C D E F G H I J K L M
N O P Q R S T U V W X Y Z
ENTER
<----
CANCEL
PRE-SHARED-KEY (PSK)
Password
0 1 2 3 4 5 6 7 8 9 . , - @
a b c d e f g h i j k h l m
n o p q r s t u v w x y z
A B C D E F G H I J K L M
N O P Q R S T U V W X Y Z
Fertig
<----
Zurück
NetRemote PIN Setup
9876

41
NeTWORK & AUDIO
Network prole
The radio automatically saves all successful network connections (proles). This means that re-
establishing these connections (for example, after the radio was disconnected from the power supply)
does not require you to re-enter the network access information.
To remove individual network proles, select the corresponding network prole and conrm the selection
and subsequent prompt with "yeS".
Note
A prole that is currently active cannot be deleted.
Delete Internet settings
All previously saved congurations are deleted after conrmation.
Keep internet connection
• This setting is a radio energy-saving function.
• If this function is inactive (NO #), the network module will be switched off whenever the radio is not
actively using the network connection (e.g. in standby mode/DAB reception).
• This means the radio will not be accessible via the network from your PC, smartphone or tablet.
• You must activate this menu item (YES #) if you want to use streaming or control functions via the app.
This function is deactivated by default.
42
NeTWORK & AUDIO
20.2 Bluetooth
®
receiver / transmitter (BT RX)
This radio has an integrated Bluetooth
®
function that allows streaming (e.g. from a smartphone) on the
radio.
20.2.1 Bluetooth
®
receiver
You can pair your terminal devices with the radio using Bluetooth
®
and use this as a playback device. You
can control playback directly on the terminal device. You can adjust the volume on the radio, as well.
Pair a new device
The radio's mode is changed to Bluetooth playback and the radio is immediately in "Pairing" mode.
This means that the radio is visible to other devices and you can connect via your smartphone/tablet or
other source device. The radio's display shows you the name under which you can nd the radio. After a
successful connection, you can start playback via the source device.
Active connection
Connected device
Shows you information about the currently connected source device.
Bluetooth
®
info
Shows you information about the radio's Bluetooth
®
module.
Disconnect
Disconnects the connection to the source device that is currently connected.
Saved devices
Saved devices
Displays a list of the last eight connected source devices. By selecting and conrming an entry, a
connection can be re-established or disconnected. If a device is disconnected in this menu, it is also
removed from the list of saved devices.
Delete device list
All previously saved devices are deleted from the list.
SySTeM
SeTTINGS
NAVIGATe
Network & Sound
Bluetooth RX
Bluetooth Receiver
eNTeR
43
NeTWORK & AUDIO
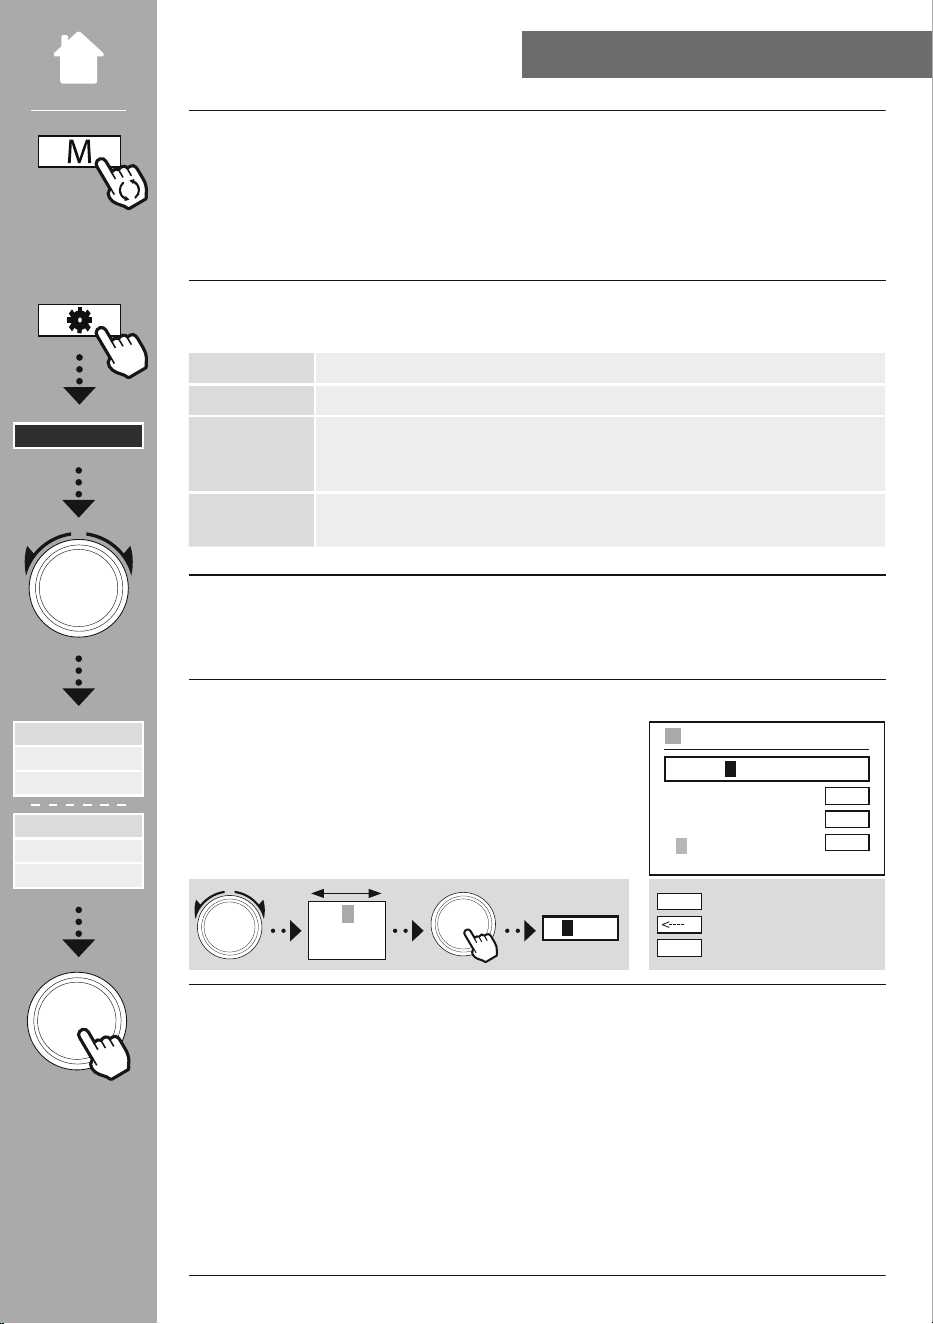
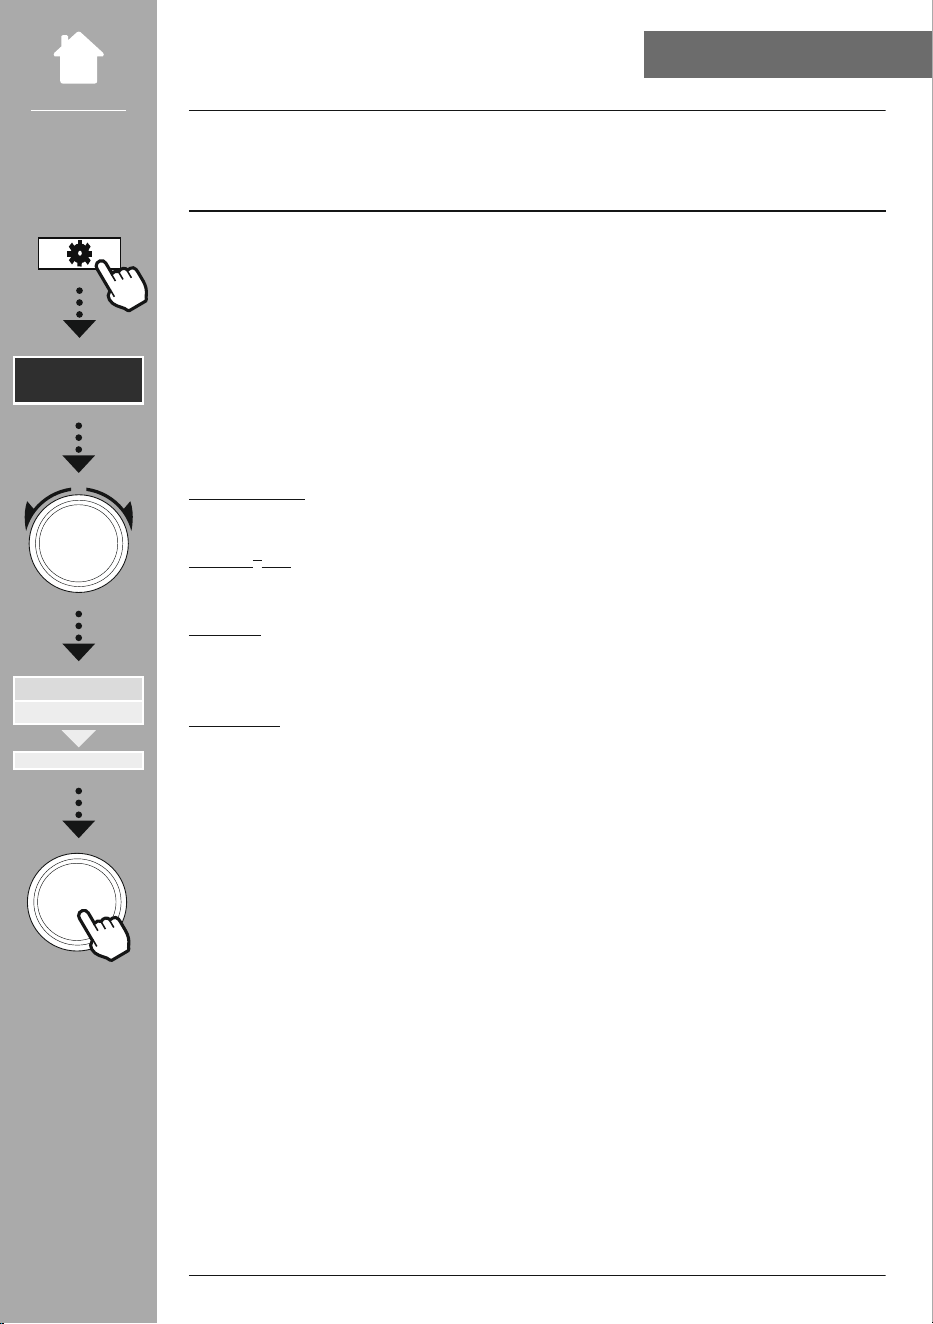
20.3 equaliser
The equaliser allows you to adjust the sound of the radio to suit your preferences by amplifying or
reducing the amount of bass or treble in the audio .
You can choose from precongured proles, adjusted to suit a variety of music genres, or create your own
custom prole.
My eQ settings
To make your own adjustment of the sound, open this menu item and then select whether you want to
adjust the bass or treble. After completing the settings, return to the previous menu and then select the
prole "My eQ" , which contains your settings.
NAVIGATE
ENTER
My EQ profile setup
BASS
TREBLE
BASS
–+
SySTeM
SeTTINGS
NAVIGATe
Network & Sound
Equaliser
eNTeR
44
ScReeN SeTTINGS
21. Screen settings
This radio has an integrated twilight sensor that adjusts the lighting intensity of the display to the
surrounding lighting conditions. If the sensor is activated, the display is dimmed in a dark environment
and illuminated again more strongly when the brightness is sucient.
Note
The twilight sensor can be controlled automatically by means of the software. In addition to the "Low",
"Medium" and "High" setting options, there is also the "Auto" value for this in the individual operating
modes. The screen brightness is adapted in this case automatically according to the surrounding light
levels.
21.1 Display illumination
21.1.1 Operating mode
The Display illumination setting refers to regular operation of the radio with the twilight sensor/auto
dimmer deactivated. You can choose between "high", which corresponds to maximum intensity,
"Medium" a reduction of the illumination to approx. 60%, and "low", which corresponds to very low
intensity.
21.1.2 Standby mode
This setting refers to the radio's standby mode, i.e. when the radio has been set to standby. The
"Timeout (sec)" function refers to the period of time between switching off the radio and adjusting
the lighting intensity. If the timeout function is deactivated, the intensity of the display illumination is
adjusted immediately when the radio is put into standby mode.
The "Display illumination" menu item allows you to again choose between the values "high", "
Medium", "low " and additionally "Off" , which completely deactivates the illumination of the display.
21.1.3 Snooze mode
If a snooze function is activated via the Routines function, you can use this menu item to adjust the
lighting intensity used during snooze mode. After snooze mode has ended, the radio switches to standby
mode and uses the intensity selected accordingly. The values "high", "Medium", "low" and "Off" are
available to choose from.
21.2 colour scheme
This radio has several ready-made colour displays that differ in the colours of the text and the
background. Choose your preferred colour scheme here.
Note
Colour scheme 1 is used by default.
SySTeM
SeTTINGS
NAVIGATe
Display
eNTeR
45
SySTeM
22. System
The radio's general settings are summarised under the System item.
22.1 Setup wizard
We recommend using the setup wizard for quick and easy rst-time setup (setting of the time, date,
Internet connection, etc.).
The settings included in the setup wizard can of course also be made or adjusted separately. The wizard
contains the settings: "Time format", "Time synchronisation", "Time zone", "Summer and winter
time" and keeping the network connection.
Note
If the setup wizard is used for the rst time or is restarted without a network connection set up, the
wizard is supplemented with the "Network wizard" and the selection of the system language.
22.2 Time settings
22.2.1 Time / date setting
If you want to set the date and time manually, you can do this via the screen mask and conrm the
entries one after the other for the day, month, year, hours and minutes.
NAVIGATE
ENTER
TIME/DATE
12 : 30
TIME/DATE
12 : 30
12 : 35
12 : 25
Note
If the setup wizard is used for the rst time or is restarted without a network connection set up, the
wizard is supplemented with the "Network wizard" and the selection of the system language.
22.2.2 Time synchronisation
When this option is selected, the time and date are synchronised automatically from a radio source.
You can select an available radio receiver as the source. If you do not want automatic synchronisation,
select "Do not update".
Note
If there is a power cut, the radio will request the current time from the selected source and adopt it.
Note
If automatic time synchronisation via the radio signal is selected, the adjustment of the time zone and
the manual adjustment of summer and winter time are deactivated and are no longer visible.
SySTeM
SeTTINGS
NAVIGATe
System
eNTeR
46
SySTeM
22.2.3 Time display
You can choose between the display formats of 24 or 12 hours (am/pm) and adjust this at any time.
22.2.4 Setting the time zone
You can freely choose between the available time zones of Coordinated Universal Time (UTC) and use time
zones from -12 hours to +14 hours. For relevant time zones, metropolises and cities are listed after the
time zone adjustment.
22.2.5 Summer / winter time
If synchronisation via the Internet has been selected or you want to adjust the manually set time because
of the time change, you can activate summer time (YES) or winter time (NO) with this function.
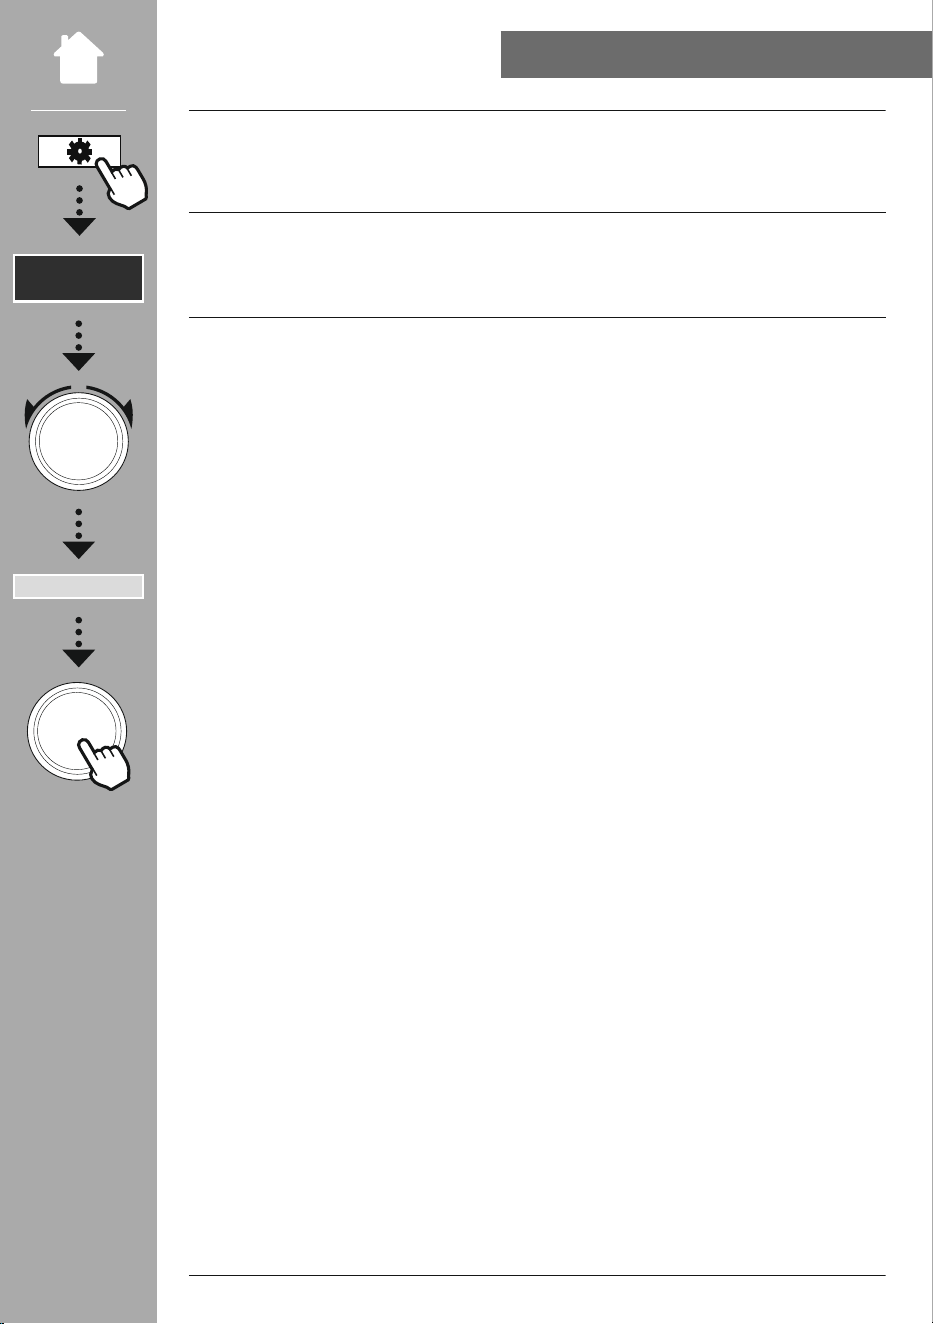
22.3 language
This menu allows you to change the radio's system language.
22.4 Auto standby
The radio regularly switches to standby mode after 15 minutes without playback in order to save power.
Occasionally, there may be problems with playback via a jack connection because the transmitted signal
is too weak and the radio mistakenly assumes there is no active playback. To remedy this, you can
deactivate automatic standby by conrming the query with "NO".
22.5 Software update
We are constantly developing improvements and new features for our radios to x problems, add
functionality, etc. We recommend that you keep your radio’s software up to date.
• Select Auto-Updates (YES) to allow the radio to automatically check for new software updates on a
regular basis. (Recommendation)
• Choose Check now to manually start a check for software updates.
22.6 factory settings
This function allows you to reset your radio to the factory settings on the software side. Conrm the
prompt with "yeS" to start the process.
Note
Resetting to the factory default settings can remedy some problems and malfunctions.
However, all settings made previously, such as equaliser presets, station presets and network proles,
will be permanently deleted.
47
ABOUT - SySTeM INfORMATION
23. About - System information
This menu provides you with further information about your digital radio and the associated data
protection policy, which is provided by the web service provider.
23.1 Info
A summary of the radio's software and hardware. You can nd the current software version of your device
in this information, should you require support from Hama's product advice team.
23.2 Data protection policy
The data protection policy is provided by the provider of the web-based applications.
Cooperation can be changed within the framework of optimisations and adjustments and possibly
another provider may be integrated.
SySTeM
SeTTINGS
NAVIGATe
About
eNTeR
48
TechNIcAl DATA
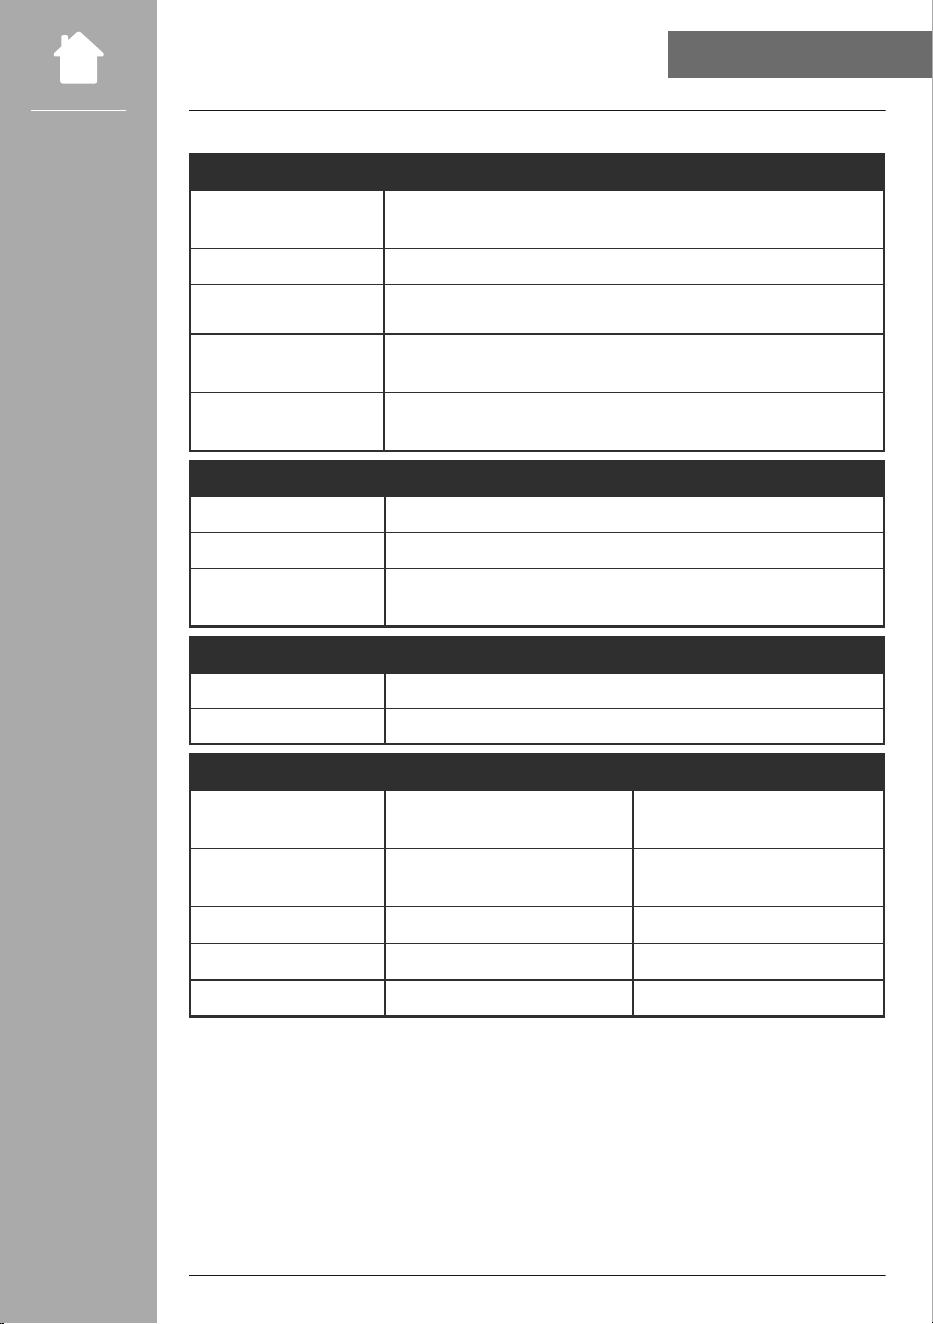
24. Technical data
Technical data
Display
2.8" (7.11cm) colour TFT
320 x 240px
loudspeaker 2.75“ Coxial speaker 2x10W (RMS)
Power supply DC 12.0V / 2.0A, max 24.0W
languages supported
English, German, Danish, Dutch, Finnish, French, Italian, Norwegian,
Polish, Portuguese, Spanish, Swedish, Turkish, Czech, Slovak
Packaging contents
Hama DIR3300SBT, Power Supply, Remote GB-RC001, Batteries 2x
AAA, Quick Start Manual, Telescope Antenna
connectivity
Wifi 2.4GHz (b/g/n) / 5GHz (a/n)
Bluetooth receiver (RX): 4.2, Class 1, A2DP, AVRCP
USB (fAT32 le system)
Charge: 5V / 2A
Playback: MP3
Audio connections
Inputs AUX in 3.5mm
Outputs Headphone 3.5mm, Line Out
Sources favourites
DAB/DAB+
(174.928 - 239.2 MHz)
ü
30
fM
(87.5 - 108 MHz)
ü
30
Internet radio
ü
30
Spotify connect
ü
10
Amazon Music
ü
8

hama Gmbh & co KG
86652 Monheim / Germany
Service & Support
www.hama.com
+49 9091 502-0
DG
00054247_48 / 04.22
All listed brands are trademarks of the corresponding companies. Errors and omissions excepted,
and subject to technical changes. Our general terms of delivery and payment are applied.
The Bluetooth
®
word mark and logos are registered trademarks owned by Bluetooth SIG, Inc. and
any use of such marks by Hama GmbH & Co KG is under license. Other trademarks and trade names
are those of their respective owners.
The Spotify software is subject to third party licenses found here:
www.spotify.com/connect/third-party-licenses