USA/Canada 1-800-231-9786
www.prodprotect.com/applica
Accessories/Parts (USA/Canada)
Accesorios/Partes (EE.UU/Canadá)
1-800-738-0245
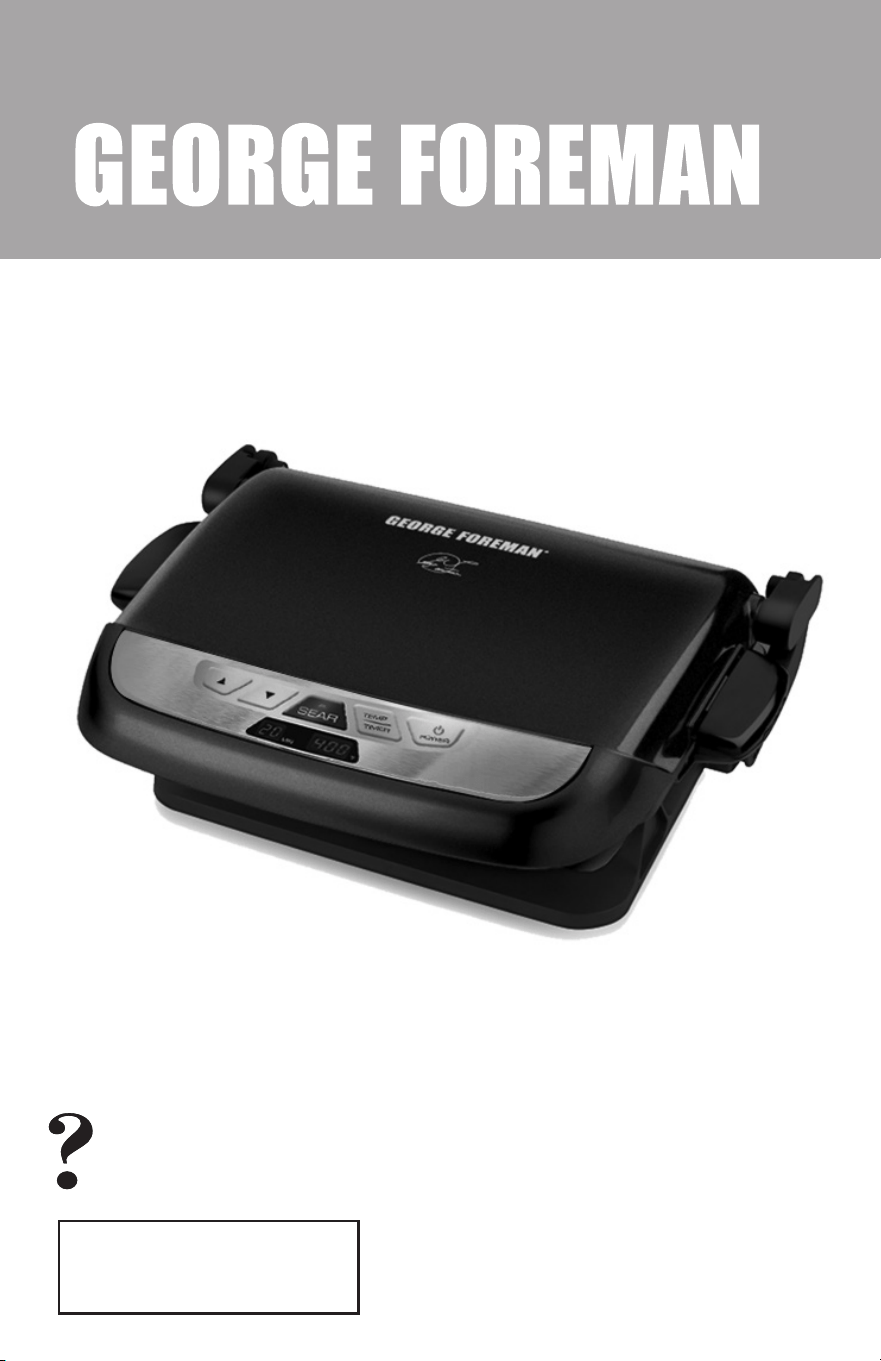
®
Please Read and Save this Use and Care Book
Por favor lea este instructivo antes de usar el producto
Model
Modelo
GRP5842

1
IMPORTANT SAFEGUARDS
When using electrical appliances, basic safety precautions should always be
followed, including the following:
❑ Read all instructions.
❑ Do not touch hot surfaces. Use handles or knobs.
❑ To protect against electrical shock do not immerse cord, plugs or appliance in
water or other liquid.
❑ Close supervision is necessary when any appliance is used by or near
children.
❑ Unplug from outlet when not in use and before cleaning. Allow to cool before
putting on or taking off parts.
❑ Do not operate any appliance with a damaged cord or plug, or after the
appliance malfunctions or has been damaged in any manner. Return
appliance to the nearest authorized service facility for examination, repair
or adjustment. Or, call the appropriate toll-free number on the cover of this
manual.
❑ The use of accessory attachments not recommended by the appliance
manufacturer may cause injuries.
❑ Do not use outdoors.
❑ Do not let cord hang over edge of table or counter, or touch hot surfaces.
❑ Do not place on or near a hot gas or electric burner, or in a heated oven.
❑ Extreme caution must be used when moving an appliance containing hot oil or
other hot liquids.
❑ To disconnect, turn any control to OFF, then remove plug from wall outlet.
❑ Do not use this appliance for other than intended use.
SAVE THESE INSTRUCTIONS.
This product is for household use only.

2
POLARIZED PLUG (USA/Mexico)
This appliance has a polarized plug (one blade is wider than the other). To reduce
the risk of electric shock, this plug is intended to fit into a polarized outlet only
one way. If the plug does not fit fully into the outlet, reverse the plug. If it still
does not fit, contact a qualified electrician. Do not attempt to modify the plug in
any way.
GROUNDED PLUG (Canada models only)
As a safety feature, this product is equipped with a grounded plug, which will
only fit into a three-prong outlet. Do not attempt to defeat this safety feature.
Improper connection of the grounding conductor may result in the risk of electric
shock. Consult a qualified electrician if you are in doubt as to whether the outlet
is properly grounded.
TAMPER-RESISTANT SCREW
Warning: This appliance is equipped with a tamper-resistant screw to prevent
removal of the outer cover. To reduce the risk of fire or electric shock, do not
attempt to remove the outer cover. There are no user-serviceable parts inside.
Repair should be done only by authorized service personnel.
ELECTRICAL CORD
a) A short power-supply cord (or detachable power-supply cord) is to be
provided to reduce the risk resulting from becoming entangled in or tripping
over a longer cord.
b) Longer detachable power-supply cords or extension cords are available and
may be used if care is exercised in their use.
c) If a long detachable power-supply cord or extension cord is used,
1) The marked electrical rating of the detachable power-supply cord
or extension cord should be at least as great as the electrical
rating of the appliance,
2) If the appliance is of the grounded type, the extension cord should
be a grounding-type 3-wire cord, and
3) The longer cord should be arranged so that it will not drape over
the countertop or tabletop where it can be pulled on by children
or tripped over.
Note: If the power supply cord is damaged, it should be replaced by qualified
personnel. In Latin America, by an authorized service center.
3
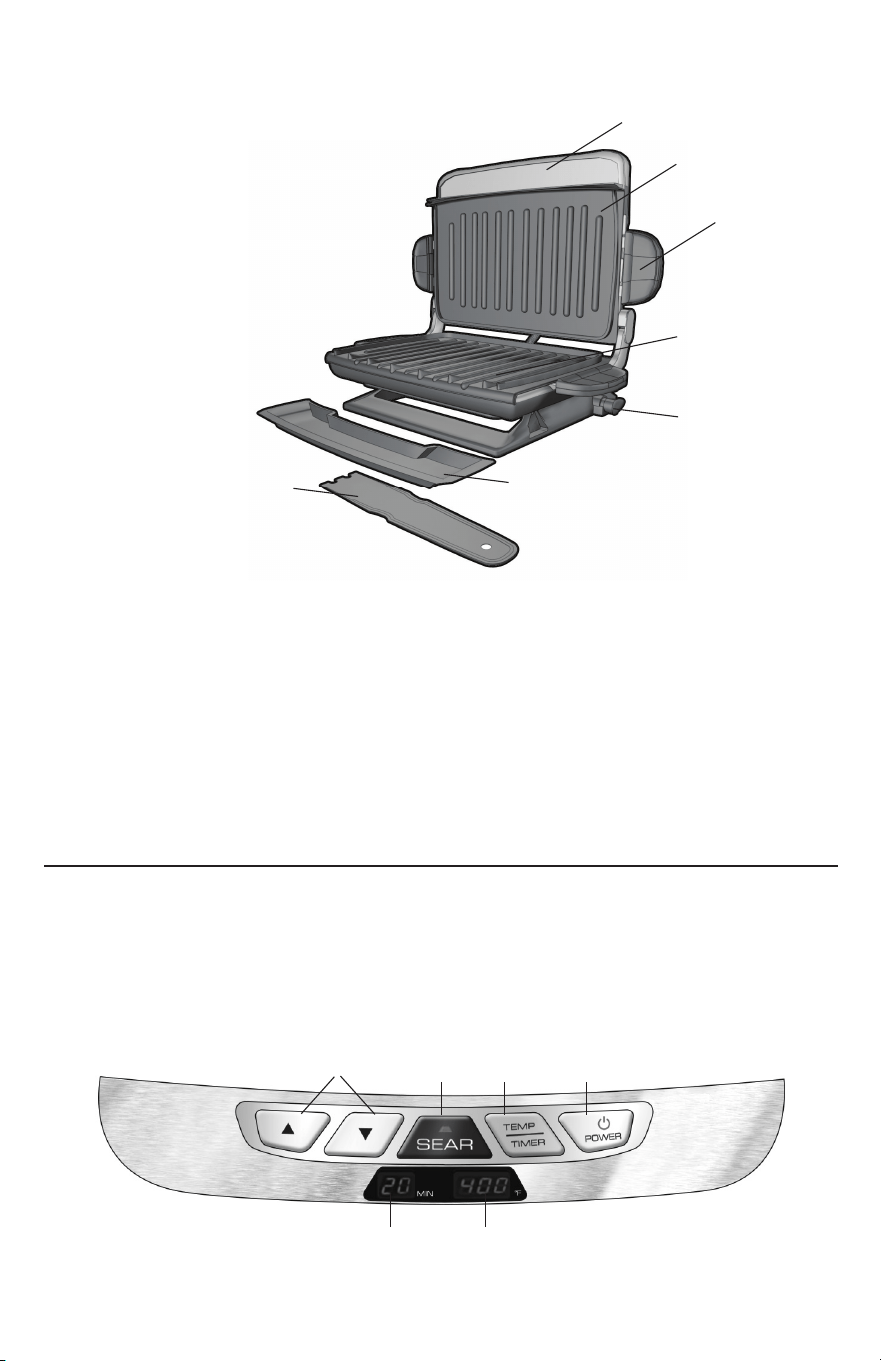
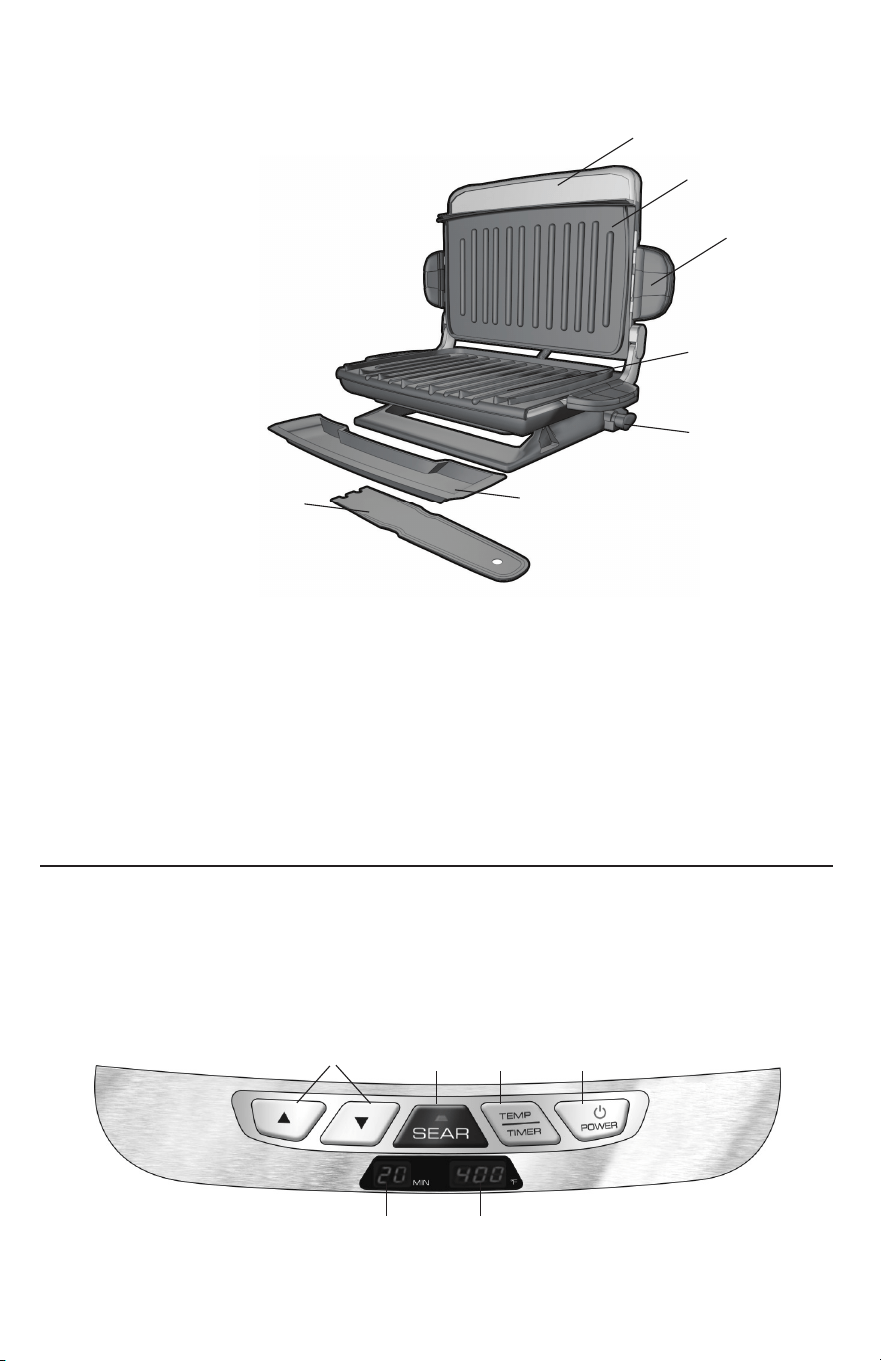
Product may vary slightly from what is illustrated.
1.
Integrated handle
†
2. Grill plate (upper) (Part # GRP5842-03)
3. Grill plate release handles (both sides)
†
4. Grill plate (lower) (Part # GRP5842-04)
5. Adjustable grill angle switch
6. Power cord (not shown)
†
7. Drip tray (Part # GRP5842-01)
†
8. Spatula (Part # GRP5842-02)
† Consumer replaceable/removable parts
1.
Up/down selection
2. Sear button
3. Temp/Timer selector
4. Power button
5. Time display
6. Temp display
A2
A1
!
!
"
"
#
#
$
$
%
%
&
'
(
4
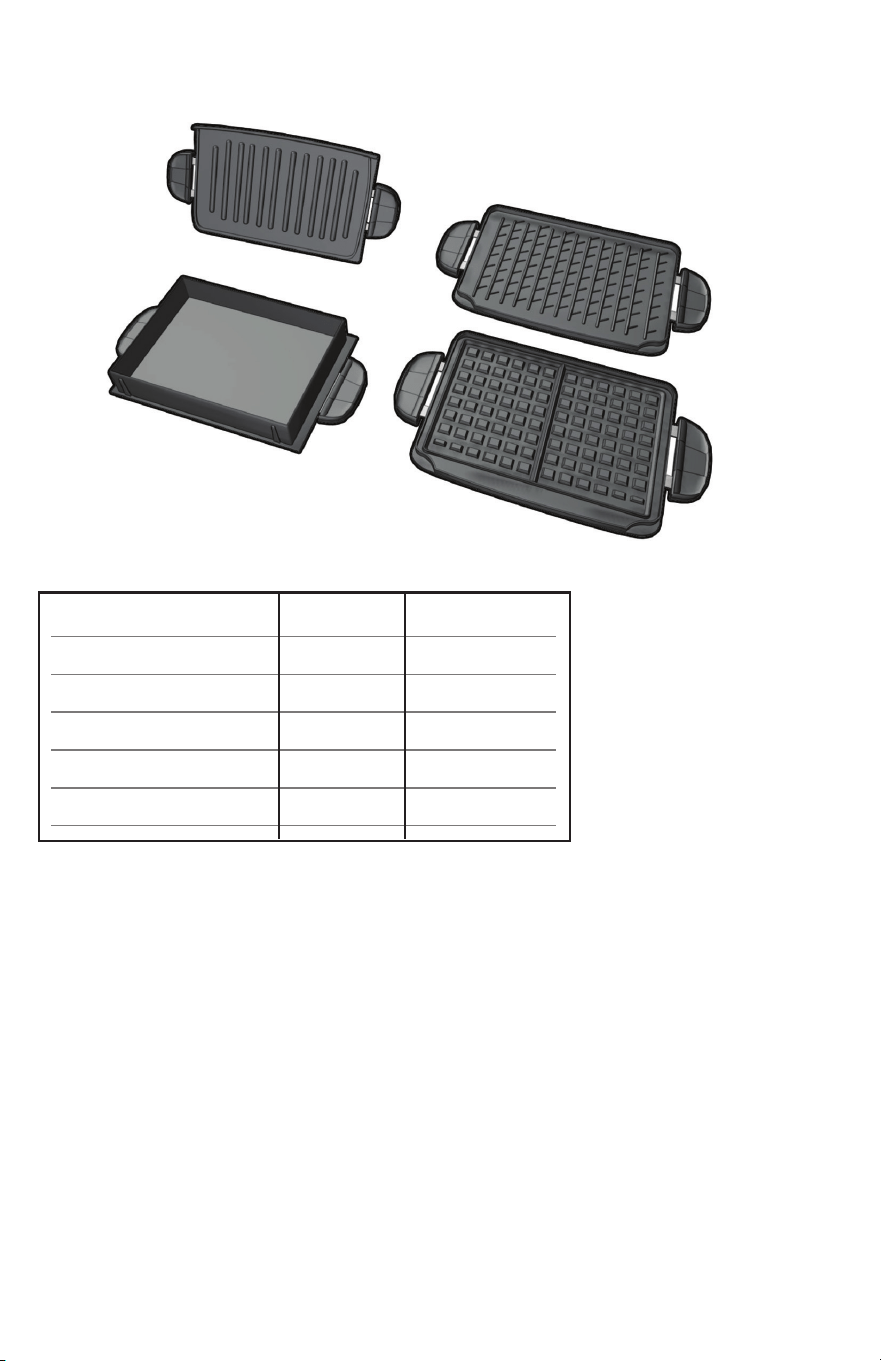
Plate Included Part #
1. Traditional grill plate 1 GRP5842-03
2. Cross-hatch grill plate 1 GRP5842-04
3. Waffle plate (upper) 1 GRP5842-05
4. Waffle plate (lower) 1 GRP5842-06
5. Deep dish bake plate 1 GRP5842-07
A3
%
#/$
"
!
5
How to use:
This product is for household use only.
GETTING STARTED
s 2EMOVEALLPACKINGMATERIALANDANYSTICKERS
s 2EMOVEANDSAVELITERATURE
s 7ASHDRIPTRAYASINSTRUCTEDIN#!2%!.$#,%!.).'SECTIONOFTHISMANUAL
s 7IPEGRILLPLATESWITHADAMPCLOTHORSPONGETOREMOVEANYDUST7IPEDRY
with a soft cloth or paper towels.
s 3ELECTLOCATIONWHEREUNITISTOBEUSEDLEAVINGENOUGHSPACEBETWEENBACK
of unit and wall to allow heat to flow without damage to cabinets and walls.
ATTACH GRILL PLATES
Important: This appliance should always be used with 2 grill plates securely
attached.
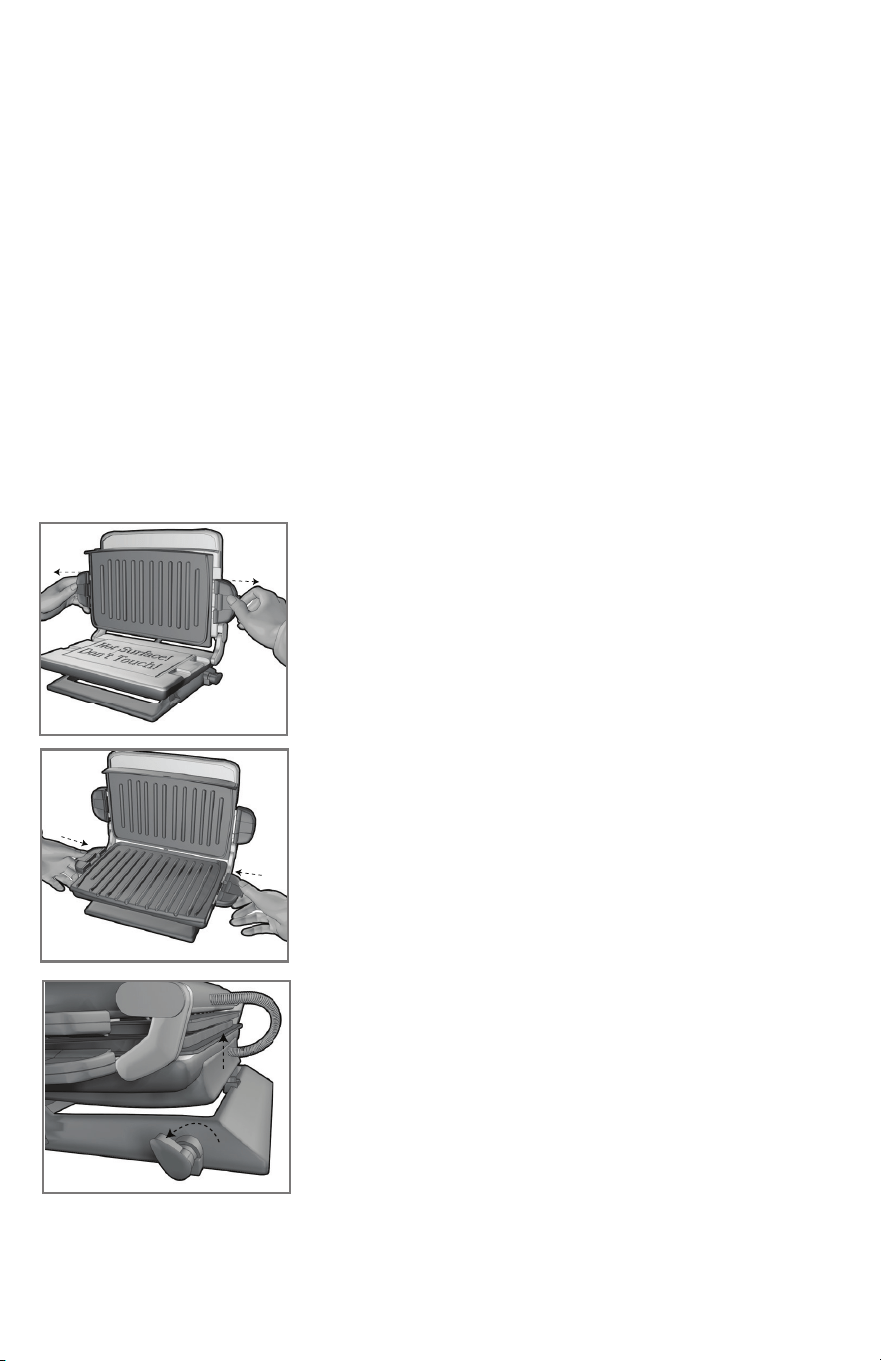
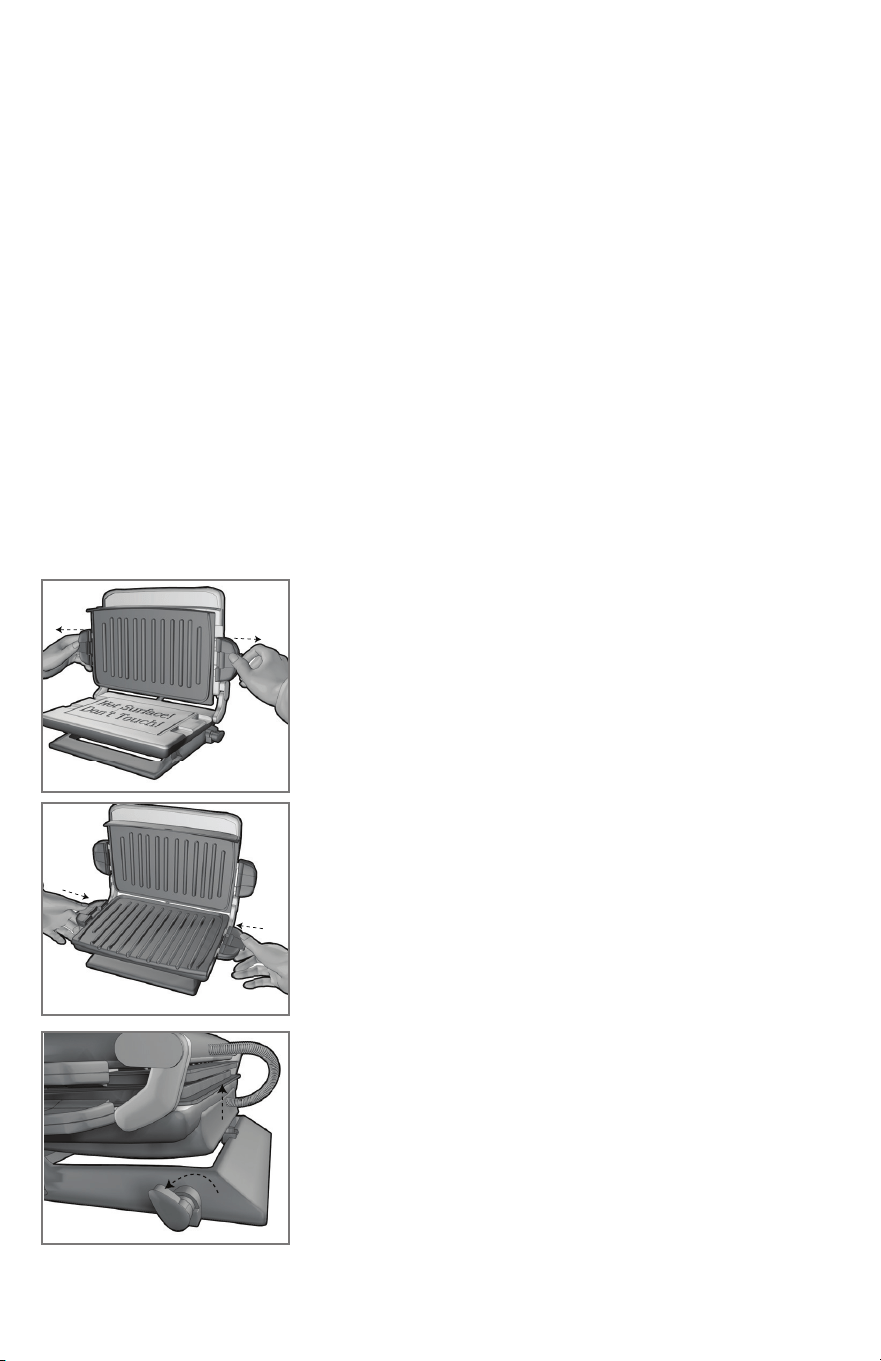
Ceramic Grill Plates (See illustration A3)
1. Securely attach top and bottom grill plates using
release handles on sides of plates (B and C).
Important: When using these grill plates, use grill
slope adjustment knob at bottom right rear of grill to
lift back of bottom grill plate and have drippings run
into drip tray. (D)
Caution: This position should only be used when grilling.
2. Place drip tray under front sloped section of bottom
plate on grill.
B
C
D

6
Waffle plates
(See illustration A3)
Important: When using these plates, make sure bottom grill plate is in a
completely horizontal position (see illustation D, pg 5).
1. When baking waffles, securely attach top and bottom waffle plates using
release handles on sides of plates.
2. Set temperature at 425º F and allow grill to preheat for at least 5 minutes.
3. Waffles take about 8 minutes to cook to golden brown.
Deep baking pan
(See illustration A3)
Important: When using this plate, make sure the grill is in a completely horizontal
position (see illustation D, pg 5).
1. If using deep baking pan, securely attach top grill plate to top of grill and
securely attach filled deep baking pan to bottom of grill using release handles
on sides of plates.
2. When finished baking in deep baking pan use pot holders to remove pan to wire
rack.
Important: When attaching the plates, be sure they are securely attached using
release handles on sides of plates.
Suggestions for using deep baking pan:
s Brownies: set temperature at 350º F and bake for 25 minutes or until tests done
s Cornbread: set temperature at 350º F and bake 20 minutes.
s Focaccia: see recipe on page 15.
s Lasagna: see recipe on page 16.
s Chicken or fish in cream sauce: set temperature at 350º F and bake for 25
minutes or until tests done.
s Beef with vegetables in gravy: brown beef in deep dish pan at 400º F; add
remaining ingredients and reduce temperature to 300º F; cook until meat and
vegetables are tender.

PREHEATING THE GRILL:
1. Close lid on grill.
2. Unwind cord and plug it into standard electrical outlet. LCD display will show
dashes where time and temperature will be displayed.
3. Press POWER to turn grill on; 5 minutes will appear on timer display and
300º F will appear flashing on temperature display.
4. To adjust the desired cooking time, press the "TEMP/TIMER" function button.
The "TEMP/TIMER" allows you to toggle between the two functions to adjust
desired grill settings.
5. Time can be changed at any time in one-minute increments by tapping or
repeatedly. Minimum cooking time is 1 minute; maximum is 20 minutes.
6. Set desired temperature by tapping repeatedly to select desired
temperature. Temperature changes in 25° increments. Temperature settings
RANGEFROM&TO&3%!2MAYALSOBESELECTEDSEE3%!2).'
7. Carefully place foods to be cooked on bottom grill plate. This grill usually
accommodates 2 to 4 servings.
Note: Do not overload the grill.
8. Close lid and allow food to cook for desired time.
Note:5SESUGGESTEDCOOKINGTIMESFOUNDIN'2),,).'#(!24ONPAGE
!FTERSELECTEDCOOKINGTIMEFOODSHOULDBEDONE
10. Using pot holder or oven mitts carefully open lid.
11. Remove cooked food using plastic spatula provided.
12. When finished cooking, press POWER and unplug grill.
Important: Heat continues to be ON until the power button is turned off or the grill
is unplugged.
Note: Always use heatproof plastic, nylon or wood utensils to avoid scratching
NONSTICKSURFACEOFGRILLPLATES.EVERUSEMETALSKEWERSTONGSFORKSORKNIVES
SEARING:
Pressing "SEAR" will enable the red LED button to become visible and
automatically set the highest temperature (500º F) for a duration of time.
In order to properly sear, make sure the surface of your meal is free of water. If
you choose to sear before grilling, place your food on the grill, then press the sear
button. The grill will heat up to 500º F. Do not touch the grill during searing. The
SEARINGWILLLASTFORSECONDS7HENSEARINGISOVERTEMPERATUREWILLDEFAULTTO
previously selected temperature. Continue with normal grilling instructions.
7

GRILLING MEAT, POULTRY, FISH AND SANDWICHES:
In this position, grill plate rests on top of food.
When grilling meats, poultry and fish, use switch at bottom right rear of the grill
to lift back of bottom grill plate and have drippings run into drip tray.
(See illustration D.)
When grilling sandwiches, tilt bottom grill plate to horizontal position.
3ELECTTIMEANDTEMPERATUREDESIREDFOLLOWINGDIRECTIONSIN02%(%!4).'
GRILL. Allow time for preheating grill.
2. Before first use, if desired, lightly oil grill plates.
Note: Aerosol cooking spray should not be used on ceramic or nonstick surface.
Chemicals that allow spray to come out of can build up on surface of grill plates
and reduce their efficiency.
3. Carefully place foods to be cooked on bottom grill plate of preheated grill.
This grill usually accommodates 2 to 4 servings.
Note: Do not overload grill plate.
4. Close lid, closing it directly onto food.
Note:5SESUGGESTEDCOOKINGTIMESFOUNDIN'2),,).'#(!24ONPAGE
5. Allow food to cook for selected time.
Important: Do not leave the appliance unattended during use.
6. During cooking, timer display will count down. When selected time has
elapsed, grill will give audible signal. Grill will remain on until it is unplugged.
7. After selected time, food should be done. If you would prefer longer cooking,
simply follow steps beginning at step 4.
8. Using pot holder, carefully open lid.
2EMOVECOOKEDFOODUSINGPLASTICSPATULAPROVIDED
Note: Always use heatproof plastic, nylon or wood utensils to avoid scratching
NONSTICKSURFACEOFGRILLPLATES.EVERUSEMETALSKEWERSTONGSFORKSORKNIVES
10. Press POWER to turn off and unplug grill.
Caution: To avoid sparks at outlet while disconnecting plug, make sure power is
off before disconnecting plug from outlet.
11. Allow drip tray to cool before removing from under grill. Wash and dry the
drip tray after each use.
Note: Be sure liquid in drip tray has cooled.
Caution: Do not remove grill plates while grill is hot. Always allow them to cool
to room temperature before removing or cleaning.
8

SUGGESTED GRILLING CHART FOR MEATS,
POULTRY, FISH AND SANDWICHES
The following are meant to be used as a guideline only. Times reflect full grill of
food. Cooking time will depend upon thickness and cut being used. Use cooking
thermometer as test for doneness. If food needs longer cooking, check periodically
to avoid overcooking food.
FOOD COOKING TIME COMMENTS
MEAT
(AMBURGEROZ nMINUTES ÐINCHTHICK
Cooked to medium (160ºF)
&ROZENHAMBURGERSOZ nMINUTES #OOKEDTOMEDIUM&
&LANKSTEAKÐLB nMINUTES ÐINCHTHICK
Cooked to medium rare (145ºF)
3KIRTSTEAKLB nMINUTES #OOKEDTOMEDIUM&
.9STRIPSTEAK nMINUTES ÐINCHTHICK
(shell steak) (6 oz.) Cooked to medium rare (145ºF)
"EEFTENDERLOINOZ nMINUTES ÐINCHTHICK
Cooked to medium rare (145ºF)
"EEFKABOBS nMINUTES #OOKEDTOMEDIUM&
0ORKLOINCHOPSBONELESS nMINUTES ÐINCHTHICK
Cooked to 160ºF
0ORKLOINCHOPSBONEIN nMINUTES INCHTHICK
Cooked to 160ºF
3AUSAGELINKORPATTY nMINUTES #OOKEDTO&
(OTDOGS nMINUTES #OOKEDTO&
"ACON nMINUTES
3MOKEDPORKLOINCHOPSnMINUTES #OOKEDTO&
boneless
,AMBCHOPSLOIN nMINUTES ÐINCHTHICK
Cooked to medium (160ºF)

10
FOOD COOKING TIME COMMENTS
POULTRY
#HICKENBREAST nMINUTES #OOKEDTO&
boneless and skinless (8 oz.)
#HICKENTENDERLOINSnMINUTES #OOKEDTO&
(4 to 6 pieces)
4URKEYTENDERLOINÐLB nMINUTES #OOKEDTO&
4URKEYBURGERSOZ nMINUTES #OOKEDTO&
FISH
4ILAPIAlLLETSOZEA nMINUTES #OOKEDTO&
4ROUTlLLETOZ nMINUTES #OOKEDTO&
3ALMONlLLETOZPIECE nMINUTES #OOKEDTO&
3ALMONSTEAKOZ nMINUTES #OOKEDTO&
4UNASTEAKOZ nMINUTES #OOKEDTO&
3HRIMP nMINUTES #OOKEDTO&
SANDWICHES
'RILLEDCHEESE nMINUTES #OOKUNTILCHEESEISMELTED
and sandwich is golden
'RILLEDCHEESEWITHTOMATOnMINUTES #OOKUNTILCHEESEISMELTED
tuna, ham or bacon and sandwich is golden
1UESADILLAS nMINUTES #OOKUNTILCHEESEISMELTED
and tortilla is lightly browned
Please note: To be sure your food is fully cooked the USDA recommends the
following guidelines. Use a meat thermometer to test for doneness by inserting
the meat thermometer into the center of the food being cooked and make sure the
thermometer is not touching the bone.

11
FOOD TO BE COOKED MEDIUM WELL DONE OR
FULLY COOKED
Chicken Breast 170ºF 77ºC
Chicken Thigh 180ºF 82ºC
Beef / Lamb/Veal 160ºF 71ºF 170ºF 77ºC
Pork 160ºF 71ºF
Reheated cooked meats and poultry 165ºF
GRILLING FRUITS AND VEGETABLES
The following are meant to be used as a guideline only. The times reflect a full grill of
food. Cooking time will depend upon thickness of food. Use a fork inserted into the
center of the food to test for doneness. (Be careful not to touch the grill plate.) If the
food needs longer cooking, check periodically to avoid overcooking the food.
FOOD GRILLING TIME
!SPARAGUSSPEARS nMINUTES
"ELLPEPPERSASSORTEDCOLORSCUTINTOINCHRINGS nMINUTES
-USHROOMSTHICKLYSLICED nMINUTES
/NIONSLICESINCH nMINUTES
0OTATOSLICESINCH nMINUTES
0ORTABELLAMUSHROOMSINCHDIAMETER nMINUTES
:UCCHINISLICESINCH nMINUTES
&RESHPINEAPPLESLICESINCH nMINUTES

12
GRILLING TIPS:
s 4OPREVENTHEATLOSSANDPROMOTEEVENCOOKINGDONOTOPENTHEGRILLCOVER
frequently while cooking.
s $ONOTOVERlLLGRILLITWILLHOLDTOSERVINGSCOMFORTABLY
s 7HENlRSTCOOKINGAPARTICULARFOODCHECKFORDONENESSSEVERALMINUTES
before suggested time; if necessary, adjust timer using control button.
s )FCOOKINGMORETHANONEPIECEOFFOODTRYTOHAVETHEMSIMILARINSIZEAND
thickness.
s 2EMEMBERTHATSINCEGRILLISCOOKINGFROMBOTHSIDESCOOKINGTIMEWILLTYPICALLY
be shorter than expected. Watch carefully to avoid overcooking.
s &ORADDEDmAVORADDDRYSEASONINGSBEFOREGRILLINGORMARINATEFOODSBEFORE
cooking.
CARE AND CLEANING
CLEANING
Caution: To avoid accidental burns, allow grill to cool thoroughly before
cleaning.
1. Before cleaning, unplug grill from wall outlet and allow to cool.
Caution: To avoid sparks at outlet while disconnecting plug, make sure power is
off before disconnecting the plug from the outlet.
Important: Heating elements will continue to be ON until grill is unplugged.
2. Place drip tray under front of grill (see illustration E). Use plastic spatula to
scrape off any excess fat and food particles left on the grill plates; runoff will
drip into the drip tray. Wipe plates dry with a paper towel or sponge to avoid
grease dripping onto your counter when plates are removed.
2EMOVEPLATESASINSTRUCTEDIN(/74/53%SEEILLUSTRATIONS"AND#4O
clean grill plates, wash in warm, soapy water; dry thoroughly with a paper
towel.
4. Empty drip tray and wash in warm, soapy water; dry thoroughly with a paper
towel.
5. Reinstall grill plates (see illustrations B and C), making sure they are securely
attached to grill body.
Note: Removable grill plates are also dishwasher-safe. If washing grill plates
in a dishwasher, wipe uncoated side with a dry towel to prevent discoloration.
Dishwasher detergent may cause oxidation on uncoated side of grill plate. This is
not harmful and can be wiped off with a damp towel.
6. To remove stubborn buildup, use a nonmetallic scrubbing pad to clean the grill
plates.

13
Important: Do not use metallic scrubbing pads, steel wool or any abrasive
cleaners to clean any part of your grill; use only nylon or nonmetallic scrubbing
pads.
7. To clean the grill cover, wipe with a warm, wet sponge and dry with a soft, dry
cloth.
Important: Do not immerse body of grill in water or any other liquid.
8. Any servicing requiring disassembly other than the above cleaning must be
preformed by a qualified electrician.
Caution: Make sure to hold grill cover by the handle while cleaning to prevent
accidental closing and injury.
STORAGE
s !LWAYSMAKESUREGRILLISCLEANANDDRYBEFORESTORING

14
TROUBLESHOOTING
PROBLEM POSSIBLE CAUSE SOLUTION
Finish on grill plates has Metal utensils have Always use heatproof
cut marks. been used. plastic, nylon or wood
utensils to avoid scratching
nonstick surface of grill plates.
.EVERUSEMETALSKEWERS
tongs, forks or knives.
Grill marks on food are Grill was not fully Always preheat grill at
very light. preheated before use. least 5 minutes before
cooking any foods.
There is food buildup on Grill not properly cleaned Use nylon scrubbing pad
grill plates. after use. and hot, soapy water to clean
grill plates. Do not use steel
wool scrubbing pads or
abrasive cleaners to clean
grill.
Food is dry and burnt. Food is overcooked. Because grill is cooking from
both sides, food is cooked
much faster than in a skillet
or under a broiler. Use cooking
chart as a guide and check
food at lowest time stated
on chart.
Grill does not turn on. Grill is not plugged in. Check to be sure appliance
is plugged into working outlet
and POWER is on.

15
RECIPES
EASY FOCCACCIA
1 pkg. (8 oz.) refrigerated garlic breadsticks
½ cup shredded Asiago cheese
½ cup chopped parsley
2 tbsp. chopped fresh rosemary
1 tbsp. olive oil
Unroll breadsticks (do not separate) and lay out in greased deep baking pan of
grill. Sprinkle evenly with cheese. Top with parsley and rosemary. Drizzle oil over
all. Attach top grill plate to grill.
Attach deep baking pan on bottom of grill. Close lid. Set baking time for 20 minutes
and temperature at 400º F. Bake until bread is golden and fully baked.
Using pot holders, remove baking pan from grill and place on heat-resistant
surface. Use nylon spatula to remove bread from baking pan. Serve warm.
Makes 6 to 8 servings.
POTATO AND LEEK FRITTATA
6 oz. red skin potatoes, thinly sliced
1 tbsp. olive oil
1 leek (white and light green part) thinly sliced
4 eggs, lightly beaten
2 tbsp. half & half
½ tsp. herbs de Provence
½ tsp. salt
¼ tsp. garlic pepper
½ cup shredded Gruyère cheese
Chopped parsley
Attach top grill plate to grill.
Place deep baking pan on bottom of grill. Set baking time at 10 minutes and
temperature at 400º F.
Add potatoes, oil and leeks. Close cover and cook, turning potatoes occasionally.
In bowl, combine eggs, half & half, herbs de Provence, salt and garlic pepper;
whisk until well blended. Stir in cheese.
Add egg mixture to deep baking pan. Set baking time for 15 minutes and
temperature at 350º F. Bake until eggs are fully baked and puffed.

16
Using pot holders, remove baking pan from grill and place on heat-resistant
surface. Garnish with parsley. Use nylon spatula to serve.
Makes 6 to 8 servings.
SPINACH LASAGNA
½ lb. part skim milk ricotta cheese
1 egg, slightly beaten
2¼ cups shredded mozzarella cheese
½ cup shredded Parmesan cheese
½ cup well drained defrosted frozen chopped spinach
2 tbsp. chopped parsley
¼ tsp. salt
2 cups marinara sauce
LASAGNANOODLESCOOKEDANDDRAINED
In medium bowl, combine ricotta cheese, egg, ½ cup mozzarella cheese, ¼ cup
Parmesan cheese, spinach, parsley and salt; blend well.
Spread ½ cup marinara sauce in ungreased deep baking pan. Top with 3 noodles.
Spread half of the spinach mixture over the noodles. Sprinkle with ½ cup
mozzarella cheese and ½ cup marinara sauce. Repeat layering pasta, spinach
mixture, cheese and sauce.
Place 3 noodles on top. Spread remaining sauce on noodles and top with
REMAININGÐCUPMOZZARELLAANDCUP0ARMESANCHEESE
Place deep baking pan onto bottom of grill. Close lid.
Set baking time for 20 minutes and temperature for 375º F. Set timer for 20 minutes.
Set temperature at 400º F. Bake until hot and cheese is melted and golden.
Using pot holders, remove baking pan from grill and place on heat-resistant
surface. Let stand 5 minutes before serving.
Makes 6 to 8 servings.

17
CHURRASCO
1 tbsp. Adobo seasoning mix
1 tbsp. instant minced onion
½ tsp dried pepper flakes
½ tsp. garlic pepper
1½ lb. skirt steak
In small bowl, combine seasonings. Sprinkle evenly on both sides of steak.
Refrigerate while preheating grill.
Grill 6 to 8 minutes on setting 12, to desired doneness.
Slice into strips to serve.
Makes 2 servings.
HAM AND PINEAPPLE GRILLED SANDWICH
¼ cup pineapple preserves
¼ cup chopped canned peaches
1 tbsp. finely diced candied ginger
4 slices sour dough bread
4 oz. thinly sliced ham
4 oz. brie, sliced
2 tbsp. melted butter
In small bowl, combine preserves, peaches and ginger; set aside. Spread melted
butter on one side of each slice of bread.
Place 2 slices of bread buttered side down on cutting board, spread pineapple
mixture on bread. Top each slice of bread with ham and cheese. Cover with
remaining slices of bread with buttered side up.
Place on preheated grill set at setting 4 and close cover. Grill 3 minutes or until
sandwich is golden and cheese is softened.
Makes 2 sandwiches.

18
TURKEY SALSA ROLL
¼ cup packaged salsa
1 tbsp. minced purple onion
1 tbsp. chopped cilantro
2 large tomato wraps
4 oz. sliced turkey
4 oz. shredded Monterey Jack cheese with jalapeno peppers
In small bowl, combine salsa, onion and cilantro; set aside.
Place wraps on cutting board, spread salsa down center of wrap. Top each with
turkey and cheese. Fold in sides and roll-up. Place end side down on preheated
grill and close cover. Grill 3 minutes on setting 4 or until sandwich is golden and
cheese is melted.
Makes 2 sandwiches.

INSTRUCCIONES IMPORTANTES
DE SEGURIDAD
Cuando se usan aparatos eléctricos, siempre se deben respetar las siguientes
medidas básicas de seguridad:
❑ Por favor lea todas las instrucciones.
❑ .OTOQUELASSUPERFICIESCALIENTES5SELASASASOLASPERILLAS
❑ A fin de protegerse contra un choque eléctrico y lesiones a las personas, no
sumerja el cable, los enchufes ni el aparato en agua ni en ningún otro líquido.
❑ Todo aparato eléctrico usado en la presencia de los niños o por ellos mismos
requiere la supervisión de un adulto.
❑ Desconecte el aparato de la toma de corriente cuando no esté en uso y antes
de limpiarlo. Espere que el aparato se enfríe antes de instalarle o retirarle
piezas y antes de limpiarlo.
❑ .OUSENING¢NAPARATOEL£CTRICOQUETENGAELCABLEOELENCHUFEAVERIADO
que presente un problema de funcionamiento o que esté dañado. Acuda a un
centro de servicio autorizado para que lo examinen, reparen o ajusten o llame
gratis al número correspondiente en la cubierta de este manual.
❑ El uso de accesorios no recomendados por el fabricante del aparato puede
ocasionar incendio, choque eléctrico o lesiones a las personas.
❑ .OUSEESTEAPARATOALAINTEMPERIE
❑ .OPERMITAQUEELCABLECUELGUEDELBORDEDELAMESAODELMOSTRADORNIQUE
entre en contacto con superficies calientes.
❑ .OCOLOQUEELAPARATOSOBRENICERCADELASHORNILLASDEGASOEL£CTRICASNI
adentro de un horno caliente.
❑ Tome mucha precaución al mover de un lugar a otro un aparato que contenga
aceite u otros líquidos calientes.
❑ Para desconectar, ajuste todo control a la posición de apagado (OFF) y
después, retire el enchufe de la toma de corriente.
❑ Este aparato se debe usar únicamente con el fin previsto.
CONSERVE ESTAS INSTRUCCIONES.
Este aparato eléctrico es para uso doméstico
únicamente.

20
ENCHUFE POLARIZADO (Solamente para los modelos de 120V)
Este aparato cuenta con un enchufe polarizado (un contacto es más ancho que
el otro). A fin de reducir el riesgo de un choque eléctrico, este enchufe encaja
en un tomacorriente polarizada en un solo sentido. Si el enchufe no entra en el
tomacorriente, inviértalo y si aun así no encaja, consulte con un electricista. Por
favor no trate de alterar esta medida de seguridad.
ENCHUFE DE TIERRA (Canadá)
Como medida de seguridad, este producto está equipado con un enchufe de
TIERRAQUESECONECTAAUNTOMACORRIENTEDETRESPATAS.OTRATEDEALTERAR
esta medida de seguridad. La conexión impropia del conductor de tierra puede
resultar en el riesgo de descarga eléctrica. Consulte a un electricista calificado
si tiene alguna duda en cuanto a si la salida es correcta a tierra.
TORNILLO DE SEGURIDAD
Advertencia: Este aparato cuenta con un tornillo de seguridad para evitar
la remoción de la cubierta exterior del mismo. A fin de reducir el riesgo de
incendio o de choque eléctrico, por favor no trate de remover la cubierta
exterior. Este producto no contiene piezas reparables por el consumidor.
Toda reparación se debe llevar a cabo únicamente por personal de servicio
autorizado.
CABLE ÉLECTRICO
a) El producto debe proporcionarse con un cable corto (o uno desmontable) para reducir
el riesgo de enredarse o de tropezar con un cable largo.
b) Se encuentran disponibles cables desmontables o de extensión más largos, que es
posible utilizar si se emplea el cuidado debido.
c) Si se utiliza un cable desmontable o de extensión,
1) El voltaje eléctrico del cable desmontable o del cable de extensión debe ser, como
mínimo, igual al del voltaje del aparato,
2) Si el aparato es del tipo que va connectado a tierra, el cable de extensión deberá ser
un cable de tres alambres connnectado a tierra.
3) El cable más largo debe acomodarse de modo que no cuelgue del mostrador
o de la mesa, para evitar que un niño tire del mismo o que alguien se tropiece.
Nota: Si el cordón de alimentación esta dañado, en América Latina se debe sustituirse
por un personal calificado o por el centro de servicio autorizado.
El producto puede variar ligeramente del que aparece ilustrado aquí.
1.
Mango integrado
†
2. Placa para asar (superior)
0IEZA.'20
3. Manijas de lanzamiento de la placa
de la parrilla (ambos lados)
†
4. Placa para asar (inferior)
0IEZA.'20
5. Ángulo de parrilla ajustable
6. Cable de alimentación (no mostrado)
†
"ANDEJADEGOTEO0IEZA.'20
†
%SPÖTULA0IEZA.'20
† Reemplazable/desmontable por el consumidor
A1
!
"
#
$
%
&
(
1. Selector para subir/bajar la temperatura
2. Botón de la función para sellar (Sear)
3. Selector de temperatura/reloj automático
4. Botón de funcionamiento
5. Pantalla de tiempo
6. Pantalla de temperatura
A2
! " # $
% '
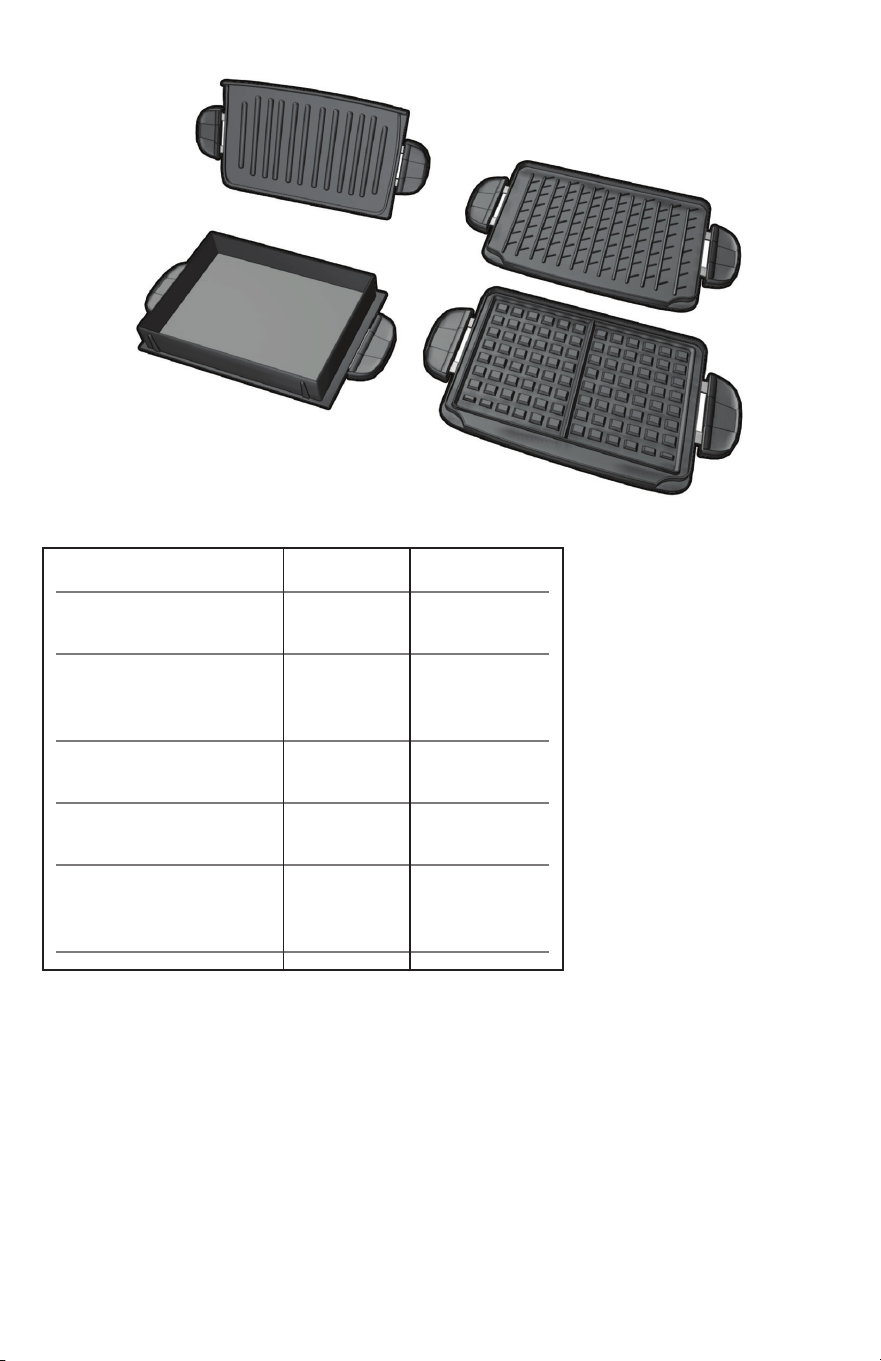
Placa Incluída(s) Pieza Nº
1. Placa para asar 1 GRP5842-03
tradicional
2. Placa para asar con 1 GRP5842-04
superficie en forma
de cruz
3. Placa para wafles 2 GRP5842-05
(superior)
4. Placa para wafles 2 GRP5842-06
(inferior)
5. Placa para hornear 1 GRP5842-07
alimentos de masa
gruesa
A3
%
#/$
"
!
23
Como usar
:
Este producto está diseñado únicamente para uso doméstico.
PASOS PRELIMINARES
s 2ETIRETODASLASETIQUETASYELMATERIALDEEMPAQUE
s 2ETIREYGUARDELALITERATURA
s ,AVELABANDEJADEGOTEOSEG¢NSEDESCRIBEENLASECCIN#5)$!$/9
LIMPIEZA de este manual.
s ,IMPIELASPLACASPARAASARCONUNPA®OOUNAESPONJAHUMEDECIDOSPARA
eliminar el polvo. Séquelas con un paño suave o toallas de papel.
s 3ELECCIONEELLUGARDONDESEUTILIZARÖELAPARATODEJANDOESPACIOSUlCIENTE
entre la parte posterior del mismo y la pared de modo que el calor fluya sin
dañar los gabinetes o las paredes.
COLOCACIÓN DE LAS PLACAS PARA ASAR
Importante: Este aparato debe utilizarse siempre con 2 placas para asar
firmemente aseguradas.
Placas de cerámica (Consulte la figura A3.)
1. Coloque la placa para asar superior e inferior
usando las palancas de liberación que se
encuentran a cada lado de las placas (B y C).
Importante: Al usar las placas para asar, use el
interruptor que se encuentra en la parte inferior
y posterior de la parrilla. De esta forma la parte
posterior de la placa inferior quedará alzada y el
goteo se dirigirá a la bandeja (D).
Precaución: Esta posición solo debe utilizarse para
asar.
B
C
D

24
2. Coloque la bandeja de goteo debajo de la sección inclinada de la placa inferior.
Placas para wafles
(Consulte la figura A3.)
Importante: Al utilizar estas placas, asegúrese de que la placa inferior esté en
posición completamente horizontal (vea D, p24).
1. Al preparar wafles, coloque la placa superior e inferior para wafles usando las
palancas de liberación que se encuentran a cada lado de las placas.
2. Configure la temperatura a 425º F y permita que la parrilla se caliente durante
al menos 5 minutos.
3. Los wafles tardan aproximadamente 8 minutos en ponerse dorados.
Placa para hornear alimentos de masa gruesa
(Consulte la figura A3.)
Importante: Al utilizar estas placas, asegúrese de que la parrilla esté en posición
completamente horizontal (vea D, p24).
1. Si se va a utilizar la placa para hornear alimentos de masa gruesa, coloque la
placa superior en la sección superior de la parrilla y la placa para alimentos de
masa gruesa, que contiene los alimentos que se van a preparar, en la sección
inferior usando las palancas de liberación que se encuentran a cada lado de
las placas.
2. Al terminar de hornear, retire la placa para hornear alimentos de masa gruesa
con la ayuda de agarraderas y colóquela sobre una bandeja de alambre.
Importante: Al colocar las placas, asegúrese de que queden firmemente
colocadas usando las palancas de liberación que se encuentran a cada lado de
las placas.
Sugerencias para el uso de la placa para hornear alimentos de masa gruesa:
s Brownies: Configure la temperatura a 350º F y hornee por 25 minutos o hasta
que estén listos.
s Pan de maíz: Configure la temperatura a 350º F y hornee por 20 minutos.
s Focaccia: Vea la receta en la página 36.
s Lasaña: Vea la receta en la página 37.
s Pollo o pescado en salsa cremosa: Configure la temperatura a 350º F y hornee
por 25 minutos o hasta que esté listo.
s Carne con vegetales y salsa: Cocine la carne en la placa para alimentos
de masa gruesa a 400º F; agregue los ingredientes restantes y reduzca la
temperatura a 300º F; cocine hasta que la carne y los vegetales estén tiernos.
Sugerencias para el uso del accesorio para bollitos:
s 3IGALASINSTRUCCIONESDELPAQUETEYLLENELOSMOLDESDELOSBOLLITOSHASTALA
MITAD(ORN£ELOSHASTAQUEEST£NDORADOS0RUEBE

o Bollitos de maíz
o Bollitos de arándano (cranberry)
o Bollitos de banana y nuez
o Bollitos de arándano azul (blueberry)
s Panes de carne en miniatura: Vea la receta en la página 38.
PRECALENTAMIENTO DE LA PARRILLA:
1. Cierre la tapa de la parrilla.
2. Desenrolle el cable y conéctelo a una toma de corriente estándar.
La pantalla digital mostrará guiones donde aparecerán el tiempo y la
temperatura.
3. Presione el botón POWER para encender la parrilla; en la pantalla del
cronómetro aparecerán 5 minutos y 300° F aparecerá parpadeando en la
pantalla de temperatura.
4. Para cambiar el tiempo de cocción, presione el botón de
temperatura/reloj automático (TEMP/TIMER). La función de TEMP/TIMER
le permite presionar el botón TEMP/TIMER una y otra vez para alternar de
una función a otra hasta alcanzar el ajuste deseado.
5. El tiempo se puede modificar en cualquier momento en incrementos de
un minuto tocando o reiteradamente. El tiempo mínimo de cocción
es de 1 minuto; el máximo es de 20 minutos. La pantalla digital mostrará
/.ENCENDIDO
6. Establezca la temperatura deseada tocando reiteradamente.
La temperatura cambia en incrementos de 25°. La temperatura se puede
establecer entre 300º F y 425º F.
7. Coloque cuidadosamente los alimentos que se van a cocinar sobre la placa
inferior. Generalmente en la parrilla caben de 2 a 4 porciones.
Nota:.OSOBRECARGUELAPARRILLA
8. Cierre la tapa y cocine los alimentos durante el tiempo deseado.
Nota: Utilice los tiempos de cocción sugeridos en la TABLA PARA ASAR en la
PÖGINA
5NAVEZTRANSCURRIDOELTIEMPODECOCCINSELECCIONADOLOSALIMENTOS
deberían estar listos.
10. Abra la tapa cuidadosamente con la ayuda de agarraderas o mitones.
11. Retire los alimentos con la espátula de plástico proporcionada.
12. Al terminar de cocinar, presione POWER y desconecte la parrilla.
Importante: La parrilla sigue generando calor hasta que se desconecta.
25

26
Nota: Utilice siempre utensilios de plástico, nylon o madera que sean resistentes
ALCALORPARANORAYARLASUPERlCIEANTIADHERENTEDELASPLACAS.UNCAUTILICE
pinchos de metal, pinzas, tenedores o cuchillos.
FUNCIÓN PARA SELLAR
Cuando se presiona el botón de la función para sellar (SEAR), la luz roja del
botón se ilumina y automáticamente se programa la temperatura de cocción más
alta (500° F) durante un período de tiempo.
Para lograr los mejores resultados al sellar, asegúrese de que la superficie
del alimento esté seca. Si prefiere sellar antes de asar, primero coloque sus
alimentos en la parrilla y después presione el botón de la función para sellar. La
PARRILLAALCANZAUNATEMPERATURADEHASTA&.OTOQUELAPARRILLADURANTEEL
CICLODESELLADO%STECICLODURARÖALREDEDORDESEGUNDOS#UANDOTERMINE
el ciclo de sellado, la temperatura cambiará a la temperatura seleccionada
anteriormente. Continue con las instrucciones bajo la sección para asar.
CÓMO ASAR CARNES, AVES, PESCADOS Y SÁNDWICHES:
En esta posición, la placa para asar se apoya sobre los alimentos.
Al asar carnes, aves y pescado, use el interruptor que se encuentra en la parte
inferior y posterior de la parrilla. De esta forma la parte posterior de la placa
inferior quedará alzada y el goteo se dirigirá a la bandeja (Consulte la figura D.)
Al preparar sándwiches, incline la placa inferior hacia la posición horizontal.
1. Seleccione el tiempo y la temperatura deseados según las instrucciones de
LASECCIN02%#!,%.4!-)%.4/$%,!0!22),,!!GREGUETIEMPOPARAQUE
la parrilla se precaliente.
2. Antes del primer uso, si lo desea, unte las placas para asar ligeramente
con aceite.
Nota:.OUTILICEACEITEPARACOCINARENAEROSOLSOBRELASUPERlCIESDECOCCIN
de cerámica o antiadherentes. Los químicos que permiten que el aerosol salga
pueden acumularse en la superficie de las placas y reducir su eficiencia.
3. Coloque cuidadosamente los alimentos que se van a cocinar sobre la placa
inferior. Generalmente en la parrilla caben de 2 a 4 porciones.
Nota:.OSOBRECARGUELAPLACAPARAASAR
4. Cierre la tapa directamente sobre los alimentos.
Nota: Utilice los tiempos de cocción sugeridos en la TABLA PARA ASAR en la
PÖGINA
5. Permita que los alimentos se cocinen durante el tiempo seleccionado.
Importante: Preste atención al aparato durante su uso.

6. Durante la cocción, el cronómetro contará de forma regresiva. Una vez
transcurrido el tiempo seleccionado, la parrilla emitirá un sonido. La parrilla
permanecerá encendida hasta que se desconecte.
7. Una vez transcurrido el tiempo seleccionado, los alimentos deberían estar
listos. Si prefiere más tiempo de cocción, siga los pasos empezando por el
paso 4.
8. Abra la tapa cuidadosamente con la ayuda de agarraderas.
2ETIRELOSALIMENTOSCONLAESPÖTULADEPLÖSTICOPROPORCIONADA
Nota: Utilice siempre utensilios de plástico, nylon o madera que sean resistentes
ALCALORPARANORAYARLASUPERlCIEANTIADHERENTEDELASPLACAS.UNCAUTILICE
pinchos de metal, pinzas, tenedores o cuchillos.
10. Presione POWER para apagar y desconectar la parrilla.
Precaución: Para evitar que se produzcan chispas en el enchufe mientras se
desconecta el aparato, asegúrese de que esté apagado antes de desconectarlo.
11. Permita que la bandeja de goteo se enfríe antes de alejarla de la parrilla.
Lave y seque la bandeja de goteo después de cada uso.
Nota: Asegúrese de que el líquido de la bandeja de goteo se haya enfriado.
Precaución: No retire las placas para asar mientras la parrilla aún esté caliente.
Permita siempre que se enfríen a temperatura ambiente antes de retirarlas o
limpiarlas.
27

28
CUADRO PARA ASAR A LA PLANCHA
SUGERIDO PARA CARNES, AVES, PESCADOS Y
SÁNDWICHES
Los siguientes valores se deben usar como guía únicamente. Los tiempos sugeridos
corresponden a la capacidad completa de la plancha. El tiempo de cocción depende
del grosor y del corte utilizados. Use un termómetro de cocción para comprobar si
el alimento está listo. Si el alimento necesita una cocción más prolongada, verifique
periódicamente para evitar cocinarlo en exceso.
ALIMENTO TIEMPO DE COCCIÓN COMENTARIOS
CARNE
(AMBURGUESAGOZ nMINUTOS CMÐPULGADADEGROSOR
Cocción a término medio
71 ºC (160 ºF)
(AMBURGUESASCONGELADASnMINUTOS #OCCINAT£RMINOMEDIO
71 ºC (160 ºF)
"ISTECDEVAC¤O nMINUTOS CMÐPULGADADEGROSOR
GÐLB #OCCINAPUNTO#&
"ISTECDEFALDAGLB nMINUTOS #OCCINAT£RMINOMEDIO
71 ºC (160 ºF)
"ISTECTIPO.9 nMINUTOS CMÐPULGADADEGROSOR
(del lomo corto) 170,1 g (6 oz) Cocción a punto 63 °C (145 ºF)
&ILETEDECARNEDERES nMINUTOS CMÐPULGADADEGROSOR
141,75 g (5 oz) Cocción a punto 63 °C (145 ºF)
0INCHOSDECARNEDERES nMINUTOS #OCCINAT£RMINOMEDIO
71 ºC (160 ºF)
#HULETASDELOMODEPUERCOnMINUTOS CMÐPULGADADEGROSOR
deshuesadas Cocción a 71 ºC (160 ºF)
#HULETASDELOMODEPUERCOnMINUTOS CMPULGADADEGROSOR
con hueso Cocción a 71 ºC (160 ºF)
%MBUTIDOSALCHICHITAOPATI nMINUTOS #OCCINA#&
(OTDOGS nMINUTOS #OCCINA#&

ALIMENTO TIEMPO DE COCCIÓN COMENTARIOS
4OCINO nMINUTOS
#HULETASDELOMODEPUERCO nMINUTOS #OCCINA#&
ahumadas, deshuesadas
#HULETASDECORDEROLOMO nMINUTOS CMÐPULGADADEGROSOR
Cocción a término medio
71 ºC (160 ºF)
AVES
0ECHUGADEPOLLO nMINUTOS #OCCINA#&
deshuesada y sin piel
226,8 g (8 oz)
,OMITOSDEPOLLOATROZOS nMINUTOS #OCCINA#&
,OMODEPAVOGÐLB nMINUTOS #OCCINA#&
(AMBURGUESASDEPAVOnMINUTOS #OCCINA#&
141,75 g (5 oz)
PESCADO
&ILETESDETILAPIA nMINUTOS #OCCINA#&
170,1 g (6 oz) c/u
&ILETEDETRUCHAGOZ nMINUTOS #OCCINA#&
&ILETEDESALMN nMINUTOS #OCCINA#&G
(8 oz) por pieza
"ISTECDESALMN nMINUTOS #OCCINA#&G
(8 oz)
"ISTECDEAT¢NGOZ nMINUTOS #OCCINA#&
,ANGOSTINOS nMINUTOS #OCCINA#&

30
Tenga en cuenta: Para asegurarse de que su alimento esté completamente
cocinado, el Departamento de Agricultura de los Estados Unidos (United States
Department of Agriculture, USDA) recomienda las siguientes pautas. Use un
termómetro para carnes para comprobar si el alimento está listo insertando el
termómetro para carnes en el centro del alimento que está cocinando y asegúrese
de que el termómetro no toque el hueso.
ALIMENTO TIEMPO DE COCCIÓN COMENTARIOS
SÁNDWICHES
1UESOASADOALAPLANCHA nMINUTOS #OCINEHASTAQUEELQUESOSE
derrita y el sándwich se dore
1UESOASADOALAPLANCHAnMINUTOS #OCINEHASTAQUEELQUESOSE
con tomate, atún, jamón derrita y el sándwich se dore
o tocino
1UESADILLAS nMINUTOS #OCINEHASTAQUEELQUESOSE
derrita y la tortilla adquiera un
color ligeramente dorado
ALIMENTO PARA COCINAR TÉRMINO MEDIO BIEN COCIDO O
TOTALMENTE COCIDO
Pechuga de pollo 170 ºF 77 ºC
Muslo de pollo 180 ºF 82 ºC
Carne de res/Cordero/Ternera 160 ºF 71 ºC 170 ºF 77 ºC
Puerco 160 ºF 71 ºC
Carne de res y ave cocidas 165 ºF 74 °C
recalentadas

ASAR A LA PLANCHA FRUTAS Y VERDURAS
Los siguientes valores se deben usar como guía únicamente. Los tiempos sugeridos
corresponden a la capacidad completa de la plancha. El tiempo de cocción
depende del grosor del alimento. Introduzca un tenedor en el centro del alimento
para comprobar si está listo. (Tenga cuidado de no tocar la placa de la plancha). Si
el alimento necesita una cocción más prolongada, verifique periódicamente para
evitar cocinarlo en exceso.
ALIMENTO TIEMPO PARA ASAR
A LA PLANCHA
2ACIMOSDEESPÖRRAGOS nMINUTOS
0IMIENTOSDIVERSOSCOLORESCORTADOS nMINUTOS
en aros de 1,27 cm (½ pulgada)
(ONGOSENREBANADASGRUESAS nMINUTOS
2EBANADASDECEBOLLACMPULGADA nMINUTOS
2EBANADASDEPAPACMPULGADA nMINUTOS
(ONGOSPORTOBELLOCMPULGADASDEDIÖMETRO nMINUTOS
2EBANADASDEZUCCHINICMPULGADA nMINUTOS
2ODAJASDEPI®AFRESCACMPULGADA nMINUTOS
CONSEJOS PARA ASAR A LA PLANCHA:
s 0ARAIMPEDIRLAP£RDIDADECALORYGENERARUNACOCCINPAREJANOABRALATAPA
de la plancha frecuentemente durante la cocción.
s .OLLENELAPLANCHAENEXCESOENTRANAPORCIONESCMODAMENTE
s !LCOCINARPORPRIMERAVEZUNALIMENTOESPEC¤lCOCOMPRUEBESIESTÖ
listo varios minutos antes del tiempo sugerido; si es necesario, ajuste el
temporizador con el botón de control.
s 3ICOCINAMÖSDEUNTROZODEALIMENTOINTENTEQUETENGANUNTAMA®OYGROSOR
similares.
s 2ECUERDEQUEDADOQUELAPLANCHACOCINADEAMBOSLADOSELTIEMPODE
cocción será típicamente más corto que lo esperado. Preste atención para
evitar cocinar en exceso.
s 0ARAOBTENERUNSABORMÖSINTENSOAGREGUELOSCONDIMENTOSSECOSANTESDE
asar a la plancha o marine los alimentos antes de cocinarlos.
33

34
Cuidado y limpieza
LIMPIEZA
Precaución: Para evitar quemaduras accidentales, espere hasta que la plancha
se enfríe completamente antes de limpiarla.
1. Antes de limpiar, desenchufe la plancha de la toma de corriente de la pared y
deje que se enfríe.
Precaución: Para evitar que se produzcan chispas en la toma de corriente
al desconectar el enchufe, asegúrese de que la alimentación eléctrica esté
apagada antes de desconectar el enchufe de la toma de corriente.
Importante: Las resistencias seguirán estando encendidas hasta desenchufar el
electrodoméstico.
2. Coloque una bandeja de goteo debajo del frente de la plancha (vea la
ilustración E). Use la espátula de plástico para raspar el exceso de grasa
y las partículas de alimentos que queden en las placas de la plancha; el
escurrimiento caerá en la bandeja de goteo. Seque las placas con una toalla
de papel o esponja para evitar que la grasa gotee sobre la superficie de trabajo
al retirar las placas.
3. Retire las placas según se indica en la sección MODO DE EMPLEO (vea las
ilustraciones B y C). Para limpiar las placas de la plancha, lávelas con agua
templada en jabón; séquela bien con una toalla de papel.
4. Vacíe la bandeja de goteo y lávela con agua templada en jabón; séquela bien
con una toalla de papel.
5. Vuelva a instalar las placas de la plancha (vea las ilustraciones B y C), y
asegúrese de que estén firmemente sujetas a la estructura de la plancha.
Nota: Las placas desmontables de la plancha se pueden lavar en un lavavajillas.
Si lava las placas de la plancha en un lavavajillas, limpie el lado no recubierto
con una toalla de papel para evitar que se decolore. El detergente del lavavajillas
puede provocar oxidación del lado no recubierto de la placa de la plancha. Esto
no es nocivo y puede retirarse con una toalla húmeda.
6. Para eliminar las acumulaciones difíciles, use una esponjilla de no metálica
para limpiar las placas de la plancha.
Importante: No use esponjillas metálicas, lana de acero ni limpiadores abrasivos
para limpiar ninguna parte de su plancha; use únicamente esponjillas de nailon
o no metálicas.
7. Para limpiar la tapa de la plancha, limpie con una esponja húmeda templada y
seque con un trapo seco suave.
Importante: No sumerja la estructura de la plancha en agua ni en ningún otro
líquido.

8. Cualquier servicio técnico que requiera desarmar la plancha, además de la
limpieza mencionada, debe ser realizado por un electricista calificado.
Precaución: Asegúrese de sujetar la tapa de la plancha por el tirador al limpiarla
para evitar que se cierre accidentalmente y provoque lesiones.
ALMACENAMIENTO
s 3IEMPREASEG¢RESEDEQUELAPLANCHAEST£LIMPIAYSECAANTESDE
almacenarla.
35

DETECCIÓN DE FALLAS
PROBLEMA CAUSA POSIBLE SOLUCIÓN
Las terminaciones de las Se han utilizado Siempre use utensilios
placas de la plancha utensilios de metal. de plástico, nailon o
tienen marcas de cortes. madera antitérmicos para
evitar rayar la superficie
antiadherente de las placas
DELAPLANCHA.UNCAUSE
espetones, pinzas, tenedores
ni cuchillos de metal.
,ASMARCASDELASADOA.OSEPRECALENTLA3IEMPREPRECALIENTELA
la plancha en los plancha completamente plancha, por lo menos,
alimentos son muy leves. antes de usarla. 5 minutos antes de cocinar
cualquier alimento.
(AYACUMULACINDE.OSELIMPILAPLANCHA5SEESPONJILLASDENAILON
comida en las placas de correctamente después y agua caliente en jabón
la plancha. de usarla. para limpiar las placas de
LAPLANCHA.OUSEESPONJILLAS
de lana de acero ni
limpiadores abrasivos para
limpiar la plancha.
El alimento está seco El alimento se ha Dado que la plancha cocina
y quemado. cocinado en exceso. de ambos lados, los alimentos
se cocinan mucho más
rápidamente que en una
sartén o en un asador. Use el
cuadro de cocción como guía
y controle el alimento cuando
haya pasado el tiempo más
bajo establecido en el cuadro.
La plancha no enciende. La plancha no está Compruebe que el
enchufada. electrodoméstico esté
enchufado en una toma de
corriente que funcione y que
el interruptor de encendido/
apagado esté en la posición
de encendido.
36

RECETAS
PAN SENCILLO ESTILO FOCCACCIA
1 paquete (8 oz) de grisines de ajo refrigerados
½ taza queso Asiago rallado
½ taza perejil picado
2 cdas romero fresco picado
1 cda aceite de oliva
Desenrolle los grisines sin separarlos y colóquelos en la placa para alimentos
de masa gruesa, previamente engrasada. Cúbralos con queso de forma pareja.
Condimente con perejil y romero. Salpíquelos con aceite. Coloque la placa para
asar superior.
Coloque la placa con los grisines en la sección inferior de la parrilla. Cierre
la tapa. Configure el tiempo de cocción a 20 minutos y la temperatura a 400º F.
(ORNEEHASTAQUEELPANEST£DORADOYLISTO
Con la ayuda de agarraderas, retire la placa con los grisines de la parrilla y
colóquela sobre una superficie resistente al calor. Utilice una espátula de nylon
para retirar el pan de la placa. Servir caliente.
Rinde 6 a 8 porciones.
FRITTATA DE PAPA Y PUERRO
6 oz. papas de piel roja, cortadas en rebanadas finas
1 cda aceite de oliva
1 puerro (parte blanca y verde claro) cortado en rebanadas finas
4 huevos ligeramente batidos
2 cdas crema (half & half)
½ cda hierbas provenzales
½ cdta sal
¼ cdta pimienta de ajo
½ taza queso Gruyère rallado
Perejil picado
Coloque la placa para asar superior.
Coloque la placa para asar alimentos de masa gruesa en la sección inferior de la
parrilla. Configure el tiempo de cocción a 10 minutos y la temperatura a 400º F.
Agregue las papas, el aceite y los puerros. Cierre la tapa y cocine, revolviendo
las papas de vez en cuando.
En un recipiente, bata los huevos, la crema, las hierbas provenzales, la sal y la
pimienta de ajo hasta que queden bien mezclados. Incorpore el queso.
37

Agregue la mezcla de huevo a la placa. Configure el tiempo de cocción a
MINUTOSYLATEMPERATURAA&(ORNEEHASTAQUELOSHUEVOSEST£N
completamente cocidos e inflados.
Con la ayuda de agarraderas, retire la placa para hornear de la parrilla y
colóquela sobre una superficie resistente al calor. Decore con perejil. Use una
espátula de nylon para servir.
Rinde 6 a 8 porciones.
LASAÑA DE ESPINACA
½ lb. queso ricotta semidescremado
1 huevo ligeramente batido
2¼ tazas queso mozzarella rallado
½ taza queso parmesano rallado
½ taza espinaca congelada, descongelada y bien escurrida
2 cdas perejil picado
¼ cdta sal
2 tazas salsa marinara
lDEOSPARALASA®ACOCIDOSYCOLADOS
En un recipiente mediano, mezcle bien el queso ricotta, el huevo, ½ taza de queso
mozzarella, ¼ taza de queso parmesano, la espinaca, el perejil y la sal.
Cubra la placa para hornear alimentos de masa gruesa con ½ taza de salsa
marinara (no es necesario engrasar la placa). Coloque 3 fideos. Vierta la mitad
de la mezcla de espinaca sobre los fideos. Cubra con ½ taza de queso mozzarella
y ½ taza de salsa marinara. Repita la secuencia de pasta, mezcla de espinaca,
queso y salsa.
4ERMINECONlDEOS6IERTALASALSARESTANTESOBRELOSlDEOSYCUBRACONLAÐ
taza de queso mozzarella y la ¼ taza de queso parmesano restantes.
Coloque la placa para hornear alimentos de masa gruesa en la sección inferior de
la parrilla. Cierre la tapa.
Configure el tiempo de cocción a 20 minutos y la temperatura a 375º F. Configure
ELCRONMETROENMINUTOS#ONlGURELATEMPERATURAA&(ORNEEHASTAQUE
la lasaña esté caliente y el queso esté derretido y dorado.
Con la ayuda de agarraderas, retire la placa para hornear de la parrilla y
colóquela sobre una superficie resistente al calor. Permita descansar 5 minutos
antes de servir.
Rinde 6 a 8 porciones.
38

CHURRASCO
1 cdta. mezcla de sazón Adobo
1 cdta. cebolla seca finamente picada
½ cdta. escamas de pimienta seca
½ cdta. pimiento con ajo
1½ lb. bistec de falda de res
En un tazón pequeño, combine los condimentos. Rocíe uniformemente en ambos
lados del bistec. Refrigérelo mientras se precalienta la parrilla.
Ajuste la parrilla al nivel 12 y cocine de 6 a 8 minutos al punto deseado.
Corte en tiras para servir.
Rinde 2 porciones.
SÁNDWICH ASADO DE JAMÓN CON PIÑA
¼ taza conserva de piña
¼ taza melocotones enlatados, picados
1 cda. jengibre caramelizado, picado finamente
4 rebanadas pan de masa agria
4 oz. jamón, en tajadas finas
4 oz. queso brie, tajado
2 cdas. mantequilla derretida
En un tazón pequeño, combine la conserva, el melocotón y jengibre; ponga
aparte. Unte la mantequilla derretida en un lado de cada rebanada de pan.
Coloque 2 rebanadas de pan con el lado untado de mantequilla hacia abajo sobre
la tabla de cortar, y úntelas con la mezcla de piña. Cubra cada rebanada con el
jamón y el queso. Cubra con las rebanadas de pan restantes, con el lado untado
de mantequilla hacia arriba.
Coloque sobre la parrilla precalentada (ajuste al nivel 4) y cierre la tapa. Cocine
durante 3 minutos o hasta que doren y el queso se haya ablandado.
Rinde 2 sándwiches.

ENROLLADO DE PAVO CON SALSA
¼ taza salsa envasada
1 cda. cebolla morada, picada finamente
1 cda. cilantro picado
2 tortillas de harina con sabor a tomate
4 oz. pavo en tajadas
4 oz. queso tipo Monterey Jack con chile jalapeño
En un tazón pequeño, combine la salsa, la cebolla y el cilantro; ponga aparte.
Coloque las envolturas sobre la tabla de cortar y unte la mezcla de salsa en el
centro. Cubra cada una con el pavo y el queso. Enróllelas y colóquelas con la
orilla hacia abajo sobre la parrilla precalentada (ajuste al nivel 4) y cierre la tapa.
Cocine durante 3 minutos o hasta que el sándwich esté dorado y el queso se haya
derretido.
Rinde 2 sándwiches.
40

NEED HELP?
For service, repair or any questions regarding your appliance, call the appropriate 800
NUMBERONCOVEROFTHISBOOK0LEASE$/./4RETURNTHEPRODUCTTOTHEPLACEOFPURCHASE
!LSOPLEASE$/./4MAILPRODUCTBACKTOMANUFACTURERNORBRINGITTOASERVICECENTER
9OUMAYALSOWANTTOCONSULTTHEWEBSITELISTEDONTHECOVEROFTHISMANUAL
Two-Year Limited Warranty
(Applies only in the United States and Canada)
What does it cover?
s !NYDEFECTINMATERIALORWORKMANSHIPPROVIDEDHOWEVER!PPLICASLIABILITYWILLNOT
exceed the purchase price of product.
For how long?
s 4WOYEARSAFTERTHEDATEOFORIGINALPURCHASE
What will we do to help you?
s 0ROVIDEYOUWITHAREASONABLYSIMILARREPLACEMENTPRODUCTTHATISEITHERNEW
or factory refurbished.
How do you get service?
s 3AVEYOURRECEIPTASPROOFOFDATEOFSALE
s #HECKOURONLINESERVICESITEATWWWPRODPROTECTCOMAPPLICAORCALLOUR
TOLLFREENUMBERFORGENERALWARRANTYSERVICE
s )FYOUNEEDPARTSORACCESSORIESPLEASECALL
What does your warranty not cover?
s $AMAGEFROMCOMMERCIALUSE
s $AMAGEFROMMISUSEABUSEORNEGLECT
s 0RODUCTSTHATHAVEBEENMODIFIEDINANYWAY
s 0RODUCTSUSEDORSERVICEDOUTSIDETHECOUNTRYOFPURCHASE
s 'LASSPARTSANDOTHERACCESSORYITEMSTHATAREPACKEDWITHTHEUNIT
s 3HIPPINGANDHANDLINGCOSTSASSOCIATEDWITHTHEREPLACEMENTOFTHEUNIT
s #ONSEQUENTIALORINCIDENTALDAMAGES0LEASENOTEHOWEVERTHATSOMESTATESDO
not allow the exclusion or limitation of consequential or incidental damages, so this
limitation may not apply to you.)
How does state law relate to this warranty?
s 4HISWARRANTYGIVESYOUSPECIFICLEGALRIGHTSANDYOUMAYALSOHAVEOTHERRIGHTSTHAT
vary from state to state or province to province.
41

42
¿NECESITA AYUDA?
Para servicio, reparaciones o preguntas relacionadas al producto, por favor llame gratis
ALN¢MEROhvQUEAPARECEENLACUBIERTADEESTEMANUAL.ODEVUELVAELPRODUCTOAL
ESTABLECIMIENTODECOMPRA.OENV¤EELPRODUCTOPORCORREOALFABRICANTENILOLLEVEAUN
centro de servicio. También puede consultar el sitio web que aparece en la cubierta de
este manual.
Dos años de garantía limitada
(Aplica solamente en Estados Unidos o Canadá)
¿Qué cubre la garantía?
s ,AGARANT¤ACUBRECUALQUIERDEFECTODEMATERIALESODEMANODEOBRA!PPLICANOSE
responsabiliza por ningún costo que exceda el valor de compra del producto.
¿Por cuánto tiempo es válida la garantía?
s 0ORDOSA®OSAPARTIRDELAFECHAORIGINALDECOMPRA
¿Qué clase de asistencia recibe el consumidor?
s %LCONSUMIDORRECIBEUNPRODUCTODEREEMPLAZONUEVOORESTAURADODEFÖBRICA
parecido al original.
¿Cómo se obtiene el servicio necesario?
s #ONSERVEELRECIBOORIGINALCOMOCOMPROBANTEDELAFECHADECOMPRA
s 3EPUEDEVISITARELSITIOWEBDEASISTENCIAALCONSUMIDOR
www.prodprotect.com/applica, o se puede llamar gratis al número
PARAOBTENERINFORMACINRELACIONADAALSERVICIODEGARANT¤A
s 3INECESITAPIEZASOACCESORIOSPORFAVORLLAMEGRATISAL
¿Qué aspectos no cubre esta garantía?
s ,OSDA®OSALPRODUCTOOCASIONADOSPORELUSOCOMERCIAL
s ,OSDA®OSOCASIONADOSPORELMALUSOABUSOONEGLIGENCIA
s ,OSPRODUCTOSQUEHANSIDOALTERADOSDECUALQUIERMANERA
s ,OSPRODUCTOSUTILIZADOSOREPARADOSFUERADELPA¤SORIGINALDECOMPRA
s ,ASPIEZASDEVIDRIOYDEMÖSACCESORIOSEMPACADOSCONELAPARATO
s ,OSGASTOSDETRAMITACINYEMBARQUERELACIONADOSCONELREEMPLAZODELPRODUCTO
s ,OSDA®OSYPERJUICIOSINDIRECTOSOINCIDENTALESSINEMBARGOPORFAVOROBSERVEQUE
algunos estados no permiten la exclusión ni la limitación de los daños y perjuicios
indirectos ni incidentales, de manera que esta restricción podría no aplicar a usted).
¿Qué relación tiene la ley estatal con esta garantía?
s %STAGARANT¤ALEOTORGADERECHOSLEGALESESPEC¤FICOSYELCONSUMIDORPODR¤ATENER
otros derechos que varían de una región a otra.

Copyright © 2013 Applica Consumer Products, Inc.
-ADEIN0EOPLES2EPUBLICOF#HINA
0RINTEDIN0EOPLES2EPUBLICOF#HINA
Fabricado en la República Popular de China
Impreso en la República Popular de China
2013/5/13/87