
Poly Studio V52 User Guide
SUMMARY
This guide provides administrators with information about configuring, maintaining, and troubleshooting the
featured product.

Legal information
Copyright and license
© 2024, 2024, HP Development Company,
L.P. The information contained herein is
subject to change without notice. The only
warranties for HP products and services are
set forth in the express warranty statements
accompanying such products and services.
Nothing herein should be construed as
constituting an additional warranty. HP shall
not be liable for technical or editorial errors
or omissions contained herein.
Trademark credits
All third-party trademarks are the property of
their respective owners.
Privacy policy
HP complies with applicable data privacy
and protection laws and regulations. HP
products and services process customer
data in a manner consistent with the HP
Privacy Policy. Please refer to HP Privacy
Statement.
Open source software used in this product
This product contains open source software.
You may receive the open source software
from HP up to three (3) years after the
distribution date of the applicable product
or software at a charge not greater than
the cost to HP of shipping or distributing
the software to you. To receive software
information, as well as the open source
software code used in this product, contact
HP by email at ipgoopensourceinf[email protected].

Table of contents
1 Getting Started....................................................................................................................................................................................................................................... 1
Poly Studio V52 Features and Capabilities................................................................................................................................................................. 1
Poly Studio V52 Hardware....................................................................................................................................................................................................... 1
Poly Studio V52 System Ports.................................................................................................................................................................................. 2
Poly Studio V52 Privacy Cover................................................................................................................................................................................. 2
Setting up the Studio V52....................................................................................................................................................................................................... 3
Setting Up the System ................................................................................................................................................................................................... 3
Set Up Your Studio V52 ...................................................................................................................................................................................... 3
Powering the System On and Off ..........................................................................................................................................................................3
Navigating the System ............................................................................................................................................................................................................. 4
Access the System Web Interface ....................................................................................................................................................................... 4
Locate the system IP address using a monitor ................................................................................................................................ 4
Change Administrator Credentials .................................................................................................................................................................................4
LED Status Indicators for the Studio V52 System.....................................................................................................................................5
2 Troubleshooting ...................................................................................................................................................................................................................................6
Studio V52 Doesn't Receive an IP Address When Connected to a Netgear Smart Switch 1G Port................................. 6
3 Getting help..............................................................................................................................................................................................................................................7
HP Inc. addresses..........................................................................................................................................................................................................................7
Document information...............................................................................................................................................................................................................7
iii

Getting Started1
The Poly Studio V52 systems provide a premium USB video bar with advanced features for the most
immersive hybrid meetings in medium rooms.
Poly Studio V52 Features and Capabilities
Studio V52 systems support the following features:
● A premium USB video bar with advanced features for the most immersive hybrid meetings in
medium rooms
● Sharp 4K, 20MP camera with 95-degree horizontal field of view
● Camera tracking technology that automatically frames the group of people in the room
● Hi-fidelity, built-in stereo microphones that pick up sound within 7.62 m (25 ft) and use spatial audio
for life-like presence and clarity
● Poly NoiseBlockAI, which eliminates background and extraneous sound in common working
environments
● Dual stereo speakers
● Simple to set up, manage, and use with Poly Lens
Poly Studio V52 Mounting Orientation
You can mount the Studio V52 above or below a display. The Studio V52 doesn't support inverted
mounting. For information on mounting the Studio V52, see the
Poly Studio V52 Quick Start Guide
.
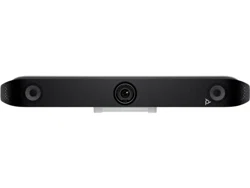
Poly Studio V52 Hardware
The following figure displays the hardware features on the Poly Studio V52 system. The table lists each
feature numbered in the figure.
Table 1-1
Poly Studio V52 Feature Descriptions
Ref. Number Feature Feature Description
1 Speaker Stereo audio output
Getting Started 1
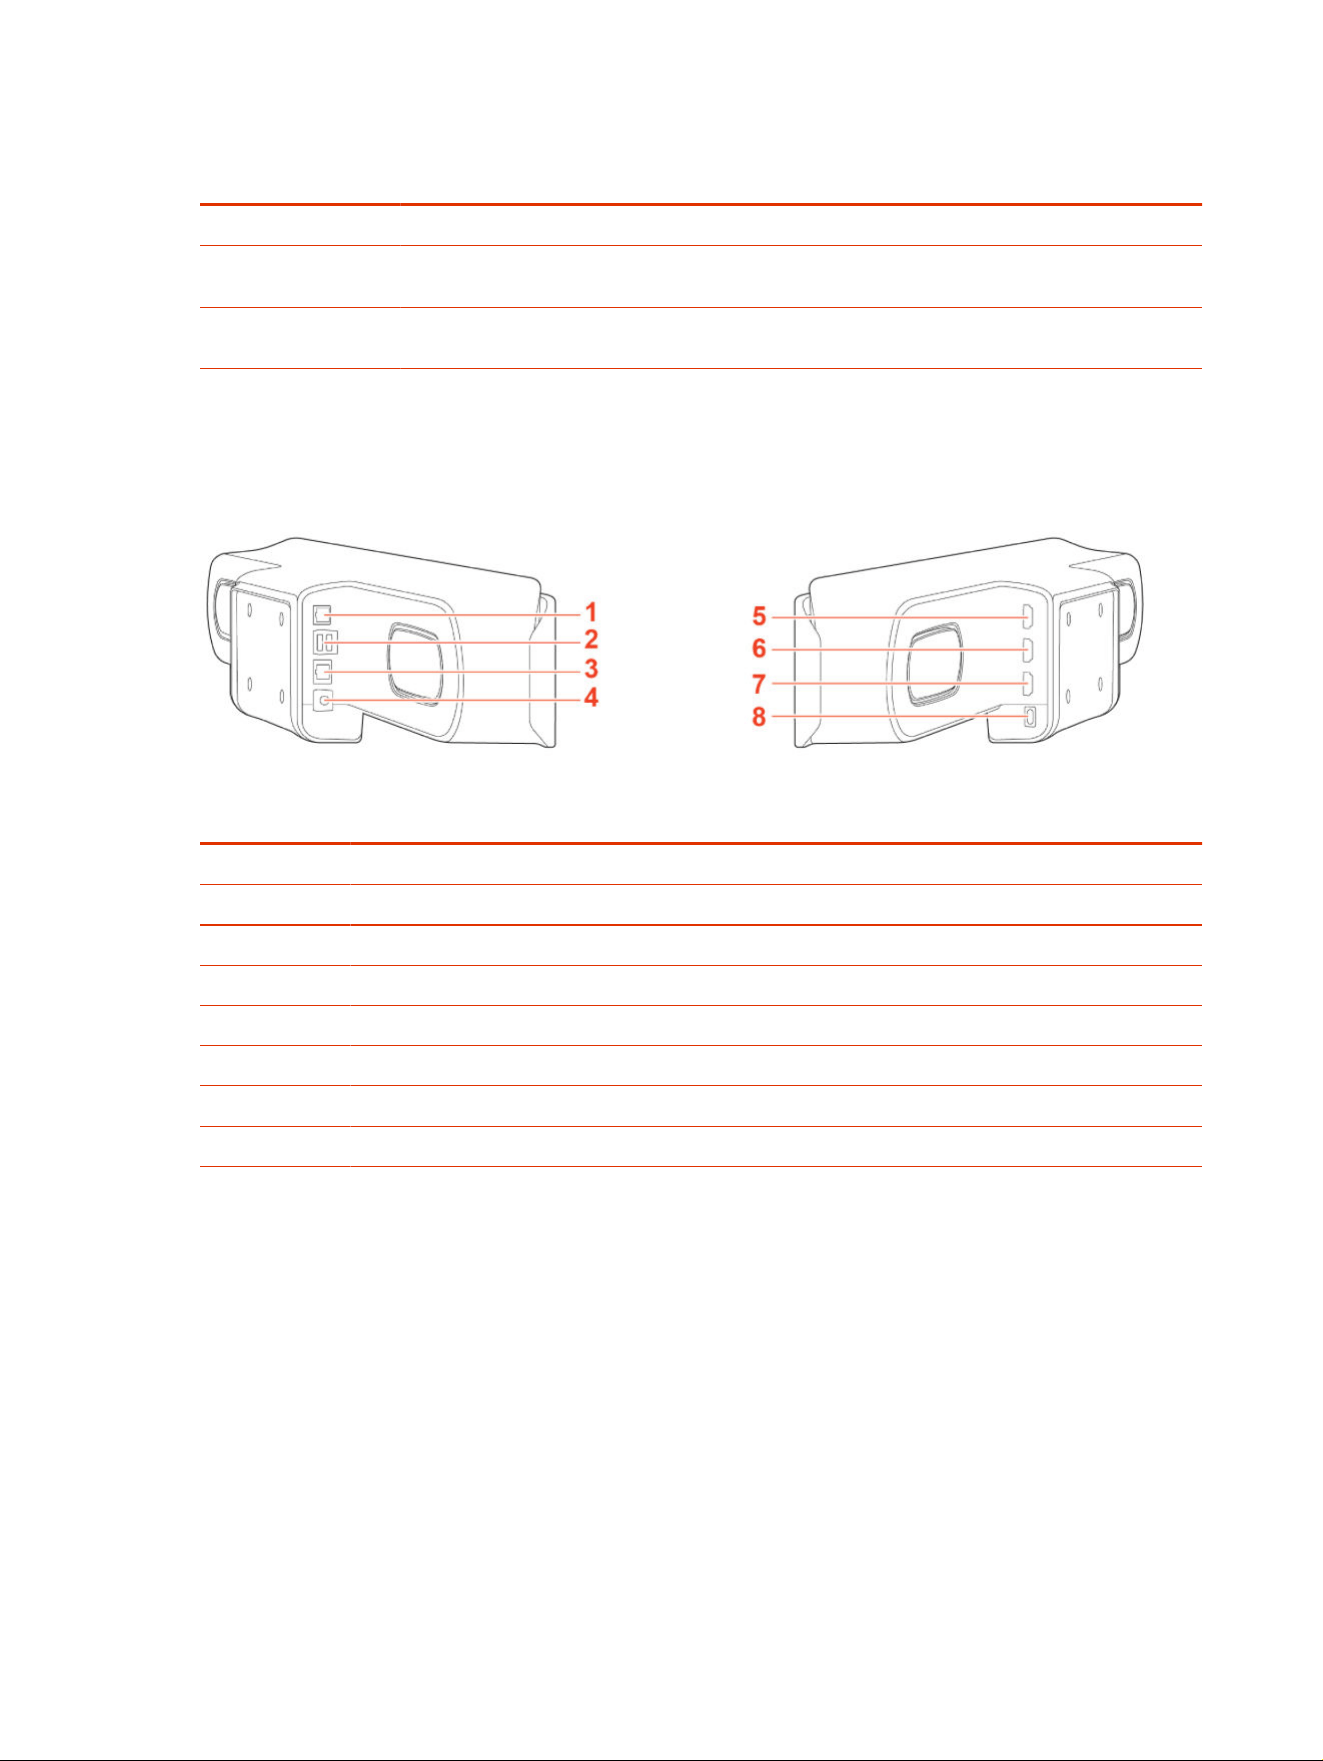
Table 1-1 Poly Studio V52 Feature Descriptions (continued)
Ref. Number Feature Feature Description
2 Microphone array Microphone array that captures audio
3 Camera Camera with a privacy cover that enables or disables the
video input as you choose
4 LED indicators Indicates the system status and information on the tracked
speaker
Poly Studio V52 System Ports
The following illustration and table explain the ports on your Poly Studio V52 system.
Table 1-2
Poly Studio V52 System Port Descriptions
Ref. Number Port Description
1 RJ-11 port for external microphone
2 USB-A port. Disabled by default, but configurable to enable.
3 RJ45 Ethernet port
4 Power port
5 HDMI output port 2
6 HDMI output port 1
7 Disabled
8 USB-C port
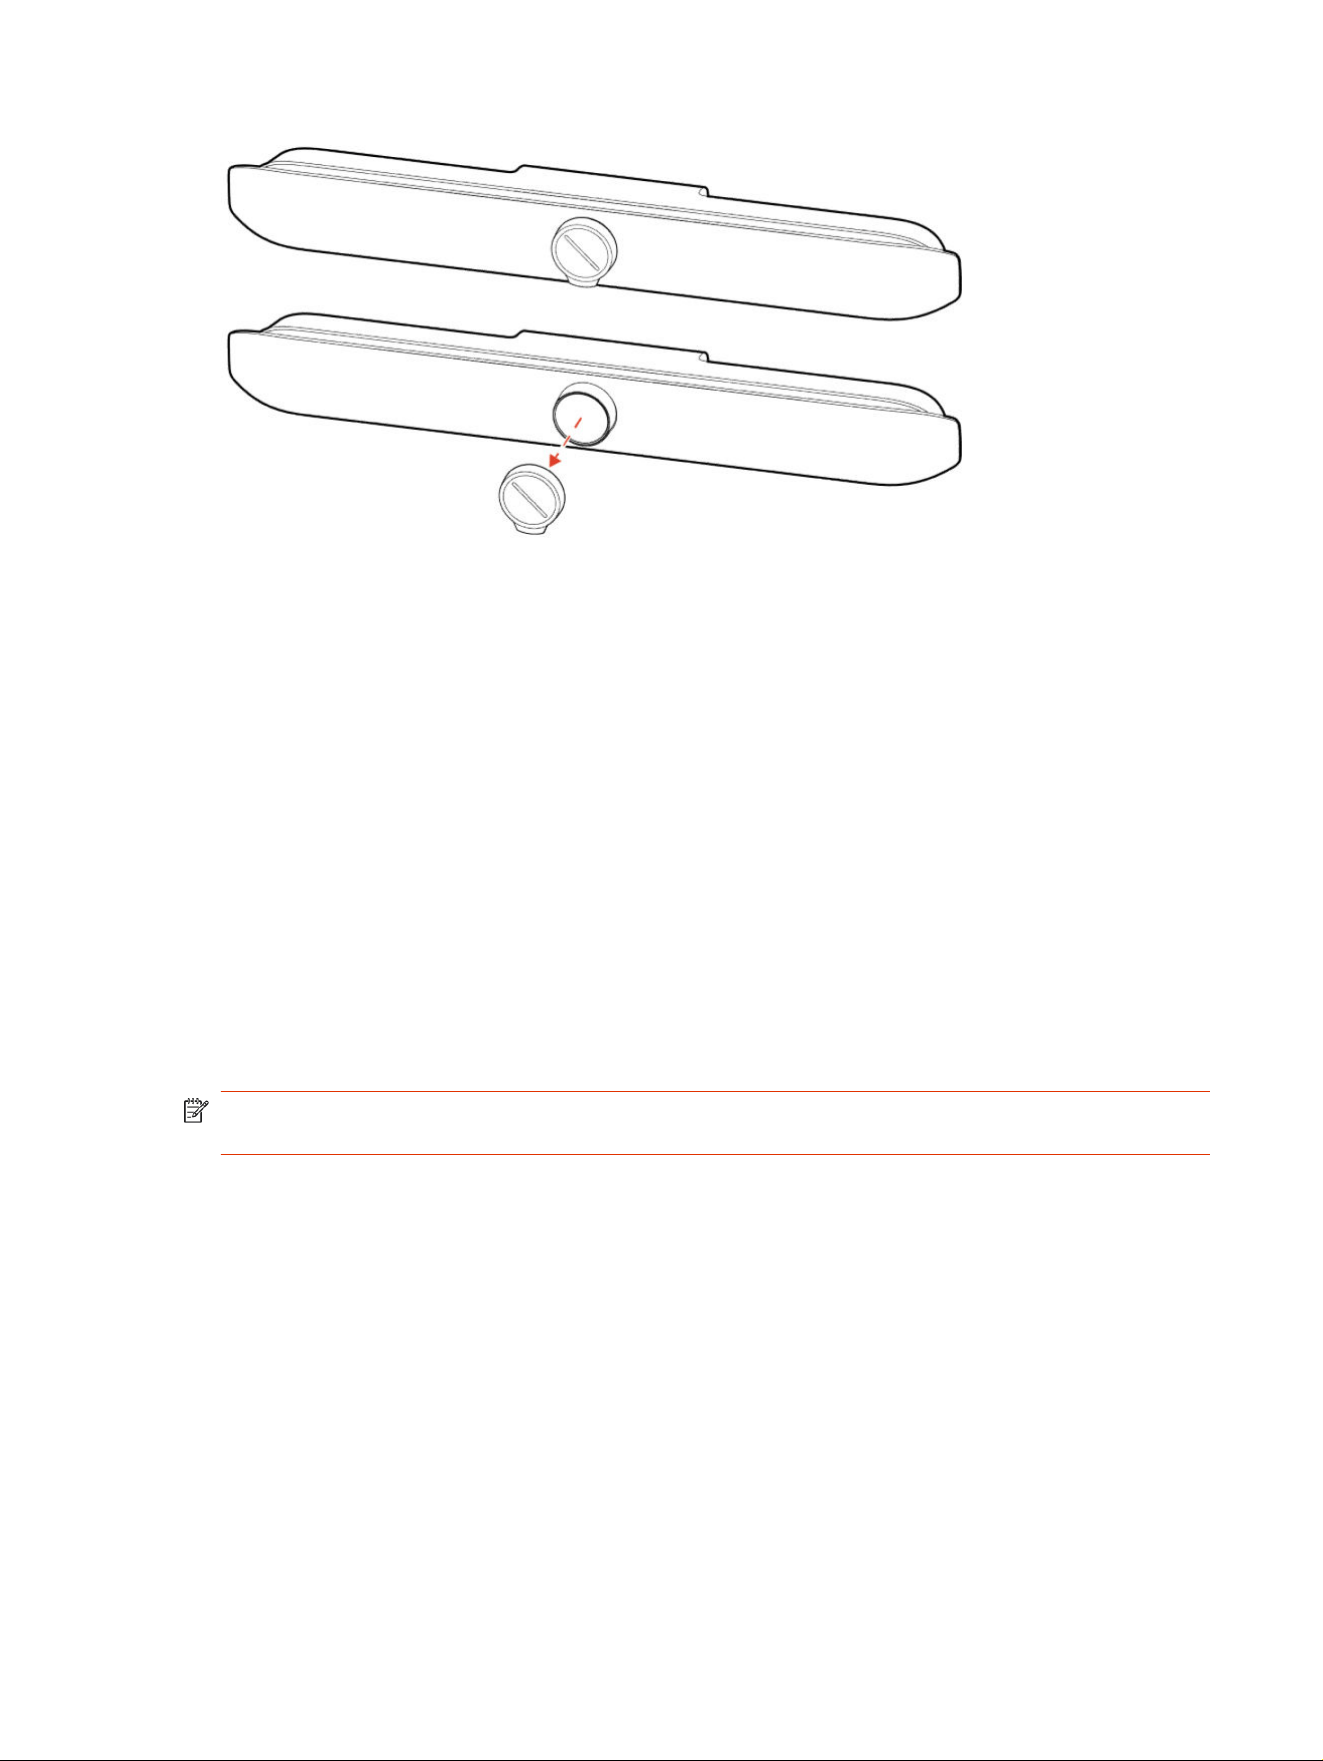
Poly Studio V52 Privacy Cover
The Poly Studio V52 system provides a physical cover that you can place over the camera lens to protect
your privacy.
2
Chapter 1 Getting Started
Setting up the Studio V52
The Studio V52 includes a 1.83m (6ft) HDMI cable, a 4.57m (15ft) LAN cable, and a USB-C cable to connect
your computer to the Studio V52.
Connect all cables before powering on the system.
You can use your Studio V52 as an external video device on your computer or connect it to a
conferencing system that supports USB cameras.
Setting Up the System
See the setup sheets applicable to your system and its peripheral devices, including cameras, monitors,
microphones, and controllers.
Set Up Your Studio V52
You can connect your Studio V52 to your computer only using the supplied USB cable. You can also
connect Studio V52 to your network and to an external monitor.
NOTE: Before powering on your system, connect the system to your network and connect an optional
monitor.
1. Connect the supplied USB cable from the USB-C port on the Studio V52 to your computer.
2. Optional: To view your system IP address, connect a monitor to an HDMI output port of your Poly
Studio V52 using the supplied HDMI cable.
3. Optional: Connect the system Ethernet port to your network using the supplied Ethernet cable.
4. Plug the system in to a power source using the supplied power supply cable.
The system powers on when you plug it in to a power source. If you have a monitor connected to the
system, the system IP address displays on the monitor.
Powering the System On and Off
The system powers on when you plug it in to a power source.
Poly recommends the following when powering off or restarting your system:
Setting up the Studio V52
3

● Don’t restart or power off the system during maintenance activities (for example, while a software
update is in progress).
● If a system restart is necessary, use the system web interface, RestAPI, Telnet, or SSH. If possible,
avoid using the power cable to restart the system.
Navigating the System
You can navigate the system using the system web interface.
Access the System Web Interface
Access the system web interface to perform administrative tasks.
The system web interface enables you to do the following actions:
● Finish setting up your system.
● Remotely configure and manage your system. Unlike the local interface, you can configure every
setting through the system web interface. Local interface is intended only for the initial setup.
1. Open a web browser and enter the system IP address.
To view the system IP address, connect a monitor to an HDMI output port of your system. The
system IP address displays on the monitor.
2. Enter the username (the default is admin).
3. Enter the password (the default is the last six characters of your system’s serial number).
The password is case sensitive.
Locate the system IP address using a monitor
Connect your Poly Studio V52 to a monitor and the IP address for Ethernet displays by default.
● Connect a monitor to an HDMI output port of your Poly Studio V52 using the supplied HDMI cable.
The Poly Studio V52 IP address for the Ethernet displays on the monitor.
Change Administrator Credentials
You can change the administrator username and password to access the system web interface and
administrator sections of the local interface.
The default username is admin and the default password is the last six characters of the system’s serial
number.
1. In the system web interface, go to Security > Local Accounts.
2. Enter the new administrator username in the Admin ID field.
3. Select Change Password.
4. Enter the current password and then the new password.
Entering an incorrect current password too many times causes the system to automatically log out
and close the session.
4
Chapter 1 Getting Started

5. Select Save.
LED Status Indicators for the Studio V52 System
Use the LED on the right side of the system to help you understand the system's behaviors.
Table 1-3 Basic Studio V52 LED Indicators and Status
Indicator Status
Off System powered off
Solid white System is idle and standing by
Pulsing white Boot initiation in progress
Pulsing amber Firmware update or factor restore in progress
Blinking blue and white Bluetooth pairing with a remote control
Solid blue for 3 seconds Bluetooth paired with a remote control
Solid green Camera or microphone in use
Solid red Audio is muted
LED Status Indicators for the Studio V52 System 5

Troubleshooting2
Use the following topics to troubleshoot your system.
Studio V52 Doesn't Receive an IP Address When Connected to
a Netgear Smart Switch 1G Port
In some cases, connecting a Studio V52 to a Netgear Smart Switch 1G port may result in no IP address
received by the system.
If Power Back Off (PBO) is enabled on a Netgear 1G Smart Switch port, the Studio V52 will fail to connect
to the network. The PBO feature isn't supported on 1G ports and if enabled can cause this issue.
Connect the Studio V52 to a 2.5G port on the switch.
Once the system receives an IP address, setup continue. You don't need to manually restart the system.
6
Chapter 2 Troubleshooting

Getting help3
Poly is now a part of HP. The joining of Poly and HP will pave the way for us to create the hybrid work
experiences of the future.
During the merge of our two organizations, information about Poly products will transition from the Poly
Support site to the HP® Support site.
The Poly Documentation Library will continue to host the installation, configuration, and administration
guides for Poly products in HTML and PDF format. In addition, the Poly Documentation Library will
provide Poly customers with up-to-date status information about the transition of Poly content from the
Poly Support site to the HP® Support site.
HP Inc. addresses
HP US
HP Inc.
1501 Page Mill Road
Palo Alto 94304, U.S.A.
650-857-1501
HP Germany
HP Deutschland GmbH
HP HQ-TRE
71025 Boeblingen, Germany
HP UK
HP Inc UK Ltd
Regulatory Enquiries, Earley West
300 Thames Valley Park Drive
Reading, RG6 1PT
United Kingdom
Document information
Model ID: Poly Studio V52
Document part number: P01288-001
Last update: March 2024
Email us at documentation.feedback@hp.com with queries or suggestions related to this document.
Getting help
7
