Technical Support and E-Warranty Certificate www.vevor.com/support
Portable Dance Pole
MODEL:HM-594/HM-590
We continue to be committed to provide you tools with competitive price.
"Save Half", "Half Price" or any other similar expressions used by us only represents an
estimate of savings you might benefit from buying certain tools with us compared to the major
top brands and does not necessarily mean to cover all categories of tools offered by us. You
are kindly reminded to verify carefully when you are placing an order with us if you are
actually saving half in comparison with the top major brands.


- 1 -
MODEL: HM-594/HM-590
Have product questions? Need technical support? Please feel free to
contact us:
Technical Support and E-Warranty Certificate
www.vevor.com/support
NEED HELP? CONTACT US!
This is the original instruction, please read all manual instructions
carefully before operating. VEVOR reserves a clear interpretation of our
user manual. The appearance of the product shall be subject to the
product you received. Please forgive us that we won't inform you again if
there are any technology or software updates on our product.
Portable Dance Pole

- 2 -
Warning-To reduce the risk of injury, user must read instructions
manual carefully.
SAFETY WARNINGS AND PRECAUTIONS
Thank you for using this product. In order to make sure that you can
operate the machine correctly, read this instruction carefully before
operation and keep it properly for future reference. Please be sure to read
the precautions and safety rules in this page to ensure your safe use. This
manual will outline safety warnings and precautions, operating,
maintenance. The warnings and instructions reviewed in this manual
cannot cover all possible conditions and situations that may occur. Caution
and common sense are not built into this product, since we believe that the
uses will comply with these codes.
Please read ALL the instructions before using your machine.
1. Assemble needs to follow these instructions. Incorrect assembly can be
a hazard.
2. Do not assemble when tired or when under the influence of alcohol,
drugs or medication.
3.Weight and elastic and other product properties are only applicable to
correctly and completely assembled products.
4. Keep the assembly area clean and well-lit.
5. Keep bystanders out of the area during assembly.
6. This is a equipment, not a toy, it needs to be used under the guidance of
a professional. Do not allow children and pets to play alone or approach
this item.
7. Inspect before every use. Do not use it if parts are loose or damaged.
8 Do not apply this unit to any other purposes than the indicated usage.
9. Do not use it for commercial purposes.
10. Do not clean it with any abrasive material.
11. Never leave it unattended while in use.
12. Pet urine and feces can damage the product, please keep away.
13. Do not place the product on or near hot air, electric burners or heaters.
- 3 -
14. Young children should be supervised to ensure that they do not play
with the product. Pets should stay away from the product.
Do not use outdoors in rainy and cloudy days, avoid lightning strikes and
falls. People or pets hanging on the product will cause injury or death.
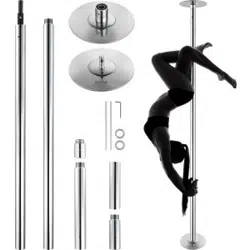
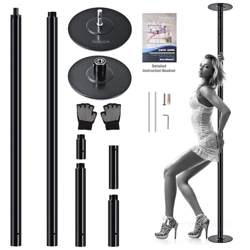
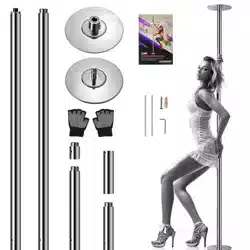
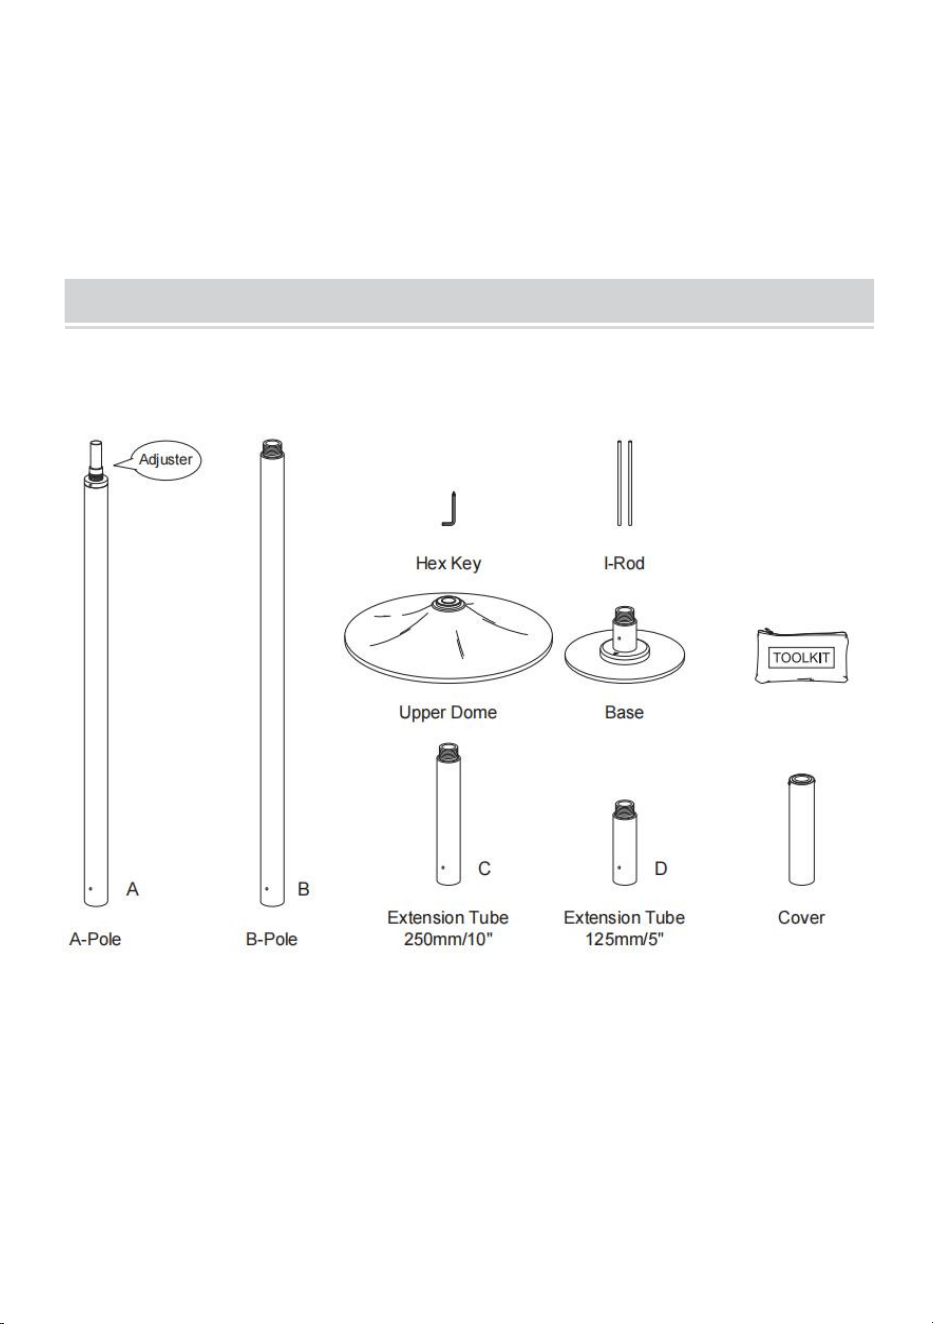
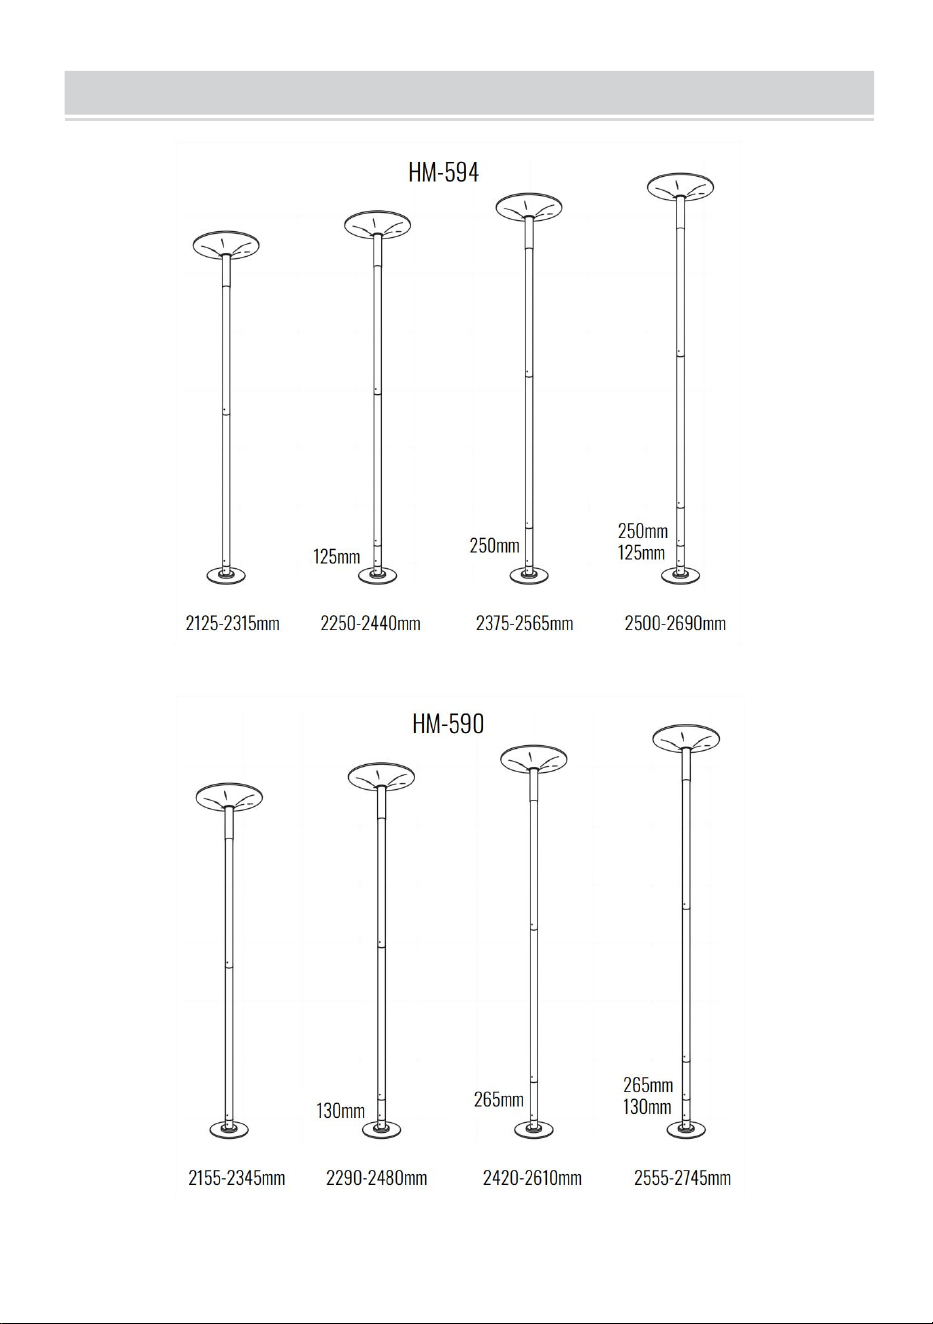
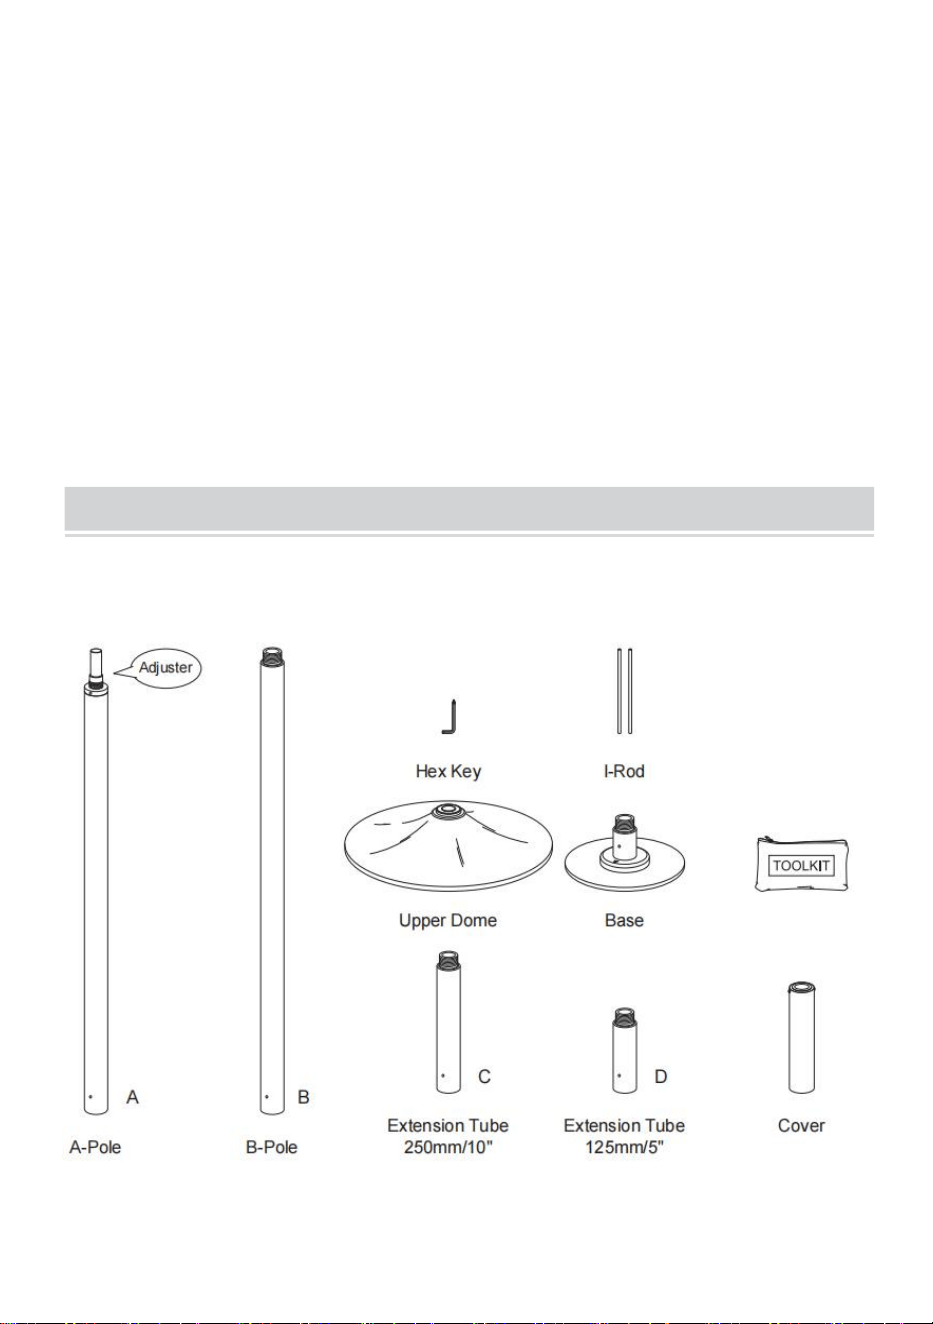
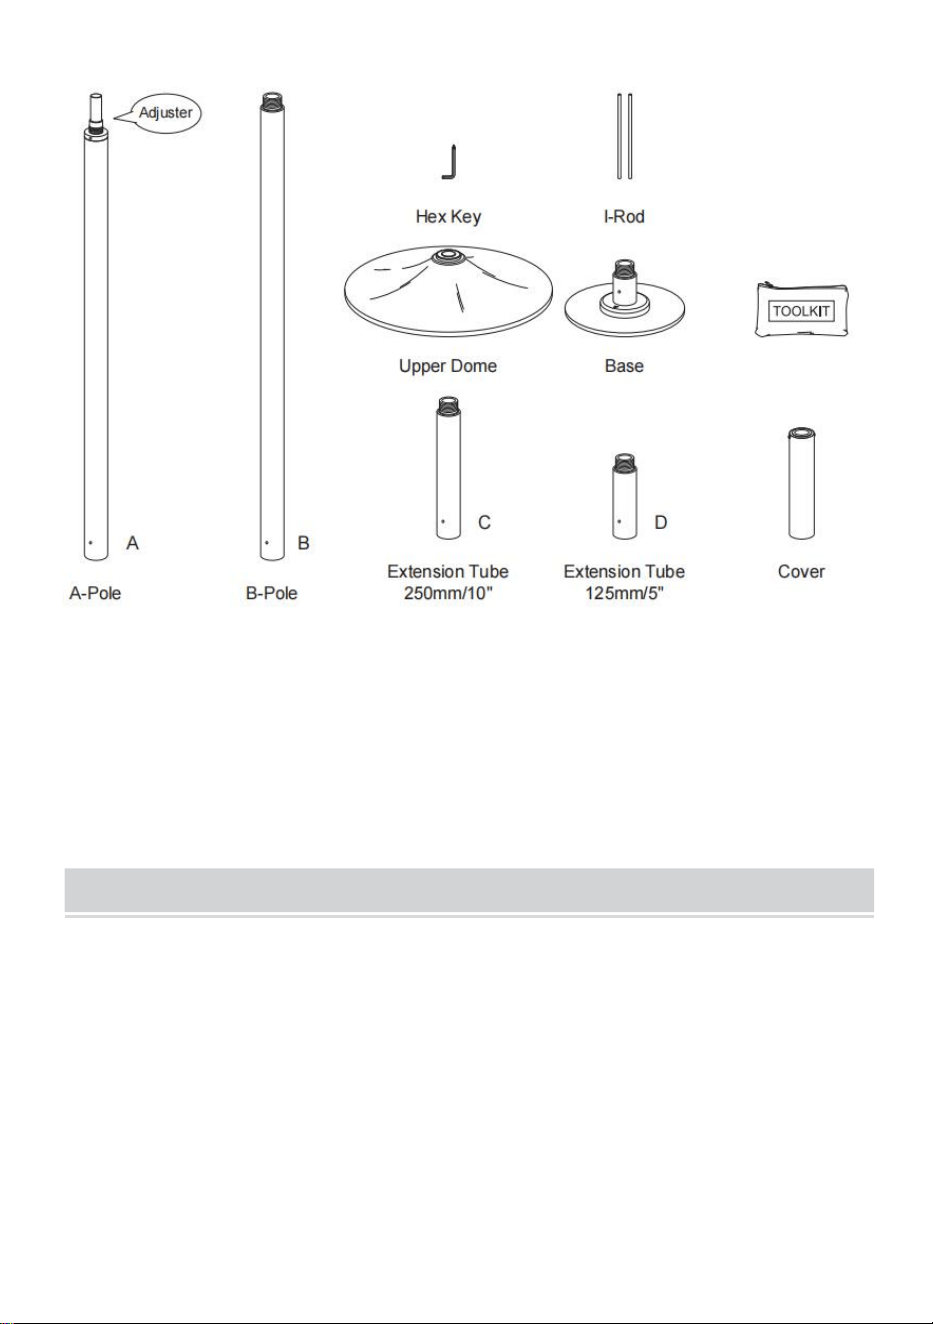
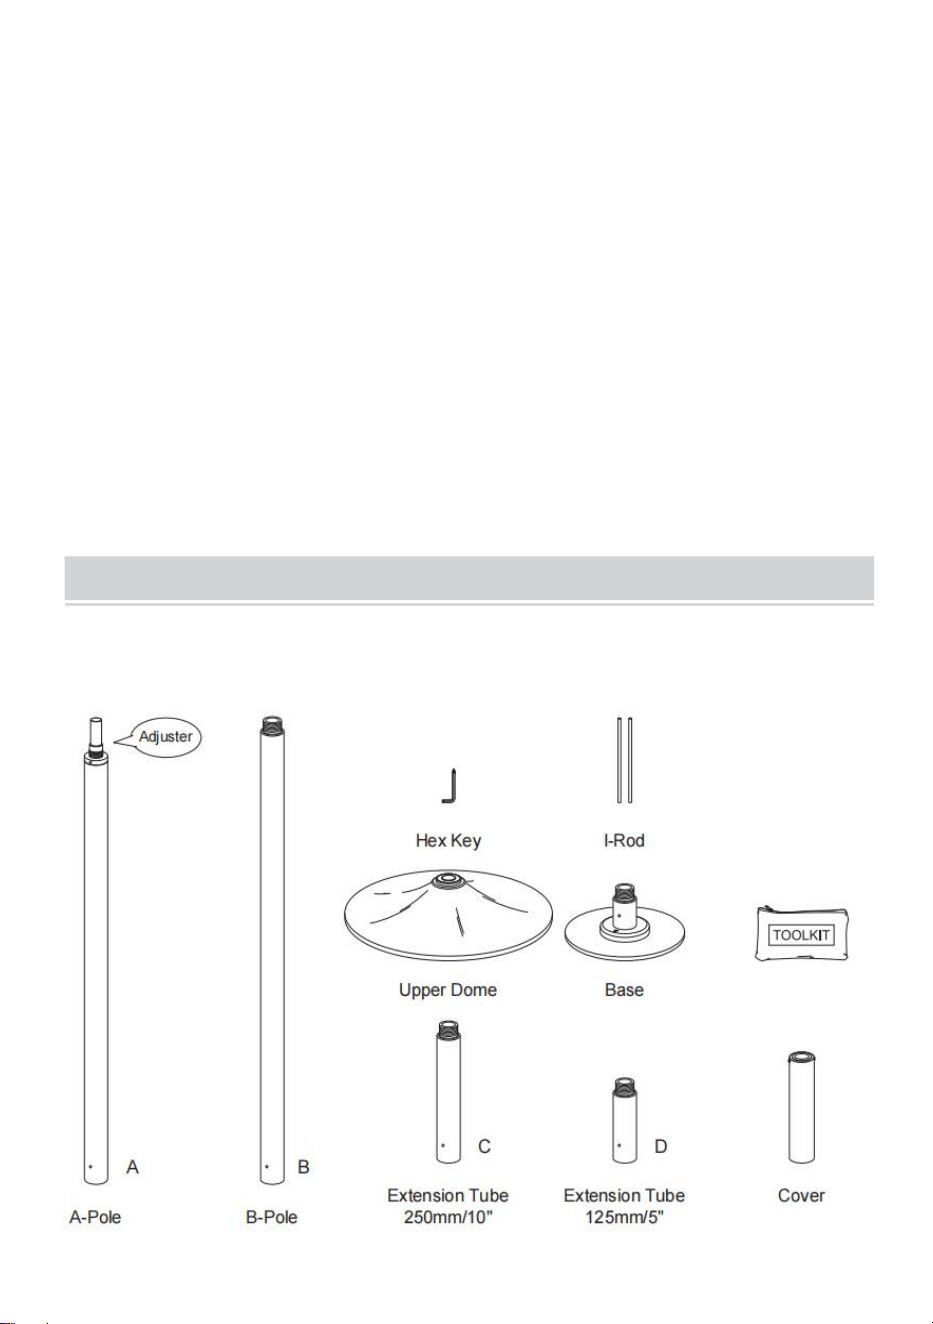
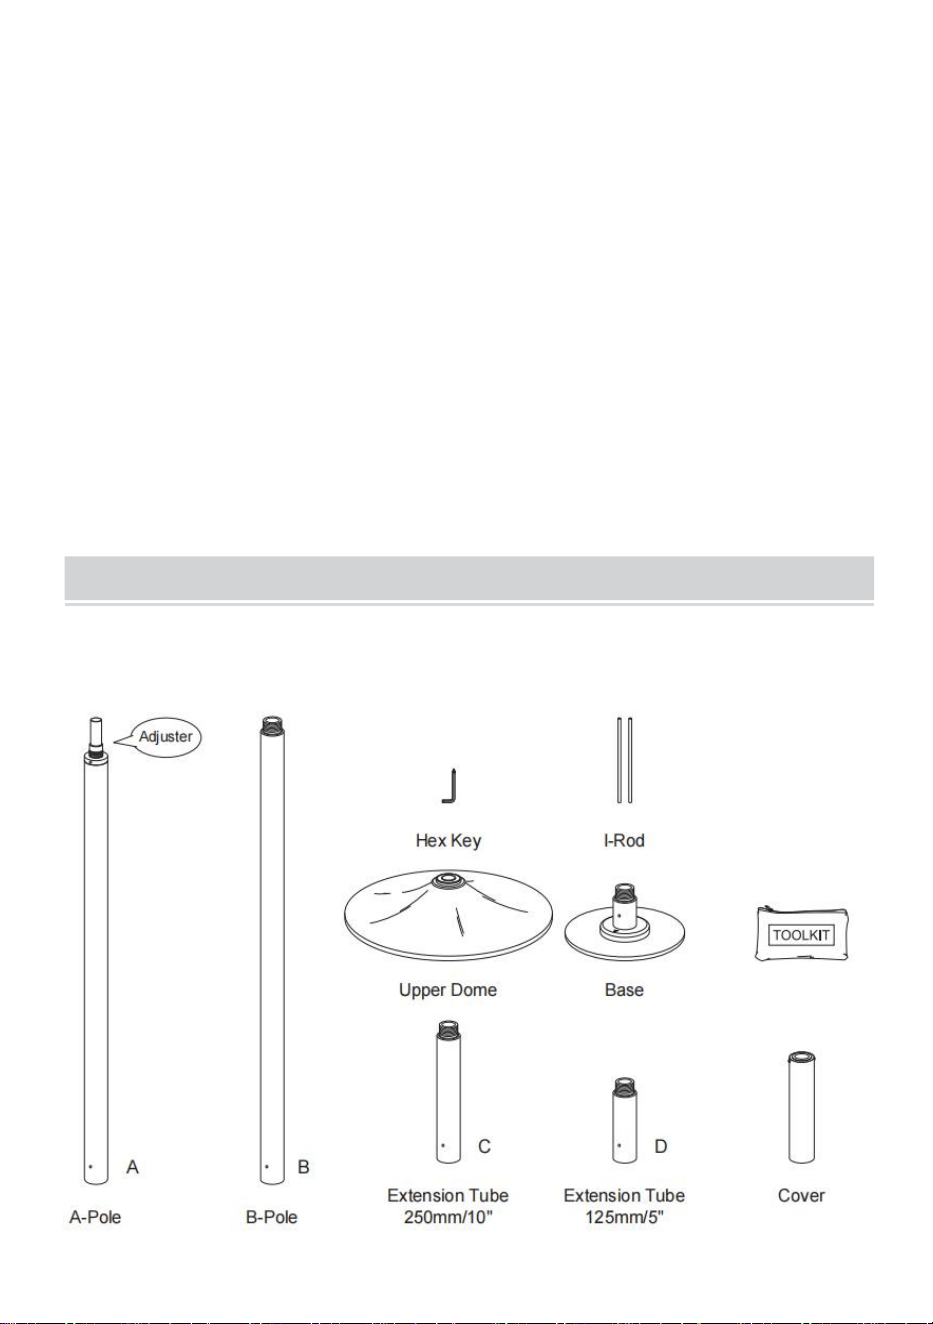
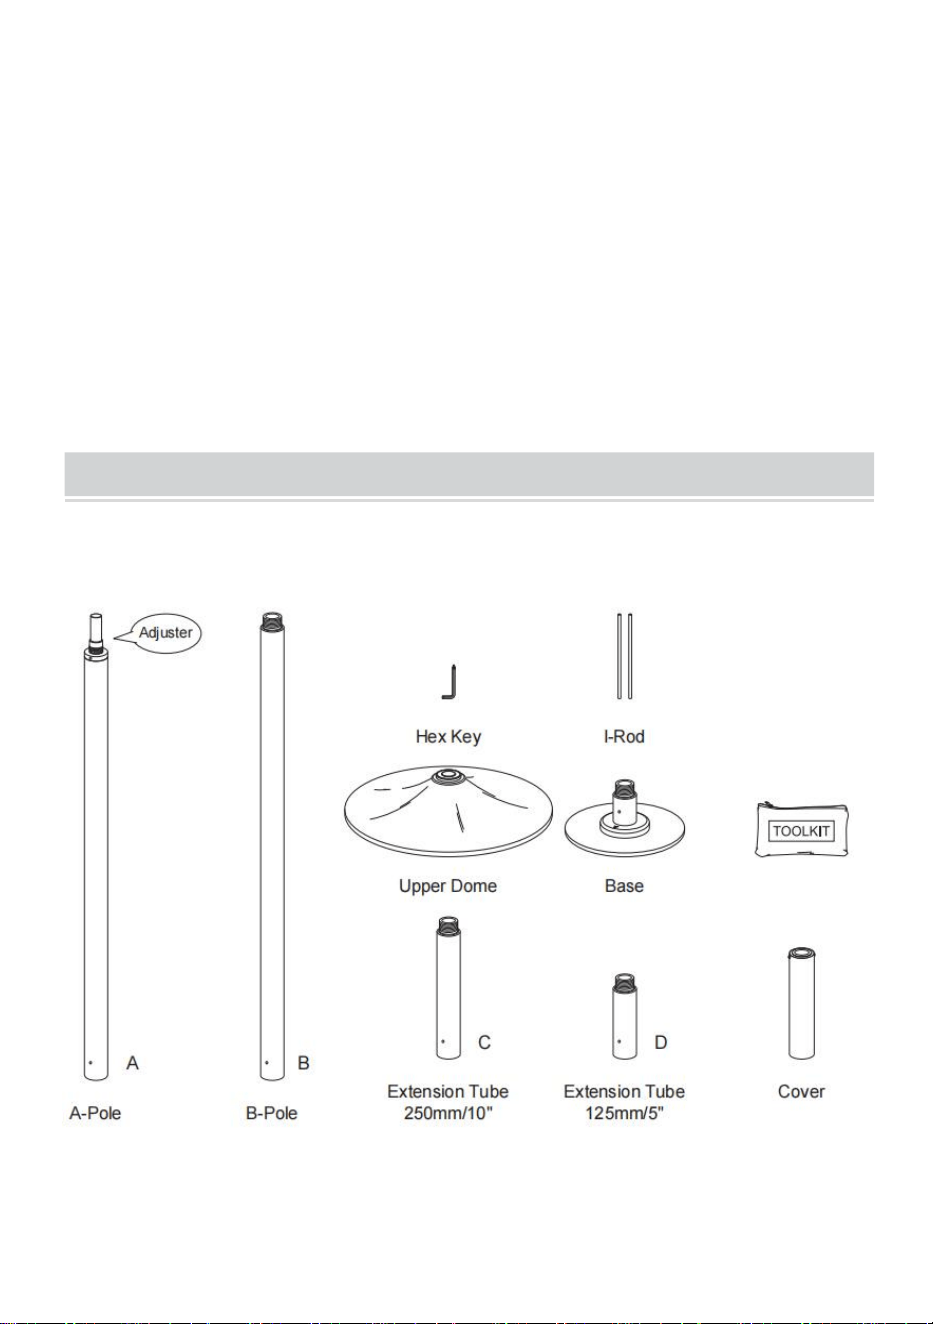
PARTS IDENTIFICATION
- 4 -
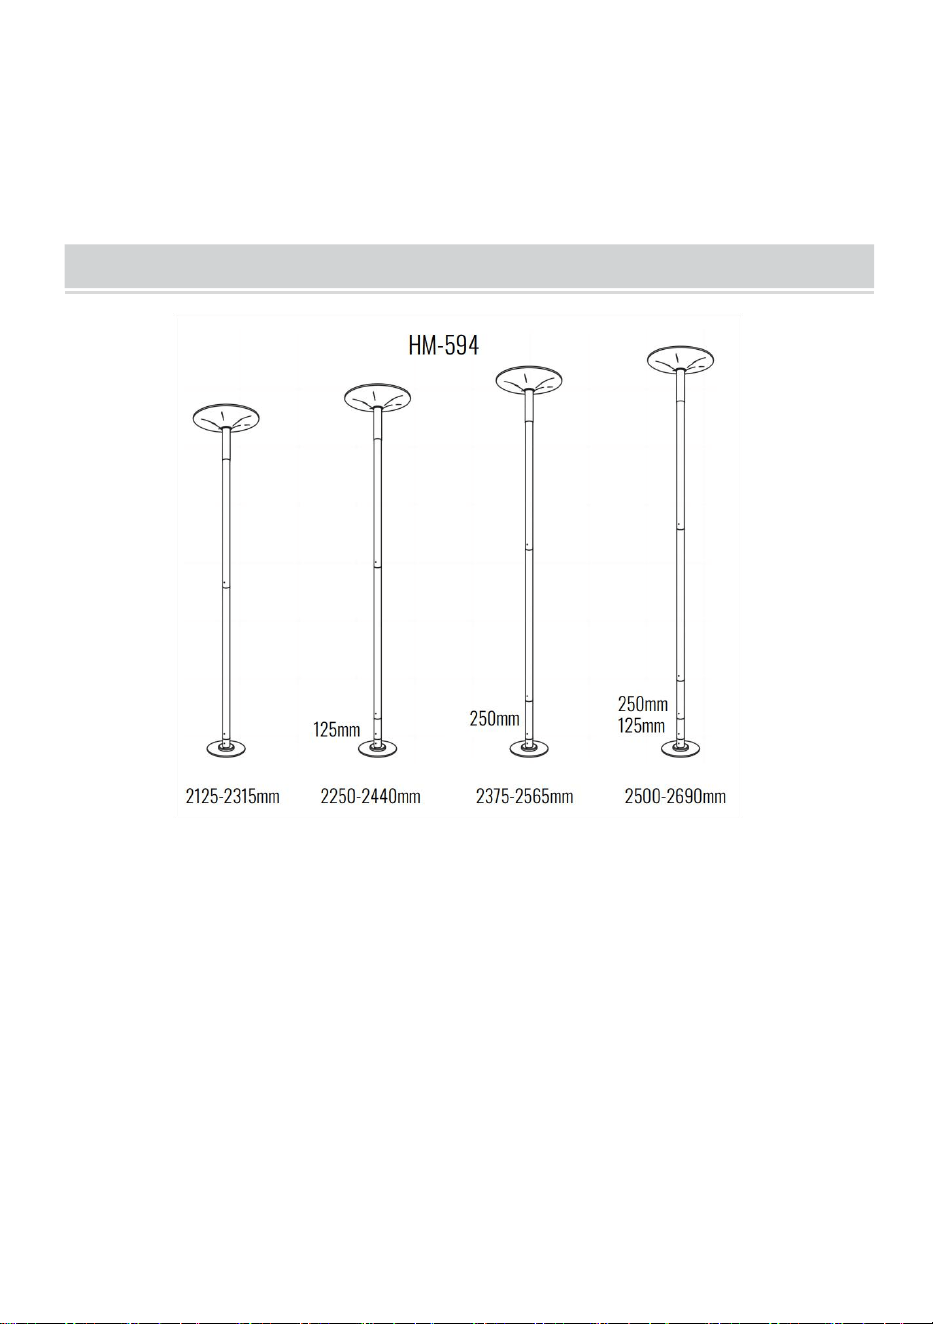
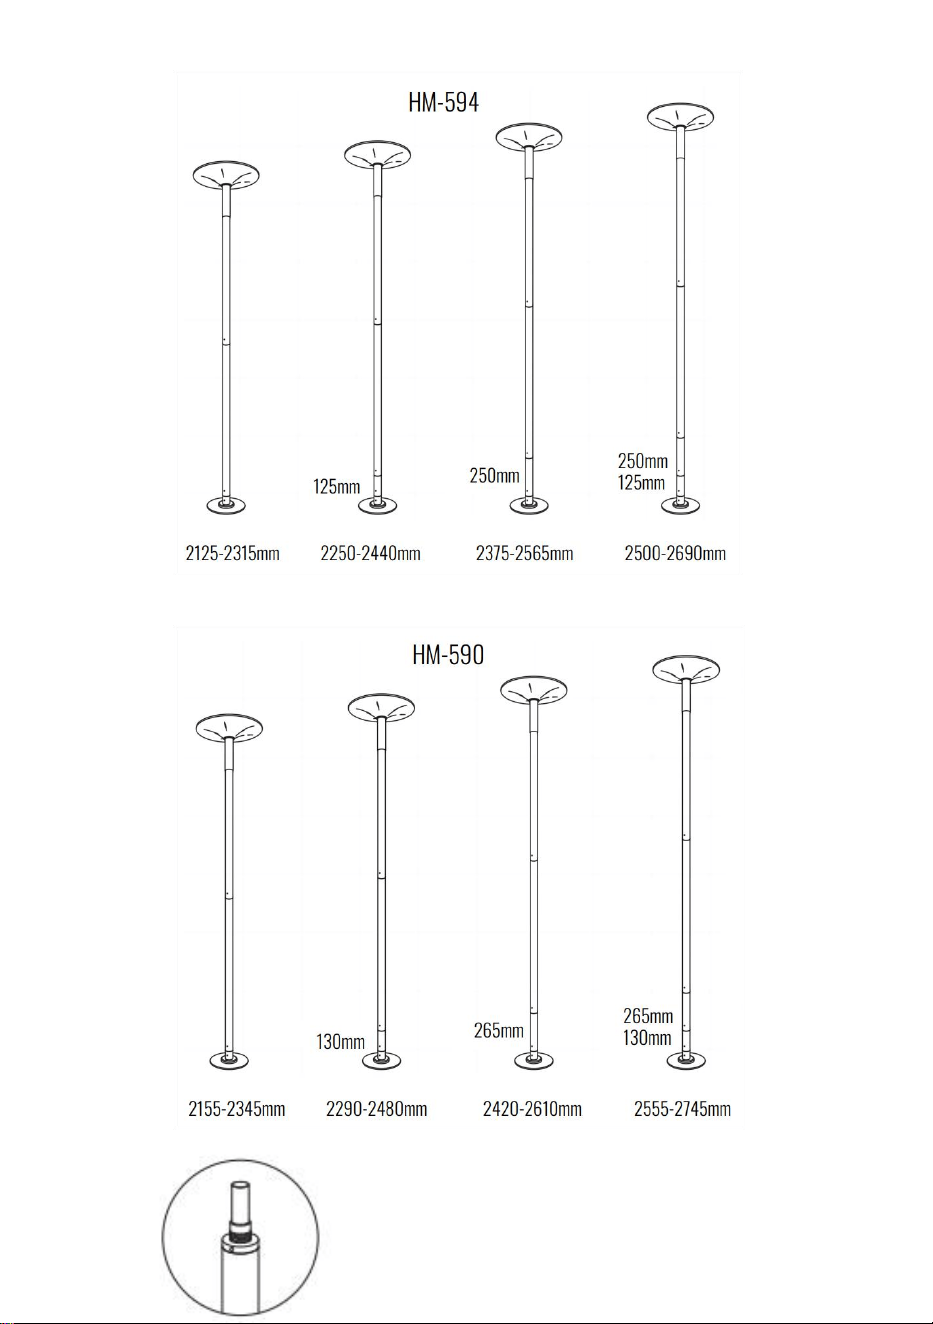
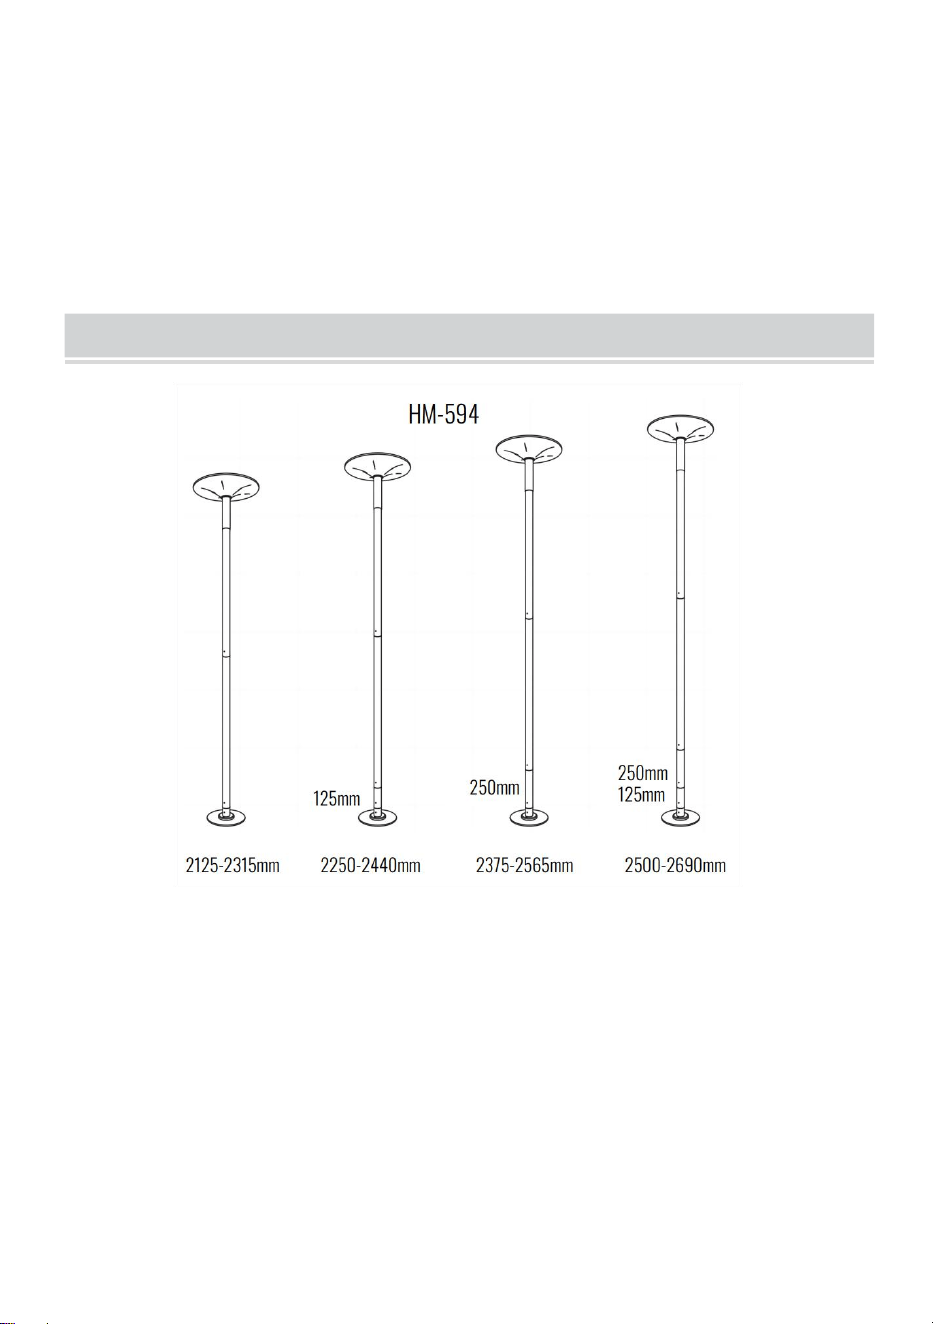
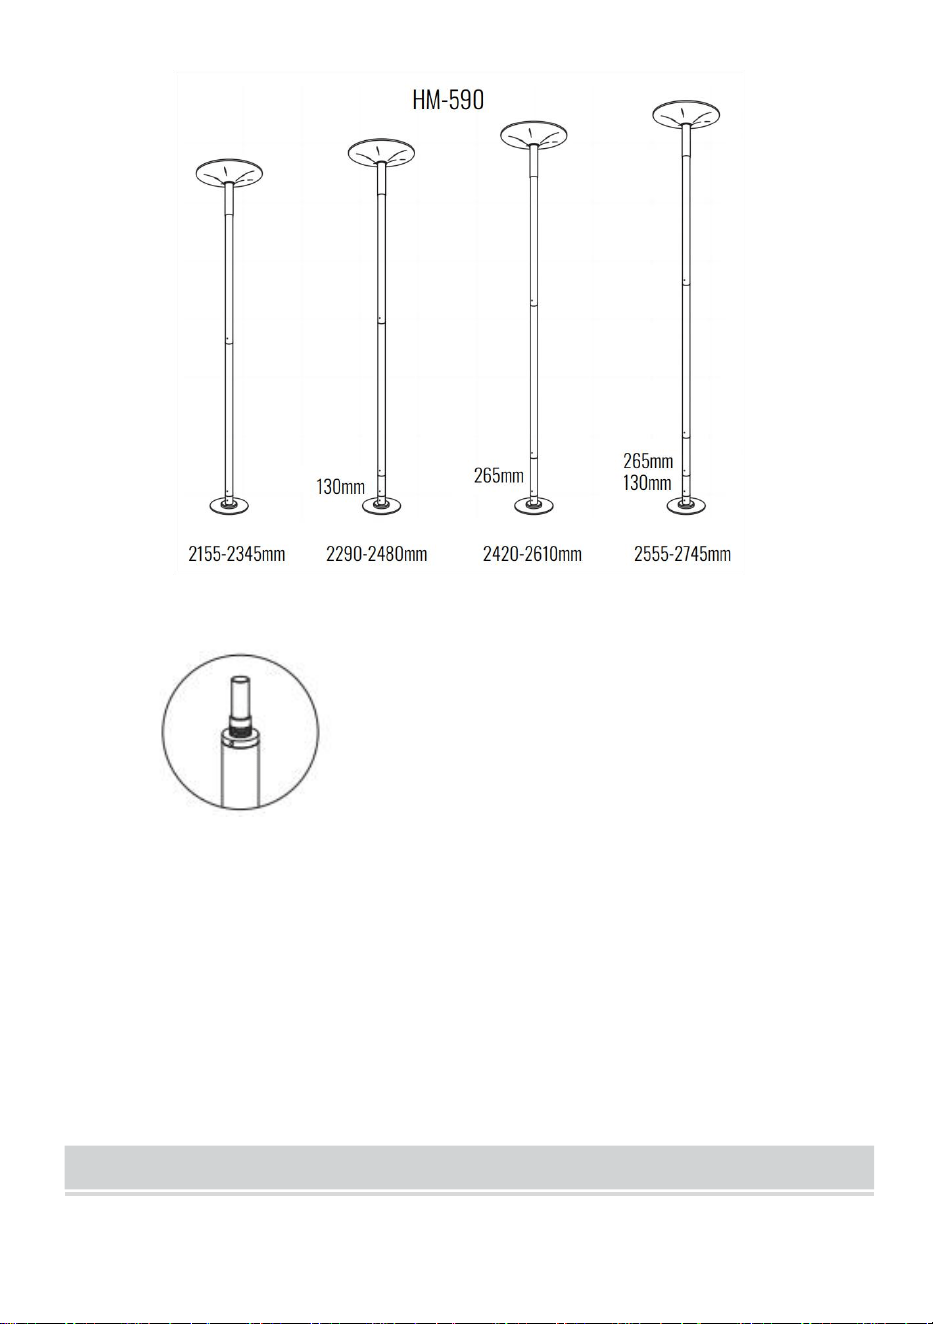
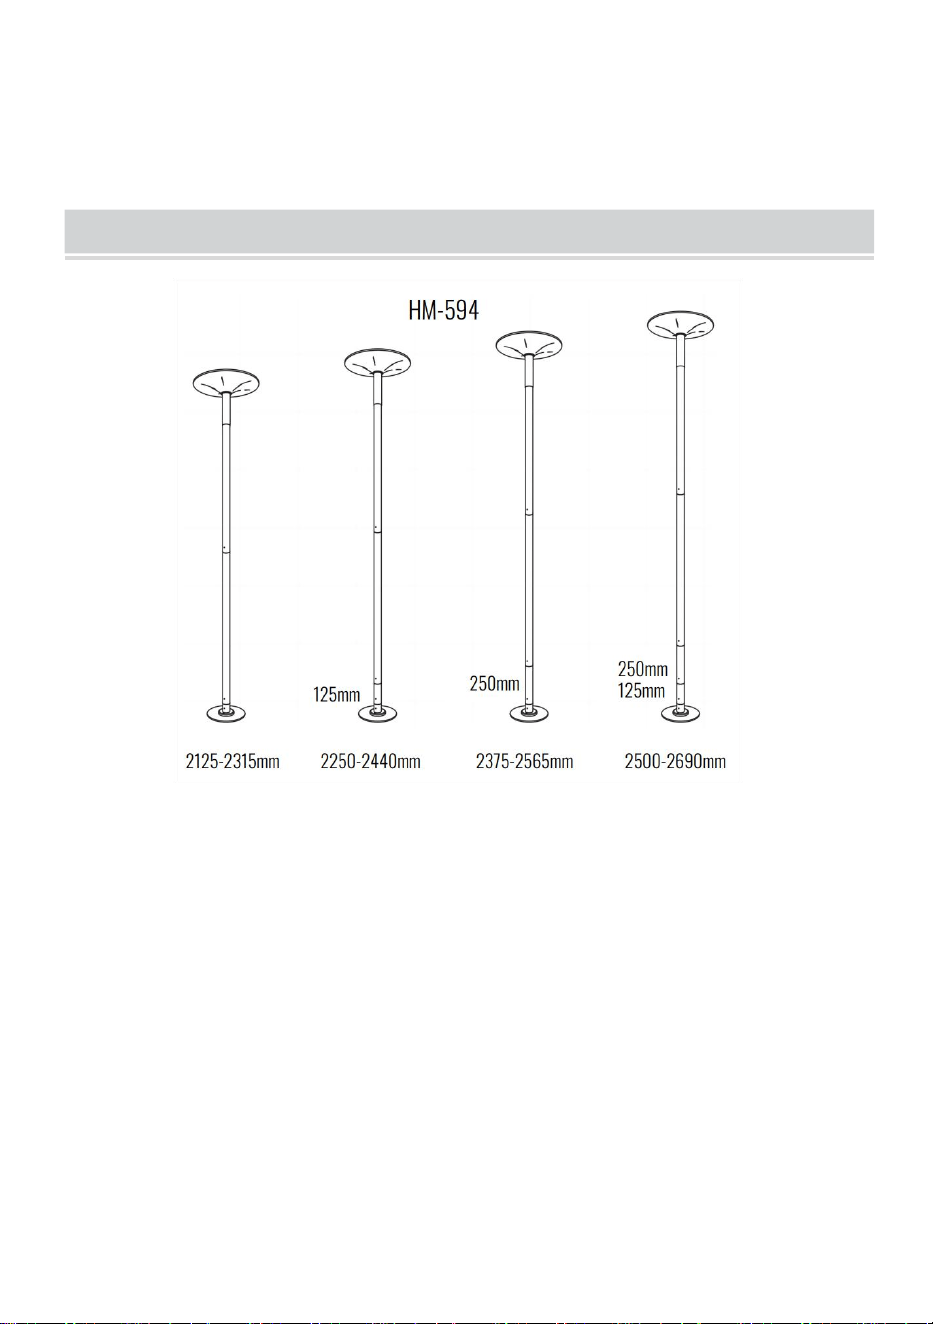
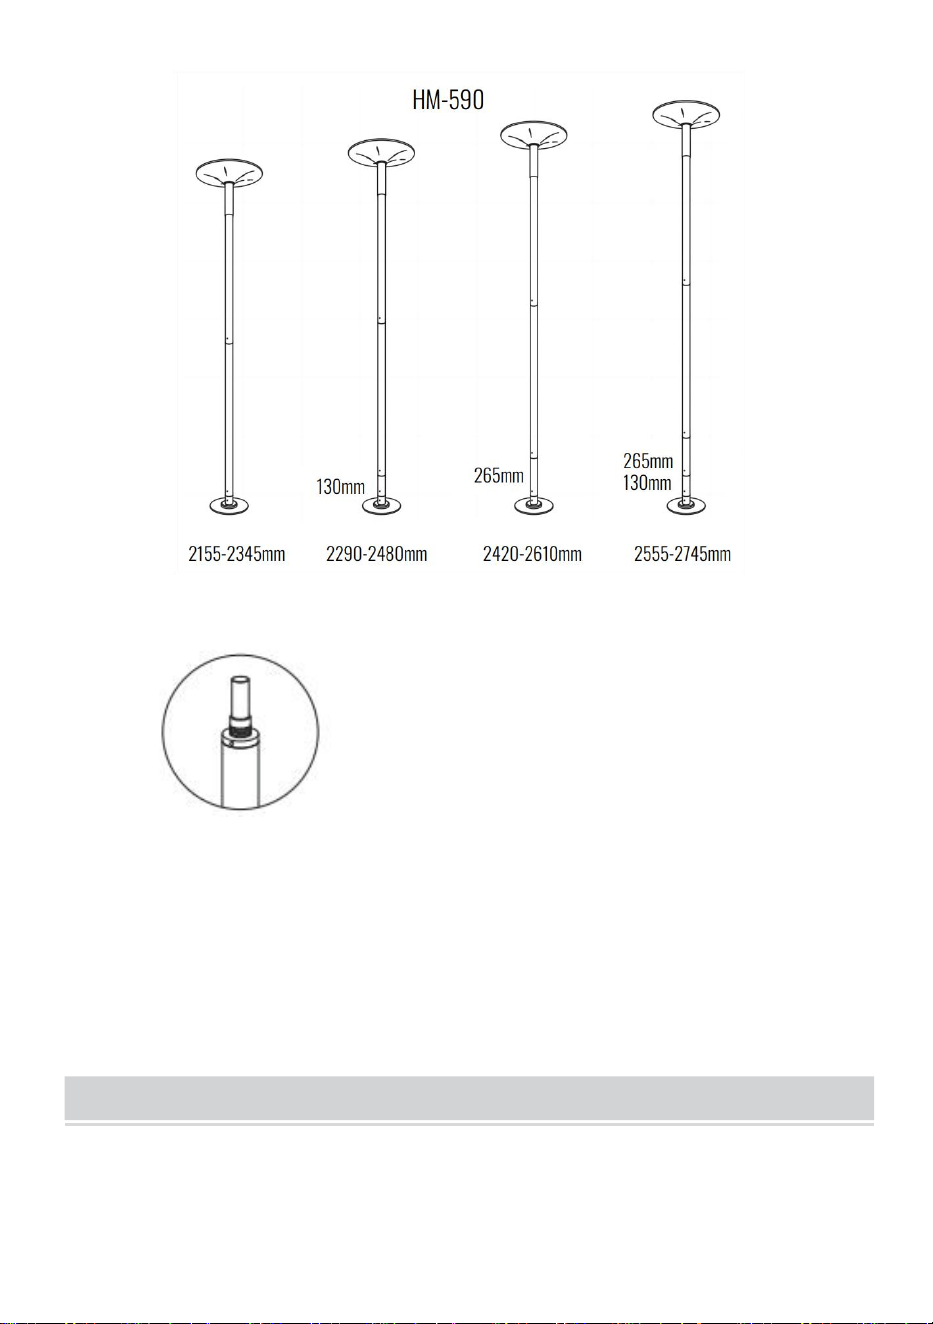
HEIGHT CALCULATOR
- 5 -
The adjuster has the capability
of extending the Pole by 190mm.
Each size change has an overlap.
Always increase the number of extensions used if possible.
Measure the height of your ceiling at the centre point of use and then refer
to the height chart left which will show you the pole tubes/extensions to be
used.Always match your ceiling height to the pole on the chart giving you
the maximum actual pole length.
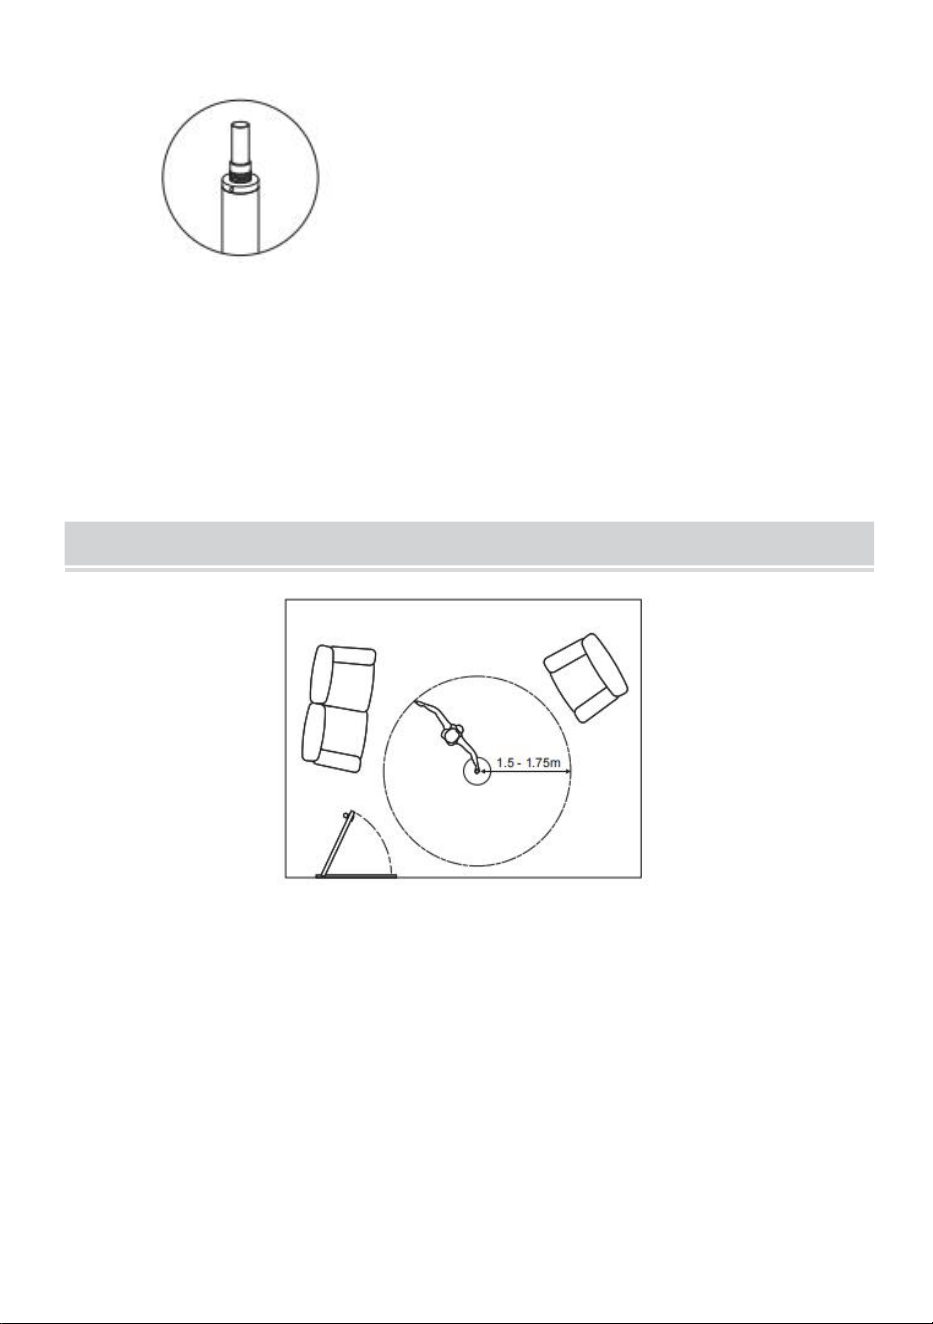
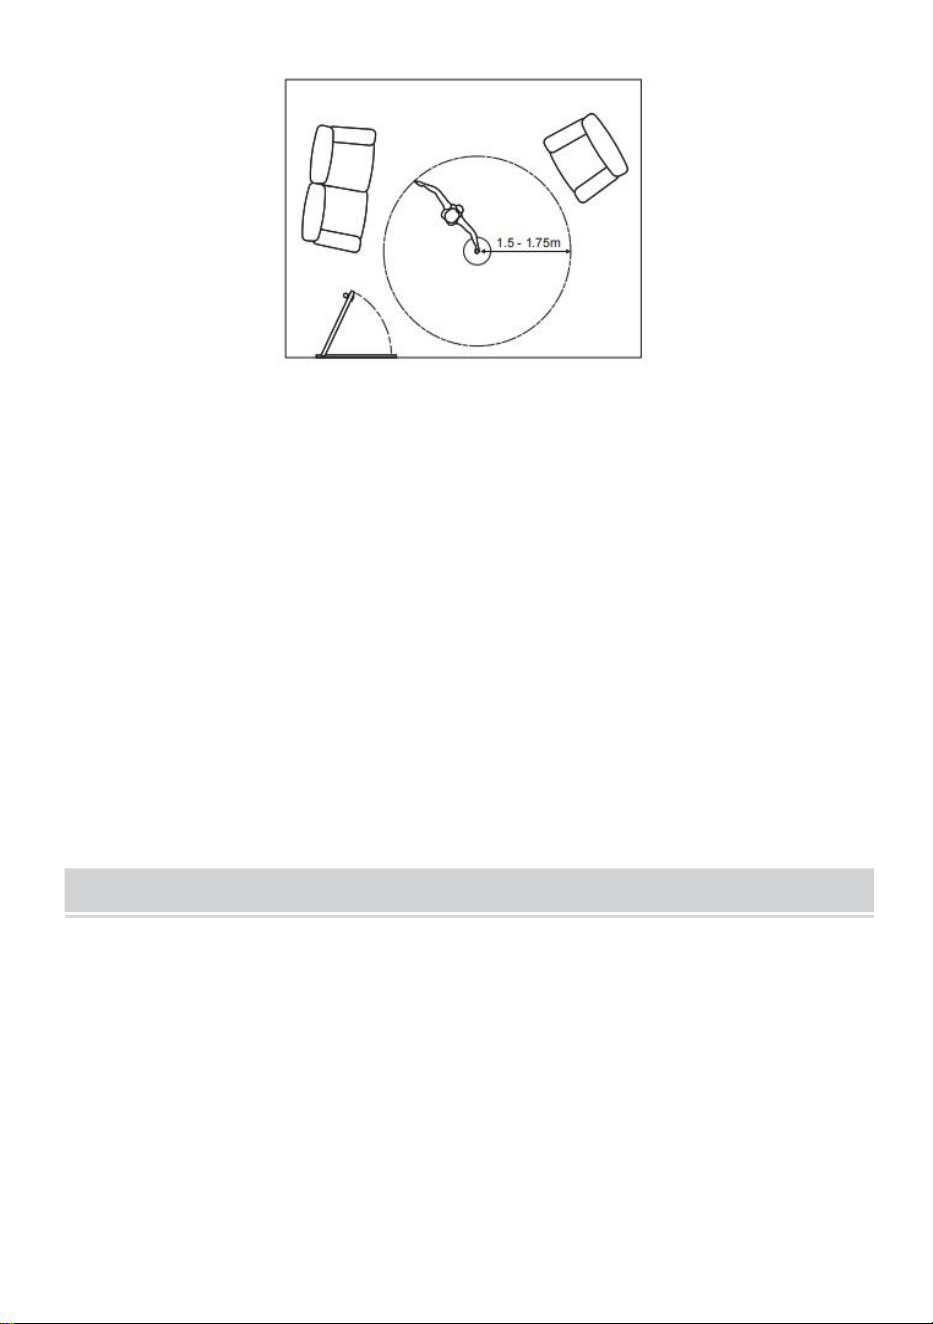
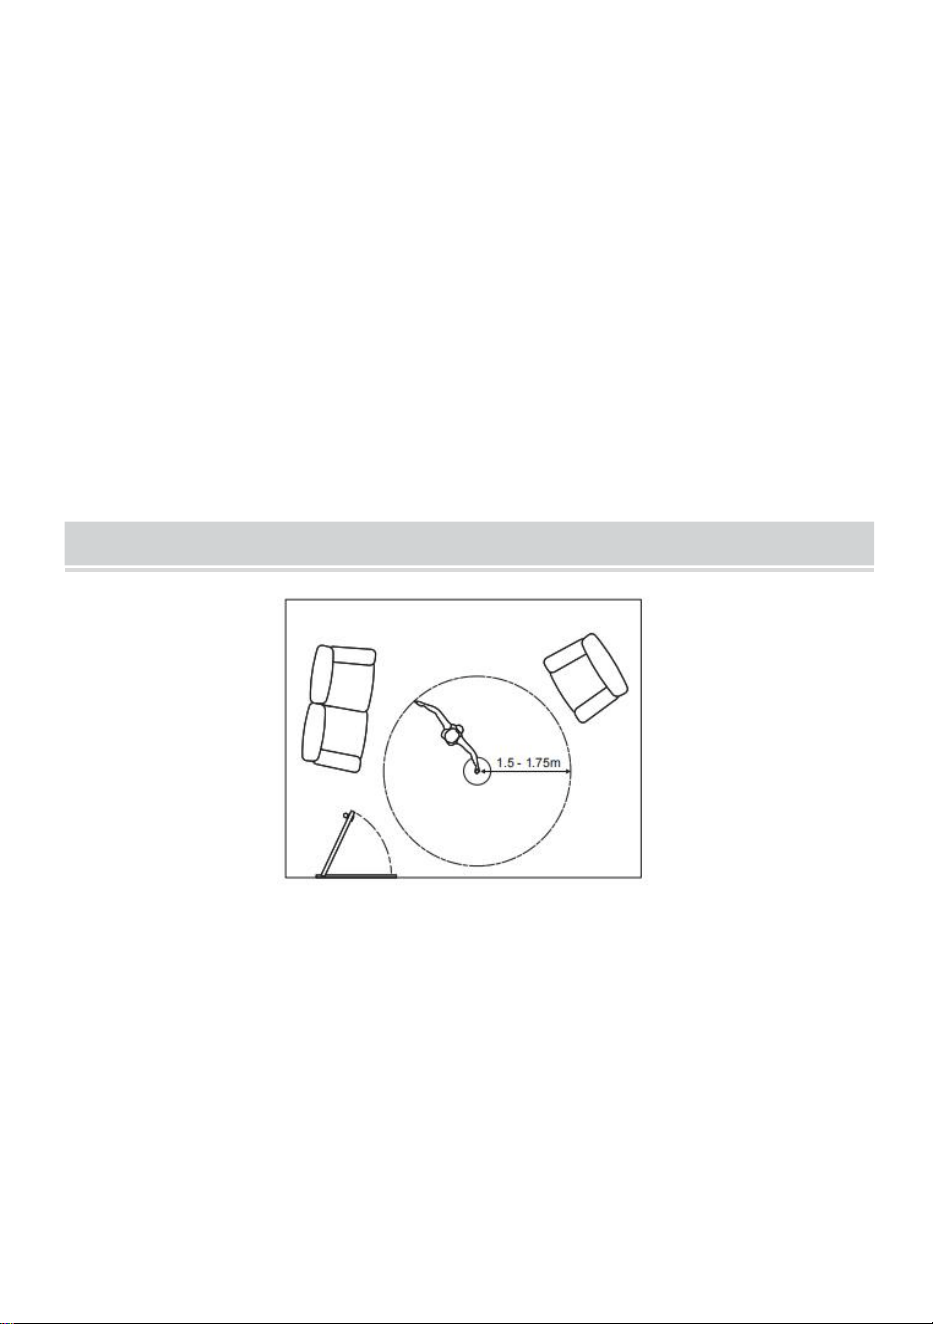
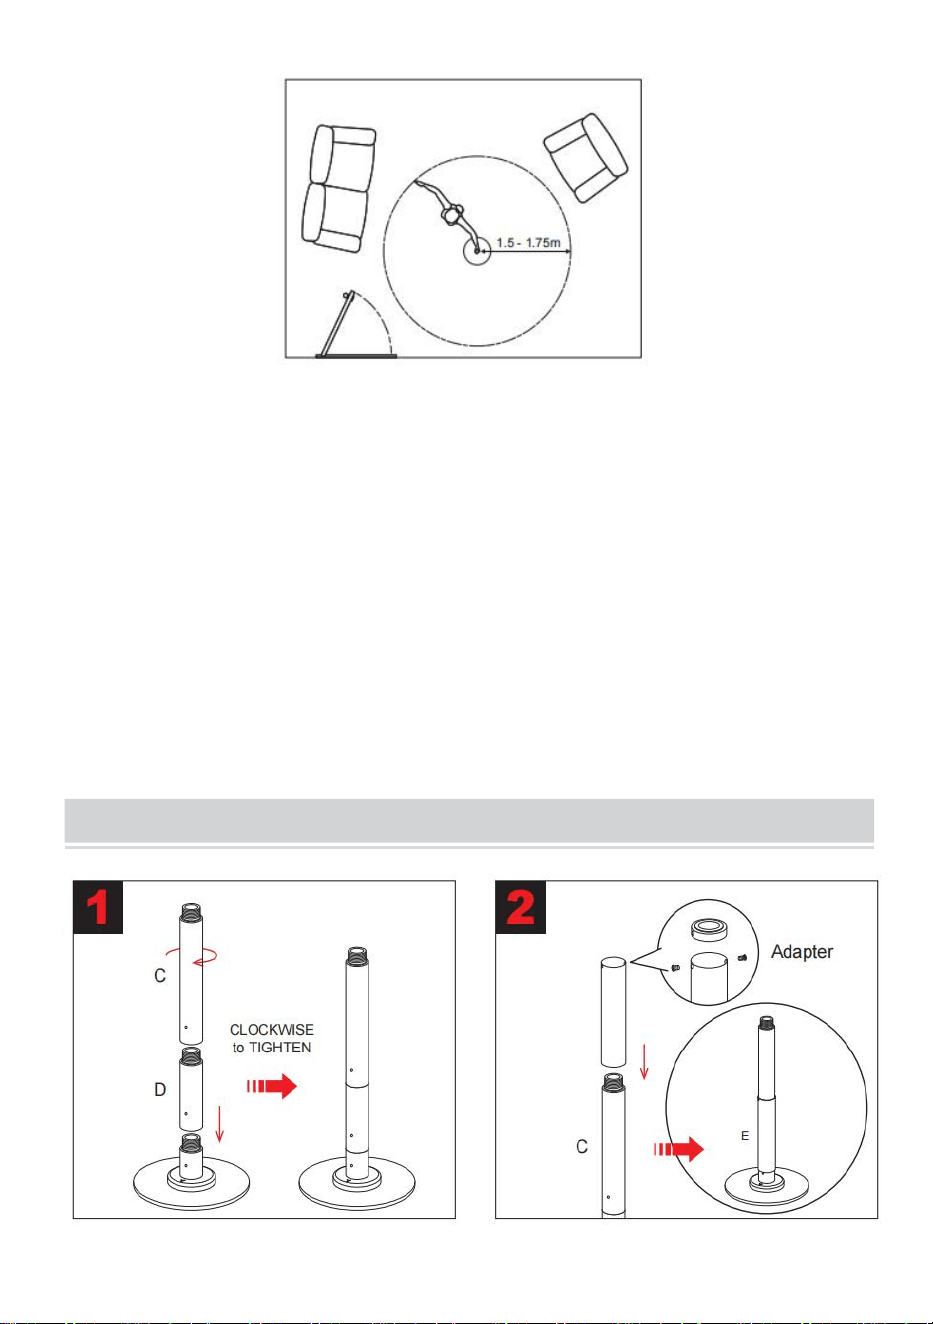
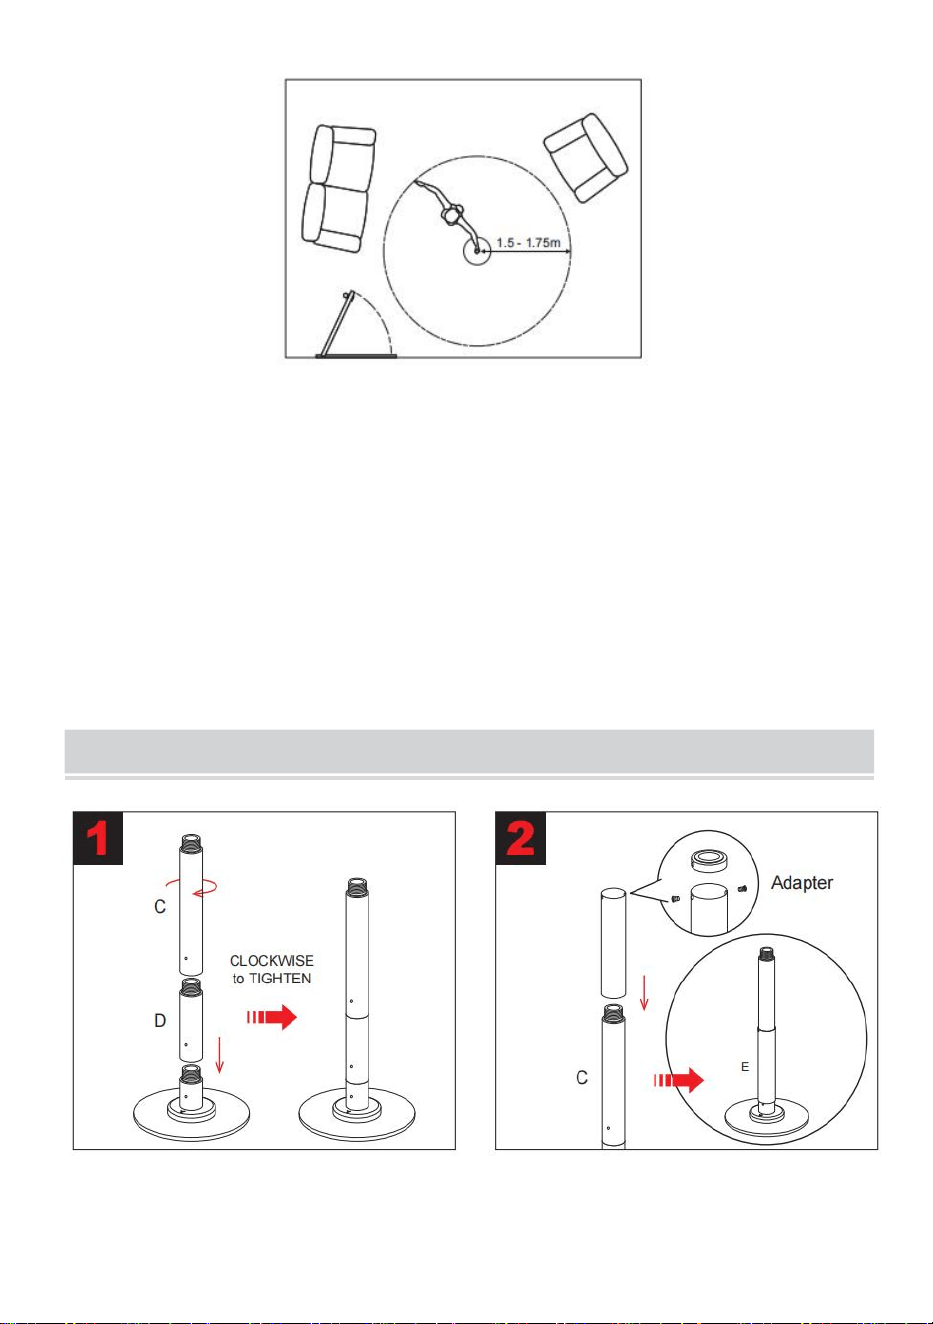
PRIOR TO ASSEMBLY
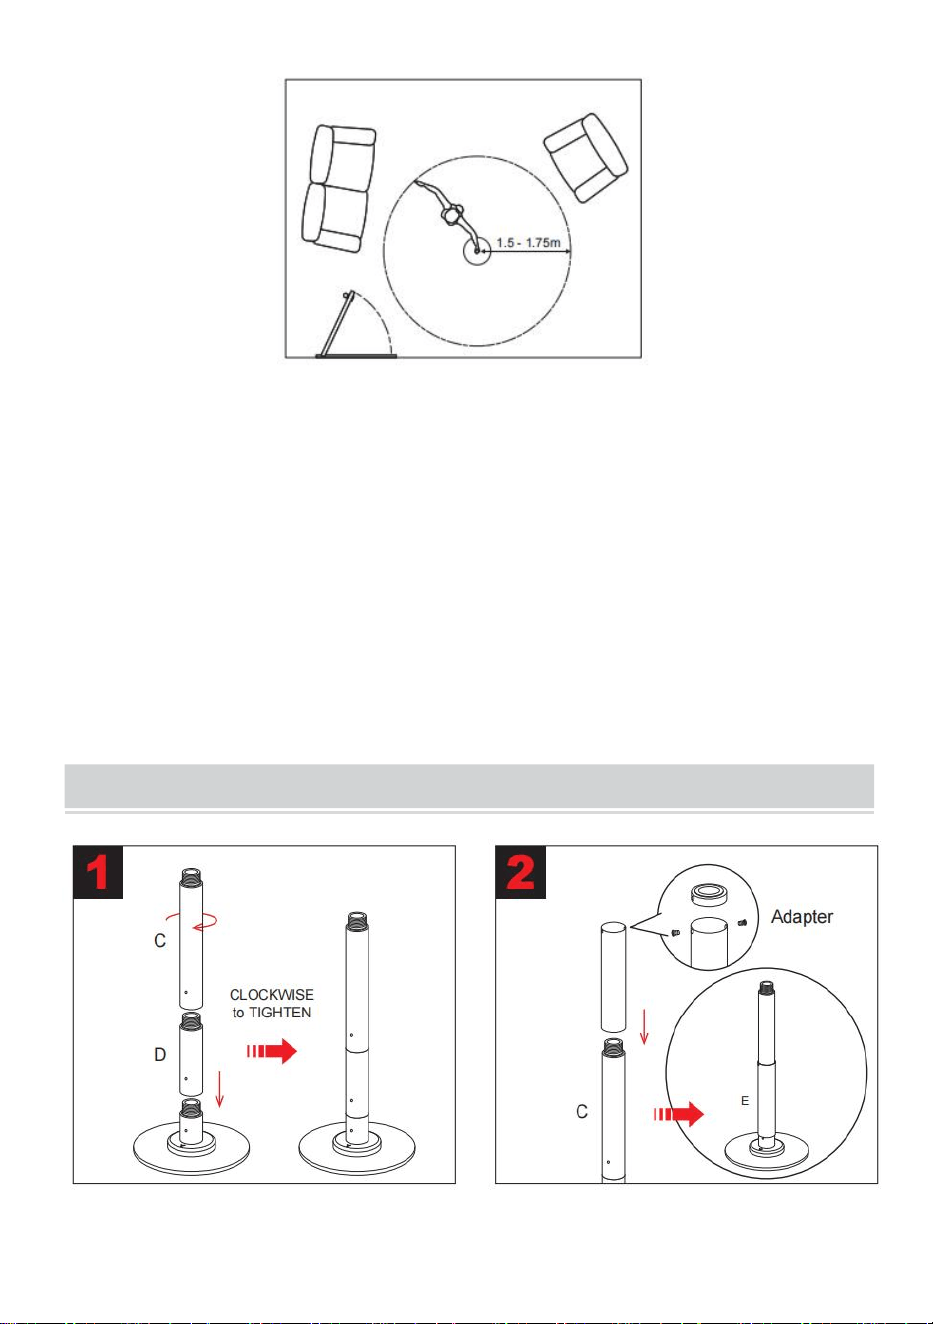
Find a suitable exercise and dance area. To use the pole properly you need
to be able to rotate around the pole with your arms outstretched without
hitting or touching anything whilst rotating. Find the area by rotating around
an imaginary pole with your arms outstretched (Fig. 1), you can use a chair
as an imaginary pole or, measure a circle with a diameter of approximately
3.0~3.5mtrs. This area will enable you to fully extend your arms.
Manoeuvres can be executed in a smaller space than the above but for
beginners the above space is recommended.
- 6 -
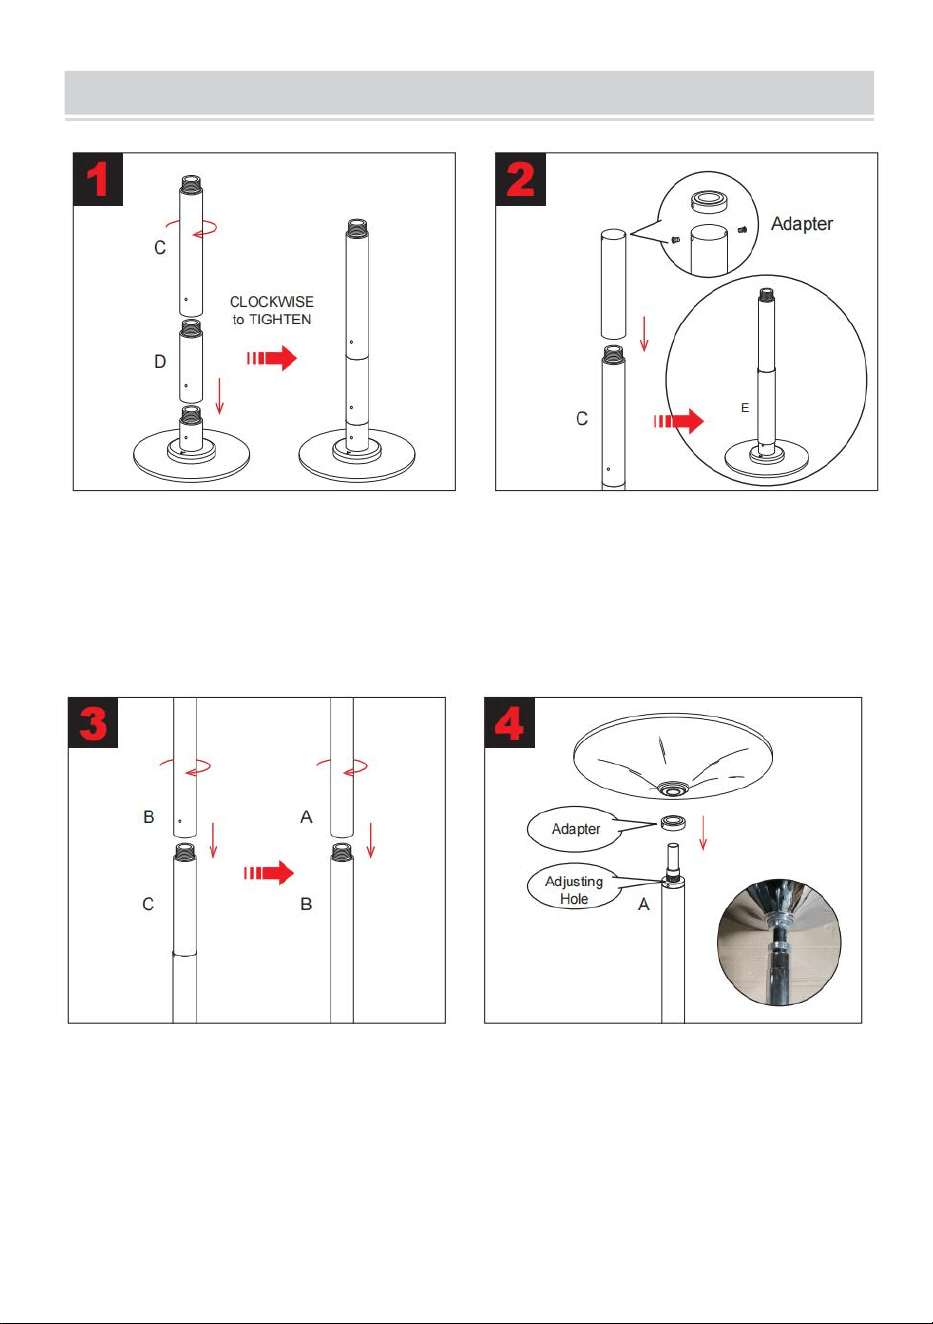
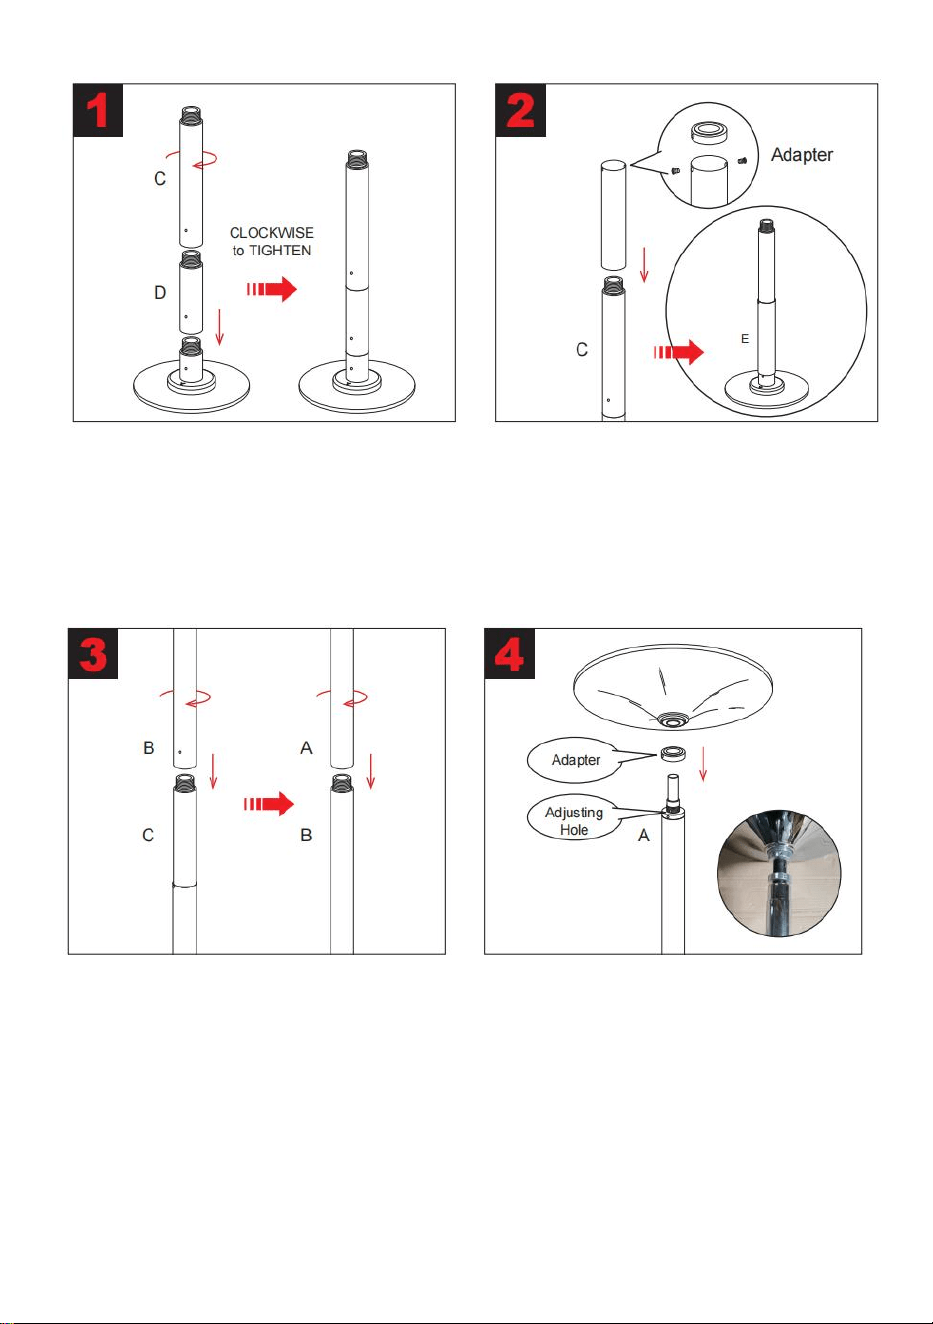
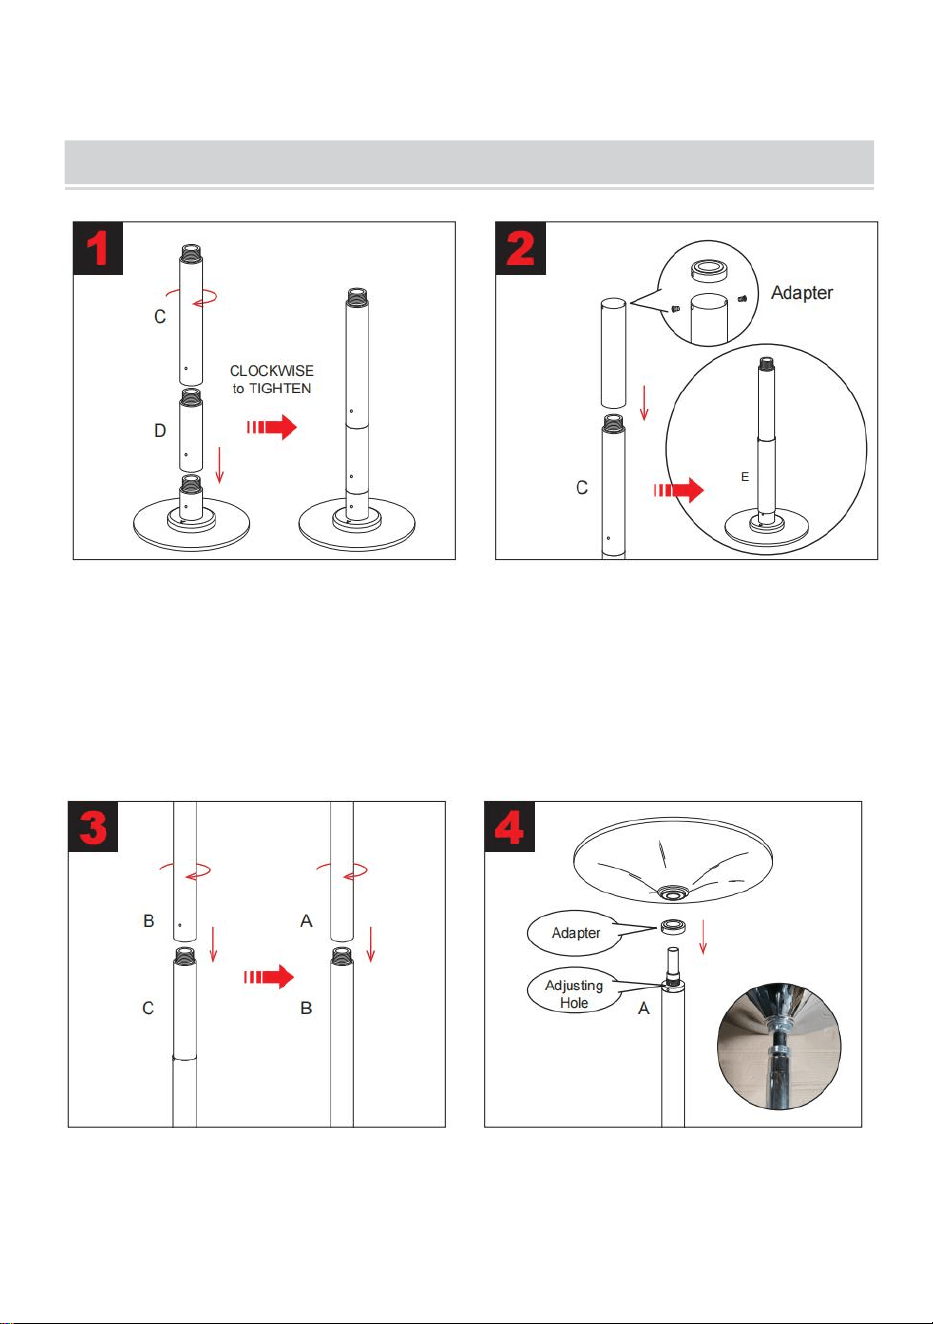
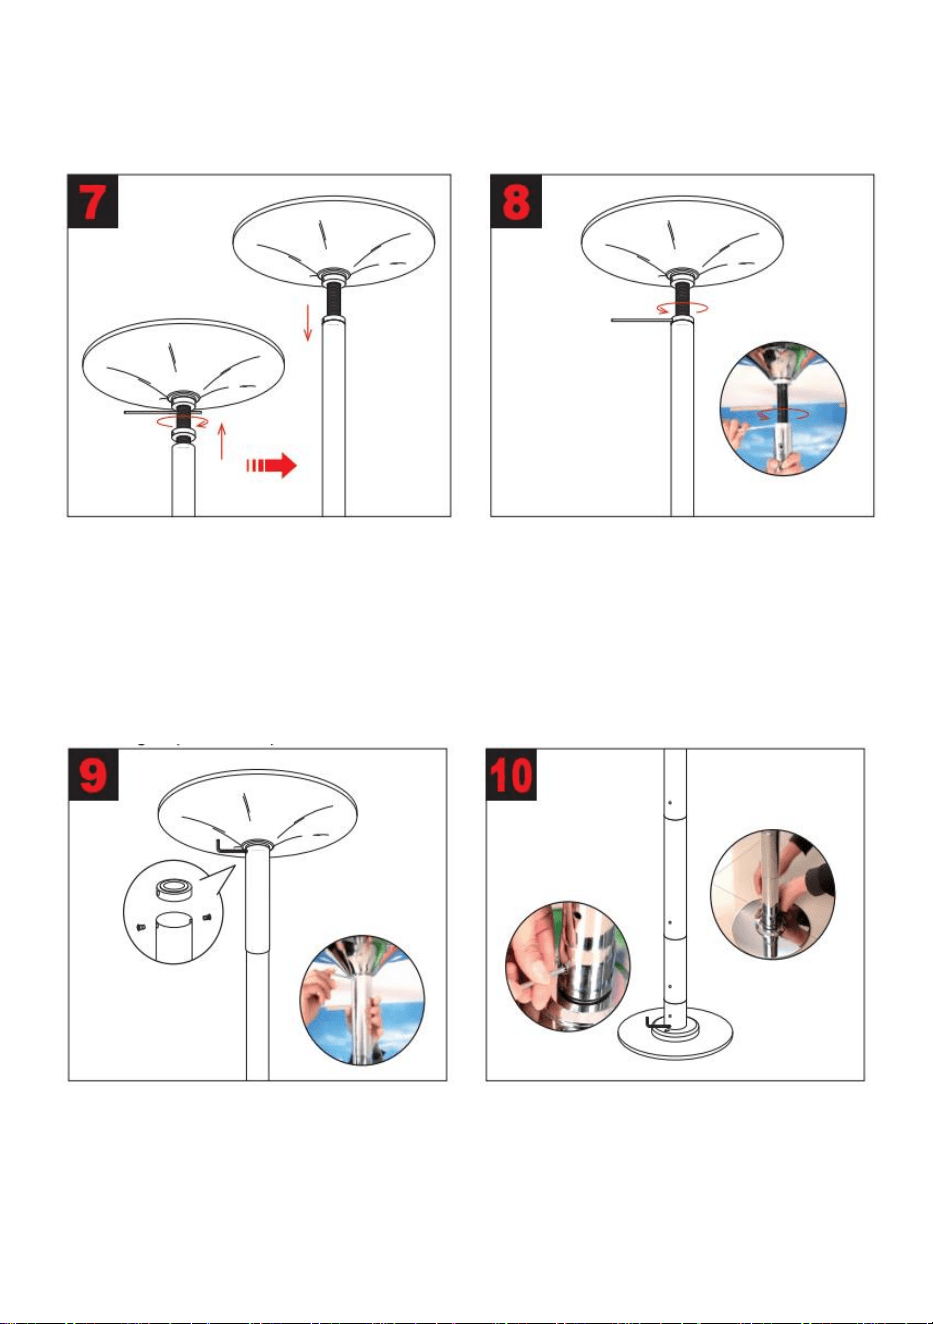
ASSEMBIY INSTRUCTIONS
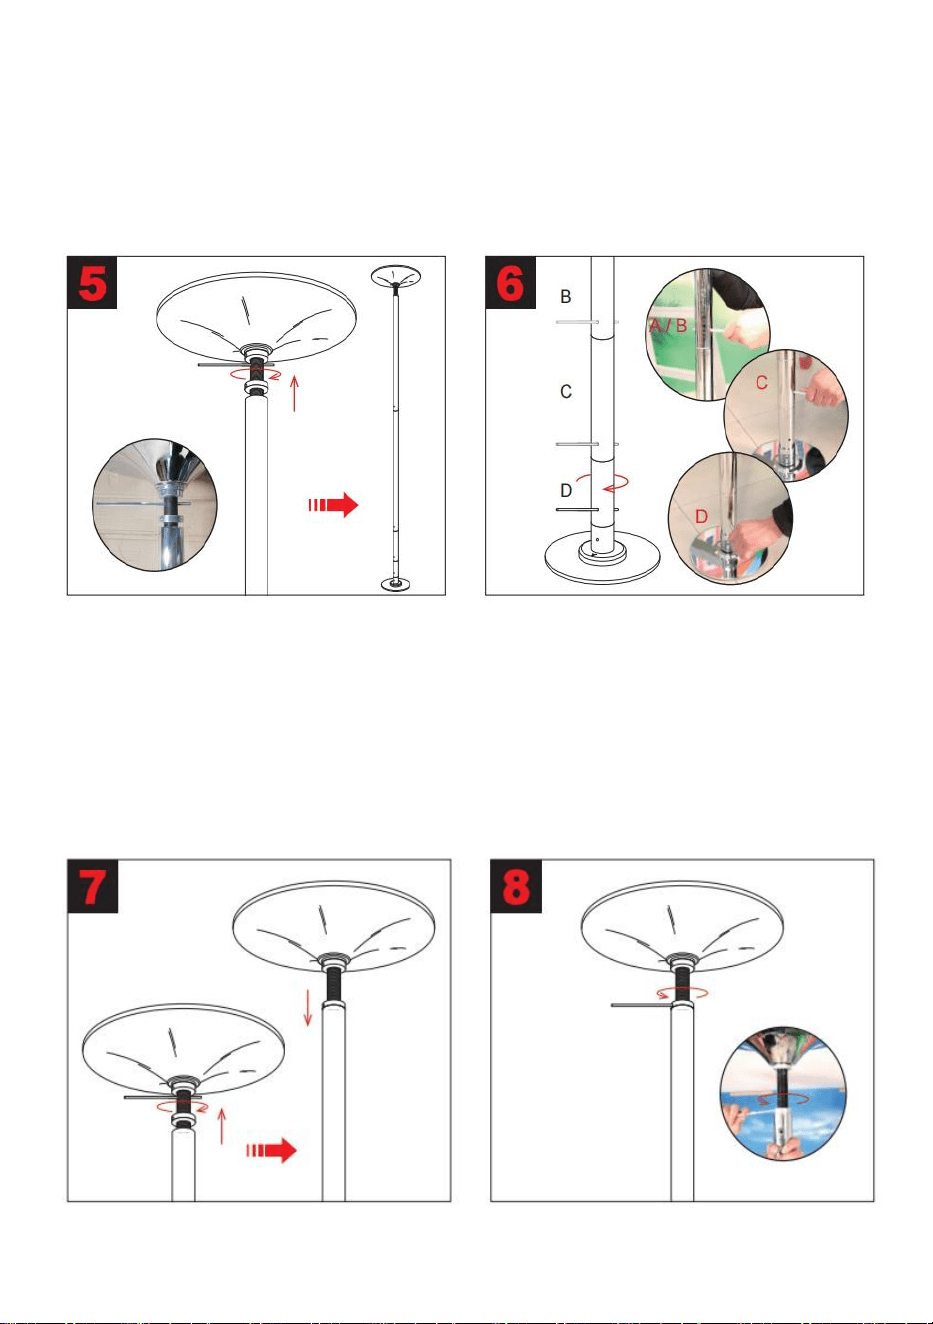
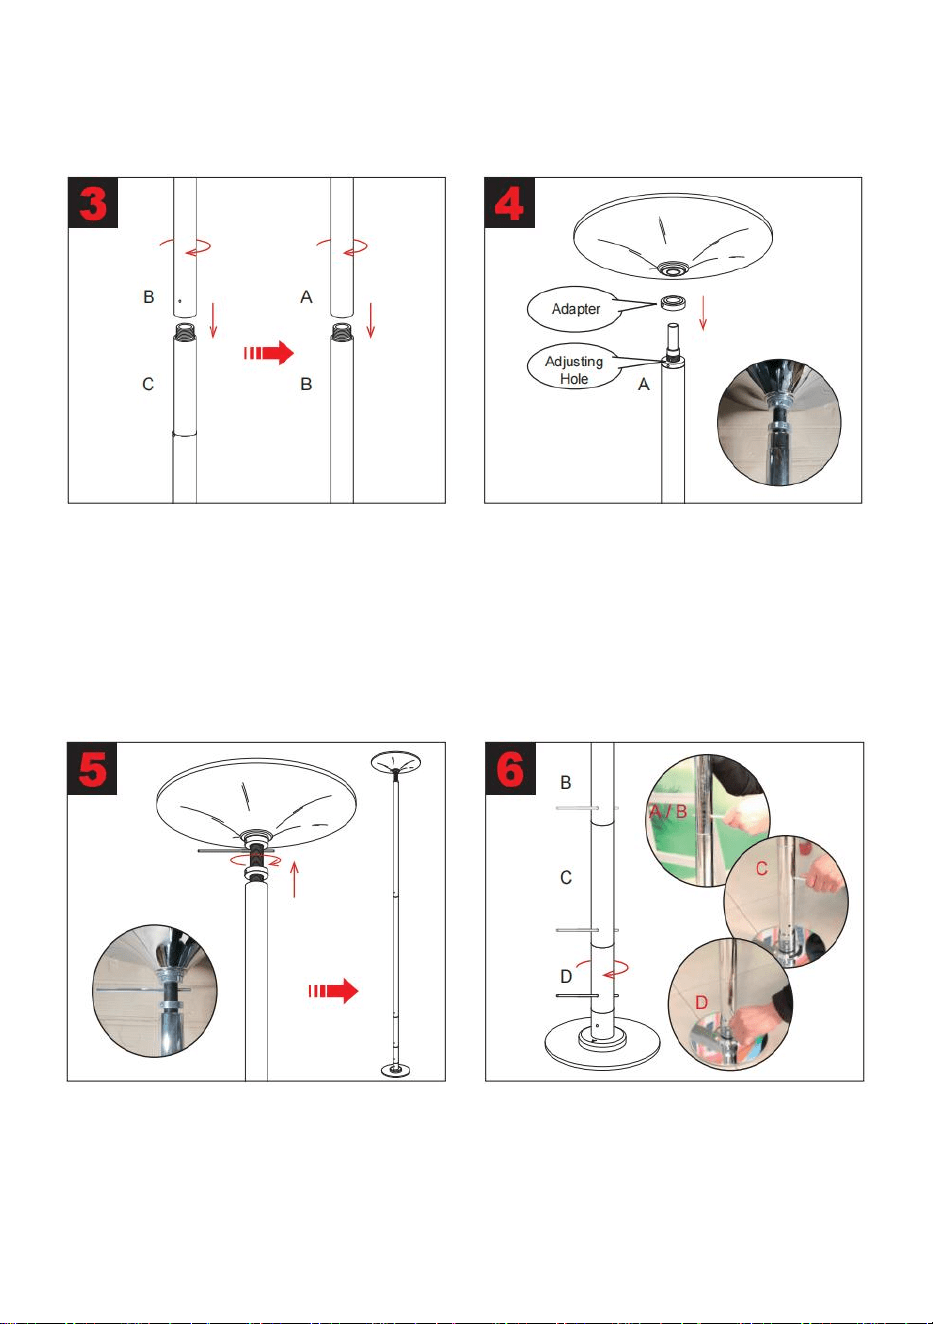
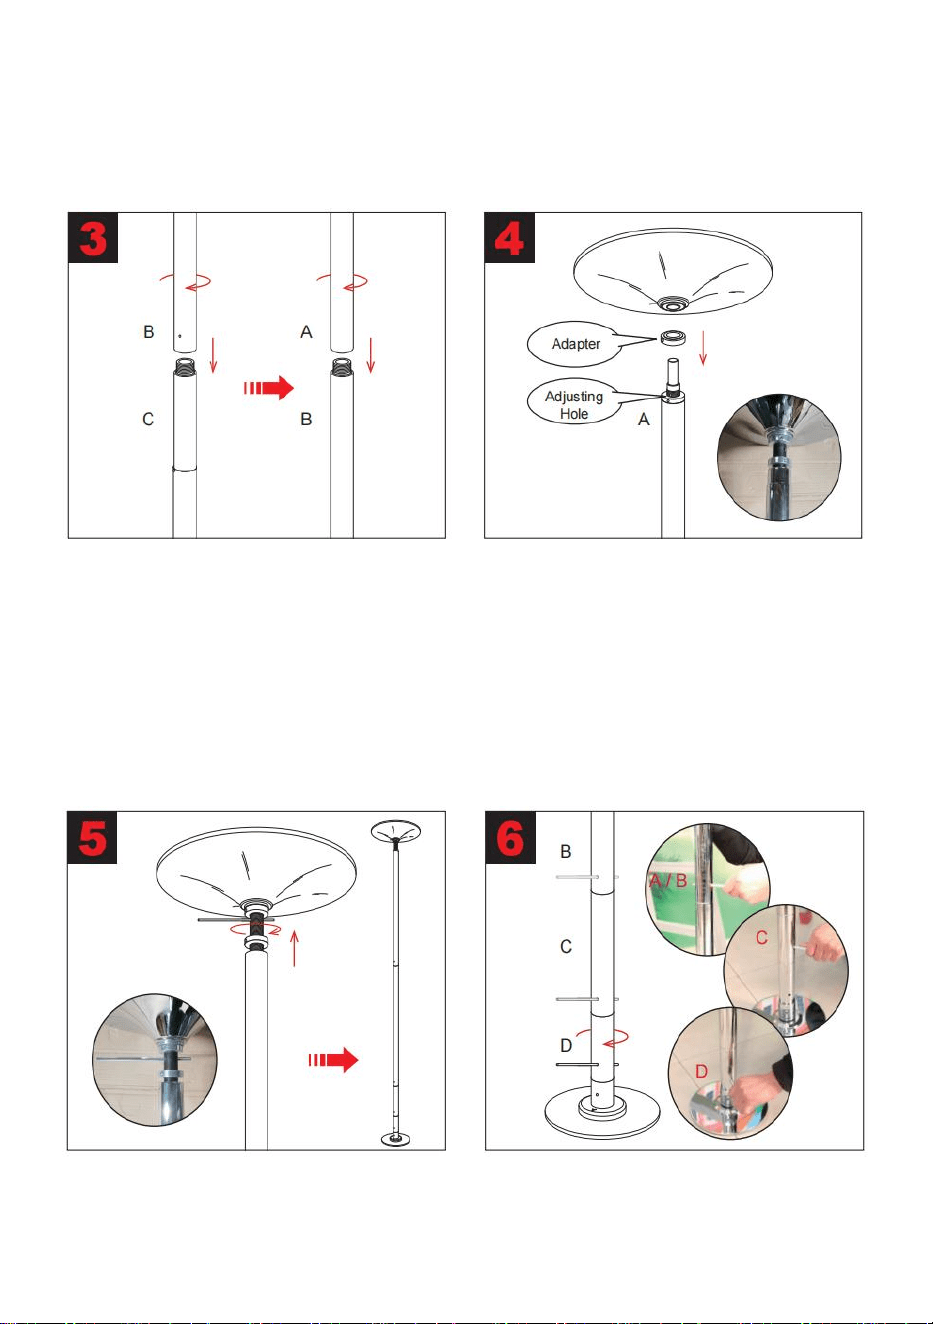
Connect the Extension Tube D and
C to the Base shaft.Ensure the tube
edges are connected tightly
together.
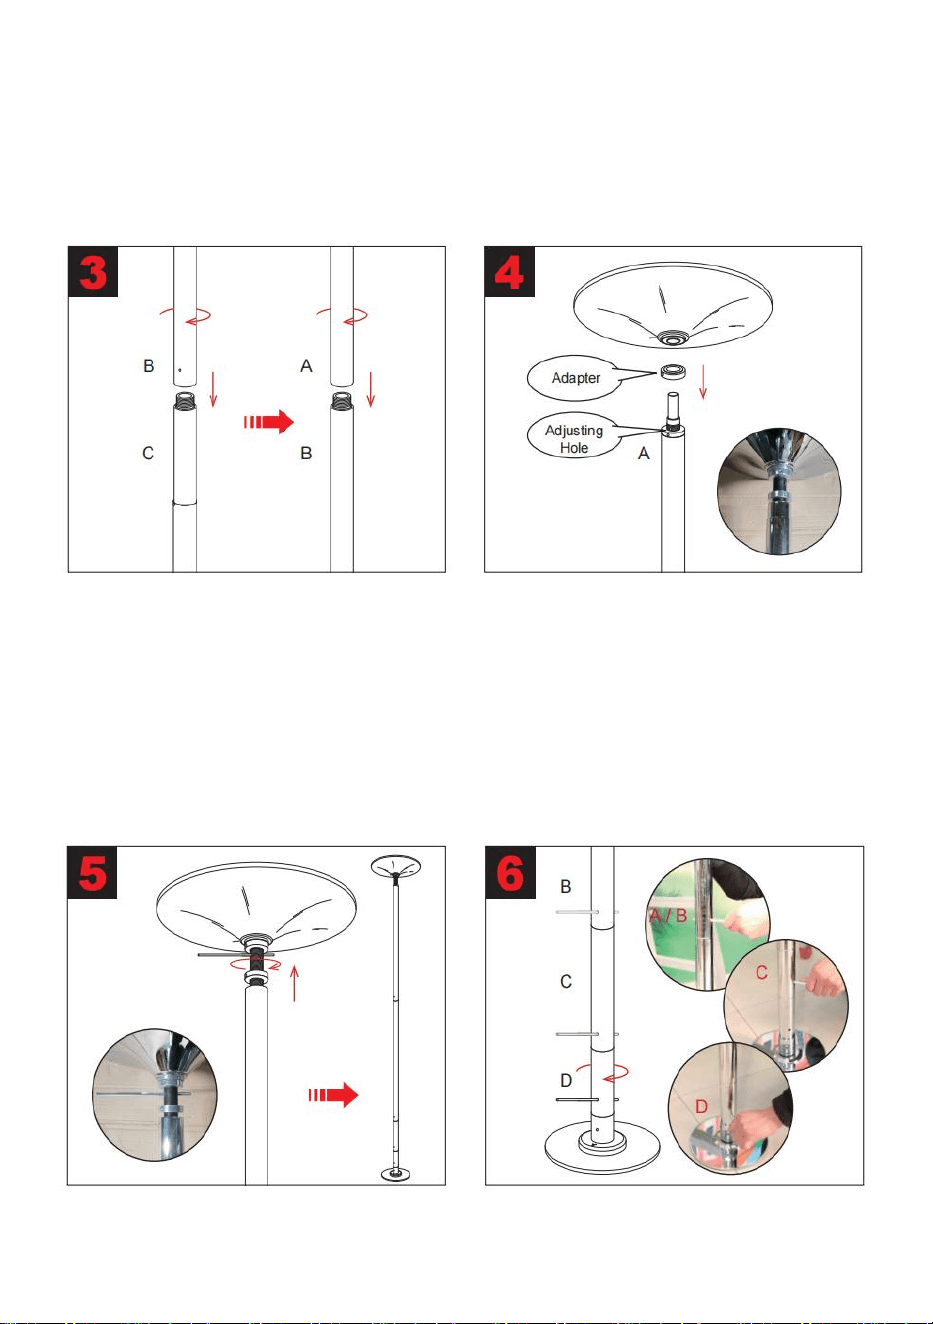
Remove the screws and the adapter
from the Cover,and then slide it onto
the Extension Tube C.(The Screws
will be re-assembled later.)
Connect the B-Pole to the Extension
Tube C.Turn the
B-pole counter-clockwise until the
adjuster is about 1.5"above the
A-pole and the adjusting hole is
visible.
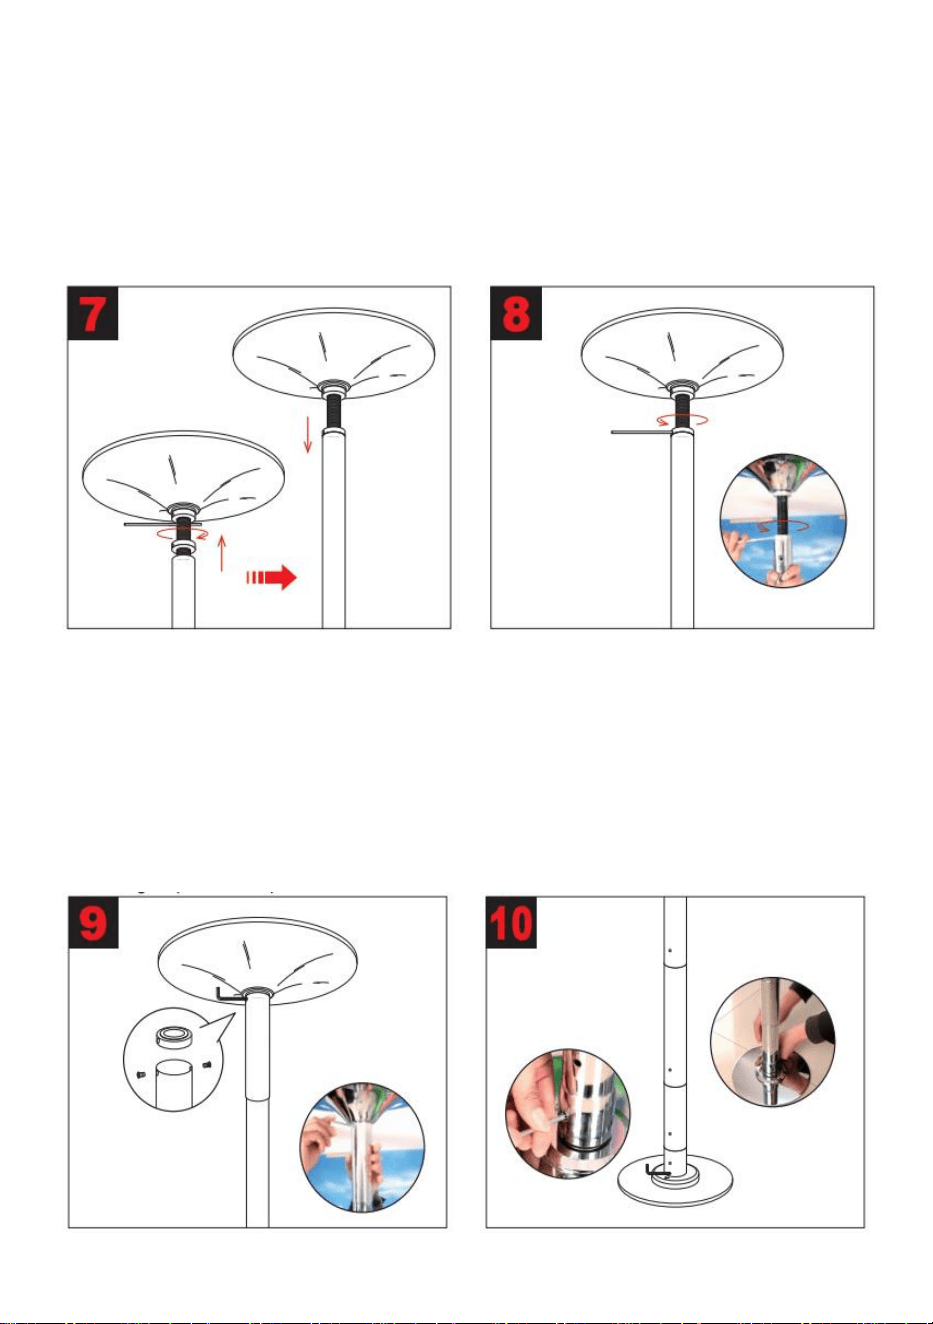
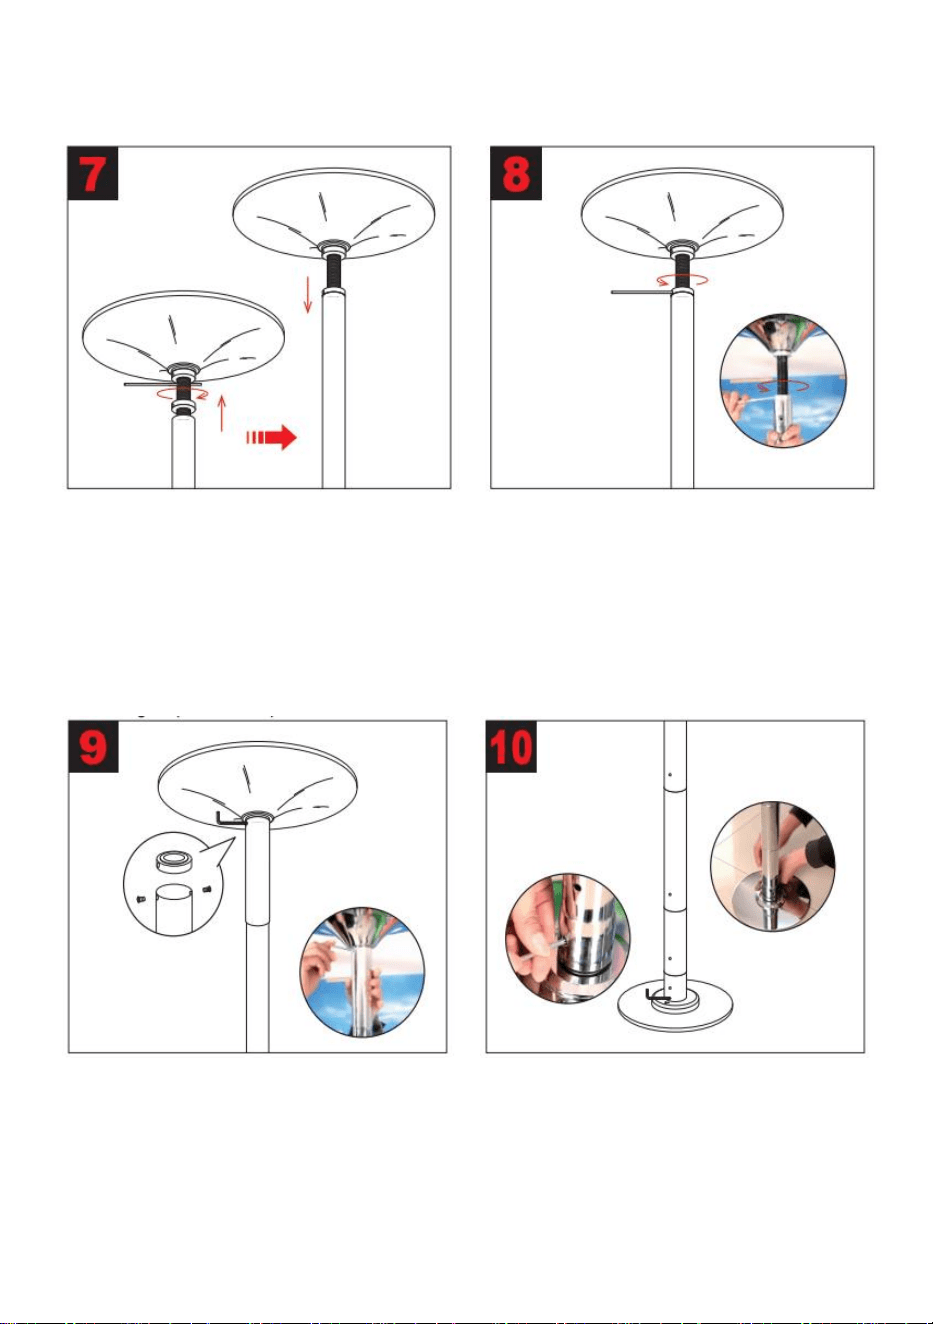
Once the B-Pole and A-Pole (and
any additional extensions) are
connected, insert the adapter into
the adjuster and then attach the
A-Pole to the upper dome.

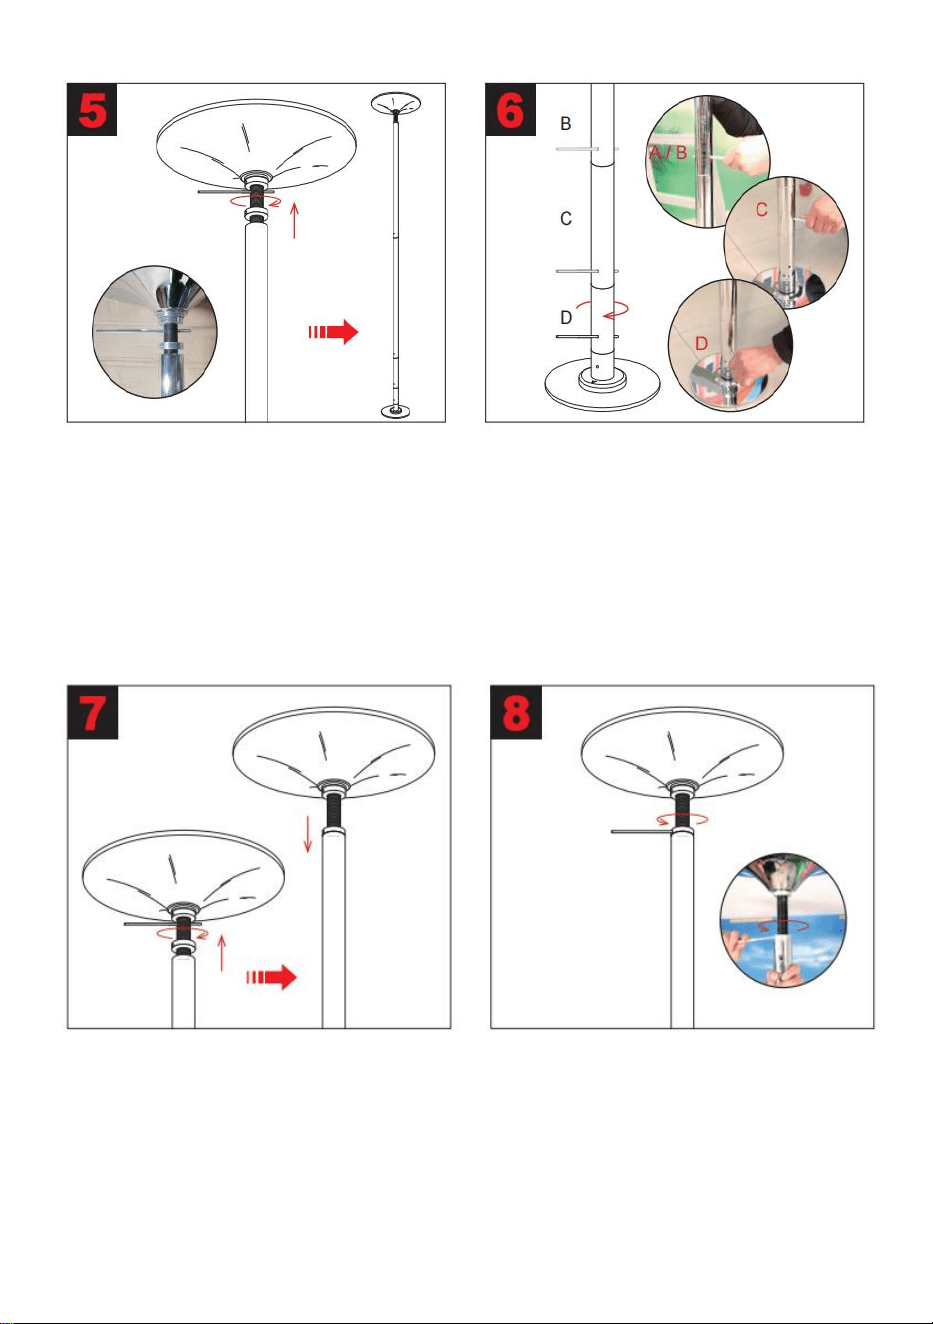
- 7 -
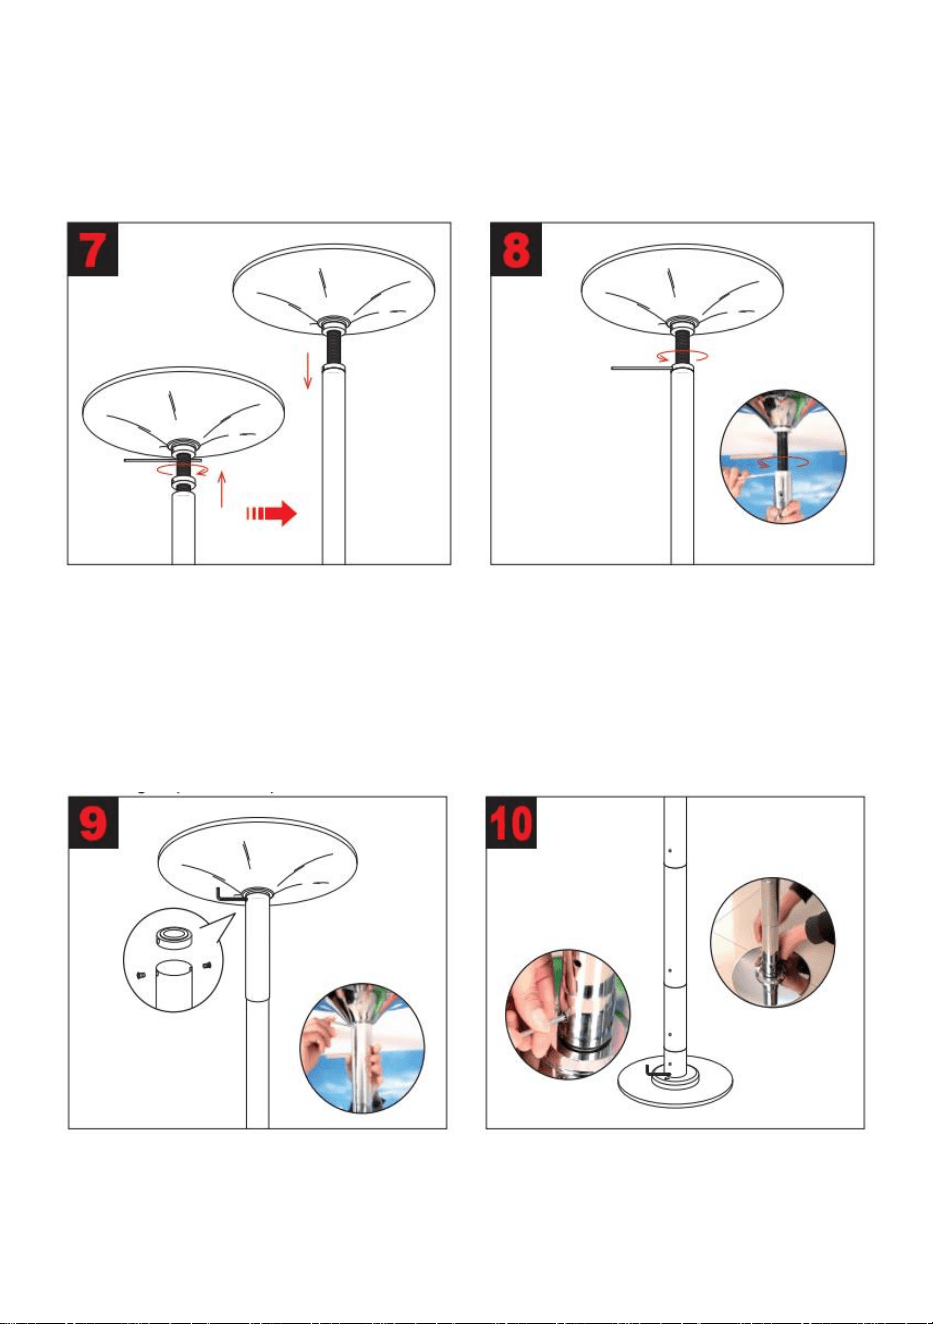
Rotate the A-pole counter-clockwise
until no further
Force can be applied to attach it in
place.
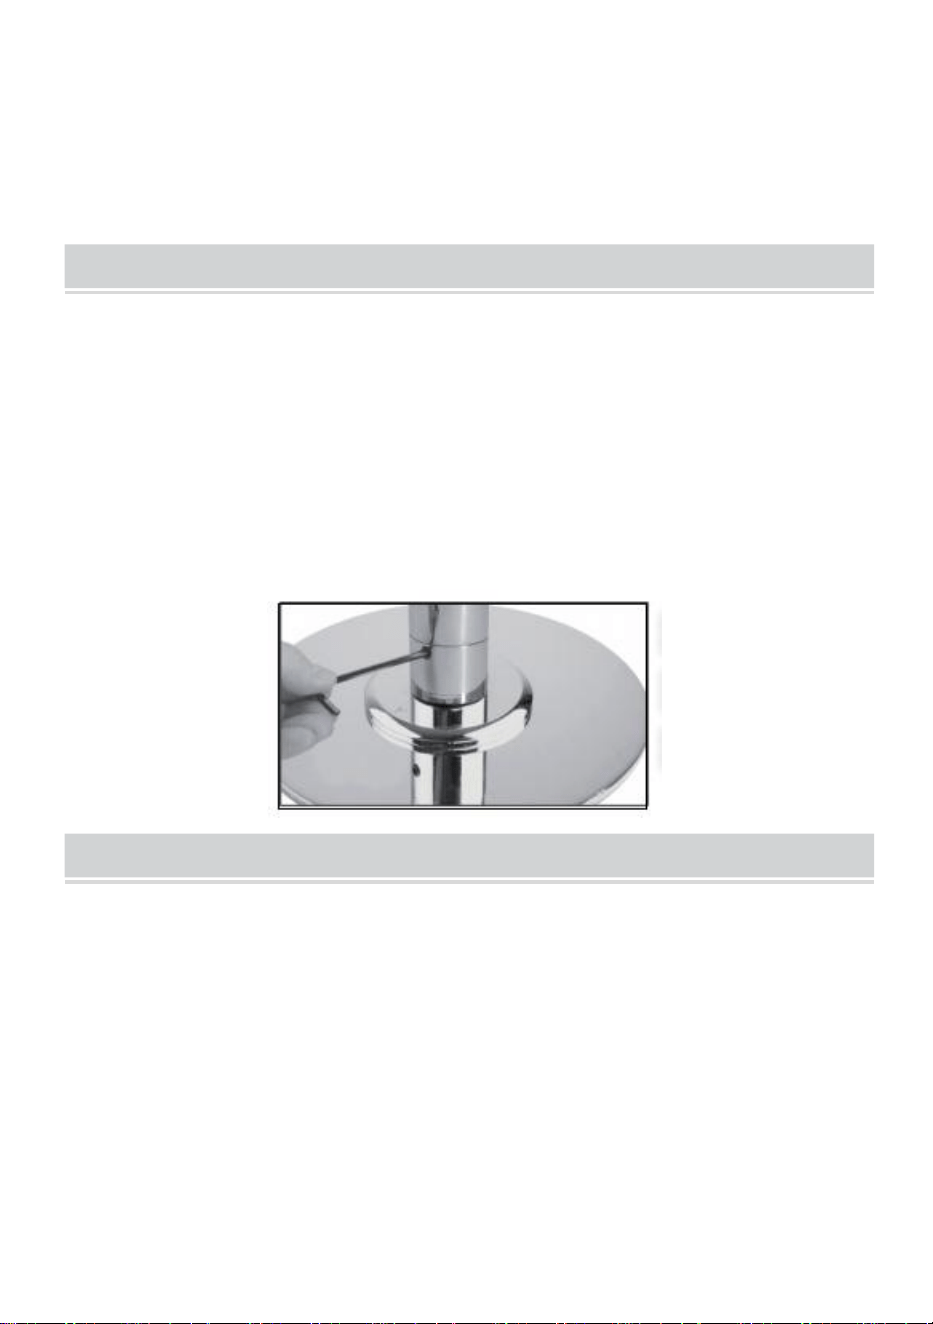
It is important to tighten all the
sections progressively to secure the
whole fixture
–
alternating between
the poles and extension tubes,
tightening Clockwise.
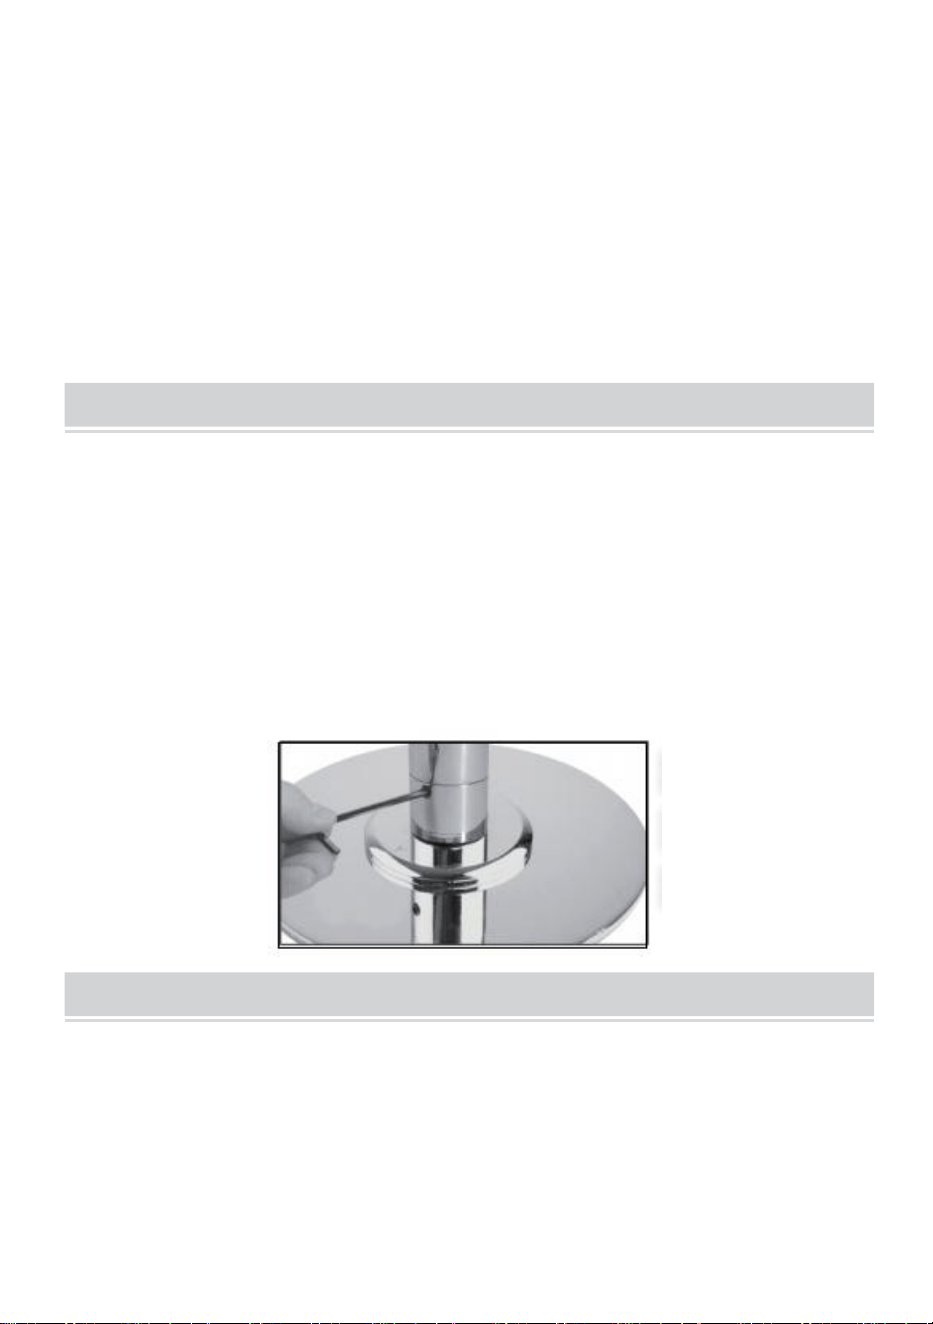
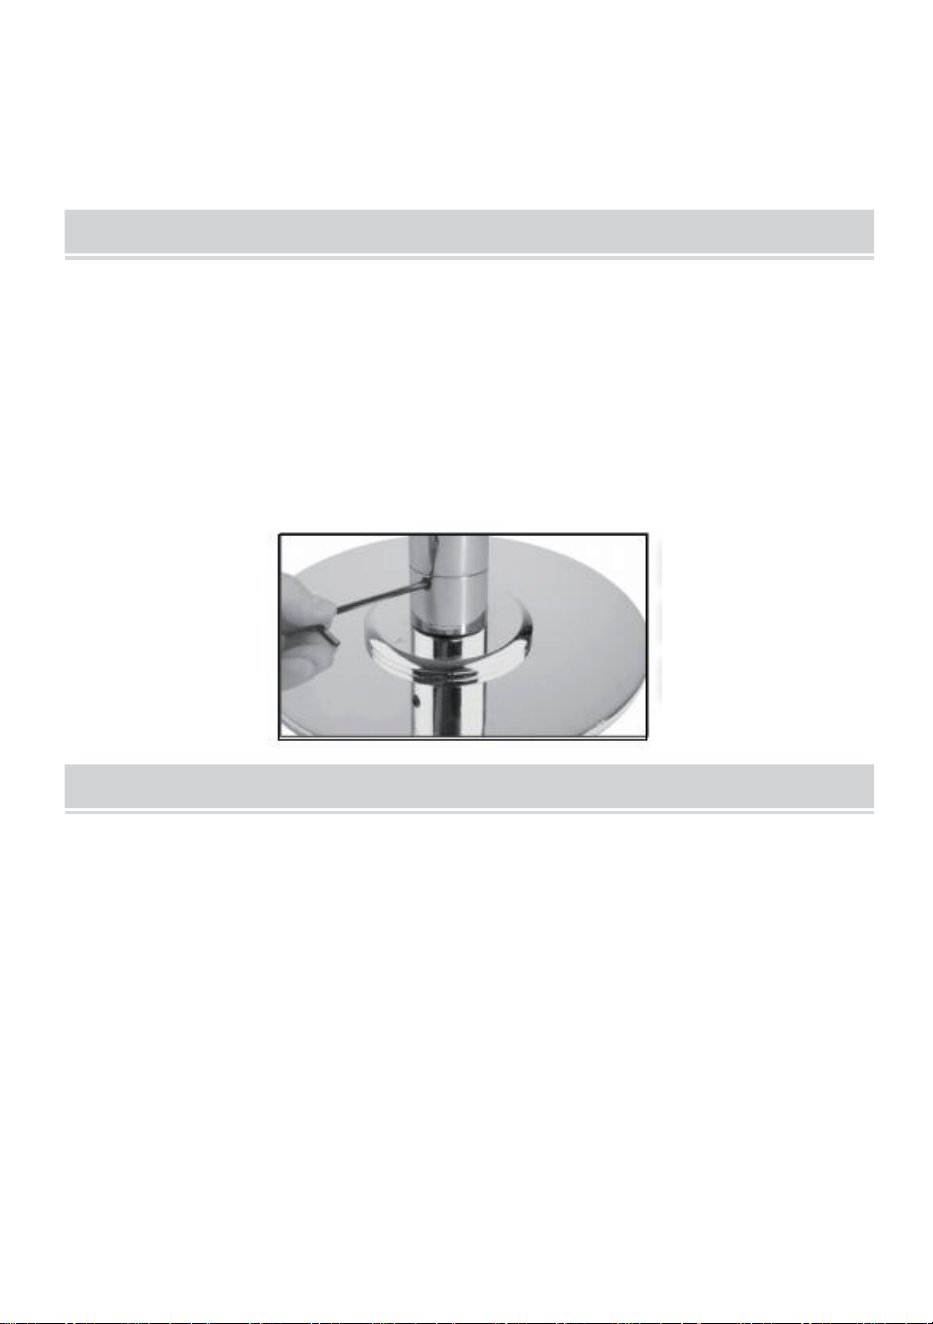
Rotate the pre-assembled nut
located on the A-pole counter
-clockwise, which will allow you to
adjust it to its original place on the
pole.
Tighten the nut by rotating it
counter-clockwise with
the l-Rod until no further force could
be applied.
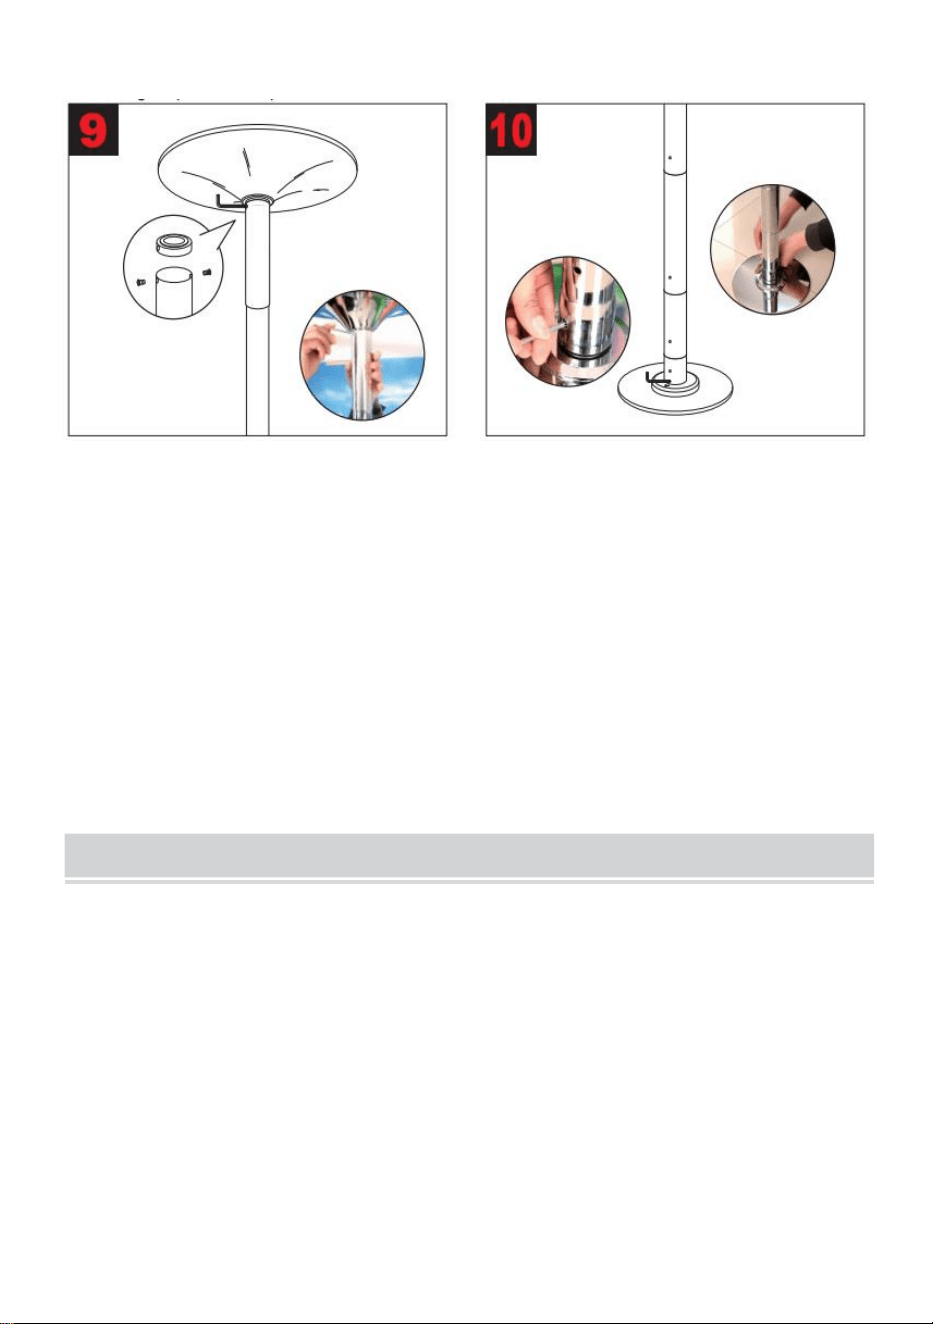
- 8 -
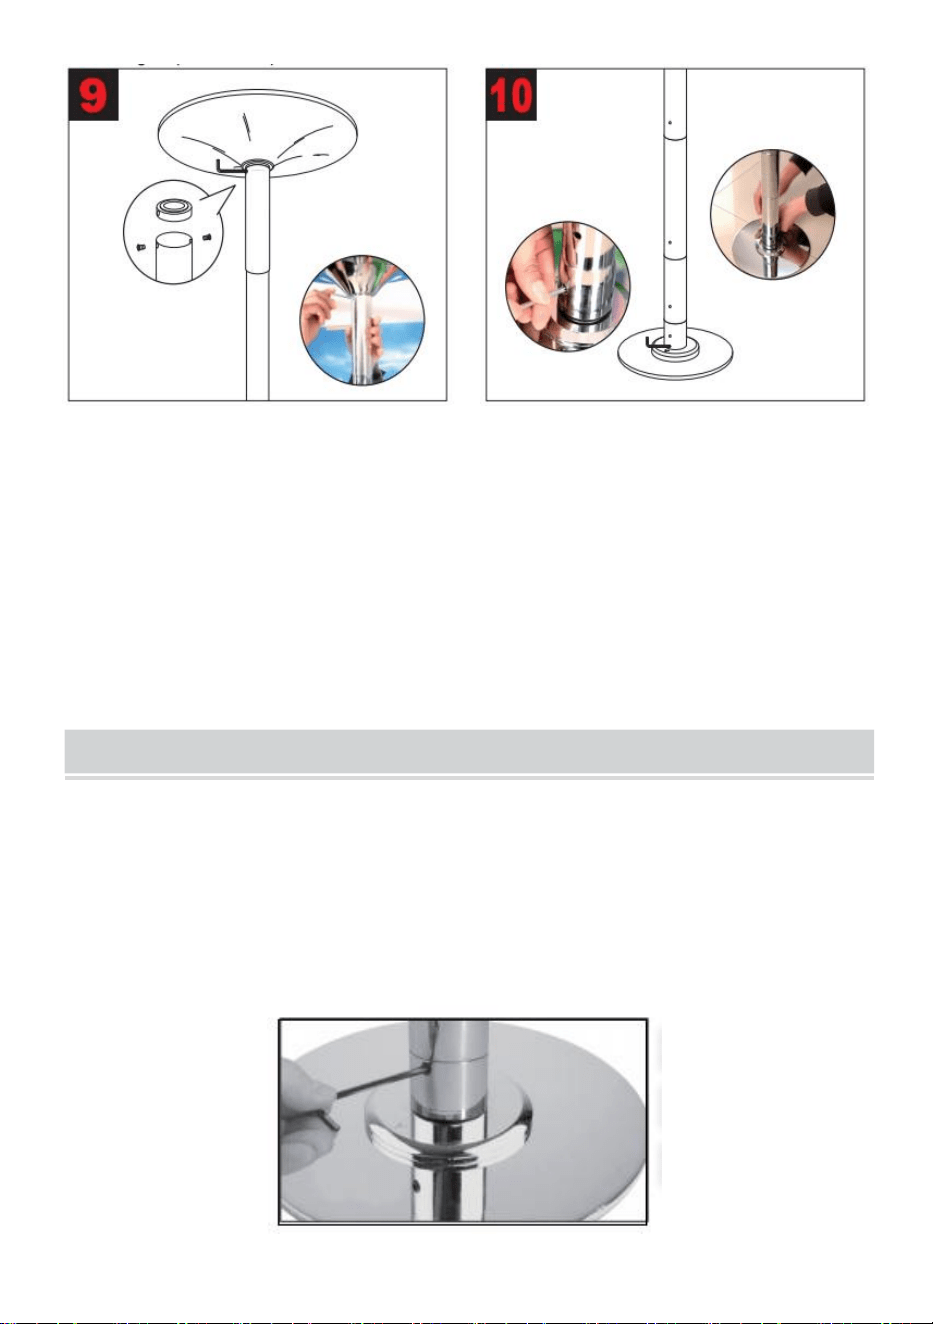
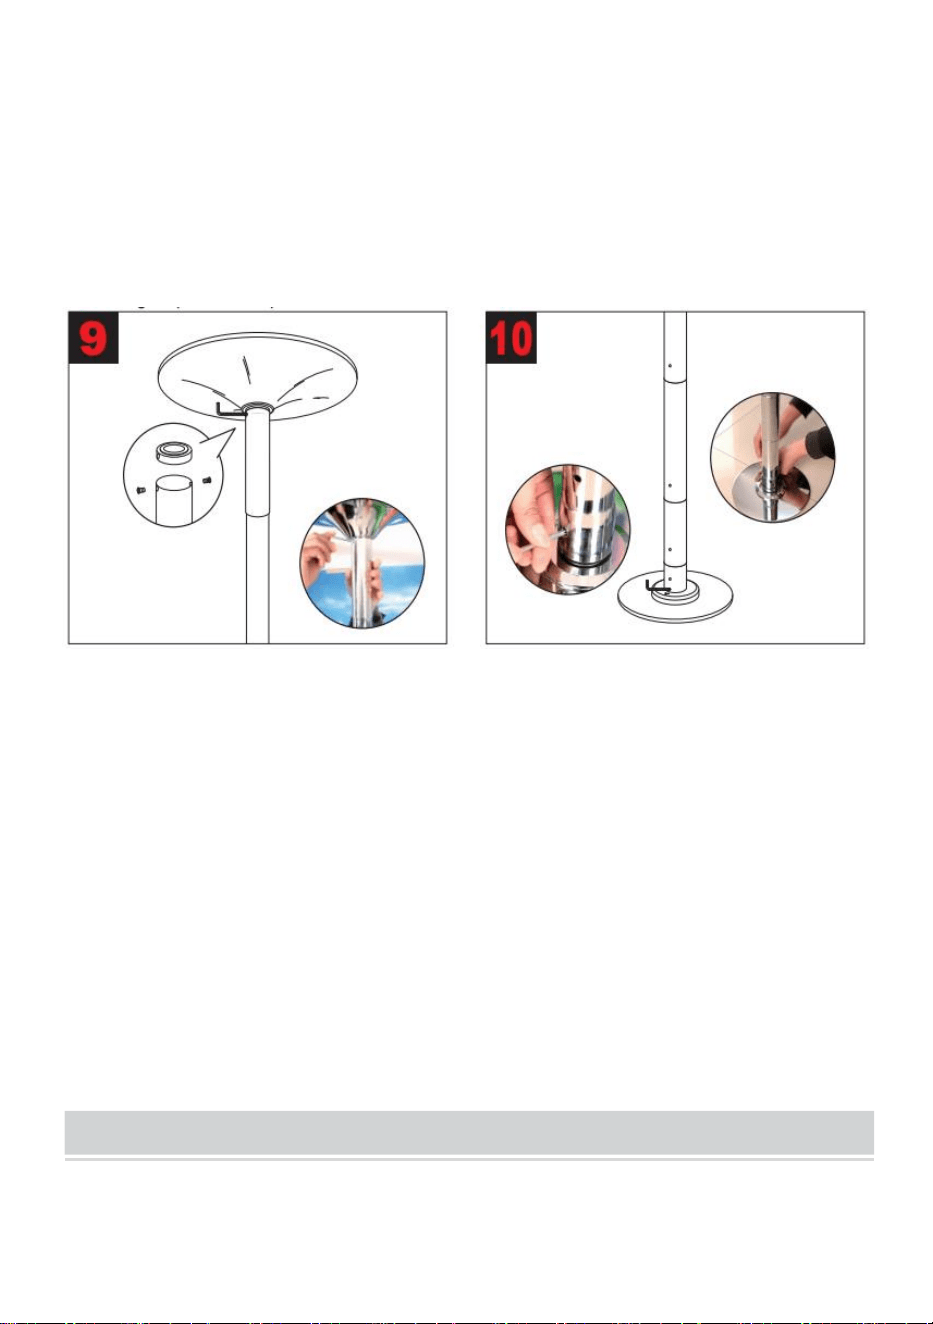
Push the Cover upwards and secure
it with the two screws that
dis-assembled from the cover at
step 2.
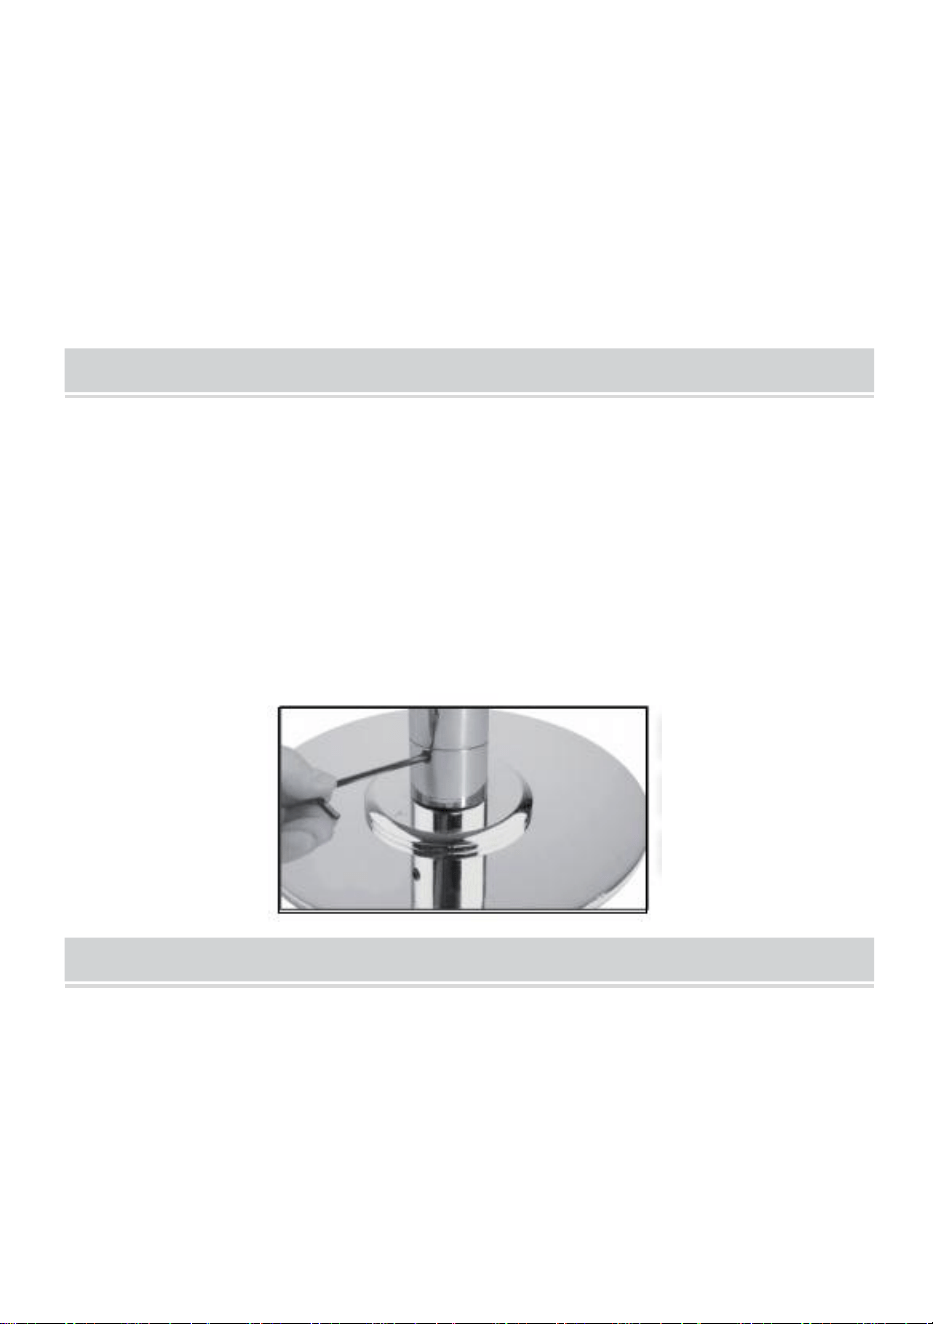
Loose the Static/Spin screws on the
both sides of the Base shaft before
use. DO NOT completely remove
the screws.
The adjusting hole need to be in line
with the "Y-Mark"on the base.
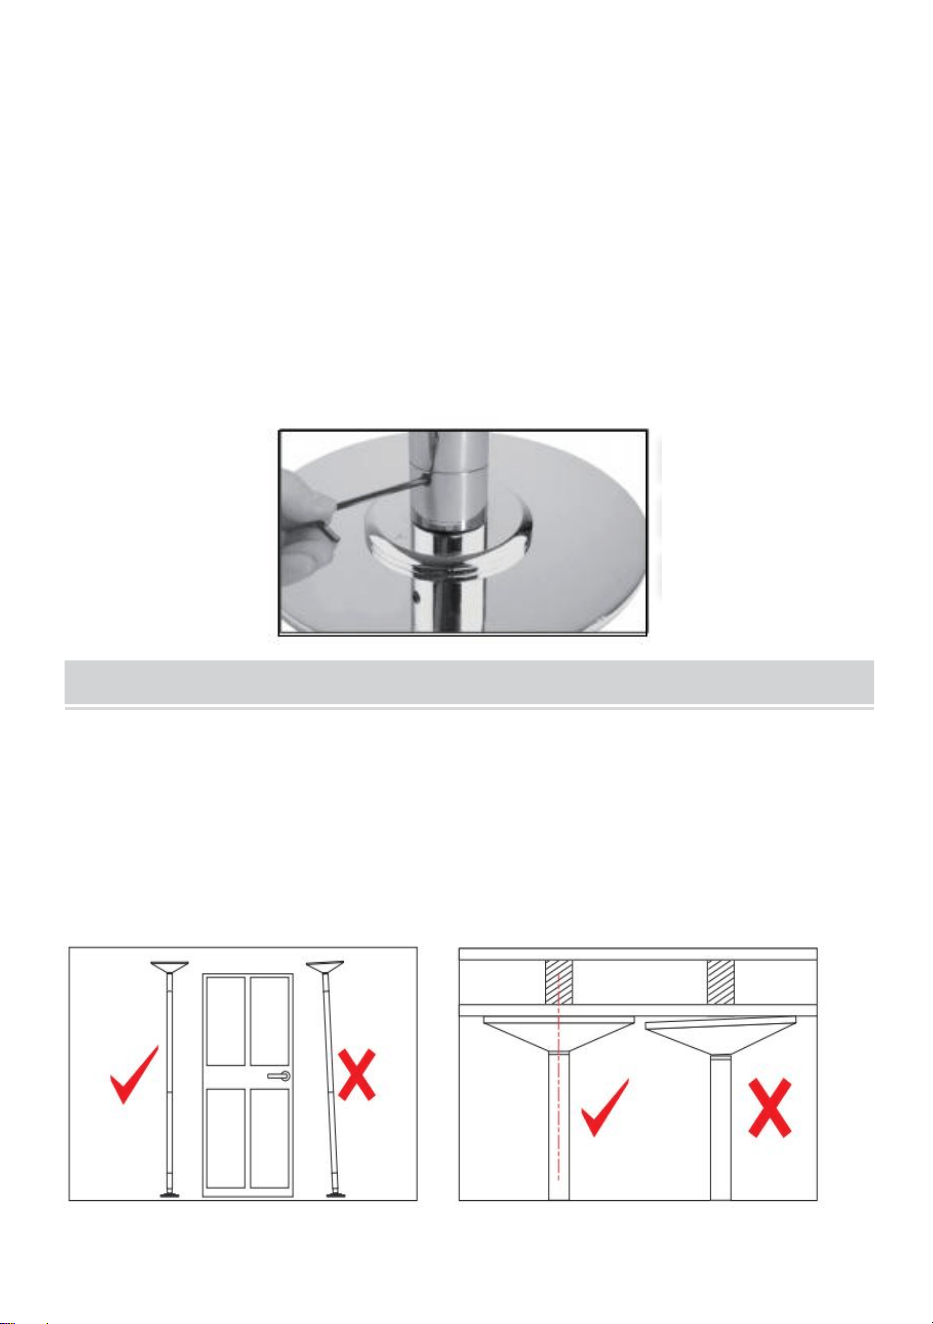
STATIC & SPINNING
The dance pole is at static mode after initial assembly.
To change the pole mode from static to spinning - loose the Static/Spin
screws on the both sides of the Base shaft - DO NOT ROMOVE
COMPLETELY - the pole will now spin freely.
To return to static, full tighten the Static/screws on the both sides of the
Base shaft.
- 9 -
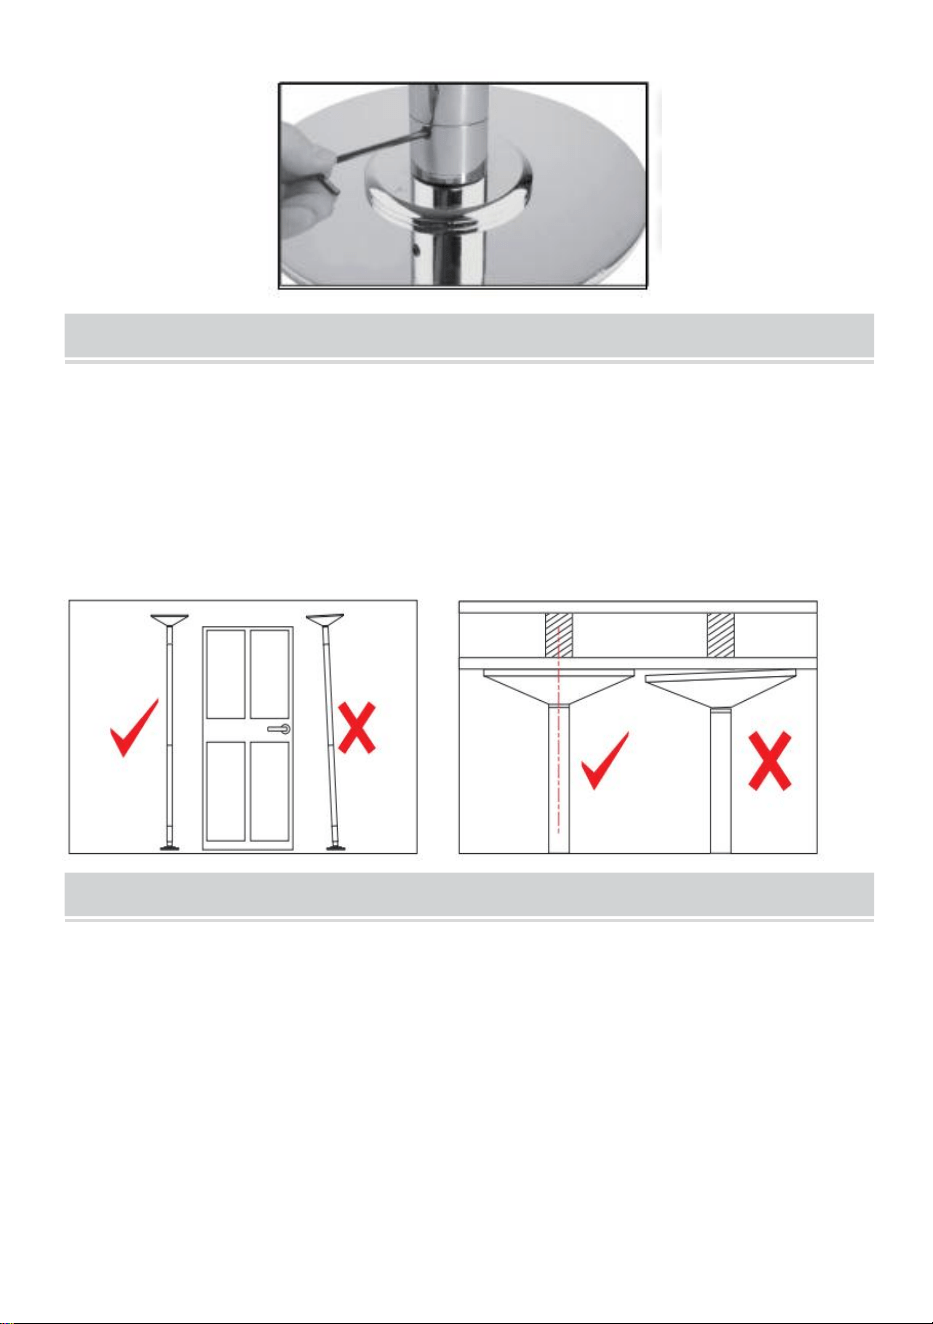
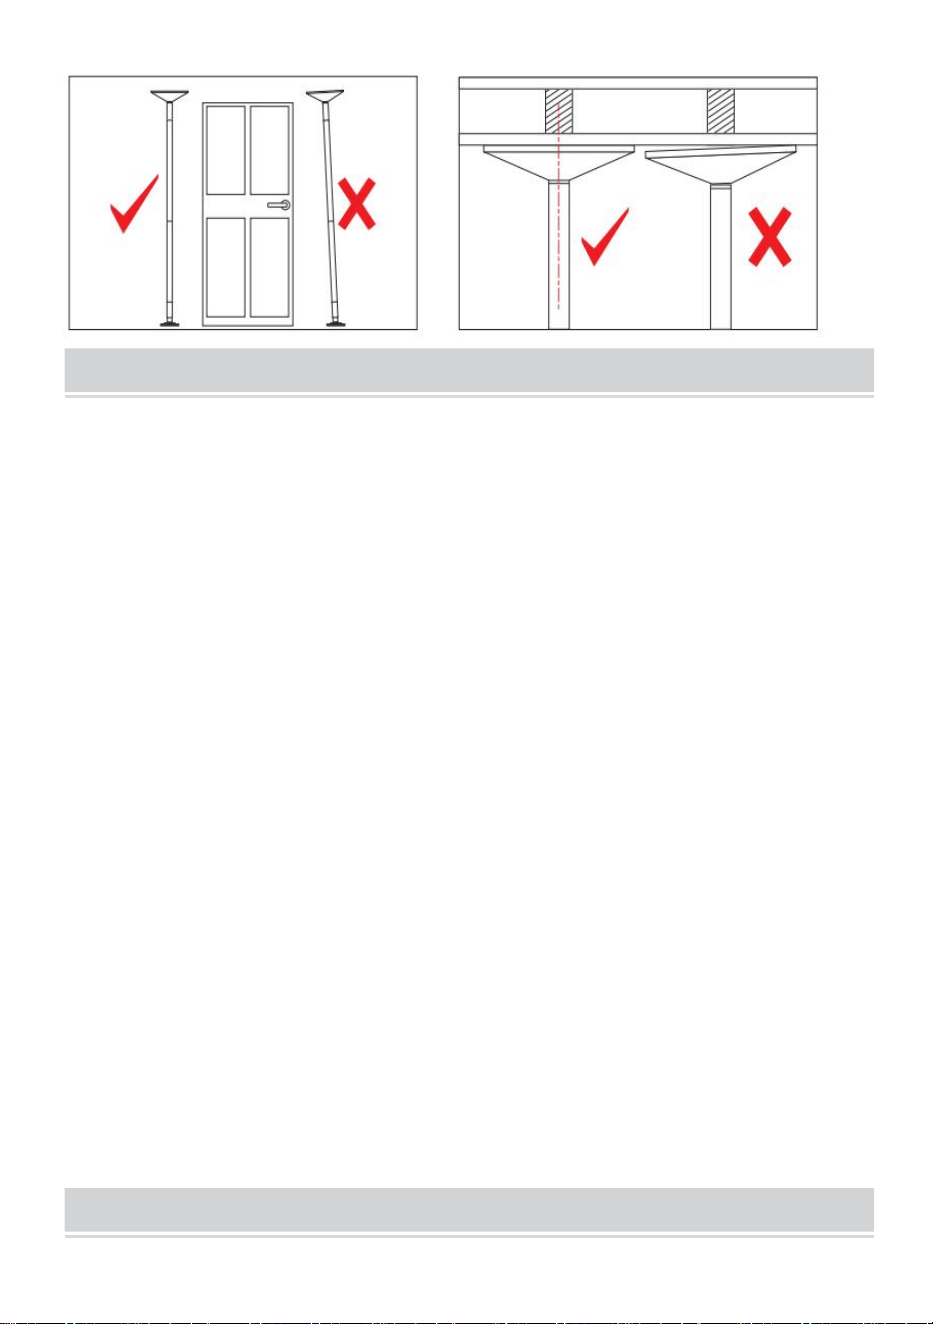
INSTALLATION TEST
·
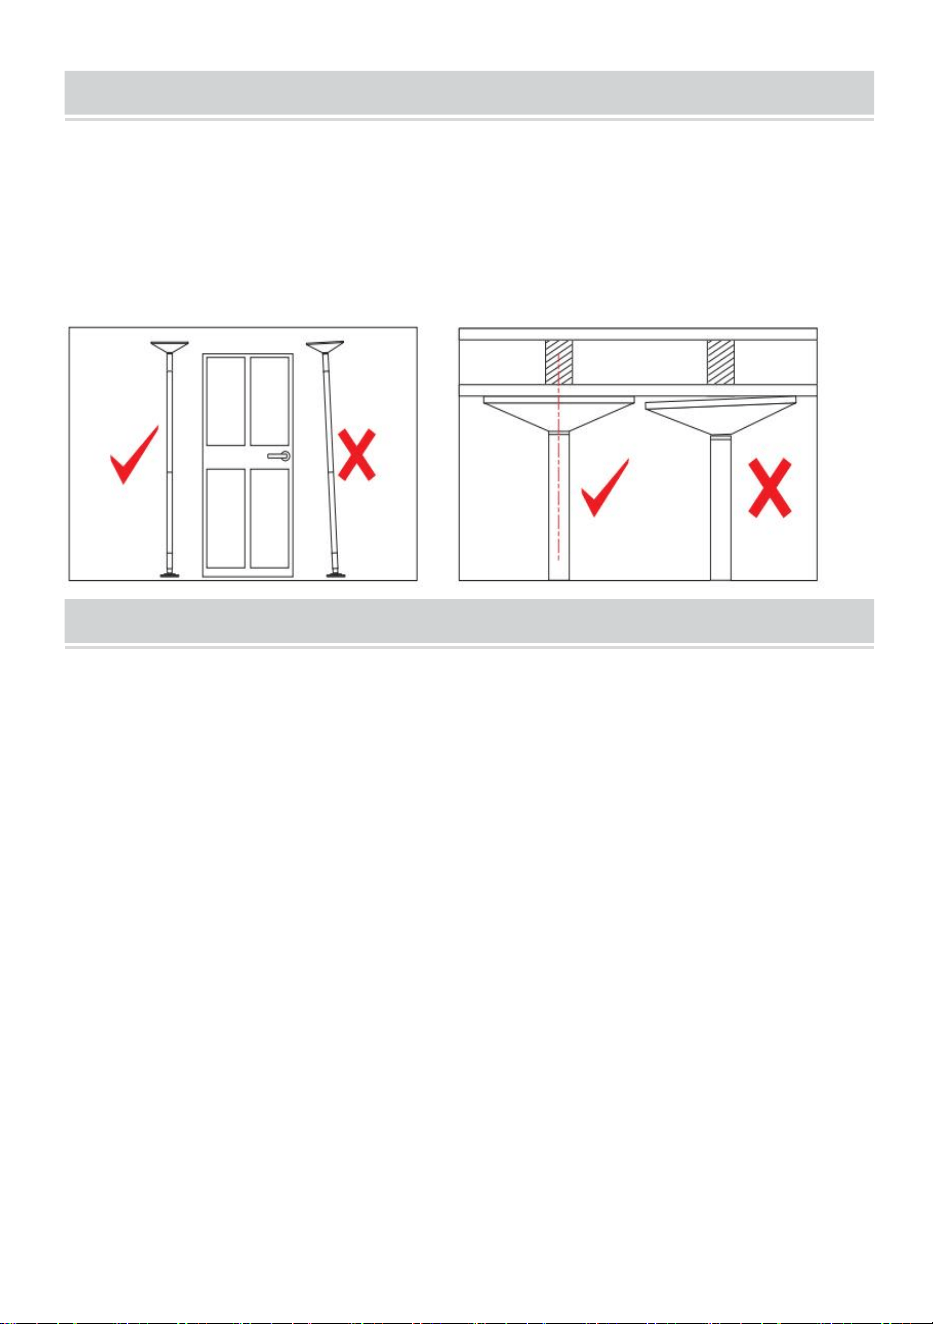
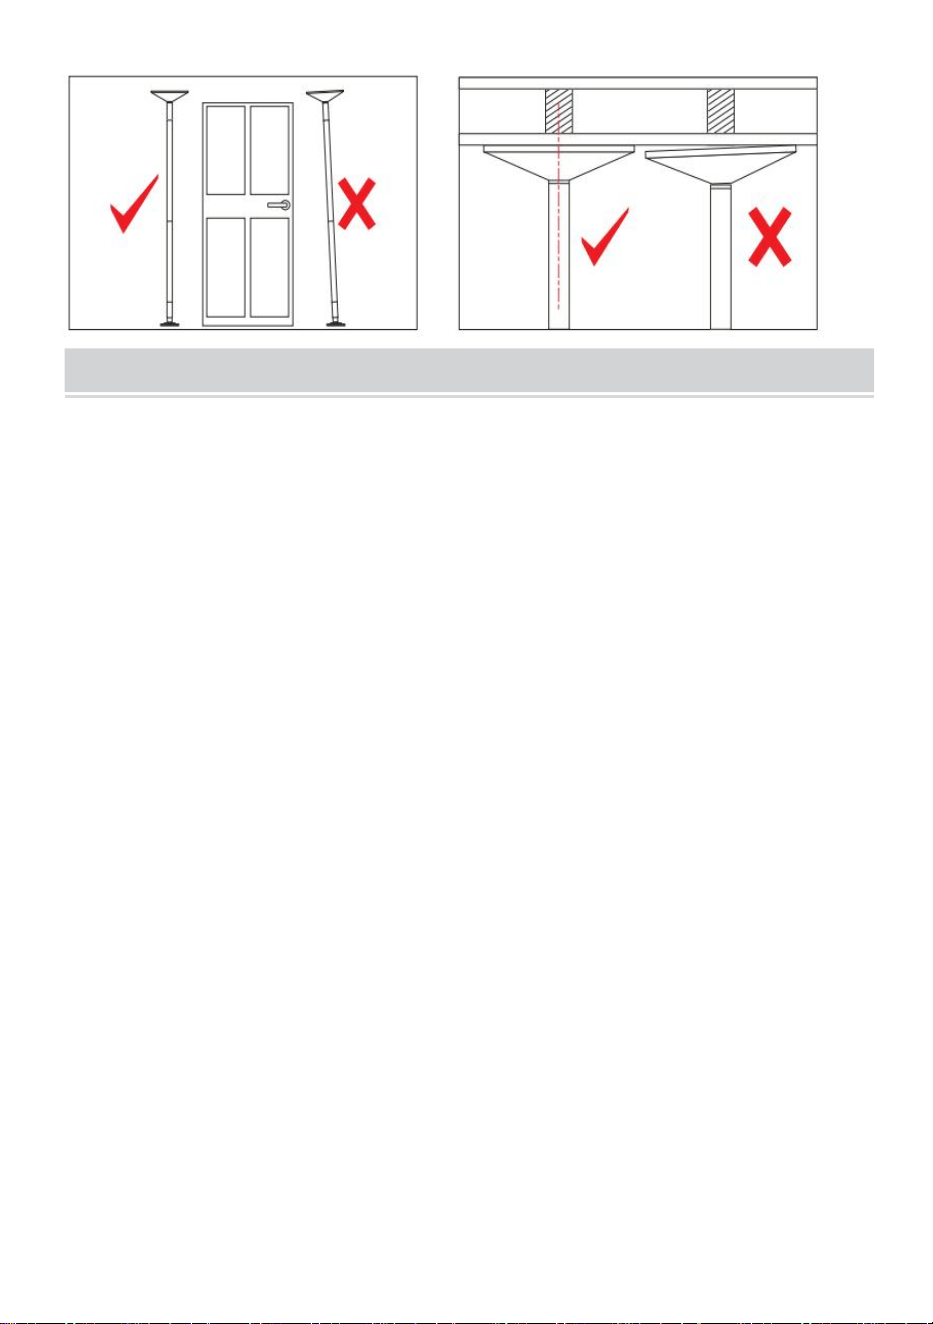
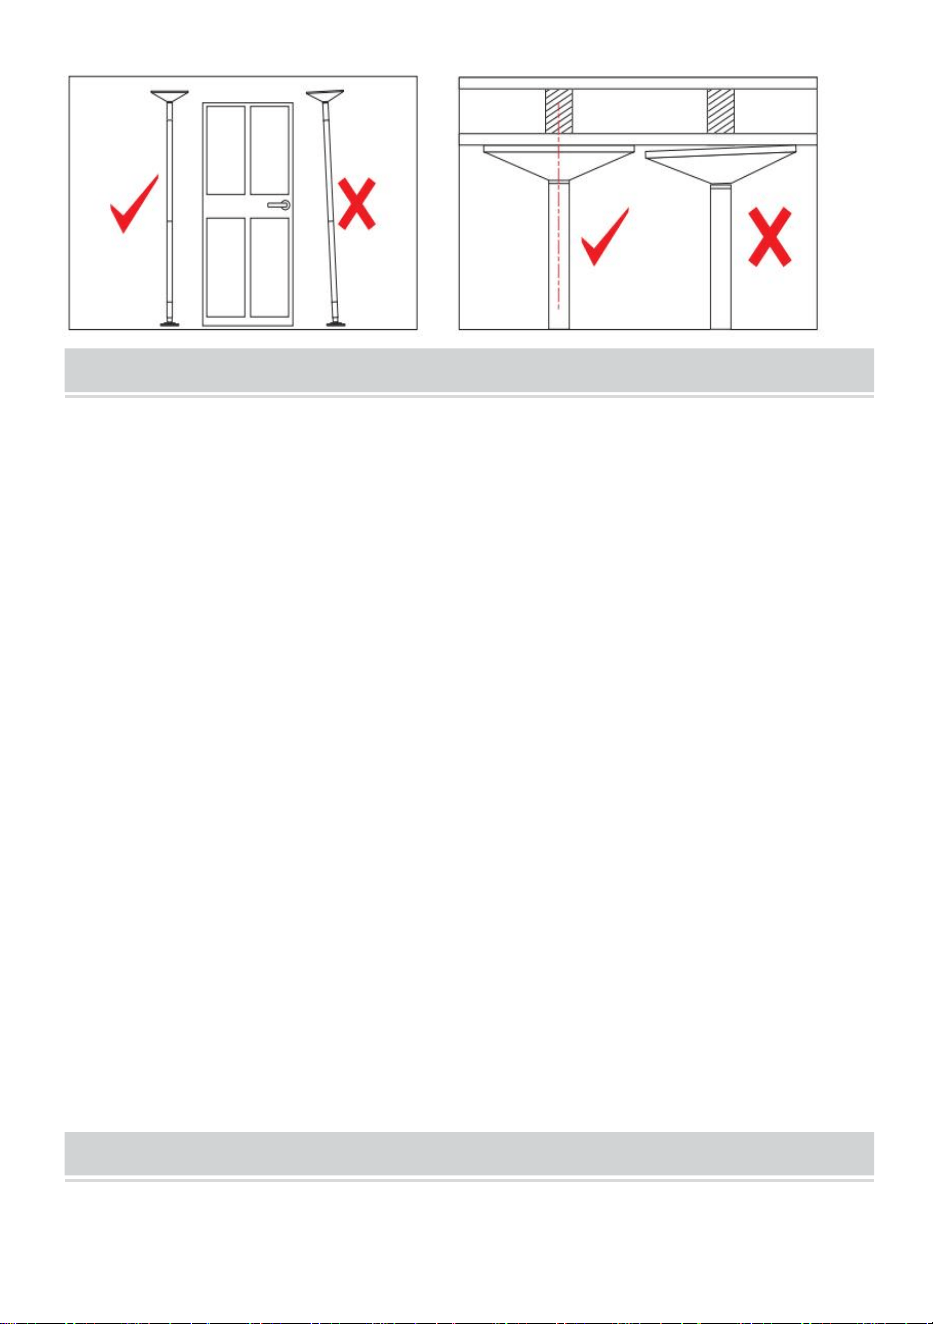
Once the Upper Dome is against the ceiling and before it is tightened
further,make sure that the pole is vertical.
·
It is critical that the Upper Dome is flat against the ceiling.DO NOT
expand the adjuster further until the upper dome is flat against the ceiling.If
the Upper Dome is not flat,the plate could rotate,and slip or damage the
ceiling.
WARNINGS
·NEVER use oils and/or lotion on your hands or body prior to using your
pole.This is very DANGEROUS.The oil can transfer onto the pole making it
slippery and impossible to hold and this could cause you or someone using
the pole after you to have a serious accident.
·The dance pole SHOULD NOT be installed under false,suspended or
non-rigid ceilings.
·Carpet,wooden or sprung floors can affect the stability of this product.
· Prior to installation,all shrink-wrap covering the pole tubes and parts
must be removed.Please DO NOT use a sharp instrument/knife to do
this,as damage may be caused.
·
When assembled,the Dance Pole is heavy and at full height,NOT easy to
handle.It is therefore MANDA-TORY/COMPULSORY that two people
install the Dance Pole-i.e.1 people should lift it into position and 1 person
hold the pole while the other rotates/expands the height adjuster.
·
NEVER use your pole if you are in any doubt about its assembly,stability
or how to use it.
·
The dance pole may make noise when making spinning moves after long
term use.It's recommended to lubricate the corresponding joints.

- 10 -
PRIOR TO USE
·
Once the pole feels tight and does not move,try practicing a turn with at
least one feet on the floor.Re-tight-en as necessary until there is no
movement.Once you are certain that the pole has been installed safely-try
a move with your feet off the ground.
·Misusing a pole can be dangerous not only to you but also anyone close
to the pole.The use of any pole is always at the user's discretion.
·Pole Exercise is extremely physical and uses muscles that you will not
have used before and therefore if you are not warmed up muscle damage
and strains can occur.
·
Practice each basic move until you are happy with your ability to do the
move before continuing on to the next one.If at any time you feel
uncomfortable,your muscles hurt,or you are short of breath-take a break
and try again later.In fact it is better to rest between moves,let someone
else try and then progress on to the next.By the way -practice does make
perfect!
NOTE
To continuously improve its products, VEVOR reserves the right to modify
this information without prior notification.
Please contact customer service via www.vevor.com with any questions,
comments, or concerns. Thank you for using VEVOR products in your
home!

- 11 -
Manufacturer: Shanghaimuxinmuyeyouxiangongsi
Address:Baoshanqu Shuangchenglu 803long 11hao 1602A-1609shi
Shanghai
Imported to USA: Sanven Technology Ltd.Suite 250, 9166 Anaheim Place,
Rancho Cucamonga, CA 91730
Made In China


Techniczny Certyfikat wsparcia i e-gwarancji www.vevor.com/support
Przenośny drążek do ta
ń
ca
MODEL : HM-594 /HM-590
We continue to be committed to provide you tools with competitive price.
"Save Half", "Half Price" or any other similar expressions used by us only represents an
estimate of savings you might benefit from buying certain tools with us compared to the major
top brands and does not necessarily mean to cover all categories of tools offered by us. You
are kindly reminded to verify carefully when you are placing an order with us if you are
actually saving half in comparison with the top major brands.


- 1 -
MODEL: HM-594/HM-590
Have product questions? Need technical support? Please feel free to
contact us:
Technical Support and E-Warranty Certificate
www.vevor.com/support
NEED HELP? CONTACT US!
This is the original instruction, please read all manual instructions
carefully before operating. VEVOR reserves a clear interpretation of our
user manual. The appearance of the product shall be subject to the
product you received. Please forgive us that we won't inform you again if
there are any technology or software updates on our product.
Portable Dance Pole

- 2 -
Ostrzeżenie — aby zmniejszyć ryzyko obrażeń, użytkownik
musi uważnie przeczytać instrukcję obsługi.
SAFETY WARNINGS AND PRECAUTIONS
Dziękujemy za korzystanie z tego produktu . Aby mieć pewność, że
będziesz mógł prawidłowo obsługiwać maszynę, przeczytaj uważnie
niniejszą instrukcję przed rozpoczęciem użytkowania i zachowaj ją
odpowiednio do wykorzystania w przyszłości . Aby zapewnić bezpieczne
użytkowanie, pamiętaj o zapoznaniu się ze środkami ostrożności i
zasadami bezpieczeństwa zawartymi na tej stronie . Niniejsza instrukcja
zawiera ostrzeżenia i środki ostrożności dotyczące bezpieczeństwa,
obsługi i konserwacji . Ostrzeżenia i instrukcje omówione w tej instrukcji
nie obejmują wszystkich możliwych warunków i sytuacji, które mogą
wystąpić . Ostrożność i zdrowy rozsądek nie są podstawą tego produktu,
ponieważ wierzymy, że jego zastosowanie będzie zgodne z tymi kodami .
Przed użyciem urządzenia przeczytaj WSZYSTKIE instrukcje .
1. Montaż musi przebiegać zgodnie z poniższymi instrukcjami.
Nieprawidłowy montaż może stanowić zagrożenie.
2. Nie montuj się będąc zmęczonym, pod wpływem alkoholu, narkotyków
lub leków.
3.Waga, elastyczność i inne właściwości produktu mają zastosowanie
wyłącznie do produktów prawidłowo i całkowicie zmontowanych.
4. Utrzymuj miejsce zbiórki w czystości i dobrze oświetlone.
5. Podczas montażu trzymaj osoby postronne z dala od obszaru.
6. To jest sprzęt, a nie zabawka, należy go używać pod okiem
profesjonalisty. Nie pozwalaj dzieciom i zwierzętom bawić się samotnie ani
nie zbliżaj się do tego przedmiotu.
7 . Sprawdź przed każdym użyciem. Nie używaj go, jeśli części są luźne
lub uszkodzone.
8 Nie używaj tego urządzenia do celów innych niż wskazane .
9 . Nie używaj go do celów komercyjnych .
1 0 . Nie czyść go żadnymi materiałami ściernymi .
- 3 -
1 1 . Nigdy nie pozostawiaj go bez nadzoru podczas użytkowania .
1 2 . Mocz i odchody zwierząt domowych mogą uszkodzić produkt, należy
je trzymać z daleka .
1 3 . Nie umieszczaj produktu na lub w pobliżu gorącego powietrza,
palników elektrycznych lub grzejników .
14 . Małe dzieci należy nadzorować, aby mieć pewność, że nie bawią się
produktem . Zwierzęta powinny trzymać się z daleka od produktu.
Nie używać na zewnątrz w deszczowe i pochmurne dni, unikać uderzeń
pioruna i upadków . Osoby lub zwierzęta wiszące na produkcie mogą
spowodować obrażenia lub śmierć .
PARTS IDENTIFICATION
- 4 -
HEIGHT CALCULATOR

- 5 -
Reżyser ma taką możliwość
przedłużenia bieguna o 190mm.
Każda zmiana rozmiaru nakłada się na siebie.
Zawsze zwiększaj liczbę używanych rozszerzeń Jeśli to możliwe.
Zmierz wysokość sufitu na środku punktu użytkowania, a następnie
zapoznaj się z tabelą wysokości po lewej stronie który pokaże Ci
rurki/przedłużki do masztu być używane. Zawsze dopasowuj wysokość
sufitu do biegun na wykresie, dający maksymalną wartość rzeczywistą
długość słupa.
PRIOR TO ASSEMBLY
- 6 -
Znajdź odpowiednie miejsce do ćwiczeń i tańca. Aby prawidłowo używać
rurki, musisz mieć możliwość obracania się wokół rury z wyciągniętymi
ramionami bez uderzania lub dotykania czegokolwiek podczas obracania.
Znajdź obszar, obracając się wokół wyimaginowanego słupa z
wyciągniętymi ramionami (ryc. 1). Możesz użyć krzesła jako
wyimaginowanego słupa lub zmierzyć okrąg o średnicy około 3,0–3,5 m.
Obszar ten pozwoli Ci w pełni wyciągnij ramiona. Manewry można
wykonywać na mniejszej przestrzeni niż powyższa, ale dla początkujących
zalecana jest powyższa przestrzeń.
ASSEMBIY INSTRUCTIONS
- 7 -
Podłącz rurę przedłużającą D i C do
wału podstawy. Upewnij się, że
krawędzie rury są ściśle ze sobą
połączone.
Wykręć śruby i adapter z pokrywy, a
następnie wsuń go na rurkę
przedłużającą C. (Śruby będą
ponownie zmontowane później.)
Podłącz słupek B do rury
przedłużającej C. Obróć
Biegun B w kierunku przeciwnym do
ruchu wskazówek zegara, aż do
regulator znajduje się około 1,5 cala
nad biegunem A i otwór regulacyjny
jest widoczny.
Po słupie B i A (i wszelkich
dodatkowych przedłużeniach) są
podłączone, włóż adapter do
regulatora, a następnie przymocuj
słupek A do górnej kopuły.
- 8 -
Obróć biegun A w kierunku
przeciwnym do ruchu wskazówek
zegara, aż do oporu
Siła można zastosować, aby
przymocować go na miejscu.
Ważne jest, aby stopniowo
dokręcać wszystkie sekcje aby
zabezpieczyć całe urządzenie – na
przemian słupy i rury przedłużające,
dokręcając zgodnie z ruchem
wskazówek zegara.
Obróć wstępnie zmontowaną
nakrętkę znajdującą się na Słup
lada
-zgodnie z ruchem wskazówek
zegara, co umożliwi regulację go na
pierwotne miejsce na słupie.
Dokręcić nakrętkę, obracając ją w
kierunku przeciwnym do ruchu
wskazówek zegara
l-Rod, aż do momentu, w którym nie
można było zastosować dalszej siły.
- 9 -
Popchnij pokrywę do góry i
zabezpiecz ją obiema częściami
śruby, które zostały zdemontowane
z pokrywy w kroku 2.
Poluzuj śruby statyczne/obrotowe
po obu stronach Wał podstawowy
przed użyciem. NIE usuwaj
całkowicie śruby.
Otwór regulacyjny musi znajdować
się w jednej linii ze znakiem „Y” na
podstawie.
STATIC & SPINNING
Po pierwszym montażu drążek taneczny znajduje się w trybie statycznym.
Aby zmienić tryb tyczki ze statycznego na wirujący, poluzuj opcję
Static/Spin
śruby po obu stronach trzonka podstawy — NIE WYJMOWAĆ
CAŁKOWICIE — słup będzie się teraz swobodnie obracał.
Aby powrócić do stanu statycznego, dokręć całkowicie statyczne/śruby po
obu stronach
Wał podstawowy.
- 9 -
INSTALLATION TEST
· Gdy Górna Kopuła dotknie sufitu i przed jej dalszym dokręceniem,
upewnij się, że słupek jest prawidłowo osadzony pionowy.
·
Bardzo ważne jest, aby górna kopuła przylegała płasko do sufitu. NIE
rozszerzaj regulatora dalej, aż do momentu górna kopuła przylega płasko
do sufitu. Jeśli górna kopuła nie jest płaska, płyta może się obracać i
ślizgać uszkodzić sufit.
WARNINGS
·
NIGDY nie używaj olejków i/lub balsamu do rąk lub ciała przed użyciem
kija. Jest to bardzo NIEBEZPIECZNE. Olej może przenieść się na kij,
czyniąc go śliskim i niemożliwym do utrzymania, co może spowodować u
ciebie lub ktoś, kto użyje kija za tobą, spowoduje poważny wypadek.
·
Drążek do tańca NIE NALEŻY instalować pod sufitami podwieszanymi,
podwieszanymi lub niesztywnymi.
· Dywany, podłogi drewniane lub sprężynowe mogą mieć wpływ na
stabilność tego produktu.

- 10 -
· Przed montażem należy usunąć całą folię termokurczliwą pokrywającą
rury słupowe i części. NIE WOLNO tego robić używaj do tego ostrego
narzędzia/noża, gdyż może to spowodować uszkodzenie.
· Po złożeniu Dance Pole jest ciężkie i ma pełną wysokość, NIE jest łatwe
w obsłudze. Dlatego OBOWIĄZKOWE/OBOWIĄZKOWE jest, aby dwie
osoby instalowały Dance Pole, tzn. 1 osoba powinna podnieść go na
miejsce i Jedna osoba trzyma drążek, druga obraca/rozsuwa regulator
wysokości.
· NIGDY nie używaj kijka, jeśli masz jakiekolwiek wątpliwości co do jego
montażu, stabilności lub sposobu jego używania.
·
Rurka do tańca może powodować hałas podczas wykonywania ruchów
obrotowych po długotrwałym użytkowaniu. Jest to zalecane nasmarować
odpowiednie przeguby.
PRIOR TO USE
·
Gdy rurka będzie już napięta i nie będzie się poruszać, spróbuj
poćwiczyć skręt, trzymając przynajmniej jedną stopę na podłodze. W razie
potrzeby dokręć ponownie, aż nie będzie żadnego ruchu. Kiedy już
będziesz pewien, że rurka została bezpiecznie zainstalowana, spróbuj
ruch ze stopami nad ziemią.
· Niewłaściwe użycie kija może być niebezpieczne nie tylko dla ciebie, ale
także dla wszystkich osób znajdujących się w pobliżu kija. Korzystanie z
dowolnego kija już tak zawsze według uznania użytkownika.
· Ćwiczenia na rurze są niezwykle fizyczne i angażują mięśnie, których
wcześniej nie używałeś, a zatem jeśli nie jesteś rozgrzany, mogą wystąpić
uszkodzenia mięśni i nadwyrężenia.
· Ćwicz każdy podstawowy ruch, aż będziesz zadowolony ze swojej
umiejętności wykonania ruchu, zanim przejdziesz dalej następny. Jeśli
kiedykolwiek poczujesz się nieswojo, bolą Cię mięśnie , brakuje Ci tchu –
zrób sobie przerwę i spróbuj ponownie później fakt, że lepiej jest odpocząć
pomiędzy ruchami, pozwolić komuś innemu spróbować, a następnie
przejść dalej następny. Swoją drogą – praktyka czyni mistrza!
NOTE

- 11 -
Aby stale udoskonalać swoje produkty, firma VEVOR zastrzega sobie
prawo do ich modyfikacji informacji bez uprzedniego powiadomienia.
W przypadku jakichkolwiek pytań, komentarzy lub wątpliwości prosimy o
kontakt z obsługą klienta za pośrednictwem witryny www.vevor.com.
Dziękujemy, że korzystasz z produktów VEVOR w swoim domu!
Producent: Shanghaimuxinmuyeyouxiangongsi
Adres: Baoshanqu Shuangchenglu 803long 11hao 1602A-1609shi
Szanghaj
Import do USA: Sanven Technology Ltd.Suite 250, 9166 Anaheim Place,
Rancho Cucamonga, CA 91730

- 12 -
Wyprodukowano w Chinach


Technisch Support- und E-Garantie-Zertifikat www.vevor.com/support
Tragbare Tanzstange
MODELL : HM-594 /HM-590
We continue to be committed to provide you tools with competitive price.
"Save Half", "Half Price" or any other similar expressions used by us only represents an
estimate of savings you might benefit from buying certain tools with us compared to the major
top brands and does not necessarily mean to cover all categories of tools offered by us. You
are kindly reminded to verify carefully when you are placing an order with us if you are
actually saving half in comparison with the top major brands.


- 1 -
MODELL: HM-594/HM-590
Have product questions? Need technical support? Please feel free to
contact us:
Technical Support and E-Warranty Certificate
www.vevor.com/support
NEED HELP? CONTACT US!
This is the original instruction, please read all manual instructions
carefully before operating. VEVOR reserves a clear interpretation of our
user manual. The appearance of the product shall be subject to the
product you received. Please forgive us that we won't inform you again if
there are any technology or software updates on our product.
Portable Dance Pole

- 2 -
Warnung: Um das Verletzungsrisiko zu verringern, muss der
Benutzer die Bedienungsanleitung sorgfältig lesen.
SAFETY WARNINGS AND PRECAUTIONS
Vielen Dank, dass Sie dieses Produkt verwenden . Um sicherzustellen,
dass Sie die Maschine ordnungsgemäß bedienen können, lesen Sie diese
Anleitung vor der Inbetriebnahme sorgfältig durch und bewahren Sie sie
zum späteren Nachschlagen sorgfältig auf . Bitte lesen Sie unbedingt die
Vorsichtsmaßnahmen und Sicherheitsregeln auf dieser Seite, um eine
sichere Verwendung zu gewährleisten . In diesem Handbuch werden
Sicherheitswarnungen und Vorsichtsmaßnahmen sowie Bedienung und
Wartung beschrieben . Die in diesem Handbuch aufgeführten Warnungen
und Anweisungen können nicht alle möglichen Bedingungen und
Situationen abdecken, die auftreten können . Vorsicht und gesunder
Menschenverstand sind in diesem Produkt nicht eingebaut, da wir davon
ausgehen, dass die Verwendung diesen Codes entspricht .
Bitte lesen Sie ALLE Anweisungen, bevor Sie Ihr Gerät verwenden .
1. Beim Zusammenbau müssen diese Anweisungen befolgt werden. Eine
falsche Montage kann eine Gefahr darstellen.
2. Montieren Sie das Gerät nicht, wenn Sie müde sind oder unter dem
Einfluss von Alkohol, Drogen oder Medikamenten stehen.
3.Gewicht, Elastizität und sonstige Produkteigenschaften gelten nur für
korrekt und vollständig montierte Produkte.
4. Halten Sie den Montagebereich sauber und gut beleuchtet.
5. Halten Sie während der Montage unbeteiligte Personen aus dem
Bereich fern.
6. Dies ist ein Gerät, kein Spielzeug, es muss unter Anleitung eines
Fachmanns verwendet werden. Erlauben Sie Kindern und Haustieren nicht,
alleine zu spielen oder sich diesem Gegenstand zu nähern.
7 . Vor jedem Gebrauch prüfen. Benutzen Sie es nicht, wenn Teile lose
oder beschädigt sind.

- 3 -
8 Benutzen Sie dieses Gerät nicht für andere Zwecke als den
angegebenen .
9 . Benutzen Sie es nicht für kommerzielle Zwecke .
1 0 . Reinigen Sie es nicht mit scheuernden Materialien .
1 1 . Lassen Sie es während des Gebrauchs niemals unbeaufsichtigt .
1 2 . Urin und Kot von Haustieren können das Produkt beschädigen, bitte
fernhalten .
1 3 . Stellen Sie das Produkt nicht auf oder in die Nähe von Heißluft-,
Elektrobrennern oder Heizgeräten .
14 . Kleine Kinder sollten beaufsichtigt werden, um sicherzustellen, dass
sie nicht mit dem Produkt spielen . Haustiere sollten vom Produkt
ferngehalten werden.
An regnerischen und bewölkten Tagen nicht im Freien verwenden,
Blitzeinschläge und Stürze vermeiden . Am Produkt hängende Personen
oder Haustiere können zu Verletzungen oder zum Tod führen .
PARTS IDENTIFICATION
- 4 -
HEIGHT CALCULATOR
- 5 -
- 6 -
Der Einsteller hat die Möglichkeit
der Polverlängerung um 190mm.
Bei jeder Größenänderung gibt es eine Überlappung.
Erhöhen Sie immer die Anzahl der verwendeten Erweiterungen wenn
möglich.
Messen Sie die Höhe Ihrer Decke in der Mitte Ort des Einsatzes und
beziehen Sie sich dann auf die Höhentabelle links Hier werden Ihnen die
Stangenrohre/-verlängerungen angezeigt verwendet werden. Passen Sie
Ihre Deckenhöhe immer an die an Pol auf dem Diagramm, der Ihnen das
tatsächliche Maximum gibt Stangenlänge.
PRIOR TO ASSEMBLY
Finden Sie einen geeigneten Bewegungs- und Tanzbereich. Um die
Stange richtig zu verwenden, müssen Sie in der Lage sein, sich mit
ausgestreckten Armen um die Stange zu drehen ohne beim Drehen auf
etwas zu stoßen oder es zu berühren. Finden Sie den Bereich, indem Sie
sich mit ausgestreckten Armen um eine imaginäre Stange drehen (Abb. 1).
Sie können einen Stuhl als imaginäre Stange verwenden oder einen Kreis
mit einem Durchmesser von etwa 3,0 bis 3,5 Metern messen. In diesem
Bereich können Sie dies vollständig tun Strecken Sie Ihre Arme aus.
Manöver können auf kleinerem Raum als den oben genannten ausgeführt
werden, für Anfänger wird jedoch der oben genannte Raum empfohlen.
- 7 -
ASSEMBIY INSTRUCTIONS
Verbinden Sie die
Verlängerungsrohre D und C mit
dem Basisschaft. Stellen Sie sicher,
dass die Rohrkanten fest
miteinander verbunden sind.
Entfernen Sie die Schrauben und
den Adapter von der Abdeckung
und schieben Sie ihn dann auf das
Verlängerungsrohr C. (Die
Schrauben werden entfernt später
wieder zusammengebaut.)
Verbinden Sie die B-Stange mit dem
Verlängerungsrohr C. Drehen Sie
die
Sobald der B-Pole und der A-Pole
(und eventuelle zusätzliche
Verlängerungen) angeschlossen
- 8 -
B-Pol gegen den Uhrzeigersinn, bis
die Der Einsteller befindet sich etwa
1,5 Zoll über der A-Säule und das
Einstellloch ist sichtbar.
sind, stecken Sie den Adapter in
den Einsteller und dann Befestigen
Sie die A-Stange an der oberen
Kuppel.
Drehen Sie die A-Stange gegen den
Uhrzeigersinn bis zum Anschlag
Gewalt kann zur Befestigung
angebracht werden.
Es ist wichtig, alle Abschnitte
schrittweise festzuziehen um die
gesamte Vorrichtung zu sichern –
abwechselnd Stangen und
Verlängerungsrohre im
Uhrzeigersinn festziehen.
Drehen Sie die vormontierte Mutter,
Ziehen Sie die Mutter fest, indem
- 9 -
die sich auf dem befindet Eine
Stange Schalter
-im Uhrzeigersinn, sodass Sie die
Einstellung vornehmen können es
an seinen ursprünglichen Platz an
der Stange.
Sie sie gegen den Uhrzeigersinn
drehen
die L-Stange, bis keine weitere Kraft
mehr ausgeübt werden kann.
Schieben Sie die Abdeckung nach
oben und befestigen Sie sie mit den
beiden Schrauben, die in Schritt 2
von der Abdeckung entfernt wurden.
Lösen Sie die
Statik-/Spin-Schrauben auf beiden
Seiten des Basisschaft vor
Gebrauch. NICHT vollständig
entfernen die Schrauben.
Das Einstellloch muss mit der „
Y-Markierung“ an der Basis
übereinstimmen.
STATIC & SPINNING
Nach der Erstmontage befindet sich die Tanzstange im statischen Modus.
- 9 -
Um den Stangenmodus von statisch auf rotierend zu ändern, lösen Sie die
Option „Statisch/Spin“.
Schrauben auf beiden Seiten des Basisschafts – NICHT VOLLSTÄNDIG
ENTFERNEN – die Stange dreht sich jetzt frei.
Um zur Statik zurückzukehren, ziehen Sie die Statik-/Schrauben auf
beiden Seiten des vollständig fest
Basisschaft.
INSTALLATION TEST
· Sobald die obere Kuppel an der Decke anliegt und bevor sie weiter
festgezogen wird, stellen Sie sicher, dass die Stange anliegt Vertikale.
·
Es ist wichtig, dass die obere Kuppel flach an der Decke anliegt.
Erweitern Sie den Einsteller NICHT weiter, bis der Die obere Kuppel liegt
flach an der Decke an. Wenn die obere Kuppel nicht flach ist, könnte sich
die Platte drehen und verrutschen die Decke beschädigen.

- 10 -
WARNINGS
· Tragen Sie NIEMALS Öle und/oder Lotionen auf Ihren Händen oder
Ihrem Körper auf, bevor Sie Ihren Stock benutzen. Dies ist sehr
GEFÄHRLICH. Das Öl kann auf den Stock übertragen werden, wodurch er
rutschig wird und sich nicht mehr festhalten lässt dass jemand, der hinter
Ihnen her die Stange benutzt, einen schweren Unfall erleidet.
·
Die Tanzstange DARF NICHT unter Zwischendecken, abgehängten oder
nicht starren Decken installiert werden.
· Teppich-, Holz- oder Schwingböden können die Stabilität dieses Produkts
beeinträchtigen.
· Vor der Installation müssen alle Schrumpffolien, die die Stangenrohre
und -teile bedecken, entfernt werden. Bitte NICHT Verwenden Sie dazu ein
scharfes Instrument/Messer, da dies zu Schäden führen kann.
· Im zusammengebauten Zustand ist die Tanzstange schwer und in voller
Höhe NICHT einfach zu handhaben. Daher ist es ZWINGEND/PFLICHT,
dass zwei Personen die Tanzstange installieren, d. h. 1 Person sollte sie in
Position heben und Eine Person hält die Stange, während die andere
Person den Höhenversteller dreht/ausdehnt.
·
Benutzen Sie Ihren Stock NIEMALS, wenn Sie Zweifel an der Montage,
Stabilität oder Verwendung haben.
· Die Tanzstange kann nach längerem Gebrauch Geräusche machen,
wenn sie sich dreht. Dies wird empfohlen Schmieren Sie die
entsprechenden Gelenke.
PRIOR TO USE
·
Sobald sich die Stange fest anfühlt und sich nicht bewegt, üben Sie eine
Drehung mit mindestens einem Fuß auf dem Boden. Ziehen Sie sie bei
Bedarf wieder fest, bis keine Bewegung mehr zu spüren ist. Sobald Sie
sicher sind, dass die Stange sicher installiert wurde, versuchen Sie es eine
Bewegung mit den Füßen über dem Boden.
· Der Missbrauch einer Stange kann nicht nur für Sie selbst, sondern auch
für alle Personen in der Nähe der Stange gefährlich sein immer im
Ermessen des Benutzers.

- 11 -
· Pole-Übungen sind äußerst körperlich anstrengend und beanspruchen
Muskeln, die Sie vorher und daher nicht beansprucht haben Wenn Sie
nicht aufgewärmt sind, kann es zu Muskelschäden und Zerrungen
kommen.
· Üben Sie jeden Grundzug, bis Sie mit Ihrer Fähigkeit zufrieden sind, den
Zug auszuführen, bevor Sie mit dem fortfahren Nächstes. Wenn Sie sich
zu irgendeinem Zeitpunkt unwohl fühlen, Ihre Muskeln schmerzen oder Sie
außer Atem sind, machen Sie eine Pause und versuchen Sie es später
noch einmal Tatsächlich ist es besser, zwischen den Zügen eine Pause
einzulegen, es jemand anderem zu überlassen und dann weiterzumachen
das nächste.Übrigens – Übung macht den Meister!
NOTE
Um seine Produkte kontinuierlich zu verbessern, behält sich VEVOR das
Recht vor, diese zu ändern Informationen ohne vorherige Ankündigung.
Bei Fragen, Kommentaren oder Bedenken wenden Sie sich bitte über
www.vevor.com an den Kundendienst. Vielen Dank, dass Sie VEVOR-
Produkte in Ihrem Zuhause verwenden!
- 12 -
Hersteller: Shanghaimuxinmuyeyouxiangongsi
Adresse: Baoshanqu Shuangchenglu 803long 11hao 1602A-1609shi
Shanghai
In die USA importiert: Sanven Technology Ltd. Suite 250, 9166 Anaheim
Place, Rancho Cucamonga, CA 91730
In China hergestellt


Technique Assistance et certificat de garantie électronique
www.vevor.com/support
Poteau de danse portable
MODÈLE : HM-594 /HM-590
We continue to be committed to provide you tools with competitive price.
"Save Half", "Half Price" or any other similar expressions used by us only represents an
estimate of savings you might benefit from buying certain tools with us compared to the major
top brands and does not necessarily mean to cover all categories of tools offered by us. You
are kindly reminded to verify carefully when you are placing an order with us if you are
actually saving half in comparison with the top major brands.

- 1 -
MODÈLE : HM-594/HM-590
Have product questions? Need technical support? Please feel free to
contact us:
Technical Support and E-Warranty Certificate
www.vevor.com/support
NEED HELP? CONTACT US!
This is the original instruction, please read all manual instructions
carefully before operating. VEVOR reserves a clear interpretation of our
user manual. The appearance of the product shall be subject to the
product you received. Please forgive us that we won't inform you again if
there are any technology or software updates on our product.
Portable Dance Pole

- 2 -
Avertissement : Pour réduire le risque de blessure, l'utilisateur
doit lire attentivement le manuel d'instructions.
SAFETY WARNINGS AND PRECAUTIONS
Merci d'avoir utilisé ce produit . Afin de vous assurer que vous pouvez
utiliser la machine correctement, lisez attentivement ces instructions avant
de l'utiliser et conservez-les correctement pour référence future . Veuillez
vous assurer de lire les précautions et les règles de sécurité contenues
dans cette page pour garantir votre utilisation en toute sécurité . Ce
manuel décrit les avertissements et les précautions de sécurité, le
fonctionnement et la maintenance . Les avertissements et instructions
examinés dans ce manuel ne peuvent pas couvrir toutes les conditions et
situations possibles qui peuvent survenir . La prudence et le bon sens ne
sont pas intégrés à ce produit, car nous pensons que les utilisations seront
conformes à ces codes .
Veuillez lire TOUTES les instructions avant d'utiliser votre machine .
1. L'assemblage doit suivre ces instructions. Un montage incorrect peut
constituer un danger.
2. Ne vous rassemblez pas lorsque vous êtes fatigué ou sous l'influence
de l'alcool, de drogues ou de médicaments.
3. Le poids, l'élasticité et les autres propriétés du produit ne s'appliquent
qu'aux produits correctement et complètement assemblés.
4. Gardez la zone de montage propre et bien éclairée.
5. Gardez les spectateurs hors de la zone pendant l'assemblage.
6. Il s’agit d’un équipement et non d’un jouet, il doit être utilisé sous la
direction d’un professionnel. Ne laissez pas les enfants et les animaux
domestiques jouer seuls ou s'approcher de cet article.
7 . Inspectez avant chaque utilisation. Ne l'utilisez pas si les pièces sont
desserrées ou endommagées.
8 N'utilisez pas cet appareil à d'autres fins que celles indiquées .
9 . Ne l'utilisez pas à des fins commerciales .
dix . _ Ne le nettoyez pas avec un matériau abrasif .
- 3 -
1 1 . Ne le laissez jamais sans surveillance pendant son utilisation .
1 2 . L'urine et les excréments d'animaux peuvent endommager le produit,
veuillez le tenir à l'écart .
1 3 . Ne placez pas le produit sur ou à proximité d'air chaud, de brûleurs
électriques ou de radiateurs .
14 . Les jeunes enfants doivent être surveillés pour s'assurer qu'ils ne
jouent pas avec le produit . Les animaux domestiques doivent rester à
l'écart du produit.
Ne pas utiliser à l'extérieur par temps pluvieux et nuageux, évitez les
coups de foudre et les chutes . Les personnes ou les animaux
domestiques accrochés au produit provoqueront des blessures, voire la
mort .
PARTS IDENTIFICATION
- 4 -
HEIGHT CALCULATOR
- 5 -
L'expert en sinistres a la capacité
d'étendre le pôle en 190mm.
Chaque changement de taille a un chevauchement.
Augmentez toujours le nombre d’extensions utilisées si possible.
Mesurez la hauteur de votre plafond au centre point d'utilisation puis
reportez-vous à la toise à gauche qui vous montrera les tubes/extensions
de poteaux à être utilisé. Adaptez toujours la hauteur de votre plafond à
celle pôle sur le graphique vous donnant le maximum réel longueur du
poteau.
PRIOR TO ASSEMBLY
- 6 -
Trouvez un espace d’exercice et de danse approprié. Pour utiliser
correctement le bâton, vous devez être capable de tourner autour du bâton
avec les bras tendus. sans heurter ni toucher quoi que ce soit pendant la
rotation. Trouvez la zone en tournant autour d'un poteau imaginaire avec
les bras tendus (Fig. 1), vous pouvez utiliser une chaise comme poteau
imaginaire ou mesurer un cercle d'un diamètre d'environ 3,0 à 3,5 mètres.
Cet espace vous permettra de pleinement tendez les bras. Les
manœuvres peuvent être exécutées dans un espace plus petit que celui
ci-dessus, mais pour les débutants, l'espace ci-dessus est recommandé.
ASSEMBIY INSTRUCTIONS
- 7 -
Connectez les tubes d'extension D
et C à l'arbre de base. Assurez-vous
que les bords du tube sont
étroitement connectés ensemble.
Retirez les vis et l'adaptateur du
couvercle, puis faites-le glisser sur
le tube d'extension C. (les vis seront
remonté plus tard.)
Connectez le pôle B au tube
d'extension C. Tournez le
Pôle B dans le sens inverse des
aiguilles d'une montre jusqu'à ce
que le le dispositif de réglage est à
environ 1,5" au-dessus du pôle A et
le trou de réglage est visible.
Une fois le B-Pole et le A-Pole (et
toutes extensions supplémentaires)
sont connectés, insérez l'adaptateur
dans le dispositif de réglage, puis
fixez le poteau A au dôme
supérieur.
Tournez le pôle A dans le sens
Il est important de resserrer
- 8 -
inverse des aiguilles d'une montre
jusqu'à ce qu'il n'y ait plus d'autre
Forcer peut être appliqué pour le
fixer en place.
progressivement toutes les sections
pour sécuriser l'ensemble du
luminaire, en alternant entre les
poteaux et tubes d'extension, en
serrant dans le sens des aiguilles
d'une montre.
Tournez l'écrou pré-assemblé situé
sur le Un poteau comptoir
-dans le sens des aiguilles d'une
montre, ce qui vous permettra
d'ajuster à sa place d'origine sur le
poteau.
Serrez l'écrou en le tournant dans le
sens inverse des aiguilles d'une
montre avec
la tige en L jusqu'à ce qu'aucune
force supplémentaire ne puisse être
appliquée.
- 9 -
Poussez le couvercle vers le haut et
fixez-le avec les deux vis
démontées du couvercle à l’étape
2.
Desserrez les vis statiques/rotatives
des deux côtés du Arbre de base
avant utilisation. NE PAS retirer
complètement les vis.
Le trou de réglage doit être aligné
avec le « Y-Mark » sur la base.
STATIC & SPINNING
Le poteau de danse est en mode statique après l'assemblage initial.
Pour changer le mode pôle de statique à spinning - desserrez le mode
Static/Spin
vis des deux côtés de l'arbre de base - NE PAS DÉPLACER
COMPLÈTEMENT - le poteau tournera maintenant librement.
Pour revenir au statique, serrez complètement les vis statiques/des deux
côtés du
Arbre de base.
INSTALLATION TEST
· Une fois le Dôme Supérieur contre le plafond et avant de le serrer
davantage, assurez-vous que le poteau est verticale.
·
Il est essentiel que le dôme supérieur soit à plat contre le plafond. NE
PAS étendre davantage le dispositif de réglage jusqu'à ce que le le dôme
supérieur est plat contre le plafond. Si le dôme supérieur n'est pas plat, la
plaque pourrait tourner et glisser ou endommager le plafond.
- 9 -
WARNINGS
· N'utilisez JAMAIS d'huiles et/ou de lotion sur vos mains ou votre corps
avant d'utiliser votre bâton. Ceci est très DANGEREUX. L'huile peut se
transférer sur le bâton, le rendant glissant et impossible à tenir, ce qui
pourrait vous causer ou quelqu'un qui utilise le poteau après que vous
ayez un accident grave.
·
Le poteau de danse NE DOIT PAS être installé sous des faux plafonds,
suspendus ou non rigides.
· La moquette, les planchers en bois ou à ressorts peuvent affecter la
stabilité de ce produit.
· Avant l'installation, toute la pellicule rétractable recouvrant les tubes et
les pièces des poteaux doit être retirée. Veuillez NE PAS utilisez un
instrument/couteau tranchant pour ce faire, car des dommages pourraient
être causés.
·
Une fois assemblé, le Dance Pole est lourd et à pleine hauteur, PAS
facile à manipuler. Il est donc OBLIGATOIRE/OBLIGATOIRE que deux
personnes installent le Dance Pole - c'est-à-dire 1 personne doit le
soulever en position et 1 personne tient le poteau pendant que l'autre fait
pivoter/étend le dispositif de réglage de la hauteur.
· N'utilisez JAMAIS votre bâton si vous avez un doute sur son montage, sa
stabilité ou son utilisation.
·
La barre de danse peut faire du bruit lors des mouvements de rotation
après une utilisation à long terme. Il est recommandé de lubrifier les joints
correspondants.

- 10 -
PRIOR TO USE
· Une fois que le poteau est serré et ne bouge pas, essayez de tourner
avec au moins un pied sur le sol. Resserrez si nécessaire jusqu'à ce qu'il
n'y ait plus de mouvement. Une fois que vous êtes certain que le poteau a
été installé en toute sécurité, essayez un mouvement avec les pieds
décollés du sol.
·
Une mauvaise utilisation d'un poteau peut être dangereuse non
seulement pour vous mais aussi pour toute personne proche du poteau.
L'utilisation de tout poteau est toujours à la discrétion de l'utilisateur.
· Le Pole Exercise est extrêmement physique et sollicite des muscles que
vous n'aurez pas sollicités auparavant et donc si vous n'êtes pas échauffé,
des dommages musculaires et des tensions peuvent survenir.
· Pratiquez chaque mouvement de base jusqu'à ce que vous soyez
satisfait de votre capacité à exécuter le mouvement avant de passer au
suivant. Si à tout moment vous vous sentez mal à l'aise, si vos muscles
vous font mal ou si vous êtes essoufflé , faites une pause et réessayez
plus tard. En fait, il vaut mieux se reposer entre les mouvements, laisser
quelqu'un d'autre essayer et ensuite passer à autre chose. le suivant. À
propos, la pratique rend parfait !
NOTE
Afin d'améliorer continuellement ses produits, VEVOR se réserve le droit
de modifier ce informations sans notification préalable.
Veuillez contacter le service client via www.vevor.com pour toute question,
commentaire ou préoccupation. Merci d'utiliser les produits VEVOR dans
votre maison !
- 11 -
Fabricant : Shanghaimuxinmuyeyouxiangongsi
Adresse : Baoshanqu Shuangchenglu 803long 11hao 1602A-1609shi
Shanghai
Importé aux États-Unis : Sanven Technology Ltd.Suite 250, 9166
Anaheim Place, Rancho Cucamonga, CA 91730
Fabriqué en Chine


Technisch Ondersteuning en e-garantiecertificaat www.vevor.com/support
Draagbare danspaal
MODEL : HM-594 /HM-590
We continue to be committed to provide you tools with competitive price.
"Save Half", "Half Price" or any other similar expressions used by us only represents an
estimate of savings you might benefit from buying certain tools with us compared to the major
top brands and does not necessarily mean to cover all categories of tools offered by us. You
are kindly reminded to verify carefully when you are placing an order with us if you are
actually saving half in comparison with the top major brands.


- 1 -
MODEL: HM-594/HM-590
Have product questions? Need technical support? Please feel free to
contact us:
Technical Support and E-Warranty Certificate
www.vevor.com/support
NEED HELP? CONTACT US!
This is the original instruction, please read all manual instructions
carefully before operating. VEVOR reserves a clear interpretation of our
user manual. The appearance of the product shall be subject to the
product you received. Please forgive us that we won't inform you again if
there are any technology or software updates on our product.
Portable Dance Pole

- 2 -
Waarschuwing-Om het risico op letsel te verminderen, moet de
gebruiker de handleiding zorgvuldig lezen.
SAFETY WARNINGS AND PRECAUTIONS
Bedankt voor het gebruik van dit product . Om er zeker van te zijn dat u de
machine correct kunt bedienen, dient u deze instructie zorgvuldig door te
lezen voordat u de machine gebruikt en deze goed te bewaren voor
toekomstig gebruik . Zorg ervoor dat u de voorzorgsmaatregelen en
veiligheidsregels op deze pagina leest om een veilig gebruik te
garanderen . Deze handleiding beschrijft veiligheidswaarschuwingen en
voorzorgsmaatregelen, bediening en onderhoud . De waarschuwingen en
instructies die in deze handleiding worden besproken, kunnen niet alle
mogelijke omstandigheden en situaties dekken die zich kunnen voordoen .
Voorzichtigheid en gezond verstand zijn niet ingebouwd in dit product,
omdat wij van mening zijn dat het gebruik aan deze codes zal voldoen .
Lees ALLE instructies voordat u uw machine gebruikt .
1. Bij het monteren moeten deze instructies worden gevolgd. Een onjuiste
montage kan een gevaar vormen.
2. Niet monteren als u moe bent of onder invloed bent van alcohol, drugs of
medicijnen.
3.Gewichts- en elastische en andere producteigenschappen zijn alleen van
toepassing op correct en compleet gemonteerde producten.
4. Houd de verzamelplaats schoon en goed verlicht.
5. Houd omstanders tijdens de montage uit de buurt.
6. Dit is een apparaat, geen speelgoed, het moet worden gebruikt onder
begeleiding van een professional. Laat kinderen en huisdieren niet alleen
spelen of in de buurt van dit artikel komen.
7 . Inspecteer vóór elk gebruik. Gebruik het niet als onderdelen loszitten of
beschadigd zijn.
8 Gebruik dit apparaat niet voor andere doeleinden dan het aangegeven
gebruik .
9 . Gebruik het niet voor commerciële doeleinden .
- 3 -
1 0 . Maak het niet schoon met schurend materiaal .
1 1 . Laat het nooit onbeheerd achter terwijl het in gebruik is .
1 2 . Urine en uitwerpselen van huisdieren kunnen het product
beschadigen, blijf uit de buurt .
1 3 . Plaats het product niet op of in de buurt van hete lucht, elektrische
branders of verwarmingstoestellen .
14 . Op jonge kinderen moet toezicht worden gehouden om ervoor te
zorgen dat ze niet met het product spelen . Huisdieren moeten uit de buurt
van het product blijven.
Niet buitenshuis gebruiken op regenachtige en bewolkte dagen, vermijd
blikseminslagen en vallen . Mensen of huisdieren die aan het product
hangen, kunnen letsel of de dood veroorzaken .
PARTS IDENTIFICATION

- 4 -
HEIGHT CALCULATOR

- 5 -
De regelaar heeft de mogelijkheid
van het uitbreiden van de pool met 190
mm.
Elke maatverandering heeft een overlap.
Verhoog altijd het aantal gebruikte extensies als dat mogelijk is.
Meet de hoogte van uw plafond in het midden gebruikspunt en raadpleeg
vervolgens de hoogtetabel links waarop u de paalbuizen/verlengingen kunt
zien worden gebruikt. Zorg ervoor dat uw plafondhoogte altijd overeenkomt
met de hoogte van uw plafond pool op de kaart die u de maximale
werkelijke waarde geeft paal lengte.
PRIOR TO ASSEMBLY
- 6 -
Zoek een geschikte oefen- en dansruimte. Om de paal goed te kunnen
gebruiken, moet je met gestrekte armen om de paal kunnen draaien
zonder iets te raken of aan te raken tijdens het draaien. Vind het gebied
door rond een denkbeeldige paal te draaien met uw armen uitgestrekt (Fig.
1). U kunt een stoel als denkbeeldige paal gebruiken of een cirkel meten
met een diameter van ongeveer 3,0 ~ 3,5 meter. In dit gebied kunt u
volledig ontspannen strek je armen uit. Manoeuvres kunnen in een kleinere
ruimte worden uitgevoerd dan hierboven, maar voor beginners wordt
bovenstaande ruimte aanbevolen.
ASSEMBIY INSTRUCTIONS
Sluit de verlengbuis D en C aan op
Verwijder de schroeven en de

- 7 -
de basisas. Zorg ervoor dat de
buisranden stevig met elkaar
verbonden zijn.
adapter uit de kap en schuif deze
vervolgens op de verlengbuis C.
(De schroeven zullen later weer in
elkaar gezet.)
Sluit de B-pool aan op de
verlengbuis C.Draai de
B-paal tegen de klok in totdat de De
regelaar bevindt zich ongeveer 1,5
inch boven de A-pool en het
afstelgat is zichtbaar.
Zodra de B-paal en A-paal (en
eventuele extra verlengstukken) zijn
aangesloten, steekt u de adapter in
de regelaar en vervolgens bevestig
de A-paal aan de bovenste koepel.
Draai de A-paal tegen de klok in tot
niet verder
Kracht kan worden toegepast om
Het is belangrijk om alle secties
geleidelijk aan te spannen om het
hele armatuur vast te zetten,
afwisselend tussen de stokken en
- 8 -
het op zijn plaats te bevestigen.
verlengbuizen, met de klok mee
vastdraaien.
Draai de voorgemonteerde moer op
de Een paal balie
-met de klok mee, waarmee u kunt
aanpassen naar de oorspronkelijke
plaats op de paal.
Draai de moer vast door deze tegen
de klok in te draaien
de l-Rod totdat er geen kracht meer
kon worden uitgeoefend.
Duw het deksel naar boven en zet
het vast met de twee schroeven die
u bij stap 2 van het deksel hebt
verwijderd.
Maak de statische/spin-schroeven
aan beide zijden van de behuizing
los Basisschacht voor gebruik. NIET
volledig verwijderen de schroeven.
- 9 -
Het afstelgat moet in lijn liggen met
de "Y-markering" op de basis.
STATIC & SPINNING
De danspaal staat na de eerste montage in de statische modus.
Om de poolmodus te veranderen van statisch naar draaiend, verlies je de
Static/Spin-knop
schroeven aan beide zijden van de basisas - NIET VOLLEDIG
VERMOGEN - de paal zal nu vrij ronddraaien.
Om terug te keren naar de statische toestand draait u de statische
schroeven aan beide zijden van het apparaat volledig vast
Basis schacht.
INSTALLATION TEST
· Zodra de Upper Dome tegen het plafond is en voordat deze verder wordt
vastgedraaid, moet u ervoor zorgen dat de paal goed vastzit verticaal.
·
Het is van cruciaal belang dat de bovenste koepel plat tegen het plafond
ligt. Zet de regelaar NIET verder uit tot de De bovenste koepel ligt plat
tegen het plafond. Als de bovenste koepel niet vlak is, kan de plaat draaien
en wegglijden het plafond beschadigen.
- 9 -
WARNINGS
· Gebruik NOOIT olie en/of lotion op uw handen of lichaam voordat u uw
paal gebruikt. Dit is zeer GEVAARLIJK. De olie kan op de paal
terechtkomen, waardoor deze glad wordt en onmogelijk vast te houden is
en dit kan ervoor zorgen dat u of iemand die de paal gebruikt nadat u een
ernstig ongeval heeft gehad.
·
De danspaal MOET NIET worden geïnstalleerd onder valse, verlaagde of
niet-stijve plafonds.
· Tapijt, houten of verende vloeren kunnen de stabiliteit van dit product
beïnvloeden.
· Voorafgaand aan de installatie moet alle krimpfolie die de paalbuizen en
onderdelen bedekt, worden verwijderd. NIET DOEN Gebruik hiervoor een
scherp instrument/mes, aangezien er schade kan ontstaan.
· Wanneer gemonteerd is de Danspaal zwaar en op volledige hoogte,
NIET gemakkelijk te hanteren. Het is daarom VERPLICHT/VERPLICHT
dat twee mensen de Danspaal installeren, dat wil zeggen dat 1 persoon
hem in positie moet tillen en 1 persoon houdt de paal vast terwijl de ander
de hoogteverstelling draait/uitbreidt.
·
Gebruik uw paal NOOIT als u twijfelt over de montage, de stabiliteit of het
gebruik ervan.
· De danspaal kan geluid maken bij het maken van draaiende bewegingen
na langdurig gebruik. Het wordt aanbevolen om dit te doen Smeer de
overeenkomstige verbindingen.
PRIOR TO USE

- 10 -
· Zodra de paal strak aanvoelt en niet beweegt, probeer dan een bocht te
oefenen met minstens één voet op de grond. Draai hem indien nodig
opnieuw vast totdat er geen beweging meer is. Probeer zodra u zeker weet
dat de paal veilig is geïnstalleerd een beweging met je voeten van de
grond.
·
Het verkeerd gebruiken van een paal kan gevaarlijk zijn, niet alleen voor
u, maar ook voor iedereen die zich in de buurt van de paal bevindt. Het
gebruik van een paal is dat ook altijd ter beoordeling van de gebruiker.
· Pole Exercise is extreem fysiek en maakt gebruik van spieren die je nog
niet eerder hebt gebruikt je bent niet opgewarmd, er kunnen
spierbeschadigingen en verrekkingen ontstaan.
· Oefen elke basisbeweging totdat u tevreden bent met uw vermogen om
de beweging uit te voeren voordat u verdergaat met de volgende. Als u
zich op enig moment ongemakkelijk voelt, uw spieren pijn doen of
kortademig bent , neem dan een pauze en probeer het later opnieuw.In In
feite is het beter om tussen de zetten door te rusten, iemand anders het te
laten proberen en dan verder te gaan de volgende. Trouwens: oefening
baart kunst!
NOTE
Om haar producten voortdurend te verbeteren, behoudt VEVOR zich het
recht voor om dit te wijzigen informatie zonder voorafgaande kennisgeving.
Neem bij vragen, opmerkingen of zorgen contact op met de klantenservice
via www.vevor.com. Bedankt dat u VEVOR- producten bij u thuis gebruikt!
- 11 -
Fabrikant: Shanghaimuxinmuyeyouxiangongsi
Adres: Baoshanqu Shuangchenglu 803long 11hao 1602A-1609shi
Shanghai
Geïmporteerd naar de VS: Sanven Technology Ltd.Suite 250, 9166
Anaheim Place, Rancho Cucamonga, CA 91730
Gemaakt in China


Teknisk Support och e-garanticertifikat www.vevor.com/support
Bärbar dansstång
MODELL : HM-594 /HM-590
We continue to be committed to provide you tools with competitive price.
"Save Half", "Half Price" or any other similar expressions used by us only represents an
estimate of savings you might benefit from buying certain tools with us compared to the major
top brands and does not necessarily mean to cover all categories of tools offered by us. You
are kindly reminded to verify carefully when you are placing an order with us if you are
actually saving half in comparison with the top major brands.


- 1 -
MODELL: HM-594/HM-590
Have product questions? Need technical support? Please feel free to
contact us:
Technical Support and E-Warranty Certificate
www.vevor.com/support
NEED HELP? CONTACT US!
This is the original instruction, please read all manual instructions
carefully before operating. VEVOR reserves a clear interpretation of our
user manual. The appearance of the product shall be subject to the
product you received. Please forgive us that we won't inform you again if
there are any technology or software updates on our product.
Portable Dance Pole

- 2 -
Varning - För att minska risken för skada måste användaren
läsa instruktionerna noggrant.
SAFETY WARNINGS AND PRECAUTIONS
Tack för att du använder den här produkten . För att försäkra dig om att du
kan använda maskinen korrekt, läs denna instruktion noggrant före
användning och förvara den på rätt sätt för framtida referens . Var noga
med att läsa försiktighetsåtgärderna och säkerhetsreglerna på den här
sidan för att säkerställa din säker användning . Denna handbok kommer att
beskriva säkerhetsvarningar och försiktighetsåtgärder, drift, underhåll .
Varningarna och instruktionerna som granskas i denna handbok kan inte
täcka alla möjliga tillstånd och situationer som kan uppstå . Försiktighet
och sunt förnuft är inte inbyggt i denna produkt, eftersom vi tror att
användningen kommer att följa dessa koder .
Läs ALLA instruktionerna innan du använder din maskin .
1. Montering måste följa dessa instruktioner. Felaktig montering kan vara
en fara.
2. Sätt dig inte ihop när du är trött eller påverkad av alkohol, droger eller
mediciner.
3. Vikt och elastik och andra produktegenskaper är endast tillämpliga på
korrekt och fullständigt monterade produkter.
4. Håll monteringsområdet rent och väl upplyst.
5. Håll åskådare borta från området under monteringen.
6. Detta är en utrustning, inte en leksak, den måste användas under
ledning av en professionell. Tillåt inte barn och husdjur att leka ensamma
eller närma sig detta föremål.
7 . Inspektera före varje användning. Använd den inte om delar är lösa
eller skadade.
8 Använd inte denna enhet för andra ändamål än den angivna
användningen .
9 . Använd den inte för kommersiella ändamål .
1 0 . Rengör den inte med något slipande material .
- 3 -
1 1 . Lämna den aldrig utan uppsikt när den används .
1 2 . Urin och avföring från husdjur kan skada produkten, håll undan .
1 3 . Placera inte produkten på eller nära varmluft, elektriska brännare eller
värmare .
14 . Små barn bör övervakas för att säkerställa att de inte leker med
produkten . Husdjur bör hålla sig borta från produkten.
Använd inte utomhus under regniga och molniga dagar, undvik
blixtnedslag och fall . Människor eller husdjur som hänger på produkten
kommer att orsaka skada eller dödsfall .
PARTS IDENTIFICATION
- 4 -
HEIGHT CALCULATOR
- 5 -
Justeraren har kapaciteten
att förlänga polen med 190 mm.
Varje storleksändring har en överlappning.
Öka alltid antalet tillägg som används om möjligt.
Mät höjden på ditt tak i mitten användningsställe och hänvisa sedan till
höjdtabellen till vänster som visar dig polrören/förlängningarna till
användas.Anpassa alltid din takhöjd till stolpen på diagrammet ger dig den
maximala faktiska stolplängd.
PRIOR TO ASSEMBLY
- 6 -
Hitta en lämplig tränings- och dansplats. För att använda stången på rätt
sätt måste du kunna rotera runt stången med armarna utsträckta utan att
slå eller röra någonting medan den roterar. Hitta området genom att rotera
runt en tänkt stolpe med armarna utsträckta (Fig. 1), du kan använda en
stol som en tänkt stolpe eller mäta en cirkel med en diameter på cirka
3,0~3,5 meter. Detta område kommer att göra det möjligt för dig att fullt ut
sträck ut armarna. Manövrar kan utföras på ett mindre utrymme än ovan
men för nybörjare rekommenderas ovanstående utrymme.
ASSEMBIY INSTRUCTIONS
Anslut förlängningsröret D och C till
basaxeln. Se till att rörkanterna är
Ta bort skruvarna och adaptern från
locket och skjut sedan in det på
- 7 -
tätt sammankopplade.
förlängningsröret C. (Skruvarna
kommer att vara återmonteras
senare.)
Anslut B-polen till förlängningsröret
C. Vrid på
B-stolpe moturs tills justeraren är ca
1,5" över A-stolpen och
justeringshålet är synligt.
När B-Pole och A-Pole (och
eventuella ytterligare förlängningar)
är anslutna, sätt in adaptern i
justeraren och sedan fäst A-polen
på den övre kupolen.
Vrid A-polen moturs tills det inte går
längre
Tvinga kan appliceras för att fästa
den på plats.
Det är viktigt att dra åt alla sektioner
successivt för att säkra hela
armaturen – omväxlande mellan
stolpar och förlängningsrör,
- 8 -
åtdragning medurs.
Vrid den förmonterade muttern som
sitter på En stång disken
-medurs, vilket gör att du kan justera
den till sin ursprungliga plats på
stolpen.
Dra åt muttern genom att vrida den
moturs med
l-staven tills ingen ytterligare kraft
kunde appliceras.
Tryck locket uppåt och fäst det med
de två skruvar som togs isär från
locket vid steg 2.
Lossa de statiska/snurrskruvarna
på båda sidorna av Basskaft före
användning. Ta INTE bort helt
skruvarna.
Justeringshålet måste vara i linje
- 9 -
med "Y-Mark" på basen.
STATIC & SPINNING
Dansstången är i statiskt läge efter den första monteringen.
För att ändra stavläget från statisk till spinning - lossa statisk/snurr
skruvar på båda sidorna av basaxeln - RÖM INTE HELT - stången kommer
nu att snurra fritt.
För att återgå till statisk ström, dra åt statiken/skruvarna på båda sidorna
av
Basskaft.
INSTALLATION TEST
· När den övre kupolen är mot taket och innan den dras åt ytterligare, se till
att stången är vertikal.
·
Det är viktigt att den övre kupolen är platt mot taket. Expandera INTE
justeraren ytterligare förrän övre kupolen är platt mot taket. Om den övre
kupolen inte är platt kan plattan rotera och glida eller skada taket.
- 9 -
WARNINGS
· Använd ALDRIG oljor och/eller lotion på händer eller kropp innan du
använder din stav. Detta är mycket FARLIGT. Oljan kan överföras till
staven och göra den hal och omöjlig att hålla och detta kan orsaka att du
eller någon som använder stången efter att du råkar ut för en allvarlig
olycka.
·
Dansstången SKA INTE installeras under falska, upphängda eller
icke-styva tak.
· Mattor, trägolv eller fjädrande golv kan påverka produktens stabilitet.
· Före installationen måste allt krympplast som täcker stolprören och
delarna tas bort. Vänligen GÖR INTE använd ett vasst instrument/kniv för
att göra detta, eftersom skada kan uppstå.
·
När den är monterad är dansstången tung och i full höjd, INTE lätt att
hantera. Det är därför OBLIGATORISKT/OBLIGATORISKT att två
personer installerar dansstången-ie1 personer ska lyfta den på plats och 1
person håller i stången medan den andra roterar/expanderar
höjdjusteringen.
· Använd ALDRIG din stolpe om du är osäker på dess montering, stabilitet
eller hur den ska användas.
·
Dansstången kan göra oväsen när man gör snurrande rörelser efter
långvarig användning. Det rekommenderas smörj motsvarande leder.
PRIOR TO USE

- 10 -
· När stången känns tight och inte rör sig, försök att öva en sväng med
minst en fot på golvet. Dra åt igen vid behov tills det inte finns någon
rörelse. När du är säker på att stången har installerats säkert - försök ett
drag med fötterna från marken.
· Att missbruka en stolpe kan vara farligt inte bara för dig utan även för alla
i närheten av stolpen. Användningen av en stolpe är alltid efter
användarens gottfinnande.
· Pole Exercise är extremt fysiskt och använder muskler som du inte
kommer att ha använt tidigare och därför om du är inte uppvärmd
muskelskador och påfrestningar kan uppstå.
·
Öva varje grundläggande drag tills du är nöjd med din förmåga att göra
draget innan du fortsätter till nästa. Om du någon gång känner dig
obekväm, dina muskler gör ont eller om du har ont om andan - ta en paus
och försök igen senare.In Faktum är att det är bättre att vila mellan dragen,
låt någon annan försöka och sedan gå vidare till nästa. Förresten - övning
ger färdighet!
NOTE
För att kontinuerligt förbättra sina produkter förbehåller sig VEVOR rätten
att ändra detta information utan föregående meddelande.
Kontakta kundtjänst via www.vevor.com om du har frågor, kommentarer
eller funderingar. Tack för att du använder VEVOR- produkter i ditt hem!

- 11 -
Tillverkare: Shanghaimuxinmuyeyouxiangongsi
Adress: Baoshanqu Shuangchenglu 803long 11hao 1602A-1609shi
Shanghai
Importerad till USA: Sanven Technology Ltd.Suite 250, 9166 Anaheim
Place, Rancho Cucamonga, CA 91730
Tillverkad i Kina


Técnico Soporte y certificado de garantía electrónica www.vevor.com/support
Barra de baile portátil
MODELO : HM-594 /HM-590
We continue to be committed to provide you tools with competitive price.
"Save Half", "Half Price" or any other similar expressions used by us only represents an
estimate of savings you might benefit from buying certain tools with us compared to the major
top brands and does not necessarily mean to cover all categories of tools offered by us. You
are kindly reminded to verify carefully when you are placing an order with us if you are
actually saving half in comparison with the top major brands.


- 1 -
MODELO: HM-594/HM-590
Have product questions? Need technical support? Please feel free to
contact us:
Technical Support and E-Warranty Certificate
www.vevor.com/support
NEED HELP? CONTACT US!
This is the original instruction, please read all manual instructions
carefully before operating. VEVOR reserves a clear interpretation of our
user manual. The appearance of the product shall be subject to the
product you received. Please forgive us that we won't inform you again if
there are any technology or software updates on our product.
Portable Dance Pole

- 2 -
Advertencia: para reducir el riesgo de lesiones, el usuario debe
leer atentamente el manual de instrucciones.
SAFETY WARNINGS AND PRECAUTIONS
Gracias por usar este producto . Para asegurarse de que puede operar la
máquina correctamente, lea atentamente estas instrucciones antes de
utilizarla y consérvelas adecuadamente para consultarlas en el futuro .
Asegúrese de leer las precauciones y reglas de seguridad en esta página
para garantizar su uso seguro . Este manual describirá las advertencias y
precauciones de seguridad, operación y mantenimiento . Las advertencias
e instrucciones revisadas en este manual no pueden cubrir todas las
condiciones y situaciones posibles que puedan ocurrir . Este producto no
incluye precaución ni sentido común, ya que creemos que los usos
cumplirán con estos códigos .
Lea TODAS las instrucciones antes de utilizar su máquina .
1. El montaje debe seguir estas instrucciones. El montaje incorrecto puede
ser un peligro.
2. No reunirse cuando esté cansado o bajo la influencia de alcohol, drogas
o medicamentos.
3. El peso, la elasticidad y otras propiedades del producto solo se aplican
a productos ensamblados correcta y completamente.
4. Mantenga el área de montaje limpia y bien iluminada.
5. Mantenga a las personas transeúntes fuera del área durante el montaje.
6. Este es un equipo, no un juguete, debe usarse bajo la guía de un
profesional. No permita que los niños y las mascotas jueguen solos o se
acerquen a este artículo.
7 . Inspeccione antes de cada uso. No lo utilice si las piezas están sueltas
o dañadas.
8 No utilice esta unidad para ningún otro propósito que no sea el indicado .
9 . No lo utilice con fines comerciales .
1 0 . No lo limpie con ningún material abrasivo .
1 1 . Nunca lo deje desatendido mientras esté en uso .

- 3 -
1 2 . La orina y las heces de las mascotas pueden dañar el producto;
manténgalo alejado .
1 3 . No coloque el producto sobre o cerca de aire caliente, quemadores o
calentadores eléctricos .
14 . Se debe supervisar a los niños pequeños para asegurarse de que no
jueguen con el producto . Las mascotas deben mantenerse alejadas del
producto.
No utilizar al aire libre en días lluviosos y nublados, evitar rayos y caídas .
Las personas o mascotas que cuelguen del producto causarán lesiones o
la muerte .
PARTS IDENTIFICATION

- 4 -
HEIGHT CALCULATOR

- 5 -
El ajustador tiene la capacidad
de ampliar el Polo 190 mm.
Cada cambio de tamaño tiene una superposición.
Aumente siempre el número de extensiones utilizadas si es posible.
Mide la altura de tu techo en el centro. punto de uso y luego consulte la
tabla de alturas a la izquierda que le mostrará los tubos/extensiones de
postes para ser utilizado. Siempre haga coincidir la altura de su techo con
la polo en el gráfico que le brinda el máximo real longitud del poste.
PRIOR TO ASSEMBLY

- 6 -
Encuentre un área adecuada para hacer ejercicio y bailar. Para utilizar el
poste correctamente, debes poder girar alrededor del poste con los brazos
extendidos. sin golpear ni tocar nada mientras gira. Encuentre el área
girando alrededor de un poste imaginario con los brazos extendidos (Fig.
1), puede usar una silla como poste imaginario o medir un círculo con un
diámetro de aproximadamente 3,0 ~ 3,5 m. Esta área le permitirá conocer
completamente extiende tus brazos. Las maniobras se pueden ejecutar en
un espacio más pequeño que el anterior, pero para principiantes se
recomienda el espacio anterior.
ASSEMBIY INSTRUCTIONS
Conecte los tubos de extensión D y
Retire los tornillos y el adaptador de
- 7 -
C al eje de la base. Asegúrese de
que los bordes del tubo estén bien
conectados.
la cubierta y luego deslícelo sobre
el tubo de extensión C. (Los
tornillos se volver a ensamblar más
tarde.)
Conecte el poste B al tubo de
extensión C. Gire el
polo B en sentido antihorario hasta
que El ajustador está
aproximadamente 1,5 "por encima
del poste A. y el orificio de ajuste es
visible.
Una vez que el B-Pole y el A-Pole (y
cualquier extensión adicional) están
conectados, inserte el adaptador en
el ajustador y luego fije el poste A al
domo superior.
Gire el polo A en el sentido contrario
a las agujas del reloj hasta que no
Es importante apretar todos los
tramos progresivamente para
asegurar todo el aparato,
- 8 -
haya más
Fuerza Se puede aplicar para fijarlo
en su lugar.
alternando entre los postes y tubos
de extensión, apretando en el
sentido de las agujas del reloj.
Gire la tuerca preensamblada
ubicada en el polo A encimera
-en el sentido de las agujas del reloj,
lo que le permitirá ajustar a su lugar
original en el poste.
Apriete la tuerca girándola en
sentido antihorario con
L-Rod hasta que ya no se pueda
aplicar más fuerza.
Empuje la cubierta hacia arriba y
asegúrela con los dos tornillos que
se desmontaron de la cubierta en el
Afloje los tornillos
estáticos/giratorios en ambos lados
del Eje base antes de su uso. NO
- 9 -
paso 2.
eliminar completamente los
tornillos.
El orificio de ajuste debe estar
alineado con la "Marca Y" en la
base.
STATIC & SPINNING
La barra de baile está en modo estático después del montaje inicial.
Para cambiar el modo del bastón de estático a giratorio, suelte el modo
Estático/Giro.
tornillos en ambos lados del eje de la base - NO LO DESMONTE
COMPLETAMENTE - el poste ahora girará libremente.
Para volver a la estática, apriete completamente los tornillos/estáticos en
ambos lados del
Eje base.
INSTALLATION TEST
· Una vez que el domo superior esté contra el techo y antes de apretarlo
más, asegúrese de que el poste esté vertical.
·
Es fundamental que el domo superior quede plano contra el techo. NO
expanda más el ajustador hasta que el El domo superior está plano contra
el techo. Si el domo superior no es plano, la placa podría girar y deslizarse
o dañar el techo.

- 9 -
WARNINGS
· NUNCA use aceites y/o lociones en sus manos o cuerpo antes de usar
su poste. Esto es muy PELIGROSO. El aceite puede transferirse al poste
haciéndolo resbaladizo e imposible de sostener y esto podría causarle a
usted o alguien que use el poste después de usted tenga un accidente
grave.
·
La barra de baile NO DEBE instalarse bajo techos falsos, suspendidos o
no rígidos.
· Los suelos alfombrados, de madera o con muelles pueden afectar la
estabilidad de este producto.
· Antes de la instalación, se debe quitar toda la envoltura retráctil que
cubre los tubos y las piezas del poste. NO Utilice un instrumento/cuchillo
afilado para hacer esto, ya que se pueden causar daños.
· Cuando está ensamblado, el Dance Pole es pesado y está a toda su
altura, NO es fácil de manejar. Por lo tanto, es
OBLIGATORIO/OBLIGATORIO que dos personas instalen el Dance Pole;
es decir, 1 persona debe levantarlo hasta su posición y 1 persona sostiene
el poste mientras la otra gira/expande el ajustador de altura.
·
NUNCA utilice su bastón si tiene dudas sobre su montaje, estabilidad o
cómo utilizarlo.
· La barra de baile puede hacer ruido al realizar movimientos giratorios
después de un uso prolongado. Se recomienda lubricar las juntas
correspondientes.
PRIOR TO USE

- 10 -
· Una vez que el poste se sienta apretado y no se mueva, intente practicar
un giro con al menos un pie en el piso. Vuelva a apretarlo según sea
necesario hasta que no haya movimiento. Una vez que esté seguro de que
el poste se ha instalado de manera segura, intente un movimiento con los
pies fuera del suelo.
·
El mal uso de un poste puede ser peligroso no sólo para usted sino
también para cualquier persona cercana al poste. El uso de cualquier
poste es siempre a criterio del usuario.
· El ejercicio en barra es extremadamente físico y utiliza músculos que no
habrás utilizado antes y por lo tanto si Si no se calienta, se pueden
producir daños musculares y distensiones.
· Practica cada movimiento básico hasta que estés satisfecho con tu
capacidad para realizar el movimiento antes de continuar con el siguiente.
Si en algún momento te sientes incómodo, te duelen los músculos o te
falta el aire, tómate un descanso. e inténtalo de nuevo más tarde. De
hecho, es mejor descansar entre movimientos, dejar que alguien más lo
intente y luego avanzar a el siguiente. Por cierto, ¡la práctica hace la
perfección!
NOTE
Para mejorar continuamente sus productos, VEVOR se reserva el derecho
de modificar este información sin previo aviso.
Comuníquese con el servicio de atención al cliente a través de
www.vevor.com si tiene alguna pregunta, comentario o inquietud. ¡Gracias
por utilizar los productos VEVOR en tu hogar!

- 11 -
Fabricante: Shanghaimuxinmuyeyouxiangongsi
Dirección: Baoshanqu Shuangchenglu 803long 11hao 1602A-1609shi
Shanghai
Importado a EE. UU.: Sanven Technology Ltd.Suite 250, 9166 Anaheim
Place, Rancho Cucamonga, CA 91730
Hecho en china


Tecnico Supporto e certificato di garanzia elettronica www.vevor.com/support
Asta da ballo portatile
MODELLO : HM-594 /HM-590
We continue to be committed to provide you tools with competitive price.
"Save Half", "Half Price" or any other similar expressions used by us only represents an
estimate of savings you might benefit from buying certain tools with us compared to the major
top brands and does not necessarily mean to cover all categories of tools offered by us. You
are kindly reminded to verify carefully when you are placing an order with us if you are
actually saving half in comparison with the top major brands.


- 1 -
MODELLO: HM-594/HM-590
Have product questions? Need technical support? Please feel free to
contact us:
Technical Support and E-Warranty Certificate
www.vevor.com/support
NEED HELP? CONTACT US!
This is the original instruction, please read all manual instructions
carefully before operating. VEVOR reserves a clear interpretation of our
user manual. The appearance of the product shall be subject to the
product you received. Please forgive us that we won't inform you again if
there are any technology or software updates on our product.
Portable Dance Pole

- 2 -
Avvertenza: per ridurre il rischio di lesioni, l'utente deve leggere
attentamente il manuale di istruzioni.
SAFETY WARNINGS AND PRECAUTIONS
Grazie per aver utilizzato questo prodotto . Per essere sicuri di poter
utilizzare correttamente la macchina, leggere attentamente queste
istruzioni prima dell'uso e conservarle adeguatamente per riferimento
futuro . Assicurati di leggere le precauzioni e le regole di sicurezza in
questa pagina per garantire un utilizzo sicuro . Questo manuale descriverà
le avvertenze e le precauzioni di sicurezza, il funzionamento e la
manutenzione . Le avvertenze e le istruzioni contenute nel presente
manuale non possono coprire tutte le possibili condizioni e situazioni che
potrebbero verificarsi . La cautela e il buon senso non sono incorporati in
questo prodotto, poiché riteniamo che gli usi saranno conformi a questi
codici .
Si prega di leggere TUTTE le istruzioni prima di utilizzare la
macchina .
1. Il montaggio deve seguire queste istruzioni. Un montaggio errato può
rappresentare un pericolo.
2. Non montare in caso di stanchezza o sotto l'effetto di alcol, droghe o
farmaci.
3.Il peso, l'elasticità e le altre proprietà del prodotto si applicano solo ai
prodotti correttamente e completamente assemblati.
4. Mantenere l'area di assemblaggio pulita e ben illuminata.
5. Tenere gli astanti lontani dall'area durante il montaggio.
6. Questa è un'attrezzatura, non un giocattolo, deve essere utilizzata sotto
la guida di un professionista. Non permettere ai bambini e agli animali
domestici di giocare da soli o di avvicinarsi a questo oggetto.
7 . Ispezionare prima di ogni utilizzo. Non utilizzarlo se le parti sono
allentate o danneggiate.
8 Non utilizzare questa unità per scopi diversi da quelli indicati .
9 . Non utilizzarlo per scopi commerciali .

- 3 -
1 0 . Non pulirlo con materiali abrasivi .
1 1 . Non lasciarlo mai incustodito durante l'uso .
1 2 . L'urina e le feci degli animali domestici possono danneggiare il
prodotto, tenere lontano .
1 3 . Non posizionare il prodotto sopra o vicino ad aria calda, fornelli
elettrici o stufe .
14 . I bambini piccoli devono essere sorvegliati per assicurarsi che non
giochino con il prodotto . Gli animali domestici devono stare lontani dal
prodotto.
Non utilizzare all'aperto nelle giornate piovose e nuvolose, evitare fulmini e
cadute . Persone o animali appesi al prodotto possono causare lesioni o
morte .
PARTS IDENTIFICATION

- 4 -
HEIGHT CALCULATOR

- 5 -
Il
regolatore ha la capacità
di estendere il Polo di 190mm.
Ogni cambio di dimensione ha una sovrapposizione.
Aumentare sempre il numero di estensioni utilizzate se possibile.
Misura l'altezza del soffitto al centro punto di utilizzo, quindi fare riferimento
alla tabella delle altezze a sinistra che ti mostrerà i tubi/estensioni dei pali
essere utilizzato.Abbinare sempre l'altezza del soffitto a pole sul grafico
che ti dà il massimo effettivo lunghezza del palo.
PRIOR TO ASSEMBLY

- 6 -
Trova un'area adatta per gli esercizi e la danza. Per utilizzare
correttamente il palo è necessario essere in grado di ruotare attorno al palo
con le braccia tese senza colpire o toccare nulla durante la rotazione.
Trova l'area ruotando attorno a un palo immaginario con le braccia tese
(Fig. 1), puoi usare una sedia come palo immaginario o misurare un
cerchio con un diametro di circa 3,0~3,5 metri. Quest'area ti consentirà di
farlo completamente allunga le braccia. Le manovre possono essere
eseguite in uno spazio più piccolo di quello sopra, ma per i principianti è
consigliato lo spazio sopra indicato.
ASSEMBIY INSTRUCTIONS
Collegare il tubo di prolunga D e C
Rimuovere le viti e l'adattatore dal
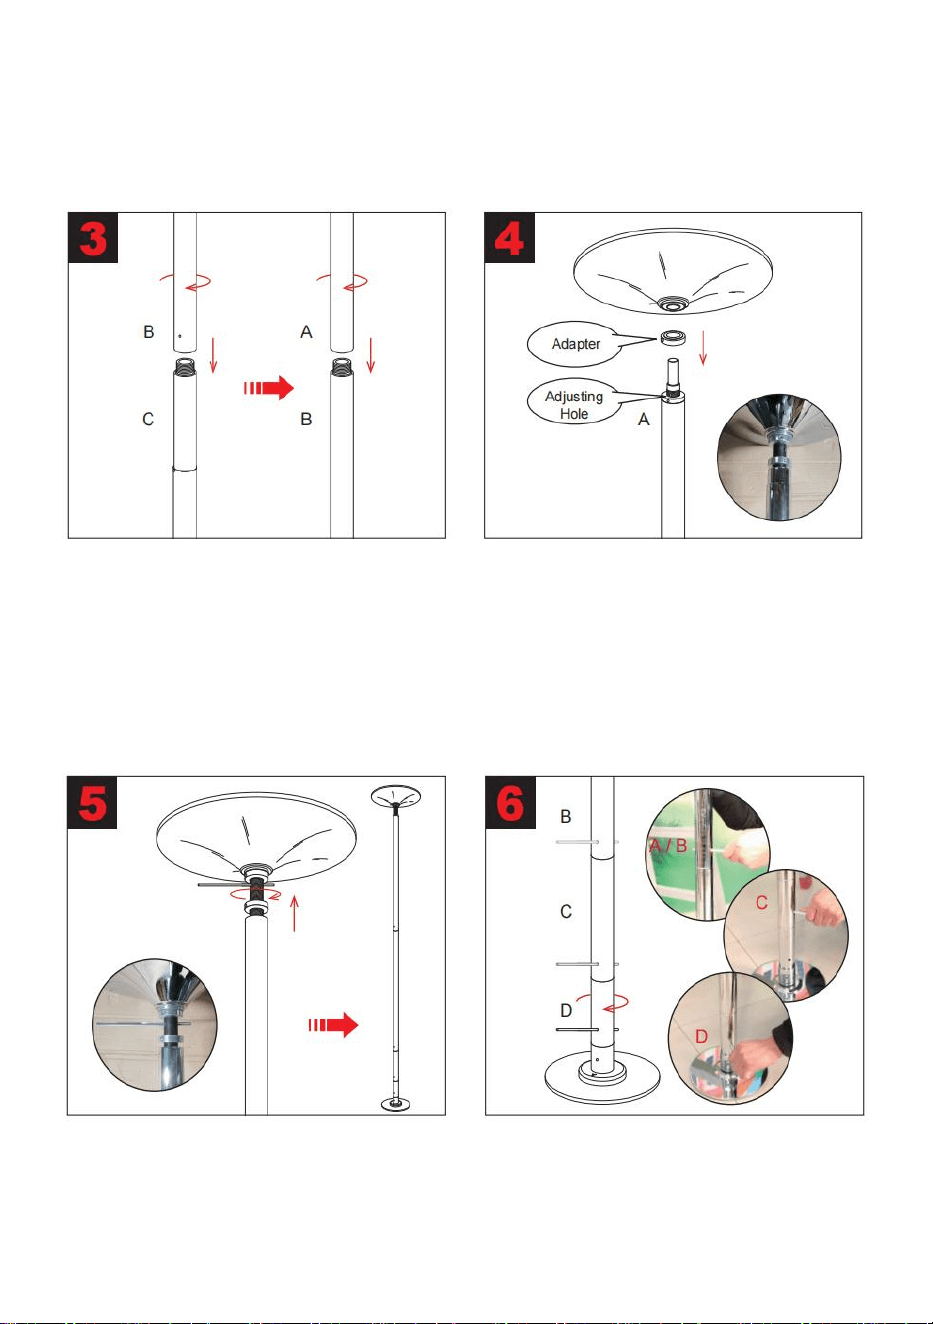
- 7 -
all'albero della base. Assicurarsi che
i bordi del tubo siano collegati
saldamente insieme.
coperchio, quindi farlo scorrere sul
tubo di prolunga C. (Le viti saranno
riassemblato più tardi.)
Collegare il polo B al tubo di
prolunga C.Ruotare il
Polo B in senso antiorario fino al il
regolatore è circa 1,5" sopra il polo
A e il foro di regolazione è visibile.
Una volta che il B-Pole e il A-Pole
(ed eventuali estensioni aggiuntive)
sono collegati, inserire l'adattatore
nel regolatore e poi collegare
l'A-Pole alla cupola superiore.
Ruotare il polo A in senso antiorario
fino al termine
Forza può essere applicato per
È importante stringere
progressivamente tutte le sezioni
per proteggere l'intero apparecchio,
alternando il pali e tubi di prolunga,
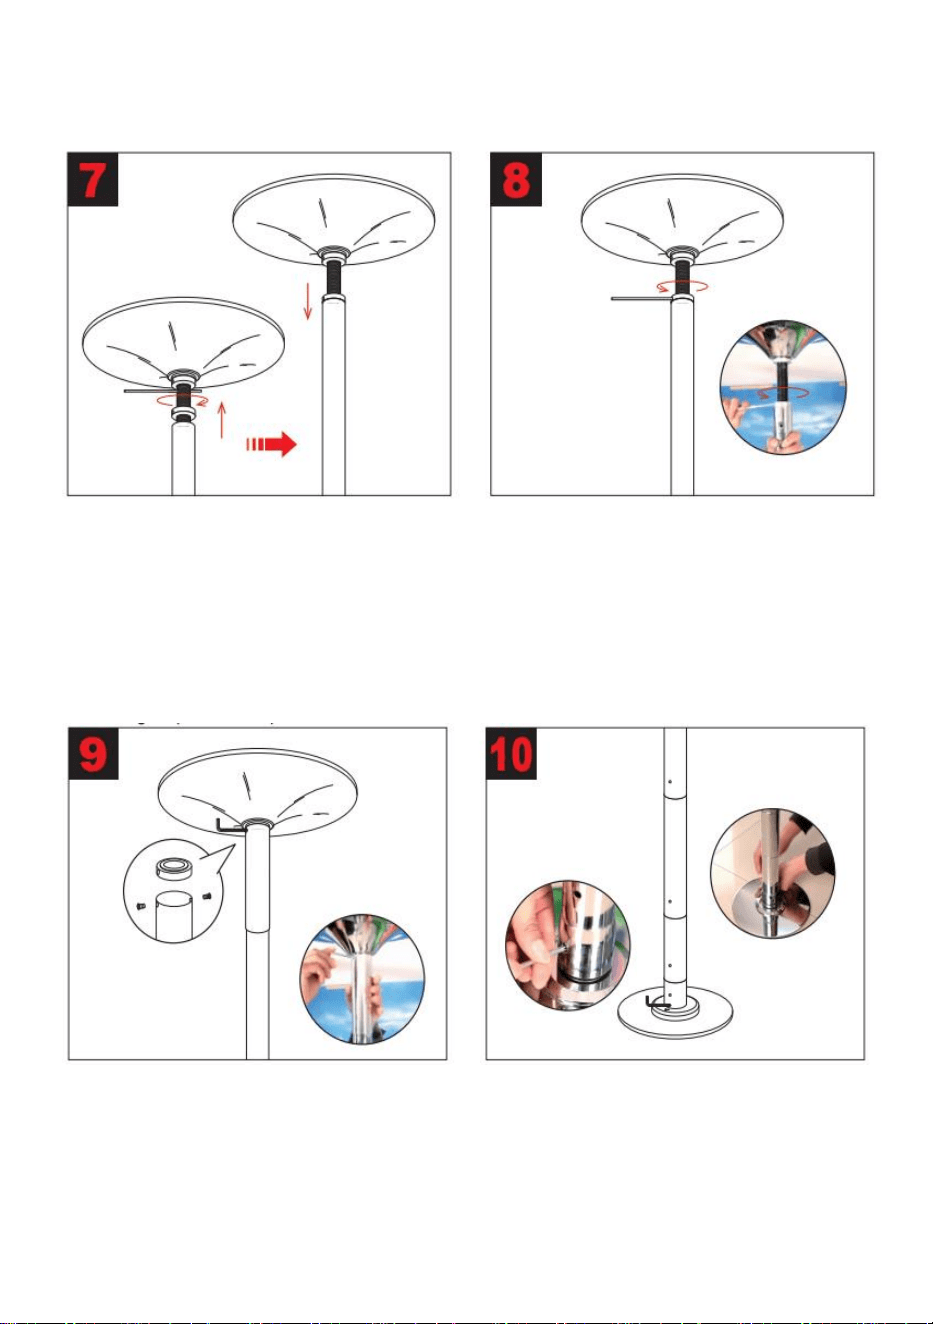
- 8 -
fissarlo in posizione.
serraggio in senso orario.
Ruotare il dado premontato situato
sul Un palo contatore
-in senso orario, che ti consentirà di
regolare riportarlo nella sua
posizione originale sul palo.
Stringere il dado ruotandolo in
senso antiorario con
l'L-Rod fino a quando non è più
possibile applicare ulteriore forza.
Spingere il coperchio verso l'alto e
fissarlo con i due viti smontate dal
coperchio al punto 2.
Allentare le viti statiche/girevoli su
entrambi i lati del Albero base prima
dell'uso. NON rimuovere
completamente le viti.
Il foro di regolazione deve essere in
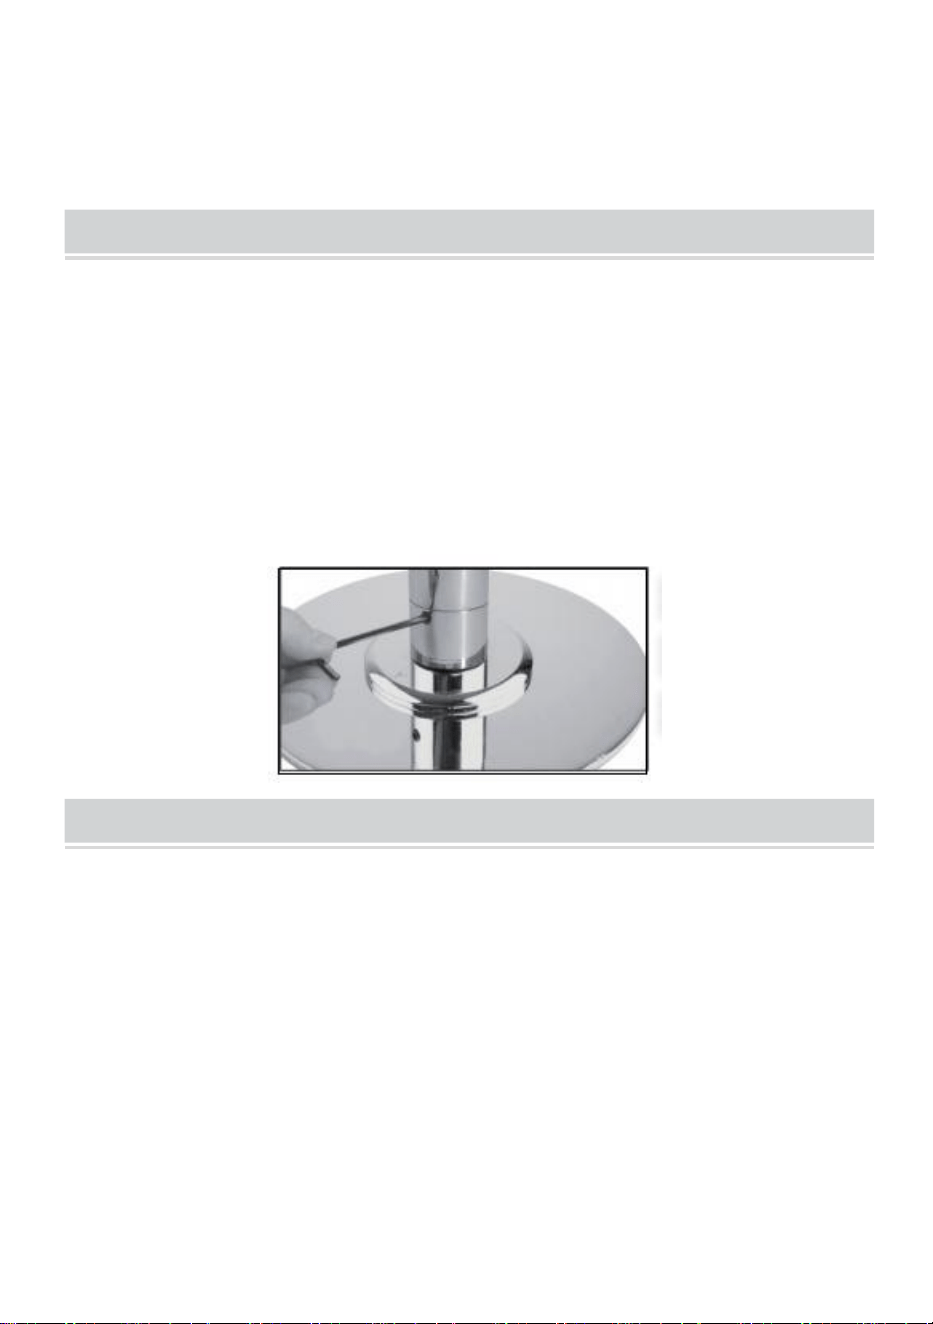
- 9 -
linea con il "segno Y" sulla base.
STATIC & SPINNING
Il palo da ballo è in modalità statica dopo il montaggio iniziale.
Per cambiare la modalità dell'asta da statica a rotante, allenta il comando
Statico/Rotazione
viti su entrambi i lati dell'albero della base - NON RIMOVERE
COMPLETAMENTE - il palo ora girerà liberamente.
Per tornare alla modalità statica, serrare completamente le viti statiche su
entrambi i lati del
Albero di base.
INSTALLATION TEST
· Una volta che la cupola superiore è contro il soffitto e prima di serrarla
ulteriormente, assicurarsi che il palo lo sia verticale.
·
È fondamentale che la cupola superiore sia piatta contro il soffitto. NON
espandere ulteriormente il regolatore fino al la cupola superiore è piatta
contro il soffitto. Se la cupola superiore non è piatta, la piastra potrebbe
ruotare e scivolare o danneggiare il soffitto.

- 9 -
WARNINGS
· Non usare MAI oli e/o lozioni sulle mani o sul corpo prima di usare il
bastoncino. Questo è molto PERICOLOSO. L'olio può trasferirsi sul
bastoncino rendendolo scivoloso e impossibile da tenere e questo
potrebbe causare qualcuno che usa il palo dopo di te ha un grave
incidente.
·
Il palo da ballo NON DEVE essere installato sotto controsoffitti, sospesi o
non rigidi.
· Moquette, pavimenti in legno o molleggiate possono compromettere la
stabilità di questo prodotto.
· Prima dell'installazione, è necessario rimuovere tutta la pellicola
termoretraibile che copre i tubi e le parti del palo. NON farlo utilizzare uno
strumento/coltello affilato per eseguire questa operazione, poiché
potrebbero verificarsi danni.
·
Una volta assemblato, il Dance Pole è pesante e a tutta altezza, NON
facile da maneggiare. È quindi OBBLIGATORIO che due persone installino
il Dance Pole: 1 persona deve sollevarlo in posizione e Una persona tiene
il palo mentre l'altra ruota/espande il regolatore di altezza.
·
Non utilizzare MAI il bastone se hai dubbi sul suo montaggio, sulla sua
stabilità o su come usarlo.
· L'asta da ballo potrebbe emettere rumore quando si eseguono movimenti
rotanti dopo un uso prolungato. Si consiglia di farlo lubrificare le
articolazioni corrispondenti.
PRIOR TO USE

- 10 -
· Una volta che il palo è stretto e non si muove, prova a fare pratica con un
giro con almeno un piede sul pavimento. Stringi nuovamente se
necessario fino a quando non c'è più movimento. Una volta che sei sicuro
che il palo è stato installato in modo sicuro, prova un movimento con i piedi
da terra.
·
L'uso improprio di un palo può essere pericoloso non solo per te ma
anche per chiunque si trovi vicino al palo. L'uso di qualsiasi palo lo è
sempre a discrezione dell'utente.
· Il Polo Esercizio è estremamente fisico e utilizza muscoli che non avresti
mai usato prima e quindi se non si viene riscaldati possono verificarsi
danni muscolari e stiramenti.
· Esercitati con ogni mossa base finché non sei soddisfatto della tua
capacità di eseguire la mossa prima di continuare con quella successivo.
Se in qualsiasi momento ti senti a disagio, ti fanno male i muscoli o ti
manca il fiato, fai una pausa e riprovare più tardi.In infatti è meglio riposarsi
tra una mossa e l'altra, lasciare che qualcun altro provi e poi proseguire il
prossimo. A proposito, la pratica rende perfetti!
NOTE
Per migliorare continuamente i propri prodotti, VEVOR si riserva il diritto di
modificarli informazioni senza preavviso.
Si prega di contattare il servizio clienti tramite www.vevor.com per qualsiasi
domanda, commento o dubbio. Grazie per aver utilizzato i prodotti VEVOR
a casa tua!

- 11 -
Produttore: Shanghaimuxinmuyeyouxiangongsi
Indirizzo: Baoshanqu Shuangchenglu 803long 11hao 1602A-1609shi
Shanghai
Importato negli Stati Uniti: Sanven Technology Ltd.Suite 250, 9166
Anaheim Place, Rancho Cucamonga, CA 91730
Made in China