GHS37 - Grow Light Hydroponic Box
PLEASE READ ALL THE INSTRUCTIONS BEFORE USE

2

3
English Manual
Manuel d’utilisation en français
Gebrauchsanleitung auf Deutsch
Manual de Instrucciones en Español
Manuale D’istruzioni In Italiano
Instrukcja obsługi. Polski
Gebruikershandleiding Nederlands
5
14
23
32
41
50
59
Contents

4
5
English Manual

6
Safety Instructions
PLEASE READ THIS MANUAL CAREFULLY AND RETAIN FOR FUTURE
REFERENCE
• For indoor household/domestic use only. Do not use outdoors.
• Do not operate this appliance if the power cable or plug is damaged. If
either is damaged return it to Duronic for service or repair by professional
technician.
• Avoid placing the lamp in direct sunlight.
• Keep the light and electronic components away from moisture.
• If any water is spilled or splashed over any electrical part, thoroughly dry
all cables and any parts that have gotten wet.
• When not using this grow box, store in a safe place. Do not place heavy
things on top of it.
• Do not use in the presence of corrosive gas – use in a well-ventilated
room.
• Please ensure the mains power supply is 220-240V / 50Hz.
• Never try to replace parts and repair the lamp by yourself.
• When adding or emptying water, ensure your hands are dry before
attempting to reconnect the power adapter into the mains socket.
• Plant nutrient solution should be stored safely out of the reach of children.
• Do not consume the plant solution. If you accidently consume some,
please seek medical advice.

7
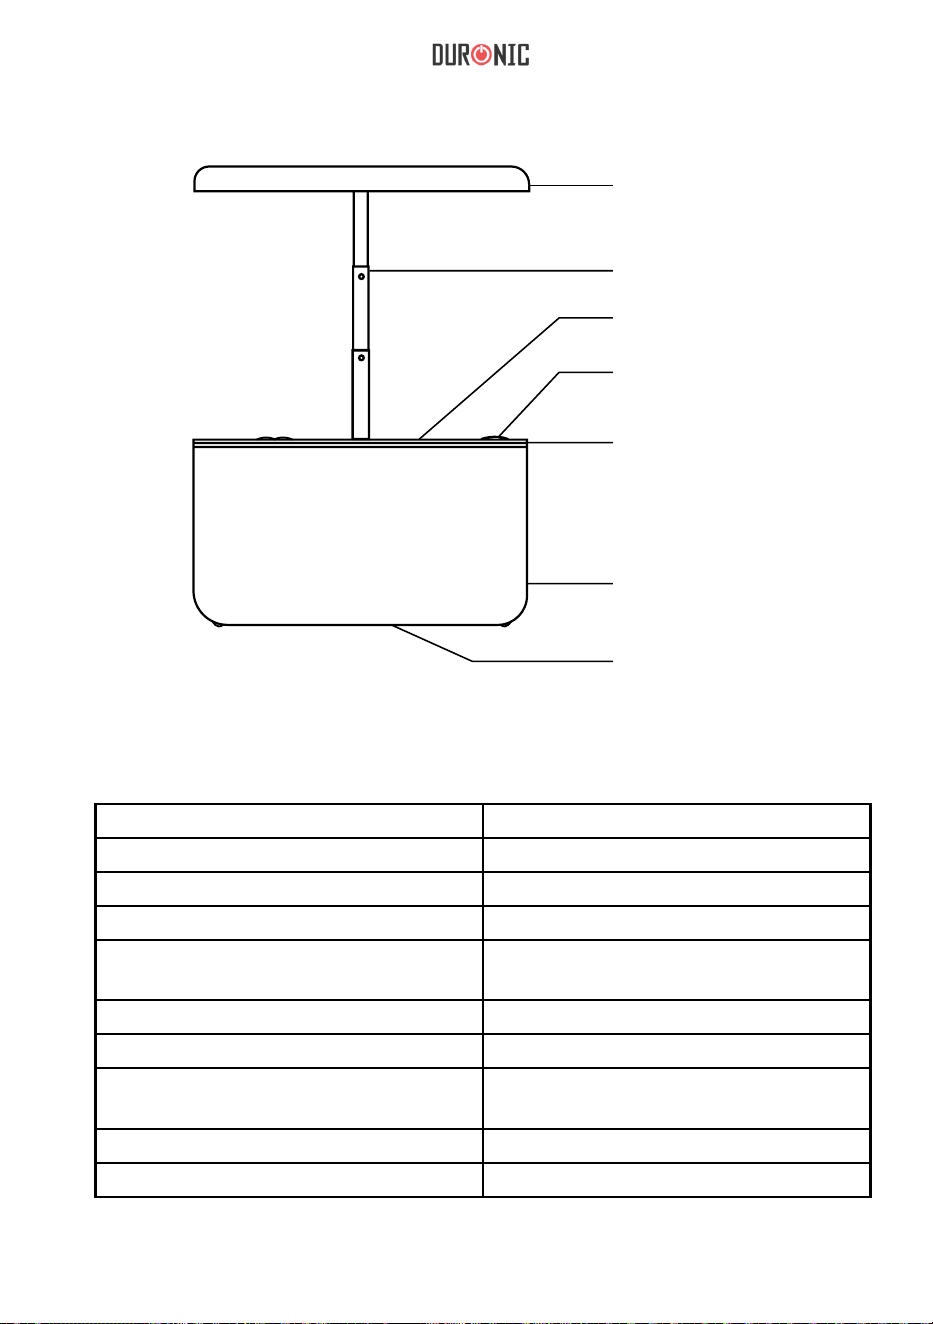
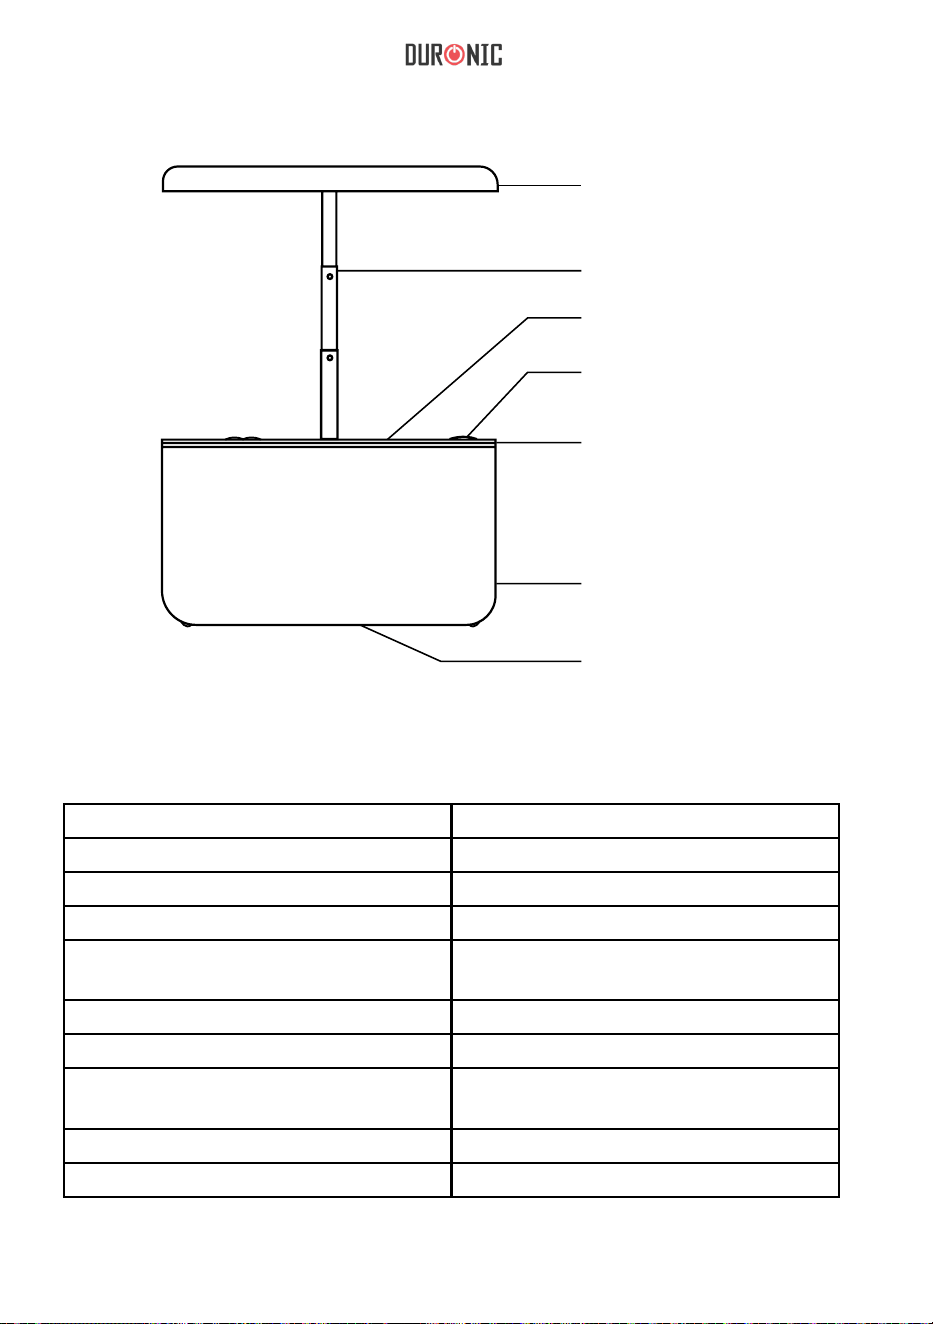
GHS37 Grow Box Components
Specications
Model Number GHS37
Item Type Grow Light Hydroponic Box
Number of Plants 7
Water Tank Capacity 5L (1 water tank)
Rated Voltage Input: 100V-240V/50-60HZ
Output: 24V
Power 25W
LED Light Specic Spectrum
Dimensions 350x140x168-503 mm
13.78x5.51x6.61-19.8 inch
Weight 1.35kg
Working Temperature -15°~ 55°
LED Light Panel
Extendable rod
Plant basket
Rubber plug + rell
nozzle
Water tank cover
Water tank
Power System
8
1. When the power adapter is plugged into the grow box and switched on
at the mains socket, the system will sound a long “beep” to indicate it is
ready to work.
2. After the machine runs for several days, the water level in the tank will
naturally fall. When the water level is no longer sufcient for the plants
to grow, the machine will sound a long “beep” to let you know. If this
happens, please rell the tank to the correct amount. Once you have done
this the alarm will automatically stop beeping.
3. When the system is working normally with the light on, a shorter “beep” will
sound when you press any button. If the mode is being changed, the light
brightness will correspond accordingly.
4. If a button on the panel is pressed when the machine is turn on and the
light is off, the machine will make a short “beep” sound. If it does not make
a beep when a button is pressed, it is likely that the system is not switched
on properly. If this occurs, try the following:
• Check if the machine is connected to the mains power supply.
• If the machine is connected to power but in a dormant standby state,
press the power button to test it. When the power button is pressed
in the dormant state, the light will go off after 3 blinks.
Key Prompts and What They Mean
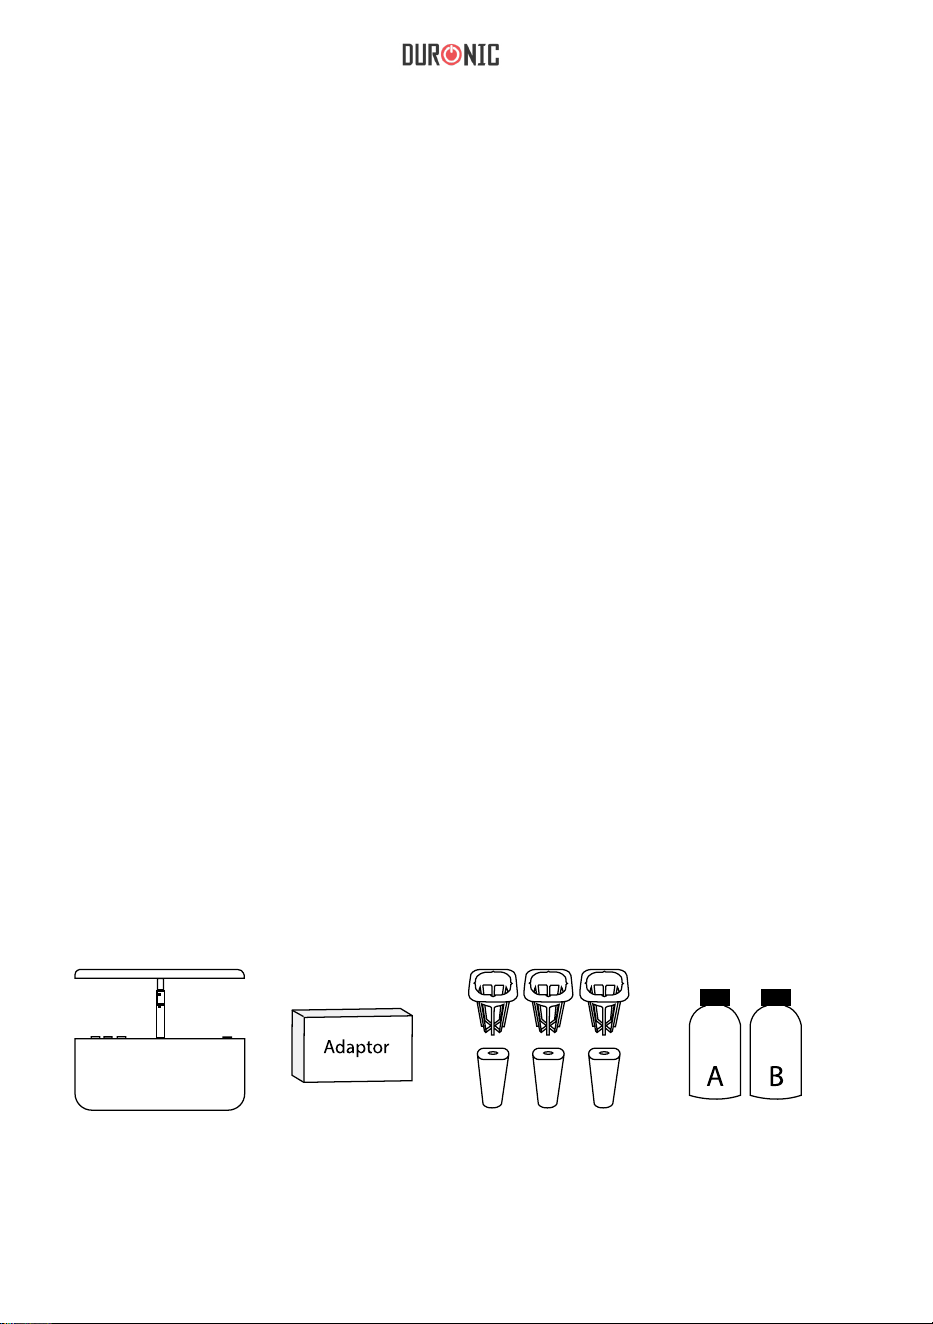
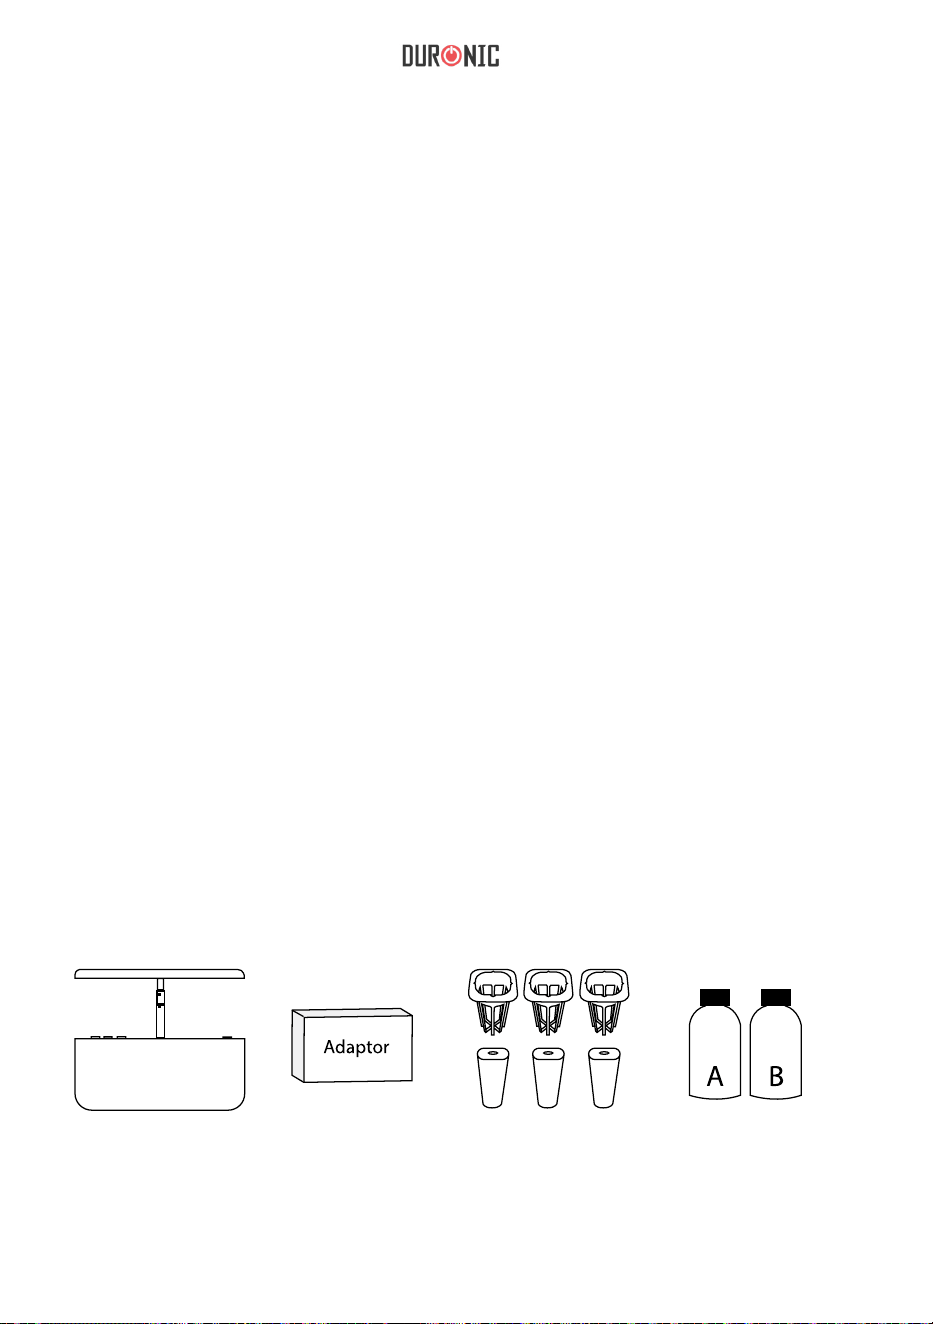
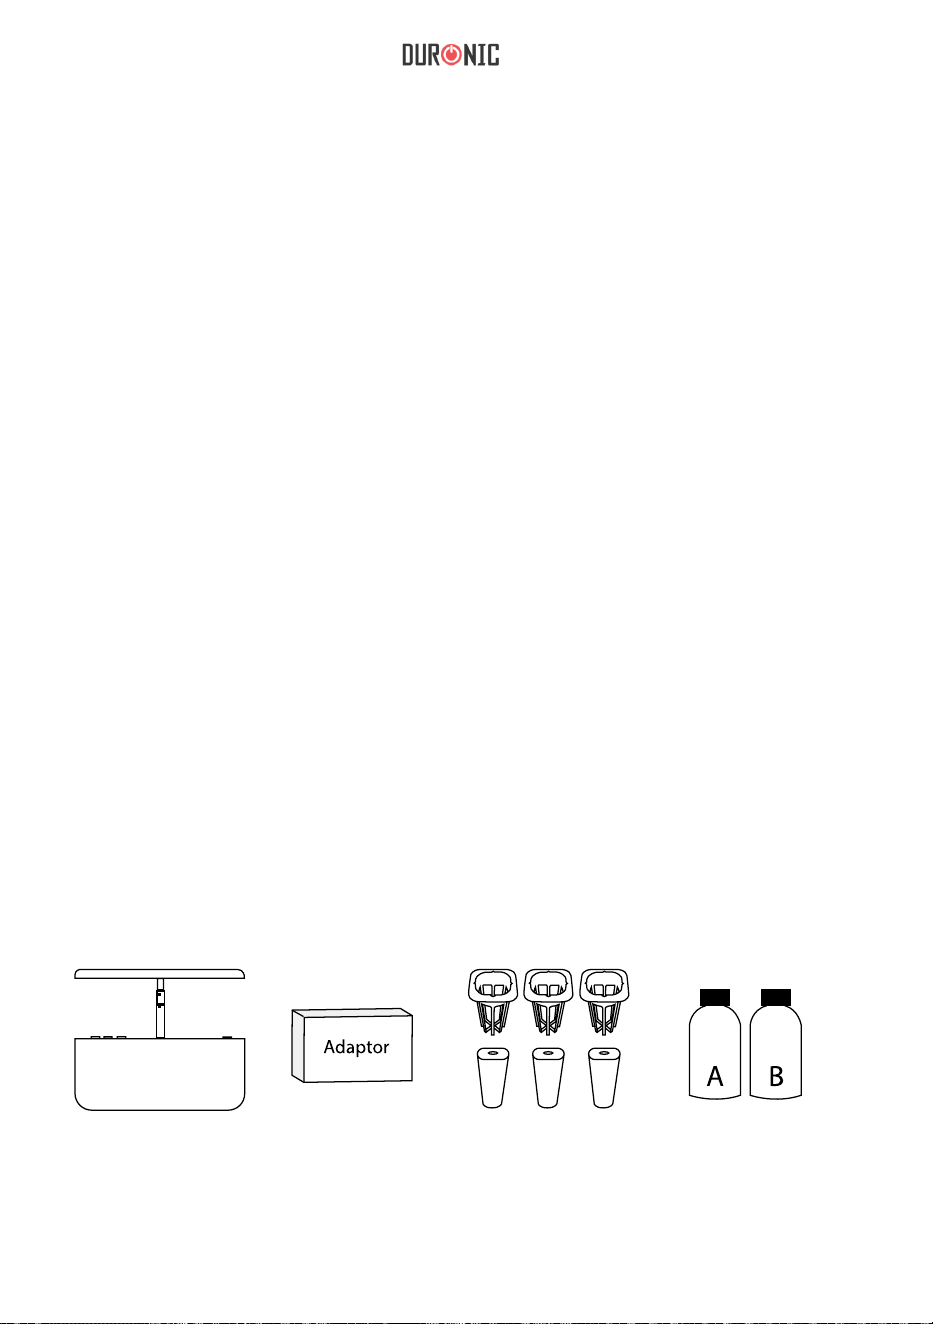
Box Contents
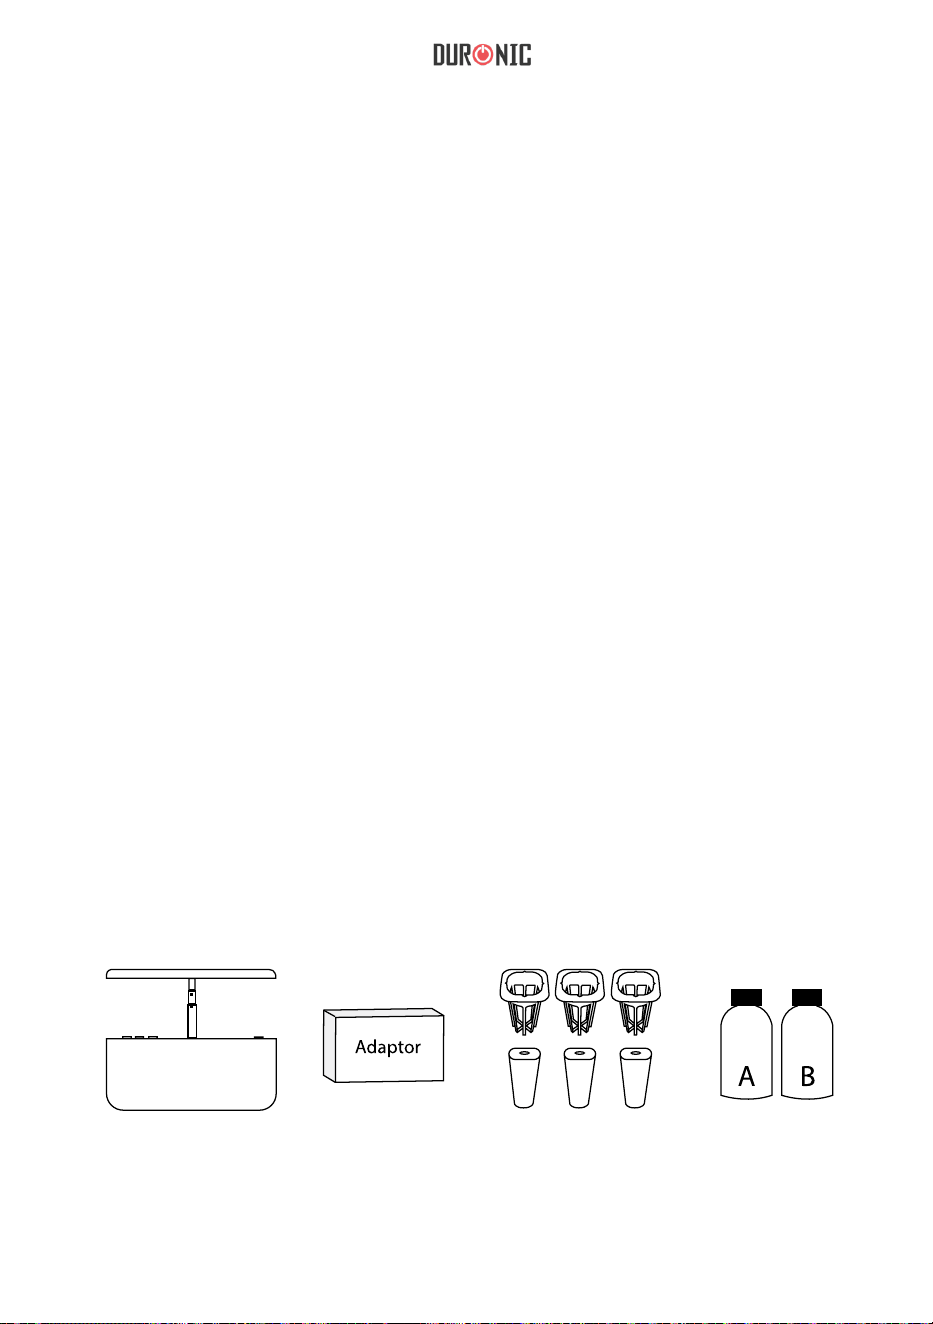
Before using your grow box, please check that you have everything you need:
A grow box system A power adapter 7x Seed pod kit
(Baskets & Cones)
Two bottles of plant
food: Nutrients A &
Nutrients B

9
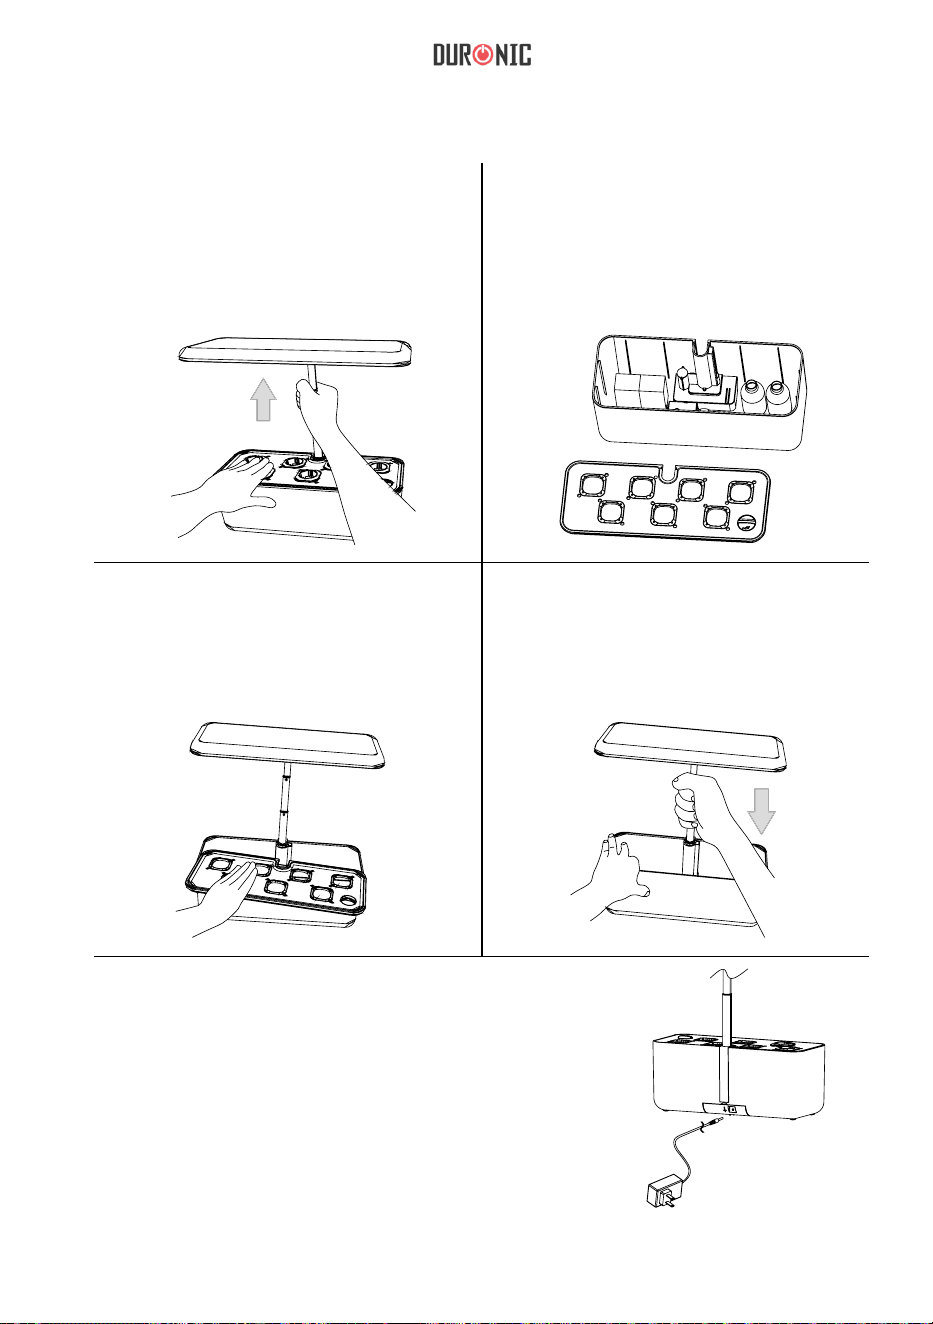
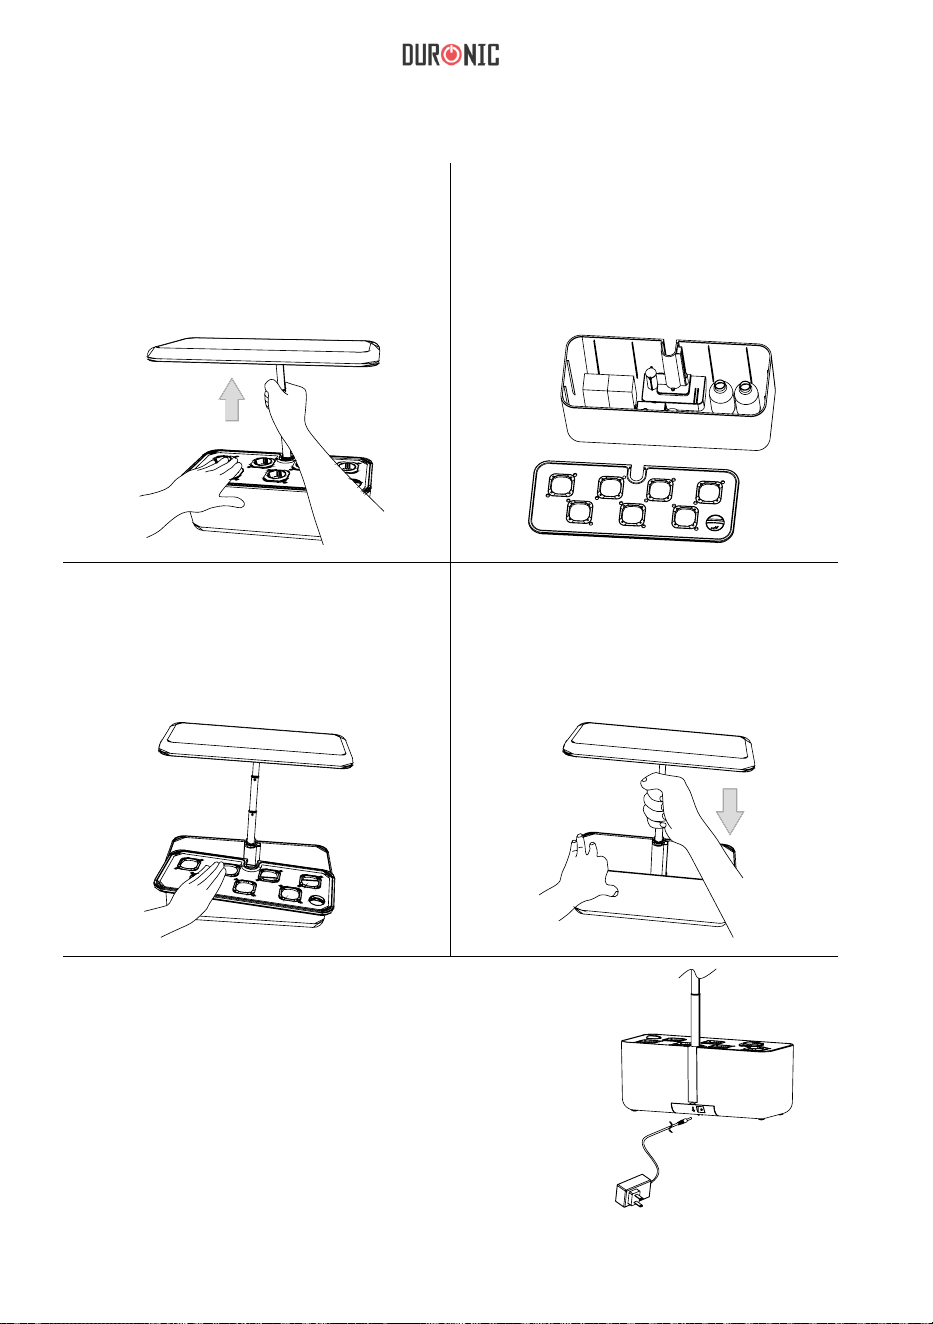
1. Using one hand on the extendable
rod, and one hand holding the
water tank down, gently pull the rod
upwards to extend it higher. Do not
use the light panel to extend the rod.
5. Assemble the power system at the bottom
of the water tank. When it is all assembled and
ready for planting, plug the power adapter into
the socket.
When the power is properly connected, the
system will make a “beep” noise, letting you
know it is ready to use.
3. To wash your water tank before
use, rst you will need to remove the
tank cover and then gently pull out
the light panel.
2. Remove the water tank cover and
take the accessories out of the tank;
power adapter, planting package and
2 bottles of nutrients.
4. After washing and drying the tank,
you can reinstall the LED light panel
using one hand while holding the
water tank down with the other hand.
Set Up Instructions
Hold down the
tank
Pull up
Hold down the
tank
Push
down to
install

10
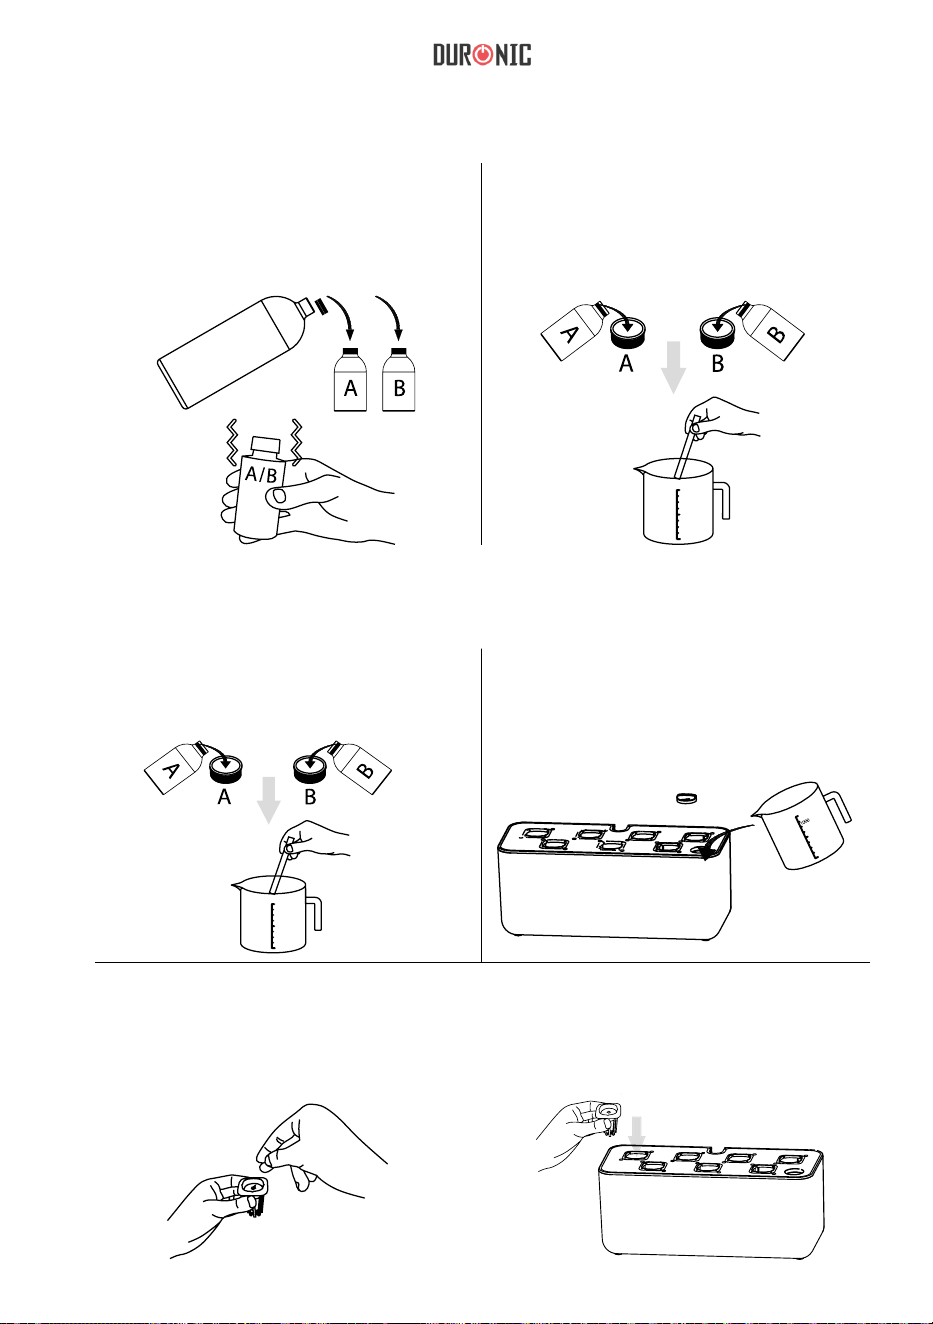
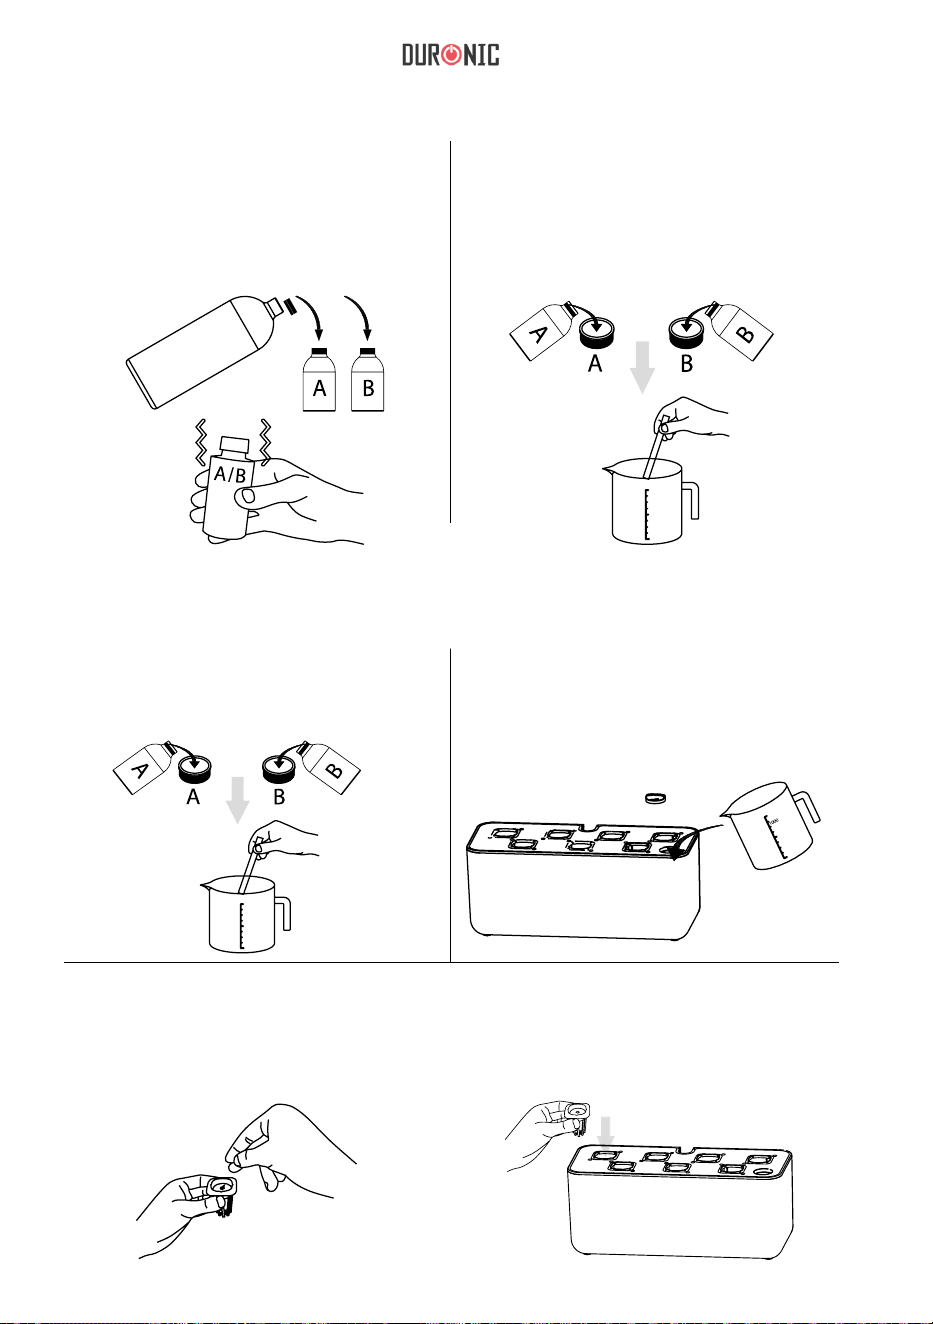
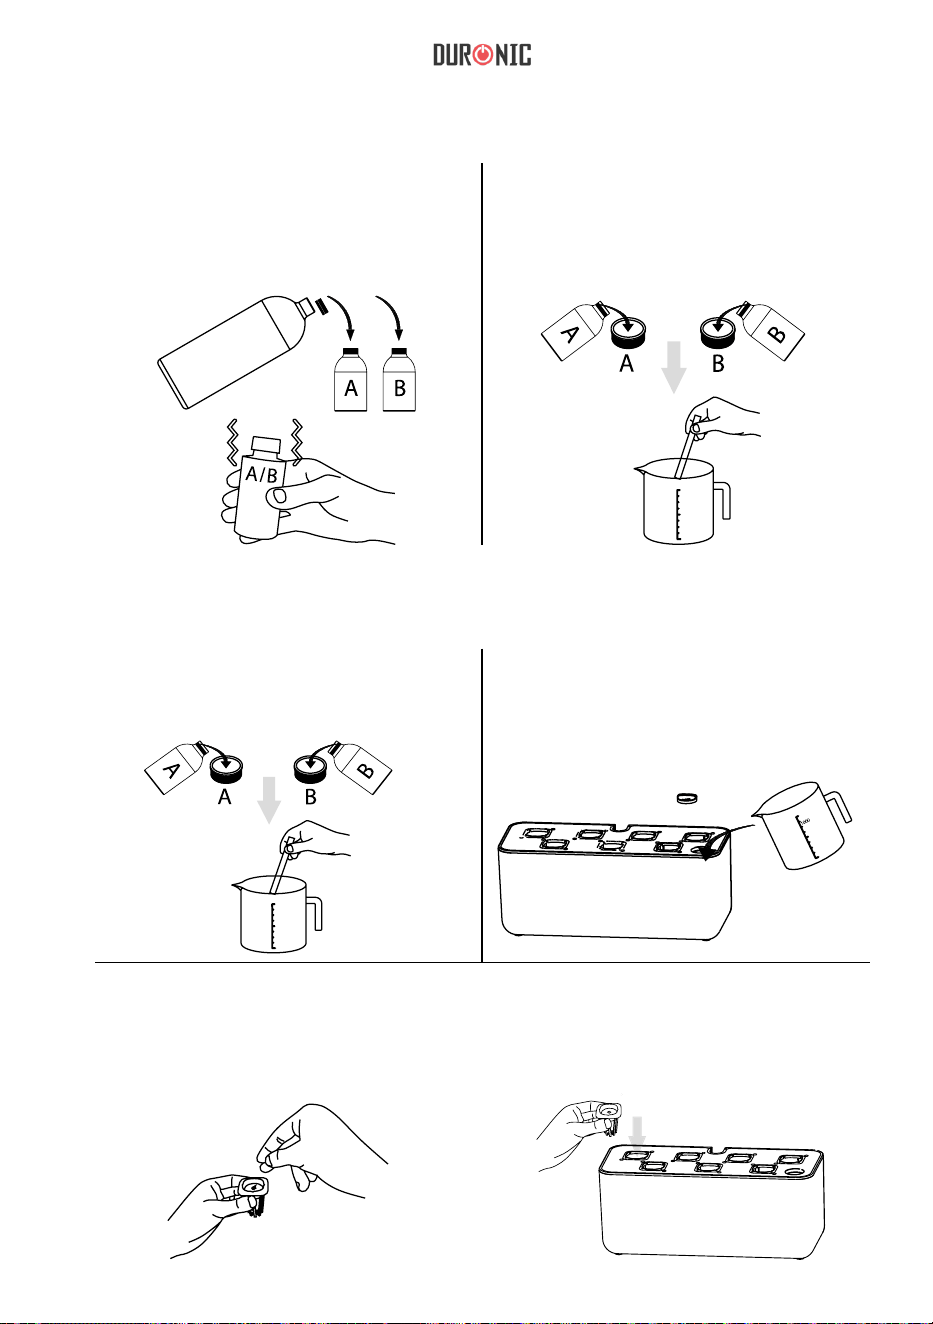
1. Fill bottle ‘A’ with water, put the lid
on and shake to fully mix the contents
until fully dissolved. Repeat the same
with bottle ‘B’.
1. Prepare the nutrient solution as
shown above.
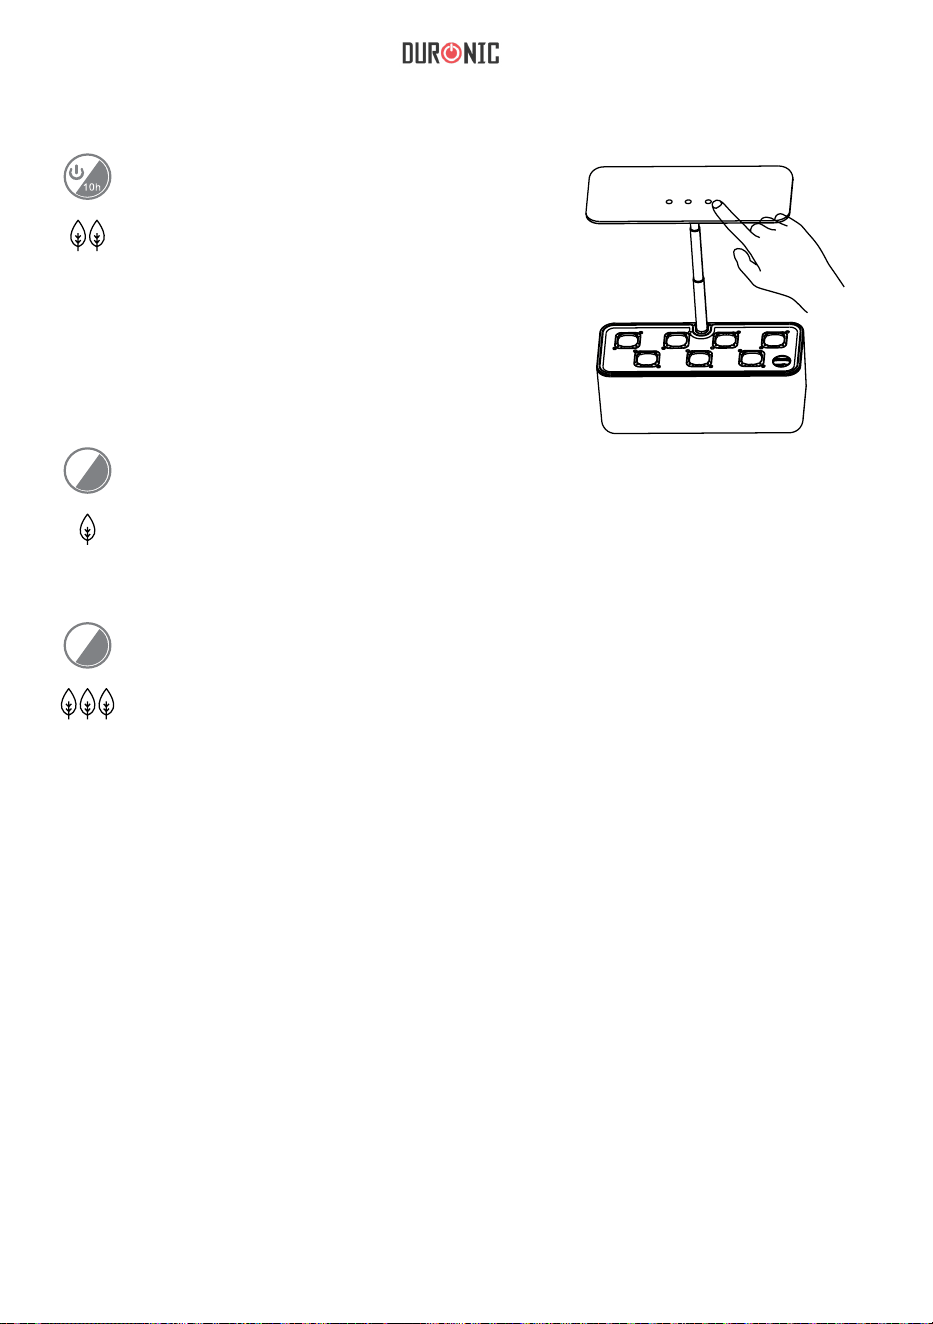
3. Soak the seeds in warm water for about an hour before planting. Place a
sponge into each basket. Sow the seeds properly in each plant basket, then
place the baskets into the spaces on the grow box lid.
2. Using the measuring caps, add
5ml of each solution to 1 litre of
water. Stir or shake well to combine it
all together.
2. Remove the grow box lid and pour
the mixed solution into the plant pot.
Place the plant pot lid back on top.
Preparing the Nutrient Solution
Planting Instructions
Shake
Water
Stir
1L
Stir
1L

11
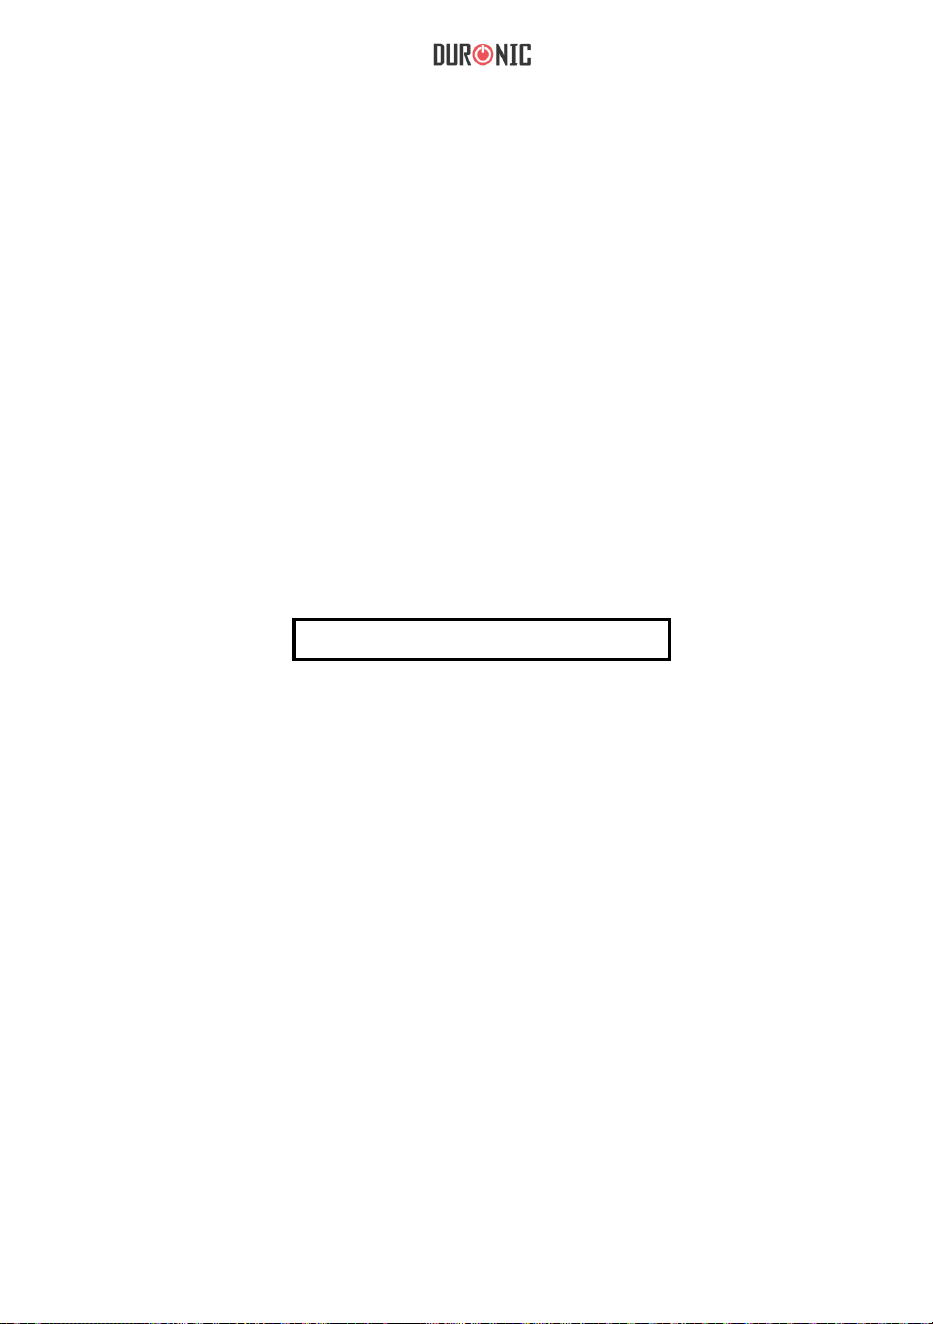
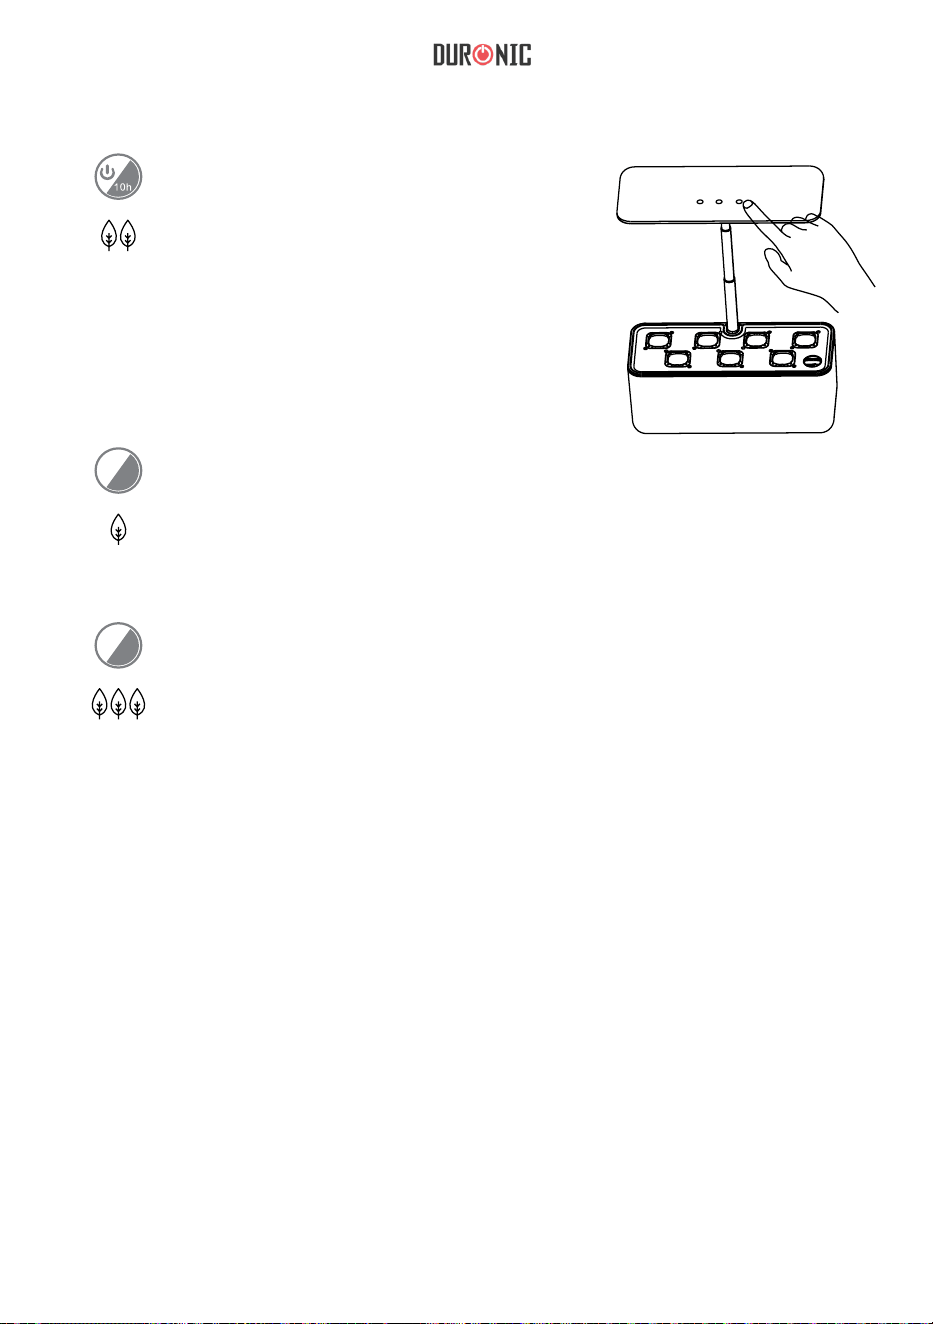
NORMAL CYCLE: 14 hours on / 10 hours
off
Press this button and the system will be
switched on. It will sound a “beep” and run
in ‘normal cycle’ mode. This means the LED
light panel will light up for 14 hours. It will
then switch off for 10 hours. The following
day it will repeat this pattern: 14hrs on /
10hrs off.
SHORT CYCLE: 12 hours on / 12 hours off
If you press this button, the system will sound a “beep” and enter the
‘short cycle’ mode. The LED panel on the top will reduce the intensity of
the light and will start a cycle of 12 hours on / 12 hours off.
LONG CYCLE: 16 hours on / 8 hours off
If you press this button, the system will sound a “beep” and enter ‘long
cycle’ mode. The LED panel on the top will increase the intensity of the
light and will start a cycle of 16 hours on / 8 hours off.
Setting the Mode
From the moment the system is connected and switched on at the plug, the
power button will luminate and the lamp will be in ‘standby mode’.
When you select a mode, it will turn on the lamp and activate a 24-hour clock
to coincide with the cycle of the mode you have chosen. Depending on the
time you rst selected the mode, this will be the same time that the light turns
on every day thereafter.
For instance, if you select the ‘normal mode’ at 10am for the rst use, the
system will run the cycle of 14 hours lights on and then 10 hours lights off.
It will then automatically turn back on at 10am the following day, and the
cycle will continue for as long as desired until the unit is either turned off into
‘standby mode’ or switched off at the plug.
Using the Control Panel
12h
8h

12
24 Hour Light-On Setting
If you wish to keep the light working all day long (for a whole 24 hours), hold
the power button down for 3 seconds.
The light will blink 3 times, then the whole system and lights will switch on
and stay on for 24 hours. After this time elapses, the system will automatically
revert back to ‘standby mode’.
If you activate this 24-hour light mode while the lamp is currently working, it will
keep the lamp lit constantly until the end of the programmed cycle and then
revert back to the mode you had been using previously.
Before cleaning ensure the lamp is unplugged from the mains socket.
Do not submerge this lamp in water or any other liquid. Do not use corrosive
cleaning products on it.
To clean, simply use a dry cloth to dust and clean the lamp.
Storing the Nutrient Mixture
• The dry unmixed nutrient particles have a storage life of 2 years if kept in
an unopened bottle in a cool dry place away from direct sunlight.
• The mixed nutrient mix (with water already added) has a storage life of 5
months if stored away from sunlight.
Care and Maintenance
13
Warranty
1 Year Guarantee from Shine-Mart Ltd, Trademark owners of Duronic Products.
NOTE: THESE STATEMENTS DO NOT AFFECT YOUR STATUTORY RIGHTS AS A
CONSUMER
This product has been manufactured under the strictest or quality control procedures, and
using the highest quality of materials, to ensure excellent performance and reliability. It will
give very good and long lasting service, provided it is properly used and maintained. The
product is guaranteed for 1 years from the date of original purchase. If any defect arises due
to a faulty materials or poor workmanship, the faulty product must be returned to the original
place of purchase. Refund or replacement is at the discretion of that company.
Duronic Products are offered with a 1 year guarantee under the following conditions:
1. The product must be returned to the retailer with original proof of purchase.
2. The product must be installed and used in accordance with the instructions
contained in this operating manual.
3. It must be used only for domestic purposes.
4. It does not cover wear and tear, malicious damage, misuse, neglect,
inexpert repairs or consumable parts.
5. Shine-Mart Ltd has no responsibilities for accidental or consequential loss or damage.
6. Shine-Mart Ltd are not liable to carry out any type of servicing work,
under the guarantee
7. Valid in the UK only
This product is tted with CE:1363 plug and fuse
Imported by Shine-Mart Ltd, RM3 8SB
Information on waste Disposal for Consumers of
Electrical & Electronic Equipment.
This mark on a product and/or accompanying documents indicates that when it
is to be disposed of, it must be treated as Waste
Electrical & Electronic Equipment, (WEEE).
Any WEEE marked products must not be mixed with general household waste,
but kept separate for the treatment, recovery and recycling of the materials used.
For proper treatment, recovery and recycling; please take all WEEE marked
waste to your Local Authority Civic waste site,
where it will be accepted free of charge.
If customers dispose of Waste Electrical & Electronic Equipment correctly, they
will be helping to save valuable resources and preventing any potential negative
effects upon human health and the environment, of any hazardous materials that
the waste may contain.
14
Manuel d’utilisation en français

15
de sécuritéInstructions
• Cet appareil est conçu pour un usage intérieur/domestique. Ne l’utilisez
pas à l’extérieur.
• Si le câble ou la prise sont endommagés et/ou ne fonctionnent pas
correctement, contactez Duronic ou faites réparer l’appareil par un
professionnel.
• Evitez de placer la lampe sous la lumière directe du soleil.
• Gardez la lampe et les composants électriques à l’abri de l’humidité.
• Si de l’eau est renversée ou éclaboussée sur n’importe quelle partie
électrique, séchez minutieusement les câbles et toutes les parties
mouillées.
• Lorsque vous n’utilisez pas ce système de culture hydroponique,
rangez-le dans un endroit sécurisé. Ne placez pas d’objets lourds sur le
dessus.
• N’utilisez pas ce système de culture hydroponique dans la présence de
gaz corrosifs. Utilisez-le dans une pièce bien ventilée.
• Assurez-vous que l’alimentation électrique principale soit de 220-240V /
50 Hz.
• N’essayez jamais de remplacer des parties ou de réparer la lampe par
vous-même.
• Lorsque vous ajoutez ou videz l’eau, assurez-vous que vos mains soient
sèches avant d’essayer de rebrancher la prise.
• Les solutions nutritives pour plantes doivent être gardées hors de portée
des enfants.
• N’ingérez pas les solutions nutritives. Si vous en avez accidentellement
ingéré, veuillez contacter un médecin.
VEUILLEZ LIRE ATTENTIVEMENT CE MANUEL AVANT D’UTILISER LE
PRODUIT ET GARDEZ-LE POUR REFERENCE FUTURE.

16
Caractéristiques
Spécications
Numéro du modèle GHS37
Type
Système
Nombre de plantes
7
du réservoir d'eauCapacité 5 L (1 réservoir d'eau)
Tension Entrante : 100V-240V/50-60HZ
Sortante : 24V
Puissance
25W
Lumière LED spécifiqueSpectre
Dimensions 350 x 140 x 168-503 mm
13.78 x 5.51 x 6.61-19.8 inch
Poids 1.35 kg
T de fonctionnementempératures -15°~ 55°
Panneau de lumières LED
Barre extensible
Bac
Bouchon en caoutchouc +
buse de recharge
Couvercle
Réservoir
d'alimentationSystème
à plantes
d'eau
du réservoir d'eau
de produit
du culture hydroponique
17
1. Lorsque l’adaptateur est connecté au système de culture hydroponique et
qu’il est branché dans une prise, une alarme produit un long « bip » pour
indiquer qu’il est prêt à être utilisé.
2. Lorsque l’appareil fonctionne pendant plusieurs jours, le niveau d’eau du
réservoir baisse naturellement. Lorsque ce niveau n’est plus suffisent pour
faire pousser les plantes, une alarme produit un long « bip » pour vous
avertir. Si cela se produit, veuillez remplir le réservoir jusqu’au niveau
conseillé. Une fois rempli, l’alarme s’arrêtera.
3. Lorsque le système fonctionne normalement avec la lumière allumée, un «
bip » plus court se fait entendre lorsque vous appuyez sur une touche. Si le
mode est changé, la luminosité va changer pour correspondre au mode.
4. Si vous appuyez sur une touche lorsque l’appareil est allumé et que la
lumière est éteinte, vous entendrez un court « bip ». Si aucun son n’est
produit lorsque vous appuyez sur une touche, il est possible que le système
ne soit pas allumé correctement. Si cela se produit :
• Vérifiez que l’appareil est branché à une prise.
• Si l’appareil est correctement branché mais qu’il est en veille, appuyez
sur la touche d’alimentation pour le tester. Lorsque vous appuyez sur
cette touche pendant la veille, la lumière va brièvement s’allumer,
clignoter 3 fois et puis s’éteindre.
de la boiteContenu
Avant d’utiliser votre système de culture hydroponique, veuillez vérifier que
vous avez tous les éléments nécessaires :
Un de culturesystème Un adaptateu
électrique
r 7x K de semencesit
(Paniers & eponges)
Les instructions clés et ce qu’elles signifient
Deux bouteilles de
nourriture pour
plantes : les
nutriments A et les
nutriments B.

18
1. En plaçant une main sur la barre
extensible, et l’autre sur le réservoir
pour le maintenir en place, tirez
doucement la barre vers le haut pour
l’étendre. N’utilisez pas le panneau
de lumières pour étendre la barre.
5. Assemblez le système d’alimentation en
dessous du réservoir. Quand tout est
assemblé et que vous êtes prêt à planter,
branchez l’adaptateur dans la prise.
Lorsque l’alimentation est correctement
connectée, une alarme produit un « bip »
pour vous avertir que le système de culture
hydroponique est prêt à l’emploi.
3. Pour nettoyer le réservoir d’eau
avant son utilisation, vous devrez
d’abord retirer le couvercle et
ensuite doucement sortir le
panneau de lumières.
2. Retirez le couvercle du réservoir
et sortez les accessoires du
réservoir ; l’adaptateur électrique,
les kits de semences et les 2
bouteilles de nutriments.
4. Après avoir nettoyé et séché le
réservoir, vous pouvez réinstaller le
panneau de lumières avec une main
tandis que l’autre main maintient le
réservoir en place.
d'installationInstructions
Maintenez
Tirez
Maintenez
Poussez
le
réservoir
doucement
le
réservoir
vers le
bas pour installer
19
1. Remplissez la bouteille « A » avec
de l’eau, placez le couvercle et
secouez afin de mélanger le contenu
jusqu’à ce qu’il soit tout à fait dissout.
Répétez avec la bouteille « B ».
3. Laissez tremper les graines dans de l’eau chaude pendant
approximativement une heure avant de les planter. Placez une éponge
dans chaque panier et plantez ensuite les graines correctement dans les
paniers. Placez ensuite les paniers à l’endroit adéquat sur le couvercle.
2. En utilisant les bouchons doseurs,
ajoutez 5 ml de chaque solution à 1L
d’eau. Mélangez bien afin de
combiner le tout.
2. Retirez le bouchon en caoutchouc
et versez la solution dans le réservoir.
Replacez le bouchon.
Préparer
de plantationInstructions
la solution nutritive
1. Préparez la solution nutritive
comme montré ci-dessus.
Secouez
Eau
Mélangez
1L
Mélangez
1L

20
Appuyez sur cette touche et le système
s’allumera. Vous entendez un « bip » et le
cycle normal (ou moyen) se mettra en
route. Cela signifie que les lumières LED
seront allumées pendant 14 heures et elles
s’éteindront ensuite pendant 10 heures. Le
jour suivant, ce même cycle sera répété.
Si vous appuyez sur cette touche, vous entendrez un « bip » et le
cycle court se mettra en route. Le panneau de lumière LED va réduire
son intensité et commencer un cycle de 12 heures allumé / 12 heures
éteint.
Si vous appuyez sur cette touche, vous entendrez un “bip” et le cycle
long se mettra en route. Le panneau de lumière LED va augmenter
son intensité et commencer un cycle de 16 heures allumé / 8 heures
éteint.
Paramétrer un mode
À partir du moment où le système est connecté et branché, la touche
d’alimentation va s’illuminer et la lumière sera en veille.
Lorsque vous sélectionnez un mode, la lumière va s’allumer et activer une
horloge de 24 heures pour coïncider avec le cycle que vous avez choisi. En
fonction de l’heure à laquelle vous avez sélectionné ce mode pour la première
fois, il s’agira de l’heure à laquelle la lumière s’allume les jours suivants.
Par exemple, si vous sélectionnez le cycle normal pour la première fois à 10
heures du matin, la lumière va s’allumer pendant 14 heures puis s’éteindre
pendant 10 heures. Elle se rallumera automatiquement à 10 heures le
lendemain matin et le cycle va continuer pour aussi longtemps que vous le
désirez jusqu’à ce que l’appareil soit mis en veille ou débranché.
Utiliser le panneau de contrôle
CYCLE NORMAL : allumé 14 heures /
éteint 10 heures
CYCLE COURT : allumé 12 heures / éteint 12 heures
CYCLE LONG : allumé 16 heures / éteint 8 heures
12h
8h

21
Cycle
Si vous souhaitez garder la lumière allumée pendant toute une journée (24
heures), maintenez appuyé la touche d’alimentation pendant 3 secondes.
La lumière va clignoter 3 fois pour confirmer le cycle de 24 heures durant
lequel la lumière et la pompe fonctionneront en continu. Une fois ce délai
écoulé, le système se mettra automatiquement en veille.
Attention : Si vous activez ce cycle alors que l’appareil avait déjà entamé un
cycle normal, court ou long, ce cycle de 24 heures déduira les heures déjà
passées durant le cycle actuel avant de reprendre le cycle originalement
programmé (normal, court ou long).
Avant de nettoyer, assurez-vous que l’appareil est débranché de la prise.
Ne submergez pas cet appareil sous l’eau ou tout autre liquide. N’utilisez
pas de produits corrosifs pour le nettoyer.
Pour nettoyer l’appareil, utilisez simplement un tissu sec afin de retirer la
poussière sur le réservoir et le panneau de lumières.
Conserver la solution nutritive
•
de 24 heures
Les nutriments secs et non mélangés ont une durée de conservation de
2 ans s’ils sont gardés dans une bouteille fermée dans un endroit sec et à
l’abri de la lumière directe du soleil.
• La solution mélangée (avec de l’eau ajoutée) peut être conservée
pendant 5 mois si elle est gardée à l’abri de la lumière directe du soleil.
Nettoyage et maintenance
22
Garantie et service après-vente
1 an de garantie de la part de Shine-Mart Ltd, propriétaire de la marque Duronic.
NOTE : CES DÉCLARATIONS N’AFFECTENT EN RIEN VOTRE DROIT STATUTAIRE EN
TANT QUE CONSOMMATEUR
Ce produit a été produit en suivant les procédures de contrôle de qualité les plus strictes en
utilisant des matériaux de qualité pour assurer une excellente durabilité et performance.
Cette centrifugeuse vous offrira de longues années de service tant que vous utilisez
correctement cette machine et suivez les instructions de maintenance contenues dans ce
manuel. Ce produit est garanti pour 1 an à partir de la date originelle d’achat. Si ce produit
était endommagée en raison d’un problème électrique ou d’une fabrication imparfaite,
le produit défectueux peut être remplacé au vendeur à la discrétion de la marque sous
conditions:
1. Le produit doit être retourné avec la preuve originale d’achat.
2. Le produit doit être installé et utilisé en accord avec les instructions contenues
dans ce manuel d’utilisation.
3. Le produit doit être réservé à un usage privé.
4. La garantie ne protège pas contre les dommages dus à l’usure normale,
l’utilisation malveillante, la mauvaise utilisation, la négligence, les réparations
conduites par des non-experts ainsi que les pièces consommables.
5. Shine-Mart Ltd ne porte pas de responsabilité pour tout dommage ou perte
accidentel ou conséquent causé par ce produit.
6. Shine-Mart Ltd se dégage de toute responsabilité en matière de réparation
durant la période de garantie.
7. Valide dans toute l’Union Européenne.
Ce produit est fourni avec une prise européenne
et un fusible de 3 ampères.
Importé par Shine-Mart Ltd, RM3 8SB.
Ce symbole apparaît sur le produit et/ou les documents accompagnant ce
produit pour indiquer que pour procéder à la destruction de ce produit, celui-ci
doit être traité comme un déchet électrique et électronique (WEEE).
Les produits marqués WEEE ne doivent être mélangés avec les déchets
ménagers et doivent être séparés pour traitement et recyclage des composants.
An de traiter et recycler ce produit, veuillez déposer tous les composants
marqués WEEE au site de recyclage le plus proche où ce produit sera repris
gratuitement. Si les clients jettent les déchets électriques et électroniques
WEEE correctement, ce geste aidera la préservation de ressources précieuses
et prévient les potentiels effets négatifs que ces composants ou tout autre
composant dangereux ont sur la santé humaine et l’environnement.
Garantie
suivez nous
www.duronic.com @Duronic_FranceDuronic France@duronic_france
23
Gebrauchsanleitung auf Deutsch

24
•
Sicherheitshinweise
•
Nur für den Heimgebrauch. Nicht im Freien verwenden.
•
Verwenden Sie dieses Gerät nicht, wenn das Netzkabel oder der
Stecker beschädigt ist. Wenn einer der beiden beschädigt ist, senden
Sie ihn zur Wartung oder Reparatur durch einen professionellen
Techniker an Duronic zurück.
•
Setzen Sie das Göret keinem Sonnenlicht aus.
•
Halten Sie LED und elektronische Komponenten von Feuchtigkeit fern.
Wenn Wasser auf ein elektrisches Teil verschüttet oder gesprüht wird,
trocknen Sie alle Kabel und Teile gründlich ab.
•
•
Wenn Sie das Gerät nicht benutzen, lagern Sie es an einem sicheren
Ort. Stellen Sie keine schweren Gegenstände darauf.
Nicht in Gegenwart von ätzendem Gas verwenden - in einem gut
belüfteten Raum verwenden.
•
Versuchen Sie niemals, Teile auszutauschen und das
Hydroponische Anzuchtsysteme selbst zu reparieren.
•
Stellen Sie beim Hinzufügen oder Entleeren von Wasser sicher,
dass Ihre Hände trocken sind, bevor Sie die Stromversorgung
anschließen.
•
Pflanzliche Nährlösung sollte außerhalb der Reichweite von Kindern
sicher aufbewahrt werden.
BITTE LESEN SIE DIESES HANDBUCH VOR DEM GEBRAUCH
SORGFÄLTIG DURCH
25
GHS37 Komponente
Spezifikationen
GHS37
7
5L (1 Wassertank)
Input: 100V-240V/50-60HZ
Output: 24V
25W
LED Lampe
350x140x168-503 mm
13.78x5.51x6.61-19.8 inch
1.35 kg
-15°~ 55°
Gummistopfen +
Einfüllöffnung
LED-Lichtpaneel
Ausziehbare Stange
Netztopf
Wassertankdeckel
Wassertank
Stromversorgungssystem
Modellnummer
Produkttyp
Anzahl der Pflanzen
Wassertankkapazität
Netzspannung
Leistung
Gewicht
Maße
Arbeitstemperatur
Hydrokultur Gerät
Spezifisches Spektrum

26
1.
Wenn das Gerät angeschlossen ist, wird einen langen akustischen
Ton ertönen.
2.
Wenn das Hydroponische Anzuchtsysteme über mehrere Tage
genutzt wird, sinkt der Wasserstand im Tank automatisch. Wenn der
Wasserstand unter dem Minimum liegt, wird ein akustisches
Geräusch ertönen. Füllen Sie in diesem Fall den Tank mit Wasser.
3.
Wenn das System bei eingeschaltetem Licht normal arbeitet, ertönt ein
kurzes akustisches Signal, sobald eine Taste gedrückt wird.
4.
•
Wenn Sie eine Taste auf dem Bedienfeld drücken, während das
Hydroponische Anzuchtsysteme eingeschaltet und das Licht
ausgeschaltet ist, ertönt ein kurzer Piepton. Wenn beim Drücken einer
Taste kein Piepton zu hören ist, ist das System möglicherweise nicht
richtig eingeschaltet. Versuchen Sie in diesem Fall Folgendes:
•
Überprüfen Sie, ob das Hydroponische Anzuchtsysteme
angeschlossen ist.
Wenn das Gewächshaus an die Stromversorgung angeschlossen
ist, sich jedoch im Standby Modus befindet, drücken Sie den
Ein/Aus Schalter.
7x Netztöpfe
Wichtige Tipps
Inhalt
Hydrokultur Gerät Netzteil
Nährstoffe
A &
Nährstoffe
B
27
1. Halten Sie mit einer Hand die
ausziehbare Stange und mit der
anderen Hand den Wassertank,
ziehen Sie die Stange vorsichtig
nach oben, um das Lichtpaneel
hochzuziehen.
5. Wenn alles zusammengebaut und bereit
zum Pflanzen ist, stecken Sie das Netzteil in
die Steckdose.
Wenn die Stromversorgung
ordnungsgemäß angeschlossen ist, wir ein
akustischer Ton ertönen.
3. Um den Wassertank vor dem
Gebrauch zu reinigen, müssen
Sie zuerst den Tankdeckel
entfernen und dann das
Lichtpaneel vorsichtig
herausziehen.
2. Entfernen Sie den
Wassertankdeckel und Nehmen Sie
das Zubehör aus dem Tank.
Netzteil, Pflanzpaket und 2 Flaschen
Nährstoffe.
4. Nach dem Waschen und
Trocknen des Tanks können Sie das
LED-Lichtpaneel wieder anbringen.
Aufstellanleitung
Wassertank festhalten
Nach
unten
drücken
Halten Sie
den Tank fest
Hochziehen
28
1. Füllen Sie die Flasche "A" mit
Wasser, setzen Sie den Deckel auf
und schütteln, um den Inhalt
vollständig zu mischen, bis er
vollständig aufgelöst ist. Wiederholen
Sie dies mit Flasche „B“.
1. Bereiten
3. Die Samen vor dem Pflanzen etwa eine Stunde lang in warmem
Wasser einweichen. Legen Sie einen Schwamm in jeden Korb. Säen Sie
die Samen richtig in jeden Pflanzenkorb und stellen Sie die Körbe in die
Zwischenräume auf dem Deckel der Wachstumsbox.
2. Fügen Sie mit den Messkappen 5
ml jeder Lösung zu 1 Liter Wasser
hinzu. Rühren oder gut schütteln,
um alles miteinander zu
kombinieren.
2. Entfernen Sie den Deckel der
Wachstumsbox und gießen Sie die
gemischte Lösung in den
Blumentopf. Setzen Sie den
Pflanzentopfdeckel wieder auf.
Nährlösung vorbereiten
Pflanzanleitung
Sie die Nährlösung
wie oben gezeigt vor.
Schütteln
Wasser
1L
Rühren
Stir
1L

29
Wenn Sie diese Taste drücken, ertönt ein
Piepton und der Modus wird im mittleren
Zyklus ausgeführt. Dies bedeutet, dass die
LED-Lampen 14 Stunden lang an sind. Es
wird dann für 10 Stunden ausgeschaltet.
Am nächsten Tag wird dieses Zyklus
wiederholt: 14 Stunden Ein / 10 Stunden
Aus.
Wenn Sie diese Taste drücken, ertönt ein Piepton und der
Kurzzyklusmodus wird aktiviert. Das LED-Feld oben verringert die
Lichtintensität und startet einen Zyklus von 12 Stunden Ein / 12
Stunden Aus.
Wenn Sie diese Taste drücken, ertönt ein Piepton und der Modus
"Langzyklus" wird aktiviert. Das LED-Feld erhöht die
Lichtintensität und startet einen Zyklus von 16 Stunden Ein / 8
Stunden Aus.
Sobald es am Stecker angeschlossen und eingeschaltet ist, leuchtet
der Ein/Aus Schalter auf und die Lampe befindet sich im
Standby-Modus.
Wenn Sie einen Modus auswählen, wird die Lampe eingeschaltet und eine
24-Stunden-Uhr aktiviert, die mit dem Zyklus des von Ihnen gewählten
Modus übereinstimmt. Abhängig von der Zeit, zu der Sie den Modus zum
ersten Mal auswählen, ist dies die gleiche Zeit, zu der das Licht jeden Tag
eingeschaltet wird.
Wenn Sie beispielsweise bei der ersten Verwendung um 10 Uhr den
„normalen Modus“ auswählen, startet das System den Zyklus von 14
Stunden Licht ein und dann 10 Stunden Licht aus.
Systemsteuerung
NORMALER ZYKLUS: 14 Stunden an /
10 Stunden aus
KURZZYKLUS: 12 Stunden ein /
12
Stunden aus
LANGER ZYKLUS: 16 Stunden an / 8
Stunden aus
Modus
12h
8h

30
Die LED-Leuchte kann auch für einen 24 Stunden gebrauch eigestellt
werden. Dafür den Ein/Aus Schalter für 3 Sekunden gedrückt halten.
Das Licht blinkt dreimal, dann schalten sich das gesamte System und die
Lichter ein und bleiben 24 Stunden lang eingeschaltet. Nach Ablauf dieser
Zeit kehrt das System automatisch in den Standby-Modus zurück.
Stellen Sie vor dem Reinigen sicher, dass das Hydroponische
Anzuchtsysteme aus der Steckdose gezogen ist.
Tauchen Sie das Gerät nicht in Wasser oder andere Flüssigkeiten.
Verwenden Sie keine ätzenden Reinigungsmittel.
Verwenden Sie zum Reinigen ein trockenes Tuch, um die
Lampe abzuwischen und zu reinigen.
Lagerung der Nährstoffmischung
•
24-Stunden-Lichteinstellung
Die trockenen Nährstoffpartikel haben eine Haltbarkeit von 2 Jahren,
wenn sie in einer ungeöffneten Flasche an einem kühlen, trockenen Ort
ohne direkte Sonneneinstrahlung aufbewahrt werden.
•
Die gemischte Nährstoffmischung (mit bereits hinzugefügtem Wasser)
hat eine Haltbarkeit von 5 Monaten, wenn sie vor Sonnenlicht
geschützt gelagert wird.
Pflege und Wartung
31
Shine-Mart Ltd, der Markeninhaber von Duronic Produkten, bietet 1 Jahr Gewährleistung.
HINWEIS: DIESE BEDINGUNGEN BEEINFLUSSEN IHRE GESETZLICHE RECHTE ALS
VERBRAUCHER NICHT
Dieses Produkt wurde unter strengen Qualitätskontrollen produziert und aus hochwertigen
Materialien hergestellt, um ausgezeichnete Leistung und Zuverlässigkeit zu gewährleisten.
Sofern das Produkt korrekt benutzt und gewartet wird, kann eine langlebige Lebensdauer
erwartet werden.
Das Produkt hat eine Gewährleistung von einem Jahr ab Kaufdatum. Beim Auftreten eines
Schadens, der von fehlerhalten Materialien oder Verarbeitung verursacht wurde, sollte das
defekte Produkt an den ursprünglichen Verkäufer zurückgegeben werden. Die Erstattung
oder Umtausch erfolgt nach Vorschriften des Unternehmens.
Duronic Produkte haben 1 Jahr Gewährleistung unter folgenden Bedingungen:
1. Das Produkt muss mit dem Kaufnachweis zurückgegeben werden.
2. Das Produkt muss unter den Anweisungen und Anleitungen installiert und benutzt
worden sein.
3. Es muss ausschließlich für den Hausgebrauch genutzt worden sein.
4. Natürliche Abnutzung oder Verschleiß, böswillige Beschädigung, Missbrauch,
Vernachlässigung und unsachgemäße Reparaturen sind von der Gewährleistung
ausgeschlossen.
5. Shine-Mart Ltd übernimmt keine Verantwortung für zufällige oder Folgeschäden.
6. Shine-Mart Ltd ist nicht für Wartungsarbeiten zuständig. Diese fallen nicht unter die
Gewährleistung.
7. Gültig in der EU
Dieses Produkt ist mit tted CE geprüfte Typ-F
Euro Stecker/BS Stecker ausgestattet
Von Shine-Mart Ltd, RM3 8SB importiert
Information über Abfalllagerung für Verbraucher von elektronischen Geräten.
Dieses Zeichen auf dem Produkt und/oder auf mitgelieferte Dokumenten
zeigt, dass, wenn eine Entsorgung erfolgt, das Gerät an einer Elektro- und
Elektronikgeräte-Abfall-Sammelstelle (WEEE) abgegeben werden muss.
Um eine weitere Behandlung und Weiterverarbeitung der Materialien zu
gewährleisten dürfen diese WEEE-markierten Produkte nicht mit dem Hausmüll
vermischt werden.
Für die korrekte Behandlung, Aufbereitung und Wiederverwendung geben Sie
alle WEEE-markierten Produkte zur kommunalen Abfallbeseitigungsanlage.
Dort können Sie diese kostenlos abgeben.
Wenn die Beseitigung von Elektro-und Elektronik-Altgeräten korrekt
durchgeführt wird, tragen Sie zur Gewinnung von wertvollen Ressourcen
bei, sowie einer möglichen Vermeidung von negativen Auswirkungen auf
Gesundheit und Umwelt.
Gewährleistung
Folgen Sie Uns
32
Manual De Instrucciones En Español

33
•
Instrucciones de seguridad
Lea este manual con atención y consérvelo para futuras consultas
•
Utilice este aparato en un espacio interior/doméstico.
•
Nunca utilice el aparato si el cable o la unidad no funcionan
correctamente. Si la máquina o el cable se ha estropeado, devuélvalo al
servicio de Duronic o póngase en contacto con un técnico profesional
para repararlo.
•
No exponga la lámpara directamente al sol.
•
Si cae agua en alguna parte eléctrica, séquela rápidamente con un trapo.
Cuando no use la unidad, guárdela en su caja y asegúrese de no
poner encima objetos pesados.
•
•
No encienda el aparato en una zona donde haya gases inflamables,
mantenga el área ventilada.
•
Conecte la máquina sólo a una toma de corriente con la tensión y la
frecuencia indicadas en la etiqueta del aparato (220-240V / 50Hz).
•
Nunca intente reemplazar partes ni reparar el aparato usted mismo.
Tras añadir agua, séquese bien las manos antes de tocar el cable.
•
Mantenga los fertilizantes para plantas fuera del alcance de los
niños.
•
Nunca ingiera el fertilizante. En caso de hacerlo, acuda urgentemente a
un médico.
•
No coloque la unidad en una zona con humedad.
34
Partes del Mini invernadero GHS37
Especificaciones
GHS37
7
5L
Entrada: 100V -240V/50-60HZ
Salida: 24V
25W
Bombilla LED
350x140x168-503 mm
13.78x5.51x6.61-19.8 pulgadas
1.35kg
-15°~ 55°
Tapón + agujero
para el agua
Panel para la
bombilla LED
Varilla regulable
Maceta
Tapa del depósito
Depósito de agua
Sistema eléctrico
Modelo
Producto Invernadero con sistema hidropónico
Capacidad máx. plantas
Capacidad del depósito
Voltaje
Potencia
Amplio espectro
Dimensiones
Peso
Temperatura funcional

35
1.
Al encender el invernadero, escuchará un largo pitido. Esto es señal
de que está listo para usarse.
2.
Tras varios días de uso, el nivel de agua va bajando. Escuchará un
largo pitido como señal de que necesita rellenar el depósito cuanto
antes. El sonido parará tras reponer el agua.
3.
Cada vez que presione un botón al estar encendido, escuchará un pitido
corto. Al cambiar de intensidad, la luz se ajustará adecuadamente.
4.
•
Si la máquina está encendida, pulsa un botón y la luz está apagada,
escuchará un pitido corto. Si no escucha este pitido, puede que el
invernadero no se haya encendido correctamente. En tal caso, pruebe lo
siguiente:
•
Compruebe que está correctamente enchufada.
Puede que la unidad esté correctamente enchufada pero en modo
standby. Para comprobarlo, presione el botón de encendido. Al
presionar este botón en standby, la bombilla se apagará después
de parpadear 3 veces.
Antes de utilizar el producto, compruebe que tiene todos los componentes:
Sonidos de la máquina
Contenido
Mini invernadero Cable de
alimentación
x7 semilleros
(maceta y cono)
Dos botes de
fertilizante:
Vitaminas A y
Vitaminas B
36
1. Con una mano en la varilla
regulable y la otra sujetando el
depósito, estire con cuidado la
varilla a la altura que desee. Nunca
tire del panel de luz.
5. Inserte el cable de alimentación debajo del
depósito de agua. Una vez lo tenga todo
montado, enchúfelo a la corriente.
Escuchará un pitido que le avisará que
todo está listo para usarse.
3. Para limpiar el tanque,
necesita retirar la tapa del
depósito y el panel de luz.
2. Retire la tapa del depósito y
saque todos los componentes de
este.
4. Vuelva a colocar el panel y la tapa
en el depósito tras haberlo limpiado.
Siempre una mano sujetando la
base y la otra encajando la varilla.
Instalación
Hold down the
tank
Pull up
Agarre el
depósito
Empuje
para
montarlo
37
1. Llene el bote A con agua, ciérrelo
y agite para mezclar los ingredientes
correctamente. Haga lo mismo con el
bote B.
1. Prepare
3. Empape bien las semillas en agua templada durante 1 hora antes de
plantarlas. Coloque una esponja hidropónica en cada semillero. Inserte
bien las semillas en cada semillero. Por último, colóquelos en su sitio
correspondiente del invernadero.
2. Con ayuda de los tapones de
medición, añada 5 ml de cada bote
a un litro de agua. Mezcle bien esta
disolución.
2. Retire el tapón del depósito y
eche la disolución de un litro del
fertilizante. Vuelva a poner el tapón.
Cómo preparar el fertilizante
Cómo plantar
el fertilizante como le
hemos indicado.
Shake
Water
Stir
1L
Stir
1L
38
Presione este botón para encender la
unidad. Escuchará un pitido que activará el
modo Ciclo Normal, el cual hará que la
bombilla ilumine durante 14 horas y se
apague otras 10 horas. Este ciclo se
repetirá cada día si está activado.
Escuchará un pitido al presionar este botón que activará el modo
Ciclo Corto, en el cual se reduce la intensidad de la bombilla y hará
un ciclo de 12 horas alumbrando y 12 horas sin alumbrar.
Escuchará un pitido al presionar este botón que activará el modo
Ciclo Largo, en el cual se aumenta la intensidad de la bombilla y hará
un ciclo de 16 horas alumbrando y 8 horas sin alumbrar.
Tras enchufar y encender el invernadero, este se pondrá en modo
standby (pausa) automáticamente.
Al elegir un ciclo, este empezará y activará un temporizador de 24 horas
que hará que el ciclo empiece y termine a la hora que usted lo puso a
funcionar. Según la hora en la que active el ciclo, este se repetirá a esa
misma hora al día siguiente.
Por ejemplo, si activa el Ciclo Normal a las 10 de la mañana, tendrá 14
horas de luz y 10 de apagado. A esa misma hora del día siguiente, el
ciclo se repetirá de nuevo siempre y cuando la unidad esté encendida y
programada correctamente.
Panel de control
CICLO NORMAL: 14 h. encendido, 10 h.
apagado
CICLO CORTO: 12 h. encendido, 12 h. apagado
CICLO LARGO: 16 h. encendido, 8 h. apagado
Ajustar los ciclos
12h
8h

39
Si desea que el invernadero ilumine durante 24 horas seguidas, mantenga
pulsado el botón de encendido durante 3 segundos.
La luz del botón parpadeará 3 veces lo que significará que el modo se ha
activado para alumbrar durante 24 horas. Pasadas estas 24 horas, la
máquina volverá al modo standby.
Si activa este ciclo de 24 horas mientras la lámpara tiene otro ciclo activado,
lo sustituirá y una vez acabe volverá al ciclo que había previamente.
Antes de limpiar la unidad, asegúrese de desenchufarla.
No sumerja la unidad en agua ni otro tipo de líquido. No use productos de
limpieza corrosivos.
Para limpiarlo, simplemente use un trapo húmedo bien escurrido.
Guardar la disolución de fertilizante
•
Programar 24 horas de luz
Los componentes de los botes sin abrir, mezclar ni estar expuestos al
sol pueden durar hasta 2 años sin caducar.
•
Sin embargo, la disolución del fertilizante con agua caduca a los 5
meses.
Limpieza y mantenimiento
40
Síguenos
NOTA: ESTAS DECLARACIONES NO AFECTAN SUS DERECHOS LEGALES COMO
CONSUMIDOR
Este producto ha sido fabricado bajo las más estrictas control de calidad y utilizando
materiales de
alta calidad para asegurar conabilidad y excelente funcionamiento. Le dará buen servicio y
una larga duración, siempre y cuando se utilice correctamente y sea bien mantenido.
El producto está garantizado por 1 año desde la fecha de compra original. Si surge
cualquier defecto debido a un error/defecto de fábrica o mano de obra, entonces el producto
debe ser devuelto al lugar original de compra. Reembolso o reemplazo es a discreción de la
compañía.
Productos Duronic se ofrecen con una garantía de 1 año bajo las siguientes condiciones:
1. El producto debe ser devuelto al vendedor con comprobante de compra original.
2. El producto debe instalarse y usarlo según las instrucciones
contenidas en este manual.
3. Este aparato es únicamente de uso doméstico.
4. No cubre desgaste, daños maliciosos, uso indebido, negligencia,
reparaciones inexpertas o partes consumibles.
5. Shine-Mart Ltd no será responsable por cualquier daño consecuente,
accidentes o pérdidas.
6. Shine-Mart Ltd no es responsable ah llevar a cabo cualquier tipo de
servicio, bajo la garantía.
7. Valido solamente dentro de la (EU).
Este producto esta equipado con enchufe/fusible Europeo
Importado por Shine-Mart Ltd, RM3 8SB
Información sobre la eliminación de residuos para los consumidores
de equipos eléctricos y eléctricos:
Esta marca en un producto y/o documentos adjuntos indica que cuando se va a
desechar, se debe tratar como equipos residuos eléctricos y electrónicos (RAEE)
Cualquier producto marcado (RAEE) no debe ser mezclado con la basura
doméstica, sino separado para el tratamiento, recuperación y reciclaje
de los materiales utilizados.
Para el tratamiento adecuado, recuperación y reciclaje; por favor, tome todos los
productos (RAEE) y llévelo al sitio de residuos de su
Autoridad Local, donde será aceptado de forma gratuita.
Si los clientes desechan los residuos eléctricos y electrónicos correctamente,
ayudar a ahorrar valiosos recursos y prevenir los efectos negativos sobre la salud
humana y el medio ambiente, de materiales peligrosos que pueden
contener los residuos
Garantía
41
Manuale D’istruzioni In Italiano

42
•
Istruzioni di sicurezza
SI PREGA DI LEGGERE ATTENTAMENTE QUESTO MANUALE
•
Solo per uso domestico. Non utilizzare all'aperto.
•
Non utilizzare questo apparecchio se il cavo di alimentazione o la spina
sono danneggiati. Se uno dei due è danneggiato, restituirlo a Duronic
per assistenza o riparazione da parte di un tecnico professionista.
•
Non esporre il sistema idroponico alla luce solare.
•
Tenere la luce e i componenti elettronici lontano dall'umidità.
Se dell'acqua viene versata o spruzzata su qualsiasi parte elettrica,
asciugare accuratamente tutti i cavi e tutte le parti che si sono
bagnate.
•
•
Quando non si utilizza la serra idroponica, conservare in un luogo
sicuro. Non posizionare oggetti pesanti sopra di essa.
•
Non utilizzare in presenza di gas corrosivo - utilizzare in un ambiente ben
ventilato.
•
Non tentare mai di sostituire parti e riparare da soli la serra idroponica.
Quando si aggiunge o si svuota l'acqua, assicurarsi che le mani siano
asciutte prima di ricollegare l'alimentatore alla presa di corrente.
•
La soluzione nutritiva delle piante deve essere conservata in
modo sicuro fuori dalla portata dei bambini.
•
Non consumare la soluzione nutritiva. In caso di consumo accidentale,
consultare un medico.

43
GHS37 Contenuto
Specifiche
Modello GHS37
7
5 L
Input: 100V-240V/50-60HZ
Output: 24V
25W
LED
350x140x168-503 mm
13.78x5.51x6.61-19.8 inch
1.35 kg
-15°~ 55°
Tappo di gomma +
ugello di riempimento
Pannello LED
Asta allungabile
Cesto per piante
Coperchio serbatoio
dell'acqua
Serbatoio d'acqua
Serbatoio d'acqua
Sistema di
alimentazione
Tipo prodotto
Numero di piante
Tensione
Potenza
Spettro specifico della luce a LED
Dimensioni
Peso
Temperatura di funzionamento
Serra idroponica
44
1.
Quando l'adattatore di alimentazione viene collegato al sistema di
illuminazione, emetterà un lungo suono acustico.
2.
Dopo che la serra idroponica viene utilizzata per diversi giorni, il
livello di acqua nel serbatoio diminuirà. Quando il livello d’acqua è
sotto il minimo emetterà un suono acustico. In questo caso riempire
il serbatoio con acqua.
3.
Quando il sistema funziona normalmente con la luce accesa, viene
emesso un suono acustico breve quando viene premuto qualsiasi
pulsante.
4.
•
Se si preme un pulsante sul pannello quando la serra è accesa e la luce
è spenta, emetterà un breve suono acustico. Se non viene emesso un
segnale acustico quando viene premuto un pulsante, è probabile che il
sistema non sia acceso correttamente. In questo caso, provare quanto
segue:
•
Controllare se la serra è collegata alla rete elettrica.
Se la serra è collegata all'alimentazione ma in uno stato di standby,
premere il pulsante di accensione. Quando il pulsante di
accensione viene premuto, la luce si spegne dopo 3 lampeggi.
7x cesti
Suggerimenti chiave
Componenti del sistema idroponico
Sistema idroponico Alimentatore
per piante
Nutrienti A e
Nutrienti B

45
1. Pressare leggermente il serbatoio
verso il basso e tirare delicatamente
l’asta vero l’alto. Non tirare mai il
pannello LED.
5. FIssare il sistema di alimentazione nella
parte inferiore del serbatoio dell'acqua. Quindi
collegare alla presa elettrica.
Quando l'alimentazione è correttamente
collegata, il sistema emetterà un "bip",
indicando che è pronto per l'uso.
3. Per lavare il serbatoio dell'acqua
prima dell'uso, è necessario
rimuovere innanzitutto il coperchio
del serbatoio, quindi estrarre
delicatamente il pannello LED.
2. Rimuovere il coperchio del
serbatoio dell'acqua ed estrarre gli
accessori dal serbatoio; adattatore e
2 bottiglie di nutrienti.
4. Dopo aver lavato e asciugato il
serbatoio, è possibile reinstallare il
pannello LED.
Istruzioni per l'installazione
Tieni premuto
il serbatoio
Tirare verso
l'alto
Tieni premuto
il serbatoio
Spingere
verso il
basso

46
1. Riempire la bottiglia "A" con
acqua, metti il coperchio e agita per
mescolare completamente il
contenuto fino a completo
scioglimento. Ripetere lo stesso con
la bottiglia "B".
1.
3. Immergere i semi in acqua calda per circa un'ora prima di piantare.
Semina correttamente i semi nel cesto delle piante, quindi posiziona il
cesto nello spazio sul coperchio del serbatoio.
2. Utilizzando i tappi per aggiungere
5 ml di ogni soluzione a 1 litro di
acqua. Mescola o agita bene per
combinare tutto insieme.
2. Rimuovere il coperchio del
serbatoio e versare la soluzione
miscelata nel serbatoio. Posizionare
il coperchio sul serbatoio.
Preparare la soluzione nutritiva
Istruzioni per piantare i semi
Preparare la soluzione nutritiva
come mostrato sopra.
Acqua
Agitare
1L
Mescolare
Stir
1L
47
Se si preme questo pulsante, verrà
emesso un segnale e funzionerà in
modalità ciclo medio. Ciò significa che il
pannello luminoso a LED si accenderà per
14 ore e si spegnerà per 10 ore. Il giorno
seguente ripeterà questo schema: 14 ore
on / 10 ore off.
Se si preme questo pulsante, il sistema emetterà un segnale acustico
e avvierà alla "modalità ciclo breve". Il pannello LED in alto ridurrà
l'intensità della luce e inizierà un ciclo di 12 ore di accensione / 12 ore
di spegnimento.
Se si preme questo pulsante, il sistema emetterà un segnale acustico
e avvierà la "modalità ciclo lungo". Il pannello a LED in alto
aumenterà l'intensità della luce e inizierà un ciclo di 16 ore acceso / 8
ore spento.
Dal momento in cui il sistema è collegato, il pulsante di accensione si
illuminerà e la lampada sarà in "modalità standby".
Quando selezioni una modalità, accenderà la lampada e attiverà un
orologio di 24 ore in coincidenza con il ciclo della modalità che hai scelto. A
seconda dell'ora in cui è stata selezionata la modalità, questa sarà la
stessa ora in cui la luce si accenderà ogni giorno successivo.
Ad esempio, se si seleziona la "modalità normale" alle 10 per il primo
utilizzo, il sistema eseguirà il ciclo di luci di 14 ore e quindi di luci di 10
ore. Quindi si riaccenderà automaticamente alle 10 del giorno
successivo e il ciclo continuerà per tutto il tempo desiderato finché
l'unità non viene spenta in "modalità standby" o spenta.
Pannello di controllo
CICLO NORMALE: 14 ore di accensione
/ 10 ore di pausa
CICLO CORTO: 12 ore on / 12 ore off
CICLO LUNGO: 16 ore di accensione / 8
ore di pausa
Impostazione delle modalità
12h
8h

48
È possibile impostare la funzione luce per 24 ore. Per attivare questa
opzione tenere premuto il pulsante di accensione per 3 secondi.
La luce lampeggerà 3 volte, quindi l'intero sistema e le luci si accenderanno
e rimarranno accesi per 24 ore. Trascorso questo tempo, il sistema tornerà
automaticamente alla "modalità standby".
Se si attiva la modalità di illuminazione 24 ore mentre la lampada è
attualmente in funzione, la manterrà costantemente accesa fino alla fine del
ciclo programmato e quindi tornerà alla modalità utilizzata in precedenza.
Prima di pulire assicurarsi che la lampada sia scollegata dalla presa di corrente.
Non immergere il prodotto in acqua o altri liquidi. Non utilizzare detergenti
corrosivi su di esso.
Per pulire, basta usare un panno asciutto per spolverare e pulire la lampada.
Conservazione della miscela di nutrienti
•
Impostazione illuminazione 24 ore
Le particelle nutritive asciutte non miscelate hanno una durata di
conservazione di 2 anni se conservate in un flacone non aperto in un
luogo fresco e asciutto, lontano dalla luce solare diretta.
•
Il mix di nutrienti misti (con acqua già aggiunta) ha una durata di
conservazione di 5 mesi se conservato lontano dalla luce solare.
Cura e manutenzione
49
Questo prodotto è garantito per una durata determinata con il distributore a partire dalla data
di acquisto contro ogni difetto derivante da difetti di fabbricazione o dei materiali. Questa
garanzia non copre difetti o danni derivanti da installazione impropria, uso improprio o usura
anomala del prodotto.
L’apparecchio deve essere restituito nella sua confezione originale e accompagnato dalla
ricevuta e deve essere stato utilizzato in modo corretto. È importante rispettare le istruzioni
per l’uso e le precauzioni di sicurezza indicate di seguito. Inoltre, non possiamo garantire
l’apparecchio se è stato modicato o riparato dall’acquirente o da terzi.
1 anno di garanzia da Shine-Mart Ltd, proprietari del marchio commerciale Duronic.
NOTA: QUESTE DICHIARAZIONI NON INFLUISCONO SUI DIRITTI LEGALI DEL
CONSUMATORE
Questo prodotto è stato realizzato con le rigorose procedure del controllo qualità, e
utilizzando materiali di altissima qualità, per garantire afdabilità e prestazioni eccellenti.
Vi regalerà un servizio ottimo e a lungo termine, purchè venga opportunamente usata e
mantenuta. Il prodotto è garantito per 1 anno dalla data di acquisto. Se sorge qualche
difetto a causa di materiali difettosi o scarsa manodopera, il prodotto difettoso dovrà essere
restituito al luogo originale di acquisto. Il rimborso o la sostituzione sono a discrezione
dell’azienda. I prodotti Duronic offrono 1 anno di garanzia alle seguenti condizioni:
1. Il prodotto deve essere restituito al rivenditore con la prova d’acquisto originale
2. Il prodotto deve essere installato e usato seguendo le istruzioni contenute nel manuale.
3. Il prodotto va utilizzato solo per scopi domestici. Non è da utilizzarsi per uso commerciale.
4. La garanzia non copre usura, danni volontari, abuso, negligenza, riparazioni
inesperte o consumo dei materiali.
5. Shine-Mart Ltd non è responsabile per Danni accidentali o consequenziali.
6. Shine-Mart Ltd non è tenuta a eseguire qualsiasi tipo di riparazione, ai sensi
della garanzia.
7. Termini validi in tutta l’unione europea *Ci riserviamo il diritto di modicare le sopracitate
condizioni Per parti di ricambio si prega di consultare il sito www.duronic.com
Corretto smaltimento del prodotto.
Qusto prodotto è inclusivo di spina certicata CE
importata da Shine-Mart Ltd, RM3 8SB
Questo segno su un prodotto o su documenti indica che quando deve essere
smaltito, deve essere trattato come i riuti elettrici ed elettronici (WEEE)
Tutti I prodotti marcati WEEE non devono essere buttati nei riuti domenistici
generici, ma separati per il trattamento, il recupero
e il riciclaggio dei materiali utilizzati.
Per un corretto trattamento, recupero e riciclaggio; si prega di portare tutti I
prodotti marcati WEEE al Vostro centro smaltimenti riuti autorizzato, dove
saranno accettati gratuitamente.
Se i consumatori sono propensi allo smaltimento corretto di riuti elettrici ed
elettronici, aiuteranno a salvare risorse importanti e a prevenire i potenziali
effetti negativi sulla salute umana e sull’ambiente di tutti i materiali pericolosi
che i riuti possono contenere.
Garanzia
Seguici
50
Instrukcja obsługi. Polski

51
•
Bezpieczeństwo użytkowania
Przed użyciem uważnie przeczytaj instrukcję obsługi. Zachowaj ją do
wglądu.
•
Urządzenie przeznaczone jest tylko do użytku domowego w
pomieszczeniach. Nie używać na wolnym powietrzu.
•
Nigdy nie włączaj urządzenia, gdy przewód zasilający lub wtyczka są
uszkodzone. Zwróć urządzenie do Duronic w celu naprawy lub
skontaktuj się z wykwalifikowanym technikiem.
•
Unikaj umieszczania urządzenia w bezpośrednim nasłonecznieniu.
•
Lamę i jej komponenty przechowuj z dala od wilgoci.
W przypadku zalania lub zachlapania elementów elektrycznych,
dokładnie osusz przewód zasilający i inne elementy jakie zostały zalane.
•
•
Jeżeli nie będziesz użytkował urządzenia przez dłuższy czas przechowuj
w bezpiecznym miejscu. Nie umieszczaj ciężkich przedmiotów na
urządzeniu.
•
Nie używaj urządzenia w obecności łatwopalnych gazów. Użytkuj w
dobrze wentylowanych pomieszczeniach.
•
Przed podłączeniem urządzenia do gniazdka upewnij się, czy napięcie
domowej sieci elektrycznej jest zgodne z napięciem oznaczonym na
tabliczce znamionowej (na dole urządzenia).
Nigdy nie próbuj samodzielnie rozkręcać lub naprawiać
urządzenia.
•
Podczas dodawania lub odlewania wody upewnij się, że masz suche
ręce, zanim ponownie podłączysz wtyczkę do kontaktu.
•
Odżywki do roślin powinny być przechowywane w bezpieczny
sposób, poza zasięgiem dzieci.
•
Nie spożywaj odżywek do roślin. Jeżeli przypadkowo spożyłeś
nawóz koniecznie skonsultuj się z lekarzem.

52
GHS37 Elemementy urządzenia
Specyfikacja
Model GHS37
7
5L (1 zbiornik)
Wejście: 100V-240V/50-60HZ
Wyjście: 24V
25W
Oświetlenie LED
350 x 140 x 168-503 mm 13.78 x
5.51 x 6.61-19.8 cali
1.35 kg
-15°~ 55°
LEDPanel
Zestaw nasienny
Pojemnik na rośliny
Rodzaj urządzenia
Ilość roślin
Pojemność zbiornika na wodę
Napięcie znamionowe
Moc
Wymiary
Waga
Zakres temp. pracy
specyficzne spektrum
Hydroponiczna lapa wzrostu roślin
Drążek regulujący
Pokrywka pojemnika
na wodę
Pojemnik na wodę
Wejście Systemu zasilania

53
1.
Po podłączeniu zasilacza do pojemnika wzrostu roślin, a następnie do
gniazdka elektrycznego usłyszysz długi sygnał dźwiękowy, co jest
oznaką gotowości urządzenia do użycia.
2.
Jeżeli urządzenie pracuje przez kilka dni, poziom wody w zbiorniku
znacznie się zmniejszać. Jeżeli poziom wody osiągnie
niewystarczający poziom dla wzrostu roślin usłyszysz dłuższy sygnał
dźwiękowy. W przypadku wystąpienia takiej sytuacji uzupełnij
poziom wody. Po dolaniu wody alarm przestanie pikać.
3.
Kiedy urządzenie jest uruchomione, a światło jest włączone, usłyszysz
krótki sygnał dźwiękowy po naciśnięciu jakiegokolwiek przycisku. Po
zmianie trybu pracy zmieni się także poziom oświetlenia.
4.
•
Kiedy urządzenie jest uruchomione, a światło jest wyłączone usłyszysz
którki sygnał dźwiękowy po naciśnięciu przycisku na panelu. Jeżeli nie
usłyszysz żadnego dźwięku oznacza to, że urządzenie jest
nieprawidłowo zamontowane. Jeżeli tak nastąpi sprawdź poniższe:
•
Sprawdź, czy urządzenie jest prawidłowo podłączone do gniazda
elektrycznego.
Jeśli urządzenie jest podłączone do zasilania, ale znajduje się w
stanie uśpienia, naciśnij przycisk uruchomienia, aby je
przetestować. Gdy przycisk zasilania zostanie naciśnięty w
stanie uśpienia, lampka zgaśnie po 3 mrugnięciach.
Sprawdź kompletność opakowania przed pierwszym użyciem.
Zawartość opakowania
Pojemnik wzrostu
roślin
Zasilacz 7x zestaw nasienny
(koszyk + gąbka
hydroponiczna)
2x butelki z odżywką:
Odżywka A i Odżywka B
Oznaczenia sygnałów dźwiękowych

54
1. Używając jednej ręki do
przytrzymania drążka, a drugiej do
przytrzymania pojemnika na wodę
pociągnij za drążek, aby podwyższyć
jego poziom. Nie pociąga za panel
świetlny, aby wydłużyć panel.
5. Pod pojemnikiem na wodę zamontuj
wtyczkę zasilacza. Kiedy jest zainstalowany i
gotowy do użycia, podłącz wtyczkę do
gniazdka.
Jeżeli urządzenie zostało prawidłowo
podłącząne usłyszysz sygnał dźwiękowy
co jest oznaką prawidłowego podłączenia
lampy.
3. Aby umyć pojemnik na wodę
przed użyciem musisz usunąć
pokrywkę pojemnika i delikatnie
wyciągnąć panel świetlny.
2. Zdemontuj pokrywkę pojemnika
na wodę i wyjmij akcesoria ukryte w
pojemniku: zasilacz, zestawy
nasienne i 2 butelki odżywek.
4. Po umyciu i osuszeniu pojemnika
możesz ponownie zainstalować
oświetlenie LED. Jedną ręką
przytrzymuj pojemnik na wodę, a
drugą zainstaluj panel świetlny.
Instrukcja montażu
Przytrzymaj
zbiornik
Podciągnij
Przytrzymaj
zbiornik
Dociśnij

55
1. Napełnij butelkę "A" wodą, zakręć
nakrętkę i wstrząśnij, aby dokładnie
wymieszać składniki. Powtórz
czynność z butelką "B".
1. Przygotuj
3. Przed zasianiem zanurz nasiona w ciepłej wodzie przez ok. godzinę.
Do koszyka włóż gąbkę hydroponiczną. Umieść nasiona w koszykach,
a następnie włóż w odpowiednie miejsce na pokrywce.
2. Przy użyciu miarki odmierz po 5
ml z każdej odżywki i rozcieńcz z 1l
wody. Zamieszaj lub wstrząśnij, aby
połączyć płyny.
2. Usuń pokrywkę pojemnika na wodę
i przelej miksturę do pojemnika.
Następnie nałóż pokrywkę.
Przygotowywanie odżywek
Instrukcja wysiewu
odżywkę zgodnie z
powyższą instrukcją.
Woda
Wstrząśnij
1L
Zamieszaj
1L
Zamieszaj

56
CYKL NORMALNY: 14 godz.
włączenia / 10 godz. wyłączenia
Przyciśnij przycisk, aby uruchomić
urządzenie. Usłyszysz krótki sygnał
dźwiękowy, a lampa zacznie pracować w
normalnym cyklu. Oznacza to, że panele
LED będą świecić przez 14 godzin, a przez
10 godzin będą wyłączone. Cykl będzie się
powtarzał każdego dnia.
KRÓTKI CYKL
12 godz. włączenia / 12 godz. wyłączenia
Po przyciśnięci tego przycisku usłyszysz krótki sygnał dźwiekowy co
oznacza, że urządzenie rozpoczęło pracę w krótkim cyklu. Panele
LED będą pracować z mniejszą intensywnością światła, w systemie:
12 godz. włączenia, 12 godz. wyłączenia.
DŁUGI CYKL: 16 godz. włączenia / 8 godz. wyłączenia
Po przyciśnięci tego przycisku usłyszysz krótki sygnał dźwiekowy co
oznacza, że urządzenie rozpoczęło pracę w długim cyklu. Panele
LED będą pracować z większą intensywnością światła, w systemie:
16 godz. włączenia, 8 godz. wyłączenia.
Od momentu, gdy system jest podłączony do zasilania, przycisk włączenia
będzie podświetlony, a lampa pozostanie w trybie czuwania.
Po wybraniu właściwego trybu lampa LED zostanie uruchomiona zgodnie z
wybranym cyklem (normalny, krótki, długi). W zależności od wybranego cyklu
światło będzie uruchamiane każdego dnia o tych samych godzinach.
Dla przykładu: po wybraniu przy pierwszym użyciu cyklu normalnego o 10
rano, system uruchomi 14 godz. cykl pracy lampy LED i 10 godz. wyłączenia.
Następnego dnia o godz. 10 rano cykl ponownie się powtórzy i pozostanie
włączony aż do momentu jego odłączenia od zasilania lub po przełączeniu w
tryb czuwania.
Obsługa panelu kontrolnego
Ustawienie cyklu
12h
8h

57
Jeżeli chcesz uruchomić oświetlenie LED na całą dobę (24 godz.) przyciśnij
przycisk włączenia przez 3 sekundy.
Przycisk mrugnie 3 razy, a następnie cały system zostanie uruchomiony na
24 godziny. Po upłynięciu całej doby system powróci do trybu czuwania.
Po uruchomieniu 24 godz. trybu oświetlenia, gdy lampa aktualnie pracuje w
danym cyklu (normalny, krótki długi), pozostanie ona włączona do
zakończenia 24 godz. cyklu, a następnie automatycznie powróci do trybu jaki
był ustawiony wcześniej.
Przed czyszczeniem upewnij się, że urządzenie jest wyłączone i odłączone
z gniazdka elektrycznego.
Nie zanurzaj urządzenia w wodzie lub innych płynach. Nie używaj środków
ściernych, aby oczyścić produkt.
Użyj suchej ściereczki, aby oczyścić lampę z kurzu i innych zabrudzeń.
Przechowywanie odżywek
•
Tryb 24 godz. - Lampa LED włączona całą dobę
•
Rozcieńczone odżywki (z już dodaną wodą) można przechowywać
przez 5 miesięcy, jeżeli produkt jest przechowywany z dala od światła
słonecznego
Czyszczenie i Pielęgnacja
Suche, niezmieszane odżywki można przechowywać przez okres 2 lat,
jeżeli są przechowywane w nieotwartej butelce w chłodnym, suchym
miejscu, z dala od bezpośredniego światła słonecznego.
58
Warunki Gwarancji
1 Rok Gwarancji rmy Shine-Mart LTD, marki handlowej Duronic Products.
UWAGA: ten dokument nie wpływa na twoje ustawowe prawo jako konsumenta.
Ten produkt został wykonany zgodnie z restrykcyjnymi normami kontroli i wykorzystuje
najwyższej jakości materiały dla uzyskania doskonałej wydajności i niezawodności.
Długotrwałość produktu zostaje osiągnięta przez właściwe użytkowanie i konserwację.
Gwarancja obejmuje 1 rok od daty zamówienia. Jeżeli jakikolwiek defekt powstanie ze
względu na wadliwość materiału lub niewłaściwe wykonanie to uszkodzony produkt musi
zostać dostarczony do miejsca, z którego został zamówiony. Zwrot pieniędzy lub wymiana
produktu jest w gestii rmy.
Duronic Products oferuje jeden rok gwarancji na podstawie poniższych warunków:
1. Produkt musi zostać zwrócony do sprzedawcy z oryginalnym dowodem zakupu.
2. Produkt był instalowany i użytkowany zgodnie z instrukcją obsługi.
3. Produkt użytkowany był wyłącznie w celach domowych.
4. Gwarancja nie obejmuje naturalnego zużycia się produktu, celowego uszkodzenia,
niewłaściwego użycia, zaniedbania, niewłaściwych napraw lub części
eksploatacyjnych.
5. Shine-Mart Ltd. nie ponosi odpowiedzialności za przypadkowe albo celowe zgubienie
produktu lub jego uszkodzenie.
6. Firma Shine-Mart Ltd nie jest zobowiązana do przeprowadzania jakichkolwiek prac
serwisowych w ramach gwarancji.
7. Obowiązuje na obszarze Unii Europejskiej.
Ten produkt jest wyposażony we wbudowaną wtyczkę typu Euro-Plug / BS z
certykatem CE importowaną przez Shine-Mart Ltd, RM3 8SB
Informacja o odpadach i utylizacja dla użytkowników sprzętu elektrycznego i
elektronicznego.
Usuwanie wyeksploatowanych urządzeń elektrycznych i elektronicznych (dotyczy
krajów Unii Europejskiej i innych krajów europejskich z wydzielonymi systemami
zbierania odpadów). Ten symbol na produkcie lub jego opakowaniu oznacza, że
produkt nie powinien być zaliczany do odpadów domowych. Należy go przekazać
do odpowiedniego punktu, który zajmuje się zbieraniem i recyklingiem urządzeń
elektrycznych i elektronicznych. Prawidłowe usunięcie produktu zapobiegnie
potencjalnym negatywnym konsekwencjom dla środowiska naturalnego i zdrowia
ludzkiego, których przyczyną mogłoby być niewłaściwe usuwanie produktu.
Recykling materiałów pomaga w zachowaniu surowców naturalnych.
Śledź Nas
59
Gebruikershandleiding Nederlands

60
•
Veiligheidsinstructies
•
Alleen geschikt voor binnenshuis gebruik. Gebruik niet buiten.
•
Gebruik dit apparaat niet als de stroomkabel of stekker beschadigd is.
Als één van deze onderdelen beschadigd raakt, retourneer het dan naar
Duronic voor onderhoud of reparatie door een professionele technicus.
•
Plaats de lamp niet in direct zonlicht.
•
Houd de lamp en elektronische onderdelen uit de buurt van vocht.
Als er water op een elektrisch onderdeel gemorst of gespetterd wordt,
schakel dan het apparaat uit en haal de stekker uit het stopcontact, droog
vervolgens alle nat geworden onderdelen grondig af.
•
•
Bewaar het product, wanneer het niet in gebruik is, op een veilige
plek. Plaats geen zware voorwerpen boven op het product.
•
Gebruik niet in de buurt van corrosief gas – gebruik alleen in een
goed geventileerde ruimte.
•
Zorg dat de netvoeding 220-240V / 50Hz is.
Probeer niet zelf onderdelen te vervangen of de lamp te repareren.
•
Zorg dat uw handen, na het toevoegen of verwijderen van water, droog
zijn voordat u de stekker weer in het stopcontact probeert te steken.
•
Bewaar de plantenvoeding buiten bereik van kinderen.
•
Slik de plantenvoeding niet in. In het geval dat u dit per ongeluk
wel doet, zoek dan AUB medisch advies.
LEES AUB DEZE HANDLEIDING AANDACHTIG DOOR EN BEWAAR
VOOR TOEKOMSTIG GEBRUIK

61
GHS37 Kweekset Onderdelen
Specications
GHS37
7
LED Lamp
-15°C~ 55°C
Rubberen stop +
bijvul opening
LED lamp
installatie
Uitschuifbare stang
Plantenmandje
Deksel
Waterreservoir
Waterreservoir
Elektrische Systeem
Model Nummer
Product Type
Aantal Planten
Inhoud waterreservoir
Nominale Spanning
Vermogen
Afmetingen
Gewicht
Werktemperatuur
Groeilamp Hydrocultuur Kweekset
5 Liter (1 waterreservoir)
Invoer: 100 V-240 V/50-60 HZ
Uitvoer: 24 V
25 W
Specifiek Spectrum
350 x 140 x 168-503 mm
13,78 x 5,51 x 6,61-19,8 inch
1,35 kg
62
1.
Als de voedingsadapter aan de kweekset wordt aangesloten, laat het
systeem een lange pieptoon horen om aan te geven dat het klaar is
voor gebruik.
2.
Nadat het apparaat enkele dagen aan heeft gestaan daalt op
natuurlijke wijze het waterniveau. Als het waterniveau te laag is om
de planten te laten groeien, laat het apparaat een lange pieptoon
horen om dit aan te geven. Vul in dit geval het water bij tot de juiste
hoeveelheid. Het alarm stopt hierna automatisch met piepen.
3.
Als het systeem normaal functioneert met het licht aan, maakt het
apparaat een korte piep als u op een knop drukt. Als u een instelling of
cyclus verandert, reageert de lichtsterkte naar aanleiding van de
geselecteerde verandering.
4.
•
Bij het indrukken van een knop op het invoerpaneel als het apparaat aan
staat en het licht uit, maakt het apparaat een korte pieptoon. Als het
apparaat niet piept, is het zeer waarschijnlijk dat het systeem niet correct
is ingeschakeld. Mocht dit het geval zijn, probeer dan het volgende:
•
Controleer of het apparaat verbonden is met de netvoeding.
Als het apparaat is aangesloten maar op stand-by staat, druk dan
op de aan/uit knop om dit te testen. Als de aan/uit knop in wordt
gedrukt als het apparaat op stand-by staat, gaat het licht uit na 3
keer knipperen
Zorg voor u uw kweekset, gebruikt dat u alle benodigde onderdelen heeft.
Pieptonen en Betekenis
Inhoud Doos
De kweekset zelf Voedingsadapter Plantenmandjes en
Sponskegeltjes (7 sets)
Twee flesjes
plantenvoeding:
Voedingsstoffen A &
Voedingsstoffen B

63
1. Houd met één hand de verlengbare
stang vast en houd met de andere het
waterreservoir tegen, trek de stang
voorzichtig omhoog om deze verder
uit te trekken. Trek niet aan de LED
lamp installatie om de stang uit te
trekken.
5. Monteer het elektrische systeem aan de
onderzijde van het waterreservoir. Als het
geheel gemonteerd is, kunt u het apparaat
met de adapter aansluiten.
Als het apparaat goed is aangesloten,
maakt het een pieptoon om u te laten
weten dat het klaar is voor gebruik.
3. Om het waterreservoir voor
gebruik af te wassen: verwijder
eerst het deksel van het
waterreservoir, verwijder dan
voorzichtig het lichtpaneel.
2. Verwijder het deksel van het
waterreservoir en haal hier de
accessoires uit; voedingsadapter,
verpakking met de plantenmandjes
en 2 flesjes plantenvoeding.
4. Nadat u het reservoir heeft
afgewassen kunt u het LED lamp
paneel weer met één hand
terugzetten terwijl u met de andere
hand het reservoir vasthoudt.
Installatie Instructies
Druk vast
om te
installeren
Houd het reservoir
tegen
Houd het
reservoir tegen
Trek omhoog

64
1. Vul flesje ‘A’ met water, draai de
dop vast en schud het flesje tot de
inhoud volledig opgelost is. Doe
hetzelfde voor flesje ‘B’.
3. Week de zaden ongeveer een uur in warm water alvorens ze te
planten. Plaats een sponskegeltje in elk plantenmandje. Zaai de zaden
voorzichtig in elke mandje, plaats vervolgens de mandjes inclusief
sponskegeltjes en zaden in openingen van het deksel van het reservoir.
2. Gebruik de meetdopjes om 5ml van
elke oplossing toe te voegen aan 1 liter
water. Roer of schud de inhoud goed
door om alles goed door te mengen.
2. Verwijder de rubberen stop uit het
deksel van de kweekset en giet de
gemengde voedingsoplossing in de
opening. Plaats hierna de rubberen
stop weer in het deksel.
Preparing the Nutrient Solution
Instructies voor het Planten
1. Bereid de voedingsoplossing
voor, naar bovenstaande
instructies.
Water
Schud
1L
Roer
1L
Roer

65
Druk op deze knop om het apparaat aan te
zetten. Het apparaat maakt een pieptoon
en activeert de ‘normale cyclus’ functie. Dit
betekent dat het LED paneel 14 uur lang
brandt. Het schakelt zichzelf dan
automatisch uit, en blijft zo voor 10 uur. De
volgende dag wordt dit patroon herhaald:
14u aan / 10u uit.
Als u deze knop indrukt hoort u een pieptoon en activeert u de ‘korte
cyclus’ functie. Het LED paneel vermindert de lichtintensiteit en begint
een cyclus van 12 uur aan / 12 uur uit.
Als u deze knop indrukt hoort u een pieptoon en activeert u de ‘lange
cyclus’ functie. Het LED paneel verhoogt de lichtintensiteit en begint
een cyclus van 16 uur aan / 8 uur uit.
Vanaf het moment dat het systeem aan is gesloten op de netvoeding,
brandt de aan/uit knop en staat de lamp op ‘stand-by’.
Na het selecteren van een functie, gaat de lamp aan en activeert een
24-uurs klok aan de hand van de gekozen functie. Afhankelijk van de tijd,
wanneer u de gekozen cyclus activeert, gaat de lamp elke volgende dag op
hetzelfde moment weer aan.
Bijvoorbeeld, als u om 10:00u de ‘normale cyclus’ voor het eerste
gebruik selecteert, draait het systeem de cyclus van 14 uur met de
lampen aan en 10 uur met de lampen uit. Het zal dan de volgende dag
om 10:00u weer aan gaan en de cyclus gaat zo lang door als u wilt, tot
het apparaat op ‘stand-by’ wordt gezet of u de stekker uit het apparaat
haalt.
Het Invoerpaneel Gebruiken
NORMALE CYCLUS: 14 uur aan / 10 uur
uit
KORTE CYCLUS: 12 uur on / 12 uur uit
LANGE CYCLUS: 16 uur aan / 8 uur uit
Functie Instellen
12h
8h

66
Als u het licht graag de hele dag aan wilt (gedurende 24 uur), houd dan de
aan/uit knop 3 seconden lang ingedrukt.
De lamp knippert dan 3 keer, waarna het gehele systeem en de lampen
ingeschakeld worden en 24 uur lang aan blijven. Nadat deze tijd is
verstreken schakelt het systeem automatisch weer terug naar ‘stand-by’.
Als u deze instelling activeert terwijl de lamp al aan is, blijft deze constant
verlicht tot het einde van de geprogrammeerde cyclus, en schakelt dan weer
terug naar de cyclus die u hiervoor gebruikte.
Zorg voor het schoonmaken dat de lamp niet op de netvoeding is
aangesloten en de stekker uit het stopcontact verwijderd is.
Dompel deze lamp niet onder in water of een andere vloeistof. Gebruik
geen schuurmiddelen om hem schoon te maken.
Gebruik simpelweg een droge doek om de lamp af te
stoffen en schoon te maken.
Opslag van de Voeding
•
24 Uur Licht Aan Instelling
De droge, ongemengde voedingskorrels hebben een
houdbaarheidstermijn van 2 jaar, zolang ze in een ongeopend flesje
worden bewaard, op een koele, droge plek zonder direct zonlicht.
•
De voedingsoplossing (voedingskorrels met water gemengd) heeft een
houdbaarheidstermijn van 5 maanden, zolang het niet aan direct
zonlicht wordt blootgesteld.
Zorg en Onderhoud
67
Garantie
1 Jaar Garantie van Shine-Mart Ltd Handelsmerk eigenaars van Duronic Producten. LET
OP: DEZE STELLINGEN HEBBEN GEEN INVLOED OP UW WETTELIJKE RECHTEN ALS
CONSUMENT
Dit product is vervaardigd onder de strengste kwaliteitscontrole procedures, met materialen
van de hoogste kwaliteit, om uitstekende werking en betrouwbaarheid te verzekeren. Het
zal zeer goed en langdurig dienstdoen, naar gelang het correct gebruikt en onderhouden
wordt. Het product heeft 1 jaar garantie van de originele aankoopdatum. Als een defect zich
toont vanwege een materiaal- of constructiefout, dient het defecte apparaat bij de originele
aankoop locatie geretourneerd te worden. Terugbetaling of vervanging is ter discretie van
dat bedrijf.
Duronic Producten worden aangeboden met een 1-jarige garantie onder de volgende
omstandigheden:
1. Het product dient naar de verkoper geretourneerd te worden met aankoopbewijs.
2. Het product dient geïnstalleerd en gebruikt te worden naar de instructies in deze
gebruikshandleiding.
3. Het product is alleen geschikt voor huishoudelijk gebruik.
4. De garantie dekt geen gebruiksschade, opzettelijke schade, verkeerd gebruik of
verwaarlozing.
5. Shine-Mart Ltd heeft geen verantwoordelijkheid voor accidentele schade of verlies.
6. Shine-Mart Ltd is niet aansprakelijk voor onderhoud onder de garantie.
7. Alleen geldig in Nederland
Dit product is uitgerust met een CE:1363 stekker en zekering.
Geïmporteerd door Shine-Mart Ltd, RM3 8SB
Informatie over afvalverwerking voor Afgedankte Elektrische en Elektronische Apparatuur
(AEEA).
Dit teken geeft aan dat een product en/of bijbehorende documentatie bij verwijdering, dient
te worden behandeld als Afgedankte Elektrische en Elektronische Apparatuur (AEEA).
Alle AEEA gemarkeerde producten dienen niet te worden gemengd met algemeen
huishoudelijk afval, maar moeten apart worden gehouden voor de behandeling, herwinning
en hergebruik van de gebruikte materialen.
Volg ons