
Tarraco
Appendix to Owner’s manual

Safety
1
Transporting children safely
Safety
Transporting children
safely
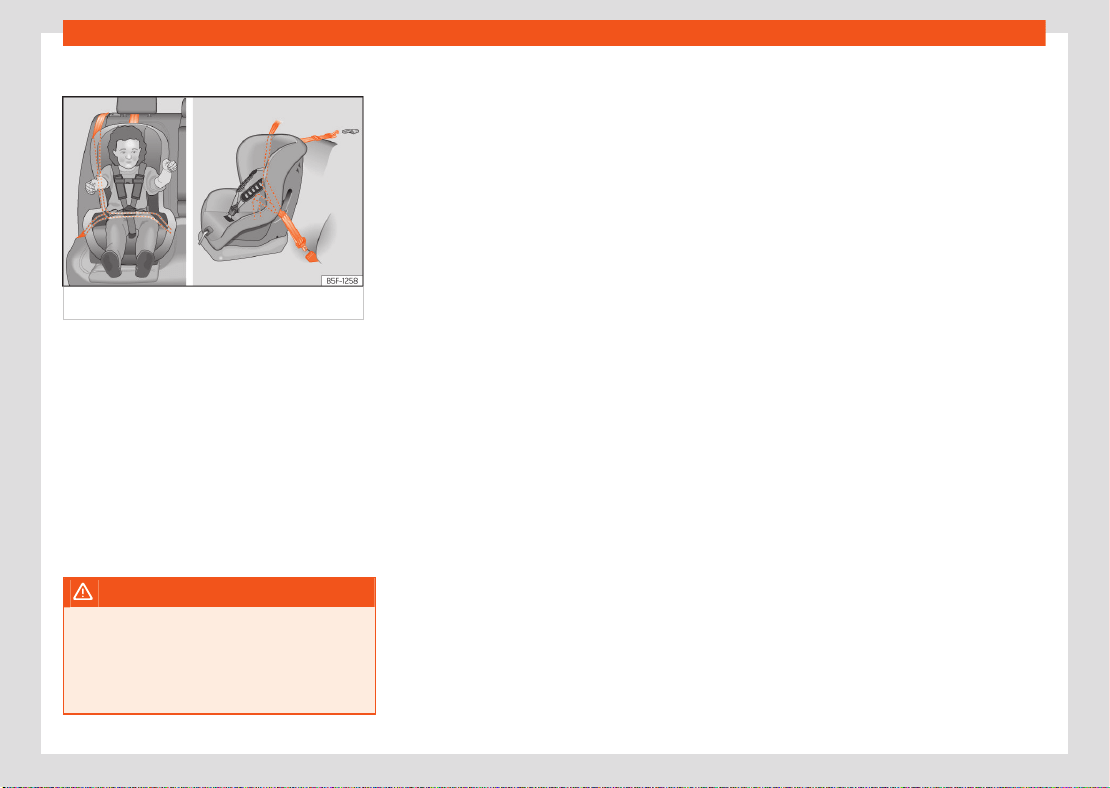
Top Tether securing belts
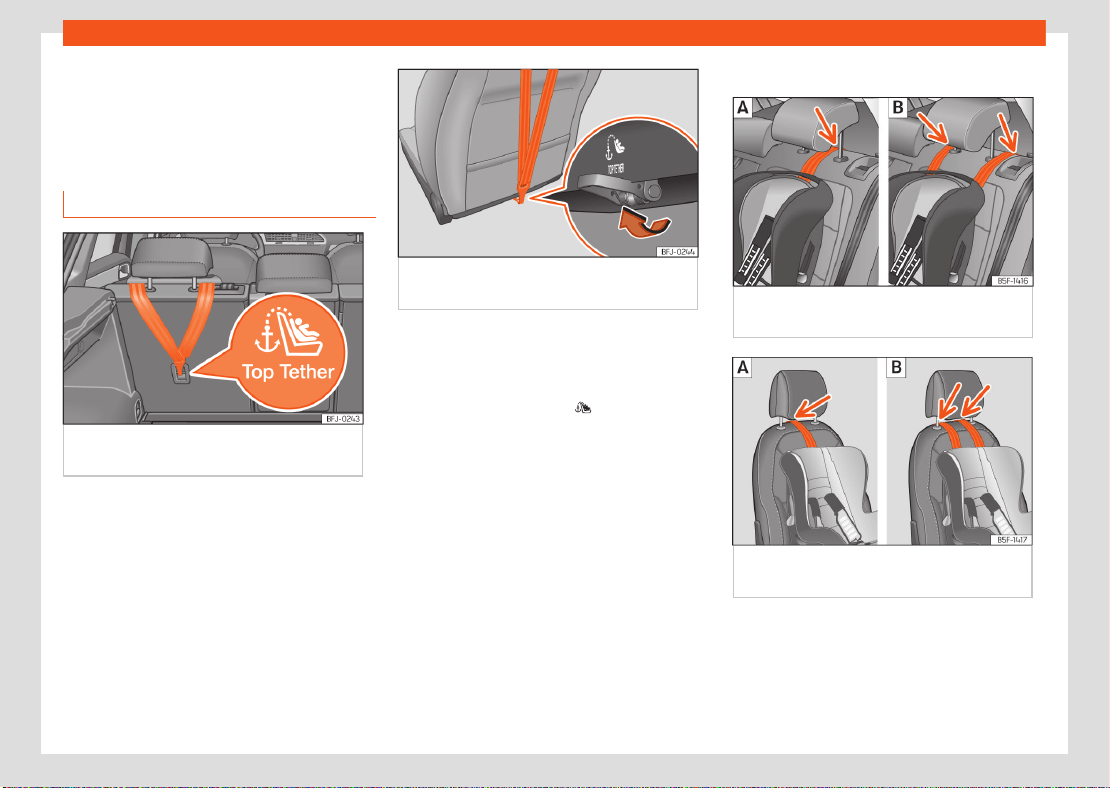
Fig.1 Rear part of the second row of rear
seats: securing rings for the Top Tether strap.
Fig.2 Rear of front passenger seat backrest:
Top Tether belt anchor.
Child seats with a Top Tether system are fitted
with an additional belt for fastening to an an-
chor point in the vehicle. This anchor point is
located on the rear of the rear seat backrest
(identified with the symbol ) and provides
better retention ›››Fig.1.
The objective of this system is to reduce for-
ward movements of the child seat in a head-on
collision, to reduce the risk of injuries that may
be caused to the child’s head by impacting
against any element of the inside of the vehicle.
Use of Top Tether on rearward-facing child
restraints
Currently, there are very few rearward-facing
child restraints with Top Tether. The car seat
manufacturer's instructions for proper installa-
tion of the Top Tether should be read carefully
and followed.
Locking the tether belt
Fig.3 Rear seats: adjustment and assembly
according to the Top Tether belt.
Fig.4 Front passenger seat: adjustment and
assembly according to the Top Tether belt.
2
Safety
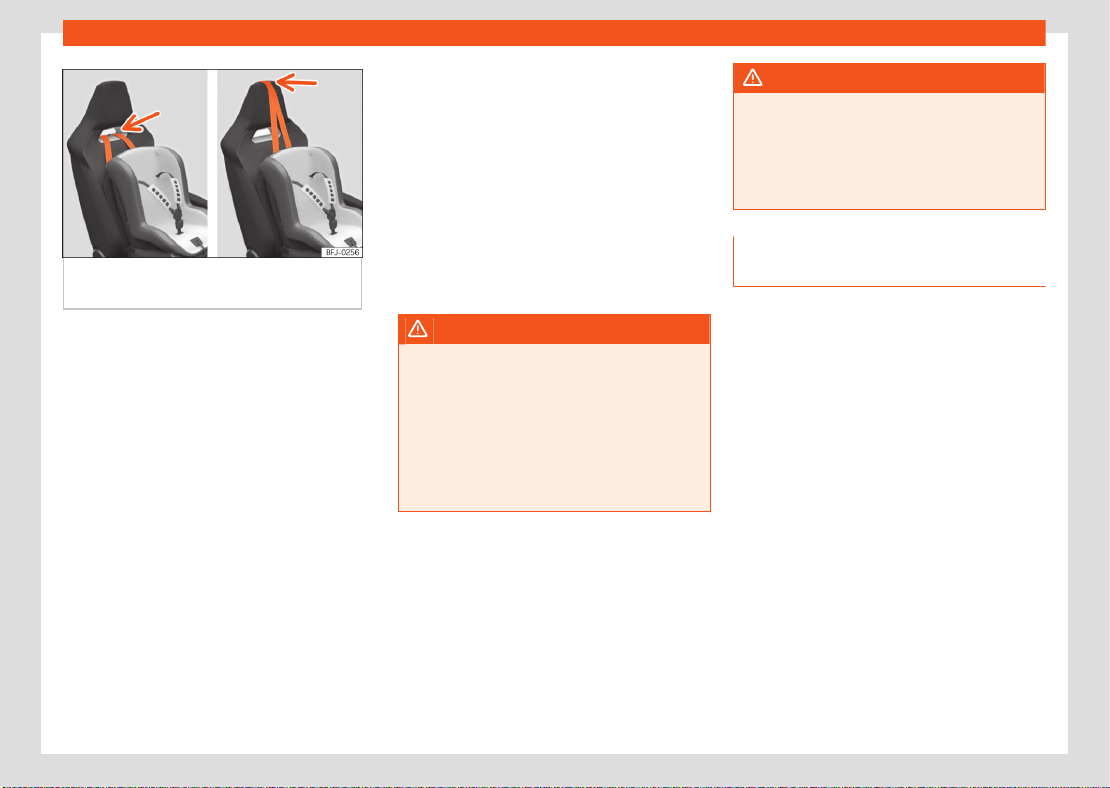
Fig.5 Front passenger seat: adjustment and
assembly according to the Top Tether belt.
●
Deploy the Top Tether belt according to the
child seat manufacturer’s instructions.
●
Position the belt under the headrest (accord-
ing to the instructions of the seat itself, lift or
remove the headrest if necessary) ›››Fig.3,
›››Fig.4.
For vehicles with built-in head restraints, pass
the strap through the gap in the head restraint
or over it ›››Fig.5.
●
Slide the belt and secure it properly with the
anchor on the rear seat backrest ›››Fig.1 ,
›››Fig.2.
●
Tighten the belt securely according to the
manufacturer’s instructions.
Release the tether belt
●
Slacken the belt according to the manufac-
turer’s instructions.
●
Press the lock and release it from the anchor
bracket.
WARNING
Installing safety seats incorrectly will in-
crease the risk of injury in the event of a colli-
sion.
●
Never attach the tether belt to a fastening
hook in the luggage compartment.
●
Never attach or secure luggage or other
items to the lower anchor points (ISOFIX) or
Top Tether anchor points.
WARNING
Child restraint anchors are designed to sup-
port the loads of properly adjusted child
restraint systems. Under no circumstances
should they be used to attach adult seat
belts, harnesses or other items or equipment
to the vehicle.
Fitting a child seat using the seat
belt
If you want to fit a universal approval category
(U) child seat in your vehicle, you must check
that the seat is approved for your vehicle.
You will find any necessary information on the
child seat’s orange ECE approval label.
The following table shows the dierent fitting
options.
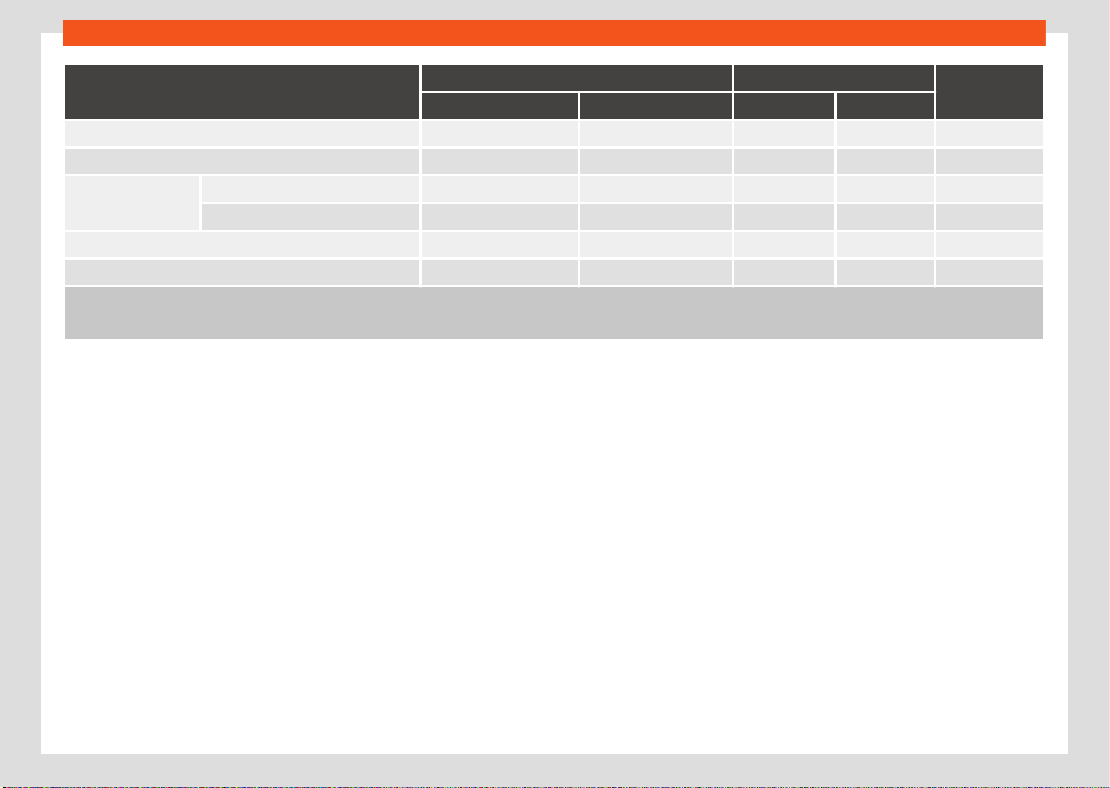
Safety
3
Transporting children safely
Weight group
Front passenger seat
a)
Second row of seats
Third row of
seats
b)
Airbag enabled
c)
Airbag deactivated
c)
side centre
d)
Group 0 up to 10 kg X U U U X
Group 0+ up to 13 kg X U U U X
Group I 9 to 18 kg
Rear-facing X U U U X
Forward-facing U X U U X
Group II 15 to 25 kg U X U U X
Group III 22 to 36 kg U X U U X
X: Not compatible for the installation of seats install chairs in this configuration.
U: Suitable for universal restraint systems for use in this weight group.
a)
Compliance with current national legislation and the manufacturer's instructions is required when using or installing child seats.
b)
Third row not available for all versions.
c)
Seats without height adjustment should be placed in their rearmost position. Seats with height adjustment should be placed in their rearmost and highest
position.
d)
For semi-universal chairs where the securing system is the car safety belt and the support bracket, do not use them in the centre rear seat or the third row.
4
Safety
Fitting a child seat using the seat belt
Fig.6 On rear seats: installing a child seat.
●
Set the height of the seat belt such that it
adapts to the child seat naturally, without twist-
ing. The lowest position of the seat belt height
regulator must be used with rear-facing child
seats.
●
Put the seat belt in place and pass it through
the child seat according to the instructions of
the child seat manufacturer.
●
Make sure that the seat belt is not twisted.
●
Insert the latch plate into the seat's buckle
until you hear the engagement click.
WARNING
When travelling, children must be secured in
the vehicle with a restraint system suitable
for age, weight and size.
●
Always read and observe information and
warnings concerning the use of child seats.
High-voltage battery
5
Charging the high-voltage battery
1
2
3
High-voltage battery
Charging the high-voltage
battery
Charging with alternating current
(AC)
✓ Valid for: hybrid vehicles
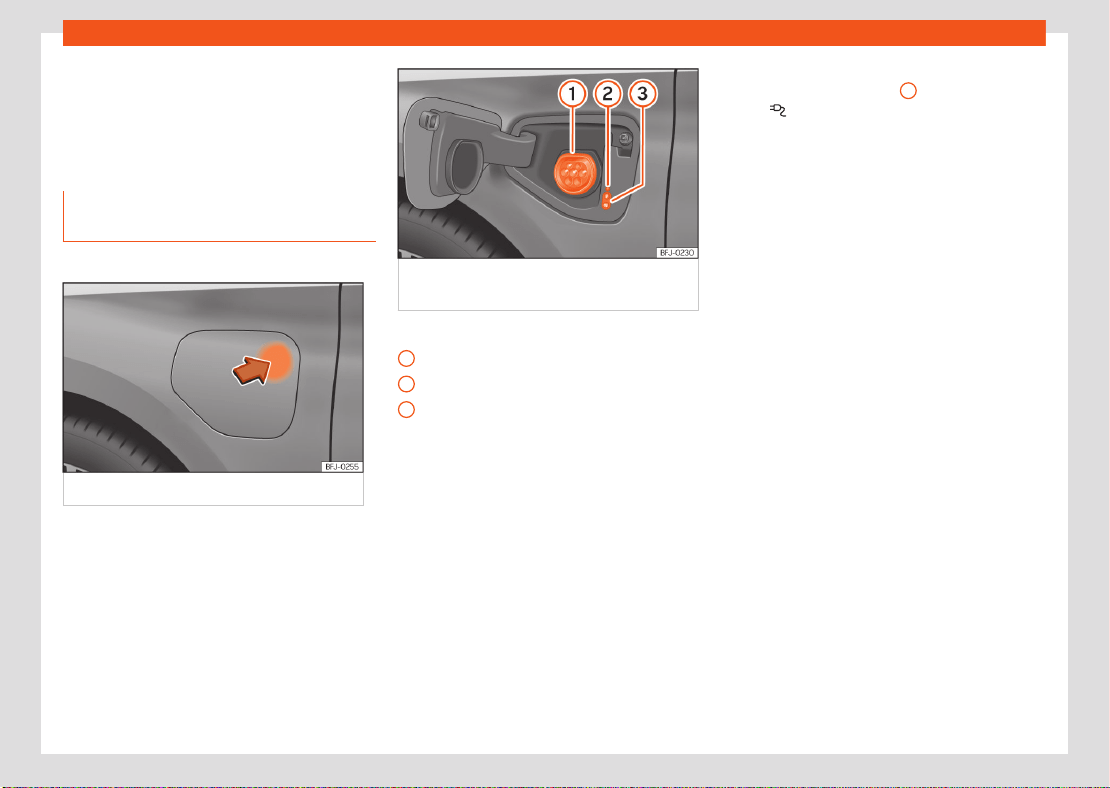
Fig.7 Opening the charging socket cover.
Fig.8 Behind the battery charging cover on
the front left-hand side: Charging socket
›››Fig.8
Charging socket
Charging process display
Charging buttons
Connecting the charging cable
●
Firstly, connect the charging cable to the
socket, or public or home charging station.
Next, fully unwind it.
●
Charging cable for domestic power sockets:
The protection device performs a self-test.
●
With the vehicle unlocked, the battery charg-
ing cover opens when the indicated zone is
pressed ›››Fig.7.
●
Plug the charging connector into the charg-
ing socket. Check that the charging connector
is fully plugged in.
The connector locks automatically.
The LED (charging process display) on the
charging socket lights up
2
. The indicator
lamp lights up on the instrument cluster dis-
play.
6
Driving
Driving
Driving on slopes
Hill Descent Control (HDC)
✓ Valid for vehicles: with 4Drive all-wheel drive
The HDC function is activated automatically
when driving down a steep hill in Oroad
mode.
Hill Descent Control limits speed on steep
downhill gradients by automatically braking all
four wheels, helping the driver to maintain pre-
cise control of the vehicle on o-road gradients
without having to constantly apply the brakes.
The system works in both forward and reverse,
even if the N position is selected on the gear-
box. Keeping the anti-lock brake system active
prevents the wheels from locking.
In vehicles with manual gearboxes, the Hill De-
scent Control adapts the theoretical speed
without braking the engine below its idling
speed.
Hill Descent Control is available when the dash
panel display shows the message
.
Indicator lamps
Lights up white.
HDC is active.
Lights up grey.
HDC is on, but is not acting because the re-
quired conditions are not met.
After starting the descent of a steep hill at
less than 30km/h (18 mph) when the system
is on, the HDC will activate automatically if
neither the accelerator nor brake pedals are
depressed. The speed is limited to a minimum
of 2 km/h (1mph) and a maximum of 30km/h
(18mph).
At any time, the driver can increase or decrease
the speed within the above-mentioned limit by
depressing the accelerator or the brake. The
function is then temporarily interrupted while
the speed is being regulated and then activa-
ted again if applicable.
However, it is essential that the surface ensures
sucient grip. For this reason, the Hill Descent
Control will not fulfil its function when, for ex-
ample, descending a slope with a frozen or slip-
pery surface.
The Hill Descent Control intervenes automati-
cally if the following conditions are met:
●
The vehicle’s engine is running.
●
The Oroad driving profile has been selec-
ted. Driving at a speed below 30km/h (18mph)
(the message is shown on the dash panel
display).
●
The downward gradient is at least 10%.
●
Neither the brake nor accelerator pedal is de-
pressed.
The hill descent control is deactivated if the
gradient is less than 5%. The function can be
switched o manually in the infotainment sys-
tem using the > HDC function button.
WARNING
Always be ready to apply the brakes. Failure
to do so could result in an accident and in-
jury.
●
The hill descent control is only an auxiliary
system which in some situations may not be
able to brake the vehicle suciently when
going downhill.
●
The vehicle's speed may increase despite
the intervention of the hill descent control.
Data transmissions
7
Cybersecurity
Data transmissions
Cybersecurity
Introduction
What is cybersecurity?
Cybersecurity refers to measures that reduce
the risk of unauthorised access to vehicle func-
tions, data and control units via malware or an
attach over the Internet.
What are connectivity components?
Control units for data transmissions, interfaces
and media and diagnostic connections are
connectivity components through which data
and information can be exchanged between
the vehicle and external devices or the Internet.
Connectivity components that are not part of
the equipment of all of the vehicles particularly
include:
●
Connection socket for diagnosis.
●
Control unit with an integrated eSIM card
(OCU).
●
Telephone interface.
●
Full Link.
●
NFC wireless communication technology.
●
Bluetooth Interface®.
●
USB (connection).
●
Transreceiver module.
The connectivity components are key points
in cybersecurity. Connectivity components are
also fitted with security mechanisms that mini-
mise the risk of unauthorised third parties gain-
ing access to vehicle systems.
Security mechanisms
Software and locking mechanisms mounted on
the vehicle are being developed continuously.
As in the case of computers or mobile phone
device operating systems, software and locking
mechanisms mounted on the vehicle can also
be updated non-periodically. In general, soft-
ware updates improve the security, stability and
speed of execution of vehicle systems that have
already been manufactured.
Minimising risks
You can contribute to reducing the risk of un-
authorized third parties accessing the vehicle
systems and their functions:
●
Do not use data storage devices, Bluetooth®
devices or mobile phone devices that contain
manipulated data or malicious software in the
vehicle.
●
Immediately install the system updates provi-
ded by SEAT.
●
Only get vehicle repair and maintenance
work done at specialised workshops. SEAT rec-
ommends visiting a SEAT dealership for this.
WARNING
The risk of unauthorised third parties gaining
access to vehicle functions, data and con-
trol units through malware or an attack over
the Internet cannot be ruled out despite the
vehicle's security mechanisms. If malicious
software is introduced into the vehicle, it can
influence, deactivate or control the control
units and vehicle functions and cause serious
accidents and fatal injuries.
●
If the vehicle operates dierently than
usual or reacts or behaves strangely, reduce
speed immediately (where possible) in a
controlled manner and drive to the nearest
specialist workshop without delay, or seek
the assistance of specialist personnel.
●
Malicious software can also access data
and information stored in control units, the
infotainment system, connected data stor-
age devices and paired mobile phone devi-
ces.
WARNING
Computers, data storage devices and mobile
phone devices that connect to the Internet or
that are used on public or private networks
can be infected by manipulated data and
malicious software.
●
Protect your computer, data media and
mobile phone devices with a suitable anti-vi-
rus program and by taking widespread pre-
cautionary measures.
8
Data transmissions
1)
Not available on all markets.
●
Regularly update the appropriate anti-vi-
rus software with updates and new versions
provided by the corresponding supplier.
Over-the-air update
Introduction
Over-the-air updates allow you to always
keep your vehicle up to date, for example for
optimising functions and for malware pro-
tection.
1)
How can you find out when an over-the-air
update is available?
The available updates are displayed in the info-
tainment system.
If several updates are available for the vehicle
at the same time, one over-the-air update must
first be successfully completed before the next
one can be performed.
Note
It is in your own interest to complete updates
as soon as possible. If the controller repeat-
edly rejects the over-the-air update, it will be
necessary to visit a qualified workshop. SEAT
recommends using a SEAT dealer.
WARNING
In very rare cases, a control unit may not
function properly after an over-the-air up-
date. Malfunctioning of a control unit and the
vehicle can lead to serious accidents and fa-
tal injuries.
●
Reduce speed in a controlled manner if the
vehicle operates or reacts dierently than
usual while driving.
●
Contact a specialised workshop. SEAT rec-
ommends using a SEAT dealer.
WARNING
If the instrument cluster does not work after
an over-the-air update, you will not be able
to see instrument cluster displays, warning
lights, symbols or text messages. Driving with
an instrument cluster that does not work can
lead to serious accidents and fatal injuries.
●
Do not use the vehicle. Please contact the
SEAT customer care service.
NOTICE
If special modifications have been made to
vehicles outside the scope of SEAT's respon-
sibility (for example, for emergency service
vehicles or taxis), there is a risk that special
functions (e.g. the taximeter) may no longer
work properly after an over-the-air update.
●
Consult with your SEAT dealer before per-
forming an over-the-air update.
Note
●
Measures to improve performance or ef-
ficiency (e.g. engine tuning) that have not
been incorporated by SEAT may be deleted
after an over-the-air update.
●
Depending on the equipment, release
notes may appear once before or after an
over-the-air update. These release notes de-
scribe changes to the vehicle status. For re-
lease notes and more information on over-
the-air updates, please visit the website:
www.seat.com
●
The over-the-air update will not update
apps installed in the vehicle.
Data transmissions
9
Over-the-air update
Prerequisites for an over-the-air up-
date
The following prerequisites must be met in order
to be able to download an update via satellite
and to install the update software.
●
The over-the-air update function is available
in your country.
●
You have subscribed to a valid SEAT Connect
contract.
●
You have assigned the vehicle to your active
user account.
●
A primary user is available. You may need to
register as a primary user.
●
The vehicle is located in an area with su-
cient mobile reception.
●
Your current privacy configuration allows you
to transmit and receive data and information.
●
The vehicle's 12-volt battery is properly
charged.
Download and install an over-the-air
update
Download costs
Over-the-air updates are downloaded via the
factory control unit with eSIM card, and are free
of charge. SEAT covers the cost of the connec-
tion.
Download timing
Downloading takes place automatically with-
out warning and may also happen while driving.
When the download is complete, a message
will appear to inform you that an over-the-air
update is available.
Note
The duration of the download process de-
pends on the quality of the network, the file
size and the type of update. The download
process may be interrupted. It will resume
when the ignition is switched on again.
Software installation pre-requisites
●
The vehicle is parked safely in accordance
with legal requirements and local regulations.
●
Previous over-the-air updates have been in-
stalled.
Installing the software from an over-the-air
update
Choose a time for the over-the-air update
when neither you nor others are unlikely to be
driving the vehicle.
WARNING
The control units will be switched
o and will
not work while the software installation is in
progress. Driving while the control units are
switched o or faulty can lead to accidents
and fatal injuries.
●
Install the software in a way that does not
interfere with other road users.
●
Do not use the vehicle during a software
installation procedure.
1.
Deactivate the vehicle's drive system and
apply the electronic parking brake.
2. Close the bonnet, boot, all windows and all
doors.
3. Confirm the software installation in the Info-
tainment system.
4. Ensure that all occupants of the vehicle get
out and that there are no animals left inside.
5. Collect all vehicle keys and get out.
6. Lock the vehicle.
Functional restrictions during software in-
stallation
The control units, central computer, functions
and displays will not be available during the
software installation. Do not use the vehicle or
the Infotainment system during installation.
10
Data transmissions
●
The system prevents the activation of the ve-
hicle's drive system.
●
The high-voltage battery is not charged.
●
The AUX-IN diagnostic socket is switched o.
●
The anti-theft alarm is switched o.
●
The “Safe” security system is switched o.
After installing the software
After the software installation and before ac-
tivating the vehicle's drive system, read the
message on the Infotainment system or in the
Instrument cluster about the complete installa-
tion of the software. It can take up to 1 minute
for the vehicle to display the status of the over-
the-air update.
●
The vehicle's drive system can be activated
once the software has been successfully instal-
led.
●
If the software installation is not successful:
›››page10, Troubleshooting.
Troubleshooting
The installation of an over-the-air update
has failed.
●
If an update is not installed correctly, an error
message will appear in the infotainment system
or in the instrument cluster. Observe the corre-
sponding messages and warnings.
Note
The control units will stop working or will not
work properly in the event of a critical instal-
lation error. The functions and screens will
not be available until the error is amended.
Do not use the vehicle. In this case, please
contact SEAT customer care.
Can I interrupt the installation of an over-
the-air update?
No, it is not possible.
What happens if the installation of an over-
the-air update is interrupted?
If the installation is interrupted, for example due
to damage to the vehicle's electrical system,
the control units may not be updated and may
not work due to incomplete installation of the
update.
WLAN access point
Configuration for sharing a connec-
tion over WLAN
Depending on the version, it is only possible
to connect in Hotspot mode to get SEAT CON-
NECT, and a maximum of 5 devices can be
connected.
Infotainment system
11
Media Mode
Infotainment system
General instructions for use
Technical data
Sound system (basic equipment):
The infotainment system that is supplied from
the factory is equipped as follows:
●
Speakers in dierent locations and with dif-
ferent power levels (watts).
●
Internal amplifier depending on the system:
–
8 speakers: 4 x 20 W.
Setting options:
●
Equaliser, depending on the system:
–
8 speakers: 5 frequency bands
●
Sound distribution, depending on the system:
–
8 speakers: Balance + Fader (left / right /
front / rear).
●
Sound optimisation by zones (valid for the 8-
speaker system):
–
Manual (Driver and All).
Radio mode
Radio equipment and symbols
Symbols on the FM/DAB frequency band
To display the frequency band for manual
selection of the FM frequency. Only the FM
band should be selected in the Radio con-
text.
DAB not available.
DAB stations support presentations (slide-
show).
Special functions in Radio mode
Additional DAB warnings
The DAB announcement function monitors pos-
sible notifications from DAB radio stations and
plays them automatically in Radio mode.
Activate deactivate additional DAB warnings:
●
Menu > Additional DAB announcements
(Activate/deactivate).
Radio text
The radio text function provides information re-
lated to the selected radio station.
Activate and deactivate Radio text:
●
Menu > Radio Text (Activate/deactivate).
Media Mode
Equipment features and media sym-
bols
Audio, multimedia and connectivity:
●
Media playback and control via Bluetooth®.
●
Audio playback in these formats: AAC, APE,
ALAC, FLAC, MP2, MP3, MP4, Vorbis, OPUS,
WMA, WAV.
●
Video playback in these formats:
–
MPEG-1 and MPEG-2
(.mpg, .mpeg, .mkv, .avi).
–
ISO MPEG-4 ASP; Xvid
(.mp4, .m4v, .mov, .mkv, .avi).
–
ISO MPEG-4 AVC / H.264
(.mp4, .m4v, .mov, .mkv, .avi).
–
Windows Media Video 9
(.wmv, .asf, .mkv, .avi).
●
Playlists on any type of device.
●
Multimedia search.
12
Miscellaneous situations
1.
2.
3.
4.
5.
6.
7.
8.
9.
10.
11.
Miscellaneous situa-
tions
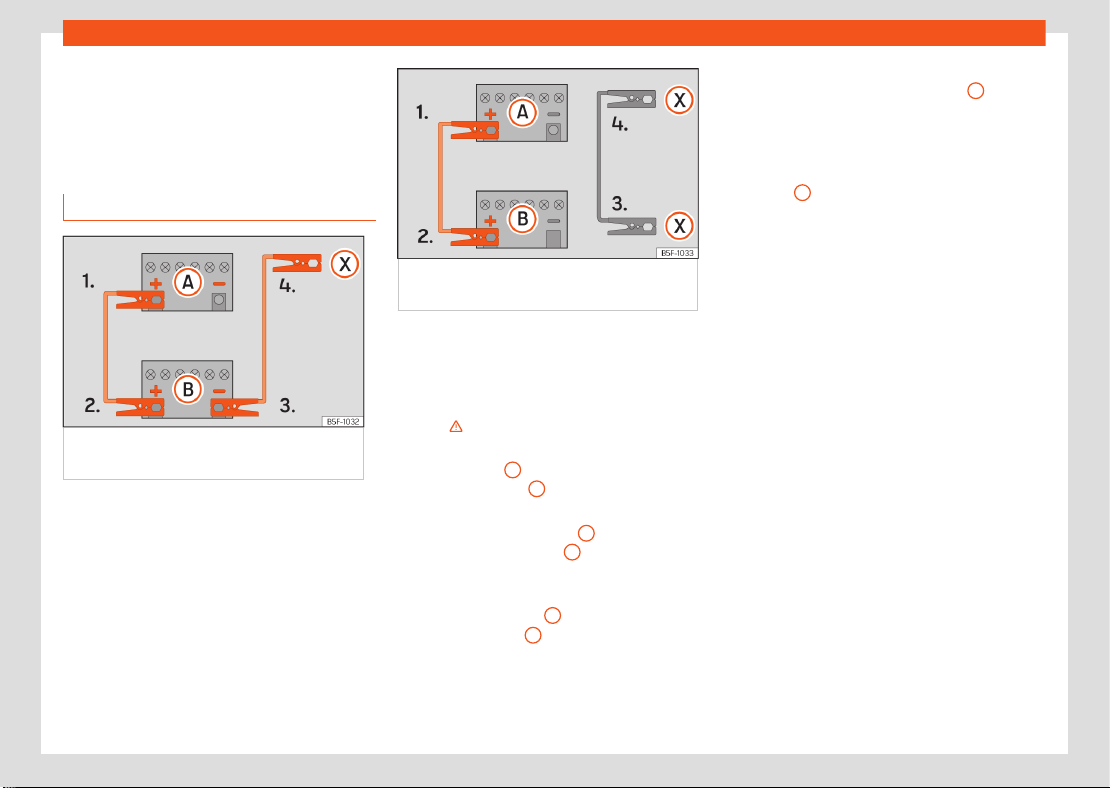
Jump start
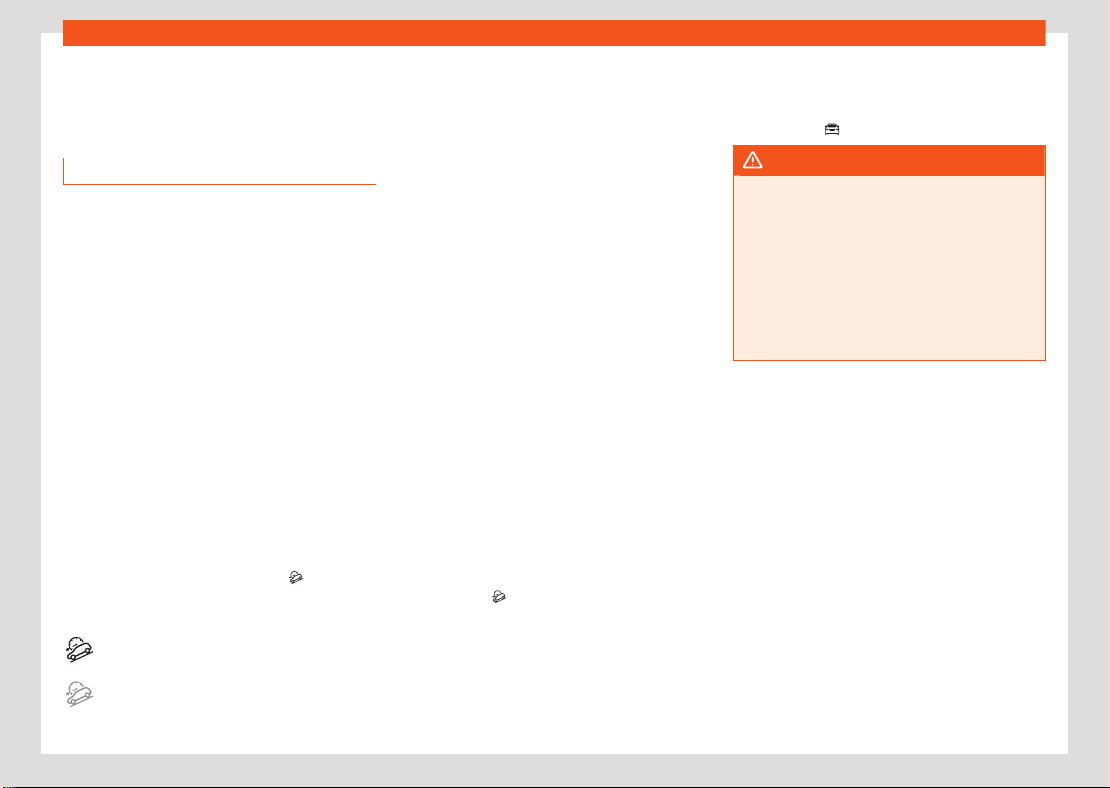
Jump start: description
Fig.9 Wiring diagram for vehicles without a
start/stop system.
Fig.10 Wiring diagram for vehicles with a
start/stop system.
Jump lead terminal connections
The jump leads should only be connected in
the order 1 > 2 > 3 > 4 ›››Fig.10.
Switch o the ignition of both vehicles
››› .
Connect one end of the red jump lead to
the positive
+
terminal of the vehicle with
the flat battery
A
.
Connect the other end of the red jump lead
to the positive terminal
+
in the vehicle
providing assistance
B
.
Vehicles without a Start-Stop system: con-
nect one end of the black jump lead to the
negative terminal
–
of the vehicle provid-
ing the current
B
›››Fig.9.
Vehicles with a Start-stop system: connect
one end of the black jump lead
X
to a
suitable ground terminal, to a solid piece of
metal in the engine block, or to the engine
block itself ›››Fig.10.
Connect the other end of the black jump
lead
X
to a solid metal component bolted
to the engine block or to the engine block
itself of the vehicle with the flat battery. Do
not connect it to a point near the battery A.
Position the leads in such a way that they
cannot come into contact with any rotating
part in the engine compartment.
Starting
Start the engine of the vehicle supplying
the current and leave it running at idle.
Start the engine of the vehicle with a dis-
charged battery and wait 2 to 3 minutes
until the engine runs.
Disconnecting the jump leads
Before disconnecting the jump leads,
switch o the dipped beam headlight if it
is on.
Turn on the heating fan and the vehicle's
heated rear window when the battery is
discharged to reduce the voltage peaks
that occur while disconnecting the battery.
While the engines are still running, discon-
nect the cables in the reverse order in
which they were connected.
Miscellaneous situations
13
Jump start
If the engine does not start after 10 seconds,
wait for approximately 1 minute and then try
again.
WARNING
●
The battery supplying the current must
have the same voltage (12V) as the flat bat-
tery. Failure to comply could result in an ex-
plosion.
14
Checking and refilling levels
Checking and refilling
levels
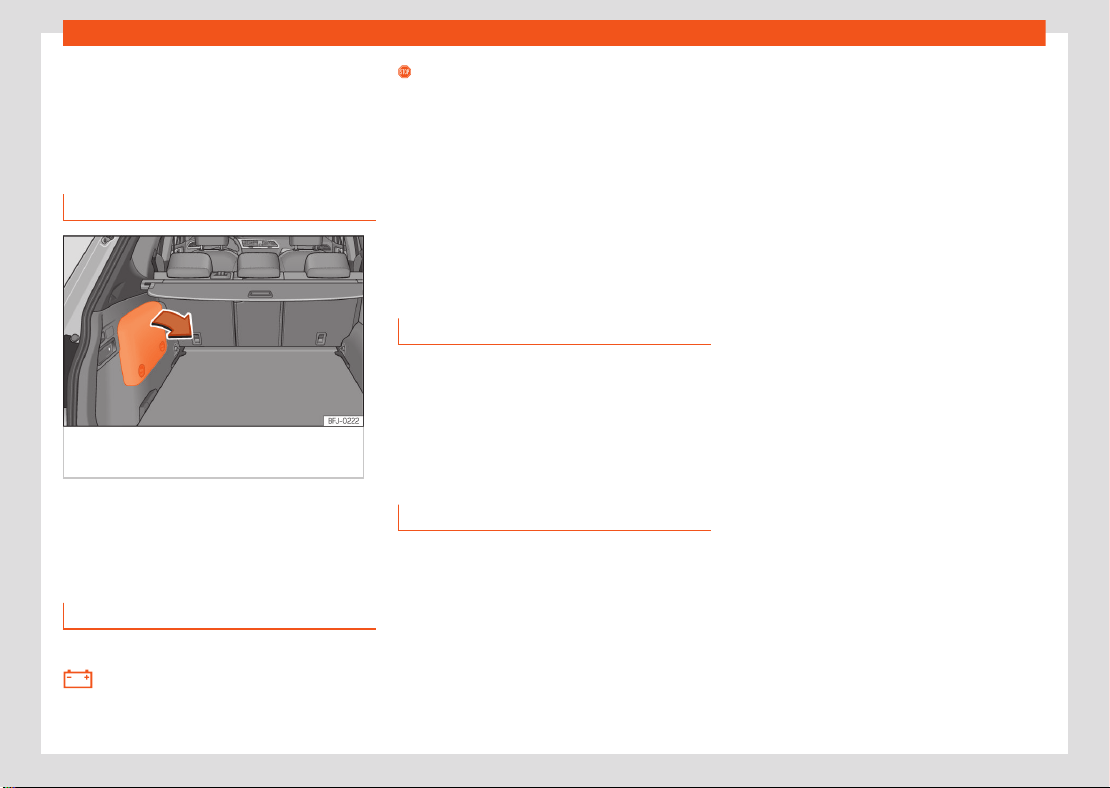
12-volt battery
Check the electrolyte level
Fig.11 Hybrid vehicles (PHEV): location of the
battery in the luggage compartment
Access to the 12 volt battery
The 12-volt battery is located in the engine
compartment (conventional vehicles) or in the
luggage compartment (PHEV hybrid vehicles).
Troubleshooting
✓ Valid only for: conventional vehicles.
Alternator fault
The control lamp lights up in RED.
Stop driving! Safely stop the vehicle at
the next opportunity. The vehicle battery stops
charging from the alternator while driving As
the battery gradually discharges, switch o all
electrical devices that are not essential.
●
Switch o the ignition and any electrical
consumers that are not required.
●
Have the electrical system checked by a
qualified workshop.
Energy management
Optimisation of the starting capacity
Battery diagnostics
Battery diagnostics determine the status of the
battery on an ongoing basis. The battery volt-
age, current and temperature are monitored for
this purpose. This is used to determine the bat-
tery's charge level and eciency.
Discharged battery
Vehicle stationary for a long period of time
If you do not drive the vehicle for a few days
or weeks, adjustments will be made to reduce
consumption or the electrical devices will be
deactivated one by one. This reduces energy
consumption and the starting capacity is main-
tained for longer. Some comfort functions may
not be available under certain circumstances.
The comfort functions will be available again
when the ignition is switched on and the engine
is started.

Information for the user
15
Return and scrapping of end-of-life vehicles
Information for the user
Information on the
EU chemicals regulation
REACH
In accordance with the European Chemicals
Regulation REACH, SEAT, S.A. has information
on the substances that may be contained in the
vehicle.
You can ask any SEAT dealer for this informa-
tion.
Return and scrapping of
end-of-life vehicles
End-of-life return
At the end of its useful life, your vehicle must
be recycled and disposed of in an environmen-
tally sound manner. For this reason, final vehicle
owners in the EU and in many other countries
are required by law to take their vehicle to an
authorised collection point, vehicle return cen-
tre or authorised dismantling facility.
SEAT already made the necessary arrange-
ments for this: an extensive network of vehicle
return centres is available throughout the EU
and in many other countries, where you can
drop
o your vehicle. If you meet the national
legal requirements, you can return your end-of-
life vehicle free of charge within the EU.
The vehicle return centre issues a recycling
certificate which serves as proof that the end-
of-life vehicle has been recycled correctly.
Information about the Vehicle Return Centres
can be obtained from your SEAT dealer.
Scrapping
The relevant safety requirements must be ob-
served when scrapping the vehicle or its in-
dividual components, e.g. airbag system and
seatbelt tensioners. Qualified workshops are
already familiar with these requirements. SEAT
recommends using a SEAT dealer.


SEAT S.A. is permanently concerned about continuous development of its types and models. For this reason we ask you to understand,
that at any given time, changes regarding shape, equipment and technique may take place on the car delivered. For this reason no right
at all may derive based on the data, drawings and descriptions in this current handbook.
All texts, illustrations and standards in this handbook are based on the status of information at the time of printing. Except for error or
omission, the information included in the current handbook is valid as of the date of closing print.
Re-printing, copying or translating, whether total or partial is not allowed unless SEAT allows it in written form.
SEAT reserves all rights in accordance with the “Copyright” Act.
All rights on changes are reserved.
❀
This paper has been manufactured using bleached non-chlorine cellulose.
© SEAT S.A.
Inglés 5FJ012720FE (01.24)
5FJ012720FE