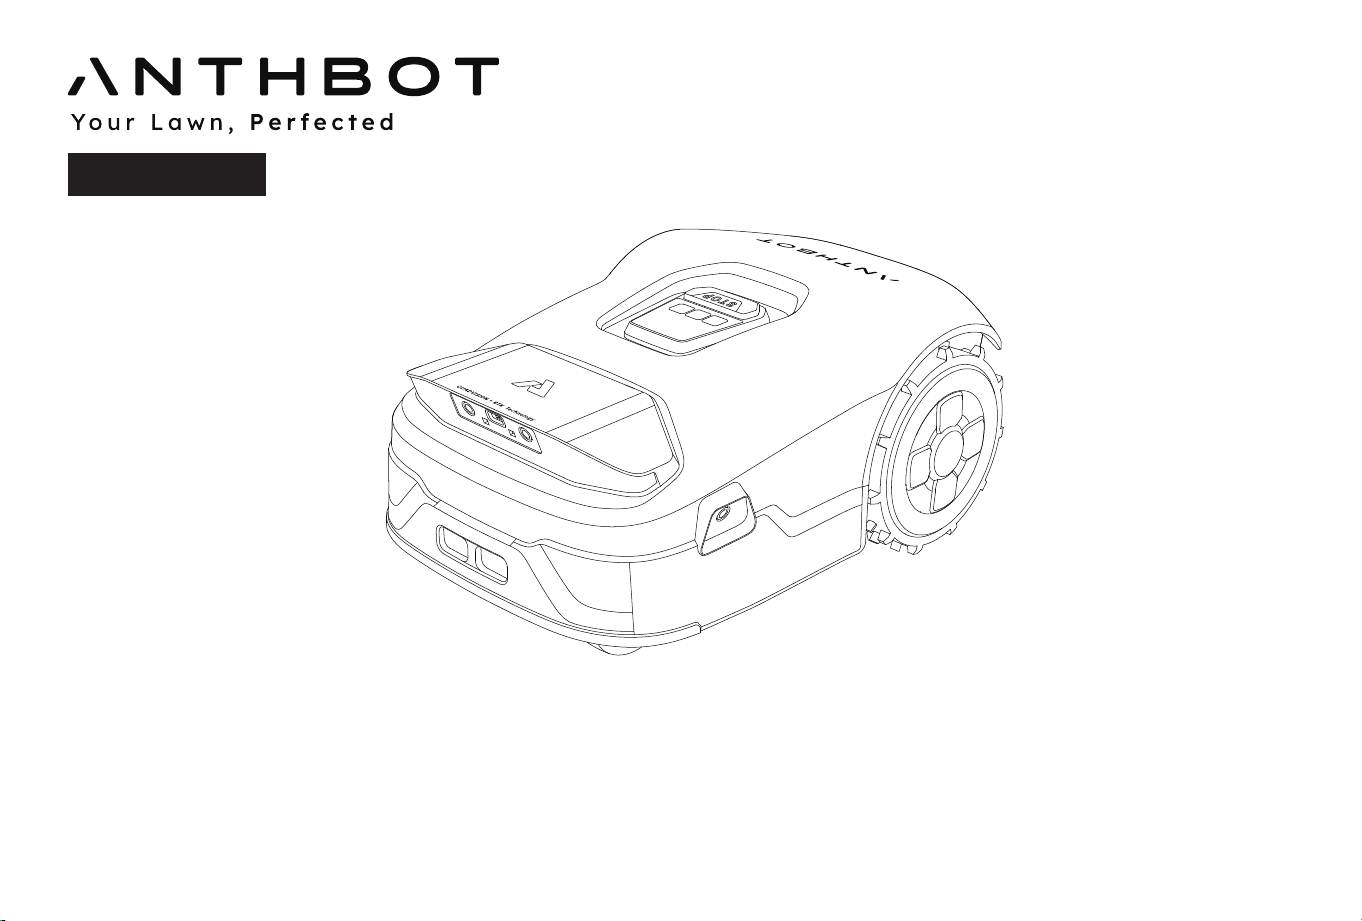
Welcome to use the Genie series mower. Please read this manual first to ensure safe and efficient operation.
Note: This product should be operated, and supervised by adults when it is operated by a child.
Instruction Manual
Original instructions
Genie Series
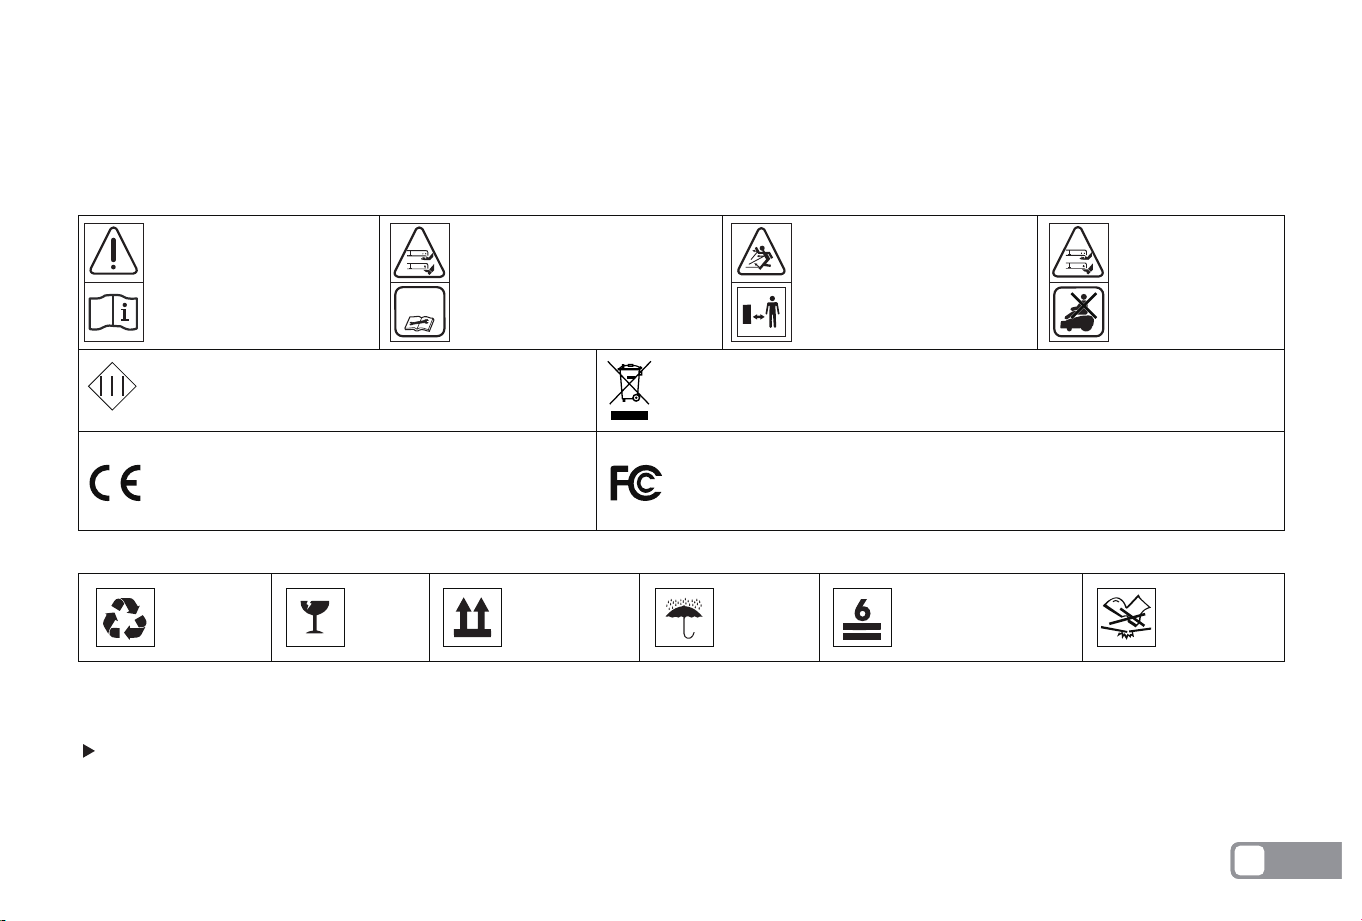
WARNING
-Read instruction
manual before oper-
ating the machine.
WARNING
-Keep a safe distance
from the machine
when operating.
WARNING
-Operate the disabling
device before working on
or lifting the machine.
WARNING
-Do not ride on
the machine.
Class III machines.
Electrical appliances must not be
disposed of with the domestic waste.
The product complies with the applicable Euro-
pean directives and an evaluation method of
conformity for these directives was followed.
This device complies with Part 15 of the FCC Rules. Operation is subject
to the following two conditions: (1) this device may not cause harmful
interference, and (2) this device must accept any interference
received,including interference that may cause undesired operation.
Important! Read all safety warnings and all instructions. Make yourself familiar with the controls and the proper
use of the machine. Please keep the instructions safe for later use!
Be sure to install and operate the mower and the charging station according to the instructions.
Using the mower for purposes other than mowing can bring serious injury. To avoid risks of injuries, please read and understand all the
warnings and cautions. Please understand that you can reduce the risk by following the instructions and warnings in this manual, but you
cannot eliminate all risk. The operator or user is responsible for accidents or hazards occurring to other people on their property.
1.
2.
Thank you for choosing the ANTHBOT robotic mower. Please read the instruction below before installing the robot.
Recyclable Fragile This side up Keep dry Stacking layers limit:6 Do not step
Welcome
Safety Notes
OPERATION
Explanation of symbols on the package
Explanation of symbols on the machine
Before using
SAFETY WARNINGS
说明书中解释:
WARNING – Operate(or Ac�vate) the disabling
device before working on or li�ing the machine
说明书中解释:
WARNING – Remove the disabling device before
working on or li�ing the machine
(针对Removable disabling device) (针对Coded protected disabling device)
EN
1

ANTHBOT has many safety sensors to protect our customers, however, safety risks still exist. Set a mowing time when there are no
people or pets on the lawn. Inform the neighbors about the risks for accidents or hazards. When using the mower on a public lawn, or
when your lawn is open to your neighbor or street, protect or fence the lawn, or put up a warning sign around the working area that says:
WARNING! Automatic lawn mower! Keep away from the machine! Supervise children!
DO NOT modify the mower by yourself. Modifications could interfere with mower operations, result in serious injury and/or damage, or
void the Limited Warranty.
Before working on the mower itself (e. g. maintenance, tool change, etc.) as well as during transport and storage, power off the mower
by pressing and holding the on/off button 15s.
The manufacturer recommends the user to be 18–70 years old. Be sure to get the necessary training before operating the machine.
Never allow children, persons with reduced physical, sensory or mental capabilities or lack of experience and knowledge or people unfa-
miliar with these instructions to use the machine, local regulations may restrict the age of the operator.
3.
4.
5.
6.
7.
1.
2.
3.
4.
5.
6.
7.
8.
9.
Regularly check that all parts of the mower can function normally.
Operate the machine only when the battery compartment is shut with the cover and all the screws in place. This protects the battery
against moisture.
Keep any supply and/or extension cords away from moving hazardous parts and the working area to avoid damage to the
cords which can lead to contact with live parts.
Do not to connect a damaged cord to the supply or touch a damaged cord before it is disconnected from the supply for the reason that
damaged cords can lead to contact with live parts.
For the best mowing results, it is recommended to mow in dry weather. Mowing in the rain can make the grass stick on the product and the
mower may slip. DO NOT mow in bad weather, such as heavy rain, thunderstorms or snow.
Periodically inspect the area where the machine is to be used and remove all stones, sticks, wires, bones and other foreign objects. The Limit-
ed Warranty does not cover damages caused by objects left on the lawn.
To avoid possible damage, keep the operating mower at least 1 m (3 ft) away from sprinkler heads. The mower and sprinklers should NOT
work simultaneously. Time the mower so that it works at a different time from sprinklers.
NEVER allow children to touch the power supply unit, charging station, blades, the battery compartment, or any parts with gaps such as the
wheels.
To connect the peripherals only to a supply circuit protected by a residual current device (RCD) with a tripping current of not more than 30mA.
Before mowing
1.
2.
While operating and as well while approaching the mower, take sufficient precaution to keep balance at all times particularly on slopes
and wet grass. Do not stretch yourself too much forwards.Do not operate the mower in a rush.
When operating the machine with the hand controls, do not operate the machine barefoot or in open-toed sandals. Always wear sturdy
shoes and long pants.
Mowing
EN
2

3.
4.
5.
6.
7.
8.
9.
10.
1.
2.
3.
4.
5.
6.
– Before clearing a blockage.
– Before checking, cleaning.
– Before storage.
– If the machine vibrates abnormally (stop and check immediately).
– After striking a foreign object, inspect the machine for damage and get advice on necessary repairs from your after-sales service.
– If the machine starts to vibrate abnormally, and to check for damage before restarting;
DO NOT operate(including charging mode) the mower outside the temperature limits: 3–45℃ (37.4–113℉), because low/high temperatures
can decrease mower performance and even lead to accidents.
DO NOT place anything on the mower or the charging station.
It is recommended to conduct regular maintenance of the mower by an adult.
Regularly check the warning devices to ensure they are effective. These devices include the voice announcer, the LED light on the charging
station, and the screen on the mower.
Before charging, please read How to Charge in To set the charging station. Improper use may cause electric shock, overheating, or leakage
of corrosive liquid.
It is recommended to inspect the moweri charging station, power cord and extension cord every six months for signs of damage or aging. If
the mower and charging station are faulty, or the power cord and extension cord are damaged, please do not use the mower and contact
the after-sales personnel for after-sales maintenance.
During manual control, it is recommended not to exceed speed, always maintain balance, always ensure a firm footing and walk on a slope,
and never run while operating the machine or its peripherals.
Avoid mowing in bad weather conditions especially when there is a risk of lightning.
If the mower vibrates abnormally or makes an abnormal sound or signals an alarm,press the STOP button immediately.
DO NOT leave the machine to operate unattended if you know that there are pets, children or people in the vicinity.
DO NOT allow children to be in the vicinity or play with the machine when it is operating.
DO NOT lift the mower in operation. DO NOT ride on the mower.
DO NOT mow on areas with slopes steeper than the maximum incline inside the working area (45%), as well as the boundary (15%).
DO NOT touch moving hazardous parts before they have come to a complete stop.
Safe usage
Turn off the mower by pressing and holding the On/Off button
1.
2.
3.
Please wear gardening gloves when handling or working near the sharp blades.
Before working on the charging station or power supply, remove plug from mains.
Clean the exterior of the machine. Remove all grass and debris, especially from the blade disc shield.
Maintenance
EN
3

4.
5.
6.
7.
8.
9.
1.
2.
3.
4.
5.
1.
2.
3.
4.
5.
6.
7.
8.
9.
10.
11.
Turn the mower upside down and clean the blade area and the swivel castors regularly. Use a stiff brush or water to remove compact-
ed grass clippings.
Make sure all nuts, bolts and screws are tight to ensure safe working with the garden tool.
Periodically visually inspect the machine and replace worn or damaged parts for safety.
Ensure that only official replacement parts are used.
Replace all blades and bolts as a set as required.
If it was need to replace the battery, open the battery holder with symbol pointing.
Before storage, power off the mower by press and holding the On/Off button 15s till mower makes a voice announcement
and charge its battery to 80% or higher to avoid over-discharge, which will cause permanent damage.
Store in a cool and dry place indoors.
Keep the mower, charging station and power supply away from heat sources (such as stoves, radiators, etc.) or chemicals.
Protect the power supply from moisture and keep it in a well-ventilated place.
Store the mower only within a temperature range between –20℃ and 60℃. As an example, do not leave the mower in the car in summer.
Do not open the battery compartment. There is a sign pointing out the position of battery, but it is not recommend open it. There is a
risk of short-circuiting.
Protect the battery against heat(e.g. against continuous intense sunlight), fire, water, and moisture. There is a risk of explosion.
Keep any unfitted battery away from paper clips, coins, keys, nails, screws or other small metal objects, that can make a connection
from one terminal to another. Shorting the battery terminals together may cause burns or a fire.
In case of damage and improper use of the battery pack, vapours may be emitted. Ventilate the area and seek medical help in case of
complaints. The vapours can irritate the respiratory system.
The battery can be damaged by pointed objects such as nails or screwdrivers or by force applied externally. An internal short circuit can
occur and the battery can burn, smoke, explode or overheat.
If used incorrectly or if the battery is damaged, flammable liquid may be ejected from the battery. Contact with this liquid should be
avoided. If contact accidentally occurs, rinse off with water. If the liquid comes into contact with your eyes, seek additional medical
attention. Liquid ejected from the battery may cause irritation or burns.
Do not short-circuit the battery. There is a risk of explosion.
Use only original battery packs intended specifically for the machine. Use of any other battery packs may create a risk of injury and fire.
Ensure the robot has power off before inserting battery. Inserting the battery pack into machines with power on can cause accidents.
The ANTHBOT will operate(including charging mode) between 3℃ and 45℃. If the battery temperature is outside this range, the APP
will display a message and the robot will not leave the charging station. If operating, the robot will return to the charging station or stay
in place.
Recharge only in the original charging station.This appliance contains batteries that are only replaceable by skilled persons.
About battery
Storage
EN
4

This product and - if applicable - the supplied accessories too are marked with "CE" and comply therefore with the applicable
harmonized European standards listed under the Machinery Directive 2006/42/EC, the Radio Equipment Directive 2014/53/EU ,
and the RoHS Directive 2011/65/EU.
Products marked with this symbol cannot be disposed of as unsorted municipal waste in the European Union. For proper recy-
cling, return this product to your local supplier upon the purchase of equivalent new equipment, or dispose of it at designated
collection points.
This symbol means: This product contains a battery that cannot be disposed of as unsorted municipal waste in the European
Union. See the product documentation for specific battery information. The battery is marked with this symbol, which may
include lettering to indicate cadmium (Cd), lead (Pb), or mercury (Hg). For proper recycling, return the battery to your supplier
or to a designated collection point.
DO NOT treat this product as domestic waste. For recycling information, contact your domestic waste service, your municipality, or point of
sale.
For questions about how to remove the battery, refer to About Battery.
WARNING: DO NOT dispose of this product in a landfill, by incineration, or by mixing with household trash. Danger or serious injury can occur
because of the electrical components.
The full text of the DECLARATION OF CONFORMITY is available at the following web link: https://www.anthbot.com/pages/doc-list
Declaration of Conformity
Regulatory information
1.
2.
3.
4.
1.
2.
3.
The mower is intended for domestic lawn mowing.
Do not operate the mower indoors.
Do not use the mower for any other purpose because of the increased risk of accidents and damage to the mower.
Never attempt to modify the mower in any way since this may result in accidents or damage to the mower.
Intended use
Recycling and end-of-life disposal
EN
5
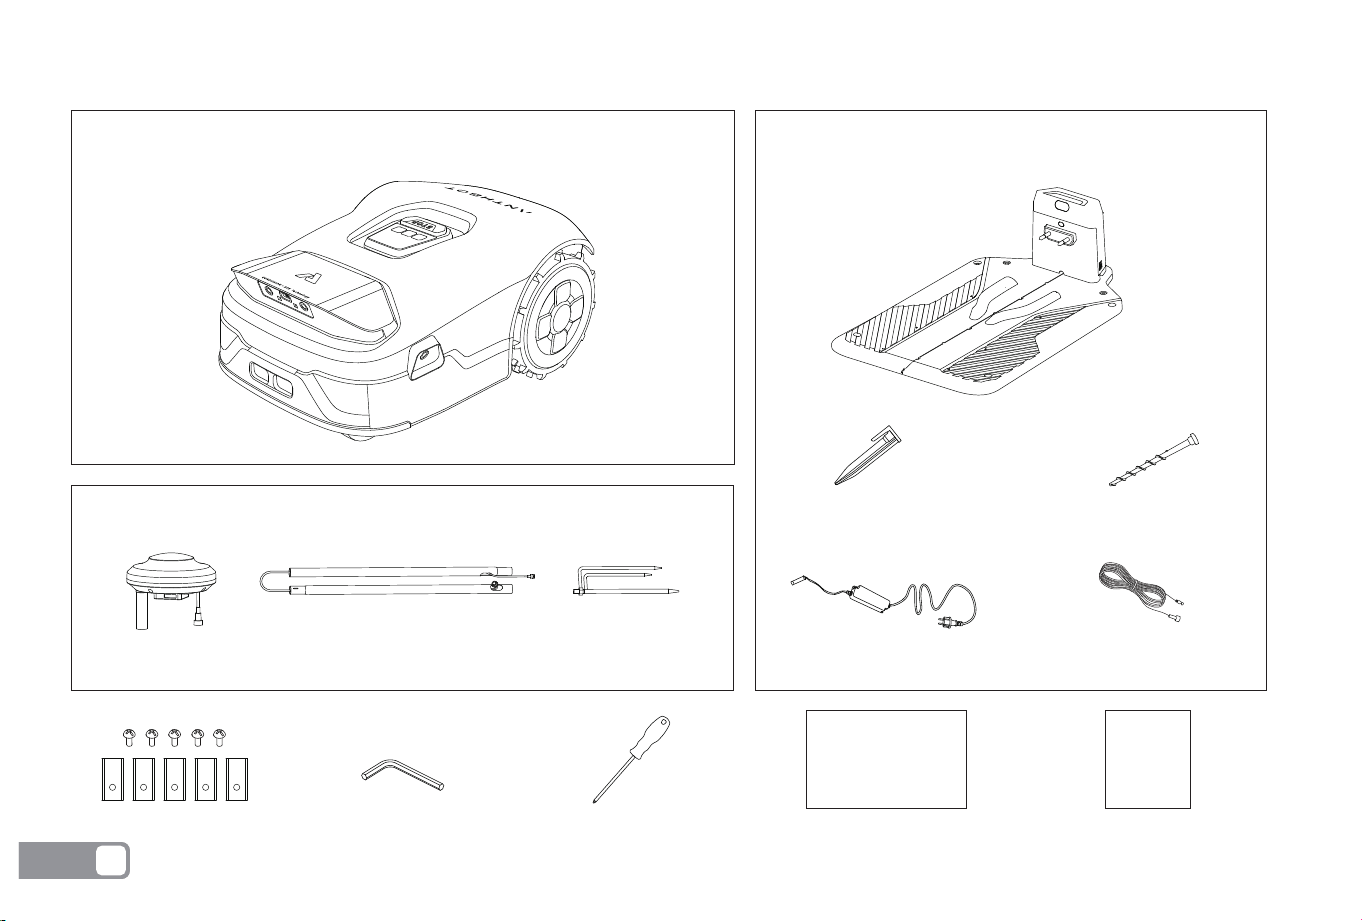
What’s in the box
Charging station and installation kitMain body
Fixing screw
Hex wrench (6mm)
Charging station
Blade + fixing screw
RTK installation kit
RTK reference station
Charging station adapter
Charging station adapter
extension cable
Adapter cable
fixing card
Screwdriver Instruction manual
Instruction manual
Fast Instruction
Fast Instruction
x 10 x 4
RTK mounting pole RTK tripod fixing stake
EN
6
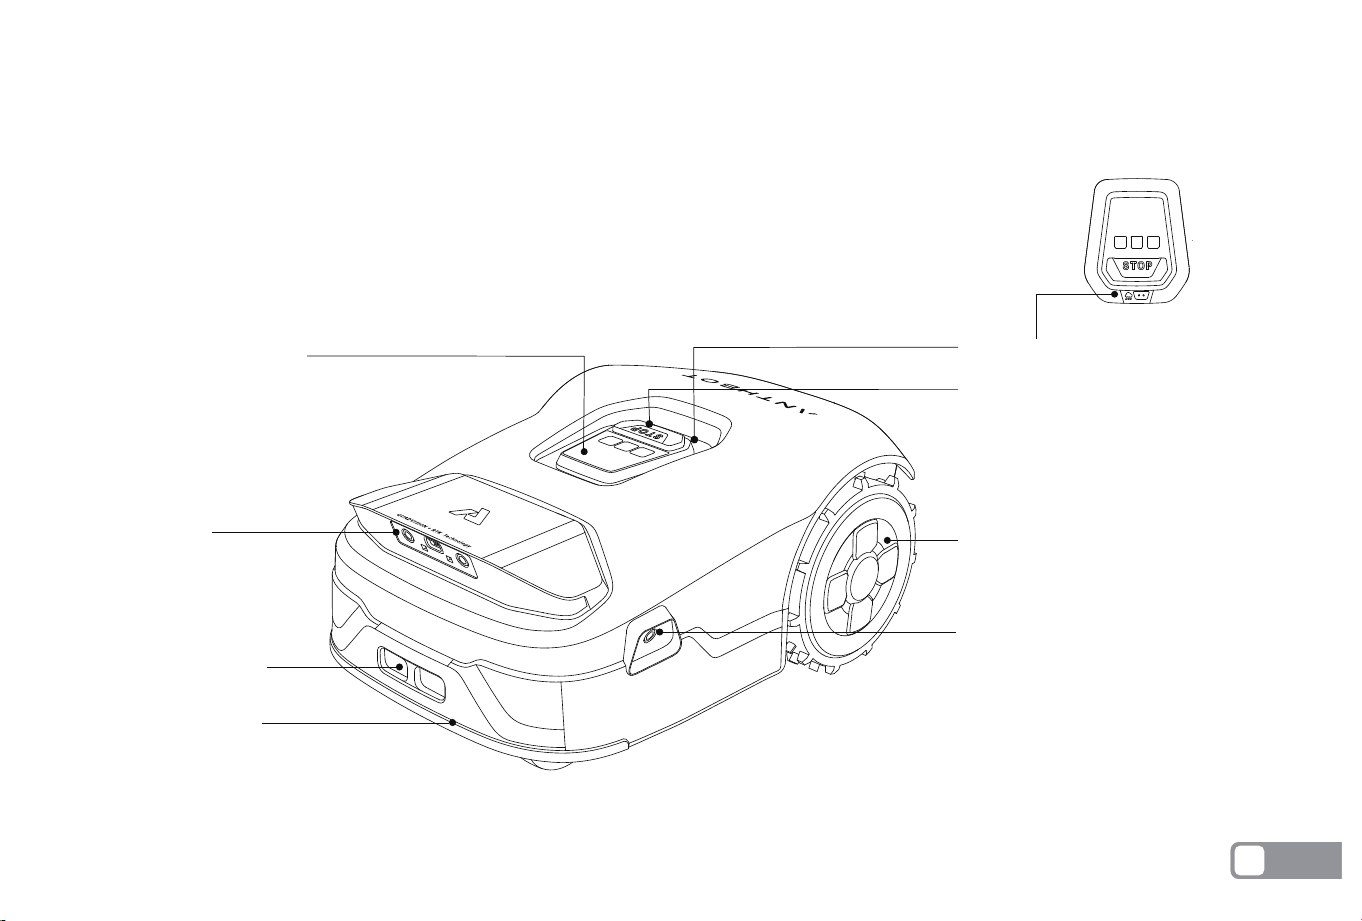
Genie Robotic Mower
TOP VIEW
Rear wheels
Stop button
Rain detection sensor
Edge camera
Charging contact
Front bumper
AI camera
Display control panel
EN
7
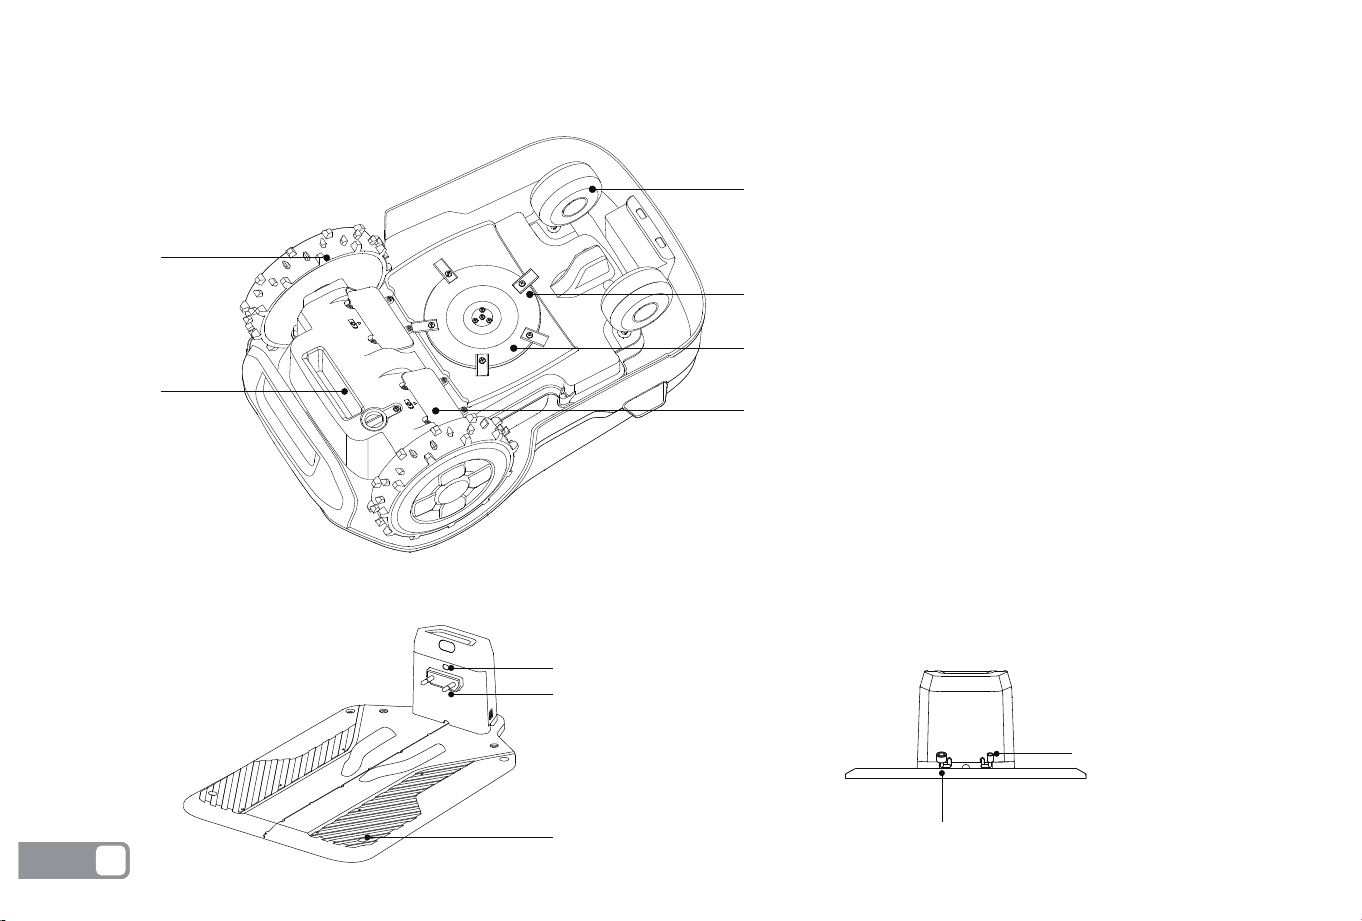
Charging Pile
Charging indicator
Charging contacts
Base plate fixing hole
RTK power interface
Charging pile power interface
Genie Robotic Mower
BOTTOM VIEW
Blade: The blades can rotate freely
after being attached to the blade disc.
When mowing, the spinning blade disc
will generate centrifugal force to keep
the blades pointing outside so that the
blades can cut grass. When hitting an
obstacle, the blade will turn inside.
Blade disc: Blade disc height adjust-
ment through ANTHBOT App.
NOTE:If the mower falls into water,
take it out immediately and put the
mower right side up to drain it. Never
submerge the mower in water,
otherwise, the components may be
damaged and the Limited Warranty
will be voided.
Omnidirectional wheel
Drive wheel
Handle
Blade disc
Blade
Battery compartment
EN
8
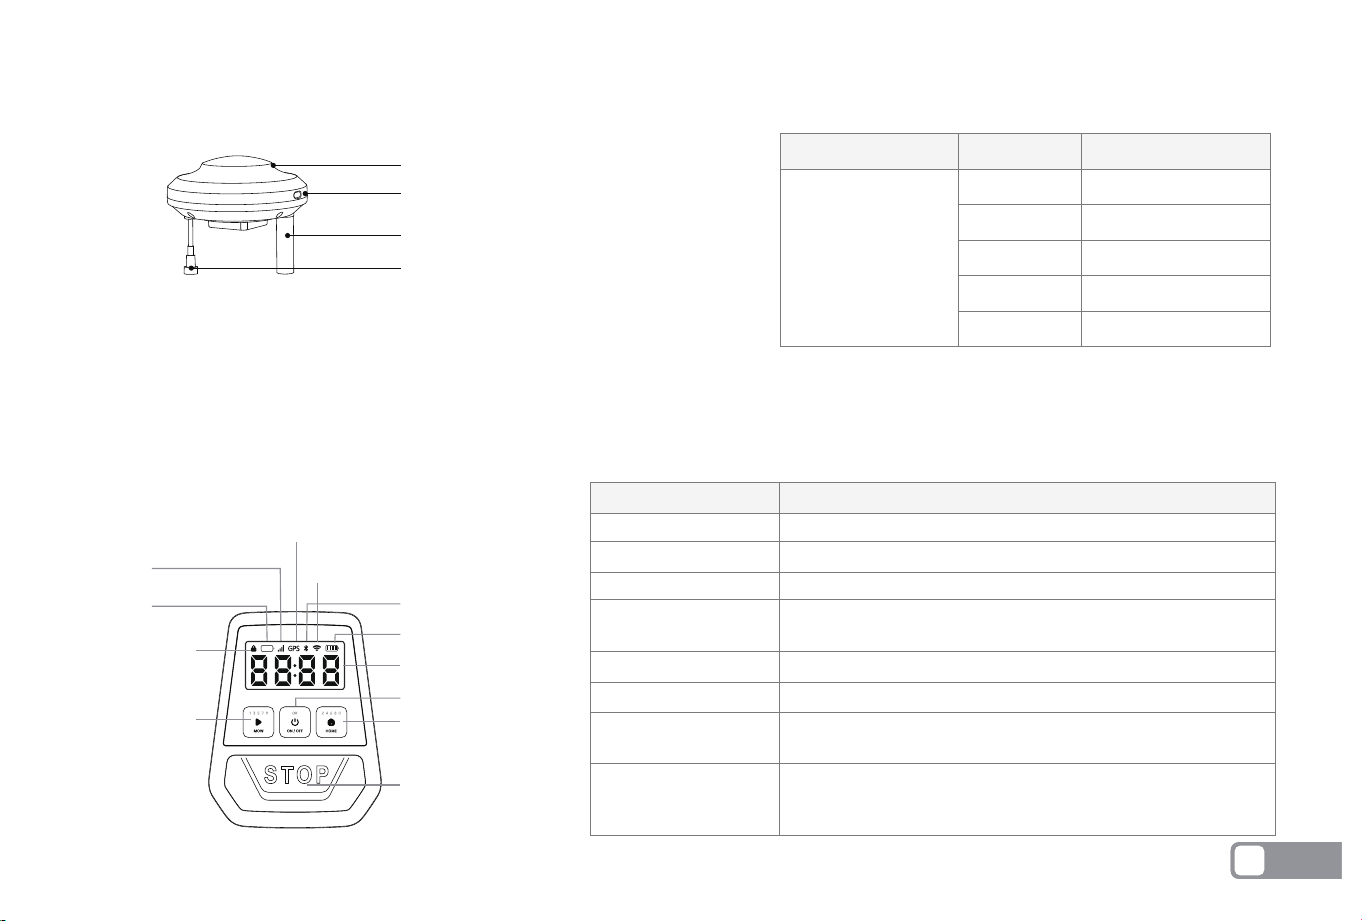
Main Body Button Description
RTK Signal Indicator
Indicator
Status
Red
Flash red
Green
Flash green
Breath green
Description
Powered on
Matching
RTK signal stabilized
RTK signal instability
Upgrading
RTK signal indicator
Indicator
Description
PIN code required for machine operation
Low device battery
4G signal normal
Green: the signal is normal
flash green: the signal is unstable
Bluetooth connected
Wi-Fi connected
Each bar represents 25% battery level, with a full charge at
100%. The last bar flashing indicates low battery, please charge
PIN code input display
Error code display (e.g., E100)
Working time display for the current task
PIN code lock
PIN code lock
Low battery indication
Low battery indication
Cellular data
GPS
GPS
Bluetooth
Wi-Fi
Battery level
Digital tube display
STOP button
Home
Digital tube display
Mow
Wi-Fi
Bluetooth
Cellular data
Battery level display
OK(ON/OFF)
RTK
RTK signal indicator
RTK module
RTK base station antenna
RTK base station power port
NOTE:Assemble the RTK, search for the RTK signal temporarily, find a place with stable signal according to the RTK signal light, and install the RTK. After the
installation is completed, the temporary power supply needs to be removed, and the RTK needs to be connected to the charging station power supply.
EN
9
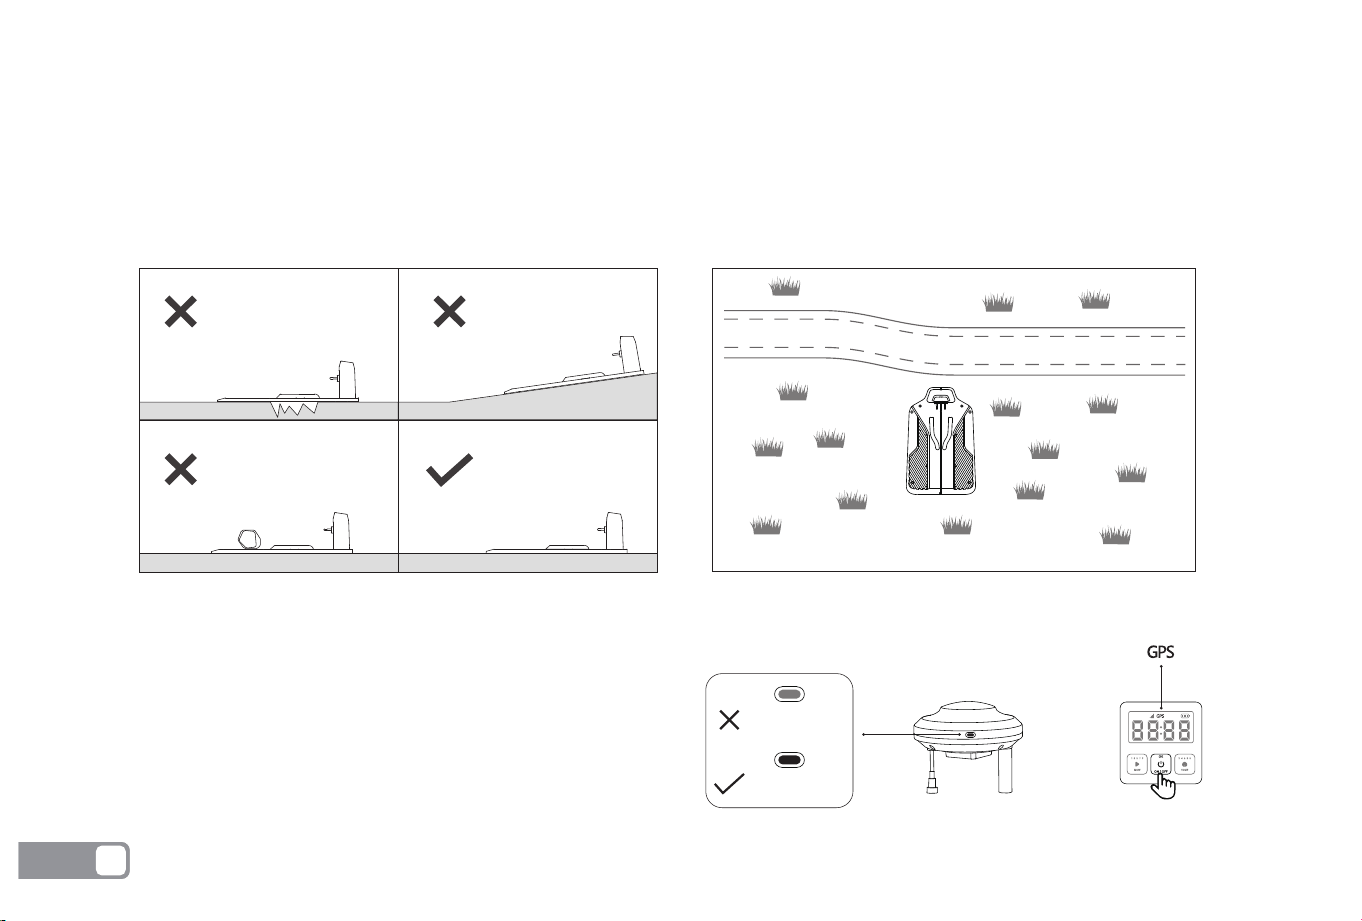
Place the charging station on a flat lawn.
Do not install the charging station in the corner of an L-shaped building or a narrow path between two buildings.
There should be no obstacles or other objects between the charging station and the docking point.
The charging station base plate should not be bent or tilted.
1.
2.
3.
4.
RTK Base Station Installation Environment Requirements
Charging Station Installation Environment Requirements
Here are some examples to clearly illustrate correct and incorrect setups:
Warning: Before installing RTK, please check whether the RTK
signal light and GPS on the host are always green. If they are
not on or flashing, please find a suitable open environment
with stable signal to install and use.
Press and hold 3s
Stable green
Flash green
EN
10
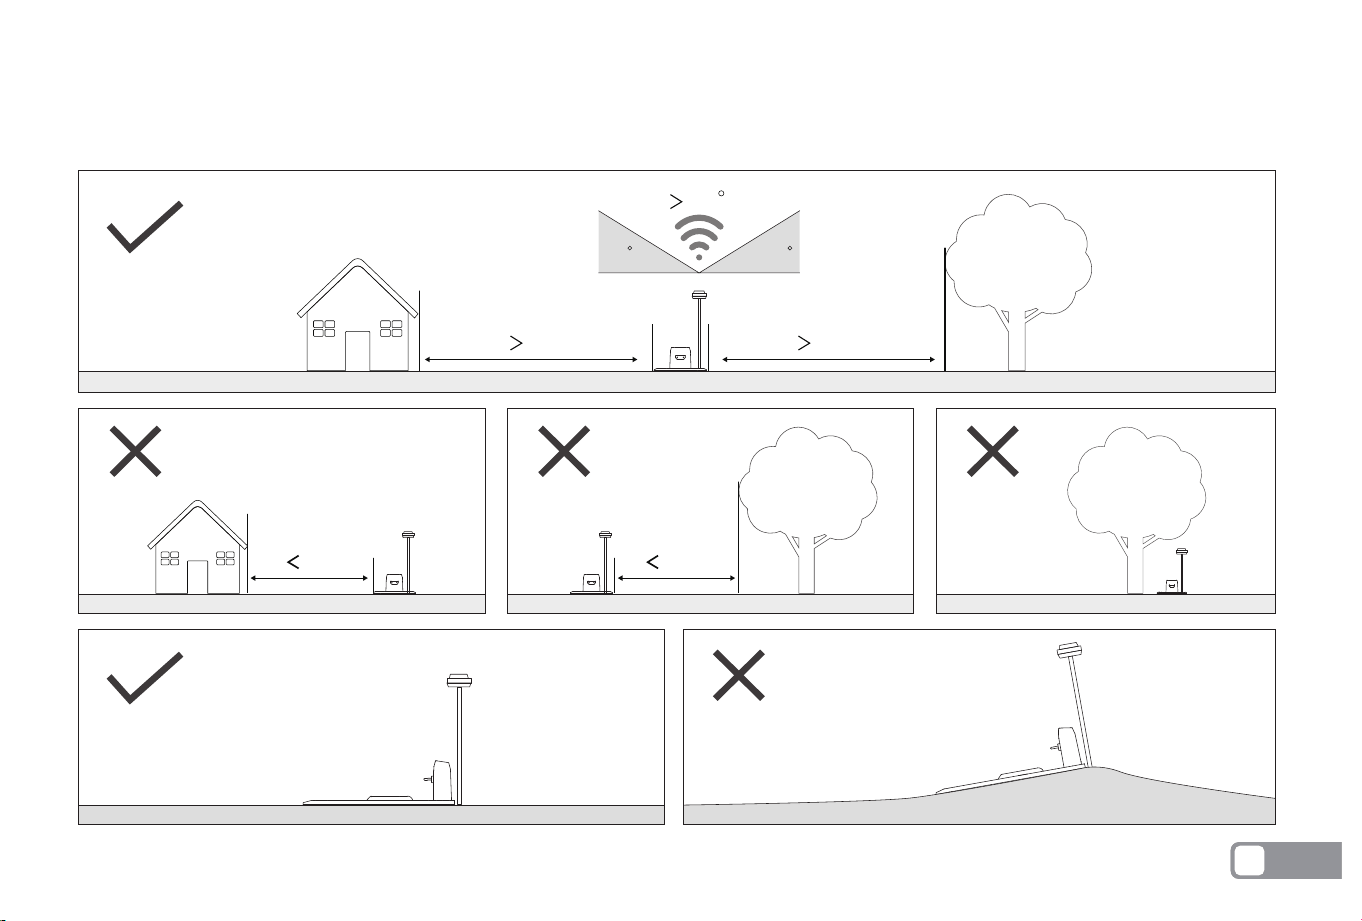
To ensure RTK signal stability, please place the RTK base station in an open area without obstruction. Avoid areas under trees, eaves, or
surrounded by multiple buildings that may cause obstructions. The following are recommended usage scenarios for installation:
3m
3m
3m 3m
120
3030
EN
11
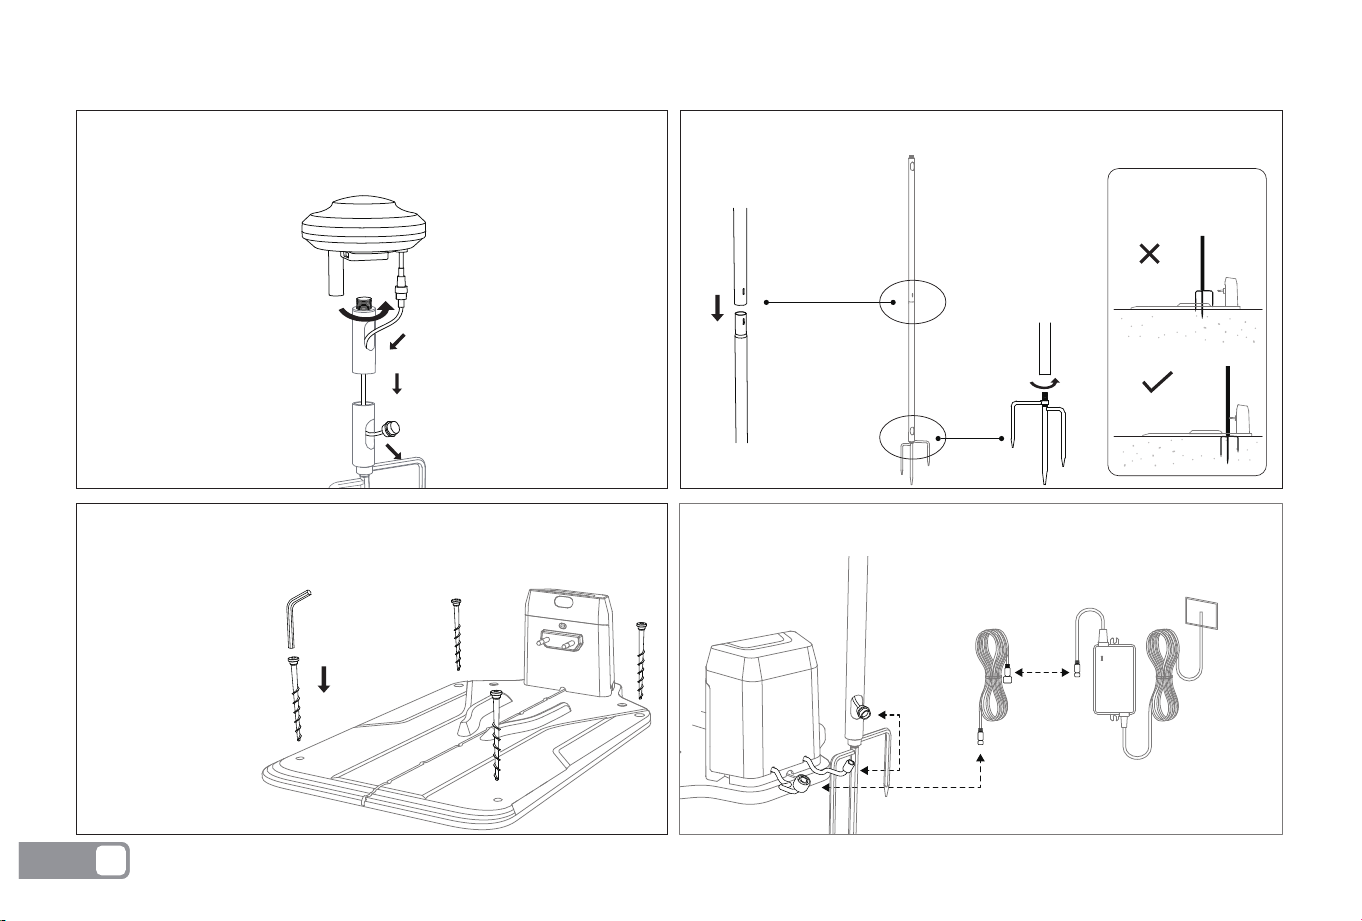
Installation of Charging Station and RTK Base Station
Connect the RTK power extension cable to the charging station power port.
Assemble two mounting poles and the tripod ground stake.
Insert the RTK tripod into the ground and keep it upright.
Warning:
Ensure that the RTK
is securely installed
Install the RTK reference station on the mounting pole.
Connect the RTK power port to the power extension cable.
Connect the RTK power extension cable to the charging station power port.
Fix the charging station on a horizontal surface with four fixing screws,
ensuring the charging station remains level.
EN
12
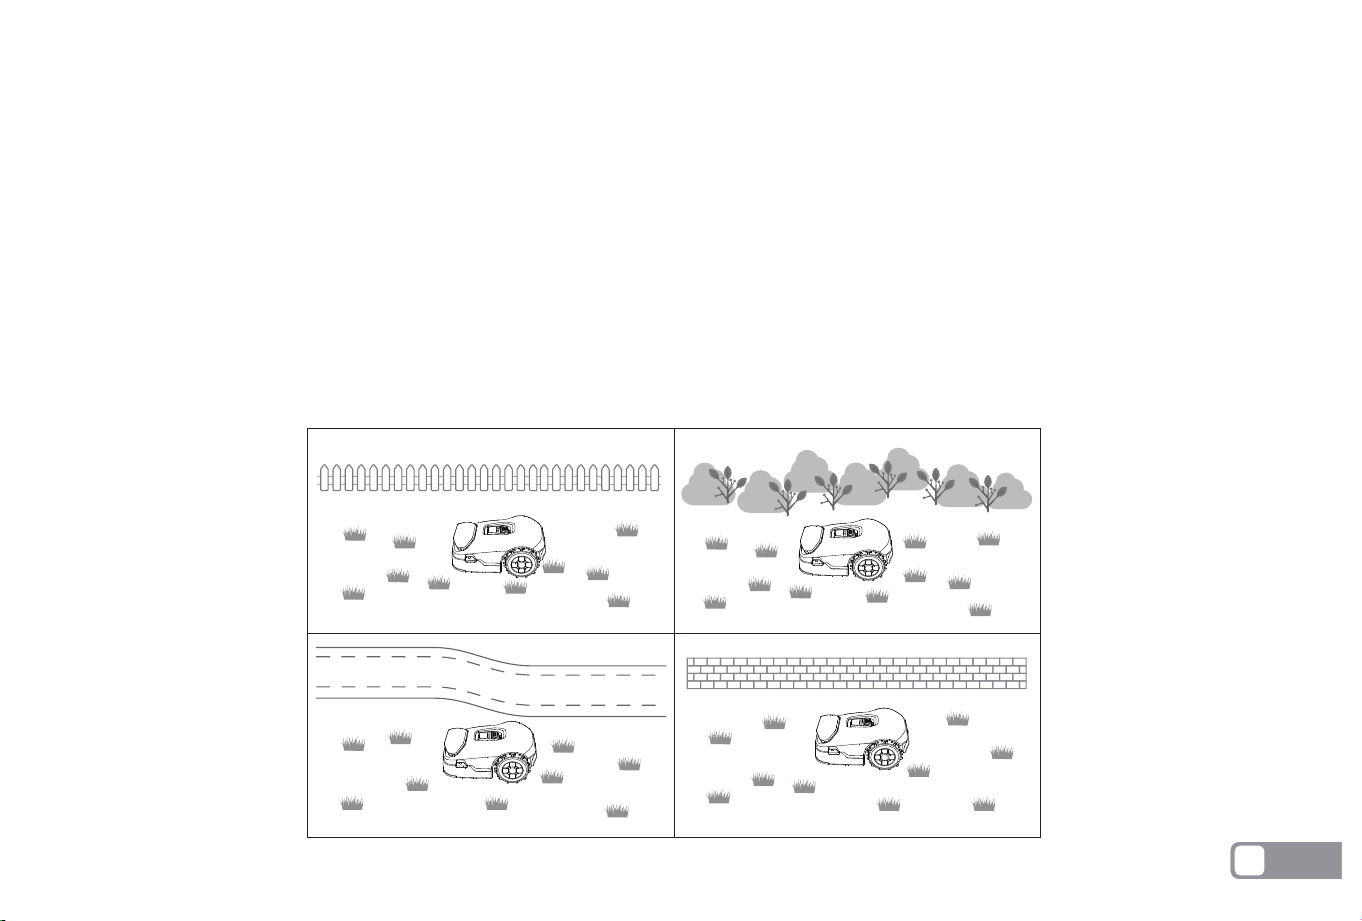
Clear boundary description:
Physical barriers:
Walls: Walls are the most common border, which can be brick walls, fences, metal fences, etc., usually through sensor detection or visual
identification to determine the boundary.
Buildings: Buildings such as houses, huts, garages can also serve as obvious boundaries on the map.
Trees and shrubs: Large trees or dense bushes can serve as borders because they are not usually crossed by lawnmowers.
1. Make sure the RTK is securely mounted.
2. Create a map for the first time. Please refer to the APP operation guide for creation.
3. After the RTK base station is moved, you need to recreate the map.
4. Move the mower to the charging station and prepare for operation.
5. Please use the APP restricted area function to mark the dangerous area to prevent the device from going astray.
6. When using automatic map creation, please make sure your lawn has clear boundaries.
Warning:
EN
13
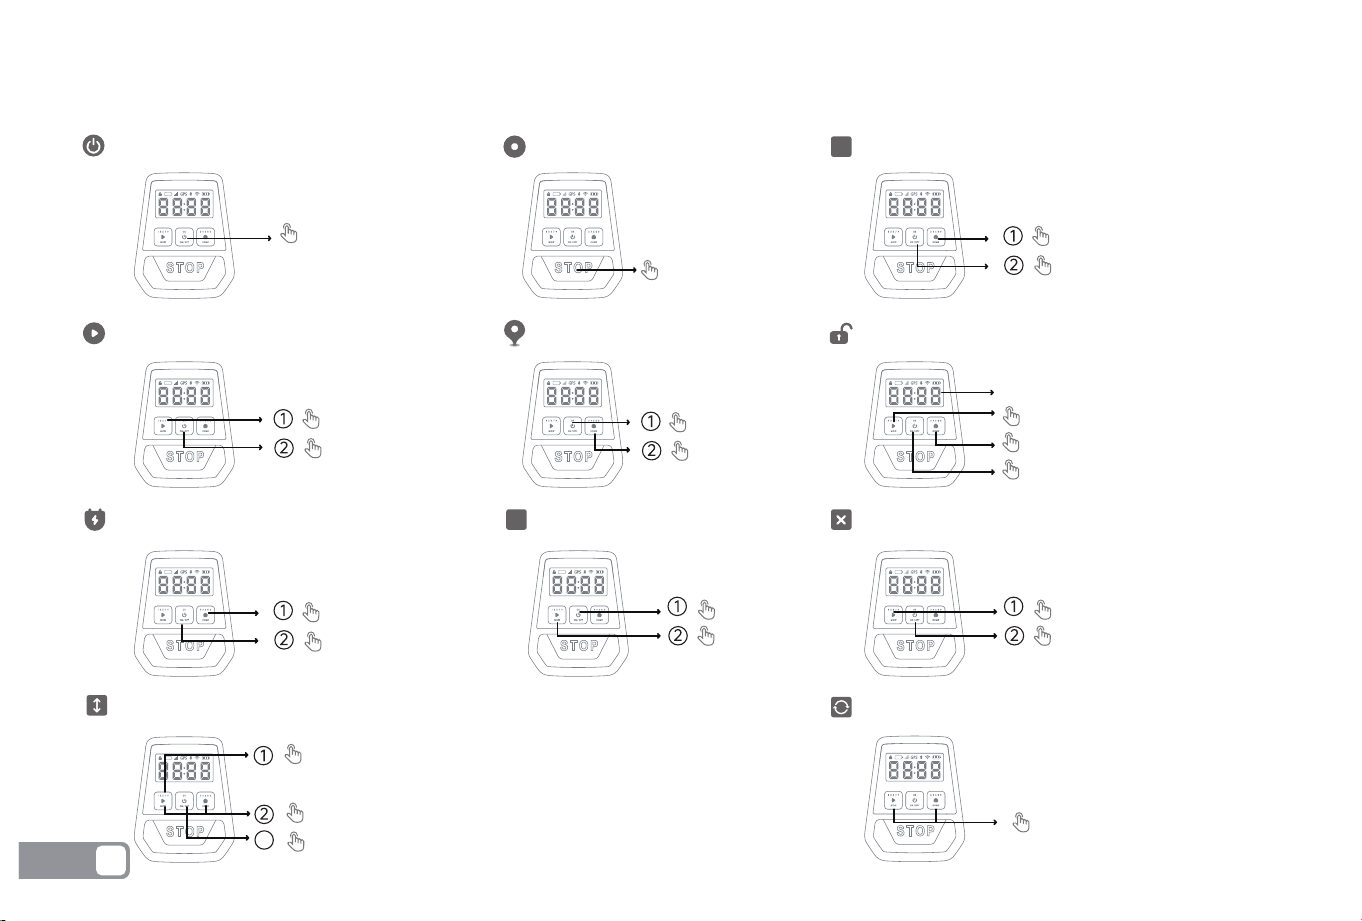
Instructional Guidance for Main Body Buttons
Power on/off
Press STOP
Press
Hold 3s
Stop mower operation
Start global mowing Start area mowing
Mower returns to the charging station
Adjust cutting height
How to unlock the mower?
Enter ACC Mapping Mode
Enter Lora Mode
Press
Hold 5s
Press
Press
Press
Hold 5s
The default code is “0000”
Press MOW to enter the singular
Press HOME to enter the dual
Press On/Off to verify input
Press and hold 3s
Press
Press
Press
Press
Note: If the mower is in lock status, you must enter the PIN code before operating the mower. The default code is 0000.
Press and hold MOW for 5s to start adjust
Press MOW to plus 5, press HOME to minus 5
Press OK to certain
The middle two digits of the digital tube show the height
3
ACC
Lora
Remove the error reporting operation
Press MOW+Home at the
same time 5S, the device
restores factory settings
Restore factory settings
EN
14

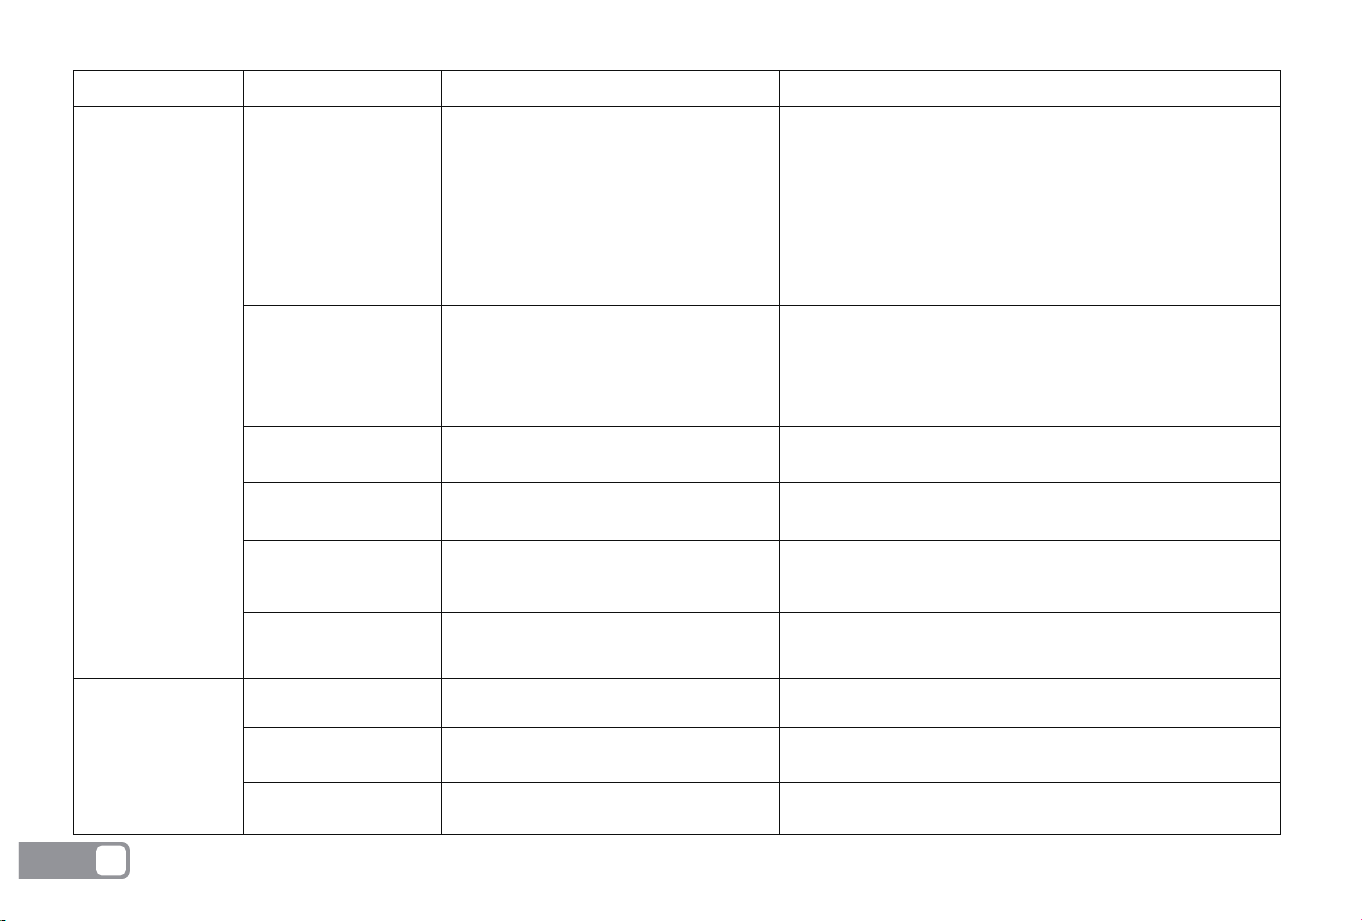
Message Cause Action
Common Fault Issues
Fault Messages
E1XX
(communication
related)
E2XX
(sensor related)
E101 RTK abnormality
E102 Lora communica-
tion abnormality
E103 RTK calibration
failed
E104 Lora pairing error
E201 Collision sensor
abnormality
E202 IMU data initializa-
tion abnormality
E203 Rain detection
sensor abnormality
E204 Device suspended
E205 Blade falls off
RTK module communication timed
out and failed to start
Lora is not paired
Upper shell omnidirectional collision
sensor is stuck
The equipment is initialized abnormally or
the machine is not placed on a level
surface when started
The rain detection sensor is dirty
or damaged
The equipment is lifted or sunk
during operation
a. The base station power supply failed to
work properly
b. There is an obstruction between the
host and the RTK base station
a. The blade is not installed firmly enough
and is loose, causing it to fall off.
b. The blade breaks when it cuts the hard
ground.
a. The current device is in an obstructed
area
b. The device calibration action failed to
complete
Try restarting. If the error persists, please contact customer
service.
Please refer to the detailed instructions (electronic file) for
pairing operations.
Please move the upper shell assembly gently to ensure that
it can move normally. If the upper shell moves normally and
the error still occurs after trying again, please contact the
customer service for processing
Please keep the machine level and restart the device. If the
error still occurs, please contact customer service
Try to wipe or clean the rain detection sensor. If the error
still occurs, please contact after-sales customer service
Please move the device to a safe area and restart
a. Please check whether the power supply is normal. Wait
about 3 minutes after re-powering on before operation
b. Please check whether the host and base station are
blocked
a. The blade is not installed firmly enough and is loose,
causing it to fall off.
b. The blade breaks when it cuts the hard ground.
a. Please check whether the device is in the obstructed area
and make sure the signal indicator is green.
b. Try to restart. If the error persists, please contact customer
service
EN
15
Message Cause Action
E4XX
(motor related)
E301 Recharge failed
E302 Machine trapped
E303 Ramp start
E304 Reposition failed
E305 Positioning signal
abnormality
E306 Device out of
bounds
E400 Left wheel motor
abnormality
E410 Right wheel motor
abnormality
E420 Lifting motor
abnormality
RTK signal is poor and the device does not
work within the map range
Left wheel motor stuck or open circuit
Right wheel motor stuck or open circuit
Lifting motor stuck or open circuit
a. The device is not within the working
area of the map boundary
b. The map is offset
a. The device is not within the signal coverage
area and is beyond the signal range
b. The device is working in a blocked area
a. The equipment is started on a slope
b. The charging pile is installed at an angle
a. The equipment is stuck in a pit and
cannot be rescued
b. The equipment is in a high grass area
c. The equipment is working in a small
corner or complex area, resulting in the
equipment being unable to be rescued
a. There are obstacles around the charging
station or tall grass near the charging pile
b. The charging electrode is in poor contact
c. The power is not enough to support the
charging pile
d. The charging pile is not powered on
e. There is dirt on the lens
Please put the device on the mobile charging station and
restart
Please check if the left wheel motor is stuck. If not, please restart the
device. If the error is not eliminated, please contact customer service.
Please check if the right wheel motor is stuck. If not, please restart the
device. If the error is not eliminated, please contact customer service.
Please check if the lifting motor is stuck. If not, please restart the
device. If the error is not eliminated, please contact customer service.
a. Please move the device within the map boundary and restart
b. Please recreate the map and try to restart
a. Make sure the device is working within the map boundary
b. Check whether the RTK base station and device are blocked, and
do not work on rainy days
a. Please move the device to a level surface and restart the device
b. Please install the charging station on a level surface
a. Please move the device to a safe working environment before
starting
b. Please trim the tall grass to less than 7cm before cutting
c. Confine dangerous and easily trapped scenes to restricted areas
a. Please clear the obstacles and tall grass around the charging
station and try to recharge again
b. Please check whether the charging pole is dirty. If it is dirty,
please clean it and try to recharge again
c. Please install the charging pile in the middle boundary of the
lawn area as much as possible
d. Please check whether the power supply of the charging pile is
connected to ensure that the power supply is normal
e. Please wipe the lens clean to avoid affecting the recognition of
the charging pile
E3XX
(path-dependent)
EN
16

Message Cause Action
E4XX
(motor related)
E5XX
(battery
related)
E6XX
(camera
related)
E7XX
(other abnor-
malities)
E430 Cutter motor abnormality
E501 Charging abnormality
E502 Battery temperature
too high
E503 Battery temperature
too low
E601 Front left camera
abnormality
E602 Front right camera
abnormality
E603 Left camera abnormality
E604 Right camera abnormality
E605 Front left camera
abnormality
E606 Front right camera
abnormality
E607 Left camera abnormality
E608 Right camera abnormality
E700 Triggering Safety Protection
Cutter motor stuck or open circuit
Abnormal charging protection
Ambient temperature too high
Ambient temperature too low
The camera is dirty or blocked
(rain, mud, etc.)
Camera module initialization is
abnormal
a. The emergency button (STOP)
is triggered during operation
b. It is lifted during operation
Please check if the lifting motor is stuck. If not, please restart the
device. If the error is not eliminated, please contact customer service.
Please recharge the device. If the error persists, please
contact customer service.
Please ensure that the device is working in a normal working
environment. The recommended working temperature of the
device is 5 to 40 degrees Celsius.
Please ensure that the device is working in a normal working
environment. The recommended working temperature of the
device is 5 to 40 degrees Celsius.
Please check whether the lens is dirty or blocked. If
it is blocked, please clean it before starting.
Please restart the device. If the error persists, please
contact customer service
Please press the MOW button first and then the OK button
to release the security protection before performing the
operation
EN
17
Mower Operation Instructions
Preparation
1. Read and understand the safety instructions before operation.
2. The charging station and RTK reference station are correctly installed.
3. Ensure the device is docked at the charging station.
4. Ensure a good Wi-Fi or hotspot signal.
5. Keep your phone's Bluetooth turned on.
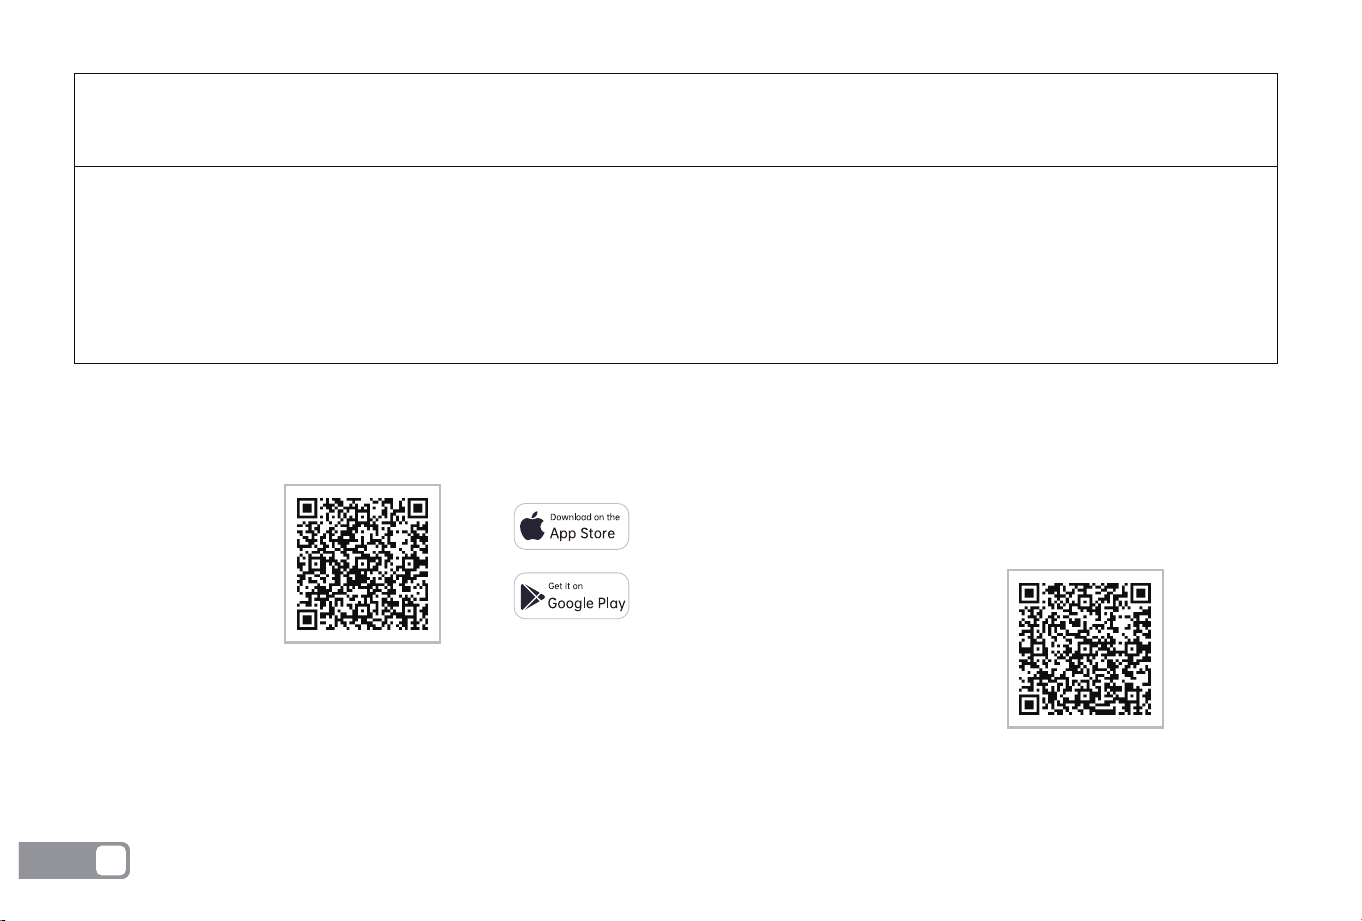
Download the ANTHBOT App
User manual
Download the app
ANTHBOT APP can be downloaded from Apple APP Store or Google Play. Or scan the QR code to download and install ANTHBOT APP.
Follow the APP prompts to add the device.
Precautions:Please make sure that the WIFI network is 2.4G before adding a device.
Product name :ANTHBOT
Type/model:
Genie 600/Genie 1000/Genie 3000/Genie 5000
Measured Sound Power Level LwA :<70dB(A)
Sound Pressure Level LpA:55dB(A)
Sound Pressure Uncertainties KpA:3.0dB(A)
Genie 600 :
Genie 1000:
Genie 3000/5000:
WARNING: Only use the supply unit provided with this appliance.
DZ048BWL240200U / DZ048BWL240200V / DZ048BWL240200B / DZ048BWL240200S
GM51-240200-1DE / GM51-240200-2DE / GM51-240200-3DE / GM51-240200-4DE
DZ100CWL280300U / DZ100CWL280300V / DZ100CWL280300B / DZ100CWL280300S
GM95-280300-1DG / GM95-280300-2DG / GM95-280300-3DG / GM95-280300-4DG
DZ180AWL2800600U / DZ180AWL2800600V / DZ180AWL2800600B / DZ180AWL2800600S
GM259-2800600-1DG / GM259-2800600-2DG / GQ150C-2800600-E3
Please scan the QR code to download
the electronic manual, which provides
you with multi-language instructions and
more detailed product introduction.
Sound Data:
EN
18

Manufacturer : ANTHBOT (SG) PTE. LTD.
Address : 14 ROBINSON ROAD #02 - 01 FAR EAST FINANCE BUILDING, 048545 SINGAPORE
Customer Service:[email protected]
Official website: https: //www.anthbot.com