
Welcome to use the MGC series mower. Please read this manual first to ensure safe
and efficient operation. Note: This product should be operated, and supervised by
adults when it is operated by a child.
Mower instruction book
MGC Series
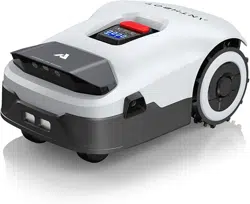
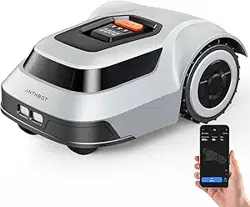
Pion Robotic Lawn Mower
EN

1
Safety notes
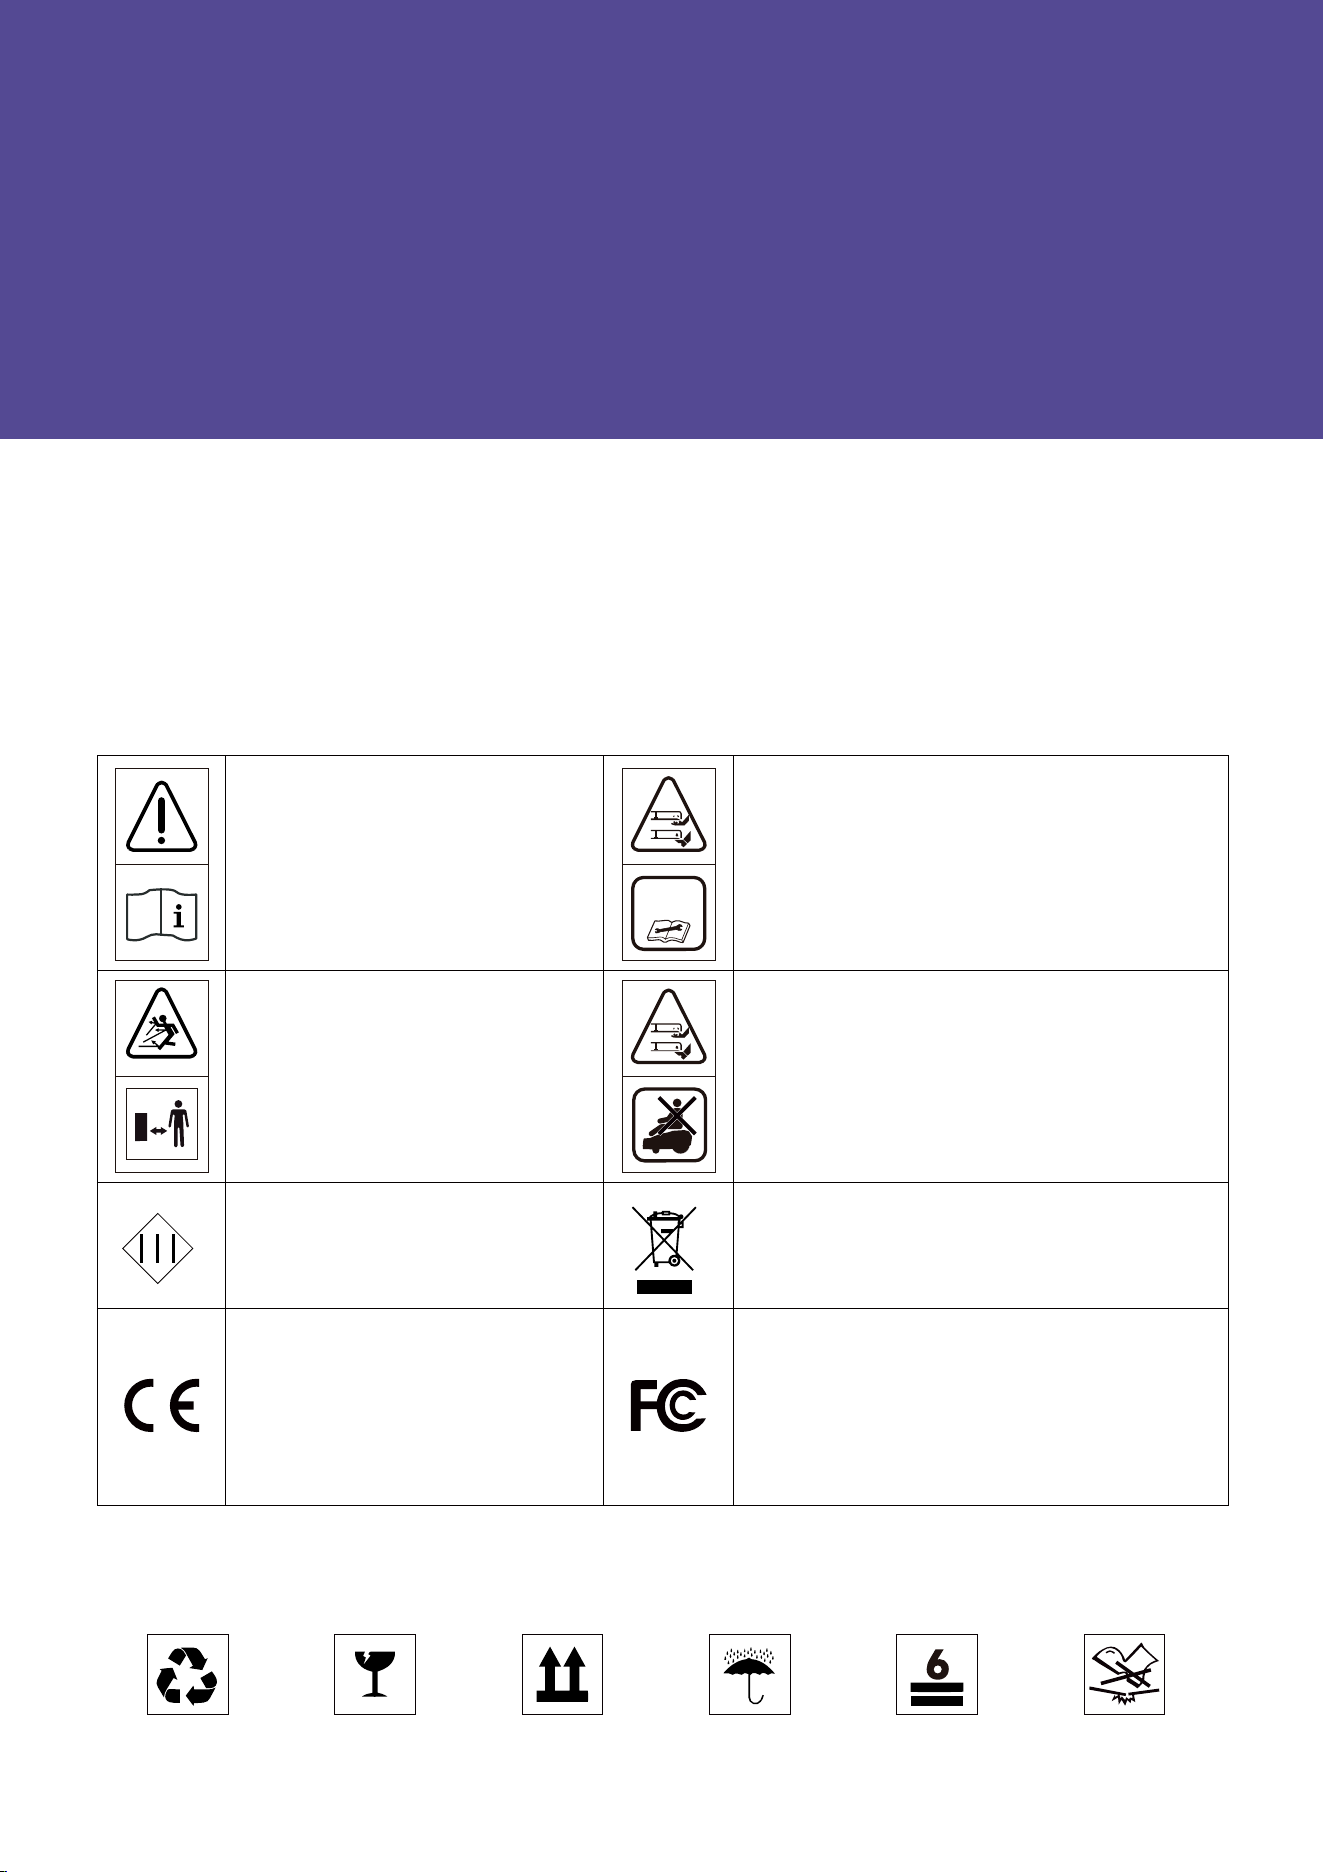
Explanation of symbols on the machine
Explanation of symbols on the package
Safty warnings
Operation
Safe usage
Turn off the mower by pressing and holding the On/Off button
Maintenance
Storage
About battery
Intended use
Regulatory information
Declaration of conformity
1.10 About power supply unit
Technical parameters
Product introduction
Installation
General preparation
Preparing tools
The boundary wire installation requirements
To set the docking station
Installation steps
To extend the boundary wire
Mower operation instructions
Display
Buttons operation instructions
Docking station light cue
Mowing
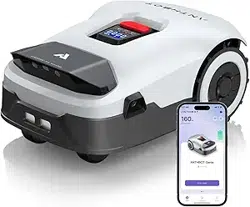
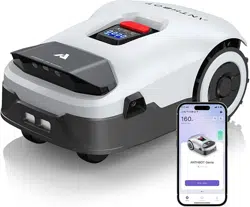
The ANTHBOT APP
Common trouble shooting
FQA
Maintenance and care
Recycling and end-of-life disposal
Warranty terms
About the manual
Note
1
2
3
4
5
6
7
8
9
10
11
12
1.1
1.2
1.3
1.4
1.5
1.6
1.7
1.8
1.9
4.1
4.2
4.3
4.4
4.5
4.6
5.1
5.2
5.3
5.4
5.5
2
2
2
3
3
4
4
4
5
5
5
6
6
6
6
8
10
10
10
10
12
13
13
14
14
15
16
16
16
17
20
21
23
23
24
24
Table of contents
2
Important! Read all safety warnings and all instructions. Make yourself familiar with the controls and the
proper use of the mower. Please keep the instructions safe for later use!
Thank you for choosing the ANTHBOT robotic mower. Please read the instruction below before
installing the robot.
Recyclable Fragile This side up
Welcome
Safty notes
Explanation of symbols on the package
Explanation of symbols on the machine
WARNING
-Read instruction manual before
operating the machine.
WARNING
-Keep a safe distance from
the machine when operating.
WARNING
-Operate the disabling device
before working on or lifting the ma-
chine.
WARNING
-Do not ride on the machine.
Keep dry Stacking layers limit:6 Do not step
说明书中解释:
WARNING – Operate(or Ac�vate) the disabling
device before working on or li�ing the machine
说明书中解释:
WARNING – Remove the disabling device before
working on or li�ing the machine
(针对Removable disabling device) (针对Coded protected disabling device)
Class III machines.
Electrical appliances must not be disposed of
with the domestic waste.
The product complies with the appli-
cable European directives and an
evaluation method of conformity for
these directives was followed.
This device complies with Part 15 of the FCC
Rules. Operation is subject to the following two
conditions: (1) this device may not cause harmful
interference, and (2) this device must accept any
interference received,including interference that
may cause undesired operation.

3
Be sure to install and operate the mower and the docking station according to the instructions.
Using the mower for purposes other than mowing can bring serious injury. To avoid risks of injuries, please read and
understand all the warnings and cautions. Please understand that you can reduce the risk by following the instructions
and warnings in this manual, but you cannot eliminate all risk. The operator or user is responsible for accidents or haz-
ards occurring to other people on their property.
ANTHBOT has many safety sensors to protect our customers, however, safety risks still exist. Set a mowing time when
there are no people or pets on the lawn. Inform the neighbors about the risks for accidents or hazards. When using the
mower on a public lawn, or when your lawn is open to your neighbor or street, protect or fence the lawn, or put up a
warning sign around the working area that says: WARNING! Automatic lawn mower! Keep away from the mower! Super-
vise children!
DO NOT modify the mower by yourself. Modifications could interfere with mower operations, result in serious injury
and/or damage, or void the Limited Warranty.
Before working on the mower itself (e. g. maintenance, tool change, etc.) as well as during transport and storage, power
off the mower by pressing and holding the ON/OFF button 15s.
The manufacturer recommends the user to be 18–70 years old. Be sure to get the necessary training before operating
the mower.
Never allow children, persons with reduced physical, sensory or mental capabilities or lack of experience and knowledge
or people unfamiliar with these instructions to use the mower, local regulations may restrict the age of the operator.
1.
2.
3.
4.
5.
6.
7.
1.
2.
3.
4.
5.
6.
7.
8.
9.
10.
1.1 Operation
Before using
1. Safty warnings
Before mowing
Regularly check that all parts of the mower can function normally.
Operate the mower only when the battery compartment is shut with the cover and all the screws in place. This protects
the battery against moisture.
DO NOT mow on areas with slopes steeper than the maximum incline inside the working area (45%), as well as the
boundary (36%).
Keep any supply and/or extension cords away from moving hazardous parts and the working area to avoid damage to
the cords which can lead to contact with live parts.
DO NOT to connect a damaged cord to the supply or touch a damaged cord before it is disconnected from the supply for
the reason that damaged cords can lead to contact with live parts.
For the best mowing results, it is recommended to mow in dry weather. Mowing in the rain can make the grass stick on
the product and the mower may slip. DO NOT mow in bad weather, such as heavy rain, thunderstorms or snow.
Periodically inspect the area where the mower is to be used and remove all stones, sticks, wires, bones and other foreign
objects. The Limited Warranty does not cover damages caused by objects left on the lawn.
To avoid possible damage, keep the operating mower at least 1 m (3 ft. ) away from sprinkler heads. The mower and
sprinklers should NOT work simultaneously. Time the mower so that it works at a different time from sprinklers.
NEVER allow children to touch the power adapter, docking station, blades, the battery compartment, or any parts with
gaps such as the wheels.
To connect the peripherals only to a supply circuit protected by a residual current device (RCD) with a tripping current of
not more than 2A.

4
1.
2.
3.
4.
5.
6.
7.
8.
9.
1.
2.
3.
4.
5.
6.
–
–
–
–
–
–
Before clearing a blockage.
Before checking, cleaning.
Before storage.
If the mower vibrates abnormally (stop and check immediately).
After striking a foreign object, inspect the machine for damage and get advice on necessary repairs from your
after-sales service.
If the machine starts to vibrate abnormally, and to check for damage before restarting.
2.
3.
4.
5.
6.
7.
8.
9.
1.
Mowing
1.2 Safe usage
1.3 Turn off the mower by pressing and holding the ON/OFF button
1.4 Maintenance
DO NOT operate the mower outside the temperature limits: 0℃–50℃ (32℉–122℉), because low/high temperatures can
decrease mower performance and even lead to accidents.
DO NOT place anything on the mower or the docking station.
It is recommended to conduct regular maintenance of the mower by an adult.
Regularly check the warning devices to ensure they are effective. These devices include the buzzer, the LED light on
the docking station, and the screen on the mower.
It is recommended to inspect the mower, docking station, power adapter and low-voltage cable every six months for
signs of damage or aging. If the mower and docking station are faulty, or the power adapter and low voltage-cable are
damaged, please do not use the mower and contact the after-sales personnel for after-sales maintenance.
Before charging, please read 4.4 To set the docking station and 4.5 Installation steps. Improper use may cause electric
shock, overheating, or leakage of corrosive liquid.
While operating and as well while approaching the mower, take sufficient precaution to keep balance at all times par-
ticularly on slopes and wet grass. DO NOT stretch yourself too much forwards.DO NOT operate the mower in a rush.
DO NOT operate the mower when barefoot or wearing open sandals, always wear substantial footwear and long trou-
sers.
Avoid mowing in bad weather conditions especially when there is a risk of lightning.
If the mower vibrates abnormally or makes an abnormal sound or signals an alarm, press the STOP button immediately.
DO NOT leave the mower to operate unattended if you know that there are pets, children or people in the vicinity.
DO NOT allow children to be in the vicinity or play with the mower when it is operating.
DO NOT lift the mower in operation. DO NOT ride on the mower.
DO NOT touch moving hazardous parts before they have come to a complete stop.
DO NOT put other cables near by the docking station and your boundary wire.
Please wear gardening gloves when handling or working near the sharp blades.
Before working on the docking station or power adapter, remove plug from mains.
Clean the exterior of the mower. Remove all grass and debris, especially from the blade disc shield.
Turn the mower upside down and clean the blade area and the swivel castors regularly. Use a stiff brush or water to
remove compacted grass clippings.
Make sure all nuts, bolts and screws are tight to ensure safe working with the garden tool.
Periodically visually inspect the mower and replace worn or damaged parts for safety.
Ensure that only official replacement parts are used.
Replace all blades and bolts as a set as required.
If it was need to replace the battery, open the battery holder with symbol pointing.

5
1.
2.
3.
4.
5.
1.
2.
3.
4.
5.
6.
7.
8.
9.
10.
11.
1.
2.
3.
4.
1.6 About battery
1.5 Storage
1.7 Intended use
Before storage, power off the mower by press and holding the ON/OFF button 15s till mower buzzed and charge its bat-
tery to 80% or higher to avoid over-discharge, which will cause permanent damage.
Store in a cool and dry place indoors.
Keep the mower, docking station and power adapter away from heat sources (such as stoves, radiators, etc.) or chemi-
cals.
Protect the power adapter from moisture and keep it in a well-ventilated place.
Store the mower only within a temperature range between –20℃ and 60℃. As an example, do not leave the mower in
the car in summer.
DO NOT open the battery compartment. There is a sign pointing out the position of battery, but it is not recommend
open it. There is a risk of short-circuiting.
Protect the battery against heat(e.g. against continuous intense sunlight), fire, water, and moisture. There is a risk of
explosion.
Keep any unfitted battery away from paper clips, coins, keys, nails, screws or other small metal objects, that can make
a connection from one terminal to another. Shorting the battery terminals together may cause burns or a fire.
In case of damage and improper use of the battery pack, vapours may be emitted. Ventilate the area and seek medical
help in case of complaints. The vapours can irritate the respiratory system.
The battery can be damaged by pointed objects such as nails or screwdrivers or by force applied externally. An internal
short circuit can occur and the battery can burn, smoke, explode or overheat.
If used incorrectly or if the battery is damaged, flammable liquid may be ejected from the battery. Contact with this
liquid should be avoided. If contact accidentally occurs, rinse off with water. If the liquid comes into contact with your
eyes, seek additional medical attention. Liquid ejected from the battery may cause irritation or burns.
DO NOT short-circuit the battery. There is a risk of explosion.
Use only original battery packs intended specifically for the mower. Use of any other battery packs may create a risk of
injury and fire.
Ensure the robot has power off before inserting battery. Inserting the battery pack into mowers with power on can
cause accidents.
The ANTHBOT will operate between 0℃ and 50℃. If the battery temperature is outside this range, the APP will display
a message and the robot will not leave the docking station. If operating, the robot will return to the docking station or
stay in place.
Recharge only in the original docking station. This appliance contains batteries that are only replaceable by skilled per-
sons.
The mower is intended for domestic lawn mowing.
DO NOT operate the mower indoors.
DO NOT use the mower for any other purpose because of the increased risk of accidents and damage to the mower.
Never attempt to modify the mower in any way since this may result in accidents or damage to the mower.
6
6
2. Technical parameters
This product and - if applicable - the supplied accessories too are marked with "CE" and comply therefore with
the applicable harmonized European standards listed under the Machinery Directive 2006/42/EC, the Radio
Equipment Directive 2014/53/EU , and the RoHS Directive 2011/65/EU.
Products marked with this symbol cannot be disposed of as unsorted municipal waste in the European Union.
For proper recycling, return this product to your local supplier upon the purchase of equivalent new equipment,
or dispose of it at designated collection points.
This symbol means: This product contains a battery that cannot be disposed of as unsorted municipal waste in
the European Union. See the product documentation for specific battery information. The battery is marked
with this symbol, which may include lettering to indicate cadmium (Cd), lead (Pb), or mercury (Hg). For proper
recycling, return the battery to your supplier or to a designated collection point.
Hereby, SHENZHEN LDROBOT CO.,LTD declares that the radio equipment type [ MGC500,MGC750,MGC1000 ] is in com-
pliance with Directive 2014/53/EU.
Hereby, SHENZHEN LDROBOT CO.,LTD declares that the Machinery equipment type [ MGC500,MGC750,MGC1000 ] is in
compliance with Directive 2006/42/EC.
The full text of the DECLARATION OF CONFORMITY is available at the following web link:
https://www.anthbot.com/pages/doc-list
1.9 Declaration of Conformity
1.10
About power supply unit
1.8 Regulatory information
Power supply unit model Applicable specifications
DZ048BWL240200V
WARNING: Only use the supply unit provided with this appliance.
Europe standard
DZ048BWL240200U
US standard
DZ048BWL240200B
British standard
DZ048BWL240200S
Australian standard
MGC500
Basic
Information
Mower
Parameters
606 x 420 x 258mm
(23.86 x 16.54 x 10.16 in.)
606 x 420 x 258mm
(23.86 x 16.54 x 10.16 in.)
606 x 420 x 258mm
(23.86 x 16.54 x 10.16 in.)
Dimensions:
Length x Width x Height
Net Weight:
(Battery Included)
10.7 kg 10.7 kg
10.7 kg
500 ㎡ (0.12 acre)
70 min 70 min
70 min
110 min 80 min
80 min
750 ㎡ (0.19 acre)
1000 ㎡ (0.25 acre)
Working Capacity
Charging Time
Area Capacity per Hour
90 ㎡ (0.02 acre)
20 cm/7.87 in.
30-70 mm/1.18-2.76 in.
30 mm/1.18 in.
Cutting Width
Cutting Height
Obstacle Height
Typical Mowing Time
Per Full Charge
MGC750 MGC1000

7
MGC500
Working
Conditions
Connectivity
Motor
Battery pack
Sound Data
Measured Sound Power Level L
wA
:<70dB(A)
Sound Pressure Level
L
pA
:55dB(A)
Sound Pressure Uncertainties K
pA
:3.0dB(A)
0℃—50℃
-20℃—60℃
45%/24°
15%
90°
Mower body IPX6; docking station IPX5; power adapter IP65
Working Temperature
Storage Temperature
IP Rating
Maximum Slope for Work Area
Maximum Slope for Boundary Wire
Minimum Angle for Cutting Area
Bluetooth
2402.0-2480.0MHz
Wi-Fi 2.4G
Wi-Fi
Motor Type
Battery Type
Nominal Voltage
Capacity
Brushless motor
0.35 m/s(0.78mph)
2500/min
Lithium-ion battery
18 V
2.5 Ah 2.5 Ah 2.5 Ah
Driving Motor Rated speed
Blade Motor Top Speed
MGC750 MGC1000
Power Adapter
The Docking
Station
Boundary Wire
Input Voltage
Output Voltage
Output Current
100~240 V AC 100~240 V AC100~240 V AC
24 V
1.5 A
2 A 2 A
1.5 A
2 A 2 A
24 V 24 V
24 V 24 V 24 V
1.5 A
2 A 2 A
24 V 24 V 24 V
Input Current
Output Voltage
Output Current
Input Voltage
Wire Supplied
120 m(393.7 ft.)
20 m(65.6 ft.)
160
180 m(590.6 ft.) 180 m(590.6 ft.) 180 m(590.6 ft.)
200 240
20 m(65.6 ft.) 20 m(65.6 ft.)
150 m(492.1 ft.) 180 m(590.6 ft.)
Minimum Required Length
Pegs Supplied
Maximum Permissible Length

Wire connector
Boundary wire
Ruler
10cm
0cm
30cm
75cm
Nail
What’s in the box
Docking station and installation kit
Main body
Screw
Hex key
Docking station
Extra Blades + Screws
Power adapter Low-voltage cable
Pegs
Instruction manual
Instruction manual
3. Product Introduction
9
Top view
Bottom view
Rear wheels
Stop button
Rain detection sensor
Charging port
Front bumper
Display and keypad
Omni-directional wheel
Drive wheel
Handle
Blade disc
Blade
Battery compartment
Blade: The blades can rotate freely after being attached to the blade disc. When mowing, the spinning blade disc will
generate centrifugal force to keep the blades pointing outside so that the blades can cut grass. When hitting an obstacle,
the blade will turn inside.
Blade disc: Blade disc height adjustment through the APP.
NOTE:Drainage outlet: If the mower falls into water, take it out immediately and put the mower right side up to drain it.
Never submerge the mower in water, otherwise, the components may be damaged and the Limited Warranty will be
voided.
Pion Robotic Lawn Mower

10
1.
2.
3.
1.
2.
3.
4.
5.
6.
7.
8.
9.
It is recommended that you mow your lawn once with a conventional lawnmower before installing and before the first
mowing of the new season and whenever the grass would be higher than 10 cm/4 in.
The mower's cutting system is designed to cut small lengths of grass (30–70 mm/1.18-2.76 in.). The clippings can remain as
mulch to fertilize the lawn, so it's no need to collect. The height of cut for mower can be adjusted to 30-70 mm/1.18-2.76 in.
via the APP.
It is recommended to start with a higher setting and then gradually decrease the height of cut as the wire disappears
under the grass. This prevents your robot from cutting the wire.
Hammer/plastic mallet: To simplify putting the pegs into the ground.
Edge cutter/straight spade: To bury the boundary wire.
Wire stripping pliers: For stripping the 10–15 mm/0.39-0.59 in. of insulation off the boundary wire to connect the docking
station.
Combination plier: For pressing the couplers together.
The recommended distance between the pegs is 75 cm/2.5 ft. Check if the boundary wire is fully pegged to the ground
avoiding any slack lengths of wire, it can ensure the accuracy of broken points detection.
Remove stones, loose pieces of wood, sticks, wire, live mains cables and other foreign objects from the cutting area.
Make sure that the cutting area is even and has no ditches, grooves and steep slopes above 24 45% that are clear
obstructions for the mower.
For slopes steeper than 15% along the outer edge of the lawn, put the boundary wire 20 cm/8 in. from the edge.
It can be add Additional boundary wire by using a wire connector.
The boundary wire can be extended up to a maximum length of 180 m/590.6 ft. under area limit.
The boundary wire can be buried up to max 5 cm/2 in. under the ground (or under non-metallic slabs).
To avoid causing damage to the boundary wire, do not vertical cut or rake the area where it is positioned.
Put the boundary wire around all of the work area. Adapt the distance between the boundary wire and obstacles.
4. Installation
4.1 General preparation
4.2 Preparing tools
4.3 The boundary wire instalation requirements
•
•
•
•
/°
Docking station
Charging indicator
Charging pins
Metal ground nail hole
Base plate fixing hole
Power port
11
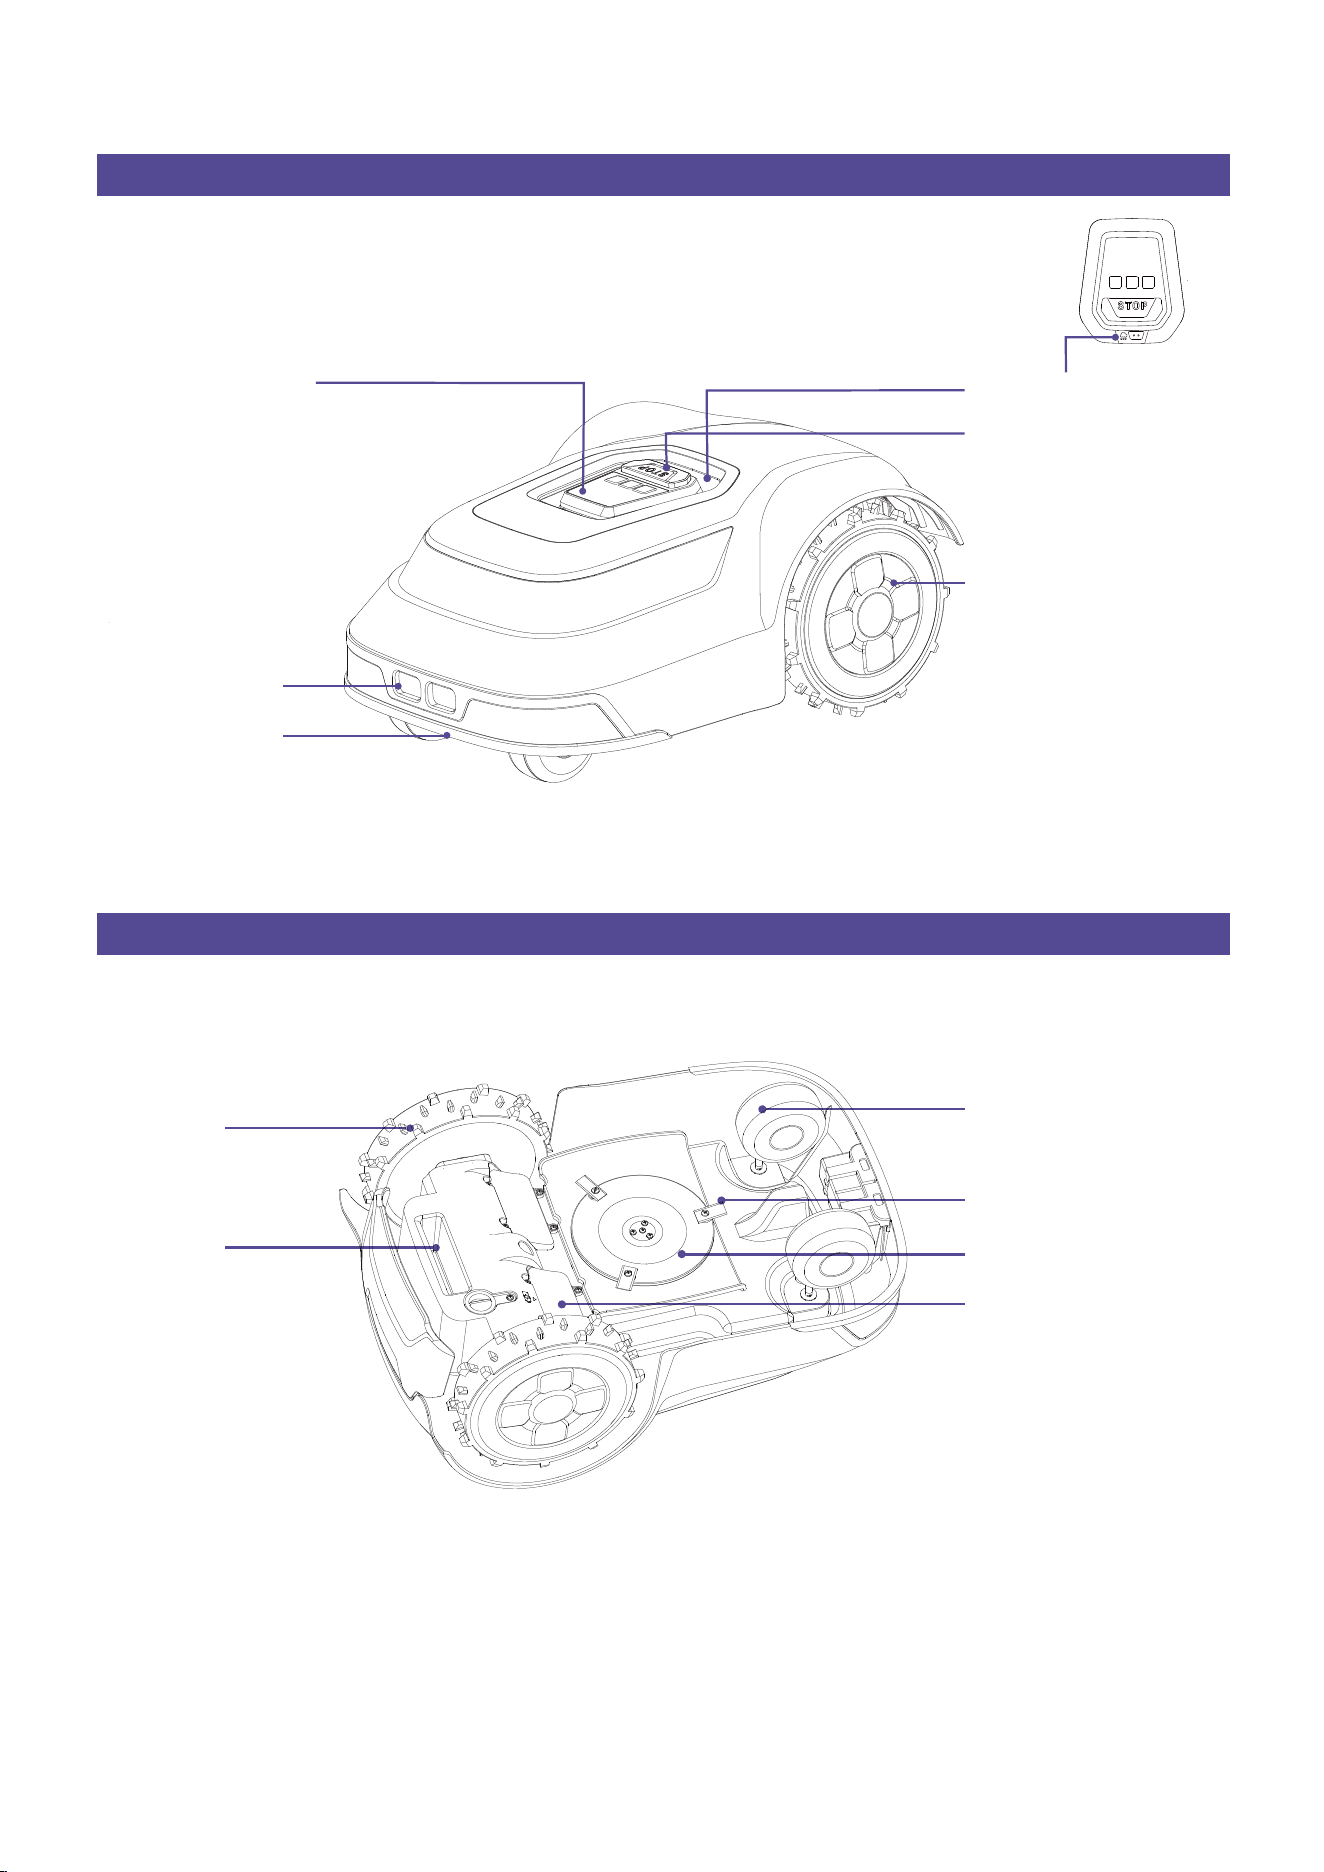
12.
10.
11.
Install the boundary wire 30 cm/12 in. away from an obstacle which height is 1-5 cm/0.4-2 in.
Install the boundary wire 35 cm/14 in. away from an obstacle which height more than 5 cm/2 in.
Install the boundary wire 10 cm/4 in. away from an obstacle which height less than 1 cm/0.4 in.
13.
14.
15.
16.
For slopes adjacent to a public road, put a barrier of minimum 15 cm/6 in. along the outer edge of the slope. You can use
a wall or a fence as a barrier.
If you have a paving stone path that is in level with the lawn, put the boundary wire below the paving stone.
Please keep no obstacles on the boundary wire.
Passages
A passage is a section that has boundary wire on each side and that connects 2 parts of the work area. The distance
between the boundary wire on each side in the passage must be a minimum of 60 cm/24 in.
≥ 60 cm/24 in.
> 5 cm/2 in.
1-5 cm/0.4-2 in.
35 cm/14 in.
30 cm/12 in.
The boundary wire
The boundary wire
1 cm/0.4 in.
10 cm/4 in.
The boundary wire
The boundary wire
12
17.
18.
19.
20.
1.
2.
3.
4.
5.
6
Island
To make an island, isolate areas in the work area with the boundary wire. We recommend to isolate all
stable objects in the work area.
Some obstacles are resistant to a collision, for example,trees or bushes that are more than 5 cm/2 in. in
height. The product will collide with the obstacle and then turn around or get around.
Run the boundary wire to the object and lay the wire around it at a distance of 35 cm/14 in., and finally
return vertically to the outer boundary wire.
The distance between the two parallel wires should be 20 cm/8 in. not crossing.
The docking station must be positioned on the wire at an outer edge of the cutting area. It may not be positioned on
the side of a tool or garden shed standing as an island within the lawn to be mowed.
Keep a minimum 1.5 m/5 ft. straight line in front and at the back of the docking station.
Put the docking station near a power outlet.
Put the docking station on a level surface.
The baseplate of the docking station must not be bent.
If the work area has two parts separated with a steep slope, we recommend to put the docking station in the lower
section.
4.4 To set the docking station
20 cm/8 in.
The left side of the docking station should be placed in the circle.
Inside the circle
1.5 m
Outside the circle
The boundary wire
The boundary wire
Head of the docking station
Tail of the docking station
Right of the docking station
Left of the docking station
1.5 m
13
1.
2.
3.
3.1
3.2
3.3
3.4
3.5
1.
2.
3.
4.
5.
6.
7.
4.
5.
6.
7.
Lay the boundary wire
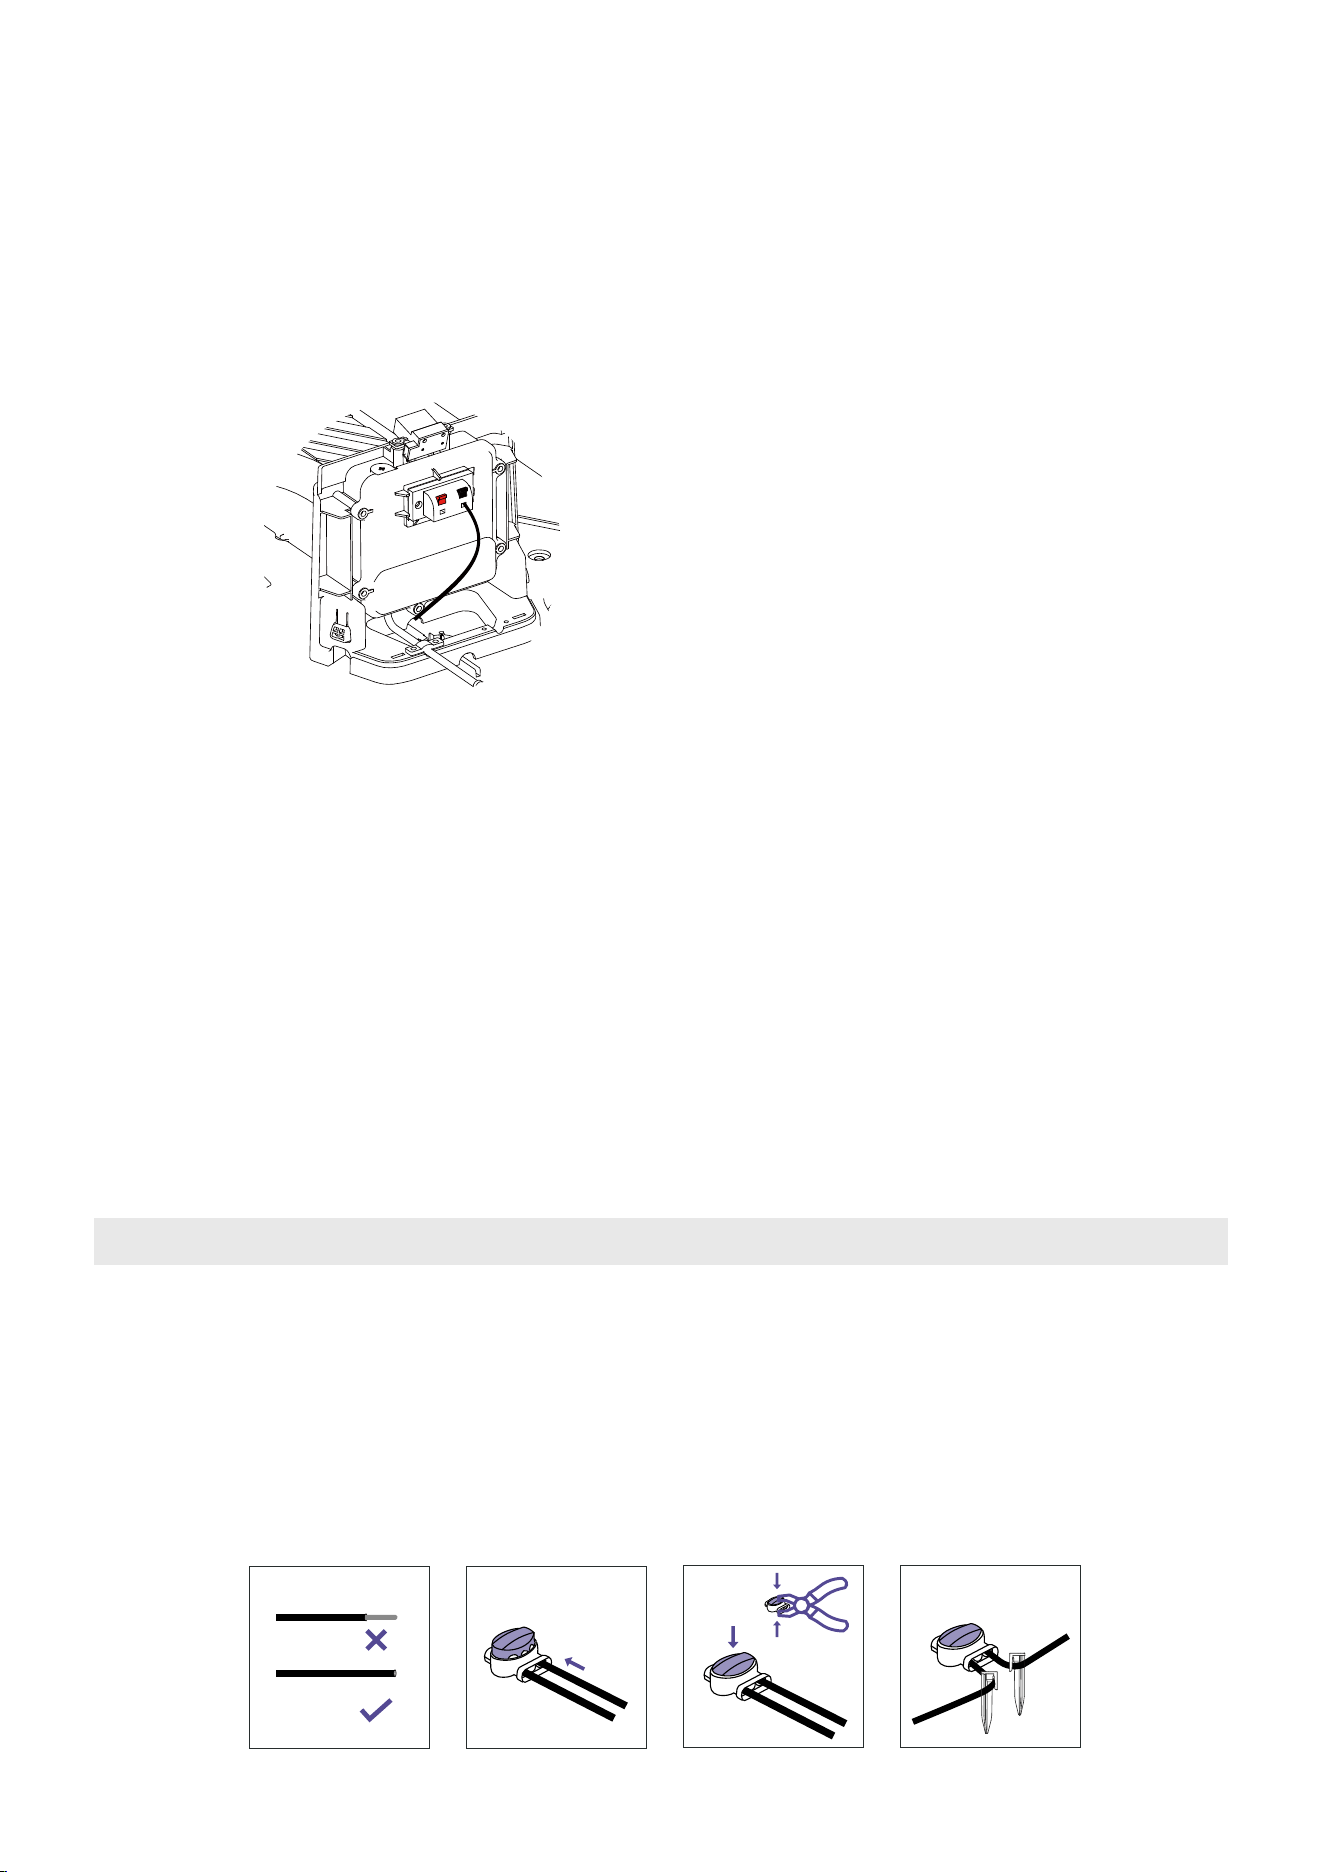
Feed the perimeter wire through the cable duct on the docking station as indicated by the arrow until it appears on
the other side.
Use the pliers to carefully strip 10–15 mm/0.39-0.59 in. of insulation off the wire.
Connect the wire to the black connector point. Ensure that no stripped wire is visible outside of the connector points.
Put the boundary wire around all of the work area. Start and complete the installation behind the docking station.
Cut the other end of boundary wire. Strip off 10–15 mm/0.39-0.59 in. of insulation. Then connect to the red connector
point.
Finish all the above steps, close the docking cover.
4.5 Installation steps
Attach the docking station to the ground with the supplied screws after the guide wire is installed.
NOTE: The docking station is must to be pinned by supplied nails.
Connect the low-voltage cable to the docking station.
Connect the power adapter to a 100-240V power outlet.
When the docking station is connected, it is possible to charge the product. Place the product in the docking station
while the boundary wire are being laid. Switch on the product. Do not continue with any product settings before the
installation is complete.
Read and understand the section To set the docking station.
Put the docking station in the selected area.
Note: DO NOT attach the docking station to the ground with the screws until the boundary wire is installed.
1 2
3 4
Disconnect the docking station from the power outlet.
Cut the boundary wire with a pair of wire cutters where it is necessary to install the extension.
Add wire where it is necessary to install the extension.
Put the boundary wire into position.
Put the wire ends into a wire connector.
Note: Make sure that you can see the ends of the boundary wire through the transparent area of the connector.
Push down the cover on the connector with adjustable pliers to attach the wires in the connector.
Connect the docking station to the power outlet.
Extend the boundary wire if it is too short for the work area. Use original spare parts, for example wire connector.
4.6 To extend the boundary wire
14
5 Mower operation instructions
5.1 Display
Indicator
Description
Mower locked. Please enter the PIN code to unlock
Bluetooth connected
Wi-Fi connected
PIN code lock status
Low battery indication
Bluetooth
Wi-Fi
Battery level
Dashboard display
STOP button
HOME
Digital tube display
Pin code lock status
Low battery indication
MOW
Wi-Fi
Bluetooth
Battery level display
ON/OFF
The quantity of cells indicates the battery level from 25% to 100%
The power levels below 15%. When this sign lights up, the
mower will return to the station and charge.
It shows the mowing duration, PIN code, error code, etc.
Meanings of the numbers and symbols on the display :
Time: Mowing duration
EXXX: error code, for example, E305. See for further instruction.
A-XX: Updating firmware progress
15
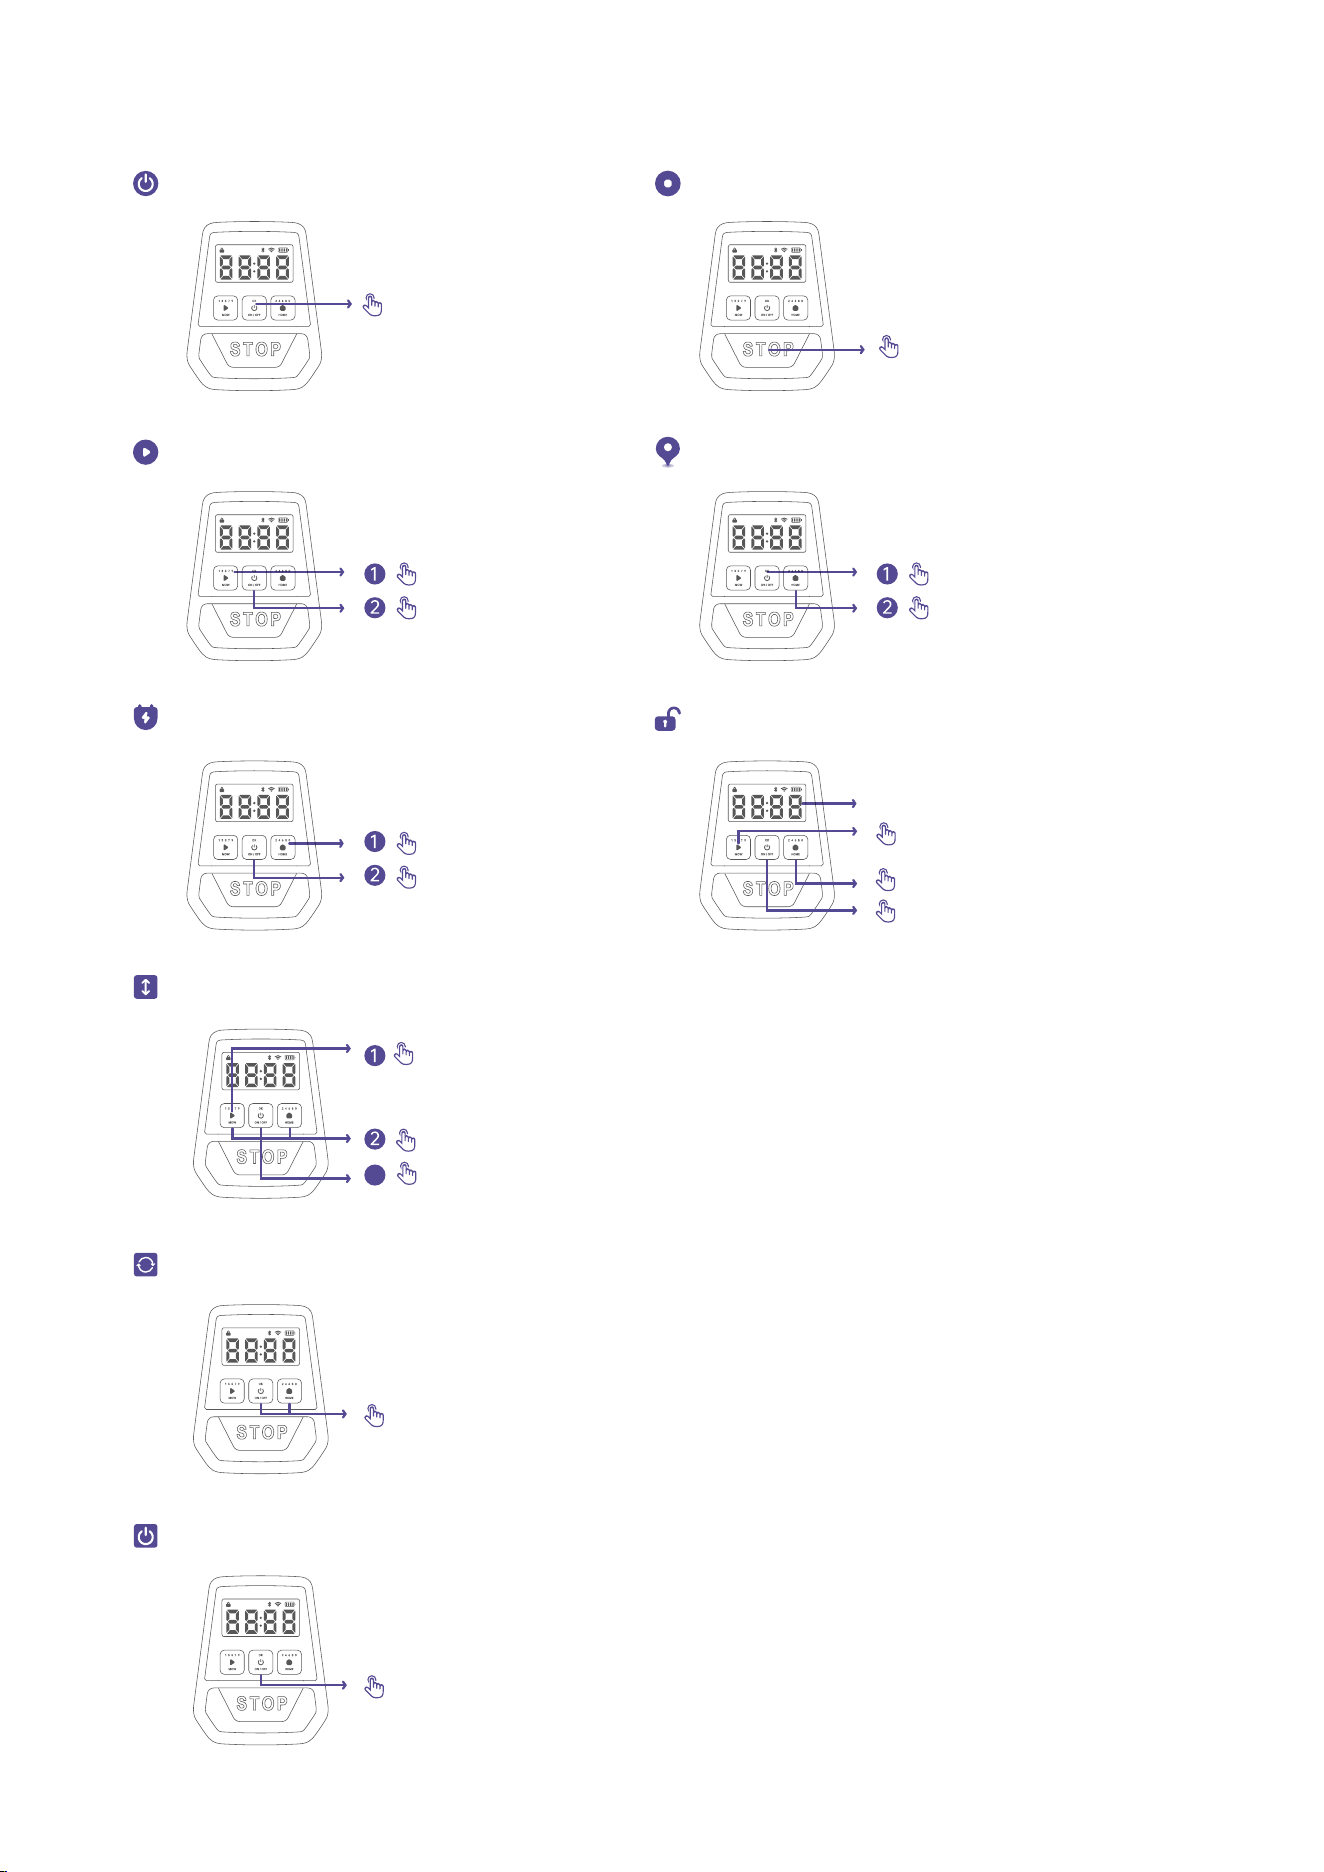
5.2 Buttons operation
Power ON/OFF
Press and hold 3s
Press and hold 15s
Press STOP
Press
Press and hold MOW for 5s to start adjust
Press MOW to plus 5, press HOME to minus 5
Press OK to certain
The middle two digits of the digital tube show the height
Press
Stop mower operation
Start global mowing
Start spot mowing
Mower returns to the docking station
Adjust cutting height
How to unlock the mower?
The default code is “0000”
Press MOW to enter the odd number
Press HOME to enter the even number
Press ON/OFF to confirm input
Press
Press
Press
Hold 3s
3
Press MOW+HOME at the same time 5s, the device restores factory settings
Restore factory settings
Forced shutdown

16
1.
2.
3.
4.
5.
5.4 Mowing
After successful installation, it's able to press and hold “ON/OFF” key 3s or move the robot on the docking station to
power on the robot.
Before mowing, it is needed to enter the PIN code to unlock the device.
Note: The default code is 0000, and you can go to Device page>MORE CONTENT>PIN-Code Reset in the APP to
reset the code.
After unlocking the device, you can begin mowing immediately by press “MOW” + “ON/OFF” on the display, or on
the APP by pressing "START” .
You could also set up a programmed schedule in the calendar using the APP.
Set a schedule with frequent repetitions. This achieves good mowing results, the battery charge will last longer and
you avoid debris on the lawn.
Docking station LED indicator color and meaning:
5.3 Docking station light cue
Solid white
The mower is not on the docking station.
Solid red
Mower is charging.
Mower is fully charged.
Boundary wire broken.
Mower is updating firmware.
Solid green
White and red flashes alternately
Flashing yellow
5.5 The ANTHBOT APP
ANTHBOT APP can be downloaded from Apple APP Store or Google Play. Or scan the QR code to download and install
ANTHBOT APP.
Do not let children ride the mower.
Press the STOP button on top of the mower before lifting. Always lift the mower by its handle.
Follow the APP prompts to add the device.

17
6. Common trouble shooting
When there is an abnormality, an error code is shown in the app and the mower display. Below is a list of the error
codes, what they mean and what to do:
Error code Meaning Solution
Error:Firmware update failed
Error:Bumper sensors
triggered constantly
Error:IMU data error
E104
E202
E204
Error:Cable-TOF sensor error
Error:Mower is trapped
E207
E301
E302
Please restart the mower and then put it in the docking station. If
the error persists, contact after-sales service.
Please restart the mower and then put it in the docking station. If
the error persists, contact after-sales service.
Please press the STOP button, then put it on boundary wire or
and press MOW+ON/OFF to resume mowing.
Please confirm no obstacles in the path and the docking station is
installed on a flat surface. Press the STOP button on the mower,
then HOME+ON/OFF to return. If the error persists, please put it in
the docking station manually.
Error:Mower cannot return
to the docking station
Please remove the obstacles or tap the sensor gently to release it,
then press the STOP button and press MOW+ON/OFF to resume
mowing. If it fails, restart the mower and then put it in the
docking station. If the error persists, contact after-sales service.
Please gently rock the top cover. If it fails, restart the mower and
then put it in the docking station. If the error persists, contact
after-sales service.
Error:Mower is lifted
E304
Error:Mower has turned over
E307
E310
Please place it in the proper position and put it back in the
boundary or docking station. Press the STOP button on the
mower, and then press MOW+OK to resume mowing. Please set
the area where the mower turns over frequently as an off-limit
island.
Please relocate the mower on the boundary or the docking
station, press the STOP button to clean error code, press
MOW+ON/OFF to start mowing.
Mower is not started on
the dock or boundary
wire
Error:
Mower has collisions on
mapping
Error:
Please place the mower on a flat surface and check if the front
wheels are stuck, then press the STOP button and press
MOW+ON/OFF to resume mowing. If it fails, restart the mower and
then put it in the docking station. If this happens frequently,
contact after-sales service
Error:Mower is at tilt over limit
E311
E313
Please clear obstacles on the boundary, then move mower to the
docking station and press the STOP button to clean error code,
Press MOW+ON/OFF to start mowing again.
Please check is the docking station set right(the left side of
docking station need to be in the mowing area).
Please place it in the proper position and put it back in the
boundary or docking station. Press the STOP button on the mower,
and then press MOW+OK to resume mowing. Please set the area
where the mower turns tilt over 24° as an off-limit island.
Please check whether the
top cover is stuck.
E314
Please gently shake the top cover to remove any foreign objects
caught in the gaps and securely close the top cover. Press
MOW+OK to start mowing.
Please clear the obstacles
around the docking station.
E315
Please clear away the obstacles around the docking station and the
foreign object on the wheels. Place the robot back on the docking
station and press MOW+OK to restart the robot.
Error:Right wheel error
E402
Please press the STOP button on the mower and press
MOW+ON/OFF to resume mowing. If the error persists, contact
after-sales service.
Error:Left wheel error
E401
Please press the STOP button on the mower and press
MOW+ON/OFF to resume mowing. If the error persists, contact
after-sales service.

18
E441
Left wheel motor
stall protection
Error:
Please check if the left wheel is stuck. Remove the unusual object,
then press the STOP button on the mower and press
MOW+ON/OFF to resume mowing. If the error persists, contact
after-sales service.
Error:Battery error
E501
Error:
Battery overvoltage
protection
E502
Please restart the mower and then put it in the docking station. If
the error persists, contact after-sales service.
Please press the STOP button on the mower. If the error persists,
disconnect the mower from the docking station, and contact
after-sales service. Do not disassemble the battery pack and make
sure to use a genuine battery.
E437
Cutting motor stall
protection
Error:
For your safety, power off the mower first. 1. Check if the blade
disc is stuck, remove the unusual object.
2. Check if the grass is too thick and dense, cut your lawn to a
height of no more than 10 cm/4 in.Restart the mower and resume
mowing. If the error persists, contact after-sales service.
E432 Error:Cutting motor error
Please keep the mower still, and try to restart the mower. If the
error persists, contact after-sales service.
E436
Error:Cutting motor error
Please press the STOP button on the mower. If the error persists,
contact after-sales service.
E440
Error : Left wheel motor error
Please press the STOP button on the mower. If the error persists,
contact after-sales service.
E445
Error : Left wheel motor error
Please press the STOP button on the mower and press
MOW+ON/OFF to resume mowing. If the error persists, contact
after-sales service.
E446
Error : Left wheel motor error
Please press the STOP button on the mower and press and hold on
ON/OFF 3s to shut down the robot, then put it on the docking
station, restart the mowing task. If the error persists, contact
after-sales service.
E450
Error : Right wheel motor error
Please press the STOP button on the mower. If the error persists,
contact after-sales service.
E455
Error : Right wheel motor error
Please press the STOP button on the mower and press
MOW+ON/OFF to resume mowing. If the error persists, contact
after-sales service.
E456
Error : Right wheel motor error
Please press the STOP button on the mower and press and hold on
ON/OFF 3s to shut down the robot, then put it on the docking
station, restart the mowing task. If the error persists, contact
after-sales service.
Error:
Error:
Error:
Right wheel motor
stall protection
E451
Please check if the right wheel is stuck. Remove the unusual
object, then press the STOP button on the mower and press
MOW+ON/OFF to resume mowing. If the error persists, contact
after-sales service.
Error:Left wheel motor error
E442
Please press the STOP button on the mower and press
MOW+ON/OFF to resume mowing. If the error persists, contact
after-sales service.
Left wheel motor
temperature anomaly
E447
Please press the STOP button on the mower and press
MOW+ON/OFF to resume mowing. If the error persists, contact
after-sales service.
Error:Right wheel motor error
E452
Please press the STOP button on the mower and press
MOW+ON/OFF to resume mowing. If the error persists, contact
after-sales service.
Right wheel motor
temperature anomaly
E457
Please wait for about 1 minute before the temperature returns to
normal.Then, press the STOP button on the mower and press
MOW+ON/OFF resume mowing.
Error code Meaning Solution

19
Error:Battery undervoltage protection
E503
The battery is over-discharged and needs to be charged. If
the battery temperature is lower than 0 degrees or higher
than 50 degrees, wait for the temperature to return to
above 0 degrees or below 50 degrees before charging.
After charging to 60% power, press the STOP button to
clear it. If the error persists, disconnect the mower from
the docking station, and contact after-sales service. Do not
disassemble the battery pack and make sure to use a
genuine battery.
E703 Error : The blade is missing or damaged
Please turn the robot off and check blades whether loose or
missing. Tighten the blade screws after replacing the new
blade. Please pay attention to safety during operation.
E507 Error:Battery temperature is too low
E601
Error:
The docking station
communication error
Place the mower in a warm environment (operating
temperature: 0℃–50℃), then press the STOP button on
the mower. If the error persists, contact after-sales
service. Do not disassemble the battery pack and make
sure to use a genuine battery.
Please re-plug the docking station into the power adapter,
then press the STOP button on the mower. If the error
persists, contact after-sales service.
Error:The boundary wire breakE604
Error:The mower out of boundary
E605
E606
E607
E609
E610
E611
Error:The mower mapped failed
Error:The boundary wire length or
working area are overlimit
Error: The Metal nails are pinned
abnormally
Error: The docking station update failed
E702 Error:Factory reset failed
Error:No boundary wire
For the latest error code, please refer to the APP online manual.
Please put the mower in the docking station, according the
broken point position showed on the APP device page to
find and fix it.
Please adjust the boundary wire laying refer to Quick
Start Guide, eg. The docking station need to be set on
flat lawn, the boundary wire need to be laid under 15%
slope...
Please put the mower in the boundary area, then adjust the
boundary wire laying where the mower go out frequently.
Please adjust the boundary wire laying to decrease the
boundary wire length.
Please re-pin the metal nails, or move the docking station
to different place, ensure the nails sink into soil.
Please restart the mower and then put it in the docking
station. If the error persists, contact after-sales service.
Please lay and connect the boundary wires correctly
before trying again.
Please restart the mower and then put it in the docking
station. If the error persists, contact after-sales service.
Error code Meaning Solution
Docking station is reversed.E612
Please change the direction of the docking station, ensuring
that the left side of the dock (with the grass icon) remains
within the working area. After adjusting the boundary wire,
press MOW+OK to start mowing.
Docking station signal error.E613
Please turn off the power, restart both the docking station
and the robot, and then start the robot to begin mowing. If
the error persists, please check if the wire at the bottom of
the docking station is broken and contact after-sales custom-
er service.

20
Check the blades and the blade disc. Replace if
damaged or worn.
The blade disc has to be replaced by an
authorized technician.
A damaged blade disc
Abnormal vibration when
the mower is operating
1.
2.
3.
1.
2.
3.
4.
1.
2.
3.
When the mower temperature returns
normal, try docking again.
Connect the docking station to the power
adapter and plug it into the power socket.
Clean the contact strip.
1.
2.
3.
High/low battery temperature
The docking station is not
connected to the power socket
The contact strip is unclean
The mower does not charge or it
turns off automatically in the
docking station
Adjust the mowing time so that it matches
the mowing area and the mower has enough
time to finish the task.
Replace the blades.
Set the cutting height to a higher level and
then lower to the desired height gradually.
Clean the blades.
1.
2.
3.
4.
The preset mowing time is
insufficient
The blades are blunt
The grass is too high
The blades cannot pivot
normally
Uneven or patchy mowing
Place the mower in the docking station,
fully charge it, and restart the mower.
The battery is over-dischargedThe mower cannot power on
Place the mower closer to the router.
Connect the mower to a 2.4 GHz Wi-Fi
network.
Grant permission to the APP.
1.
2.
3.
The mower is too far away from
the router
The Wi-Fi network is not 2.4 GHz
Wi-Fi permission is not granted
to the APP
The mower cannot connect to a
Wi-Fi network
1.
2.
3.
Make sure the STOP button is completely
released. Turn off the mower and check if
there is any foreign object stuck in the STOP
button. If yes, remove the object and try
mowing again.
Charge the mower battery to 85%.
If the rain sensor is triggered, the mower
cannot start working. Wait for the water to
dry up or turn off the rain sensor in the APP.
1.
2.
3.
The STOP button is pressed
down or jammed and the
mower cannot start
automatically
Low battery
Water on the rain sensor
The mower does not work
according to the schedule
Remove all obstacles covering, blocking
or surrounding the docking station.
The docking station is covered
or blocked by obstacles
The mower does not go back to
the docking station
Confirm if the mower collided with any
obstacles during the mapping. Remove
the obstacles, move the mower back to
the docking station, first press STOP,
then press MOW+ON to remap.
During the mapping, obstacles
may block the robot from
moving along the boundary wire
The mower shows mapping fail
1.
2.
1.
2.
Remove anything that’s stuck on the
wheels.
Fill in the gap and keep the lawn
surface level and flat.
1.
2.
3.
The wheels lost traction
because of mud or grass
Soft ground such as sand
Deep ditch
The mower is stuck
Check if the boundary wire is
overhanging, use pegs to keep bound-
ary wire tight to the ground.
The boundary wire can be buried in the
soil with a depth of less than 4 cm.
The boundary wire is not tight
to the ground
The boundary wire was cut
Issue Cause Solution
7. FQA
21
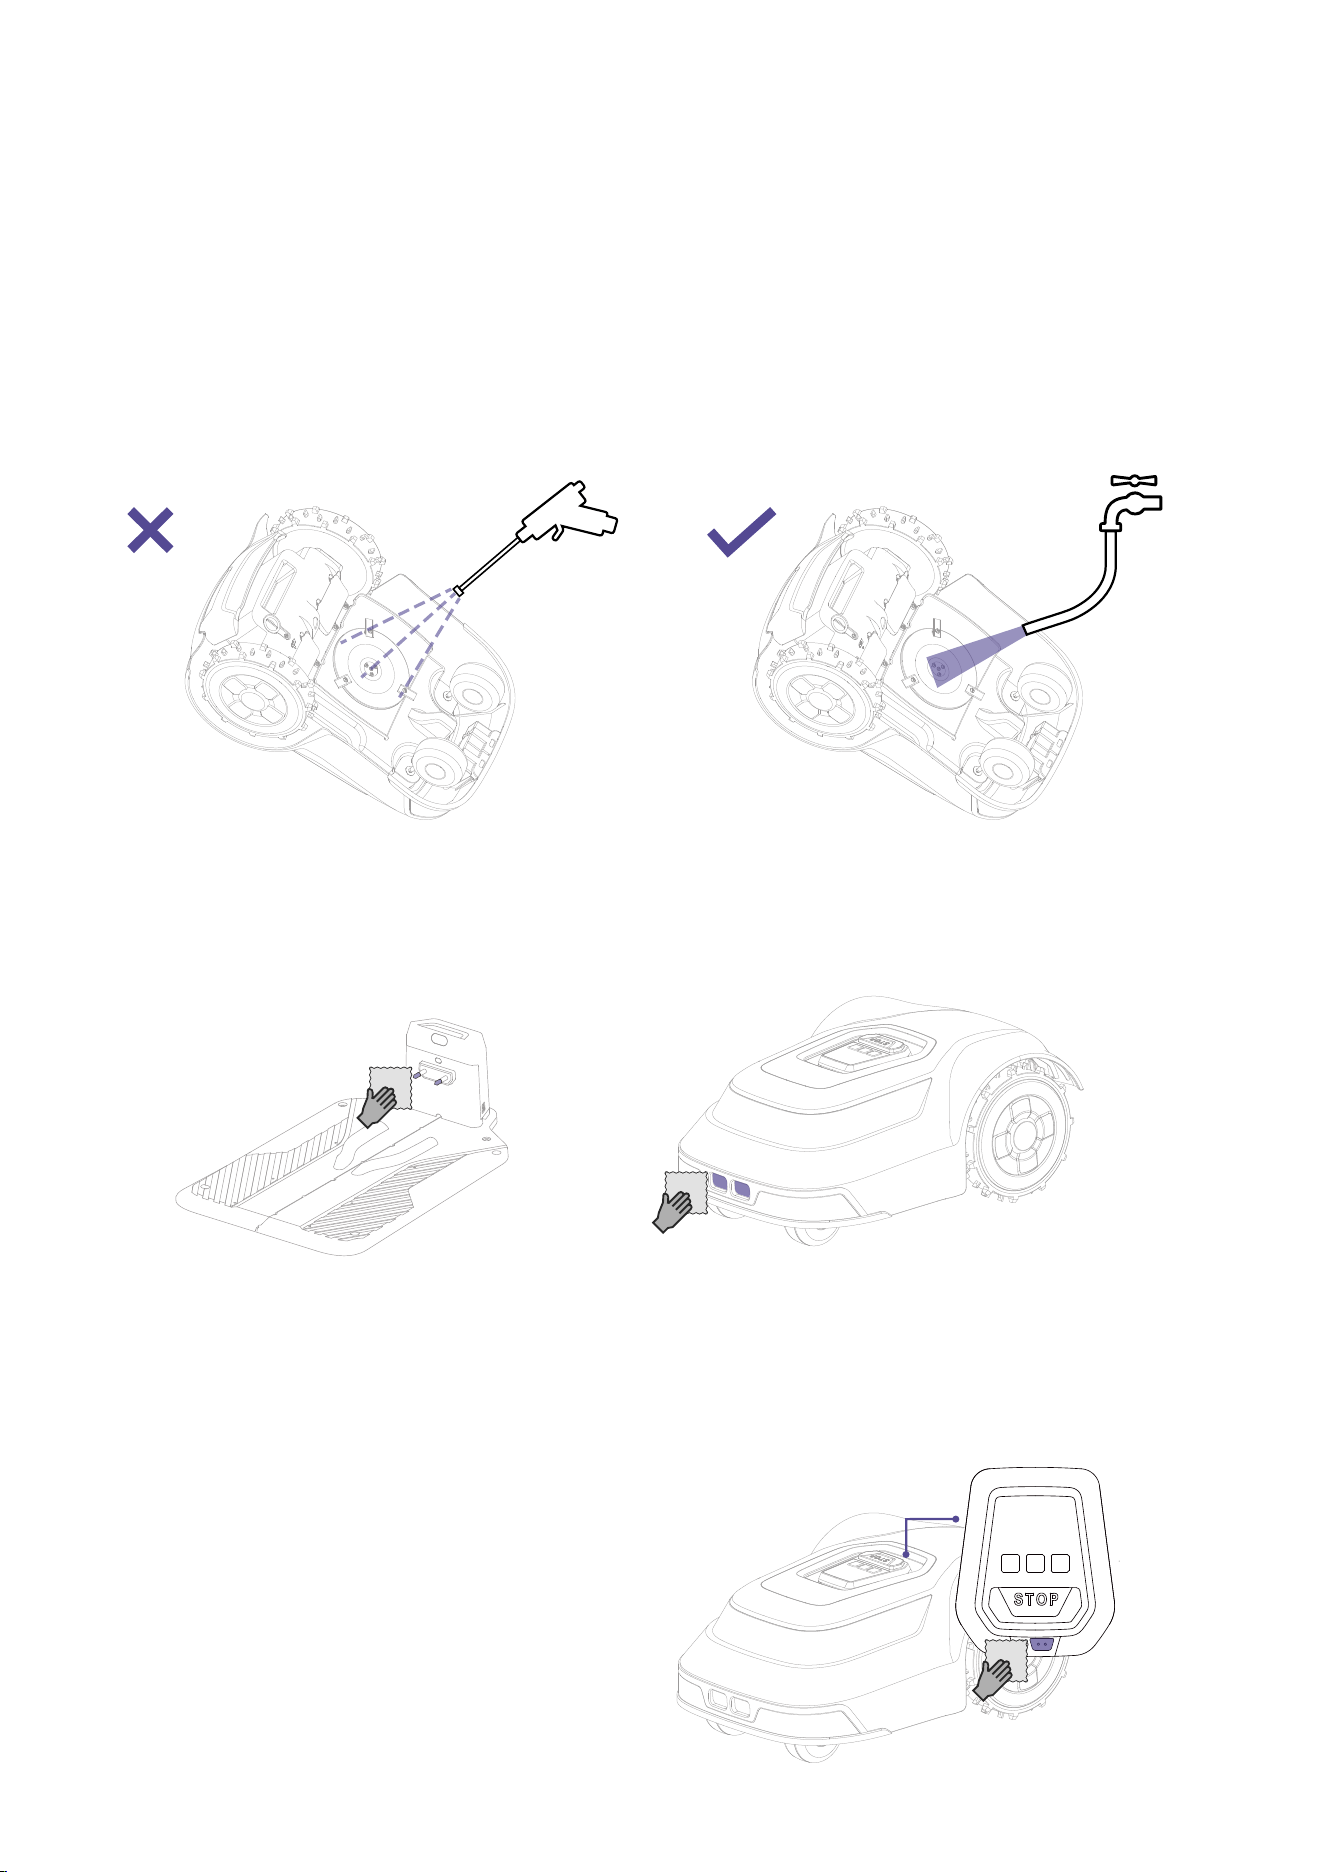
Cleaning charging ports and pins
As shown in the figure, please clean the charging contact plates regularly to prevent dirt from causing abnormal
charging contact.
Cleaning the rain detection sensor
As shown in the figure, please check regularly if the rain detection sensor is dirty and clean the sensor probe points
periodically to prevent false triggering of the rain sensor.
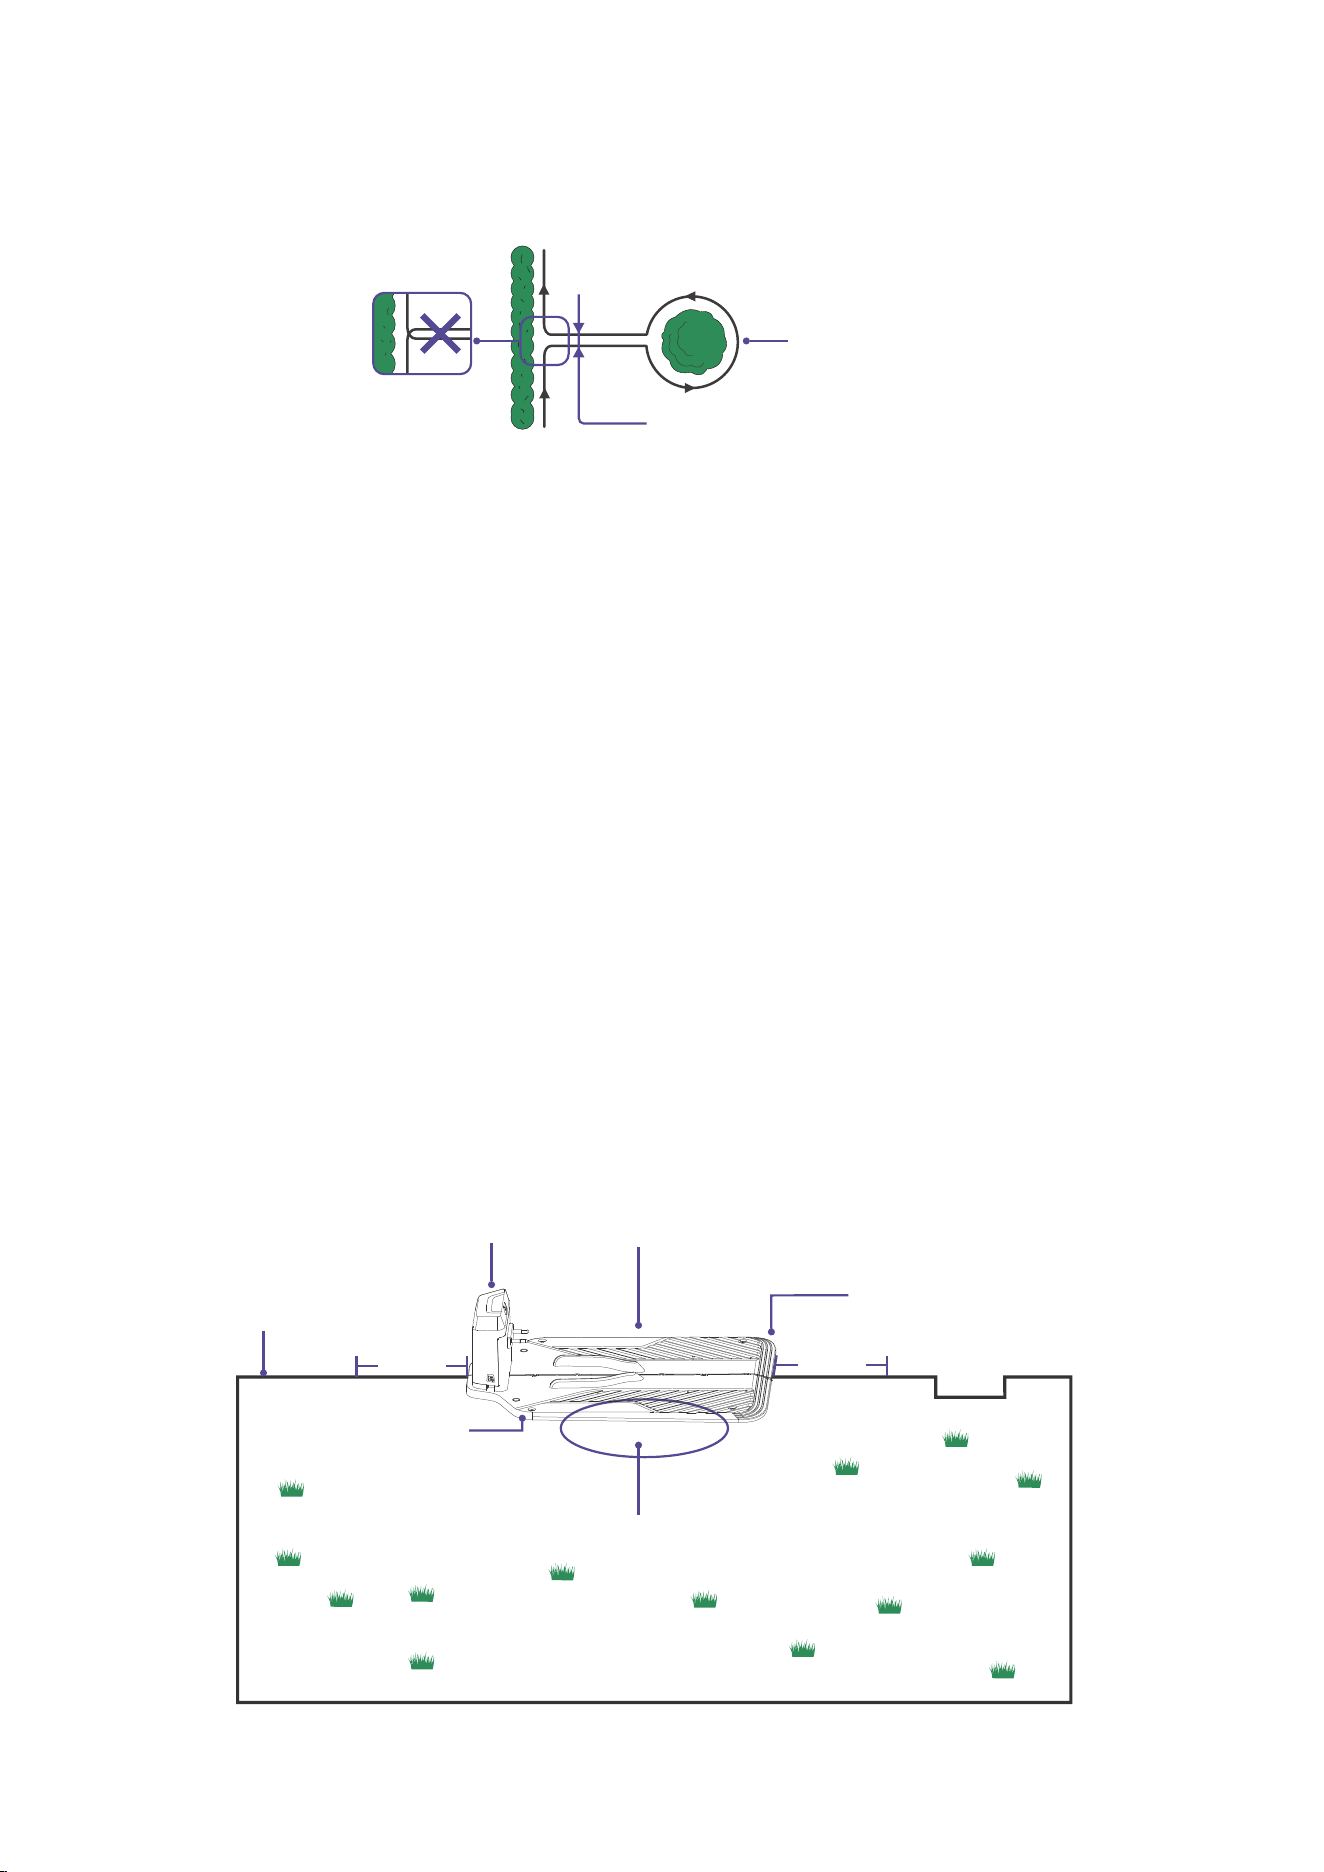
8. Maintenance and care
Regular inspection and maintenance is required to ensure optimal performance:
1. Clean debris and dirt after each use.
2. Regularly inspect critical components.
3. Check and replace worn parts.
4. Follow the manufacturer's recommended times and intervals for routine maintenance.
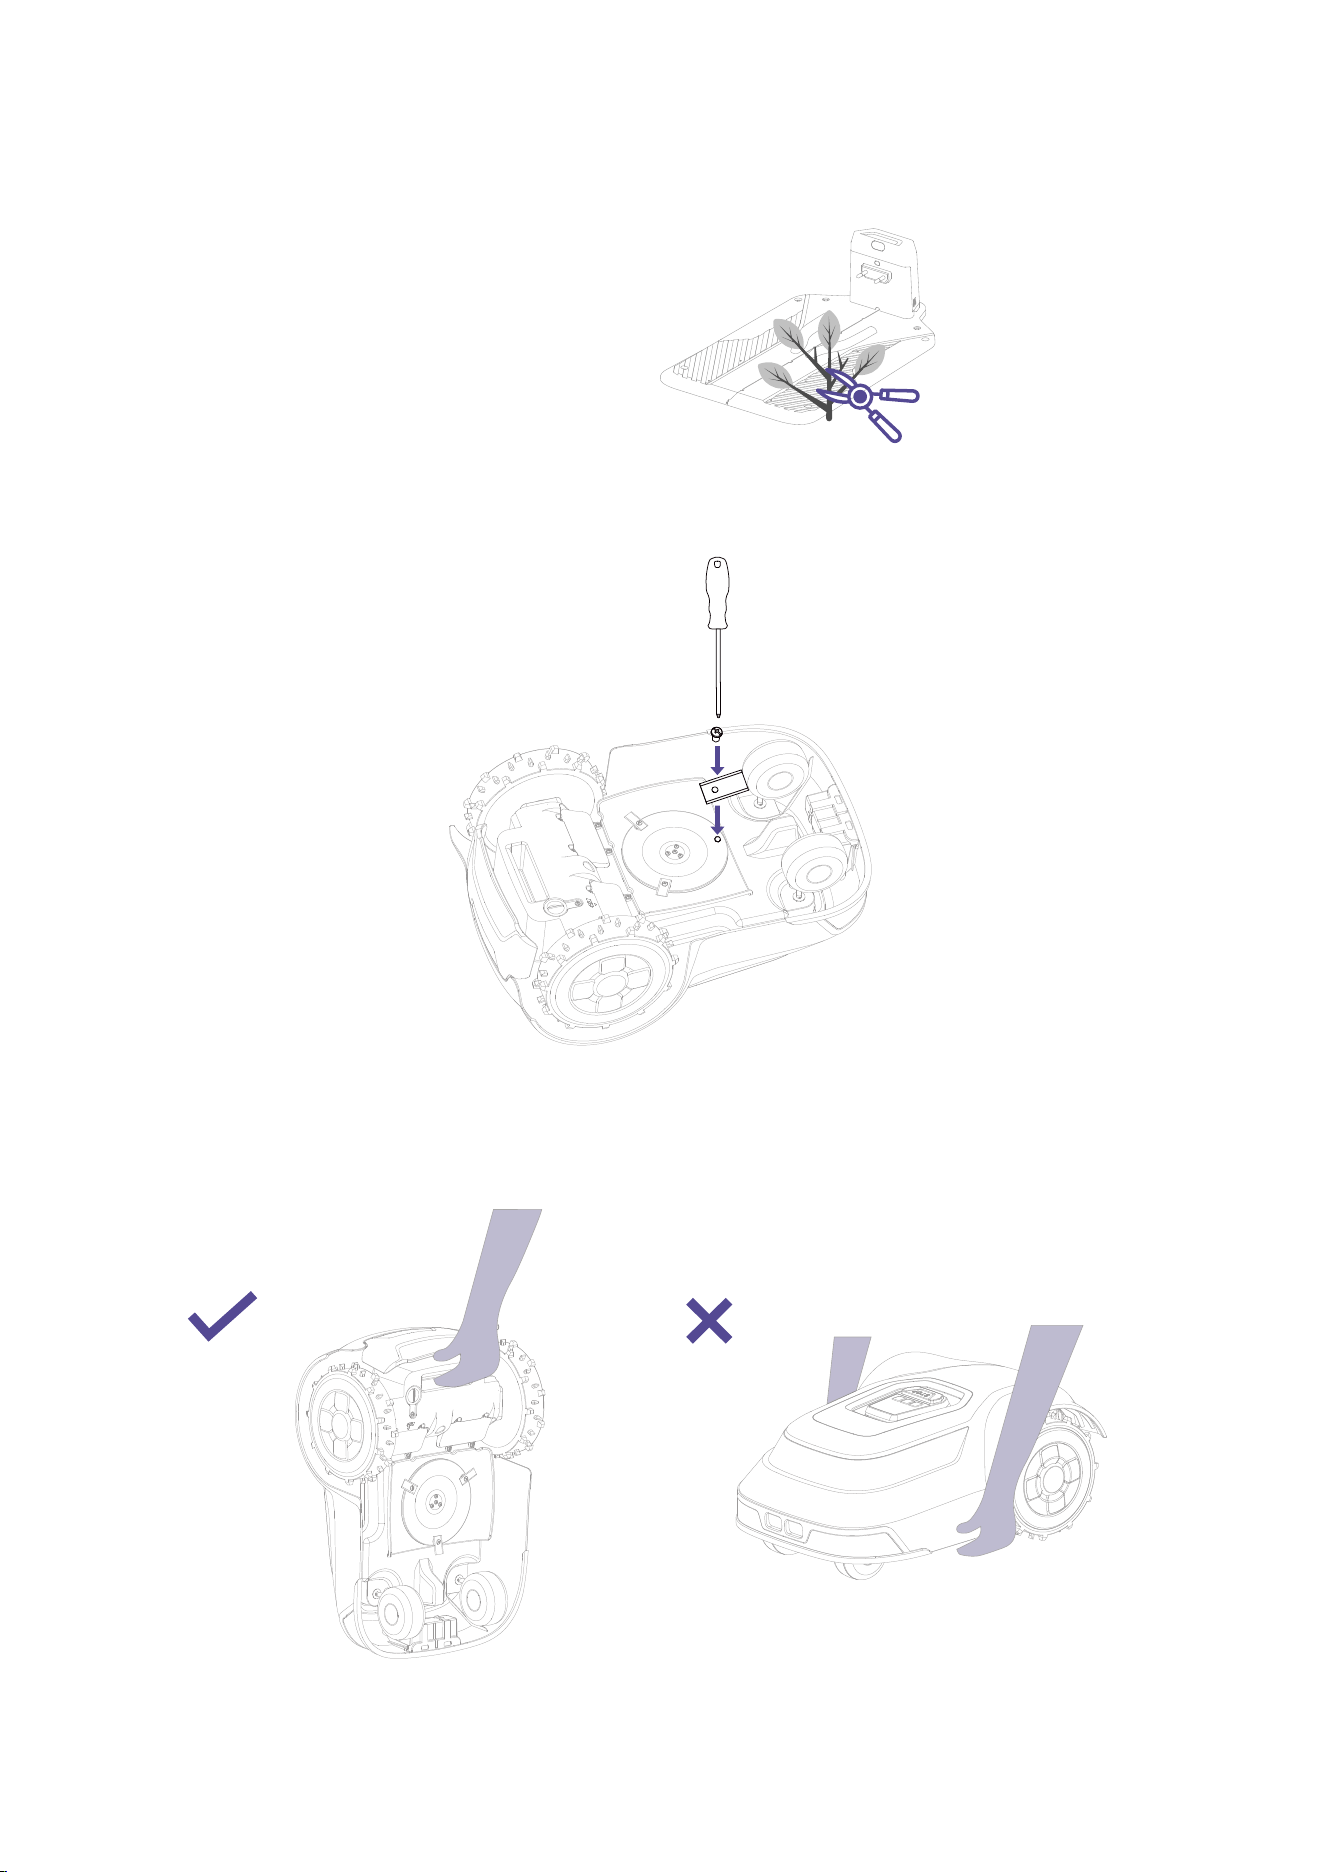
1. Cleaning the blade disc and wheel assemblies
2.
3.
As shown in the figure, please rinse the blade disc assembly regularly.
22
4.
5.
Clearing plants around docking station
Please ensure there are no obvious obstacles or plant obstructions near the docking station to prevent abnormal
docking of the device.
It is recommended to replace the blade every three months.
6. Device lifting operation illustrated
As shown in the figure, place both hands on the rear handle and end of the device, avoiding the blade disc assembly as
much as possible.
23
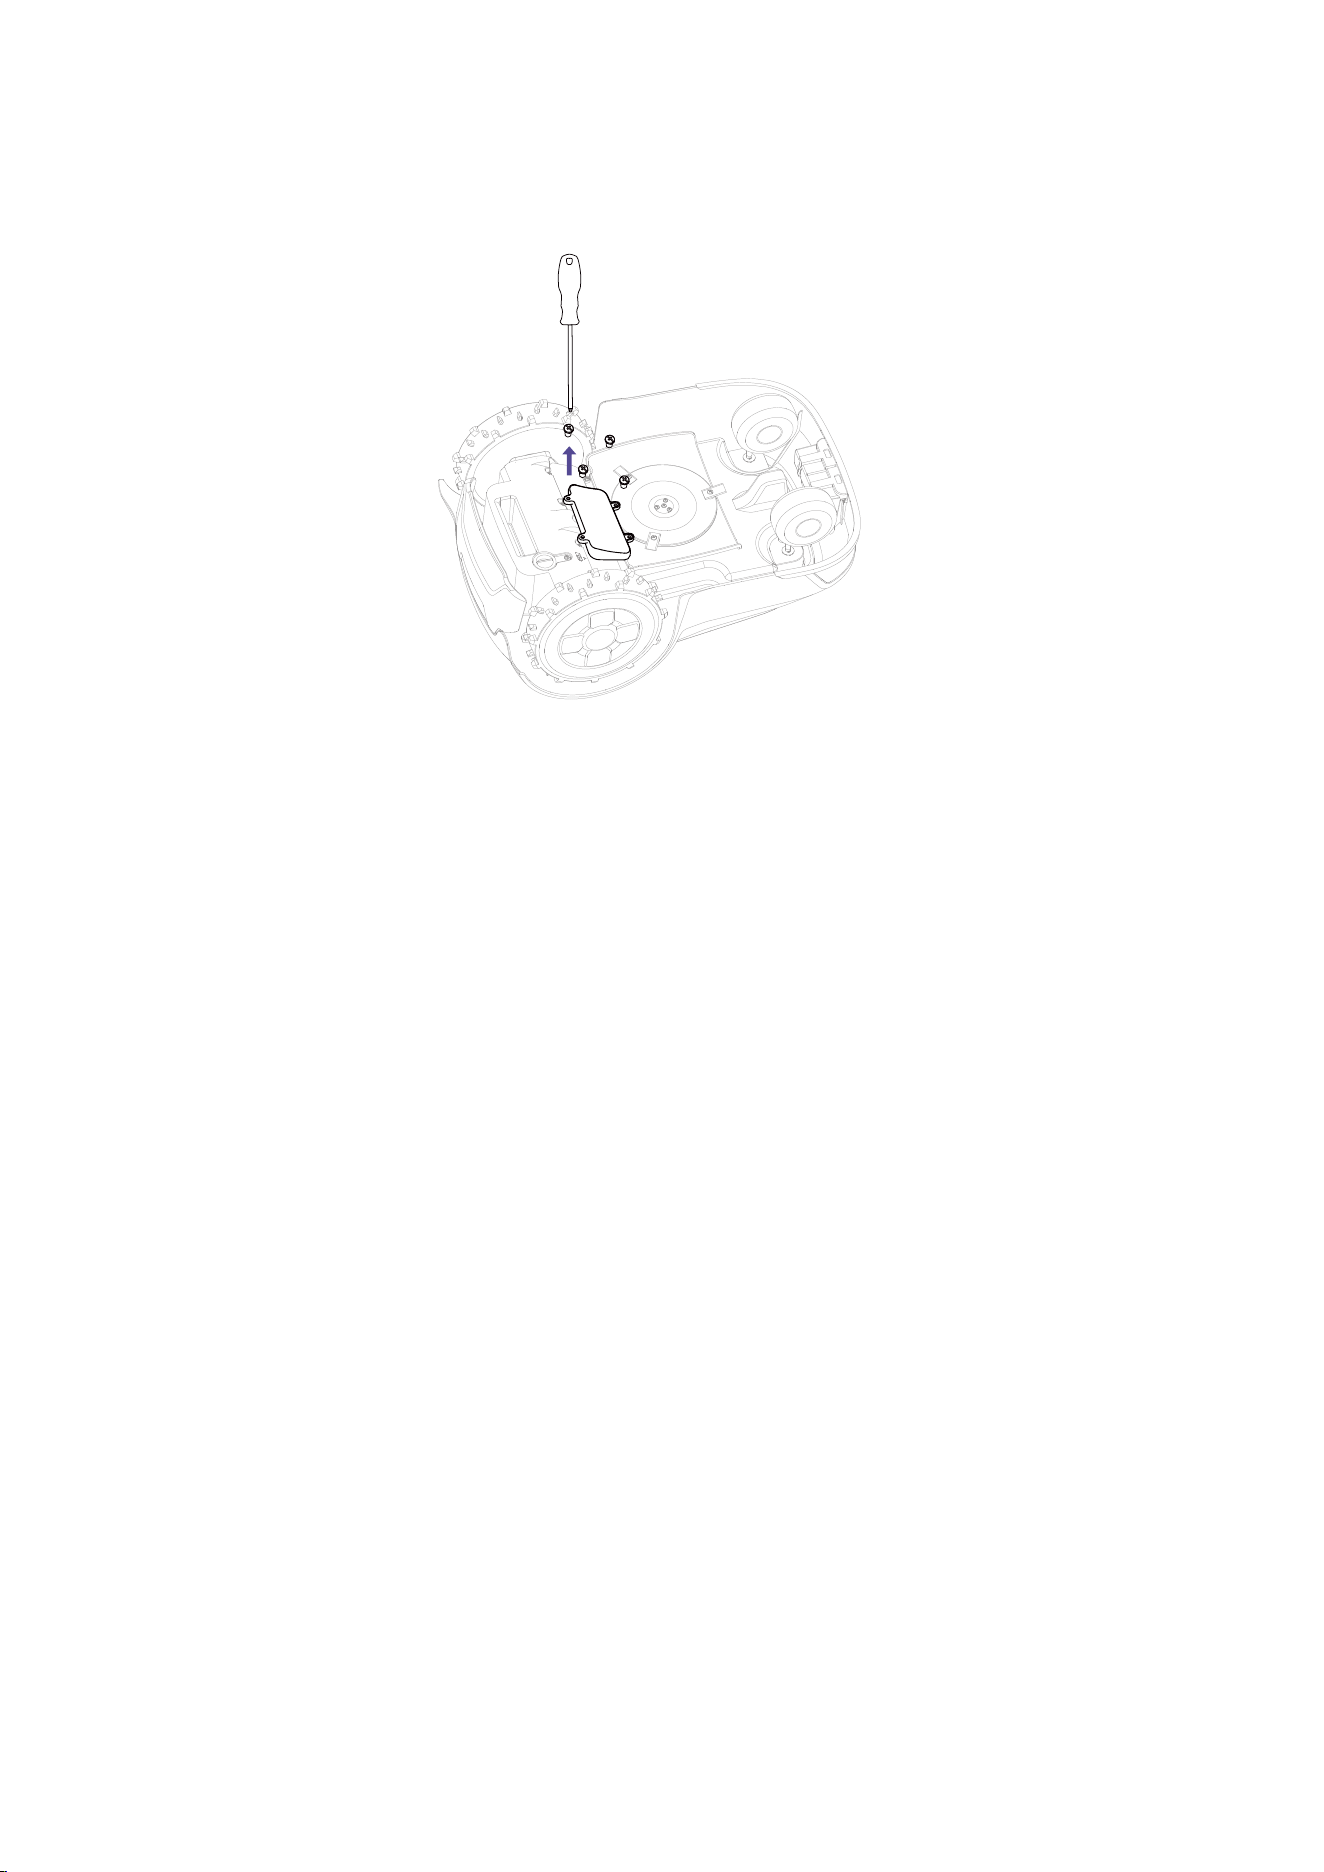
7. How to replace the battery
a. Power off the device first
b. Lay the device down on a soft, clean platform
c. Use a screwdriver to unscrew the battery compartment screws and remove/replace the battery
1.
2.
3.
•
•
•
•
•
•
•
•
•
9. Recycling and end-of-life disposal
10. Warranty terms
DO NOT treat this product as domestic waste. For recycling information, contact your domestic waste service, your mu-
nicipality, or point of sale.
For questions about how to remove the battery, refer to About Battery.
WARNING: DO NOT dispose of this product in a landfill, by incineration, or by mixing with household trash. Danger or seri-
ous injury can occur because of the electrical components.
ANTHBOT warranty covers this product's functionality for a period of 1 year from date of purchase.
The warranty covers serious faults relating to materials or manufacturing faults. Within the warranty period, we will replace
the product or repair it at no charge if the following terms are met:
The product and the docking station may only be used in compliance with the instructions in this Operator's Manual. This
manufacturer's warranty does not affect warranty entitlements against the dealer/retailer.
End-users or non-authorized third parties must not attempt to repair the product.
Examples of faults which are not included in the warranty:
Damage caused by water seepage from using a high-pressure washer, or from being submerged under water, for exam-
ple when heavy rain forms pools of water.
Damage caused by lightning.
Damage caused by improper battery storage or battery handling.
Damage caused by using a battery that is not a original battery.
Damage caused by not using original spare parts and accessories, such as blades and installation material.
Damage to the loop wire.
Damage caused by non-authorized changing or tampering with the product or its power adapter. The blades and wheels
are seen as disposable and are not covered by the warranty.
If an error occurs with your ANTHBOT product, please contact ANTHBOT customer service for further instructions. Please
have the receipt and the product's serial number at hand when contacting ANTHBOT customer service.

24
11. About the manual
Please update the APP to the latest version to obtain the most recent user manual. The table of contents can be found in
the APP under More content > Instruction.
The features and content described in this manual are related to the model of the product that you have purchased,
market, and software version. For the latest feature updates, please refer to the release notes.
This manual is copyrighted by ANTHBOT. Without the written permission of the ANTHBOT, any unit or individual shall not
copy, modify, reproduce, transcribe or transmit in any way or for any reason. This manual is subject to change without
notice at any time.
12. Note
This equipment has been tested and found to comply with the limits for a Class B digital device, pursuant to Part 15 of the
FCC Rules. These limits are designed to provide reasonable protection against harmful interference in a residential installa-
tion. This equipment generates, uses and can radiate radio frequency energy and, if not installed and used in accordance
with the instructions, may cause harmful interference to radio communications. However, there is no guarantee that inter-
ference will not occur in a particular installation. If this equipment does cause harmful interference to radio or television
reception, which can be determined by turning the equipment off and on, the user is encouraged to try to correct the inter-
ference by one or more of the following measures.
• Reorient or relocate the receiving antenna.
• Increase the separation between the equipment and receiver.
• Connect the equipment into an outlet on a circuit different from that to which the receiver is connected.
• Consult the dealer or an experienced radio/TV technician for help.
The device must not be co-located or operating in conjunction with any other antenna or transmitter.
FCC RF Radiation Exposure Statement Caution: To maintain compliance with the FCC's RF exposure guidelines, place the
product at least 20 cm/8 in. from nearby persons.
Warning: Changes or modifications to this unit not expressly approved by the party responsible for compliance could void
the user's authority to operate the equipment.

Customer Service: [email protected]
Official website: https: //www.anthbot.com
Manufacturer: SHENZHEN LDROBOT CO.,LTD
Address: 16/F, Block A, Building 6, International Innovation Valley, Nanshan District, Shenzhen,
518055 GUANGDONG, P.R. CHINA