
Baridi Tabletop Fridge with Ice Box, 46L Capacity, Adjustable
Thermostat, Reversible Door (White - DH256, Black - DH257)
Thank you for purchasing a Dellonda product. Manufactured to a high standard, this product will,
if used according to these instructions, and properly maintained, give you years of trouble free performance.
DH256, DH257 Issue:5 29/11/24
www.dellonda.co.uk
Models: DH256, DH257

Important Information
Please read these instructions carefully. Note the safe operational requirements, warnings & cautions. Use the product correctly and with care
for the purpose for which it is intended. Failure to do so may cause damage and/or personal injury and will invalidate the warranty. Keep these
instructions safe for future use.
1.1. ELECTRICAL SAFETY
WARNING! It is the user’s responsibility to check the following:
9 Check all electrical equipment and appliances to ensure that they are safe before using. Inspect power supply leads, plugs and all
electrical connections for wear and damage. Dellonda recommend that an RCD (Residual Current Device) is used with all electrical
products.
9 Electrical safety information: It is important that the following information is read and understood.
9 Ensure that the insulation on all cables and on the appliance is safe before connecting it to the power supply.
9 Regularly inspect power supply cables and plugs for wear or damage and check all connections to ensure that they are secure.
Important: Ensure that the voltage rating on the appliance suits the power supply to be used and that the plug is tted with the correct
fuse - see fuse rating in these instructions.
8 DO NOT pull or carry the appliance by the power cable.
8 DO NOT pull the plug from the socket by the cable.
8 DO NOT use worn or damaged cables, plugs or connectors.
9 Ensure that any faulty item is repaired or replaced immediately by a qualied electrician.
9 If the cable or plug is damaged during use, switch off the electricity supply and remove from use. Supply cord must be replaced by the
manufacturer, its service agent or similarly qualied persons in order to avoid a hazard.
9 Ensure that repairs are carried out by a qualied electrician.
8 NOT designed to be used with an inverter.
8 DO NOT use with an extension cord.
1.2. GENERAL SAFETY
9 Children from age 8 years and above, persons with reduced physical, sensory, or mental capabilities those with lack of experience and
knowledge can use the appliance, if they have been given supervision or instruction concerning use of the appliance in a safe way to
understand the hazards involved.
9 Children aged from 3 to 8 years are allowed to load and unload refrigeration devices.
9 Children shall NOT play with the appliance.
9 Cleaning and user maintenance on the appliance shall not be made by children without supervision.
9 The appliance shall be disconnected from its power source during service and when replacing parts and, if that the removal of the
plug is foreseen, it shall be clearly indicated that the removal of the plug has to be such that an operator can check from any of the
points to which he has access that the plug remains removed.
9 This refrigeration appliance is not intended to be used as a built-in appliance.
9 This refrigerant appliance is intended to be used at ambient temperatures ranging from 16°C to 38°C.
8 DO NOT store explosive substances such as aerosol cans with a ammable propellant in this appliance.
9 This appliance is intended to be used in household and similar applications such as:
– staff kitchen areas in shops, ofces and other working environments
– farm houses and by clients in hotels, motels and other residential type environments
– bed and breakfast type environments
– catering and similar non-retail applications.
9 To avoid contamination of food, please respect the following instructions:
- Opening the door for long periods can cause a signicant increase of the temperature in the compartments of the appliance.
- Regularly clean surfaces that can come in contact with food and accessible drainage systems.
9 Store raw meat and sh in suitable containers in the refrigerator, so that it is not in contact with or drip onto other food.
*One star(-6°C) is perfect for making ice cubes and is sufciently cold to keep food for 3 or 4 days. ** Two stars (-12°C), *** Three
stars (-18°C) will keep food safe for up to 3 months.**** Four stars (below -18°C) means that the compartment provides the ideal
conditions for freezing down fresh and precooked food and stores food for 15 to 20 days.
8 Refrigerator NOT suitable for freezing foodstuffs.
9 If the refrigerating appliance is left empty for long periods, switch off, defrost, clean, dry, and leave the door open to prevent mould
developing within the appliance.
WARNING! When positioning the appliance, ensure the supply cord is not trapped or damaged.
WARNING! DO NOT locate multiple portable socket-outlets or portable power supplies at the rear of the appliance.
1.2.1. Compression type appliances which use ammable refrigerants
WARNING! DO NOT use mechanical devices or other means to accelerate the defrosting process, other than those recommended by
the manufacturer.
WARNING! DO NOT damage the refrigerant circuit.
WARNING! DO NOT use electrical appliances inside the food storage compartments of the appliance, unless they are of the type
recommended by the manufacturer.
Refer to
instructions
Indoor use
only
Warning:
ammable
material
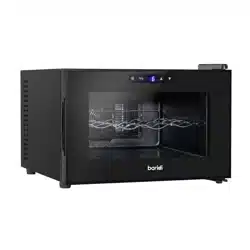
PRODUCT FEATURES
No. Description
1 Thermostat knob
2 Chiller door
3 Drip tray
4 Shelf
5 Adjustable front feet
6 Plastic retainer
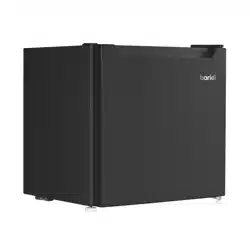
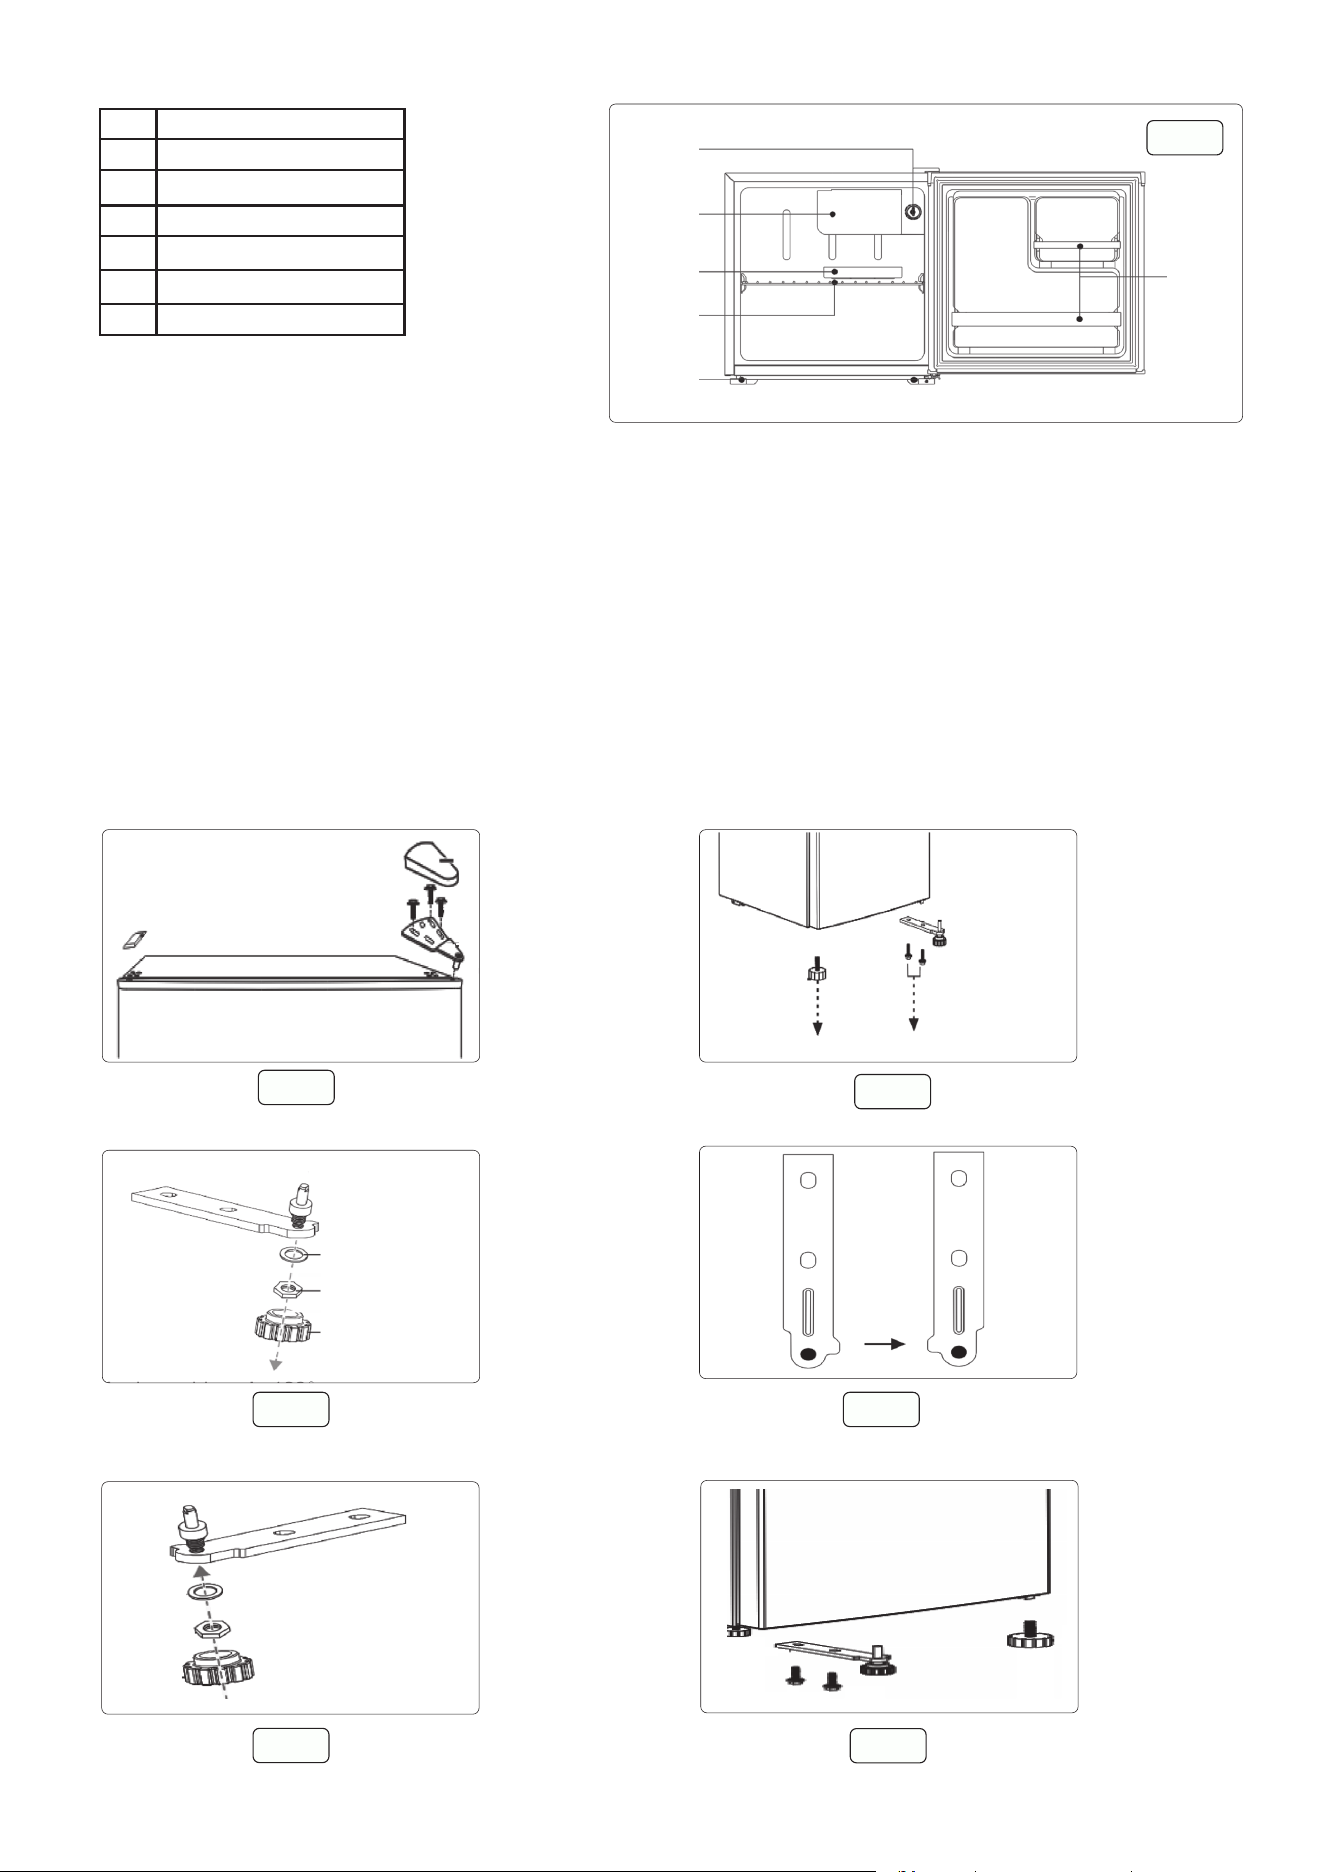
• DOOR REVERSAL INSTRUCTIONS
• 1. Make sure that your refrigerator is unplugged.
• 2. Remove the hinge cover and upper hinge from the top right side of the cabinet. Remove the screw hole cover from the top left side of the
cabinet. (g.2)
• 3. Remove the refrigerator compartment door from the cabinet.
• 4. Remove the screws that secure the lower hinge of the right side of the cabinet (g.3), then remove the hinge. Remove the adjustable foot to the
left.
• 5. Remove the adjustable foot on the lower hinge shaft, and remove the washer and nut (g.4).
• 6. Turn the lower hinge by180° (g.5).
• 7. Install the washer and nut into the hole on the pin shaft, and then install the adjustable foot (g.6).
• 8. Install the lower hinge on the left side of the cabinet. Install the adjustable foot at the right side (g.7).
• 9. Remove the screw that secures the door stop from the bottom right of the refrigerator compartment door, then remove the door stop and
install to the bottom left side (g.8).
• 10. Install the refrigerator compartment door.
• 11. Move the door bushing from the top right side of the refrigerator door to the top left side of the door and move the left hole cover to the right
side (g.9).
• 12. Secure the upper hinge to the top left side of the cabinet with the three screws you removed previously. Before you tighten the upper hinge
screws, make sure that the top of the door is level with the cabinet and that the rubber gasket makes a good seal.
g.1
g.2
g.3
g.4
g.6
g.7
g.5
1
2
3
4
5
6
SPECIFICATION
•
• INSTALLATION LOCATION
• VENTILATION CONDITIONS
• 1. The position you select for the fridge installation should be well-ventilated and not near a heat source such as cooker, and away from direct
sunlight, thus guaranteeing the refrigeration effect while saving energy consumption. DO NOT locate the fridge in the damp place, so as to
prevent the fridge from rusting. Note: The amount of refrigerant gas for the fridge can be found on the serial plate.
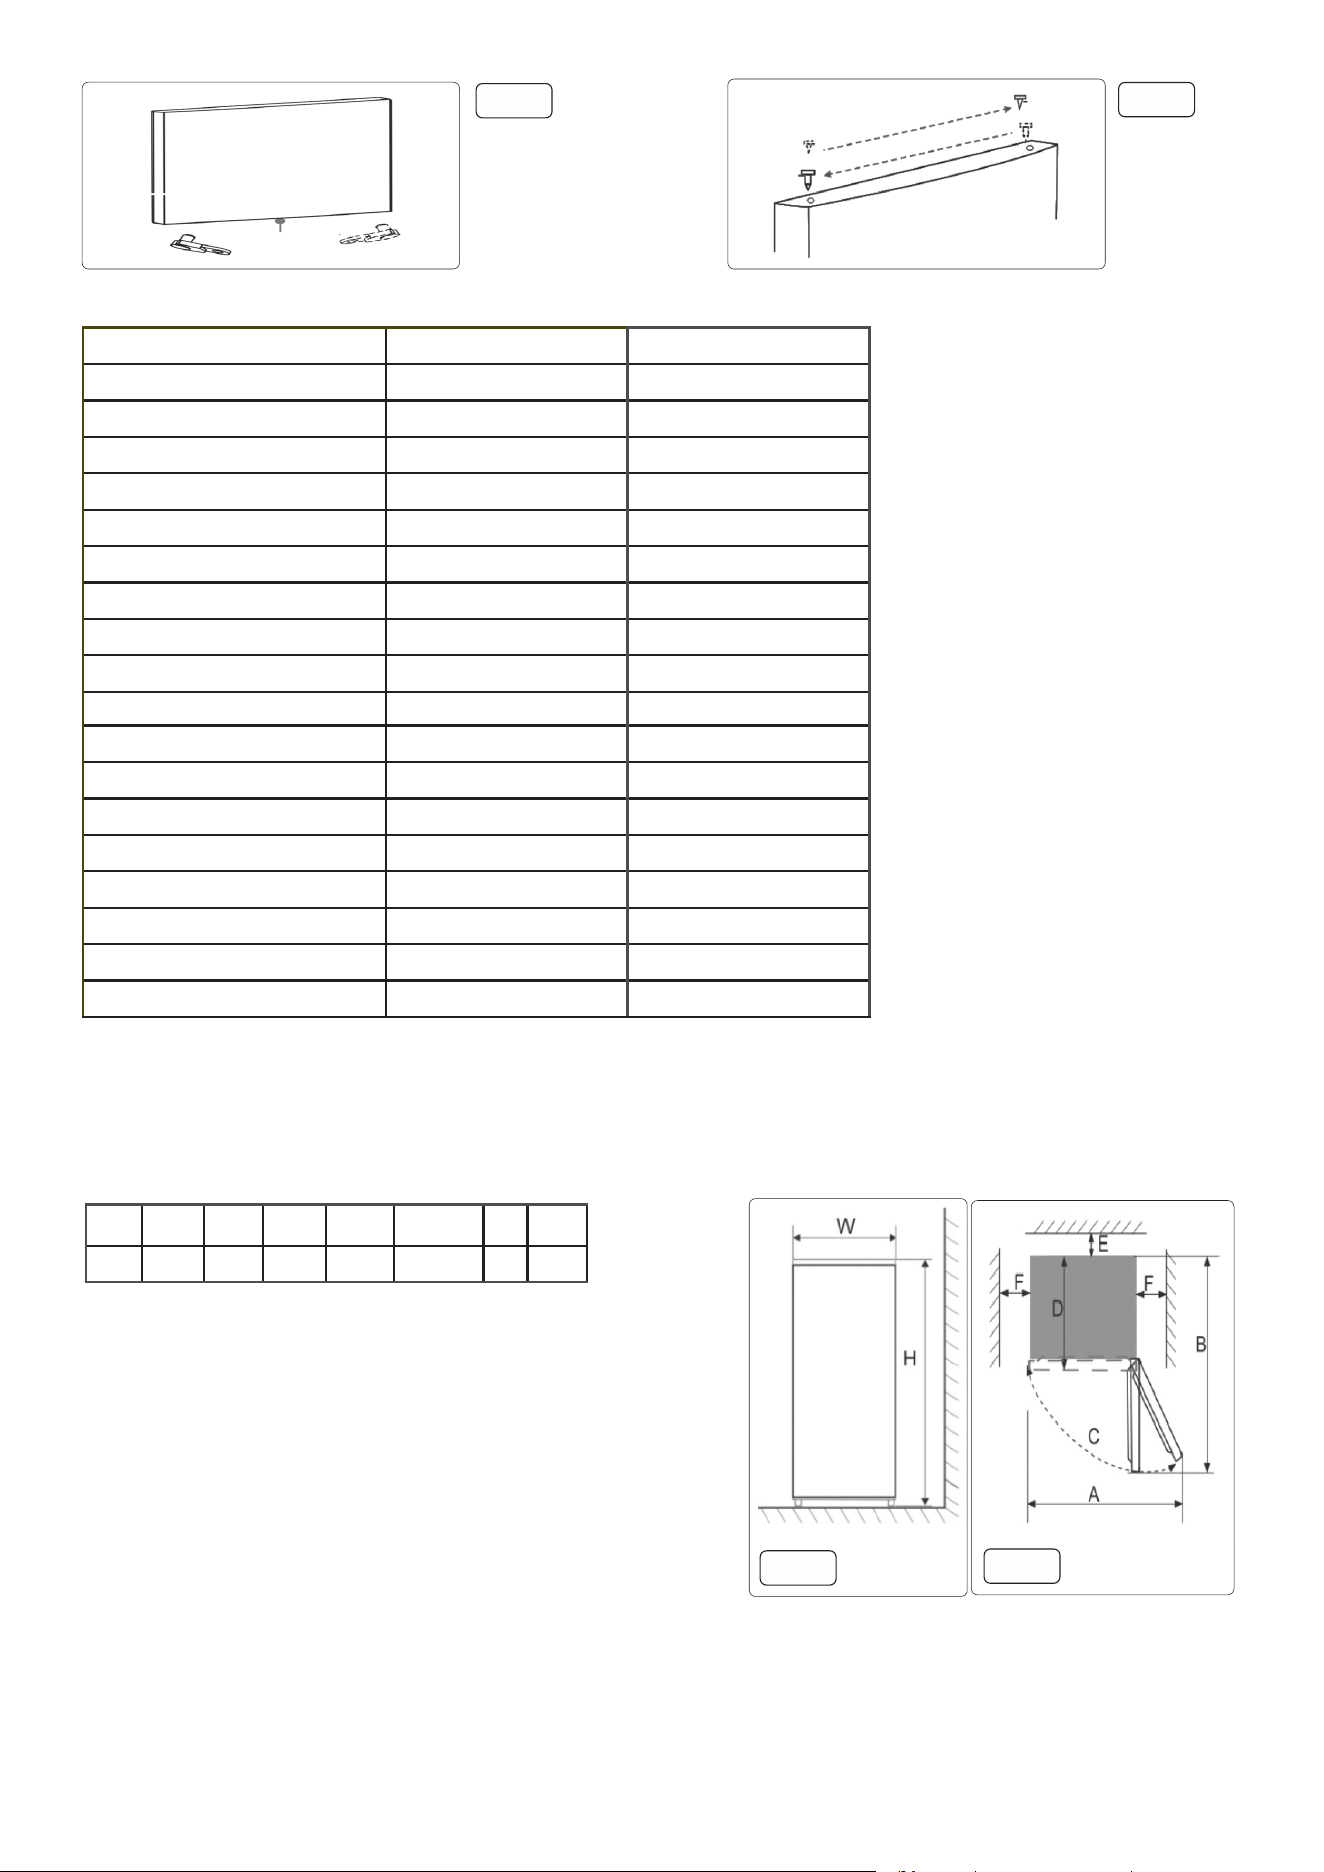
• 2.Please allow at least the free space requirements shown below when installing the unit.
• NOTE: Fig.10, Fig. 11 illustrate the space required around the unit installation.
• 3. Level ground
• Place the fridge on the solid and at ground (oor) to keep it stable, or else, it will
vibrate and be noisy. When the fridge is placed on materials such as carpet, straw
mat, polyvinyl chloride, solid backing plates should be tted underneath the unit to
prevent damage to the ooring.
• NOTE: Unobstructed ventilation shall be maintained around the appliance or in an
embedded structure.
• PREPARATIONS FOR USE
• Standing time
• 1. After the fridge is properly installed and well cleaned, do not switch it on
immediately. Leave the fridge to stand for more than 4 hours to allow gas to settle,
thus ensuring its normal operation.
• 2.Cleaning
• Wipe the inside of the fridge with a soft cloth.
• 3.Power-on
• Insert the plug into the solid socket to start the compressor. After 1 hour, open the fridge door, if the temperature inside the fridge compartment
drops, it indicates the refrigeration system is working normally.
• 4.Storage of food
• After the fridge runs for a period of time, the internal temperature of the fridge will be automatically controlled according to the user’s temperature
setting. After the fridge is fully cooled, put in your food, which usually need 2~3 hours to be fully cooled. In summer, when the temperature is high,
g.8
g.9
MODEL NO: DH256 DH257
Capacity 46L (41L Fridge, 5L Ice Box) 46L (41L Fridge, 5L Ice Box)
Climate Class N/ST N/ST
Colour White Black
Defrost Method Manual Manual
Door Style Reversible Reversible
Energy Rating E E
Foaming Gas Cyclopentane Cyclopentane
Internal Dimensions (W x D x H) 387 x 354 x389mm 387 x 354 x 389mm
Number of Shelves 1 1
Nett Weight 14kg 14kg
Operating Sound Level: 39dB 39dB
Power Cable Length 1.8m 1.8m
Product Dimensions (W x D x H): 470 x 447 x 496mm 470 x 447 x 496mm
Rated Current 0.6A 0.6A
Refrigerant R600a (15g) R600a (15g)
Temperature Range 0 -- 10°C 0 -- 10°C
Type Fridge Fridge
Supply
220-240V~50Hz 220V-240V~50Hz
W D H A B
C (°)
E F
470 447 496 800 874 130 ±5 50 100
g.10
g.11

it takes more than 4 hours for the foods to be fully cooled. (Open the door as little as possible before the internal temperature cools down).
• Setting up the fridge may cause noise or image disturbance on your mobile phone, xed-line telephone, radio receiver, television surrounding it.
Keep the fridge as far away from these items as possible.
• OPERATION
• PRE CHECKS - Ensure unit is not connected to the power source.
• 1.Clean the fridge with lukewarm water and detergent and wipe dry.
• Note: Electrical components should be cleaned with a dry cloth.
• 2.Turn the thermostat knob to the “2” position (g.12), and plug the fridge into the wall outlet.
The compressor will begin to run.
• 3. Check, after 30 minutes of operation, to ensure that the fridge is cold.
• TEMPERATURE CONTROL
• 1. The temperature control is located near the top of the unit.
• 2.Turning the thermostat knob adjusts the temperature of the fridge.
• 3.The marks on the knob represent different settings. Setting “1” is the warmest and setting “7” is
the coolest.
• 4. We recommend setting is “2” for normal operating conditions.
• DO NOT turn on the fridge for 4 hours. After the fridge is in place it needs to be left for 4 hours. This
allows time for the coolant to settle.
• INSTRUCTIONS FOR FOOD STORAGE
• DO NOT overload the fridge with food. Keep enough space between foods; if too close, the cold air ow will be blocked, thus affecting the
refrigeration performance. DO NOT store excessive or overweight foods, to avoid the shelf from being crushed. When storing the foods, keep a
distance away from the inner wall; and do not place the water-rich foods too close to the fridge rear wall, lest they get frozen on the inner wall.
• FRIDGE MODE
• Long-term storage of foods: The chiller compartment, where the temperature is generally controlled to -14°C, is suitable for the preservation of
foods for a long term, but the shelf life indicated on the food packages should be abided by.
• For large quantities of meat or sh, cut them into smaller pieces, pack them up separately with bags, and distribute them evenly in the drawer.
• Allow the hot foods to cool down to the room temperature before putting them in the fridge compartment.
• DO NOT put a glass container with liquid or canned liquids that are sealed into the fridge compartment to avoid bursting due to volume expansion
after the liquid gets frozen up.
• Its better to pack the food up before freezing it, and the packing bag used should be dry to avoid the packing bags get frozen together. Foods
should be packed or covered by suitable materials that are impervious to air and water, non-toxic and pollution-free, to avoid cross-contamination
and transfer of odour.
• TIPS FOR SHOPPING THE FROZEN FOODS
• 1. When you are buying frozen food, look at the storage guidelines on the packaging. You will be able to store each item of frozen food for the
period shown against the star rating. This is usually the period stated as “Best to use them before ×”, found on the front or rear of the packaging.
• 2. Check the temperature of the frozen food cabinet in the shop where you buy the frozen foods.
• 3. Make sure the frozen food package is in perfect condition.
• 4. Always buy frozen products last on your shopping trip or visit to the supermarket.
• 5. Try to keep frozen food together whilst shopping and on the journey home, as this will help to keep the food cooler.
• 6. Don’t buy frozen food unless you can freeze it straight away. Special insulated bags can be bought from most supermarkets and hardware
shops. These keep the frozen foods cold longer.
• 7. For some foods, thawing before cooking is unnecessary. Vegetables and pasta can be added directly to boiling water or steam cooked. Frozen
sauces and soups can be put into a saucepan and heated gently until thawed.
• 8. Use quality food and handle it as little as possible. When foods are frozen in small quantities, it will take less time for them to freeze up and
thaw.
• 9. Estimate the amount of foods to be frozen up. When freezing large amounts of fresh food, adjust the temperature control knob to the low
mode, with the fridge temperature lowered. So, foods can be frozen up in fast manner, with the food freshness ensured.
• HOW TO USE THE ICE-MAKING BOX
• Place the ice-making box in the upper position of the fridge compartment, so that it ices up as soon as possible.
• MOVING THE FRIDGE
• DO NOT drag or lift the fridge directly from its top frame when moving the fridge, to avoid damaging the top frame.
• MAINTENANCE AND CLEANING
• WARNING: Before cleaning, unplug the power plug rst. DO NOT plug in or pull plug out the plug with wet hands because of the risk of electric
shock and injury. Do not spill water directly on the fridge to avoid rust, electricity shock and accidents. DO NOT stretch your hands into the bottom
of the fridge, since you might be scratched by sharp metal corners.
• WARNING: The appliance shall be disconnected from its power source during service and when replacing parts and, if that the removal of the
plug is foreseen, it shall be clearly indicated that the removal of the plug has to be such that an operator can check from any of the points to
which he has access that the plug remains removed.
• Cleaning and user maintenance on the appliance shall not be made by children without supervision.
• INTERNAL CLEANING AND EXTERNAL CLEANING
• The food residuals in the fridge are liable to produce bad odour, so the fridge must be cleaned regularly.
• Remove all removable internal ttings and clean them with a soft towel or sponge dipped in warm water or neutral detergent.
• Clear off the dust accumulated on the rear panel and side plates of the fridge often.
• After using detergent, be sure to rinse it with clean water, and then wipe it dry.
• DO NOT use bristle brush, steel wire brush, detergent, soap powder, alkaline detergent, benzene, gasoline, acid, hot water and other corrosive or
soluble items to cleanse the cabinet surface, door gasket, plastic decorative parts, etc, so as to avoid damage.
• Carefully wipe dry the door gasket, clean the groove using a wooden implement wrapped with cotton string.
• After the cleaning, x the four corners of the door gasket rst, and then embed it segment by segment into the door groove.
• INTERRUPTION OF POWER SUPPLY OR FAILURE OF THE REFRIGERATING SYSTEM
• Take care of the frozen foods in the event of an extended non-running of the refrigerating appliance (such as interruption of power supply or
failure of the refrigerating system).
• Try to open the fridge door as infrequently as possible, in this way food can be safely and freshly kept for hours even in hot summer.
• If you get the power outage notice in advance.
• 1) Adjust the thermostat knob to the high mode an hour in advance, so that foods get fully frozen (Do not store new food during this time).
Restore the temperature mode to the original setting when power supply becomes normal in a timely manner.
• 2) You can also make ice with a watertight container, and put it in the upper part of the fridge, so as to extend the time for fresh food to be stored.
g.12

• NOTE: Once the fridge is used, use it continuously; and under normal circumstance, do not stop its use, so as not to affect the service life.
• DEFROSTING
• After a period of use, a thin layer of frost will be formed on the fridge compartment inner walls surface which may affect the refrigeration effect
if exceeding 5mm in thickness. In such case, you need to gently scrape the frost off using a wooden/plastic ice scraper rather than a metal or
sharp hardware. Frost needs to be cleared off every 3 months or so, and if the drawers and access of foods are affected by frosting, make sure to
remove the frost in a timely manner.
• FOLLOW THE FOLLOWING STEPS TO DEFROST
• 1. Take out the frozen foods, shut off the mains power supply, open the fridge door, and gently remove the frosts from the inner wall with an ice
scraper. To speed up the thawing process, you are suggested to place a bowl of hot water inside the fridge, and when the solid ice frosts become
loose, use an ice scraper to scrape them off and then take them out.
• 2. After defrosting, clean the fridge inside, and switch on the power supply.
• NOTE: When the appliance is not in use for long periods, disconnect from the electricity supply, empty all foods and clean the appliance, leaving
the door ajar to prevent unpleasant smells.
• SAFETY-CHECK AFTER MAINTENANCE
• Is the power cord broken or damaged?
• Is the power plug rmly inserted into the socket?
• Is the power plug abnormally overheated.
• NOTE: Electric shock and re accident may be caused in case the power cord and plug is damaged or stained by dust. If any abnormality, please
unplug the power plug and get in contact with the vendor.
• HOW TO DISASSEMBLE THE PARTS
• SHELVES
• Hold one end of the shelf, and lift it up while pulling it outwards.
• FLIP COVER
• Keep the ip cover in the vertical direction, align it with the rotating shaft opening on the right side, and pull it outward to remove it.
• During use of the fridge, do not close the door when the ip cover is opened, to avoid damaging the fridge door.
• END OF LIFE DISPOSAL
• Recycle unwanted packaging materials. When this product is no longer required, or has reached the end of it’s useful life, please dispose of it in
an environmentally friendly way. Drain any fluids (if applicable) into approved containers and in accordance with local waste regulations.
• Check local regulations for appropriate waste disposal instructions.
• TROUBLESHOOTING
Fault Checks Solutions
No operation Is power switched o
Are breakers and fuses tripped or blown
No electricity power cut
Switch on
Open the door and checking whether the lamp is lit.
Abnormal noise Is fridge stable.
Does fridge touch the wall.
Adjusting fridge's adjustable feet.
Pull away from wall.
Poor refrigerating eciency Hot food or overloading.
Door closing.
Is the fridge in direct sunlight or close to
central heating.
Is the fridge well ventilated.
Check temperature settings
Allow food to cool and do not overload compartments.
Check the door closing times and seal.
Move appliance to a cooler area.
Clear vents to maintain good ventilation.
Set the appropriate temperature.
Peculiar smell in fridge Spoiled food.
Fridge requires cleaning.
Remove oending articles.
Clean fridge.
Dellonda Limited, Sole UK Distributor of Baridi
Kempson Way, Suffolk Business Park, Bury St Edmunds, Suffolk. IP32 7AR
01284 757575 suppor[email protected] www.dellonda.co.uk
Environment Protection and Waste Protection and Electrical Equipment Regulations (WEEE)
Recycle unwanted packaging materials. When this product is no longer required, or has reached the end of it’s useful life, please dispose of it in an
environmentally friendly way. Drain any fluids (if applicable) into approved containers, in accordance with local waste regulations. It is our policy to
continually improve products and we reserve the right to alter data, specifications and parts without prior notice. No liability is accepted for incorrect
use of this product. Guarantee is 12 months from purchase date, proof of which is required for any claim.