This symbol represents a warning. To ensure safe use,
always adhere to the instructions described in this
documentation.
This symbol is followed by a user
’
s tip.
Precautions
- Do not subject the unit to excessive force or shock.
- Avoid contact with any corrosive materials.
- Do not dispose this unit in a re as it may explode.
- Do not recharge and do not dispose of batteries in re.
- Technical specications and user manual contents for this product are
subject to change without notice.
Package contents
Y
ou can nd the follow items in the package.
Stop watch Carabiner User manual
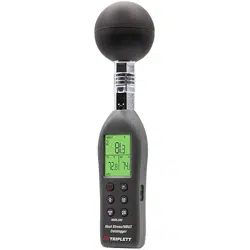
Features
1
5
6
7
8
4
9
11
10
3
2
1. Black globe sensor
2. [ SPLIT / RESET ] key
3. [ RECALL ] key
4. LCD display
5. Thermo-hygro sensor
6. Neck rope
7. [ START / STOP ] key
8. [ MODE] key
9. String hole
10. Buckle hole
1
1.
Battery door
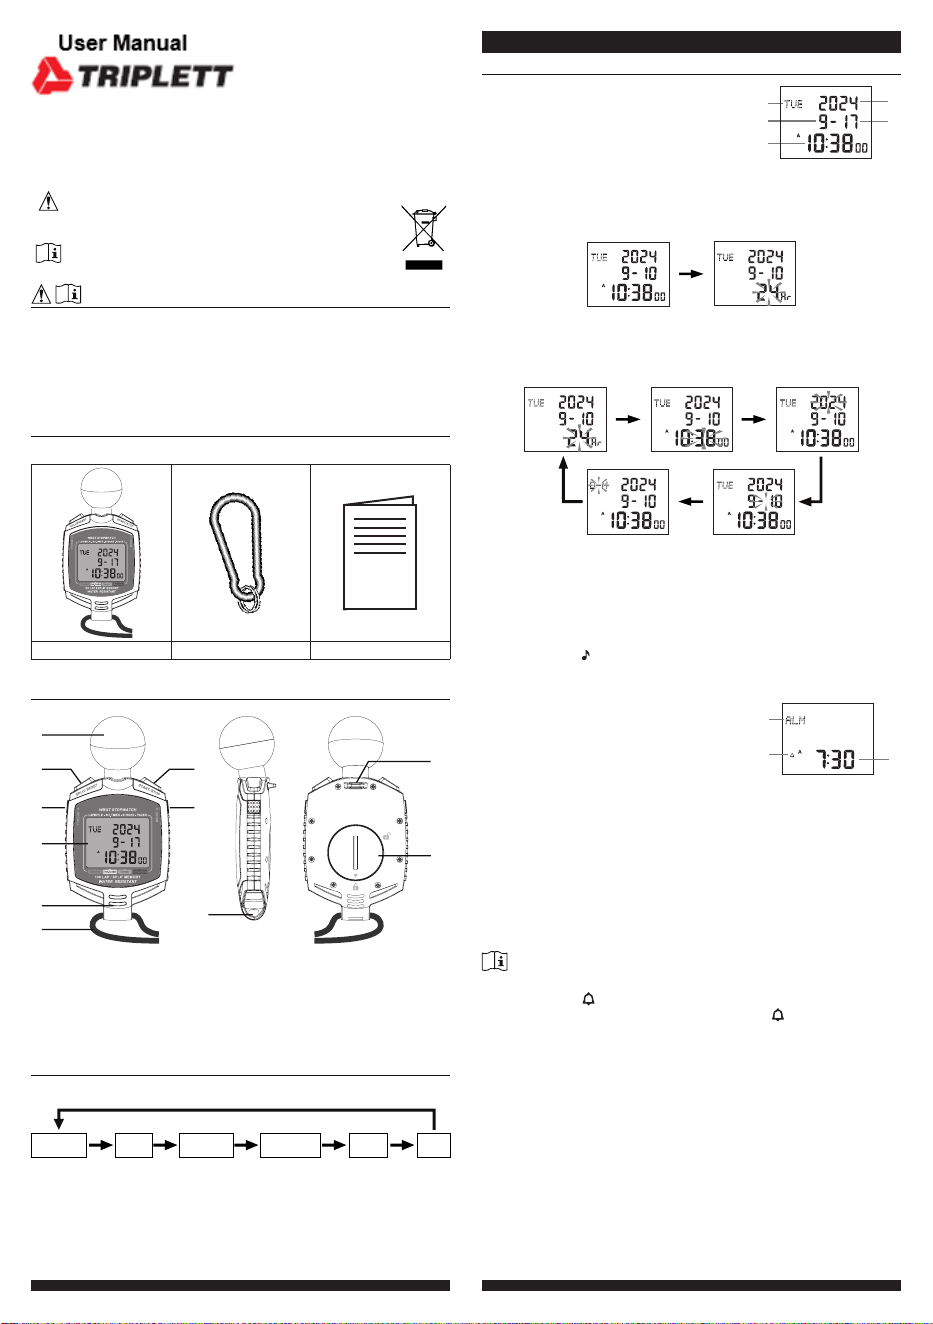
Mode selection
Y
ou can press
[ MODE ] to switch the modes in below sequence:
Time &
date mode
WBGT
mode
Stopwatch
mode
Interval
timer mode
Stroke
mode
Pace
T
ime & date mode
1. Day of the week
2. Month
3. Time
4. Year
5. Day
1
4
5
2
3
T
ime and calendar setting
1. In T
ime & date mode
, Press and hold [ RECALL
]
for 2 seconds to
enter setting mode with 12hr icon ashing.
Time & date mode
12/24 hour format
2. Press [ SPLIT / RESET ] or [ START / STOP ] to toggle between
12 / 24 hour format.
3. Press [ MODE ] to proceed with next step of the setting as below:
Month / day format
12/24 hour format
Set date
Set time Set year
4. Once you complete the setting, press [ RECALL ] to save and exit
the setting mode, or let it exit automatically 30 seconds later without
pressing any key.
T
urn on key tone
In time & date mode, press [ START / STOP ] to turn on / o key tone,
once turn on the icon will shown on the screen’s top right corner.
Alarm time mode
1. Alarm mode icon
2. Alarm activated icon
3. Alarm time
1
2
3
Set alarm time
1. In Time & date mode, press [ SPLIT / RESET ] to switch to Alarm
time mode with 5 seconds.
2. Press and hold [ RECALL ] for 2 seconds to enter setting mode
with alarm time ashing as below.
3. Press [ SPLIT / RESET ] or [ ST
ART / ST
OP
]
to adjust the minute
and hour value (hold the key for fast adjust).
4. Press [ RECALL
]
to save and back to T
ime & date mode
, or let it
exit automatically 30 seconds later without pressing any key.
Note:
- Once you enter alarm time setting mode, the alarm will automatically
turn on and the icon will be shown.
- Press [ ST
ART / ST
OP
]
to turn on alarm and the icon will be shown.
Alarm operation
When the time reaches the alarm time, the alarm sound will beep.
The
alarm beeping can be stopped by following operation:
- Auto-stop after 1 minutes if without any operation and the alarm will
activate again in the next day
.
- By pressing any key to stop the current alarm when it is sounding.
HSW50
Combination Heat Stress Stopwatch
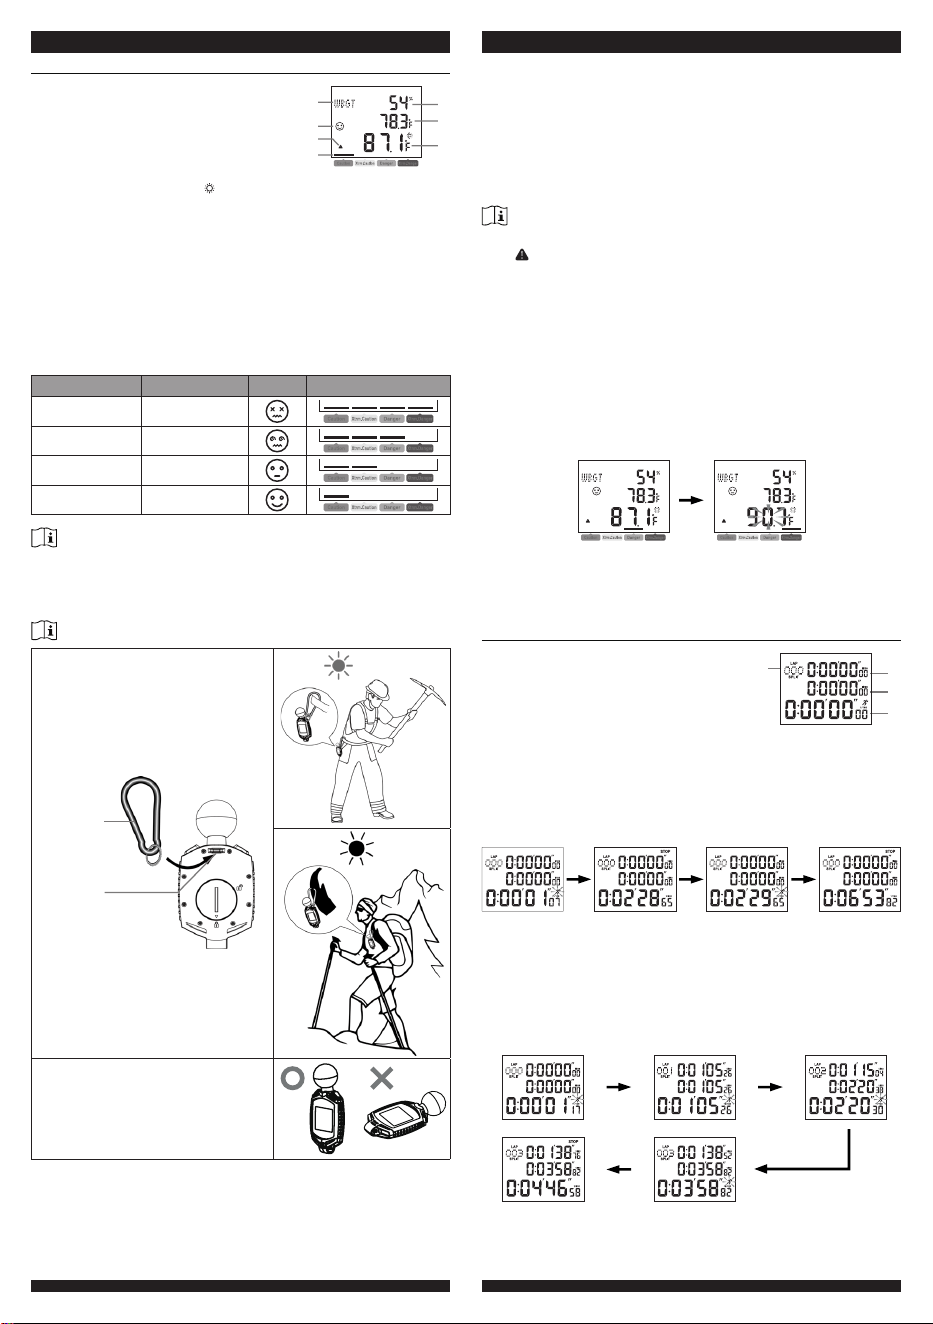
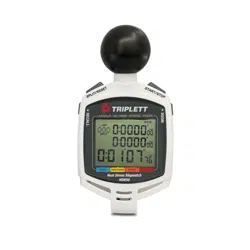
WBGT mode
1. WBGT mode icon
2. WBGT level icon
3. WBGT alert icon
4. WBGT level indicator
5. Humidty
6. Temperature
7. WBGT temperature (with icon)
1
2
3
4
5
6
7
About WBGT
The wet-bulb globe temperature (WBGT) is a measure of
environmental heat as it aects humans. Unlike a simple temperature
measurement, WBGT accounts for major environmental heat factors:
air temperature, humidity, and radiant heat from sunlight. It is used
by industrial hygienists, athletes, sporting events and the military to
determine appropriate exposure levels to high temperatures.
WBGT caution icons and level
Description WBGT Icon Level
Extreme Danger > 90°F
Danger 88 ~ 89.8°F
Extreme Caution 84.9 ~ 87.8°F
Caution 80 ~ 29.3°F
Note:
- WBGT display range is 10 ~ 50°C (50 ~ 122°F), if below or above the
measurement range, the reading will show "Lo" or "HI" respectively
- There is no WBGT level indication when the WBGT is below 26.7°C
(80.1°F)
How to make an accurate measurement of WBGT
This stopwatch is designed for outdoor
measurement. It can be worn around
the neck or waist. Attach the carabiner
(included) to the back of the stopwatch
and hook it to your belt. Please stay
away heat source from the human
body.
Carabiner
Mounting
hole
Keep the Black globe sensor face
up and out of the shade as much as
possible. If the black bulb is in the
shade, the temperature of the black
bulb will drop and it will not be possible
to measure the WBGT accurately.
Set WBGT alert
1. In WBGT mode, press and hold [ RECALL ] for 2 seconds to enter
WBGT alert setting mode.
2. Press [ START / STOP ] or [ SPLIT / RESET ] to adjust the value.
3. Press [ RECALL ] to save and back to WBGT mode, or let it exit
automatically 30 seconds later without pressing any key.
4. Once the WBGT match, the alert will sound 1 minute and the
WBGT value will ash.
5. Press any key to stop the sound.
Note:
- Once you set the WBGT alert, the alert will automatically turn on and
the icon will be shown. You can also press the [ START / STOP ] to
toggle the alert on /o in WBGT mode.
- If the stopwatch state in other mode, when alert is sounding, it will back
to WBGT mode.
Set temperature Unit
In WBGT mode, press [ SPLIT / RESET ] to switch temperature unit
between °C and °F.
WBGT alert operation
When the WBGT reaches the alert temperature, the alert sound will
beep.
WBGT mode
WBGT reaches the
alert temperature
The alert beeping can be stopped by following operation:
- Auto-stop after 1 minutes if without any operation and the alert will
activate again if WBGT reaches the alert temperature again.
- By pressing any key to stop.
Stopwatch mode
1. Number of lap & split
2. Current lap time
3. Current split time
4. Stopwatch
1
2
3
4
Accumulated elapsed time measurement
1. In Stopwatch mode, press [ START / STOP ] to start.
2. Press [ START / STOP ] again to stop.
3. Press [ START / STOP ] again to restart.
4. Press [ START / STOP ] again to stop again.
Start Stop Restart Stop
Split time measurement
1. In Stopwatch mode, press [ START / STOP ] to start.
2. Press [ SPLIT / RESET ] to split 1.
3. Press [ SPLIT / RESET ] again to split 2 and release.
4. Press [ SPLIT / RESET ] again to split 3 and release.
5. Press [ START / STOP ] key again to stop.
[SPLIT /
RESET]
[SPLIT /
RESET]
[SPLIT /
RESET]
[START
/ STOP]
Start Lap/Split 1 Lap/Split 2
Stop Lap/Split 3
6. When the time measurement is stopped, press [ SPLIT / RESET ] to
reset the values to 0:00’00”00.
Note:
- Measures up to 9:59’59”, and restart from 0:00’00”00.
- The sports timer can display up to 999 lap/split records, but only rst
500 lap/split time can be stored in memory with fastest & lowest lap and
average time.
- It can be used to record times for up to 500 dierent runners by press
[ SPLIT / RESET ] as each runner crosses the nish line.
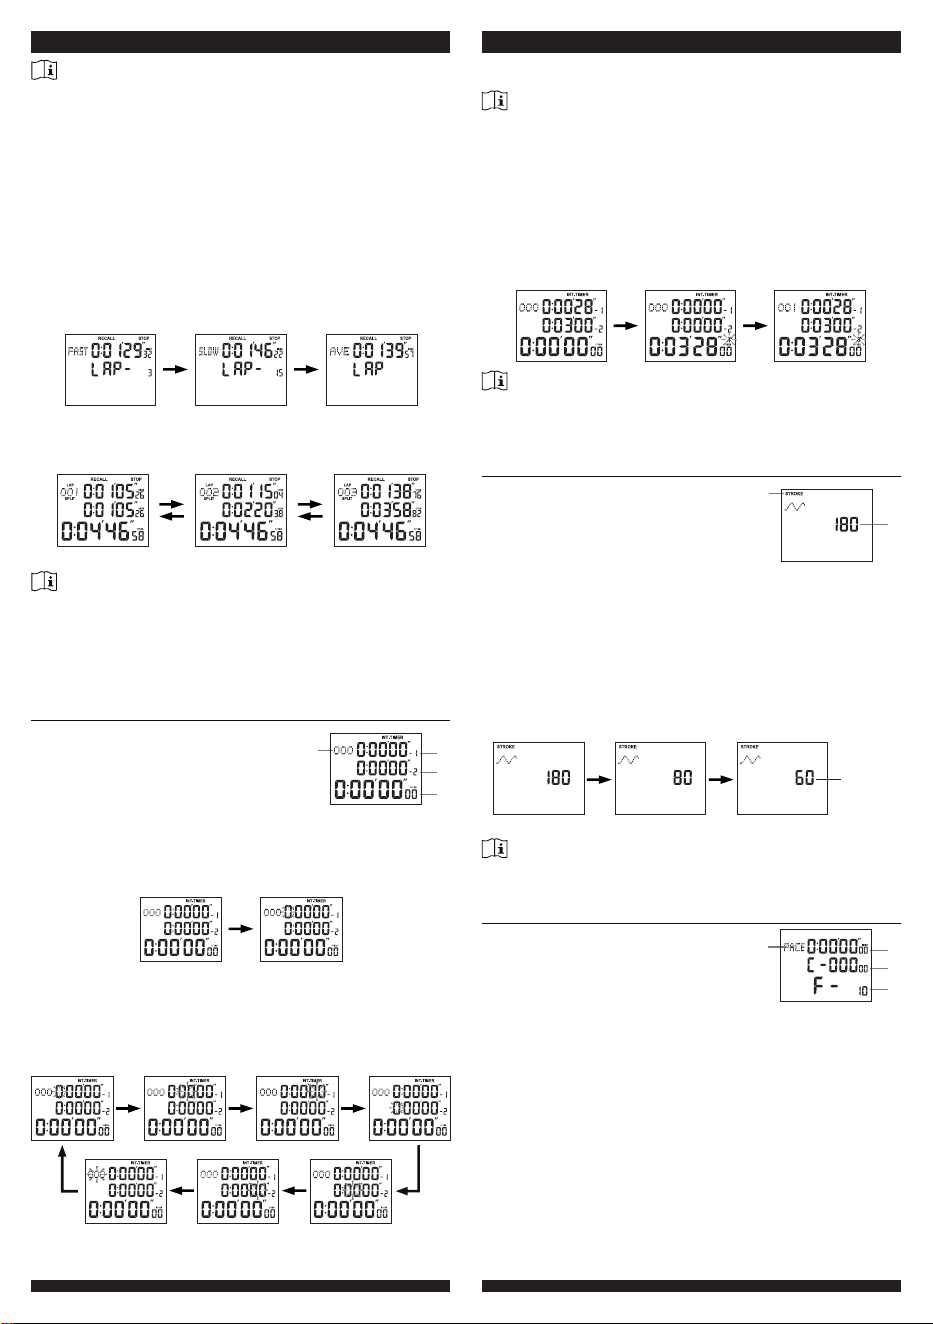
How to recall the records
1. Measure lap/split time as described in the previous section.
2. Press [ RECALL ] to enter recall mode when there is at least one
lap/split time record.
3. Press [ RECALL ] again to check the fastest lap time / lowest lap
time / average lap time.
Fastest lap time Slowest lap time Average lap time
4. Press [ START / STOP ] or [ SPLIT / RESET ] to check lap/split
time records downwards or upwards.
Lap 1 record Lap 2 record Lap 3 record
5. Press [ MODE ] to return to Stopwatch mode.
Note:
- The sports timer can display up to 999 lap/split records, but only rst 500
lap/split time can be stored in memory with fastest lap, lowest lap and
average time.
- If the lap & split time displays exceed 999, the average records will be
invalid; Or the fastest & slowest & average records will be invalid if the
measuring time exceeds 9 hours 59 minutes 59 seconds.
Interval timer mode
1. Cycle times
2. Current countdown time 1
3. Current countdown time 2
4. Stopwatch
1
2
3
4
Countdown time setting
1. In Countdown time mode, press and hold [ RECALL ] for 2
seconds to enter setting mode with Timer 1’s Hour digit ashing.
Countdown mode Hour (1) setting
2. Press [ START / STOP ] to adjust its value or press [ START /
STOP ] without releasing to speed up the setting.
3. Press [ SPLIT / RESET ] to step other setting items as below
sequence: Hour (1) > Minute(1) > Second(1) > Hour(2) > Minute(2)
> Second(2) > Lap.
Set hour (2)
Set minute (2)Set second (2)Set lap
Set hour (1) Set minute (1) Set second (1)
4. Press [ RECALL ] again to save and exit the setting mode, or let it
exit automatically 30 seconds later without pressing any key.
Note:
- The maximum pre-set countdown time is 9:59’59” and 999 laps.
- Press and hold [ SPLIT / RESET ] for 2 seconds to clear the pre-set
countdown time value.
Use of the Interval timer
1. Set the countdown time as described in the previous section.
2. Press [ START / STOP ] to start the Interval timer.
3. Press [ START / STOP ] again to stop the Interval timer.
4. Press [ SPLIT / RESET ] to clear the counting value
Start Countdown to 0:00’00”00 Cycle the counting
Note:
- When the timer countdown to 0:00’00”00, it will cycle its counting and
record the cycle times.
- The maximum countdown cycle times can be up to 999.
Stroke frequency counter mode
1. Stroke mode icon
2. Stroke frequency per minute
1
2
This stroke function is used to measure a sample of 3 strokes or
actions and returns a frequency or rate per minute. Ideal for swimming
or rowing.
1. In Stroke frequency counter mode, press [ START / STOP ] to
start measuring the stroke rate, and it display countdown from 180.
2. Press [ START / STOP ] again after 3 stroke or actions to show the
rate per minute.
3. Press [ SPLIT / RESET ] to return the value to 180.
Stroke
frequency
1
st
stroke
Start
2
nd
stroke 3
rd
stroke
Stop
Note:
The measurable rate of stroke per minute is: 11 - 180 If the rate of
stroke per minute is out of range, “---” will be displayed on the LCD.
Pace mode
1. Pace mode icon
2. Pace time
3. Number of total paces
4. Pace frequency per minute
1
2
3
4
This Pace function enables you set an audible beep rate (from 10 to
320 beats) per minute for maintaining the pace of the activity. This is
useful if you need to carry out activities at a rate per minute.
Pace frequency setting
1. In Pace mode, the frequency digit ashing.
2. Press [ SPLIT / RESET ] to set the pace frequency per minute as:
10, 20, 30, 40, 60, 80, 120, 160, 240 or 320.
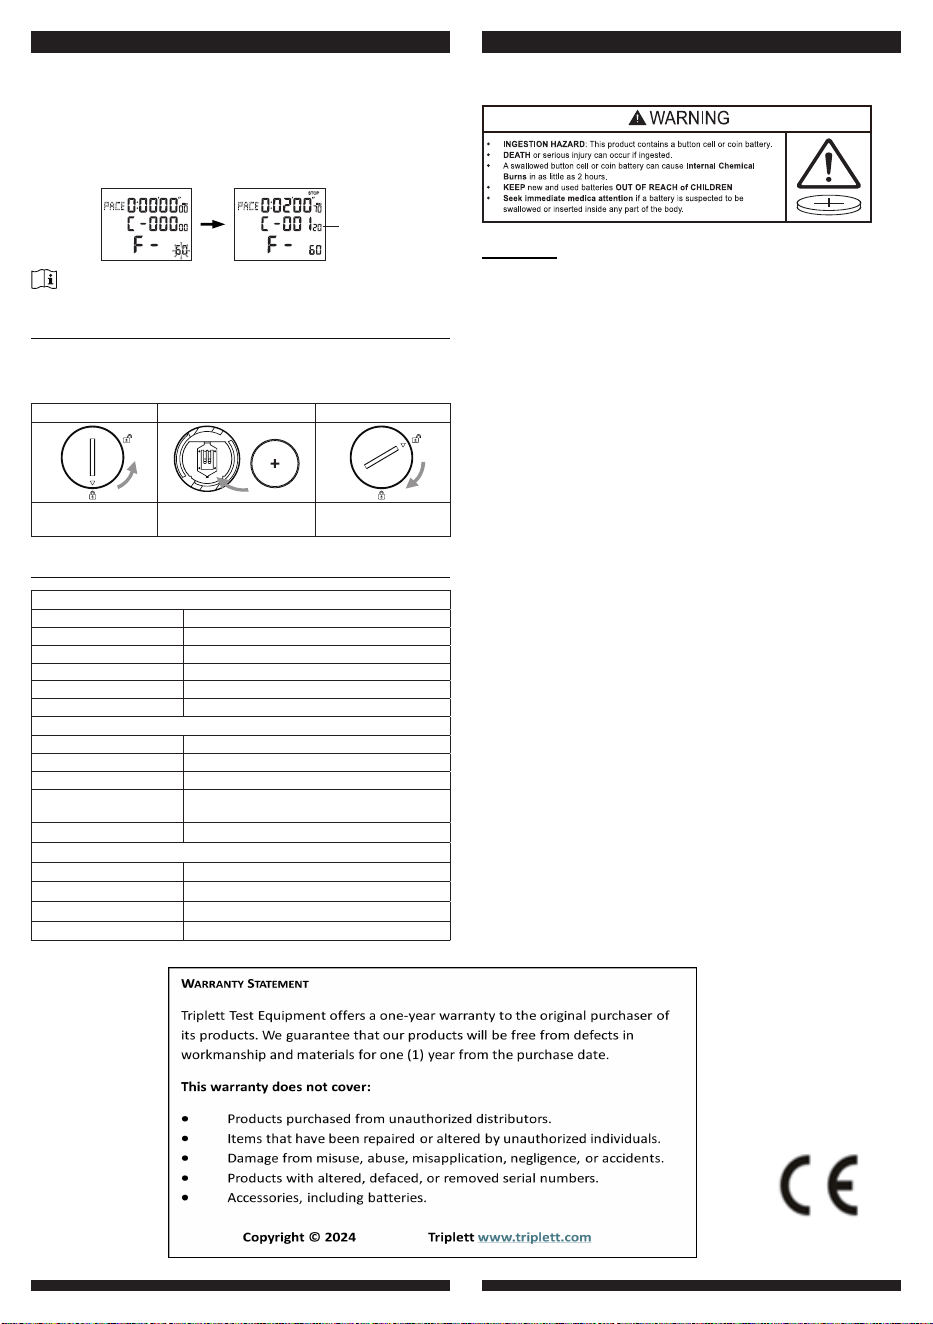
Pace Measurement
1. Set the Pace frequency as described in the previous section.
2. Press [ ST
ART / ST
OP
]
to start the pace measurement.
3. Press [ ST
ART / ST
OP
]
again to stop the pace measurement with
the number of paces displayed on the LCD.
4. Press [ SPLIT / RESET ] to clear the values and reset the
frequency.
Number
of paces
Start
Stop
Note:
It will clear all the pace values automatically if you exit the pace mode.
Battery replacement
When the LCD becomes dim, remove the screws in the back case
and replace with a new CR2450 battery. Pay attention to the battery
polarity.
Step1 Step2 Step3
Remove the battery
door with coin
Insert a new CR2450
button cell battery
Replace the battery
door
Specication
General
Hour format: 12 hour
AM / PM or 24 hour
Calender format: D - M or M - D
Main power: CR2450
Dimension: 63mm(W) x 122mm(H) x 34mm(D)
Operating temperature: 0°C ~ 50°C(32°F ~ 122°F)
Operating humidity: RH 10% ~ 90% non-condensing
Temperature
Unit: °C or °F
Display range: 23 ~ 122°F
WBGT
display range:
50 ~ 122°F
Accuracy: ≤0°C ± 2°C (≤32°F ± 3.6°F)
>0 °C ± 1°C (>32 °F ± 1.8°F)
Resolution: 1 decimal place (°C / °F)
Humidity
Unit: %
Display range: RH 1 ~ 99%
Accuracy: RH ±5%
Resolution: 1%
WARNING :danger of explosion if battery is incorrectly replace.
Replace only with the same or equivalent type.
WARNING
a) Remove and immediately recycle or dispose of used batteries
according to local regulations and keep away from children. Do
NOT dispose of batteries in household trash or incinerate.
b) Even used batteries may cause severe injury
or death.
c) Call a local poison control center for treatment information.
d) The compatible battery type: CR2450.
e) The nominal battery voltage: 3V DC.
f) Non-rechargeable batteries are not to be recharged.
g) Do not force discharge, recharge, disassemble, heat above
(manufacturer’s specied temperature rating) or incinerate. Doing
so may result in injury due to venting, leakage or explosion resulting
in chemical burns.
h) Ensure the batteries are installed correctly according to polarity (+
and -).
i) Do not mix old and new batteries, dierent brands or types of
batteries, such as alkaline, carbon-zinc, or rechargeable batteries.
j) Remove and immediately recycle or dispose of batteries
from
equipment not used for an extended period of time according
to
local regulations.
k) Always completely secure the battery compartment. If the battery
compartment does not close securely, stop using the product,
remove the batteries, and keep them away from children.