
Customer Service
Email: [email protected]
Website:www.belifeclean.com
Product Specification
Battery
Charging time
Battery charger output
Working time
Max Power
Vacuum
25.9V/2500mAh
5 hours
50mins (low gear) , 30mins (mid gear),15mins( high gear)
250W
30V/500mA
10-15-23 KPa
www.belifeclean.com
Email: [email protected]
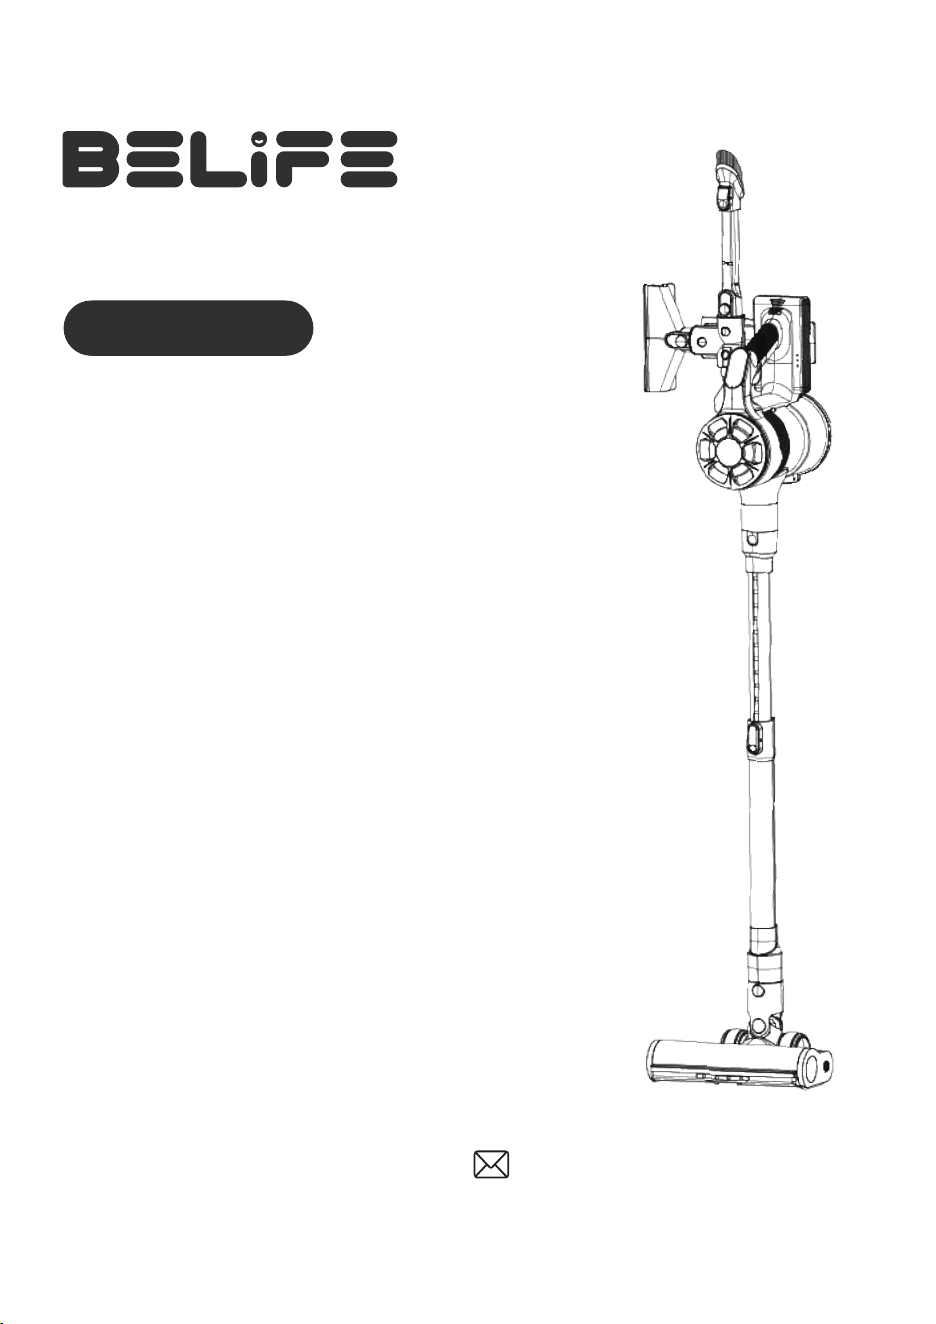
Stick vacuum cleaner
S11
USER MANUAL
Read this instruction carefully before use.
BELIFE IS HERE TO HELP.
We'll get back to you within 1 business day.

2 3
TABLE OF CONTENTS
SAFETY NOTES
3~6
TABLE OF CONTENTS
2
INTRODUCTION OF COMPONENTS
6
PRODUCT INSTALLMENT
7~8
PRODUCT OPERATION
8~14
TROUBLE SHOOTINGS
15-16
PROBLEMS
17
SAFETY NOTES
Important Safety Notes
WARNING: When using electrical appliances, basic safety precautions should
always be observed, including the following measures to reduct
the risk of, electric shock or personal injury.
1. Store it in a dry place indoors, where it is not easily accessible to children.
2. Children 10 years old and above should use this equipment with full
understanding of the hazards involved, under parental supervision or guidance
for safe use.
3. Do not allow children to use and play with this machine.
4. Use only the accessories provided in this manual, misuse or use of other
accessories may cause personal injury.
5. Please take extra care when using the vacuum cleaner continuously.
6. Keep the vacuum cleaner away from fire and other hot places.
7. Do not block the vacuum cleaner or obstruct the airflow, keep the vacuum
cleaner free of any objects including, lint, clothes, clothing and other debris.
8.Pay special attention to keeping away from hair to prevent personal injury caused
by entanglement.
Electrical Safety
1. Use the charger and battery provided by the manufacturer.
2. Do not modify the charger in any ways.
3. The provided voltage is within the approved voltage range shown
on the charger nameplate.
4. Use the charger with the battery pack, otherwise it may cause a fire.

4 5
SAFETY NOTES
SAFETY NOTES
5. Check the charger cable for signs of damage or deterioration before use.
Damaged or tangled charger cables can increase the risk of fire and electric
shock.
6. Do not abuse or use the wrong charger cord.
7. Do not carry the charger by the cord.
8. Do not pull the power cord to disconnect it from the outlet, grasp the plug and
pull to disconnect it.
9. Do not wrap the power cord around the charger when storing it.
10. keep the charger cord away from hot surfaces and sharp objects.
11. If charge cable is damaged, purchase charger from our Belife official store
or Amazon store or contact our customer service for help.
12. Do not operate the charger or appliance with wet hands.
13. Do not store or charge outdoors.
14. The charger must be disconnected from the outlet before removing the
battery, cleaning or maintaining the device.
Battery Safety
1. The package contains a large volume lithium-ion battery.Do not burn the
batteries or expose them to high temperatures, as they may explode.
2. Stop using the battery when there is liquid leaked. The liquid from battery may
cause irritation or burns to skin.
3. In case of emergency, contact local professional service immediately for
support.
4. Under extreme conditions, individual cells may leak. Do not touch any liquid
that leaks from the battery. If the liquid gets on your skin, wash immediately
with soap and water. If liquid gets in your eyes, rinse immediately with water
for at least 10 minutes, then seek medical attention. Handle the battery with
gloves and dispose of it immediately in accordance with local regulations.
5. Short circuiting of the battery terminals may result in burns or fire.
6. When the battery pack is not in use, keep it away from paper clips, coins, keys,
nails, screws or other small metal objects that may connect one terminal
to the other.
7. When scrapping the vacuum cleaner, remove the batteries and dispose of them
safely according to local regulations.
Maintenance Services
1. Stop using this equipment if any part is damaged or defective. Contact us
customer service first for help.
2. Do not use this equipment if any part is damaged or defective.
3. Repairs should be made by a service agent or qualified personnel in
accordance with relevant safety regulations. Repairs by unqualified personnel
may be dangerous,and will not be covered by our warranty policy.
4. Do not modify the equipment in any way as this may increase the risk of
personal injury.
5. Only use replacement parts or accessories provided or recommended by the
manufacturer.
Applicable scenarios
1. This equipment is designed for household dry vacuum cleaning only.
2. Do not use the device to suck liquids on wet surfaces.
3. Do not vacuum flammable, burning or smoking items.
4. Use only as described in this manual.
5. Do not suck concrete, tar gravel or other hard objects.
6 7
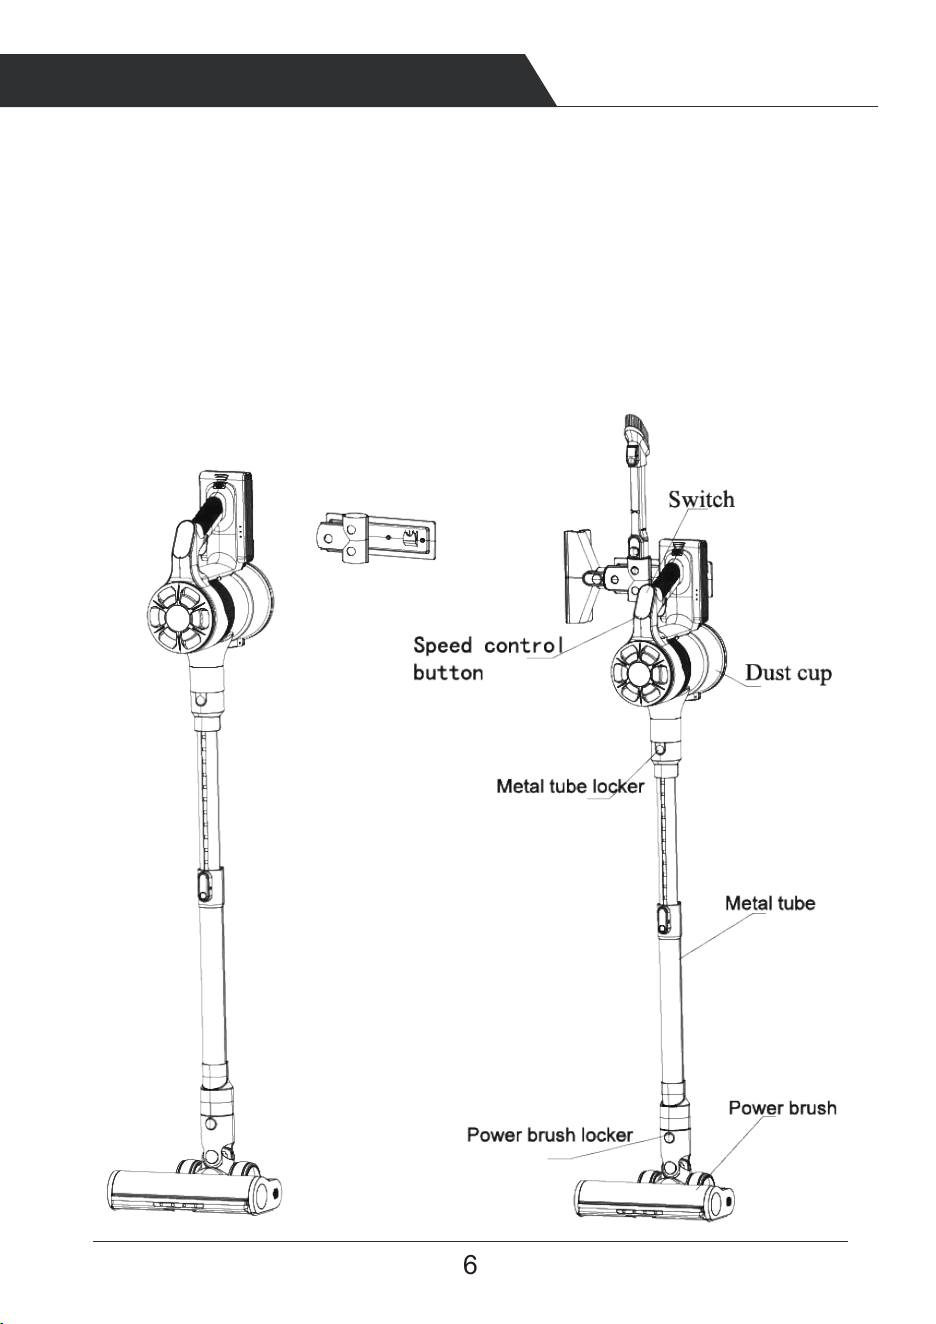
INTRODUCTION OF COMPONENTS
PRODUCT INSTALLMENT
Warning
1. Do not use water, solvents or polishes to clean the exterior of the unit; wipe
clean with a dry cloth.
2. Do not immerse the unit in water or clean it in the dishwasher.
Main body
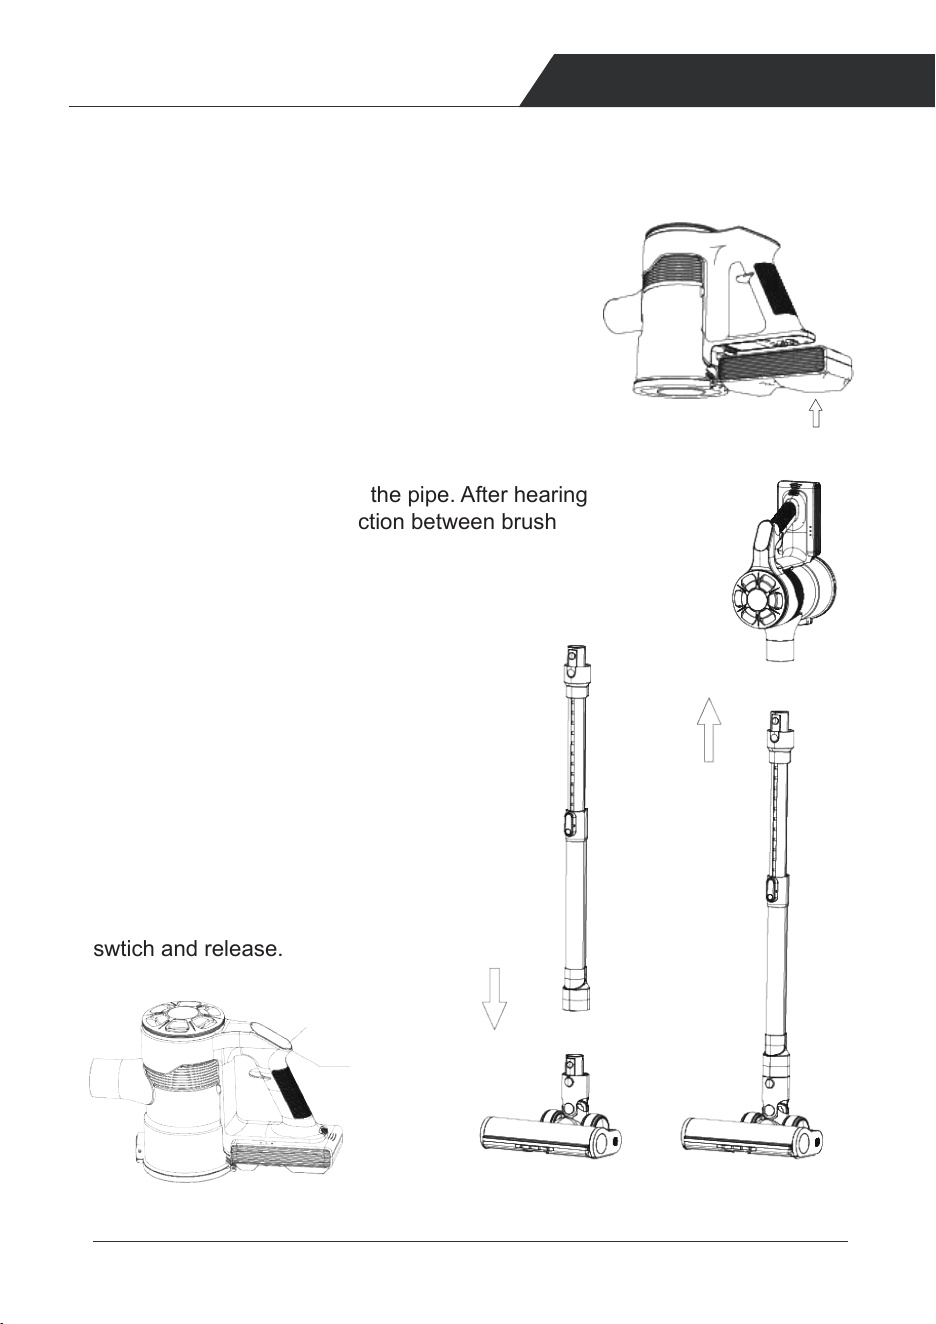
1.Use as the stick vacuum cleaner
b. Insert the ground brush into the pipe. After hearing
the 'click' sound, the connection between brush
and pipe is done.
a. Assemble the battery into the dust cup, make
sure the battery bolt head is inserted into the
dust cup slot rightly as below.
The battery is properly installed in place as
shown in the diagram, and after hearing the
clicking sound,the installation is firm and reliable.
c. Attach the brush to another head of the
tube as showed. Insert the pipe into the
top part the same way as ground brush
into the pipe. After the 'click' sound, the
assembly process is finished.
(b) (c)
d. To starting vacuuming, press the On/Off
swtich and release.
(a)
(d)
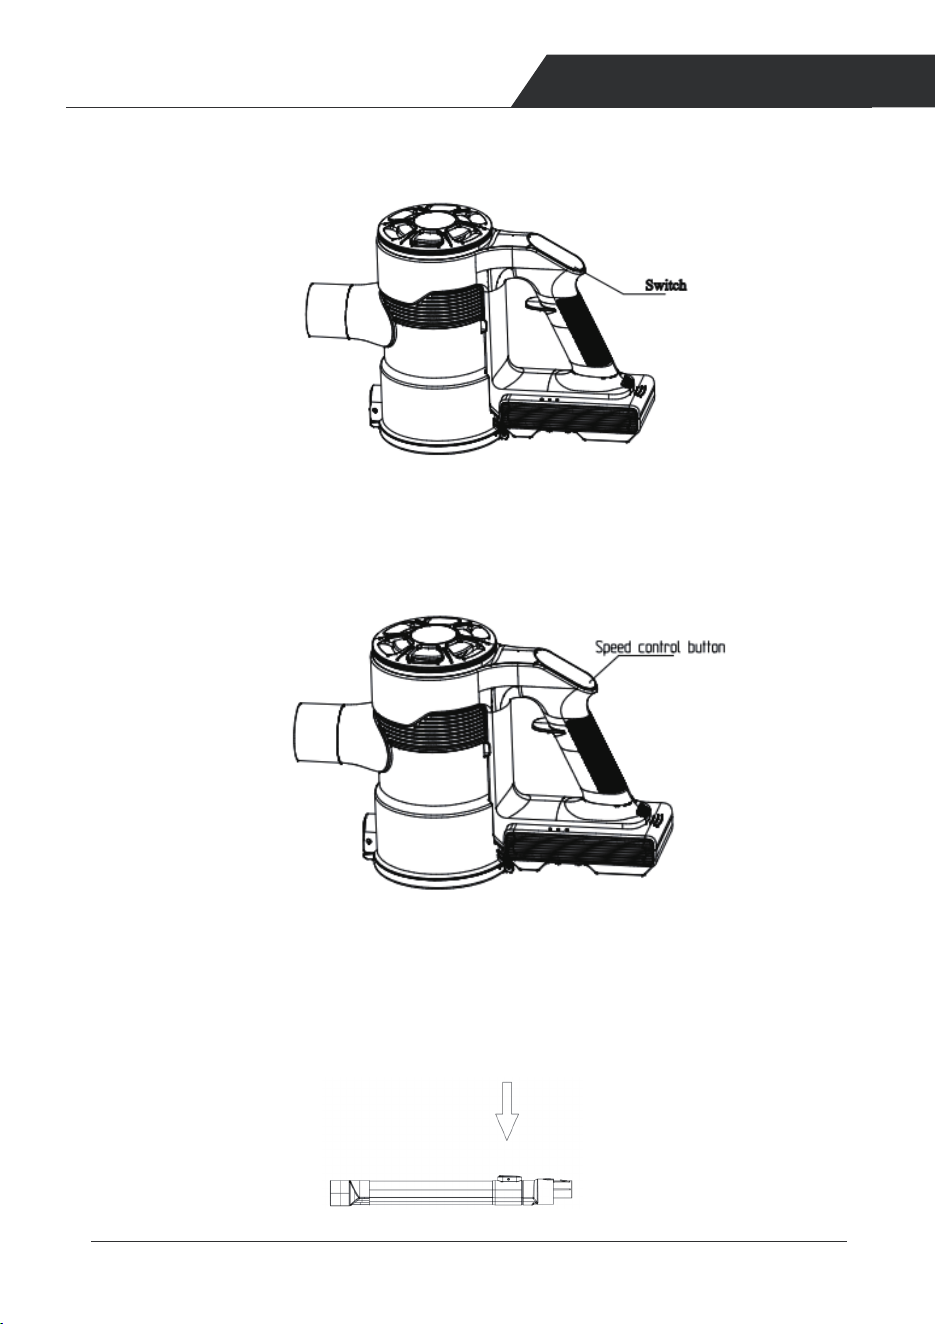
Speed control button
Switch
6 7
INTRODUCTION OF COMPONENTS
PRODUCT INSTALLMENT
Warning
1. Do not use water, solvents or polishes to clean the exterior of the unit; wipe
clean with a dry cloth.
2. Do not immerse the unit in water or clean it in the dishwasher.
Main body
1.Use as the stick vacuum cleaner
b. Insert the ground brush into the pipe. After hearing
the 'click' sound, the connection between brush
and pipe is done.
a. Assemble the battery into the dust cup, make
sure the battery bolt head is inserted into the
dust cup slot rightly as below.
The battery is properly installed in place as
shown in the diagram, and after hearing the
clicking sound,the installation is firm and reliable.
c. Attach the brush to another head of the
tube as showed. Insert the pipe into the
top part the same way as ground brush
into the pipe. After the 'click' sound, the
assembly process is finished.
(b) (c)
d. To starting vacuuming, press the On/Off
swtich and release.
(a)
(d)
Speed control button
Switch
98
PRODUCT INSTALLMENT PRODUCT OPERATION
3 Battery Charging
Turn off the Power Before Charging.
To avoid short circuit caused by current over-loading, please use the original
charger to charge the battery.
3 Charging Methods
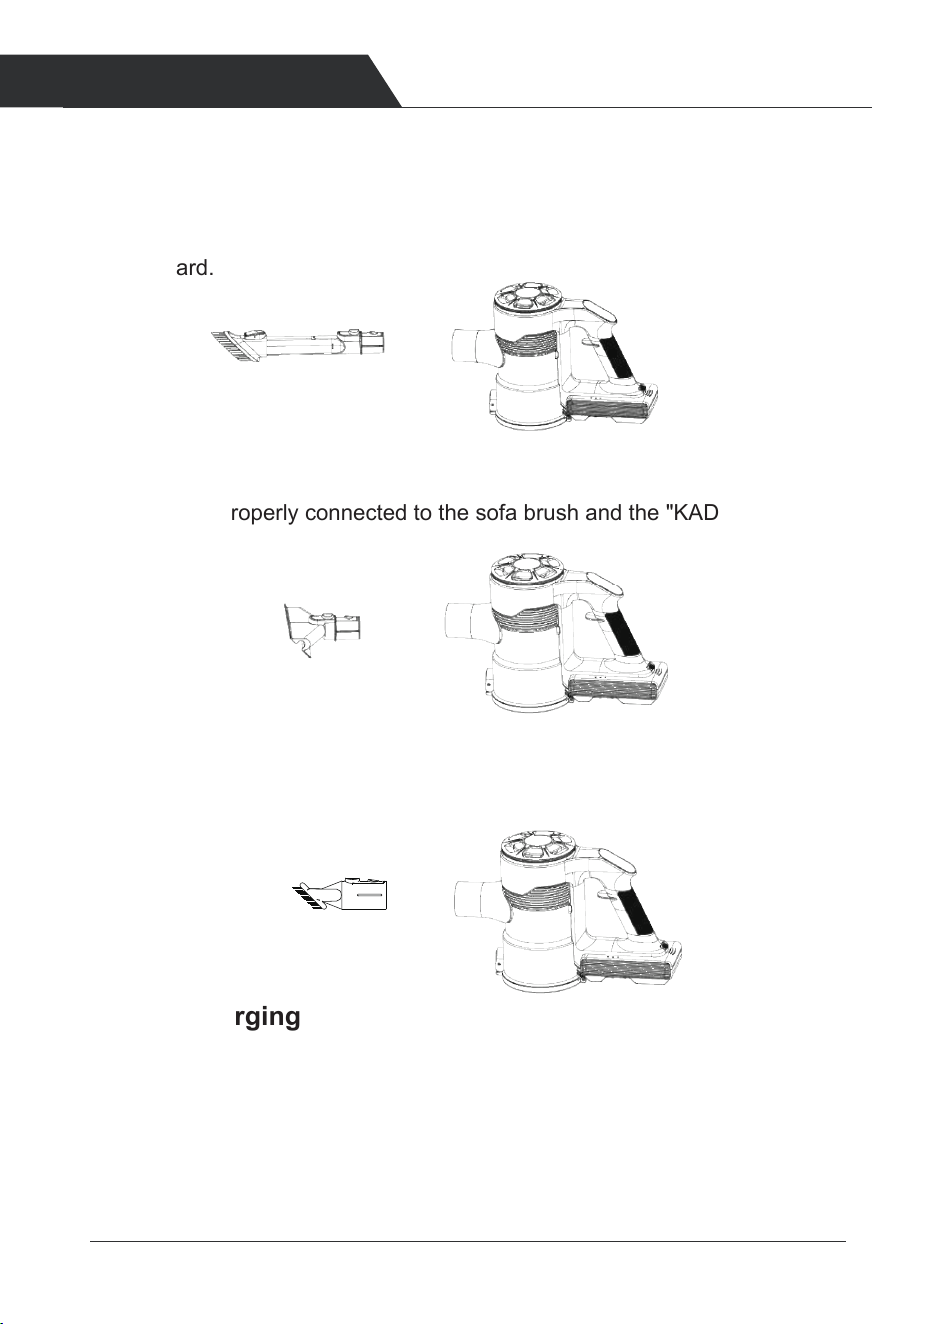
2.Use as a hand vacuum
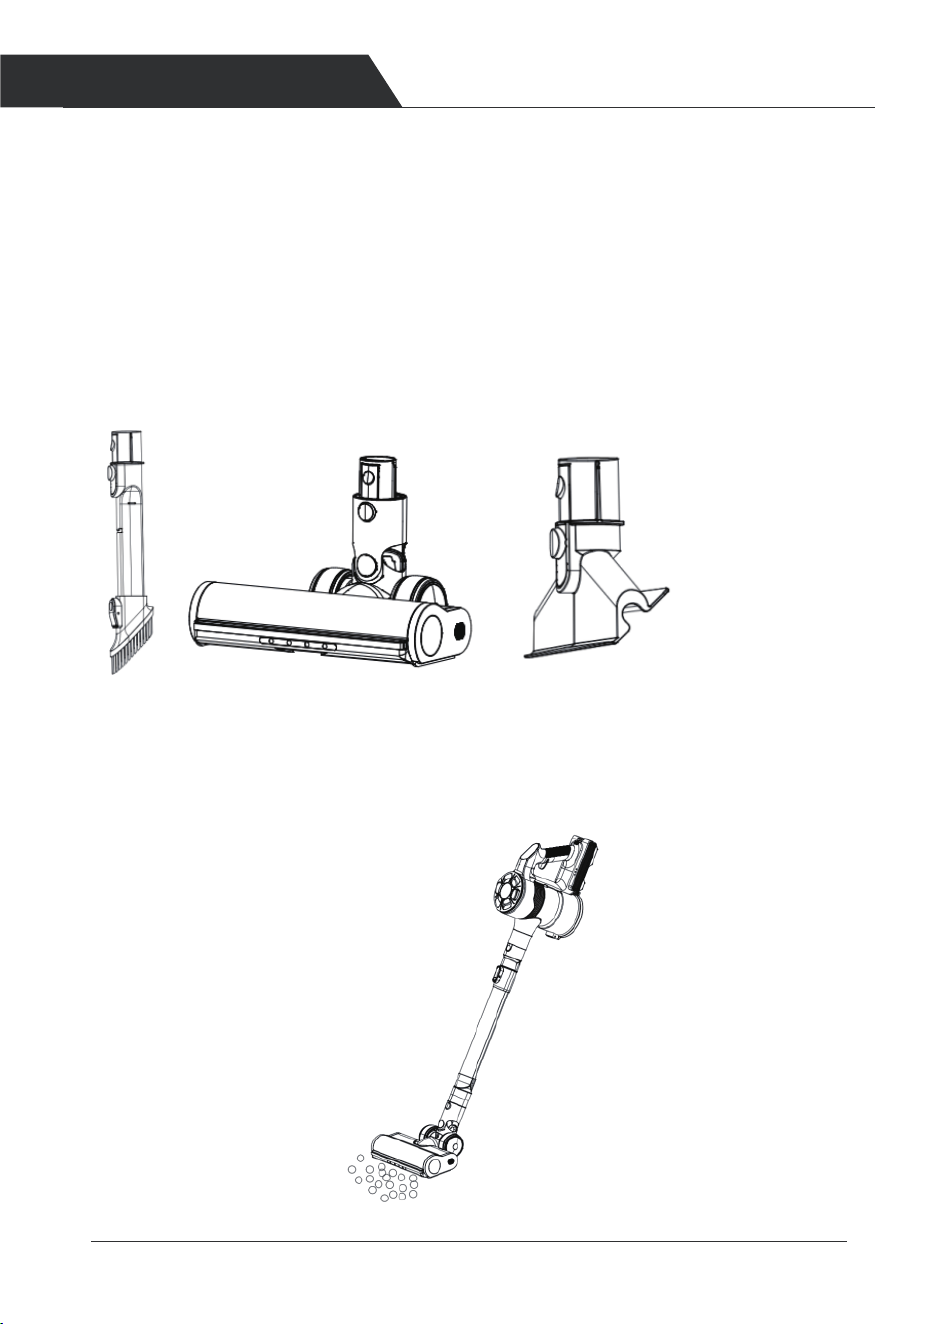
Insert the accessory (bristle brush or long crevice) the top part as shown below
The machine is properly connected to the 2-in-1 flat suction and the "KADA"
sound is heard.
The machine is properly connected to the sofa brush and the "KADA" sound
is heard.
Long crevice
Bristle brush
The machine is properly connected to the dust brush and the "KADA" sound
is heard.
dust brush
1. When the red indicator flashes on the battery pack, it means the battery level
is low. please turn off the vacuum cleaner and charge it.
2. The 3 LED lights will be displayed on battery pack and the battery pack
light on display will flash in white while charging.
3. After fully charged, the 3 marquee lights will be solid blue and the battery pack
light on board will light up, all the lights will go off after 1 min.
4. Estimate charge time from 0 to 100%: 5 hours.
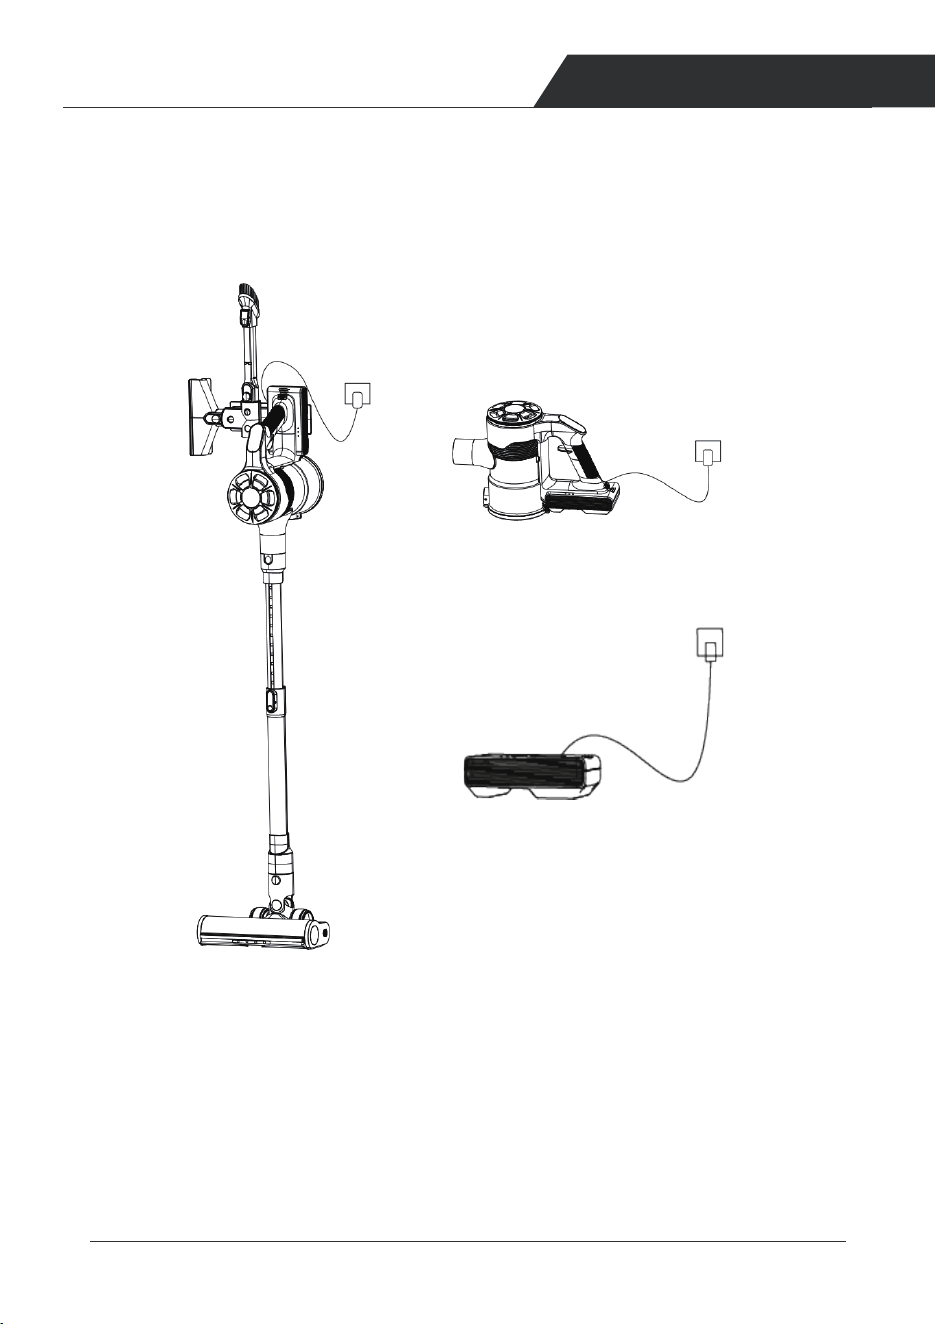
1.Hang the vacuum cleaner and connect to the charger.
2.Connect the battery pack on handle directly to charge.
3. Remove the battery and directly connect the charger for charging.
98
PRODUCT INSTALLMENT PRODUCT OPERATION
3 Battery Charging
Turn off the Power Before Charging.
To avoid short circuit caused by current over-loading, please use the original
charger to charge the battery.
3 Charging Methods
2.Use as a hand vacuum
Insert the accessory (bristle brush or long crevice) the top part as shown below
The machine is properly connected to the 2-in-1 flat suction and the "KADA"
sound is heard.
The machine is properly connected to the sofa brush and the "KADA" sound
is heard.
Long crevice
Bristle brush
The machine is properly connected to the dust brush and the "KADA" sound
is heard.
dust brush
1. When the red indicator flashes on the battery pack, it means the battery level
is low. please turn off the vacuum cleaner and charge it.
2. The 3 LED lights will be displayed on battery pack and the battery pack
light on display will flash in white while charging.
3. After fully charged, the 3 marquee lights will be solid blue and the battery pack
light on board will light up, all the lights will go off after 1 min.
4. Estimate charge time from 0 to 100%: 5 hours.
1.Hang the vacuum cleaner and connect to the charger.
2.Connect the battery pack on handle directly to charge.
3. Remove the battery and directly connect the charger for charging.
10 11
PRODUCT OPERATION PRODUCT OPERATION
4 Using
Clean the dust cup before trash inside reach the 'MAX' line of dust collection.
Please keep the suction nozzle unobstructed and avoid blockage. Otherwise,
the motor will overheat and cause danger.
Choose a brush head according to your needs.
1. Aim the suction port of the vacuum cleaner at the surface of the object to be
cleaned . Please refer to the following picture to use the vacuum cleaner.
2. Press and then release the ON/OFF button to start vacuuming.
3. Press the speed control to adjust different suction levels. It will be in middle
gear when turn on the vacuum cleaner, and shows in pink, high gear light and
low gear light is red and blue.
4. The length of the pipe can be adjusted to your personal need. When
you need to extend the tube, press the button behind it and extend it at the
same time. When you need to adjust the pipe length, press and hold the
button behind to change to suitable length, then release the button and it locks.
12 13
PRODUCT OPERATION PRODUCT OPERATION
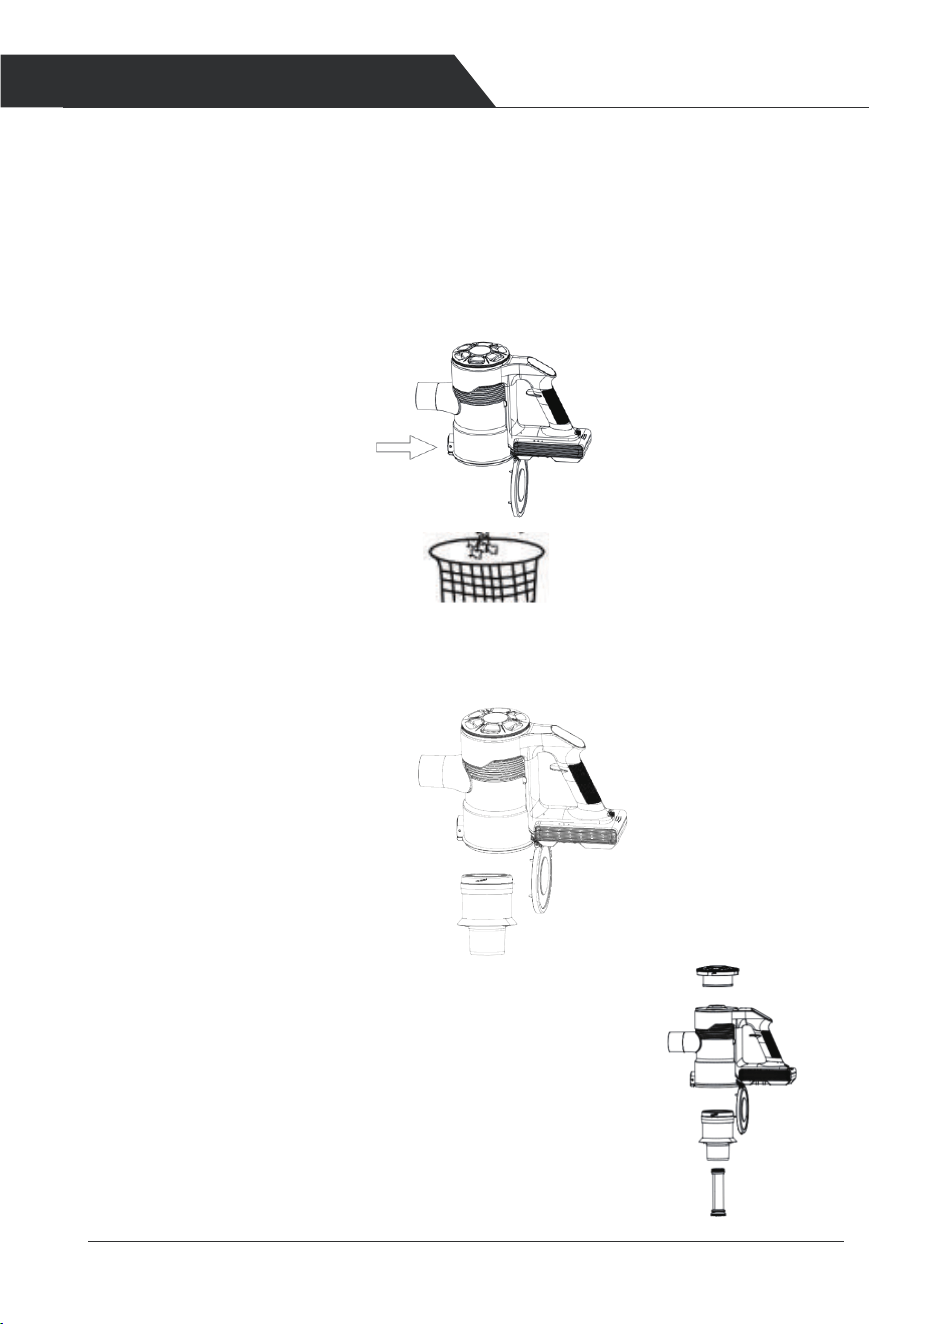
Open the dust cup as shown below.
5 Cleaning
1.Clean the dust cup.
To maintain good suction power, please empty the dust cup and clean the filter
after each use. Press the release button on the dust cup to open the dust cup lid,
and dump out the trash.
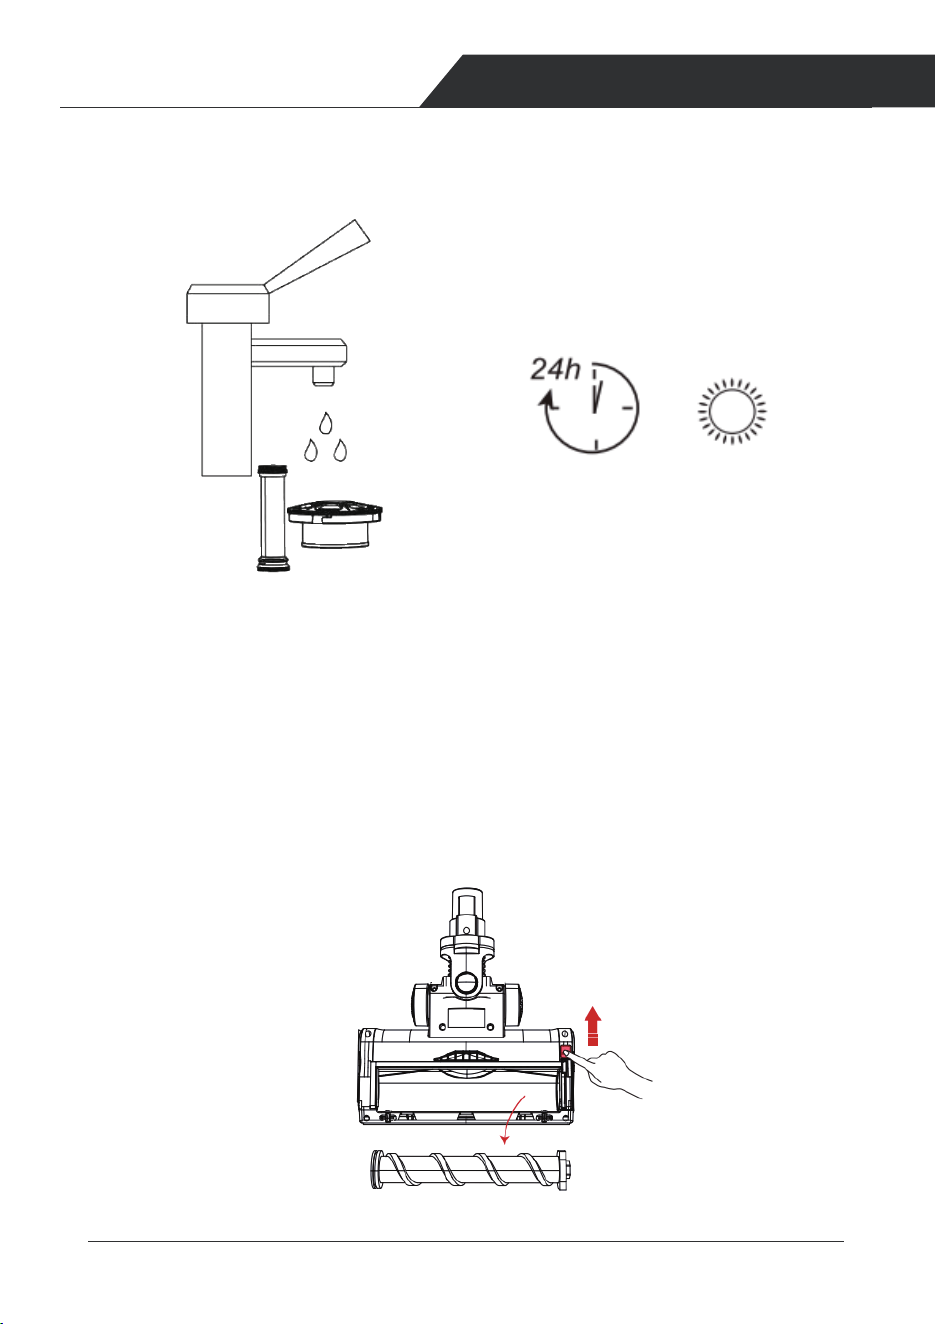
Take out the filter case, then take out the filter.
Wash the filter case (with running water, and let it dry for 24 h before re-
assembling. ).
2.Cleaning brush
Ensure the appliance is disconnected from the charger before removing the roller
brush. Be careful not to turn off button.
Push up the switch to the “unlock” side, remove the plug, then take out the roller
brush.
12 13
PRODUCT OPERATION PRODUCT OPERATION
Open the dust cup as shown below.
5 Cleaning
1.Clean the dust cup.
To maintain good suction power, please empty the dust cup and clean the filter
after each use. Press the release button on the dust cup to open the dust cup lid,
and dump out the trash.
Take out the filter case, then take out the filter.
Wash the filter case (with running water, and let it dry for 24 h before re-
assembling. ).
2.Cleaning brush
Ensure the appliance is disconnected from the charger before removing the roller
brush. Be careful not to turn off button.
Push up the switch to the “unlock” side, remove the plug, then take out the roller
brush.
14 15
PRODUCT OPERATION TROUBLE SHOOTINGS
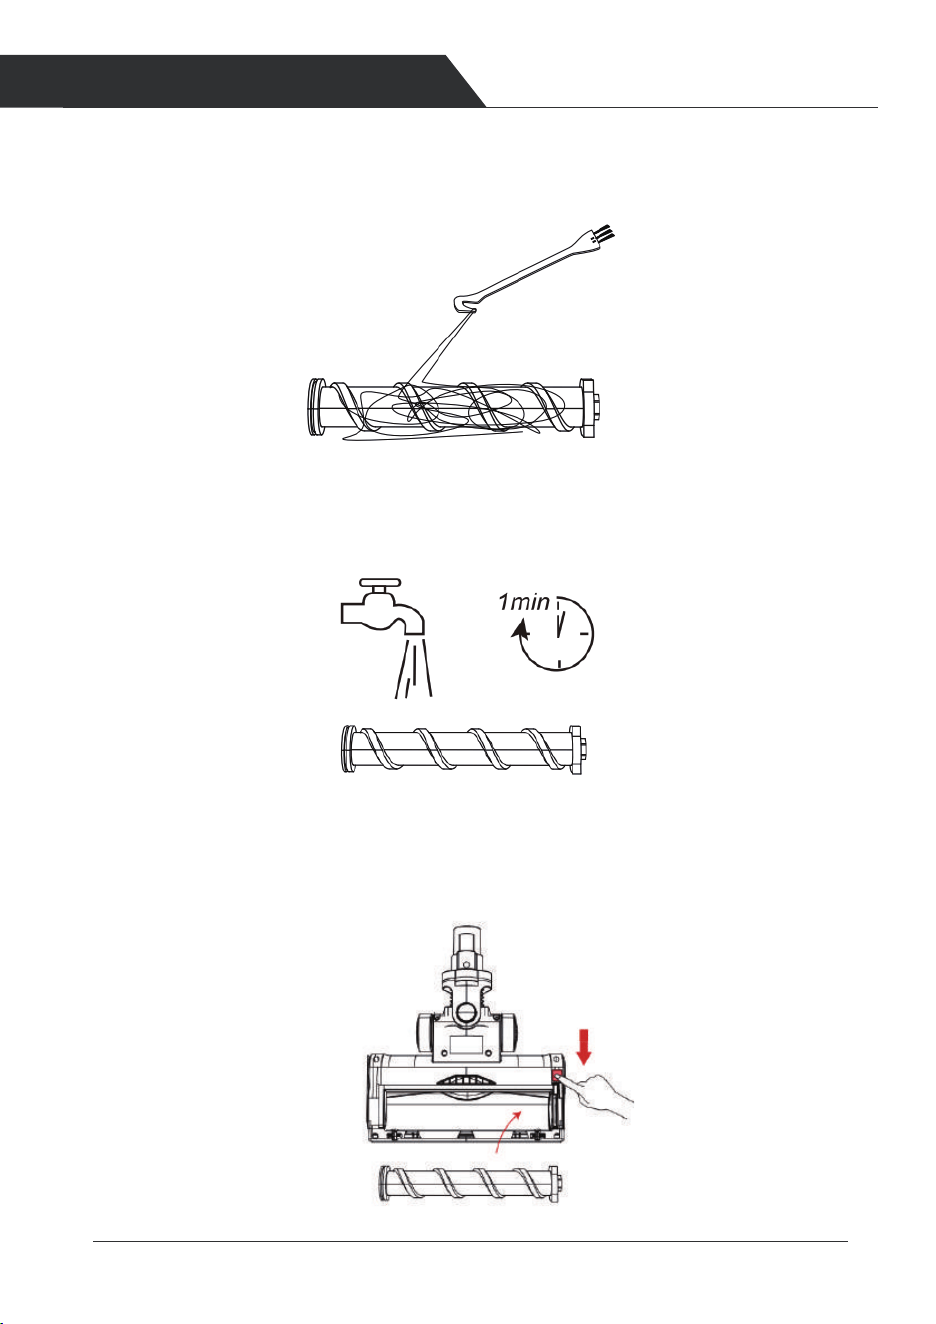
Use the small cleaning brush to sweep away the trash on the roller.The knife side
used to remove the tangled hairs from brush roller.
Clean the roller brush with water.
Gently insert the roller brush,Before inserting, please make sure the
brush is completely dry. Please refer to the following figure to install.
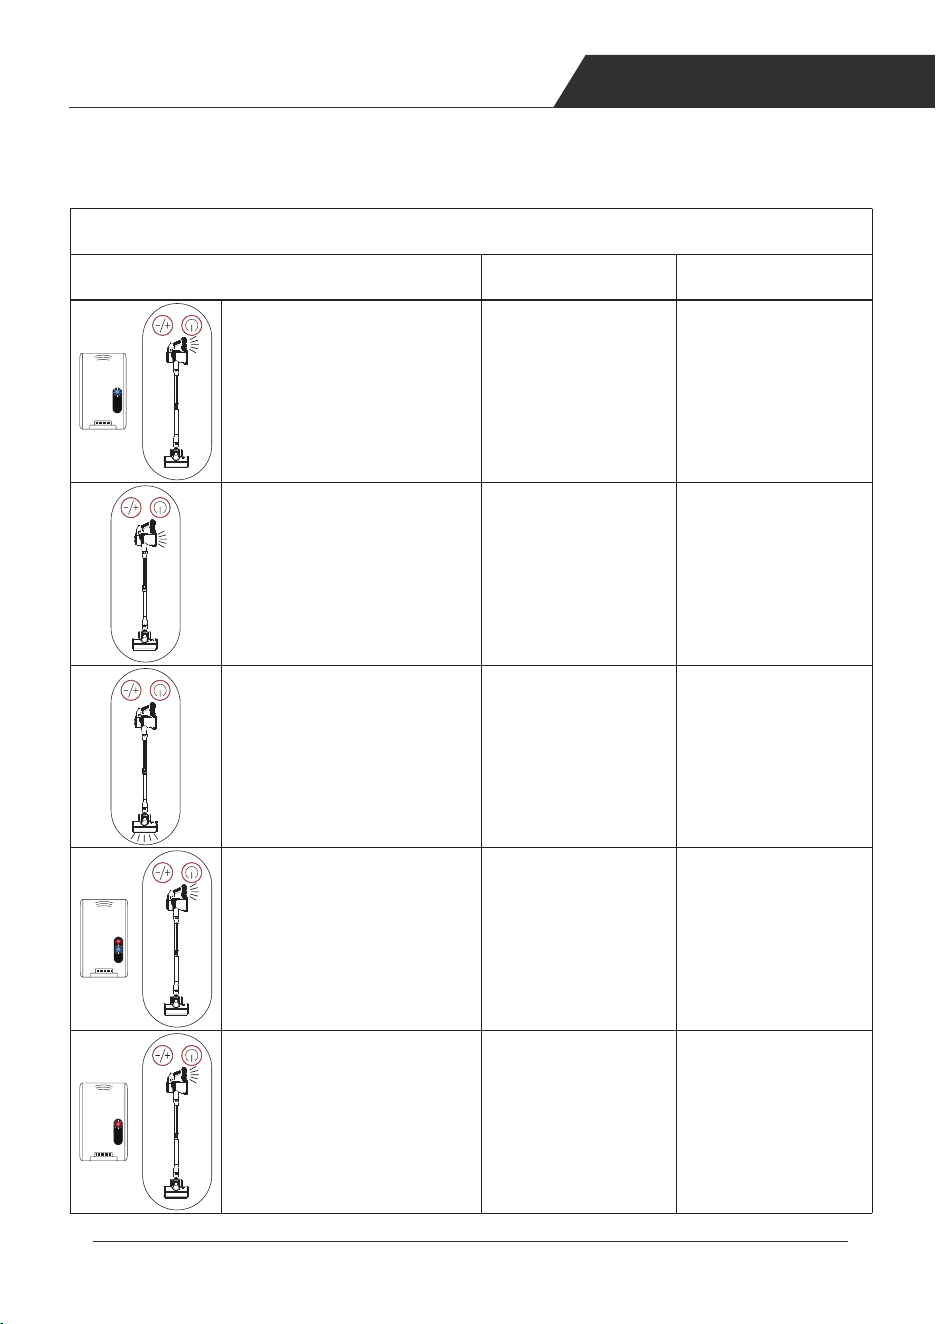
Trouble Shootings
LED1 flashes on Battery pack,
and the light of battery on the
screen flashes
Vacuum cannot working
Display Status
Possible causes Solutions
Without power of the
battery
Charge the battery
Clean the dust cup and
filter system
Clean the floor brush
Turn off vacuum and
let it cool down.
Change a Battery
Contact Customer
Service
Airflow inlet is blocked
or dust cup is full
Floor brush is clogged
High Temperature
WARNING
Abnormal Battery
The light of dust cup on the
screen flashes
And the light of floor brush on
the screen flashes slowly
Battery red LED1 indicator light
and blue LED2 indicator
lightflash fast, and the light of
battery on the screen flashes
fast
Battery red LED1 indicator light
flashes fast, and the light of
battery on the screen flashes
fast
14 15
PRODUCT OPERATION TROUBLE SHOOTINGS
Use the small cleaning brush to sweep away the trash on the roller.The knife side
used to remove the tangled hairs from brush roller.
Clean the roller brush with water.
Gently insert the roller brush,Before inserting, please make sure the
brush is completely dry. Please refer to the following figure to install.
Trouble Shootings
LED1 flashes on Battery pack,
and the light of battery on the
screen flashes
Vacuum cannot working
Display Status
Possible causes Solutions
Without power of the
battery
Charge the battery
Clean the dust cup and
filter system
Clean the floor brush
Turn off vacuum and
let it cool down.
Change a Battery
Contact Customer
Service
Airflow inlet is blocked
or dust cup is full
Floor brush is clogged
High Temperature
WARNING
Abnormal Battery
The light of dust cup on the
screen flashes
And the light of floor brush on
the screen flashes slowly
Battery red LED1 indicator light
and blue LED2 indicator
lightflash fast, and the light of
battery on the screen flashes
fast
Battery red LED1 indicator light
flashes fast, and the light of
battery on the screen flashes
fast
1716
COMMON FAULTS
PROBLEMS
Cannot be charged
Using the wrong
adapter
Red LED1 indicator,blue LED2
and LED3 indicators flash fast,
and light of battery on screen
flashes fast
Red LED1 indicator light flashes
fast and the light of battery on
screen flashes fast
Abnormal Battery Change a Battery
Contact Customer
Service
Change a Battery
Contact Customer
Service
Abnormal BatteryRed LED1 indicator light and
blue LED2 indicator Light flash
fast, and light of battery on
screen flashes fast
Common Faults Possible causes Solutions
Vacuum can not work
Suction reduced
Battery indicator does
not light up
1. Low battery power
2. Battery malfunction
3. The floor brush is blocked with
hair or other debris
1. Charge before use
2. Change a battery
3. Remove blockage in suction inlet
1. The dust cup is full
2. The filters are full of dust
3. The telescopic tube or brush
inlet are blocked
1. Empty the dust cup
2. Clean or change the filter
3. Remove blockage in tube and
brush inlet
4. low battery level 4. Charge before use
1. Battery damaged
2. Screen damaged
3. Adaptor incorrectly connected
or damaged
1. Change a battery
2. Change the motor unit
3. Change the adaptor or fully insert
the charging terminal into the
battery
Display Status
Possible causes Solutions
Email: [email protected]
Problems
The motor part of the screen
flickers
Abnormal motor. Remove the cyclone
cover to clean the
motor cover or replace
the host.
Roller brush can not
work
Clogged with hair, pebbles,
or other debris
1. Clean the roller brush
2. Avoid picking up large rubbish,
such as pebbles
Insufficient use time
after charging
1. Insufficient charging time
2. Battery aging
3. The dust cup is full of dust
4. The filters are full of dust
5. The telescopic tube or brush inlet
is blocked
5. Remove blockage in tube and
brush inlet
4. Clean or change the filter
3. Empty the dust cup
2. Change a battery
1. Recharge the battery
Customer Service
Email: [email protected]
Website:www.belifeclean.com
Product Specification
Battery
Charging time
Battery charger output
Working time
Max Power
Vacuum
25.9V/2500mAh
5 hours
50mins (low gear) , 30mins (mid gear),15mins( high gear)
250W
30V/500mA
10-15-23 KPa
www.belifeclean.com
Email: [email protected]
Stick vacuum cleaner
S11
USER MANUAL
Read this instruction carefully before use.
BELIFE IS HERE TO HELP.
We'll get back to you within 1 business day.
