
DIGITAL AIR FRYER
USER GUIDE
6 QT
PH11921, 120V~ 60Hz 1700W
Thank you for purchasing the 6 QT Digital Air Fryer. Write down and retain the model number and serial number,
which can be found on a sticker located on the bottom of the product.
READ ALL INSTRUCTIONS BEFORE USE.
For your safety and enjoyment of the product, please read all instructions in the user guide before use.

IMPORTANT
SAFEGUARDS
When using electrical appliances, basic safety precautions
should always be followed, including the following:
1. Read all instructions before use.
2. Never leave the appliance unattended while in use.
3. Do not touch hot surfaces. Use handles. Use oven mitts
or potholders.
4. To protect against fire, electric shock, and injury to
persons, do not place or immerse cord, plug, or
appliance in or near water or other liquids.
5. Do not use the appliance near water or other liquids, with
wet hands, or while standing on a wet surface.
6. Close supervision is necessary when any appliance
is used by or near children or individuals with certain
disabilities. This product is not a toy and is not intended
for use by children; children should be supervised to
ensure that they do not play with the appliance. This
appliance is not intended for use by persons with
reduced physical, sensory, or mental capabilities, or lack
of experience and knowledge unless they are provided
with supervision and instruction concerning use of the
appliance by a person responsible for their safety.
7. Unplug from outlet when not in use and before cleaning,
moving, or storage. Allow appliance to cool completely
before putting on or taking off parts, moving, cleaning,
or storing the appliance.
8. Do not operate any appliance with a damaged cord or
plug or aer the appliance malfunctions, is dropped, or has
been damaged in any matter. Contact Epoca International
customer service for examination, repair, or adjustment.
9. The use of accessory attachments not recommended by
Epoca International may result in fire, electric shock, or
injuries to persons.
10. Do not use outdoors.
11. Do not let cord hang over edge of table or counter, or
touch hot surfaces.
12. Do not place on or near any heat source, such as
radiators, heat registers, stovetops, a hot gas or electric
burner, in a heated oven, or other products that produce
heat. Keep away from fire or other flammable substances.
13. Extreme caution must be used when moving an appliance
containing hot oil or other hot liquids.
14. This appliance has a built-in timer and will automatically
shut off when the timer has finished. The appliance can
be switched OFF manually by pressing and holding the
POWER/START icon for 2 seconds.
15. To safely disconnect power at any time, turn any control
to “OFF”, then remove the plug from the wall outlet.
16. WARNING! To reduce the risk of fire or electrical shock,
repair should be done only by authorized personnel.
The appliance has no user serviceable parts.
17. Do not operate the appliance in an appliance garage
or under a wall cabinet. When storing in an appliance
garage, always unplug the unit from the electrical outlet.
Not doing so could create a risk of fire, especially if the
appliance touches the walls of the garage or the door
touches the unit as it closes.
18. Do not fill the Frying Basket with oil to avoid a fire hazard.
Never use Air Fryer to boil water.
19. During air frying, make sure all ingredients are kept in the
Frying Basket. Overfilling the Frying Basket may result
in damage to the Air Fryer and serious personal injury.
Never fill past the MAX fill line indicator in the Frying
Basket.
20. Do not obstruct the Air Outlet or Air Inlets when the
appliance is functioning. Do not place anything on top
of the appliance while it is operating or hot aerward.
21. WARNING! HOT SURFACES! This appliance generates
heat and escaping steam during use, and will retain heat
for some time aer turning OFF. Appropriate precautions
must be taken to prevent the risk of burns, fires, or any
injury to persons or damage to property.
22. During operation, hot steam is released through the
Air Outlet openings. Avoid escaping steam from the
Air Outlet during use. Keep your hands and face at a

safe distance from the steam and from the Air Outlet
openings. Be careful of hot steam and air when you
remove the Frying Basket from the appliance.
23. During and aer operation, extreme caution must be
used when handling the Frying Basket, Crisping Tray, and
cooked foods. Always use the Frying Basket Handle to
open the Frying Basket drawer. Aer operation, ensure
the Frying Basket is placed on a flat, heat-resistant surface.
24. Do not place the appliance directly against a wall or other
objects. Leave at least 6 inches of free space surrounding
the appliance.
25. Make sure the Crisping Tray is in place with the Rubber
Tips attached before adding food. The Air Fryer will not
operate unless the Frying Basket is fully closed. Make sure
the Frying Basket is locked securely into the front of the
Air Fryer during operation.
26. Immediately unplug the appliance if you see dark smoke
coming out of it. Wait for the smoke emission to stop
before you remove the Frying Basket from the appliance.
If this appliance begins to malfunction during use, pull the
Frying Basket out from the Body, then unplug from the
outlet; do not use or attempt to repair the malfunctioning
appliance.
27. Make sure that the voltage indicated on the appliance
matches the local mains voltage. Always make sure that
the plug is inserted into a grounded wall socket properly.
28. Epoca International shall not accept liability for damages
caused by improper use of the appliance.
29. Improper use of the appliance can result in property
damage or personal injury.
30. Do not use appliance for other than its intended use.
It is made for household use only.
HOUSEHOLD USE ONLY
SAVE THESE
INSTRUCTIONS
POLARIZED PLUG
This appliance has a polarized plug (one blade is wider than
the other). To reduce the risk of electric shock, this plug is
intended to fit into a polarized outlet only one way. If the plug
does not fit fully into the outlet, reverse the plug. If it still does
not fit, contact a qualified electrician. Do not attempt to modify
the plug in any way.
CORD INSTRUCTIONS
- A short power-supply cord is provided to reduce the risk
resulting from becoming entangled in or tripping over a
longer cord.
- Extension cords are available and may be used if care is
exercised in their use.
- If an extension cord is used, the marked electrical rating
of the extension cord should be at least as great as the
electrical rating of the appliance. The extended cord
should be arranged so that it will not drape over the
countertop or tabletop where it can be pulled on by
children or tripped over unintentionally.
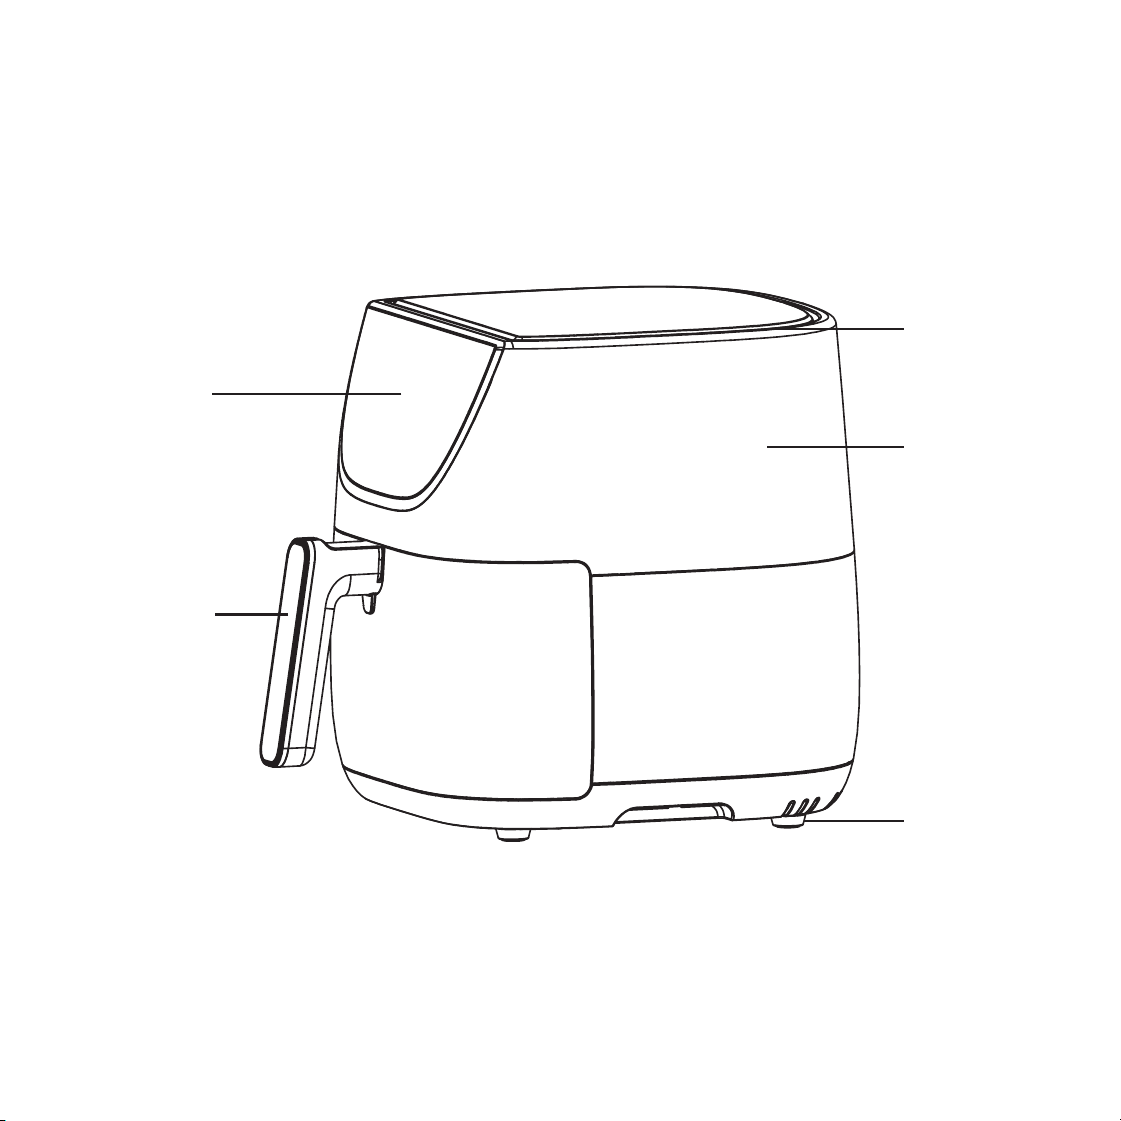
PARTS & FEATURES
Touchscreen
Control
Frying Basket
with Handle
Air Inlets
Air Fryer
Body
Non-slip Feet
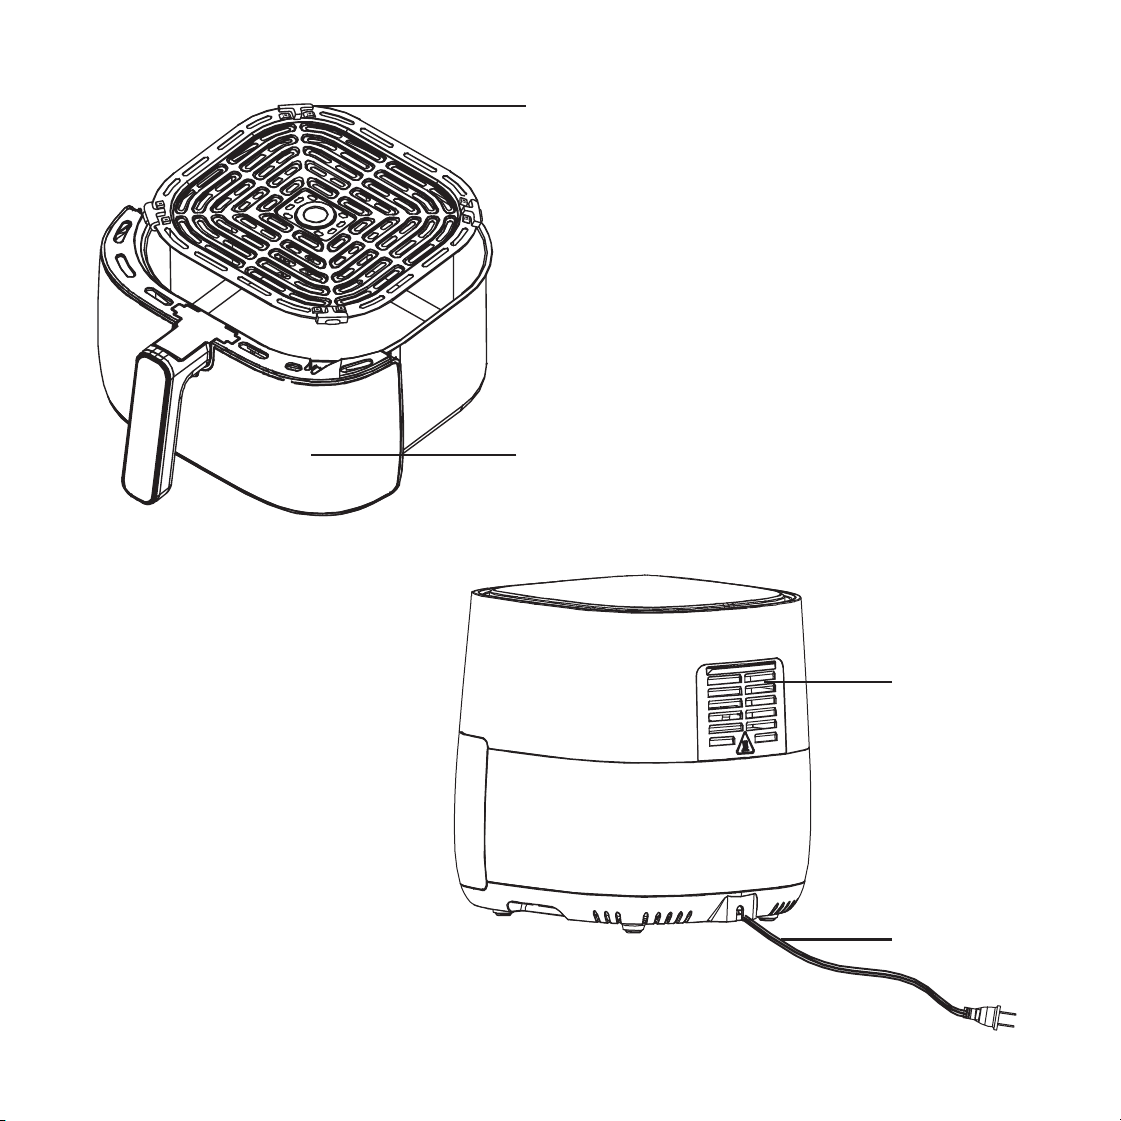
Crisping Tray
with Rubber Tips
Frying Basket
with Handle
Air Outlet
Power Cord
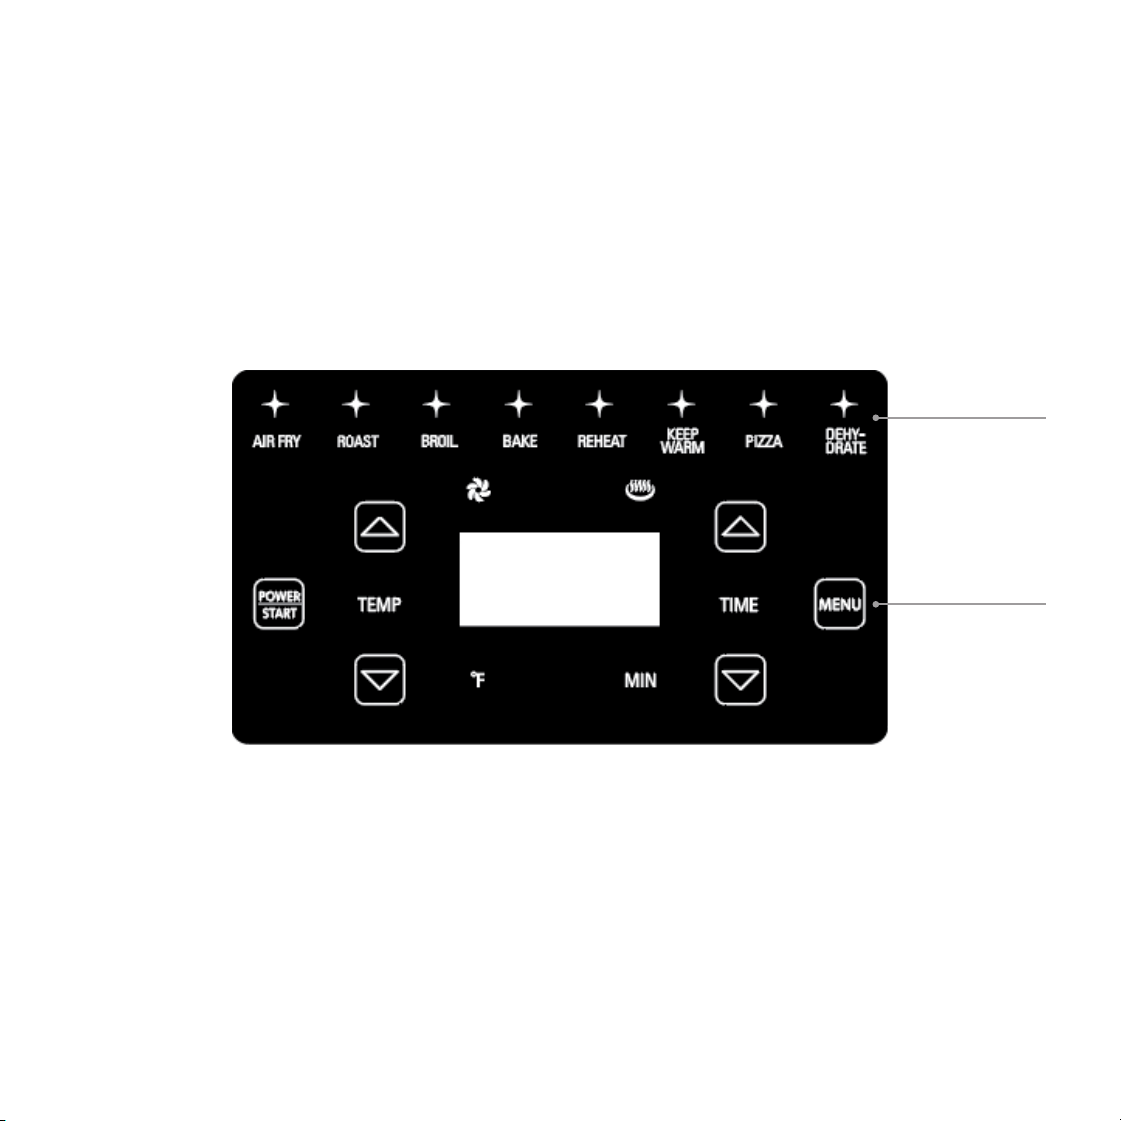
TOUCHSCREEN DIGITAL CONTROL PANEL
- Touch the red POWER/START button to activate the touchscreen.
Preset Cooking
Options: Press the
MENU button to
access and advance
through options
MENU Button
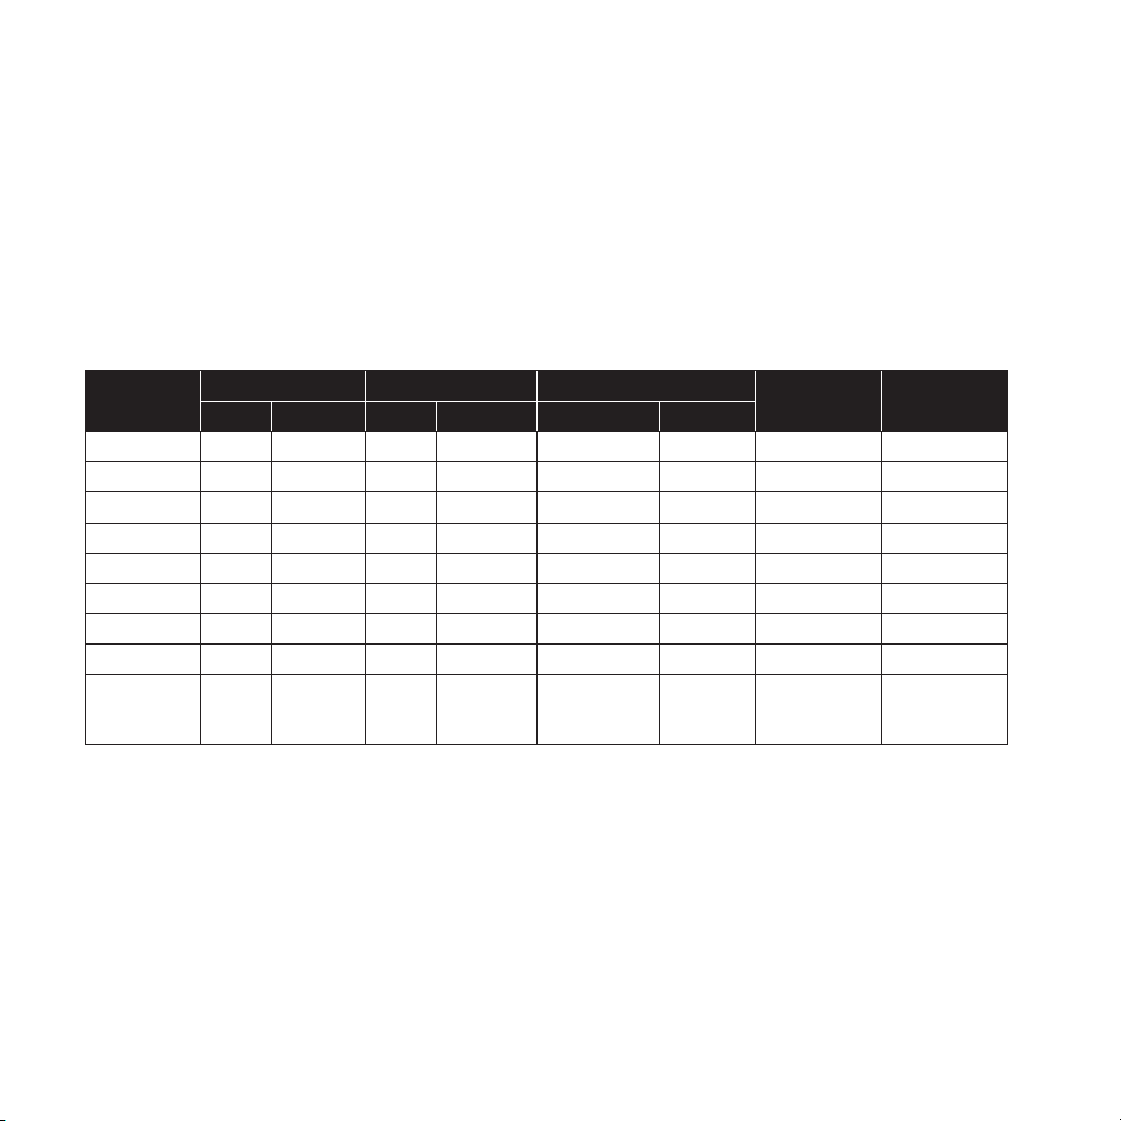
SETTING
COOKING TIME TEMPERATURE ADJUSTABLE INCREMENTS
TURN ALERT SHAKE?
Default Range Default Range TIME TEMP
Default 15 1 – 60 Min. 370°F 170 – 400°F 1 Min. 10 Degrees Yes Every 10 min.
AIR FRY 18 1 – 60 Min. 400°F 170 – 400°F 1 Min. 10 Degrees Yes Every 9 min.
ROAST 35 1 – 60 Min. 400°F 350 – 400°F 1 Min. 10 Degrees Yes Every 20 min.
BROIL 20 1 – 30 Min. 400°F – 1 Min. – – No
BAKE 18 1 – 60 Min. 350°F 170 – 400°F 1 Min. 10 Degrees Yes Every 9 min.
REHEAT 6 1 – 60 Min. 250°F 170 – 400°F 1 Min. 10 Degrees – No
KEEP WARM 60 1 – 60 Min. 170°F 150 – 200°F 1 Min. 10 Degrees – No
PIZZA 8 1 – 60 Min. 360°F 170 – 400°F 1 Min. 10 Degrees – No
DEHYDRATE 8 H 1 – 24 H 130°F 90 – 170°F
30 Min. incr.
until 10 H, then
1 H incr.
10 Degrees – No
AIR FRYER FUNCTION CHART

BEFORE USE
Remove all packaging materials and any stickers on the Air Fryer, except
for the rating label on the bottom that must remain on the unit. Make
sure there is no packaging underneath and around the Frying Basket and
Crisping Tray.
Inspect the Air Fryer for any visible damage or missing parts. Prior to the
first use or aer extended storage, clean and dry the Air Fryer, per the
instructions in the “Cleaning and Maintenance Instructions.”
NOTE: Never use Air Fryer without Crisping Tray with all four Rubber Tips
attached and inserted into the Frying Basket. The Crisping Tray is necessary
to help air circulate around your food and keep excess oil and grease from
collecting around your food.
OPERATING INSTRUCTIONS
1. Place the appliance on a clean, stable, and flat heat-resistant surface.
2. Remove the Frying Basket from the Air Fryer, by securely gripping its
Handle and pulling out, then place on a clean, stable and flat surface.
Ensure Crisping Tray with Rubber Tips attached is inserted in the
Frying Basket.
3. Place food in the Frying Basket. Never fill the Frying Basket with
ingredients past the MAX fill line in the Frying Basket.
NOTE: Do not fill the Basket more than ²⁄33 full to allow for proper air
circulation and cooking. For optimum performance air frying fresh
vegetables, do not add more than 1½ cups of food to the Frying
Basket per batch.
4. Carefully slide the Frying Basket back into the Air Fryer Body by
aligning with the guides inside the Body of the Air Fryer. Be sure the
Frying Basket is completely closed.
5. Plug the Power Cord into a standard electrical outlet. You will hear
an audible beep, indicating the Air Fryer is ready for use, and the
POWER/START button will illuminate red on the control panel.
6. Press the red POWER/START, and the control panel will appear. The
default TIME of 15 minutes and TEMP of 370°F will alternate flashing
on the display, and the POWER/START button will illuminate white.
7. To select one of the 8 preset cooking options displayed across the
top of the control panel, press MENU to access and advance through
the options, which will blink once selected.
8. From either the default setting or the MENU selected preset cooking
options, press the UP or DOWN arrows on the right side of the control
panel to increase or decrease TIME, and the UP or DOWN arrows on
the le side of the control panel to increase or decrease TEMP.
NOTE: Refer to the “Air Fryer Function Chart” for the functionality
and shake recommendation for the default setting and each of the
8 preset cooking options. The chart identifies TIME and TEMP
defaults, ranges, and adjustable increments for each, if the setting
includes the audible turn/shake alert, and if turning/shaking is
recommended for the setting.
9. When the desired settings appear on the display, press the white
POWER/START to START the Air Fryer. You will see the white
convection fan icon start to blink and the heating icon briefly
illuminate to indicate the Air Fryer is in operation.
NOTE: The selected time and temperature will alternate on the
touchscreen until the time has elapsed. The Air Fryer will not
heat until the white POWER/START is pressed. The Air Fryer will
automatically turn off if no buttons are pressed within 1 minute.
IMPORTANT: To power OFF the Air Fryer at any point, simply press
and hold the white POWER/START button for 2 seconds. The white
convection fan will flash for 15 seconds and then stop. “END” will be
displayed for 15 seconds, accompanied by 3 beeps. The POWER/
START button will turn red.
10. To ensure proper cooking and browning results, always open the
Frying Basket halfway through the cooking time and check, turn or
shake foods in the Frying Basket. Adjust TIME or TEMP if needed.
To shake, carefully remove the Frying Basket from the Air Fryer and
gently shake it from side to side. Carefully, slide the Frying Basket
back into the Air Fryer.
NOTE: The Air Fryer features a turn/shake alert for default, AIR FRY,
ROAST, and BAKE settings. Halfway through cooking, the display
will change to “trn” and beeps for 5 seconds to alert you to turn or
shake your food items. To pause the program, simply remove the
Frying Basket. Aer turning or shaking your food as needed, reinsert
the Frying Basket to automatically resume cooking.
11. When the selected air frying TIME is up, the white convection fan will
continue to flash for 15 more seconds. “END” will be displayed for
15 seconds, accompanied by 3 beeps. The POWER/START button
will turn red. Carefully, slide the Frying Basket out of the Air Fryer and
place on a clean, stable, and flat heat-resistant surface. Check if the
food is done. If additional cooking time is needed, slide the Frying
Basket back into the Air Fryer, adjust the TEMP if desired, and set the
TIME for between 2 and 5 minute intervals until food is fully cooked.
12. To remove food from the Frying Basket, use heat-resistant, nonstick
surface safe tongs. Do not turn the Frying Basket over to dump food
out, as the excess oil that has accumulated in the bottom of the
Frying Basket will spill onto the food. Allow the appliance to cool
completely before disposing of excess oil.
Food Item
Cooking
Temperature
Cooking Time
(Minutes)
Instructions
Cake (1 layer, 7-inch) 310°F 30 Test for doneness.
Root Vegetables (fresh, roasted) 370°F 15 – 20 Toss with oil, shake the basket 3 times.
Asparagus (fresh, thin stems) 370°F 7 – 9 Spray with oil, shake the basket 2 times.
Broccoli (fresh, roasted) 370°F 5 – 7 Spray with oil, shake the basket 3 times.
Brussels Sprouts (halved) 370°F 8 – 10 Spray with oil, shake the basket 2 times.
Butternut Squash (1/2-in. chunks) 370°F 15 Spray with oil, shake the basket 3 times.
Kale Chips (stemmed, chopped) 370°F 3 Spray with oil, shake the basket 1 time.
Sweet Potato Fries (fresh, hand cut) 400°F 13 – 15 Spray with oil, shake the basket 3 times.
French Fries (frozen) 400°F 18 Spray with oil, shake the basket 3 times.
Meat (Roast, Chops, 1 lb.) 350°F 25 Rub or spray with oil, add seasoning, turn over, test for doneness.
Meatloaf (1 lb.) 350°F 35 – 40 Test for doneness.
Steak (1 lb., medium rare) 400°F 12 Rub or spray with oil, add seasoning, turn over, test for doneness.
Hamburgers (1/4 lb.) 350°F 6 – 10 Rub or spray with oil, add seasoning, turn over, test for doneness.
Chicken Wings (fresh/thawed, 1 lb.) 360°F 20 Spray with oil, shake the basket 2 times, test for doneness.
Chicken Tenders/Fingers (1 lb.) 360°F 20 Spray with oil, shake the basket 1 time.
Chicken Cutlet (1 lb.) 360°F 20 – 30 Spray with oil, turn over, test for doneness.
Fish Sticks (thawed/battered) 350°F 10 Spray with oil, turn over, test for doneness.
Fish (fresh, thawed, battered) 350°F 10 Spray with oil, turn over, test for doneness.
Shrimp (thawed, battered) 330°F 8 Spray with oil, turn over, shake the basket.
RECOMMENDED TEMP AND TIME SETTINGS
Consider these temperature and time suggestions as general guidelines. The actual cooking time required may vary, based on quantity, size, and
shape of food. Always ensure your food is properly cooked before eating. Consult the USDA’s Safe Minimum Internal Temperature Chart for the
safe minimum internal temperature for your food.

AIR FRYING GUIDE
- Smaller foods and less food per batch will require slightly less
cooking time than larger foods and larger batches.
- Shaking smaller items halfway through the preparation time
improves the end result and can help prevent unevenly fried foods.
- For crispier homemade fries, soak the cut-up potatoes in water for
30 minutes, then toss with a small amount of oil. Once the oil is
applied, air fry within a few minutes.
- Snacks that can be prepared in an oven, like chicken nuggets or
breaded mozzarella bites, can also be prepared in the Air Fryer.
- Use store-bought dough to prepare filled snacks quickly and easily.
Store-bought dough also requires a shorter preparation time than
homemade dough.
- To bake a cake or quiche or fry fragile or filled foods, use a baking
pan in the Fryer Basket.
- The Air Fryer can also be used to reheat food.
- For browned and crispy results, all foods that are not pre-packaged
and pre-oiled should be lightly oiled before air frying.
- Always check food halfway though cooking time to determine final
cook time and temperature.
- Always pat food dry before cooking to encourage browning and
avoid excess smoke.
- To avoid excess smoke, when cooking naturally high fat foods, such
as chicken wings or sausages, it may be necessary to empty fat from
the Frying Basket drawer between batches. It is not recommended
to prepare extremely greasy foods in the Air Fryer.
- For crispier results, air fry small batches of freshly breaded foods.
For best results, use smaller pieces and press breading onto food
to help it adhere. Breaded foods should be refrigerated for at least
30 minutes before frying. Arrange breaded food in Frying Basket
so that food is not touching to allow air flow on all surfaces.
- To add oil to foods, spray olive or vegetable oil work best for even
distribution with less oil needed.
- The four Rubber Tips must always be attached to the Crisping Tray
during operation.
CLEANING AND MAINTENANCE INSTRUCTIONS
- The Air Fryer must be turned OFF, unplugged, and completely cool
before cleaning, handling, emptying grease from the Frying Basket,
or storing. Remove the Frying Basket to allow the Air Fryer to cool
more quickly.
- Clean the appliance aer every use.
- Never immerse the appliance, cord, or plug in water or any other
liquids. The Air Fryer is not dishwasher safe.
- Never use abrasive cleaning products or metal kitchen utensils, as
this may damage the appliance and the nonstick coating on the
Frying Basket and Crisping Tray.
- Use a so, non-abrasive damp cloth to wipe the outside of the
Air Fryer clean.
- The Crisping Tray is removable from the Frying Basket for easy
cleaning. Ensure all four Rubber Tips are reattached to the Crisping
Tray aer cleaning.
- The Frying Basket and Crisping Tray are dishwasher safe. For optimal
results, place them on the top rack of your dishwasher for cleaning.
- The Frying Basket and Crisping Tray can be hand washed with hot,
soapy water and a non-abrasive sponge.
- To remove difficult food residue from the Frying Basket or Crisping
Tray, fill the Frying Basket with hot water and dish soap, place the
Crisping Tray in the Frying Basket, and let it soak for approximately
10 minutes before hand washing.
- Clean the inside of the appliance with hot water and a non-abrasive
sponge.
- Clean the heating element with a cleaning brush to remove any food
residue.
NOTE: Ensure the appliance has completely cooled for an extended
period before cleaning the heating element.
- Allow all parts to air dry completely, or wipe completely dry with
a non-abrasive cloth. Ensure the Air Fryer is completely dry before
operation or storing.
- Store the unplugged, fully assembled Air Fryer in a safe, dry place,
and out of reach from children.
- Never use cooking sprays on any nonstick surfaces.
- Any other servicing should be performed by an authorized service
representative. If service is required, do not return to your store.
The appliance has no user serviceable parts. If your appliance fails
to work, contact our customer service department via email at

1-YEAR LIMITED WARRANTY
(U.S. Only)
Congratulations on your purchase of Paris Hilton product. This product
is warranted to be free from defects in material and workmanship under
normal household use for a period of one (1) year from the original
date of purchase or delivery, whichever is later. During this period, the
manufacturer’s obligation shall be limited to repairing or replacing, at its
option, FOB Epoca International Distribution Facility or the authorized
selling agent, any defective part of the product covered by the terms of the
limited warranty.
This warranty shall not apply to glass parts, wear from normal use, use not
in conformity with the printed directions, neglect including failure to clean
product regularly in accordance with the manufacturer’s instructions, use
for commercial purposes or other than single-family household use,
damages resulting from accidents, alteration, abuse or misuse, including
damage caused by overheating, and does not apply to scratches, stains,
discoloration or other damage, which does not impair the functionality of
the product. This warranty extends only to the original consumer purchaser
or gi recipient, and is valid only for the first quality goods purchased from
an authorized selling agent of Epoca International, LLC. Keep the original
sales receipt, as proof of purchase is required to make a warranty claim.
If the warranty period is based on the original date of delivery, also keep
proof of the delivery date, as proof of the delivery date will also be required
to make a warranty claim.
THIS WARRANTY IS IN LIEU OF ANY OTHER WARRANTY OR CONDITION,
WHETHER EXPRESS OR IMPLIED, WRITTEN OR ORAL, INCLUDING,
WITHOUT LIMITATION, ANY STATUTORY WARRANTY OR CONDITION OF
MERCHANTABILITY OR FITNESS FOR A PARTICULAR PURPOSE. ANY
LIABILITY IS EXPRESSLY LIMITED TO AN AMOUNT EQUAL TO THE
PURCHASE PRICE PAID, AND ALL CLAIMS FOR SPECIAL, INCIDENTAL
AND CONSEQUENTIAL DAMAGES ARE HEREBY EXCLUDED.
This warranty gives you specific legal rights, and you may also have
other legal rights that vary depending on where you live. Some states
do not allow limitations on implied warranties or special, incidental or
consequential damages, so the foregoing limitations may not apply to you.
To claim your warranty, send the product, proof of purchase, proof of
delivery date (if applicable), and an $8.00 USD check for shipping and
handling to: Epoca International, LLC, Attn.: Customer Service, 931
Clint Moore Rd., Boca Raton, FL 33487 or contact [email protected].

Paris Hilton is a registered trademark and used under license.
©2024 Paris Hilton Entertainment.
MANUFACTURED BY: Epoca International, LLC
Boca Raton, FL 33487 Made in China
Contact us at: [email protected]