
9

- 1 -
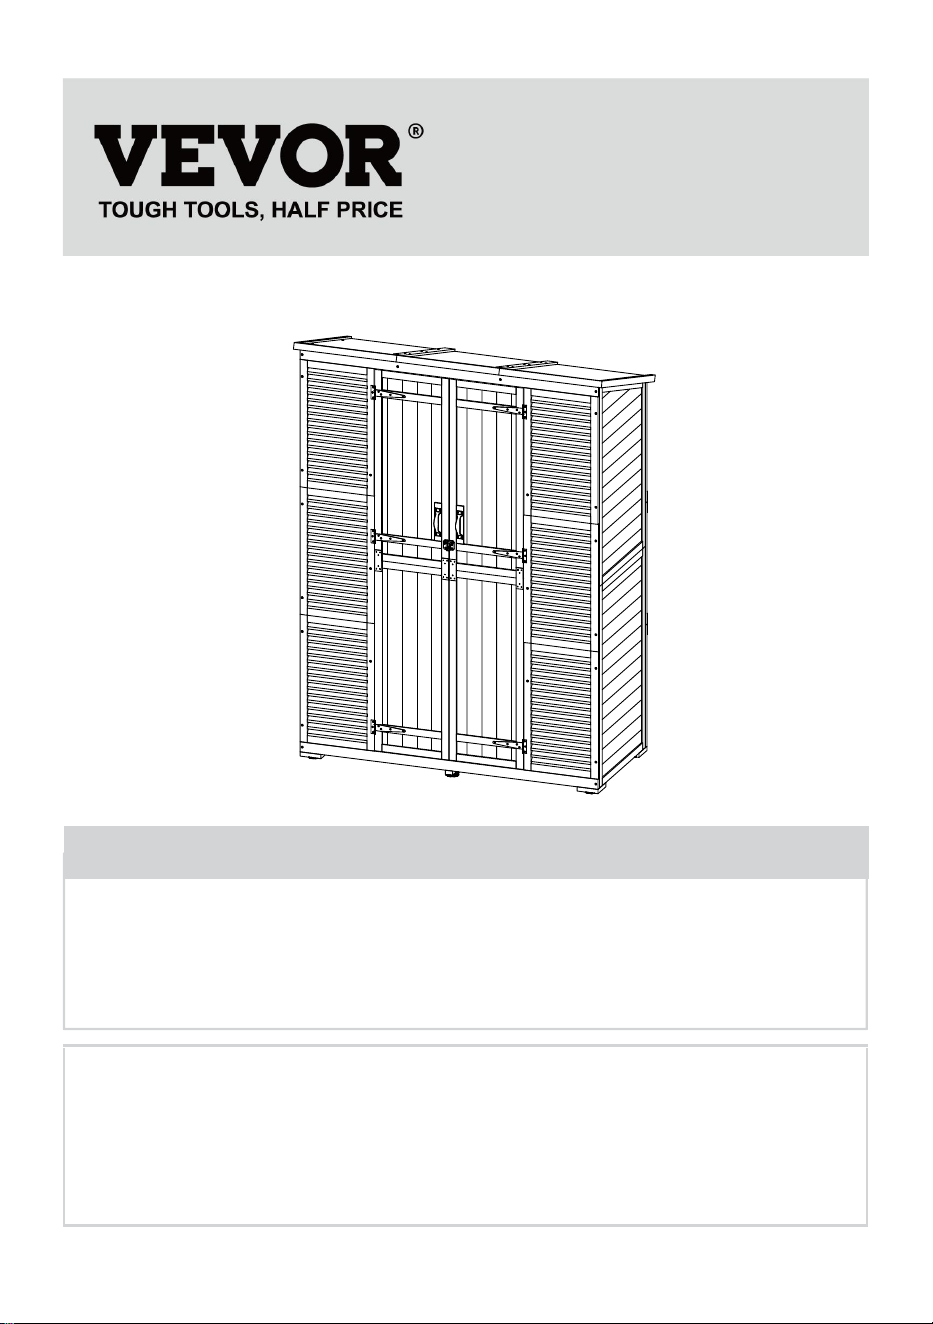
MODEL: TY-OP2419
Have product questions? Need technical support? Please feel free to
contact us:
Technical Support and E-Warranty Certificate
www.vevor.com/support
NEED HELP? CONTACT US!
This is the original instruction, please read all manual instructions
carefully before operating. VEVOR reserves a clear interpretation of our
user manual. The appearance of the product shall be subject to the
product you received. Please forgive us that we won't inform you again if
there are any technology or software updates on our product.
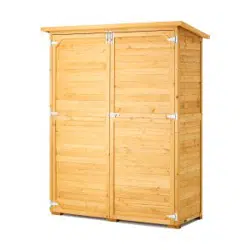
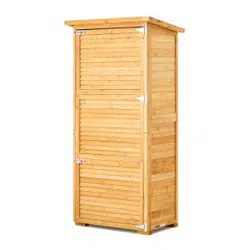
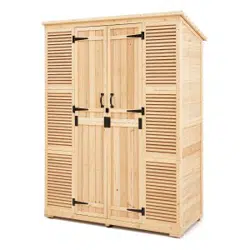
OUTDOOR STORAGE SHED

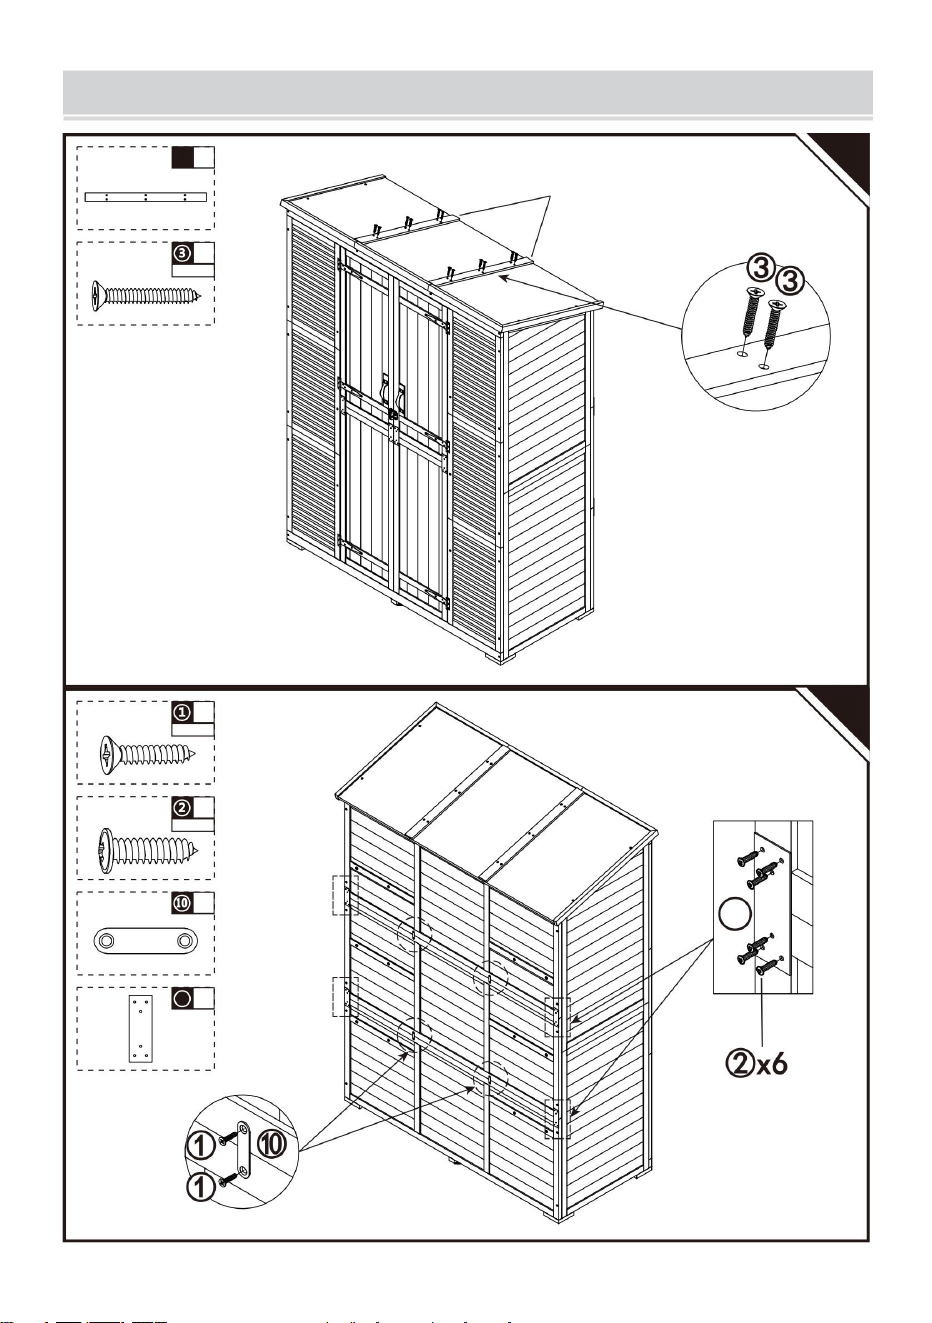
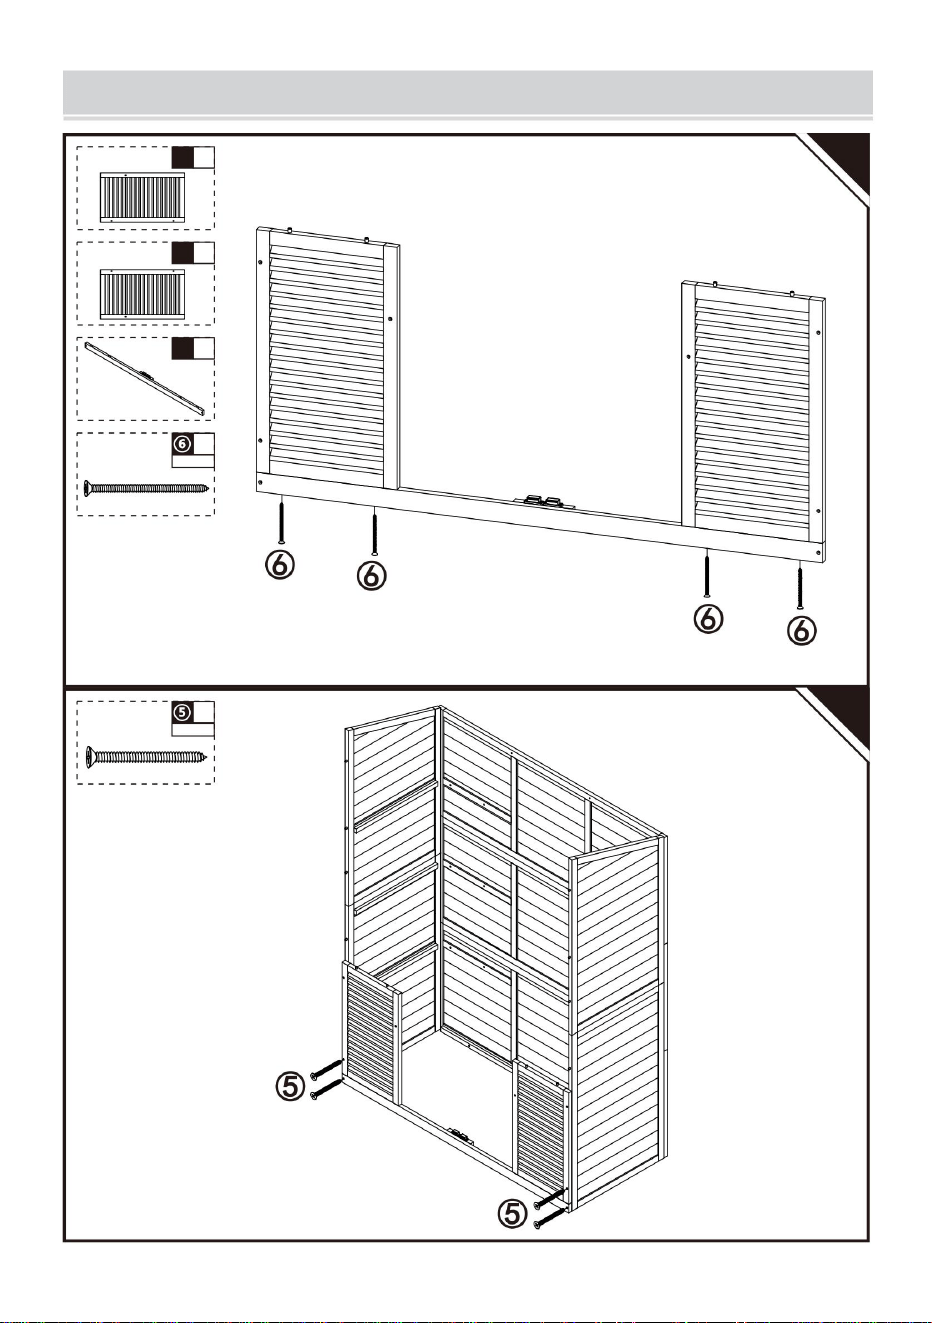
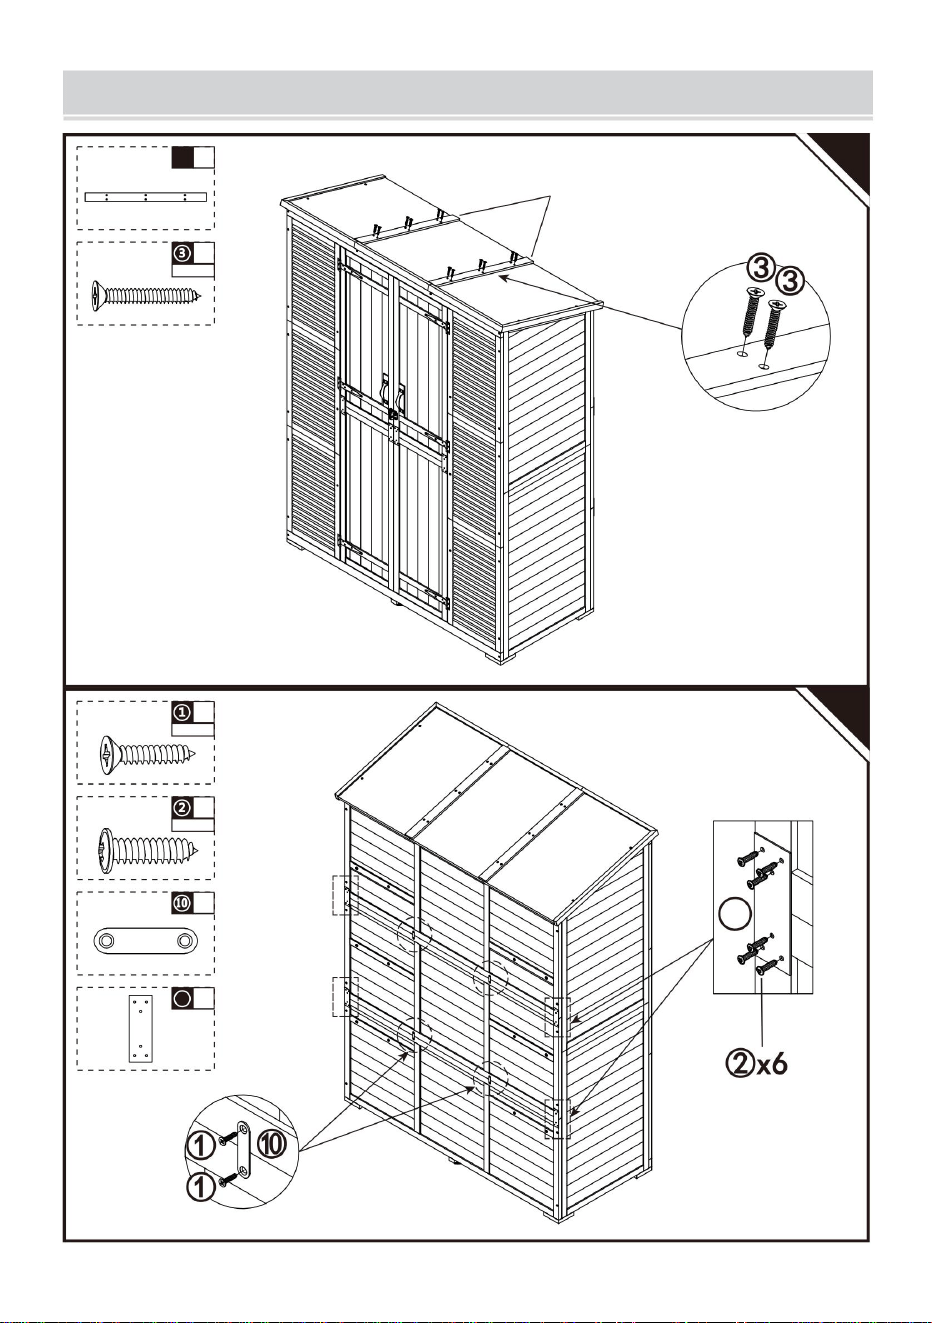
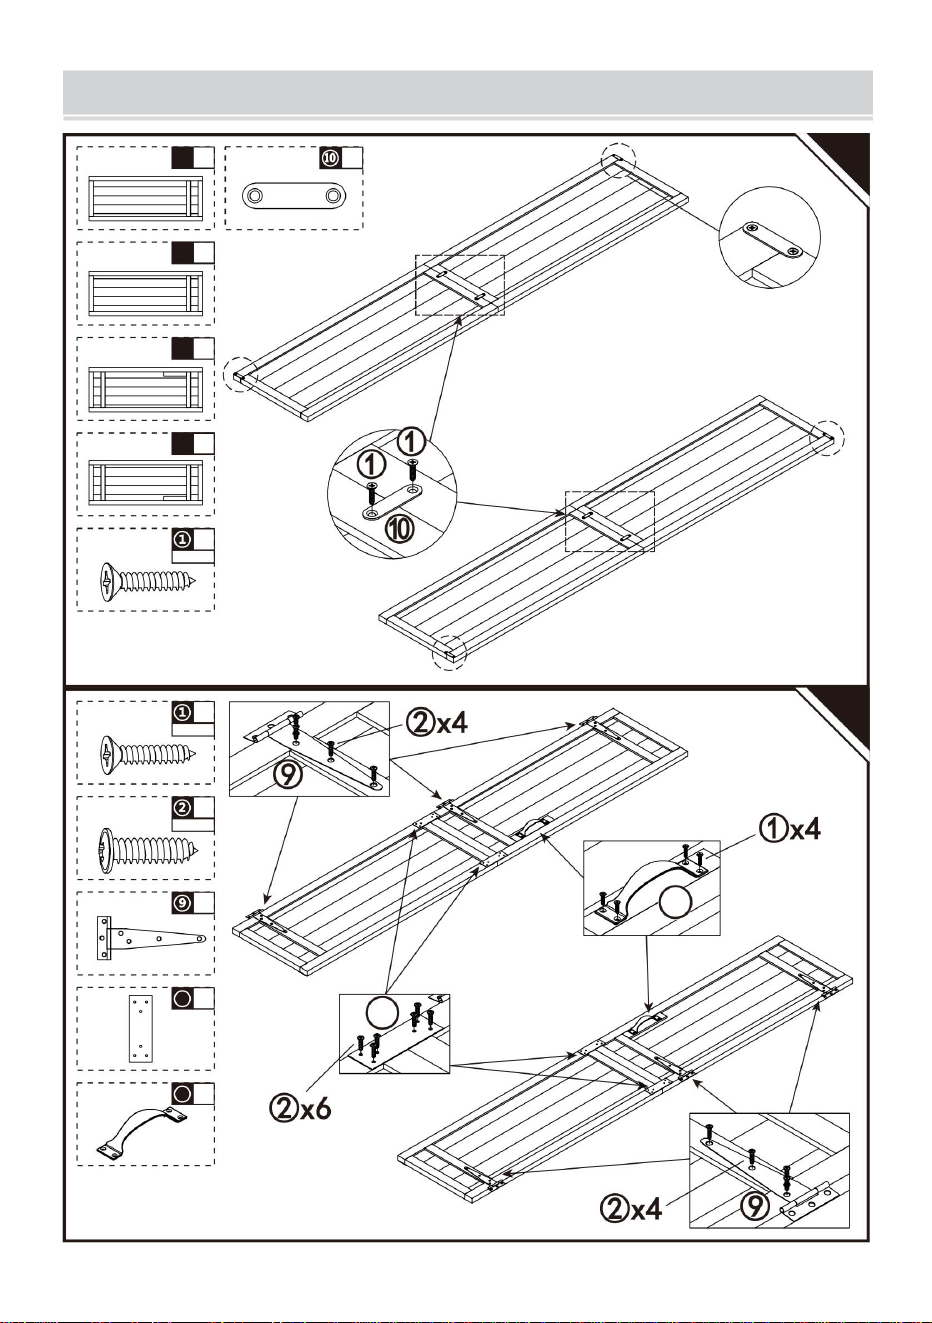
4. Before installation, please place all materials according to the
manual list, so that you can check whether there are any missing
materials, and it can also reduce the installation time.
- 3 -
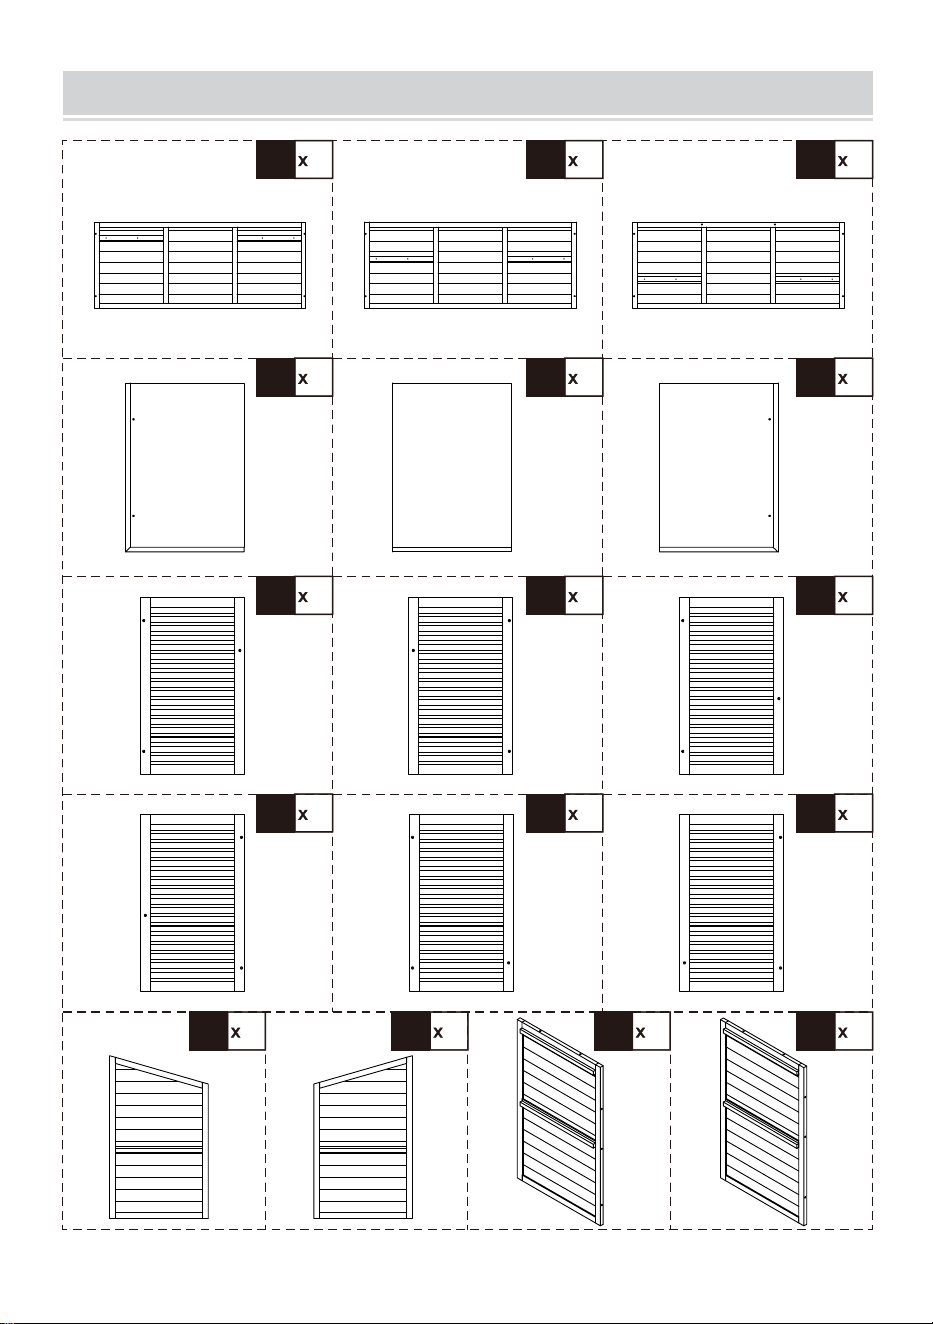
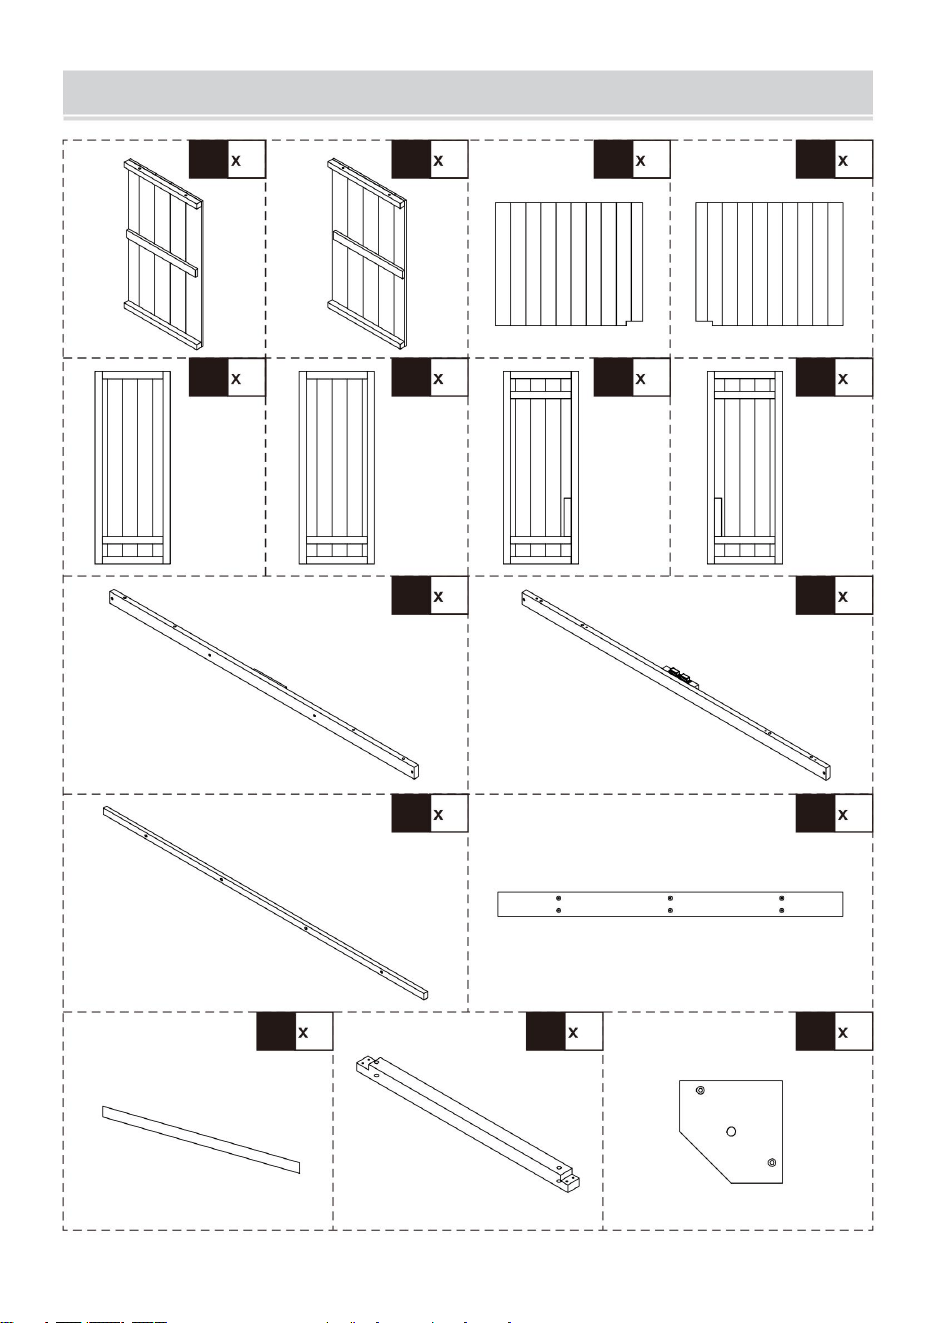
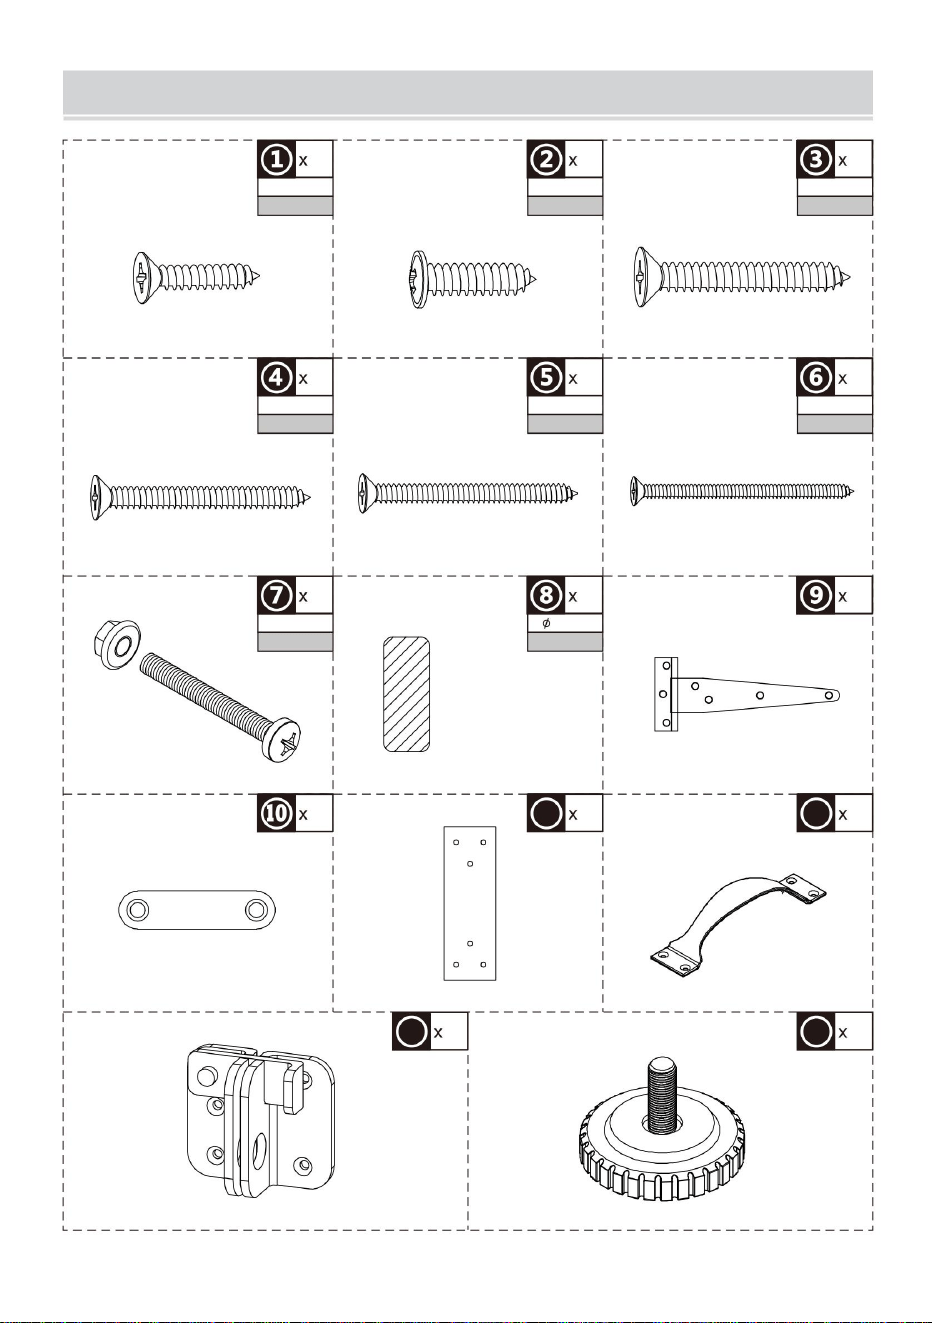
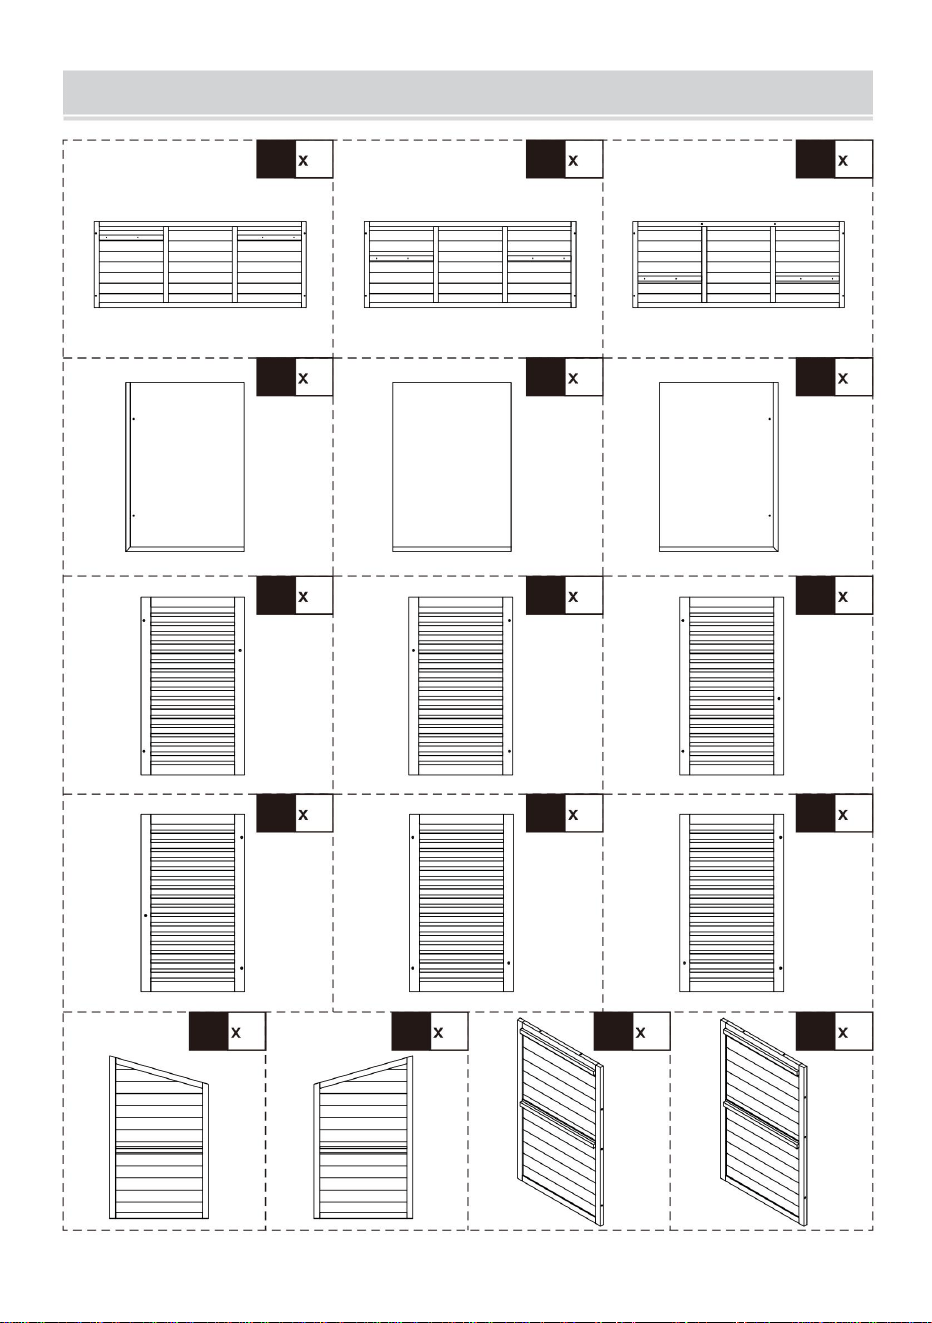
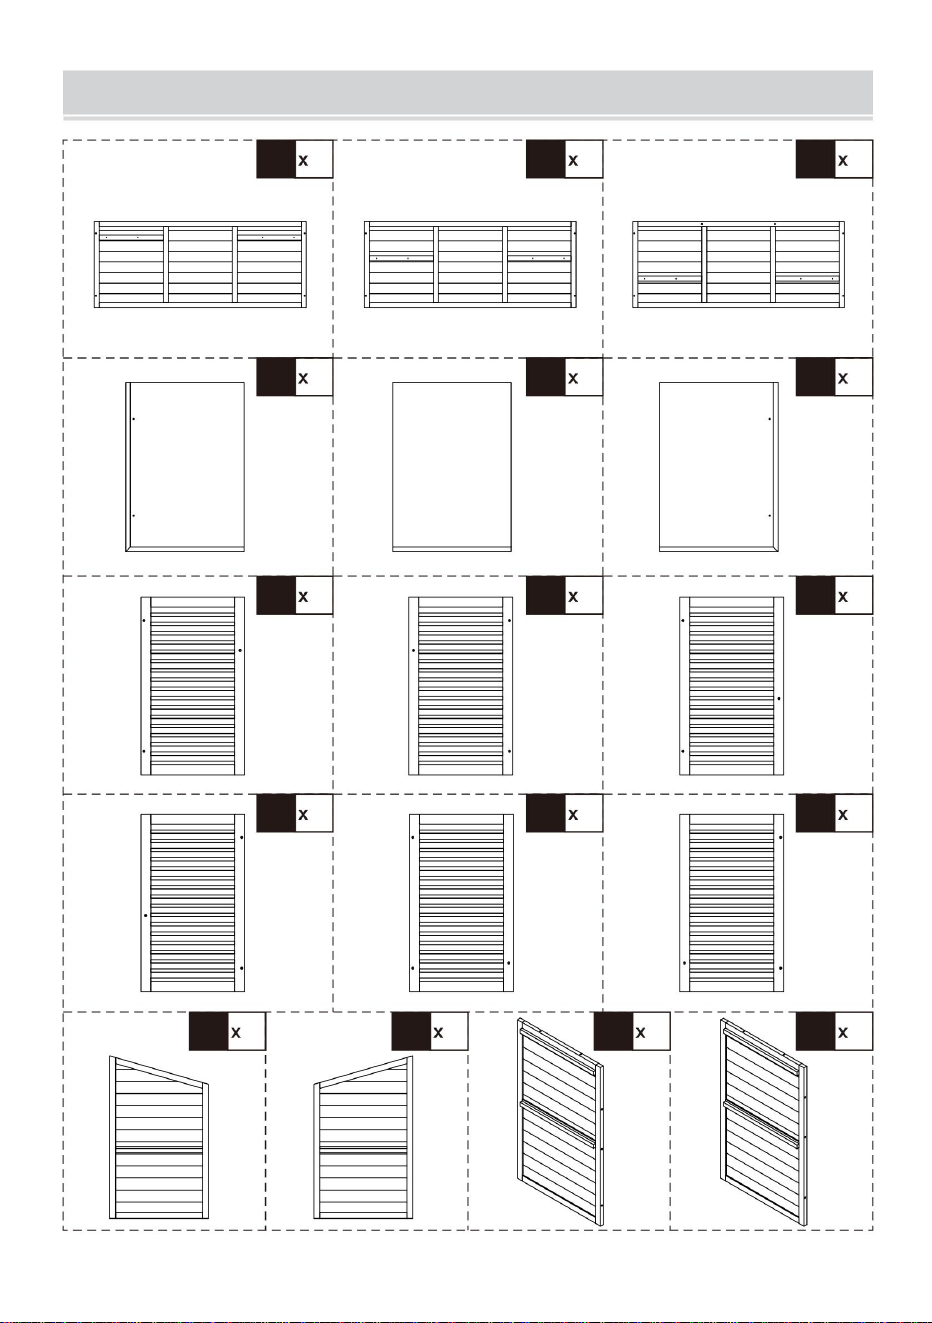
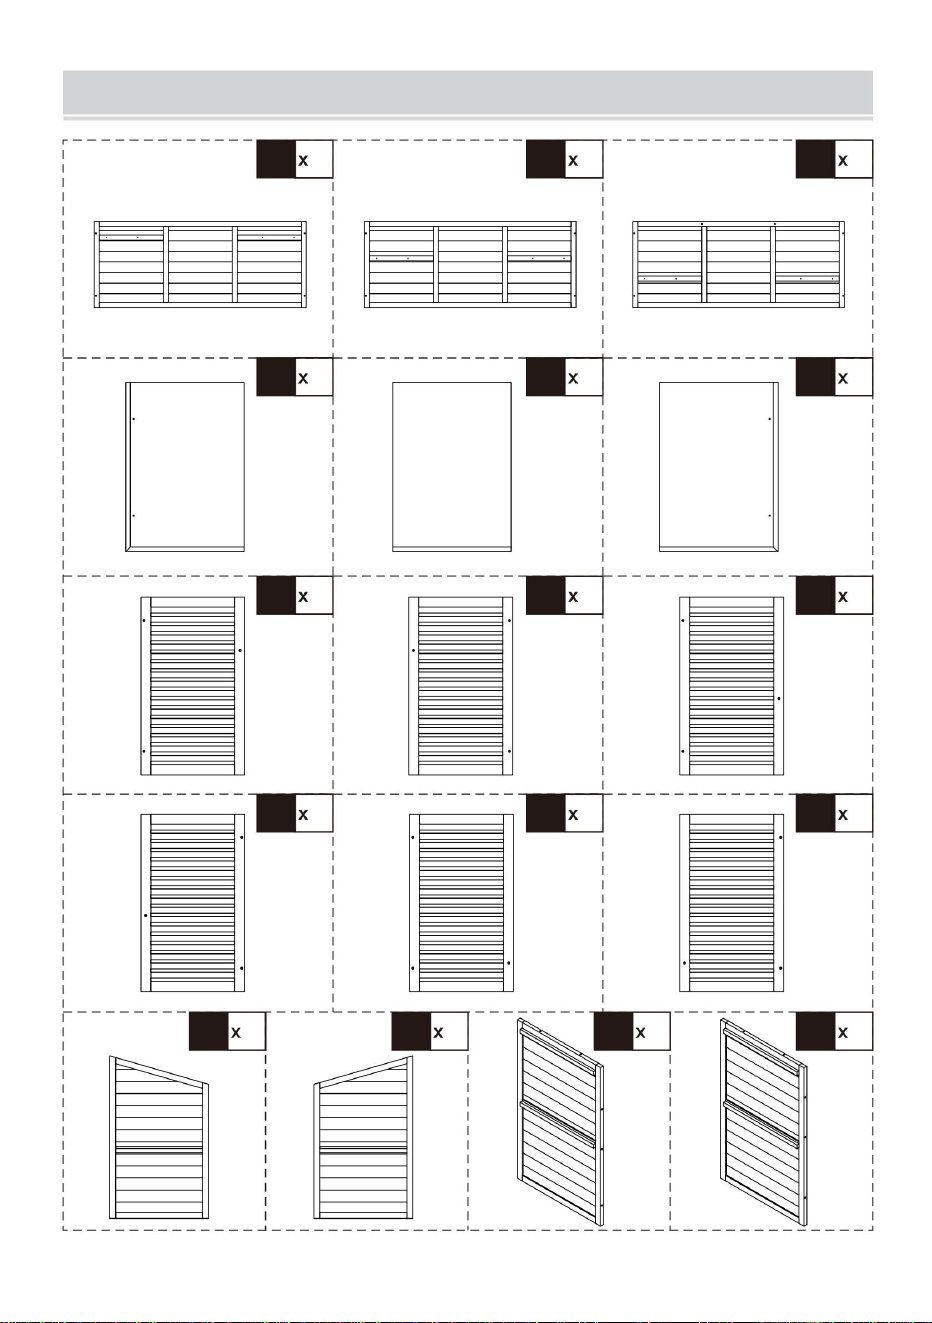
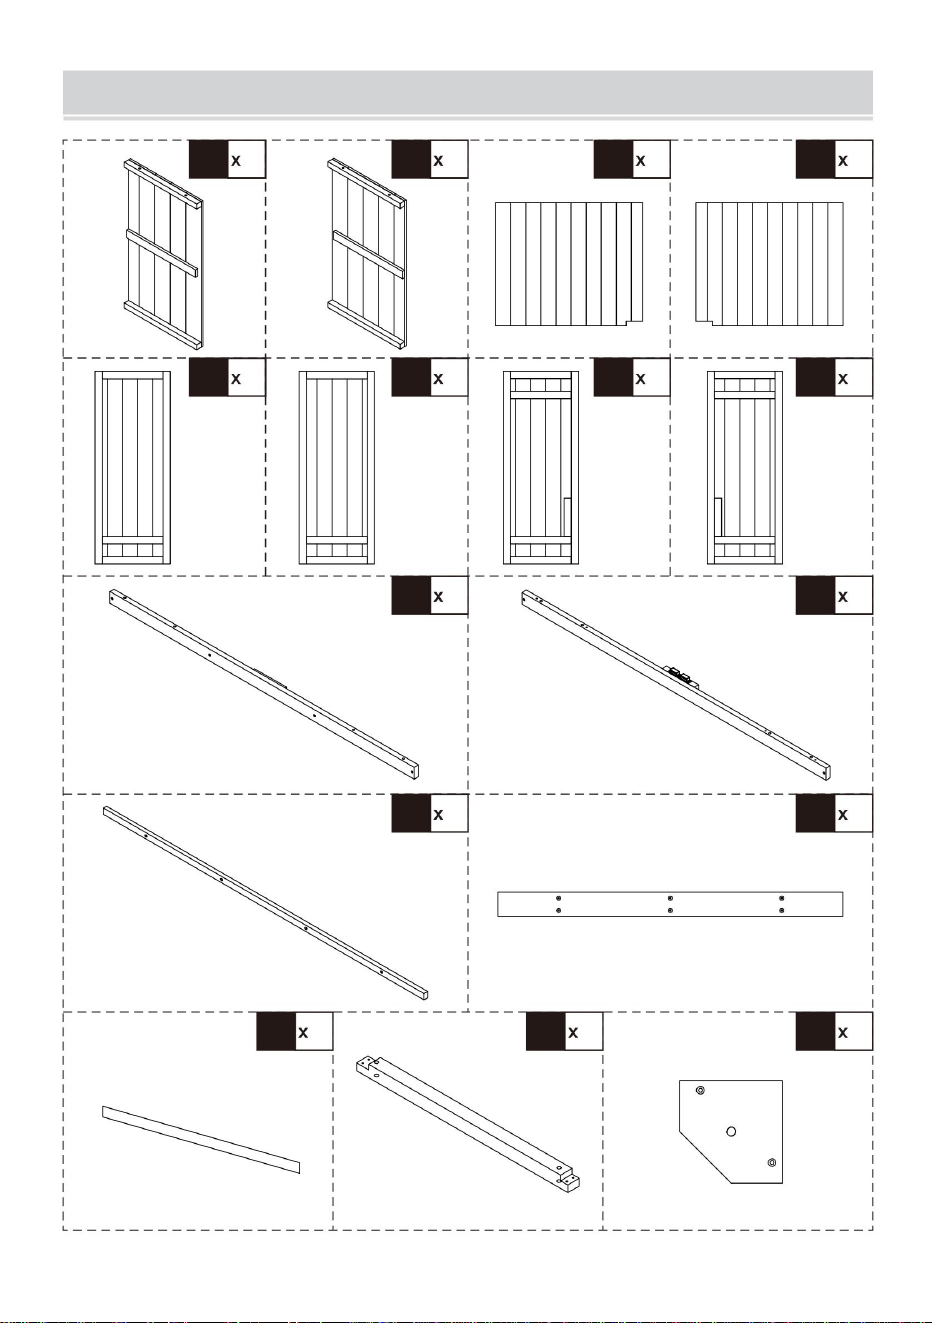
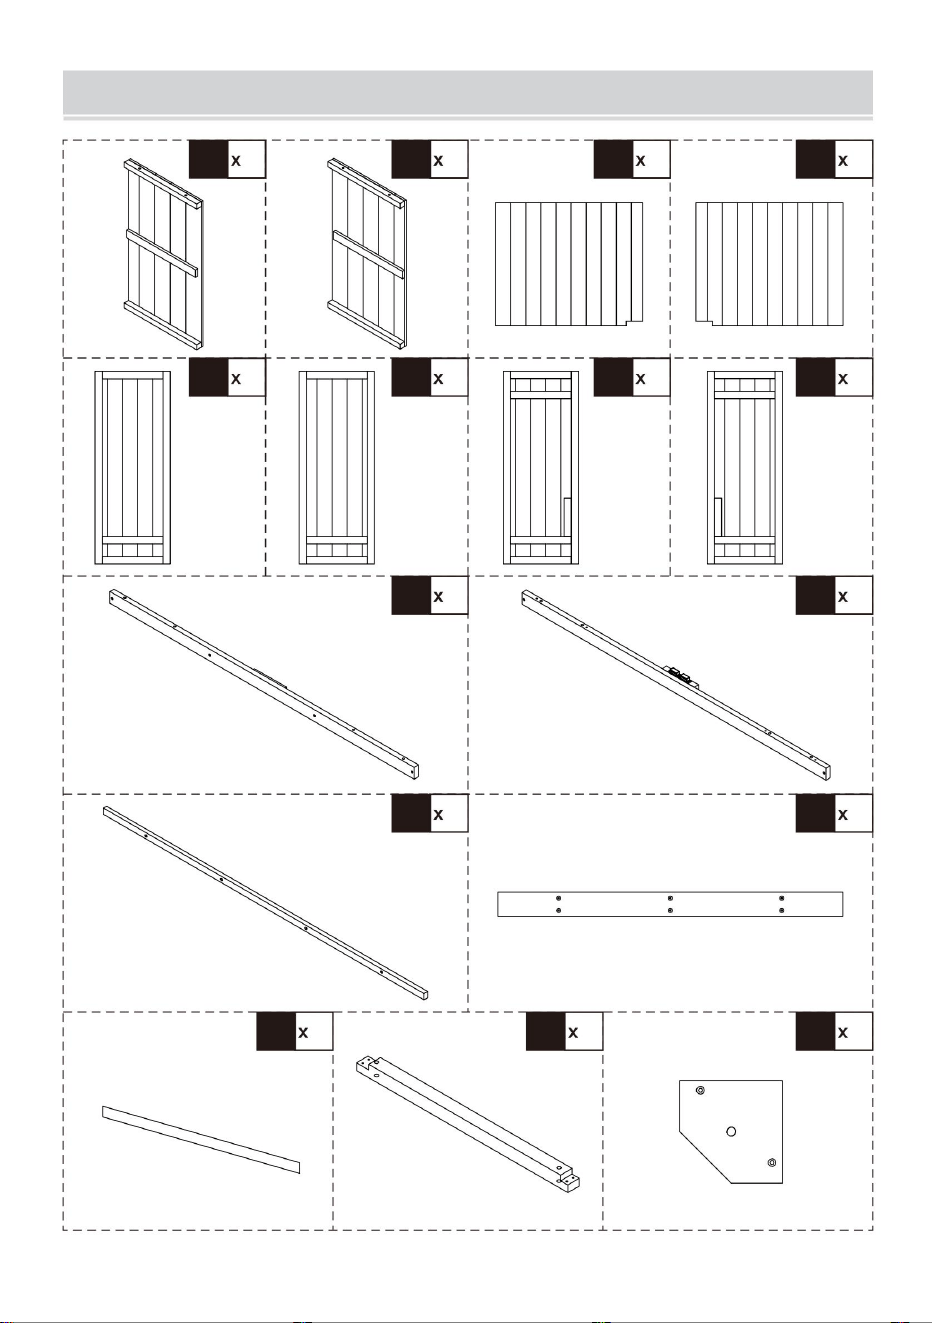
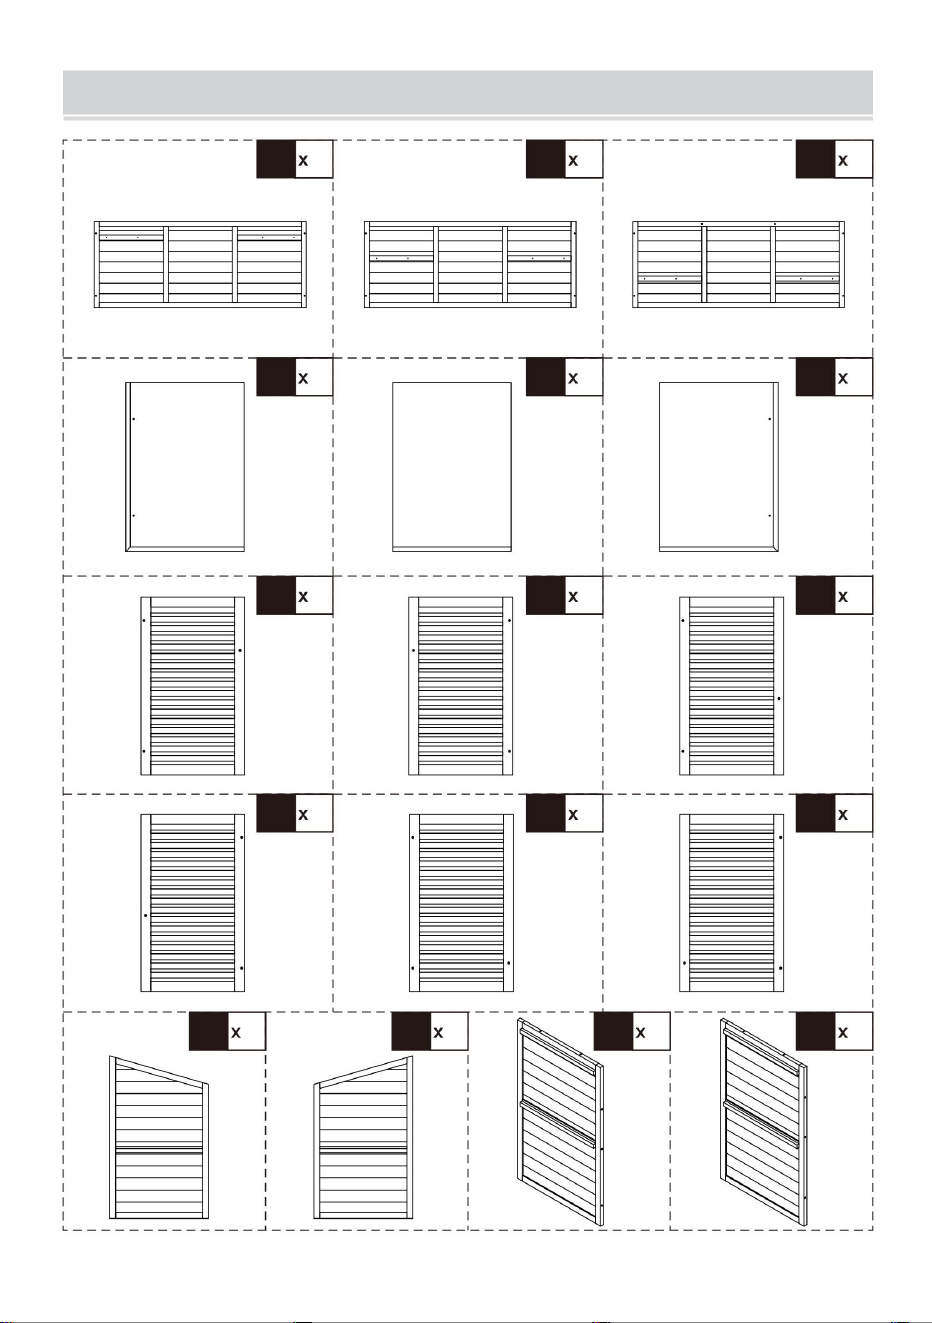
PART LIST
1
A1
1
E1
1
F2
1
H1
1
H2
1
I1
1
I2
1
B
1
A2
1
E2
1
G1
1
C
1
A3
1
F1
1
G2
1
D
- 4 -
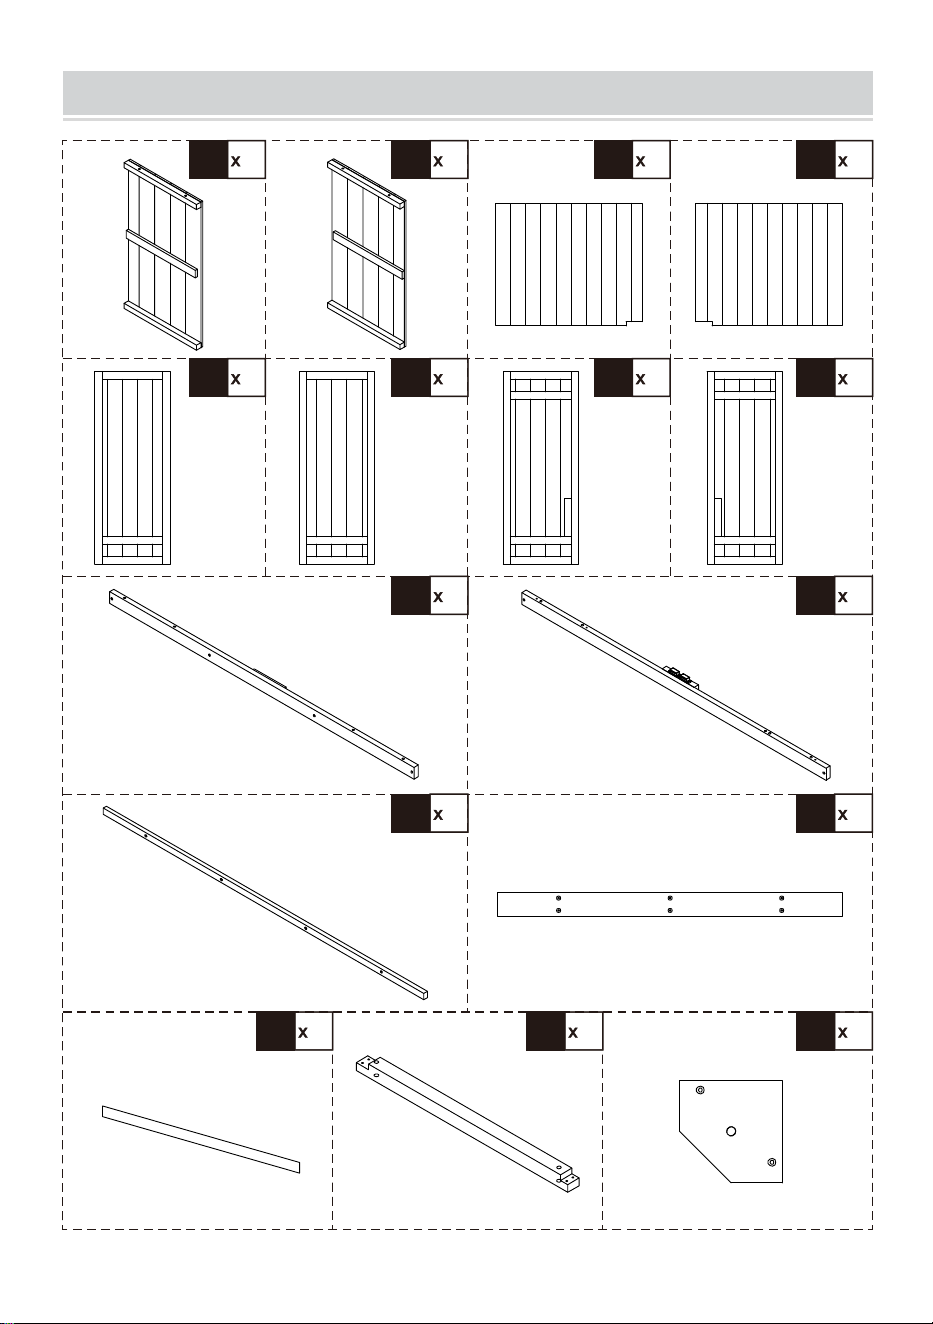
PART LIST
2
R
1
S
4
T
2
Q
1
O
1
P
1
N
3
J1
3
J2
1
K1
1
K2
1
L1
1
L2
1
M1
1
M2
- 5 -
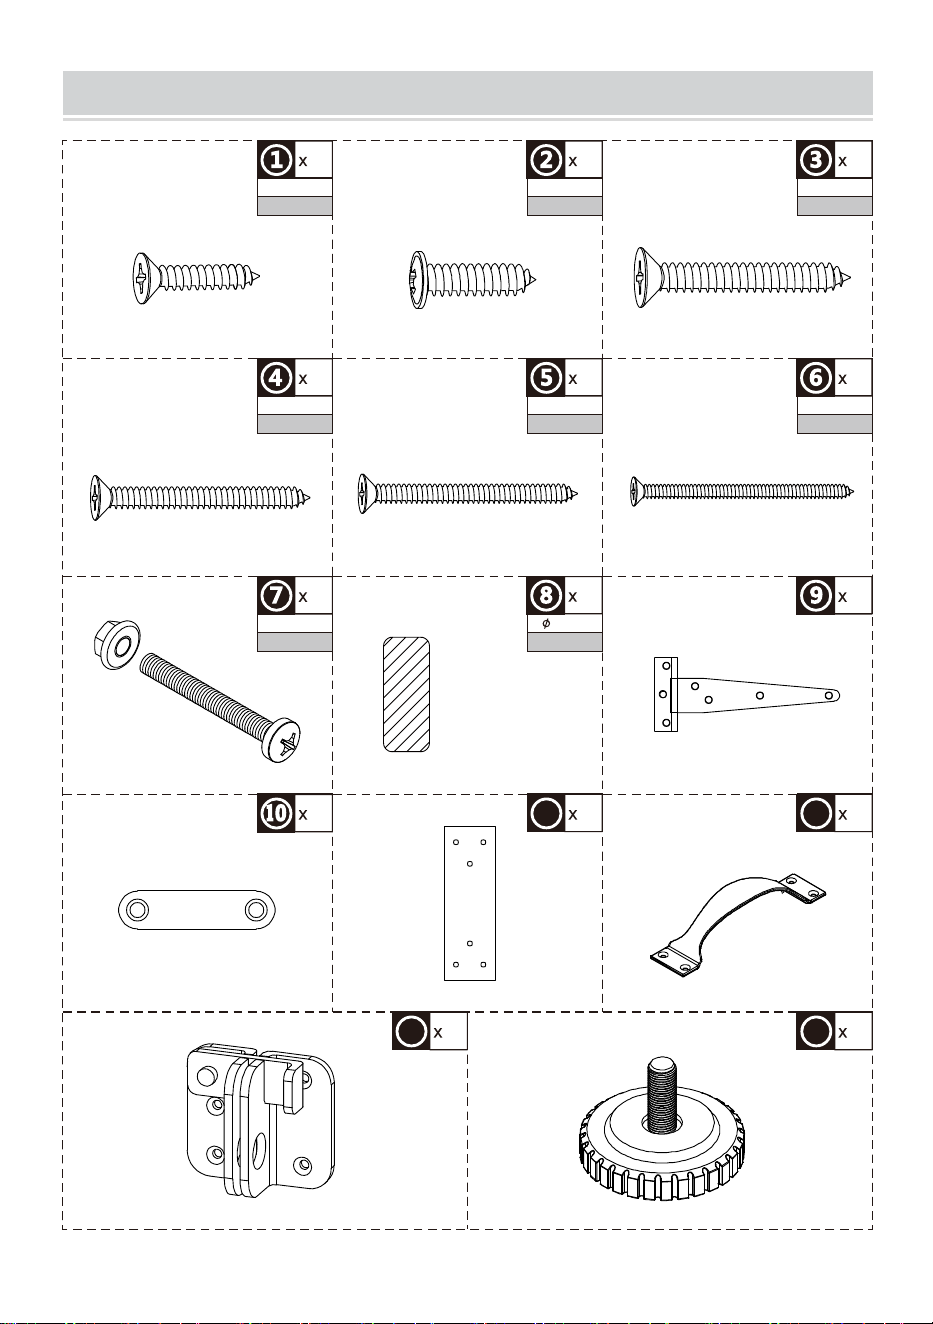
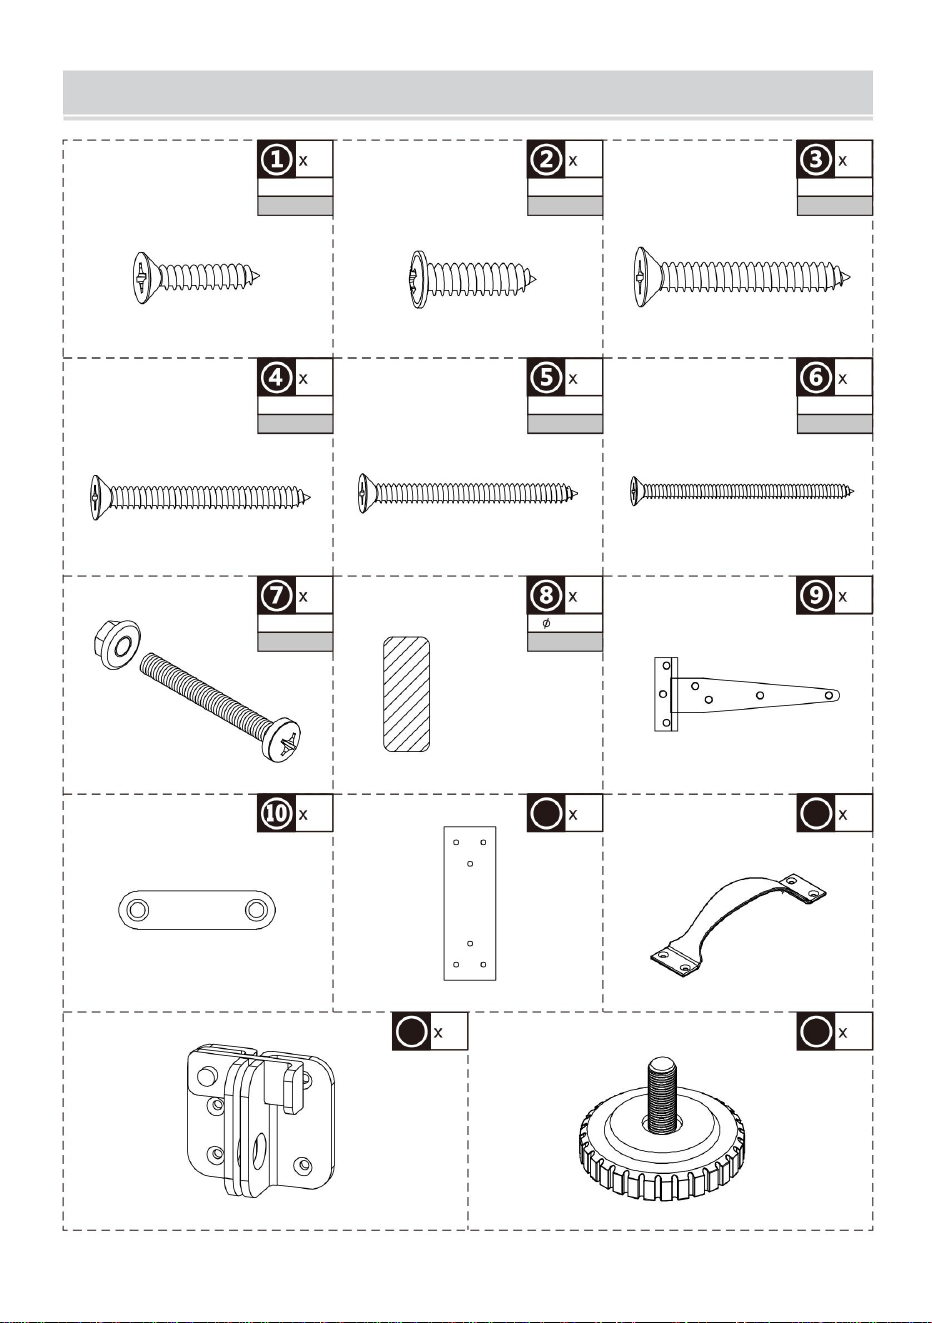
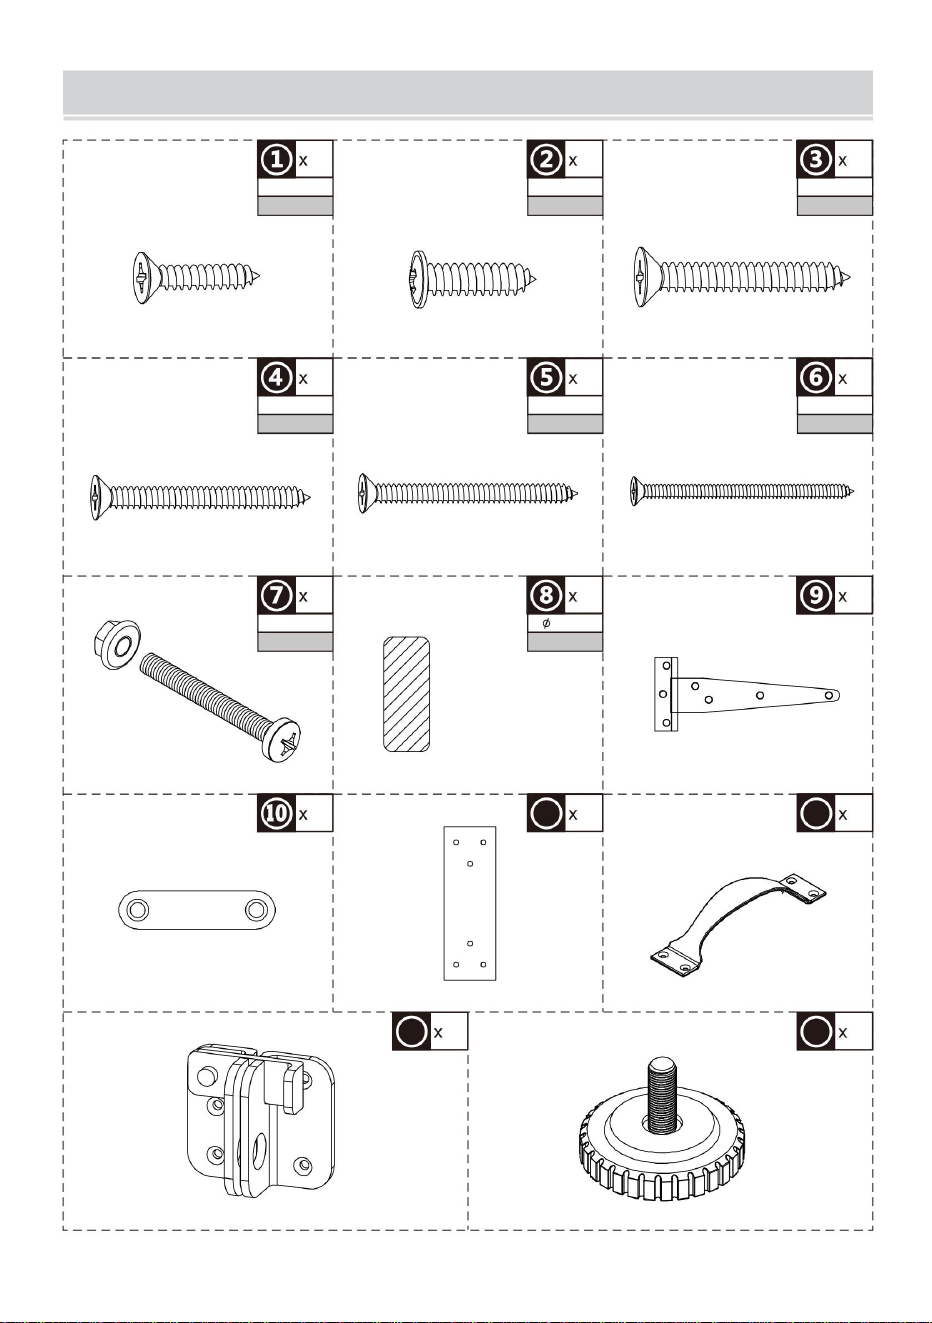
PART LIST
28
M3.0*14
+2(spare)
90
M3.0*14
+3(spare)
12
M3.5*20
+1(spare)
8
M3.5*30
+1(spare)
50
M3.5*35
+2(spare)
8
M3.5*50
+1(spare)
12
M6.0*50
+1(spare)
8
6
52
+3(spare)
8*20
wood stick
8
11
2
12
6
14
1
13
- 6 -
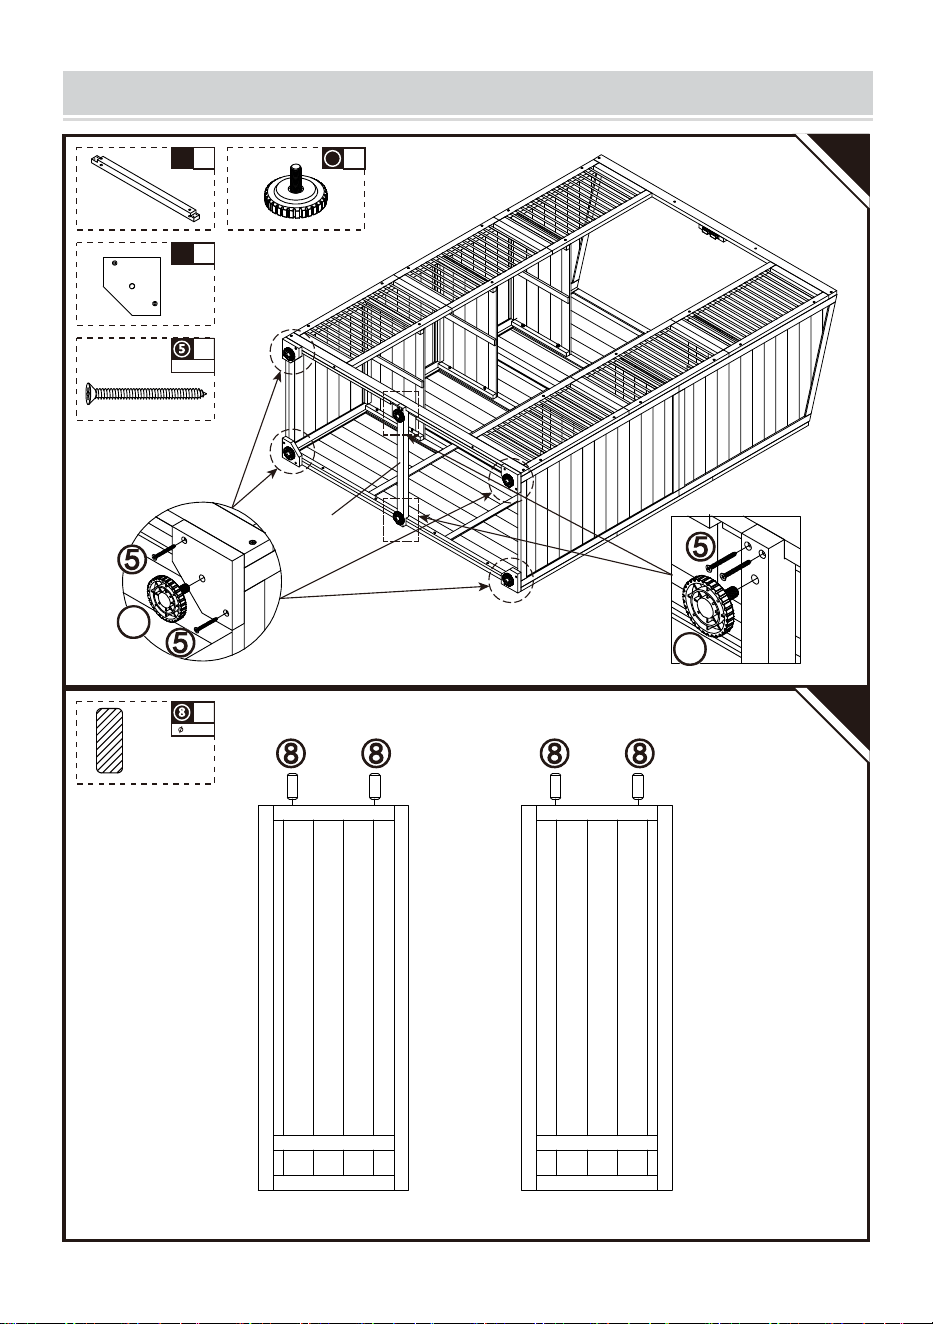
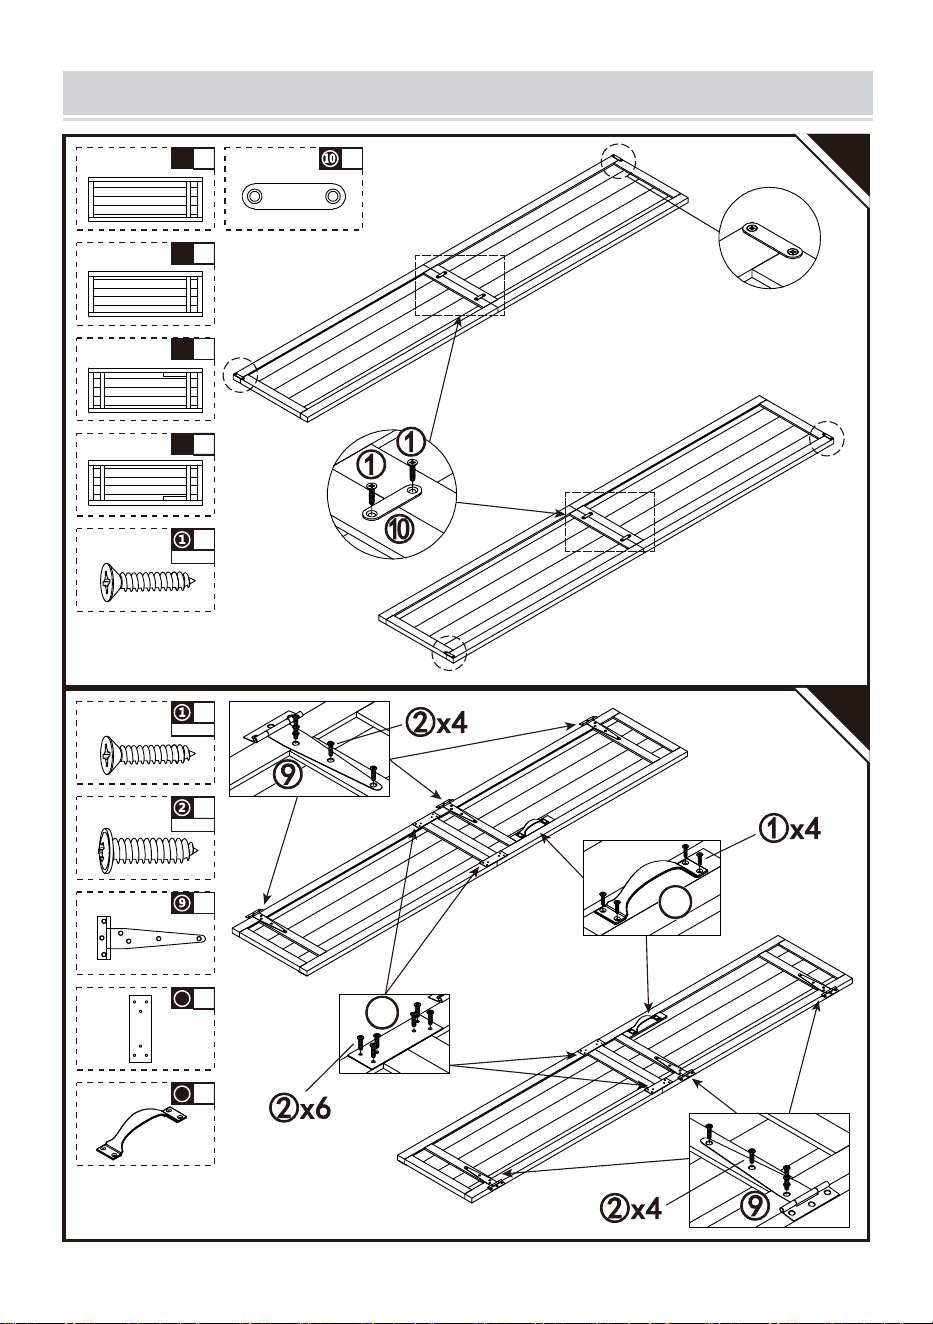
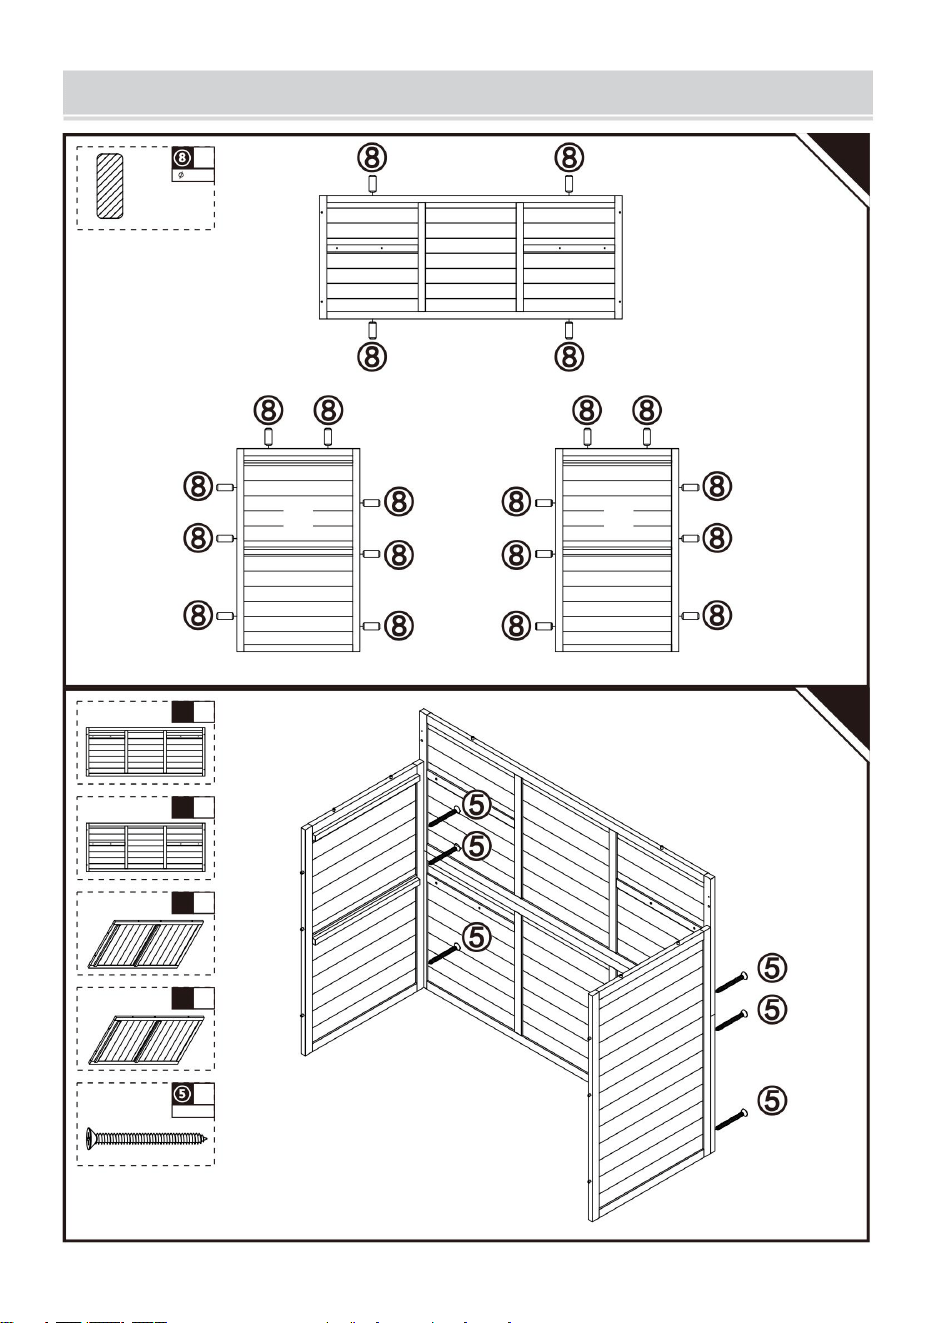
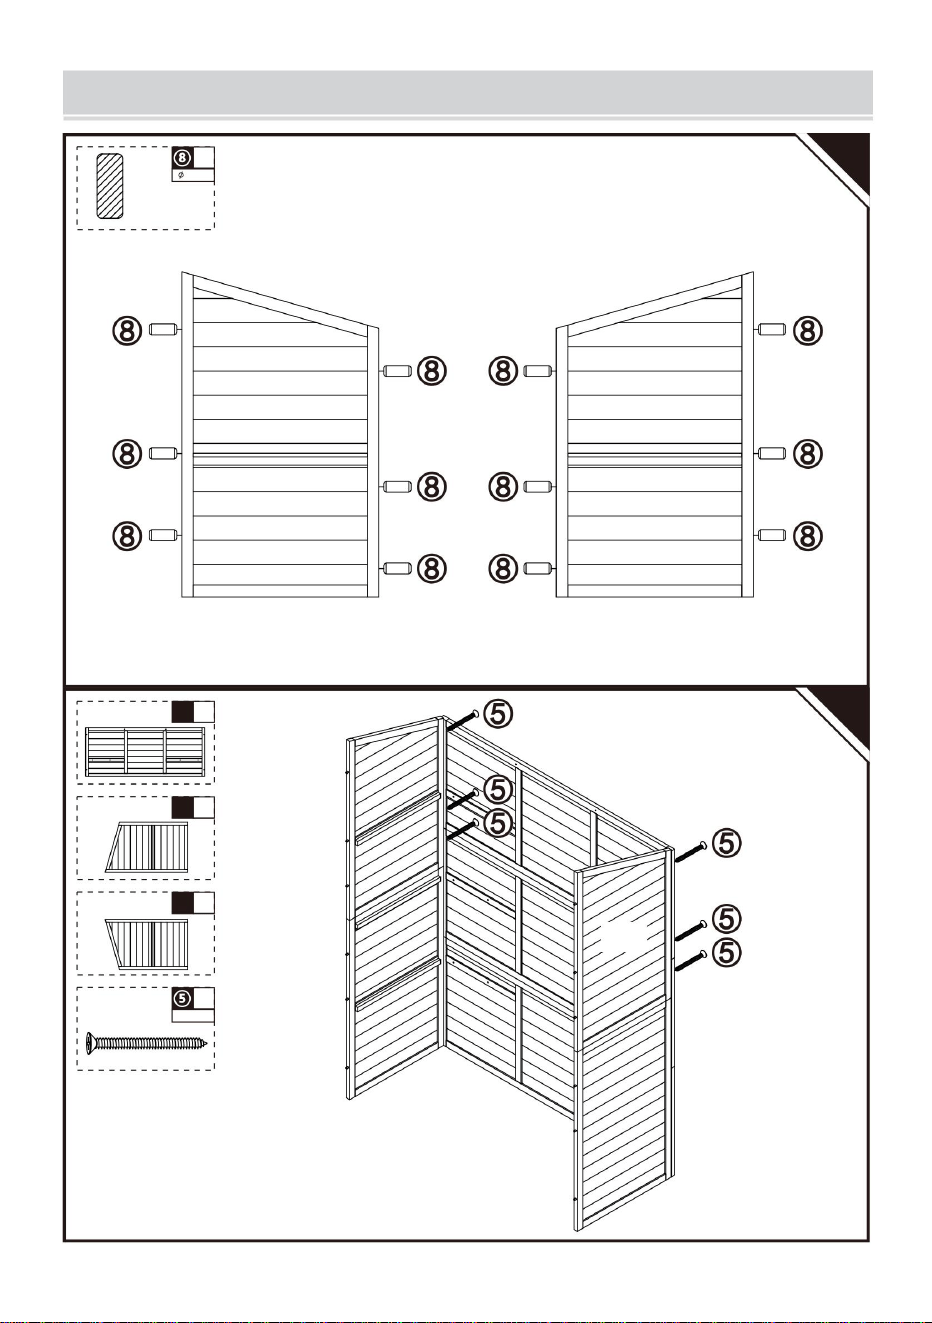
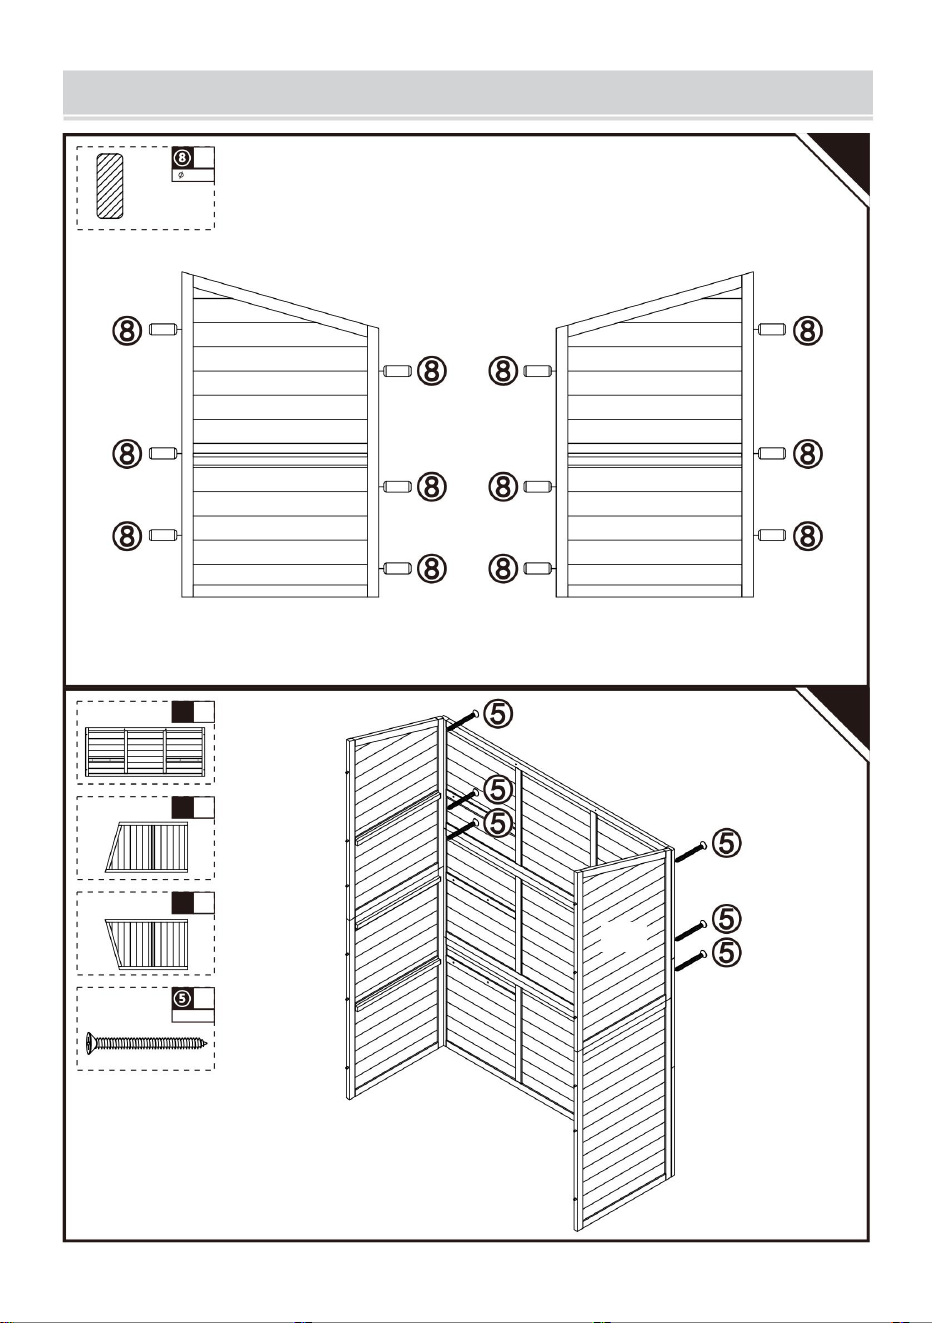
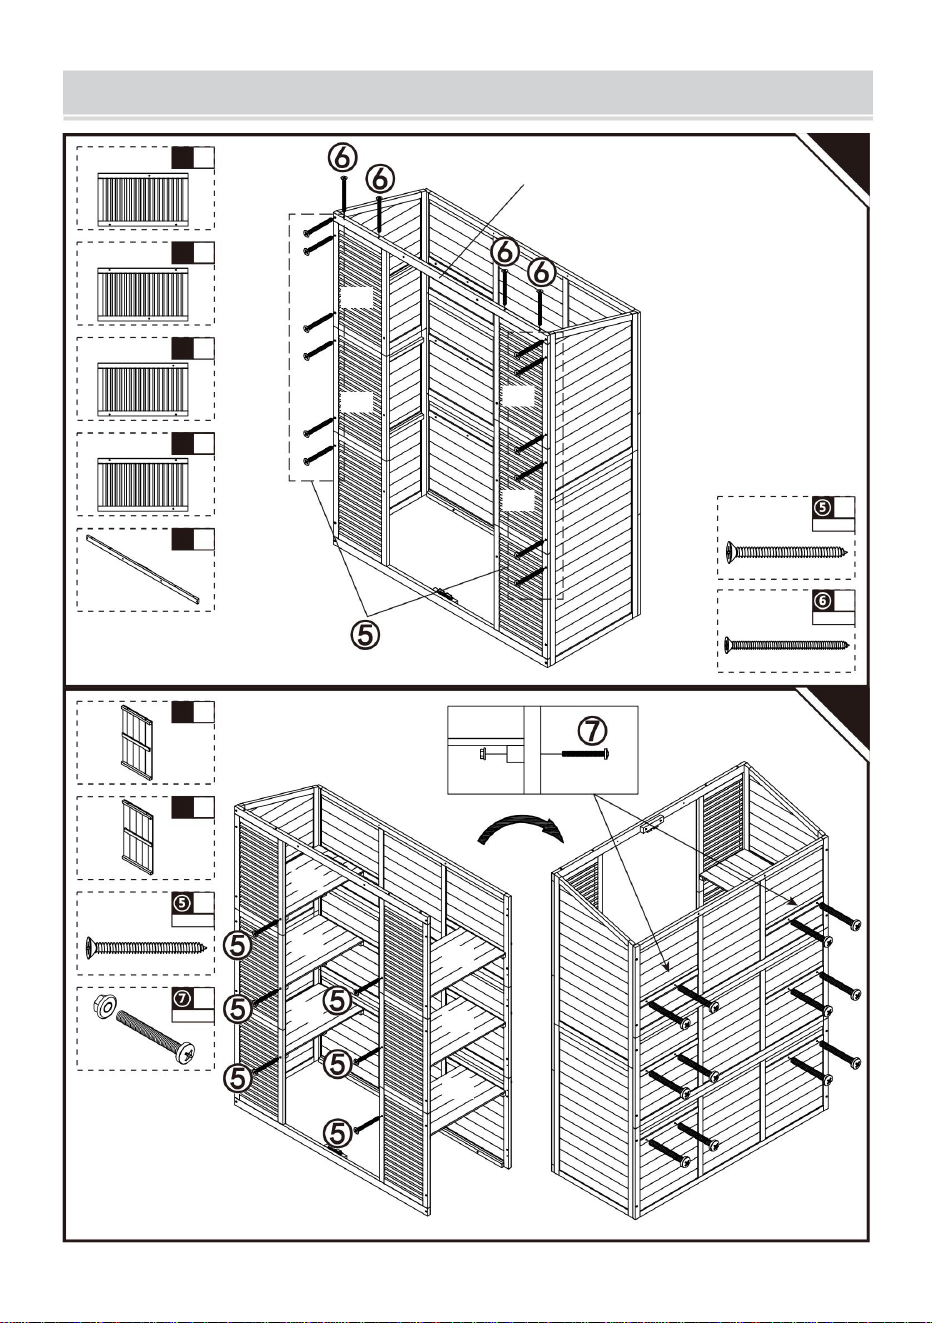
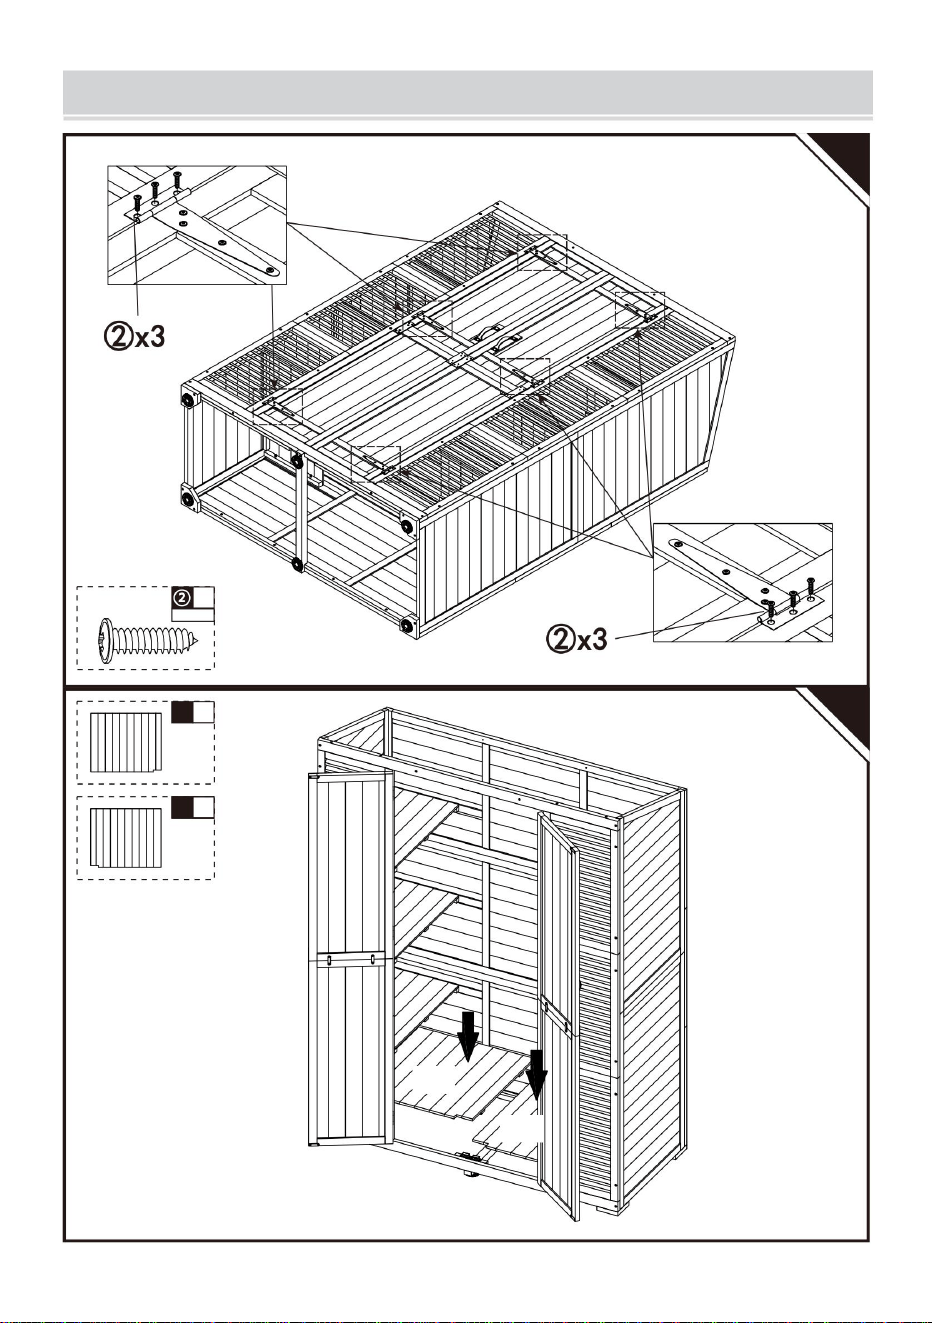
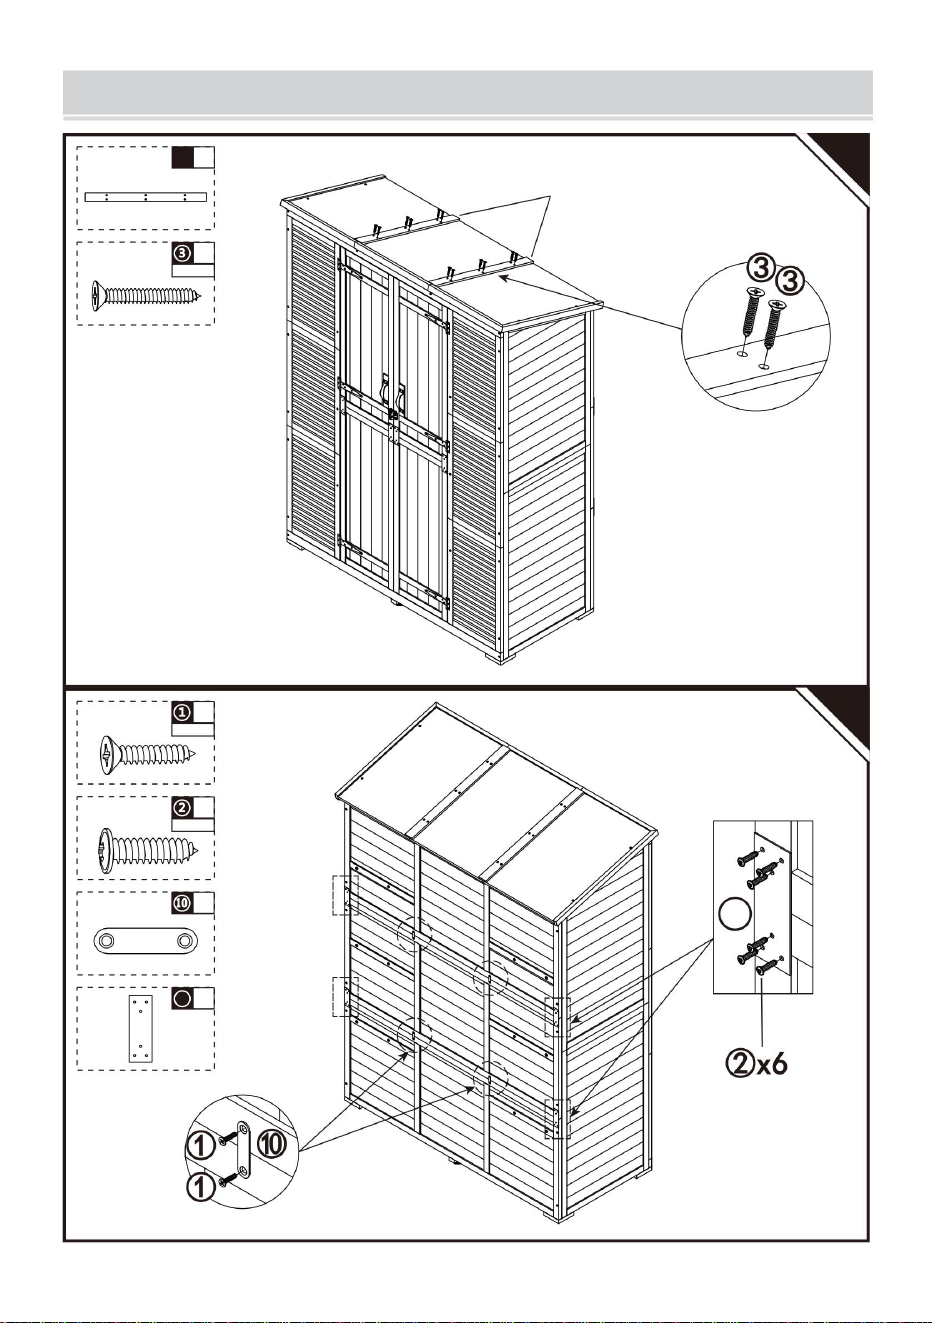
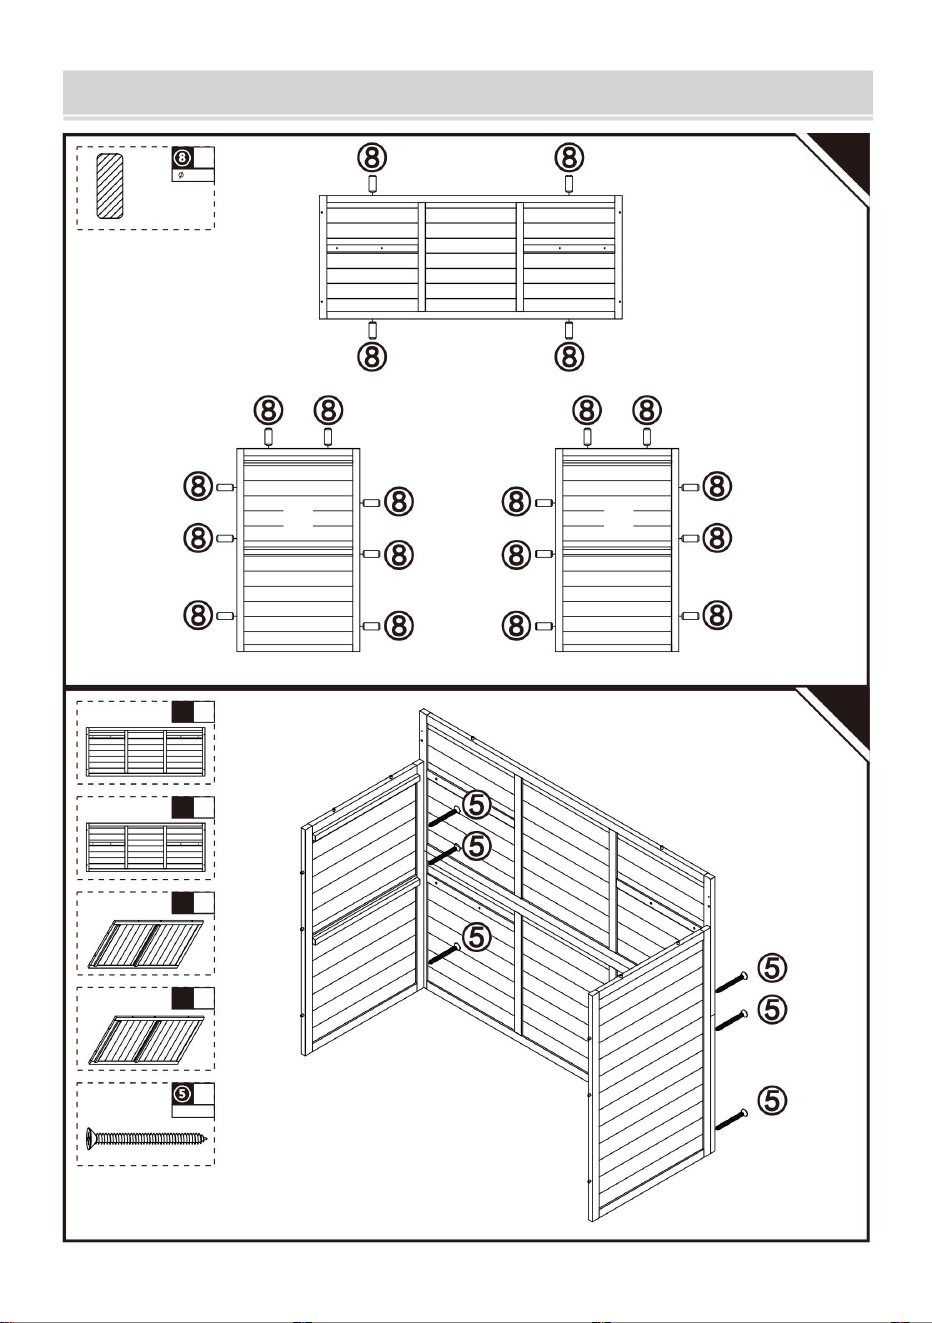
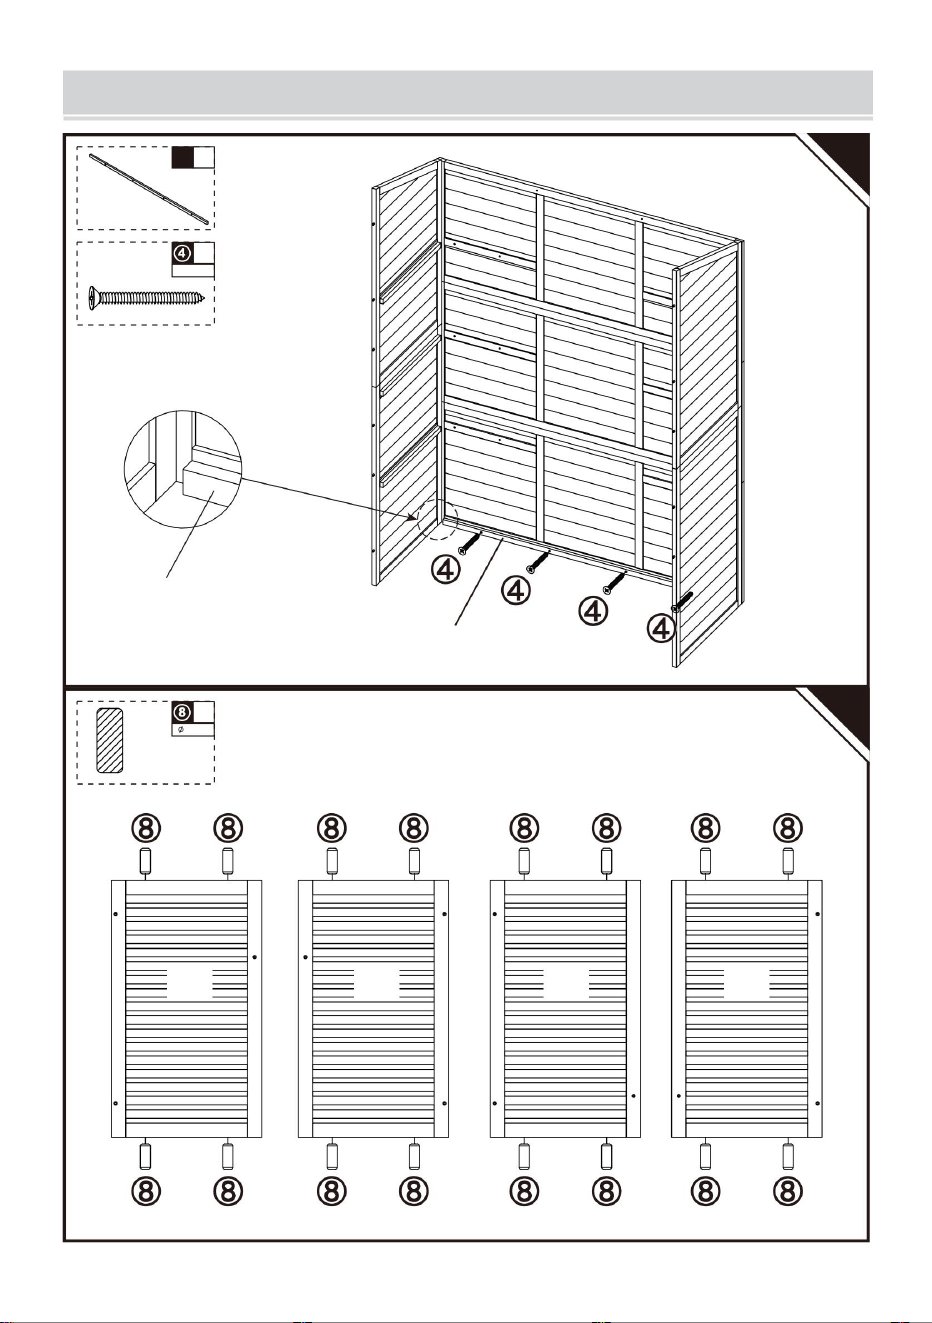
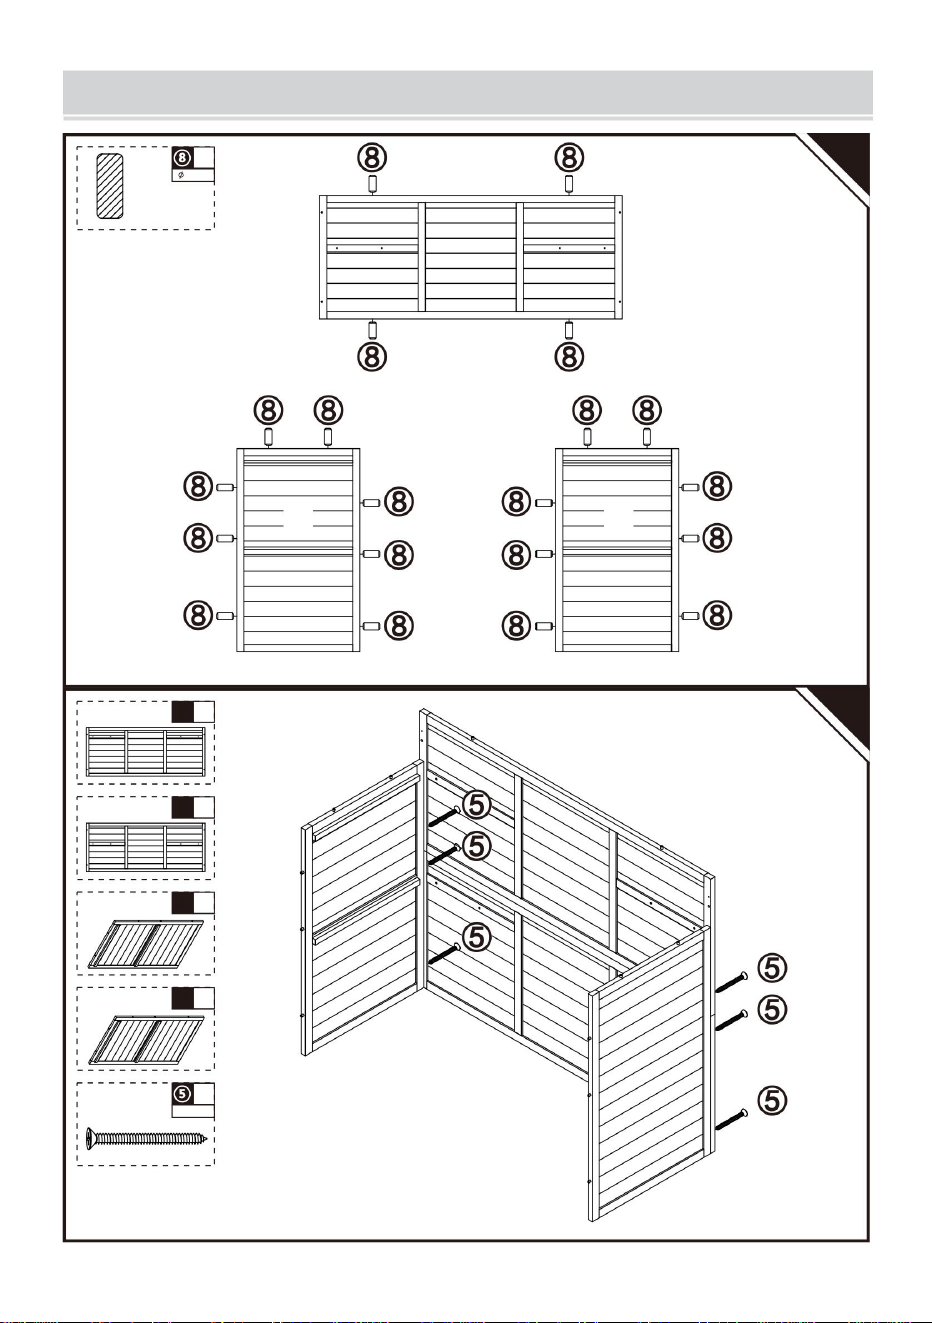
ASSEMBLY GUIDE
01
x20
8*20
02
x1
A1
x1
A2
x1
I1
x1
I2
x6
M3.5*35
I1 I2
A2
A2
A1
I1
I2
wood stick
- 7 -
ASSEMBLY GUIDE
03
x12
8*20
04
x1
A3
x1
H1
x1
H2
x6
M3.5*35
H2H1
A3
H1
wood stick
H2
- 8 -
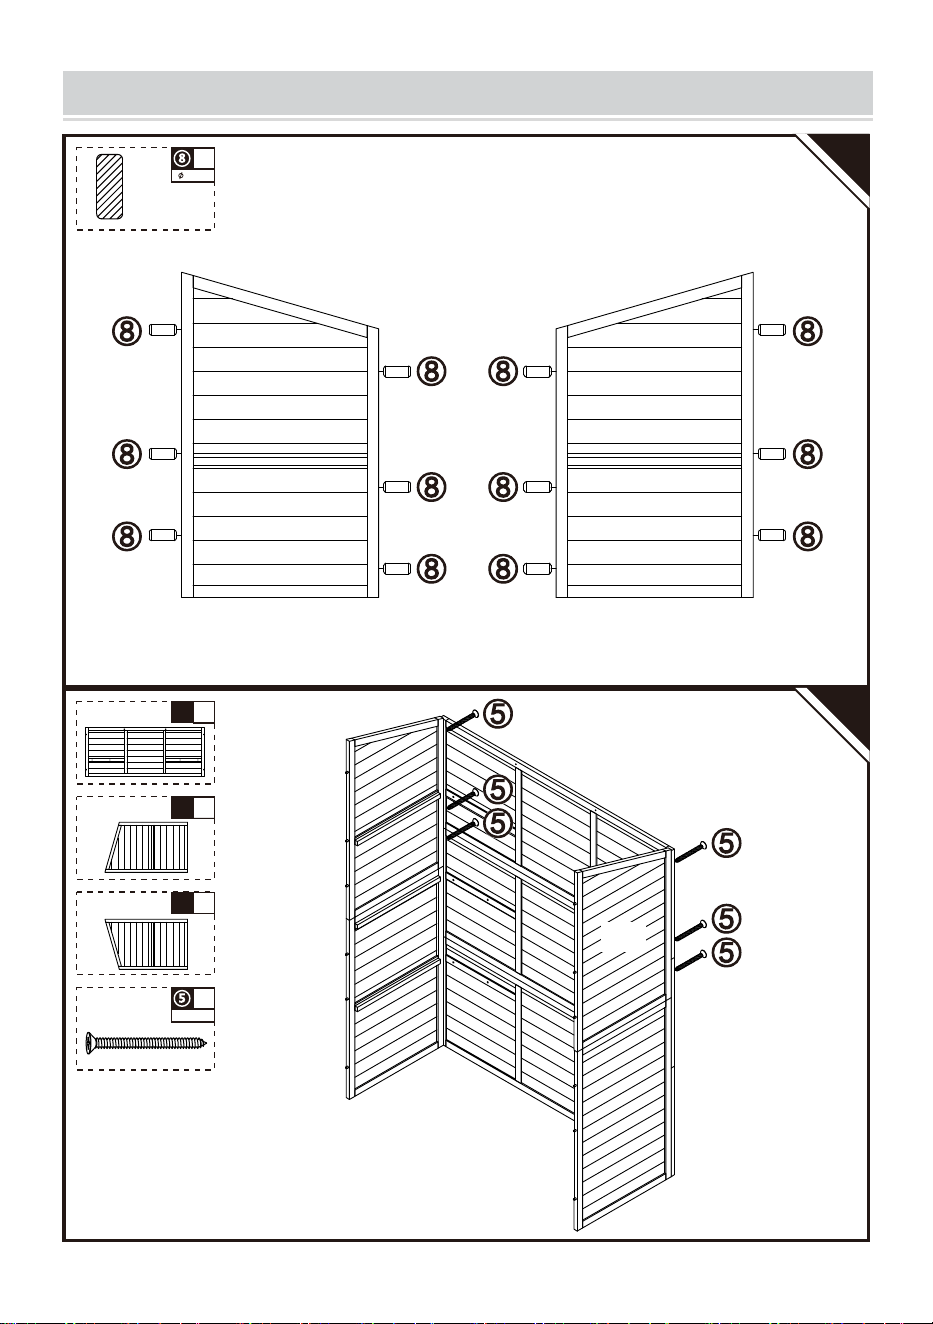
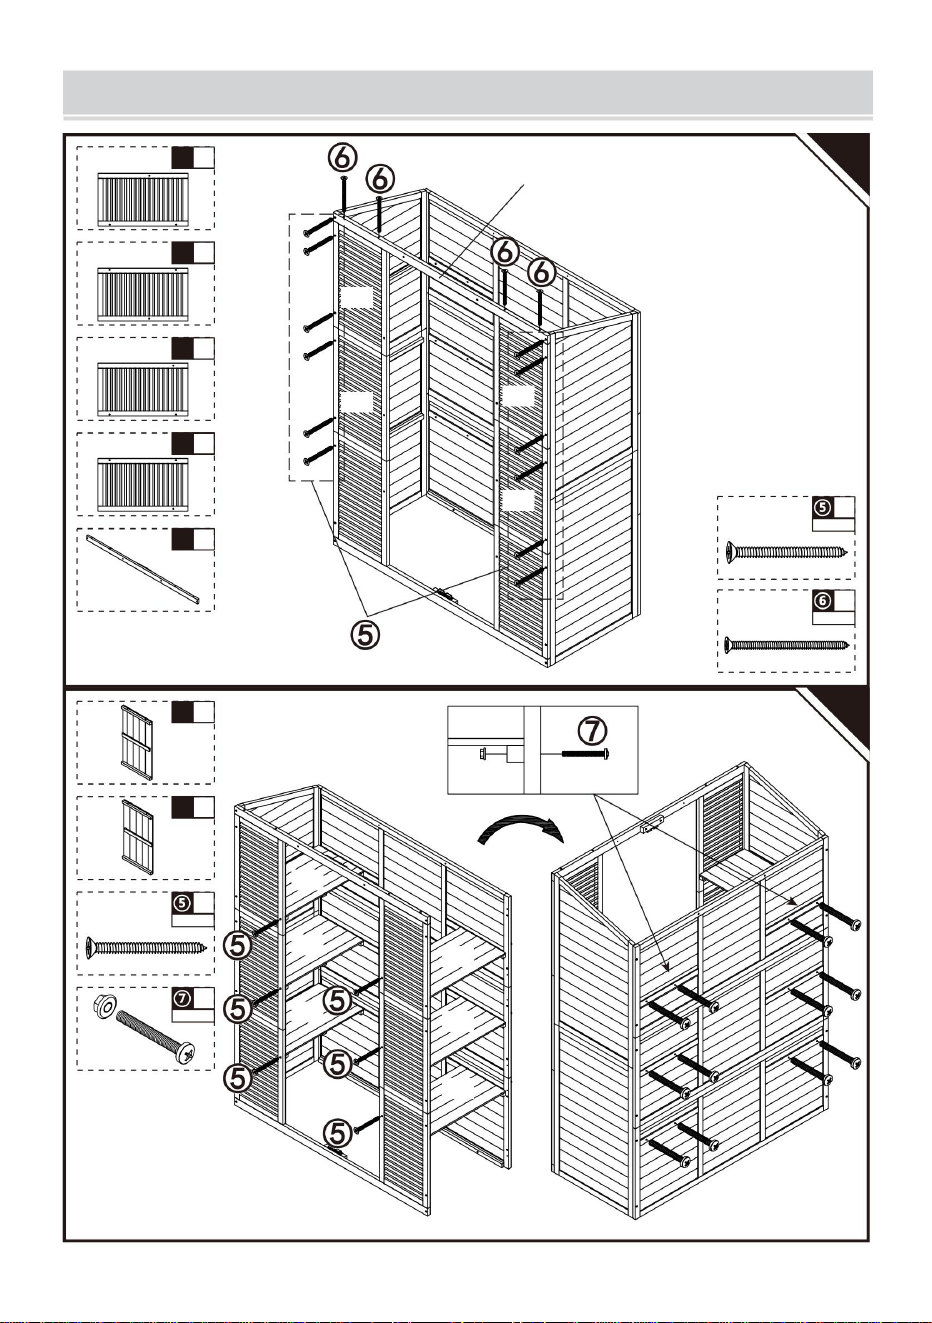
ASSEMBLY GUIDE
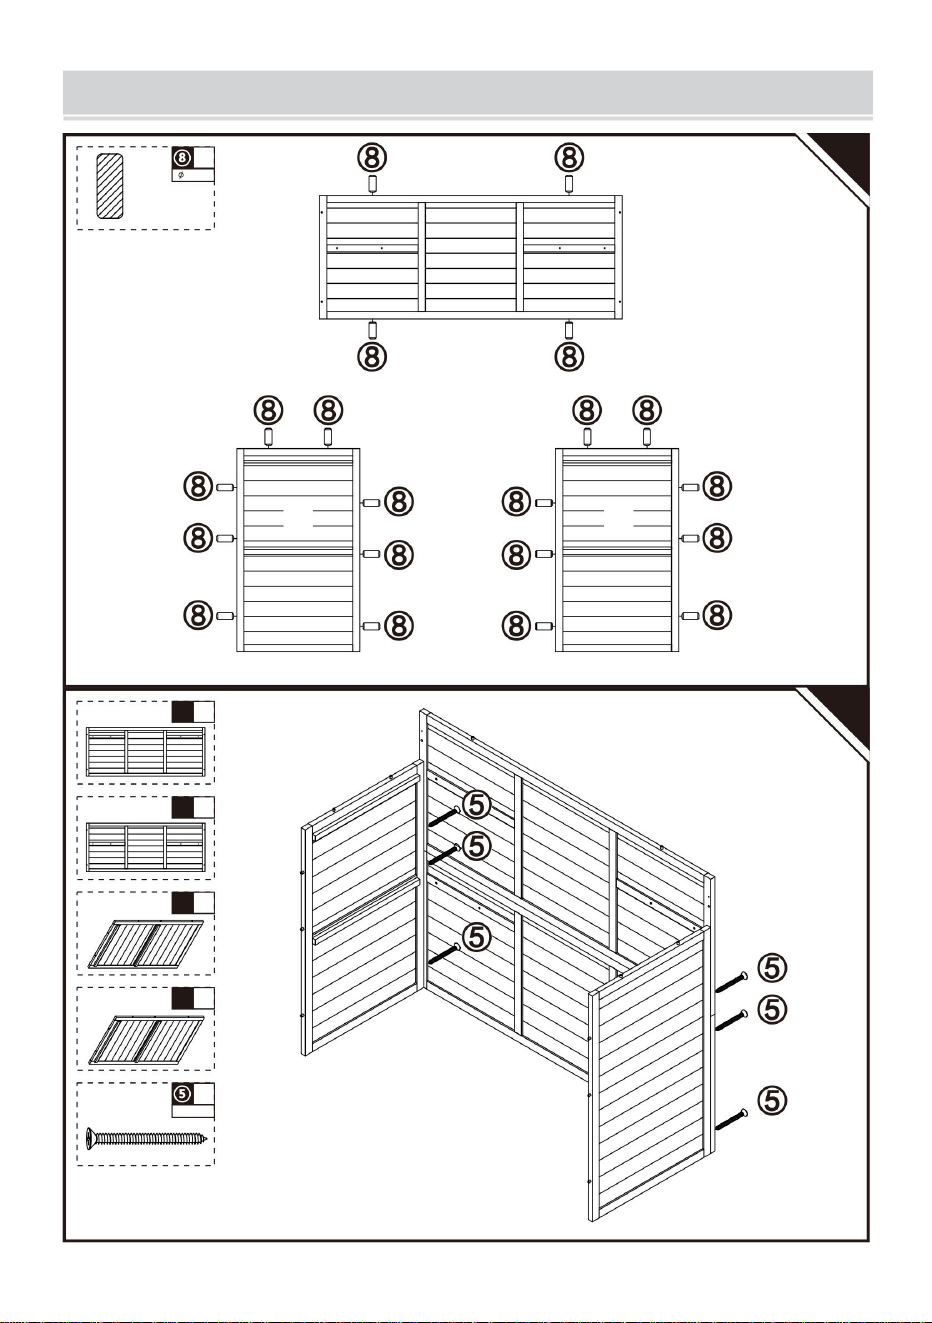
05
x1
P
x4
M3.5*30
06
P
P
x16
8*20
wood stick
E2E1 G2G1

- 9 -
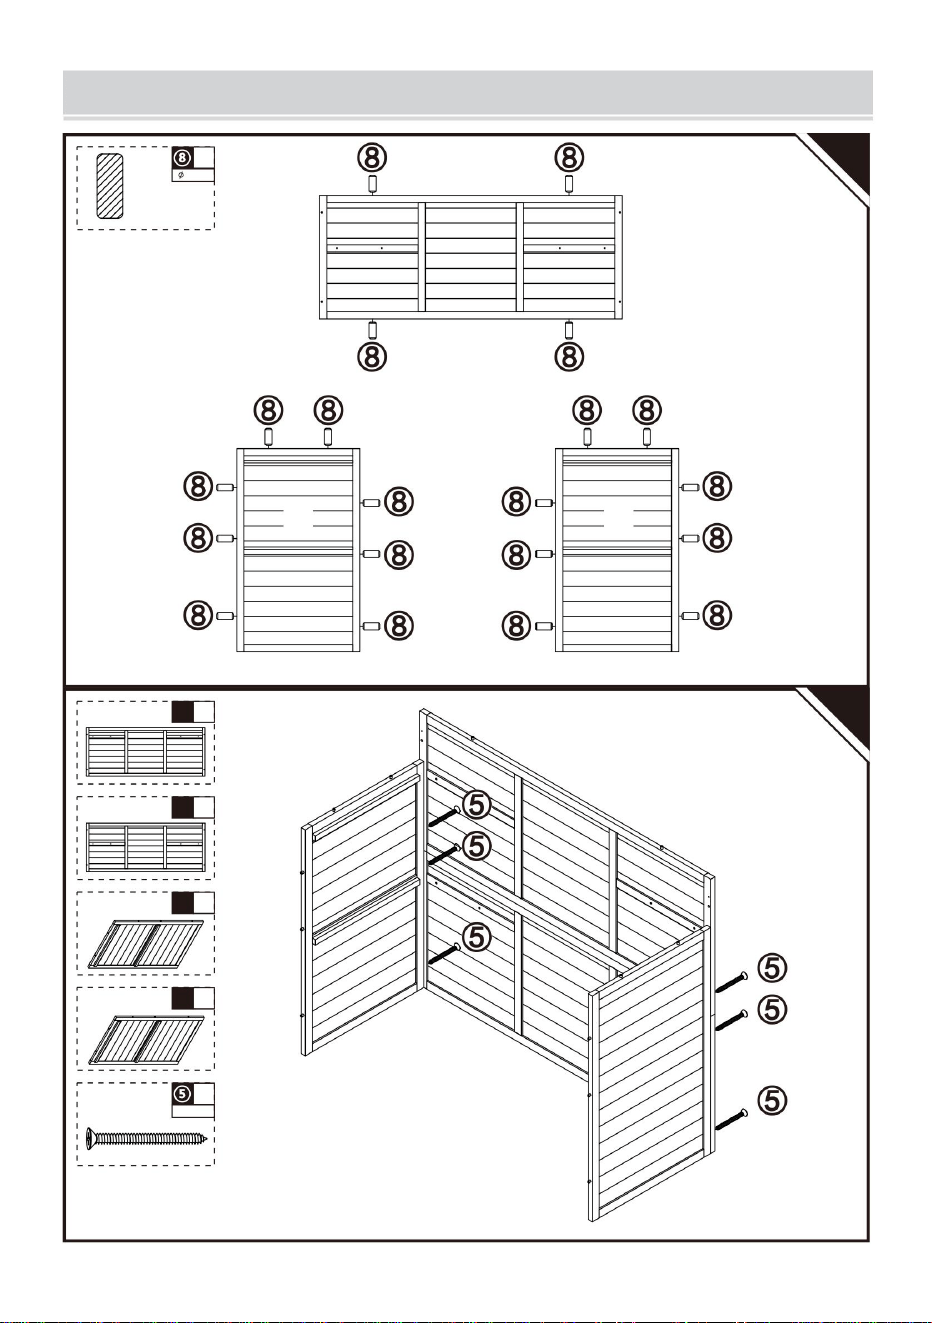
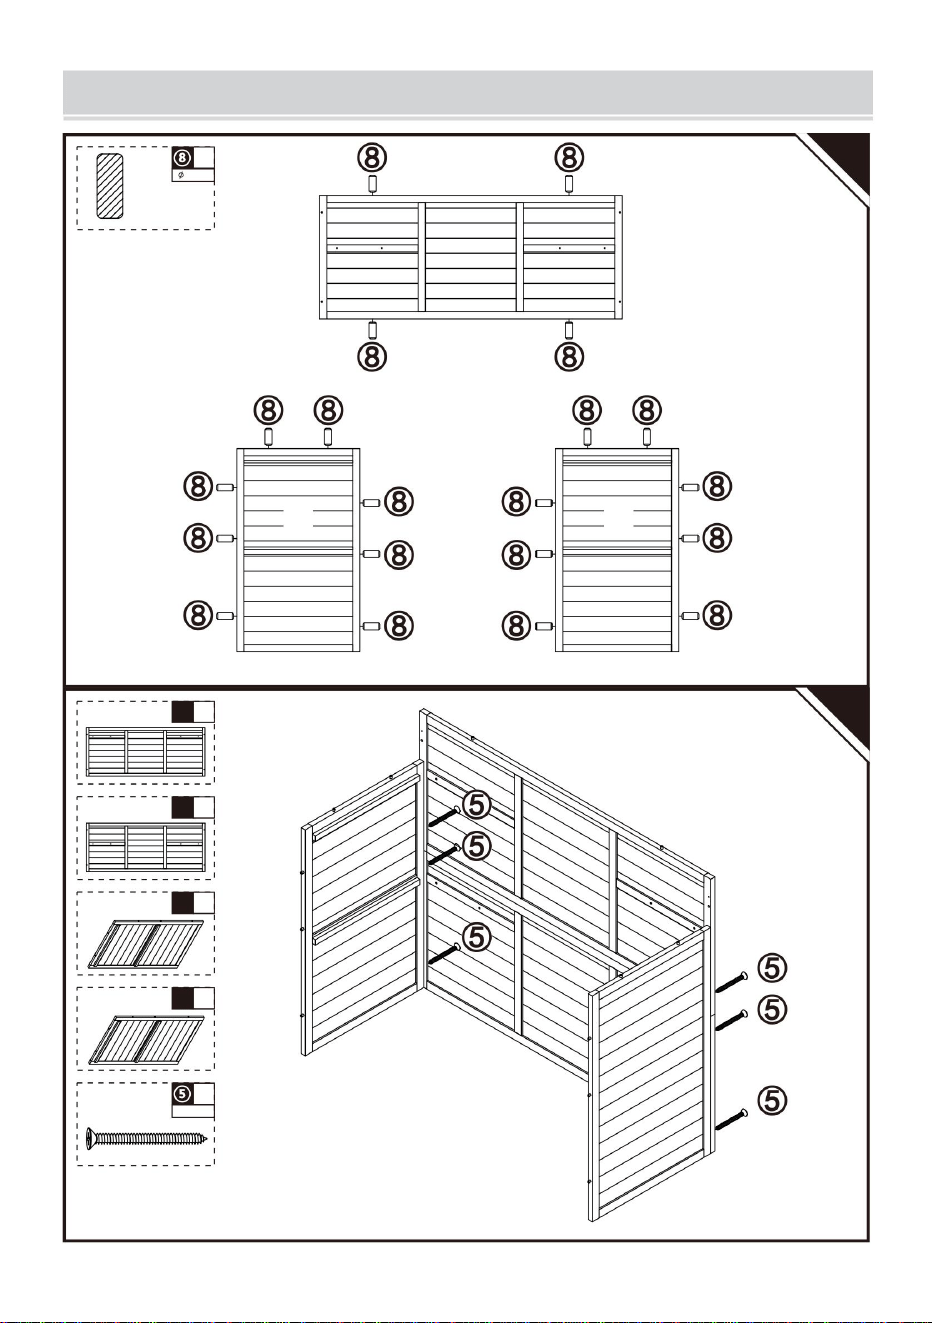
ASSEMBLY GUIDE
07
x4
x1
O
M3.5*50
08
x1
E1
x1
E2
E2
E1
O
x4
M3.5*35
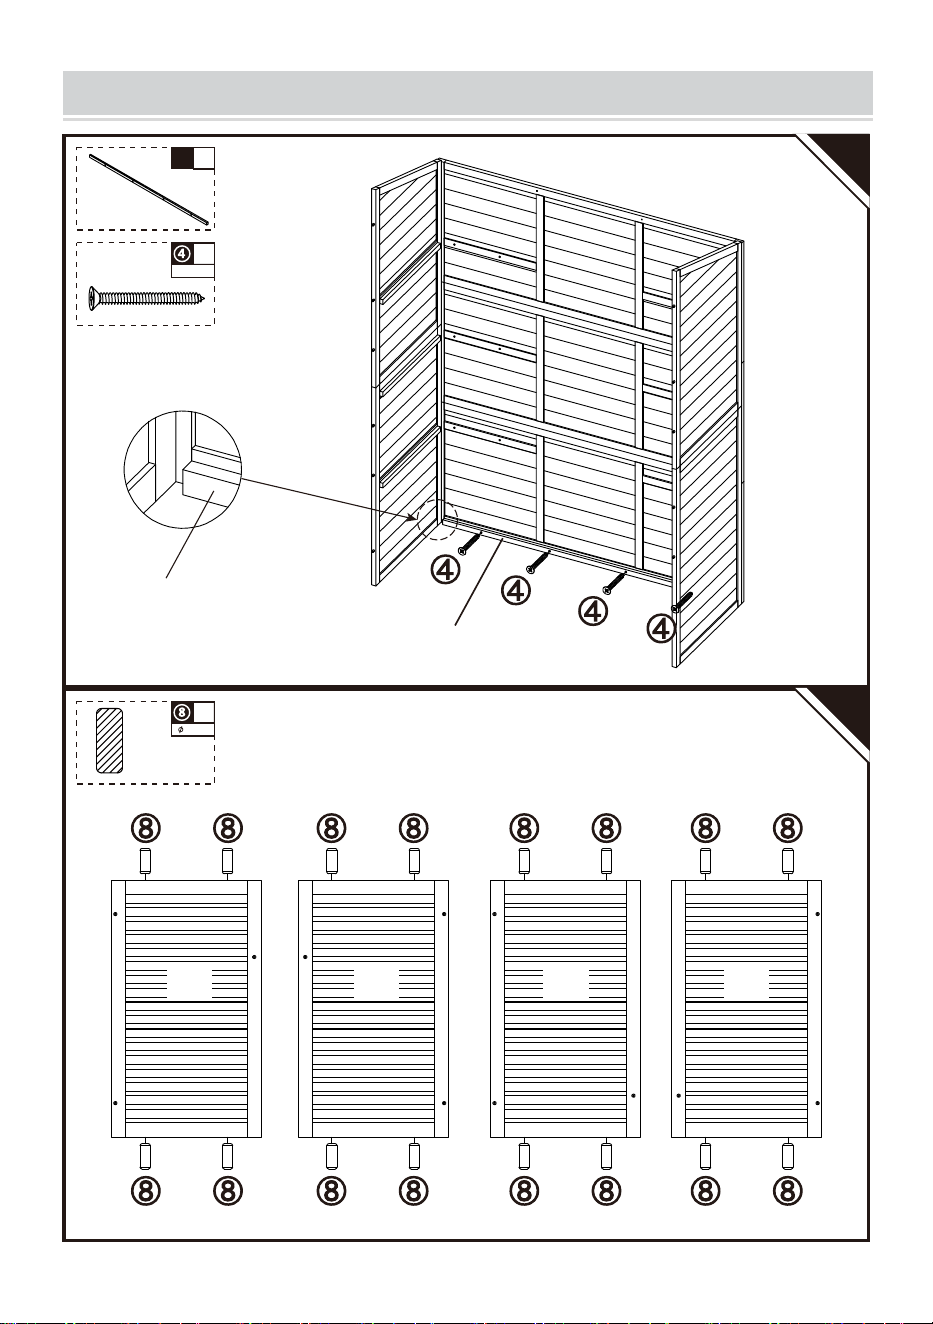
-10-
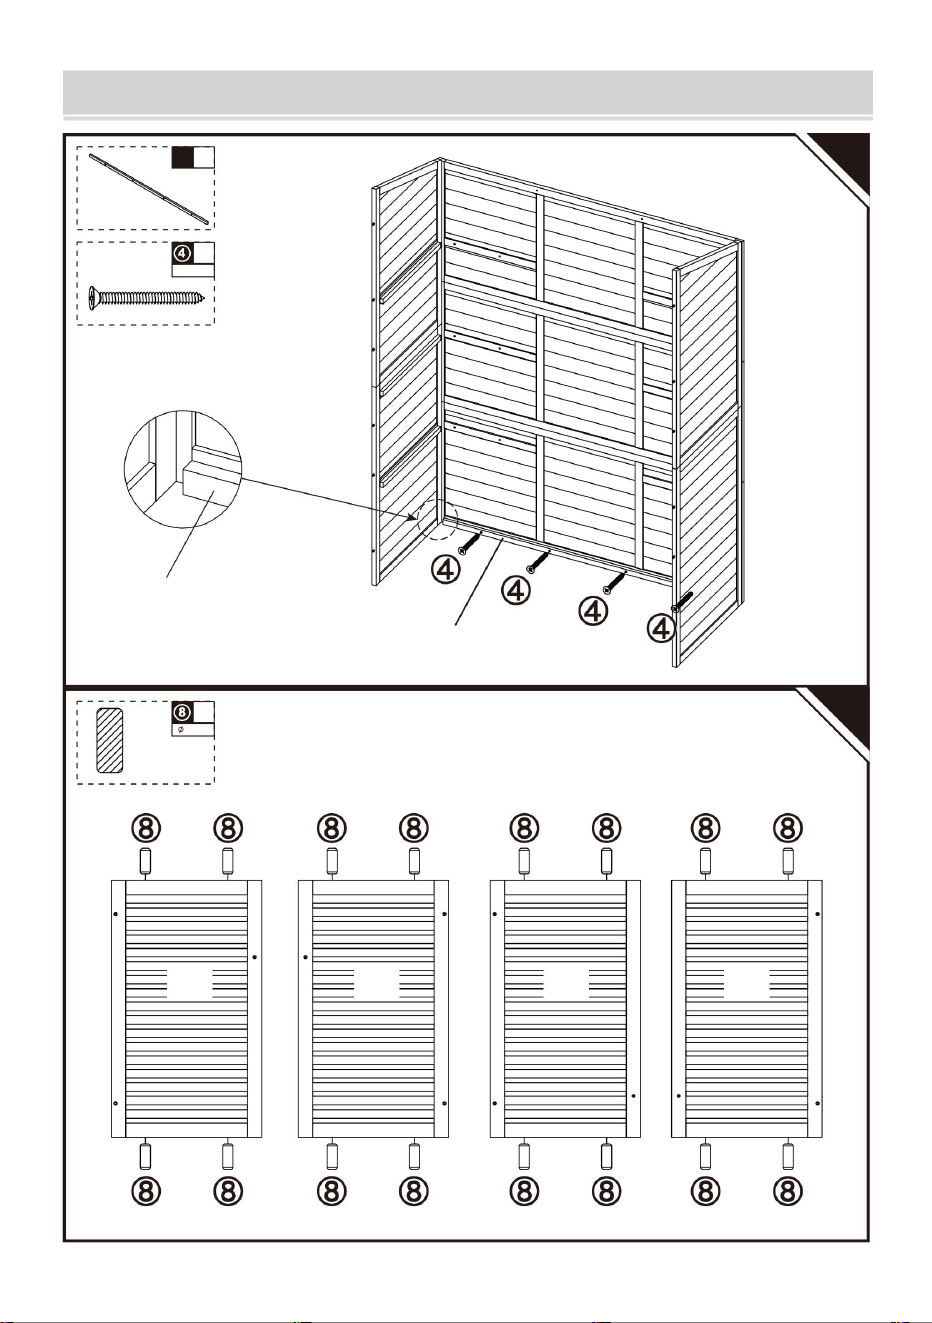
ASSEMBLY GUIDE
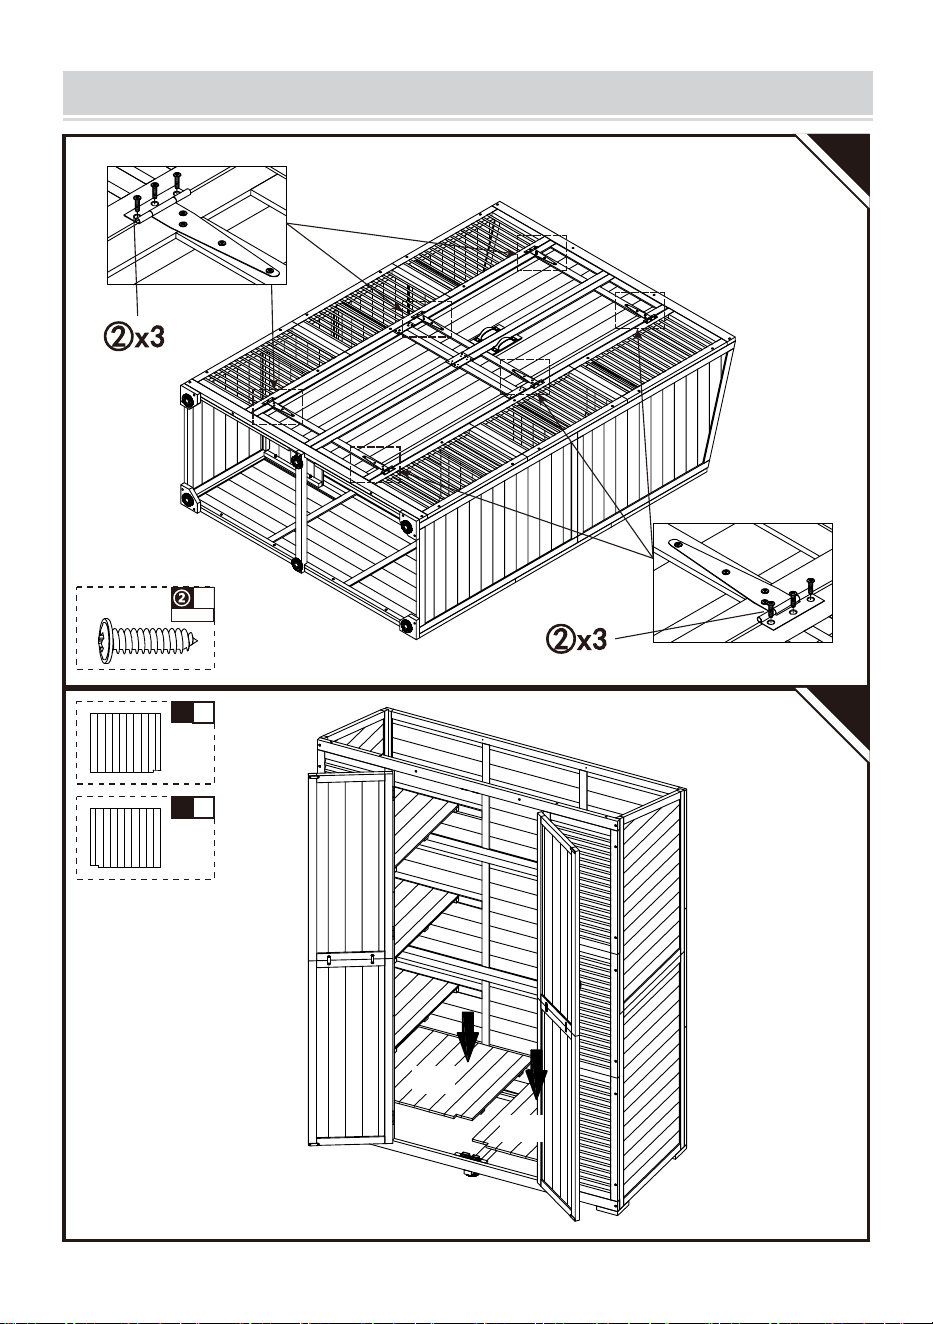
09
x1
B
10
x1
N
x12
M6.0*50
x4
M3.5*50
x12
M3.5*35
x6
M3.5*35
x1
F1
x1
F2
x1
B
x1
G1
x1
G2
x3
B
x3
J1
J2
F1
F2
G1
G2
N
J1
J2
J1
J2
J1
J2
-11-
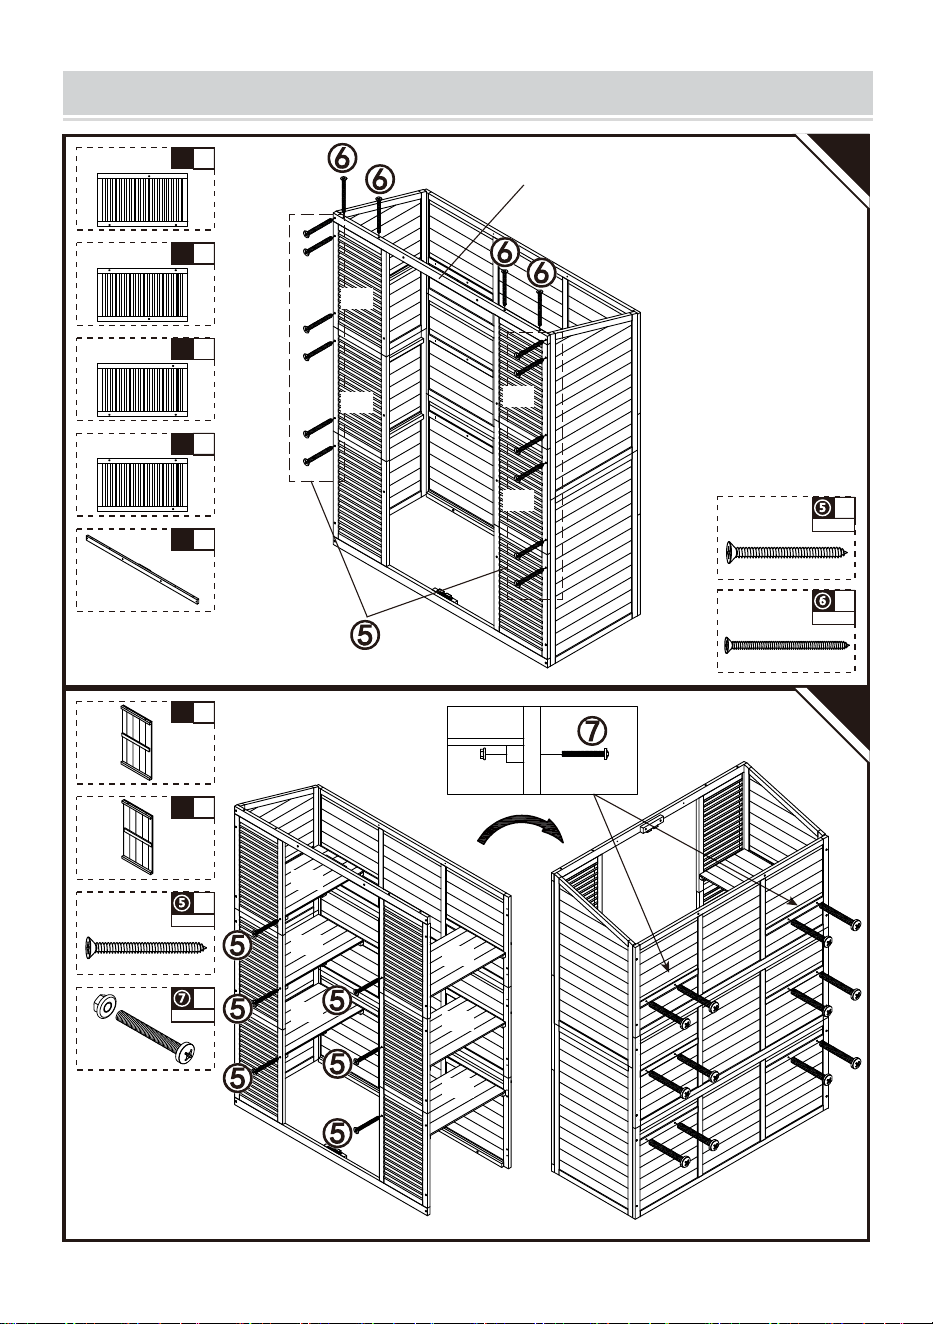
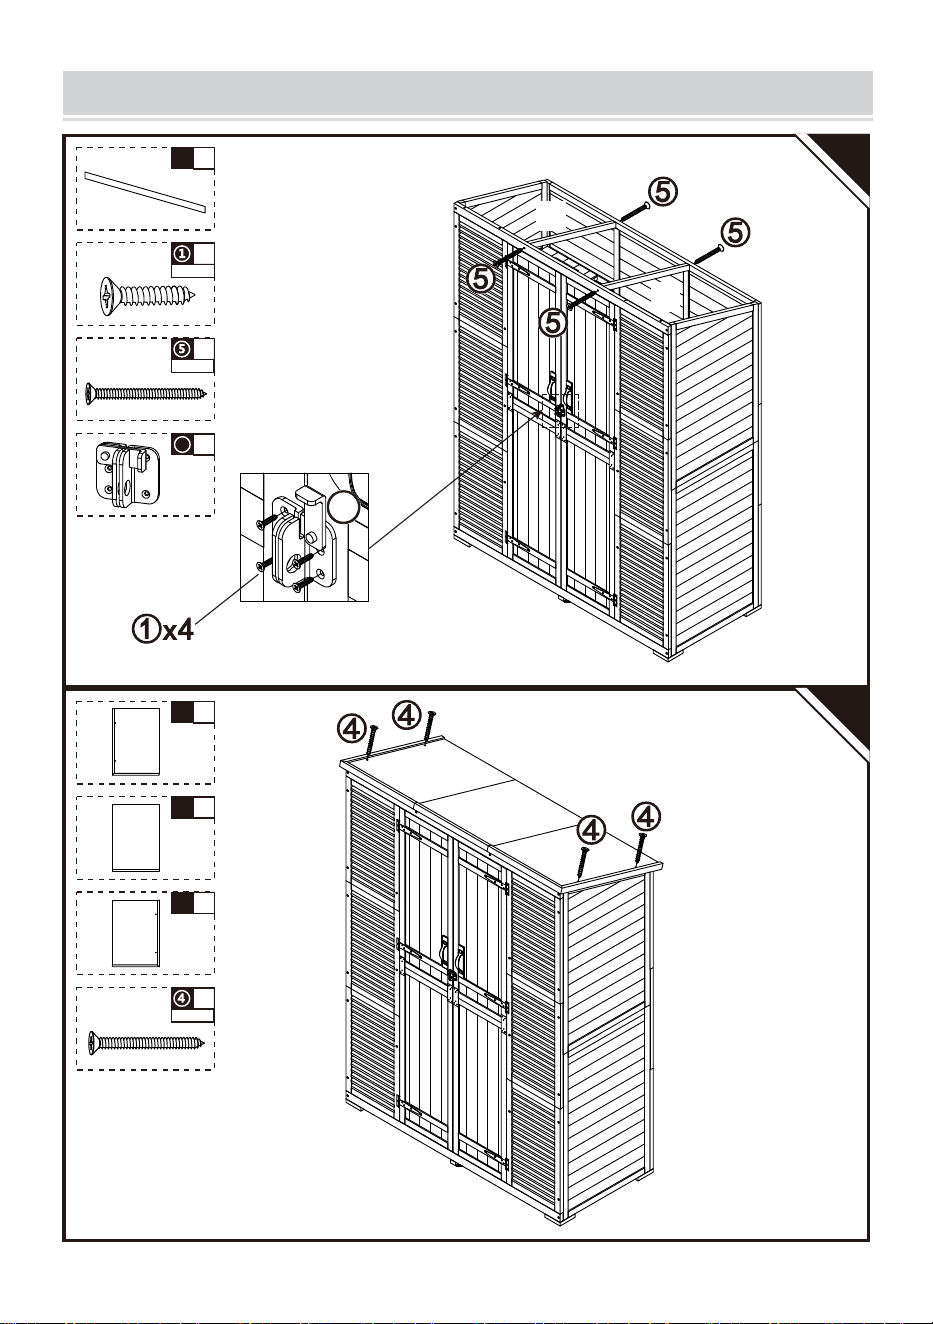
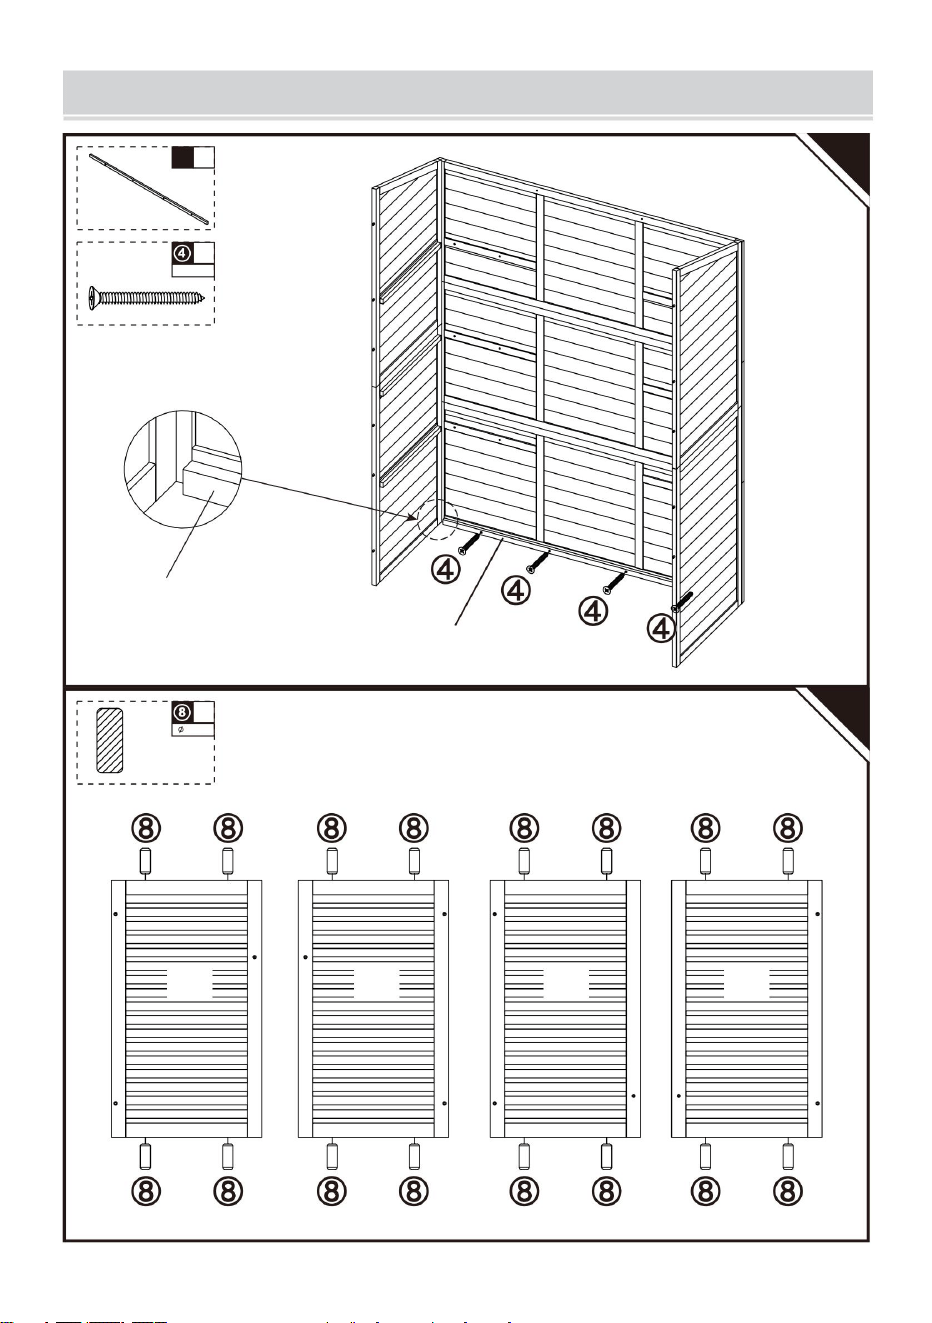
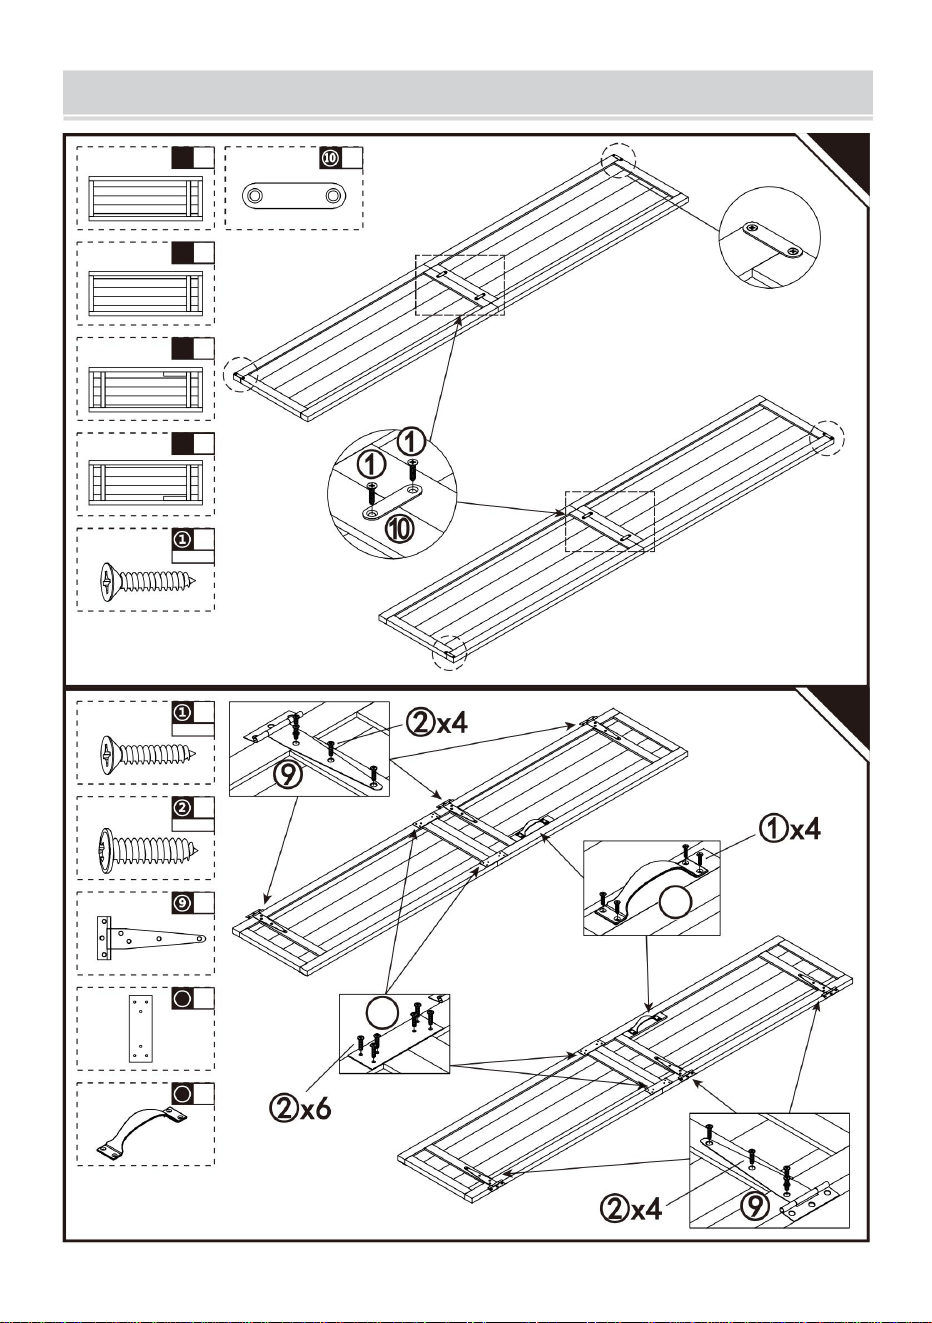
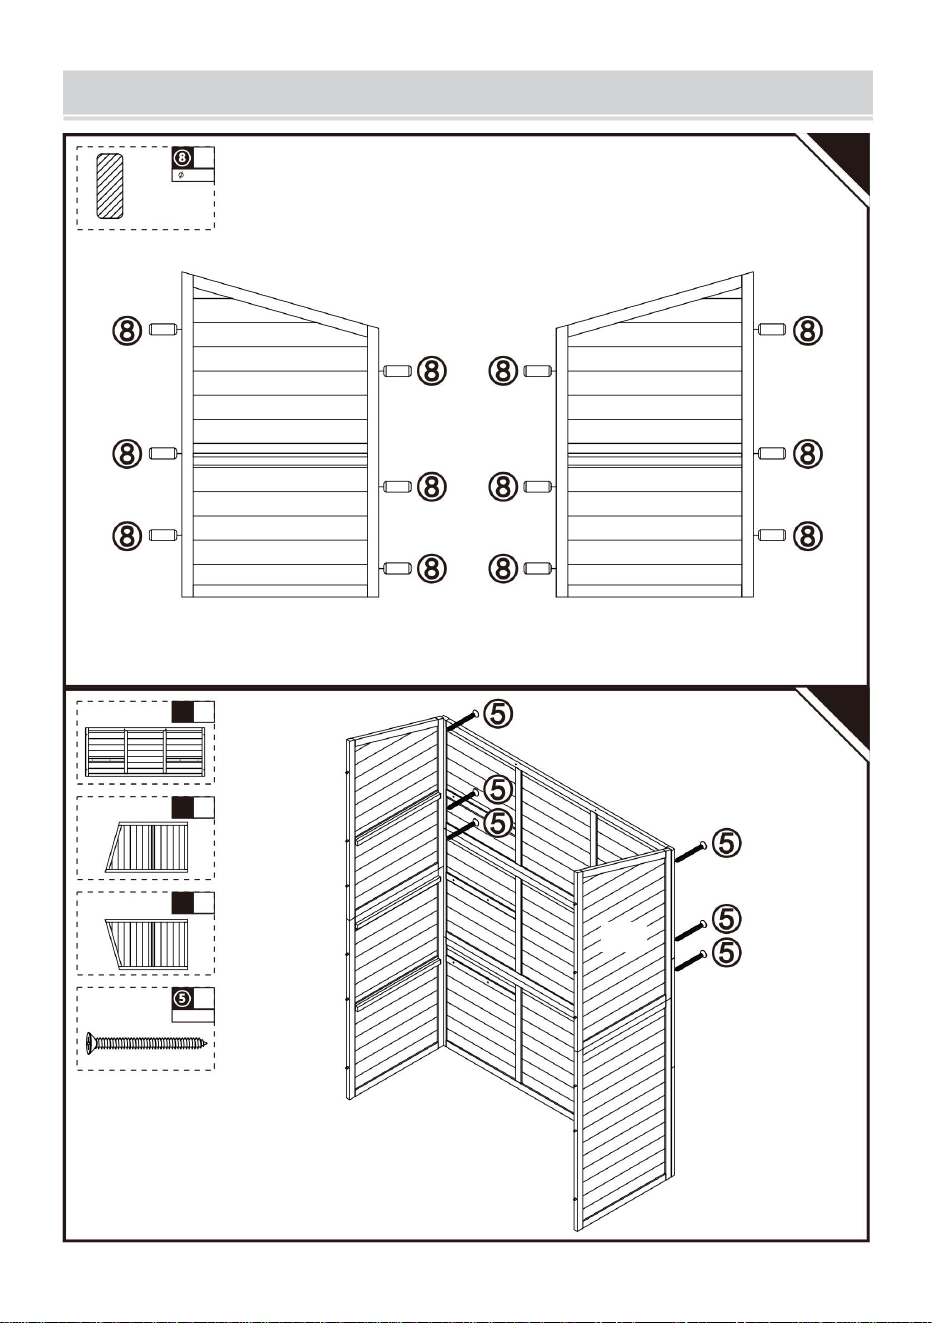
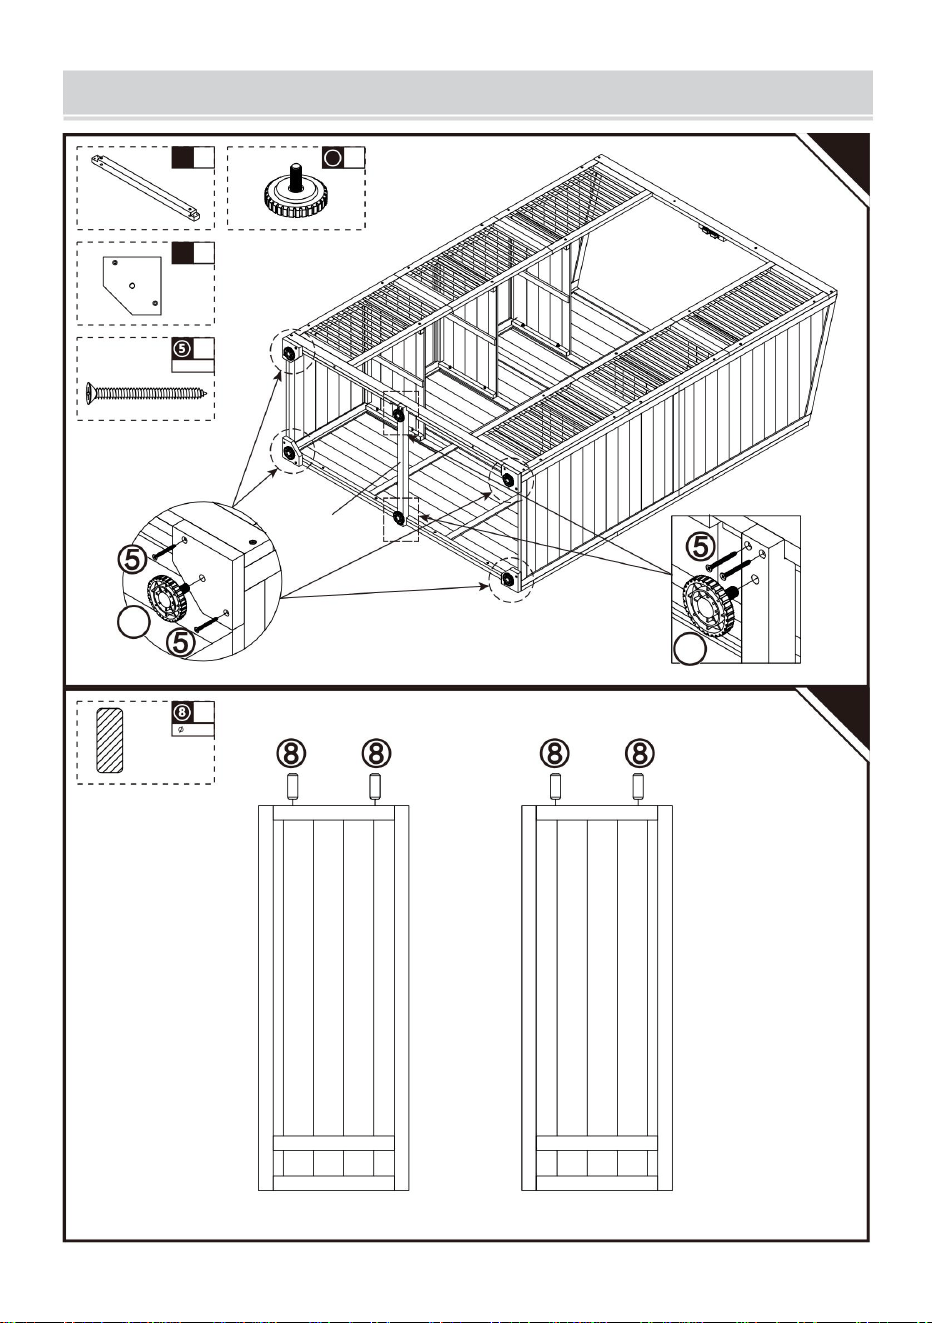
ASSEMBLY GUIDE
11
x1
S
x4
T
12
x4
8*20
wood stick
x12
M3.5*35
x6
14
14
14
T
S
S
L1 L2
-12-
ASSEMBLY GUIDE
13
x8
M3.0*14
x4
14
x48
M3.0*14
x1
B
x1
L1
x1
L2
x1
B
x1
M1
x1
M2
x8
M3.0*14
x6
L1
L1
L2
L2
M1
M1
M2
M2
x4
11
x2
12
11
12
-13-
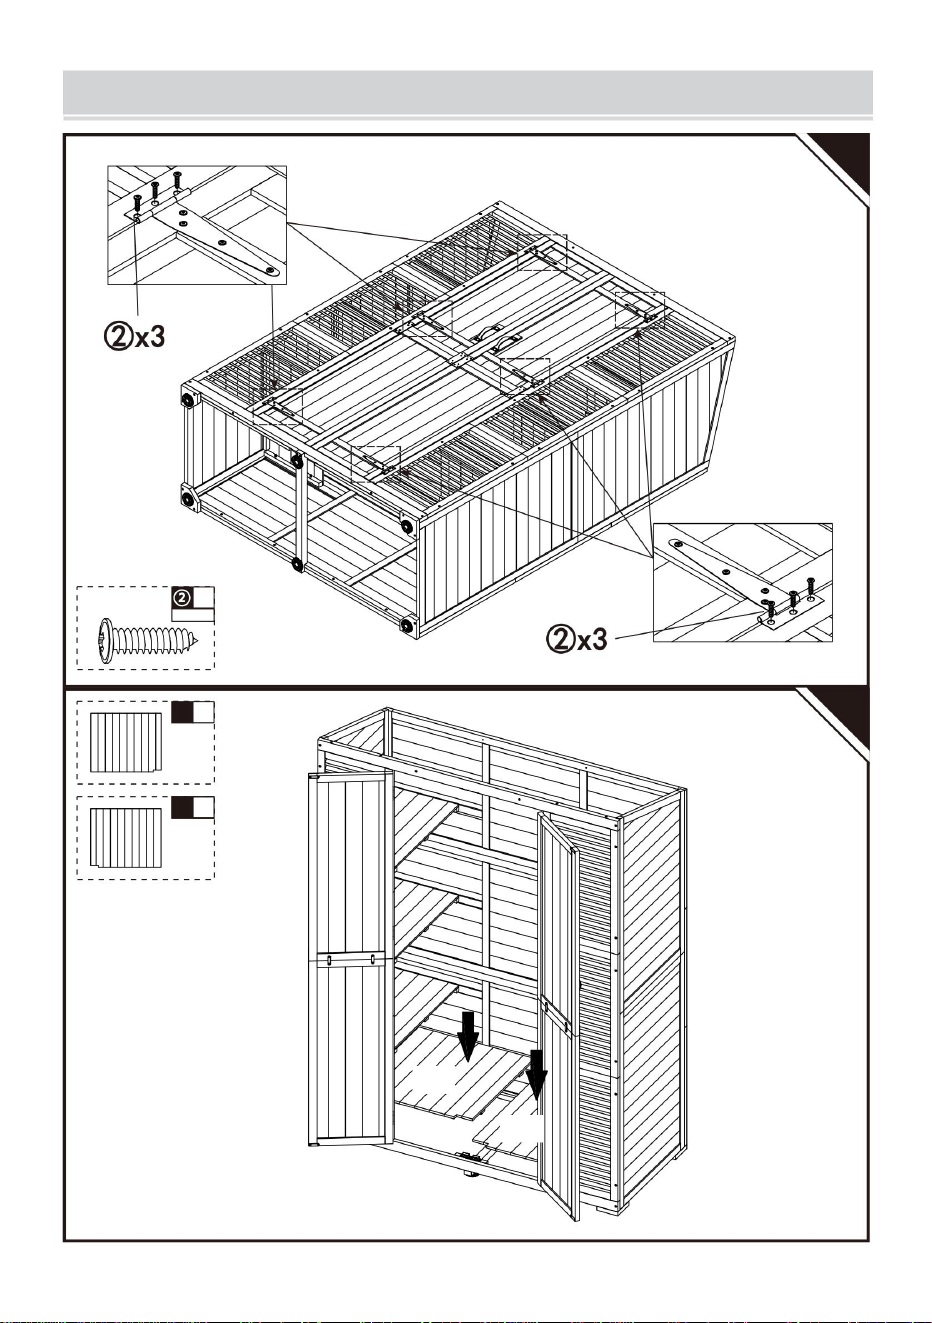
ASSEMBLY GUIDE
15
16
x18
M3.0*14
x1
B
x1
K1
x1
K2
K2
K1
-14-
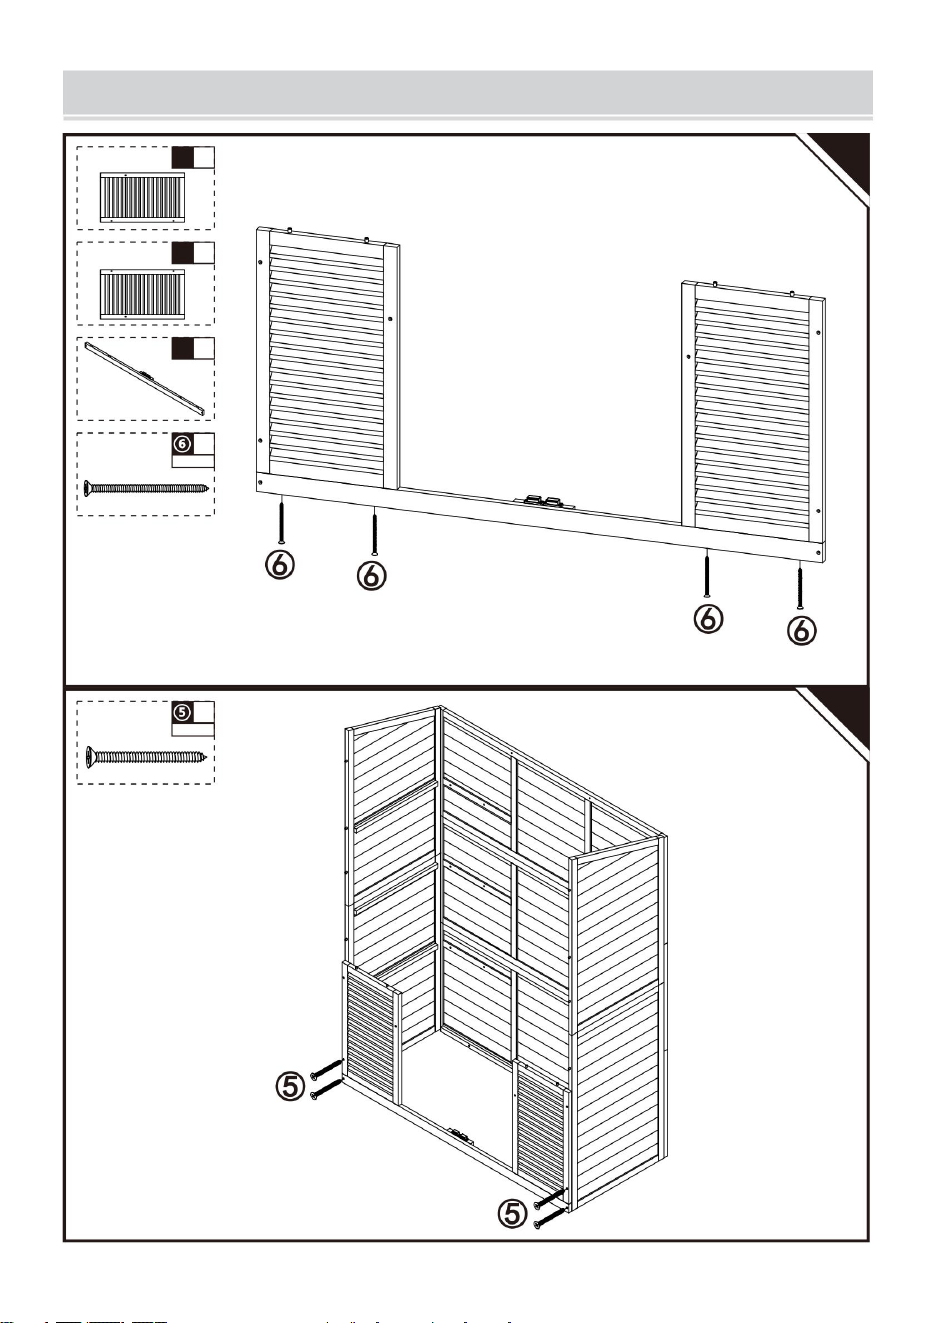
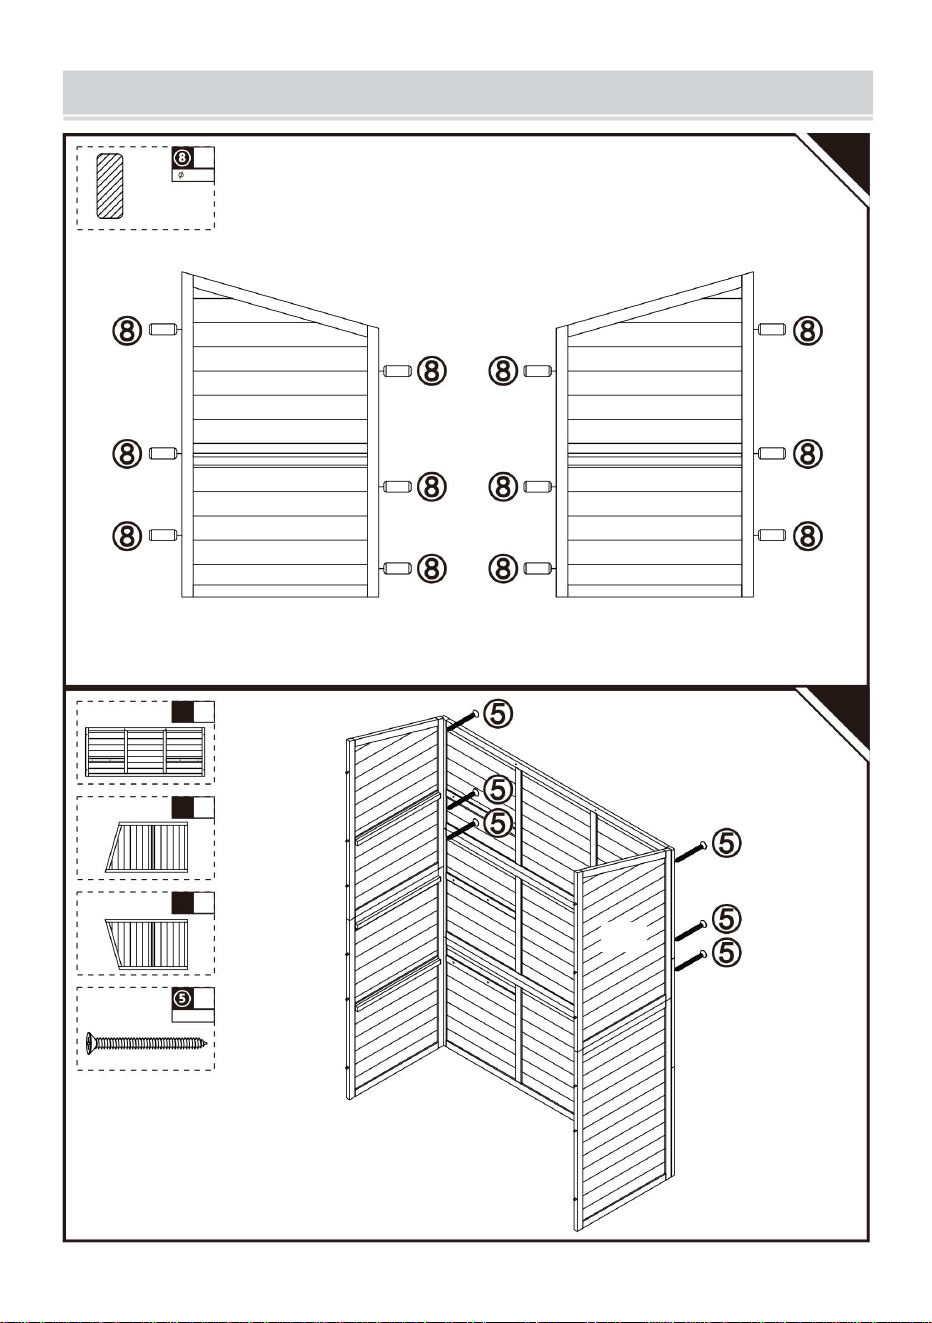
ASSEMBLY GUIDE
17
x2
R
18
x1
B
x1
C
x1
D
x4
M3.0*14
x1
13
13
x4
M3.5*35
R
B
C
D
R
x4
M3.5*30
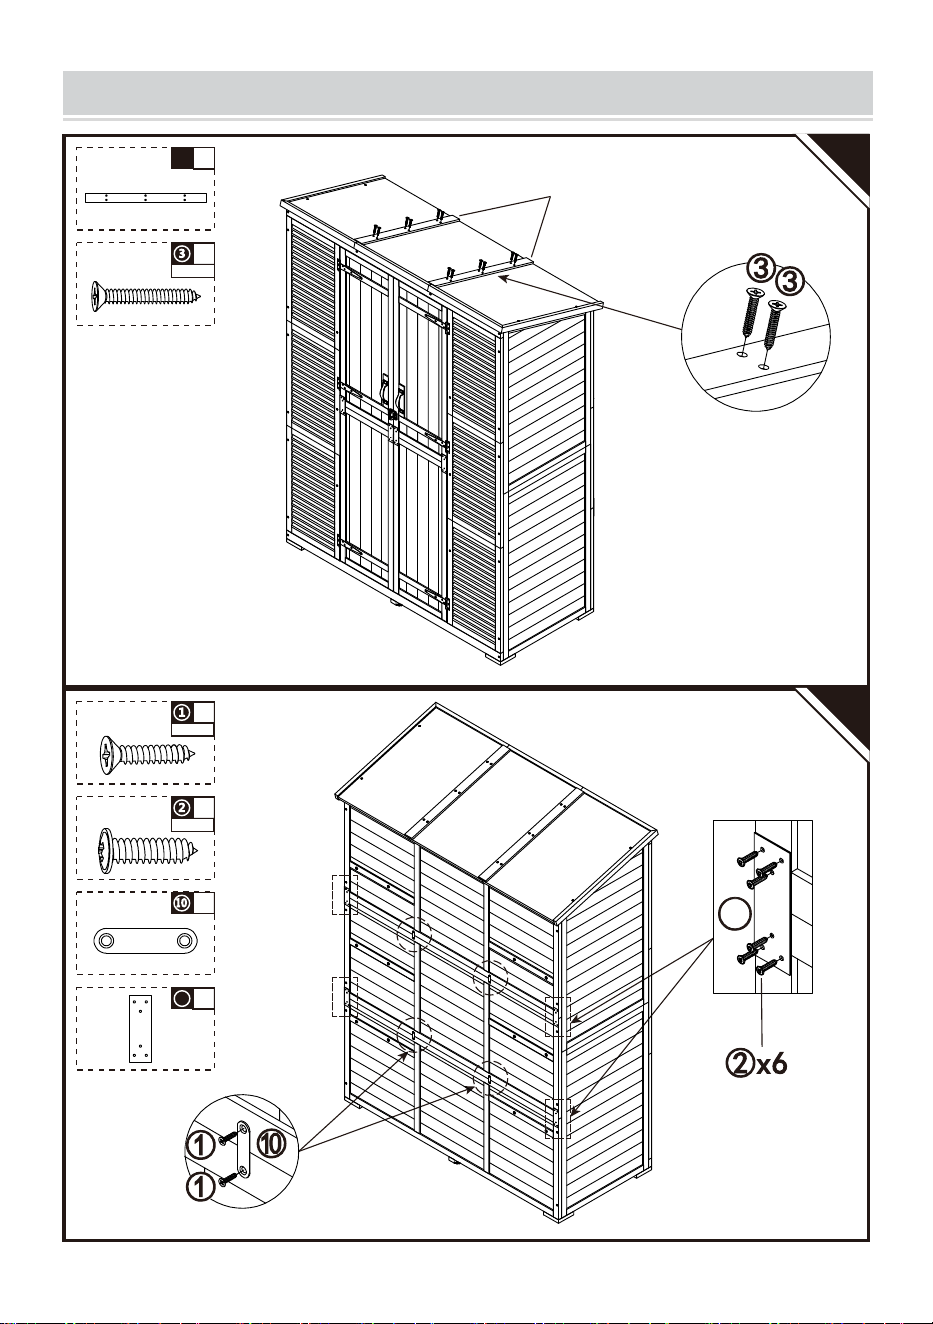
-15-
ASSEMBLY GUIDE
19
x2
Q
x12
M3.5*20
Done
Q
x8
M3.0*14
x4
x24
M3.0*14
x4
11
11


POTRZEBUJESZ POMOCY? SKONTAKTUJ SIĘ Z NAMI!
Masz pytania dotyczące produktu? Potrzebujesz wsparcia technicznego? Skontaktuj się z nami:
Wsparcie
techniczne i certyfikat E-Gwarancji www.vevor.com/support
MODEL: TY-OP2419
To jest oryginalna instrukcja, przed użyciem należy uważnie przeczytać wszystkie
instrukcje. VEVOR zastrzega sobie jasną interpretację naszej instrukcji obsługi. Wygląd produktu
będzie zależał od produktu, który otrzymałeś. Prosimy o wybaczenie, że nie poinformujemy
Cię ponownie, jeśli w naszym produkcie pojawią się jakiekolwiek aktualizacje technologiczne lub
oprogramowania.
ZEWNĘTRZNA SZAFA MAGAZYNOWA
- 1 -

4. Przed montażem należy ułożyć wszystkie materiały zgodnie z listą w
instrukcji, dzięki czemu można sprawdzić, czy czegoś nie brakuje, co
skróci również czas montażu.

F2 1
F1 1E2 1
H2 1
A3-1
E1 1
A2 1A1 1
H1 1 Ja2 1
G2 1
Ja1 1
G1 1
- 3 -
C1
B1 D1
LISTA CZĘŚCI
O1
Pytanie 2
Strona 1
N 1
R2
S1
T4
- 4 -
L1 1 Poziom 2 1 M1 1 M2 1
J2 3
K2 1K1 1
J1 3
LISTA CZĘŚCI

M3.5*50
+1(zapasowy)
M3.5*35
+2(zapas)
M6.0*50
+1(zapasowy)
8*20
+3(zapas)
M3,5*20
+1(zapasowy)
M3,5*30
+1(zapasowy)
M3.0*14
+3(zapasowy)
M3.0*14
+2(zapasowy)
12
850
52
12
8
9028
6
8
LISTA CZĘŚCI
patyk drewniany
13 1
14 6
12 211 8
- 5 -
A2 x1
x6
A1 x1
x20
8*20
I2 x1
Ja1 x1
patyk drewniany
01
02
INSTRUKCJA MONTAŻU
Ja2
Ja1
Ja1
A2
A1
A2
Ja2
- 6 -
M3,5*35

8*20
patyk drewniany
M3,5*35
H1 x1
H2 x1
A3 x1
x12
x6
A3
H2H1
H2
H1
03
04
INSTRUKCJA MONTAŻU
- 7 -
x4
x16
M3,5*30
8*20
patyk drewniany
06
05
E1 E2
P
P
G1 G2
P1
INSTRUKCJA MONTAŻU
- 8 -
E1 x1
E2 x1
O
E1
E2
08
07
INSTRUKCJA MONTAŻU
x4
O x1
x4
M3,5*50
M3,5*35
- 9 -
x4
B3x3
x6
x12
x12
N x1
B1 x1
B1 x1
J1
J1
J2
G2
F2
F1
G1
J2
J2
J1
M3,5*35
M3,5*50
M3,5*35
M6,0*50
09
10
N
F2 x1
G2
G1 x1
F1 x1
J1 x3
J2
INSTRUKCJA MONTAŻU
-10-
x4
x12
M3,5*35
S
L1
T
S
L2
12
11
14 x6
T x4
S x1
INSTRUKCJA MONTAŻU
-11-
patyk drewniany
8*20
14
14
B1 x1
x8
B1 x1
x4
x8
x48
x6
M1
M2
L1
M2
L2
L1
M1
L2
M3,0*14
M3,0*14
M3,0*14
13
14
11
12
L2
M2
M1 x1
L1 x1
INSTRUKCJA MONTAŻU
-12-
11x4
12 x2

16
15
-13-
B1 x1
x18
K1 x1
INSTRUKCJA MONTAŻU
M3,0*14
K2
K2
K1
x4
x4
M3.0*14
x4
M3,5*30
M3,5*35
13 x1
C x1
D x1
B1 x1
R x2
R
D
B
R
C
18
17
INSTRUKCJA MONTAŻU
-14-
13
x8
x24
x12
x4
M3,0*14
M3,5*20
M3,0*14
Zrobione
11
Q- x2
Q
19
INSTRUKCJA MONTAŻU
-15-
11x4


Brauchen Sie Hilfe? Kontaktieren Sie uns!
- 1 -
Haben Sie Fragen zum Produkt? Benötigen Sie technischen Support? Bitte kontaktieren Sie
uns:
Technischer Support und E-Garantie-Zertifikat www.vevor.com/
support
MODELL: TY-OP2419
Dies ist die Originalanleitung. Bitte lesen Sie alle Anweisungen sorgfältig durch, bevor
Sie das Gerät in Betrieb nehmen. VEVOR behält sich eine klare Auslegung unserer
Bedienungsanleitung vor. Das Erscheinungsbild des Produkts richtet sich nach dem
Produkt, das Sie erhalten haben. Bitte verzeihen Sie uns, dass wir Sie nicht erneut informieren,
wenn es Technologie- oder Software-Updates für unser Produkt gibt.
Lagerschuppen für den Außenbereich

4. Legen Sie vor der Installation alle Materialien gemäß der Liste in der
Anleitung bereit. So können Sie überprüfen, ob Materialien fehlen.
Außerdem kann dadurch die Installationszeit verkürzt werden.

E2 1
F2 1
E1 1
G2 1
A3 1
F1 1
A2 1A1 1
H1 1 H2 1
G1 1
Ich1 1 I2 1
- 3 -
C 1
B 1 T 1
TEILELISTE

L1 1 L2 1 M1 1 M2 1
K1 1 K2 1
J2 3J1 3
- 4 -
Teil 1
R 2
O 1
Nr. 1
Frage 2
S 1
T 4
TEILELISTE
M3.5*50
+1 (Ersatz)
M3.5*30
+1 (Ersatz)
M6.0*50
+1 (Ersatz)
8*20
+3(Ersatz)
M3.5*20
+1 (Ersatz)
M3.5*35
+2 (Ersatz)
M3.0*14
+3 (Ersatz)
M3.0*14
+2 (Ersatz)
Holzstab
50
12
8
52
12
8
9028
6
8
TEILELISTE
12 2
13 1
11 8
14 6
- 5 -
01
02
Holzstab
A2 x1
I1 x1
A1 x1
x20
8*20
I2 x1
x6
MONTAGEANLEITUNG
Ich 2
A2
Ich 1
A2
Ich 1
A1
Ich 2
M3,5*35
- 6 -
Holzstab
A3
H1
H2H1
H2
M3,5*35
A3 x1
x6
H1 x1
x12
H2 x1
8*20
04
03
MONTAGEANLEITUNG
- 7 -

M3,5*30
E1
G1
P
P
E2
G2
8*20
Holzstab
06
05
x16
x4
P x1
MONTAGEANLEITUNG
- 8 -

E1 x1
E2 x1
E2
E1
O
08
07
MONTAGEANLEITUNG
x4
O x1
x4
M3,5*35
M3,5*50
- 9 -
x4
B x3
x6
x12
x12
N x1
B x1
B x1
F2
J1
J2
J2
Formel 1
J1
G2
G1
J1
J2
M3,5*35
M6,0*50
M3,5*50
M3,5*35
10
09
N
F2 x1
J2
G1 x1
F1 x1
G2
J1 x3
MONTAGEANLEITUNG
-10-

x12
x4
M3,5*35
S
L1
T
S
L2
-11-
12
11
14 x6
T x4
S x1
MONTAGEANLEITUNG
8*20
14
14
Holzstab
M2
L1
M1
M2
L2
L1
M1
L2
M3.0*14
M3.0*14
M3.0*14
11
12
M1 x1
L2
L1 x 1
M2
B x1
x8
B x1
x4
x8
x48
x6
14
13
MONTAGEANLEITUNG
12 x2
11 x4
-12-
K1 x1
x18
B x1
M3.0*14
16
15
MONTAGEANLEITUNG
K2
K2
K1
-13-

x4
x4
M3.0*14
x4
M3,5*30
M3,5*35
13 x1
B x1
T x1
C x1
R x2
B
C
R
R
D
18
17
MONTAGEANLEITUNG
-14-
13

x8
x4
x24
x12
M3.0*14
M3,5*20
M3.0*14
Erledigt
11
Q x2
Q
19
MONTAGEANLEITUNG
11 x4
-15-


Ils'agitdelanoticed'utilisationd'origine.Veuillezlireattentivementtoutesles
instructionsdumanuelavantdel'utiliser.VEVORseréserveledroitd'interpréterclairement
notremanueld'utilisation.L'apparenceduproduitdépendduproduitquevousavezreçu.
Veuilleznousexcuser,nousnevousinformeronsplussidesmisesàjourtechnologiquesou
logiciellessontdisponiblessurnotreproduit.
MODÈLE:TYOP2419
Vousavezdesquestionssurnosproduits?Vousavezbesoind'assistancetechnique?
N'hésitezpas
ànouscontacter:Assistancetechniqueetcertificatdegarantie
électroniquewww.vevor.com/support
BESOIND'AIDE?CONTACTEZNOUS!
ABRIDESTOCKAGEEXTÉRIEUR
1

4.Avantl'installation,veuillezplacertouslesmatériauxconformément
àlalistedumanuel,afindepouvoirvérifiers'ilmanquedesmatériaux,
etcelapeutégalementréduireletempsd'installation.
C1
B1 D1
3
F11E11
F21
H11
A31
E21
A21A11
H21 I11
G11
I21
G21
LISTEDESPIÈCES

O1
Q2
P1
N1
R2
S1
T4
4
L11 L21 M11 M21
J23
K21K11
J13
LISTEDESPIÈCES
88
12
52
90
50
12
28
8
6
M3,5*35+2
(derechange)
M6.0*50+1
(derechange)
M3,5*30+1
(derechange)
8*20
+3(derechange)
M3,5*20+1
(derechange)
M3,5*50+1
(derechange)
M3.0*14+3
(derechange)
M3.0*14+2
(derechange)
LISTEDESPIÈCES
122
146
131
118
bâtondebois
5
A2x1
Je1x1
A1x1
x20
8*20
I2x1
x6
bâtondebois
02
01
GUIDED'ASSEMBLAGE
M3,5*35
6
I1
A2
Je2
A2
I1
A1
Je2
bâtondebois
8*20
A3
H1
H2H1
H2
7
H1x1
H2x1
A3x1
x12
x6
M3,5*35
04
03
GUIDED'ASSEMBLAGE

M3,5*30
x16
x4
E1 E2
P
P
G1 G2
Px1
8*20
06
05
GUIDED'ASSEMBLAGE
8
bâtondebois
E1x1
E2x1
E2
E1
O
08
07
GUIDED'ASSEMBLAGE
M3,5*35
M3,5*50
x4
Ox1
x4
9

J1
J1
J2
J2
F1
F2
G2
G1
J1
J2
x4
Bx3
x6
x12
x12
Nx1
Bx1
Bx1
M3,5*50
M6.0*50
M3,5*35
M3,5*35
10
G1x1
J1x3
F2x1
F1x1
J2
G2
N
10
09
GUIDED'ASSEMBLAGE

M3,5*35
x4
x12
S
L2
T
S
L1
14
14
Tx4
Sx1
14x6
11
12
GUIDED'ASSEMBLAGE
8*20
bâtondebois
11

L2
M1
L1
M2
M2
L1
M1
L2
Bx1
x8
Bx1
x4
x8
x6
x48
M3.0*14
M3.0*14
M3.0*14
12x2
11x4
M1x1
L2
L1x1
M2
11
12
14
13
GUIDED'ASSEMBLAGE
12

Bx1
x18
K1x1
13
15
16
GUIDED'ASSEMBLAGE
K2
M3.0*14
K2
K1
13x1
x4
x4
M3.0*14
x4
M3,5*35
M3,5*30
13
Cx1
Bx1
Rx2
Dx1
B
C
R
R
D
18
17
GUIDED'ASSEMBLAGE
14
Fait
x24
x4
x8
x12
M3.0*14
M3,5*20
M3.0*14
15
Qx2
Q
19
GUIDED'ASSEMBLAGE
11x4
11


HULP NODIG? NEEM CONTACT MET ONS OP!
Heeft u vragen over het product? Heeft u technische ondersteuning nodig? Neem dan gerust
contact met
ons op: Technische ondersteuning en E-garantiecertificaat
www.vevor.com/support
MODEL: TY-OP2419
Dit is de originele instructie, lees alle handleidingen zorgvuldig door voordat u het
product gebruikt. VEVOR behoudt zich een duidelijke interpretatie van onze gebruikershandleiding
voor. Het uiterlijk van het product is afhankelijk van het product dat u hebt ontvangen.
Vergeef ons dat we u niet opnieuw zullen informeren als er technologie- of software-updates voor
ons product zijn.
BUITEN OPSLAGSCHUUR
- 1 -

4. Plaats vóór de installatie alle materialen volgens de lijst in de
handleiding, zodat u kunt controleren of er materialen ontbreken. Dit kan
ook de installatietijd verkorten.
E2 1 F1 1
F2 1
G21
A3 1
E1 1
A2 1A1 1
H11 H2 1
G1 1
Ik1 1 Ik2 1
- 3 -
D1B1
C1
ONDERDELENLIJST
M1 1
K2 1
L2 1
K1 1
L1 1
J2 3J1 3
M21
- 4 -
O1
Vraag 2
P1
N1
S1
T4R2
ONDERDELENLIJST

M3.5*35
+2(reserve)
M3.5*50
+1(reserve)
M6.0*50
+1(reserve)
8*20
+3(reserve)
M3.0*14
+3(reserve)
M3.5*30
+1(reserve)
M3.5*20
+1(reserve)
M3.0*14
+2(reserve)
12 2
14 6
13 1
11 8
50 8
12
52
12
8
9028
6
8
ONDERDELENLIJST
- 5 -
houten stok

02
01
houten stok
A2x1
Ik1x1
A1x1
x20
8*20
x6
Ik2x1
MONTAGEGIDS
M3.5*35
Ik2
A2
Ik1
A2
Ik1
A1
Ik2
- 6 -
M3.5*35
A3
H1
H2H1
H2
8*20
04
03
houten stok
H1x1
H2x1
A3x1
x12
x6
MONTAGEGIDS
- 7 -
8*20
E1 E2
P
P
G2G1
x16
x4
houten stok
Px1
M3.5*30
06
05
MONTAGEGIDS
- 8 -

E2x1
E1x1
O
E1
E2
07
08
MONTAGEGIDS
M3.5*35
M3.5*50
- 9 -
x4
Ox1
x4
J1
J2
J1
J2
Formule 1
F2
G2
G1
J1
J2
M3.5*35
M3.5*50
M3.5*35
M6.0*50
Bx3
Nx1
x6
x12
x12
x4
Bx1
Bx1
G1x1
G2
F2x1
F1x1
J1x3
J2
N
10
09
MONTAGEGIDS
-10-

M3.5*35
T
L1
S
S
L2
x4
x12
8*20
Tx4
Sx1
14x6
12
11
MONTAGEGIDS
-11-
houten stok
14
14

M3.0*14
M3.0*14
M3.0*14
11
12
Bx1
x8
Bx1
x4
x8
x48
x6
M1x1
M2
L2
L1x1
M1
M2
L1
M2
L2
L1
M1
L2
14
13
MONTAGEGIDS
-12-
12x2
11x4
K1x1
x18
Bx1
K2
16
15
MONTAGEGIDS
K2
K1
-13-
M3.0*14

13x1
M3.5*30
M3.5*35
x4
x4
M3.0*14
x4
-14-
Cx1
Dx1
Bx1
Rx2
R
B
R
D
C
18
17
MONTAGEGIDS
13
Klaar
M3.0*14
M3.5*20
M3.0*14
x24
x4
x8
x12
11
Vraag x2
Q
19
MONTAGEGIDS
-15-
11x4


BEHÖVER HJÄLP? KONTAKTA OSS!
- 1 -
Detta är den ursprungliga instruktionen, läs alla instruktioner noggrant innan du använder
den. VEVOR reserverar sig för en tydlig tolkning av vår användarmanual. Utseendet på produkten
är beroende av den produkt du fått. Ursäkta oss att vi inte kommer att informera dig igen
om det finns någon teknik eller mjukvaruuppdateringar på vår produkt.
MODELL: TY-OP2419
Har du produktfrågor? Behöver du teknisk support? Kontakta oss gärna: Teknisk support och
e-
garanticertifikat www.vevor.com/support
UTOMHUSFÖRVARINGSSHUD

4. Före installation, vänligen placera allt material enligt manuallistan, så
att du kan kontrollera om det saknas material, och det kan också minska
installationstiden.
C 1
B 1 D 1
E1 1 F1 1
F2 1
G1 1
A2 1
E2 1
A3 1
A1 1
H1 1 H2 1
G2 1
I2 1I1 1
DELLISTA
- 3 -
P 1
T 4
O 1
N 1
R 2
S 1
Q 2
L2 1L1 1 M1 1 M2 1
K1 1 K2 1
J2 3J1 3
DELLISTA
- 4 -

M3,5*35
+2(reserv)
M6.0*50
+1(reserv)
M3,5*50
+1(reserv)
8*20
+3 (reserv)
M3,5*20
+1(reserv)
M3,5*30
+1(reserv)
M3.0*14
+3(reserv)
M3.0*14
+2(reserv)
träpinne
8 8
12
52
12
50
9028
8
6
DELLISTA
12 2
13 1
11 8
14 6
- 5 -
A2 x1
I1 x1
A1 x1
x20
8*20
I2 x 1
x6
I1
A2
I2
A2
I2
A1
I1
02
01
MONTERINGSGUIDE
M3,5*35
träpinne
- 6 -
A3
H1
H2H1
H2
träpinne
M3,5*35
H1 x1
A3 x1
x12
x6
H2 x1
8*20
03
04
MONTERINGSGUIDE
- 7 -

E1
P
P
G1 G2
E2
M3,5*30
8*20
träpinne
P x1
x16
x4
05
06
MONTERINGSGUIDE
- 8 -

E1 x1
E2 x1
- 9 -
08
07
MONTERINGSGUIDE
x4
O x1
x4
E2
E1
O
M3,5*50
M3,5*35

B x3
x4
x6
x12
x12
N x1
B x1
B x1
N
J1
J1
F2
J2
F1
J2
G2
G1
J1
J2
G1 x1
G2
F2 x1
F1 x1
J1 x3
J2
M3,5*50
M6,0*50
M3,5*35
M3,5*35
10
09
MONTERINGSGUIDE
-10-
x4
x12
14 x 6
M3,5*35
-11-
S x1
T x4
S
L2
T
S
L1
11
12
MONTERINGSGUIDE
8*20
14
14
träpinne
12
11
M1
L2
M2
L1
L1
M2
M1
L2
M3,0*14
M3,0*14
M3,0*14
M1 x1
M2
L2
L1 x1
B x1
x48
B x1
x4
x6
x8
x8
14
13
MONTERINGSGUIDE
12 x 2
11 x 4
-12-

K1 x1
x18
B x1
M3,0*14
16
15
MONTERINGSGUIDE
-13-
K2
K1
K2

x4
x4
M3.0*14
x4
R
C
B
R
D
13 x 1
18
17
M3,5*30
M3,5*35
B x1
C x1
R x2
D x1
MONTERINGSGUIDE
-14-
13

x24
x4
x8
x12
F
Gjort
11
Q x2
M3,0*14
M3,5*20
M3,0*14
19
MONTERINGSGUIDE
11 x 4
-15-


¿Tienepreguntassobreelproducto?¿Necesitaasistenciatécnica?Nodudeenponerseen
contactocon
nosotros:Asistenciatécnicaycertificadodegarantíaelectrónica
www.vevor.com/support
MODELO:TYOP2419
Estassonlasinstruccionesoriginales,leaatentamentetodaslasinstruccionesdel
manualantesdeutilizarelproducto.VEVORsereservaunainterpretaciónclaradenuestro
manualdeusuario.Laaparienciadelproductoestarásujetaalproductoquerecibió.
Perdónenospornoinformarlenuevamentesihayactualizacionesdetecnologíaosoftwareen
nuestroproducto.
¿NECESITASAYUDA?¡CONTÁCTANOS!
COBERTIZODEALMACENAMIENTOALAIRELIBRE
1

4.Antesdelainstalación,coloquetodoslosmaterialesdeacuerdocon
lalistadelmanual,paraquepuedaverificarsifaltaalgúnmaterialy
tambiénpuedareducireltiempodeinstalación.

C1
B1 D1
3
E21 F11
F21
G11
A31
E11
A21A11
G21
H21 Yo11 yo21H11
LISTADEPIEZAS
Pág.1
Pregunta2
O1
N°1
S1
R2 T4
4
Nivel11 M11
K21
M21
K11
Nivel21
J23J13
LISTADEPIEZAS

M3.5*35
+2(repuesto)
M3.5*50
+1(repuesto)
M6.0*50
+1(repuesto)
8*20
+3(repuesto)
M3.5*20
+1(repuesto)
M3.5*30
+1(repuesto)
M3.0*14
+3(repuesto)
M3.0*14
+2(repuesto)
50 8
12
12
8
9028
6
8
52
LISTADEPIEZAS
131
146
122118
palodemadera
5
A1x1
A2x1
x20
8*20
Yo1x1
yo2x1
x6
palodemadera
01
02
GUÍADEMONTAJE
M3,5*35
6
Yo2
Yo1
Yo1
A2
A2
A1
Yo2

palodemadera
8*20
H2
A3
H1
H1
H2
7
A3x1
H2x1
H1x1
x12
x6
M3,5*35
04
03
GUÍADEMONTAJE
M3,5*30
x16
x4
PAG
E2E1
PAG
G2G1
Px1
8*20
06
05
GUÍADEMONTAJE
8
palodemadera
E2x1
E1x1
Oh
E1
E2
08
07
GUÍADEMONTAJE
M3,5*35
M3,5*50
x4
Ox1
x4
9
J1
J1
J2
J1
F1
F2
G2
G1
J2
J2
x4
Bx3
Nx1
x12
x6
Bx1
Bx1
x12
M3,5*50
M6.0*50
M3,5*35
M3,5*35
10
G1x1
G2
F2x1
F1x1
J1x3
J2
norte
10
09
GUÍADEMONTAJE
M3,5*35
x4
x12
S
L1
yo
S
L2
14
14
Tx4
Sx1
14x6
12
11
GUÍADEMONTAJE
8*20
palodemadera
11
M1
M2
L1
L2
M2
L2
L1
M1
Bx1
x8
Bx1
x4
x8
x48
x6
M3.0*14
M3.0*14
M3.0*14
12x2
11x4
L2
M2
M1x1
L1x1
11
12
13
14
GUÍADEMONTAJE
12

K1x1
x18
Bx1
13
16
15
GUÍADEMONTAJE
K2
M3.0*14
K2
K1

13x1
x4
x4
M3.0*14
x4
M3,5*30
M3,5*35
13
Bx1
Dx1
Cx1
Rx2
B
R
R
do
D
17
18
GUÍADEMONTAJE
14

Hecho
x8
x24
x12
x4
M3.0*14
M3,5*20
M3.0*14
15
Qx2
Q
19
GUÍADEMONTAJE
11x4
11


Hai domande sul prodotto? Hai bisogno di supporto tecnico? Non esitare a contattarci:
Supporto
tecnico e certificato di garanzia elettronica www.vevor.com/
support
MODELLO: TY-OP2419
Questa è l'istruzione originale, si prega di leggere attentamente tutte le istruzioni del
manuale prima di utilizzare. VEVOR si riserva una chiara interpretazione del nostro manuale
utente. L'aspetto del prodotto sarà soggetto al prodotto ricevuto. Vi preghiamo di
perdonarci se non vi informeremo di nuovo se ci sono aggiornamenti tecnologici o software sul
nostro prodotto.
HAI BISOGNO DI AIUTO? CONTATTACI!
CAPANNONE PER STOCCAGGIO ESTERNO
- 1 -

4. Prima dell'installazione, posizionare tutti i materiali secondo l'elenco
del manuale, in modo da poter verificare se ci sono materiali mancanti
e ridurre i tempi di installazione.
Domanda 1 1E1 1
La domanda è :
G1 1
La 3 1
E2 1
La 2 1La 1a
Il 21
Altezza 1 1a parte Io1 1 Io2 1
- 3 -
La 1
La 1 Il 1
ELENCO DEI PEZZI

L1 1 L2 1 M1 1
K1 1 Chilometro 1
J2 3J1 3
M2 1
- 4 -
La persona 1
Domanda 2
Il 1
Il 1
La 2
L' 1
Il 4
ELENCO DEI PEZZI
88
12
12
50
9028
6
52
8
M3.5*35
+2 (di scorta)
M6.0*50
+1(ricambio)
M3.5*30
+1(di scorta)
M3.5*20
+1(ricambio)
M3.5*50
+1(di scorta)
M3.0*14
+3(di scorta)
M3.0*14
+2(ricambio)
8*20
+3(di scorta)
ELENCO DEI PEZZI
12 2
14 6
13 1
11 8
bastone di legno
- 5 -
La1x1
Io1x1
A2 x1
20x8 *20
Io2 x1
x6
bastone di legno
01
02
GUIDA AL MONTAGGIO
Vite M3.5*35
- 6 -
Io2
La 2
Io1
La 2
Io1
A1
Io2

bastone di legno
8*20
L'H2
H1
La A3
H1
L'H2
- 7 -
Formato A3 x1
Altezza 2 x 1
Altezza 1 x 1
numero x12
x6
Vite M3.5*35
03
04
GUIDA AL MONTAGGIO

Vite M3.5*30
numero x16
x4
E1 E2
P
P
G1 G2
P x1
8*20
06
05
GUIDA AL MONTAGGIO
- 8 -
bastone di legno

E1 x1
E2 x1
E2
E1
Lo
07
08
GUIDA AL MONTAGGIO
M3.5*50
Vite M3.5*35
x4
Il x1
x4
- 9 -
Machine Translated by Google
J1
J1
J2
J1
Formula 1
La F2
G2
G1
J2
J2
x4
La x3
x6
numero x12
N x1
La x1
La x1
numero x12
M3.5*50
M6.0*50
Vite M3.5*35
Vite M3.5*35
-10-
10
09
N
G1 x1
1 x 3
F2 x1
F1 x1
J2
G2
GUIDA AL MONTAGGIO
Machine Translated by Google
Vite M3.5*35
x4
numero x12
S
L2
T
S
L1
14
14
12
11
14x6
Il x4
Lx1
GUIDA AL MONTAGGIO
8*20
bastone di legno
-11-
Machine Translated by Google
L2
La M1
L1
L2
La M2
La M2
L1
La M1
La x1
x8
La x1
x4
x8
x6
x48
M3.0*14
M3.0*14
M3.0*14
12x2
11x4
14
13
12
11
M1 x1
L2
L1 x1
La M2
GUIDA AL MONTAGGIO
-12-
Machine Translated by Google

16
15
-13-
Chilo1x1
numero x18
La x1
GUIDA AL MONTAGGIO
K2
M3.0*14
K2
K1
Machine Translated by Google
13x1
x4
x4
M3.0*14
x4
Vite M3.5*30
Vite M3.5*35
13
La x1
La x1
La x2
E x1
B
C
R
R
D
18
17
GUIDA AL MONTAGGIO
-14-
Machine Translated by Google
Fatto
x24
x4
x8
numero x12
M3.0*14
Vite senza testa M3.5*20
M3.0*14
-15-
Domanda x2
Q
19
GUIDA AL MONTAGGIO
11x4
11
Machine Translated by Google

Machine Translated by Google

Machine Translated by Google

Machine Translated by Google