

Poly TC10 User Guide 6.4.0
SUMMARY
This guide provides end-users with task-based user information for the featured product.

Legal information
Copyright and license
© 2022, 2024, HP Development Company,
L.P. The information contained herein is
subject to change without notice. The only
warranties for HP products and services are
set forth in the express warranty statements
accompanying such products and services.
Nothing herein should be construed as
constituting an additional warranty. HP shall
not be liable for technical or editorial errors
or omissions contained herein.
Trademark credits
All third-party trademarks are the property
of their respective owners.
Privacy policy
HP complies with applicable data privacy
and protection laws and regulations. HP
products and services process customer
data in a manner consistent with the HP
Privacy Policy. Please refer to
HP Privacy
Statement.
Open source software used in this product
This product contains open source
software. You may receive the open source
software from HP up to three (3) years
after the distribution date of the applicable
product or software at a charge not
greater than the cost to HP of shipping
or distributing the software to you. To
receive software information, as well as
the open source software code used in
this product, contact HP by email at

Table of contents
1Before you begin ................................................................................................................................................ 1
Audience, purpose, and required skills ........................................................................................................... 1
Product terminology used in this guide ........................................................................................................... 1
Icons used in Poly documentation .................................................................................................................. 1
2Getting Started ................................................................................................................................................... 2
Poly TC10 Overview ....................................................................................................................................... 3
Poly TC10 as a Poly Video Controller ..................................................................................................... 3
Poly TC10 Local Interface........................................................................................................................ 4
Home Screen in Poly Video Mode ........................................................................................................... 4
Poly TC10 in Zoom Rooms Mode............................................................................................................ 5
Poly TC10 as a Zoom Rooms Controller ................................................................................................. 5
Poly TC10 as a Zoom Rooms Scheduler................................................................................................. 5
Poly TC10 in Microsoft Teams Mode....................................................................................................... 6
Poly TC10 as a Microsoft Teams Rooms Controller................................................................................ 6
Poly TC10 as a Microsoft Teams Rooms Panel ...................................................................................... 6
Poly TC10 Controller Hardware Overview ............................................................................................... 6
Poly TC10 Status Bars............................................................................................................................. 7
Access the Poly Control Center ............................................................................................................... 8
Waking the Poly TC10 ............................................................................................................................ 8
Direct access to AV controls on a Poly touch controller.................................................................................. 9
Access the Poly AV Control feature......................................................................................................... 9
Accessibility Features ................................................................................................................................... 10
Users Who Are Deaf or Hard of Hearing ............................................................................................... 10
Users Who Are Blind, Have Low Vision, or Have Limited Vision........................................................... 10
Users with Limited Mobility .................................................................................................................... 10
3Using the Poly TC10 in Poly Video Mode ........................................................................................................ 12
Calling ........................................................................................................................................................... 13
Placing Calls .......................................................................................................................................... 13
Place a Call..................................................................................................................................... 13
Answer a Call.................................................................................................................................. 13
Ignore a Call ................................................................................................................................... 14
End a Call ....................................................................................................................................... 14
Calling Contacts..................................................................................................................................... 14
Call a Contact ................................................................................................................................. 14
iii

Call a Recent Contact..................................................................................................................... 14
Calling Favorite Contacts....................................................................................................................... 14
Favorite a Contact .......................................................................................................................... 15
Unfavorite a Contact....................................................................................................................... 15
Call a Favorite Contact ................................................................................................................... 15
Joining Meetings from the Calendar ...................................................................................................... 15
Meeting Cards ................................................................................................................................ 15
View Meeting Cards ................................................................................................................ 15
Join a Meeting from a Meeting Card ....................................................................................... 16
Join an Overbooked Meeting .................................................................................................. 16
Join a Password-Protected Meeting............................................................................................... 16
Sharing Content ............................................................................................................................................ 17
Minimize Content ................................................................................................................................... 17
Maximize Content .................................................................................................................................. 17
Take a Snapshot of Your Content.......................................................................................................... 17
Delete Snapshots or Content................................................................................................................. 17
End a Call with Blackboard or Whiteboard Content............................................................................... 17
Cameras........................................................................................................................................................ 19
Adjust an In-Room Camera ................................................................................................................... 19
Adjust a Far-Site Camera ...................................................................................................................... 19
Turn Your Camera On or Off ................................................................................................................. 19
Turn Camera Tracking On or Off ........................................................................................................... 20
Selecting the Primary Camera ............................................................................................................... 20
Camera Priority............................................................................................................................... 20
Select the Primary Camera Using the Poly TC10 .......................................................................... 20
Using Camera Presets........................................................................................................................... 20
Save a Camera Preset Using the Poly TC10 ................................................................................ 21
Select a Preset ............................................................................................................................... 21
Delete a Preset............................................................................................................................... 21
Environment Controls.................................................................................................................................... 22
Control Room Elements Using the Poly TC10 ...................................................................................... 22
Settings ......................................................................................................................................................... 23
Video Adjustments ................................................................................................................................. 23
Change the Participant Layout ....................................................................................................... 23
Audio Adjustments ................................................................................................................................. 23
Mute Your Microphones.................................................................................................................. 23
Unmute Your Microphones............................................................................................................. 23
Adjust the Volume.................................................................................................................................. 24
Poly DirectorAI Perimeter setup.................................................................................................................... 25
Define Poly DirectorAI Perimeter on Poly touch controller .................................................................... 25
Poly TC10 LED Status Indicators as a Room Controller in Poly Video Mode............................................... 25
4Using the Poly TC10 Touch Controller in Partner Modes ................................................................................ 26
Using the Poly TC10 in Zoom Rooms Controller Mode ................................................................................ 27
Start an Instant Meeting in Zoom Rooms .............................................................................................. 27
Start a Scheduled Meeting in Zoom Rooms .......................................................................................... 27
Call a Contact in Zoom Rooms .............................................................................................................. 27
iv

Sharing Content in Zoom Rooms from a Poly TC10 ............................................................................. 27
Sharing Content in Zoom Rooms Using a Sharing Key or Meeting ID .................................................. 27
Poly TC10 LED Status Indicators in Zoom Rooms Controller Mode............................................................. 28
Using the Poly TC10 in Zoom Rooms Scheduler Mode................................................................................ 29
Schedule a Meeting on the Zoom Rooms Scheduler ............................................................................ 29
Delete a Meeting from the Zoom Rooms Scheduler.............................................................................. 29
Disable Instant Room Reservation ........................................................................................................ 29
Poly TC10 LED Status Indicators in Zoom Rooms Scheduler Mode ............................................................ 30
Using the Poly TC10 as a Microsoft Teams Controller ................................................................................. 31
Start or join a meeting in Microsoft Teams Rooms ................................................................................ 31
Call a Contact in Microsoft Teams Rooms............................................................................................. 31
Manage a meeting in Microsoft Teams Rooms ..................................................................................... 31
Poly TC10 LED Status Indicators in Microsoft Teams Rooms Controller Mode ........................................... 31
Using the Poly TC10 as a Microsoft Teams Panel........................................................................................ 33
Reserve an Ad Hoc Meeting on the Microsoft Teams Panel ................................................................. 33
Extend or Release a Teams Room Reservation.................................................................................... 33
Poly TC10 LED Status Indicators in Microsoft Teams Panel Mode .............................................................. 33
5Device Maintenance......................................................................................................................................... 35
Updating a touch controller ........................................................................................................................... 35
Unpair the TC10 from a Video System ......................................................................................................... 35
Restart the Poly TC10 device ....................................................................................................................... 36
6Troubleshooting................................................................................................................................................ 37
View the Poly TC10 and Paired Video System Information .......................................................................... 37
Zoom Rooms Pairing Error ........................................................................................................................... 37
7Getting help ...................................................................................................................................................... 38
HP Inc. addresses......................................................................................................................................... 38
Document information ................................................................................................................................... 38
v

Before you begin1
This guide helps you understand how to set up, manage, and use your Poly TC10 device.
Audience, purpose, and required skills
This guide is intended for beginning-to-intermediate users who participate in video-conferencing calls.
Product terminology used in this guide
Use the terminology in this section to help you understand how this guide sometimes refers to Poly
products.
Device
Refers to the Poly TC10 device.
Video system
Refers to the Poly G7500 and Poly Studio X Series video conferencing systems.
System
Another way of referring to the Poly G7500 and the Poly Studio X Series video conferencing
systems.
Icons used in Poly documentation
This section describes the icons used in Poly documentation and what they mean.
WARNING! Indicates a hazardous situation that, if not avoided, could result in serious injury or
death.
CAUTION: Indicates a hazardous situation that, if not avoided, could result in minor or moderate
injury.
IMPORTANT: Indicates information considered important but not hazard-related (for example,
messages related to property damage). Warns the user that failure to follow a procedure exactly as
described could result in loss of data or in damage to hardware or software. Also contains essential
information to explain a concept or to complete a task.
NOTE: Contains additional information to emphasize or supplement important points of the main
text.
TIP: Provides helpful hints for completing a task.
Before you begin
1

Getting Started2
The Poly TC10 delivers room scheduling, room control with any Poly partner app, or lets you control
supported Poly video conferencing systems.
Flexible deployment options provide a range of operating modes that meet different room
requirements.
2
Chapter 2Getting Started

Poly TC10 Overview
You can pair the Poly TC10 with a Poly video system or use it as a standalone (unpaired) room
scheduler.
In paired mode, Poly TC10 pairs with a Poly video system and operates as a controller for the
provider selected in the Poly Video system. This provider can be Poly or a supported third party app
such as Microsoft Teams Rooms or Zoom Rooms.
Poly TC10 can pair with the following devices:
● Poly G7500
● Poly Studio G62
● Poly Studio X30
● Poly Studio X50
● Poly Studio X52
● Poly Studio X70
In standalone mode, Poly TC10:
● Operates alone; you don't pair it with a Poly video system.
● Supports the following modes:
– Zoom Rooms running either Zoom Room Controller or Zoom Rooms Scheduler
– Microsoft Teams Rooms running Microsoft Teams Panel
Poly TC10 as a Poly Video Controller
With the Poly TC10, you can control and manage aspects of a Poly video system.
The Poly TC10 must be paired with a video system to operate in Poly Video Mode.
The following features and capabilities are available in Poly Video Mode:
● Placing and joining video calls
● Viewing and joining scheduled calendar meetings
● Managing contacts, call lists, and directories
● Managing shared content
– Taking snapshots
– Maximizing, minimizing, and stopping content
● Adjusting camera pan, tilt, zoom and tracking settings
● Creating camera presets
● Adjusting display brightness
● Using multiple Poly TC10 controllers to control a single system
Poly TC10 Overview
3
● Pairing with video systems over the network (wired LAN) for flexible room setups
Poly TC10 Local Interface
The Poly TC10 controller’s local interface displays controls and settings available to you depending
on the mode you're using.
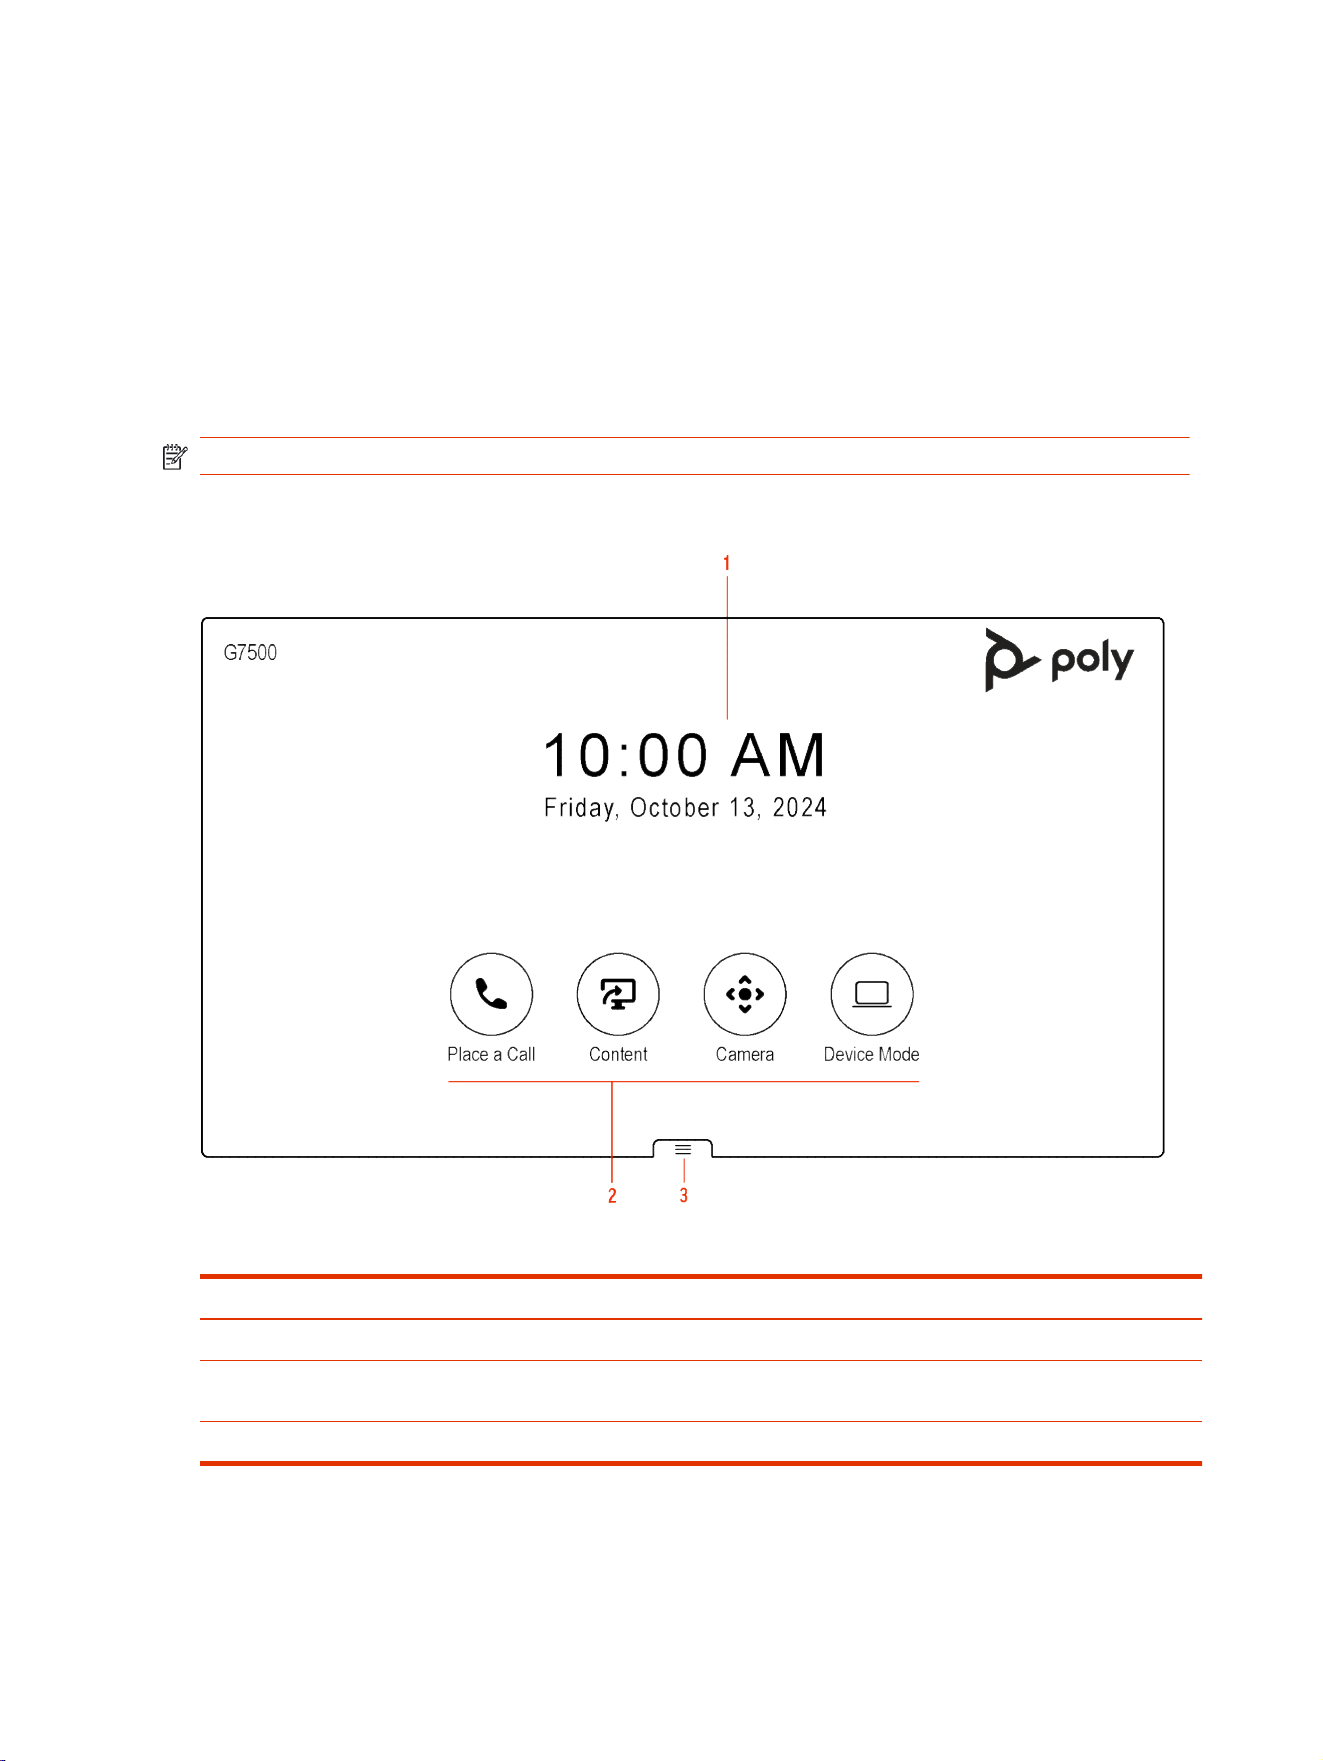
Home Screen in Poly Video Mode
The Home screen is the first screen you encounter in Poly Video Mode. From this screen, you have
quick access to many of the system functions.
NOTE: Some elements of your screen may be different depending on the system configuration.
Home Screen
Table 2-1
Feature descriptions
Ref. Number Description
1 Time and date information
2 Task buttons for placing calls, managing content, controlling cameras, or launching
Poly Device Mode.
3 Menu for accessing other features.
Some of the following interactive and read-only elements might not display on your system depending
on the system configuration.
4
Chapter 2Getting Started
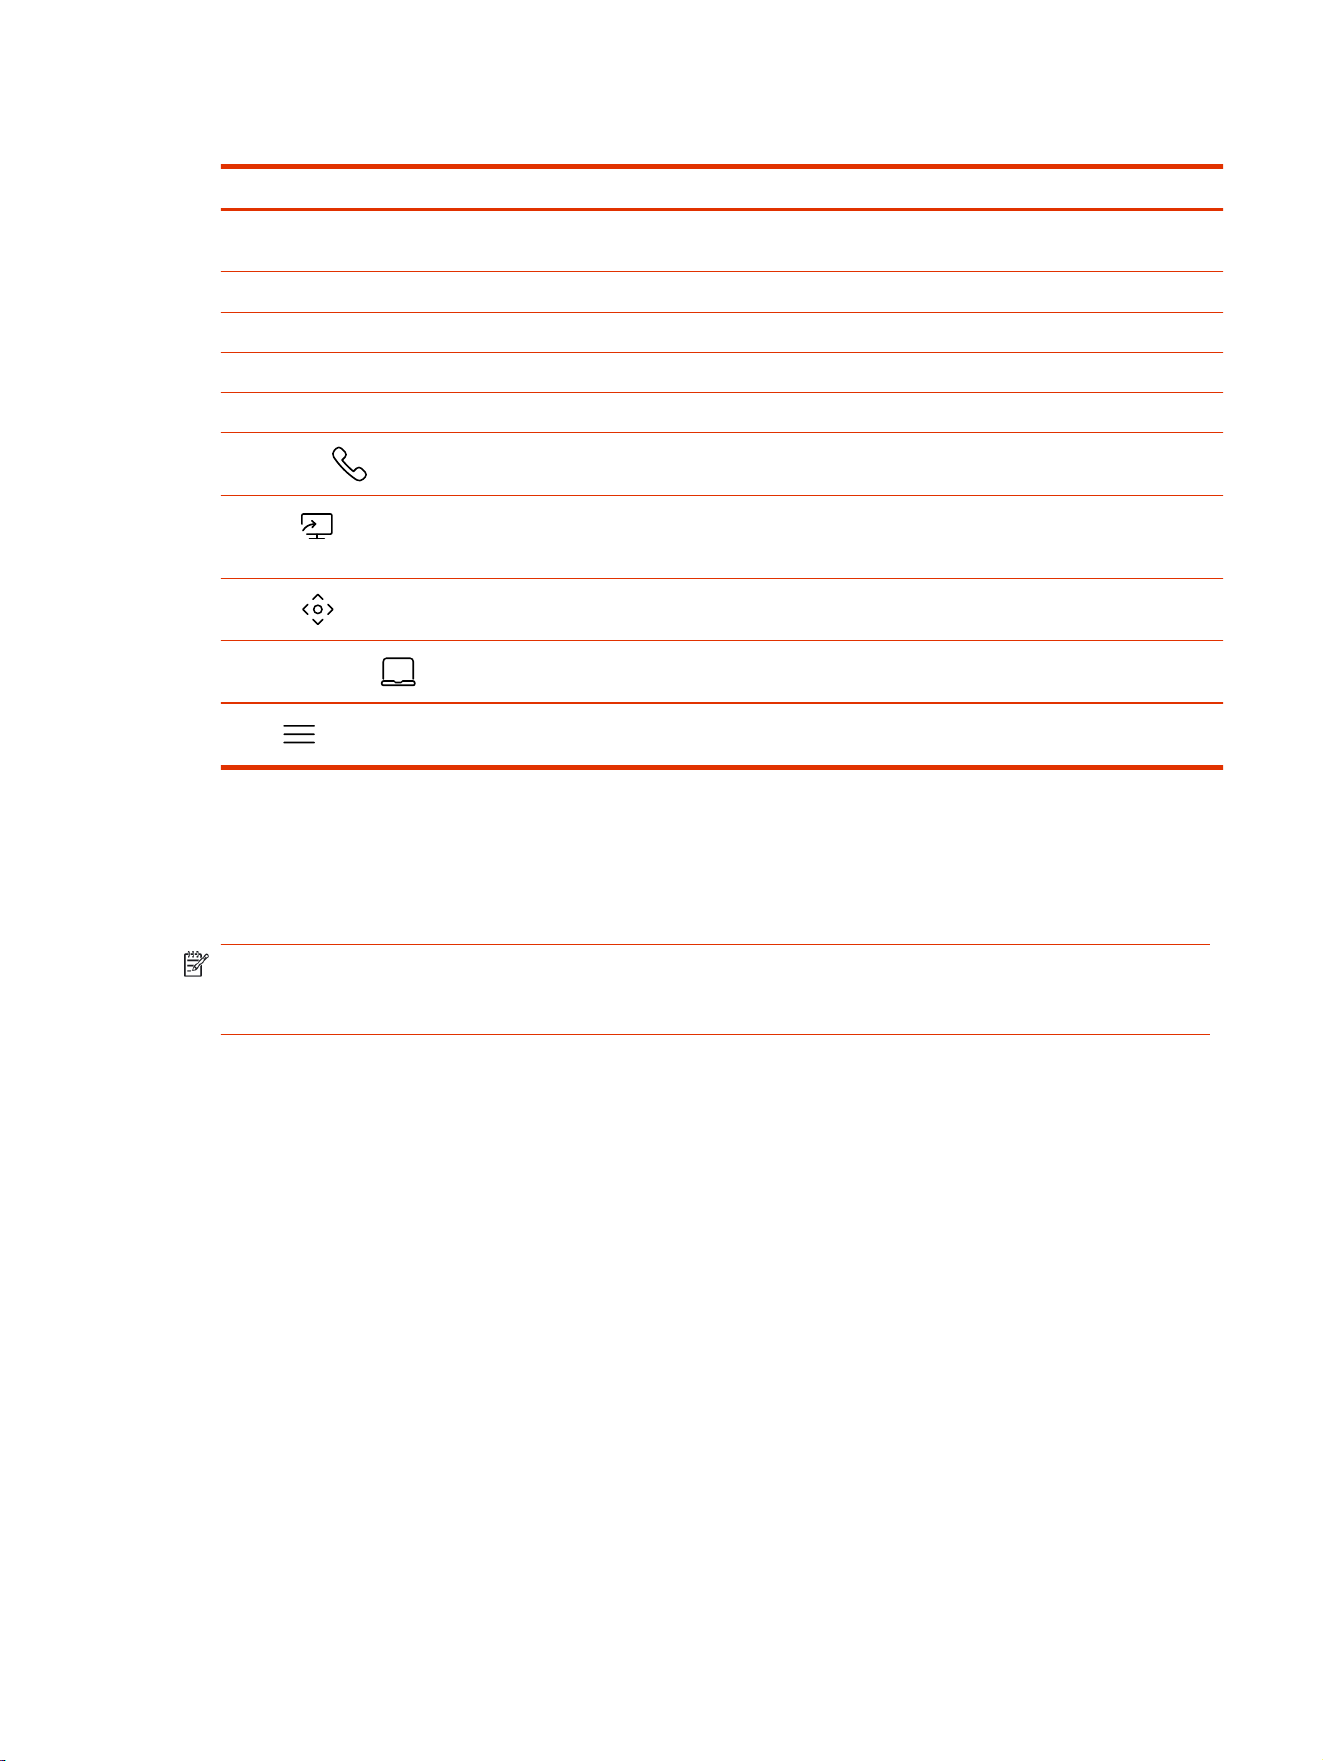
Table 2-2 Element descriptions
Element Description
Name Descriptive name determined by the system administrator. Used when you want to
connect to a system.
IP address IP address, SIP, H.323, or secondary network configured for your system.
Current time Local time zone.
Current date Local time zone date.
Calendar or Favorites cards View your calendar or favorites.
Place a Call
Opens a call screen where you can dial a call, or you can select a card to dial
numbers, access favorites, or view your calendar.
Content
When content is available, the system displays a list of available content. Otherwise,
this function opens a help screen that describes how to set up content sharing using
HDMI, the Polycom Content App, or an AirPlay- or a Miracast-certified device.
Camera
Opens the camera control screen.
Poly Device Mode
Launches Poly Device Mode, which allows you to use the Poly Video system as an
external camera, microphone, and speaker for your connected laptop.
Menu
Opens new menu selections for calling, sharing content, camera control, and
additional functions.
Poly TC10 in Zoom Rooms Mode
In Zoom Rooms mode, the Poly TC10 can run either as a Zoom Rooms Controller or a Zoom Rooms
Scheduler.
NOTE: To use Zoom Rooms Controller and Scheduler, you need a Zoom Rooms account. To use
all of the functionality of the Zoom Rooms Scheduler, log in to the scheduler with a Zoom Rooms
admin account.
Poly TC10 as a Zoom Rooms Controller
Run Zoom Rooms Controller on a Poly TC10 positioned inside a conference room to launch and
manage Zoom meetings.
With Zoom Rooms Controller, a Poly TC10 in either paired or standalone mode controls the Zoom
Room. Once logged into the Zoom Room, you can join a scheduled meeting, start an unscheduled
meeting, invite participants to a meeting, view upcoming meetings, share content, dial a phone
number, and manage all aspects of a Zoom meeting.
Poly TC10 as a Zoom Rooms Scheduler
Run Zoom Rooms Scheduler on a Poly TC10 mounted outside a meeting room to manage the room.
The Poly TC10 displays the current status of the room and any scheduled meetings, and can be used
for room reservation.
Administrators can sync the following calendars to a Zoom Room:
● Google Calendar
● Office 365
Poly TC10 in Zoom Rooms Mode
5

● Microsoft Exchange
Once synced, the calendar meetings for that day appear on the display.
Users can perform the following tasks on a Poly TC10 running Zoom Rooms Scheduler:
● See the current status of the Zoom Room and any upcoming meetings
● Reserve a time slot in the Zoom Room calendar
● Reserve a time slot in another Zoom Room in an integrated floor plan
● Cancel a meeting that a user scheduled through the Zoom Rooms Scheduler
Poly TC10 in Microsoft Teams Mode
In Microsoft Teams mode, Poly TC10 can run either as a Microsoft Teams Room Controller (paired
mode) or a Microsoft Teams Room Panel (standalone mode).
NOTE: To use Microsoft Teams Room Controller and Panel, you need a Microsoft Teams Rooms
account. For more see Microsoft Teams Rooms licenses.
Poly TC10 as a Microsoft Teams Rooms Controller
Positioned inside a conference room, paired to a codec, use the Poly TC10 as a touchscreen
controller for Microsoft Teams.
The following features and capabilities are available in Microsoft Teams controller mode:
● Placing and joining video calls
● Viewing and joining scheduled calendar meetings
● Managing contacts, call lists, and directories
● Sharing content
Poly TC10 as a Microsoft Teams Rooms Panel
A standalone Poly TC10 mounted outside a meeting room can run Microsoft Teams Panel to manage
a meeting space.
A Poly TC10 Microsoft Teams Panel provides the following:
● Current room status
● List of upcoming meetings
● Reservation capabilities
● Options to reserve, check-in to, or release the meeting space, if configured in the settings
Poly TC10 Controller Hardware Overview
The following illustration and table outline the hardware features of the TC10 controller.
Figure 2-1 Poly TC10 hardware features
6
Chapter 2Getting Started
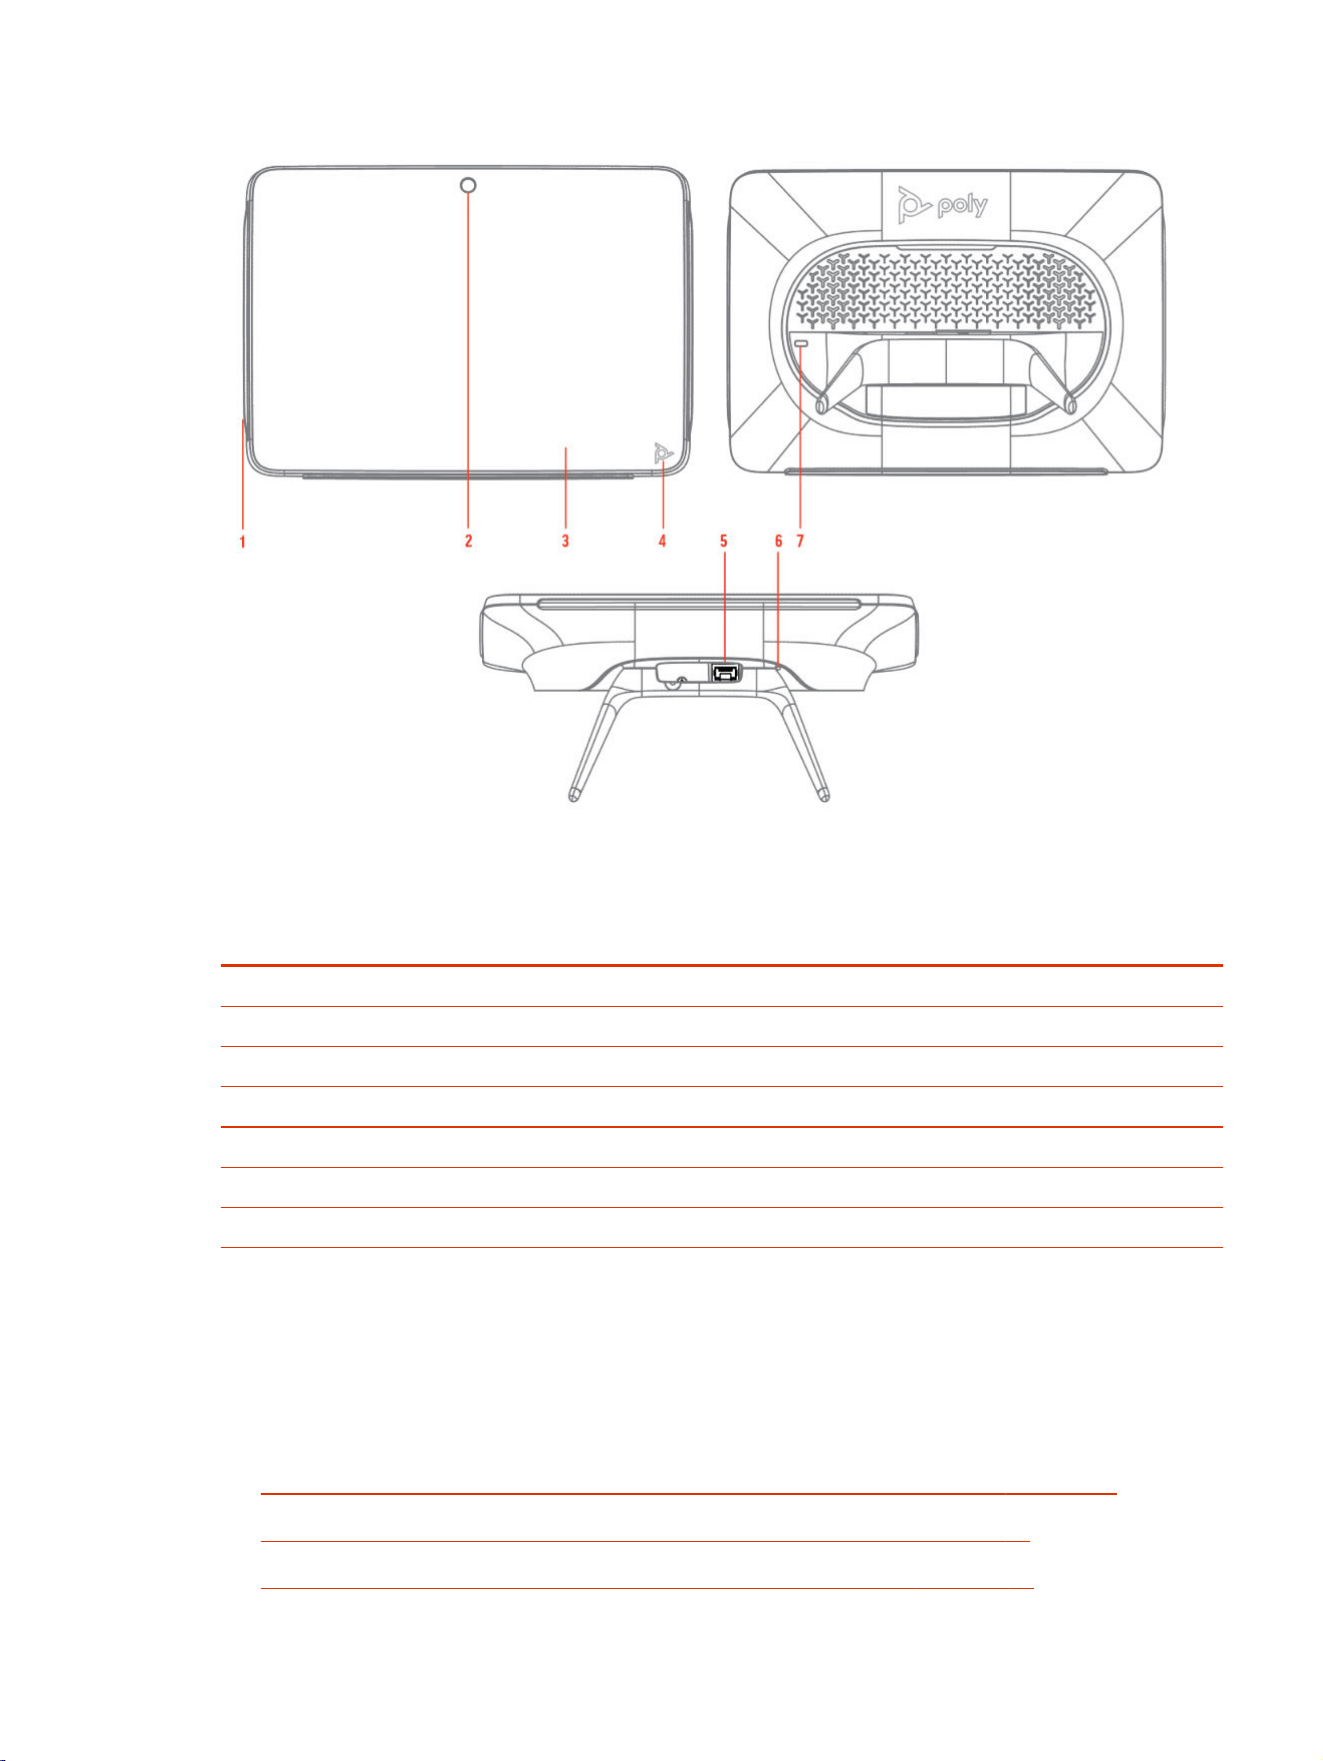
Table 2-3 Poly TC10 feature descriptions
Reference
number
Description
1 LED bar
2 Motion sensor to wake up display
3 Touchscreen
4 Poly touch button to launch Poly control dock menu
5 POE port
6 Factory restore pinhole
7 Security lock
Poly TC10 Status Bars
The Poly TC10 controller provides two LED bars on the right and left edges of the screen.
These LEDs help you understand the controller's behaviors. For more information, review the
following topics:
● Poly TC10 LED Status Indicators as a Room Controller in Poly Video Mode on page 25
● Poly TC10 LED Status Indicators in Zoom Rooms Controller Mode on page 28
● Poly TC10 LED Status Indicators in Zoom Rooms Scheduler Mode on page 30
Poly TC10 Status Bars
7

● Poly TC10 LED Status Indicators in Microsoft Teams Controller Mode on page 31
● Poly TC10 LED Status Indicators in Microsoft Teams Panel Mode on page 33
Access the Poly Control Center
If your system is using a conferencing application that isn’t Poly, you can still access the Poly TC10
device and paired video system settings in the Poly Control Center.
■
On the right side of the device touchscreen, swipe left, or touch the Poly touch button on the
bottom right of your touch screen.
The Poly Control Center opens.
Waking the Poly TC10
After a period of no activity, the system enters sleep mode (if configured by your administrator). When
the motion sensor over the touchscreen detects movement, it wakes up the display.
8
Chapter 2Getting Started

Direct access to AV controls on a Poly touch controller
Poly touch controllers provide direct access and interaction with third-party AV hardware interfaces
directly from the touch controller interface.
You can manage a range of environmental aspects of your meeting experience on various AV
devices, such as adjusting lights, temperature, blinds, camera, and video inputs such as switching
from cable TV to Poly devices.
The Poly AV control feature provides integration with any vendor by providing a chromium webview
wrapper around their site. For more information, review the Poly AV Control Admin Guide.
Access the Poly AV Control feature
Access the Poly AV Control feature from the Poly Control Center.
The administrator has configured the Poly AV Control feature.
1. To access the AV controls, swipe left from the right-side of the Poly TC10 or Poly TC8 screen
and select AV Control.
2. To return to the main controls screen, swipe left from the right-side of the Poly TC10 or Poly TC8
screen and select Home.
Direct access to AV controls on a Poly touch controller
9

Accessibility Features
Poly products include a number of features to accommodate users with disabilities.
Users Who Are Deaf or Hard of Hearing
Your system includes accessibility features so that users who are deaf or hard of hearing can use the
system.
The following table lists the accessibility features for users who are deaf or hard of hearing.
Table 2-4 Accessibility Features for Users Who Are Deaf or Hard of Hearing
Accessibility Feature Description
Visual notifications Status and icon indicators let you know when you have incoming, outgoing,
active, or held calls. Indicators also alert you of the device’s status and when
features are enabled.
Status indicator lights
The system uses LEDs to indicate some statuses, including if your microphones
are muted.
Adjustable call volume While in a call, you can raise or lower the volume of the device.
Auto-answering You can enable the system to auto-answer calls.
Users Who Are Blind, Have Low Vision, or Have Limited Vision
Your system includes accessibility features so that users who are blind, have low vision, or have
limited vision can use the system.
The following table lists the accessibility features for users who are blind, have low vision, or have
limited vision.
Table 2-5
Accessibility Features for Users Who Are Blind, Have Low Vision, or Have Limited Vision
Accessibility Feature Description
Auto-answering You can enable the system to auto-answer calls.
Adjustable backlight settings You can change the brightness of the screen by adjusting backlight intensity
settings.
Visual notifications Status and icon indicators let you know when you have incoming, outgoing,
active, or held calls. Indicators also alert you of the device’s status and when
features are enabled.
Users with Limited Mobility
Your system includes accessibility features so that users with limited mobility can use various system
features.
The following table lists the accessibility features for users with limited mobility.
Table 2-6
Accessibility Features for Users with Limited Mobility
Accessibility Feature Description
Alternative control interface This product provides an alternative control interface for the connected video
conferencing system for people with disabilities that cause limited manipulation
issues.
10 Chapter 2Getting Started

Table 2-6 Accessibility Features for Users with Limited Mobility (continued)
Accessibility Feature Description
Auto-answering You can enable the system to auto-answer calls.
Calling from a personal device With administrator credentials, you can wirelessly access the system web
interface from your own device to make calls and manage contacts and
favorites.
Flexible mounting/display configurations
Product isn’t stationary and can be mounted or displayed in various
configurations. Touch controls require minimal strength to operate.
Users with Limited Mobility 11

Using the Poly TC10 in Poly Video Mode3
Pair the Poly TC10 with a video system and set the Provider to Poly in the system web interface to
control and manage your Poly video system with the Poly TC10.
NOTE: Poly Video Mode isn't available if the Poly TC10 is in standalone mode.
12
Chapter 3Using the Poly TC10 in Poly Video Mode

Calling
There are several ways to initiate calls on the system. You can place a call by entering your contact’s
name or number, choosing a contact in the directory, calling a favorite or recent contact, or joining a
scheduled meeting.
You can place calls using the following methods:
● Call using the dialpad
● Call a contact
● Call a frequently used number
● Call a recent contact
● Call a favorite
● Join a meeting from the calendar
Placing Calls
You can place audio calls, video calls, and call into meetings using the onscreen keyboard.
Use the following dialing formats when placing calls:
● IPv4 address: 192.0.2.0
● Host name: room.company.com
● SIP address: [email protected]
● H.323 or SIP extension: 2555
● Phone number: 9782992285
Place a Call
You can place an audio or video call to a contact.
1. Go to Place a Call.
2. On the Dialpad screen, move the slider to Audio or Video .
3. Enter a number on the dialpad or select Keyboard to enter characters.
4. Select Call.
Answer a Call
The way the system handles incoming calls depends on how your administrator configured it. The
system either answers the call automatically or prompts you to answer manually.
■
If you receive an incoming call notification, select Answer.
Calling
13

Ignore a Call
If the system doesn’t answer incoming calls automatically, you can choose to ignore the call rather
than answer it.
■
If you receive an incoming call notification, select Ignore.
End a Call
When your call is complete, hang up the call. If you have content such as blackboards, whiteboards,
or snapshots, the system asks if you want to keep them.
■
Select Menu > Hang Up.
Calling Contacts
You can access and call contacts, recent contacts, and frequent contacts on your system.
If configured by your administrator, contacts display on the
Place a Call
screen. Contact cards can
display the following information:
● Contact name
● Contact number
● Contact email address
● Contact IP address
Call a Contact
To quickly dial a contact, you can search and select a contact card from the results. Contact cards
display for frequent contacts, directory contacts, and favorites.
1. Using the controller or remote control, select Place a Call > Contact.
2. In the search field, use the onscreen keyboard to type characters or numbers and select Search.
3. Select a contact card to view contact details.
4. Select Call.
Call a Recent Contact
You can quickly call recent contacts from a list (organized by most to least recent).
1. Go to Place a Call > Recent.
2. Scroll through the list of recent contacts (sorted by date) and select one.
The call automatically dials.
Calling Favorite Contacts
To quickly access a short list of contacts you call most often, create favorites.
Favorites display on the
Favorites
,
Contacts
, or
Home
screens, depending on your system
configuration. The system adds a star icon next to the contact’s name, providing you an easy way to
identify and call favorites.
14
Chapter 3Using the Poly TC10 in Poly Video Mode

Favorite a Contact
Create favorites to display contacts that you call the most often.
1. Go to Place a Call > Contacts.
2. Select a contact card, then select Favorite.
The contact receives a star icon and displays in the Contacts and Favorites lists.
Unfavorite a Contact
Unfavorite a contact to remove the contact from your Favorites list.
1. Go to Place a Call > Favorites.
2. Choose a favorite card, then select Unfavorite.
The contact is removed from the Favorites list.
Call a Favorite Contact
To quickly call a contact, select a favorite card.
1. Select a favorite card on the
Favorites
,
Contacts
, or
Home
screen.
2. Select Call.
Joining Meetings from the Calendar
On the
Home
screen, you can join meetings directly from your calendar using the meeting cards on
the screen (if configured).
NOTE: If calendaring isn’t configured for your system, the system doesn’t display meeting cards.
You must dial manually to join meetings.
Meeting Cards
If configured, meeting cards display on the
Home
screen. You can access meeting cards to view
meeting details.
Meeting cards display the following scheduling information:
● All-day meetings display as the first meeting card.
● For meetings scheduled later in the day, a Free until
[time/day]
message displays, followed by
upcoming meeting cards in the time and date order they’re scheduled.
● For meetings scheduled later in the week, a Free until
[time/day]
message displays until the day
of the next scheduled meeting.
● If there are no scheduled meetings for the current week, a No Meetings message displays.
View Meeting Cards
On the
Home
screen, you can view meeting cards that show your calendar event details. Meeting
cards display meeting times, subjects, and organizers.
NOTE: Private meetings are labeled Private Meeting. Except for the time, meeting details are
hidden.
Favorite a Contact
15

■
Do one of the following:
● To view meeting information, choose a meeting card.
● To view upcoming scheduled meetings, select a card and scroll to the right.
Join a Meeting from a Meeting Card
On the
Home
screen, you can select a meeting card for options to join a meeting.
The system supports automatic dialing if the meeting organizer added calling information to the
calendar event and your administrator has configured calendaring.
■
Do one of the following:
● On a current meeting card, select Join.
● If the meeting card doesn’t include calling information, select to display the dialpad. Dial the
number to join the meeting.
Join an Overbooked Meeting
If two or more meetings are scheduled at the same time, the meetings display as Overbooked. You
can join one of the meetings using its individual meeting card.
1. Select an overbooked meeting card.
The individual meeting cards display.
2. Choose one of the meeting cards and select Join to connect to the meeting.
Join a Password-Protected Meeting
Some meetings may require a password to join.
Make sure that you have the password for password-protected meetings before you join. If you don’t
have a meeting password and a message prompts you for one, contact the meeting organizer for the
password.
NOTE: Meeting cards don’t indicate if a meeting is password protected.
1. Do one of the following:
● Manually dial in to a meeting.
● Join a meeting from a meeting card.
2. Enter the meeting password and select Join.
If you enter an incorrect password, the password prompt displays again.
16
Chapter 3Using the Poly TC10 in Poly Video Mode

Sharing Content
You can manage aspects of live content sharing from your device.
Minimize Content
You can minimize shared content to the content tray.
1. On the
Home
screen, select Content.
2. Select Minimize next to the content you want to minimize.
The content is available in the content tray if you need it.
Maximize Content
You can expand content that’s in the content tray.
1. On the
Home
screen, select Content.
2. From the content tray, select the content you want to display on the screen.
Take a Snapshot of Your Content
You can take a picture of your current content.
A limited number of snapshots are available. A prompt notifies you when you have reached the
snapshot limit.
■
With a board or content on the screen, select Snapshot .
The system captures the content and displays it as
Snapshot-1
. The system names additional
snapshots with successive numbers.
Delete Snapshots or Content
You can delete snapshots or content that you no longer need.
1. Select a snapshot or piece of content in the content tray.
2. Select Delete and confirm that you want to delete it.
NOTE: This option isn’t available for content shared from a far-site participant. To delete that
content, you must end the call.
End a Call with Blackboard or Whiteboard Content
If there’s an open blackboard or whiteboard in your call (including drawings, markup, snapshots, or
even a blank board), you can keep that content session going after hanging up. (Markup doesn’t
include highlights.)
1. In a call with blackboard or whiteboard content, select Hang Up .
The call ends and the system prompts if you want to keep content.
Sharing Content
17

2. Do one of the following:
● Select Yes, Keep Content.
● Select No, End Session.
If you keep content, the content session continues.
18 Chapter 3Using the Poly TC10 in Poly Video Mode

Cameras
Camera controls are available in and out of calls.
You can control cameras, depending upon the camera type, in the following ways:
● Adjust an in-room camera
● Turn camera tracking on or off
Adjust an In-Room Camera
To enhance the view of meeting participants, make adjustments to the in-room camera.
If camera tracking is on, camera control is unavailable. Turn tracking off to access camera controls.
With the Studio X50 and Studio X30 systems, you can’t pan or tilt the camera if it’s zoomed all the
way out.
1. Select Camera .
2. On the
Camera Control
screen, select Main from the drop-down menu.
3. Press + to zoom in or - to zoom out. Press the arrows to tilt up and down or to pan left to right.
4. To exit the control screen, select Back .
Adjust a Far-Site Camera
To enhance your view of the other meeting participants during a call, you can adjust the far-site
camera.
If camera tracking is on, camera control is unavailable. Turn tracking off to access camera controls.
NOTE: Contact your administrator for help setting up this feature.
1. Select Camera .
2. On the
Camera Control
screen, select Main (Far) from the drop-down menu.
3. Press + to zoom in or - to zoom out. Press the arrows to tilt up and down or to pan left to right.
4. To exit the control screen, select Back .
Turn Your Camera On or Off
You can turn your camera on to show local video or turn your camera off to hide your local video.
1. If you’re out of a call, select Menu .
2. Select On or Off to show or hide your video.
Cameras
19

Turn Camera Tracking On or Off
When camera tracking is on, the camera automatically frames the group of people in the room or the
current speaker (depending on your camera and how your system is configured).
NOTE: If you mute your local microphone, the system disables speaker tracking.
1. Select Camera .
2. Toggle Camera Tracking on ( ) or off ( ).
Selecting the Primary Camera
If you have more than one camera attached to the system, you can select the primary camera in or
out of a call.
Camera Priority
When you connect or disconnect a camera, camera priority determines the primary or active camera.
The system observes the following camera type priority:
1. Embedded camera (Poly Studio X only)
2. HDCI camera (Poly G7500 only)
3. USB camera
4. HDMI source set to display as people
Select the Primary Camera Using the Poly TC10
When you attach multiple cameras to the system, you can select the primary camera from the TC10
Camera Controls
screen.
1. Select Camera .
2. From the camera drop-down menu, select a camera.
The selected camera becomes the primary camera.
Using Camera Presets
If your camera supports presets, you can save up to 10 camera positions. Camera presets are stored
camera positions that let you quickly point a camera at predefined locations in a room.
Near camera presets are available in or out of a call. Far camera presets are only available during a
call. If enabled, you can use them to control the far-site camera.
When you save a preset, the preset saves the selected camera and the camera position.
NOTE: If camera tracking is on, camera controls and presets are unavailable. Turn tracking off to
access these features.
20
Chapter 3Using the Poly TC10 in Poly Video Mode

Save a Camera Preset Using the Poly TC10
Save the current camera position as a preset for later use.
Use saved presets to change the near camera position in or out of a call. Far camera presets are
available only in a call.
1. Select Camera .
2. Adjust the camera to the desired position.
3. Under Presets, do one of the following:
● On an empty preset card, press the preset card.
● To replace a preset, long press the preset card for 1 second.
Select a Preset
Using previously created camera presets, you can quickly move the camera to a desired position in a
call.
1. Select Camera .
2. Select the image of the preset you want.
Delete a Preset
You can delete a camera preset that you no longer need.
1. Select Camera .
2. Select Delete .
Save a Camera Preset Using the Poly TC10
21

Environment Controls
Using the Poly TC10, you can control room elements that enable you to customize your meeting
environment.
Control Room Elements Using the Poly TC10
You can control room elements such as electronic shades, smart lighting, monitors, and projectors
using the Extron Room Control App on the Poly TC10.
The administrator must enable the Environment menu option and configure the room elements using
an Extron processor.
1. Select Environment .
2. Choose one of the following:
● Lights - Adjust the lights in the room.
● Shades - Adjust the electronic shades in the room.
● Display - Control monitors and projectors in the room.
22
Chapter 3Using the Poly TC10 in Poly Video Mode

Settings
Before or during calls, you can adjust video and audio settings, including adjusting the volume and
changing the video layout.
Video Adjustments
You can manage video and certain user interface settings.
Change the Participant Layout
During a call, you can change from the current layout to another layout better suited for the meeting.
The layout frames include the near site and far site.
If you’re sharing content on a single monitor, content displays in one of the frames.
1. In a call, go to Layouts.
2. Select one of the following layouts:
● Equal: All participants are the same size.
● Gallery: Participants display at the top of the screen and the speaker displays in the main
frame.
● Fullscreen: The active speaker displays in full screen.
Audio Adjustments
You can control several audio settings on the system.
Mute Your Microphones
To prevent distractions for the speaker and meeting participants, you can mute your microphones.
You can mute your audio in or out of a call.
■
Do one of the following:
● Out of a call, select Menu > Mute .
● In a call, select Mute .
A notification displays that the system muted your local microphones.
Unmute Your Microphones
When your audio is muted and you’re ready to speak in a call, unmute your microphones.
■
Do one of the following:
● In a call, select Unmute .
● Out of a call, select Menu > Unmute .
Settings
23

Adjust the Volume
You can adjust the volume before or during a call.
1. Do one of the following:
● In a call, select Volume.
● Out of a call, select Menu > Volume.
2. Use the volume slider to increase or decrease the speaker volume.
24 Chapter 3Using the Poly TC10 in Poly Video Mode

Poly DirectorAI Perimeter setup
Administrators can set up a meeting room perimeter in a live view on Poly touch controllers.
The Poly DirectorAI Perimeter configuration displays a real-time view of detected heads—who is
included or excluded from the Poly DirectorAI Perimeter. As you draw or adjust the boundaries
interactively, you see in real-time which participants are included or excluded from the in-call framing
experience.
Define Poly DirectorAI Perimeter on Poly touch controller
Define the Poly DirectorAI Perimeter directly on Poly touch controller.
1. On the touch controller, go to Settings > Admin Settings.
2. Select DirectorAI Perimeter.
3. Toggle the DirectorAI Perimeter switch to Enabled.
4. Drag the boundary of DirectorAI Perimeter to include or exclude participants in the meeting area
as required.
In real-time, participants are marked with either a blue check mark to show they’re included, or
with a red x showing they’re outside the set boundary and are therefore excluded from DirectorAI
Perimeter.
Poly TC10 LED Status Indicators as a Room Controller in
Poly Video Mode
The following table lists each LED indicator and its related status while the Poly TC10 is operating in
Poly Video Mode as a room controller.
Table 3-1
Poly TC10 Status Indicators as a Room Controller in Poly Video Mode
Status LED Color Animation Behavior
Boot initialization in progress White Breathing
Idle (not in a call) White Solid
Sleep Amber Solid
Incoming call Green Fluttering
Outgoing call Green Solid
Call in progress Green Solid
Muted microphone/Audio mute Red Solid
Firmware update in progress Amber Breathing
Poly DirectorAI Perimeter setup 25

Using the Poly TC10 Touch Controller in
Partner Modes
4
When paired to a room system, the Poly controller runs the provider selected in the system web
interface.
In standalone mode, you can launch Zoom Rooms (Controller or Scheduler) and Microsoft Teams
Panel.
26
Chapter 4Using the Poly TC10 Touch Controller in Partner Modes

Using the Poly TC10 in Zoom Rooms Controller Mode
The Poly TC10 in Controller mode controls the functionality of the Zoom Room, including any video/
audio capabilities.
Start an Instant Meeting in Zoom Rooms
You can start an instant meeting from the Zoom Rooms home screen.
■
On the Home screen, select New Meeting.
Start a Scheduled Meeting in Zoom Rooms
You can start a scheduled meeting in Zoom Rooms using the meeting's calendar card or meeting ID.
■
To start a scheduled meeting in Zoom Rooms, do one of the following:
● Select Join, enter the Meeting ID, and select Join.
● On the Home screen, select the calendar card, and select Start.
Call a Contact in Zoom Rooms
You can call people or Zoom Rooms listed in your contacts list.
1. Select Contacts.
2. Select the contact you want to call.
3. Select Meet.
4. To end the call, select End.
Sharing Content in Zoom Rooms from a Poly TC10
You can share content from a connected desktop, iPhone, iPad, or camera in Zoom Rooms.
1. In the active meeting window, select Share Content.
2. Select the sharing method that you want to use:
● Desktop - Uses a connected desktop to share content using the Zoom Rooms app or a web
browser.
● iPhone/iPad - Uses iOS screen mirroring to share content from an iPhone or iPad.
● Camera - Shares content from a connected camera.
3. Follow the onscreen instructions to share your content.
4. Select Stop Sharing to end sharing.
Sharing Content in Zoom Rooms Using a Sharing Key or Meeting ID
You can share content to a Zoom Room by using a sharing key or a meeting ID.
1. In the active meeting window, select Share Content.
The Share Content dialog box, the sharing key and meeting ID display.
Using the Poly TC10 in Zoom Rooms Controller Mode
27

2. On the computer or device from which you want to share, do one of the following:
● Open the Zoom app, click Share Content, enter the sharing key, and select Share Screen.
● Go to www.zoom.us/share and enter the meeting ID. Select the screen or application that
you want to share.
3. Select Stop Sharing to end sharing.
Poly TC10 LED Status Indicators in Zoom Rooms Controller
Mode
The following table lists each LED indicator and its associated status while the Poly TC10 is operating
in Zoom Rooms as a meeting controller.
Table 4-1
TC10 LED Status Indicators as a Meeting Controller in Zoom Rooms
Status LED Color Animation Behavior
Boot up in progress White Breathing
Idle (not in a call) White Solid
Outgoing call Green Solid
Call in progress Green Solid
Muted microphone / Audio mute Red Solid
Firmware update in progress Amber Breathing
28 Chapter 4Using the Poly TC10 Touch Controller in Partner Modes

Using the Poly TC10 in Zoom Rooms Scheduler Mode
Run Zoom Rooms Scheduler on a Poly TC10 mounted outside a meeting room to manage the room.
The Poly TC10 displays the current status of the room and any scheduled meetings.
IMPORTANT: To be able to reserve a Zoom Room directly on the Zoom Room Scheduler, an
administrator must sync a calendar to the Zoom Room in the Room Management area in the Zoom
Room web portal.
Schedule a Meeting on the Zoom Rooms Scheduler
You can schedule a meeting directly on the Zoom Room Scheduler to reserve a time slot for the
Zoom Room.
1. On the Zoom Room Scheduler, select Reserve.
2. If you have a floor plan for your location configured in the Zoom web portal, you can reserve a
different meeting space by selecting Reserve Another Room.
3. Enter a name for the meeting in the New Meeting field.
4. If required, toggle the options for Require Meeting Passcode and Waiting Room.
5. Add the email addresses of the participants, selecting the enter key on the keyboard to add each
one to the list.
6. Drag and drop the two blue lines to set the start and end times of the meeting.
7. Select Reserve.
The new meeting adds to the calendar and participants receive an invite via email.
Delete a Meeting from the Zoom Rooms Scheduler
You can delete a scheduled meeting directly from the Zoom Rooms Scheduler.
You can only delete a meeting that was reserved on the Zoom Rooms Scheduler. For meetings
scheduled using the synced calendar, only a Close option appears when you select it.
1. On the Zoom Room Scheduler, select the meeting you want to delete.
2. Select Delete.
The meeting no longer appears on the list of upcoming meetings on the Scheduler.
Disable Instant Room Reservation
Administrators can disable instant room reservation on the Zoom web portal.
1. Log into https://zoom.us/profile with an administrator login.
2. Select Room Management > Zoom Room.
3. Search for the Zoom Room you want to manage.
4. Select Edit.
5. Select Scheduling Display.
Using the Poly TC10 in Zoom Rooms Scheduler Mode
29

6. Disable Instant Room Reservation by switching the toggle to the left.
Poly TC10 LED Status Indicators in Zoom Rooms Scheduler
Mode
The following table lists each LED indicator and its associated status while the device is in Zoom
Rooms Scheduler Mode.
Table 4-2 TC10 LED Status Indicators in Zoom Rooms Scheduler Mode
Status LED Color Animation Behavior
Boot up in progress White Breathing
Room available Green Solid
Room occupied - meeting in progress Red Solid
Firmware update in progress Amber Breathing
30 Chapter 4Using the Poly TC10 Touch Controller in Partner Modes

Using the Poly TC10 as a Microsoft Teams Controller
Run the Microsoft Teams controller app on a Poly TC10 device to easily manage Microsoft Teams
meetings.
When paired with a Microsoft Teams account, you can use Poly TC10 as a companion controller for
Microsoft Teams Rooms. Use the Poly TC10 to start or join a meeting, share content, and manage all
aspects of a Teams meeting.
Start or join a meeting in Microsoft Teams Rooms
Start or join a meeting in Microsoft Teams Rooms directly from your Poly touch controller.
You can join a scheduled or unscheduled meeting or start a new meeting.
● To join a scheduled meeting, on the meeting tile, select Join.
● To join a meeting that isn’t on your calendar, select Join with meeting ID, and enter the meeting
ID.
● To start a new meeting, select Meet.
Call a Contact in Microsoft Teams Rooms
You can call contacts from your contacts list.
To call a contact from your contacts list:
1. Select Meet.
2. Search for a contact under Type Your Name.
3. Select the contact you want to meet.
The contact will be called in an instant meeting.
Manage a meeting in Microsoft Teams Rooms
Manage various aspects of a Microsoft Teams Rooms meeting directly from your Poly touch
controller.
Manage your Microsoft Teams meeting using the icons available to you in the meeting controls.
● To add a participant, search for their name in the search bar, then select the participant.
● To toggle between different views, select View.
● To share content from a connected device or the Teams whiteboard, select Share Content.
Poly TC10 LED Status Indicators in Microsoft Teams Rooms
Controller Mode
The following table lists each LED indicator and its associated status while the device is in Microsoft
Teams Rooms Controller Mode.
Using the Poly TC10 as a Microsoft Teams Controller
31

Table 4-3 Poly TC10 LED status indicators in Microsoft Teams Rooms controller mode
Status LED Color Animation Behavior
Boot up in progress White Breathing
Boot complete White Solid
Call incoming (not functional until launch) Green Pulsing
Call in progress (not functional until
launch)
Green Solid
Mic muted (not functional until launch) Red Solid
Firmware update in progress Amber Breathing
32 Chapter 4Using the Poly TC10 Touch Controller in Partner Modes

Using the Poly TC10 as a Microsoft Teams Panel
Run the Microsoft Teams Panel app on a Poly TC10 device in standalone mode to easily manage a
Microsoft Teams meeting space.
When paired with a Microsoft Teams account in standalone mode, you can use the Poly TC10
mounted outside a Meeting Room to manage the room. The Poly TC10 displays the current status of
the room and any upcoming scheduled meetings. It also provides options to reserve, check-in to, or
release the meeting space.
Reserve an Ad Hoc Meeting on the Microsoft Teams Panel
You can reserve an ad hoc meeting directly on the Microsoft Teams Panel.
If the option is enabled in the admin settings for the Microsoft Teams Room, users can reserve an
immediate time slot on the Microsoft Teams Panel.
1. On the Microsoft Teams Panel, select Reserve.
2. Select an ending time for the meeting.
3. Select Reserve.
A new Microsoft Teams meeting is added to the Microsoft Teams Panel.
Extend or Release a Teams Room Reservation
On the Microsoft Teams Panel, you can extend the length of a Teams Rooms meeting, or release a
Teams Room if a meeting ends early.
NOTE: The tasks outlined here can be enabled or disabled in the admin settings in Microsoft
Teams Panel.
Before entering the Microsoft Teams Room space for a meeting, check-in to confirm that the meeting
is going ahead. If you don't check in, the meeting is released after a period of time, as defined in the
admin settings.
You can also extend a meeting that continues after the reserved time slot, or release a room if a
meeting ends early, so that it shows as available for other users.
● To check in to a room, select Check in.
● To extend a meeting beyond its reserved slot, select Manage. Then select Extend room
reservation. Choose a new ending time and choose Reserve.
● To release a room early to make it available again, select Manage. Then select Check out and
Check out again.
Poly TC10 LED Status Indicators in Microsoft Teams Panel
Mode
The following table lists each LED indicator and its associated status while the device is in Microsoft
Teams Panel Mode.
Using the Poly TC10 as a Microsoft Teams Panel
33

Table 4-4 TC10 LED Status Indicators in Microsoft Teams Panel Mode
Status LED Color Animation Behavior
Boot up in progress White Breathing
Room available Green Solid
Room occupied - meeting in progress Red or purple (as defined in
admin settings)
Solid
Firmware update in progress Amber Breathing
34 Chapter 4Using the Poly TC10 Touch Controller in Partner Modes

Device Maintenance5
You have several options to keep your device running properly.
Updating a touch controller
Update a Poly touch controller in one of the following ways. Update methods can vary based on
whether the touch controller is in standalone mode or paired mode.
NOTE: Updating your touch controller to version Poly TCOS 4.1.0 or later includes a major
platform update to Android 11. Once updated to this platform, you can't downgrade to a previous
version.
Updating a paired touch controller
● When an update becomes available, you may be prompted to update via the touch controller
device interface. Follow the onscreen instructions.
● When paired to a Poly video conferencing system, update the touch controller through the Poly
VideoOS system web interface.
Updating a standalone Poly TC10
● When an update becomes available, you may be prompted to update via the touch controller
device interface. Follow the onscreen instructions.
● If using the touch controller as a Microsoft Teams Scheduling Panel, update the device via the
Microsoft Teams Admin Center. For more information, visit Manage Devices in Teams.
● If using the touch controller as a Zoom Rooms Scheduler, update the device via the Zoom Device
Manager (ZDM). For more information, visit Remotely upgrading Zoom Room devices with ZDM.
Unpair the TC10 from a Video System
Unpair the TC10 if you no longer want to use it with a particular video system.
Don’t unpair devices if you plan to use them with the same system. For example, if you move your
video-conferencing equipment to another room, just disconnect and reconnect the devices in the new
location.
1. In the system web interface, go to General Settings > Device Management.
Device Maintenance
35

2. Under Connected Devices, find the device by its MAC address (for example, 00e0db4cf0be) and
select Unpair.
The unpaired device moves from Connected Devices to Available Devices (which shows
discovered devices you can pair with the system).
Restart the Poly TC10 device
If you have issues, restart the Poly TC10 device to try resolving them.
1. Do one of the following:
● If your device is wall or glass mounted, take it down and remove any mounting brackets.
● For a desk-mounted device, remove the Poly TC10 stand.
For more information, refer to your product’s relevant Quick Start Guide.
2. Disconnect the LAN cable from the Poly TC10 device and reconnect it.
36
Chapter 5Device Maintenance

Troubleshooting6
These troubleshooting tips can help when encountering issues with your TC10 device.
View the Poly TC10 and Paired Video System Information
You can see basic information about your TC10 and the paired video system in the device local
interface.
■
In the device local interface, go to Settings > Information.
Some of the Poly TC10 and video system details include:
● Device name
● Name of paired-video system
● Model
● MAC address
● IP address
● Hardware version
● Software version
● Serial number
Zoom Rooms Pairing Error
Use the following information to troubleshoot pairing errors with Zoom Rooms.
Symptom:
You get an error message when pairing a Poly TC10 to a Zoom Room that is already logged into a
room.
Workaround:
Ignore the code and pair the device to the Zoom Room using the authorization code or enter the
pairing code at zoom.us/pair
Troubleshooting
37

Getting help7
Poly is now a part of HP. The joining of Poly and HP paves the way for us to create the hybrid work
experiences of the future. Information about Poly products has transitioned from the Poly Support site
to the HP Support site.
The Poly Documentation Library is continuing to host the installation, configuration/administration, and
user guides for Poly products in HTML and PDF format. In addition, the Poly Documentation Library
provides Poly customers with information about the transition of Poly content from Poly Support to HP
Support.
The HP Community provides additional tips and solutions from other HP product users.
HP Inc. addresses
HP US
HP Inc.
1501 Page Mill Road
Palo Alto 94304, U.S.A.
650-857-1501
HP Germany
HP Deutschland GmbH
HP HQ-TRE
71025 Boeblingen, Germany
HP UK
HP Inc UK Ltd
Regulatory Enquiries, Earley West
300 Thames Valley Park Drive
Reading, RG6 1PT
United Kingdom
Document information
Model ID: Poly TC10 (RMN: P030 & P030NR)
Document part number: 3725-13686-006A
Last update: November 2024
Email us at [email protected] with queries or suggestions related to this document.
38
Chapter 7Getting help
