Minipack-torre S.p.A.
Via Provinciale, 54 - 24044 Dalmine (BG) - Italy
Tel. (035) 563525 – Fax (035) 564945
E-mail: info@minipack-torre.it
hiip://www.minipack-torre.it
IT ISTRUZIONI PER L’INSTALLAZIONE, L’USO E LA MANUTENZIONE
EN INSTALLATION, OPERATION AND MAINTENANCE
DE INSTALLATIONS-, GEBRAUCHS- UND WARTUNGSANLEITUNG
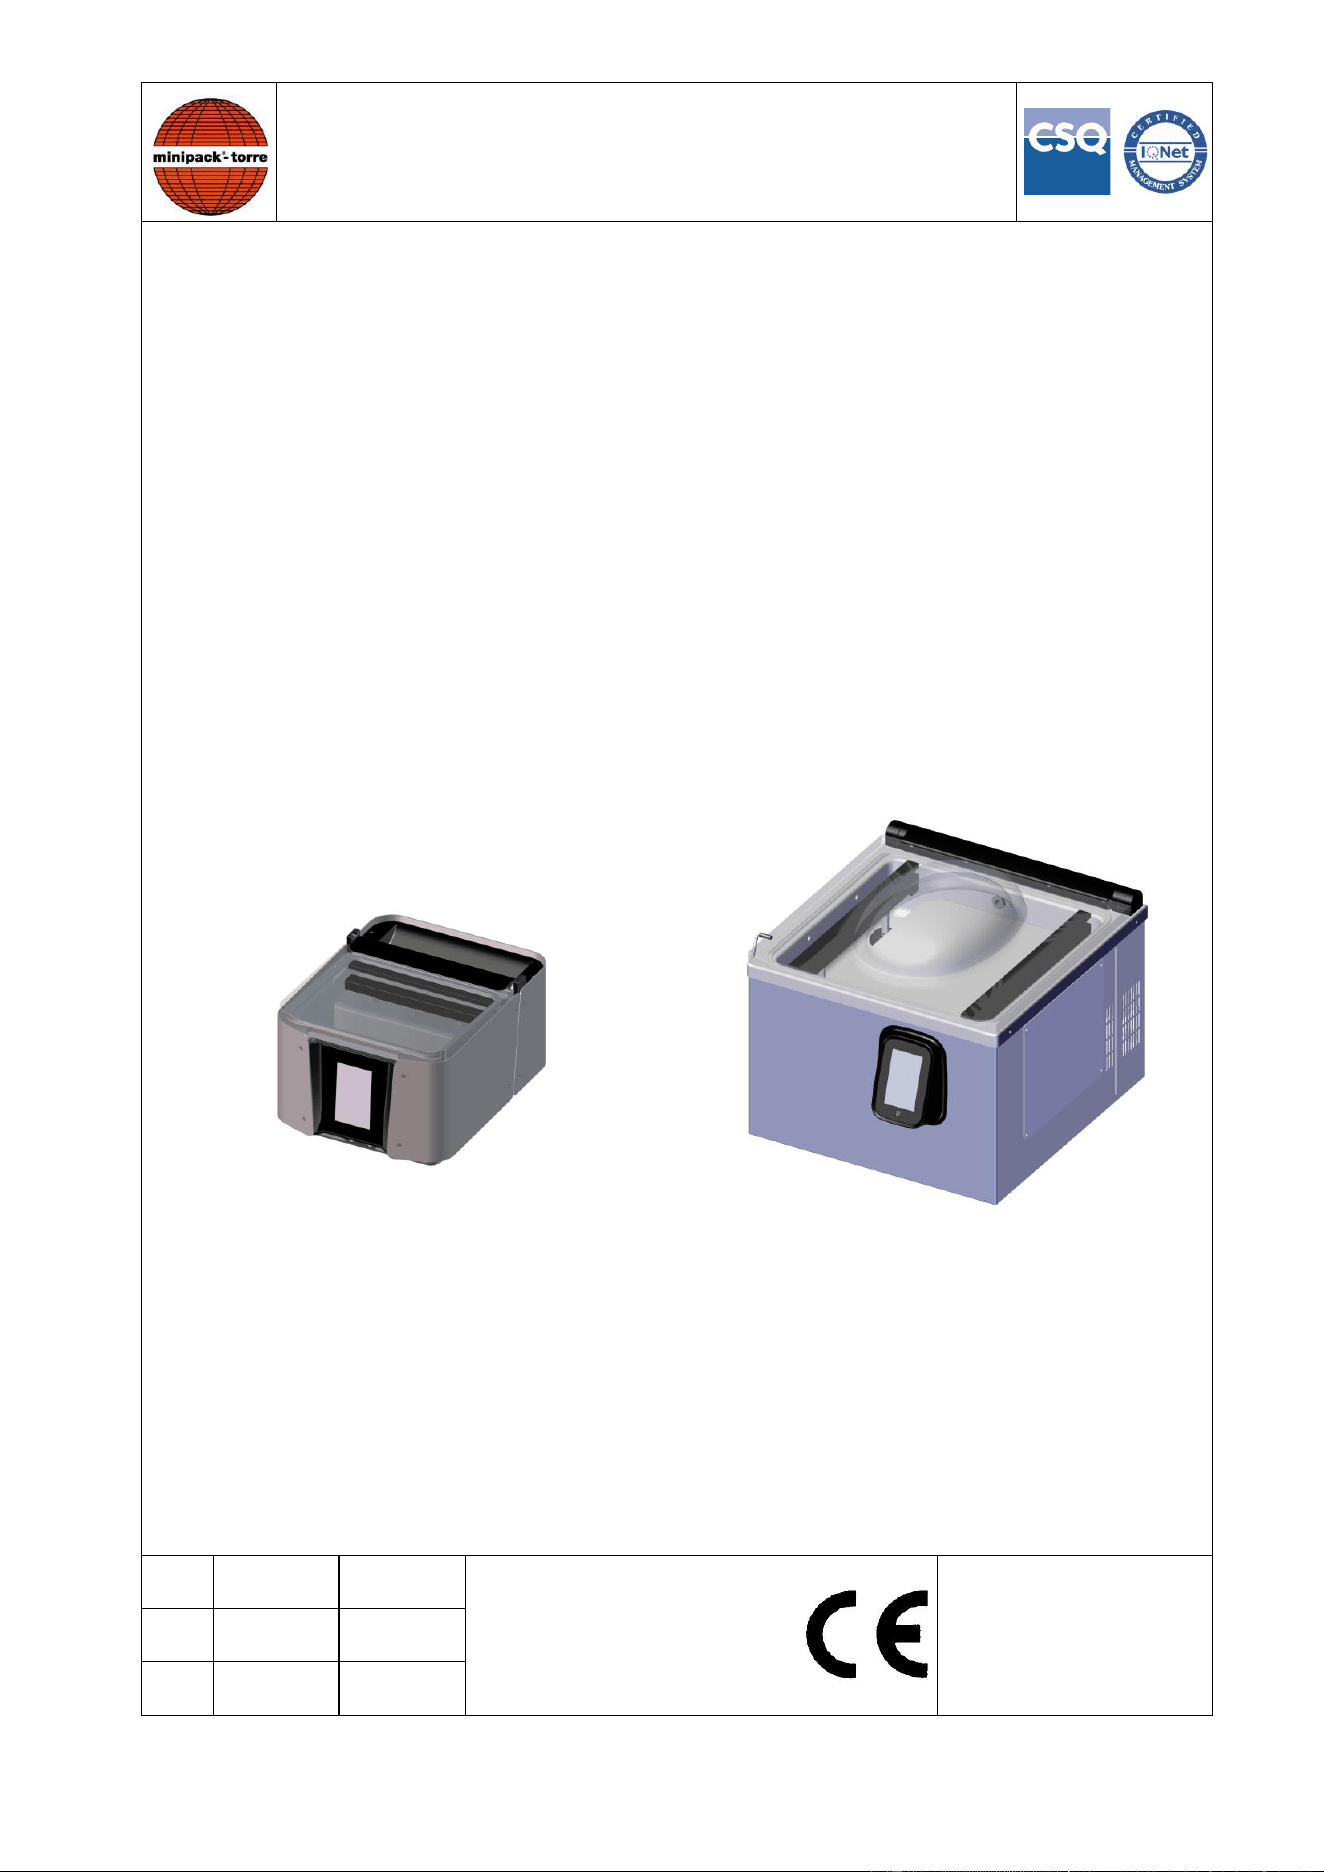
IT MACCHINA CONFEZIONATRICE SOTTOVUOTO
EN VACUUM PACKING MACHINE
DE VAKUUMMASCHINE
MX 2
(Versione 1.3.9 / 1.3.9 Version / Version 1.3.9)
MX 4
(Versione 1.3.9 / 1.3.9 Version / Version 1.3.9)
IT LEGGERE ATTENTAMENTE QUESTE ISTRUZIONI PRIMA DI USARE LA MACCHINA
EN BEFORE USING THE MACHINE PLEASE CAREFULLY READ THE INSTRUCTIONS
DE BITTE LESEN SIE DIESE ANLEITUNG GENAU DURCH, BEVOR SIE DIE MASCHINE BENÜTZEN
IT
Italiano
Pagina 1
DOC. N. FM111243A
REV. 02
ED. 12.2019
EN
English
Page 26
DE
Deutsch
Seite 51

1
ISTRUZIONI ORIGINALI
Indice
IT
Capitolo 1.
Descrizione
Pagina
1.1.
Prefazione…………………………………......................……………………………
02
1.2.
Prestazioni della macchina………………….....................………………………....
02
1.3.
Descrizione della macchina……………………………………………………………
03
1.4.
Dati tecnici della macchina................…………………………………………..……
04
Capitolo 2.
Caratteristiche delle buste
2.1.
Buste da adoperare.........................................................……………….……….…
05
Capitolo 3.
Condizioni d’uso della macchina
3.1.
Ciò che si può confezionare……………………………………………………….….
05
3.2.
Ciò che non si deve confezionare...................................……………………….….
05
Capitolo 4.
Informazioni per la sicurezza
4.1.
Sicurezza dei bambini e delle persone vulnerabili…………………………………..
06
4.2.
Avvertenze di sicurezza generali……………………………………………………..
06
Capitolo 5.
Istruzioni per la sicurezza
5.1.
Installazione……………………………………………………………………………..
07
5.2.
Condizioni ambientali…………………………………………………………………..
07
5.3.
Collegamento elettrico………………………………………………………………….
08
5.4.
Utilizzo…………………………………………………………………………………….
08
5.5.
Pulizia e cura……………………………………………………………………………
09
5.6.
Smontaggio, demolizione e smaltimento residui…………………………………….
09
5.7.
Assistenza Tecnica……………………………………………………………………..
09
Capitolo 6.
Utilizzo
6.1.
Prima pulizia……………………………………………………………………………...
10
6.2.
Prima accensione……………………………………………………………………….
10
6.3.
Utilizzo quotidiano………………………………………………………………………
10
6.4.
Ricette…………..……………………………………………………………………….
12
6.5.
Setting…………………………………………………………………………………....
19
Capitolo 7.
Manutenzione ordinaria
7.1.
Pulizia e cura……………………………………………………………………………
23
7.2.
Soluzione dei problemi…………………………………………………………………
24
Capitolo 8.
Garanzia
8.1.
Certificato di garanzia…………………………………………………………….……
25
8.2.
Condizioni di garanzia…………………………………………………………….…...
25
Dichiarazione CE di conformità……………………………………………….…..…..
76

2
Capitolo 1. Descrizione
IT
1.1. Prefazione
Il presente manuale è redatto nel rispetto della norma UNI 10893 del Luglio 2000. È rivolto a tutti gli utilizzatori al fine di
consentire un corretto uso della macchina. Conservarlo in luogo facilmente accessibile vicino alla macchina e noto a tutti
gli utilizzatori. Il presente manuale è parte integrante della macchina ai fini della sicurezza. Per migliorare la comprensione
precisiamo di seguito i simboli utilizzati.
ATTENZIONE:
Norme antinfortunistiche per l’operatore. Tale avvertimento indica la presenza di pericoli che possono
causare lesioni a chi sta operando sulla macchina.
ATTENZIONE:
Organi caldi. Indica il pericolo di ustioni con rischio di infortunio, anche grave per la persona esposta.
Informazioni e suggerimenti generali.
Tutti i diritti di riproduzione del presente manuale sono riservati alla ditta costruttrice. La riproduzione, anche parziale, è
vietata a termini di legge. Le descrizioni e le illustrazioni presenti in questo manuale non sono impegnative, di conseguenza
la ditta costruttrice si riserva il diritto di apportare in qualsiasi momento tutte le modifiche che riterrà opportune. Il presente
manuale non può essere ceduto in visione a terzi senza autorizzazione scritta della ditta costruttrice.
1.2. Prestazioni della macchina
Questo prodotto è ideale per:
• Confezionamento di alimenti sottovuoto per cottura a bassa temperatura “SousVide”.
• Confezionamento di alimenti sottovuoto per conservazione.
• Marinatura di alimenti.
• Infusione di alimenti.
3
Capitolo 1. Descrizione
IT
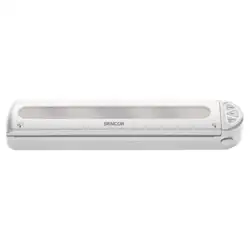
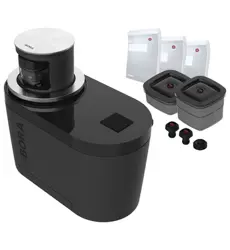
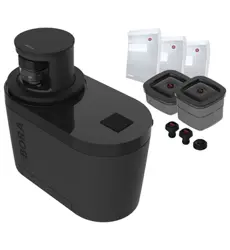
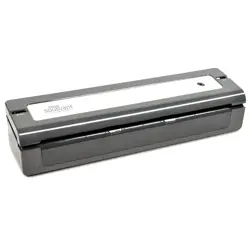
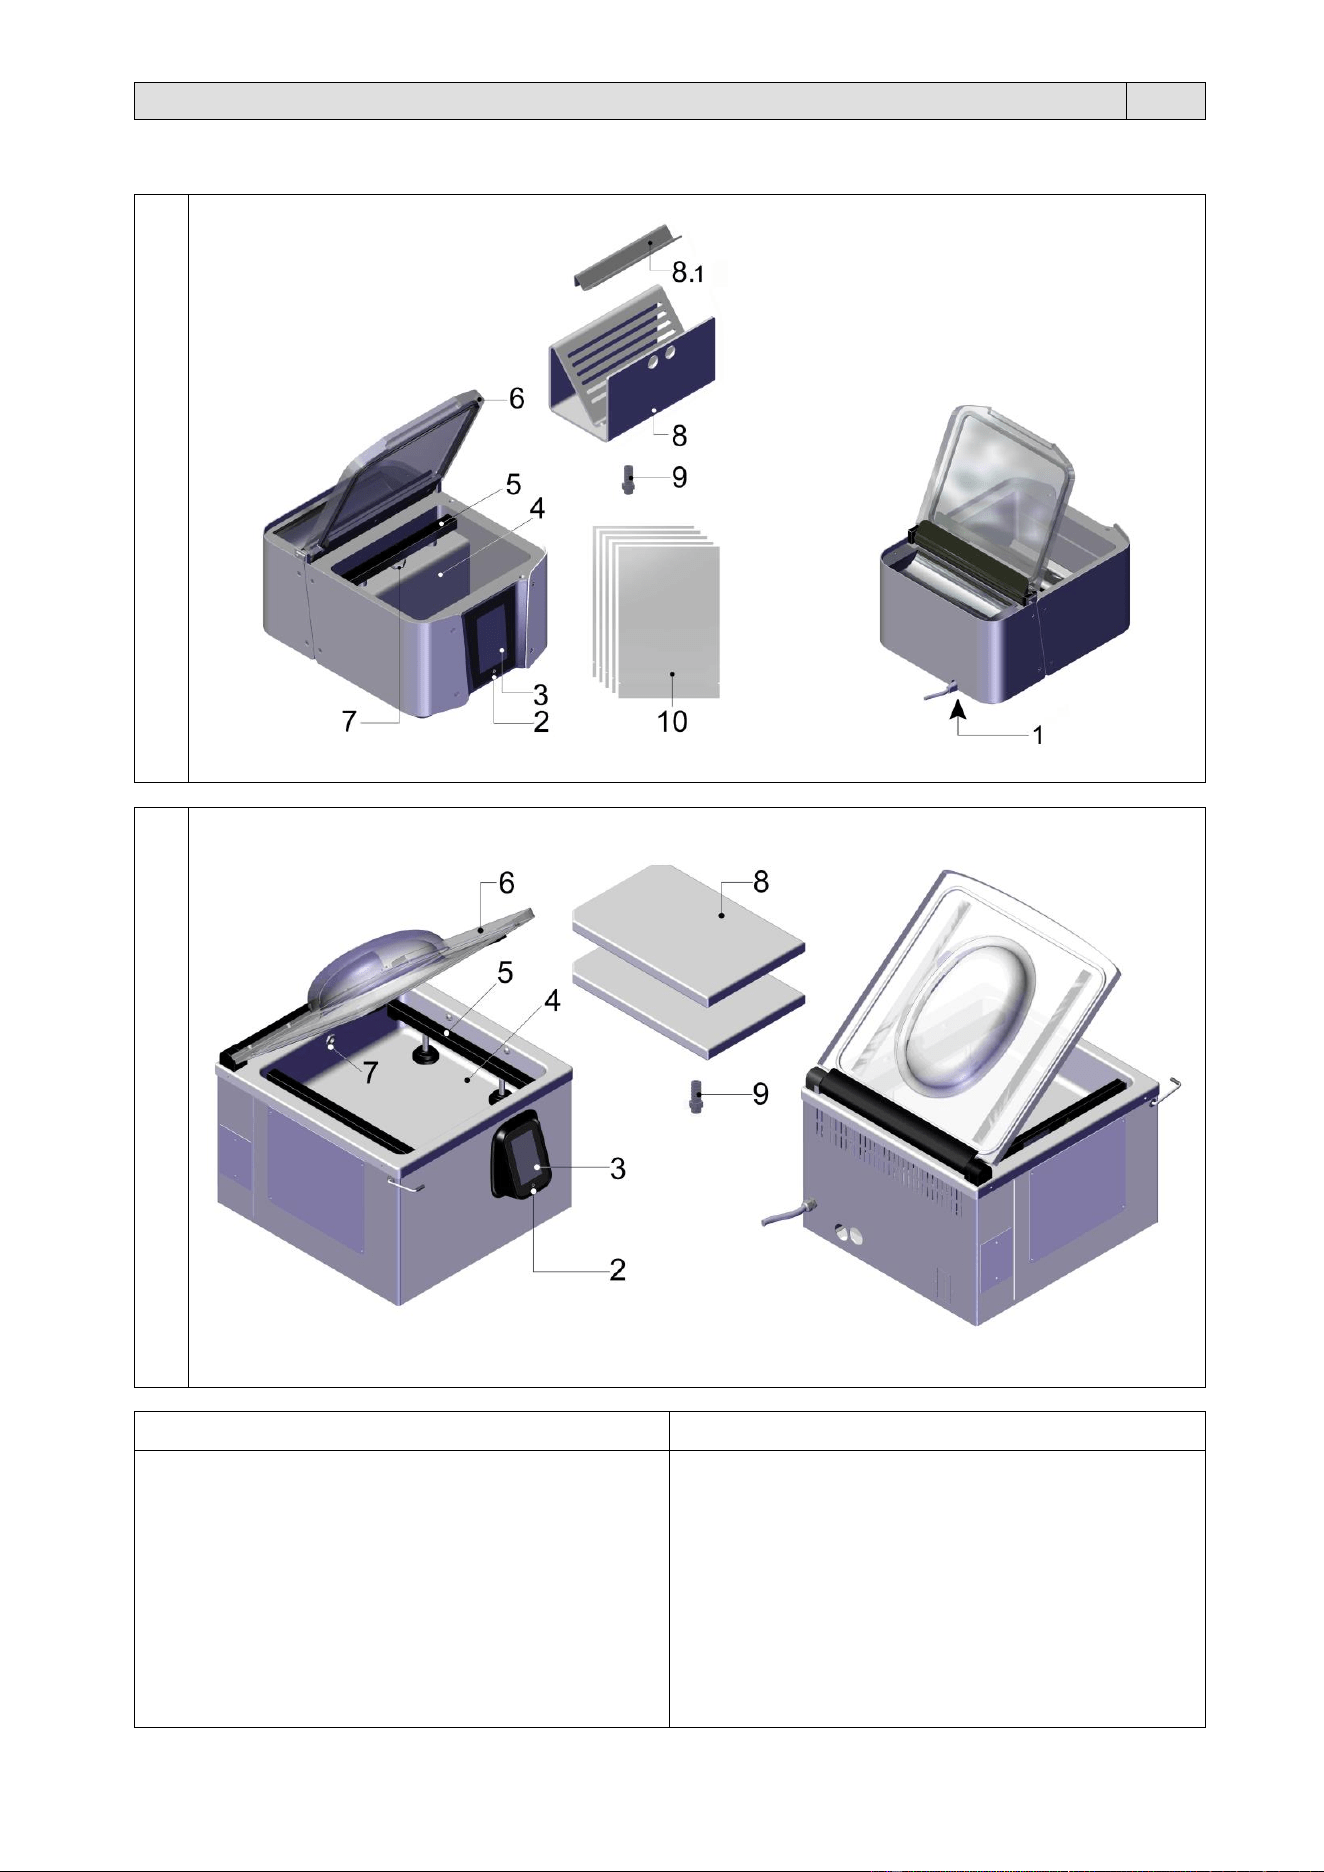
1.3. Descrizione della macchina
MX 2
MX 4
MX 2
MX 4
1) Interruttore generale
2) Pulsante di accensione/spegnimento
3) Display
4) Vasca
5) Barra saldante
6) Coperchio
7) Ugello di aspirazione
8) Supporto delle buste
8.1) Angolare per posizionamento buste con liquidi
9) Raccordo per sottovuoto esterno
10) Buste per surgelazione, cottura e conservazione
(Nr. 25 20x30 cm)
2) Pulsante di accensione/spegnimento
3) Display
4) Vasca
5) Barra saldante
6) Coperchio
7) Ugello di aspirazione
8) Tavoletta
9) Raccordo per sottovuoto esterno
4
Capitolo 1. Descrizione
IT
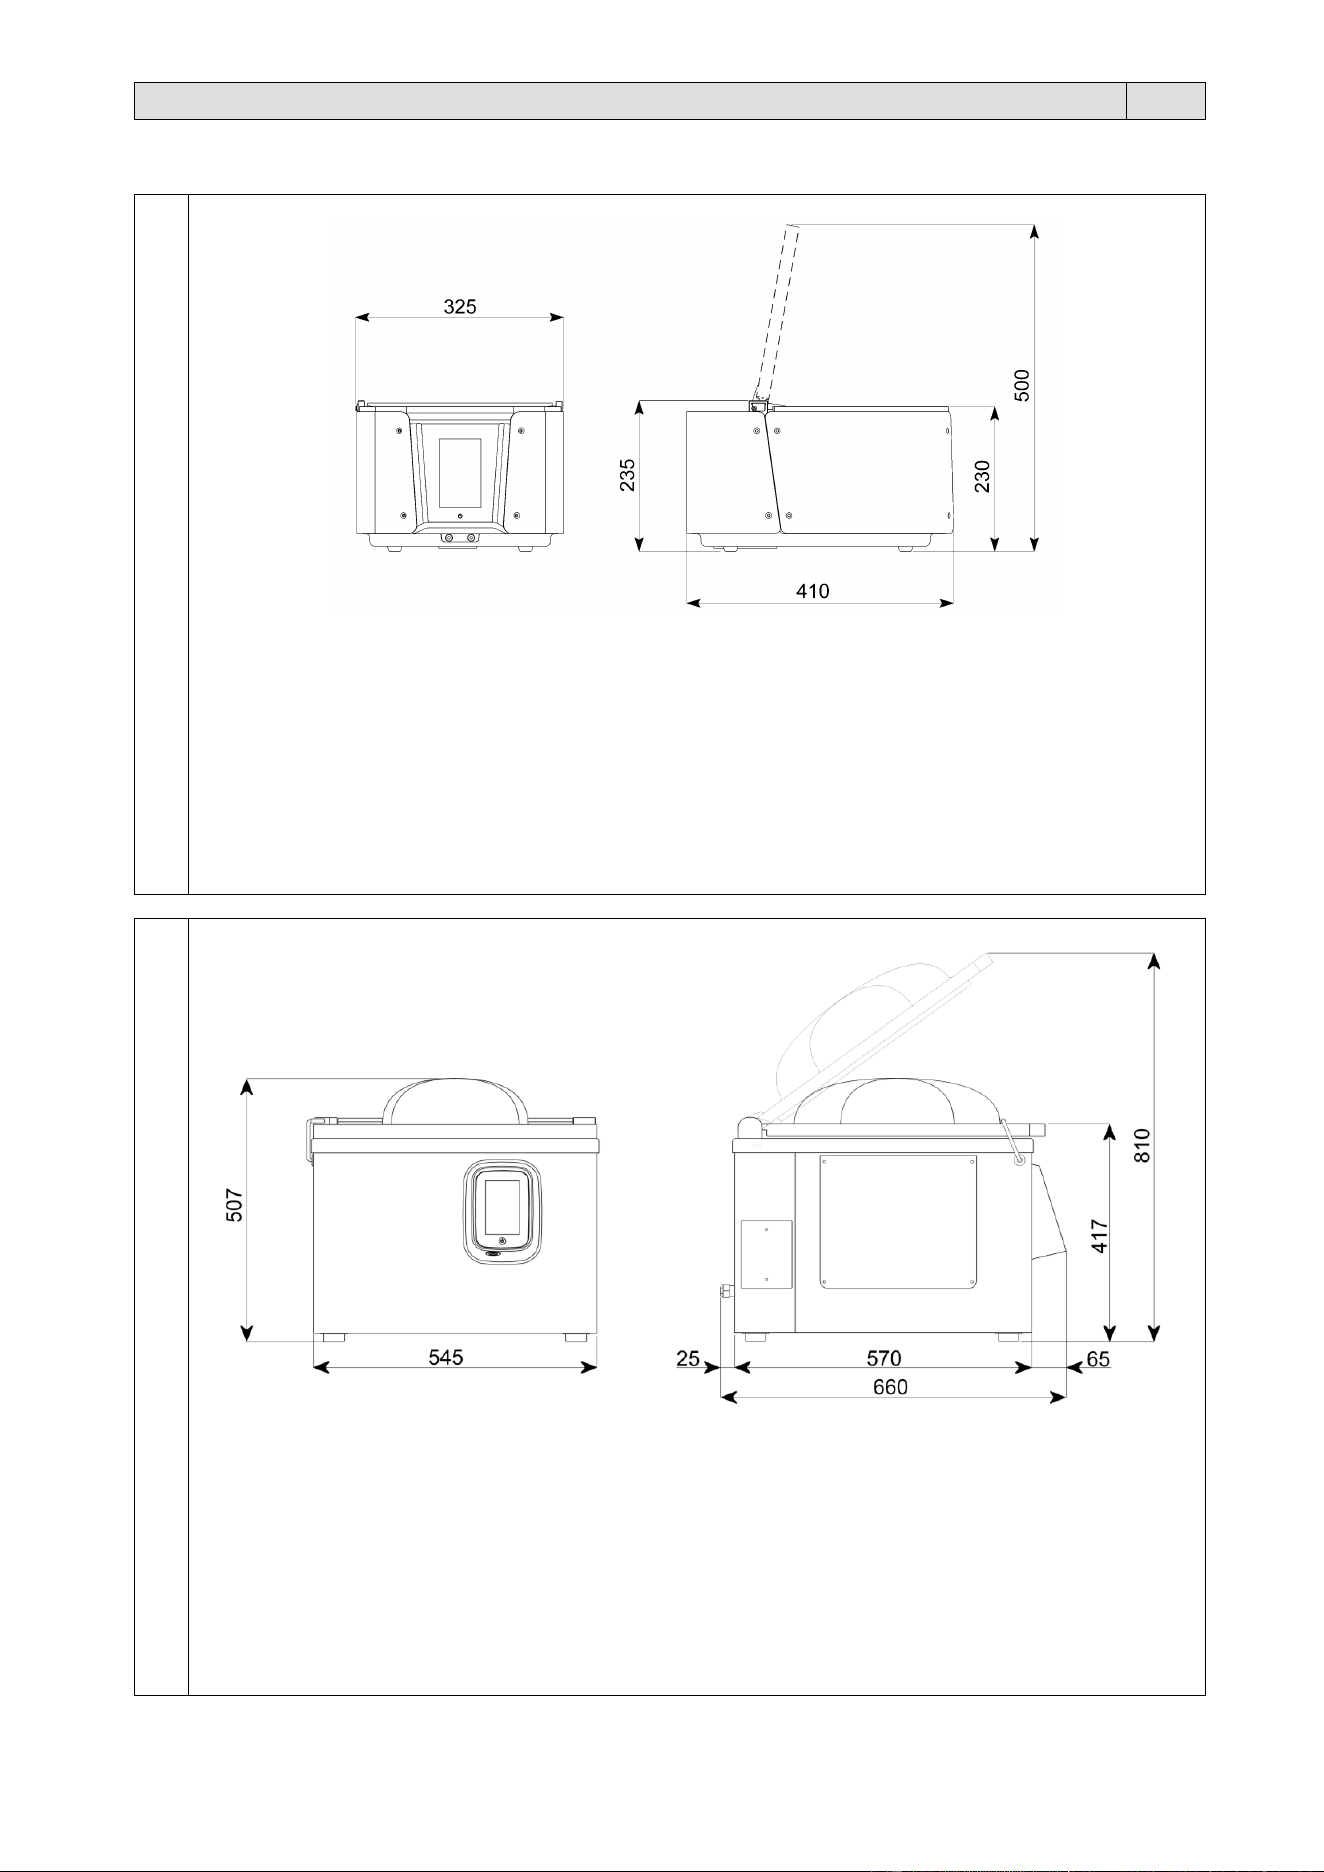
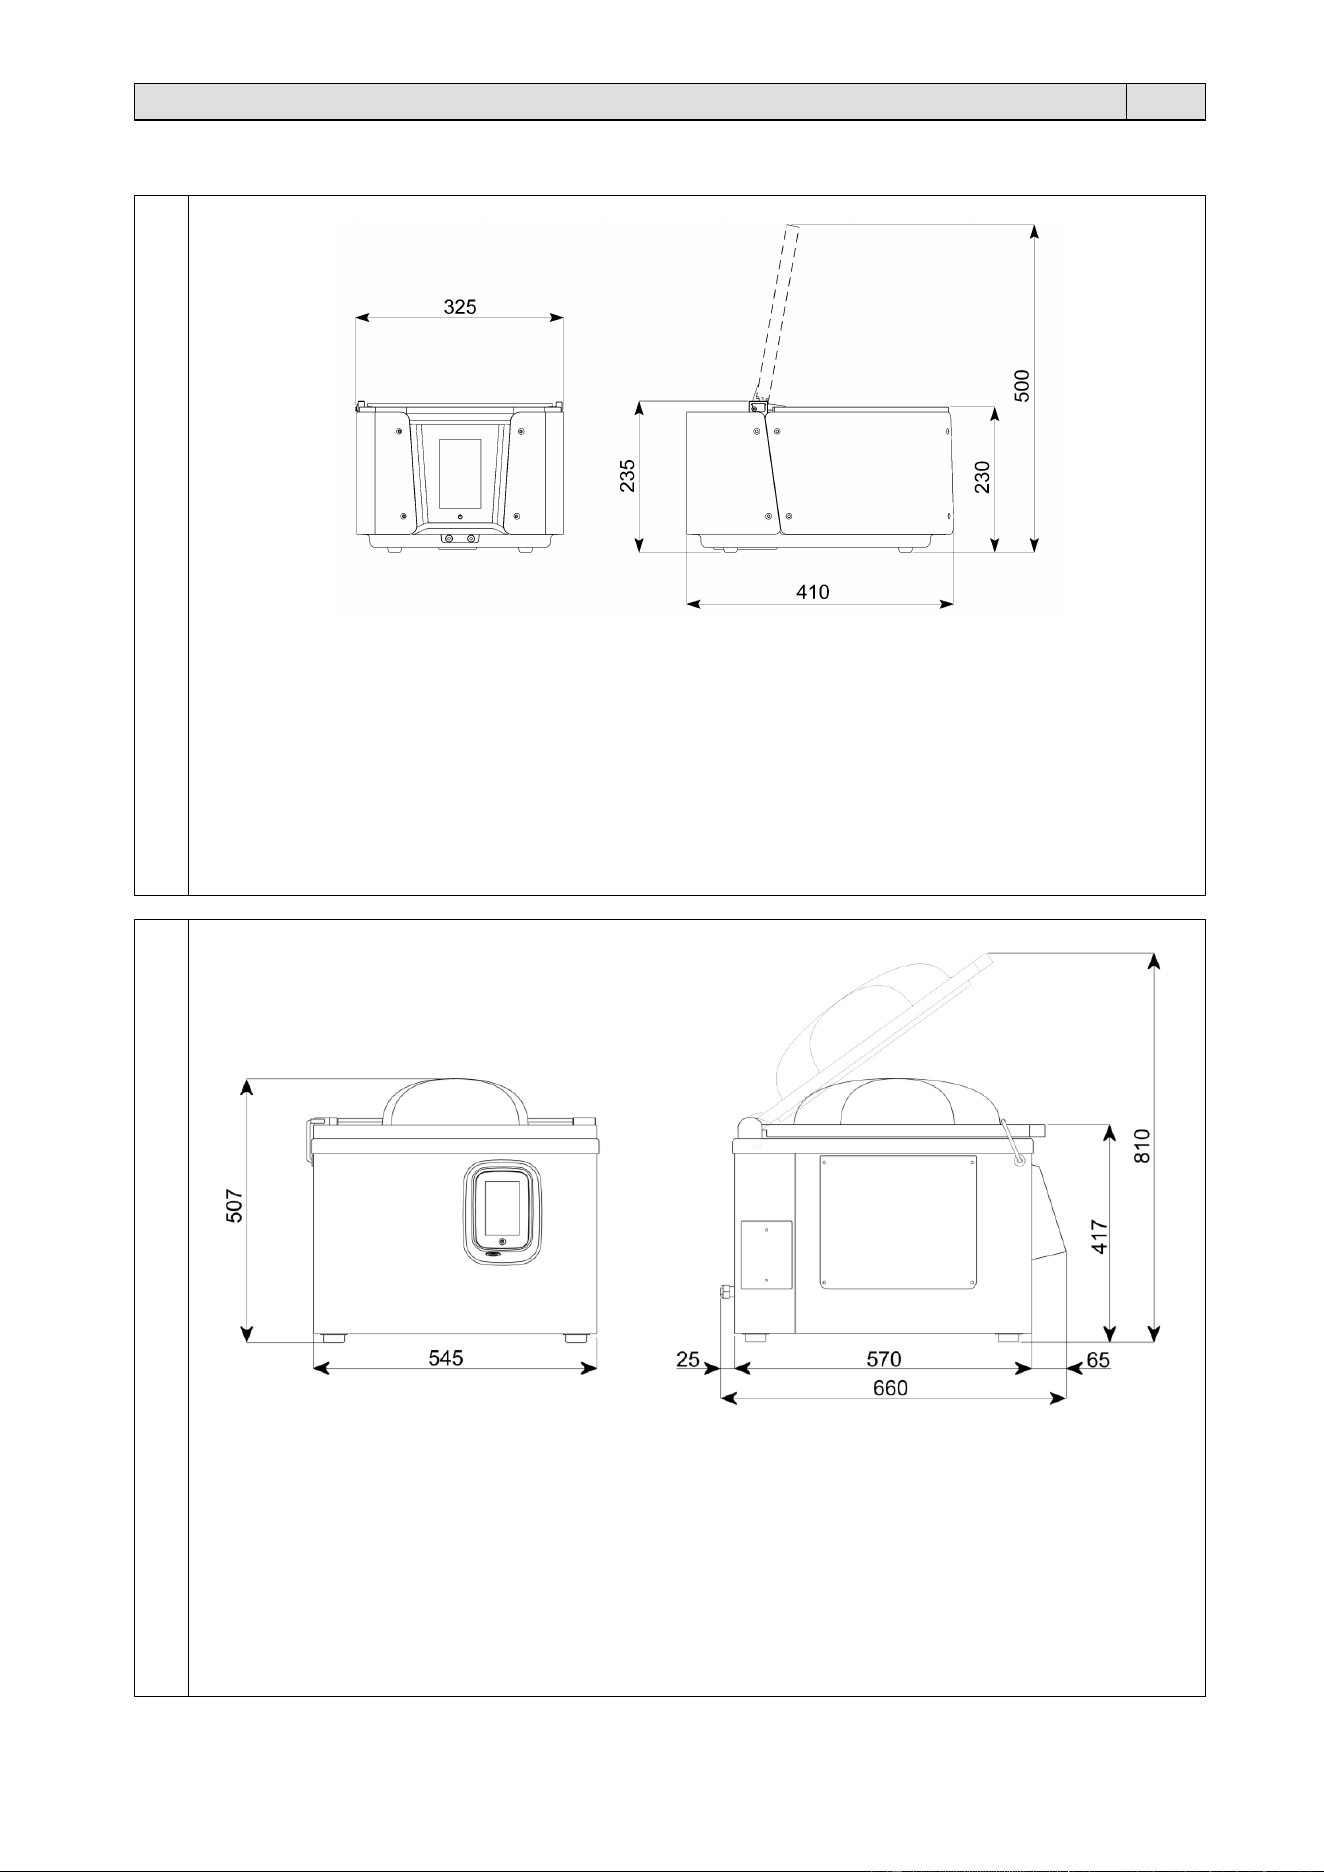
1.4. Dati tecnici della macchina
MX 2
Peso e dimensioni dell’imballo
Larghezza = 535 mm
Lunghezza = 420 mm
Altezza = 310 mm
Peso = 25 kg
Peso della macchina
Peso = 22 kg
Pompa vuoto = 4 m³
MX 4
Peso e dimensioni dell’imballo
Larghezza = 760 mm
Lunghezza = 690 mm
Altezza = 715 mm
Peso = 25 kg
Peso della macchina
Peso = 22 kg
Pompa vuoto = 16 m³ (versione 230V) / 20 m³ (versione 120V)
5
Capitolo 2. Caratteristiche delle buste
IT
2.1. Buste da adoperare
• Si raccomanda l’utilizzo di buste originali.
• Si raccomanda di consultare le schede tecniche e di sicurezza delle buste utilizzate e di attenersi
alle prescrizioni descritte!
MX 2
Le buste fornite sono ideali per la surgelazione, conservazione e la cottura di alimenti sottovuoto a basse temperature.
Codice per ordine buste: KR220102
25 buste per surgelazione, cottura sottovuoto e conservazione (dimensione: 20x30 cm - 90µm)
MX 4
Le buste possono essere di diversi spessori (85÷200µm) e devono avere caratteristiche di “barriera” al passaggio del gas
e dell’aria. È obbligatorio l’utilizzo delle sole buste con idoneità alimentare. Nella tabella seguente trovate le dimensioni
massime delle buste che si possono utilizzare sui vari modelli di macchina.
Macchina
Larghezza busta lato aperto
Lunghezza busta lato chiuso
MX 4 (barra frontale)
450mm
430mm
MX 4 (barra laterale)
450mm
375mm
La tabella seguente indica i limiti di temperatura min/max alla quale le buste possono essere sottoposte.
Tipo di busta
Temperatura minima
Temperatura massima
per la cottura
-15°C
+120°C per 30 minuti
per la conservazione
-20°C
+70°C per 2 ore; +100°C per 15 minuti.
Capitolo 3. Condizioni d’uso della macchina
IT
3.1. Ciò che si può confezionare
Questa macchina consente di confezionare la maggior parte dei prodotti alimentari, tra cui: verdura, frutta, prodotti ittici,
prodotti caseari, carni, salumi, prodotti da forno, prodotti di gastronomia, prodotti secchi, alimenti liquidi (zuppe, creme,
salse), ecc.
3.2. Ciò che non si deve confezionare
È assolutamente vietato confezionare i seguenti tipi di prodotti per evitare di danneggiare in modo permanente la macchina,
oltre che provocare rischi di infortuni all’utilizzatore:
• Materiali infiammabili ed esplosivi
• Bombolette con gas a pressione o di qualsiasi tipo
• Eventuali materiali e prodotti non previsti che possano in qualche modo essere pericolosi per
l’utente e provocare danni alla macchina stessa.

6
Capitolo 4. Informazioni per la sicurezza
IT
Leggere attentamente le istruzioni fornite prima di installare e utilizzare l’apparecchiatura. Il produttore non è responsabile
se un’installazione ed un uso non corretto dell’apparecchiatura provocano lesioni e danni. Tenere sempre le istruzioni a
portata di mano come riferimento futuro.
4.1. Sicurezza dei bambini e delle persone vulnerabili
• Questa apparecchiatura può essere usata da bambini a partire dagli 8 anni e da adulti con limitate capacità fisiche,
sensoriali o mentali o con scarsa esperienza o conoscenza sull’uso dell’apparecchiatura, solamente se sorvegliati o
se istruiti relativamente all’uso dell’apparecchiatura e se hanno capito i rischi coinvolti.
• Non consentire ai bambini di giocare con l’apparecchiatura.
• Tenere i materiali di imballaggio al di fuori della portata dei bambini.
• Tenere i bambini e gli animali domestici lontano dall’apparecchiatura durante il funzionamento.
• Tenere lontani i bambini al di sotto dei 3 anni se non costantemente supervisionati.
4.2. Avvertenze di sicurezza generali
• L’installazione dell’apparecchiatura e la sostituzione dei cavi deve essere svolta unicamente da personale qualificato.
• Prima di eseguire qualsiasi intervento di manutenzione, scollegare l’apparecchiatura dalla rete elettrica.
• Non usare una pulitrice a vapore per pulire l’apparecchiatura.
• Non utilizzare detergenti abrasivi o raschietti di metallo per pulire l’apparecchiatura.
• Se il cavo di alimentazione è danneggiato, esso deve essere sostituito da un cavo o un assieme speciali disponibili
presso il costruttore o il suo servizio di assistenza tecnica.

7
Capitolo 5. Istruzioni per la sicurezza
IT
5.1. Installazione
• L’installazione dell’apparecchiatura deve essere eseguita da personale qualificato!
• Nel trasporto e nel posizionamento della macchina si raccomanda di manovrare con molta
cautela!
Prima di ogni movimentazione, assicurarsi che il mezzo di sollevamento sia idoneo a sollevare il
carico da movimentare!
Nel caso di trasporto a mano, la normativa vigente determina il limite di peso che una persona può
sollevare (vedi tabella seguente).
Pertanto, in base al peso da sollevare (vedi paragrafo 1.4) e all’operatore che lo solleva, sono
necessarie più persone.
PESO MAX SOLLEVABILE
ETÁ
MASCHI
FEMMINE
> 18 ANNI
30
20
15-18 ANNI
20
15
• Rimuovere tutti i materiali di imballaggio.
• Non installare o utilizzare l’apparecchiatura se danneggiata.
• Attenersi alle istruzioni fornite insieme all’apparecchiatura.
• Prestare sempre attenzione in fase di spostamento dell’apparecchiatura. Indossare sempre guanti di sicurezza.
• Non capovolgere o inclinare l’apparecchiatura! Questo da luogo alla fuoriuscita dell’olio dalla pompa che potrebbe
danneggiare l’apparecchiatura stessa.
• Rimuovere il tappo rosso dalla pompa e montare il filtro prima dell’uso (solo per MX 2).
5.2. Condizioni ambientali
• Sollevare la macchina e posizionarla sul piano di lavoro accertandosi che sia in un ambiente adatto, privo di materiali
infiammabili, gas, esplosivi. La macchina deve essere installata solamente su superfici lisci, orizzontali e non
infiammabili.
Condizioni consentite negli ambienti in cui é collocata la macchina:
• Temperatura da + 5°C a + 40°C.
• Umidità relativa da 30% a 90% senza condensazione.
L’illuminazione del locale di utilizzo deve essere conforme alle leggi vigenti nel paese in cui è installata la macchina e deve
comunque essere uniforme e garantire una buona visibilità, per salvaguardare la sicurezza e la salute dell’operatore.
GRADO DI PROTEZIONE DELLA MACCHINA = IP20
IL RUMORE AEREO PRODOTTO DALLA MACCHINA È INFERIORE A 70 dB(A)
8
Capitolo 5. Istruzioni per la sicurezza
IT
5.3. Collegamento elettrico
Rischio di incendio e scossa elettrica.
• Tutti i collegamenti elettrici devono essere realizzati da un elettricista qualificato.
• L’apparecchiatura deve disporre di una messa a terra.
• Non utilizzare prese multiple e prolunghe.
• Inserire la spina di alimentazione nella presa solo al termine dell’installazione.
• Nel caso in cui la spina di corrente sia allentata, non collegarla alla presa.
• Non tirare il cavo di alimentazione per scollegare l’apparecchiatura. Tirare solo la spina.
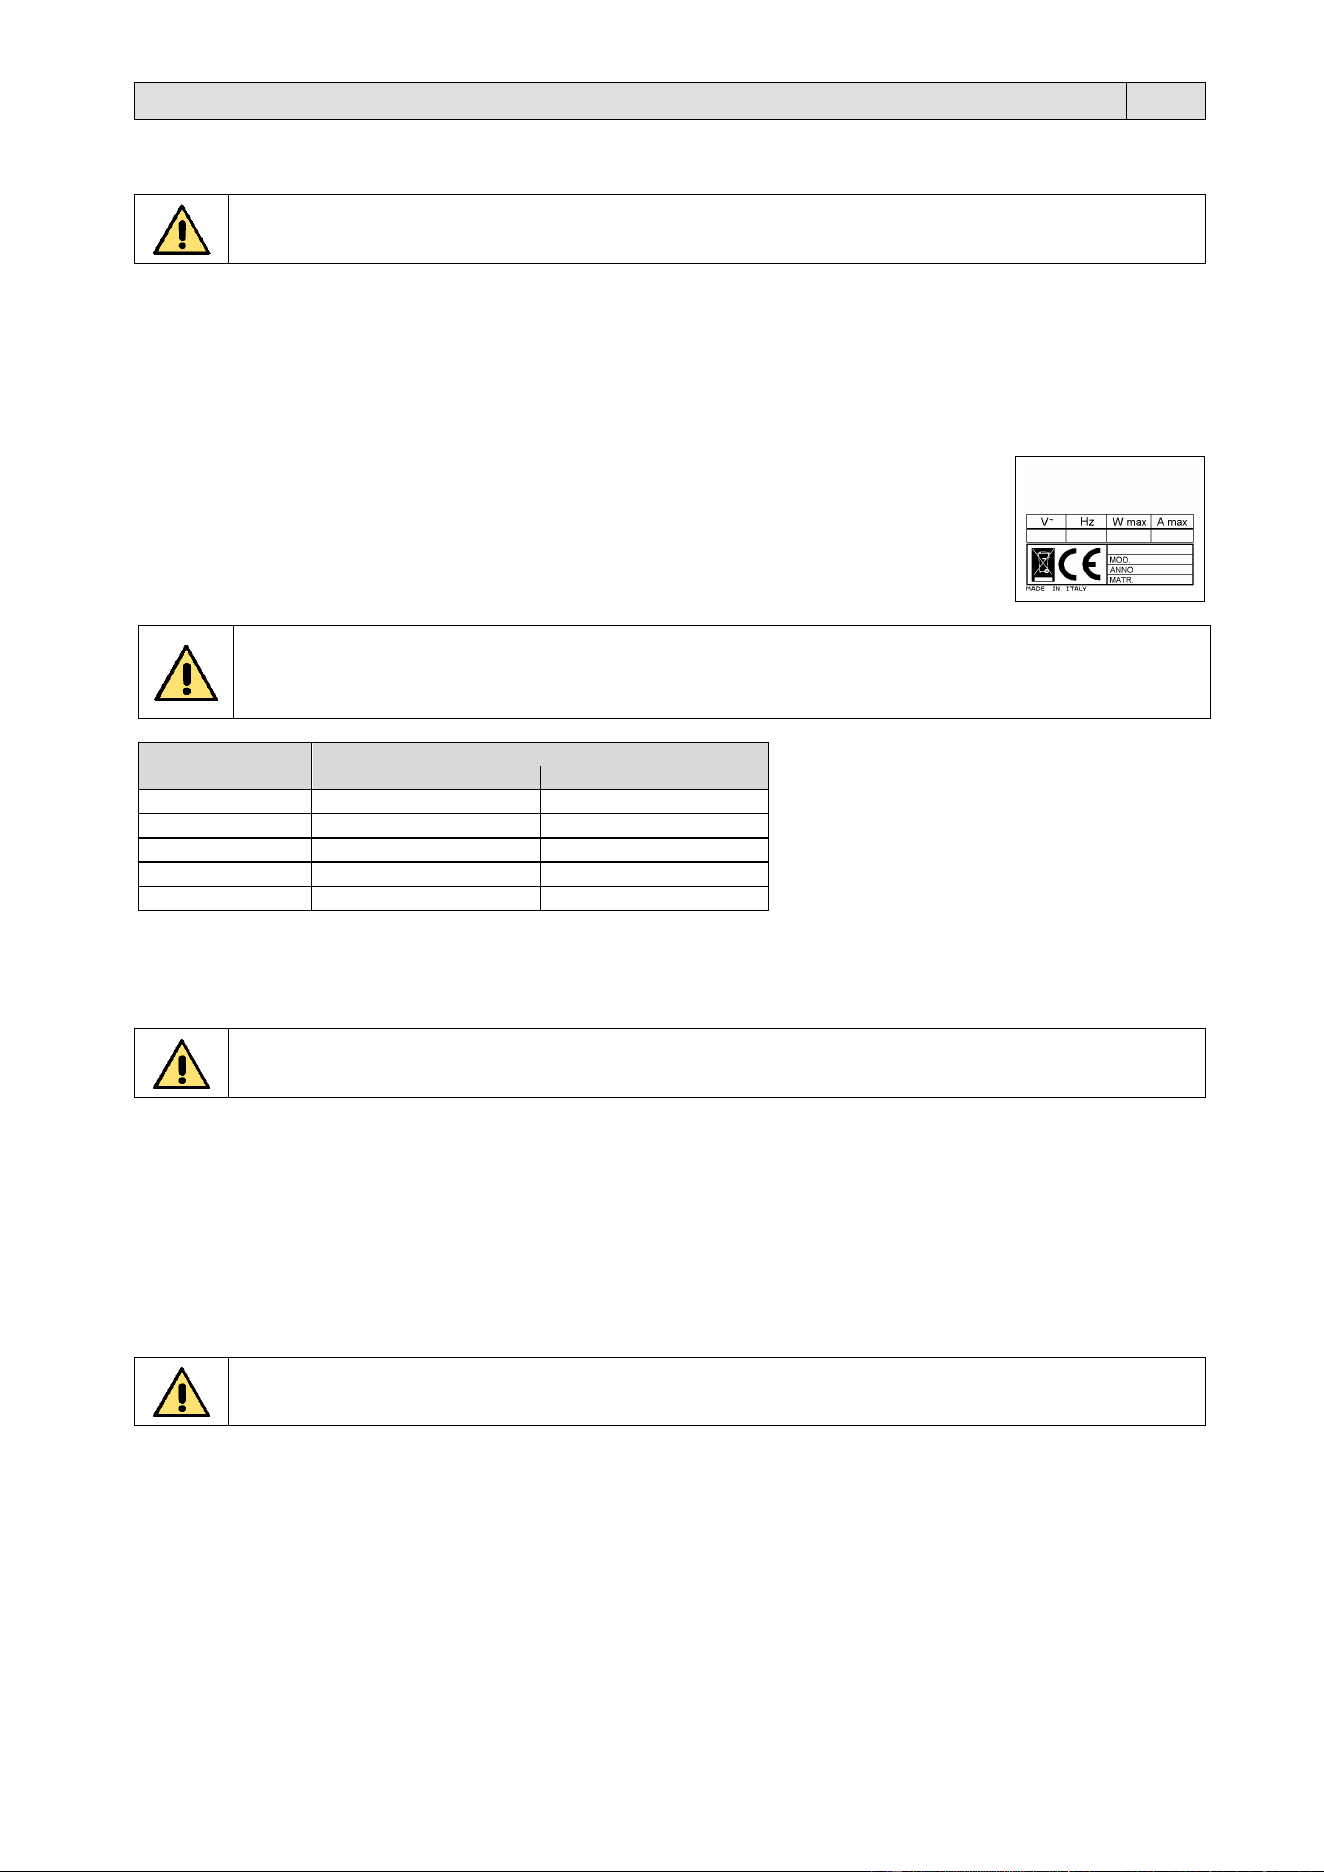
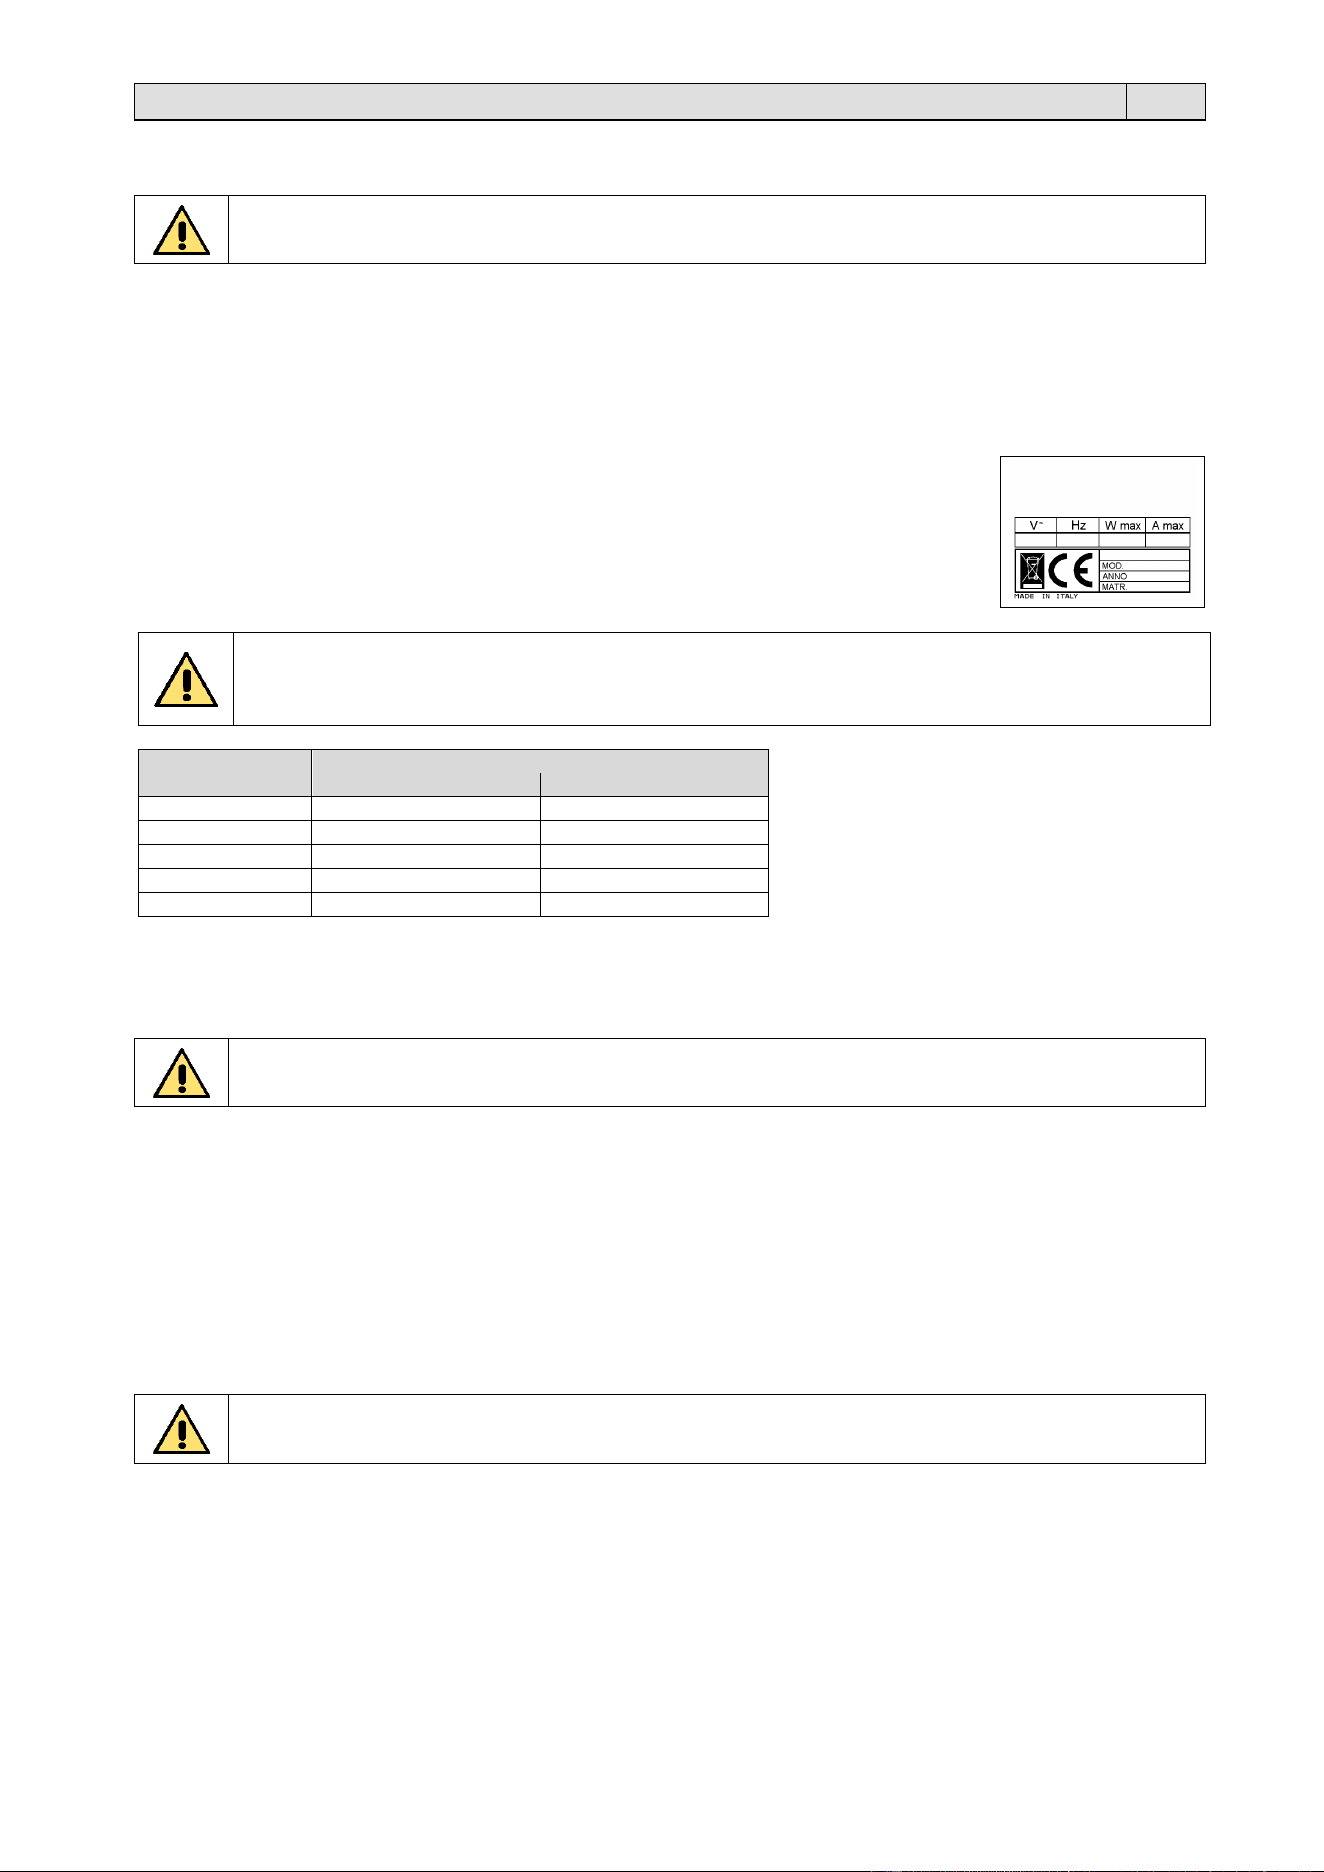
Verificare che i dati elettrici riportati sulla targhetta dei dati corrispondano a quelli dell’impianto.
In caso contrario, contattare un elettricista.
Nota: per qualsiasi comunicazione con il costruttore, citare sempre il modello della macchina e il
numero di matricola indicati sulla targhetta applicata nella parte posteriore della macchina.
La linea di alimentazione deve essere protetta da un interruttore differenziale tipo A con corrente differenziale
nominale “IΔn” da 30 mA.
Di conseguenza la massima resistenza dell’elettrodo di terra deve corrispondere ai valori indicati nella tabella
seguente.
IΔn
Massima resistenza dell’elettrodo di terra
(50 V)
(25 V)
3 A
16 Ω
8 Ω
1 A
50 Ω
25 Ω
500 mA
100 Ω
50 Ω
300 mA
166 Ω
83 Ω
30 mA
1666 Ω
833 Ω
5.4. Utilizzo
Rischio di lesioni, ustioni, scosse elettriche o esplosioni.
• Non toccare la barra saldante (5) dopo l’uso. Il calore residuo può causare scottature.
• Non apportare modifiche alle specifiche di questa apparecchiatura.
• Non lasciare mai l’apparecchiatura incustodita durante il funzionamento.
• Spegnere l’apparecchiatura dopo ogni utilizzo.
• Non mettere in funzione l’apparecchiatura con le mani umide o quando c’è un contatto con l’acqua.
• Non utilizzare l’apparecchiatura come superficie di lavoro o come piano di appoggio.
• Non appoggiare o tenere liquidi o materiali infiammabili, né oggetti facilmente incendiabili sull’apparecchiatura, al suo
interno o nelle immediate vicinanze.
• Non procedere nel confezionamento in caso di cricche o rottura del coperchio (6).
Rischio di danneggiare l’apparecchiatura.
• Prestare attenzione quando si tolgono o inseriscono gli accessori.
• Non forzare l’apertura del coperchio (6) durante il ciclo di lavoro.
• Non forzare l’apertura del coperchio (6) durante il ciclo di lavoro in mancanza di energia elettrica.
• Non appoggiare nessun peso sul coperchio (6).
• Evitare di fare cadere qualunque oggetto sul coperchio (6)! Questo potrebbe alterarne l’integrità, causando cricche o
rottura.
9
Capitolo 5. Istruzioni per la sicurezza
IT
Prestare attenzione agli adesivi di sicurezza presenti sulla macchina:
▪ Sull’ingresso dell’alimentazione elettrica.
ATTENZIONE! Verificare periodicamente il corretto isolamento del cavo elettrico e l’integrità della
presa stessa. Durante il funzionamento della macchina i pannelli d’ispezione all’impianto elettrico
devono essere correttamente montati.
▪ Sulla barra saldante (5) posizionata all’interno della vasca (4).
▪ Sulla pompa del vuoto posizionata all’interno della macchina.
ATTENZIONE! Organi caldi. Indica il pericolo di ustioni con rischio di infortunio, anche grave per la
persona esposta.
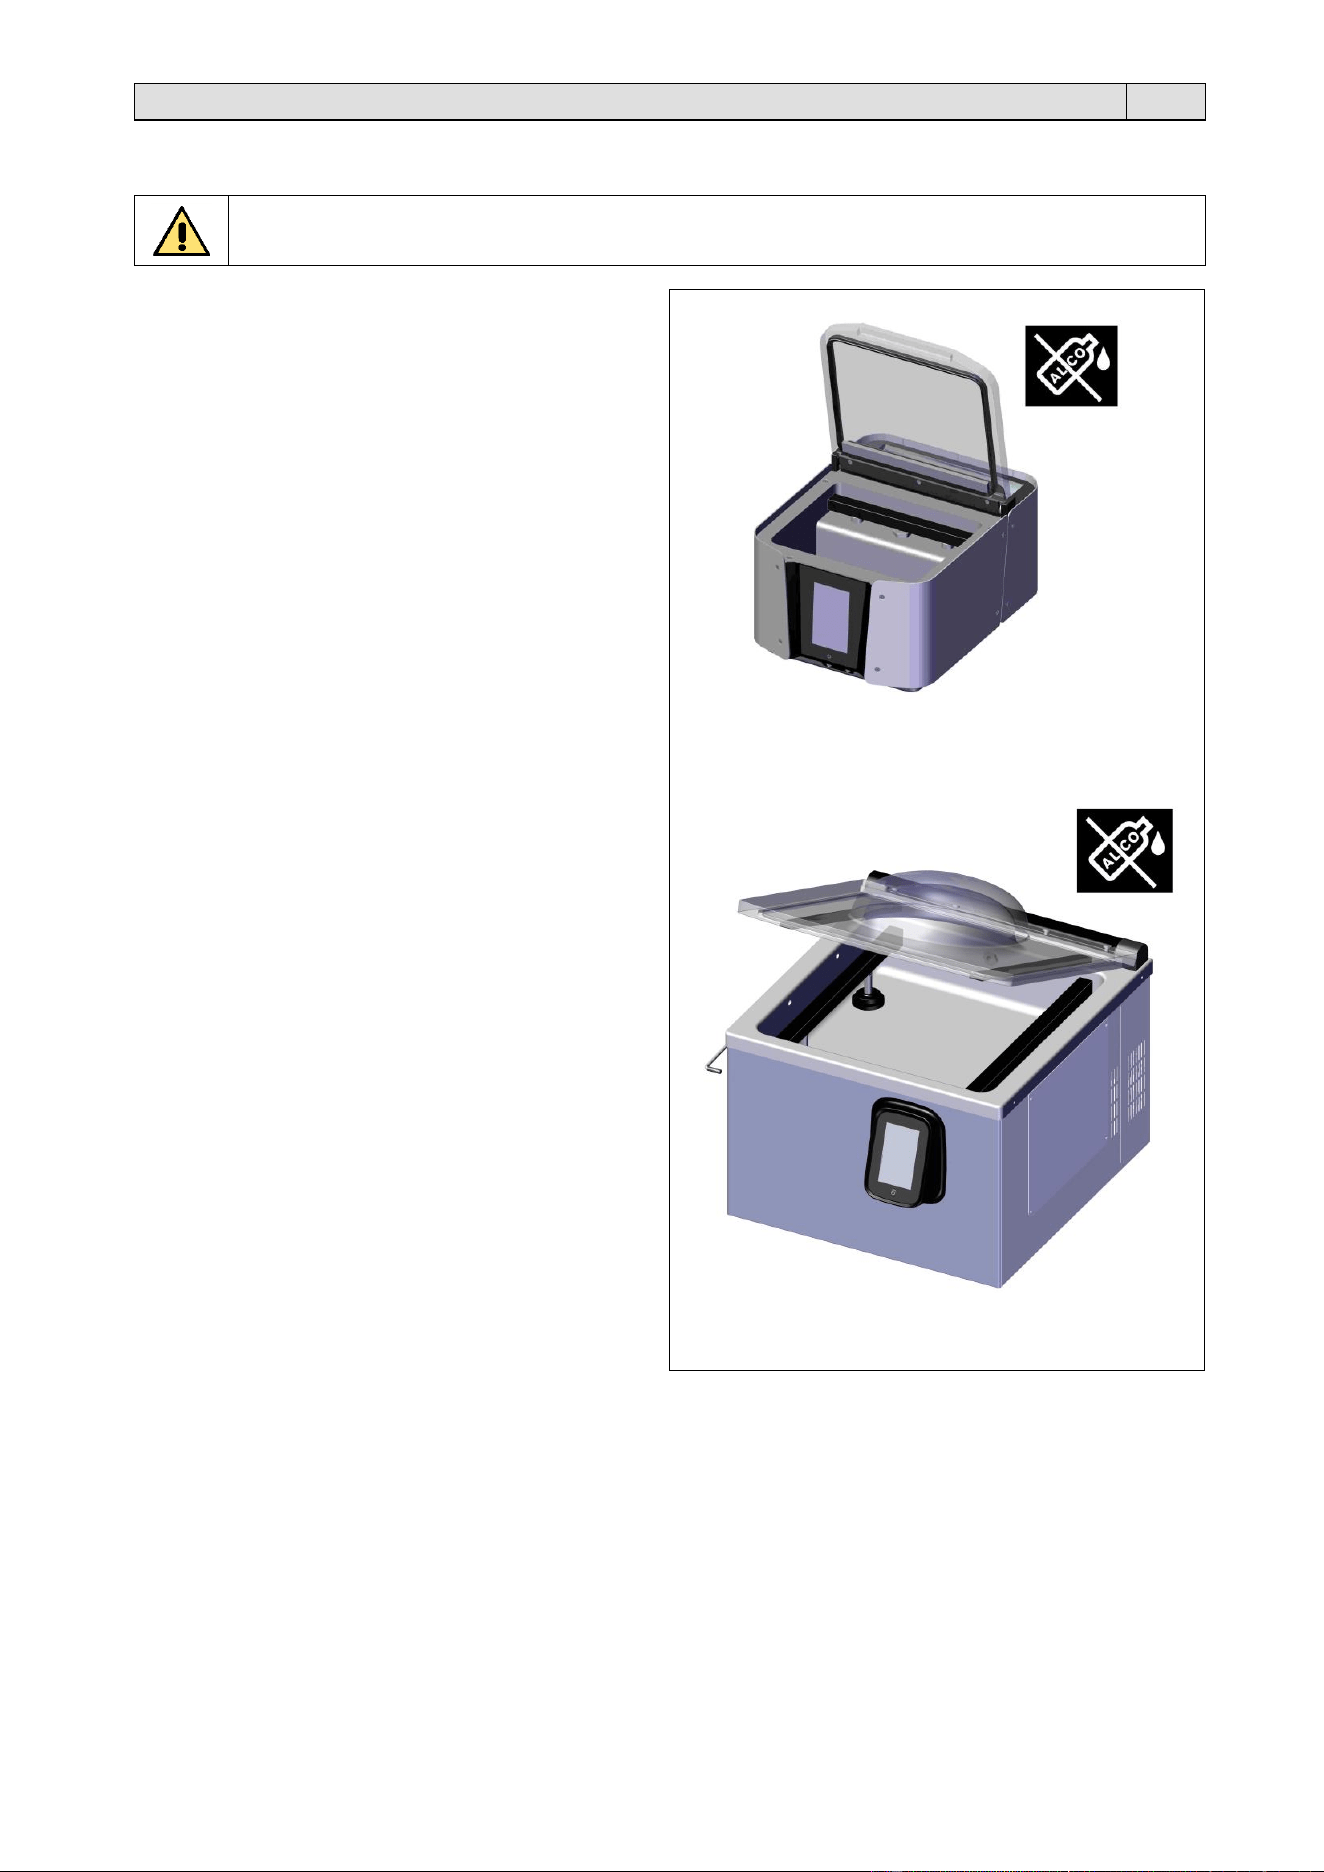
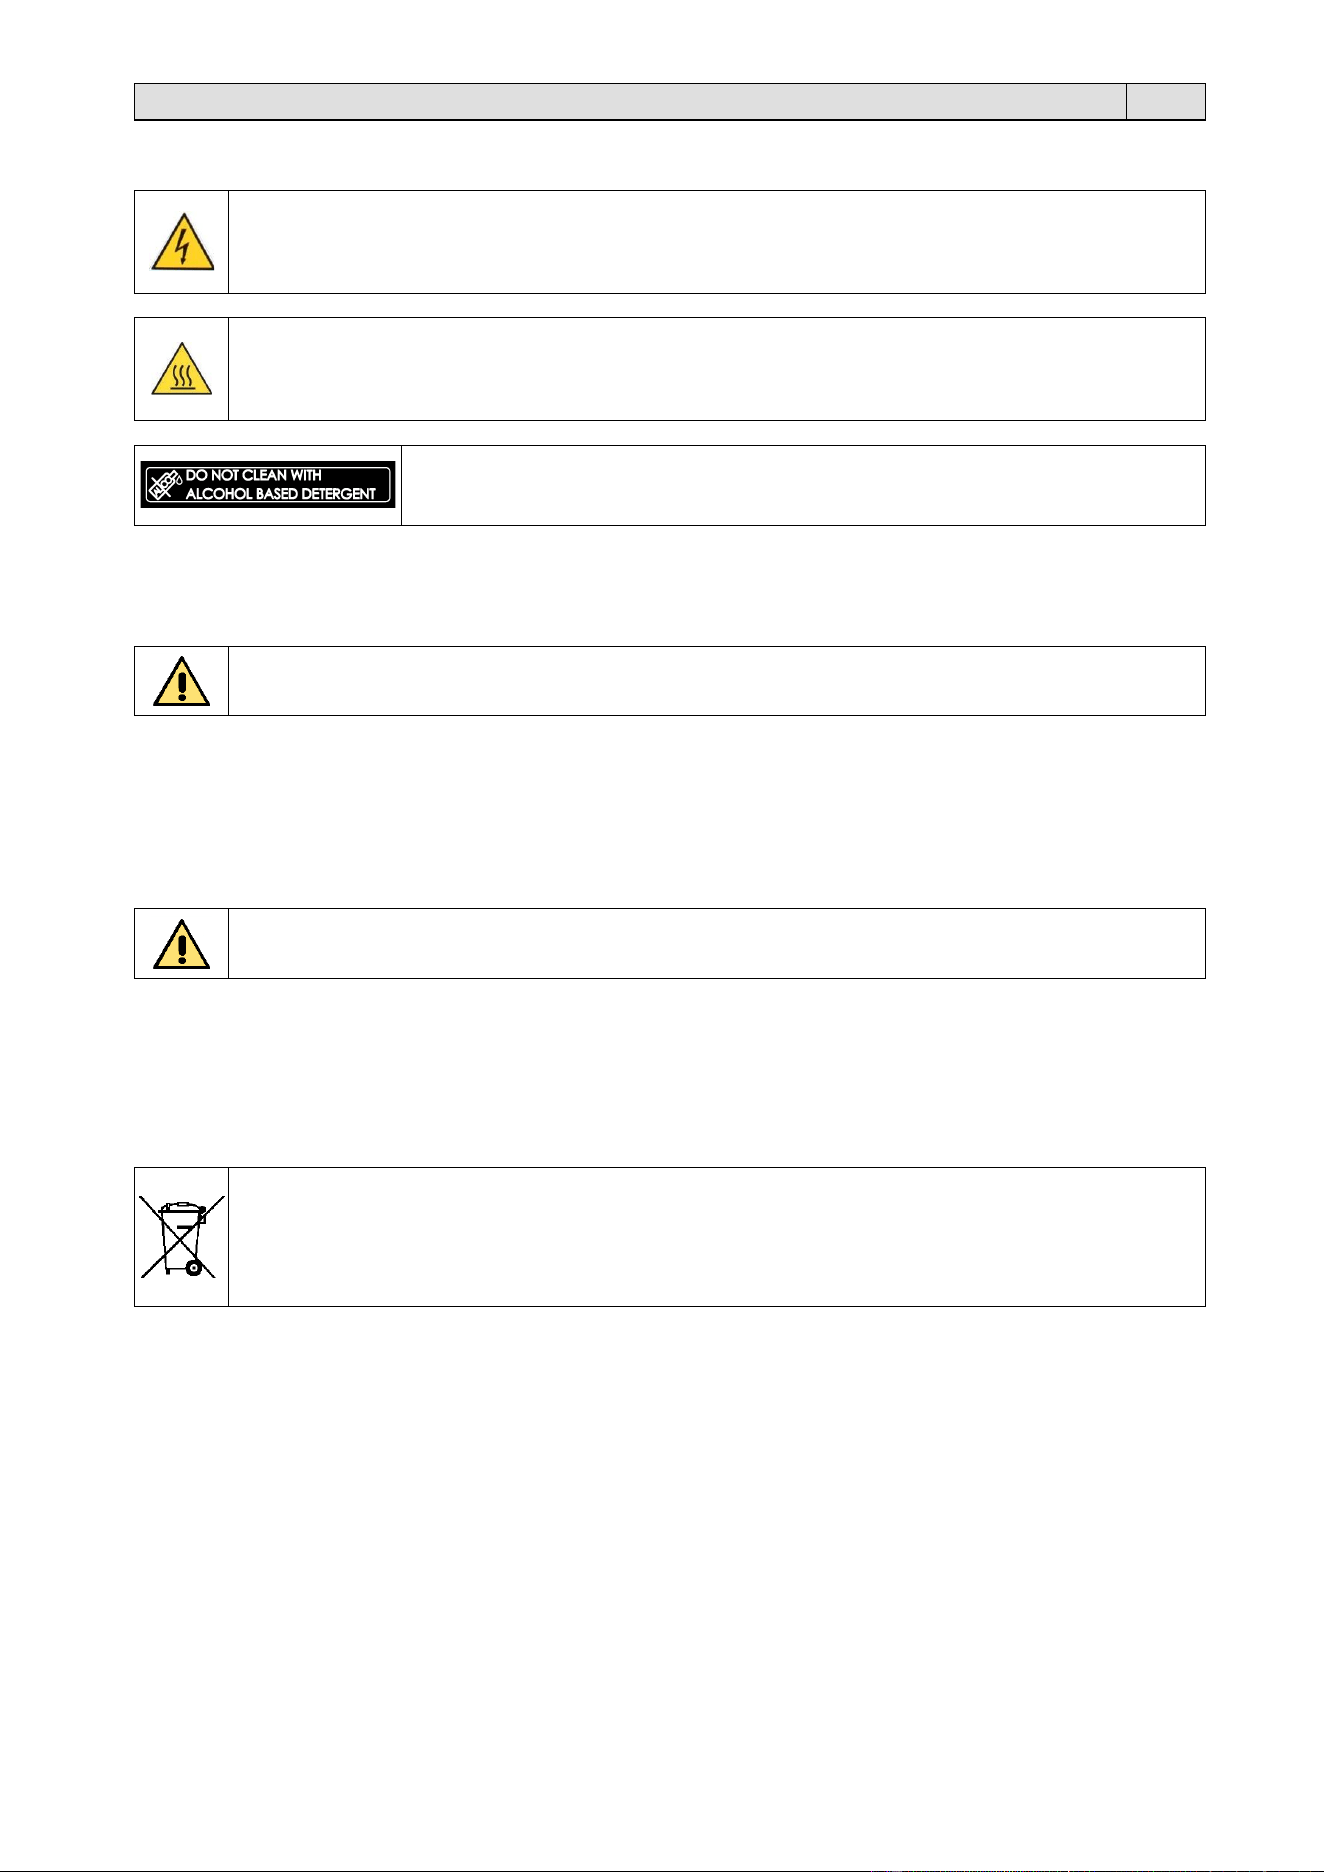
▪ Sul coperchio (6).
ATTENZIONE! Indica la modalità di pulizia del coperchio per evitare di
danneggiarlo, ridurne la trasparenza o la resistenza.
5.5. Pulizia e cura
Rischio di lesioni, incendio o danni all’apparecchiatura.
• Prima di eseguire qualunque intervento di manutenzione, spegnere l’apparecchiatura ed estrarre la spina dalla presa.
• Controllare che l’apparecchiatura sia fredda.
5.6. Smontaggio, demolizione e smaltimento residui
Le operazioni di smontaggio e demolizione devono essere affidate a personale specializzato a tali attività e
dotato delle competenze meccaniche ed elettriche necessarie a lavorare in condizioni di sicurezza.
Procedere nel seguente modo:
• scollegare la macchina dalla rete di alimentazione elettrica
• smontare i componenti
• svuotare l’olio dalla pompa.
Ciascun rifiuto deve essere trattato, smaltito o riciclato in base alla classificazione ed alle procedure previste dalla
legislazione vigente nel paese di installazione.
Il simbolo indica che questo prodotto non deve essere trattato come rifiuto domestico.
Assicurando che il prodotto venga correttamente eliminato, si faciliterà la prevenzione di potenziali
conseguenze negative per l’ambiente e la salute dell’uomo, che potrebbero altrimenti essere causate da un
inappropriato trattamento del rifiuto di questo prodotto.
Per informazioni più dettagliate riguardo il riciclaggio di questo prodotto, contattare il venditore del prodotto, o
in alternativa il servizio di post vendita o l’appropriato servizio di trattamento dei rifiuti.
5.7. Assistenza Tecnica
• Per riparare l’apparecchiatura contattare il Centro di Assistenza autorizzato.
• Utilizzare esclusivamente ricambi originali.

10
Capitolo 6. Utilizzo
IT
6.1. Prima pulizia
• Fare riferimento al paragrafo 7.1. “Pulizia e cura”.
• Pulire con un panno umido tutte le parti prima del primo utilizzo.
6.2. Prima accensione
Premere l’interruttore generale (1) posto sul retro dell’apparecchiatura (solo per MX 2).
Accendere l’apparecchiatura premendo per almeno 1 secondo il pulsante .
Il display (3) si accende e viene richiesto in sequenza:
• La calibrazione del display.
• La scelta della lingua.
• L’impostazione del fuso orario (in modalità automatica tramite collegamento alla rete Wi-Fi, o manuale).
6.3. Utilizzo quotidiano
Accendere l’apparecchiatura premendo per almeno 1 secondo il pulsante .
Attendere fino a quando il display (3) visualizza la “Home page”.
Le mie ricette
Consente di creare/archiviare le nuove ricette per poi eseguirne il ciclo di
confezionamento.
Marinatura
Consente di eseguire la ricetta per la marinatura degli alimenti.
È possibile creare/archiviare le vostre nuove ricette nel menù .
Conservazione
Consente di eseguire il confezionamento di alimenti sottovuoto in busta e/o
vaschetta scegliendo tra 7 ricette standard, programmate in funzione della
tipologia dell’alimento da confezionare.
Infusione
Consente di preparare un infuso.
È possibile creare/archiviare le vostre nuove ricette nel menù .
Sous Vide
Consente di eseguire il confezionamento di alimenti sottovuoto per la cottura a
bassa temperatura “Sous Vide”.
A seconda dell’alimento è possibile scegliere tra 8 ricette standard, programmate
in funzione della tipologia dell’alimento da confezionare.
• Scegliere la ricetta di confezionamento desiderata (vedi paragrafo 6.4).
• Sollevare il coperchio (6) e posizionare nella vasca (4) la busta con all’interno l’alimento da confezionare lasciando
almeno 2 cm oltre la barra saldante (5).
Se è inserita la funzione “GAS” la busta deve essere posizionata con il lembo aperto sul beccuccio del gas posto
sul lato della barra saldante.
Per garantire una perfetta saldatura è importante non sporcare la busta nella zona in cui avviene la saldatura. Per
questo si consiglia di ripiegare il lato interno della busta verso l’esterno per 4/5 cm. Una volta inserito l’alimento
ripiegare la busta nella condizione iniziale.
• Chiudere il coperchio (6) esercitando una leggera pressione e premere il pulsante Start. Il ciclo di confezionamento
avrà così inizio.
• Al termine del ciclo aprire il coperchio (6) ed estrarre la busta.
• Terminato l’utilizzo, spegnere l’apparecchiatura premendo il pulsante .
11
Capitolo 6. Utilizzo
IT
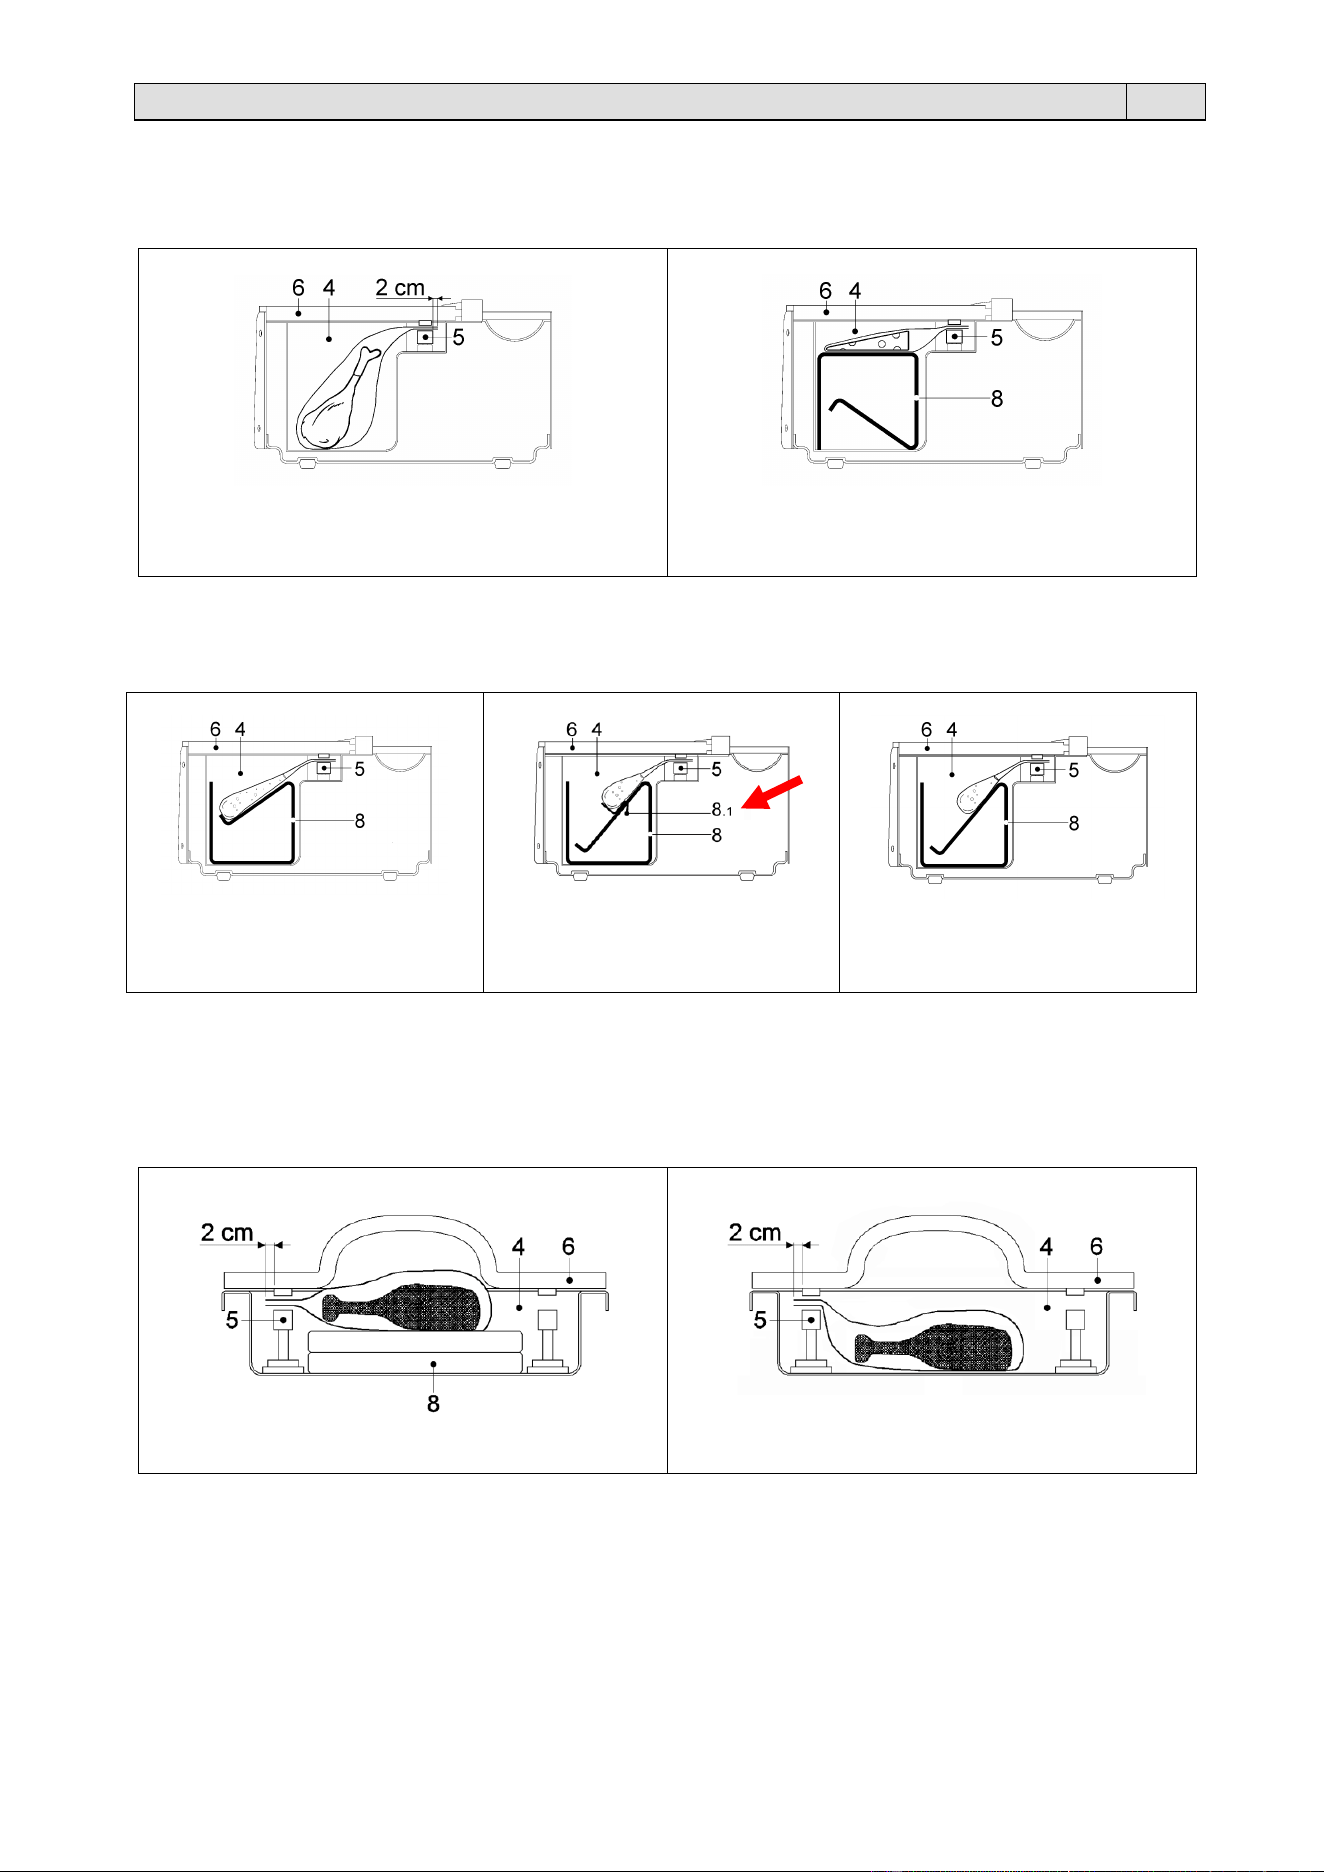
MX 2
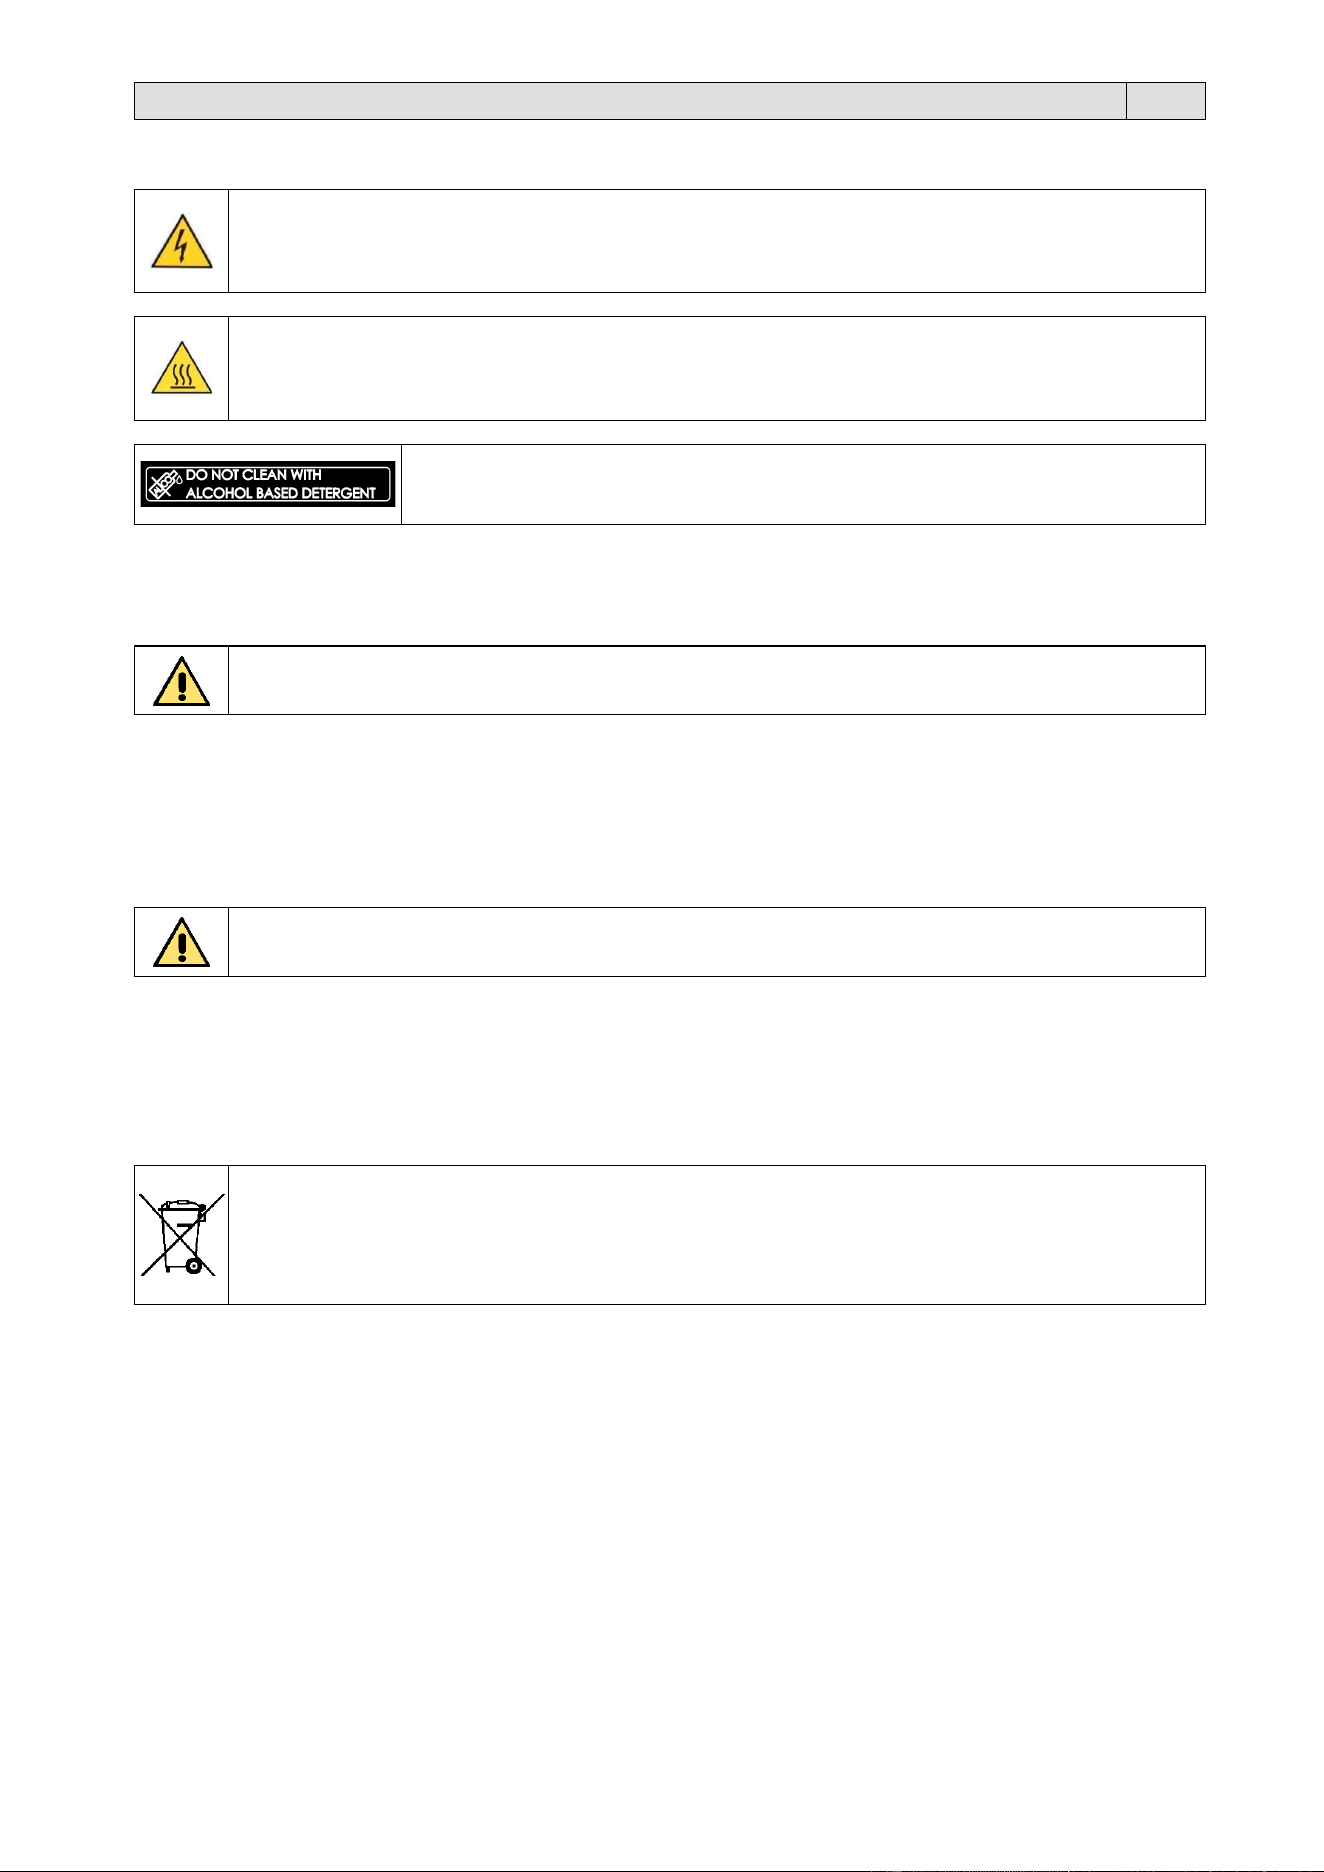
A seconda del tipo di alimento da confezionare utilizzare il supporto delle buste (8) come da schema sotto indicato.
L’eventuale utilizzo del supporto (8) favorisce una migliore posizione della busta rispetto alla barra saldante (5).
Confezionamento di alimenti
di grosse dimensioni
Confezionamento di alimenti
di piccole dimensioni
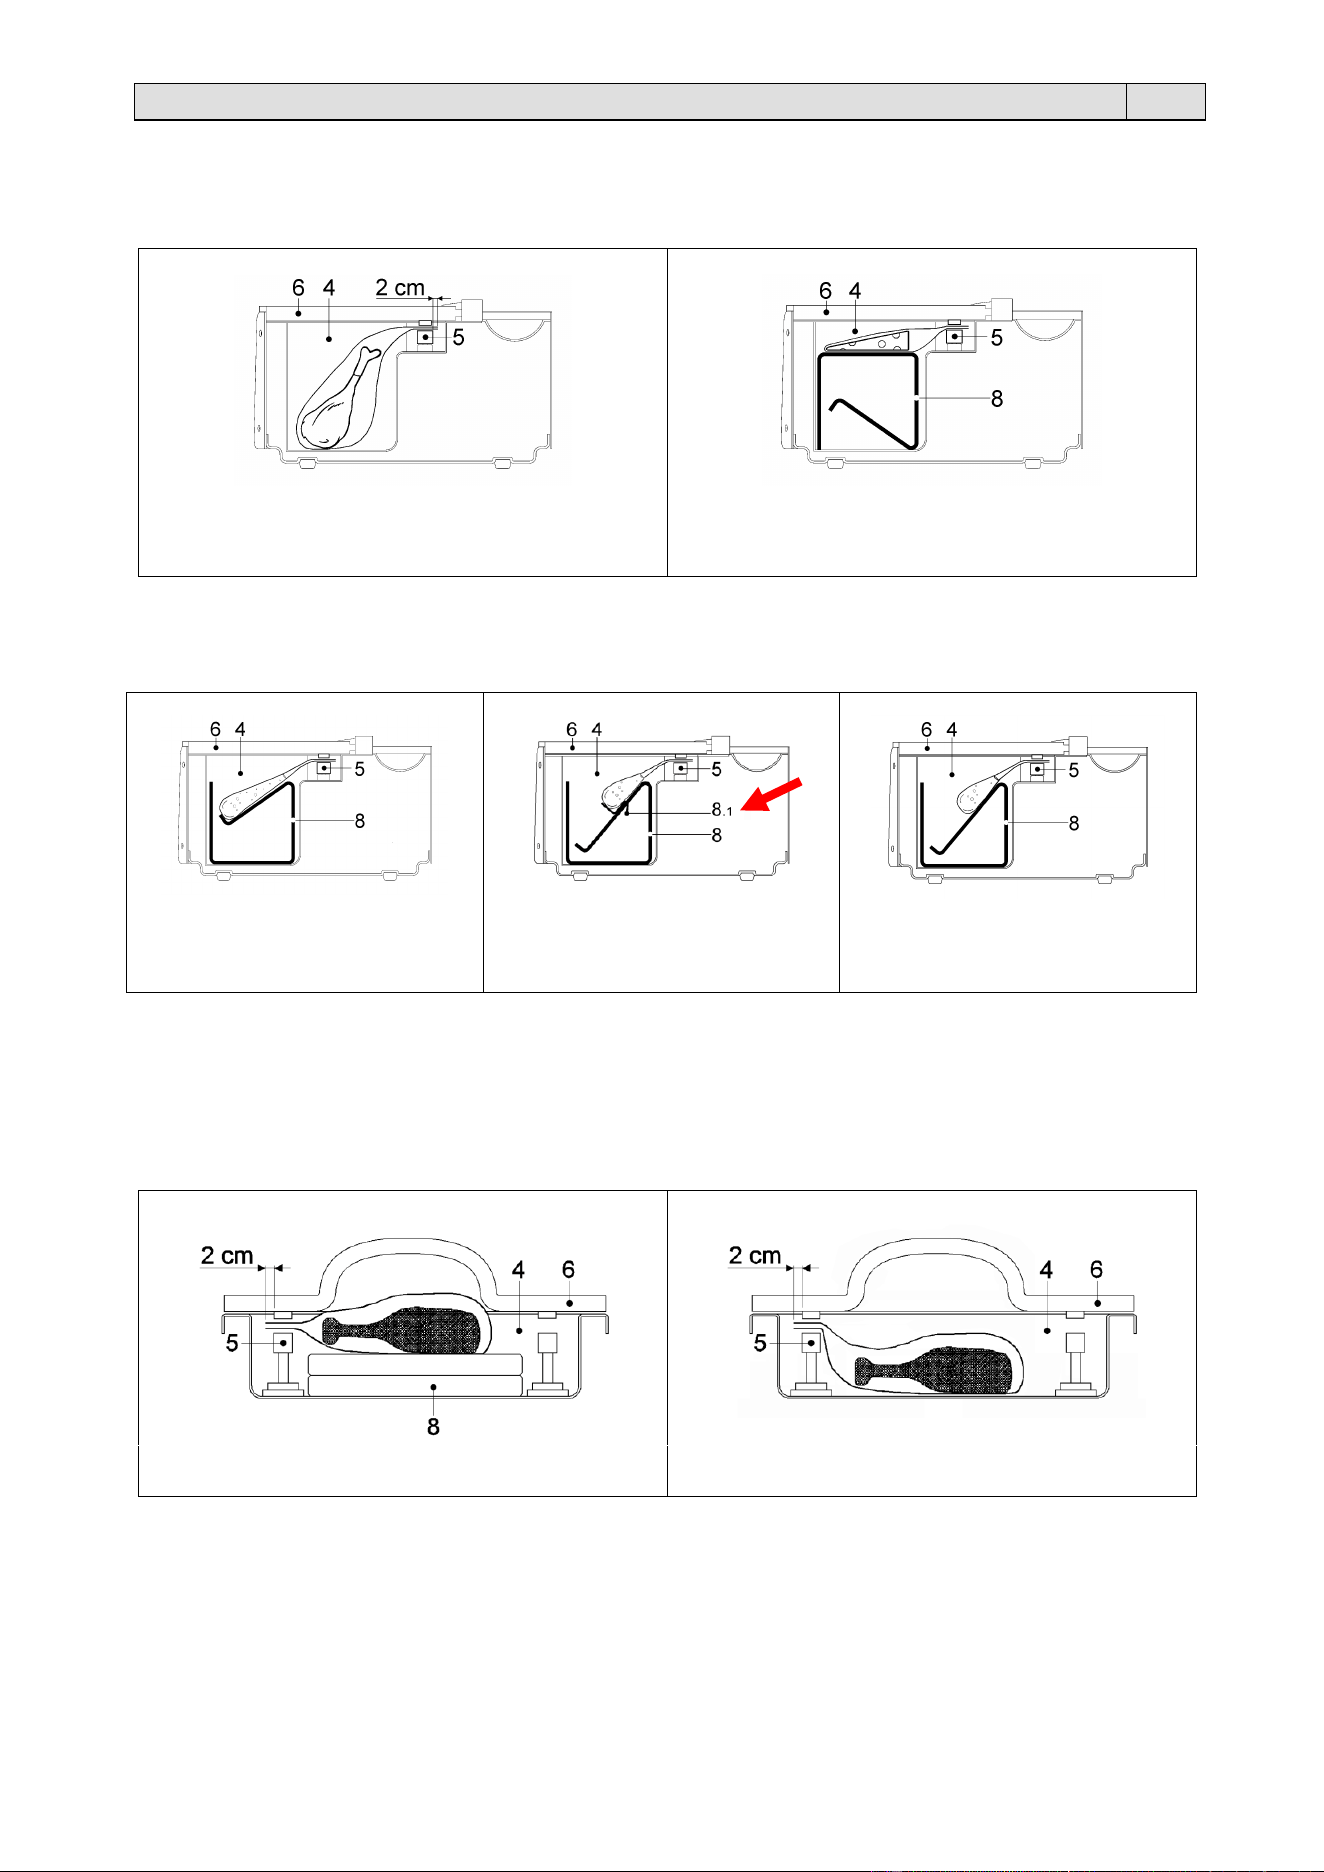
Nel caso di confezionamento di liquidi in busta posizionare il supporto delle buste (8) come da schema sotto indicato.
Se si utilizzano buste di “lunghezza ridotta” utilizzare l’angolare (8.1) per favorire il suo corretto posizionamento.
OK
OK
NO
MX 4
A seconda del tipo di alimento da confezionare utilizzare la/e tavoletta/e (8) come da schema sotto indicato.
L’eventuale utilizzo delle tavolette (8) favorisce una migliore posizione della busta rispetto alla barra saldante (5).
OK
NO
12
Capitolo 6. Utilizzo
IT
6.4. Ricette
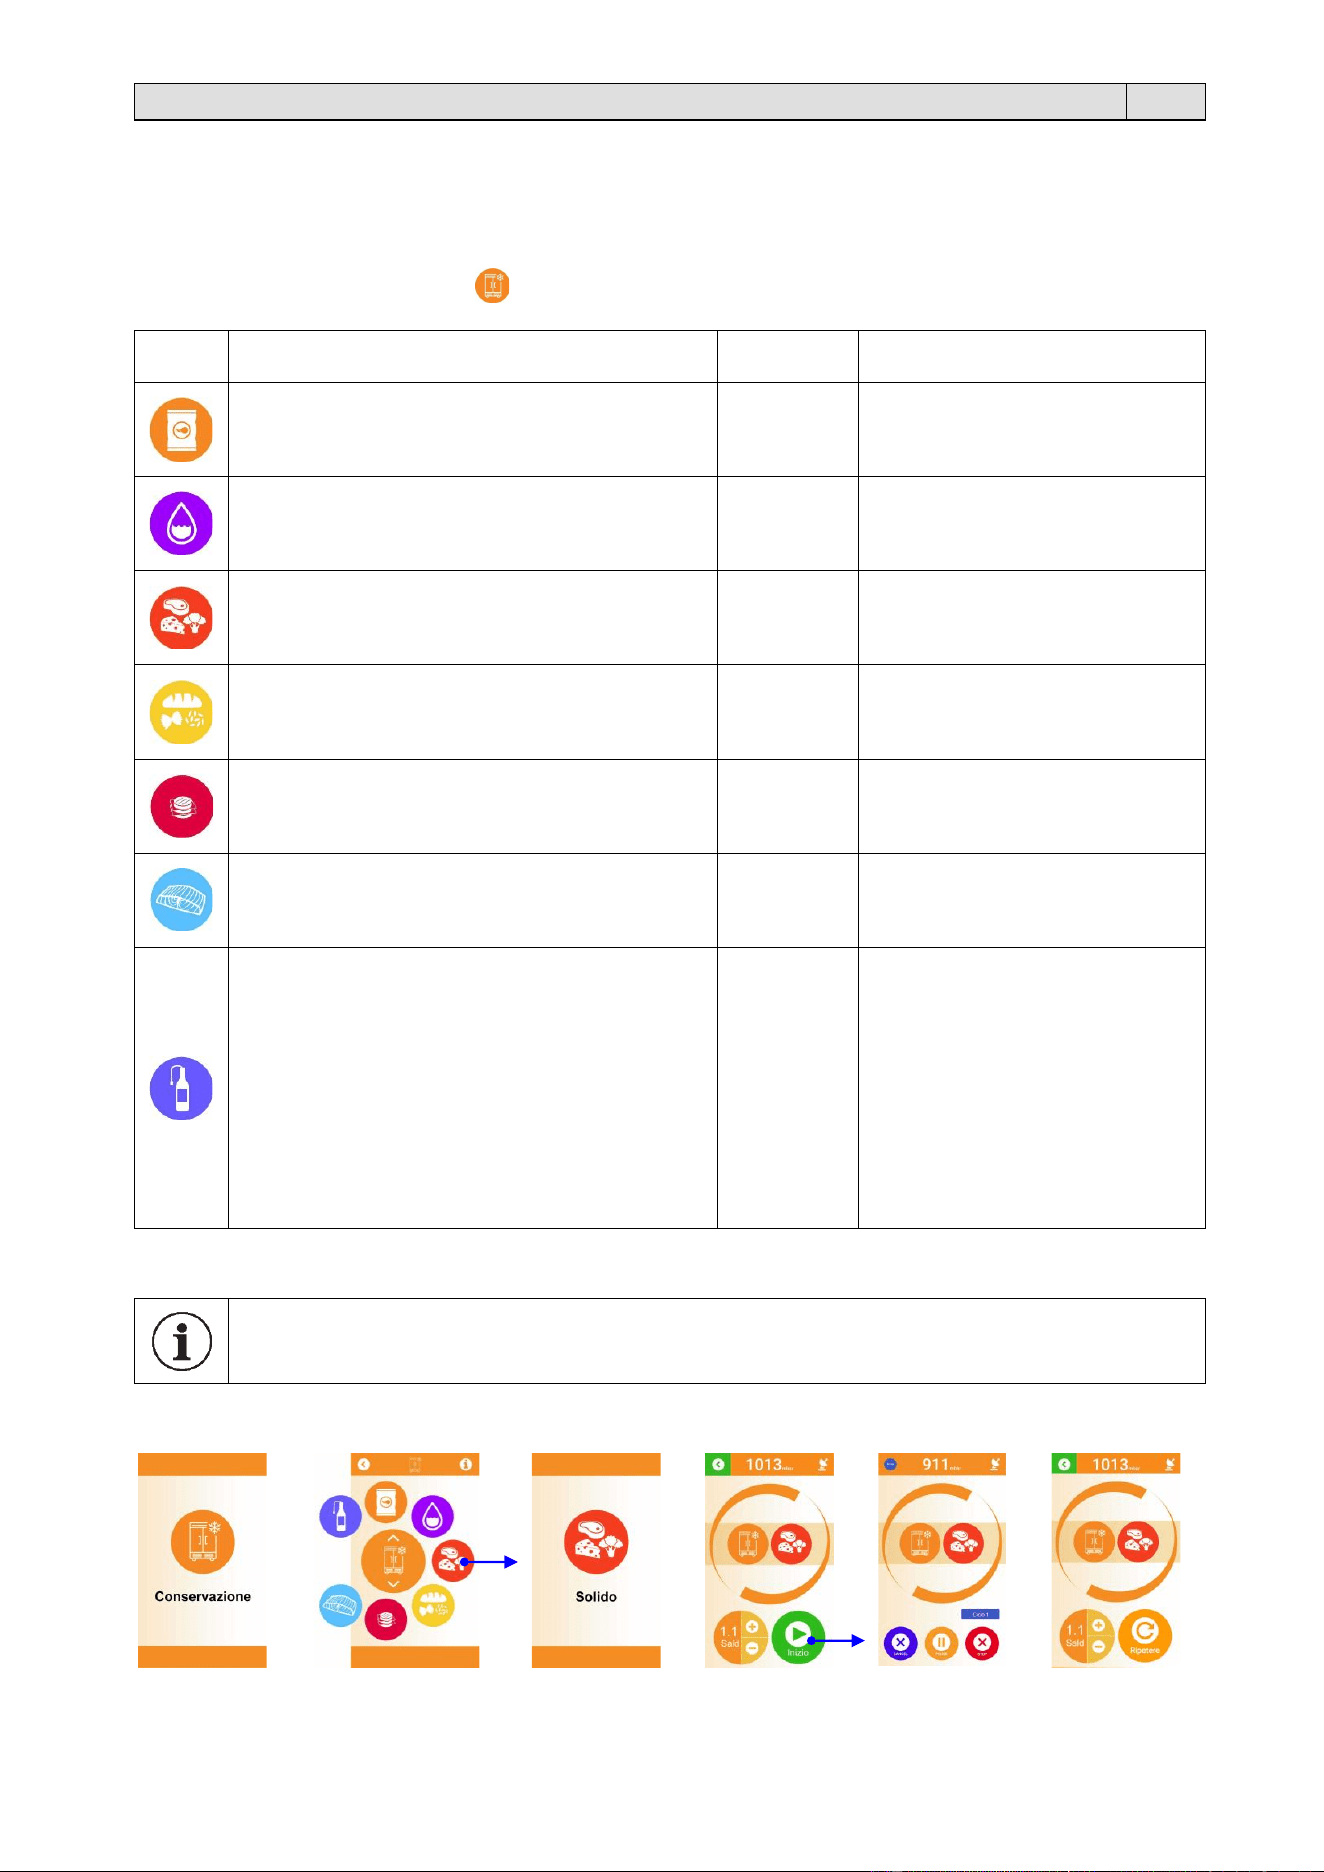
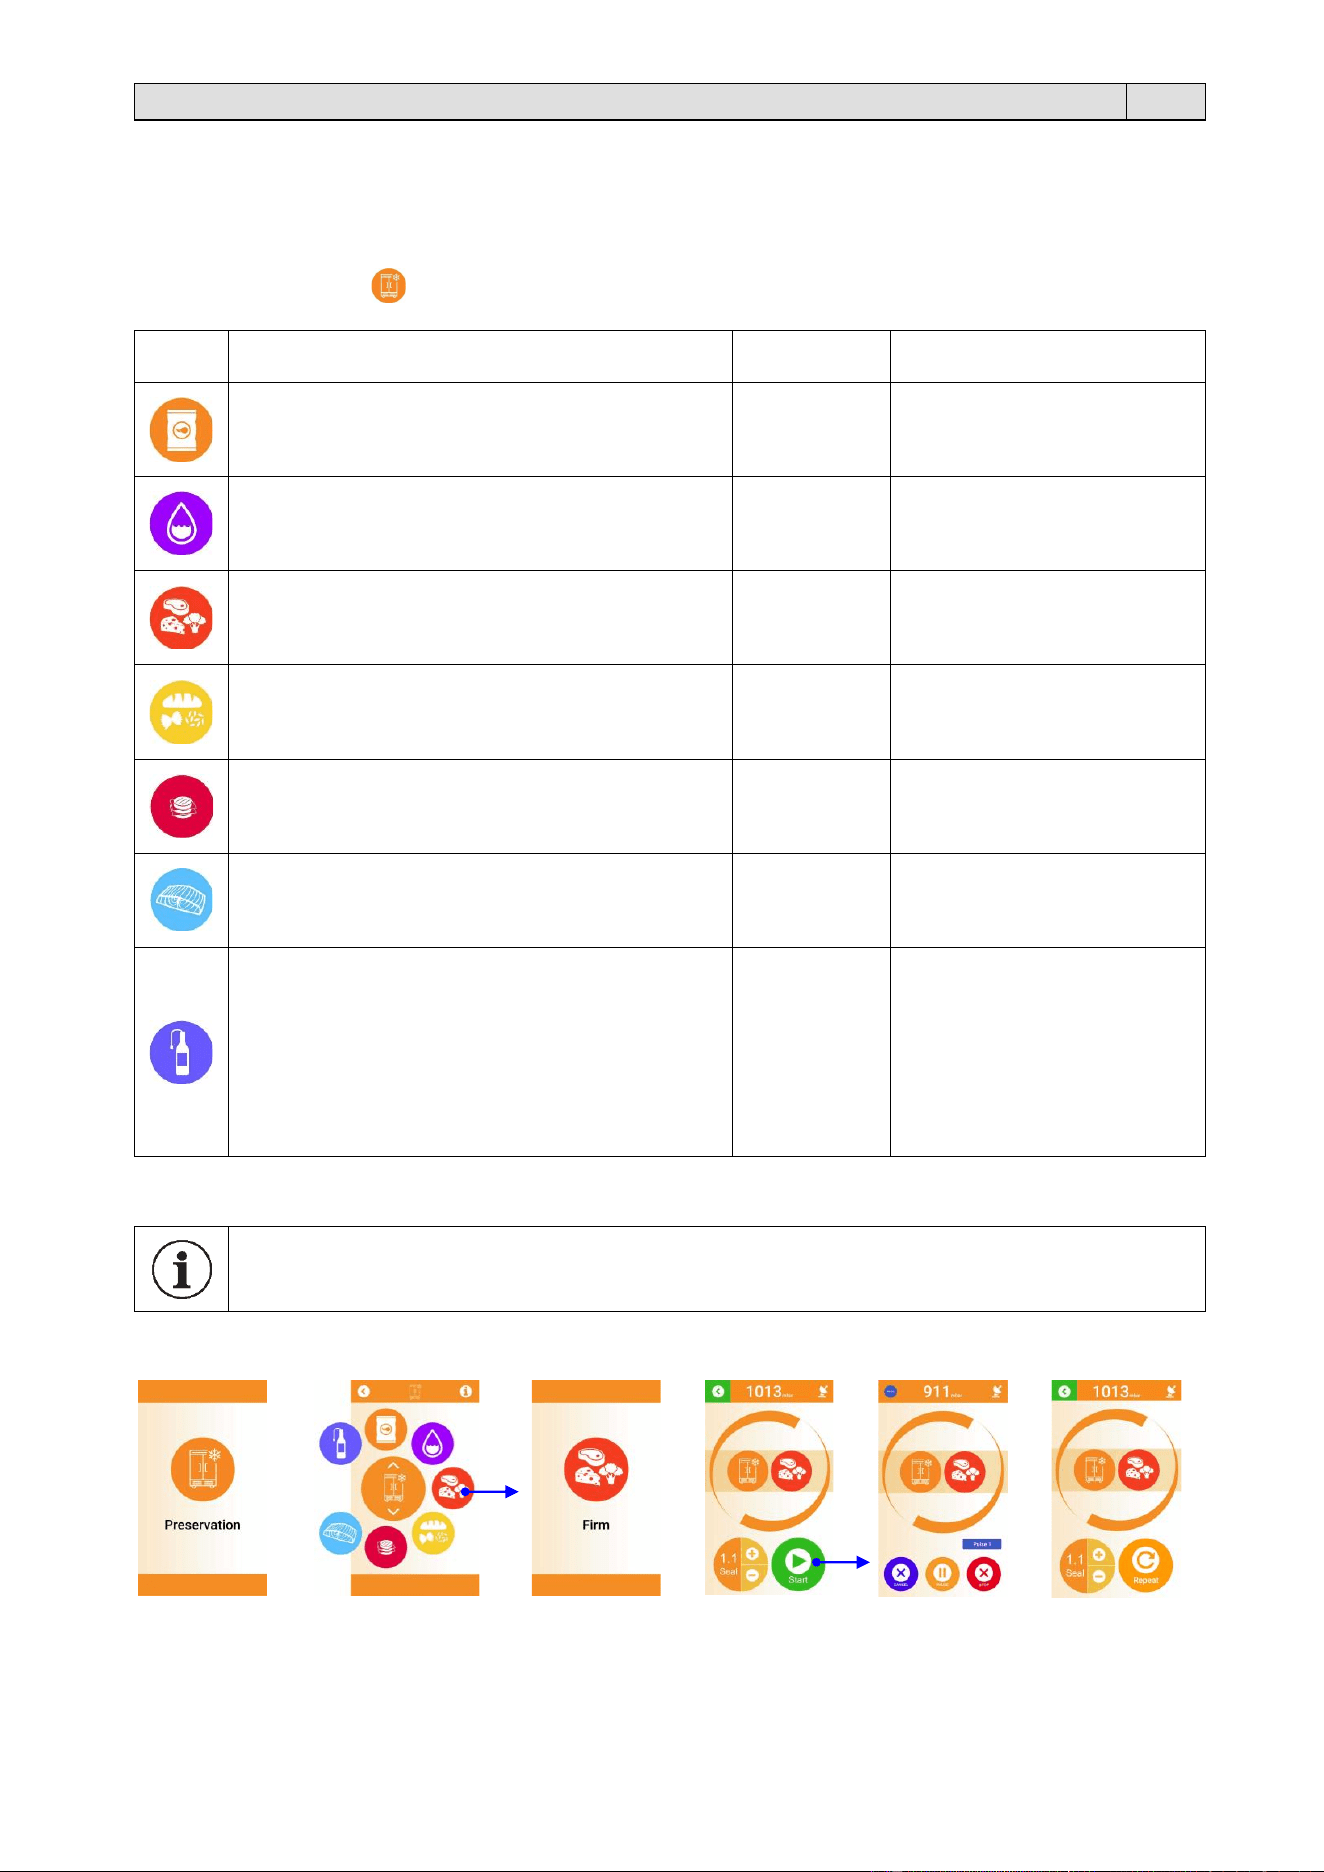
6.4.1. Conservazione
Consente di eseguire il confezionamento di alimenti sottovuoto in busta e/o vaschetta scegliendo tra 7 ricette standard,
programmate in funzione della tipologia dell’alimento da confezionare.
Dalla “Home page” premere il pulsante e scegliere la ricetta.
Ricetta
Confezione
Parametro impostabile
Patatine fritte
Busta
Tempo di saldatura: OFF / 0,1÷4 s
Default: 1,1 s
Liquido
Busta
Tempo di saldatura: OFF / 0,1÷4 s
Default: 1,1 s
Solido
Busta
Tempo di saldatura: OFF / 0,1÷4 s
Default: 1,1 s
Morbido
Busta
Tempo di saldatura: OFF / 0,1÷4 s
Default: 1,1 s
Hamburger / Salsicce
Busta
Tempo di saldatura: OFF / 0,1÷4 s
Default: 1,1 s
Fragile
Busta
Tempo di saldatura: OFF / 0,1÷4 s
Default: 1,1 s
Vuoto esterno
è la ricetta da utilizzare per l’eliminazione dell’aria
all’interno di speciali contenitori richiudibili
ermeticamente (non in dotazione con questa
apparecchiatura).
• Avvitare il raccordo (9), nell’ugello di
aspirazione (7) all’interno della vasca (4).
• Collegare il tubo del contenitore al raccordo
(9).
• Con il coperchio (6) dell’apparecchiatura
aperto premere il pulsante Start per avviare il
ciclo di confezionamento.
Contenitore
speciale
-
Il confezionamento sottovuoto allunga i tempi di conservazione degli alimenti.
Nel caso si vuole confezionare sottovuoto alimenti appena cotti, questi vanno prima refrigerati, possibilmente
mediante un abbattitore di temperatura.

13
Capitolo 6. Utilizzo
IT
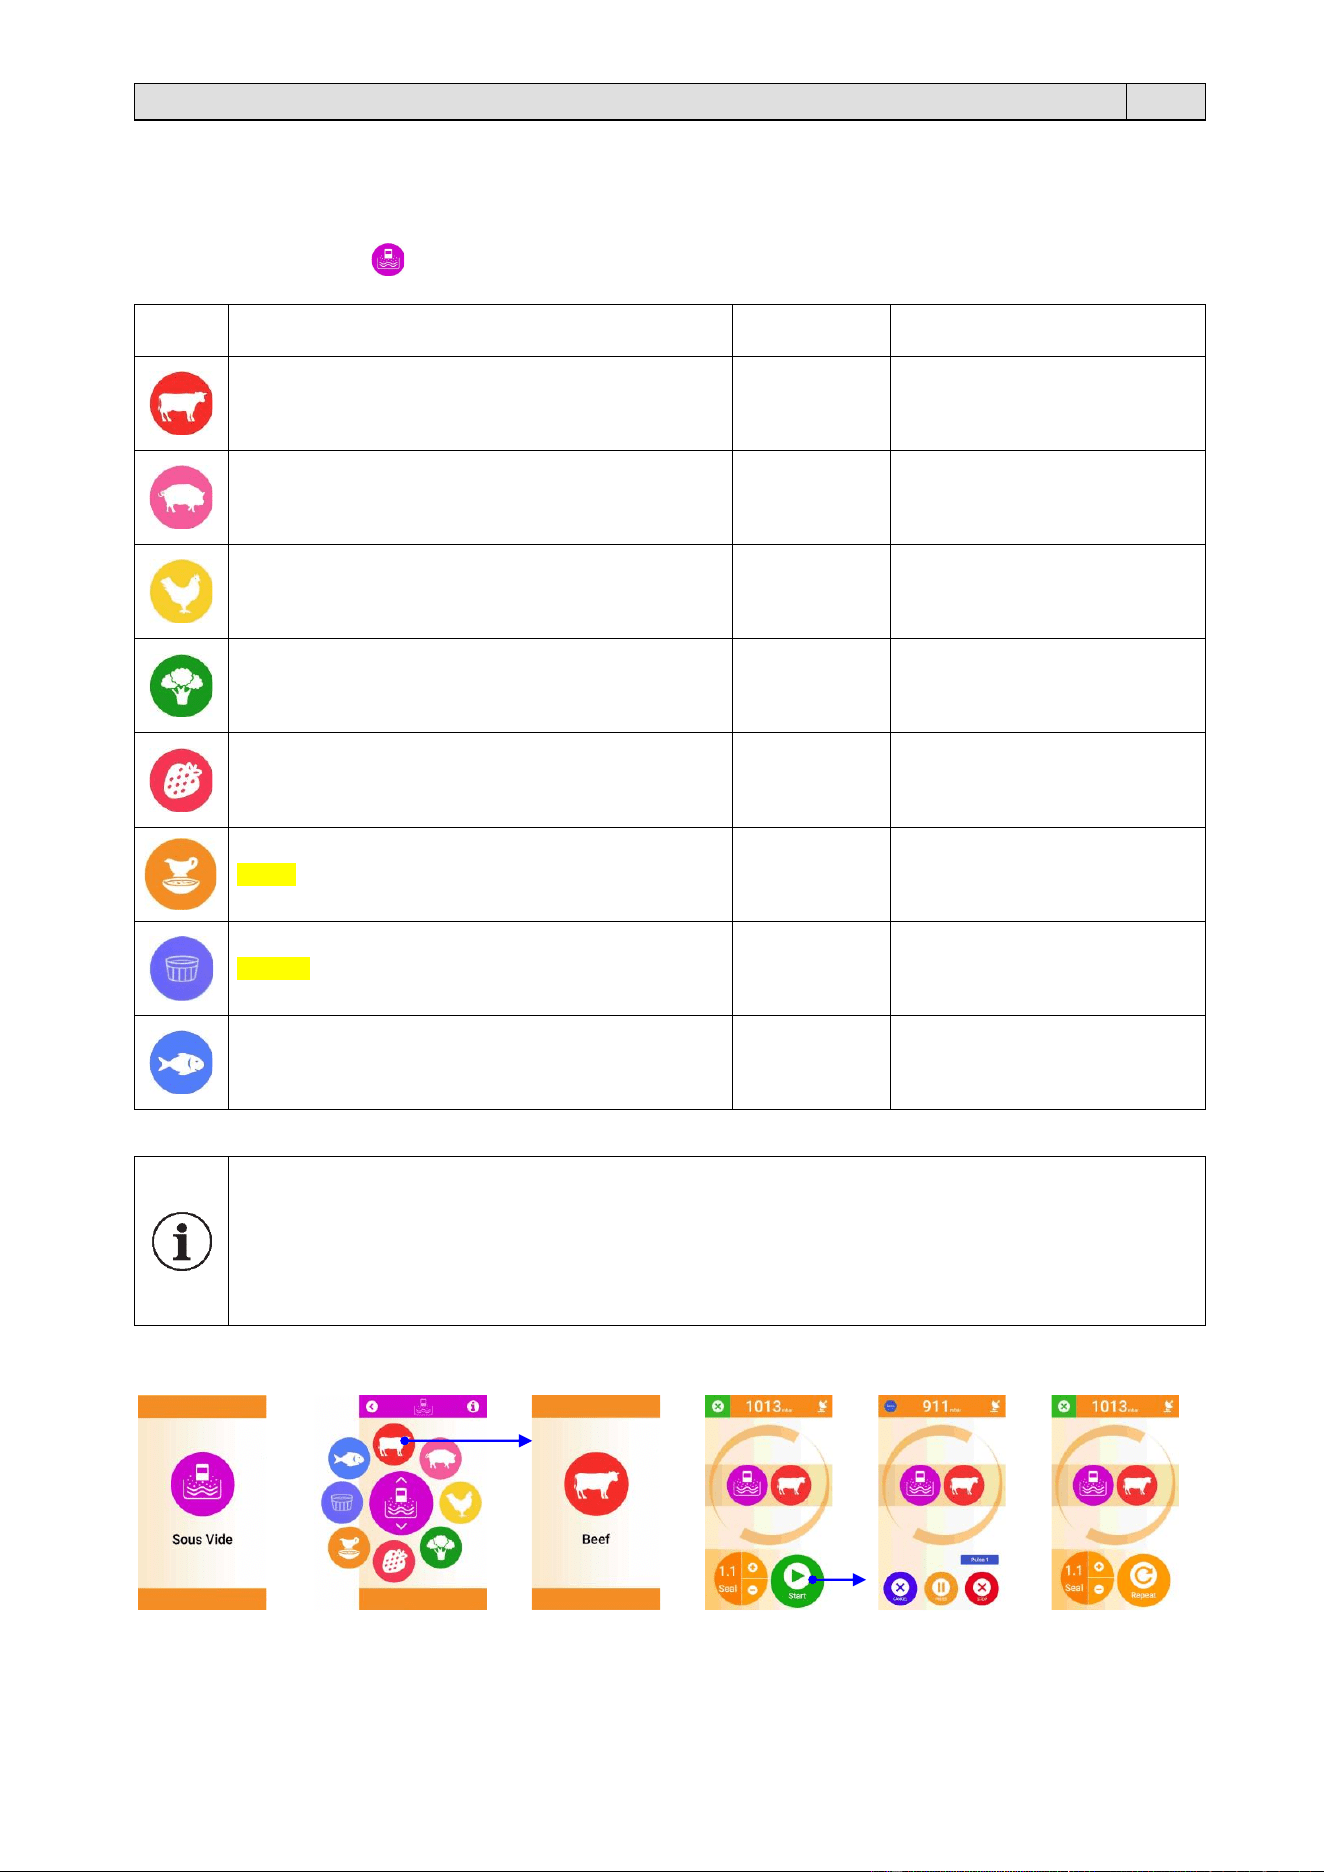
6.4.2. Sous Vide
Consente di eseguire il confezionamento di alimenti sottovuoto per la cottura a bassa temperatura “Sous Vide”.
A seconda dell’alimento è possibile scegliere tra 8 ricette standard, programmate in funzione della tipologia dell’alimento
da confezionare.
Dalla “Home page” premere il pulsante e scegliere la ricetta.
Ricetta
Confezione
Parametro impostabile
Manzo
Busta
Tempo di saldatura: OFF / 0,1÷4 s
Default: 1,1 s
Maiale
Busta
Tempo di saldatura: OFF / 0,1÷4 s
Default: 1,1 s
Pollame
Busta
Tempo di saldatura: OFF / 0,1÷4 s
Default: 1,1 s
Ortaggi
Busta
Tempo di saldatura: OFF / 0,1÷4 s
Default: 1,1 s
Frutta
Busta
Tempo di saldatura: OFF / 0,1÷4 s
Default: 1,1 s
Salsa
Busta
Tempo di saldatura: OFF / 0,1÷4 s
Default: 1,1 s
Dessert
Busta
Tempo di saldatura: OFF / 0,1÷4 s
Default: 1,1 s
Pesce
Busta
Tempo di saldatura: OFF / 0,1÷4 s
Default: 1,1 s
Questa tecnica prevede che gli alimenti sigillati nella busta sottovuoto siano poi cotti lentamente a basse
temperature.
I vantaggi sono innumerevoli:
• Il sapore e la consistenza del cibo rimangono inalterati.
• I sapori e i profumi vengono preservati in quanto gli aromi non vengono persi durante la cottura.
• La minore perdita di liquidi rende i cibi più morbidi e meno asciutti.
• Le proprietà nutritive come sali minerali e vitamine vengono preservati nell’alimento.
• Non è necessario aggiungere né oli né grassi per la cottura.

14
Capitolo 6. Utilizzo
IT
6.4.3. Marinatura
Consente di eseguire la ricetta per la marinatura degli alimenti.
Dalla “Home page” premere il pulsante .
Inserire il nome che si vuole
dare alla ricetta (facoltativo).
Premere .
Inserire l’elenco degli
ingredienti e la quantità
(facoltativo). Premere
Inserire le istruzioni per la
preparazione della ricetta
(facoltativo). Premere .
Impostare:
• numero di ripetizioni del
ciclo di marinatura (1÷7)
• tempo di sospensione tra
2 cicli successivi (10÷70
secondi)
Selezionare:
: se si vuole confezionare
in vaschetta.
: se si vuole confezionare
in busta.
In questo caso è possibile
impostare il tempo di
saldatura.
Premere:
: se si vuole salvare la ricetta.
: se si vuole eseguire il ciclo
di marinatura senza salvare
la ricetta.
Se avete premuto per
salvare la ricetta, il display
visualizza le 8 categorie
presenti in .
Selezionate la categoria in
cui verrà salvata la ricetta.
La ricetta è stata salvata.
Se si vuole eseguire il ciclo di
marinatura premere sul nome
della ricetta.
Dopo aver inserito l’alimento con la
marinata di aromi nella
busta/vaschetta e posizionata nella
vasca (4), premere per avviare
il ciclo di marinatura.
La marinatura sottovuoto degli alimenti risulta di grande vantaggio in cucina.
Confezionare sottovuoto un alimento con la marinata di aromi, permette ai componenti del condimento di
penetrare con maggior facilità e in minor tempo all’interno dei tessuti.

15
Capitolo 6. Utilizzo
IT
6.4.4. Infusione
Consente di eseguire la ricetta per ottenere un infuso.
Dalla “Home page” premere il pulsante e scegliere la ricetta.
Inserire il nome che si vuole
dare alla ricetta (facoltativo).
Premere .
Inserire l’elenco degli
ingredienti e la quantità
(facoltativo). Premere
Inserire le istruzioni per la
preparazione della ricetta
(facoltativo). Premere .
Impostare:
: Numero di cicli di infusione.
: Tempo di sospensione tra i
due cicli successivi.
: Tempo di attesa (misurato
dal termine della fase di
sospensione alla fase
successiva di rientro aria).
Selezionare:
: se si vuole confezionare
in vaschetta.
: se si vuole confezionare
in busta.
In questo caso è
possibile impostare il
tempo di saldatura.
Premere:
: se si vuole salvare la ricetta.
: se si vuole eseguire il ciclo
di infusione senza salvare la
ricetta.
Se avete premuto per
salvare la ricetta, il display
visualizza le 8 categorie
presenti in .
Selezionate la categoria in
cui verrà salvata la ricetta.
La ricetta è stata salvata.
Se si vuole eseguire il ciclo di
infusione premere sul nome
della ricetta.
Dopo aver inserito l’nfuso nella
busta/vaschetta e posizionata nella
vasca (4), premere per avviare
il ciclo di infusione.
L'infusione è il metodo utilizzato per estrarre le proprietà benefiche dagli elementi e si ottiene immergendo le
piante o alimenti in un liquido per un tempo più o meno lungo.

16
Capitolo 6. Utilizzo
IT
6.4.5. Le mie ricette
In questo menù è possibile:
• Creare una nuova ricetta
• Eseguire il ciclo di confezionamento delle ricette archiviate.
Quando si vuole creare una ricetta il display visualizza 8 categorie in cui è possibile salvare la ricetta a seconda
dell’alimento e del tipo di confezionamento.
Latticini
Bevande
Altro
Marinato
Infuso
In questa categoria sono già presenti 3 ricette standard:
Cold Brew: Ideale per ottenere una bevanda rinfrescante a base
di acqua con infusione di caffè.
Spa Water: Ideale per ottenere una bevanda rinfrescante a base
di acqua con infusione di frutta fresca ed erbe
aromatiche.
Sangria: Ideale per ottenere una bevanda rinfrescante a base di
vino con infusione di frutta fresca e spezie
Cereali
Frutta
Proteine
Verdure
Selezionare la categoria:
Premere il tasto .
Inserire il nome che si vuole dare alla
ricetta e premere . Nelle due
videate successive si possono
inserire gli ingredienti e istruzioni per
la preparazione della ricetta
(facoltativo). Premere .

17
Capitolo 6. Utilizzo
IT
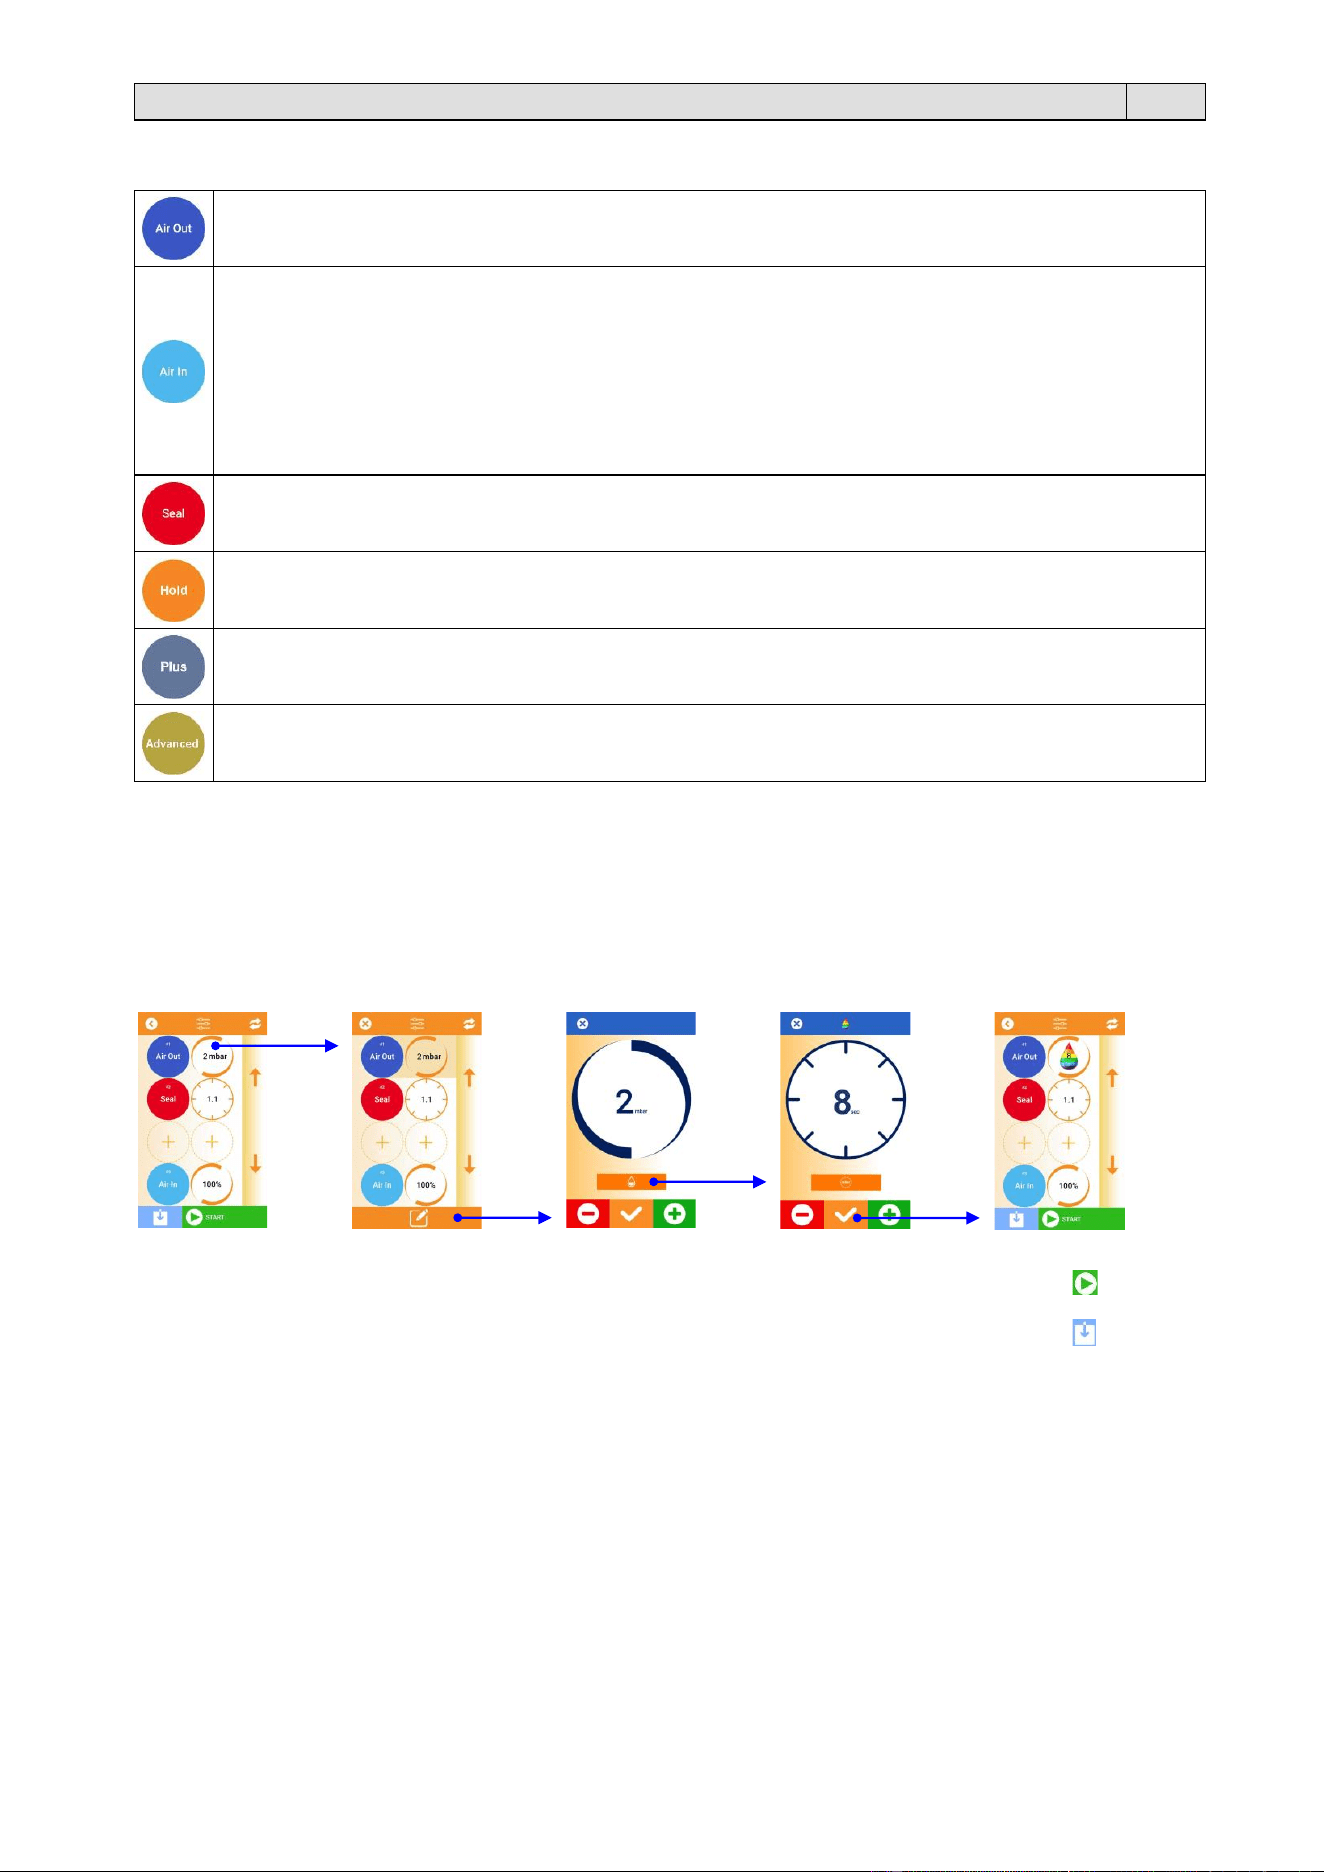
A questo punto viene chiesto di impostare i parametri della ricetta, che sono:
Uscita aria (Air Out)
Imposta la pressione che si vuole ottenere all’interno della vasca (4): 2÷735 mbar
0÷30 s (se attiva la funzione Liquidi)
Rientro aria (Air in)
Imposta la parzializzazione (nr. di cicli) del rientro dell’aria all’interno della vasca (4): 10% (10 cicli)
15% (7 cicli)
20% (4 cicli)
35% (3 cicli)
100% (1 ciclo)
Nota: oltre che come ultima fase del ciclo di confezionamento, è possibile inserire una fase di rientro aria
durante il ciclo (1÷95%).
Saldatura (Seal)
Imposta il tempo durante il quale viene eseguita la saldatura della busta: 0÷4 s
Sospendi (Hold)
Imposta il tempo di sospensione tra due fasi di confezionamento: 0÷10 min
Più (Plus)
Imposta il tempo, durante il ciclo di confezionamento, di un ulteriore estrazione dell’aria dalla vasca: 0÷10 min
Avanzate (Advanced)
Blocca busta, Rilascia busta
Confezionamento di alimenti liquidi
Nel caso di confezionamento di alimenti liquidi (es. ragù), si consiglia di attivare la funzione “liquidi”.
Durante il ciclo di sottovuoto questi alimenti possono andare in ebollizione.
Con la funzione attiva, il ciclo si arresta dopo il tempo di attesa (*) impostato e viene eseguita immediatamente la fase
successiva.
Impostare il tempo
di attesa (*) misurato
dalla fase di
ebollizione alla fase
successiva (0-30s).
A questo punto:
• premere per
eseguire il ciclo di
confezionamento
• premere per
salvare la ricetta.
18
Capitolo 6. Utilizzo
IT
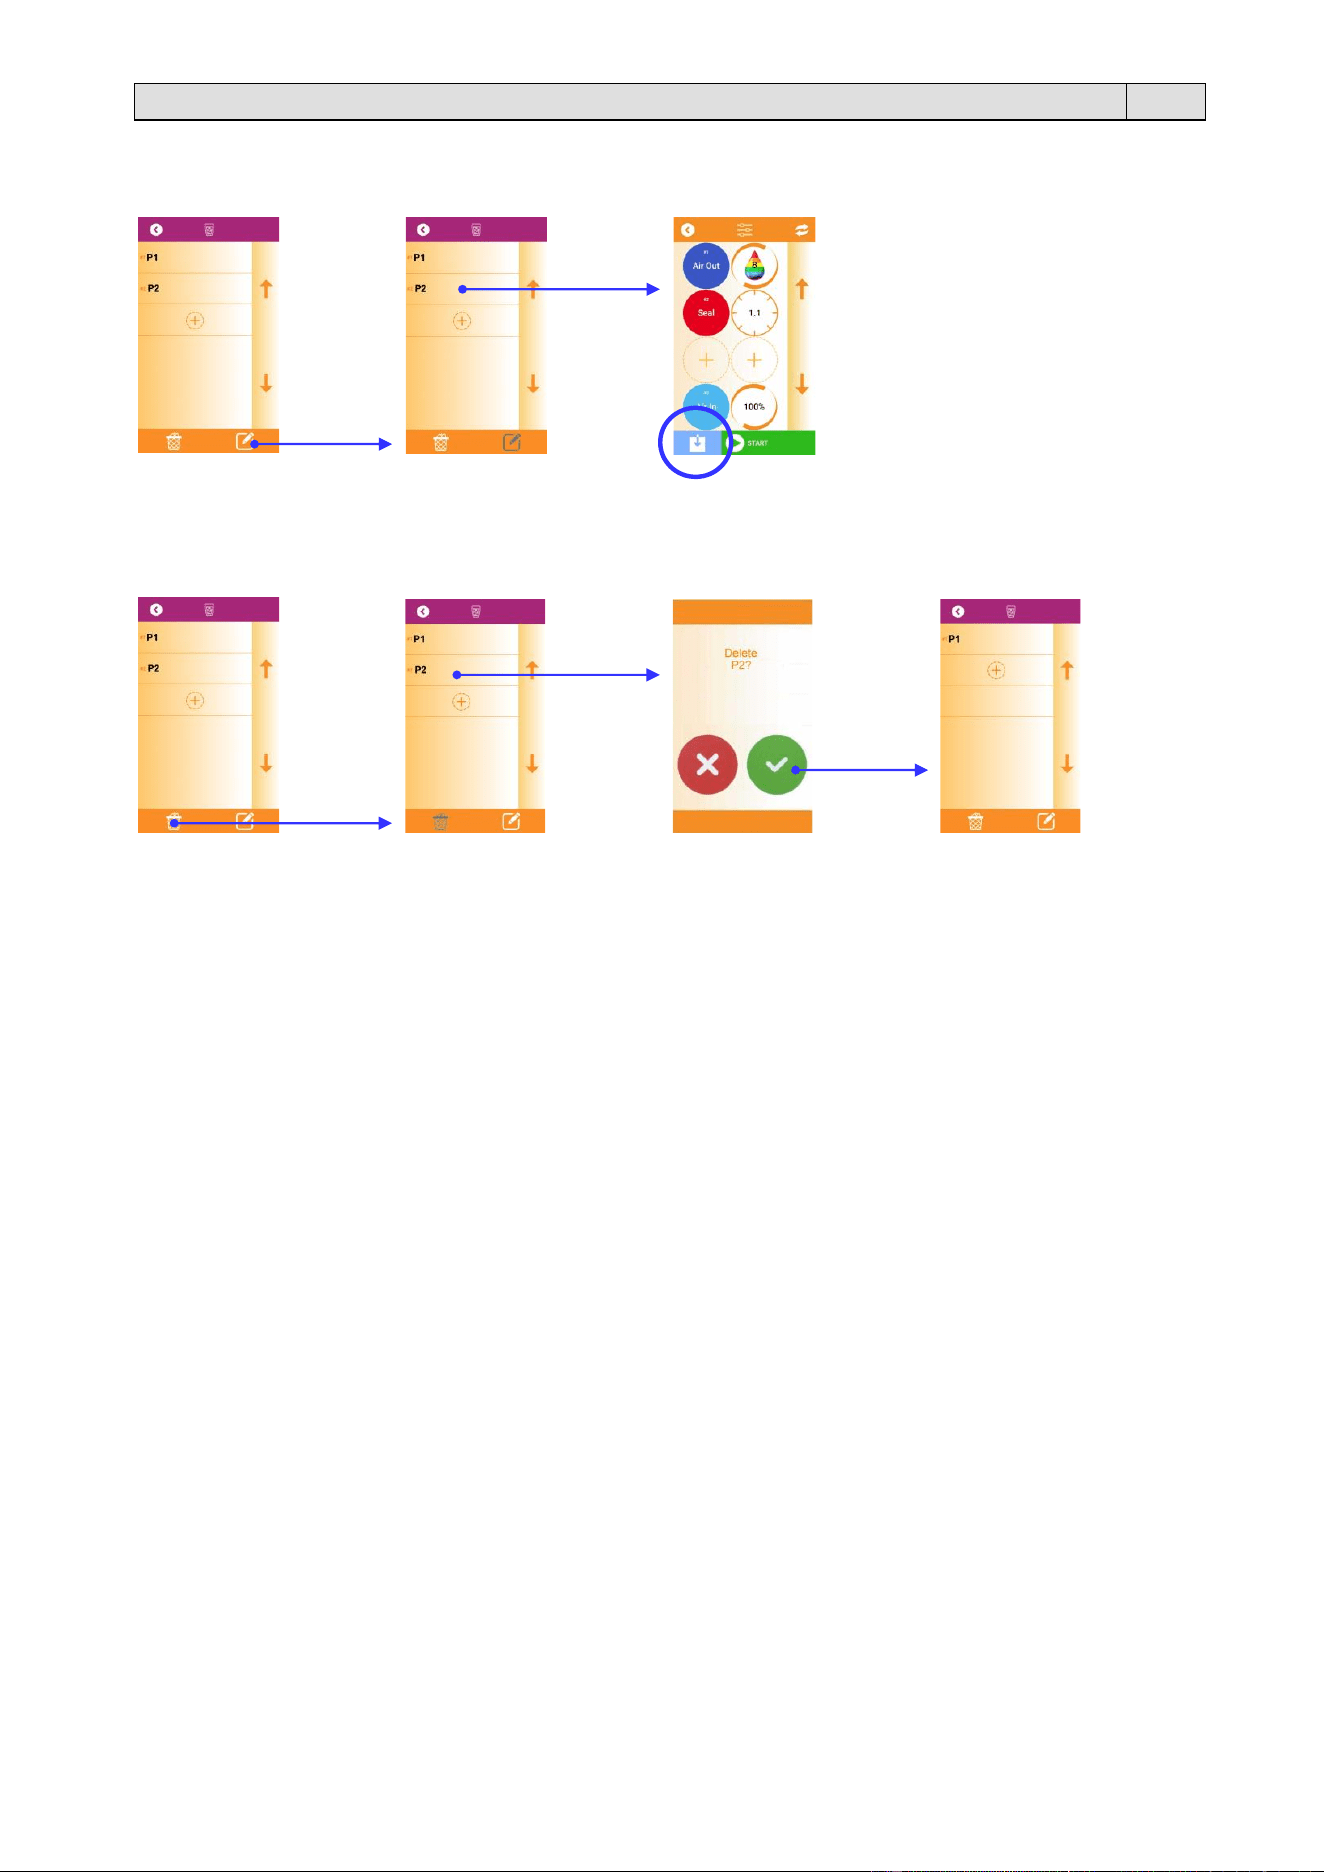
6.4.6. Modificare una ricetta
Per modificare una ricetta:
6.4.7. Cancellare una ricetta
Per cancellare una ricetta:

19
Capitolo 6. Utilizzo
IT
6.5. Setting
Impostazioni generali
In questo menù è possibile impostare le seguenti funzioni:
Ingredienti
Attiva/disattiva la visualizzazione, quando si crea una ricetta, della pagina in cui si possono inserire (quindi
memorizzare) quantità ed elenco degli ingredienti.
Istruzioni
Attiva/disattiva la visualizzazione, quando si crea una ricetta, della pagina in cui si possono inserire (quindi
memorizzare) le istruzioni per la preparazione della ricetta.
Tempo di saldatura
Permette di impostare il tempo di saldatura di “default” a seconda del tipo di busta utilizzata.
Il tempo impostato viene applicato per tutte le ricette.
È possibile impostare un tempo da 0,1 a 4,0 s. Il tempo di default impostato in fabbrica è 1,1 s.
Ciclo pulizia olio
Permette di programmare un ciclo di pulizia dell’olio con cadenza settimanale o mensile.
Cancella tutti i dati
Permette di cancellare le ricette salvate nel menù “Le mie ricette”.
Tono tattile
Attiva/disattiva il suono alla pressione dei pulsanti del display.
Impostazione screensaver
Attiva/disattiva lo screensaver.
Se attivo, permette la scelta dell’immagine che compare sul display.
Importa / Esporta
Permette di importare/esportare le ricette tramite una chiavetta USB.
Vac temporizzatore
Vac rapido
Riscaldamento
La funzione è da attivare se l’apparecchiatura lavora in ambienti molto freddi.
Ad ogni accensione dell’apparecchiatura, la pompa si accende in modo da garantire una temperatura ottimale dell’olio
contenuto nella pompa ed essere in temperatura già al primo ciclo di confezionamento.
20
Capitolo 6. Utilizzo
IT
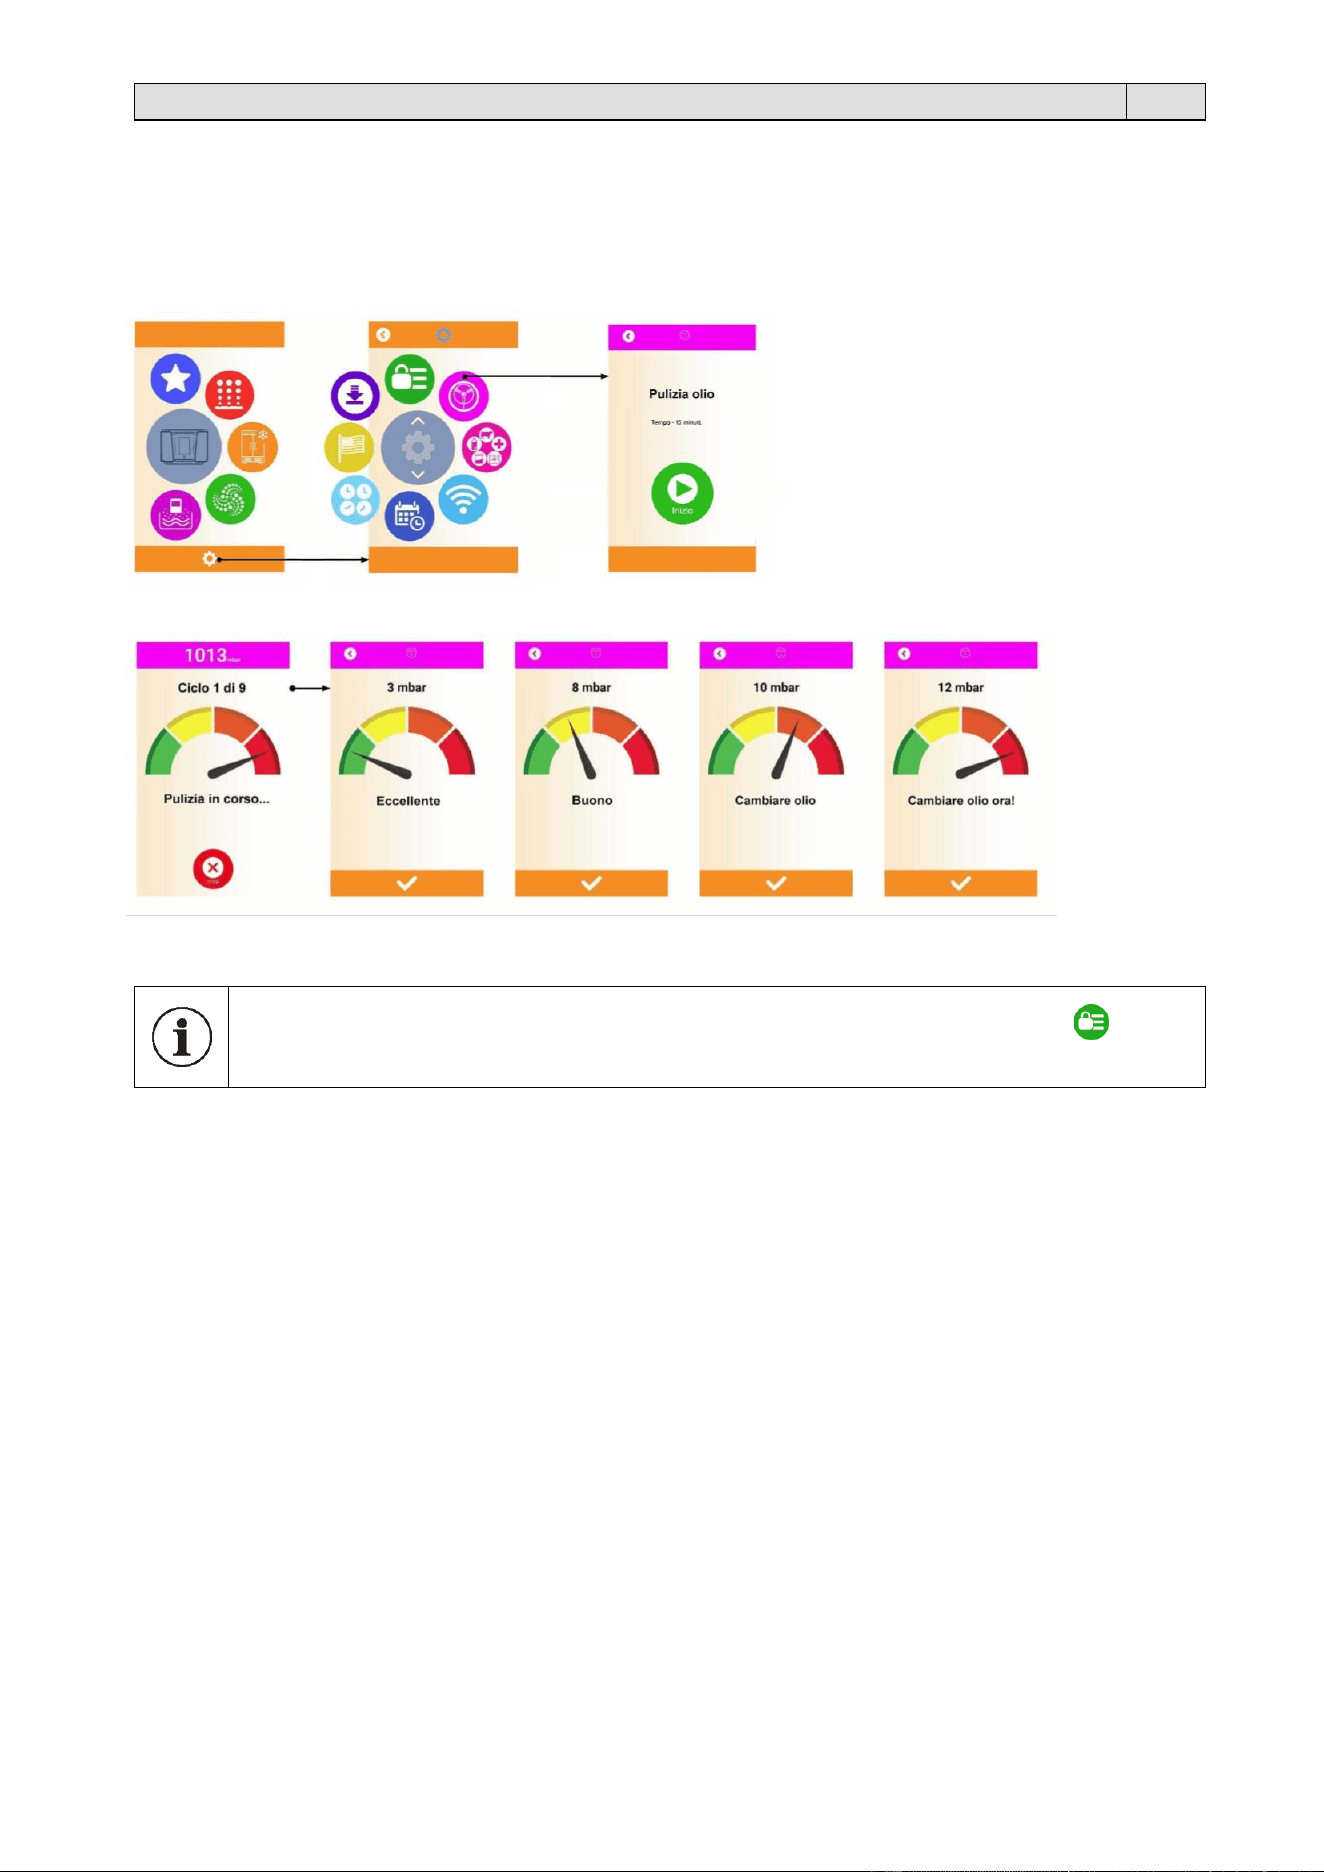
Pulizia olio
Permette di eseguire un ciclo di pulizia dell’olio della pompa.
Il ciclo di pulizia, della durata di circa 15 minuti, permette alla pompa di raggiungere temperature alte in modo che le
impurità contenute nell’olio evaporino.
Al termine del ciclo di pulizia il display visualizza la qualità dell’olio. Se è richiesto di cambiare l’olio contattare l’Assitenza
Tecnica.
È possibile programmare un ciclo di pulizia dell’olio con cadenza settimanale o mensile (menù ).
La pulizia regolare dell’olio della pompa è essenziale per garantirne un funzionamento corretto e prolungato.

21
Capitolo 6. Utilizzo
IT
Presets
Permette di visualizzare ( ) o nascondere ( ) una ricetta.
Esempio:
Se si nasconde il menù “Conservazione” , questo non
comparirà nella pagina iniziale.
Se invece nel menù “Conservazione” si nasconde la sola
ricetta “Solido”, questa non comparirà nell’elenco delle
ricette disponibili nel menù “Conservazione”.
WiFi
Permette la connessione alla rete WiFi.

22
Capitolo 6. Utilizzo
IT
Data/ora
Permette l’impostazione di data e ora.
Fuso orario
Permette l’impostazione del fuso orario.
Lingua
Permette la selezione della lingua di visualizzazione del display.
Update
Permette di verificare/installare un eventuale aggiornamento del software (necessaria la connessione alla rete WiFi).
23
Capitolo 7. Manutenzione ordinaria
IT
7.1. Pulizia e cura
Prima di effettuare le operazioni di manutenzione spegnere la macchina agendo sull’interruttore
generale e togliere la spina dalla presa di rete.
• Pulire l’apparecchiatura dopo ogni utilizzo con un
panno inumidito e morbido.
• Per la pulizia del coperchio in plexiglas (6), pulire sia
l’esterno che l’interno esclusivamente con detergenti
neutri (acqua e sapone).
• Non usare prodotti abrasivi, detergenti a base di
alcool, spugnette abrasive, solventi od oggetti
metallici.
• Nel caso in cui si usino prodotti per la pulizia della
vasca (4) in acciaio, attenersi alle istruzioni di
sicurezza indicate sulla confezione.
• Per la pulizia della vasca (4), soprattutto in caso di
residui liquidi, si consiglia di estrarre verso l’alto la
barra saldante (5).
• Pulire la barra saldante (5) con un panno asciutto.
Rimuovere eventuali residui che si depositano sulla
barra saldante (5).
• Pulire le superfici metalliche con normali detergenti
per l’acciaio inox.
• Mantenere pulito e asciutto il display (3).
MX 2
MX 4

24
Capitolo 7. Manutenzione ordinaria
IT
7.2. Soluzione dei problemi
Problema
Causa
Soluzione
La saldatura della
busta non è eseguita
correttamente
• Il tempo di saldatura non è corretto.
• La guarnizione del coperchio (6) è
sporca o usurata.
• La busta non è posizionata
correttamente sulla barra saldante (5).
• La barra saldante (5) è usurata (il
rivestimento in teflon è bruciato).
• La lama posizionata sotto il teflon della
barra saldante (5) è rotta.
• Modificare il tempo di saldatura.
• Pulire o sostituire la guarnizione del
coperchio (6) (per la sostituzione
contattare l’assistenza tecnica).
• Posizionare correttamente la busta.
• Sostituire la barra saldante (5) (per la
sostituzione contattare l’assistenza
tecnica).
• Sostituire la barra saldante (5) (per la
sostituzione contattare l’assistenza
tecnica).
Vuoto finale
insufficiente
• La percentuale di vuoto impostata non è
corretta.
• La guarnizione del coperchio (6) è
sporca o usurata.
• Il coperchio (6) non è chiuso
correttamente.
• Impurità presenti nell’olio della pompa.
• Modificare la percentuale di vuoto.
• Pulire o sostituire la guarnizione del
coperchio (6) (per la sostituzione
contattare l’assistenza tecnica).
• Chiudere correttamente il coperchio (6)
• Verificare che tra coperchio (6) e vasca (4)
del vuoto non ci siano oggetti o sporcizia.
• Eseguire un ciclo di “Pulizia olio” (vedi
paragrafo 6.4) e verificarne la qualità. Se
da sostituire, contattare l’Assistenza
Tecnica).
Il coperchio (6) non si
apre
• Mancanza dell’energia elettrica.
• Attendere il ripristino dell’energia elettrica.
Il coperchio (6)
presenta cricche o
rotture.
• Coperchio (6) danneggiato.
• Sostituire il coperchio (6) (per la
sostituzione contattare l’Assistenza
Tecnica).
Se dopo aver effettuato i suddetti controlli la macchina non dovesse funzionare ancora perfettamente, contattate
il servizio di assistenza descrivendo esattamente il difetto riscontrato.

25
Capitolo 8. Garanzia
IT
8.1. Certificato di garanzia
La Garanzia ha validità 12 mesi dalla data di installazione alle condizioni riportate sul libretto d’istruzioni. Compilare il retro
della cartolina in ogni sua parte, strappare lungo la linea e spedire.
8.2. Condizioni di garanzia
La garanzia è valida 12 mesi e decorre dalla data di installazione della macchina. La garanzia consiste nella sostituzione
o riparazione gratuita di tutte quelle parti riscontrate da noi difettose per anomalie di materiali. Le riparazioni o sostituzioni
avvengono normalmente presso la casa costruttrice con l’addebito all’acquirente delle spese di trasporto o manodopera.
Qualora le riparazioni o sostituzioni vengano eseguite presso la sede dell’acquirente, quest’ultimo sarà tenuto a pagare le
spese di viaggio, trasferta e manodopera. Le prestazioni di garanzia vengono eseguite esclusivamente a cura della casa
costruttrice o dal rivenditore autorizzato. Per avere diritto a prestazioni di garanzia inviare alla casa costruttrice od al
rivenditore autorizzato il pezzo difettoso, perché sia effettuata la riparazione o sostituzione. La riconsegna di tale pezzo
riparato o sostituito, rientrerà nell’adempimento delle operazioni di garanzia.
La garanzia viene annullata:
• per il mancato immediato invio postale del CERTIFICATO DI GARANZIA al momento dell’acquisto, debitamente
compilato e firmato entro 20 giorni
• per la errata installazione, la inadeguata alimentazione, negligenza d’uso e manomissione da parte di persone non
autorizzate
• per modifiche effettuate sulla macchina senza il consenso scritto della casa
• qualora la macchina non sia più proprietà del primo acquirente.
La casa costruttrice declina a termine di legge ogni responsabilità per danni a persone o cose qualora venga
effettuata un’errata installazione o collegamento alla rete di alimentazione elettrica o esclusione della messa a
terra od in caso di manomissioni della macchina stessa.
La casa costruttrice si riserva di approntare modifiche e cambiamenti secondo esigenze tecniche e di
funzionamento.
PER QUALUNQUE CONTROVERSIA LEGALE
IL FORO COMPETENTE È QUELLO DI BERGAMO (ITALIA).

26
TRANSLATION OF THE
ORIGINAL INSTRUCTIONS
Index
EN
Chapter 1.
Description
Page
1.1.
Preface..…………………………………......................………………………………
27
1.2.
Performances of the machine………................................……………….…….…...
27
1.3.
Machine description……………………………………………………………………..
28
1.4.
Technical data of the machine.....……………………………………….…………….
29
Chapter 2.
Pouches features
2.1.
Pouches to use.....................................……......………………………………….…
30
Chapter 3.
Machine usage conditions
3.1.
Items that may be packaged……………………………………………………….….
30
3.2.
Items not to be packed….........................……..……………………………….….…
30
Chapter 4.
Safety information
4.1.
Safety of children and vulnerable adults……………………………………………..
31
4.2.
Warnings on general safety……………………………………………………………
31
Chapter 5.
Safety instructions
5.1.
Installation………………………………………………………………………………..
32
5.2.
Environmental conditions………………………………………………………………
32
5.3.
Electrical connection……………………………………………………………………
33
5.4.
Use………………………………………………………………………………………..
33
5.5.
Cleaning and maintenance…………………………………………………………….
34
5.6.
Disassembling, demolition and elimination of residuals…………………………….
34
5.7.
Technical Assistance…………………………………………………………………..
34
Chapter 6.
Use
6.1.
Cleaning for the first time……………………………………………………………….
35
6.2.
First start-up…………………………………………………………………………….
35
6.3.
Daily use…………………………………………………………………………………
35
6.4.
Recipes…………………………………………………………………………………..
37
6.5.
Setting…………………………………………………………………………………….
44
Chapter 7.
Ordinary maintenance
7.1.
Cleaning and maintenance…………………………………………………………….
48
7.2.
Problem solving………………………………………………………………………….
49
Chapter 8.
Guarantee
8.1.
Certificate of guarantee...............................….………………………………….…..
50
8.2.
Guarantee conditions..................................…………………………………….……
50
CE declaration of conformity………………………………………………………….
76

27
Chapter 1. Description
EN
1.1. Preface
This manual has been drawn up in compliance with the UNI 10893 standard dated July 2000. It is meant for all users in
order to enable them to use the machine correctly. Keep it in a place which can be easily accessed in the proximity of the
machine and which is known to all users. This manual is an integral part of the machine for safety reasons. We wish to
specify the symbols in use here below in order to improve their understanding.
ATTENTION:
Accident prevention rules for the operator. This warning indicates the presence of dangers which can
injure the person operating on the machine.
ATTENTION:
Hot parts. Shows the danger of burning, thus involving the risk of a serious accident for the exposed
person.
Information and general recommendations.
All reproduction rights of this manual are reserved to the manufacturer. Partial or complete reproduction is forbidden as
provided by the law. Descriptions and pictures provided in this manual are not binding. Therefore, the manufacturer,
reserves the right to make any change considered necessary. This manual cannot be transferred for viewing to third parties
without authorisation in writing from the manufacturing company.
1.2. Performances of the machine
This product is ideal for:
• Vacuum food packaging for “SousVide” low temperature cooking.
• Vacuum packaging for food preservation.
• Food marinade.
• Food infusion.

28
Chapter 1. Description
EN
1.3. Machine description
MX 2
MX 4
MX 2
MX 4
1) Main switch
2) ON/OFF button
3) Display
4) Tank
5) Sealing bar
6) Cover
7) Suction nozzle
8) Pouch support
8.1) Corner to position pouches with liquids
9) Fitting for external vacuum
10) Pouches for freezing, cooking and storage
(N. 25 20x30 cm)
2) ON/OFF button
3) Display
4) Tank
5) Sealing bar
6) Cover
7) Suction nozzle
8) Table
9) Fitting for external vacuum
29
Chapter 1. Description
EN
1.4. Technical data of the machine
MX 2
Package weight and sizes
Width = 535 mm
Length = 420 mm
Height = 310 mm
Weight = 25 kg
Machine weight
Weight = 22 kg
Vacuum pump = 4 m³
MX 4
Package weight and sizes
Width = 760 mm
Length = 690 mm
Height = 715 mm
Weight = 25 kg
Machine weight
Weight = 22 kg
Vacuum pump = 16 m³ (230V version) / 20 m³ (120V version)
30
Chapter 2. Pouches features
EN
2.1. Pouches to use
• It is recommended to use original pouches.
• It is recommended to refer to the technical and safety sheets of the pouches in use and to observe
the corresponding instructions!
MX 2
The pouches provided are ideal for freezing, storage and cooking vacuum packed food at low temperatures.
Pouches order code: KR220102
25 pouches for freezing, vacuum cooking and storage (dimensions: 20x30 cm - 90 µm)
MX 4
They may be of different thickness (85÷200µm) and shall be both airtight and gastight. Only food packaging pouches can
be used. The following table indicates the maximum dimensions of the pouches that can be used with the various machine
models.
Machine
Pouch width open side
Pouch length closed side
MX 4 (front bar)
450mm
430mm
MX 4 (side bar)
450mm
375mm
The following table indicates the min/max temperature limits the pouches can undergo to.
Type of pouch
Minimum temperature
Maximum temperature
for cooking
-15°C
+120°C for 30 minutes
for storage
-20°C
+70°C for 2 hours; +100°C for 15 minutes.
Chapter 3. Machine usage conditions
EN
3.1. Items that may be packaged
This machine can be used to pack the majority of foodstuffs, including: fruit, fish products, dairy products, meat,
delicatessen, oven ready products, gastronomic products, dried products, liquid food (soup, cream, sauce), etc.
3.2. Items not to be packed
It is strictly forbidden to package the following types of products to prevent permanently damaging the machine, as well as
causing risks of injury to the user:
• Inflammable and explosive materials
• Gas bottles under pressure or of any type
• Any material and product which might in any way cause the user to be in a dangerous situation
and damage the machine.

31
Chapter 4. Safety information
EN
Carefully read the instructions before installing and using the appliance. The manufacturer is not liable for improper
installation and use of the appliance that may cause injuries and damage. Always keep the instructions available for future
reference.
4.1. Safety of children and vulnerable adults
• This appliance can be used by children aged 8 years and above and persons with reduced physical, sensory or mental
capabilities or lack of experience and knowledge only if they are given supervision or trained on how to use the
appliance in a safe way and understand the hazards involved.
• Children should not play with the appliance.
• Keep packaging materials away from children.
• Keep children and pets away from the appliance during operation.
• Children under the age of 3 years must be ket away unless constantly supervised.
4.2. Warnings on general safety
• Only qualified personnel can install the appliance and replace the cables.
• Disconnect the appliance from the power supply before carrying out any maintenance operation.
• Do not use steam cleaners to clean the appliance.
• Do not use abrasive detergents or metal scrapers to clean the appliance.
• If the supply cord is damaged, it must be replaced by a special cord or assembly available from the manufacturer or
its service agent.
32
Chapter 5. Safety instructions
EN
5.1. Installation
• The appliance must be installed by qualified personnel only!
• Handle with great care during transport and positioning!
Before any movement, make sure that the lifting means is suitable for the load to be lifted!
If carrying by hand, the current legislation determines the weight limit that a person can lift (see the
following table).
Therefore, depending on the weight to be lifted (see paragraph 1.4) and the operator who lifts,
several people are needed.
MAX WEIGHT TO BE LIFTED
AGE
MALE
AGE
> 18 YEARS OLD
30
> 18 YEARS OLD
15-18 YEARS OLD
20
15-18 YEARS OLD
• Remove the packaging material.
• Do not install or use the appliance if damaged.
• Comply with the instructions supplied with the appliance.
• Always pay attention when moving the appliance. Always wear safety gloves.
• Do not turn the appliance upside down or tilt it! This may cause oil to leak from the pump and damage the equipment.
• Remove the red cap from the pump and mount the filter before use (for MX 2 only).
5.2. Environmental conditions
• Lift the machine and place it on the working surface. Make sure the machine is placed in a proper environment without
any inflammable and explosive materials or gas. The machine may only be installed on smooth, flat non-inflammable
surfaces.
Working environmental conditions:
• Temperature from + 5°C to + 40°C.
• Relative humidity from 30% to 90%, without condensation.
The lighting of the operation room shall comply with the laws in force in the country where the machine is installed.
However, it shall be uniform and provide for good visibility in order to safeguard the operator’s safety and health.
MACHINE SAFETY FACTOR = IP20
THE AERIAL NOISE MADE BY THE MACHINE IS LOWER THAN 70 dB(A)
33
Chapter 5. Safety instructions
EN
5.3. Electrical connection
Risk of fire and electric shock.
• All the electrical connections must be made by a qualified electrician.
• The appliance must be earthed.
• Do not use multi-plug adapters or extension cables.
• Connect the mains plug to the mains socket only once installation has been completed.
• Do not connect the mains plug if the mains socket is loose.
• Do not pull the mains cable to disconnect the appliance. Pull only the mains plug.
Make sure that all the electrical data shown on the data plate correspond to those of the system.
Otherwise, contact an electrician.
Note: when contacting the Manufacturer, always indicate the model and the serial number
specified on the plate on the rear part of the machine.
The power line must be protected with a type A residual current device with rated residual current equal to
“IΔn”, 30 mA.
As a result, the maximum resistance of the earth electrode must correspond to the values indicated in the
following table.
IΔn
Maximum resistance of the earth electrode
(50 V)
(25 V)
3 A
16 Ω
8 Ω
1 A
50 Ω
25 Ω
500 mA
100 Ω
50 Ω
300 mA
166 Ω
83 Ω
30 mA
1666 Ω
833 Ω
5.4. Use
Risk of injury, burns, electric shock or explosion.
• Do not touch the sealing bar after use. Residual heat can cause burns.
• Do not modify the specifications of this appliance.
• Do not leave the appliance unattended during operation.
• Turn the appliance off after use.
• Do not use the appliance with wet hands or when it could come into contact with water.
• Do not use the appliance as a work surface or as a support surface.
• Do not place or keep flammable liquids, materials or objects on the appliance, or inside or close to it.
• Do not proceed with packaging if the cover (6) has cracks or is broken.
You may damage the appliance.
• Pay attention when you remove or insert the accessories.
• Do not force the cover (6) open during the work cycle.
• Do not force the cover (6) open during the work cycle in the case of a power cut.
• Do not place any weight on the cover (6).
• Prevent any object from falling on the cover (6)! This can compromise the integrity, causing cracks or damage.
34
Chapter 5. Safety instructions
EN
Pay attention to the safety stickers on the machine:
▪ On the power input.
ATTENTION! Periodically check the correct insulation of the power cable and the integrity of the
socket. During machine operation, the inspection panels to the electric system must be correctly
fitted.
▪ On the sealing bar (5) positioned inside the tank (4).
▪ On the vacuum pump positioned inside the machine.
ATTENTION! Hot members. It shows the danger of burning, thus involving the risk of a serious
accident for the exposed person.
▪ On the cover (6).
ATTENTION! Indicates how to clean the lid to prevent damaging it and reducing its
transparency or strength.
5.5. Cleaning and maintenance
There is a risk of injury, fire or damage.
• Before carrying out any maintenance operation, turn the appliance off and disconnect the plug from the mains socket.
• Check that the appliance is cold.
5.6. Disassembling, demolition and elimination of residuals
ATTENTION!
All operations about disassembling and demolition must be done by qualified personnel with mechanical and
electrical expertise required to work in security conditions.
Proceed as follows:
• disconnect machine from power mains
• disassemble components
• drain the oil from the pump.
All wastes must be treated, eliminated or recycled according to their classification and to the procedures in force
established by the laws in force in the country the equipment has been installed.
The symbol indicates that this product shall not be treated as household waste.
By assuring that the product will be properly disposed of, you will facilitate the prevention of potential negative
effects for the environment and the man’s health, which might be otherwise caused by the improper waste
treatment of this product.
For more detailed information about the recycling of this product, please contact the product seller or, as an
alternative, the after-sales service or the corresponding waste treatment service.
5.7. Technical Assistance
• Contact the authorised Assistance Centre to repair the appliance.
• Only use original spare parts.

35
Chapter 6. Use
EN
6.1. Cleaning for the first time
• Refer to the 7.1. "Cleaning and maintenance" paragraph.
• Wipe all parts with a damp cloth before the first use.
6.2. First start-up
Set the main switch (1), located on the rear of the machine (for MX 2 only).
Turn the appliance on by holding down the button for at least 1 second.
The display (3) lights up and the following is requested in sequence:
• Calibration of the display.
• Language selection.
• Time zone setting (in automatic mode via connection to the Wi-Fi network, or in manual mode).
6.3. Daily use
Turn the appliance on by holding down the button for at least 1 second.
Wait until the “Home page” appears on the display (3).
Mine
It enables to create/store new recipes and then run the packaging cycle.
Marination
It allows you to run the recipe for marinating food.
You can create/store your new recipes in the menu.
Preservation
It allows you to pack vacuum-packed foods in pouches and/or trays choosing
from 7 standard recipes, programmed according to the type of food to be
packaged.
Infusion
It allows you to prepare an infusion.
You can create/store your new recipes in the menu.
Sous Vide
It allows you to pack vacuum-packed foods for “Sous Vide” low temperature
cooking.
Depending on the food, you can choose from 8 standard recipes, programmed
according to the type of food to be packaged.
• Select the desired packaging recipe (see par. 6.4).
• Lift the cover (6) and place the pouch containing the food to be packed inside the tank (4), leaving at least 2 cm
beyond the sealing bar (5).
If the “GAS” function is on, the pouch must be positioned with the strip open on the gas nozzle on one side of the
sealing bar.
It is important not to soil the pouch in the sealing area so as to guarantee a perfect seal. For this reason, it is advisable
to fold the inner side of the pouch outwards by 4-5 cm. Once the food is inserted, fold the pouch again in its initial
condition.
• Close the cover (6) by pressing gently and press the Start button. The packaging cycle will then start.
• At the end of the cycle, open the cover (6) and remove the pouch.
• After use, turn off the appliance by pressing .
36
Chapter 6. Use
EN
MX 2
Depending on the type of food to be packaged, use the pouch support (8) as shown in the diagram below.
Using the support (8) helps position the pouch better with respect to the sealing bar (5).
Packaging large-sized
foods
Packaging small-sized
foods
In the case of packaged liquids in pouches, place the pouch support (8) as shown in the diagram below.
If "reduced length" pouches are used, use the corner (8.1) to facilitate its correct positioning.
OK
OK
NO
MX 4
Depending on the type of food to be packaged, use the table/s (8) as shown in the diagram below.
Using the tables (8) helps position the pouch better with respect to the sealing bar (5).
OK
NO
37
Chapter 6. Use
EN
6.4. Recipes
6.4.1. Preservation
It allows you to pack vacuum-packed foods in pouches and/or trays choosing from 7 standard recipes, programmed
according to the type of food to be packaged.
From the home page press and select the recipe.
Recipe
Package
Settable parameter
Chips
Pouch
Sealing time: OFF / 0,1÷4 s
Default: 1,1 s
Liquid
Pouch
Sealing time: OFF / 0,1÷4 s
Default: 1,1 s
Firm
Pouch
Sealing time: OFF / 0,1÷4 s
Default: 1,1 s
Soft
Pouch
Sealing time: OFF / 0,1÷4 s
Default: 1,1 s
Formed
Pouch
Sealing time: OFF / 0,1÷4 s
Default: 1,1 s
Fragile
Pouch
Sealing time: OFF / 0,1÷4 s
Default: 1,1 s
External
It is to be used to eliminate the air inside special air-
tight containers (not supplied with this appliance).
• Tighten the fitting (9), into the suction nozzle (7)
inside the tank (4).
• Connect the container pipe to the fitting (9).
• With the appliance cover (6) open press the
button to start the packaging cycle.
Special
containers
-
Vacuum packing extends food preservation.
If you wish to vacuum pack freshly cooked food, it must first be chilled, possibly using a blast chiller.
38
Chapter 6. Use
EN
6.4.2 Sous Vide
It allows you to pack vacuum-packed foods for “Sous Vide” low temperature cooking.
Depending on the food, you can choose from 8 standard recipes, programmed according to the type of food to be
packaged.
From the home page press and select the recipe.
Recipe
Package
Settable parameter
Beef
Pouch
Sealing time: OFF / 0,1÷4 s
Default: 1,1 s
Pork
Pouch
Sealing time: OFF / 0,1÷4 s
Default: 1,1 s
Poultry
Pouch
Sealing time: OFF / 0,1÷4 s
Default: 1,1 s
Vegetable
Pouch
Sealing time: OFF / 0,1÷4 s
Default: 1,1 s
Fruit
Pouch
Sealing time: OFF / 0,1÷4 s
Default: 1,1 s
Sauce
Pouch
Sealing time: OFF / 0,1÷4 s
Default: 1,1
Dessert
Pouch
Sealing time: OFF / 0,1÷4 s
Default: 1,1
Fish
Pouch
Sealing time: OFF / 0,1÷4 s
Default: 1,1 s
With this method, the food sealed in the vacuum pouch is then cooked slowly at low temperature.
The benefits provided are many:
• The flavour and texture remains unaltered.
• Both flavour and aromas are preserved, as the cooking process does not disperse them.
• The reduced loss of liquid makes the food softer and moister.
• Nutrients are preserved.
• You don’t need to add oils or fats for cooking.

39
Chapter 6. Use
EN
6.4.3. Marination
It allows you to run the recipe for marinating food.
From the home page press .
Enter the name you want to
assign to the recipe (optional).
Press .
Enter the list of
ingredients and the
quantity (optional).
Press
Enter the instructions for
preparing the recipe (optional).
Press .
Set:
• number of repetitions of the
marinating cycle (1-7)
• pause time between 2
subsequent cycles (10-70
seconds)
Select:
: if you want to pack in a
tray.
: if you want to pack in a
pouch.
In this case it is possible
to set the sealing time.
Press:
: if you want to save the
recipe.
: if you want to run the
marinating cycle without
saving the recipe.
If you have pressed to
save the recipe, the display
shows the 8 categories in .
Select the category in
which the recipe will be saved.
The recipe has been saved.
If you want to run the
marinating cycle press the
name of the recipe.
After inserting the food with the
marinade in the pouch/tray and
positioning it in the tank (4), press
to start the marinating cycle.
Vacuum-marinating food offers great cooking advantages.
Vacuum-packing food with a marinade allows the seasoning to penetrate into the tissues more easily and in
less time.

40
Chapter 6. Use
EN
6.4.4. Infusion
Allows you to run the recipe to prepare an infusion.
From the home page press and select the recipe.
Enter the name you want to
assign to the recipe (optional).
Press .
Enter the list of
ingredients and the
quantity (optional).
Press
Enter the instructions for
preparing the recipe (optional).
Press .
Set:
: Number of infusion cycles.
: Pause time between two
subsequent cycles.
: Stand-by time (measured
from the end of the pause
phase to the subsequent
air return phase).
Select:
: if you want to pack in a
tray.
: if you want to pack in a
pouch.
In this case it is possible
to set the sealing time.
Press:
: if you want to save the
recipe.
: if you want to run the
infusion cycle without
saving the recipe.
If you have pressed to
save the recipe, the display
shows the 8 categories in .
Select the category in
which the recipe will be saved.
The recipe has been saved.
If you want to run the infusion
cycle press the name of the
recipe.
After inserting the infusion in the
pouch/tray and positioning it in the
tank (4), press to start the
infusion cycle.
Infusion is the method used to extract beneficial properties from the elements and is obtained by soaking
plants or foods in a liquid for a certain period of time.

41
Chapter 6. Use
EN
6.4.5. Mine
In this menu you can:
• Create a new recipe
• Run the packaging cycle of the stored recipes.
When you want to create a recipe, the display shows 8 categories in which you can save the recipe according to the food
and the type of packaging.
Dairy
Beverages
Other
Marinated
Infused
In this category there are already 3 standard recipes:
Cold Brew: Ideal for a refreshing water-based drink with a coffee
infusion.
Spa Water: Ideal for a refreshing wine-based drink with an infusion
of fresh fruit and aromatic herbs.
Sangria: Ideal for a refreshing wine-based drink with an infusion
of fresh fruit and spices.
Grains
Fruits
Protein
Vegetables
Select the category:
Press .
Enter the name you want to give to
the recipe and press . In the two
following screens you can enter the
ingredients and instructions for
preparing the recipe (optional).
Press .
42
Chapter 6. Use
EN
At this point you are asked to set the recipe parameters, which are:
Air Out
Sets the required pressure inside the tank (4): 2-735 mbar
0-30 s (if the Liquids function is enabled)
Air in
Sets the partialisation (number of cycles) for the return of air inside the tank (4): 10% (10 cycles)
15% (7 cycles)
20% (4 cycles)
35% (3 cycles)
100% (1 cycle)
Note: it is possible to add an air return phase during the cycle (1-95%) as well as during the last stage of the
packaging cycle.
Seal
Sets the time during which the pouch is sealed: 0-4 s
Hold
Sets the pause time between two packaging stages: 0-10 min
Plus
Sets the time, during the packaging cycle, for additional extraction of air from the tank: 0-10 min
Advanced
Pinch Pouch, Releases Pouch
Packaging liquid food
It is advisable to activate the “liquids” feature for packaging liquid food (e.g. ragù).
This type of food can reach boiling point during the vacuum cycle.
With the function active, the cycle stops after the set stand-by time (*) and the next phase is performed immediately.
Set the timeout (*)
between the
boiling stage and
the next stage
(0-30 s).
At this point:
• press to run the
packaging cycle
• press to save
the recipe.

43
Chapter 6. Use
EN
6.4.6. Editing a recipe
To edit a recipe:
6.4.7. Deleting a recipe
To delete a recipe:

44
Chapter 6. Use
EN
6.5. Setting
General settings
The following features can be set in this menu:
Ingredients
Activates/disables the display, when creating a recipe, of the page where you can enter (and then store) the quantity
and list of ingredients.
Directions
Activates/disables the display, when creating a recipe, of the page where you can enter (and then store) the instructions
for preparing the recipe.
Global Seal Time
To set the “default” sealing time depending on the type of pouch used.
The set time is applied to all the recipes.
A time of between 0.1 and 4.0 s can be set. The default time is 1.1 s.
Oil Cleaning
To programme a weekly or monthly oil cleaning cycle.
All Memory Clear
To clear the recipes saved in the “Mine” menu.
Touch sound
To activate/deactivate the sound by touching a key on the display.
Screensaver Setting
Enables/disables the screensaver.
When active, it allows you to choose the image that appears on the display.
Import / Export
To import/export the recipes using a USB flash drive.
Vac timer
Quick Vac
Cold Room Location
This feature must be activated if the appliance operates in a very cold environment.
Every time the appliance is started, the pump starts in order to guarantee optimal oil temperature in the pump and to
warm up, ready for the first packaging cycle.

45
Chapter 6. Use
EN
Oil Cleaning Due
To run a cycle for cleaning the oil in the pump.
The cleaning cycle, which takes about 15 minutes, allows the pump to reach a high temperature, causing evaporation of
any impurities in the oil.
At the end of the cleaning cycle, the quality of the oil appears on the display. Contact Technical Assistance if the oil needs
to be changed.
A weekly or monthly oil cleaning cycle can be programmed (menu ).
Routine cleaning of the oil in the pump is essential to guarantee correct and long-lasting operation.

46
Chapter 6. Use
EN
Presets
To display ( ) or hide ( ) a recipe.
Example:
If the “Preservation” menu is hidden, it will not appear on
the home page.
If instead only the “Firm” recipe in the “Preservation”
menu is hidden, it will not appear in the list of recipes
available in the “Storage” menu.
WiFi
To connect to the WiFi network.

47
Chapter 6. Use
EN
Date/time
To set the date and time.
Time zone
To set the time zone.
Language
To select the language used on the display.
Update
To check/install any software updates (connection to the WiFi network is required).

48
Chapter 7. Ordinary maintenance
EN
7.1. Cleaning and maintenance
Before any routine maintenance switch the machine off by acting on the main switch and remove the
plug from the mains socket.
• Clean the appliance after each use with a damp and
soft cloth.
• Clean the Plexiglas cover (6) inside and out using
only neutral detergents (water and soap).
• Do not use abrasive products, alcohol-based
detergents, abrasive sponges, solvents or metal
objects.
• Follow the safety instructions indicated on the
packaging when using products to clean the steel tank
(4).
• Clean the tank (4), especially in the case of residue
liquid, it is advisable to remove the sealing bar (5)
upwards.
• Clean the sealing bar (5) with a dry cloth. Remove
any residue that deposits on the sealing bar (5).
• Clean the metal surfaces using normal detergents
suitable for stainless steel.
• Keep the display (3) clean and dry.
MX 2
MX 4

49
Chapter 7. Ordinary maintenance
EN
7.2. Problem solving
PROBLEM
CAUSE
SOLUTION
The pouch is not
sealed correctly
• The sealing time is not correct.
• The cover gasket (6) is dirty or worn.
• The pouch is not placed correctly on the
sealing bar (5).
• The sealing bar (5) is worn (the Teflon
coating is burnt).
• The blade placed under the Teflon of the
sealing bar (5) is broken.
• Change the sealing time.
• Clean or replace the cover gasket (6)
(contact the Technical Assistance Service
for a replacement).
• Position the pouch correctly.
• Replace the sealing bar (5) (contact the
Technical Assistance Service for a
replacement).
• Replace the sealing bar (5) (contact the
Technical Assistance Service for a
replacement).
Final vacuum is poor
• The set vacuum percentage is incorrect.
• The cover (6) gasket is dirty or worn.
• The cover (6) is not closed correctly.
• Impurities contained in the pump oil.
• Change the vacuum percentage.
• Clean or replace the cover gasket (6)
(contact the Technical Assistance Service
for a replacement).
• Close the cover (6) correctly.
• Make sure that objects or dirt are not
found between the cover (6) and tank (4).
• Run a “Oil Cleaning” (see par. 6.4) cycle
and check its quality. Contact the
Technical Assistance Service if it needs
replacing.
The cover (6) does
not open
• No power supply.
• Wait until the power supply is restored.
The cover (6) is
cracked or broken.
• Damaged cover (6).
• Replace the cover (6) (contact the
Technical Assistance Service for a
replacement).
If the machine does not work properly after the above-mentioned checks, contact the Assistance Service
describing the detected defect.

50
Chapter 8. Guarantee
EN
8.1. Certificate of guarantee
The guarantee runs for 12 months after the installation date under the conditions set forth on the instruction manual.
Fill in the card with all data requested, tear out along the perforations and send in.
8.2. Guarantee conditions
The guarantee runs for 12 months and goes into force on the installation date of the machine. The guarantee covers free
replacement or repair of any parts due to defects arising from faulty material. The repairs or replacement are usually carried
out at the manufactures, with transport or workmanship at buyer’s charge. If the repair or replacement is carried out at the
buyer’s place, he shall bear the travelling, transfer and workmanship charges. Work under guarantee can be carried out
exclusively by the manufacturer or by the authorised dealer. In order to be entitled to repairs under the guarantee, the
faulty part must be sent for repair or replacement to the manufacturer or his authorised dealer. The return of such repaired
or replaced part will be considered to be the performance of the guarantee.
The guarantee is voided:
• in case of failure to mail the CERTIFICATE OF GUARANTEE, duly filled in and signed, with in 20 days after the date
of purchase
• in case of inappropriate installation, power supply, misuse and mishandling by unauthorised persons
• in case of changes made to the machine without prior agreement in writing by the manufacturers
• if the machine is no longer the property of the first buyer.
The manufacturer decline any responsibility for damage to persons or things in case of inappropriate installation
or connection to the power mains or omission of connection to earth or in case of any mishandling of the machine.
The manufacturer undertake to carry out any variations and changes made necessary by technical and operating
requirements.
IN THE EVENT OF DISPUTES THE COURT OF BERGAMO (ITALY)
SHALL HAVE SOLE JURISDICTION.

51
ÜBERSETZUNG DER ORIGINAL-
ANLEITUNG
Inhaltsverzeichnis
DE
Kapitel 1.
Beschreibung
Seite
1.1.
Vorwort..……..………………........……………….……………………………………...
52
1.2.
Leistungen der Maschine……………..……..………………........………….……..…..
52
1.3.
Beschreibung der Maschine.…………………………………………………………….
53
1.4.
Technische Angaben der Maschine………………………………………………….…
54
Kapitel 2.
Eigenschaften der Beutel
2.1.
Verwendbare Beutel..……………………...........................………………….….…..…
55
Kapitel 3.
Verwendung der Maschine
3.1.
Was verpackt werden kann…………………………………………….…………….…..
55
3.2.
Was nicht verpackt werden darf..………………………................….……….…….….
55
Kapitel 4.
Sicherheitshinweise
4.1.
Sicherheit von Kindern und schutzbedürftigen Personen…………………………….
56
4.2.
Allgemeine Sicherheitshinweise…………………………………………………………
56
Kapitel 5.
Sicherheitsanweisungen
5.1.
Installation………………………………………………………………………………….
57
5.2.
Umweltbedingungen………………………………………………………………………
57
5.3.
Stromanschluss……………………………………………………………………………
58
5.4.
Gebrauch…………………………………………………………………………………..
58
5.5.
Reinigung und Pflege……………………………………………………………………..
59
5.6.
Demontage, Abbau und Entsorgung der Rückstände…………………………………
59
5.7.
Technischer Kundendienst………………………………………………………………..
59
Kapitel 6.
Gebrauch
6.1.
Erste Reinigung…………………………………………………………………………….
60
6.2.
Erstmaliges Einschalten…………………………………………………………….........
60
6.3.
Tägliche Verwendung……………………………………………………………………..
60
6.4.
Rezepte……………………………………………………………………………………
62
6.5.
Einstellung…………………………………………………………………………………
69
Kapitel 7.
Planmäßige Wartung
7.1.
Reinigung und Pflege……………………………………………………………………..
73
7.2.
Problemlösungen…………………………………………………………………………..
74
Kapitel 8.
Garantiezeit
8.1.
Garantieschein..............................................……………………………….……….…
75
8.2.
Garantiebedingungen....................................……….……………………….…………
75
EG Konformitätserklärung.............................……………………………….………....
76

52
Kapitel 1. Beschreibung
DE
1.1. Vorwort
Das vorliegende Handbuch wurde gemäß den Norm UNI 10893 von Juli 2000 abgefasst. Es richtet sich an alle Benutzer
und dient zur korrekten Bedienung der Maschine. Bewahren Sie es an einem leicht zugänglichen Ort in der Nähe der
Maschine auf, der allen Benutzern bekannt ist. Das vorliegende Handbuch ist hinsichtlich der Sicherheit, ein wesentlicher
Teil der Maschine. Zur besseren Verständlichkeit werden die verwendeten Symbole erläutert.
ACHTUNG:
Vorschriften zum Unfallschutz für den Bediener. Diese Warnung weist auf bestehende Gefahren hin,
die zu Verletzungen des Maschinenbedieners führen können.
ACHTUNG:
Heiße Maschinenteile. Zeigt eine Verbrennungsgefahr durch heiße Maschinenteile an, die für die
ausgesetzte Person auch schwerwiegend sein kann.
Informationen und allgemeine Hinweise.
Alle Rechte des vorliegenden Handbuchs sind dem Hersteller vorbehalten. Die Vervielfältigung, auch auszugsweise, ist
gesetzlich verboten. Die in diesem Handbuch enthaltenen Beschreibungen und Abbildungen sind unverbindlich. Der
Hersteller behält sich vor, jederzeit Änderungen vorzunehmen, die er als notwendig erachtet. Dieses Handbuch darf ohne
schriftliche Genehmigung des Herstellers nicht zur Einsicht an Dritte ausgehändigt werden.
1.2. Leistungen der Maschine
Dieses Produkt ist ideal geeignet für:
• Vakuumverpackung von Lebensmitteln für Garvorgänge bei niedrigen Temperaturen “SousVide”.
• Vakuumverpackung von Lebensmitteln für die Aufbewahrung.
• Marinieren von Lebensmitteln.
• Aufguss von Nahrungsmitteln.

53
Kapitel 1. Beschreibung
DE
1.3. Beschreibung der Maschine
MX 2
MX 4
MX 2
MX 4
1) Hauptschalter
2) Taste EIN/AUS
3) Bedienfeld (Display)
4) Wanne
5) Schweißbalken
6) Deckel
7) Absaugdüse
8) Beutelhalter
8.1) Winkel zum Positionieren von Tüten mit Flüssigkeiten
9) Verbindungsstück für externes Vakuum
10) Beutel zum Einfrieren, Garen und Aufbewahren
(25 St. 20x30 cm)
2) Taste EIN/AUS
3) Bedienfeld (Display)
4) Wanne
5) Schweißbalken
6) Deckel
7) Absaugdüse
8) Tablett
9) Verbindungsstück für externes Vakuum

54
Kapitel 1. Beschreibung
DE
1.4. Technische Angaben der Maschine
MX 2
Gewicht und Größen der Verpackung
Breite = 535 mm
Länge = 420 mm
Höhe = 310 mm
Gewicht = 25 kg
Gewicht der Maschine
Gewicht = 22 kg
Vakuumpumpe = 4 m³
MX 4
Gewicht und Größen der Verpackung
Breite = 760 mm
Länge = 690 mm
Höhe = 715 mm
Gewicht = 25 kg
Gewicht der Maschine
Gewicht = 22 kg
Vakuumpumpe = 16 m³ (Version 230V) / 20 m³ (Version 120V)
55
Kapitel 2. Eigenschaften der Beutel
DE
2.1. Verwendbare Beutel
• Die Verwendung von Originalbeuteln wird empfohlen.
• Es wird empfohlen, die technischen Blätter und Sicherheitshinweise der verwendeten Beutel
durchzulesen und sich an die Angaben zu halten!
MX 2
Die mitgelieferten Beutel sind optimal zum Einfrieren, Aufbewahren und Vakuumgaren von Lebensmitteln bei niedrigen
Temperaturen geeignet.
Code für die Bestellung der Beutel: KR220102
25 Beutel zum Einfrieren, Vakuumgaren und Aufbewahren (Größe 20x30 cm - 90 µm)
MX 4
Die Tüten können unterschiedliche Stärken besitzen und müssen gas- und luftundurchlässig sein (85÷200µm). Die
Verwendung von lebensmitteltauglichen Tüten ist verpflichtend vorgeschrieben.
In der nachstehenden Tabelle finden Sie die maximalen Tütenabmessungen für die einzelnen Maschinenmodelle.
Maschine
Tütenbreite offene Seite
Tütenlänge geschlossene Seite
MX 4 (vordere Schweißleiste)
450mm
430mm
MX 4 (seitliche Schweißleiste)
450mm
375mm
In der folgenden Tabelle sind die Temperaturgrenzen (min./max.) angeführt, welchen die Tüten ausgesetzt werden
können.
Tütentyp
Mindesttemperatur
Höchsttemperatur
Kochen
-15°C
+120°C, 30 Minuten lang
Aufbewahrung
-20°C
+70°C, 2 Stunden lang; +100°C, 15 Minuten lang.
Kapitel 3. Verwendung der Maschine
DE
3.1. Was verpackt werden kann
Diese Maschine eignet sich zum Verpacken der meisten Lebensmittelprodukte, wie u.a.: Gemüse, Obst, Fischprodukte,
Milchprodukte, Fleisch, Wurst, Backwaren, Gastronomieprodukte, trockene Produkte, flüssigen Lebensmitteln (Suppen,
Cremes, Saucen), usw.
3.2. Was nicht verpackt werden darf
Es ist strikt verboten, die folgenden Produkttypen zu verpacken, um bleibende Schäden an der Maschine sowie die Gefahr
von Verletzungen des Benutzers zu vermeiden:
• Brennbare und Explosive Materialien
• Unter Druck stehende Behälter
• Materialien und Produkte, die auf irgendeine Weise für den Bediener oder der Maschine schaden
können.

56
Kapitel 4. Sicherheitshinweise
DE
Vor der Installation und der Verwendung des Geräts muss die Bedienungsanleitung aufmerksam gelesen werden. Der
Hersteller übernimmt keine Haftung, wenn es durch eine unsachgemäße Installation und Verwendung des Geräts zu
Verletzungen kommt. Die Bedienungsanleitung immer für zukünftiges Nachschlagen griffbereit aufbewahren.
4.1. Sicherheit von Kindern und schutzbedürftigen Personen
• Dieses Gerät kann von Kindern ab 8 Jahren sowie von Personen mit beeinträchtigten, körperlichen oder geistigen
Fähigkeiten bzw. eingeschränkter Wahrnehmung oder ohne Erfahrung und Kenntnissen benutzt werden, wenn sie
beaufsichtigt werden oder in die sichere Benutzung des Geräts eingewiesen wurden und wenn sie die sich daraus
ergebenden Gefahren verstehen.
• Kinder dürfen nicht mit dem Gerät spielen.
• Die Verpackungsmaterialien immer außerhalb der Reichweite von Kindern halten.
• Kinder und Haustiere dürfen sich während des Betriebs nicht in der Nähe des Geräts aufhalten.
• Kinder, die jünger als 3 Jahre sind, vom Gerät fernhalten, wenn sie nicht laufend überwacht werden.
4.2. Allgemeine Sicherheitshinweise
• Die Installation des Geräts und der Austausch der Kabel dürfen ausschließlich von Fachpersonal durchgeführt
werden.
• Vor der Durchführung von Wartungstätigkeiten muss das Gerät immer vom Stromnetz getrennt werden.
• Für die Reinigung des Geräts keine Dampfreiniger verwenden.
• Keine scheuernden Reinigungsmittel oder Metallschaber für die Reinigung des Geräts verwenden.
• Falls das Stromversorgungskabel beschädigt ist, muss es durch ein anderes Kabel oder durch eine Sonderbaugruppe
ersetzt werden, die beim Hersteller oder bei dessen technischem Kundendienst erhältlich sind.
57
Kapitel 5. Sicherheitsanweisungen
DE
5.1. Installation
• Die Installation des Geräts muss von qualifiziertem Personal durchgeführt werden!
• Gehen Sie bei der Beförderung und beim Aufstellen der Maschine mit größter Vorsicht vor!
Vor jeder Bewegung muss sich davon überzeugt werden, dass die Zugausstattung für die zu
transportierende Last geeignet ist!
Beim Transport von Hand bestimmt die aktuelle Gesetzgebung die Gewichtsgrenze, die eine Person
heben kann (siehe folgende Tabelle).
Je nach dem zu hebenden Gewicht (siehe Abschnitt 1.4) und dem Bediener, der es hebt, werden
daher mehrere Personen benötigt.
MAX. HUBGEWICHT
ALTER
MÄNNER
ALTER
> 18 JAHRE
30
> 18 JAHRE
15-18 JAHRE
20
15-18 JAHRE
• Sämtliche Verpackungsmaterialien entfernen.
• Das Gerät nicht installieren oder verwenden, wenn es beschädigt ist.
• Die mit dem Gerät gelieferten Anleitungen beachten.
• Beim Umstellen des Geräts immer besondere Vorsicht walten lassen. Immer Sicherheitshandschuhe tragen.
• Das Gerät nicht umdrehen oder kippen! Dadurch tritt das Öl aus der Pumpe aus, wodurch das Gerät beschädigt
werden könnte.
• Den roten Verschluss von der Pumpe abnehmen und den Filter vor der Verwendung montieren (nur bei MX 2).
5.2. Umweltbedingungen
• Die Maschine anheben und auf dem Arbeitstisch abstellen, auf eine angemessene Umgebung achten, die frei von Gas,
brennbaren und explosiven Materialien ist. Die Maschine darf nur auf glatten, ebenen und nicht entzündbaren Flächen
aufgestellt werden.
Zulässige Umgebungsbedingungen am Aufstellungsort der Maschine:
• Temperaturen zwischen + 5°C und + 40°C.
• Relative Luftfeuchtigkeit zwischen 30% und 90%, ohne Kondensierung.
Die Beleuchtung im Benutzungsraum muss den in dem jeweiligen Land, in dem die Maschine installiert ist, geltenden
Normen entsprechen und muss jedenfalls gleichmäßig sein und eine gute Sichtbarkeit gewährleisten, um die Sicherheit
und die Gesundheit des Bedieners zu schonen.
SCHUTZGRAD DER MASCHINE = IP20
DAS VON DER MASCHINE GEMACHTE LUFTGERÄUSCH IST UNTER 70 dB(A)
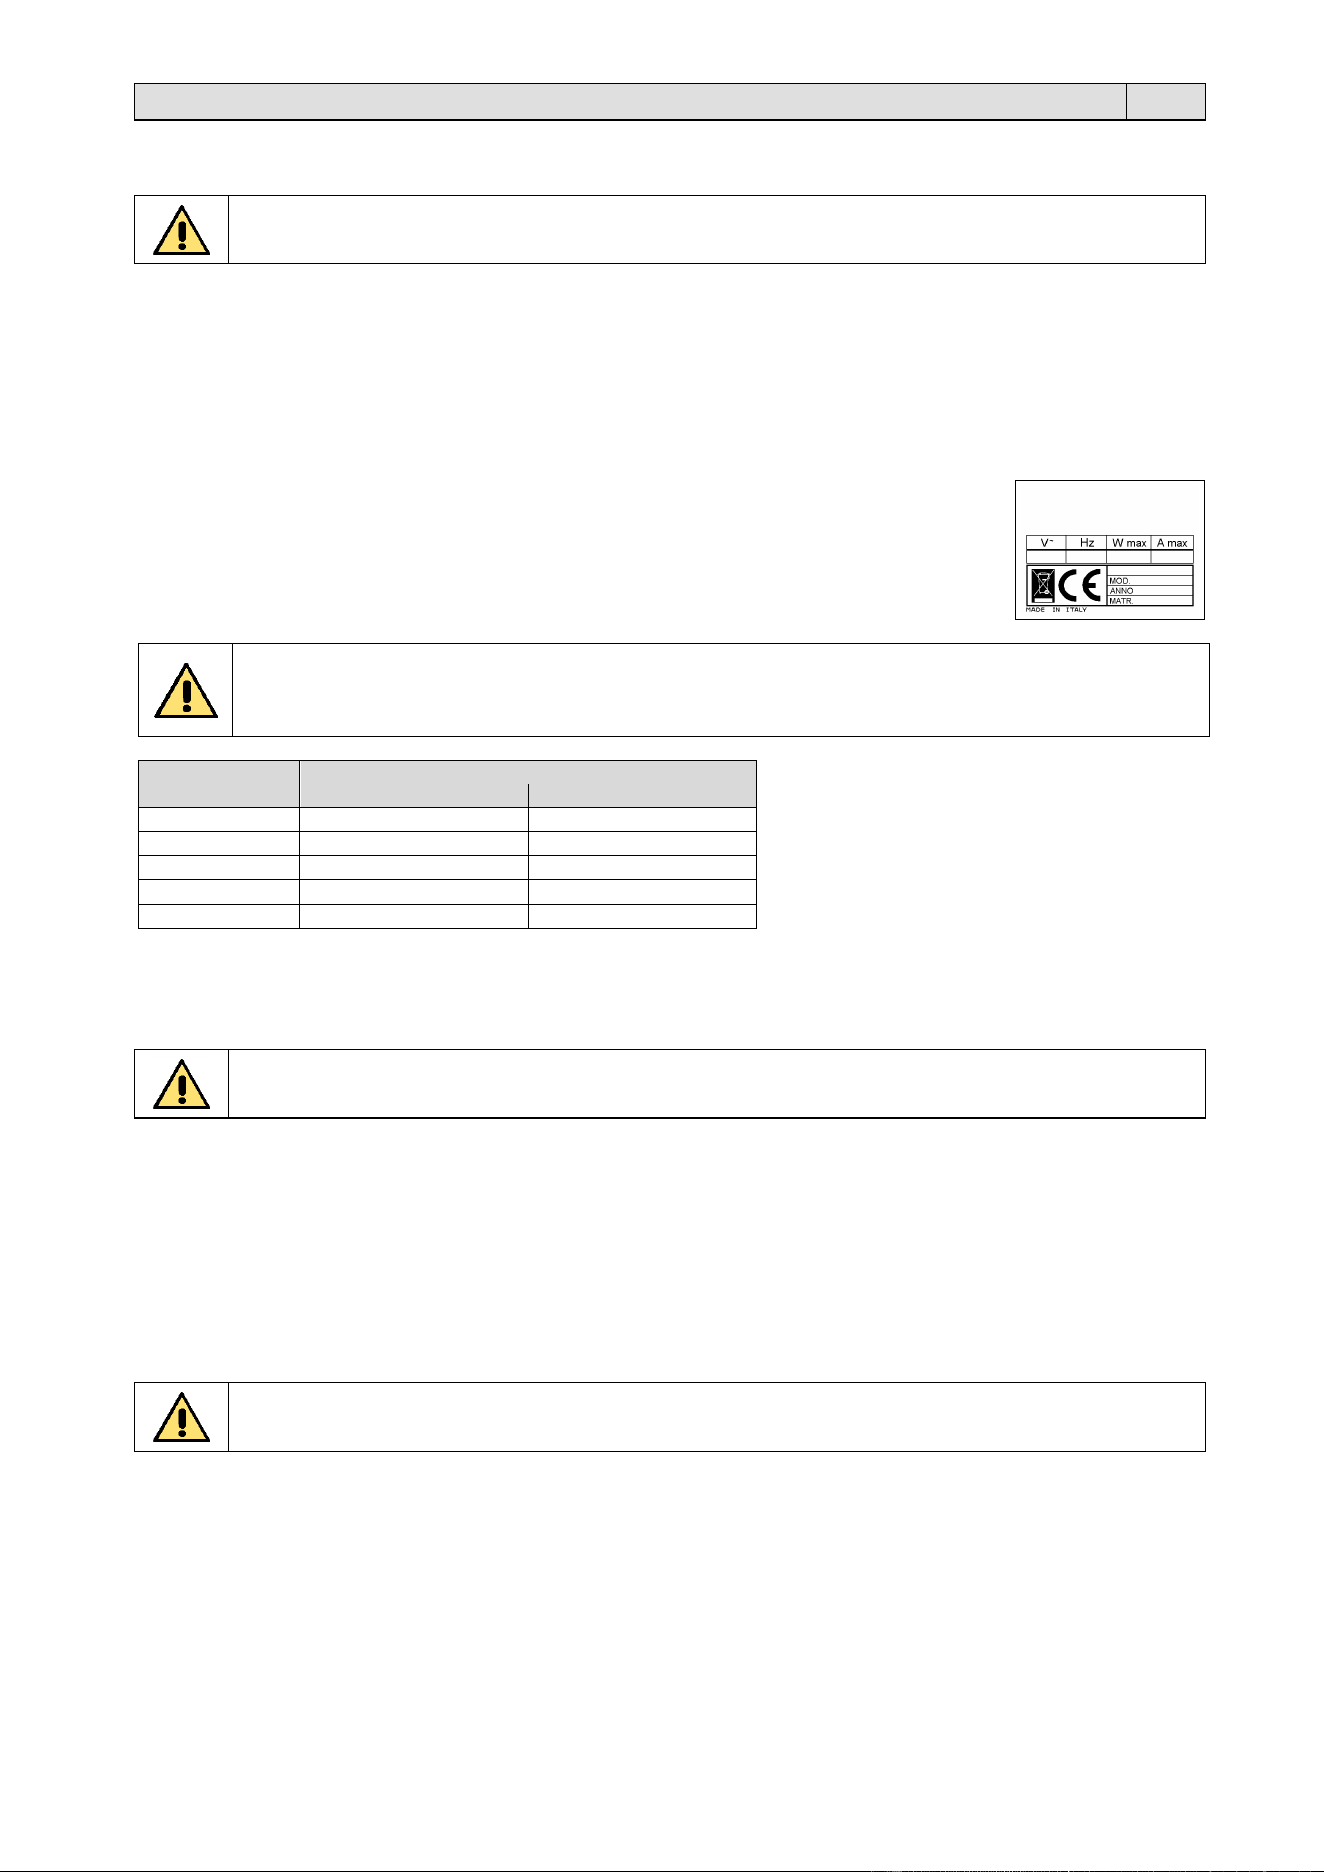
58
Kapitel 5. Sicherheitsanweisungen
DE
5.3. Stromanschluss
Brand- und Stromschlaggefahr.
• Sämtlichen elektrischen Anschlüsse müssen von einem qualifizierten Elektriker hergestellt werden.
• Das Gerät muss geerdet werden.
• Keine Mehrfachsteckdosen und Verlängerungskabel verwenden.
• Den Versorgungsstecker nur nach Abschluss der Installation in die Steckdose einstecken.
• Sollte der Stecker gelockert sein, darf er nicht in die Steckdose eingesteckt werden.
• Zum Trennen des Geräts von der Stromversorgung niemals am Versorgungskabel ziehen. Ausschließlich am Stecker
ziehen.
Sicherstellen, dass die auf dem Typenschild angeführten elektrischen Daten jenen der Anlage
entsprechen. Andernfalls einen Elektriker zu Rate ziehen.
Hinweis: Nennen Sie bitte bei jeglicher Kommunikation mit dem Hersteller immer das Modell und
die Seriennummer der Maschine, die auf dem Schild angegeben sind, das sich auf der Rückseite
der Maschine befindet.
Die Zuleitung muss durch einen Schutzschalter des Typs A mit einem Bemessungsfehlerstrom “IΔn” von 30
mA geschützt werden.
Folglich muss der maximale Widerstand der Masseelektrode den Werten entsprechen, wie in der folgenden
Tabelle angegeben.
IΔn
Maximaler Widerstand der Masseelektrode
(50 V)
(25 V)
3 A
16 Ω
8 Ω
1 A
50 Ω
25 Ω
500 mA
100 Ω
50 Ω
300 mA
166 Ω
83 Ω
30 mA
1666 Ω
833 Ω
5.4. Gebrauch
Gefahr von Verletzungen, Verbrennungen, Stromschlägen oder Explosionen.
• Den Siegelbalken (5) nach der Verwendung nicht berühren. Die Restwärme kann Verbrennungen verursachen.
• Keine Änderungen an den Spezifikationen dieses Geräts vornehmen.
• Das Gerät während des Betriebs niemals unbeaufsichtigt lassen.
• Das Gerät nach jeder Verwendung ausschalten.
• Das Gerät niemals mit feuchten Händen oder wenn ein Kontakt mit Wasser vorliegt in Betrieb nehmen.
• Das Gerät nicht als Arbeits- oder Ablagefläche verwenden.
• Keine entflammbaren Flüssigkeiten oder Materialien bzw. leicht entzündliche Gegenstände auf dem Gerät, in dem
Gerät oder in unmittelbarer Nähe ablegen oder aufbewahren.
• Nicht mit der Verpackung fortfahren, wenn der Deckel (6) Risse oder Bruchstellen aufweist.
Das Gerät könnte dadurch beschädigt werden.
• Bei der Anbringung und Entfernung von Zubehörteilen besondere Vorsicht walten lassen.
• Während des Arbeitszyklus den Deckel (6) nicht gewaltsam öffnen.
• Bei einem Stromausfall den Deckel (6) während des Arbeitszyklus nicht gewaltsam öffnen.
• Kein Gewicht auf dem Deckel (6) abstellen.
• Vermeiden, dass Gegenstände auf den Deckel (6) fallen! Das könnte zu Beschädigungen führen und Risse oder den
Bruch hervorrufen.
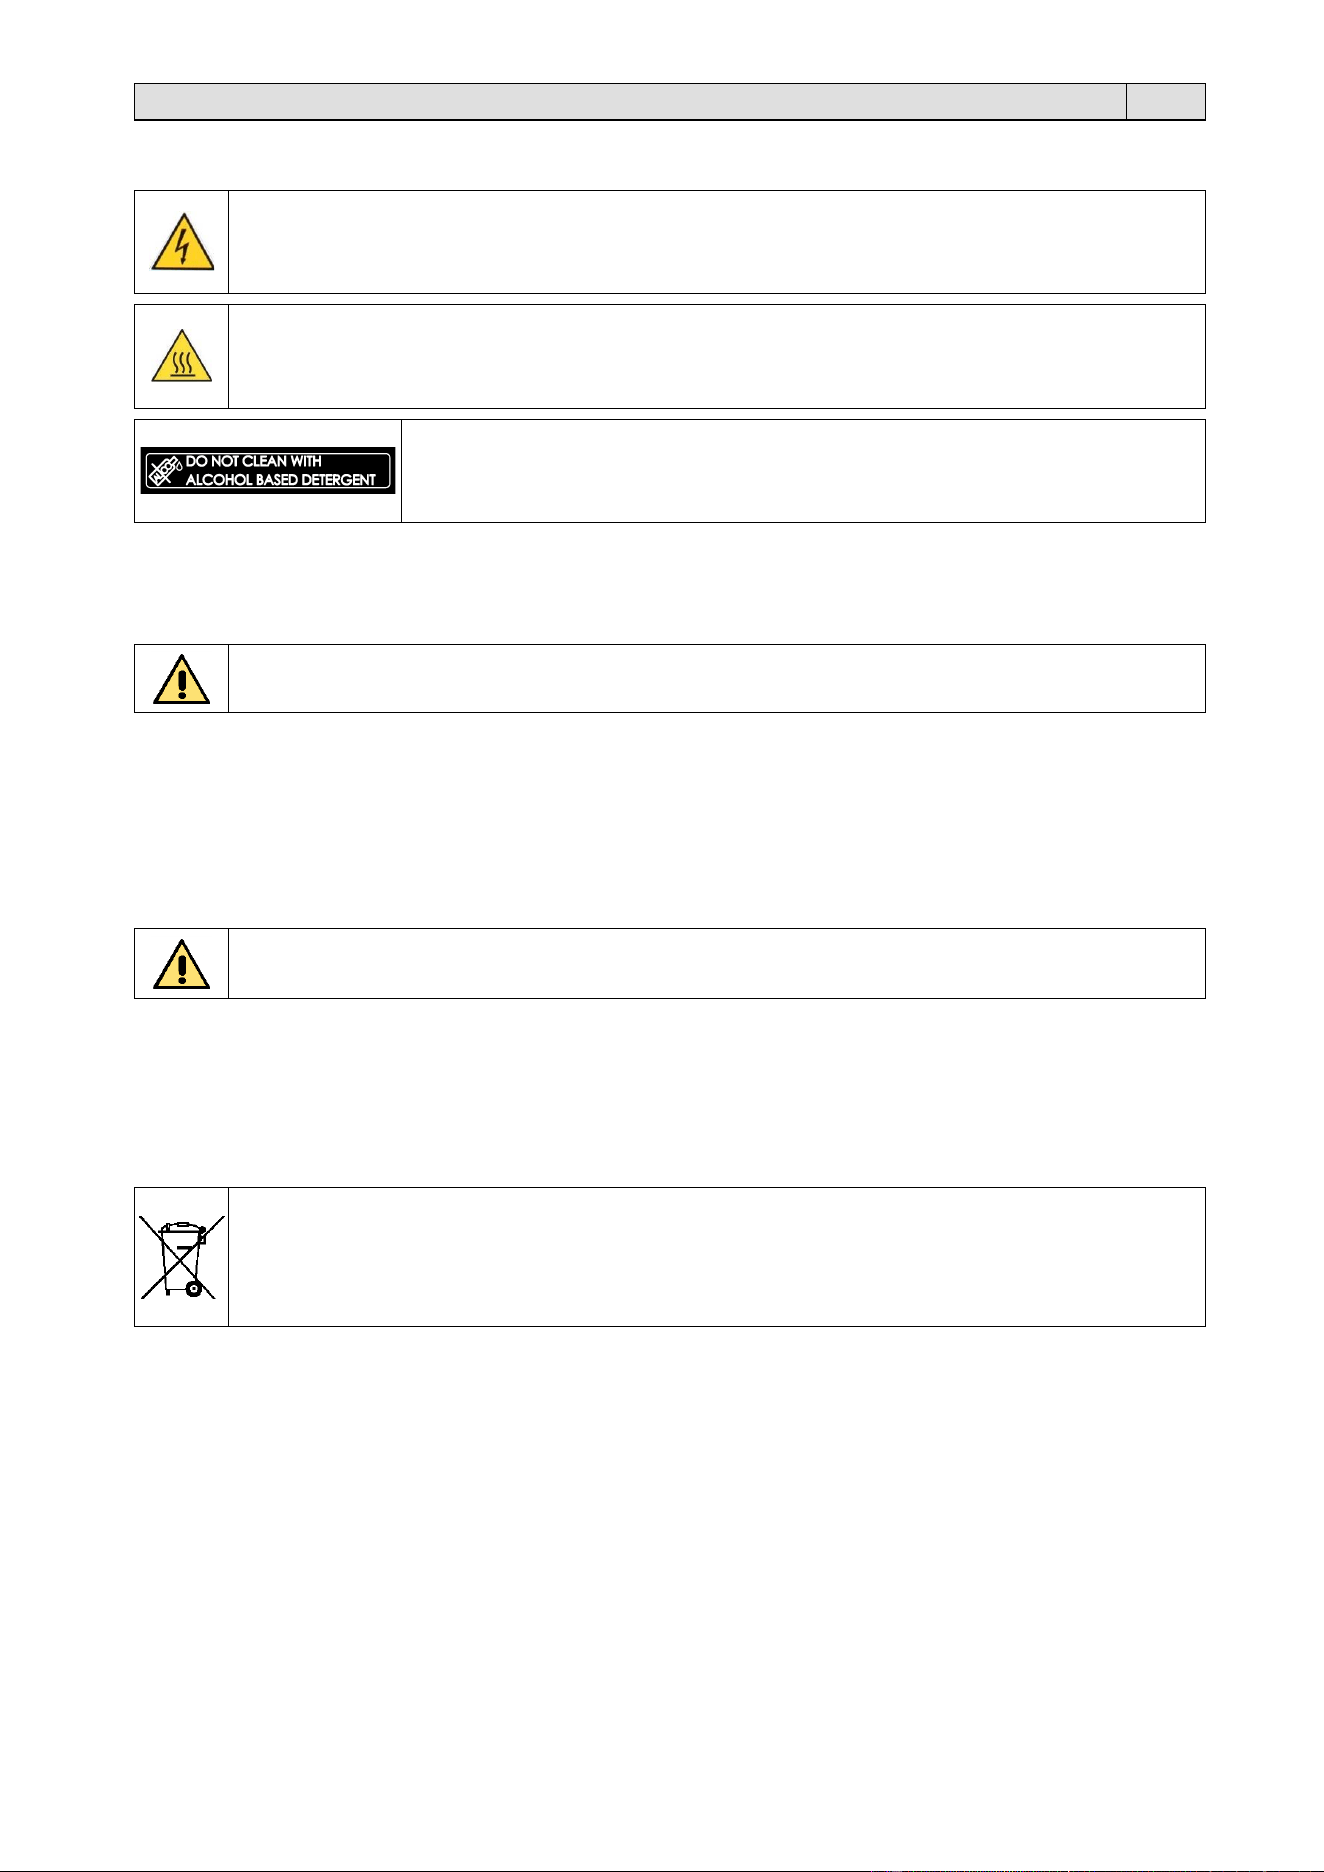
59
Kapitel 5. Sicherheitsanweisungen
DE
Die Sicherheitsaufkleber an der Maschine genau beachten:
▪ Am Eingang der Stromversorgung.
ACHTUNG! Überprüfen Sie regelmäßig, ob das Stromkabel richtig isoliert und ob die Dose unversehrt
ist. Während des Maschinenbetriebs müssen die Prüfpaneele für die Stromanlage ordnungsgemäß
montiert sein.
▪ Am Schweißbalken (5), der in der Wanne (4) angebracht ist.
▪ An der Vakuumpumpe, die sich in der Maschine befindet.
ACHTUNG! Heiße Maschinenteile. Zeigt eine für die ausgesetzte Person auch schwerwiegende
Verbrennungsgefahr durch heiße Maschinenteile an.
▪ An der Deckel (6).
ACHTUNG! Zeigt das Vorgehen zur Reinigung der Abdeckung an, um sie nicht zu
beschädigen und ihre Durchsichtigkeit oder ihre Widerstandsfähigkeit nicht zu
beeinträchtigen.
5.5. Reinigung und Pflege
Es besteht die Gefahr von Verletzungen, Brand oder Schäden am Gerät.
• Vor der Durchführung von Wartungstätigkeiten muss das Gerät immer ausgeschaltet und der Stecker gezogen
werden.
• Sicherstellen, dass das Gerät abgekühlt ist.
5.6. Demontage, Abbau und Entsorgung der Rückstände
ACHTUNG!
Die Demontage- und Abbauarbeiten dürfen nur vom dafür qualifizierten Personal durchgeführt werden, das
die zum sicheren Betrieb notwendigen mechanischen und elektrischen Fachkenntnisse besitzt.
Wie folgt vorgehen:
• Die Maschine vom Stromnetz trennen
• Die Bestandteile demontieren
• Das Öl aus der Pumpe entfernen.
Alle Rückstände müssen nach der Klassifizierung und nach den von den im Installationsort geltenden Gesetzen
vorgeschrieben Prozeduren behandelt, entsorgt oder wiederverwertet werden.
Das Symbol weist darauf hin, daß dieses Produkt als Hausmüll nicht behandelt werden darf.
Das Gewährleisten, daß die Produktentsorgung sachgemäß erfolgen wird, wird die Verhütung potentieller
negativer Folgen für die Umwelt und die Menschgesundheit erleichtern, die durch die unsachgemäße
Müllbehandlung von diesem Produkt sonst verursacht werden könnten.
Für nähere Informationen über das Recycling von diesem Produkt kontaktieren Sie bitte den Produktverkäufer
oder, als Alternative, die Kundendienststelle oder die entsprechende Dienststelle für die Müllbehandlung.
5.7. Technischer Kundendienst
• Für die Reparatur des Geräts eine autorisierte Kundendienststelle kontaktieren.
• Ausschließlich Originalersatzteile verwenden.

60
Kapitel 6. Gebrauch
DE
6.1 Erste Reinigung
• Das Kapitel 7.1. „Reinigung und Pflege“ berücksichtigen.
• Vor der ersten Verwendung alle Teile mit einem feuchten Tuch reinigen.
6.2. Erstmaliges Einschalten
Den Hauptschalter (1) auf der Rückseite des Geräts betätigen (nur bei MX 2).
Das Gerät einschalten, hierzu die Taste mindestens 1 Sekunde lang gedrückt halten.
Das Display (3) leuchtet auf und nacheinander wird aufgefordert zur:
• Kalibrierung des Displays.
• Wahl der Sprache.
• Einstellung der Zeitzone (automatisch durch Anschluss an das WLAN oder aber von Hand).
6.3. Tägliche Verwendung
Das Gerät einschalten, hierzu die Taste mindestens 1 Sekunde lang gedrückt halten.
Warten, bis das Display (3) die „Homepage" anzeigt.
Meine Rezepte
Ermöglicht es, die neuen Rezepte zu erstellen/speichern, um dann deren
Verpackungszyklus auszuführen.
Marinierung
Ermöglicht es, das Rezept zum Marinieren der Nahrungsmittel auszuführen.
Es können Ihre neuen Rezepte im Menü erstellt/gespeichert werden.
Konservierung
Ermöglicht die Vakuumverpackung der Nahrungsmittel in Beutel und/oder Schale,
wobei unter 7 Standardrezepten gewählt werden kann, die je nach dem zu
verpackenden Nahrungsmittel programmiert sind.
Aufguss
Ermöglicht die Zubereitung eines Aufgusses.
Es können Ihre neuen Rezepte im Menü erstellt/gespeichert werden.
Sous Vide
Ermöglicht das Verpacken von Nahrungsmitteln unter Vakuum für das
Niedertemperaturgaren „Sous Vide“.
Je nach Lebensmittel kann aus 8 Standardrezepten gewählt werden, die je nach
Art der zu verpackenden Nahrungsmittel programmiert sind.
• Das gewünschte Verpackungsrezept wählen (siehe Abs. 6.4).
• Den Deckel (6) anheben und den Beutel mit den zu verpackenden Lebensmittel in der Wanne (4) positionieren, dabei
mindestens 2 cm nach dem Schweißbalken (5) frei lassen.
Ist die “GAS”-Funktion ein, dann muß der Umschlag mit offenem Streifen auf der Gasdüse auf einer Seite der
Schweißstange positioniert werden.
Zur Gewährleistung einer optimalen Versiegelung darf der Beutel im Bereich, in dem die Versiegelung stattfindet
nicht verschmutzt werden. Aus diesem Grund wird empfohlen, die Innenseite des Beutels auf einer Breite von 4-5
cm nach außen umzuschlagen. Nachdem die Lebensmittel in den Beutel gegeben wurden, diesen wieder in den
Anfangszustand bringen.
• Den Deckel (6) schließen, dabei einen leichten Druck ausüben, und die Starttaste drücken. Nun wird der
Verpackungszyklus gestartet.
• Am Ende des Zyklus den Deckel (6) öffnen und den Beutel entnehmen.
• Nach der Verwendung das Gerät durch Drücken der Taste ausschalten.
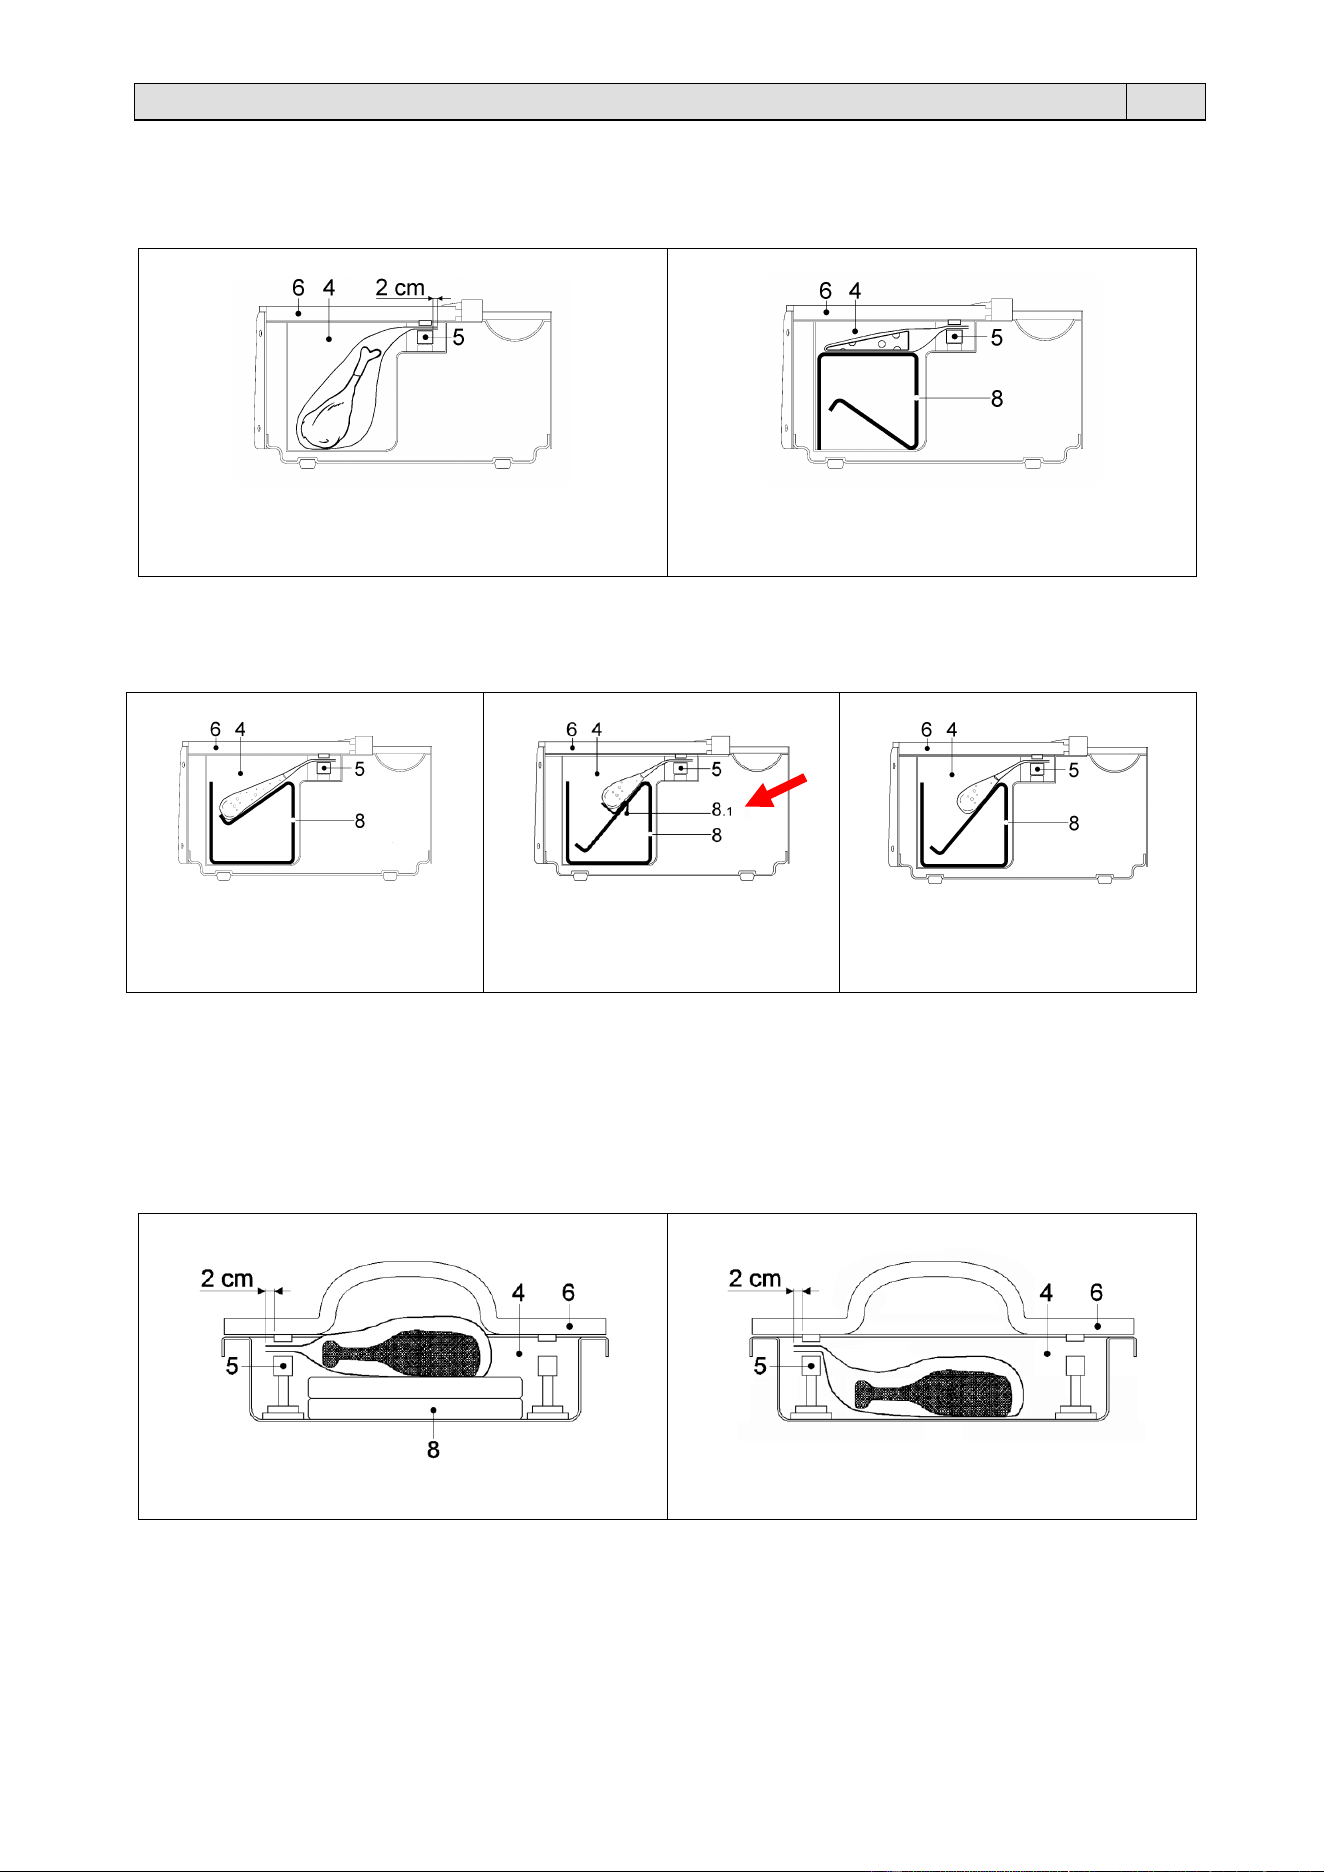
61
Kapitel 6. Gebrauch
DE
MX 2
Je nach Art des zu verpackenden Nahrungsmittels ist der Beutelhalter (8) wie in der folgenden Abbildung dargestellt zu
verwenden. Bei Beutelhalter (8) wird der Beutel besser am Schweißbalken (5) ausgerichtet.
Verpackung von Nahrungsmitteln
großen Ausmaßes
Verpackung von Nahrungsmitteln
kleinen Ausmaßes
Wenn Flüssigkeiten in Tüten abgefüllt werden, den Tütenhalter (8) wie in der folgenden Abbildung gezeigt platzieren.
Wenn „kurze" Beutel verwendet werden, den Winkel (8.1) verwenden, um seine korrekte Positionierung zu erleichtern.
OK
OK
NO
MX 4
Je nach Art des zu verpackenden Nahrungsmittels ist/sind die Einlegeplatte/n (8) wie in der folgenden Abbildung dargestellt
zu verwenden.
Bei Verwendung der Einlegeplatten (8) wird der Beutel besser am Schweißbalken (5) ausgerichtet.
OK
NO

62
Kapitel 6. Gebrauch
DE
6.4. Rezepte
6.4.1. Konservierung
Ermöglicht die Vakuumverpackung der Nahrungsmittel in Beutel und/oder Schale, wobei unter 7 Standardrezepten gewählt
werden kann, die je nach dem zu verpackenden Nahrungsmittel programmiert sind.
Auf der „Homepage“ die Taste drücken und das Rezept wählen.
Rezept
Verpackung
Einstellbarer Parameter
Chips
Beutel
Versiegelungszeit: OFF / 0,1÷4 s
Default: 1,1 s
Flüssig
Beutel
Versiegelungszeit: OFF / 0,1÷4 s
Default: 1,1 s
Fest
Beutel
Versiegelungszeit: OFF / 0,1÷4 s
Default: 1,1 s
Weich
Beutel
Versiegelungszeit: OFF / 0,1÷4 s
Default: 1,1 s
Geformt
Beutel
Versiegelungszeit: OFF / 0,1÷4 s
Default: 1,1 s
Empfindlich
Beutel
Versiegelungszeit: OFF / 0,1÷4 s
Default: 1,1 s
Extern
Dieses Rezept wird zur Beseitigung der Luft aus
speziellen, wieder hermetisch verschließbaren
Behältern (die nicht im Lieferumfang des Geräts
enthalten sind) verwendet.
• Das Anschlussstück (9) an der Absaugdüse
(7) im Innern der Wanne (4) anschrauben.
• Die Leitung des Behälters an das
Anschlussstück (9) anschließen.
• Den Deckel (6) des Geräts geöffnet lassen und
die Starttaste zum Starten des
Verpackungszyklus drücken.
Spezialbehälter
-
Die Vakuumverpackung verlängert die Aufbewahrungszeit der Lebensmittel.
Für die Vakuumverpackung von soeben gegarten Lebensmitteln müssen sie zuerst gekühlt werden,
idealerweise mittels Schockkühlung.
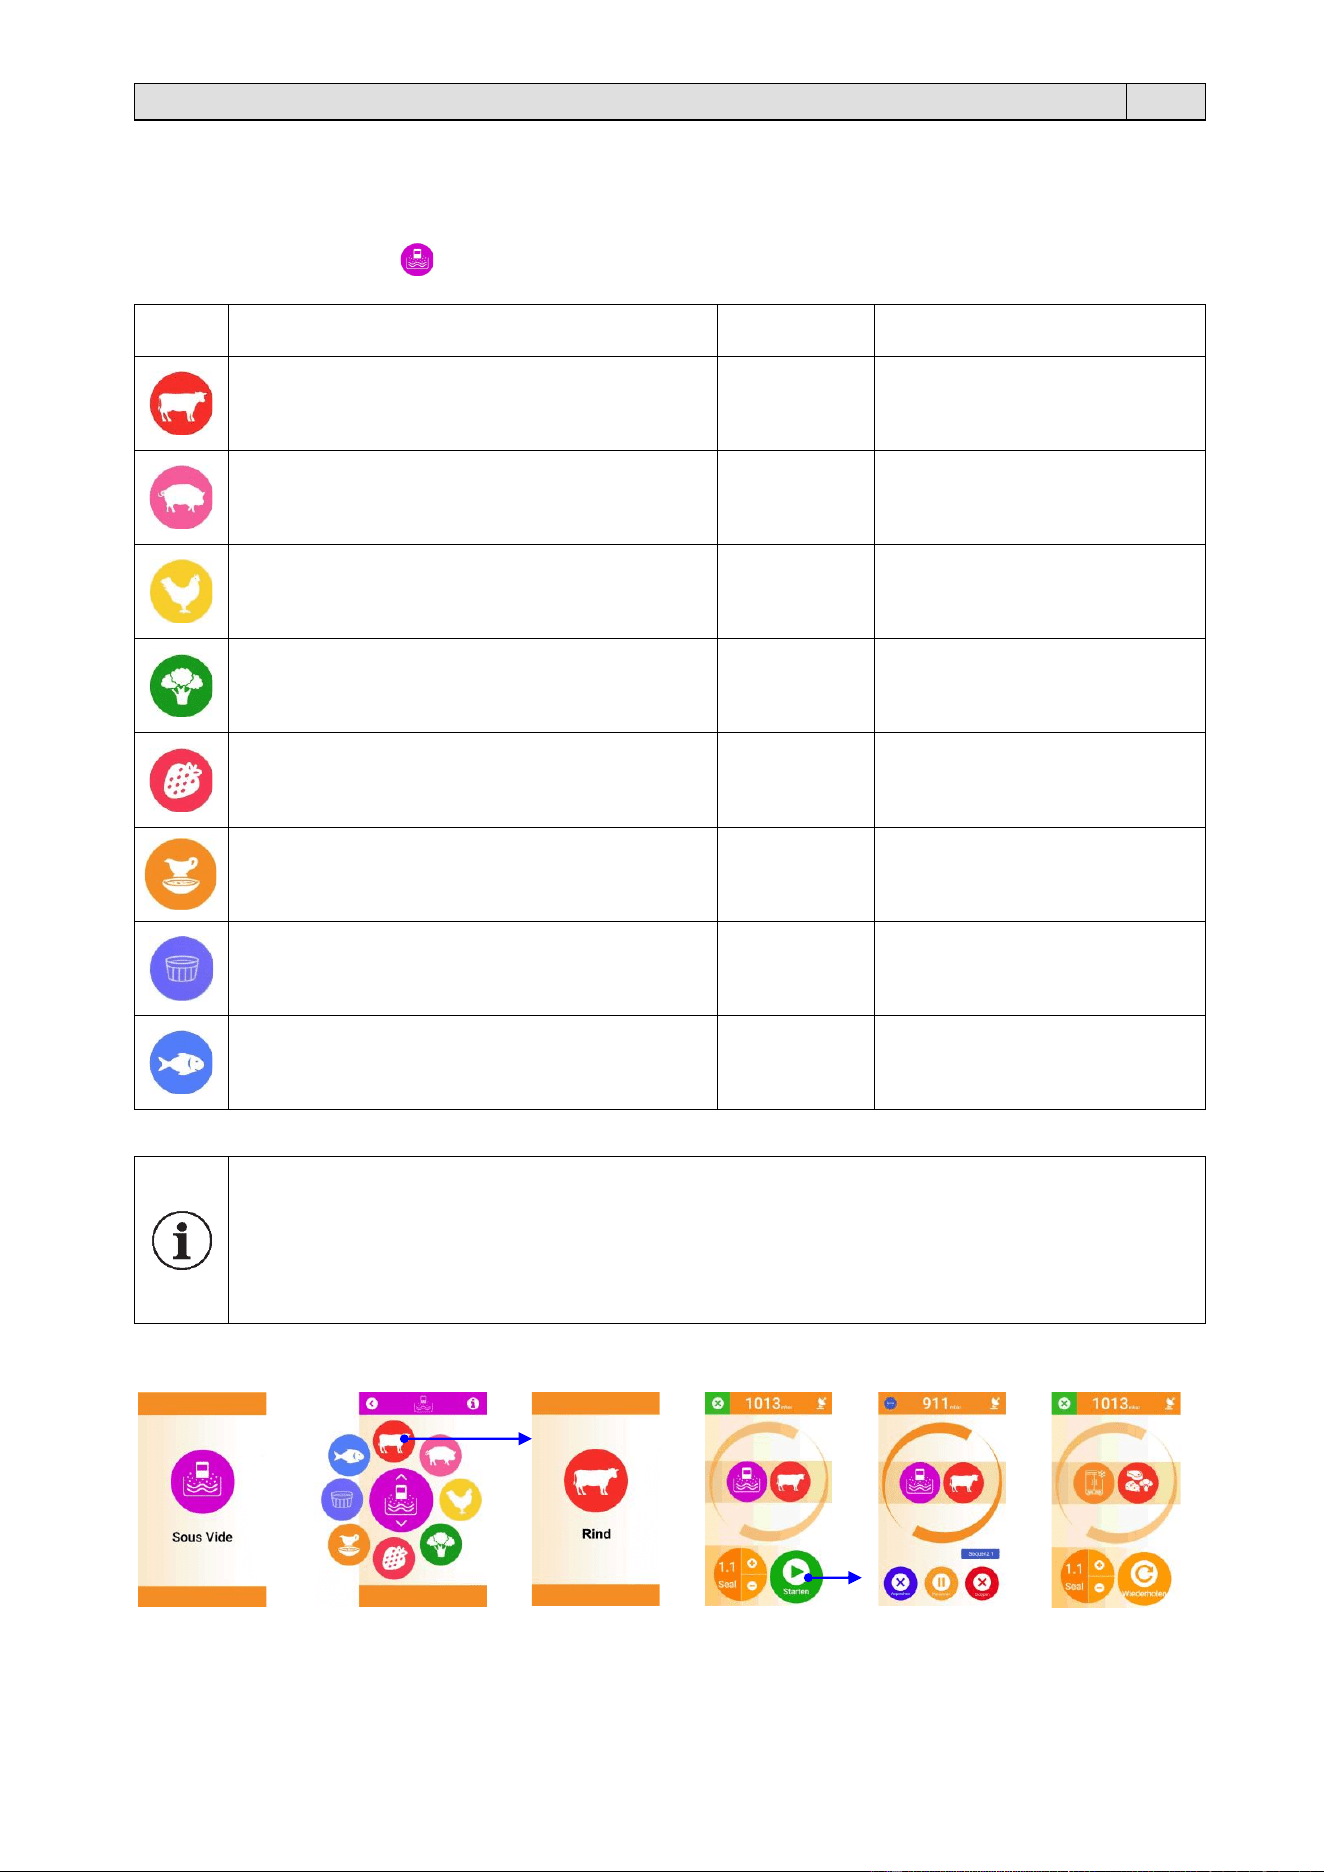
63
Kapitel 6. Gebrauch
DE
6.4.2. Sous Vide
Ermöglicht das Verpacken von Nahrungsmitteln unter Vakuum für das Niedertemperaturgaren „Sous Vide“.
Je nach Lebensmittel kann aus 8 Standardrezepten gewählt werden, die je nach Art der zu verpackenden Nahrungsmittel
programmiert sind.
Auf der „Homepage“ die Taste drücken und das Rezept wählen.
Rezept
Verpackung
Einstellbarer Parameter
Rind
Beutel
Versiegelungszeit: OFF / 0,1÷4 s
Default: 1,1 s
Schwein
Beutel
Versiegelungszeit: OFF / 0,1÷4 s
Default: 1,1 s
Geflügel
Beutel
Versiegelungszeit: OFF / 0,1÷4 s
Default: 1,1 s
Gemüse
Beutel
Versiegelungszeit: OFF / 0,1÷4 s
Default: 1,1 s
Früchte
Beutel
Versiegelungszeit: OFF / 0,1÷4 s
Default: 1,1 s
Sauce
Beutel
Versiegelungszeit: OFF / 0,1÷4 s
Default: 1,1 s
Dessert
Beutel
Versiegelungszeit: OFF / 0,1÷4 s
Default: 1,1 s
Fisch
Beutel
Versiegelungszeit: OFF / 0,1÷4 s
Default: 1,1 s
Diese Technik sieht einen langsamen Garvorgang der in versiegelten Beuteln vakuumverpackten
Lebensmittel bei niedrigen Temperaturen vor. Es gibt zahlreiche Vorteile:
• Geschmack und Konsistenz der Lebensmittel bleiben unverändert.
• Geschmack und Duft werden beibehalten, da die Aromen während des Garvorgangs nicht verloren gehen.
• Dank des geringen Flüssigkeitsverlusts bleiben die Lebensmittel zarter und weniger trocken.
• Die Nährstoffe wie Mineralsalze und Vitamine bleiben im Lebensmittel erhalten.
• Für den Garvorgang müssen weder Öl noch Fett hinzugefügt werden.

64
Kapitel 6. Gebrauch
DE
6.4.3. Marinierung
Ermöglicht, das Rezept zum Marinieren der Nahrungsmittel auszuführen.
Auf der „Homepage“ die Taste drücken.
Den Namen eingeben, der
dem Rezept zugeordnet
werden soll (fakultativ).
Betätigen Sie .
Die Liste und die Mengen
der Zutaten eingeben
(fakultativ).
Betätigen Sie
Die Anweisungen für die
Zubereitung des Rezepts
eingeben (fakultativ).
Betätigen Sie .
Stellen Sie ein:
• Zahl der Wiederholungen des
Marinierzyklus (1÷7)
• Pausenzeit zwischen zwei
aufeinanderfolgenden Zyklen
(10÷70 Sekunden)
Wählen Sie:
: wenn man in eine Schale
verpacken möchte.
: wenn man in einen Beutel
verpacken möchte.
In diesem Fall kann die
Schweißzeit eingestellt
werden.
Drücken Sie:
: wenn das Rezept
gespeichert werden soll.
: wenn der Zyklus zum
Marinieren ausgeführt
werden soll, ohne dass das
Rezept gespeichert wird.
Wenn gedrückt wurde, um
das Rezept zu speichern,
werden auf dem Display die 8
in vorhandenen
Kategorien angezeigt.
Die Kategorie auswählen,
in der das Rezept gespeichert
werden soll.
Das Rezept wurde
gespeichert.
Wenn ein Zyklus zum
Marinieren ausgeführt werden
soll, auf den Namen des
Rezepts drücken.
Wenn das Nahrungsmittel mit der
Marinade mit den Aromen in den
Beutel/die Schale und in die
Wanne (4) gegeben wurde, auf
drücken, um den Zyklus zum
Marinieren zu starten.
Die Vakuum-Marinade der Nahrungsmittel erweist sich in der Küche als sehr vorteilhaft.
Die Vakuumverpackung eines Nahrungsmittels mit der Marinade aus Aromen ermöglicht es, dass die
Bestandteile des Würzmittels leichter und in kürzerer Zeit in das Gewebe eindringen.

65
Kapitel 6. Gebrauch
DE
6.4.4. Aufguss
Ermöglicht die Ausführung des Rezepts, um einen Aufguss zu erhalten.
Auf der Startseite die Taste drücken und das Rezept wählen.
Den Namen eingeben, der
dem Rezept zugeordnet
werden soll (fakultativ).
Betätigen Sie .
Die Liste und die Mengen
der Zutaten eingeben
(fakultativ).
Betätigen Sie
Die Anweisungen für die
Zubereitung des Rezepts
eingeben (fakultativ).
Betätigen Sie .
Stellen Sie ein:
: Anzahl der Einlegezyklen.
: Pausenzeit zwischen zwei
aufeinanderfolgenden Zyklen.
: Wartezeit (gemessen ab dem
Ende der
Unterbrechungsphase bis zur
darauf folgenden Phase des
erneuten Lufteintritts).
Wählen Sie:
: wenn man in eine
Schale verpacken
möchte.
: wenn man in einen
Beutel verpacken
möchte.
In diesem Fall kann die
Schweißzeit eingestellt
werden.
Drücken Sie:
: wenn das Rezept
gespeichert werden soll.
: wenn der Zyklus zum
Einlegen ausgeführt werden
soll, ohne dass das Rezept
gespeichert wird.
Wenn gedrückt wurde, um
das Rezept zu speichern,
werden auf dem Display die 8
in vorhandenen
Kategorien angezeigt.
Die Kategorie auswählen,
in der das Rezept gespeichert
werden soll.
Das Rezept wurde
gespeichert.
Wenn ein Zyklus zum
Einlegen ausgeführt werden
soll, auf den Namen des
Rezepts drücken.
Wenn das Nahrungsmittel mit dem
Aufguss in den Beutel/die Schale
und in die Wanne (4) gegeben
wurde, auf drücken, um den
Zyklus zum Einlegen zu starten.
Der Aufguss ist das Verfahren, mit dem die wohltuenden Inhaltsstoffe aus den Elementen extrahiert werden,
und wird durch mehr oder weniger langes Eintauchen von Pflanzen oder Lebensmitteln in eine Flüssigkeit
erhalten.

66
Kapitel 6. Gebrauch
DE
6.4.5. Meine Rezepte
In diesem Menü ist Folgendes möglich:
• Erstellen eines neuen Rezepts
• Ausführung des Verpackungszyklus der gespeicherten Rezepte.
Wenn ein Rezept erstellt werden soll, zeigt das Display 8 Kategorien an, in denen das Rezept je nach der Art des
Nahrungsmittels und der Verpackungsart gespeichert werden kann.
Milchprodukte
Getränke
Andere
Mariniertes
Aufgegossenes
In diesen Kategorien sind bereits drei Standardrezepte vorhanden:
Cold Brew: Ideal für die Zubereitung eines Erfrischungsgetränks auf
Wasserbasis mit Kaffeeaufguss.
Spa Water: Ideal für die Herstellung eines Erfrischungsgetränks auf
Wasserbasis mit einem Aufguss aus frischen Früchten
und aromatischen Kräutern.
Sangria: Ideal für ein erfrischendes Weingetränk mit einem
Aufguss von frischem Obst und Gewürzen
Getreide
Früchte
Proteine
Gemüse
Auswahl der Kategorie:
Die Taste drücken.
Den Namen eingeben, der dem Rezept
zugeordnet werden soll und drücken.
Auf den beiden folgenden
Bildschirmanzeigen können die Zutaten
und die Anweisungen für die Zubereitung
des Rezepts eingegeben werden
(fakultativ). Betätigen Sie .
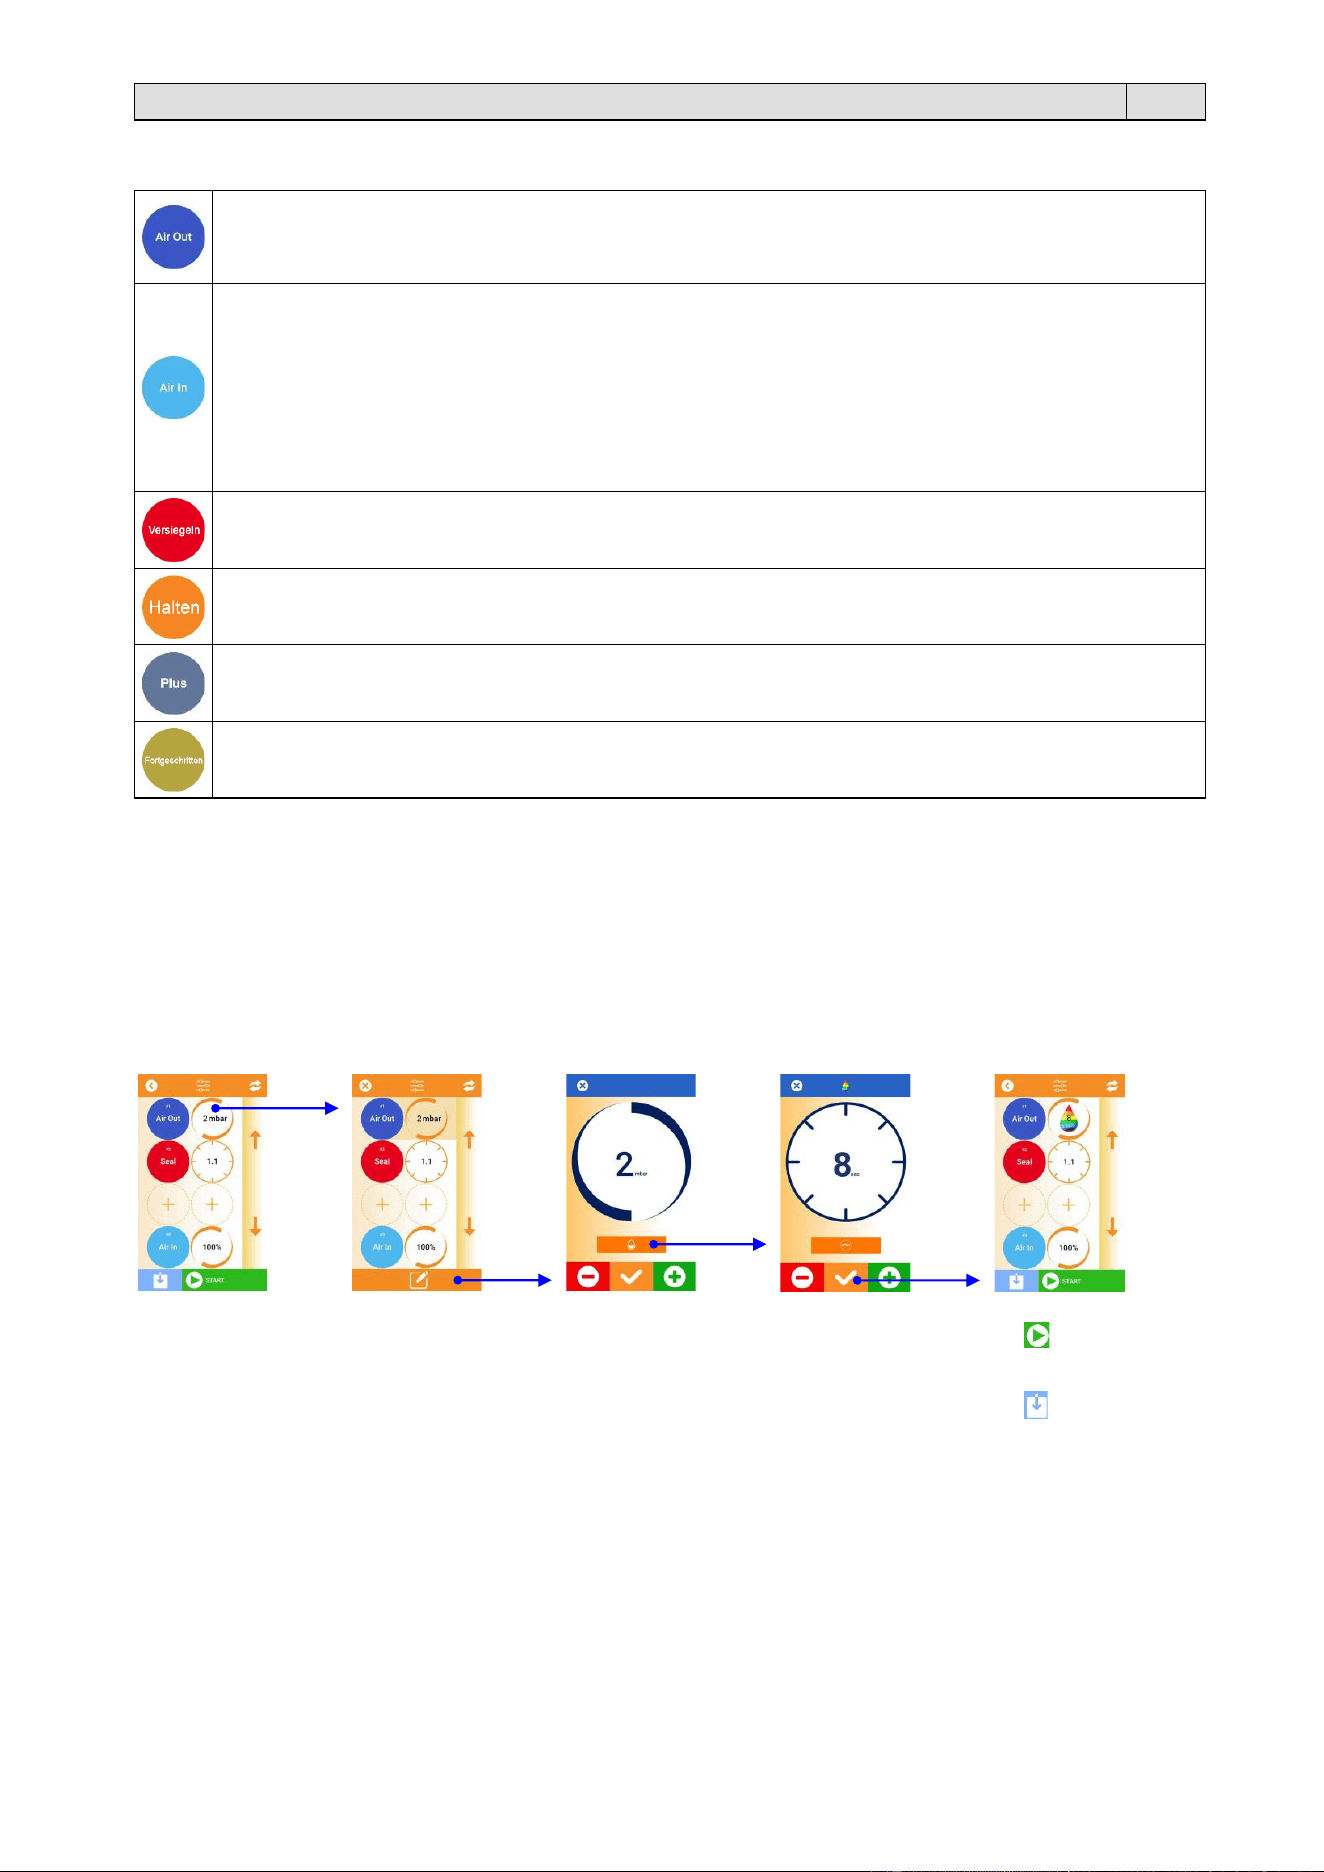
67
Kapitel 6. Gebrauch
DE
Nun müssen die Parameter des Rezepts eingestellt werden, und zwar:
Air out (Air Out)
Damit wird der Druck eingestellt, der in der Wanne (4) erreicht werden soll: 2÷735 mbar
0÷30 s (wenn die Funktion
Flüssigkeiten aktiv ist)
Air in (Air in)
Damit wird die Partialisierung (Anzahl der Zyklen) der Rückbelüftung der Wanne (4) eingestellt: 10% (10 Zyklen)
15% (7 Zyklen)
20% (4 Zyklen)
35% (3 Zyklen)
100% (1 Zyklus)
Hinweis: Zusätzlich zur letzten Phase des Verpackungszyklus ist es möglich, während des Zyklus eine
Rückbelüftungsphase einzufügen (1÷95%).
Versiegeln (Seal)
Einstellung der Zeit, während der die Versiegelung des Beutels stattfindet: 0÷4 s
Halten (Hold)
Einstellung der Pausenzeit zwischen zwei Verpackungsvorgängen: 0÷10 min
Plus (Plus)
Einstellung der Zeit einer weiteren Entnahme der Luft aus der Wanne während des Verpackungszyklus: 0÷10
min
Fortgeschritten (Advanced)
Beutel drücken, Beutel freigeben
Verpackung von flüssigen Lebensmitteln
Bei der Verpackung von flüssigen Lebensmitteln (z.B. Fleischsauce) empfehlen wir die Aktivierung der Funktion
„Flüssigkeiten“.
Diese Lebensmittel können während des Vakuumzyklus kochen.
Wenn die Funktion aktiv ist, stoppt der Zyklus nach der eingestellten Wartezeit (*), und der nächste Schritt wird sofort
ausgeführt.
Sie können die
Wartezeit (*),
gemessen von der
Kochphase zur
nächsten Phase (0-30
s) einstellen.
Nun:
• drücken, um den
Verpackungszyklus
auszuführen
• drücken, wenn
das Rezept
gespeichert werden
soll.

68
Kapitel 6. Gebrauch
DE
6.4.6. Ändern eines Rezepts
Zum Ändern eines Rezepts:
6.4.7. Löschen eines Rezepts
Zum Löschen eines Rezepts:

69
Kapitel 6. Gebrauch
DE
6.5. Einstellung
Allgemeine Einstellungen
In diesem Menü können Sie die folgenden Funktionen einstellen:
Zutaten
Aktiviert/deaktiviert, wenn ein Rezept erstellt wird, die Anzeige der Seite, auf der die Liste und die Menge der Zutaten
eingegeben (und daher gespeichert) werden können.
Zubereitung
Aktiviert/deaktiviert, wenn ein Rezept erstellt wird, die Anzeige der Seite, auf der die Anweisungen für die Zubereitung
des Rezepts eingegeben (und daher gespeichert) werden können.
Versiegelungszeit
Ermöglicht es Ihnen, die Standardversiegelungszeit entsprechend dem verwendeten Tütentyp einzustellen.
Die eingestellte Zeit wird auf alle Rezepte angewendet.
Es ist möglich, eine Zeit von 0,1 bis 4,0 s einzustellen. Die werkseitig voreingestellte Zeit beträgt 1,1 s.
Ölreinigung
Ermöglicht die Programmierung eines wöchentlichen oder monatlichen Ölreinigungszyklus.
Speicher zurücksetzen
Ermöglicht das Löschen von Rezepten, die im Menü „Meine Rezepte“ gespeichert sind.
Berührungston
Aktiviert/deaktiviert den Ton beim Drücken der Tasten auf dem Display.
Screensaver-Einstellungen
Aktiviert/deaktiviert den Bildschirmschoner.
Bei Aktivierung kann das Bild ausgewählt werden, das auf dem Display erscheint.
Import / Export
Ermöglicht den Import/Export von Rezepten über einen USB-Stick.
Vac Timer
Quick Vac
Maschine vorwärmen
Die Funktion ist zu aktivieren, wenn das Gerät in sehr kalter Umgebung arbeitet.
Bei jedem Einschalten des Gerätes wird die Pumpe eingeschaltet, um eine optimale Temperatur des in der Pumpe
enthaltenen Öls zu gewährleisten und um bereits beim ersten Verpackungszyklus auf Temperatur zu sein.
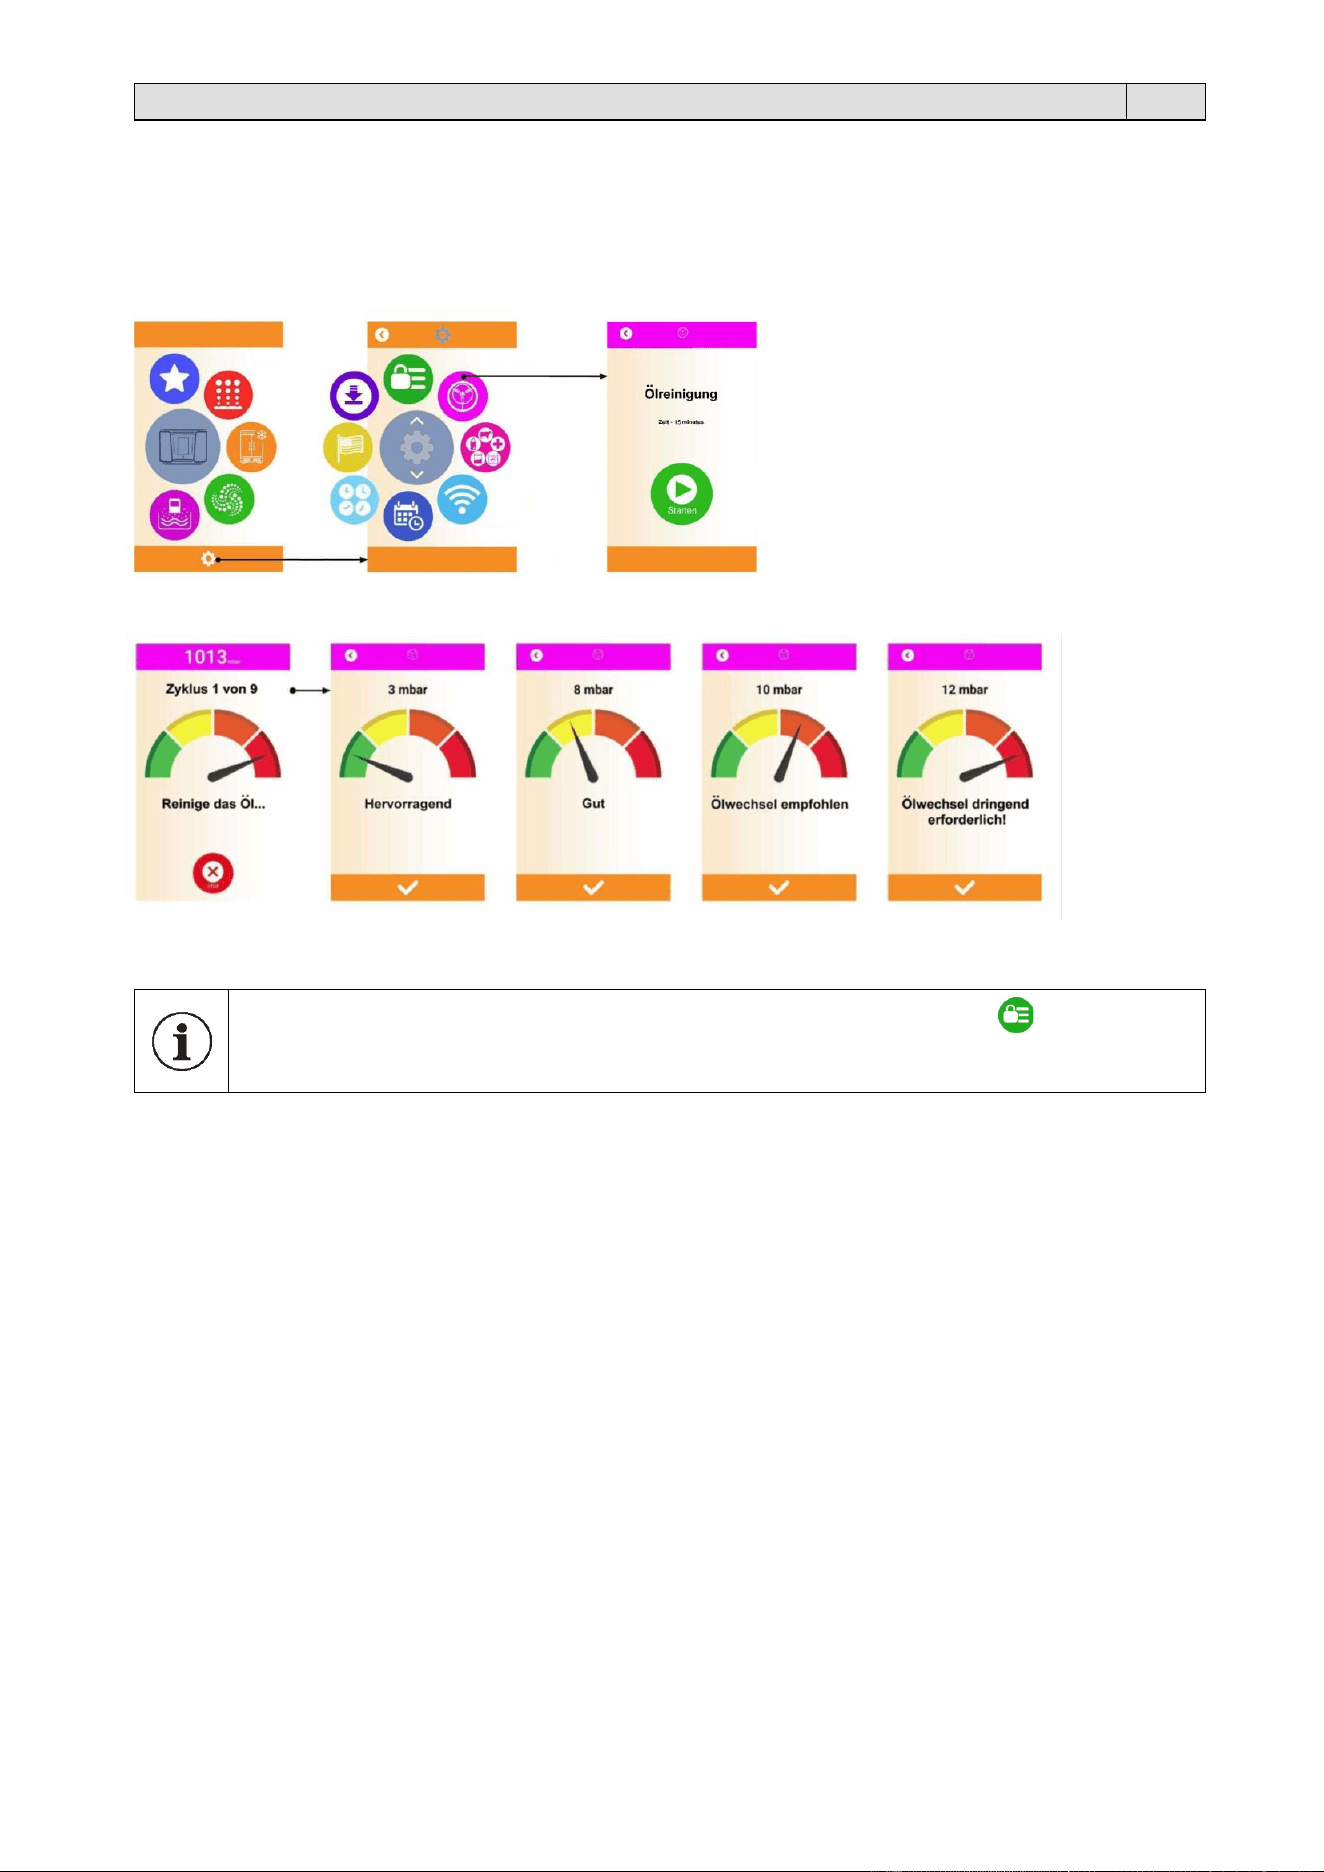
70
Kapitel 6. Gebrauch
DE
Ölreinigung
Ermöglicht die Durchführung eines Reinigungszyklus des Öls der Pumpe.
Der ca. 15 Minuten dauernde Reinigungszyklus ermöglicht es der Pumpe, hohe Temperaturen zu erreichen, so dass die
im Öl enthaltenen Verunreinigungen verdunsten.
Am Ende des Reinigungszyklus zeigt das Display die Qualität des Öls an. Wenn ein Ölwechsel erforderlich ist, wenden
Sie sich bitte an den technischen Kundendienst.
Ein Ölreinigungszyklus kann wöchentlich oder monatlich programmiert werden (Menü ).
Eine regelmäßige Reinigung des Pumpenöls ist unerlässlich, um einen ordnungsgemäßen und dauerhaften
Betrieb zu gewährleisten.

71
Kapitel 6. Gebrauch
DE
Voreinstellungen
Ermöglicht es Ihnen, ein Rezept anzuzeigen ( ) oder auszublenden ( ).
Beispiel
Wenn Sie das Menü „Aufbewahrung“ ausblenden,
erscheint es nicht auf der Startseite.
Wenn im Menü „Aufbewahrung“ nur das Rezept „Fest“
ausgeblendet ist, erscheint es nicht in der Liste der im Menü
„Aufbewahrung“ verfügbaren Rezepte.
WLAN
Ermöglicht die Verbindung zum WiFi-Netzwerk.

72
Kapitel 6. Gebrauch
DE
Datum/Uhrzeit
Ermöglicht die Einstellung von Datum und Uhrzeit.
Zeitzone
Ermöglicht die Einstellung der Zeitzone
Sprache
Ermöglicht die Einstellung der Anzeigesprache des Displays.
Update
Ermöglicht es Ihnen, ein mögliches Software-Update zu überprüfen/installieren (Verbindung zum WiFi-Netzwerk
erforderlich).

73
Kapitel 7. Planmäßige Wartung
DE
7.1. Reinigung und Pflege
Vor wartungseingriffen die Maschine am hauptschalter ausschalten und den stecker vom netz
trennen.
• Das Gerät nach jeder Verwendung mit einem
feuchten und weichen Tuch reinigen.
•
• Für die Reinigung des Plexiglasdeckels (6) sowohl
die Außen- als auch die Innenseite ausschließlich mit
neutralen Mitteln reinigen (Wasser und Seife).
• Keinen scheuernden Produkte, Produkte auf
Alkoholbasis, Scheuerschwämme, Lösungsmittel
oder metallische Gegenstände verwenden.
• Wenn Produkte zur Reinigung der Stahlwanne (4)
verwendet werden, müssen die Sicherheitshinweise
auf der Verpackung eingehalten werden.
• Es wird empfohlen, für die Reinigung der Wanne (4),
vor allem bei Vorhandensein von
Flüssigkeitsrückständen, den Schweißbalken (5) nach
oben heraus zu ziehen.
• Den Schweißbalken (5) mit einem trockenen Tuch
reinigen. Eventuelle Ablagerungen von Rückständen
vom Schweißbalken (5) entfernen.
• Die metallischen Oberflächen mit normalen
Reinigungsmitteln für Edelstahl reinigen.
• Das Display (3) muss sauber und trocken gehalten
werden.
MX 2
MX 4

74
Kapitel 7. Planmäßige Wartung
DE
7.2. Problemlösungen
Problem
Ursache
Lösung
Die Schweißung des
Beutels wurde nicht
korrekt ausgeführt
• Die Schweißdauer ist nicht korrekt.
• Die Dichtung des Deckels ist
schmutzig oder verschlissen.
• Der Beutel wurde nicht korrekt am
Schweißbalken positioniert.
• Der Schweißbalken ist abgenutzt (die
Teflonverkleidung ist verbrannt).
• Die Klinge unter dem Teflon des
Schweißbalkens ist beschädigt.
• Schweißdauer einstellen.
• Die Dichtung des Deckels reinigen oder
austauschen (für den Austausch den
technischen Kundendienst kontaktieren).
• Den Beutel korrekt positionieren.
• Den Schweißbalken austauschen (für den
Austausch den technischen Kundendienst
kontaktieren).
• Schweißbalken (5) austauschen (für den
Austausch den technischen Kundendienst
kontaktieren).
Endgültiges Vakuum
unzureichend
• Der eingestellte Prozentsatz für das
Vakuum ist nicht korrekt.
• Die Dichtung des Deckels ist
schmutzig oder verschlissen.
• Der Deckel ist nicht korrekt
geschlossen.
• Verunreinigungen im Pumpenöl.
• Den Vakuumprozentsatz verändern.
• Die Dichtung des Deckels reinigen oder
austauschen (für den Austausch den
technischen Kundendienst kontaktieren).
• Den Deckel korrekt verschließen.
• Sicherstellen, dass sich zwischen dem
Deckel und der Schale nichts und auch
kein Schmutz befinden.
• Einen „Ölreinigungs“-Zyklus vornehmen
(siehe Abs. 6.4) und die Qualität
überprüfen. Sofern ein Ölwechsel
erforderlich ist, den Technischen
Kundendienst kontaktieren.
Der Deckel öffnet sich
nicht
• Fehlende Stromversorgung.
• Abwarten, bis die Stromversorgung
wiederhergestellt ist.
Der Deckel (6) weist
Risse oder
Bruchstellen auf.
• Der Deckel (6) ist beschädigt.
• Den Deckel (6) austauschen (für den
Austausch den technischen Kundendienst
kontaktieren).
Sollte nach Durchführung der oben beschriebenen Kontrollen die Maschine noch immer nicht perfekt
funktionieren, den Kundendienst kontaktieren und diesem das aufgetretene Problem exakt beschreiben.

75
Kapitel 8. Garantiezeit
DE
8.1. Garantieschein
Die Garantie gilt für den Zeitraum von 12 Monaten nach Aufstellung, zu den in der Bedienungsanleitung abgedruckten
Bedingungen. Füllen Sie die Rückseite der Garantiekarte vollständig aus, reißen Sie sie entlang der perforierten Linie aus
und senden Sie sie per Post an uns.
8.2. Garantiebedingungen
Die Garantie gilt für den Zeitraum von 12 Monaten nach der Aufstellung der Geräts. Sie erstreckt sich auf den kostenlosen
Austausch oder die Reparatur der von uns aufgrund von Werkstoffanomalien als fehlerhaft festgestellten Teile. Die
Reparaturen oder der Austausch werden normalerweise im Herstellungswerk vorgenommen, wobei der Käufer die
Transportkosten und den Arbeitslohn trägt. Sollte die Reparatur oder der Austausch beim Käufer vorgenommen werden,
so trägt dieser die Reisekosten, das Tagegeld und den Arbeitslohn. Die Garantieleistungen werden ausschließlich durch
den Hersteller oder durch autorisierte Fachhändler durchgeführt. Um Anrecht auf Garantieleistungen zu haben, muß das
defekte Teil dem Hersteller oder dem autorisierten Fachhändler zugeschickt werden, damit die Reparatur oder der
Austausch vorgenommen werden können. Die Rücklieferung eines solchen reparierten oder ausgetauschten Teils fällt
unter die Erfüllung der Garantieleistungen.
Die Garantie verfällt:
• wenn die GARANTIEURKUNDE nich innerhalb von 20 Tagen nach Zustellung des Geräts vollständing ausgefüllt und
unterschrieben versandt wird
• wenn das Gerät falsch aufgestellt, angeschlossen oder durch nicht autorisierte Personen fahrlässig bedient oder
gehandhabt wird
• wenn am Gerät vom Hersteller nicht schriftlich genehmigte Konstruktive Veränderungen vorgenommenwerden
• wenn das Gerät sich nicht mehr im besitz des ersten Käufers befindet.
Der Hersteller weist aufgrund bestehenden Rechts jede Haftung für Schäden an Personen oder Gegenständen
zurück, sollte das Gerät falsch aufgestellt, falsch ans Stromnetz oder ohne Erdung angeschlossen werden oder
wenn Änderungen am Gerät vorgenommen werden sollten.
Der Hersteller behält sich das recht vor, aus technischen oder funktionellen Gründen Änderungen am Gerät
vorzunehmen.
FÜR JEGLICHEN RECHTSSTREIT
IST DAS GERICHT BERGAMO (ITALIEN) ZUSTÄNDIG.
76
IT DICHIARAZIONE CE DI CONFORMITA’
EN CE DECLARATION OF CONFORMITY
DE KONFORMITÄTSERKLÄRUNG
FR DECLARATION CE DE CONFORMITE’
ES DECLARACIÓN CE DE CONFORMIDAD
SV ÖVERENSTÄMMELSEFÖRKLARING EC
PT DECLARAÇÃO CE DE CONFORMIDADE
EL ΔΗΛΩΣΗ ΠΙΣΤΟΠΟΙΗΣΗΣ CE
CS ES PROHLÁŠENÍ O SHODĚ
RU ДЕКЛАРАЦИЯ СООТВЕСТВИЯ CE
IT Noi:
EN We:
DE Wir:
FR Nous:
ES Nosotros:
SV Vi:
PT Nós:
EL Εμείς:
CS My:
RU Мы:
MINIPACK-TORRE S.p.A.
Via Provinciale, 54 - 24044 - DALMINE (BG)
IT dichiariamo sotto la nostra esclusiva responsabilità che il prodotto
EN declare under our responsibility that the product
DE erklären unter unserer ausschließlichen Verantwortung, dass das in dieser Erklärung genannte Produkt
FR déclarons sous notre exclusive responsabilité que le produit
ES declaramos bajo nuestra exclusiva responsabilidad que el producto
SV förklarar under eget ansvar, att produkten
PT declaramos sob a nossa exclusiva responsabilidade que o produto
EL δηλώνουμε υπεύθυνα ότι το προϊόν
CS prohlašujeme výhradně na vlastní zodpovědnost, že produkt
RU под нашу исключительную ответственность заявляем, что данное изделие
IT MACCHINA CONFEZIONATRICE TIPO:
EN PACKAGING MACHINE MODEL:
DE VERPACKUNGSMASCHINE TYP:
FR MACHINE D’EMBALLAGE MODELE:
ES MÁQUINA CONFECCIONADORA TIPO:
SV PACKNINGSMASKIN TYP:
PT MÁQUINA CONFECCIONADORA TIPO:
EL ΜΗΧΑΝΗ ΣΥΣΚΕΥΑΣΙΑΣ ΤΥΠΟΥ:
CS BALICI SROJ MODEL:
RU УПАКОВОЧНАЯ МАШИНА ТИПА:
MX 2
n°
/
MX 4
n°
/
IT è conforme ai requisiti essenziali di sicurezza e a tutte le disposizioni pertinenti delle direttive applicabili
EN conforms to the essential safety requirements and all the provisions of the applicable directives
DE entspricht den grundlegenden Sicherheitsanforderungen und allen betreffenden Bestimmungen der einschlägigen Richtlinien
FR est conforme aux exigences essentielles de sécurité et à toutes les dispositions pertinentes des directives applicables
ES cumple los requisitos fundamentales de seguridad y todas las normas pertinentes de las directivas aplicables
SV uppfyller de väsentliga säkerhetskraven och relevanta bestämmelser i gällande direktiv
PT é conforme os requisitos essenciais de segurana e a todas as disposições pertinentes das directrizes aplicáveis
EL συμμορφώνεται με τις βασικές απαιτήσεις ασφαλείας και όλες τις συναφείς διατάξεις των εφαρμόσιμων οδηγιών
CS splňuje základní požadavky na bezpečnost a všechna příslušná ustanovení platných směrnic
RU соответствует основным требованиям безопасности и всем соответствующим положениям в действующих директивах
2006/42/CE, 2014/30/UE, 2014/35/UE
IT E inoltre dichiariamo che sono state applicate le seguenti norme armonizzate
EN And furthermore we declare that the following rules have been applied
DE außerdem bestätigen wir, dass folgende harmonisierte Richtlinien angewendet wurden
FR Nous déclarons également que les normes harmonisées suivantes ont été appliquées
ES Además declaranos que han sido aplicadas las siguientes normas armonizadas
SV Dessutom förklarar vi, att följande harmoniserade normer har använts
PT E, além disso, declaramos que foram aplicadas as seguintes normas harmonizadas
EL Επίσης δηλώνουμε ότι εφαρμόσθηκαν οι εξής εναρμονισμένες προδιαγραφές
CS A kromě toho prohlašujeme, že byly aplikované následující harmonizované normy
RU Также мы заявляем, что были применены следующие согласованные нормативы
EN 12100:2010, EN 61000-6-3:2007, EN 61000-6-1:2007, EN 60335-1:2013
IT Persona autorizzata a costituire il Fascicolo Tecnico: Responsabile Ufficio Tecnico
EN Person authorised to compile the Technical File: Technical Office Manager
DE Zur Erstellung des Technischen Merkhefts befugte Person: Verantwortlicher der Technischen Abteilung
FR Personne autorisée à constituer le Fascicule Technique: Responsable Bureau Technique
ES Persona autorizada a elaborar el Fascículo Técnico: Responsable del Departamento Técnico
SV Person med behörighet att skapa den Tekniska Dokumentationen: Tekniskt ansvarig
PT Pessoa autorizada a compilar o Processo Técnico: Responsável pelo Gabinete Técnico
EL Άτομο εξουσιοδοτημένο να καταρτίσει το Τεχνικό Τεύχος: Υπεύθυνος Τεχνικού Γραφείου
CS Osoba autorizovaná k vystavení Technické dokumentace: Vedoucí technického oddělení
RU Лицо, уполномоченное для составления технического файла: начальник технического отдела
Dalmine,
IT Consigliere Delegato
EN Managing Director
DE Geschäftsführer
FR Directeur Général
ES Consejero Delegado
SV Verkställande Direktör
PT Conselheiro Delegado
EL Ο Διευθύνων Σύμβουλος
CS Generální ředitel
RU Управляющий директор

77

78
(IT) Tipo / (EN) Type CERTIFICATO DI GARANZIA / CERTIFICATE OF GUARANTEE
(DE) Typ / (FR) Type GARANTIESCHEIN / BULLETIN DE GARANTIE
(ES) Tipo / (SV) Typ CERTIFICADO DE GARANTIA / GARANTIINTYG
(PT) Tipo / (EL) Τύπος CERTIFICADO DE GARANTIA / ΠΙΣΤΟΠΟΙΗΤΙΚΟ ΕΓΓΥΗΣΗΣ
(CS) Typ / (RU) Тип CERTIFIKÁT ZÁRUKY / ГАРАНТИЙНЫЙ СЕРТИФИКАТ
(IT) Matricola n° / (EN) Serial n° Data e timbro rivenditore / Date and dealer’s stamp
(DE) Kennummer / (FR) No. de série Datum und stempel des verkaufers / Date et timbre du revendeur
(ES) No.de matrícula / (SV) Registreringsnummer Fecha y timbre del revendedor / Datum och återförsäljarens stämpel
(PT) Número de série / (EL) Κωδικός Data e carimbo revendedor / Ημερομηνία και σφραγίδα εξουσιοδοτημένου πωλητή
(CS) Výrobní číslo / (RU) Паспортный № Datum a razítko prodejce / Дата и печать продавца
(IT) Collaudo / (EN) Test n°
(DE) Abnahmeprüfung / (FR) Essai
(ES) Ensayo / (SV) Besiktning
(PT) Teste / (EL) Δόκιμη
(CS) Kolaudace / (RU) Проверочные испытания
(IT) Indirizzo acquirente / (EN) Customer address
(DE) Adresse des Abnehmers / (FR) Adresse de l’acheteur
(ES) Dirección del comprador / (SV) Köparens adress
(PT) Endereço comprador / (EL) Διεύθυνση αγοραστή
(CS) Adresa zákazníka / (RU) Адрес покупателя
(IT) Data di acquisto / (EN) Purchase date
(DE) Einkaufdatum / (FR) Date d’achat
(ES) Fecha de compra / (SV) Inköpsdatum
(PT) Data de compra / (EL) Ημερομηνία αγοράς
(CS) Datum zakoupení / (RU) Дата покупки

79
IT Queste istruzioni sono disponibili nelle lingue italiano, inglese, tedesco, francese, spagnolo, portoghese, olandese,
svedese, finlandese, danese, greco, ceco, russo, cinese, coreano, giapponese. In caso necessitiate di una lingua
diversa da quelle che avete ricevuto a corredo con la macchina, verificate la disponibilità contattando la casa
costruttrice.
EN These instructions are available in Italian, English, German, French, Spanish, Portuguese, Dutch, Swedish,
Finnish, Danish, Greek, Czech, Russian, Chinese, Korean, and Japanese. Should you require a different language
to the one supplied with the machine, please contact the manufacturer for availability.
DE Die vorliegende Anleitung ist in den Sprachen Italienisch, Englisch, Deutsch, Französisch, Spanisch,
Portugiesisch, Niederländisch, Schwedisch, Finnisch, Dänisch, Griechisch, Tschechisch, Russisch, Chinesisch,
Koreanisch und Japanisch erhältlich. Sollte die Anleitung in einer anderen Sprache als jener, die mit der Maschine
mitgeliefert wurde, benötigt werden, bitte beim Hersteller anfragen, ob sie verfügbar ist.
FR Ces instructions sont disponibles en italien, anglais, allemand, français, espagnol, portugais, néerlandais, suédois,
finlandais, danois, grec, tchèque, russe, chinois, coréen, japonais. S’il faut une langue différente de celles reçue
avec la machine, en vérifier la disponibilité en contactant le Fabricant.
ES Estas instrucciones están disponibles en italiano, inglés, alemán, francés, español, portugués, holandés, sueco,
finlandés, danés, griego, checo, ruso, chino, coreano, japonés. Si necesita un idioma diferente del que ha recibido
con la máquina, compruebe la disponibilidad poniéndose en contacto con el fabricante.
Spett.le
minipack-torre S.p.A.
Via Provinciale, 54
24044 DALMINE (BG)
ITALY
MADE IN ITALY