Model: SJ-VS2037 | Brand: OSTBA
Overview
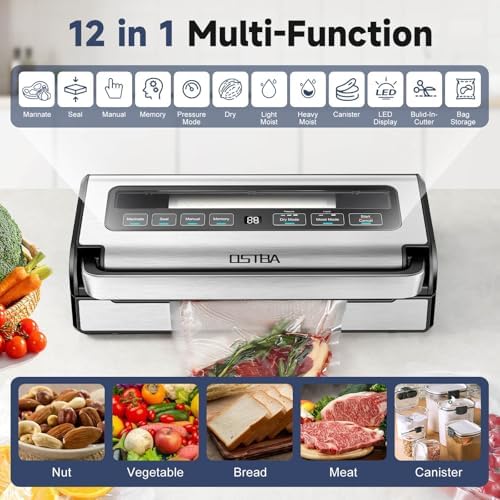
The OSTBA 180W Vacuum Sealer is a countertop appliance designed to remove air from specially designed bags and containers to preserve food freshness. It features a dual-pump motor, a built-in bag cutter and storage compartment, and multiple sealing modes for different food types.

Package Contents
- OSTBA Vacuum Sealer Machine (Model SJ-VS2037)
- 1 Roll of Vacuum Bags (20 cm x 300 cm)
- External Air Suction Hose
- User Manual
Product Dimensions & Specifications
| Specification | Details |
|---|---|
| Dimensions (L x W x H) | 16 x 8.5 x 4.5 inches |
| Weight | 6.6 pounds |
| Power | 180 Watts |
| Voltage | 120 Volts (AC) |
| Suction Power | Up to -95 kPa |
| Material | ABS, Stainless Steel |
| Color | Silver |
Features
Control Panel & Indicators

The control panel includes a digital display and seven function buttons:
- Marinate – Rapidly marinates meats by vacuum-sealing and releasing pressure.
- Seal – Seals the bag without vacuuming (for pre-made bags or resealing).
- Manual – Allows manual control of vacuum and seal process.
- Memory – Stores the last used settings for repeat use.
- Dry (3 levels: Light / Medium / Strong) – For dry foods like nuts, coffee, crackers.
- Moist (2 levels) – For moist or juicy foods like meats, sauces, or marinated items.
Dual-Pump Motor
The 180W dual-pump motor generates up to -95 kPa of suction, completing a vacuum cycle in 8–18 seconds. An integrated cooling system allows for continuous sealing of multiple bags without downtime.
Easy-Lock Handle
The ergonomic handle secures the lid with a one-handed snap-lock mechanism, eliminating the need for clamps or hard pressing.
Built-in Cutter & Bag Storage
A compartment inside the machine stores a roll of vacuum bags. The integrated cutter lets you trim bags to the desired length without scissors.
Digital Display
The display shows the current mode and progress of the vacuum/seal cycle.
Removable Drip Tray
A drip tray collects any liquids that may be drawn out during vacuuming. It can be removed for cleaning.
External Vacuum Function
The included suction hose allows you to vacuum-seal canisters, wine bottles, and other accessories with a compatible valve.
Use Guide
Preparing the Machine
- Place the vacuum sealer on a flat, dry, stable surface.
- Plug the power cord into a 120V AC outlet.
- Ensure the drip tray is properly inserted.
- Open the lid using the easy-lock handle.
Creating a Vacuum Bag from a Roll
- Open the bag storage compartment and pull out the bag roll.
- Close the lid and use the built-in cutter to cut the desired length.
- Seal one end of the bag: press the Seal button. The machine will heat-seal the open end.
- Fill the bag with food, leaving at least 3 inches of space at the open end.
Vacuum Sealing (Dry Mode)
- Place the open end of the filled bag into the vacuum channel.
- Close and lock the lid using the easy-lock handle.
- Press the Dry button. Select Light, Medium, or Strong depending on the food texture.
- The machine will automatically vacuum the air and seal the bag.
- Wait for the cycle to complete (indicator will turn off). Unlock the lid and remove the bag.
Vacuum Sealing (Moist Mode)
- Follow steps 1–2 from Dry Mode.
- Press the Moist button. Select the desired level.
- The machine will vacuum and seal, adjusting for moisture content.
Using the Marinate Function
- Place food and marinade in a vacuum bag.
- Seal the bag using the Seal button (do not vacuum yet).
- Press the Marinate button. The machine will cycle vacuum and release to accelerate marination.
- After the cycle, open the bag or proceed to vacuum seal.
Manual Mode
- Press the Manual button.
- The vacuum pump will start. Press Seal when you want to stop vacuuming and seal the bag.
- This is useful for delicate items like chips or bread.
Memory Function
After using a specific mode (e.g., Moist Strong), press Memory to save those settings. The next time you power on, press Memory to recall the saved mode.
External Vacuum (Canisters / Wine Bottles)
- Insert one end of the suction hose into the external vacuum port on the machine.
- Attach the other end to the compatible canister lid or wine stopper.
- Press the Manual button to start vacuuming. Monitor the process; press Seal or stop when desired vacuum is reached.
Cleaning & Maintenance
- Unplug the machine before cleaning.
- Remove and empty the drip tray. Wash with warm soapy water and dry thoroughly.
- Wipe the exterior with a damp cloth. Do not immerse in water.
- Clean the sealing gasket and vacuum channel with a soft brush to remove food particles.
Video Guide
The following video demonstrates the setup and operation of the OSTBA vacuum sealer:
Video: Product setup and usage demonstration.
Troubleshooting
| Issue | Possible Cause | Solution |
|---|---|---|
| Machine does not start | No power / unplugged | Check power cord and outlet (120V). |
| Bag does not seal | Lid not fully locked / gasket dirty | Ensure handle is fully locked. Clean the sealing gasket. |
| Vacuum pump runs but bag does not empty | Bag not positioned correctly / hole in bag | Re-position bag in vacuum channel. Check for punctures. |
| Liquid drawn into drip tray | Moisture content too high | Use Moist mode. Empty drip tray after use. |
| Continuous sealing stops | Overheating protection activated | Allow machine to cool for 1–2 minutes before resuming. |
Warranty & Support
This product is covered by a 1-year warranty from OSTBA APPLIANCE INC. For warranty claims, support, or questions, contact OSTBA through their Amazon store or the contact information provided in the included user manual.
Manufacturer: OSTBA APPLIANCE INC
Model Number: SJ-VS2037