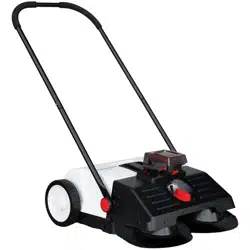
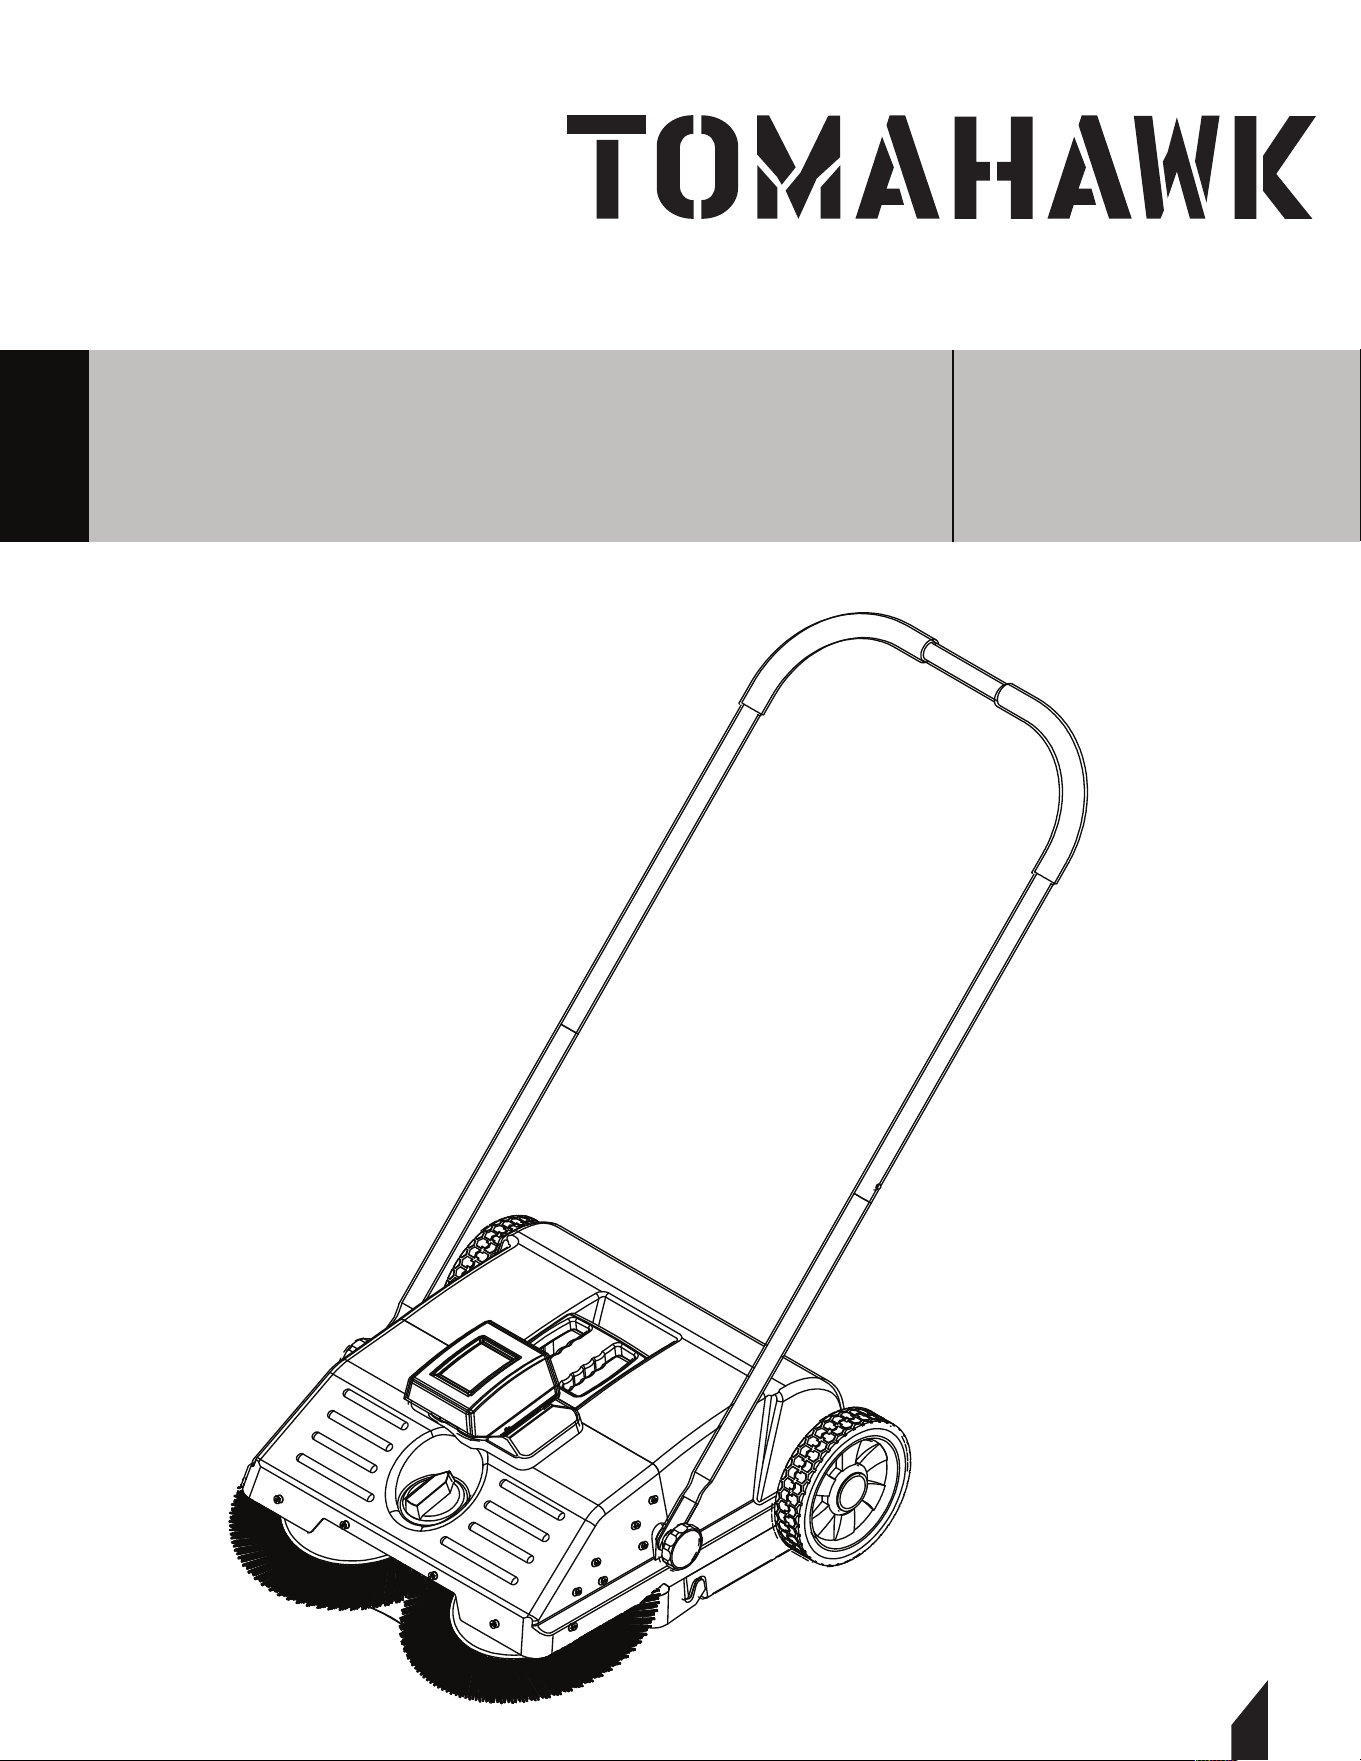
22” BATTERY POWERED
PUSH SWEEPER
MODEL NUMBER: eTOS22
To reduce the risk of injury, the user must read and understand the Operator’s
Manual before using this product. Save these instructions for future reference.
Operation Manual
W
A
R
R
A
N
T
Y

2
TABLE OF CONTENTS
1. SAFETY INFORMATION
1.1 Operating Safety
1.2 Usage Safety
1.3 Battery Safety
1.4 Service Safety
2. EQUIPMENT PERFORMANCE
2.1 Battery Powered Push Sweeper Design
2.2 TOMAHAWK® Battery
2.3 Unpacking the Unit
2.4 Battery Powered Push Sweeper Parts
3. SPECIFICATIONS
4. EQUIPMENT ASSEMBLY
4.1 Integrating The Water Proof Cover
4.2 Integrating The Battery
4.3 Handle Assembly
4.4 Waste Bin Assembly
5.
OPERATION
5.1 Using the Sweeper
5.2 Checking the Equipment Prior to Use
5.3 Brush Adjustment
5.4 Battery Charging
5.5 Emptying Waste Container
5.6 Brush(Circular Broom) Replacement
5.7 Work Indicator Light
6. STORAGE
7. TROUBLESHOOTING
7.1 Cleaning the Equipment
8. MAINTENANCE RECORD
9. REPLACEMENT PARTS
10. EQUIPMENT WARRANTY
11. PARTS MANUAL
12. TOMAHAWK CATALOG
4
5
5
6
6
6
6
7
7
8
8
8
8
8
9
10
10
10
11
11
11
11
12
13
13
14
14
15
15
16
17
22

3
Register Your Equipment
Thank you for purchasing TOMAHAWK® equipment! Your product is covered by the
TOMAHAWK® Warranty policy, but in order to activate your warranty, we need you to register
your product. In addition to activating your equipment warranty, product registration will
grant you access to important product updates, streamlined customer service and more.
INCLUDED WITH YOUR REGISTRATION
☑ Equipment Warranty Activation
☑ Product Updates
☑ Streamlined Customer Service
☑ Exclusive Discounts and Sales
STEPS TO REGISTER YOUR EQUIPMENT
1. Visit www.tomahawk-power.com
2. Choose “Product Registration” at the bottom of the page
3. Enter your equipment’s serial number to get started
4. Provide all required information
5. Submit Registration
Equipment Resources
TOMAHAWK® Customer Service doesn’t stop at checkout. We understand to keep a job-site
running smoothly - the proper equipment, spare parts, instruction manuals, and more are
needed at the drop of a hat. Visit www.tomahawk-power.com to gain access to the incredible
resources below.
How To Video Library
More of a visual person? Visit our Video Library for equipment
assembly instructions, troubleshooting tips, and more!
Found at the TOMAHAWK® Resource Center
Manual and Assembly Guide Library
Visit our Manual Library if you are looking for a lost
operations manual or a particular spare part?
Found on the TOMAHAWK® Manuals Page
Service Requests
In need of a quick fix or a service center referral? Submit a
Service Request and a TOMAHAWK® Technician will respond
shortly to get you the help you need.
Choose “Service Request” at the bottom of www.tomahawk-power.com

This manual provides information and procedures to safely operate and maintain this
model. For your own safety and protection from injury, carefully read, understand and
observe the safety instructions described in this manual.
Keep this manual or a copy of it with the machine. If you lose this manual or need an
additional copy, please contact TOMAHAWK® or visit www.tomahawk-power.com This
machine is built with user safety in mind; however, it can present hazards if improperly
operated and serviced. Follow operating instructions carefully. If you have questions about
operating or servicing this equipment, please contact TOMAHAWK®.
The information contained in this manual is based on machines in production at the time of
publication. TOMAHAWK® reserves the right to change any portion of this information
without notice.
No part of this publication may be reproduced in any form or by any means, electronic or
mechanical, including photocopying, without express written permission from
TOMAHAWK®.
Any type of reproduction or distribution not authorized by TOMAHAWK® represents an
infringement of valid copyrights and will be prosecuted. We expressly reserve the right to
make technical modifications, even without due notice, which aim at improving our
machines or their safety standards.
1. SAFETY INFORMATION
This manual contains DANGER, WARNING, CAUTION, and NOTE callouts which must be
followed to reduce the possibility of personal injury, damage to the equipment, or improper
service.
This is the safety alert symbol. It is used to alert you to potential personal injury
hazards. Obey all safety messages that follow this symbol to avoid possible injury
or death.
DANGER indicates an imminently hazardous situation which, if not avoided, will
result in death or serious injury.
WARNING indicates a potentially hazardous situation which, if not avoided, could
result in death or serious injury.
CAUTION indicates a potentially hazardous situation which, if not avoided, may
result in minor or moderate injury.
DANGER
WARNING
CAUTION
4

5
1.1 Operating Safety
Familiarity and proper training are required for the safe operation of equipment!
Equipment operated improperly or by untrained personnel can be dangerous! Read
the operating instructions contained in both this manual and the parts manual and
familiarize yourself with the location and proper use of all controls. Inexperienced operators
should receive instruction from someone familiar with the equipment before being allowed
to operate the machine.
1.1.1 Observe all applicable local safety regulations, standards, and ordinances.
1.1.2 Individuals who operate the sweeper must be informed about the dangers related to
use of the machine.
1.1.3 DO NOT operate the sweeper if you are under the influence of any substance
(drugs, alcohol) which might impair vision, dexterity, or judgment.
1.1.4 Keep bystanders, especially children, and animals away from the work area.
1.1.5 The user is responsible for avoiding injury to third parties or damage to their property.
1.1.6 DO NOT lend or rent your power tool without the instruction manual. Be sure that
anyone using it understands the information contained in this manual.
1.1.7 If you have any condition that might be aggravated by strenuous work, check with
your doctor before operating a power tool.
1.2 Usage Safety
1.2.1 The sweeper is designed for sweeping road dust, leaves, grass, paper, and similar
items from flat and hard surfaces.
1.2.2 DO NOT sweep substances that are dangerous to health. The power tool is not
suitable for sweeping liquids.
1.2.3 NEVER sweep explosive dusts, liquids, acids, or solvents.
1.2.4 DO NOT operate the power tool in potentially explosive atmospheres.
1.2.5 DO NOT use the power tool as a means of transport.
1.2.6 Wear sturdy shoes with non-slip soles.
WARNING
Indicates a possibly dangerous situation. Where there is a risk of damaging the
machine or its individual components.
Indicates to read the Operation Manual. It is important that you read the operation
manual before first use and keep it in a safe place for future reference.

6
1.3 Battery Safety
1.3.1 NEVER store or charge battery in wet conditions.
1.3.2 NEVER make any adjustments to the tool if battery is connected.
1.3.3 NEVER interfere with the batteries integrity as this can cause injury and void
warranty.
1.3.4 NEVER use or dispose battery in fire as this can cause it to explode.
Check local codes for more information on proper battery disposal.
1.3.5 NEVER use equipment if it has been damaged or modified as this can cause injury.
1.3.6 When not in use, ensure battery is stored in a dry place away from any
flammable objects.
1.3.7 Allow battery to cool down aer each use to avoid burn injuries.
1.3.8 Only use the manufacturer’s designated battery with this machine.
Use of any other battery can damage unit and will void warranty.
1.3.9 Battery leakage may occur when operated in extreme temperature conditions.
If battery liquid contacts skin, wash immediately with water and soap, following with
white distilled vinegar or lemon juice to neutralize. If the liquid comes in contact with
eyes, flush out eyes with water for 10 minutes and seek medical attention immediately.
1.3.10 Have all servicing done by an approved TOMAHAWK® Technician or Service Center
with original replacement parts.
1.4 Service Safety
2. EQUIPMENT PERFORMANCE
2.1 22” Battery Powered Push Sweeper Design
TOMAHAWK® Battery Powered Push Sweeper are 5X faster than a broom covering a wider
path on every pass helping you cover more surface area so you can finish sweeping faster!
Operation is easy, simply adjust the broom settings for lighter or deeper cleaning of any hard
surface and push forward letting the powered two brush system effortlessly clean up against
walls, sidewalks, curbs, corners, between tight spaces, and more.
WARNING
Always follow the chemical manufacturer’s instructions, safety
guidelines,and recommendations when using any chemicals/solutions with
this machine.
WARNING
WARNING
WARNING
Poorly maintained equipment can become a safety hazard!
In order for the equipment to operate safely and properly over a long
period of time, periodic maintenance and occasional repairs are necessary.
7
2.2 TOMAHAWK® Battery
TOMAHAWK® 18V Lithium-Ion 5 Ah batteries charge faster and work longer than standard
batteries, giving you superior performance. With a fast charge time, spend more time
working on the things that matter and less time waiting for a charge.
2.3 Unpacking the Unit
Make sure to carefully remove all parts and accessories from the box. Ensure all parts listed
in the manual are in the box. Do not throw away the packaging or packing material until
you have inspected all parts and successfully operated the machine. Do not discard this
operations manual.
If any parts are missing or damaged, please contact TOMAHAWK® customer support by
email at support@tomahawk-power.com or call (866) 577-4476.
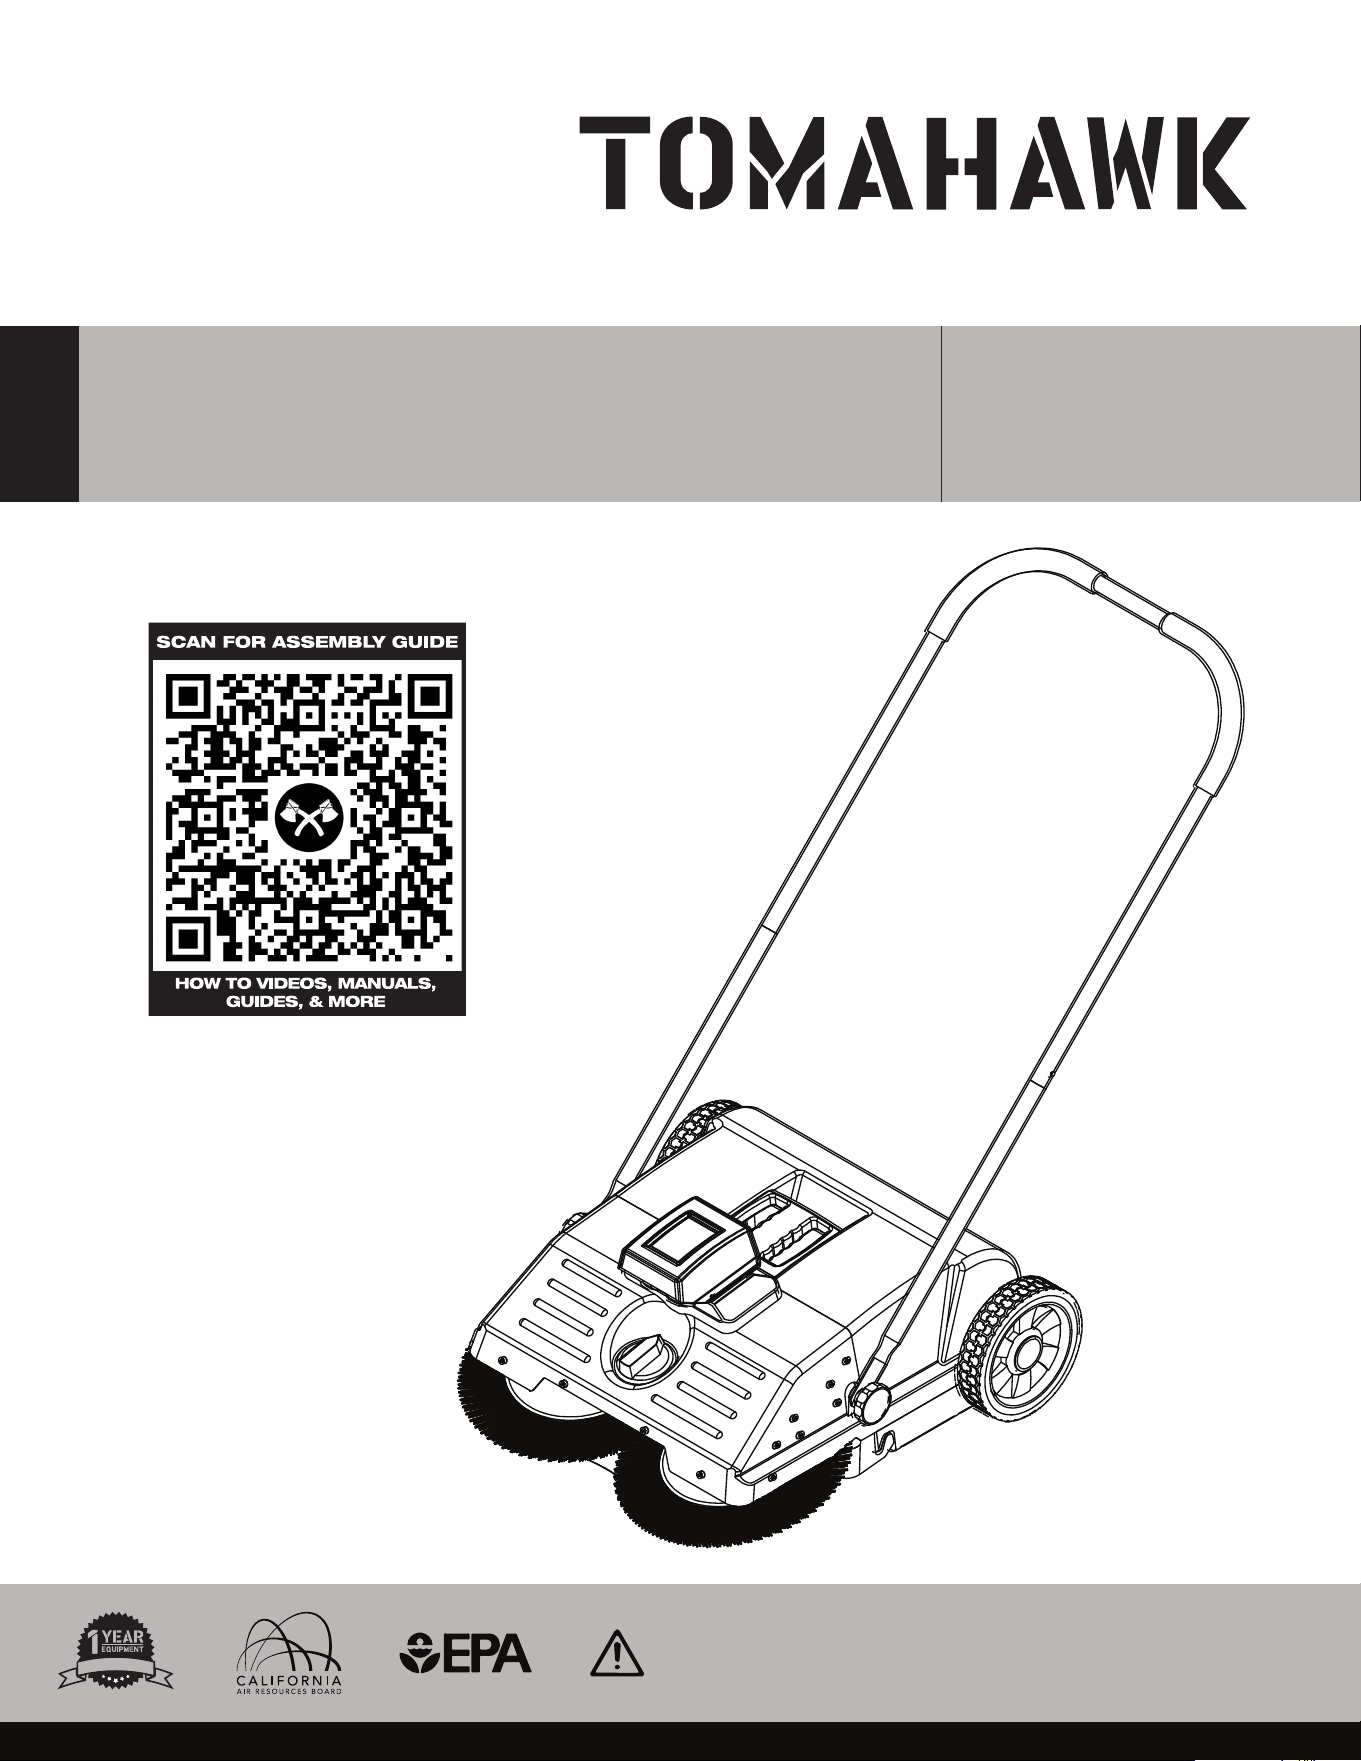
2.4 Battery Powered Push Sweeper Parts
1. Push Handle
2. Waste Bin
3. Waste Bin Handle
4. Brush Adjustment Knob
5. Power Button
6. Disc Brush
7. Running Wheel
8. Wheel Cover
9. Front Cover
10. Angled Wheel
11. Handle Grip

8
3. SPECIFICATIONS
4. ASSEMBLY GUIDE
4.1. Integrating The Water Proof Cover
Insert one side first, then into the other along the slot. FIGURE 1.
4.2 Integrating The Battery
Insert the battery into the holder slot on the machine. Slide in until the battery clicks.
FIGURE 2.
eTOS22 SPECIFICATIONS
22” (550mm)
6 gal (25 l)
2500㎡/H
17.8 lbs/20.7 lbs (8.1kg/9.4kg)
18v
5ah
5h
3-4h
22” * 9” * 24.2” (58 * 25 * 61.5cm)
Total Sweeping Width
Container
Working Efficiency
Net /Gross Weight
Voltage
Battery
Run Time
Charging Time
Packing Size
50 F°~122 F° (°10C°~50C°)
14 F°~104 F° (10C°~40C°)
32 F°~104 F° (0C°~40C°)
Running Temperature
Store Temperature
Charging Temperature
FIGURE 1
FIGURE 2
9
4.3. Handle Assembly
4.3.1 Insert the sliding handle into the adjustable handle and push handle
until it clicks into the locking position. FIGURE 3.
4.3.2 Connect the sliding handle hole to the screw on the side of the sweeper body
and tighten knob. FIGURE 4.
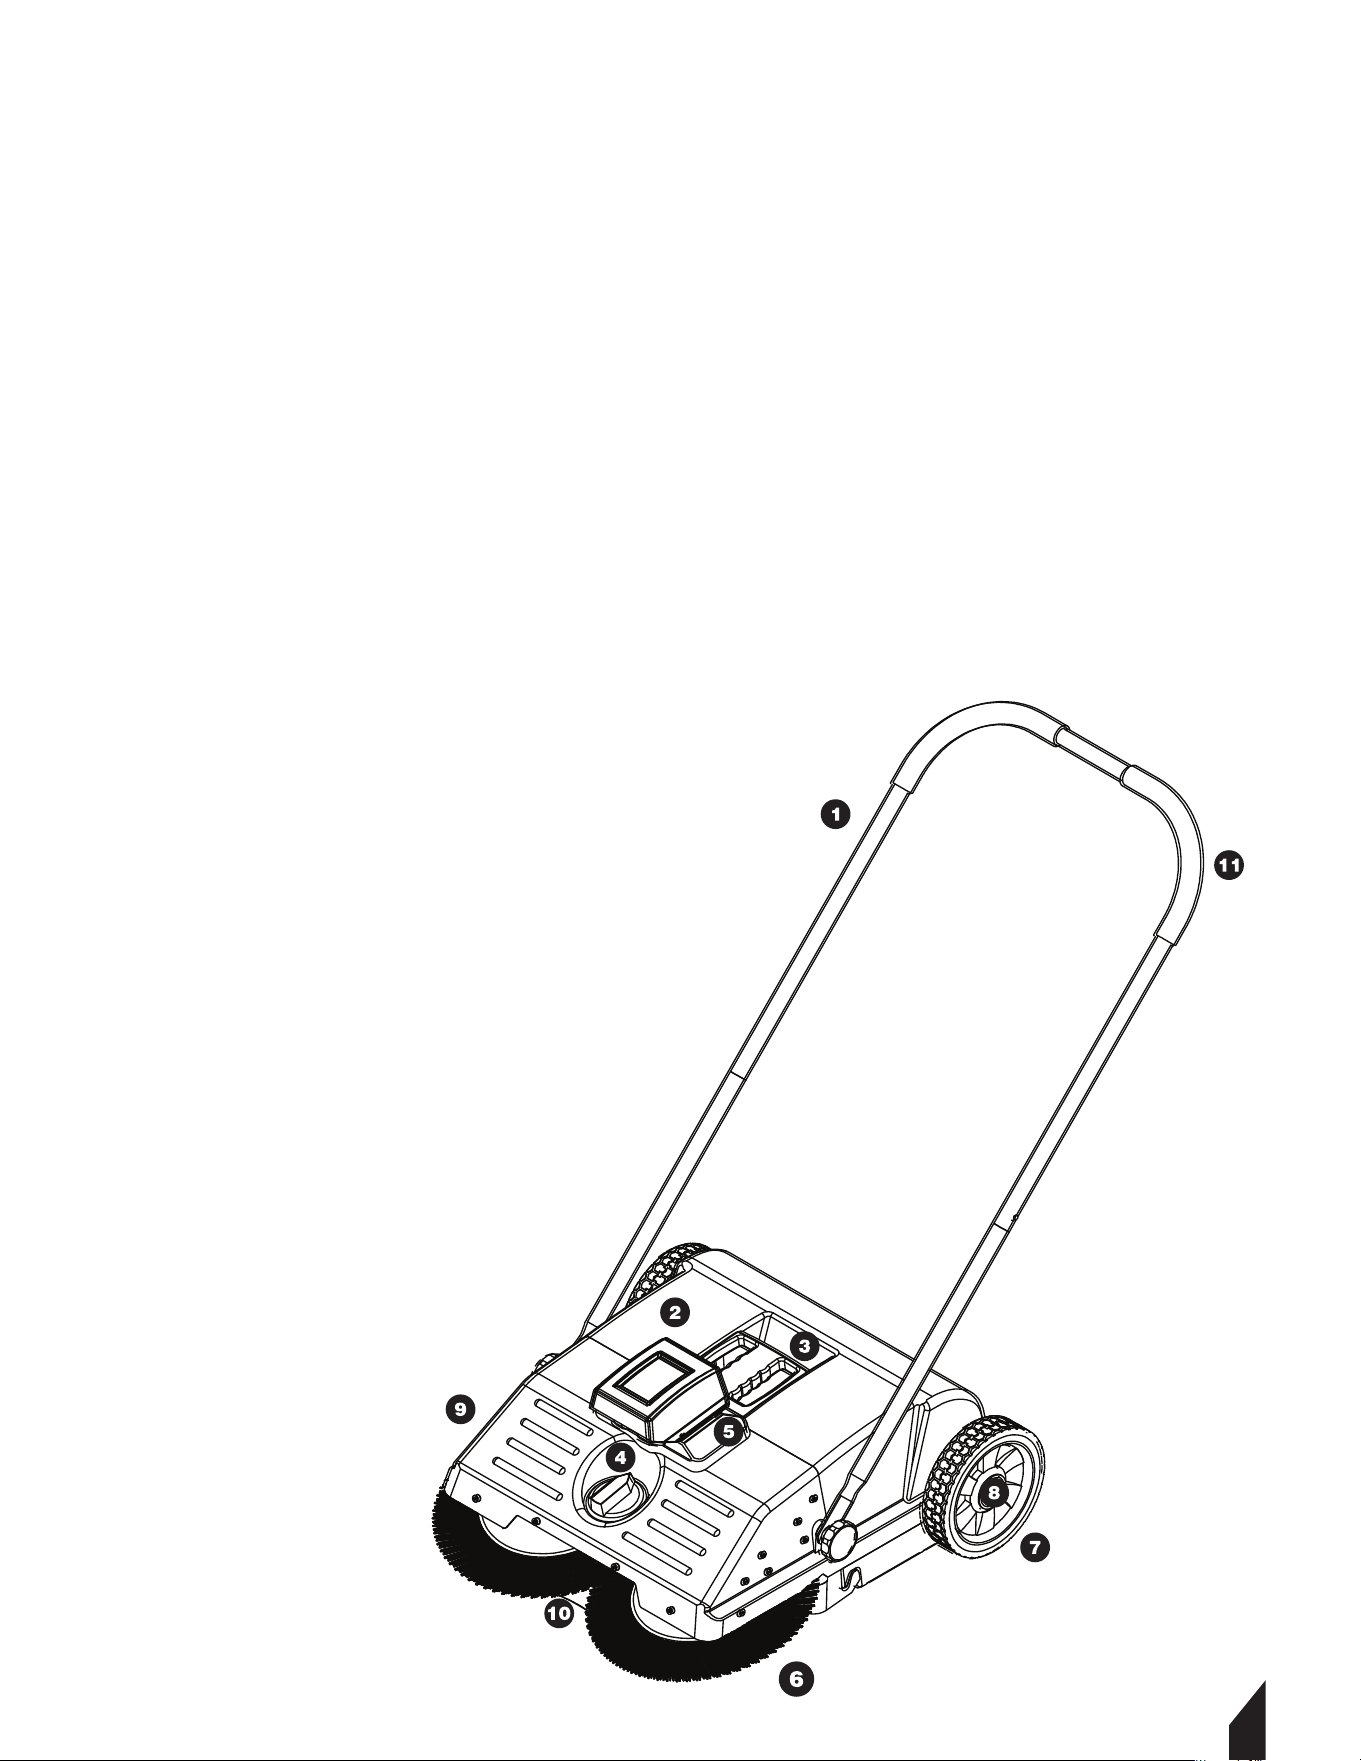
4.4 Waste Bin Assembly
4.4.1 Li the container handle and release it.
4.4.2 When liing the front part and the waste bin,li at an angle, creating a V shape with the
two parts. FIGURE 5.
4.4.3 Connect the hook of the front body with the groove on the waste bin body,
ensure the connecting parts are leveled. FIGURE 6.
4.4.4 Aer connecting the two parts on the sweeper.
Push down on the container handle to lock it in place.
FIGURE 3
FIGURE 4
FIGURE 5 FIGURE 6
Waste Bin Body
Front Part Container handle
5. OPERATION
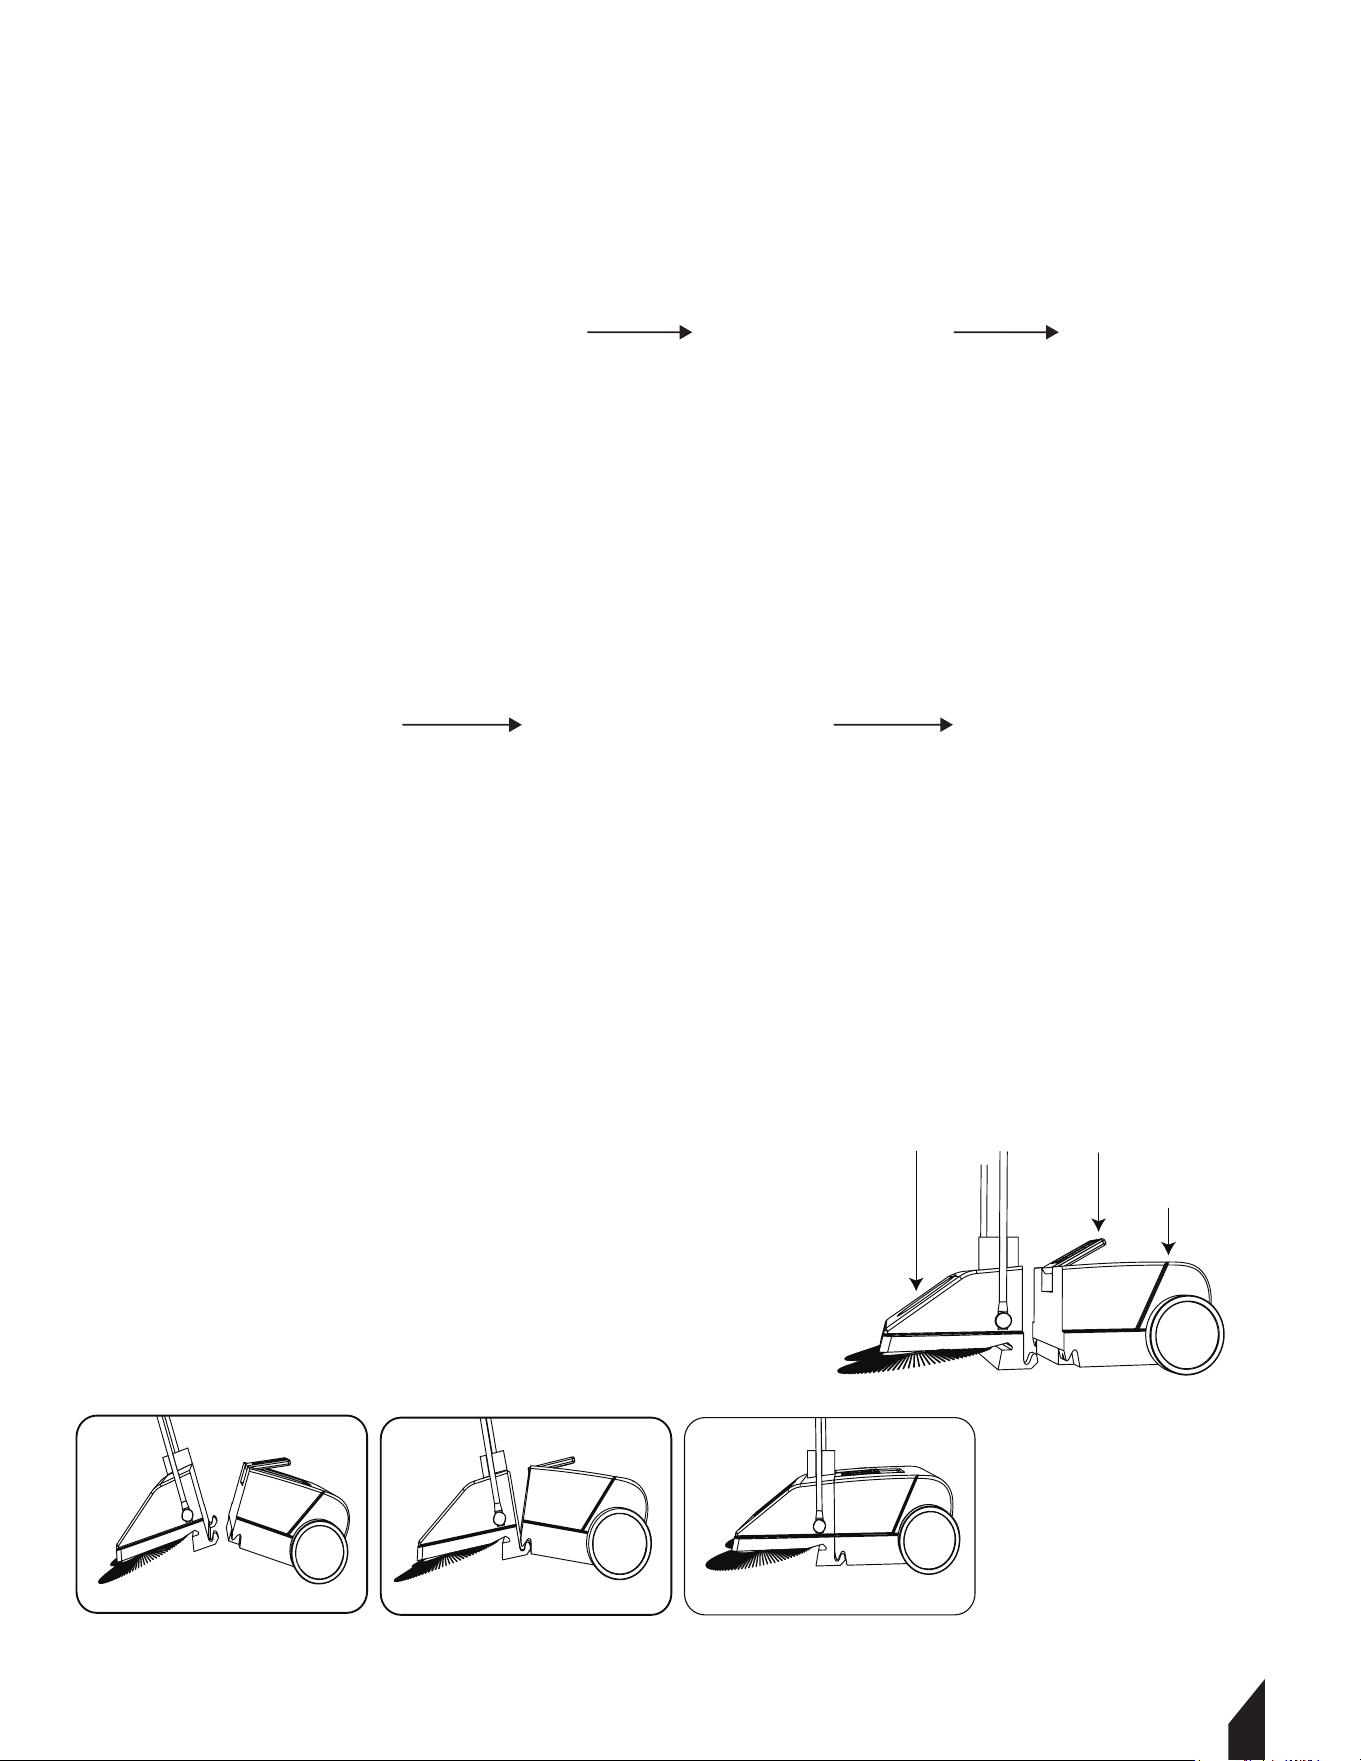
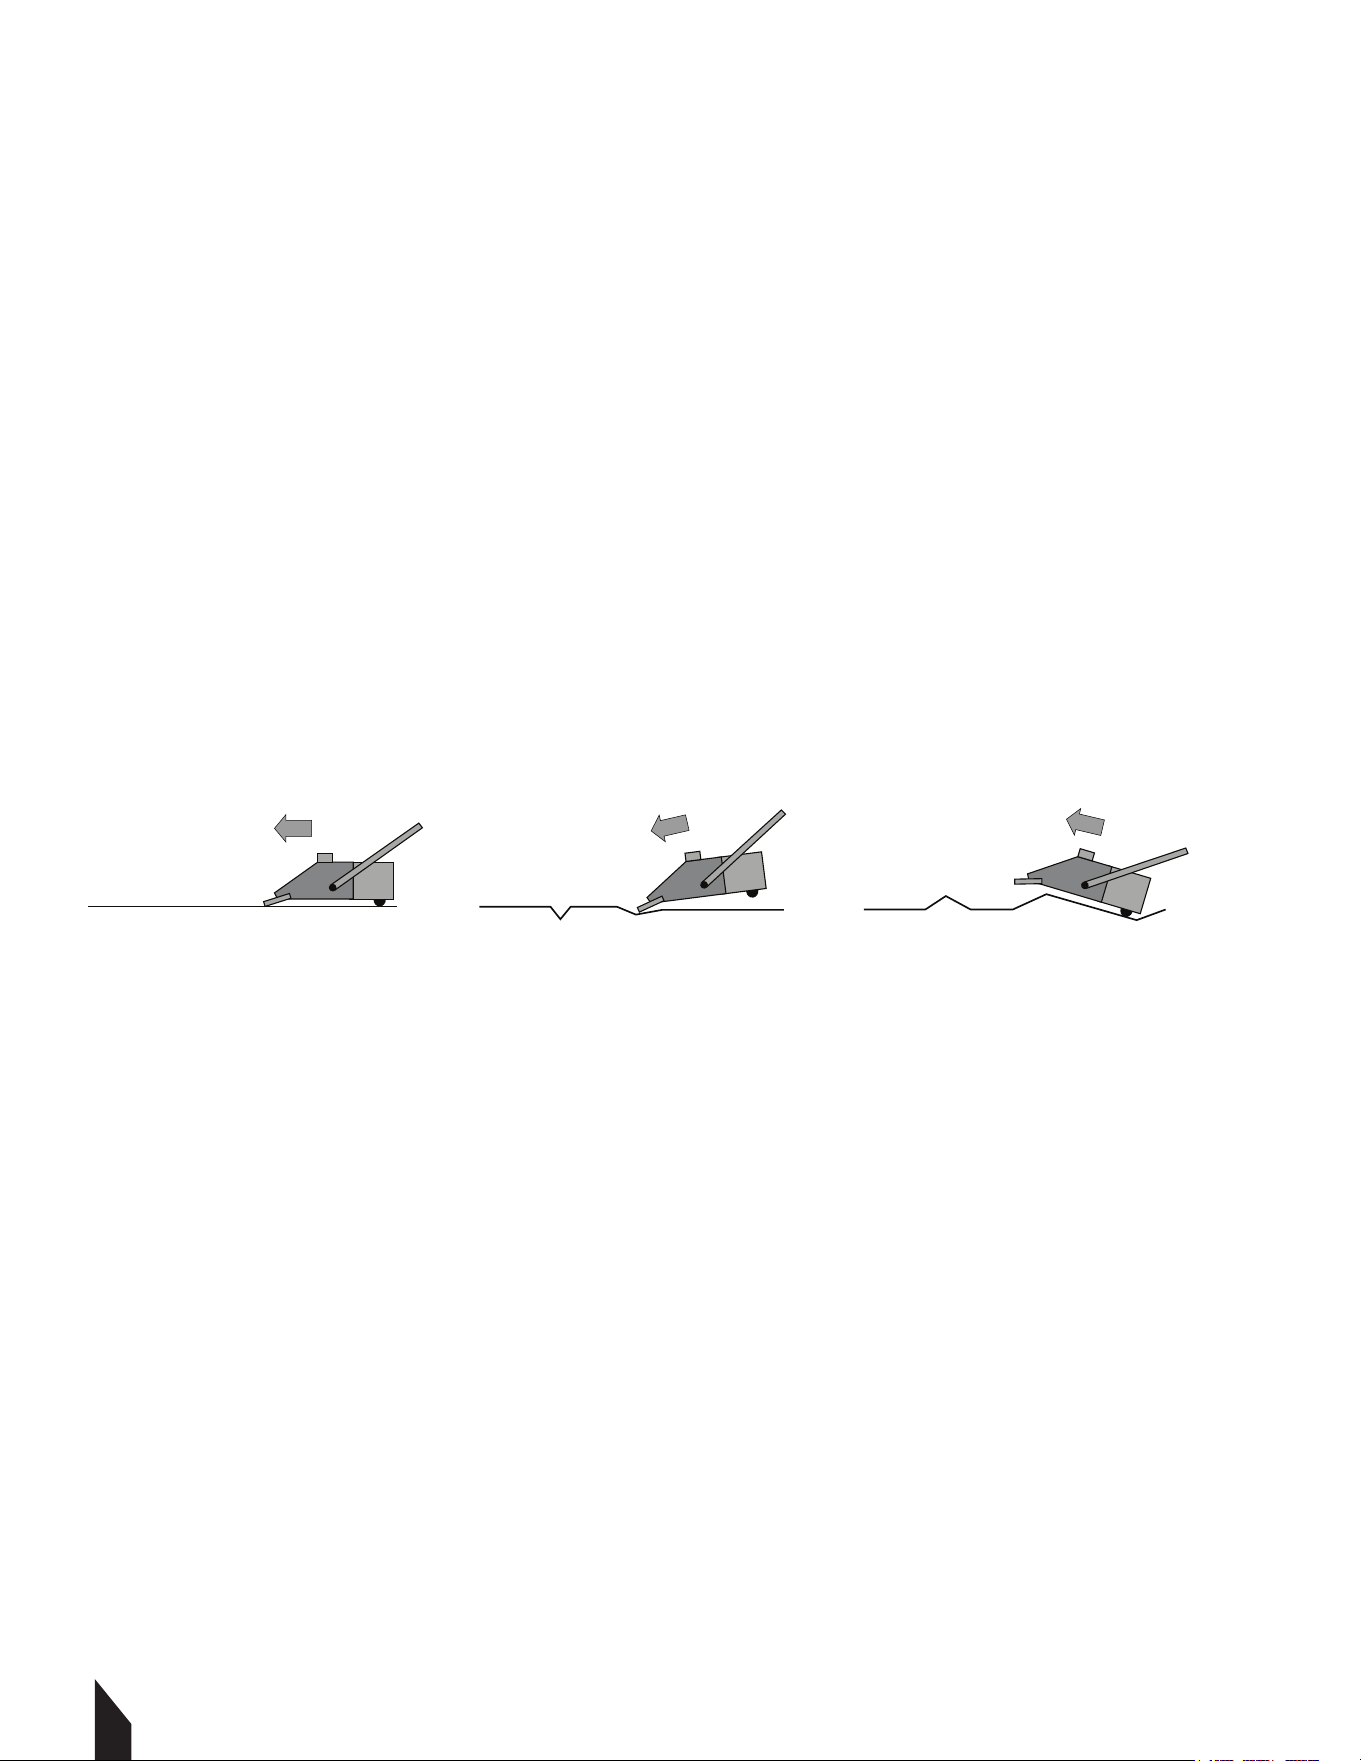
5.1. Using the Sweeper
5.1.1 Press the top button to turn on the sweeper. FIGURE 6.
5.1.2 Aer turning on the machine to begin sweeping, push forward at a normal
walking speed. Use on surfaces including workshops, driveways, walkways, store fronts,
patios, garages, pool side.
5.1.3 While sweeping the carrying capacity of the waste container can be
maximized by liing the front to allow the waste to fall into the waste container.
5.1.4 The surface should be relatively flat with no bumps.
FIGURE 7.
5.2 Checking the Equipment Prior to Use
5.2.1 Check to ensure that the push handle is securely attached to the sweeper.
5.2.2 Check condition of waste bin and ensure that it is securely attached.
5.2.3 Check the disc brushes and fine dirt sweeping roller for stuck parts and embedded
dirt - bristles must move freely.
5.2.4 Check height adjustment of the disc brushes and adjust to the ground to be swept.
5.2.5 Check the height adjustment.
10
NOTE: Do not pull the sweeper in reverse. It will
not properly collect trash in the reverse direction.
NOTE: The sweeper must be serviced regularly. Do not attempt any maintenance or
repair work not described in the Instruction Manual. All other work should be carried
out by a servicing dealer.
OK Not Good Not Good
FIGURE 7
FIGURE 6
11
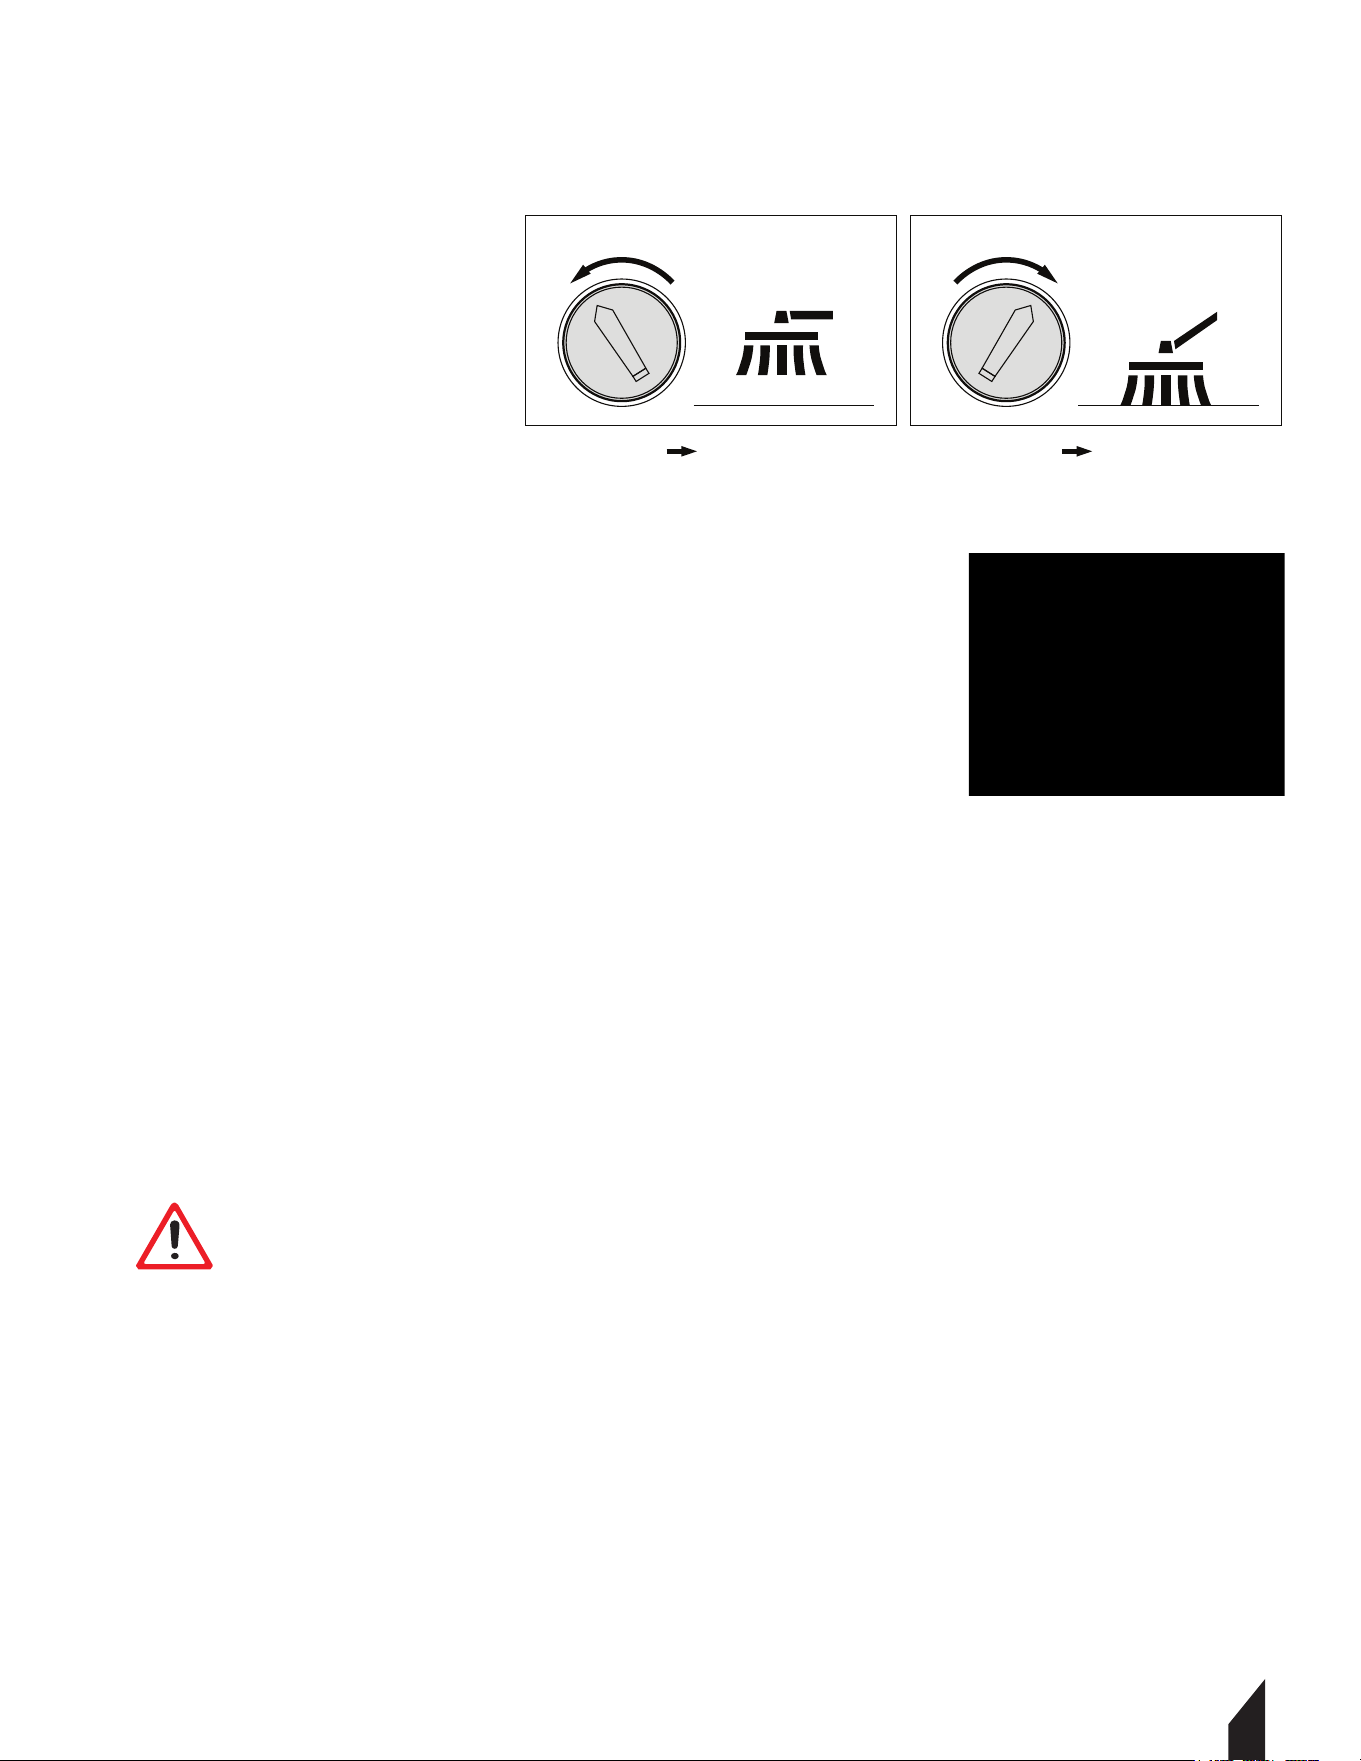
5.3 Brush Adjustment
5.3.1 The broom's adjustment knob is positioned on the front of the machine.
Move to the le to raise and to the right to lower. FIGURE 8.
5.4 Emptying Waste Container
5.4.1 Hold the handle and li up to remove
the waste bin. FIGURE 8.
5.4.2 Dump the garbage into a trash bin.
NOTE: When the main brush is entangled with debris,
stop sweeping and remove debris from brush.
5.5 Battery Charging
5.5.1 To remove the battery from the sweeper. Press down and hold the button located at
the bottom of the battery, then pull the battery forward. FIGURE 10.
5.5.2 When charging, insert the DC side first, then insert the AC side. FIGURE 11.
5.5.3 The red light will turn on when charging, then turn green when it’s finish charging.
FIGURE 12.
NOTE: Make sure your hands are dry when unplugging or inserting the battery.
FIGURE 8
FIGURE 9
FIGURE 12 FIGURE 11
FIGURE 10
Raise the brush.
Brush Adjustment Dial Brush Adjustment Dial
Turn to the left Lower the brush.Turn to the right
WARNING
Please use the original charger and keep the charger away from water.

5.6 Brush(Circular Broom) Replacement
5.6.1 Set the adjusting wheel knob to the far right side. FIGURE 13.
5.6.2 Pull the inclined wheels strongly to remove them (FIGURE 14.). Keep note of which
wheel belongs on the le and right. When re-installing the wheels place back in the correct
side to insure proper use.
5.6.3 Take off the screw and bolt first, before taking off the collecting plate parts.
FIGURE 15 & 16.
5.6.4 Pull out the entire circular broom system. FIGURE 17.
5.6.5 Remove the toothed sleeve. FIGURE 18.
5.6.6 Insert the toothed sleeve into the new replacement brush.
5.6.7 Reinsert the brush and ensure it is completely seated into the rod housing.
FIGURE 19.
5.6.8 Reinsert the inclined wheel and axel into the rod by firmly pushing until the wheels
pops into position.
5.6.9 Place the adjusting handle back into working gear. FIGURE 20.
12
FIGURE 13 FIGURE 14 FIGURE 15 FIGURE 16
FIGURE 17 FIGURE 18 FIGURE 19 FIGURE 20
WARNING
Always charge the battery in an area between 0-40 C°, do not charge at around
flammable liquid, gas or dust, or areas where there is a risk of explosion.

5.7 Work Indicator Light
Solid Green Light:Works normally.
Flashing Green Light:Overloaded or stalled, turn off the power to help troubleshoot.
Solid Red Light :The battery is low, charge it as soon as possible.
Flashing Red Light:The battery is too low to function, needs to be charged.
6. STORAGE
6.1 Once finished, fold the tube handle flat to make the sweeper vertical. The sweeper can
now be hung on the wall to save storage space. FIGURE 22 & 23.
6.2 When stored away long-term, the battery should be charged to 60%-70%, then placed in
dry and cool place. Also, the battery needs to be fully charged and discharged at least once
every three months.
6.3 When taking down the sweeper, please do so carefully to avoid dropping the sweeper on
the ground. This may cause damage to the sweeper.
13
FIGURE 21
FIGURE 23FIGURE 22
① ② ③

14
7. TROUBLESHOOTING
7.1 Cleaning the Equipment
7.1.1 Always clean, dust off and clear debris from the sweeper.
7.1.2 Do not use any grease solvents, or pressure washer for cleaning the sweeper.
7.1.3 Wear safety gear when cleaning to reduce the risk of injury.
7.1.4 Store the machine in a safe and dry area.
Side brush blockage or
entangled foreign debris
Brush Does Not Turn
(Green LED light is flashing)
Replace the gear
Rotate the handle to adjust
the height of the side brush
Turn off the power and
remove debris
Charging
Empty trash bin
Turn off the power and
remove debris
Replace the lining plate of
dust collection board
The brush is too low from the
ground and the resistance is
high
The gear of side brush is
worn out
Power, circuit board protection
When the battery is low, the
brush is blocked or entangled
with debris
The trash bin is full
Wear or missing lining plate
of dust collection board
Improper storage
Remove the side brush,
Dry vertically or scald it
straight with hot water
Brush Does Not Turn
(Green LED light is always lit)
Brush Does Not Turn
(Red LED light is flashing)
Poor Cleaning Effect
Side Brush Deformation
15
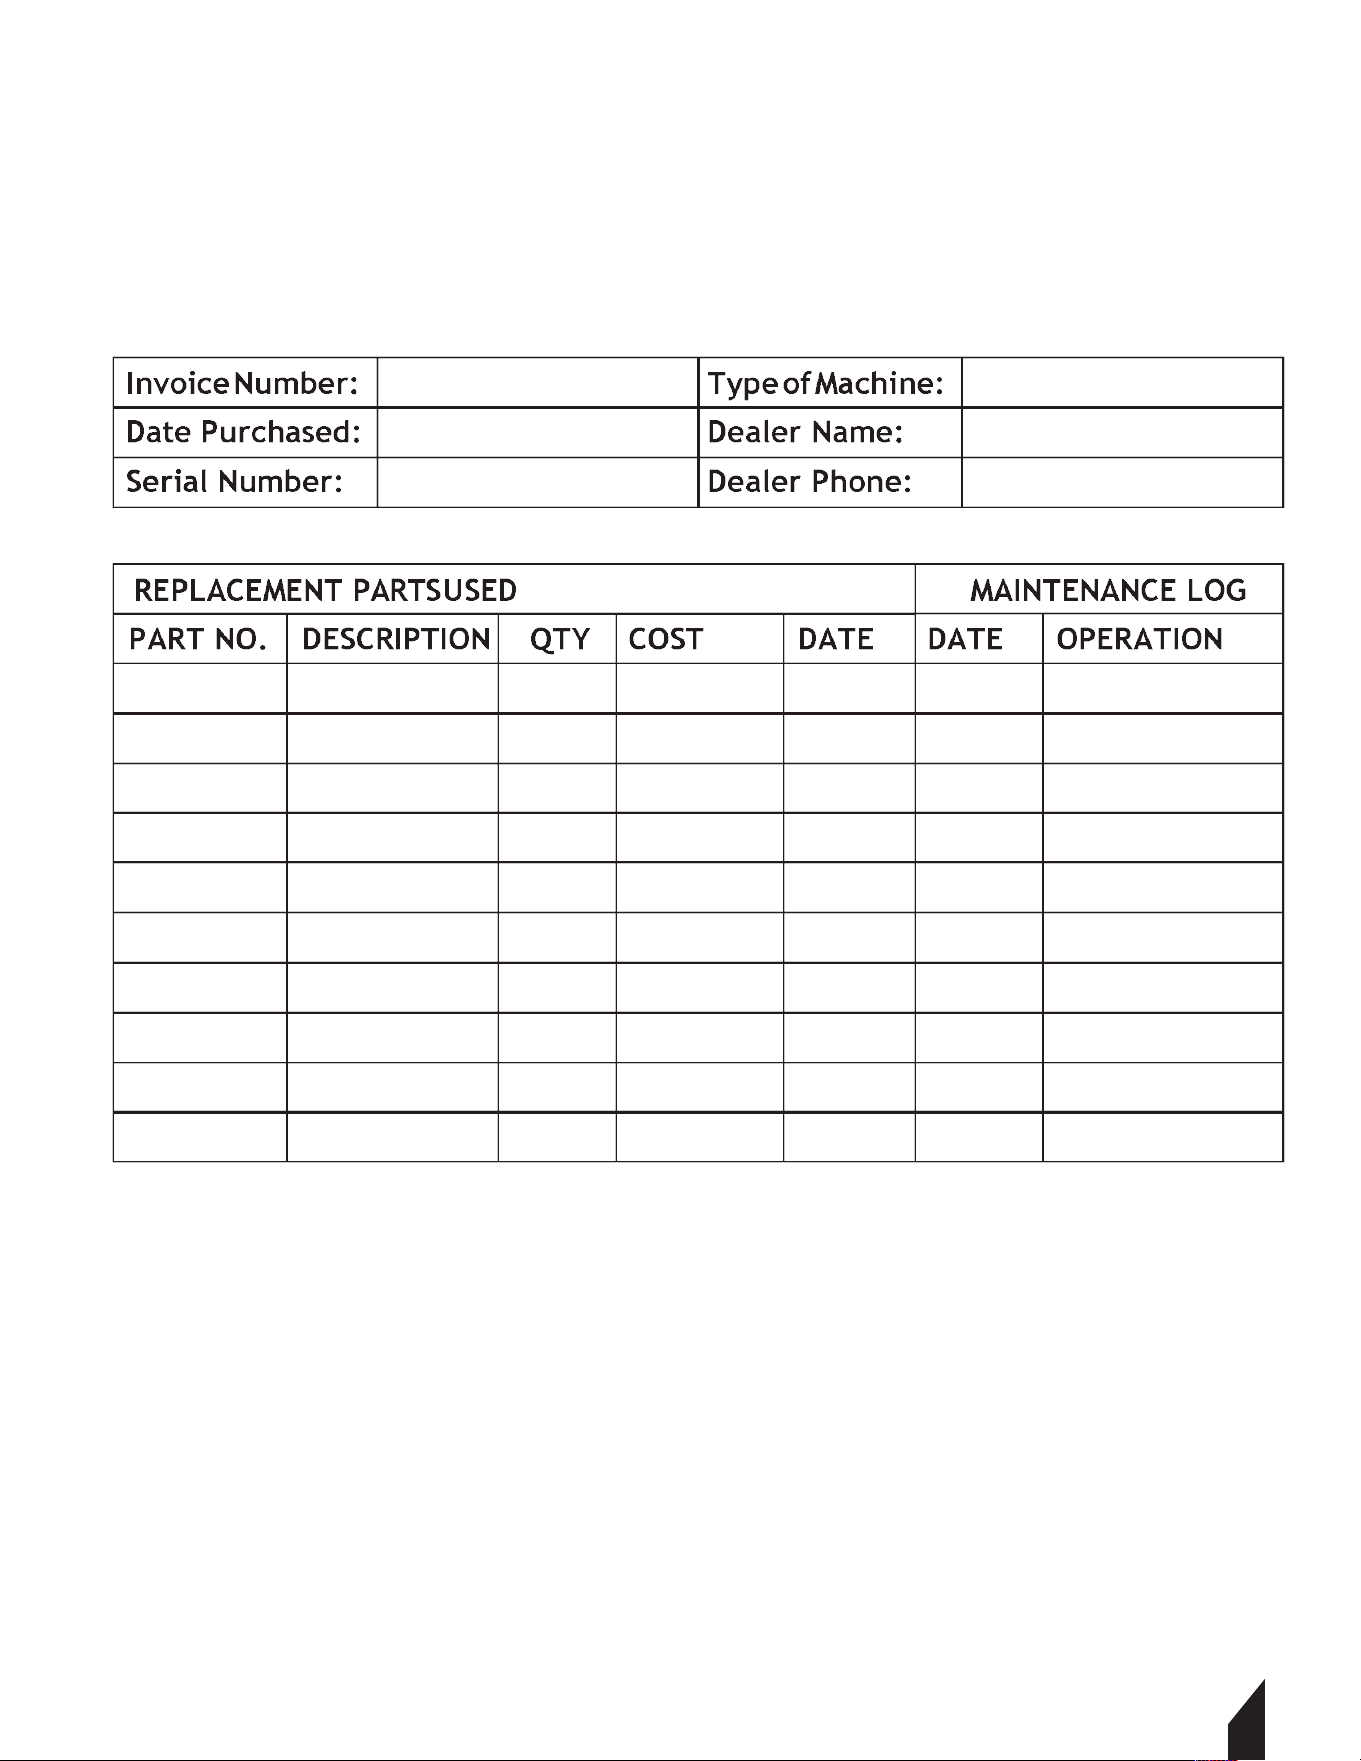
8. MAINTENANCE RECORD
TOMAHAWK® tools are assembled with care and will provide years of service when properly
maintained. Preventative maintenance and routine service are essential to the long life of
your tool. Adhere to reading through this manual thoroughly. You will find that you can do
some of the regular maintenance yourself. However, when in need of parts or major service,
be sure to contact a TOMAHAWK® Technician. For your convenience we have provided this
space to record relevant data about your TOMAHAWK® equipment.
9. REPLACEMENT PARTS
9.1
9.2
9.3
9.4

16
10. EQUIPMENT WARRANTY
Your new TOMAHAWK® equipment is warranted to the original purchaser for a period of
one-year (12 months) from the original date of purchase. The TOMAHAWK® warranty is
against defects in design, materials and workmanship.
The following are not covered under the warranty:
10.1.1 Damage caused by abuse, misuse, dropping or other similar damage caused by or as
a result of failure to follow assembly, operation or user maintenance instructions.
10.1.2 Alterations, additions or repairs carried out by persons other than TOMAHAWK® or
their recognized agents.
10.1.3 Transportation or shipment costs to and from TOMAHAWK® or their recognized
agents, for repair or assessment against a warranty claim, on any machine.
10.1.4 Materials and/or labor costs to renew, repair or replace components due to fair
wear and tear.
10.1.5 TOMAHAWK® and/or their recognized agents, directors, employees or insurers will not
be held liable for consequential or other damages, losses or expenses in connection with or
by reason of or the inability to use the machine for any purpose.
Warranty Claims
Before submitting any warranty claim, you will need to register
your new TOMAHAWK® equipment through
www.tomahawk-power.com.
Follow the steps on page 3 or scan this QR codes to complete
the equipment registration. Aer registration is complete,
all warranty claims should firstly be directed to TOMAHAWK®
through the online Service Request form found
at www.tomahawk-power.com/pages/service-request.
Parts Manual
22” BATTERY POWERED
PUSH SWEEPER
MODEL NUMBER: eTOS22
17

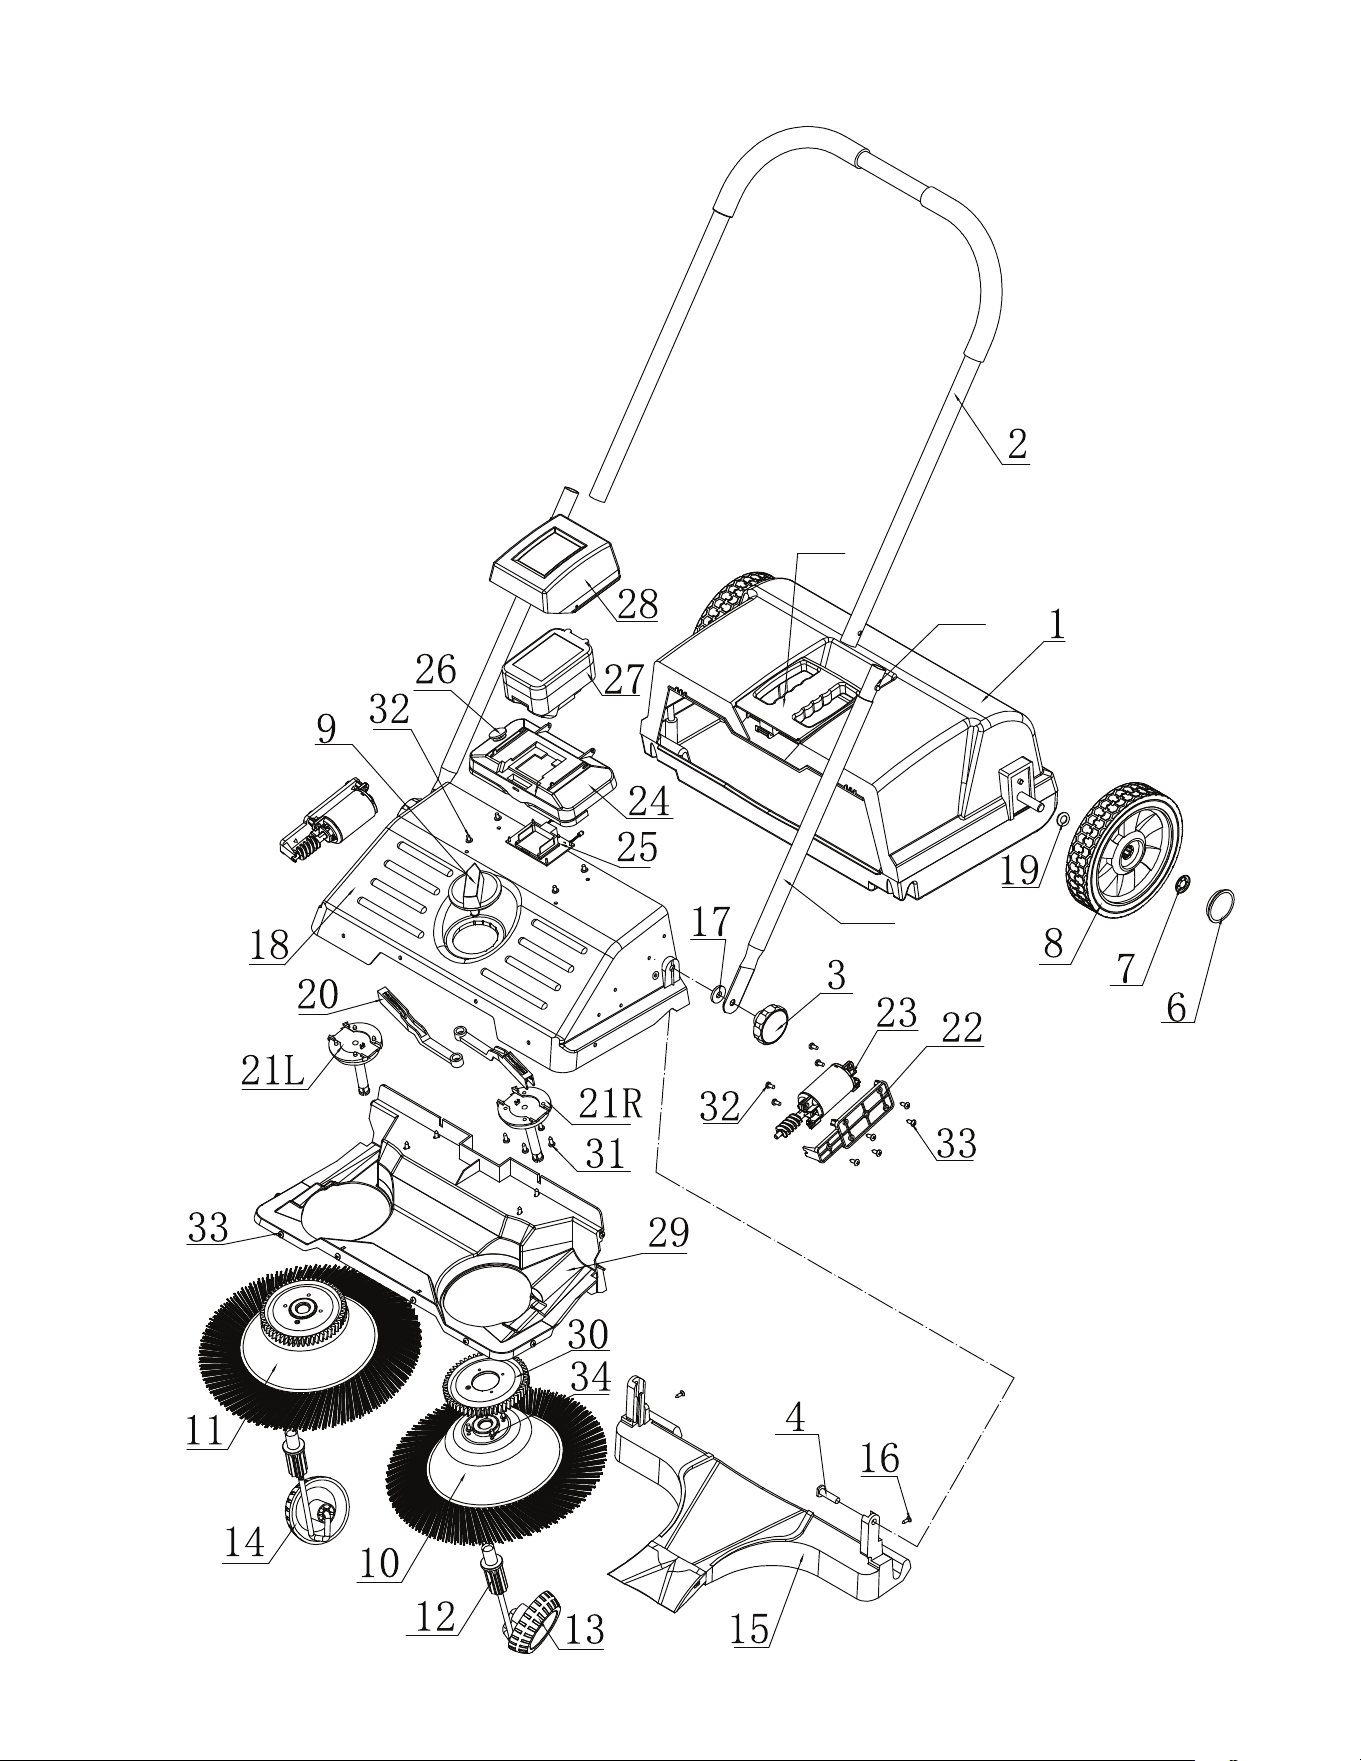
EXPLOSION DIAGRAM

eTOS22 PARTS
NO. Name Quantity
Container Assembly
Handle
Handle Grip
Turning Knob(Nut M8)
Bolt M8x3 0
Sliding Handle Parts
Stop Spring
Wheel Cap
Quick-Fastener 11.5
Wheel
Bearing 6901
Turning Knob
Left Circular Broom
Right Circular Broom
Toothed Bushing
Left Inclined Wheel
Right Inclined Wheel
Collecting Plate
Countersunk Head Self Tapping Screw St3.6x13
Pu Washer
Front Cover
Washer
Adjusting Bar
Axle Cover
Fixed Bracket
Front Brush Motor Assembly
Battery Holder
Circuit Board
Switch
Battery
Water Proof Cover
Baffle
Toothed Bushing
Cross Pan Head Screws t3.5x14
Cross Pan Head Screws t4.2x13
Flat Tail Screws tM4x12(Black)
Cross Pan Head Screws t4.2x8(Stainless Steel Flat Tail)
Charger
Container Handle
1
1
2
2
2
2
2
2
2
2
4
1
1
1
2
1
1
1
2
2
1
2
2
2
2
2
1
1
1
1
1
1
2
8
12
22
8
1
1
1
3
4
5.1
5.2
6
7
8
9
10
11
12
13
14
15
16
17
18
19
20
21
22
23
24
25
26
27
28
29
30
31
32
33
34
35
36
2

CLEAN MORE
IN LESS TIME
For big areas and busy schedules,
Tomahawk Floor Scrubbers cover a wider
path to reach more surface area so you can
finish cleaning faster around indoor and
outdoor spaces and on wet or dry surfaces!
Item #: TMOP18e
ELECTRIC FLOOR
SCRUBBER CLEANER
www.tomahawk-power.com

Part#: eTMD14 Part#: TPS25
4 Gal Mosquito Fogger/ Blower
2-in-One Spreader / Blower
Gas-Powered, 3HP, 2-Stroke, 30ft Reach
4 Gallon Tank, Cover 1 Acre in 30 Minutes
Lawn, Seed Feed, Ice Melt
5-70 Adjustable PSI
25ft Reach, Battery-Powered, 12V/7ah
Cover 1 Acre of Land in 15 Minutes
Run Time @ 45 PSI: > 11 Hours (400cc/min)
2-in-One Spreader / Blower
Battery-Powered, 36V/7.5ah, 25ft Reach
5 Gallon Tank, Cover 1 Acre in 30 Minutes
Lawn, Seed Feed, Ice Melt
2-in-One Spreader / Blower
Battery-Powered, 36V/7.5ah, 25ft Reach
310 CFM/150 MPH, 25-100 Microns
4 Gallon Tank, Spray 1 Acre in 30 Minutes
2-in-One Spreader / Blower
Gas-Powered, 3HP, 2-Stroke, 40ft Reach
490 CFM/220 MPH, 25-100 Microns
4 Gallon Tank, Spray 1 Acre in 30 Minutes
50-450 Adjustable PSI
30ft Reach, Gas-Powered, 1.8HP, 2-Stroke
Cover 1 Acre of Land in 15 Minutes
Flow Rate: 1-2.5 GPM, 5 Gallon Tank
Trash Water Pumps
Part#:
TW3H
TW4H
3" Pump, Honda GX270, 375 GPM
Elevation: 89ft, Suction: 25ft
4" Pump, Honda GX390, 581 GPM
Elevation: 92ft, Suction: 26ft
HAVE QUESTIONS?
Contact us. We’re here to help!
Email us at [email protected]
4 Gal Mosquito Fogger/ Blower
5 Gal Motorized Backpack Sprayer
Part#: TGS30Part#: eTPS18 Part#: eTGS30
PEST CONTROL
5 Gal Backpack Battery Sprayer 4 Gal Fertilizer Spreader
5 Gal Battery Fertilizer Spreader
LANDSCAPINGLANDSCAPING
(866) 577-4476
20
24
Equipment Guide
Power Buggy
48V-20Ah Battery
Handles up to 8 cu ft or 660 lbs. Bucket Capacity
Hydraulic Bucket with 92
o
Tilt, 8 Hour Run Time
Snow Plow Attachment & Bucket Extender Available
Part#: TBUGGY300e
GX35, 50-500 Adjustable PSI
30ft Reach, Honda Gas-Powered, 1.8HP
4-Stroke, Cover 1 Acre in 15 Minutes
Includes 100ft Hose and Nozzle
Part#: TBS500
500 PSI Skid Sprayer
Assorted Wand Choices
Assorted Nozzle Choices
7 Gal Tank Available
Part#: TMD14
Assorted Wand Choices

QUIET INVERTER SERIES
QUIET INVERTER SERIES
4,500 - 5,500 Watt Series
10,500 Watt Series
QUIET INVERTER SERIES
& MORE GENERATORSCONCRETE
www.tomahawk-power.com
(866) 577-4476
ASSEMBLED IN THE
PARTS SOURCED GLOBALLY
USA
TG2000i
TG3000i
2,000 - 3,300 Watt Series
20
24
Equipment Guide
4,500w Max / 3,800w Rated
5,500w Max / 5,000w Rated, 120/220V
Run Time 8 Hrs @ 50% Load
CARB Compliant, GFCI
TG4500i
TG5500i
10,500w Max / 8,500w Rated
Voltage Selector, 120/220V
Run Time 14.5hrs @ 25% Load
CARB Compliant,
GFCI, CO Detector
TG9000i
2,200w Max / 2,000w Rated
3,300w Max
/ 3,000w Rated,
120/220V, 30 AMP Twist Lock
Run Time 8 Hrs @ 50% Load
CARB Compliant, GFCI 120v
Welder Generators
120 Amp Welder, 60% Duty Cycle,
2000w, Includes Wheel Kit
210 Amp Welder, 60% Duty Cycle,
2000w, Includes Wheel Ki
t
6010-7024 Rods Compatible
Part#:
TWG120A
TWG210A
Floor Sweepers
38" Working Width, Triple Broom
System, 14.5 Gallon
30" Working Width, Battery Powered
Triple Broom System, 13.5 Gallon
Part#:
TOS38
eTOS30
Assorted Brush Choices
Rammers
Part#:
TR68H
JX60H
eJX60H
3,550 lbs/sq ft, Honda GX120
3,350 lbs/sq ft, Honda GX100
3,350 lbs/sq ft, Honda GXE2.0S
TVSA-H
TVSA-T
eTVSA
Power Screeds
Part#:
Honda, Gas-Powered, 6-16 ft Magnesium Blades
Battery-Powered, 6-16 ft Magnesium Blades
Gas-Powered, 6-14 ftAluminum Blades
Part#:
TPT24H
TPT36H
TPT46H
2 ft Edger, Honda GX160, 0-28
o
Blade Pitch
3 ft, Honda GX160/GX270, 0-28
o
Blade Pitch
4 ft, Honda GX270/GX390, 0-28
o
Blade Pitch
Walk Behind Trowels
Items Listed Includes Combo Blades
Early Entry Saws
Part#:
TFS6H
TFS10H
6" Blade Diameter, Blade Compatibility,
Honda GX120
10" Blade Diameter, Self Propelled,
Blade Compatibility, Honda GX270/GX390

TOMAHAWK®, LLC
San Diego, CA
Sales Support
(866) 577-4476
Equipment Support
(866) 577-4476
www.tomahawk-power.com
Tomahawk understands to keep a job-site running smoothly the proper equipment and
spare parts are needed at the drop of a hat. With same day shipping and faster
delivery times, count on Tomahawk to keep you powered throughout the day! With
long lasting parts and engines, Tomahawk equipment will be the star of your fleet for
years to come. Visit www.tomahawk-power.com to get started today!
Power Your World
FACEBOOK
facebook.com/TomahawkPowerUSA
YOUTUBE
youtube.com/TomahawkPower
INSTAGRAM
@tomahawkpower