Read the User Manual carefully before use.
Make sure you understand all the instructions and safety warnings.
Version 2.1
04/13/2023
User Manual
Navimow

Table of Contents
Original Instructions
1. Navimow Overview
1.1 Introduction
1.2 Safety Warning
1.3 What's in the Box
1.4 Parts and Functions
1.5 Symbols and Decals
1.6 How the EFLS Works
1.7 How to Choose a Model
1.8 Specifications
2. Setup & Mapping
2.1 Before You Start
2.2 Install the Charging Station and the Antenna
2.3 Charge and Activate the Mower
2.4 Set up the Work Area
2.5 Test Drive
3. Daily Use
3.1 Display and Control on the Mower
3.2 Light Cue
3.3 Mow
3.4 Navimow app
3.5 Notifications
3.6 Settings (Mower)
3.7 Settings (app)
3.8 IoT
3.9 Obstacle Avoidance
3.10 VisionFence Sensor (optional)
3.11 Accessories (optional)
4. Maintenance
4.1 Cleaning
4.2 Replace Blades
4.3 Transportation
4.4 Battery
4.5 Power Supply
4.6 Storage
4.7 Recycling and End-of-life Disposal
4.8 Others
5. FAQ & Troubleshooting
6. Important Information
6.1 Trademark and Legal Statement
6.2 EC DECLARATION OF CONFORMITY
6.3 UKCA DECLARATION OF CONFORMITY
6.4 Certifications
6.5 Limited Warranty
6.6 About the Manual
6.7 Contact Us
3
3
4
6
7
9
10
11
13
15
15
16
20
23
27
28
28
30
32
34
36
37
41
42
43
43
46
49
49
50
51
51
53
53
53
54
55
59
59
60
61
62
64
67
67

Welcome
Thank you for choosing Navimow!
With Exact Fusion Locating System (EFLS) and superb
traversing capabilities, Navimow can handle lawns of all
types. No perimeter wires are needed and it's super easy to
use, thanks to smart app connectivity and the intuitive
control panel.
Collection of grass is not necessary because the fine grass
clippings serve as a natural fertilizer. Enjoy the fun of
carefree mowing and a perfectly maintained lawn.
1. Navimow Overview
1.1 Introduction
Navimow
Segway Navimow is an advanced robotic mowing system that uses a virtual boundary, eliminating the need for complicated
perimeter wiring. Easy to operate and manage, Navimow gives you more free time to do the things you love and an effortlessly
impeccable lawn with every use.
Navimow contains a robotic mower, a charging station, and a GNSS (Global Navigation Satellite System) antenna. The robotic
mower and GNSS antenna simultaneously receive positioning signals from satellites to locate the mower and the work area. The
charging station charges the mower and transmits the satellite positioning signal received by the GNSS antenna to the mower to
improve the positioning accuracy of the mower.
The Mower
The robotic mower is powered by a lithium battery and can automatically cut grass in a defined work area. The work area can be
defined by remotely controlling the mower through the Navimow app as needed. When mowing, the mower's driving path is
automatically planned by the algorithm according to the shape of the work area to achieve the highest mowing efficiency. If the
entire lawn cannot be completed at one time, the mower will automatically return to the charging station to charge. When the
charging level reaches 85%, the mowing resumes from the position where it stopped.
Navimow app
The Navimow app is an important part of the Navimow system. You can follow the interactive guidance shown via the app to
complete the system installation and set up the work area. You can also use the app to adjust the settings of the mower, manage
the work area, view the work status of the mower, control the mower remotely, etc. You can also get the latest and most compre-
hensive official Help and Support content through the app.
MOW NOW
3
1
)
Be sure to install and operate the mower and the charging station according to the instructions. Go to navimow.segway.com
for the complete User Manual and the latest user materials.
2
)
The product can be used both by consumers and for professional purposes. Using the mower for purposes other than mowing
can bring serious injury. To avoid risks of injuries, please read and understand all the warnings and cautions. Please
understand that you can reduce the risk by following the instructions and warnings in this manual, but you cannot eliminate
all risk. The operator or user is responsible for accidents or hazards occurring to other people on their property.
3
)
Navimow has many built-in safety sensors, however, safety risks still exist. Set a mowing time when there are no people or
pets on the lawn. Inform the neighbors about the risks for accidents or hazards. When using the mower on a public lawn, or
when your lawn is open to your neighbor or street, protect or fence the lawn, or put up a warning sign around the working
area that says: WARNING! Automatic lawn mower! Keep away from the machine! Supervise children!
4
)
DO NOT modify the mower by yourself. Modifications could interfere with mower operations, result in serious injury and/or
damage, or void the Limited Warranty. Use only Segway approved parts and accessories.
5
)
The manufacturer recommends the user to be 18–70 years old. Be sure to get the necessary training before operating the
machine.
WARNING
Never allow children, persons with reduced physical, sensory or mental capabilities or lack of experience and knowledge or
people unfamiliar with these instructions to use the machine. Local regulations may restrict the age of the operator.
Before Mowing:
Regularly check that all parts of the mower can function normally.
For the best mowing results, it is recommended to mow in dry weather. Mowing in the rain can make the grass stick on the
product and the mower may slip. DO NOT mow in bad weather, such as heavy rain, thunderstorms or snow.
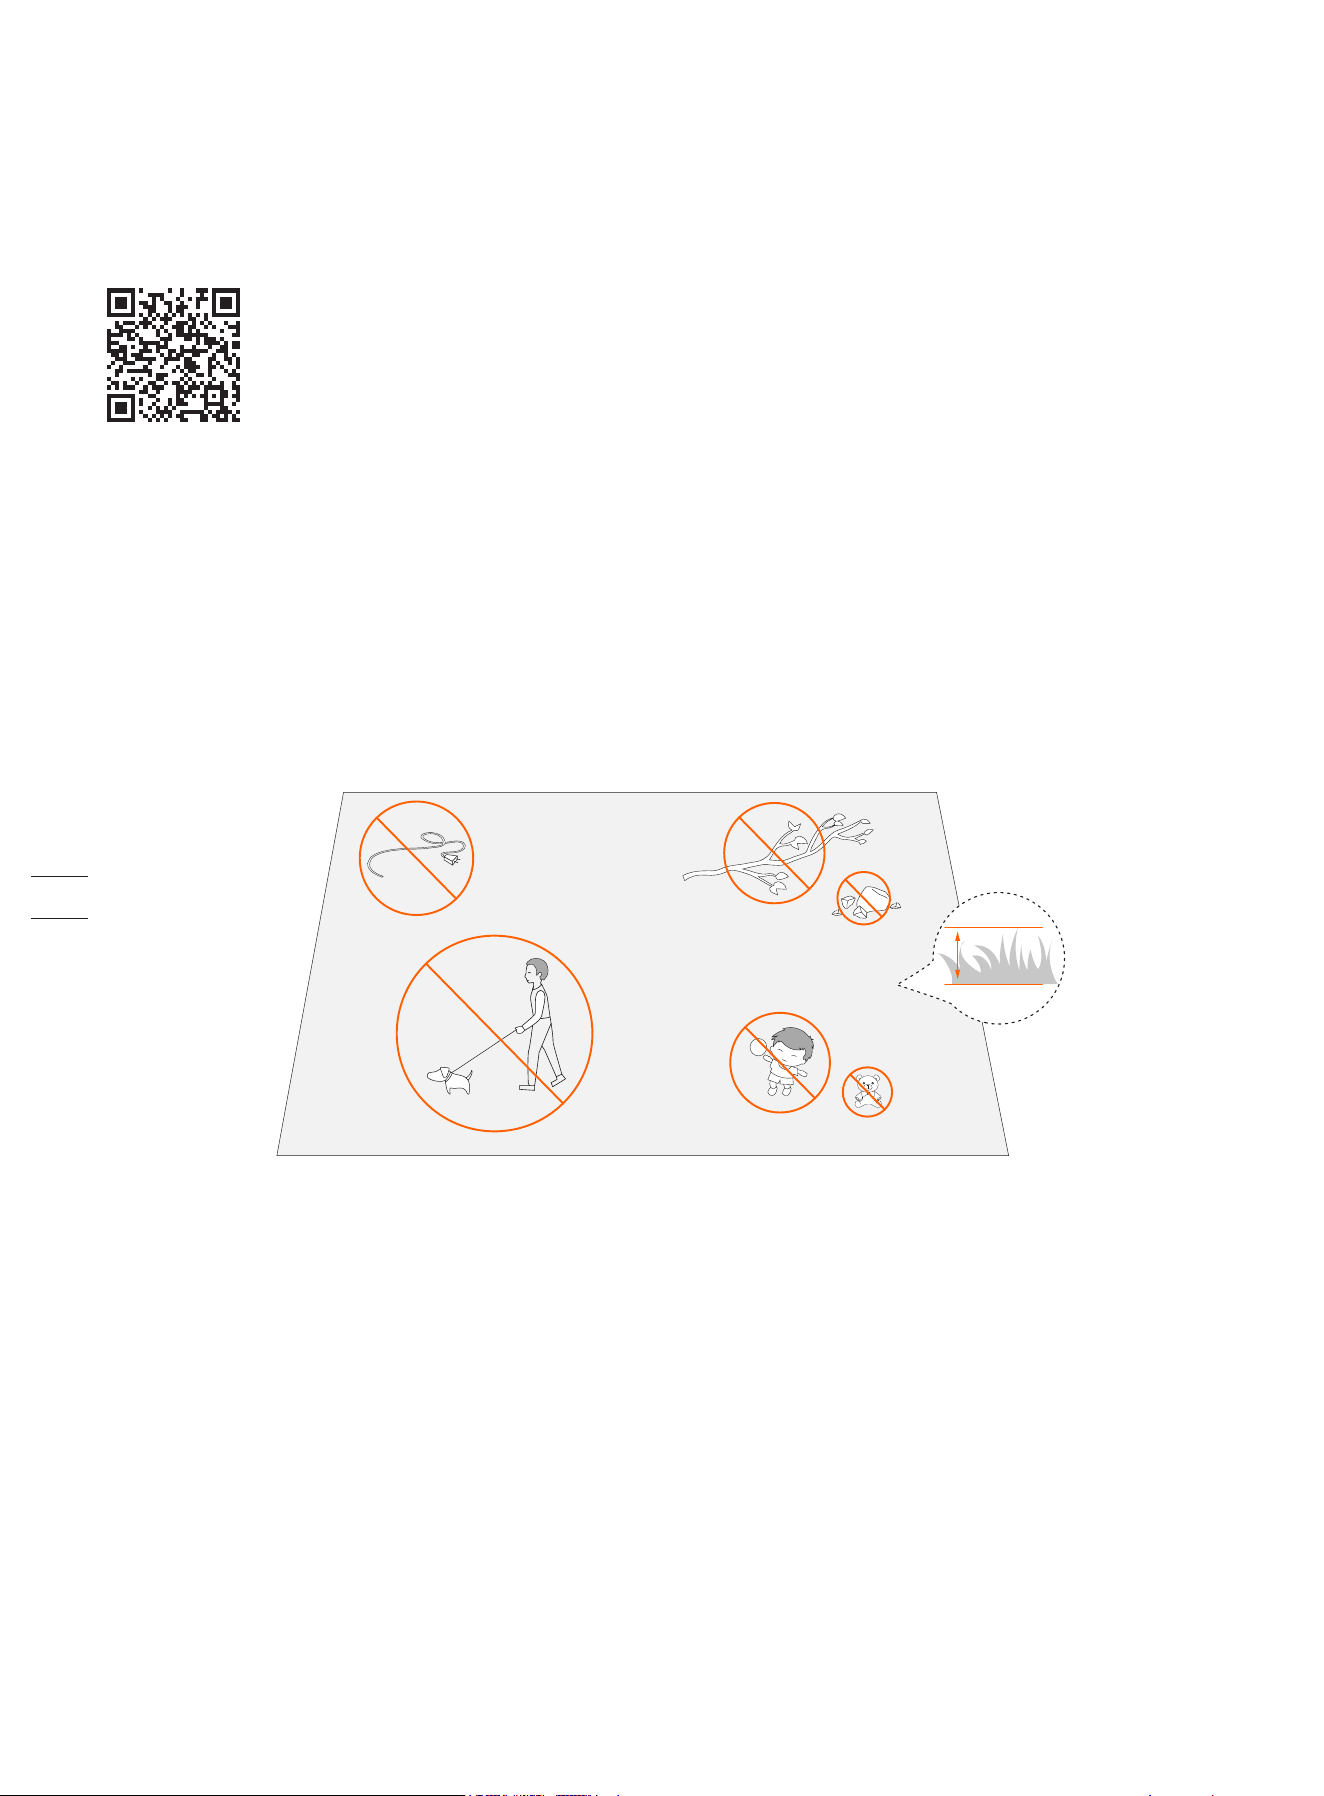
Periodically inspect the area where the machine is to be used and remove all stones, sticks, wires, bones and other foreign
objects. The Limited Warranty does not cover damages caused by objects left on the lawn.
To avoid possible damage, keep the operating mower at least 1 m (3 feet) away from sprinkler heads. The mower and
sprinklers should NOT work simultaneously. Time the mower so that it works at a different time from sprinklers.
NEVER allow children to touch the power supply unit, charging station, blades, the battery compartment, or any parts with gaps such as
the wheels.
WARNING
Never operate the machine and/or its peripherals with defective guards or shields, or if the cord is damaged or worn.
When Mowing:
Keep away from the rotating blades! DO NOT put hands or feet under or near the rotating blades.
Watch out for projectile objects! Keep a safe distance from the mower when operating.
DO NOT leave the machine to operate unattended if you know that there are pets, children or people in the vicinity.
DO NOT overreach. Keep your balance at all times and always be sure of the footing on slopes. Walk, never run while operat-
ing the machine or its peripherals.
WARNING
DO NOT allow children to be in the vicinity or play with the machine when it is operating.
DO NOT lift the mower in operation. DO NOT ride on the mower.
DO NOT mow on areas with slopes steeper than the maximum incline inside the working area (45%), as well as the boundary (10%).
If the mower makes an abnormal sound or signals an alarm, press the STOP button immediately.
If there are abnormal vibrations, turn off the mower, place it on level ground for about 30 seconds and then restart. If the
issue persists, contact authorized after-sales service.
DO NOT touch moving hazardous parts before they have come to a complete stop.
1.2 Safety Warnings
IMPORTANT
READ CAREFULLY BEFORE USE
KEEP FOR FUTURE REFERENCE
4
Safe Usage:
DO NOT operate the mower outside the temperature limits: 0–50℃ (32–122°F), because low/high temperatures can decrease
mower performance and even lead to accidents.
DO NOT place anything on the mower or the charging station.
It is recommended to conduct regular maintenance of the mower (see 4. Maintenance) by an adult.
Regularly check the warning devices to ensure they are effective. These devices include the buzzer, the LED light on the
charging station, and the ambient light on the mower.
Before charging, please read How to Charge in Chapter 2.3. Improper use may cause electric shock, overheating, or leakage of
corrosive liquid.
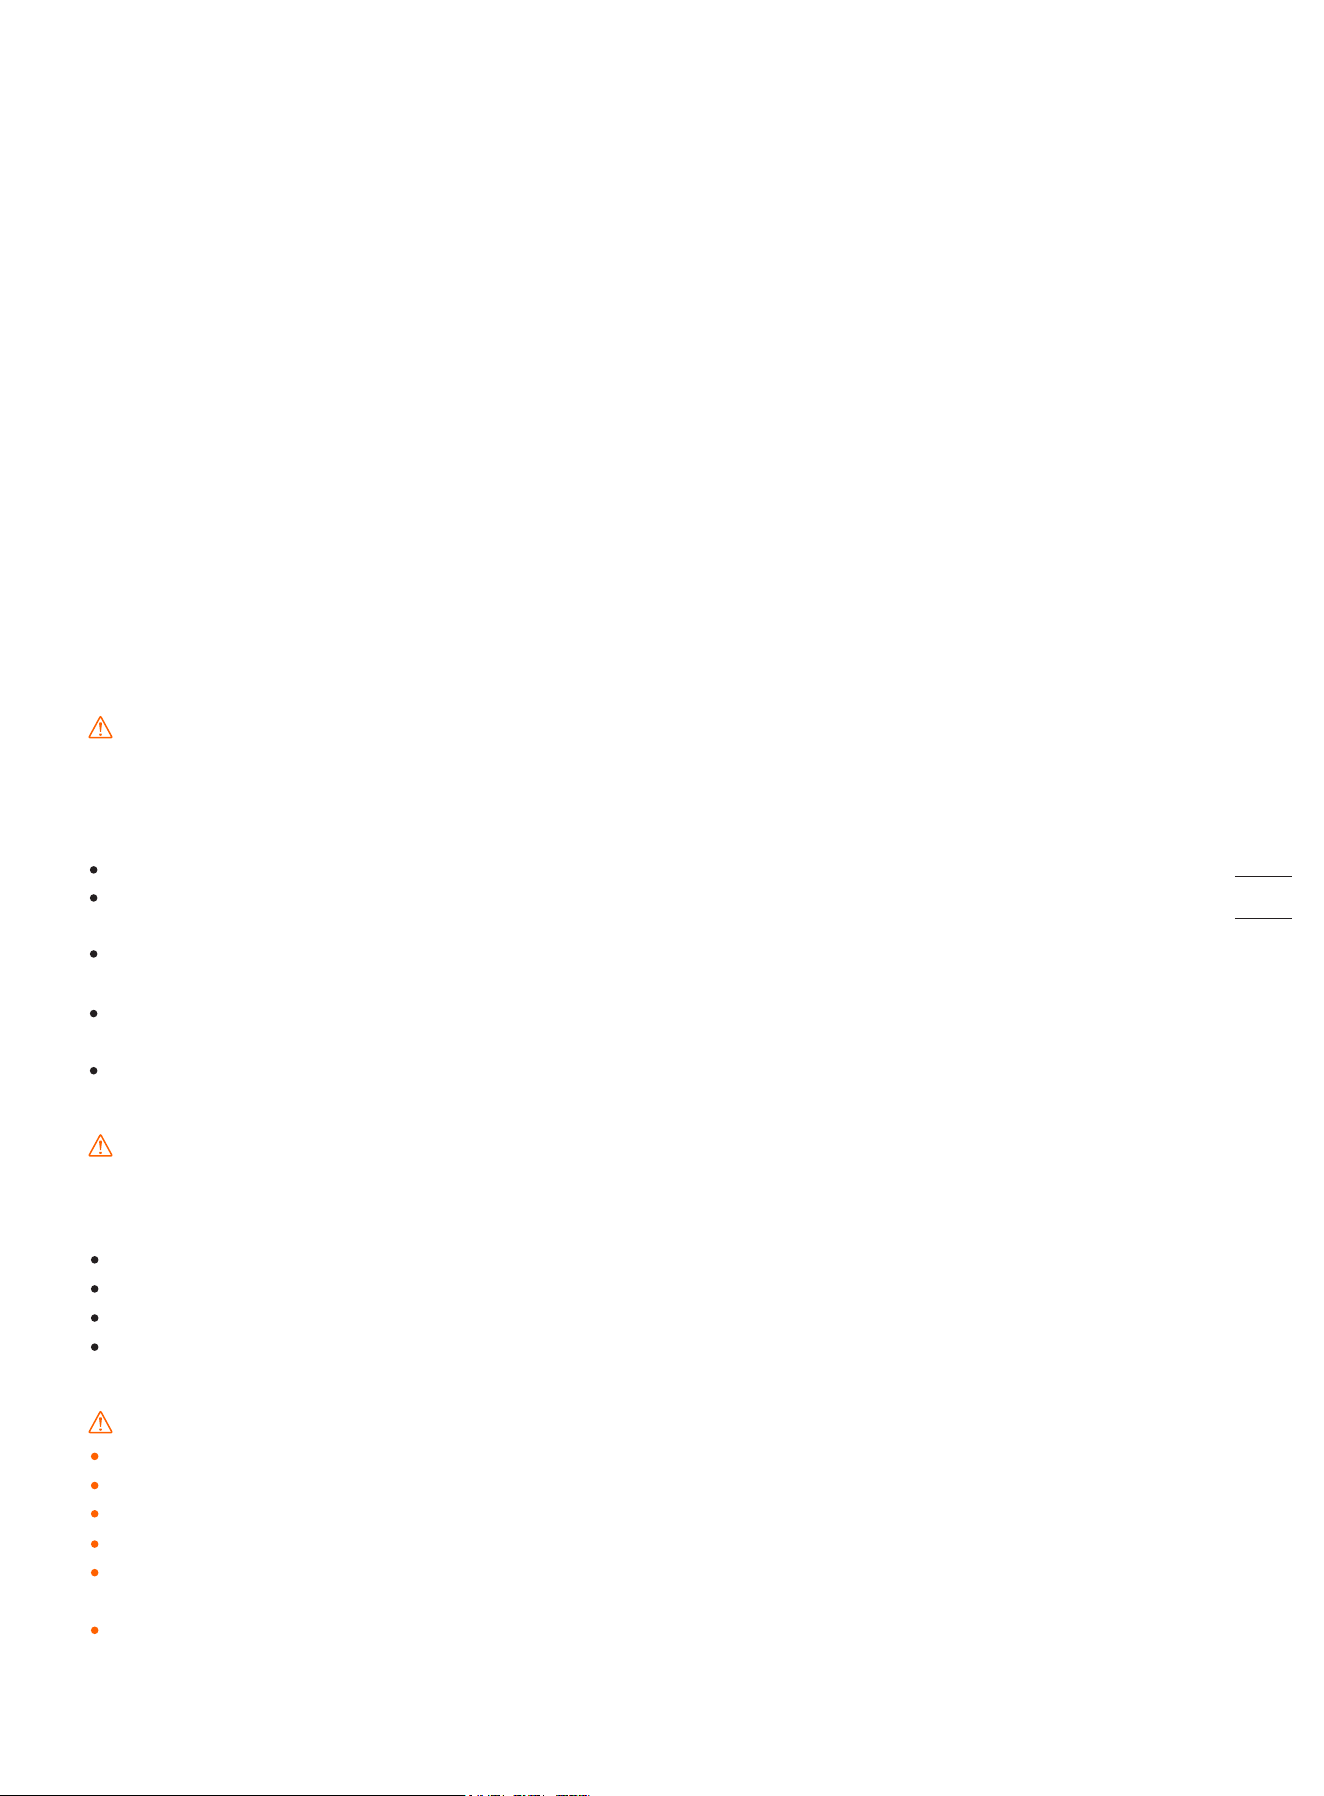
If the cord on the power supply or the extension cable becomes damaged or entangled during use, disconnect the power
supply from the power socket and then untangle. To avoid a hazard, pull the body of the plug rather than the cord when
separating the power supply from the power socket. Contact after-sales service and have a professional technician to repair or
replace the cord.
5

1.3 What’s in the Box?
If there are missing or defective parts, please contact
after-sales service. We recommend retaining the
package for future transportation and shipping.
Navimow
Quick Start Guide
Welcome Card
Important Information
User materials
Quick Start GuideImportant Information
Welcome Card
Spare blades and bolts
12
12
Power supply Extension cable Pegs to secure the extension cable
Charging station and the installation kit
Antenna installation kit
GNSS antenna kit
10
5
WARNING
Sharp edges. Do not point at people.
4
6
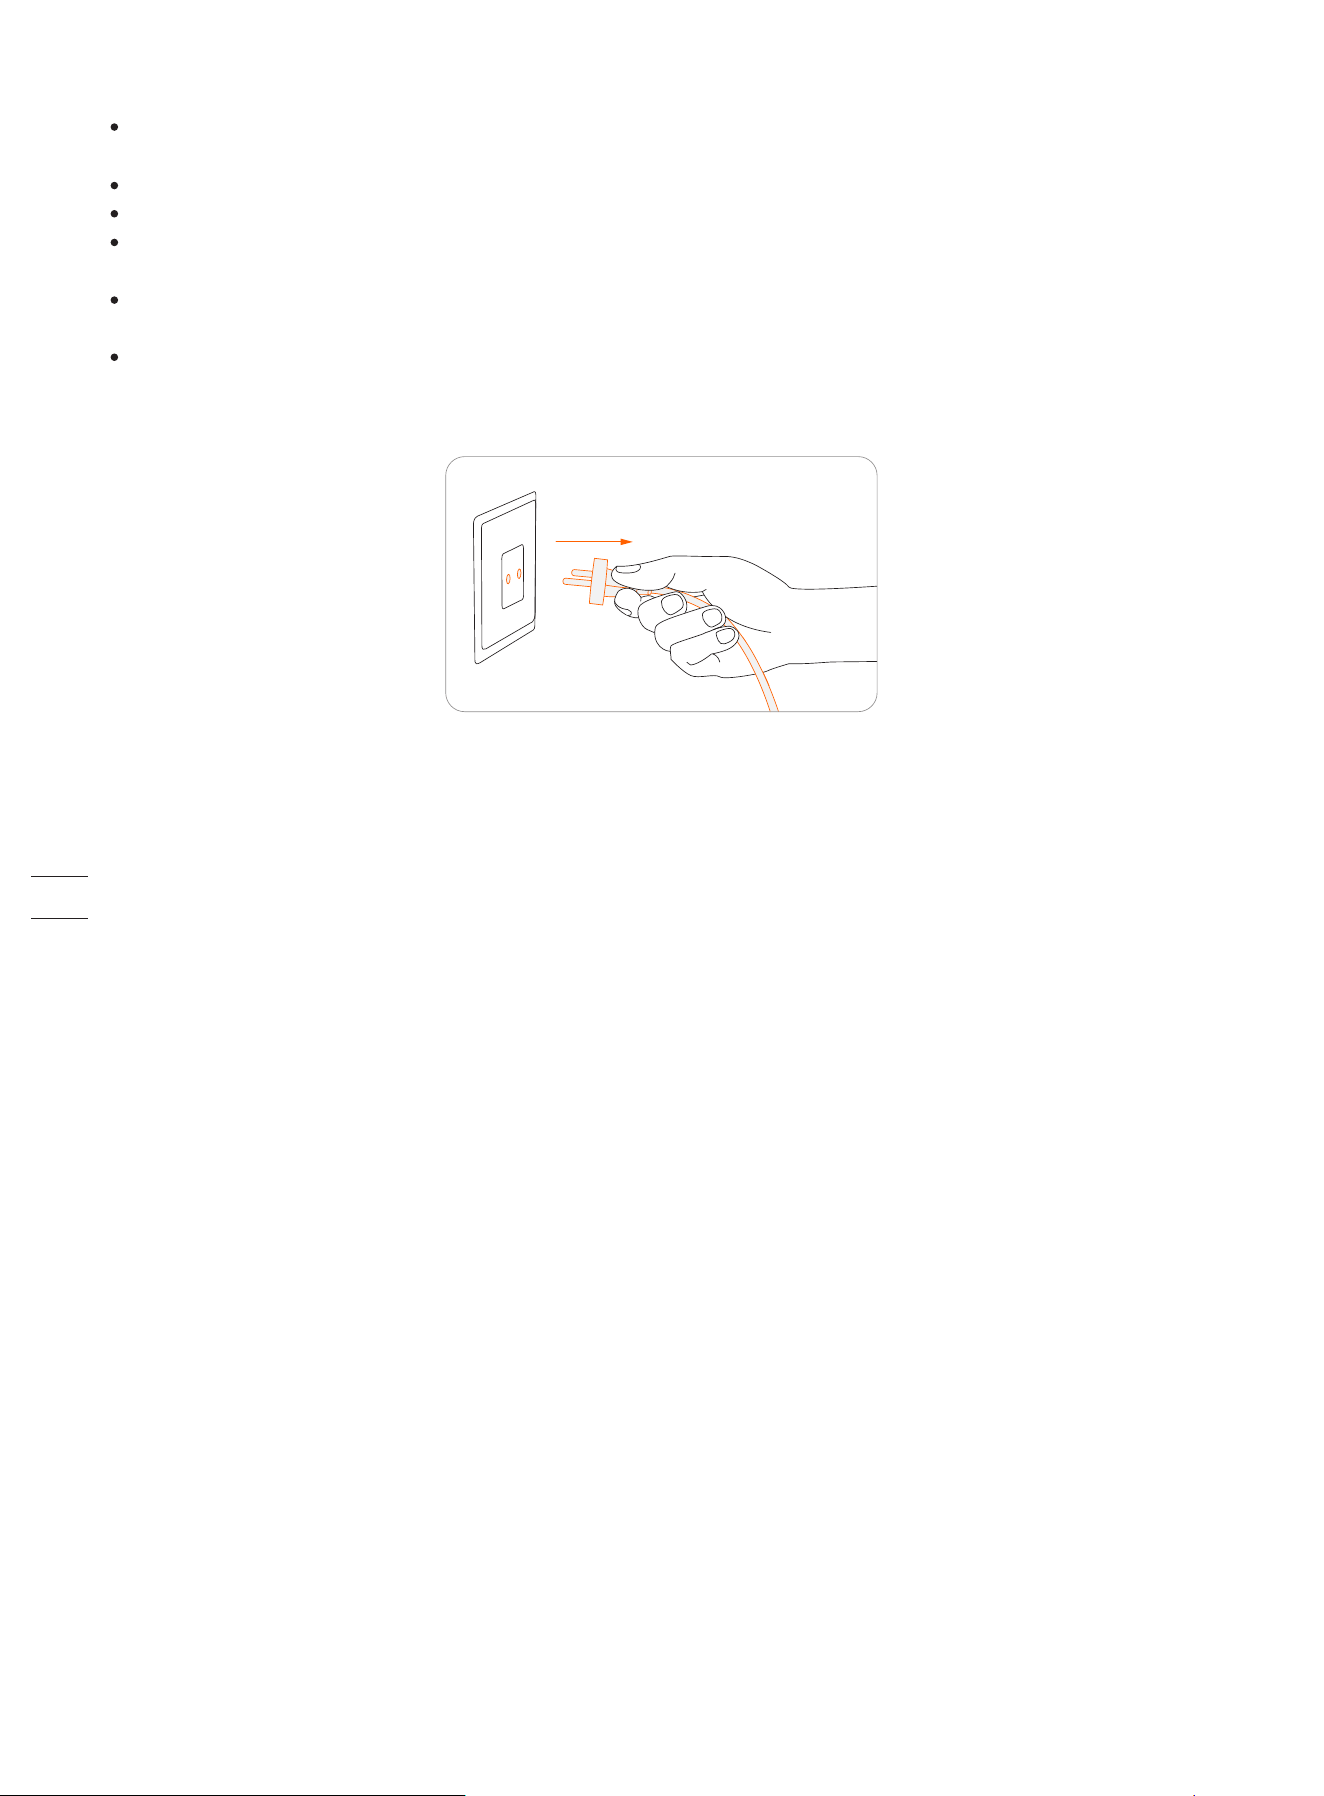
Ambient light: Navimow will have specific lighting effects to remind you to pay attention to the state of the mower. See 3.2 Light
Cue.
Lifting handle: Helps you to lift the mower when necessary. See 4.3 Transportation.
Stop button: Stops the mower and the blade immediately. When the mower encounters a fault and displays a 4-digit error
code, press the STOP button to clear the error code and try to fix the fault. See 5. FAQ & Troubleshooting for detailed guidance.
Control panel: The buttons on the control panel can be used for the basic operations of the mower: switch the mower on and off,
start mowing, return to the charging station, enter the PIN code to unlock the mower, etc. See 3.1 Display and Control on the
Mower.
Rain sensor: For raindrop detection. See Rain sensor in 3.6 Settings (Mower).
Bumper: When the bumper hits an obstacle and triggers the internal sensor, the mower will go backward and avoid the
obstacle. See Bumper in 3.9 Obstacle Avoidance.
GNSS antenna in the mower: In addition to the GNSS antenna connected to the charging station, there is also a GNSS antenna
inside the mower to improve positioning accuracy. See 1.6 How the EFLS Works.
1.4 Parts and Functions
Top view
STOP button
Control panel
Rain sensor
Buzzer
Charging strip
Bumper
Lifting handle
Ambient light
GNSS antenna in the mower
7
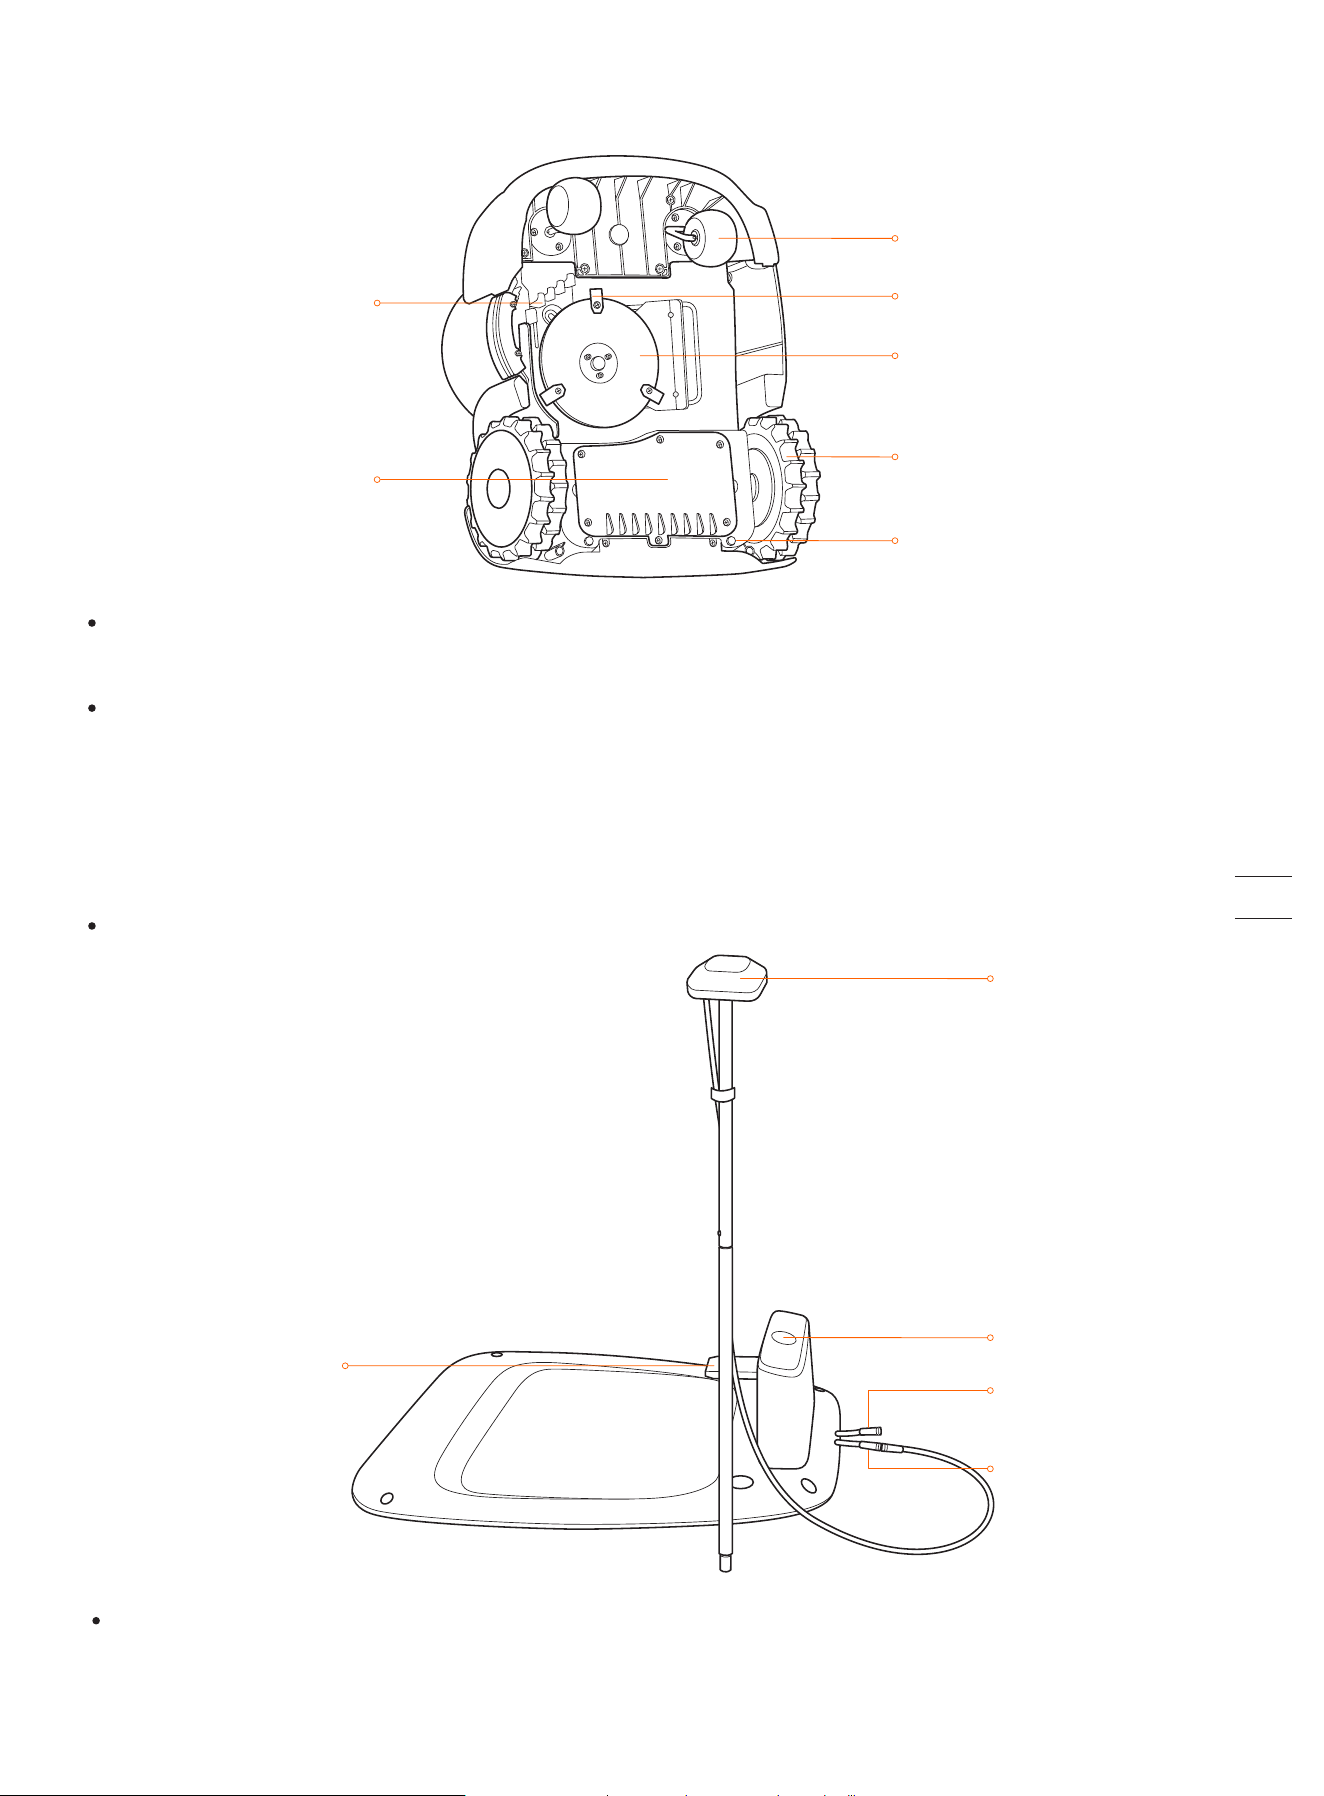
NOTE: If the GNSS antenna has poor signal due to surrounding buildings or trees, the mower will not work properly. You need to
find a better spot for the antenna until the LED indicator turns green/blue. If no suitable place can be found, Segway
recommends purchasing the antenna extension kit for roof/wall installation.
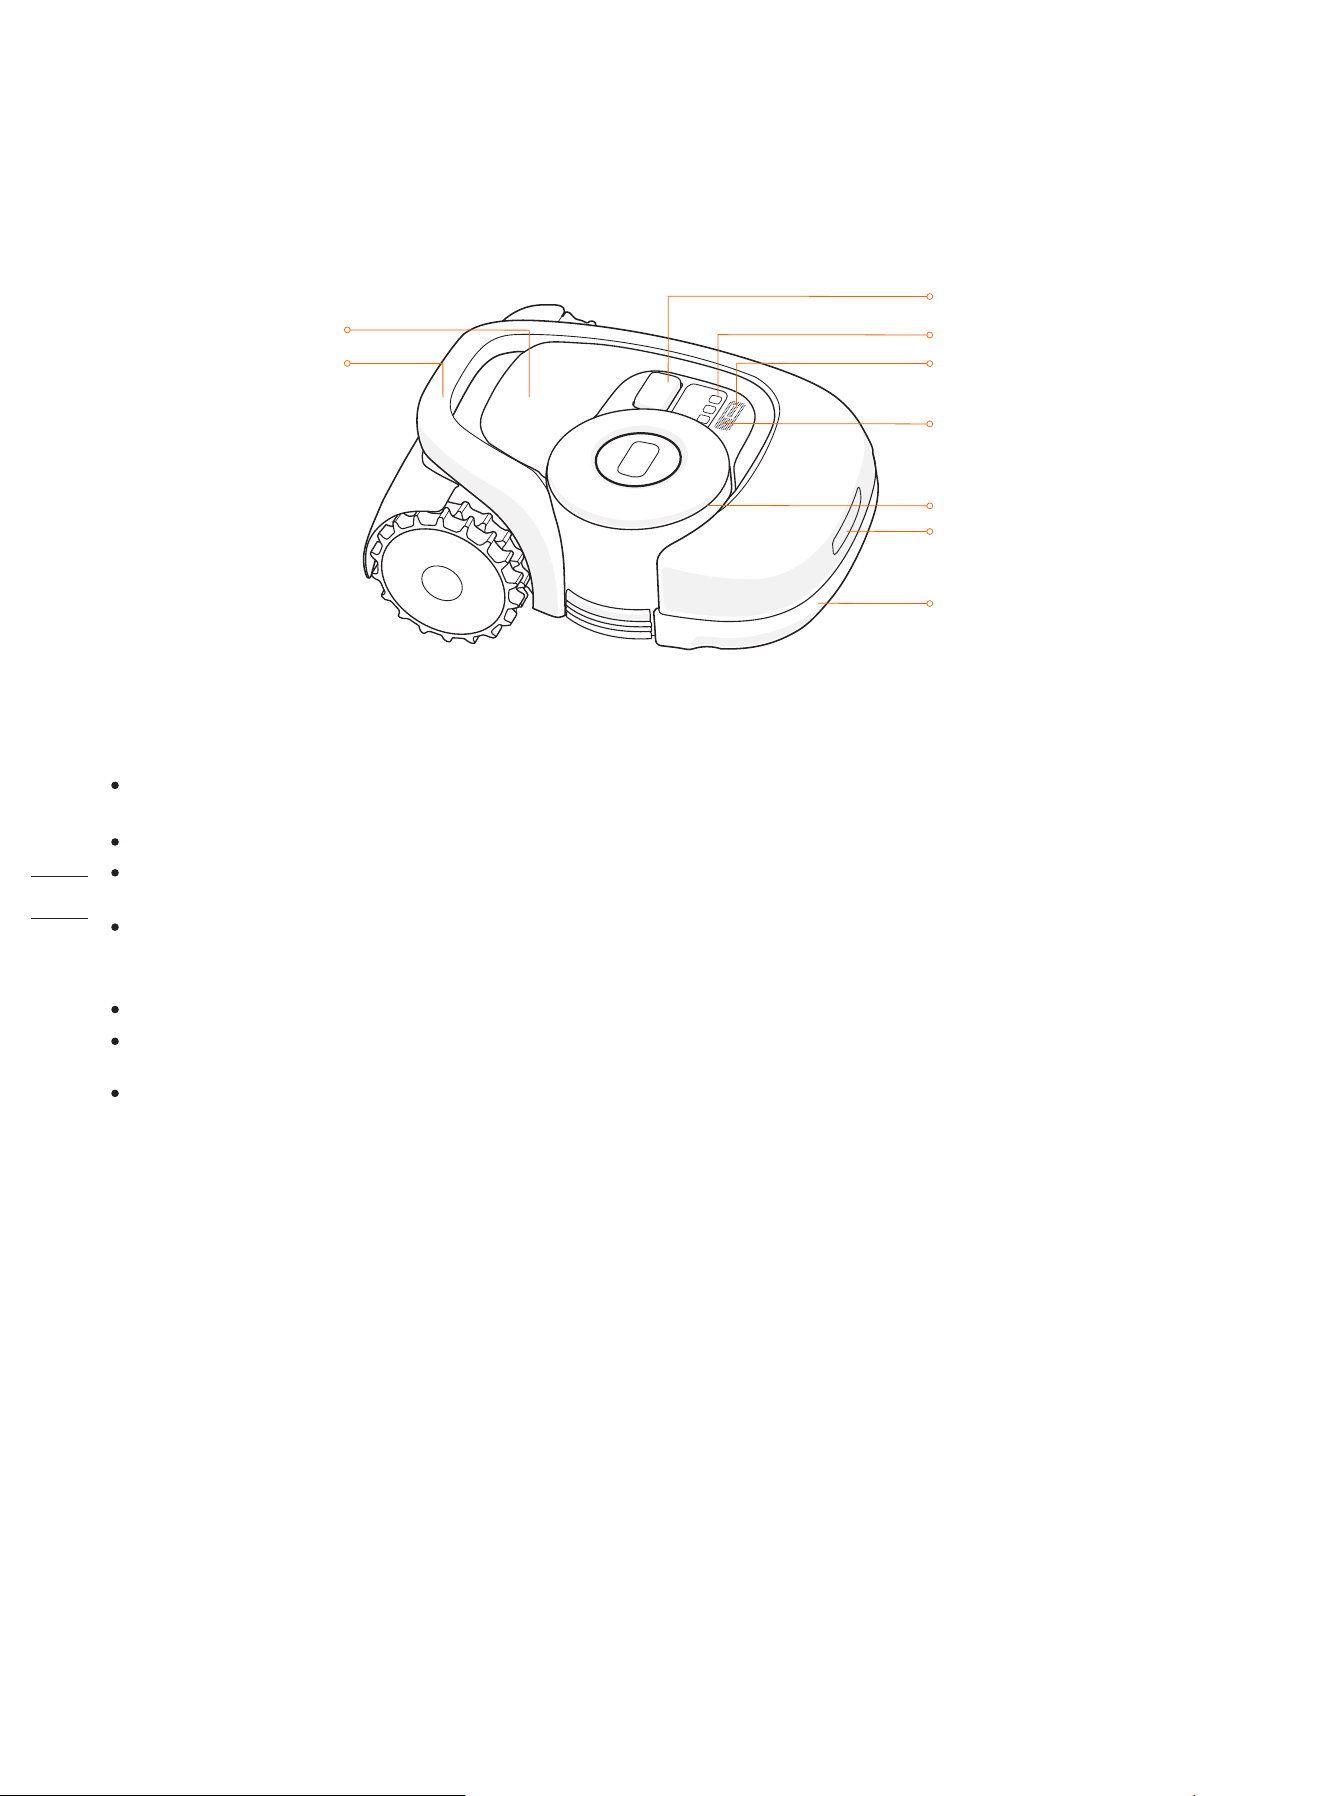
Bottom view
NOTE:Drainage outlet: If the mower falls into water, take it out immediately and put the mower right side up to drain it. Never
submerge the mower in water, otherwise, the components may be damaged and the Limited Warranty will be voided.
Blade disc
Blade
Rear wheel/Hub motor
Blade fender
Battery compartment
Front wheel
Drainage outlet
Power interface
GNSS antenna
LED indicator
Contact strip
Antenna interface
LED indicator: Indicate different working states with various colors. See 3.2 Light Cue for details.
Blade: The blades can rotate freely after being attached to the blade disc. When mowing, the spinning blade disc will generate
centrifugal force to keep the blades pointing outside so that the blades can cut grass. When hitting an obstacle, the blade will
turn inside. See 4.2 Replace Blades for replacement guide.
Blade disc: Blade disc height adjustment through Navimow App. See How to change the cutting height in 3.6 Settings (Mower).
Charging station and the GNSS antenna
GNSS antenna: Receives satellite signals to improve the positioning accuracy of the mower. See 1.6 How the EFLS Works for
details.
8
This product conforms to the applicable
EC Directives.
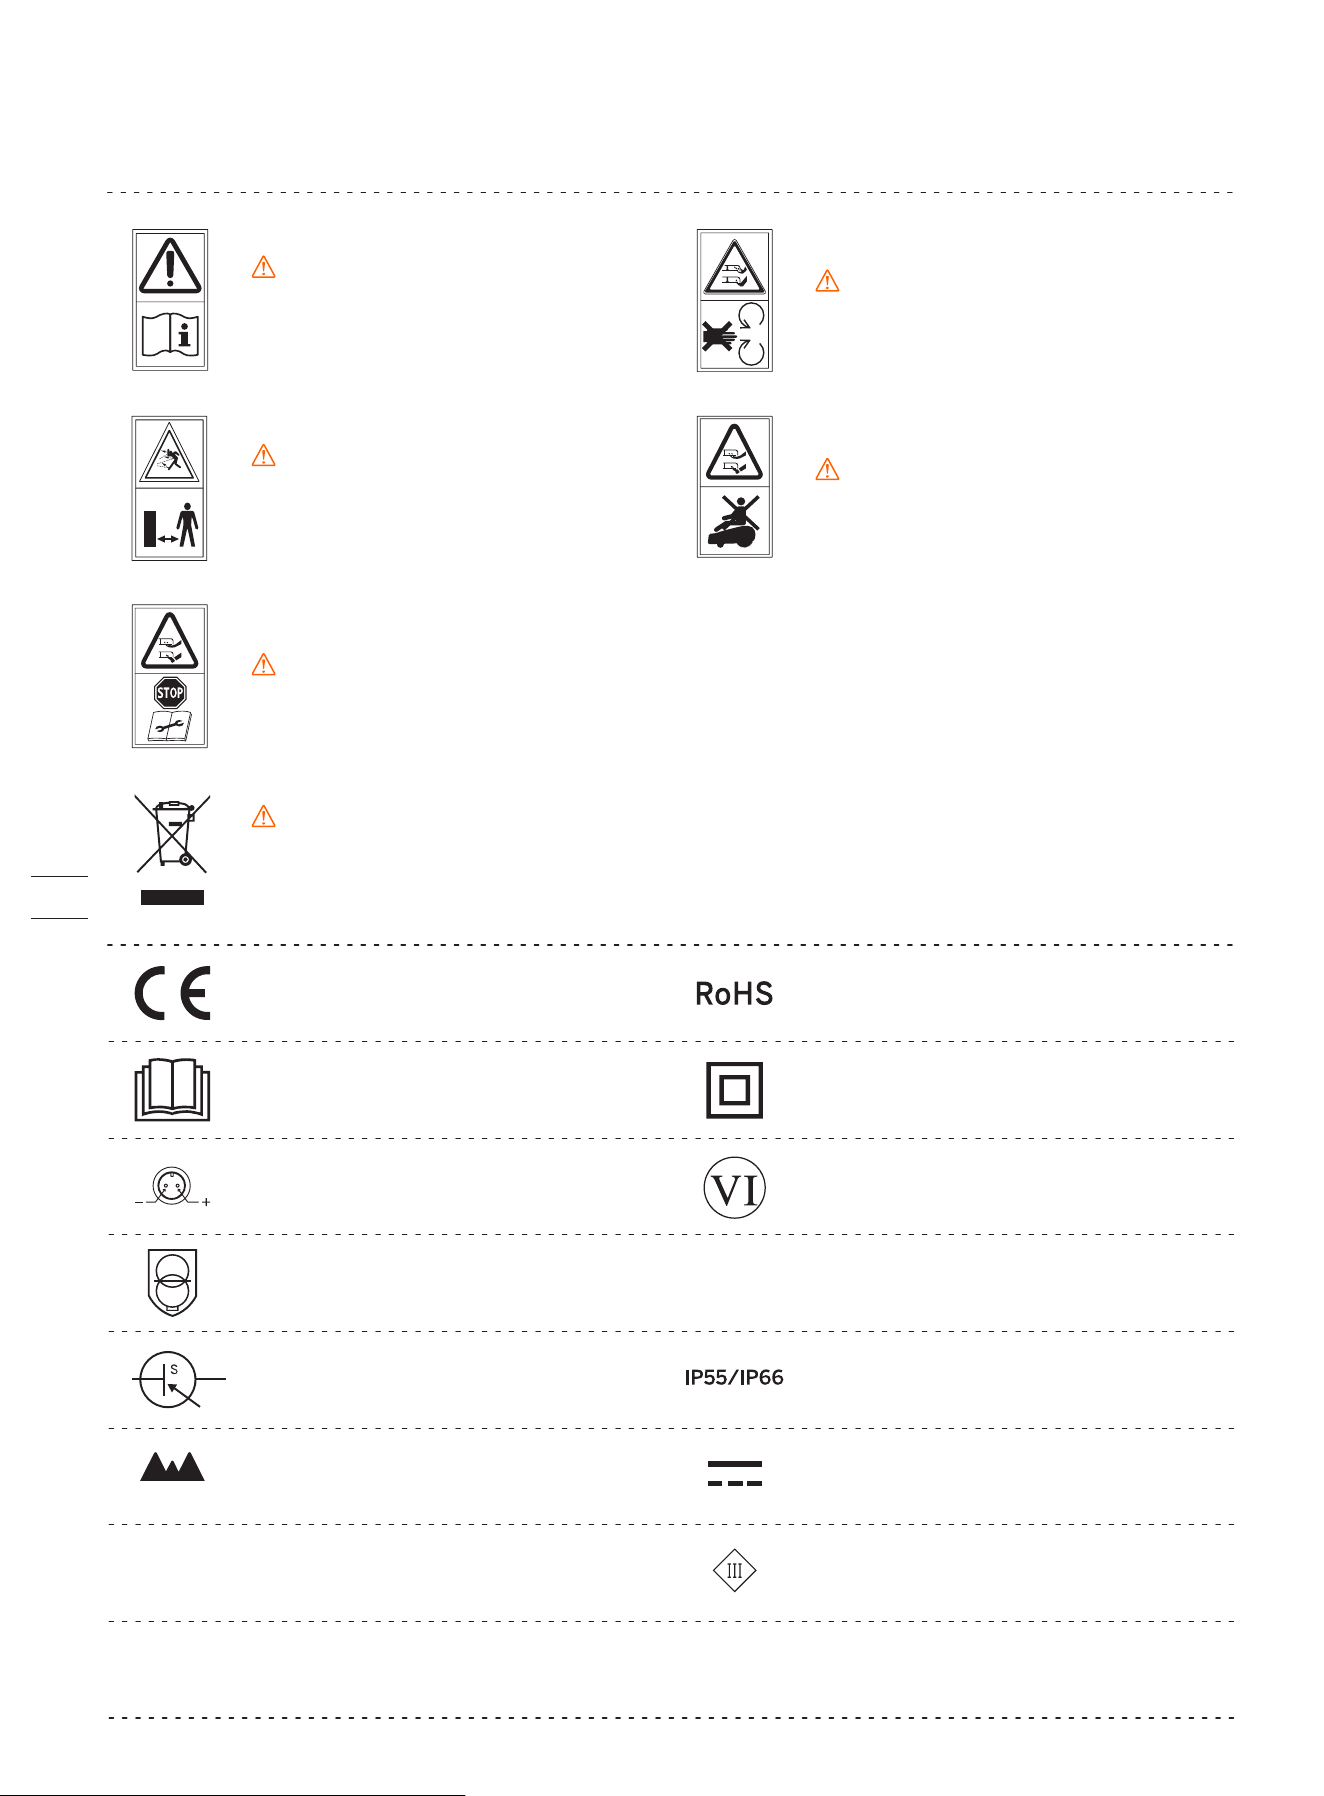
1.5 Symbols and Decals
Please study the symbols on the product and labels carefully and understand their meaning:
WARNING-Read instruction
manual before operating the
machine.
WARNING-Do not touch
rotating blade.
WARNING-Keep a safe
distance from the machine
when operating.
WARNING-Operate the disabling device before working on or lifting the machine*.
WARNING-It is not permitted to dispose of this product as normal household
waste. Ensure that the product is recycled in accordance with local legal
requirements.
WARNING-Do not ride on the
machine.
*The disabling device hereby refers to the PIN code. Make sure the mower is locked by
the PIN code before lifting or operating.
Polarity of the charging port
Class II appliance
IP55/IP66
SMPS incorporating a short-circuit-proof safety isolating transformer (inherently or
non-inherently)
SMPS (Switch mode power supply unit)
DoE Level VI efficiency
The maximum altitude of use is 5000m
The maximum temperature of use is 40
℃
Direct current
Alternating current
Before charging, read the instructions.
This product conforms to the regulations
of Restriction of Hazardous Substances.
ta: 40℃
≤ 5000m
~
Class III appliance
9
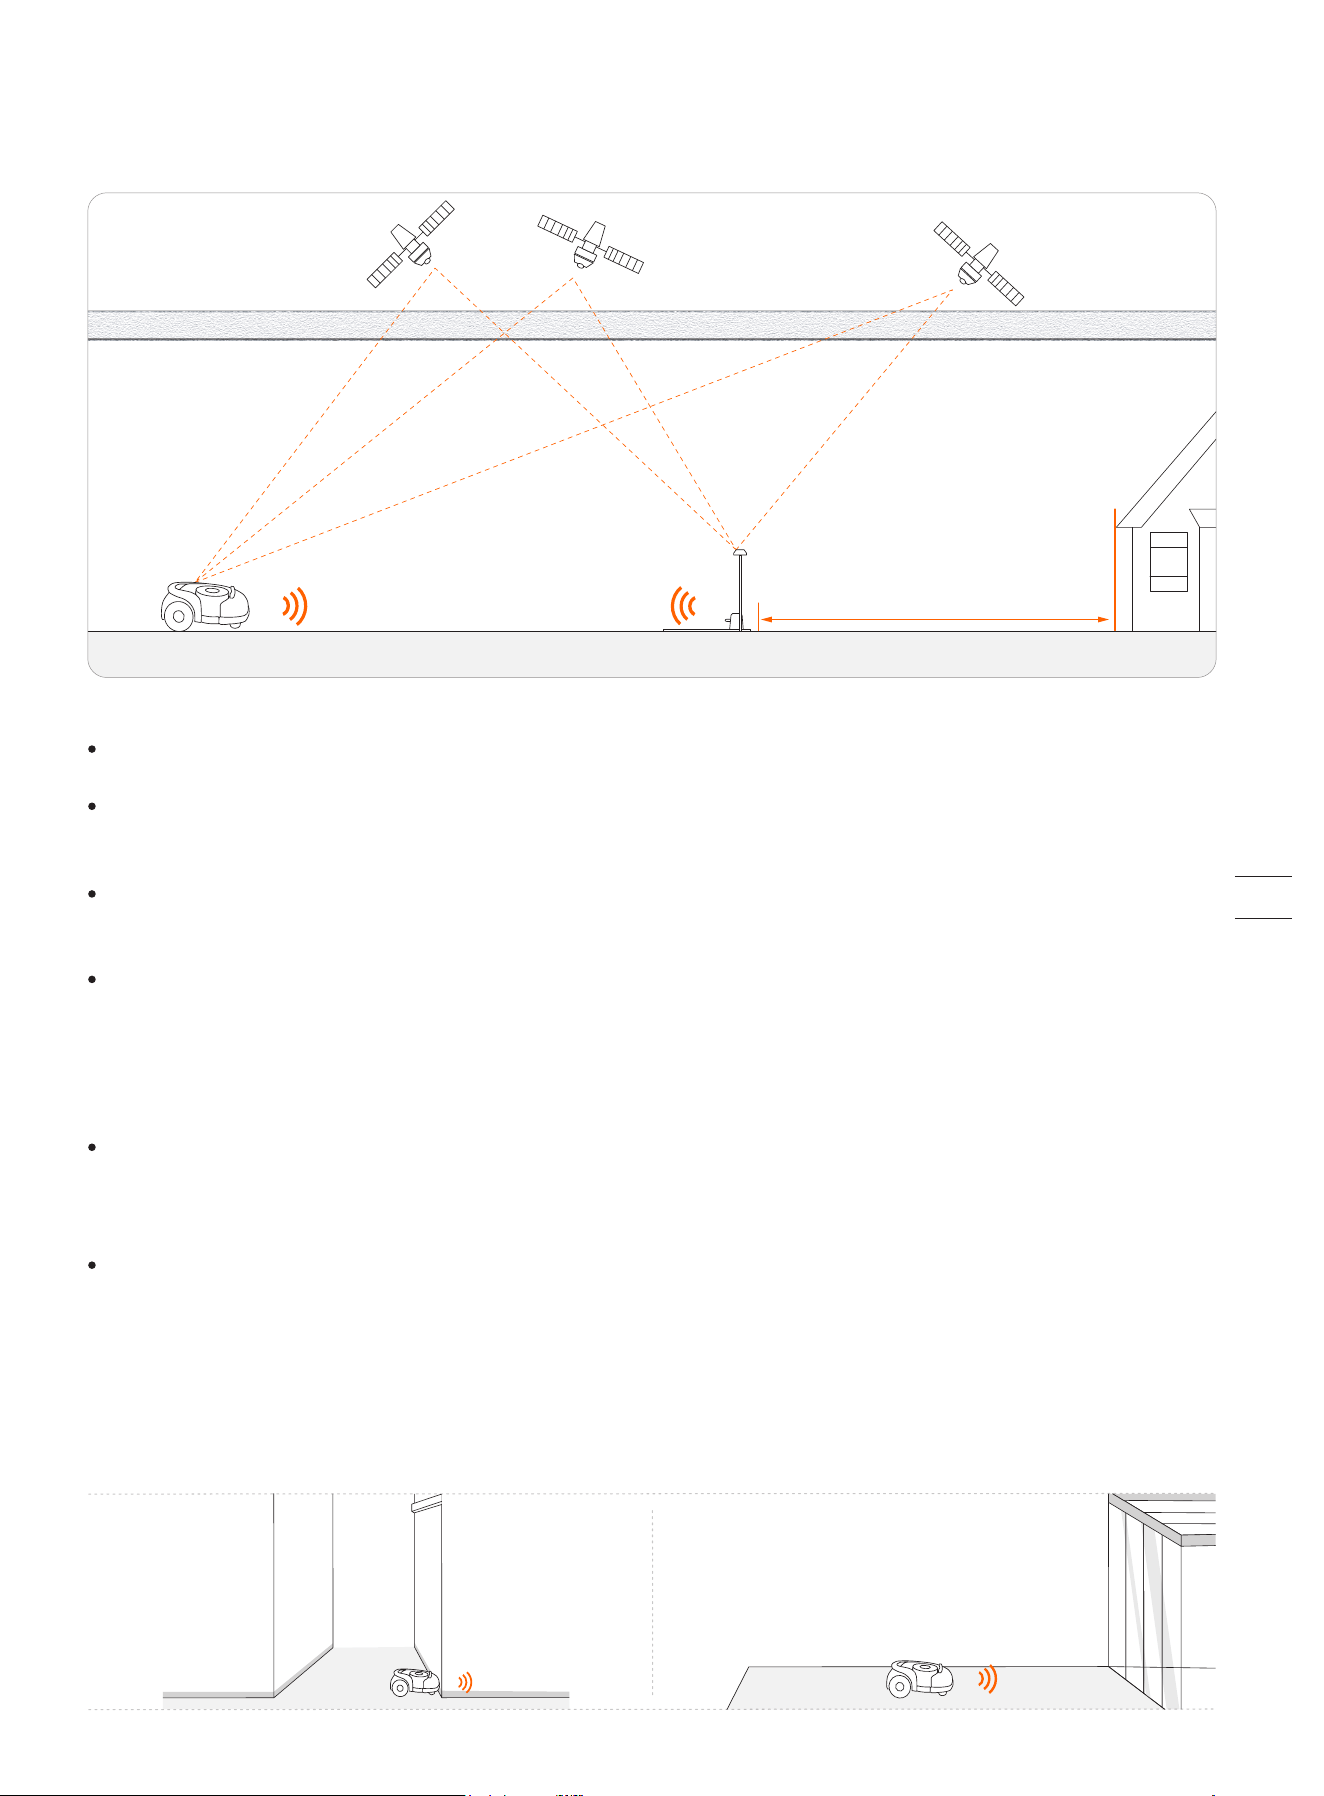
Multi-sensor data fusion improves the applicability of EFLS to complex environments, but serious satellite signal issues will still
greatly affect the normal operation of Navimow. Below are major cases of satellite signal issues:
Blocking
If there are any obstacles on or surrounding the antenna and/or the mower, the signal will be weakened or blocked.
Solution: DO NOT install the charging station and antenna under a roof, tree or anywhere that may block the signal. You can
also buy the antenna extension kit and install the antenna on the roof/wall.
Signal Interference
Signals from the satellite are transmitted to the antenna after being reflected by the wall, instead of directly from the sky. This
is called Multipath Effect.
Solution: install the antenna far from the house to get rid of the multipath effect. It is recommended not to use the mower in a
scenario with walls that have long and flat surfaces or that are made of glass or metal. The long and flat surface/glass and
metal surface will interfere with the signal, hence the mower may bump into the walls. The map should not be built between
two high walls, because the walls will block the signal and the mower will not be able to work in this area.
EFLS (Exact Fusion Locating System) is Segway's unique high-precision fusion technology. Based on satellite positioning, EFLS
technology integrates various sensor data to improve positioning accuracy and fault tolerance through algorithm fusion.
The mower can locate itself through satellite signals, which can also be picked up by the antenna. By comparing the satellite
signals from the antenna and the mower, errors in the transmission of the signal (such as the offset of the satellite signal as it
travels through the ionosphere) can be minimized, improving satellite positioning accuracy to the centimeter level.
In addition, the data collected by the gyroscope, accelerometer, magnetic compass, and odometer sensors can also be integrat-
ed into this system through Segway's data fusion algorithms, further improving the applicability of Navimow to various environ-
ments.
With EFLS technology, Navimow can draw a precise work area in complex outdoor environments without laying boundary
wires, and optimize the mowing path through algorithms in the work area to achieve planned mowing results and maximize
the mower's work efficiency.
lonosphere & troposphere lonosphere & troposphere
≥ 2m
1.6 How the EFLS Works
10
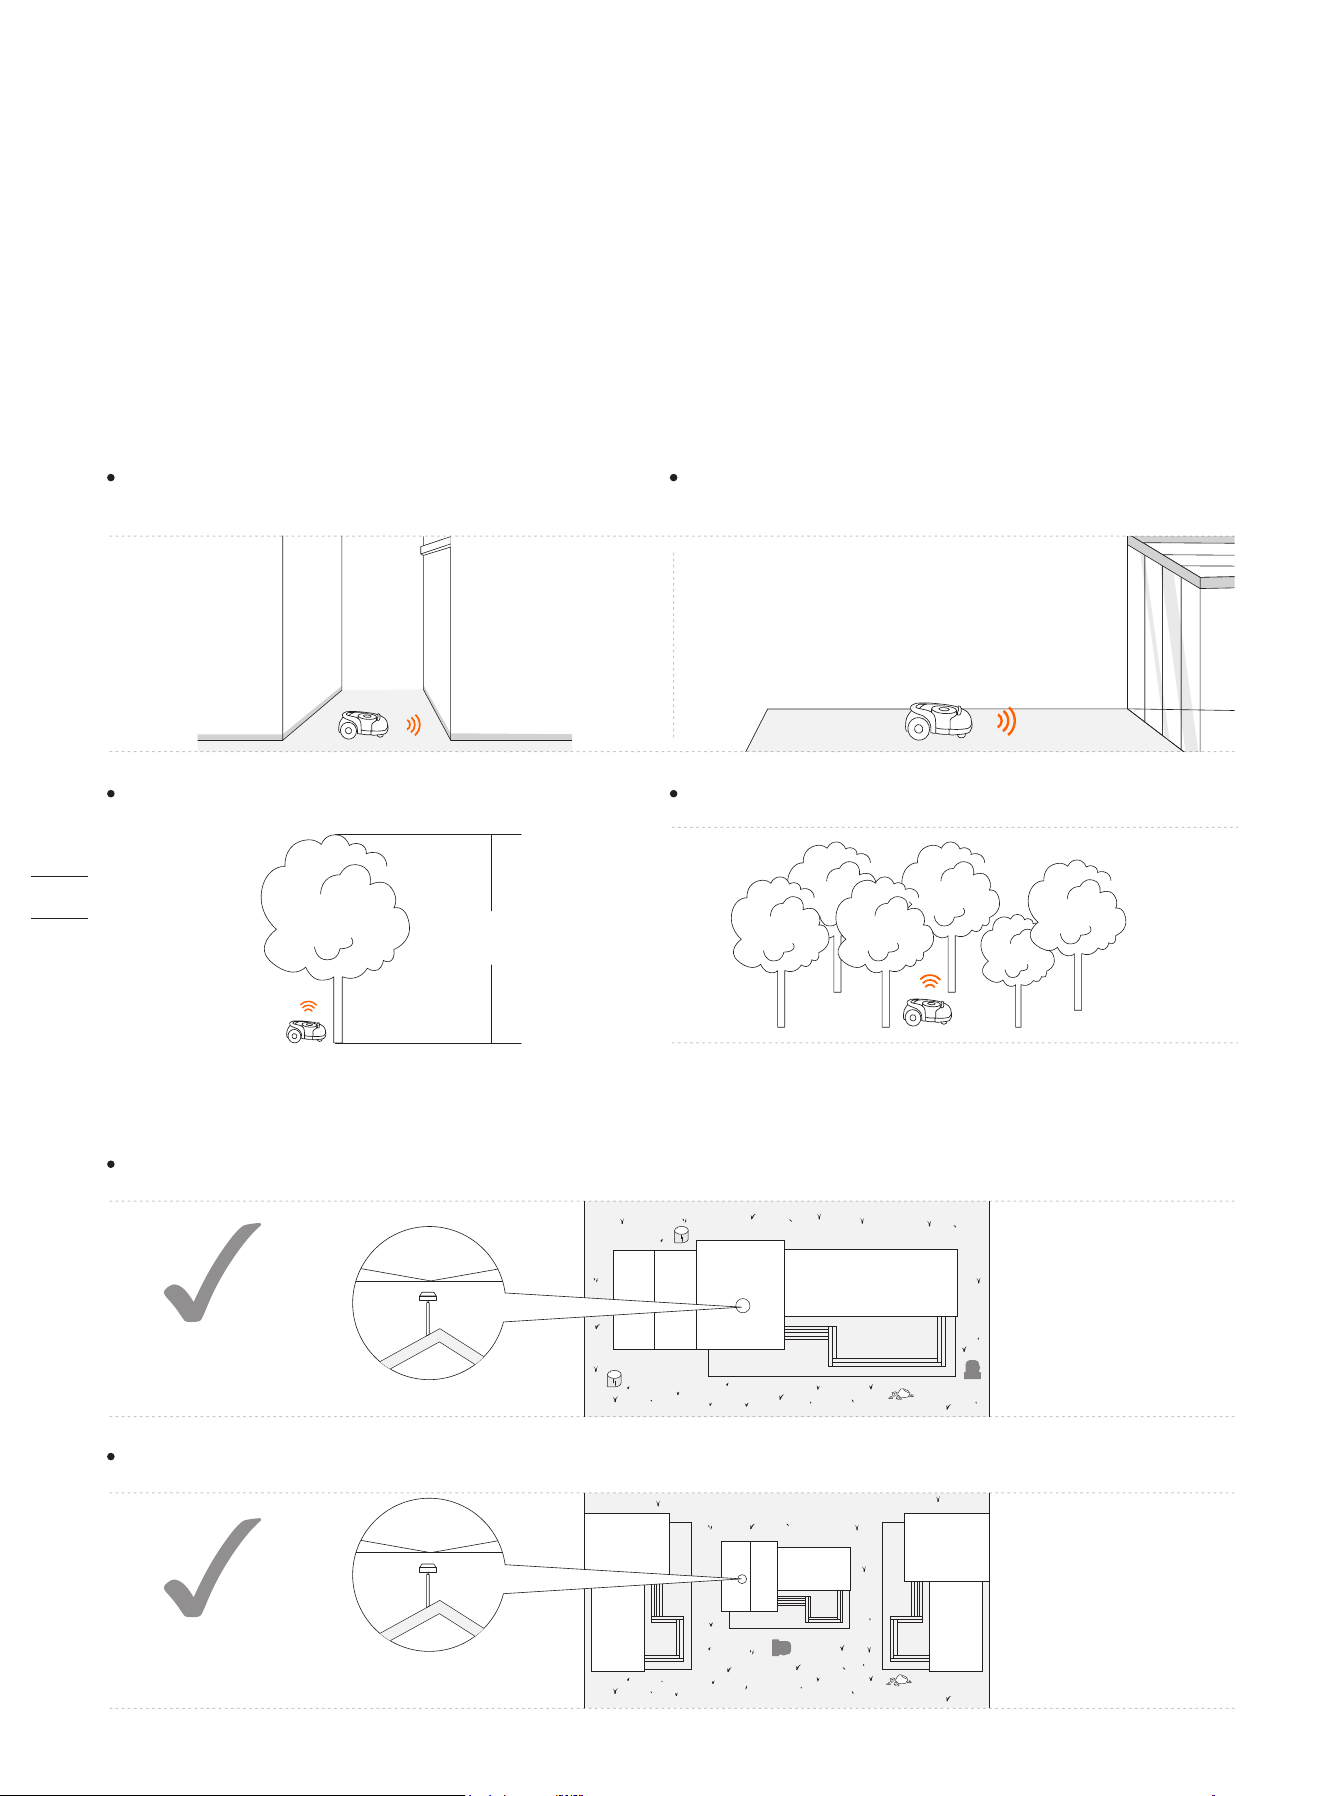
The use of Navimow relies on fine satellite positioning signals and has certain requirements for the site being used: relatively
open and flat, no high-rise buildings and trees, and a large area of the sky is visible.
We created a checklist with questions on lawn shapes, houses, trees and other objects in yards. After completing the checklist,
you will have a clearer understanding of whether Navimow is suitable for your yard and get a purchase suggestion. To complete
the
checklist, visit https://navimow.segway.com/checklist.
If your yard has the following features, you will need to purchase the VisionFence sensor to help Navimow handle more complex
yards. For more information, visit https://navimow.segway.com.
There is a large area of a glass/metal wall or a wall
with a long and flat surface.
1.7 How to Choose a Model
Is Navimow suitable for your yard?
There are tall trees (usually above 5 m) with big tree crowns. The density of the trees is thick.
The lawn tightly surrounds the building, and other buildings are within close proximity.
If your yard has the following features, you may need to purchase the Antenna Extension Kit, and install the antenna at a higher
position to obtain better satellite signals, but the possibility of poor performance cannot be ruled out.
The satellite signal is poor in the narrow path connecting the front yard and the back yard.
The lawn has a long and narrow area with high walls
on both sides.
≥5m
≥160°
≥160°
11
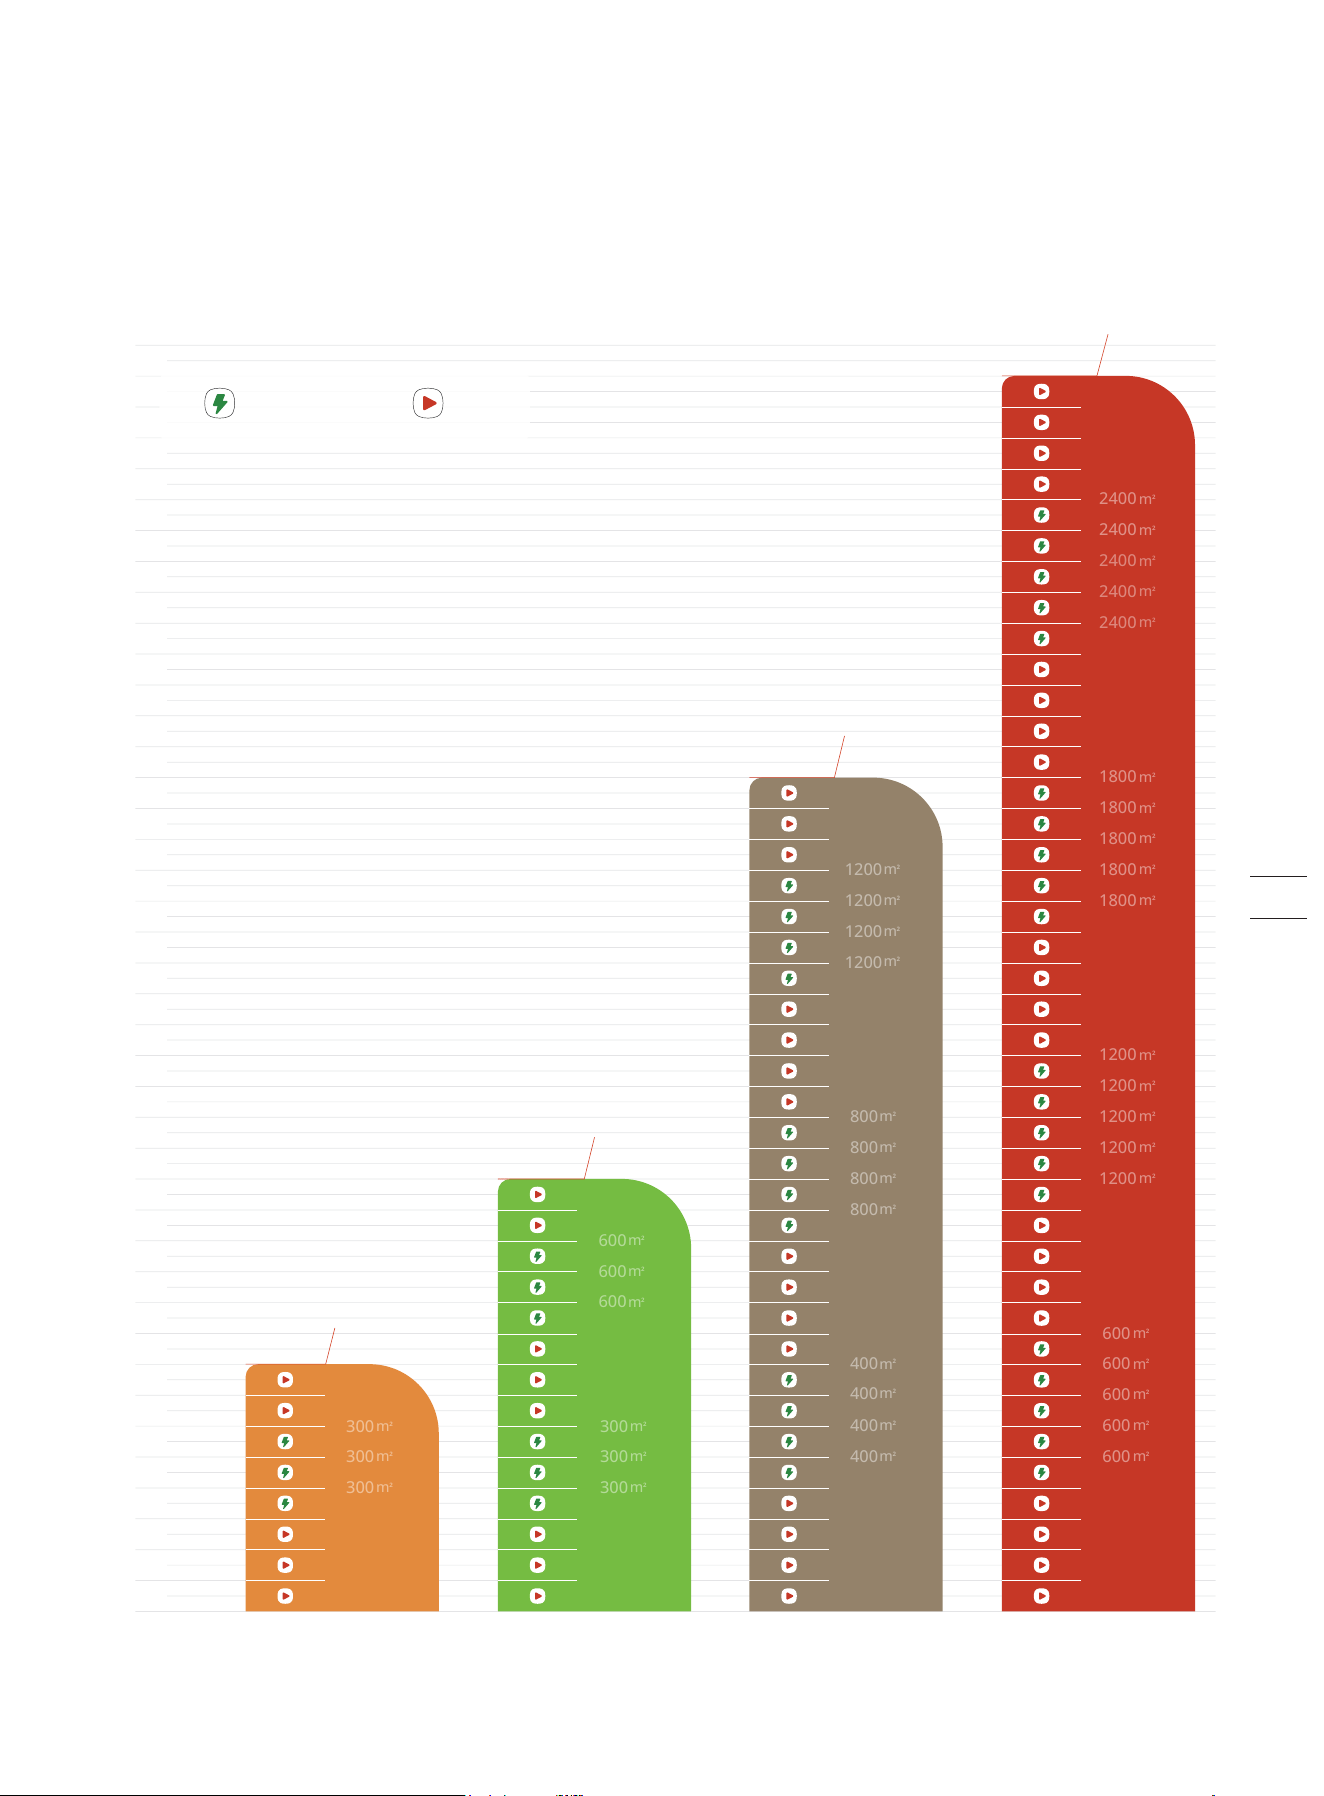
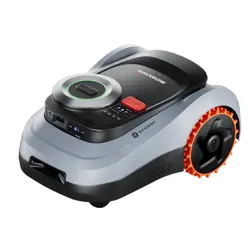
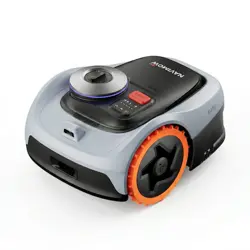
How to choose a Navimow model for your yard?
The charging time and working efficiency are different for each model. Refer to the following chart to choose a suitable model
according to your lawn size and expected working hours (e.g., H500E model can cut a 500m² lawn in approx. 8 hours).
01h
00h
H500E H800E H1500E H3000E
02h
03h
04h
05h
06h
07h
08h
09h
10h
11h
12h
13h
14h
15h
16h
17h
18h
19h
20h
21h
22h
23h
24h
25h
26h
27h
28h
29h
30h
31h
32h
33h
34h
35h
36h
37h
38h
39h
40h
41h
Working Time
m
2
m
2
m
2
m
2
m
2
m
2
800
m
2
500
100
m
2
m
2
m
2
m
2
m
2
m
2
200
300
300
300
m
2
300
400
600
600
600
600
700
m
2
m
2
m
2
m
2
m
2
m
2
m
2
m
2
m
2
m
2
m
2
m
2
m
2
m
2
m
2
m
2
m
2
m
2
m
2
m
2
m
2
m
2
m
2
m
2
m
2
1500
m
2
100
200
300
400
400
400
400
m
2
400
500
600
700
800
800
800
800
800
900
1000
1100
1200
1200
1200
1200
1200
1300
1400
m
2
m
2
m
2
m
2
m
2
m
2
m
2
m
2
m
2
m
2
m
2
m
2
m
2
m
2
m
2
m
2
m
2
m
2
m
2
m
2
m
2
m
2
m
2
m
2
m
2
m
2
m
2
m
2
m
2
m
2
m
2
m
2
m
2
m
2
m
2
m
2
m
2
m
2
m
2
2400 min
3000
m
2
150
300
450
600
600
600
600
600
600
750
900
1050
1200
1200
1200
1200
1200
1200
1350
1500
1650
1800
1800
1800
1800
1800
1800
1950
2100
2250
2400
2400
2400
2400
2400
2400
2550
2700
2850
100
m
2
m
2
m
2
m
2
m
2
m
2
200
300
300
300
m
2
300
400
500
m
2
1620 min
840 min
480 min
Charging Mowing
12

1.8 Specifications
Navimow
Segway
603 × 468 × 264 mm ( 23.7 × 18.4 × 10.4 in)
16.3 kg (35.93 lbs) 16.6 kg (36.59 lbs) 16.9 kg (37.26 lbs)
Mower frame: PP; cover: ASA
Basic Information
Product Name
Brand
Net Weight
(Battery Included)
Material
Dimensions:
Length × Width × Height
H500E H800E H1500E
H3000E
GPS, Beidou, Galileo, GLONASS
500
m² (0.12 acre) 800 m² (0.20 acre) 1500 m² (0.37 acre)
About 180 min
3000 m² (0.74 acre)
About 240 min
21 cm (8.3 in)
30–60 mm (1.2–2.4 in)
About 3 h About 4 h About 5 h
Mower Parameters
Recommended Mowing Area
Area Capacity per Hour
Cutting Width
Cutting Height
Charging Time
GNSS Working Mode
Typical Mowing Time
Per Full Charge
[1]
Noise Emissions
[2]
Measured Sound Power
Level LWA
Sound Power
Uncertainties KWA
54 dB(A)
3 dB(A)
Sound pressure
level LpA
Sound pressure
uncertainties KpA
43 dB(A)
3 dB(A)
100
m² (0.025 acre) 150 m² (0.04 acre)
8-inch hub motor
Driving Motor
Rated Speed
Motor Type
2800/min
Brushless motor
Blade Motor
Top Speed
Motor Type
Wi-Fi 2.4 GHz
(2400–2483.5M)
Connectivity
ISM band radio connection
Bluetooth®
Frequency Range
Wi-Fi/Cellular Network
865-868 MHz
2400.0–2483.5 MHz
Cellular network
LTE-FDD: B1/B3/B5/B7/B8/B20/B28
LTE-TDD: B38/B40/B41
0–50℃(32–122°F);10–35℃(50–95°F)recommended
-20–50℃ (-4–122°F); 10–35℃ (50–95°F) recommended
Mower body IP66; charging station IP56; power supply IP55
Working Conditions
Working Temperature
Storage Temperature
IP Rating
Max. Incline at Boundary
Max. Incline Inside
Woking Area
Minimum Angle
for Cutting Area
45%
10%
90°
Battery Pack
Battery
Management System
Lithium-ion battery
21.6 V DC
Over-heating, short circuit, over-current and over-charge protection
Battery Type
Nominal Voltage
Nominal Capacity/Energy
5200 mAh /112 Wh 7800 mAh /168 Wh 10400 mAh/224 Wh
0.4 m/s
0.6 m/s
For the European Union: NBW32D002D5N-EU, for the United Kingdom: NBW32D002D5N - UK
100–240 V AC
32 V DC MAX
2.5 A
Power Supply
Supply Unit Model
Input Voltage
Output Voltage
Output Current
Wi-Fi 2.4 GHz
(2400–2483.5M)
[3]
+
13

H500E H800E H1500E
H3000E
[1] Tested at a standard cutting speed with a full battery at an ambient temperature of 25°C (77°F) while mowing a flat lawn. The
product can mow more per hour on open areas than on separated small lawns. When the grass is wet or long, the working
capacity is also smaller. The flatter the lawn surface, the larger the working capacity.
[2] The noise emission declarations conform to EN 50636-2-107.
[3] Wi-Fi connectivity is only available for products manufactured after week 39 2022.
Omni-directional wheel with built-in Hall sensor
Rubber tyres with hub motor
Other Features
Front Wheel
Rear Wheel
Sensors
IMU Sensor,
BladeHalt Sensor,
Bump Sensor, Lift
Sensor, Rain
Sensor, Wheel
Encoder
IMU Sensor,
BladeHalt Sensor,
Ultrasonic sensor,
Bump Sensor, Lift
Sensor, Rain Sensor,
Wheel Encoder
32 V DC
2.5 A MAX
25.2 V DC
2.5 A
LED
Charging Station
Input Voltage
Input Current
Output Voltage
Output Current
Indicator
14
To ensure a successful setup, please scan the QR
code to download the Navimow app. Alternatively,
go to the Google Play Store (Android) or the Apple
App Store (iOS) and search "Navimow". After
installing the app, please register and log in.
2. Setup & Mapping
2.1 Before You Start
Prepare the app
NOTE: During use, the app will ask you for Bluetooth, GPS positioning, and Wi-Fi networking accesses when necessary. To ensure
normal use, it is recommended that you enable the above accesses. For more information, please refer to our Privacy Policy. Go
to Settings>app>About>Privacy Policy.
Prepare the lawn
Remove debris, piles of leaves, toys, wires, stones and other obstacles. Make sure children and pets are off the lawn. Please cut
your lawn to a height of no more than 6 cm.
<
6 cm
15
2.2 Install the Charging Station and the Antenna
Step 1: Find a good spot
Install the charging station on a soft and flat surface.
When placed outside, the charging station and the lawn should be kept at the same level.
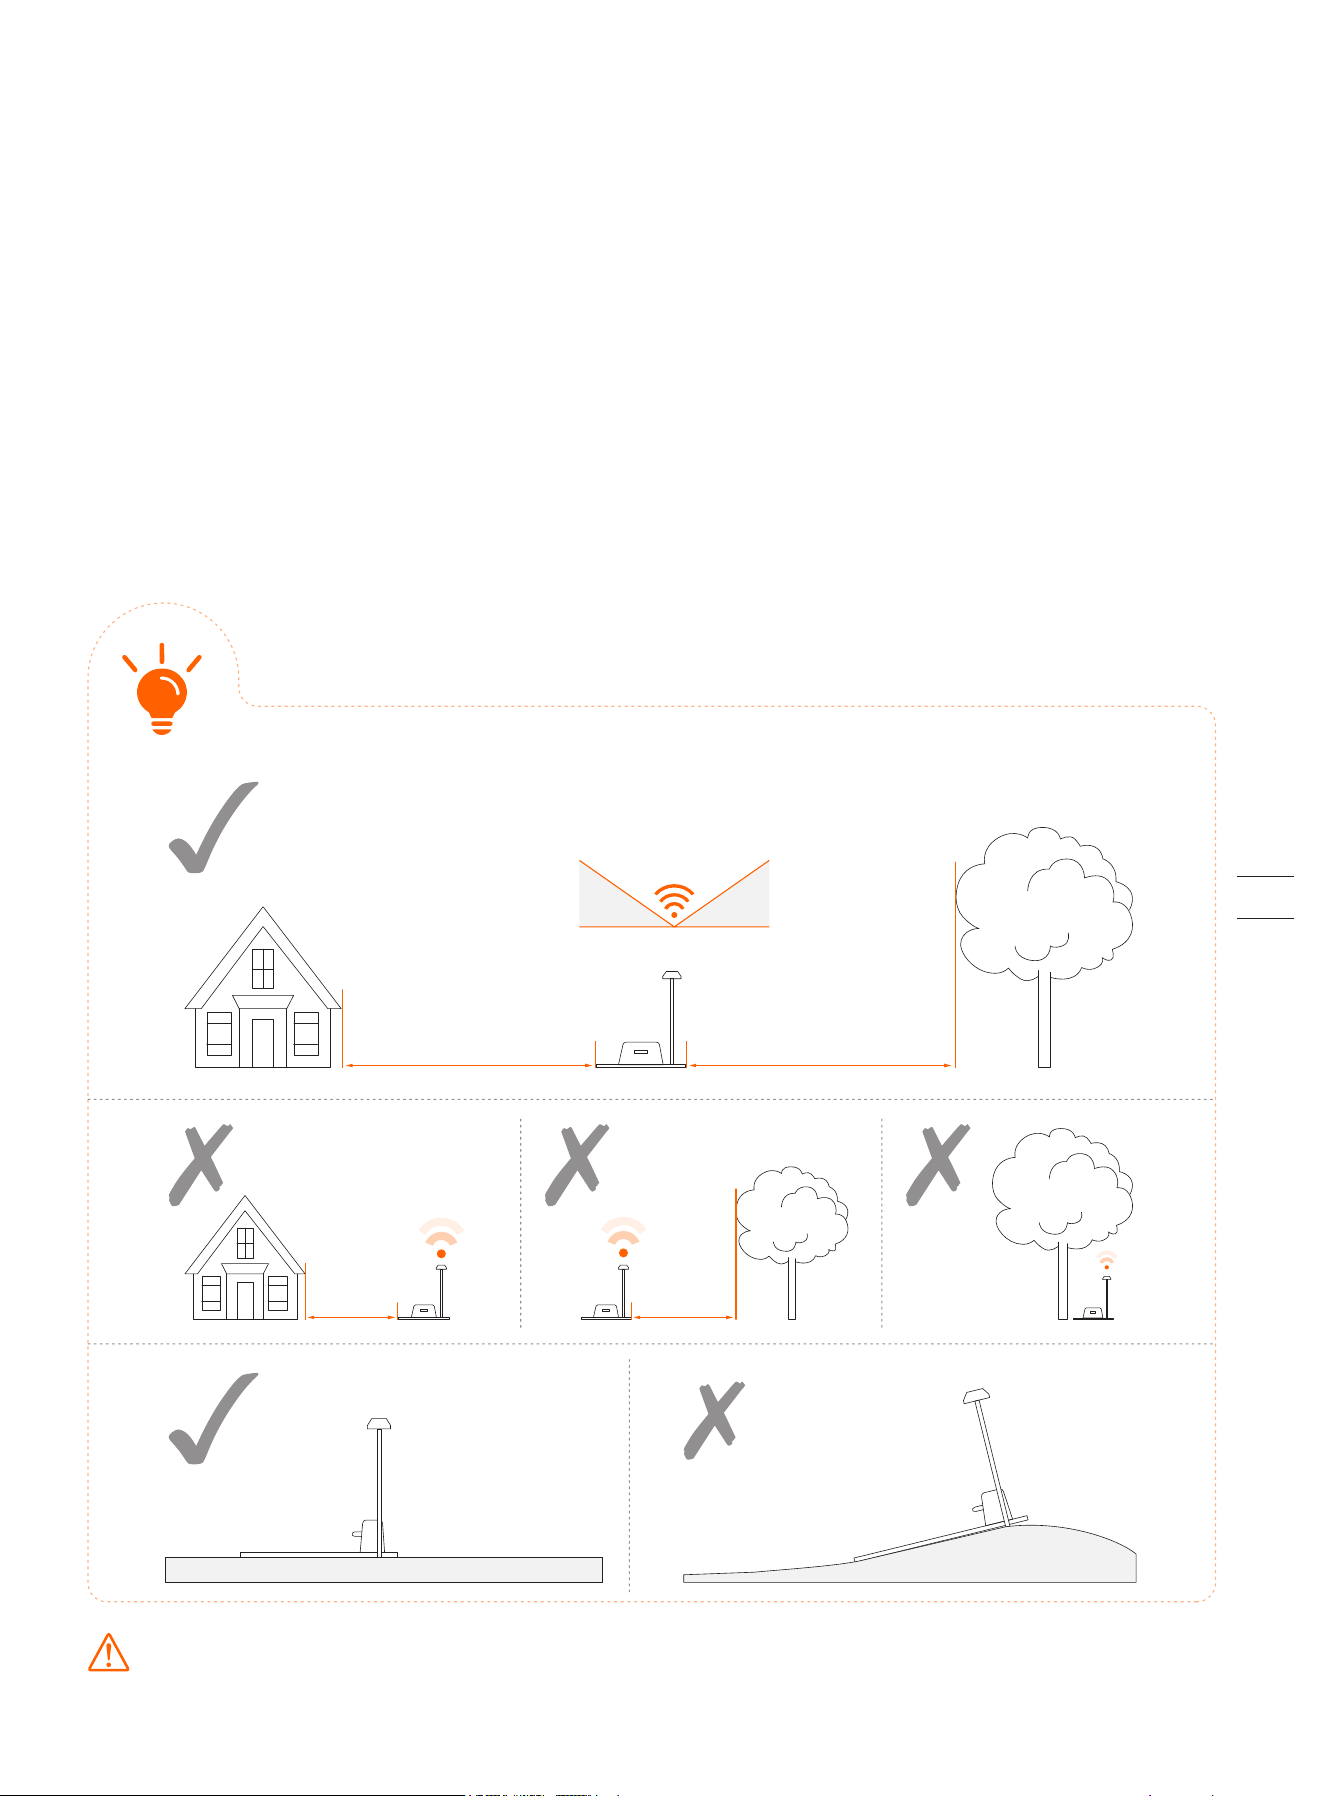
In order to ensure that the antenna can receive good satellite signals, please choose a suitable location to install the charging
station and antenna:
1. Remain a certain distance away (greater than 2 m) from houses, trees and walls.
2. Install the charging station and antenna in an open space with nothing blocking the signal (for example, the tree canopy or the
sunshade umbrella), where the antenna has a clear sky view that at least 110° of the sky is unobstructed.
3. Please place the charging station on a flat non-hardened ground with the antenna upright. Do not install the antenna at an
angle.
4. To ensure smooth docking, leave a minimum of 10 cm at the back of the charging station and 1 m at the front.
5. Stay away from sprinkler heads, fountains or other outdoor water systems.
6. Stay away from substations, generators, water pump stations and air conditioners.
Please choose the location carefully. Once the map is saved, if the location of the charging station or GNSS antenna is
changed, you need to create a new map.
≥ 2m ≥ 2m
<
2m
<
2m
>110°
35° 35°
16
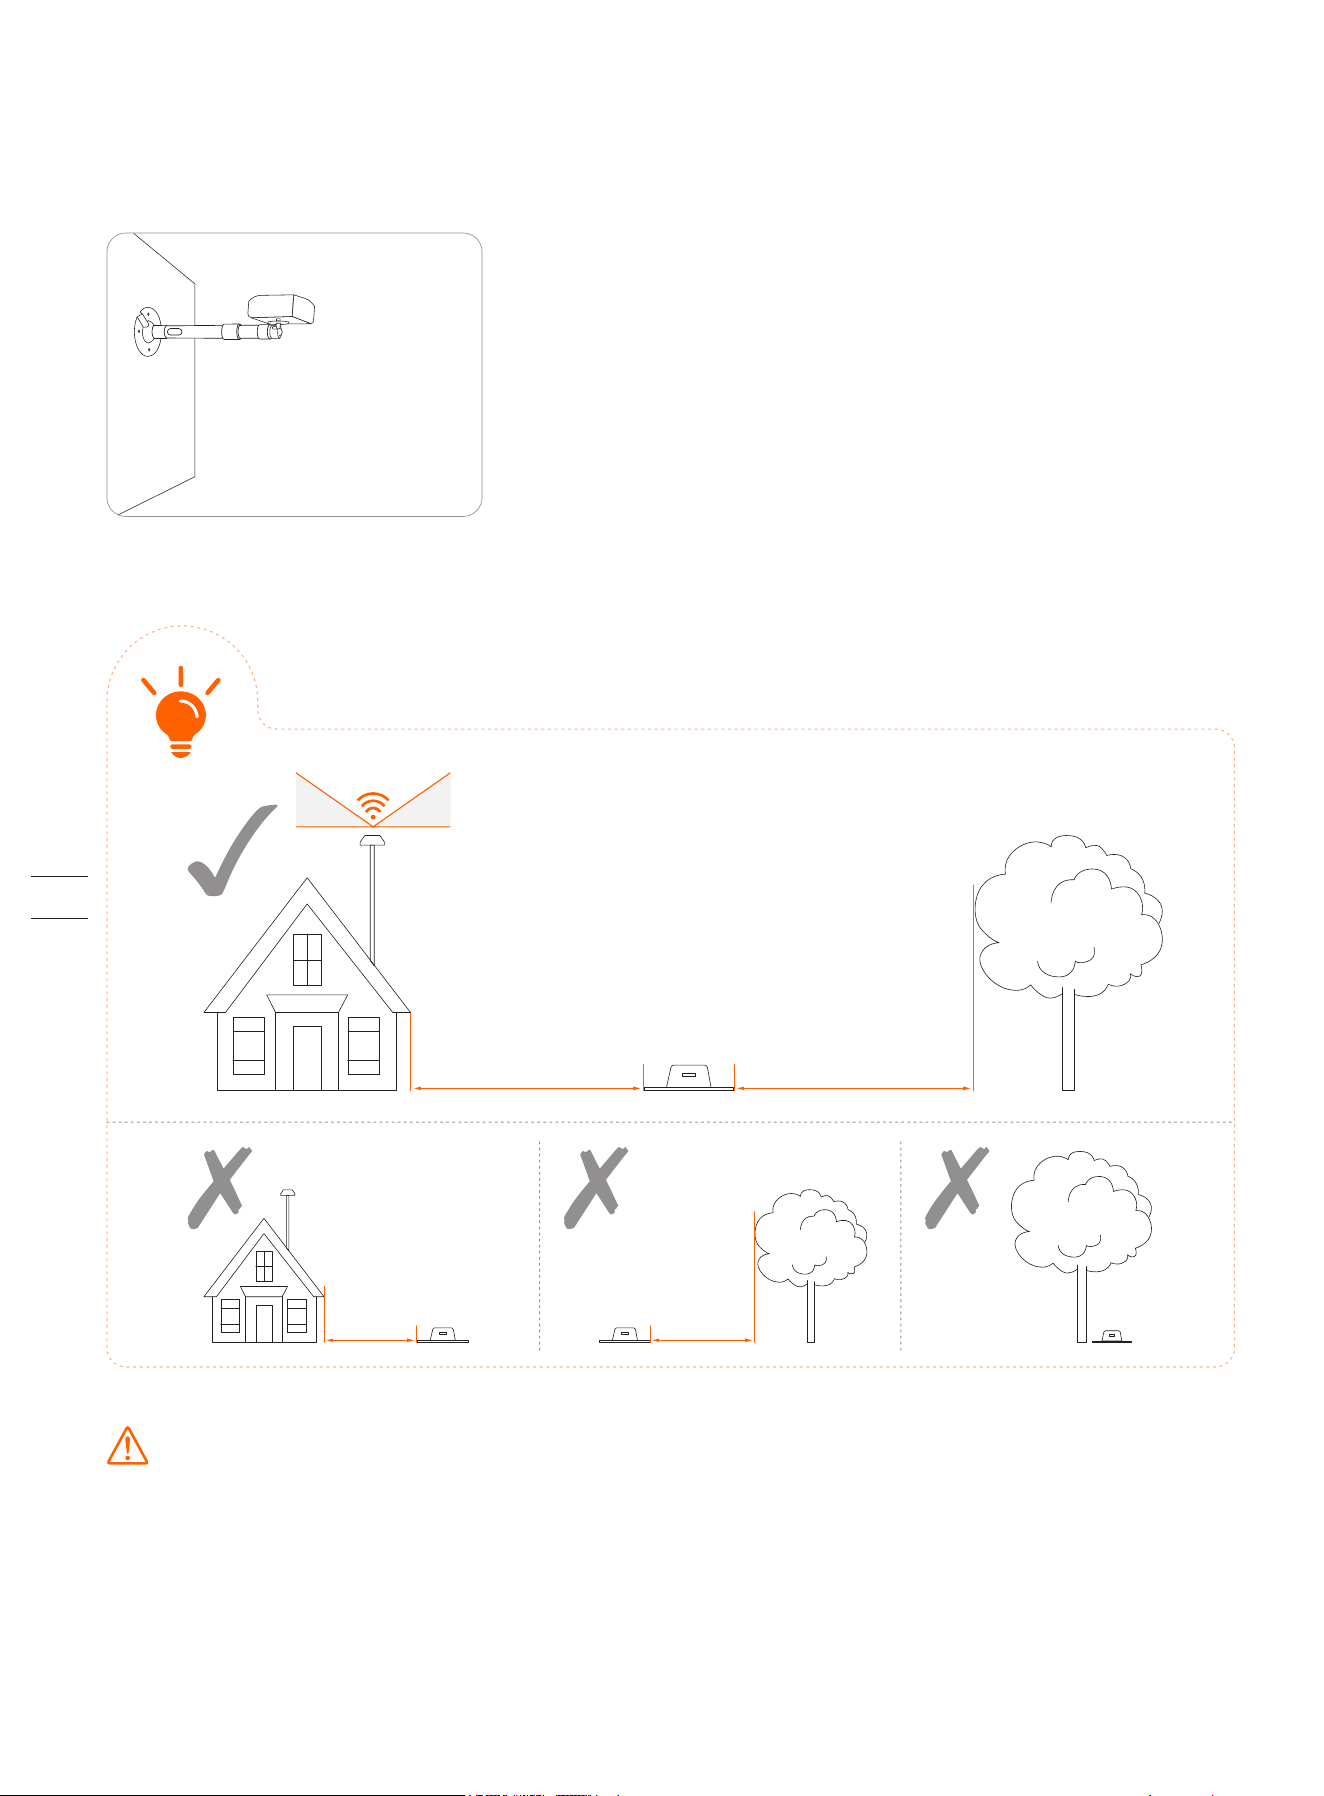
If you can't find a suitable location on the ground, consider using the Antenna Extension Kit (sold separately) to mount the
antenna on a roof or wall for a better satellite signal. See Antenna Extension Kit in 3.10 Accessories (optional) for more
information.
1. When installing the Antenna Extension Kit, please ensure that the antenna stays upward, and is not blocked by leaves,
chimneys and other facilities, so that the antenna has a clearance range greater than 110°.
2. When using the Extension Kit to install the antenna at a high place, it is also necessary to ensure that the charging station is
not too close to tall walls and trees on the ground.
≥ 2m ≥ 2m
<
2m
<
2m
WARNING! Roof top antennas of any sort should have lightening protection.
>110°
35° 35°
17
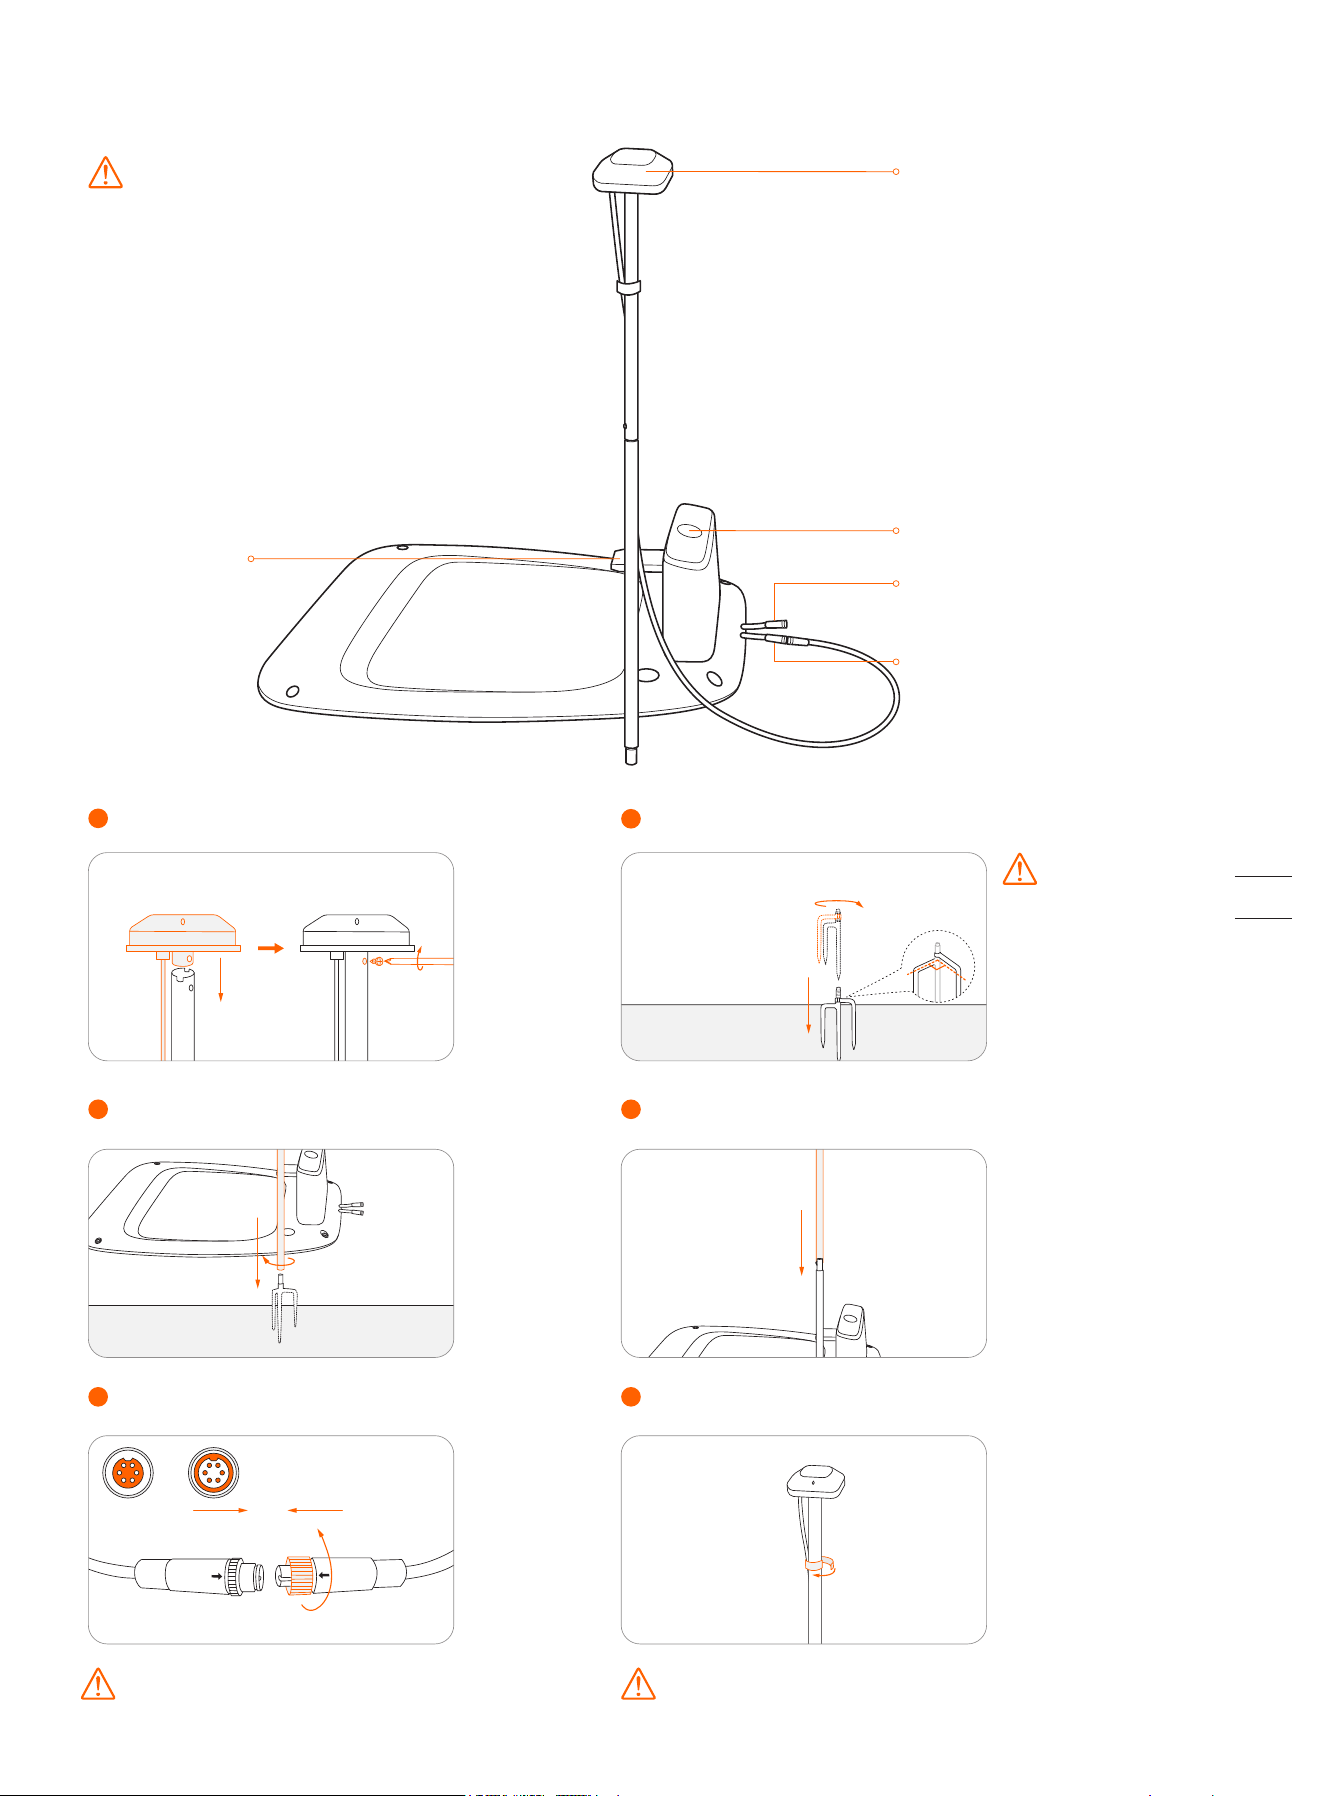
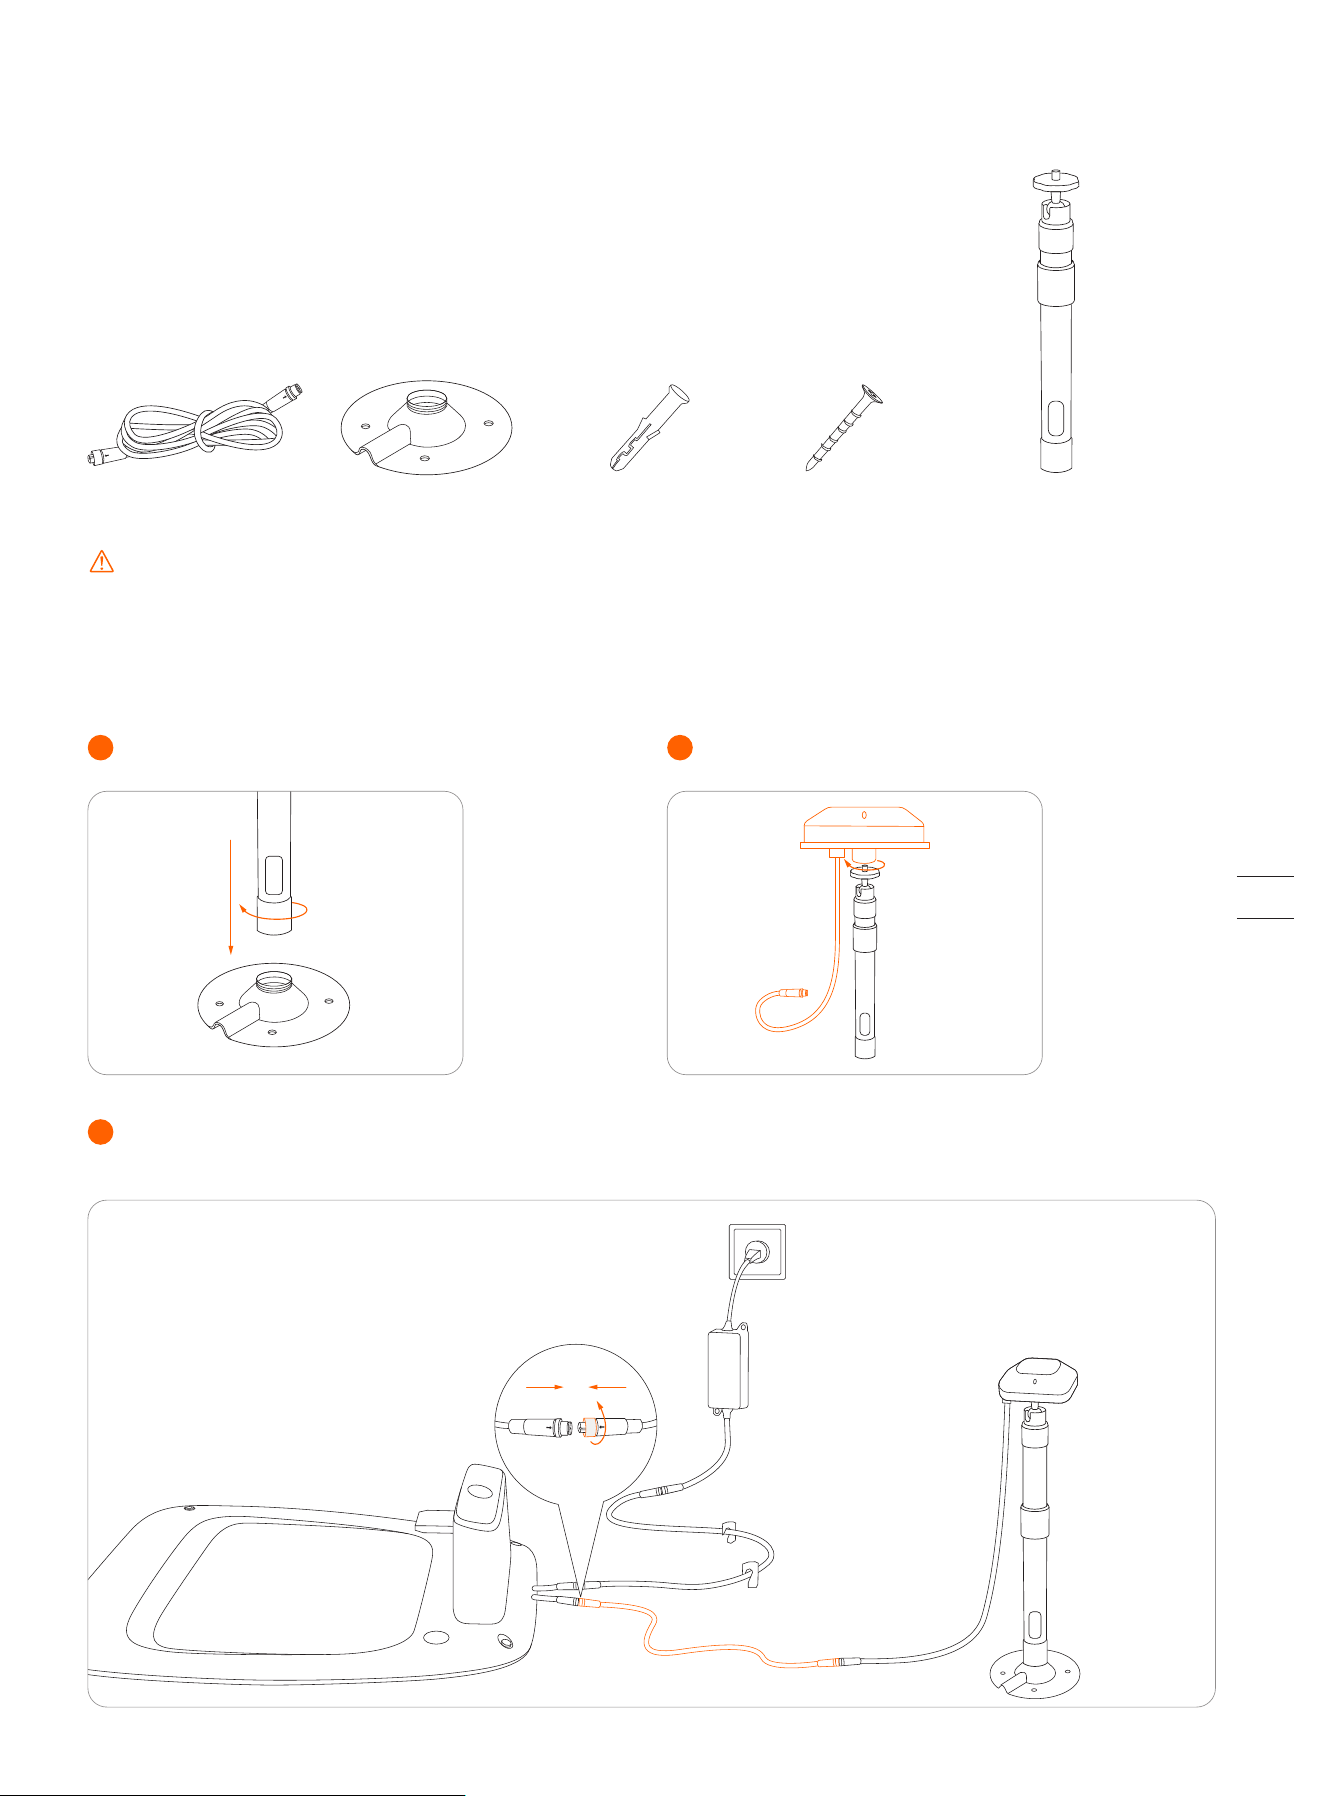
Step 2: Install the GNSS antenna
Connect the GNSS antenna to the charging station.
5
Secure the cable on the pole with the supplied hook and loop tape.
6
3
Slide in the tube with the antenna.
4
Fix the GNSS antenna on the tube.
1
2
Unfold the base fork and insert it into the ground.
A B
To make sure that the
antenna can be stably
connected to the charging
station once the
installation is completed,
please fully insert the base
fork into the groud.
Secure the nuts tightly to prevent water from
entering them.
Power interface
GNSS antenna
LED indicator
Contact strip
Antenna interface
90°
2
Rotate the other extension tube onto the base fork.
To ensure satellite signal, DO NOT put
anything on the antenna.
Caution: The illustrations in this user manual are for
your reference only. For the actual distance between
the antenna assembling metal tube and the charging
station, please keep it as long as possible. If the
distance is too small, the radio-frequency signal
generated by the charging station might interfere with
the satellite signal reception.
18
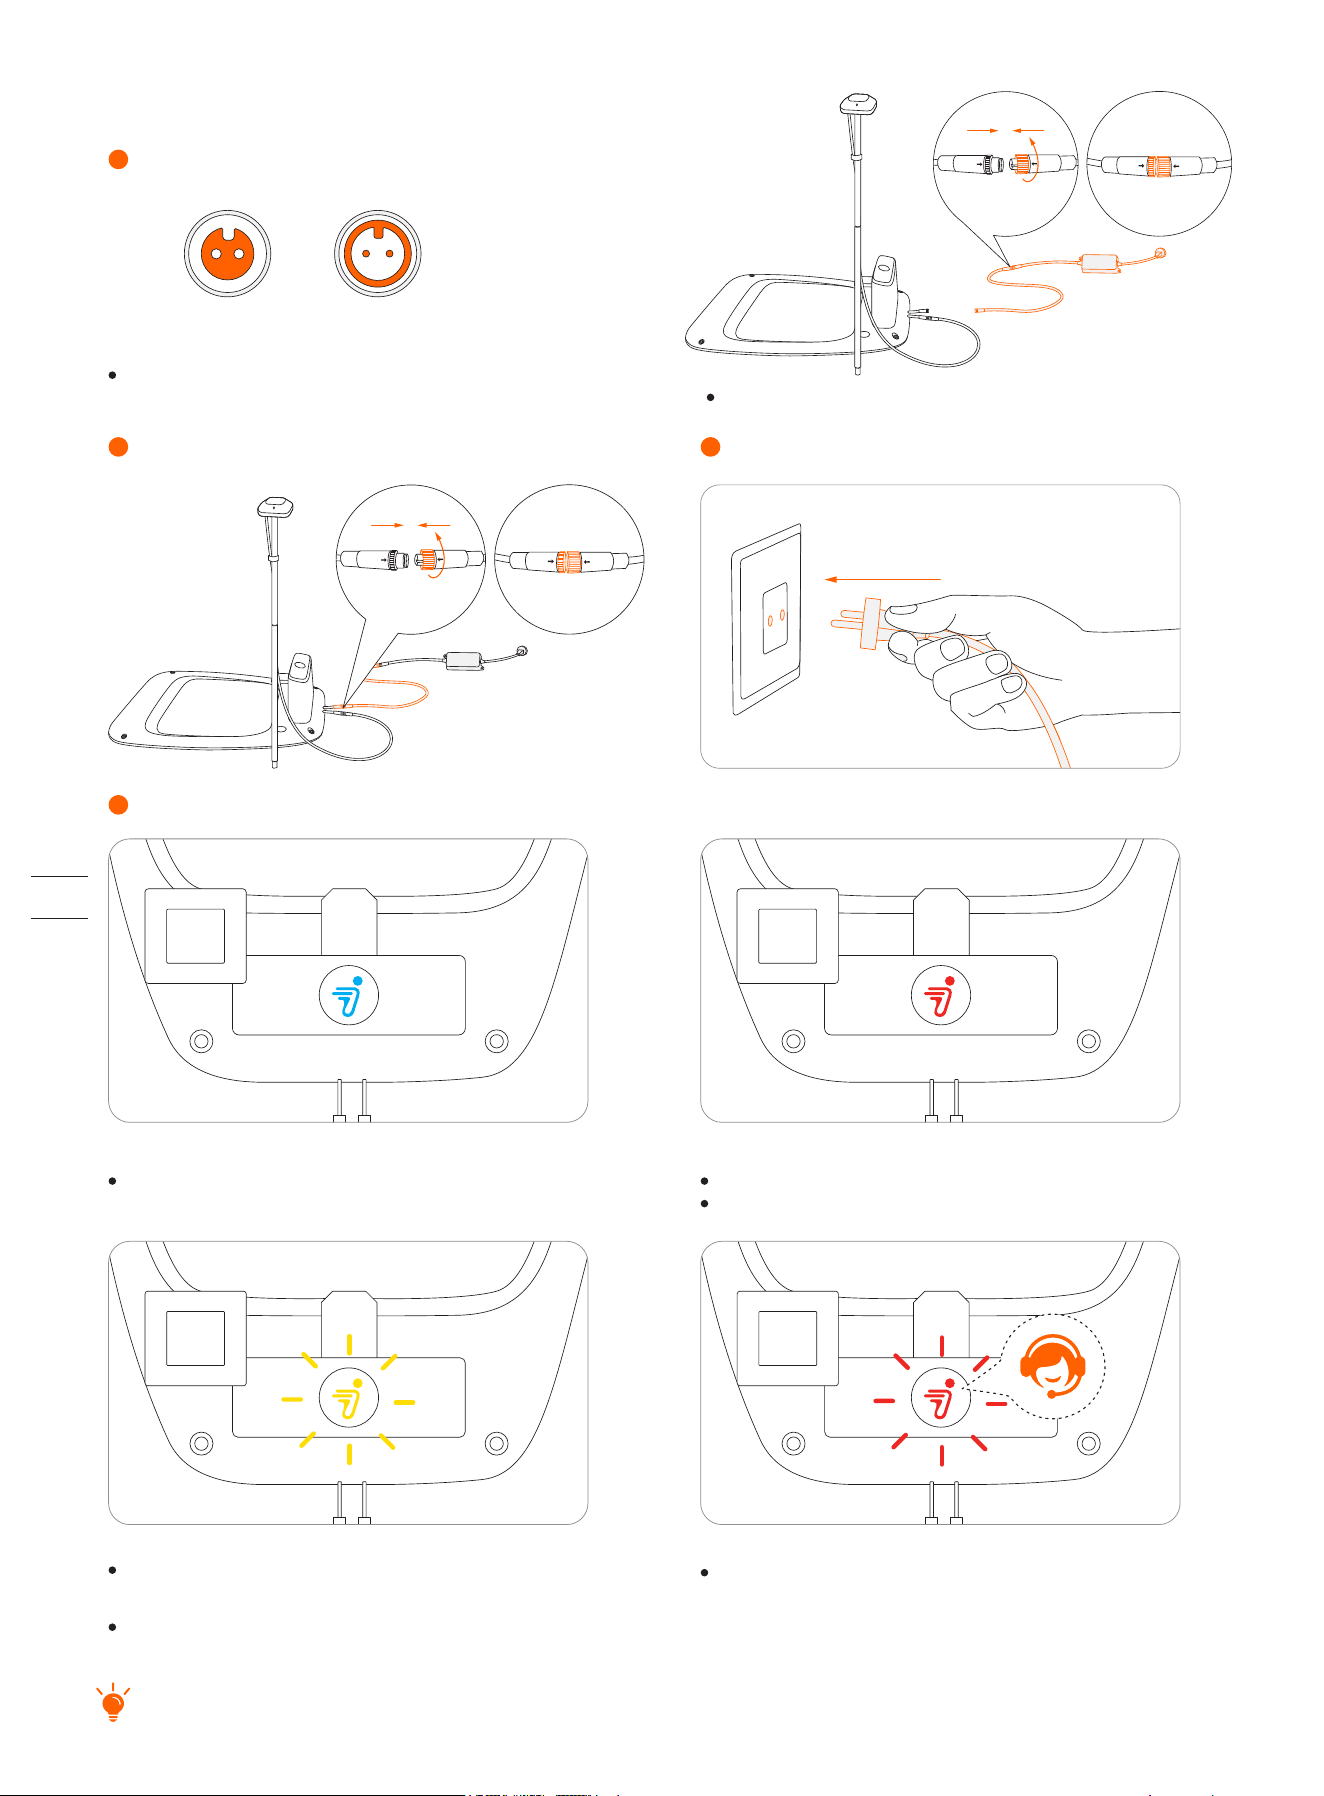
Check the signal.
4
Insert the power plug into a suitable power socket.
3
Connect the extension cable and the power interface.
2
If the signal is poor, relocate the GNSS antenna to an open space. Buy the antenna extension kit individually if you need to install it
on a wall or roof.
Flashing red:
Malfunction. Please contact after-sales service.
Solid blue:
Satellite signal is strong.
Solid red:
No connection between the charging station and the mower.
The mower might be powered off.
Align the notch on the extension cable (A)
with the groove on the power supply connector (B).
A B
Turn the nuts until they are locked into each other.
Step 3: Check the satellite signal
Connect the extension cable with the power supply.
1
Note: To avoid performance degradation, always keep the
connectors, accessories, connection part of the charging station
and antenna away from any dirt or mud. Never allow water to get
into the connectors or any parts and connection points.
Poor signal, please relocate the charging station to
an open space (see Step 1).
The GNSS antenna is not connected to the charging
station (see ⑤ in Step 2).
Flashing yellow:
19

2.3 Charge and Activate the Mower
How to charge
How to charge for the first time:
A new mower may have a low battery after long storage. Fully charge the mower before the first use.
Place the mower in the charging station. Make sure the charging strip on the mower and the contact strip on the charging station
are in good contact.
Charging: pulsating green Fully charged: solid green
20
30 cm (12 in)
WARNING
DO NOT charge if the mower, the power supply, the charging station, or the power socket is damaged.
DO NOT charge the mower when the temperature is above 45℃ (113°F), or below 5℃ (41°F). The battery has built-in
temperature protection and will not charge if the limit is exceeded.
When there is an abnormal smell, sound or light display, stop charging immediately and contact after-sales service.
Keep away from inflammable and explosive materials when charging.
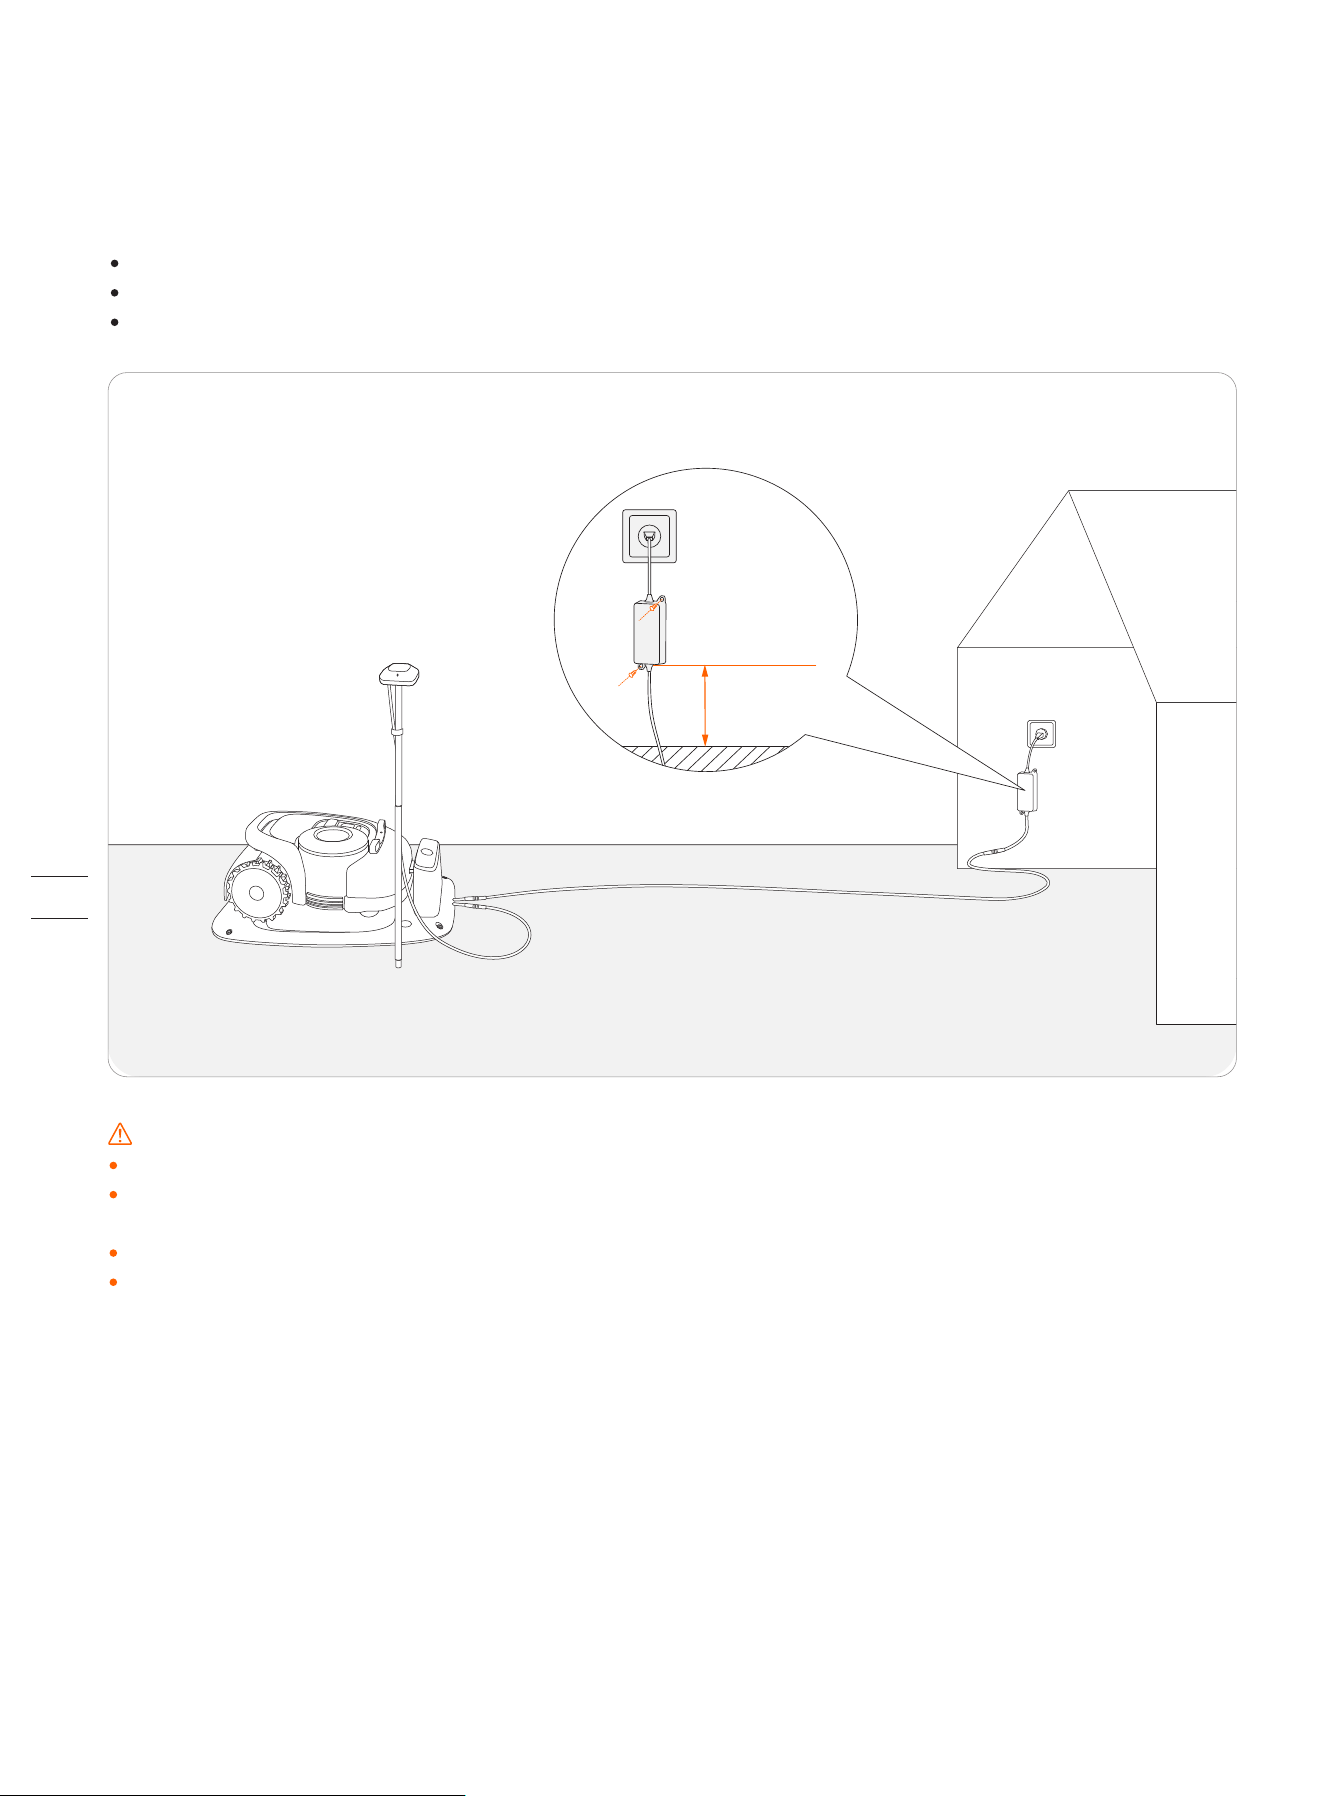
Where to place the power supply:
Protection from direct sunlight and rain
Indoors with good ventilation
Keep it at least 30 cm (12 in) above the floor to avoid possible damages caused by water.
Automatic charging:
After setting up the virtual boundary, the mower will return to the charging station automatically when the mowing task is
completed, or when the battery is low (<10%). During the mowing session, you can press the HOME and then OK button to
command the mower to go back to the charging station.
21
Note: Before updating the firmware ensure that
The mower is in the charging station.
The mower is connected to a network and the signal is strong (through 4G or Wi-Fi).
The battery power is more than 20%.
There is no mowing task scheduled in the next hour.
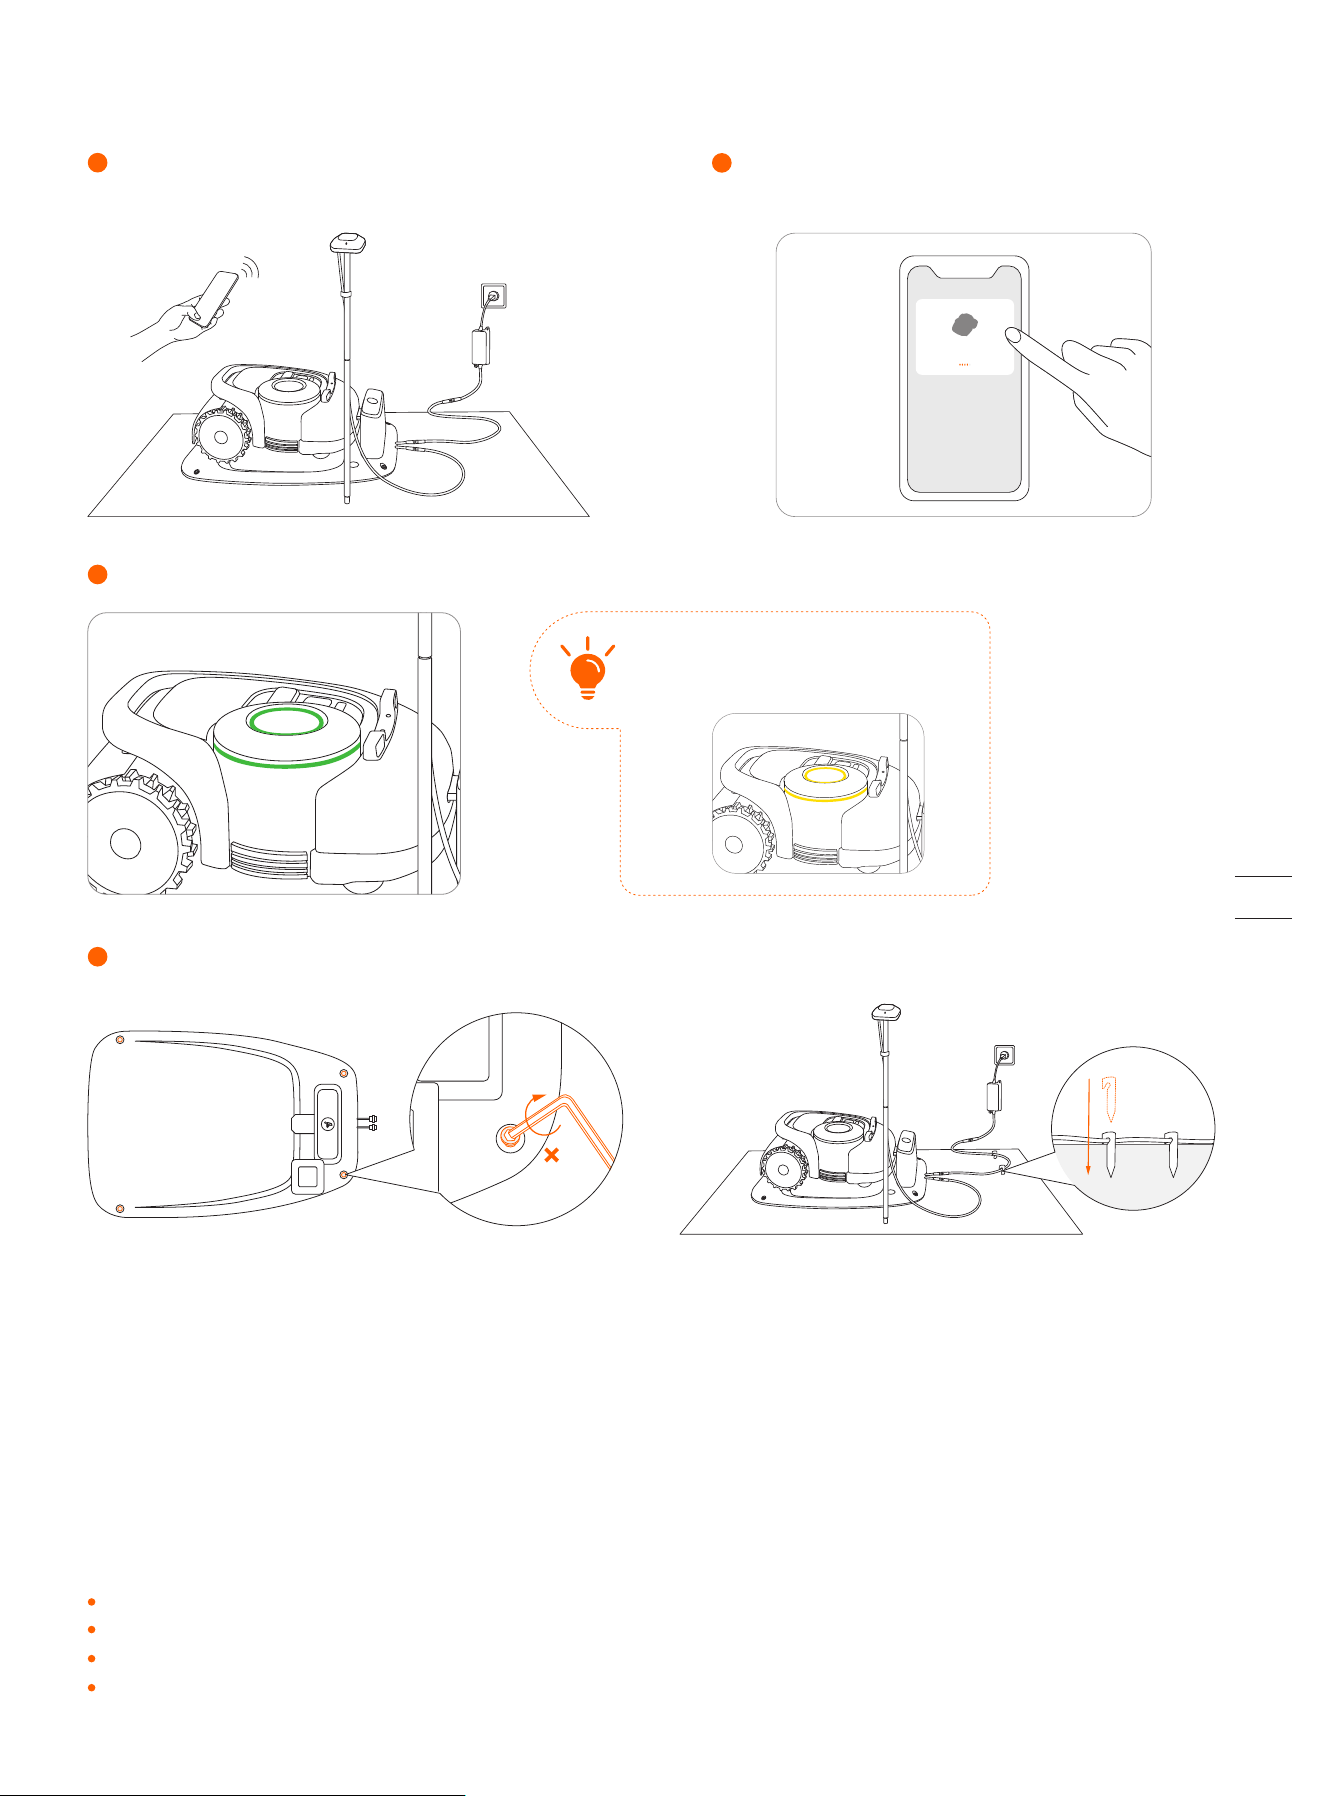
Activate the mower
Enable Bluetooth on your phone, log in to the app
and follow the instructions to pair with the mower.
2
Wait patiently for 3 min until the ambient light turns green (or blue).
3
Connect the charging station to the power supply. Make
sure the mower is in the charging station.
1
XXXXXXXXX
If the light flashes yellow for more than
3min, it means the satellite signal is weak.
Please return to Step 1 in chapter 2.2 .
4
Secure the charging station with the nails supplied and secure the extension cable.
4
Update the mower to the latest firmware
To fully experience Navimow, prior to use, please upgrade to the latest firmware.
How to update:
After activating the device, maintain the network connection state, follow the guidance in the pop-up window, and wait for 10-15 min
to automatically complete the device update. During this process, please do not power off or perform other operations. You can
start using it after the app prompts that the update is successful.
22
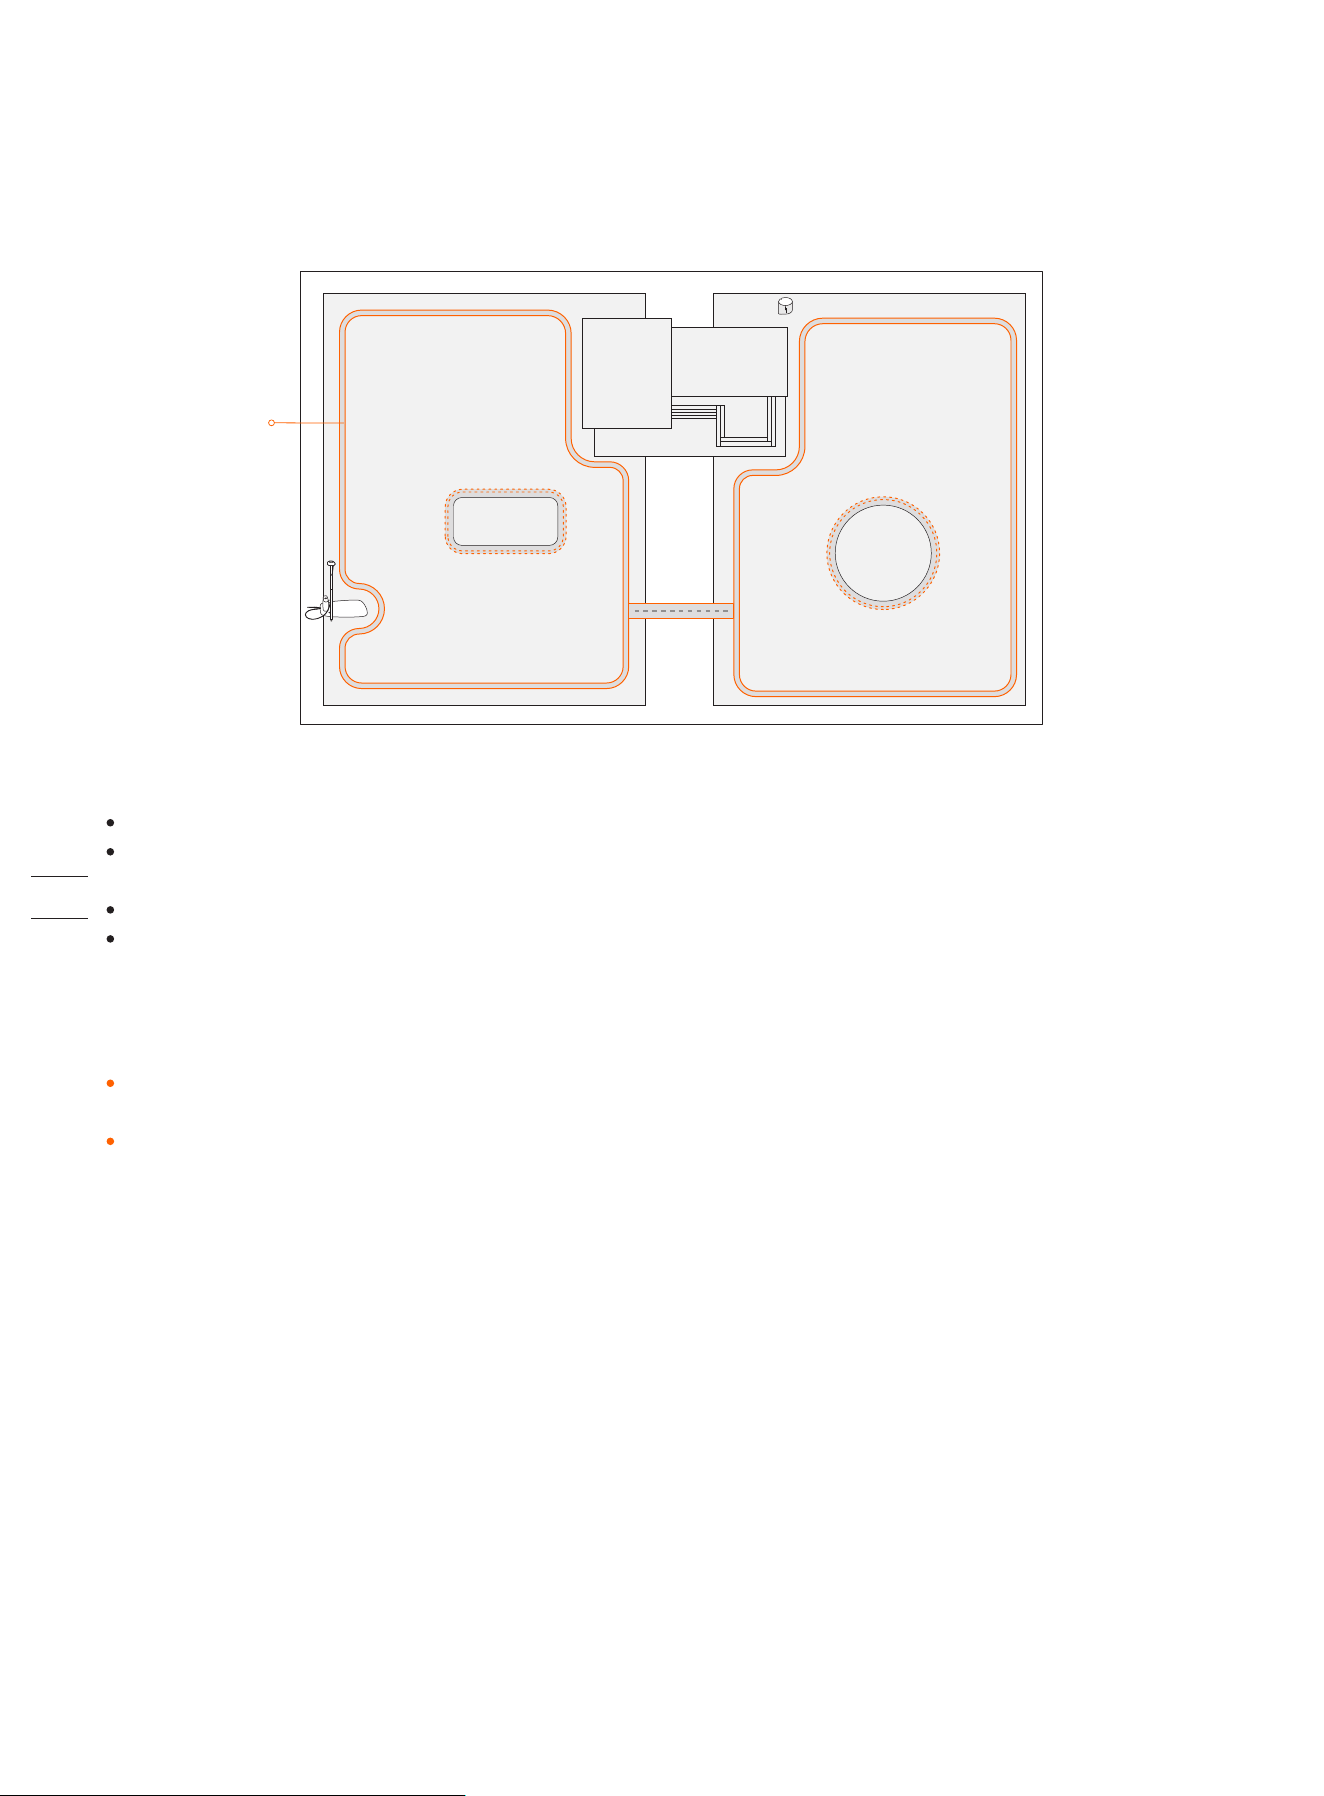
The work area consists of Boundary, Off-limit Island and Channel.
Boundaries delineate one single complete work area, Off-limit Islands delineate areas where the mower is prohibited, and Channels
are used to connect multiple work areas.
Inside the Channel, the mower will just pass through without cutting the grass.
The charging station and the GNSS antenna can be installed inside or outside the work area. If the charging station is outside the
work area, a channel towards the nearest boundary will be automatically set once the map is completed. The mower will return to
the charging station using this channel. This channel cannot be edited or deleted.
2.4 Set up the Work Area
Follow the instructions in the app and control the mower to create the work area (referred to as the map in the manual). The
mower will intelligently decide its moving pattern within the map.
NOTES:
If the location of the charging station or GNSS antenna is changed, the existing map CANNOT be used anymore and you MUST
create a new map.
Make sure your phone and mower are fully charged before mapping. Mapping will only start when the mower battery power
level is above 50%.
Boundary
Off-limit lsland
Channel
23
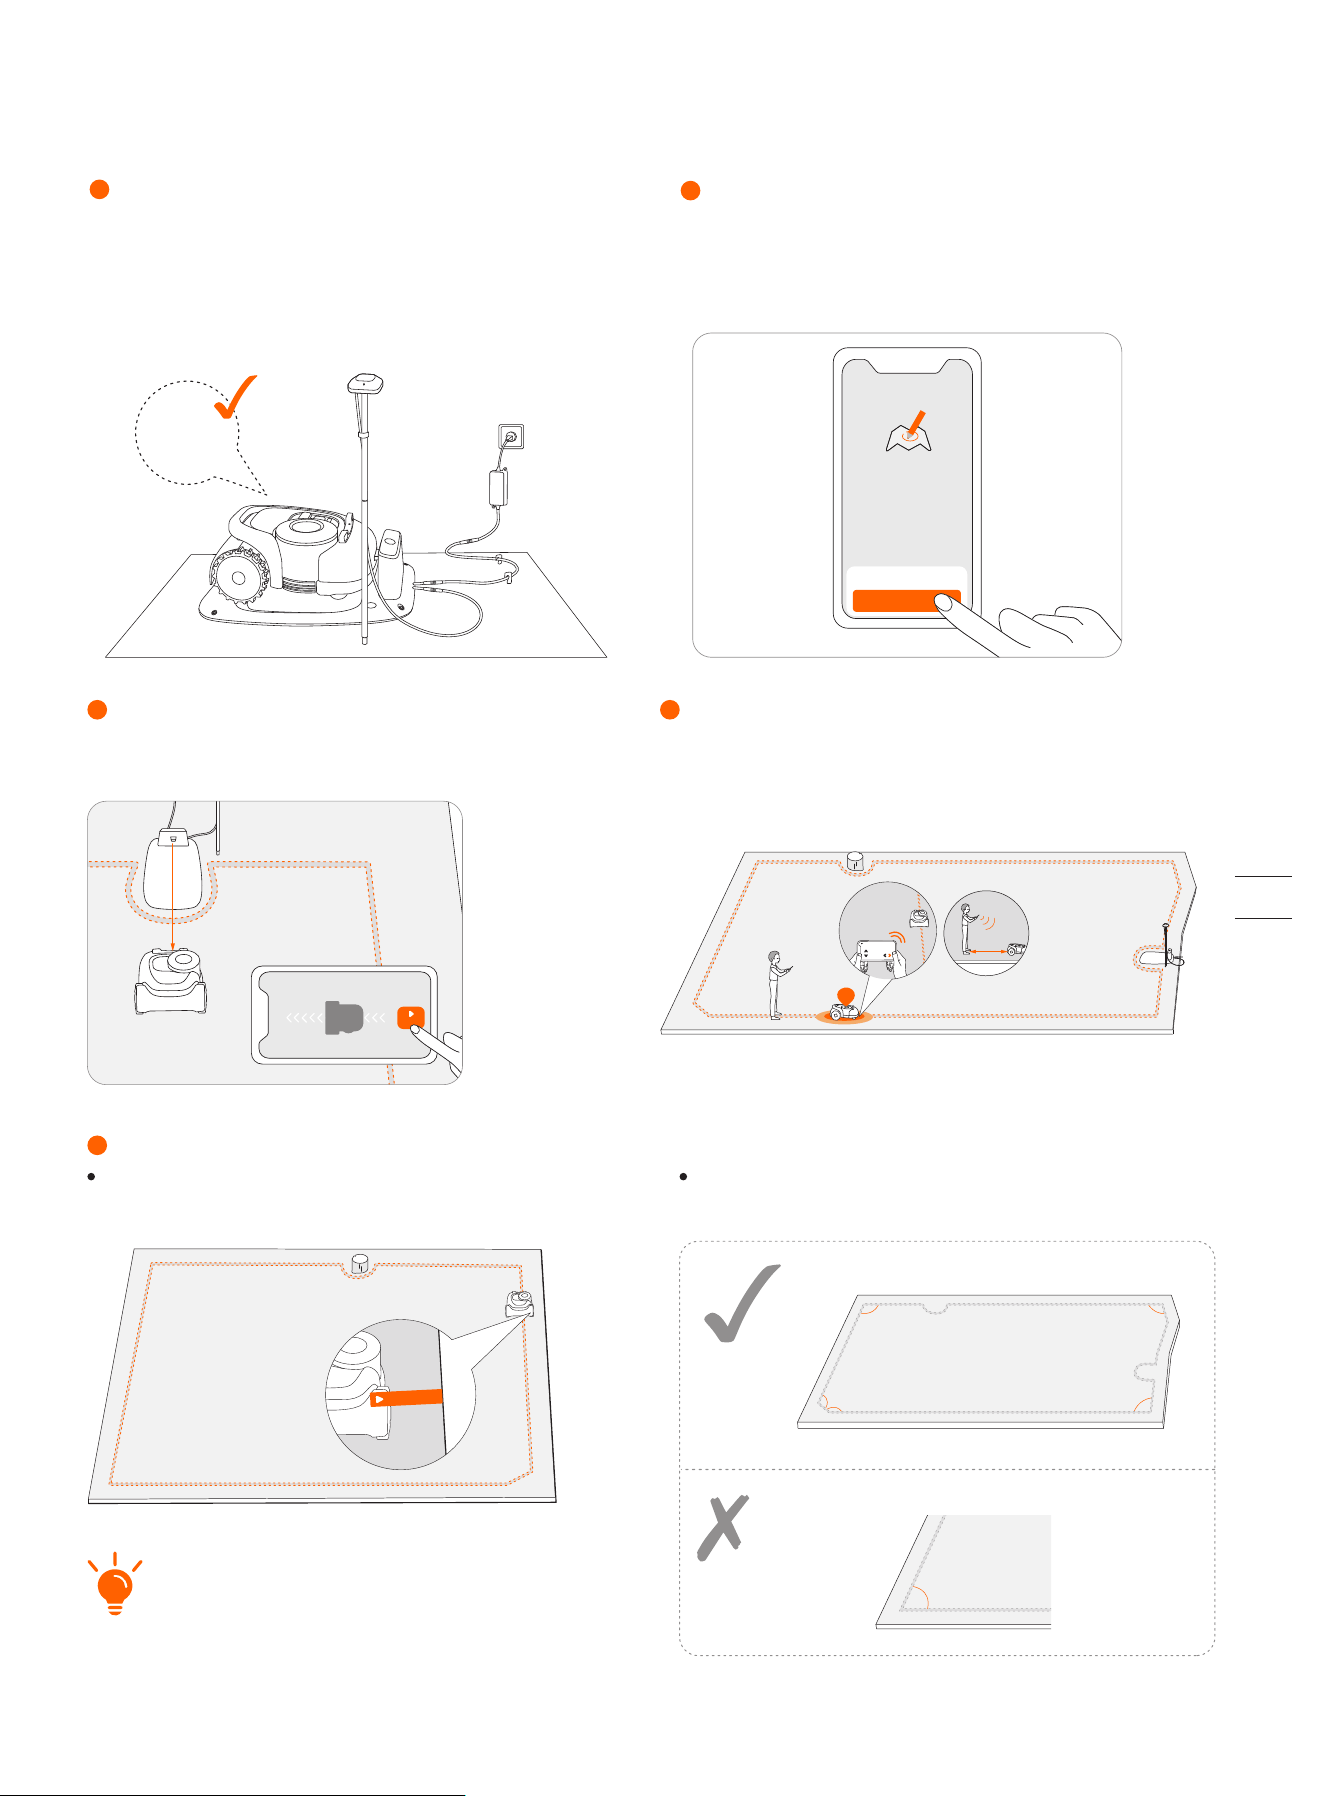
Step 1: Map out the boundary
3
2
1
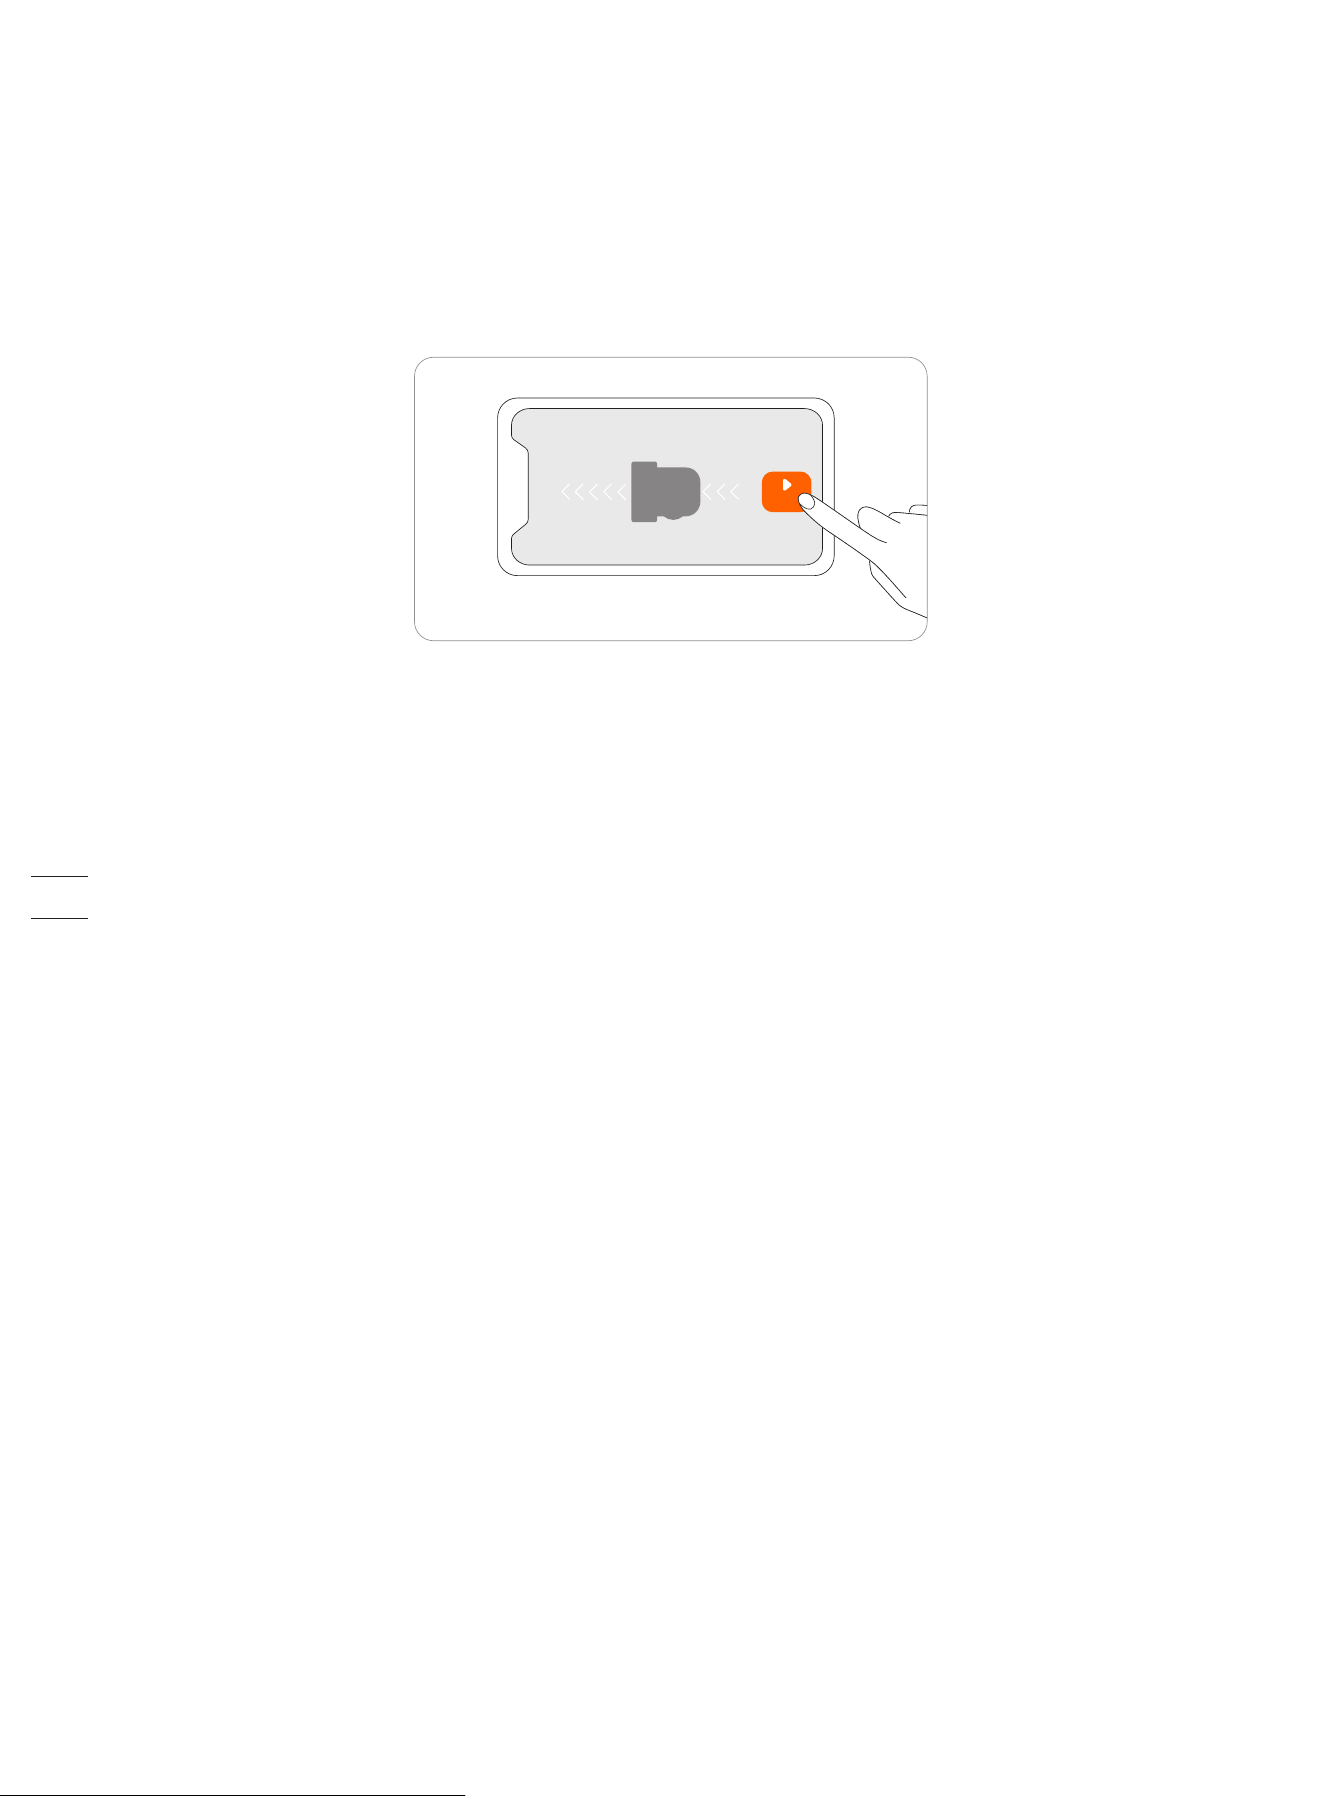
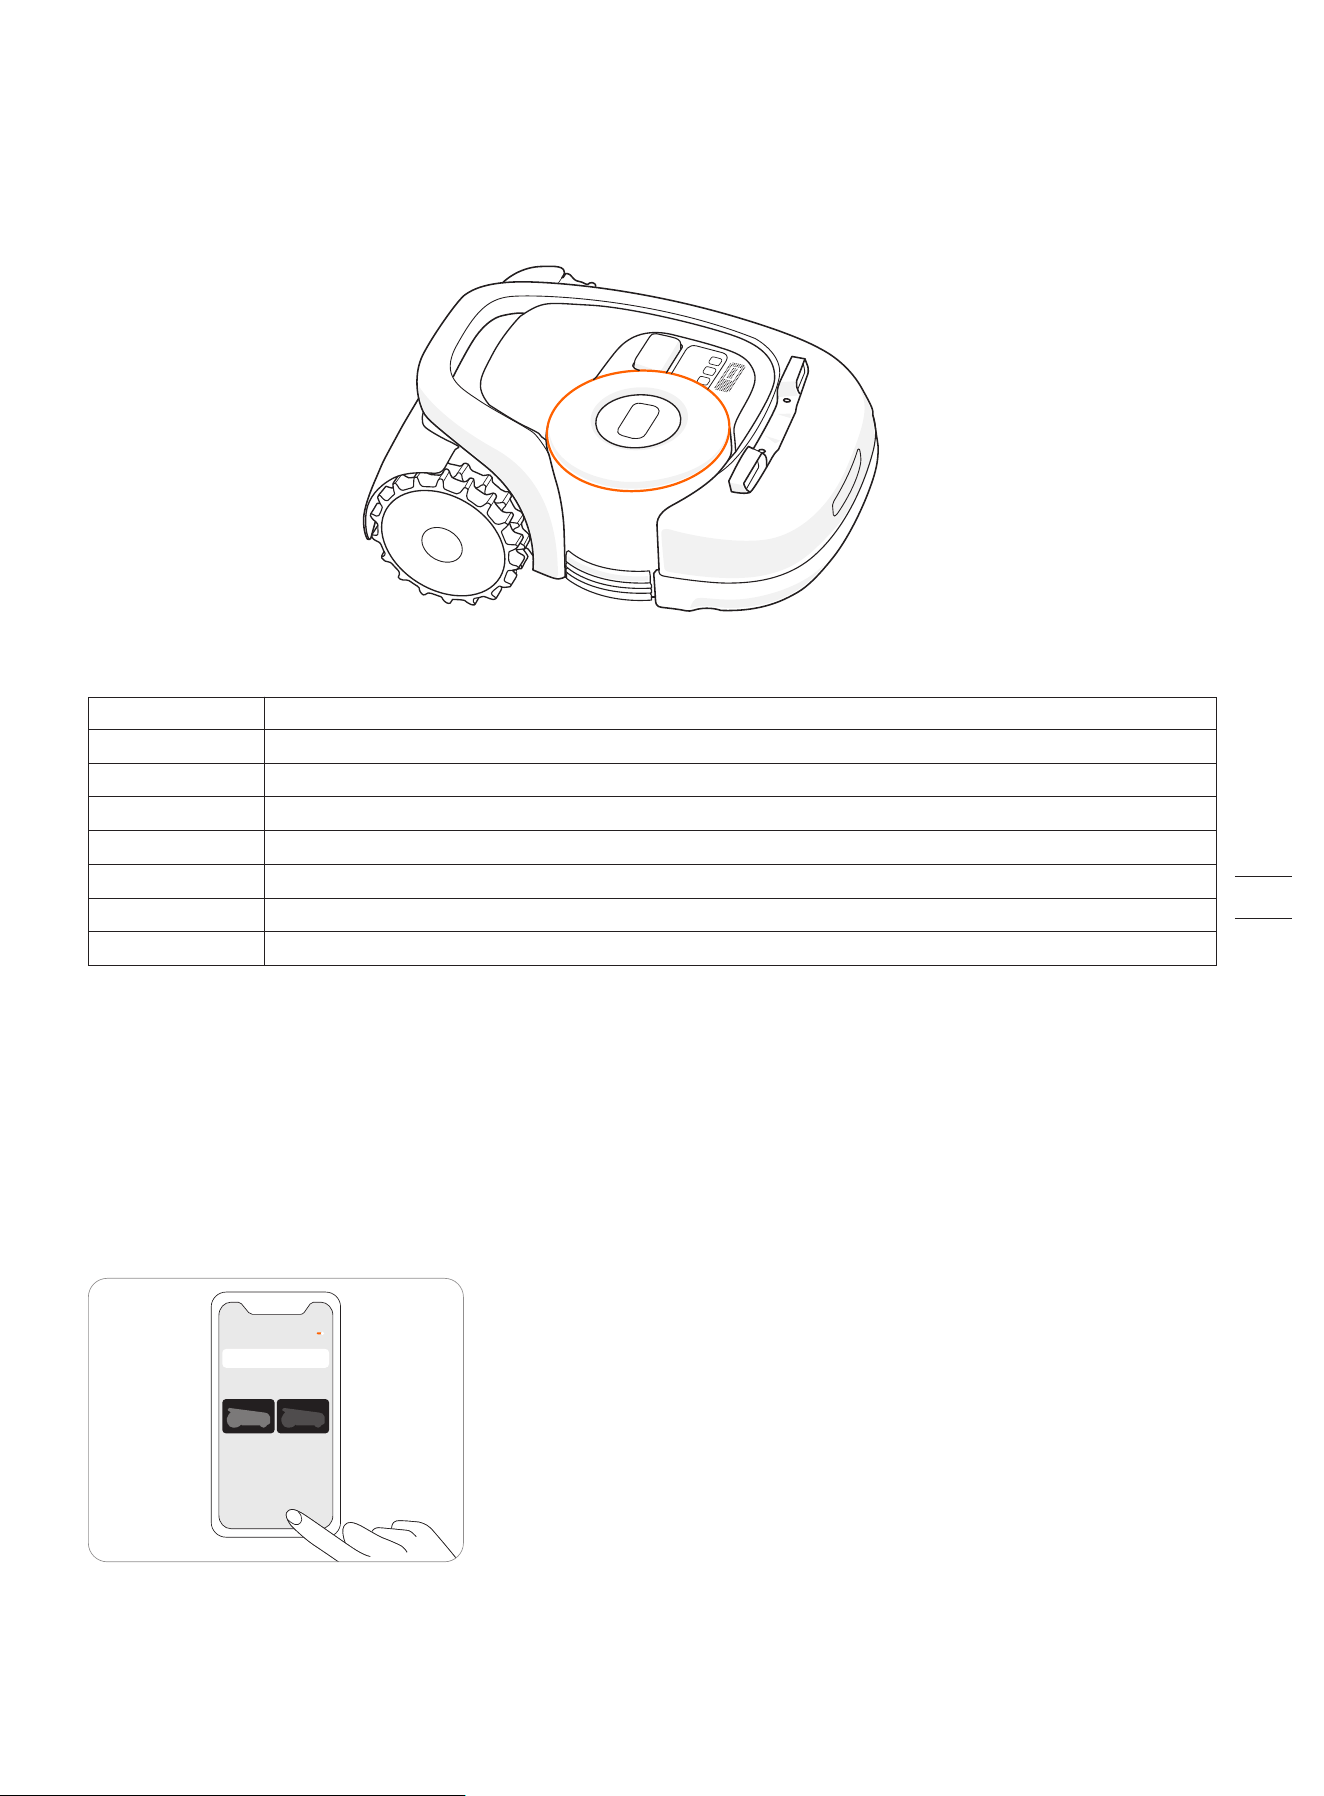
Tap “Create a map” to start mapping.
Make sure the mower is powered on. With Bluetooth
connection, your phone will connect to the mower
automatically.
ON
Note: If the mower is in lock status, you must enter the
PIN code before operating the mower. The default code
is 0000 and can be reset via the Navimow app. See 3.1
Display and Control on the Mower.
4
≤ 6m
START
Use the Navimow ruler to measure the distance. The
outer side ruler end should not exceed the edge of
the lawn.
Angle: Make sure to follow a straight line with a smooth
turning angle of no smaller than 90°.
Distance from the edge: always keep 15 cm.
Walk along the edge.5
<90°
>90°
>90°
>90°
>90°
>90°
15cm
Find a proper starting point along the edge of your lawn
(15 cm between the mower's right side and the edge).
Keep within 6 m from the mower during the mapping
process.
Calibrate the mower to ensure accurate positioning.
Calibrate
+
+
Create a map
x x x x
24
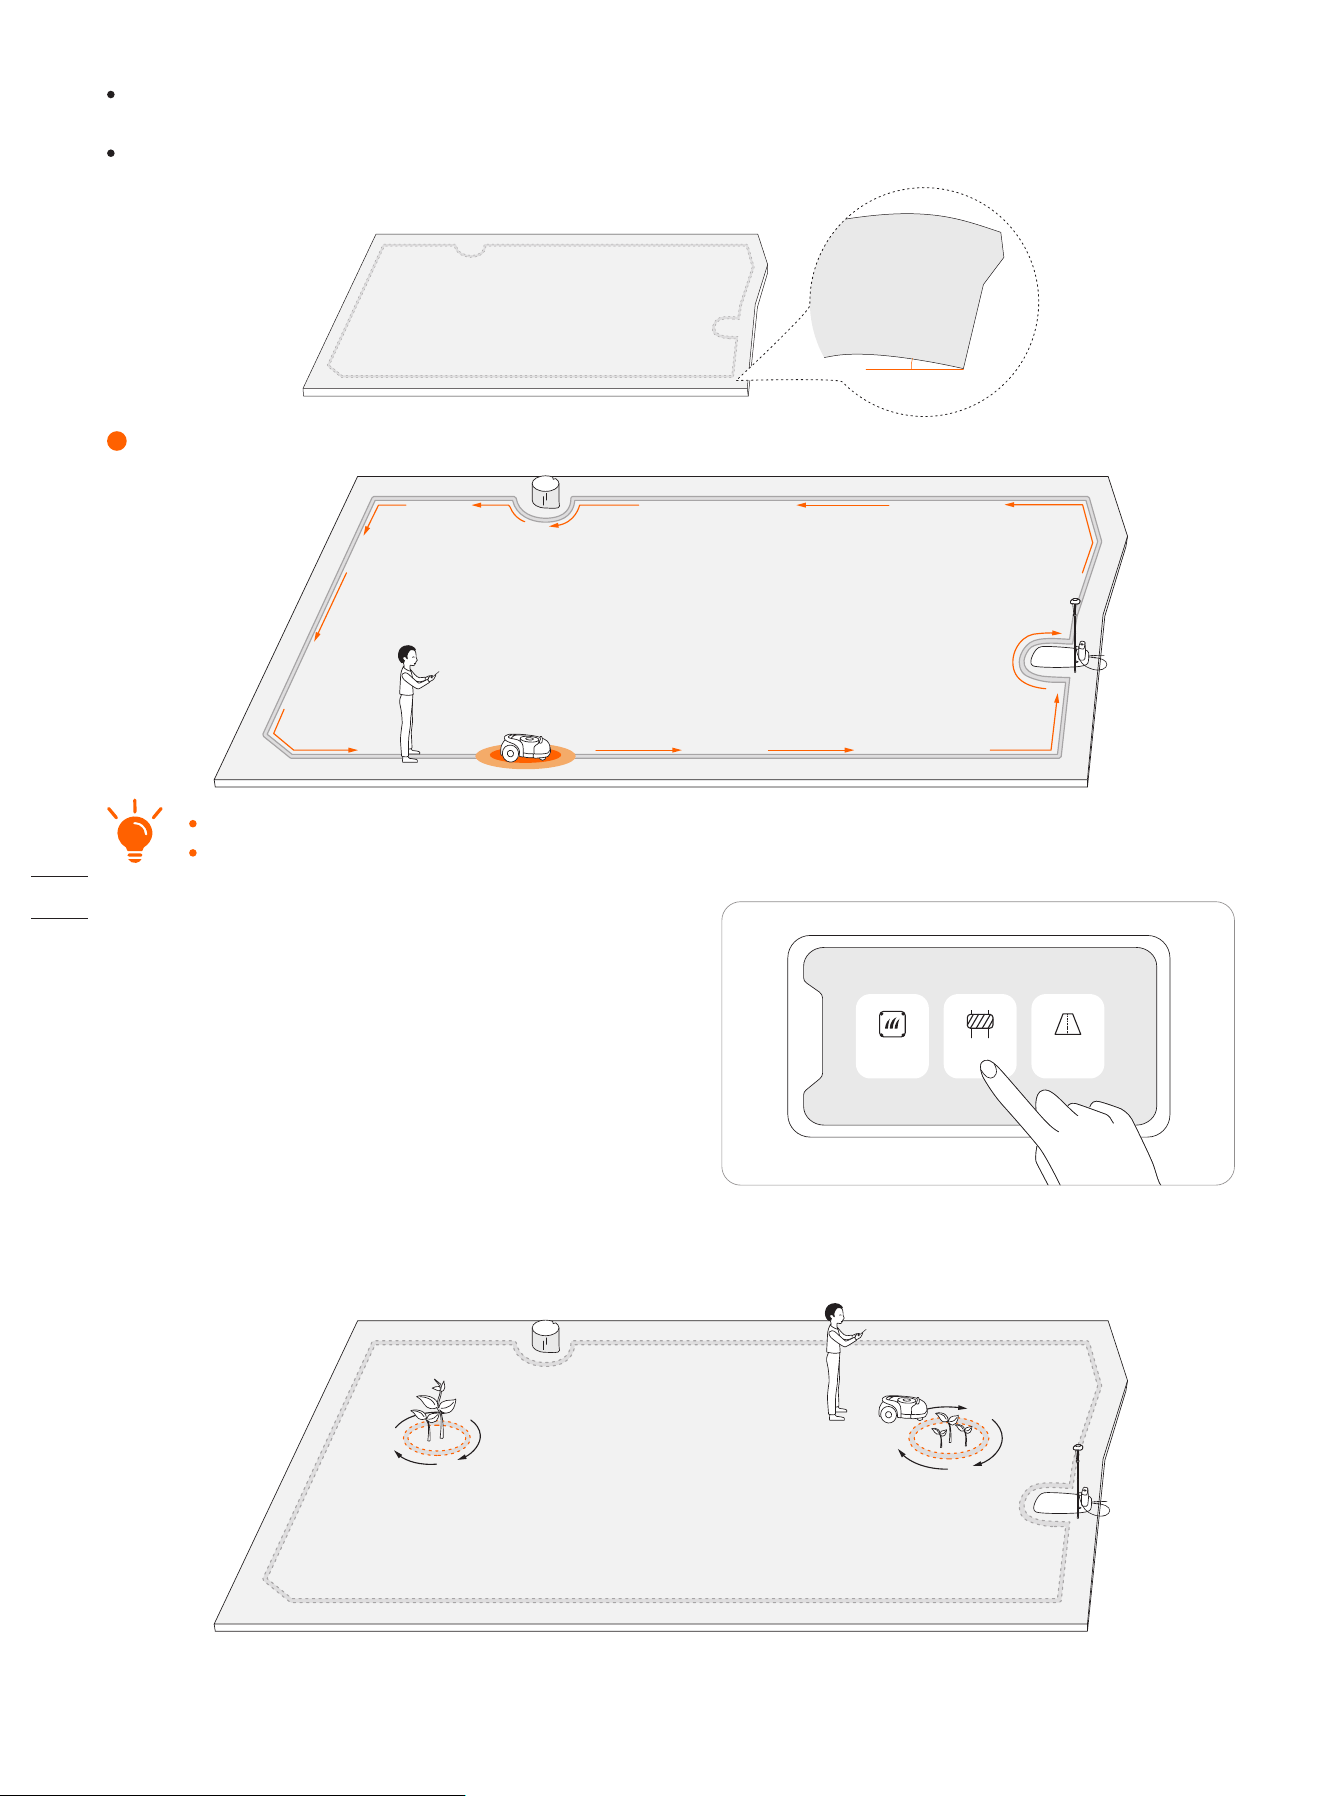
Step 2: Set up off-limit island
Go back to the starting point to finish the boundary mapping.6
Direction: Make sure the mower's right side (when moving forward) faces the boundary, so that the mower can cut as close to the
boundary as possible.
Slope: Even though the mower can traverse slopes up to 45% within the lawn, make sure the slope along the edge does not exceed
10%.
<10%
If there is a sudden interruption and failure, follow the instructions in the app to continue or restart.
If you have multiple separate lawns, please repeat this step.
How: Follow the instructions in the app. When you need to cancel the area (like when you remove the trampoline from the lawn),
just delete it via the app. See How to edit the map in 3.6 Settings (Mower).
When the mower hits a hard obstacle taller than 10 cm (such as big
rocks or a tree trunk), it will reverse and change the direction
automatically. However, you need to lay borders for objects that
need protection or areas you don't want the mower to enter, e.g., a
flowerbed, small trees, lawn decorations, pond, sprinkler heads,
emerged roots, etc. If you recently installed a trampoline or grill on
the lawn, you can also set an off-limit island to protect it.
Boundary
Off-limit island
Channel
NOTE: Make smooth turning angles when setting the islands. The angles should not be smaller than 90°. Make sure the
mower's right side faces the islands. You also need to walk along the edge when setting the island. Refer to part 5 of Step 1.
25
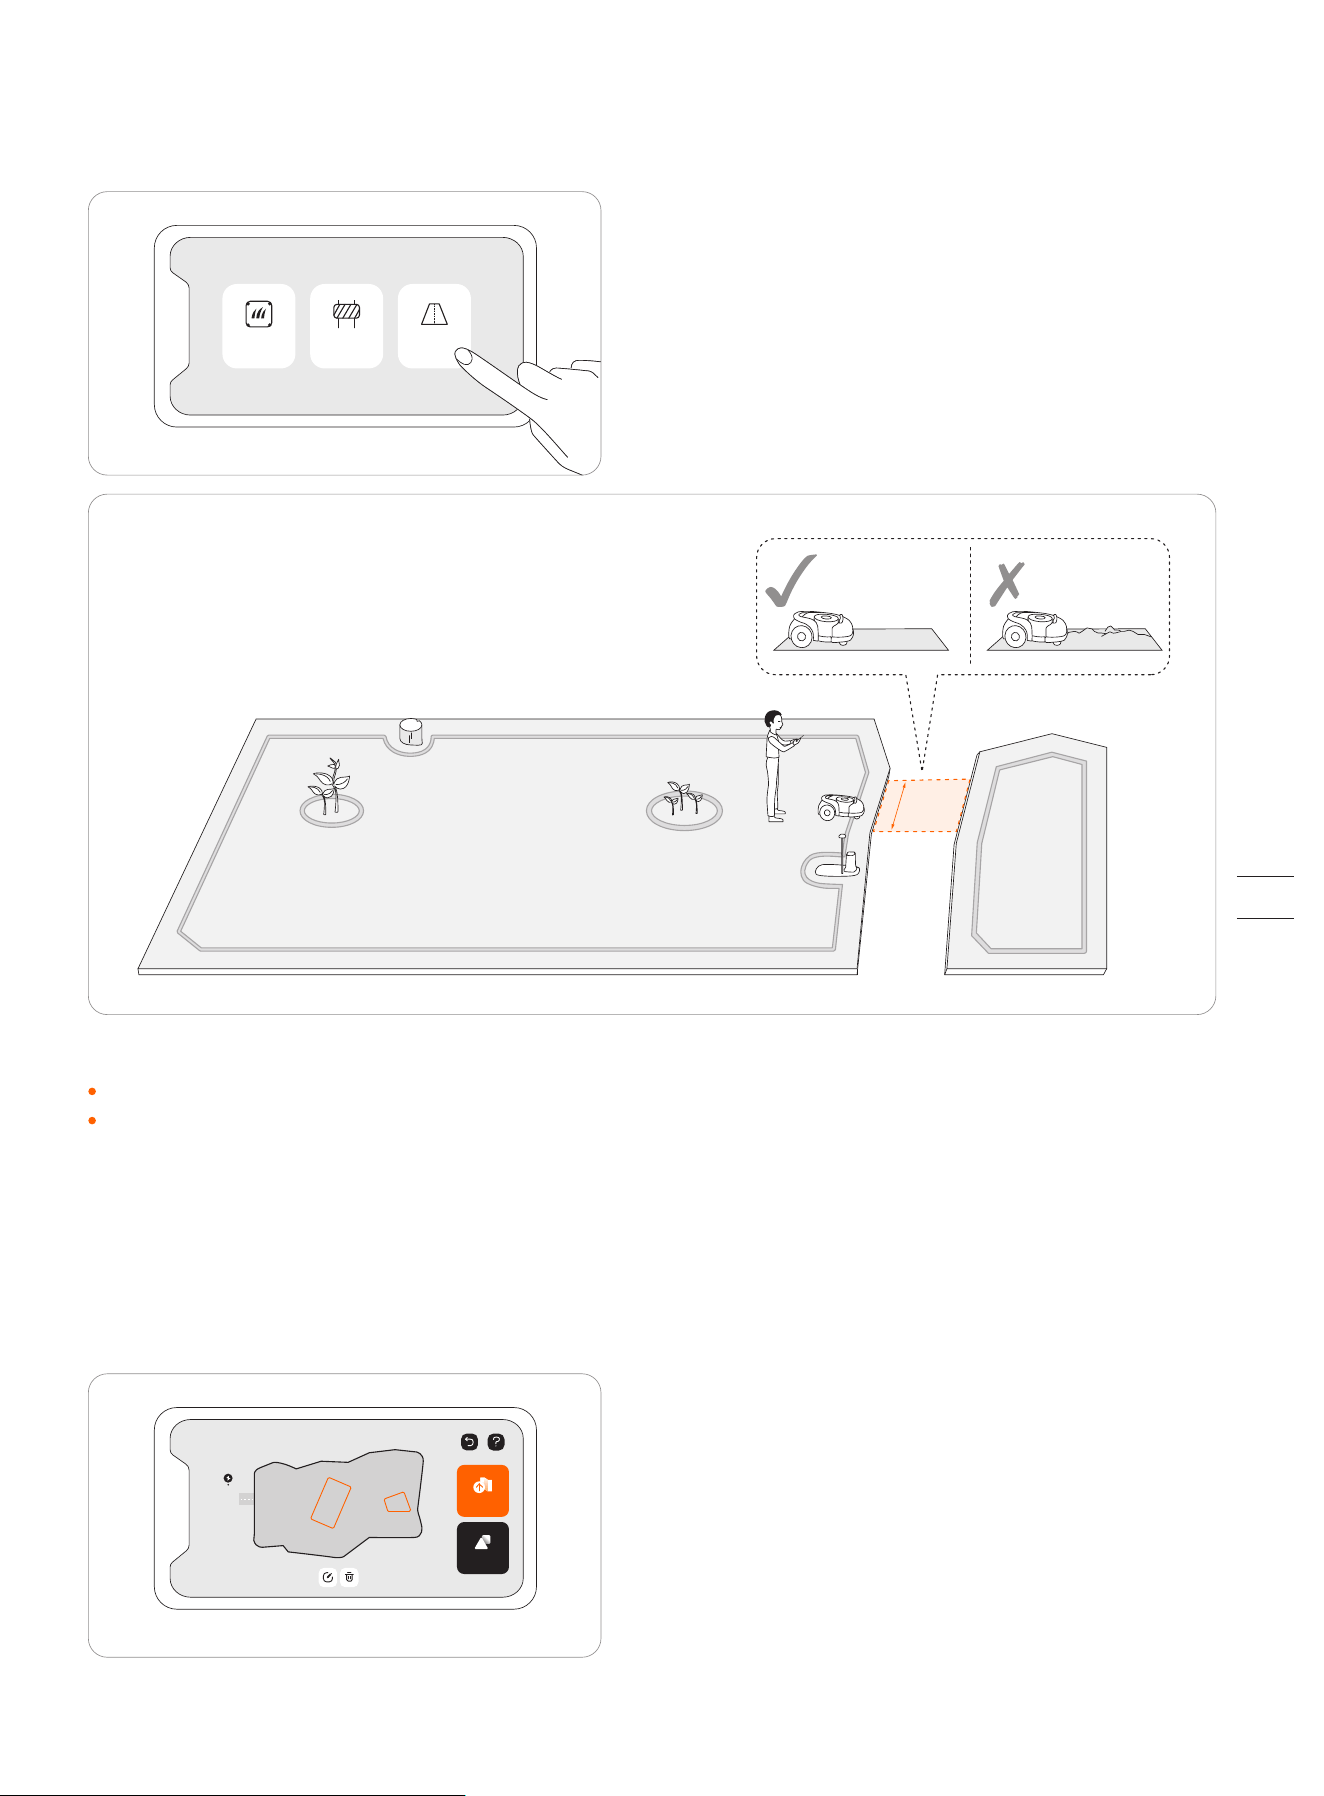
Step 3: Create a channel to connect separate areas
Following the instructions in the app, create a channel between separate boundaries.
>
1m
Boundary
Off-limit island
Channel
NOTE: When creating a channel:
Do not choose ground that is bumpy, muddy, or wet.
The width of the channel needs to be greater than 1 m. In order to ensure smooth passage, when establishing the channel,
please drive along the centerline of the passable area. Being too close to the edge may scratch the mower during work.
Step 4: Adjust the map
You can always adjust parts of the map in the Navimow app instead of re-creating it. Just go to Settings>MOWER>Map management>Edit,
tap a boundary or off-limit island, and then tap the edit icon.
Save Map
Add More
A
26
If the mower goes beyond the boundary, make sure the satellite signal is strong at the problematic spot. The mower and the
GNSS antenna need to see satellites to have accurate positioning. You can try to relocate the charging station, set the map again,
and then test one more time. Get help from professional technicians when necessary. Contact your nearest dealer to solve
problems. You can also send an email to our after-sales service. Email: [email protected]
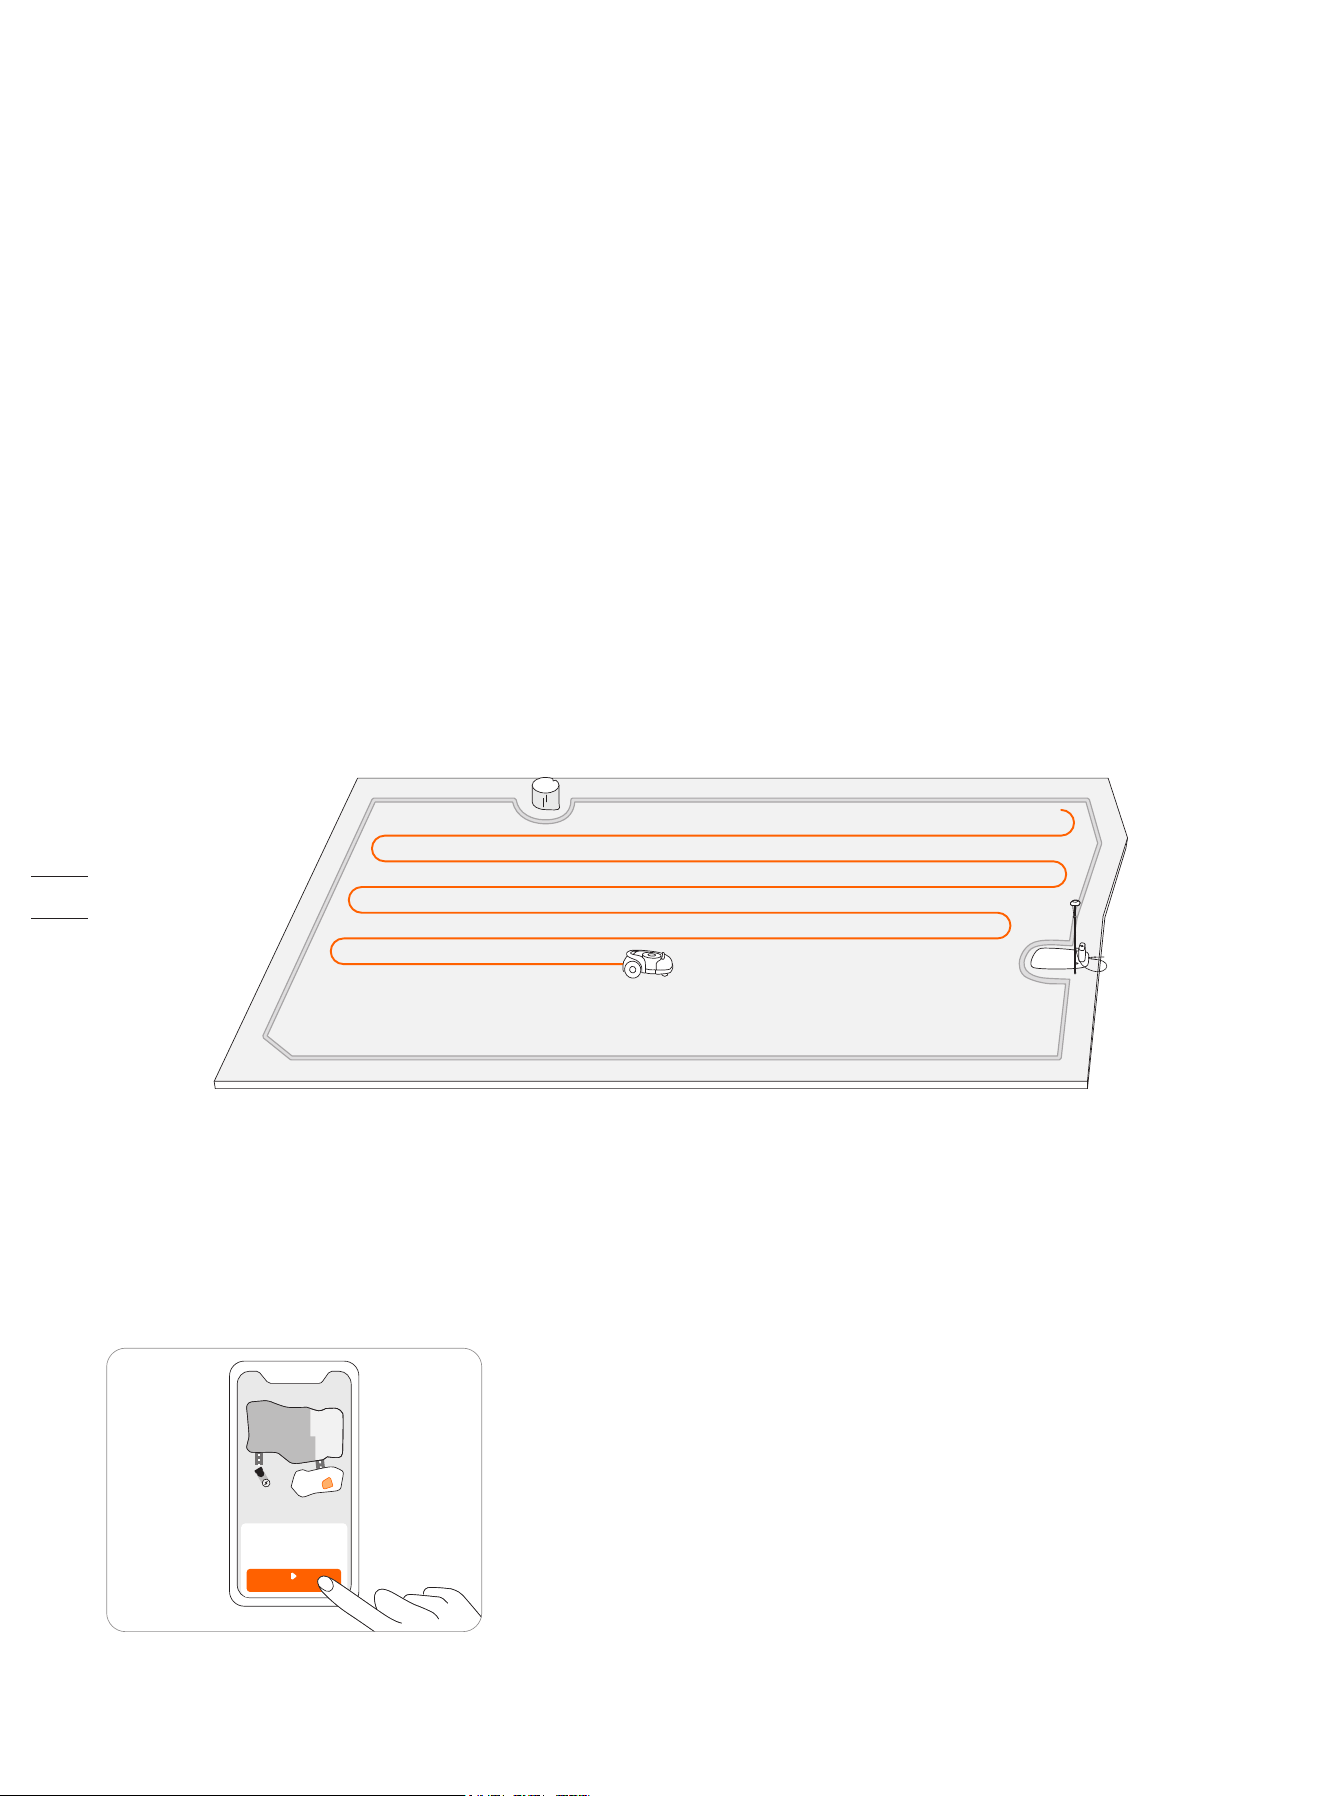
2.5 Test Drive
After saving the map, tap 'TEST' in the app to see if the mower works within the map. The mower will navigate along the
boundary, off-limit island, and channel to test the map. After completing the test, the mower should be able to drive into
the charging station and exit on its own. During the test, you need to observe whether the walking path is consistent with
the mapping.
If you are adjusting the map or have a VisionFence Sensor installed, This test drive can be skipped.
TEST
27
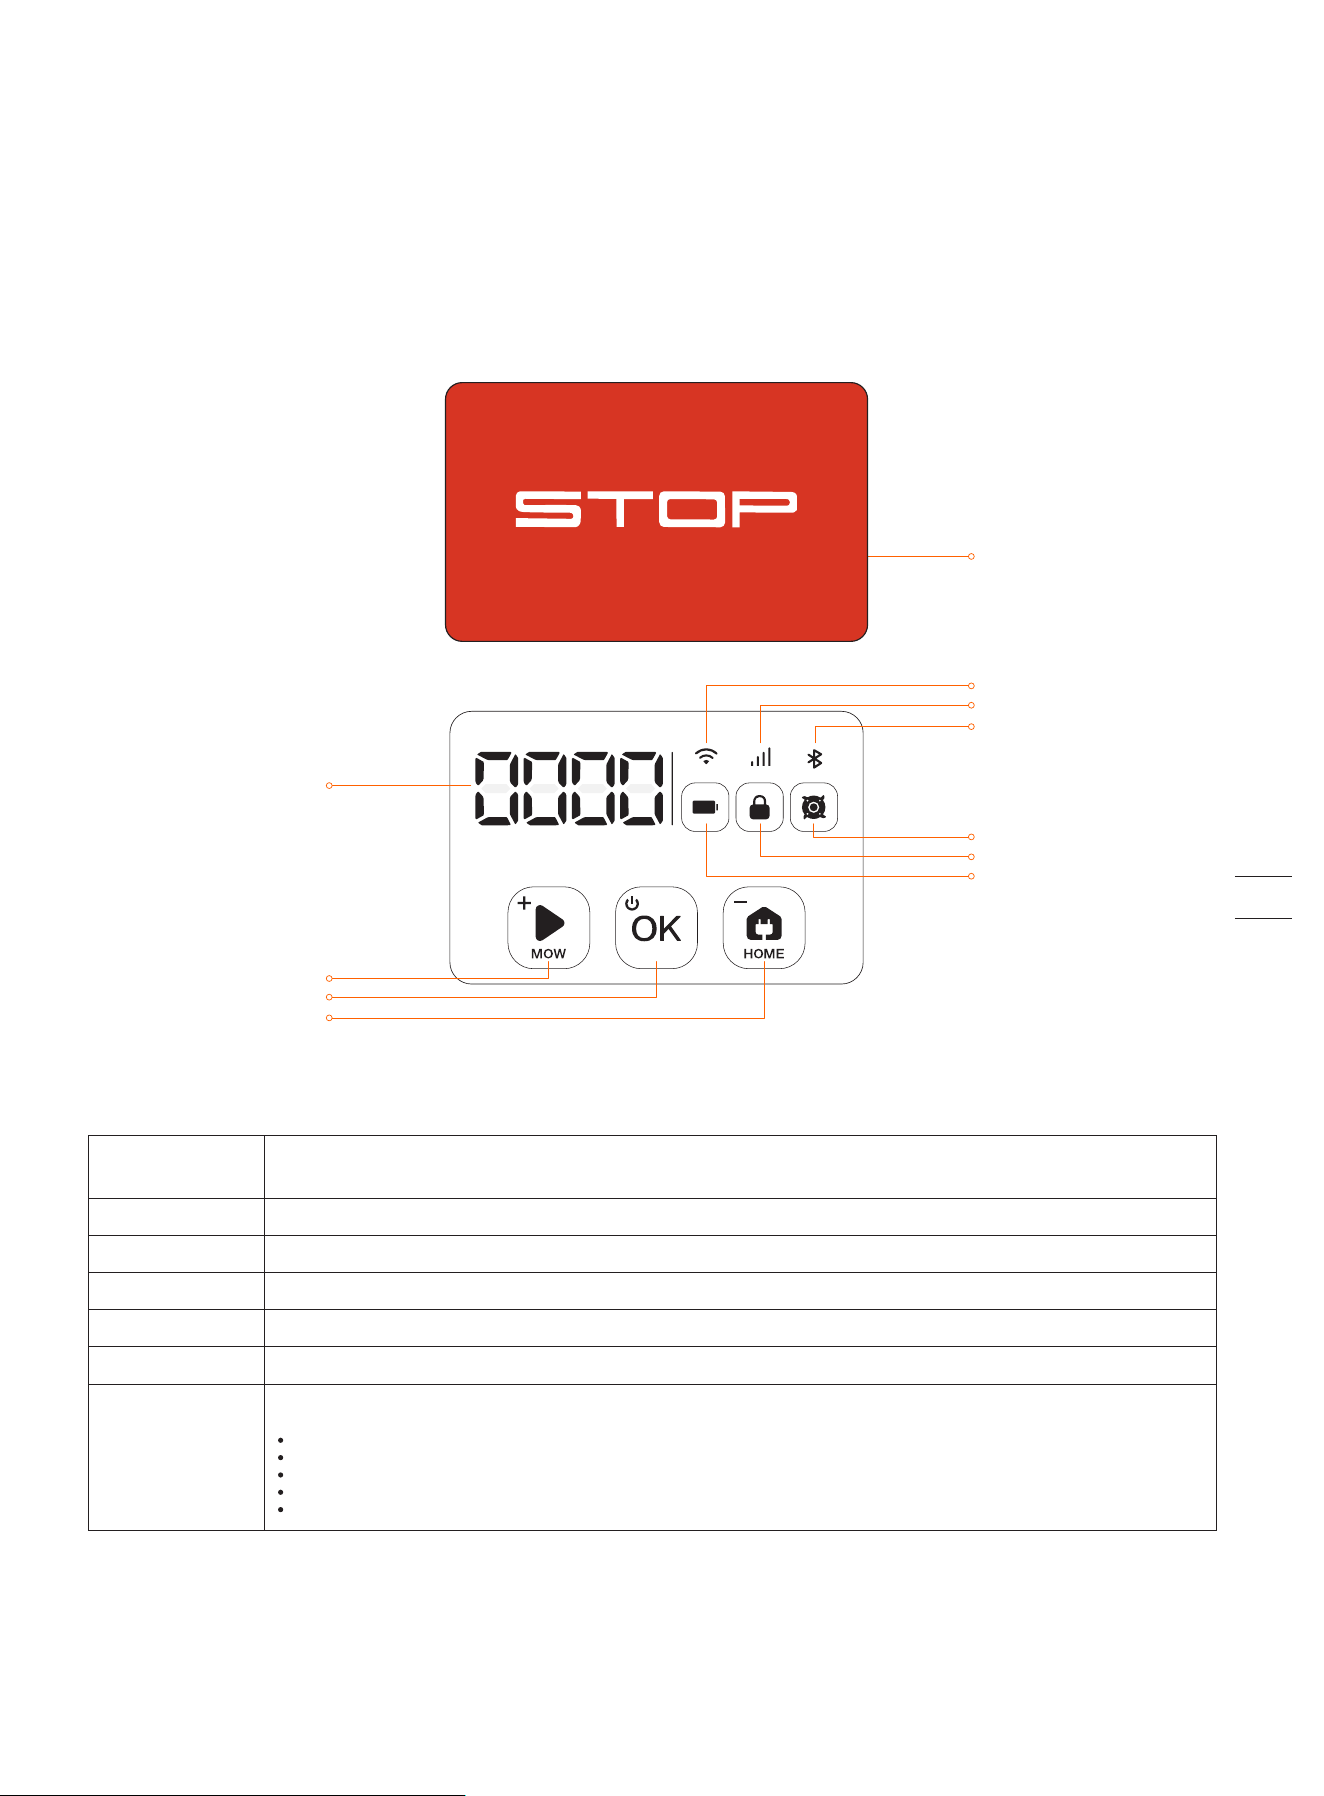
OK
HOME
MOW
Wi-Fi
Cellular data
Bluetooth
Battery level
PIN code lock status
Blade indicator
Dashboard display
3. Daily Use
3.1 Display and Control on the Mower
The display shows various states of the mower, and the control buttons can be used for the basic operations:
power the machine on and off, start mowing, return to the charging station, enter the PIN code to unlock the
machine, emergency stop, etc.
The color indicates the battery level: 50%–100% solid green, 20%–49% solid yellow, 5%–19% solid red, ≤5% red flashing.
When the battery level is below 10%, the mower will return to the station and charge.
It shows the mowing percentage, PIN code, error code, etc.
Meanings of the numbers and symbols on the display :
----: no map.
0~100: Mowing progress will be displayed as 0~100 in percentage, for example, 70 indicates that 70% of the map is already mowed.
Four-digit number: error code, for example, 4011. See for further instruction.
StOP: the STOP button is pressed during mowing.
OtA: Updating firmware.
Battery level
PIN code lock status
Blade indicator
Wi-Fi
Cellular data
Bluetooth
Dashboard display
Mower locked. Please enter the PIN code to unlock
Blade disc is rotating. Please do not approach
WiFi connected
4G connected (for H800E, H1500E and H3000E models)
Bluetooth connected
Display
5. FAQ & Troubleshooting
STOP button
28
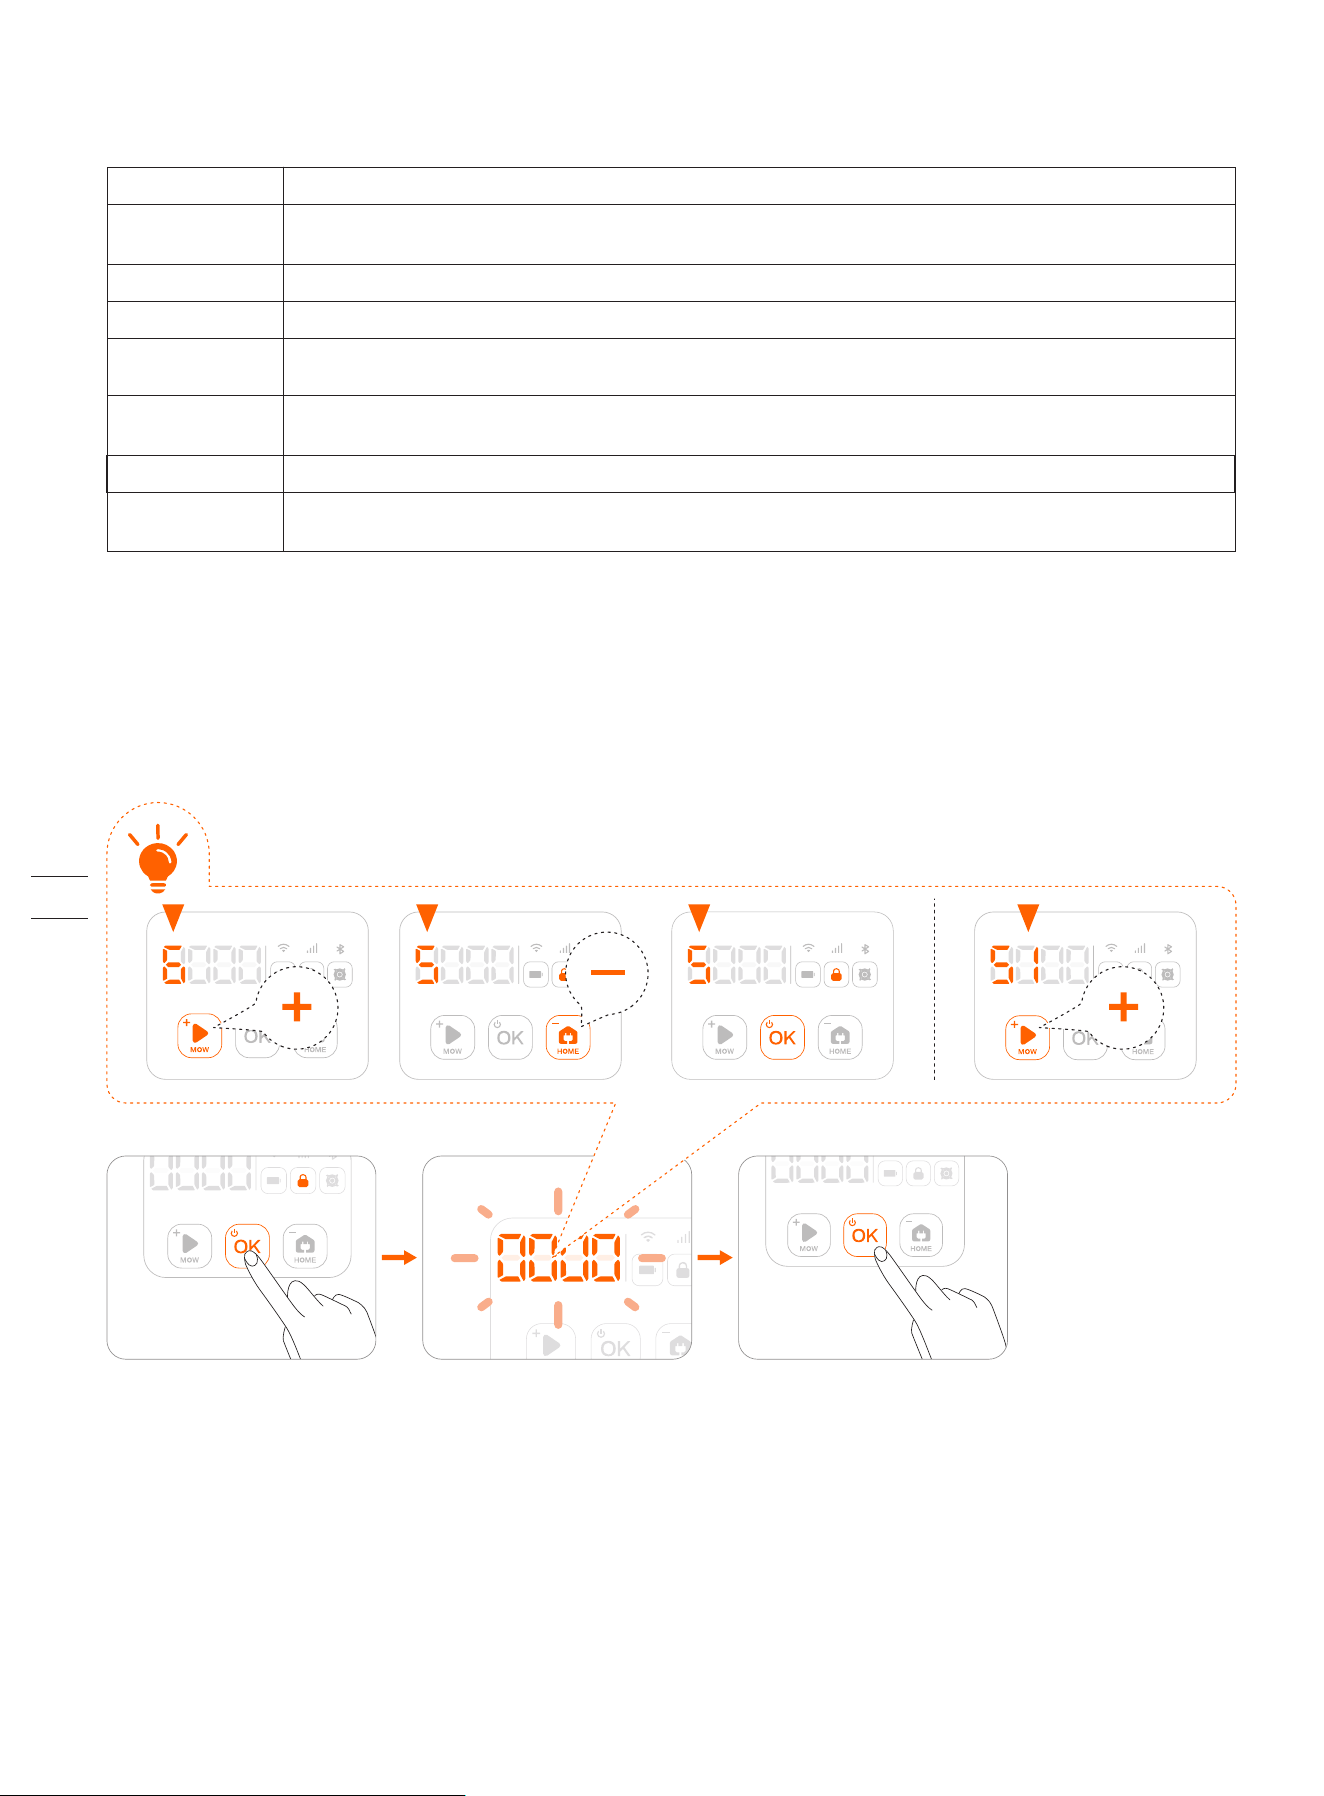
How to enter PIN code
Press MOW/HOME to increase/decrease the number and press OK to confirm the code.
Note: The default code is 0000, and you can go to Settings>MOWER>Reset PIN code in the Navimow app to reset the code.
How to lock the mower
Press and hold MOW + HOME for 4s.
Power on
Power off
Start mowing
Stop mower operation
Mower returns to the
charging station
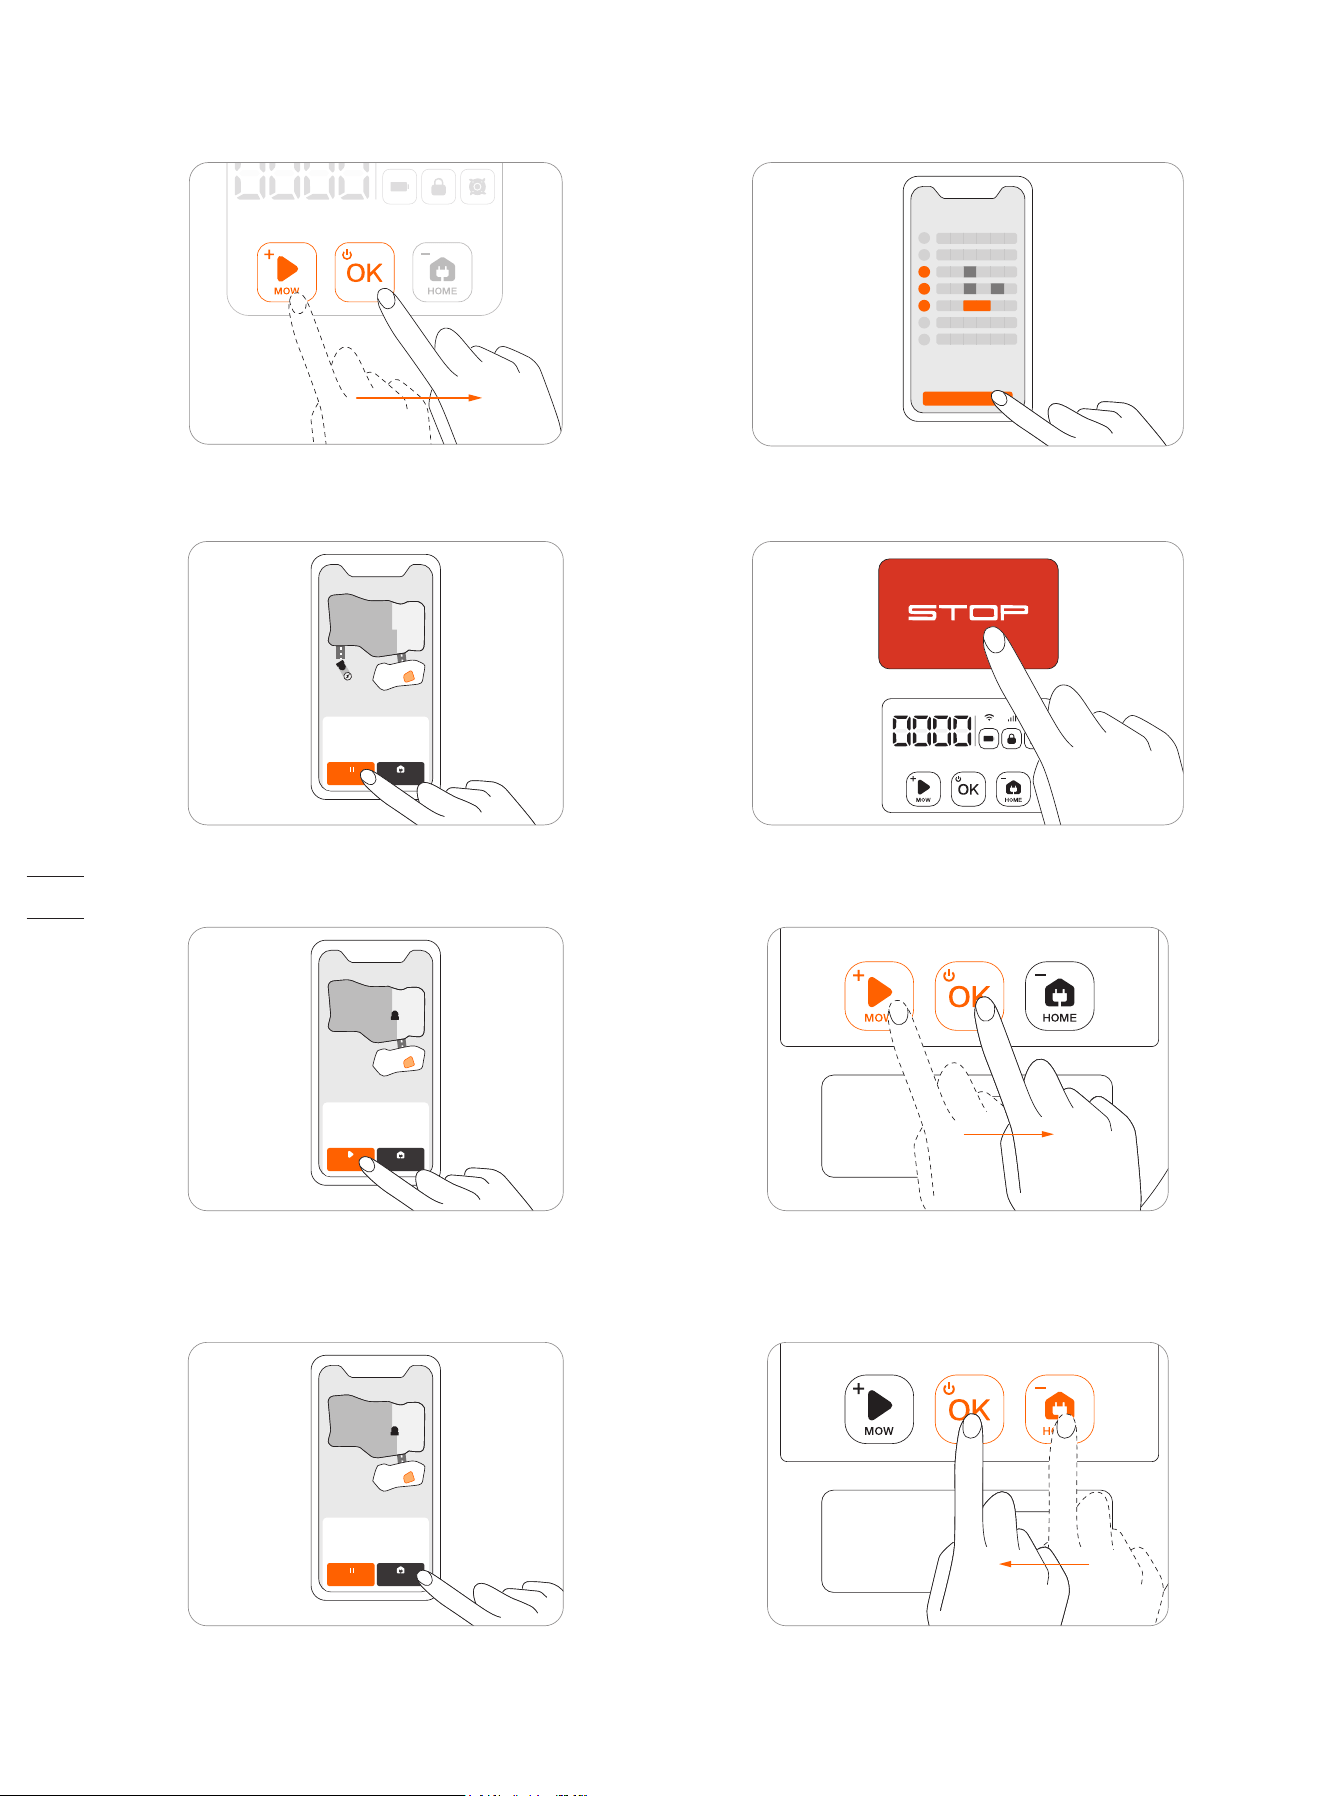
Press MOW and then OK.
Press STOP.
Press HOME and then OK.
Control
Basic operations
Press OK.
Press and hold OK for 4s. The mower cannot be turned off when it's in the charging station. When the mower is turned off, you will hear a sound, display
on the mower and the ambient light will be off.
To restart the mower, please turn it off first. Then press the OK button on the mower, or push the mower into the charging station.
How to restart the
mower
Enter the PIN code.
How to unlock the
mower
29
3.2 Light Cue
Navimow will have specific light effects, reminding you to pay attention to the state of the mower.
Ambient light color and meaning:
Mower ambient light cue
NOTE: When an abnormality occurs, the LED ring flashes red along with a four-digit error code on the dashboard display. Check
the app for error code meanings and solutions.
Pulsating blue
Flashing blue
Solid blue
Solid green
Flashing yellow
Solid red
Flashing red
Flashing white
Mowing.
The satellite signal is weak but still works fine.
Normal working status.
Mower is in the charging station.
Poor satellite signal.
Emergency stop/lifted up/no connection between the charging station and the mower.
Under error status.
OTA/Blade starts to work.
Dark mode
When Navimow works at night, you can turn on the dark mode to reduce the brightness of the ambient light. Go to Settings >
MOWER > Light setting to turn on the dark mode. Then, customize your active time.
Dark mode
Before After
Active time 21:00-07:00
xxxxx
xxxxxxxxxxxx
30

Charging station light cue
Charging station LED indicator color and meaning
Solid blue
Solid green
Pulsating green
Solid yellow
Flashing yellow
Pulsating yellow
Solid red
Flashing red
Strong satellite signal, the mower is not in the charging station.
Mower is in the charging station and fully charged.
Mower is charging.
Poor satellite signal, the mower is not in the charging station.
No signal from GNSS antenna/ GNSS antenna is not connected.
Antenna connected, no GNSS data.
No connection between the charging station and the mower./ The mower might be powered off.
Under error status.
31
How does Navimow mow your lawn
NOTE:
1. Before mowing for the first time, please cut your lawn to a height of no more than 6 cm.
2. During the working process, if the battery is low (< 10%), the mower will stop mowing and return to the charging station to
charge. After fully charged, it will automatically return to the position where it previously stopped and continue mowing.
3. The mowing progress can be seen on both the app and the display of the mower. The mowing progress is defined as: current
mowed area/total work area.
Start Mowing
NOTE: If the mower is in lock status, first enter the PIN code to unlock the mower (see How to enter PIN code in 3.1).
There are three ways to start mowing:
3.3 Mow
This part is mainly about how the mower works, how to start and pause it during daily work, etc. Work settings related to mowing,
such as: scheduled mowing, how to change cutting height, map management, etc., see 3.6 Settings (Mower).
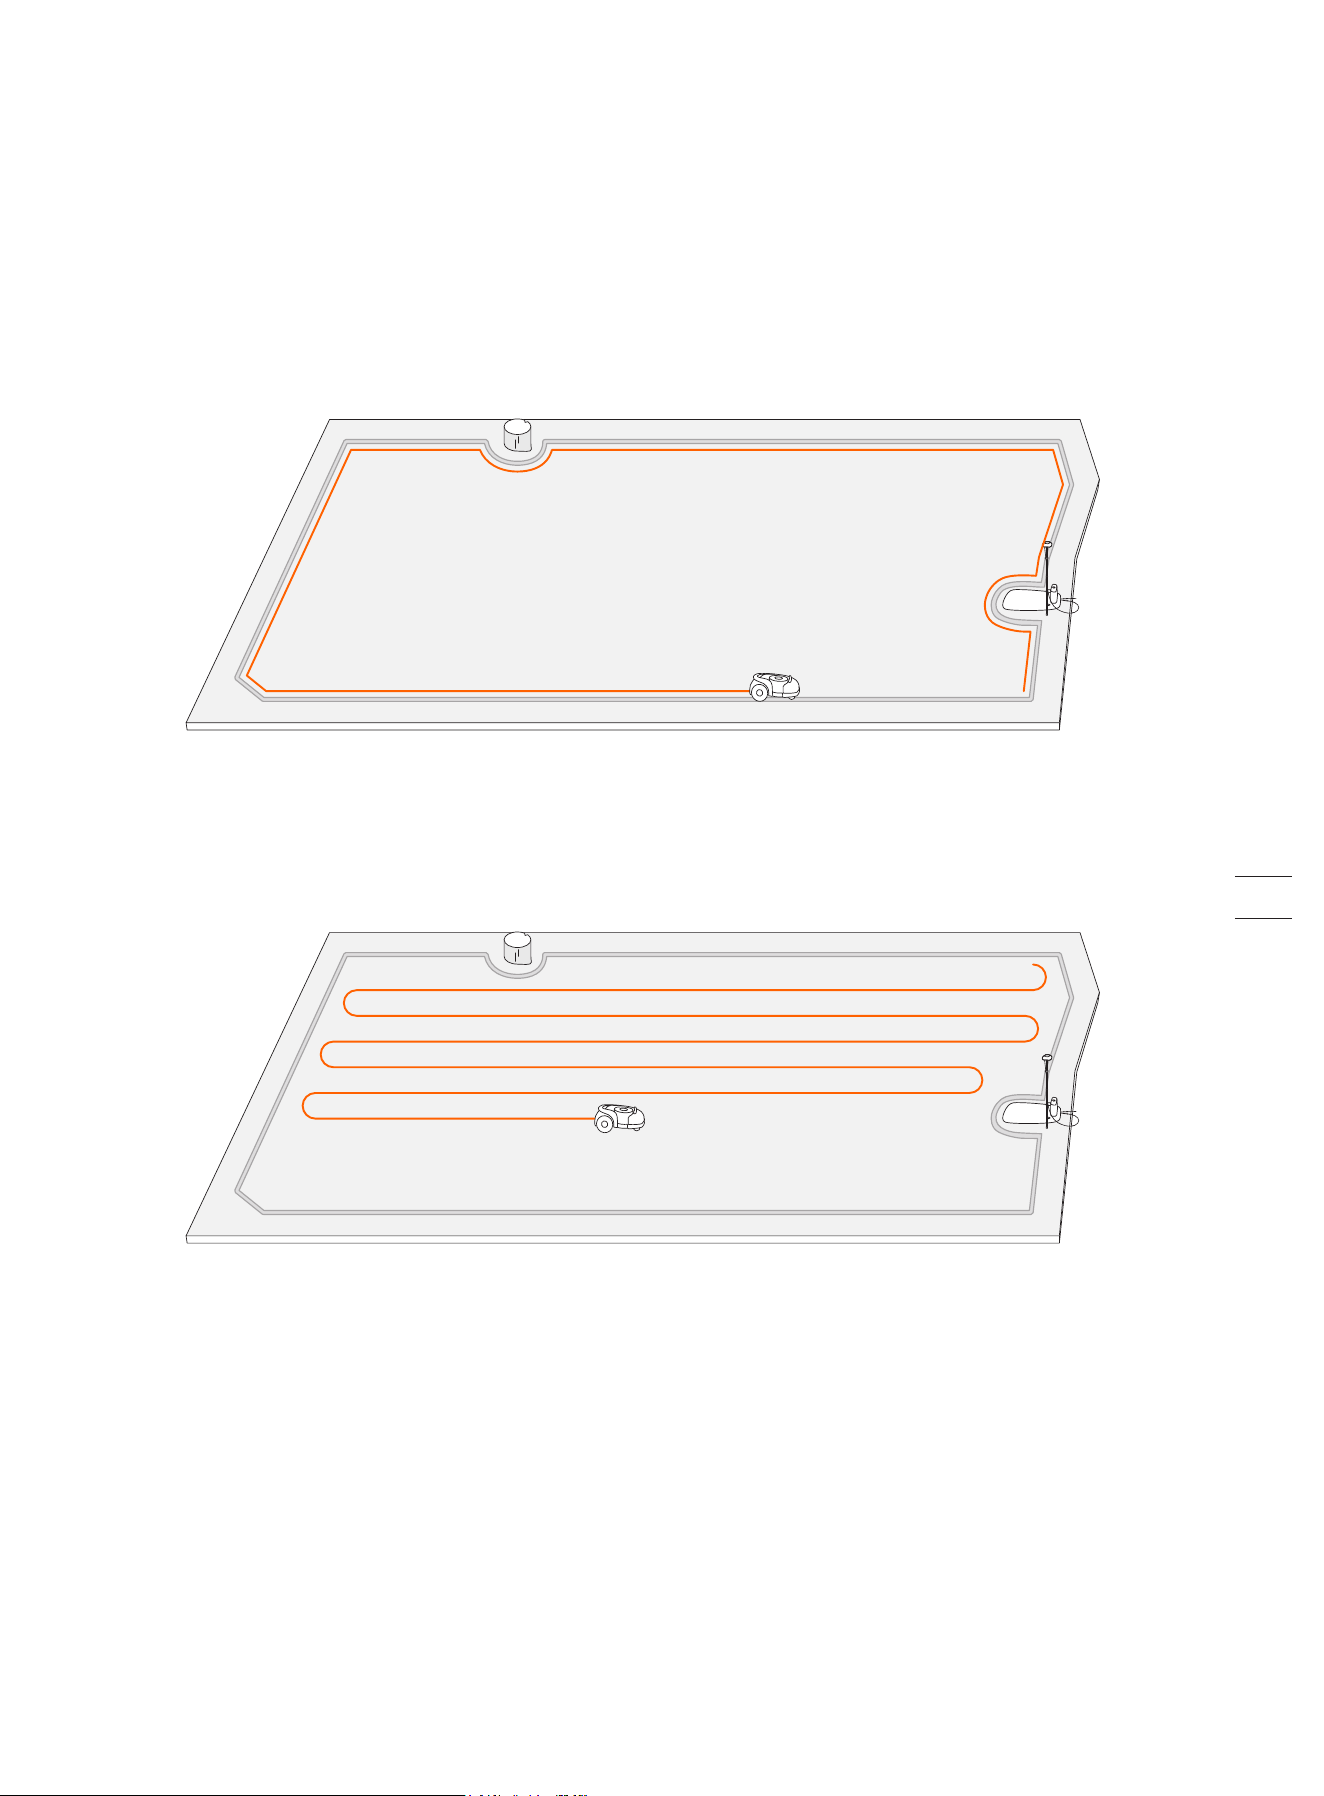
Edge cut
Before mowing the work area, the mower will cut along the boundary.
For optimal mowing results, the mowing path pattern rotates at certain angle for each new mowing task. Therefore, Navimow will
not leave indentations on the lawn.
Planned cut
Unlike most robotic lawnmowers, inside the work area, the lawnmower will mow the lawn along a planned path by an algorithm
for maximum efficiency.
32
Save
0 4 8 12 16 20 24
S
M
T
W
T
F
S
Pause
Press the STOP button on the mower or in the app to pause mower operation at any time.
Resume Mowing
Continue mowing by tapping the MOW button in the app or by pressing the MOW and then OK button on the control panel.
Return to the Charging Station
Send the mower back to the charging station in the app or press HOME and then OK button on the mower.
NOTES:
1. If the satellite signal is weak for more than one minute, the mower will return to the charging station. And if the satellite signal
is recovered in the return process, the mower will continue the mowing task.
2. The mower cannot be powered off when it is in the charging station.
HOMESTOP
HOMEMOW
HOMESTOP
c. The mower starts automatically according to the mowing
schedule. See How to set mowing schedule in 3.6 Settings (Mower)
for details.
a. In the app, tap Mow Now.
b. On the mower, press MOW and then OK to start mowing.
NOTE: If a scheduled mowing task is paused and resumed later, Navimow will still stick to the preset schedule.
33
+
+
Create a map
x x x x
Add device
+
3.4 Navimow app
NOTE: The following illustrations regarding the app are for demonstration purposes only. Depending on software version, the
options available may be different.
The Navimow app is an important part of Navimow, you can use the app to:
1. Bind and activate the mower
2. Create a map (work area)
3. Check the status and work progress of the mower, remotely control the mower to start, stop or return to the charging station, etc.
4. View and change mower work settings (Mowing schedule, Cutting height, Map management)
5. View and change mower security/function settings (PIN, ambient light, BladeHalt, Anti-theft, etc.)
6. Update firmware, and change network connection
7. Unbind and add devices
8. Get help information and after-sales support
To Use the Navimow App
1. Please search and download the Navimow app through the APP store or Play Store.
2. Register and log in to your account
3. Turn on your phone's Bluetooth function and make sure your phone has a network signal
NOTES:
1. If you have registered an account through other services of Segway-Ninebot, you can log in to the Navimow app with the
account and vice versa.
2. If you cancel your Navimow account, all data related to Segway-Ninebot will be deleted.
3. During use, the Navimow app will ask you for Bluetooth (iOS/Android), location (iOS/Android), and Wi-Fi access (Android). To
ensure normal use, please grant the above accesses.
4. If you use Navimow with an iOS mobile device, when configuring the mower's Wi-Fi network for the first time, please make sure
that your mobile phone is connected to the same Wi-Fi network.
See the following chapters for more information:
2.2 Install the Charging Station and the Antenna
2.3 Charge and Activate the Mower
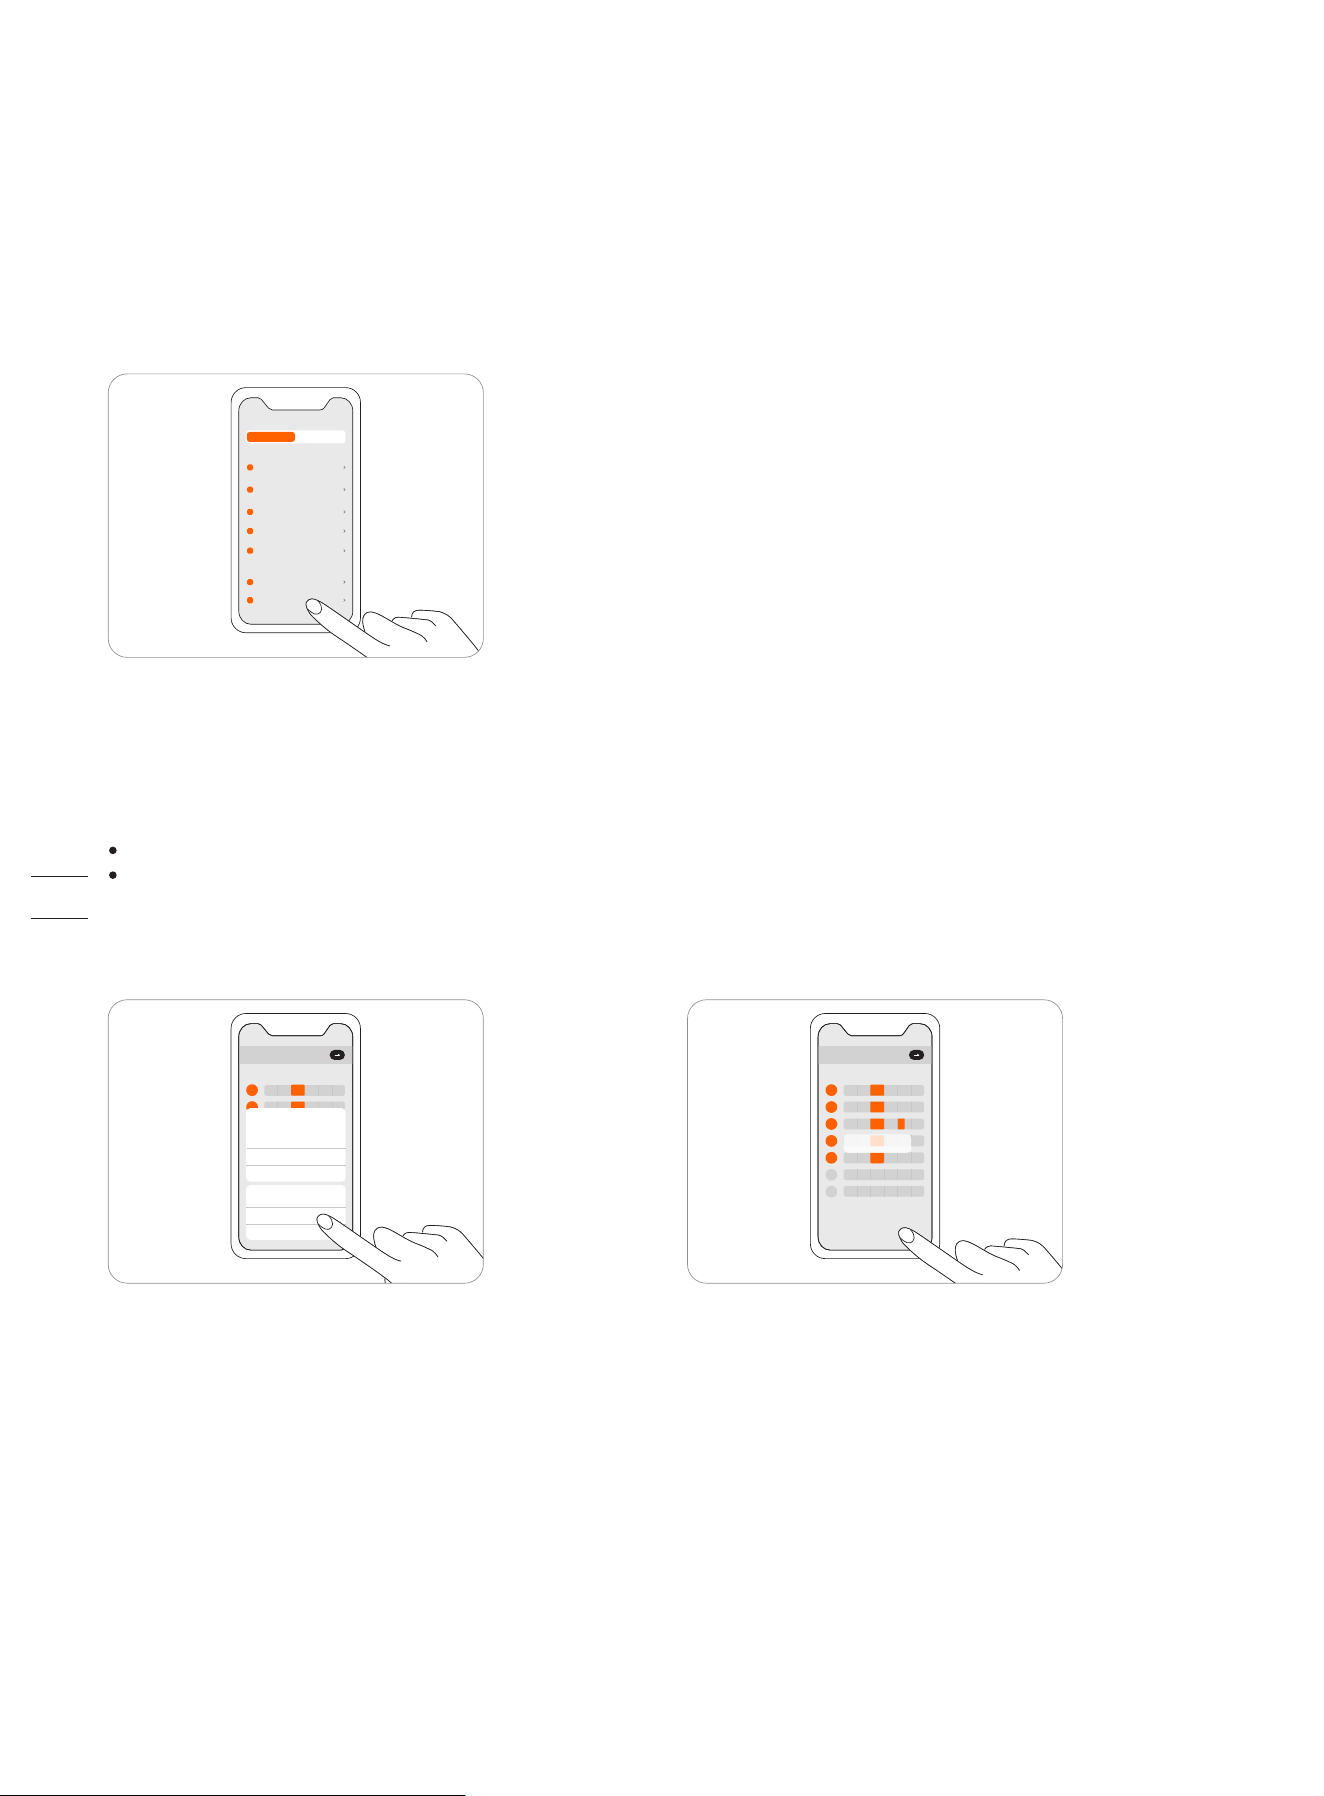
Create a map
Before mowing your lawn with Navimow, you need to create a
work area (map) using the Navimow app. Tap “Create a map”,
and follow the instructions in the app. For detailed steps and
tips, see 2.4 Set up the Work Area.
Maps can also be edited or deleted on the settings page. See
How to edit the map in 3.6 Settings (Mower).
After registration and login, you will come to Device
Activation Guidance, which will guide you to install,
connect and activate your Navimow. Tap Add device.
Activate your mower
34
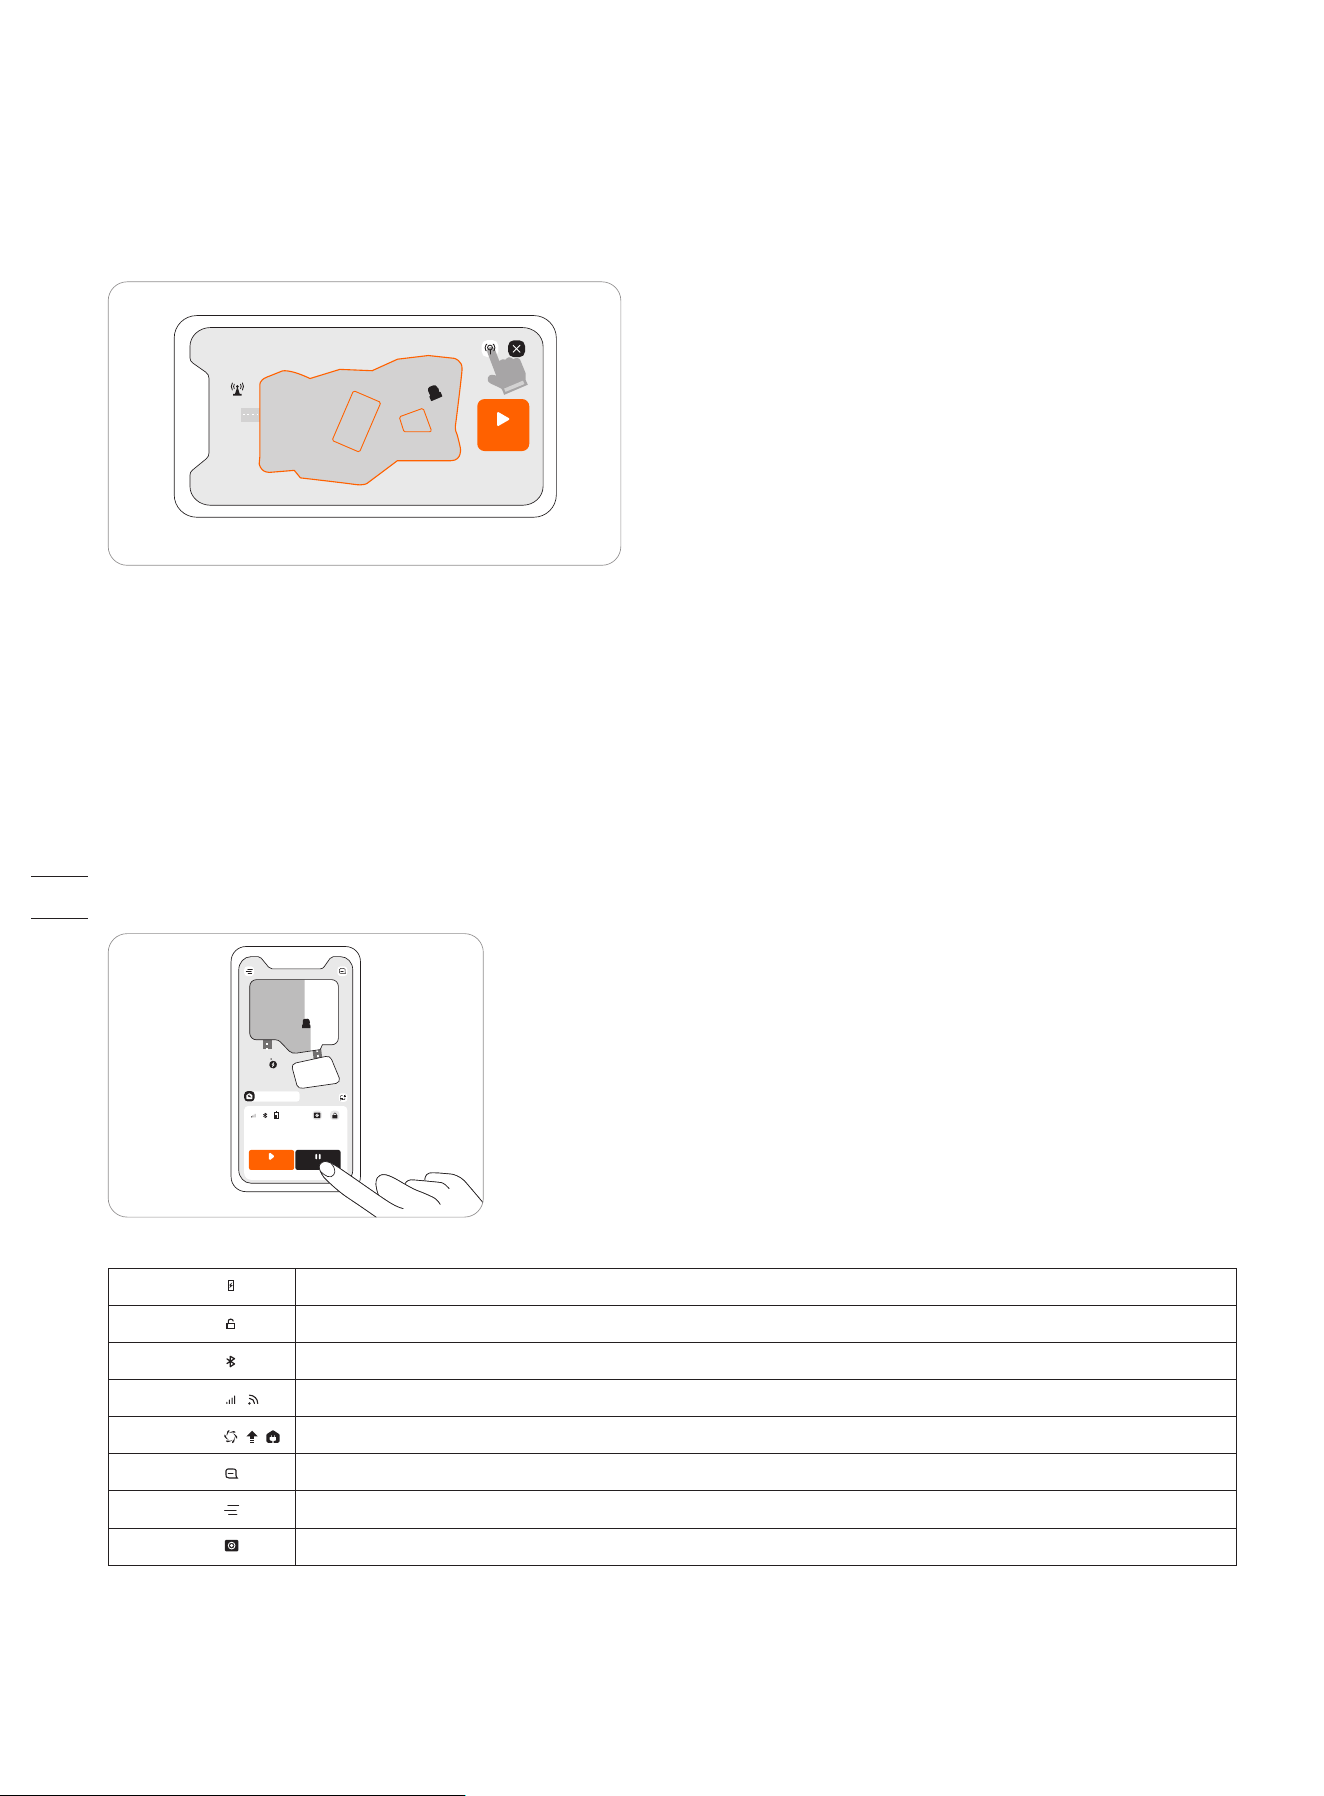
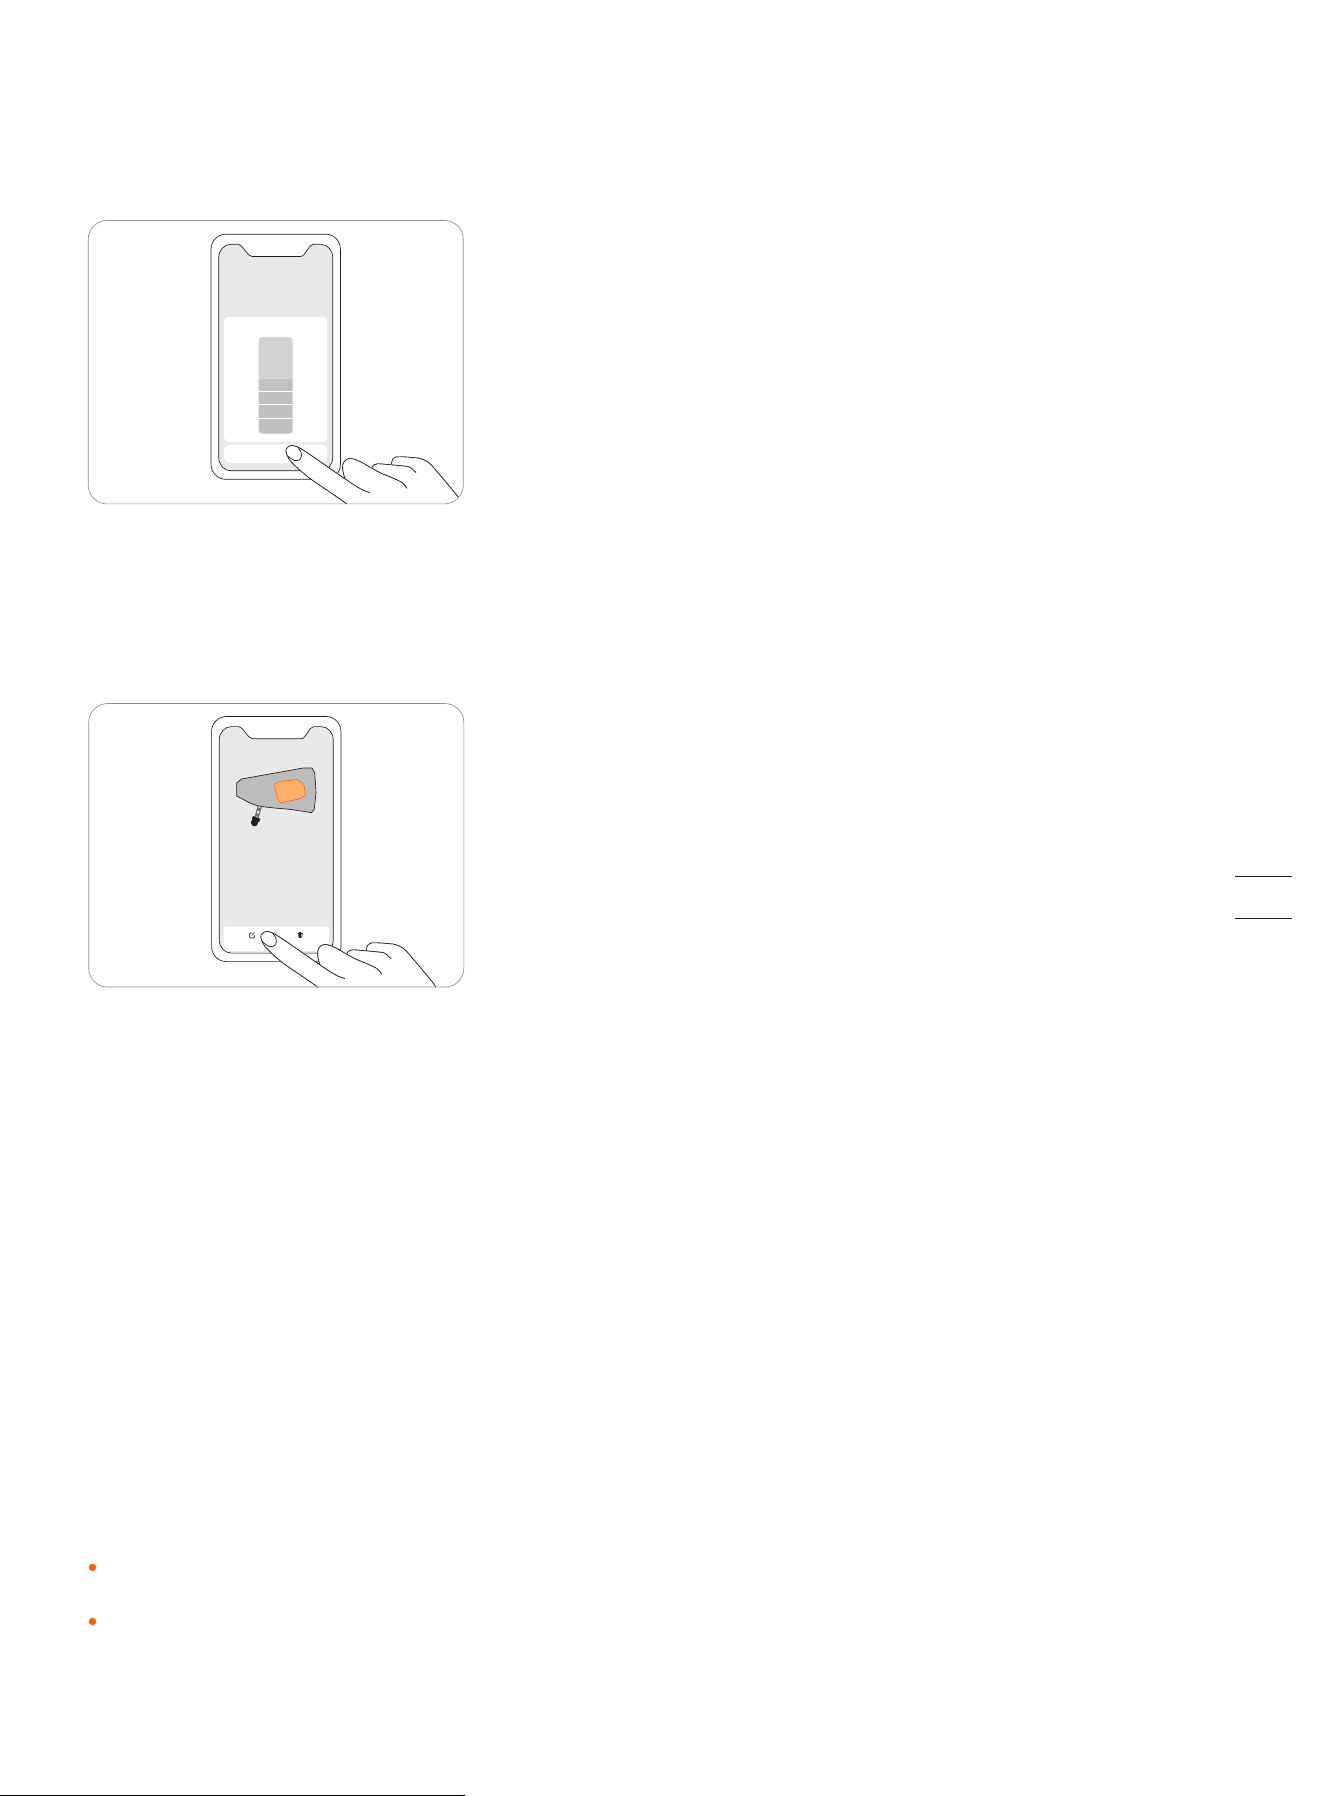
Homepage
After mapping, you will come to the Homepage, where you can view the entire work area, the status of the mower, and the work
progress (percentage and actual area), and remotely control the mower to start, pause or return to the charging station. Settings and
Notification pages can also be accessed from here.
Battery level Battery level and charging status
Lock status
Mower locked. Unlock the mower before any operation. See how to enter PIN code in 3.1
Bluetooth Bluetooth connected. When disconnected, tap to reconnect
Connectivity
Connects to internet (Wi-Fi or 4G)
Mower status Displays the current status of the mower
Notifications Notifications from the device & app
Settings Settings of the mower and the app
VisionFence VisionFence sensor status
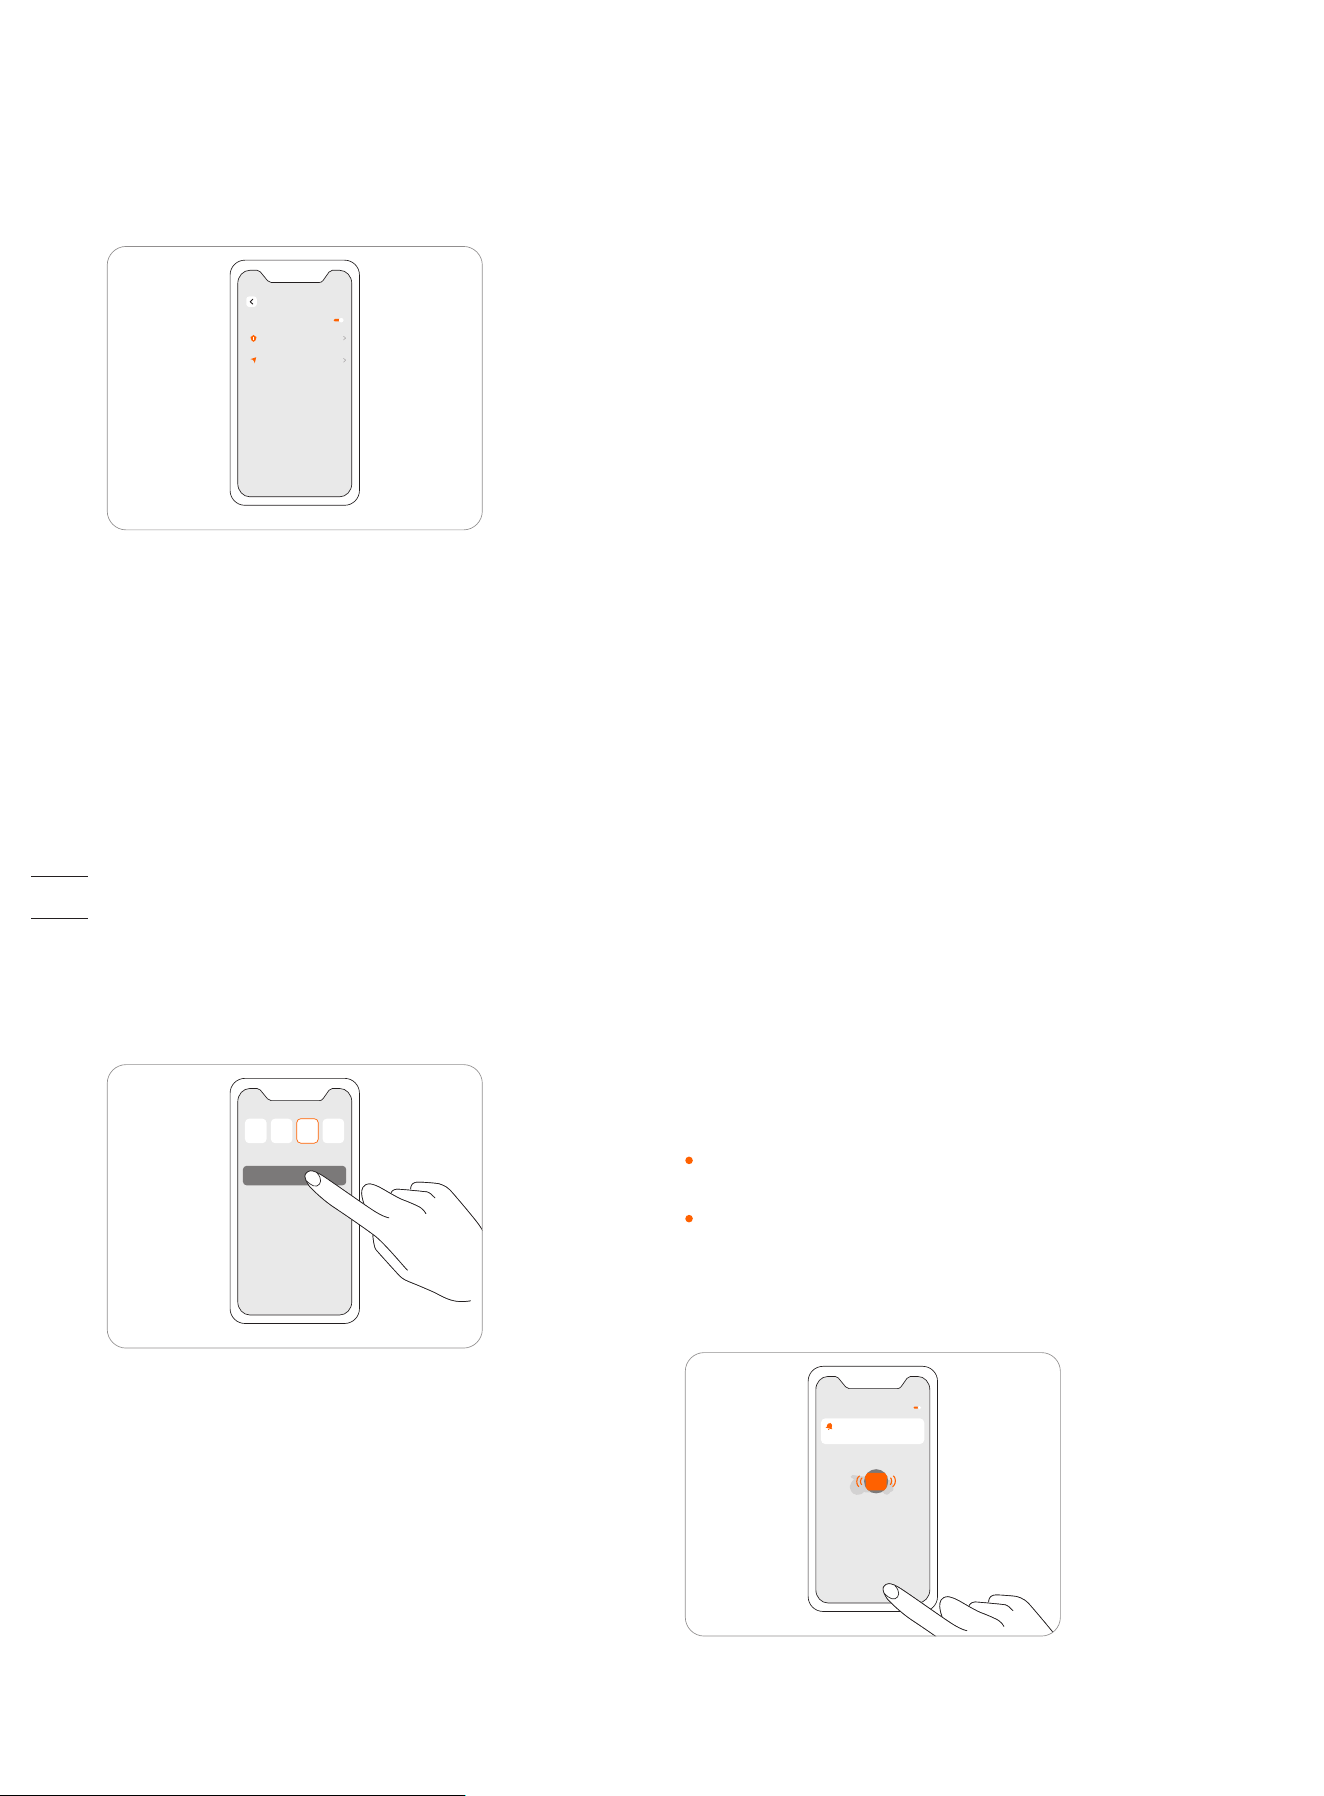
Check the signal
After the map is saved, satellite signal strength across the whole map will be measured and displayed. You can check or adjust the
position of the charging station according to the tips in the app so that the mower can perform better.
To check the signal distribution of the newly created map, you need to tap the signal icon in the upper right corner in the Navimow app.
You can also tap "How to check" for further guidance and advice.
NOTES:
1. You can review the signal distribution map at any time in Map management.
2. The signal distribution map only reflects the state of the satellite signal at the time the map data was recorded.
TEST
How to check?
MOW STOP
170
㎡
64
%
Coverage Progress
35
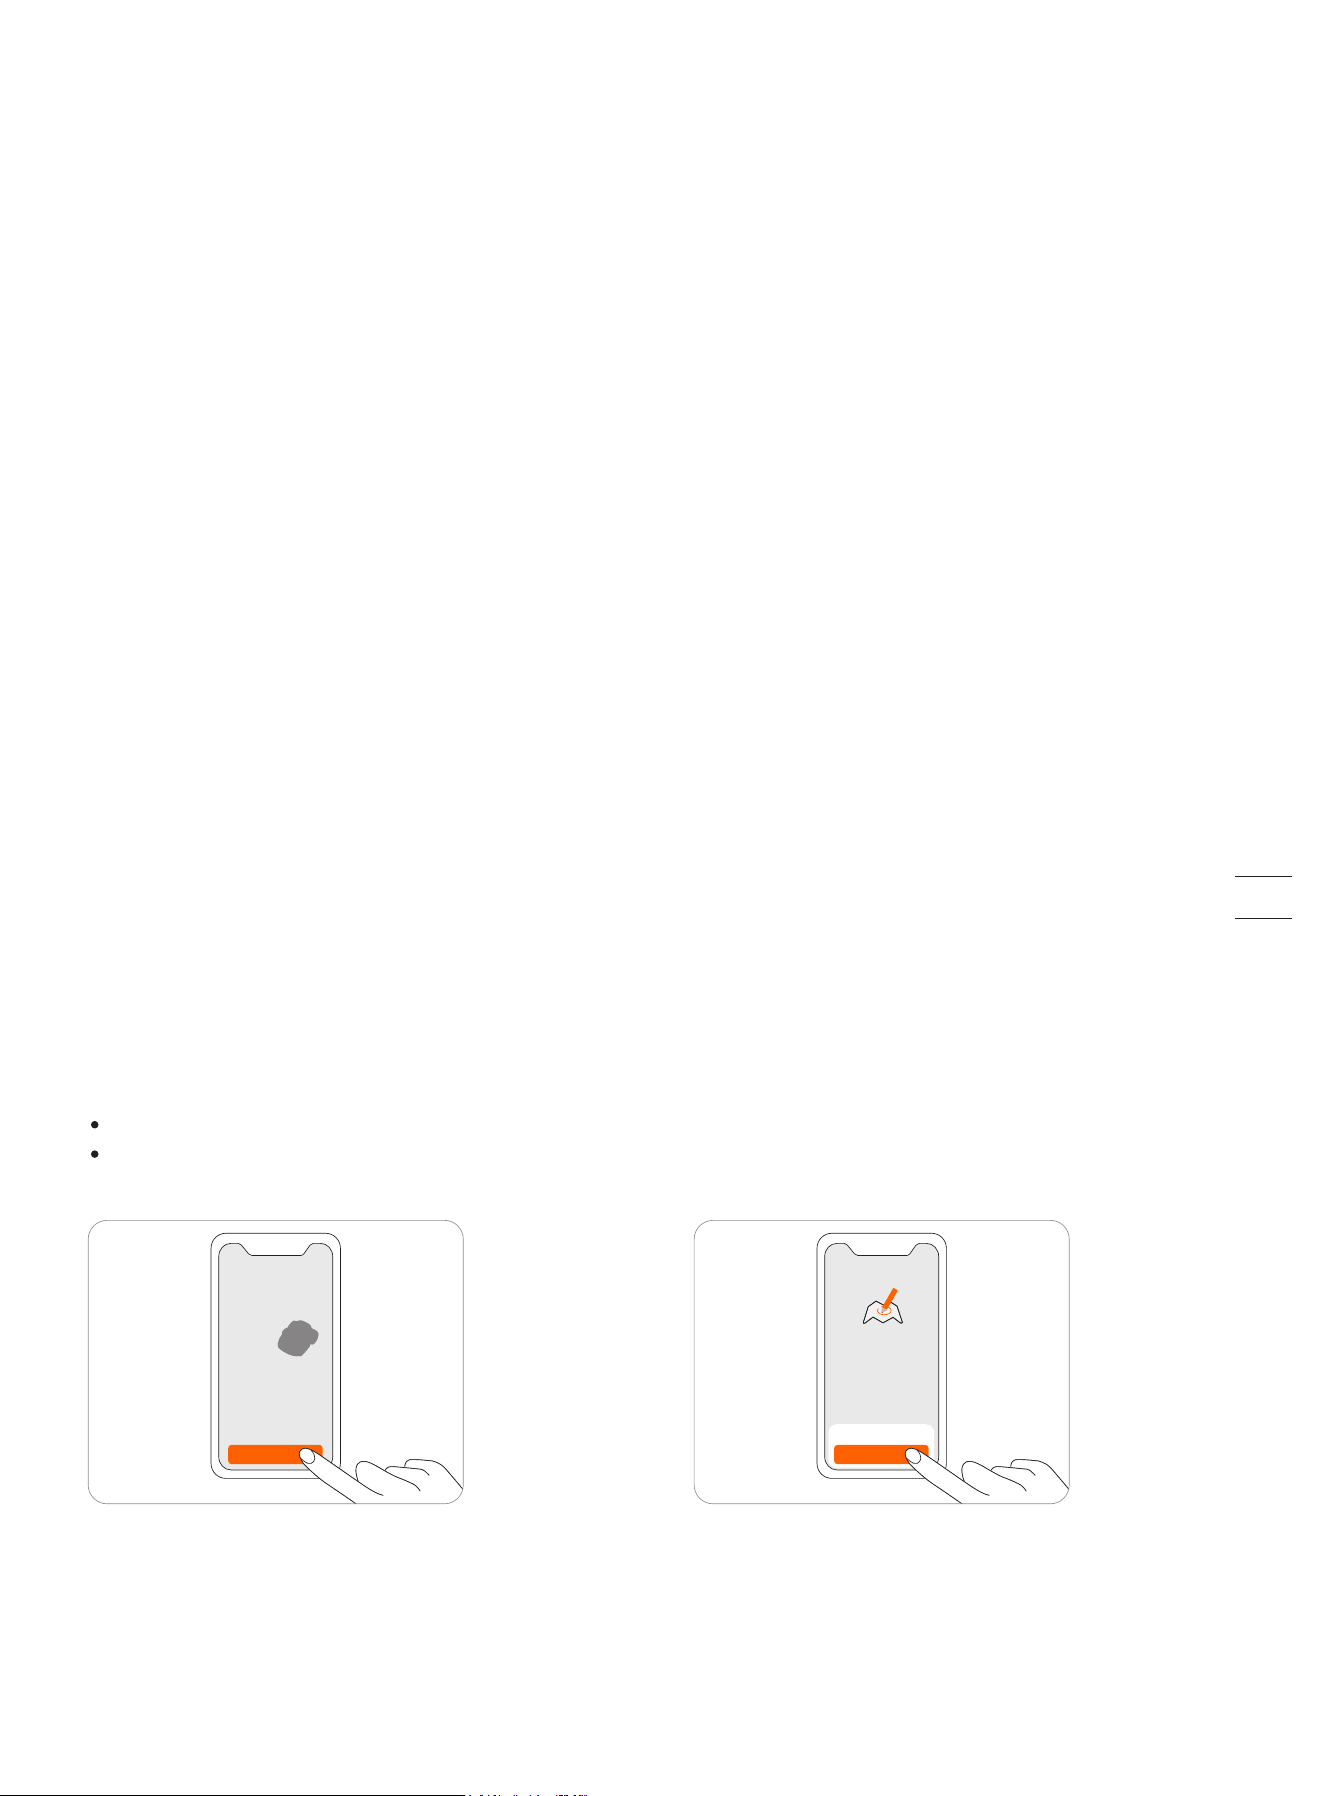
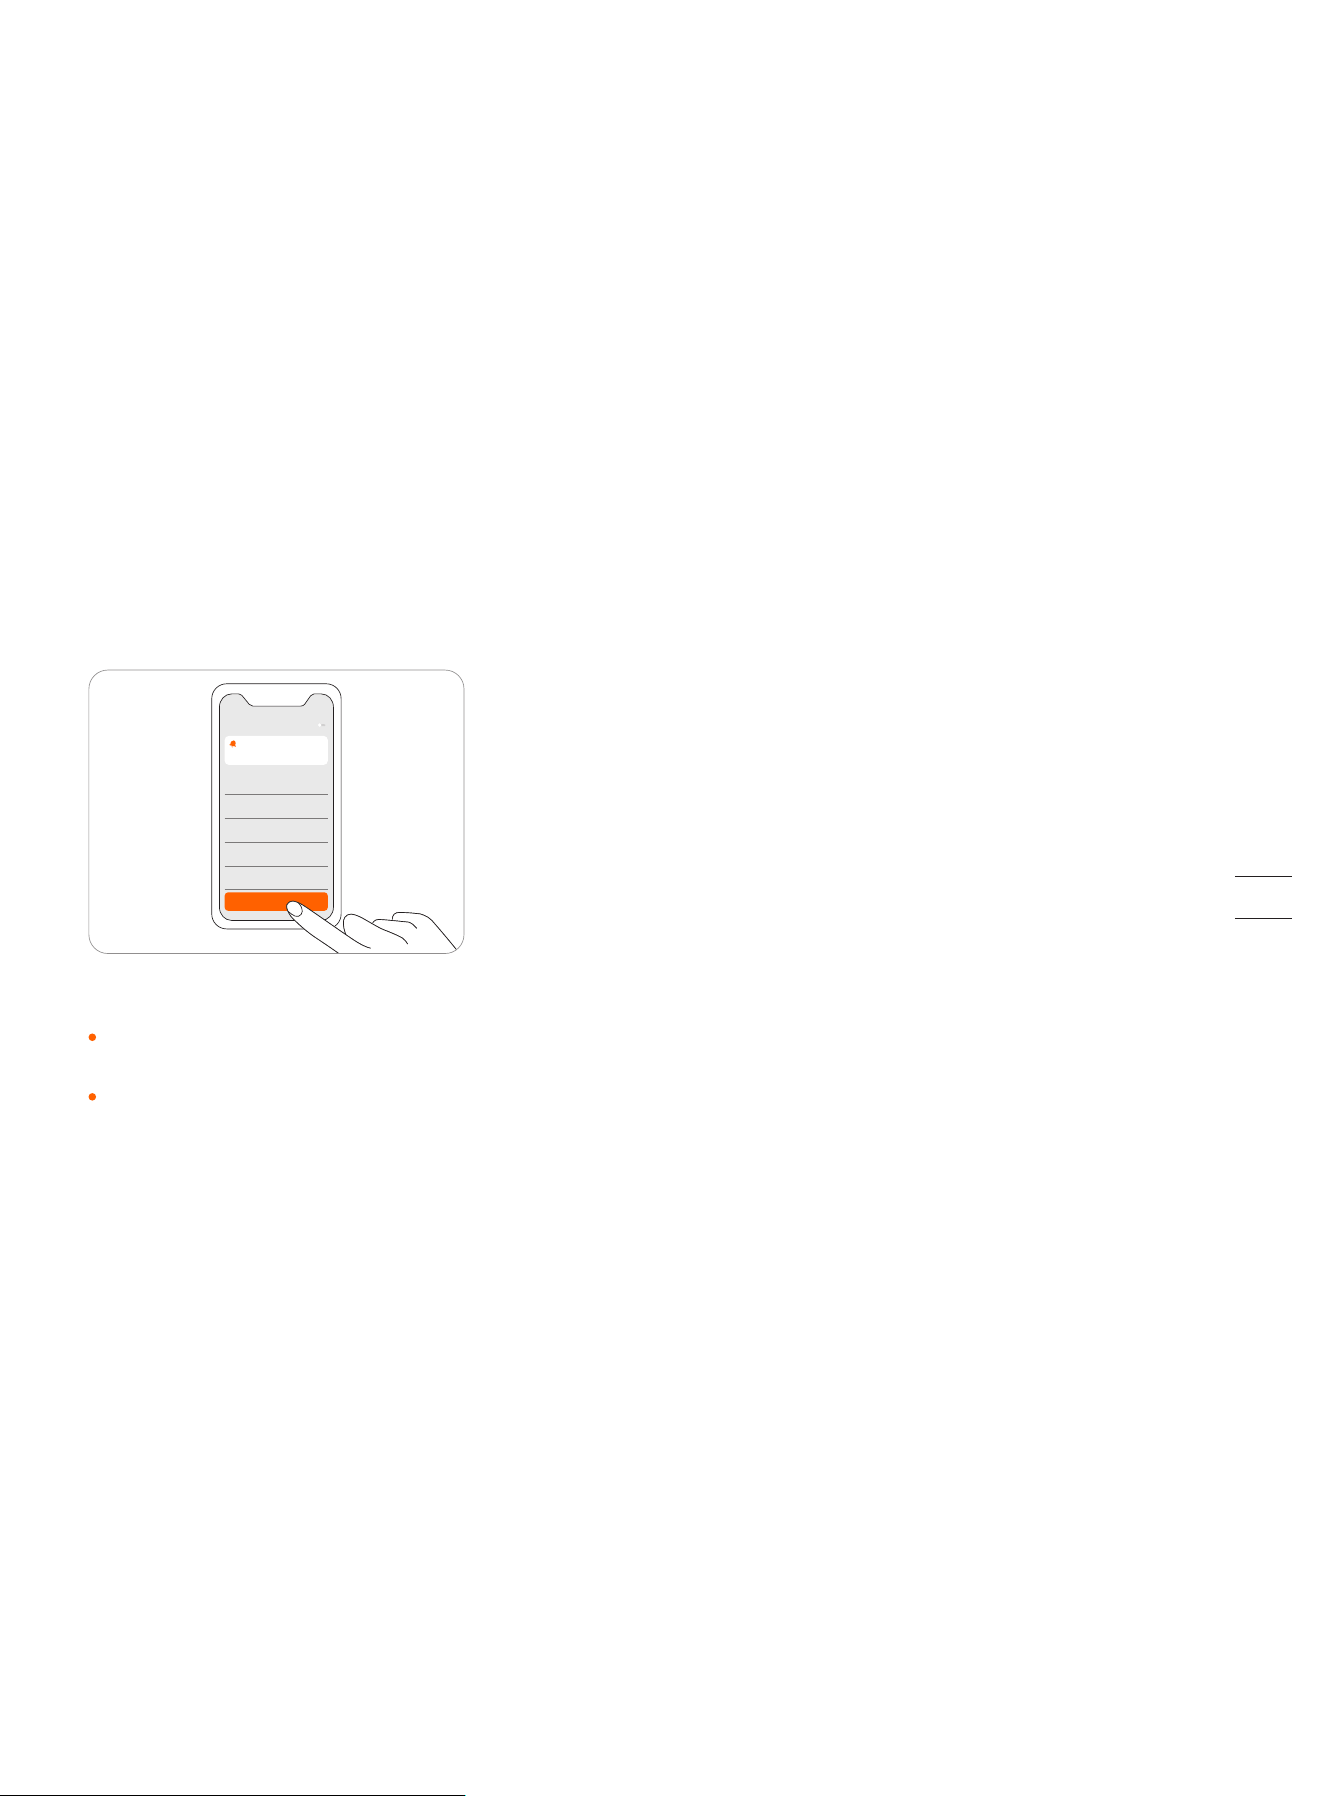
3.5 Notifications
System notifications
Latest news and updates from Navimow team.
Device notifications
The mower will send you device notifications in the following situations: work status update (such as mowing completed), blade
replacement, unexpected behaviors, abnormal position, etc.
Pop-up messages
Pop-up messages appear at the center of the screen. For example, an error code message appears if an error has occurred.
System notifications
xxxxx
xxxxx
xxxxx
xxxxx
xxxxx
xxxxx
xxxxx
Notifications
XXXX
OK
36
3.6 Settings (Mower)
All mower-related settings can be adjusted in the app. You can:
1. Change mower work settings (mowing schedule, cutting height, map managemen, etc.)
2. Change mower security settings and function settings (reset PIN code, ambient light and sound settings, BladeHalt, etc.)
3. View device firmware information, network connection status, unbind devices, switch devices, etc.
NOTE: Setting adjustment requires the mower to be online or connected to your phone via Bluetooth.
How to set mowing schedule
You can set the mowing schedule in the mower settings. The mower will work automatically according to the schedule.
0 4 8 12 16 20 24
M
T
W
T
F
S
S
Deleted successfully
0 4 8 12 16 20 24
M
T
Start and end time
08:00 12:00
12:30
11:30
08:30
07:30
xxxx
Delete the schedule
Confirm
Cancel
Choose a specific date and time period on the schedule page to set your mowing schedule:
Tap the Hour bar on the page to add or delete working hours in the pop-up page.
Tap a day of the week to toggle the mowing schedule on/off for that day.
NOTE:A single work period is at least half an hour, and a maximum of 4 work periods can be added per day.
MOWER APP
XXXXXXXXX
XXXXXXXXX
XXXXXXXXX
XXXXX
XXXXXXXXX
XXXXXXXXX
XXXXX
XXXXXXXXX
XXXXX
XXXXXXXXX
XX
XXXXXXXXX
XXXXXXXXX
37
Adjust cutting height
Cancel
60mm
55mm
50mm
45mm
40mm
35mm
30mm
How to change the cutting height
The cutting height can be adjusted in Settings >MOWER>Cutting height, the adjustment range is 30~60mm, and the minimum
adjustable segment is 5mm.
By tapping "Edit" you can: add or delete boundary, off-limit island, and channels. You can also fine-tune parts of the map. Tap a
boundary or off-limit island in the map and then tap the edit icon to fine-tune the map. For the definition of boundary, off-limit
island, and channels, see 2.4 Set up the Working Area.
NOTES:
1. The channel leading to the charging station is automatically generated and cannot be deleted.
2. When you delete a boundary, the element associated with the boundary (channel) is also deleted.
3. By tapping Delete you will delete the entire map. You need to create a new map before using the mower.
Rain sensor
If it rains when mowing, the rain sensor will be triggered after receiving a certain amount of rainwater, and the mower will
automatically return to the charging station. After the water on the rain sensor dries, it will automatically resume the mowing
task.
Before the water dries, the mower cannot be started via the app or by pressing the buttons on the mower. This is normal and not
a malfunction of the mower. To continue mowing, please wait for the water to dry up and then press MOW and then OK, start via
the app or wait for the next mowing schedule to start.
You can also turn off the rain sensor in Settings>MOWER>Rain sensor. See 4.1 Cleaning for maintenance tips.
Edit Delete
NOTES:
For the best mowing results, it is recommended to mow in dry weather. Mowing in the rain can make the grass stick on the
wheel and the mower may slip.
DO NOT mow in bad weather, such as heavy rain, thunderstorms or snow.
How to edit the map
You can edit or delete the entire map in Settings>MOWER>Map management. Make sure your phone is connected to the mower
via Bluetooth.
38
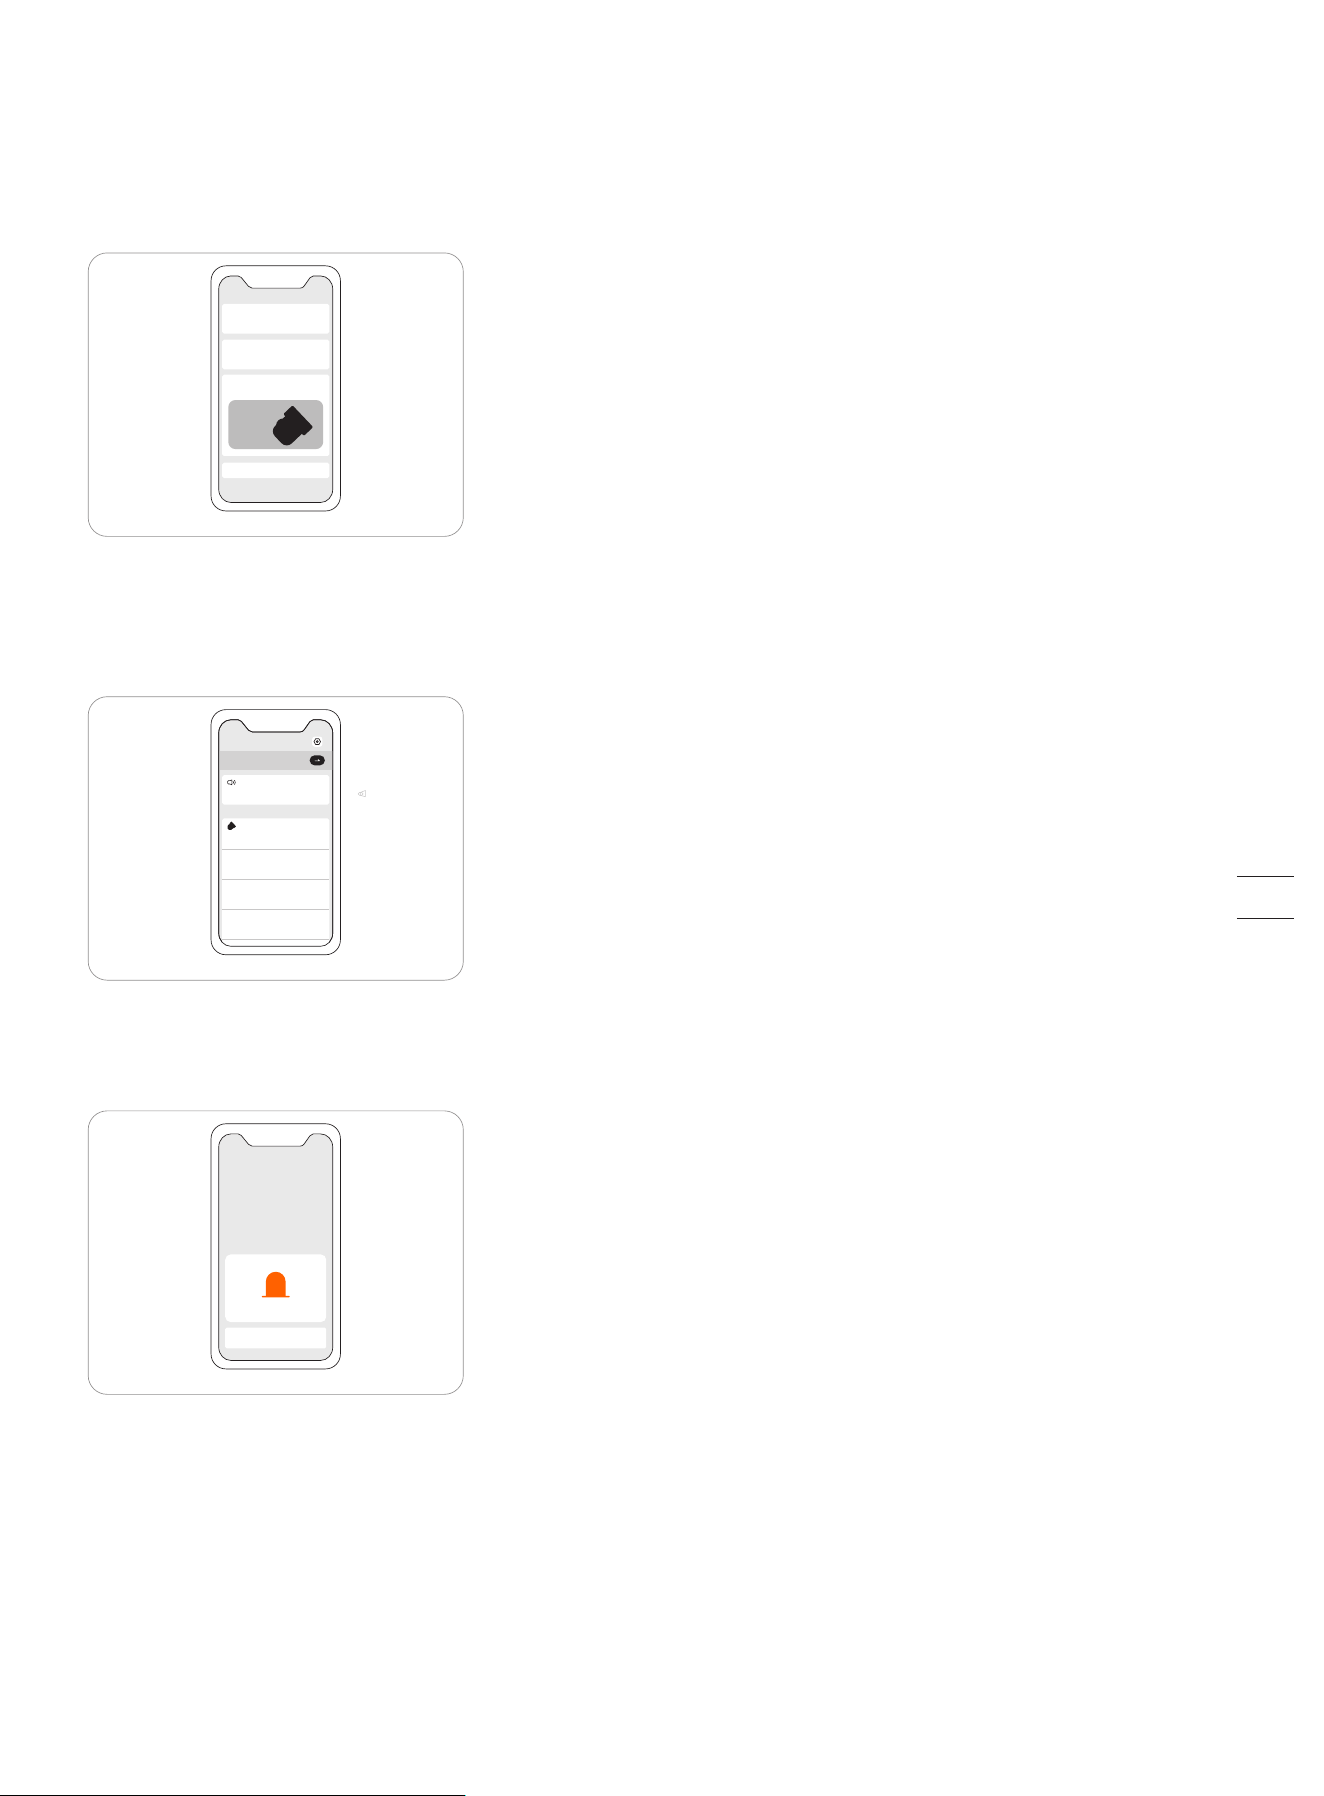
How to turn on Anti-theft
The anti-theft function can precisely locate Navimow and effectively prevent accidents such as mower theft. When moving out of
a designated area, Navimow will sound an alarm and you will receive a notification on the app simultaneously. When Anti-theft is
on, you can set the geofence and check Navimow's location in the map in real time.
BladeHalt
BladeHalt is a sensor that will be triggered when humans
or animals touch it. This is an experimental function and
will not guarantee 100% accuracy. The sensor is off by
default. It will be enabled when the sensor area is
touched. Meanwhile the blades will stop spinning
automatically. This sensor will only work when the blade
disc is spinning.
NOTES:
When the mower is performing the edge cutting, the
BladeHalt sensor won't work.
We recommend disabling this feature when mowing for the
first time to ensure normal function because the sensor
may mistake tall or thick grass as a pet or other sensitive
object and stop the blades.
BladeHalt sensor
xxxxx
xxxxxxxxxxxx
How to reset PIN code
In factory settings, the default PIN code: 0000. You can
reset the PIN code in Settings>MOWER>Reset PIN code.
NOTE: It is recommended that you reset the PIN code
after activating your mower.
106
Confirm
xxxxxx
xxxxxx
Operation steps:
Step 1: Turn on Anti-theft.
Step 2: Tap 'Geofence extension' to configure the distance of the geofence extension, and then tap 'save' to save.
Step 3: Tap 'Find my mower' to check the location of the mower on the map.
NOTES:
1. If Anti-theft is enabled, you need to enter PIN on the mower before powering off the mower.
2. If Anti-theft is accidentally activated, you need to enter PIN on the mower to disable the alarm and end the push notification.
3. Anti-theft is only available with 4G connection.
Anti-theft
Anti-theft alarm
xxxxx
xx
xxxxx
39
How to unbind a mower
Each mower currently only supports binding to one app account. Before unbinding, it cannot be bound to another app account.
You can unbind the mower in the app. When unbinding, you need to verify your identity through email or SMS verification code.
Network setting
You can manage the network used by Navimow on the Network management page. For H800E, H1500E, and H3000E models, go
to Settings > MOWER > Network management to switch between Wi-Fi and 4G networks.
On the Wi-Fi settings page, you can view the currently connected Wi-Fi network or reconnect to the Wi-Fi.
NOTES:
1. Changing Wi-Fi settings requires your phone to be connected to the mower via Bluetooth.
2. Network switching is only available on products manufactured after week 39 2022.
Firmware version
We will update the functions and firmware of Navimow from time to time. In order to better experience the functions of
Navimow, it is recommended that you regularly check and update the firmware to the latest version.
Auto-update
xxxxx
xxx
xxxxx
xxx
xxxxx
xxx
xxxxx
xxx
xxxxx
xxx
Check for updates
NOTES:
When activating the device for the first time the firmware will be updated automatically. Once the update is completed, you
will be noticed by the update result. Refer to Update the mower to the latest firmware in 2.3 Charge and Activate the Mower.
When updating the firmware for the device that is not activated for the first time, the conditions below need to be met before
updating.
-The mower is in the charging station.
-The mower is connected to a network and the signal is strong (through 4G or Wi-Fi).
-The battery power is more than 20%.
-There is no mowing task scheduled in the next hour.
If the pop-up window for updating is closed, you can also search for the new firmware in Settings>MOWER>Firmware version to
update the firmware.
40
3.7 Settings (app)
Go to Settings>APP to browse and adjust the Navimow app-related settings.
Account and security
You can check your bound email address or mobile number, change the password, download the data, and delete your account.
Language
You can set the language to the one that you need. Up to now, fifteen languages are supported, which are English, German,
French, Dutch, Italian, Swedish, Norwegian, Finnish, Danish, Portuguese, Spanish, Russian, Czech, Slovak, and Polish.
Help and support
You can view the latest User Manual, FAQ and contact of after-sales service here.
About
You can view the User Agreement and Privacy Policy here.
Log out
You can log out of your account here, and your data will not be deleted after logging out.
MOWER APP
XXXXXXXXX
XXXXXXXXX
XXXXX
XXXXXXXXX
XXXXX
XXXXXXXXX
XXXXXXXXX
41

3.8 IoT
Navimow is an Internet of Things (IoT) device. Connect the mower to the Internet via cellular network or your Wi-Fi network,
enabling the following functionalities:
1. Firmware Updates Over-The-Air (OTA), keep your mower updated to the latest features.
2. Enables remote control through the network: start mowing, stop mowing, return to charging station, set mowing schedule, set
cutting height and other functions.
3. Remotely monitor the mowing progress and mower location.
4. Report error code and mower status through the network.
5. Anti-theft ( 4G connection only).
Wi-Fi
H500E model only uses Wi-Fi to connect to a network. See Network setting in 3.6 Settings (Mower) for more details.
NOTES:
Navimow only supports 2.4GHz Wi-Fi network.
If you are using an iOS device, the mower can only connect to the Wi-Fi that your mobile device is connected to. Please follow
the instructions in the app. Connect your mobile device to the Wi-Fi first, then connect the mower to the same Wi-Fi. There are
no such requirements for Android devices.
4G
H800E, H1500E and H3000E models use both Wi-Fi and cellular data networks, which will connect the mower to the Internet after
activation. The usage of cellular data will incur charges. H800E and H1500E models come with one year of free data after
activation. The H3000E model comes with three years of free data after activation. You can go to Settings > MOWER > Basic info in
the app to check the expiration date of free data.
When the free data period expires, you need to recharge your 4G data plan via the app so that you can continue to use the IoT
and OTA functions.
If the 4G data is not recharged, the SIM card will remain effective for 2 years. The recharging and activation can be done at
anytime during these 2 years. However, after 2 years you cannot activate it anymore. You need to replace the hardwares
through the after-sales service. You need to pay the repairment and service fee as well.
Firmware updates
We will update the firmware periodically to fix security vulnerabilities and improve the existing features. After firmware updating,
you can experience new features and have a better use experience. When a new firmware version is available, you will receive a
pop-up notification in the app. Please follow the instructions shown on the pop-up window to complete the update. A firmware
update usually takes 10-15 minutes.
To manually check for updates, go to Settings>MOWER>Device management > Firmware version.
To update the firmware successfully, the following conditions need to be met:
-The mower is in the charging station.
-The mower is connected to a network and the signal is strong (through 4G or Wi-Fi).
-The battery power is more than 20%.
-There is no mowing task scheduled in the next hour.
NOTE: Some new features might require the app and the mower to be updated to certain versions and above, please check our
release notes for more details.
WARNING
Do not power off the device or run other operations during the update.
42
3.9 Obstacle Avoidance
Obstacle avoidance features are designed to increase the performance of your mower and your safety.
Bumper sensor
Sensors are installed inside the Navimow’s front rubber bumper to detect obstacles. When the bumper bumps into an obstacle
and triggers the sensor, the mower will go backward and avoid the obstacle.
NOTES:
Your Navimow is able to avoid objects after bumping into them. However, it is still recommended to remove excess clutter
before mowing.
If your yard has a lot of trees and continuous obstacles, we recommend that you install an ultrasonic sensor for active
obstacle avoidance.
43
3.10 VisionFence Sensor
VisionFence Sensor can significantly improve Navimow's obstacle recognition and avoidance capability. It is sold separately and
can be installed on all Navimow models. Consult your dealer for further information.
The VisionFence Sensor is designed to achieve accurate obstacle avoidance by identifying and calculating grass and non-grass
objects. When the signal is weak, the mower will start avoiding obstacles through visual recognition. Thanks to the advanced
visual recognition algorithm, the sensor can identify obstacles and start avoiding obstacles when the mower is about 0.3 m away
from them. With the VisionFence Sensor, the mower can avoid some obstacles, such as trees and flowerpots, without setting
them as off-limit islands. However, there is a certain probability that the VisionFence Sensor will fail to recognize obstacles that
are too small (less than 10 cm in length and width), too thin, tilted, dangling, or easily confused with lawn. For example wire
fences, moss, ornamental grass, bushes, dirt, roots, leaves, etc.
With the VisionFence Sensor installed, the mower is more adaptable to complex yards. When the satellite signal is weak in areas
with challenging layouts, the VisionFence Sensor can identify the lawn's edge and allow the mower to keep mowing the lawn.
Separate from the mower, the VisionFence Sensor has its own Wi-Fi module to connect to the internet. The VisionFence Sensor
can function normally without network, but it must be connected to a Wi-Fi network when the firmware needs to be updated.
44
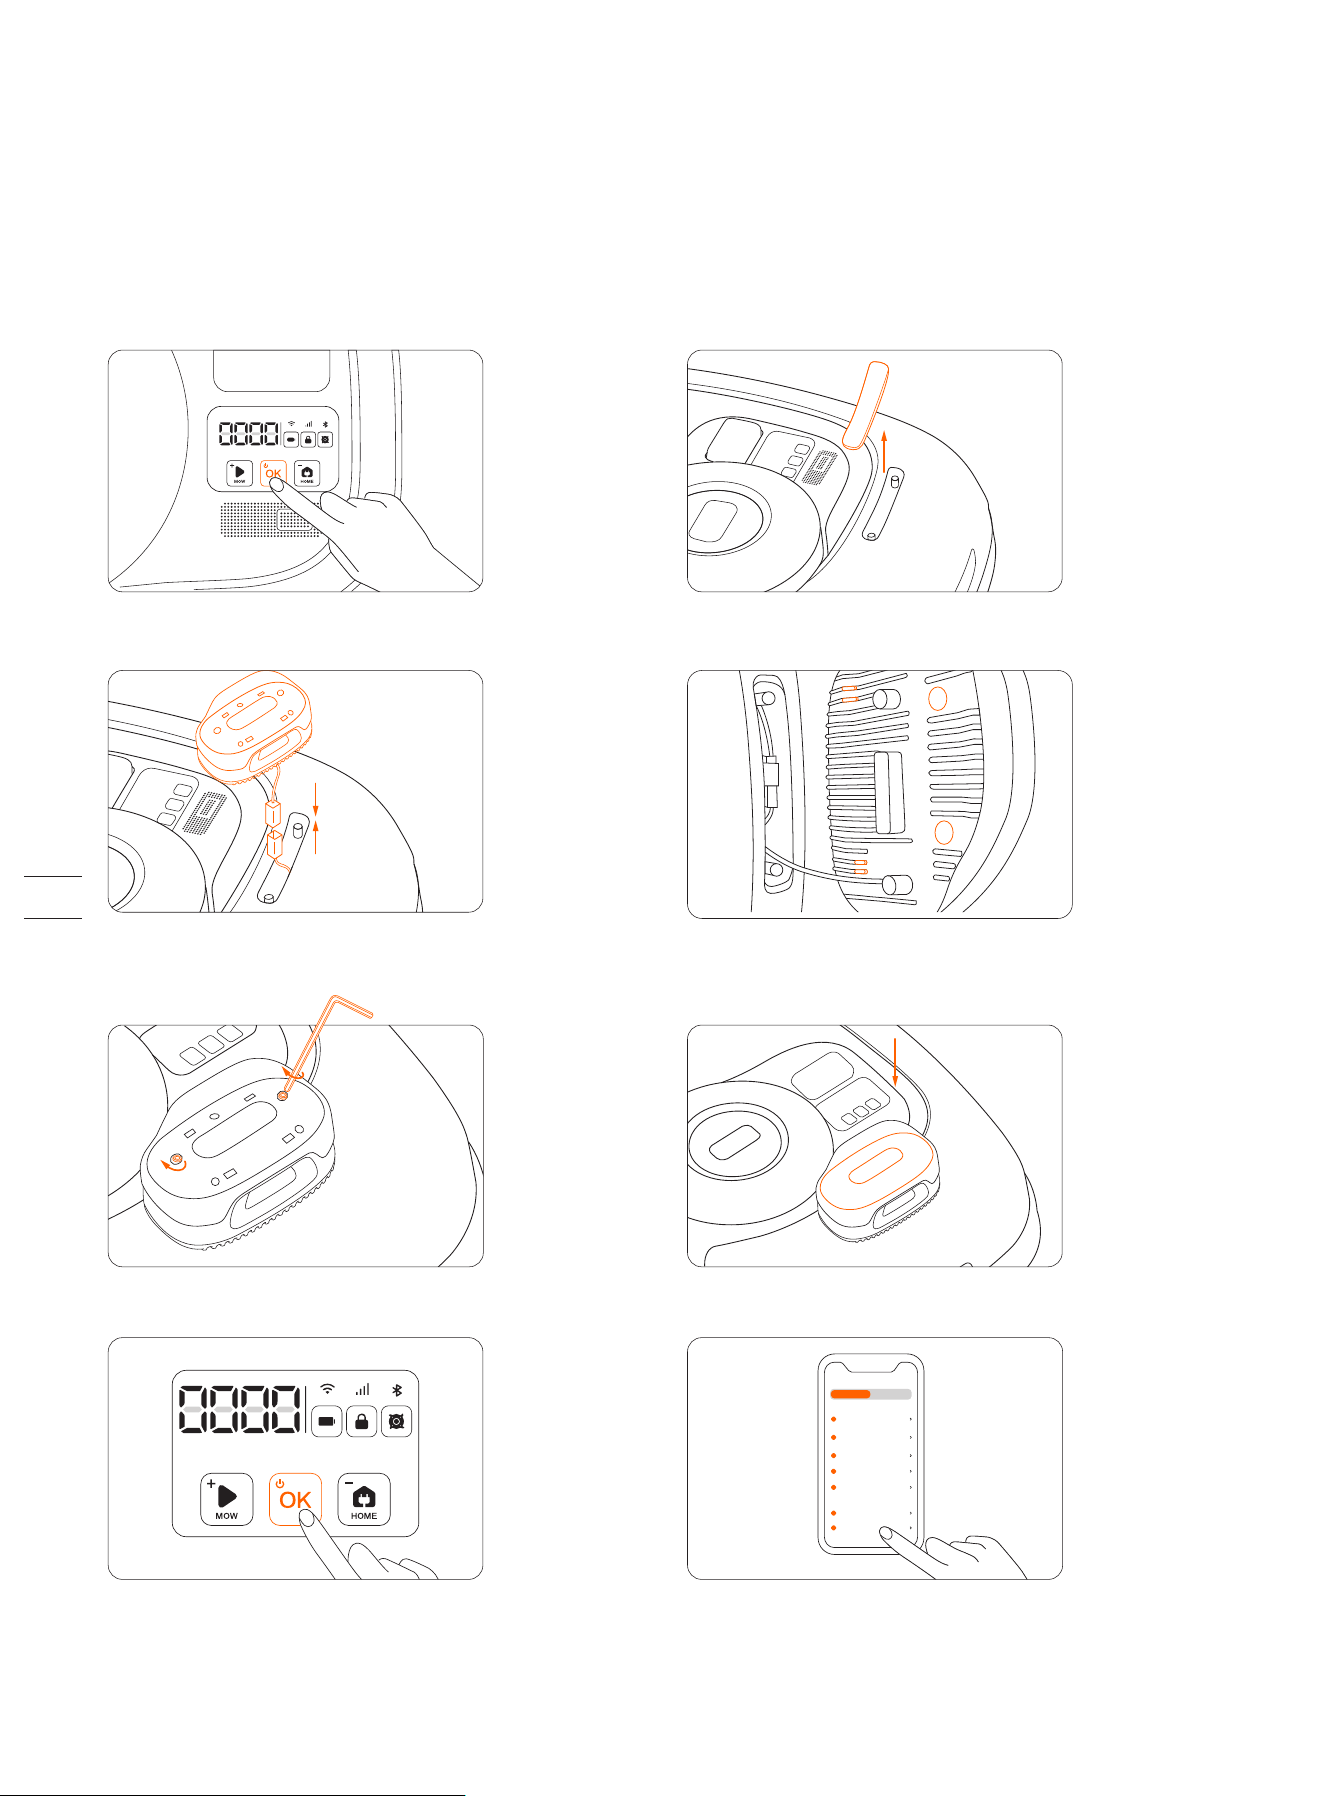
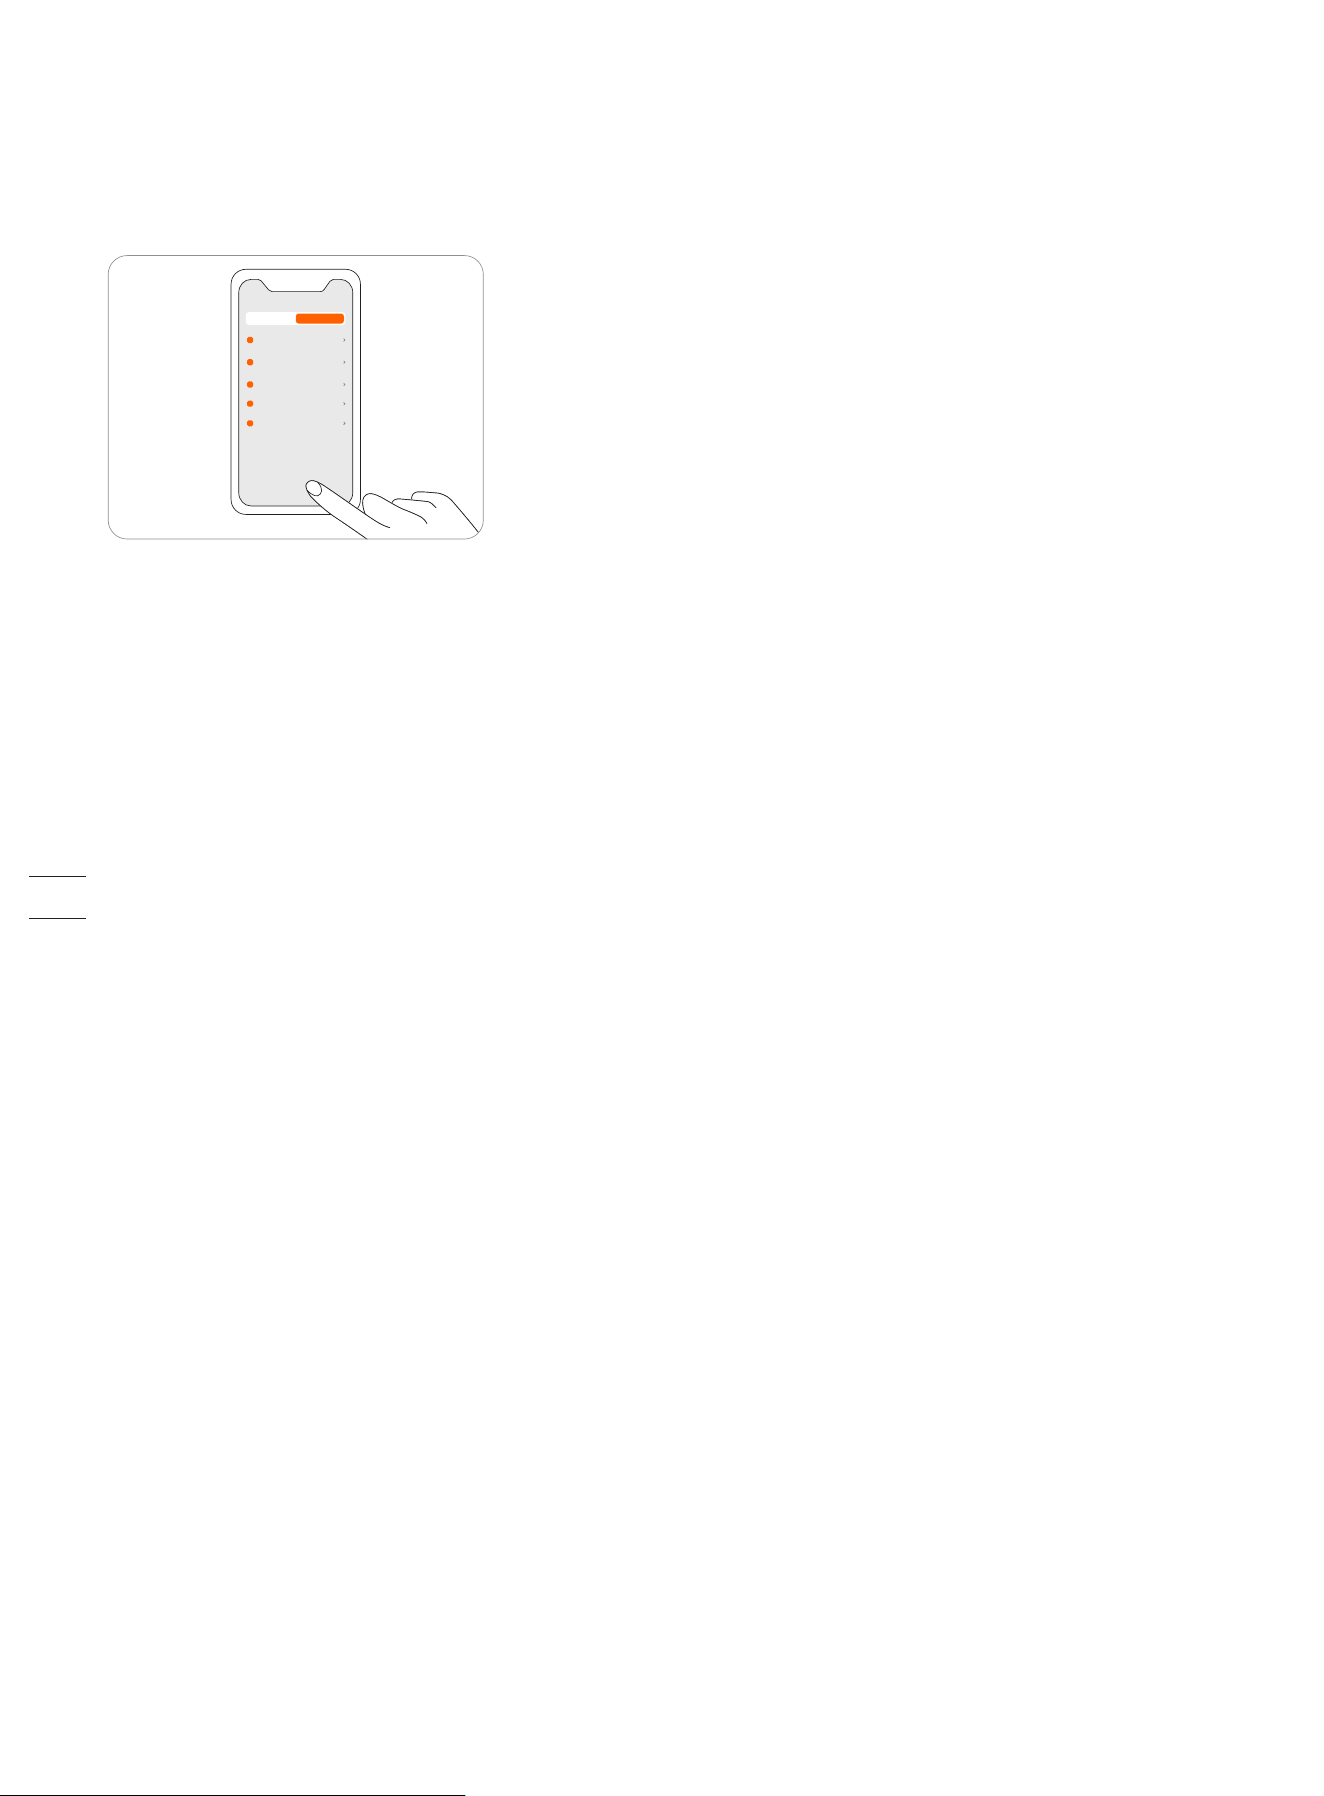
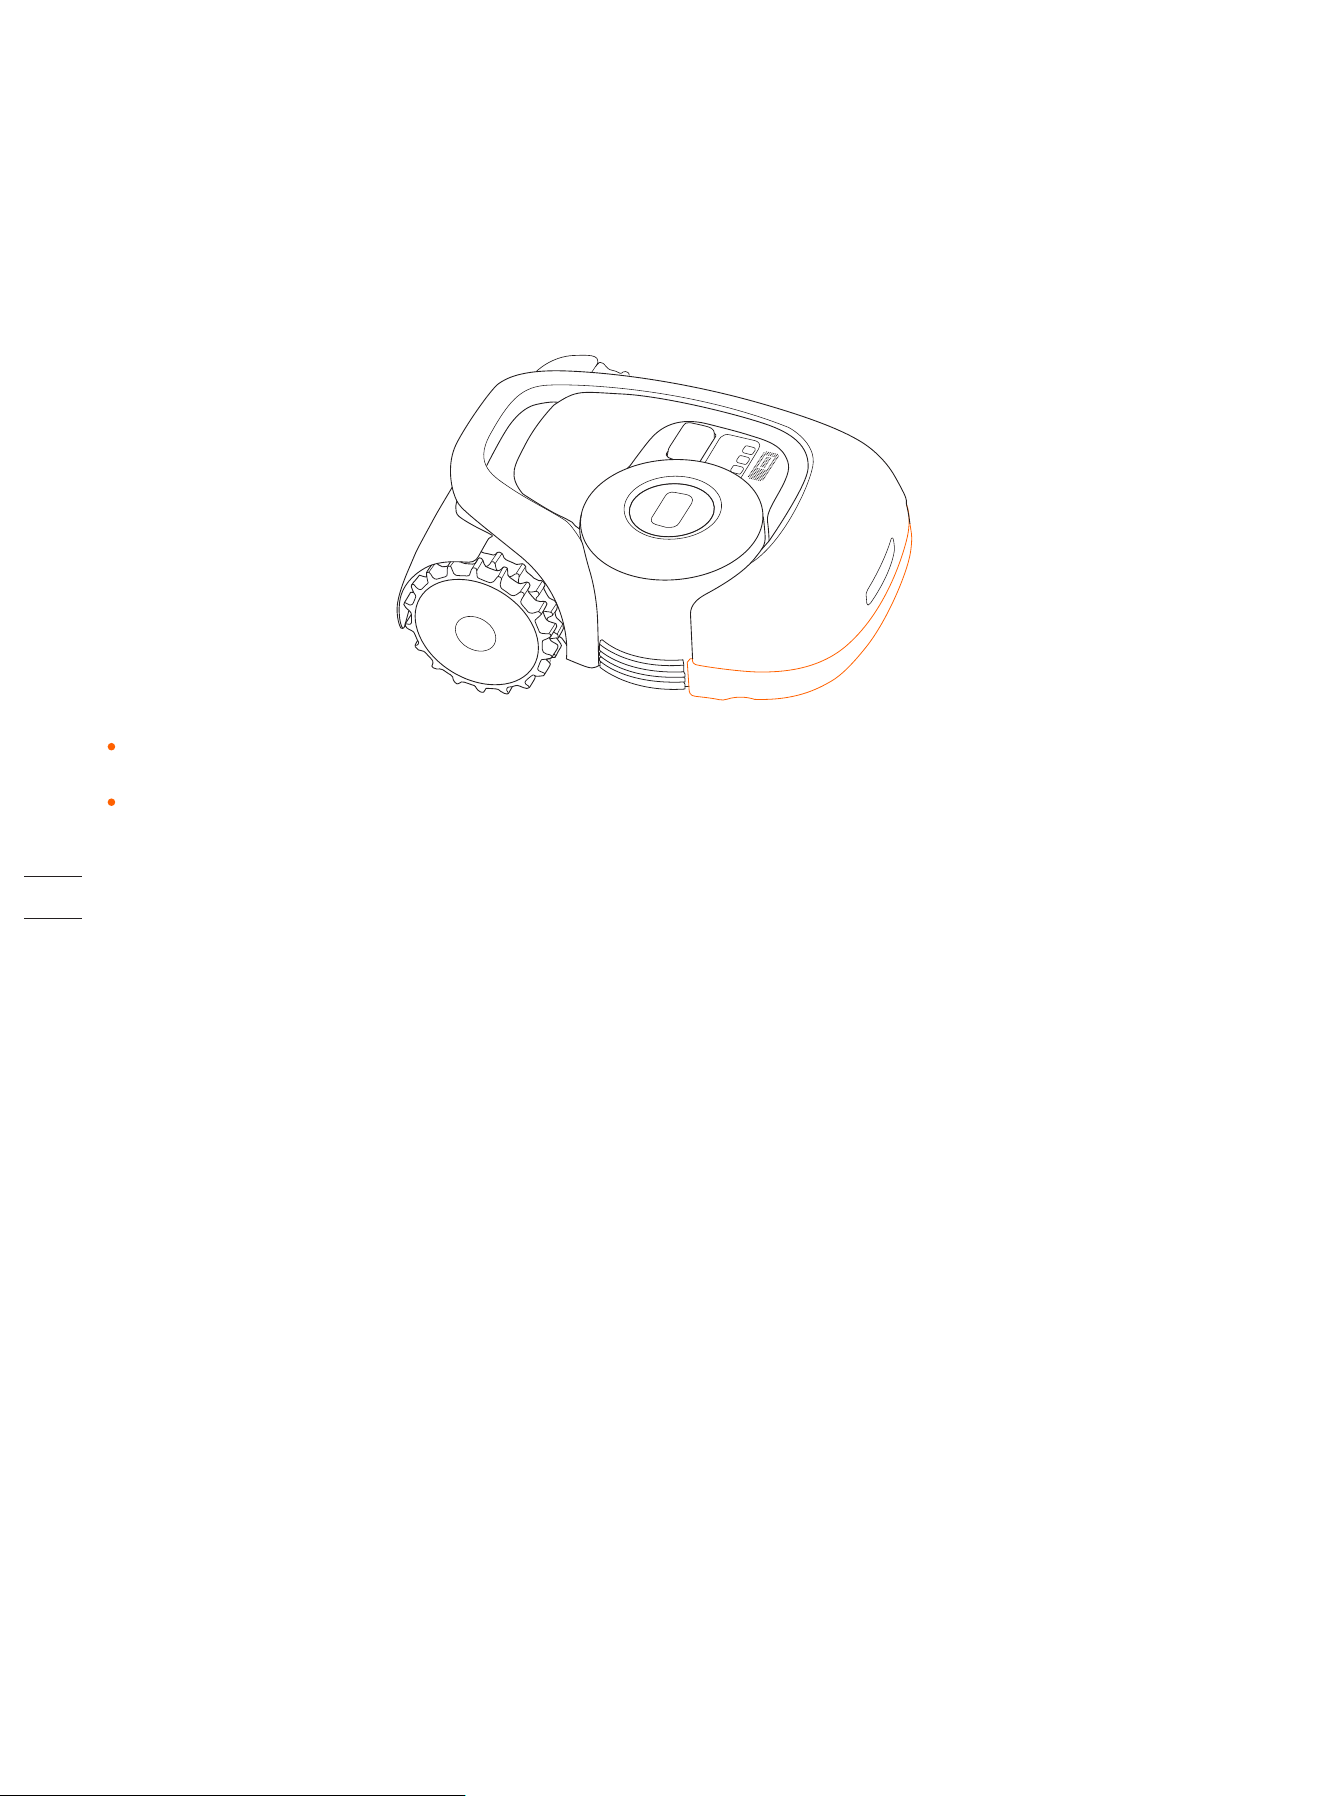
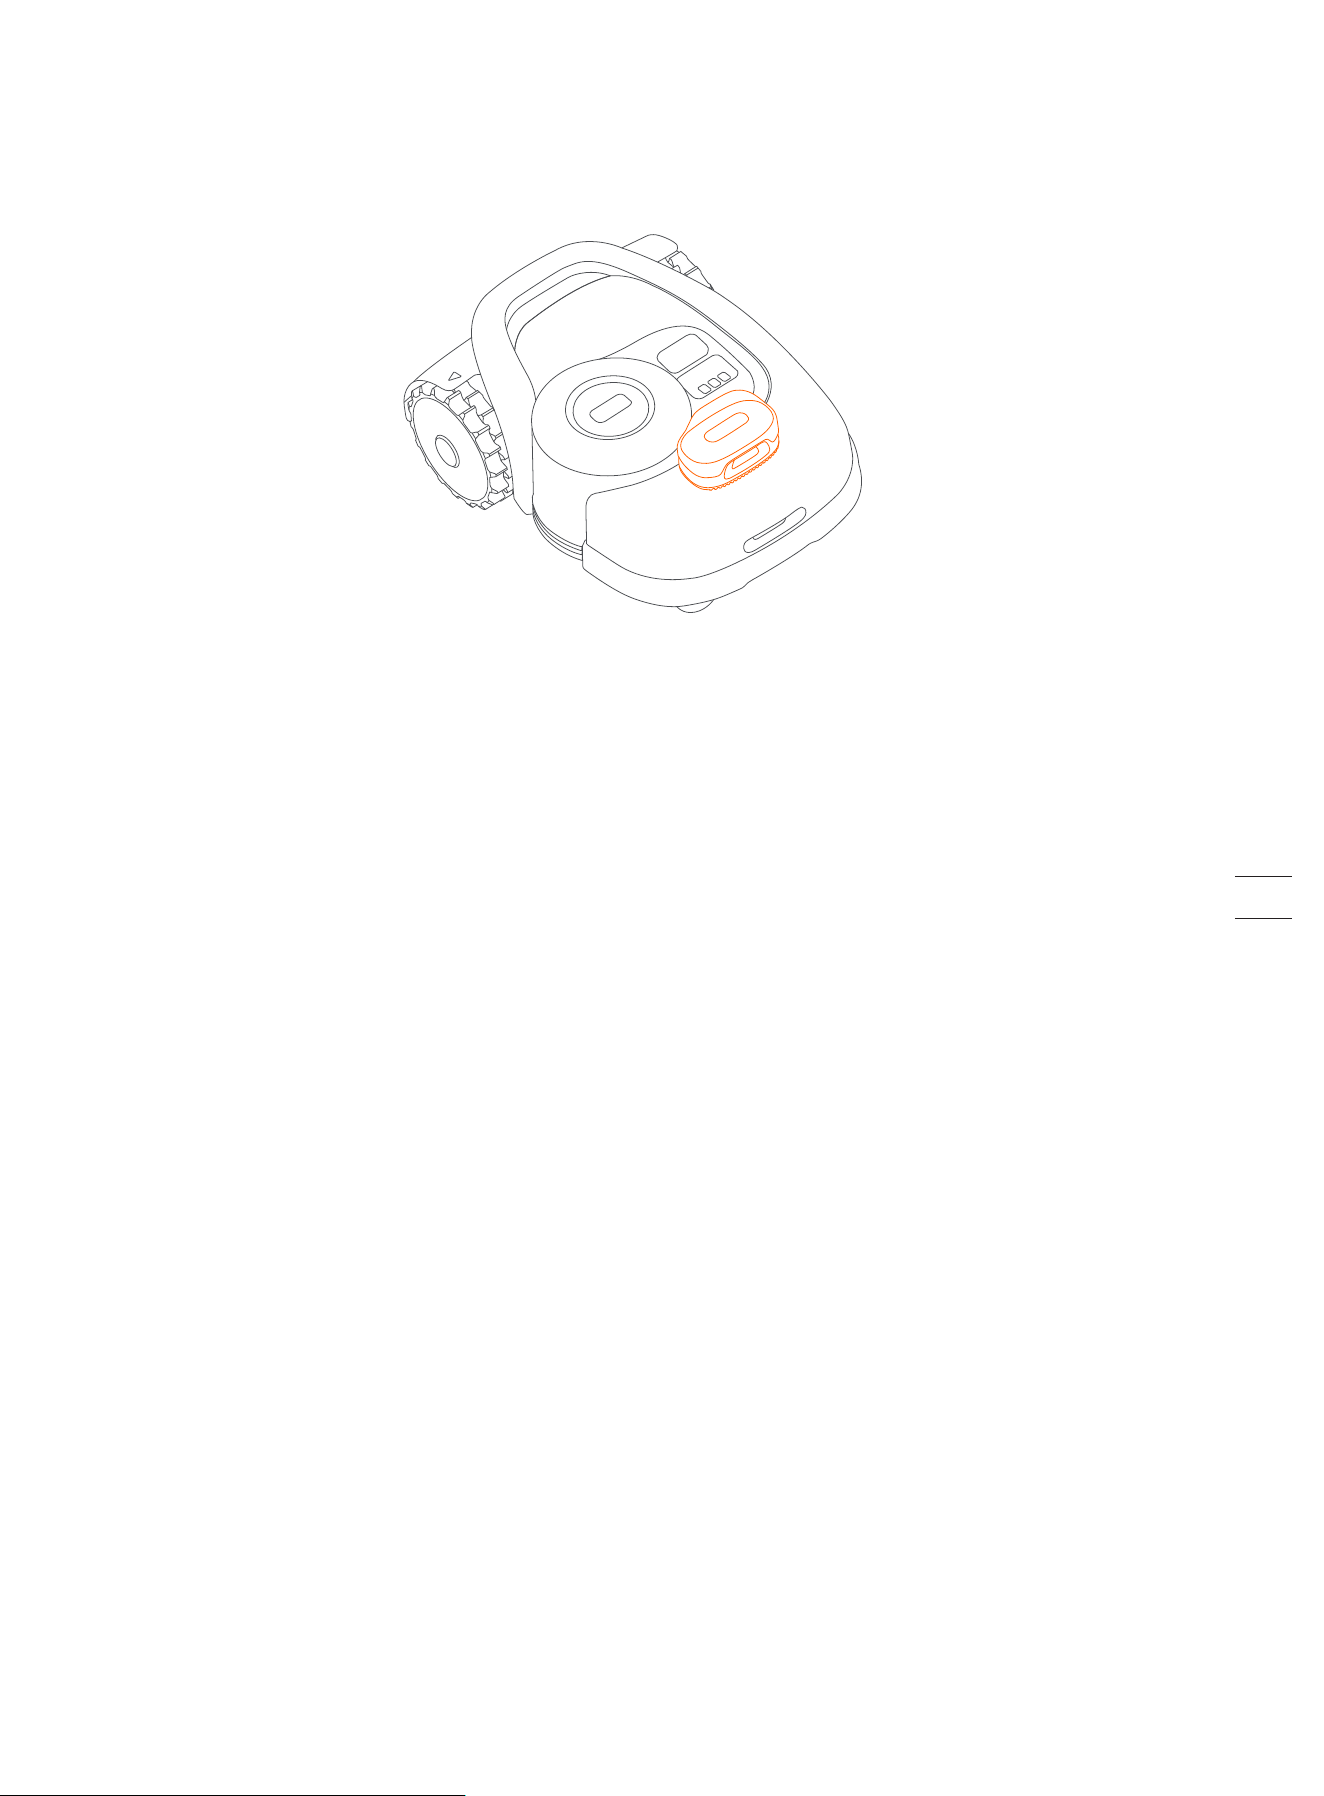
How to install VisionFence Sensor
How to change the VisionFence Sensor setting
You can go to Settings >MOWER>VisionFence Sensor to turn on/off the sensor, check the sensor firmware version and configure
the sensor network setting.
≥4s
MOWER APP
XXXXXXXXX
XXXXXXXXX
XXXXXXXXX
XXXXX
XXXXXXXXX
XXXXXXXXX
XXXXX
XXXXXXXXX
XXXXX
XXXXXXXXX
XX
XXXXXXXXX
XXXXXXXXX
4. Place the rubber stoppers and bumps
against the surface of the mower.
3. Connect the plug.
1. Power off the mower. 2. Take off the cover.
5. Tighten the screws. 6. Install the decorative cover.
7. Power on the mower. 8. Tap VisionFence Sensor in the Navimow
app to configure the network.
NOTES:
1. VisionFence Sensor may not work well in low-light situations, resulting in limited obstacle avoidance performance in some complex
yards.
2. Clean the lens of VisionFence Sensor by spraying water regularly, avoiding the lens being obscured by stains or mud.
3. For the best obstacle avoidance effect, we recommend that obstacles larger than 1 m and smaller than 0.1 m in diameter
should be set as off-limit islands.
4. To update VisionFence's firmware, please connect it to a Wi-Fi first. Make sure the charging station is also in the coverage of a
2.4 GHz Wi-Fi network.
45
3.11 Accessories (optional)
The following accessories are sold separately. Please consult your dealer for details.
Antenna Extension Kit
Antenna Extension Kit is for antenna installation on a wall or roof, improving satellite signal.
Center column×1Extension cable×10m Expansion tube×4 Self-tapping screw×4Installation base×1
CAUTION:
Whenever the location of the antenna is changed, the existing map cannot be used anymore,
please create a new map for your lawn.
Overview
How to install
Connect the extension cable with the charging station. In case the cable is still not long enough, connect another 10 m
extension cable. The total length of the extension cable can be 20 m. Insert the power plug into a suitable power outlet.
Affix the center column on the installation base. Install the GNSS antenna.
1 2
3
46
Blade Assembly
Blades for regular replacement. For advice and how-to guides for blade replacement, see 4.2 Replace Blades.
Spare blades and bolts
12 12
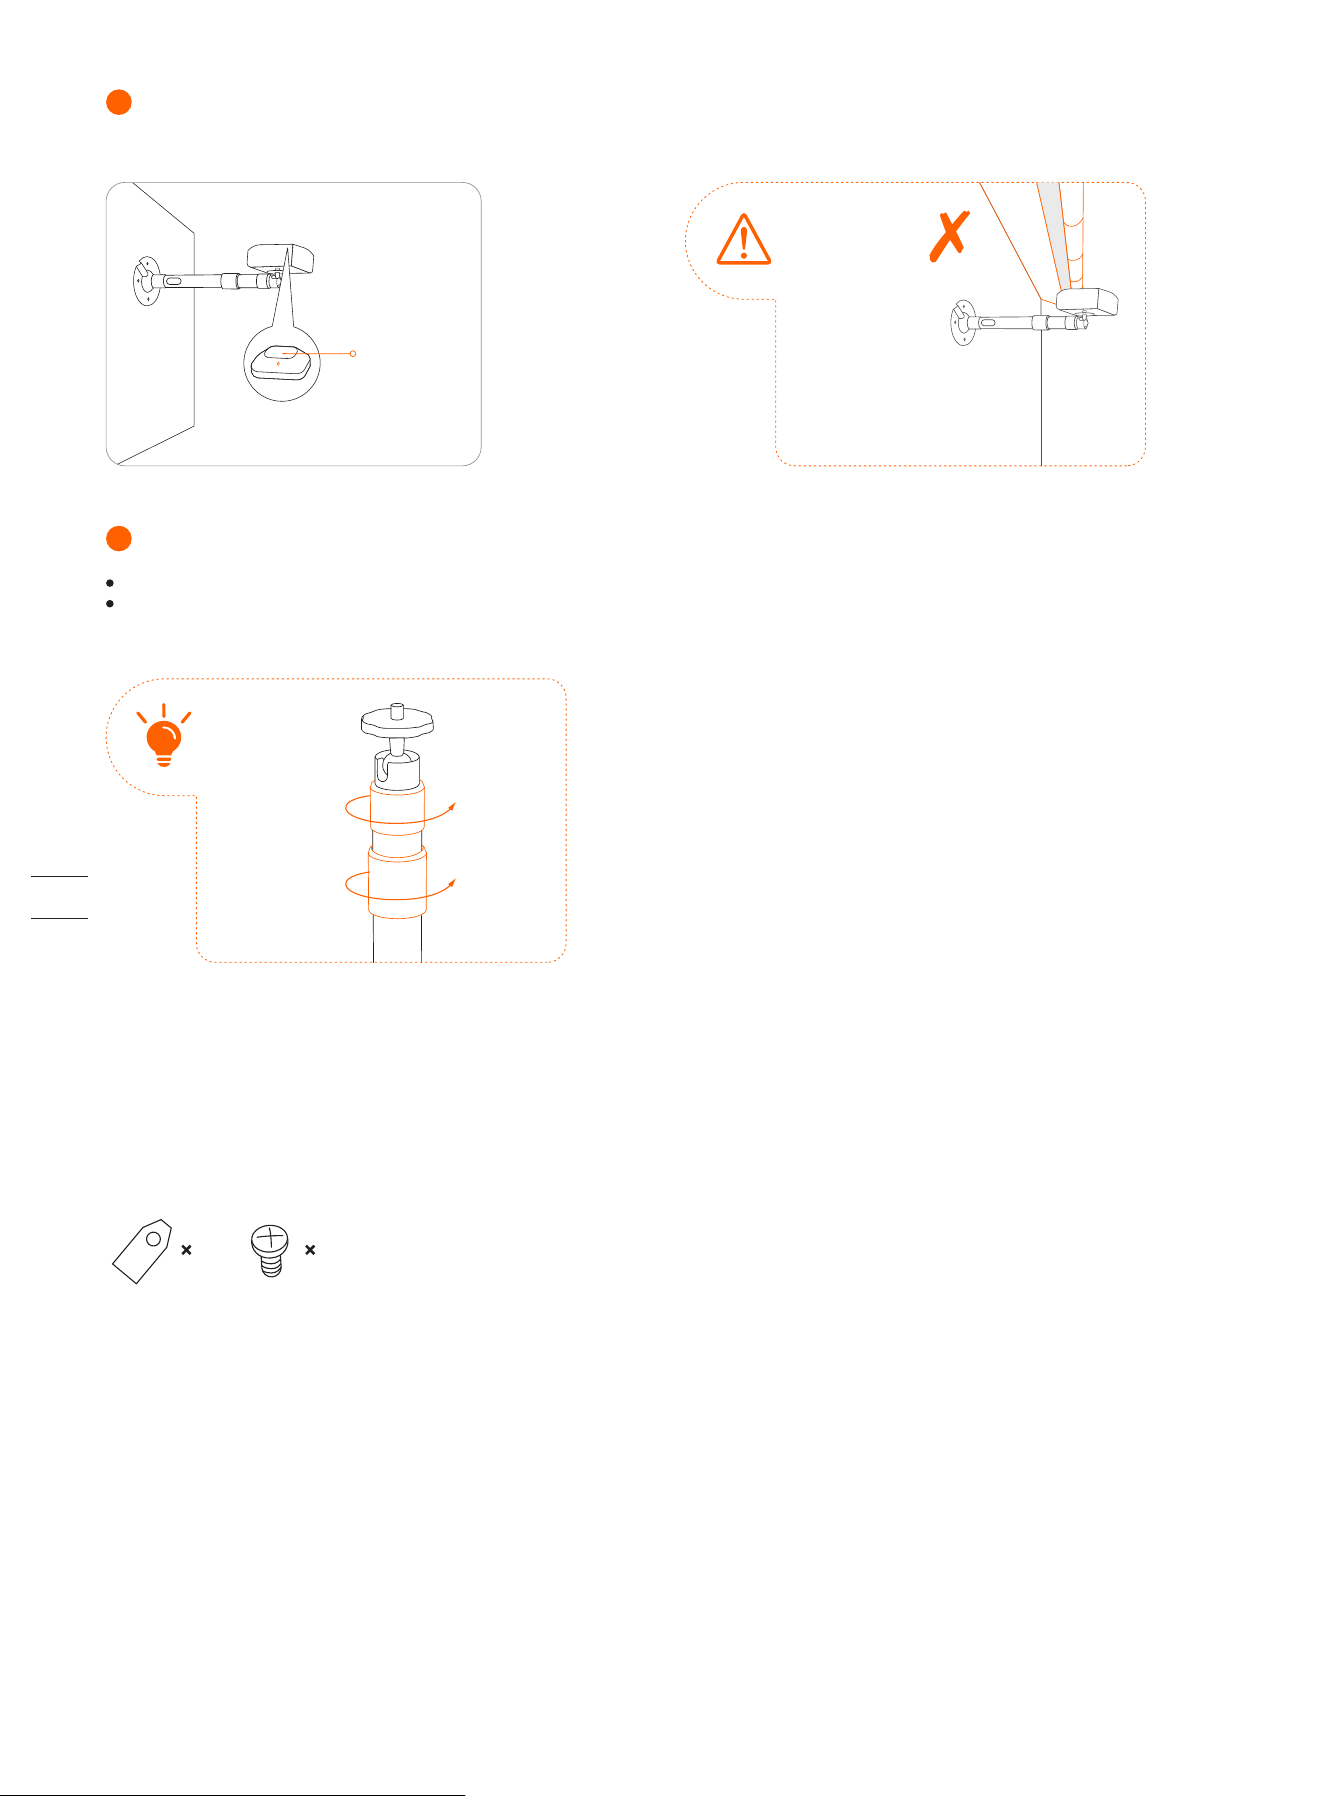
Hold the GNSS antenna to a place where you want to install it. Make sure that the top surface of the antenna points straight
up. When the signal indicator on the antenna becomes solid green, the signal is strong.
Make sure
there is
nothing
blocking the
antenna.
For a wooden surface, just secure the base with the self-tapping screws.
For harder surfaces (like concrete, brick and stone), drill two 8 mm holes, insert the expansion tubes, and then secure the base
by tightening the screws.
You can rotate the
collars to adjust the
angle of the
antenna and the
length of the center
column.
Top surface
4
Secure the installation base.
5
47

4. Maintenance
To achieve better mowing results and increase the service life, be sure to keep the mower clean and the blades in good
condition. Inspection and maintenance should be carried out by an adult every week. Any damaged or worn parts should be
replaced.
DO NOT perform maintenance when wearing open sandals or barefoot. Always wear long trousers and work shoes
when servicing the mower.
4.1 Cleaning
Use a soft brush or cloth to clean the exterior of the mower thoroughly. DO NOT clean with alcohol, gasoline, acetone, or other
corrosive/volatile solvents. These substances may damage the appearance and internal structure of your mower.
For proper docking, periodically inspect and clean the charging station from debris and mud. Make sure all connecting parts of
the
charging station, the extension cable, and the power supply are not blocked.
A. Chassis and blade disc
If the chassis and blade disc are dirty, use a brush or a water hose to clean. DO NOT use a high-pressure washer. At the same
time, make sure that the blade disc rotates freely and the blades can pivot freely.
CAUTION: High-pressure water can leak into the sealings and damage electronic and mechanical parts.
B. Blade fender
Check the blade fender regularly. If mud, grass clippings or other objects gather on the blade fender, remove them with a dry
brush or scraper.
C. Wheels
Grass on the wheels can affect how the mower performs when climbing slopes. Remove mud or other objects stuck in between to
ensure strong grip.
D. Front wheels (universal wheels)
Inspect and clean universal wheels regularly. If the wheels are stuck, clean off the debris and lubricate the wheels.
E. Rain sensor
Check the rain sensor regularly and make sure the rain sensor is not covered by mud, grass clippings or other objects. You can
either wash it or clean it with a soft brush. After cleaning, dry the sensor area.
WARNING
Before cleaning, make sure the mower is powered off.
When the mower is upside down, it must be powered off.
48
4
3
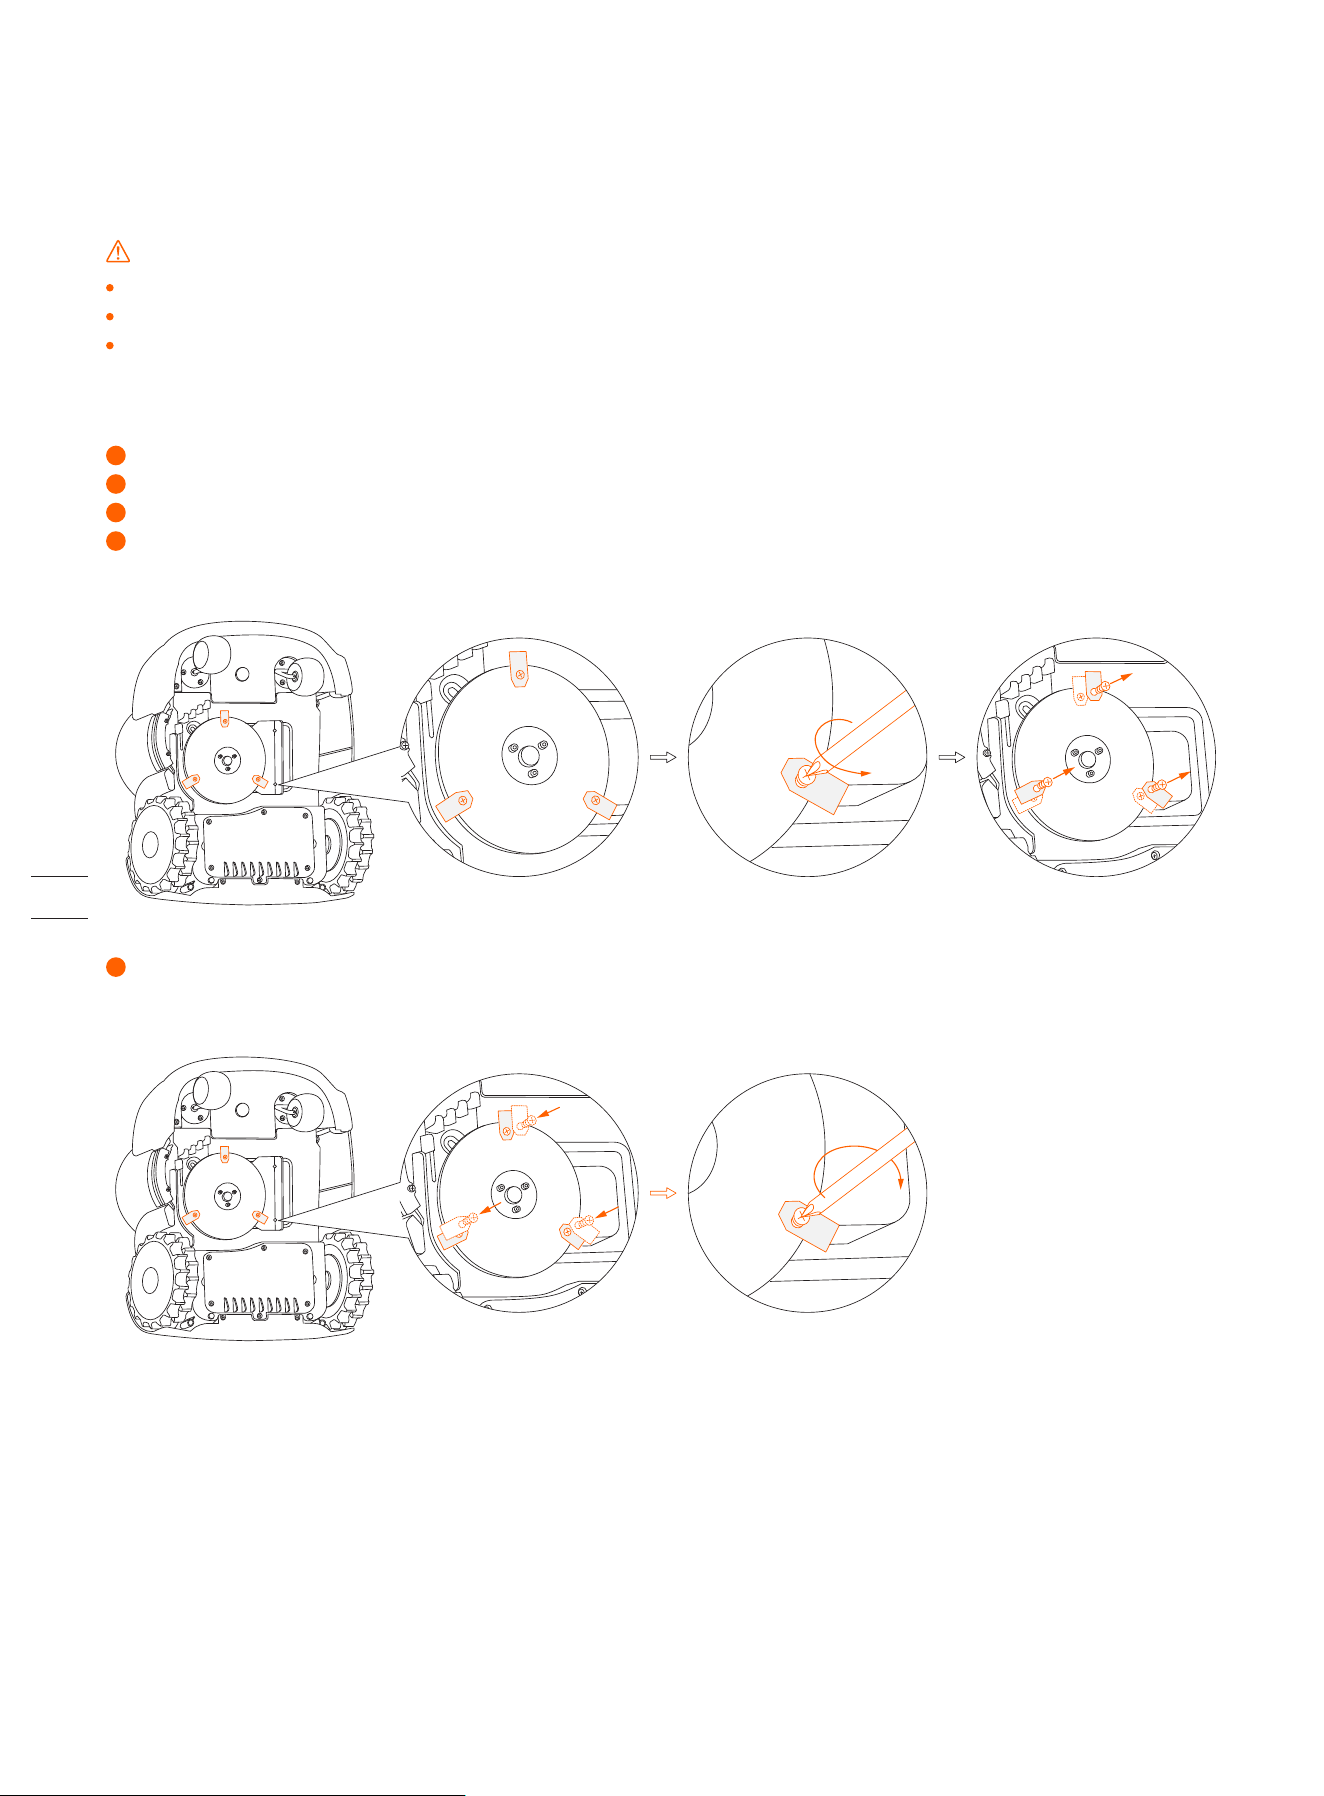
How to replace the blades
Turn off the mower.
To avoid scratching, place the mower on a soft and clean surface in an upside-down position.
Use a cross-tip screwdriver to loosen the three screws.
Remove the screws and blades.
1
2
Fasten the new blades and screws (Torque: 1 N·m). Make sure the blades can pivot freely.
5
Note: After fastening the blades and screws the blades will still seem loose. Refer to Blade in 1.4 Parts and Functions.
4.2 Replace Blades
If the mower is used on a regular basis, it is recommended to replace the blades and screws every 1–2 months to ensure safety
and better mowing results. Replace all three blades and their screws at the same time for a safe cutting system.
WARNING
Wear heavy gloves when you inspect or service the blade.
Only use the right type of screws and original blades as approved by Segway. Blade model: HA002E.
DO NOT reuse the screws. Doing so can cause serious injury.
49
4.3 Transportation
To protect the mower, use the original packaging for long-distance transportation. Before lifting, moving, or transporting the
product, turn it off. Handle with care and avoid violent force, such as throwing and heavy pressure. Never pick up or carry the
mower while the motor is running.
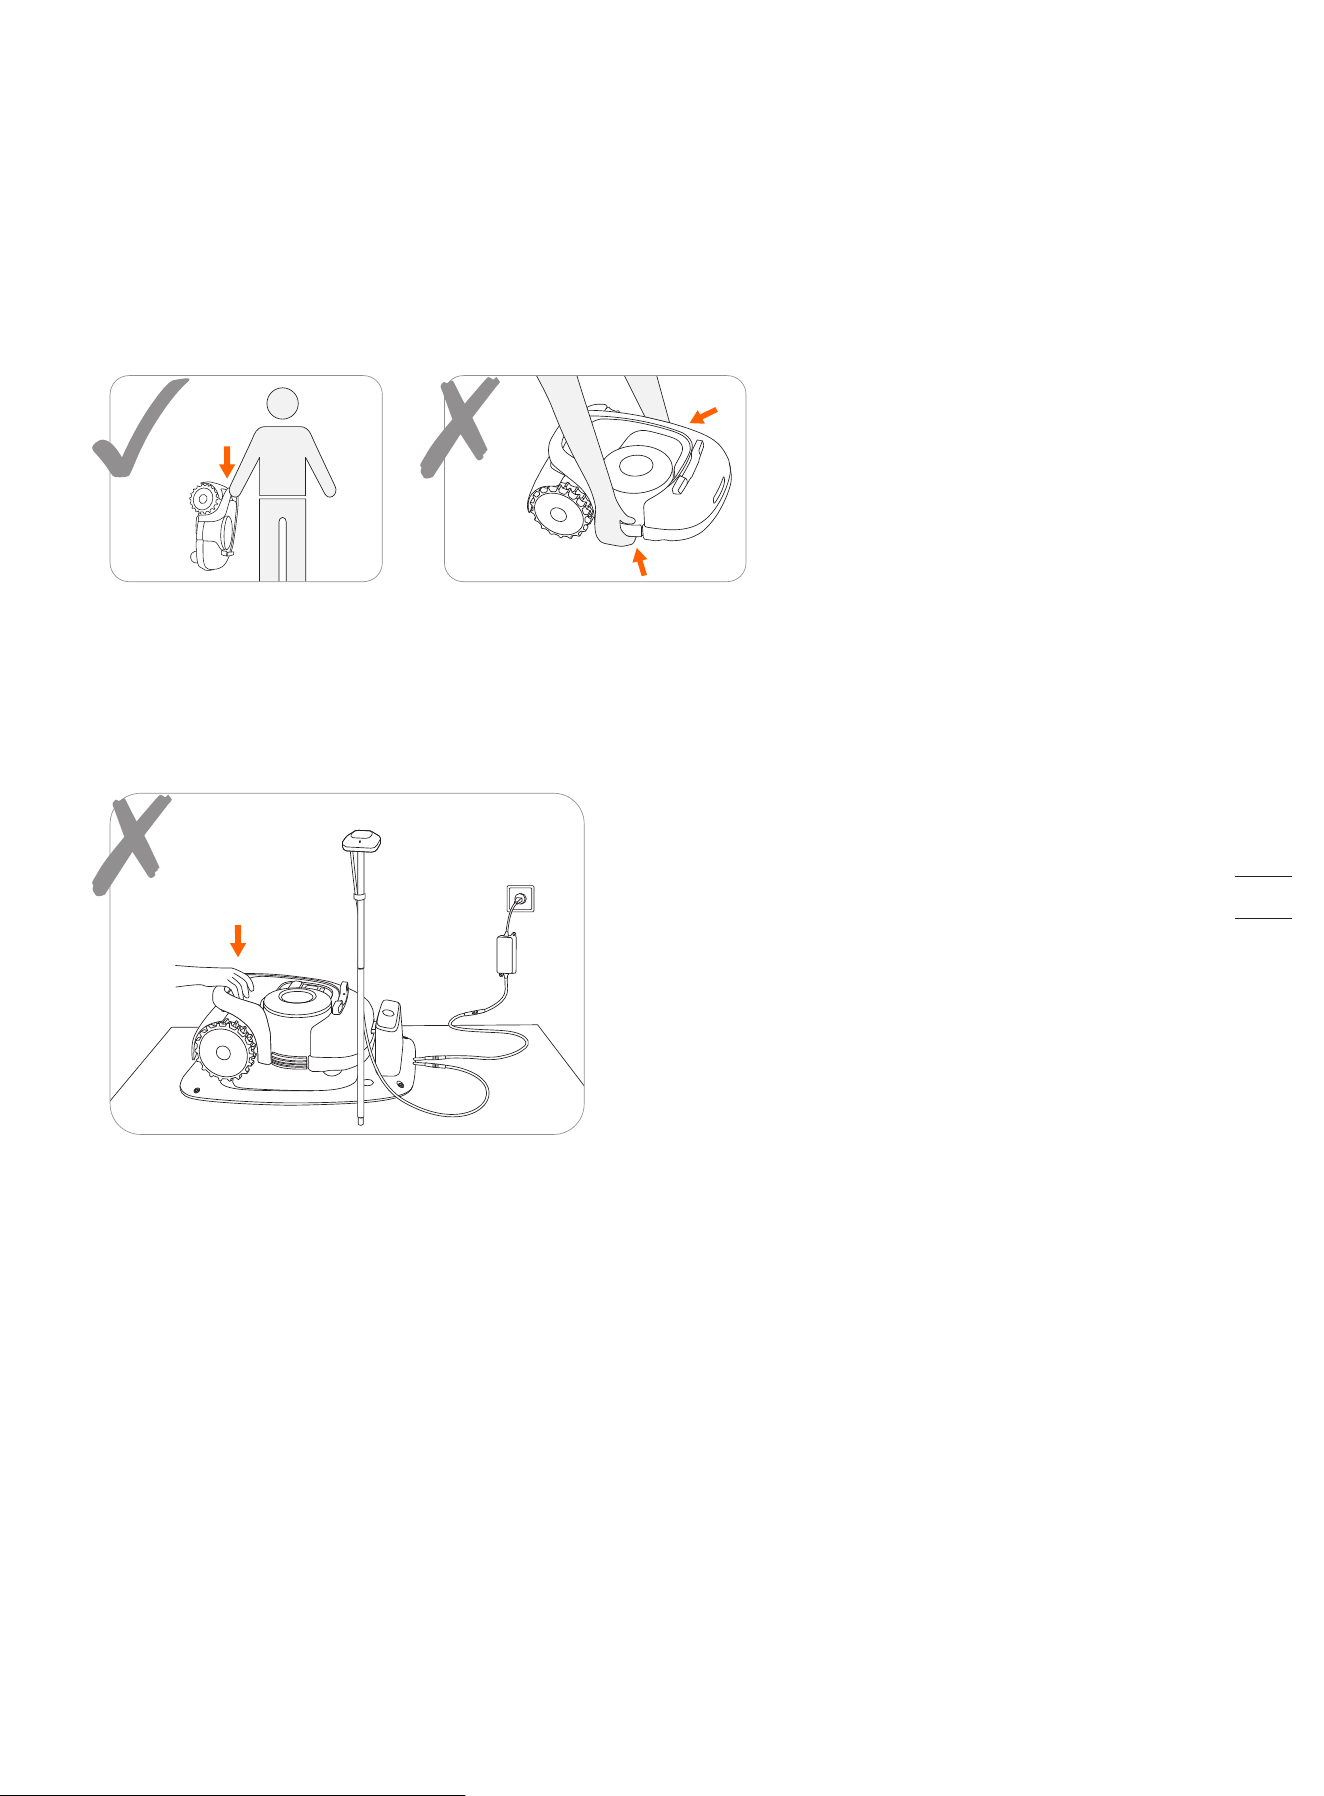
How to move or lift properly
Carry the mower by the handle, with the blade disc facing away from your body.
CAUTION:
To avoid damage to the mower and/or the charging station, DO NOT lift the mower by the handle when it's
parked in the charging station. Remove the mower from the charging station before lifting the mower.
4.4 Battery
Power off the mower and charge its battery to 85% or higher before storage to avoid over-discharge and damage to the
electrical components. Charge the mower every 120 days for long-time storage.
Battery damage caused by over-discharge will not be covered by the Limited Warranty.
DO NOT use or store the battery under extreme temperature conditions, i.e., above 50°C (122°F) or below -20°C (-4°F).
Temperature protection will be activated at 0°C (32°F)/50°C (122°F), the battery won't be charged unless the temperature
reaches 5°C (41°F) or above/reduces to 45°C (113°F) or below.
When the battery temperature is too high or too low, the mower will not start mowing. You will also receive a push notification in
the Navimow app.
NOTE: The battery life depends on how often the product is used and the total working hours. When the operation time is
significantly shorter than usual per full charge or the lawn is not well-cut, consider replacing the battery.
50
WARNING
Use only the original battery pack or that of the same model as specified by Segway. Each mower contains one battery pack.
Depending on the specific mower model, the rated capacity of the battery is 5200 mAh, 7800 mAh, or 10400 mAh.
Do not use non-rechargeable batteries. For the purposes of recharging the battery, only use the detachable supply unit
provided with this appliance. For the European Union: use only with NBW32D002D5N - EU supply unit. For the United Kingdom:
use only with NBW32D002D5N - UK supply unit.
DO NOT dismantle or puncture the battery casing. Keep away from metal objects to prevent short circuit. Keep away from fire,
heat and direct sunlight.
For information about battery and electrical waste, please contact your household waste disposal service, your local or
regional waste management office, or your point-of-sale.
The battery compartment is not supposed to be opened regularly. Only open the battery compartment when you need to change the
battery.
The battery pack contains electrolytes. If the electrolyte leakage comes into contact with your skin, wash off with soap and
water immediately. Get medical help in case of eye contact and immediately flush the eyes with plenty of water for at least 15
minutes without rubbing.
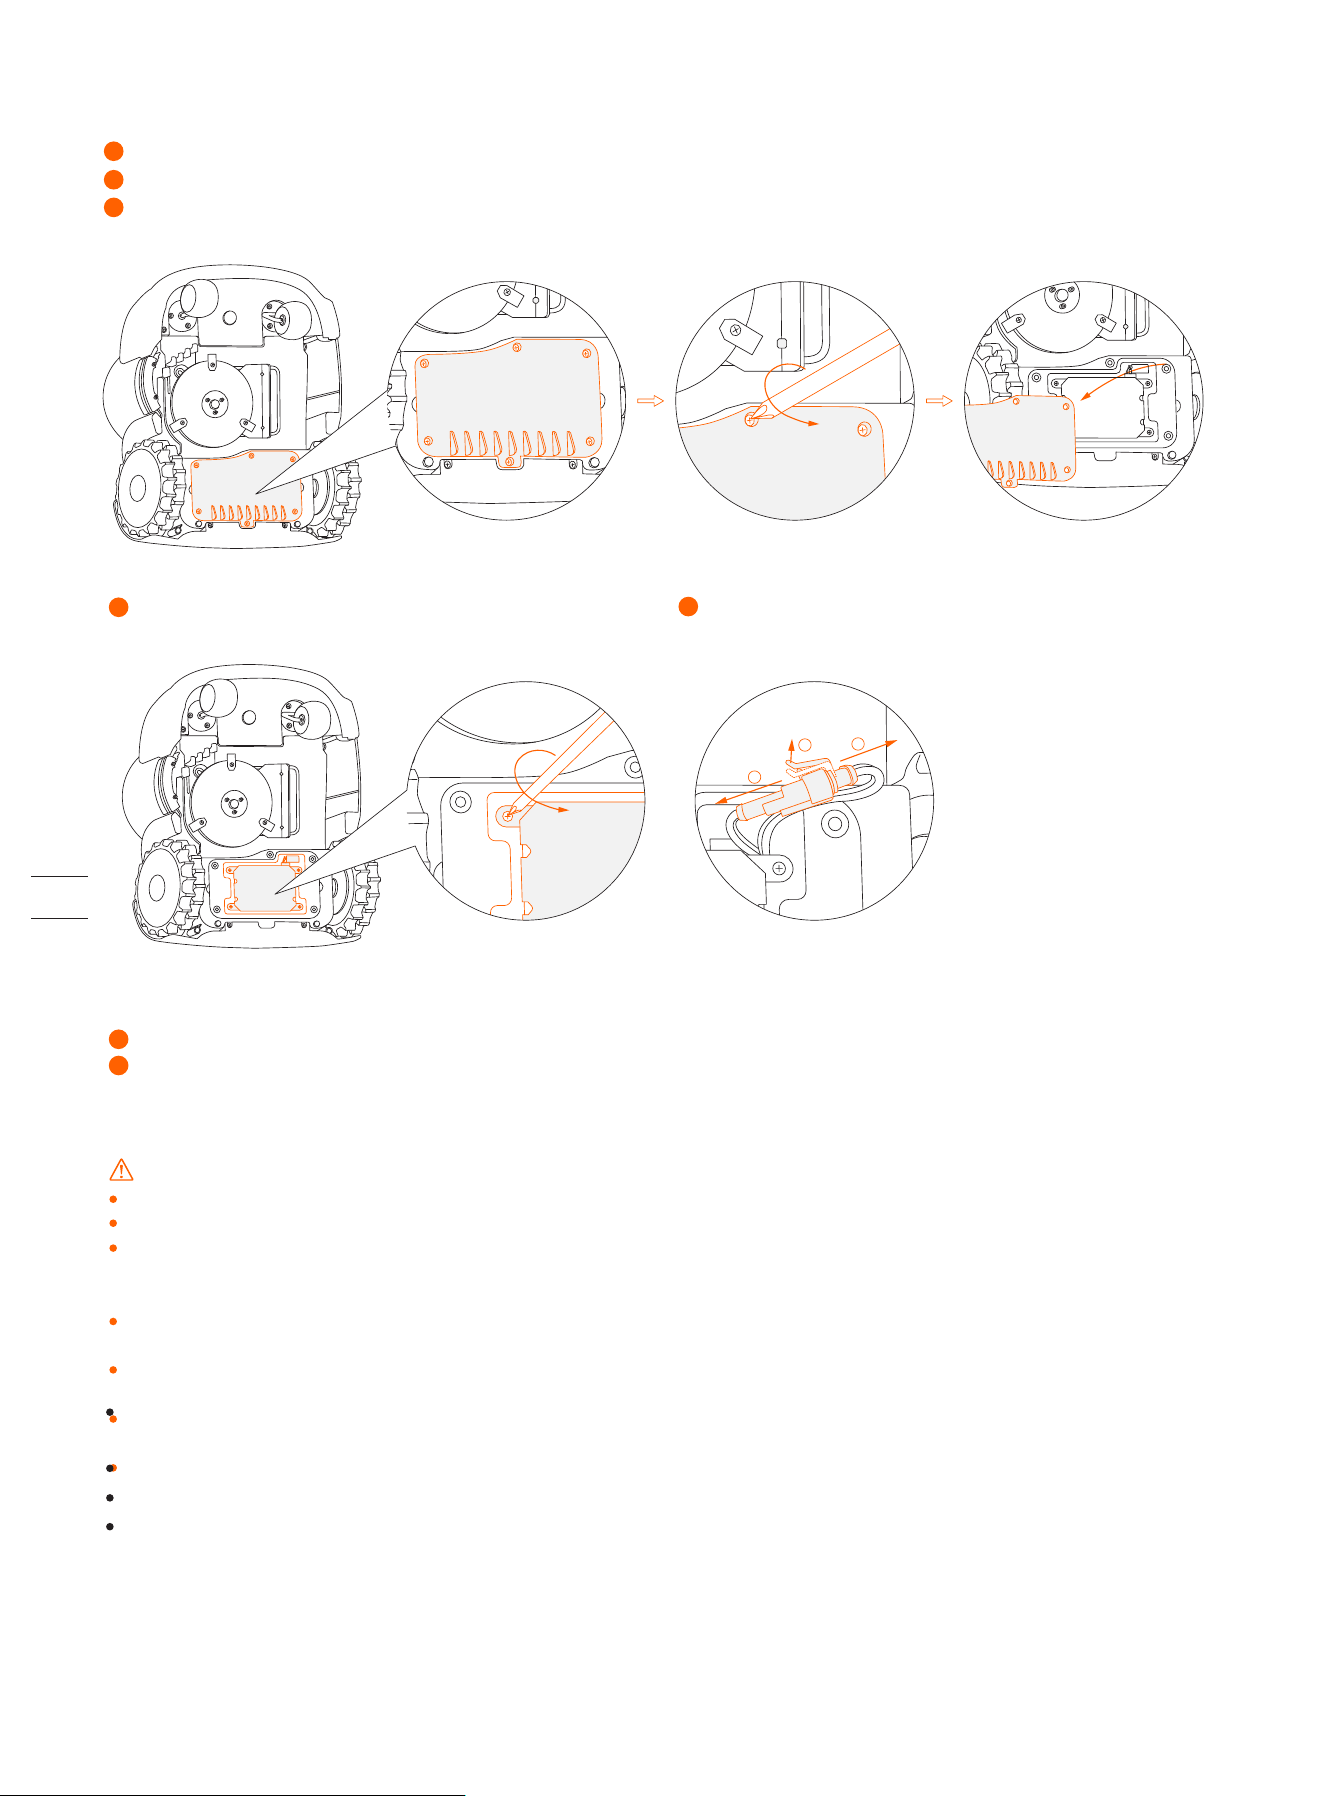
Loosen the 4 screws in the battery compartment.
4
Take out the battery pack and replace it with the new one.
Connect the plugs and tighten all the screws.
6
7
Disconnect the two plugs.
5
1
2
2
3
How to replace the battery
Turn off the mower.
Place the mower on a soft and clean surface in an upside-down position.
Use a cross-tip screwdriver to loosen the 6 screws on the battery compartment.
1
2
51

4.5 Power Supply
Disconnect the power supply:
- Before clearing a blockage;
- Before checking, cleaning or working on the machine;
- After striking a foreign object to inspect the machine for damage.
Regularly examine the cord, plug, enclosure and other parts. If any damage or signs of aging are found, stop using
immediately.
WARNING
DO NOT operate a damaged power supply. If the supply cord is damaged, it must be replaced by the manufacturer, its service agent
or similarly qualified persons in order to avoid a hazard. If the extension cable is defective, please replace it with the 10-meter long
cable as approved by Segway.
DO NOT connect a damaged cord to the power supply or touch a damaged cord or extension cable before it is disconnected
from the power socket. Damaged cords can lead to contact with live parts.
DO NOT use the power supply with any other product or battery, otherwise there will be risks of personal injury, fire or
electrical shock. Product safety cannot be guaranteed with other than original batteries.
DO NOT charge when the battery is leaking.
Keep the extension cable away from moving hazardous parts to avoid damage to the cords which can lead to contact with live
parts.
Recommendation
Connect the mower and/or its peripherals only to a supply circuit protected by a residual current device (RCD) with a tripping
current of not more than 30 mA.
4.6 Storage
Before storage, power off the mower and charge its battery to 85% or higher to avoid over-discharge, which will cause
permanent damage.
Store in a cool and dry place indoors. Exposure to sunlight and temperature extremes (both hot and cold) will accelerate the
aging process of the components and may permanently damage the battery.
Keep the mower, charging station and power supply away from heat sources (such as stoves, radiators, etc.) or chemicals.
Protect the power supply from moisture and keep it in a well-ventilated place.
WARNING
When there is a risk of a thunderstorm, unplug the power supply from the power socket. Disconnect all cables and wires
connecting to the charging station. Reconnect when there is no longer a risk of thunder.
Extra requirements for winter storage
The mower
Clean the mower thoroughly before storage. Check the components subject to wear such as the blades. Repair or replace
them if they are in poor condition. Store the mower in a dry and frost-free place, while standing on all wheels, preferably in
the original packaging.
The charging station and GNSS antenna
Unplug the power supply from the power socket and disconnect it from the charging station. Disconnect the GNSS antenna
from the charging station and take it down from the standing pole or the antenna extension kit. Keep the charging station and
GNSS antenna indoors and out of direct sunlight.
For more information, visit https://navimow.zendesk.com/hc/en-001/articles/11039122526489
52
4.8 Others
Keep all screws, nuts and bolts tight to ensure normal and safe operation.
Tyres supplied with the product are to be mounted on the wheel by a professional repairer. Removing the wheels is complicated
and incorrect assembly can lead to instability and malfunctions.
To ensure good grip of the tread, keep the drive wheels (rear wheels) clean by removing any mud with a brush.
The chassis compartment behind the bumper must be opened and resealed by authorized service technicians ONLY. Servicing
by yourself can void the Limited Warranty.
NOTICE: INSURANCE
YOUR INSURANCE POLICIES MAY NOT PROVIDE COVERAGE FOR ACCIDENTS INVOLVING THE USE OF THIS
PRODUCT. TO DETERMINE IF COVERAGE IS PROVIDED, PLEASE CONTACT YOUR INSURANCE COMPANY OR
AGENT.
4.7 Recycling and End-of-life Disposal
DO NOT treat this product as domestic waste. For recycling information, contact your domestic waste service, your municipality, or
point of sale.
WARNING
DO NOT dispose of this product in a landfill, by incineration, or by mixing with household trash. Danger or serious injury can occur
because of the electrical components.
53

5. FAQ and Troubleshooting
The following chart offers a guide to help identify an issue, and if possible, repair by yourself. When the problem cannot be solved,
consult an authorized dealer or repairer.
Abnormal vibration when the mower is operating
Delayed mower movement when laying the boundary
via the app
The mower does not go back to the charging station
The mower does not work according to the schedule
1. The GNSS antenna on the mower is covered or blocked
2. The GNSS antenna or charging station is covered or
blocked
3. The firmware version is too old
1. Make sure the mower is not covered by anything.
2. Remove anything that is covering or blocking the charging station,
or relocate the GNSS antenna to a place with a good signal.
3. Update to the latest firmware
1. When the mower temperature returns normal, try
charging again.
2. Connect the charging station to the power supply
and plug it into the power socket.
3. Clean the contact strip.
1. Make sure the STOP button is completely released.
Turn off the mower and check if there is any foreign object
stuck in the STOP button. If yes, remove the object and try
mowing again.
2. Charge the mower battery to ≥85%.
3. If the rain sensor is triggered, the mower cannot start
working. Wait for the water to dry up or turn off the rain
sensor in the app.
1. Aged battery pack
2. Lawn condition (long grass, changed garden
layout, etc.)
1. The STOP button is pressed down or jammed
and the mower cannot start automatically
2. Low battery
3. Water on the rain sensor
1. The GNSS antenna is blocked
2. The charging station is covered or blocked by
obstacles
3. Items are blocking the upper surface of the mower so that
the built-in GNSS antenna cannot receive the signal well
Remove all obstacles covering, blocking or surrounding the
charging station and the antenna.
1. High/low battery temperature
2. The charging station is not connected to the
power socket
3. The contact strip is unclean
1. Replace the battery pack.
2. This is normal.
A damaged blade disc
Aged battery pack Replace the battery pack.
Unstable Bluetooth signal
Check the blades and the blade disc. Replace if damaged or worn.
The blade disc has to be replaced by an authorized technician.
Stay close to the mower (within 6 meters) when laying the
boundary.
Possible Causes Issue Solutions
The mower cannot get accurate GPS location
persistently
It takes less time to fully charge the mower
The mower does not charge or it turns off
automatically in the charging station
Shorter working hours per full charge
The mower is stuck
The mower goes outside the boundary
The mower does not move in a regular pattern in
certain areas
There are obstacles in the area
The mower will automatically adjust its moving pattern and
resumes to normal.
1. The wheels lost traction because of mud or grass
2. Soft ground such as sand
3. Deep ditch
1. The wheels lost traction because of mud or grass
2. The boundary is set on a slope
3. Weak satellite signal reception
1. Remove anything that’s stuck on the wheels.
2. Change the location of the boundary.
3. Try to install the antenna in a relatively open space to allow
the antenna to have a clear view of the sky, where at least 110°
of the sky is unobstructed.
1. Remove anything that’s stuck on the wheels.
2. Set soft areas as off-limit islands when necessary.
3. Fill in the gap and keep the lawn surface level and flat.
Uneven or patchy mowing
The mower cannot power on The battery is over-discharged
Place the mower in the charging station, fully charge it, and
restart the mower.
The mower cannot connect to a Wi-Fi network
1. The mower is too far away from the router
2. The Wi-Fi network is not 2.4 GHz
3. Wi-Fi permission is not granted to Navimow app
1. Place the mower closer to the router.
2. Connect the mower to a 2.4 GHz Wi-Fi network.
3. Grant permission to the app.
1. The preset mowing time is insufficient
2. The blades are blunt
3. The grass is too high
4. The blades cannot pivot normally
1. Adjust the mowing time so that it matches the mowing area
and the mower has enough time to finish the task.
2. Replace the blades.
3. Set the cutting height to a higher level and then lower to the
desired height gradually.
4. Clean the blades.
54

Possible Causes Issue Solutions
The mower mows the lawn by itself without any manual
operation
1. Manual mowing mode (start mowing either via
the app or by pressing the mower buttons)
2. Mowing schedule
3. Rain sensor
1. If you started manual mowing mode before, the mower will
keep working until 100% of the mowing task is completed.
When the battery level is lower than 10%, the mower will return
to the charging station. When the battery is charged to 85%, the
mower will resume the previous mowing task automatically. When
the mowing task is completed (100%), the mower will exit the
manual mowing mode.
2. If you have set a mowing schedule (and you didn't start manual
mowing before), the mower will automatically start the mowing
task according to the schedule.
When the battery level is lower than 10%, the mower will return
to the charging station. When the battery is charged to 85%, the
mower will resume the previous mowing task automatically until
the mowing task is completed (100%).
3. When the rain sensor is triggered, the mower will stop the task
and return to the charging station. After the water on the rain
sensor is dry, it will automatically continue until the mowing task
is finished. However, if it's past the scheduled time, the mower will
not resume mowing.
The mower does not cut the grass, or the blades stop
rotating during the mowing process
1. Cutting motor over-current protection
2. Foreign objects
3. Obstacle avoidance
4. The mower does not cut when going back to
the charging station, or when going to the
starting point of the mowing session. This is
normal and the mower will only cut on the
planned cutting path.
1. When the grass is too thick, the cutting motor will
automatically enter self-protection and stop rotating when the
current is too high. At this time, it is recommended to increase
the mowing height, or use other mowing tools to trim the lawn
to 6cm or lower first.
2. Please confirm whether there is any foreign object stuck in
blade disc or blades, if any, please clean it in time.
3. When the mower is avoiding an obstacle, the bump sensor
will shut down the blades temporarily. When this protection
mechanism is finished, the blades will continue rotating.
4. Normal
1. The mower's moving path depends on satellite positioning,
occasionally inaccurate positioning may lead to missed cuts, and
the missed area will be covered after a few more cuts.
2. If an obstacle is encountered during mowing, the mower will
avoid the obstacle, which can result in certain areas not being cut.
This is normal and a new feature will be added to make the
mower cut the missed area with obstacles again.
3. If the grass is higher than 15cm, the ultrasonic sensor will be
triggered and the mower will avoid areas with high grass.
Certain areas are not cut
1. Inaccurate positioning
2. Obstacle avoidance
3. Tall grass
55

When there is an abnormality, an error code is shown in the app and the mower display. Below is a list of the error codes, what they
mean and what to do:
1001
1002
1003
1004
1005
1008
1009
Mowing motor
initialization failed
Mowing motor
overvoltage protection
Mowing motor
undervoltage protection
Mowing motor
overcurrent protection
Mowing motor stall
protection
Cutting height motor
stall protection
Cutting height motor
overcurrent protection
Please keep the mower still, and try to restart the mower. If the error persists, contact after-sales
service.
Please press the STOP button on the mower. If the error persists, contact after-sales service. Do not
disassemble the battery pack and make sure to use a genuine battery.
Please charge the mower until it has more than 50% battery (the battery indicator becomes green),
then press the STOP button on the mower. If the error persists, contact after-sales service. Do not
disassemble the battery pack and make sure to use a genuine battery.
Please press the STOP button on the mower. If the error persists, contact after-sales service.
For your safety, power off the mower first. 1. Check if the blade disc is stuck, remove the foreign
objects. 2. Check if the grass is too thick and dense, cut your lawn to a height of no more than 6 cm.
Restart the mower and resume mowing. If the error persists, contact after-sales service.
For your safety, power off the mower first. Check if there are foreign objects above the blade fender,
such as grass clippings, stones, etc., and clean it up. Restart the mower, and adjust the cutting height
to 60 mm for testing. If the error persists, contact after-sales service.
MeaningError Code Solution
1010
1018
1020
1021
1022
NCU self-check failure
Cutting height motor control failure
Battery overvoltage protection
Battery undervoltage protection
Battery discharging protection
Please restart the mower and resume mowing. If the error persists, contact after-sales service.
Please restart the mower and resume mowing. If the error persists, contact after-sales service.
Please press the STOP button on the mower. If the error persists, disconnect the mower from the
charging station, and contact after-sales service. Do not disassemble the battery pack and make sure
to use a genuine battery.
The battery is over-discharged and needs to be charged. If the battery temperature is lower than 0
degrees or higher than 48 degrees, wait for the temperature to return to above 5 degrees or below 44
degrees before charging. After charging to 50% power, press the STOP button to clear it. If the error
persists, disconnect the mower from the charging station, and contact after-sales service. Do not
disassemble the battery pack and make sure to use a genuine battery.
Please press the STOP button on the mower. If the error persists, shut down the mower immediately,
and contact after-sales service.
Battery charging
protection
Battery temperature is
too high
Battery temperature is
too low
Sensor system
self-check failure
Hub motor stall
protection
Hub motor overspeed
protection
IMU bias error
Please press the STOP button on the mower. If the error persists, take the mower out of the charging
station and contact after-sales service. Do not disassemble the battery pack and make sure to use a
genuine battery.
Place the mower in the shade (operating temperature: 0~40 degrees Celsius), then press the STOP
button on the mower. If the error persists, contact after-sales service. Do not disassemble the battery
pack and make sure to use a genuine battery.
Place the mower in a warm environment (operating temperature: 0~40 degrees Celsius), then press
the STOP button on the mower. If the error persists, contact after-sales service. Do not disassemble
the battery pack and make sure to use a genuine battery.
Please restart the mower and then put it in the charging station. If the error persists, contact
after-sales service.
Please check if the wheels are stuck. Remove the foreign objects, then press the STOP button on the
mower and press MOW+OK to resume mowing. If the error persists, contact after-sales service.
Please press the STOP button on the mower and press MOW+OK to resume mowing. If the error
persists, contact after-sales service.
Please keep the mower level and still, restart the mower. If the error persists, contact after-sales
service.
1023
1024
1025
2010
3001
3002
3003
3004
Power off the mower, and lift the rear wheels off the ground by the lifting handle. Then, power on and
wait for the rear wheel to rotate and calibrate. After calibration, continue to use it as usual. If the error
persists, contact after-sales service.
Please press the STOP button on the mower and press MOW+OK to resume mowing. If it fails, restart
the mower and then put it in the charging station. If the error persists, contact after-sales service.
Please restart the mower and then put it in the charging station. If the error persists, contact
after-sales service.
3005
3006
Hub motor short circuit
protection
Hub motor calibration
corrupted
Please wait for about 1 minute before the temperature returns to normal. Then, press the STOP
button on the mower and press MOW+OK to resume mowing. If the error persists in the same area,
set the area as an off-limit island.
Please restart the mower and then put it in the charging station. If the error persists, contact
after-sales service.
3007
3008
Hub motor communication
error
Hub motor over temperature
Hub motor calibration
error
ECU over temperature
VCU over temperature
Please press the STOP button on the mower and press MOW+OK to resume mowing. If it fails, restart
the mower and then put it in the charging station. If the error persists, contact after-sales service.
3010
Please restart the mower and then put it in the charging station. If the error persists, contact
after-sales service.
VCU self-check failure
4001
Storage system error
4003
4004
4007
4008
4010
Place the mower in the shade (operating temperature: 0~40 degrees Celsius), then press the
STOP button on the mower. If the error persists, contact after-sales service.
Bluetooth link error
IoT link error
Mower motor
communication error
4011
Charging station
communication error
Please make sure the charging station is plugged into a power outlet, and the distance between the
charging station and the mower is within 200 meters. Please press the STOP button on the mower and
press MOW+OK to resume mowing. If it fails, restart the mower and then put it in the charging station.
If the error persists, contact after-sales service.
56

In case of an accident or breakdown, contact an authorized repairer if the product is still under warranty. If it’s not, you can contact any
specialized repairer of your choice.
MeaningError Code Solution
ECU system self-check failure
Unable to connect GNSS
antenna
Charging station guiding wire
error
Charging station overcurrent or
overvoltage protection
Please restart the mower and then put it in the charging station. If the error persists, contact
after-sales service.
Please check if the GNSS antenna is connected to the charging station, then press the STOP button on
the mower. If the error persists, contact after-sales service.
Please re-plug the charging station into the power supply, then press the STOP button on the mower.
If the error persists, contact after-sales service.
4020
5001
5002
5003
6004
6005
6006
6007
6008
6010
6011
6014
Mower cannot return to the
charging station
Mower cannot return to the
charging station
Bumper sensors triggered
constantly
Mower is lifted
Bumper sensor triggered too
many times
Motion planning error
Motion planning error
Motion planning error
Please confirm no obstacles in the path and the charging station is installed on a flat surface. Press the
STOP button on the mower, then HOME+OK to return. If the error persists, check if the charging
station and the antenna have been moved since the previous mapping and rebuild the map. If it still
cannot be solved, contact the after-sales service.
Please remove the obstacles or tap the sensor gently to release it, then press the STOP button and
press MOW+OK to resume mowing. If it fails, restart the mower and then put it in the charging station.
If the error persists, contact after-sales service.
Please place the mower on a flat surface and check if the front wheels are stuck, then press the STOP
button and press MOW+OK to resume mowing. If it fails, restart the mower and then put it in the
charging station. If this happens frequently, contact after-sales service.
Please remove the obstacles, then press the STOP button and press MOW+OK to resume mowing. If it
fails, restart the mower and then put it in the charging station.
Please relocate the mower to a flat spot within the boundary, press the STOP button to clean error
code, Press MOW+OK to resume mowing. Please set the area where the mower stuck frequently as an
off-limit island.
Please check if the mower is stuck. Remove the foreign objects, then press the STOP button on the
mower and press MOW+OK to resume mowing. Please set the area where the mower stuck frequently
as an off-limit island.
Please remove the mower from the obstacles and place it on a flat surface within the boundary. Press
the STOP button on the mower and press MOW+OK to resume mowing. Please set the area where the
mower stuck frequently as an off-limit island.
NOTE: Error codes 8001-8006 are associated with the VisionFence Sensor. When a VisionFence Sensor is mounted on your
mower, these error codes may be shown in the app and the mower display.
4013
Ultrasonic module
communication error
Please make sure the ultrasonic sensor cables are connected correctly, then restart the mower. If the
error persists, contact after-sales service.
5005
6002
6003
GNSS antenna data error
Mower is outside the boundary
Mower has turned over
Please reconnect the GNSS antenna to the charging station, and then press the STOP button on the
mower. If the error persists, contact after-sales service.
Please place the mower on an open and flat surface within the boundary, and press the STOP button on
the mower. When the mower light turns blue, press MOW+OK to resume mowing. If it fails, restart the
mower and then put it in the charging station. If the error persists in the same area, set the area as an
off-limit island.
Please place it in the proper position and put it back in the boundary or charging station. Press the
STOP button on the mower, and then press MOW+OK to resume mowing. Please set the area where
the mower turns over frequently as an off-limit island.
Localization recovery is not
successful
VisionFence sensor
communication error
VisionFence sensor map
error
Stained camera
VisionFence sensor
disconnected
VisionFence sensor system
error
Please confirm no obstacles in the path and the charging station is installed on a flat surface. Press the
STOP button on the mower, then HOME+OK to return. If the error persists, check if the charging station
and the antenna have been moved since the previous mapping and rebuild the map. If it still cannot be
solved, contact the after-sales service.
Please remove the obstacles or tap the sensor gently to release it, then press the STOP button and press
MOW+OK to resume mowing. If it fails, restart the mower and then put it in the charging station. If the
error persists, contact after-sales service.
Check if there are obstacles or complex terrain around the mower. To help the mower to recover
localization, place it in an open and flat area. Press the STOP button and then resume mowing or parking.
Motion planning error
Motion planning error
Mower gets stuck in obstacles
Motion planning error
IMU/TICKS data error
Fail to read VCU version
GPS data error
Compass data error
Localization data streaming fault
6015
6016
6017
6018
7001
7002
7003
7004
7005
7006
8001
8002
8003
8005
8006
Please press the STOP button on the mower and press MOW+OK to resume mowing. If it fails, restart
the mower. If the error persists, contact after-sales service.
Please clean the camera lens, then press the STOP button on the mower and press MOW+OK to
resume mowing. If the error persists, contact after-sales service.
Please check if the VisionFence sensor is disconnected from the mower. If you intended to do so,
please disable the VisionFence sensor in APP setting. If the error persists, contact after-sales service.
A system error occurred in VisionFence sensor. Please restart the mower. If the error persists, contact
after-sales service.
57

Place: Changzhou, China Date: 2024-12-31
Name: Crystal Zhuang Function: Certification Manager
Signature:
Signed for and on behalf of: Navimow B.V.
6. Important Information
6.1 EC DECLARATION OF CONFORMITY
EC Declaration of Conformity for Robot Lawn Mower
Manufacturer: Willand (Beijing) Technology Co., LTD.
Address: Room 203, A-1 Bldg. Zhongguancun Dongsheng Technology Park (Northern Territory), No. 66, Xixiaokou Rd, Haidian Dist., Beijing,
China.
Authorized Representative
Name: AR Experts B.V.
Address: P.O. Box 5047, 3620 AA Breukelen, The Netherlands
Object of the declaration
Generic designation: Robotic Lawnmower
Product name: Navimow
Type/model: H500E-VF/H800E-VF/H1500E-VF/H3000E-VF
Serial number: S2RA x yyyy x yyyy/S2RC x yyyy x yyyy/S2RE x yyyy x yyyy/S2RT x yyyy x yyyy
(“x” indicates any letter from A-Z except O and I, “y” indicates any letter from A-Z except O and I or any number from 0-9)
This Declaration of Conformity is issued under the sole responsibility of the manufacturer.
The object of the declaration described above is in conformity with the following EU Directives:
1. Radio Equipment Directive (2014/53/EU)
2. Machinery Directive (2006/42/EC)
3. RoHS Directive (2011/65/EU) and amending directive ((EU)2015/863)
Conformity with these Directives has been assessed for this product by demonstrating compliance to the following harmonized
standards and/ or technical specifications:
EN 60335-1:2012+A11:2014+AC:2014+A13:2017+A1:2019+A14:2019+A2:2019+A15:2021
EN 50636-2-107:2015+A1:2018+A2:2020+A3:2021
EN IEC 61000-3-2:2019+A1:2021 EN 301 908-1 V13.1.1
EN 61000-3-3:2013+A1:2019 EN 301 489-1 V2.2.3
EN IEC 55014-1:2021 EN 301 489-3 V2.2.0
EN IEC 55014-2:2021 EN 301 489-17 V3.2.4
EN 300 220-1 V3.1.1 EN 301 489-19 V2.1.1
EN 300 220-2 V3.1.1 EN 301 489-52 V1.2.1
EN 300 328 V2.2.2 EN 301 511 V12.5.1
EN 303 413 V1.1.1 EN IEC 62311:2020
EN 50665:2017 EN IEC 63000:2018
EN 62133-2:2017
58

Place: Changzhou, China Date: 2024-12-31
Name: Crystal Zhuang Function: Certification Manager
Signature:
Signed for and on behalf of: Navimow B.V.
EC Declaration of Conformity for Antenna
Manufacturer
Name: Willand (Beijing) Technology Co., LTD.
Address: Room 203, A-1 Bldg. Zhongguancun Dongsheng Technology Park (Northern Territory), No. 66, Xixiaokou Rd, Haidian Dist., Beijing,
China.
Email: [email protected]
Authorized Representative
Name: AR Experts B.V.
Address: P.O. Box 5047, 3620 AA Breukelen, The Netherlands
Email: info@certification-experts.com
Object of the declaration
Generic designation: Antenna
Product name: Antenna
Type/model: H1R00G
Serial number: KS x yyyy x y x yyyy
(“x” indicates any letter from A-Z except O and I, “y” indicates any letter from A-Z except O and I or any number from 0-9)
This Declaration of Conformity is issued under the sole responsibility of the manufacturer.
The object of the declaration described above is in conformity with the following EU Directives:
1. Electromagnetic Compatibility Directive (2014/30/EU)
2. RoHS Directive (2011/65/EU) and amending directive ((EU)2015/863)
Conformity with these Directives has been assessed for this product by demonstrating compliance to the following harmonized
standards and/ or technical specifications:
EN IEC 55014-1:2021
EN IEC 55014-2:2021
EN IEC 61000-6-3:2021
EN IEC 61000-6-1:2019
EN IEC 63000:2018
59

Place: Changzhou, China Date: 2024-12-31
Name: Crystal Zhuang Function: Certification Manager
Signature:
Signed for and on behalf of: Navimow B.V.
EC Declaration of Conformity for Charging Station
Manufacturer
Name: Willand (Beijing) Technology Co., LTD.
Address: Room 203, A-1 Bldg. Zhongguancun Dongsheng Technology Park (Northern Territory), No. 66, Xixiaokou Rd, Haidian Dist., Beijing,
China.
Email: [email protected]
Authorized Representative
Name: AR Experts B.V.
Address: P.O. Box 5047, 3620 AA Breukelen, The Netherlands
Email: info@certification-experts.com
Object of the declaration
Generic designation: Navimow Charging Station
Product name: Navimow Charging Station
Type/model: H25D2E
Serial number: KL x yyyy x y x yyyy
(“x” indicates any letter from A-Z except O and I, “y” indicates any letter from A-Z except O and I or any number from 0-9)
This Declaration of Conformity is issued under the sole responsibility of the manufacturer.
The object of the declaration described above is in conformity with the following EU Directives:
1. Radio Equipment Directive (2014/53/EU)
2. RoHS Directive (2011/65/EU) and amending directive ((EU)2015/863)
Conformity with these Directives has been assessed for this product by demonstrating compliance to the following harmonized
standards and/ or technical specifications:
EN IEC 55014-1:2021
EN IEC 55014-2:2021
EN IEC 61000-6-3:2021
EN IEC 61000-6-1:2019
EN 300 220-1 V3.1.1
EN 300 220-2 V3.1.1
EN IEC 63000:2018
60
6.4 Certifications
European Union Compliance Statement
European Union Compliance Statement
Information on Disposal for Users of Waste Electrical & Electronic Equipment
This symbol on the product or on its packaging indicates that used electrical and electronic products should not be mixed with unsorted
municipal waste. For proper treatment, it is your responsibility to dispose of your waste equipment by arranging to return it to designated
collection points.
Disposing of this product correctly will help save valuable resources and prevent any potential negative effects on human health and the
environment, which could otherwise arise from inappropriate waste handling.
To return your used device, please use the return and collection systems or contact the retailer where the product was purchased, which
is free of charge, please contact your local authority for further details of your nearest designated collection point.
Penalties may be applicable for incorrect disposal of this waste, in accordance with your national legislation.
Information on Disposal for Users of used batteries
This symbol means that batteries and accumulators, at their end-of-life, should not be mixed with unsorted municipal waste. Your
participation is an important part of the effort to minimize the impact of batteries and accumulators on the environment and on human
health. For proper recycling you can return this product or the batteries or accumulators it contains to your supplier or to a designated
collection point, which is free of charge.
Disposing of this product correctly will help save valuable resources and prevent any potential negative effects on human health and the
environment, which could otherwise arise from inappropriate waste handling.
Penalties may be applicable for incorrect disposal of this waste, in accordance with your national legislation. there are separate collection
systems for used batteries and accumulators.
Please, dispose of batteries and accumulators correctly at your local community waste collection/recycling center.
Restriction of the use of certain hazardous substances (RoHS) Directive
Navimow B.V. hereby declares the whole product including parts (cables, cords, and so on) meets the requirements of RoHS Directive
2011/65/EU and amendment Commission Delegated Directive (EU) 2015/863 on the restriction of the use of certain hazardous substances
in electrical and electronic equipment ("RoHS recast" or "RoHS 2.0").
Radio Equipment Directive
Navimow B.V. hereby declares that the product listed in this section comply with the essential requirements and other relevant provisions
of the Radio Equipment Directive 2014/53/EU.
Machinery Directive
Navimow B.V. hereby declares that the product listed in this section comply with the essential requirements and other relevant provisions
of the Machinery Directive 2006/42/EC.
Europe Authorised Representative:
AR Experts B.V. P.O. Box 5047,3620 AA Breukelen, The Netherlands
Navimow B.V. hereby declares that the product comply with the essential requirements and other relevant provisions of the RoHS
Directive 2011/65/EU and amendment Commission Delegated Directive (EU) 2015/863, the Radio Equipment Directive 2014/53/EU and
the Machinery Directive 2006/42/EC.
61

Segway’s online services are available at navimow.segway.com. During your use of the Product, you believe the Product or its
component is defective and/or does not work correctly. PLEASE IMMEDIATELY STOP USING THE PRODUCT, AND STORE THE
PRODUCT PROPERLY. YOUR CONTINUED USE OF THE PRODUCT UNDER SUCH CIRCUMSTANCE MAY CAUSE SEVERE BODILY INJURY
OR EVEN DEATH TO YOU OR THE OTHERS AND/OR CAUSE PROPERTY DAMAGES. Thereafter, please immediately contact Segway at
[email protected]. Segway’s technical support personnel are available to assist you online or over the phone in
diagnosing the defect, and if any, and providing further instructions. In the event the warranty services are required, please
prepare for the following materials, including (i) proof of the original purchase of the Product from Segway Dealers, (ii) the
Product’s serial number, and (iii) a description of the defect if applicable. Upon the verification of your eligibility for the Limited
Warranty protection and/or services, you should provide your name, email address, mailing address, and contact phone number
to us, we will guide you to get our service.
If you want to return the defective unit to service, you shall be responsible for the cost of shipping and risk of loss and damage
that may occur during the shipment from you to Segway and (ii) from Segway to you. You must include your defective Product or
component within the original or Segway-approved packaging, which will be provided at your cost, for shipment of the Product to
Segway. You shall defend, indemnify, and hold Segway harmless any loss and/or damages that may be caused by your improper
packaging or shipment of the Product or component to Segway.
An authorized service provider or Segway Dealer will inspect your returned Product. If Segway reasonably determines that the
problem is not covered by the Limited Warranty, Segway will notify you and inform you of service or replacement alternatives
that are available to you on a fee basis, or Segway will return your Product to you unrepaired, and in such instance, you will be
responsible for the cost of shipping and insurance for shipment of your Product from Segway to you. In an event that any
services is not covered by the limited warranty and you reject a paid service recommended by Segway Parties and/or Segway
Dealer, you understand and acknowledge that failure to repair and/or services the Product may increase the risk of fall and/or
Product failure
which may result in severe property damages, severe bodily injury or death, and you agree that this is your informed consent to
take such risk.
For a return eligible for the warranty protection and/or services, Segway will serve defective Products with new or reconditioned
parts of the same or similar style at no cost to you for the service. Parts replaced by Segway will be retained by and become the
property of Segway. In such a situation, Segway will pay reasonable return shipping charges for the return of the Product to you.
3. Limited Warranty Eligibility
3.1 Your service request must be received by Segway within the Limited Warranty Period as described above, and Segway must
receive your Product in accordance with the Limited Warranty Service Process defined above.
3.2 Your Product must be purchased from an authorized Segway Dealer.
3.3 You must provide the original purchase receipt.
3.4 Your Product must have serial number legible, unobscured, untampered, and unmodified.
3.5 All tamper-resistant seals must be intact, in place, and unmodified.
4. Limited Warranty Exclusions
This Limited Warranty describes the service available to you if your product requires warranty service, and you may have
additional protections under your local laws. This Limited Warranty does not cover and excludes damage to your product or any
component thereof caused by:
4.1 Abuse, misuse, recklessness, negligence, or commercial use.
4.2 Improper charging, storage, maintenance, or operation of the Product not in compliance with instructions or limitations as
provided in the user materials.
4.3 Use of the Product not in compliance with applicable laws and regulations.
4.4 Use of the Product by persons with inadequate experience.
4.5 Accident, collision, fire damage, water damage, chemical damage, use of the product outside of the product’s working temperature
range, high-pressure water spray, earthquake, dropping.
4.6 Modifications to mechanical parts, modification of electronic parts, or modifications to software embedded in the Product.
4.7 Service, repair, and maintenance by unauthorized providers.
4.8 Cosmetic damages.
4.9 Use of the Product with third party product, component, or accessory.
4.10 The normal deterioration of wear and tear parts.
4.11 Use of the Product with overdue wear and tear parts.
5. LIABILITY DISCLAIMER AND LIMITATION
5.1 SEGWAY PARTIES DO NOT ASSUME OR AUTHORIZE ANYONE TO ASSUME ON ITS BEHALF, ANY OTHER OBLIGATION OR LIABILITY
IN CONNECTION WITH THE PRODUCT, ITS COMPONENT PARTS, ACCESSORIES, SERVICE REPAIR, OR THIS LIMITED WARRANTY.
64

5.2 SEGWAY PARTIES AND SEGWAY DEALERS ARE NOT RESPONSIBLE FOR ANY LOSS OF USE OF A PRODUCT, ITS COMPONENT
PARTS, ACCESSORIES, OR FOR ANY INCONVENIENCE OR OTHER LOSS OR DAMAGE WHICH MIGHT BE CAUSED FROM ANY
DEFECT IN A PRODUCT, ITS COMPONENT PARTS, ACCESSORIES, SERVICE REPAIR, OR FOR ANY OTHER INCIDENTAL OR
CONSEQUENTIAL DAMAGES YOU MAY HAVE AS A RESULT OF ANY DEFECT IN A PRODUCT, ITS COMPONENT PARTS,
ACCESSORIES, OR SERVICE REPAIR. SOME COUNTRIES DO NOT ALLOW THE EXCLUSION OR LIMITATION OF INCIDENTAL OR
CONSEQUENTIAL DAMAGES, SO THE ABOVE LIMITATION OR EXCLUSION MAY NOT APPLY TO YOU TO THE EXTENT THAT IT IS
DISALLOWED BY APPLICABLE LAW.
5.3 IN NO EVENT, SEGWAY PARTIES AND SEGWAY DEALERS’ TOTAL AND AGGREGATE LIABILITY FOR ALL CLAIMS UNDER ANY AND
ALL APPLICABLE LAW OR THEORY, JOINTLY OR SEVERALLY, ARISING OUT OF OR RELATED TO THE PURCHASE OF THE PRODUCT,
USE OF THE PRODUCT, BREACH OF CONTRACT, TORTS (INCLUDING NEGLIGENCE) OR OTHERWISE, EXCEEDS THE DUTY TO
REPAIR OR REPLACE ANY DEFECTIVE PRODUCT, FURTHER SUBJECT TO SEGWAY’S SOLE AND EXCLUSIVE DISCRETION. IN NO
EVENT SHALL BE SEGWAY PARTIES AND SEGWAY DEALERS BE LIABLE TO ANY PERSON FOR CONSEQUENTIAL, INDIRECT,
INCIDENTAL, SPECIAL, EXEMPLARY, PUNITIVE OR ENHANCED DAMAGED ARISING OUT OF, OR RELATING TO, AND/OR IN
CONNECTION WITH THE PURCHASE OF THE PRODUCT, ANY BREACH OF THIS AGREEMENT OR MANUFACTURER’S DUTIES
REGARDLESS OF (A) WHETHER SUCH DAMAGES WERE FORESEEABLE, (B) WHETHER OR NOT SEGWAY OR OTHER SEGWAY
PARTIES WERE ADVISED OF THE POSSIBILITY OF SUCH DAMAGES, AND (C) THE LEGAL OR EQUITABLE THEORY (CONTRACT,
TORT OR OTHERWISE) UPON WHICH THE CLAIM IS BASED UNLESS SUCH LIMITATIONS AND EXCLUSIONS ARE PROHIBITED BY
APPLICABLE LAW. THE FOREGOING LIMITATIONS OR EXCLUSIONS APPLY EVEN IF AN AGGRIEVED CUSTOMER OR ANY OTHER
PERSON’S (WHO MIGHT HAVE RIGHT OR CLAIM UNDER THIS AGREEMENT BY OPERATION OF LAW OR EQUITY) REMEDIES
UNDER THIS AGREEMENT FAIL THEIR ESSENTIAL PURPOSE. IN THE EVENT SOME COUNTRIES DO NOT ALLOW THE EXCLUSION
OR LIMITATION OF CERTAIN OR ALL OF THE FOREGOING DAMAGES, SO TO THE EXTENT THAT SUCH LIMITATIONS OR
EXCLUSIONS ARE NOT ALLOWED BY LAW, THEY MAY NOT APPLY TO YOU. SOME COUNTRIES DO NOT ALLOW THE EXCLUSION
OR LIMITATION OF INCIDENTAL OR CONSEQUENTIAL DAMAGES, SO TO THE EXTENT THAT SUCH LIMITATIONS OR EXCLUSIONS
ARE NOT ALLOWED BY LAW, THE ABOVE LIMITATION OR EXCLUSION MAY NOT APPLY TO YOU.
5.4 To the extent permitted by applicable law, SEGWAY PARTIES and SEGWAY DEALERS hereby DISCLAIM any liability and thereby
shall not be responsible for any damages, including but not limited to death, bodily injury, or damages to property, arising out
of or related to any conduct (including misconduct), action, inaction, act (including failure to act), omission or negligence by
any authorized or unauthorized dealer, distributor, wholesaler, retailer, service provider or third party that involves into the
distribution of Product or the services thereto. To the extent permitted by applicable law, the explicit representations and
warranties, if any, provided herein, shall be the only warranties and representations made by SEGWAY PARTIES to YOU, any
consumer, and/or end-user. and SEGWAY PARTIES shall not be responsible for any other warranties and/or representations
that may be given and/or provided by another person unless SEGWAY PARTIES have in a written form explicitly authorized
such additional warranty and/or representation to be given to consumer or end-user.
6. Claims, Dispute Resolution and Arbitration
THE CLAUSES CONTAINED HEREIN ARE LEGALLY BINDING BETWEEN YOU (EITHER AN INDIVIDUAL OR ENTITY), AND SEGWAY
DISCOVERY B.V., ITS AFFILIATES, SEGWAY PARTIES AND SEGWAY DEALERS. THE CLAUSES CONTAINED HEREIN MAY AFFECT YOUR
RIGHTS, AND IT IS YOUR RESPONSIBILITY TO READ THE FOLLOWING SECTIONS. YOU CAN OPT OUT OF THE AGREEMENT WITHIN
30 CALENDAR DAYS OF THE FIRST CONSUMER PURCHASE BY EMAILING [email protected] AND PROVIDING THE APPLICABLE
INFORMATION. FOR MORE DETAILS, PLEASE SEE SECTION 6.2.
6.1 Binding Arbitration
Segway Parties, Segway Dealers and you agree that any dispute, controversy or claim arising out of, relating to or in
connection with this agreement, the limited warranty, the sale, condition or performance of the product, whether based in
contract, tort, fraud, misrepresentation, or any other legal theory at law or in equity, including but not limited to any claims
for death, injury or property damages, shall be governed by and construed in accordance with the laws of the Netherlands
with the exclusion of its conflicts of law provisions, and finally resolved bytheInternational Chamber of Commerce(ICC)
under the 2021ICC Rules of Arbitration (ICCRules) for the time being in force, which Rules are deemed to be incorporated by
reference into thisclause. Further the Parties agree that:
i. The seat of the arbitration shall be Amsterdam, Netherlands.
ii. The Tribunal shall consist of 3 arbitrator(s).
iii. The language of the arbitration shall be English.
Section 6 “Claims, Dispute Resolution and Mandatory Arbitration” clause shall survive upon termination or expiration of this
agreement and/or limited warranty or in an event that this agreement and/or the limited warranty is held as void, avoidable,
invalid, or unenforceable, either in whole or part, by a competent adjudication institution with actual authority and
jurisdiction over this matter.
65

6.2 Opt-Out
YOU MAY OPT OUT OF THIS DISPUTE RESOLUTION PROCEDURE BY PROVIDING NOTICE TO SEGWAY or SEGWAY PARTIES NO
LATER THAN THIRTY (30) CALENDAR DAYS AFTER THE DATE OF THE FIRST CONSUMER PURCHASER’S PURCHASE OF THE
PRODUCT. TO OPT-OUT, YOU MUST SEND NOTICE BY EMAIL AT [email protected], WITH THE SUBJECT LINE:
“ARBITRATION OPT-OUT.” THE OPT-OUT NOTICE BY E-MAIL MUST INCLUDE (A) YOUR NAME, EMAIL ADDRESS, MAILING
ADDRESS, AND PHONE NUMBER; (B) THE DATE ON WHICH THE PRODUCT WAS PURCHASED; (C) THE PRODUCT MODEL NAME
OR MODEL NUMBER; AND (D) THE SERIAL NUMBER. ALTERNATIVELY, YOU MAY OPT OUT BY SENDING AN ELECTION TO
OPT-OUT LETTER TO SEGWAY AT Dynamostraat 7, 1014BN Amsterdam,TheNetherlands. CERTIFIED MAIL WITHIN THIRTY (30)
CALENDAR DAYS FROM THE DATE OF THE FIRST END USER’S PURCHASE OF THE PRODUCT FROM SEGWAY DEALER. THE
OPT-OUT LETTER SHALL CONTAIN THE FOLLOWING INFORMATION: (A) YOUR NAME, EMAIL ADDRESS, MAILING ADDRESS, AND
PHONE NUMBER; (B) THE DATE ON WHICH THE PRODUCT WAS PURCHASED; (C) THE PRODUCT MODEL NAME OR MODEL
NUMBER; (D) THE SERIAL NUMBER; AND (E) AN STATEMENT AS FOLLOWS: THE ABOVE CONSUMER ELECTS TO OPT-OUT THE
DISPUTE RESOLUTION PROCEDURE AS PROVIDED BY THIS LIMITED WARRANTY, THESE ARE THE ONLY TWO EFFECTIVE WAYS TO
OPT-OUT THIS DISPUTE RESOLUTION PROCEDURE. ELECTION TO OPT-OUT THIS DISPUTE RESOLUTION PROCEDURE WILL NOT
AFFECT THE COVERAGE OF THE LIMITED WARRANTY IN ANY WAY, AND YOU WILL CONTINUE TO ENJOY THE BENEFITS OF THE
LIMITED WARRANTY.
6.3 Language
This Agreement may be translated into different languages. In the event of a conflict, the English version shall prevail and
control.
6.6 About the Manual
Please update the Navimow app for the latest version to get the latest User Manual.
The content entry can be found in the app via Settings>APP>Service and Help.
The functions and contents mentioned in this manual are related to the product model you purchase, the markets and the software
version. Refer to the release note for the latest feature updates.
6.7 Contact Us
Manufacturer: Willand (Beijing) Technology Co., LTD.
Address: Room 203, A-1 Bldg. Zhongguancun Dongsheng Technology Park (Northern Territory), No. 66, Xixiaokou Rd, Haidian Dist., Beijing, China.
Email: [email protected]
Europe Authorised representative: AR Experts B.V., P.O. Box 5047, 3620 AA Breukelen, The Netherlands
Website: navimow.segway.com
Email: info@certification-experts.com
Contact us if you experience issues relating to the operation, maintenance and safety, or errors/faults with your mower.
66

The manufacturer reserves the right to make changes to the product, release firmware updates, and update this manual at any
time. Illustrations of the product, accessories, and app interface in the User Manual are for reference purposes only. Actual
product and functions may vary. Go to navimow.segway.com for the latest user materials.
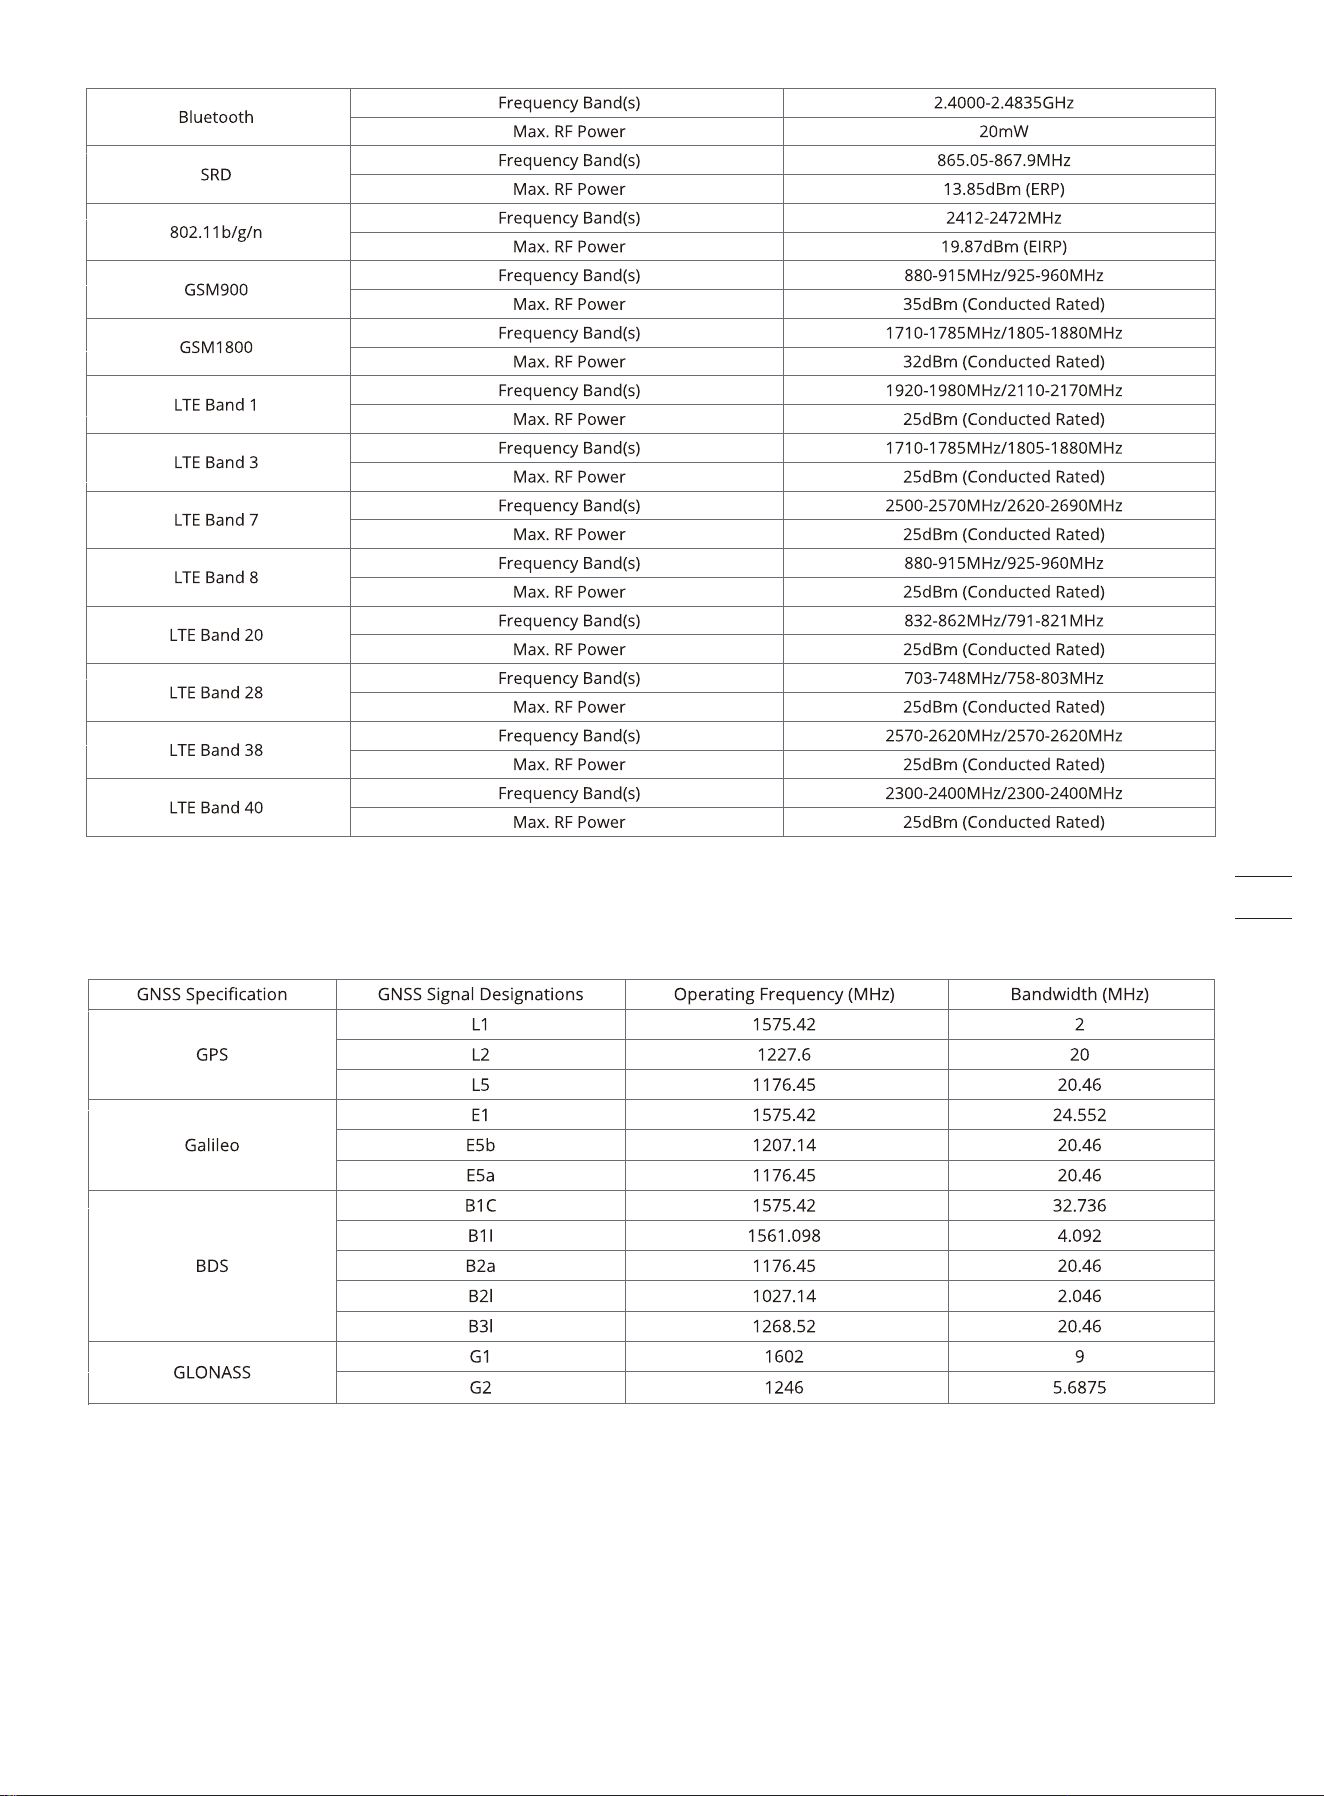
62
6.5 Limited Warranty
Limited Warranty and Arbitration Agreement
NOTICE: PLEASE READ THIS LIMITED WARRANTY AND ARBITRATION AGREEMENT AND KEEP THIS AGREEMENT FOR FUTURE REFERENCE.
THIS AGREEMENT CONTAINS LIMITED WARRANTY CLAUSES FOR CONSUMERS IN EUROPE AND ARBITRATION CLAUSES WITH RESPECT TO
NAVIMOW (“PRODUCT”) AND ANY AND ALL TRANSACTION AND CLAIM RELATED TO AND/OR ARISING OUT OF THE PRODUCT.
THIS IS A BINDING LEGAL AGREEMENT (“AGREEMENT”) BETWEEN YOU (EITHER AN INDIVIDUAL OR ENTITY) AND THE MANUFACTURER
(“WILLAND”), NAVIMOW B.V. ("NAVIMOW"), AND THEIR AFFILIATES (INCLUDING BUT NOT LIMITED TO THEIR PARENT COMPANY, SUBSIDI-
ARY, AFFILIATED COMPANIES, PREDECESSOR, SUBSEQUENT COMPANY, ADMINISTRATORS, SUCCESSORS, ASSIGNS, OFFICERS, DIRECTORS,
MANAGERS, EMPLOYEES, MEMBERS, SHAREHOLDERS, AND AGENTS, ATTORNEYS, INSURERS OR REINSURERS) (COLLECTIVELY “NAVIMOW
PARTIES”), NAVIMOW DEALERS (AS DEFINED BELOW) AND THEIR AFFILIATES (COLLECTIVELY “NAVIMOW DEALERS”).
PURCHASING THE PRODUCT, OPENING THE PRODUCT PACKAGING, USING THE PRODUCT, RETAINING THE PRODUCT, EXPLOITING THE
BENEFITS OF THIS AGREEMENT, OR ELECTRONIC ACCEPTANCE OF THIS AGREEMENT SHALL CONSTITUTE ACCEPTANCE OF THIS AGREE-
MENT. IN AN EVENT YOU, AS A PARENT(S) OR LEGAL GUARDIAN(S), PURCHASE THIS PRODUCT ON BEHALF OF OR FOR YOUR CHILDREN,
YOU HEREBY CONSENT TO AND APPROVE IN ALL RESPECTS THE TERMS AND CONDITIONS OF THE AGREEMENT AND AGREE THAT BOTH
YOU AND YOUR CHILDREN SHALL BE BOUND BY THIS AGREEMENT. YOU ACKNOWLEDGE AND AGREE THAT YOU RECEIVE SUFFICIENT
NOTICE OF THIS AGREEMENT AND YOU AGREE TO THIS AGREEMENT.
1. Limited Warranty
This Limited Warranty covers only defects of any material or quality of the Product and components when the Product and components
thereof are being used under normal and ordinary conditions. In the event that a defect covered by this Limited Warranty occurs,
Navimow and/or other Navimow Parties in its sole discretion will repair or replace the defective Product or components thereof in
accordance with this Limited Warranty, or the date it was activated (the later date prevails) from either of Navimow, Navimow’s
authorized reseller, Navimow’s authorized distributor, or an authorized Dealer (each a “Navimow Dealer” or collectively the “Navimow
Dealers”).
THIS LIMITED WARRANTY HEREIN IS THE ONLY EXPRESS WARRANTY APPLICABLE TO PRODUCT AND ITS COMPONENT PARTS,
ACCESSORIES, AND SERVICE REPAIR. SEGWAY AND SEGWAY PARTIES DISCLAIM ALL OTHER EXPRESS WARRANTIES. SEGWAY AND OTHER
SEGWAY PARTIES LIMIT THE DURATION AND REMEDIES OF ALL IMPLIED WARRANTIES, INCLUDING WITHOUT LIMITATION TO THE
WARRANTIES OF MERCHANTABILITY AND FITNESS FOR A PARTICULAR PURPOSE, WHETHER ARISING BY LAW, COURSE OF DEALING,
COURSE OF PERFORMANCE, USAGE OF TRADE OR OTHERWISE, TO THE DURATION OF THIS EXPRESS LIMITED WARRANTY.
THIS LIMITED WARRANTY DESCRIBES THE SERVICE AVAILABLE TO YOU IN THE EVENT YOUR PRODUCT REQUIRES WARRANTY SERVICE.
THIS LIMITED WARRANTY IS AN ADDITIONAL WARRANTY, THAT DOES NOT IN ANY WAY AFFECT OR LIMIT THE STATUTORY RIGHTS YOU
MAY HAVE AS A CONSUMER, FOR EXAMPLE, WITH RESPECT TO CONFORMITY, AND YOU MAY HAVE ADDITIONAL PROTECTIONS UNDER
YOUR LOCAL LAWS.
2. Limited Warranty Service Process
Serial Number Here
Product covered by this warranty
H500E,H800E
H1500E, H3000E
Battery pack and power adaptors
Ultrasonic sensor
VisionFence sensor
Limited Warranty Period
3 years
4 years
2 years (H500E, H800E) 3 years (H1500E, H3000E)
2 years
2 years
Blades are seen as disposible and are not covered by this warranty.
Record your Product’s Serial Number
Record your Product’s Serial Number below. You can find the Serial Number on the
exterior of the shipping box, or on the bottom of the Product.
Contacts
The Product is manufactured for
Navimow B.V.
(“Navimow”).
63