
1
IMPORTANT SAFETY INFORMATION
We thank you for choosing our product. To ensure your safety and health, please use this
equipment correctly. It is important to read this entire manual before assembling and using the
equipment. Safe and effective use can only be achieved if the equipment is assembled, maintained,
and used properly. It is your responsibility to ensure that all users of the equipment are informed of
all warnings and precautions.
1. Before starting any exercise program, you should consult your physician to determine if you
have any medical or physical conditions that could put your health and safety at risk or prevent
you from using the equipment properly. Your physician’s advice is essential if you are taking
medication that affects your heart rate, blood pressure, or cholesterol level.
2. Be aware of your body’s signals. Incorrect or excessive exercise can damage your health. Stop
exercising if you experience any of the following symptoms: pain, tightness in your chest,
irregular heartbeat, shortness of breath, lightheadedness, dizziness, or feelings of nausea. If
you do experience any of these conditions, you should consult your physician before continuing
with your exercise program.
3. Keep children and pets away from the equipment.
4. Use the equipment on a solid flat level surface with a protective cover your floor or carpet.
To ensure safety, the equipment should have at least 200 cm of free space behind it and 100
cm on each side. Do not place the equipment on any surface that blocks air openings. To
protect the floor or carpet from damage, place a mat under the equipment.
5. Ensure that all nuts and bolts are securely tightened before using the equipment. The safety of
the equipment can only be maintained if it is regularly examined for damage and/or wear and
tear.
6. Always use the equipment as indicated. If you find any defective components while assembling
or checking the equipment, or if you hear any unusual noises coming from the equipment during
exercise, discontinue use of the immediately and do not use until the problem has been rectified.
7. Wear suitable clothing while using the equipment. Avoid wearing loose clothing that may
become entangled in the equipment.
8. Do not place fingers or objects into the moving parts of the equipment.
9. The maximum weight capacity of this unit is 350 lbs (160 kgs).
10. The equipment is not suitable for therapeutic use.
11. To avoid bodily injury and/or damage to the product or property, proper lifting and moving are
required.
12. Your product is intended for use in cool, dry conditions. You should avoid storage in extreme
cold, hot, or damp areas as this may lead to corrosion and other related problems.
13. This equipment is designed for indoor and home use only; it is not intended for commercial use.

2
IMPORTANT SAFETY INFORMATION
When using an electrical appliance, basic precautions should always be followed, including the
following:
Read all instructions before using (this appliance).
DANGER – To reduce the risk of electric shock and the injury from moving parts:
Always unplug this appliance from the electrical outlet immediately after using and before cleaning
or servicing.
WARNING – To reduce the risk of burns, fire, electric shock, or injury to persons:
1) An appliance should never be left unattended when plugged in. Unplug from outlet when not in
use, and before putting on or taking off parts.
2) This appliance is not intended for use by persons with reduced physical, sensory, or mental
capabilities, or lack of experience and knowledge, unless they have been given supervision or
instruction concerning use of the appliance by a person responsible for their safety. Keep children
under the age of 13 away from this machine.
3) Use this appliance only for its intended use as described in this manual. Do not use attachments
not recommended by the manufacturer.
4) Never operate this appliance if it has a damaged cord or plug, if it is not working properly, if it
has been dropped or damaged, or dropped into water. Please contact Customer Service at
5) Do not carry this appliance by supply cord or use cord as a handle.
6) Keep the cord away from heated surfaces.
7) Never operate the appliance with the air openings blocked. Keep the air openings free of lint,
hair, and the like.
8) Never drop or insert any object into any opening.
9) Do not use outdoors. Household use only.
10) Do not operate where aerosol (spray) products are being used or where oxygen is being
administered.
11) To disconnect, turn all controls to the off position, then remove plug from outlet.
12) CAUTION: Risk of Injury to Persons – To Avoid Injury, use extreme caution when stepping
onto or off of a moving belt. Read Instruction Manual Before Using.
13) Connect this appliance to a properly grounded outlet only. See Grounding Instructions
SAVE THESE INSTRUCTIONS!
3
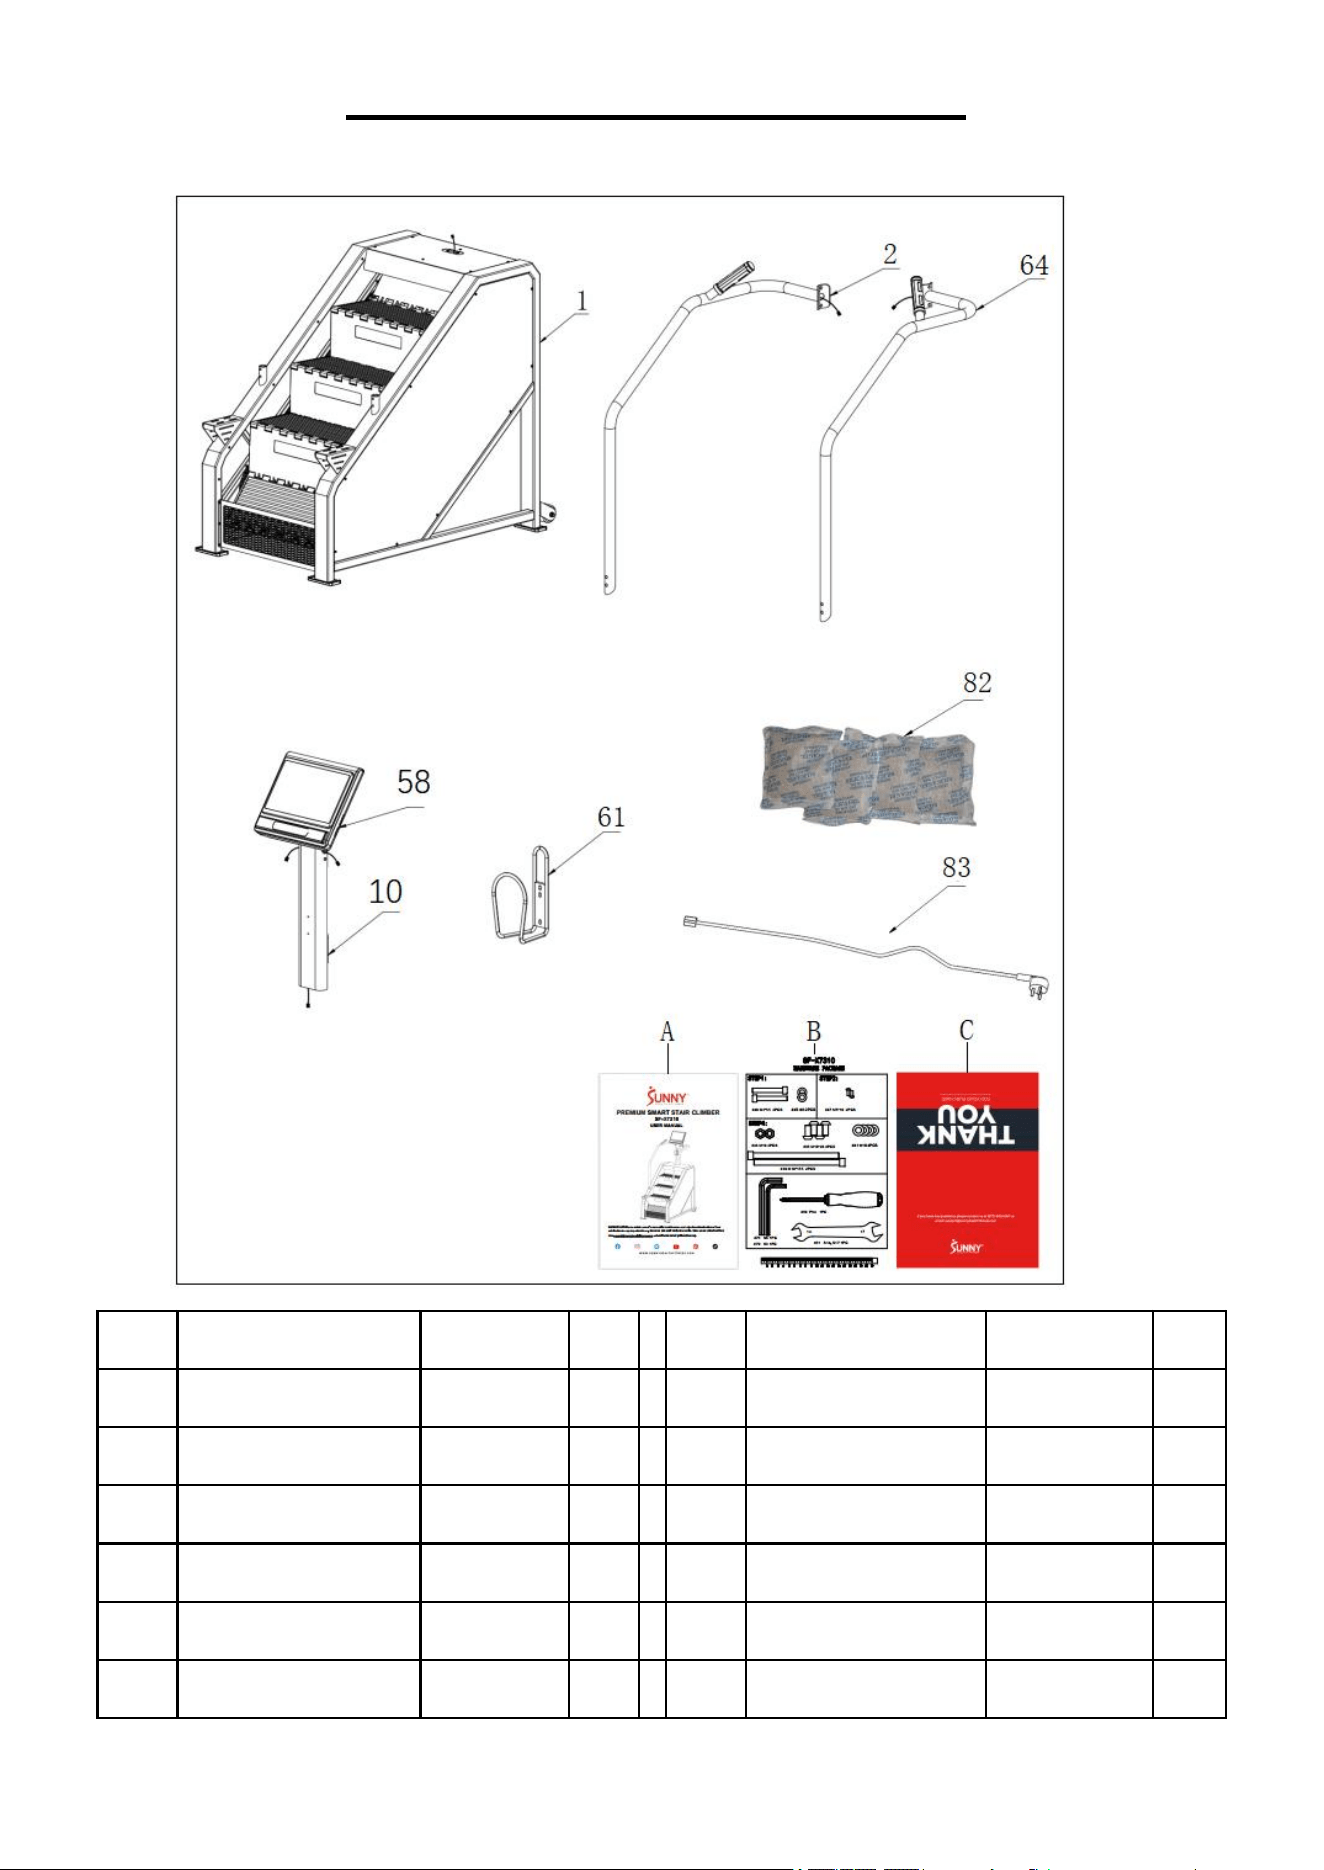
PRE-ASSEMBLY CHECKLIST
Before you start to assemble, please make sure all parts are included.
No.
Description
Spec.
Qty
No.
Description
Spec.
Qty
1
Main Frame
1
83
Power Cord
1
10
Computer Support
1
82
Desiccant
100g
4
58
Computer
DL800-2400
1
A
Manual
1
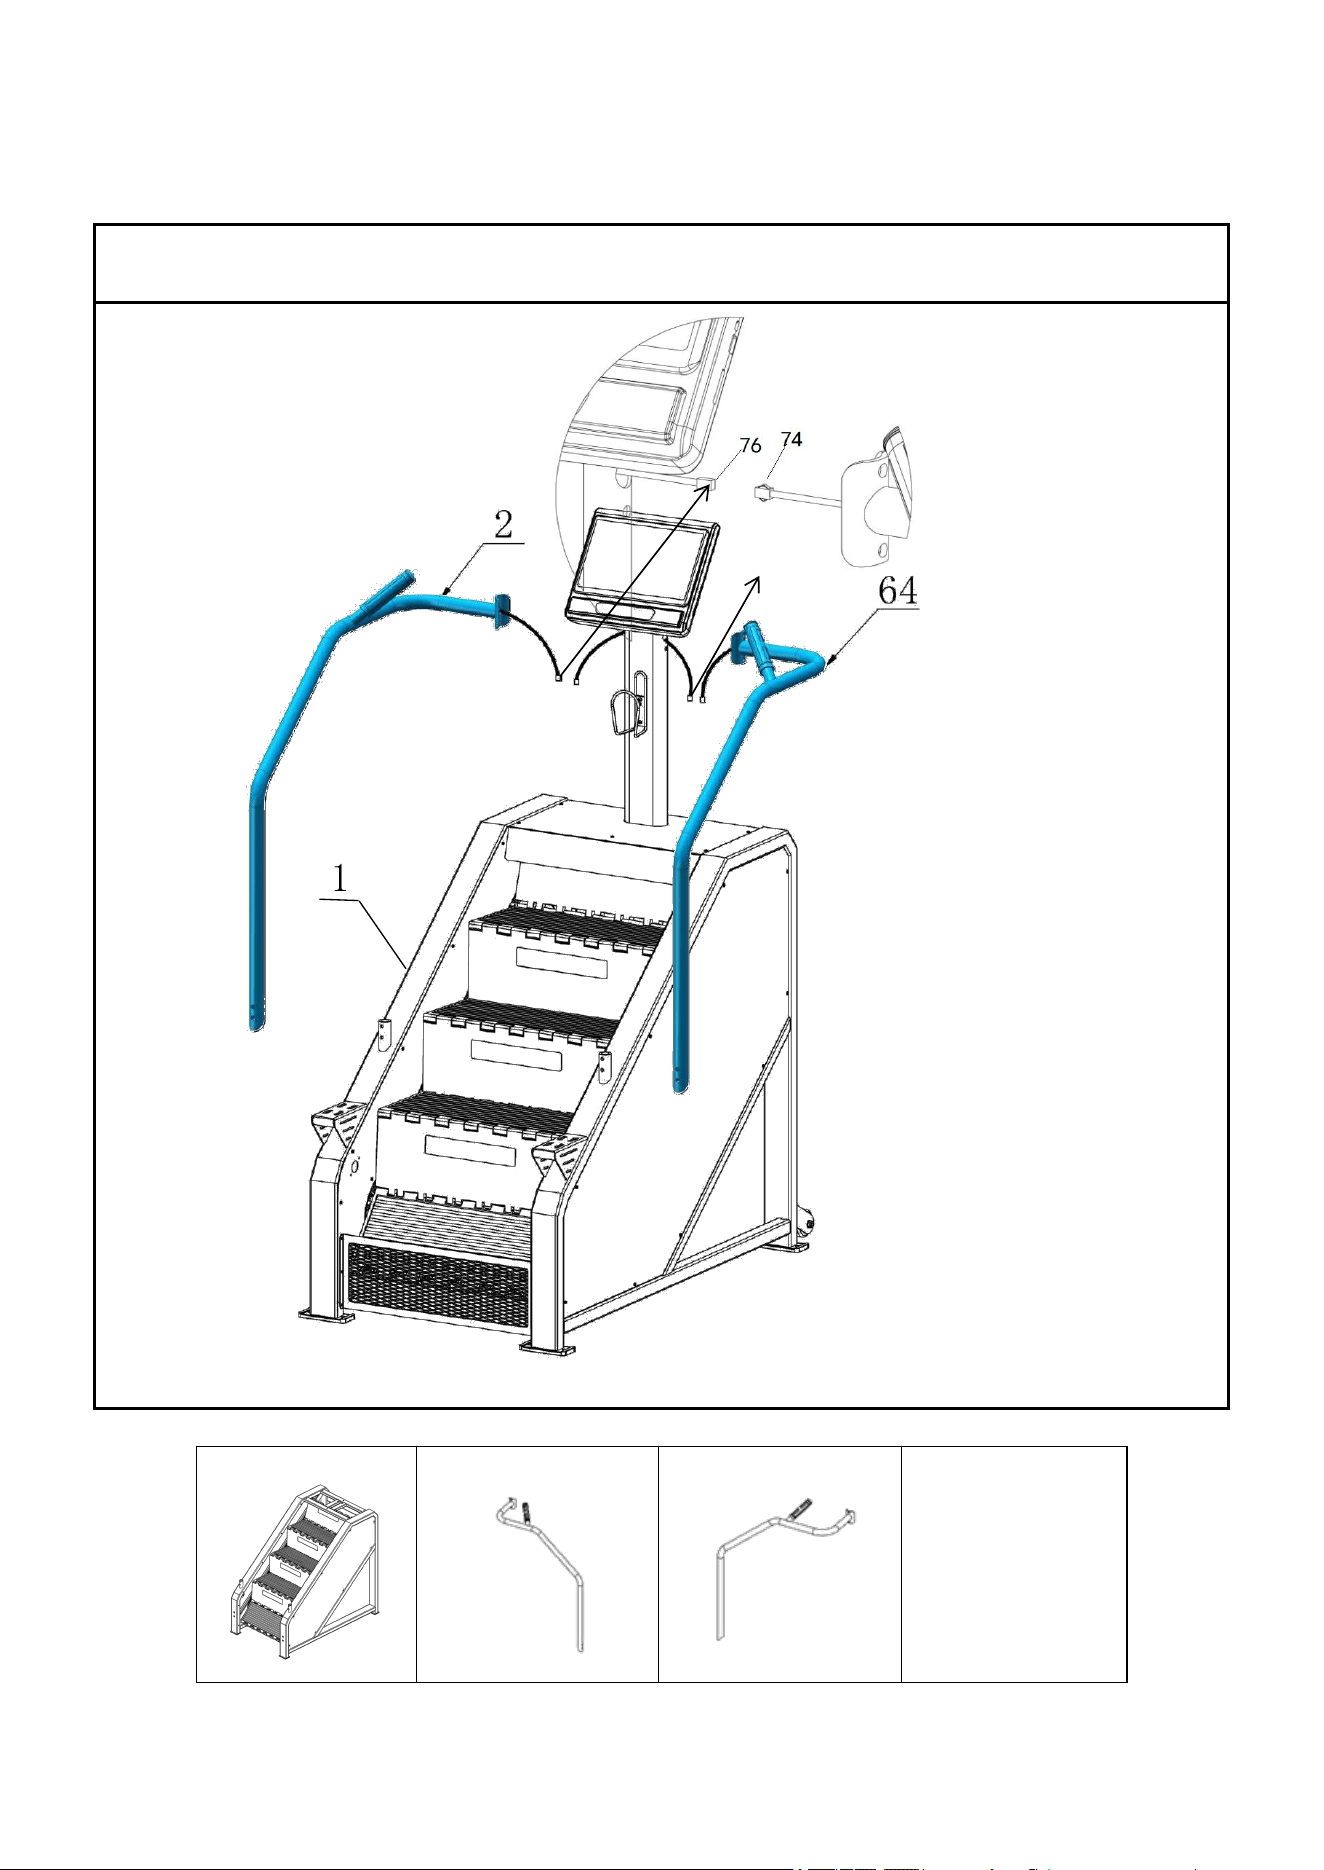
2
Left Handrail
1
B
Hardware Package
1
64
Right Handrail
1
C
Thank You Card
SUNNY
1
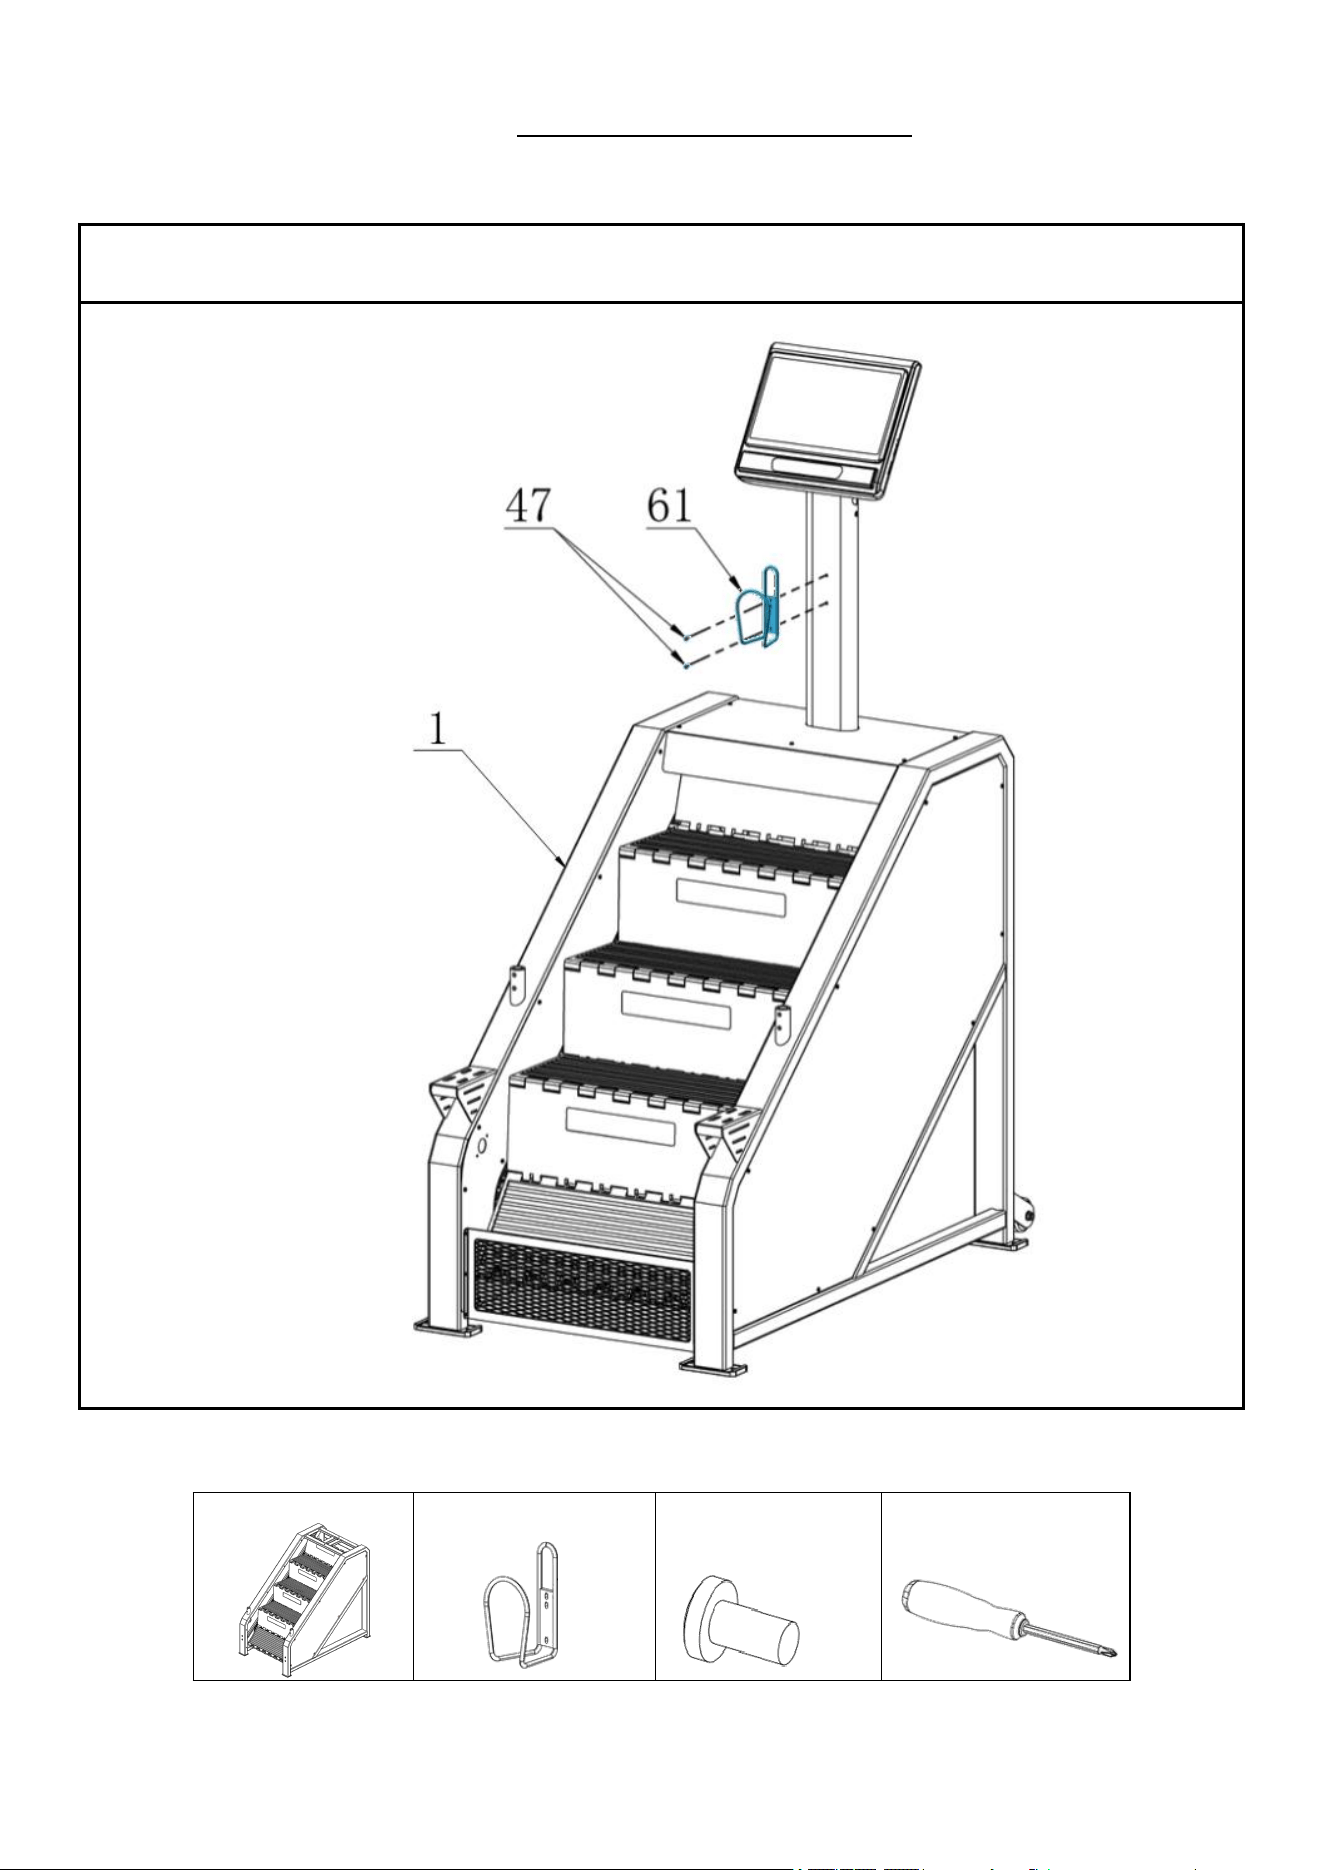
61
Bottle Holder
4
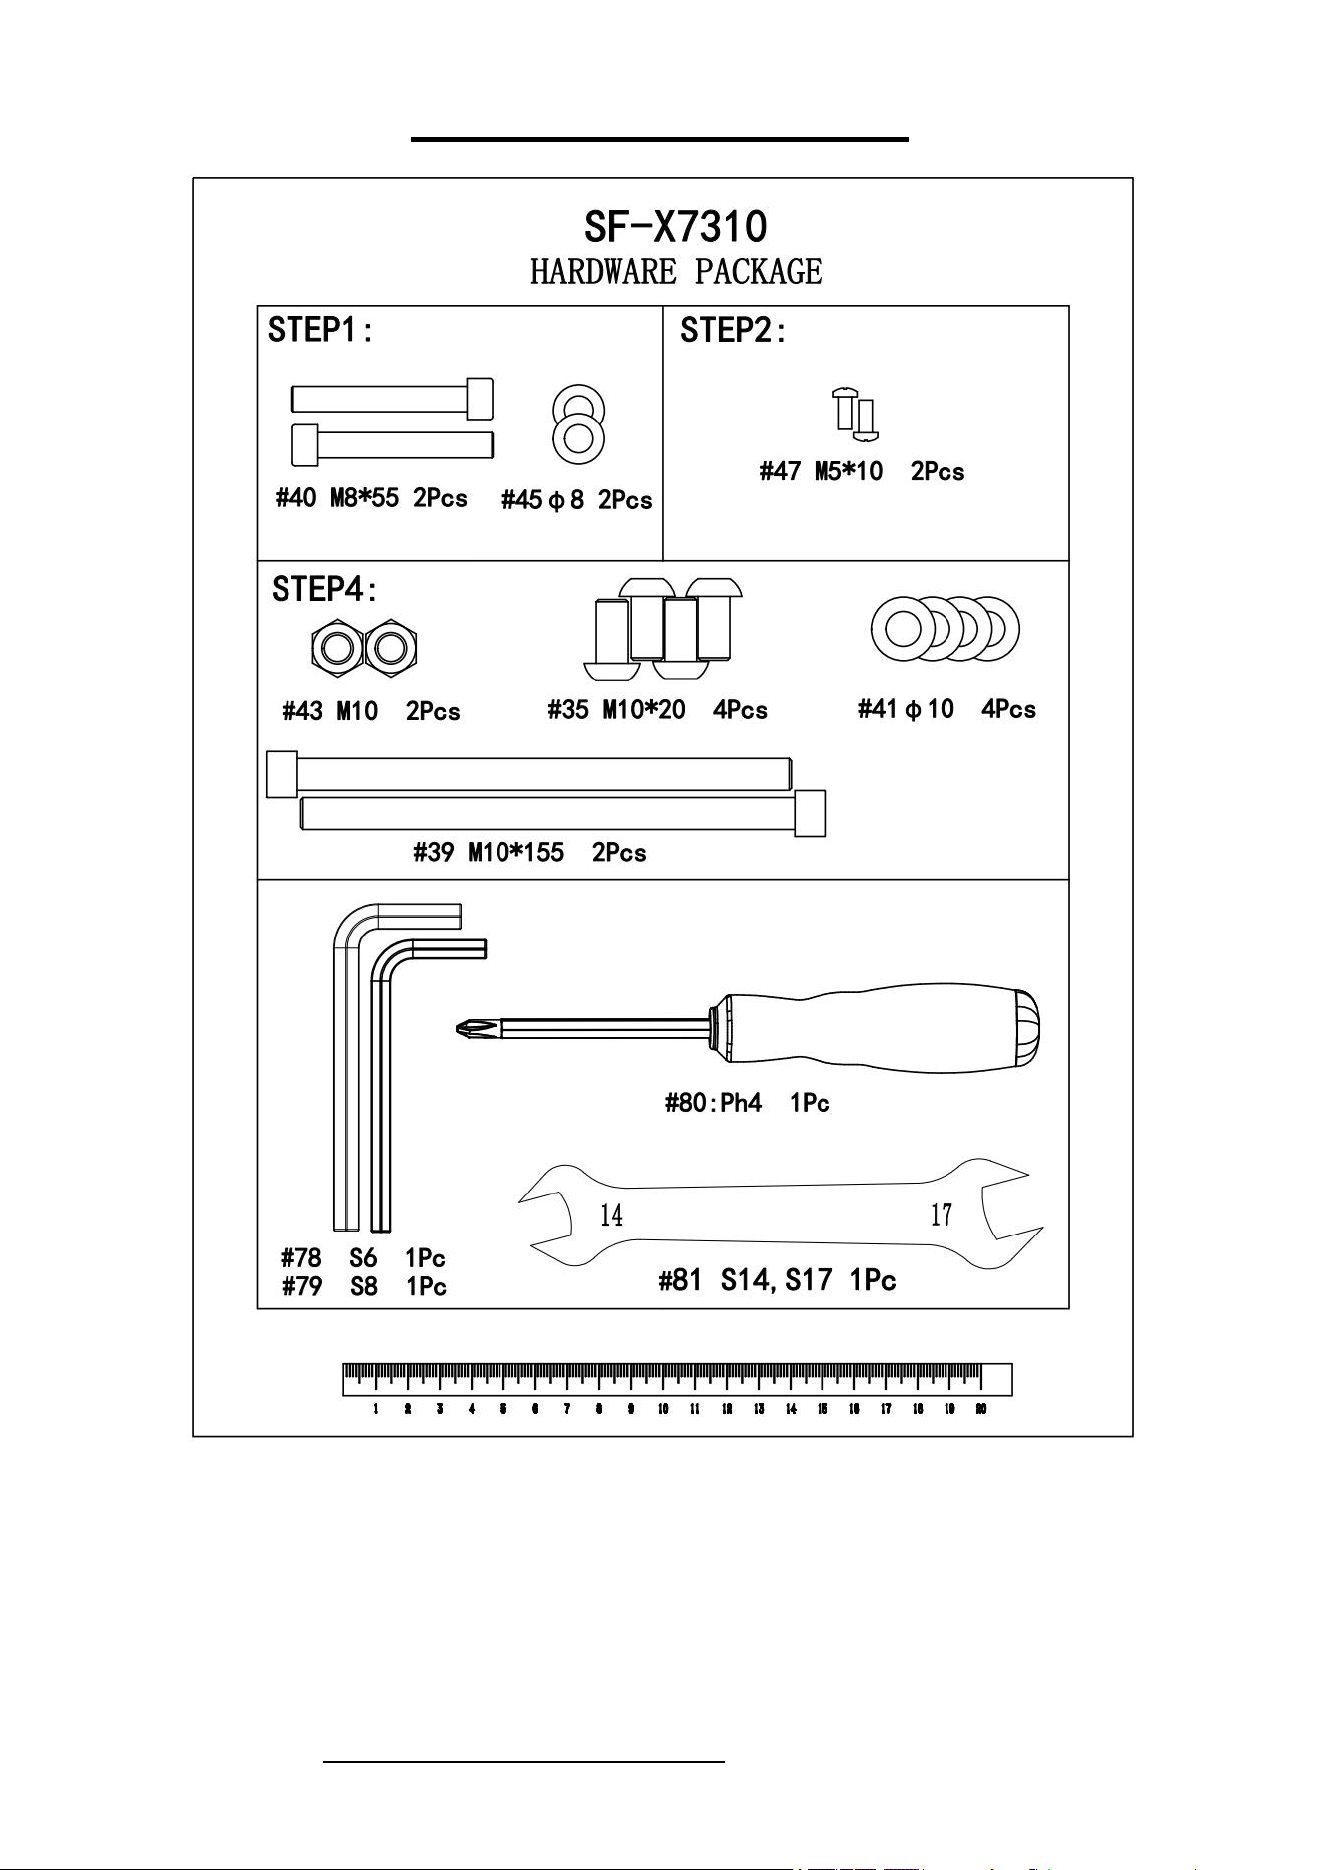
HARDWARE PACKAGE
Ordering Replacement Parts (U.S. and Canadian Customers only)
Please provide the following information in order for us to accurately identify the part(s) needed:
The model number (found on cover of manual)
The product name (found on cover of manual)
The part number found on the “EXPLODED DIAGRAM” (page 17) and “PARTS LIST” (page
18)
Please contact us at support@sunnyhealthfitness.com or 1-877-90SUNNY (877-907-8669)
6
We value your experience using Sunny Health and Fitness products. For assistance with parts or
907-8669).
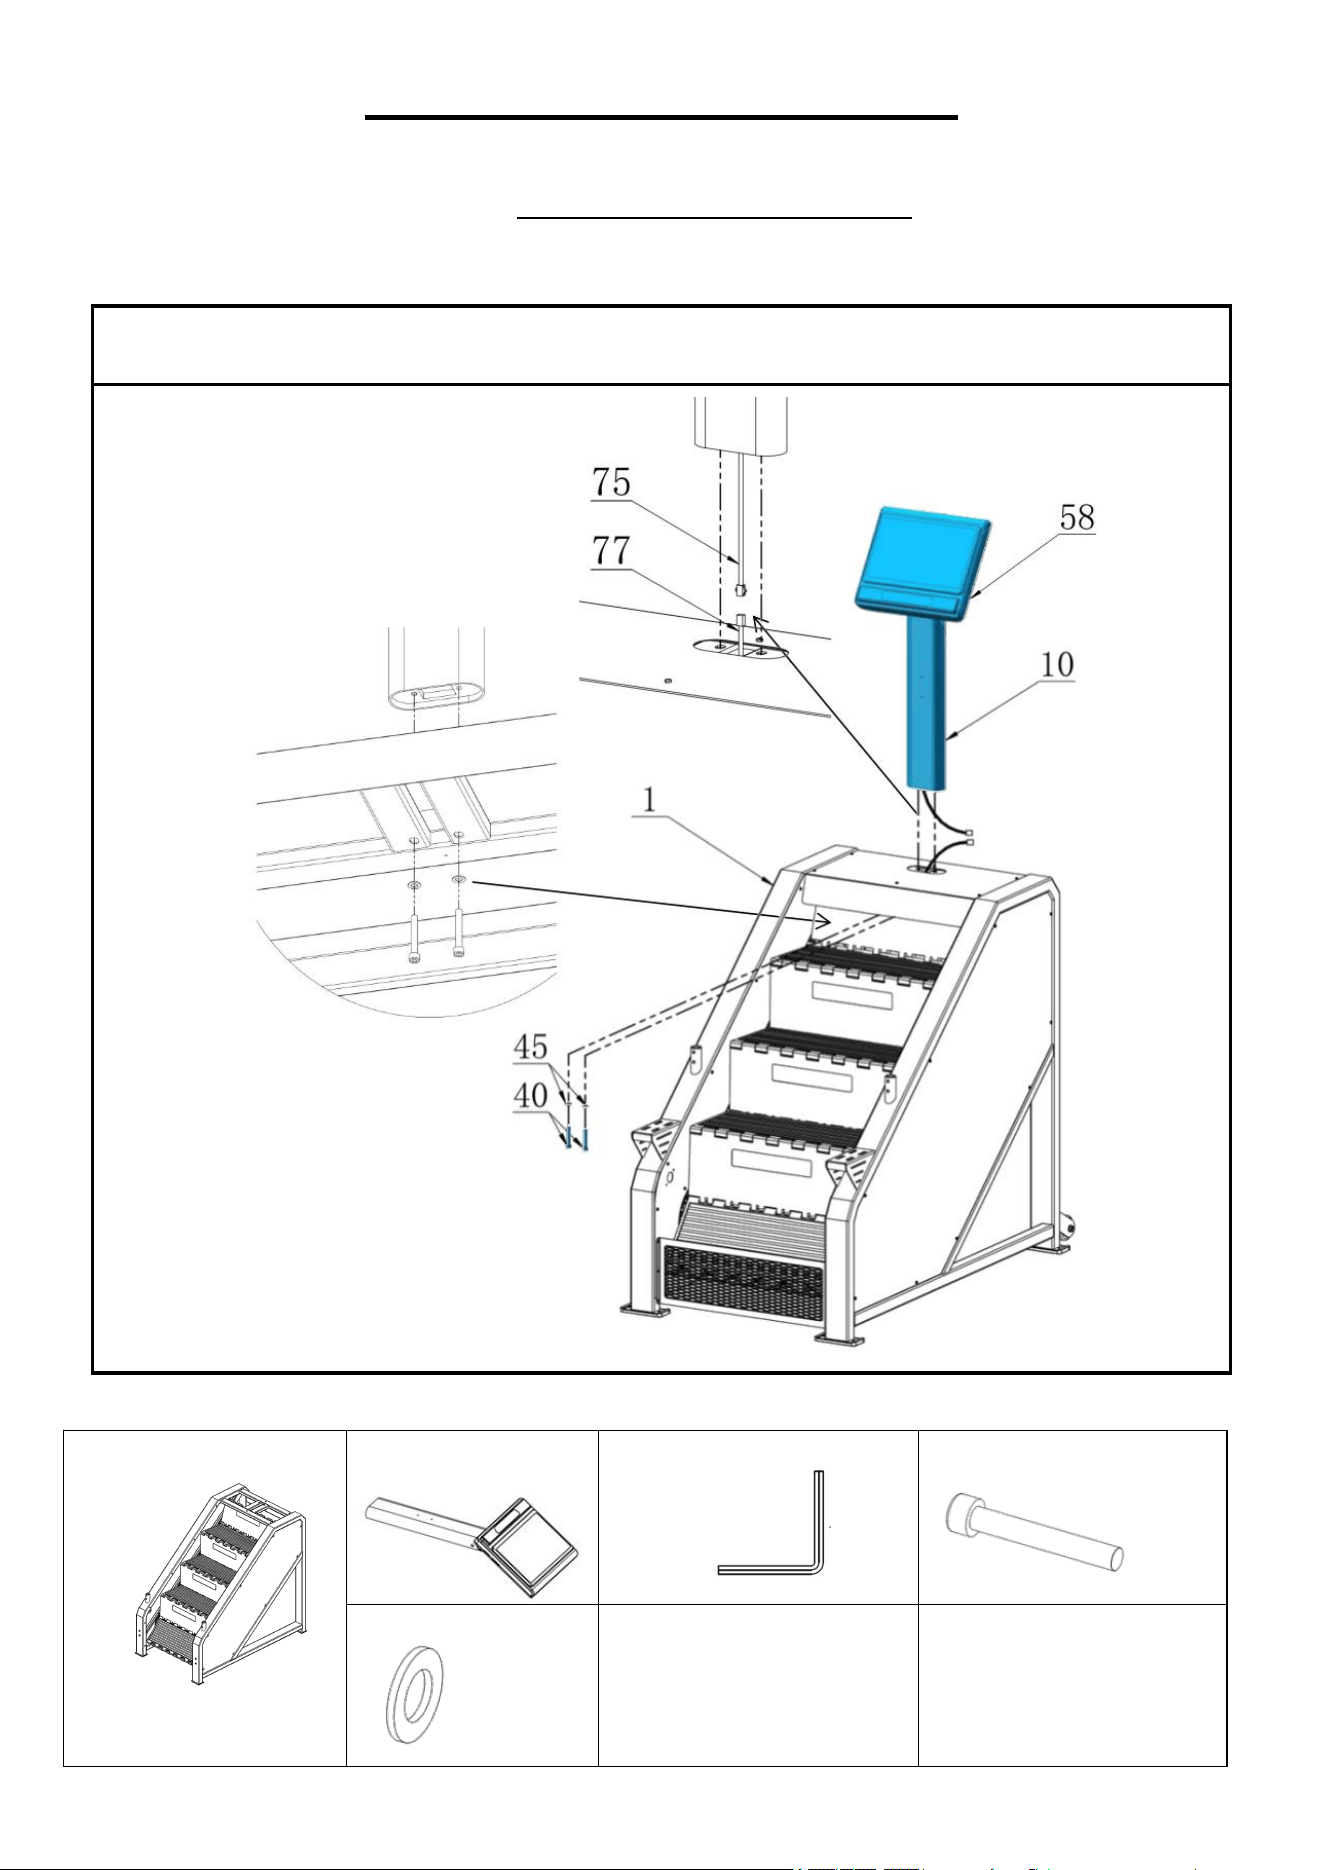
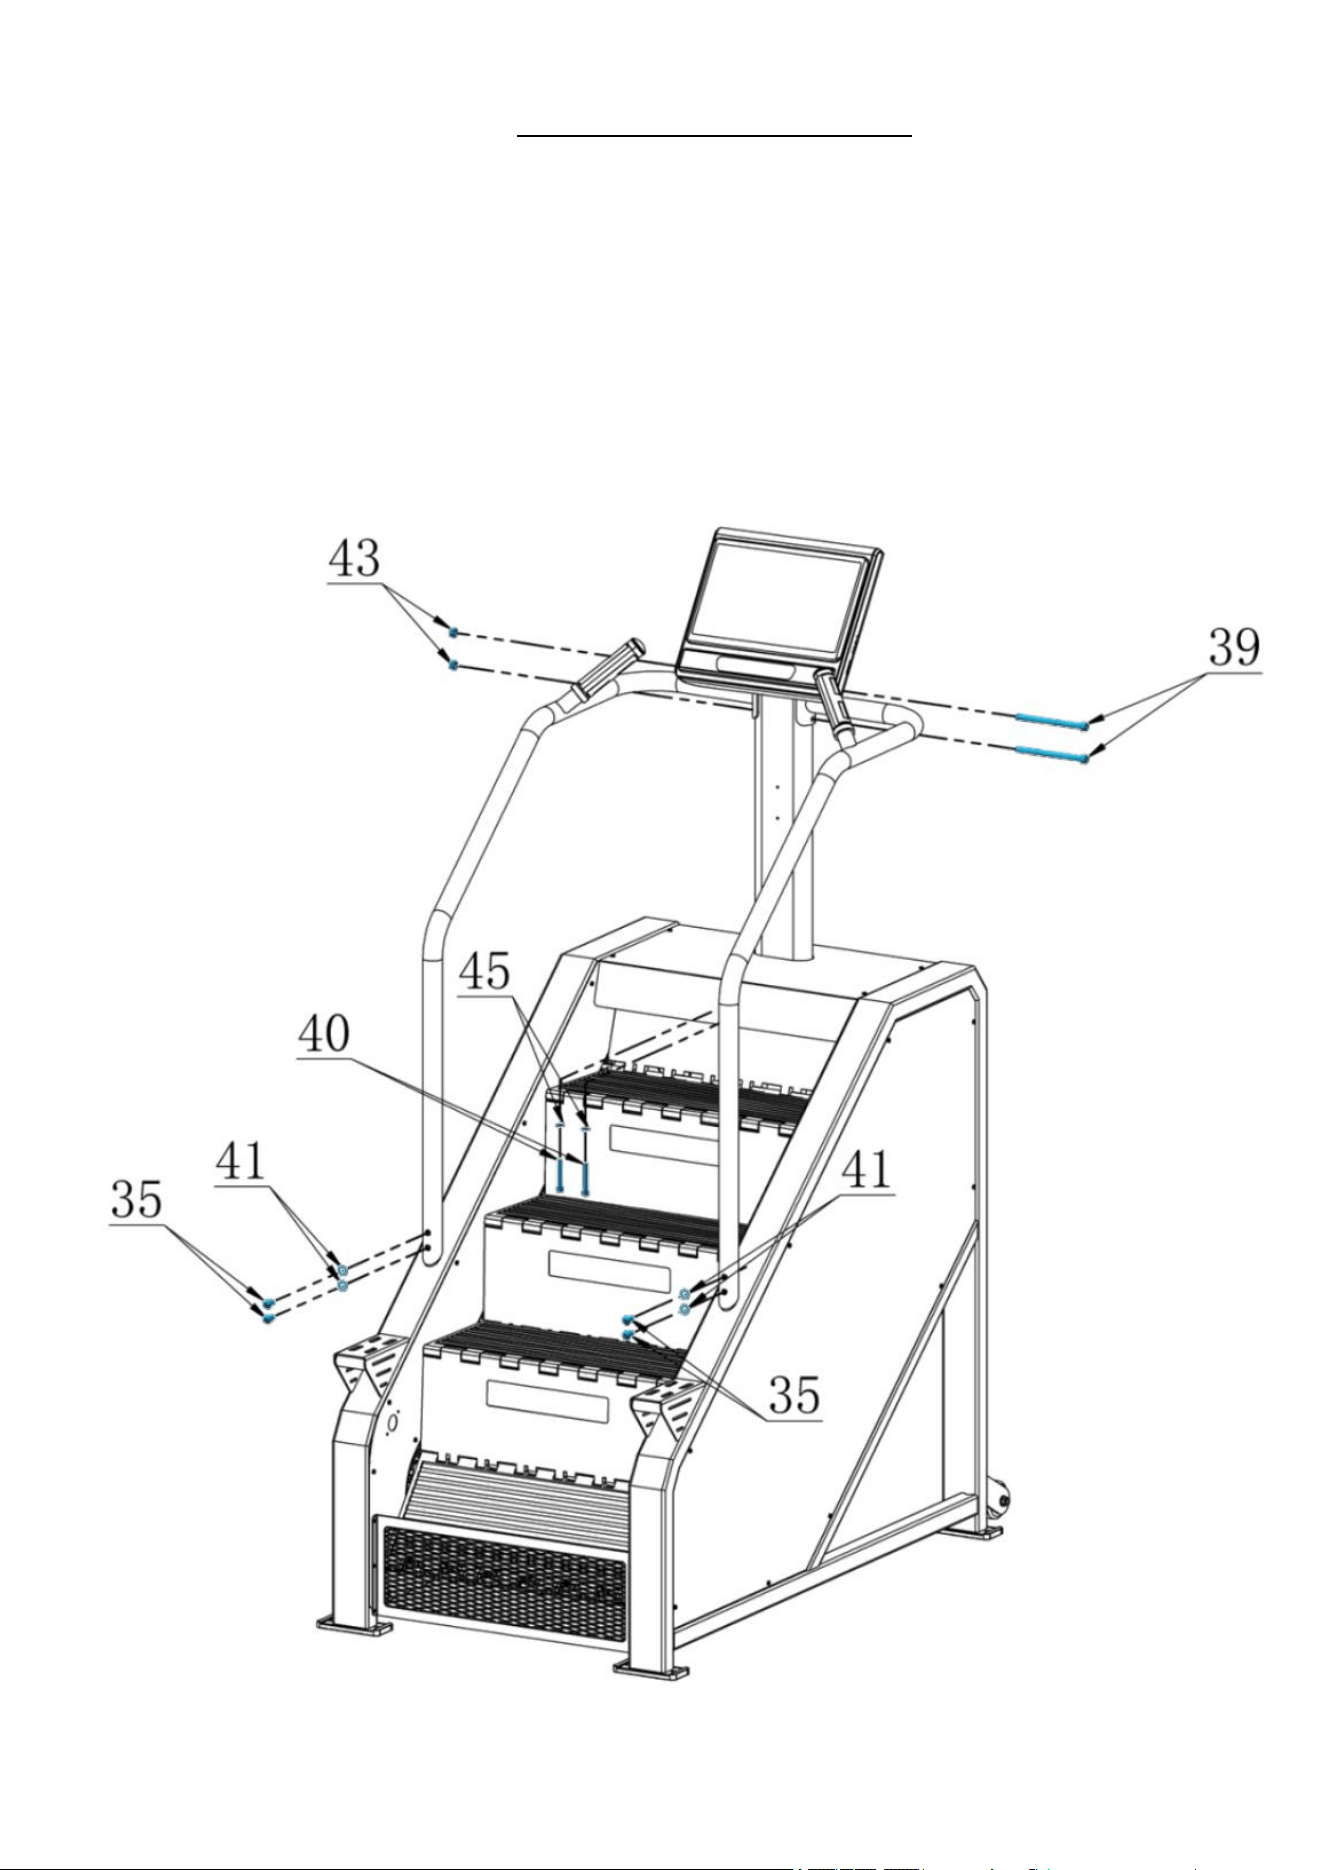
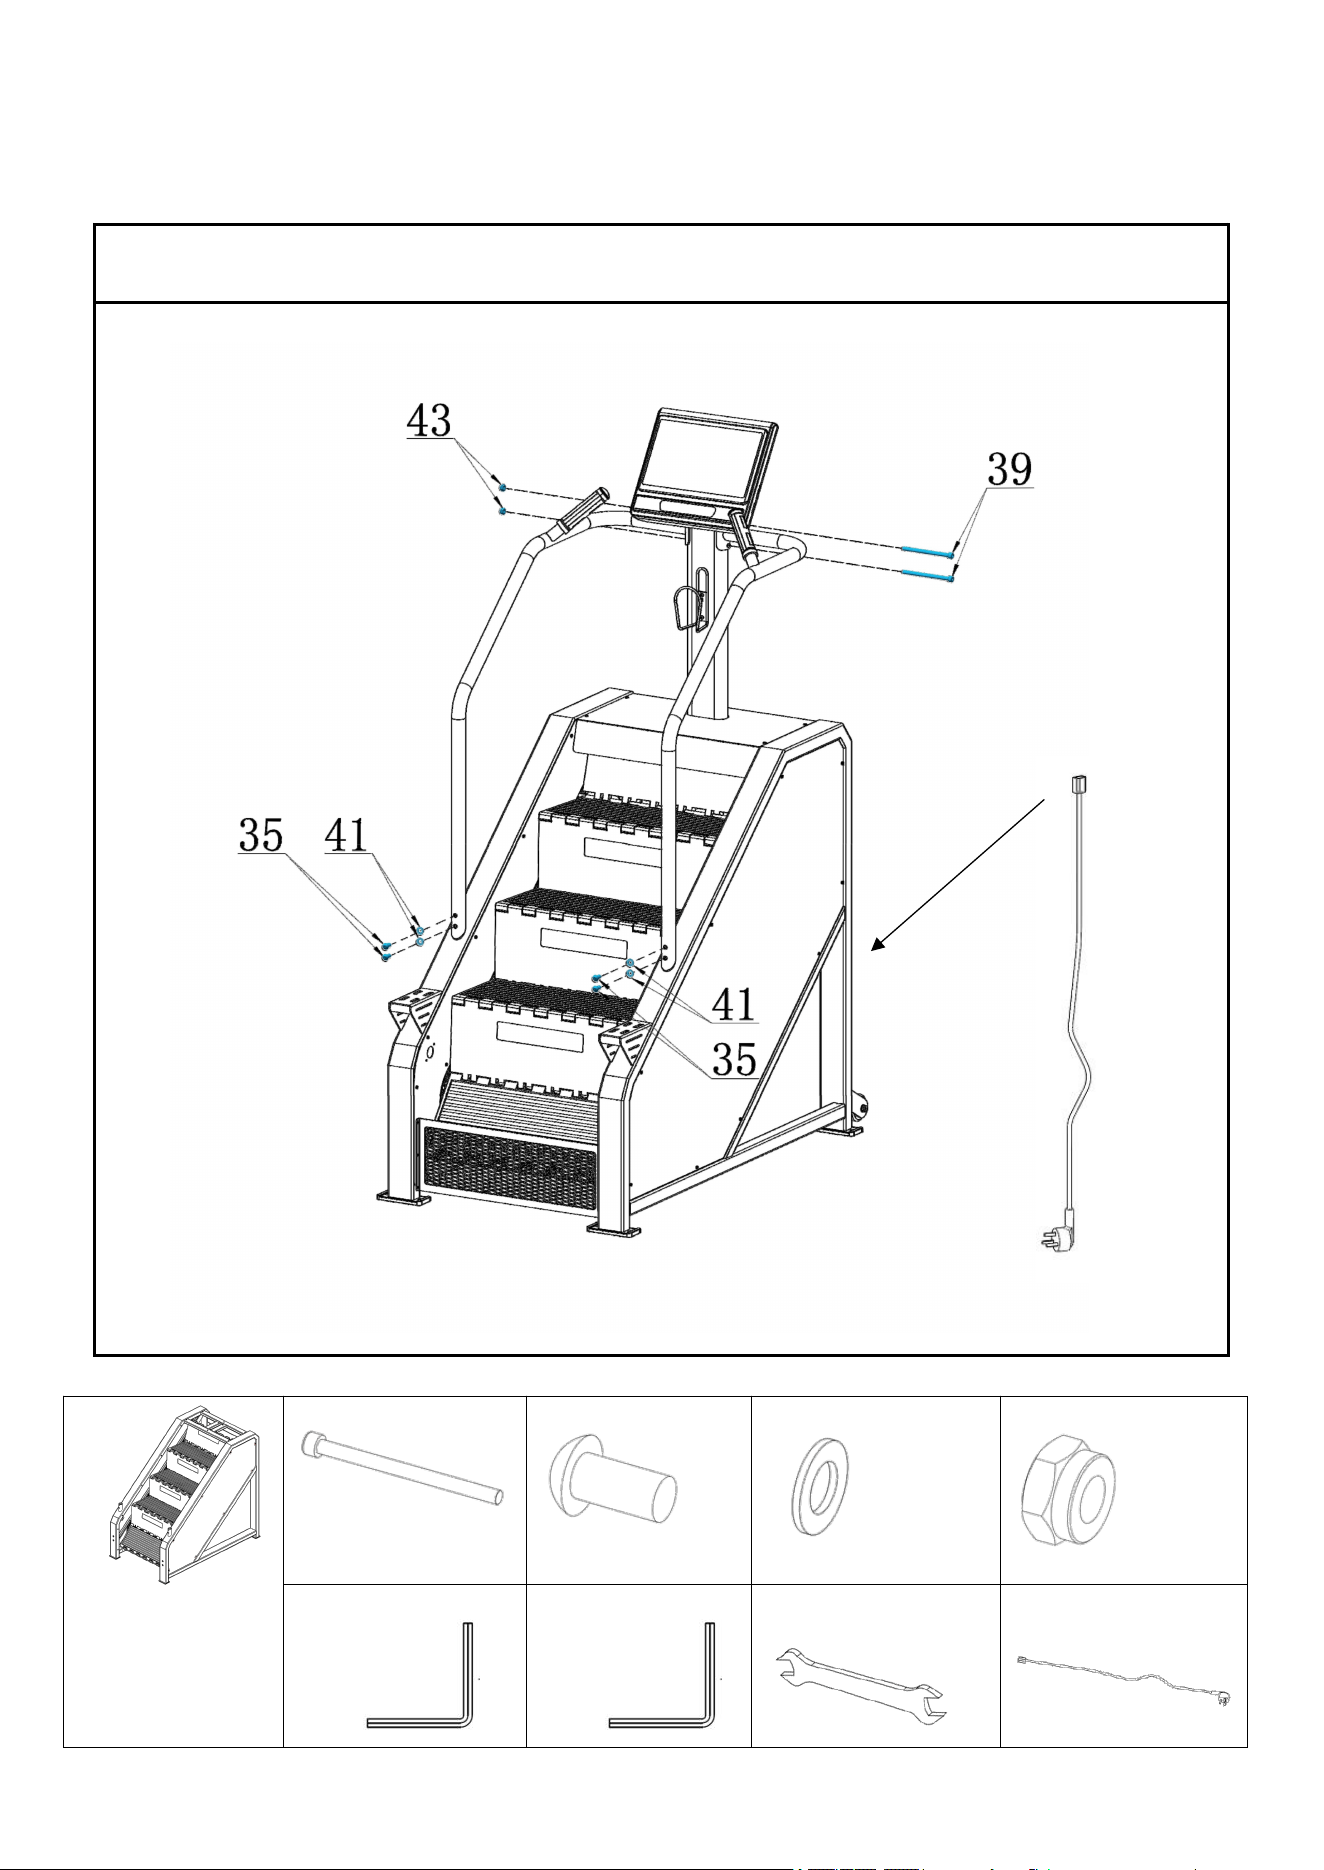
NOTE: Please pre-secure the 4 Flat Head Screws (No. 35), 2 Inner Hexagon Cylinder Bolts (No. 39)
and 2 Inner Hexagon Cylinder Bolts (No. 40) by hand first. Make sure all the screws and bolts are in
place and partially threaded in, then tighten the 4 Flat Head Screws (No. 35) and 2 Inner Hexagon
Cylinder Bolts (No. 39) with the Allen Wrench (No. 79) and Spanner (No. 81) and tighten the 2 Inner
Hexagon Cylinder Bolts (No. 40) with the Allen Wrench (No. 78).
10
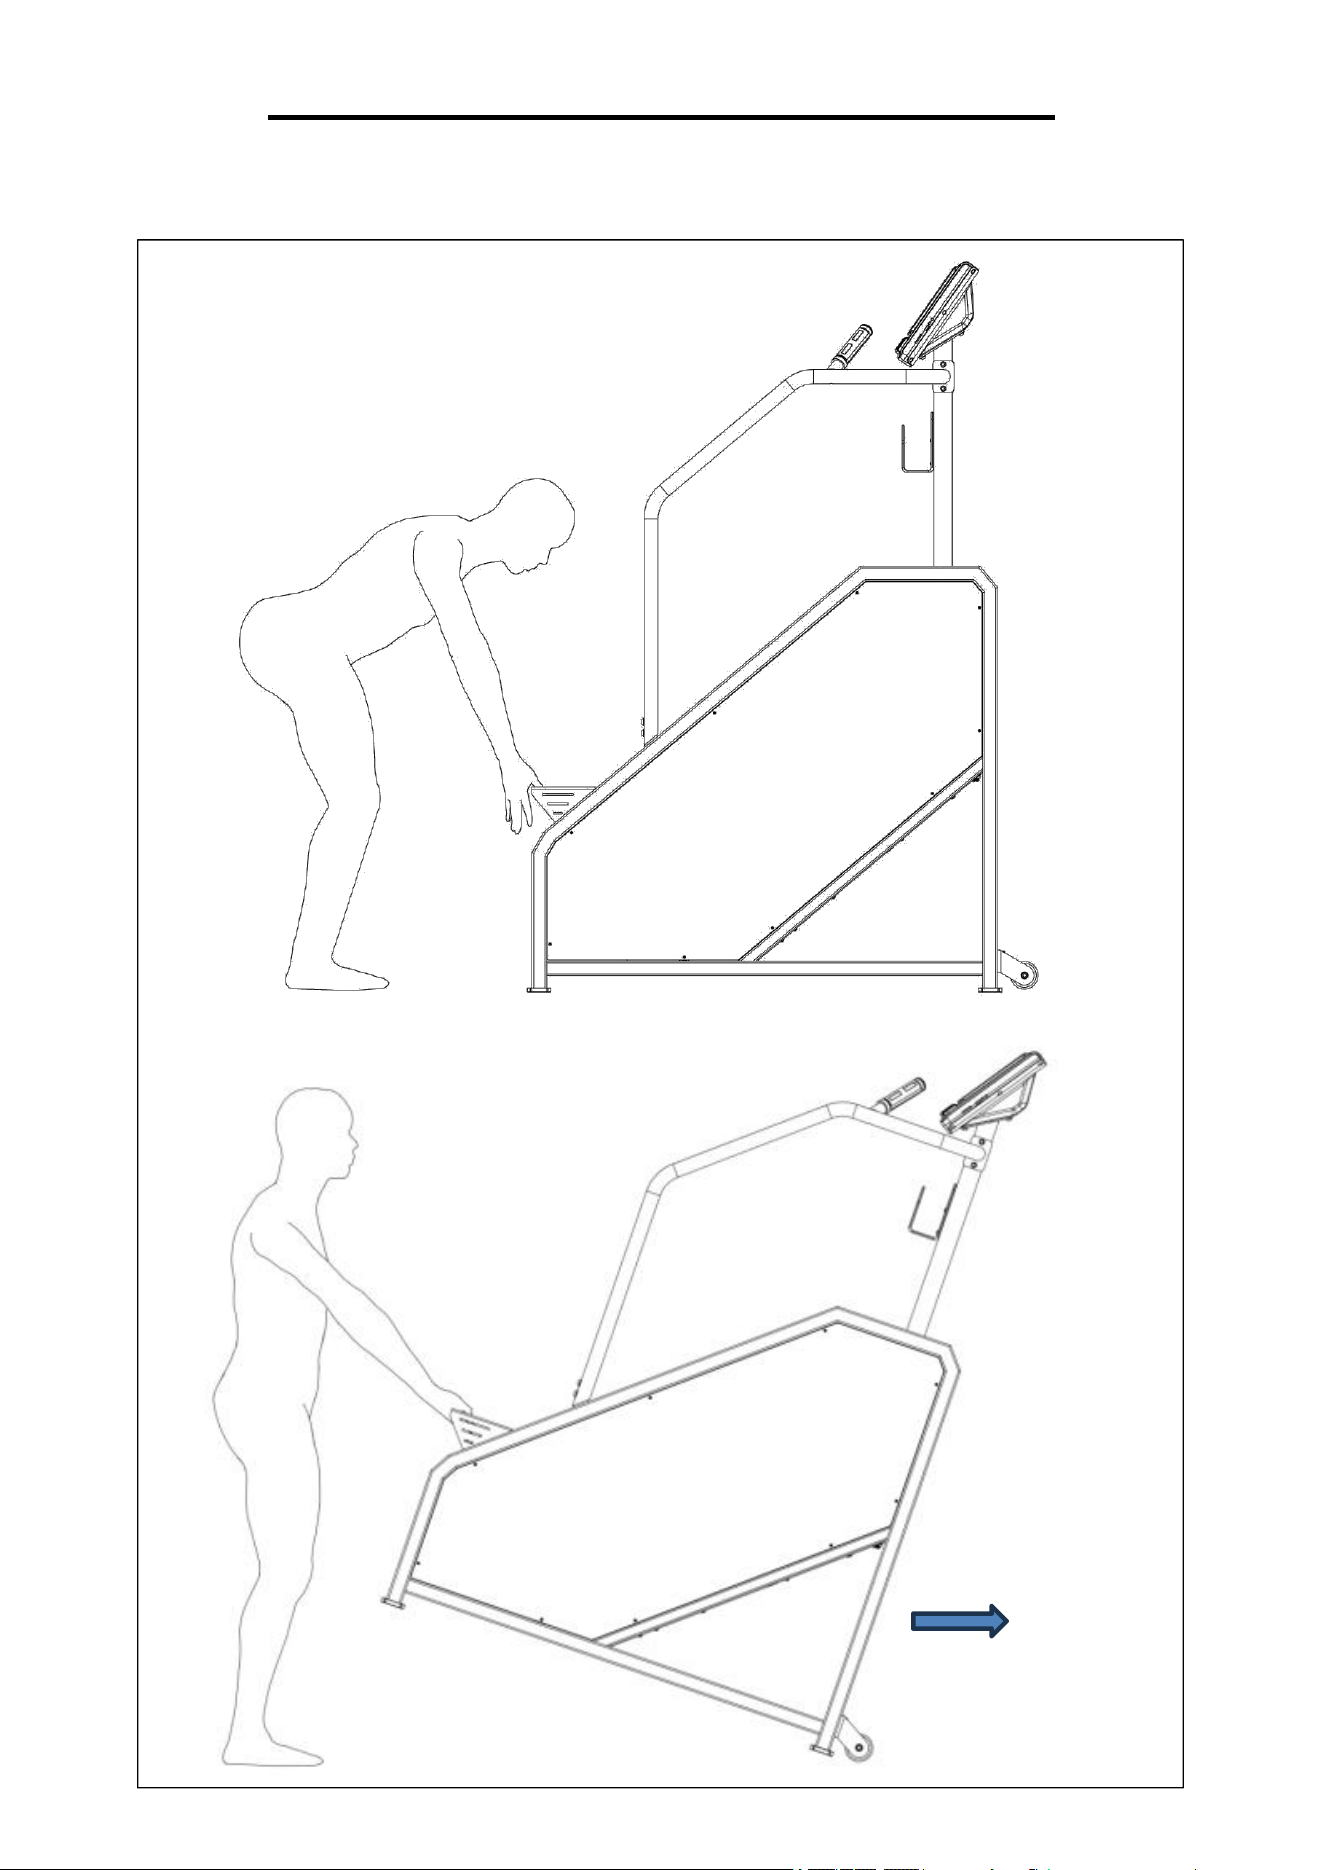
HOW TO MOVE THE STAIR CLIMBER
WARNING: Machine is very heavy, please make sure there is adequate amount of people to help
move the machine.
.

11
GROUNDING INSTRUCTIONS
WARNING: This stair climber requires a power source of 10A (110V-240V~) to properly operate.
For your safety, as well as the safety of others, please verify that the power source is correct before
powering the equipment. Any power source above or below this level could cause significant
damage to the equipment and/or user.
This product must be grounded. If it should malfunction or breakdown, grounding provides a path of
least resistance for electric current to reduce the risk of electric shock. This product is equipped
with a cord having an equipment-grounding conductor and a grounding plug. The plug must be
plugged into an appropriate outlet that is properly installed and grounded in accordance with all
local codes and ordinances.
DANGER – Improper connection of the equipment-grounding conductor can result in a risk of
electric shock. Check with a qualified electrician or serviceman if you are in doubt as to whether the
product is properly grounded. Do not modify the plug provided with the product – if it will not fit the
outlet, have a proper outlet installed by a qualified electrician.
For a grounded, cord-connected product rated less than 15 A and intended for use on a nominal
120- V supply circuit, the instructions in either (1) or (2):
1) This product is for use on a nominal 120-V circuit and has a grounding plug that looks like the
plug illustrated in sketch A in Figure 1. A temporary adapter that looks like the adapter illustrated in
sketches B and C may be used to connect this plug to a 2-pole receptacle as shown in sketch B if a
properly grounded outlet is not available.
The temporary adapter should be used only until a properly grounded outlet (sketch A) can be
installed by a qualified electrician. The green colored rigid ear, lug, or the like extending from the
adapter must be connected to a permanent ground such as a properly grounded outlet box cover.
Whenever the adapter is used, it must be held in place by a metal screw.
2) This product is for use on a nominal 120-V circuit and has a grounding plug that looks like the
plug illustrated in sketch A in Figure 1. Make sure that the product is connected to an outlet having
the same configuration as the plug. No adapter should be used with this product.
WARNING!
1. NEVER use a ground fault circuit interrupt (GFCI) wall outlet with this stair climber. Route the
power cord away from any moving parts of the stair climber including the elevation mechanism and
transportation wheels.
2. NEVER operate the stair climber using a generator or UPS power supply.
3. NEVER remove any cover without first disconnecting the power cord.
4. NEVER expose the stair climber to rain or moisture. This stair climber is not designed for
outdoor use or use in any other high humidity environment.
12
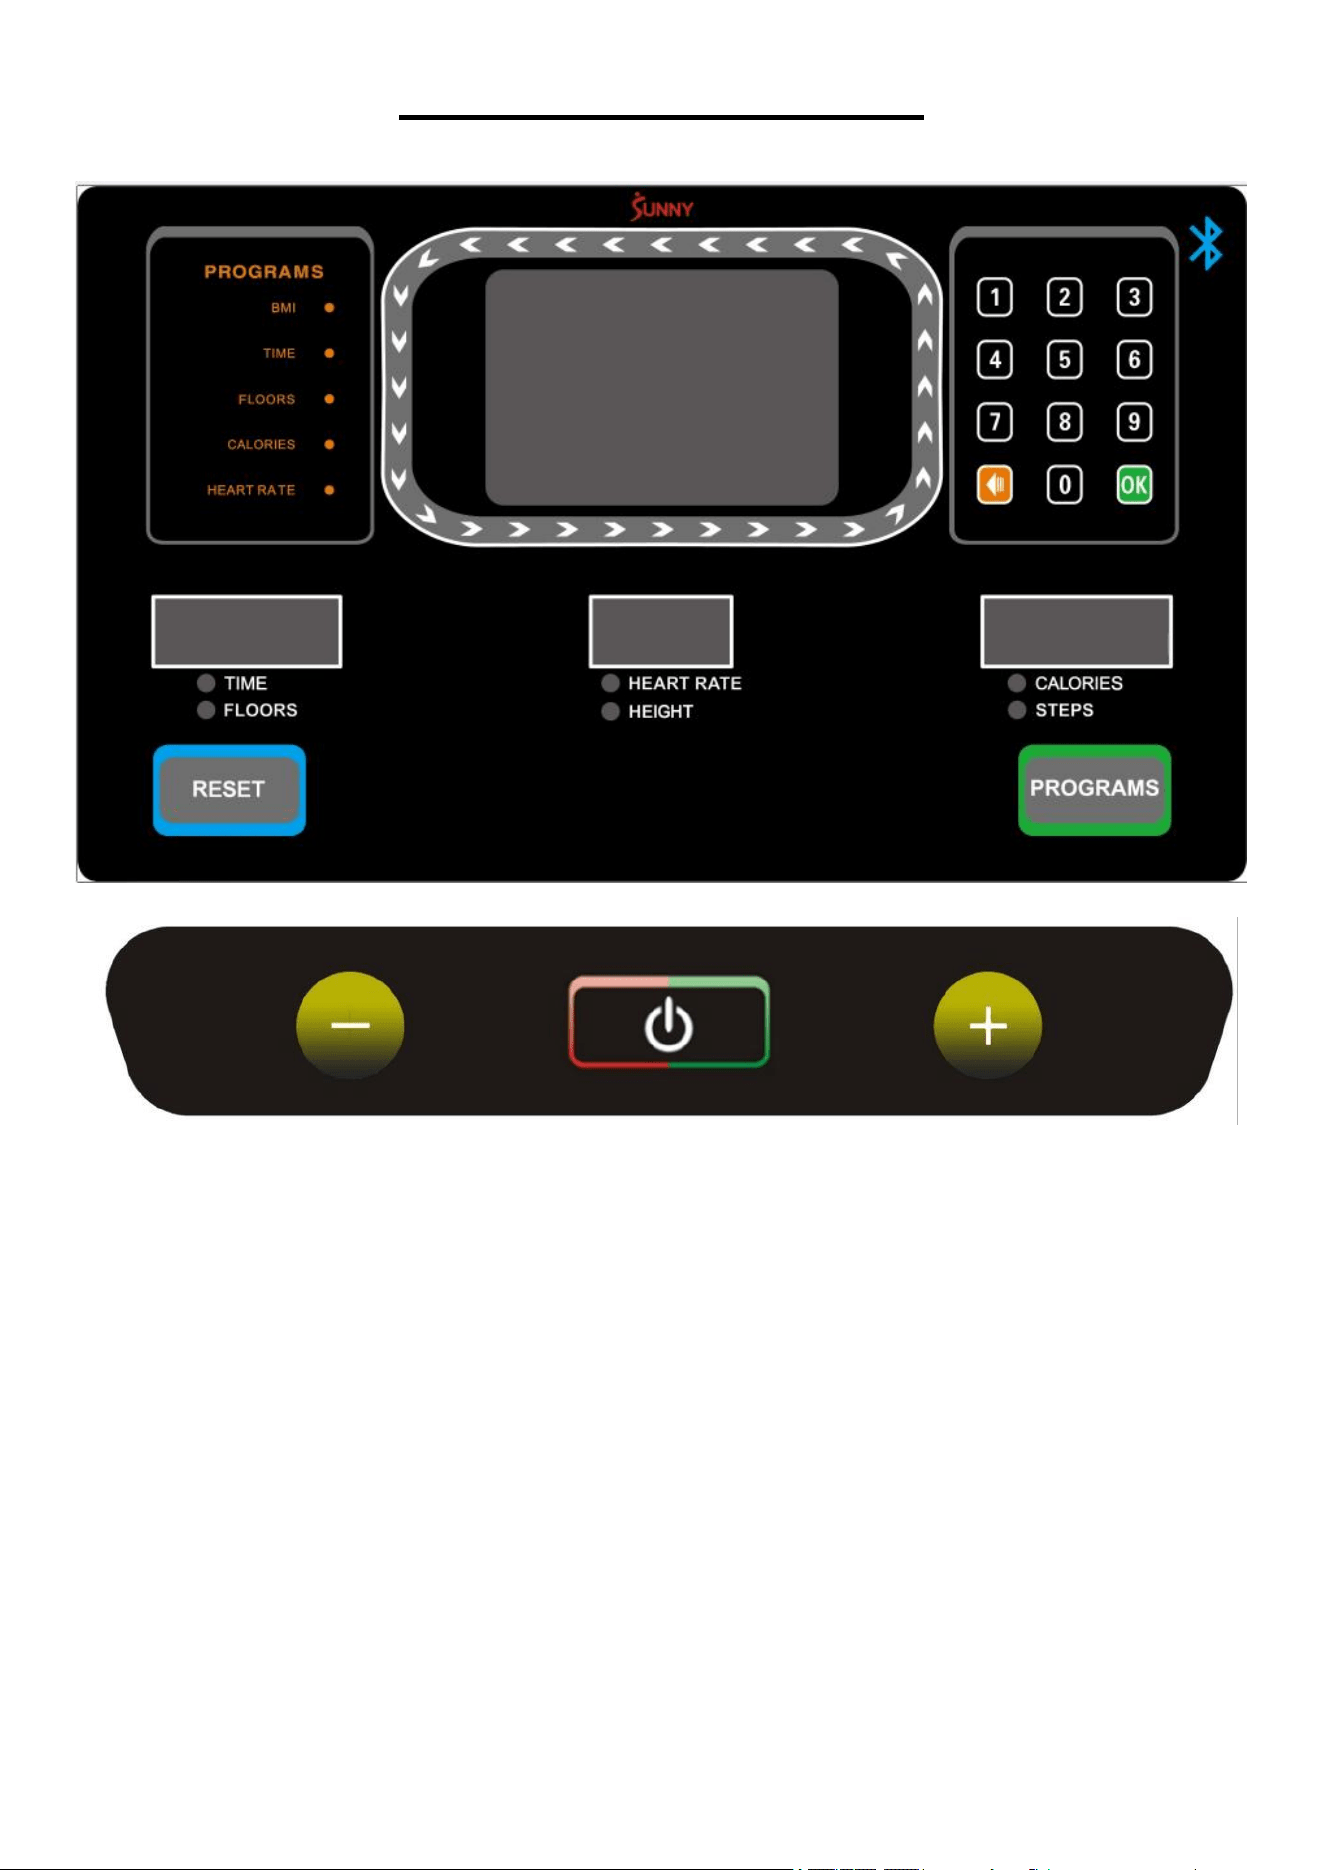
THE DISPLAY CONSOLE
WINDOW DISPLAY:
1)."TIME/FLOORS” window: Displays the exercise time and floors climbed, and switches display
every 5 seconds. The time ranges from 0:00 to 99:59. When the time reaches 99:59, it will reset to
zero and start counting again.
The floors range from 0 to 9999. When the count reaches 9999, it will also reset to zero and
start counting again.
2). “HEART RATE/HEIGHT” window: Displays heart rate (50-200 BPM) and climbed height, and
switches display every 5 seconds.
The height climbed display range is from 0.00 to 999 meters. When the count reaches 999, it
will reset to zero and start counting again.
The heart rate will display when hands are placed on the pulse sensors or connected to a
heart rate monitor. The console can be connected to the heart rate monitor at any time except in
power saving mode. (This data is for reference only and cannot be used as medical purposes.)
NOTE: Heart rate monitor is not included, wireless heart rate function works with the SunnyFit
Heart Rate Monitor HR200.

13
3). “CALORIES/STEPS” window: Displays the calories burned and the number of steps, and
switches display every 5 seconds.
The calories display range is from 0.00 to 999.9. When the count reaches 999.9, it will reset to
zero and start counting again.
The steps display range is from 0 to 9999. When the step count reaches 9999, it will reset to
zero and start counting again.
4). "MAIN" window: Displays level and program progress chart, etc. In program mode, this window
displays the program diagram.
The green arrow around the display is a circular runway with a circle of 400 meters in height.
FUNCTION:
1). “ ”: Press this key at any time to start the stair climber, the running level is 1.
During exercise, press this key to stop the stair climber and all values will reset to zero.
In the STOP state, press and hold the STOP key for 6 seconds to disconnect the heart rate
monitor. To reconnect the heart rate monitor, press and hold the STOP key for 6 seconds again
When the infrared sensor detects an object, the stair climber will stop immediately and report an
error. Press this key to exit the error and return the stair climber to standby mode.
2). “+” and “-”: During exercise, these keys are used to adjust the level, the value will adjust by 1
each time. Total 15 levels. 24 steps/min for level 1, 164 steps/min for level 15. Increasing by 10-
step per level. In setting mode, it is used to adjust the set values. The value will increase or
decrease continuously if you press and hold the key for more than 0.5 seconds.
3). "RESET": Press this key to return to the standby interface.
4). "Number keypad (1、 2、3、4、5、6、7、8、9、 、0、OK" In climbing or setting state,
press the keypad number key to quickly set the parameter value. The delete key clears the input
value. The “OK” key sets the parameter to the input value. Always press “OK” key to confirm the
setting after parameters are set. (For example, enter 1 and 5, will result in 15, and press the OK
key to confirm.) If the input value exceeds the set range, the console will automatically be set to the
maximum or minimum value. The maximum speed is 15.
5). "PROGRAMS": In the standby state, press this key to select the “BMI”, “TIME”, “FLOORS”,
“CALORIES”, “HEART RATE” or P1-P8 programs.
A. BMI MODE: Press “PROGRAMS” key to select BMI mode in standby mode, then press “ ”
to enter, you can press “+/-” keys to set Man or Female. The press “ ” and “+/-” keys to set
AGE, HEIGHT and WEIGHT. After setting is complete, press “ ” to confirm, then your Body
Mass Index (BMI) will be displayed.
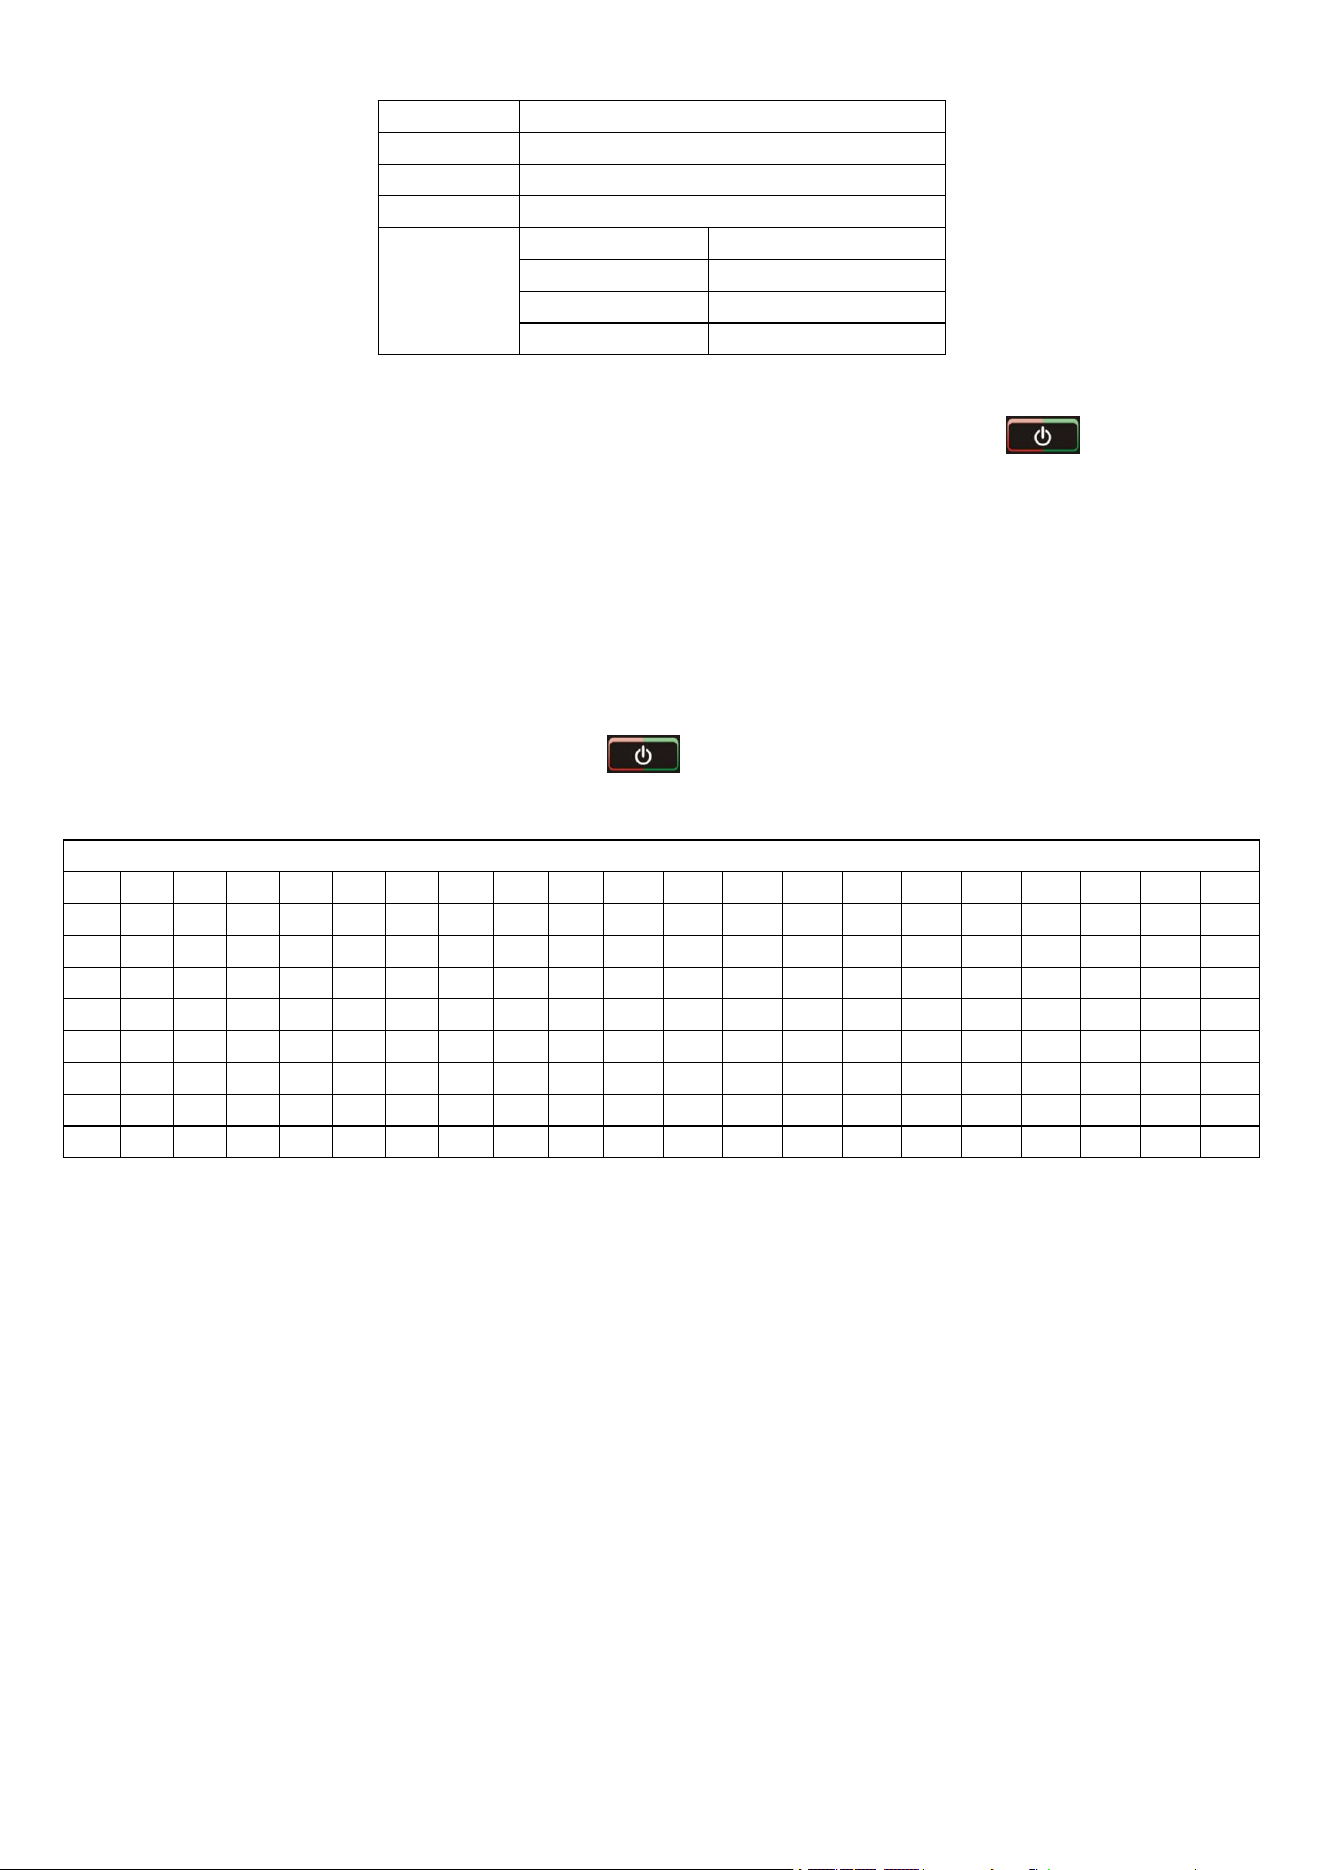
PROGRAMS
Initial
Default value
Set rage
Display rage
TIME (MIN : SECOND)
0:00
30:00
5:00-99:00
0:00 - 99:59
HEIGHT (meters)
0.00
0
N/A
0 -999
CALORIES (Kcal)
0.00
100
10-990
0.0 - 9999
LEVEL
0
0
1-15
1 - 15
STEPS
0
N/A
N/A
0 - 9999
FLOORS
0
50
5-9999
0 - 9999
HEART RATE (times/min)
P
100
50-200
50 - 200
Input power supply voltage:
AC100V——AC240V
Power cord specification:
10A AC250V
14
Setting rage
AGE
10-99
HEIGHT
3.3-7.5 (ft)
WEIGHT
44-331 (lbs)
BMI
≤ 19
Underweight
= (20---25)
Normal weight
= (26---29)
Overweight
≥ 30
Obese
B. COUNTDOWN MODE: Press “PROGRAMS” key to select TIME, FLOORS or CALORIES mode
in standby mode, then press “+/-” keys to set the exercise goal, then press “ ” to begin the
exercise.
NOTE: Once the countdown mode program is complete, the climber will stop, then return to
standby mode.
C. HEART RATE MODE: Press “PROGRAMS” key to select HEART RATE mode in standby mode,
then press “+/-” keys to set target heart rate. When your heart rate exceeds the set target heart
rate, the console will beep.
D. PROGRAMS: Press “PROGRAMS” key to select P1-P8 mode in standby mode, then press “+/-”
keys to set the exercise time, then press “ ” to start the exercise. Each program is divided
into 20 exercise segments in an equal time division. Please see chart below.
PROGRAM SCHEDULE
S1
S2
S3
S4
S5
S6
S7
S8
S9
S10
S11
S12
S13
S14
S15
S16
S17
S18
S19
S20
P1
3
3
5
5
4
4
6
6
8
8
7
7
8
8
7
7
5
5
4
4
P2
3
3
4
4
5
5
8
8
9
10
7
7
6
6
5
5
4
4
3
3
P3
3
3
5
5
5
7
7
7
7
9
9
6
6
7
7
5
4
4
3
3
P4
3
3
5
5
7
7
10
10
7
7
10
10
5
5
3
3
4
4
4
3
P5
4
4
6
6
8
8
10
10
8
8
6
6
4
4
3
3
4
4
3
3
P6
2
2
4
4
6
6
8
8
10
10
8
8
6
6
4
4
3
3
2
2
P7
1
1
1
1
5
5
5
5
8
8
8
8
6
6
5
5
5
5
4
4
P8
2
2
4
4
6
6
4
4
6
6
4
4
6
6
4
4
5
5
3
3
INFRARED SENSOR
There is an infrared sensor installed in the lower right corner of the step. When an object is
detected, the stair climber will stop immediately to ensure safety. When using, please ensure that
the infrared sensor is functioning properly; and in non-emergency situations, please do not
deliberately obstruct the infrared sensing area.
POWER SAVING MODE
This machine has a power saving function. In the standby state, if there is no key input for 10
minutes, when Bluetooth is not connected, the console will enter power saving mode and
automatically closes the display. Press any key to wake the system.
POWER OFF
You can turn off the stair climber at any time by turning off the power switch, it will not damage the
stair climber.

15
TROUBLESHOOTING
Fault analysis
Error code
Possible Reasons
Solution
Machine has no
display.
1. Not plugged in, or no power.
2. Power switch is not turned on.
3. Controller is without power or
damaged.
4. Console wires are disconnected.
5. Console is damaged.
1.Connect the power cord to the AC socket
or check the AC socket.
2.Set the power switch to the ON position.
3.Replace Controller.
4.Replace the console wires and plug them
in again.
5.Replace the console
E01
Communication error
Communication line is poorly connected,
needle is bent or lower control board is
damaged
E02
The machine to stop
Damaged display board or poor
communication line contact
E03
No upper control signal was
received
Damaged display board or poor
communication line contact

16
APP CONNECTION:
Connect Smart Equipment to SunnyFit App:
1. Scan to download SunnyFit from the app store:
2. Ensure that the Bluetooth function is turned on from your mobile device.
3. If this is your first time using the SunnyFit app, follow the in-app instructions to register for
your free SunnyFit account and log in.
4. Begin any workout activity that matches your smart equipment, then follow the onscreen
prompts to search for and connect to your smart equipment.
5. When connected, your stats and records will be displayed at the end of your course/session,
and recorded in your account profile!
Troubleshooting:
If you are having trouble connecting your smart equipment, visit www.sunnyfit.com/guide or
scan the QR code below:
If you require additional support, please contact sup[email protected]
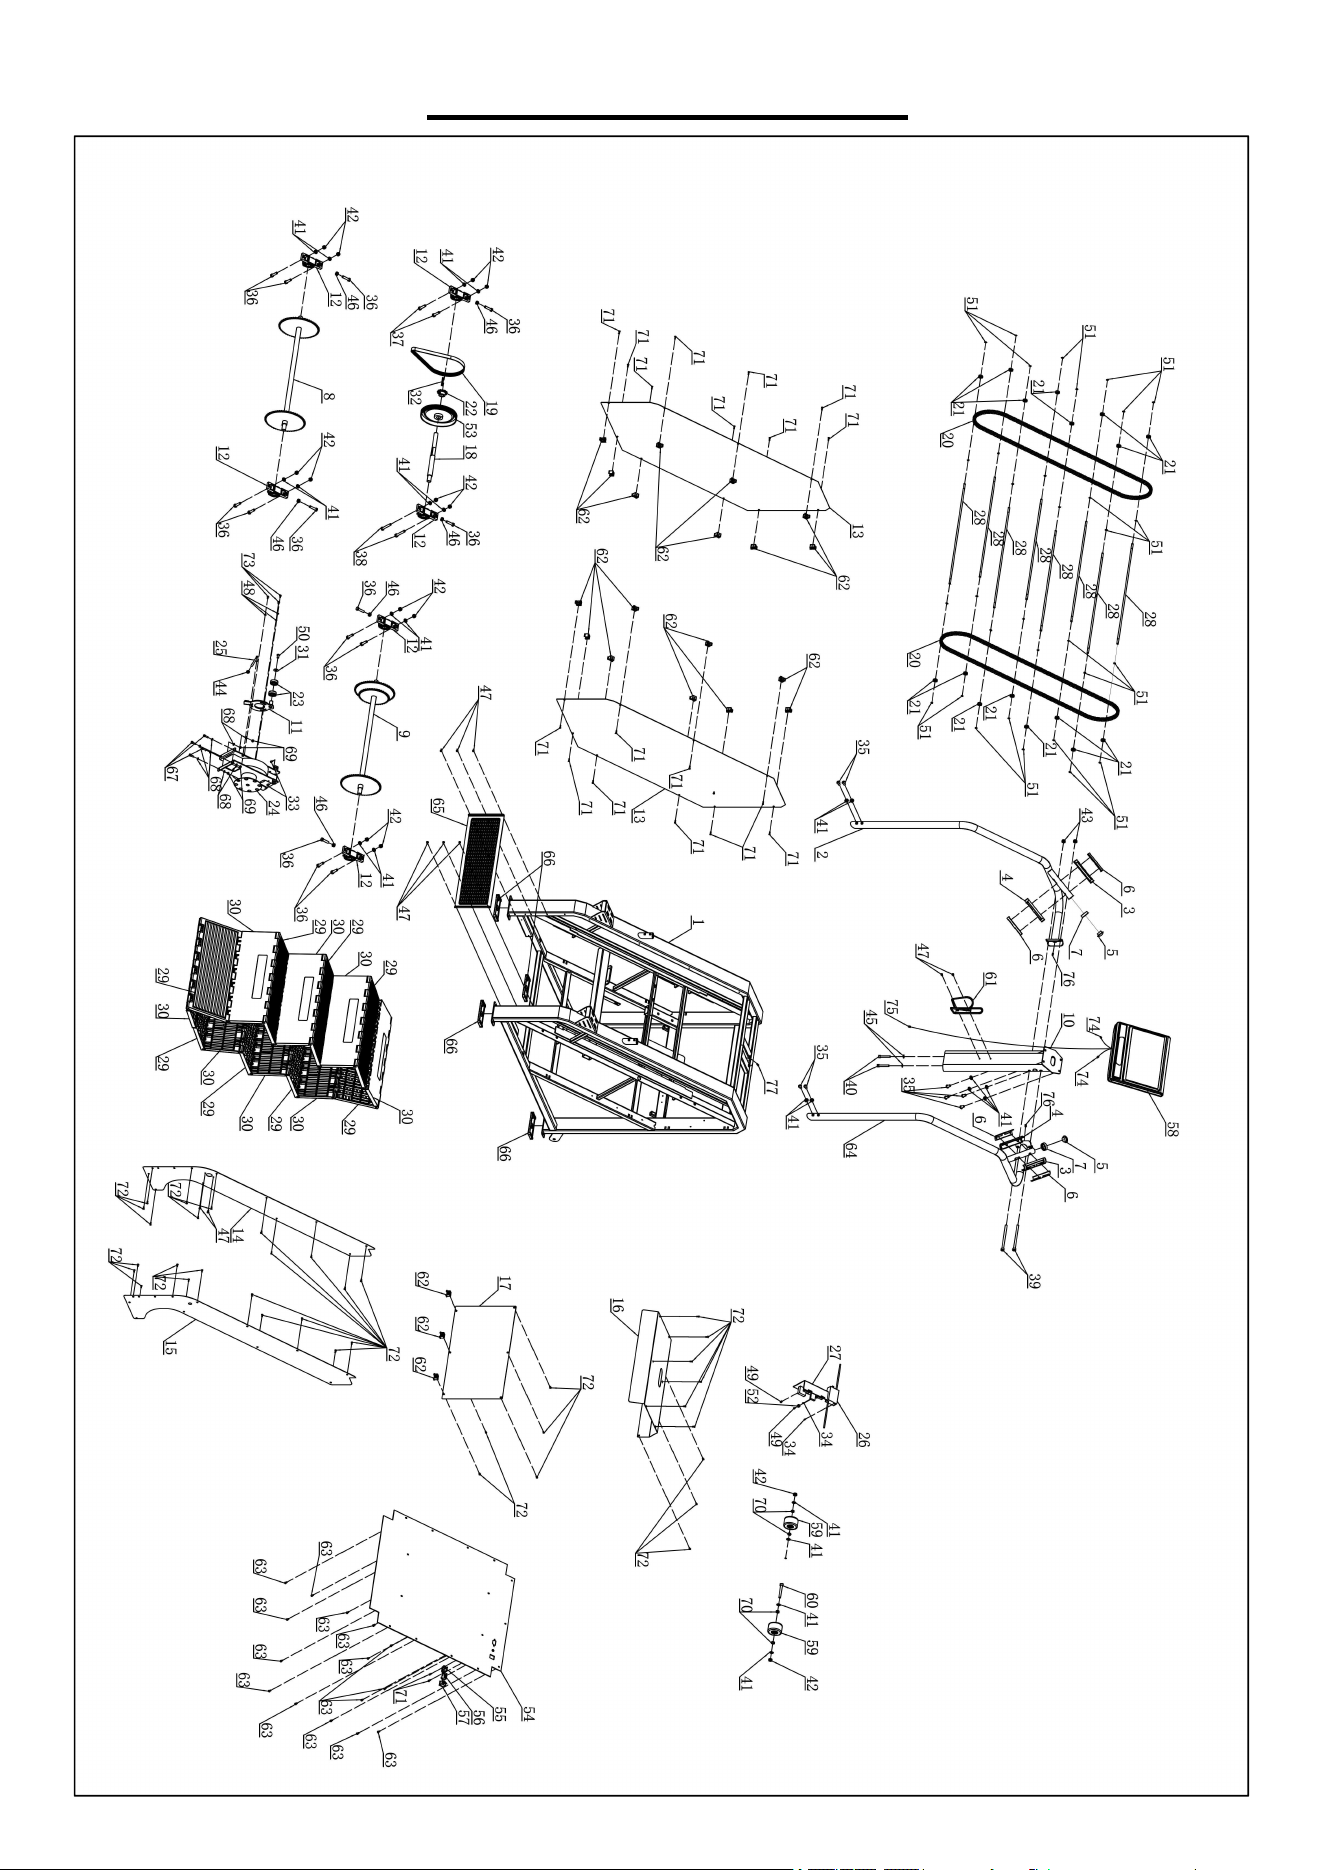
17
EXPLODED DIAGRAM

18
PARTS LIST
Version 1.2
No.
Description
Spec.
Qty
No.
Description
Spec.
Qty
1
Main Frame
1
43
Lock Nut
M10
2
2
Left Handrail
1
44
Lock Nut
M8
1
3
Hand Pulse Upper Cover
7039-0615
2
45
Flat Washer
Φ8
2
4
Hand Pulse Lower Cover
7039-0615
2
46
Hexagon Nut
M10
6
5
End Cap
7039
1
47
Phillips Screw W/T
Washer Head
M5*10
13
6
Pulse
4
48
Flat Washer
Φ5
3
7
Plastic Part No. 81
2
49
Phillips Screw W/T
Washer Head
M4*8
7
8
Chain Wheel Assembly
7037-0200-D
1
50
Screw
M8*16
1
9
Chain Wheel Assembly
7037-0300-E
1
51
Outer Snap Ring
Φ8
32
10
Computer Support
7037-0500
1
52
Small Pulley
Φ4.5*Φ13*8.5
1
11
Bearing Cover
7037-1200
1
53
Belt Pulley
1
12
Pedestal Bearing
UELP204
6
54
Lower Cover
1
13
Protective Cover
DL800-2001
2
55
Fixing Plug
1
14
Left Inner Protective Cover
DL800-2200
1
56
Protector
1
15
Right Inner Protective
Cover
DL800-2300
1
57
Switch
1
16
Upper Protective cover
7037-1200
1
58
Computer
1
17
Rear Cover
1
59
Transportation Wheel
2
18
Relay Shaft
7037-0205-B
1
60
Inner Hexagon Cylinder
Bolt
M10*75
1
19
Belt
7037-0206
1
61
Bottle Holder
1
20
Chain
2
62
Protective Cover Fixing
Seat
21
21
Ball Bearing
Φ22*Φ8*7
16
63
Phillips Screw W/T
Washer Head
M5*12
15
22
Chain Wheel
7037-0207
1
64
Right Handrail
1
23
Ball Bearing
Φ40*Φ17*12
2
65
Protective Net
1
24
Magnet Motor
LDWZ2-8 DC12V
18W 8NM
1
66
Foot Pad
4
25
Locking Column
1
67
Plastic Part
2
26
Adapter
1
68
Flat Washer
Φ6
8
27
Controller Board
1
69
Lock Nut
M6
4
28
Long Shaft
8
70
Outer Snap Ring
Φ6*16*6
4
29
Pedal 1
8
71
Screw
M4*16
20
30
Pedal 2
8
72
Screw
M4*13
37
31
Big Washer
Ф24*Ф8.4*2
1
73
Phillips Screw W/T
Washer Head
M5*10
3
32
Flat Key
6*50
1
74
Pulse Extension Wire
2
33
Inner Hexagon Bolt
M6*12
2
75
Computer Wire
1
34
Phillips Screw W/T Washer
Head
M3*10
2
76
Pulse Extension Wire
2
35
Flat Head Screw
M10*20
8
77
Computer Lower Wire
1
36
Outer Hexagon Bolt
M10*40
14
78
Allen Wrench
S6
1
37
Outer Hexagon Bolt
M10*45
2
79
Allen Wrench
S8
1
38
Outer Hexagon Bolt
M10*70
2
80
Phillips Screwdriver
Ph4
1
39
Inner Hexagon Cylinder
Bolt
M10*155
2
81
Spanner
S14, S17
1
40
Inner Hexagon Cylinder
Bolt
M8*55
2
82
Desiccant
100g
4
41
Flat Washer
Φ10
24
83
Power Cord
1
42
Lock Nut
M10
14