Read all instructions and product labels.
When using electrical tools, follow all the precautions to reduce
the risk of fire, electric shock, and other personal injury.
Model: NRT4335-10C
Rotary Tool
Rev:20220913

1
Content Page
Safety Instruc
on for Power tools 2
Safety Rules for Rotary Tools 4
Descrip
on and Features 7
Opera
on Instruc on 8
Clean and Maintenance 13
14
Custo
er Service & Warranty 16
Manual
Neu Master

2
WARNING: When using electric tools, basic safety precau
ons should always be
followed to reduce risk of
re, electric shock, and personal injury, including the
following.
READ ALL INSTRUCTIONS
TO REDUCE RISK OF INJURY:
• Before any use, be sure everyone using this tool reads and understands all safety instructions
and other information contained in this manual.
• Save these instruc
ons and review frequently prior to use and in instruc
ng others.
General Safety Warnings and Instructions for All Tools
•
KEEP WORK AREA CLEAN.
Cluttered areas and benches invite injuries.
•
CONSIDER WORK AREA ENVIRONMENT.
Don’t expose power tools to rain.
Don’t use power tools in damp or wet locations. Keep work area well lit. Do not
use in presence of flammable liquids or gases. Motors in these tools normally
spark, and the sparks may ignite the fumes.
•
GUARD AGAINST ELECTRIC SHOCK.
Prevent body contact with grounded
surfaces. For example; pipes, radiators, ranges, refrigerator enclosures. Use
extreme caution when drilling, driving, or cutting into walls, floors, ceilings or
other areas or wherever live electrical wires may be contacted, do not touch any
metal parts of the tool. Hold the tools only by the plastic handle to prevent
electric shock.
•
KEEP CHILDREN AWAY.
Do not let children and visitors contact tool or
extension cord. All children and visitors should be kept away from work area.
•
STORE IDLE TOOLS.
When not in use, tools should be stored in dry, and high
or locked up place–out of reach of children.
•
DON’T FORCE TOOL.
It will do the job better and safer at the rate for which it
was intended.
•
USE RIGHT TOOL.
Don’t force small tool or attachment to do the job of a
heavy-duty tool. Don’t use tool for purposes not intended.
•
DRESS PROPERLY.
Do not wear loose clothing or jewelry. They can be caught
in moving parts. Heavy duty gloves to protect hands and non-skid footwear are
recommended when working outdoors. Wear protective hair covering to contain
long hair.
•
USE SAFETY GLASSES AND OTHER SAFETY EQUIPMENT.
Use safety
goggles or safety gla
sses with side shields, complying with applicable safety
standards and, when needed, a face shield. Also use face or dust mask if
cutting operation is dusty. This applies to all persons in the work area. Also
use a hard hat, hearing protection, gloves, safety shoes and dust collection
systems when specified or required.
•
DON’T ABUSE CORD.
Never carry tool by cord or yank it to disconnect
from receptacle.
Keep cord from heat, oil, and sharp edges.
•
SECURE WORK.
Use clamps or a vise to hold work. It’s safer than using
your hand and it frees both hands to operate tool.
•
DON’T OVERREACH.
Keep proper footing and balance at all times.
•
MAINTAIN TOOLS WITH CARE.
Keep tools sharp and clean for better and

3
safer performance. Follow instructions for lubricating and changing accessories.
Inspect tool cords periodically and if damaged, have repaired by authorized
service facility. Inspect extension cords periodically and replace if damaged.
Keep handles dry, clean, and free from oil and grease.
•
DISCONNECT TOOLS.
Unplug the tool when not in use, when moving tool
from place to place, before servicing, a
nd when changing accessories (such as
blades, bits, cutters) or making adjustments.
•
REMOVE ADJUSTING KEYS AND WRENCHES.
Form habit of checking to
see that key and adjusting wrenches are removed from tool before turning it on.
•
AVOID UNINTENTIONAL STARTING.
Don’t carry tool with finger on switch. Be
sure switch is off when plugging in.
•
OUTDOOR USE EXTENSION CORDS
.
When tool is used outdoors, use only
extension cords intended for use outdoors and so marked.
•
STAY ALERT.
Watch what you are doing. Use common sense. Do not operate
tool when you are tired or otherwise impaired.
•
CHECK DAMAGED PARTS.
Before further use of the tool, a guard or other
part that is damaged should be carefully checked to determine that it will
operate properly and perform its intended function. Check for alignment of
moving
parts, binding of moving parts, breakage of parts, mounting, and any
other conditions that may affect its operation. A guard or other part that is
damag
ed should be properly repaired or replaced by an authorized service
center. Do not use tool if switch does not turn it on and off.
•
REPAIRS AND SERVICE
.
Repairs, maintenance and any adjustments not
specified in this manual should be performed by authorize
d service centers or
other qualified service organizations, always using identical replacement parts.
•
USE OF ACCESSORIES AND ATTACHMENTS.
The use of any accessory or
attachment not recommended for use with the tool could be hazardous. Note:
Refer to the accessory section of this manual for further details.
SAFETY GUIDELINES - DEFINITIONS
It is important for you to read and understand this manual.
The information it contains relates to protecting YOUR SAFETY and PREVENTING
PROBLEMS. The symbols below are used to help you recognize this information.
DANGER: Indicates an imminently hazardous situation which, if not avoided, will result
in death or serious injury.
WARNING: Indicates a potentially hazardous situation which, if not avoided, could
result in death or serious injury.
CAUTION: Indicates a potentially hazardous situation which, if not avoided, may result
in minor or moderate injury.
CAUTION: Used without the safety alert symbol indicates a potentially hazardous
situation which, if not avoided, may result in property damage.

Safety Rules for Rotary Tools
4
Hold power tool by
insulate d
g
r
i
pp
i
ng
surfaces,
because the cutter may
contact
its own cord. Cutting a” live” wire may make exposed metal parts of the power tool” live” and
shock the operator.
Use clamps or another
practical
way
to
secure and
support
the
workpiece
to a
stable
platform.
Holding the work by your hand or against the body leaves it unstable and
may lead to loss
of control.
Accessories
must be rated for at least
t
h
e speed
recommended
on the tool
w
a
r
n
i
ng
label. Wheels and other accessories running over rated speed can fly apart and cause injury.
If
cutting
into
existing
walls or other
b
li
nd
areas where
electrical
wiring
may exist
i
s
unavoidable,
disconnect
all fuses or
c
i
r
cu
i
t
breakers feeding this
wo
r
ks
i
t
e
.
Do not operate the
flexible
shaft with a sharp bend. Over bending the shaft can
generate excessive heat on the jacket or hand piece. The recommended minimum is 5"
radius.
Always
disconnect
the power cord
f
r
om
t
h
e
p
o
w
e r
s
o
u
r
c
e
b
e
f
o
r
e
m
a
k
i
n
g a
ny
adjustments
or
attaching
any a
cc
e
sso
r
i
e
s
.
You may unexpectedly cause the tool to start
leading to serious personal injury.
Be aware of the
switch
location,
wh
e
n
placing
the tool down or when
picking
t
h
e
tool up. You may accidentally activate the switch.
Always ho
ld the hand piece firmly in your hands during the start-up. The reaction torque of
the motor, as it accelerates to full speed, can cause the shaft to twist
Always wear safety goggles and dust mask. Use only in well ventilated area.
Using
personal safety devices and working in safe environment reduces risk of injury.
Do not reach in the area of the spinning bit.
The proximity of the spinning bit to your
hand may not always be obvious.
Allow brushes to run at operating speed for at least one minute before using wheel.
During this time no one is to stand in front or in line with the brush.
Loose bristles
or wires will be discharged during the run-in time.
Wire and bristle brushes must never be operated at speeds greater than
15,000/
min. Direct the discharge of the spinning wire brush away from you.
Small
particles and tiny wire fragments may be discharged at high velocity during the “cleaning”
action with these brushes and may become imbedded in your skin. Bristles or wires will
be discharged from the brush at high speeds.
Wear protective gloves and face shield with wire or bristle brushes. Apply wire or
bristle brushes lightly to t
he work as only the tips of the wire/bristles do the work.
“Heavy” pressure on bristles will cause the wire or bristle to become overstressed
resulting in a wiping action and will cause the bristles/wire to be discharged.
Carefully handle both the tool and individual grinding wheel to avoid chipping or
cracking. Install a new wheel if tool is dropped while grinding. Do not use a wheel
that may be dama
ged.
Fragments from a wheel that bursts during operation will fly away
at great velocity possibly striking you or bystanders.
Never use dull or damaged bits. Sharp bits must be handled with care
. Damaged
bits can snap during use. Dull bits require more force to push the tool, possibly causing
the bit to break.

5
may cause the bit to “bite” or jump toward you. Clamping a small workpiece allows you
to use both hands to control the tool.
Inspect your workpiece before cutting. When cutting irregularly shaped
workpieces, plan your work so it will not slip and pinch the bit and be torn from
your hand.
For example, if carving wood, make sure there are no nails or foreign objects
in the workpiece. Nails or foreign o
bjects can cause the bit to jump.
Never start the tool when the bit is engaged in the material.
The bit cutting edge may
grab the material causing loss of control of the cutter.
Avoid bouncing and snagging the wheel, especially when working corners, sharp
edges etc.
This can cause loss of control and kick-back.
The direction of feed with the bit into the material when carving, routing or cutting
is
very important. Always feed the bit into the material in the same direction as
the cutting edge is exiting from the material (which is the same direction as the
chips are thrown).
Feeding the tool in the wrong direction, causes the cutting edge of
the bit to climb out of the work and pull the tool in the direction of this feed.
If the workpiece or bit becomes jammed or bogged down, turn the tool “OFF” by
the switch. Wait for all moving parts to stop and unplug the tool, then work to free
the jammed material.
If the switch to the tool is left “ON” the tool could restart
unexpectedly causing serious personal injury.
Do not leave a running tool unattended, turn power off.
Only when tool comes to a
complete stop is it safe to put it down.
Do not grind or sand near flammable materials.
Sparks from the wheel could ignite
these materials.
Do not touch the bit or collet after use.
After use the bit and collet are too hot to be
touched by bare hands.
Regularly clean the tool's air vents by compressed air.
Excessive accumulation of
powdered metal inside the motor housing may cause electrical failures.
Do not allow familiarity gained from frequent use of your rotary tool to become
commonplace.
Always remember that a careless fraction of a second is sufficient to
inflict severe injury.
Do not alter or misuse tool.
Any alteration or modification is a misuse and may result
in serious personal injury.
This product is not intended for use as a dental drill, in human or veterinary
medical applications.
Serious personal injury may result.
When using the steel saws, cutoff wheels, high speed cutters or tungsten carbide
cutters, always have the work securely clamped. Never attempt to hold the work
with one hand while using any of these accessories.
The reason is that these wheels
will grab if they become slightly canted in the groove, and can kickback be causing loss
of control resulting in serious injury. Your second hand should be used to steady and
guide the hand holding the tool. When a cutoff wheel
grabs, the wheel itself usually breaks.
When the steel saw, high speed cutters or tungsten carbide cutter grab, it may jump from the
groove and you could lose control of the tool.
Use clamps to support work piece whenever practical. Never hold a small
workpiece in one hand and the tool in the other hand while in use. Allow for
sufficient space, at least “6”, between your hand and the spinning bit.
Round
material such as dowel rods, pipes or tubing have a tendency to roll while being cut, and

6
After changing bits or making any adjustment make sure the bit is properly
secured by included wrench.
Loose adjustment devices can unexpectedly shift,
causing loss of control, loose rotating components may be ejected.
Important Electrical Information
Use only an extension cord that will accept the plug on the product. Make sure your
extension cord is in good condition. When using an extension cord, be su
re to use one
heavy enough to carry the current your product will draw. An undersized cord will
cause a drop in line voltage resulting in loss of power and overheating. A SJT type
cord is required. Cord shall be 14 AWG minimum for general indoor use. This
appliance has a polarized plug (one blade is wider than the other). To reduce the risk
of electric shock, this plug is intended to fit in a polarized outlet only
one way. If the
plug does not fit fully in the outlet, reverse the plug. If it still does not fit, contact a
qualified electrician. Do not modify the plug in any way. When servicing, only use
identical service parts. Contact Phalanx for a replacement cord set. For proper size
cords see chart below
Be sure your power supply agrees with the nameplate marking. 120 Volts AC only
means your tool will operate on standard 60 Hz household power. Do not operate AC
tools on DC. Lower voltage will cause loss of power performance.
Use only Neu Master accessories for high performance.
Other accessories are
not
designed for this tool and may lead to personal injury or property damage.
7
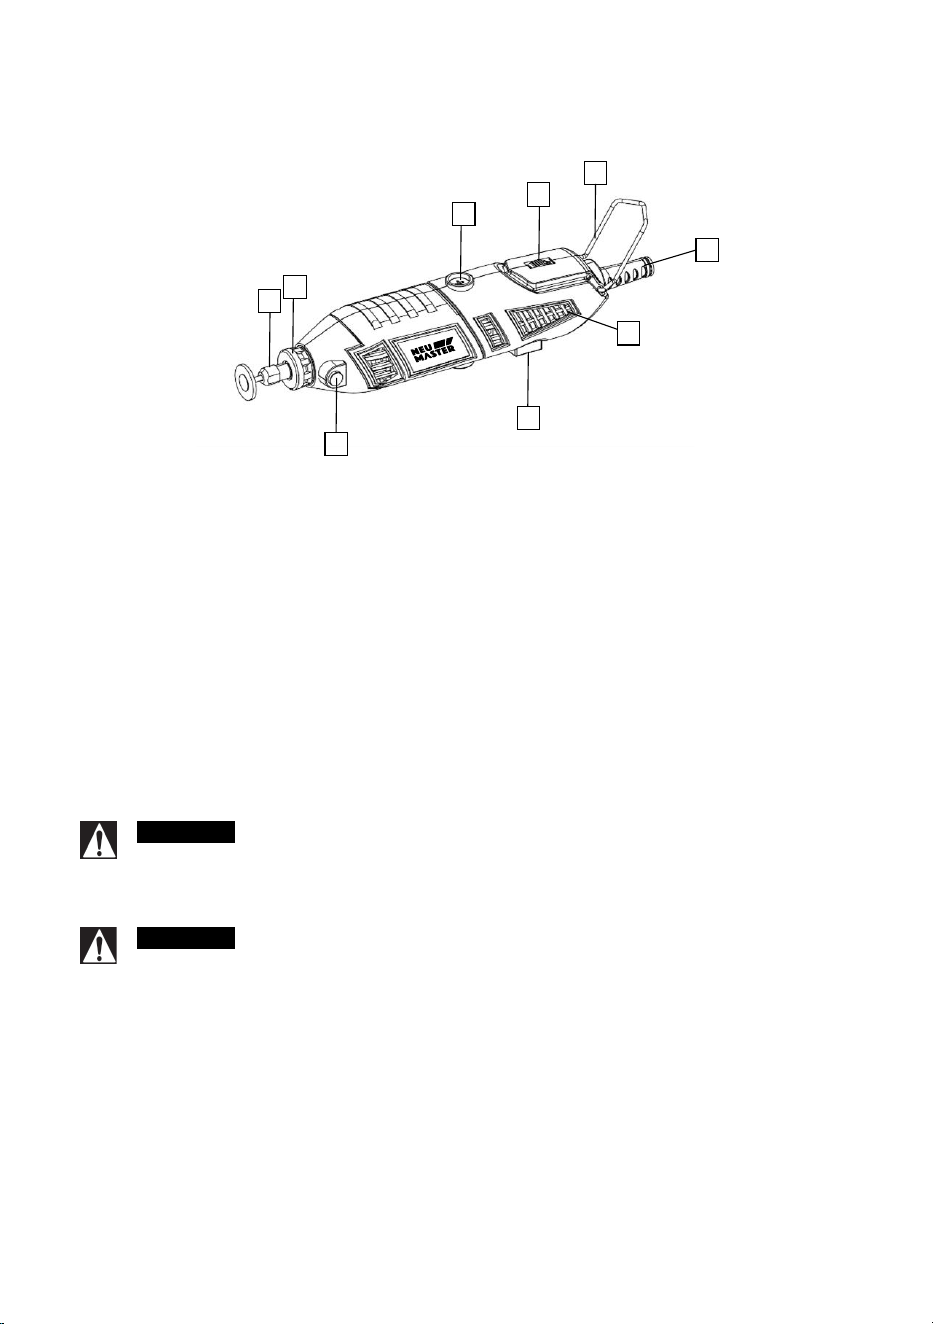
Description and Features
WARNING
Always unplug Rotary Tool changing collets or service your Rotary
Tool.
WARNING
after change its or making and adjustments, make sure the bit is
properly secured by included wrench. Loose adjustment devices can
unexpectedly shift, causing loss of control, loose rotating components may be ejected.
1. On/Off Switch
2. Carbon Brush Cover (one on each side)
3. Spindle Lock Button
4. Umbrella Cover
5. Variable Speed Dial
6. Wire hanger
7. Collet Nut
8. Ventilation Openings
9. Power cord
1
2
3
6
5
6
7
8
9
4

8
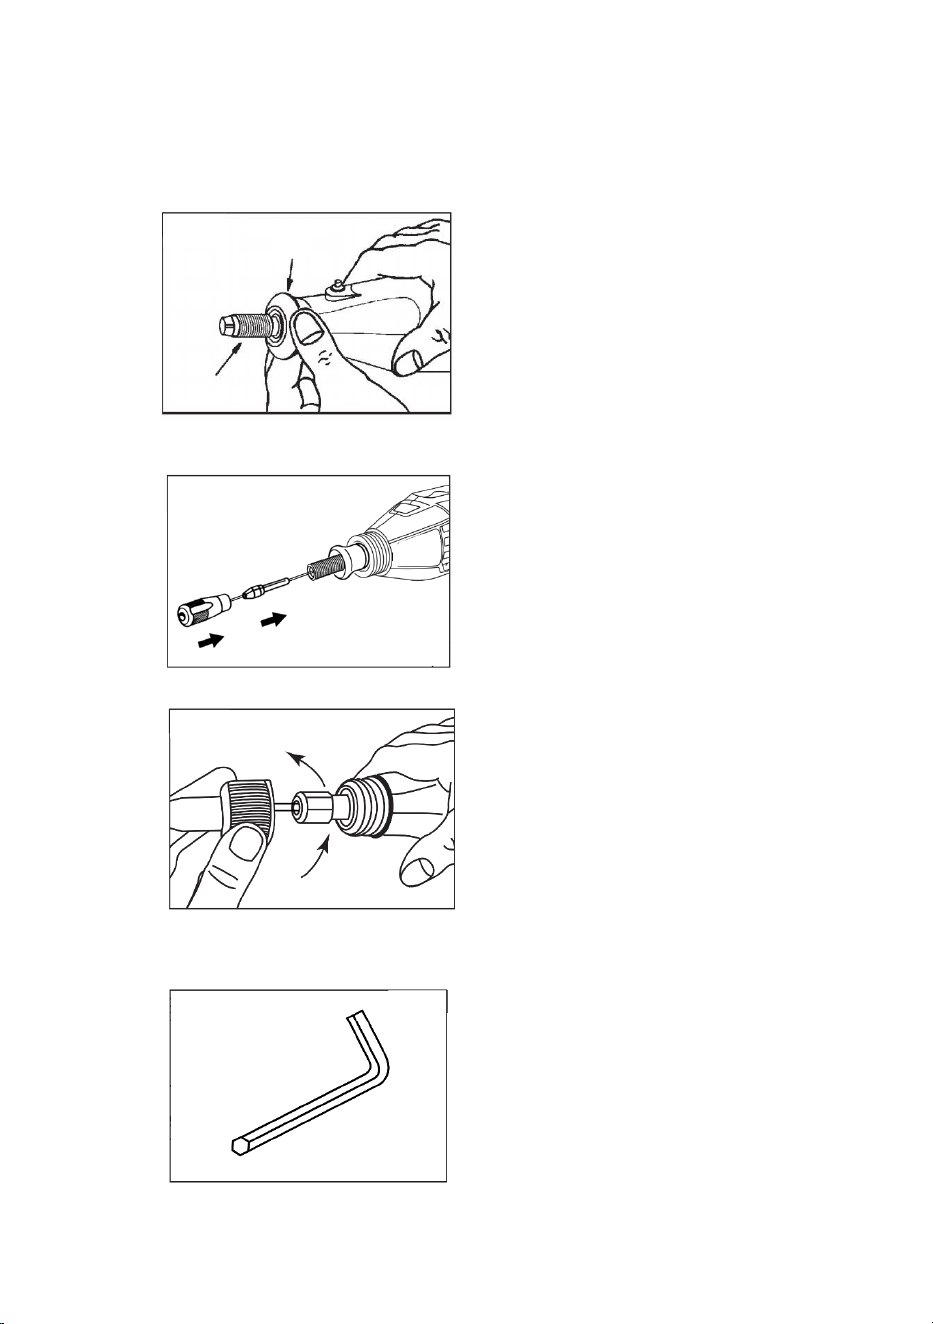
Changing the Collet
Some accessories require the use of different sized collets. Collet sizes can be Metric 3.0mm,
1/16” 3/32”, 1/8”. It is important to ensure that the collet size matches the accessory.
Collet diameter just a little bigger than accessories diameter is the better fit.
WARNING:
Use a collet that is too larger for the accessory will result in the accessory
possibly being thrown from the tool causing serious injury.
1. Turn the tool switch OFF and remove
the plug from the power source
2. Depress the spindle lock button (1)
and slowly turn the collet nut (2) until
the spindle lock button locks the
spindle with a click down.
3. While holding the spindle lock button
dow
n, turn the collet nut counter
clockwi
se until it is removed.
4. Remove the collet (3) by pulling it out
of the spindle (4)
5. Insert the replacement collet into the spindle and replace the collet nut by
turning it clockwise while holding the spindle lock button down.
Note
: Do not tighten the collet nut without an accessory installed in the collet. You will
damage the collet.
Installing Accessories
1. Turn the switch OFF and disconnect the
tool from the power source.
2. Depress the spindle lock button (1) and
slowly turn the collet (2) until the spindle
lock button locks the spindle with a click
down.
3. While holding the spindle lock button
down, turn the collet nut counter clockwise until the collet is loose inside the
collet nut.
4. Insert the accessory (3) into the collet.
Notes:
A. 4 collet size to accommodate different accessories shank size. Make
sure the correct collet is used for the accessory. If collet is too larger,
7replace the collet with the next smaller size.
B. Insert accessory all the way in until it stopped.
5. Press the spindle lock button and engage it in the spindle. While holding the
spindle lock button down, hand tighten the collet by turning it clockwise.
Note: Do not use
pliers to tighten the collet nut. Use the small wrench (4)
supplied. Over tightening will cause damage to the tool.
6. Try to pull the accessory out to ensure it is securely in place. (Can
not
pull out
means secured)
Assembly & Operation
9
1. Turn and remove the umbrella Cover.
2. Pull put the shaft core and place into the spindle hole. Fix it as per the
instruction for collet assembly.
3. Turn and fit the shaft cover onto the rotary tool head.
4. Attach accessory to flexible head same as above instruction for “installing
accessories”. The only difference is that we need use special included wrench
to lock shaft from rotation.
Flexible Shaft Assembly
10
Rotary Tool Introduction
A rotary tool is a handheld power tool with a rotary tip that accepts a variety of
attachments for different tasks like sanding, polishing, carving and more. Its compact
size, versatility and high speed make it an appealing alternative to large, bulky power
tools.
Rotary tool is high speed low torque tool. You don’t apply pressure to the tool but
simply hold it in hand and guide it
to get its job done easily. The key takes away of
rotary tool is a matter of learning how to let its speed work for you.
The first step in leaning to use rotary tool is to get the “feeling” of it. Hold it in your
hands and get the feel of its weight, grip, tumbling, etc.
WARNING
Always wear eye protection. Always hold the tool away from your
face. Accessories can be damaged during handling, and can fly apart as they
come up to speed. This is not common, but it does happen.
CAUTION
Whenever you hold the tool. Be careful not to cover the air
ventilation openings with your hand. This blocks the air flow and causes the
motor to overheat.
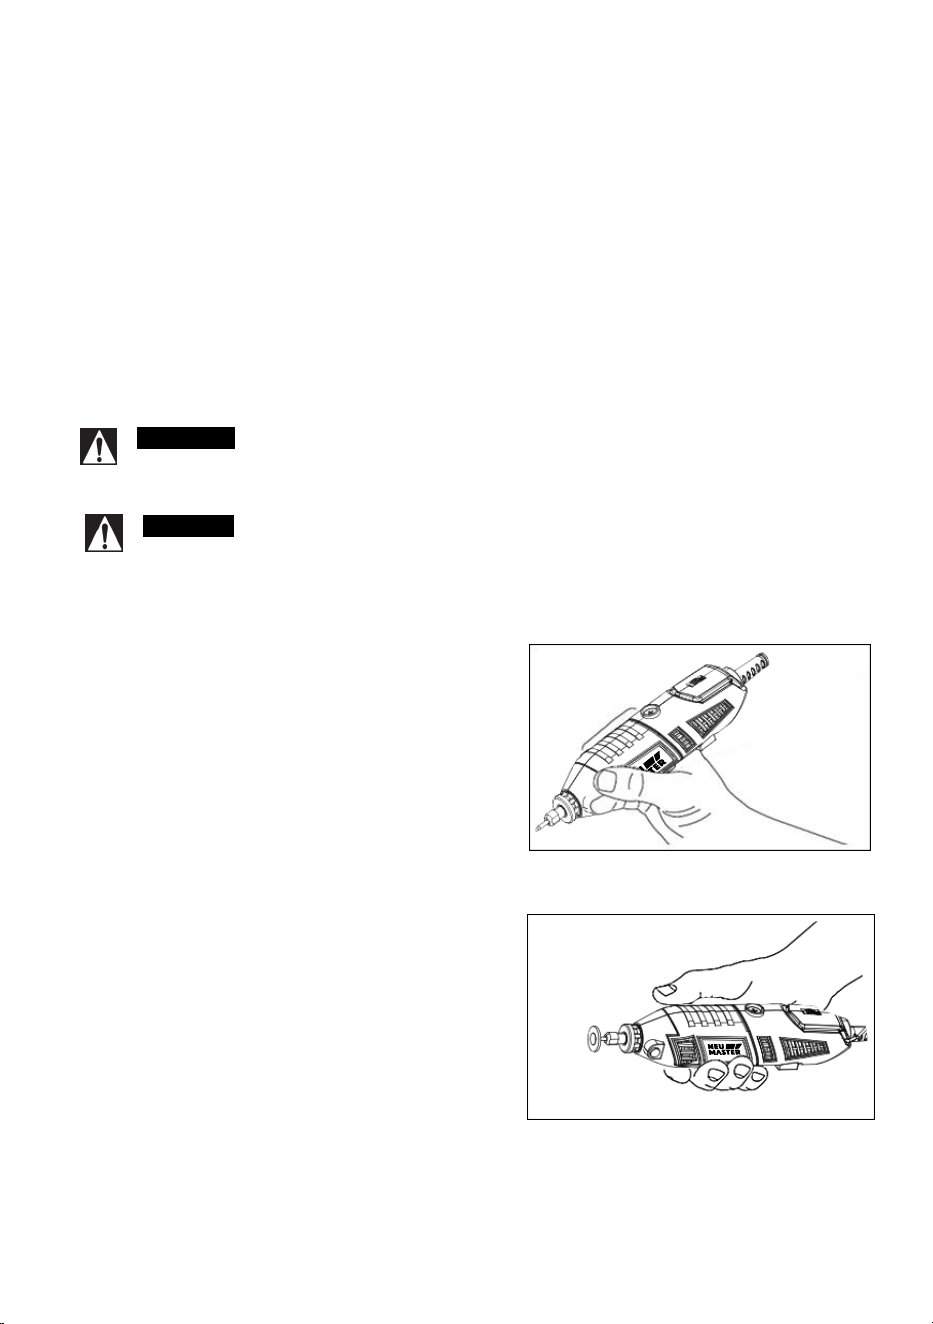
How to Hold the Tool in Hand
Drawing Grip: For best control in close work,
grip the rotary tool like a pencil between your
thumb and forefinger.
Putting Grip: Holding the tool like golf putter,
used for more aggressive operations such
as
grinding a flat surface or using cutoff wheels
11
Practice on scrap materials first to see how the Rotary Tool's high-speed action
performs. Keep in mind that the work is done by the speed of the tool and by the
accessory in the collet. You should not lean on or push the tool during use.
Instead, lower the spinning accessory lightly to the work and allow it to touch the point
at which you want cutting (or sanding or etching, etc.) to begin. Concentrate on guiding
the tool over the work using very little pressure from your hand. Allow the accessory to
do the work.
Usually, it is best to make a series of passes with the tool rather than attempt to do all
the work in one pass. To make a cut, for example, pass the tool back and forth over
the work, much as you would a small paint brush. Cut a little material on each pass
until you reach the desir
ed depth. For most work, the gentle touch is best. With it, you
have the best control, are less likely to make errors, and will get the most efficient work
out of the accessory.
The hanger is provided for the use of hanging your tool while using the flex-shaft or for
storage. If you do not use the hanger, snap it back into place so it will be out of the way
while the tool is in use.
Turn on/off the To
ol
The tool is turn on or off by press the power switch.
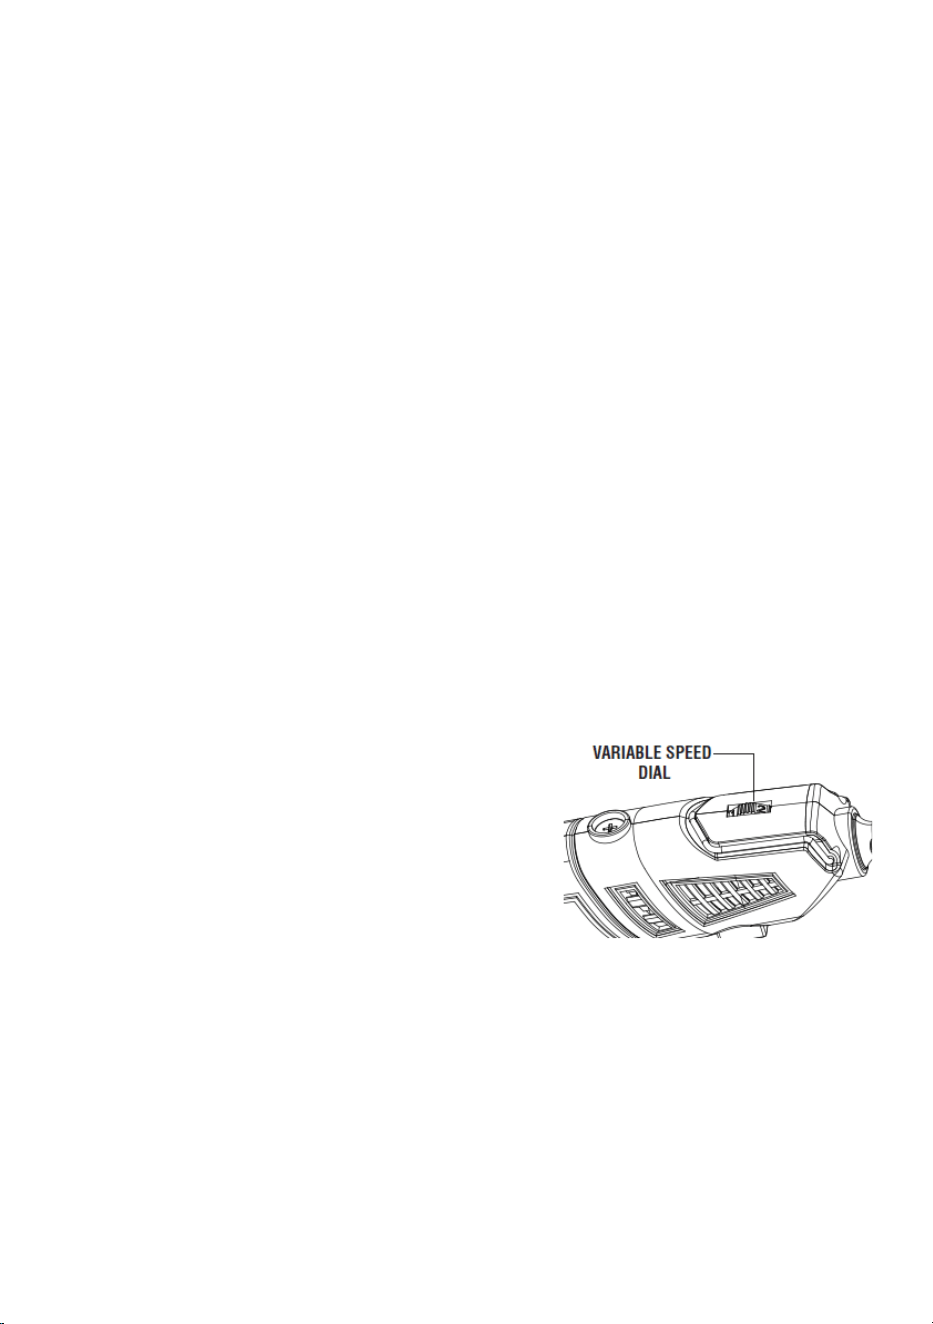
Operating Speeds
The speed of Rotary Tool can be adjusted by turn
the dial on the housing.
Certain materials, however, (some plastics and
precious metals, for example requires relatively
slow speed because at high speed the friction of
the accessory generates heat and may cause
damage to the material.
Slow speeds (15,000 RPM or less) usually are best
for polishing operations employing the felt polishing accessories. They may also be
best for working on delicate projects as “eggery” work, delicate wood carving and
fragile model parts. All brushing applications require lower speeds to avoid wire
discharge from the holder.
Higher speeds are better for carving, cutting, routing, shaping, cutting dadoes or
rabbets in wood.
Hardwoods, metals and glass requi
re high speed operation, and drilling should also be
done at high speeds.
Ultimately, the best way to determine the correct speed for work on any material is to
practice for a few minutes on a piece of scrap, even after referring to the chart. You

12
can quickly learn that a slower or faster speed is more effective just by observing what
happens as you make a pass or two at different speeds. When working with plastic, for
example, start at a slow rate of speed and increase the speed until you observe that
the plastic is melting at the point of contact. Then reduce the speed slightly to get the
optimum working speed.
Some rules of thumb in regard to speed:
1. Plastic and other materials that melt at low temperatures should be cut at low
speeds.
2. Polishing, buffing and cleaning with any type of bristle brush must be done at
speeds not greater than 15,000 RPM to prevent damage to the brush from
bristles flying toward operator.
3. Wood should be cut at high speed.
4. Iron or steel should be cut at high speed. If a high-speed steel cutter starts to
chatter — this n
ormally means it is running too slow.
5. Aluminum, copper alloys, lead alloys, zinc alloys and tin may be cut at various
speeds, depending on the type of cutting being done. Use paraffin or other
suitable lubricant on the cutter to prevent the cut material from adhering to the
cutter teeth.
Increasing the pressure on the tool is not the answer when it is not performing as
you think it should. Perhaps you should be
using different accessory, and perhaps
an adjustment in speed would solve the problem
. Leaning on the tool does not help.
Let speed do the work!
13
Maintenance Information and Cleaning
WARNING
To assure product SAFETY and RELIABILITY, repairs, maintenance
and adjustment (other than those listed in this manual) should be performed by
authorized service centers or other qualified service personnel, always using identical
replacement parts.
WARNING
To avoid injury from unexpected starting or electrical shock, always
remove plug from the wall outlet before performing service or cleaning.
Carbon brushes
The brushes and commutator in your tool have been engineered for many hours of dependable
service.
In order to prepare your brushes for use, run your tool at full speed for 5 minutes under no load.
This will properly “seat” your brushes, whi
ch extends the life of both your br
ushes and your
tool.
To maintain peak efficiency of the motor, we recommend every 40 - 50 hours the
brushes be examined. Only Neu Master replacement brushes specially designed for
your
tool should be used.
Maintenance of Replaceable Brushes
The brushes should be inspected frequently when tools are used continuously. If your tool
runs sporadically, loses power, makes unusual noi
ses or runs at a reduced speed, check
the brushes.
CAUTION
Continue using the rotary tool in the condition will permanently damage
your tool.
Please follow these steps to check/change the rotary tool carbon brushes:
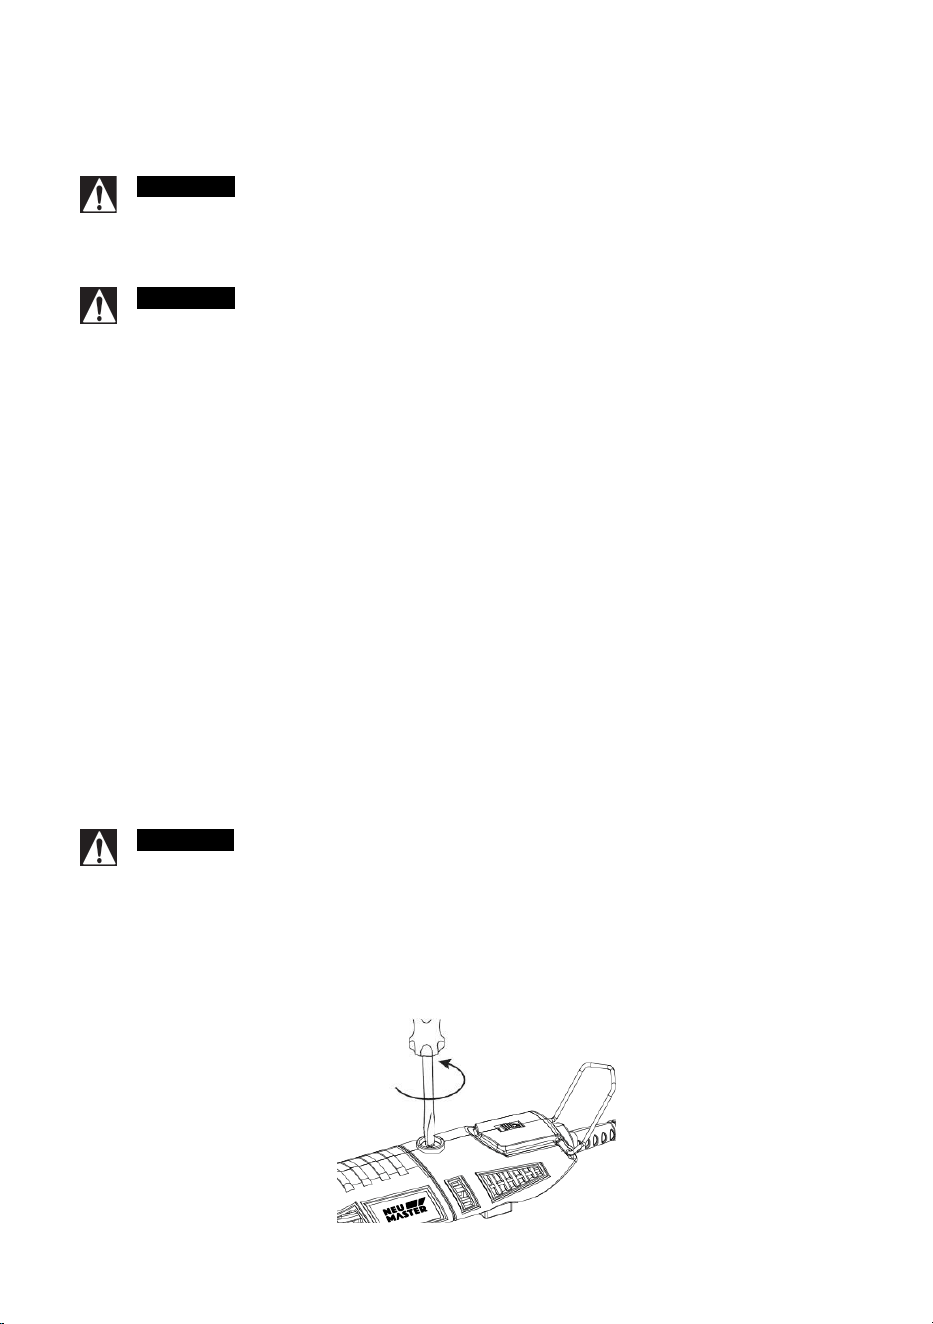
1. Make sure cord unplugged, place the rotary tool on a clean flat surface. Use a
screwdriver to remove the carbon brushes cover on housing. There are two
brushes located on each side.
14
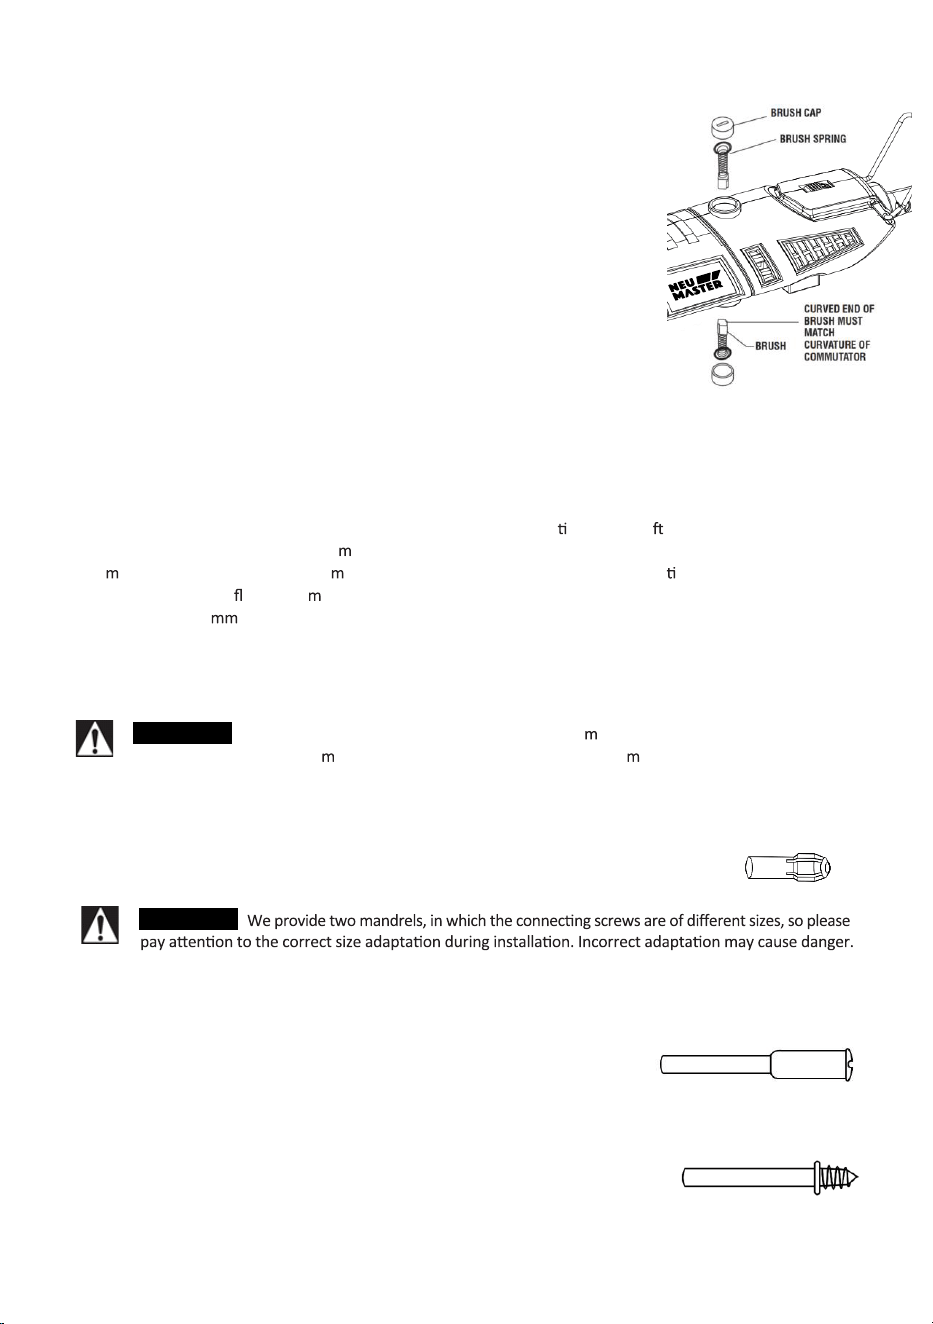
2. Pulling the spring out together with the carbon brushes. If
the brushes is less than 3mm long and the end surface of
the brush that contacts the commutator is rough and/or
pitted, then they should be replaced. Usually, the brushes
will not wear out simultaneously. If one brush is worn out,
replace both brushes. Make sure the brushes are
installed as illustrated. The curved surface of the brush
must match the
curvature of the commutator. Also check
that the brush covers sit flush with the tool housing.
3
. After replacing brushes, the tool should be run at no-load;
place it on a clean surface and run it freely at full
speed for 5 minutes before loading (or using) the tool.
This helps brushes “seat” pr
operly and will give you
more hours of life from each set of brushes. This will
also extend the total life cycle of your rotary tool since
the commutator surface will “wear” longer.
Cleaning
Keep the intake openings on the housing clean and free of obstruc ons. Us a so , dry brush to clean the
openings periodically. Use only a da
p cloth to clean the heat gun. Many household cleaners contain
che
icals which could seriously da age the housing. Do not use gasoline, turpen ne, lacquer or paint
thinner, dry-cleaning
uids or si ilar products when cleaning the heat gun. Never allow any liquid to get
inside the tool or i
erse any part of the tool into a liqui
d.
Neu Master Attachments
WARNING
Use only Neu Master accessories for best perfor ance. Other accessories are not
designed for this tool and
ay lead to personal injury or property da age.
Collets:
As band, accepting shank of accessories and tightened so as to grip it. So that
the spindle rotation can pass to biters. There are 5 diameter collets supplied. There are
3/32” (Assembled), Metric 3.0mm, 1/16”, 3/32”, 1/8”.
Mandrels:
A mandrel is a shank with a threaded or screw head which are required when
you use polishing accessories, cutting wheels, sanding discs, and polishing points. The
reason mandrels are used is that sanding discs, cutting
wheels and similar accessories must be replaced frequently.
The mandrel is a permanent shank, allowing you to replace
only the worn head, when necessary, thus saving the
expense of replacing the shaft each time.
Screw Mandrel:
This is a mandrel with a small screw at its tip,
and is used with emery and fiberglass cutting wheels, sanding
discs and poli
shing wheels.
1/8" shank.
WARNING
15
Safe-tape screw Mandrel:
This is a screw mandrel used with the felt polishing tip and
felt polishing wheels. 1/8" shank.
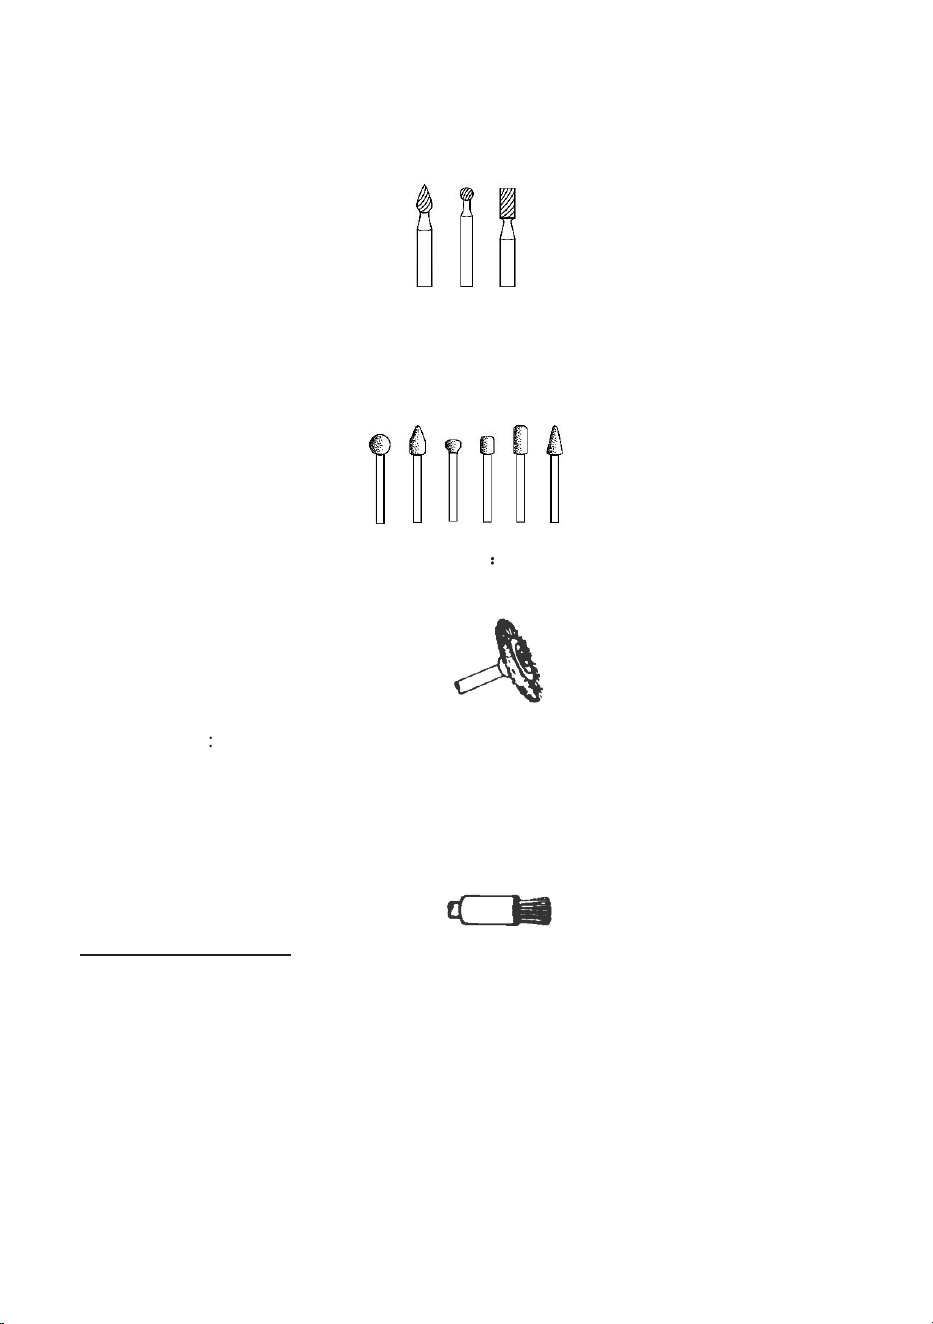
Engraving Cutters:
This group has a wide variety of sizes and shapes, and are made
for intricate work on ceramics, wood carvings, jewelry and scrimshaw. They often are
used in making complicated printed circuit boards. They should not be used on steel
and other very hard materials but are excellent on wood, plastic and soft metals. 3/32"
shank.
Structured
Tooth
Tungsten
Carbide C
u
tt
e
r
s
Fast cutting, needle-sharp teeth for
greater material removal with minimum loading. Use on fiberglass, wood, plastic,
epoxy and rubber. 1/8" shank.
Wire Brushes
For best results wire brushes should be used at speeds not greater than
15,000 RPM. There wires are stainless steel, brass and carbon wire which perform well
on pewter, aluminum, stainless steel, and other metals, without leaving "after-rust".
Bristle Brushes:
These are excellent cleaning tools on silverware, jewelry and
antiques. The three shapes make it possible to get into tight corners and other diff
icult
places. Bristle brushes can be used with polishing compound for faster cleaning or
polishing.
Tips for Bristle brushes:
1. Remember, the tips of a bristle brushes do the work. Operate the brush with the
lightest pressure so only the tips of the wire come in contact with the work.
2. If heavier pressures are used, the bristle will be overstressed, resulting in a
wiping action; and if this is continued, the life of the brush will be shortened due
to wire fatigue.
3. Apply the brush to the work in such a way that as much
of the brush face as
possible is in full contact with the work. Applying the side or edge of the brush
to the work will result in wire breakage and shortened brush life.
16
Polishing:
Cloth polishing wheel, all used for polishing plastics, metals, jewelry and
small parts. For best results polishing accessories should be used at speeds not
greater than 15,000 RPM.
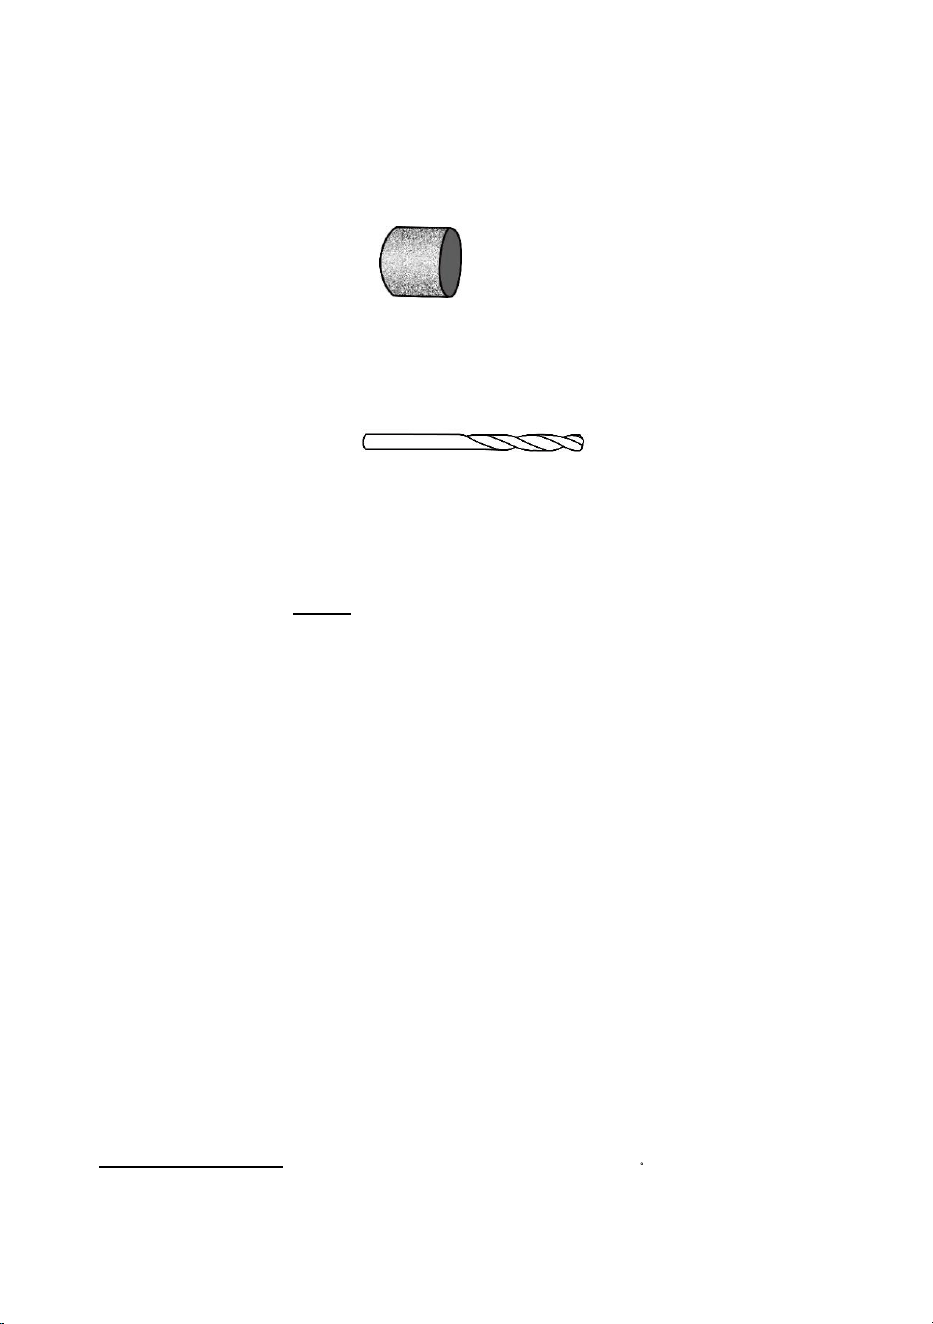
Drum Sander:
A tiny drum which fits into the Rotary Tool and makes it possible to
shape wood, smooth fiberglass, sand inside curves and other difficult places,
and .other sanding jobs. You replace the sanding bands on the drum as they become
worn and lose their grit. Bands come in fine medium and coarse grades.
Drywall Cutting Bit:
To cut in drywall.
Customer Service & Warranty
This tool is guaranteed for 1 years from the date of purchase, if bought in store, delivered or if bought
online. You may only make a claim under this guarantee upon presentation of your sales receipt or
purchase invoice. Please keep your proof of purchase in a safe place.
This guarantee covers product failures and malfunctions provide NEU MASTER power tool was used for the
purpose for which it is intended and subject to installation, cleaning, care and maintenance in
accordance with standard practice and with the informat
ion contained above and in the user manual.
This guarantee does
not cover defects and damage caused by or resulting from:
• Normal wear and tear
• Overload, misuse or neglect
• Repairs attempted by anyone other than an authorized agent
• Cosmetic damage
• Damage caused by foreign objects, substance or accidents
• Accidental damage or modification
• Failure to follow manufacture’s guidelines
The product
is designed for home usage only. If used for commercial or rental purposes. This warranty
applies only for 30 days from the date o
f purchase.
In the United States, to contact to a customer service representative, mail our Technical Service
at [email protected] 24/7. We will get back to you within 24 hours.