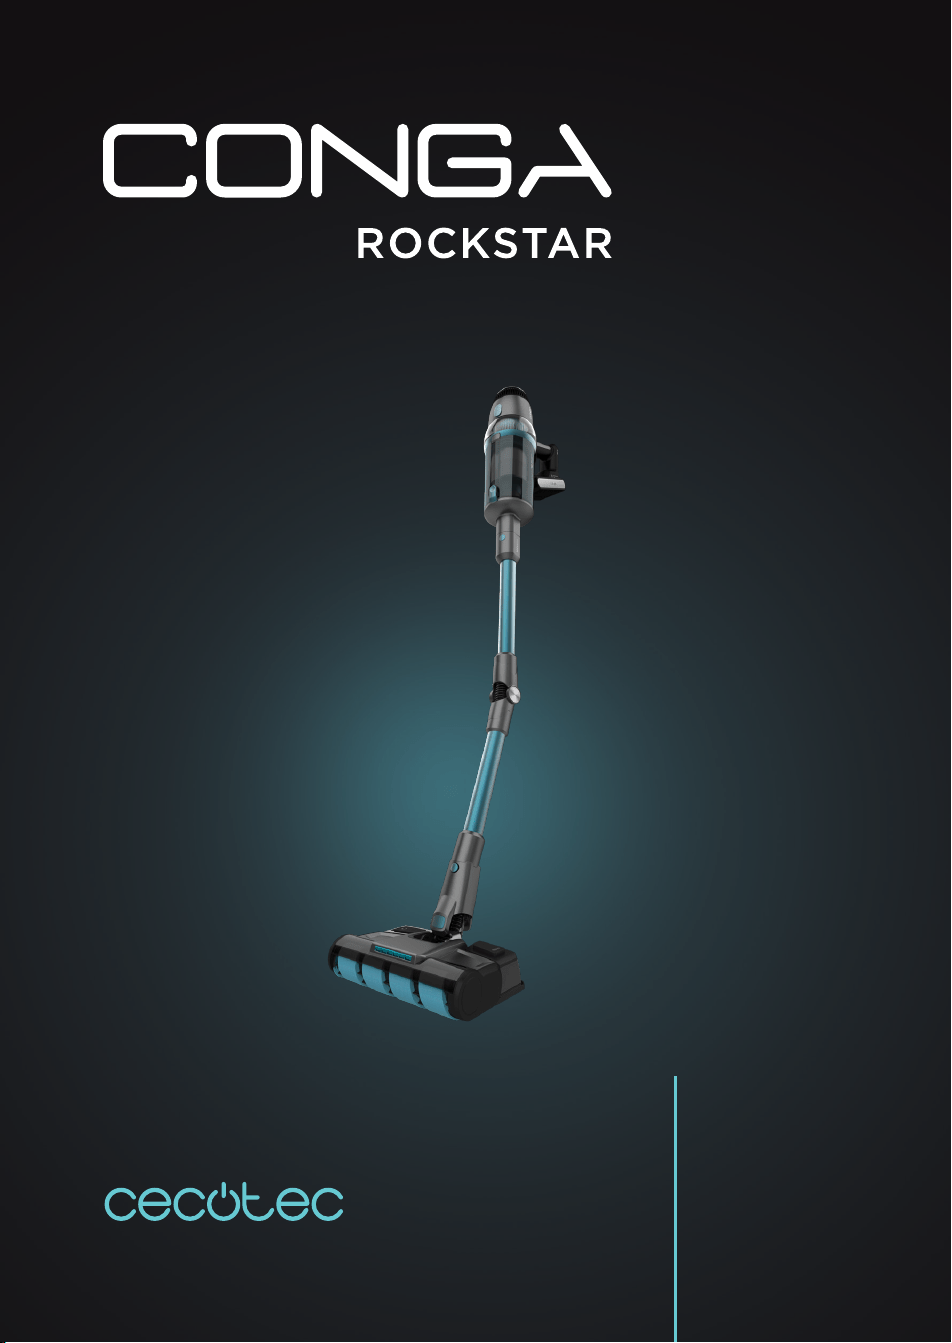
CONGA ROCKSTAR 2500 VITAL ERGOWET
Aspirador vertical / Upright vacuum cleaner
Manual de instrucciones
Instruction manual
Manuel d’instructions
Bedienungsanleitung
Manuale di istruzioni
Manual de instruções
Handleiding
Instrukcja obsługi
Návod k použití

50
ENGLISH
1. PARTS AND COMPONENTS
Fig. 1
1. Vacuuming brush head release button
2. Vacuuming tube release button
3. Dust tank bottom cover unlock button
4. Dust tank opening button and lter access
5. On/O button
6. Power adapter
7. 2-in-1 narrow accessory for corners and furniture
8. Jaliscazo brush
9. Vacuuming brush head
10. Flexible vacuuming tube
11. Water tank
12. Charging base
Fig. 2
1. Display
2. Speed-dial
3. On/O button
4. Battery
5. Battery release button
PLEASE NOTE:
The graphics in this manual are schematic representations and may not exactly match the
product.
2. BEFORE USE
- This upright vacuum cleaner includes a package designed to protect it during transport.
Take the product out of the box and remove all packaging materials. Keep the original box
and other elements in a safe place, as this will help you prevent product damage when
transporting it in the future. In case the original packaging is disposed of, make sure all
packaging materials are recycled accordingly.
- Make sure all parts and components are included and in good conditions. If there is any
piece missing or not in good condition, immediately contact the Technical Support Service
of Cecotec.
- Fully charge the device before the rst use.
- Remove the rst-use tab installed in the lter.
- During the rst 3 uses, it is recommended to charge the device for 12 hours between uses.

CONGA ROCKSTAR 2500 VITAL ERGOWET
51
ENGLISH
- The normal charge time is 6 hours approx. When the battery is fully charged, unplug it.
Box contents
- Conga Rockstar 2500 Vital ErgoWet Vacuum Cleaner
- 2-in-1 narrow accessory for corners and furniture
- Jaliscazo brush
- Flexible vacuuming tube
- Watertank accessory
- Charging base
- Instruction manual
3. PRODUCT ASSEMBLY
Vacuuming tube and brush head assembly
- To install the vacuuming brush head into the vacuuming tube, align both of them making
sure the tab on the brush head matches the guides on the tube, and introduce one into the
other until they are rmly xed.
- To disassemble them, press the vacuuming brush head release button and pull from the
vacuuming tube while you hold the vacuuming brush head.
Warning
When assembling these 2 parts, make sure the handle and the brush are facing the same
direction.
Vacuuming tube, vacuuming brush head and main body assembly
To complete the vacuum cleaner’s installation, once the vacuuming brush head is mounted on
the vacuuming tube, hold the tube vertically and insert it into the main body.
Battery assembly
Fig. 3
- Introduce the battery in the slot located in the main body following the guides. Once it is
introduced, it will click into place. Once inserted, check that it is secured in position.
- To disassemble the battery, press the release button and remove the battery.
Warning
Remove the battery and store it in a safe, dry place if the device is not going to be used in a
long period of time.

52
ENGLISH
4. OPERATION
- You can use this vacuum cleaner in two dierent manners:
- Handheld vacuum cleaner, attaching the accessories directly to the main body.
- Upright vacuum cleaner, using the vacuuming tube with the accessories assembled.
Using the vacuum cleaner
- Press the power button to turn the device on or o.
- Press the speed dial repeatedly to select the device’s operating speed: LOW, MED, HIGH
and AUTO. The device will turn on in LOW mode by default.
- If AUTO mode is selected, the vacuum cleaner will automatically adjust the suction power
based on dust concentration and surface type.
- When the battery shows a percentage equal to or less than 20 % while running at high
speed, the vacuum cleaner will start running at medium speed automatically to extend
the battery life.
Using the vacuuming brush head
- Press the power button to turn the device on or o.
- Press the speed dial to set the power level to: LOW, MED, HIGH, and AUTO.
- If you select the AUTO mode, the device will automatically adjust suction power according
to the concentration of dust and the type of surface.
- When operating at high speed and a battery at 20% or lower, the device will automatically
switch to medium speed in order to lengthen the battery life.
- The vacuuming brush head can remove dust from carpets, hard and soft oors, and tiles.
- If too many particles or bres are vacuumed, or if a child touches the brush during operation
by accident, the rotary brush stops spinning automatically in order to prevent tangles and
possible damage.
Accessories
This device includes dierent accessories that allow cleaning dierent types of surfaces,
objects, and dirt. Some of them are suitable for the upright vacuum cleaner, and others are
preferably used with the handheld one.
Jaliscazo brush
Assemble this brush to the upright vacuum cleaner. This brush is especially designed for
cleaning hard oors, but can be used to eciently clean soft oors too.
2-in-1 narrow accessory for corners and furniture
Fig. 4
This accessory is preferably used with the handheld vacuum cleaner and allows cleaning
furniture without damaging it and reaching less accessible dirt in corners.

CONGA ROCKSTAR 2500 VITAL ERGOWET
53
ENGLISH
exible vacuuming tube
Use the Flex tube to reach and vacuum dirt from the most inaccessible zones. Press the Flex
button to bend the tube.
Watertank accessory
With this accessory you will mop and scrub your oor just by attaching it to the vacuum cleaner.
Wall charging base installation
Fig. 5
- Place the charging base on the wall and mark 3 spots to be drilled to x the base. You must
take into account the height of the installation, it is important that vacuuming brush head
rests on the oor to avoid the charging base from holding all the vacuum cleaner’s weight.
- Drill the 3 holes (previously marked) and insert the pegs and M4 x 32 mm screws.
- Make sure that the charging base is securely xed on the wall and place the vacuum
cleaner on the charging base by placing the vacuum cleaner charging terminals over the
charging base charging terminals (plastic tab).
- Once the wall charging base is installed, connect the power adapter to the charging port,
and then you can charge the vacuum cleaner by simply sliding it up and down the wall
charging base. Fig. 6
Charge and display
- When the battery percentage is 20% or below, the device will automatically enter
low consumption mode. It is recommended to charge the device when it reaches this
percentage.
- The battery must be charged with the charging base while it is connected to the main body.
Connect one of the ends of the power adapter to the power supply and the other to the
charging base. Fig. 6
- During charging, the charge light indicator will turn on red and the display will show the
current charge percentage. When the device is fully charged, the battery indicator will turn
green and the display will show 100%. Fig. 7
- You can also charge the battery without using the charging base. You can charge the
battery when the battery is installed or not in the device. Connect the adapter and connect
the other end to the battery, paying attention to the direction. Once it is properly connected,
the charge light indicator will turn on red and will turn green once the charge is complete.
Fig. 8
5. WATERTANK ACCESSORY
- Do not use cleaning agents. Use clean and room temperature water only. Do not use the
vacuum cleaner to vacuum water.

54
ENGLISH
- When the vacuum cleaner is not going to be used for a long time, please remove the
water tank and empty the remaining water. Do not expose it to direct sunlight or to damp
environments.
Mop installation
- Place the mop cloth on the ground with the Velcro facing upwards.
- Align the mop cloth with the Velcro strips on the water tank and attach it without covering
the wheels. Fig. 9
Replacing the mop
- Remove the water tank from the device.
- Use your foot to hold the accessory against the ground and pull the vacuum cleaner
upwards until both parts are separated.
- Replace the mop and rell the water tank.
- Install the water tank again, insert the tank in the lower part of the vacuuming brush head
and press until it is xed.
Water emission
- When using this product for the rst time, make sure the water tank lid is not fully open.
- When the product is not in use, check that the water release button and cap are closed, as
the product may continue to let out water if the water tank is full.
- To activate the water emission, the water emission push button must be pressed, and to
stop the water emission, the push button must be in the original position, as shown in
gure 10.
6. CLEANING AND MAINTENANCE
- Turn the appliance o, unplug it from the power socket, and allow it to cool down before
cleaning it.
- Use a soft, slightly dampened cloth to clean the device’s surface.
- Never immerse the device in water or other liquids. Do not allow liquids to enter the device.
- Do not use sponges, powder products, or abrasive cleaning agents to clean the product.
- Do not leave the device in a place with direct sunlight.
- Do not leave the device in a wet place after cleaning it.
- After the brush has been used for a long time, bristles might start to tangle with hair and
other particles. Clean it in order for it to operate correctly again.
Filters and tank cleaning
- To prevent the appliance from overheating and losing suction power, it is suggested to

CONGA ROCKSTAR 2500 VITAL ERGOWET
55
ENGLISH
clean the lters frequently. To make the most of the suction power, it is suggested to clean
the lter after every use.
- The lters shelf life will depend on the accumulated use and the type of particles which are
frequently vacuumed. It is recommended to replace the lters every 6 months.
- To remove the lters (Fig. 11):
1. Press the dust tank opening button, marked with the word “CLEAN”, and pull on the
metallic handle to remove the ltering system.
2. Once the ltering system is out, turn the metallic handle anticlockwise and you will be
able to take the high-eciency lters out.
- Vacuum and shake the lters to remove every particle and dust remain that may block
them and dicult the correct air circulation. Remember not to use the vacuum cleaner
without the lters properly assembled.
- Filters cannot be washed inside a washing machine nor dried with a hair dryer.
- Do not brush the high-eciency lter.
- To empty the dust tank, press the dust tank lower cover opening button, open it and empty
it. Fig. 12
Cleaning the Jaliscazo brush
Fig. 13
- Move the rotary brush release button with the nger toward the arrow and remove the
cover on the same side of the brush.
- Take one end of the brush out as shown on the image.
- It is important to clear and clean all the residues left in the brush rotary axis.
- If you decide to wash the brush, you must air dry all the pieces. Assemble the pieces back
in order to use the brush again.
Watertank cleaning
- To clean the water tank, ll it with clean water, shake it, and empty it.
- The mop is washable; therefore, it is suggested to wash it after every use.
- Replace the cloth after 20-30 uses, depending on the use.
- When the mop cloth is used for a long time, it is possible that the water output is aected.
This can be avoided by cleaning both the mop and water tank regularly.
How to remove the battery
Press the battery release button and remove the battery as shown in gure 14. Store the
battery in a plastic bag and leave it in a dry place.
Vacuum claner storage
If the robot will not be used for a long period of time, remove the battery from the product and
store it in a dry and safe place.
56
ENGLISH
Maintenance indicator
The full tank icon or the clogged lter icon will be displayed if the device has not been properly
and frequently maintained. Fig. 15
7. TROUBLESHOOTING
Problem Possible cause Solution
The motor does not
operate
The battery does not work
any longer.
The metallic tubes, oor
brushes, batteries or the
device itself are not properly
assembled.
Charge the vacuum cleaner.
Make sure all parts of
the device are correctly
assembled.
The suction power
decreased and the
appliance makes a lot of
noise.
The dust tank is full. Fig. 15
The lter has too much dust.
Fig. 17
The electric rotary brush inlet
is obstructed or the brush is
blocked. Fig. 16
Clean the dirt.
Clean or replace the lter.
Clean the dust inside the
electric rotary brush.
Insucient operating
time after charging the
device.
(The battery life may vary
according to the room
temperature).
Insucient charge time.
The battery is old.
Fully charge the battery
following the instructions in
this manual.
Batteries are easily
recycled. Go to the closest
maintenance point and buy
new batteries.
8. ERROR CODES
Code Problem Cause
E1 The vacuum cleaner shuts down
does not charge.
Short circuit
E2 The vacuum cleaner does not
charge.
The charger’s voltage is below 36.3 V

CONGA ROCKSTAR 2500 VITAL ERGOWET
57
ENGLISH
E2 The vacuum cleaner does not
charge.
The charger’s voltage is below 32.1 V
The vacuum cleaner shuts down. Low battery
E3 The device turns o and displays
E3.
The motor short-circuits when the
battery is low
E5 The device turns o and displays
E5
Main motor overload (second level)
E6 The device turns o and displays
E6
Main motor overload
E9 The device turns o and displays
E9
Temperature too high or low
E7 The device stops working or
does not turn on and shows E7
Battery fault (rst level)
E8 The device turns o and displays
E8
NTC error (thermistor short circuit)
High-
eciency
lter
indicator
blinks
The device stops or does not
switch on. Fig. 17
High-eciency lter not installed
The lter
icon ashes
It works normally. Fig. 15 The dust tank or the inlet lter is
blocked
The brush
icon ashes
The long brush and motor stop
working. Fig. 16
Blocked long brush
Long brush full of hair
Note
- The low battery warning will disappear when the charger is disconnected.
- Low battery error (excluding shut down due to low battery), will stop after 6 seconds. If
not, press the on/o button to stop it.
9. TECHNICAL SPECIFICATIONS
Product reference: 05772
Product: Conga Rockstar 2500 Vital ErgoWet
Voltage and frequency: 100-240 V ~ 50/60 Hz
58
ENGLISH
29.6 V DC 3000 mAh 88 Wh battery
Motor rated power: 630 W
Brush rated power: 50 W
Charger output: 34.2 V DC 0.6 A
Technical specications may change without prior notication to improve product quality.
Made in China | Designed in Spain
10. DISPOSAL OF OLD ELECTRICAL AND ELECTRONIC APPLIANCES
This symbol indicates that, according to the applicable regulations, the
product and/or battery must be disposed of separately from household
waste. When this product reaches the end of its shelf life, you should
dispose of the batteries/accumulators and take them to a collection point
designated by the local authorities.
For detailed information on the most appropriate way to dispose of
electrical and electronic equipment and/or batteries, consumers should
contact their local authorities.
Compliance with the above guidelines will help to protect the environment.
11. TECHNICAL SUPPORT AND WARRANTY
Cecotec shall be liable to the end user or consumer for any lack of conformity that exists at the
time of delivery of the product under the terms, conditions, and deadlines established by the
applicable regulations.
It is recommended that repairs be carried out by qualied personnel.
If at any moment you detect any problem with your product or have any doubt, do not hesitate
to contact Cecotec ocial Technical Support Service at +34 963 210 728.
12. COPYRIGHT
The intellectual property rights over the texts in this manual belong to CECOTEC INNOVACIONES,
S.L. All rights reserved. The contents of this publication may not, in whole or in part, be
reproduced, stored in a retrieval system, transmitted, or distributed by any means (electronic,
mechanical, photocopying, recording or similar) without the prior authorization of CECOTEC
INNOVACIONES, S.L.
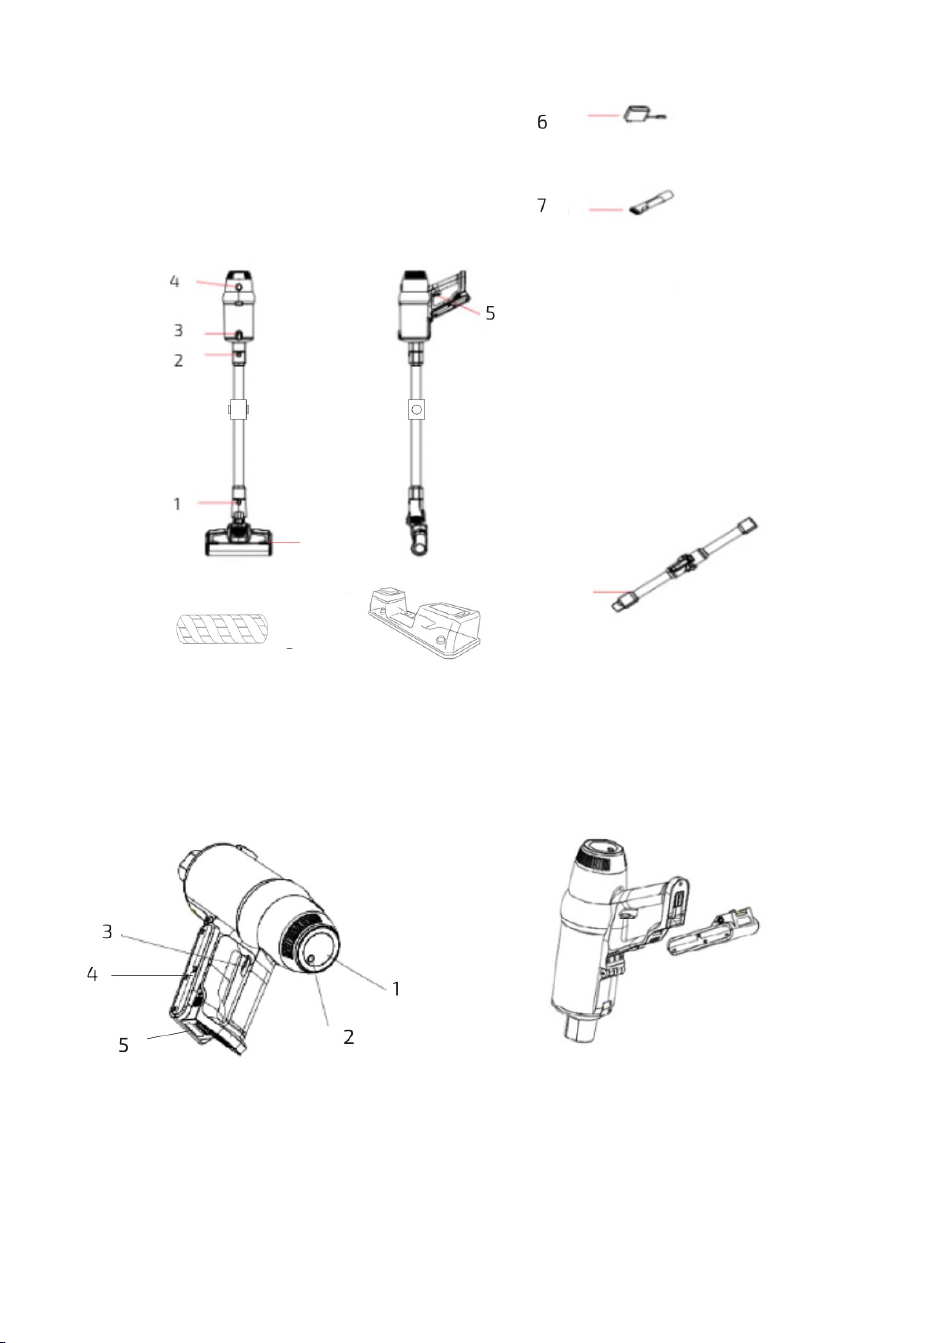
Fig./Img./Abb./Afb./ Rys./Obr. 1
Fig./Img./Abb./Afb./ Rys./Obr. 2 Fig./Img./Abb./Afb./ Rys./Obr. 3
11
Fig./Img./Abb./
Afb./ Rys./Obr. 6
9
8
10
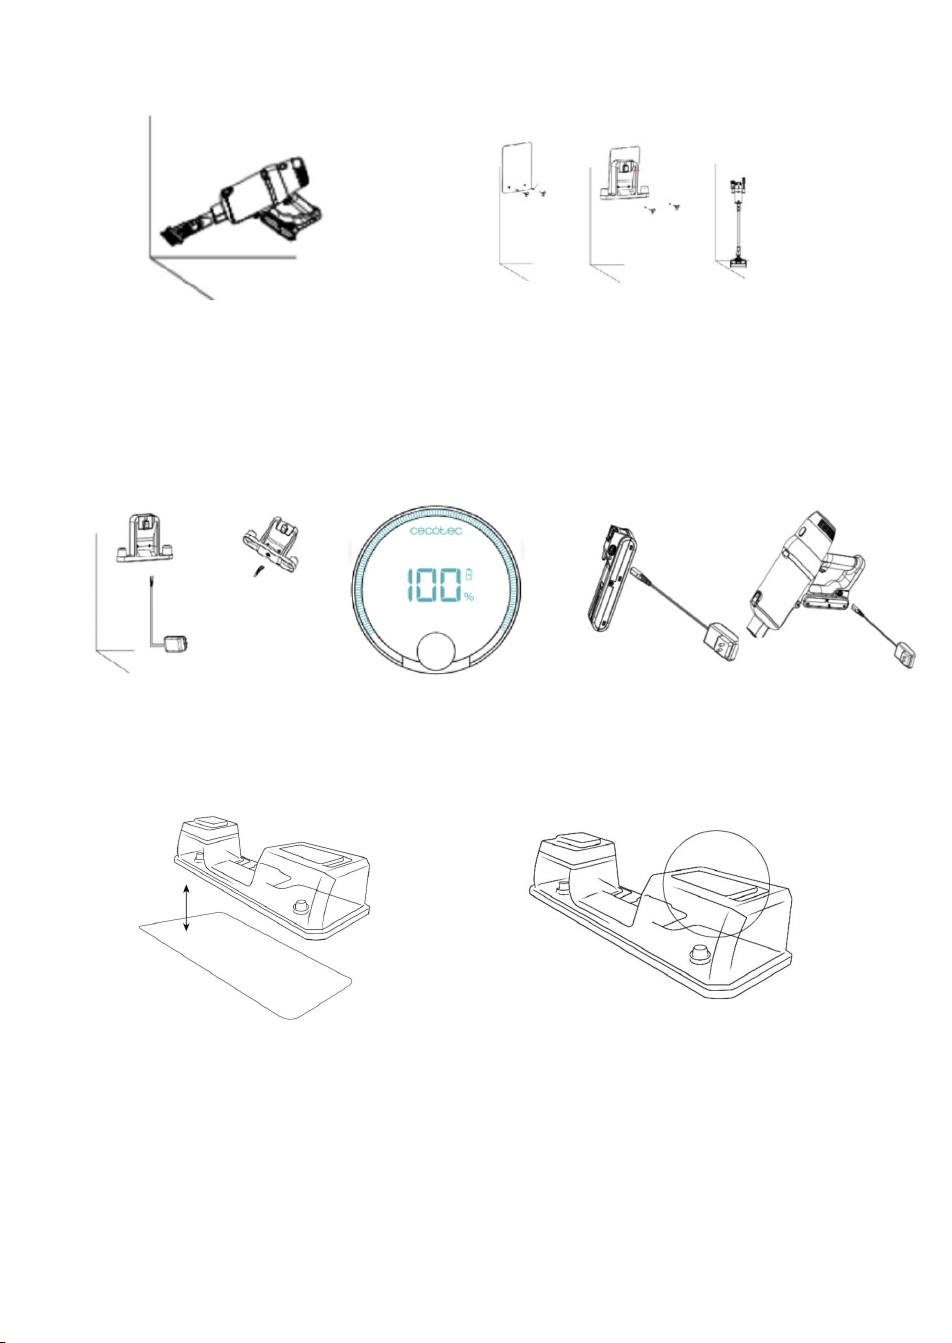
Fig./Img./Abb./
Afb./ Rys./Obr. 6
Fig./Img./Abb./
Afb./ Rys./Obr. 8
Fig./Img./Abb./Afb./ Rys./Obr. 9 Fig./Img./Abb./Afb./ Rys./Obr. 10
Fig./Img./Abb./Afb./
Rys./Obr. 4
Fig./Img./Abb./Afb./
Rys./Obr. 5
Fig./Img./Abb./
Afb./ Rys./Obr. 7
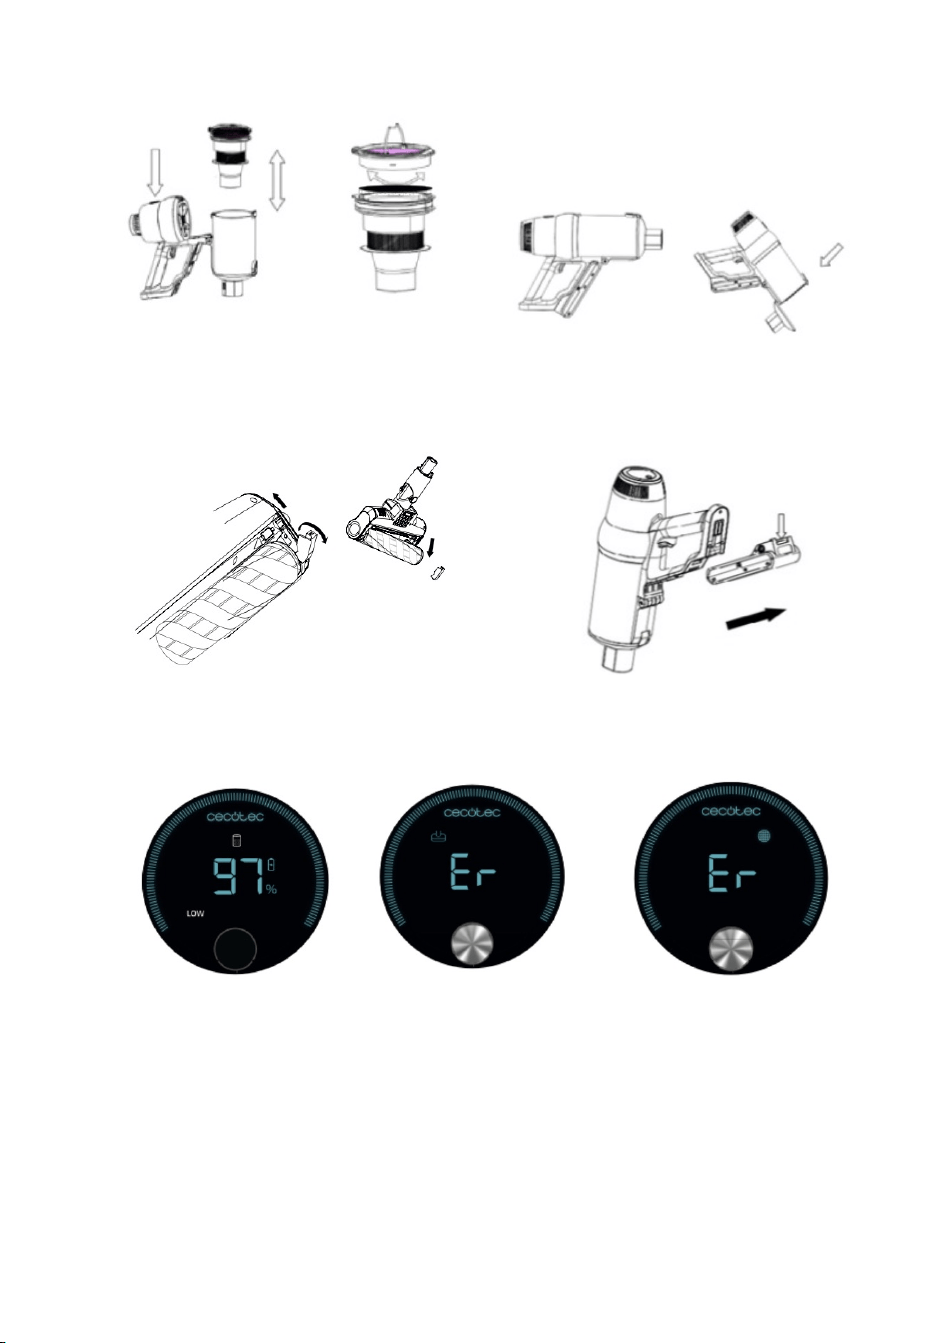
Fig./Img./Abb./Afb./ Rys./Obr. 11 Fig./Img./Abb./Afb./ Rys./Obr. 12
Fig./Img./Abb./Afb./ Rys./Obr. 13 Fig./Img./Abb./Afb./ Rys./Obr. 14
Fig./Img./Abb./Afb./
Rys./Obr. 15
Fig./Img./Abb./Afb./
Rys./Obr. 16
Fig./Img./Abb./Afb./
Rys./Obr. 17

www.cecotec.es
Cecotec Innovaciones S.L.
C/ de la Pinadeta s/n, 46930
Quart de Poblet, Valencia (Spain)
YV012220510