Manual de instrucciones
Instruction manual
Manuel d’instructions
Bedienungsanleitung
Manuale di istruzioni
Manual de instruções
Instructiehandleiding
Instrukcja obsługi
Návod k použití
Robot aspirador/ Robot vacuum cleaner
05797_Conga Perfect&Clean Connected Titanium_IM_YV_01220802.indd 105797_Conga Perfect&Clean Connected Titanium_IM_YV_01220802.indd 1 2/8/22 14:552/8/22 14:55

6
Instrucciones de la batería
• El aparato incluye una batería de ion-litio, no la queme ni la
exponga a temperaturas altas, ya que podría explotar.
• Tanto la batería como las pilas pueden presentar fugas
en condiciones extremas. Si la batería gotea, no toque el
líquido. Si el líquido entra en contacto con la piel, lávese
inmediatamente con agua y jabón. Si el líquido entra en
contacto con los ojos, láveselos de forma inmediata con
abundante agua limpia durante un mínimo de 10 minutos
y busque asistencia médica. Utilice guantes para manejar
la batería y deséchela inmediatamente de acuerdo con la
normativa local.
• Evite el contacto entre la batería y pequeños objetos
metálicos como clips, monedas, llaves, clavos o tornillos.
• Cargue la batería al completo si es nueva o antes de utilizar
el producto por primera vez después de un periodo largo de
inactividad.
• Asegúrese siempre de que la batería está cargada al 100 %
si no se ha utilizado en mucho tiempo.
• Mantenga fuera del alcance de los niños las pilas y baterías
que tengan riesgo de ser ingeridas.
• La ingestión de pilas y baterías puede provocar quemaduras,
perforación de partes blandas y la muerte. Pueden
provocarse quemaduras graves en las dos horas siguientes
a la ingesta.
• En caso de ingerir pilas o baterías acuda rápidamente a su
centro médico más cercano.
SAFETY INSTRUCTIONS
Read these instructions thoroughly before using the appliance.
Keep this instruction manual for future reference or new users.
05797_Conga Perfect&Clean Connected Titanium_IM_YV_01220802.indd 605797_Conga Perfect&Clean Connected Titanium_IM_YV_01220802.indd 6 2/8/22 14:552/8/22 14:55

7
• This product must be used in accordance with the directions
in this instruction manual. Cecotec cannot be held liable or
responsible for any damage or injuries caused by improper
use.
• Make sure that the mains voltage matches the voltage
stated on the rating label of the appliance and that the wall
outlet is grounded.
• This product can only be assembled and disassembled by
qualied personnel.
• Do not touch the cable, the power socket or the charger
when your hands are wet.
• Keep the robot vacuum cleaner away from clothing, curtains
and any other similar materials.
• Do not expose the device to direct sunlight, re or wet
environments.
• Do not sit or place heavy or sharp objects on top of the
appliance.
• This product is designed for household use only, do not use
it outdoors or with commercial purposes.
• Before operating the robot vacuum cleaner, prepare the
room and supervise it, to do so, remove any objects and
cables that may aect its operation.
• Always place the device on a at and stable surface. Avoid
placing it in unstable places where there is risk of falling,
such as tables or chairs.
• Turn o the power switch, located on the side of the robot,
when it will not be used for a long period of time.
• Before operating it, make sure all the robot and charging
base connections are in good condition.
• Avoid operating the product under extremely high or low
temperatures.
• The appliance should only be used with the battery and
05797_Conga Perfect&Clean Connected Titanium_IM_YV_01220802.indd 705797_Conga Perfect&Clean Connected Titanium_IM_YV_01220802.indd 7 2/8/22 14:552/8/22 14:55

8
power adapter supplied with it or with compatible units
approved by Cecotec.
• WARNING: to recharge the battery, use only the detachable
power supply provided with the device.
• Disconnect the appliance from the power socket before
removing the battery or carrying out any maintenance
tasks.
• Remove the battery from the product interior before
disposing of the robot vacuum cleaner.
• This appliance can be used by children aged 8 and above,
and persons with reduced physical, sensory or mental
capabilities or lack of experience and knowledge, as long as
they have been given supervision or instruction concerning
the use of the appliance in a safe way and understand the
hazards involved.
• Children shall not play with the appliance. Close supervision
is necessary when the appliance is being used by or near
children.
• Cleaning and maintenance should not be performed by
children without supervision.
• The plug must be removed from the charging base before
cleaning or any maintenance task.
Battery instructions
• This appliance includes a Li-ion battery, do not incinerate
or expose them to high temperatures, as they may explode.
• Leaks from the battery or battery cells can occur under
extreme conditions. Do not touch any liquid that leaks from
the battery. If the liquid gets into contact with skin, wash
immediately with soap and water. If the liquid gets into
the eyes, ush them immediately with clean water for a
minimum of 10 minutes and seek medical attention. Wear
gloves to handle the battery and dispose of immediately in
05797_Conga Perfect&Clean Connected Titanium_IM_YV_01220802.indd 805797_Conga Perfect&Clean Connected Titanium_IM_YV_01220802.indd 8 2/8/22 14:552/8/22 14:55

9
accordance with local regulations.
• Avoid contact between the battery and small metallic
objects such as paper clips, coins, keys, nails or screws.
• Before a new battery is used or the battery is used for the
rst time after long-term storage, fully charge the battery.
• When the device is stored and not used for long periods of
time, ensure that the battery pack is fully charged.
• Keep batteries out of the reach of children when there is a
risk of ingestion.
• Battery ingestion can cause burns, soft tissue perforation
and death. It can cause severe burns within two hours of
the ingestion.
• In case of battery ingestion please seek medical help
immediately.
INSTRUCTIONS DE SÉCURITÉ
Veuillez lire les instructions suivantes avec attention avant
d’utiliser l’appareil. Gardez bien ce manuel pour de futures
références ou pour tout nouvel utilisateur.
• Cet appareil doit être utilisé conformément aux instructions
de ce manuel d’instructions. Cecotec ne se fera responsable
d’aucun dommage ni accident qui soit dû à une utilisation
inappropriée de l’appareil.
• Assurez-vous que le voltage du réseau coïncide avec le
voltage spécié sur l’étiquette de classication de l’appareil
et que la prise possède une connexion à terre.
• L’appareil peut être monté et démonté uniquement par du
personnel qualié.
• Ne touchez pas le câble, la prise de courant ni le chargeur
avec les mains mouillées.
• Maintenez le robot aspirateur éloigné des vêtements, des
05797_Conga Perfect&Clean Connected Titanium_IM_YV_01220802.indd 905797_Conga Perfect&Clean Connected Titanium_IM_YV_01220802.indd 9 2/8/22 14:552/8/22 14:55

40
ENGLISH
1. PARTS AND COMPONENTS
The graphics in this manual are schematic representations and may not exactly match the
product.
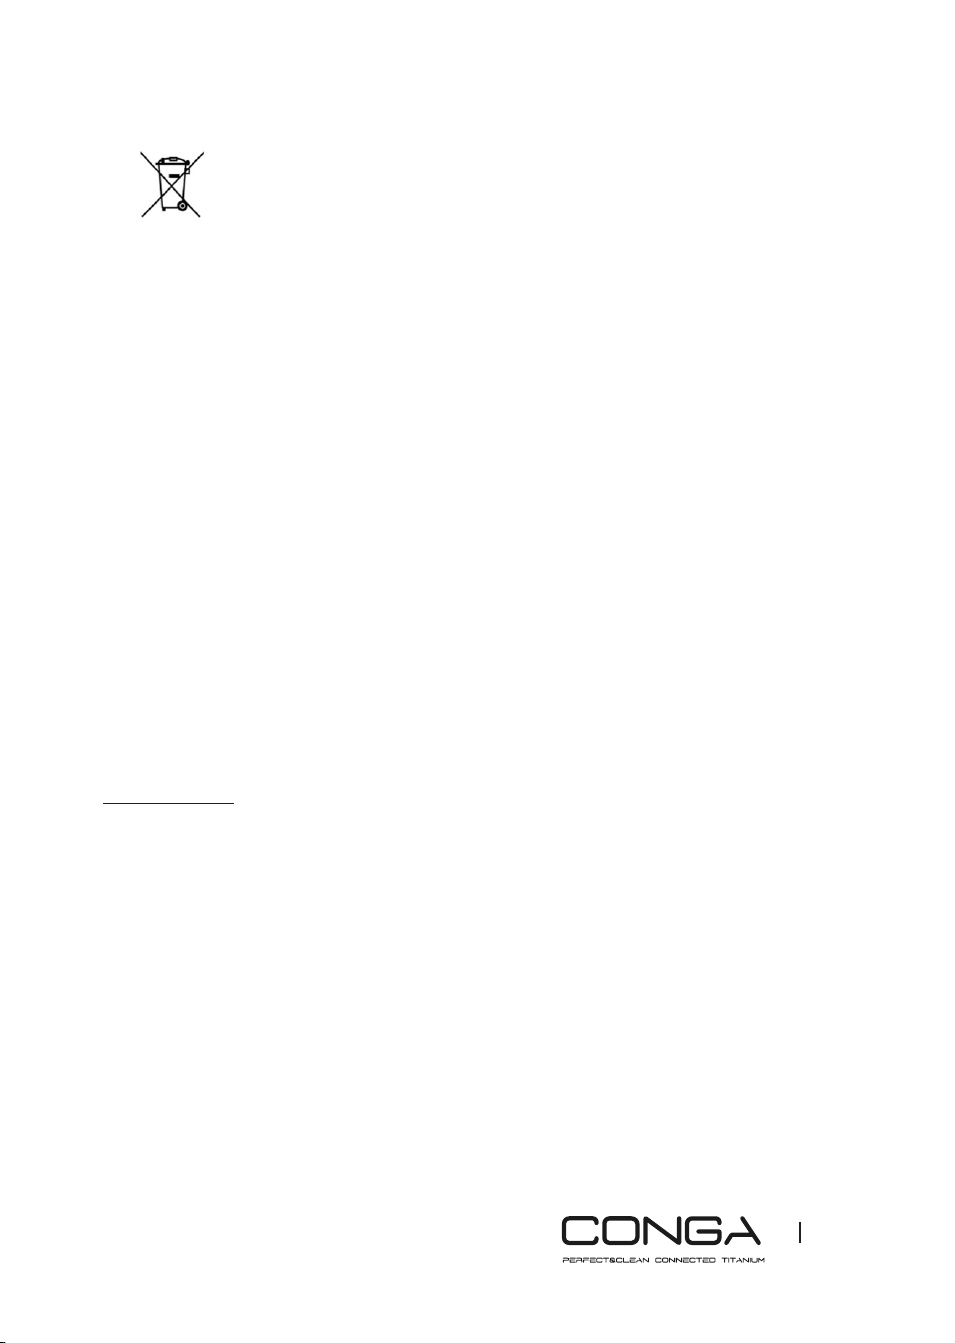
Fig. 1
1. Start/Pause button
2. Back home button
Back home button
The robot vacuum cleaner will automatically go to the charging base when you press this
button on the robot or on the app.
Indicator light
- Steady orange light: low battery/back home mode.
- Flashing orange light: charging.
- Steady blue light: fully charged/standby mode/cleaning.
- Oscillating/steady red light: error/tank missing.
Start/Pause button
1. Hold down this button for a few seconds to turn the robot on or o.
2. Press it to start cleaning too.
Fig. 2
1. Anti-collision sensor
2. Power switch
Fig. 3
1. Free-fall sensors
2. Driving wheels
3. Charging terminals
4. Omnidirectional wheel
5. Side brushes
6. Battery
7. Mixed tank
8. Jalisco brush
Charging base. Fig. 4
1. Charge indicator
2. Remote control holder
05797_Conga Perfect&Clean Connected Titanium_IM_YV_01220802.indd 4005797_Conga Perfect&Clean Connected Titanium_IM_YV_01220802.indd 40 2/8/22 14:552/8/22 14:55

41
ENGLISH
3. Signal transmitter
4. Charging terminals
- Power adapter. Fig. 5
- Mixed tank. Fig. 6
- Primary and high-eciency lters. Fig. 7
- Jalisco brush. Fig. 8
- Side brushes (4). Fig. 9
- Mops (2). Fig. 10
- Autoclean brush. Fig. 11
2. BEFORE USE
- This robot vacuum cleaner includes a package designed to protect it during transport. Take
the robot vacuum cleaner out of the box. Keep the original box and other elements in a safe
place, as this will help you prevent product damage when transporting it in the future. In
case the original packaging is disposed of, make sure all packaging materials are recycled
accordingly.
- Make sure all parts and components are included and in good conditions. If there is any
piece missing or in bad conditions, contact the Technical Support Service of Cecotec
immediately.
Warnings
- Remove all objects around the robot vacuum cleaner such as clothing, papers, cables,
curtains or other fragile objects which may block or slow down the operation of the robot
vacuum cleaner. Fig. 12
- If the room to be cleaned is near a balcony or stairs, a physical barrier must be placed in
order to prevent product damage and ensure safe operation. Fig. 13
- Direct exposure to sunlight or great light contrasts may aect the correct operation of the
sensors. If this happens, the robot will stop operating, move it to a new location for it to
start operating again.
3. INSTALLATION
1. Place the charging base against the wall and leave a minimum free space of 2 metres to
the front and 1 metre to each side. Fig. 14
2. Connect the charging base to a power socket. Wind and store the remaining cable in the
lower part of the charging base to prevent accidents. Fig. 15
3. Install both side brushes in their corresponding slots, located on the robot lower part.
05797_Conga Perfect&Clean Connected Titanium_IM_YV_01220802.indd 4105797_Conga Perfect&Clean Connected Titanium_IM_YV_01220802.indd 41 2/8/22 14:552/8/22 14:55

42
ENGLISH
Press until they click to make sure they are properly xed. Fig. 16
4. Press the power switch located on the side of the robot. Make sure the power switch is in
the on position (I). Fig. 17
5. Place the robot on the charging base and make sure the charging terminals on the robot
match those of the charging base. Once the robot is properly placed, it will beep once and
the light indicator will light up. If the light is oscillating orange, it means the battery is
not completely charged. To ensure the maximum cleaning time, wait until the light turns
into steady blue, as this will indicate the battery is fully charged and the robot is ready to
clean. Fig. 18
4. OPERATION
Starting the cleaning. Fig. 19
- Hold down the Start/Pause button on the robot to turn it on.
- Press the Start/Pause button on the robot vacuum cleaner or on the app to start cleaning.
Note
- If the robot runs out of battery while cleaning, it will automatically return to the charging
base. Once the battery is fully charged, the robot can start a new cleaning cycle.
- If there is no good access to the charging base, the robot will not be able to return to it. If
this happens, place it manually on the charging base.
Pausing the cleaning. Fig. 19
- Press the Start/Pause button on the robot vacuum cleaner or on the app to pause the
cleaning process.
- Press the Start/Pause button on the robot vacuum cleaner or on the app to resume the
cleaning process.
Returning to the charging base
Press the Back home button on the robot or on the app (with a house icon) in order to send the
robot to the charging base. The robot vacuum cleaner will continue vacuuming until it reaches
the charging base.
Turning o. Fig. 19
Hold down the Start/Pause button on the robot to turn it o.
Warning
The robot vacuum cleaner has a power switch (with positions I and 0) located on the side of
the main body. If the robot will not be used for long periods of time, it is recommended to turn it
o using this switch. As a safety measure, if the robot is switched o, it will restore the factory
05797_Conga Perfect&Clean Connected Titanium_IM_YV_01220802.indd 4205797_Conga Perfect&Clean Connected Titanium_IM_YV_01220802.indd 42 2/8/22 14:552/8/22 14:55

43
ENGLISH
default settings. To operate the robot, the switch must be in the on position (I).
Cleaning modes
This robot includes dierent modes and functions that can be activated via the app.
Automatic mode. Fig. 20
- Press the Start/Pause button or select the auto cleaning mode on the app, then the robot
vacuum cleaner will start the automatic cleaning.
- The robot will clean the whole surface, edges, around objects such as tables, chairs etc.,
until the battery is low, then it will return to the charging base.
Random mode
The robot vacuum cleaner will clean randomly until the battery percentage is low and it will
return to the charge base.
To activate this mode, press the random cleaning button on the app.
Scrubbing mode. Fig. 21
- Attach the mop to the bracket and the latter to the mixed tank. Fill the water tank.
- Place the mixed tank on the robot vacuum cleaner and select the scrubbing level with the
remote control: high, medium or low.
- Once you have selected the desired scrubbing level on the app, the robot vacuum cleaner
will start the All in One function to vacuum, scrub and sweep simultaneously thanks to its
mixed tank.
Note
- If you wish to mop, do not ll the water tank.
- If the robot has the mixed tank installed with water in it, when it leaves the charging base,
it will turn around itself to soak the mop.
- To ensure a perfect scrubbing from the start, it is suggested to dampen the mop evenly
with water before xing it to the mixed tank. It is also recommended to wash the mop after
every use.
- It is recommended to be present when the robot is scrubbing.
- When the robot vacuum cleaner returns to the charging base, you must remove the mop.
Do not leave the robot vacuum cleaner charging with the mop assembled.
Spiral mode. Fig. 22
The robot will carry out an intense cleaning of a specic area when this mode is activated. It
will start cleaning at a specic spot and will move outwards in a spiral motion (1 metre). Then,
it will return to the starting spot in an inwards spiral motion again.
- Once it has nished and returns to the starting spot, the robot will start cleaning in Auto
mode until it runs out of battery.
05797_Conga Perfect&Clean Connected Titanium_IM_YV_01220802.indd 4305797_Conga Perfect&Clean Connected Titanium_IM_YV_01220802.indd 43 2/8/22 14:552/8/22 14:55

44
ENGLISH
- Before using this mode, place it in the spot you wish to clean.
- To activate this mode, press the spiral cleaning button on the app.
Edge mode. Fig. 23
- When this mode is selected, the robot will clean along walls and around furniture (e.g.
table or chair legs).
- Press the edge cleaning button on the app.
Room mode. Fig. 24
- The robot will carry out a 30-minute cleaning cycle when this mode is selected.
- Press the room cleaning button on the app.
- To ensure an ecient cleaning of the room, make sure the robot stays in the room.
Back home mode
Press the Back home button on the robot or on the app (with a house icon) in order to send the
robot to the charging base. The robot vacuum cleaner will continue vacuuming until it reaches
the charging base.
Manual mode
Select the manual cleaning mode on the app to steer your robot vacuum cleaner manually.
Power level function
Select the power level on the app to control the robot suction power during cleaning processes.
There are three suction power levels: Turbo, Normal and Eco.
Cleaning scheduling
To make cleaning easier, the robot has a function that allows it to be programmed daily from
the app. According to the setting, the robot will automatically start cleaning in the selected
days at the desired time.
5. CLEANING AND MAINTENANCE
High-eciency lter. Fig. 25-26
The high-eciency lter is designed with bres that help trap dust particles, dust mites,
pollen... It is very important to periodically clean the lter, to avoid these particles from
building up in the lter, causing eciency loss. It is convenient to carry out this maintenance
once a week.
It is recommended to replace the high-eciency lter with a new one without exceeding 160
cleaning hours.
05797_Conga Perfect&Clean Connected Titanium_IM_YV_01220802.indd 4405797_Conga Perfect&Clean Connected Titanium_IM_YV_01220802.indd 44 2/8/22 14:552/8/22 14:55

45
ENGLISH
Recommendation
Dirt can be removed with a small brush or by shaking it carefully against a hard surface for
dust to fall o. The high-eciency lter cannot be washed.
Mesh primary lter and sponge lter
The ltering system is featured with a primary mesh lter and a sponge lter, located next to
the high-eciency lter. It is suggested to replace them either after a maximum of 160 hours
of use or when they are worn out due to operation.
Recommendation
Dirt can be removed with a small brush or by shaking carefully against a hard surface for dust
to fall o. You can also use warm water without detergents to obtain better results. Always
make sure they are completely dry before installing them again; otherwise, moisture can reach
the robot motor and damage it.
Free-fall sensors cleaning
Use a clean, dry and soft cloth to wipe o any dust from the free-fall sensor located on the
robot lower part.
Warning
Do not apply cleaning products directly on the sensors.
Cleaning the Jalisco brush
The Jalisco brush is designed for hard oors. Its micro-bre technology captures dust, sand,
mites and lint eciently in a single pass. This brush is in contact with the oor, and therefore
with dirt, so it can be worn out over time, aecting negatively to the cleaning eciency. For
this reason, it is suggested to replace the Jalisco brush after a maximum of 320 hours or less.
1. Slightly press the Jaliscazo brush frame tabs in order to open the slot and remove it. Fig.
27
2. Remove any hair, lint or other dirt trapped in the brush and around the shafts.
3. Clear and clean the robot suction channel. Fig. 28
4. Reinstall the Jalisco brush and its frame.
Recommendation
It is recommended to clean the Jaliscazo brush once a week with the help of the cleaning brush.
Side brushes
Side brushes are designed with multiple bristles and are used to push dirt towards the suction
nozzle and to thoroughly clean edges and corners. These brushes can wear out over time,
aecting negatively to the cleaning eciency. For this reason, it is suggested to replace each
side brush after a maximum of 220 hours or less.
05797_Conga Perfect&Clean Connected Titanium_IM_YV_01220802.indd 4505797_Conga Perfect&Clean Connected Titanium_IM_YV_01220802.indd 45 2/8/22 14:552/8/22 14:55
46
ENGLISH
Recommendation
It is recommended to clean the side brushes once a week with the help of the autoclean brush.
Sensors
- Your robot vacuum cleaner has dierent types of sensors, for example, proximity sensors
that allow the robot to move around while detecting obstacles, or free-fall sensors that
help the robot detect slopes or possible gaps/unevenness such as staircases. These
sensors are always in contact with dust particles, and therefore can deteriorate over time,
causing possible navigation errors.
- It is suggested to clean all the robot sensors with a dry and soft cloth after a maximum of
35 hours of operation or less.
Battery charge and replacement
- To lengthen the battery shelf life, keep the robot charging on the charging base when not
in use.
- Remove the battery and store it in a safe, dry place if the device will not be used for a long
period of time.
To replace the battery, follow the instructions below:
1. Unscrew the 2 screws on the battery slot, remove the battery cover and the battery. Fig.
29
2. Insert the new battery with the battery label facing up. Fig. 30
3. Place the battery and the battery cover in its place and x properly the screws back again.
6. TROUBLESHOOTING
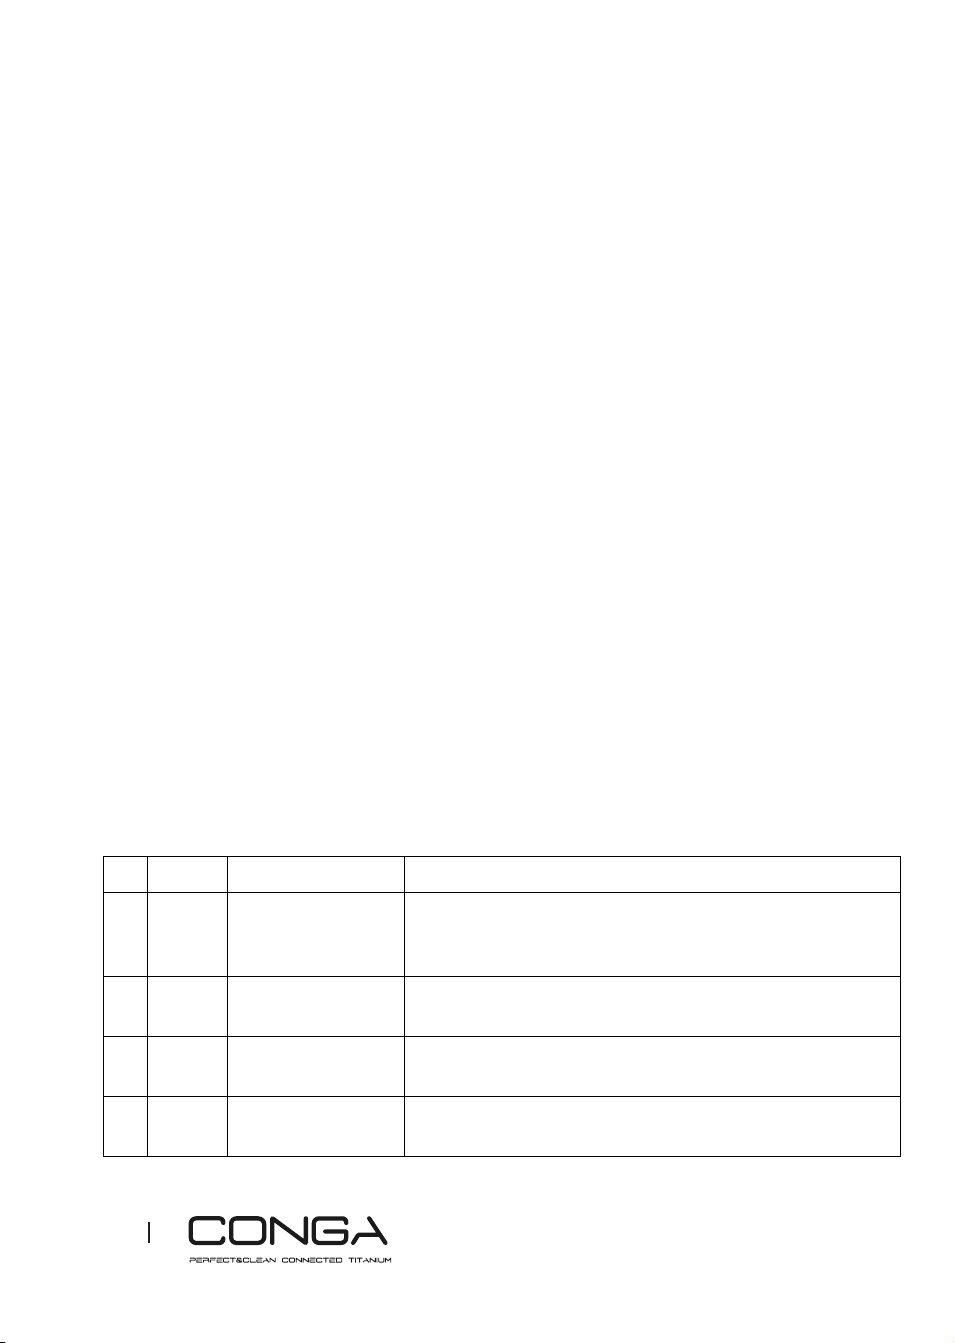
Beeps while the oscillating red light is on:
Beeps Error Solution
01 1 Gyroscope error Place the robot vacuum cleaner on a stable surface and
restart it by turning it o and on with the power switch. Do
not move it.
02 2 Bumper error Check the bumper and remove any object that may be
blocking it.
03 3 Free-fall sensor
error
Check if the bumper is dirty and clean the sensor.
02 4 Low battery or
charging error
The robot has run out of battery and you need to manually
place it on the charging base.
05797_Conga Perfect&Clean Connected Titanium_IM_YV_01220802.indd 4605797_Conga Perfect&Clean Connected Titanium_IM_YV_01220802.indd 46 2/8/22 14:552/8/22 14:55
47
ENGLISH
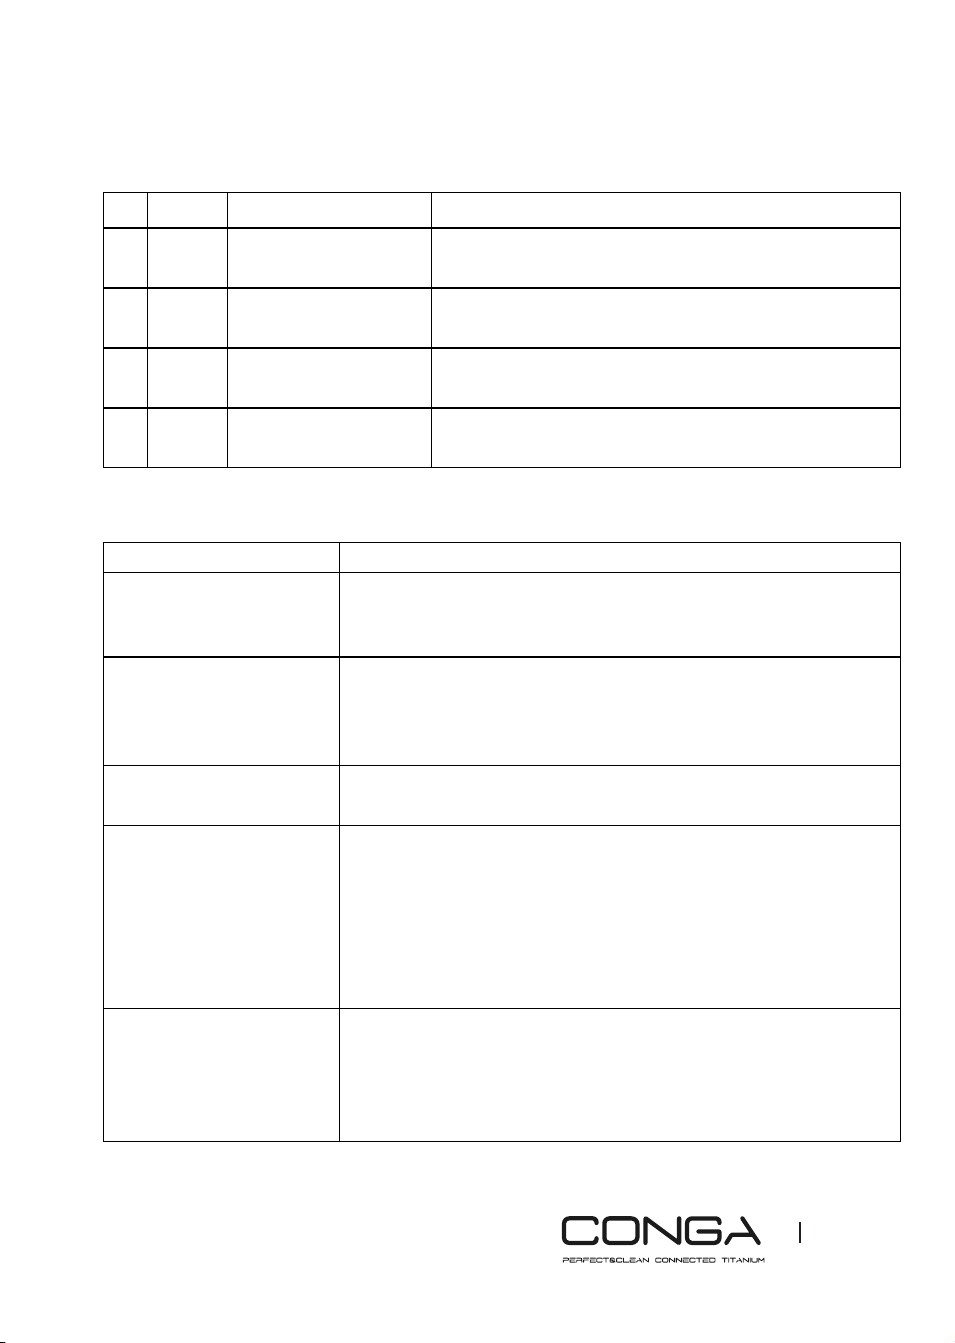
Beeps while the indicator light is steady red:
Beeps Error Solution
01 1 Driving wheel error Check if the driving wheel is blocked. Unblock and clean
it.
02 2 Robot side brushes
error
Check if the side brushes are blocked and clean them.
03 3 Fan error Clean the dust or objects that may be blocking the air
inlet channel.
02 4 Main brush error Check if the main brush is tangled or blocked and clean
it.
Other possible scenarios:
Problem Solution
The robot vacuum cleaner
does not activate.
Make sure the power switch is in the on position (I).
Make sure the battery is fully charged.
If the problem continues, turn the switch o and restart it.
The device suddenly stops
working.
Check if the robot is trapped or stuck with any obstacle.
Check the battery level.
If the problem continues, turn the switch o, wait for 2 seconds and
restart it.
The programming function
does not work
Make sure the power switch is in the on position (I).
Check if the robot battery is too low to turn on.
Suction power level is very
low
Check if there are obstructions blocking the air inlet.
Empty the tank.
Clean the lters with a vacuum cleaner or a cleaning brush.
Check if the lters are wet.
Dry the lters in a natural way before using them. Make sure they
are completely dry, if there are any moisture remains they could
reach the motor and damage the robot.
The robot vacuum cleaner
does not charge.
Check if the charging base indicators are on. If they are not, contact
the ocial Technical Support Service of Cecotec.
Clean the charging terminals with a dry cloth.
Check if the robot beeps when it gets to the charging base.
Otherwise, contact the ocial Technical Support Service of Cecotec.
05797_Conga Perfect&Clean Connected Titanium_IM_YV_01220802.indd 4705797_Conga Perfect&Clean Connected Titanium_IM_YV_01220802.indd 47 2/8/22 14:552/8/22 14:55
48
ENGLISH
The robot does not return
to the charging base.
Remove the objects 1 metre on the left and right, and 2 metres in
front of the charging base.
The robot will return to the charging base faster when it is near it.
When it is far, it will take more time to identify it. Clean the charging
terminals.
The main brush does not
spin.
Clean the main brush.
Check if the main brush is installed correctly.
The robot movements or
route are unusual.
Carefully clean the sensors with a dry cloth.
Restart the robot vacuum cleaner. To do so, turn the power switch
o and on.
7. TECHNICAL SPECIFICATIONS
Model: Conga Perfect&Clean Connected Titanium
Product reference: 05797
Voltage: 100-240 V ~, 50/60 Hz
Rated capacity: 14.4 V DC, 2500 mAh
Typical capacity: 2600 mAh
Frequency bands: 2.4 GHz
Maximum power transmission: 17.5 dBm
Technical specications may change without prior notication to improve product quality.
Manufactured in China | Designed in Spain
8. DISPOSAL OF OLD ELECTRICAL APPLIANCES
This symbol indicates that, according to the applicable regulations, the
product and/or battery must be disposed of separately from household
waste. When this product reaches the end of its shelf life, you should dispose
of the batteries/accumulators and take them to a collection point designated
by the local authorities.
Consumers must contact their local authorities or retailer for information
concerning the correct disposal of old electrical appliances and/or their
batteries.
Compliance with the above guidelines will help protect the environment.
05797_Conga Perfect&Clean Connected Titanium_IM_YV_01220802.indd 4805797_Conga Perfect&Clean Connected Titanium_IM_YV_01220802.indd 48 2/8/22 14:552/8/22 14:55
49
ENGLISH
9. TECHNICAL SUPPORT AND WARRANTY
Cecotec shall be liable to the end user or consumer for any lack of conformity
that exists at the time of delivery of the product under the terms, conditions
and deadlines established by the applicable regulations.
It is recommended that repairs be carried out by qualied personnel.
If at any moment you detect any problem with your product or have any doubt, do not hesitate
to contact Cecotec ocial Technical Support Service at +34 96 321 07 28.
10. COPYRIGHT
The intellectual property rights over the texts in this manual belong to CECOTEC INNOVACIONES,
S.L. All rights reserved. The contents of this publication may not, in whole or in part, be
reproduced, stored in a retrieval system, transmitted or distributed by any means (electronic,
mechanical, photocopying, recording or similar) without the prior authorization of CECOTEC
INNOVACIONES, S.L.
11. DECLARATION OF CONFORMITY
Cecotec Innovaciones hereby declares this robot vacuum cleaner, model 05797_Conga
Perfect&Clean Connected Titanium , complies with the Directive 2014/53/EU on radio
equipment.
The complete text of the EU declaration of conformity is available in the following Internet
address:
www.cecotec.es
1. PIÈCES ET COMPOSANTS
Les graphiques de ce manuel sont des représentations schématiques et peuvent ne pas
correspondre exactement à ceux du produit.
05797_Conga Perfect&Clean Connected Titanium_IM_YV_01220802.indd 4905797_Conga Perfect&Clean Connected Titanium_IM_YV_01220802.indd 49 2/8/22 14:552/8/22 14:55
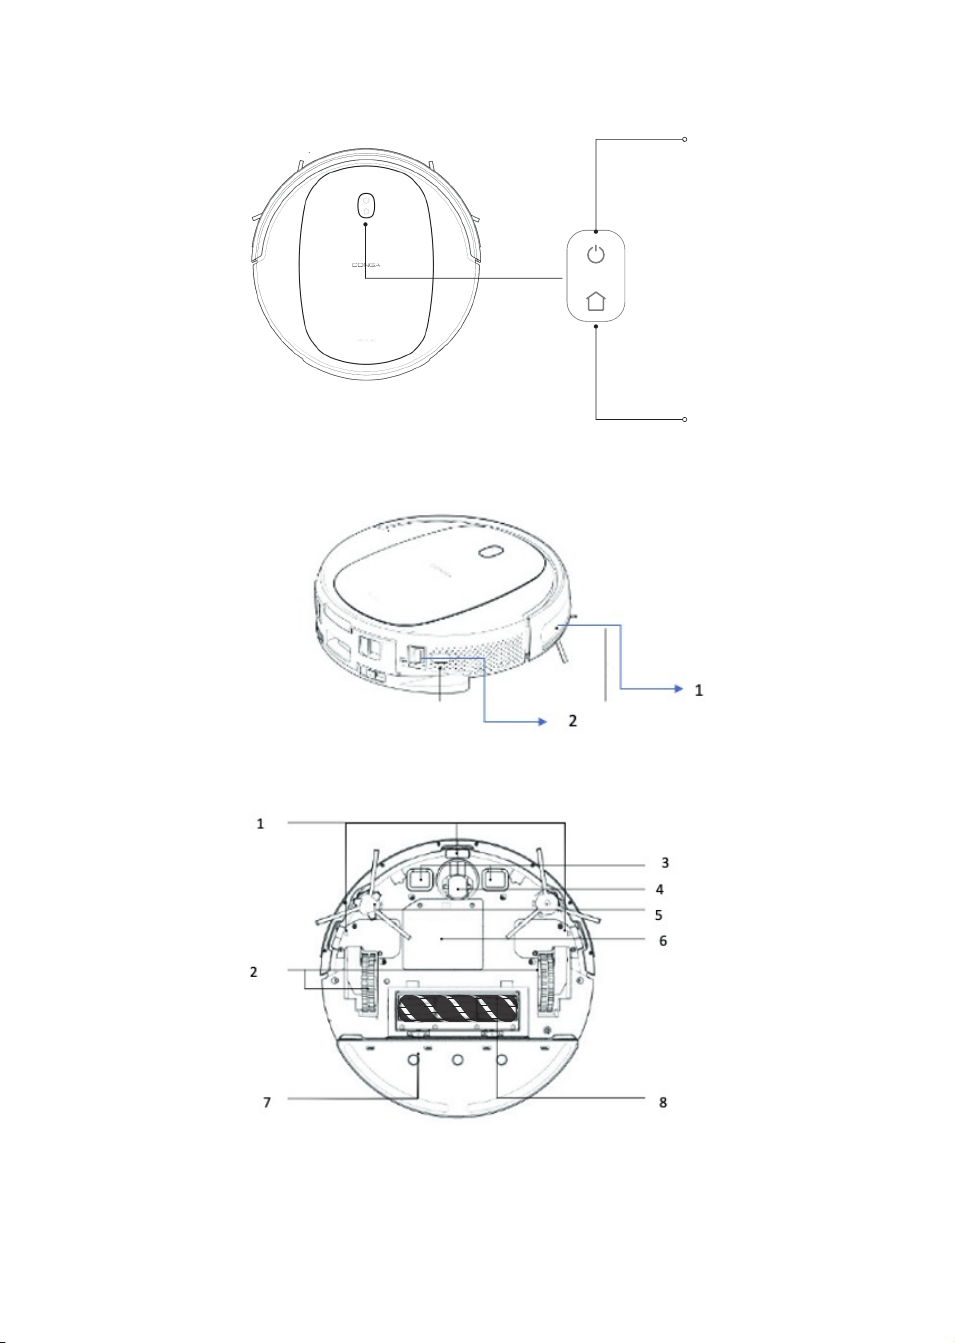
Fig./Img./Abb./Afb./ Rys./Obr. 3
Fig./Img./Abb./Afb./ Rys./Obr. 2
Fig./Img./Abb./Afb./ Rys./Obr. 1
1
2
05797_Conga Perfect&Clean Connected Titanium_IM_YV_01220802.indd 12405797_Conga Perfect&Clean Connected Titanium_IM_YV_01220802.indd 124 2/8/22 14:552/8/22 14:55
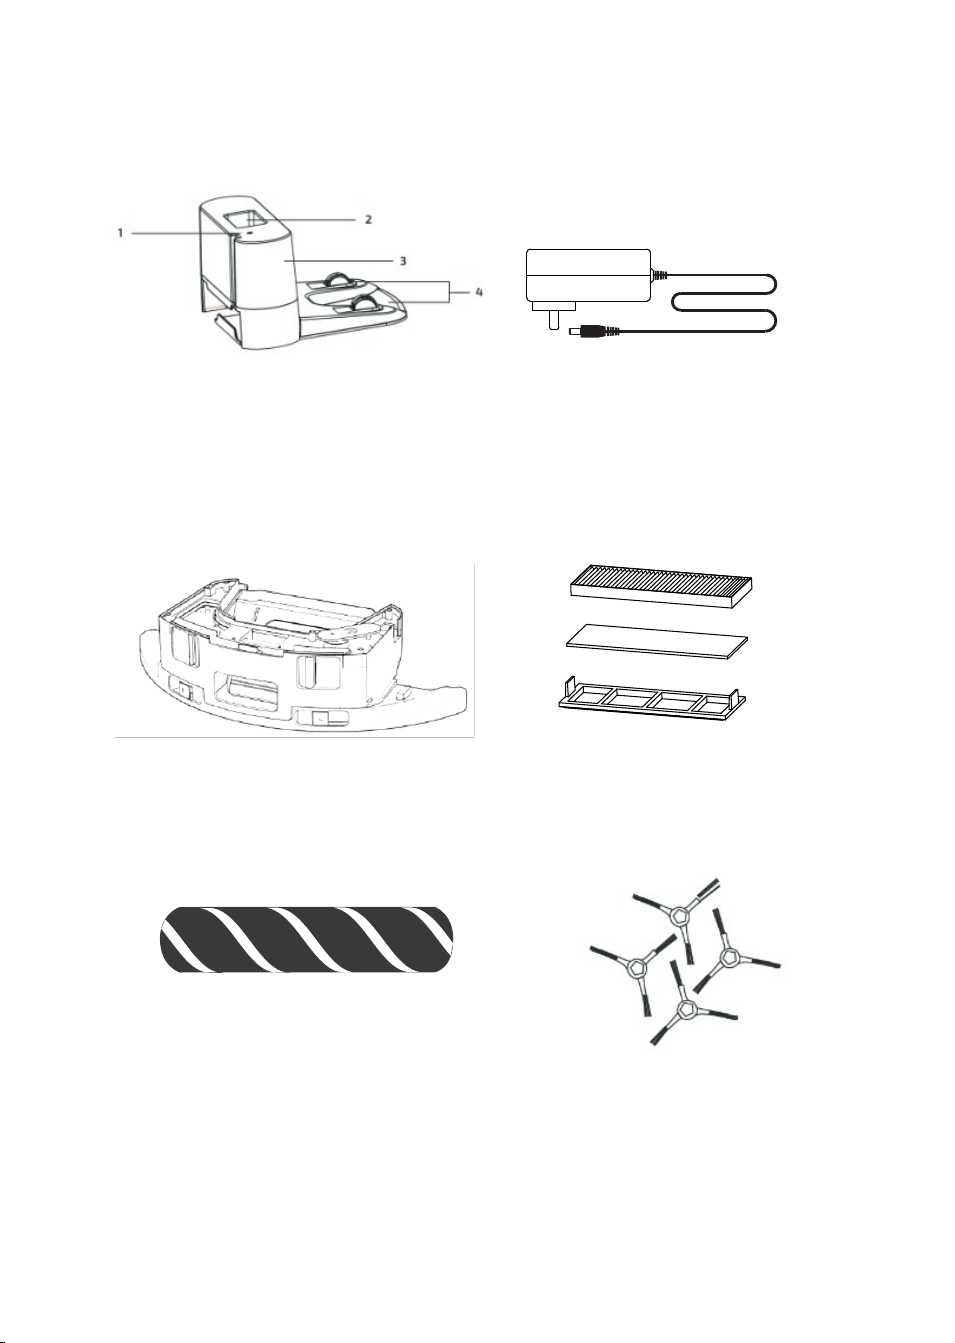
Fig./Img./Abb./Afb./ Rys./Obr. 4
Fig./Img./Abb./Afb./ Rys./Obr. 6
Fig./Img./Abb./Afb./ Rys./Obr. 5
Fig./Img./Abb./Afb./ Rys./Obr. 8
Fig./Img./Abb./Afb./ Rys./Obr. 7
Fig./Img./Abb./Afb./ Rys./Obr. 9
05797_Conga Perfect&Clean Connected Titanium_IM_YV_01220802.indd 12505797_Conga Perfect&Clean Connected Titanium_IM_YV_01220802.indd 125 2/8/22 14:552/8/22 14:55
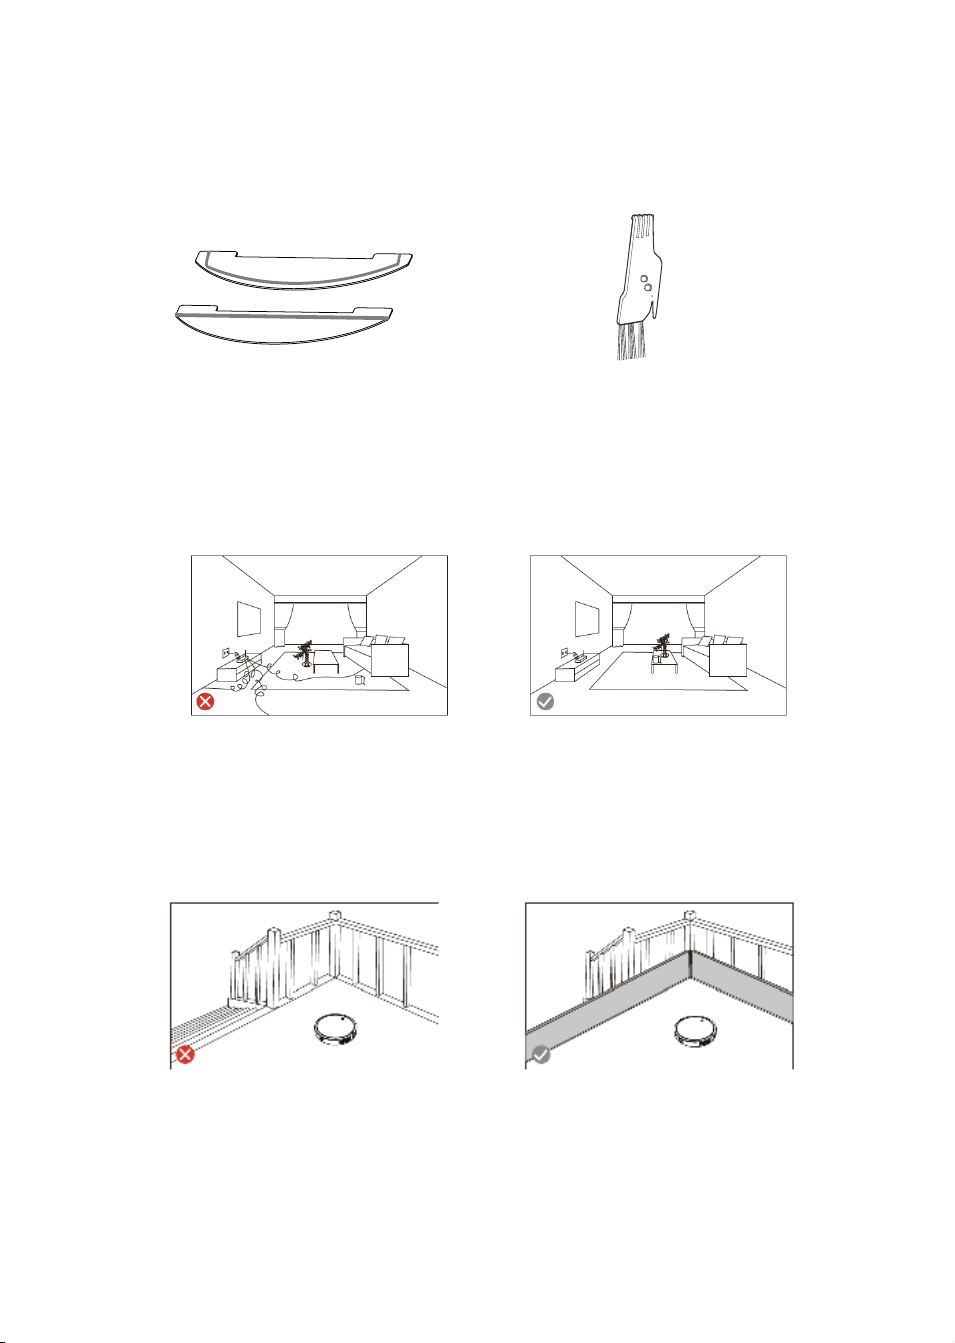
Fig./Img./Abb./Afb./ Rys./Obr. 10
Fig./Img./Abb./Afb./ Rys./Obr. 13
Fig./Img./Abb./Afb./ Rys./Obr. 11
Fig./Img./Abb./Afb./ Rys./Obr. 12
05797_Conga Perfect&Clean Connected Titanium_IM_YV_01220802.indd 12605797_Conga Perfect&Clean Connected Titanium_IM_YV_01220802.indd 126 2/8/22 14:552/8/22 14:55
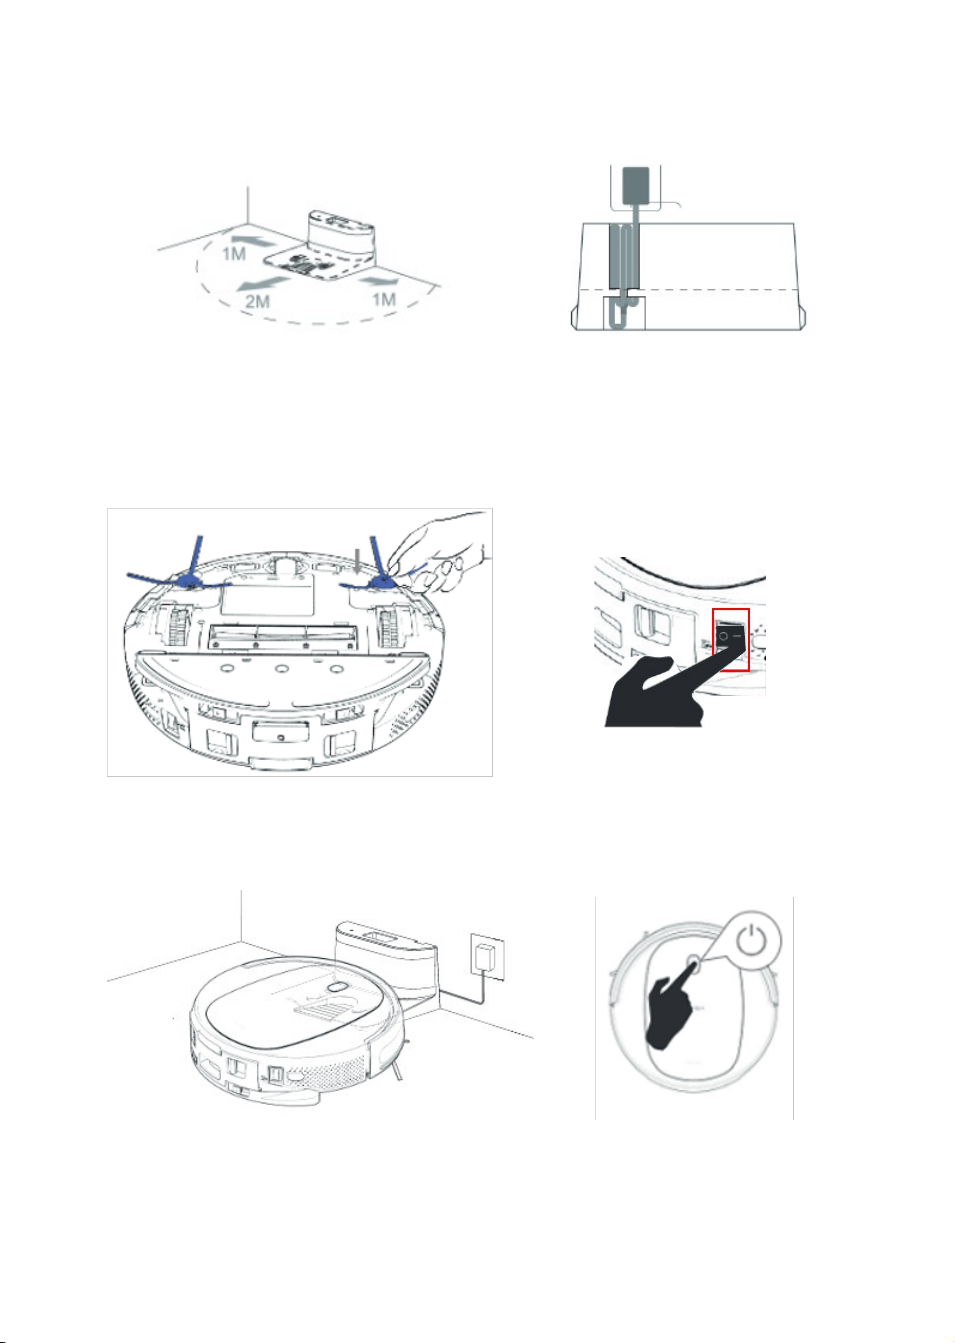
Fig./Img./Abb./Afb./ Rys./Obr. 14 Fig./Img./Abb./Afb./ Rys./Obr. 15
Fig./Img./Abb./Afb./ Rys./Obr. 16 Fig./Img./Abb./Afb./ Rys./Obr. 17
Fig./Img./Abb./Afb./ Rys./Obr. 18 Fig./Img./Abb./Afb./ Rys./Obr. 19
05797_Conga Perfect&Clean Connected Titanium_IM_YV_01220802.indd 12705797_Conga Perfect&Clean Connected Titanium_IM_YV_01220802.indd 127 2/8/22 14:552/8/22 14:55
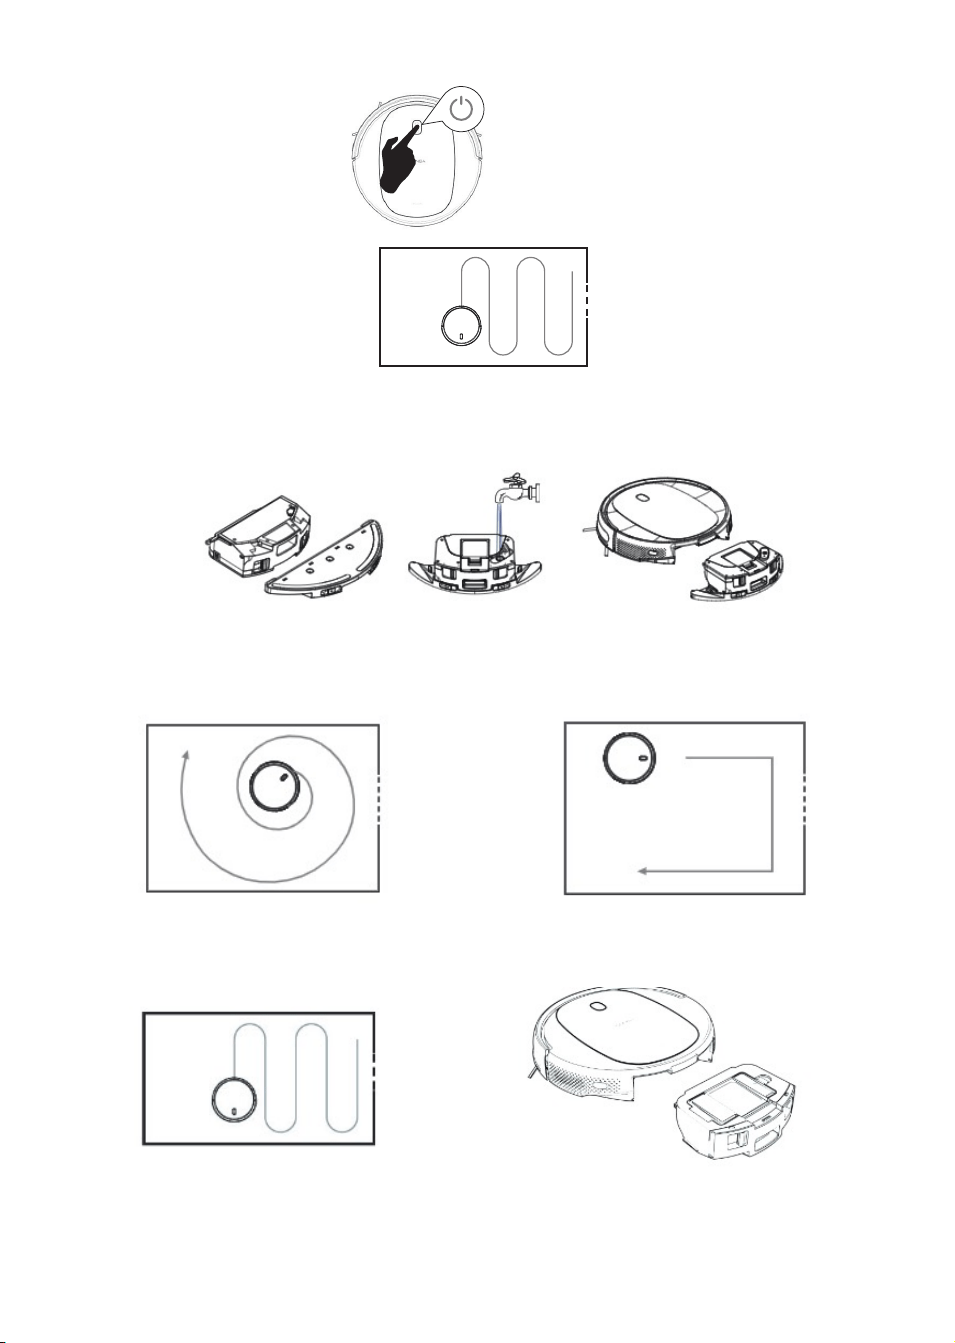
Fig./Img./Abb./Afb./ Rys./Obr. 21
Fig./Img./Abb./Afb./ Rys./Obr. 22
Fig./Img./Abb./Afb./ Rys./Obr. 20
Fig./Img./Abb./Afb./ Rys./Obr. 23
Fig./Img./Abb./Afb./ Rys./Obr. 24
Fig./Img./Abb./Afb./ Rys./Obr. 25
05797_Conga Perfect&Clean Connected Titanium_IM_YV_01220802.indd 12805797_Conga Perfect&Clean Connected Titanium_IM_YV_01220802.indd 128 2/8/22 14:552/8/22 14:55
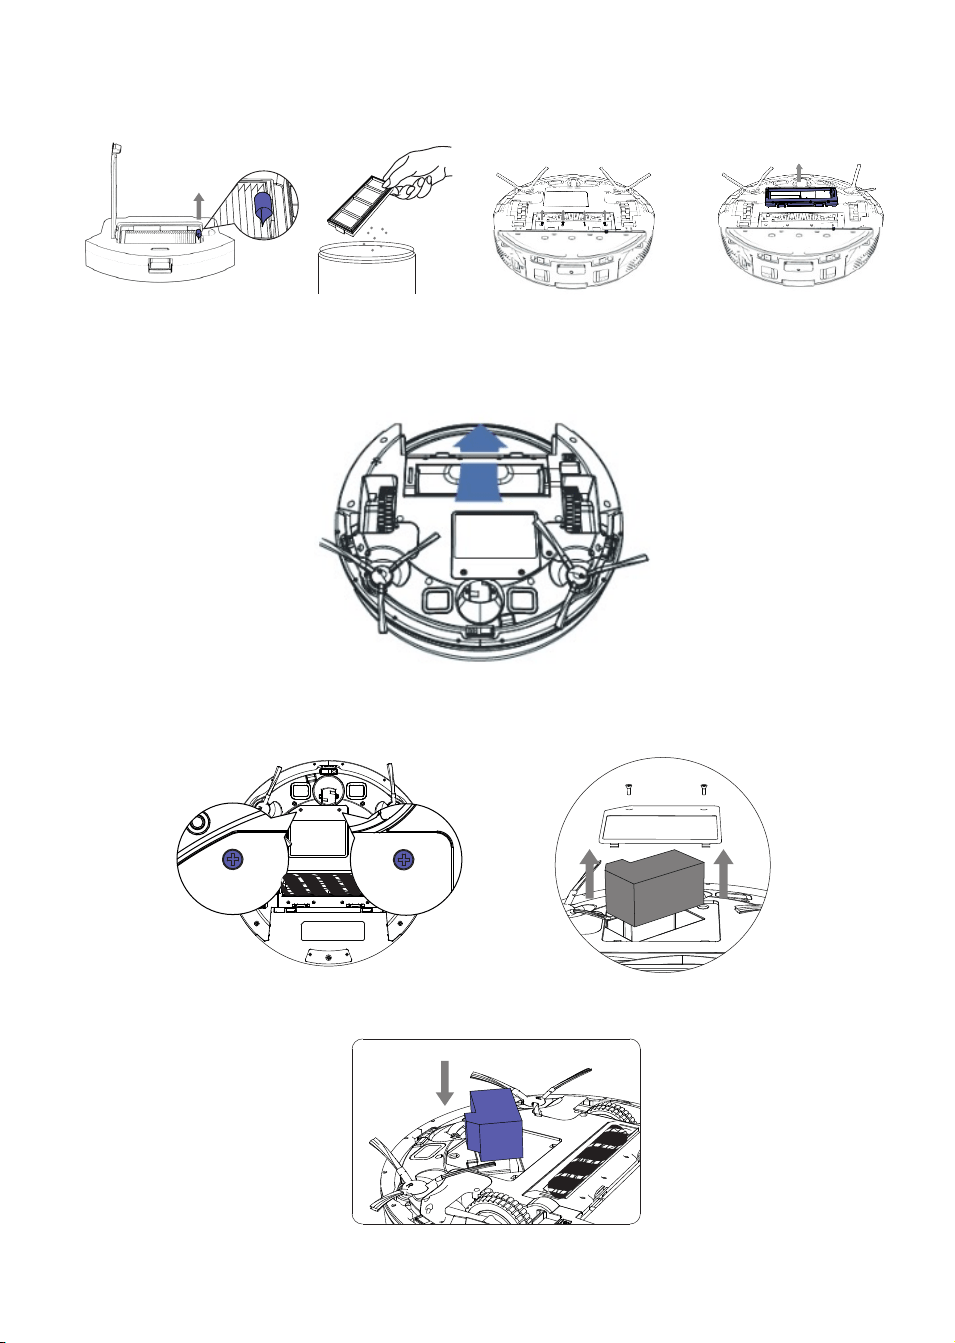
Fig./Img./Abb./Afb./ Rys./Obr. 26
Fig./Img./Abb./Afb./ Rys./Obr. 27
Fig./Img./Abb./Afb./ Rys./Obr. 28
Fig./Img./Abb./Afb./ Rys./Obr. 29
Fig./Img./Abb./Afb./ Rys./Obr. 30
05797_Conga Perfect&Clean Connected Titanium_IM_YV_01220802.indd 12905797_Conga Perfect&Clean Connected Titanium_IM_YV_01220802.indd 129 2/8/22 14:552/8/22 14:55

www.cecotec.es
Cecotec Innovaciones S.L.
C/ de la Pinadeta s/n, 46930
Quart de Poblet, Valencia (Spain)
YV_01220802
05797_Conga Perfect&Clean Connected Titanium_IM_YV_01220802.indd 13205797_Conga Perfect&Clean Connected Titanium_IM_YV_01220802.indd 132 2/8/22 14:552/8/22 14:55