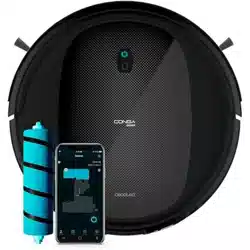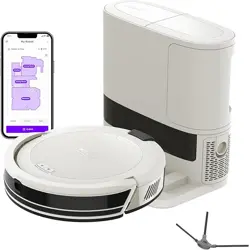
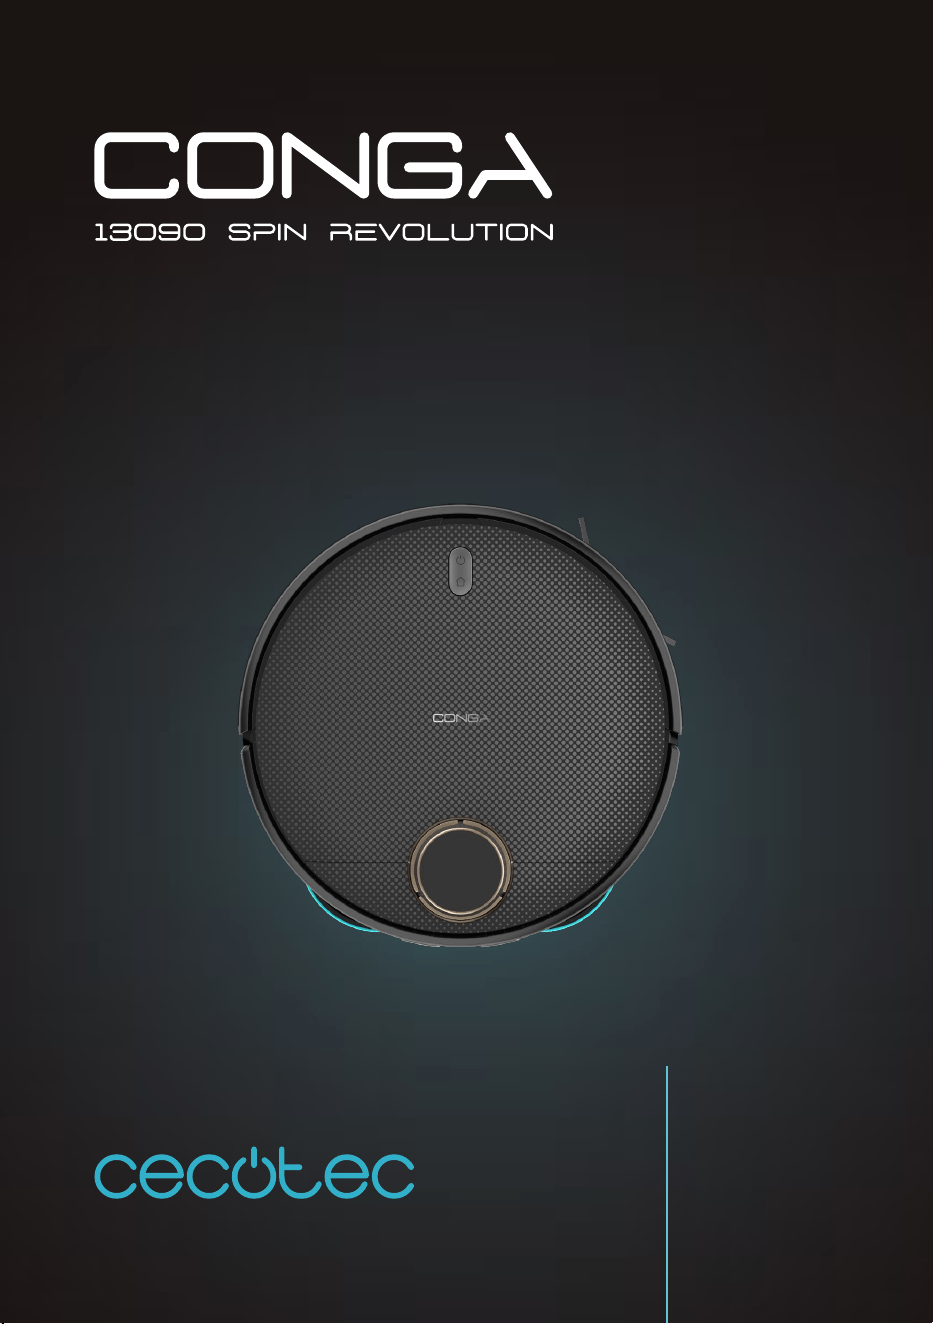
CONGA 13090 SPIN REVOLUTION HOME&WASH
Robot Aspirador/ Vacuum-cleaner robot
Manual de instrucciones
Instruction manual
Manuel d’instructions
Bedienungsanleitung
Manuale di istruzioni
Manual de instruções
Handleiding
Instrukcja obsługi
Návod k použití
Kullanma kılavuzu
Οδηγίες χρήσης
Manual d’instruccions

Instrucciones de seguridad 5
Safety instructions 9
Instructions de sécurité 13
Sicherheitshinweise 18
Istruzioni di sicurezza 23
Instruções de segurança 27
Veiligheidsinstructies 31
Instrukcja bezpieczeństwa 35
Bezpečnostní pokyny 39
Güvenlik talimatları 43
Οδηγίες ασφαλείας 47
Instruccions de seguretat 51
ÍNDICE
1. Piezas y componentes 55
2. Antes de usar 56
3. Funcionamiento 58
4. Limpieza y mantenimiento 62
5. Resolución de problemas 65
6.Especicaciones técnicas 67
7. Reciclaje de aparatos eléctricos
y electrónicos 67
8. Garantía y SAT 68
9. Copyright 68
10. Declaración de conformidad 68
INDEX
1. Parts and components 69
2. Before use 70
3. Operation 72
4. Cleaning and maintenance 76
5. Troubleshooting 78
6.Technical specications 80
7. Disposal of old electrical and
electronic appliances 81
8. Technical support and warranty 81
9. Copyright 81
10. Declaration of conformity 81
SOMMAIRE
1. Pièces et composants 82
2. Avant utilisation 83
3. Fonctionnement 85
4. Nettoyage et entretien 89
5. Résolution de problèmes 92
6.Spécications techniques 94
7. Recyclage des équipements
électriques et électroniques 95
8. Garantie et SAV 95
9. Copyright 95
10. Déclaration de conformité 95
INHALT
1. Teile und Komponenten 96
2. Vor dem Gebrauch 97
3. Bedienung 100
4. Reinigung und Wartung 103
5. Problembehebung 106
6.Technische Spezikationen 109
7. Recycling von Elektro- und
Elektronikgeräten 109
8. Garantie und Kundendienst 109
9. Copyright 110
10. Konformitätserklärung 110
INDICE
1. Parti e componenti 111
2. Prima dell’uso 112
3. Funzionamento 114
4. Pulizia e manutenzione 118
5. Risoluzione dei problemi 120
7. Riciclaggio di apparecchiature
elettriche ed elettroniche 123
8. Garanzia e supporto tecnico 124
9. Copyright 124
10. Dichiarazione di conformità 124
ÍNDICE
1. Peças e componentes 125
2. Antes de usar 126
3. Funcionamento 128
4. Limpeza e manutenção 132
5. Resolução de problemas 134
6. Reciclagem de produtos elétricos
e eletrónicos 137
8. Garantia e SAT 137
9. Copyright 137
10. Declaração de conformidade 137
INHOUD
1. Onderdelen en componenten 138
2. Vóór u het apparaat gebruikt 139
3. Werking 141
4. Schoonmaak en onderhoud 145
5. Probleemoplossing 147
6. Recycling van elektrische en
elektronische apparatuur 150
8. Garantie en technische ondersteuning 151
9. Copyright 151
10. Verklaring van overeenstemming 151
SPIS TREŚCI
1. Części i komponenty 152
2. Przed użyciem 153
3. Funkcjonowanie 155
4. Czyszczenie i konserwacja 159
5. Rozwiązywanie problemów 161
7. Recykling urządzeń elektrycznych
i elektronicznych 164
8. Gwarancja i Serwis Pomocy Technicznej 164
9. Prawa autorskie 164
10. Deklaracja zgodności 164
OBSAH
1. Díly a součásti 165
2. Před použitím 166
3. Provoz 168
4. Čištění a údržba 172
5. Řešení problémů 174
7. Recyklace elektrických a
elektronických zařízení 177
8. Záruka a technický servis 177
9. Copyright 177
10. Prohlášení o shodě 177
İÇINDEKILER
1. Parçalar ve bileşenler 178
2. Kullanmadan önce 179
3. Cihazın kullanımı 181
4. Temizlik ve bakım 184
5. Sorun Giderme 187
7. Elektrikli ve elektronik ekipmanların
geri dönüşümü 190
8. Garanti ve Müşteri hizmetleri 190
9. Telif Hakları 190
10. Uygunluk beyannamesi 190
ΕΥΡΕΤΉΡΙΟ
1. Μέρη και εξαρτήματα 191
2. Πριν από τη χρήση 192
3. Λειτουργία 195
4. Καθαρισμός και συντήρηση 198
5. Επίλυση προβλημάτων 201
6.Τεχνικές προδιαγραφές 203
7. Ανακύκλωση ηλεκτρικού και ηλεκτρονικού
υλικού 204
8. Τεχνική υποστήριξη και εγγύηση 204
9. Copyright 205
10. Δήλωση συμμόρφωσης 205
ÍNDEX
1. Peces i components 206
2. Abans de l’ús 207
3. Funcionament 209
4. Neteja i manteniment 213
5. Resolució de problemes 215
7. Reciclatge d’aparells elèctrics i
electrònics 218
8. Garantia i SAT 218
9. Copyright 218
10. Declaració de conformitat 219
CONGA 13090 SPIN REVOLUTION HOME&WASHCONGA 13090 SPIN REVOLUTION HOME&WASH
6968
ENGLISHESPAÑOL
Para obtener información detallada acerca de la forma más adecuada de desechar sus
aparatos eléctricos y electrónicos y/o las correspondientes baterías, el consumidor deberá
contactar con las autoridades locales.
El cumplimiento de las pautas anterioresayudará a proteger el medio ambiente.
8. GARANTÍA Y SAT
Cecotec responderá ante el usuario o consumidor nal de cualquier falta de conformidad que
exista en el momento de la entrega del producto en los términos, condiciones y plazos que
establece la normativa aplicable.
Se recomienda que las reparaciones se efectúen por personal especializado.
Si detecta una incidencia con el producto o tiene alguna consulta, póngase en contacto con el
Servicio de Asistencia Técnica ocial de Cecotec a través del número de teléfono +34 96 321
07 28.
9. COPYRIGHT
Los derechos de propiedad intelectual sobre los textos de este manual pertenecen a CECOTEC
INNOVACIONES, S.L. Quedan reservados todos los derechos. El contenido de esta publicación no
podrá, ni en parte ni en su totalidad, reproducirse, almacenarse en un sistema de recuperación,
transmitirse o distribuirse por ningún medio (electrónico, mecánico, fotocopia, grabación o
similar) sin la previa autorización de CECOTEC INNOVACIONES, S.L.
10. DECLARACIÓN DE CONFORMIDAD
Por la presente, Cecotec Innovaciones declara que este robot aspirador, modelo A01_
EU01_100828 Conga 13090 Spin Revolution Home&Wash. es conforme con la Directiva
2014/53/EU de equipos radioeléctricos.
El texto completo de la declaración UE de conformidad está disponible en la dirección de
internet siguiente:
www.cecotec.es
1. PARTS AND COMPONENTS
Fig. 1.1:
1. Charging terminals
2. Infrared sensor
3. Laser sensor
4. Top lid
5. Back Home button
6. Indicator lights
7. Power button
8. Infrared sensor
9. Rotating mops
10. Drive wheels
11. Main brush cover
12. Main brush
13. Side brush
14. Omnidirectional wheel
15. Free-fall sensors
16. Battery
Robot vacuum cleaner accessories. Fig. 1.2:
1. Mains cable
2. Side brush
3. Mop (x2)
4. Self-cleaning brush
5. High-eciency lter
6. Self-emptying base bag
7. Instruction manual
8. Brush
Self-cleaning base. Fig. 2:
1. Dirt tank
2. Clean-water tank
3. LED indicator light
4. Washing base
5. Dirt tank cover
6. Waste-water tank
7. Water duct
8. Mop washing system
9. Charging terminals
10. Tank emptying system

CONGA 13090 SPIN REVOLUTION HOME&WASHCONGA 13090 SPIN REVOLUTION HOME&WASH
7170
ENGLISH ENGLISH
11. Tank emptying system
12. Access tray and robot bracket
Mixed tank. Fig. 3:
1. Dirt tank
2. Tank opening
3. Top dirt tank cover
4. High-eciency lter + primary lter + sponge lter
NOTE:
The graphics in this manual are schematic representations and may not exactly match the
device.
2. BEFORE USE
- This robot vacuum cleaner includes a package designed to protect it during transport.
Take the robot vacuum cleaner out of the box. Keep the original box and other elements
in a safe place, as this will help you prevent damage to the robot vacuum cleaner when
transporting it in the future. In case the original packaging is disposed of, make sure all
packaging materials are recycled accordingly.
- Make sure all parts and components are included and in good conditions. If there is any
piece missing or not in good condition, contact the ocial Cecotec Technical Support
Service immediately.
Warnings
- Remove all objects around the robot vacuum cleaner such as clothing, papers, cables,
curtains, or other fragile objects which may block or slow down the operation of the robot
vacuum cleaner. Fig. 4
- If the room to be cleaned is near a balcony or stairs, a physical barrier should be placed to
prevent the robot vacuum cleaner from falling and getting damaged, thus ensuring safe
operation. Fig. 5.
- Do not use the robot vacuum cleaner to vacuum up liquids. Fig. 6.
- Direct exposure to sunlight or heavy light contrasts may aect the correct operation of the
sensors. If this happens, the robot vacuum cleaner will cease operation. Move it to a new
location for it to start operating again.
- Please note that the total height of the robot vacuum cleaner is 10 cm, and the sensors
are at the bottom, so it is advisable to prevent access to all areas below 10 cm to avoid
damaging the laser.
Charging base installation
- Place the charging base against a wall and leave a minimum free space of 1.5 metres to the
front and 0.5 metres to each side. Fig. 7
- Connect the charging base to a power socket. Wind and store the remaining cable to
prevent accidents.
- Press and hold the Start/Pause button for a few seconds.
- When the indicator light turns on, place the robot vacuum cleaner in the charging base and
make sure the charging terminals on the robot match those on the charging base. If the
indicator light is ashing blue, it means the battery is not completely charged. To ensure
the maximum cleaning time, wait until the indicator light turns into steady blue, as this
indicates that the battery is fully charged, and that the robot vacuum cleaner is ready to
clean.
Note
- Take the robot vacuum cleaner to the charging base if the battery is low. The robot vacuum
cleaner may not turn on if battery is too low.
- The robot vacuum cleaner will automatically turn on when placed on the charging base.
- The robot vacuum cleaner cannot be turned o during recharge.
Clean water tank installation Fig. 8
- Pull out the clean-water tank (tank with transparent cover) in the direction shown.
- Lift up the cover and ll the water tank with clean water. Do not exceed the “MAX” mark
on the tank.
- Install again the clean-water tank in its original position.
Recommendations
- Add a few drops of cleaning agent to the water, if necessary, as long as it is non-corrosive.
- Using cleaning agents in excess might block water outlets.
- In order to get perfect scrubbing, it is suggested to moisten the mop before using it and
washing it after each use.
First use
- Once the robot vacuum cleaner and the charging base are installed, follow these steps
before the rst cleaning.
- First of all, fully charge the robot vacuum cleaner. It is suggested to allow the robot to
charge overnight. Once fully charged, it may carry out the rst cleaning cycle and save
the rst map. To do so, activate the Auto mode and select the Eco suction level. It is very
important to follow these instructions so that the robot vacuum cleaner recognises every
corner of your house and can carry out a complete mapping of it.
- If your house is very large and the robot vacuum cleaner runs out of battery, it will return
to the charging base, save both complete and incomplete maps, and, once charged, it will

CONGA 13090 SPIN REVOLUTION HOME&WASHCONGA 13090 SPIN REVOLUTION HOME&WASH
7372
ENGLISH ENGLISH
resume cleaning where it left o until the entire surface has been mapped. The robot
vacuum cleaner is constantly mapping, so it adapts in an individual and personalised way
to the particularities of each home and constantly improves its map.
- The robot will return to the charging base to clean the mops and moisten them again to
continue cleaning, according to the frequency selected in the application.
Information about the charging base
- The charging base includes the charging function, mop cleaning and dirt tank emptying.
After cleaning, the robot will automatically return to the charging base to recharge the
battery, empty the dirt tank, clean and dry the mops.
- During cleaning, the robot will return to the charging base to clean the mops and moisten
them again to continue cleaning where it left o, depending on the frequency selected in
the app.
- The base will perform the self-emptying function according to the emptying frequency
value selected on the app.
- In addition, it is possible to force the emptying of the dirt tank from the robot vacuum
cleaner by pressing the Back Home button or from the app.
- When the robot vacuum cleaner reaches the charging base it will beep once, indicating that
it has made good contact with the charging terminals of the base.
- The base will then clean the mops and collect the dirty water generated. After cleaning and
dirty water collection, the base will activate the mop drying function.
- If the indicator light on the charging base is red, it may indicate that the dirt bag is not
attached or is full, the clean-water tank is empty or the dirty water tank is full.
- If so, t or replace the bag, ll the clean-water tank or empty the dirty water tank.
3. OPERATION
Robot vacuum cleaner’s buttons
Auto Mode
- Press the Start/Pause button on the robot vacuum cleaner or from the app for the robot
to automatically start cleaning in Edge mode and perform a cleaning cycle in an orderly
zig-zag pattern, while recognising which areas it has cleaned and which it hasn’t. The
robot vacuum cleaner will automatically plan the cleaning route during cleaning.
- The robot will return to the charging base to clean the mops and moisten them again to
continue cleaning, according to the frequency selected in the application.
- If you control the robot vacuum cleaner manually during this mode, the robot will
recalculate the route, so it may pass through already cleaned areas. To ensure ecient
cleaning, do not operate the robot vacuum cleaner manually during automatic cleaning.
- Thanks to its Total Surface 2.0 technology, if the battery is low during the cleaning cycle,
the robot vacuum cleaner will smartly return to the charging base automatically and once
fully charged, it will resume the cleaning process from the same point.
- During cleaning, the robot vacuum cleaner will stop briey to evaluate the area and
calculate the cleaning route (this stop will vary depending on the house conditions).
Back Home mode
- Press the Back Home button on the robot vacuum cleaner or from the app to send the robot
vacuum cleaner to the charging base.
- This mode can be activated during any cleaning cycle.
- The robot vacuum cleaner will take the shortest route back to the charging base thanks to
its map-memorisation feature and the smart back-home function.
- Upon completing a cleaning cycle or when the battery is low, thanks to its TotalSurface
2.0 technology, the robot vacuum cleaner will automatically return to the charging base to
avoid running out of battery. Once the robot has recharged, it will resume cleaning from
the point it has stopped.
Note:
If there is no good access to the charging base, the robot vacuum cleaner will not be able to
return to it. If this happens, manually place it in the self-emptying base.
Functions
Pause
While the robot vacuum cleaner is operating, press the Start/Pause button on the robot
vacuum cleaner or select it in the app to pause the cleaning process. Press the Start/Pause
button on the robot vacuum cleaner or on the app to resume the cleaning process.
Standby
The robot vacuum cleaner will automatically enter standby mode after 10 minutes of inactivity.
Press the Start/Pause button on the robot vacuum cleaner or in the app to activate it again.
Cleaning modes
- The robot vacuum cleaner includes dierent modes and functions that can be toggled
from the app.
- In addition, in every one of the cleaning modes on the app, you will be able to select the
Turbo mode on carpets, which activates the maximum suction power when the robot
vacuum cleaner detects a carpet.
- Please note that the robot will stop the rotary movement of the mops when it detects
the carpet, but if the mops are wet it may dampen the carpet. To avoid this, from the
application you can indicate restricted areas in the areas where the carpets are in your
home, or directly from the application indicate that the robot does not climb on the carpet
when it detects it.

CONGA 13090 SPIN REVOLUTION HOME&WASHCONGA 13090 SPIN REVOLUTION HOME&WASH
7574
ENGLISH ENGLISH
Edge mode
- When this mode is selected, the robot vacuum cleaner will clean along walls and around
furniture (e.g., table or chair legs).
- The robot will return to the charging base to clean the mops and moisten them again to
continue cleaning, according to the frequency selected in the application.
- Press the edge cleaning mode in the app.
Spiral mode
- When this mode is enabled, the robot vacuum cleaner will thoroughly clean a specic area.
It will start cleaning at a specic spot and will move outwards in a spiral motion, and it will
return to the starting spot in an inwards spiral motion again.
- When it nishes and returns to the starting spot, the robot vacuum cleaner will return to
the charging base directly.
- Before using this mode, place it in the spot you wish to clean.
- Select the spiral cleaning mode on the app.
Manual mode
The robot vacuum cleaner can be moved manually by selecting manual mode in the app and
using the arrow keys.
Back Home mode
Press the Back Home button on the robot vacuum cleaner or select the option in the app to
send the robot vacuum cleaner to the charging base in any cleaning mode.
Smart Area mode
- Once the home’s map has been saved, select this mode for the robot to clean a specic area
in zigzag motion. The robot vacuum cleaner will clean the selected area and then return
directly to the charging base. You can select more than one area on the map at a time. The
robot vacuum cleaner will only clean the area selected on the map. It will therefore go to
the selected area and return to the base without vacuuming.
- To activate this mode, select the Smart Area option on the app.
Spot mode
- Select this mode if you want to thoroughly clean a specic point in the map, making the
most of the robot vacuum cleaner’s maximum power. The robot vacuum cleaner will clean
an area of 1.6m x 1.6m in a zigzag pattern and return directly to the charging base once
nished. The robot vacuum cleaner will only clean the area selected on the map. It will
therefore go to the selected area and return to the base without vacuuming.
- To activate this mode, select the spot cleaning option on the app.
Restricted Area mode
Mark out specic areas on the map that you do not want the robot vacuum cleaner to clean.
The robot vacuum cleaner will detect the dened area and will not clean it.
You can select more than one restricted area on the map.
Complete cleaning mode
Select this mode to perform a deep cleaning of your house.The robot vacuum cleaner will
clean in Edge mode and continue zigzagging horizontally and vertically. It will then return to
the charging base.
To activate this mode, select the Complete Cleaning option on the app.
Power level function
Select the power level on the app to control the robot vacuum cleaner’s suction power during
cleaning. There are four suction power levels: 3: O, Eco, Normal and Turbo.
Cleaning schedule
- To make cleaning easier, the robot vacuum cleaner has a function that allows it to be
programmed daily from the app. According to the setting, the robot vacuum cleaner will
automatically start cleaning in the selected days at the desired time.
- Before adjusting the time and settings, make sure the robot vacuum cleaner is switched
on.
- In addition, you can select dierent predened cleaning programmes for dierent
situations in your daily life.
Other Functions
Sleep mode
A Do Not Disturb time slot can be selected to control the operation of the robot vacuum cleaner,
and it can be modied or cancelled from the app. During the set time, the robot vacuum cleaner
will disable the automatic, continuous cleaning and timer functions.
Map editing function
This function allows you to edit the generated maps: rename cleaning areas, split or combine
areas, and edit cleaning mode, mark restricted areas and select dierent suction powers.
Robot vacuum cleaner’s Location function
Allows to locate the robot vacuum cleaner on the map.

CONGA 13090 SPIN REVOLUTION HOME&WASHCONGA 13090 SPIN REVOLUTION HOME&WASH
7776
ENGLISH ENGLISH
4. CLEANING AND MAINTENANCE
Cleaning the main brush. Fig. 9
The main brush spins at top speed and helps pushing the dirt into the suction mouth. This
brush is in contact with the oor, and therefore with dirt, so it can wear out overtime, aecting
negatively to the cleaning eciency. For this reason, it is suggested to replace the main brush
after a maximum of 320 hours or less.
1. Slightly press the main brush frame’s tabs to open the main brush compartment and
remove it.
2. Remove hair, lint, and other dirt trapped in the brush and around the shafts with the help
of the self-cleaning brush.
3. Clear and clean the robot vacuum cleaner’s suction channel.
4. Reinstall the main brush and its frame.
Recommendation
It is recommended to clean the main brush once a week with the help of the self-cleaning
brush.
Side brush. Fig. 10
The side brush is designed with many bristles and used both to push dirt into the suction
mouth and thoroughly clean edges and corners. This brush may wear out overtime, which will
negatively aect cleaning eciency.
Recommendations
It is recommended to clean the side brush once a week with the help of the self-cleaning brush.
Remove the retaining screw of the side brush with a screwdriver and clean the brush regularly.
After cleaning, reinstall the side brush using the screwdriver.
Recommendation
To ensure perfect cleaning, it is recommended to change the side brush every 3 months
(depending on frequency and type of use).
Dirt tank. Fig. 11.
1. Lift the top cover of your robot.
2. Press the tank removal button and remove the tank.
3. Use the self-cleaning brush to clean the inside of the mixed tank.
4. You can clean the dirt tank with water, without immersing the tank.
5. Reinstall the dusk tank on the robot vacuum cleaner.
Filters.
High-eciency lter
- The high-eciency lter is designed with bres that help trap dust particles, dust mites,
pollen, etc. It is very important to periodically clean the lter, to prevent these particles
from building up in the lter, causing eciency loss. It is convenient to carry out this
maintenance once a week.
- Replace the high eciency lter every 3 months, depending on the frequency and type of
use.
Recommendation
You can remove dirt from the high-eciency lter with a small brush or gently shake the lter
on a hard surface to remove the dust. The high-eciency lter cannot be washed.
Primary mesh lter and sponge lter
The ltering system is featured with a primary mesh lter and a sponge lter, located next to
the high-eciency lter. It is suggested to replace them either after a maximum of 160 hours
of use or when they are worn out due to operation.
Recommendation
Dirt can be removed with a small brush or by shaking carefully against a hard surface for dust
to fall o. You can also use warm water without detergents to obtain better results. Always
make sure they are completely dry before installing them again; otherwise, moisture can reach
the robot vacuum cleaner’s motor and damage it.
Sensor cleaning. Fig. 12:
- The robot vacuum cleaner has dierent types of sensors, for example, proximity sensors
that allow the robot to move around while detecting obstacles, or fall-detection sensors
that help the robot detect slopes or possible gaps/unevenness such as staircases. These
sensors are always in contact with dust particles, and therefore can deteriorate over time,
causing possible navigation errors.
- Use a clean, dry, and soft cloth to wipe o any dust from the free-fall sensor located on the
robot vacuum cleaner part.
- It is recommended to clean all sensors of the robot vacuum cleaner every 35 hours of use
or less, using a soft, dry cloth.
Mop holder. Fig. 13:
- The mop holder is attached to the robot with magnets. It is important to keep these clean
to ensure good contact.
- For cleaning, remove the mop holders and wipe the magnets with a soft, dry, clean cloth.
- Replace the holders.
Charging base. Fig. 14:
- Clean the dirty water tank and the dierent cleaning areas of your charger base by
removing these parts as indicated by the direction arrows.
CONGA 13090 SPIN REVOLUTION HOME&WASHCONGA 13090 SPIN REVOLUTION HOME&WASH
7978
ENGLISH ENGLISH
- In addition, the charging base has two charging terminals that can be dusty and dirty. Wipe
them with a clean, soft, dry cloth.
Charging and replacing the battery
- To extend battery life, leave the robot vacuum cleaner charging on the self-emptying base
whenever not in use.
- Remove the battery and store it in a safe, dry place if the robot vacuum cleaner will not be
used for a long period of time.
1. To replace the battery, follow the instructions below:
2. Unscrew the screws on the bottom battery cover, remove the cover and remove the
battery.
3. Insert the new battery.
4. Replace the battery and the lower casing and refasten the screws.
5. TROUBLESHOOTING
Robot vacuum cleaner
Problem Possible cause and solution
The robot vacuum cleaner does
not switch on or does not clean
The robot vacuum cleaner does not work when battery
is low. Charge it before operation.
The room temperature is below 0 °C or above 40 °C.
The robot vacuum cleaner isn’t
charging or returning to the self-
emptying base
There are too many obstacles near the self-emptying
base. Relocate the base to an obstacle-free area.
Clean the charging terminals of the robot vacuum
cleaner and the self-emptying base.
Make sure the robot vacuum cleaner is switched on.
The robot vacuum cleaner is too far away from the
self-emptying base. Place it closer and try again.
The robot vacuum cleaner does
not work properly
Turn o the robot vacuum cleaner and turn it on again.
Reset the robot vacuum cleaner by pressing the side
Reset button.
The robot vacuum cleaner
makes a strange noise during
operation
The main brush, side brush, or omnidirectional wheel
are blocked or tangled. Stop the robot vacuum cleaner
and clean them.
The robot vacuum cleaner does
not clean eciently or doesn’t
pick up all the dirt
The high-eciency lter is blocked. Clean it.
The main brush is blocked or tangled. Clean it.
The dirt tank is full, empty it.
The robot vacuum cleaner could
not connect to the Wi-Fi network
Bad Wi-Fi signal. Check that the robot vacuum cleaner
is located in an area with good Wi-Fi signal.
The Wi-Fi connection is unstable. Reset the router,
check if there are any App updates, and try again. This
robot vacuum cleaner only supports the 2.4 GHz band.
Make sure that your smartphone mobile data are
disabled to improve the pairing process.
The robot vacuum cleaner did
not carry out the scheduled
cleaning task
Check if the robot vacuum cleaner is in Sleep mode
and change mode. This option can be found on the
general settings of the robot vacuum cleaner and
allows you to dene time slots in which the robot will
not perform the scheduled cleaning tasks when in
Sleep mode.
Make sure the robot vacuum cleaner is plugged to the
mains, that it will not be able to carry out scheduled
cleanings oine, and that the battery is not low.
The robot vacuum cleaner does
not return to the self-emptying
base after nishing Spot
cleaning or changing the starting
position
The robot vacuum cleaner will map and calculate a
new route after running in Spot cleaning mode or after
changing its starting position.
If the self-emptying base is too far away from the
robot vacuum cleaner, the latter won’t be able to
return to the base. Manually move the robot vacuum
cleaner close to the base.
CONGA 13090 SPIN REVOLUTION HOME&WASHCONGA 13090 SPIN REVOLUTION HOME&WASH
8180
ENGLISH ENGLISH
The robot vacuum cleaner does
not resume cleaning
Make sure the robot vacuum cleaner is not in Sleep
mode, as it will not resume cleaning in this mode.
When manually placed in the self-emptying base, the
robot will not resume cleaning.
The robot vacuum cleaner is
always oine
Make sure the robot vacuum cleaner is successfully
connected to a 2.4 GHz network and always in areas
with good Wi-Fi signal.
The connection between the
smartphone and the robot
vacuum cleaner failed
Make sure the robot vacuum cleaner and the charging
base are in an area with good Wi-Fi signal, reset the
router, and retry connection.
Self-cleaning base
Problem Possible cause and solution
The self-cleaning base does not
clean the mops
There is not enough water in the clean-water
tank. Fill it in.
The waste-water tank is full. Empty and clean it.
Also, clean the openings of the waste water lter.
6. TECHNICAL SPECIFICATIONS
Product: Conga 13090 Spin Revolution Home&Wash
Product reference: EU01_100828
Voltage: 20 V DC 1.5 A
Rechargeable Li-ion battery
Rated capacity: 14.8 V ⎓ 3200 mAh
Wi-Fi connection: Wi-Fi IEEE 802.11 b/g/n 2.4 GHz
Maximum Transmission Power: 20 dBm
Product: Self-emptying base
Input: 220-240 V ~ 50/60 Hz
Output: 20 V ⎓ 1.8 A
Power: 650 W
Technical specications may change without prior notication to improve product quality
Made in China | Designed in Spain
7. DISPOSAL OF OLD ELECTRICAL AND ELECTRONIC APPLIANCES
This symbol indicates that, according to the applicable regulations, the product
and/or batteries must be disposed of separately from household waste.
When this product reaches the end of its shelf life, you should dispose of the
batteries/accumulators and take them to a collection point designated by the
local authorities.
Consumers must contact their local authorities or retailer for information
concerning the correct disposal of old appliances and/or their batteries.
Compliance with the above guidelines will help protecting the environment.
8. TECHNICAL SUPPORT AND WARRANTY
Cecotec shall be liable to the end user or consumer for any lack of conformity that exists at the
time of delivery of the product under the terms, conditions, and deadlines established by the
applicable regulations.
It is recommended that repairs be carried out by qualied personnel.
If at any moment you detect any problem with your product or have any doubt, do not hesitate
to contact the ocial Cecotec Technical Support Service at +34 963 210 728.
9. COPYRIGHT
The intellectual property rights over the texts in this manual belong to CECOTEC INNOVACIONES,
S.L. All rights reserved. The contents of this publication may not, in whole or in part, be
reproduced, stored in a retrieval system, transmitted, or distributed by any means (electronic,
mechanical, photocopying, recording or similar) without the prior authorization of CECOTEC
INNOVACIONES, S.L.
10. DECLARATION OF CONFORMITY
Cecotec Innovaciones hereby declares that this robot vacuum cleaner, model EU01_100828
Conga 13090 Spin Revolution Home&Wash is in conformity with the Radio Equipment Directive
2014/53/EU.
The full text of the EU Declaration of Conformity can be found on the following website:
www.cecotec.es
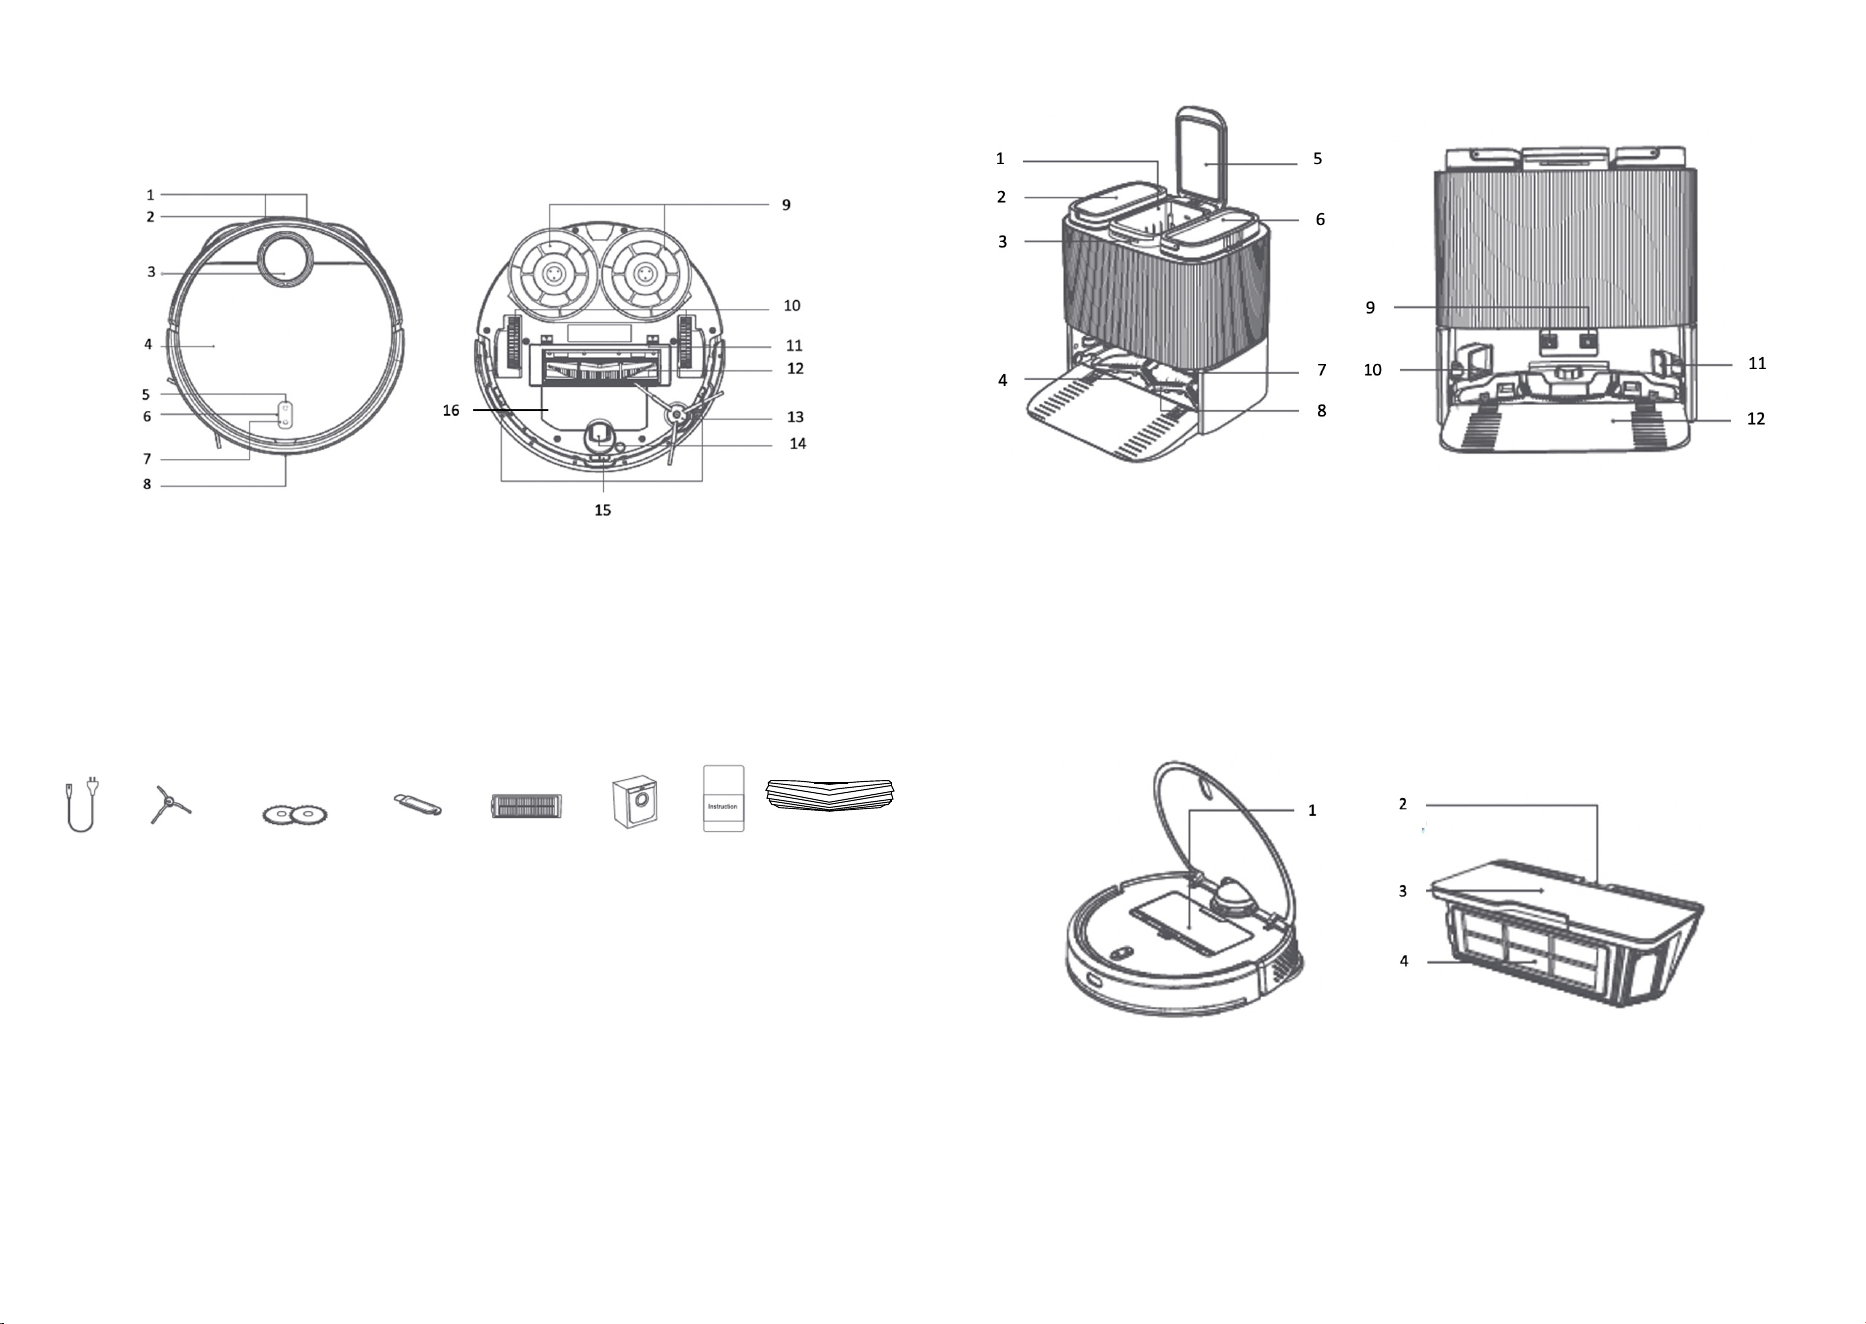
Fig./Img./Abb./Afb./ Rys. 1
Fig./Img./Abb./Afb./ Rys. 1.2
Fig./Img./Abb./Afb./ Rys. 2
Fig./Img./Abb./Afb./ Rys. 3
1 2 3 4 5 6
7
8
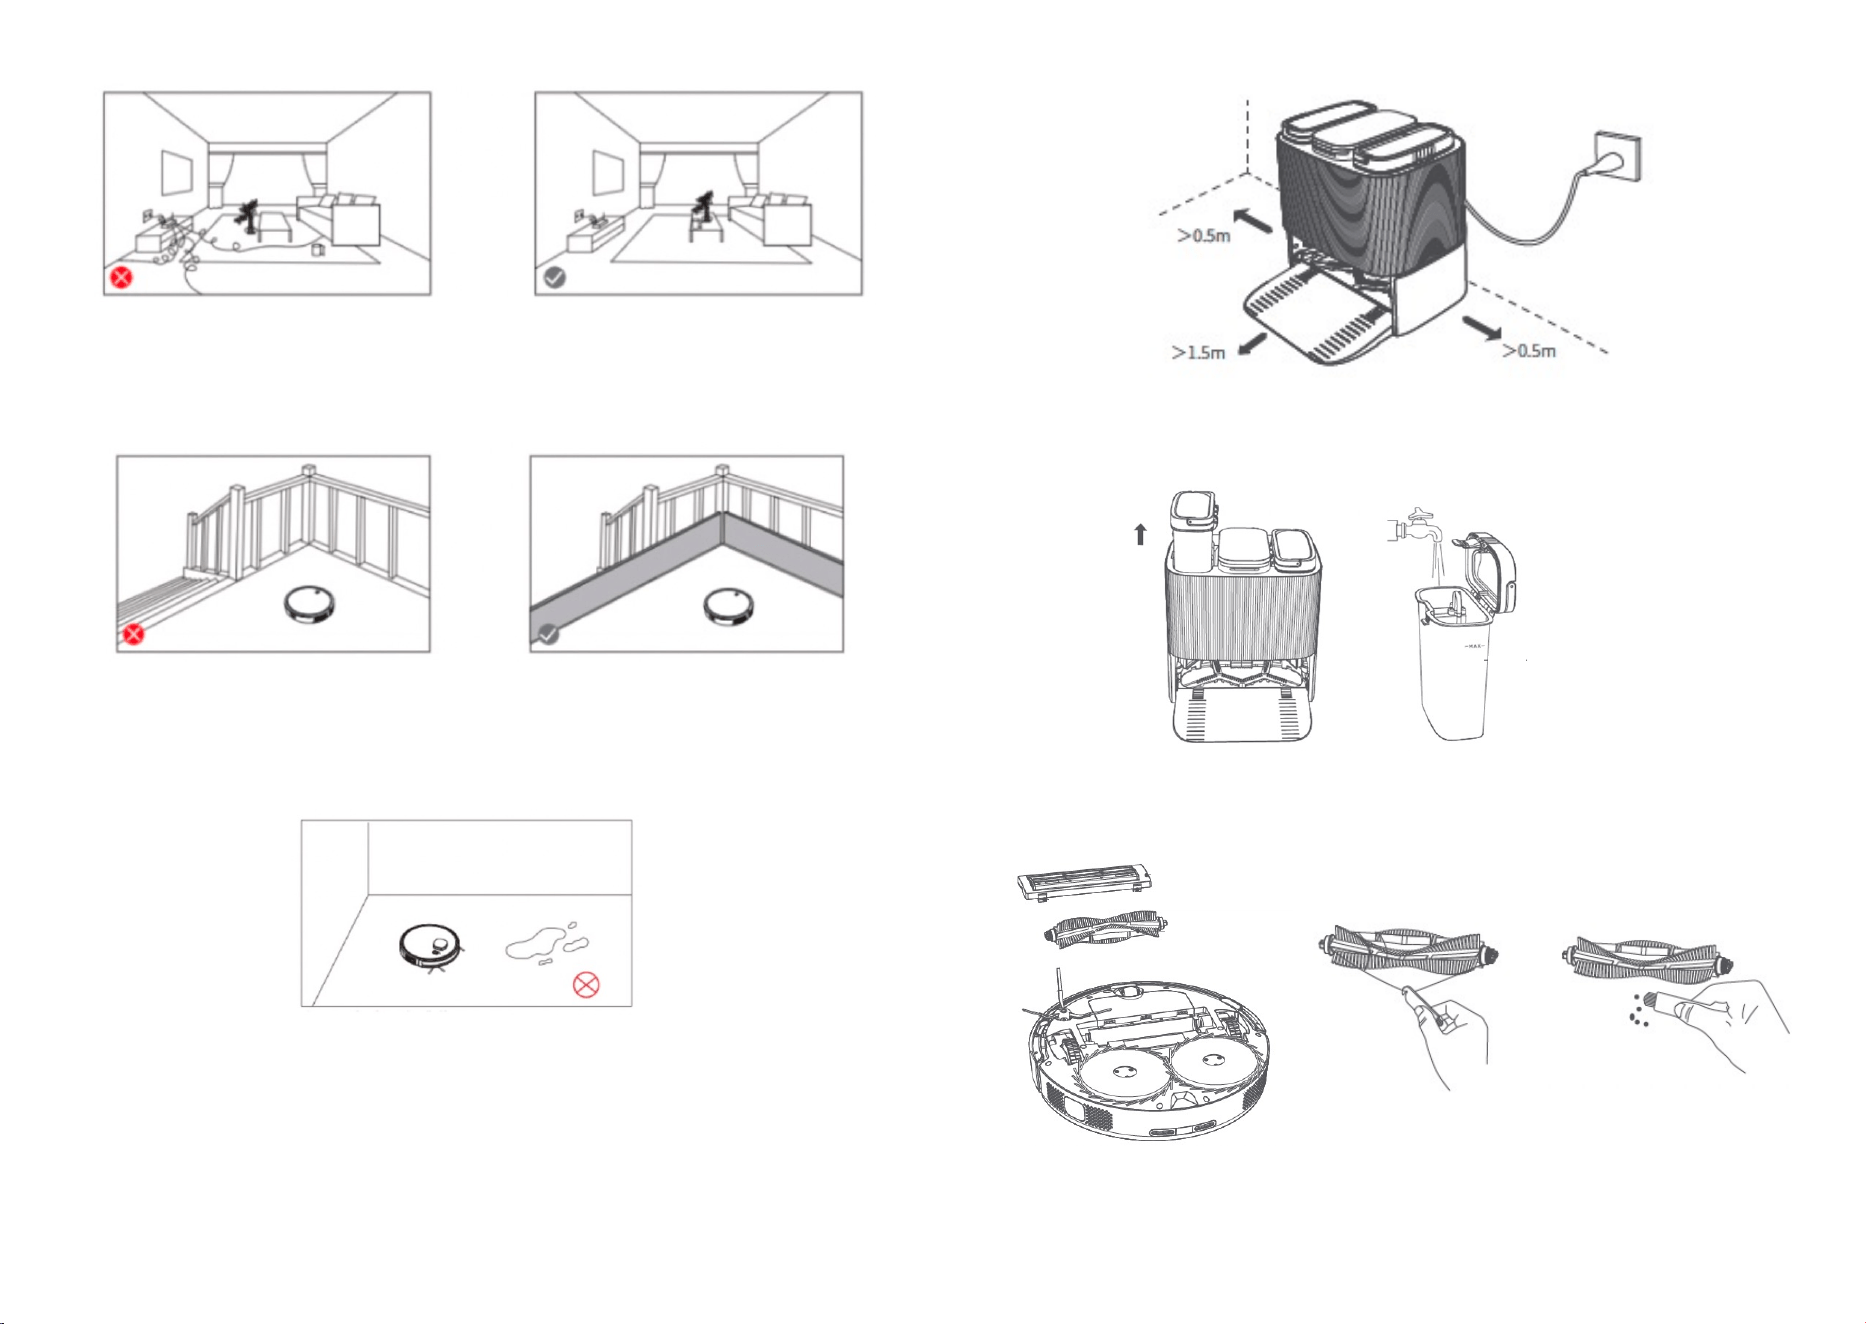
Fig./Img./Abb./Afb./ Rys. 4
Fig./Img./Abb./Afb./ Rys. 5
Fig./Img./Abb./Afb./ Rys. 6
Fig./Img./Abb./Afb./ Rys. 7
Fig./Img./Abb./Afb./ Rys. 8
Fig./Img./Abb./Afb./ Rys. 9
Fig./Img./Abb./Afb./ Rys. 10
Fig./Img./Abb./Afb./ Rys.11
Fig./Img./Abb./Afb./ Rys. 12
Fig./Img./Abb./Afb./ Rys. 13
Fig./Img./Abb./Afb./ Rys. 14

Cecotec Innovaciones S. L.
Av. Reyes Católicos, 60
46910, Alfafar (Valencia), Spain
www.cecotec.es