www.klarstein.com
ICEFESTIVAL
BULLET
Eiswürfelmaschine
Ice Cube Maker
Máquina de hielo
Machine à glaçons
Macchina per cubetti di ghiaccio
10046440


3
DE
INHALT
Sehr geehrte Kundin, sehr geehrter Kunde,
wir gratulieren Ihnen zum Erwerb Ihres Gerätes. Bitte
lesen Sie die folgende Anleitung sorgfältig durch und
befolgen Sie sie, um mögliche Schäden zu vermeiden.
Für Schäden, die durch Nichtbeachtung der Anleitung
und unsachgemäßen Gebrauch entstehen, übernehmen
wir keine Haftung. Scannen Sie den QR-Code, um Zugriff
auf die aktuellste Bedienungsanleitung und weitere
Informationen rund um das Produkt zu erhalten.
TECHNISCHE DATEN
Artikelnummer 10046440
Tägliche Eiswürfelproduk-
tion
15 kg/24 h
Aufbewahrungskapazität
für Eiswürfel
1 kg
Kapazität des Wasserbe-
hälters
1,8 L
Kältemittel R290
Eiswürfelform Bullet
Maße 310*400*420 mm
Sicherheitshinweise 4
Produktbeschreibung 6
Bedienfeld und Bedienung 7
Bedienungsanleitung 8
Reinigung und Pege 10
Fehlersuche und Fehlerbehebung 11
Hinweise zur Entsorgung 12
Hersteller & Importeur (UK) 12

4
DE
SICHERHEITSHINWEISE
Um Unfälle zu vermeiden, beachten Sie bitte die folgenden Bedienungshinweise:
• Trennen Sie das Gerät vor Wartungsarbeiten von der Stromversorgung.
• Ziehen Sie nicht direkt am Kabel, wenn Sie das Gerät einstecken oder
ausstecken.
• Wenn das Eis ungewöhnlich ist, wenden Sie sich bitte an den Verkäufer.
• Es ist normal, dass die Oberäche des Kompressors und Kondensators
während des Betriebs Temperaturen zwischen 70 °C und 90 °C erreichen und
die umliegenden Bereiche heiß werden können. Bitte fassen Sie diese nicht
an.
• Aufgrund des schnellen Gefrierens können die Eiswürfel "trüb" erscheinen.
Dabei handelt es sich um eingeschlossene Luft im Wasser, die weder die
Qualität noch den Geschmack des Eises beeinträchtigt.
• Bei Nichtgebrauch, öffnen Sie die Schublade bitte mindestens 2 cm, damit Luft
zirkulieren kann und die Metallteile nicht rosten.
• Dieses Gerät kann von Kindern ab 8 Jahren und Personen mit eingeschränkten
körperlichen, sensorischen oder geistigen Fähigkeiten oder mangelnder
Erfahrung und Kenntnis benutzt werden, wenn sie dabei beaufsichtigt oder
in die sichere Benutzung des Geräts eingewiesen werden und die damit
verbundenen Gefahren verstehen.
• Kinder dürfen mit dem Gerät nicht spielen.
• Die Reinigung und Benutzerwartung darf nicht von Kindern ohne Aufsicht
durchgeführt werden.
• Wenn das Netzkabel beschädigt ist, muss es vom Hersteller, einer
Fachwerkstatt oder ausgebildetem Fachpersonal ersetzt werden, um eine
Gefährdung zu vermeiden.
• Bitte beachten Sie die örtlichen Vorschriften zur Entsorgung des Geräts wegen
der brennbaren Treibmittel. Bevor Sie das Gerät ausrangieren, nehmen Sie
bitte die Türen ab, um ein Einschließen von Kindern zu vermeiden.
• Dieses Gerät ist für die Verwendung in Haushalten und ähnlichen
Anwendungen vorgesehen, wie z. B.:
– Küchenbereiche für Personal in Geschäften, Büros und anderen
Arbeitsumgebungen;
– von Kunden in Hotels, Motels und anderen Wohnumgebungen;
– Umgebungen wie Bed & Breakfasts;
– Catering und ähnliche nicht-einzelhandelsbezogene Bereiche.
• Lagern Sie in diesem Gerät keine explosiven Stoffe wie Spraydosen mit einem
brennbaren Treibmittel.
• Kinder im Alter von 3 bis 8 Jahren dürfen Kühlgeräte ein- und ausladen.
• Längeres Öffnen der Tür kann zu einem erheblichen Temperaturanstieg in
den Fächern des Geräts führen.
• Reinigen Sie die mit Lebensmitteln in Berührung kommenden Flächen und die
zugänglichen Abusssysteme regelmäßig.
• Reinigen Sie die Wassertanks, wenn sie 48 Stunden lang nicht benutzt worden
sind.
• Wenn das Kühlgerät längere Zeit nicht benutzt wird, schalten Sie es aus,

5
DE
tauen Sie es ab, reinigen Sie es, trocknen Sie es und lassen Sie die Tür offen,
um Schimmelbildung im Gerät zu vermeiden.
• Achten Sie beim Aufstellen des Geräts darauf, dass das Netzkabel nicht
eingeklemmt oder beschädigt wird.
• Bringen Sie keine Mehrfachsteckdosen oder tragbare Netzteile an der
Rückseite des Geräts an.
• Nur mit Trinkwasser befüllen oder an die Trinkwasserversorgung anschließen.
• Halten Sie die Lüftungsöffnungen im Gerätegehäuse oder in der
Einbaustruktur frei von Hindernissen.
• Verwenden Sie keine anderen als die vom Hersteller empfohlenen Mittel zur
Beschleunigung des Abtauvorgangs oder zur Reinigung.
• Der Kältemittelkreislauf darf nicht beschädigt werden.
• Verwenden Sie keine elektrischen Geräte in den
Lebensmittelaufbewahrungsfächern des Geräts, es sei denn, es handelt sich
um den vom Hersteller empfohlenen Typ.
• Brandgefahr/brennbare Materialien: Achten Sie darauf, dass kein Brand durch
Entzündung brennbarer Materialien entsteht.
• Verwenden Sie die neuen Schläuche, die mit dem Gerät geliefert wurden, und
verwenden Sie alte Schläuche nicht wieder.
6
DE
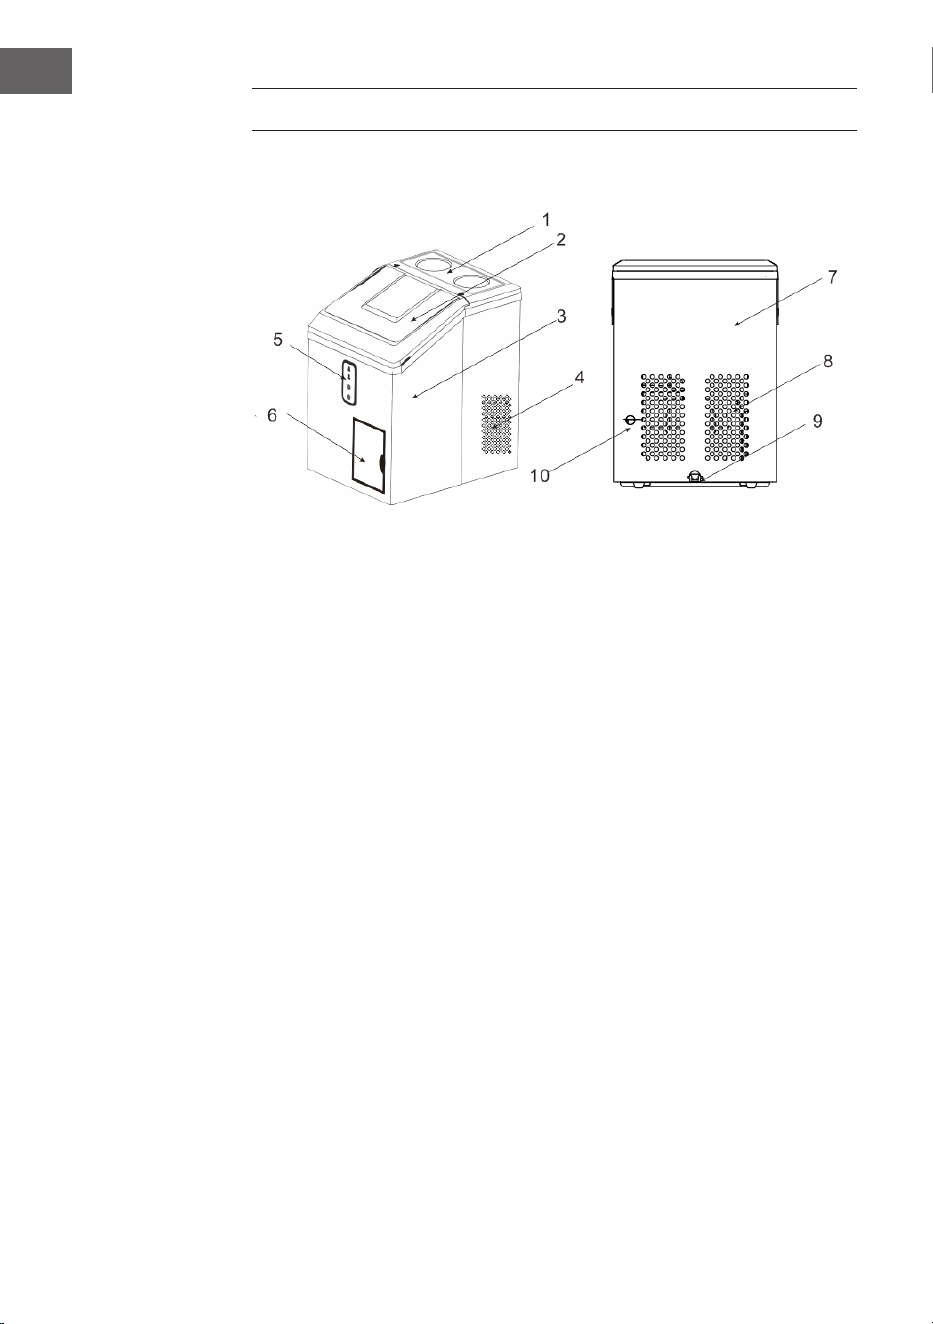
PRODUKTBESCHREIBUNG
1 Vorderer Deckel oben
2 Halbtransparenten Sichtfenster
3 Vordere Abdeckung
4 Ventilatorabdeckung
5 Bedienfeld
6 Tür für geraspeltes Eis
7 Hintere Abdeckung
8 Kühlöffnung in der hinteren
Abdeckung
9 Netzkabel und Stecker
10 Wasserzulauf vom Wasserhahn

7
DE
Vor/während der ersten Nutzung Ihres Eiswürfelbereiters
• Während des Transports sollte der Neigungswinkel des Gehäuses nicht mehr
als 45° betragen. Stellen Sie den Eiswürfelbereiter nicht auf den Kopf. Dies
könnte den Kompressor und das geschlossene System beschädigen.
• Entfernen Sie das gesamte Verpackungsmaterial und überprüfen Sie die
Eiswürfelmaschine sorgfältig, um sicherzustellen, dass sie sich in einem guten
Zustand bendet und dass das Eismodul oder das Netzkabel und der Stecker
nicht beschädigt sind.
• Der Eisbereiter sollte waagerecht auf einer ebenen Fläche aufgestellt werden.
Oben, hinten und an den Seiten sind 150 mm Platz erforderlich, um eine gute
Belüftung der Eiswürfelmaschine zu gewährleisten. Stellen Sie den Eisbereiter
nicht in der Nähe eines Ofen, Heizkörpers oder einer anderen Wärmequelle
auf.
• Bevor Sie den Eisbereiter zum ersten Mal benutzen, warten Sie bitte 2
Stunden, nachdem Sie ihn aufgestellt haben, und lassen Sie den vorderen
Deckel für mindestens 2 Stunden geöffnet.
• Vergewissern Sie sich, dass die auf dem Eisbereiter angegebene Spannung
mit der Spannung in Ihrem Haus übereinstimmt.
• Reines Wasser darf für dieses Gerät nicht verwendet werden, es wird
Quellwasser empfohlen.
• Bitte halten Sie das Sichtfenster während der Eiswürfelherstellung immer
geschlossen.
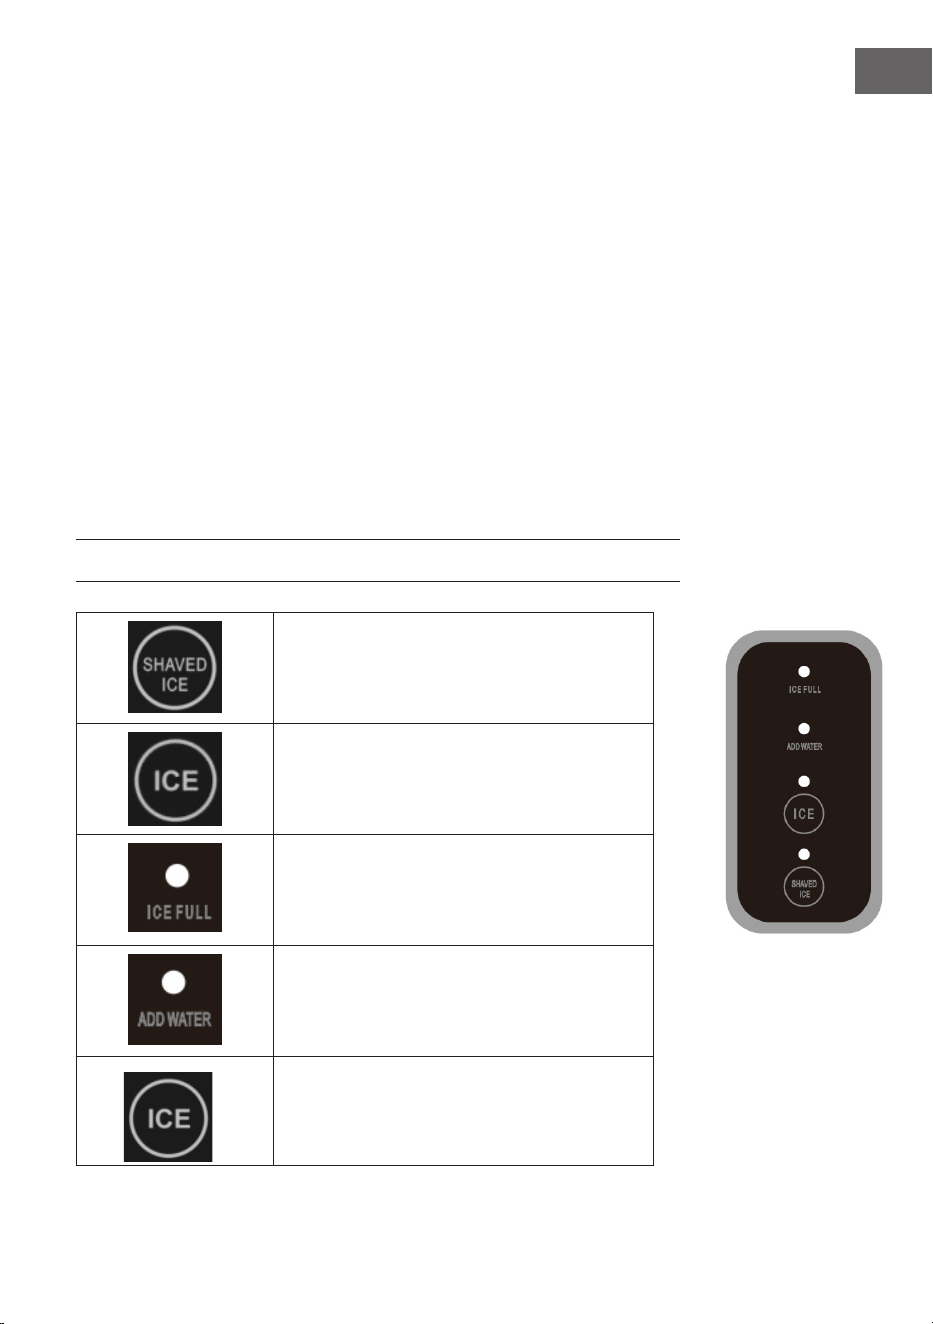
BEDIENFELD UND BEDIENUNG
Drücken Sie diese Taste für Shaved Ice.
Bevor Sie den Knopf drücken, geben Sie bitte
genügend Eis in die Schüssel und schließen Sie
den Deckel gut.
Eiswürfelherstellung läuft, wenn diese Lampe
leuchtet ohne zu blinken
Sie leuchtet auf, wenn der Eiskorb voll mit
Eiswürfeln ist.
Sie leuchtet auf, wenn das Wasser im Wassertank
nicht ausreicht.
8
DE
Drücken Sie die Taste, um die
Eiswürfelherstellung zu starten.
BEDIENUNGSANLEITUNG
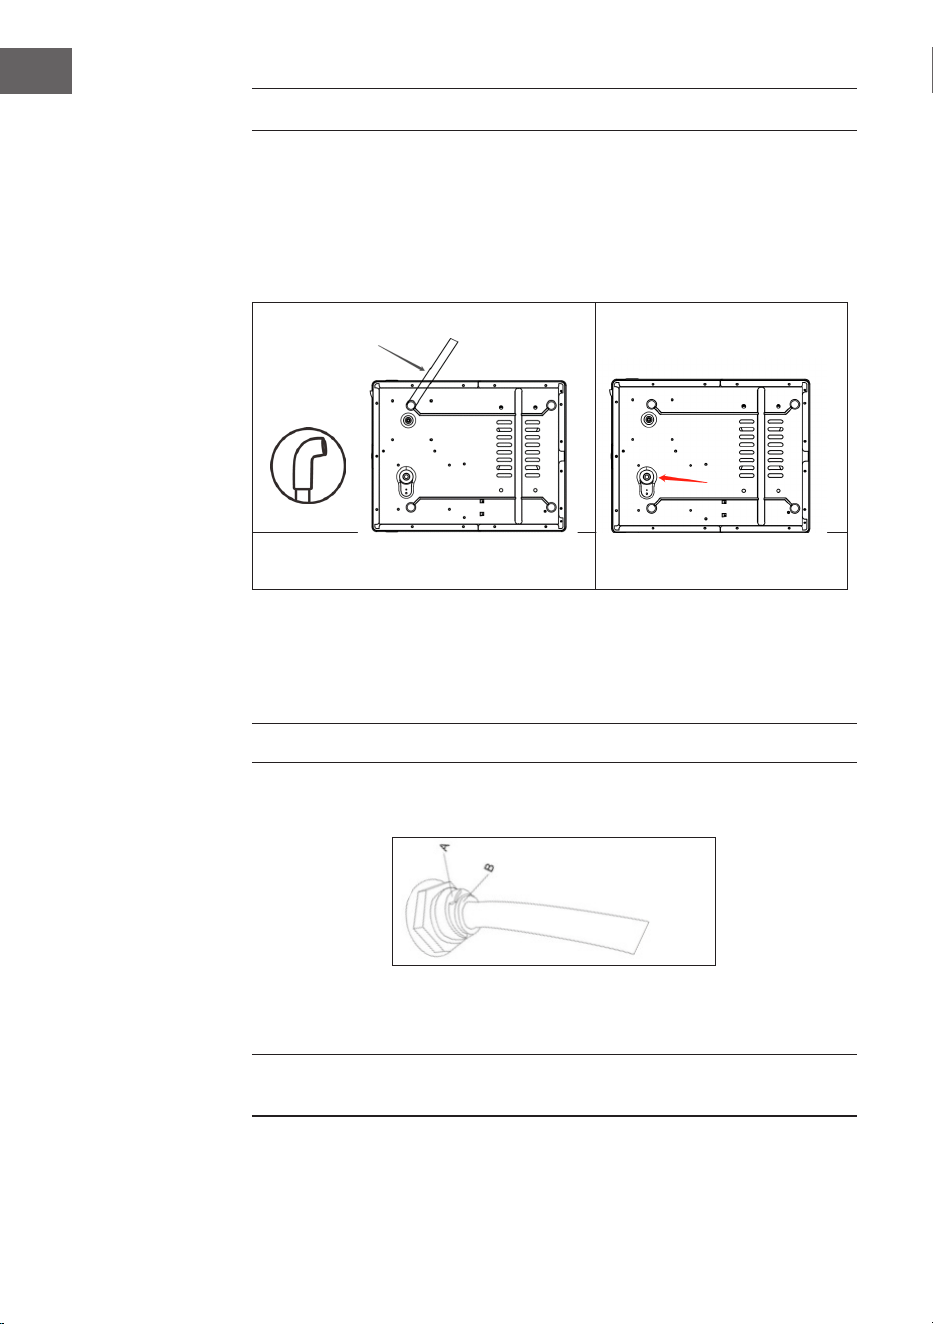
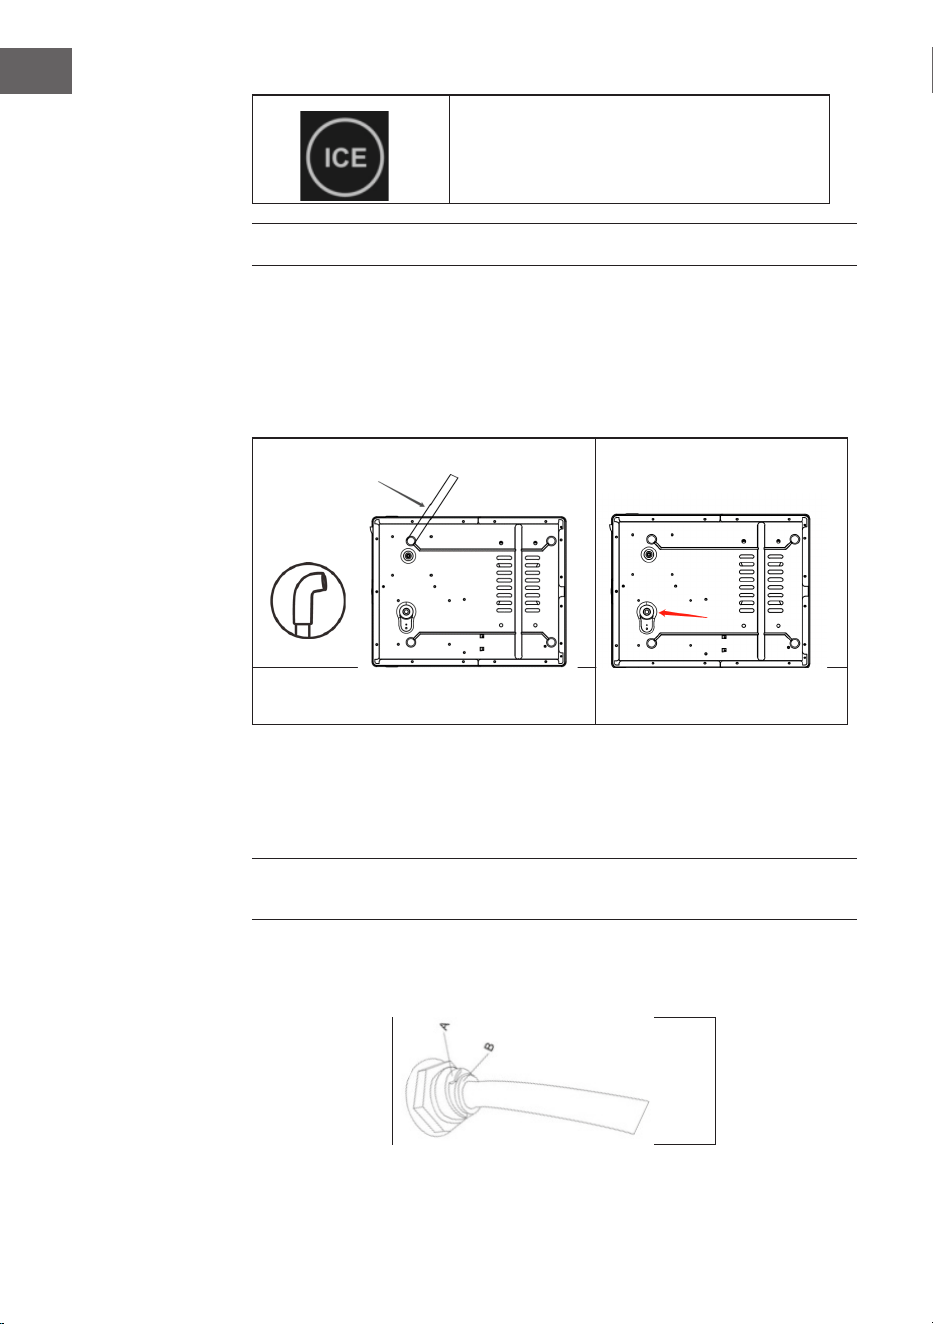
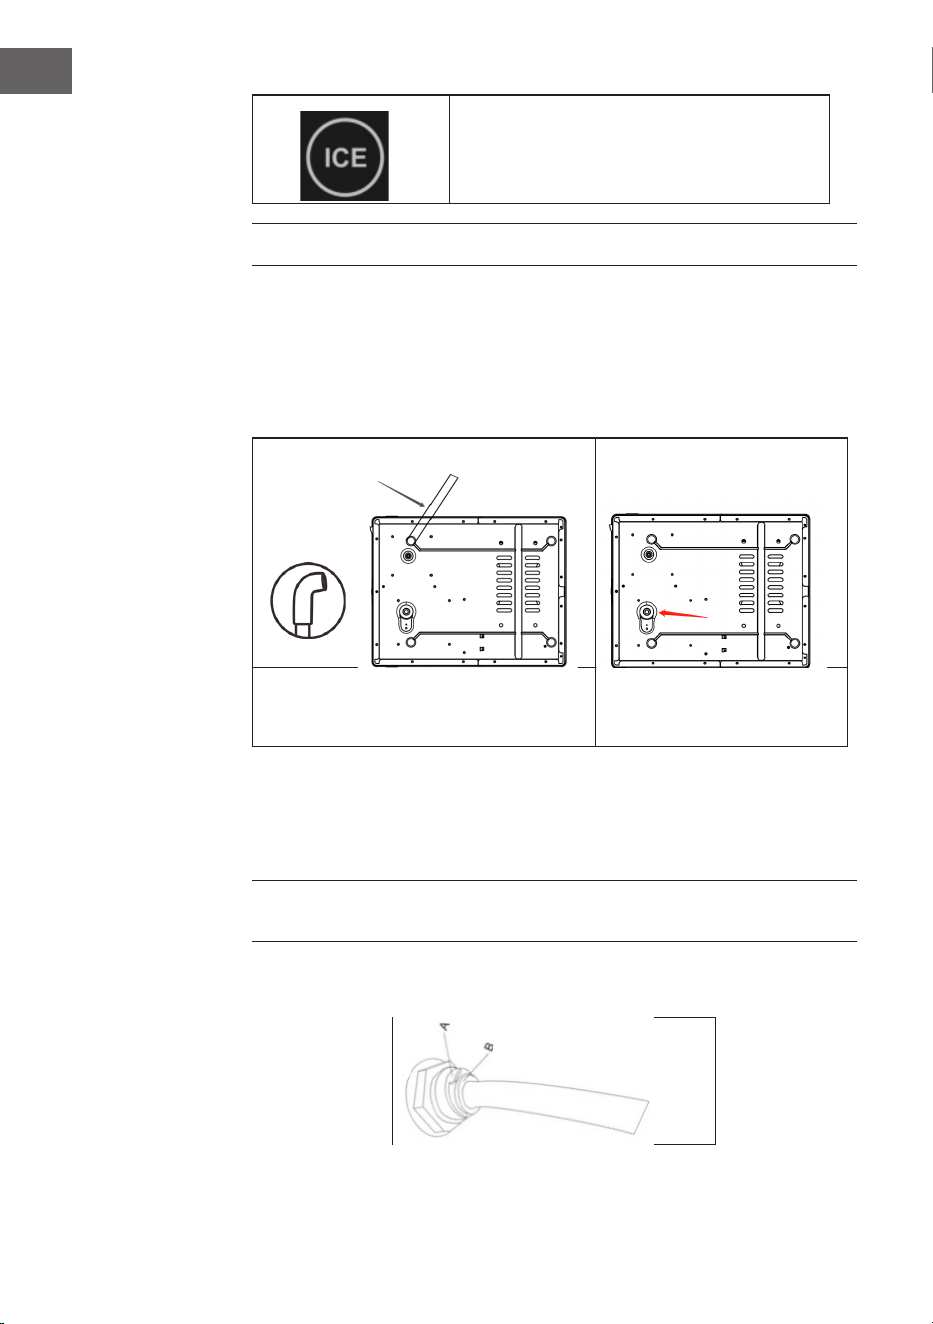
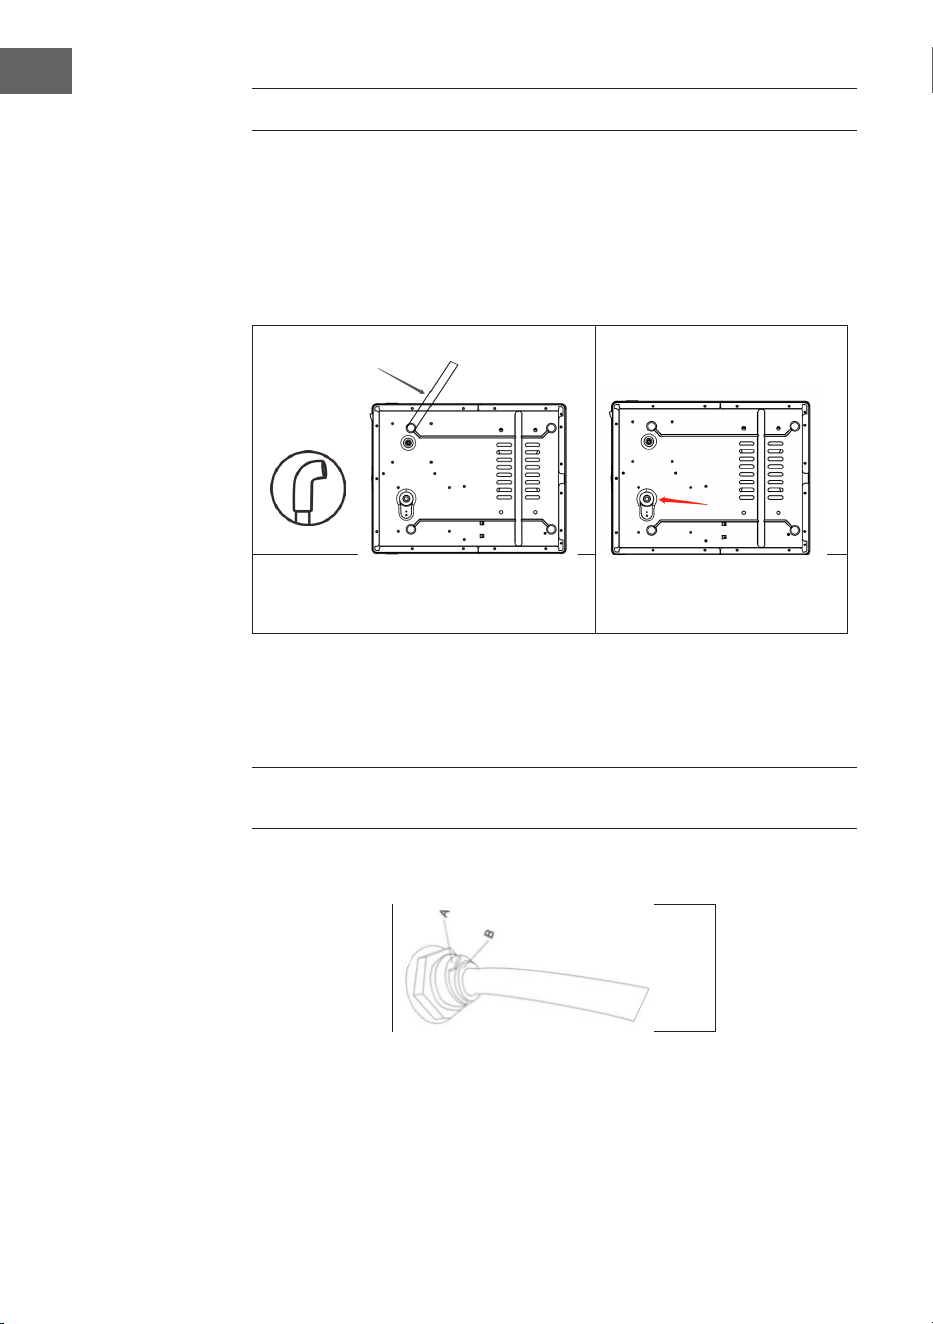
Schritt 1
Anschluss des Ablaufschlauchs
Da gehobeltes Eis schmelzen kann, wird dringend empfohlen, einen
Ablaufschlauch am Boden des Geräts anzuschließen. Die Schritte sind wie folgt.
Ablaufschlauch Ablass des Wassertanks am
Boden der Maschine
Schritt 2
Manuelle Wasserbefüllung: Öffnen Sie den Deckel, nehmen Sie den Eiskorb
heraus und füllen Sie den Wassertank mit Wasser.
Hinweis: Achten Sie darauf, dass das Wasser nicht auf dem Boden der
Eisauffangschale steht.
Automatische Wasserbefüllung: Schließen Sie den Schlauch an der Rückseite des
Geräts direkt an den Wasserhahn an.
Wasserfüllleitung

9
DE
Schritt 3
Drücken Sie die ICE Taste, um das Gerät einzuschalten. Der Eisbereiter beginnt zu
arbeiten.
Hinweis: In den ersten drei Zyklen können die Eiswürfel klein und unregelmäßig
sein, eventuell entsteht sogar gar kein Eis.
Schritt 4
Wenn die Anzeige ADD WATER aueuchtet, nehmen Sie bitte den Korb heraus und
fügen Sie dann wie in Schritt 2 beschrieben Wasser hinzu.
Schritt 5
Wenn die Anzeige ICE FULL aueuchtet, nehmen Sie bitte das Eis mit der Schaufel
heraus.
Hinweis: Wenn der Eiskorb voll ist, nehmen Sie das Eis bitte sofort heraus. Achten
Sie darauf, dass die Eisauffangschale nicht zu voll ist.
Schritt 6
Drücken Sie die SHAVED ICE Taste für Shaved Ice.
Hinweis: Bevor Sie den Knopf drücken, geben Sie bitte genügend Eis in die
Schüssel und schließen Sie den Deckel gut.
Schritt 7
Drücken Sie die ICE Taste, um das Gerät anzuhalten.
Schritt 8:
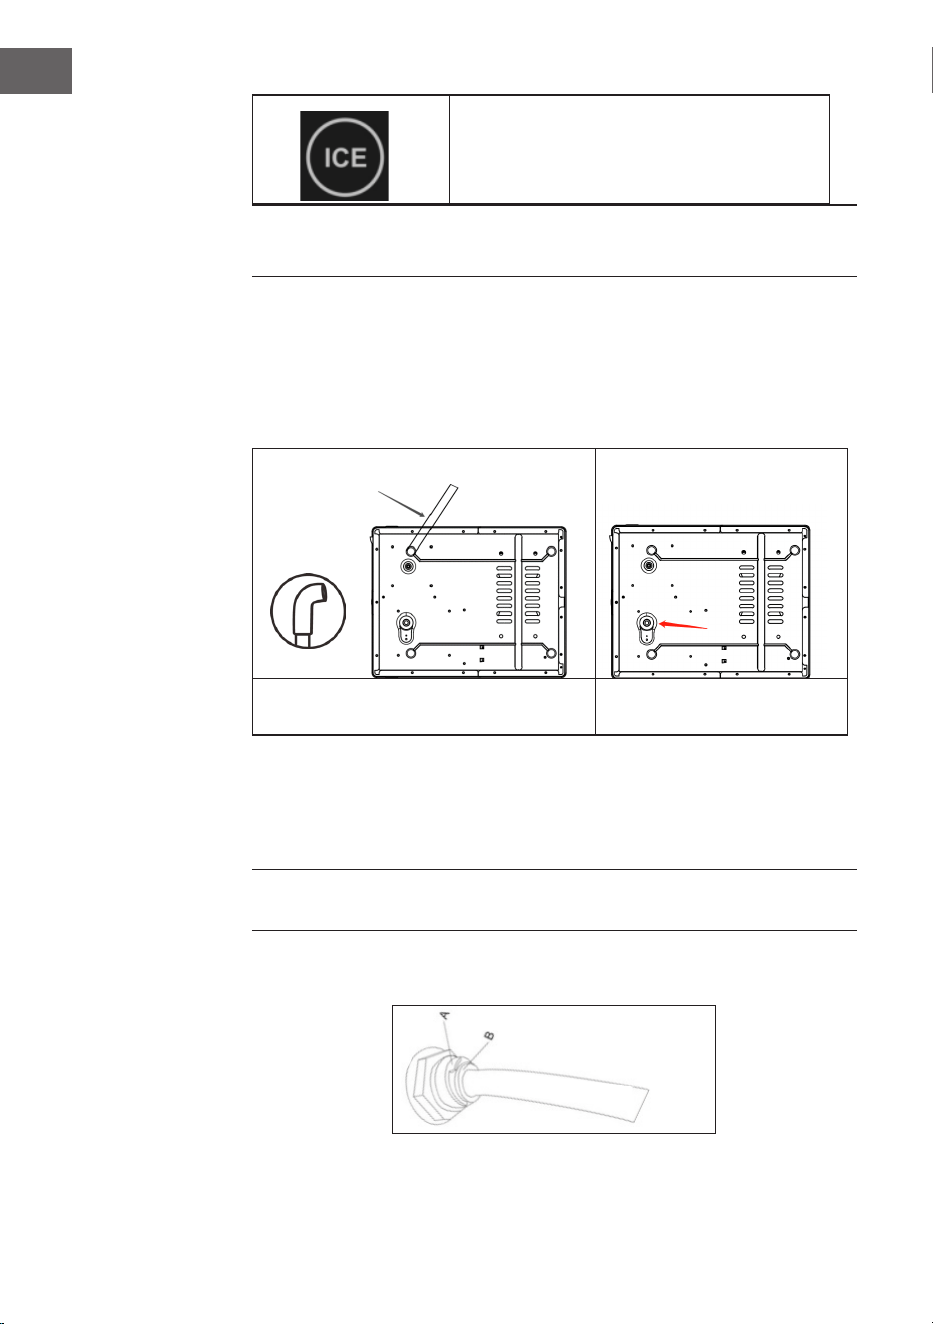
Platzieren Sie einen Behälter unter dem Gerät, ziehen Sie das Gerät ein wenig nach
vorne und ziehen Sie den Ablassstopfen in der Mitte des Tanks, um das Wasser
abzulassen.
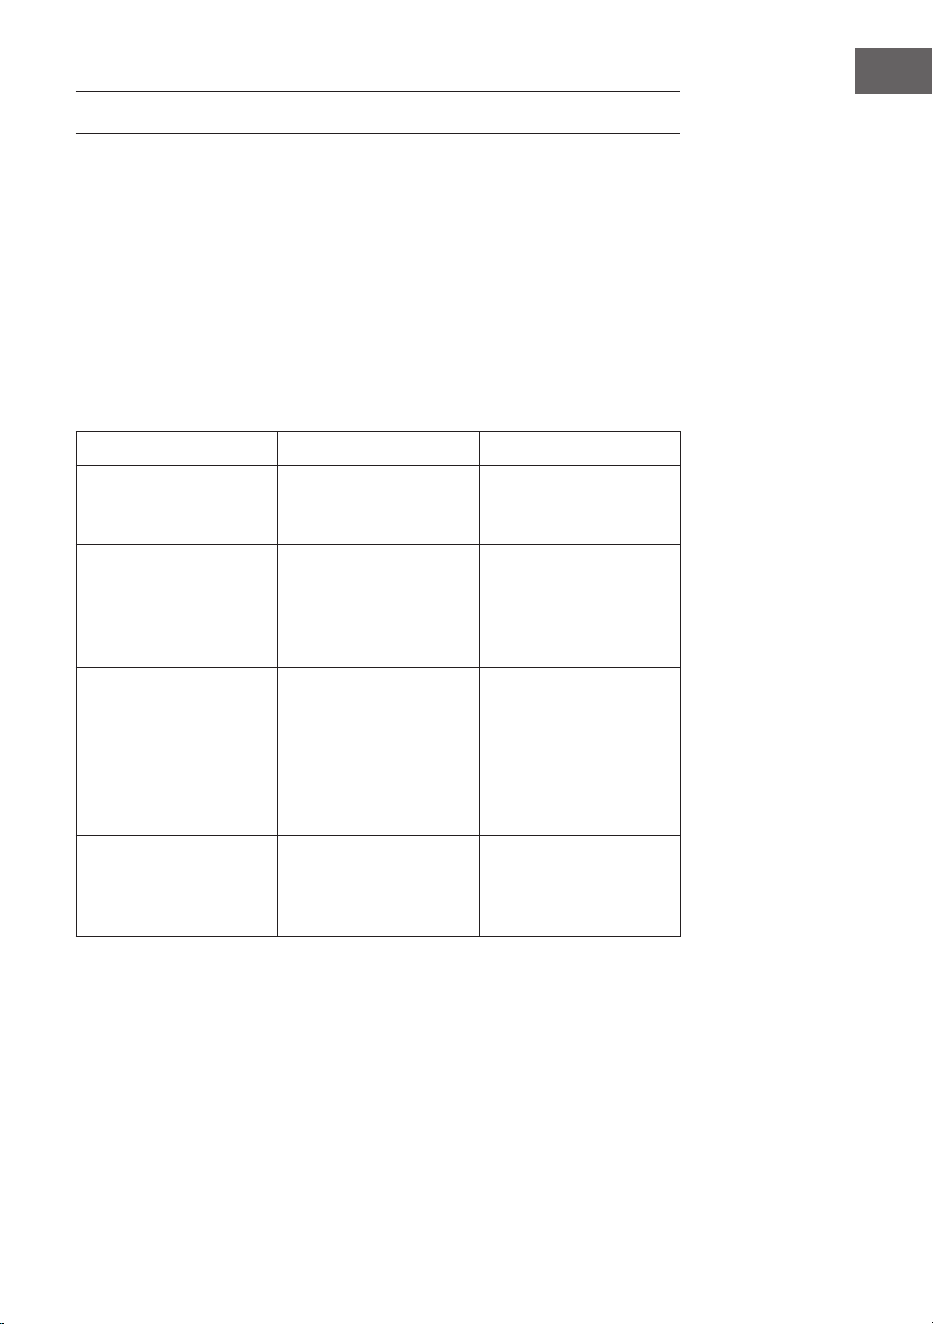
Schritt 9
Zum Abnehmen des Rohrs schauen Sie bitte die Abbildung oben an. Entfernen Sie
zuerst den blauen Ring mit der Bezeichnung A (falls vorhanden), dann drücken Sie
den weißen Ring (Verschluss) an der Außenseite mit der Bezeichnung B. Zuletzt
nehmen Sie das Rohr heraus.

10
DE
REINIGUNG UND PFLEGE
• Reinigen Sie die Innenauskleidung, die Eisauffangschale, den Wasserbehälter,
die Eisschaufel und den Verdampfer regelmäßig. Ziehen Sie bei der
Reinigung den Netzstecker und entfernen Sie die Eiswürfel. Verwenden
Sie eine verdünnte Lösung aus Wasser und Essig, um die Innen- und
Außenächen des Eisbereiters zu reinigen. Besprühen Sie den Eisbereiter
nicht mit Chemikalien oder verdünnten Mitteln wie Säuren, Benzin oder Öl.
Vor dem Gebrauch gründlich abspülen.
• Halten Sie die Lüftungsöffnungen im Gerätegehäuse oder in der
Einbaustruktur frei von Hindernissen. Verwenden Sie keine anderen als die
vom Hersteller empfohlenen Mittel zur Beschleunigung des Abtauvorgangs
oder zur Reinigung.
• Um die Sauberkeit der Eiswürfel zu gewährleisten, wird empfohlen, das
Wasser im Wassertank alle 24 Stunden zu wechseln.
• Wenn der Kompressor aus irgendeinem Grund ausfällt, z. B. wegen
Wassermangels, zu viel Eis, Stromausfall usw. Starten Sie das System nicht
sofort, sondern warten Sie 3 Minuten und starten Sie den Eisbereiter dann
erneut.
• Verwenden Sie immer frisches Wasser, bevor Sie mit der Eiswürfelproduktion
beginnen, entweder bei der Erstinstallation oder nach einer längeren
Stillstandszeit.
• Dieses Gerät ist nur für den Hausgebrauch, nicht für den Außenbereich
geeignet. Wenn es draußen verwendet werden soll, stellen Sie bitte sicher,
dass das Sichtfenster geschlossen ist.

11
DE
FEHLERSUCHE UND FEHLERBEHEBUNG
1 Bitte beachten Sie, dass sich bei einem Stromausfall durch Abziehen
des Netzkabels oder durch Drücken der Ausschalttaste während eines
Eisproduktionszyklus kleine Eissplitter bilden können, die sich in der
automatischen Schaufel festsetzen und diese blockieren können. In diesem
Fall können Sie die Eisstücke entfernen, indem Sie das Netzkabel abziehen und
die Schaufel vorsichtig zur Rückseite des Gehäuses schieben, um die Eisstücke
zu entfernen, und dann das Gerät neu starten.
2 Starten Sie die Eismaschine neu, indem Sie auf Stop und dann auf Start
drücken. Wenn die Eisschaufel das Eis nicht in den Eissammler schiebt,
nachdem das gebildete Eis von dem Verdampfernger gefallen ist, während
gleichzeitig die M-Leuchte leuchtet, prüfen Sie, ob die Wasserschale
waagerecht oder im Gleichgewicht ist. Ist dies nicht der Fall, drücken Sie leicht
mit Ihrem Finger auf die Eisschaufel. Starten Sie dann den Eisbereiter erneut.
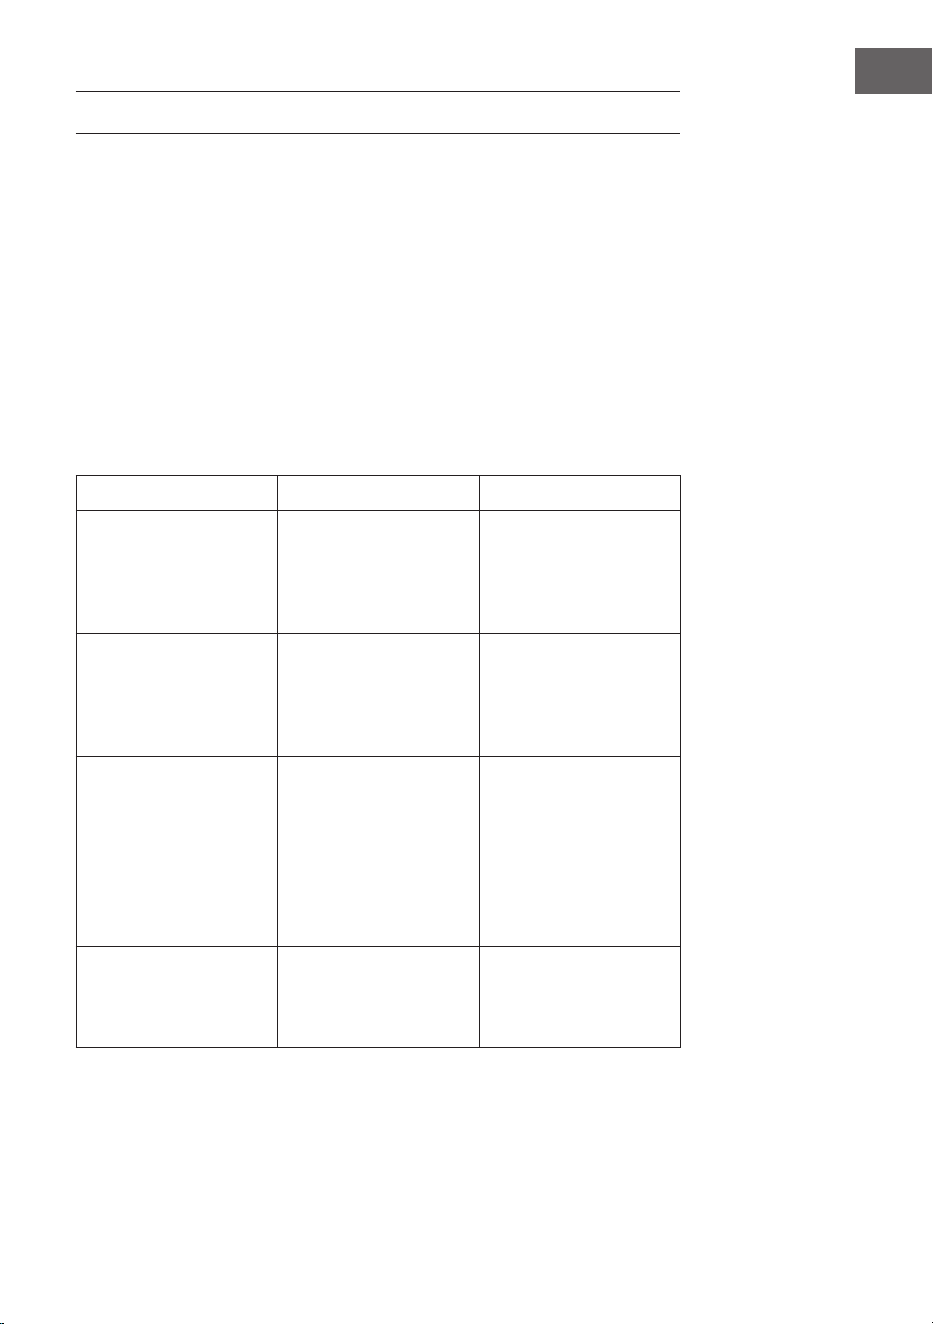
Problem Grund Lösung
Der Kompressor arbeitet
ungewöhnlich mit einem
summenden Geräusch.
Die Spannung ist
niedriger als empfohlen.
Schalten Sie den
Eisbereiter aus und
starten Sie ihn erst
wieder, wenn die
Spannung normal ist.
Bedingungen für die
Eiswürfelherstellung
Die Durchgänge laufen
korrekt, doch keine
Eiswürfel entstehen.
Kältemittellecks. Das
geschlossene System ist
blockiert.
Wenden Sie sich an eine
Fachwerkstatt.
Die Lichter von "Ice
full" und "Add water"
leuchten gleichzeitig auf.
Die Wasserschale ist
durch einen Eiswürfel
blockiert.
Entfernen Sie den
Eiswürfel unter der
Eisschaufel, ziehen Sie
den Stecker heraus,
stecken Sie ihn wieder
ein und drücken Sie die
ICE Taste. 3 Minuten
später startet das Gerät
automatisch neu.
Die Maschine läuft
weiter, aber das Wasser
ist wärmer als das
normale Wasser.
Das Magnetventil ist
kaputt.
Ersetzen Sie das
Magnetventil.

12
DE
HINWEISE ZUR ENTSORGUNG
Wenn es in Ihrem Land eine gesetzliche Regelung für die
Entsorgung von elektrischen und elektronischen Geräten
gibt, weist dieses Symbol auf dem Produkt oder auf der
Verpackung darauf hin, dass dieses Produkt nicht mit
dem Hausmüll entsorgt werden darf. Stattdessen muss
es zu einer Sammelstelle für das Recycling von Elektro-
und Elektronikgeräten gebracht werden. Indem Sie es
vorschriftsmäßig entsorgen, schützen Sie die Umwelt und
die Gesundheit Ihrer Mitmenschen. Für Informationen
zum Recycling und zur Entsorgung dieses Produkts
wenden Sie sich bitte an Ihre örtliche Behörde oder Ihren
Hausmüllentsorgungsdienst.
Dieses Produkt enthält Batterien. Wenn in Ihrem Land
Gesetze zur Entsorgung von Batterien gelten, dürfen
diese nicht im Hausmüll entsorgt werden. Informieren
Sie sich über die örtlichen Vorschriften für die Entsorgung
von Batterien. Indem Sie es vorschriftsmäßig entsorgen,
schützen Sie die Umwelt und die Gesundheit Ihrer
Mitmenschen.
HERSTELLER & IMPORTEUR (UK)
Hersteller:
Chal-Tec GmbH, Wallstrasse 16, 10179 Berlin, Deutschland.
Importeur für Großbritannien:
Berlin Brands Group UK Limited
PO Box 42
272 Kensington High Street
London, W8 6ND
Großbritannien
13
EN
CONTENTS
Dear Customer,
Congratulations on purchasing this device. Please read
the following instructions carefully and follow them to
prevent possible damages. We assume no liability for
damage caused by disregard of the instructions and
improper use. Scan the QR code to get access to the latest
user manual and more product information.
TECHNICAL DATA
Item number 10046440
Daily Ice Output 15 kg/24 h
Ice Storage Capacity 1 kg
Water Reservoir Capacity 1.8 L
Refrigerant R290
Ice Shape Bullet
Dimensions 310*400*420 mm
Safety Instructions 14
Product Description 16
Control Panel Operation 17
Operating Instructions 18
Cleaning and Care 20
Troubleshooting 21
Disposal Considerations 22
Manufacturer & Importer (UK) 22

14
EN
SAFETY INSTRUCTIONS
In order to avoid any accidents, please refer to following operation:
• Disconnect power before servicing.
• Do not pull directly on wire when plugging or unplugging the unit.
• If ice is abnormal, please call the seller.
• It is normal for the compressor and condenser surface to reach temperatures
between 70°C and 90°C during operation and surrounding areas may be hot.
Please don't touch it.
• Due to fast freezing, ice cubes may appear “Cloudy”. This is trapped air in the
water and it will not affect quality or taste of ice.
• When out of use, please open the drawer at least 2cm to allow for air
circulation and avoid any metallic components becoming rusted.
• This appliance can be used by children aged from 8 years and above and
persons with reduced physical, sensory or mental capabilities or lack of
experience and knowledge if they have been given supervision or instruction
concerning use of the appliance in a safe way and understand the hazards
involved.
• Children shall not play with the appliance,
• Cleaning and user maintenance shall not be made by children without
supervision.
• If the supply cord is damaged; it must be replaced by the manufacturer, its
service agent or a similarly qualied person in order to avoid a hazard.
• Please according to local regulations regarding disposal of the appliance for
its ammable blowing gas. Before you scrap the appliance, please take off the
doors to prevent children trapped.
• This appliance is intended to be used in household and similar applications
such as
– staff kitchen areas in shops, oces and other working environments;
– farm houses and by clients in hotels, motels and other residential type
environments;
– bed and breakfast type environments;
– catering and similar non-retail applications.
• Do not store explosive substances such as aerosol cans with a ammable
propellant in this appliance.
• Children aged from 3 to 8 years are allowed to load and unload refrigerating
appliances.
• Opening the door for long periods can cause a signicant increase of the
temperature in the compartments of the appliance.
• Clean regularly surfaces that can come in contact with food and accessible
drainage systems.
• Clean water tanks if they have not been used for 48 h.
• If the refrigerating appliance is left empty for long periods, switch off, defrost,
clean, dry, and leave the door open to prevent mould developing within the
appliance.

15
EN
• When positioning the appliance, ensure the supply cord is not trapped or
damaged.
• Do not locate multiple portable socket-outlets or portable power supplies at
the rear of the appliance.
• Fill with potable water only or connect to potable water supply only.
• Keep ventilation openings, in the appliance enclosure or in the built-in
structure, clear of obstruction.
• Do not use mechanical devices or other means to accelerate the defrosting
process, other than those recommended by the manufacturer.
• Do not damage the refrigerant circuit.
• Do not use electrical appliances inside the food storage compartments of the
appliance, unless they are of the type recommended by the manufacturer.
• Risk of re / ammable materials, taking care to avoid causing a re by
igniting ammable material.
• The new hose-sets supplied with the appliance are to be used and that old
hose-sets should not be reused.

16
EN
PRODUCT DESCRIPTION
1 Front top lid
2 Viewing semi-transparent window
3 Front cover
4 Fan cover
5 Control Panel
6 Take Shaved ice door
7 Back cover
8 Back cover cooling hole
9 Power Cord and Plug
10 Water inlet from tap
17
EN
Before/First Use of Your Ice Maker
• During transportation, the incline angle of the cabinet should not be over 45°.
Do not turn the Ice maker upside down. As this may damage the compressor
and sealed system.
• Remove all packing material and carefully check your ice maker to ensure it
is in good condition and that there is no damage to the ice maker or power
cord and plug.
• The Ice maker should be placed horizontally on a level surface.To ensure
proper ventilation for your Ice maker allow 150 mm of space at the top, the
back and on each side. Do not install the Ice maker near an oven, radiator, or
any other heat source.
• Before using the Ice maker for the rst time, please wait 2 hours after
positioning it, and keep the front lid open for at least 2hours
• Ensure that the voltage indicated on the ice maker corresponds with the
voltage in your home.
• Pure water is not allowed to be used on this unit, spring water is
recommended.
• Please always keep the viewing window close during ice making.
CONTROL PANEL OPERATION
Press this button to shaved ice.
Before pressing this button, please put enough
ice into the bowl and covers the bowl cover well.
Unit under ice making process if it lights up
without ash
It lights up when the ice in ice basket is full.
It lights up when the water in water tank is not
enough.
Press it to start the ice making.
18
EN
OPERATING INSTRUCTIONS
Step 1
Connect drain hose
Shaved ice may melt, so it is strongly recommended that a drain hose at bottom of
unit be connected. The steps are as follows.
drain pipe Water tank drain outlet at the
bottom of machine
Step 2
Add water manually: Open the lid,take out of the ice basket and ll the water
reservoir with water.
Note: Make sure the water is not over the bottom of the ice collecting tray.
Add water by auto lling: please connect the pipe at back of the unit to the water
tap directly.
Step 3
Press the ICE button to turn unit on. The ice maker begins to work.
Note: For the rst three cycles, the ice may be small and irregular in size, or even
no ice.
water lling pipe

19
EN
Step 4
If indicator ADD WATER lights up, please take out the basket, then add water as
per step 2.
Step 5
If indicator ICE FULL lights up, please take out the ice with the scoop.
Note: When the ice basket is full please remove the ice immediately. Do not allow
the ice collecting tray overll.
Step 6
Press SHAVED ICE button to shave ice.
Note: Before the press of this button, please put enough ice into the shaved ice
bowl and cover the bowl cap well.
Step 7
Press ICE button to stop the machine.
Step 8
Put a tank in below the unit, then pull the unit a little forward, pull the drain plug
at middle of the tank to drain water.
Step 9
If you want to take off the pipe,sketch as above,rstly take off the blue ring named
as A(if any),then press the white ring(lock) at the outer side named as B. At last
take out the pipe.

20
EN
CLEANING AND CARE
• Clean the inner liner, ice collecting tray, water box, ice shovel and evaporator
frequently. When cleaning, unplug the unit and remove the ice cubes. Use
a diluted solution of water and vinegar to clean the inside and the outside
surface of the Ice maker. Do not spray Ice maker with chemicals or diluted
agents such as acids, gasoline or oil. Rinse thoroughly before starting.
• Keep ventilation openings in the appliance enclosure, or in the built-in
structure, clear of obstruction. Do not use mechanical devices or other means
to accelerate the defrosting process, other than those recommended by the
manufacturer.
• To ensure the cleanliness of the ice cubes, water in the water reservoir is
suggested to be replaced every 24 hours.
• If the compressor stops for any reason such as water shortage, too much Ice,
power off, etc. Do not start the system right away, wait 3 minutes, and then
re-start the Ice maker.
• Always use fresh water before starting ice production either at initial
installation or after a long shut-off period.
• This unit is for home use only, not for outdoor use, if it is necessary for use
outside, please make sure the view window is closed.
21
EN
TROUBLESHOOTING
1 Please note, if a power failure occurs due to disconnection of the power cord,
or the off power button has been pushed off during an ice making cycle, small
ice chips may formed and lodge in the automatic shovel causing it to jam. If
this occurs, the ice chips may be removed by disconnecting the power cord
and gently pushing the shovel to the rear of the cabinet and removing the ice
chips, then restarting.
2 Please restart the ice maker by pressing Stop and then Start. If the Ice shovel
does not push the Ice into the Ice collector after the formed Ice drops from
the evaporator nger while at the same time the M light is on, check to see if
the water tray is horizontal or balanced. If not then adjust by pressing the Ice
shovel lightly with your nger. Then re-start the Ice maker.
Problem Reason Solution
The compressor works
abnormally with a
Buzzing noise.
The voltage is lower than
recommended
Stop the Ice maker and
do not restart until the
voltage is normal.
Conditions for Ice
making
Cycle are right but no ice
is made.
Refrigerant leaks. Sealed
system is blocked.
Call for service.
The lights of ice full and
add water come at in the
same time.
Water tray is blocked by
ice cube.
Clear the ice cube under
the ice shovel pull out
the plug and insert It
again then press the ICE
button, 3 minutes later
the machine will restart
automatically.
Machine keeps
running,but the water is
warmer than the normal
water.
The magnetic valve is
broken.
Replace the magnetic
valve.

22
EN
DISPOSAL CONSIDERATIONS
If there is a legal regulation for the disposal of electrical
and electronic devices in your country, this symbol on the
product or on the packaging indicates that this product
must not be disposed of with household waste. Instead,
it must be taken to a collection point for the recycling
of electrical and electronic equipment. By disposing of
it in accordance with the rules, you are protecting the
environment and the health of your fellow human beings
from negative consequences. For information about the
recycling and disposal of this product, please contact your
local authority or your household waste disposal service.
This product contains batteries. If there is a legal
regulation for the disposal of batteries in your country,
the batteries must not be disposed of with household
waste. Find out about local regulations for disposing
of batteries. By disposing of them in accordance with
the rules, you are protecting the environment and the
health of your fellow human beings from negative
consequences.
MANUFACTURER & IMPORTER (UK)
Manufacturer:
Chal-Tec GmbH, Wallstrasse 16, 10179 Berlin, Germany.
Importer for Great Britain:
Berlin Brands Group UK Limited
PO Box 42
272 Kensington High Street
London, W8 6ND
United Kingdom
23
FR
CONTENU
Chère cliente, cher client,
Nous vous félicitons d'avoir acheté cet appareil. Veuillez
lire attentivement les instructions suivantes et les
respecter an d'éviter tout dommage potentiel. Nous
déclinons toute responsabilité pour les dommages causés
par le non-respect des instructions et une utilisation
inappropriée. Scannez le code QR pour accéder au dernier
manuel d'utilisation et à d'autres informations sur le
produit.
DONNÉES TECHNIQUES
Numéro de l'article 10046440
Production journalière de
glace
15 kg/24 h
Capacité de stockage de
glace
1 kg
Capacité du réservoir d'eau 1,8 L
Réfrigérant R290
Forme de la glace Balle
Dimensions 310*400*420 mm
Consignes de sécurité 24
Description du produit 26
Fonctionnement du panneau de contrôle 27
Mode d'emploi 28
Nettoyage et entretien 30
Dépannage 31
Informations pour le recyclage 32
Fabricant & importateur (Royaume-Uni) 32

24
FR
CONSIGNES DE SÉCURITÉ
An d'éviter tout accident, veuillez vous référer à l'opération suivante :
• Débrancher l'alimentation électrique avant de procéder à l'entretien.
• Ne tirez pas directement sur le l lorsque vous branchez ou débranchez
l'appareil.
• Si la glace est anormale, veuillez appeler le vendeur.
• Il est normal que la surface du compresseur et du condenseur atteigne des
températures comprises entre 70°C et 90°C pendant le fonctionnement et les
zones environnantes peuvent être chaudes. Ne le touchez pas.
• En raison de la congélation rapide, les glaçons peuvent paraître "troubles".
Il s'agit d'air emprisonné dans l'eau qui n'affecte ni la qualité ni le goût de la
glace.
• Lorsqu'il n'est pas utilisé, le tiroir doit être ouvert d'au moins 2 cm pour
permettre la circulation de l'air et éviter que les composants métalliques ne
rouillent.
• Cet appareil peut être utilisé par des enfants âgés de 8 ans et plus et des
personnes ayant des capacités physiques, sensorielles ou mentales réduites
ou dénuées d'expérience et de connaissances s'ils ont reçu une surveillance
ou des instructions concernant l'utilisation de l'appareil en toute sécurité et
en comprennent les dangers.
• Les enfants ne doivent pas jouer avec l'appareil,
• Le nettoyage et l'entretien par l'utilisateur ne doivent pas être effectués par
des enfants sans surveillance.
• Si le cordon d'alimentation est endommagé, il doit être remplacé par le
fabricant, son agent de service ou une personne de qualication similaire an
d'éviter tout danger.
• Veuillez vous conformer aux réglementations locales concernant l'élimination
de l'appareil pour son gaz de souage inammable. Avant de mettre
l'appareil au rebut, retirez les portes an d'éviter que des enfants ne s'y
coincent.
• Cet appareil est destiné à être utilisé dans des applications domestiques et
similaires telles que
- les cuisines du personnel dans les magasins, les bureaux et autres
environnements de travail ;
- les fermes et les clients des hôtels, des motels et d'autres environnements
de type résidentiel ;
- des environnements de type « bed and breakfast » ;
- la restauration et les applications similaires hors commerce de détail.
• Ne stockez pas de substances explosives telles que des bombes aérosols
contenant un agent propulseur inammable dans cet appareil.
• Les enfants âgés de 3 à 8 ans sont autorisés à charger et décharger les
appareils de réfrigération.
• L'ouverture prolongée de la porte peut entraîner une augmentation
signicative de la température dans les compartiments de l'appareil.
• Nettoyez régulièrement les surfaces susceptibles d'entrer en contact avec les
aliments et les systèmes d'évacuation accessibles.

25
FR
• Nettoyer les réservoirs d'eau s'ils n'ont pas été utilisés pendant 48 heures.
• Si l'appareil de réfrigération reste vide pendant de longues périodes,
éteignez-le, dégivrez-le, nettoyez-le, séchez-le et laissez la porte ouverte an
d'éviter la formation de moisissures à l'intérieur de l'appareil.
• Lorsque vous placez l'appareil, veillez à ce que le cordon d'alimentation ne
soit pas coincé ou endommagé.
• Ne placez pas de prises de courant multiples ou de blocs d'alimentation
portables à l'arrière de l'appareil.
• Remplir uniquement avec de l'eau potable ou raccorder uniquement à
l'alimentation en eau potable.
• Veillez à ce que les ouvertures de ventilation, dans l'enceinte de l'appareil ou
dans la structure intégrée, ne soient pas obstruées.
• Ne pas utiliser de dispositifs mécaniques ou d'autres moyens pour accélérer
le processus de dégivrage, autres que ceux recommandés par le fabricant.
• Ne pas endommager le circuit du réfrigérant.
• N'utilisez pas d'appareils électriques à l'intérieur des compartiments de
stockage des aliments de l'appareil, sauf s'ils sont du type recommandé par
le fabricant.
• Risque d'incendie / matières inammables, en veillant à ne pas provoquer
d'incendie en enammant des matières inammables.
• Les nouveaux tuyaux fournis avec l'appareil doivent être utilisés et les anciens
tuyaux ne doivent pas être réutilisés.

26
FR
DESCRIPTION DU PRODUIT
1 Couvercle supérieur avant
2 Fenêtre de visualisation semi-
transparente
3 Cache avant
4 Cache du ventilateur
5 Panneau de contrôle
6 Prenez la porte de glace pilée
7 Cache arrière
8 Orice de refroidissement du
cache arrière
9 Cordon d'alimentation et che
10 Arrivée d'eau du robinet

27
FR
Avant la première utilisation de la machine à glaçons
• Pendant le transport, l'angle d'inclinaison de la machine ne doit pas dépasser
45°. Ne pas retourner la machine à glaçons. Cela pourrait endommager le
compresseur et le système d'étanchéité.
• Retirez tous les matériaux d'emballage et vériez soigneusement votre
machine à glaçons pour vous assurer qu'elle est en bon état et que
la machine à glaçons, le cordon d'alimentation et la prise ne sont pas
endommagés.
• La machine à glaçons doit être placée horizontalement sur une surface plane.
Pour assurer une bonne ventilation de votre machine à glaçons, prévoyez un
espace de 150 mm en haut, à l'arrière et de chaque côté. Ne pas installer la
machine à glaçons à proximité d'un four, d'un radiateur ou de toute autre
source de chaleur.
• Avant d'utiliser la machine à glaçons pour la première fois, attendez 2 heures
après l'avoir mise en place et laissez le couvercle ouvert pendant au moins 2
heures
• Assurez-vous que la tension indiquée sur la machine à glaçons correspond à
celle de votre domicile.
• L'utilisation d'eau pure n'est pas autorisée sur cet appareil, il est recommandé
d'utiliser de l'eau de source.
• Veillez à ce que la fenêtre d'observation soit toujours fermée pendant la
fabrication de la glace.
FONCTIONNEMENT DU PANNEAU DE CONTRÔLE
Appuyez sur cette touche pour obtenir de la
glace pilée.
Avant d'appuyer sur ce bouton, mettez
susamment de glace dans le bol et fermez bien
le couvercle du bol.
Appareil en cours de fabrication de glace si elle
s'allume sans ash
Il s'allume lorsque le panier à glace est plein.
Il s'allume lorsque le réservoir d'eau est
insusant.
28
FR
Appuyez sur cette touche pour lancer la
fabrication de glace.
MODE D'EMPLOI
Étape 1
Raccorder le tuyau de vidange
La glace pilée peut fondre, il est donc fortement recommandé de raccorder un
tuyau d'évacuation au bas de l'appareil. Les étapes sont les suivantes.
tuyau d'évacuation Sortie de vidange du réservoir
d'eau en bas de la machine
Étape 2
Ajouter de l'eau manuellement : Ouvrez le couvercle, retirez le panier à glace et
remplissez le réservoir d'eau.
Remarque : Assurez-vous que l'eau ne dépasse pas le fond du bac de
récupération des glaçons.
Ajouter de l'eau par remplissage automatique : veuillez connecter le tuyau à
l'arrière de l'unité au robinet d'eau directement.
tuyau de remplissage d'eau
29
FR
Étape 3
Appuyez sur le bouton ICE pour mettre l'appareil en marche. La machine à glaçons
commence à fonctionner.
Note : Pendant les trois premiers cycles, la glace peut être petite et de taille
irrégulière, voire inexistante.
Note : Pendant les trois premiers cycles, la glace peut être petite et de taille
irrégulière, voire inexistante.
Étape 4
Si l'indicateur ADD WATER (ajouter de l'eau) s'allume, retirez le panier, puis
ajoutez de l'eau comme indiqué à l'étape 2.
Étape 5
Si l'indicateur ICE FULL s'allume, retirez la glace à l'aide de la pelle.
Remarque : Lorsque le panier à glace est plein, retirez immédiatement la glace.
Ne pas laisser le bac de récupération des glaçons se remplir excessivement.
Étape 6
Appuyez sur SHAVED ICE pour obtenir de la glace pilée.
Remarque : Avant d'appuyer sur ce bouton, mettez susamment de glace dans le
bol et fermez bien le couvercle du bol.
Étape 7
Appuyez sur le bouton ICE pour arrêter la machine.
Étape 8
Placez un réservoir sous l'appareil, puis tirez l'appareil un peu vers l'avant, tirez le
bouchon de vidange au milieu du réservoir pour évacuer l'eau.
Étape 9
Si vous voulez retirer le tuyau, faites le même schéma que ci-dessus, retirez
d'abord l'anneau bleu nommé A (s'il y en a un), puis appuyez sur l'anneau blanc
(verrou) du côté extérieur nommé B. Enn, retirez le tuyau.

30
FR
NETTOYAGE ET ENTRETIEN
• Nettoyer fréquemment le revêtement intérieur, le bac de récupération des
glaçons, le bac à eau, la pelle à glace et l'évaporateur. Lors du nettoyage ,
débranchez l'appareil et retirez les glaçons. Utilisez une solution diluée d'eau
et de vinaigre pour nettoyer l'intérieur et l'extérieur de la machine à glaçons.
Ne pas vaporiser la machine à glaçons avec des produits chimiques ou avec
des agents dilués tels que des acides, de l'essence ou de l'huile. Rincer
abondamment avant de commencer.
• Veillez à ce que les ouvertures de ventilation, dans l'enceinte de l'appareil
ou dans la structure intégrée, ne soient pas obstruées. Ne pas utiliser de
dispositifs mécaniques ou d'autres moyens pour accélérer le processus de
dégivrage, autres que ceux recommandés par le fabricant.
• Pour garantir la propreté des glaçons, il est conseillé de remplacer l'eau du
réservoir toutes les 24 heures.
• Si le compresseur s'arrête pour une raison quelconque (manque d'eau, trop
de glace, coupure d'électricité, etc. Ne pas démarrer le système tout de suite,
attendre 3 minutes, puis redémarrer la machine à glaçons.
• Utiliser toujours de l'eau fraîche avant de commencer la production de glace,
que ce soit lors de l'installation initiale ou après une longue période d'arrêt.
• Cet appareil est destiné à un usage domestique uniquement, pas à un usage
extérieur. S'il est nécessaire de l'utiliser à l'extérieur, veillez à ce que la fenêtre
de visualisation soit fermée.

31
FR
DÉPANNAGE
1 Veuillez noter que si une panne de courant se produit en raison d'un
débranchement du cordon d'alimentation, ou si le bouton d'arrêt a été
enfoncé pendant un cycle de fabrication de glace, de petits morceaux de glace
peuvent se former et se loger dans la pelle automatique, provoquant ainsi
son blocage. Si cela se produit, les morceaux de glace peuvent être enlevés
en débranchant le cordon d'alimentation et en poussant doucement la pelle
vers l'arrière de l'armoire et en enlevant les morceaux de glace, puis en
redémarrant.
2 Veuillez redémarrer la machine à glaçons en appuyant sur Stop puis sur Start.
Si la pelle à glace ne pousse pas la glace dans le collecteur de glace après que
la glace formée soit tombée du doigt de l'évaporateur alors que le voyant M
est allumé, vériez si le bac à eau est horizontal ou équilibré. Si ce n'est pas
le cas, ajustez en appuyant légèrement sur la pelle à glace avec votre doigt.
Redémarrer ensuite la machine à glaçons.
Problème Raison Solution
Le compresseur
fonctionne
anormalement
avec un bruit de
bourdonnement.
La tension est inférieure
à celle recommandée
Arrêter la machine à
glaçons et ne pas la
redémarrer tant que
la tension n'est pas
normale.
Conditions pour la
fabrication de glace
Les cycles sont corrects
mais il n'y a pas de
glace.
Fuites de réfrigérant. Le
système d'étanchéité est
bloqué.
Appeler le service clients.
Les voyants de la glace
pleine et de l'ajout d'eau
s'allument en même
temps.
Le bac à eau est bloqué
par un glaçon.
Dégagez le glaçon
sous la pelle à glace,
débranchez la prise
et réinsérez-la, puis
appuyez sur le bouton
ICE, 3 minutes plus tard,
la machine redémarre
automatiquement.
La machine continue de
fonctionner, mais l'eau
est plus chaude que
l'eau normale.
La valve magnétique est
cassée.
Remplacer la vanne
magnétique.
32
FR
INFORMATIONS POUR LE RECYCLAGE
S'il existe une réglementation légale pour l'élimination
des appareils électriques et électroniques dans votre
pays, ce symbole sur le produit ou sur l'emballage indique
que ce produit ne doit pas être jeté avec les ordures
ménagères. En revanche, il doit être déposé dans un point
de collecte pour le recyclage des équipements électriques
et électroniques. En vous en débarrassant conformément
aux règles, vous protégez l'environnement et la santé de
vos semblables des conséquences négatives. Pour obtenir
des informations sur le recyclage et l'élimination de ce
produit, veuillez contacter les autorités locales ou votre
service d'élimination des déchets ménagers.
Ce produit contient des piles. S'il existe une
réglementation légale pour l'élimination des piles
dans votre pays, les piles ne doivent pas être jetées
avec les déchets ménagers. Renseignez-vous sur les
réglementations locales en matière d'élimination des
piles. En vous en débarrassant conformément aux
règles, vous protégez l'environnement et la santé de vos
semblables des conséquences négatives.
FABRICANT & IMPORTATEUR (ROYAUME-UNI)
Fabricant :
Chal-Tec GmbH, Wallstrasse 16, 10179 Berlin, Allemagne.
Importateur pour la Grande-Bretagne :
Berlin Brands Group UK Limited
Boîte postale 42
272 Kensington High Street
Londres, W8 6ND
Royaume-Uni
33
IT
INDICE
Gentile cliente,
Congratulazioni per aver acquistato questo dispositivo.
Leggere attentamente le seguenti istruzioni e seguirle
per evitare possibili danni. Non ci assumiamo alcuna
responsabilità per danni causati dalla mancata osservanza
delle istruzioni e da un uso improprio. Scansionare il
codice QR per accedere al manuale d'uso più recente e
ottenere ulteriori informazioni sul prodotto.
DATI TECNICI
Numero di articolo 10046440
Produzione giornaliera di
ghiaccio
15 kg/24 ore
Capacità di stoccaggio del
ghiaccio
1 kg
Capacità del serbatoio
dell'acqua
1,8 L
Refrigerante R290
Forma del ghiaccio Cubetti cavi
Dimensioni 310x400x420 mm
Avvertenze di sicurezza 34
Descrizione del prodotto 36
Funzionamento del pannello di controllo. 37
Istruzioni per l'uso 38
Pulizia e manutenzione 40
Risoluzione dei problemi 41
Avviso di smaltimento 42
Produttore e importatore (Regno Unito) 42

34
IT
AVVERTENZE DI SICUREZZA
Per evitare incidenti, fare riferimento alle seguenti procedure:
• Scollegare l'alimentazione prima di effettuare la manutenzione.
• Non tirare direttamente il lo quando si collega o scollega il dispositivo.
• Se il ghiaccio è anomalo, si prega di chiamare il rivenditore.
• È normale che durante il funzionamento la supercie del compressore e del
condensatore raggiunga temperature comprese tra 70 °C e 90 °C e che le aree
circostanti siano calde. Si prega di non toccarla.
• A causa del rapido congelamento, i cubetti di ghiaccio possono apparire
opachi. Si tratta di aria intrappolata nell'acqua che non inuisce sulla qualità o
sul gusto del ghiaccio.
• Quando il dispositivo non viene utilizzato, aprire il cassetto di almeno 2 cm
per consentire la circolazione dell'aria ed evitare che i componenti metallici si
arrugginiscano.
• Questo dispositivo può essere utilizzato da persone (compresi i bambini) con
ridotte capacità siche, sensoriali o mentali, o con mancanza di esperienza
e conoscenza, a patto che siano supervisionate o abbiano ricevuto istruzioni
sull'uso sicuro del dispositivo e comprendano i rischi connessi.
• I bambini non devono giocare con il dispositivo.
• La pulizia e la manutenzione da parte dell'utente non devono essere eseguite
da bambini senza supervisione.
• Se il cavo di alimentazione è danneggiato, deve essere sostituito dal
produttore, dal suo servizio di assistenza o da una persona qualicata per
evitare pericoli.
• Attenersi alle norme locali sullo smaltimento dei dispositivi con gas
inammabile. Prima di smaltire il dispositivo, togliere gli sportelli per evitare
che i bambini rimangano intrappolati.
• Questo dispositivo è destinato all'uso in contesti domestici e simili, come ad
esempio
- aree di cucina per il personale di negozi, uci e altri ambienti di lavoro;
- agriturismi e da clienti di alberghi, motel e altri ambienti di tipo residenziale;
- ambienti di tipo bed and breakfast;
- ristorazione e applicazioni simili non al dettaglio.
• Non conservare in questo dispositivo sostanze esplosive come bombolette
spray con propellente inammabile.
• I bambini di età compresa tra i 3 e gli 8 anni sono autorizzati a caricare e
scaricare i dispositivi di refrigerazione.
• L'apertura prolungata dello sportello può causare un aumento signicativo
della temperatura nei vani del dispositivo.
• Pulire regolarmente le superci che possono entrare in contatto con gli
alimenti e i sistemi di scarico accessibili.
• Pulire i serbatoi dell'acqua se non sono stati utilizzati per 48 ore.
• Se il dispositivo di refrigerazione viene lasciato vuoto per lunghi periodi,
spegnerlo, sbrinarlo, pulirlo, asciugarlo e lasciare lo sportello aperto per
evitare la formazione di muffa all'interno.

35
IT
• Quando si posiziona il dispositivo, assicurarsi che il cavo di alimentazione non
rimanga incastrato o venga danneggiato.
• Non collocare prese multiple o alimentatori portatili sul retro del dispositivo.
• Riempirlo solo con acqua potabile o collegarlo solo a un punto di ausso di
acqua potabile.
• Mantenere libere le aperture di ventilazione sull'alloggiamento del dispositivo
o nella struttura integrata.
• Non utilizzare dispositivi meccanici o altri mezzi per accelerare il processo di
sbrinamento, se non quelli raccomandati dal produttore.
• Non danneggiare il circuito del refrigerante.
• Non utilizzare apparecchiature elettriche all'interno degli scomparti per la
conservazione degli alimenti del dispositivo, a meno che non siano del tipo
raccomandato dal produttore.
• Rischio di incendio/materiali inammabili, facendo attenzione a non provocare
un incendio con l'accensione di materiali inammabili.
• Devono essere utilizzati i nuovi set di tubi forniti con il dispositivo e quelli
vecchi non devono essere riutilizzati.

36
IT
DESCRIZIONE DEL PRODOTTO
1 Coperchio superiore anteriore
2 Finestra semitrasparente
3 Copertura anteriore
4 Copertura della ventola
5 Pannello di controllo
6 Sportello per rimuovere il ghiaccio
tritato
7 Copertura posteriore
8 Foro di raffreddamento della
copertura posteriore
9 Cavo e spina di alimentazione
10 Ingresso dell'acqua del rubinetto
37
IT
Prima di procedere all'uso della macchina del ghiaccio
• Durante il trasporto, l'angolo di inclinazione del dispositivo non deve superare
i 45°. Non capovolgere la macchina del ghiaccio. Ciò potrebbe danneggiare il
compressore e il sistema sigillato.
• Rimuovere tutto il materiale di imballaggio e controllare attentamente la
macchina del ghiaccio per vericare che sia in buone condizioni e che non vi
siano danni al dispositivo o al cavo e alla spina di alimentazione.
• La macchina del ghiaccio deve essere collocata orizzontalmente su una
supercie piana. Per garantire una ventilazione adeguata della macchina del
ghiaccio, lasciare uno spazio di 150 mm in alto, sul retro e su ciascun lato.
Non installare la macchina del ghiaccio vicino a un forno, a un radiatore o a
qualsiasi altra fonte di calore.
• Prima di utilizzare la macchina del ghiaccio per la prima volta, attendere 2 ore
dopo averla posizionata e tenere il coperchio anteriore aperto per almeno 2
ore.
• Assicurarsi che il voltaggio indicato sulla macchina del ghiaccio corrisponda a
quello della propria abitazione.
• Non è consentito l'uso di acqua depurata con questo dispositivo; si
raccomanda l'uso di acqua del rubinetto.
• Durante la preparazione del ghiaccio, tenere sempre chiusa la nestra
semitrasparente.
FUNZIONAMENTO DEL PANNELLO DI
CONTROLLO.
Premere questo tasto per tritare il ghiaccio.
Prima di premere questo tasto, mettere una
quantità suciente di ghiaccio nella ciotola e
chiudere bene il coperchio della ciotola.
Dispositivo in fase di produzione del ghiaccio se
si accende senza lampeggiare.
Si accende quando il cestello è pieno di ghiaccio.
Si accende quando l'acqua nel serbatoio non è
suciente.
38
IT
Premere per avviare la produzione di ghiaccio.
ISTRUZIONI PER L'USO
1° passaggio
Collegare il tubo di scarico
Il ghiaccio tritato può sciogliersi, pertanto si raccomanda vivamente di collegare
un tubo di scarico alla base del dispositivo. I passaggi sono i seguenti.
Tubo di scarico Uscita di scarico del serbatoio
dell'acqua sul fondo del
dispositivo
2° passaggio
Aggiungere acqua manualmente: aprire il coperchio, estrarre il cestello del
ghiaccio e riempire d'acqua il serbatoio.
Nota: assicurarsi che l'acqua non superi il fondo della vaschetta di raccolta del
ghiaccio.
Aggiungere acqua tramite riempimento automatico: collegare il tubo sul retro
del dispositivo direttamente al rubinetto dell'acqua.
Tubo di riempimento
dell'acqua

39
IT
3° passaggio
Premere il tasto ICE per accendere il dispositivo. La macchina del ghiaccio inizia a
funzionare.
Nota: per i primi tre cicli, il ghiaccio può essere di piccole dimensioni e irregolare, o
addirittura assente.
4° passaggio
Se si accende l'indicazione ADD WATER (aggiungere acqua), estrarre il cestello e
aggiungere l'acqua come indicato al 2° passaggio.
5° passaggio
Se l'indicazione ICE FULL (cestello del ghiaccio pieno) si accende, togliere il
ghiaccio con la paletta.
Nota: quando il cestello del ghiaccio è pieno, rimuovere immediatamente il
ghiaccio. Non lasciare che la vaschetta di raccolta del ghiaccio si riempia troppo.
6° passaggio
Premere il tasto SHAVED ICE (ghiaccio tritato) per tritare il ghiaccio.
Nota: prima di premere questo tasto, mettere una quantità suciente di ghiaccio
nella ciotola del ghiaccio tritato e chiudere bene il coperchio della ciotola.
7° passaggio
Premere il tasto ICE per arrestare il dispositivo.
8° passaggio
Posizionare un recipiente sotto il dispositivo, quindi tirare il dispositivo un po' in
avanti e rimuovere il tappo di scarico al centro del serbatoio per scaricare l'acqua.
9° passaggio
Se si vuole togliere il tubo, come indicato sopra, prima togliere l'anello blu
denominato A (se presente), poi premere l'anello bianco (blocco) sul lato esterno
denominato B e inne togliere il tubo.

40
IT
PULIZIA E MANUTENZIONE
• Pulire frequentemente il rivestimento interno, la vaschetta di raccolta del
ghiaccio, il contenitore dell'acqua, la paletta del ghiaccio e l'evaporatore. Per
procedere alla pulizia, staccare la spina e rimuovere i cubetti di ghiaccio.
Utilizzare una soluzione diluita di acqua e aceto per pulire la supercie
interna ed esterna della macchina del ghiaccio. Non spruzzare sulla macchina
del ghiaccio prodotti chimici o agenti diluiti come acidi, benzina o olio.
Risciacquare accuratamente prima di riprendere l'uso.
• Tenere libere le aperture di ventilazione sull'alloggiamento del dispositivo
o nella struttura integrata. Non utilizzare dispositivi meccanici o altri mezzi
per accelerare il processo di sbrinamento, se non quelli raccomandati dal
produttore.
• Per garantire l'igiene dei cubetti di ghiaccio, si consiglia di sostituire l'acqua
nel serbatoio ogni 24 ore.
• Se il compressore si arresta per qualsiasi motivo, ad esempio per mancanza
d'acqua, eccesso di ghiaccio, interruzione dell'alimentazione, ecc. non avviare
subito il sistema, attendere 3 minuti e riavviare la macchina del ghiaccio.
• Utilizzare sempre acqua fresca prima di avviare la produzione di ghiaccio,
sia al momento dell'installazione iniziale sia dopo un lungo periodo di non
utilizzo.
• Questo dispositivo è adatto solo per uso domestico, non per uso esterno; se
è necessario utilizzarla all'esterno, assicurarsi che la nestra semitrasparente
sia chiusa.

41
IT
RISOLUZIONE DEI PROBLEMI
1 Se si verica un'interruzione dell'alimentazione dovuta allo scollegamento
del cavo o se il tasto di spegnimento è stato premuto durante un ciclo di
produzione del ghiaccio, è possibile che si formino piccoli frammenti di
ghiaccio che si depositano nella pala automatica causandone l'inceppamento.
In tal caso, è possibile rimuovere i frammenti di ghiaccio scollegando il cavo di
alimentazione e spingendo delicatamente la pala verso la parte posteriore del
dispositivo, rimuovendo i frammenti di ghiaccio e riavviando la macchina.
2 Riavviare la macchina del ghiaccio premendo Stop e poi Start. Se la pala non
spinge il ghiaccio nel raccoglitore dopo che il ghiaccio prodotto è caduto
dell'evaporatore e contemporaneamente si accende la spia M, vericare se
la vaschetta dell'acqua è orizzontale o in bilico. In caso contrario, regolare
premendo leggermente la pala del ghiaccio con un dito. Quindi riavviare la
macchina del ghiaccio.
Problema Causa Soluzione
Il compressore funziona
in modo anomalo con un
ronzio.
La tensione è inferiore a
quella raccomandata
Arrestare la macchina
del ghiaccio e non
riavviarla nché la
tensione non è normale.
Condizioni per la
produzione di ghiaccio
Il ciclo funziona
correttamente, ma non
viene prodotto ghiaccio.
Perdite di refrigerante.
Il sistema sigillato è
bloccato.
Contattare il servizio di
assistenza ai clienti.
Le spie per il contenitore
del ghiaccio pieno
e l'aggiunta di
acqua si accendono
contemporaneamente.
La vaschetta dell'acqua
è bloccata da un cubetto
di ghiaccio.
Rimuovere il cubetto
di ghiaccio sotto la
pala, estrarre la spina
e reinserirla, quindi
premere il tasto ICE;
dopo 3 minuti la
macchina si riavvia
automaticamente.
La macchina continua a
funzionare, ma l'acqua è
più calda del normale.
La valvola magnetica è
rotta.
Sostituire la valvola
magnetica.
42
IT
AVVISO DI SMALTIMENTO
Se nel vostro Paese vige una normativa sullo smaltimento
dei dispositivi elettrici ed elettronici, questo simbolo sul
prodotto o sulla confezione indica che il prodotto non
deve essere smaltito nei riuti domestici. Deve invece
essere portato in un punto di raccolta per il riciclaggio
di dispositivi elettrici ed elettronici. Smaltendoli secondo
le regole, si tutela l'ambiente e la salute del prossimo da
conseguenze negative. Per informazioni sul riciclaggio e
lo smaltimento di questo prodotto, contattare le autorità
locali o il servizio di smaltimento dei riuti domestici.
Questo prodotto contiene batterie. Se nel vostro Paese
vige una normativa sullo smaltimento delle batterie,
queste non devono essere smaltite con i riuti domestici.
Informarsi sulle norme locali per lo smaltimento delle
batterie. Smaltendole secondo le regole, si tutela
l'ambiente e la salute del prossimo da conseguenze
negative.
PRODUTTORE E IMPORTATORE (REGNO UNITO)
Produttore:
Chal-Tec GmbH, Wallstrasse 16, 10179 Berlino, Germania.
Importatore per la Gran Bretagna:
Berlin Brands Group UK Limited
PO Box 42
272 Kensington High Street
London, W8 6ND
United Kingdom

43
ES
ÍNDICE
Estimado cliente:
Enhorabuena por la compra de este aparato. Lea
atentamente las siguientes instrucciones y sígalas para
evitar daños. No asumimos ninguna responsabilidad
por los daños causados por la inobservancia de las
instrucciones y el uso indebido. Escanee el código QR
para acceder al manual de usuario más reciente y a más
información sobre el producto.
DATOS TÉCNICOS
Número de artículo 10046440
Producción diaria de hielo 15 kg/24 h
Capacidad de almacena-
miento de hielo
1 kg
Capacidad del depósito de
agua
1.8 L
Refrigerante R290
Forma de hielo Bala
Dimensiones 310*400*420 mm
Instrucciones de seguridad 44
Descripción del producto 46
Funcionamiento del panel de control 47
Instrucciones de uso 48
Limpieza y cuidado 50
Solución de problemas 51
Consideraciones sobre la eliminación 52
Fabricante e importador (Reino Unido) 52

44
ES
INSTRUCCIONES DE SEGURIDAD
Con el n de evitar cualquier accidente, por favor reérase a la siguiente
operación:
• Desconecte la alimentación antes de realizar el mantenimiento.
• No tire directamente del cable al enchufar o desenchufar la unidad.
• Si el hielo es anormal, llame al vendedor.
• Es normal que el compresor y la supercie del condensador alcancen
temperaturas entre 70°C y 90°C durante el funcionamiento y las zonas
circundantes pueden estar calientes. Por favor, no lo toques.
• Debido a la rápida congelación, los cubitos de hielo pueden parecer "turbios".
Se trata de aire atrapado en el agua que no afecta a la calidad ni al sabor del
hielo.
• Cuando no se utilice, abra el cajón al menos 2 cm para permitir la circulación
del aire y evitar que se oxiden los componentes metálicos.
• Este aparato puede ser utilizado por niños a partir de 8 años y personas
con capacidades físicas, sensoriales o mentales reducidas, o con falta de
experiencia y conocimientos, si han recibido supervisión o instrucciones
relativas al uso del aparato por parte de una persona responsable de su
seguridad.
• Los niños no deben jugar con el aparato,
• La limpieza y el mantenimiento del usuario no deben ser realizados por niños
sin supervisión.
• Si el cable de alimentación está dañado, debe ser sustituido por el fabricante,
su agente de servicio o una persona con cualicación similar para evitar
riesgos.
• Por favor, siga la normativa local en cuanto a la eliminación del aparato por su
gas inamable de soplado. Antes de desguazar el aparato, retire las puertas
para evitar que los niños queden atrapados.
• Este aparato está destinado a ser utilizado en aplicaciones domésticas y
similares, tales como
- zonas de cocina del personal en tiendas, ocinas y otros entornos de
trabajo;
- granjas y por clientes de hoteles, moteles y otros entornos de tipo
residencial;
- entornos tipo bed and breakfast;
- restauración y aplicaciones no comerciales similares.
• No guarde en este aparato sustancias explosivas como aerosoles con
propelente inamable.
• Los niños de 3 a 8 años pueden cargar y descargar aparatos frigorícos.
• La apertura prolongada de la puerta puede provocar un aumento signicativo
de la temperatura en los compartimentos del aparato.
• Limpie regularmente las supercies que puedan entrar en contacto con los
alimentos y los sistemas de desagüe accesibles.
• Limpiar los depósitos de agua si no se han utilizado durante 48 h.
• Si el aparato frigoríco se deja vacío durante mucho tiempo, apáguelo,
descongélelo, límpielo, séquelo y deje la puerta abierta para evitar que se

45
ES
forme moho dentro del aparato.
• Al colocar el aparato, asegúrese de que el cable de alimentación no quede
atrapado ni sufra daños.
• No coloque varias tomas de corriente portátiles o fuentes de alimentación
portátiles en la parte trasera del aparato.
• Llenar sólo con agua potable o conectar sólo al suministro de agua potable.
• Mantenga las aberturas de ventilación, en la caja del aparato o en la
estructura empotrada, libres de obstrucciones.
• No utilice dispositivos mecánicos u otros medios para acelerar el proceso de
descongelación que no sean los recomendados por el fabricante.
• No dañe el circuito de refrigerante.
• No utilice aparatos eléctricos dentro de los compartimentos de
almacenamiento de alimentos del aparato, a menos que sean del tipo
recomendado por el fabricante.
• Riesgo de incendio / materiales inamables, teniendo cuidado de no provocar
un incendio por ignición de material inamable.
• Deben utilizarse los juegos de mangueras nuevos suministrados con el
aparato y no deben reutilizarse los viejos.

46
ES
DESCRIPCIÓN DEL PRODUCTO
1 Tapa superior delantera
2 Visualización de una ventana
semitransparente
3 Portada
4 Cubierta del ventilador
5 Panel de control
6 Toma Puerta de hielo raspado
7 Contraportada
8 Oricio de refrigeración de la tapa
trasera
9 Cable de alimentación y enchufe
10 Entrada de agua del grifo
47
ES
Antes/primer uso de la máquina de hielo
• Durante el transporte, el ángulo de inclinación del armario no debe superar
los 45°. No ponga la máquina de hielo boca abajo. Ya que esto puede dañar el
compresor y el sistema sellado.
• Retire todo el material de embalaje y compruebe cuidadosamente su máquina
de hielo para asegurarse de que está en buenas condiciones y que no hay
daños en la máquina de hielo o en el cable de alimentación y el enchufe.
• La máquina de hielo debe colocarse horizontalmente sobre una supercie
nivelada. Para garantizar una ventilación adecuada de la máquina de hielo,
deje un espacio de 150 mm en la parte superior, en la parte posterior y a cada
lado. No instale la máquina de hielo cerca de un horno, radiador o cualquier
otra fuente de calor.
• Antes de utilizar la máquina de hielo por primera vez, espere 2 horas después
de colocarla y mantenga la tapa frontal abierta durante al menos 2 horas
• Asegúrese de que el voltaje indicado en el fabricador de hielo se corresponde
con el voltaje de su vivienda.
• No se permite el uso de agua pura en esta unidad, se recomienda agua de
manantial.
• Mantenga siempre cerrada la mirilla durante la fabricación de hielo.
FUNCIONAMIENTO DEL PANEL DE CONTROL
Pulse este botón para hacer hielo picado.
Antes de pulsar este botón, pon suciente hielo
en el bol y cubre bien la tapa del bol.
Unidad en proceso de fabricación de hielo si se
enciende sin ash
Se enciende cuando la cesta de hielo está llena.
Se enciende cuando el agua del depósito es
insuciente.
Pulsa para iniciar la fabricación de hielo.
48
ES
INSTRUCCIONES DE USO
Paso 1
Conectar la manguera de drenaje
El hielo picado puede derretirse, por lo que se recomienda encarecidamente
conectar una manguera de drenaje en la parte inferior de la unidad. Los pasos son
los siguientes.
tubo de desagüe Salida de desagüe del depósito
de agua en la parte inferior de
la máquina
Paso 2
Añada agua manualmente: Abra la tapa, saque la cesta de hielo y llene el
depósito de agua.
Nota: Asegúrese de que el agua no sobrepasa el fondo de la cubeta de recogida
de hielo.
Añadir agua por llenado automático: conecte el tubo de la parte posterior de la
unidad al grifo de agua directamente.
Paso 3
Pulse el botón ICE para encender la unidad. La máquina de hielo empieza a
funcionar.
tubo de llenado de agua

49
ES
Nota: Durante los tres primeros ciclos, es posible que el hielo sea pequeño y de
tamaño irregular, o incluso que no haya hielo.
Paso 4
Si se enciende el indicador ADD WATER, saque la cesta y añada agua como se
indica en el paso 2.
Paso 5
Si se enciende el indicador ICE FULL, saque el hielo con la pala.
Nota: Cuando la cesta de hielo esté llena, retire el hielo inmediatamente. No
permita que la bandeja colectora de hielo se llene en exceso.
Paso 6
Pulse este botón SHAVED ICE para hacer hielo picado.
Nota: Antes de pulsar este botón, pon suciente hielo en el bol de hielo picado y
cierra bien la tapa del bol.
Paso 7
Pulse el botón ICE para detener la máquina.
Paso 8
Coloque un tanque debajo de la unidad, luego tire de la unidad un poco hacia
adelante, tire del tapón de drenaje en el centro del tanque para drenar el agua.
Paso 9
Si quiere quitar el tubo, haga un esquema como el anterior, primero quite el anillo
azul llamado A (si lo hay), luego presione el anillo blanco (bloqueo) en el lado
exterior llamado B. Por último, quite el tubo.

50
ES
LIMPIEZA Y CUIDADO
• Limpie con frecuencia el revestimiento interior, la bandeja colectora de
hielo, el depósito de agua, la pala de hielo y el evaporador. Cuando limpie ,
desenchufe la unidad y retire los cubitos de hielo. Utilice una solución diluida
de agua y vinagre para limpiar el interior y la supercie exterior de la máquina
de hielo. No rocíe la máquina de hielo con productos químicos o agentes
diluidos como ácidos, gasolina o aceite. Aclarar bien antes de empezar.
• Mantenga las aberturas de ventilación, en la caja del aparato o en la
estructura empotrada, libres de obstrucciones. No utilice dispositivos
mecánicos u otros medios para acelerar el proceso de descongelación que no
sean los recomendados por el fabricante.
• Para garantizar la limpieza de los cubitos de hielo, se recomienda sustituir el
agua del depósito cada 24 horas.
• Si el compresor se para por cualquier motivo, como falta de agua, demasiado
hielo, corte de corriente, etc. No arranque el sistema inmediatamente, espere
3 minutos y vuelva a arrancar la máquina de hielo.
• Utilice siempre agua dulce antes de iniciar la producción de hielo, ya sea en la
instalación inicial o después de un largo periodo de inactividad.
• Esta unidad es sólo para uso doméstico, no para uso al aire libre, si es
necesario para su uso fuera, por favor asegúrese de que la ventana de vista
está cerrada.
51
ES
SOLUCIÓN DE PROBLEMAS
1 Tenga en cuenta que, si se produce un fallo de alimentación debido a la
desconexión del cable de alimentación, o si se pulsa el botón de apagado
durante un ciclo de fabricación de hielo, pueden formarse pequeños trozos
de hielo que se alojen en la pala automática y provoquen su atasco. Si esto
ocurre, los trozos de hielo pueden retirarse desconectando el cable de
alimentación y empujando suavemente la pala hacia la parte trasera del
armario y retirando los trozos de hielo, para luego volver a arrancar.
2 Por favor, reinicie el fabricador de hielo pulsando Stop y luego Start. Si la
pala de hielo no empuja el hielo hacia el colector de hielo después de que el
hielo formado cae del dedo del evaporador y al mismo tiempo la luz M está
encendida, compruebe si la bandeja de agua está horizontal o equilibrada.
Si no es así, ajústela presionando ligeramente la pala de hielo con el dedo. A
continuación, vuelva a poner en marcha la máquina de hielo.
Problema Razón Solución
El compresor funciona
de forma anormal con
un zumbido.
La tensión es inferior a la
recomendada
Detenga la máquina
de hielo y no vuelva
a ponerla en marcha
hasta que la tensión sea
normal.
Condiciones para la
fabricación de hielo
El ciclo es correcto pero
no se hace hielo.
Fugas de refrigerante.
El sistema sellado está
bloqueado.
Llamada al servicio.
Las luces de hielo lleno y
añadir agua vienen en el
mismo tiempo.
La bandeja de agua está
bloqueada por un cubito
de hielo.
Despeje el cubo de hielo
debajo de la pala de
hielo saque el enchufe
e insértelo de nuevo
luego presione el botón
ICE, 3 minutos después
la máquina se reiniciará
automáticamente.
La máquina sigue
funcionando, pero el
agua está más caliente
que el agua normal.
La válvula magnética
está rota.
Sustituya la válvula
magnética.

52
ES
CONSIDERACIONES SOBRE LA ELIMINACIÓN
Si en su país existe una normativa legal para la
eliminación de aparatos eléctricos y electrónicos, este
símbolo en el producto o en el embalaje indica que este
producto no debe desecharse con la basura doméstica.
En su lugar, debe llevarse a un punto de recogida para
el reciclado de aparatos eléctricos y electrónicos. Al
deshacerse de ella de acuerdo con las normas, está
protegiendo el medio ambiente y la salud de sus
congéneres de las consecuencias negativas. Para obtener
información sobre el reciclaje y la eliminación de este
producto, póngase en contacto con las autoridades
locales o con el servicio de eliminación de residuos
domésticos.
Este producto contiene pilas. Si en su país existe una
normativa legal para la eliminación de pilas, éstas no
deben desecharse con la basura doméstica. Infórmate
sobre la normativa local para deshacerse de las pilas.
Al deshacerse de ella de acuerdo con las normas,
está protegiendo el medio ambiente y la salud de sus
congéneres de las consecuencias negativas.
FABRICANTE E IMPORTADOR (REINO UNIDO)
Fabricante:
Chal-Tec GmbH, Wallstrasse 16, 10179 Berlín, Alemania.
Importador para Gran Bretaña:
Berlin Brands Group UK Limited
Apartado de correos 42
272 Kensington High Street
Londres, W8 6ND
Reino Unido