
METAL FUEL CADDY
MODEL:JGC40
Technical Support and E-Warranty Certificate
www.vevor.com/support

- 1 -
MODEL:JGC40
This is the original instruction, please read all manual instructions carefully
before operating. VEVOR reserves a clear interpretation of our user
manual. The appearance of the product shall be subject to the product you
received. Please forgive us that we won't inform you again if there are any
technology or software updates on our product.
METAL FUEL CADDY

- 2 -
1. Read carefully and understand all ASSEMBLY AND OPERATION
INSTRUCTIONS before operating.
2. Failure to follow the safety rules and other basic safety precautions may
result in serious personal injury.
GENERAL SAFETY RULES
When using this product, basic precautions should always be followed,
including the following;
• This product is not intended for use by persons (including children) with
reduced physical, sensory or mental capabilities, or lack of experience
and knowledge, unless they have been given supervision or instruction
concerning using the product by a person responsible for their safety.
• Do not use this product for anything other than intended use.
• Wear proper protection equipment when installing or using this product.
• Ensure all fittings and threaded connections are tightened and leak-free
before operating.
A DANGER!
Fuels are extremely flammable. Keep away from heat sparks, and open
flame.
• Do not use electronics or mobile communications devices such as
mobile phones when pumping flammable liquids.
• Attach ground wire and bond containers that are being pumped from
and into. Ground all containers to a known ground source to dissipate
static electricity before pumping liquids.
• Fuel vapors can explode. Harmful or fatal if swallowed. Avoid breathing
in fuel vapors.
• Do not smoke near or while using the fuel caddy.
- 3 -
• This product is intended for fuel transfer only and is not intended to be
used to transport fuel in any vehicle or trailer.
• Do not modify this product.
A WARNING! CAUTION! ATTENTION!
• Do not use this product for prop-longed fuel storage.
• Use a caddy for one type of fuel only to avoid possible damage.
• Monitor flow rate and fill level to prevent overflows and spills.
• Always empty the pump and hose after using the caddy. Lift the hose
and turn the handle to the opposite direction to empty all remaining
liquid back into the caddy.
• Caution when filling the caddy through the fill tube. Monitor closely to
prevent overflows or spills.
• Never use the fuel caddy near open flames or heat sources.
SAVE THESE INSTRUCTIONS
MODEL AND PARAMETERS
Model
JGC40
Capacity
40 Gallons
Fuel Type
Gasoline, Diesel
Pump
Hand
Max. Flow
15 L/min,100rpm ;(4GPM)
Hose
Φ19(Inside Diameter)xL300cm
Wheel
2.5"(Front) ; 10"(Back)
Material
Steel
Color
Red
- 4 -
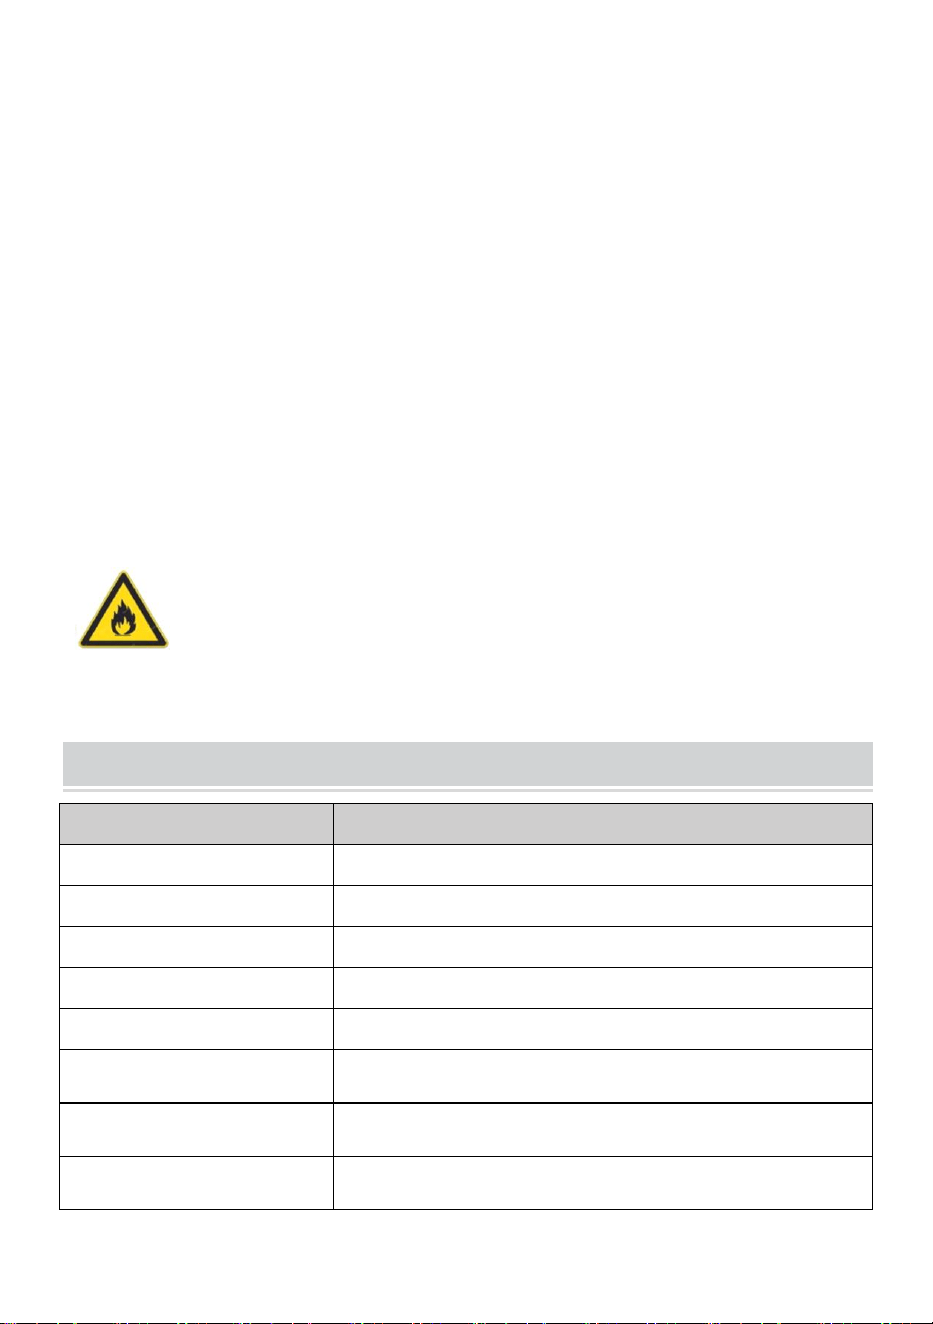
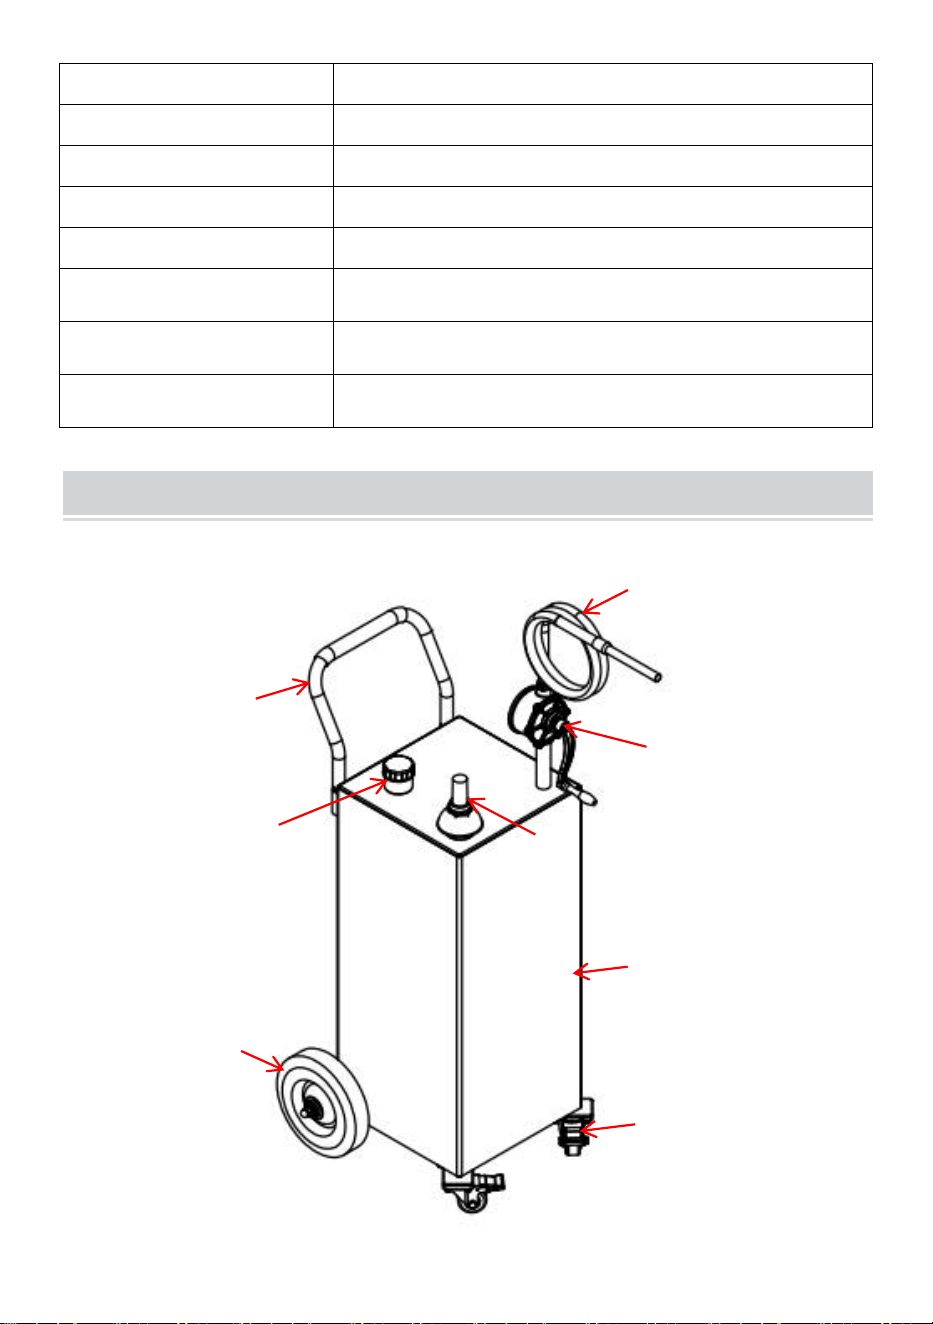
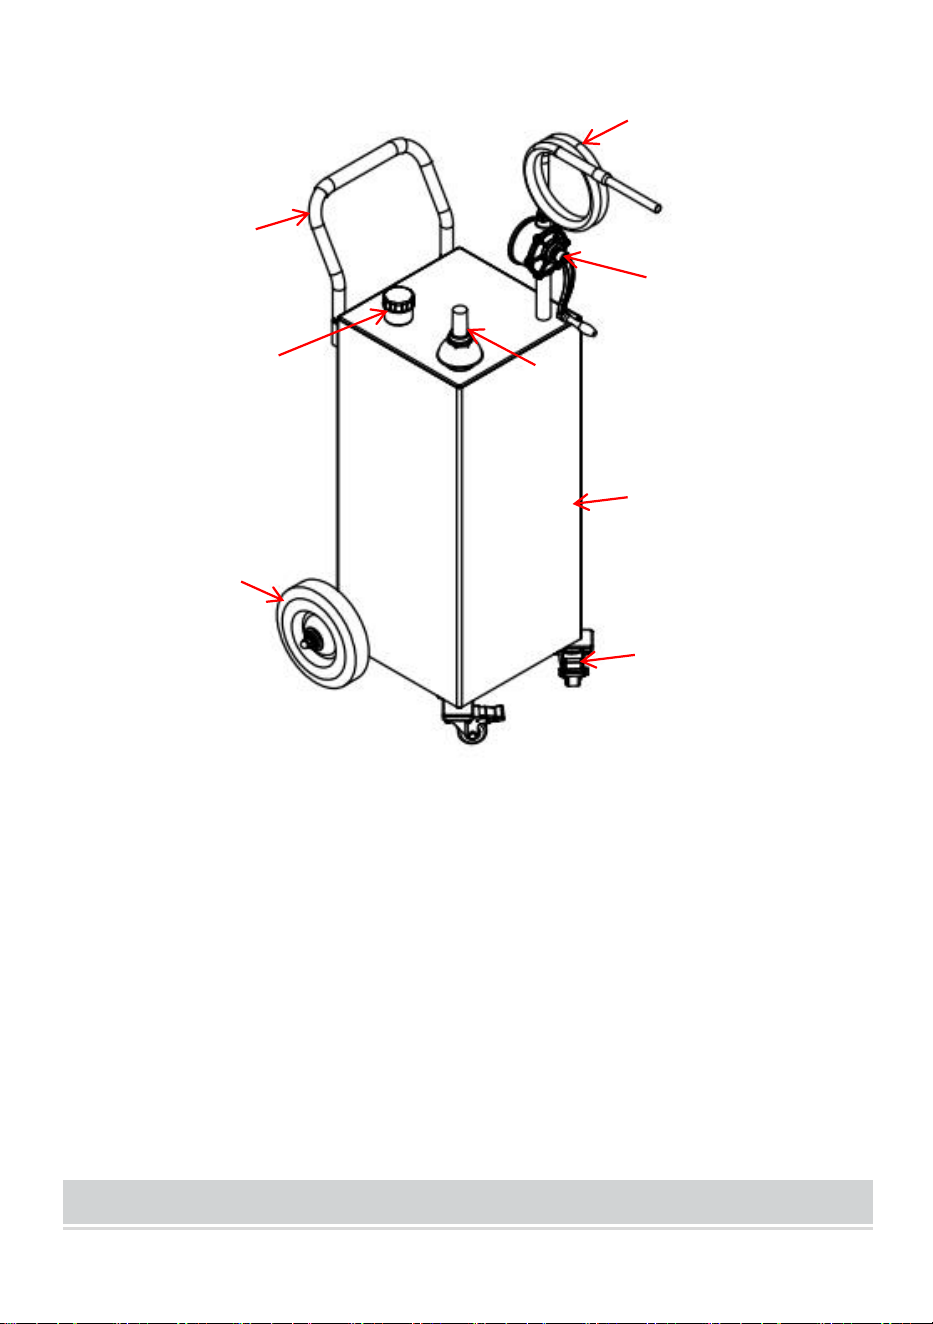
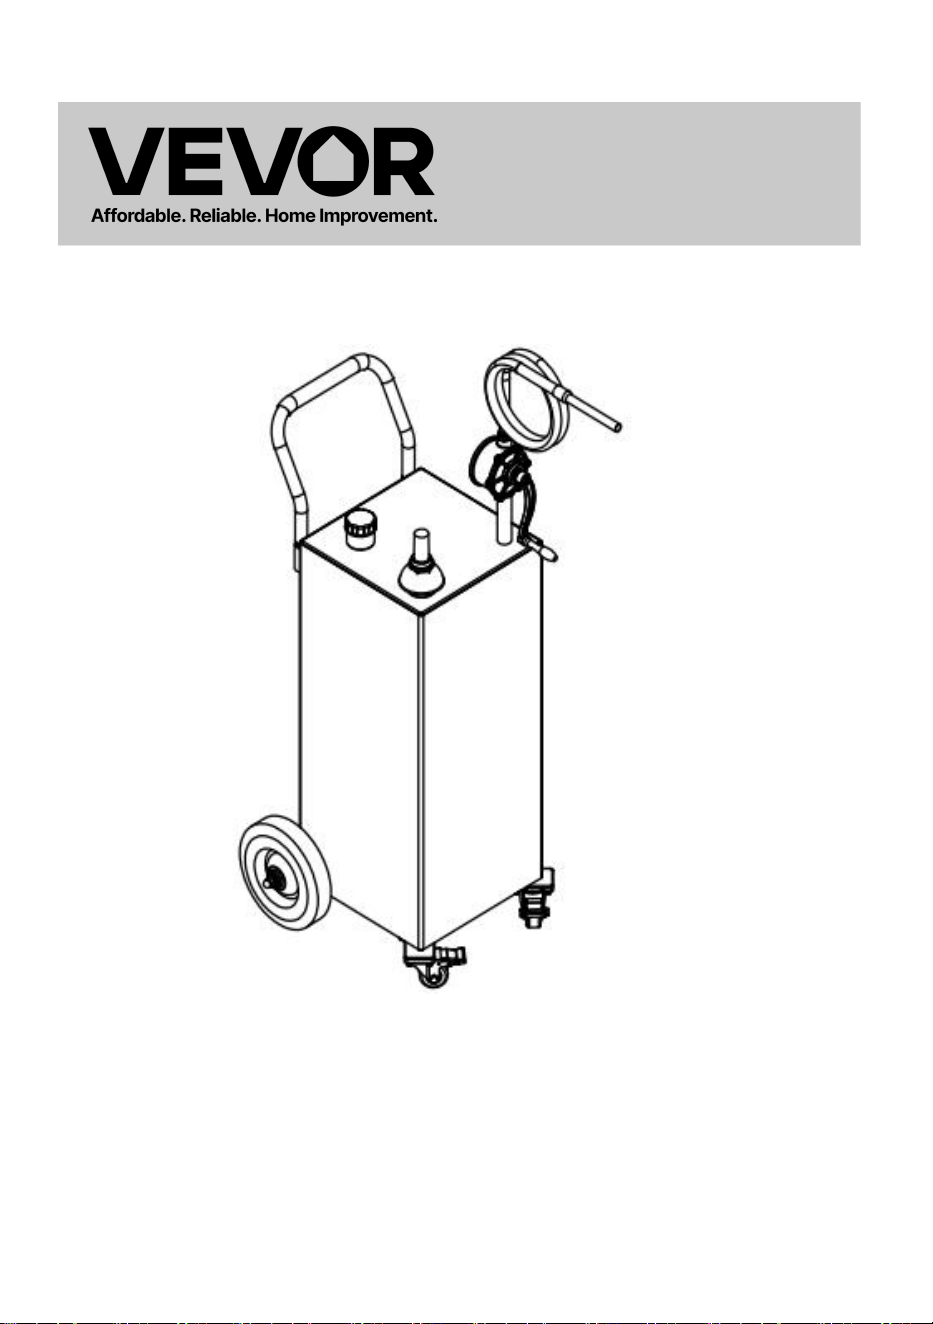
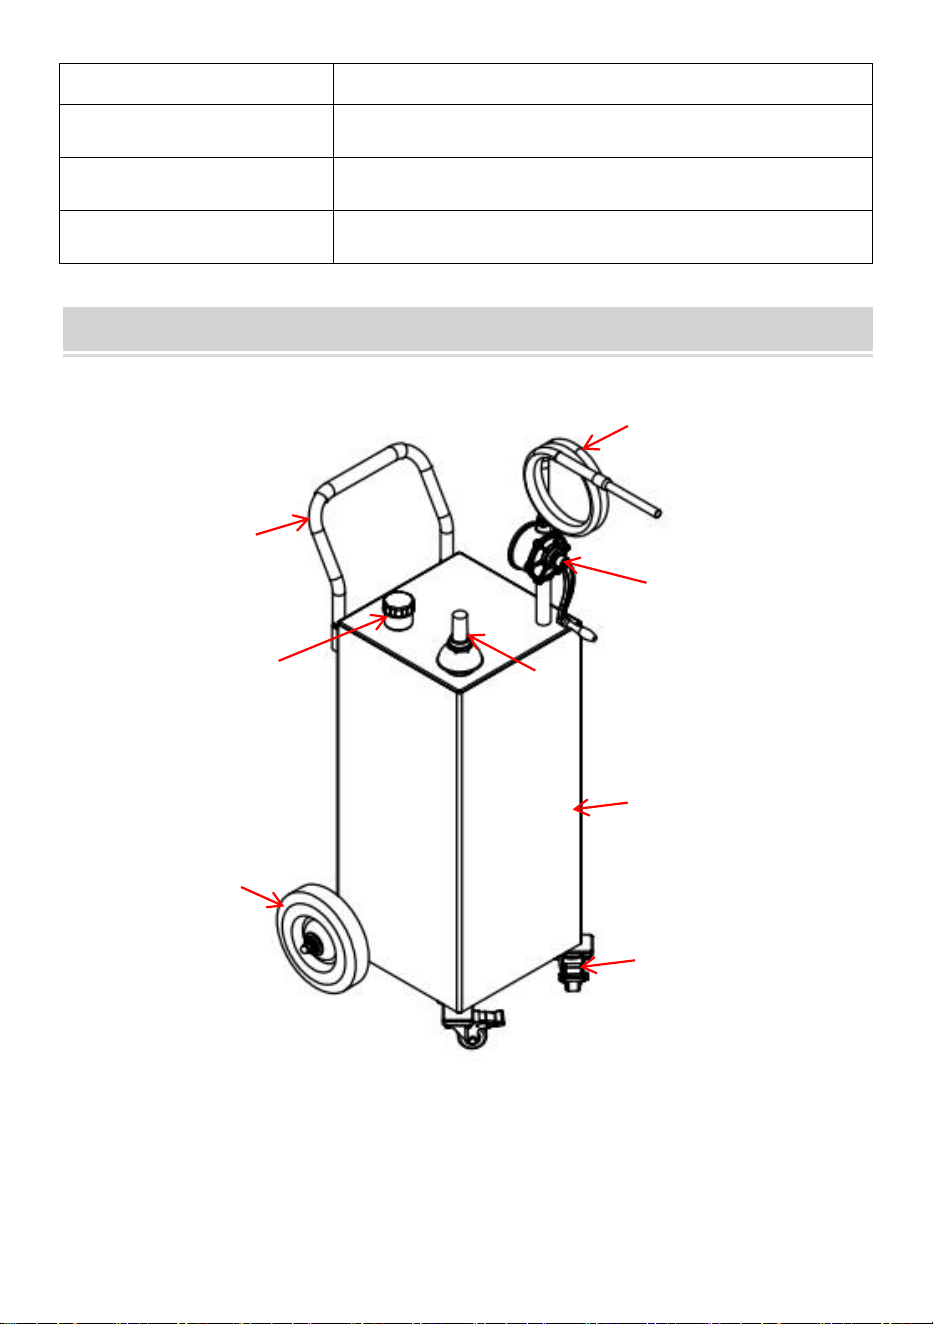
STRUCTURE DIAGRAM
1. Handle 2. Hose 3. Pump 4.Oil gauge 5.Fuel inlet Cap
6. Fuel Tank 7.Swivel Caster (Front) 8. Fixed Wheel
1
8
2
3
6
4
7
5
- 5 -
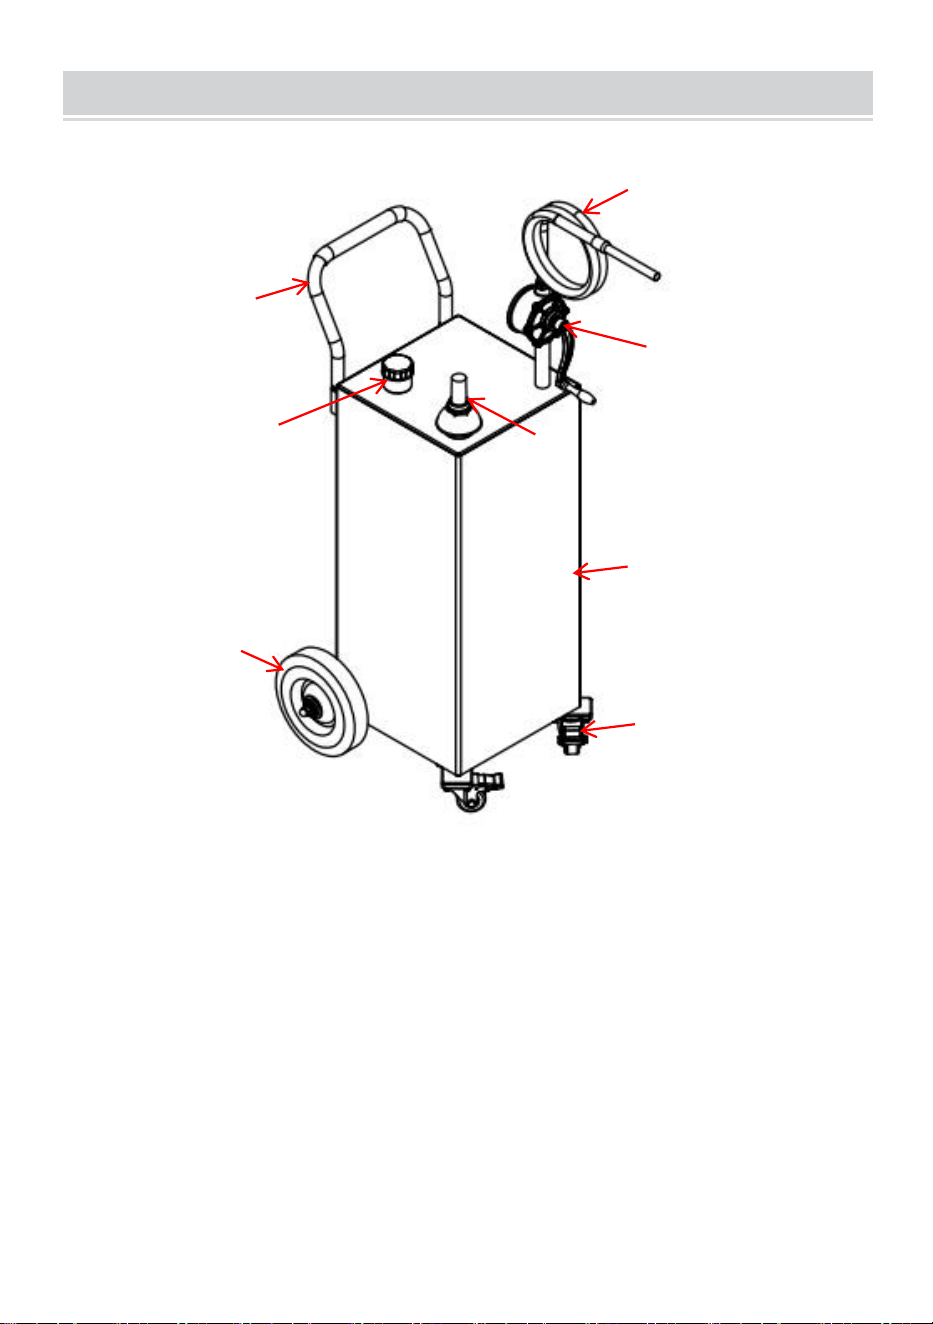
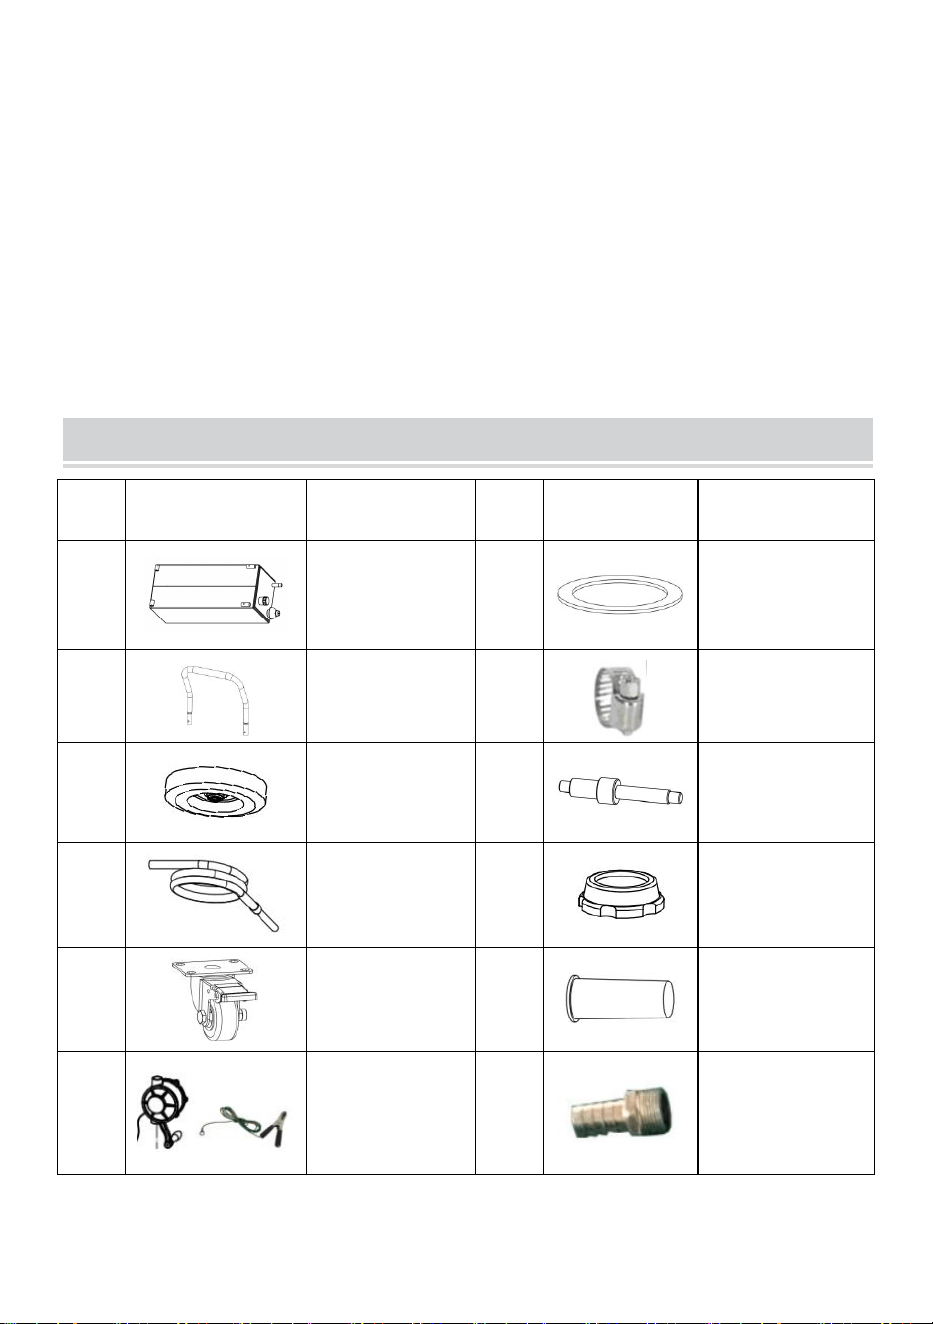
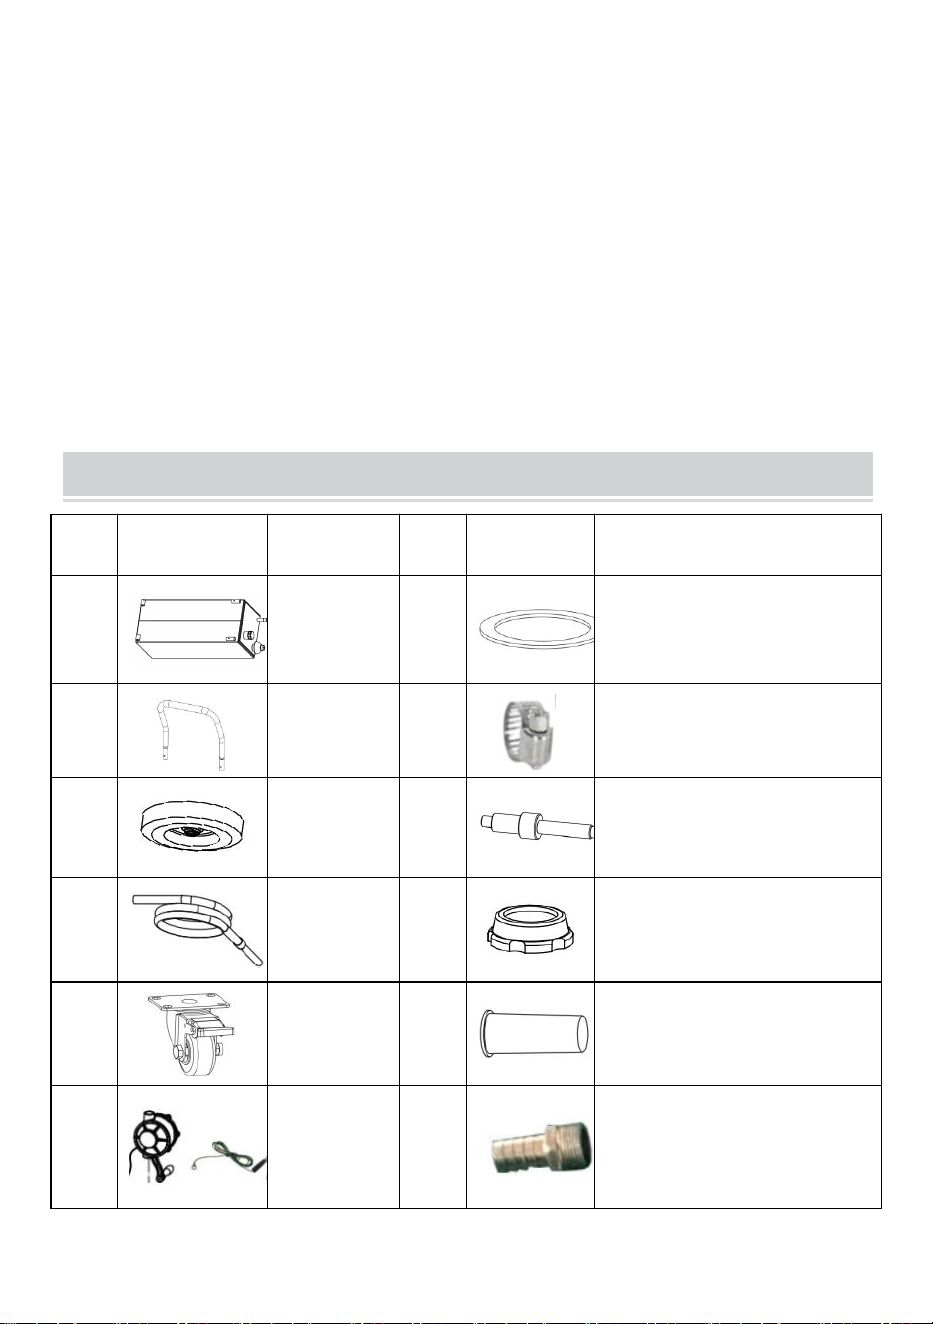
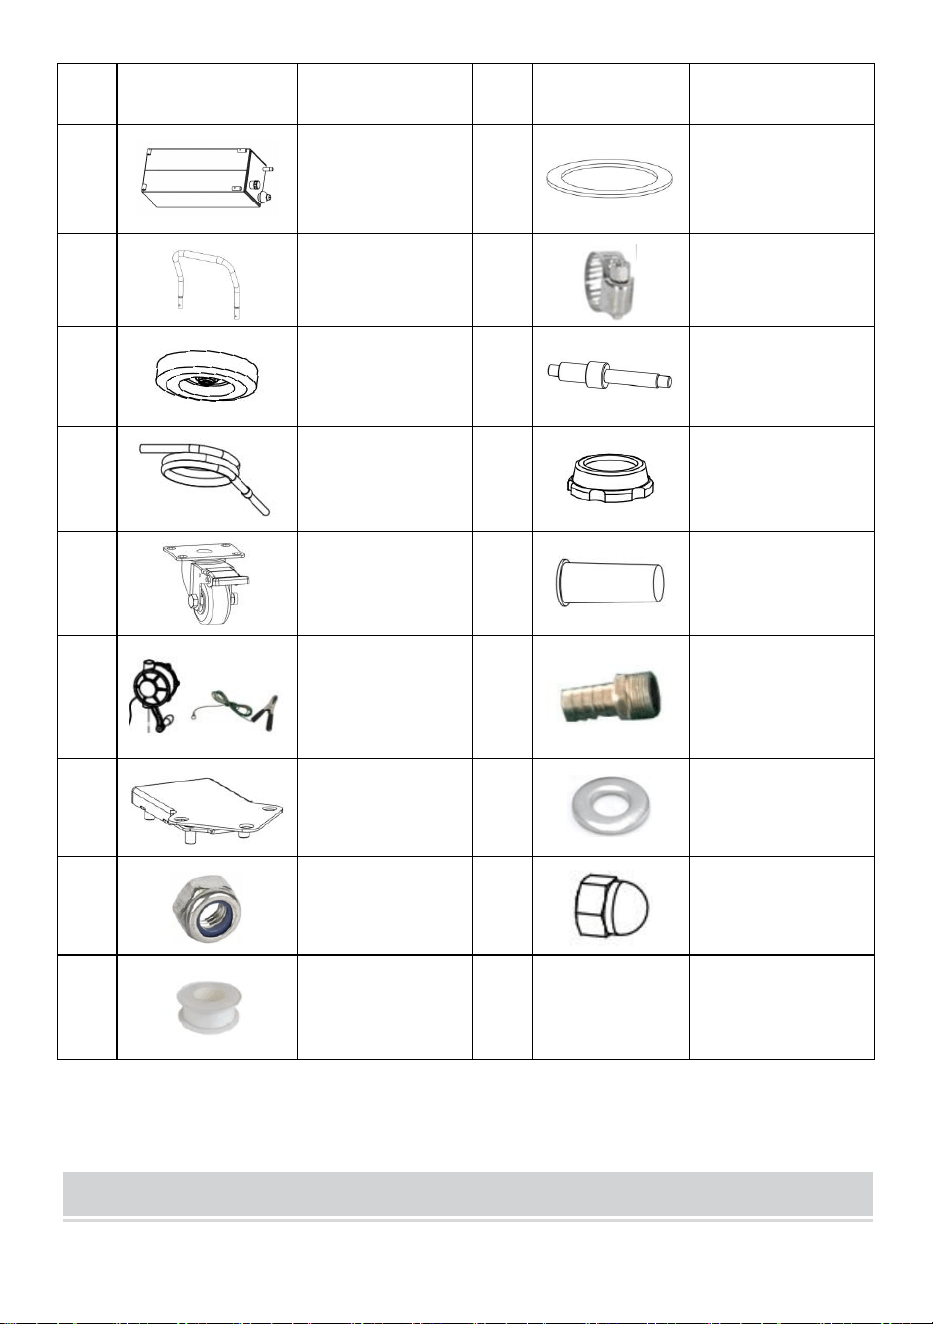
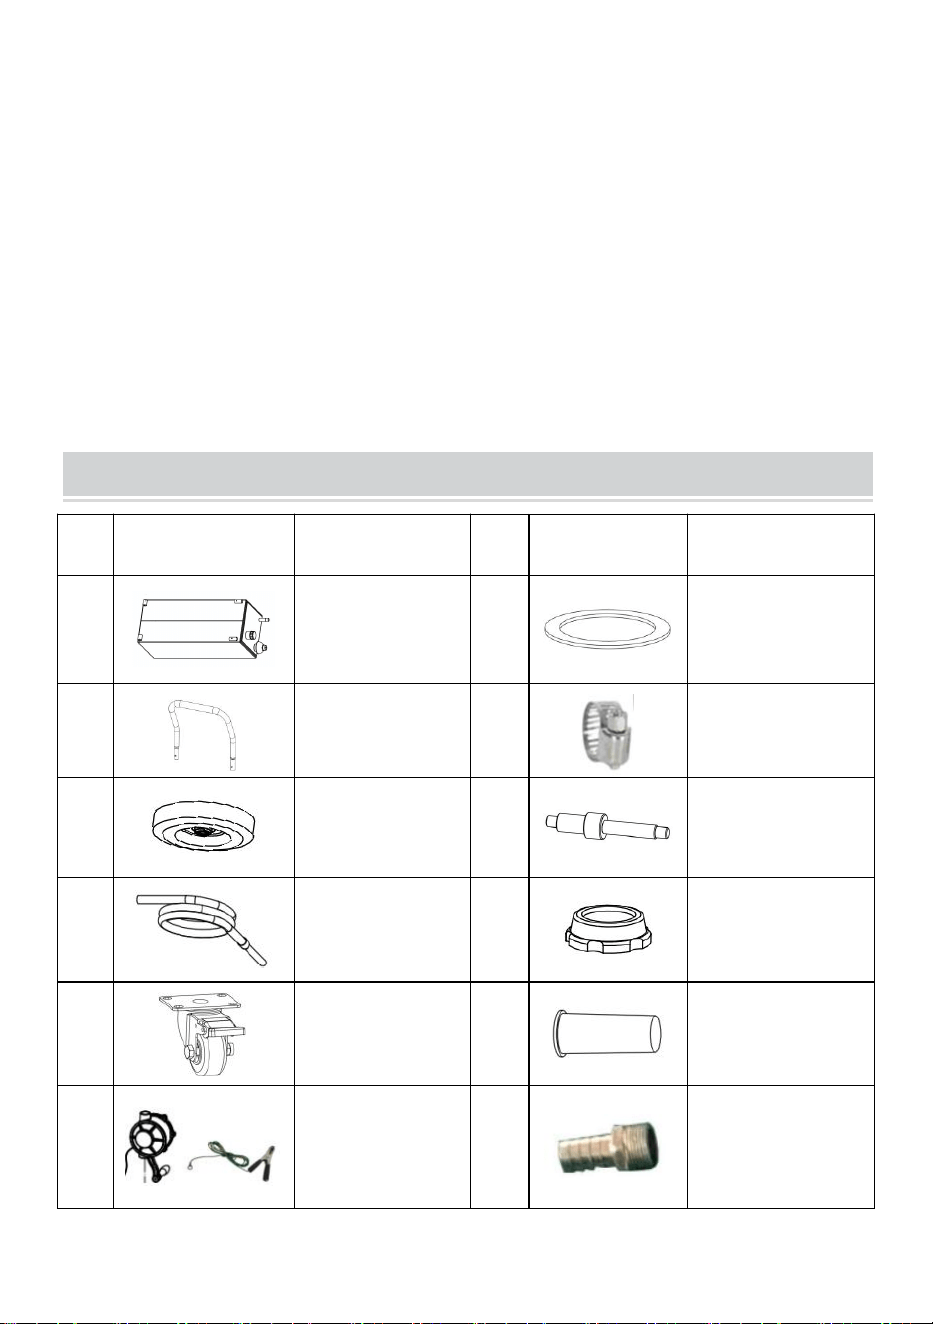
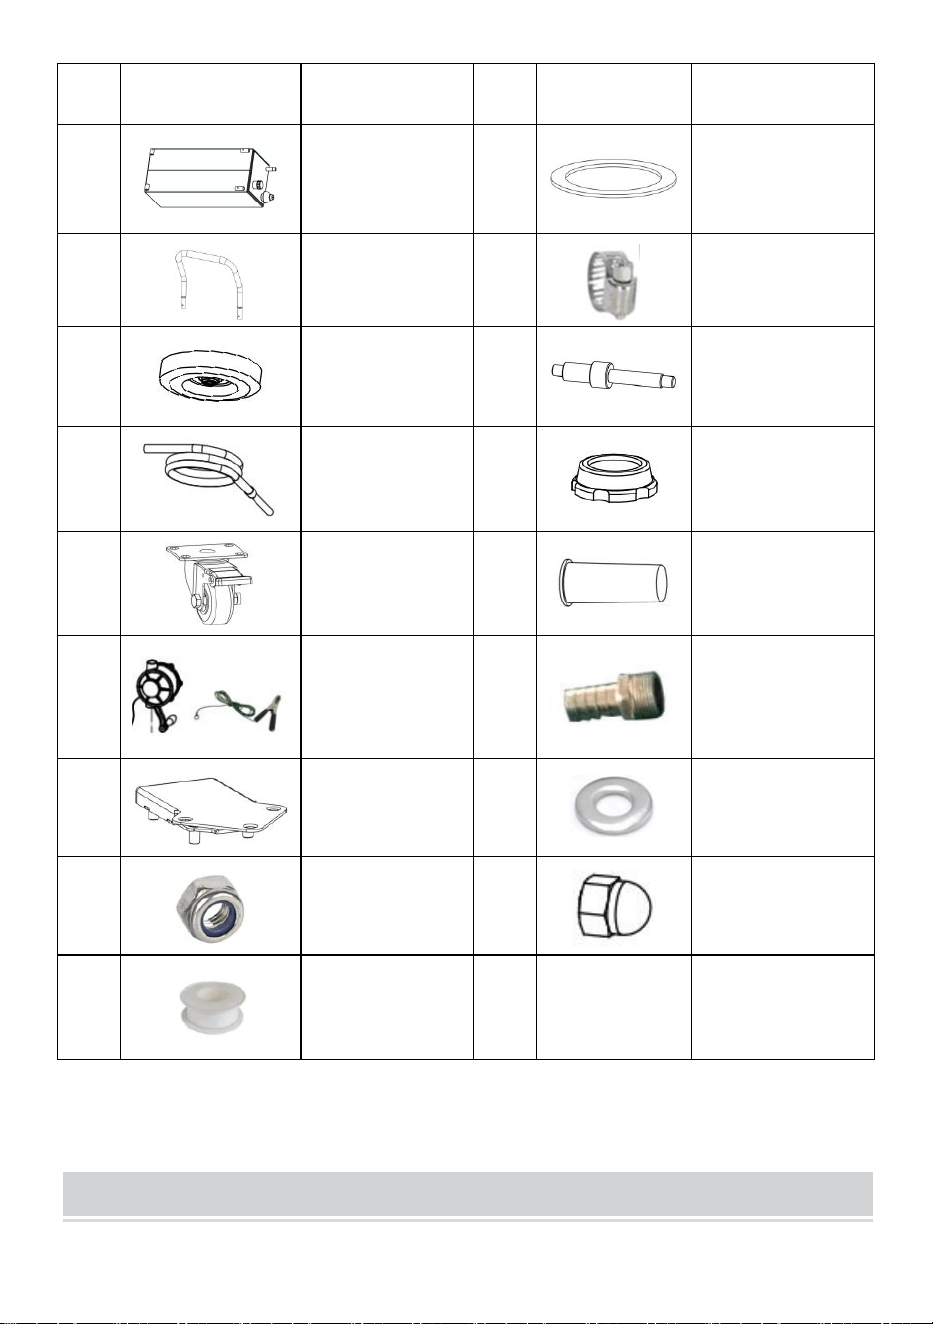
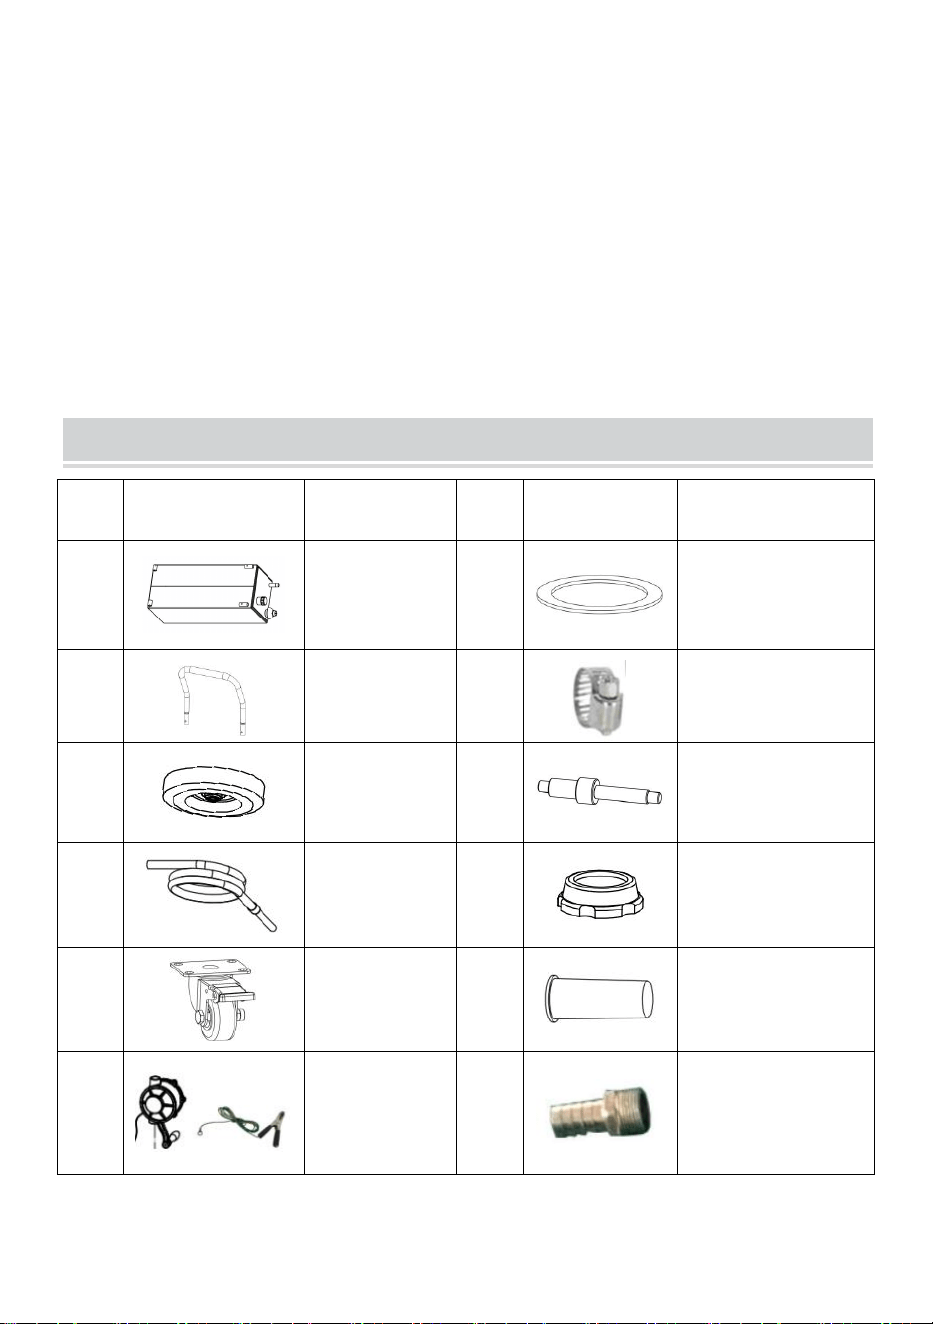
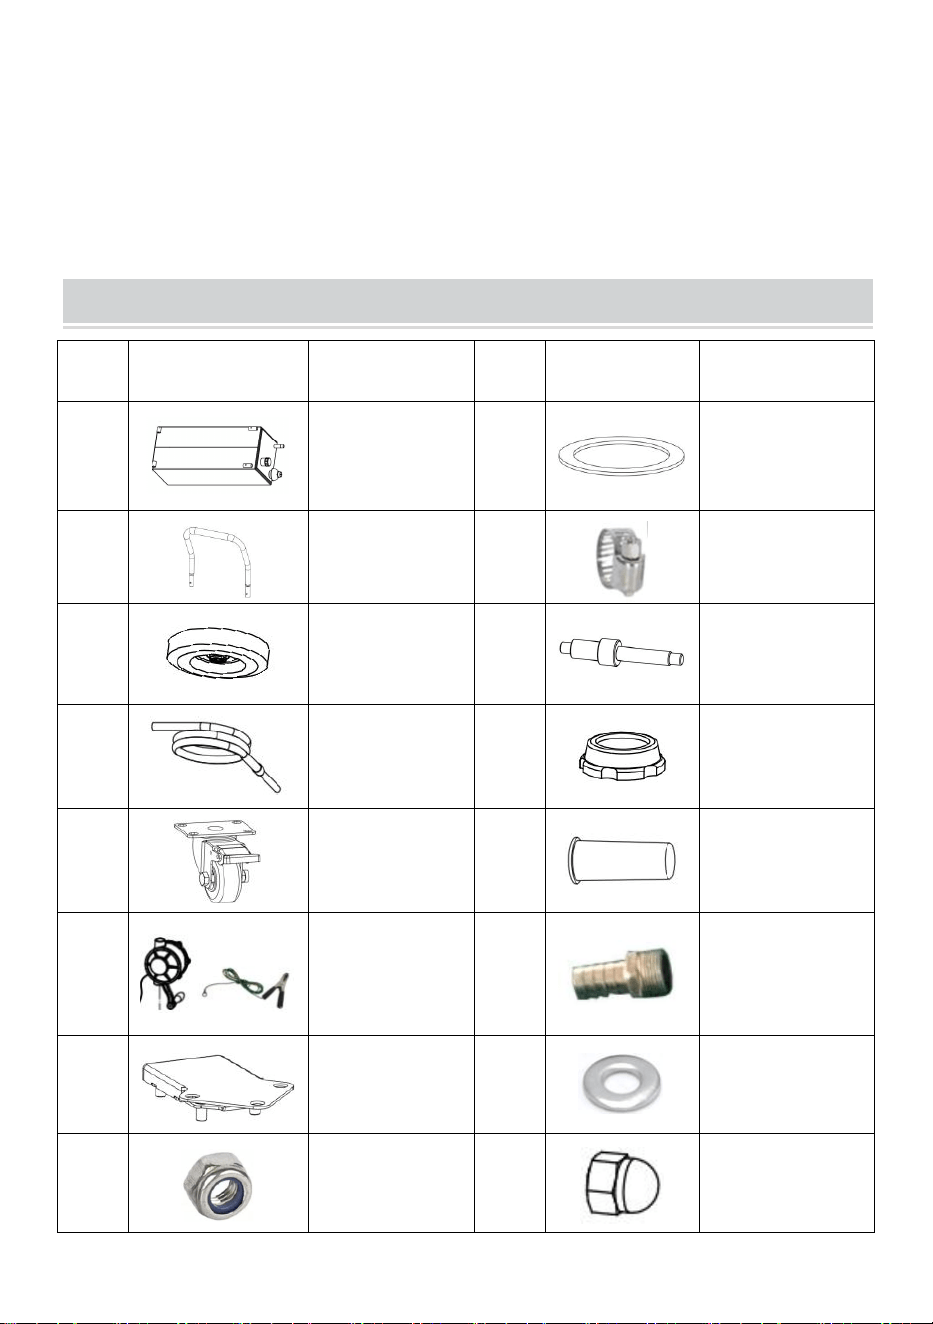
COMPONENTS
No.
Picture
Name and Qty
No.
Picture
Name and Qty
1
Fuel Tank(x1)
10
Lock Nut(x1)
2
Handle (x1)
11
Hose
Clamp(x1)
3
Wheel (x2)
12
Wheel shaft (x2)
4
Oil Hose (x1)
13
Oil Gauge Fixing
Nut(x1)
5
Swivel Caster
(x2)
14
Oil gauge (x1)
6
Oil Pump(with
handle and
ground lead) (x1)
15
Hose Fitting(x1)
7
Swivel Caster
Film (x2)
16
Flat Gasket(x2)
8
Nut M8 (x8)
17
Acorn Nut
M12(x2)
9
Raw Tape(x1)
18
/
User Manual(x1)
- 6 -
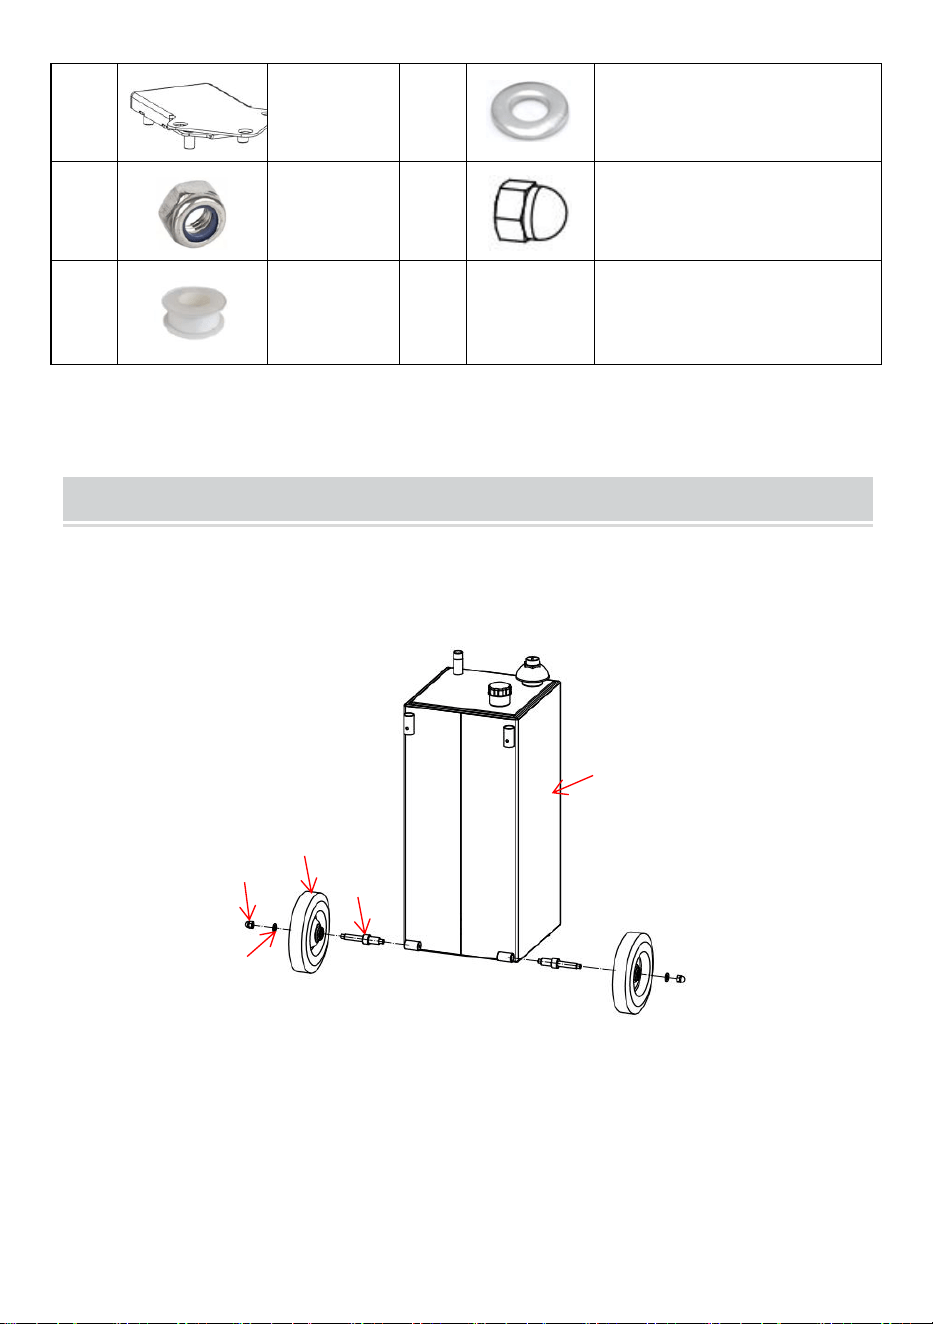
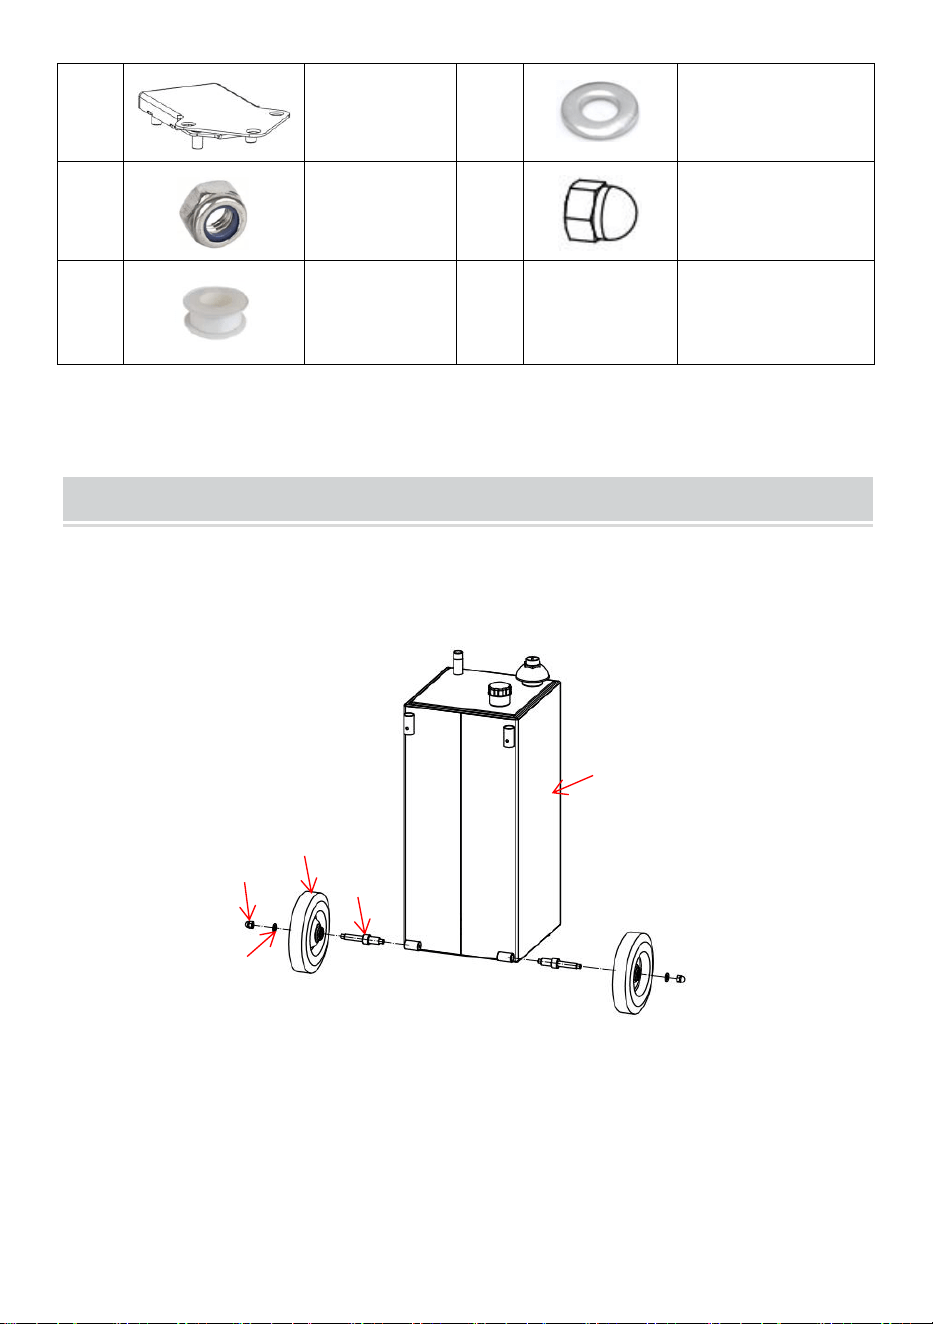
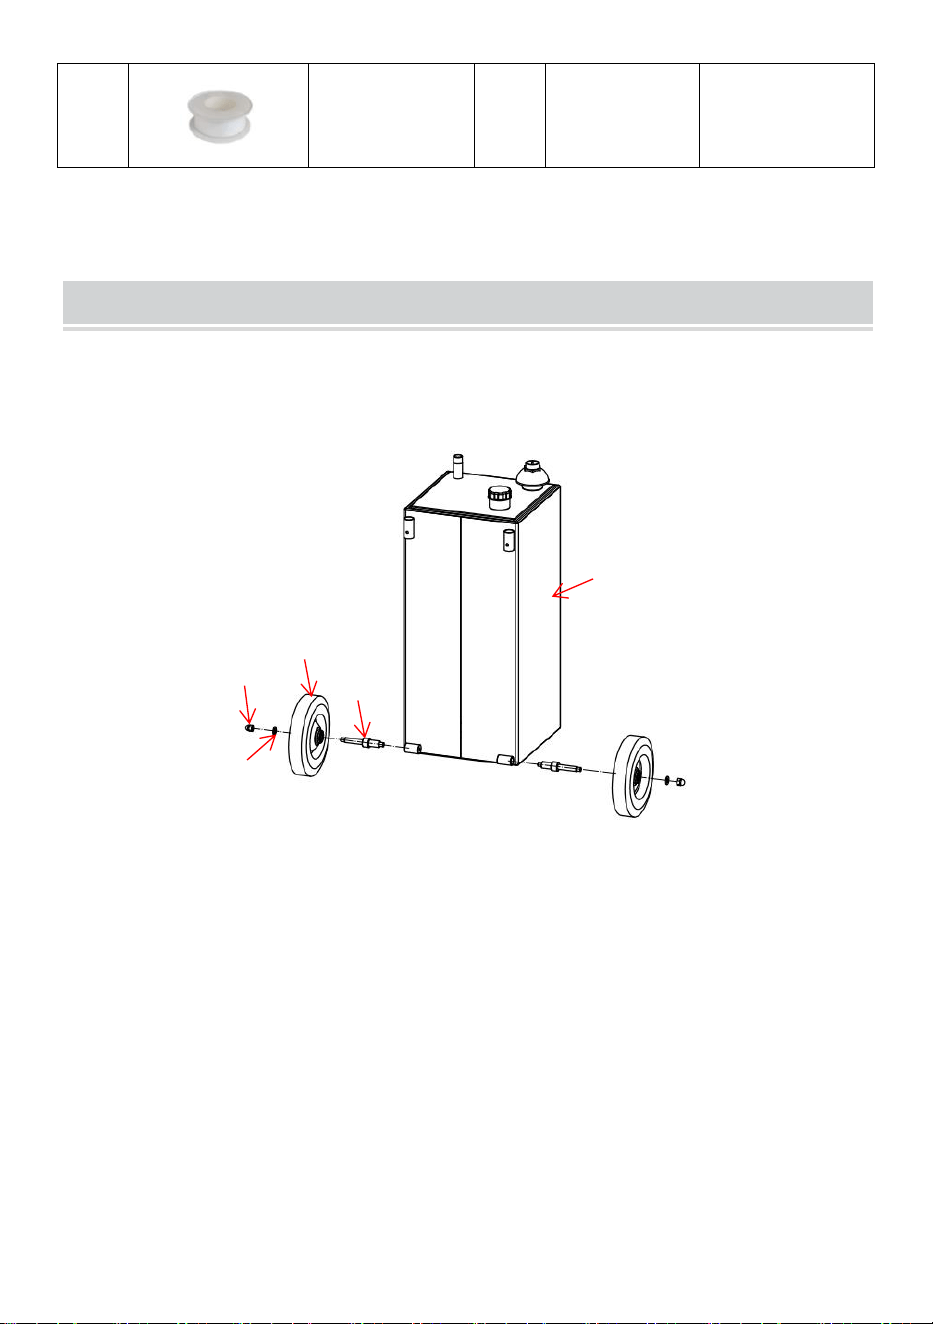
ASSEMBLY
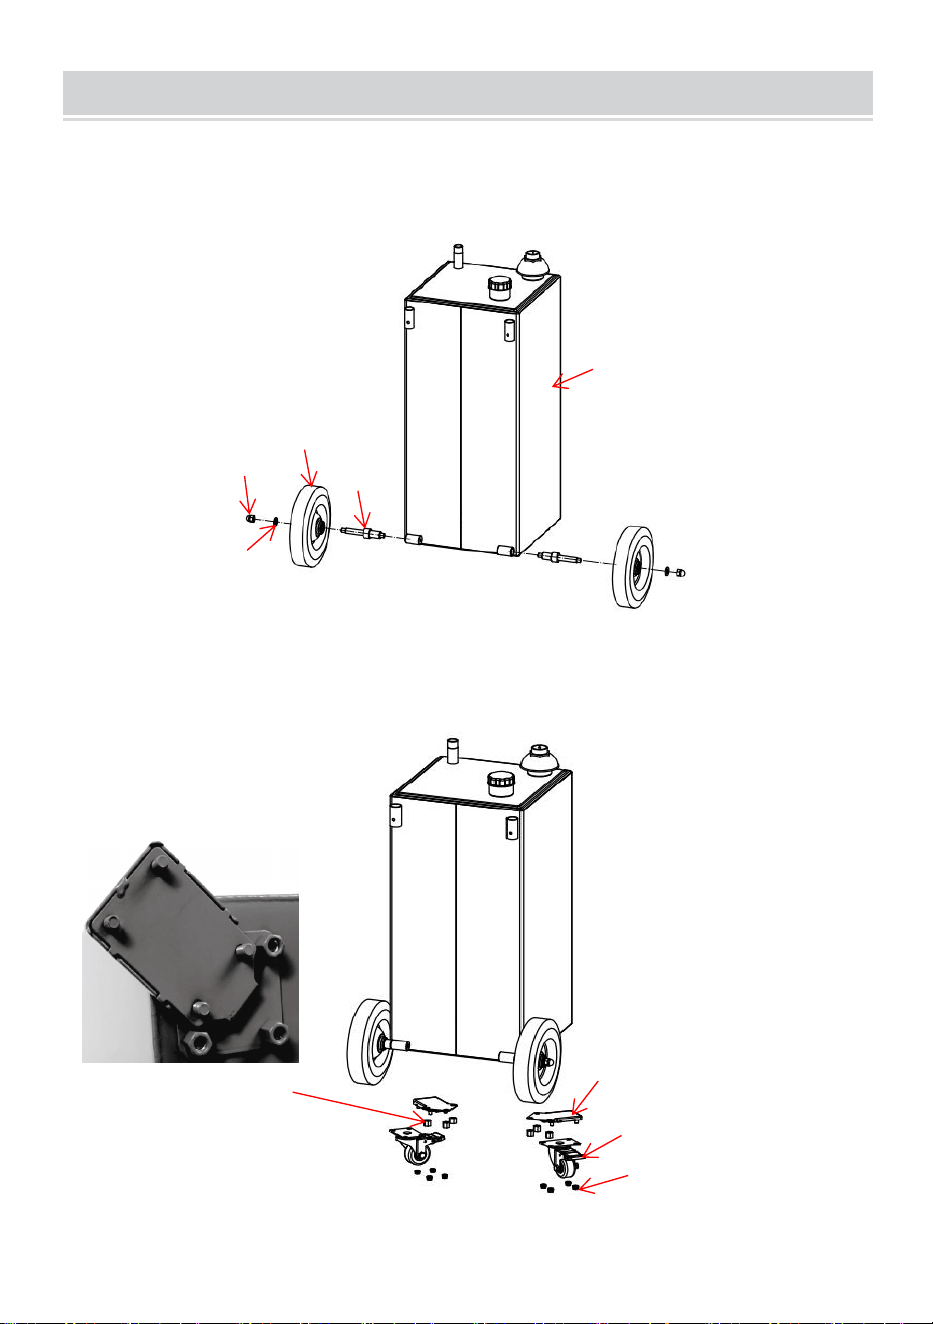
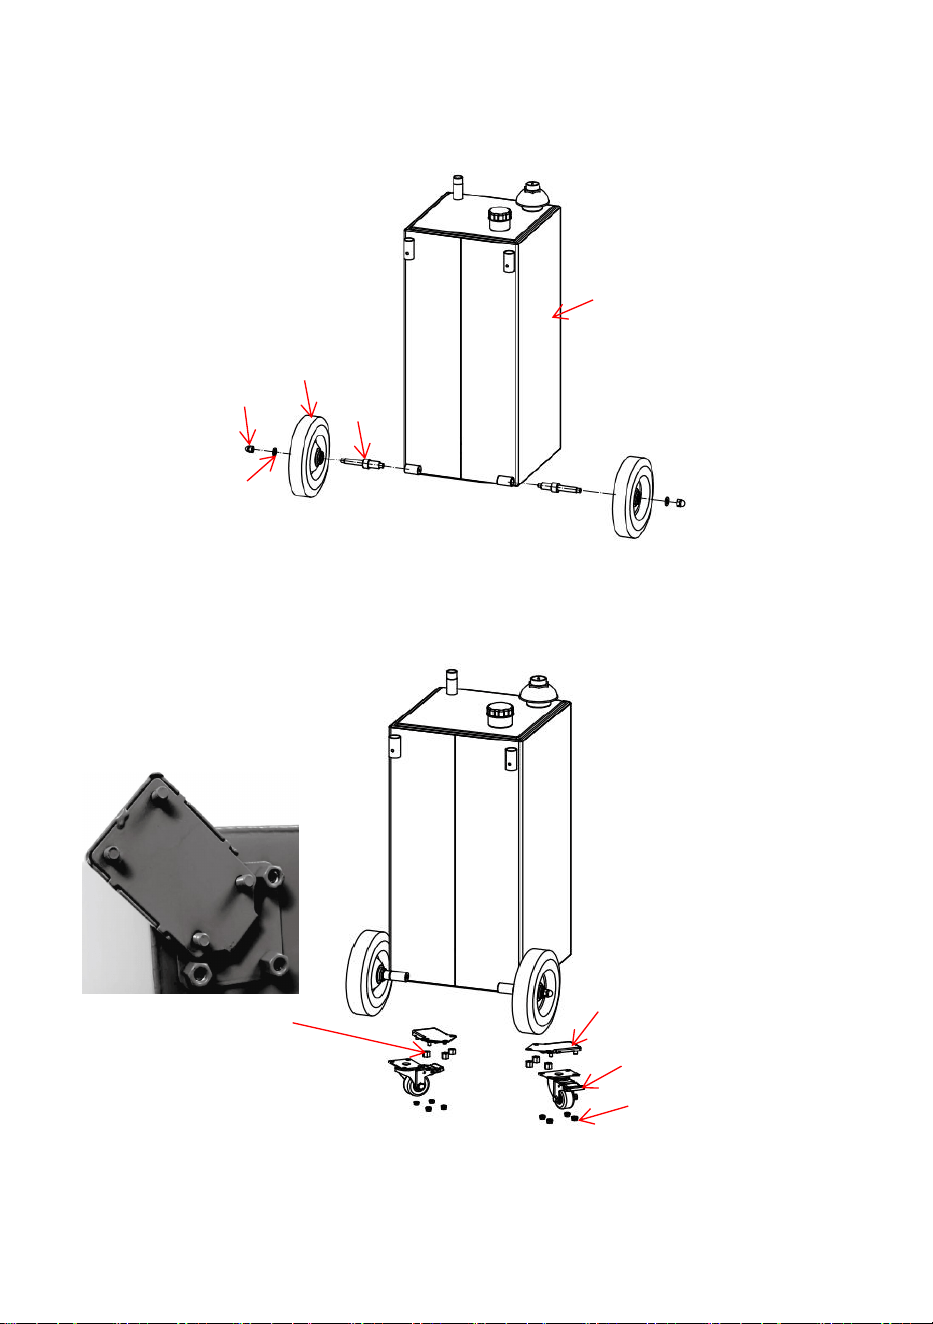
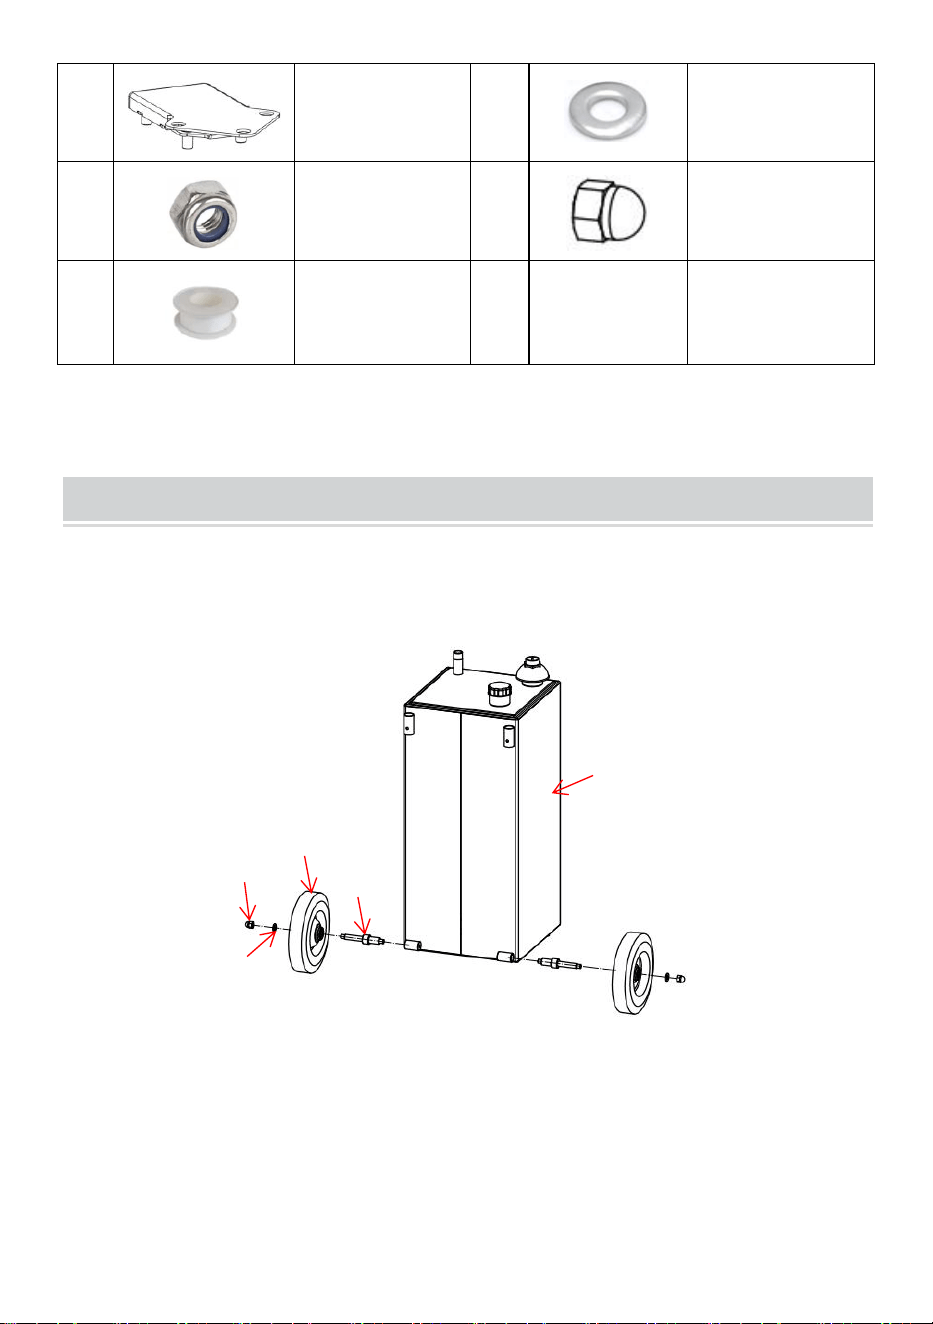
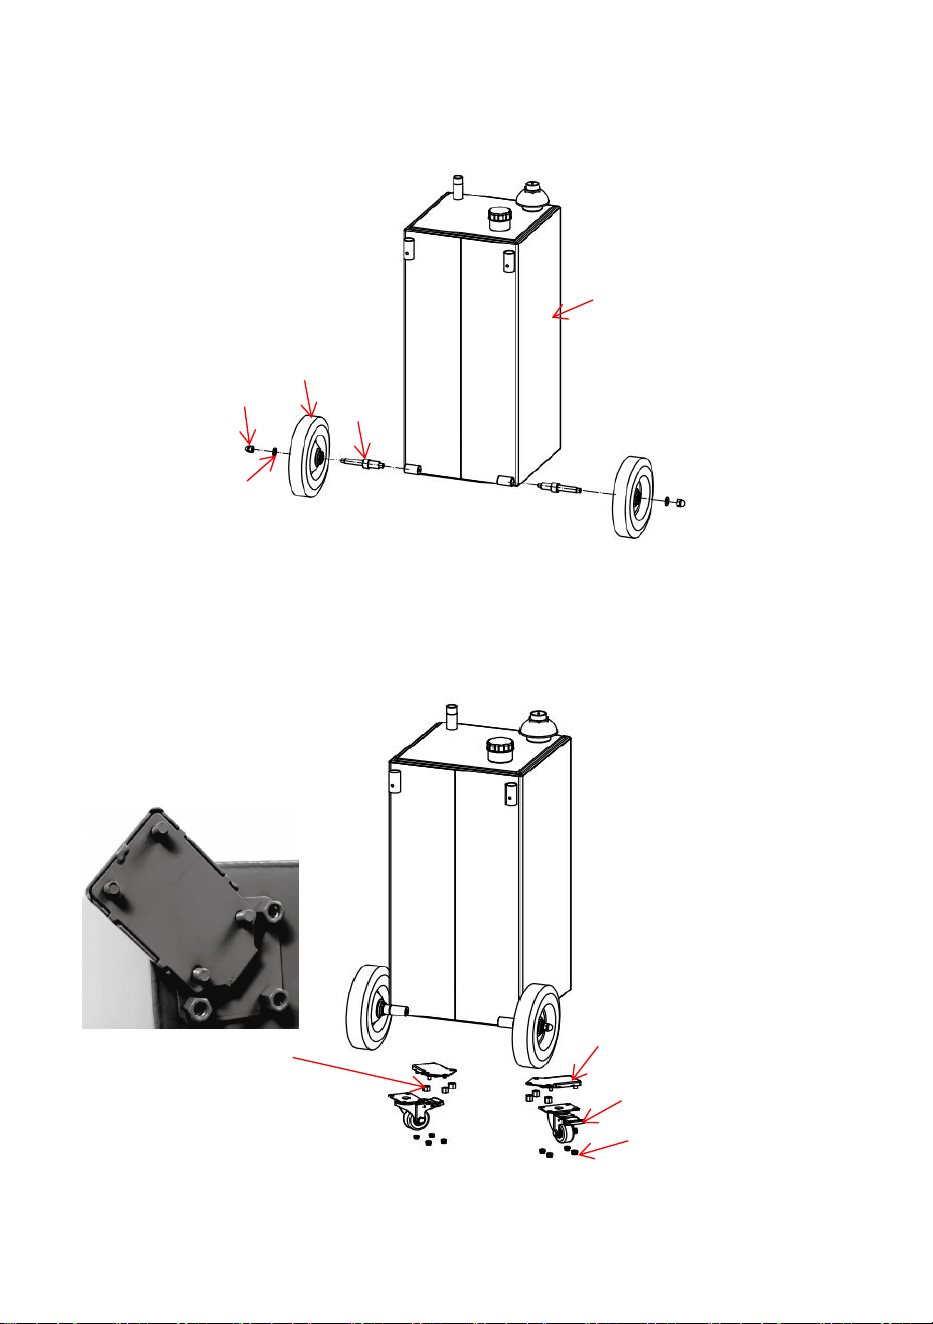
Step1:Install the fixed wheels. Screw the wheel shafts(12) into the fuel
tank, then put the fixed wheels (3) into the wheel shafts and lock them with
gaskets and nuts(16+17).
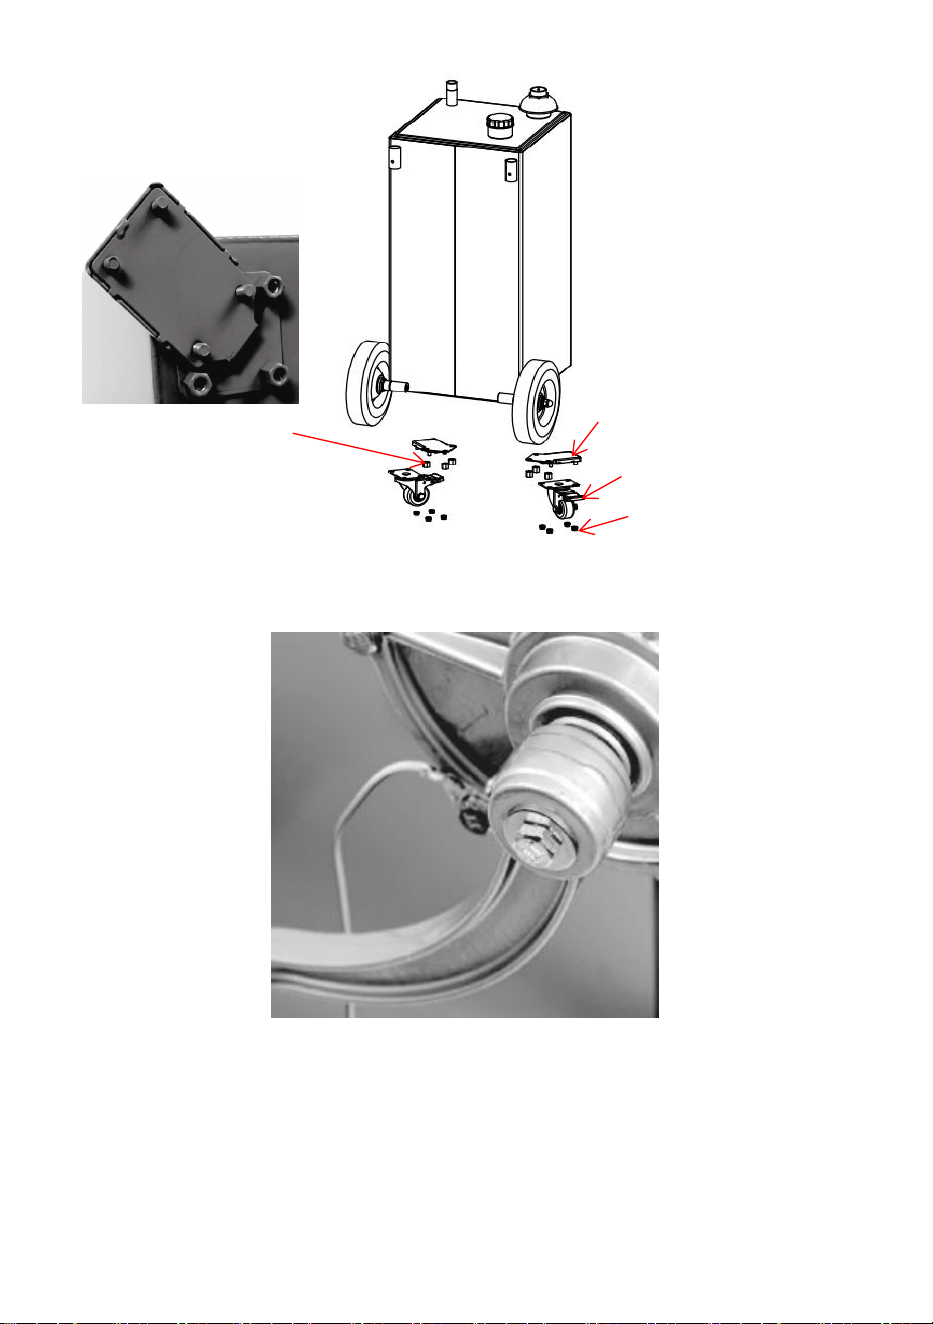
Step2:Unscrew the nuts at the bottom of the tank first, then install the
swivel caster films(7) and the swivel casters(5), and screw the nuts.
1
12
17
3
16
7
5
8
Nuts(at the bottom
of the tank)
- 7 -
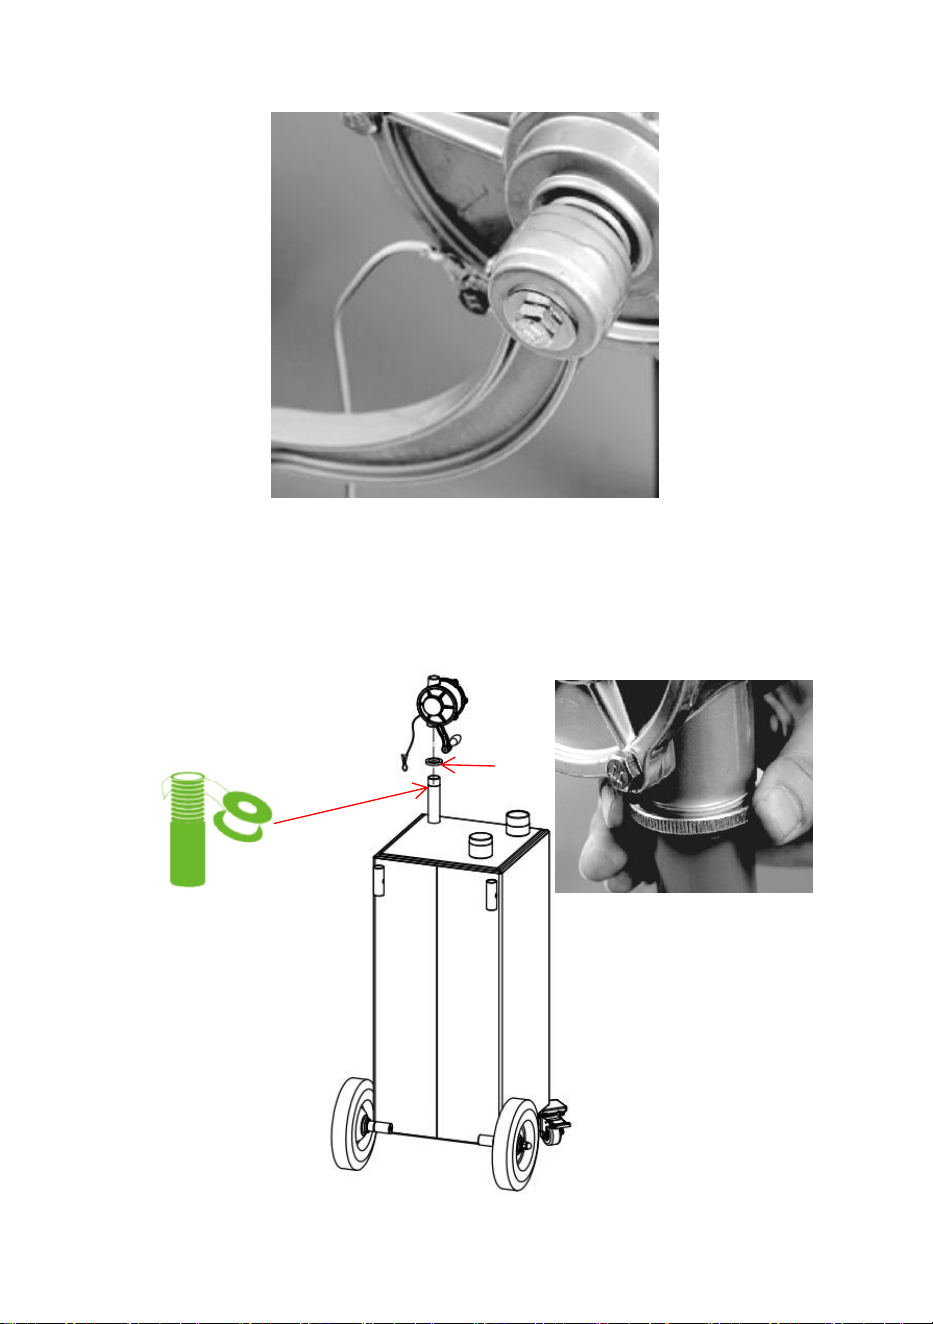
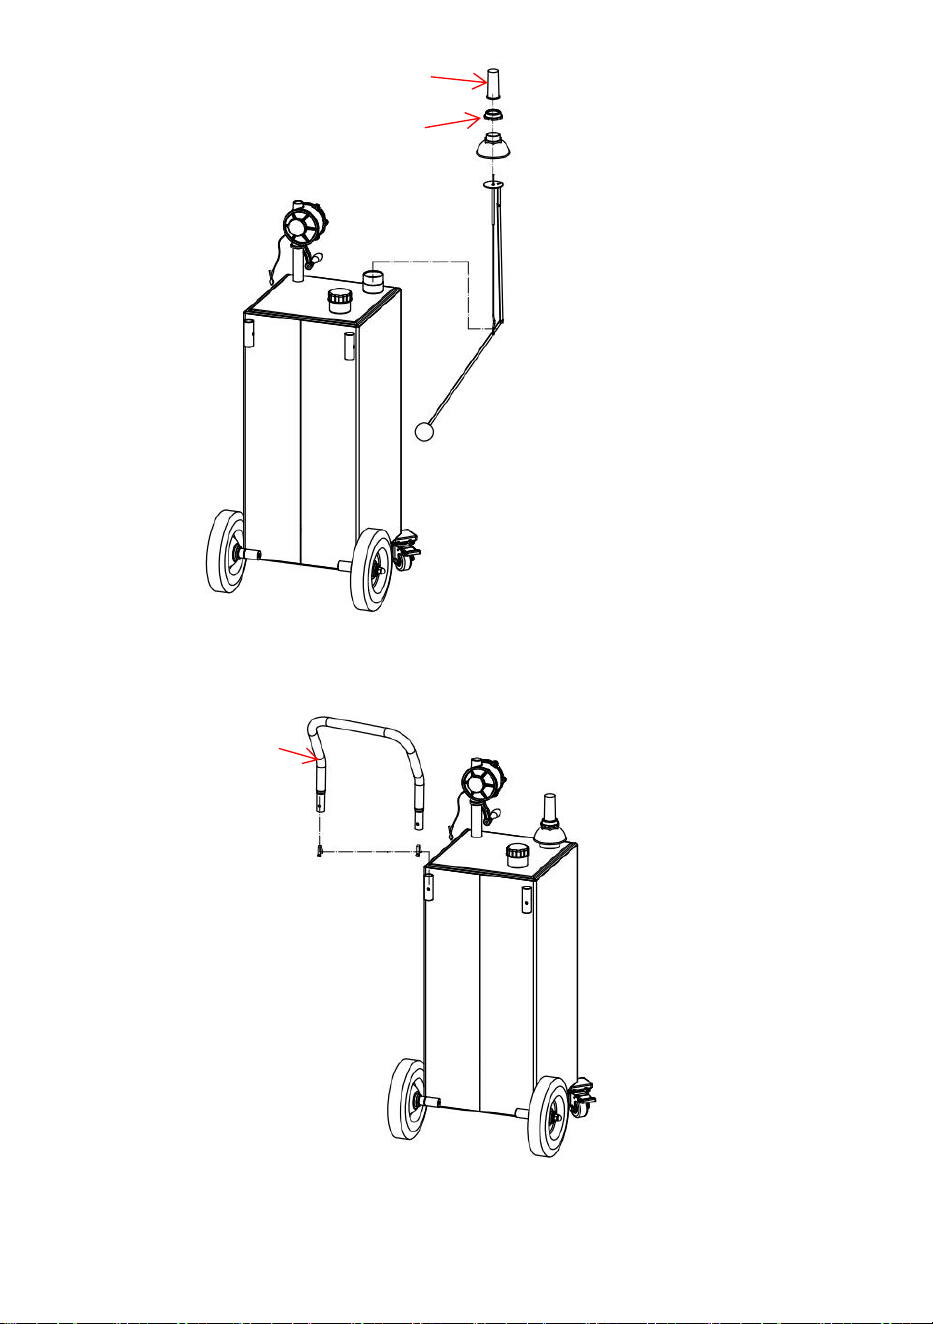
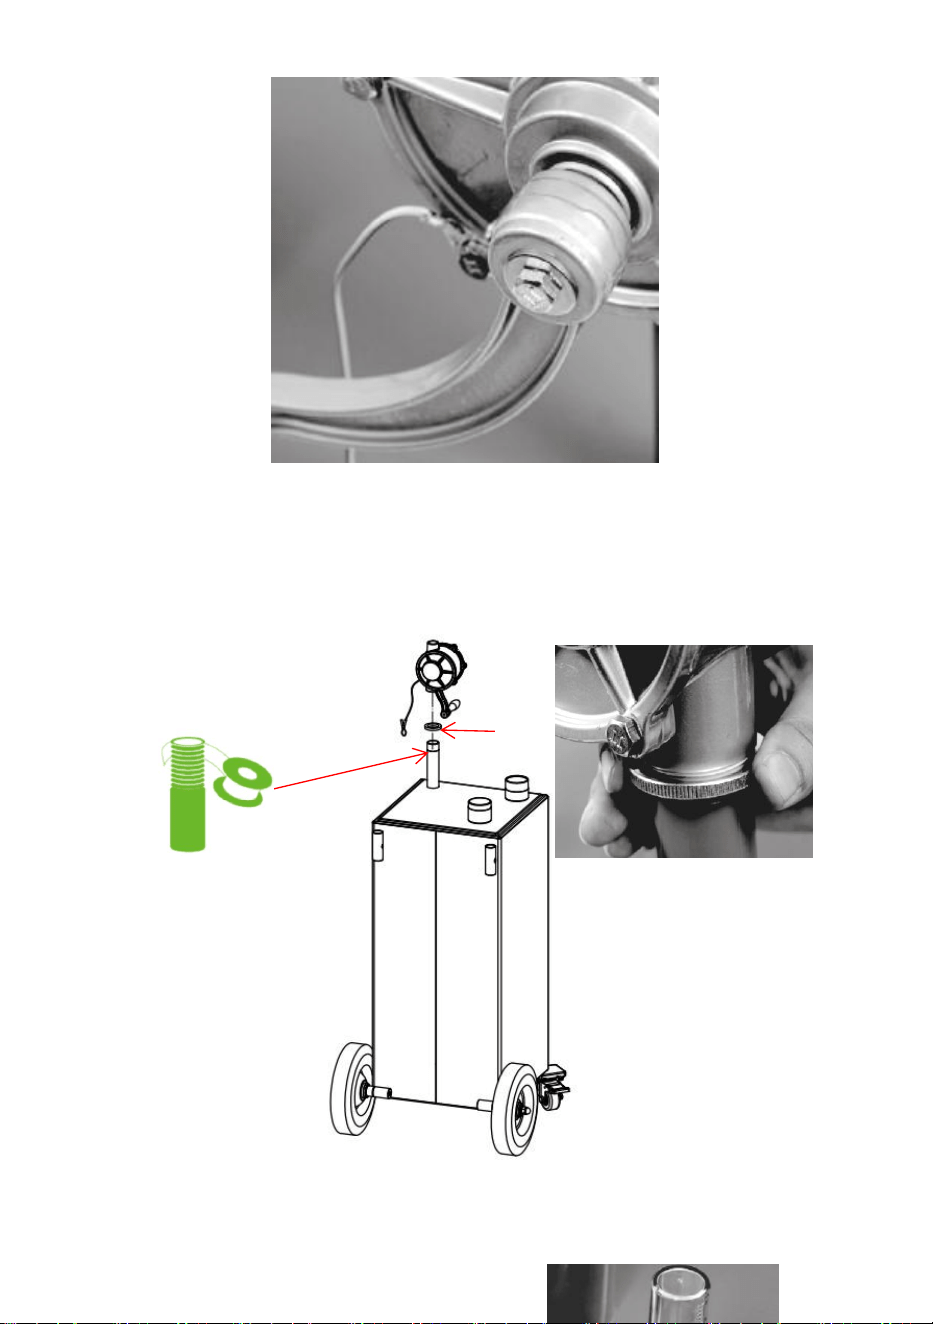
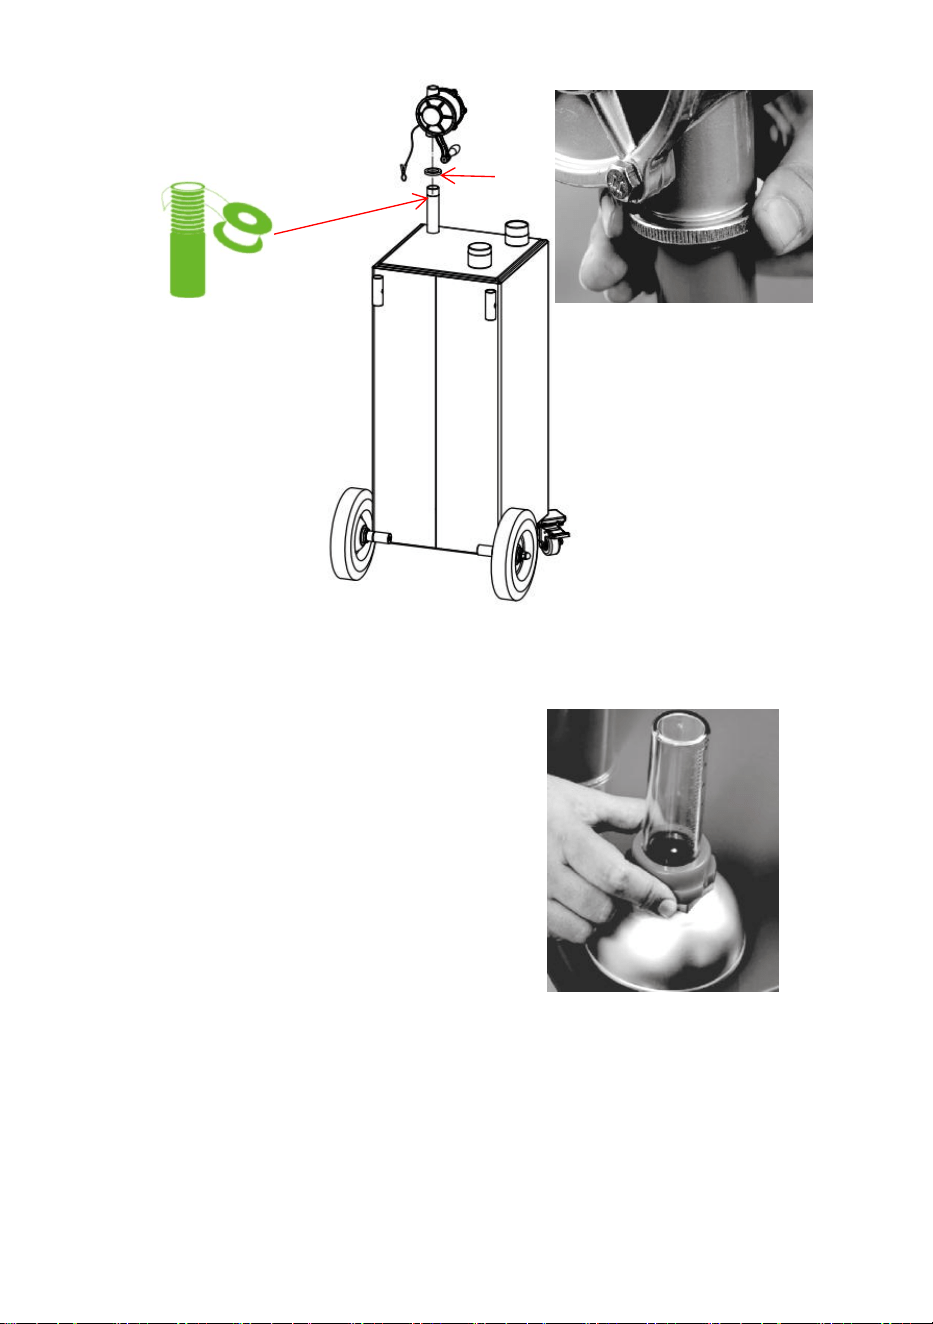
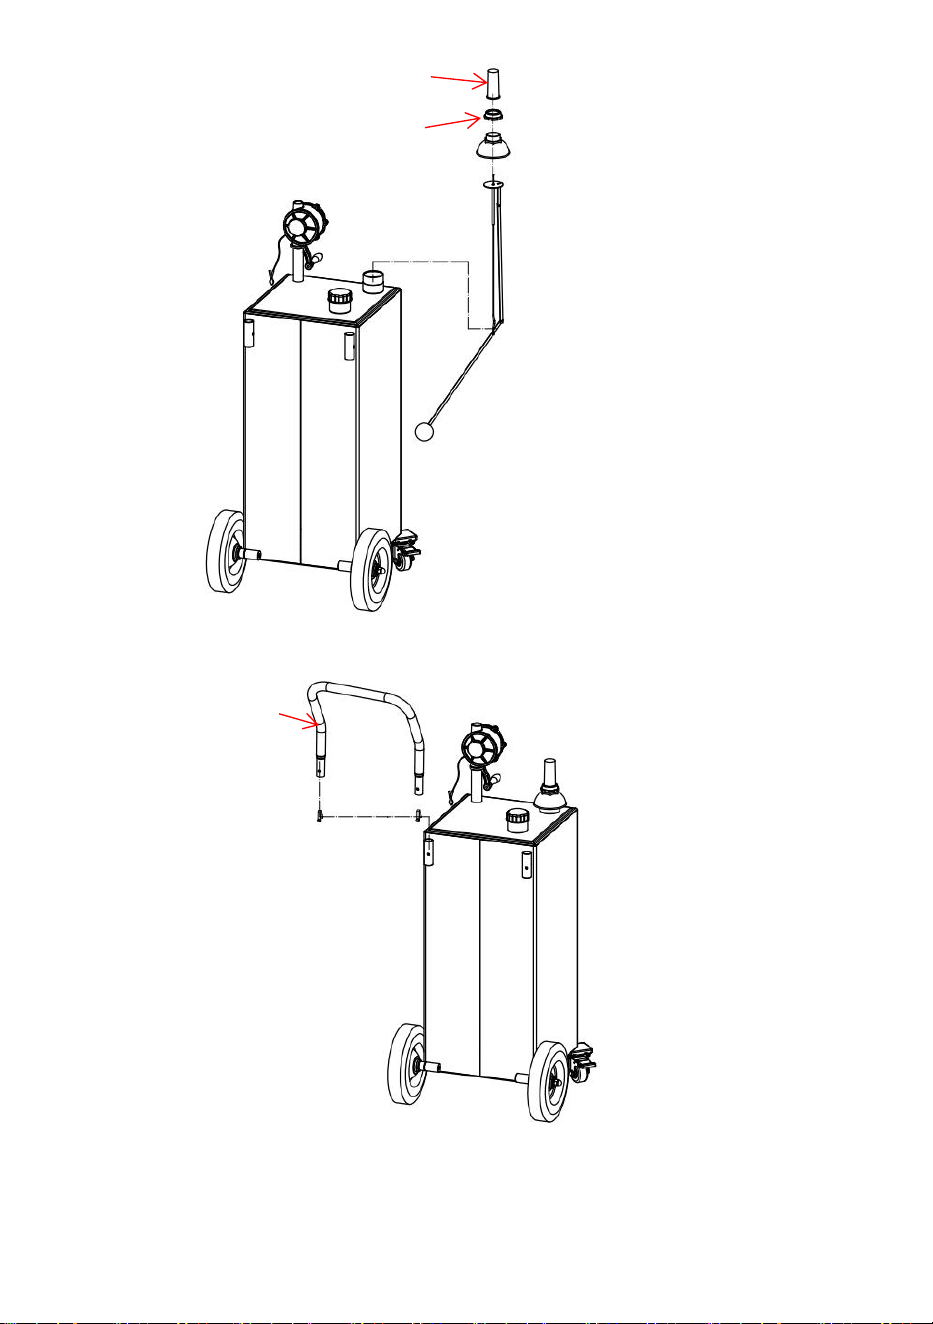
Step3:Attach the pump handle to the oil pump.
Step4:Screw the lock nut(10) into the oil outlet. Wrap not less than 5
circles of raw tape on the outlet, then screw the pump(6) on the outlet and
adjust the orientation, and finally, reversely turn the lock nut to lock the
pump.
10
Winding direction
- 8 -
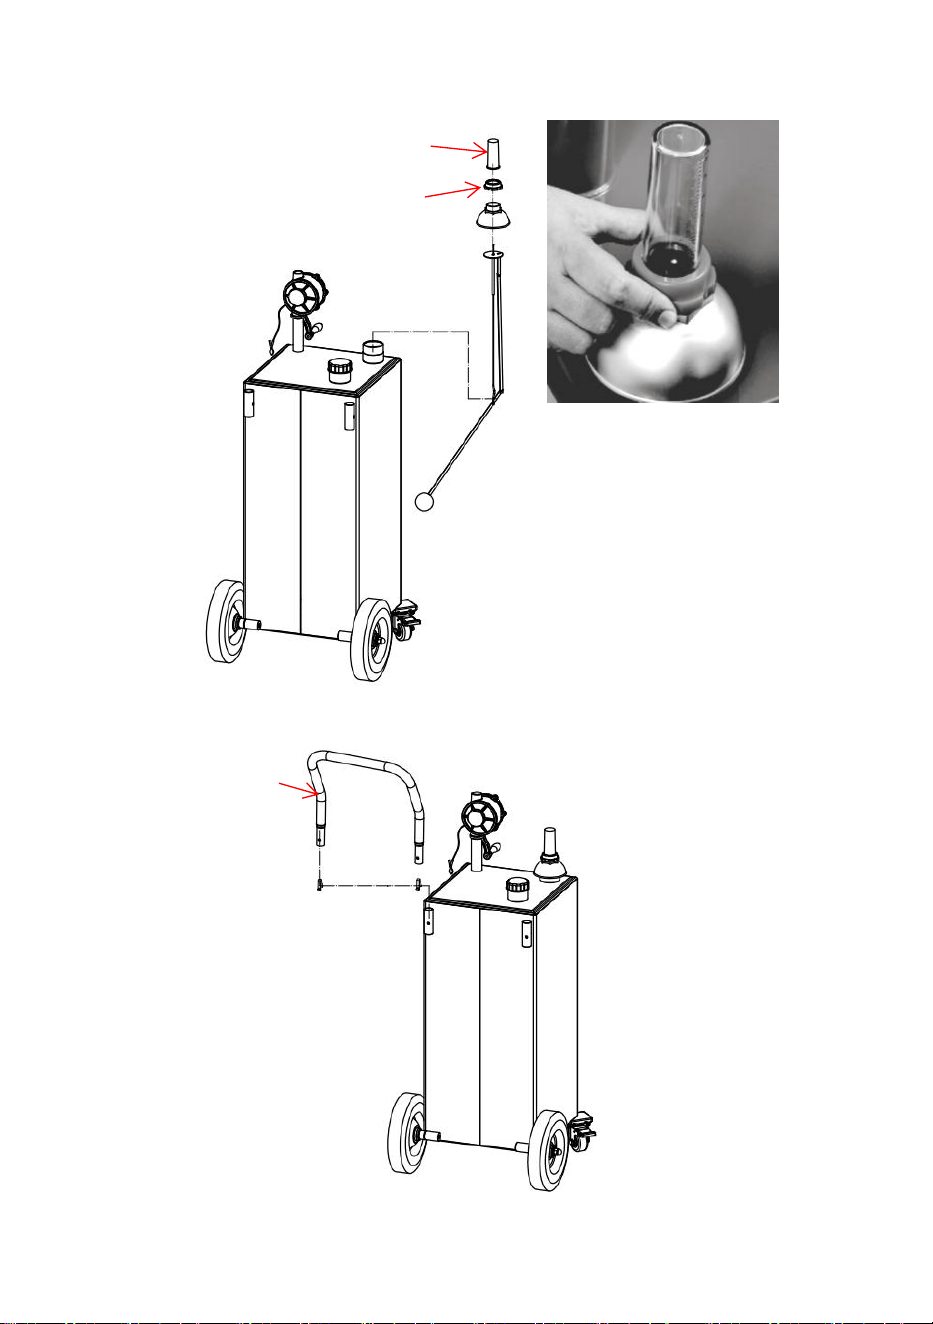
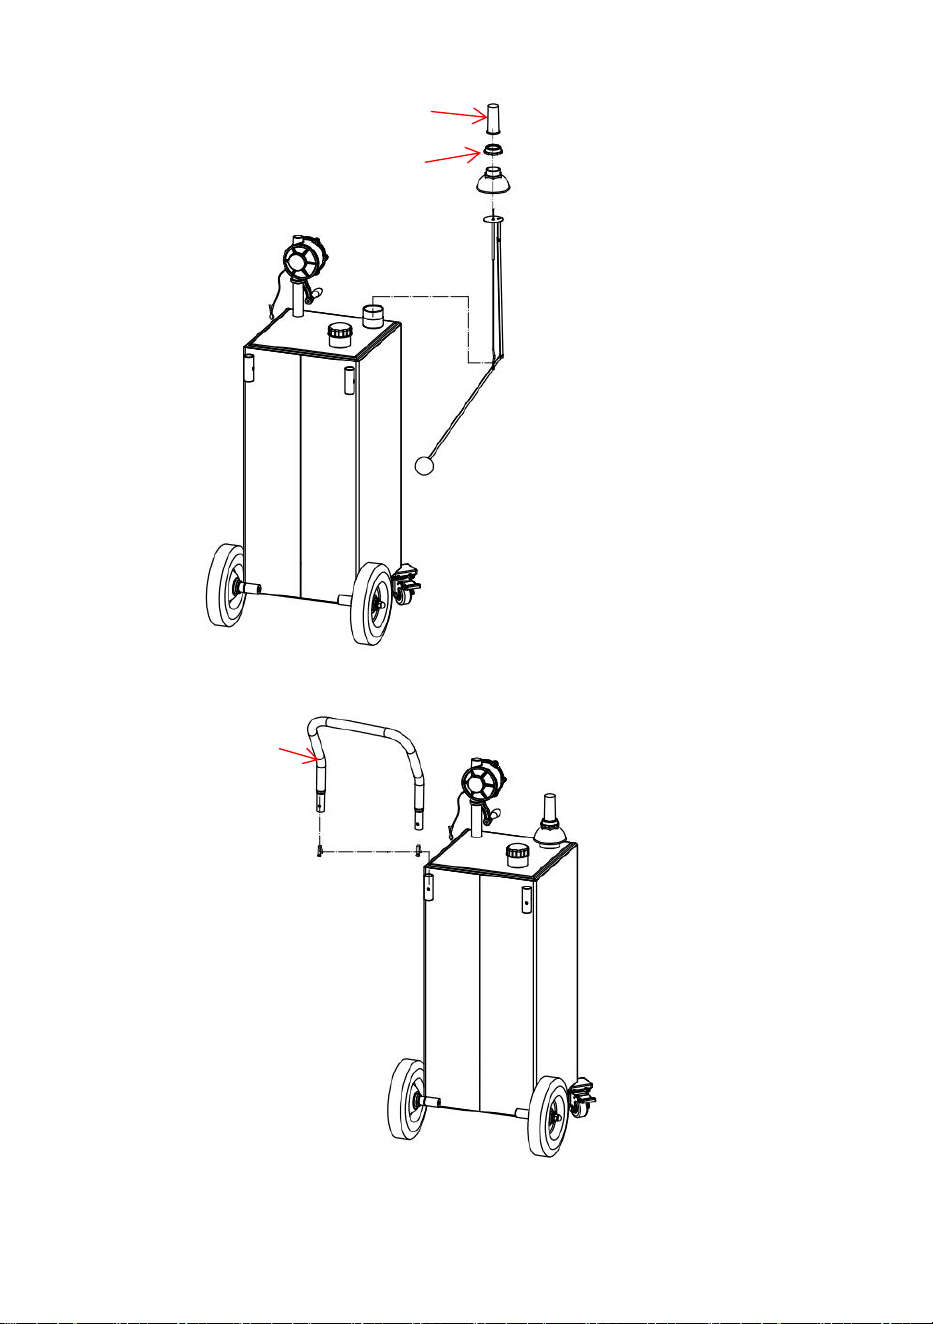
Step5:Lock the oil gauge(14) on the pump with the oil gauge fixing (13), as
shown.
Step6:Insert the handle(2) into the tank at the appropriate position.
2
14
13

- 9 -
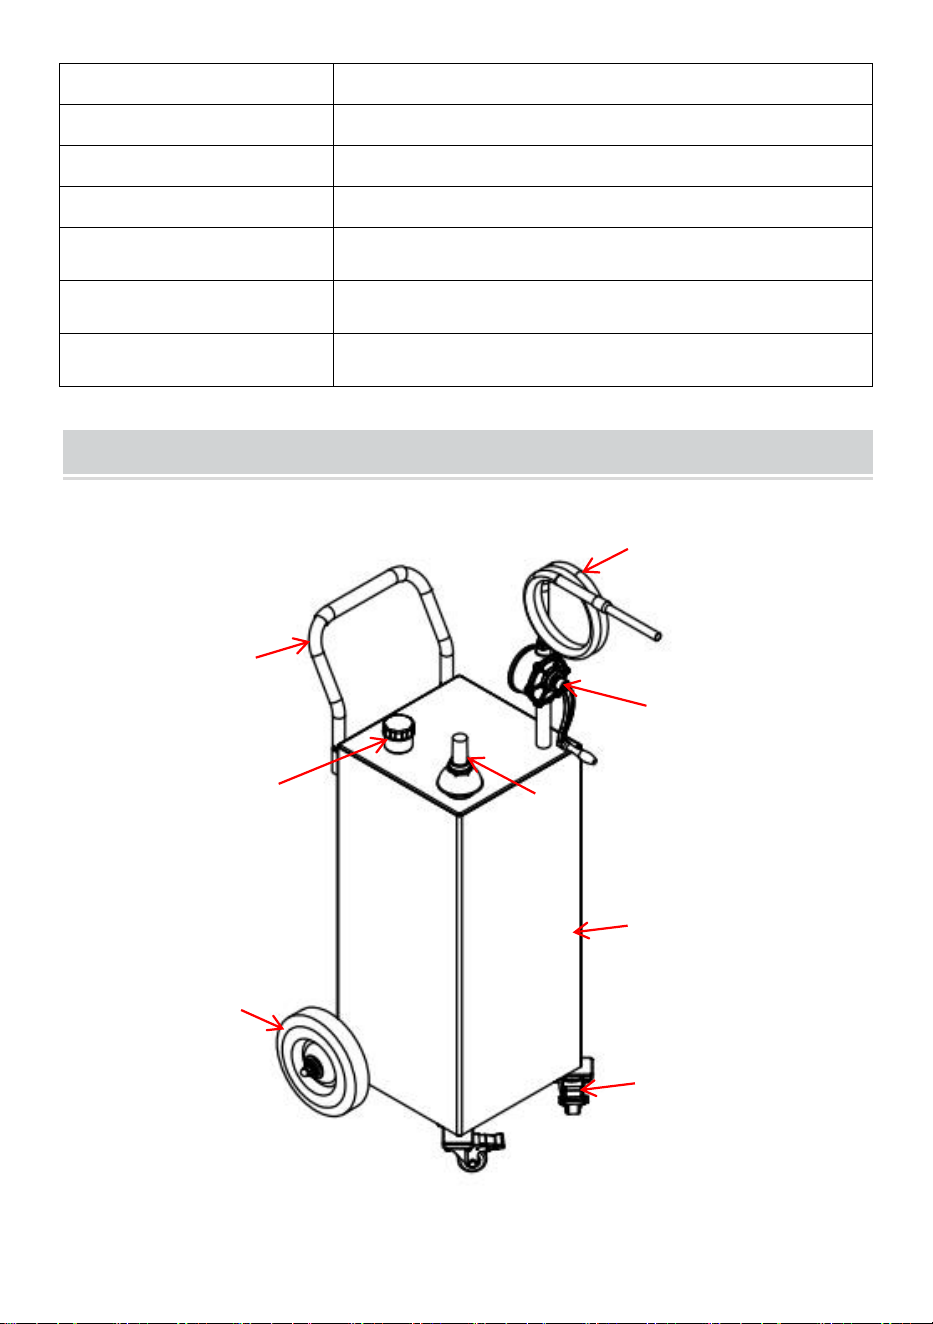
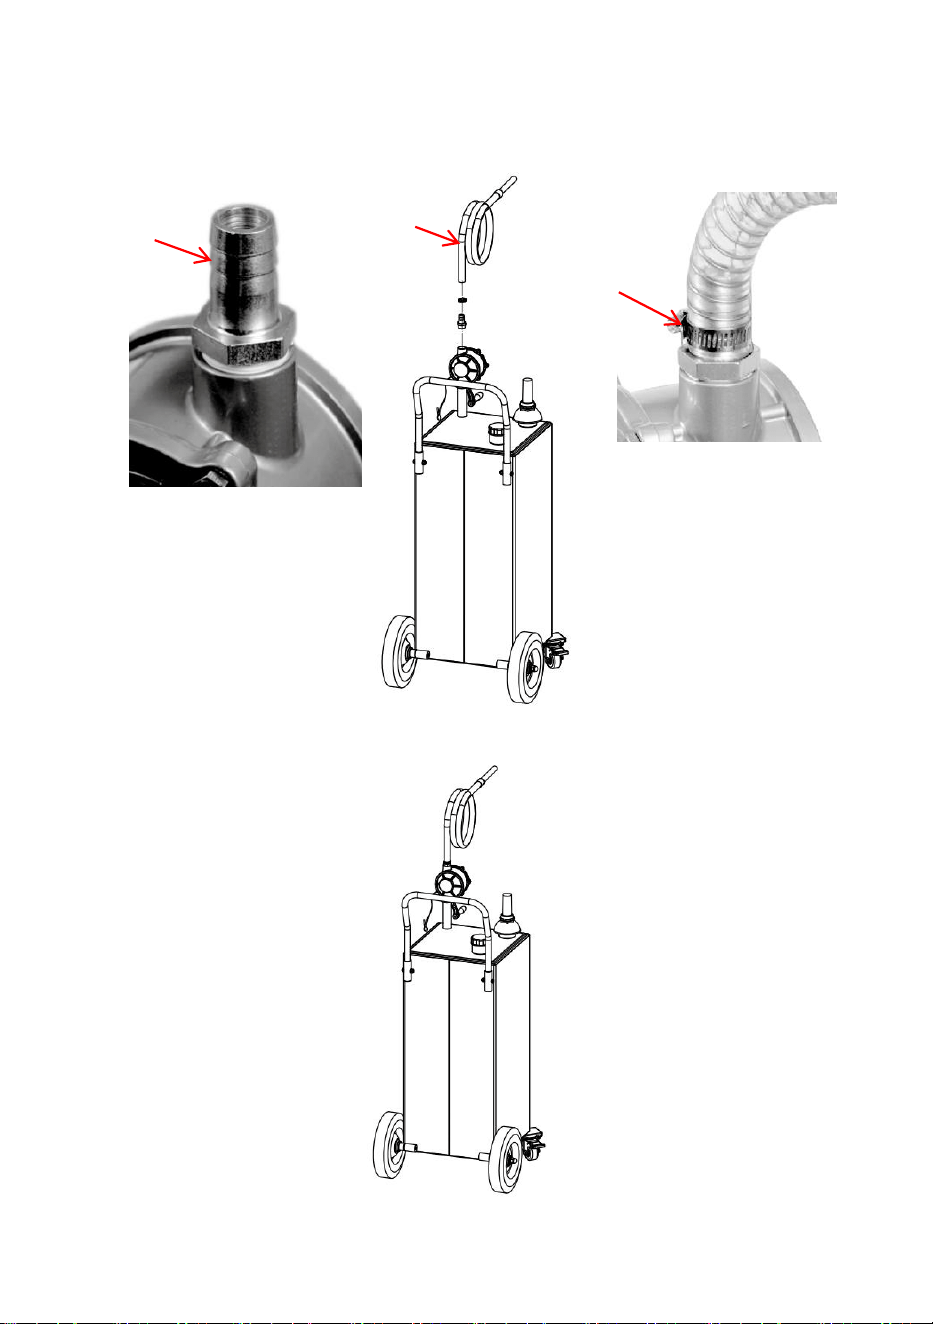
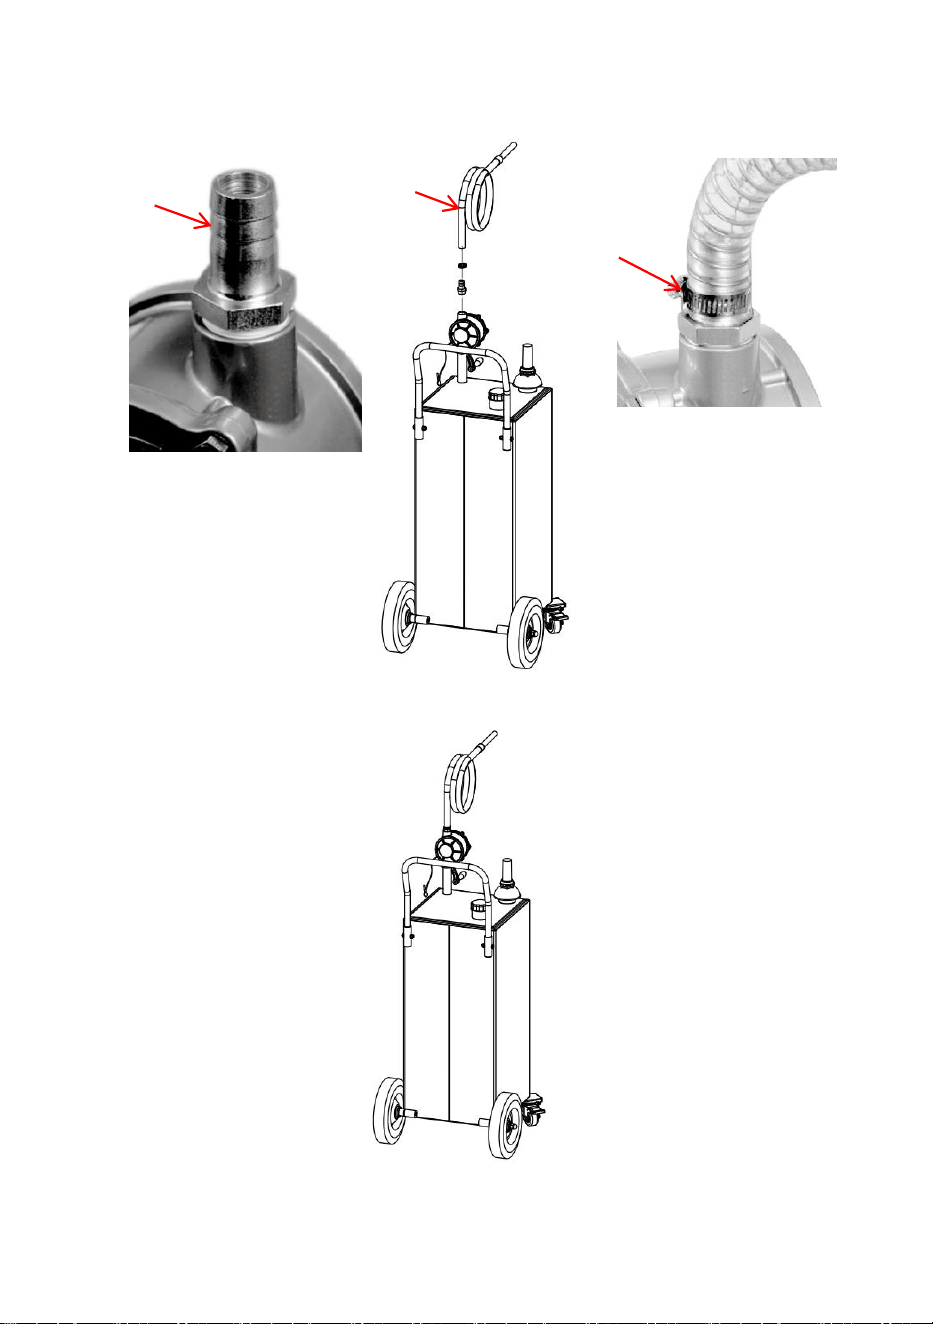
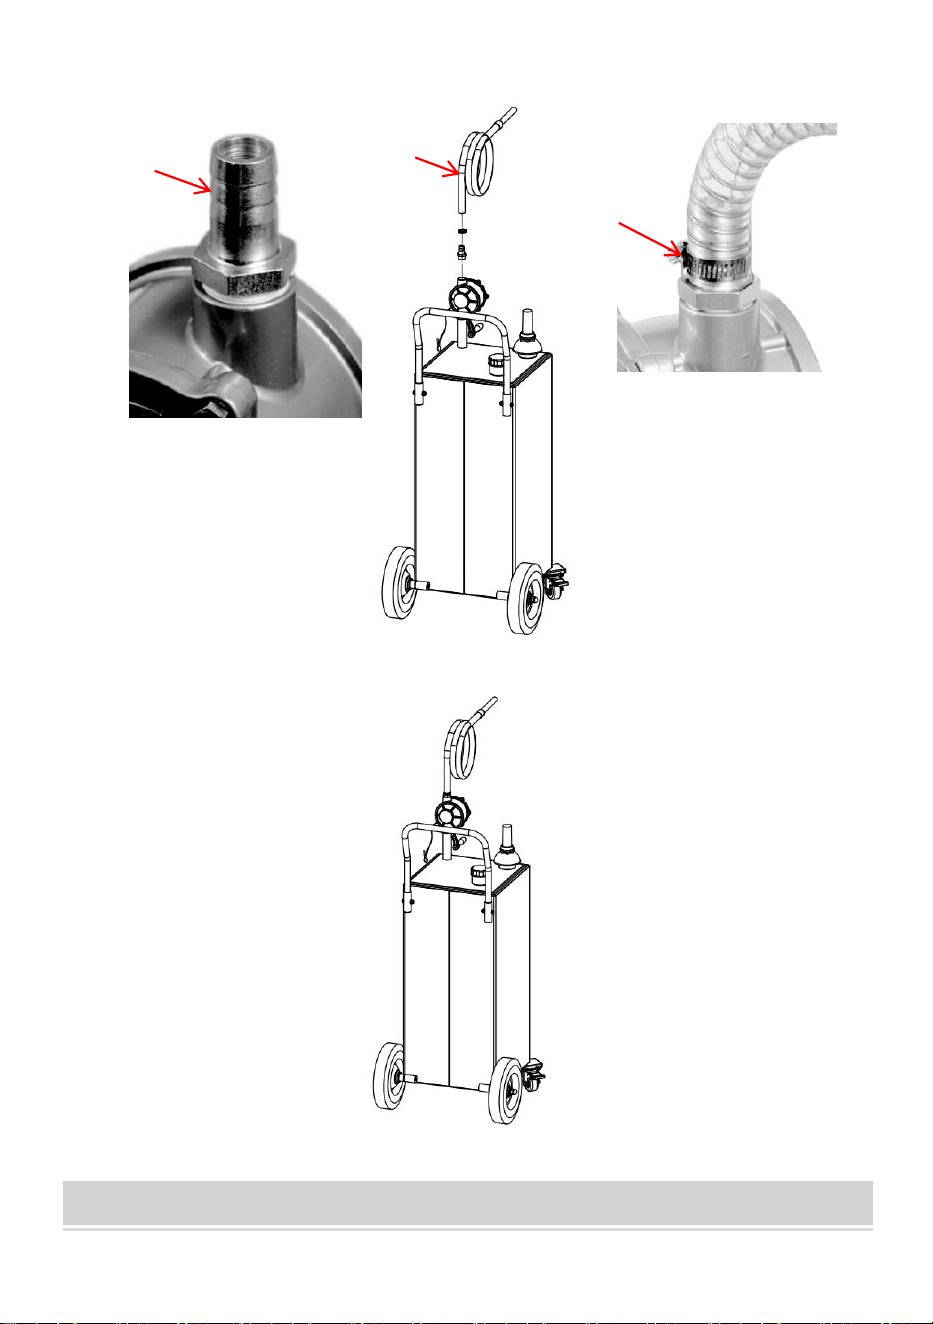
Step7:Wrap not less than 5 circles of raw tape on the hose fitting(15) and
screw it to the pump outlet; then attach the oil hose (4) to the hose
fitting(15) and lock it with a hose clamp (11).
Step 8. The product is assembled and ready for use.
15
11
4

- 10 -
OPERATION&MAINTENANCE
1. Connect the clipper of grounding wire to a good earthing terminal and
ensure user safety ;
2. Put the oil into the caddy through the oil inlet. For the first time usage,
please eliminate air while noticing the measure shows.
3. Please do not add oil that is beyond the capacity. When the red pointer
reaches the highest limit, do not add oil anymore.
4. Please clean the measure and filter regularly.
5. This machine is suitable for gasoline, and diesel. But it is not suitable for
water,or other corrosive solvents.
6. Operate the machine in a horizontal position, do not incline;
7. Keep away from fire.
8. For different types of oil, it is recommended to clean the tank before
storing another type of oil.
9. If this product is not used for a long time, it is recommended to clean
and store it in a cool and dry environment.
Manufacturer: Shanghaimuxinmuyeyouxiangongsi
Address: Shuangchenglu 803nong11hao1602A-1609shi, baoshanqu,
shanghai 200000 CN.
Imported to AUS: SIHAO PTY LTD. 1 ROKEVA STREETEASTWOOD
NSW 2122 Australia
Imported to USA: Sanven Technology Ltd. Suite 250, 9166 Anaheim
Place, Rancho Cucamonga, CA 91730
REP
UK
YH CONSULTING LIMITED. C/O YH Consulting
Limited Office 147, Centurion House, London
Road, Staines-upon-Thames, Surrey, TW18 4AX
REP
EC
E-CrossStu GmbH
Mainzer Landstr.69,
60329 Frankfurt am Main.

- 11 -
Technical Support and E-Warranty Certificate
www.vevor.com/support

- 12 -
BOÎTE À CARBURANT EN MÉTAL
MODÈLE : JGC40
Assistance technique et certificat de garantie électronique
www.vevor.com/support

- 1 -
MODÈLE : JGC40
Ceci est le mode d'emploi d'origine. Veuillez lire attentivement l'intégralité
du manuel avant utilisation. VEVOR se réserve le droit d'interpréter
clairement ce manuel d'utilisation. L'apparence du produit dépend du
produit que vous avez reçu. Veuillez nous excuser pour les éventuelles
mises à jour technologiques ou logicielles.
METAL FUEL CADDY

- 2 -
3. Lisez attentivement et comprenez toutes les INSTRUCTIONS
D'ASSEMBLAGE ET D'UTILISATION avant d'utiliser l'appareil.
4. Le non-respect des règles de sécurité et des autres précautions de
sécurité de base peut entraîner des blessures graves.
GENERAL SAFETY RULES
Lors de l’utilisation de ce produit, des précautions de base doivent toujours
être respectées, notamment les suivantes :
• Ce produit n'est pas destiné à être utilisé par des personnes (y compris
les enfants) ayant des capacités physiques, sensorielles ou mentales
réduites, ou manquant d'expérience et de connaissances, à moins
qu'elles n'aient reçu une supervision ou des instructions concernant
l'utilisation du produit par une personne responsable de leur sécurité.
• N'utilisez pas ce produit à d' autres fins que celles prévues.
• Portez un équipement de protection approprié lors de l’installation ou
de l’utilisation de ce produit.
• Assurez-vous que tous les raccords et connexions filetées sont serrés
et étanches avant de commencer l'utilisation.
UN DANGER!
Les carburants sont extrêmement inflammables. Tenir à l'écart de la
chaleur, des étincelles et des flammes nues.
• N'utilisez pas d'appareils électroniques ou de communication mobile
tels que des téléphones portables lors du pompage de liquides
inflammables.
• Fixez le fil de terre et reliez les récipients dans lesquels le liquide est
pompé . Reliez tous les récipients à une terre connue afin de dissiper
l'électricité statique avant de pomper des liquides.

- 3 -
• de carburant peuvent exploser . Nocif, voire mortel, en cas d'ingestion.
Éviter de respirer les vapeurs de carburant.
• Ne fumez pas à proximité ou pendant l’utilisation du réservoir de
carburant .
• Ce produit est destiné uniquement au transfert de carburant et n'est
pas destiné à être utilisé pour transporter du carburant dans un
véhicule ou une remorque.
• Ne pas modifier ce produit.
AVERTISSEMENT ! ATTENTION !
• N'utilisez pas ce produit pour le stockage de carburant à propulsion .
• Utilisez un bac pour un seul type de carburant afin d'éviter d'éventuels
dommages.
• Surveillez le débit et le niveau de remplissage pour éviter les
débordements et les déversements.
• Videz toujours la pompe et le tuyau après utilisation du bac. Soulevez
le tuyau et tournez la poignée dans le sens inverse pour vider tout le
liquide restant dans le bac.
• Attention lors du remplissage du caddy par le tube de remplissage .
Surveillez attentivement pour éviter les débordements ou les
déversements.
• N'utilisez jamais le réservoir de carburant à proximité de
flammes nues ou de sources de chaleur .
CONSERVEZ CES INSTRUCTIONS
MODEL AND PARAMETERS
Modèle
JGC 40
Capacité
40 gallons
- 4 -
Type de carburant
Essence, Diesel
Pompe
Main
Débit max.
15 L / min, 100 tr/ min ; (4 GPM)
Tuyau
Φ19 (diamètre intérieur ) x L300 cm
Roue
2,5 " (avant) ; 10 " (arrière)
Matériel
Acier
Couleur
Rouge
STRUCTURE DIAGRAM
1
8
2
3
6
4
7
5
- 5 -
2. Poignée 2. Tuyau 3. Pompe 4. Jauge d'huile 5. Bouchon d'arrivée de
carburant
7. Réservoir de carburant 7. Roulette pivotante (avant) 8. Roue fixe
COMPONENTS
Non.
Image
Nom et
quantité
Non.
Image
Nom et quantité
1
Réservoir de
carburant (x1)
10
Contre-écrou
(x1)
2
Poignée (x1)
11
Tuyau
Lampe C (x1)
3
Roue (x2)
12
Arbre de roue
(x2)
4
Tuyau d'huile
(x1)
13
Écrou de fixation
de jauge d'huile
(x1)
5
Roulette
pivotante
(x2)
14
Jauge d'huile
(x1)
6
Pompe à huile
(avec poignée
et câble de
terre ) (x1)
15
Raccord de
tuyau (x1 )

- 6 -
7
Roulette
pivotante
Film (x2)
16
Joint plat ( x2 )
8
Écrou M8 (x8)
17
Écrou borgne
M12 (x2)
9
Ruban adhésif
brut (x1)
18
/
Manuel
d'utilisation (x1)
ASSEMBLY
Étape 1 : Installez les roues fixes. Vissez les axes de roue (12) dans le
réservoir de carburant, puis insérez les roues fixes (3) dans les axes et
bloquez- les avec les joints et les écrous (16 et 17).
Étape 2 : Dévissez d’abord les écrous au bas du réservoir, puis installez
les films de roulettes pivotantes (7) et les roulettes pivotantes (5), et vissez
les écrous.
1
12
17
3
16

- 7 -
Étape 3 : Fixez la poignée de la pompe à la pompe à huile.
Étape 4 : Vissez le contre-écrou (10) dans la sortie d'huile . Enroulez au
moins cinq cercles de ruban adhésif brut autour de la sortie, puis vissez la
pompe (6) sur la sortie et ajustez l'orientation. Enfin , tournez le
contre-écrou dans le sens inverse pour verrouiller la pompe.
7
5
8
Nuts(at the bottom
of the tank)

- 8 -
Étape 5 : Verrouillez la jauge d'huile (14) sur la pompe avec la fixation de
la jauge d'huile (13), comme indiqué.
10
14
Winding direction

- 9 -
Étape 6 : Insérez la poignée (2) dans le réservoir à la position appropriée .
Étape 7 : Enroulez au moins 5 cercles de ruban adhésif brut sur le raccord
du tuyau (15) et vissez-le à la sortie de la pompe ; puis fixez le tuyau
2
13

- 10 -
d'huile (4) au raccord de tuyau (15) et verrouillez-le avec un collier de
serrage (11).
Étape 8. Le produit est assemblé et prêt à l’emploi.
15
11
4

- 11 -
OPERATION&MAINTENANCE
10. Connectez la pince du fil de terre à une bonne borne de terre et
assurez la sécurité de l'utilisateur ;
11. Versez l'huile dans le boîtier par l'orifice d'admission. Lors de la
première utilisation, purgez l'air en observant la graduation .
12. Veuillez ne pas ajouter d'huile au -delà de la capacité. Lorsque
l'aiguille rouge atteint la limite maximale, n'ajoutez plus d'huile.
13. Veuillez nettoyer régulièrement la mesure et le filtre.
14. Cette machine est compatible avec l'essence et le diesel. Elle ne
convient pas à l'eau ni aux solvants corrosifs .
15. Utilisez la machine en position horizontale, ne l'inclinez pas ;
16. Tenir à l'écart du feu.
17. Pour différents types d’huile, il est recommandé de nettoyer le
réservoir avant de stocker un autre type d’huile.
18. Si ce produit n'est pas utilisé pendant une longue période, il est
recommandé de le nettoyer et de le stocker dans un environnement frais et
sec.
Fabricant : Shanghaimuxinmuyeyouxiangongsi
Adresse : Shuangchenglu 803nong11hao1602A-1609shi, baoshanqu,
Shanghai 200 000 CN.
Importé en Australie : SIHAO PTY LTD. 1 ROKEVA STREET, ASTWOOD
NSW 2122 Australie
Importé aux États-Unis : Sanven Technology Ltd. Suite 250, 9166
Anaheim
Lieu, Rancho Cucamonga, CA 91730

- 12 -
REP
UK
YH CONSULTING LIMITED. C/O YH Consulting
Limited Office 147, Centurion House, London
Road, Staines-upon-Thames, Surrey, TW18 4AX
REP
EC
E-CrossStu GmbH
Mainzer Landstr.69,
60329 Frankfurt am Main.

- 13 -
Assistance technique et certificat de garantie électronique
www.vevor.com/support

- 14 -
METALL-TREIBSTOFF-CADDY
MODELL: JGC40
Technischer Support und E-Garantie-Zertifikat
www.vevor.com/support

- 1 -
MODELL: JGC40
Dies ist die Originalanleitung. Bitte lesen Sie alle Anweisungen sorgfältig
durch, bevor Sie das Gerät in Betrieb nehmen. VEVOR behält sich das
Recht vor , die Bedienungsanleitung klar und deutlich zu interpretieren.
Das Aussehen des Produkts hängt vom gelieferten Produkt ab. Bitte haben
Sie Verständnis dafür, dass wir Sie nicht erneut über Technologie- oder
Software-Updates informieren.
METAL FUEL CADDY

- 2 -
5. Lesen Sie vor der Inbetriebnahme alle MONTAGE- UND
BEDIENUNGSANWEISUNGEN sorgfältig durch und stellen Sie sicher,
dass Sie sie verstanden haben .
6. Die Nichtbeachtung der Sicherheitsregeln und anderer grundlegender
Sicherheitsvorkehrungen kann zu schweren Verletzungen führen.
GENERAL SAFETY RULES
Bei der Verwendung dieses Produkts sollten immer grundlegende
Vorsichtsmaßnahmen beachtet werden, darunter die folgenden:
• für ihre Sicherheit verantwortlichen Person beaufsichtigt oder in die
Verwendung des Produkts eingewiesen .
• Verwenden Sie dieses Produkt nicht für andere als die vorgesehenen
Zwecke.
• Tragen Sie bei der Installation oder Verwendung dieses Produkts
geeignete Schutzausrüstung.
• vor der Inbetriebnahme sicher, dass alle Armaturen und
Gewindeverbindungen festgezogen sind und keine Lecks aufweisen .
EINE GEFAHR!
Kraftstoffe sind hochentzündlich. Von Hitze, Funken und offenem Feuer
fernhalten.
• Verwenden Sie beim Pumpen brennbarer Flüssigkeiten keine
elektronischen Geräte oder mobile Kommunikationsgeräte wie
Mobiltelefone.
• Bringen Sie ein Erdungskabel an und verbinden Sie die Behälter, aus
denen bzw. in die gepumpt wird . Erden Sie alle Behälter an einer

- 3 -
bekannten Erdungsquelle, um statische Elektrizität abzuleiten, bevor
Sie Flüssigkeiten pumpen.
• Kraftstoffdämpfe können explodieren . Gesundheitsschädlich oder
tödlich beim Verschlucken. Einatmen von Kraftstoffdämpfen vermeiden.
• Rauchen Sie nicht in der Nähe des Kraftstoffbehälters oder während
der Verwendung .
• Dieses Produkt ist nur für die Kraftstoffübertragung vorgesehen und
nicht für den Transport von Kraftstoff in Fahrzeugen oder Anhängern.
• Nehmen Sie an diesem Produkt keine Änderungen vor.
EINE WARNUNG! VORSICHT! ACHTUNG!
• Verwenden Sie dieses Produkt nicht zur längerfristigen Lagerung von
Kraftstoff.
• verwenden Sie einen Caddy nur für eine Kraftstoffart.
• Überwachen Sie Durchflussrate und Füllstand, um Überläufe und
Verschütten zu verhindern.
• Entleeren Sie nach Gebrauch des Behälters immer die Pumpe und den
Schlauch. Heben Sie den Schlauch an und drehen Sie den Griff in die
entgegengesetzte Richtung, um die restliche Flüssigkeit zurück in den
Behälter zu entleeren.
• Vorsicht beim Befüllen des Behälters durch das Füllrohr . Beobachten
Sie genau, um ein Überlaufen oder Verschütten zu verhindern.
• Verwenden Sie den Brennstoffbehälter niemals in der Nähe von
offenem Feuer oder Wärmequellen .
BEWAHREN SIE DIESE ANLEITUNG AUF
MODEL AND PARAMETERS
Modell
JGC 40
- 4 -
Kapazität
40 Gallonen
Kraftstoffart
Benzin, Diesel
Pumpe
Hand
Max. Durchfluss
15 L / min, 100 U/ min ; (4 GPM)
Schlauch
Φ19 (Innendurchmesser ) x L300 cm
Rad
2,5 Zoll (Vorderseite); 10 Zoll (Rückseite)
Material
Stahl
Farbe
Rot
STRUCTURE DIAGRAM
1
8
2
3
6
4
7
5
- 5 -
3. Griff 2. Schlauch 3. Pumpe 4. Ölstandsanzeige 5.
Kraftstoffeinlasskappe
8. Kraftstofftank 7. Lenkrolle (vorne) 8. Bockrad
COMPONENTS
NEI
N.
Bild
Name und
Menge
NEI
N.
Bild
Name und Menge
1
Kraftstofftan
k (x1)
10
Kontermutter (x1)
2
Griff (x1)
11
Schlauch
C- Lampe (x1)
3
Rad (x2)
12
Radwelle (x2)
4
Ölschlauch
(x1)
13
Ölstandsanzeige-Befestigung
smutter (x1)
5
Lenkrolle
(x2)
14
Ölstandsanzeige (x1)
6
Ölpumpe
(mit Griff
und
Erdungskab
15
Schlauchanschluss ( x1 )
- 6 -
7
Lenkrolle
Film (x2)
16
Flache Dichtung ( x2 )
8
Mutter M8
(x8)
17
Hutmutter M12 (x2)
9
Rohband
(x1)
18
/
Benutzerhandbuch (x1)
ASSEMBLY
Schritt 1: Montieren Sie die Festräder. Schrauben Sie die Radwellen (12)
in den Kraftstofftank, setzen Sie dann die Festräder (3) in die Radwellen
ein und sichern Sie sie mit Dichtungen und Muttern (16+17).
Schritt 2: Lösen Sie zuerst die Muttern am Boden des Tanks, installieren
Sie dann die Lenkrollenfolien (7) und die Lenkrollen (5) und schrauben Sie
die Muttern fest.
1
12
17
3
16

- 7 -
Schritt 3: Befestigen Sie den Pumpengriff an der Ölpumpe.
Schritt 4 : Schrauben Sie die Kontermutter (10) in den Ölauslass . Wickeln
Sie mindestens 5 Kreise Klebeband um den Auslass, schrauben Sie dann
die Pumpe (6) auf den Auslass und passen Sie die Ausrichtung an. Drehen
Sie abschließend die Kontermutter in die entgegengesetzte Richtung, um
die Pumpe zu verriegeln .
7
5
8
Nuts(at the bottom
of the tank)

- 8 -
Schritt 5 : Befestigen Sie die Ölstandsanzeige (14) mit der
Ölstandsanzeigebefestigung (13) an der Pumpe, wie gezeigt.
10
14
Winding direction
- 9 -
Schritt 6 : Stecken Sie den Griff (2) an der entsprechenden Stelle in den
Tank .
Schritt 7: Wickeln Sie mindestens 5 Kreise Klebeband um den
2
13
- 10 -
Schlauchanschluss (15) und schrauben Sie ihn an den Pumpenauslass.
Anschließend den Ölschlauch (4) an der Schlauchverschraubung (15)
befestigen und mit einer Schlauchschelle (11) fixieren.
Schritt 8. Das Produkt ist zusammengebaut und einsatzbereit.
15
11
4

- 11 -
OPERATION&MAINTENANCE
19. Schließen Sie den Erdungskabelschneider an eine gute
Erdungsklemme an und sorgen Sie für die Sicherheit des Benutzers.
20. Füllen Sie das Öl durch die Ölöffnung in den Behälter. Entfernen Sie
vor dem ersten Gebrauch die Luft und achten Sie dabei auf die
Maßangaben .
21. Bitte füllen Sie kein Öl mehr nach , als die Kapazität zulässt. Wenn der
rote Zeiger die Obergrenze erreicht, füllen Sie kein weiteres Öl nach .
22. Bitte reinigen Sie das Messgefäß und den Filter regelmäßig.
23. Diese Maschine ist für Benzin und Diesel geeignet . Sie ist jedoch
nicht für Wasser oder andere ätzende Lösungsmittel geeignet .
24. Betreiben Sie die Maschine in horizontaler Position, neigen Sie sie
nicht;
25. Von Feuer fernhalten.
26. Bei unterschiedlichen Ölsorten empfiehlt es sich, den Tank vor der
Einlagerung einer anderen Ölsorte zu reinigen.
27. Wenn dieses Produkt längere Zeit nicht verwendet wird, wird
empfohlen, es zu reinigen und in einer kühlen und trockenen Umgebung
aufzubewahren.
Hersteller: Shanghaimuxinmuyeyouxiangongsi
Adresse: Shuangchenglu 803nong11hao1602A-1609shi, baoshanqu,
Shanghai 200.000 CN.
Nach AUS importiert: SIHAO PTY LTD. 1 ROKEVA
STREETEASTWOOD
NSW 2122 Australien
Importiert in die USA: Sanven Technology Ltd. Suite 250, 9166 Anaheim
Place, Rancho Cucamonga, CA 91730

- 12 -
REP
UK
YH CONSULTING LIMITED. C/O YH Consulting
Limited Office 147, Centurion House, London
Road, Staines-upon-Thames, Surrey, TW18 4AX
REP
EC
E-CrossStu GmbH
Mainzer Landstr.69,
60329 Frankfurt am Main.

- 13 -
Technischer Support und E-Garantie-Zertifikat
www.vevor.com/support

- 14 -
CONTENITORE PER CARBURANTE IN
METALLO
MODELLO:JGC40
Supporto tecnico e certificato di garanzia elettronica
www.vevor.com/support

- 1 -
MODELLO:JGC40
Questa è l'istruzione originale, si prega di leggere attentamente tutte le
istruzioni del manuale prima di utilizzare. VEVOR si riserva una chiara
interpretazione del nostro manuale utente. L'aspetto del prodotto sarà
soggetto al prodotto ricevuto. Vi preghiamo di perdonarci se non vi
informeremo di nuovo se ci sono aggiornamenti tecnologici o software sul
nostro prodotto.
METAL FUEL CADDY

- 2 -
7. leggere attentamente e comprendere tutte le ISTRUZIONI DI
MONTAGGIO E FUNZIONAMENTO .
8. La mancata osservanza delle norme di sicurezza e di altre precauzioni
di sicurezza di base può causare gravi lesioni personali.
GENERAL SAFETY RULES
Quando si utilizza questo prodotto, è necessario seguire sempre le
precauzioni di base, tra cui le seguenti:
• Questo prodotto non è destinato all'uso da parte di persone (bambini
compresi) con ridotte capacità fisiche, sensoriali o mentali, o prive di
esperienza e conoscenza, a meno che non siano supervisionate o
abbiano ricevuto istruzioni sull'uso del prodotto da una persona
responsabile della loro sicurezza.
• Non utilizzare questo prodotto per scopi diversi da quello previsto.
• Indossare adeguati dispositivi di protezione durante l'installazione o
l'utilizzo di questo prodotto.
• assicurarsi che tutti i raccordi e i collegamenti filettati siano serrati e
privi di perdite .
UN PERICOLO!
I carburanti sono estremamente infiammabili. Tenere lontano da scintille di
calore e fiamme libere.
• Non utilizzare dispositivi elettronici o di comunicazione mobile, come i
telefoni cellulari, durante il pompaggio di liquidi infiammabili.
• Collegare il filo di terra e i contenitori da cui e verso cui si sta
pompando . Collegare a terra tutti i contenitori a una fonte di terra nota

- 3 -
per dissipare l'elettricità statica prima di pompare liquidi.
• del carburante possono esplodere . Dannosi o fatali se ingeriti. Evitare
di respirare i vapori del carburante.
• Non fumare in prossimità del serbatoio del carburante o durante
l'utilizzo .
• Questo prodotto è destinato esclusivamente al trasferimento di
carburante e non è destinato al trasporto di carburante in alcun veicolo
o rimorchio.
• Non modificare questo prodotto.
ATTENZIONE! ATTENZIONE! ATTENZIONE!
• Non utilizzare questo prodotto per lo stoccaggio del carburante a lungo
termine .
• Per evitare possibili danni, utilizzare un contenitore solo per un tipo di
carburante.
• Monitorare la portata e il livello di riempimento per evitare
traboccamenti e fuoriuscite.
• Svuotare sempre la pompa e il tubo dopo aver utilizzato il caddy.
Sollevare il tubo e girare la maniglia nella direzione opposta per
svuotare tutto il liquido rimanente nel caddy.
• Prestare attenzione quando si riempie il cadd y attraverso il tubo di
riempimento . Monitorare attentamente per evitare traboccamenti o
versamenti.
• Non utilizzare mai il contenitore del carburante vicino a fiamme
libere o fonti di calore .
SALVA LE ISTRUZIONI SE
MODEL AND PARAMETERS

- 4 -
Modello
40° anniversario
Capacità
40 galloni
Tipo di carburante
Benzina, Diesel
Pompa
Mano
Portata massima
15 L / min, 100 giri/min ; (4 GPM)
Tubo flessibile
Φ19 (diametro interno ) x L300c m
Ruota
2,5 " (anteriore); 10 " (posteriore)
Materiale
Acciaio
Colore
Rosso
STRUCTURE DIAGRAM
- 5 -
4. Maniglia 2. Tubo flessibile 3. Pompa 4. Indicatore dell'olio 5. Tappo di
ingresso del carburante
9. Serbatoio del carburante 7. Ruota girevole (anteriore) 8. Ruota fissa
COMPONENTS
1
8
2
3
6
4
7
5
- 6 -
NO.
Immagine
Nome e
quantità
NO.
Immagine
Nome e quantità
1
Serbatoio
carburante (x1)
10
Controdado (x1)
2
Maniglia (x1)
11
Tubo flessibile
Lampada C (x1)
3
Ruota (x2)
12
Perno ruota (x2)
4
Tubo flessibile
dell'olio (x1)
13
Dado di fissaggio
dell'indicatore
dell'olio (x1)
5
Ruota girevole
(x2)
14
Indicatore livello
olio (x1)
6
Pompa dell'olio
(con maniglia e
cavo di terra )
(x1)
15
Raccordo per
tubo flessibile (x1)
7
Ruota girevole
Pellicola (x2)
16
Guarnizione
piatta ( x2 )
8
Dado M8 (x8)
17
Dado cieco
M12(x2)
9
Nastro grezzo
(x1)
18
/
Manuale utente
(x1)
ASSEMBLY
- 7 -
Fase 1: Installare le ruote fisse. Avvitare gli alberi delle ruote (12) nel
serbatoio del carburante, quindi inserire le ruote fisse (3) negli alberi delle
ruote e bloccarle con guarnizioni e dadi (16+17).
Fase 2: Svitare prima i dadi sul fondo del serbatoio, quindi installare le
pellicole delle ruote girevoli (7) e le ruote girevoli (5) e avvitare i dadi.
Fase 3: Fissare la maniglia della pompa alla pompa dell'olio.
1
12
17
3
16
7
5
8
Nuts(at the bottom
of the tank)

- 8 -
Fase 4 : Avvitare il controdado (10) nell'uscita dell'olio . Avvolgere non
meno di 5 cerchi di nastro grezzo sull'uscita, quindi avvitare la pompa (6)
sull'uscita e regolare l'orientamento e, infine , ruotare in senso inverso il
controdado per bloccare la pompa.
Fase 5 : Bloccare l'indicatore dell'olio (14) sulla pompa con il fissaggio
10
14
Winding direction
- 9 -
dell'indicatore dell'olio (13), come mostrato.
Fase 6 : Inserire la maniglia (2) nel serbatoio nella posizione appropriata .
Fase 7: Avvolgere almeno 5 cerchi di nastro adesivo grezzo sul raccordo
2
13

- 10 -
del tubo (15) e avvitarlo all'uscita della pompa; quindi collegare il tubo
dell'olio (4) al raccordo del tubo (15) e bloccarlo con una fascetta
stringitubo (11).
Fase 8. Il prodotto è assemblato e pronto per l'uso.
15
11
4

- 11 -
OPERATION&MAINTENANCE
28. Collegare il tagliacapelli del filo di messa a terra a un buon terminale di
messa a terra e garantire la sicurezza dell'utente;
29. Mettere l'olio nel contenitore attraverso l'ingresso dell'olio. Per il primo
utilizzo, eliminare l'aria osservando che la misura mostra s .
30. Si prega di non aggiungere olio oltre la capacità. Quando la lancetta
rossa raggiunge il limite massimo, non aggiungere altro olio.
31. Si prega di pulire regolarmente il misurino e il filtro.
32. Questa macchina è adatta per benzina e gasolio . Ma non è adatta per
acqua o altri solventi corrosivi .
33. Utilizzare la macchina in posizione orizzontale, non inclinarla;
34. Tenere lontano dal fuoco.
35. Per diversi tipi di olio, si consiglia di pulire il serbatoio prima di
immagazzinare un altro tipo di olio.
36. Se il prodotto non viene utilizzato per un lungo periodo, si consiglia di
pulirlo e conservarlo in un ambiente fresco e asciutto.
Produttore: Shanghaimuxinmuyeyouxiangongsi
Indirizzo: Shuangchenglu 803nong11hao1602A-1609shi, baoshanqu,
shanghai 200000 CN.
Importato in AUS: SIHAO PTY LTD. 1 ROKEVA STREETEASTWOOD
Nuovo Galles del Sud 2122 Australia
Importato negli USA: Sanven Technology Ltd. Suite 250, 9166 Anaheim
Luogo, Rancho Cucamonga, CA 91730
REP
UK
YH CONSULTING LIMITED. C/O YH Consulting
Limited Office 147, Centurion House, London
Road, Staines-upon-Thames, Surrey, TW18 4AX
REP
EC
E-CrossStu GmbH
Mainzer Landstr.69,
60329 Frankfurt am Main.

- 12 -
Supporto tecnico e certificato di garanzia elettronica
www.vevor.com/support

- 13 -
CONTENEDOR DE COMBUSTIBLE DE
METAL
MODELO: JGC40
Soporte técnico y certificado de garantía electrónica
www.vevor.com/support
- 1 -
MODELO: JGC40
Estas son las instrucciones originales; lea atentamente todas las
instrucciones del manual antes de utilizarlo. VEVOR se reserva el derecho
de interpretar su manual de usuario. La apariencia del producto dependerá
del producto que haya recibido. Le rogamos que nos disculpe si no le
informamos de nuevo si hay actualizaciones tecnológicas o de software en
nuestro producto.
METAL FUEL CADDY

- 2 -
9. Lea atentamente y comprenda todas las INSTRUCCIONES DE
MONTAJE Y OPERACIÓN antes de operar.
10. El incumplimiento de las normas de seguridad y otras precauciones
básicas de seguridad puede provocar lesiones personales graves.
GENERAL SAFETY RULES
Al utilizar este producto, siempre se deben seguir precauciones básicas,
incluidas las siguientes:
• Este producto no está diseñado para ser utilizado por personas
(incluidos niños) con capacidades físicas, sensoriales o mentales
reducidas, o con falta de experiencia y conocimientos, a menos que
hayan recibido supervisión o instrucciones sobre el uso del producto
por parte de una persona responsable de su seguridad.
• No utilice este producto para ningún otro uso que no sea el previsto.
• Utilice el equipo de protección adecuado al instalar o utilizar este
producto.
• Asegúrese de que todos los accesorios y conexiones roscadas estén
bien apretados y sin fugas antes de operar.
¡PELIGRO!
Los combustibles son extremadamente inflamables. Mantener alejado del
calor, chispas y llamas abiertas.
• No utilice dispositivos electrónicos ni de comunicación móvil, como
teléfonos móviles, al bombear líquidos inflamables.
• Conecte el cable de tierra y conecte los recipientes desde y hacia los
cuales se bombea . Conecte todos los recipientes a una fuente de

- 3 -
tierra conocida para disipar la electricidad estática antes de bombear
líquidos.
• de combustible pueden explotar . Es dañino o mortal si se ingiere. Evite
inhalarlos .
• No fume cerca ni mientras utilice el depósito de combustible .
• Este producto está diseñado únicamente para la transferencia de
combustible y no está destinado a utilizarse para transportar
combustible en ningún vehículo o remolque.
• No modifique este producto.
¡ADVERTENCIA! ¡PRECAUCIÓN! ¡ATENCIÓN!
• No utilice este producto para almacenar combustible durante mucho
tiempo .
• Utilice un contenedor para un solo tipo de combustible para evitar
posibles daños.
• Monitoree el caudal y el nivel de llenado para evitar desbordes y
derrames.
• Vacíe siempre la bomba y la manguera después de usar el contenedor.
Levante la manguera y gire la manija en la dirección opuesta para
vaciar todo el líquido restante en el contenedor.
• Precaución al llenar el carrito a través del tubo de llenado . Vigilar de
cerca para evitar desbordamientos o derrames.
• Nunca utilice el depósito de combustible cerca de llamas
abiertas o fuentes de calor .
GUARDE ESTAS INSTRUCCIONES
MODEL AND PARAMETERS
Modelo
JGC 40

- 4 -
Capacidad
40 galones
Tipo de combustible
Gasolina, diésel
Bomba
Mano
Caudal máximo
15 L / min, 100 rpm ; (4 GPM)
Manguera
Φ19(diámetro interior ) x L300 cm
Rueda
2,5 " (delantero); 10 " (trasero)
Material
Acero
Color
Rojo
STRUCTURE DIAGRAM
1
8
2
3
6
4
7
5
- 5 -
5. Mango 2. Manguera 3. Bomba 4. Indicador de aceite 5. Tapa de
entrada de combustible
10. Tanque de combustible 7. Rueda giratoria (delantera) 8. Rueda fija
COMPONENTS
No.
Imagen
Nombre y
cantidad
No.
Imagen
Nombre y
cantidad
1
Tanque de
combustible (x1)
10
Tuerca de
seguridad (x1)
2
Mango (x1)
11
Manguera
Lámpara C (x1)
3
Rueda (x2)
12
Eje de rueda (x2)
4
Manguera de
aceite (x1)
13
Tuerca de fijación
del indicador de
aceite (x1)
5
Rueda giratoria
(x2)
14
Indicador de
aceite (x1)
6
Bomba de aceite
(con manija y
cable de tierra )
( x1)
15
Accesorio de
manguera (x1 )
- 6 -
7
Rueda giratoria
Película (x2)
16
Junta plana ( x2 )
8
Tuerca M8 (x8)
17
Tuerca de bellota
M12(x2)
9
Cinta sin rematar
(x1)
18
/
Manual de
usuario (x1)
ASSEMBLY
Paso 1: Instale las ruedas fijas. Atornille los ejes de las ruedas (12) al
tanque de combustible, luego coloque las ruedas fijas (3) en los ejes y
fíjelas con juntas y tuercas (16+17).
Paso 2: Primero desatornille las tuercas en la parte inferior del tanque,
luego instale las películas de las ruedas giratorias (7) y las ruedas
giratorias (5), y atornille las tuercas.
1
12
17
3
16
- 7 -
Paso 3: Conecte la manija de la bomba a la bomba de aceite.
Paso 4 : Enrosque la contratuerca (10) en la salida de aceite . Envuelva al
menos 5 círculos de cinta adhesiva en la salida. Luego, enrosque la
bomba (6) en la salida y ajuste la orientación. Finalmente , gire la
contratuerca en sentido inverso para bloquear la bomba.
7
5
8
Nuts(at the bottom
of the tank)

- 8 -
Paso 5 : Bloquee el medidor de aceite (14) en la bomba con la fijación del
medidor de aceite (13), como se muestra.
10
14
Winding direction

- 9 -
Paso 6 : Inserte el mango (2) en el tanque en la posición adecuada .
Paso 7: Envuelva no menos de 5 círculos de cinta adhesiva en el conector
de la manguera (15) y atorníllelo a la salida de la bomba; A continuación,
2
13

- 10 -
conecte la manguera de aceite (4) al conector de la manguera (15) y
bloquéela con una abrazadera de manguera (11).
Paso 8. El producto está ensamblado y listo para usar.
15
11
4

- 11 -
OPERATION&MAINTENANCE
37. Conecte el cortador de cable de tierra a un buen terminal de tierra y
garantice la seguridad del usuario;
38. Vierta el aceite en el depósito a través de la entrada. Al usarlo por
primera vez, elimine el aire observando la lectura .
39. No agregue aceite por encima de la capacidad. Cuando el indicador
rojo alcance el límite superior, no agregue más aceite.
40. Limpie el medidor y el filtro periódicamente.
41. Esta máquina es apta para gasolina y diésel . Sin embargo, no es apta
para agua ni otros disolventes corrosivos .
42. Opere la máquina en posición horizontal, no la incline;
43. Mantener alejado del fuego.
44. Para diferentes tipos de aceite, se recomienda limpiar el tanque antes
de almacenar otro tipo de aceite.
45. Si este producto no se utiliza durante un tiempo prolongado, se
recomienda limpiarlo y guardarlo en un ambiente fresco y seco.
Fabricante: Shanghaimuxinmuyeyouxiangongsi
Dirección: Shuangchenglu 803nong11hao1602A-1609shi, baoshanqu,
Shanghái 200000 CN.
Importado a AUS: SIHAO PTY LTD. 1 ROKEVA STREET, EASTWOOD
NSW 2122 Australia
Importado a EE. UU.: Sanven Technology Ltd. Suite 250, 9166 Anaheim
Lugar, Rancho Cucamonga, CA 91730
REP
UK
YH CONSULTING LIMITED. C/O YH Consulting
Limited Office 147, Centurion House, London
Road, Staines-upon-Thames, Surrey, TW18 4AX
REP
EC
E-CrossStu GmbH
Mainzer Landstr.69,
60329 Frankfurt am Main.

- 12 -
Soporte técnico y certificado de garantía electrónica
www.vevor.com/support

- 13 -
METALOWY KASETA NA PALIWO
MODEL:JGC40
Wsparcie techniczne i certyfikat e-gwarancji
www.vevor.com/support

- 1 -
MODEL:JGC40
To jest oryginalna instrukcja, przed użyciem należy uważnie przeczytać
wszystkie instrukcje. VEVOR zastrzega sobie jasną interpretację naszej
instrukcji obsługi. Wygląd produktu będzie zależał od produktu, który
otrzymałeś. Prosimy o wybaczenie, że nie poinformujemy Cię ponownie,
jeśli w naszym produkcie pojawią się jakiekolwiek aktualizacje
technologiczne lub oprogramowania.
METAL FUEL CADDY

- 2 -
11. należy uważnie przeczytać i zrozumieć całą INSTRUKCJĘ MONTAŻU
I OBSŁUGI .
12. Nieprzestrzeganie zasad bezpieczeństwa i innych podstawowych
środków ostrożności może skutkować poważnymi obrażeniami ciała.
GENERAL SAFETY RULES
Stosując ten produkt należy zawsze zachować podstawowe środki
ostrożności, w tym:
• Produkt ten nie jest przeznaczony do użytku przez osoby (w tym dzieci)
o ograniczonej sprawności fizycznej, sensorycznej lub umysłowej, a
także osoby nieposiadające odpowiedniego doświadczenia lub wiedzy,
chyba że znajdują się pod nadzorem osoby odpowiedzialnej za ich
bezpieczeństwo lub otrzymały od niej instrukcje dotyczące korzystania
z produktu.
• Nie używaj tego produktu niezgodnie z jego przeznaczeniem.
• Podczas instalacji i użytkowania tego produktu należy nosić
odpowiedni sprzęt ochronny.
• Przed uruchomieniem należy sprawdzić, czy wszystkie przyłącza i
gwinty są dobrze dokręcone i szczelne .
NIEBEZPIECZEŃSTWO!
Paliwa są niezwykle łatwopalne. Trzymać z dala od iskier cieplnych i
otwartego ognia.
• Podczas pompowania cieczy łatwopalnych nie należy używać
urządzeń elektronicznych ani mobilnych urządzeń komunikacyjnych,
takich jak telefony komórkowe.

- 3 -
• Podłącz przewód uziemiający i połącz pojemniki, z których i do których
pompowana jest ciecz . Uziem wszystkie pojemniki do znanego źródła
uziemienia, aby rozproszyć elektryczność statyczną przed
pompowaniem cieczy.
• paliwa mogą eksplodować . Szkodliwe lub śmiertelne w przypadku
połknięcia. Unikaj wdychania oparów paliwa.
• Nie palić w pobliżu ani podczas korzystania z pojemnika na paliwo .
• Produkt ten jest przeznaczony wyłącznie do przesyłu paliwa i nie
należy go używać do jego transportu w żadnym pojeździe ani
przyczepie.
• Nie wolno modyfikować tego produktu.
OSTRZEŻENIE! UWAGA! UWAGA!
• Nie należy używać tego produktu do długotrwałego przechowywania
paliwa.
• należy używać pojemnika przeznaczonego wyłącznie do jednego
rodzaju paliwa.
• Monitoruj natężenie przepływu i poziom napełnienia, aby zapobiegać
przepełnieniom i rozlaniom.
• Zawsze opróżniaj pompę i wąż po użyciu pojemnika. Podnieś wąż i
obróć uchwyt w przeciwnym kierunku, aby opróżnić cały pozostały płyn
z powrotem do pojemnika.
• Należy zachować ostrożność podczas napełniania pojemnika przez
rurkę wlewową . Uważnie obserwuj, aby zapobiec przepełnieniu lub
rozlaniu.
• Nigdy nie używaj pojemnika na paliwo w pobliżu otwartego ognia
lub źródeł ciepła .
ZAPISZ INSTRUKCJĘ SE

- 4 -
MODEL AND PARAMETERS
Model
JGC40
Pojemność
40 galonów
Typ paliwa
Benzyna, Diesel
Pompa
Ręka
Maksymalny przepływ
15 l / min, 100 obr./min ; (4GPM)
Wąż gumowy
Φ19 (średnica wewnętrzna ) x L300c m
Koło
2,5 " (przód); 10 " (tył)
Tworzywo
Stal
Kolor
Czerwony
STRUCTURE DIAGRAM

- 5 -
6. Uchwyt 2. Wąż 3. Pompa 4. Wskaźnik poziomu oleju 5. Korek wlewu
paliwa
11. Zbiornik paliwa 7. Koło skrętne (przód) 8. Koło stałe
COMPONENTS
1
8
2
3
6
4
7
5
- 6 -
NIE.
Zdjęcie
Nazwa i ilość
NIE.
Zdjęcie
Nazwa i ilość
1
Zbiornik paliwa
(x1)
10
Nakrętka
zabezpieczająca
2
Uchwyt (x1)
11
Wąż gumowy
Lampa C (x1)
3
Koło (x2)
12
Wał koła (x2)
4
Wąż olejowy
(x1)
13
Nakrętka
mocująca
wskaźnik
5
Kółko obrotowe
(x2)
14
Wskaźnik
poziomu oleju
6
Pompa olejowa
(z uchwytem i
przewodem
uziemiającym )
15
Złączka do węża
(x1 )
7
Kółko obrotowe
Filmik (x2)
16
Uszczelka płaska
( x2 )
8
Nakrętka M8
(x8)
17
Nakrętka
żołędziowa
M12(x2)
9
Surowa taśma
(x1)
18
/
Instrukcja obsługi
(x1)
ASSEMBLY
- 7 -
Krok 1: Zamontuj koła stałe. Wkręć wałki kół (12) do zbiornika paliwa, a
następnie umieść koła stałe (3) w wałkach kół i zablokuj je uszczelkami i
nakrętkami (16+17).
Krok 2: Najpierw odkręć nakrętki na spodzie zbiornika, następnie
zamontuj folie kółek obrotowych (7) i kółka obrotowe (5) i przykręć
nakrętki.
Krok 3: Przymocuj uchwyt pompy do pompy oleju.
1
12
17
3
16
7
5
8
Nuts(at the bottom
of the tank)
- 8 -
Krok 4 : Przykręć nakrętkę zabezpieczającą (10) do wylotu oleju . Owiń
wylot nie mniej niż 5 kręgów surowej taśmy, następnie przykręć pompę (6)
do wylotu i dostosuj orientację, a na koniec odwróć nakrętkę
zabezpieczającą , aby zablokować pompę.
Krok 5 : Zablokuj wskaźnik poziomu oleju (14) na pompie za pomocą
10
14
Winding direction

- 9 -
mocowania wskaźnika poziomu oleju (13), jak pokazano.
Krok 6 : Włóż uchwyt (2) do zbiornika w odpowiednim miejscu .
Krok 7: Owiń przyłącze węża (15) nie mniej niż 5 kręgami taśmy klejącej i
2
13
- 10 -
przykręć je do wylotu pompy; następnie podłącz wąż olejowy (4) do
przyłącza węża (15) i zablokuj go opaską zaciskową (11).
Krok 8. Produkt jest zmontowany i gotowy do użycia.
15
11
4

- 11 -
OPERATION&MAINTENANCE
46. Podłącz zacisk przewodu uziemiającego do dobrego zacisku
uziemiającego i zapewnij bezpieczeństwo użytkownika;
47. Wlej olej do pojemnika przez wlot oleju. Przy pierwszym użyciu usuń
powietrze, zwracając uwagę na wskaźnik pomiaru s .
48. Proszę nie dodawać oleju , który przekracza pojemność. Gdy
czerwony wskaźnik osiągnie najwyższy limit, nie dodawaj więcej oleju.
49. Proszę regularnie czyścić miarkę i filtr.
50. Ta maszyna nadaje się do benzyny i oleju napędowego. Nie nadaje się
jednak do wody ani innych żrących rozpuszczalników .
51. Używaj urządzenia w pozycji poziomej, nie przechylaj go;
52. Trzymać z dala od ognia.
53. W przypadku innych rodzajów oleju zaleca się wyczyszczenie
zbiornika przed przechowywaniem innego rodzaju oleju.
54. Jeżeli produkt nie będzie używany przez dłuższy czas, zaleca się jego
wyczyszczenie i przechowywanie w chłodnym i suchym miejscu.
Producent: Shanghaimuxinmuyeyouxiangongsi
Adres: Shuangchenglu 803nong11hao1602A-1609shi, baoshanqu,
Szanghaj 200000 CN.
Importowane do AUS: SIHAO PTY LTD. 1 ROKEVA
STREETEASTWOOD
NSW 2122 Australia
Importowane do USA: Sanven Technology Ltd. Suite 250, 9166 Anaheim
Miejsce, Rancho Cucamonga, CA 91730

- 12 -
REP
UK
YH CONSULTING LIMITED. C/O YH Consulting
Limited Office 147, Centurion House, London
Road, Staines-upon-Thames, Surrey, TW18 4AX
REP
EC
E-CrossStu GmbH
Mainzer Landstr.69,
60329 Frankfurt am Main.

- 13 -
Wsparcie techniczne i certyfikat e-gwarancji
www.vevor.com/support

- 14 -
METALEN BRANDSTOFCADEAU
MODEL:JGC40
Technische ondersteuning en e-garantiecertificaat
www.vevor.com/support

- 1 -
MODEL:JGC40
Dit is de originele instructie, lees alle handleidingen zorgvuldig door
voordat u het product gebruikt. VEVOR behoudt zich een duidelijke
interpretatie van onze gebruikershandleiding voor. Het uiterlijk van het
product is afhankelijk van het product dat u hebt ontvangen. Vergeef ons
dat we u niet opnieuw zullen informeren als er technologie- of
software-updates voor ons product zijn .
METAL FUEL CADDY

- 2 -
13. Lees alle MONTAGE- EN GEBRUIKSAANWIJZINGEN zorgvuldig
door en zorg dat u ze begrijpt voordat u het apparaat gaat gebruiken.
14. Het niet naleven van de veiligheidsregels en andere elementaire
veiligheidsmaatregelen kan leiden tot ernstig persoonlijk letsel.
GENERAL SAFETY RULES
Bij het gebruik van dit product dienen altijd de volgende
basisvoorzorgsmaatregelen in acht te worden genomen:
• Dit product is niet bedoeld voor gebruik door personen (inclusief
kinderen) met beperkte fysieke, sensorische of mentale vermogens, of
met een gebrek aan ervaring en kennis, tenzij zij onder toezicht staan
of instructies hebben gekregen over het gebruik van het product door
een persoon die verantwoordelijk is voor hun veiligheid.
• Gebruik dit product uitsluitend voor het beoogde doel.
• Draag geschikte beschermingsmiddelen wanneer u dit product
installeert of gebruikt.
• Zorg ervoor dat alle fittingen en schroefdraadverbindingen goed
vastzitten en dat er geen lekkage is voordat u het apparaat in gebruik
neemt.
EEN GEVAAR!
Brandstoffen zijn extreem ontvlambaar. Blijf uit de buurt van hittevonken en
open vuur.
• Gebruik geen elektronica of mobiele communicatieapparaten zoals
mobiele telefoons bij het pompen van ontvlambare vloeistoffen.
• Bevestig de aarddraad en bind containers die worden gepompt van en

- 3 -
naar. Aard alle containers aan een bekende aardbron om statische
elektriciteit af te voeren voordat u vloeistoffen pompt.
• Brandstofdampen kunnen exploderen . Schadelijk of dodelijk bij
inslikken. Vermijd het inademen van brandstofdampen.
• Rook niet in de buurt van de brandstofcaddy of terwijl u deze gebruikt .
• Dit product is uitsluitend bedoeld voor het overbrengen van brandstof
en is niet bedoeld voor het vervoeren van brandstof in een voertuig of
aanhanger.
• Wijzig dit product niet.
WAARSCHUWING! LET OP! LET OP!
• Gebruik dit product niet voor het opslaan van brandstof onder
propellorbevestiging .
• Gebruik een caddy alleen voor één soort brandstof om mogelijke
schade te voorkomen.
• Controleer de stroomsnelheid en het vulniveau om overlopen en
morsen te voorkomen.
• Leeg altijd de pomp en slang na gebruik van de caddy. Til de slang op
en draai de hendel in de tegenovergestelde richting om alle resterende
vloeistof terug in de caddy te laten lopen.
• Wees voorzichtig bij het vullen van de caddy via de vulbuis . Houd goed
toezicht om overlopen of morsen te voorkomen.
• Gebruik de brandstofcaddy nooit in de buurt van open vuur of
warmtebronnen .
BEWAAR DE SE -INSTRUCTIES
MODEL AND PARAMETERS
Model
JGC40

- 4 -
Capaciteit
40 gallons
Brandstoftype
Benzine, Diesel
Pomp
Hand
Maximale stroom
15 L / min, 100 tpm ; (4 GPM)
Slang
Φ19( Binnendiameter )x L300c m
Wiel
2,5 " (voorkant); 10 "(achterkant)
Materiaal
Staal
Kleur
Rood
STRUCTURE DIAGRAM
1
8
2
3
6
4
7
5
- 5 -
7. Handvat 2. Slang 3. Pomp 4. Oliepeilstok 5. Brandstofinlaatdop
12. Brandstoftank 7. Zwenkwiel (voor) 8. Vast wiel
COMPONENTS
Nee.
Afbeelding
Naam en
Hoeveelheid
Nee.
Afbeelding
Naam en
Hoeveelheid
1
Brandstoftank
(x1)
10
Borgmoer (x1)
2
Handvat (x1)
11
Slang
C- lamp (x1)
3
Wiel (x2)
12
Wielas (x2)
4
Olieslang (x1)
13
Bevestigingsmoer
oliepeilstok (x1)
5
Zwenkwiel
(x2)
14
Oliepeilstok (x1)
6
Oliepomp
(met handvat
en
aardleiding )
15
Slangfitting ( x1 )
- 6 -
7
Zwenkwiel
Filmpje (x2)
16
Platte pakking
( x2 )
8
Moer M8 (x8)
17
Eikelmoer M12(x2)
9
Ruwe tape
(x1)
18
/
Gebruiksaanwijzing
(x1)
ASSEMBLY
Stap 1: Installeer de vaste wielen. Schroef de wielassen (12) in de
brandstoftank, plaats vervolgens de vaste wielen (3) in de wielassen en
vergrendel ze met pakkingen en moeren (16+17).
Stap 2: Draai eerst de moeren aan de onderkant van de tank los, monteer
vervolgens de zwenkwielfilms (7) en de zwenkwielen (5) en draai de
moeren vast.
1
12
17
3
16

- 7 -
Stap 3: Bevestig de pomphendel aan de oliepomp.
Stap 4 : Schroef de borgmoer (10) in de olie-uitlaat . Wikkel niet minder
dan 5 cirkels van ruwe tape om de uitlaat, schroef vervolgens de pomp (6)
op de uitlaat en pas de oriëntatie aan, en draai ten slotte de borgmoer
omgekeerd om de pomp te vergrendelen.
7
5
8
Nuts(at the bottom
of the tank)
- 8 -
Stap 5 : Vergrendel de oliepeilstok (14) op de pomp met de
oliepeilstokbevestiging (13), zoals afgebeeld.
10
14
Winding direction

- 9 -
Stap 6 : Plaats de hendel (2) op de juiste positie in de tank .
Stap 7: Wikkel minimaal 5 cirkels van ruwe tape om de slangaansluiting
(15) en schroef deze vast aan de uitlaat van de pomp; Bevestig vervolgens
2
13

- 10 -
de olieslang (4) aan de slangaansluiting (15) en zet deze vast met een
slangklem (11).
Stap 8. Het product is gemonteerd en klaar voor gebruik.
15
11
4

- 11 -
OPERATION&MAINTENANCE
55. Sluit de schaar van de aarddraad aan op een goede aardingsklem en
zorg voor de veiligheid van de gebruiker;
56. Doe de olie in de caddy via de olie-inlaat. Verwijder bij het eerste
gebruik de lucht terwijl u let op de maataanduiding s .
57. Voeg geen olie toe die de capaciteit overschrijdt. Wanneer de rode
wijzer de hoogste limiet bereikt , voeg dan geen olie meer toe.
58. Maak de maatbeker en het filter regelmatig schoon.
59. Deze machine is geschikt voor benzine en diesel. Maar het is niet
geschikt voor water of andere corrosieve oplosmiddelen .
60. Bedien de machine in horizontale positie, niet hellend;
61. Uit de buurt van vuur houden.
62. Bij verschillende soorten olie is het raadzaam om de tank schoon te
maken voordat u een ander soort olie opslaat.
63. Als u dit product gedurende langere tijd niet gebruikt, raden wij u aan
het schoon te maken en op een koele, droge plaats op te bergen .
Fabrikant: Shanghaimuxinmuyeyouxiangongsi
Adres: Shuangchenglu 803nong11hao1602A-1609shi, baoshanqu,
Sjanghai 200000 CN.
Geïmporteerd naar AUS: SIHAO PTY LTD. 1 ROKEVA
STREETEASTWOOD
NSW 2122 Australië
Geïmporteerd naar de VS: Sanven Technology Ltd. Suite 250, 9166
Anaheim
Plaats, Rancho Cucamonga, CA 91730

- 12 -
REP
UK
YH CONSULTING LIMITED. C/O YH Consulting
Limited Office 147, Centurion House, London
Road, Staines-upon-Thames, Surrey, TW18 4AX
REP
EC
E-CrossStu GmbH
Mainzer Landstr.69,
60329 Frankfurt am Main.

- 13 -
Technische ondersteuning en e-garantiecertificaat
www.vevor.com/support

- 14 -
METALL FUEL CADDY
MODELL: JGC40
Teknisk support och e-garanticertifikat
www.vevor.com/support

- 1 -
MODELL: JGC40
Detta är den ursprungliga instruktionen, läs alla instruktioner noggrant
innan du använder den. VEVOR reserverar sig för en tydlig tolkning av vår
användarmanual. Utseendet på produkten är beroende av den produkt du
fått. Ursäkta oss att vi inte kommer att informera dig igen om det finns
någon teknik eller mjukvaruuppdateringar på vår produkt.
METAL FUEL CADDY

- 2 -
15. Läs noggrant och förstå alla MONTERINGS- OCH
DRIFTINSTRUKTIONER innan användning.
16. Underlåtenhet att följa säkerhetsreglerna och andra grundläggande
säkerhetsåtgärder kan resultera i allvarliga personskador.
GENERAL SAFETY RULES
När du använder denna produkt bör grundläggande försiktighetsåtgärder
alltid följas, inklusive följande;
• Denna produkt är inte avsedd att användas av personer (inklusive barn)
med nedsatt fysisk, sensorisk eller mental förmåga, eller bristande
erfarenhet och kunskap, såvida de inte har fått övervakning eller
instruktioner angående användning av produkten av en person som
ansvarar för deras säkerhet.
• Använd inte denna produkt för något annat än avsedd användning.
• Bär lämplig skyddsutrustning när du installerar eller använder denna
produkt.
• Se till att alla kopplingar och gängade anslutningar är åtdragna och
läckfria innan användning.
EN FARA!
Bränsle är extremt brandfarliga. Håll borta från värmegnistor och öppen
låga.
• Använd inte elektronik eller mobila kommunikationsenheter som
mobiltelefoner när du pumpar brandfarliga vätskor.
• Fäst jordtråd och bondbehållare som pumpas från och in i. Jorda alla
behållare till en känd jordkälla för att avleda statisk elektricitet innan
vätskor pumpas.
• Bränsleångor kan explodera . Skadligt eller dödligt vid förtäring. Undvik

- 3 -
att andas in bränsleångor.
• Rök inte nära eller medan du använder bränslebehållaren .
• Denna produkt är endast avsedd för bränsleöverföring och är inte
avsedd att användas för att transportera bränsle i något fordon eller
släp.
• Modifiera inte denna produkt.
EN VARNING! FÖRSIKTIGHET! UPPMÄRKSAMHET!
• Använd inte denna produkt för långvarig lagring av bränsle.
• Använd endast en caddie för en typ av bränsle för att undvika
eventuella skador.
• Övervaka flödeshastighet och fyllnadsnivå för att förhindra spill och
spill.
• Töm alltid pumpen och slangen efter att ha använt caddien. Lyft upp
slangen och vrid handtaget åt motsatt håll för att tömma all återstående
vätska tillbaka i caddien.
• Var försiktig när du fyller cadd y genom påfyllningsröret . Övervaka
noga för att förhindra spill eller spill.
• Använd aldrig bränslebehållaren nära öppna lågor eller
värmekällor .
SPARA SE- INSTRUKTIONERNA
MODEL AND PARAMETERS
Modell
JGC 40
Kapacitet
40 liter
Bränsletyp
Bensin, Diesel
Pump
Hand
Max. Flöde
15 L / min, 100 rpm ; (4GPM)
- 4 -
Slang
Φ19(innerdiameter ) x L300c m
Hjul
2,5 " (framtill); 10 " (bakåt)
Material
Stål
Färg
Röd
STRUCTURE DIAGRAM
8. Handtag 2. Slang 3. Pump 4. Oljemätare 5. Bränsleinloppslock
13. Bränsletank 7. Svänghjul (Främre) 8. Fast hjul
1
8
2
3
6
4
7
5
- 5 -
COMPONENTS
Inga.
Bild
Namn och
antal
Inga.
Bild
Namn och antal
1
Bränsletank
(x1)
10
Låsmutter (x1)
2
Handtag (x1)
11
Slang
C -lampa (x1)
3
Hjul (x2)
12
Hjulaxel (x2)
4
Oljeslang (x1)
13
Fästmutter för
oljemätare(x1)
5
Svänghjul
(x2)
14
Oljemätare (x1)
6
Oljepump (med
handtag och
jordledning )
( x1)
15
H ose F itting
(x1)
7
Svänghjul
Film (x2)
16
F lat G -fråga
(x2)
8
Mutter M8 (x8)
17
Acorn Nut
M12(x2)
- 6 -
9
Råtejp (x1)
18
/
Användarmanual
(x1)
ASSEMBLY
Steg 1: Installera de fasta hjulen. Skruva in hjulaxlarna (12) i
bränsletanken, sätt sedan in de fasta hjulen (3) i hjulaxlarna och lås dem
med packningar och muttrar (16+17).
Steg 2: Skruva loss muttrarna i botten av tanken först, sedan installerar jag
de svängbara hjulfilmerna (7) och de svängbara hjulen (5) och skruva fast
muttrarna.
1
12
17
3
16

- 7 -
Steg 3: Fäst pumphandtaget till oljepumpen.
Steg 4 : Skruva fast låsmuttern (10) i oljeutloppet . Linda inte mindre än 5
cirklar med rå tejp på utloppet, skruva sedan på pumpen (6) på utloppet
och justera orienteringen, och slutligen vrid tillbaka låsmuttern för att låsa
pumpen.
7
5
8
Nuts(at the bottom
of the tank)

- 8 -
Steg 5 : Lås oljemätaren (14) på pumpen med oljemätarens fäste (13),
som visas.
10
14
Winding direction
- 9 -
Steg 6
:
Sätt in handtaget (2) i tanken i lämplig position .
Steg 7: Linda inte mindre än 5 cirklar med rå tejp på slangkopplingen (15)
och skruva fast den i pumpens utlopp; Fäst sedan oljeslangen (4) på
2
13
- 10 -
slangkopplingen (15) och lås den med en slangklämma (11).
Steg 8. Produkten är monterad och klar för användning.
OPERATION&MAINTENANCE
15
11
4

- 11 -
64. Anslut jordkabelns klippare till en bra jordningsterminal och säkerställ
användarens säkerhet;
65. Häll oljan i caddien genom oljeinloppet. Vid första användning,
vänligen eliminera luft samtidigt som du märker att åtgärden visar s .
66. Vänligen tillsätt inte olja som är över kapaciteten. När den röda visaren
når den högsta gränsen, fyll inte på olja längre.
67. Rengör måtten och filtrera regelbundet.
68. Denna maskin är lämplig för bensin och diesel . Men det är inte
lämpligt för vatten eller andra frätande lösningsmedel .
69. Kör maskinen i horisontellt läge, luta inte;
70. Håll borta från eld.
71. För olika typer av olja rekommenderas att rengöra tanken innan du
lagrar en annan typ av olja.
72. Om denna produkt inte används under en längre tid, rekommenderas
att rengöra och förvara den i en sval och torr miljö.
Tillverkare: Shanghaimuxinmuyeyouxiangongsi
Adress: Shuangchenglu 803nong11hao1602A-1609shi, baoshanqu,
shanghai 200 000 CN.
Importerad till AUS: SIHAO PTY LTD. 1 ROKEVA STREETEASTWOOD
NSW 2122 Australien
Importerad till USA: Sanven Technology Ltd. Suite 250, 9166 Anaheim
Place, Rancho Cucamonga, CA 91730
REP
UK
YH CONSULTING LIMITED. C/O YH Consulting
Limited Office 147, Centurion House, London
Road, Staines-upon-Thames, Surrey, TW18 4AX
REP
EC
E-CrossStu GmbH
Mainzer Landstr.69,
60329 Frankfurt am Main.

Teknisk support och e-garanticertifikat
www.vevor.com/support