
USER GUIDE
5.1ch Soundbar with wireless subwoofer
and semi-wireless sub
100135498_EN_01052024

Contents & Information
Contents & Information
Overview
Safety Precautions
Unpacking
Wall Mounting Setup (Optional)
Assembly
Operation
Cleaning & Care
Specifications
Troubleshooting
• 5.1 Channels
• Roku TV Ready™
• Bluetooth®
• DTS X and DTS VX
• 6 Internal speaker + 1 wireless subwoofer +1 Semi-
wireless surround
• 175W RMS output / 700 W peak output (4 x RMS)
• Dolby Atmos (supporting Dolby Atmos)
Features
• 1 x HDMI® (eARC/ARC)
• 1 x AUX
• 1 x Optical
• 1 x USB
Connections
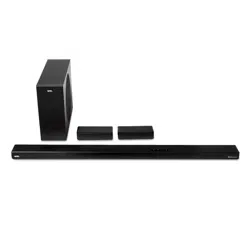
BT
DISPLAY PANEL
SOUNDBAR
Overview
Standby
5TANDBY
AUX
AUX
USB
U5B
Optical
OPT
HDMI eARC/ARC
EARC
Bluetooth device connected
BT
Bluetooth device disconnect
NO BT
Maximum/minimum volume
V MAX
/
V MIN
Mute
MUTE
VRT:X
VRT X ON
/
VRT X OFF
Dimmer (Low/Medium/High)
DIM O1
/
DIM O2
/
DIM O3
Sound mode (Movie/Music/Talk)
Movie
/
Mu5ic
/
TalK
Bass/Treble +/-
BA5+3
~
BA5-3
/
TRE+3
~
TRE-3
Center/Surround
CTR +3
~
CTR -3
/
L+ 3
~
L- 3
/
R+3
~
R-3
VOLUME UP
VOLUME DOWN
SOURCEON/OFF
REMOTE CONTROL SENSOR
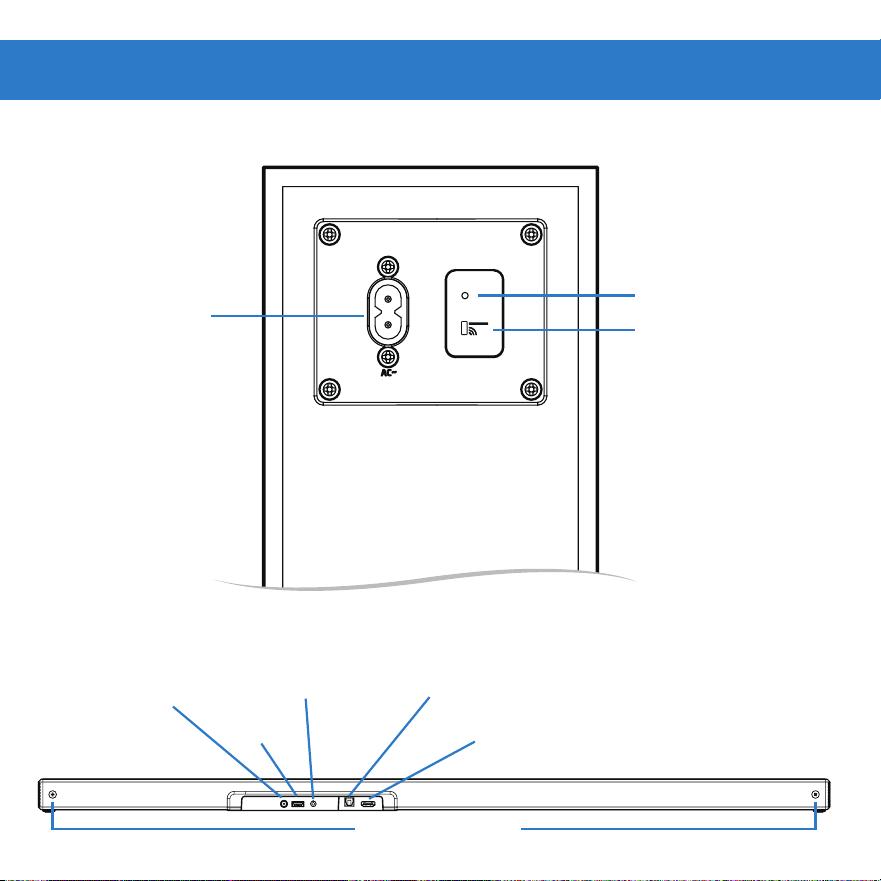
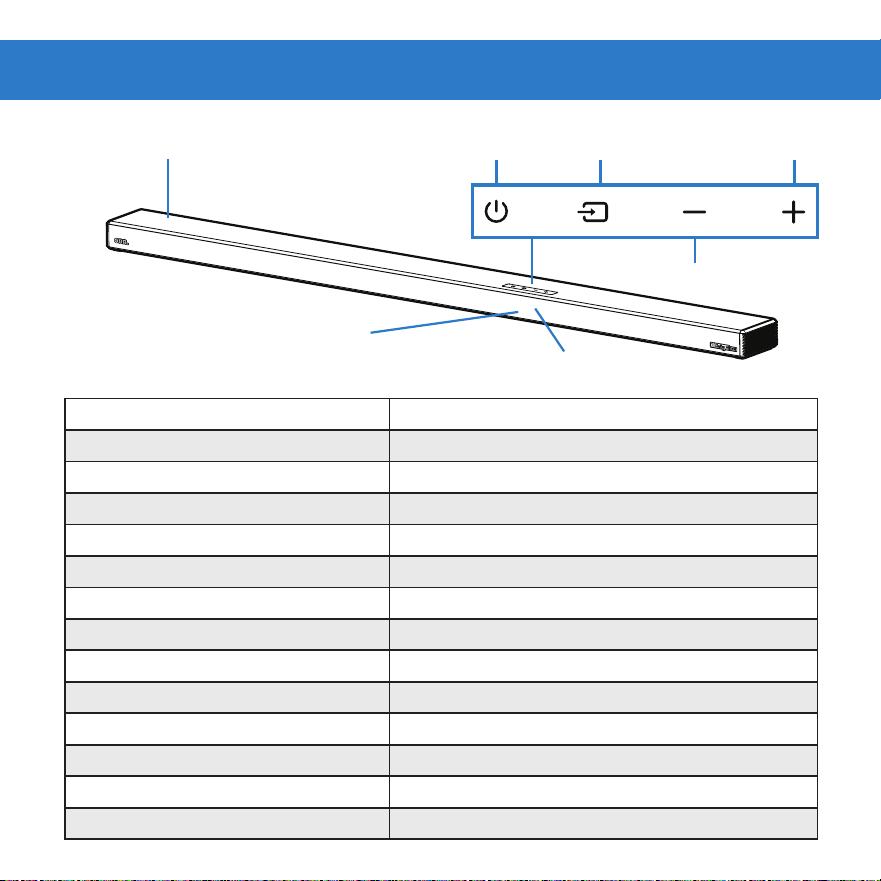
PAIR INDICATOR
POWER
PAIR BUTTON
WALL MOUNTS
HDMI eARC/ARCUSB
AUX AUDIO IN
(STEREO 3.5MM)
OPTICAL
AUDIO IN
DC IN
SOUNDBAR BACK
SUBWOOFER BACK
PAIR BUTTON
DC IN
REMOTE CONTROL
BASS DOWN
VRT: X
TREBLE DOWN
BASS UP TREBLE UP
BLUETOOTH
NEXT TRACK
PLAY/PAUSE
SETTING
SOUND MODE
SOURCE
POWER
ON/OFF
VOLUME UP
VOLUME DOWN
PREVIOUS TRACK
MUTE
WALL MOUNTS
SURROUND BACK
WALL MOUNTS
SPEAKER (R)
SOCKET
SPEAKER (L)
SOCKET
DIMMER
Safety Precautions
• Read these instructions – All safety and
operating instructions should be read
before product is operated.
• Keep these instructions – The safety and
operating instructions should be retained
for future reference.
• Heed all warnings – All warnings on
appliance and in operating instructions
should be adhered to.
• All operating and use instructions should
be followed.
• Do not use this apparatus near water
– Appliance should not be used near
water or moisture – for example, in a wet
basement or near a swimming pool, etc.
• Do not block any ventilation openings.
Install in accordance with manufacturer’s
instructions.
• Do not install near any heat sources such
as radiators, heat registers, stoves, or
other apparatus (including amplifiers) that
produce heat.
• Do not defeat the safety purpose of the
polarized or grounding plug. A polarized
plug has two blades with one wider than
the other. A grounding plug has two blades
and a third grounding prong. The wide
blade or the third prong is provided for
your safety. If the provided plug does not
fit into your outlet, consult an electrician
for replacement of the obsolete outlet.
• Protect power cord from being walked
on or pinched particularly at the plugs,
convenience receptacles, and at the point
where they exit from the apparatus.
• Only use attachments/accessories
specified by the manufacturer.
• Use only with the cart, stand, tripod,
bracket, or table specified by the
manufacturer, or sold with the apparatus.
When a cart or rack is used, use caution
when moving the cart/ apparatus
combination to avoid injury from tip-over.
• Unplug apparatus during lightning storms
or when unused for long periods of time.
WARNING

• Refer all servicing to qualified personnel.
Servicing is required when apparatus has
been damaged in any way, such as power
supply cord or plug is damaged, liquid has
been spilled or objects have fallen into
apparatus. Apparatus has been exposed
to rain or moisture, does not operate
normally, or has been dropped.
• Maintain ventilation around equipment.
Do not install in a confined space such as
a book case or similar unit. Do not cover
the ventilation openings with items such as
newspaper, table-cloths, curtains etc.
• This equipment is a Class II or double
insulated electrical appliance. It has been
designed in such a way that it does not
require a safety connection to electrical
earth.
• The equipment shall be used at maximum
35 degree C ambient temperature.
• Do not replace a battery with an incorrect
type that can defeat a safeguard (for
example,in the case of some lithium
battery types).
• Do not dispose of a battery in a fire or a
hot oven. Do not mechanically crush or
cut a battery. These conditions can result
in an explosion.
• Leaving a battery in an extremely high
temperature environment can result in
an explosion or the leakage of flammable
liquid or gas.
• A battery subjected to extremely low air
pressure may result in an explosion or
the leakage of flammable liquid or gasTo
reduce the risk of fire or electric shock,
do not expose this apparatus to rain or
moisture. The apparatus shall not be
exposed to dripping, splashing or objects
filled with liquids, such as vases, etc.
• The mains plug is used as disconnect
device, the disconnect device shall remain
readily operable.
• To reduce the risk of electric shock, do
not remove cover (or back) as there are
no user-serviceable parts inside. Refer
servicing to qualified personnel.
• To prevent injury, this apparatus must
be securely attached to the floor/
wall in accordance with the installation
instructions.
• Danger of explosion if the remote control
batteries are incorrectly replaced. Replace
only with the same or equivalent type.

FCC Statement :
This device complies with Part 15 of the FCC Rules. Operation is subject to the following two
conditions: 1) This device may not cause harmful interference, and 2) This device must accept
any interference received, including interference that may cause undesired operation.
Note: This equipment has been tested and found to comply with the limits for a Class B digital
device, pursuant to part 15 of the FCC Rules. These limits are designed to provide reasonable
protection against harmful interference in a residential installation. This equipment generates,
uses and can radiate radio frequency energy and, if not installed and used in accordance with
the instructions, may cause harmful interference to radio communication. However, there
is no guarantee that interference will not occur in a particular installation. If this equipment
does cause harmful interference to radio or television reception, which can be determined by
turning the equipment off and on, the user is encouraged to try to correct the interference
by one or more of the following measures:
• Reorient or relocate the receiving antenna.
• Increase the separation between the equipment and receiver.
• Connect the equipment into an outlet on a circuit different from that to which the receiver
is connected.
• Consult the dealer or an experienced radio/TV technician for help.
FCC Caution:
• Changes or modifications not expressly approved by the party responsible for compliance
could void the user’s authority to operate the equipment.
• This equipment complies with FCC and IC radiation exposure limits set forth for an
uncontrolled environment. This equipment should be installed and operated with minimum
distance 20cm between the radiator & your body.
• Shielded cables must be used with this unit to ensure compliance with the Class B
FCC limits.
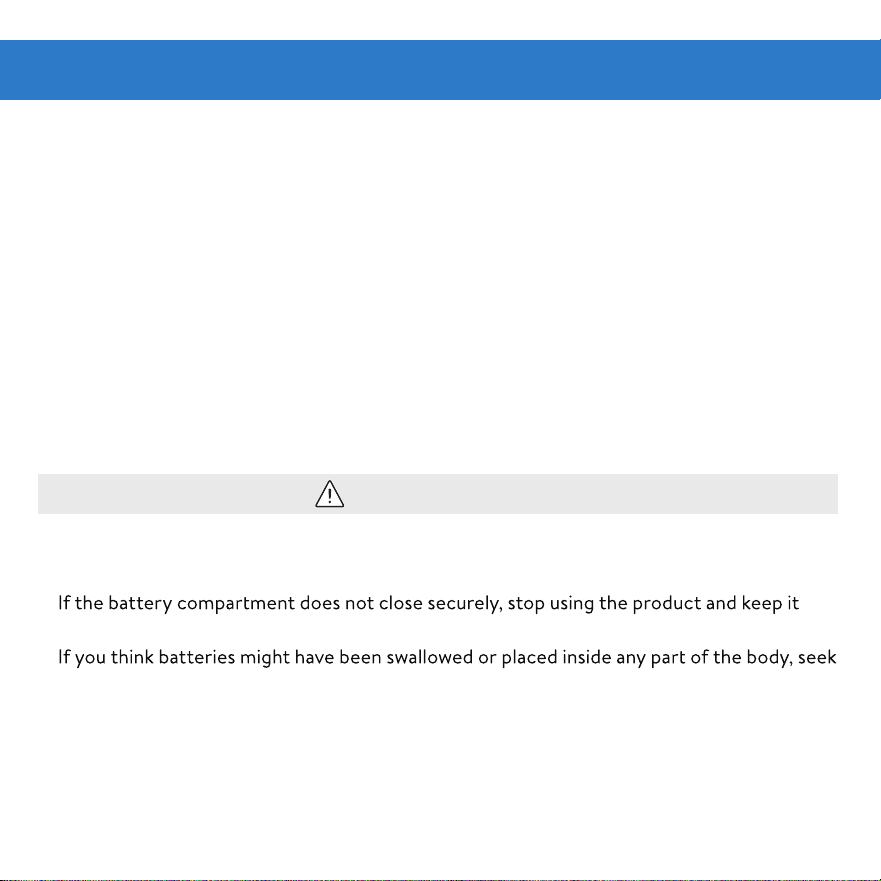
CAUTION
• Batteries should not be exposed to excessive heat such as sunshine, fire, etc.
• Keep new and used batteries away from children.
•
away from children.
•
immediate medical attention.
This device contains licence-exempt transmitter(s)/receiver(s) that comply with Innovation,
Science and Economic Development Canada’s licence-exempt RSS(s). Operation is subject
to the following two conditions:
• This device may not cause interference.
• This device must accept any interference, including interference that may cause undesired
operation of the device.
L’émetteur/récepteur exempt de licence contenu dans le présent appareil est conforme aux
CNR d’Innovation, Sciences et Développement économique Canada applicables aux appareils
radio exempts de licence. L’exploitation est autorisée aux deux conditions suivantes:
• L’appareil ne doit pas produire de brouillage;
• L’appareil doit acc
epter tout brouillage radioélectrique subi, même si le brouillage est
susceptible d’en compromettre le fonctionnement.

• The terms HDMI, HDMI High-Definition Multimedia Interface, HDMI trade dress and the HDMI
Logos are trademarks or registered trademarks of HDMI Licensing Administrator, Inc.
• Dolby, Dolby Atmos, and the double-D symbol are registered trademarks of Dolby Laboratories
Licensing Corporation. Manufactured under license from Dolby Laboratories. Confidential
unpublished works. Copyright © 2012-2021 Dolby Laboratories. All rights reserved.
• The Bluetooth® word mark and logos are registered trademarks owned by the Bluetooth SIG, Inc.
and any use of such marks by Walmart Inc. is under license. Other trademarks and trade names
are those of their respective owners.
• For DTS patents, see http://patents.dts.com. Manufactured under license from DTS, Inc. or
DTS Licensing Limited. DTS, DTS:X, Virtual:X, and the DTS:X logo are registered trademarks or
trademarks of DTS, Inc. in the United States and other countries. © 2021 DTS, Inc. ALL RIGHTS
RESERVED.
• Roku, the Roku logo, Roku TV, Roku TV Ready, and the Roku TV Ready logo are
trademarks and/or registered trademarks of Roku, Inc.
This product is Roku TV Ready-supported in the United State. Countries are subject to change.
For the most current list of countries in which this product is Roku TV Ready-supported, please
email rokutvready@roku.com.
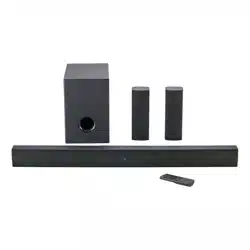
Part Description Qty
1 Soundbar 1
2 Subwoofer 1
3 Surround Speaker 2
4 AC adapter 2
5 Power cable 1
6 2.5mm AUX cable 1
Part Description Qty
7 HDMI cable 1
8 Wall mounting template 1
9
Wall mounting kit (for
Soundbar)
1
10
Wall mounting kit (for Sur-
round Speaker)
1
11
Remote control (AAA
batteries x2)
1
PARTS
11
3
8
9
2
1
PARTS DIAGRAM
5
4
6
7
Unpacking
5.1ch Sound bar with wireless subwoofer
and semi-wireless sub
Model:100135498
Wall Mounting Template
10
25
min
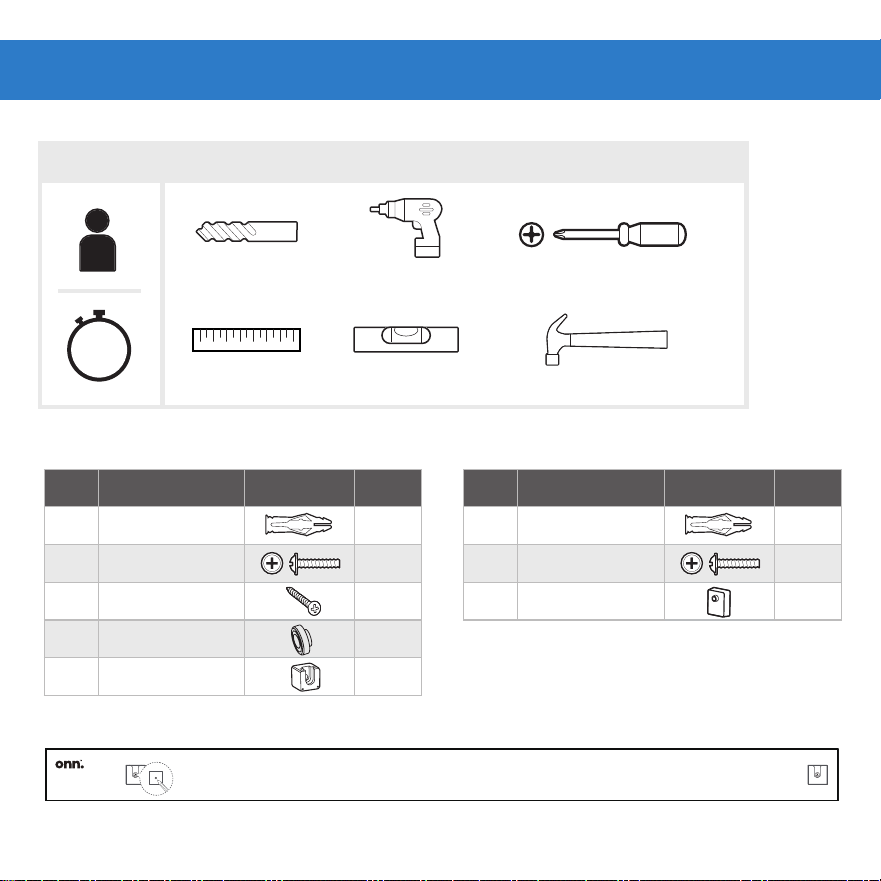
Part Description Picture Qty
A Anchor
2
B Screws
2
C Screws
2
D Washers 2
E Wall mounting
2
Cross Head Screwdriver
Drill bit
Ruler Level Hammer
Drill
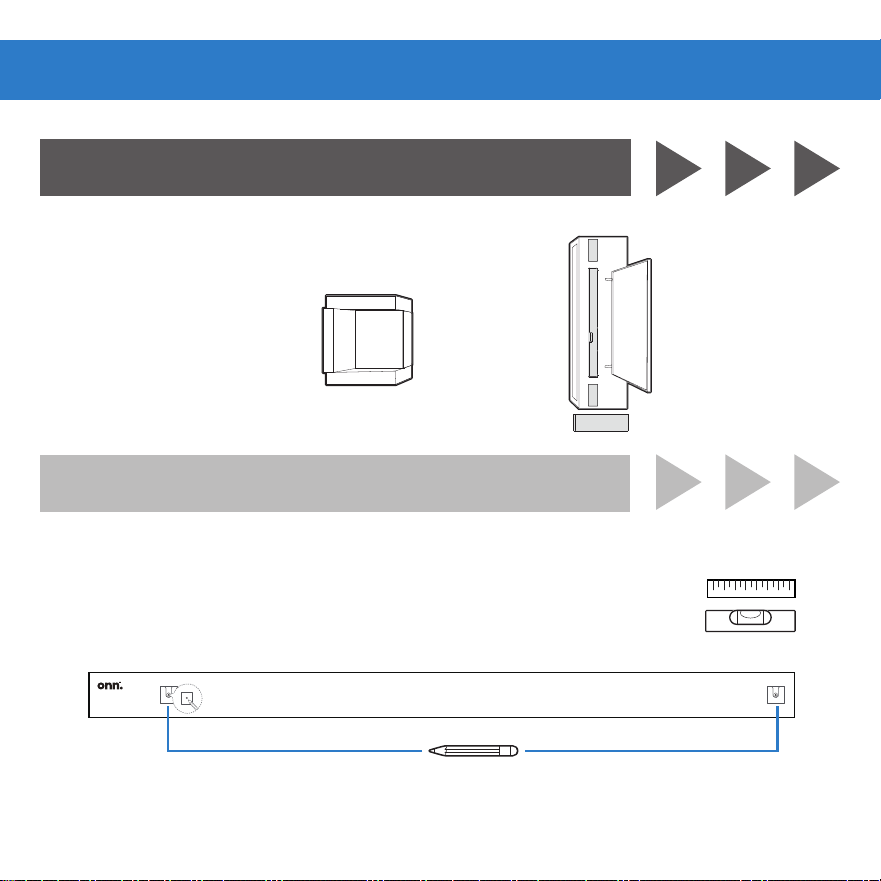
SETUP
TOOLS NEEDED (NOT SUPPLIED)
Wall Mounting Setup (Optional)
HARDWARE (SOUNDBAR)
(Wall mounting, optional)
5.1ch Sound bar with wireless subwoofer
and semi-wireless sub
Model:100135498
Wall Mounting Template
Wall mounting template
Part Description Picture Qty
A Anchor
4
B Screws
4
C Wall mounting
4
(SURROUND SPEAKER)
• Be sure screws will be attached to wood studs or use anchors
for drywall, or anchors for concrete or brick walls.
5.1ch Sound bar with wireless subwoofer
and semi-wireless sub
Model:100135498
Wall Mounting Template
1B. PLACE (SOUNDBAR)
1A. CENTER
1. Wall mount template on wall under TV.
2. Mark Bracket holes (Ensure enough space between soundbar
and TV) See 4B. HANG.
1. Below TV, close to ear level
2. Go to step 4
Assembly
ON A SURFACE
ON A WALL
ON A WALL
2B. INSTALL (SOUNDBAR)
Wallmounts Screws and Anchors (if required)
1. Drill holes
REQUIRED
(A) Anchors x2
(B) Screws x2
(C) Screws x2
(D) Washers x2
(E) Wall mounting x2
2. Hammer
in anchors
3. Screw in screws
and wall mounting
into anchors
4. Remove the screws at
the back of the soundbar
5. Install the screws and
washers into the back of
the soundbar
Anchors not
needed if screwed
into Studs
45
ON A WALL
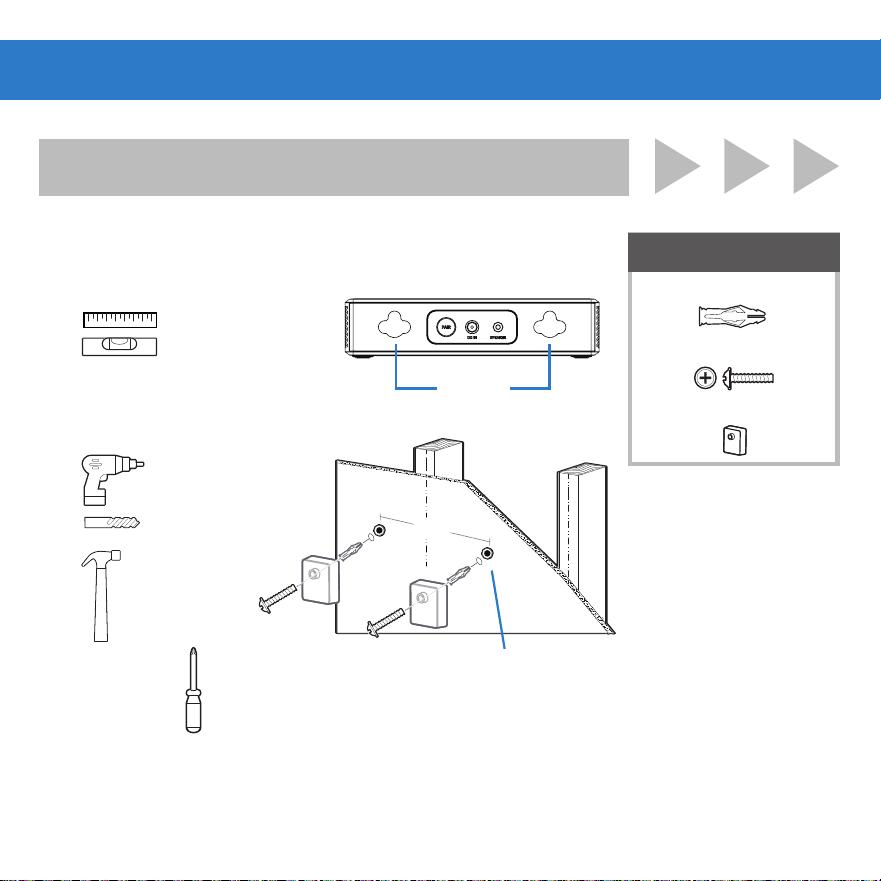
3B. INSTALL (SURROUND SPEAKER)
REQUIRED
(A) Anchors x4
(B) Screws x4
(C) Wall mounting x4
96mm
Wallmounts Screws and Anchors (if required)
2. Drill holes
3. Hammer
in anchors
4. Screw in screws
and wall mounting
into anchors
Anchors not
needed if screwed
into Studs
96mm
1. The distance
between the
holes should
be 96mm.
CAUTION
5.1ch Sound bar with wireless subwoofer
and semi-wireless sub
Model:100135498
Wall Mounting Template
Note: Make sure wall
mount orientation
matches example
Note: Make sure wall
mount orientation
matches example
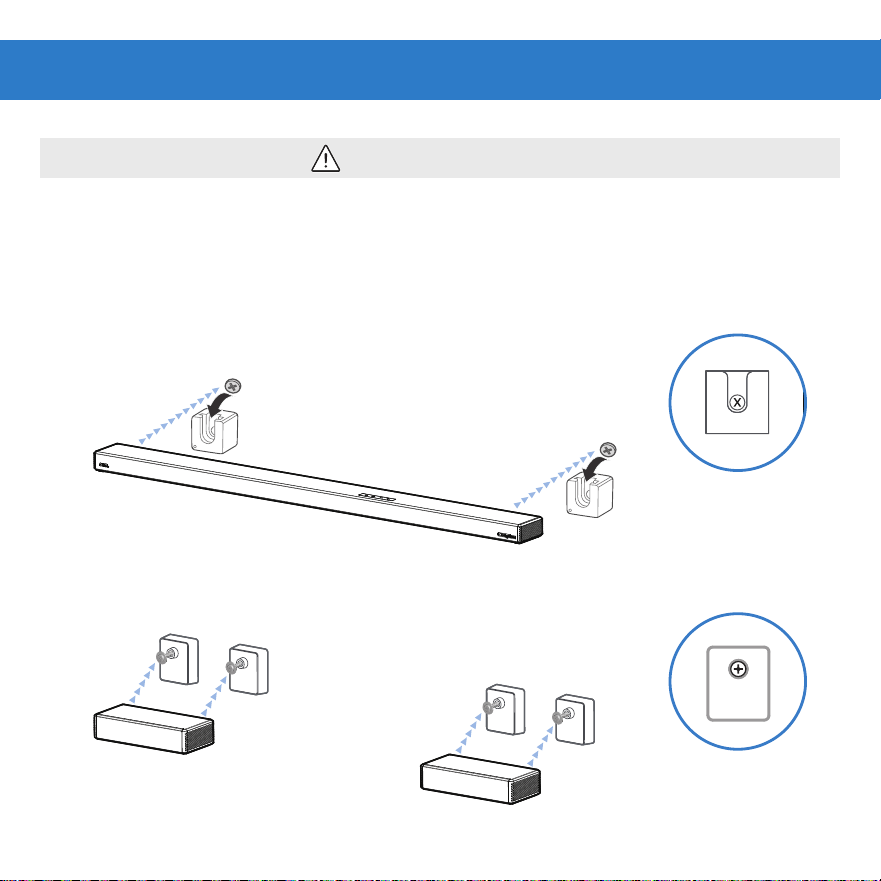
Mounting hooks on screws then slide down to lock in place.
If you are unfamilar with power tools or layout of electrical wiring in the walls of your
home, consult a professional installer.
4B. HANG
• Soundbar
• Surround Speaker
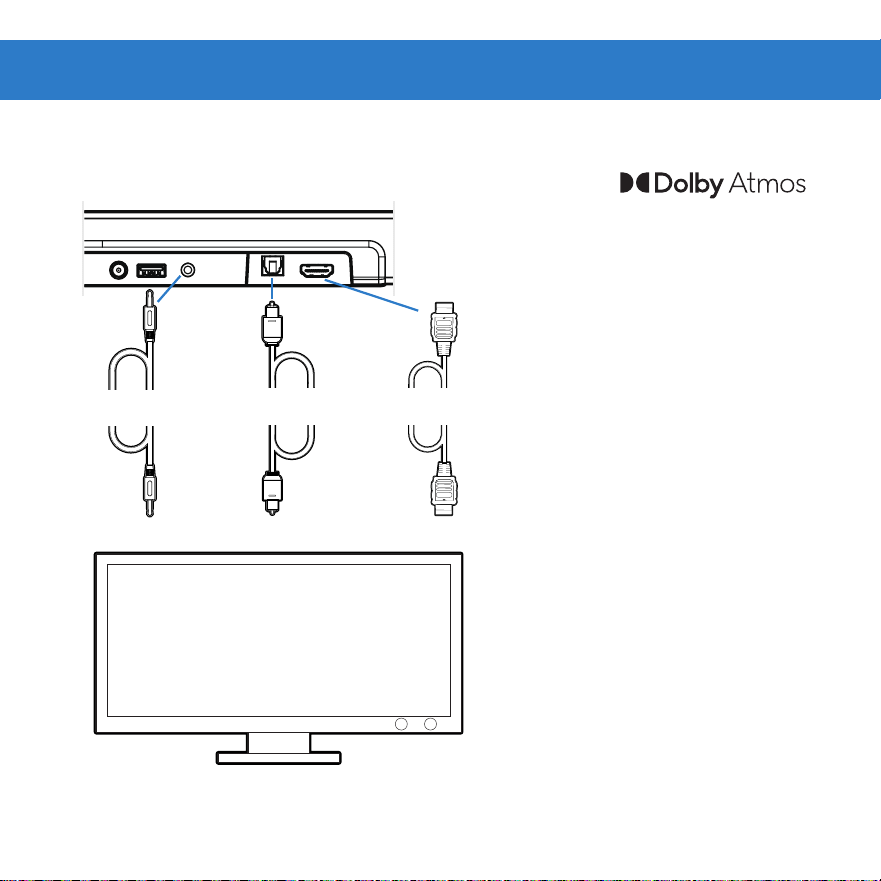
5. CHOOSE CABLE
Connect one cable to soundbar and TV
*
If no Audio using Digital
Inputs See troubleshooting.
HDMI ARC
3.5MM AUX
• To use
in HDMI eARC/ARC mode, your
TV has to support Dolby Atmos®
• Enable CEC and ARC on TV
• Settings for CEC and ARC may
differ by TV manufacturer. See
TV’s user guide for more.
• To control soundbar volume on
TV remote, enable System Audio
Control in CEC menu.
• CEC Function naming may differ
by TV Manufacture. See TV’s user
guide for more.
• The full Dolby Atmos experience
is only available when the
soundbar is connected to the
source via a HDMI 2.0 cable.
BestGood
OPTICAL
Better
Tip: If you have a Roku TV™, setup is easy. Just use the included cable to connect your
soundbar to the HDMI ARC port on your TV and follow the on-screen instructions.
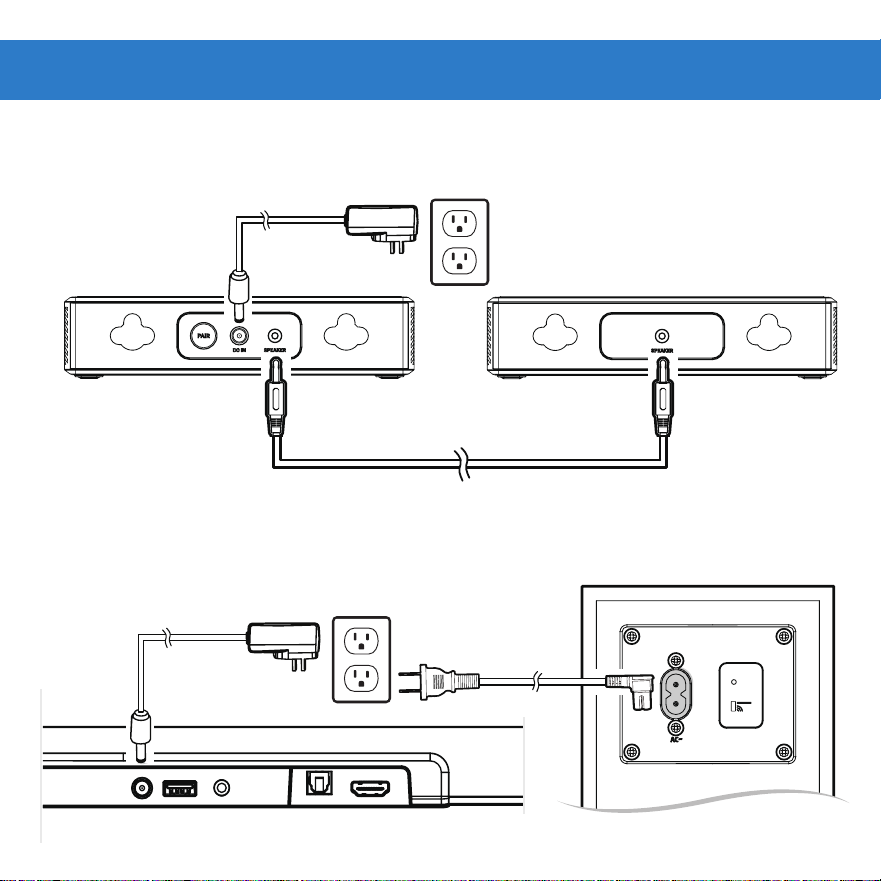
7. CONNECT POWER
6. CONNECT SURROUND SPEAKERS
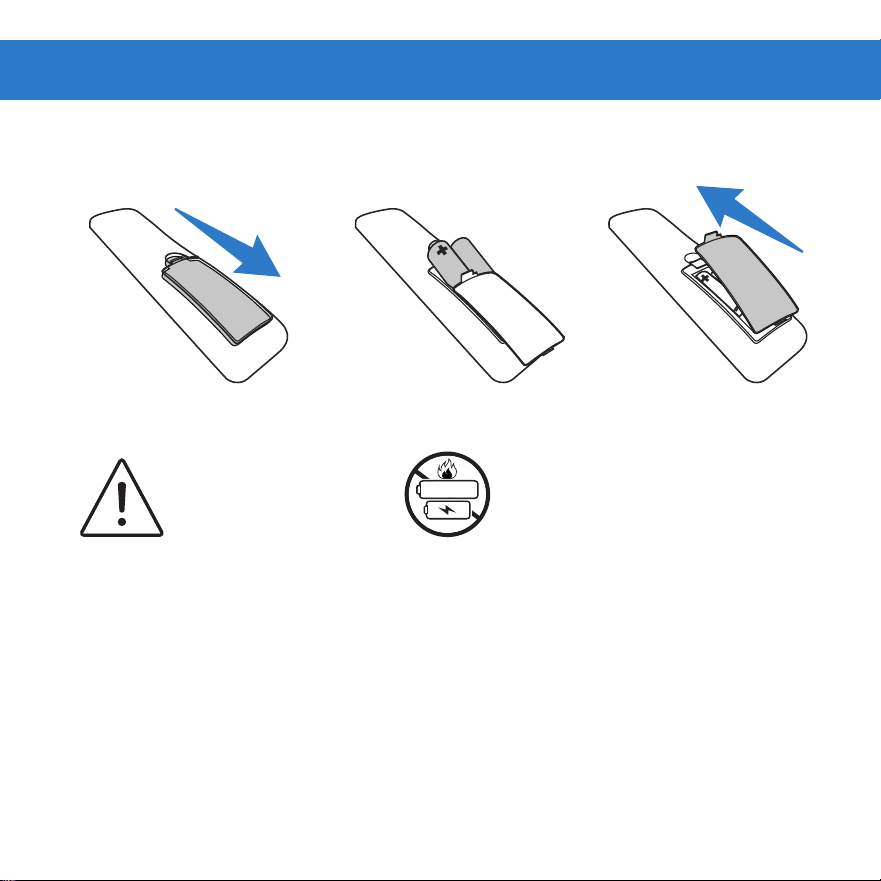
WARNING
Do not mix old and
new batteries.
WARNING
Do not mix alkaline, standard
(carbon-zinc) or rechargeable (ni-
cad, ni-mh, etc.) batteries.
Alk/Zinc/Ni-Mh
8. INSTALL BATTERIES
Remove battery door Insert batteries Replace battery door

-OR-
Operation
LED State Status
Quick flash Subwoofer/Surround in pairing mode
Slow flash Connection/Pairing Failed
Solid Connected/Pairing successful
1A. AUTOMATIC PAIRING
Connect Subwoofer
BT

A: Press and hold the PAIR button of the subwoofer ( ) or surround (PAIR).
B: Press the button on the soundbar or on the remote control.
The indicator will
flash rapidly.
-OR-
WARNING
The subwoofer and
surround is within 5m of
the soundbar.
1B. MANUAL PAIRING (IF AUTOMATIC PAIRING FAILED)
Connect Subwoofer
Press
and hold
BT
ON/OFF
SETTING
-OR-
ON/OFF
C: Press and hold the button, the subwoofer/surround and soundbar will enter the
pairing mode.
D: When wireless connection is successful, the indicator will be solid orange.
ON/OFF
SOURCE
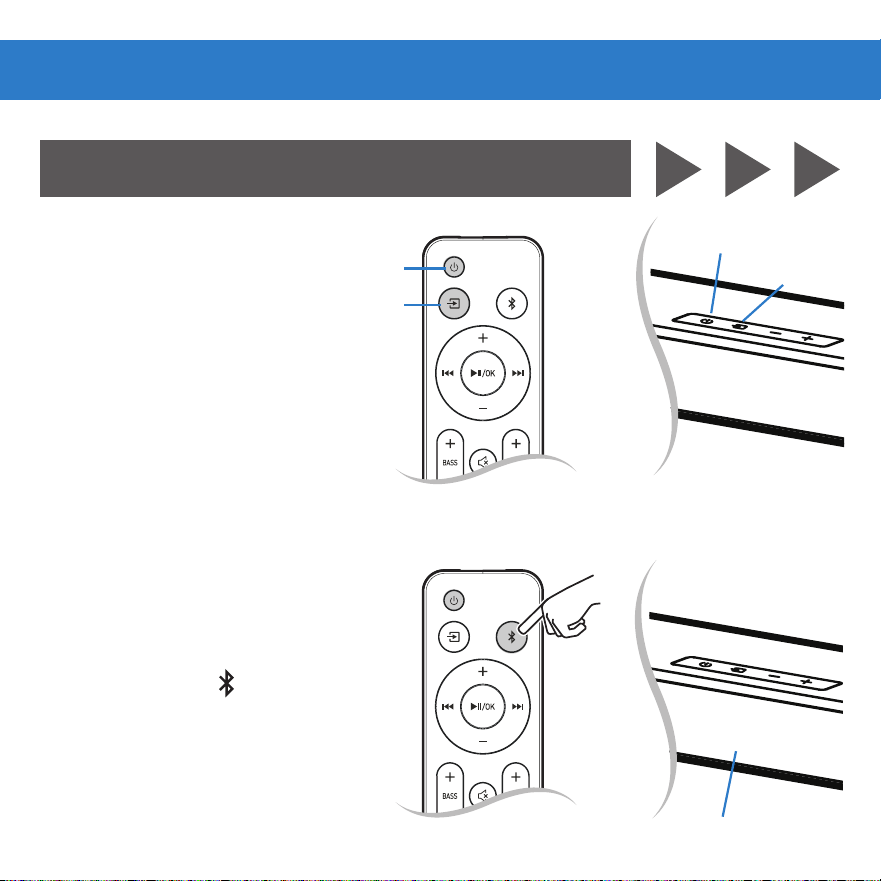
1C. POWER ON/OFF
Soundbar (Remote or Bar)
2C. SELECT SOURCE
To switch between audio sources
(Remote or Bar)
3C. PAIR DEVICE
Press and hold the button on
remote.
-OR-
-OR-
Press and hold
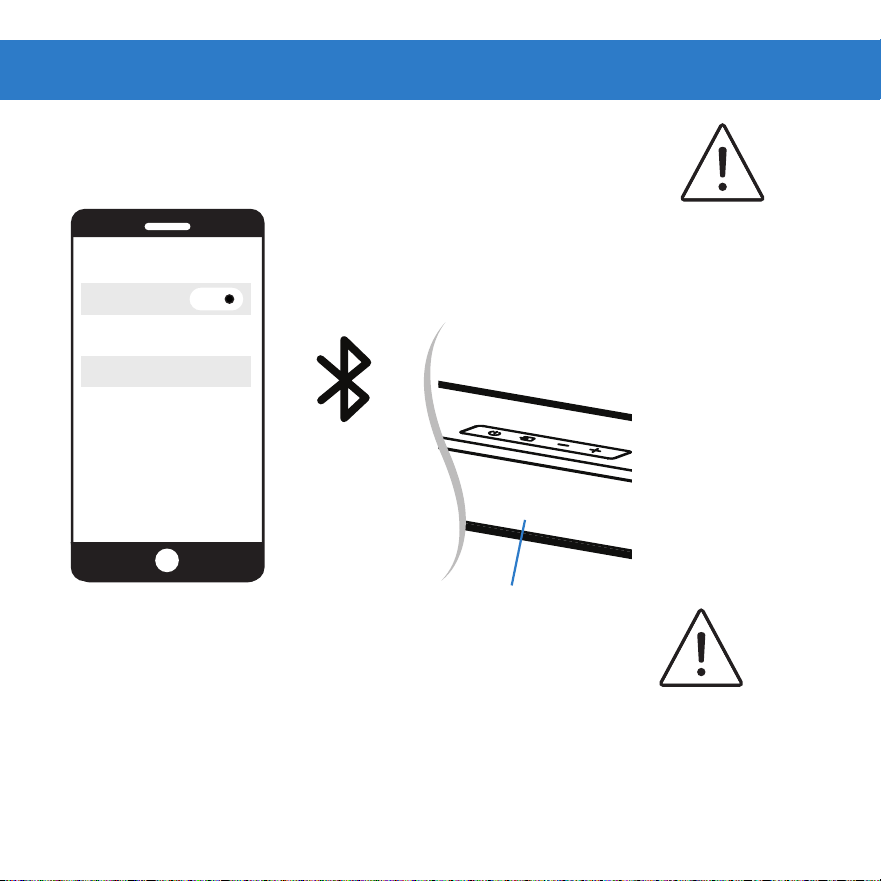
Bluetooth® Operation
BT
BT
ON/OFF
SOURCE
Display show NO BT
NO BT
WARNING
High volume levels can
damage your hearing.
Reduce the volume levels
before pressing Play.
IMPORTANT
Soundbar does not
include microphone
and cannot operate as
hands-free device.
BLUETOOTH
onn. 5.1 slim soundbar
DEVICES
Bluetooth
ON
4C. SEARCH ON DEVICE
Select “onn. 5.1 slim soundbar” on device
5C. PLAY AUDIO
From device
6C. VOLUME
Controlled by Device, Remote or soundbar
BT
Device is connected
when display show BT.

Bluetooth use
Your soundbar supports music streaming from smartphones, tablets, and computers with
Bluetooth capability.
Device compatibility will vary, see your device’s documentation for more information. Once
you have paired your source device to the soundbar, as long as you stay within range of the
soundbar, your device should remain paired.
If the input is changed, the Bluetooth device will disconnect. If the source is changed back to
Bluetooth, any paired Bluetooth device will reconnect automatically.
A Bluetooth signal has a range of up to 27 feet. Keep in mind that Bluetooth is a compressed
audio format, so streamed music may lose some integrity when compared to a wired
connection.
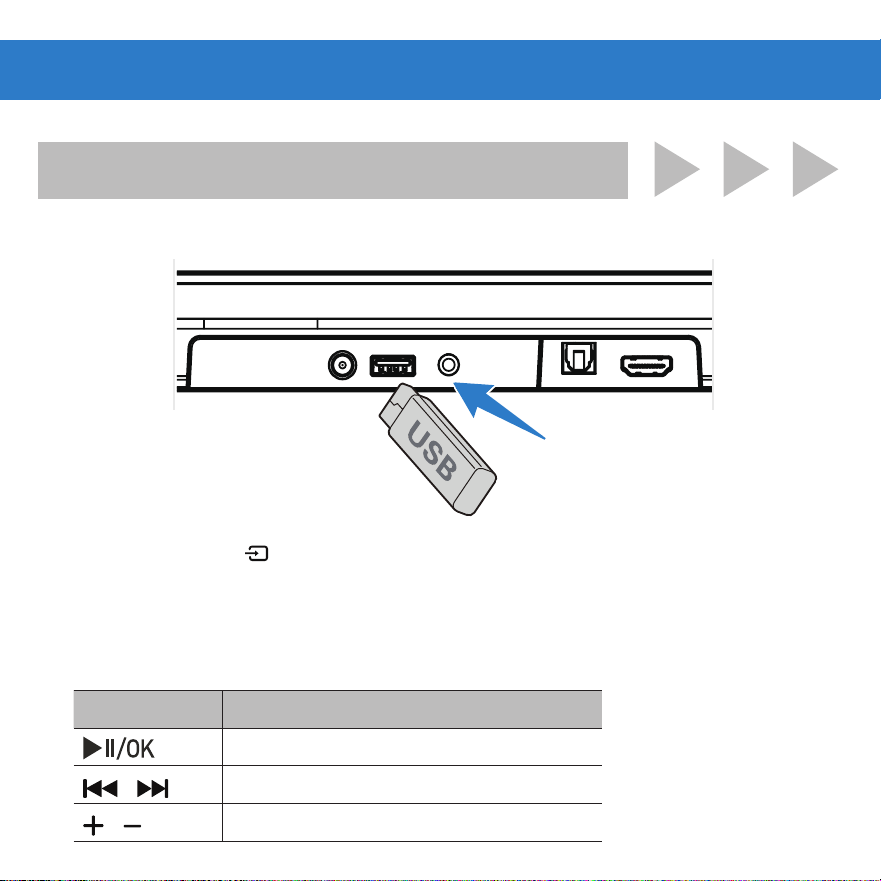
2D. SELECT SOURCE
3D. PLAY AUDIO
Button Action
Play, pause or resume play.
/
Skip to the previous or next track.
/
Increase/decrease the volume.
Select USB Mode
(Remote or soundbar button)
Tip: Support the USB music file format of MP3.
1D. INSERT THE USB DEVICE
USB Operation
CAUTION
Ensure the unit is fully unplugged from
the power supply before cleaning.
• Wipe down surfaces with a light cloth.
• Never use abrasive pads to clean device.
• Avoid using liquids to clean device.
CLEANING
Cleaning & Care
Specifications
Soundbar
Adapter Mode
• Input
• Output
KA4801A-2402000US
100-240V~ 50/60Hz, 1.2A (Max)
24V 2.0A
Power Consumption
30W
USB
5V 500mA
Hi-Speed USB (2.0) / FAT32 / FAT16, MP3
Dimension (WxHxD) 35.98” x 1.38” x 3.19” (914 x 35 x 81 mm)
Net weight 2.87 lbs (1.3 kg)
Audio input sensitivity 500mV
Frequency Response 120Hz - 20KHz
Wireless Specifiation
Bluetooth version/profiles Bluetooth
frequency range
V 5.3 (A2DP, AVRCP)
2402 MHz ~ 2480 MHz
Modulation Type GFSK, π/4 DQPSK, 8DPSK
Subwoofer
Power
100-240V~ 50/60Hz
30 W / < 0.5 W (StandBy)
Dimension (WxHxD) 6.2” x 1.38” x 3.19” (157.5 x 35 x81 mm)
Net weight 7.78 lbs (3.53 kg)
Frequency Response 40Hz - 120Hz
Surround Speaker
Adapter Mode
• Input
• Output
KA3601A-2401500US
100-240V~ 50/60Hz, 1.0A (Max)
24V 1.5A
Power Consumption 15 W x 2
Dimension (WxHxD) 2.52” x 5.31” x 2.75” (64 x 135x 70 mm)
Net weight 0.79 lbs (0.36 kg )
Frequency Response 160Hz-20KHz
Remote Control
Distance/Angle 19.7 feet (6m) / 30°
Battery type AAA (1.5V x 2)

Problem Cause Solution
No power
Power off
Press “ ” button on remote
control or on soundbar.
Loose power cord
Ensure the power cord is securely
connected.
Faulty outlet
Plug a different device into the
electrical outlet to verify that the
outlet is working correctly
No audio
Low Volume / Mute
Press “ ”
Increase volume
Some TVs do not Pass
through Digital Audio
Change TV output to PCM
Input source Select different Input source
Not All TVs have Audio
outputs listed.
Connect directly to another
device (Blu-Ray, Game System,
etc.)
TV set to variable audio
output
Set audio output to fixed or
standard, NOT variable.
Troubleshooting
• Input LEDs will flash rapidly if an unsupported format is present.
• Consult your TV’s user manual for more detailed information.

Problem Cause Solution
No audio
Bluetooth source device
Increase volume / unmute source
device
Subwoofer and soundbar
too far
The subwoofer or surround is
out of range, please move the
subwoofer or surround closer
to the soundbar. Make sure the
subwoofer or surround is within
5m of the soundbar.
Bluetooth break-
up or disconnect
Source too far
Move the source device closer to
soundbar
Solid obstruction
Move source device into
line-of-site of soundbar
Other wireless devices
Turn off / move devices away
(wireless security cameras,
wireless video baby monitors,
cordless phones, and microwave
ovens

NOTES

1-888-516-2630
THIS GUIDE CONTAINS
IMPORTANT SAFETY
INFORMATION.
For product assistance:
WE CAN HELP
PLEASE READ AND KEEP
FOR FUTURE REFERENCE.
7 DAYS/WEEK 7:00am- 9:00pm CST
Find more at Walmart.com
Manufactured in China for Walmart Inc.