User manual V1.0
Remote Control Drone
X440
8

Contents
1-24
EN
ENGLISH INTRODUCTION
Contents
1.0 Important Safety Information
2.0 Product Description
2.1 Specifications
2.2 Drone Diagram
2.3 Remote Control Diagram
3.1 Propeller Installation
3.2 Propeller Guard Installation
3.3 Drone Arm Installation
3.4 Drone Battery Charging
3.5 Remote Control Use
4.1 Flight Preparation
4.2 Flight Control
4.3 Flight Mode
4.4 Smart Flight Feature
4.5 Product Feature
3.0 Product Assembly
4.0 Flight Guide
5.0 Troubleshooting
7.0 Product Accessories
2
4
9
18
19
4
5
5
6.0 Contact Us
19
9.0 Warranty
22
8.0 Exploded View
20
6
6
6
7
8
9
9
11
12
13
17
1
EN

1. To protect the legitimate rights and interests of users, please be sure to read the contents of this
manual carefully before using this product.
2. When using this product, please be sure to strictly observe and perform the requirements, including
but not limited to the instructions and safety guidelines. For any personal injury, accident,
property loss, legal dispute, or any other adverse event causing a conflict of interest resulting from the
use of the product or any irresistible factors that violate the safety instructions, the user shall bear the
related responsibilities and losses. Syma will not take any responsibility.
3. Once you start using the product. You are deemed to have read, understood, recommended, and
accepted the terms and contents of the instructions (including disclaimers, safety instructions,
warning instructions, etc) included with this product.
4. In case you are having challenges with any aspect of the product, may it be operation or
maintenance, please get in touch with our customer service directly.
1.0 Important Safety Information
Safety Guidelines
Thank you for purchasing this SYMA product. To ensure that you operate the drone correctly and
conveniently, please read these instructions carefully before first use and store them safely for future
reference.
1. Please store the smaller-sized drone accessories in places that are out of reach of children.
2. For all first-time flights, the left joystick must be slowly pushed up in order to prevent the drone from
ascending too fast to avoid unnecessary collision and possible damage and injury.
3. When the flight is ended, first turn off the power of the remote control. Then turn off the power of the
drone.
4. Avoid placing the batteries in places with high temperatures and exposure to heat.
5. Take extra precautions to ensure that the drone is at a minimum distance of 15 feet from the pilot,
other people, and animals in order to prevent bodily injury during flight operations. A minimum
separation distance of 20 cm must be maintained between the user's body and the device under
normal use conditions.
6. Children under the age of 8 must be instructed in the correct and safe operation of the drone by an
adult.
7. Children must be under adult supervision when using this drone.
8. Non-rechargeable batteries are not to be recharged; Batteries are to be inserted with the correct
polarity; Different types of batteries or new and used batteries must not be mixed.
9. The supply terminals can not be short-circuited.
10. Discharge the battery to 40%-50% (On a full charge, fly for half of the total flight time) if it is not used
for 10 days or more, this can greatly extend the battery life.
2
EN

Repair and maintenance
1. Use a dry and soft cloth to clean the product.
2. Do not expose the product to extreme heat or direct sunlight.
3. Do not immerse the product in water as this may damage the electrical components.
4. Please check the blades, motors, and batteries regularly. In case of any damage is found, please stop
using it unless it is repaired or replaced.
11. Please keep a safe distance from the spinning propellers to avoid injury.
12. To ensure the electromagnetic environment requirement of the aviation radio (station), using
remote controls in the zone, which is in a radius of about 5000m zones from the circle center of the
airport runway, is forbidden. All users also should abide by the radio regulation set forth by the
government and regulatory agencies including the duration and area.
13. Only uses the recommended transformer for the model, and the transformer is not a toy. Check the
cord, plug, enclosure, and other parts of the transformer regularly. If any damages have been
discovered, please immediately stop using it, until it is completely repaired.
14. Never look steadily at the laser beam since the laser radiation.
15. NOTE: Assemble the drone under adult supervision.
16. The pilot is responsible for the safe operation and safe distance from uninvolved persons and
property on the ground and from other airspace users and shall never fly the drone above crowds (> 12
persons).
17. The packing has to be kept since it contains important information.
18. It is strongly recommended to fly in areas without airflow. Do not fly in areas with an air
conditioner/electric fan or table lamp, or other electrical equipment that may be easily damaged.
19. Use only the supplied charging cable.
20. Chargers used with the drone should be examined regularly, such as the cord, plug, enclosures,
and other parts. In case of any damages are found, please stop using it unless it is repaired or replaced.
21. Do not touch the rotating rotor, avoid loose clothing or hair that could be caught in the rotor, and
do not fly near the face.
3
EN
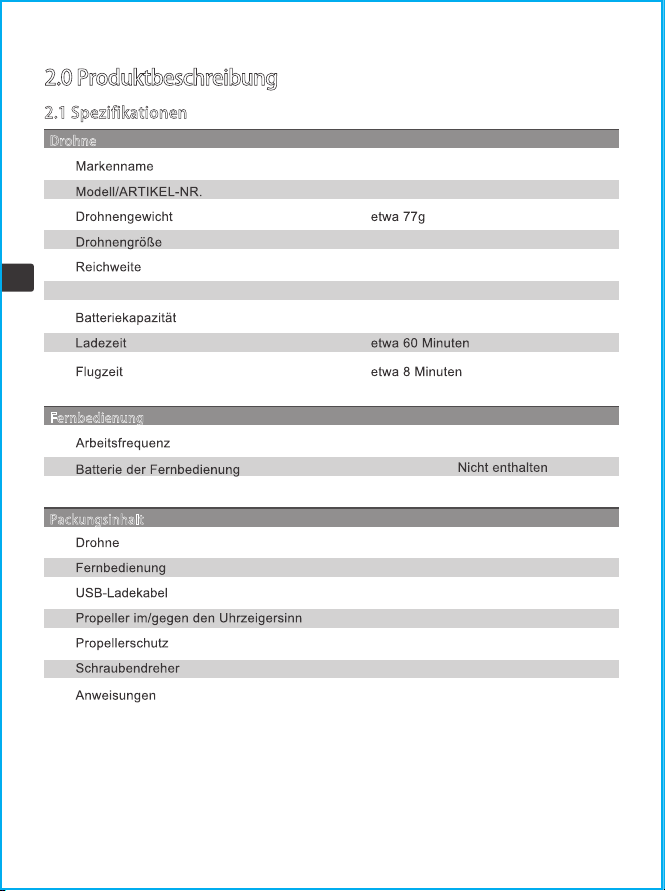
2.0 Product Description
2.1 Specifications
Drone weight about 77g
Drone size 275x275x52mm
Motor ø7
Range 30m
Battery capacity 3.7V 400mAh
Charging time about 60 minutes
Flight time about 8 minutes
Remote control
Operating frequency 2.4 GHz
Remote control battery 4 X1.5V"AAA"(Not included)
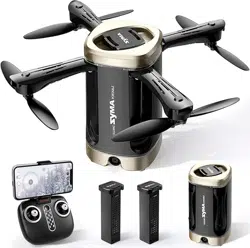
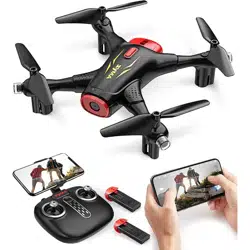
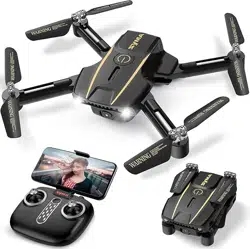
Package contents
Drone 1
Remote control 1
USB charging cable 1
Clockwise/counterclockwise propellers
Screwdriver
Instructions
2 (A/B)
Propeller guard 4
1
1
Drone
Brand Name
Model/ITEM NO. X440
SYMA
4
EN

5
EN
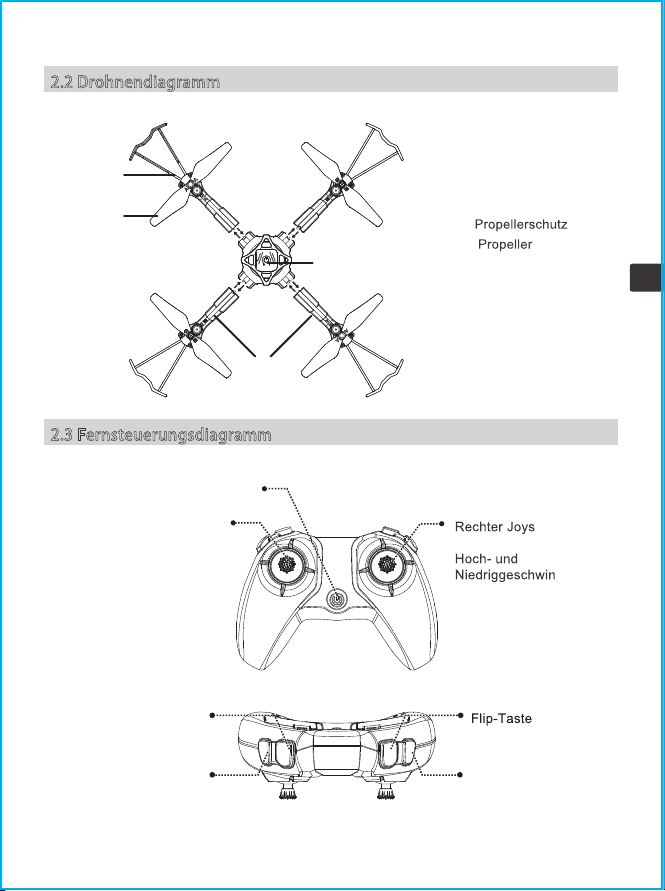
2.3 Remote Control Diagram
① Propeller guard
② Propeller
③ Power switch
④ Arm
①
②
③
④
2.2 Drone Diagram
Power switch
Left joystick(short press
to change the light
effects; press and hold
for trimming adjustment
and release when
finished; to clear
trimming settings, press
and hold simultaneously
with the power button)
Right joystick(short
press to switch between
high and low speed
mode)
Rotate button
Spin button
Flip button
One key take-off/
landing
6
EN
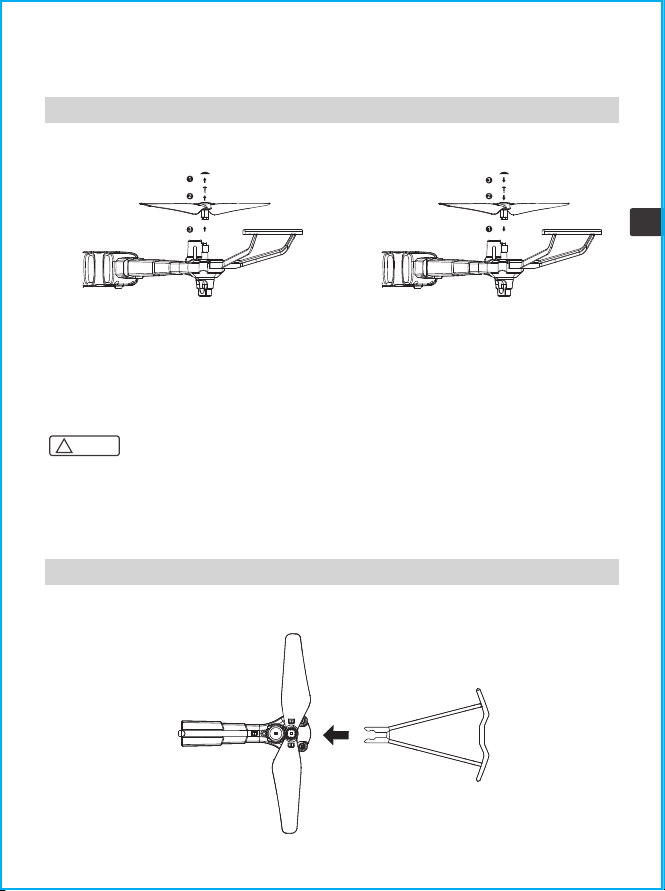
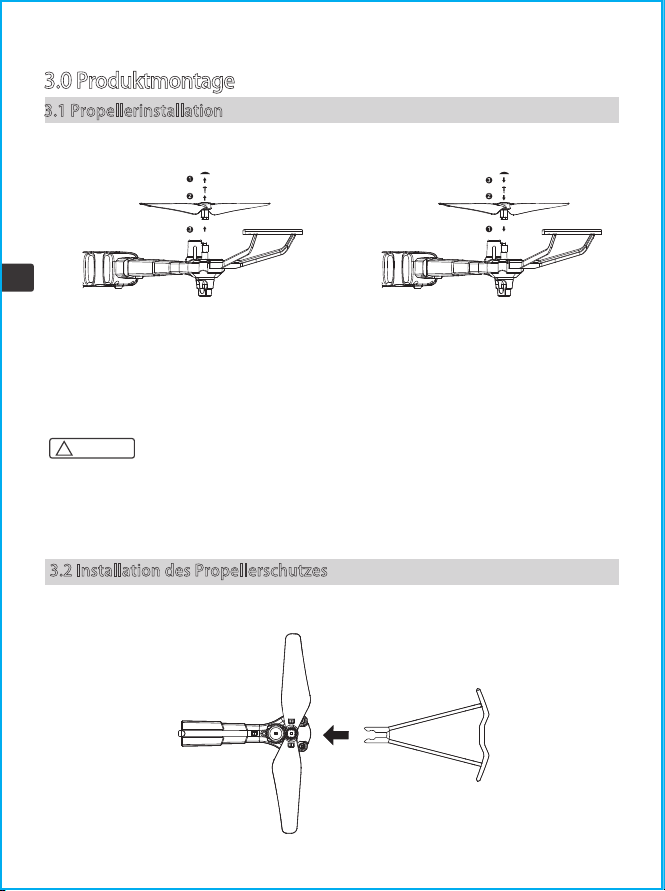
1. Please make sure that the forward and reverse propellers are installed in the correct position. If the
installation is incorrect, the drone will not be able to fly normally.
2. Since the propeller is thin, please be careful when installing them to prevent accidental scratches.
3. Please use the propellers provided by our manufacturer.
4. The propellers are consumables, if necessary, please purchase additional accessories.
Note:
!
3.1 Propeller Installation
3.2 Propeller Guard Installation
3.0 Product Assembly
Detaching the propellers Installing the propellers
Remove the propeller caps and screws in the
direction of the arrow, and then detach the
propellers.
Refer to the figure, install the label "A" propeller and label "B" propeller in the
corresponding positions, and use a screwdriver to tighten the screws.
Insert the guard into the arm in the direction of the arrow.
Place the propellers on the arm in the
direction of the arrow, tighten the screws
then place the propeller caps.
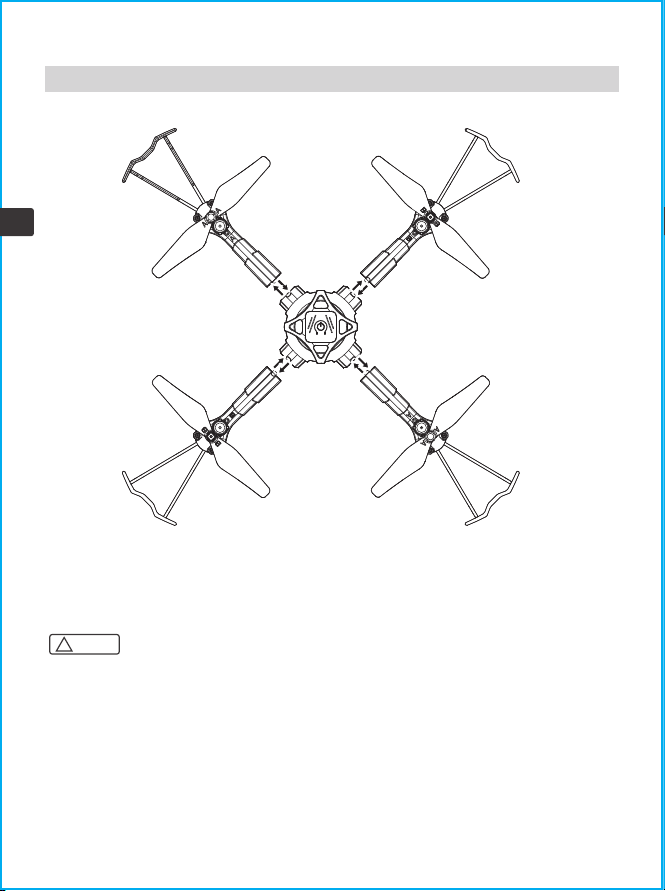
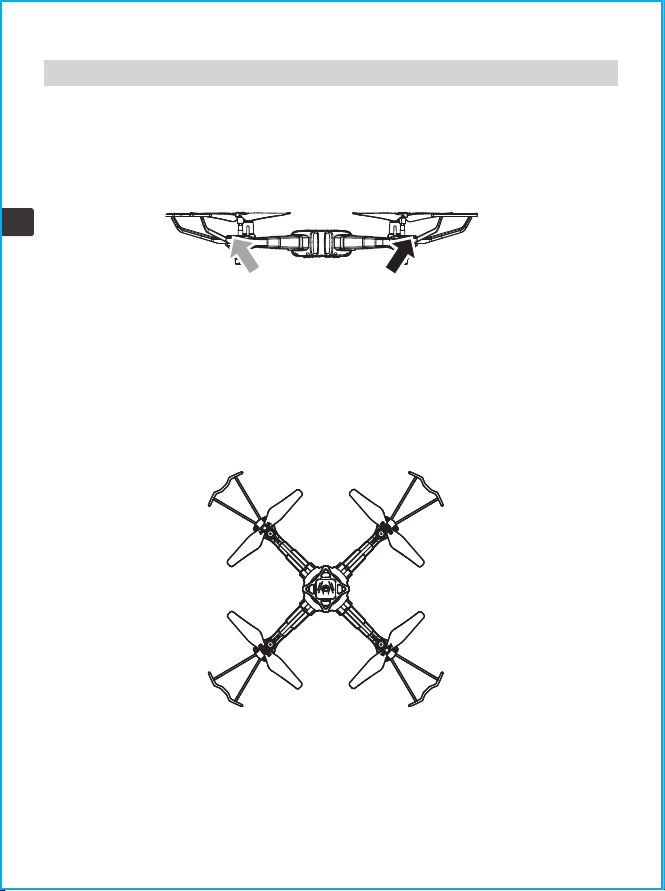
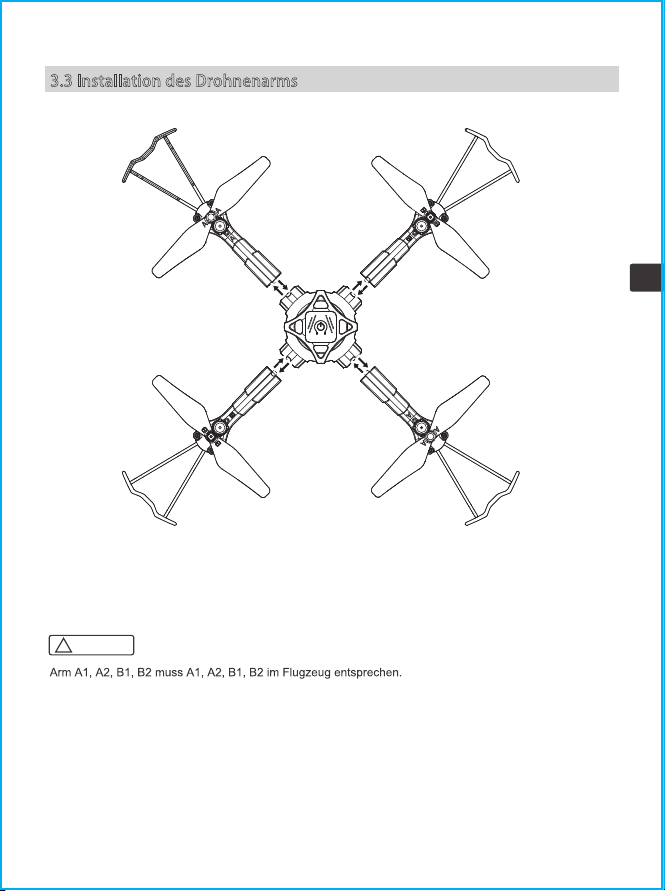
3.3 Drone Arm Installation
Arm A1, A2, B1, B2 must correspond to A1, A2, B1, B2 on the aircraft.
Note:
!
7
EN
Removing the arm: Press the lock on the bottom of the aircraft and take out the arm in the
direction of the arrow.
Installing the arm: Insert the arm into the aircraft in the direction of the arrow, and install it
in place when you hear a click.

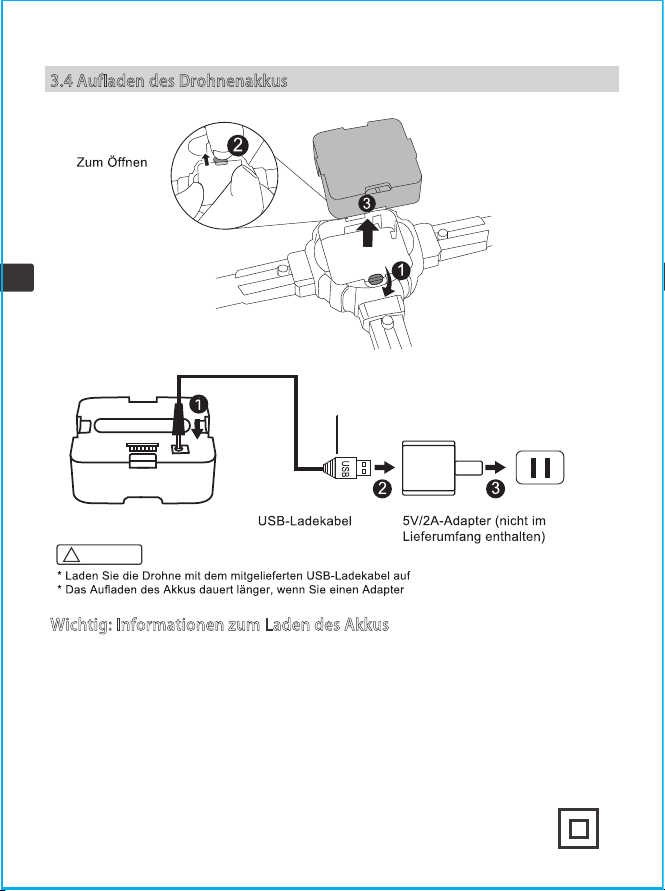
3.4 Drone Battery Charging
* Charge the drone with the USB charging cable that came with the product.
* The battery will take longer to charge when you use an adapter with a smaller rated current.
Note:
!
8
EN
Push to open
the buckle
Remove the battery
Unscrew the battery lock
When charging: the red light is on
When fully charged: the red light is off
Battery USB charging cable 5V/2A adapter(Not included)
1. Rechargeable batteries should only be charged under adult supervision.
2. Caution: Risk of explosion if the battery is replaced with incorrect ones. Please dispose of the
batteries according to the instructions.
3. Don't use or place batteries near heat sources such as fires or heaters.
4. After flying, do not charge the battery at once to avoid the battery overheating to cause a fire, make
sure it cools down before charging.
5. Don't hit or drop the battery when charging to avoid an internal short circuit.
6. Only use the supplied charging cable for charging. If the battery is aging, please replace it with a new
battery in time.
7. After fully charged, please remove the adapter in time, otherwise the battery will be discharged and
recharged, which will shorten the battery life.
8. The toy is only to be connected to Class II equipment bearing the symbol:
Important: Battery Charging Information
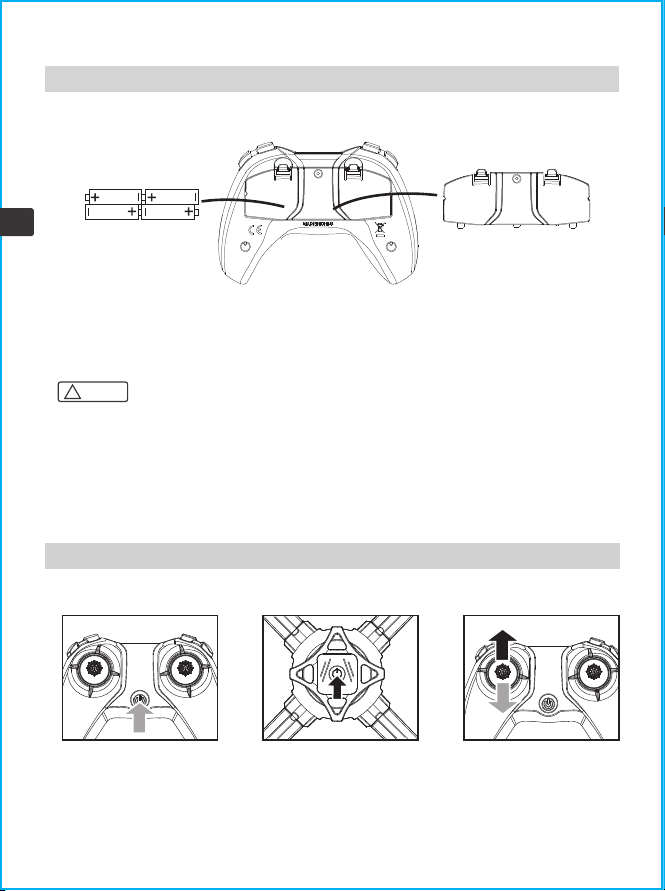
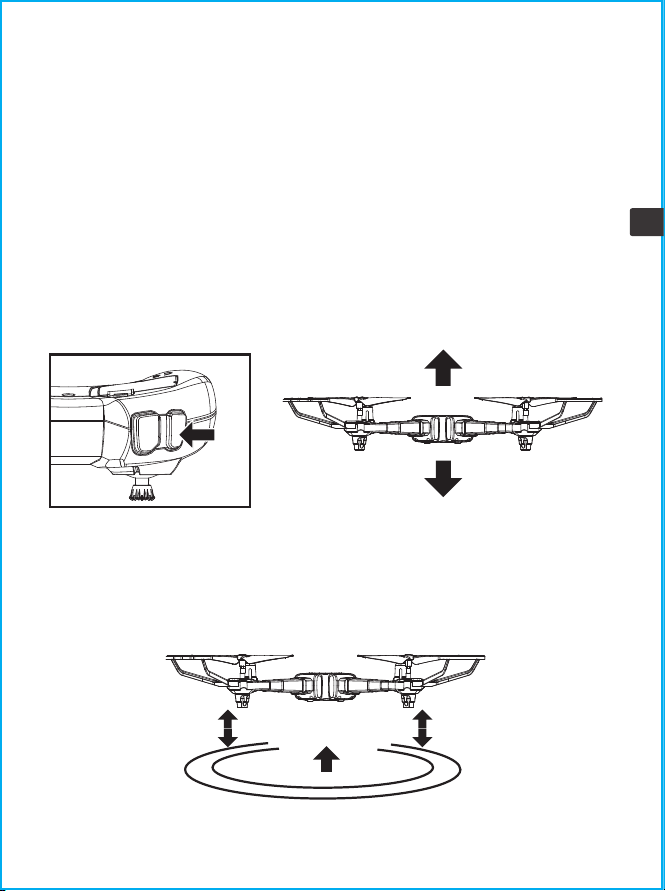
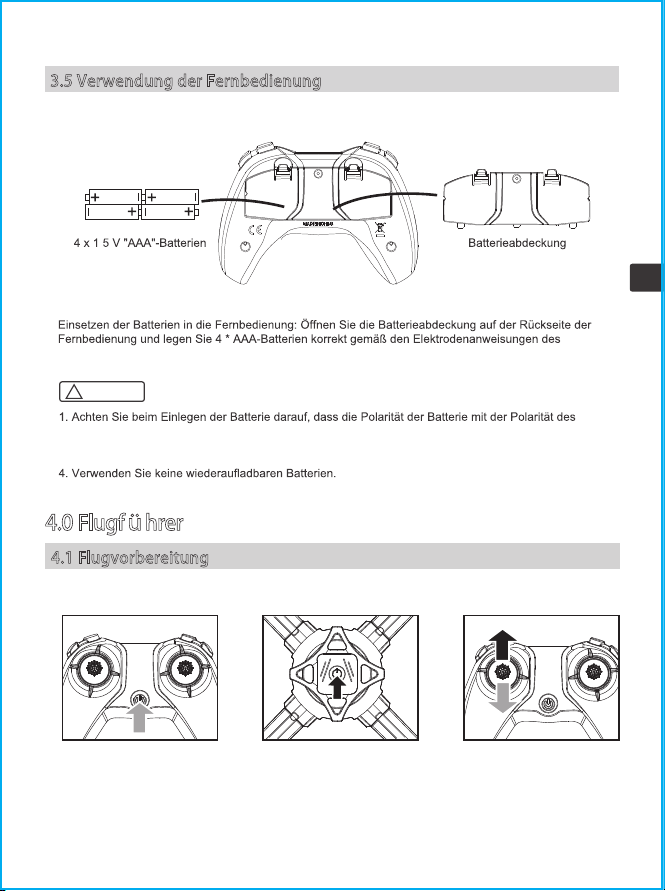
3.5 Remote Control Use
Remote control battery installation: Open the battery cover on the back of the remote control, and
install 4*AAA batteries correctly according to the electrode instructions of the battery box(battery
needs to be purchased separately)
1. When installing the battery, please make sure that the polarity of the battery matches the polarity of
the battery box. Batteries must not be installed with reversed polarity.
2. Please do not use new and old batteries together.
3. Please do not use different types of batteries together.
4. Do not use rechargeable batteries.
4x1.5V"AAA"batteries Battery cover
Note:
!
9
EN
4.0 Flight Guide
4.1 Flight Preparation
1. Turn on the power switch of
the remote control.
2. Press and hold the power
switch on the drone for 2
seconds to switch on the drone.
3. Push the left joystick (throttle)
fully up and down. The indicators
on the drone and remote will
change from flashing to solid to
indicate that the drone is in
flight-standby mode.
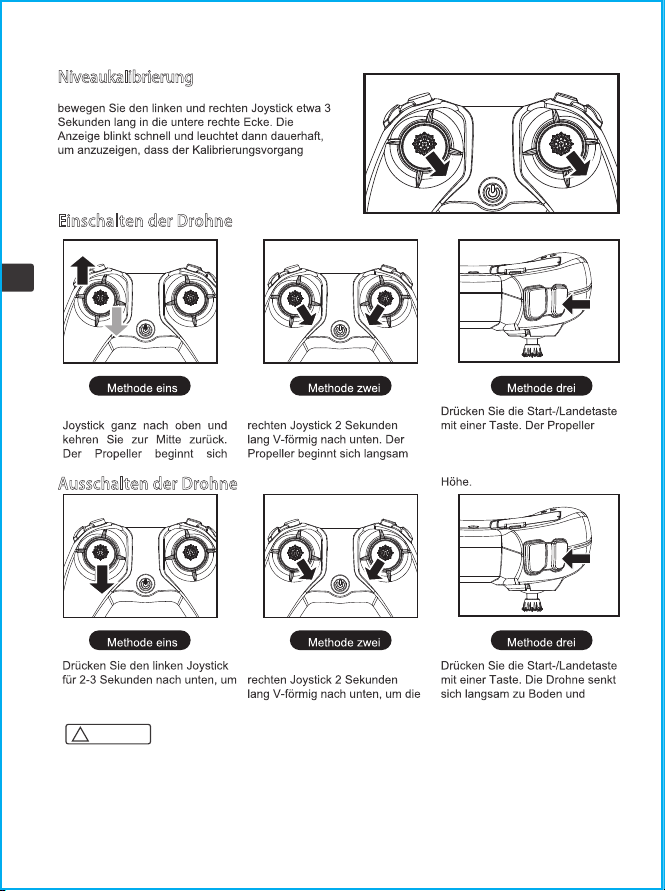
Pairing the drone with the remote control
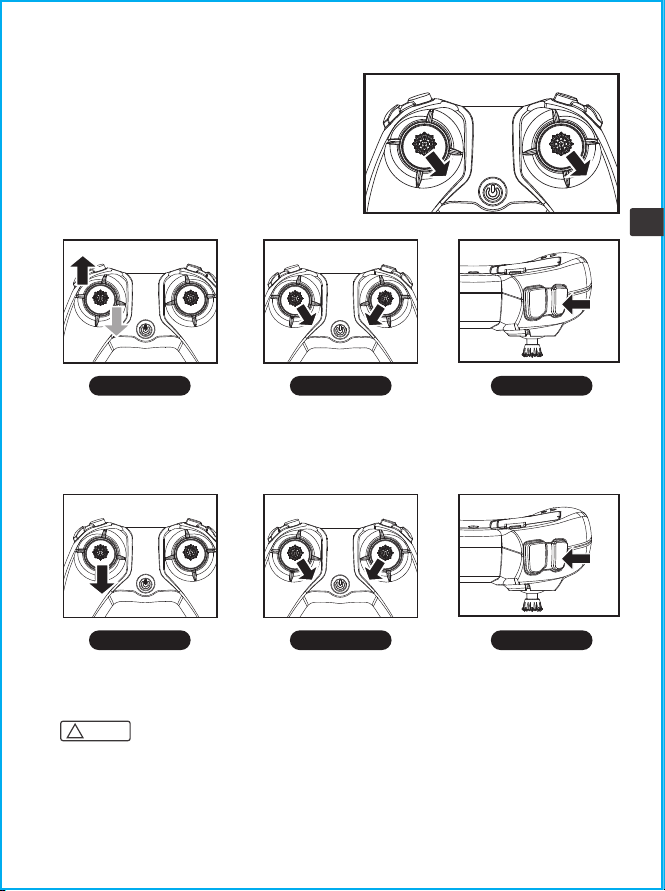
Place the drone on a flat surface and move the left
and right joysticks to the lower right corner for
approximately 3 seconds. The indicator will flash
rapidly and then turn solid to indicate that the
calibration process is complete.
The drone cannot be calibrated if the angle of
inclination is greater than 10 degrees.
1. The drone will switch off automatically if its angle of inclination exceeds 90 degrees.
2. If the drone is flown out of range from the remote control, the drone indicator light will start to
flash and the drone will land slowly.
3. If the remote control suddenly turns off or runs out of power during flight, the drone will
automatically land and come to a stop. If the remote control is turned back on during this process,
you will be able to control the aircraft again.
Note:
!
10
EN
Push the left joystick fully up
and return to the center. The
propeller will begin to rotate
slowly.
Push the left and right joysticks
downward in a V shape for 2
seconds. The propeller will
begin to rotate slowly.
Press the one key take-off/landing
button. The propeller will begin to
rotate slowly then the drone will
automatically take off and hover
at a fixed height.
Turning the drone on
Level calibration
Method one Method two Method three
Push the left joystick downward
for 2-3 seconds to switch the
drone off.
Push the left and right joysticks
downward in a V shape for 2
seconds to switch the drone off.
Press the one key take-off/landing
button. The drone will slowly
descend to the ground and switch
off automatically.
Turning the drone off
Method one Method two Method three
11
EN
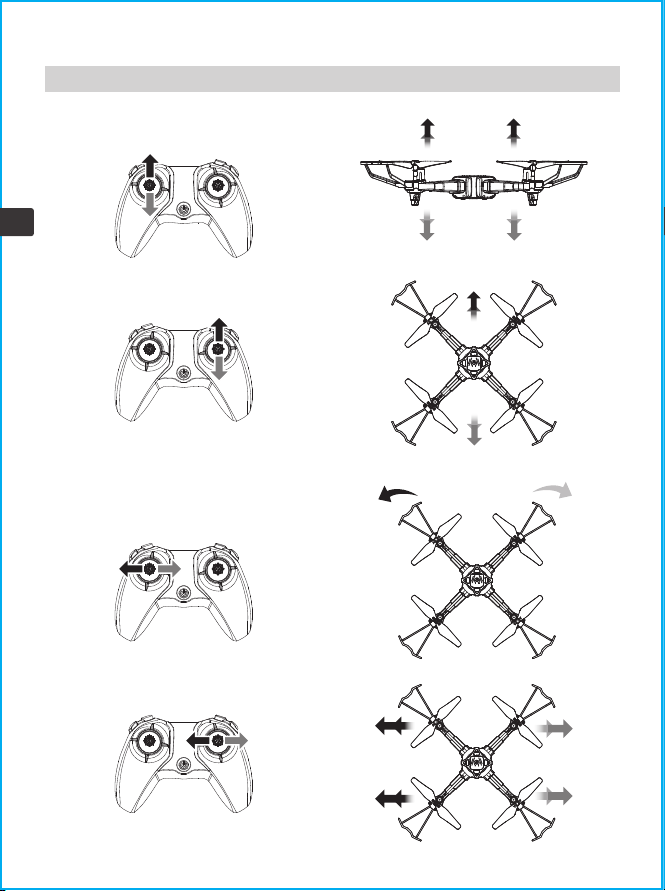
4.2 Flight Control
Ascend
Descend
Forward
Backward
Front
Rear
Front
Rear
Rotate rightRotate left
Fly left Fly right
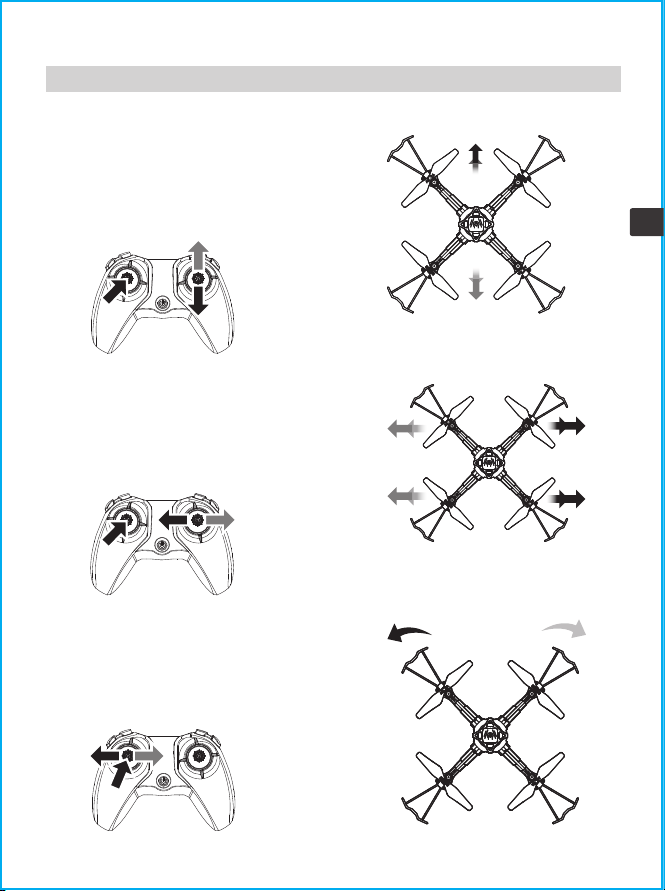
12
EN
4.3 Flight Mode
Trimming
Trimming forward and backward
When the drone is hovering in the air, when it
drifts forward or backward automatically, you
can press and hold the trim button and push the
right joystick in the backward or forward
direction to adjust until the drone is stable and
then release it.
Trimming left and right
When the drone is hovering in the air, when it
automatically drifts to the left or right, you can
press and hold the trim button and push the
right joystick to the right or left direction to
adjust, until the drone is stable, you can release
the trim button.
Trimming left and right rotation
When the drone hovers in the air, it can
automatically rotate to the left or right. When
flying, you can press and hold the trim button and
push the left joystick to the right or left direction
for adjustment. Until the drone is stable, you can
release the trim button.

13
EN
4.4 Smart Flight Feature
High/low speed modes
Flip function
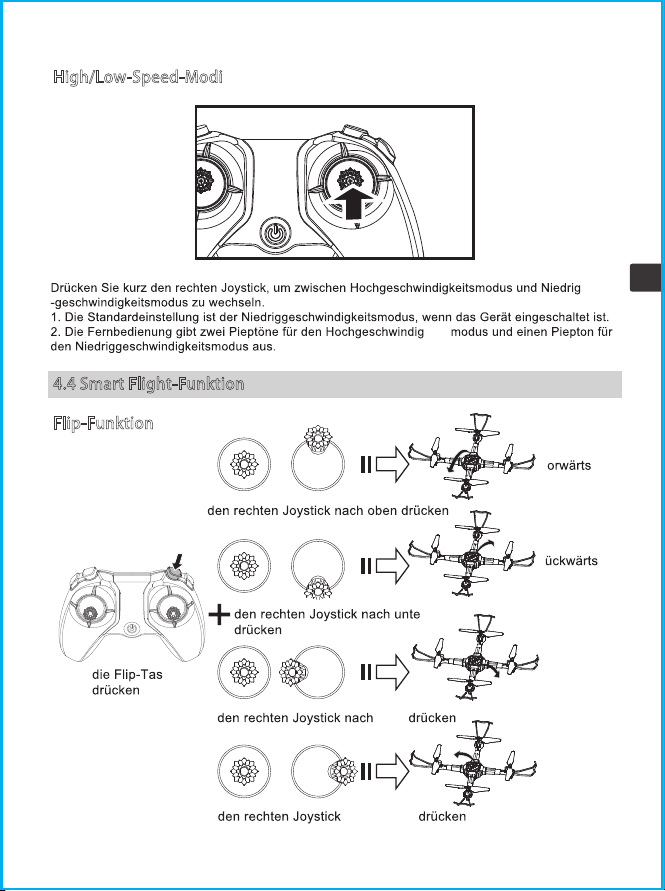
Short press the right joystick to switch between high speed mode and low speed mode.
1. The default is low speed mode when the power is on.
2. The remote control emits two beeps for high speed mode and one beep for low speed
mode.
Press the flip
button
Push the right
joystick up
Flip forwards
Flip backwards
Flip left
Flip right
Push the right
joystick down
Push the right joystick
to the left
Push the right joystick
to the right

For best results, fully charge the battery before performing stunt flip manoeuvres.
Note:
!
14
EN
Corner flip function
Rotate function
Press the flip
button twice
Push the right joystick to
the upper-left corner
Push the right joystick to
the lower-left corner
Push the right joystick to
the upper-right corner
Push the right joystick to
the lower-right corner
Flip towards
upper-left
corner
Flip towards
lower-left
corner
Flip towards
upper-right
corner
Flip towards
lower-right
corner
Press the rotate
button
Push the right joystick
to the left
Push the right joystick
to the right
Rotate left
Rotate right

15
EN
Rotate and return to position function
Spin function
Rotate and spin function
Press the rotate
button twice
Press the spin
button twice
Press the spin
button
Push the right joystick
to the left
Rotate left and return to position
Rotate right and return to position
Push the right joystick
to the right
Push the right joystick
to the left
Push the right joystick
to the right
Push the right joystick
to the left
Rotate and spin left
Rotate and spin right
Push the right joystick
to the right
Spin left
Spin right
The start-up colourful lights default to a gradual change. Press the left joystick or right joystick to left
and right during standby mode to change the colourful lights into seven cycles. Press the left joystick
during flight to change the colourful lights. Seven times for a cycle.
1. When the drone is in standby mode, press the one key takeoff/landing button, the drone will
automatically take off and hover at a height of 1.5 meters.
2. When the drone is in flight, press the one key takeoff/landing button and the drone will automati-
cally land on the ground.
When releasing the left joystick (throttle) after controlling the drone to ascend/descend, the drone
will continue to hover at the current height.
16
EN
Light controls
One key take-off/landing
Altitude hold
17
EN
When the two indicators on the rear of the drone start to flash, it means that the power of the drone
is low. At this time, please control the drone to return.
If the drone's blades collide with another object or become stuck, the drone's circuit will engage the
overcurrent protection mechanism.
4.5 Product Feature
Undervoltage protection
Overcurrent protection

18
EN
5.0 Troubleshooting
After the is powered
on/failed to take off,
the indicator light
keeps flashing rapidly
1. The and the remote control are not
bound with each other.
2. The enters low voltage protection
Fly sideways
when hovering
No horizontal calibration
CauseProblem Solution
1. Correctly bind the frequency between
the and the remote control. The indicator
light keeps on with the successful
frequency bind.
2. The battery voltage of the is too low,
please fully charge the battery
Unstable fixed
height/movement
up and down
1. Re-level calibration, place the on a
horizontal surface, and push the left and
right push sticks of the remote control to
the lower right corner for about 3
seconds. The indicator light on the
flashes quickly and then turns normal
on, indicating that the calibration is
successful.
2. Try to avoid flying in bad weather and
use it in a windless environment indoors
3. Re-level calibration and operate
according to point 1
1. No horizontal calibration
2. Unstable air pressure in bad
weather conditions
3.Cluttered gyroscope data due to
violent collision
Motor not working
Regular inspection and cleaningCheck the motor for foreign objects
(eg: hair, sand)
Remote control not
working
1. Within the controllable flight range
2. Replace the remote control battery
and install it with correct polarity.
1. Beyond the remote control
distance
2. Low battery of the remote control
Violent vibration
The fan blade is deformed, replace the
fan blade and install the front and back
fan blades correctly
Check whether the fan blade is
installed correctly or the fan blade is
damaged
Unable to bind
frequency
Charge the , or replace the battery of the
remote control with the correct
installation
Check the battery of helicopter and
remote control
Re-level calibration, place the on a
horizontal surface, and push the left and
right push sticks of the remote control to
the lower right corner for about 3
seconds. The indicator light on the
flashes quickly and then turns normal
on, indicating that the calibration is
successful.
19
EN
6.0 Contact Us
Please do not hesitate to contact us if you need any further support.
+1 718-312-0558(US)
+44 (0)7723708421(UK)
+4933545519201(DE)
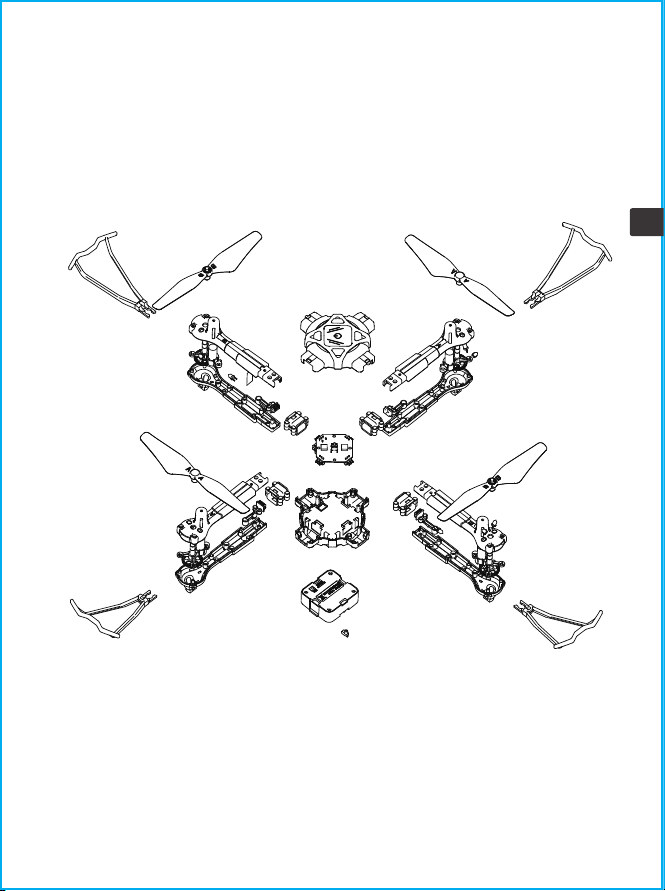
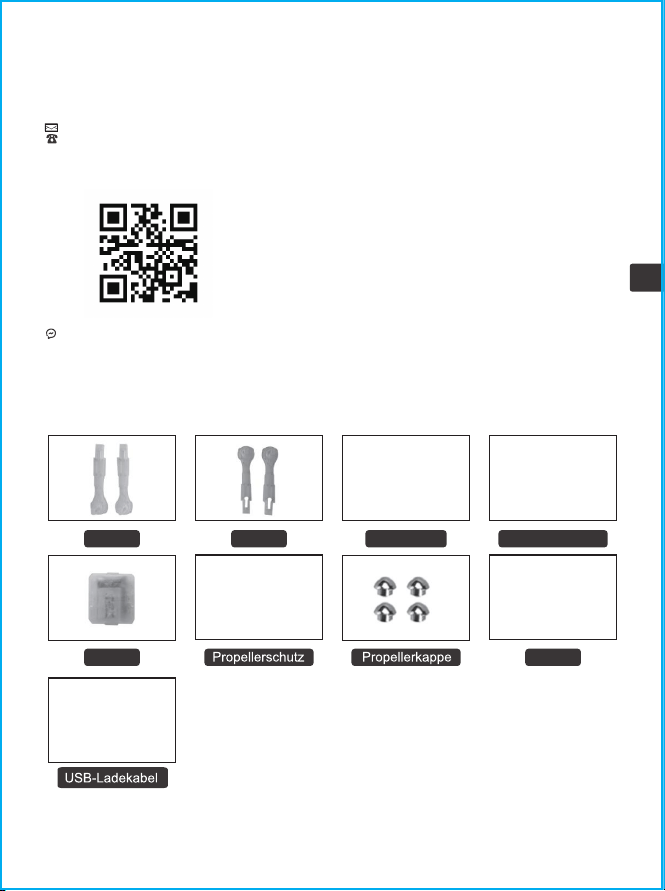
7.0 Product Accessories
For online support, please scan this
code with Facebook Messenger
Propeller
USB Charging
Cable
Arm A
Battery Motor
Arm B Remote control
Propeller guard Propeller cap
20
EN
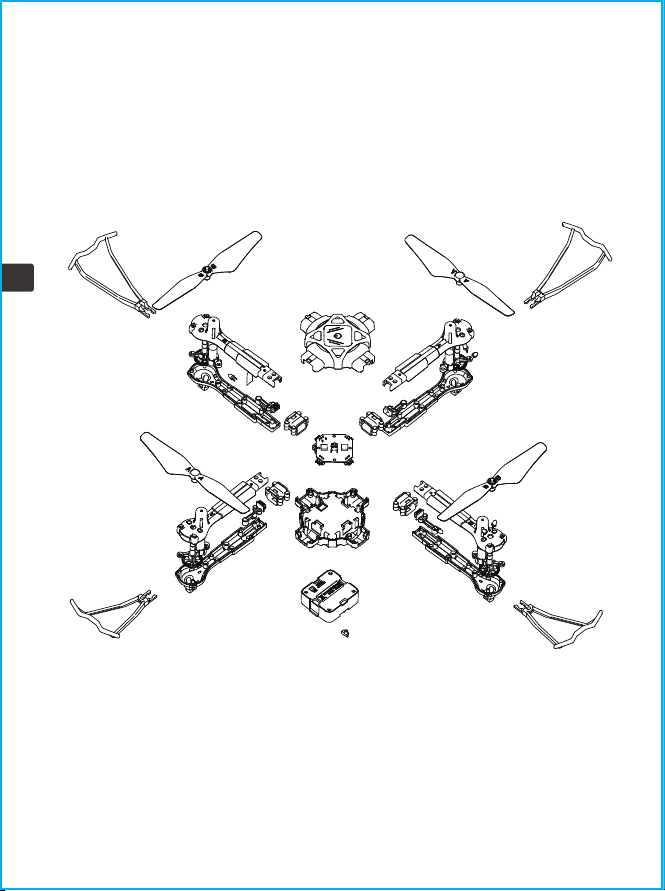
8.0 Exploded View

Warning: Changes or modifications to this unit not expressly approved by the party
responsible for compliance could void the user's authority to operate the equipment.
FCC Notice.
Any Changes or modifications not expressly approved by the party responsible for compliance
could void the user's authority to operate the equipment.
This device complies with part 15 of the FCC Rules.
Operation is subject to the following two conditions:
1. This device may not cause harmful interference,and
2. This device must accept any interference received, including interference that may cause
undesired operation.
NOTE: This equipment has been tested and found to comply with the limits for a Class B
digital device, pursuant to Part 15 of the FCC Rules. These limits are designed to provide
reasonable protection against harmful interference in a residential installation.This
equipment generates, uses and can radiate radio frequency energy and, if not installed and
used in accordance with the instructions, may cause harmful interference to radio
communications.
However, there is no guarantee that interference will not occur in a particular installation. If
this equipment does cause harmful interference to radio or television reception, which can be
determined by turning the equipment off and on, the user is encouraged to try to correct the
interference by one or more of the following measures:
●Reorient or relocate the receiving antenna.
●Increase the separation between the equipment and receiver.
●Connect the equipment into an outlet on a circuit different from that to which the receiver is
connected.
●Consult the dealer or an experienced radio/TV technician for help.
"This device complies with FCC radiation exposure limits set forth for general population
(uncontrolled exposure). This device must not be collocated or operating in conjunction with
any other antenna or transmitter."
RF frequency band :2408-2472MHZ
Transmitter power : -3.73dBm (Max.)
Product name: [Drone]
Decoration of Conformity Inserts: Hereby, GuangDong SYMA Model Aircraft Industrial Co., Ltd.
declares that the radio equipment type helicopter is in compliance with Directive 2014/53/EU.
The full text of the EU declaration of conformity is available at the following internet address:
http://www.symatoys.com/down/declaration-of-conformity.html
21
EN
WARRANTY:
LIMITED 2-YEAR WARRANTY AND FREE LIMITED REPLACEMENT PARTS FOR 2-YEARS
Symatoys.com.cn warrants to the original buyer only that its products will be free from
defects in material and workmanship for 2 years from the date upon which the product is
shipped, either directly from symatoys.com.cn or from an Authorized Re-seller’s location, to
the buyer.
The following condition's must to be eligible for warranty coverage:
1. During the warranty period product is used as intended by the manufacturer.
2. The Product has not been disassembled or modified.
3. The labels and serial numbers show no signs of tampering or altering.
4. Buyer has a warranty code obtained by registering their product online prior to making a
claim.
EXCEPTIONS: THE LIMITED WARRANTY SHALL NOT APPLY TO:
• Damage caused by normal wear and tear
• Accident, negligence, abuse, misuse, misapplication or willful damage by buyer (or its
agents), or acts of nature
• Crash or burning caused by non-manufacturing factors
• Damage caused by authorized modification or disassembly not authorized by the instruction
manual
• Damage. caused by incorrect use or operation
• Damage caused by mismatch or misuse of battery or charger
• Failure of the operator to follow the operating instruction or use outside the products
operating parameters
• Damage caused by operating the product in or around electromagnetic interference (i.e.,
radio transmitting tower, high-voltage wire, substation, etc.)
• Damage caused by operating the product where there may be interference caused by other
wireless devices
• Operating the product with load capacity in excess of the sale weight listed in the manual
• Operating the product with aged, damaged or unauthenticated third-party components
• Operating the product with a defective battery
WARRANTY
PROCEDURE: Any claims for breach of the foregoing limited warranty shall only be valid if
buyer makes such claim in writing within 2 year of the date of shipment of the product to
which the claim. To make a warranty claim, please email at: [email protected] with
your full name. address. phone number, order number. vehicle type. part type and purchase
date and product issue.
W
A
R
R
A
N
T
Y
W
A
R
R
A
N
T
Y
2 YEAR
22
EN

LIMITED REMEDY:
Symatoys.com.cn's sole liability, and buyer's sole remedy for any breach of the foregoing
warranty shall be at Symatoys.com.cn's option to exchange the product with a new product or
a refurbished product that is functionally equivalent to the original product, or issue a credit
or refund to the purchase price the product.
Any replaced products shall be warranted as set forth herein, provided that the period within
which buyer may make further claims shall be limited to the remainder of the original period.
for the applicable product or 2 years, whichever is longer (although the warranty period shall
be suspended during any period of replacement)
DISCLAIMER:
Haftungsausschluss:
THE WARRANTY AND REMEDIES ARE EXCLUSIVE AND IN LIEU OF ALL OTHER WARRANTIES.
AND Symatyos.com.cn DISCLAIMS ALL OTHER WARRANTIES, EXPRESS OR IMPLIED, INCLUDING
WITHOUT LIMITATION THE IMPLIED WARRANTIES OF MERCHANTABILITY AND FITNESS FOR A
PARTICULAR PURPOSE, NON-INFRINGEMENT AND ANY WARRANTIES ARISING OUT OF COURSE
OF DEALING, COURSE OF PERFORMANCE AND TRADE USAGE.
Symatoys.com.cn IS NOT RESPONSIBLE FOR DIRECT, SPECIAL, INCIDENTAL OR CONSEQUEN-
TIAL DAMAGES RESULTING FROM ANY BREACH OF WARRANTY OR CONDITION, OR UNDER ANY
OTHER LEGAL THEORY. INCLUDING BUT NOT UMITED TO COSS OF USE; LOSS OF REVENUE;
LOSS OF ACTUAL ANTICIPATED PROFITS (INCLUDING LOSS OF PROFITS ON CONTRACTS);
LOSS OF THE USE OF MONEY, LOSS OF ANTICIPATED SAVINGS; LOSS OF BUSINESS COSS OF
OPPORTUNITY; LOSS OF GOODWILL, LOSS OF EPUTATION; LOSS OF DAMAGE TO COMPRO-
MISE OR CORRUPTION OF DATA; OR ANY INDIRECT OR CONSEQUENTIAL LOSS OR DAMAGE
HOWSOEVER CAUSED INCLUDING THE REPLACEMENT OF EQUIPMENT AND PROPERTY.
ANY COSTS OF RECOVERING OR REPRODUCING ANY DATA STORED IN OR USED WITH THE
PRODUCT OR ANY FAILURE TO MAINTAIN THE CONFIDENTIALITY OF INFORMATION STORED
THE PRODUCT.
Some states do not allow the exclusion or limitation of incidental or consequential damages.
so the above limitation or exclusion may not apply to you. In addition, some states do not
allow limitations on how long an implied warranty lasts. so the above limitation may not
apply to you.
FREE REPLACEMENT PARTS FOR 2 YEARS: Symatoys.com.cn shall also make available any
spare part needed for registered vehicles free of charge for 2 years from the date of purchase,
with the exception of batteries, motors, and transmitters. Shipping charges may apply Limit
one part type request per registered vehicle (e.g., registrants are entitled to one extra set of
batteries per registered vehicle}. To request spare parts. please email at:
[email protected] with your warranty code, vehicle name/model, current shipping
address, purchase date, and part type.
GET YOUR WARRANTY CODE AT symatoys.com.cn/pages/warranty-signup
HAVE YOUR ORDER NUMBER AND PRODUCT MODEL READY
23
EN
European Representative:
CET PRODUCT SERVICE LTD.
Osterholzallee 144
71636 Ludwigsburg Germany
Phone:+4971416432236
E-mail:[email protected]
British Representative:
CET PRODUCT SERVICE LTD.
Beacon House Stokenchurch Business Park,
Ibstone Rd, Stokenchurch
High Wycombe HP14 3FE UK
Tel: +447419325266
E-mail:[email protected]
United States Representative:
Duvin Trade Inc
5800 Wood Sorrel Dr,Littleton,Co, 80123,United States
Phone: 718-312-0558
E-mail: [email protected]
Manufacturer: GUANGDONG SYMA MODEL AIRCRAFT INDUSTRIAL CO., LTD
Address: NO.2 WEST XINGYE ROAD LAIMEI INDUSTRIAL AREA CHENG HAI , Shantou, China
Postal Code: 515800
The company has the right of final interpretation of this user manual.
+1 718-312-0558 +44(0)7723708421(UK) +49 335-4551-9201(DE)
[email protected](US) [email protected](EU)
https://www.symatoys.com.cn
24
EN
Made in china
DE
Contents
25-49
DEUTSCH EINFÜHRUNG
25
DE
Inhalt
33
42
43
43
44
31
32
33
33
35
41
1.0 wichtiger Sicherheitshinweis
2.0 Produktbeschreibung
2.1 Spezifikationen
2.2 Drohnendiagramm
2.3 Fernsteuerungsdiagramm
3.0 Produktmontage
3.1 Propellerinstallation
3.2 Installation des Propellerschutzes
3.3 Installation des Drohnenarms
3.4 Aufladen der Drohnenbatterie
3.5 Verwendung der Fernbedienung
4.0 Flugführer
4.1 Flugvorbereitung
4.2 Flugkontrolle
4.3 Flugmodus
4.4 Smart Flight-Funktion
4.5 Produkteigenschaft
5.0 Fehlerbehebung
6.0 Kontaktiere uns
7.0 Produktzubehör
8.0 Explosionsansicht
9.0 Garantie
26
DE
1.
bitte sorgfältig durch, bevor Sie dieses Produkt verwenden.
2. Achten Sie bei der Verwendung dieses Produkts darauf, die Anforderungen strikt einzuhalten und
auszuführen, einschließlich, aber nicht beschränkt auf die Anweisungen und Sicherheitsrichtlinien. Für
Personenschäden, Unfälle, Sachs
die sich aus der Verwendung des Produkts oder unwiderstehlichen Faktoren
ergeben, die gegen die Sicherheitsanweisungen verstoßen, trägt der Benutzer die damit verbundenen
Verantwortlichkeiten und Verluste. Syma übernimmt keine Verantwortung.
3. Sobald Sie mit der Verwendung des Produkts beginnen. Es wird davon ausgegangen, dass Sie die
Warnhinweise usw.), die diesem Produkt beiliegen, gelesen, verstanden, empfohlen und akzeptiert haben.
4. Falls Sie Probleme mit irgendeinem Aspekt des Produkts haben, sei es Betrieb oder Wartung, wenden Sie sich
bitte direkt an unseren Kundendienst.
Sicherheitsrichtlinien
1.0 Wichtige Sicherheitsinformationen
Vielen Dank für
Sie bitte diese Anleitung vor dem ersten Gebrauch sorgfältig durch und
bewahren Sie sie zum späteren Nachschlagen sicher auf.
1. Bitte bewahren Sie das kleinere Drohnenzubehör an Orten auf, die für Kinder unzugänglich sind.
2. Bei allen Erstflügen muss der linke Joystick langsam nach oben gedrückt werden, um zu verhindern, dass
die Drohne zu schnell aufsteigt, um unnötige Kollisionen und mögliche Schäden und Verletzungen zu
vermeiden.
3. Wenn der Flug beendet ist, schalten Sie zuerst die Stromversorgung der Fernbedienung aus. Schalten Sie
dann die Stromversorgung der Drohne aus.
4. Vermeiden Sie es, die Batterien an Orten mit hohen Temperaturen und Hitzeeinwirkung aufzubewahren.
5. Treffen Sie zusätzliche Vorkehrungen, um sicherzustellen, dass sich die Drohne in einem Mindestabstand
von 15 Fuß zum Piloten, anderen Personen und Tieren befindet, um Körperverletzungen während des
Flugbetriebs zu vermeiden. Unter normalen Nutzungsbedingungen muss zwischen dem Körper des Benutzers
und dem Gerät ein Mindestabstand von 20 cm eingehalten werden.
6. Kinder unter 8 Jahren müssen von einem Erwachsenen in die richtige und sichere Bedienung der Drohne
eingewiesen werden.
7. Kinder müssen bei der Verwendung dieser Drohne unter Aufsicht eines Erwachsenen sein.
8. Nicht wiederaufladbare Batterien dürfen nicht wieder aufgeladen werden; Batterien sind polrichtig einzulegen;
Unterschiedliche Batterietypen oder neue und gebrauchte Batterien dürfen nicht gemischt werden.
9. Die Versorgungsklemmen dürfen nicht kurzgeschlossen werden.
10. Entladen Sie den Akku auf 40 % - 50 % (fliegen Sie bei voller Ladung die Hälfte der gesamten Flugzeit),
wenn er 10 Tage oder länger nicht verwendet wird, kann dies die Lebensdauer des Akkus erheblich verlängern.

27
DE
Reparatur und Wartung
11. Bitte halten Sie einen sicheren Abstand zu den sich drehenden Propellern, um Verletzungen zu vermeiden.
12. Um die Anforderungen an die elektromagnetische Umgebung des Flugfunks (Station) zu gewährleisten, ist
die Verwendung von Fernbedienungen in der Zone, die sich in einem Umkreis von etwa 5000 m Zonen um den
Kreismittelpunkt der Start- und Landebahn des Flughafens befindet, verboten. Alle Benutzer sollten sich auch an
die von der Regierung und den Regulierungsbehörden festgelegten Funkvorschriften halten, einschließlich der
Dauer und des Bereichs.
13. Verwendet nur den empfohlenen Transformator für das Modell, und der Transformator ist kein Spielzeug.
Überprüfen Sie regelmäßig das Kabel, den Stecker, das Gehäuse und andere Teile des Transformators. Sollten
Schäden festgestellt werden, stellen Sie bitte sofort die Verwendung ein, bis es vollständig repariert ist.
14. Schauen Sie seit der Laserstrahlung niemals direkt in den Laserstrahl.
15. HINWEIS: Bauen Sie die Drohne unter Aufsicht eines Erwachsenen zusammen.
16. Der Pilot ist für den sicheren Betrieb und Sicherheitsabstand zu unbeteiligten Personen und Sachen am
Boden sowie zu anderen Luftraumnutzern verantwortlich und darf die Drohne niemals über
Menschenansammlungen (> 12 Personen) fliegen.
17. Die Verpackung ist aufzubewahren, da sie wichtige Informationen enthält.
18. Es wird dringend empfohlen, in Bereichen ohne Luftströmung zu fliegen. Fliegen Sie nicht in Bereichen mit
einer Klimaanlage/einem elektrischen Ventilator oder einer Tischlampe oder anderen elektrischen Geräten, die
leicht beschädigt werden können.
19. Verwenden Sie nur das mitgelieferte Ladekabel.
20. Ladegeräte, die mit der Drohne verwendet werden, sollten regelmäßig überprüft werden, wie Kabel, Stecker,
Gehäuse und andere Teile. Falls Schäden festgestellt werden, verwenden Sie es bitte nicht mehr, es sei denn,
es wird repariert oder er
setzt.
21. Berühren Sie nicht den rotierenden Rotor, vermeiden Sie lose Kleidung oder Haare, die sich im Rotor
verfangen könnten, und fliegen Sie nicht in die Nähe des Gesichts.
1. Verwenden Sie ein trockenes und weiches Tuch, um das Produkt zu reinigen.
2. Setzen Sie das Produkt keiner extremen Hitze oder direkter Sonneneinstrahlung aus.
3. Tauchen Sie das Produkt nicht in Wasser, da dies die elektrischen Komponenten beschädigen kann.
4. Bitte überprüfen Sie regelmäßig die Klingen, Motoren und Batterien. Falls ein Schaden festgestellt wird,
verwenden Sie es bitte nicht mehr, es sei denn, es wird repariert oder ersetzt.
28
DE
2.0 Produktbeschreibung
2.1 Spezifikationen
275x275x52mm
Motor ø7
30m
3.7V 400mAh
Fernbedienung
2.4 GHz
4 X1.5V"AAA"(
)
Packungsinhalt
1
1
1
2 (A/B)
4
1
1
Drohne
X440
SYMA
29
DE
2.3 Fernsteuerungsdiagramm
①
②
③ Stromschalter
④ Arm
①
②
③
④
2.2 Drohnendiagramm
tick (kurz
drücken, um zwischen
digkeits
modus zu wechseln)
Stromschalter
Linker Joystick (kurz drücken,
um die Lichteffekte zu ändern;
gedrückt halten, um die
Trimmung anzupassen, und
loslassen, wenn Sie fertig
sind; um die
Trimmeinstellungen zu
löschen, gleichzeitig mit der
Ein-/Aus-Taste drücken und
halten)
Drehknopf
Spinnknopf
Ein-Schlüssel-Start/
Landung
30
DE
3.0 Produktmontage
3.1 Propellerinstallation
Lösen der Propeller Installieren der Propeller
Entfernen Sie die Propellerkappen und
Schrauben in Pfeilrichtung und nehmen Sie
dann die Propeller ab.
Beziehen Sie sich auf die Abbildung, installieren Sie den Propeller mit der
Aufschrift "A" und den Propeller mit der Aufschrift "B" an den entsprechenden
Stellen und ziehen Sie die Schrauben mit einem Schraubendreher fest.
! Achtung:
3.2 Installation des Propellerschutzes
Führen Sie den Schutz in Pfeilrichtung in den Arm ein.
Setzen Sie die Propeller in Pfeilrichtung
auf den Arm, ziehen Sie die Schrauben
fest und setzen Sie dann die Propeller
-kappen auf.
1. Bitte stellen Sie sicher, dass die Vorwärts- und Rückwärtspropeller in der richtigen Position
installiert sind. Wenn die Installation nicht korrekt ist, kann die Drohne nicht normal fliegen.
2. Da der Propeller dünn ist, seien Sie bitte vorsichtig bei der Installation, um versehentliche
Kratzer zu vermeiden.
3. Bitte verwenden Sie die von unserem Hersteller bereitgestellten Propeller.
4. Die Propeller sind Verbrauchsmaterialien, bitte kaufen Sie bei Bedarf zusätzliches Zubehör.
31
DE
3.3 Installation des Drohnenarms
Abnehmen des Arms: Drücken Sie auf die Verriegelung an der Unterseite des Flugzeugs und
nehmen Sie den Arm in Pfeilrichtung heraus.
Montage des Arms: Führen Sie den Arm in Pfeilrichtung in das Fluggerät ein und installieren
Sie ihn, wenn Sie ein Klicken hören.
! Achtung:
32
DE
3.4 Aufladen des Drohnenakkus
der Schnalle
drücken
Entfernen Sie die Batterie
Schrauben Sie die
Batterieverriegelung ab
Während des Ladevorgangs: Das rote
Licht leuchtet
Bei vollständiger Aufladung: Das rote
Licht ist aus
Batterie
Wichtig: Informationen zum Laden des Akkus
.
mit einem geringeren Nennstrom
verwenden.
1. Wiederaufladbare Batterien sollten nur unter Aufsicht von Erwachsenen geladen werden.
2. Achtung: Explosionsgefahr, wenn die Batterie durch falsche ersetzt wird. Bitte entsorgen Sie die
Batterien gemäß den Anweisungen.
3. Verwenden oder platzieren Sie Batterien nicht in der Nähe von Wärmequellen wie Feuer oder
Heizungen.
4. Laden Sie den Akku nach dem Fliegen nicht sofort auf, um zu vermeiden, dass der Akku überhitzt und
einen Brand verursacht. Stellen Sie sicher, dass er vor dem Laden abgekühlt ist.
5. Stoßen Sie den Akku beim Laden nicht an oder lassen Sie ihn fallen, um einen internen Kurzschluss zu
vermeiden.
6. Verwenden Sie zum Laden ausschließlich das mitgelieferte Ladekabel. Wenn der Akku altert, ersetzen
Sie ihn bitte rechtzeitig durch einen neuen Akku.
7. Entfernen Sie nach dem vollständigen Aufladen den Adapter rechtzeitig, da sonst der Akku entladen und
wieder aufgeladen wird, was die Lebensdauer des Akkus verkürzt.
8. Das Spielzeug darf nur an Geräte der Klasse II angeschlossen werden, die das Symbol tragen:
! Achtung:
33
DE
3.5 Verwendung der Fernbedienung
Batteriekastens ein (Batterien müssen separat erworben werden).
.
4.0 Flugführer
4.1 Flugvorbereitung
1. Schalten Sie den
Netzschalter der
Fernbedienung ein.
2. Halten Sie den Netzschalter
an der Drohne 2 Sekunden lang
gedrückt, um die Drohne
einzuschalten.
3. Drücken Sie den linken Joystick (Gas)
ganz nach oben und unten. Die Anzeigen
auf der Drohne und der Fernbedienung
wechseln von Blinken zu Dauerlicht, um
anzuzeigen, dass sich die Drohne im
Flugbereitschaftsmodus befindet.
Koppeln der Drohne mit der Fernbedienung
Batteriekastens übereinstimmt. Batterien dürfen nicht verpolt eingebaut werden.
2. Bitte verwenden Sie keine neuen und alten Batterien zusammen.
3. Bitte verwenden Sie keine unterschiedlichen Batterietypen zusammen.
! Achtung:
34
DE
Drücken Sie den linken
langsam zu drehen.
Drücken Sie den linken und
zu drehen.
beginnt sich langsam zu drehen,
dann hebt die Drohne automatisch
ab und schwebt auf einer festen
Niveaukalibrierung
Stellen Sie die Drohne auf eine ebene Fläche und
abgeschlossen ist.
Die Drohne kann nicht kalibriert werden, wenn der
Neigungswinkel größer als 10 Grad ist.
Einschalten der Drohne
die Drohne auszuschalten.
Drücken Sie den linken und
Drohne auszuschalten. schaltet sich automatisch aus.
Ausschalten der Drohne
1. Die Drohne schaltet sich automatisch ab, wenn ihr Neigungswinkel 90 Grad überschreitet.
2. Wenn die Drohne außerhalb der Reichweite der Fernbedienung geflogen wird, beginnt die
Drohnenanzeige zu blinken und die Drohne landet langsam.
3. Wenn sich die Fernbedienung plötzlich ausschaltet oder während des Flugs keinen Strom mehr hat,
landet die Drohne automatisch und stoppt. Wenn die Fernbedienung während dieses Vorgangs wieder
eingeschaltet wird, können Sie das Fluggerät wieder steuern.
! Achtung:
35
DE
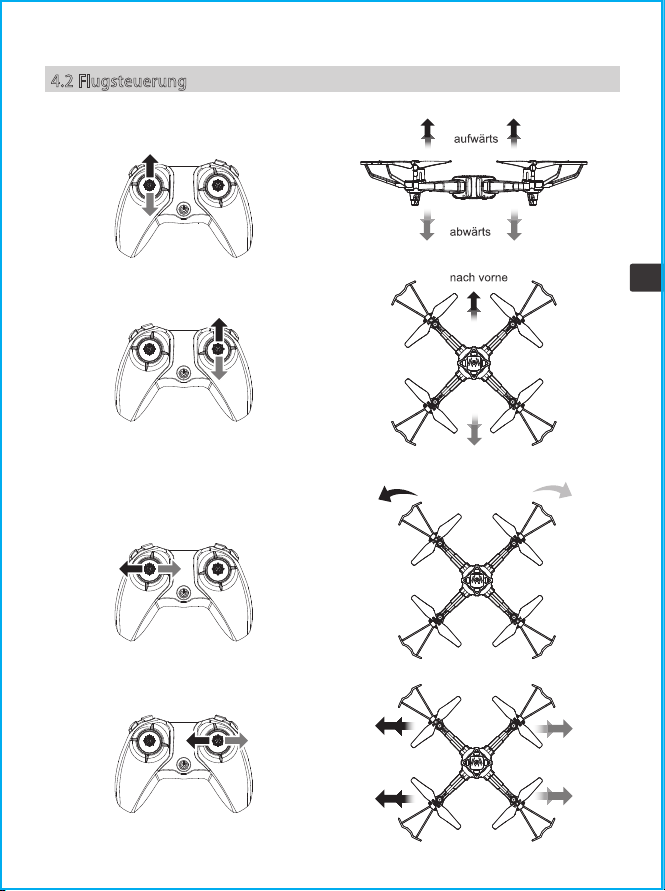
4.2 Flugsteuerung
nach hinten
Vorderseite
Rückseite
Vorderseite
Rückseite
nach rechts
drehen
nach links
drehen
nach links nach rechts
36
DE
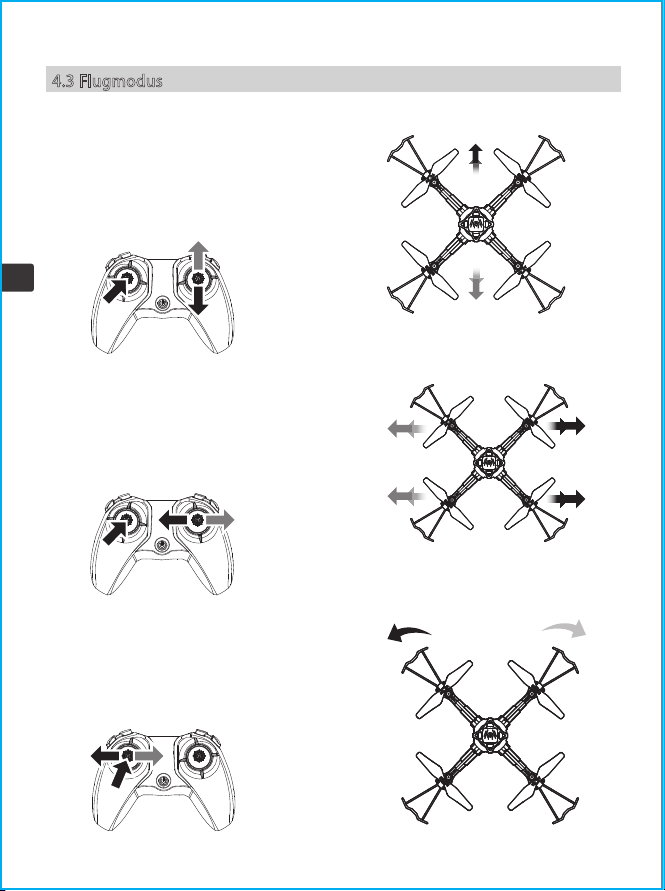
4.3 Flugmodus
Trimmen
Trimmen vorwärts und rückwärts
Wenn die Drohne in der Luft schwebt, wenn sie
automatisch vorwärts oder rückwärts driftet,
können Sie die Trimmtaste gedrückt halten und
den rechten Joystick nach hinten oder vorne
drücken, um die Einstellung vorzunehmen, bis die
Drohne stabil ist, und dann loslassen.
Trimmen links und rechts
Wenn die Drohne in der Luft schwebt, wenn sie
automatisch nach links oder rechts driftet,
können Sie die Trimmtaste gedrückt halten und
den rechten Joystick nach rechts oder links
drücken, um sie anzupassen, bis die Drohne
stabil ist, können Sie loslassen die Trimmtaste.
Links- und Rechtslauf trimmen
Wenn die Drohne in der Luft schwebt, kann sie sich
automatisch nach links oder rechts drehen. Beim
Fliegen können Sie die Trimmtaste gedrückt halten
und den linken Joystick zur Einstellung nach rechts
oder links drücken. Bis die Drohne stabil ist, können
Sie die Trimmtaste loslassen.
37
DE
High/Low-Speed-Modi
4.4 Smart Flight-Funktion
F
lip-Funktion
keits
te
v
klappen
r
klappen
links
klappen
rechts
klappen
n
links
nach rechts
38
DE
Corner-Flip-Funktion
Drehfunktion
drücken
den rechten Joystick in die
den rechten Joystick in die
den rechten Joystick in
drücken
den rechten Joystick
nach links drücken
den rechten Joystick
nach rechts drücken
nach links
drehen
nach rechts
drehen
! Achtung:
39
DE
Spin-Funktion
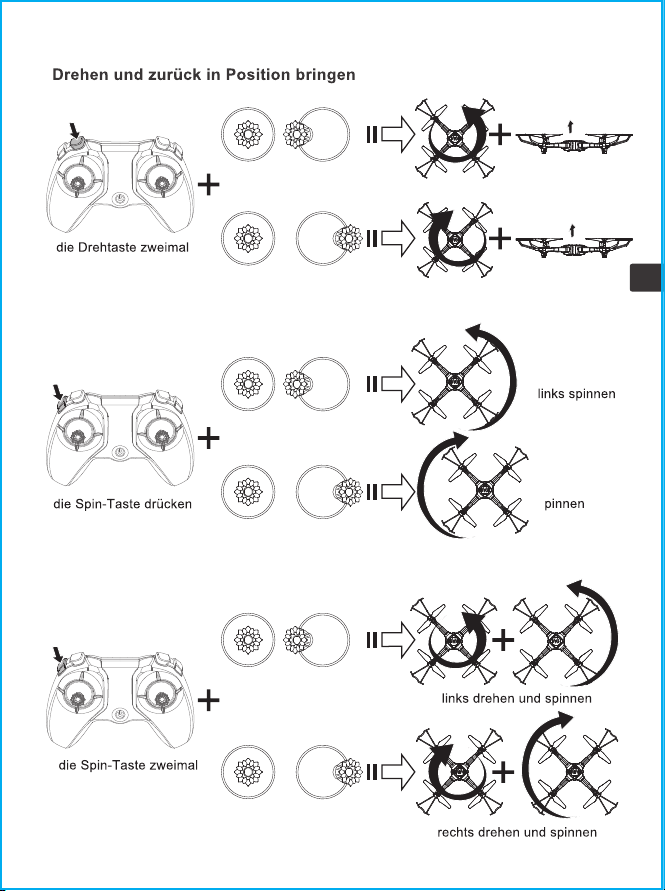
Dreh&Spin-Funktion
drehen
drücken
den rechten Joystick
nach links drücken
Nach links drehen und zur Position
zurückkehren
Nach rechts drehen und zur
Position zurückkehren
den rechten Joystick
nach rechts drücken
den rechten Joystick
nach links drücken
den rechten Joystick
nach rechts drücken
den rechten Joystick
nach links drücken
den rechten Joystick
nach rechts drücken
rechts
s
40
DE
e.
J
Höhe halten
Wenn Sie den linken Joystick (Gas) loslassen, nachdem Sie die Drohne zum Steigen/Sinken gesteuert
haben, schwebt die Drohne weiterhin auf der aktuellen Höhe.
41
DE
Wenn die beiden Anzeigen auf der Rückseite der Drohne zu blinken beginnen, bedeutet dies, dass die
Leistung der Drohne niedrig ist. Steuern Sie zu diesem Zeitpunkt bitte die Drohne, um zurückzukehren.
der Schaltkreis der Dr hanismus.
Überstromschutz
42
DE
5.0 Fehlerbehebung
die Kontrollleuchte
Ursache
Problem
Lösung
und leuchtet dann normal auf, um anzuzeigen,
Regelmäßige Kontrolle und Reinigung
Motor funktioniert nicht Prüfen Sie den Motor auf
Fremdkörper (zB: Haare, Sand)
funktioniert nicht
und leuchtet dann normal auf, um
43
DE
6.0 Kontaktieren Sie uns
Bitte zögern Sie nicht, uns zu kontaktieren, wenn Sie weitere Unterstützung benötigen.
+1 718-312-0558(US)
+44 (0)7723708421(UK)
+4933545519201(DE)
7.0 Produktzubehör
Für Online-Support scannen Sie bitte diesen
Code mit Facebook Messenger
PropellerArm A
Batterie
Motor
Arm B
Fernbedienung
44
DE
8.0 Explosionsansicht

Warnung: Änderungen oder Modifikationen an diesem Gerät, die nicht ausdrücklich von der für
die Konformität verantwortlichen Partei genehmigt wurden, können die Berechtigung des
Benutzers zum Betrieb des Geräts erlöschen lassen.
FCC-Hinweis.
Jegliche Änderungen oder Modifikationen, die nicht ausdrücklich von der für die Konformität
verantwortlichen Partei genehmigt wurden, können die Berechtigung des Benutzers zum
Betrieb des Geräts aufheben.
Dieses Gerät entspricht Teil 15 der FCC-Bestimmungen.
Der Betrieb unterliegt den folgenden zwei Bedingungen:
1. Dieses Gerät darf keine schädlichen Interferenzen verursachen und
2. Dieses Gerät muss alle empfangenen Störungen akzeptieren, einschließlich Störungen, die
einen unerwünschten Betrieb verursachen können.
HINWEIS: Dieses Gerät wurde getestet und entspricht den Grenzwerten für ein digitales Gerät
der Klasse B
gemäß Teil 15 der FCC-Bestimmungen. Diese Grenzwerte sollen einen angemessenen Schutz vor
schädlichen Interferenzen bei einer Installation in Wohngebieten bieten. Dieses Gerät erzeugt,
verwendet und kann Hochfrequenzenergie ausstrahlen und kann, wenn es nicht gemäß den
Anweisungen installiert
und verwendet wird, schädliche Interferenzen mit dem Funkverkehr verursachen.
Es gibt jedoch keine Garantie dafür, dass bei einer bestimmten Installation keine Interferenzen
auftreten.Wenn dieses Gerät schädliche Interferenzen beim Radio- oder Fernsehempfang
verursacht, was durch Ein- und Ausschalten des Geräts festgestellt werden kann, wird dem
Benutzer empfohlen, zu versuchen, die Störung zu beheben durch eine oder mehrere der
folgenden Maßnahmen stören:
● Richten Sie die Empfangsantenne neu aus oder verschieben Sie sie.
●Vergrößern Sie den Abstand zwischen dem Gerät und dem Empfänger
●Schließen Sie das Gerät an eine Steckdose an, die sich in einem anderen Stromkreis befindet
als der, an den der Empfänger angeschlossen ist.
●Wenden Sie sich an den Händler oder einen erfahrenen Radio-/Fernsehtechniker, um Hilfe zu
erhalten.
"Dieses Gerät entspricht den FCC-Grenzwerten für die Strahlenbelastung, die für die allgemeine
Bevölkerung festgelegt wurden (unkontrollierte Exposition). Dieses Gerät darf nicht zusammen
mit anderen Antennen oder Sendern aufgestellt oder betrieben werden.“
Konformitätsauszeichnungsbeilagen: GuangDong SYMA Model Aircraft Industrial Co., Ltd. erklärt
hiermit, dass das Funkgerätetyp Helikopter der Richtlinie 2014/53/EU entspricht Der
vollständige Text der EUKonformitätserklärung
HF-Frequenzband: 2415-2465MHz
Sendeleistung: -15.25dBm(Max.)
Produktname: RC Hubschrauber
ist im folgenden Internet verfügbar Adresse: http://www.symatoys.com/down/
conformitydeclaration.html
45
DE

Garantie
BEFRISTETE GARANTIE VON 2 Jährige UND KOSTENLOSE BEGRENZTE ERSATZTEILE FÜR 2
Jahre
Symatoys.com.cn garantiert dem ursprünglichen Käufer, wenn Produkte neunzig 2 Jahr ab
dem Datum des Versands an den Käufer Material- und Verarbeitungsfehlern haben, kann der
Käufer einen kostenfreien Ersatz erhalten, entweder direkt von symatoys.com.cn oder von
einem autorisierten Wiederverkäufer Standort.
Die folgenden Voraussetzungen müssen für die Gewährleistung erfüllt sein:
1. Während der Garantiezeit wird das Produkt wie vom Hersteller vorgesehen verwendet.
2. Das Produkt wurde nicht zerlegt oder modifiziert.
3. Die Etiketten und Seriennummern zeigen keine Anzeichen von Manipulationen oder
Veränderungen.
4. Der Käufer verfügt über einen Garantiecode, den er erhalten hat, indem er sein Produkt
online registriert, bevor er einen Anspruch geltend macht.
AUSNAHMEN: DIE BEGRENZTE GARANTIE GILT NICHT FÜR:
• Schäden durch normalen Verschleiß
• Unfall, Fahrlässigkeit, Missbrauch, fehlerhafte Anwendung oder vorsätzliche Beschädigung
durch den Käufer (oder seine Vertreter) oder höhere Gewalt
• Absturz oder Verbrennung durch nicht herstellungsbedingte Faktoren
• Schäden, die durch autorisierte Änderungen oder Demontagen verursacht wurden, die nicht
durch die Bedienungsanleitung autorisiert wurden
• Schäden durch unsachgemäße Verwendung oder Bedienung
•Schäden durch Nichtübereinstimmung oder Missbrauch des Akkus oder Ladegeräts
•Nichtbeachtung der Bedienungsanleitung durch den Bediener zur Verwendung außerhalb der
Betriebsparameter des Produkts
•Das sind Schäden, die durch den Betrieb des Produkts in oder um elektromagnetische
Störungen (d.h. Funkübertragungsturm, Hochspannungskabel, Umspannwerk usw.)
verursacht werden.
• Das sind Schäden, die durch den Betrieb des Produkts verursacht werden, wenn Störungen
durch andere drahtlose Geräte auftreten können
•Betrieb des Produkts mit einer Tragfähigkeit, die über das im Handbuch angegebenen
Verkaufsgewicht ist.
•Betrieb des Produkts mit gealterten, beschädigten oder nicht authentifizierten Komponenten
von Drittanbietern
•Betrieb des Produkts mit defekter Batterie
GARANTIE
VERFAHREN: Ansprüche wegen Verletzung der vorstehenden begrenzten Garantie sind nur
gültig, wenn der Käufer diesen Anspruch innerhalb von Jahre ab dem Datum des Versands des
Produkts, an das der Anspruch geltend gemacht wird, schriftlich geltend macht. Um einen
Garantieanspruch geltend zu machen, senden Sie bitte eine E-Mail an warranty @
symatoys.com.cn mit Ihrem vollständigen Namen, Adresse, Telefonnummer, Bestellnummer,
Fahrzeugtyp, Teiletyp und Kaufdatum sowie Produktausgabe.
G
e
w
ä
h
r
l
e
i
s
t
u
n
g
G
e
w
ä
h
r
l
e
i
s
t
u
n
g
2-jährige
46
DE

BEGRENZTE ABHILFE:
Die alleinige Haftung von Symatoys.com.cn und das alleinige Rechtsmittel des Käufers bei
Verstößen gegen die vorstehende Garantie liegt in der Option von Symatoys.com.cn, das
Produkt gegen ein neues Produkt oder ein generalüberholtes Produkt auszutauschen, und
funktional dem Originalprodukt entspricht, oder eine Gutschrift oder Rückerstattung auf den
Kaufpreis des Produkts auszustellen.
Für alle ersetzten Produkte wird eine Garantie gemäß den hierin festgelegten Bestimmungen
gewährt, sofern die Frist, innerhalb derer der Käufer weitere Ansprüche geltend machen kann,
auf den Rest der ursprünglichen Frist für das betreffende Produkt oder auf 2 Jährige begrenzt
ist, je nachdem, welcher Zeitraum länger ist (Die Gewährleistungsfrist wird jedoch während
jeder Austauschzeit ausgesetzt)
Haftungsausschluss:
DIE GARANTIE UND DIE RECHTSMITTEL SIND AUSSCHLIESSLICH UND ERSETZEN ALLE
ANDEREN GARANTIEN.
UND Symatoys.com.cn SCHLIESST ALLE ANDEREN AUSDRÜCKLICHEN ODER STILLSCHWEI-
GENDEN GEWÄHRLEISTUNGEN AUS, EINSCHLIESSLICH, ABER NICHT BESCHRÄNKT AUF DEN
STILLSCHWEIGENDEN GEWÄHRLEISTUNGEN FÜR MARKTGÄNGIGKEIT UND EIGNUNG FÜR
EINEN BESTIMMTEN ZWECK, NICHTVERLETZUNG UND JEGLICHE GEWÄHRLEISTUNGEN, DIE
AUS DEM HANDELSKURS, DEM LEISTUNGSKURS UND DER NUTZUNG DES HANDELS
ENTSTEHEN.
Symatoys com.cn ÜBERNIMMT KEINE VERANTWORTUNG FÜR DIREKTE, BESONDERE, NEBEN-
ODER FOLGESCHÄDEN, DIE WEGEN VERSTOß GEGEN EINE GEWÄHRLEISTUNG ODER EINE
BEDINGUNGEN ODER UNTER ANDEREN RECHTLICHEN THEORIEN ENTSTEHEN.
EINSCHLIESSLICH, ABER NICHT BESCHRÄNKT AUF; VERLUST DES NUTZENS; UMSATZVER-
LUST; VERLUST VON TATSÄCHLICHEN ERWARTETEN GEWINNEN (EINSCHLIESSLICH VERLUST
VON GEWINNEN AUS VERTRÄGEN); VERLUST DER VERWENDUNG VON GELD, VERLUST VON
VORAUSSICHTLICHEN EINSPARUNGEN; VERLUST VON GESCHÄFTSKOSTEN DER GELEGEN-
HEIT; VERLUST DES GUTEN WILLENS, VERLUST DER EPUTATION; VERLUST VON SCHÄDEN
DURCH KOMPROMISSION ODER KORRUPTION VON DATEN; ODER JEGLICHE INDIREKTE ODER
FOLGENDE VERLUSTE ODER SCHÄDEN, DIE JEDOCH VERURSACHT WURDEN,
EINSCHLIESSLICH DES AUSTAUSCHS VON AUSRÜSTUNG UND EIGENTUM.
JEGLICHE KOSTEN FÜR DIE WIEDERHERSTELLUNG ODER WIEDERHERSTELLUNG VON DATEN,
DIE IN DEM PRODUKT GESPEICHERT ODER VERWENDET WERDEN, ODER JEGLICHE
NICHTBEHALTUNG DER VERTRAULICHKEIT VON INFORMATIONEN, DIE DAS PRODUKT LAGERT.
Einige Staaten erlauben nicht den Ausschluss oder die Beschränkung von Neben- oder
Folgeschäden. Daher gilt die oben genannte Einschränkung oder der oben genannte
Ausschluss möglicherweise nicht für Sie. Darüber hinaus erlauben einige Staaten keine
Einschränkungen hinsichtlich der Dauer einer impliziten Garantie. Daher gilt die oben
genannte Einschränkung möglicherweise nicht für Sie.
47
DE

KOSTENLOSER AUSTAUSCH VON TEILEN FÜR 2 Jahr:
Symatoys.com.cn stellt alle Ersatzteile, die für registrierte Fahrzeuge benötigt werden, 2
Jährige ab Kaufdatum kostenlos zur Verfügung, mit Ausnahme von Batterien und Motoren,
Leiterplatten und Fernbedienug. Es können Versandkosten anfallen. Beschränken Sie die
Anforderung eines Teiletyps pro registriertem Fahrzeug (z. B. Registranten haben Anspruch
auf einen zusätzlichen Satz Batterien pro registriertem Fahrzeug). Um Ersatzteile anzufordern,
senden Sie bitte eine E-Mail an [email protected] mit Ihrem Garantiecode,
Fahrzeugnamen / Modell , aktuelle Lieferadresse, Kaufdatum und Teiletyp
ERHALTEN SIE IHREN GARANTIECODE UNTER
symatoys.com.cn/pages/warranty-signup
HABEN SIE IHRE BESTELLNUMMER UND / ODER DAS
FAHRZEUG UPC BEREIT
48
DE
European Representative:
CET PRODUCT SERVICE LTD.
Osterholzallee 144
71636 Ludwigsburg Germany
Phone:+4971416432236
E-mail:[email protected]
British Representative:
CET PRODUCT SERVICE LTD.
Beacon House Stokenchurch Business Park,
Ibstone Rd, Stokenchurch
High Wycombe HP14 3FE UK
Tel: +447419325266
E-mail:[email protected]
United States Representative:
Duvin Trade Inc
5800 Wood Sorrel Dr,Littleton,Co, 80123,United States
Phone: 718-312-0558
E-mail: [email protected]
Hersteller: GUANGDONG SYMA MODEL AIRCRAFT INDUSTRIAL CO.,LTD
Adresse: NO.2 WEST XINGYE ROAD LAIMEI INDUSTRIAL AREA CHENG HAI , Shantou, China
Postleitzahl: 515800
+1 718-312-0558 (US) +44(0)7723708421 (UK) +49 335-4551-9201(DE)
https://www.symatoys.com.cn
Das Unternehmen hat das Recht der endgültigen Auslegung dieses Benutzerhandbuchs.
49
DE
In China hergestellt


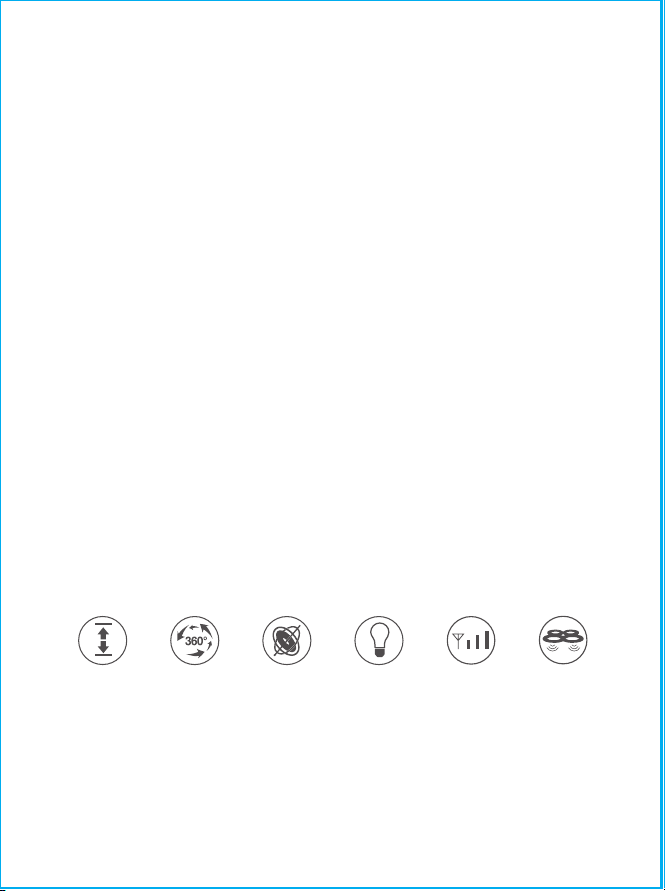
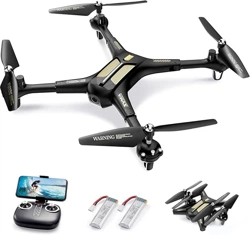
Take-off/landing
Flip stunts
6 Axis gyroscope
Flashing LED
lights
2.4 GHz frequency Hover function
REMOTE CONTROL DRONE