
Technical Support and E-Warranty Certificate www.vevor.com/support
Electric Meat Grinder
MODEL:MG-435
We continue to be committed to provide you tools with competitive price.
"Save Half", "Half Price" or any other similar expressions used by us only
represents an estimate of savings you might benefit from buying certain tools
with us compared to the major top brands and does not necessarily mean to cover
all categories of tools offered by us. You are kindly reminded to verify carefully
when you are placing an order with us if you are actually Saving
Half in comparison with the top major brands.

- 1 -
MODEL:MG-435
NEED HELP? CONTACT US!
Have product questions? Need technical support? Please feel free to
contact us:
Technical Support and E-Warranty Certificate
www.vevor.com/support
This is the original instruction, please read all manual instructions
carefully before operating. VEVOR reserves a clear interpretation of our
user manual. The appearance of the product shall be subject to the
product you received. Please forgive us that we won't inform you again if
there are any technology or software updates on our product.
Electric Meat Grinder
- 2 -
Warning-To reduce the risk of injury, the user must read the
instructions manual carefully.
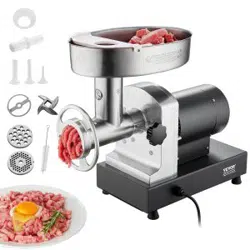
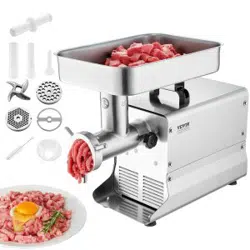
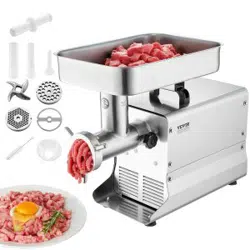
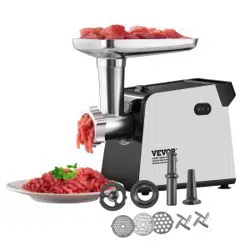
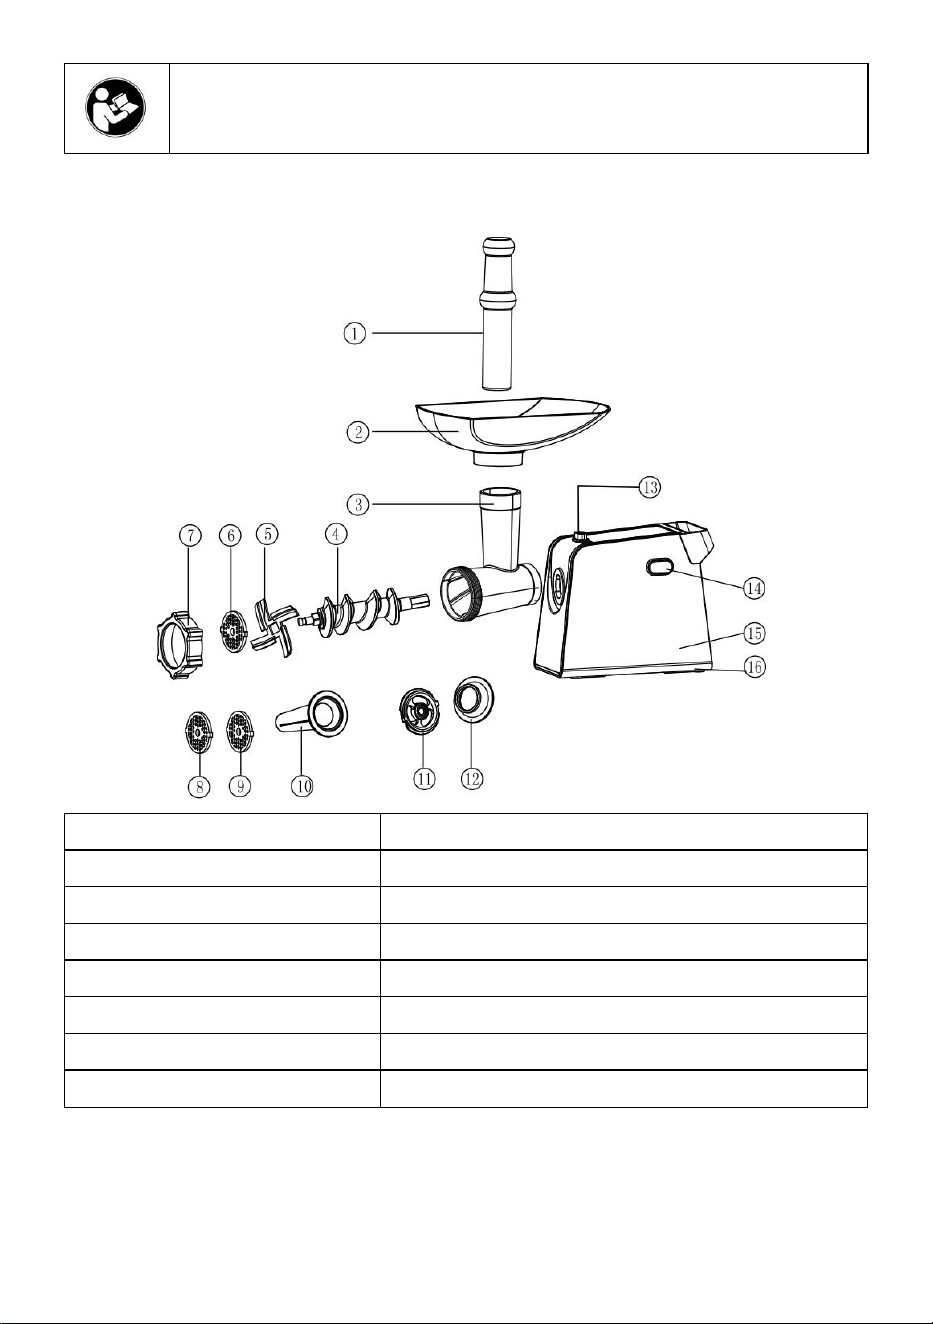
DESCRIPTION
1. Food pusher
9. Fine disc
2. Food tray
10. Sausage
3. Feeding Tube
11. Kebbe attachment 1
4. Screw
12. Kebbe attachment 2
5. Cross knife
13. Fasten button
6. Medium disc
14. Handle
7. Fixing ring
15. ON/OFF/Reverse switch
8. Coarse disc
16. Base
INTRODUCTION
This appliance is equipped with a thermostat system. This system will

- 3 -
automatically cut off the power supply to the appliance in case of
overheating.
If you appliance suddenly stops running:
1.Pull the mains plug out of the socket.
2.Press the switch button to turn off the appliance.
3.Let the appliance cool down for 60 minutes.
4.Put the mains plug in the socket.
5.Switch the appliance on again.
6.This appliance shall not be used by children. Keep the appliance and its
cord out of reach of children.
7.Appliances can be used by persons with reduced physical, sensory or
mental capabilities or lack of experience and knowledge if they have been
given supervision or instruction concerning use of the appliance in a safe
way and if they understand the hazards involved.
8.Children shall not play with the appliance.
9.Switch off the appliance and disconnect from supply before changing
accessories or approaching parts that move in use.
Please contact your dealer of an authorized service center if the thermostat
system is activated too often.
If you plug in, the indicator light will be on.
CAUTION: In order to avoid a hazardous situation, this appliance must
never be connected to a time switch.
IMPORTANT
1.Read these instructions for use carefully and look at the illustrations
before using the appliance.
2.Before use, tight the fixing ring by spanner, make sure the ring can not be
detach by 4 Nm.
3.Keep these instructions for future reference.
4.Check if the voltage indicated on the appliance corresponds to the local
mains voltage before you connect the appliance.
5.Never use any accessories of parts from other manufacture .Your
guarantee will become invalid if such accessories or parts have been used.

- 4 -
6.Do not use the appliance if the mains cord, the plug or other parts are
damaged.
7.If the power cord of this appliance is damaged, it must always be
replaced by manufacture or a service center authorized, in order to avoid
hazardous situations.
8.Thoroughly clean the parts that will come into contact with food before
you use the appliance for the first time.
9.Unplug the appliance immediately after use.
10.Never use your finger or an objection to push ingredients down the feed
tube while the appliance is running. Only the pusher is to be used for this
purpose.
11.Keep the appliance out of the reach of children.
12.Never let the appliance run unattended.
13.Switch the appliance off before detaching and install any accessory.
14.Wait until moving parts have stopped running before you remove the
parts of the appliance.
15.Never immerse the motor unit in the water or any other liquid, nor rinse
it under the tap. Use only a moist cloth to clean the motor unit.
16.Do not attempt to grind bones, nuts or other hard items.
17.Never reach into the cutter housing. Always use the pusher.
18.Mincers are fed with sinewless, boneless and fatless beef that has been
cut into pieces approximately 20 mm x 20 mm x 60 mm. Pushers are
pressed with a force of 5N against the meat. Do not use the appliance for
more than 5 minutes consecutively. Leave the appliance to cool for 10
minutes before using again.
19.Accessories shall include instructions for their safe use.
20.It shall warn of potential injury from misuse.
21.This appliance is not intended for use by persons (including children)
with reduced physical, sensory or mental capabilities, or lack of experience
and knowledge, unless they have been give supervision or instruction
concerning use of the appliance by a person responsible for their safety.
22.Children should be supervised to ensure that they do not play with the

- 5 -
appliance.
23.If the appliance is locked, please press Reversal button(REV). The
meat locked in cutter housing is untrodden, so the appliance can renew its
usual condition.
24.Disposal of appliances and batteries.
25.After the implementation of the European Directive 2002/96/EU in the
national legal system, the followi ng applies:
26.Electrical and electronic devices may not be disposed of with domestic
waste. Consumers are obliged by law to return electrical and electronic
devices at the end of their service lives to the public collecting points set up
for this purpose or point of sale. Details to this are defined by the national
law of the respective country. This symbol on the product, the instruction
manual or the package indicates that a product is subject to these
regulations. By recycling, reusing the materials or other forms of utilising
old devices, you are making an important contribution to protecting our
environment.
27.This appliance can be used by children aged from 8 years and above if
they have been given supervision or instruction concerning use of the
appliance in a safe way and if they understand the hazards involved.
Cleaning and user maintenance shall not be made by children unless they
are aged from 8 years and above and supervised. Keep the appliance and
its cord out of reach of children aged less than 8 years.
28.This appliance is intended to be used in household and similar
applications such as:
– staff kitchen areas in shops, offices and other working environments;
– farm houses;
– by clients in hotels, motels and other residential type environments;
– bed and breakfast type environments.
INSTRUCTION FOR USE
ASSEMBLING
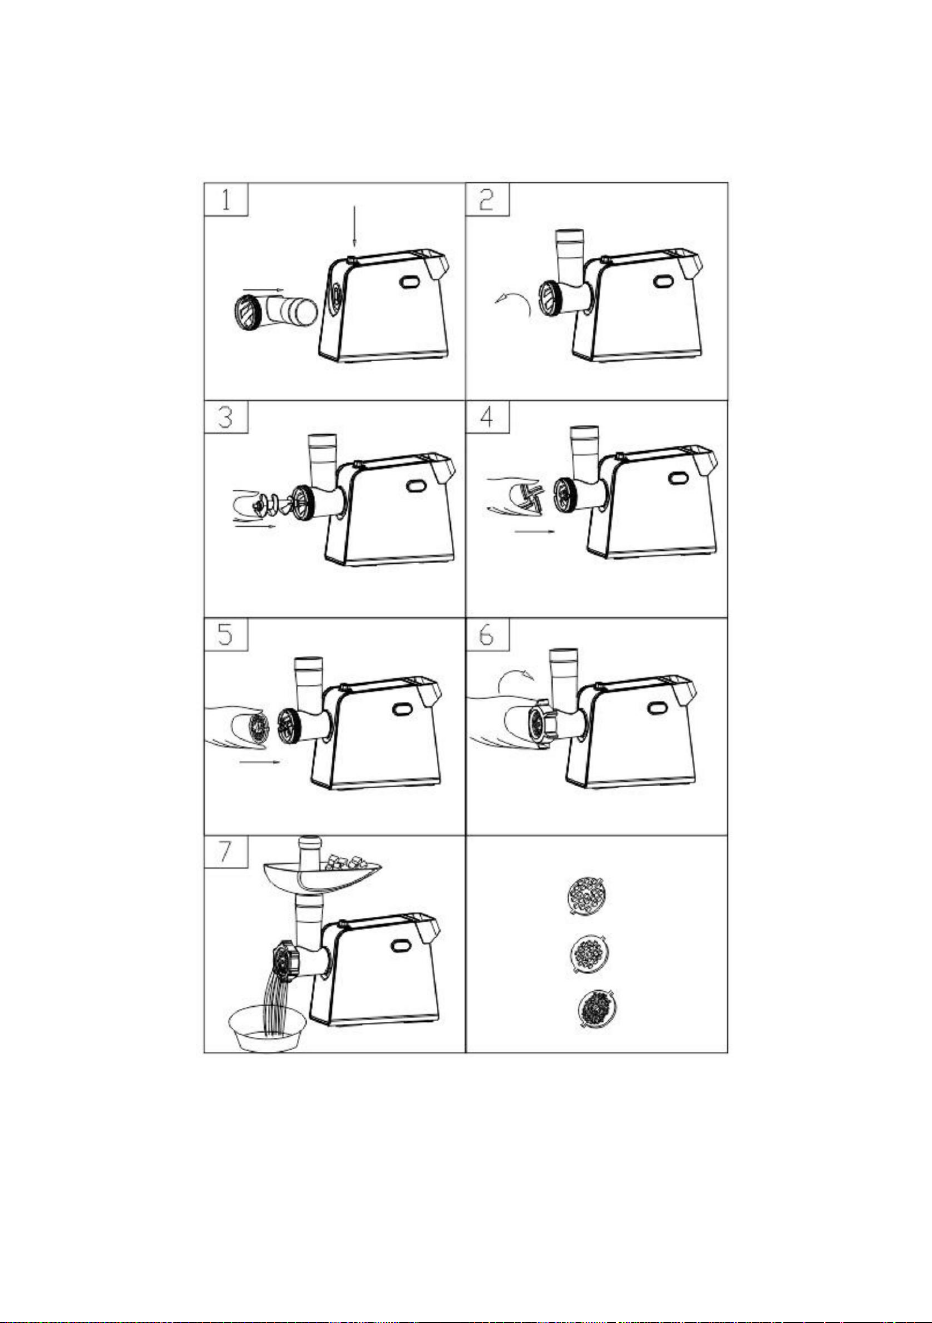
• Press the fasten button,hold the head and insert it into the inlet(when
inserting please pay attention the head must be slanted as
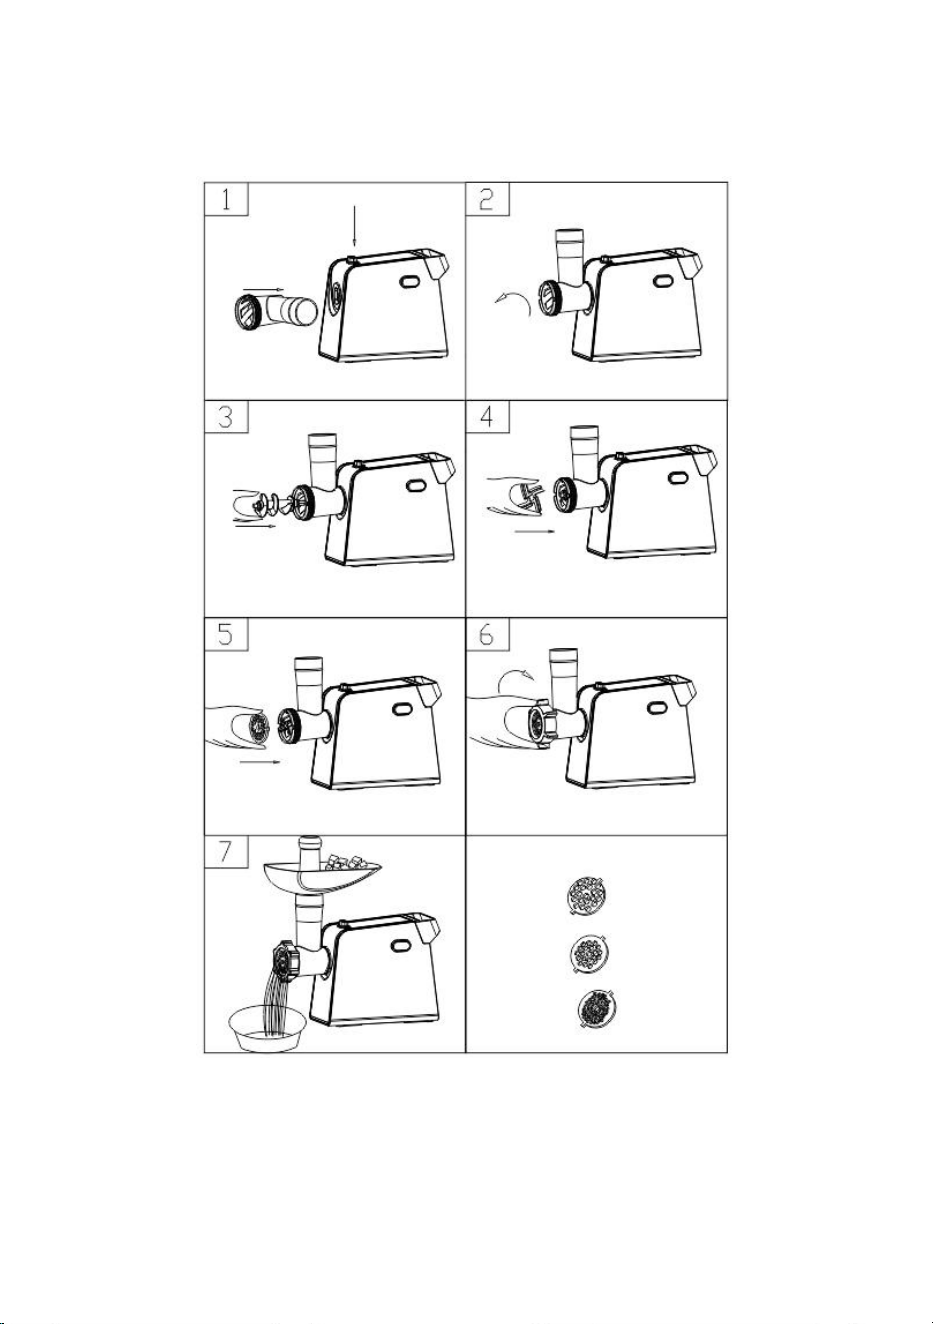
- 6 -
• per arrow indicated on the top, see fig.1),
• then move the head anticlockwise so that the head being fastened
tightly .(fig.2)
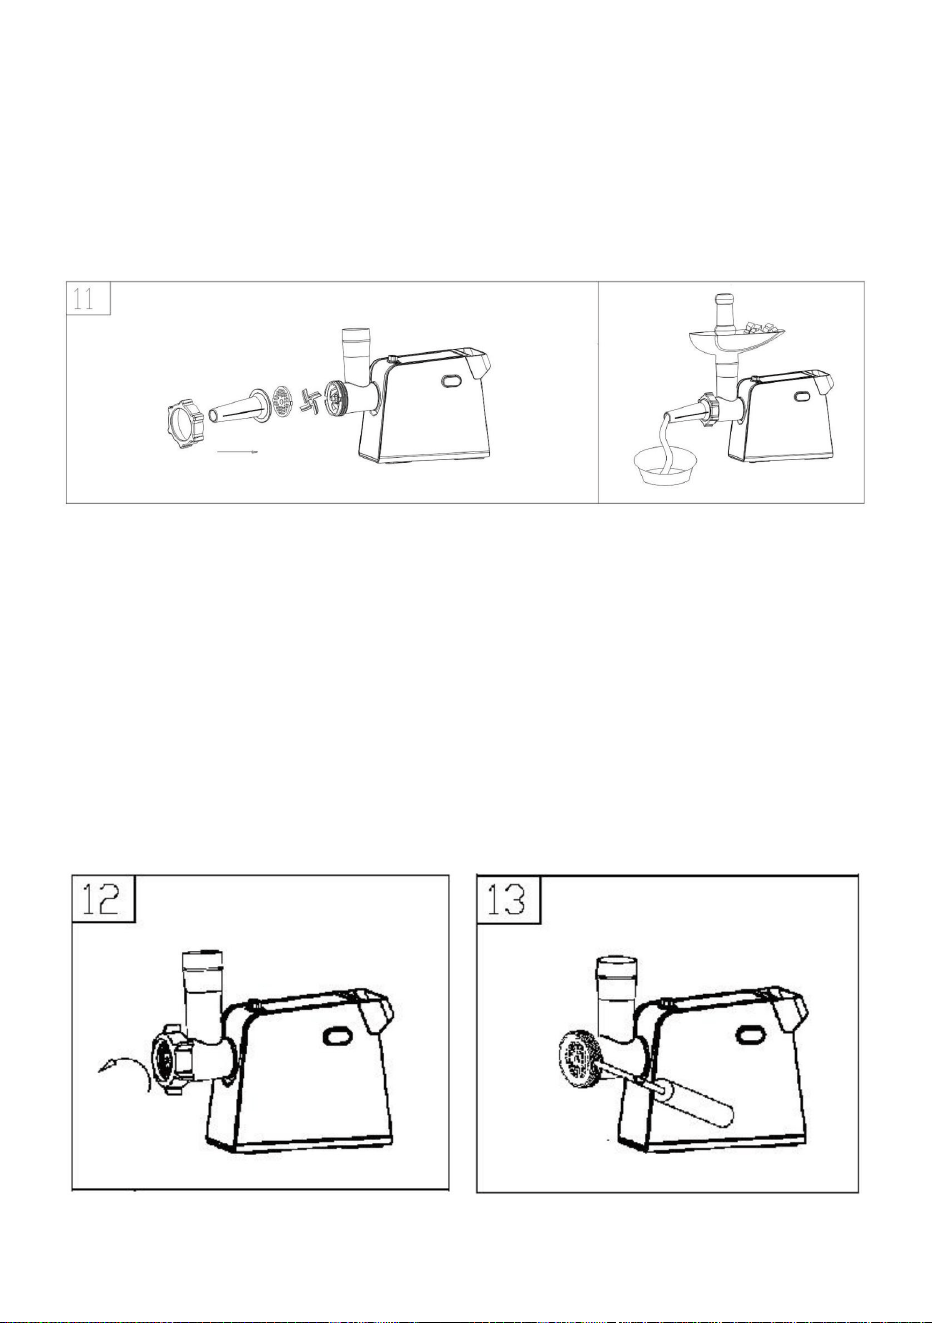
• Place the snake into the head, long end first,and turn to feed the screw
slightly until it is set into the motor housing (fig.3).
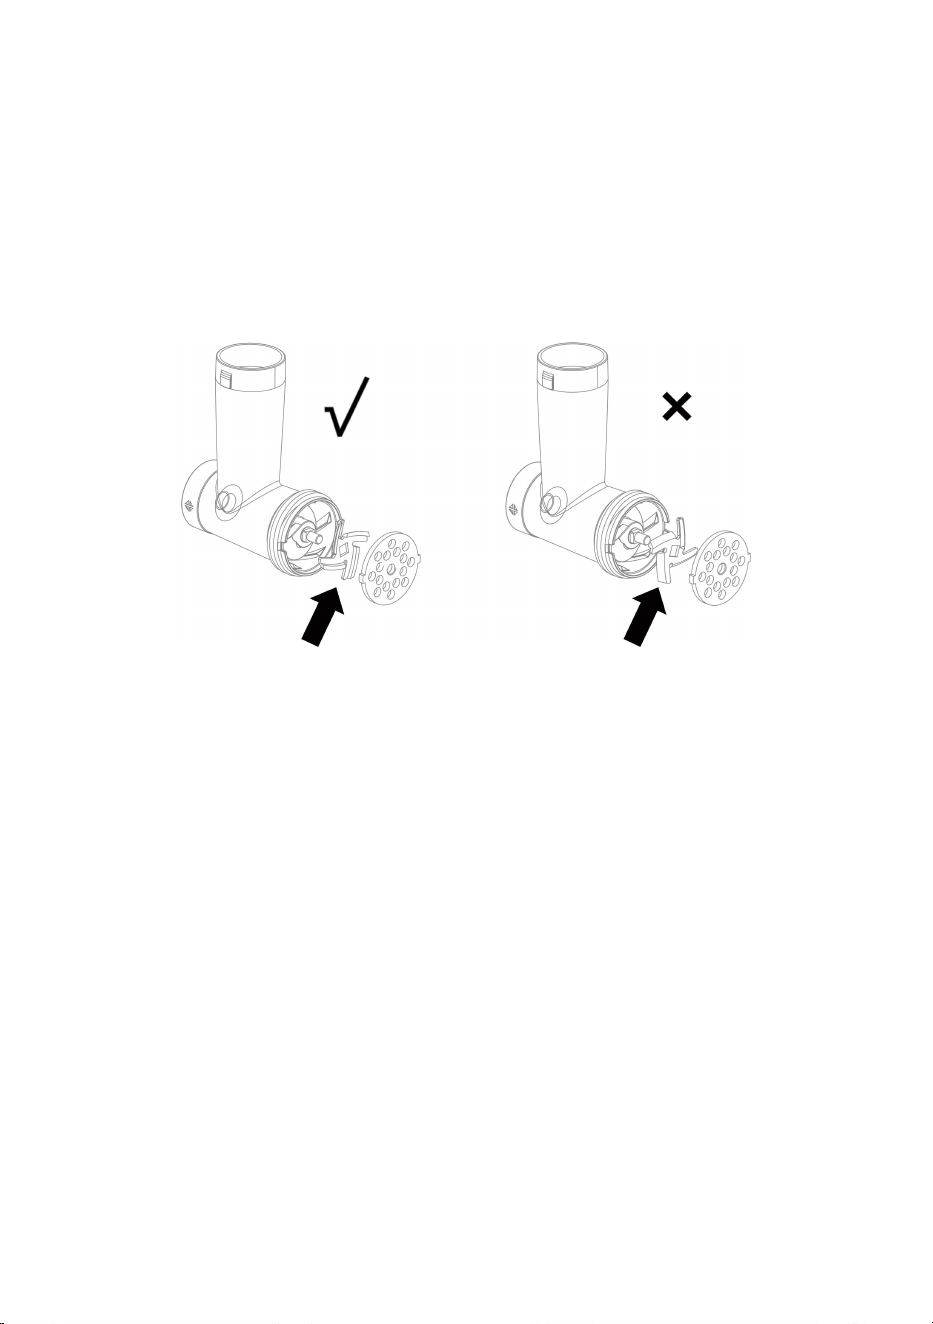
• Place the cutting blade onto the snake shaft with the blade facing the
front as illustrated (fig.4).If it is not fitted properly, meat will not be grinded.
- 7 -
• Place the desired cutting plate next to the cutting blade, fitting protrusions
in the slot (fig.5).
• Support or press the center of the cutting plate with one finger then screw
the fixing ring tight with another hand (fig.6). Do not over tighten.
• Place the hopper plate on the head and fix it into position.
• Locate the unit on a firm place.
• The air passage at the bottom and the side of the motor housing should
be kept free and not blocked.
Cutting Blade Assembly
Mincer
1.Insert the worm shaft into the cutter housing, the plastic end first.
Place the cutter unit onto the worm shaft. (The cutting edges should be at
the front) Place the medium grinding disc or coarse grinding disc
(depending on the consistency you prefer) onto the worm shaft. (Make
sure the notch of the grinding disc fit onto the projections of the mincer
head.) Turn the screw ring in the direction of the arrow on the cutter
housing until it is properly fastened.
2.Attach the cutter housing to the motor unit.
3.Place the tray on the upright part of the cutter housing.
4. Now the appliance is ready for mincing.
Cut the meat into 10cm-long, 2cm-thick strips. Remove bones, pieces of
gristle and sinews as much as possible. (Never use frozen meat!)
Put the meat in the tray. Use the pusher to gently push the meat into the

- 8 -
cutter hosing. (For steak tartare , mince the meat with the medium grinding
disc twice. )
Making kebbe
Insert the worm shaft into the cutter housing, the
1.plastic end first.(fig.8)
Place the cone in the cutter housing.
Place the former on the cutter housing and screw the ring on the cutter
housing.(fig.9)
2.Attach the cutter housing to the motor unit.
3.Place the tray on the upright part of the cutter housing.
4.Now the appliance is ready for making kebbe.(fig.10)
Feed the prepared kebbe mixture through the kebbe maker.
Cut the continuous hollow cylinder into the desired lengths and user as
required.
Kebbe is a traditional Middle Eastern dish made primarily of lamp and
bulgur wheat which are minced together to form a paste the mixture is
extruded through the kebbe maker and cut into short lengths . The tubes
can then be stuffed with a minced meat mixture, the ends pinched together
and then deep fried.
Making sausages
1.Mince the meat
Insert the worm shaft into the cutter housing , the plastic end first.(fig.11)
Place the separator in the cutter housing.
Place the sausage horn on the cutter housing and screw the ring on the
- 9 -
cutter housing.
(Make sure the notches of the separator fit onto the projections of the
mincer head.)
2.Attach the cutter housing to the motor unit.
3.Place the tray on the upright part of the cutter housing.
4.Now the appliance is ready for making sausages.
Put the ingredients in the tray. Use the pusher to gently push the meat into
the cutter housing.
Put the sausage skin in lukewarm water for 10 minutes. Then slide the wet
skin onto the sausage horn. Push the (seasoned) minced meat into the
cutter housing. If the skin gets stuck onto the sausage horn, wet it with
some water.
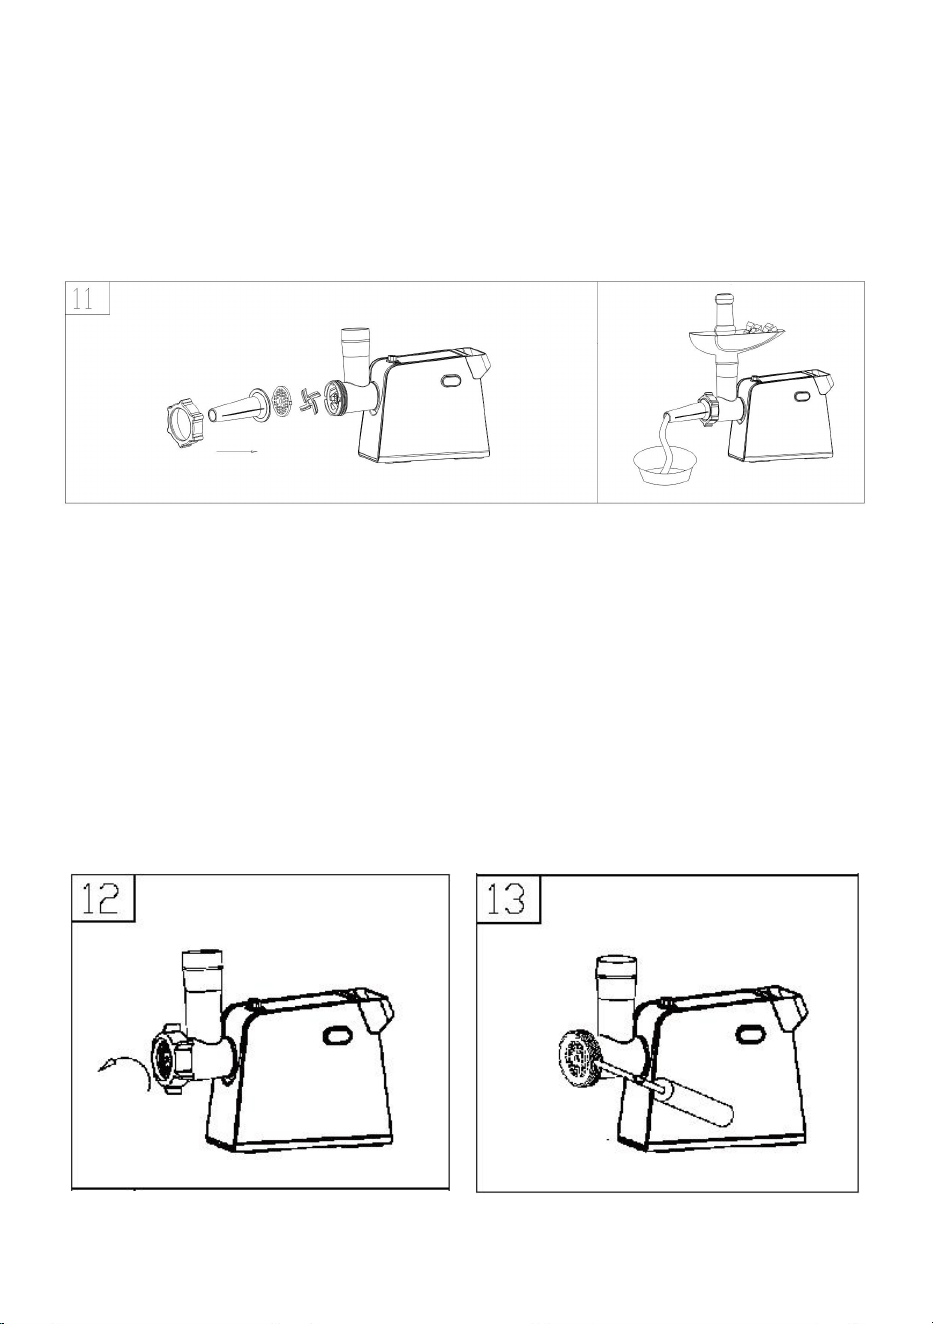
HOW TO CLEAN YOUR APPLIANCES
Meat left behind in the cutter housing may be removed from the inside of
the appliance by passing a slice of bread through the cutter housing.

- 10 -
Before you clean the appliance, switch the appliance off
1.and remove the plug from the socket.(fig.12)
2.Press the release button and turn the whole cutter housing in the
direction of the arrow. Remove the pusher and the tray.(fig.13)
3.Unscrew the screw ring and remove all parts of the cutter housing. Do
not clean the parts in the dishwasher!
4.Wash all parts that have come into contact with meat in hot soapy water.
Clean them immediately after use.
5.Rinse them with clear hot water and dry them immediately.
6.We advise you to lubricate the cutter unit and the grinding discs with
some vegetable oil.
6.Food pusher
12.Cutting plate (coarse)
7.Food tray
13.Fixing ring
10.blade
14.Sausage
11.Cutting plate (middium)
14.Sausage
Foshan Toc Electrical Appliance Co., Ltd.
Address: 3F, No.9 Chaoguang Road, Gaoli, Ronggui, Shunde, Foshan,
Guangdong, China.


MODÈLE:MG435
Hachoiràviandeélectrique
Assistancetechniqueetcertificatdegarantieélectroniquewww.vevor.com/support
«Économisezlamoitié»,«Moitiéprix»outouteautreexpressionsimilaireutiliséepar
nousnereprésentequ'uneestimationdeséconomiesquevouspourriezréaliserenachetant
certainsoutilscheznousparrapportauxgrandesmarquesetnecouvrepasnécessairementtoutes
lescatégoriesd'outilsquenousproposons.Nousvousrappelonsdebienvouloirvérifier
soigneusementlorsquevouspassezunecommandecheznoussivous
économisezréellementlamoitiéparrapportauxgrandesmarques.
Nouscontinuonsànousengageràvousfournirdesoutilsàdesprixcompétitifs.
Machine Translated by Google

Assistancetechniqueetcertificatdegarantie
électroniquewww.vevor.com/support
Vousavezdesquestionssurnosproduits?Vousavezbesoind'uneassistancetechnique?N'hésitezpasà
nouscontacter:
MODÈLE:MG435
Ils'agitdelanoticed'utilisationd'origine.Veuillezlireattentivementtouteslesinstructionsdu
manuelavantdel'utiliser.VEVORseréserveledroitd'interpréterclairementnotremanueld'utilisation.
L'apparenceduproduitdépendduproduitquevousavezreçu.Veuilleznousexcuser,nousnevous
informeronsplussidesmisesàjourtechnologiquesoulogiciellessontdisponiblessurnotreproduit.
Hachoiràviandeélectrique
BESOIND'AIDE?CONTACTEZNOUS!
1
Machine Translated by Google

DESCRIPTION
INTRODUCTION
10.Saucisse
7.Baguede
fixation8.Disquegrossier
11.AccessoireKebbe1
12.AccessoireKebbe2
Cetappareilestéquipéd'unsystèmedethermostat.Cesystème
AvertissementPourréduirelerisquedeblessure,l'utilisateurdoitlirele
13.Boutondefixation
14.Poignée
Lisezattentivementlemanueld'instructions.
15.Interrupteurmarche/arrêt/marchearrière
16.Base
1.Poussoirà
nourriture2.
Plateauànourriture3.
Tubed'alimentation4.Vis
5.Couteaucroisé
6.Disquemoyen
9.Disquefin
2
Machine Translated by Google

IMPORTANT
Sivotreappareils'arrêtesoudainementdefonctionner:
capacitésmentalesoumanqued'expérienceetdeconnaissancess'ilsontété
ATTENTION:Afind'éviterunesituationdangereuse,cetappareildoit
3.Conservezcesinstructionspourréférenceultérieure.
tensiondusecteuravantdebrancherl'appareil.
manièreets’ilscomprennentlesdangersencourus.
lagarantiedeviendrainvalidesidetelsaccessoiresoupiècesontétéutilisés.
2.Appuyezsurleboutondel'interrupteurpouréteindrel'appareil.
4.Branchezlafichesecteurdanslaprise.
9.Éteignezl'appareiletdébranchezledel'alimentationavantdechanger
avantd'utiliserl'appareil.
6.Cetappareilnedoitpasêtreutilisépardesenfants.Conservezl'appareiletson
Veuillezcontactervotrerevendeurouuncentredeserviceagréésilethermostat
sedétacherde4Nm.
surchauffe.
7.Lesappareilspeuventêtreutiliséspardespersonnesayantdescapacitésphysiques,sensoriellesou
Sivouslebranchez,levoyantlumineuxs'allumera.
4.Vérifiezsilatensionindiquéesurl'appareilcorrespondàlatensionlocale
1.Retirezlafichesecteurdelaprise.
avoirreçuunesupervisionoudesinstructionsconcernantl'utilisationdel'appareildansunenvironnementsûr
nejamaisêtreconnectéàuninterrupteurhoraire.
5.N'utilisezjamaisd'accessoiresoudepiècesd'unautrefabricant.Votre
1.Lisezattentivementcesinstructionsd'utilisationetregardezlesillustrations
3.Laissezl’appareilrefroidirpendant60minutes.
8.Lesenfantsnedoiventpasjoueravecl’appareil.
5.Remettezl’appareilenmarche.
accessoiresoupiècesd'approchequisedéplacentlorsdel'utilisation.
2.Avantutilisation,serrezlabaguedefixationavecuneclé,assurezvousquelabaguenepeutpasêtre
couperautomatiquementl'alimentationélectriquedel'appareilencasde
cordonhorsdeportéedesenfants.
lesystèmeestactivétropsouvent.
3
Machine Translated by Google

4
7.Silecordond'alimentationdecetappareilestendommagé,ildoittoujoursêtre
11.Gardezl’appareilhorsdeportéedesenfants.
18.Leshachoirssontnourrisavecdubœufsanstendons,sansosetsansgraissequiaété
21.Cetappareiln'estpasdestinéàêtreutilisépardespersonnes(ycomprisdesenfants)
etdesconnaissances,àmoinsqu'ilsn'aientreçuunesupervisionoudesinstructions
13.Éteignezl'appareilavantdedétacheretd'installerunaccessoire.
presséavecuneforcede5Ncontrelaviande.N'utilisezpasl'appareilpour
22.Lesenfantsdoiventêtresurveilléspours'assurerqu'ilsnejouentpasavec
situationsdangereuses.
vousutilisezl'appareilpourlapremièrefois.
piècesdel'appareil.
minutesavantdel'utiliserànouveau.
10.N'utilisezjamaisvotredoigtouunobjetpourpousserlesingrédientsverslebasdufour.
souslerobinet.Utilisezuniquementunchiffonhumidepournettoyerleblocmoteur.
20.Ildoitavertirdesblessurespotentiellesrésultantd’unemauvaiseutilisation.
endommagé.
but.
17.Nejamaismettrelamaindanslecarterducoupeherbe.Toujoursutiliserlepoussoir.
ayantdescapacitésphysiques,sensoriellesoumentalesréduites,oumanquantd'expérience
remplacéparlefabricantouuncentredeserviceautorisé,afind'éviter
12.Nelaissezjamaisl’appareilfonctionnersanssurveillance.
coupéenmorceauxd'environ20mmx20mmx60mm.Lespoussoirssont
concernantl'utilisationdel'appareilparunepersonneresponsabledesasécurité.
plusde5minutesconsécutives.Laissezl'appareilrefroidirpendant10
8.Nettoyezsoigneusementlespiècesquientrerontencontactaveclesalimentsavant
14.Attendezquelespiècesmobilesaientcessédefonctionneravantderetirerle
9.Débranchezl’appareilimmédiatementaprèsutilisation.
15.Nejamaisimmergerleblocmoteurdansl'eauoutoutautreliquide,nilerincer.
19.Lesaccessoiresdoiventincluredesinstructionspourleurutilisationentoutesécurité.
6.N'utilisezpasl'appareilsilecordond'alimentation,laficheoud'autrespiècessont
tubependantquel'appareilestenmarche.Seullepoussoirdoitêtreutilisépourcela
16.N’essayezpasdebroyerdesos,desnoixoud’autresobjetsdurs.
Machine Translated by Google

MODED'EMPLOI
25.Aprèslamiseenœuvredeladirectiveeuropéenne2002/96/UEdansle
anciensappareils,vousapportezunecontributionimportanteàlaprotectiondenotre
systèmejuridiquenational,lesdispositionssuivantess'appliquent:
environnement.
26.Lesappareilsélectriquesetélectroniquesnepeuventpasêtrejetésaveclesdéchetsménagers.
27.Cetappareilpeutêtreutilisépardesenfantsâgésde8ansetplussi
ASSEMBLAGE
appareil.
déchets.Lesconsommateurssontobligésparlaloiderapporterlesappareilsélectriquesetélectroniques
appareilsenfindevieauxpointsdecollectepublicsmisenplace
ilsontreçuunesupervisionoudesinstructionsconcernantl'utilisationdu
23.Sil'appareilestverrouillé,appuyezsurleboutond'inversion(REV).
àcettefinouaupointdevente.Lesdétailsàcesujetsontdéfinisparlalégislationnationale
Lespersonnesquiutilisentl’appareilentoutesécuritéetquicomprennentlesdangersencourus.
laviandeenferméedansleboîtierducoupevianden'estpaspiétinée,cequipermetàl'appareilderenouvelersa
laloidupaysconcerné.Cesymbolesurleproduit,lesinstructions
Lenettoyageetl'entretiendel'utilisateurnedoiventpasêtreeffectuéspardesenfants,saufs'ils
sontâgésde8ansetplusetsurveillés.Gardezl'appareilet
étathabituel.
lemanueloul'emballageindiquequ'unproduitestsoumisàces
soncordonhorsdeportéedesenfantsdemoinsde8ans.
•Appuyezsurleboutondefixation,maintenezlatêteetinsérezladansl'entrée(lorsque
réglementations.Enrecyclant,enréutilisantlesmatériauxouenutilisantd'autresformes
28.Cetappareilestdestinéàêtreutilisédansdesapplicationsdomestiquesetsimilaires.
lorsdel'insertion,veuillezfaireattentionàcequelatêtesoitinclinéecar
24.Éliminationdesappareilsetdespiles.
applicationstellesque:–
lescuisinesdupersonneldanslesmagasins,bureauxetautresenvironnementsdetravail;–
lesfermes;–par
lesclientsdansleshôtels,motelsetautresenvironnementsdetyperésidentiel;–les
environnementsdetypechambresd'hôtes.
5
Machine Translated by Google

6
•Placezleserpentdanslatête,l'extrémitélongueenpremier,ettournezpouralimenterlavis
devantcommeillustré(fig.4).Siellen'estpascorrectementinstallée,laviandeneserapashachée.
hermétiquement.(fig.2)
•selonlaflècheindiquéeenhaut,voirfig.1),•puis
déplacerlatêtedanslesensinversedesaiguillesd'unemontredefaçonàcequelatêteàfixer
légèrementjusqu'àcequ'ilsoitfixédansleboîtierdumoteur(fig.
3).•Placezlalamedecoupesurl'arbreduserpentaveclalametournéeversle
Machine Translated by Google

7
Hachoir
3.Placezleplateausurlapartieverticaleduboîtierducoupeherbe.
1.Insérezl'arbreàvissansfindansleboîtierducoupeur,l'extrémitéenplastiqueenpremier.
4.L'appareilestmaintenantprêtàhacher.
Placezl'unitédecoupesurl'arbreàvissansfin.(Lesbordsdecoupedoiventêtreà
Coupezlaviandeenlanièresde10cmdelongetde2cmd'épaisseur.Retirezlesos,lesmorceauxde
•Placezlaplaquedecoupesouhaitéeàcôtédelalamedecoupe,enajustantlessaillies
l'avant)Placezledisquedemeulagemoyenouledisquedemeulagegrossier
(selonlaconsistancequevouspréférez)surl'arbreàvissansfin.(Faites
cartilagesettendonsautantquepossible.(N'utilisezjamaisdeviandecongelée!)
danslafente(fig.5).•
Soutenezouappuyezaucentredelaplaquedecoupeavecundoigtpuisvissez
assurezvousquel'encochedudisquedebroyages'adapteauxsailliesduhachoir
Placezlaviandedansleplateau.Utilisezlepoussoirpourpousserdoucementlaviandedansle
•Serrezlabaguedefixationavecl'autremain(fig.6).Neserrezpastrop.•Placezlaplaque
detrémiesurlatêteetfixezlaenposition.•Placezl'appareilsurunendroitstable.
•Lepassaged'airaubasetsurlecôtédu
boîtierdumoteurdoitêtre
tête.)Tournezlabagueàvisdanslesensdelaflèchesurlecutter
êtremaintenulibreetnonbloqué.
boîtierjusqu'àcequ'ilsoitcorrectementfixé.
2.Fixezleboîtierdecoupeaublocmoteur.
Ensembledelamesdecoupe
Machine Translated by Google

8
1.extrémitéenplastiqueenpremier.(fig.8)
requis.
Placezlecônedansleboîtierducoupecouteau.
LekebbeestunplattraditionnelduMoyenOrientcomposéprincipalementdelampeset
Placezlacorneàsaucissesurleboîtierducoupesaucisseetvissezlabaguesurle
Placezl'anciensurleboîtierducutteretvissezlabaguesurlecutter
boulgourquisonthachésensemblepourformerunepâte,lemélangeest
Tuyaucouperuban.(Pourledisquedesteak
tartaredeuxfois.)
2.Fixezleboîtierdecoupeaublocmoteur.
logement.(fig.9)
extrudésàtraverslamachineàkebbeetcoupésenlongueurscourtes.Lestubes
hacherlaviandeaveclamouturemoyenne
3.Placezleplateausurlapartieverticaleduboîtierducoupeherbe.
peutensuiteêtrefarcid'unmélangedeviandehachée,lesextrémitéspincéesensemble
,
4.L'appareilestmaintenantprêtàpréparerdukebbe.(fig.10)
etensuitefrit.
Passezlemélangedekebbépréparédanslamachineàkebbé.
1.Hacherlaviande
Coupezlecylindrecreuxcontinudansleslongueurssouhaitéesetutilisezlecomme
Insérezl'arbreàvissansfindansleboîtierducoupeur,l'extrémitéenplastiqueenpremier.(fig.11)
Insérezl'arbreàvissansfindansleboîtierducoupeur,le
Placezleséparateurdansleboîtierducoupeur.
Fairedukebbé
Fabricationdesaucisses
Machine Translated by Google

COMMENTNETTOYERVOSAPPAREILS
Mettezlesingrédientsdansleplateau.Utilisezlepoussoirpourpousserdoucementlaviandedans
4.L'appareilestmaintenantprêtàfairedessaucisses.
2.Fixezleboîtierdecoupeaublocmoteur.
Mettezlapeaudelasaucissedansdel'eautièdependant10minutes.Ensuite,faitesglisserlapeauhumide
(Assurezvousquelesencochesduséparateurs'adaptentauxprojectionsdu
3.Placezleplateausurlapartieverticaleduboîtierducoupeherbe.
têtedehachoir.)
boîtierdecoupe.
peausurlacornedesaucisse.Poussezlaviandehachée(assaisonnée)dansla
boîtierdecoupe.Silapeaurestecolléesurlacornedesaucisse,mouillezlaavec
unpeud'eau.
Laviandelaisséedansleboîtierducoupeviandepeutêtreretiréedel'intérieur
l'appareilenpassantunetranchedepainàtraversleboîtierducoupepain.
leboîtierducoupeur.
9
Machine Translated by Google

10
nepasnettoyerlespiècesaulavevaisselle!
14.Saucisse
4.Laveztouteslespiècesquiontétéencontactaveclaviandedansdel’eauchaudesavonneuse.
14.Saucisse
Nettoyezlesimmédiatementaprèsutilisation.
11.Plaquedecoupe(middium)
Avantdenettoyerl'appareil,éteignezle
5.Rincezlesàl’eauchaudeclaireetséchezlesimmédiatement.
6.Nousvousconseillonsdelubrifierl'unitédecoupeetlesdisquesdemeulageavec
FoshanTocAppareilsÉlectriquesCo.,Ltd.
1.etretirezlafichedelaprise.(fig.12)
unpeud'huilevégétale.
Adresse:3F,routen°9Chaoguang,Gaoli,Ronggui,Shunde,Foshan,Guangdong,Chine.
2.Appuyezsurleboutondedéverrouillageettournezl'ensembleduboîtierdecoupedanslesensinversedesaiguillesd'unemontre.
6.Poussoiràaliments
7.Plateauà
aliments10.Lame
danslesensdelaflèche.Retirerlepoussoiretleplateau.(fig.13)
12.Plaquedecoupe(grossière)
13.Baguedefixation
3.Dévissezlabaguefiletéeetretireztouteslespiècesduboîtierducoupeherbe.
Machine Translated by Google


MODELL:MG-435
„Sparen Sie die Hälfte“, „Halber Preis“ oder andere ähnliche Ausdrücke, die wir verwenden,
stellen nur eine Schätzung der Ersparnis dar, die Sie beim Kauf bestimmter Werkzeuge bei uns
im Vergleich zu den großen Topmarken erzielen können, und decken nicht unbedingt alle von uns
angebotenen Werkzeugkategorien ab. Wir möchten Sie freundlich daran erinnern, bei der
Bestellung bei uns sorgfältig zu prüfen, ob Sie im Vergleich zu den großen
Topmarken tatsächlich die Hälfte sparen.
Wir sind weiterhin bestrebt, Ihnen Werkzeuge zu wettbewerbsfähigen Preisen anzubieten.
Elektrischer Fleischwolf
Technischer Support und E-Garantie-Zertifikat www.vevor.com/support
Machine Translated by Google

Technischer Support und E-Garantie-Zertifikat
www.vevor.com/support
- 1 -
Sie haben Fragen zu unseren Produkten? Sie benötigen technischen Support? Dann kontaktieren
Sie uns gerne:
MODELL:MG-435
Dies ist die Originalanleitung. Bitte lesen Sie alle Anweisungen sorgfältig durch, bevor Sie
das Gerät in Betrieb nehmen. VEVOR behält sich eine klare Auslegung unserer Bedienungsanleitung
vor. Das Erscheinungsbild des Produkts richtet sich nach dem Produkt, das Sie erhalten
haben. Bitte verzeihen Sie uns, dass wir Sie nicht erneut informieren, wenn es Technologie- oder
Software-Updates für unser Produkt gibt.
Brauchen Sie Hilfe? Kontaktieren Sie uns!
Elektrischer Fleischwolf
Machine Translated by Google

EINFÜHRUNG
BESCHREIBUNG
Lesen Sie die Bedienungsanleitung sorgfältig durch.
15. EIN/AUS/Rückwärtsschalter
16. Basis
1. Stopfer 2.
Futterschale 3.
Einfüllstutzen 4.
Schraube
5. Kreuzmesser
9. Feine Scheibe
6. Mittlere Scheibe
10. Wurst
7. Befestigungsring
8. Grobscheibe
11. Kebbe-Aufsatz 1
12. Kebbe-Aufsatz 2
Dieses Gerät ist mit einem Thermostatsystem ausgestattet. Dieses System wird
13. Knopf befestigen
Warnung-Um das Verletzungsrisiko zu verringern, muss der Benutzer die
14. Griff
- 2 -
Machine Translated by Google

WICHTIG
Bitte wenden Sie sich an Ihren Händler oder ein autorisiertes Servicecenter, wenn der Thermostat
Mit 4 Nm lösen.
1.Ziehen Sie den Netzstecker aus der Steckdose.
unter Aufsicht oder Einweisung in die sichere Verwendung des Gerätes
darf niemals an eine Zeitschaltuhr angeschlossen werden.
4.Überprüfen Sie, ob die auf dem Gerät angegebene Spannung mit der örtlichen Spannung übereinstimmt.
5.Verwenden Sie niemals Zubehör oder Teile anderer Hersteller.
3. Lassen Sie das Gerät 60 Minuten lang abkühlen.
8. Kinder dürfen nicht mit dem Gerät spielen.
1.Lesen Sie diese Gebrauchsanweisung sorgfältig durch und sehen Sie sich die Abbildungen an
5.Schalten Sie das Gerät wieder ein.
Zubehör oder sich nähernde Teile, die sich im Gebrauch bewegen.
2. Vor Gebrauch den Befestigungsring mit einem Schraubenschlüssel festziehen und sicherstellen, dass der Ring nicht
Das System wird zu oft aktiviert.
3. Bewahren Sie diese Anleitung zum späteren Nachschlagen auf.
unterbricht automatisch die Stromzufuhr zum Gerät im Falle
Kabel außerhalb der Reichweite von Kindern aufbewahren.
Wenn Ihr Gerät plötzlich nicht mehr läuft:
geistigen Fähigkeiten oder Mangel an Erfahrung und Wissen, wenn sie
ACHTUNG: Um eine gefährliche Situation zu vermeiden, muss dieses Gerät
Netzspannung, bevor Sie das Gerät anschließen.
2. Drücken Sie den Schalter, um das Gerät auszuschalten.
Art und Weise und ob sie die damit verbundenen Gefahren verstehen.
Bei Verwendung solcher Zubehörteile oder Teile erlischt die Garantie.
4.Stecken Sie den Netzstecker in die Steckdose.
9.Schalten Sie das Gerät aus und trennen Sie es von der Stromversorgung, bevor Sie es wechseln.
bevor Sie das Gerät benutzen.
Überhitzung.
7.Geräte können von Personen mit eingeschränkten physischen, sensorischen oder
Wenn Sie das Gerät anschließen, leuchtet die Kontrollleuchte.
6. Dieses Gerät darf nicht von Kindern benutzt werden. Bewahren Sie das Gerät und seine
- 3 -
Machine Translated by Google

- 4 -
spülen Sie es unter fließendem Wasser ab. Reinigen Sie die Motoreinheit ausschließlich mit einem feuchten Tuch.
20.Es soll vor möglichen Verletzungen durch Missbrauch warnen.
durch den Hersteller oder ein autorisiertes Servicecenter ersetzt werden, um zu vermeiden
12. Lassen Sie das Gerät niemals unbeaufsichtigt laufen.
in Stücke von ca. 20 mm x 20 mm x 60 mm geschnitten. Drücker sind
mit eingeschränkten körperlichen, sensorischen oder geistigen Fähigkeiten oder mangelnder Erfahrung
über die Verwendung des Geräts durch eine für die Sicherheit verantwortliche Person.
8. Reinigen Sie die Teile, die mit Lebensmitteln in Berührung kommen, gründlich, bevor Sie
14.Warten Sie, bis bewegliche Teile zum Stillstand gekommen sind, bevor Sie die
mehr als 5 Minuten hintereinander. Lassen Sie das Gerät 10 Minuten abkühlen.
9.Ziehen Sie das Gerät sofort nach Gebrauch vom Stromnetz.
15. Tauchen Sie die Motoreinheit niemals in Wasser oder andere Flüssigkeiten und spülen Sie sie nicht
19. Dem Zubehör müssen Anweisungen für die sichere Verwendung beiliegen.
16. Versuchen Sie nicht, Knochen, Nüsse oder andere harte Gegenstände zu mahlen.
21.Dieses Gerät ist nicht für den Gebrauch durch Personen (einschließlich Kinder) bestimmt
6. Benutzen Sie das Gerät nicht, wenn das Netzkabel, der Stecker oder andere Teile beschädigt sind.
bei laufendem Gerät. Hierzu ist ausschließlich der Stopfer zu verwenden.
7.Wenn das Netzkabel dieses Gerätes beschädigt ist, muss es immer
11. Bewahren Sie das Gerät außerhalb der Reichweite von Kindern auf.
18.Wölfe werden mit sehnen-, knochen- und fettfreiem Rindfleisch gefüttert, das
und Wissen, es sei denn, sie wurden beaufsichtigt oder angewiesen
Gefahrensituationen.
13.Schalten Sie das Gerät aus, bevor Sie Zubehör abnehmen und installieren.
mit einer Kraft von 5N gegen das Fleisch gedrückt. Verwenden Sie das Gerät nicht für
22.Kinder sollten beaufsichtigt werden, um sicherzustellen, dass sie nicht mit dem
Sie das Gerät zum ersten Mal benutzen.
Teile des Gerätes.
Minuten, bevor Sie es erneut verwenden.
beschädigt.
Zweck.
17. Greifen Sie niemals in das Messergehäuse. Benutzen Sie immer den Stopfer.
10. Benutzen Sie niemals Ihren Finger oder einen Gegenstand, um Zutaten in den Einfüllstutzen zu schieben.
Machine Translated by Google

GEBRAUCHSANWEISUNG
23.Wenn das Gerät gesperrt ist, drücken Sie bitte die Umkehrtaste (REV).
für diesen Zweck oder Verkaufsstelle. Einzelheiten hierzu werden von den nationalen
Das im Gehäuse des Cutters festsitzende Fleisch wird nicht zertreten, so dass das Gerät seine
Gesetz des jeweiligen Landes. Dieses Symbol auf dem Produkt, der Gebrauchsanweisung
Reinigung und Benutzerwartung dürfen nicht von Kindern durchgeführt werden, es sei denn, sie
sind ab 8 Jahren und werden beaufsichtigt. Halten Sie das Gerät und
normaler Zustand.
Handbuch oder Verpackung weist darauf hin, dass ein Produkt diesen
Bewahren Sie das Kabel außerhalb der Reichweite von Kindern unter 8 Jahren auf.
24. Entsorgung von Geräten und Batterien.
Vorschriften. Durch Recycling, Wiederverwendung der Materialien oder andere Formen der Verwertung
28. Dieses Gerät ist für den Gebrauch im Haushalt und ähnlichen
25.Nach der Umsetzung der europäischen Richtlinie 2002/96/EG in den
Altgeräten leisten Sie einen wichtigen Beitrag zum Schutz unserer
Anwendungen wie
beispielsweise: – Personalküchenbereiche in Geschäften, Büros und anderen
Arbeitsumgebungen;
– Bauernhöfe; – durch Kunden in Hotels, Motels und anderen wohnähnlichen
Umgebungen; – Bed-and-Breakfast-Umgebungen.
nationalen Rechtsordnung gilt folgendes:
Umfeld.
26.Elektrische und elektronische Geräte dürfen nicht im Hausmüll entsorgt werden.
27. Dieses Gerät kann von Kindern ab 8 Jahren verwendet werden, wenn
MONTAGE
Verbraucher sind gesetzlich verpflichtet, elektrische und elektronische Geräte
sie wurden beaufsichtigt oder in die Benutzung des Geräts eingewiesen
• Drücken Sie den Befestigungsknopf, halten Sie den Kopf fest und stecken Sie ihn in den Einlass (wenn
Gerät.
Altgeräte am Ende ihrer Lebensdauer bei den öffentlich eingerichteten Sammelstellen
Sie das Gerät sicher bedienen und die damit verbundenen Gefahren verstehen.
Beim Einsetzen ist darauf zu achten, dass der Kopf schräg steht, da
- 5 -
Machine Translated by Google

- 6 -
fest (Abb. 2)
• Setzen Sie die Spirale mit dem langen Ende zuerst in den Kopf ein und drehen Sie, um die Schraube einzuführen
• durch den oben angezeigten Pfeil, siehe Abb. 1), • dann
den Kopf gegen den Uhrzeigersinn drehen, so dass der zu befestigende Kopf
vorne wie abgebildet (Abb. 4). Wenn es nicht richtig eingesetzt ist, wird das Fleisch nicht zerkleinert.
leicht, bis es im Motorgehäuse sitzt (Abb. 3). • Setzen Sie die
Schneidklinge auf die Schlangenwelle, wobei die Klinge zur
Machine Translated by Google

Schneidklingeneinheit
2. Befestigen Sie das Schneidgehäuse an der Motoreinheit.
Setzen Sie die Schneideinheit auf die Schneckenwelle. (Die Schneidkanten sollten
Das Fleisch in 10 cm lange und 2 cm dicke Streifen schneiden. Knochen,
1. Setzen Sie die Schneckenwelle mit dem Kunststoffende zuerst in das Fräsergehäuse ein.
4. Jetzt ist das Gerät zum Zerkleinern bereit.
Legen Sie das Fleisch in die Schale. Schieben Sie das Fleisch mit dem Stopfer vorsichtig in die
in den Schlitz (Abb. 5).
• Stützen Sie die Mitte der Schneidplatte mit einem Finger oder drücken Sie sie fest,
Stellen Sie sicher, dass die Kerben der Mahlscheibe auf die Vorsprünge des Fleischwolfs passen
vorne) Setzen Sie die mittlere Mahlscheibe oder die grobe Mahlscheibe
• Platzieren Sie die gewünschte Schneidplatte neben dem Schneidmesser, wobei die Vorsprünge
(je nach gewünschter Konsistenz) auf die Schneckenwelle. (Machen Sie
Knorpel und Sehnen möglichst entfernen. (Niemals gefrorenes Fleisch verwenden!)
freigehalten und nicht blockiert werden.
bis es richtig befestigt ist.
Kopf.) Drehen Sie den Schraubring in Pfeilrichtung auf dem Fräser
Ziehen Sie den Befestigungsring mit der anderen Hand fest (Abb. 6). Nicht zu fest
anziehen. • Setzen Sie die Trichterplatte auf den Kopf und befestigen Sie sie in
Position. • Stellen Sie das Gerät auf einen
festen Untergrund. • Der Luftdurchgang unten und an der Seite des Motorgehäuses sollte
Fleischwolf
3.Stellen Sie das Tablett auf den aufrechten Teil des Schneidergehäuses.
- 7 -
Machine Translated by Google

Kebbe zubereiten
Würste herstellen
Den durchgehenden Hohlzylinder in die gewünschte Länge schneiden und verwenden
Platzieren Sie den Former auf dem Fräsergehäuse und schrauben Sie den Ring auf den Fräser
Bulgurweizen, die zusammen gehackt werden, um eine Paste zu bilden, ist die Mischung
Setzen Sie die Schneckenwelle mit dem Kunststoffende zuerst in das Fräsergehäuse ein. (Abb. 11)
Setzen Sie den Kegel in das Schneidgehäuse ein.
Kebbe ist ein traditionelles Gericht aus dem Nahen Osten, das hauptsächlich aus Lamm und
Setzen Sie das Wursthorn auf das Schneidegehäuse und schrauben Sie den Ring auf den
kann dann mit einer Hackfleischmischung gefüllt werden, die Enden zusammengedrückt
Das Fleisch mit dem mittleren Mahlgrad zerkleinern
3.Stellen Sie das Tablett auf den aufrechten Teil des Schneidergehäuses.
und dann frittiert.
Gehäuse (Abb. 9).
Cutter abspritzen. (Für Tatarscheibe zweimal.)
2. Befestigen Sie das Schneidgehäuse an der Motoreinheit.
durch den Kebbe-Maker extrudiert und in kurze Stücke geschnitten. Die Rohre
1. Das Fleisch zerkleinern
Führen Sie die vorbereitete Kebbe-Mischung durch den Kebbe-Maker.
4.Jetzt ist das Gerät zur Kebbe-Zubereitung bereit. (Abb. 10)
,
1. Zuerst das Kunststoffende (Abb. 8)
erforderlich.
Platzieren Sie den Separator im Schneidgehäuse.
Die Schneckenwelle in das Fräsergehäuse einsetzen, die
- 8 -
Machine Translated by Google
SO REINIGEN SIE IHRE GERÄTE
2. Befestigen Sie das Schneidgehäuse an der Motoreinheit.
3.Stellen Sie das Tablett auf den aufrechten Teil des Schneidergehäuses.
Legen Sie die Zutaten in die Schale. Drücken Sie das Fleisch mit dem Stopfer vorsichtig in
Legen Sie die Wursthaut für 10 Minuten in lauwarmes Wasser. Schieben Sie dann die nasse
(Achten Sie darauf, dass die Kerben des Trenners auf die Vorsprünge des
4.Jetzt ist das Gerät zur Wurstherstellung bereit.
Fleischwolfkopf.)
Fräsergehäuse.
Haut auf das Wursthorn. Schieben Sie das (gewürzte) Hackfleisch in die
Schneidgehäuse. Wenn die Haut am Wursthorn hängen bleibt, befeuchten Sie sie mit
etwas Wasser.
Im Kuttergehäuse verbliebenes Fleisch kann aus dem Inneren des
das Gerät, indem Sie eine Scheibe Brot durch das Schneidgehäuse führen.
das Messergehäuse.
- 9 -
Machine Translated by Google

- 10 -
1. und ziehen Sie den Stecker aus der Steckdose. (Abb. 12)
etwas Pflanzenöl.
2.Drücken Sie den Entriegelungsknopf und drehen Sie das gesamte Schneidegehäuse in die
6. Stopfer 7.
Lebensmittelfach
10. Klinge
Pfeilrichtung. Entfernen Sie den Schieber und das Fach. (Abb. 13)
12.Schneidplatte (grob)
3. Den Schraubring abschrauben und alle Teile des Messergehäuses entfernen.
13.Befestigungsring
Teile nicht in der Spülmaschine reinigen!
14.Wurst
4. Alle Teile, die mit Fleisch in Berührung gekommen sind, in heißem Seifenwasser waschen.
14.Wurst
Reinigen Sie sie sofort nach Gebrauch.
11.Schneidplatte (Mitte)
5. Mit klarem, heißem Wasser abspülen und sofort trocknen.
Foshan Toc Elektrogeräte Co., Ltd.
Bevor Sie das Gerät reinigen, schalten Sie es aus
6.Wir empfehlen Ihnen, die Schneideinheit und die Schleifscheiben mit
Adresse: 3F, No.9 Chaoguang Road, Gaoli, Ronggui, Shunde, Foshan, Guangdong,
China.
Machine Translated by Google


MODELLO:MG-435
"Risparmia la metà", "Metà prezzo" o qualsiasi altra espressione simile da noi
utilizzata rappresenta solo una stima del risparmio che potresti ottenere acquistando
determinati utensili con noi rispetto ai principali marchi principali e non significa
necessariamente coprire tutte le categorie di utensili da noi offerti. Ti ricordiamo
gentilmente di verificare attentamente quando effettui un ordine con noi
se stai effettivamente risparmiando la metà rispetto ai principali marchi principali.
Continuiamo a impegnarci per fornirvi strumenti a prezzi competitivi.
Tritacarne elettrico
Supporto tecnico e certificato di garanzia elettronica www.vevor.com/support
Machine Translated by Google

Supporto tecnico e certificato di garanzia
elettronica www.vevor.com/support
- 1 -
Questa è l'istruzione originale, si prega di leggere attentamente tutte le istruzioni del
manuale prima di utilizzare. VEVOR si riserva una chiara interpretazione del nostro manuale
utente. L'aspetto del prodotto sarà soggetto al prodotto ricevuto. Vi preghiamo di
perdonarci se non vi informeremo di nuovo se ci sono aggiornamenti tecnologici o software sul
nostro prodotto.
MODELLO:MG-435
Hai domande sui prodotti? Hai bisogno di supporto tecnico? Non esitare a contattarci:
HAI BISOGNO DI AIUTO? CONTATTACI!
Tritacarne elettrico
Machine Translated by Google

- 2 -
12. Kebbe allegato 2
Questo apparecchio è dotato di un sistema di termostato. Questo sistema
11. Kebbe allegato 1
attentamente il manuale di istruzioni.
13. Pulsante di fissaggio
15. Interruttore ON/OFF/Inversione
Attenzione - Per ridurre il rischio di lesioni, l'utente deve leggere attentamente le istruzioni per l'uso.
14. Maniglia
1. Spingi-cibo 2.
Vassoio per
alimenti 3. Tubo di
alimentazione 4. Vite
5. Coltello incrociato
16. Base
10. Salsiccia
7. Anello di fissaggio
8. Disco a grana grossa
9. Disco fine
6. Disco medio
INTRODUZIONE
DESCRIZIONE
Machine Translated by Google

- 3 -
2. Premere il pulsante dell'interruttore per spegnere l'apparecchio.
5.Riaccendere l'apparecchio.
accessori o parti in avvicinamento che si muovono durante l'uso.
2. Prima dell'uso, stringere l'anello di fissaggio con la chiave inglese, assicurarsi che l'anello non possa essere
il sistema viene attivato troppo spesso.
3. Conservare queste istruzioni per riferimento futuro.
interrompere automaticamente l'alimentazione elettrica dell'apparecchio in caso di
cavo fuori dalla portata dei bambini.
1. Estrarre la spina dalla presa di corrente.
supervisione o istruzioni riguardanti l'uso dell'apparecchio in modo sicuro
non essere mai collegato a un interruttore orario.
5. Non utilizzare mai accessori o parti di altri produttori.
4. Controllare che la tensione indicata sull'apparecchio corrisponda a quella locale
1. Leggere attentamente le presenti istruzioni per l'uso e osservare le illustrazioni
3. Lasciare raffreddare l'apparecchio per 60 minuti.
8. I bambini non devono giocare con l'apparecchio.
4. Inserire la spina nella presa di corrente.
9. Spegnere l'apparecchio e scollegarlo dall'alimentazione prima di sostituirlo.
prima di utilizzare l'apparecchio.
7. Gli apparecchi possono essere utilizzati da persone con ridotte capacità fisiche, sensoriali o
surriscaldamento.
Se si collega, la spia luminosa si accenderà.
6. Questo apparecchio non deve essere utilizzato dai bambini. Tenere l'apparecchio e i suoi
Contattare il rivenditore o un centro di assistenza autorizzato se il termostato
staccare di 4 Nm.
Se l'elettrodomestico smette improvvisamente di funzionare:
capacità mentali o mancanza di esperienza e conoscenza se sono state
ATTENZIONE: Per evitare situazioni pericolose, questo apparecchio deve
tensione di rete prima di collegare l'apparecchio.
modo e se comprendono i pericoli implicati.
la garanzia decade qualora siano stati utilizzati tali accessori o parti.
IMPORTANTE
Machine Translated by Google

situazioni pericolose.
9. Scollegare l'apparecchio immediatamente dopo l'uso.
15. Non immergere mai l'unità motore nell'acqua o in altri liquidi, né risciacquarla.
19. Gli accessori devono includere istruzioni per il loro utilizzo sicuro.
16. Non tentare di macinare ossa, noci o altri oggetti duri.
21. Questo apparecchio non è destinato all'uso da parte di persone (bambini compresi)
6. Non utilizzare l'apparecchio se il cavo di alimentazione, la spina o altre parti sono
tubo mentre l'apparecchio è in funzione. Per questa operazione si deve usare solo lo spingitore
sostituito dal produttore o da un centro di assistenza autorizzato, al fine di evitare
12. Non lasciare mai l'apparecchio in funzione senza sorveglianza.
tagliati in pezzi di circa 20 mm x 20 mm x 60 mm. I pusher sono
riguardanti l'uso dell'apparecchio da parte di una persona responsabile della loro sicurezza.
con ridotte capacità fisiche, sensoriali o mentali, o mancanza di esperienza
per più di 5 minuti consecutivamente. Lasciare raffreddare l'apparecchio per 10
8. Pulire accuratamente le parti che entreranno in contatto con gli alimenti prima
14. Attendere che le parti mobili si siano fermate prima di rimuovere l'
si utilizza l'apparecchio per la prima volta.
parti dell'elettrodomestico.
minuti prima di riutilizzarlo.
scopo.
danneggiato.
17. Non mettere mai le mani nell'alloggiamento della fresa. Utilizzare sempre lo spingitore.
10. Non usare mai le dita o un oggetto per spingere gli ingredienti nel contenitore.
sotto il rubinetto. Per pulire l'unità motore, utilizzare solo un panno umido.
20. Deve mettere in guardia contro i potenziali danni derivanti da un uso improprio.
7.Se il cavo di alimentazione di questo apparecchio è danneggiato, deve essere sempre
11.Tenere l'apparecchio fuori dalla portata dei bambini.
18.I tritacarne vengono nutriti con carne di manzo senza tendini, disossata e senza grasso che è stata
e conoscenza, a meno che non siano stati sottoposti a supervisione o istruzione
premuto con una forza di 5N contro la carne. Non utilizzare l'apparecchio per
13.Spegnere l'apparecchio prima di smontare e installare qualsiasi accessorio.
22. I bambini devono essere sorvegliati per assicurarsi che non giochino con l'
- 4 -
Machine Translated by Google

- 5 -
26. Gli apparecchi elettrici ed elettronici non possono essere smaltiti insieme ai rifiuti domestici.
27. Questo apparecchio può essere utilizzato da bambini di età pari o superiore a 8 anni se
28.Questo apparecchio è destinato all'uso domestico e similare.
ASSEMBLAGGIO
ordinamento giuridico nazionale, si applica quanto segue:
ambiente.
l'apparecchio in modo sicuro e se sono consapevoli dei pericoli connessi.
inserendo si prega di prestare attenzione la testa deve essere inclinata come
per questo scopo o punto vendita. I dettagli a questo proposito sono definiti dalla legge nazionale
23.Se l'apparecchio è bloccato, premere il pulsante di inversione (REV).
rifiuti. I consumatori sono obbligati per legge a restituire i prodotti elettrici ed elettronici
hanno ricevuto supervisione o istruzioni in merito all'uso del
apparecchio.
dispositivi giunti a fine vita ai punti di raccolta pubblici istituiti
La pulizia e la manutenzione da parte dell'utente non devono essere eseguite da bambini a meno che non siano
condizione usuale.
il manuale o la confezione indica che un prodotto è soggetto a queste
il cavo fuori dalla portata dei bambini di età inferiore agli 8 anni.
• Premere il pulsante di fissaggio, tenere la testa e inserirla nell'ingresso (quando
la carne bloccata nell'alloggiamento del cutter non è calpestata, quindi l'apparecchio può rinnovare il suo
legge del rispettivo paese. Questo simbolo sul prodotto, le istruzioni
hanno un'età pari o superiore a 8 anni e sono sorvegliati. Conservare l'apparecchio e
25.Dopo l'attuazione della direttiva europea 2002/96/UE nel
vecchi dispositivi, stai dando un contributo importante alla protezione del nostro
applicazioni quali: – aree
cucina per il personale in negozi, uffici e altri ambienti di lavoro; – case coloniche; – da parte
dei clienti in hotel,
motel e altri ambienti di tipo residenziale; – ambienti di tipo bed and breakfast.
24. Smaltimento di elettrodomestici e batterie.
regolamenti. Riciclando, riutilizzando i materiali o altre forme di utilizzo
ISTRUZIONI PER L'USO
Machine Translated by Google

• Posizionare il serpente nella testa, prima l'estremità lunga, e girare per alimentare la vite
leggermente fino a quando non è inserito nell'alloggiamento del motore
(fig.3). • Posizionare la lama di taglio sull'albero del serpente con la lama rivolta verso l'
strettamente.(fig.2)
• come indicato dalla freccia in alto, vedi fig.1), • quindi
muovere la testa in senso antiorario in modo che la testa da fissare
anteriore come illustrato (fig.4). Se non è montato correttamente, la carne non verrà macinata.
- 6 -
Machine Translated by Google

- 7 -
Posizionare l'unità di taglio sull'albero della vite senza fine. (I bordi taglienti devono essere a
Tagliare la carne in strisce lunghe 10 cm e spesse 2 cm. Togliere le ossa, i pezzi di
1. Inserire l'albero della vite senza fine nell'alloggiamento della fresa, partendo dall'estremità in plastica.
4. Ora l'apparecchio è pronto per tritare.
Metti la carne nel vassoio. Usa lo spingitore per spingere delicatamente la carne nel
nella fessura (fig.5). •
Sostenere o premere il centro della piastra di taglio con un dito quindi avvitare
la parte anteriore) Posizionare il disco abrasivo medio o il disco abrasivo grosso
assicurarsi che la tacca del disco di macinazione si adatti alle sporgenze del tritacarne
cartilagini e tendini il più possibile. (Non usare mai carne congelata!)
• Posizionare la piastra di taglio desiderata accanto alla lama di taglio, adattando le sporgenze
(a seconda della consistenza che preferisci) sul gambo del verme. (Fai
essere tenuti liberi e non bloccati.
alloggiamento finché non è fissato correttamente.
l'anello di fissaggio stretto con un'altra mano (fig.6). Non stringere eccessivamente. •
Posizionare la piastra della tramoggia sulla testa e fissarla in posizione. •
Posizionare l'unità su un luogo stabile. • Il
passaggio dell'aria nella parte inferiore e laterale dell'alloggiamento del motore deve
testa.) Girare l'anello filettato nella direzione della freccia sulla fresa
Tritacarne
3. Posizionare il vassoio sulla parte verticale dell'alloggiamento della taglierina.
2. Fissare l'alloggiamento della lama all'unità motore.
Gruppo lama di taglio
Machine Translated by Google

- 8 -
Posizionare il formatore sull'alloggiamento della fresa e avvitare l'anello sulla fresa
grano bulgur che vengono macinati insieme per formare una pasta la miscela è
Inserire l'albero della vite senza fine nell'alloggiamento della fresa, prima l'estremità in plastica. (fig. 11)
Posizionare il cono nell'alloggiamento della fresa.
Il kebbe è un piatto tradizionale mediorientale fatto principalmente con lamponi e
Posizionare il corno di salsiccia sull'alloggiamento del tagliacarte e avvitare l'anello sul
può poi essere farcito con un composto di carne macinata, le estremità pizzicate insieme
tritare la carne con macinatura media
alloggiamento.(fig.9)
3. Posizionare il vassoio sulla parte verticale dell'alloggiamento della taglierina.
estruso attraverso il kebbe maker e tagliato in piccole lunghezze. I tubi
tubo flessibile per tagliare la carne. (Per il disco di bistecca
alla tartara due volte.)
2. Fissare l'alloggiamento della lama all'unità motore.
e poi fritti.
Versare il composto per kebbe preparato nella macchina per kebbe.
1. Tritare la carne
,
4.Ora l'apparecchio è pronto per preparare il kebbe.(fig.10)
1.prima l'estremità in plastica.(fig.8)
necessario.
Posizionare il separatore nell'alloggiamento della fresa.
Inserire l'albero della vite senza fine nell'alloggiamento della fresa, il
Tagliare il cilindro cavo continuo nelle lunghezze desiderate e utilizzarlo come
Fare le salsicce
Fare kebbe
Machine Translated by Google

COME PULIRE I TUOI ELETTRODOMESTICI
4. Ora l'apparecchio è pronto per preparare le salsicce.
3. Posizionare il vassoio sulla parte verticale dell'alloggiamento della taglierina.
Metti gli ingredienti nel vassoio. Usa lo spingitore per spingere delicatamente la carne dentro
Metti la pelle della salsiccia in acqua tiepida per 10 minuti. Poi fai scivolare la pelle bagnata
(Assicurarsi che le tacche del separatore si adattino alle sporgenze del
2. Fissare l'alloggiamento della lama all'unità motore.
testa del tritacarne.)
alloggiamento della fresa.
pelle sul corno della salsiccia. Spingere la carne macinata (condita) nel
alloggiamento della fresa. Se la pelle si attacca al corno della salsiccia, bagnarla con
un po' d'acqua.
La carne rimasta nell'alloggiamento del cutter può essere rimossa dall'interno di
l'apparecchio facendo passare una fetta di pane attraverso il contenitore della lama.
l'alloggiamento della fresa.
- 9 -
Machine Translated by Google

- 10 -
Pulirli subito dopo l'uso.
11.Piatto di taglio (medio)
4. Lavare con acqua calda e sapone tutte le parti venute a contatto con la carne.
14.Salsiccia
Indirizzo: 3F, No.9 Chaoguang Road, Gaoli, Ronggui, Shunde, Foshan, Guangdong,
Cina.
un po' di olio vegetale.
1. e togliere la spina dalla presa.(fig.12)
5. Sciacquateli con acqua calda pulita e asciugateli immediatamente.
Azienda produttrice di elettrodomestici Foshan Toc.
Prima di pulire l'apparecchio, spegnerlo
6.Si consiglia di lubrificare l'unità di taglio e i dischi abrasivi con
direzione della freccia. Togliere lo spingitore e il vassoio.(fig.13)
12.Piatto di taglio (grossolano)
2.Premere il pulsante di rilascio e ruotare l'intero alloggiamento della fresa nella
6. Spingi-cibo 7.
Vassoio per
alimenti 10. Lama
non lavare i pezzi in lavastoviglie!
14.Salsiccia
3. Svitare l'anello filettato e rimuovere tutte le parti dell'alloggiamento della fresa.
13.Anello di fissaggio
Machine Translated by Google


MODELO:MG435
Picadoradecarneeléctrica
Soportetécnicoycertificadodegarantíaelectrónicawww.vevor.com/support
"Ahorrelamitad","mitaddeprecio"ocualquierotraexpresiónsimilarqueutilicemos
solorepresentaunaestimacióndelahorroquepodríaobteneralcomprarciertas
herramientasconnosotrosencomparaciónconlasprincipalesmarcasynonecesariamente
significaquecubratodaslascategoríasdeherramientasqueofrecemos.Lerecordamos
que,alrealizarunpedidoconnosotros,verifiquecuidadosamentesi
realmenteestáahorrandolamitadencomparaciónconlasprincipalesmarcas.
Seguimoscomprometidosabrindarleherramientasaprecioscompetitivos.
Machine Translated by Google

Soportetécnicoycertificadodegarantía
electrónicawww.vevor.com/support
¿Tienepreguntassobreelproducto?¿Necesitaasistenciatécnica?Nodudeenponerseencontacto
connosotros:
MODELO:MG435
Estassonlasinstruccionesoriginales,leaatentamentetodaslasinstruccionesdelmanual
antesdeutilizarelproducto.VEVORsereservaunainterpretaciónclaradenuestromanualde
usuario.Laaparienciadelproductoestarásujetaalproductoquerecibió.Perdónenosporno
informarlenuevamentesihayactualizacionesdetecnologíaosoftwareennuestroproducto.
¿NECESITASAYUDA?¡CONTÁCTANOS!
Picadoradecarneeléctrica
1
Machine Translated by Google

DESCRIPCIÓN
INTRODUCCIÓN
Leaatentamenteelmanualdeinstrucciones.
15.Interruptordeencendido/apagado/reversa
16.Base
1.Empujadorde
alimentos2.Bandeja
dealimentos3.Tubode
alimentación4.Tornillo
5.Cuchillocruzado
9.Discofino
6.Discomediano
10.Salchicha
7.Anillode
fijación8.Discogrueso
11.Accesorioparakebben.°1
12.Accesorioparakebben.°2
Esteaparatoestáequipadoconunsistemadetermostato.Estesistema
13.Abrocharelbotón
Advertencia:Parareducirelriesgodelesiones,elusuariodebeleerlas
14.Manejar
2
Machine Translated by Google

IMPORTANTE
Sisuaparatodejadefuncionarrepentinamente:
capacidadesmentalesofaltadeexperienciayconocimientossihansido
PRECAUCIÓN:Paraevitarunasituaciónpeligrosa,esteaparatodebe
tensiónderedantesdeconectarelaparato.
2.Pulseelbotóndelinterruptorparaapagarelaparato.
caminoysicomprendenlospeligrosinvolucrados.
Lagarantíaquedaráinvalidadasisehanutilizadodichosaccesoriosopiezas.
4.Conecteelenchufealatomadecorriente.
9.Apagueelaparatoydesconéctelodelafuentedealimentaciónantesdecambiarlo.
antesdeutilizarelaparato.
6.Esteaparatonodebeserutilizadoporniños.Mantengaelaparatoysuscomponentes
Comuníqueseconsudistribuidoroconuncentrodeservicioautorizadosieltermostato
soltar4Nm.
7.Losaparatospuedenserutilizadosporpersonascondiscapacidadesfísicas,sensorialesomentalesreducidas.
calentamientoexcesivo.
Siloenchufas,laluzindicadoraseencenderá.
4.Compruebesielvoltajeindicadoenelaparatocorrespondeallocal.
1.Desconecteelenchufedelatomadecorriente.
Selehadadosupervisiónoinstrucciónsobreelusodelaparatodeformasegura.
Nuncaseconectaráauninterruptorhorario.
5.Nuncautiliceaccesoriosnipiezasdeotrosfabricantes.
3.Dejequeelaparatoseenfríedurante60minutos.
8.Losniñosnodebenjugarconelaparato.
1.Leaatentamenteestasinstruccionesdeusoyobservelasilustraciones.
5.Enciendanuevamenteelaparato.
accesoriosopiezasqueseaproximanyquesemuevenduranteeluso.
2.Antesdeusar,aprieteelanillodefijaciónconunallave,asegúresedequeelanillonosepuedasoltar.
cortaautomáticamenteelsuministrodeenergíaalaparatoencasode
Cablefueradelalcancedelosniños.
Elsistemaseactivacondemasiadafrecuencia.
3.Conserveestasinstruccionesparafuturasconsultas.
3
Machine Translated by Google

4
7.Sielcabledealimentacióndeesteaparatoestádañado,siempredebe
11.Mantengaelaparatofueradelalcancedelosniños.
18.Laspicadorassealimentanconcarnederessinnervios,sinhuesosysingrasaquehasido
yconocimientos,amenosquehayanrecibidosupervisiónoinstrucción
situacionespeligrosas
13.Apagueelaparatoantesdedesmontareinstalarcualquieraccesorio.
Sepresionaconunafuerzade5Ncontralacarne.Noutiliceelaparatopara
22.Losniñosdebensersupervisadosparagarantizarquenojueguenconlos
utilizaelaparatoporprimeravez.
partesdelaparato.
minutosantesdevolverausarlo.
10.Nuncausesudedoniningúnobjetoparaempujarlosingredienteshaciaabajoenelalimentador.
Lávelobajoelgrifo.Utiliceúnicamenteunpañohúmedoparalimpiarlaunidadmotora.
20.Deberáadvertirdeposiblesdañosderivadosdelmaluso.
objetivo.
dañado.
17.Nuncaintroduzcalamanoenlacarcasadelacuchilla.Utilicesiempreelempujador.
concapacidadesfísicas,sensorialesomentalesreducidas,ofaltadeexperiencia
reemplazadoporelfabricanteouncentrodeservicioautorizado,conelfindeevitar
12.Nuncadejeelaparatofuncionandosinsupervisión.
Cortarentrozosdeaproximadamente20mmx20mmx60mm.Losempujadoresson
relativoalusodelaparatoporpartedeunapersonaresponsabledesuseguridad.
8.Limpiebienlaspartesqueentraránencontactoconlosalimentosantes
14.Esperehastaquelaspiezasmóvileshayandejadodefuncionarantesderetirarlas.
másde5minutosseguidos.Dejeenfriarelaparatodurante10minutos.
9.Desenchufeelaparatoinmediatamentedespuésdesuuso.
15.Nuncasumerjalaunidaddelmotorenaguanienningúnotrolíquido,nilaenjuague.
19.Losaccesoriosdeberánincluirinstruccionesparasuusoseguro.
6.Noutiliceelaparatosielcabledealimentación,elenchufeuotraspiezasestán
tubomientraselaparatoestáenfuncionamiento.Paraello,solosedebeutilizarelempujador.
16.Nointentemolerhuesos,nuecesuotroselementosduros.
21.Esteaparatonoestádiseñadoparaserutilizadoporpersonas(incluidosniños)
Machine Translated by Google

INSTRUCCIONESDEUSO
paraestefinopuntodeventa.Losdetallesalrespectoestándefinidosporlalegislaciónnacional.
23.Sielaparatoestábloqueado,presioneelbotóndereversa(REV).
Lacarneatrapadaenlacarcasadelacortadoranosepisa,porloqueelaparatopuederenovarsu
leydelpaísrespectivo.Estesímboloenelproducto,lasinstrucciones
Lalimpiezayelmantenimientoporpartedelusuarionodebenserrealizadosporniñosamenosque
tienen8añosomásyestánsupervisados.Mantengaelaparatoy
condiciónhabitual.
Elmanualoelpaqueteindicanqueunproductoestásujetoaestas
sucablefueradelalcancedelosniñosmenoresde8años.
24.Eliminacióndeelectrodomésticosybaterías.
reglamentos.Medianteelreciclaje,lareutilizacióndelosmaterialesuotrasformasdeutilización
28.Esteaparatoestádestinadoaserutilizadoenusosdomésticosysimilares.
25.TraslaaplicacióndelaDirectivaEuropea2002/96/UEenel
Conlosdispositivosantiguos,estáshaciendounaimportantecontribuciónalaproteccióndenuestros
aplicacionestalescomo:
–áreasdecocinaparaelpersonalentiendas,oficinasyotrosentornosdetrabajo;
–casasde
campo;–porclientesenhoteles,motelesyotrosentornosdetiporesidencial;–
entornosdetipobedandbreakfast.
Enelordenamientojurídiconacionalseaplicalosiguiente:
ambiente.
26.Losaparatoseléctricosyelectrónicosnopuedendesecharsejuntoconlosresiduosdomésticos.
27.Esteaparatopuedeserutilizadoporniñosmayoresde8añossi:
MONTAJE
residuos.Losconsumidoresestánobligadosporleyadevolverlosaparatoseléctricosyelectrónicos.
Seleshadadosupervisiónoinstrucciónsobreelusodel
•Presioneelbotóndesujeción,sujeteelcabezaleinsérteloenlaentrada(cuando
aparato.
dispositivosalfinaldesuvidaútilalospuntosderecogidapúblicosestablecidos
aparatodeformaseguraysicomprendenlospeligrosqueimplica.
Alinsertar,presteatenciónaquelacabezadebeestarinclinada.
5
Machine Translated by Google
6
•Coloquelaserpienteenlacabeza,primeroelextremolargo,ygireparaintroducireltornillo.
firmemente.(fig.2)
•segúnlaflechaindicadaenlapartesuperior,verfig.1),•
luegomoverelcabezalensentidoantihorariodemaneraqueelcabezalquedefijado
ligeramentehastaquequedecolocadaenlacarcasadelmotor(fig.
3).•Coloquelacuchilladecortesobreelejedelaserpienteconlacuchillaorientadahaciael
partedelanteracomoseilustra(fig.4).Sinoestácolocadacorrectamente,lacarnenosetriturará.
Machine Translated by Google

Conjuntodecuchillasdecorte
enlaranura(fig.5).•
Sostengaopresioneelcentrodelaplacadecorteconundedoyluegoatornille
Asegúresedequelamuescadeldiscodemoliendaencajeenlasproyeccionesdelapicadora.
Aprieteelanillodefijaciónconlaotramano(fig.6).Noaprietedemasiado.•Coloquelaplaca
delatolvaenelcabezalyfíjelaensuposición.•Coloquelaunidadenunlugarfirme.
•Elpasodeaireenlaparteinferioryellateral
delacarcasadelmotordebe
cabeza.)Gireelanillodetornilloenladireccióndelaflechaenelcortador
mantenerselibreynobloqueado.
carcasahastaquequedebienfijada.
2.Conectelacarcasadelcortadoralaunidaddelmotor.
Máquinadepicarcarne
3.Coloquelabandejaenlaparteverticaldelacarcasadelcortador.
1.Inserteelejedelsinfínenlacarcasadelcortador,comenzandoporelextremodeplástico.
4.Ahoraelaparatoestálistoparapicar.
Coloquelaunidaddecortesobreelejesinfín.(Losbordesdecortedebenestara
Cortarlacarneentirasde10cmdelargopor2cmdegrosor.Quitarloshuesos,lostrozosde
lapartedelantera)Coloqueeldiscodemoliendamediooeldiscodemoliendagrueso
cartílagosytendonestantocomoseaposible.(¡Nuncausecarnecongelada!)
•Coloquelaplacadecortedeseadajuntoalacuchilladecorte,ajustandolasprotuberancias
(dependiendodelaconsistenciaqueprefieras)sobreelejedelsinfín.(Haz
Coloquelacarneenlabandeja.Utiliceelempujadorparaempujarsuavementelacarnehacialabandeja.
7
Machine Translated by Google

hacerkebbe
Elaboracióndesalchichas
Picarlacarneconelmolidomedio.
3.Coloquelabandejaenlaparteverticaldelacarcasadelcortador.
,
4.Ahoraelaparatoestálistoparahacerkebbe.(fig.10)
yluegofrito.
Paselamezcladekebbepreparadaatravésdelamáquinaparahacerkebbe.
1.Picarlacarne
Inserteelejedelsinfínenlacarcasadelcortador,el
Corteelcilindrohuecocontinuoenlaslongitudesdeseadasyutilícelocomodesee.
Inserteelejedelsinfínenlacarcasadelcortador,primeroelextremodeplástico.(fig.11)
1.Primeroelextremodeplástico(fig.8)
requerido.
Coloqueelseparadorenlacarcasadelcortador.
Coloqueelconoenlacarcasadelcortador.
ElkebbeesunplatotradicionaldeOrienteMedioelaboradoprincipalmenteconcarnedecorderoy
Coloqueelcuernodesalchichaenlacarcasadelcortadoryenrosqueelanilloenel
Coloqueelmoldeenlacarcasadelcortadoryatornilleelanilloenelcortador.
trigobulgurquesemuelejuntoparaformarunapasta,lamezclaes
Vivienda.(fig.9)
extruidoatravésdelamáquinaparahacerkebbesycortadoentrozoscortos.Lostubos
Mangueradecorte.(Paradiscodesteak
tartardosveces.)
2.Conectelacarcasadelcortadoralaunidaddelmotor.
Luegosepuederellenarconunamezcladecarnepicada,uniendolosextremos.
8
Machine Translated by Google

9
2.Conectelacarcasadelcortadoralaunidaddelmotor.
3.Coloquelabandejaenlaparteverticaldelacarcasadelcortador.
Coloquelosingredientesenlabandeja.Utiliceelempujadorparaempujarsuavementelacarnehaciaadentro.
Pongalapieldelasalchichaenaguatibiadurante10minutos.Luegodeslicelapielhúmeda
cabezadepicadora.)
4.Ahoraelaparatoestálistoparahacersalchichas.
(Asegúresedequelasmuescasdelseparadorencajenenlasproyeccionesdel
carcasadelacortadora
Coloquelapielsobreelcuernodelasalchicha.Presionelacarnepicada(sazonada)enla
carcasadelcortador.Silapielsequedapegadaalcuernodelasalchicha,humedézcalacon
Unpocodeagua.
Lacarnequequedaenlacarcasadelcortadorsepuederetirardesdeelinterior.
elaparatopasandounarebanadadepanatravésdelacarcasadecorte.
Lacarcasadelcortador.
CÓMOLIMPIARTUSELECTRODOMÉSTICOS
Machine Translated by Google

10
Unpocodeaceitevegetal.
1.yretireelenchufedelatomadecorriente.(fig.12)
2.Presioneelbotóndeliberaciónygiretodalacarcasadelcortadorenla
6.Empujadordealimentos
7.Bandejade
alimentos10.Cuchilla
direccióndelaflecha.Retireelempujadorylabandeja.(fig.13)
12.Placadecorte(gruesa)
3.Desatornilleelanilloroscadoyretiretodaslaspiezasdelacarcasadelcortador.
13.Anillodefijación
¡Nolimpielaspiezasenellavavajillas!
14.Salchicha
4.Laveconaguacalienteyjabóntodaslaspartesquehayanestadoencontactoconlacarne.
14.Salchicha
Límpielosinmediatamentedespuésdesuuso.
11.Placadecorte(mediana)
5.Enjuágalosconaguacalientelimpiaysécalosinmediatamente.
FoshanTocAparatosEléctricosCo.,Ltd.
Antesdelimpiarelaparato,apáguelo.
6.Lerecomendamosquelubriquelaunidaddecorteylosdiscosdemoliendacon
Dirección:3F,No.9ChaoguangRoad,Gaoli,Ronggui,Shunde,Foshan,Guangdong,China.
Machine Translated by Google


MODEL:MG-435
Elektryczna maszynka do mięsa
Wsparcie techniczne i certyfikat gwarancji elektronicznej www.vevor.com/support
„Oszczędź połowę”, „Połowa ceny” lub inne podobne wyrażenia używane przez
nas stanowią jedynie szacunkowe oszczędności, jakie możesz uzyskać, kupując u nas
określone narzędzia w porównaniu z głównymi markami i niekoniecznie oznaczają one
objęcie wszystkich kategorii narzędzi oferowanych przez nas. Uprzejmie przypominamy,
aby dokładnie sprawdzić, czy składając u nas zamówienie faktycznie
oszczędzasz połowę w porównaniu z głównymi markami.
Nadal staramy się oferować Państwu narzędzia w konkurencyjnych cenach.
Machine Translated by Google

Wsparcie techniczne i certyfikat gwarancji
elektronicznej www.vevor.com/support
Masz pytania dotyczące produktu? Potrzebujesz wsparcia technicznego? Skontaktuj się z nami:
MODEL:MG-435
To jest oryginalna instrukcja, przed użyciem należy uważnie przeczytać wszystkie
instrukcje. VEVOR zastrzega sobie jasną interpretację naszej instrukcji obsługi. Wygląd
produktu będzie zależał od produktu, który otrzymałeś. Prosimy o wybaczenie, że nie
poinformujemy Cię ponownie, jeśli w naszym produkcie pojawią się jakiekolwiek aktualizacje
technologiczne lub oprogramowania.
POTRZEBUJESZ POMOCY? SKONTAKTUJ SIĘ Z NAMI!
Elektryczna maszynka do mięsa
- 1 -
Machine Translated by Google

- 2 -
11. Nakładka do kebbe 1
12. Nakładka do Kebbe 2
To urządzenie jest wyposażone w system termostatu. Ten system będzie
13. Zapnij guzik
Ostrzeżenie – aby zmniejszyć ryzyko obrażeń, użytkownik musi zapoznać się z treścią instrukcji.
14. Uchwyt
uważnie przeczytaj instrukcję obsługi.
15. Przełącznik WŁ./WYŁ./Wsteczny
16. Podstawa
1. Popychacz żywności
2. Tacka na
żywność 3. Rurka do
karmienia 4. Śruba
5. Nóż krzyżowy
9. Dysk drobny
6. Średni dysk
10. Kiełbasa
7. Pierścień
mocujący 8. Tarcza gruba
WSTĘP
OPIS
Machine Translated by Google

- 3 -
5. Ponownie włącz urządzenie.
akcesoria lub części zbliżające się do siebie, które poruszają się podczas użytkowania.
2. Przed użyciem dokręć pierścień mocujący kluczem, upewnij się, że pierścień nie może się przekręcić.
automatycznie odcina dopływ prądu do urządzenia w przypadku
Przewód należy trzymać w miejscu niedostępnym dla dzieci.
system jest aktywowany zbyt często.
3. Zachowaj niniejszą instrukcję do wykorzystania w przyszłości.
4. Sprawdź, czy napięcie podane na urządzeniu jest zgodne z napięciem lokalnym.
1. Wyciągnij wtyczkę sieciową z gniazdka.
zapewniono nadzór lub instruktaż dotyczący bezpiecznego korzystania z urządzenia
Nigdy nie podłączaj się do wyłącznika czasowego.
5. Nigdy nie używaj akcesoriów ani części pochodzących od innych producentów.
1. Przeczytaj uważnie niniejszą instrukcję użytkowania i zapoznaj się z ilustracjami
3. Pozostaw urządzenie do ostygnięcia na 60 minut.
8. Dzieci nie mogą bawić się urządzeniem.
4.Podłącz wtyczkę sieciową do gniazdka.
9. Przed wymianą wyłącz urządzenie i odłącz je od zasilania.
przed użyciem urządzenia.
6. To urządzenie nie powinno być używane przez dzieci. Trzymaj urządzenie i jego
W przypadku awarii termostatu prosimy o kontakt z autoryzowanym punktem serwisowym.
odłączyć za pomocą 4 Nm.
przegrzanie.
7. Urządzenia mogą być używane przez osoby o ograniczonej sprawności fizycznej, sensorycznej lub
Po podłączeniu kontrolka będzie się świecić.
Jeśli urządzenie nagle przestanie działać:
zdolności umysłowe lub brak doświadczenia i wiedzy, jeżeli zostały
UWAGA: Aby uniknąć niebezpiecznych sytuacji, należy wyłączyć to urządzenie.
napięcie sieciowe przed podłączeniem urządzenia.
sposób i czy rozumieją związane z tym zagrożenia.
gwarancja straci ważność w przypadku użycia takich akcesoriów lub części.
2. Naciśnij przycisk przełącznika, aby wyłączyć urządzenie.
WAŻNY
Machine Translated by Google

9. Natychmiast po użyciu odłącz urządzenie od zasilania.
15. Nigdy nie zanurzaj jednostki silnikowej w wodzie ani innym płynie, ani nie płucz jej.
19.Do akcesoriów dołączona jest instrukcja ich bezpiecznego użytkowania.
6. Nie używaj urządzenia, jeśli przewód sieciowy, wtyczka lub inne części są uszkodzone.
rurka podczas pracy urządzenia. Do tego celu należy używać wyłącznie popychacza
16. Nie próbuj mielić kości, orzechów ani innych twardych przedmiotów.
21. Urządzenie to nie jest przeznaczone do użytku przez osoby (w tym dzieci):
o ograniczonej sprawności fizycznej, sensorycznej lub umysłowej lub braku doświadczenia
wymienić u producenta lub w autoryzowanym punkcie serwisowym, aby uniknąć
12. Nigdy nie pozostawiaj urządzenia włączonego bez nadzoru.
pokroić na kawałki o wymiarach około 20 mm x 20 mm x 60 mm. Popychacze są
dotyczące użytkowania urządzenia przez osobę odpowiedzialną za jego bezpieczeństwo.
dłużej niż 5 minut z rzędu. Pozostaw urządzenie do ostygnięcia na 10
8. Dokładnie wyczyść części, które będą miały kontakt z żywnością przed
14. Przed wyjęciem urządzenia należy odczekać, aż ruchome części przestaną się obracać.
używasz urządzenia po raz pierwszy.
części urządzenia.
minut przed ponownym użyciem.
10. Nigdy nie używaj palca ani przedmiotu do wpychania składników do podajnika.
pod kranem. Do czyszczenia jednostki silnikowej należy używać wyłącznie wilgotnej ściereczki.
20. Powinien ostrzegać przed potencjalnymi obrażeniami wynikającymi z niewłaściwego użycia.
uszkodzony.
zamiar.
17. Nigdy nie sięgaj do obudowy noża. Zawsze używaj popychacza.
7. Jeśli przewód zasilający tego urządzenia jest uszkodzony, należy go zawsze wymienić.
11. Przechowuj urządzenie w miejscu niedostępnym dla dzieci.
18.Minersy karmione są wołowiną bez ścięgien, kości i tłuszczu,
i wiedzy, chyba że sprawowano nad nimi nadzór lub udzielano im instrukcji
13. Przed odłączeniem i instalacją akcesoriów wyłącz urządzenie.
dociskany siłą 5N do mięsa. Nie używaj urządzenia do
22. Należy nadzorować dzieci, aby mieć pewność, że nie bawią się
niebezpieczne sytuacje.
- 4 -
Machine Translated by Google

- 5 -
Zastosowania takie jak: –
kuchnie dla pracowników w sklepach, biurach i innych środowiskach pracy; –
gospodarstwa
rolne; – przez klientów w hotelach, motelach i innych środowiskach mieszkalnych; –
środowiska typu bed and breakfast.
w krajowym systemie prawnym stosuje się następujące zasady:
środowisko.
26.Urządzeń elektrycznych i elektronicznych nie wolno wyrzucać razem z odpadami domowymi.
27. Z urządzenia mogą korzystać dzieci w wieku od 8 lat, jeżeli:
ZŁOŻENIE
odpady. Konsumenci są zobowiązani przez prawo do zwrotu sprzętu elektrycznego i elektronicznego
zapewniono im nadzór lub instruktaż dotyczący korzystania z
• Naciśnij przycisk zapięcia, przytrzymaj głowicę i włóż ją do otworu wlotowego (gdy
urządzenie.
urządzeń po zakończeniu ich eksploatacji do publicznych punktów zbiórki utworzonych
urządzenia w bezpieczny sposób i czy rozumieją związane z tym zagrożenia.
wkładając proszę zwrócić uwagę, że głowa musi być pochylona jak
23. Jeśli urządzenie jest zablokowane, naciśnij przycisk Reversal (REV).
w tym celu lub w punkcie sprzedaży. Szczegóły w tym zakresie określają przepisy krajowe
Dzieciom nie wolno czyścić ani konserwować urządzeń, chyba że:
mięso zamknięte w obudowie noża nie jest deptane, dzięki czemu urządzenie może je odnowić
prawo danego kraju. Ten symbol na produkcie, instrukcji
są w wieku od 8 lat i starsze i nadzorowane. Trzymaj urządzenie i
normalny stan.
instrukcja lub opakowanie wskazuje, że produkt podlega tym przepisom
przewód powinien znajdować się w miejscu niedostępnym dla dzieci poniżej 8 roku życia.
24.Utylizacja urządzeń i baterii.
przepisy. Poprzez recykling, ponowne wykorzystanie materiałów lub inne formy wykorzystania
28. Urządzenie to przeznaczone jest do użytku domowego i podobnego.
25. Po wdrożeniu dyrektywy europejskiej 2002/96/UE w
starych urządzeń, wnosisz istotny wkład w ochronę naszego
INSTRUKCJA UŻYCIA
Machine Translated by Google

• Umieść wąż w głowie, najpierw dłuższym końcem i przekręć, aby wprowadzić śrubę
z przodu, jak pokazano na rysunku (rys.4). Jeśli nie zostanie zamontowany prawidłowo, mięso nie zostanie zmielone.
ściśle.(fig.2)
• zgodnie ze strzałką widoczną na górze, patrz rys. 1), • następnie
przesuń głowicę w kierunku przeciwnym do ruchu wskazówek zegara, tak aby głowica była mocowana
lekko, aż zostanie osadzony w obudowie silnika (rys. 3). •
Umieść ostrze tnące na wale węża ostrzem skierowanym w stronę
- 6 -
Machine Translated by Google

- 7 -
1. Włóż wałek ślimakowy do obudowy noża, zaczynając od plastikowego końca.
4. Teraz urządzenie jest gotowe do mielenia.
Umieść jednostkę tnącą na wale ślimakowym. (Krawędzie tnące powinny być pod kątem
Pokrój mięso na paski o długości 10 cm i grubości 2 cm. Usuń kości, kawałki
(przód) Umieść tarczę szlifierską średnią lub tarczę szlifierską grubą
chrząstek i ścięgien, o ile to możliwe. (Nigdy nie używaj mrożonego mięsa!)
• Umieść żądaną płytkę tnącą obok ostrza tnącego, dopasowując wystające elementy
(w zależności od preferowanej konsystencji) na wał ślimakowy. (Zrób
Włóż mięso do tacki. Użyj popychacza, aby delikatnie wepchnąć mięso do
w szczelinie (rys.5).
• Podeprzyj lub naciśnij środek płytki tnącej jednym palcem, a następnie wkręć
upewnij się, że wycięcie tarczy mielącej pasuje do wypustek maszynki do mięsa
pierścień mocujący dokręcić drugą ręką (rys. 6). Nie dokręcać zbyt mocno. •
Umieść płytę leja na głowicy i zamocuj ją na miejscu. • Umieść
urządzenie w stabilnym miejscu. •
Przejście powietrza na dole i z boku obudowy silnika powinno
(głowica.) Obrócić pierścień śrubowy w kierunku strzałki na frezie.)
być wolne i nieblokowane.
obudowy, dopóki nie zostanie ona prawidłowo zamocowana.
2. Przymocuj obudowę noża do jednostki silnika.
Maszynka do mielenia mięsa
3. Umieść tackę na pionowej części obudowy noża.
Zespół ostrza tnącego
Machine Translated by Google
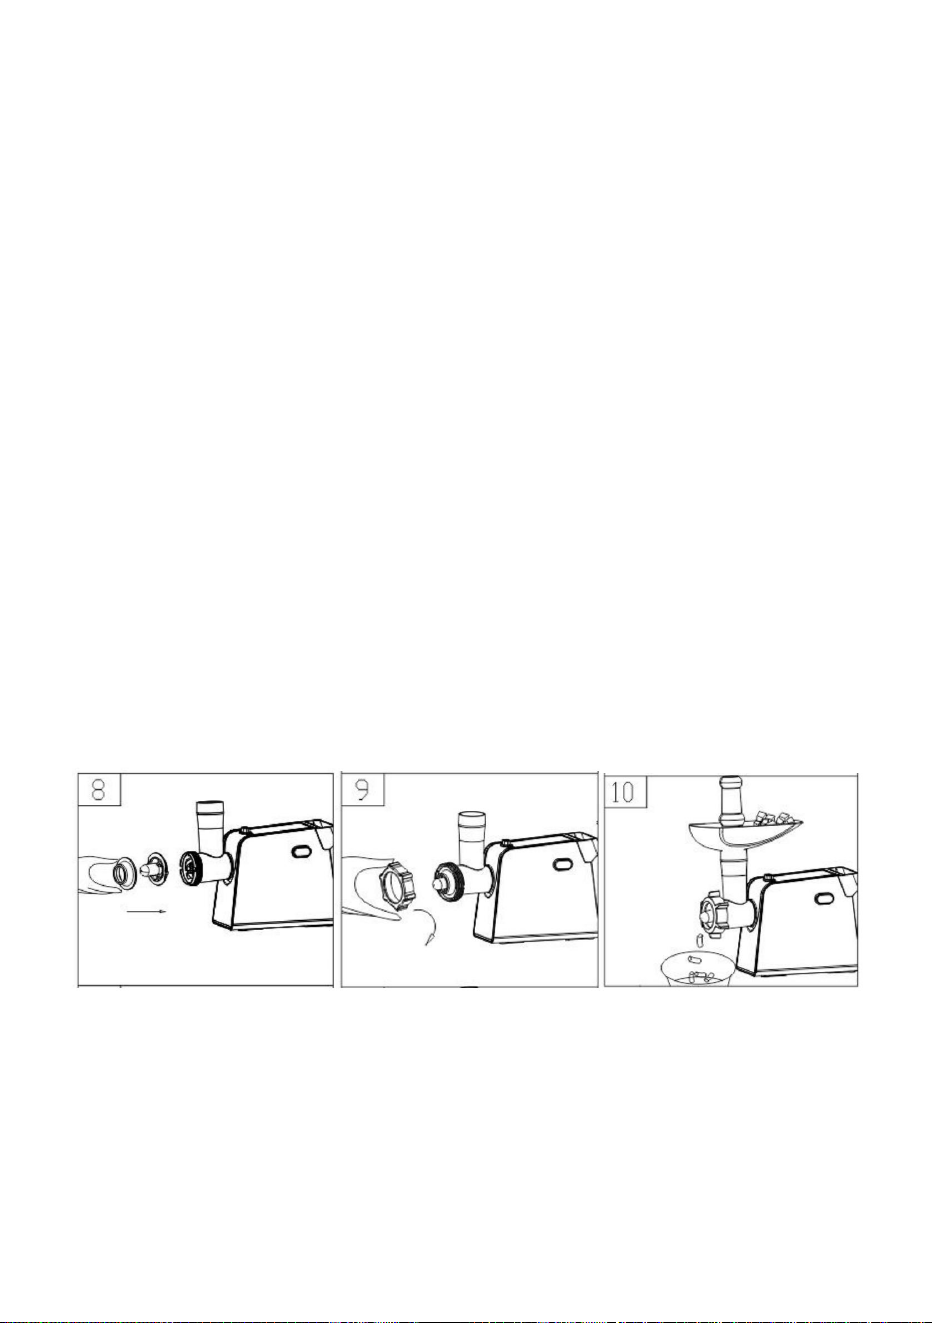
- 8 -
Umieść separator w obudowie noża.
Umieść stożek w obudowie noża.
Kebbe to tradycyjne danie kuchni bliskowschodniej, przygotowywane głównie z mięsa i
Umieść róg do kiełbasy na obudowie noża i przykręć pierścień na
Umieść pierwszą na obudowie noża i przykręć pierścień do noża
bulgur, który jest mielony razem, aby utworzyć pastę, mieszanka jest
mieszkanie.(rys.9)
wytłoczone przez maszynę do robienia kebbe i pocięte na krótkie odcinki. Rurki
wężyk do krojenia. (Do tarczy do tatara
dwa razy.)
2. Przymocuj obudowę noża do jednostki silnika.
następnie można je nadziać mieszanką mięsa mielonego, a końce należy ścisnąć razem
zmielić mięso na średnią grubość
3. Umieść tackę na pionowej części obudowy noża.
a następnie smażone w głębokim tłuszczu.
,
4. Teraz urządzenie jest gotowe do przygotowania kebbe. (rys.10)
Włóż przygotowaną mieszankę do kebbe do urządzenia do robienia kebbe.
1.Mieszaj mięso
Włóż wał ślimakowy do obudowy noża,
Przytnij ciągły pusty cylinder na żądaną długość i użyj go w następujący sposób
Włóż wałek ślimakowy do obudowy noża, zaczynając od plastikowego końca. (rys. 11)
1. najpierw końcówka z tworzywa sztucznego (rys. 8)
wymagany.
Robienie kebbego
Robienie kiełbas
Machine Translated by Google

JAK CZYŚCIĆ URZĄDZENIA AGD
Umieść składniki na tacy. Użyj popychacza, aby delikatnie wepchnąć mięso do środka.
4. Teraz urządzenie jest gotowe do produkcji kiełbas.
2. Przymocuj obudowę noża do jednostki silnika.
Włóż skórkę kiełbasy do letniej wody na 10 minut. Następnie przesuń mokrą
(Upewnij się, że wycięcia separatora pasują do wypustek
3. Umieść tackę na pionowej części obudowy noża.
(głowica maszynki do mielenia mięsa.)
obudowa noża.
na róg kiełbasy. Włóż (doprawione) mielone mięso do
obudowa noża. Jeśli skóra przyklei się do rogu kiełbasy, zwilż ją
trochę wody.
Mięso pozostałe w obudowie noża można usunąć z wnętrza
urządzenie poprzez przepuszczenie kromki chleba przez obudowę noża.
Obudowa noża.
- 9 -
Machine Translated by Google
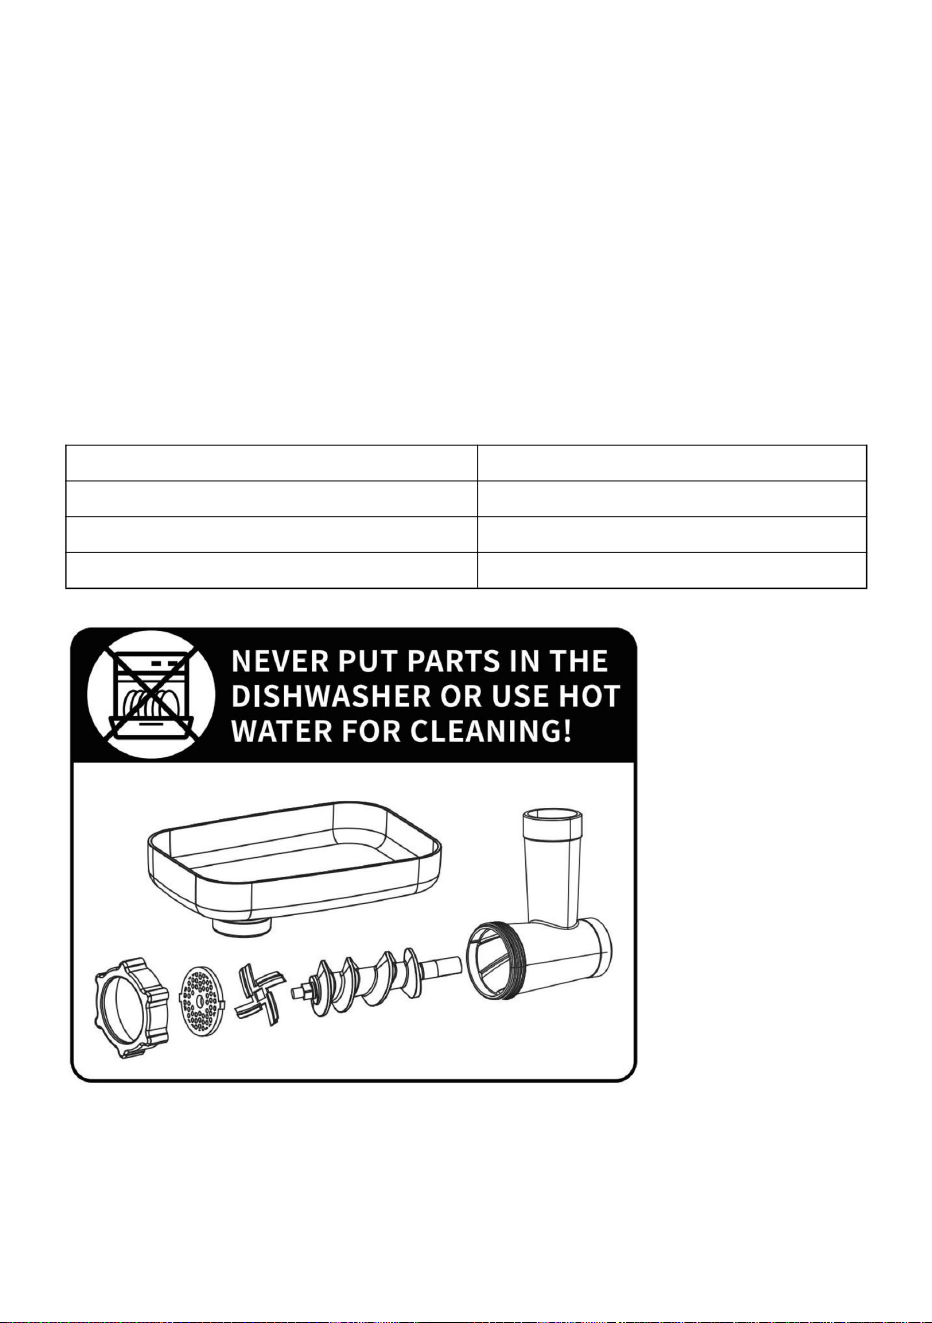
- 10 -
4. Umyj wszystkie części, które miały kontakt z mięsem, w gorącej wodzie z mydłem.
14.Kiełbasa
Wyczyść je natychmiast po użyciu.
11. Talerz do krojenia (middium)
5. Opłucz je czystą, gorącą wodą i natychmiast osusz.
Foshan Toc Electrical Appliance Co., Ltd.
Przed czyszczeniem urządzenia wyłącz je.
6. Zalecamy smarowanie zespołu tnącego i tarcz szlifierskich za pomocą
Adres: 3F, nr 9 Chaoguang Road, Gaoli, Ronggui, Shunde, Foshan, Guangdong,
Chiny.
1. i wyjmij wtyczkę z gniazdka. (rys.12)
trochę oleju roślinnego.
2. Naciśnij przycisk zwalniający i obróć całą obudowę noża w
6. Popychacz do
żywności 7. Tacka
na żywność 10. Ostrze
kierunek strzałki. Wyjmij popychacz i tackę.(rys.13)
12. Talerz tnący (gruby)
3. Odkręć pierścień śrubowy i usuń wszystkie części obudowy noża.
13.Pierścień mocujący
Nie myj części w zmywarce!
14.Kiełbasa
Machine Translated by Google


Elektrische vleesmolen
Wij streven er voortdurend naar om u gereedschappen tegen concurrerende prijzen te leveren.
"Save Half", "Half Price" of andere soortgelijke uitdrukkingen die wij gebruiken, geven alleen
een schatting van de besparingen die u kunt behalen door bepaalde gereedschappen bij ons te
kopen in vergelijking met de grote topmerken en betekent niet noodzakelijkerwijs dat alle categorieën
gereedschappen die wij aanbieden, worden gedekt. Wij herinneren u eraan om zorgvuldig te
controleren of u daadwerkelijk de helft bespaart in vergelijking met de grote
topmerken wanneer u een bestelling bij ons plaatst.
MODEL:MG-435
Technische ondersteuning en e-garantiecertificaat www.vevor.com/support
Machine Translated by Google
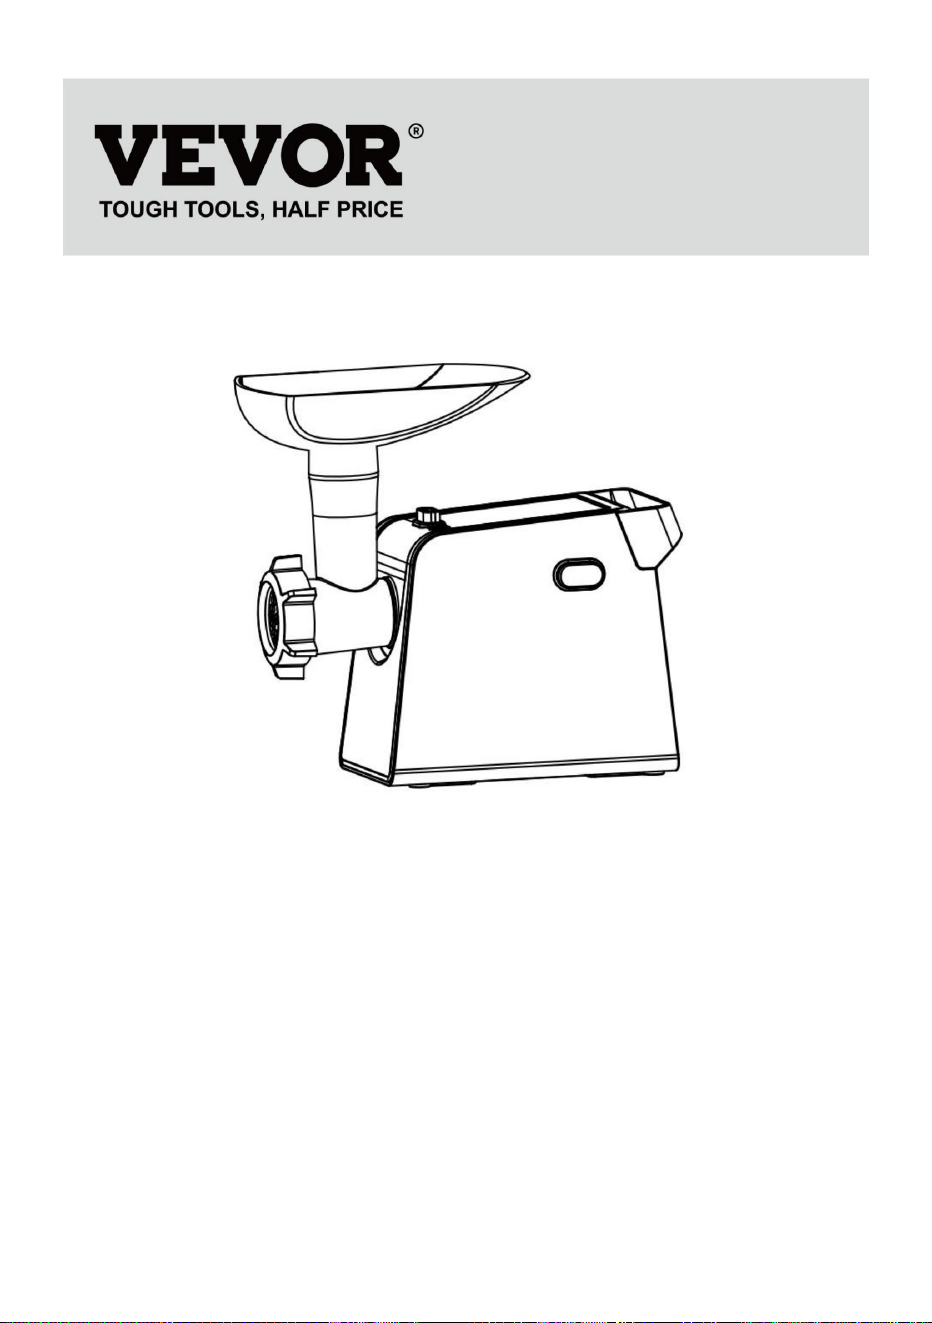
Technische ondersteuning en e-
garantiecertificaat www.vevor.com/support
- 1 -
Dit is de originele instructie, lees alle handleidingen zorgvuldig door voordat u het product
gebruikt. VEVOR behoudt zich een duidelijke interpretatie van onze gebruikershandleiding voor.
Het uiterlijk van het product is afhankelijk van het product dat u hebt ontvangen. Vergeef ons
dat we u niet opnieuw zullen informeren als er technologie- of software-updates voor ons product
zijn.
MODEL:MG-435
Heeft u vragen over het product? Heeft u technische ondersteuning nodig? Neem dan gerust
contact met ons op:
Elektrische vleesmolen
HULP NODIG? NEEM CONTACT MET ONS OP!
Machine Translated by Google
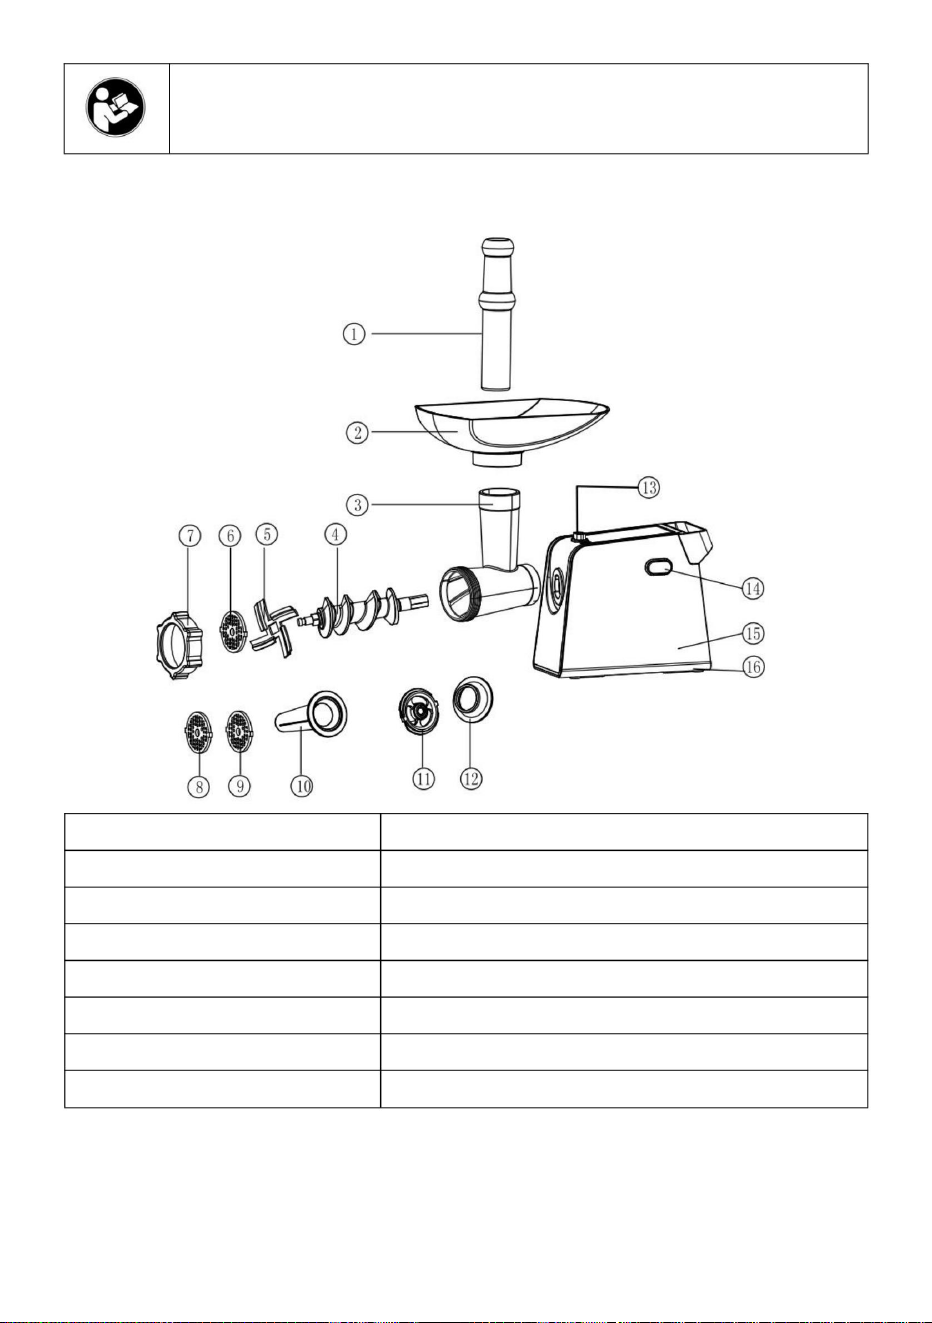
- 2 -
15. AAN/UIT/achteruit schakelaar
16. Basis
1. Voedselduwer 2.
Voedsellade 3.
Voedingsbuis 4.
Schroef
9. Fijne schijf
5. Kruismes
6. Middelgrote schijf
10. Worst
7. Bevestigingsring
8. Grove schijf
11. Kebbe-bijlage 1
Dit apparaat is uitgerust met een thermostaatsysteem. Dit systeem zal
12. Kebbe-bijlage 2
13. Knoop vastmaken
Waarschuwing - Om het risico op letsel te verminderen, moet de gebruiker de gebruiksaanwijzing lezen.
14. Handvat
Lees de gebruiksaanwijzing zorgvuldig door.
INVOERING
BESCHRIJVING
Machine Translated by Google

- 3 -
mentale vermogens of gebrek aan ervaring en kennis als ze zijn
Als uw apparaat plotseling stopt met werken:
LET OP: Om gevaarlijke situaties te voorkomen, moet dit apparaat
3. Bewaar deze instructies voor toekomstig gebruik.
systeem wordt te vaak geactiveerd.
netspanning voordat u het apparaat aansluit.
De garantie vervalt indien dergelijke accessoires of onderdelen zijn gebruikt.
manier en of ze de gevaren begrijpen die ermee gepaard gaan.
2. Druk op de schakelaar om het apparaat uit te schakelen.
4. Steek de stekker in het stopcontact.
9. Schakel het apparaat uit en koppel het los van de stroomvoorziening voordat u het apparaat vervangt.
voordat u het apparaat gebruikt.
losmaken met 4 Nm.
6. Dit apparaat mag niet door kinderen worden gebruikt. Houd het apparaat en de bijbehorende
7. Apparaten kunnen worden gebruikt door personen met een lichamelijke, zintuiglijke of verstandelijke beperking.
Als u de stekker in het stopcontact steekt, gaat het indicatielampje branden.
Neem contact op met uw dealer of een erkend servicecentrum als de thermostaat defect is.
oververhitting.
4. Controleer of de spanning die op het apparaat staat aangegeven overeenkomt met de plaatselijke
Nooit op een tijdschakelaar aansluiten.
1. Trek de stekker uit het stopcontact.
toezicht of instructies krijgen over het gebruik van het apparaat op een veilige manier
5. Gebruik nooit accessoires of onderdelen van andere fabrikanten.
1. Lees deze gebruiksaanwijzing zorgvuldig door en bekijk de illustraties
3.Laat het apparaat 60 minuten afkoelen.
8. Kinderen mogen niet met het apparaat spelen.
accessoires of naderende onderdelen die bewegen tijdens het gebruik.
5.Schakel het apparaat weer in.
2. Draai voor gebruik de bevestigingsring vast met een sleutel, zorg ervoor dat de ring niet los kan raken.
automatisch de stroomtoevoer naar het apparaat afsluiten in geval van
snoer buiten bereik van kinderen houden.
BELANGRIJK
Machine Translated by Google

11. Houd het apparaat buiten bereik van kinderen.
7. Als het netsnoer van dit apparaat beschadigd is, moet u het altijd vervangen.
18. Gehaktmachines worden gevoed met peesloos, botloos en vetloos rundvlees dat is
21. Dit apparaat is niet bedoeld voor gebruik door personen (inclusief kinderen)
16. Probeer geen botten, noten of andere harde voorwerpen te malen.
en kennis, tenzij zij onder toezicht of instructie zijn geplaatst
22. Kinderen moeten onder toezicht staan om ervoor te zorgen dat ze niet met de
13. Schakel het apparaat uit voordat u accessoires loskoppelt en installeert.
gevaarlijke situaties.
met een kracht van 5N tegen het vlees gedrukt. Gebruik het apparaat niet voor
u het apparaat voor de eerste keer gebruikt.
onderdelen van het apparaat.
minuten wachten voordat u het opnieuw gebruikt.
20. Het moet waarschuwen voor mogelijk letsel door verkeerd gebruik.
10. Gebruik nooit uw vinger of een voorwerp om ingrediënten in de toevoer te duwen
doel.
17.Grijp nooit in de snijbehuizing. Gebruik altijd de duwer.
onder de kraan. Gebruik alleen een vochtige doek om de motorunit schoon te maken.
beschadigd.
met verminderde fysieke, sensorische of mentale vermogens, of gebrek aan ervaring
in stukken gesneden van ongeveer 20 mm x 20 mm x 60 mm. Duwers zijn
vervangen door een geautoriseerde fabrikant of servicecentrum, om te voorkomen
12. Laat het apparaat nooit onbeheerd werken.
betreffende het gebruik van het apparaat door een persoon die verantwoordelijk is voor zijn veiligheid.
meer dan 5 minuten achter elkaar. Laat het apparaat 10 minuten afkoelen
8. Maak de onderdelen die in contact komen met voedsel grondig schoon voordat u het apparaat gebruikt.
14.Wacht tot de bewegende delen tot stilstand zijn gekomen voordat u de
15. Dompel de motorunit nooit onder in water of een andere vloeistof en spoel hem ook niet af.
9. Haal de stekker van het apparaat direct na gebruik uit het stopcontact.
19. Bij de accessoires moeten instructies worden geleverd voor het veilige gebruik ervan.
6. Gebruik het apparaat niet als het netsnoer, de stekker of andere onderdelen beschadigd zijn.
buis terwijl het apparaat draait. Hiervoor mag alleen de duwer worden gebruikt
- 4 -
Machine Translated by Google

- 5 -
voor dit doel of verkooppunt. Details hierover worden bepaald door de nationale
Reiniging en gebruikersonderhoud mogen niet door kinderen worden uitgevoerd, tenzij ze
wet van het betreffende land. Dit symbool op het product, de instructie
vlees dat in de snijbehuizing is opgesloten, wordt niet betreden, zodat het apparaat zijn
zijn vanaf 8 jaar en ouder en worden begeleid. Houd het apparaat en
bij het invoegen let op dat de kop schuin moet staan
Houd het snoer buiten bereik van kinderen jonger dan 8 jaar.
normale toestand.
24. Afvoer van apparaten en batterijen.
handleiding of de verpakking geeft aan dat een product aan deze voorwaarden is onderworpen
regelgeving. Door recycling, hergebruik van de materialen of andere vormen van gebruik
25.Na de implementatie van de Europese Richtlijn 2002/96/EU in de
oude apparaten, levert u een belangrijke bijdrage aan de bescherming van onze
28. Dit apparaat is bedoeld voor gebruik in huishoudelijke en soortgelijke omgevingen.
toepassingen zoals: –
personeelskeukens in winkels, kantoren en andere werkomgevingen; – boerderijen; – door
cliënten in hotels,
motels en andere residentiële omgevingen; – bed and breakfast-achtige omgevingen.
nationale rechtsorde geldt het volgende:
omgeving.
27. Dit apparaat kan worden gebruikt door kinderen van 8 jaar en ouder als:
26. Elektrische en elektronische apparaten mogen niet met het huishoudelijk afval worden weggegooid.
MONTEREN
• Druk op de bevestigingsknop, houd de kop vast en steek deze in de inlaat (wanneer
afval. Consumenten zijn wettelijk verplicht om elektrische en elektronische apparaten terug te sturen
apparaat.
apparaten aan het einde van hun levensduur naar de daarvoor opgezette openbare inzamelpunten
zij hebben toezicht of instructie gekregen met betrekking tot het gebruik van de
apparaat op een veilige manier gebruiken en als ze de gevaren begrijpen die ermee gepaard gaan.
23. Als het apparaat vergrendeld is, druk dan op de omkeerknop (REV).
GEBRUIKSAANWIJZING
Machine Translated by Google

• Plaats de slang in de kop, met het lange uiteinde eerst, en draai om de schroef te voeden
lichtjes totdat het in de motorbehuizing zit (fig. 3). • Plaats het
snijblad op de slangenas met het blad naar de
strak.(fig.2)
• volgens de pijl die bovenaan is aangegeven, zie fig.
1), • beweeg vervolgens de kop tegen de klok in zodat de vast te zetten kop
voorkant zoals afgebeeld (fig. 4). Als deze niet goed is gemonteerd, wordt het vlees niet gemalen.
- 6 -
Machine Translated by Google

- 7 -
Zorg ervoor dat de inkeping van de maalschijf op de uitsteeksels van de vleesmolen past
(kop.) Draai de schroefring in de richting van de pijl op de snijder
de bevestigingsring met een andere hand vast (fig. 6). Niet te vast aandraaien. •
Plaats de trechterplaat op de kop en bevestig deze op zijn plaats. • Plaats
de eenheid op een stevige plek. • De
luchtdoorgang aan de onderkant en de zijkant van de motorbehuizing moet
vrij worden gehouden en niet worden geblokkeerd.
behuizing totdat deze goed vastzit.
2. Bevestig de snijbehuizing aan de motoreenheid.
Vleesmolen
3. Plaats de lade op het verticale deel van de snijbehuizing.
1. Plaats de wormas in de freesbehuizing, met het plastic uiteinde eerst.
4. Het apparaat is nu klaar om te malen.
Snijd het vlees in 10 cm lange, 2 cm dikke reepjes. Verwijder botten, stukjes
Plaats de snij-eenheid op de wormas. (De snijkanten moeten aan de
(de voorkant) Plaats de middelgrote slijpschijf of de grove slijpschijf
• Plaats de gewenste snijplaat naast het snijblad, met passende uitsteeksels
(afhankelijk van de gewenste consistentie) op de wormschacht. (Maak
kraakbeen en pezen zoveel mogelijk verwijderen. (Gebruik nooit bevroren vlees!)
Leg het vlees in de schaal. Gebruik de duwer om het vlees voorzichtig in de
in de sleuf (fig. 5). •
Ondersteun of druk het midden van de snijplaat met één vinger en schroef vervolgens vast
Montage van het snijblad
Machine Translated by Google

- 8 -
3. Plaats de lade op het verticale deel van de snijbehuizing.
en dan gefrituurd.
4. Het apparaat is nu klaar om kebbe te maken (fig.10).
,
1. Hak het vlees fijn
Doe het bereide kebbemengsel in de kebbemaker.
Plaats de wormas in de freesbehuizing, de
Snijd de doorlopende holle cilinder in de gewenste lengtes en gebruik deze als volgt:
1. plastic uiteinde eerst. (fig. 8)
vereist.
Plaats de wormas in de freesbehuizing, met het plastic uiteinde eerst (fig. 11).
Plaats de scheider in de snijbehuizing.
Plaats de kegel in de snijbehuizing.
Kebbe is een traditioneel gerecht uit het Midden-Oosten, voornamelijk gemaakt van lamp en
Plaats de worsthoorn op de snijbehuizing en schroef de ring erop
bulgur die tot een pasta wordt vermalen, het mengsel is
Plaats de mal op de freesbehuizing en schroef de ring op de frees
behuizing.(fig.9)
cutter slang. (Voor steak tartaar schijf
twee keer.)
2. Bevestig de snijbehuizing aan de motoreenheid.
geëxtrudeerd door de kebbemaker en in korte lengtes gesneden. De buizen
kan dan gevuld worden met een gehaktmengsel, de uiteinden samengeknepen
hak het vlees fijn met de medium maalgraad
Worsten maken
Kebbe maken
Machine Translated by Google

HOE U UW APPARATEN SCHOONMAAKT
3. Plaats de lade op het verticale deel van de snijbehuizing.
4.Nu is het apparaat klaar om worsten te maken.
Doe de ingrediënten in de schaal. Gebruik de duwer om het vlees voorzichtig in de schaal te duwen.
Leg het worstvel 10 minuten in lauw water. Schuif daarna de natte
(vleesmolenkop.)
2. Bevestig de snijbehuizing aan de motoreenheid.
(Zorg ervoor dat de inkepingen van de scheider op de uitsteeksels van de
snijbehuizing.
vel op de worsthoorn. Duw het (gekruide) gehakt in de
behuizing van de snijder. Als het vel aan de worsthoorn blijft plakken, bevochtig het dan met
wat water.
Vlees dat in de snijbehuizing achterblijft, kan van binnenuit worden verwijderd
het apparaat door een sneetje brood door de snijbehuizing te halen.
de snijbehuizing.
- 9 -
Machine Translated by Google

- 10 -
wat plantaardige olie.
6.Voedselduwer
7.Voedsellade
10.Mes
2. Druk op de ontgrendelingsknop en draai de hele snijbehuizing in de
richting van de pijl. Verwijder de duwer en de lade.(fig.13)
3. Draai de schroefring los en verwijder alle onderdelen van de snijbehuizing.
12.Snijplaat (grof)
13. Bevestigingsring
Maak de onderdelen niet schoon in de vaatwasser!
14.Worst
4. Was alle onderdelen die in contact zijn gekomen met vlees in heet sop.
14.Worst11.Snijplaat (middium)
Maak ze direct na gebruik schoon.
5. Spoel ze af met helder, heet water en droog ze onmiddellijk af.
Voordat u het apparaat schoonmaakt, schakelt u het apparaat uit
6.Wij adviseren u om de snij-eenheid en de slijpschijven te smeren met
Foshan Toc Elektrische Apparaten Co., Ltd.
Adres: 3F, Chaoguang Road nr. 9, Gaoli, Ronggui, Shunde, Foshan, Guangdong,
China.
1. en haal de stekker uit het stopcontact. (fig.12)
Machine Translated by Google


Elektrisk köttkvarn
MODELL: MG-435
Teknisk support och e-garanticertifikat www.vevor.com/support
"Spara hälften", "halva priset" eller andra liknande uttryck som används av oss
representerar bara en uppskattning av besparingar du kan dra nytta av att köpa vissa
verktyg hos oss jämfört med de stora toppmärkena och betyder inte nödvändigtvis att täcka
alla kategorier av verktyg som erbjuds av oss. Du påminns om att noggrant kontrollera
när du gör en beställning hos oss om du verkligen sparar hälften i
jämförelse med de främsta varumärkena.
Vi fortsätter att vara engagerade i att ge dig verktyg till konkurrenskraftiga priser.
Machine Translated by Google

Teknisk support och e-garanticertifikat
www.vevor.com/support
Detta är den ursprungliga instruktionen, läs alla instruktioner noggrant innan du
använder den. VEVOR reserverar sig för en tydlig tolkning av vår användarmanual. Utseendet
på produkten är beroende av den produkt du fått. Ursäkta oss att vi inte kommer att
informera dig igen om det finns någon teknik eller mjukvaruuppdateringar på vår produkt.
MODELL: MG-435
Har du produktfrågor? Behöver du teknisk support? Kontakta oss gärna:
BEHÖVER HJÄLP? KONTAKTA OSS!
Elektrisk köttkvarn
- 1 -
Machine Translated by Google

INTRODUKTION
BESKRIVNING
16. Bas
1. Matpåskjutare 2.
Matbricka 3.
Matningsrör 4. Skruv
5. Korskniv
6. Medium skiva
9. Fin skiva
10. Korv
7. Fästring 8.
Grov skiva
11. Kebbe bilaga 1
Denna apparat är utrustad med ett termostatsystem. Detta system kommer
12. Kebbe bilaga 2
Varning - För att minska risken för skador måste användaren läsa igenom
14. Handtag
13. Fäst knapp
bruksanvisningen noggrant.
15. ON/OFF/Reverse-brytare
- 2 -
Machine Translated by Google

VIKTIG
tillbehör eller närmande delar som rör sig under användning.
5. Slå på apparaten igen.
2.Före användning, dra åt fästringen med skiftnyckel, se till att ringen inte kan vara
bryta automatiskt strömförsörjningen till apparaten i händelse av
sladden utom räckhåll för barn.
systemet aktiveras för ofta.
3. Spara dessa instruktioner för framtida referens.
4.Kontrollera om spänningen som anges på apparaten överensstämmer med den lokala spänningen
aldrig kopplas till en ur.
1. Dra ut stickkontakten ur uttaget.
övervakning eller instruktioner angående användning av apparaten i ett kassaskåp
5.Använd aldrig några tillbehör till delar från annan tillverkning. Din
3.Låt apparaten svalna i 60 minuter.
8.Barn får inte leka med apparaten.
1. Läs denna bruksanvisning noggrant och titta på illustrationerna
4. Sätt i nätkontakten i uttaget.
9.Stäng av apparaten och koppla från strömförsörjningen innan du byter
innan du använder apparaten.
lossa med 4 Nm.
6. Denna apparat får inte användas av barn. Behåll apparaten och dess
Kontakta din återförsäljare av ett auktoriserat servicecenter om termostaten
Om du ansluter, kommer indikatorlampan att lysa.
överhettning.
7. Apparater kan användas av personer med nedsatt fysisk, sensorisk eller
mentala förmågor eller brist på erfarenhet och kunskap om de har varit det
Om din apparat plötsligt slutar fungera:
VARNING: För att undvika en farlig situation måste denna apparat
nätspänning innan du ansluter apparaten.
2.Tryck på strömbrytaren för att stänga av apparaten.
garantin blir ogiltig om sådana tillbehör eller delar har använts.
sätt och om de förstår riskerna.
- 3 -
Machine Translated by Google

- 4 -
15. Doppa aldrig motorenheten i vatten eller någon annan vätska, och skölj inte heller
9. Koppla ur apparaten direkt efter användning.
19. Tillbehör ska innehålla instruktioner för säker användning.
6. Använd inte apparaten om nätsladden, kontakten eller andra delar är det
rör medan apparaten är igång. Endast pushern ska användas för detta
16. Försök inte att slipa ben, nötter eller andra hårda föremål.
21. Denna apparat är inte avsedd att användas av personer (inklusive barn)
med nedsatt fysisk, sensorisk eller mental förmåga, eller bristande erfarenhet
skär i bitar ca 20 mm x 20 mm x 60 mm. Pushers är
ersättas av tillverkare eller ett auktoriserat servicecenter, för att undvika
12. Låt aldrig apparaten gå utan uppsikt.
angående användning av apparaten av en person som är ansvarig för deras säkerhet.
8. Rengör de delar som kommer i kontakt med livsmedel noggrant innan
14.Vänta tills rörliga delar har slutat fungera innan du tar bort
mer än 5 minuter i följd. Låt apparaten svalna i 10
du använder apparaten för första gången.
delar av apparaten.
minuter innan du använder den igen.
20.Den ska varna för potentiell skada från felaktig användning.
10. Använd aldrig fingret eller en invändning för att trycka ner ingredienser i fodret
den under kranen. Använd endast en fuktig trasa för att rengöra motorenheten.
17. Grip aldrig in i fräshuset. Använd alltid pushern.
skadad.
ändamål.
11.Förvara apparaten utom räckhåll för barn.
7.Om nätsladden till denna apparat är skadad måste den alltid vara det
18. Mincers matas med sen-, ben- och fettfritt nötkött som har varit
och kunskap, såvida de inte har fått handledning eller instruktioner
farliga situationer.
22.Barn bör övervakas för att säkerställa att de inte leker med
13.Stäng av apparaten innan du tar bort och installerar något tillbehör.
pressas med en kraft av 5N mot köttet. Använd inte apparaten till
Machine Translated by Google

BRUKSANVISNING
respektive lands lag. Denna symbol på produkten, instruktionen
kött som är inlåst i fräshuset är obetrampat, så att apparaten kan förnya sin
på ett säkert sätt och om de förstår riskerna.
Rengöring och användarunderhåll får inte utföras av barn om inte de
är från 8 år och uppåt och övervakade. Behåll apparaten och
vanligt skick.
manual eller förpackningen anger att en produkt omfattas av dessa
dess sladd utom räckhåll för barn under 8 år.
• Tryck på fästknappen, håll i huvudet och sätt in det i inloppet (när
föreskrifter. Genom återvinning, återanvändning av materialen eller andra former av utnyttjande
24. Avfallshantering av apparater och batterier.
28. Denna apparat är avsedd att användas i hushåll och liknande
införa vänligen uppmärksamma huvudet måste vara lutande som
applikationer såsom: –
personalköksytor i butiker, kontor och andra arbetsmiljöer; – bondgårdar; – av kunder i
hotell, motell och
andra bostadsmiljöer; – miljöer av bed and breakfast-typ.
25.Efter genomförandet av det europeiska direktivet 2002/96/EU i
gamla enheter, du gör ett viktigt bidrag till att skydda vår
nationellt rättssystem gäller följande:
miljö.
27.Denna apparat kan användas av barn från 8 år och uppåt om
26. Elektriska och elektroniska enheter får inte kasseras i hushåll
apparat.
enheter vid slutet av sin livslängd till de offentliga insamlingsställen som inrättats
MONTERING
avfall. Konsumenter är enligt lag skyldiga att lämna tillbaka elektriska och elektroniska
23.Om apparaten är låst, tryck på Reversal-knappen (REV). De
för detta ändamål eller försäljningsställe. Detaljer för detta definieras av den nationella
de har fått tillsyn eller instruktioner om användningen av
- 5 -
Machine Translated by Google

- 6 -
• Placera ormen i huvudet, den långa änden först, och vrid för att mata skruven
något tills den sitter i motorhuset (fig.3). • Placera
skärbladet på ormskaftet med bladet vänd mot
tätt .(fig.2)
• per pil som anges på toppen, se fig.1), •
flytta sedan huvudet moturs så att huvudet som fästs
framsidan enligt bilden (fig.4). Om den inte är ordentligt monterad kommer köttet inte att malas.
Machine Translated by Google
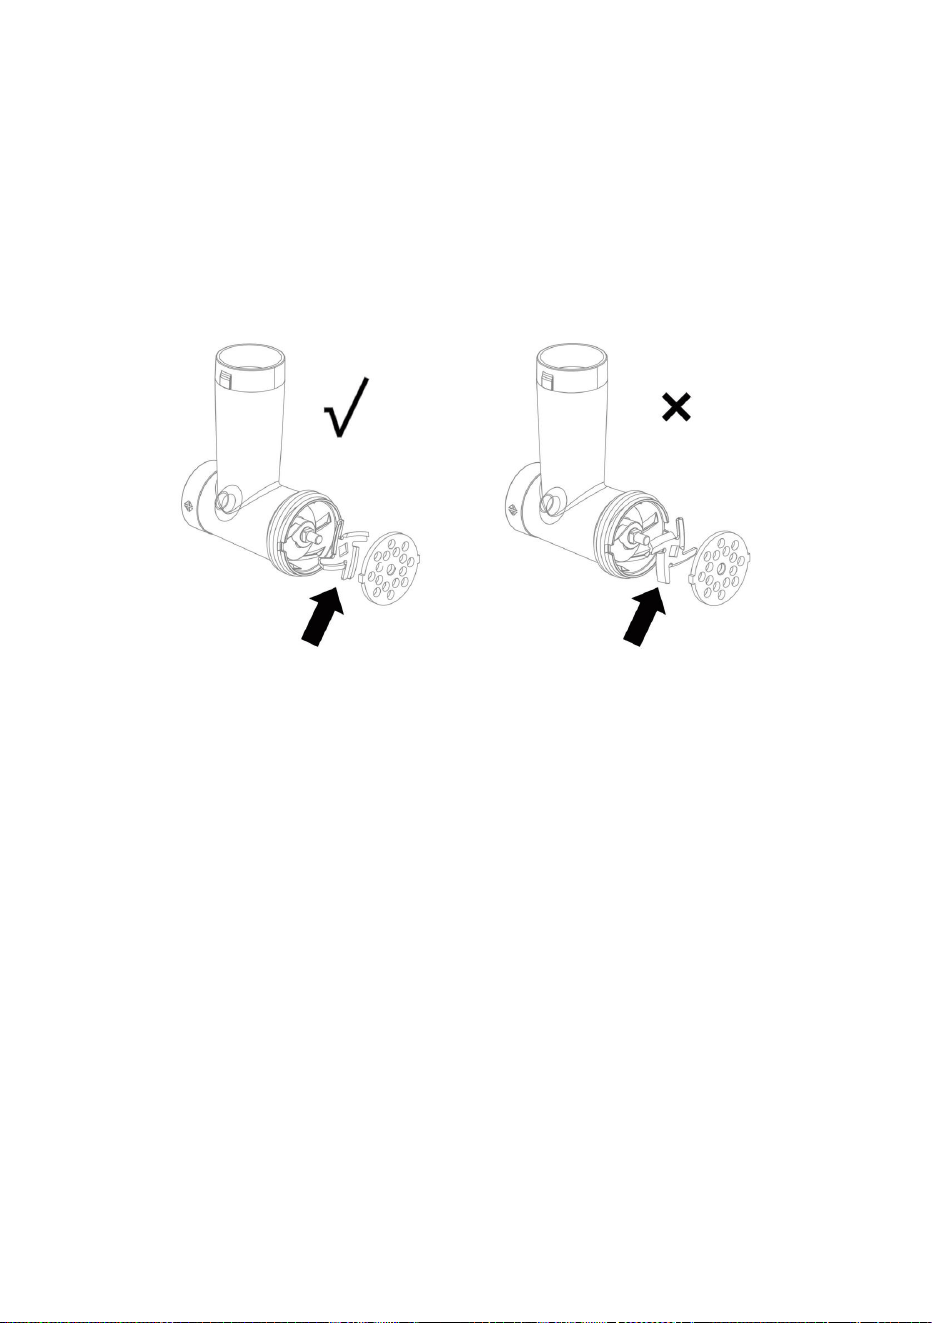
Skärbladsenhet
huvud.) Vrid skruvringen i pilens riktning på kniven
fästringen dra åt med en annan hand (fig.6). Dra inte åt för hårt. •
Placera behållaren på huvudet och fixera den på plats. • Placera
enheten på en stadig plats. •
Luftpassagen i botten och sidan av motorhuset ska
Lägg köttet i brickan. Använd påskjutaren för att försiktigt trycka in köttet i
hållas fri och inte blockeras.
höljet tills det är ordentligt fastsatt.
2. Fäst fräshuset på motorenheten.
Mincer
3.Placera brickan på den upprättstående delen av skärhuset.
1. Sätt in snäckaxeln i fräshuset, plaständen först.
4. Nu är apparaten redo för malning.
Skär köttet i 10 cm långa, 2 cm tjocka strimlor. Ta bort ben, bitar av
Placera skärenheten på snäckaxeln. (Skäreggarna ska vara vid
• Placera önskad skärplatta bredvid skärbladet, passa utsprång
(beroende på vilken konsistens du föredrar) på maskskaftet. (Göra
framsidan) Placera mellanslipskivan eller grovslipskivan
i skåran (fig.5). •
Stöd eller tryck på mitten av skärplattan med ett finger och skruva sedan
se till att skåran på slipskivan passar på utsprången på färsen
brus och senor så mycket som möjligt. (Använd aldrig fryst kött!)
- 7 -
Machine Translated by Google

Att göra korv
Att göra kebbe
4.Nu är apparaten redo att göra kebbe.(fig.10)
,
kan sedan fyllas med en köttfärsblandning, ändarna nypas ihop
och sedan friterad.
1.Färs köttet
Mata den beredda kebbeblandningen genom kebbemaskinen.
Skär den kontinuerliga ihåliga cylindern i önskade längder och använd som
Sätt in snäckaxeln i fräshuset, den
Sätt in snäckaxeln i skärhuset, plaständen först.(fig.11)
Placera separatorn i fräshuset.
1.plaständen först.(fig.8)
nödvändig.
Placera konen i fräshuset.
Kebbe är en traditionell mellanösternrätt gjord främst av lampa och
Placera korvhornet på fräshuset och skruva fast ringen
bulgurvete som mals ihop till en pasta blandningen är
Placera den tidigare på fräshuset och skruva fast ringen på fräsen
frässpolning. (För bifftartarskiva
två gånger.)
2. Fäst fräshuset på motorenheten.
bostäder.(fig.9)
finhacka köttet med medelhög malning
3.Placera brickan på den upprättstående delen av skärhuset.
extruderade genom kebbemaskinen och skär i korta längder. Rören
- 8 -
Machine Translated by Google

HUR DU RENGÖR DINA APPARATER
3.Placera brickan på den upprättstående delen av skärhuset.
4.Nu är apparaten redo att göra korv.
Lägg ingredienserna i brickan. Använd påskjutaren för att försiktigt trycka in köttet
fräshus. Om skinnet fastnar på korvhornet, blöt det med
hackhuvud.)
2. Fäst fräshuset på motorenheten.
(Se till att skårorna på separatorn passar på utsprången på den
fräshus.
Lägg korvskinnet i ljummet vatten i 10 minuter. Skjut sedan det våta
skinn på korvhornet. Tryck ner den (kryddade) köttfärsen
fräshuset.
Kött som lämnas kvar i fräshuset kan tas bort från insidan av
apparaten genom att föra en skiva bröd genom skärhuset.
lite vatten.
- 9 -
Machine Translated by Google

6.Matpåskjutare
7.Matbricka
10.blad
2.Tryck på frigöringsknappen och vrid hela fräshuset i
Adress: 3F, No.9 Chaoguang Road, Gaoli, Ronggui, Shunde, Foshan,
Guangdong, Kina.
pilens riktning. Ta bort påskjutaren och brickan.(fig.13)
12. Skärplåt (grov)
13. Fästring
3.Skruva loss skruvringen och ta bort alla delar av skärhuset. Do
Rengör inte delarna i diskmaskinen!
14.Korv
4.Tvätta alla delar som har kommit i kontakt med kött i varmt tvålvatten.
14.Korv11. Skärplåt (medelhög)
Rengör dem direkt efter användning.
Stäng av apparaten innan du rengör apparaten
6.Vi rekommenderar att du smörjer skärenheten och slipskivorna med
5. Skölj dem med rent varmt vatten och torka dem omedelbart.
1.och dra ut kontakten ur uttaget.(fig.12)
lite vegetabilisk olja.
Foshan Toc Electrical Appliance Co., Ltd.
- 10 -
Machine Translated by Google