
2

3
CONTENTS
TECHNICAL DATA .................................................................................................................................3
INTRODUCTION ..................................................................................................................................... 4
SAFETY INFORMATION ....................................................................................................................... 4
GENERAL SAFETY RULES ................................................................................................................... 5
SPECIFIC SAFETY RULES FOR ELECTRIC WOOD SHREDDER .................................................... 9
SYMBOLS ...............................................................................................................................................10
ASSEMBLY INSTRUCTION .................................................................................................................12
OPERATING INSTRUCTION ............................................................................................................... 13
MAINTENANCE .................................................................................................................................... 15
RECYCLING AND DISPOSAL .............................................................................................................16
TROUBLE SHOOTING ..........................................................................................................................17
EXPLODED VIEW & PART LIST ........................................................................................................ 18
WARRANTY .......................................................................................................................................... 20
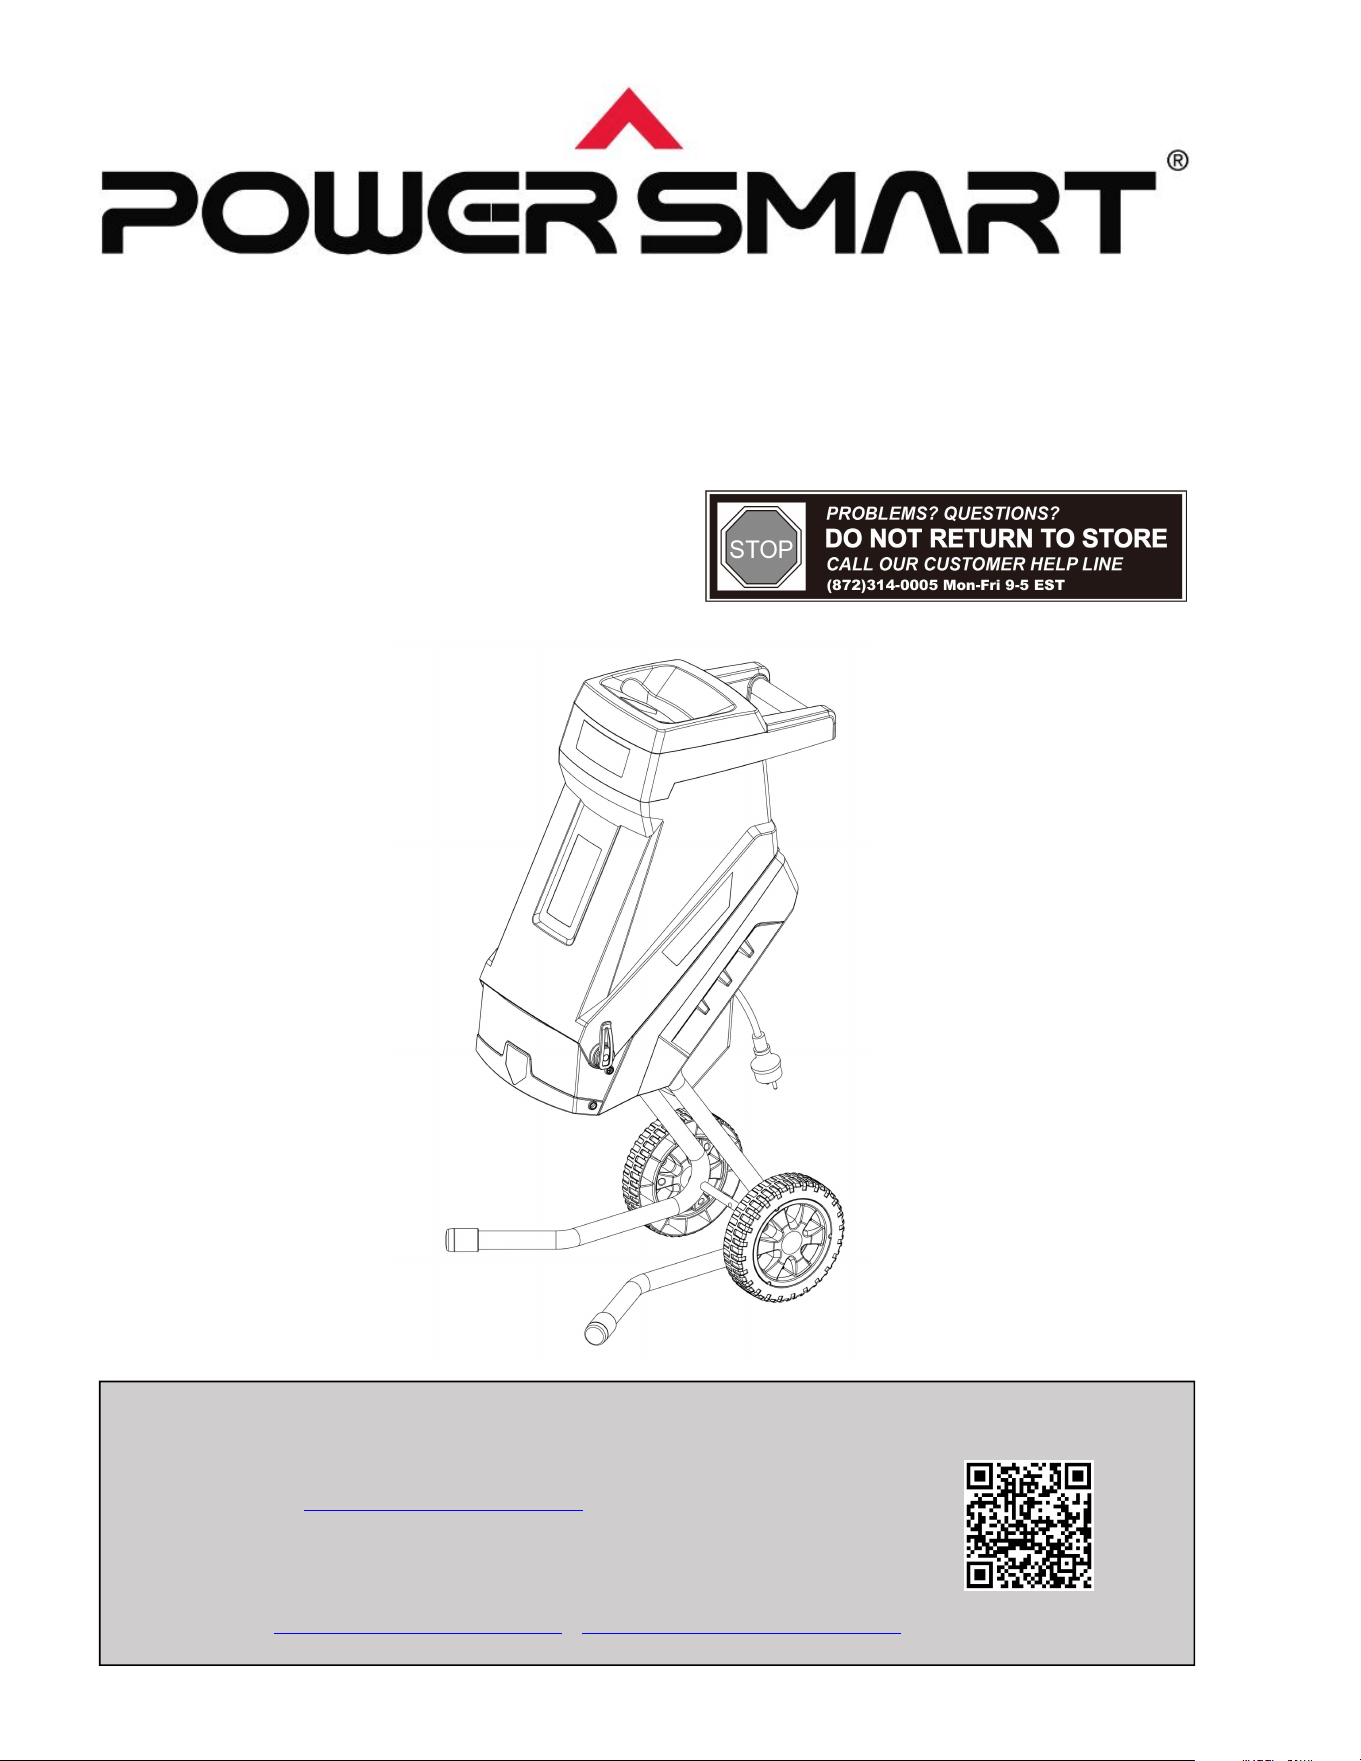
TECHNICAL DATA
Electric Wood Shredder Model#DB6610
Motor: 120 V,60Hz,15A
No-load speed: 3700RPM
Branch Diameter: 1-3/4
"
(45mm)
Wheel Size: 7"
Discharge: Bag
Protection level: IPX4
Package Dimensions (L x W x H): 24.4x12.6x14inch
Net Weight: 22.7 lb.

4
INTRODUCTION
Thank You for Purchasing a PowerSmart
®
Product. This manual provides information regarding the safe
operation and maintenance of this product. Every effort has been made to ensure the accuracy of the
information in this manual. PowerSmart
®
reserves the right to change this product and specifications at
any time without prior notice.
Please keep this manual available to all users during the entire life of the chipper shredder.
This manual contains special messages to bring attention to potential safety concerns the
shredder as well as helpful operating and servicing information. Please read all the
information carefully to avoid injury and machine damage.
QUESTIONS? PROBLEMS?
Please contact our Customer Service Dept. with any questions and/or comments, either by Email:
available Mon-Fri 9am-5pm EST to help solve any issues that you might encounter.
SAFETY INFORMATION
Before operating this wood shredder, read and observe all warnings, cautions, and instructions on the
wood shredder and in this Owner’s Manual.
NOTE: The following safety information is not meant to cover all possible conditions and situations that
may occur. Read the entire Owner’s Manual for safety and operating instructions. Failure to follow
instructions and safety information could result in serious injury or death.
This safety alert symbol is used to identify safety information about hazards that can result in personal
injury.
A signal word (DANGER, WARNING, or CAUTION) is used with the alert symbol to
indicate the likelihood and the potential severity of injury. In addition, a hazard symbol may
be used to represent the type of hazard.
DANGER Indicates a hazard, which, if not avoided, will result in death or serious injury.
WARNING Indicates a hazard, which, if not avoided, could result in death or serious injury.
CAUTION Indicates a hazard, which, if not avoided, might result in minor or moderate injury.
CAUTION Without the alert symbol, indicates a situation that could result in damage.
5
GENERAL SAFETY RULES
Safety is a combination of common sense, staying alert, and knowing how your wood shredder works.
SAVE THESE SAFETY INSTRUCTIONS.
WARNING: Do not operate this unit until you read this instruction manual for safety,
operation and maintenance instructions. Failure to follow all instructions listed below may
result in electric shock, fire, and/or serious personal injury.
Work Area Safety
Keep your work area clean and well lit. Cluttered and dark areas invite accidents.
Do not operate power tools in explosive atmospheres, such as in the presence of flammable liquids,
gases, or dust. Power tools create sparks which may ignite the dust or fumes.
Keep bystanders, children, and visitors away while operating a power tool. Distractions can cause
you to lose control.
Electrical Safety
Grounding instructions
IN THE EVENT OF A MALFUNCTION OR BREAKDOWN, grounding provides the path of least
resistance for electric current and reduces the risk of electric shock. This tool is equipped with an electric
cord that has an equipment grounding conductor and a grounding plug. The plug MUST be plugged into
a matching outlet that is properly installed and grounded in accordance with ALL local codes and
ordinances.
DO NOT MODIFY THE PLUG PROVIDED. If it will not fit the outlet, have the proper outlet installed
by a licensed electrician.
IMPROPER CONNECTION of the equipment grounding conductor can result in electric shock. The
conductor with the green insulation (with or without yellow stripes) is the equipment grounding
conductor. If repair or replacement of the electric cord or plug is necessary, DO NOT connect the
equipment grounding conductor to a live terminal.
CHECK with licensed electrician or service personnel if you do not completely understand the grounding
instructions, or if you are not sure if the tool is properly grounded.
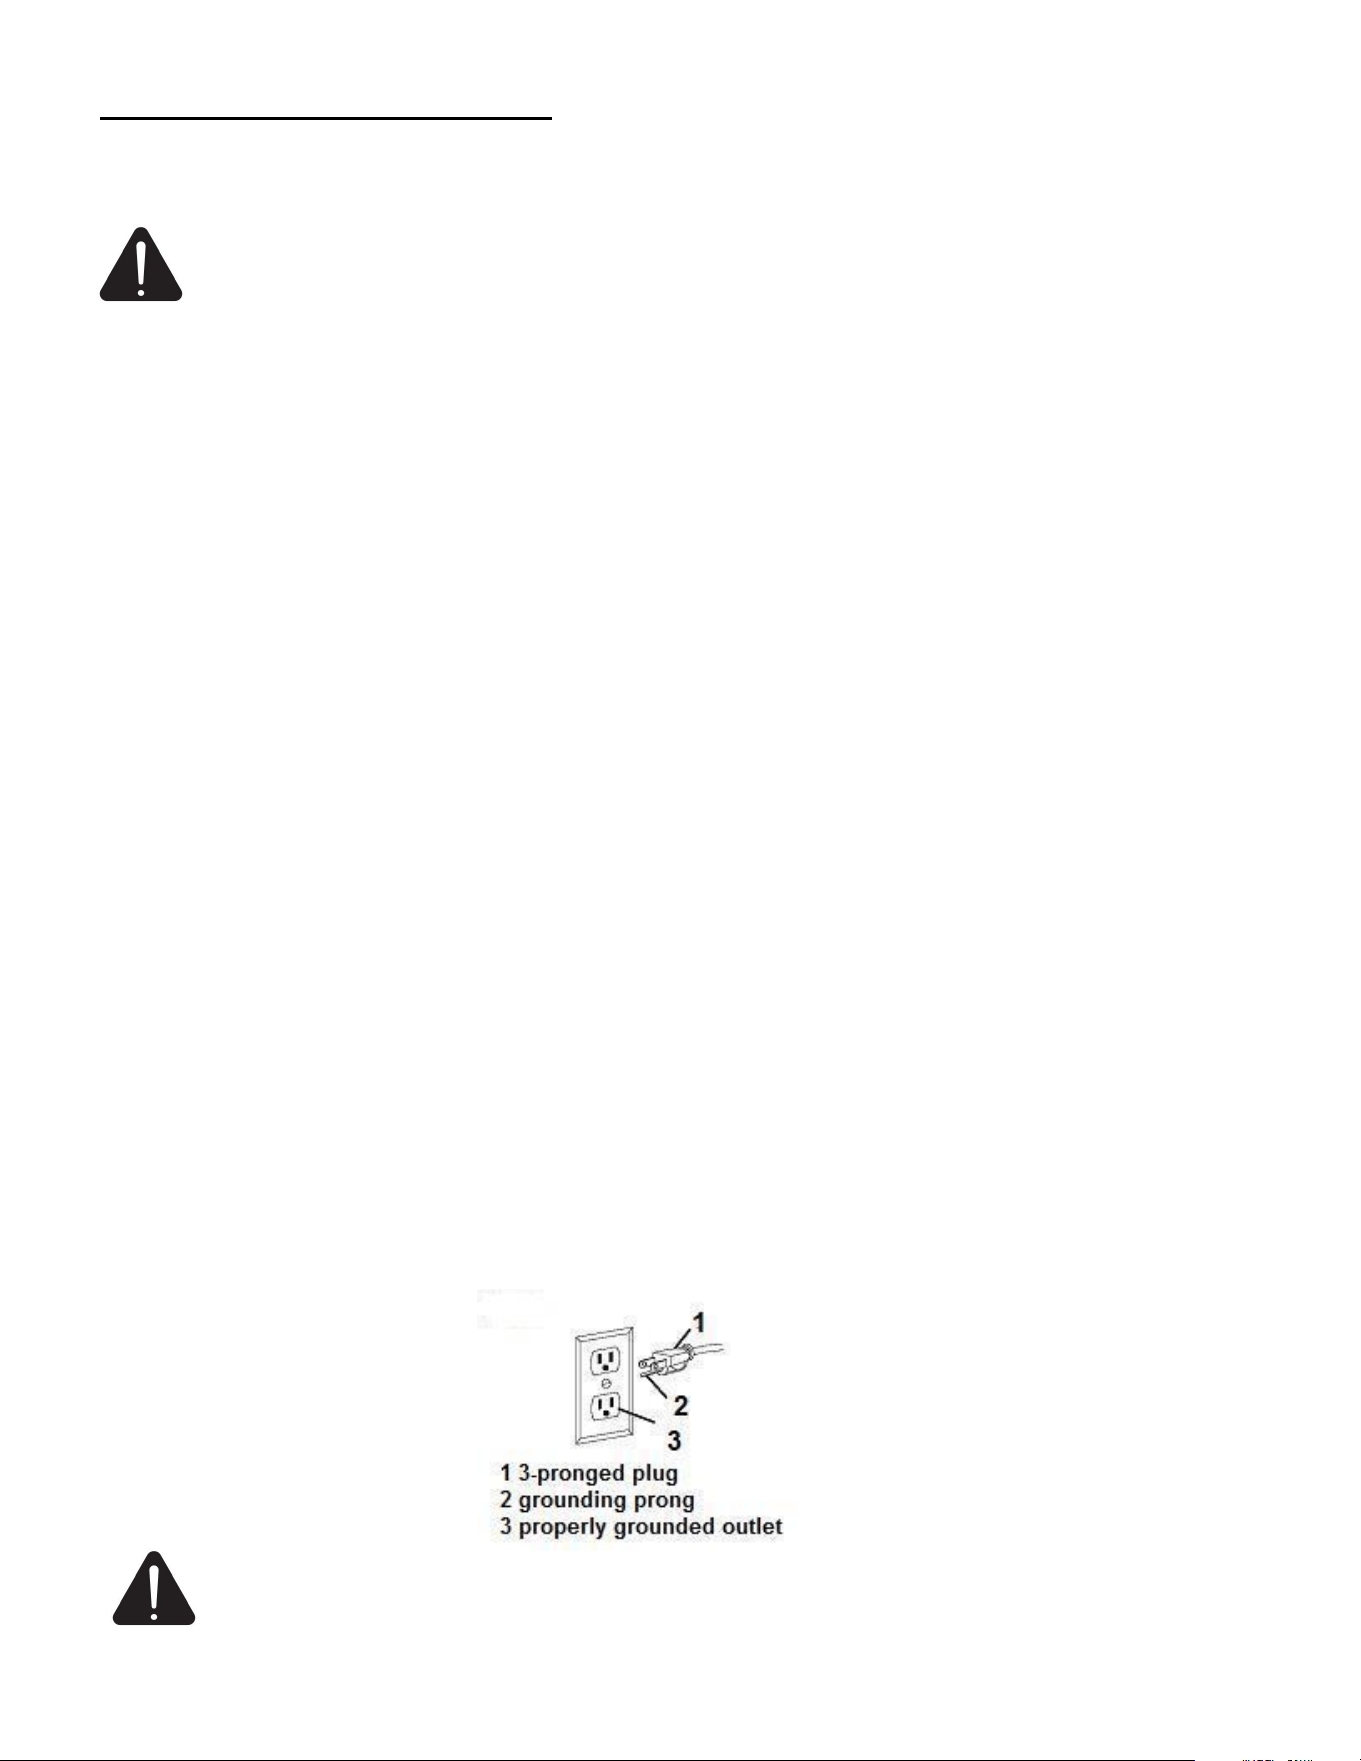
USE ONLY THREE-WIRE EXTENSION CORDS that have 3-pronged plugs and outlets that accept the
tool's plug as shown in Fig. A. Repair or replace a damaged or worn cord immediately.
CAUTION: In all cases, make certain the outlet in question is properly grounded. If you are
not sure if it is, have a licensed electrician check the outlet.

6
WARNING: Do not expose to rain or use in damp locations.
Guidelines for using extension cords
Make sure your extension cord is in good condition. When using an extension cord, be sure to use one
heavy enough to carry the current your product will draw. An undersized cord will cause a drop in line
voltage resulting in loss of power and overheating. The table below shows the correct size to be used
according to cord length and nameplate ampere rating. If in doubt, use the next heavier gauge. The
smaller the gauge number, the heavier the cord.
Minimum Gauge for Extension Cords (AWG)
(When using 120 V only)
Ampere Rating
Total Length of Cord in feet
More Than
Not More Than
25
50
100
150
0
6
18
16
16
14
6
10
18
16
14
12
10
12
16
16
14
12
12
16
14
12
Not Recommended
Make sure your extension cord is properly wired and in good condition. Always replace a damaged
extension cord or have it repaired by a qualified person before using it.
Protect your extension cords from sharp objects, excessive heat and damp or wet areas.
Use a separate electrical circuit for your tools. This circuit must not be less than a #12 wire and should be
protected with a 15 A time-delayed fuse. Before connecting the motor to the power line, make sure the
switch is in the OFF position and the electric current is rated the same as the current stamped on the motor
nameplate. Running at a lower voltage will damage the motor.
WARNING: If you are uncertain, have it checked by a certified electrician. Always make sure
that your outlet is property grounded. This garden shredder is for outdoor use only. Do not
expose to rain or use in damp locations.
Although this shredder is double-insulated, the extension cord and receptacle must still be grounded
while in use to protect the operator from electric shock.
For All Double Insulated Appliances
1. Replacement Parts: when servicing use only identical replacement parts.
2. Polarized Appliance Connections: to reduce the risk of electric shock, this appliance has a polarized
plug (one blade is wider than the other) and will require the use of a polarized extension cord. The
appliance plug will fit into a polarized extension cord only one way. If the plug does not fit fully into the
extension cord, reverse the plug. If the plug still does not fit, obtain the correct polarized extension cord.
A polarized extension cord will require the use of a polarized wall outlet. This plug will fit into the
polarized wall outlet only one way. If the plug does not fit fully into the wall outlet, reverse the plug. If
the plug still does not fit, contact a qualified electrician to install the proper wall outlet. Do not change the
equipment plug, extension cord receptacle, or extension cord plug in any way.
For All Appliances
1. Do not use appliances in damp or wet locations as this can be dangerous.
2. Do not use in the rain.
3. Keep children away. All visitors should be kept at a safe distance from the work area.
7
4. Dress properly. Do not wear loose clothing or jewellery, which can get caught in moving parts. Use of
rubber gloves and heavy footwear is recommended when working outdoors. Wear protective hair
covering to contain long hair.
5. Use safety glasses. Always use face or dust mask if operation is dusty.
6. Use the right appliance. Do not use appliance for any job except that for which it is intended.
7. Ground Fault Circuit Interrupter (GFCI) protection should be provided on the circuit(s) or outlet(s) to
be used for the gardening appliance. Receptacles with built-in GFCI protection may be used for this
measure of safety.
8. Warning—to reduce the risk of electric shock, use only with an extension cord intended for outdoor
use, such as an extension cord of cord type SW-A, SOW-A, STW-A, STOW-A, SJW-A, SJOW-A,
SJTW-A or SJTOW-A.
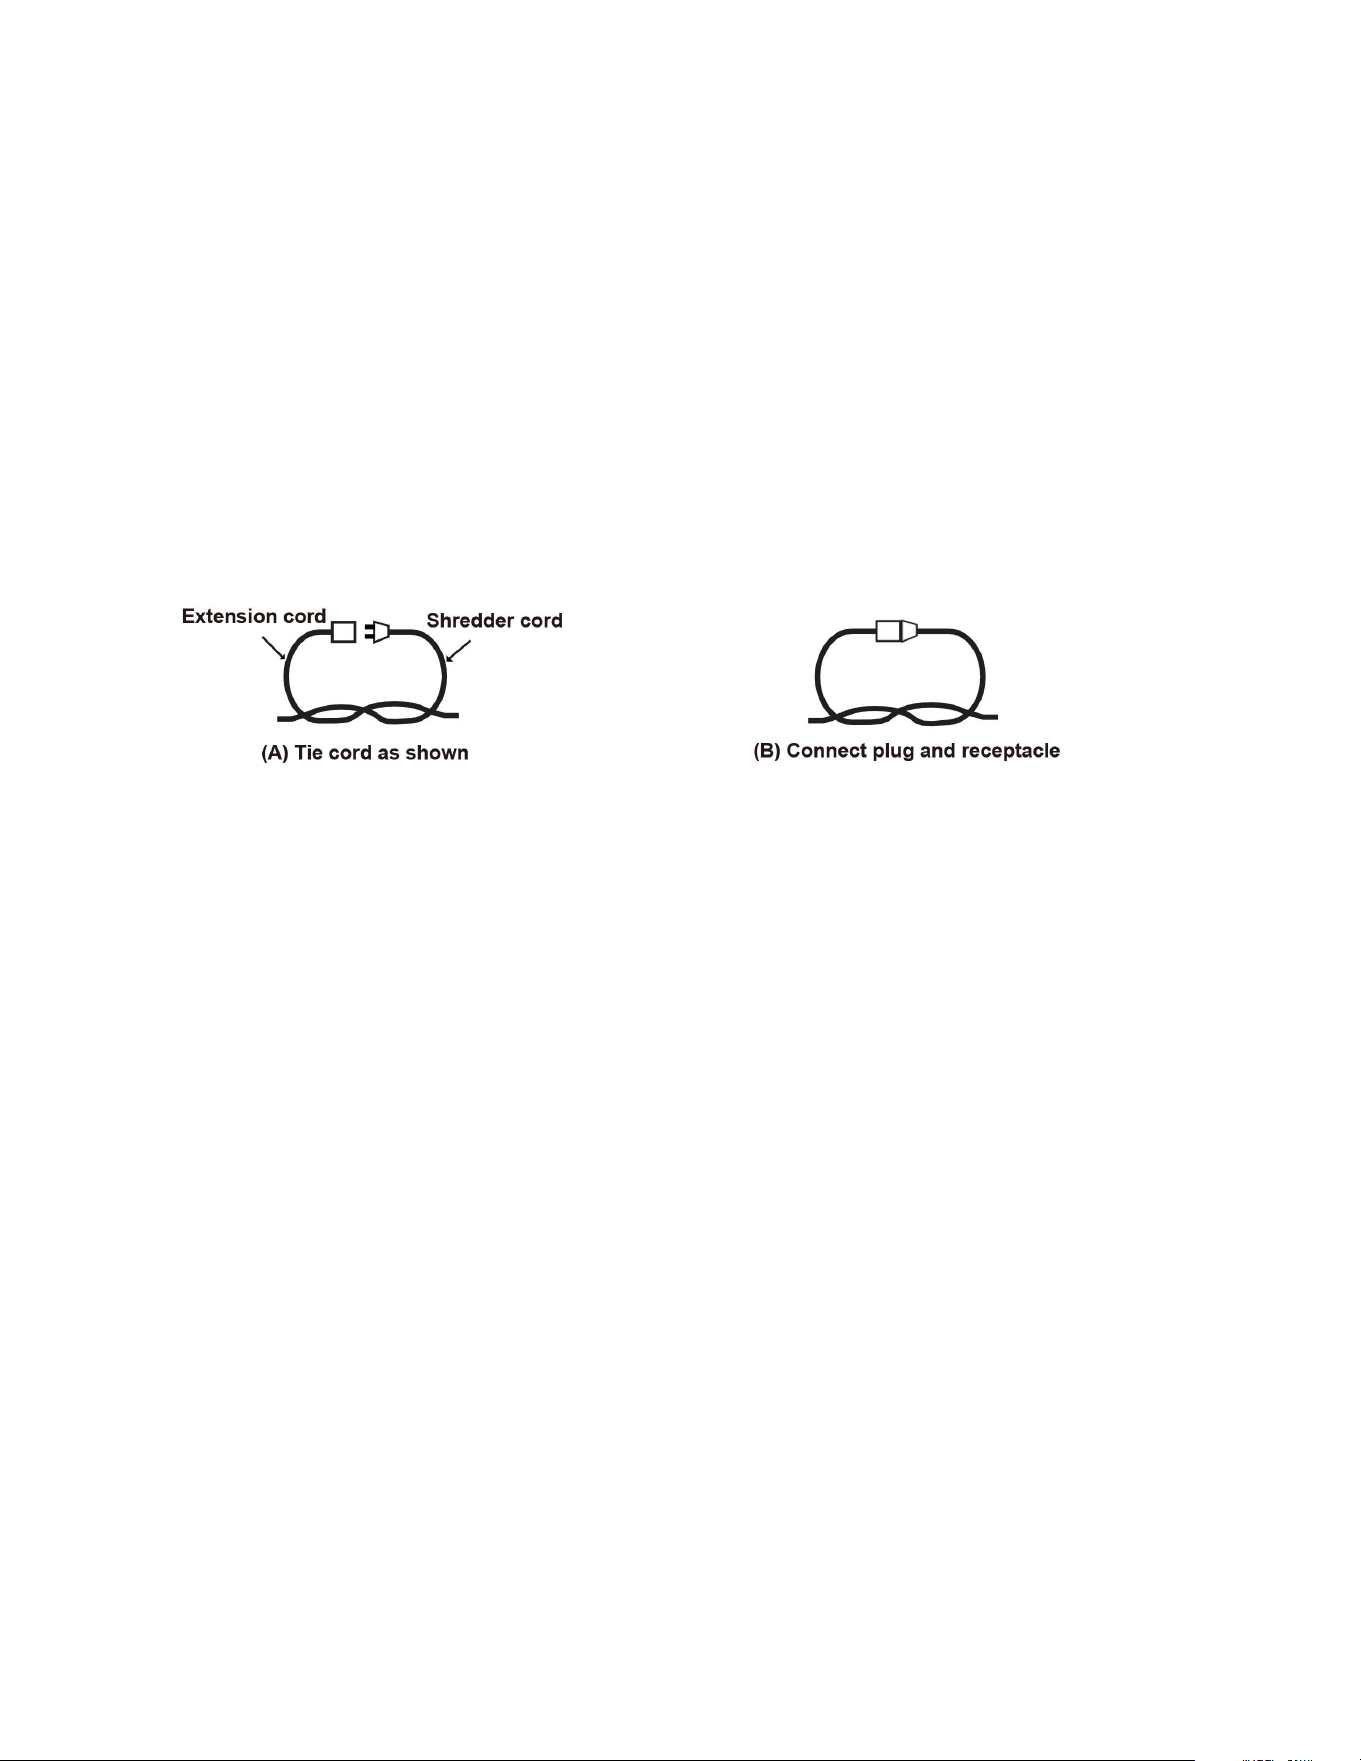
9. Extension Cord
Make sure your extension cord is in good condition and is heavy enough to carry the current your product
will draw. An undersized extension cord will cause a drop in line voltage resulting in loss of power and
overheating. To reduce the risk of disconnection of appliance cord from the extension cord during use:
i) make a knot as shown in below.
ii) Use one of the plug-receptacle retaining straps or connectors described in this manual.
10. Avoid unintentional starting. Do not carry plugged-in appliance with finger on switch. Be sure switch
is off when plugging in.
11. Do not abuse cord. Never carry appliance by cord or yank it to disconnect from receptacle. Keep cord
away from heat, oil, and sharp edges.
12. Do not force appliance. It will do the job better and with less likelihood of a risk of injury at the rate
for which it was designed.
13. Do not overreach. Keep proper footing and balance at all times.
14. Stay alert. Watch what you are doing. Use common sense. Do not operate appliance when you are
tired.
15. Disconnect the appliance from the power supply when not in use, before servicing, when changing
accessories such as blades, and the like.
16. Keep guards in place and in working order.
17. Keep blades sharp.
18. Keep hands and feet away from cutting area.
Personal Safety
Stay alert, watch what you are doing and use common sense when operating a power tool. Do not use
a power tool while you are tired or under the influence of drugs, alcohol or medication. A moment of
inattention while operating power tools may result in serious personal injury.
Use safety equipment. Always wear eye protection. Dust mask, non-skid safety shoes, hard hat, or
hearing protection must be used for appropriate conditions.
Dress properly. Do not wear loose clothing or jewelry. Contain long hair. Keep your hair, clothing,
and gloves away from moving parts. Loose clothes, jewelry, or long hair can be caught in moving
parts.

8
Avoid accidental starting. Be sure switch is off before connecting to power source and/ or battery
pack, pick up or carrying the tool. Carrying power tools with your finger on the switch or energizing
power tools that have the switch on invites accidents.
Remove any adjusting key or wrench before turning the power tool on. A wrench or a key left
attached to a rotating part of the power tool may result in personal injury.
Do not overreach. Keep proper footing and balance at all times. Proper footing and balance enable
better control of the power tool in unexpected situations.
If devices are provided for the connection of dust extraction and collection facilities, ensure theses
are connected and properly used. Use of dust collection can reduce dust-related hazards.
Service
Tool service must be performed only by qualified repair personnel. Service or maintenance
performed by unqualified personnel could result in a risk of injury.
When servicing a tool, use only identical replacement parts. Follow instructions in the Maintenance
section of this manual. Use of unauthorized parts or failure to follow Maintenance Instructions may
create a risk of electric shock or injury.

9
SPECIFIC SAFETY RULES FOR ELECTRIC WOOD SHREDDER
WARNING: Do not operate your electric shredder until it is completely assembled and
installed according to the instructions.
Before starting the shredder, make sure that the hopper inlet is empty.
Keep your face and body away from the opening.
Do not allow hands or any other part of the body or clothing near the hopper or discharge chute.
Never put your hands into the hopper while the wood shredder is running. Always use the paddle
supplied with your shredder to push items into the hopper.
Do not try to force objects larger than the recommended diameter of 1-3/4" into the hopper.
Keep proper balance and footing at all times. Do not overreach. Never stand at a higher level than the
base of the tool when feeding material into the shredder.
Always stand clear of the discharge zone when operating the wood shredder. Never reach under the
shredder until it has come to a complete stop.
When feeding material into wood shredder be careful to remove pieces of metal, rocks, bottles, cans
or other foreign objects that may damage the blades.
If the cutting mechanism strikes a foreign object or if the shredder should start making any unusual
noise or vibration, turn it off and allow it to come to a complete stop. Disconnect from power supply
and take the following steps:
- Inspect for damage.
- Check for and tighten any loose parts.
Do not allow processed material to build up in the discharge zone; this may prevent proper discharge
and can result in kickback of material through the hopper.
If the shredder becomes clogged, turn it OFF and disconnect from power supply before clearing
debris. Keep the power source clear of debris and other accumulations to prevent damage to the
power source.
Keep all guards and deflectors in place and in good working condition.
Do not operate the shredder on a paved or gravel surface where ejected material could cause injury.
Turn off the chipper shredder and disconnect it from the power supply whenever you leave the work
area.
Do not tilt the shredder while it is running.
Never reach into the hopper until the shredder has come to a complete stop and has been
disconnected from the power supply. The blades will continue to rotate for a few seconds after the
shredder is turned off.
10
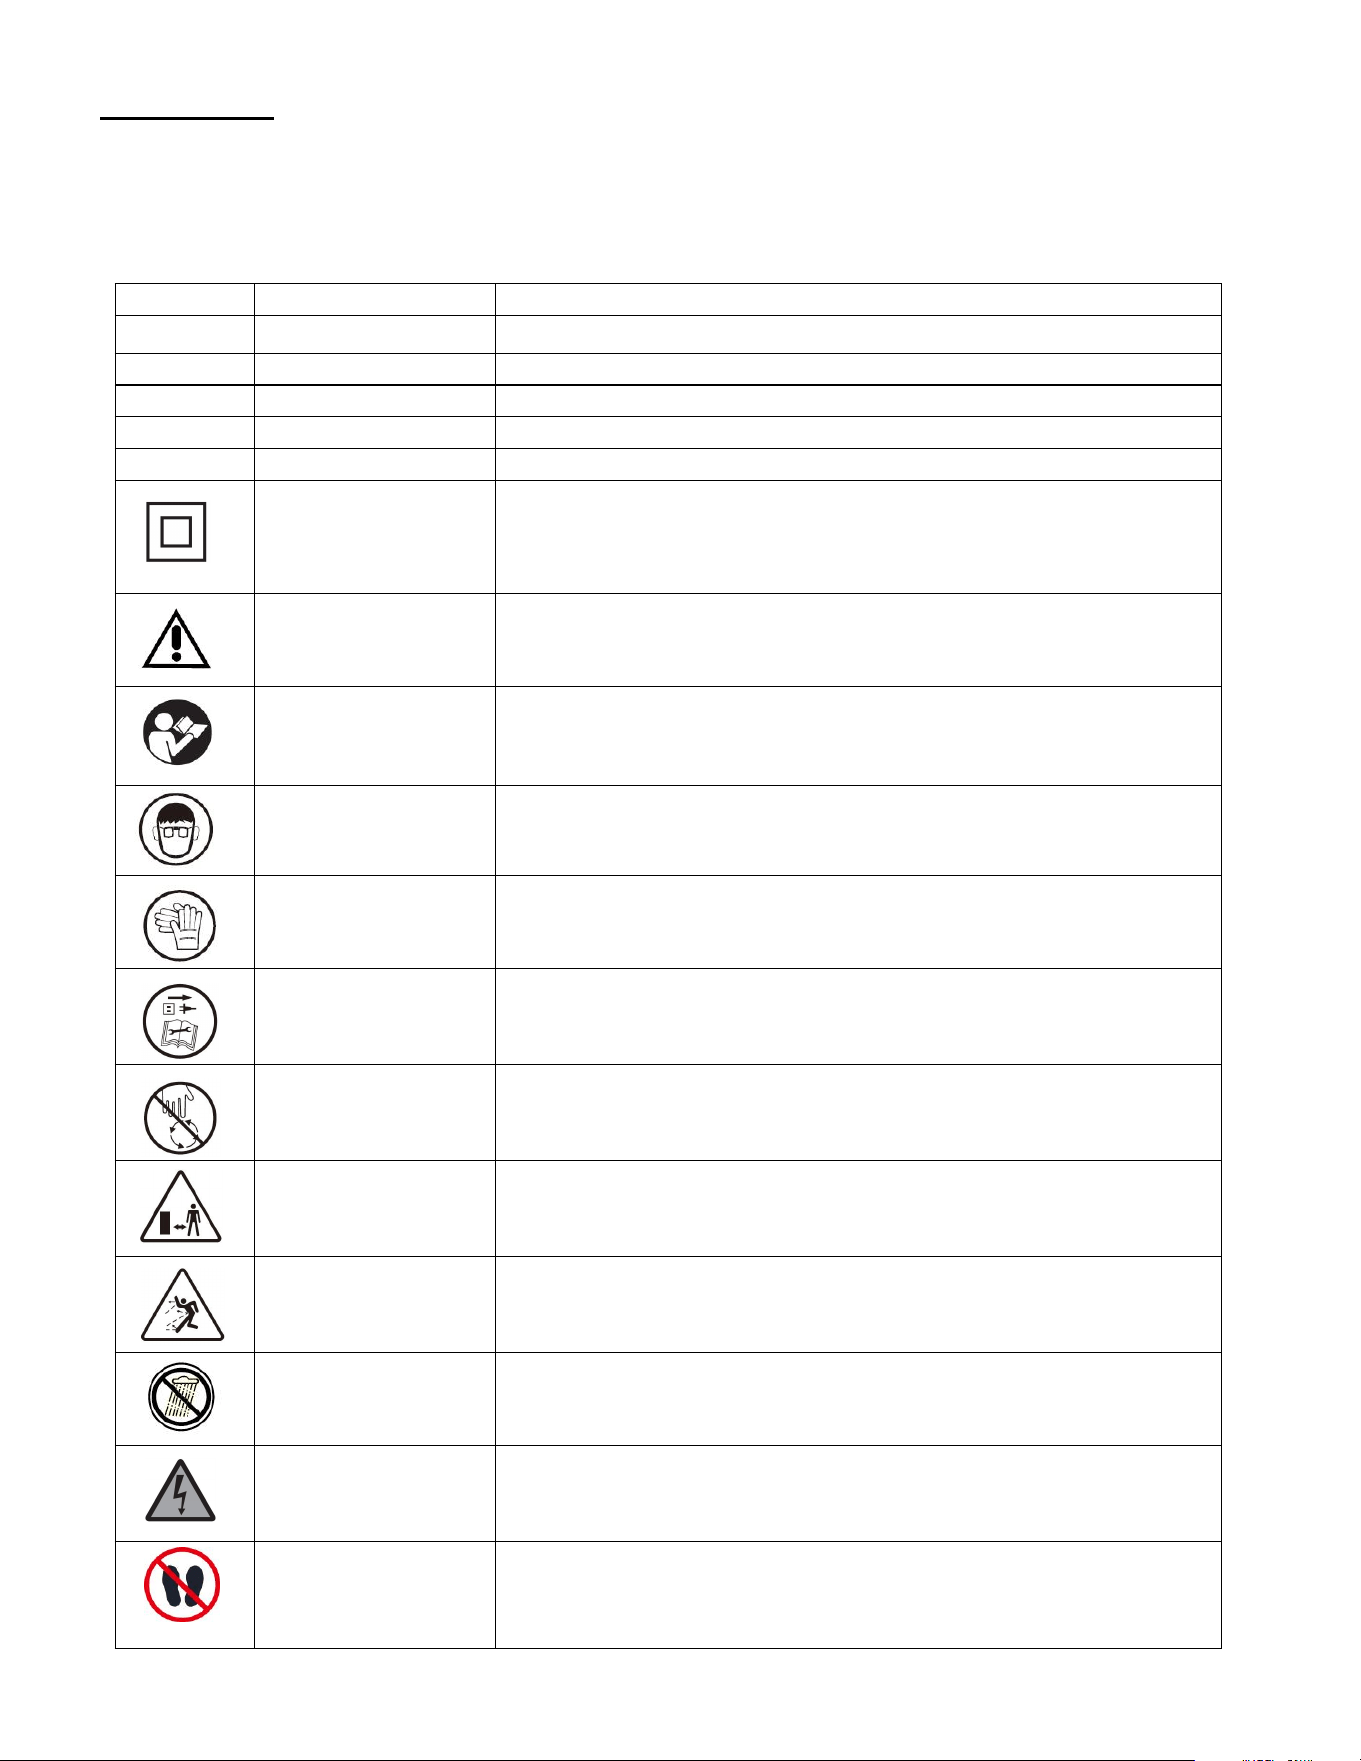
SYMBOLS
Some of the following symbols may be used on this product. Please study them and learn their meaning.
Proper interpretation of these symbols will allow you to operate the product better and safer.
SYMBOL
NAME
DESIGNATION/EXPLANATION
V
Volts
Voltage
A
Amperes
Current
Hz
Hertz
Frequency (cycles per second)
W
Watts
Power
MIN
Minutes
Time
Double Insulation
Class II construction Double Insulated construction
Safety Alert
Precautions that involve your safety.
Read the user’s
manual
To reduce the risk of injury, user must read and understand user’s
manual before using this product.
Eye and hearing
protection
For protection against injury, wear ear defenders and safety
goggles.
Wear protective
gloves
Wear protective gloves when using the machine and handling
debris.
SWITCH OFF!
Remove plug from outlet before cleaning or conducting
maintenance checks.
DANGER!
ROTATING
BLADES
Keep hands and feet away from openings while the unit is running.
Keep bystanders
away
Keep bystanders a safe distance away from the work
area.
Ricochet
Thrown objects and rotating
blade can cause severe injury.
Wet conditions alert
Do not expose to rain or use in damp locations.
Electric shock alert
Beware of electric shock hazard.
Do not stand alert
Do not stand on the machine.
11
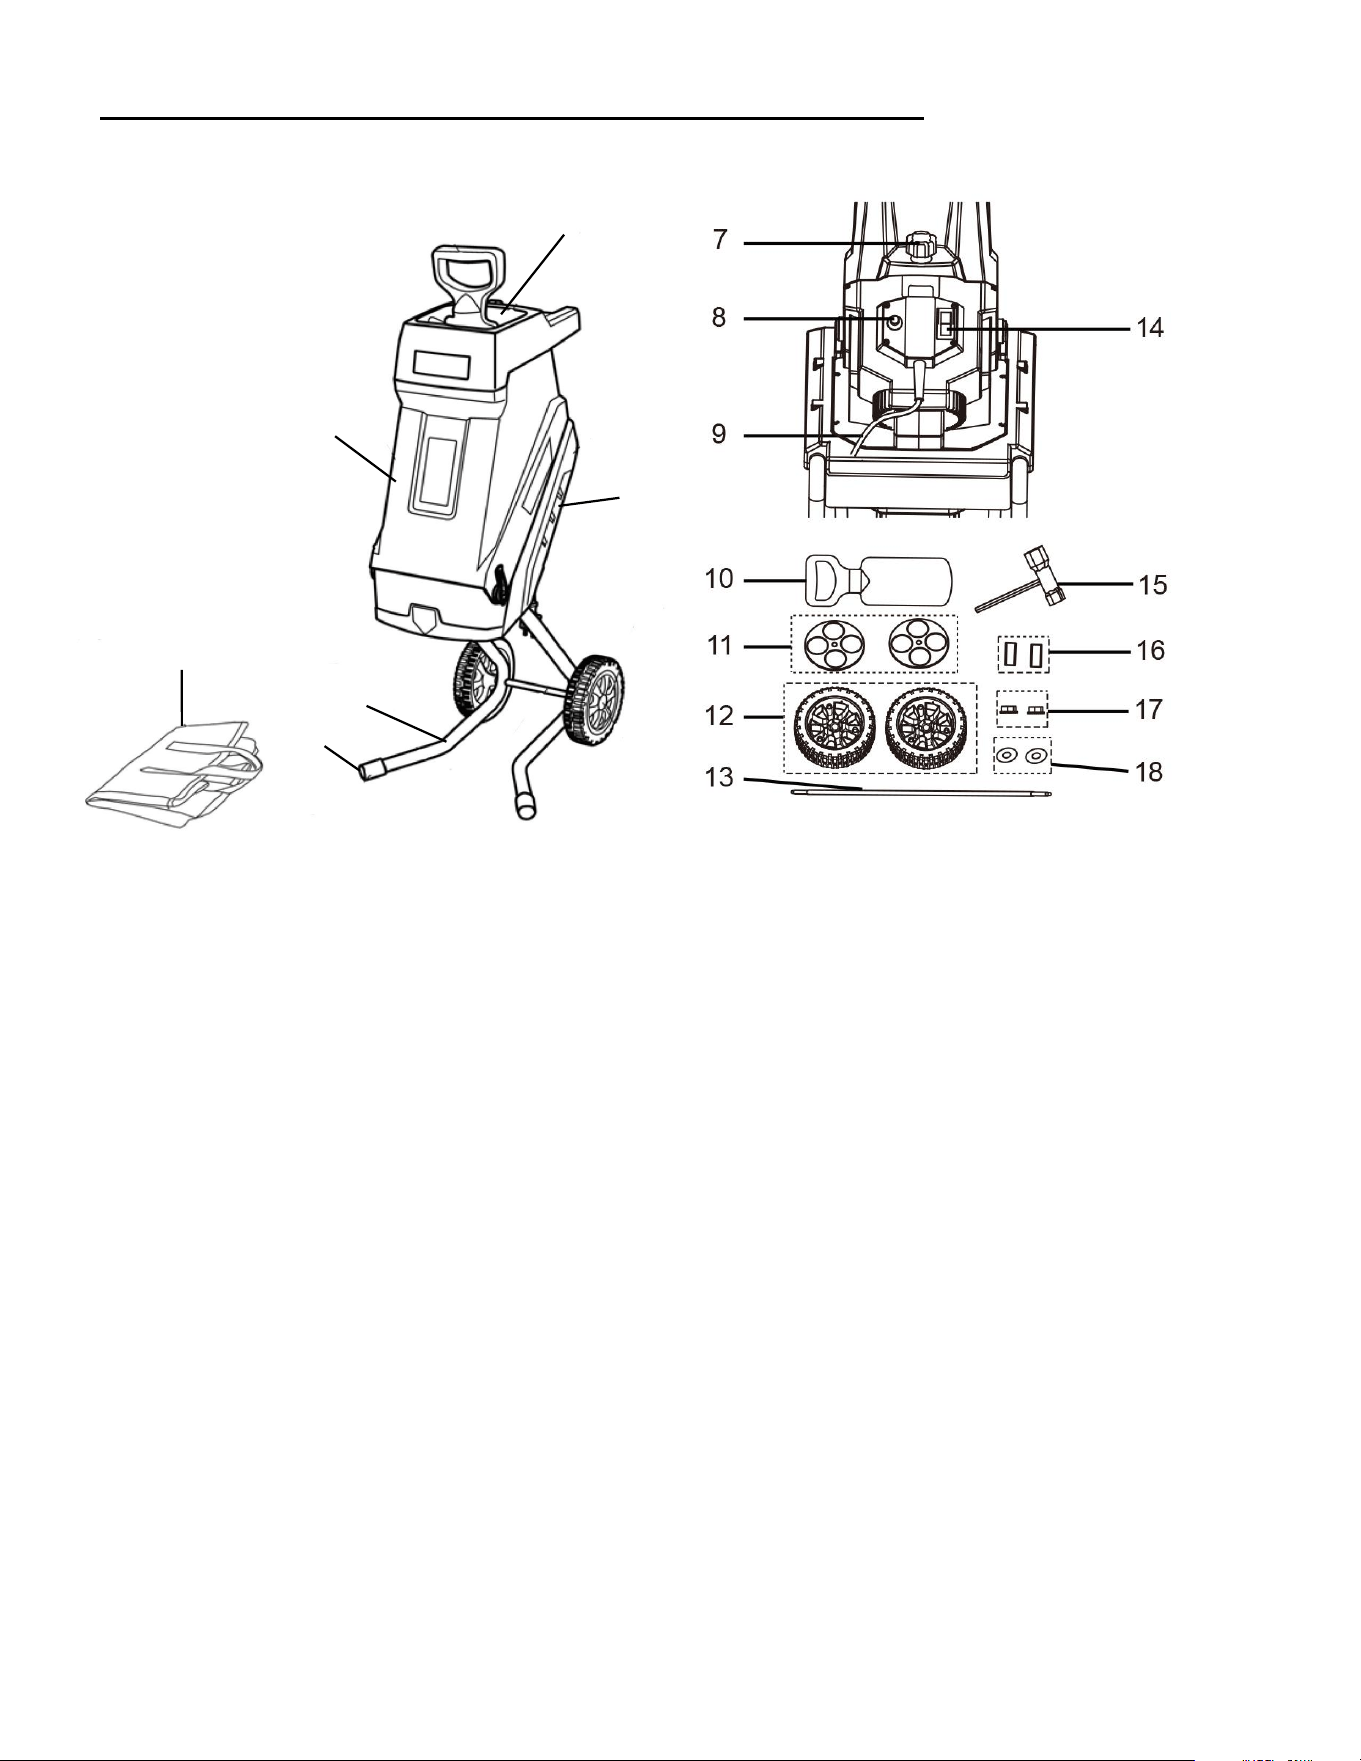
KNOWING YOUR ELECTRIC WOOD SHREDDER
Unpacking
Unpack the power tool and all its parts, and compare against the list below. Do not discard the carton or
Including:
Wood Shredder/ Collection Bag /Supporting Tube*2/ Screw For Supporting Tube*4/ Wheel*2
/Wheel cover*2 / Axle Tube with nuts / Socket Wrench / Plunger / User Manual
1
Feed hopper
7
Locking knob
13
Axle tube
2
Up housing
8
Overload protector
14
On/Off switch
3
Down housing
9
Power cable
15
Socket wrench
4
Supporting tube
10
Plunger
16
Wheel bushing
5
Foot pad
11
Wheel covers
17
Self-locking nut
6
Collection bag
12
Wheels
18
Washer
1
2
5
4
3
6
12
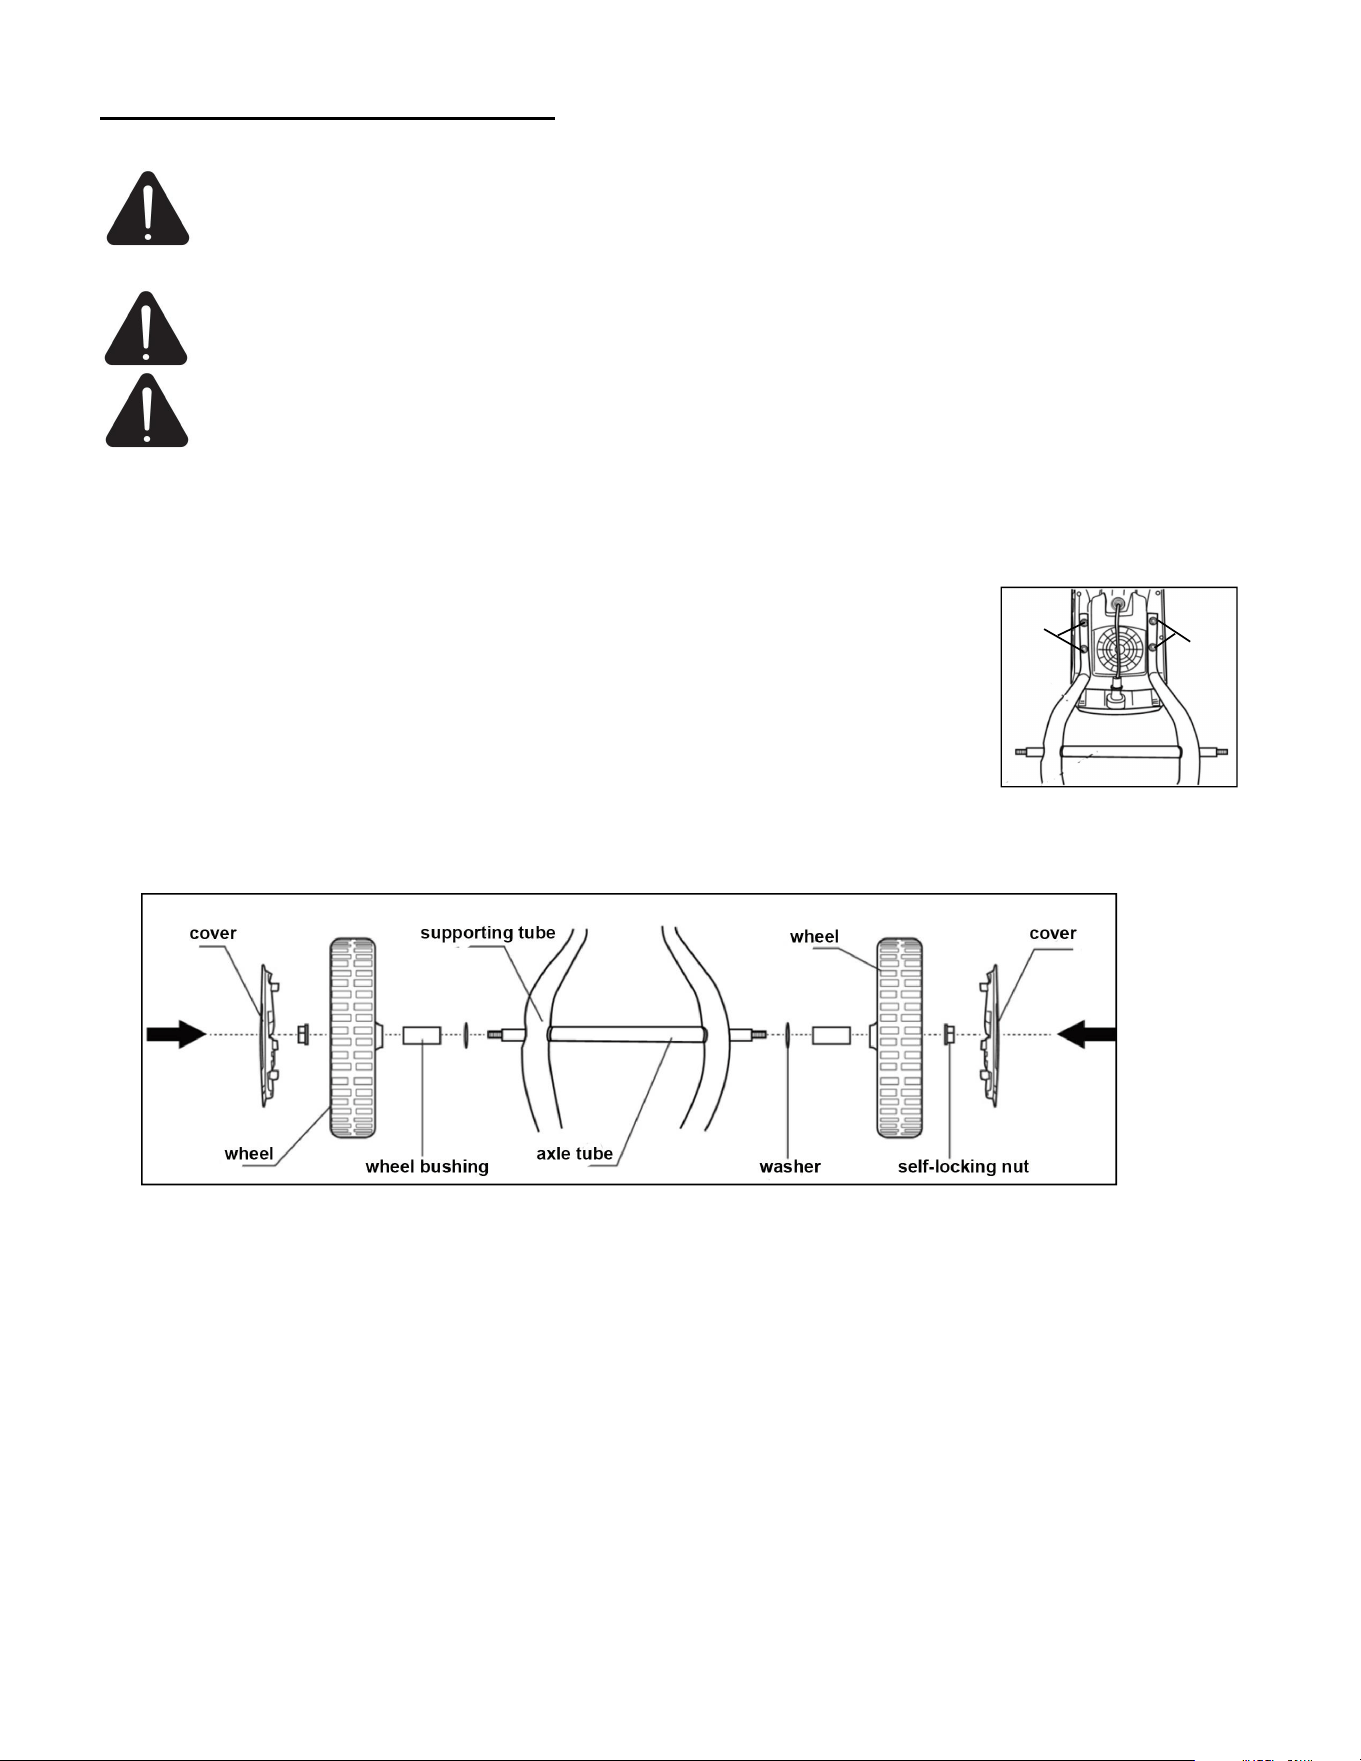
ASSEMBLY INSTRUCTION
WARNING: If any parts are damaged or missing do not operate this product until the parts
are replaced. Use of this product with damaged or missing parts could result in serious
personal injury.
WARNING: Read the user manual before assemble and operating the electric wood chipper.
WARNING: To reduce the risk of injury, turn unit off, disconnect it from power source
before installing and removing accessories, before adjusting or when making repairs. An
accidental start-up can cause injury.
Assemble The Wood Shredder
1. Turn the machine upside down on a flat surface.
2. Attach the supporting tubes to the machine as shown in the right figure, fix them
with four screws.
3. Attach the axle tube between the left and right brackets as shown in below figure.
Slide the axle through the assembly hole in left bracket then through out the other
assembly hole in the right bracket.
4. Position the washers and wheel bushings on each end of the axle tube. Then
assemble the wheels onto each end of the axle end. Use the self-locking nuts on each end of the axle and
tighten both the self-locking nuts using the wrench supplied.
5. Attach the wheel cover and make sure everything is assembled in the correct position.
6. Clamp the holding loops of the collection bag in the holders on both sides of the wood shredder.
NOTE: The wheels must be fitted the correct way round to allow the nuts to tighten on each end of the
axle.
Take care when tilting the unit onto its wheels as the machine has an uneven weight distribution when
tilted and during wheeled transportation.
e
screw
screw
13
OPERATING INSTRUCTION
Start/ Stop The Shredder
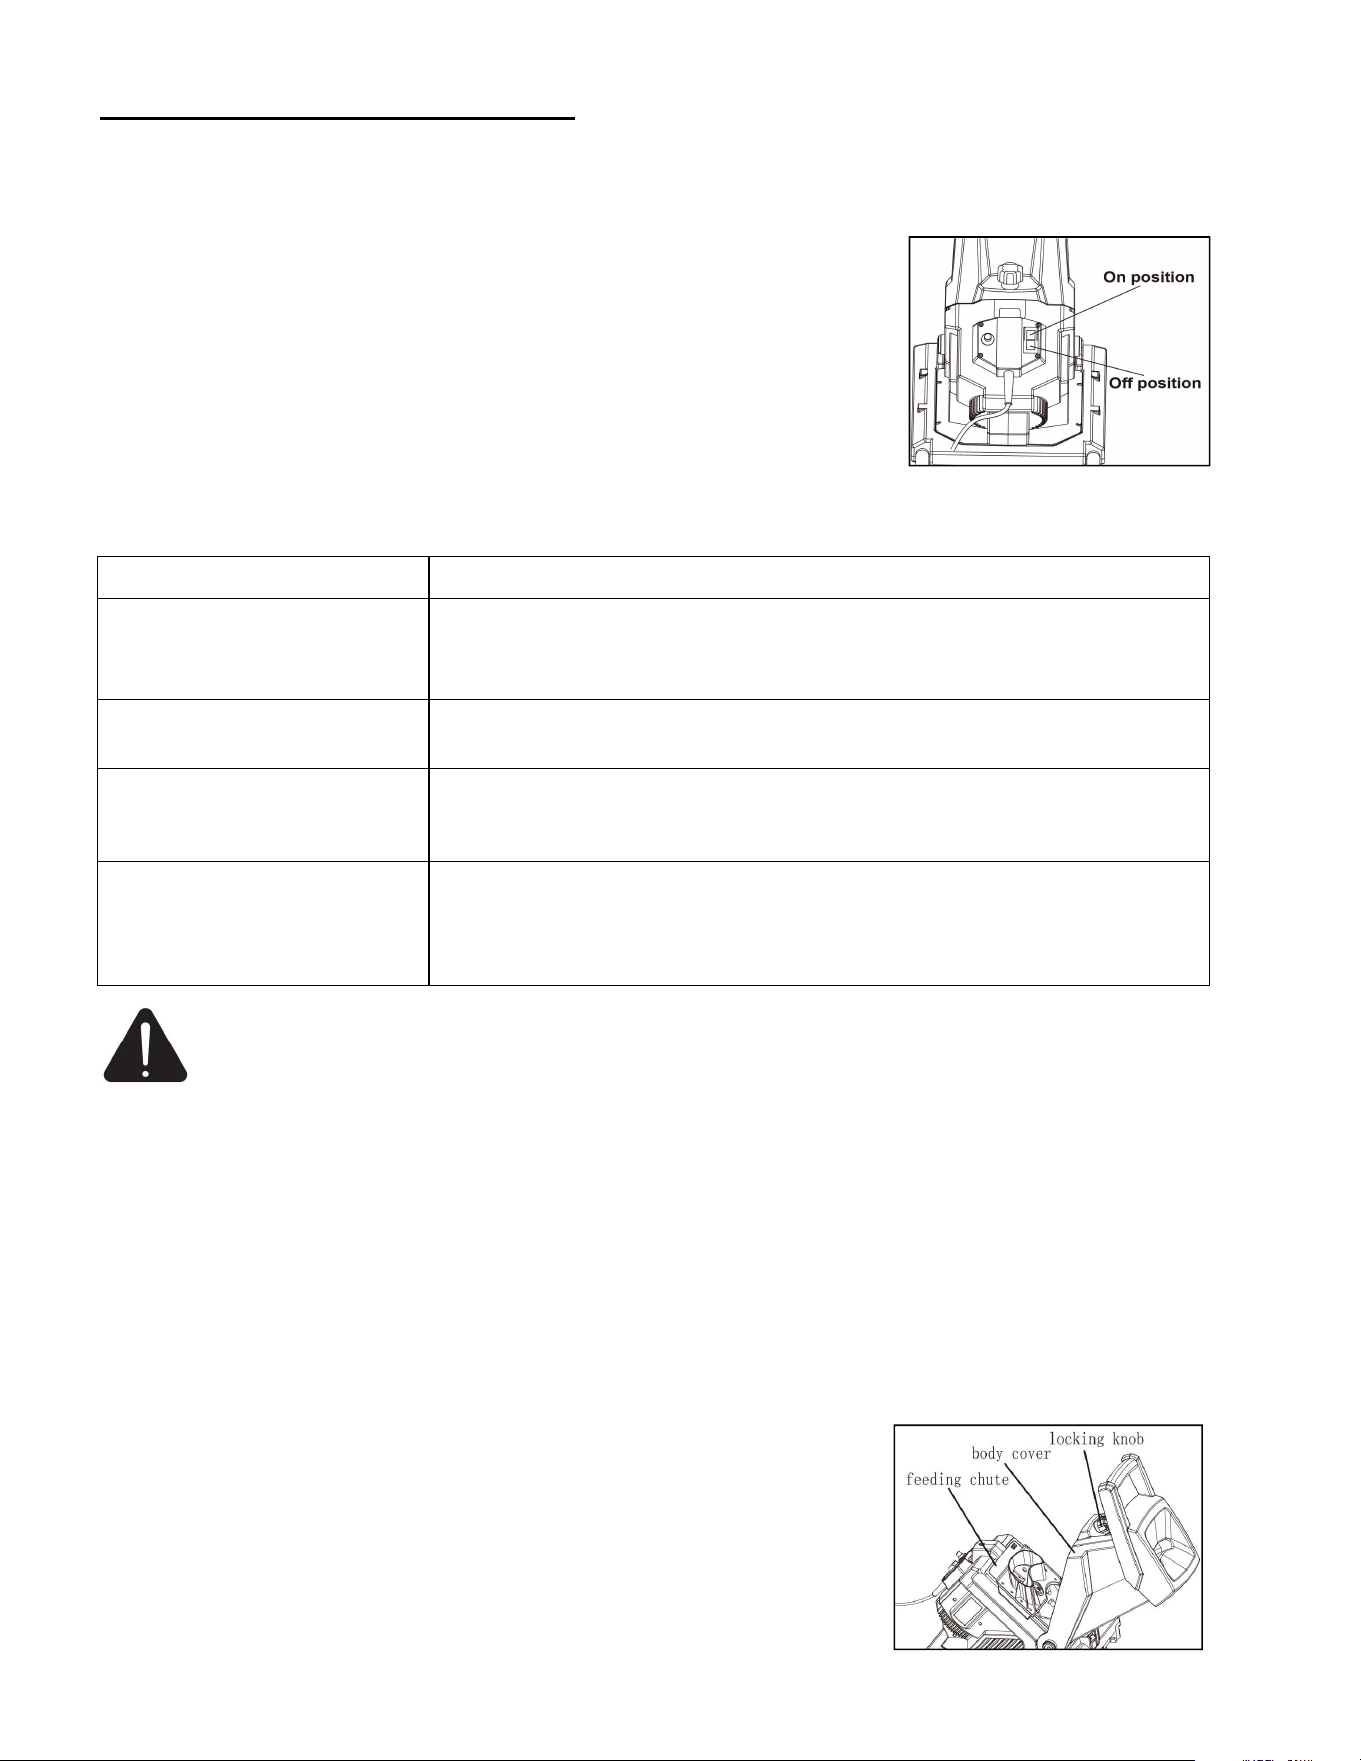
1. Connect the shredder to the electric power supply.
2. To start the shredder, press the power On/Off switch to the ON
position(I).
3. To stop the shredder, simply press the On/Off switch to the OFF
position(O).
NOTE: Ensure power On/Off switch is in the OFF position before
plugging in the shredder.
For best results when shredding, follow the guidelines shown in the table below.
WARNING: Do not put your hands into the feeding chute. The shredder must be used in the
upright position only. Do not operate the shredder if it is lying on its side.
When feeding long woody branches/stems into the shredder, be careful of whip and vibrations as they get
caught by the cutter. The cutting device has a tendency to pull branches/stems into the machine. Do not
try to impede entry of the material being cut once feeding has started.
Clearing Obstructions
If the shredder becomes jammed, power to the motor will automatically cut off. If the shredder jams and
can not be restarted, the following actions should be taken.
1. Switch the shredder OFF.
2. Disconnect shredder from electric power supply before attempting to unblock any jams.
3. Unscrew locking knob, located on underside of cover.
4. Lift body cover up so you can clearly see the cutting section.
5. Remove any twigs, branches or other material that may be clogging the
blades, feeding chute or discharge chute.
6. Close body cover, make sure it is correctly located and securely
re-tighten the locking knob. Leave the motor a few minutes to cool down,
connect the plug and switch on the shredder.
MATERIAL
SHREDDING METHOD
Twigs and pruning up to
1/4" (6 mm) diameter.
Feed into the feeding chute at a rate which the shredder will accept
without overloading. Use the plunger to push the material into the chute
if required.
Branches and pruning up to
1 3/4" (45 mm) in diameter.
Clip off all side growth with pruning shears before feeding into the
feeding chute with the plunger.
Bedding plants, weeds and
shrubby growth.
Knock soil and stones off the roots to avoid damage to the blades.
Avoid weeds that may have seeded. The seeds may not decompose and
may germinate later.
Freshly cut foliage, hedge
pruning, and kitchen waste
(e.g., cabbage leaves,
vegetable peelings, etc.)
With any material having a high, moisture content, it is advisable to
feed in some drier sticks at regular intervals to help push the material
through the cutting assembly and prevent it from clogging.
14
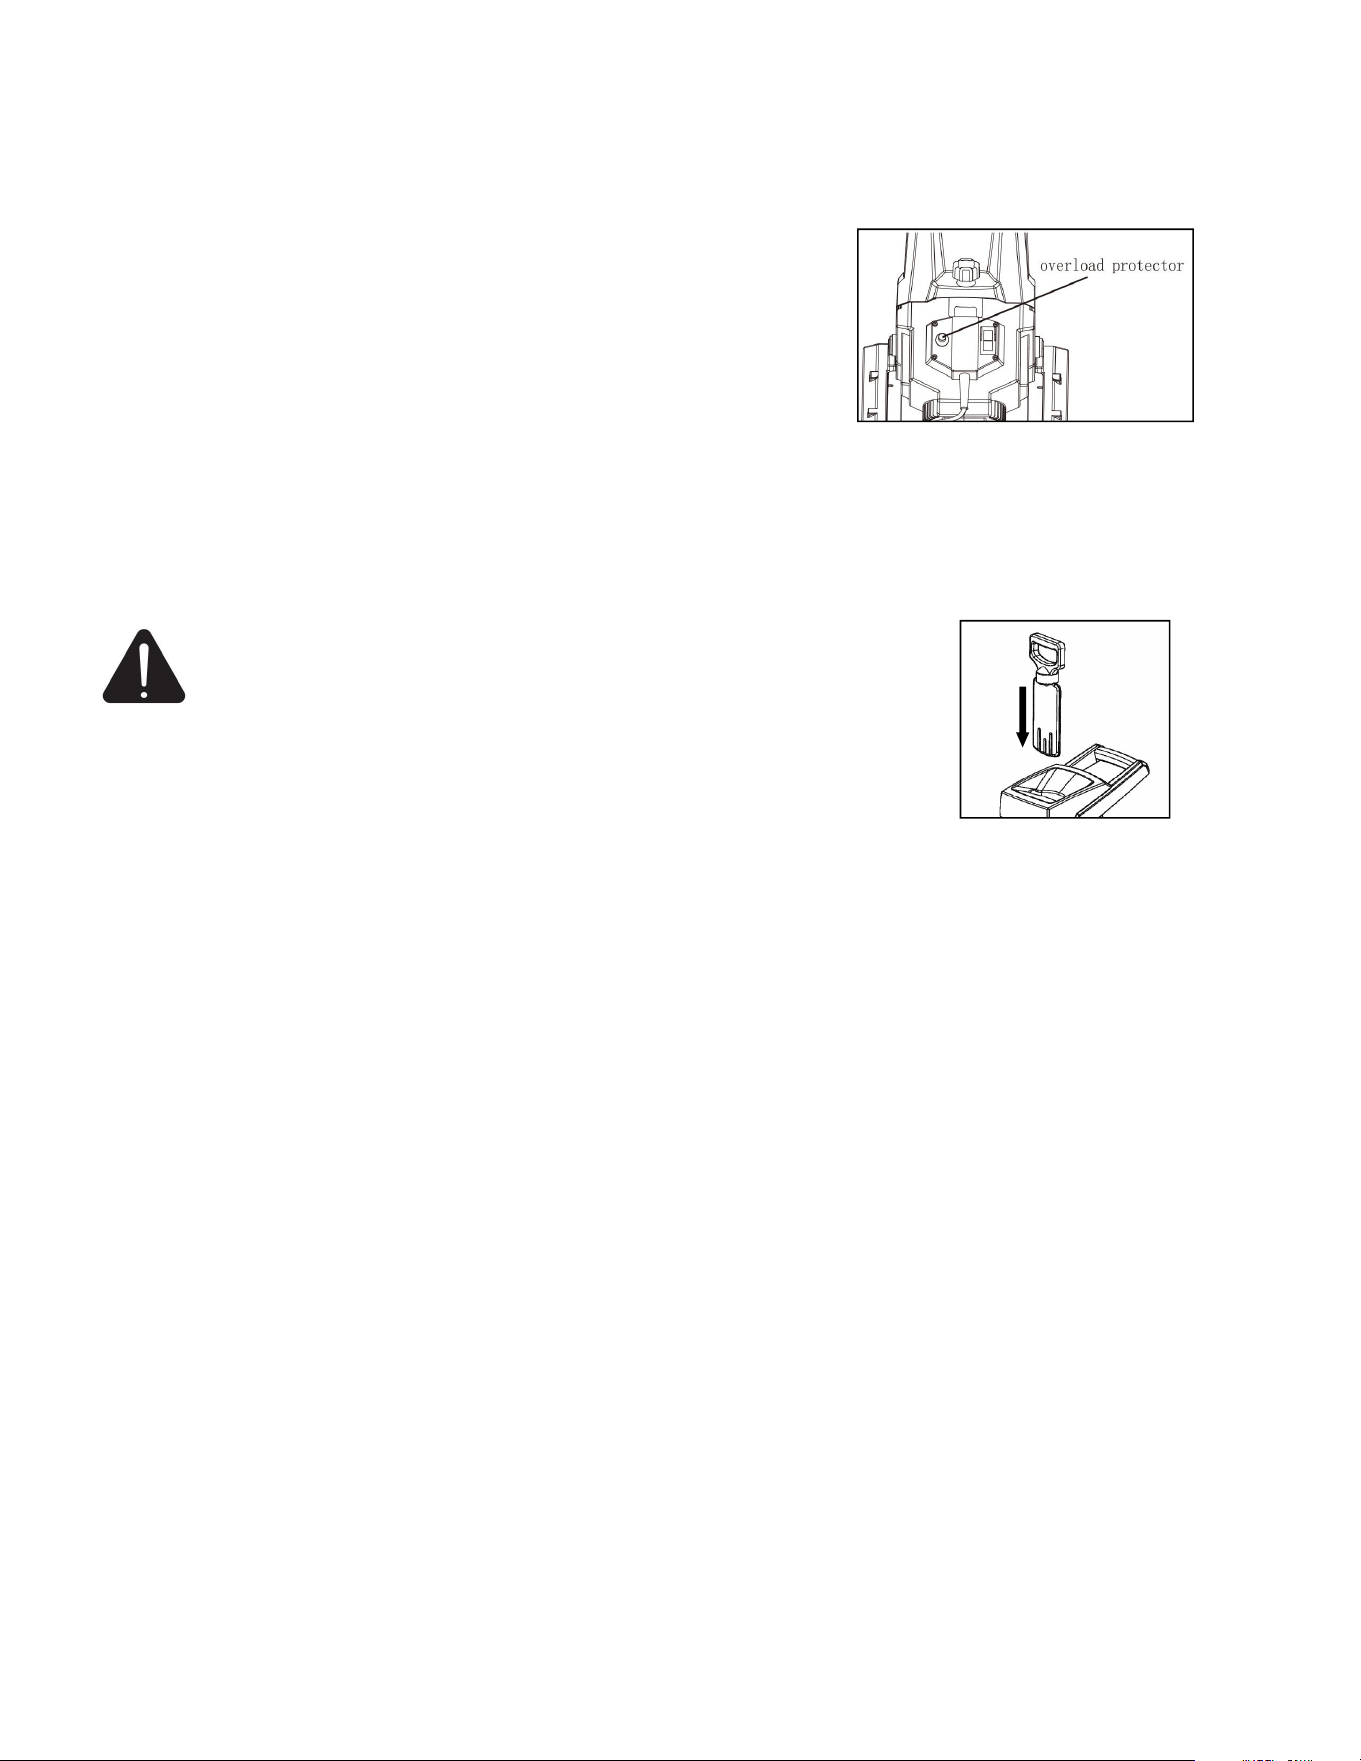
Operation Of Overload Protector
If the machine is overloaded, the overload protector incorporated in the motor will cut off the power to
the shredder.
1. Leave the shredder for a few minutes, then press the overload
protector to reset the machine.
2. Press the main switch to the ON position(I) to restart the shredder.
NOTE: If after above steps the shredder still can not be started, the
motor protector needs to be disconnected from the power circuit.
Unplug the power cable from the socket, wait for a few minutes, then plug it in and follow above steps to
restart the shredder. Or check the locking knob is locked tightly.
Use Plunger
Use the plunger provided to help push the branches/stems down into the feeding chute.
WARNING: The garden shredder has a tendency to pull branches/
stems into the machine. Do not try to impede entry of the material
being cut once feeding has started.
NOTE: After prolonged use, the shredder may lose performance. If the blades
become worn or damaged, they can be reversed to provide a new cutting edge.
Do not allow garden waste to accumulate before shredding as it will begin to compost and become
too damp and clog the cutting assembly. Dry material will help most material to clear the ejection
chute. Save some dry sticks until last to help clean the blade area.
Frequently monitor the build-up of shredded material.
Do not allow shredded material to build up and fill the inside of the shredder's discharge chute.
When the collection bag is full, make sure to press the On/Off switch to turn the garden shredder off
before emptying collection bag.
Practical Tips
• Be sure to observe the safety instructions.
• Wear work gloves, goggles and ear protection.
• The material is drawn into the shredder automatically. CAUTION! Long pieces of material
projecting out of the funnel inlet may whiplash when it is drawn in – keep a safe distance between
yourself and the machine.
• Judge the quantity of material which you put into the funnel inlet so that the funnel does not clog.
• If you want to shred withered, damp material that has been lying in the garden for several days,
alternate between putting in this material and branches. This will help to prevent the loading funnel
becoming clogged with material.
• Entangled branches and leaves should be tho roughly shredded before loading any more material.
• Do not allow the discharge opening to become clogged with shredded material – risk of pile-ups.
• Do not cover the ventilation slits.
• Do not place heavy material or thick branches into the machine continuously. This may cause the
blade to jam.
• Swing open the loading funnel by opening the locking knob and remove it. You can now remove
blockages from the inside of the equipment. To assemble, proceed in reverse order.
15
MAINTENANCE
WARNING: In order to avoid personal injury and the risk of fire and electric shock, always
unplug the power cord before adjusting, inspecting, or cleaning the shredder.
WARNING: When servicing, use only identical replacement parts. Use of any other parts
could create a hazard or cause product damage.
Blades Maintenance
WARNING: For safety reasons we recommend that you have all sharpening and blade
replacement work carried out by a specialist workshop. Wear heavy duty working gloves.
The shredder has two blades that are attached to a rotating support. When one side of a blade becomes
dull, it can be turned over in order to use the other side. Dull blades can be replaced or properly
sharpened.
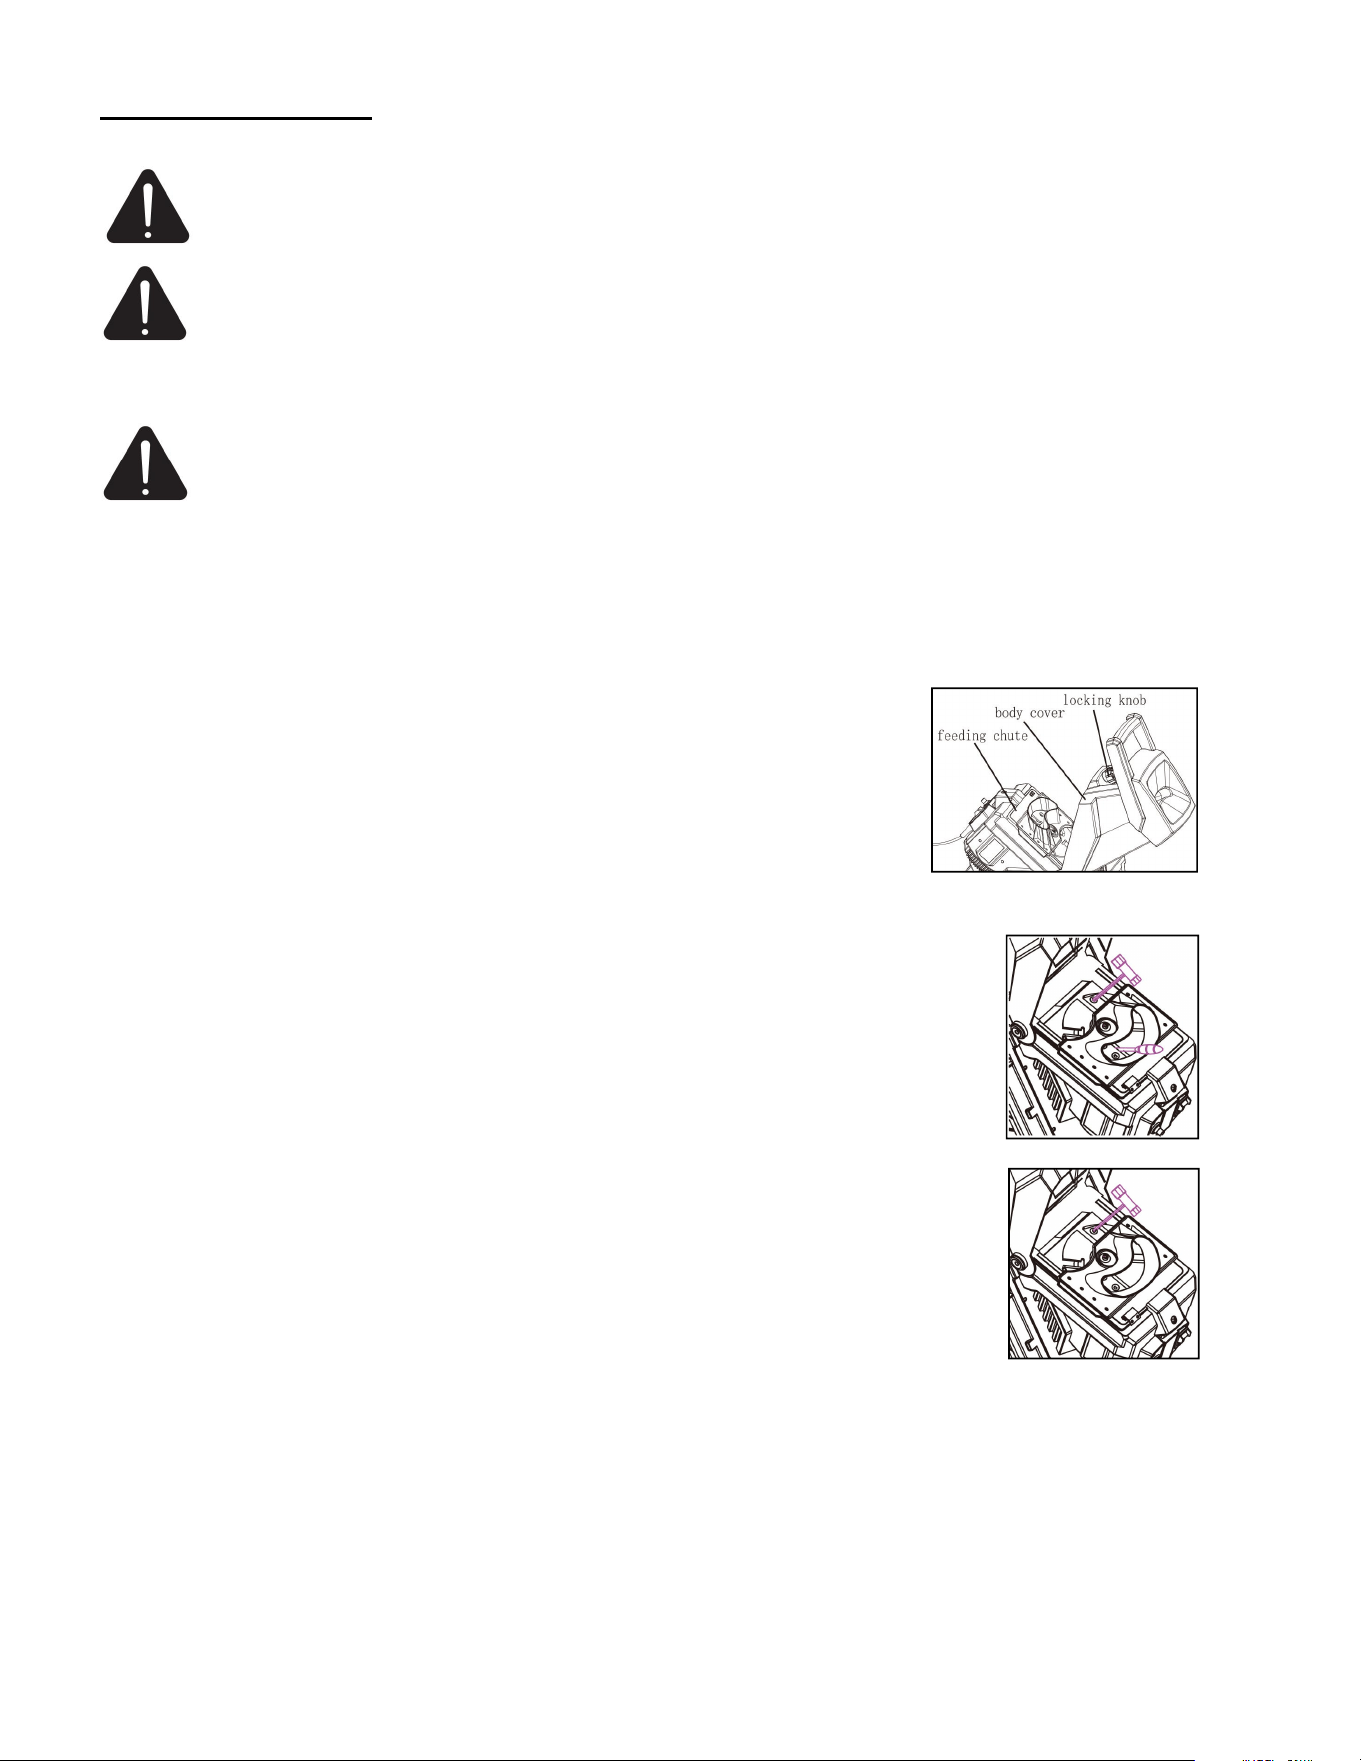
1. Switch shredder off by pressing the power On/Off switch to the Off position(O).
2. Disconnect the shredder from the electric power supply.
3. Turn the locking knob counter-clockwise until the body cover can be
opened. Lift up the body cover to expose the two blades.
4. Wearing protective gloves, use a screwdriver (not supplied) to hold the blade plate, then use the
hexagonal end of the socket wrench supplied to loosen and remove the first hexagon socket head screw.
5.Turn the blade plate 180°, use the hexagonal wrench to loosen and remove the
other hexagon socket head screw.
6.Lift out the old blade. Either reinsert the blade with the sharp edge in position as
the cutting surface or insert a replacement blade.
7. Follow the same procedure for the opposite cutting blade.
8. Replace and tighten the two screws in order to secure the new blade to the
support.
9. Close cover, making sure it is correctly placed, and securely re-tighten locking
knob.
General Maintenance And Storage
Clean the machine regularly. This will help to keep the machine in good working order and is the basis
for a long working life.
• Keep the vent slots clean while working.

16
• Clean the plastic body and other plastic parts with a mild household cleaning agent and a damp cloth.
Do not use any aggressive agents or solvents for cleaning purposes. Never clean the shredder by
spraying with water.
• Prevent water getting inside the machine.
• Check the chassis securing screws from time to time to ensure that they are tight.
• If you do not intend to use the shredder for a lengthy period, protect it from corrosion using
environmentally friendly oil.
• Store the device in a dry room, out of reach of children.
• When you have finished your work, pull the loading funnel forwards and clean the inside. Use a
brush to remove deposits from metal parts on the inside. Apply a thin coating of oil to the cleaned
blade plate and blades.
• If abnormal vibration or noise occurs, turn the garden shredder OFF immediately and have the
problem corrected before further use.
• If damaged or performing abnormally, do not use the shredder until it has been properly repaired, or
replaced.
• If an extension cord is used it shall not be of lighter grade than the supply cord already fitted to the
appliance. Check the supply and any extension cord regularly for damage or signs of aging. Do not
use the appliance, if the cords are damaged.
• When servicing the cutting means be aware that even though the motor will not start due to the
interlock feature of the guard, the cutting means can still be moved if the motor is turned by hand.
• Never attempt to override the interlock feature of the guarding.
RECYCLING AND DISPOSAL
Recycle unwanted materials instead of disposing of them as waste. All tools, hoses and packaging
should be sorted, taken to the local recycling centre, and disposed of in an environmentally safe way.
Recycle rather than dispose of unwanted material in landfill whenever possible. The machine is
delivered in rigid packaging to avoid damage during transportation, but the packaging, roller, and the
machine itself are manufactured from recyclable materials and should be disposed of accordingly.
Do not throw your clippings into a rubbish bin where it will be disposed of in landfill. You can
dispose of clippings on your compost heap, alternating them with other garden material.
Alternatively, many communities provide a public collection point where you can dispose of your
garden waste in an environmentally friendly manner.
Recycle packaging where facilities exist.

17
TROUBLE SHOOTING
If your device is not operating properly, follow the instructions below. If this does not solve the problem,
please contact your local repair agent.
Problem
Possible Cause
Possible Solution
The motor does not
run.
Power failure/unit not
plugged into a working
receptacle.
Check to make sure unit is plugged into a
working outlet.
The motor protection is
triggered.
Remove all chipped pieces and press reset
button.
The safety switch is
triggered.
Check to make sure the hopper is secured and
the lock knob is tightened;
Make sure the collection box is in position.
The material to be
chopped is not pulled
in.
The material is jammed in
the feed inlet.
Disconnect the power supply and open the
hopper. Pull the material from the feed inlet.
The cutting blade is
blocked.
Disconnect the power supply and open the
hopper. Remove the blocked material and
press the reset button.
The discharge chute is
blocked.
Disconnect the power supply and open the
hopper. Open the plate of the discharge chute
to clear the blocked material.
Shredding
performance
unsatisfactory
Blades worn.
Turn, sharpen or replace blades
18
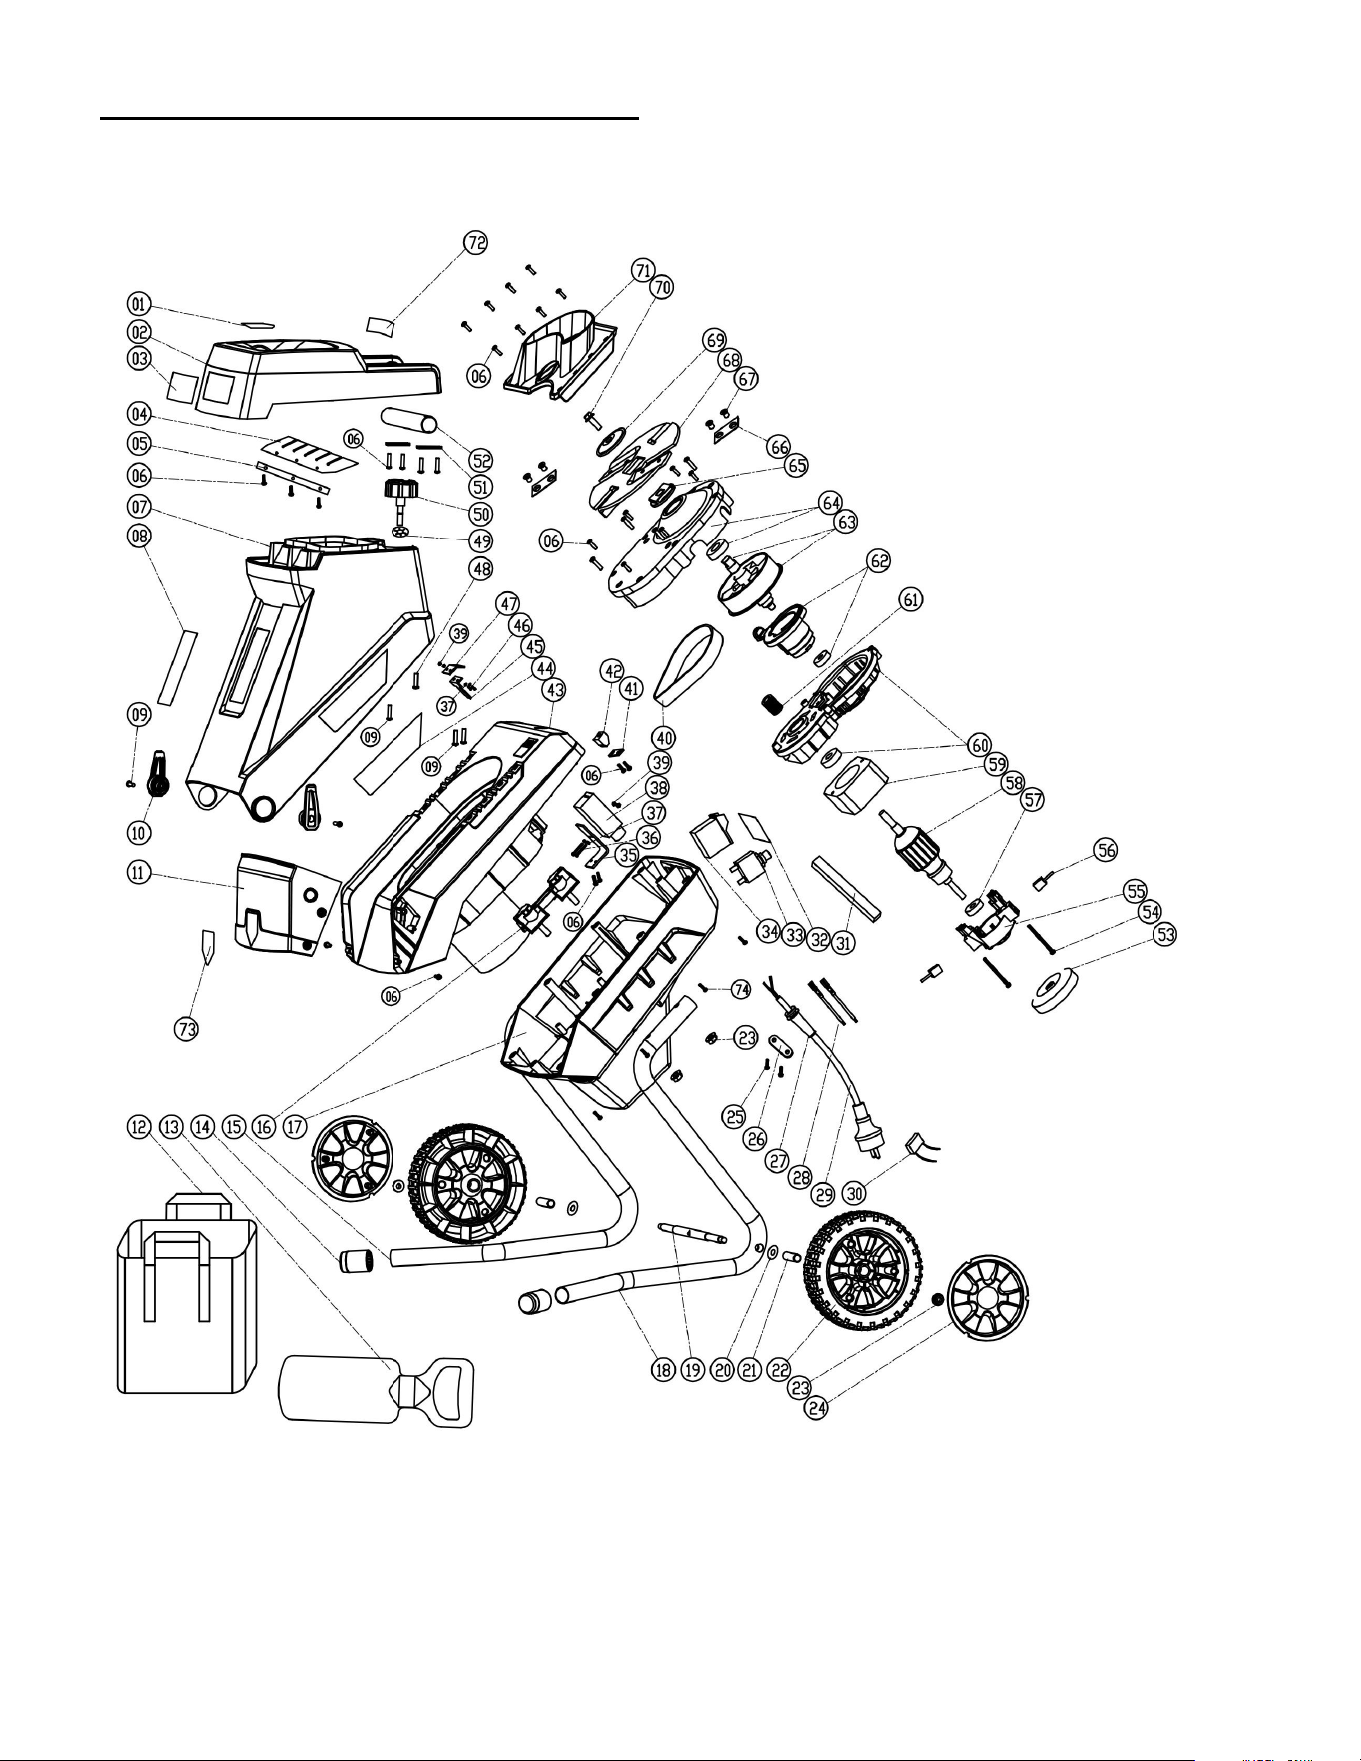
EXPLODED VIEW & PART LIST

19
Item
stock#
Description.
Qty
Item
stock#
Description.
Qty
1
DB6610-001
label 1
1
41
DB6610-038
overload switch
1
2
DB6610-002
feeder hopper
1
42
DB6610-039
nut
4
3
DB6610-003
label
1
43
DB6610-040
belt
1
4
DB6610-004
scraps defend block
1
44
DB6610-041
Fix-up nut
1
5
DB6610-005
clamp bar
1
45
DB6610-042
nut plate
1
6
DB6610-006
Screw
33
46
DB6610-043
down housing
1
7
DB6610-007
up housing
1
47
DB6610-044
label
1
8
DB6610-008
label 2
1
48
DB6610-045
switch pin
1
9
DB6610-009
screw
11
49
DB6610-046
Screw
2
10
DB6610-010
pothook
2
50
DB6610-047
Bolt frame plate
1
11
DB6610-011
front cover
1
51
DB6610-048
H type screw
2
12
DB6610-012
collection bag
1
52
DB6610-049
Retaining ring
1
13
DB6610-013
flat push stick
1
53
DB6610-050
knob
1
14
DB6610-014
foot pad
2
54
DB6610-051
knob Screw
1
15
DB6610-015
right supporting tube
1
55
DB6610-052
Hopper handle
1
16
DB6610-016
support tube plate
2
56
DB6610-053
handle tablet
2
17
DB6610-017
hexagonal head bolt
4
57
DB6610-054
fan
1
18
DB6610-018
motor case
1
58
DB6610-055
field screw
2
19
DB6610-019
left supporting tube
1
59
DB6610-056
Carbon brush holder
assembly
1
20
DB6610-020
connecting pole
1
60
DB6610-057
carbon brush
2
21
DB6610-021
washer
2
61
DB6610-058
bearing
1
22
DB6610-022
shaft sleeve
2
62
DB6610-059
armature
1
23
DB6610-023
wheel
2
63
DB6610-060
field
1
24
DB6610-024
non-slip nuts
2
64
DB6610-061
down cover of gear
box
1
25
DB6610-025
wheel cover
2
65
DB6610-062
bearing
1
26
DB6610-026
screw
2
66
DB6610-063
small belt wheel
1
27
DB6610-027
cord clamp plate
1
67
DB6610-064
Eccentric wheel
1
28
DB6610-028
cord sheath
1
68
DB6610-065
bearing
1
29
DB6610-029
connecting wire
2
72
DB6610-066
Big belt wheel
1
30
DB6610-030
supply cord
1
69
DB6610-067
output shaft
1
31
DB6610-031
capacitance
1
70
DB6610-068
up cover of gear box
1
32
DB6610-032
sponge
1
71
DB6610-069
bearing
1
33
DB6610-033
label
1
73
DB6610-070
drive block
1
34
DB6610-034
Over current
protective switch
1
74
DB6610-071
blade
2
35
DB6610-035
electonmagnetic
switch
1
75
DB6610-072
hex nut
4
36
DB6610-036
switch frame plate
1
76
DB6610-073
blade plate
1
37
DB6610-037
screw
2
77
DB6610-074
clamp block
1

20
TWO (2) YEARS LIMITED WARRANTY
PowerSmart
®
is committed to building tools that are dependable for years. Our warranties are consistent with our
commitment and dedication to quality.
TWO (2) YEARS LIMITED WARRANTY OF POWERSMART PRODUCTS FOR HOME USE.
PowerSmart (“Seller") warrants to the original purchaser only, that all PowerSmart consumer power tools will be
free from defects in material or workmanship for a period of two (2) years from date of purchase. Ninety (90) days
for all PowerSmart Products, if the tool is used for professional or commercial use.
SELLER’S SOLE OBLIGATION AND YOUR EXCLUSIVE REMEDY under this Two (2) Years Limited
Warranty and, to the extent permitted by law, any warranty or condition implied by law, shall be the repair or
replacement of parts, without charge, which are defective in material or workmanship and which have not been
misused, carelessly handled, or misrepaired by persons other than Seller or Authorized Service Center. To make a
claim under this Limited Warranty, you must return the entire power tool product; transportation prepaid, to
PowerSmart Include a legible copy of the original receipt, which lists the date of purchase (month and year) and the
name of the company purchased from.
THIS LIMITED WARRANTY DOES NOT APPLY TO ANY ACCESSORY ITEMS INCLUDED WITH THE
TOOL SUCH AS CIRCULAR SAW BLADES OTHER RELATED ITEMS OR TO ANY REPLACEMENT
PARTS LISTED UNDER MAINTENANCE.
ANY IMPLIED WARRANTIES SHALL BE LIMITED IN DURATION TO TWO (2) YEARS FROM DATE OF
PURCHASE. SOME STATES IN THE U.S. AND SOME CANADIAN PROVINCES DO NOT ALLOW
LIMITATIONS ON HOW LONG AN IMPLIED WARRANTY LASTS, SO THE ABOVE LIMITATION MAY
NOT APPLY TO YOU.
IN NO EVENT SHALL SELLER BE LIABLE FOR ANY INCIDENTAL OR CONSEQUENTIAL DAMAGES
(INCLUDING BUT NOT LIMITED TO LIABILITY FOR LOSS OF PROFITS) ARISING FROM THE SALE
OR USE OF THIS PRODUCT. SOME STATES IN THE U.S. AND SOME CANADIAN PROVINCES DO NOT
ALLOW THE EXCLUSION OR LIMITATION OF INCIDENTAL OR CONSEQUENTIAL DAMAGES, SO
THE ABOVE LIMITATION OR EXCLUSION MAY NOT APPLY TO YOU.
THIS LIMITED WARRANTY GIVES YOU SPECIFIC LEGAL RIGHTS, AND YOU MAY ALSO HAVE
OTHER RIGHTS WHICH VARY FROM STATE TO STATE IN THE U.S., PROVINCE TO PROVINCE IN
CANADA AND FROM COUNTRY TO COUNTRY.
For questions / comments, technical assistance or repair parts –
Please call toll free at: 1-872-314-0005 (M-F 9am – 5pm EST)
Email: [email protected] / [email protected]
SAVE YOUR RECEIPTS. THIS WARRANTY IS VOID WITHOUT THEM.