DO NOT DISCARD – GIVE TO USER
WARNING
BEFORE USE
Study, understand and follow all instructions provided
with this product. Read these instructions carefully
before installing, operating, servicing, or repairing this
tool. Keep these instructions in a safe, accessible place.
INTENDED USE OF THE TOOL
WARNING
The SK8MAT is intended to be used for soldering, heat
shrink and general wiring and terminal repair. Do not
use this tool outside of the designed intent. Never
modify the tools for any other purpose or use.
Torches must be empty when returned for warranty.
The manufacturer warrants this product to the original user against
defective material or workmanship for a period of 1 year from the
date of purchase.
The manufacturer reserves the right to determine whether the part
or parts failed because of defective material, workmanship or other
causes. Failures caused by accident, alteration or misuse are not
covered by this warranty.
The manufacturer, at its discretion, will repair or replace product
covered under this warranty free of charge. Repairs or replacements
of products covered under this warranty are warrantied for the
remainder of the original warranty period.
The manufacturer or its authorized service representatives must
perform all warranty repairs. Any repair to the product by
unauthorized service representatives voids this warranty. The rights
under this warranty are limited to the original user and may not be
transferred to subsequent owners.
The warranty is in lieu of all other warranties, expressed or implied,
including warranties of merchantability and fitness for a particular
purpose. Some states do not allow the exclusion or limitations of
incidental or consequential damages, so the above limitations may
not apply to you.
1 YEAR LIMITED WARRANTY
(TORCH. ACCESSORIES ARE CONSUMABLE.)
Before use, READ AND UNDERSTAND THE WARNINGS
ON PAGE 5 and check the parts diagram and part
number listing on page 6 to make sure all parts are
included. If any parts are missing or damaged, please
call your distributor.
Caution: To help prevent personal injury
Normal use of this product is likely to expose the user to
dust and/or microscopic particles containing chemicals
known to the State of California to cause cancer, birth
defects or other reproductive harm. Always wear
appropriate safety equipment and clothing when using
this product. Study, understand and follow all instructions
provided with this product. Failure to read and follow all
warnings and operating instructions may result in
damages, serious injury or death.
• Always wear ANSI approved goggles when using this
product (users and bystanders).
• Never use this tool for any application other than for
which it was designed.
• Only use accessories designed for this tool.
• Never alter or modify this tool in any way.
• Improper operation and/or maintenance of the tool,
modification of the tool or use of the tool with
accessories not designed for it could result in serious
injury or death.
• Always select the correct accessories of the correct
size and design for the job that you are attempting to
perform.
• Always work in a clean, safe, well-lit, organized and
adequately equipped area.
• Do not begin repairs without assurance that vehicle is
in secure position and will not move during repair.
Page 1
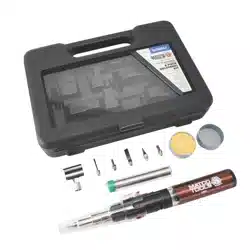
SK8MAT
8 PIECE SOLDERING KIT
1702073-14 MA
PRODUCT INFORMATION
Made in Taiwan
to Matco specifications
Durable. Features a leak-free tank for extended storage
as well as triple plated tip, heavy duty ignition and
non-oxidizing internals for long lasting, repeated use.
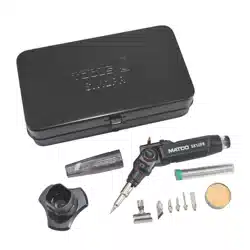
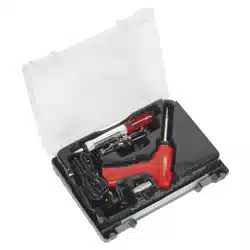
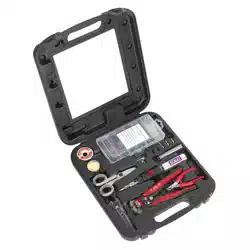
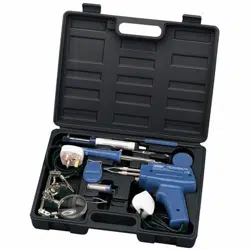
Comprehensive. Includes LBSI torch and clear cover,
lead-free solder, heat shrink deflector, sponge w/tray,
and pointed, chisel, anvil, needle and angle knife
soldering tips.
Powerful. Replace up to a 150W soldering iron with
2,400°F flame, and 840°F to 1100°F tip temperature
for up to 75 minutes.
Page 2
8 PIECE SOLDERING KIT
1702073-14 MA
SK8MAT
IGNITION
1. Make sure the exhaust vent is facing upward to avoid the damage of tabletop.
2. Press the safety lock button and, simultaneously using your thumb, pull down on the trigger.
This action will ignite the soldering iron.
3. Hold the ignition button and release the safety lock button.
Move the continuous flame switch to right for a constant flame.
EXTINGUISHING
Move the continuous flame switch to left, and this will cut off the gas supply and extinguish the flame.
HOT BLOWER
Disassemble the soldering tip by rotating the tip counterclockwise. The torch will now be used as
hot blower without the soldering tip. Operation will be the same as above for the soldering iron.
PENCIL TORCH
Disassemble the soldering housing by rotating the assembly lock counterclockwise. Take off the soldering
housing with the tip attached and install the metal sleeve back onto the torch. Operation will be the same
as above for the soldering iron.
FLAME ADJUSTMENT
Move the adjustment lever to the right to increase the flame strength, or left to decrease the flame strength.
When the flame is at “+” position, the longer flame may cause the torch to flare out of the exhaust port, or even
extinguish. In this situation, please move the gas adjustment lever to the “-” side to decrease the flame strength
and adjust the flame for the most effective use.
GAS REFILLING
• Upon initial use, the torch requires gas charging. Please use high quality butane (gas used by lighters).
WARNING: Refilling must be done in well-ventilated area away from flames or sparks.
• Before filling, make sure the torch is off and the flame is out.
• Let torch cool 5 minutes before refilling.
• Hold the torch upside down. Insert and press down the gas cylinders nozzle into the gas filling valve.
• A complete fill takes about 5-10 seconds.
• Stop refilling once gas starts to overflow.
• Please allow the fuel to stabilize for a few minutes before lighting the torch.
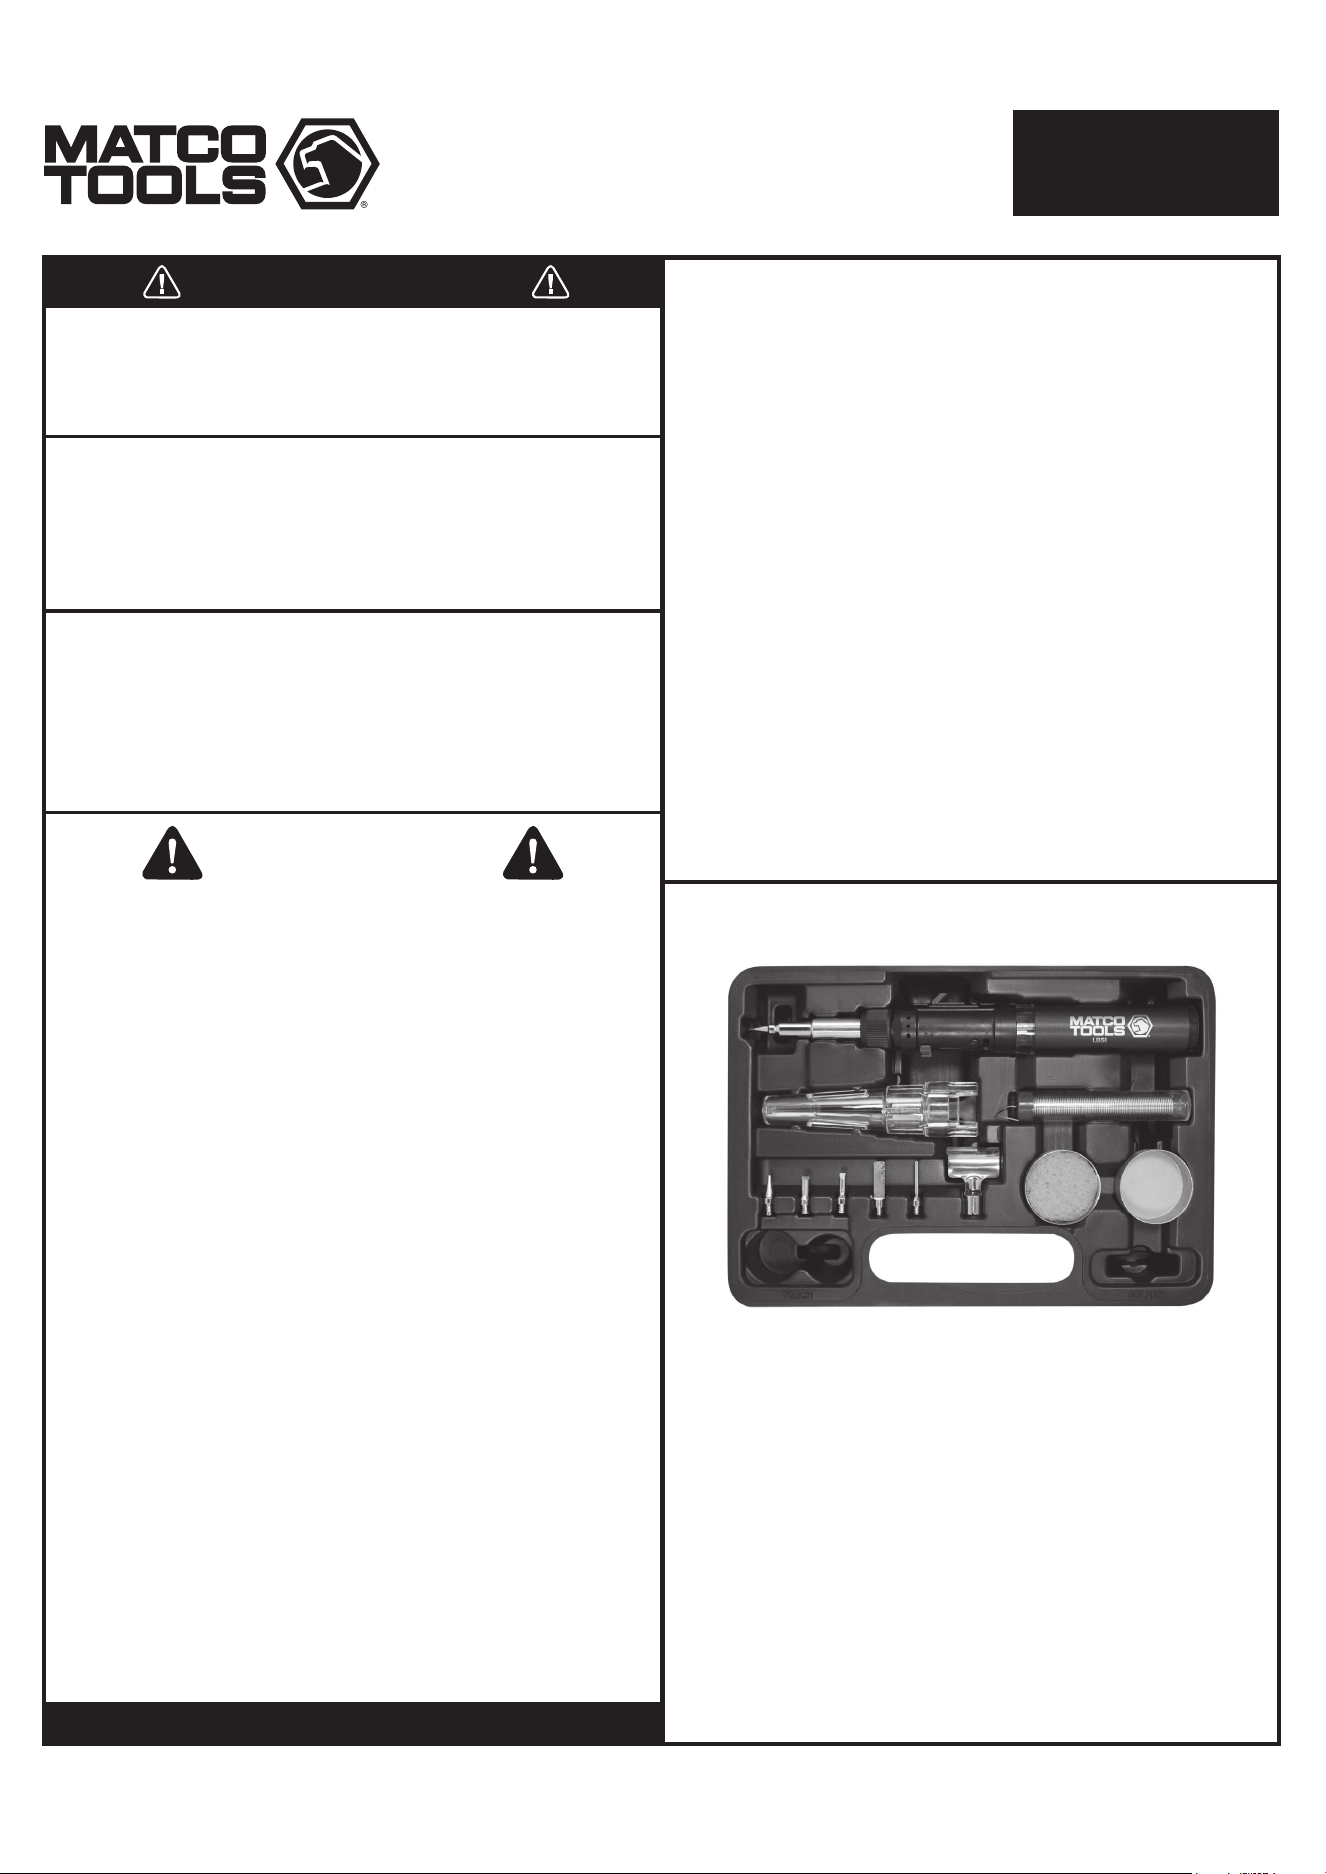
Please read the following safety and operational information thoroughly
before using this item.
SAFETY LATCH
SOLDERING IRON TIP
CONTINUOUS FLAME SWITCH
GAS ADJUSTMENT DIAL
TRIGGER
REFILLING
VALVE

ADVERTENCIA
Estudie, entienda y siga todas las instrucciones que se
proveen con este producto. Lea las instrucciones
detenidamente antes de instalar, operar, dar servicio o
reparar esta herramienta. Guarde estas instrucciones en
un lugar seguro y accesible.
Precaución: Para ayudar a evitar lesiones a las personas
El uso normal de esta herramienta puede exponer al usuario al
polvo o a partículas microscópicas que contienen sustancias
químicas que se conocen en el estado de California por causar
cáncer, defectos del nacimiento u otros daños reproductivos.
Siempre use equipo y ropa de seguridad adecuados para
trabajar con esta herramienta. Lea, comprenda y siga todas las
instrucciones incluidas con esta herramienta. Omitir la lectura
y el no seguir todas las advertencias e instrucciones de
operación puede traer como
consecuencia daños y lesiones graves o hasta la muerte.
• Siempre use guantes del tipo aprobado por la ANSI para
trabajar con esta herramienta (tanto usuarios como
espectadores).
• Nunca utilice esta herramienta para cualquier otra cosa que
no sean las aplicaciones para lo que fue diseñada.
• Sólo utilice los accesorios diseñados para esta herramienta.
• No modifique o altere esta herramienta de ninguna manera.
• El funcionamiento y/o mantenimiento inadecuado de la
herramienta, la modificación, o la utilización de la herramienta
con accesorios inadecuados podrían causar lesiones graves o
la muerte.
• Siempre usar los correctos accesorios para el trabajo queUd.
está realizando.
• Trabaje siempre en un área limpia, segura, bien iluminada,
organizada y equipada adecuadamente.
• NUNCA empiece reparaciones sin estar seguro de que el
vehículo esté en posición segura y que no se mueva durante
la reparación.
DESEMPACADO
APLICACIÓN DE LA HERRAMIENTA
El SK8MAT está destinado a ser utilizado para soldadura,
encogimiento por calor, cableado general y reparación
de terminales. No utilice esta herramienta fuera de la
intención de su diseño. Nunca modifique las herramientas
para ningún otro propósito o uso.
GARANTÍA LIMITADA DE UN AÑO
(LOS ACCESORIOS SON CONSUMIBLES)
Antes de usar, LEA Y COMPRENDA LAS ADVERTENCIAS
EN LA PÁGINA 5 y verifique el diagrama de piezas y
partes en la página 6 para asegurarse de que todas
estén incluidas. En caso de que falten piezas o que estén
dañadas, comuníquese con su distribuidor.
Page 3
SK8MAT
KIT DE SOLDADURA
DE 8 PIEZAS
1702073-14 MA
Las antorchas deben estar vacías cuando sean devueltas para la
garantía. El fabricante garantiza este producto al usuario original
contra defectos de materiales o de mano de obra durante un periodo
de un año a partir de la fecha de compra.
El fabricante se reserva el derecho a determinar si una pieza o piezas
fallaron debido a material defectuoso, mano de obra, o por otras
causas. Esta garantía no cubre fallas causadas por accidentes,
alteraciones o uso indebido.
El fabricante, a su entera discreción, reparará o reemplazará los
productos cubiertos por esta garantía sin costo alguno. Las
reparaciones o reemplazos de productos cubiertos por esta garantía
quedan garantizados durante el resto del periodo original de garantía.
El fabricante o sus representantes autorizados de servicio deben llevar
a cabo todas las reparaciones de garantía. Toda reparación hecha al
producto por representantes de servicio no autorizados invalida la
presente garantía. Los derechos que ampara esta garantía están
limitados al usuario original y no se pueden transferir a dueños
posteriores.
Esta garantía reemplaza a todas las demás garantías expresas o
implícitas, incluyendo garantías de comercialización e idoneidad para
un propósito particular. Algunos estados no permiten la exclusión o
limitaciones de daños incidentales o imprevistos, de manera que las
limitaciones mencionadas anteriormente pueden no ser aplicables
en su caso.
NO LO DESCARTE O DESECHE, ENTREGESELO AL USUARIO
Hecho en Taiwan
Para Matco especificaciones
ADVERTENCIA
INFORMACIÓN DEL PRODUCTO
Durable. Cuenta con tanque a prueba de fugas para
almacenar por largo tiempo, así como una punta de triple
chapado, ignición de alta resistencia y componentes
internos anti oxidantes para uso prolongado y repetido.
Exhaustivo. Incluye antorcha LBSI y cubierta transparente,
soldadura sin plomo, deflector termoretráctil, esponja
con bandeja, cinceles para soldadura en punta, yunque,
aguja y cuchilla en ángulo.
Poderoso. Reemplace un soldador de 150W por una llama
de 2,400°F y uno de 840°F por una de1100°F durante un
máximo de 75 minutos.

Page4
KIT DE SOLDADURA
DE 8 PIEZAS
SK8MAT
ENCENDIDO
1. Asegúrese de que el conducto de ventilación esté orientado hacia arriba para evitar daños en el tablero de la mesa.
2. Presione el botón de bloqueo de seguridad y simultáneamente con el pulgar, tire hacia abajo del gatillo.
Esta acción encenderá el hierro de soldar.
3. Sujete el botón de encendido y suelte el botón de bloqueo de seguridad. Mueva la llama continua a la derecha
para una llama constante.
EXTINGUIR
Mueva el interruptor de llama continuo a la izquierda, y esto cortará el suministro de gas y extinguirá la llama.
VENTILADOR CALIENTE
Desmonte la punta de soldadura girando la punta en sentido contrario a las manecillas del reloj. La antorcha se
utilizará ahora como soplador caliente sin la punta de soldadura. La operación será la misma que la anterior para soldar.
TORCHA DE LÁPIZ
Desmonte la carcasa de soldadura girando la cerradura en sentido contrario a las agujas del reloj. Retire la caja de
soldadura con la punta conectada e instale la funda metálica de nuevo en la antorcha. La operación será la misma
que la anterior para soldar.
AJUSTE DE LLAMA
Mueva la palanca de ajuste hacia la derecha para aumentar la resistencia de la llama o hacia la izquierda para
disminuir la resistencia de la llama. Cuando la llama está en la posición "+", la llama más larga puede hacer que la
antorcha salte fuera del puerto de escape, o incluso que se extinga. En esta situación, mueva la palanca de ajuste de
gas hacia el lado "-" para disminuir la resistencia de la llama y ajustar la llama para uso más efectivo.
RECARGA DE GAS
• En el uso inicial, la antorcha requiere la carga de gas. Utilice butano de alta calidad (gas utilizado por encendedores).
ADVERTENCIA: El relleno debe realizarse en un área bien ventilada, lejos de llamas o chispas.
• Antes del llenado, asegúrese de que la antorcha esté apagada así como también la llama.
• Dejar enfriar la antorcha 5 minutos antes de rellenar.
• Sostenga la antorcha boca abajo. Inserte y presione hacia abajo la boquilla de los cilindros de gas en la válvula
de llenado de gas.
• Un relleno completo tarda unos 5 a 10 segundos.
• Deje de rellenar una vez que el gas comience a desbordarse.
• Permita que el combustible se estabilice durante unos minutos antes de encender la antorcha
Por favor lea la siguiente información operativa por completo antes de
usar este artículo.
Pestillo de seguridad
Punta de soldadura
Interruptor de llama continua
Caratula y/o marcador para el ajuste de gas
Desencadenar
Válvula de
llenado
1702073-14 MA
8 PIECE SOLDERING KIT
Page 5
SK8MAT
1702073-14 MA
WARNING
ADVERTENCIA
AVERTISSEMENT
• Torches must be empty when returned for warranty. • Read and follow operating instructions and warning and familiarize yourself
with the torch before lighting or using. Review instructions and warnings periodically to maintain awareness. • Keep the torch out of
the reach of children. • Extremely flammable contents under pressure. • Maintain good ventilation. • Always wear goggles and
protective gloves and use proper tools to handle hot work. • Never breathe in welding/soldering fumes. • Do not puncture or
incinerate. • Never attempt to modify the torch construction, use unapproved accessories or fuels, or attempt to repair a damaged
torch. • Do not drop the micro torch as the unit might be damaged and ceramic could be broken. • Never store at temperatures above
45°C such as in a car, or prolonged sunlight. • Follow refilling procedure to avoid serious accidents. • Do not ignite the torch near to
the face, hands, clothing or inflammable materials. • Please note the butane flame may be barely visible in certain light conditions.
• Allow the micro torch to cool down before storage. • Ensure flame extinguished and gas off after each use. • Never attempt to use
torch as a cigarette lighter. • Be extra careful when using the torch outdoors on sunny or windy days. • Wind may carry the torch’s
heat back toward you or other areas not intended to be heated. • Never use a torch to remove lead-based paint indoors, or in any
confined area. • Always check to make sure no unintended parts or materials are being heated. • Whenever there is a possibility that
unintended material has been heated, wait at least two hours before leaving the area. • Be especially careful to avoid fumes from
cadmium, plating and galvanized metal. • Beware that the torch tip and accessories get hot during use. • Be sure not pointed in a
direction which would cause nearby objects to ignite. • Heating the torch is extremely dangerous, especially after it has been
“emptied”. • Always have a fire extinguisher and a bucket of water near the torch and work area. • Do not use water to cool down the
torch; it will hurt the product. • Store and transport the container upright. • After use, please wait 2 minutes until confirming the torch
is extinguished and cooled down.
• Les torches doivent être vides lorsqu'elles sont retournées pour la garantie. • Lisez et suivez les instructions d'utilisation et
avertissez-vous et familiarisez-vous avec la torche avant d'allumer ou d'utiliser. Examiner périodiquement les instructions et les
avertissements afin de maintenir la sensibilisation. • Gardez la torche hors de la portée des enfants. • Contenu extrêmement
inflammable sous pression. • Maintenez une bonne ventilation. • Toujours porter des lunettes et des gants de protection et utiliser
des outils appropriés pour manipuler le travail à chaud. • Ne jamais respirer les fumées de soudage / soudage. • Ne pas percer ou
incinérer. • N'essayez jamais de modifier la construction de la torche, utilisez des accessoires ou des carburants non approuvés ou
essayez de réparer une torche endommagée. • Ne laissez pas tomber la micro-torche car l'appareil pourrait être endommagé et la
céramique pourrait être brisée. • Ne jamais entreposer à des températures supérieures à 45 ° C, par exemple dans une voiture, ni à la
lumière solaire prolongée. • Suivre la procédure de remplissage pour éviter les accidents graves. • N'allumez pas la torche près du
visage, des mains, des vêtements ou des matériaux inflammables. • Veuillez noter que la flamme de butane peut être à peine visible
dans certaines conditions de lumière. • Laisser refroidir la micro-torche avant stockage. • S'assurer que la flamme est éteinte et
éteinte après chaque utilisation. • N'essayez jamais d'utiliser la torche comme allume-cigare. • Soyez prudent lorsque vous utilisez la
torche à l'extérieur par temps ensoleillé ou venteux. • Le vent peut transporter la chaleur de la torche vers vous ou vers d'autres
endroits qui ne sont pas destinés à être chauffés. • N'utilisez jamais une torche pour enlever la peinture à base de plomb à l'intérieur
ou dans une zone confinée. • Toujours vérifier pour s'assurer qu'aucune pièce ou matériel non désiré n'est chauffé. • Chaque fois
qu'il est possible que des matériaux non prévus aient été chauffés, attendez au moins deux heures avant de quitter la zone. • Soyez
particulièrement prudent pour éviter les fumées provenant du cadmium, du placage et du métal galvanisé. • S'assurer que la pointe
et les accessoires de la torche chauffent pendant l'utilisation. • Veillez à ne pas pointer dans un sens qui pourrait provoquer
l'inflammation d'objets proches. • Le chauffage de la torche est extrêmement dangereux, surtout après "vide". • Toujours avoir un
extincteur et un seau d'eau près de la torche et de la zone de travail. • N'utilisez pas d'eau pour refroidir la torche; Il va blesser le
produit. • Entreposer et transporter le récipient en position verticale. • Après utilisation, attendre 2 minutes avant de confirmer que la
torche est éteinte et refroidie.
• Las antorchas deben estar vacías cuando sean devueltas para su garantía. • Lea y siga las instrucciones y advertencias de
funcionamiento y familiarice con la antorcha antes de encender o usar. Revise las instrucciones y advertencias periódicamente para
asegurarse del buen funcionamiento. • Mantenga la antorcha fuera del alcance de los niños. • Contenido extremadamente inflamable
bajo presión. • Mantenga una buena ventilación. • Siempre use gafas y guantes protectores y utilice las herramientas apropiadas
para manejar trabajos calientes. • Nunca respire los vapores de soldadura. • No perforar ni incinerar. • Nunca intente modificar la
construcción de la antorcha, ni use accesorios no aprobados o combustibles, tampoco intente reparar una antorcha dañada. • No deje
caer la antorcha porque la unidad podría dañarse y la cerámica podría romperse. • Nunca almacene a temperaturas superiores a
45°C, como en un automóvil, o luz solar directa y prolongada. • Siga el procedimiento de relleno para evitar accidentes graves. • No
encender la antorcha cerca de la cara, manos, ropa o materiales inflamables. • Tenga en cuenta que la llama de butano puede ser
apenas visible en ciertas condiciones de luz. • Deje que la antorcha se enfríe antes de guardarla. • Asegúrese siempre de que la llama
se haya apagado después de cada uso. • Nunca intente usar la antorcha como encendedor. • Tenga mucho cuidado al usar la
antorcha al aire libre en días soleados o ventosos. • El viento puede llevar el calor de la antorcha hacia usted u otras áreas que no
están destinadas a ser calentadas. • Nunca use una antorcha para quitar la pintura a base de plomo en interiores, o en cualquier área
confinada. • Siempre revise para asegurarse de que no se calienten piezas o materiales no deseados. • Siempre que haya habido la
posibilidad de calentamiento de materiales no deseados, espere al menos dos horas antes de salir del área para asegurarse de que
estos no se incendien. • Tenga especial cuidado de evitar los vapores de cadmio, del chapado y del metal galvanizado. • Tenga
cuidado porque la antorcha y los accesorios que ha utilizado estarán calientes después de su uso. • Asegúrese de no apuntar en una
dirección que haga que los objetos cercanos se incendien. • Calentar la antorcha es extremadamente peligroso, especialmente
después de haber "Vaciado". • Siempre tenga un extintor de incendios y un cubo de agua cerca de la antorcha y el área de trabajo. •
No utilice agua para enfriar la antorcha; Dañará el producto. • Almacene y transporte el recipiente en posición vertical. • Después del
uso, espere 2 minutos hasta que se confirme que la antorcha está apagada y enfriada.
8 PIECE SOLDERING KIT
Page 6
SK8MAT
1702073-14 MA
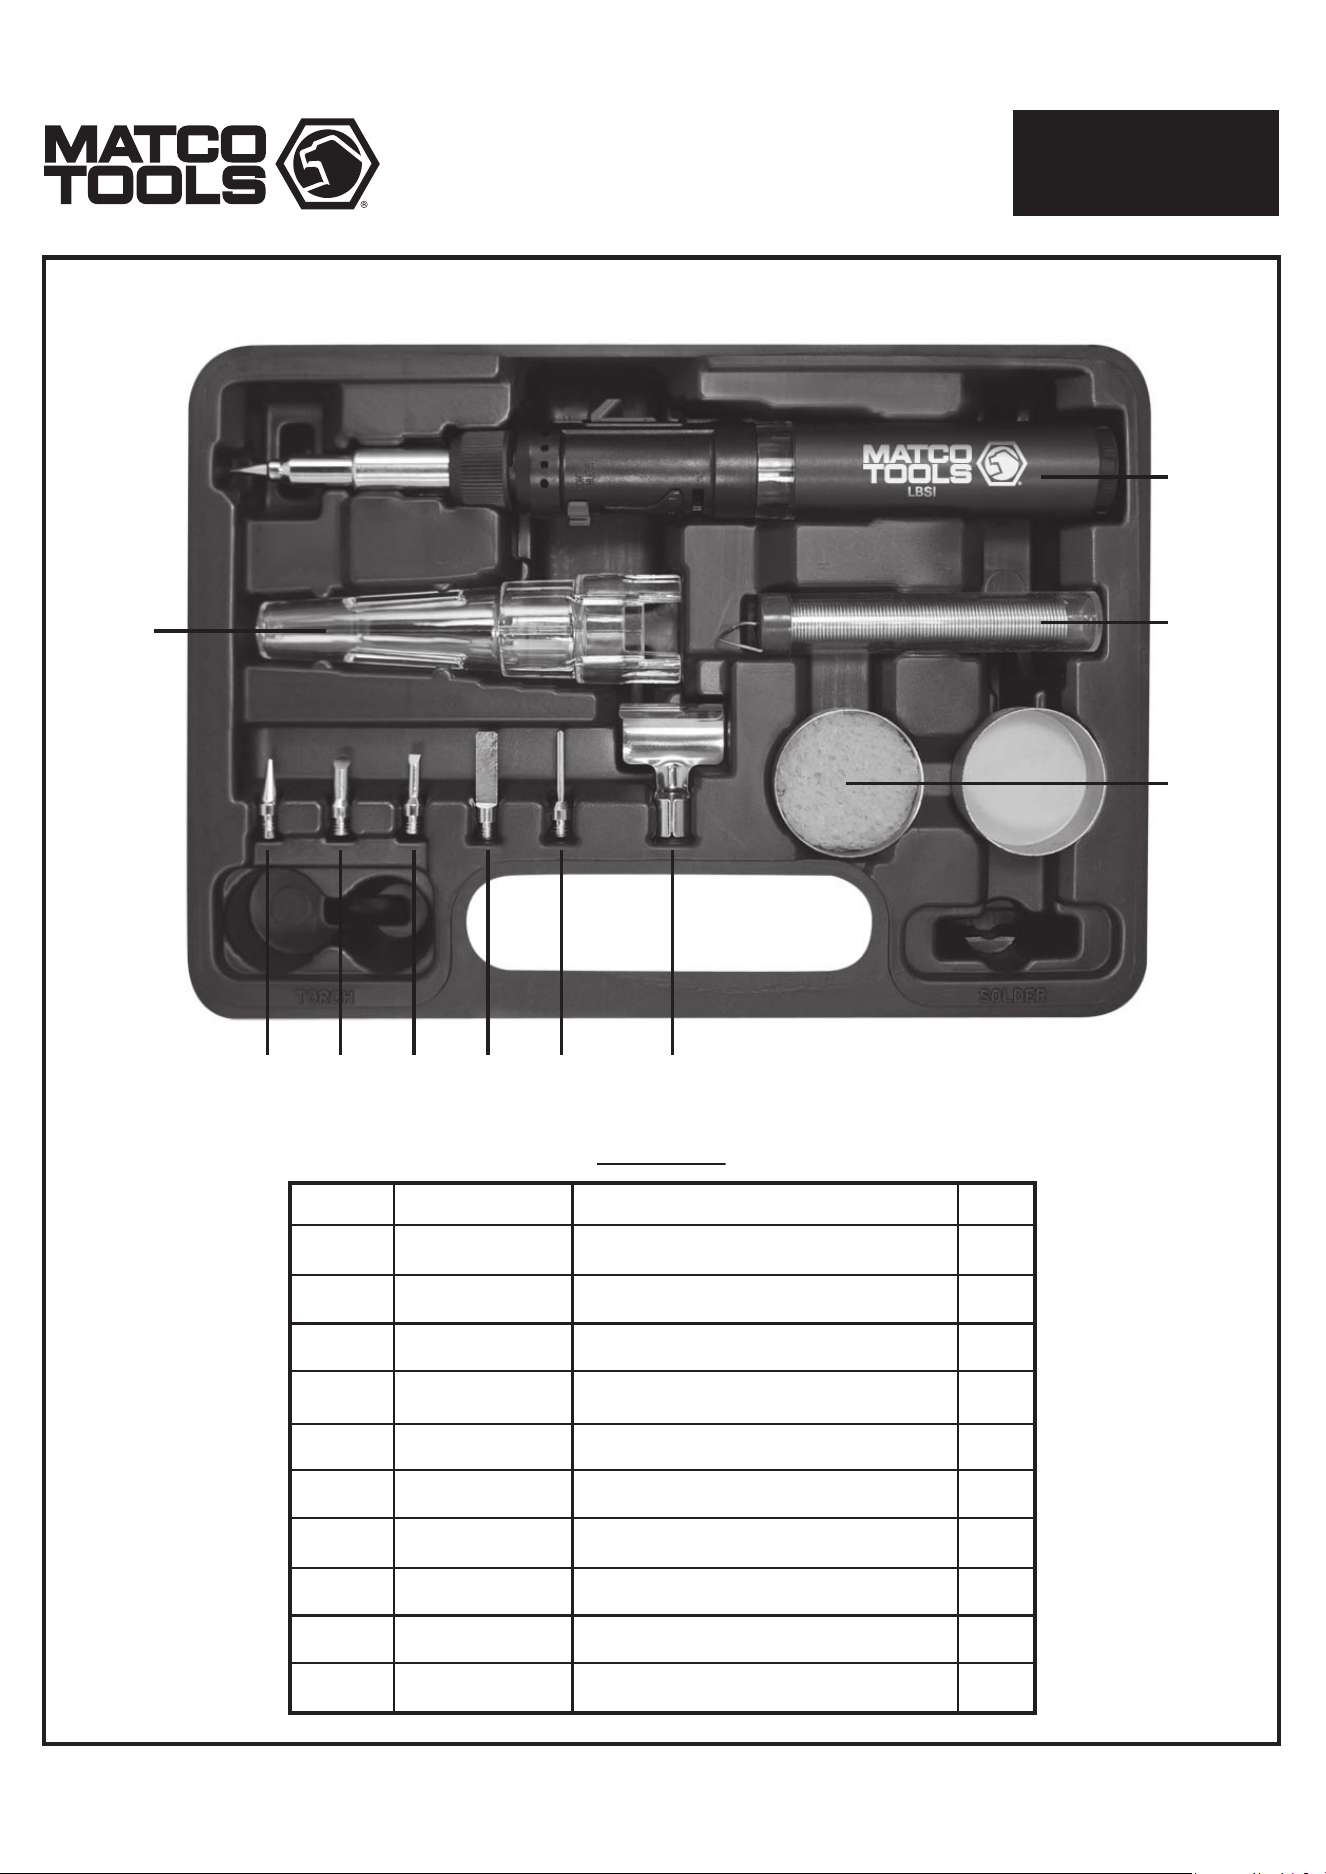
Part #Index #
Parts List
PARTS BREAKDOWN
LBSI
LBSI01
SK8MAT01
SK8MAT02
SK8MAT03
SK8MAT04
SK8MAT05
SK8MAT06
SK8MAT07
SK8MAT08
1
2
3
4
5
6
7
8
9
10
Long Barrel Soldering Iron
Clear Nose Cover for LBSI
Triple Plated Soldering Point Tip
Chisel Soldering Tip
Anvil Soldering Tip
Needle Soldering Tip
Angle Knife Soldering Tip
Heat Shrink Deflector
Sponge W/Tray
Lead-Free Solder
Description
1
1
2
1
1
1
1
1
1
1
Q’ty
1
10
9
2
3 45 67 8