RHDL95
Temperature/Humidity/Dewpoint Monitor with SD
Card Datalogging
Index
PAGE
INTRODUCTION..................................... 1
MATERIAL SUPPLIED................................1
POWER SUPPLY...................................... 2
LCD DISPLAY.........................................3
HOUSING & KEYPAD...............................4-5
OPERATION.......................................... 6
-STARTING UP................................. 6
-SETUP......................................... 6
-REAL TIME CLOCK SETTING............ 6
-ALARM SETTING........................ 8
-LOGGING SAMPLING RATE............ 11
-TEMPERATURE UNIT SETTING.........11
-DATALOGGING.............................. . 12
-SD CARD PREPARATION............... 12
-SD CARD LOGGING SETUP.............13
-SD CARD LOGGING START/STOP...... 14
-SD CARD DATA REVIEW................ 15
-MAXIMUM AND MINIMUM MEASUREMENT... 15
MAINTENANCE..................................... . 16
TROUBLE SHOOTING.............................. . 16
SPECIFICATION..................................... 17
APPENDIX
:
DEW POINT............................ 18

1
Introduction
Thank you for purchasing the Triplett RHDL95 Temperature
/Humidity/Dewpoint Monitor with SD Card Datalogging. This meter is user-
friendly and reliable. Please read this manual thoroughly before operation.
Features:
Simultaneously Displays temperature and
humidity SD card logging design for continuous
recording Easy-to-read super big LCD display
Programable danger zone for warning purpose
Design with capacitance RH Sensor to get accurate & quick reading
Temperature unit
O
C/
o
F switchable
Max/Min function to review data
Low Battery Indicator
Real Time Display (Hour & Minute, AM/PM)
Desktop &wall-mounted design for long time monitor
Audible beeper & red LED for danger zone warning
Long Battery Life (via Alkaline Battery)
-No Logging status: One Year
-SD Card Logging: One Month (sampling Rate:1min, 1G SD card)
MATERIAL SUPP
L
IED
Meter
Adaptor
Battery
SD card
Color box
Manual
2
A
d
a
p
t
o
r
POWER SUPP
L
Y
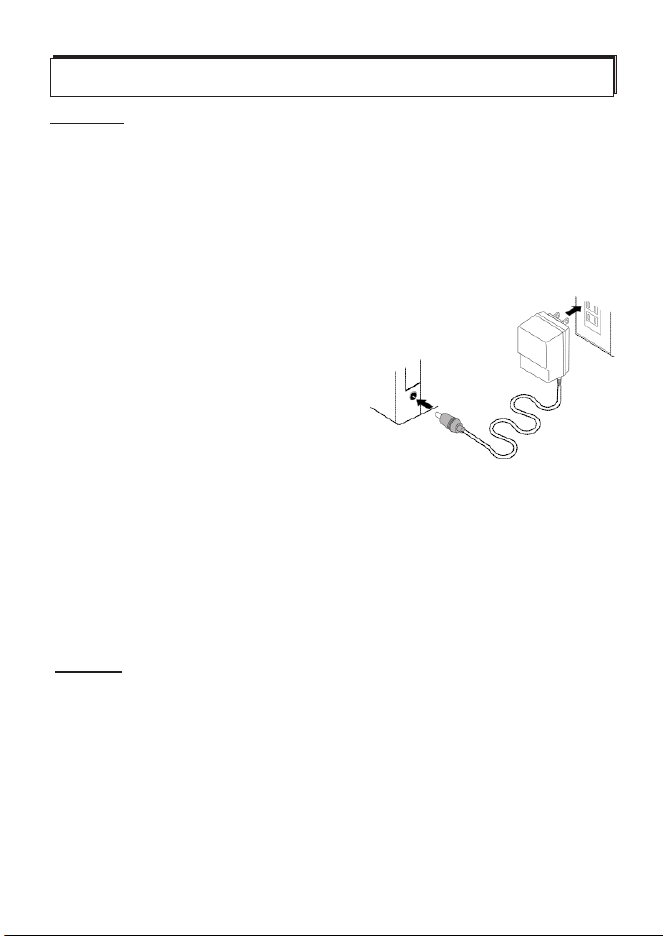
it can be powered by 5VDC adaptor and 3pcs AA batteries.
One 5V adaptor (I/P: AC 100-240V, 50/60Hz, O/P: DC5V, 0.5A)
encloses in each SD card logger package. Suggest using adaptor
for long-term logging. 4 different plugs are packed with each adaptor
, choose and assemble the correct plug per your need.
The power jack is on the right side of the meter.
Ca
u
t
i
on
:
1.Don’t operate adaptor with wet hands!
2.In a black-out, the meter will be shut-off. When electric power
is reverted, the meter will not be activated automatically.
Suggest using battery as spare power even the adaptor is
plugged.
3.While using adaptor and battery at the same time, low battery
icon will not appear even the battery power is low. Suggest to
renew the spare battery regularly.
B
a
tt
e
r
y
SD card logger series and regular monitor series are both able to
be powered by 3pcs AA batteries.
While in logging status, the battery life under below condition is 1
month:
o
25 C operation temp., 1 min sampling rate, no warming setting,
1G SD card, alkaline battery.
While in regular monitor status, the battery lifetime is 1 year via
using 3pcs alkaline batteries.
3
When low battery icon appears on LCD,
please remove the battery cover from the
rear side and install 3 new AA batteries.
into the battery compartment with correct
polarity and good contact.
Ca
u
t
i
on
:
1.High-capacity SD card and high operating temp. will shorten
the battery life.
2. Please finish the battery replacement process in one minute
otherwise the meter setting will revert to default.
3. Please remove the batteries before long-term storage.
4. Don't mix use the new and old battery to avoid battery leakage.
5. Please follow up your local rules to handle the exhausted battery
LCD DISP
LA
Y
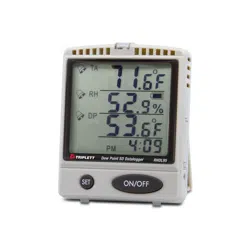
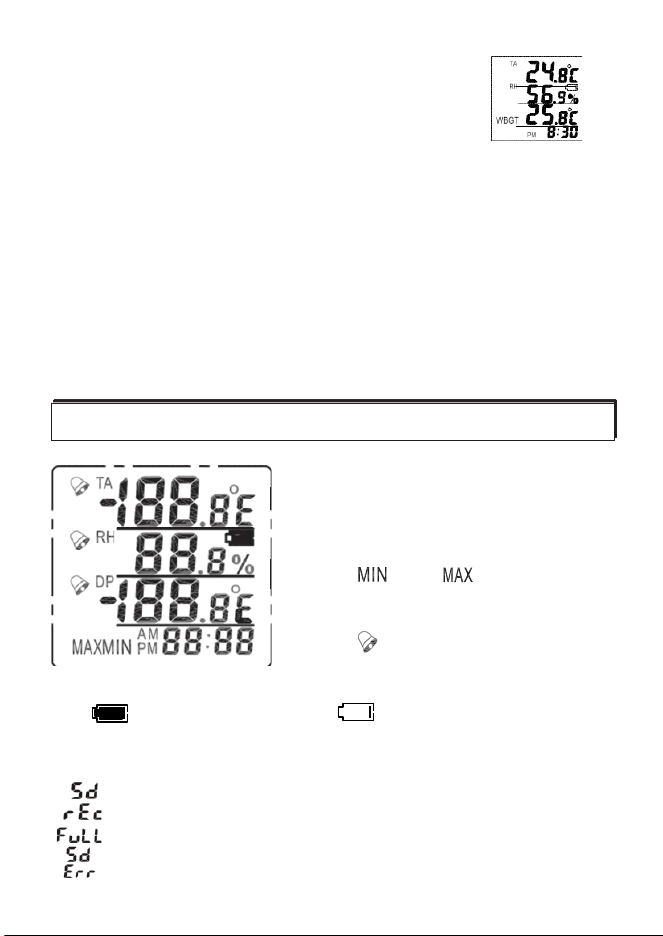
1.
Top data screen displays air temp.
2.
Middle data screen displays humidity
3.
Lower data screen displays Dewpoint
temperature
4.
The " " & “ “ icon indicates the
minimum & maximum value since power
on.
5. The " " indicates the reading is
over the warming threshold
6. “ " is battery full indicator, “ “ is battery low indicator
7. Bottom display is real time display (24HR or AM/PM) and SD card
status display:
: displayed every 5 seconds to indicate the SD card is inserted
: displayed every 5 seconds to indicate the logging is activated
: displayed every 5 seconds to indicate the SD card capacity is full
&
: displayed in turns to indicate the SD card is useless on this meter
4
HOUSING &
K
EYP
A
D
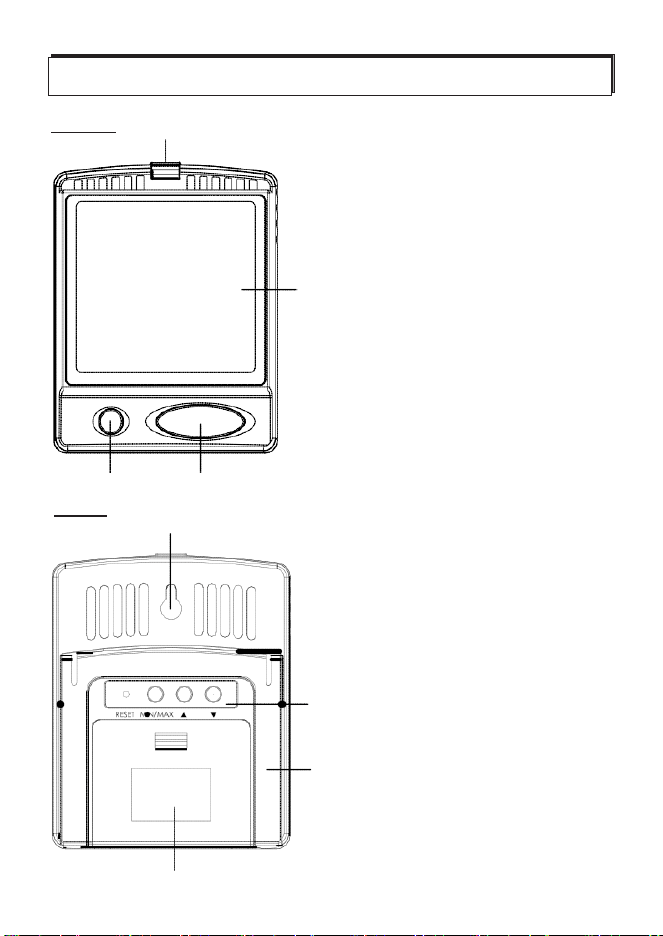
FR ON T
④
1.Power key to turn on /off the meter
2. SET key to program parameters:
-high/ low alarm setting
-sampling rate (logger series only)
③
-start/stop logging
-ON/OFF beeper
3. Large LCD with air temp./humidity
/DP/time display
4. Bright red LED alarm
②
①
R E
A
R
⑦
5. Rear side operation key
(see next page)
6. Desktop mount
7. Wall-mounted hole
⑤
8. Battery compartment
⑥
⑧
5
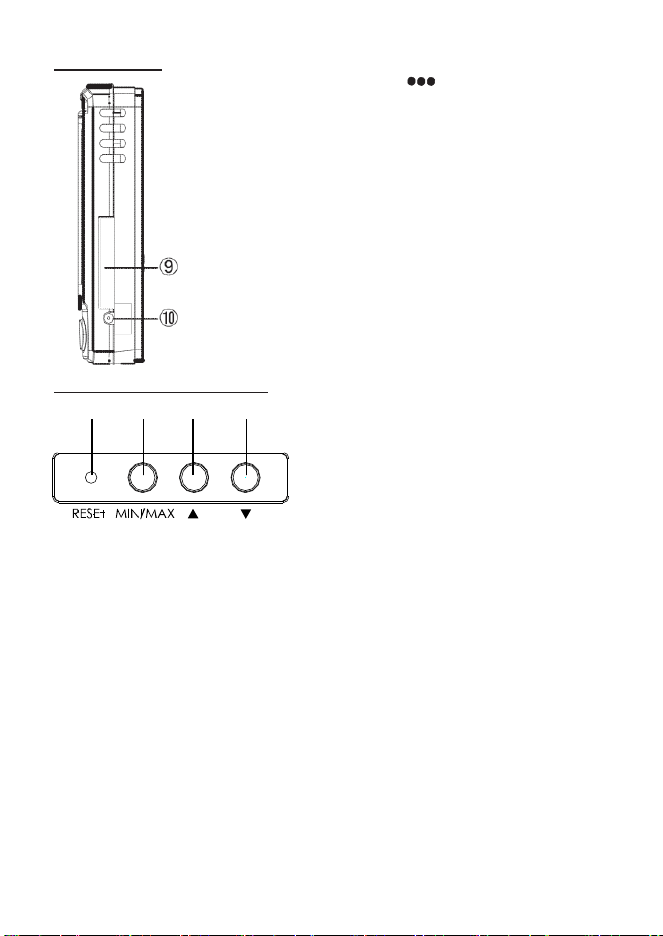
R IGH T SID E 9. SD card slot
-Press “ “ to raise the slot cover.
-Insert the SD card by following the
icon reminder on housing.
- To take out the SD card, press the
SD card to eject.
10. Adaptor socket.
NOTE
:
For regular
monitor
s
e
r
i
e
s
,
this side is flat
without
SD slot
&
adaptor
s
o
ck
e
t
R E
A
R OPER ATION
K
EY
d a b
c
a. Press to check the MIN or MAX
value of temp. & humidity since
power on.
Press more than 2 sec. to reset
the MIN/MAX memory
b. Press to increase the value while
setting
Press to switch temperature unit
o o
C or F
c.Press to decrease the value while setting
Press with “SET” key simultaneously for 2 seconds to enter the
real time clock setting.
d. When the meter crashes, use small tip to reset the meter and
revert to default setting.
6
OPER
A
TION
STARTING UP
1 . Connect with adaptor and install 3 pcs AA batteries as spare
power source. (See page 2)
2. Press “ ON/OFF” key to power on the meter. If the measured value
is over the limit, the beeper sounds and red LED flashes for first
10 seconds and then beeper sound will be off.
3. Program the real time and alarm setting for the first time using.
Without the batteries as spare power source, all the parameters
will be defaulted after the adaptor power is removed.
SETUP
The advanced SETUP function lets you customize your meter's
preferences and defaults. The programmable parameters are:
1. Real time
s
e
tt
i
ng
:
24 hour/12 hour, hour, minute and date
2. Alarm
s
e
tt
i
ng
:
High and low threshold setting for air temp., air humidity,
and dew point
3. Sampling
r
a
t
e
:
Logging sampling rate setting from 1 min to 720 mins.
4. Temp. unit
s
e
tt
i
ng
:
Degree C or Degree F setting.
REAL TIME C
L
OC
K
Use this program to adjust local time of the meter. With the adaptor
connected or batteries installed, the power will drive the real time
clock even the meter is turned off.
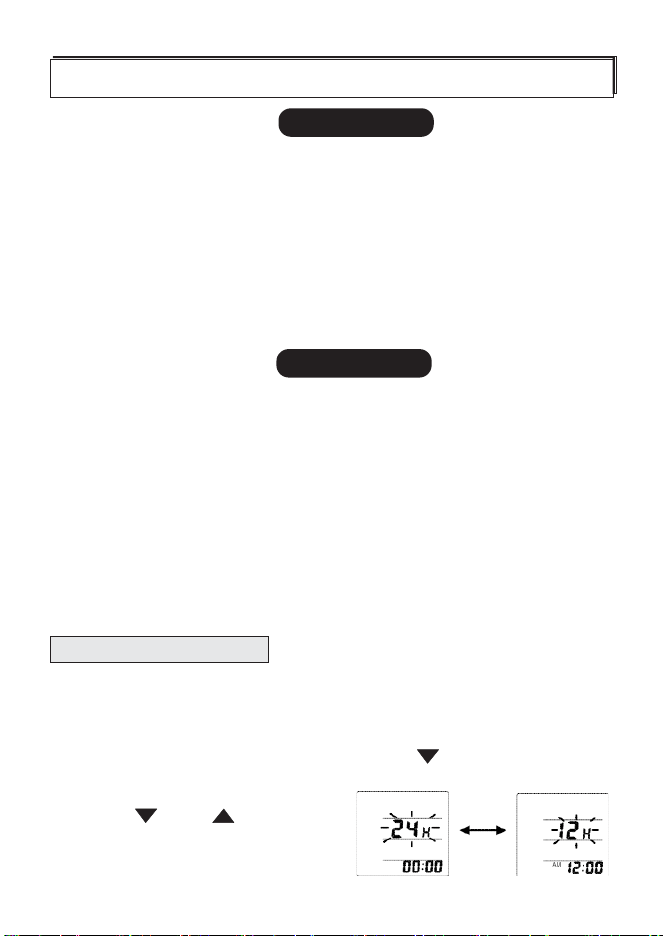
1. When meter is on, press “SET” key and “ “key simultaneously
for 2 seconds to enter the real time clock setting.
2. Press “ “ or “ “ key to
program the time format as
12 Hours or 24 Hours
7
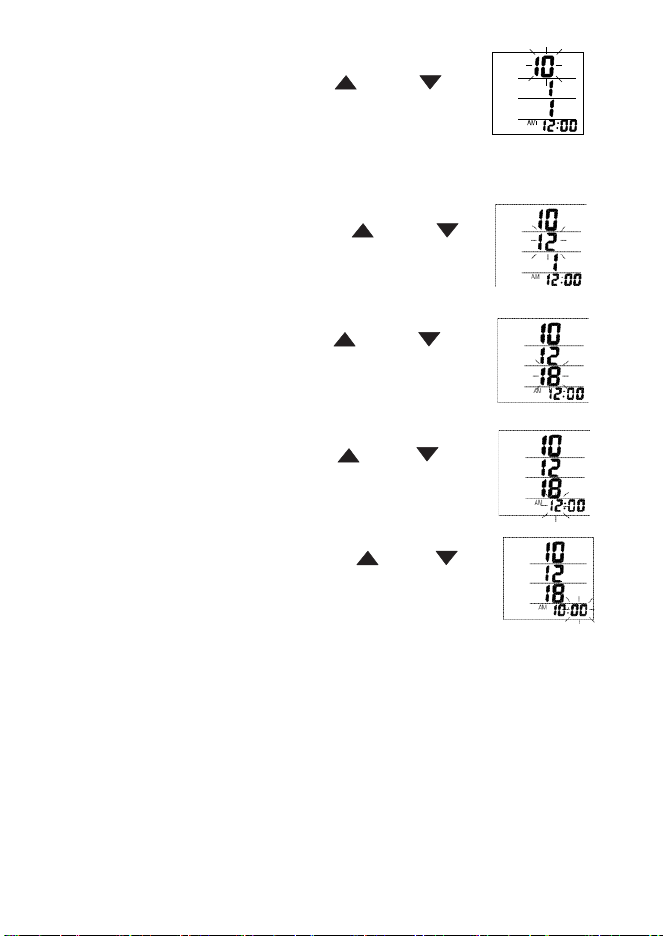
3. Press “ SET “ key to confirm the time format
and enter Year setting. Press “ “ or “ “
key to program the year.
For example
:
2010 is displayed as 10
.
2011 is displayed as 11
.
.
4. Press “ SET “ key to confirm the Year setting
and enter Month setting. Press “ “ or “ “
key to program the Month.
5. Press “ SET “ key to confirm the Month setting
and enter Day setting. Press “ “ or “ “
key to program the Day.
6. Press “ SET “ key to confirm the Day setting
and enter Hour setting. Press “ “ or “ “
key to program the Hour.
6. Press “ SET “ key to confirm the Hour setting
and enter Minute setting. Press “ “ or “ “
key to program the Minute.
7. Press “ SET “ key to confirm the Minute setting and revert to
normal display
NOTE
:
1. Before
starting
the
datalogging,
be sure to program the
m
e
t
e
r
with correct date and time. To change the date and
t
i
m
e
while
logging
will stop the logger right a
w
a
y
.
8
ALARM SETTING
Use this function to set the high & low threshold of each parameters
Alarm is activated while measurement is over the threshold:
1. Symbol
w
a
r
n
i
ng
When the measured value is higher than the
high limit threshold or lower than the low
DP
limit threshold, the “ “ symbol flashes
on LCD at the left side of measured value.
The symbol disappears when the measured value
is reverted to normal range.
2. LED flash
w
a
r
n
i
ng
When the measured value is higher than the high limit threshold or
lower than the low limit threshold, the red LED flashes for about 10
seconds. After the initial 10 seconds, the LED flashes every 10
second until the measured value is back to normal range.
3. Beeper alarm
w
a
r
n
i
ng
When the measured value is higher than the high limit threshold or
lower than the low limit threshold, the beeper sounds for about 10
seconds. After the initial 10 seconds, the beeper sounds every 10
second until the measured value is back to normal range.
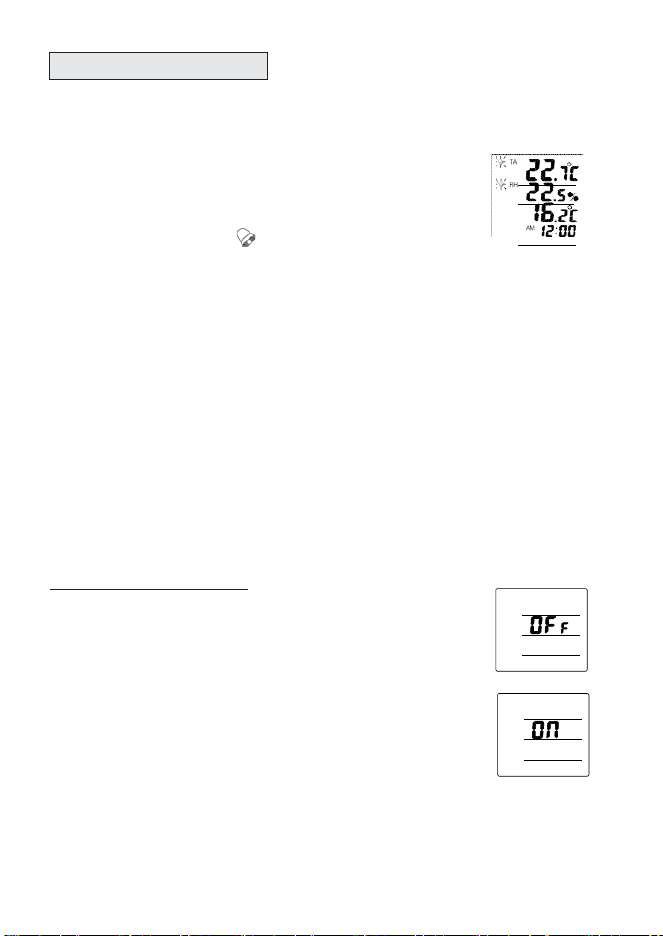
B
e e
p
e r a
l
a
r
m ON /OFF
To mute the alarm beeper, short press
“SET” key once and “OFF” will appear
on LCD. Symbol flash and LED flash will
not be affected by this program.
To activate the alarm beeper sound,
short press “SET” key again and “ON”
will appear on LCD.
9
A
l
a
r
m Se
t
up
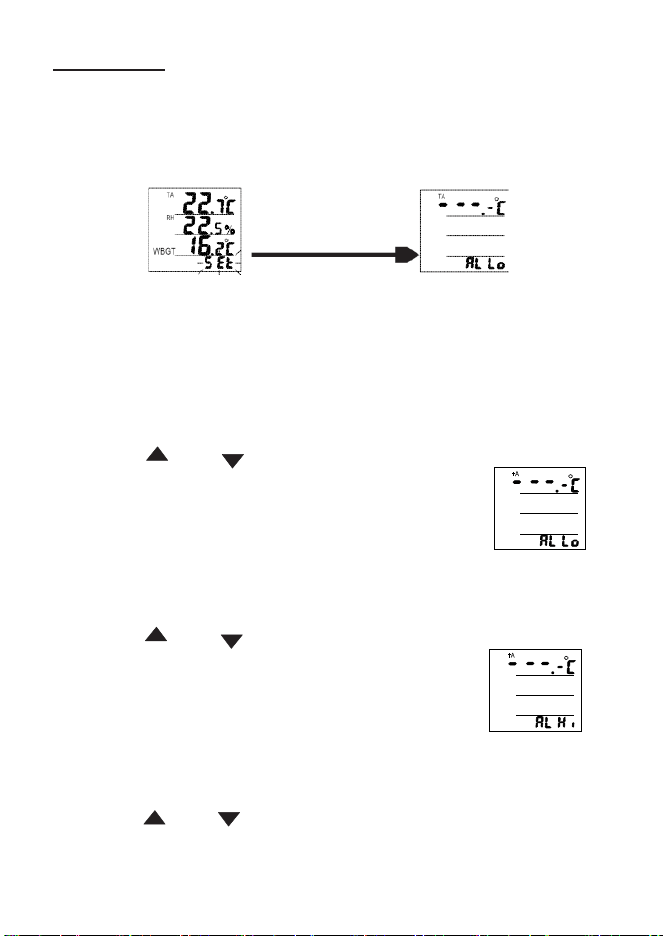
1. When meter is on, press “SET” key for 3 seconds and release
key while seeing “SEt” appear on the bottom of the LCD.
After releasing key, the LCD is in alarm setting mode and ready
for programming.
Release SET key
2. Press “SET” key repeatedly to select the parameters which you
want to program. The programmable values are:
TA Low limit --> TA High limit --> RH% Low limit --> RH% High limit
-->DP Low limit --> DP high limit -->Ending
o
3.TA Low alarm limit setup (adjustable range:-10.0~70.0 C):
-Press “ ” or “ “ key to adjust the
TA low limit threshold.
-While need to leave the setting blank,
press “ MIN/MAX “ key to erase the previous
setting and LCD displays “ - - - “.
-Press “ SET “ key to confirm the setting
and enter TA high alarm limit setup.
o
4.TA High alarm limit setup (adjustable range:-10.0~70.0 C):
-Press “ ” or “ “ key to adjust the
TA high limit threshold.
-While need to leave the setting blank,
press “MIN/MAX “ key to erase the previous
setting and LCD displays “ - - - “.
-Press “SET“ key to confirm the setting
and enter RH% low alarm limit setup.
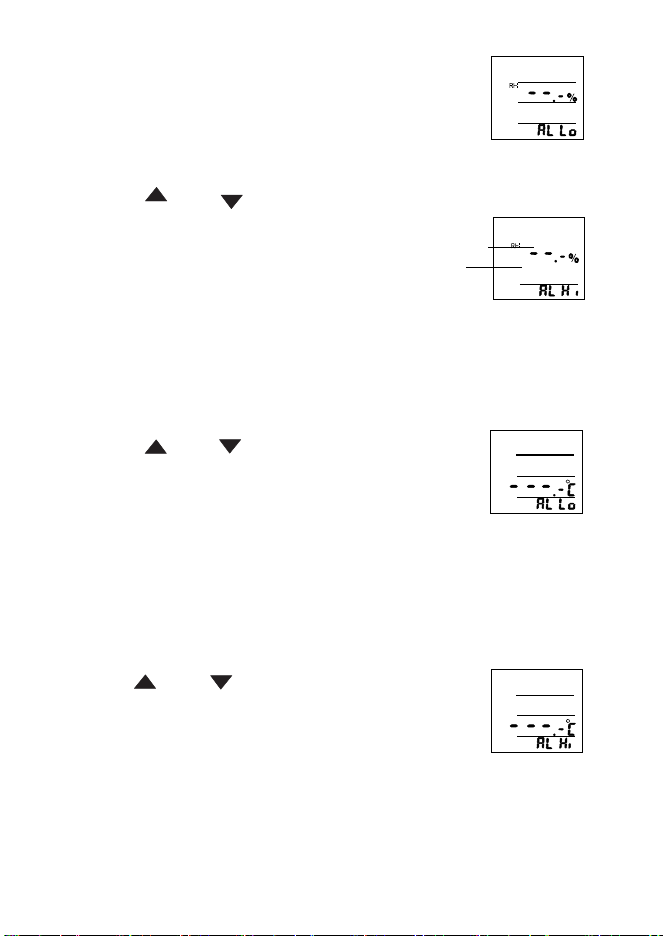
5.RH% Low alarm limit setup (adjustable range:5%~95%):
-Press “ ” or “ “ key to adjust the
RH% low limit threshold.
10
-While need to leave the setting blank,
press “MIN/MAX “ key to erase the previous
setting and LCD displays “- - - “.
-Press “ SET“ key to confirm the setting
and enter RH% high alarm limit setup.
6.TA High alarm limit setup (adjustable range:5%~95%):
-Press “ ” or “ “ key to adjust the
RH% high limit threshold.
-While need to leave the setting blank, press
“MIN/MAX“ key to erase the previous setting
and LCD displays “- - - “.
-Press “SET“ key to confirm the setting
and enter Dplow alarm limit setup.
7. DP Low alarm limit setup
o
Adjustable range:-20.0~70.0 C
-Press “ ” or “ “ key to adjust the
low limit threshold.
DP
-While need to leave the setting blank,
press “MIN/MAX“ key to erase the previous
setting and LCD displays “- - - “.
-Press “ SET“ key to confirm the setting
and enter high alarm limit setup.
8. DP High alarm limit setup
o
Adjustable range:-20.0~70.0 C
-Press “ ” or “ “ key to adjust the
high limit threshold.
DP
-While need to leave the setting blank,
press “MIN/MAX“ key to erase the previous
setting and LCD displays “- - - “.
-Press “SET“ key to confirm the setting
and finish the high alarm limit setup.
11
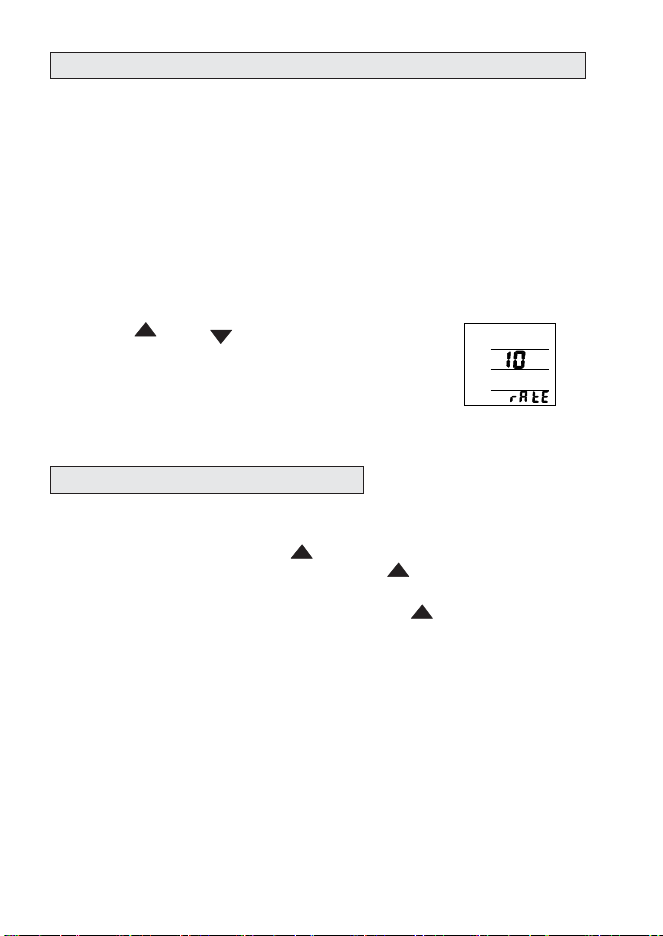
LOGGING SAMPLING R
A
TE
Use this function to setup the logger sampling rate. The setting
range is 1~720 minutes. The default is 10 mins.
1. When the meter is on, press “SET” key for 3 seconds and
release key while seeing “SEt” appear on the bottom of the
LCD.
After releasing the key, the LCD is in alarm setting mode and
ready for programming.
2. Press “SET” key repeatedly to skip the alarm setting and
enter logger sampling rate setup.
3. Press “ ” or “ “ key to adjust the
sampling rate.
4
.
Press “SET“ key to confirm the setting
and revert to normal display.
TEMPERATURE UNIT SETTING
Use this function to setup the temperature unit of your meter.
1. When meter is on, press “ “ key >2 seconds until you see
the temperature unit change. Press “ “ again to change it.
2. Automatically saving after 10 seconds “ “ key inactivity.
12
D
A
T
AL
OGGING
The advanced SD card logging function lets you record all data into
SD card per your preset sampling rate. The sampling rate can be 1
min to 720 mins(12 hours).
Once a new logging is started, a file name will be auto created. The
file name is given per the start date and time. For example:
if the logging starts at 2010/08/28 16:58, the fine name will be given
as 08281658.txt
The maximum file size is 30000 records. Once the file size is bigger
than 30000 records, a new file will be created, and the file name will
be generated.
NOTE
:
A complete date/time/TA/RH%/TEMP. data is treated as 1
r
e
c
o
r
d
.
SD CARD PREP
A
R
A
TION
This product is compatible with FAT16 & FAT32 format SD card.
Suggest maximum SD card capacity is 8GB SD or 4GB SDHC
card.
Before loading or unloading the SD card into meter, please following
below suggestion:
1. The data loss caused by the damaged SD card is not in the product
warranty. Please make sure your SD card can function well before
running a logging.
2. This product is compatible with FAT16 & FAT32. No NTFS formats.
3. Check the available SD card capacity before logging. This meter
will show “FULL” if the capacity is not enough for logging.
4. This meter is designed to use SD or SDHC cards only.
5. This instrument has not been extensively tested by MMX
and SDHC which capacity is over 8GB, so we do not
recommend using it.

13
6.We don’t warranty that all brands SD card is compatible with
this meter. Suggest running a short-term logging to ensure your
SD card is working on this logger before official recording.
7. Please don’t add extra label on SD card in case the label is stuck
on the SD card slot.
8. Following the correct direction to load the SD card.
A
l
w
a
ys
power off the meter before loading and
unloading
the SD
c
a
r
d
.
9. Avoid using the SD card in strong statics, high temperature or
high humidity environment to minimize the SD card damage.
SD CARD LOGGING SETUP
Always power off the meter before loading and unloading the SD
card. Run a short-term logging to ensure the SD card works well on
meter.
Following below steps to start logging.
1. Power off the meter and load the SD card.
Power on the meter, “Sd” flashes on the
right-bottom of the LCD every 5 seconds.
2. Setup the date and time. Please see page 6
3. Setup the sampling rate. Please see page 11
4. The datalogging can be powered by battery however the battery
lifetime is short. For example: While sample rate is 1 min and
using 1GB SD card, the battery lifetime is 1 month only.
Suggest using adaptor for long-term logging. While in a black-out,
the logging will stop and will not be reverted even the electric
is back.
5. If possible, use both battery and adaptor. While in a black-out,
the logging can be continued by using battery.
NOTE:
1. When receiving the meter, one SD card is inserted in the
meter already for initial functional testing.
14
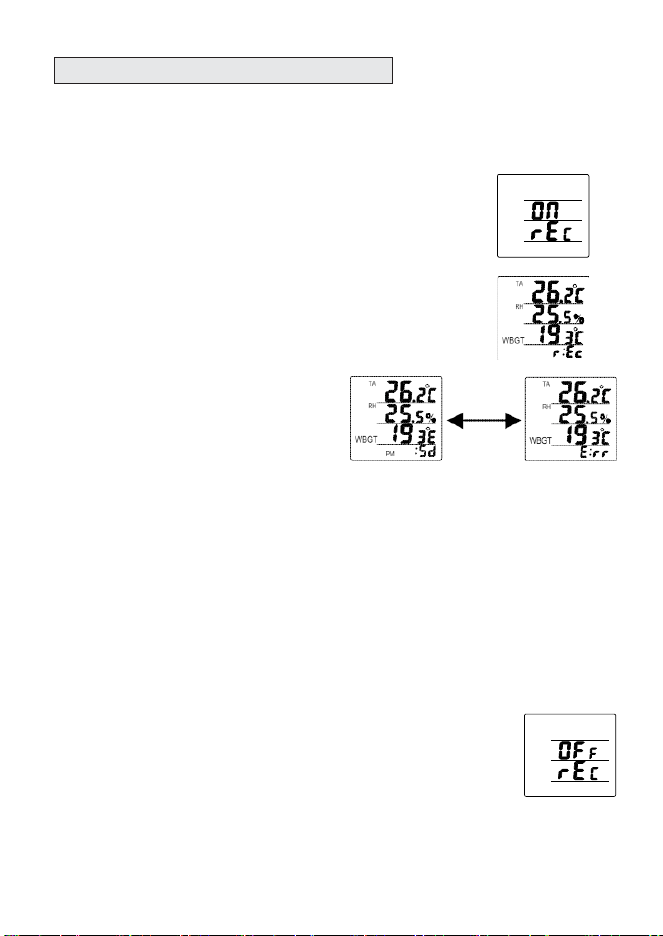
SD CARD LOGGING START/ STOP
After finishing the sampling rate setting, press “SET” key more than
5 seconds to activate the logging. “ON REC” will appear on LCD
and start to record data into SD card.
1. The “ON REC” will appear on LCD for 2~10
seconds, depended on the SD card capacity.
2. While starting logging, “REC” appears on
LCD every 5 seconds.
3. Power off the meter will terminate the logging.
Power on the meter again will not activate the
logging again.
4. While logging, unload the SD
card will stop logging.
“sd” & “Err” appear on the LCD
interchangeably.
NOTE
:
Following conditions
will terminate the
logging.
Repeat a
bo
v
e
steps again to re-activate the
l
ogg
i
ng
.
1. Power off the
m
e
t
e
r
2. While low battery icon appears on
L
CD
3. In a
black-out
while using adaptor
on
l
y
4. SD card
un
l
o
a
d
5. Real time clock setting
c
h
a
ng
e
6. Sampling rate setting
c
h
a
ng
e
7. Alarm
threshold
setting
c
h
a
ng
e
8. Temperature unit
c
h
a
ng
e
9. Press
“
RESET
”
to stop the
l
ogg
i
ng
5. Press “SET” key more than 5 seconds to stop
the logging. “OFF rEC” appears on LCD and
SD logging stops.
6. To unload the SD card, power off the meter first.
Press the SD slot door and push SD card to eject.
15
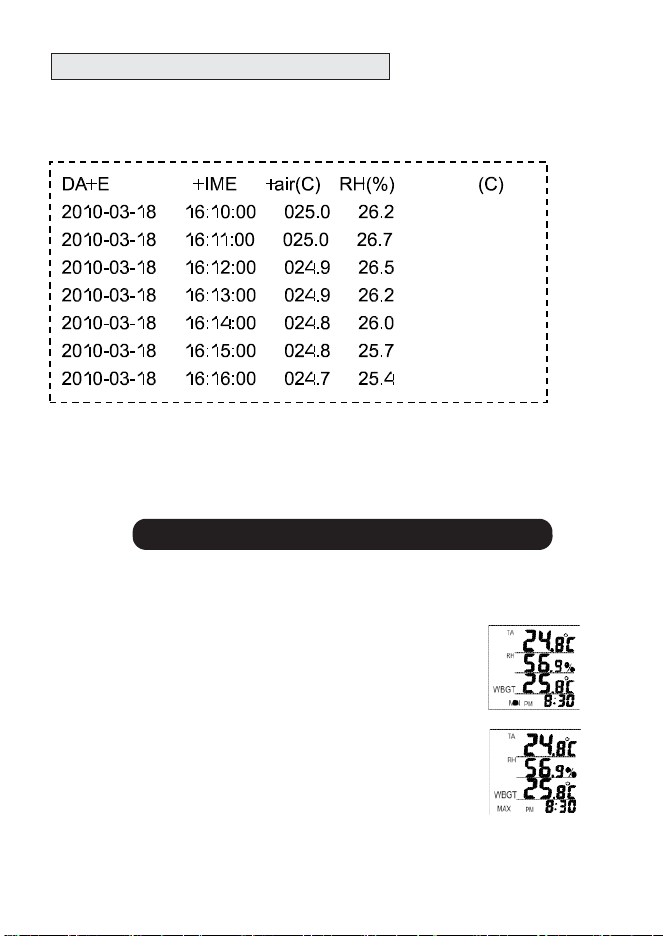
SD CARD DATA REVIEW
The recorded data is stored in SD card in following format:
Temperature unit is depended o n setting
DP
4.3
4.6
4.4
4.2
4.0
3.9
3.6
Please use an external SD card reader if you don’t have this
device built in your computer. The SD card reader is not included
in our standard package. Please purchase it from your local
stores.
MAXIMUM AND MINIMUM ME
A
SUREMENT
This meter can show you the maximum and minimum value since
power is on.
1. Press “MIN/MAX” key once, “MIN” appears on
LCD left bottom. The minimum TA, RH% and
DP appear on LCD.
2. Press “MIN/MAX” key again, “MAX” appears on
LCD left bottom. The maximum TA, RH% and
DP appears on LCD.
3. To clear the maximum and minimum value, press “MIN/MAX” key
more than 2 seconds until the whole LCD flash once.
16
M
A
INTEN
A
NCE
To clean the housing of the meter, please use dry, clean and soft cloth.
Don’t use any chemical solution or polishing powder to clean the plastic.
TROU
BL
ESHOOTING
?
METER COULD NOT BE POWERED ON
- Press "POWER” key > 0.3sec.
- Check the connection status of adaptor or batteries.
?
SLOW RESPON SE
- The meter is designed to update the value every 10 seconds.
It is normal to see an unchanging reading for the initial few
seconds while the measured environment is dramatically
changed.
?
ER R OR C OD ES ST
A
N D FOR
:
Error Problem & S
o
l
u
t
i
on
E02 The value is under the lower limit.
Solution
: Operate the meter in specified range only.
E03 The value is over the upper limit .
Solution
: Operate the meter in specified range only.
E04 The temperature sensor or circuit error.
Solution:
Relief E02/03 first. If not working, send it
back for further investigation.
E11 Humidity sensor or circuit error.
Solution
: sent back for further investigation.
E32 IC failure.
E33 IC failure.
Solution
: sent back for further investigation.
17
SPECIFIC
A
TION
Te mp . ra n g e 14° to 158°F (
-1 0 .0 to 7 0 .0
o
C )
Temp. resolution
0.1
o
C/
o
F
Te mp . accu ra cy
+/-1
o
C
Humidity. range
0%~99.9%RH
H u mi d i ty re so l u ti o n
0 .1 % R H
Humidity accuracy
+/-3%RH (at 25
o
C, 10~90%RH,
others +/-5%RH)
D e w p o i n t te mp . Ra n g e -2 0 ~7 0
o
C
SD card
Sampling rate
Beeper (dB)
SD card or SDHC card
(MMC and SDXC cards are not
compatible)
1 to 720 mins. Default:10 mins
~65dB
R H % Se l f ca l i b ra ti o n
NO -Contact Support
Power consumption
<0.4mA
L C D si ze (mm)
6 3 (H )x7 0 (W)
Operation temp.
0~50
o
C
Op e ra ti o n R H %
H u mi d i ty < 90 %
Storage temp.
-10~50
o
C
Sto ra g e R H %
H u mi d i ty < 90 %
Dimensions
4.3x3.5x1.2”(H)
We i g h t
~2 0 0 g
Power
Standard Package
AA x3pcs or 5V adaptor
Meter/adaptor/batteries/Manual/
Paper box/SD card
18
APPENDI
X B:
WHAT
IS DEW
POI
NT
The dew point temperature is the temperature at which the air can
no longer hold all of its water vapor and some of the water vapor
must condense into liquid water. Condensation of water vapor
begins when the temperature of air is lowered to its dew point and
beyond.
Dew Point
App
li
c
a
t
i
on
:
• In summer or high humidity season, identifies and warns when
conditions for mold growth exist.
• In winter or low humidity season, identifies and warns when
conditions for static electricity exist.
• Air temperature and dew point temp. indicate where condensation
may occur
• Monitor conditions in laboratories, basement and other controlled
environment settings.