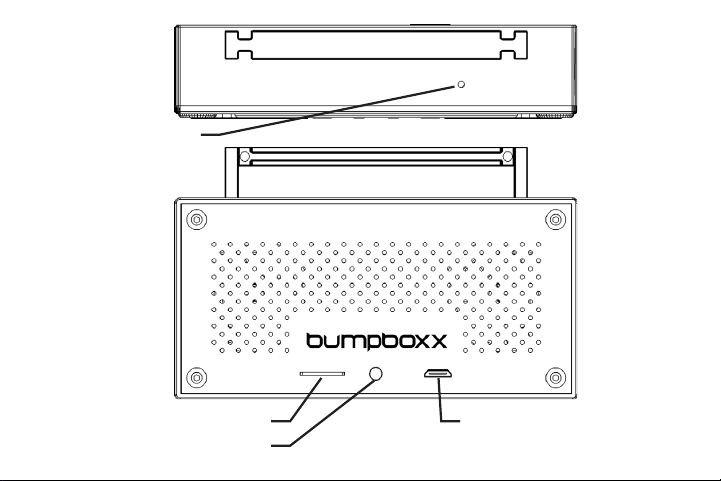
Micro SD Card Slot
Charging Indicator LED
Micro USB Charging Port
Microphone
Instruction Manual:
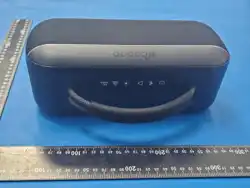
Bumpboxx Microboom
Inside The Box:
USB Charging Cable
Necklace
Microboom Speaker
Microboom
R
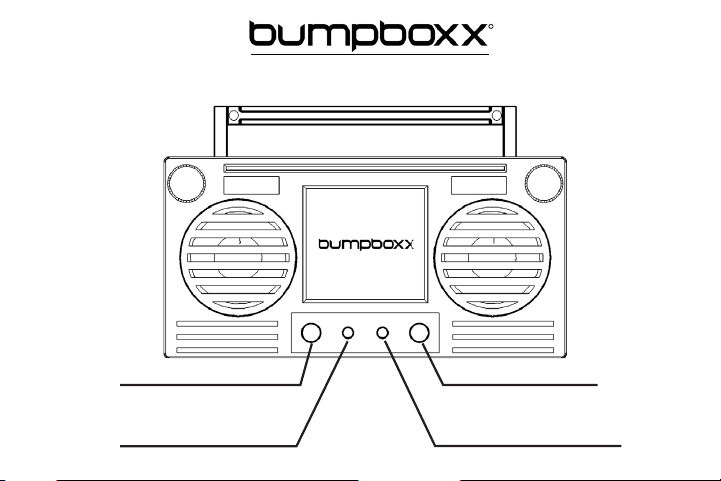
Power On/Power O
TWS Pairing
Volume (-) = Hold Down
Skip Back = Single Press
Play/Pause
Answer Call/End Call
Volume (+) = Hold Down
Skip Forward = Single Press

LIMITATION OF LIABILITY
THE MAXIMUM LIABILITY OF BUMPBOXX UNDER THIS LIMITED WARRANTY IS EXPRESSLY LIMITED TO
THE LESSER OF THE
PRICE YOU HAVE PAID FOR
THE PRODUCT OR THE COST OF REPAIR OR REPLACEMENT OF THAT PRODUCT OR ANY
COMPONENT OR PART THAT MALFUNCTION IN CONDITIONS OF NORMAL USE. EXCEPT AS INDICATED ABOVE, IN NO
EVENT WILL BUMPBOXX, LLC
BE LIABLE FOR ANY DAMAGES CAUSED BY
THE PRODUCT OR
THE FAILURE OF THE PRODUC
T
TO PERFORM, INCLUDING ANY LOST PROFITS OR SAVINGS OR SPECIAL, INCIDENTAL, OR CONSEQUENTIAL DAMAGES.
BUMPBOXX, LLC IS NOT LIABLE FOR ANY CLAIM MADE BY A THIRD PARTY OR MADE BY YOU FOR A THIRD PARTY. THIS
LIMITATION OF LIABILITY APPLIES WHETHER DAMAGES ARE SOUGHT, OR A CLAIM MADE, UNDER THIS LIMITED WARRANTY
OR AS A TORT CLAIM (INCLUDING L
IMITATION OF LIABILITY), A CONTRACT CLAIM, OR ANY OTHER CLAIM. THIS LIMITATION
OF LIABILITY CANNOT BE WAIVED OR AMENDED BY ANY PERSON. THIS LIMITATION OF L
IABILITY WILL BE EFFECTIVE EVEN
IF YOU HAVE ADVISED BUMPBOXX, LLC
OR AN AUTHORIZED REPRESENTATIVE OF
BUMPBOXX, LLC OF THE POSSIBILITY OF
ANY SUCH DAMAGES. THIS LIMITATION OF LIABILITY WILL ALSO APPLY TO CLAIMS FOR PERSONAL INJURY.
To explore our full selection of products, please visit
www.bump
bo
xx.com
.
The illustrated products and specications may dier slightly from those supplied.
All other trademarks and trade names are those of their respective ow
ners.
Made In China
2016 Bumpboxx, LLC

Getting Started:
Connect the USB charging cable to the Micro USB charging port. Connect the opposite end
to your power source and allow the speaker to fully charge before use. The Red
charging Indicator LED will turn on when the battery is charging. When fully charged
the LED will turn o. Press the power button to turn the speaker on. The Bumpboxx
screen logo will ash while waiting to be paired with a Bluetooth device or Micro
SD card to be inserted.
Connecting to Bluetooth:
On your Bluetooth enabled device search for and connect to the device named “Bumpboxx”.
The screen logo will stop ashing once the Bluetooth is connected.
Connect Two speakers with TWS pairing:
1. Turn on both speakers at the same time and the logo screens will begin to flash.
2. Press the power button quickly on one speaker and you will hear a beep. The logo screen on the
opposite speaker will stop flashing to indicate that the 2 speakers are now connected.
3. Follow the steps above to pair only one speaker to the Bluetooth device named “Bumpboxx”.
4. Once paired both logo screens will stay lit and the speakers are ready to play together.
Playing MP3 Files From a Micro SD Card:
Insert a Micro SD card into the slot to play music. The Bumpboxx logo will turn white once a Micro SD
card is inserted. Music les must be MP3 format. Remove the Micro SD card to allow Bluetooth
streaming. *Note: The Micro SD card capacity cannot exceed 32MB.
Answering Phone Calls:
When receiving an incoming phone call the speaker will play an audio alert. To answer the call press
the Answer Call/End Call button. The microphone is located on the top of the speaker. To end the call
press the Answer Call/End Call button.