Instruction
Booklet
For your safety and continued enjoyment of this product,
always read the instruction book carefully before using.
Nugget Ice
Cube Maker
IMC-12 SERIES
TRADUCCIÓN AL ESPAÑOL INCLUIDA
GARANTíA DE
UN AÑO

2
Important
Safeguards
When using an electrical appliance, basic safety
precautions should always be followed to reduce
the risk of re, electric shock, and/or injury, including
the following:
1. Read all instructions before using.
2. Remove all packing material and carefully check
your ice maker to ensure it is in good condition
and that there is no damage to the ice maker
or power cord and plug.
3. If the supply cord is damaged, it must be
replaced by the manufacturer or its service
agent or a similarly qualied person in order
to avoid a hazard.
4. This appliance is not intended for use by persons
(including children) with reduced physical,
sensory, or mental capabilities, or lack of
experience and knowledge, unless they have
been given supervision or instruction concerning
use of the appliance by a person responsible for
their safety. Children should be supervised to
ensure that they do not play with the appliance.
This appliance can be used by children aged 8
years and above and persons with reduced
physical, sensory, or mental capabilities or lack
of experience and knowledge if they have been
given supervision or instruction concerning use
of the appliance in a safe way and understand
the hazards involved. Children should not play
with the appliance. Cleaning and user
maintenance should not be done by children
without supervision.
5. This appliance is intended to be used in
households and similar applications such as
sta kitchen areas in shops, oces, and other
working environments; farmhouses; bed and
breakfast type environments; and by clients in
residential hotel and motel type environments.
6. WARNING: Do not store explosive substances
such as aerosol cans with a ammable
propellant in this appliance.
WARNING: Keep ventilation openings, in the
appliance enclosure or in the built-in structure,
clear of obstruction.
WARNING: Do not use mechanical devices or
other means to accelerate the defrosting
process, other than those recommended by the
manufacturer.
WARNING: Do not damage the refrigerant circuit.
WARNING: When positioning the appliance,
ensure the supply cord is not trapped or
damaged.
WARNING: Do not locate power strips or other
portable power supplies at the rear of the
appliance.
WARNING: When disposing of the appliance,
do so only at an authorized waste disposal
center. Do not expose to ame.
WARNING: Fill with potable water only.
7. The refrigerant (R600a) is ammable.
CAUTION: The refrigerant circuit of the appliance
contains isobutane (R600a). Isobutane is a
natural refrigerant gas with a high level of
environmental compatibility, but it is
nevertheless ammable. During transportation
and installation of the appliance, ensure that
none of the components of the refrigerant circuit
becomes damaged.
If the refrigerant circuit should be damaged:
Avoid open ames and sources of ignition.
Thoroughly ventilate the room in which the
appliance is situated.
8. Before using the ice maker for the rst time,
please wait 2 hours after positioning it.
9. Tap water should not be used in this unit. Spring
or ltered water is recommended.
10. Ensure the voltage is compliant with the voltage
range stated on the rating label and ensure the
grounding of the socket is in good condition.
11. Do not upend this product or incline it over
a 45° angle.
12. To protect against risk of electric shock,
do not pour water on cord, plug, or ventilation,
or immerse the appliance in water or any other
liquid.
13. Unplug the appliance when not in use or before
cleaning.
14. Keep the appliance 3.5 inches from other objects
to ensure enough room for ventilation.
15. Do not use accessories that are not
recommended by manufacturer.
16. Do not use the appliance near ames, hot
plates, or stoves.
17. After switching the unit o, wait at least 5
minutes before switching it on again to avoid
damaging the compressor.
18. Do not use outdoors.
19. Never clean with scouring powders or hard
implements.
20. Please keep the instruction manual.
21. To avoid contamination of water/ice cubes:
Regularly clean surfaces that can come in
contact with water and accessible drainage
systems. Clean water tanks if they have not been
used for 48 hours. If the refrigerating appliance

3
is left empty for long periods, switch o, clean,
dry, and leave the lid open to prevent mold from
developing in the appliance.
22. Component parts shall be replaced with like
components and that servicing should be done
by factory authorized service personnel to
minimize the risk of possible ignition due to
incorrect parts or improper service.
23. During servicing, service personnel should power
down and unplug the ice maker.
24. If the power cord is damaged, it must be
replaced by the manufacturer, its service agent,
or a similarly qualied person in order to avoid
a hazard.
25. It is normal for the compressor and condenser
surface to reach temperatures between 158°F -
198°F during operation, and surrounding areas
may be very hot.
Save These
Instructions
For Household
Use Only
Special Cord
Set Instructions
A short power-supply cord is provided to reduce the
risks resulting from becoming entangled in or tripping
over a longer cord. Extension cords may be used if
care is exercised in their use.
If an extension cord is used, the marked electrical
rating of the extension cord must be at least as great
as the electrical rating of the appliance, and the
longer cord should be arranged so that it will not
drape over the countertop or tabletop where it can
be pulled on by children or tripped over.
Notice
This appliance has a polarized plug (one blade is wider
than the other). To reduce the risk of electric shock,
this plug will t into a polarized outlet only one way. If
the plug does not t fully into the outlet, reverse the
plug. If it still does not t, contact a qualied
electrician. Do not modify the plug in any way.
Specifications
Model Number: IMC-12
Voltage: 110-120V/60Hz
Current: 1.8A
Daily Ice Output: 36 lb./24 hours
Ice Storage Capacity: 2L
Water Tank Capacity: 1.5L
N.W: 20.94 lb.
G.W: 26.90 lb.
Compression-Type Refrigeration: 110-120V/60Hz
Cooling Agent: R600a environmentally friendly
refrigerant
Max Overall Dimensions (WxDxH): 8.86" x 15.43" x 13.5"
Packaging Dimensions (WxDxH): 11.93" x 17.87" x 15.83"
Carton Dimensions (WxDxH): 12.40" x 18.43" x 16.46"
4
Contents
Important Safeguards 2-3
Unpacking Your Ice Cube Maker 4
Setting Up Your Ice Machine 4
Features and Benefits 5
Getting to Know Your Control Panel 5
Before First Use 6
Operating Instructions 6
After Use 6
Cleaning and Maintenance 7
Troubleshooting 8
Warranty 9
Unpacking Your
Ice Cube Maker
Remove all packaging material. You may want to keep
the box and packing materials for use at a later date.
Before using your Cuisinart
®
Nugget Ice Cube Maker for
the rst time, remove all protective paper and
wrapping. Wipe housing and internal compartments
with a damp cloth to remove any dust from the
warehouse or shipping.
Setting Up Your
Ice Machine
1. During transportation, do not tilt the machine more
than 45 degrees, and do not turn the machine
upside down. This may damage the compressor
and the internal sealing system.
2. Remove all packing materials, check the machine
carefully, and make sure that the machine, power
cord, and plug are undamaged.
3. Put the machine on a level surface. To ensure
sucient ventilation, the distance from the back of
ice maker to the wall should be at least 6 inches.
Place it away from the oven, radiator, or other heat
sources.
4. Before using the machine for the rst time, leave it
unplugged and open for at least two hours.
5. Make sure that the home voltage is consistent with
the voltage indicated by the machine.
6. Do not use chemicals, acidic, or alkaline liquids
to make ice.
Warning: Risk of Fire or Electric Shock
The lightning flash with arrowhead symbol within an equilateral triangle is
intended to alert the user to the presence of uninsulated, dangerous voltage
within the product’s enclosure that may be of sufficient magnitude to
constitute a risk of fire or electric shock to persons.
The exclamation point within an equilateral triangle is intended to alert
the user to the presence of important operating and maintenance (servicing)
instructions in the literature accompanying the appliance.
.

1
3
5
1
8
2
3
4
5
7
5
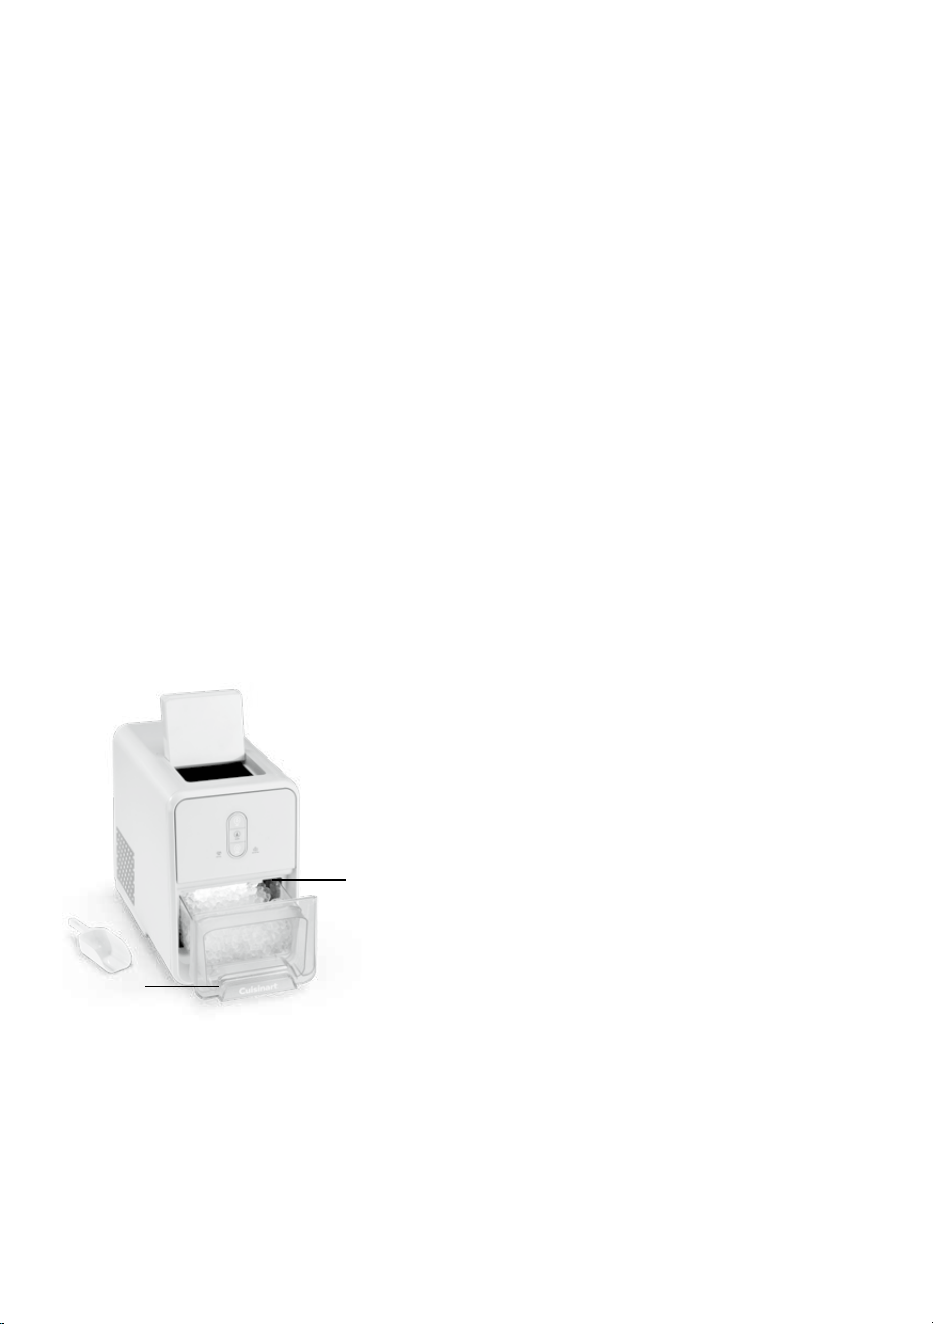
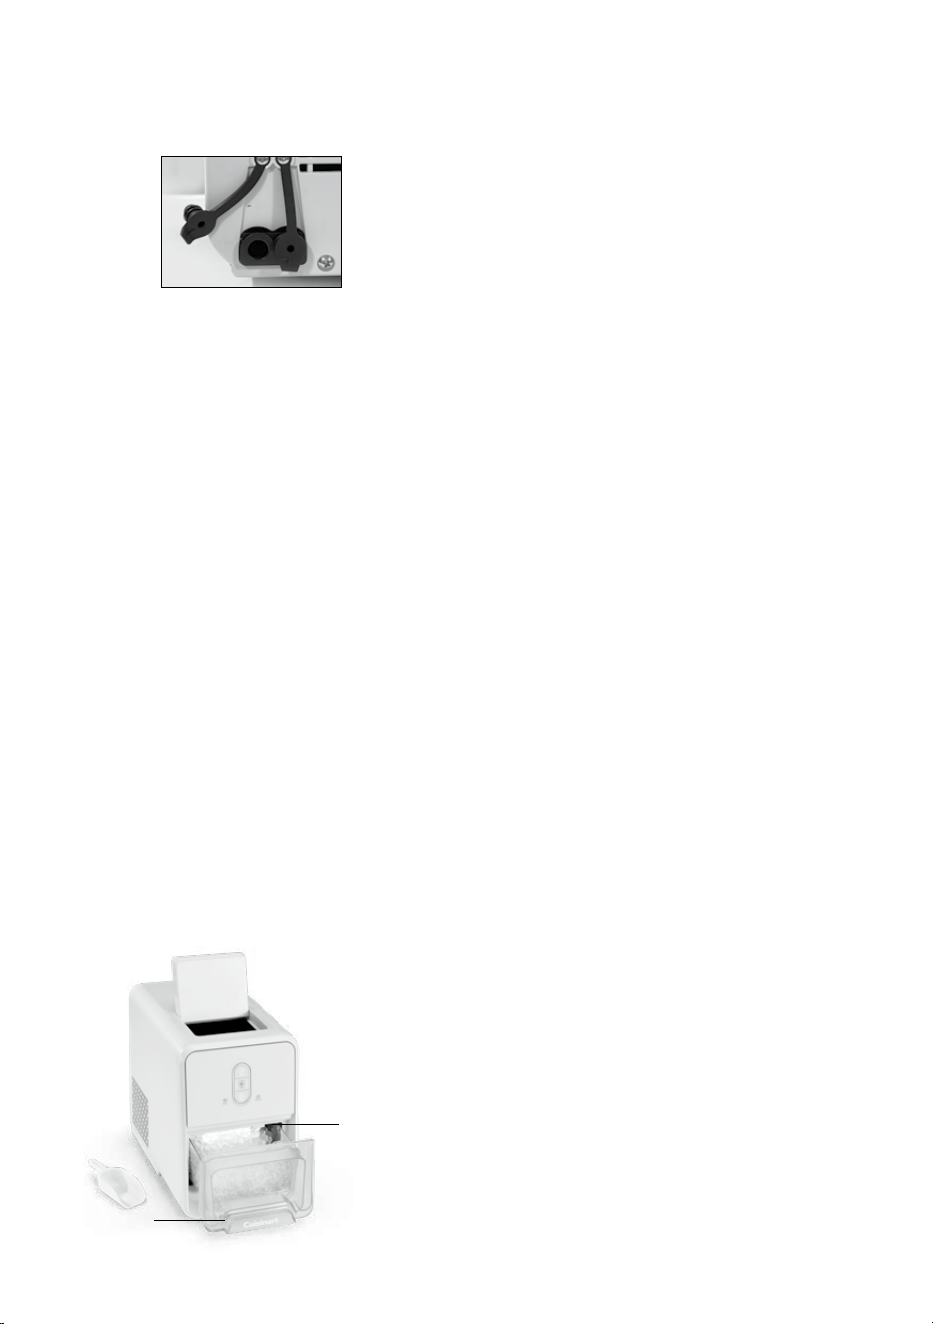
Features and Benefits
1. Unit Lid
2. Control Panel
3. Water Tank
4. Ice Basket
5. Thermal Window/Air Vent
6. Filter Cover
7. Ice Scoop
8. Lower Reservoir
9. Drain Outlets (not shown)
10. Auto O (not shown)
Unit shuts o after
30 minutes of nonuse.
Simply press any button
on the control panel to
reactivate the unit.
Getting to Know
Your Control Panel
1. LIGHT BUTTON
Turns on/o the internal ice basket lights
2. CLEAN BUTTON
Starts/stops self-cleaning cycle
3. POWER ON/OFF BUTTON
Starts/stops the ice making process
4. ICE FULL
Ice full alarm indicator light
5. ADD WATER
Water shortage alarm indicator light
2
4
6
6
Before First Use
Follow the steps under Cleaning and Maintenance
before using this unit.
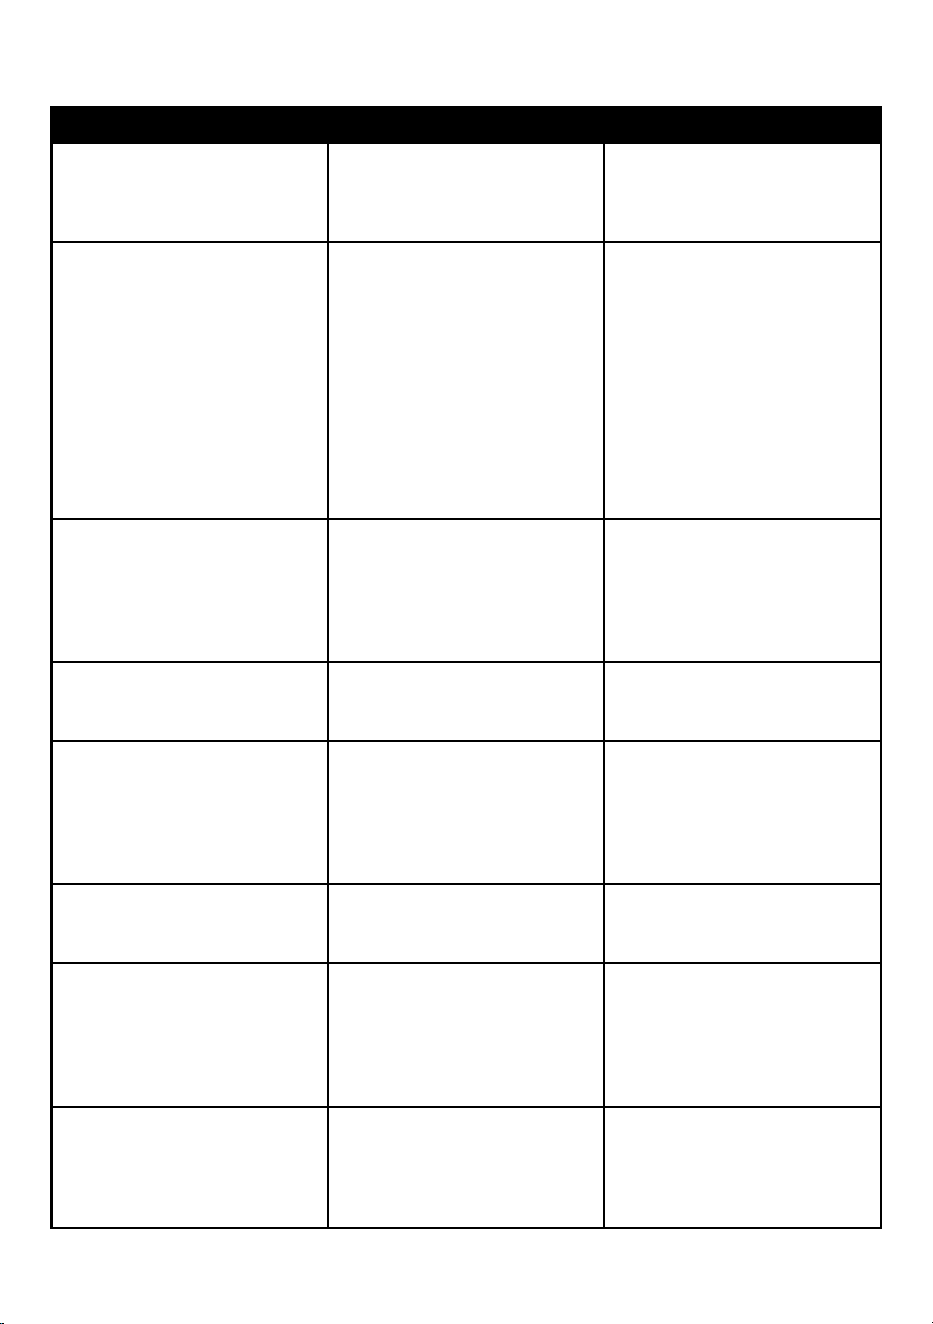
Operating Instructions
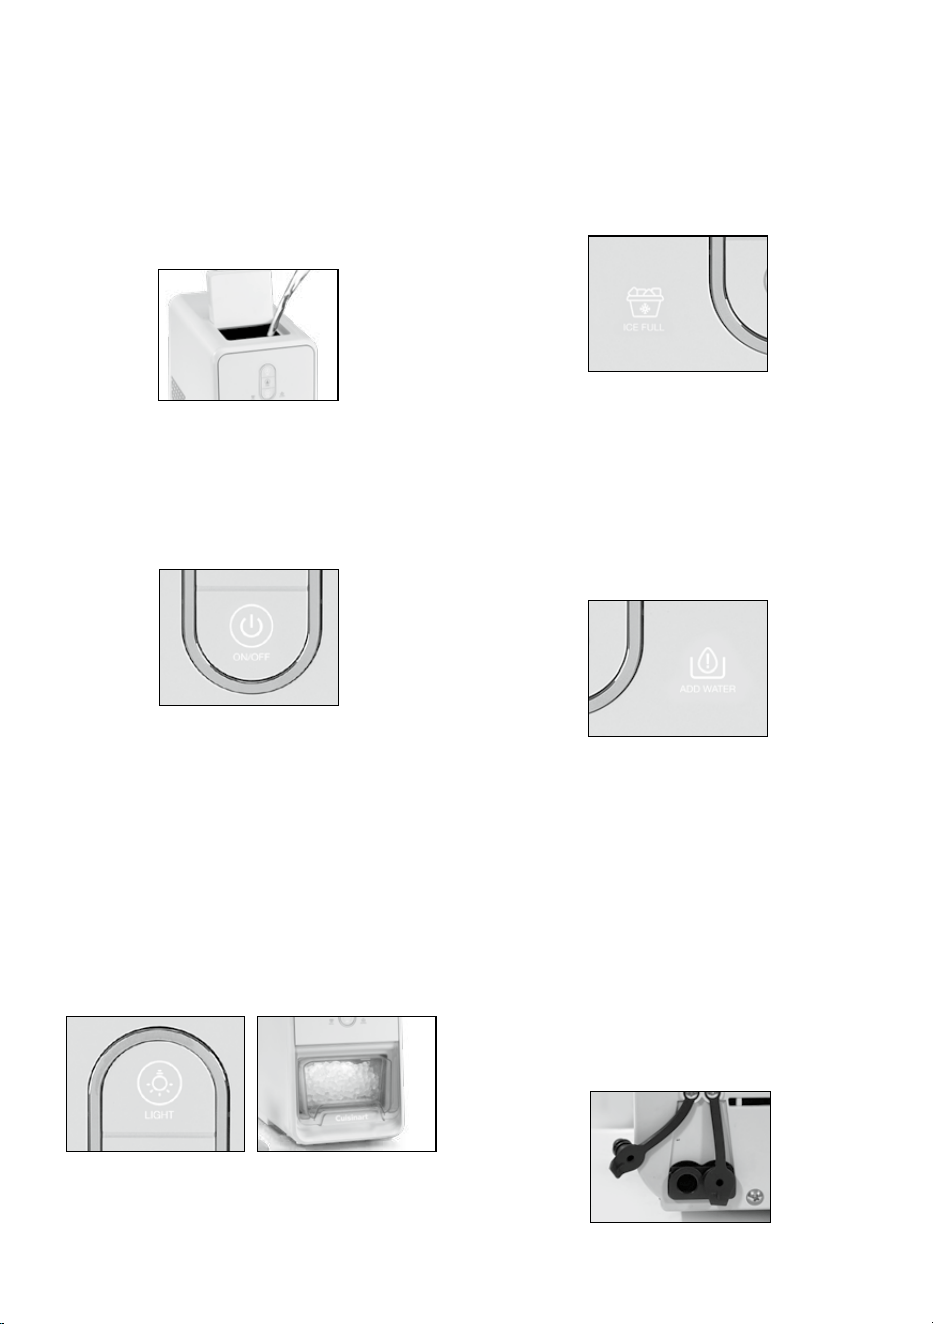
1. Adding water: Flip up the lid and pour fresh, potable
water into the water tank. Do not ll past the MAX
ll line. Close the lid once lled.
2. Plug in the unit to a power supply. The POWER ON/
OFF button indicator light will ash, indicating that
the unit is in standby.
3. Making ice: Press the POWER ON/OFF button once
to begin making ice. The POWER ON/OFF button
indicator light will remain solid, indicating the unit
ice making cycle is active.
ADD WATER: If the ADD WATER indicator light is
ashing, add water to the water tank and close the
lid. The ADD WATER indicator light will turn o and
the ice making cycle will start.
4. Light feature: To easily view ice during production,
press the LIGHT button once. The LIGHT button
indicator will illuminate, indicating the selection is
active. The internal ice basket lights will turn on.
To turn o the light feature: Press the LIGHT button
once. The LIGHT button indicator and the internal
ice basket lights will turn o.
NOTE: The light feature is designed to turn o
automatically after 10 minutes.
5. The unit will continue to make ice until the ice
basket is full, the tank is out of water, or the
operation is canceled.
NOTE: To cancel operation and return to standby
mode, press the POWER ON/OFF button once. The
POWER ON/OFF button indicator light will ash.
6. ICE FULL: The unit will continue to make ice until
the ice basket is full. The ICE FULL indicator light
will ash and the unit will stop. Remove and empty
the ice basket, and then return to the ice maker to
continue making ice.
NOTE: The water tank holds enough water to make 1
full basket of nugget ice cubes. The machine will
continue to make ice until the ice basket is
full, the tank is out of water, or operation
is canceled.
7. ADD WATER: When the water level in the water tank
is low, the ADD WATER indicator light will ash and
the unit will stop. To continue making ice, open the
unit lid and pour water into the tank. The ice making
cycle will restart.
After Use
1. Remove and empty the ice basket. If ice will not be
used immediately, transfer it to a freezer-safe
container and store it in a freezer for future use.
NOTE: Always remove ice from the unit after use to
minimize melting. Melted ice may collect in the
lower reservoir, potentially causing water to drip
onto the counter when the ice basket is removed.
2. Return the empty ice basket to its position inside
the unit.
3. Drain excess water from the upper water tank and
lower reservoir after use. To empty both areas,
locate the two drain outlets positioned on the back
of the unit.
7
Carefully slide the unit to the edge of the counter and
hold a suciently large container below the drain
outlets.
TIP: It is recommended that the container is larger
than the capacity of the water tank (1.5L). Each plug
should be removed and drained separately.
Your unit can also be brought to the edge of the sink
to drain. Be sure the unit remains at at all times and
is not tilted more than 45 degrees to avoid damaging
the compressor system.
Upper water tank: Remove the plug from the left
drain outlet to empty the upper water tank. Let
water drain into the container until the water
stops owing.
Lower reservoir: Remove the plug from the right
drain outlet to empty the lower reservoir. Let
water drain into the container until the water
stops owing.
TIP: After fully draining the water tank and lower
reservoir, leave the unit lid open for 2 hours to allow
the interior to dry thoroughly.
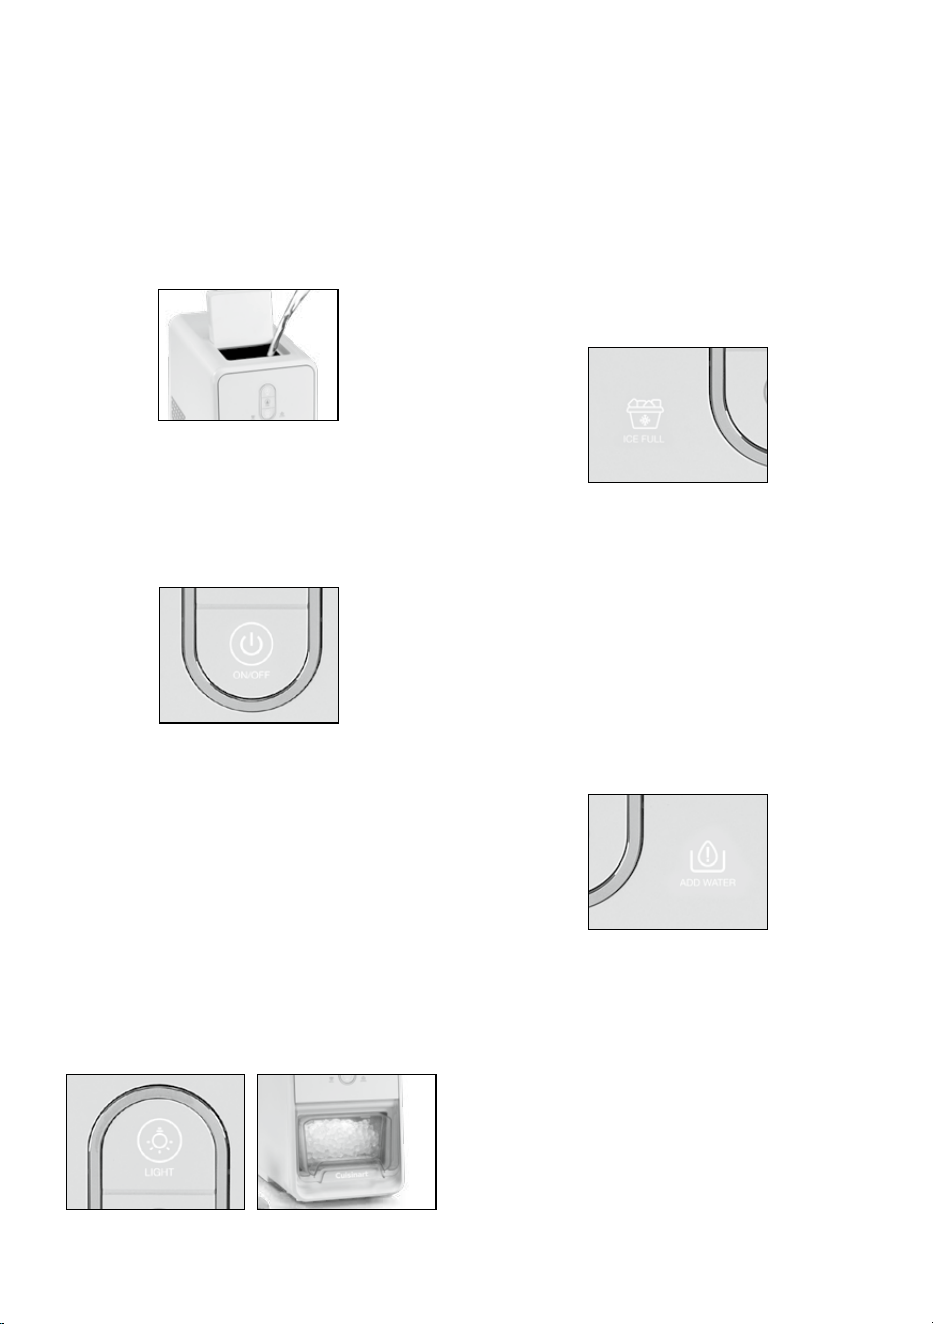
4. The lter cover in the lower water reservoir should
be cleaned regularly to prevent the water inlet from
being blocked by scale. Remove the ice basket and
then the lter cover from the lower water reservoir.
Clean the lter cover with a brush. Replace the lter
cover and then the ice basket.
Cleaning and Maintenance
Your ice maker is equipped with an automatic cleaning
function to help clean the interior of your unit,
including the water lines. Following these steps will
help to maintain the unit and add to longevity. It is
recommended to follow these cleaning steps on a
monthly basis to ensure optimal cleanliness.
1. Before cleaning, unplug the unit and remove the ice
cubes, then drain any leftover water by unplugging
the two drain outlets on the back of the unit.
Replace the drain outlet plugs.
2. Clean the inner liner, ice basket, water tank, lower
reservoir, and ice scoop frequently. The ice basket
can be washed in warm, soapy water and rinsed.
The ice scoop can be cleaned in the upper rack of
the dishwasher, or washed in warm, soapy water
and rinsed. Use a diluted solution of water and
white vinegar to wipe the inside and the outside
surfaces of the ice maker. Rinse thoroughly before
using again.
3. Fill the water tank and lower reservoir to the MAX ll
line with fresh potable water. To access the water
tank, ip up the lid at the top of the unit. To access
the lower reservoir, remove the ice basket.
4. Plug in the unit to a power supply. Press the CLEAN
button once to initiate auto cleaning mode. The
CLEAN indicator light will illuminate when the unit
enters cleaning mode.
NOTE: To cancel cleaning and return to standby
mode, press and hold the CLEAN button for 3
seconds.
5. After 7 minutes, the auto cleaning process will
complete. The CLEAN indicator light will turn o and
the unit will switch back to standby mode.
6. If the ice maker has been idle for a period of time,
an air blockage may prevent it from being able to
pump enough water to operate. If this happens, the
ADD WATER light will ash. Press and hold the
CLEAN button for 3 seconds to go back to standby
mode, then press the CLEAN button once to start
the cleaning process.
7. For the freshest ice, change the water in the tank at
least once a day. If the ice maker is going to be idle
for an extended period of time, drain and clean the
water tank and lower reservoir. Always use potable
water before starting ice production either at initial
installation or after a long shuto period.
8. If the compressor doesn’t work because the water
tank is empty, the ice basket is full, or power has
failed, the machine has a 3-minute delay before
restarting.
Maintenance
Any other servicing should be performed by an
authorized service representative.
Filter cover
located at
the back
right side
of lower
reservoir
Ice basket
8
PROBLEM POSSIBLE CAUSE SUGGESTED SOLUTIONS
The compressor works
abnormally with a
buzzing noise.
The voltage is lower than
recommended.
Unplug the ice maker.
Allow it to rest for one hour
before plugging it back in
and restarting the operation.
ADD WATER indicator is on.
The pump needs to be primed
with water, or there is no water.
Add water to the water tank until
it reaches the MAX ll line, and
press the POWER ON/OFF button
so water runs through the pump.
NOTE: If using the automatic
cleaning function, both the lower
reservoir and water tank must
be lled to the MAX ll line.
See page 7 for Cleaning and
Maintenance details. If this does
not resolve the issue, call the
Consumer Service Center.
Indicator lights on control panel
are not on.
There is no power.
Plug in the unit to a power supply
and try pressing any button on
the control panel to reactivate
the unit. If this does not resolve
the issue, call the Consumer
Service Center.
The ice making process
was correct, but no ice
came out.
The compressor is not
working.
Call the Consumer Service
Center.
ADD WATER and ICE FULL indica-
tor lights ash at the same time.
Possible evaporator cylinder
freeze-up.
Unplug the ice maker. Allow it to
rest for one hour before plug-
ging it back in and restarting the
operation. If this does not resolve
the issue, call the Consumer
Service Center.
ADD WATER and CLEAN indicator
lights ash at the same time.
Possible water pump failure.
Call the Consumer Service
Center.
When the ice basket is full, the
ICE FULL indicator light does not
illuminate.
An overly bright light in the loca-
tion of the unit may be causing
interference.
Move the unit to an indoor area
or away from direct bright light to
prevent light interference. If this
does not resolve the issue, call
the Consumer Service Center.
Water is left in the
lower reservoir after ice
production, visible when
ice basket is removed.
Melted ice has dripped
into the lower reservoir
from the ice basket.
Keep the unit plugged in.
The unit will automatically pump
water back to the
water tank every 30 minutes as it
remains connected to power.
Troubleshooting

9
Limited Warranty
Subject to the exclusions and limitations contained
herein, Conair LLC dba Cuisinart (“Cuisinart”) warrants
that the Cuisinart
®
Nugget Ice Cube Maker ("Product")
will be free from material defects in materials and
workmanship under normal home use conditions for a
period of ONE (1) year beginning on the date the
Product was purchased in its original, sealed
packaging, unless otherwise specied in this Limited
Warranty. This Limited Warranty is only for U.S.
consumers (dened herein as purchasers at retail for
personal, family, or household use) who originally
purchase the Product from Cuisinart or an authorized
Cuisinart
®
reseller (if you are unsure whether a retailer
or other point of sale is an authorized or unauthorized
Cuisinart reseller, contact Cuisinart).
This Limited Warranty does NOT cover:
• Normal wear and tear;
• Any Product purchased by commercial purchasers
or for commercial or non-household uses;
• Accessories, parts, or software added to
the Product after the system is shipped
from Cuisinart;
• Any costs associated with the replacement or
repair of the Product, including labor, installation,
or other costs incurred by you without prior
Cuisinart approval;
• Damage to the Product, defective conditions, or
nonconformities due to: (1) external causes,
including shipping, accidents, problems with
electrical power (Product designed only for use
with 120-volt outlets), abnormal conditions (such
as mechanical or environmental); (2) usage not in
accordance with Product instructions; (3) misuse,
neglect, unauthorized alteration, unauthorized
repair; and (4) acts of god or other events beyond
Cuisinart’s control;
• Though necessary repairs and maintenance might
be performed by any company, damage caused by
you or any nonauthorized third party may void this
Limited Warranty;
• Damage caused by accessories or replacement
parts not specically authorized by Cuisinart may
void this Limited Warranty; and
• Any Product where the original Product
identication markings (trademark or serial
number) have been removed, altered, or
obliterated from the Product.
It is recommended that you visit our website, https://
www.cuisinart.com/register-your-product.html, for a
fast, ecient way to complete your product
registration. However, product registration does not
eliminate the need for the consumer to maintain the
original proof of purchase in order to obtain the
warranty benets. In the event that you do not have
proof of purchase date, the purchase date for purposes
of this Limited Warranty will be the date of
manufacture.
Hassle-free warranty
If the Product that is the subject of this Limited
Warranty fails during the warranty period for reasons
covered by this Limited Warranty, Cuisinart will, at its
option, repair the Product, replace the Product with
another identical or reasonably equivalent product, or
if Cuisinart is unable to repair or replace the Product,
refund the purchase price, less the amount directly
attributable to the consumer’s prior usage of the
Product. To obtain a return shipping label, email us at
https://www.cuisinart.com/customer-care/product-
assistance/product-inquiry/, or call our Consumer
Service Center toll-free at 1-800-726-0190 to speak
with a representative.
Upon receipt of the Product, Cuisinart will inspect the
Product and, if required under this Limited Warranty,
attempt to repair, replace, or refund the Product within
thirty (30) days. However, there may be delays beyond
Cuisinart’s control, in which case that time period may
be extended as reasonably necessary.
IMPORTANT: If the nonconforming Product is to be
serviced by someone other than Cuisinart’s Authorized
Service Center, please remind the servicer to call our
Consumer Service Center at 1-800-726-0190 to ensure
that the problem is properly diagnosed, the Product is
serviced with the correct parts, and the Product is still
under warranty.
California Residents Only
The ONE (1) year Limited Warranty period begins on the
date the Product was delivered, which may be dierent
than the date the Product was purchased. California
residents also have the option of obtaining the benets
of this Limited Warranty by bringing the Product to (A)
the store where it was purchased or (B) another retail
store that sells Cuisinart products of the same type.
The retail store shall then, according to its preference,
either repair the Product, refer the consumer to an
independent repair facility, replace the Product with
another identical or reasonably equivalent product,
or refund the purchase price less the amount directly
attributable to the consumer’s prior usage of the
Product. California residents may also, according to
their preference, return nonconforming products
directly to Cuisinart for repair or, if necessary,
replacement with another identical or reasonably
equivalent product by calling our Consumer Service
Center toll-free at 1-800-726-0190. Cuisinart will be
responsible for the cost of such repair, replacement,

10
and/or shipping and handling for such nonconforming
products under warranty.
THIS LIMITED WARRANTY GIVES YOU SPECIFIC LEGAL
RIGHTS, AND YOU MAY ALSO HAVE OTHER RIGHTS
THAT VARY FROM STATE TO STATE OR BY
JURISDICTION. IN THE EVENT THIS LIMITED
WARRANTY IS BREACHED, YOU MAY HAVE CLAIMS FOR
REPLACEMENT, DAMAGES, OR OTHER PENALTIES.
LIMITATIONS OF LIABILITY/ADDITIONAL LIMITATIONS
AND EXCLUSIONS
ALL EXPRESS AND IMPLIED WARRANTIES ARE
LIMITED IN DURATION TO THE LIMITED WARRANTY
PERIOD. NO WARRANTIES APPLY AFTER THAT PERIOD.
SOME STATES DO NOT ALLOW LIMITATIONS ON HOW
LONG AN IMPLIED WARRANTY LASTS, SO THIS
LIMITATION MAY NOT APPLY TO YOU. CUISINART’S
RESPONSIBILITY UNDER THIS OR ANY OTHER
WARRANTY, IMPLIED OR EXPRESS, IS LIMITED TO
REPAIR, REPLACEMENT, OR REFUND, AS SET FORTH
ABOVE. THESE REMEDIES ARE THE SOLE AND
EXCLUSIVE REMEDIES FOR ANY BREACH OF
WARRANTY. TO THE MAXIMUM EXTENT PERMITTED BY
LAW, CUISINART IS NOT RESPONSIBLE FOR ANY
DIRECT, INDIRECT, SPECIAL, INCIDENTAL, OR
CONSEQUENTIAL DAMAGES RESULTING FROM ANY
BREACH OF WARRANTY OR UNDER ANY OTHER LEGAL
THEORY (INCLUDING, BUT NOT LIMITED TO, LOST
PROFITS, DOWNTIME, GOODWILL, DAMAGE TO OR
REPLACEMENT OF EQUIPMENT AND PROPERTY, AND
ANY COSTS OF RECOVERING, REPROGRAMMING, OR
REPRODUCING ANY PROGRAM OR DATA STORED IN OR
USED WITH A SYSTEM CONTAINING THE PRODUCT),
EVEN IF CUISINART HAS BEEN ADVISED OF THE
POSSIBILITY OF SUCH DAMAGES. SOME STATES DO
NOT ALLOW THE EXCLUSION OR LIMITATION OF
INCIDENTAL OR CONSEQUENTIAL DAMAGES, SO THE
ABOVE LIMITATIONS OR EXCLUSIONS MAY NOT APPLY
TO YOU. ALL EXPRESS AND IMPLIED WARRANTIES ARE
LIMITED IN DURATION TO THE LIMITED WARRANTY
PERIOD. NO WARRANTIES APPLY AFTER THAT PERIOD.
SOME STATES (OR JURISDICTIONS) DO NOT ALLOW
LIMITATIONS ON HOW LONG AN IMPLIED WARRANTY
LASTS, SO THIS LIMITATION MAY NOT APPLY TO YOU.
This Limited Warranty is issued by:
Conair LLC
1 Cummings Point Road
Stamford, CT 06902
1-800-726-0190

11
Medidas de
seguridad
importantes
Al usar aparatos eléctricos, siempre se deben
tomar precauciones básicas de seguridad para
reducir el riesgo de incendio, descarga eléctrica
o lesiones, entre ellas las siguientes:
1. Lea todas las instrucciones antes del uso.
2. Quite todo el material de embalaje y compruebe
cuidadosamente que el aparato esté en buenas
condiciones y que no haya daños en él, el cable
ni en el enchufe.
3. Para su seguridad, si el cable está dañado, debe
ser sustituido por el fabricante, un técnico
autorizado u otra persona calicada.
4. Los niños o las personas que carezcan de la
experiencia o de los conocimientos necesarios
para manipular el aparato, o aquellas cuyas
capacidades físicas, sensoriales o mentales estén
limitadas, no deben usar el aparato sin la
supervisión o la dirección de una persona
responsable por su seguridad. No deje que los
niños jueguen con este aparato. Este aparato
no debe ser usado por niños menores 8 años
o personas que carezcan de la experiencia o de
los conocimientos necesarios para manipularlo,
o personas cuyas capacidades físicas sensoriales
o mentales estén limitadas, a menos que una
persona responsable por su seguridad le haya
explicado el funcionamiento y los riesgos o
supervise el uso del aparato. No deje que los
niños jueguen con este aparato. La limpieza y
el mantenimiento no deben ser llevados a cabo
por niños, a menos que sean supervisados por
un adulto.
5. Este aparato ha sido diseñado para uso
doméstico y otras aplicaciones similares, como,
por ejemplo: las cocinas reservadas para los
empleados de ocina y tienda; las alquerías/
ncas; los cuartos de hotel, motel y otros
entornos residenciales; los entornos de tipo
pensiones/hostales/“bed and breakfast”.
6. ADVERTENCIA: No guarde sustancias explosivas,
tales como latas de aerosol que contengan un
agente propulsor inamable, en este aparato.
ADVERTENCIA: Mantenga los oricios de
ventilación internos y externos libres de
obstrucciones.
ADVERTENCIA: No use ningún dispositivo
mecánico u otros medios, excepto los
recomendados por el fabricante, para acelerar el
proceso de descongelación.
ADVERTENCIA: No dañe el circuito refrigerante.
ADVERTENCIA: Al ubicar el aparato, compruebe
que el cable de alimentación no quede atrapado
ni resulte dañado.
ADVERTENCIA: No ubique el aparato frente a una
multitoma/enchufe múltiple u otras fuentes de
alimentación portátiles.
ADVERTENCIA: Al desechar el aparato, hágalo
solamente en un centro de eliminación de
residuos autorizado. No lo exponga al fuego.
ADVERTENCIA: Llene el depósito de agua con
agua potable solamente.
7. El refrigerante (R600a) es inamable.
PRECAUCIÓN: El circuito refrigerante del aparato
contiene isobutano (R600a). El isobutano es un
gas refrigerante natural con un alto nivel de
compatibilidad medioambiental, pero no
obstante es inamable. Cerciórese de que
ninguno de los componentes del circuito de
refrigerante resulte dañado durante el transporte
y la instalación del aparato. En caso de daño del
circuito refrigerante: Evite las llamas abiertas y
las fuentes de ignición. Ventile a fondo la
habitación en la que se encuentre el aparato.
8. Después de instalar el aparato, espere al menos
2 horas antes de usarlo.
9. No use agua de la llave en el aparato.
Se recomienda usar solamente agua ltrada
o mineral.
10. Compruebe que el voltaje de la toma de corriente
coincida con el voltaje indicado en la placa de
datos del aparato y de que la toma de corriente
esté en buen estado.
11. No vuelque ni incline el aparato a un ángulo
superior a 45˚.
12. Para reducir el riesgo de descarga eléctrica,
no moje el cable, el enchufe, ni los oricios
de ventilación, ni sumerja el aparato en agua
u otros líquidos.
13. Desenchufe el aparato cuando no esté en uso
y antes de limpiarlo.
14. Mantenga el aparato a una distancia mínima
de 3.5in (8cm) de otros objetos para asegurar
una ventilación adecuada del motor.
15. Solo use los accesorios/aditamentos
recomendados por fabricante.
16. No use el aparato cerca de llamas, placas
calientes o estufas.
17. Después de apagar el aparato, espere al menos
5 minutos antes de encenderlo de nuevo para
evitar dañar el compresor.
18. No lo use en exteriores.
19. Nunca limpie el aparato con productos/
materiales abrasivos o utensilios duros.

12
20. Conserve este manual de instrucciones para
futura referencia.
21. Para evitar contaminar el agua/los cubitos de
hielo: Limpie regularmente las supercies en
contacto con el agua y los sistemas de desagüe
accesibles. Limpie los depósitos de agua/hielo si
el aparato no se ha usado desde más de 48
horas. Si el aparato permanece vacío durante
mucho tiempo, apáguelo, límpielo, séquelo y deje
la tapa abierta para evitar la formación de moho
en su interior.
22. Para minimizar el riesgo de una posible ignición
debida a piezas incorrectas o un servicio
inadecuado, las piezas deben ser reemplazadas
por repuestos idénticos, y las reparaciones
deben ser realizadas por técnicos autorizados
solamente.
23. El técnico debe apagar y desenchufar el aparato
antes de realizar cualquier operación de
mantenimiento.
24. Para su seguridad, si el cable está dañado, debe
ser sustituido por el fabricante, un técnico
autorizado u otra persona calicada.
25. El compresor y la supercie del condensador
pueden alcanzar 158-198°F (70-92°C) durante el
funcionamiento; las áreas circundantes pueden
ponerse muy calientes.
Guarde estas
instrucciones
PARA USO
DOMÉSTICO
SOLAMENTE
Instrucciones especiales
acerca del cable
El cable provisto con este aparato es corto, para
reducir el peligro de que alguien se enganche o
tropiece con un cable más largo. Se puede usar un
alargador, siempre que se respeten las precauciones
siguientes.
La clasicación nominal del alargador debe ser por lo
menos igual a la del aparato. El cable más largo debe
ser acomodado de tal manera que no cuelgue de la
encimera/mesa, donde puede ser jalado por niños o
causar tropiezos.
AVISO
El cable de este aparato cuenta con un enchufe
polarizado (una pata es más ancha que la otra). Como
medida de seguridad, aquel enchufe se podrá enchufar
de una sola manera en las tomas de corriente
polarizadas. Si el enchufe no entra en la toma de
corriente, inviértalo. Si aun así no entra
completamente, comuníquese con un electricista. No
intente modicarlo.
Especificaciones técnicas
Modelo: IMC-12
Voltaje: 110-120V / 60Hz
Corriente: 1.8 A
Capacidad de producción de hielo: 36 lb (16.3kg)
por día (24 horas)
Capacidad de almacenamiento de hielo: 2 L
Capacidad del depósito de agua: 1.5 L
Peso neto: 20.94 lb (9.5kg)
Peso bruto: 26.90 lb (12.2kg)
Sistema de refrigeración por compresión: 110-120V /
60Hz
Agente refrigerante: Butano (R600a)
Dimensiones del producto (largo x ancho x alto): 8.86 x
15.43 x 13.5 in
Dimensiones del embalaje (largo x ancho x alto): 11.93 x
17.87 x 15.83 in
Dimensiones de la caja (largo x ancho x alto): 12.40 x
18.43 x 16.46 in

13
Índice
Medidas de seguridad importantes 11
Instrucciones de desembalaje 13
Instrucciones de instalación 13
Piezas y características 14
Panel de control 14
Antes del primer uso 15
Instrucciones de uso 15
Después del uso 15
Limpieza y mantenimiento 16
Resolución de problemas 17
Garantía 18
Instrucciones
de desembalaje
Retire todo el material de embalaje. Se recomienda
conservar el material de embalaje para uso futuro.
Antes el aparato por primera vez, quite todo el material
de embalaje y protección. Limpie la carcasa del
aparato y los compartimentos internos con un paño
húmedo para eliminar el polvo acumulado durante la
fabricación y el transporte.
Instrucciones
de instalación
1. Durante la instalación, tenga cuidado de no inclinar
el aparato a un ángulo superior a 45˚, ni ponerlo
boca abajo; esto puede dañar el compresor y el
sistema de sellado interno.
2. Retire todos el material de embalaje, revise
cuidadosamente el aparato y compruebe que el
aparato, el cable y el enchufe no estén dañados.
3. Coloque el aparato sobre una supercie nivelada.
Deje una distancia de al menos 6in (15cm) entre la
parte trasera del aparato y la pared para permitir
una ventilación adecuada. Coloque el aparato lejos
de hornos, radiadores u otras fuentes de calor.
4. Deje el aparato desenchufado y con la tapa abierta
por al menos dos horas antes de usarlo por primera
vez.
5. Compruebe que el voltaje de la toma de corriente
corresponda al voltaje indicado en la placa de datos
del aparato.
6. No use productos químicos ni líquidos ácidos o
alcalinos para hacer hielo.
Advertencia: Riesgo de incendio o descarga eléctrica
El símbolo de relámpago con punta de flecha dentro de un triángulo equilátero
tiene como fin alertar al usuario de la presencia de voltajes peligrosos no
aislados en el interior del aparato, los cuales pueden ser de suficiente
magnitud para constituir un riesgo de incendio o descarga eléctrica.
El signo de exclamación dentro de un triángulo equilátero tiene como fin
alertar al usuario de la presencia de instrucciones importantes de uso y
mantenimiento (servicio) en la documentación que acompaña al equipo.

1
3
5
1
8
2
3
4
5
7
14
Piezas y características
1. Tapa
2. Panel de control
3. Depósito de agua
4. Depósito de hielo
5. Rejilla de ventilación
6. Cubre-ltro
7. Pala de hielo
8. Bandeja de goteo
9. Válvulas de desagüe (no ilustradas)
10. Apagado automático (no ilustrado)
Apaga el aparato después
de 30 minutos sin uso.
Simplemente presione
cualquier botón para volver
a activarlo.
Panel de control
1. BOTÓN LIGHT (LUZ)
Ilumina el interior del depósito de hielo
2. BOTÓN CLEAN (LIMPIEZA)
Inicia/detiene el ciclo de limpieza automática
3. BOTÓN ON/OFF (ENCENDIDO/APAGADO)
Inicia/detiene el proceso de fabricación de hielo
4. INDICADOR “ICE FULL” (depósito de hielo lleno)
Se enciende cuando el depósito de hielo está lleno
5. INDICADOR “ADD WATER” (nivel de agua bajo)
Se enciende cuando el depósito de agua está vacío
2
4
6
15
Antes del primer uso
Antes de usar el aparato por primera vez, límpielo
según se describe en la sección “Limpieza y
mantenimiento”.
Instrucciones de uso
1. Llenado del depósito de agua: Abra la tapa y llene
el depósito de agua con agua potable fresca, sin
exceder la línea “MAX”. Cierre la tapa.
2. Enchufe el aparato; la luz del botón ON/OFF
empezará a parpadear, lo que indica que el aparato
está en el modo de espera.
3. Para hacer hielo: Presione el botón ON/OFF para
encender el aparato; la luz del botón ON/OFF
permanecerá encendida, lo que indica que el ciclo
de fabricación de hielo ha empezado.
Indicador “ADD WATER” (nivel de agua bajo): Si el
indicador “ADD WATER” empieza a parpadear,
agregue agua al depósito de agua y vuelva a cerrar
la tapa; el indicador “ADD WATER” se apagará y
el ciclo de fabricación de hielo empezará.
4. Función de luz: Para ver fácilmente el hielo durante
el proceso de fabricación, presione el botón LIGHT;
la luz del botón LIGHT se encenderá, lo que indica
que la función ha sido activada. La luz interna se
encenderá e iluminará el interior del depósito
de hielo.
Para apagar la luz: Presione el botón LIGHT otra vez;
la luz del botón LIGHT y la luz interna se apagarán.
NOTA: La luz está diseñada para apagarse
automáticamente después de 10 minutos.
5. El aparato permanecerá encendido hasta que el
depósito de hielo esté lleno o que el depósito de
agua esté vacío, o hasta que presione el botón de
encendido/apagado para cancelar el ciclo de
fabricación.
NOTA: Para cancelar el ciclo de fabricación de hielo y
volver al modo de espera, presione el botón ON/OFF;
la luz del botón ON/OFF parpadeará.
6. Indicador “ICE FULL” (depósito de cubitos de hielo
lleno): El aparato dejará automáticamente de hacer
hielo cuando el depósito de hielo esté lleno. Cuando
esto ocurra, el indicador “ICE FULL” empezará a
parpadear y el ciclo de preparación se detendrá.
Retire el depósito de hielo, vacíelo y vuelva a
colocarlo en su puesto para continuar haciendo
hielo.
NOTA: El depósito de agua tiene cabida para
suciente agua para llenar el depósito de hielo de
pepitas de hielo. El aparato permanecerá encendido
hasta que el depósito de hielo esté lleno o que el
depósito de agua esté vacío, o hasta que presione el
botón de encendido/apagado para cancelar el ciclo
de fabricación.
7. Indicador “ADD WATER” (nivel de agua bajo): Cuando
el nivel de agua en el depósito de agua esté bajo, el
indicador “ADD WATER” se encenderá y el proceso de
fabricación de hielo se detendrá. Para continuar
haciendo hielo, abra la tapa y llene el depósito de
agua con agua; el ciclo de fabricación de hielo se
reiniciará.
Después del uso
1. Retire y vacíe el depósito de hielo Si no va a usar
el hielo inmediatamente, páselo a un recipiente
apto para congelador y consérvelo en el
congelador.
NOTA: Retire siempre el hielo del depósito de hielo al
nal del ciclo de fabricación para evitar que se
derrita. El hielo derretido puede acumularse en la
bandeja de goteo, lo que puede hacer que agua
gotee sobre la encimera al retirar el depósito de
hielo.
2. Vuelva a colocar el depósito de hielo vacío en el
aparato.
16
3. Vacíe el exceso de agua del depósito de agua y de
la bandeja de goteo después de cada uso. Para
hacer esto: Ubique las dos válvulas de desagüe
situadas en la parte trasera del aparato.
Deslice con cuidado el aparato hacia el borde de
la encimera y sostenga un recipiente grande
debajo de las válvulas de desagüe.
CONSEJO: Se recomienda usar un recipiente de
capacidad superior a la del depósito de agua (1.5L).
Cada depósito debe vaciarse por separado; por lo
tanto, solo quite un tapón a la vez.
También puede hacer esto por encima del fregadero.
Cerciórese de nunca inclinar el aparato a un ángulo
superior a 45˚ para evitar daños al compresor.
Depósito de agua: Quite el tapón de la válvula de
desagüe izquierda para vaciar el depósito de agua.
Deje que el agua salga hasta que el depósito esté
completamente vacío.
Bandeja de goteo: Quite el tapón de la válvula de
desagüe derecha para vaciar la bandeja de goteo.
Deje que el agua salga hasta que el depósito esté
completamente vacío.
CONSEJO: Después de vaciar el depósito de agua
y la bandeja de goteo, deja la tapa del aparato
abierta por 2 horas para dejar que el interior
se seque.
4. Limpie la cubierta del ltro del depósito inferior
regularmente para evitar la acumulación de sarro.
Para esto: Quite el depósito de hielo y retire la
cubierta del ltro del depósito inferior. Limpie la
cubierta del ltro con un cepillo. Vuelva a colocar
la cubierta del ltro y el depósito de cubitos de
hielo en su puesto,
Limpieza y Mantenimiento
Este aparato cuenta con una función de limpieza
automática para ayudar a mantener el interior del
aparato, incluyendo las líneas de agua, limpio. Se
conseja limpiar el aparato una vez al mes, siguiendo
las instrucciones a continuación.
1. Desenchufe el aparato y vacíe el depósito de hielo.
Vacíe el exceso de agua en el depósito de agua y la
bandeja de goteo, abriendo las válvulas de desagüe
en la parte trasera del aparato. Vuelva a cerrar las
válvulas de desagüe.
2. Limpie la parte interna de la carcasa, el depósito de
hielo, el depósito de agua, la bandeja de goteo y la
pala de hiela con frecuencia. Lave el depósito de
hielo en agua tibia con jabón y enjuáguelo. La pala
de hielo puede lavarse a mano, en agua tibia con
jabón, o en la bandeja superior del lavavajillas. Use
una solución de agua con vinagre blanco para
limpiar el interior y el exterior del aparato. Enjuague
bien.
3. Llene el depósito de agua y la bandeja de goteo con
agua potable hasta la línea de llenado máximo
“MAX”. Para acceder al depósito de agua, levante la
tapa. Para acceder a la bandeja de goteo, quite el
depósito de hielo.
4. Enchufe el aparato. Presione el botón CLEAN para
iniciar el ciclo de limpieza automática; la luz del
botón CLEAN se encenderá, lo que indica que el
aparato está en el modo de limpieza.
NOTA: Para cancelar el ciclo de limpieza y volver al
modo de espera, mantenga presionado el botón
CLEAN por 3 segundos.
5. Después de 7 minutos, el proceso de limpieza estará
terminado. La luz del botón CLEAN se apagará, lo
que indica que el aparato ha vuelto al modo de
espera.
6. Si el aparato no se ha usado durante un período de
tiempo, es posible que una obstrucción de aire
impida que pueda bombear suciente agua para
hacer hielo. Si esto sucede, el indicador “ADD
WATER” empezará a parpadear aunque el depósito
de agua no está vacío. Para volver al modo de
espera, mantenga presionado el botón CLEAN por 3
segundos. A continuación, presione el botón CLEAN
otra vez para llevar a cabo un ciclo de limpieza.
7. Para siempre tener hielo fresco, cambie el agua en el
depósito de agua al menos una vez al día. Si no se va
a usar el aparato durante un largo período de
tiempo, vacíe y limpie el depósito de agua y la
bandeja de goteo. Siempre use agua fresca en el
depósito de agua. Cambie el agua si no se ha usado
el aparato por un largo período.
8. Si el aparato se apaga porque el depósito de agua
está vacío, el depósito de hielo está lleno, o se ha
producido un fallo de alimentación, demorará 3
minutos antes de volverse a encender.
Cubre-ltro
situado en
la parte
posterior
derecha la
bandeja de
goteo
Depósito
de hielo
17
PROBLEMA POSIBLE CAUSA SOLUCIÓN
El compresor funciona, pero
produce un zumbido.
El voltaje es inferior al
recomendado.
Desenchufe el aparato. Deje que se
enfríe por una hora antes
de volver a enchufarlo y usarlo.
El indicador “ADD WATER”
está encendido.
La bomba debe cebarse con agua,
o no hay agua en el depósito.
Llene el depósito de agua hasta la
línea MAX y presione el botón POWER
ON/OFF para que el agua circule por
la bomba. NOTA: Si usa la función de
limpieza automática, tanto el depósito
inferior como el tanque de agua
deben llenarse hasta la línea MAX.
Véase las instrucciones de limpieza y
mantenimiento y la página 16.
Si esto no resuelve el problema, llame
al Centro de Atención al Cliente.
Las luces en el panel de
control están apagadas.
El aparato no está en tensión.
Conecte el aparato a una fuente de
alimentación y presione cualquier
botón del panel de control para
reactivarlo. Si esto no resuelve el
problema, llame al Centro de Atención
al Cliente.
El aparato no produce hielo. El compresor no funciona.
Llame al Centro de Atención
al Cliente.
Los indicadores “ADD
WATER” y “ICE FULL”
parpadean al mismo tiempo.
Puede que el cilindro evaporador
esté congelad.
Desenchufe el aparato. Deje que se
enfríe por una hora antes de volver
a enchufarlo y usarlo. Si esto no
resuelve el problema, llame al Centro
de Atención al Cliente.
Los indicadores “ADD
WATER” y “CLEAN”
parpadean al mismo tiempo.
Posible fallo de la bomba de agua.
Llame al Centro de Atención
al Cliente.
El indicador “ICE FULL” no se
enciende cuando el depósito
de hielo esté lleno.
Es posible que una luz muy
intensa en la ubicación del aparato
esté causando interferencias.
Mueva el aparato a un lugar interior
o lejos de la luz intensa directa para
evitar interferencias lumínicas. Si esto
no resuelve el problema, llame
al Centro de Atención al Cliente.
Hay agua en la bandeja de
goteo al nal del ciclo de
fabricación de hielo.
Hielo se ha derretido y agua ha
goteado en la bandeja de goteo.
Mantenga el aparato enchufado; el
aparato bombeará automáticamente
agua de vuelta al depósito de agua
cada 30 minutos.
Resolución de problemas
Mantenimiento
Cualquier otro servicio debe ser realizado por un técnico de servicio autorizado.

18
Garantía limitada
Sujeto a las exclusiones y limitaciones contenidas en
este documento, Conair LLC/Cuisinart (“Cuisinart”)
garantiza que la máquina de hielo en pepitas Cuisinart
®
(“Producto”) estará libre de defectos de materiales y
fabricación en condiciones normales de uso doméstico
durante un período de UN (1) año a partir de la fecha
de compra del Producto en su embalaje original
sellado, a menos que se especique lo contrario en
esta Garantía Limitada. Esta Garantía Limitada es solo
para consumidores de Estados Unidos (denidos aquí
como compradores al por menor para uso personal,
familiar o doméstico) que compren originalmente el
Producto a Cuisinart o a un revendedor autorizado de
Cuisinart. Si no está seguro de si un minorista u otro
punto de venta es un revendedor autorizado de
Cuisinart, póngase en contacto con Cuisinart.
Esta Garantía Limitada NO cubre:
• El desgaste normal;
• Cualquier Producto adquirido por compradores
comerciales o para usos comerciales o no
domésticos;
• Accesorios, piezas o programas añadidos al
Producto después de que Cuisinart lo haya
enviado;
• Cualquier costo asociado con el reemplazo o
reparación del Producto, incluyendo mano de obra,
instalación u otros costos incurridos por usted sin
previa aprobación de Cuisinart;
• Daños, defectos y fallas debidos a: (1) causas
externas, incluyendo el envío, accidentes,
problemas con el suministro eléctrico (el Producto
está diseñado para su uso exclusivo con enchufes
de 120 V), condiciones anormales (como mecánicas
o medioambientales); (2) uso no conforme a las
instrucciones del Producto; (3) uso indebido,
negligencia, alteración no autorizada, reparación no
autorizada; y (4) casos fortuitos u otros
acontecimientos fuera del control de Cuisinart;
• Aunque cualquier empresa puede realizar las
reparaciones y el mantenimiento necesarios, los
daños causados por usted o por terceros no
autorizados pueden anular esta Garantía Limitada;
• Los daños causados por accesorios o repuestos no
autorizados especícamente por Cuisinart pueden
anular esta Garantía Limitada; y
• Cualquier Producto cuyas marcas de identicación
originales (marca comercial o número de serie)
hayan sido retiradas, alteradas o borradas del
Producto.
Se recomienda llenar el formulario de registro
disponible en https://www.cuisinart.com/register-
your-product.html a n de facilitar la vericación de la
fecha de compra original de este producto. Sin
embargo, no es necesario registrar el producto para
recibir servicio bajo esta garantía. En ausencia de
prueba de la fecha de compra, el período de garantía
será calculado a partir de la fecha de fabricación del
producto.
GARANTÍA DE SIN DIFICULTADES
Si el Producto objeto de esta Garantía Limitada falla
durante el período de garantía por razones cubiertas
por esta Garantía Limitada, Cuisinart, a su elección,
reparará el Producto, sustituirá el Producto por otro
idéntico o razonablemente equivalente, o si Conair no
puede reparar o sustituir el Producto, reembolsará al
consumidor el precio de compra, menos la cantidad
directamente atribuible al uso anterior del Producto
por parte del consumidor. Para obtener una etiqueta de
devolución, contáctenos, visitando https://www.
cuisinart.com/customer-care/product-assistance/
product-inquiry/ o llamando a nuestro servicio de
atención al cliente, al 1-800-726-0190, para hablar con
un representante.
Tras la recepción del Producto, Conair lo inspeccionará
y, si lo requiere esta Garantía Limitada, intentará
reparar, reemplazar o reembolsarlo en un plazo de
treinta (30) días. No obstante, pueden producirse
retrasos fuera del control de Cuisinart, en cuyo caso
dicho plazo podrá ampliarse en la medida en que sea
razonablemente necesario.
IMPORTANTE: Si debe llevar el producto defectuoso a
un centro de servicio no autorizado, por favor informe
al personal del centro de servicio que deben llamar al
servicio de atención al cliente de Cuisinart, al 1-800-
726-0190, a n de diagnosticar el problema
correctamente, usar las piezas correctas para repararlo
y comprobar que el producto aún esté bajo garantía.
Residentes de California Solamente
El período de Garantía Limitada de UN (1) año
comienza en la fecha de entrega del Producto, que
puede ser diferente de la fecha de compra del
Producto. Los residentes en California también tienen
la opción de obtener los benecios de esta Garantía
Limitada devolviendo el producto defectuoso (A) a la
tienda donde lo compraron, o (B) a otra tienda que
venda productos Cuisinart
®
del mismo tipo. La tienda
podrá, a su elección, reparar el producto, referir al
consumidor a un centro de servicio independiente,
sustituir el producto por uno idéntico o
razonablemente equivalente, o reembolsar al
consumidor el precio de compra menos la cantidad
directamente atribuible al uso anterior del producto
por el consumidor. Los residentes de California
también pueden, si lo desean, enviar el producto
defectuoso directamente a Cuisinart para que sea

19
reparado o sustituido por uno idéntico o
razonablemente equivalente. Para esto, deben llamar a
nuestro servicio de atención al cliente al 1-800-726-
0190. Cuisinart será responsable por los gastos de
reparación, reemplazo, manejo y envío de los
productos defectuosos durante el período de garantía.
ESTA GARANTÍA LIMITADA LE OTORGA DERECHOS
LEGALES ESPECÍFICOS, Y TAMBIÉN PUEDE TENER
OTROS DERECHOS QUE VARÍAN DE UN ESTADO A
OTRO O EN FUNCIÓN DE LA JURISDICCIÓN. EN CASO
DE INCUMPLIMIENTO DE ESTA GARANTÍA LIMITADA,
USTED PUEDE RECLAMAR LA SUSTITUCIÓN, UNA
INDEMNIZACIÓN POR DAÑOS Y PERJUICIOS U OTRAS
SANCIONES.
LIMITACIONES DE RESPONSABILIDAD/LIMITACIONES Y
EXCLUSIONES ADICIONALES
TODAS LAS GARANTÍAS EXPRESAS E IMPLÍCITAS
TIENEN UNA DURACIÓN LIMITADA AL PERÍODO DE
GARANTÍA LIMITADA. NO SE APLICARÁ NINGUNA
GARANTÍA DESPUÉS DE ESTE PERÍODO. ALGUNOS
ESTADOS NO PERMITEN LIMITACIONES EN LA
DURACIÓN DE UNA GARANTÍA IMPLÍCITA, DE MODO
QUE LAS LIMITACIONES MENCIONADAS PUEDEN NO
REGIR PARA USTED. LA RESPONSABILIDAD DE
CUISINART BAJO ESTA O CUALQUIER OTRA GARANTÍA,
IMPLÍCITA O EXPRESA, SE LIMITA A LA REPARACIÓN,
SUSTITUCIÓN O REEMBOLSO, SEGÚN LO
ESTABLECIDO ANTERIORMENTE. ESTOS RECURSOS
SON LOS ÚNICOS Y EXCLUSIVOS EN CASO DE
INCUMPLIMIENTO DE LA GARANTÍA. EN LA MEDIDA
MÁXIMA PERMITIDA POR LA LEY, CUISINART NO SE
HACE RESPONSABLE DE NINGÚN DAÑO DIRECTO,
INDIRECTO, ESPECIAL, INCIDENTAL O CONSECUENTE
RESULTANTE DE CUALQUIER INCUMPLIMIENTO DE LA
GARANTÍA O BAJO CUALQUIER OTRA TEORÍA LEGAL
(INCLUYENDO, PERO NO LIMITADO A, LUCRO
CESANTE, TIEMPO DE INACTIVIDAD, PÉRDIDA DEL
FONDO DE COMERCIO, DAÑOS O SUSTITUCIÓN DE
EQUIPOS Y BIENES, Y CUALQUIER COSTE DE
RECUPERACIÓN, REPROGRAMACIÓN O
REPRODUCCIÓN DE CUALQUIER PROGRAMA O DATOS
ALMACENADOS EN O UTILIZADOS CON UN SISTEMA
QUE CONTENGA EL PRODUCTO), INCLUSO SI
CUISINAART HA SIDO ADVERTIDO DE LA POSIBILIDAD
DE TALES DAÑOS. ALGUNOS ESTADOS (O
JURISDICCIONES) NO PERMITEN LA EXCLUSIÓN O
LIMITACIÓN DE DAÑOS ESPECIALES, INCIDENTALES O
CONSECUENTES, DE MODO QUE LAS LIMITACIONES
MENCIONADAS PUEDEN NO REGIR PARA USTED.
TODAS LAS GARANTÍAS EXPRESAS E IMPLÍCITAS
TIENEN UNA DURACIÓN LIMITADA AL PERÍODO DE
GARANTÍA LIMITADA. NO SE APLICARÁ NINGUNA
GARANTÍA DESPUÉS DE ESTE PERÍODO. ALGUNOS
ESTADOS (O JURISDICCIONES) NO PERMITEN
LIMITACIONES EN LA DURACIÓN DE UNA GARANTÍA
IMPLÍCITA, DE MODO QUE LAS LIMITACIONES
MENCIONADAS PUEDEN NO REGIR PARA USTED.
Esta Garantía Limitada es emitida por:
Conair LLC
1 Cummings Point Road
Stamford, CT 06902
1-800-726-0190

IB-18814-ESP-A
©2025 Cuisinart
Glendale, AZ 85307
Printed in Thailand
Impreso en la Tailandia
24CE200425
